

Page 1
Assembly Instructions
Mode d’assemblage
Console for 60” Plasma TV
Console pour le plasma TV de 60”
Series / Séries # PS-6000
If you have any missing parts, please send an email to
[email protected], visit www.prepacmfg.com or call:
1-877-PREPAC1 (1-877-773-7221) Mon - Fri 7:00am to
4:30pm Pacific Time (10:00am - 7:30pm Eastern).
Please have your product series number available.
Si des pièces sont manquantes, veuillez envoyer un email
à [email protected], visitez www.prepacmfg.com ou
téléphoner au 1-877-PREPAC1 (1-877-773-7221) lors
des heures suivantes: LUN - VEN 7h à 16h 30, heure
du Pacifique. Veuillez noter le numéro de série avant de
téléphoner. Pour le service en français, contactez s’il
vous plaît votre détaillant.
DATE CODE
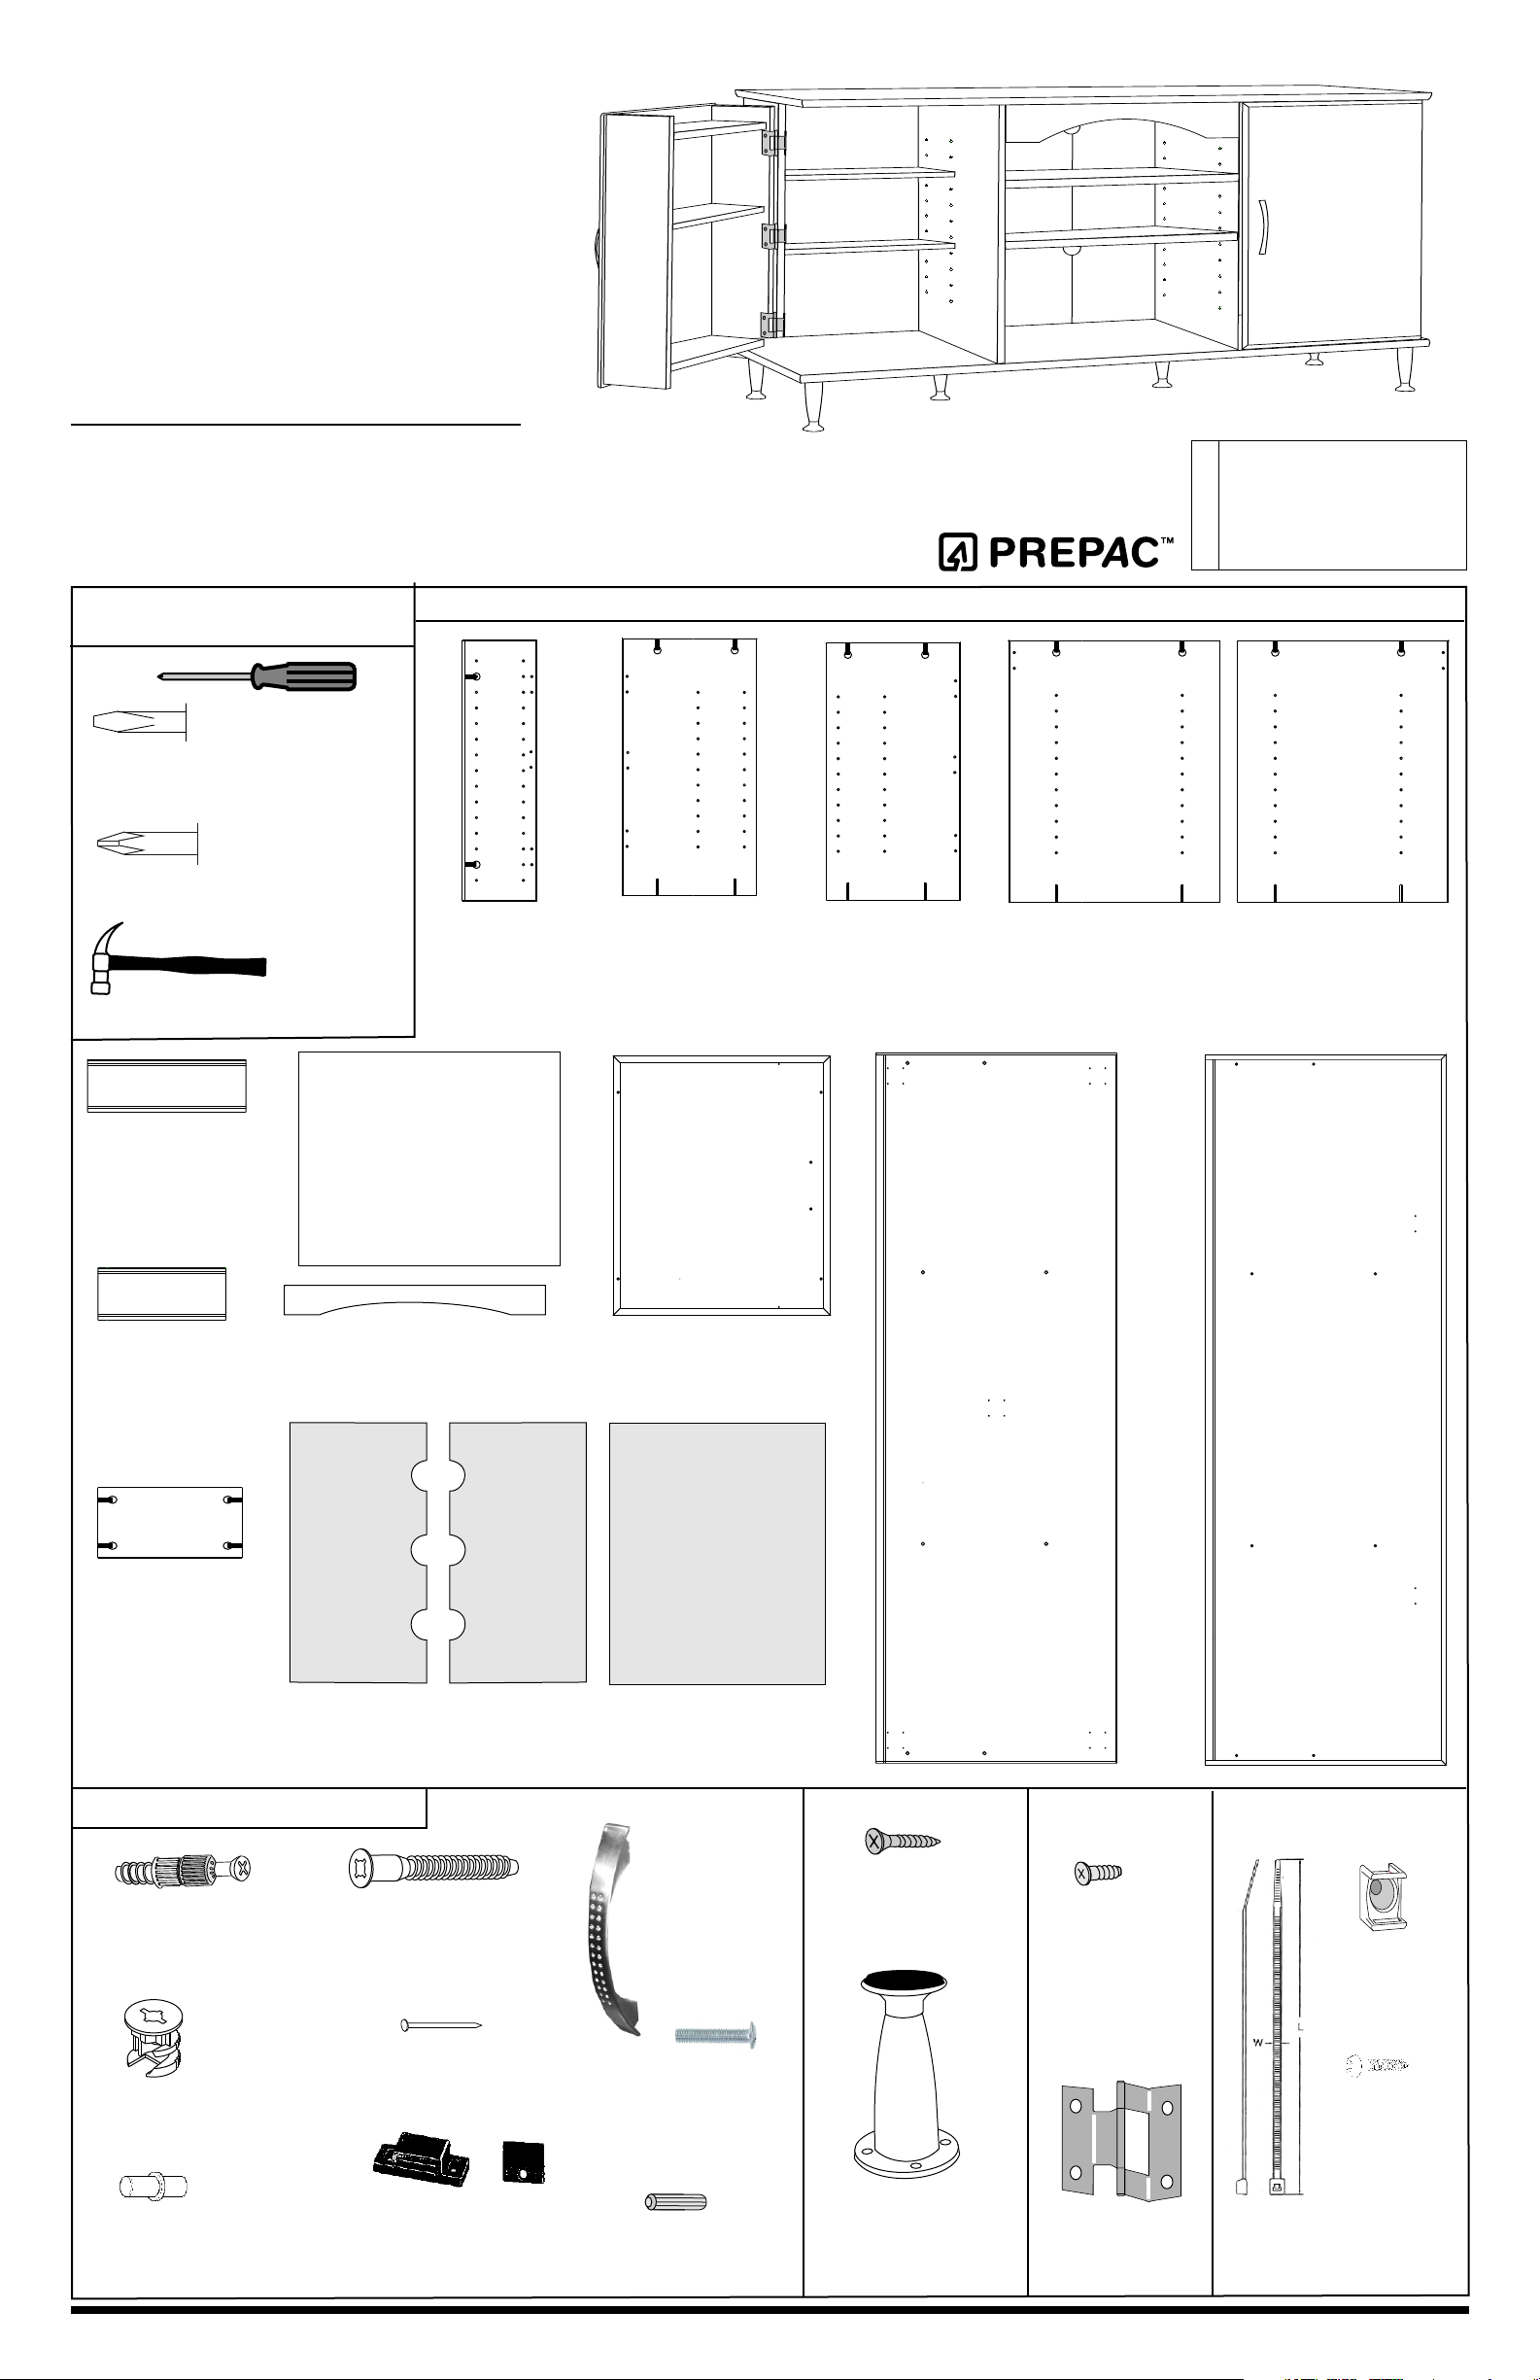
Tools Needed /
Outils nécessaires
Flathead Screwdriver
Phillips Screwdriver
Tournevis à pointe cruciforme
Hammer / Marteau
Long Adjustable
Shelves (4)
Longues tablettes
ajustables
SH-0615
Tournevis principal plat
Large Adjustable
Shelves (2)
Grande tablettes
ajustables
SH-0693
cherry / cerise
SH-0613
Black / noir
Cabinet Parts / Pièces de l'armoire
Door Sides (4)
Côtés de la porte
SG-0691
cherry / cerise
SG-0611
black / noir
Left Outer Side (1)
Côté gauche extérieur
SL-0692
cherry / cerise
SL-0612
black / noir
Right Outer Side (1)
droit Côté extérieur
SR-0692
cherry / cerise
SR-0612
black / noir
Left Inner Side (1)
Côté gauche intérieur
SL-0693
cherry / cerise
SL-0613
black / noir
Right Inner Side (1)
droit inCôté térieur
SR-0693
cherry / cerise
SR-0613
black / noir
Short Adjustable
Shelves (2)
Petites tablettes
ajustables
SH-0614
Black / noir
Fixed Door
Shelves (4)
Tablettes fixe
de porte
DO-0612
Black / noir
Stabilizer / (1)
ST-0692
ST-0612 black / noir
Inside Backer
Hardware / Quincaillerie
Renforcement
cherry / cerise
(2)
Dos intérieur
BB-0611
Door (2)
Porte
DR-0693 cherry / cerise
DR-0613 black / noir
Outside Backer
Dos extérieur
BB-0613
(2)
HP-0736 HP-0899
Bottom / (1)Le bas
BT-0693 cherry / cerise
BT-0613 black / noir
HP-0588
Top / Dessus (1)
TP-0693 cherry / cerise
TP-0613 black / noir
HP-0608
Green Twister Dowel (32)
Goujon de torsion vert
RM-0501
15mm Zinc Cam
Ferrure en zinc (32)
RM-0103
Metal Dowel Pins
Goujons de métal
(32)
RM-0014
© 2011-04-11
2" Confirmat Screws
Vis Confirmat (8)
RM-0001
¾" Nail
Clou ¾ po. (16)
RM-0022
Magnetic Catch & Plate (2 bags)
Attache magnétique et plaque
métal (2 sac)
RM-0409
Satin Nickel
Handle (2)
RM-0300
#4-20mm Machine
Screw (4)
Vis de machne de
20mm
RM-0471
Wood Dowel
Goujon de bois
RM-0069
(4)
#8 - 5/8" Screw
Vis no. 8 - 5/8 po. (24)
RM-0394
Nickel Finished
Adjustable Legs
Pieds ajustable en
finition nickel (6)
RM-0662
Drawer Slide
Screw (24)
Vis pour
coulisse de tiroir
RM-0074
Hinge
Penture (6)
RM-0638
Mounting Base (2)
Base de support
RM-0458
#6-¾” Pan Head
Screw (1)
Vis #6-¾ po.
RM-0460
Cable Tie (1)
Attache pour câble
RM-0459
LB-0607 Page 1 of/de 4
Page 2
1.
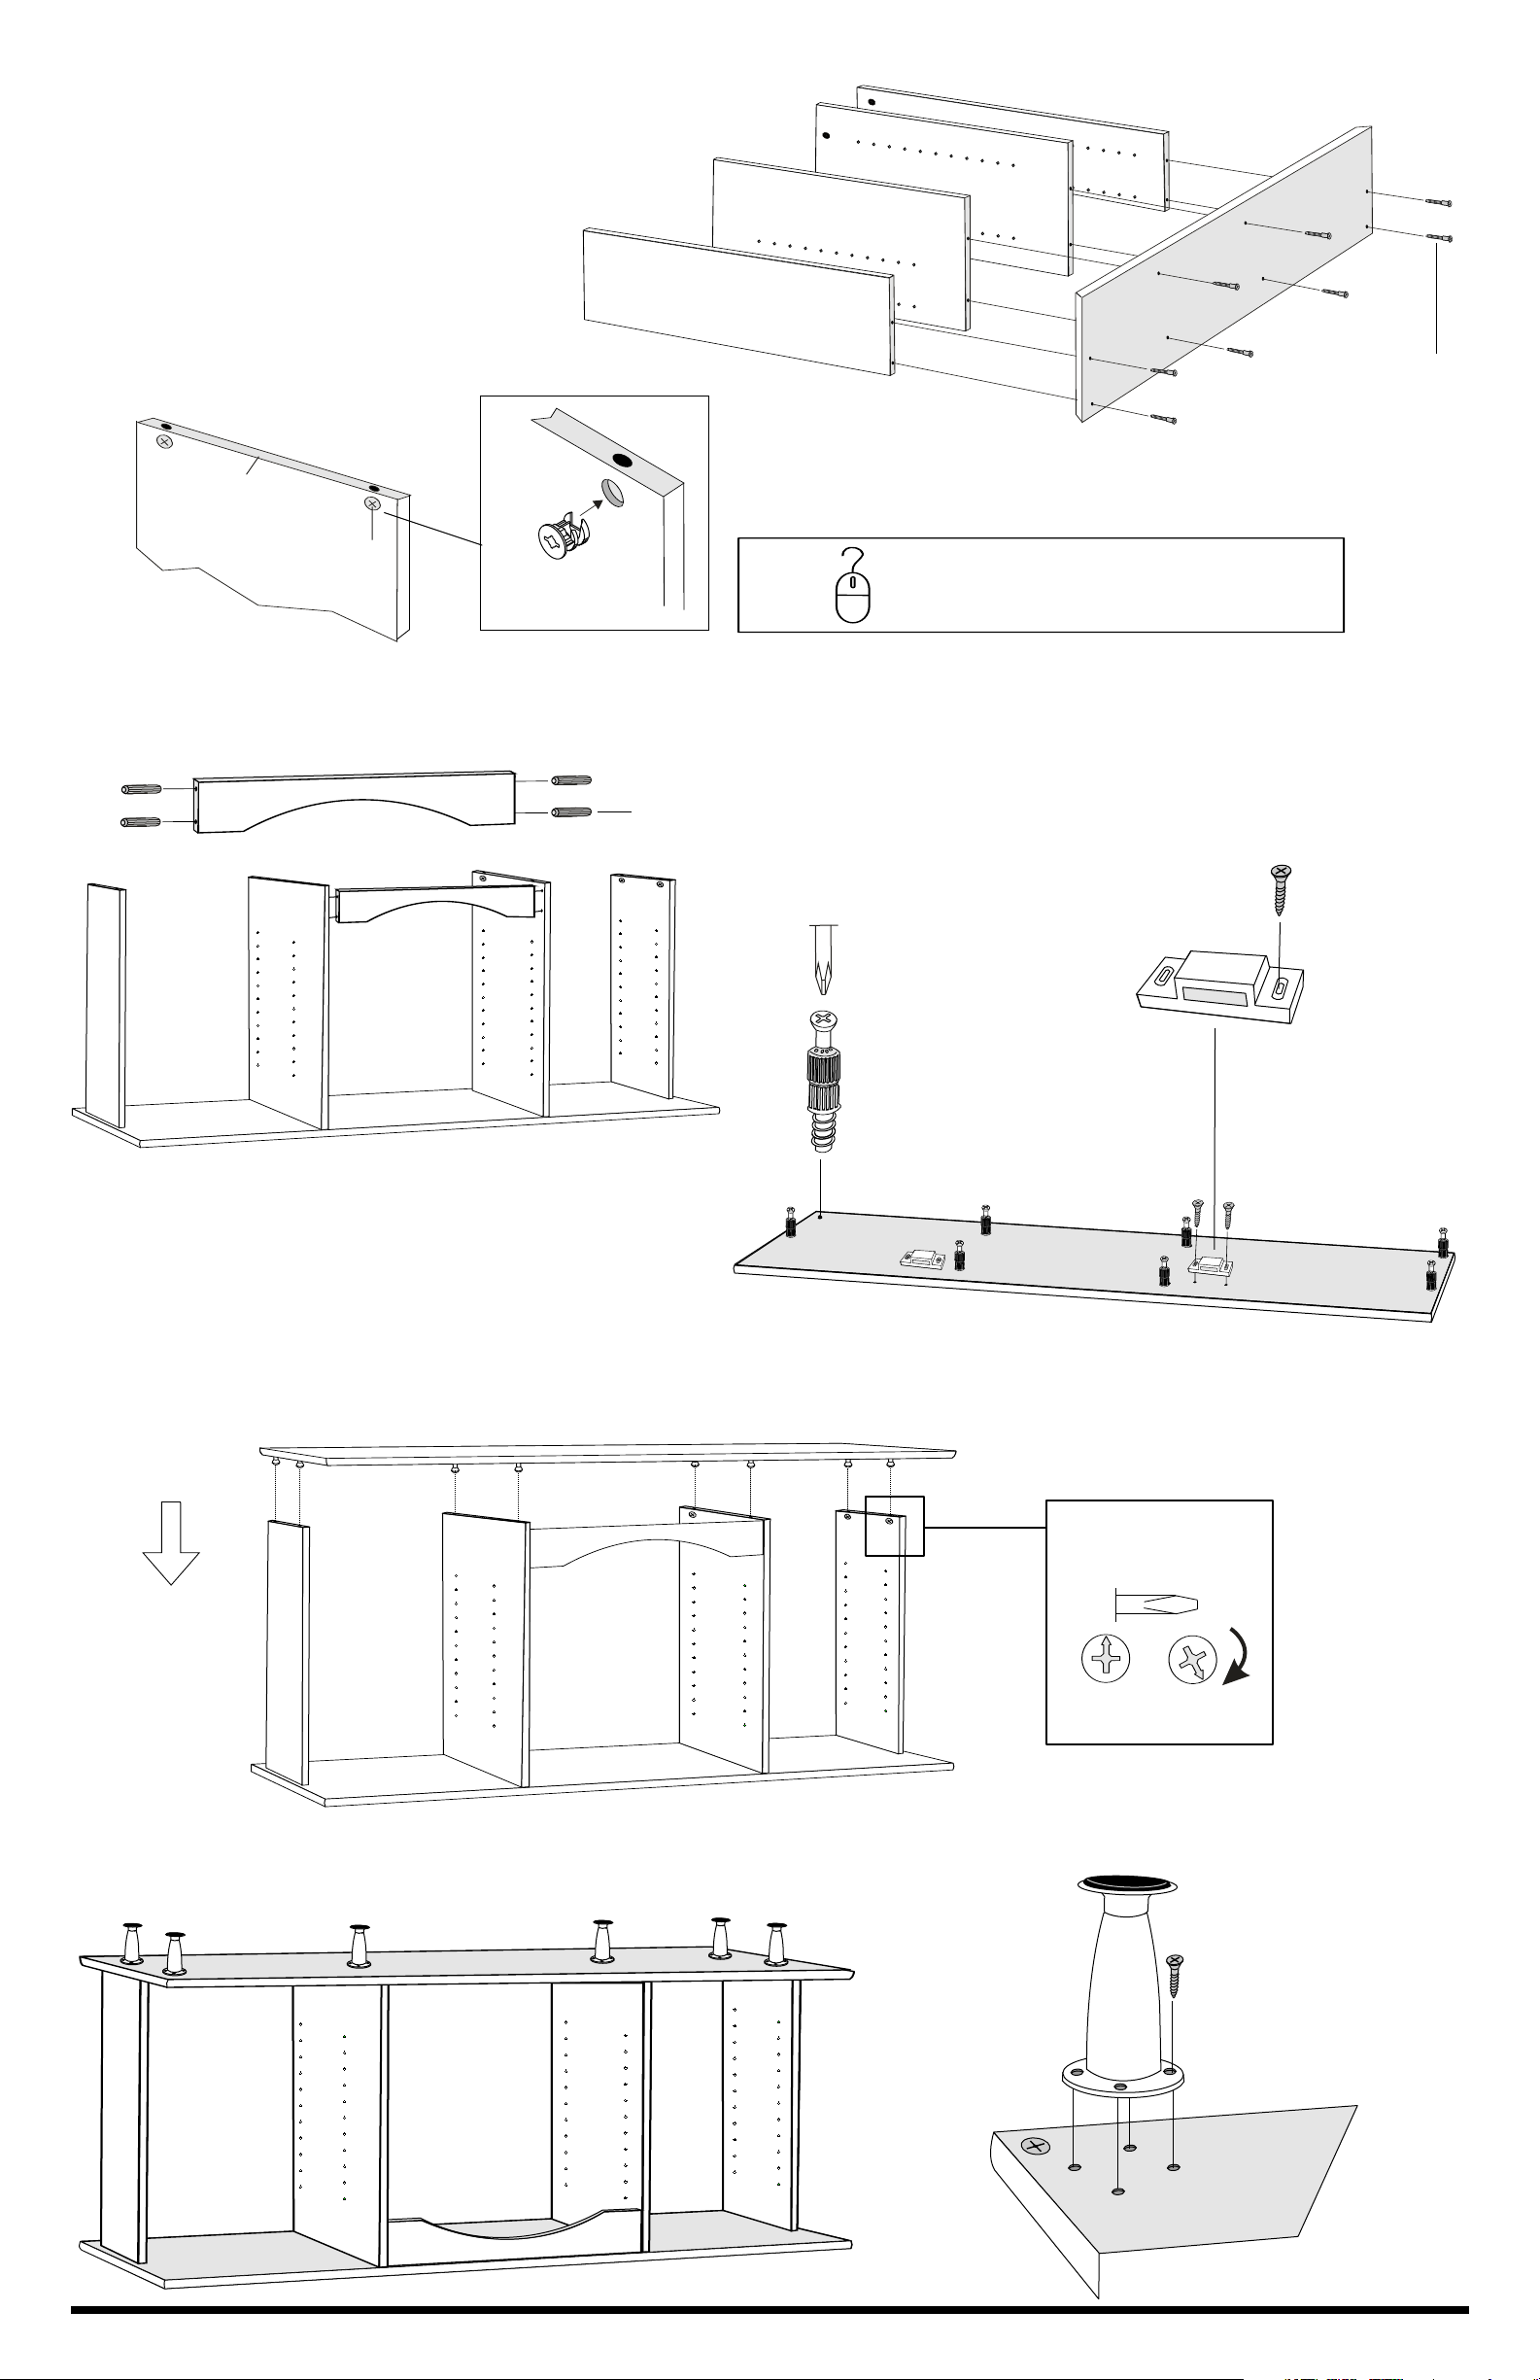
Attach the bottom to sides using Confirmat Screws.
Fixez le bas aux côtés à l'aide des vis Confirmat
2.
Side
Côté
3.
Insert cams into the top of all sides.
Insérez les ferrures au dessus de chacun des côtés
Top
Dessus
Cam
Ferrure
Attach stabilizer with wood dowels
Attachez le stabilisateur avec les goujons de bois
Wood Dowel
Goujon de bois
ONLINE
HELP
To see a video showing how the cam and
connectors work, visit our website:
www.prepacmfg.com/support/assemblyvideos.html
4.
Screw green twister dowels and magnetic catches into the
underside of the top.
Vissez les goujon de torsion vert et
dans le dessous du dessus.
Confirmat Screw
Vis Confirmat
les attaches magnétique
5.
Turn top over, attach to sides & tighten cams.
Faites tourner le dessus, fixez aux côtés et serrez les ferrures.
Green Twister Dowel
Goujon de torsion vert
Magnetic catch
Attache magnétic
Tightening Cams
Serrez les ferrures
6.
Turn upside down and attach feet
Faites tourner le dessus, fixez aux côtés et serrez les ferrures.
Unlocked
Déverrouillé
Locked
Verrouillé
#8 - 5/8" Screw
Vis no. 8 - 5/8 po.
© 2011-04-11
LB-0607 Page 2 of/de 4
Page 3
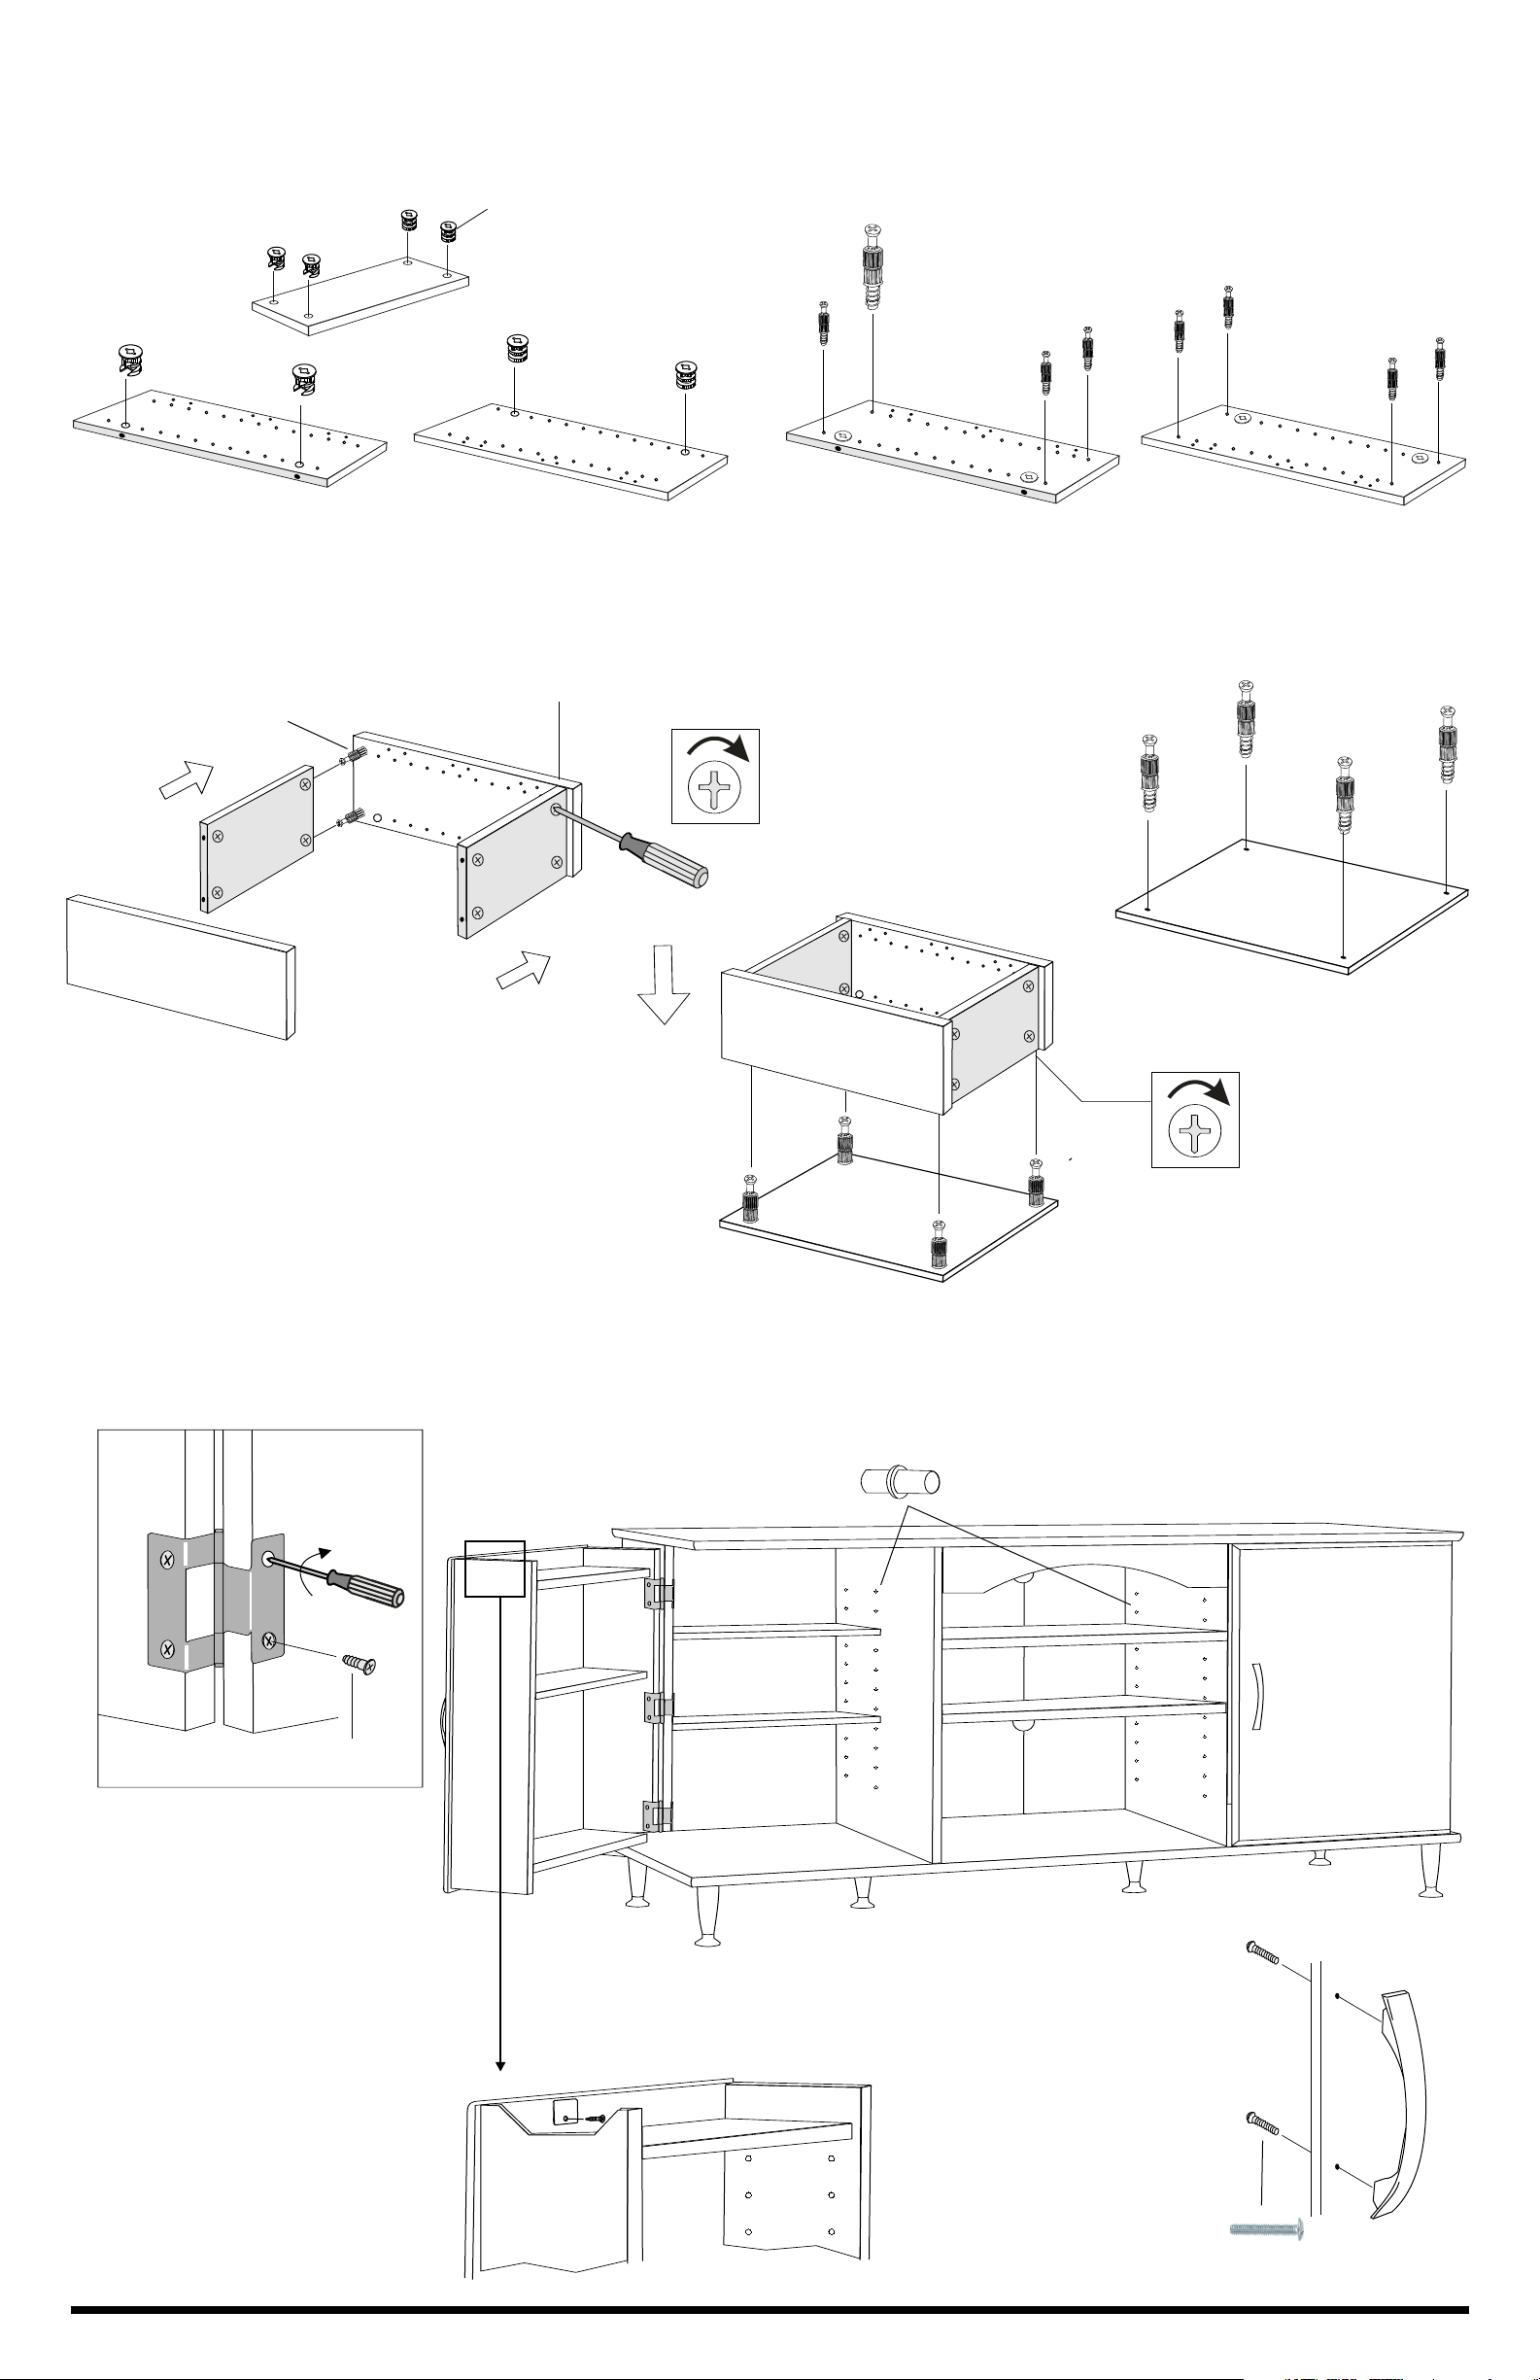
Assembling and Attaching the Doors / Assembler et fixer les portes
7.
Left Door Side
Côté gauche de la porte
9.
Insert cams into fixed shelves and all 4 door sides
Insérez les ferrures dans les tablettes fixes et
chacun des 4 côtés de porte
Fixed Shelf
Tablette fixe
Attach Door Sides to fixed shelves and tighten cams.
Fixez les côtés de la porte aux tablettes fixes et serrez les ferrures.
Cam
Ferrure
Right Door Side
Côté droit de la porte
8.
Left Door Side
Côté gauche de la porte
Insert green twister dowels into the bottom and top row on
ALL door sides.
Insérez les goujon de torsion vert dans le fond et la rangée
supérieure de TOUS LES côtés de porte.
Green twister dowel
Goujon de torsion vert
10.
Insert g into each door front. reen twister dowels
Right Door Side
Côté droit de la porte
oujons de torsion vertInsérez les g dans le devant des portes.
Green twister dowel
Goujon de torsion vert
11.
Attach door sides to door fronts and tighten cams
Fixez les côtés de la porte au devant des portes et
serrez les ferrures.
Finished edge
Côté fini
Titus
Door Front
Devant de la porte
Fixed Shelf
Tablette fixe
Titus
12.
Attach hinges to cabinet side.
and attach hinges to door.
Posez les pentures aux côtés de l'armoire.
la porte avec l'armoire et fixez les pentures à la porte.
Door
Porte
Cabinet
Armoire
Drawer Slide Screw
Vis pour coulisse de tiroir
Then, align door with cabinet
Alignez ensuite
13.
ls into shelf
In ert metal
o s e
r
do
fo
Insérez le
posez les t
légèrement dans l t
ow
rs and cabinet vary
u s
s
go jon
b
a lett s. Les t
de mét
e o
ablettes pour des portes et
aillea .
al
d
holes and a
lightly in siz .
dans les trous d s tablette
d adjusta le shelves.
e
b S l
s
ajust
le c ffret changent
a
ble et
he vess d e
14.
© 2011-04-11
Attach the metal plates to the top
of each door with screw supplied.
Posez les plaques métalliques
au-dessus de chaque porte la vis
étant fourni.
15.
Attach n
metal
Fixez les p
métalllique en finition
nickel satinée
ickel finished
handles
oignée
Machine Screw
Vis de machine
LB-0607 Page 3 of/de 4
Page 4
16.
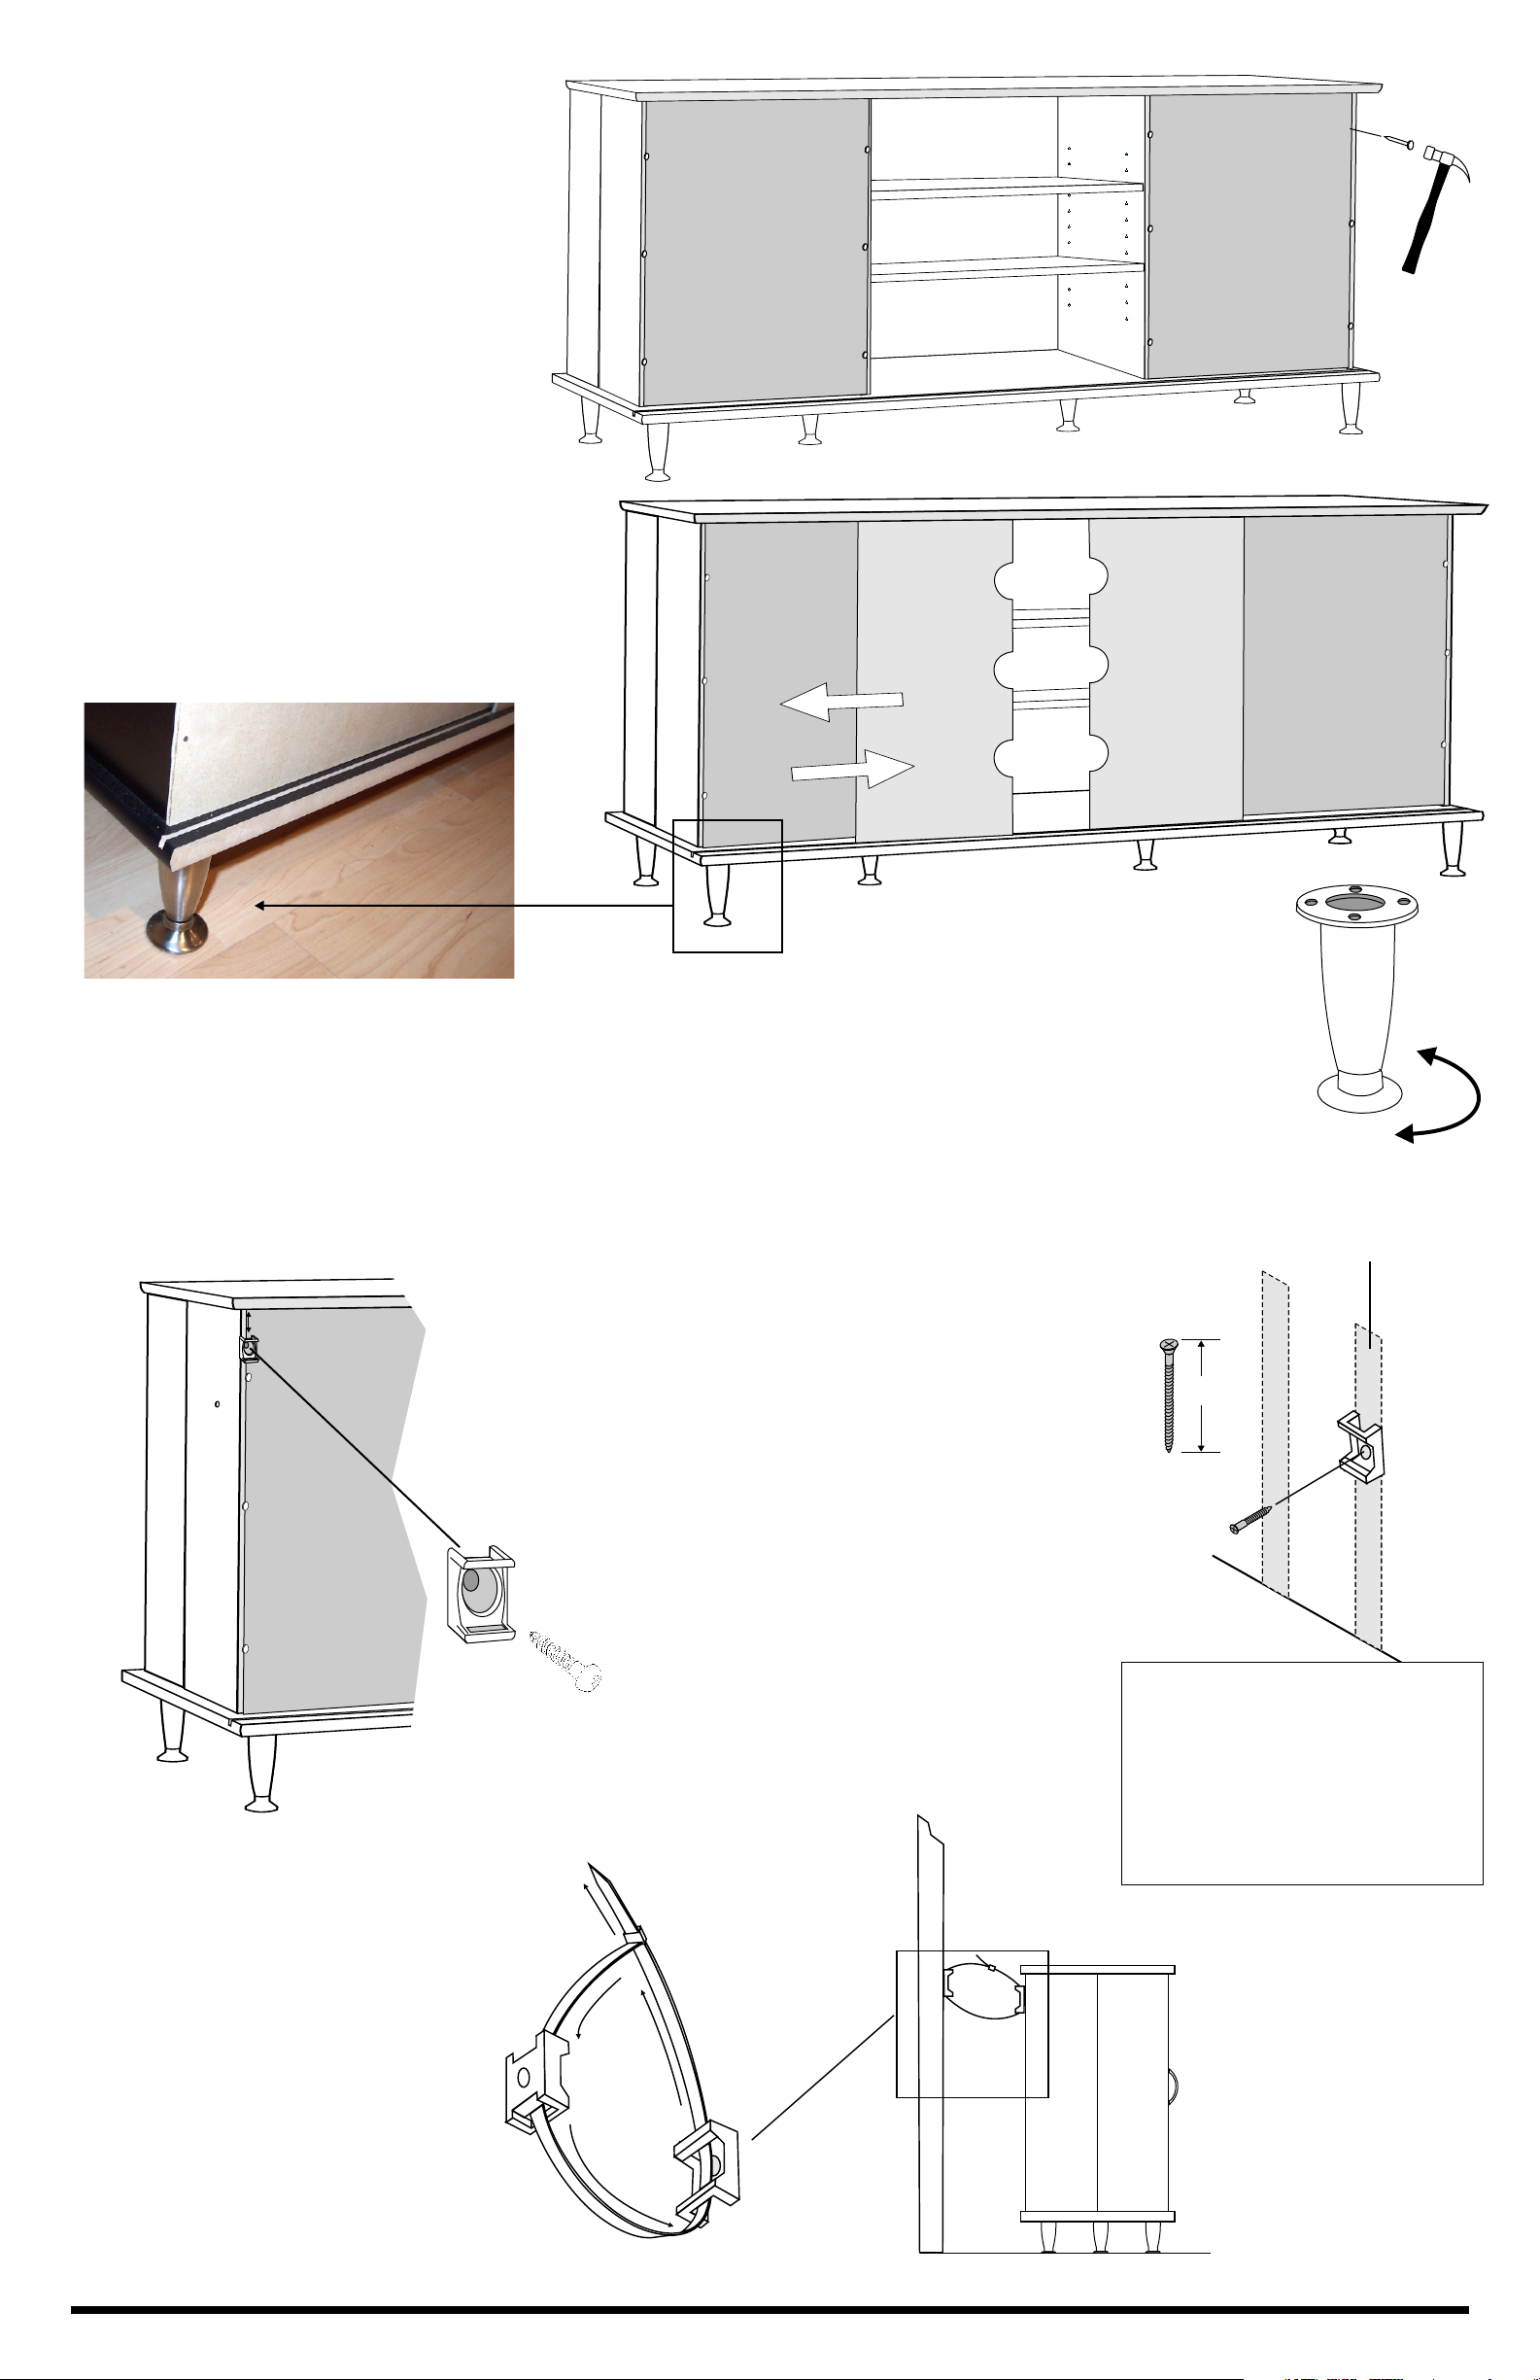
Attach the two outer backers to top and
sides using 3/4” nails. Leave 2-3
inches space from each corner.
Attachez les deux dos extérieures à
l'aide des clou ¾ po. Laissez des 2 ou 3
" l'espace de chaque coin.
17.
Secure Plasma TV Stand to wall using the Cable Ties (see next step for
details)
Fixez le stand du plasma TV au mur en utilisant l’attache pour
la prochaine étape pour des détails)
Slide inner backers along the rear groove.
Slide open and closed to access electronic
components
Glissez les appuis intérieurs le long de la
cannelure arrière. Glissière ouverte et fermée
aux composants électroniques d'accès
câble (voir
18.
If your floor is uneven, tighten or loosen
bottom of legs to adjust height.loosen
bottom of legs to adjust height.
Si votre plancher est inégal, serrez ou
détachez le fond des jambes pour ajuster la
taille.
20.
1”
19a.
Feed the cable tie through each
mounting base and then through
the locking mechanism to tighten.
19a.
19b.
#6 - 3/4" screw
Vis no. 6 - ¾ po.
With the #6-¾” screw, attach one of the mounting
bases to the center gable 1 inch from the top.
Avec #6 le ¾ " vis, attachez un des bases de
support au pignon central 1 pouce de l'attache
supérieure.
Attach the 2nd mounting base to the wall 2” lower
than the one on the cabinet
Important: Find a wall stud and attach the
mounting base with a 1½” screw (not included). If
you cannot locate a stud, use an approved wall
mounting system
Le 2ème base de support au mur 2 " inférieurs à
celui sur le module.
Important: Trouvez un goujon de mur et attachez
la base de support avec la " vis un 1½ (non
inclus). Si vous ne pouvez pas localiser un
goujon, utilisez un système approuvé de support
de mur
Wall
Locking mechanism
dispositif de verrouillage
le mur
Wall Stud
Goujon de mur
1½”
19b.
We recommend you screw into a stud.
If you cannot locate a stud use a wall
anchor appropriate for your type of
wall.
Nous vous recommandons vis dans un
goujon. Si vous ne pouvez pas
localiser une utilisation de goujon une
ancre de mur appropriée pour votre
type de mur.
Alimentez le serre-câble par
chaque base de support et alors
par le dispositif de verrouillage
pour serrer.
© 2011-04-11
LB-0607 Page 4 of/de 4
 Loading...