

Page 1

Assembly Instructions
Mode d'assemblage
Living Room Console
Console de salon
Series / Séries # LC-4830
LB-0553 Page 1 of/de 4
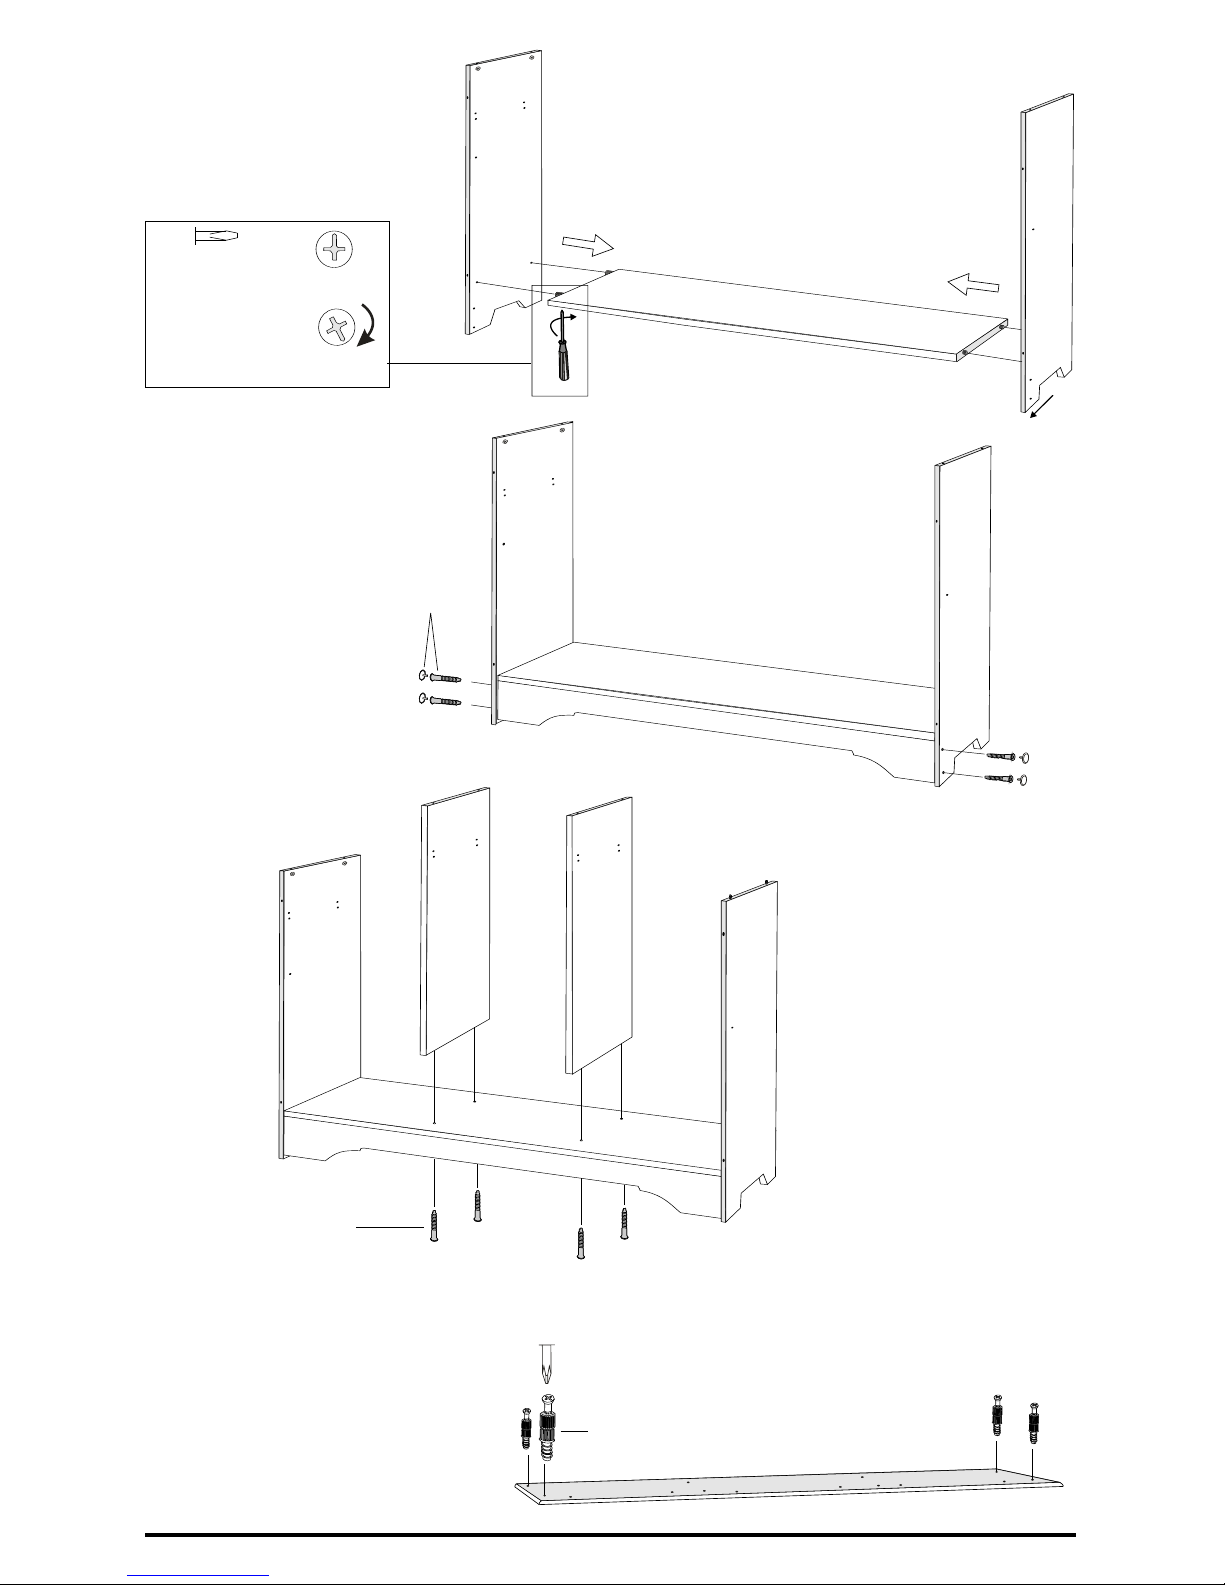
Insert cams and connecting rods bottom shelf.
Insérez les ferrures et les vis d’assemblage dans la
tablette du bas.
into the
1c.
Hammer Tack Glides into the bottom of each side
À l’aide d’un marteau, enfoncez les patins à la fond de chacun des côtés
.
.
If you have any missing parts, please send an
email to parts@prepacmfg.com, visit
www.prepacmfg.com or call: 1-877-PREPAC1
(1-877-773-7221) Mon - Fri 7:00am to 4:30pm
Pacific Time (10:00am - 7:30pm Eastern).
Have your product series number available.
Si des pièces sont manquantes, veuillez
envoyer un email à parts@prepacmfg.com,
visitez www.prepacmfg.com ou téléphoner au
1-877-PREPAC1 (1-877-773-7221) lors des
heures suivantes: LUN - VEN 7h 30 à 16h 30,
heure du Pacifique. Veuillez noter le numéro
de série avant de téléphoner. Pour le service
en français, contactez s’il vous plaît votre
détaillant.
DATE CODE
1a.
15mm Zinc Cam (8)
Ferrure en zinc
RM-0103
Plastic Dowels (18)
Goujons en plastique
RM-0072
2" Confirmat Screws
Vis Confirmat 2" (10)
RM-0001
¾” Nail (40)
Clou ¾”
RM-0022
Tack Glide (4)
Patin à clou
RM-0139
Screw Cover Caps
Capuchons des vis
RM-0226 black / noir
RM-0304 espresso
RM-0523 maple / érable
RM-0008 white / blanc
(6)
Brushed Nickel Knob (3)
Poignée
RM-0464
Black / noir
Maple / érable
nickel balayé
#8-32mm Machine Screw (3)
Vis de machne de 32mm
RM-0465
12” Metal Drawer
Glides (3 SETS)
Coulisses de métal pour
tiroir 12” (3 paires)
RM-0469
12mm Zinc Cam (6)
Ferrure en zinc 12mm
RM-0715
Plain Wood Dowel (6)
Goujons de bois naturel
RM-0503
#8 - 1½” Screws (12)
Vis no.8 - 1½”
RM-0504
Cabinet Hardware
Drawer Slide Screw (48)
Vis pour coulisse de tiroir
RM-0074
Drawer Hardware
T Spacer (12)
Entretoise de “T”
RM-0628
© 2010-02-25
1b.
Insert cams the top of each side.
Insérez les ferrures au dessus de
chacun des côtés
into
Side
Côté
Cam
Ferrure
Top
dessus
Tack Glide
Patins à clou
Bottom Shelf
Tablette du bas
Cabinet Parts / Pièces de l’armoire
Drawer Front (3)
Devant du tiroir
DF-9710 maple / érable
DF-9010 white / blanc
DF-9110 black / noir
DF-9610 espresso
Right Drawer Side (3)
Côté droit du tiroir
DS- -R
Unfinished / non-fini
9000
Drawer Bottom (3)
Fond du tiroir
DB-9000
Unfinished / non-fini
Left Drawer Side (3)
Côté gauche du tiroir
DS- -L
Unfinished / non-fini
9000
Drawer Back (3)
Arrière du tiroir
DK-9000
Unfinished / non-fini
Right Side (1)
Côté droit
Left Side (1)
Côté gauche
Top Molding (3)
Moulure supérieure
TR-9610
espresso
TR-9710
maple / érable
TR-9110
Black / noir
TR-9010
white / blanc
Gable Molding (2)
Moulure de pignon
TR-9612
espresso
TR-9712
maple / érable
TR-9112
black / noir
TR-9012
white / blanc
Center Gables (2)
Pignons centraux
GA-9611 espresso
GA-9711 maple / érable
GA-9011 white / blanc
GA-9111 black / noir
Front Kicker (1)
Renforcement avant
KR-9112 KR-9712
black / noir maple / érable
KR-9612 KR-9012
espresso white / blanc
Side Molding (2)
Moulure latérale
TR-9713 maple / érable
TR-9013 white / blanc
TR-9113 black / noir
TR-9613 espresso
1 Backer (folded)
BB-9612 espresso
BB-9712 maple / érable
1 Dos (plié)
BB-0128 black / noir
BB-9012 white / blanc
Tools Needed /
Outils nécessaires
We recommend that two people
assemble this unit.
Nous recommandons que deux
personnes assemblent cette unité.
Blue Rapid Rod (4)
Tige rapide bleu
RM-0583
Green Twister Dowel (10)
Goujon de torsion vert
RM-0501
Insert cams in the
unlocked position, with
the opening facing
toward the hole for the
rod.
Insérez les ferrures
dans la position
déverrouillée, de façon
à ce que l’overture soit
face au trou de la tige.
Cam
Ferrure
Blue Rapid Rod
Tige rapide bleu
SL-9112 black / noir SR-9112
SL-9612 espresso SR-9612
SL-9712 maple / érable SR-9712
SL-9012 white / blanc SR-9012
Brushed Nickel Knob (3)
Poignée
RM-0302 espresso
nickel balayé
Square Brushed Nickel Knob (3)
Poignée carré
RM-0323 white / blanc
nickel balayé
Front Stabilizer (1)
Stabilisateur avant
ST-9112 ST-9712
black / noir maple / érable
ST-9612 ST-9012
espresso white / blanc
Bottom Shelf (1)
Tablette du bas
BT-9112 BT-9712
black / noir maple / érable
BT-9612 BT-9012
espresso white / blanc
Top / Dessus (1)
TP-9112 TP-9712
black / noir maple / érable
TP-9612 TP-9012
espresso white / blanc
Page 2
Attach bottom shelf to left & right sides
and tighten cams
Attachez la tablette du bas aux côtés
gauche et droit et serrez les ferrures
Attach center gables to bottom shelf with
Confirmat screws.
Posez les pignons centraux à la tablette
du bas avec les vis Confirmat.
LB-0553 Page 2 of/de 4
Use the flat head
screwdriver and turn cams
to the RIGHT almost 180
degrees until tight.
Utilizer le tournevis
principal plat et serrez
les ferrures en tournant
vers LA DROITE jusqu’a
180 degrés.
Tt s
i
u
Locked
Verrouillé
Titus
Unlocked
Déverrouillé
Tightening Cams
Serrage des ferrures
Right Side
Côté droit
Left Side
Côté gauche
2.
3.
4.
FRONT
DEVANT
Attach front kicker and with
Confirmat Screws.
Posez le renforcement avant
avec les vis Confirmat.
Confirmat
screws
Vis Confirmat
Finished side up
Haut latéral fini
Confirmat screws
& cover caps
Vis Confirmat et
capuchons des vis
5.
Screw green twister dowels into the
underside of the top.
Vissez les goujons de torison vert dans le
dessous du dessus.
Green Twister Dowel
Goujon de torsion vert
© 2010-02-25
Page 3

LB-0553 Page 3 of/de 4
Use the flat head screwdriver and
turn cams to the RIGHT almost 180
degrees until tight.
Utilizer le tournevis principal plat et
serrez les ferrures en tournant vers LA
DROITE jusqu’a 180 degrés.
T
i
t
us
Locked
Verrouillé
Titus
Unlocked
Déverrouillé
Tightening Cams
Serrage des ferrures
6.
8.
10.
Attach top to sides and center gables & tighten cams on
each side.
Fixez le dessus aux côtés et les pignons centraux et
serrez les ferrures de chaque côté.
Attach backer to sides, center gables and bottom using
¾” nails. Leave a 2-3” space from each corner.
Posez le dos aux côtés, aux pignons centraux et au bas à
l'aide des clou ¾ po. Laissez des 2 ou 3 " l'espace de
chaque coin.
Insert the plastic dowels into each side molding.
Insérez les goujons dans chaque
moulure
en plastique
latéral.
Side Molding
Moulure latérale
View from Top
Vue à partir de dessus
7.
Insert plastic dowels into the top of each center gable.
Insérez les goujons en plastique
pignon central.
dans le dessus de
chaque
2”
2”
11.
Front Stabilizer
Stabilisateur avant
Side Molding
Moulure latérale
Insert moldings into the notch at each end of the front
stabilizer until the three pieces form an “H”
Insérez les moulures dans l'entaille à chaque extrémité
du stabilisateur avant jusqu'à ce que les trois morceaux
forment un "H"
9.
Assemble drawers and attach drawer glides & “T”
spacers to the sides and to the center gables.
Assemblez les tiroirs et les glissements de tiroir
d'attache et les entretoises de "T" aux côtés et aux
pignons centraux (référez-vous aux instructions
d'Assemblée de tiroir # au LB-0555 pour des
détails)
(refer
to Drawer Assembly Instructions #LB-0555 for
details)
Front Stabilizer
Stabilisateur avant
Drawer Slide Screw
Vis pour glissement de tiroir
Right Glide
Glissement droit
FRONT
DEVANT
Drawer Slide Screw
Vis pour glissement de tiroir
FRONT
DEVANT
Left Glide
Glissement gauche
© 2010-02-25
Page 4

Using plastic dowels, first a
moulures
moulures
ttach the top
moldings, then attach the gable moldings
En utilisant les doigts en plastique, attachez
d'abord les supérieurs, attachent
alors les de pignon.
LB-0553 Page 4 of/de 4
Insert drawers. See LB-0555
instructions for drawer assembly
Insérez les tiroirs. Voir les
instructions LB-0555 pour le tiroir
14.
Confirmat screws
& cover caps
Vis Confirmat et
capuchons des vis
Attach the front stabilizer and side moldings (combined to form an “H”) to the front of the center gables and left
and right sides. Align the plastic dowels with the holes on the left & right sides.
Attachez le stabilisateur avant et les bâtis latéraux (combinés pour former un "H") à l'avant des pignons centraux
et des côtés gauches et droits. Alignez les doigts en plastique avec les trous des côtés gauches et bons.
12.
Once front stabilizer and side moldings are in
place, secure to left & right sides with
Confirmat screws.
Une fois que le stabilisateur avant et les bâtis
latéraux sont en place, fixez aux côtés gauches
et bons avec des vis de Confirmat.
13.
15.
Top Molding
Moulure supérieure
Gable Molding
Moulure de pignon
Right Side
Côté droit
Left Side
Côté gauche
14b.
14a.
You may find it easier to lay the
console on its back for these steps
Vous pouvez le trouver plus facile
d'étendre la console sur son dos
pour ces étapes
© 2010-02-25
 Loading...