


Model # CH-6600
6-Drawer Dresser
Assembly Instructions
This product is shipped in
2 cartons
DATE STAMP
CALL US FIRST
1-877-PREPAC1
1-877-773-7221
Mon - Fri 7am - 4pm PST
10am - 7pm EST
Anytime: parts@prepacmfg.com
• For help with assembly
• If you have received a damaged or defective part or
are missing hardware.
We will process replacement parts
less. Parts are shipped via
Before you call please:
1) Record the following information from the shipping
label on the outside of the box. You will need it for
warranty purposes:
UPS Ground or mail.
in 2 business days or
1 of 2
2 of 2
• Ship To Name
• Sales Order Number
2) Note the
3) Review the contents of your shipment to determine
what you are missing. This unit is shipped in 2
cartons. Make sure you have received both.
Online Option:
Fill out the Replacement Parts Order form in the Product
Support section of our website: www.prepacmfg.com
product model number.
Required Tools
Screwdrivers
Hammer
Phillips Head
Flat Head
Optional Tools
Using a power screwdriver
will speed up assembly.
Caution
Do not over tighten any screw.
The last few turns of each screw
should be done very slowly or by hand.
Prepac Manufacturing Ltd.
6705 Dennett Place
Delta, BC V4G 1N4
10
05
LB2016-06-13
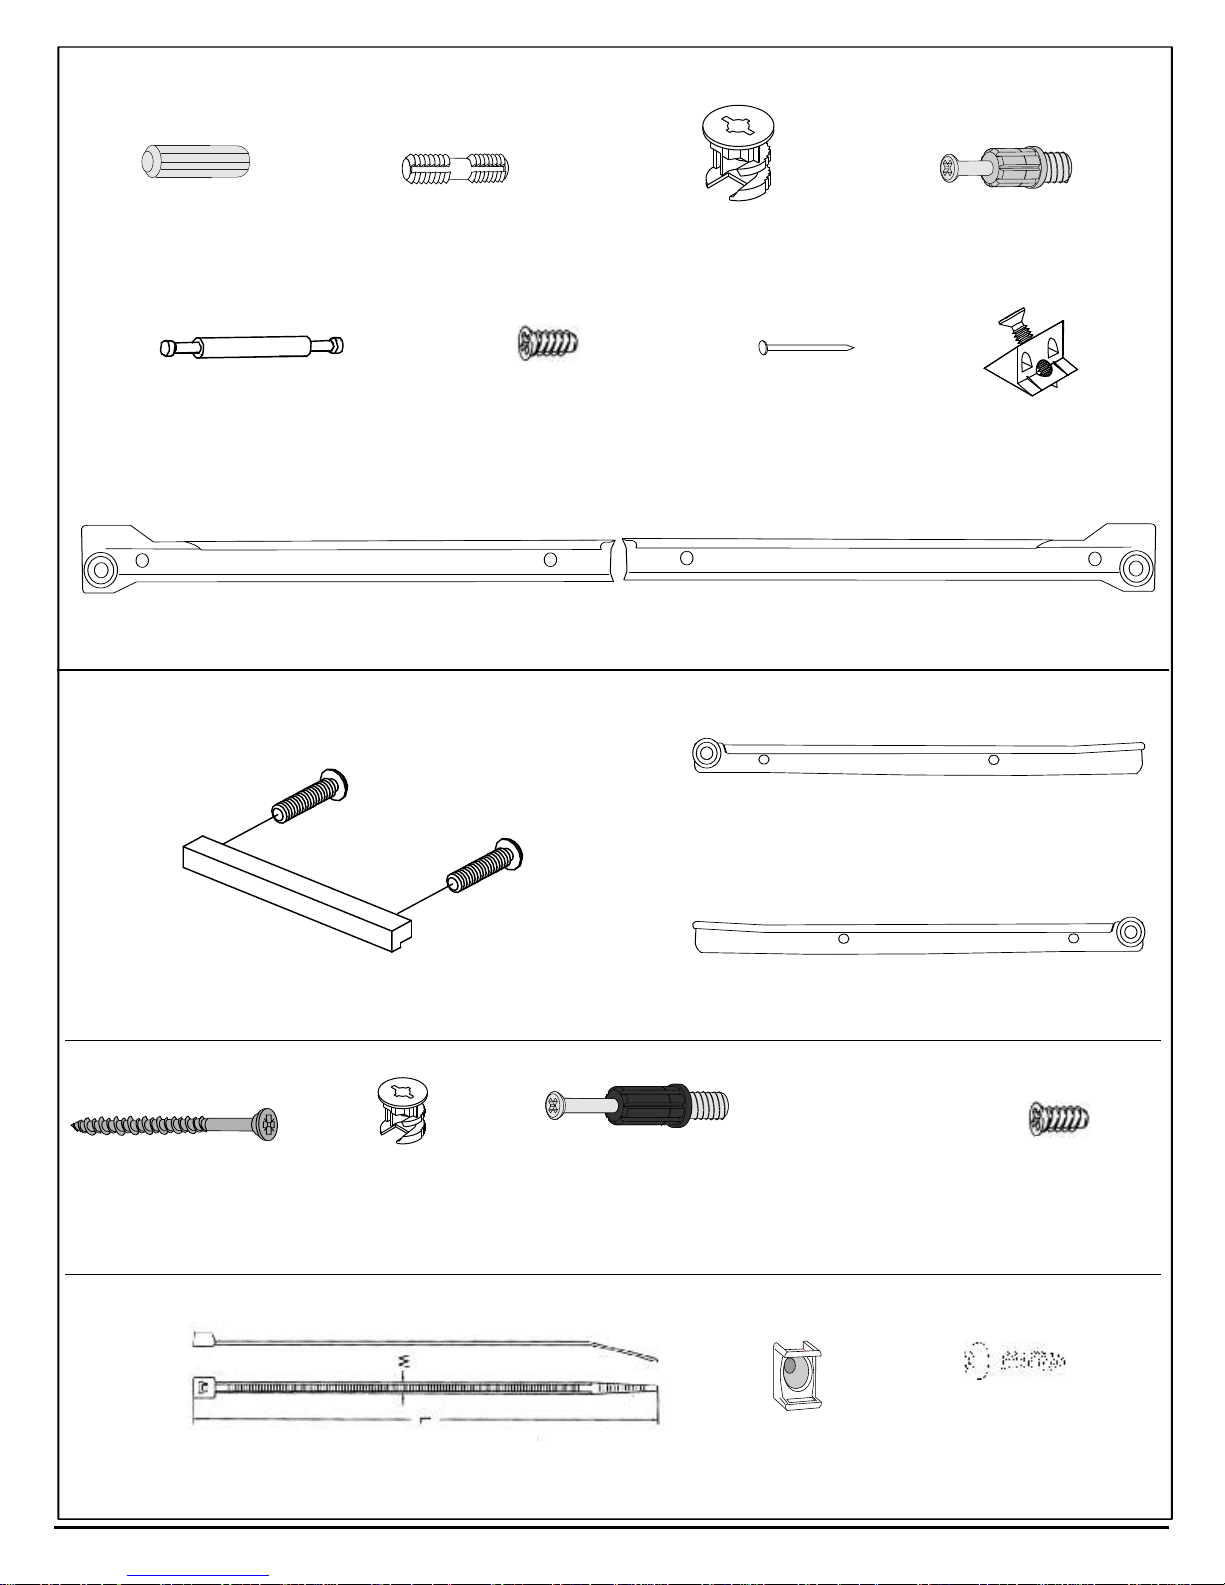
Cabinet Hardware
Matériel De Cabinet
Wood Dowel (4)
Goujons de bois
RM-0069
Double-ended Connecting Rod (2)
Goujons double-terminé
RM-0800
LEFT Cabinet Slide
Glissière GAUCHE De Cabinet (6)
RM-0469
Drawer Hardware
Plastic Dowels (10)
Goujons en plastique
RM-0072
Drawer Slide Screw (24)
Vis pour coulisse de tiroir
RM-0074
15mm Zinc Cam (14)
Ferrure en zinc
RM-0103
¾” Nail (26)
Clou ¾”
RM-0022
More than required
Plus que requis
RIGHT Cabinet Slide
Glissière DROITE De Cabinet
Green Twister Dowel (10)
Goujon de torsion vert
RM-0501
Drawer Bottom
Stabilizer (12)
Stabilisateur inférieur
de tiroir
RM-0839
RM-0469
Matériel De Tiroir
1 LEFT Drawer Slide per Drawer
1 Glissière GAUCHE de tiroir par tiroir (Total = 6)
RM-0469
(6)
Handle with screws
(6)Poignée avec les vis
RM-0736
4 per drawer
#8 - 1½” Hi Lo Screws
Vis no.8 - 1½ po. (24)
RM-0504
12mm Zinc Cam
Ferrure en zinc 12mm
RM-0715
Cable Tie Hardware Package
HP-0608
Cable Tie (1)
Attache pour câble
RM-0459
(24)
Black Twister Dowel
Goujon de torsion noir
RM-0500
1 RIGHT Drawer Slide per Drawer
1 Glissière DROITE de tiroir par tiroir (Total = 6)
RM-0469
4 par tiroir
(24)
Mounting Base (2)
Base de support
RM-0458
Drawer Slide Screw
Vis pour coulisse de
tiroir
RM-0074
#6-¾” Pan Head
Screw (1)
Vis #6-¾ po.
RM-0460
(24)
Page 2 of 16
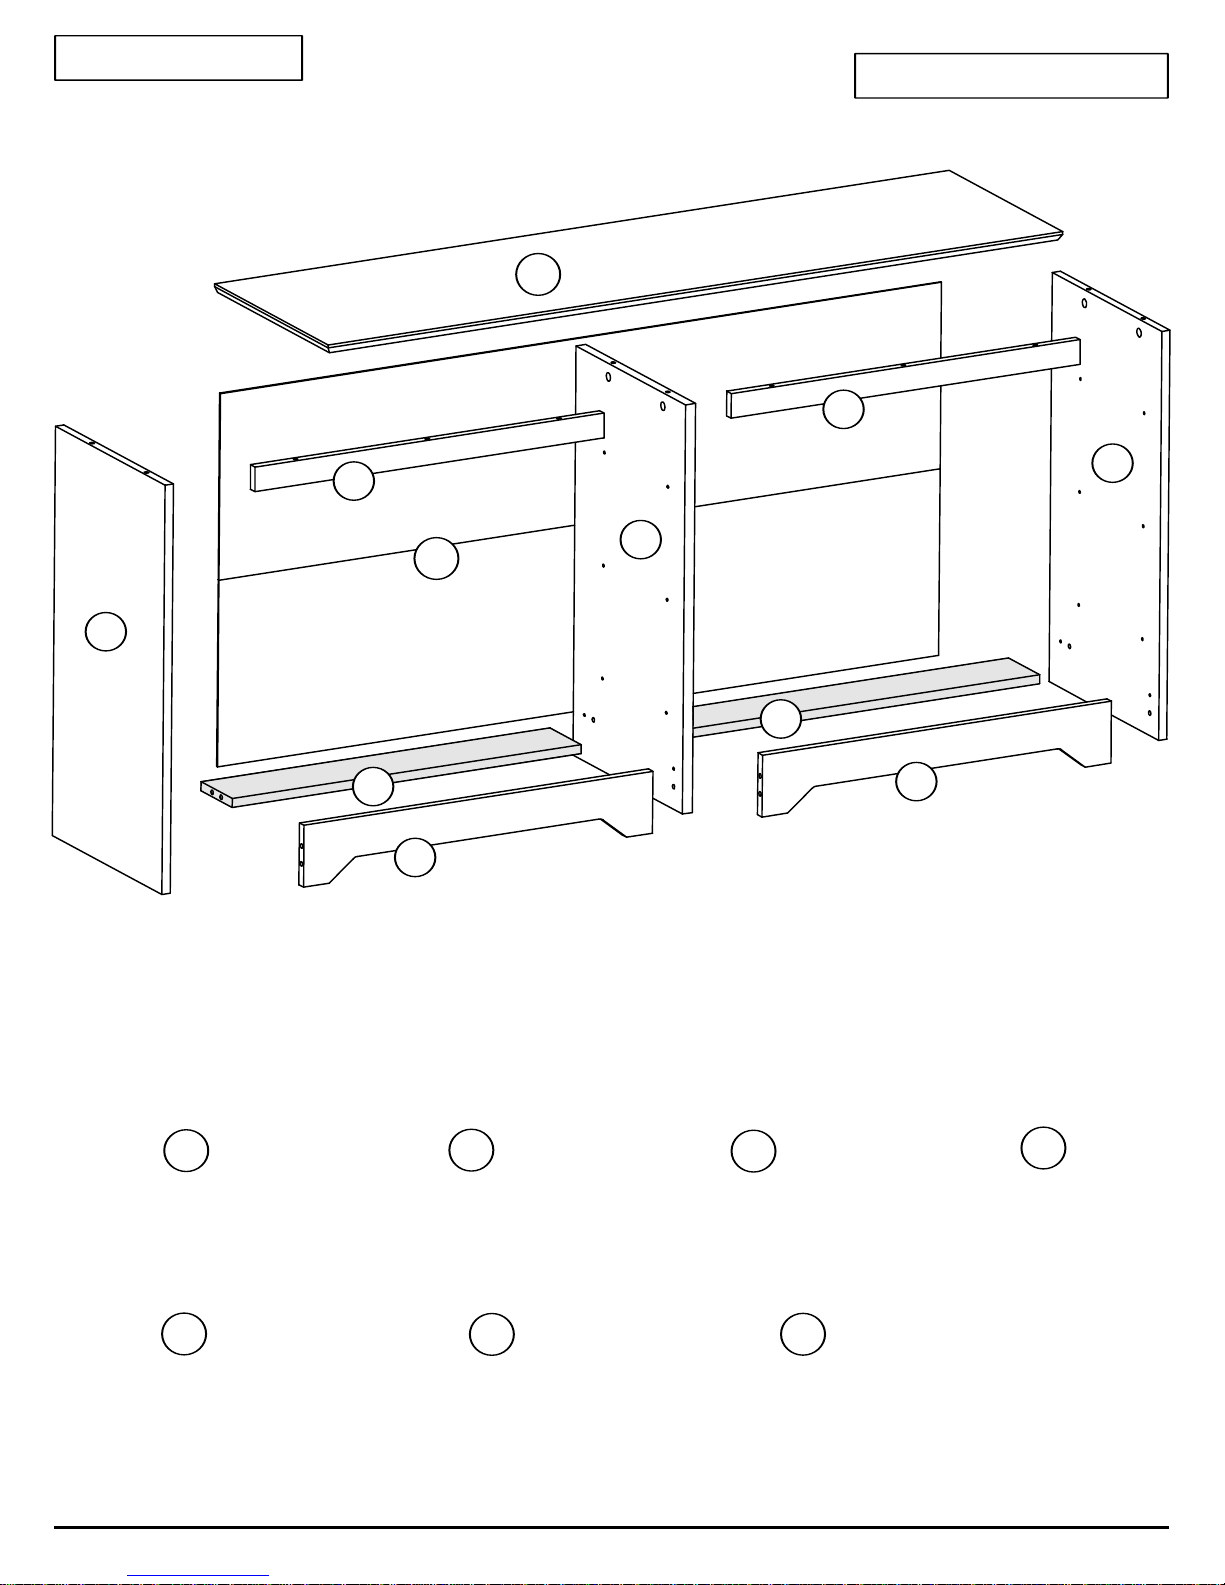
Cabinet Parts
Pièces De Cabinet
C1
C2
C3
C2
C6
C5
C4
C8
C6
C7
C7
C1
Top / Dessus (1)
TP-4145 black / noir
TP-4645 espresso
Top Molding /
TR-4144 black / noir
TR-4644 espresso
C5
Right Side / (1)
SR-4146
SR-4646 espresso
Côté droit
black / noir
Unifinished Rear Stabilizer /
Renforcement arriere non-fini (2)
C2
C6
ST-4544
C3
Left Side / (1)
(2)Moulure supérieure
SL-4146
Côté gauche
black / noir
SL-4646 espresso
Pignon central (1)
GA-4155
GA-4655 espresso
C4
Center Gable /
black / noir
C7
Front Stabilizer
Renforcement devant (2)
KR-4144
KR-4644 espresso
black / noir
Backer / Dos (1)
BB-4502
Page 3 of 16
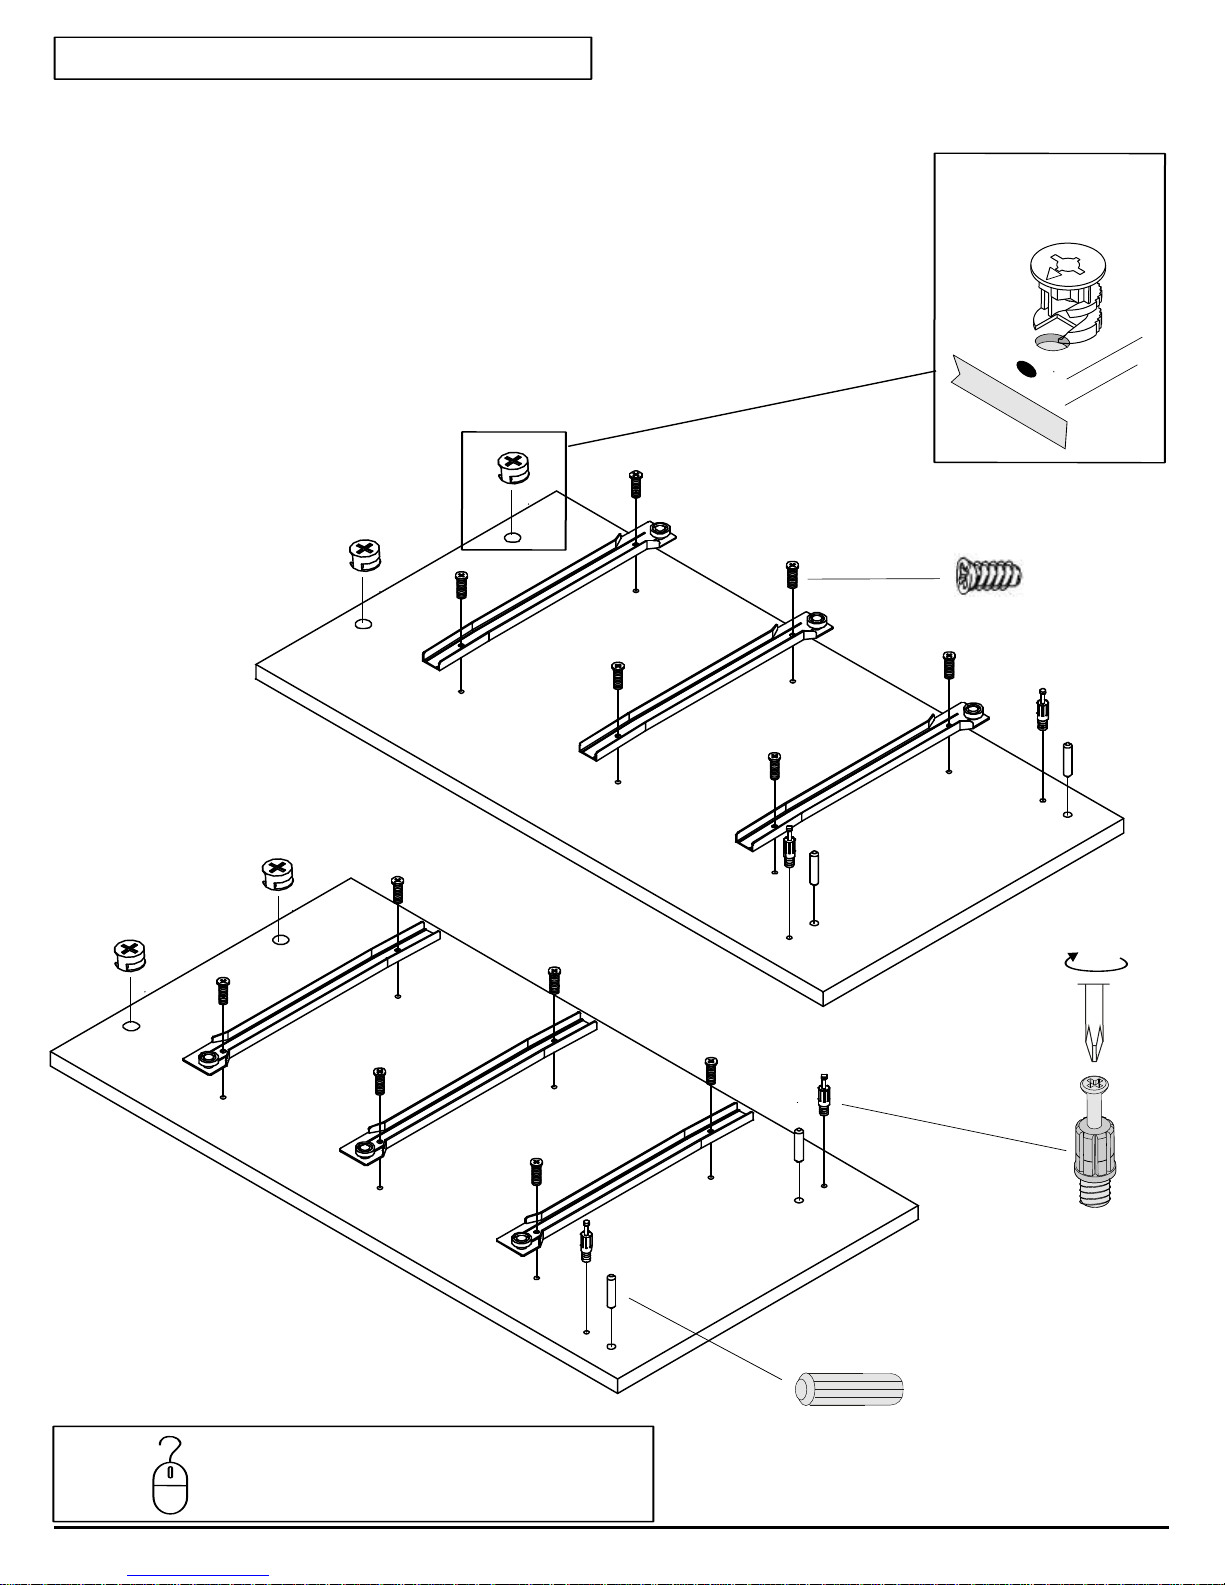
STEP 1
Estimated Time: 25 minutes
1a
1b
1c
1d
Insert large cams into holes on the top of left and right sides.
Insérez les ferrures grande dans des trous sur le dessus des côtés gauche et droit
Attach metal cabinet slides to left and right sides using drawer slide screws
Les glissières de coffret en métal d'attache aux côtés gauche et droit en
utilisent le tiroir glissent des vis
Screw green twister dowels into the left and right sides
Vissez les goujons de torison vert aux côtés gauche et droit
Insert wooden dowels into the left and right sides
Inserez les goujons de bois aux côtés gauche et droit
1a
1b
Make sure arrow on
cam faces hole for
connecting bolt
Drawer Slide Screw
Vis pour coulisse de tiroir
Left Side
Côtés gauche
Right Side
Côtés droit
1d
Front
Devant
1c
Green Twister
Dowel
Goujon de
torsion vert
ONLINE
HELP
To see a video showing how to use cams and
connectors, visit Product Support on our website:
www.prepacmfg.com/support/assemblyvideos.html
Front
Devant
Wood Dowel
Goujons de bois
Page 4 of 16
1e
Insert large cams into holes on the top of the center gable.
Insérez les ferrures grande dans des trous sur le pignon central
1f
Center Gable
Pignon central
Attach metal cabinet slides to BOTH sides of the center gable
AUX DEUX côtés du pignon centralLes glissières de coffret en métal d'attache
Front
Devant
Front
Devant
Center Gable
Pignon central
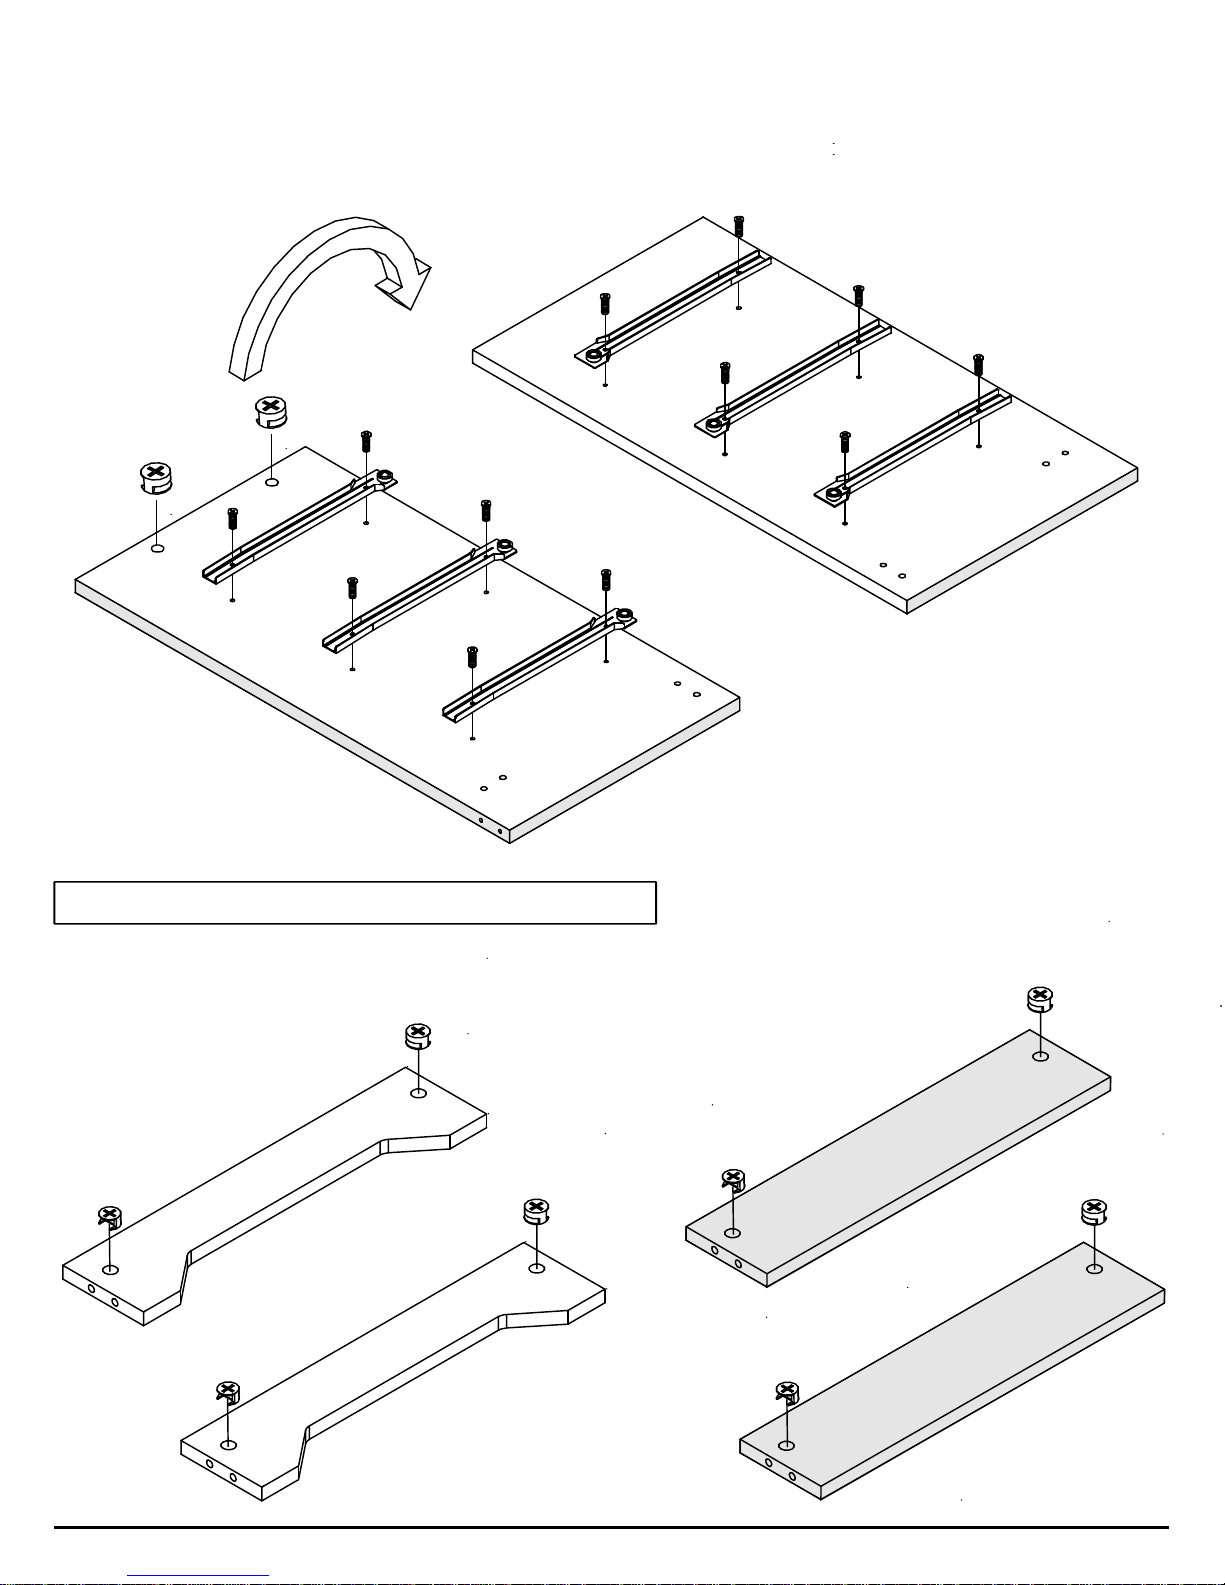
STEP 2
Insert large cams into front and rear stabilizers
Insérez les ferrures grand dans les stabilisateur devant et arriere
Estimated Time: 3 minutes
Page 5 of 16

STEP 3
Estimated Time: 15 minutes
3a
3b
3b
Attach front (C7) stabilizers to right side
and tighten cams.
Attachez les stabilisateurs arriere (C6) & devant (C7)
aux côtés droit et serrez les ferrures.
Insert plastic dowels and double-ended connecting rods into
front and rear stabilizers and tighten cams.
Insérez les goujons en plastique et goujons double-terminé
aux stabilisateurs devant et arriere et serrez les ferrures.
rear (C6) &
C4
C5
C7
3a
C6
3c
Attach the center gable (C4) to the front
an rear stabilizers. The double-ended
rods will protrude through.
Attachez le pignon central (C4) aux
stabilisateurs devant et arriere. Les
goujons double-terminé dépasseront
passé.
C3
C7
C6
C4
3d
C5
C7
C6
3c
Repeat to attach the left side.
R petez pour attacher le gaucheé côté
3d
Page 6 of 16

STEP 4
Screw green twister dowels into the underside of the top
Vissez les goujons de torison vert dans le dessous du dessus
Estimated Time: 5 minutes
STEP 5
Hammer plastic dowels into top moldings
Martelez les goujons en plastique noir
dans la moulure supérieure
Estimated Time: 3 minutes
Page 7 of 16

STEP 6
Estimated Time: 5 minutes
6a
Attach top molding to the top. Using your hands,
apply even pressure to molding and press firmly.
Attachez la moulure supérieure au dessus. En
utilisant vos mains, appliquez-vous même la
pression à la moulure supérieure et serrez
fermement.
XX
6b
Attach top to sides and lock cams
using a flat head screwdriver
Attachez le dessus aux côtés et
serrez les ferrures à l'aide d'un
tournevis principal plat
Page 8 of 16

STEP 7
Attach backer with nails
Attachez le dos avec les clous
Estimated Time: 5 minutes
Page 9 of 16

STEP 8 Estimated Time:
5 Minutes per Drawer
D4
D2
ÉTAPE 8 Temps prévu :
5 minutes PAR TIROIR
D3
D5
D1
Drawer Parts
Pièces de tiroir
D1
D2
Drawer Front (6)
Devant du tiroir
DF-10022-B black / noir
DF-10022-E espresso / expresso
Left Drawer Side (6)
Côté gauche du tiroir
DS-10001-L
Unfinished
non-fini
a
Right Drawer Side (6)
D3
Côté droit du tiroir
DS-10001-R
Unfinished
non-fini
Drawer Back (6)
D4
Arrière du tiroir
DK-10043
Unfinished
non-fini
Drawer Bottom (6)
D5
Fond du tiroir
DB-10043
Unfinished
non-fini
D1
x4
Black Twister Dowel
Goujon de torsion noir
Page 10 of 16

b
x4
Drawer Slide Screw
Vis pour coulisse de tiroir
D2
Bottom Edge
Bord Inférieur
D3
R
c
Bottom Edge
Bord Inférieur
L
x4
Small Zinc Cam
Petite ferrure en zinc
D2
Front
Devant
D3
D1
Page 11 of 16

d
D5
D3
D1
D2
e
D4
D5
Page 12 of 16

f
x4
g
#8 - 1½” Screws
Vis no.8 - 1½ po.
D4
D5
Groove on drawer
front & back
Cannelure sur l’avant
& l’arrière de tiroir
Page 13 of 16

h
Machine Screw
Vis de machne
Step 9 Estimated Time: 1 Minute
Insert drawers
Insérez les tiroirs
A.
B.
Note: When drawers are installed correctly, you will not be
able to remove them without first lifting up the drawer front.
DrawerCabinet
NOTE: Quand des tiroirs sont installés correctement, vous ne pourrez
pas les enlever sans se soulever d’abord vers le haut de l’avant de tiroir.
Page 14 of 16

STEP 10
Attaching and Using the Cable Tie
Attacher et Utilisation
de l'Attache de Câble
We strongly recommend using a cable tie on all
furniture, especially if small children have access
a b
With the #6-3/4” screw, attach one of
the mounting bases to one of the sides
1 inch from the top.
Avec le #6-3/4” vis, attacher une des
bases montant à un des côtés 1 pouce
du sommet.
1”
#6 - 3/4" screw
Vis no. 6 - ¾ po.
Nous recommandons utilisant fortement une
attache de câble sur tous les meubles, surtout
si les petits enfants ont accès
Attach the 2nd mounting base to the wall 2” lower than the one
on the cabinet
Important:
a 1½” screw (not included). If you cannot locate a stud, use an
approved wall mounting system
Attacher la deuxième base montant au mur 2” plus bas que le
l'un sur le cabinet.
Important :
avec un 1½ » la vis (n'a pas inclus). Si vous ne pouvez pas
localiser un clou, utilisez un
système fixé au mur approuvé
Find a wall stud and attach the mounting base with
Trouver un clou de mur et attacher la base montant
Wall Stud
Goujon de mur
1½”
c
Feed the cable tie through each
mounting base and then through
the locking mechanism to tighten.
Nourrir l'attache de câble par
chacun montant la base et alors
par le mécanisme de verrouillage
pour resserrer.
Give Us Your Feedback
CALL US
1-877-PREPAC1 (1-877-773-7221)
Mon - Fri 7am - 4pm PST
10am - 7pm EST
Email Us: assembly@prepacmfg.com
Page 15 of 16
 Loading...