

Prentke Romich Company Vanguard Plus Operator's Manual

™
Vanguard
Operator’s Manual
For devices with system software 5.05 and above
Plus
PRC HEADQUARTERS PRC INTERNATIONAL
1022 Heyl Rd • Wooster, OH 44691
Telephone: (330 262-1984 • (800) 262-1984 Minerva Business Park
Fax: (330) 263-4829 Lynch, Peterborough, Cambridgeshire
E-mail Address: info@prentrom.com
Web Site Address: www.prentrom.com
Web Site Address: www.liberator.co.uk
Fax: +44 845 2661155
E-mail Address: info@liberator.co.uk
Liberator Ltd
PE2 6FT UK
VANGUARD PLUS MANUAL
14777-1v2.01

Data can be uploaded from this unit to a personal computer for storage on a hard disk, CD, or other storage medium. Be sure to make multiple
copies of all important data to protect against accidental loss.
Vanguard Plus, Vanguard, WordCore, Language Activity Monitor (LAM), MemoryTransfer Interface (MTI) and Picture Prediction are trademarks of
Prentke Romich Company.
Minspeak and Unity are registered trademarks of Semantic Compaction Systems, Inc. in the United States and/or other countries.
Semantic Compaction is a trademark of Semantic Compaction Systems, Inc.
PCS Symbols are a product of Mayer-Johnson.
Fonix-DECtalk Text-to-Speech software is a copyright of Fonix Corporation; all rights reserved.
RealSpeak Text-to-Speech is a trademark of Nuance Communications, Inc. Acapella speech technologies licensed from the Acapella Group.
Windows, WindowsXP, Windows Explorer, Windows Media Player, Microsoft Outlook, Microsoft Word, Windows WordPad and Microsoft PowerPoint
are registered trademarks of Microsoft, Inc.
IBM is a registered trademark of International Business Machines.
Tracker is a trademark of Madentec, Inc.
Headpointing technology by Madentec
IntelliTools is a registered trademark of IntelliTools, Inc.
HeadMouse is a trademark of Origin Instruments, Inc.
WordQ is a trademark of Bloorview MacMillan Children’s Centre
Paint Shop Pro software is copyrighted by JASC Software, Inc.Inmage Viewer/32 is shareware from SB Software.
Bluetooth Wireless Technology is a registered trademark. The Bluetooth word mark and logos are owned by the Bluetooth SIG, Inc. and any use of
such marks by PRC is under license. Other trademarks and trade names are those of their respective owners.
Digital photos of the devices courtesy of Doug Miller
ELECTRONIC INTERFERENCE INFORMATION
This device complies with Part 15 of the FCC Rules. Operation is subject to two conditions: (1) this device may not cause harmful interference, and (2)
this device must accept any interference received, including interference that may cause undesired operation.
Warning! Changes or modifications to this product which are not authorized by Prentke Romich Company could exceed FCC limits and negate your
authority to use this product.
This equipment has been tested and found to comply with the limits for a Class B digital device, pursuant to Part 15 of the FCC Rules. These limits are
designed to provide reasonable protection against harmful interference in a residential installation. This equipment generates, uses and can radiate
radio frequency energy and, if not installed and used in accordance with the instructions, may cause harmful interference to radio communications.
However, there is no guarantee that interference will not occur in a particular installation. You can determine whether this product is causing
interference in your radio or television by turning this product off. If the interference stops, it was probably caused by this product or one of its
accessories. You can attempt to correct the interference by using one or more of the following measures:
•Turn the television or radio antenna until the interference stops.
•Move this product to one side or the other of the television or radio.
•Move this product farther away form the television or radio.
•Plug this product into an outlet that is on a different circuit from the television or radio; that is, this product should be controlled by different circuit
breakers/fuses from the television or radio.
•If necessary, contact a Prentke Romich Company service technician for assistance.
This Class B digital apparatus meets all requirements of the Canadian Interference-Causing Equipment Regulations. Cet appareil numérique de la
classe B respect toutes les exigences du Règlement sur le matériel brouiller du Canada.
CE ENVIRONMENTAL INFORMATION: Use: 0
o
40
C.
CLASS 1 LED PRODUCT –The Tracker Headpointing option falls within the limits of a Class 1 LED product as specified by CENELEC EN 60825-1,
Amendments 1 and 2.
o
- 45o C; Storage: (-20o) - 50o C; 95% maximum relative humidity @ ambient temperatures less than
Attention! Consult accompanying documents.
Not intended to be an emergency call device or sole communication device.
Warnings!
When operating this device in a medical environment, do not use with any product that is not medically approved.
Any mounts used should be fitted by a qualified person.
Failure to install the mounting system according to the manufacturer’s instructions may result in an injury to the user.
©Prentke Romich Company 2010. All rights reserved. Under copyright laws this manual may not be copied, in whole or in part,
without the written consent of the Prentke Romich Company.
PRC • 1022 Heyl Rd. • Wooster, OH 44691 • Tel: 800-262-1984 • Fax: 330-263-4829 • info@prentrom.com • www.prentrom.com
LIBERATOR LTD • Liberator House • Minerva Business Park • Lynch Wood, Peterborough, Cambridgeshire • PE2 6FT UK •
info@liberator.co.uk
• www.pri-liberator.com
VANGUARD PLUS MANUAL
14777-1v2.0

END USER LICENSING AGREEMENT
Microsoft, Inc.
You have acquired a Vanguard ™ which includes software licensed by Prentke Romich Company from Microsoft
Licensing Inc. or its affiliates (“MS”). Those installed software products of MS origin, as well as associated media,
printed materials and “online” or electronic docum ent at i on ( s oftware) are protected by international intellectual
property laws and treaties.
IF YOU DO NOT AGREE TO THIS END USER LICENSE AGREEMENT (EULA), DO NOT USE THE
DEVICE OR COPY THE SOFTWARE. INSTEAD, PROMPTLY CONTACT PRENTKE RO MICH COMPANY
FOR INSTRUCTIONS ON RETURN OF THE UNUSED DEVICE(S) FOR A REFUND. ANY USE OF THE
SOFTWARE, INCLUDING BUT NOT LIMITED TO USE ON THE DEVICE, WILL CONSTITUTE
YOUR AGREEMENT TO THIS EULA (OR RATIFICATION OF ANY PREVIOUS CONSENT).
GRANT OF SOFTWARE LICENSE.
This EULA grants you the following license:
You may use the SOFTWARE only on a VANGUARD.
NOT FAULT TOLERANT. THE SOFTWARE IS NOT FAULT TOLERANT. PRC HAS INDEPENDE NT LY
DETERMINED HOW TO USE THE SOFTWARE AND MS HAS RELIED UPON PRC TO CONDUCT
SUFFICIENT TESTING TO DETERMINE THAT THE SOFTWARE IS SUITABLE FOR SUCH USE.
NO WARRANTIES FOR THE SOFTWARE. THE SOFTWARE is provided “AS IS” and with all faults. THE
ENTIRE RISK AS TO SATISFACTORY QUALITY, PERFORMANCE, ACCURACY, AND EFFORT
(INCLUDING LACK OF NEGLIGENCE) IS WITH YOU. ALSO TH ERE IS NO WARRANTY AGAINST
INTERFERENCE WITH YOUR ENJOYMENT OF THE SOFTWARE OR AGAINST INFRINGEMENT. IF
YOU HAVE RECEIVED ANY WARRANTIES REGARDING THE DEVICE OR SOFTWARE, THOSE
WARRANTIES DO NOT ORIGINATE FROM, AND ARE NOT BI NDING ON, MS.
Note on Java Support. The SOFTWARE may contain support for programs written in Java. Java technology is
not fault tolerant and is not designed, manufactured, or intended for use or resale as online control equipment in
hazardous environments requiring fail-safe performance, such as in the operation of nuclear facilities, aircraft
navigation or communication systems, air traffic control, direct life support machines, or weapons systems, in
which the failure of Java technology could lead directly to death, personal injury or severe physical or
environmental damage. Sun Microsystems, Inc. has contractually obligated MS to make this disclaimer.
No Liability for Certain Damages. EXCEPT AS PROHIBITED BY LAW, MS SHALL HAVE NO LIABILITY
FOR ANY INDIRECT, SPECIAL CONSQUENTIAL OR INCIDENTAL DAMAGES ARISING FROM OR IN
CONNECTION WITH THE USE OR PERFORMANCE OF THE SOFTWARE. THIS LIMITATION SHALL
APPLY EVEN IF ANY REMEDY FAILS OF ITS ESSENTIAL PURPOSE. IN NO EVENT SHALL MS BE
LIABLE FOR ANY AMOUNT IN EXCESS OF U.S. TWO HUNDRED FIFTY DOLLARS (U.S. $250.00).
Limitations on Reverse Engineering, Decompilation and Disassembly. You may not reverse engineer, decompile,
or disassemble the SOFTWARE, except and only to the extent that such activity is expressly permitted by
applicable law notwithstanding this limitation.
SOFTWARE TRANSFER ALLOWED BUT WITH RESTRICTIONS. You may permanently transfer rights
under this EULA only as part of a permanent sale or transfer of the Device, and only if the recipient agrees to this
EULA. If the SOFTWARE is an upgrade, any transfer must also include all prior versions of SOFTWARE.
EXPORT RESTRICTIONS. You acknowledge that SOFTWARE is subject to U.S. export jurisdiction. You
agree to comply with all applicable international and national laws that apply to the SOFTWARE, including U.S.
Export Administration Regulations, as well as end-user, end-use and destination restrictions issued by U.S. and other
governments. For additional information see http://www.microsoft.com/exporting/
.
VANGUARD PLUS MANUAL

iv

IMPORTANT!
Remove your device from
Shipping Mode
Plug in your battery charger.
Press the key on the front of the case.
It will take a few moments for the device to boot up.
VANGUARD PLUS MANUAL
v

vi

Table of Contents
GETTING ACQUAINTED WITH YOUR VANGUARD PL
US ..........................................................................11
The Front Panel ...........................................................................................................................................................12
The Left Side Panel.....................................................................................................................................................14
The Right Side Panel...................................................................................................................................................15
Top of the Vanguard....................................................................................................................................................16
Back of the Vanguard..................................................................................................................................................17
The Display Areas.......................................................................................................................................................18
Different Ways to Turn your Device Off.....................................................................................................................20
About the Batteries in your Vanguard.........................................................................................................................22
The Touch Screen and the Exploration Wizard...........................................................................................................23
The Unity® 45 Sequenced Overlay..............................................................................................................................25
About Minspeak®........................................................................................................................................................27
Icon Prediction Shows Where You Have Messages Stored ........................................................................................28
About the Color-Coded Toolbox.................................................................................................................................30
Change the Speaker Volume .......................................................................................................................................31
The Simple Toolbox....................................................................................................................................................32
About the CALL Tool in the Toolbox.........................................................................................................................33
SETTING UP YOUR COMMUNICATION DEVICE ..........................................................................................35
About Setting Up your Device ....................................................................................................................................36
Select a User Area.......................................................................................................................................................36
Access Methods...........................................................................................................................................................41
The ACCESS METHOD MENU................................................................................................................................42
Touch Options.............................................................................................................................................................43
1 Switch Scanning Methods........................................................................................................................................44
1 Switch Scanning Options.......................................................................................................................................... 46
2 Switch Scanning Methods........................................................................................................................................48
2 Switch Scanning Options.......................................................................................................................................... 49
Headpointing/Joystick Methods ..................................................................................................................................50
Internal Headpointing Options ....................................................................................................................................50
Joystick Options ..........................................................................................................................................................53
Internal Headpointing Options ....................................................................................................................................54
Mouse/Trackball/USB Joystick Options .....................................................................................................................56
The FEEDBACK MENU............................................................................................................................................58
FEEDBACK MENU Options......................................................................................................................................60
SPEECH MENU Options............................................................................................................................................62
The AUDITORY PROMPT MENU............................................................................................................................65
The OUTPUT MENU .................................................................................................................................................68
Save Your Set-Up Settings..........................................................................................................................................70
Store the “Use Settings” Keys on your Overlay..........................................................................................................71
WORD PREDICTION..............................................................................................................................................73
About Unity® Core Vocabulary and Word Prediction.................................................................................................74
Spell and Select Words................................................................................................................................................75
Other Word Prediction Options...................................................................................................................................79
REMINDERS MENU................................................................................................................................................89
The REMINDERS MENU..........................................................................................................................................90
USING YOUR OVERLAY.......................................................................................................................................97
About Core Vocabulary and Activity Row Vocabulary..............................................................................................98
About Recorded and Computer Speech.......................................................................................................................99
Before You Begin to Store, Plan!................................................................................................................................99
Record a Vocabulary Message ..................................................................................................................................100
TABLE OF CONTENTS
Vanguard Plus Manual
vii

Erase a Recorded Message........................................................................................................................................107
Store a Computer Speech Message............................................................................................................................109
Edit a Computer Speech Message.............................................................................................................................113
Completely Erase the Contents of a Key...................................................................................................................114
Link an Icon Sequence to an Already Created Page..................................................................................................114
Hide Vocabulary Keys – Single Hit Overlays...........................................................................................................115
Swap Core Vocabulary Keys on Your Overlay.........................................................................................................118
PAGES......................................................................................................................................................................119
About Custom Pages .................................................................................................................................................120
Set Page Template.....................................................................................................................................................121
Create a Custom Page................................................................................................................................................123
Go to Your Custom Page...........................................................................................................................................125
Modify a Custom Page..............................................................................................................................................126
STORE TEXT AREA Tool .......................................................................................................................................127
Link a Page to another Page...................................................................................................................................... 129
Create a Scene Page...................................................................................................................................................130
Copy Pages/Activities from your Current User Area to Another User Area.............................................................138
Copy Activities or Pages from One Device to Another.............................................................................................138
Expand a User Area or Page......................................................................................................................................139
ACTIVITIES............................................................................................................................................................143
Activities....................................................................................................................................................................144
Set Activity Template................................................................................................................................................145
Create a New Activity—An Example .......................................................................................................................147
Dynamic Activities....................................................................................................................................................149
Erase a Dynamic Activity Link; Review All Dynamic Activities.............................................................................150
About the Picture Prediction Option..........................................................................................................................151
Modify an Already Existing Activity ........................................................................................................................154
Link an Activity to a Page or to another Activity......................................................................................................155
Copy Pages/Activities from your Current User Area to Another User Area.............................................................157
Copy Activities or Pages from One Device to Another.............................................................................................159
STORE/ASSIGN TOOLS AND MACROS IN CORE, ACTIVITIES AND PAGES........................................161
To Store a Tool Use the INSERT TOOL Key on the Spelling Keyboard.................................................................162
Store a Tool Under an Icon Sequence .......................................................................................................................162
Assign a Tool to a Core Key......................................................................................................................................163
Erase the Tool and Restore the Original Icon............................................................................................................164
Assign a Tool to an Activity Row Key......................................................................................................................165
Assign a Tool to a Front Panel Key...........................................................................................................................166
About Macros............................................................................................................................................................167
Store a Macro Under an Icon Sequence.....................................................................................................................169
Assign a Macro to a Core Key...................................................................................................................................170
Erase Macros.............................................................................................................................................................171
Change All Occurrences of an Icon...........................................................................................................................172
Copy or Erase all Sequences Beginning with Selected Icon(s).................................................................................172
REVIEW VOCABULARY.....................................................................................................................................173
Using the REVIEW VOCABULARY MENU..........................................................................................................174
Using the REVIEW TO OUTPUT METHOD Option..............................................................................................175
Icon Tutor Options.....................................................................................................................................................176
NOTEBOOKS..........................................................................................................................................................177
About Notebooks.......................................................................................................................................................178
The Notebook Workspace .........................................................................................................................................178
New Notebooks .........................................................................................................................................................179
Close a Notebook; Save a Notebook.......................................................................................................................179
Open or Delete a Notebook .......................................................................................................................................180
TABLE OF CONTENTS
Vanguard Plus Manual
viii

Rename a Notebook; Transfer a Notebook to a Com puter File.................................................................................180
Print a Notebook........................................................................................................................................................181
Speak a Notebook; Lock a Notebook........................................................................................................................182
Copy a Notebook from One Area to Another............................................................................................................183
Store a Notebook under an Icon Sequence................................................................................................................183
Editing Tools.............................................................................................................................................................184
THE SPEECH DICTIONARY...............................................................................................................................187
The Speech DICTIONARY MENU..........................................................................................................................188
Add Words to the Dictionary.....................................................................................................................................188
Delete Words from the Dictionary.............................................................................................................................189
Review Words in the Dictionary ...............................................................................................................................190
Load Default Dictionary............................................................................................................................................190
CALCULATOR.......................................................................................................................................................191
Using the Calculator..................................................................................................................................................192
THE MAINTENANCE MENU..............................................................................................................................195
The MAINTENANCE MENU..................................................................................................................................196
TRANSFER MEMORY MENU ............................................................................................................................199
About Memory Transfers ..........................................................................................................................................200
Memory Transfer using a USB Flash Drive or Secure Digital Card.........................................................................201
Importing Icons/Photos (graphics).............................................................................................................................202
Load Icons from an MTI File....................................................................................................................................204
Load Pages/Activities; Save Pages/Activities ...........................................................................................................204
Load an IR Device/Save an IR Device......................................................................................................................205
Save and Load Contacts ............................................................................................................................................206
Delete MTI File.........................................................................................................................................................207
Using the Select Save Directory Option....................................................................................................................208
Using the FILE ORGANIZER..................................................................................................................................209
USING THE CELL PHONE ..................................................................................................................................211
Bluetooth Phone ........................................................................................................................................................212
The Phone Page.........................................................................................................................................................213
The Phone Activity Row ...........................................................................................................................................214
Pair your Cell Phone with the Vanguard...................................................................................................................215
Using the Dial Pad.....................................................................................................................................................218
Add Contacts.............................................................................................................................................................220
Send a Text Message.................................................................................................................................................224
Reading a Text Message............................................................................................................................................225
Options for Listening to Callers ................................................................................................................................226
Using the Internal Microphone to Speak...................................................................................................................228
Adjusting Caller and Listener Volume......................................................................................................................229
USING THE MP3 PLAYER MENU .....................................................................................................................231
Listening to Music with your Communication Aid (MP3, WAV and WMA files)...................................................232
Creating and Using Playlists......................................................................................................................................235
Music Tools...............................................................................................................................................................236
About Importing Sound Files to Store on your Overlay............................................................................................237
Store a Sound File under an Icon or Icon Sequence on your Overlay.......................................................................238
Using the FILE ORGANIZER..................................................................................................................................239
USING A REMOTE CONTROL...........................................................................................................................241
Using your Communication Aid as a Remote Control..............................................................................................242
About Teaching Remote Control Signals to your Device..........................................................................................243
Teach Remote Control Signals to your Device..........................................................................................................244
Add a New Device to the IR SETUP MENU............................................................................................................247
Create a New REMOTE Page using “Copy from Existing Page”.............................................................................248
TABLE OF CONTENTS
Vanguard Plus Manual
ix

Place the TV BDRM Page in your REMOTES Activity...........................................................................................249
How to Store the IR Functions under an Icon Sequence...........................................................................................250
Delete a Device..........................................................................................................................................................251
Rename a Device.......................................................................................................................................................251
Add a New Function to an Existing Device ..............................................................................................................252
Rename a Function....................................................................................................................................................253
Delete a Function.......................................................................................................................................................253
Re-Learn Signals.......................................................................................................................................................254
The IR REMOTE Page..............................................................................................................................................255
ON-OFF Control of Non-Remote Appliances: Using the X-10...............................................................................256
USING A COMPUTER ..........................................................................................................................................257
Using a Computer with a USB Cable........................................................................................................................258
Using a Computer with the PRC Bluetooth Wireless Adapter..................................................................................259
The Computer Activity and the Computer Page........................................................................................................260
About Modifying or Creating Computer Commands................................................................................................263
APPENDICES..........................................................................................................................................................265
Appendix A: Recalibrate the Touch Screen..............................................................................................................266
Appendix B: The RESET BUTTON........................................................................................................................267
Appendix C: Serial Macro Tool...............................................................................................................................268
Appendix D: Modify Scan Pattern............................................................................................................................269
Appendix E: Pagelets................................................................................................................................................277
Appendix F: Vocabulary Masking on the Fly...........................................................................................................281
Appendix G: Vocabulary Builder Menu....................................................................................................................298
Appendix H: Mid-Sequence Category.......................................................................................................................322
Appendix I: Using the LAM (Language Activity Monitoring) .................................................................................324
Appendix J: All Tools List........................................................................................................................................327
Appendix K: IBM and Macintosh Computer Keyboard Names; Mouse Commands................................................338
Appendix L: The Joystick and Headphone Adapters ................................................................................................346
Appendix M: RealSpeak™ Speech Tips.....................................................................................................................347
Appendix N: Helpful DECtalk Speech Tips.............................................................................................................362
Appendix O: Troubleshooting...................................................................................................................................371
INDEX ......................................................................................................................................................................375
Index..........................................................................................................................................................................377
TABLE OF CONTENTS
Vanguard Plus Manual
x

Getting Acquainted with your Vanguard Plus
GETTING ACQUAINTED WITH YOUR VANGUARD PLUS
Vanguard Plus Manual
11
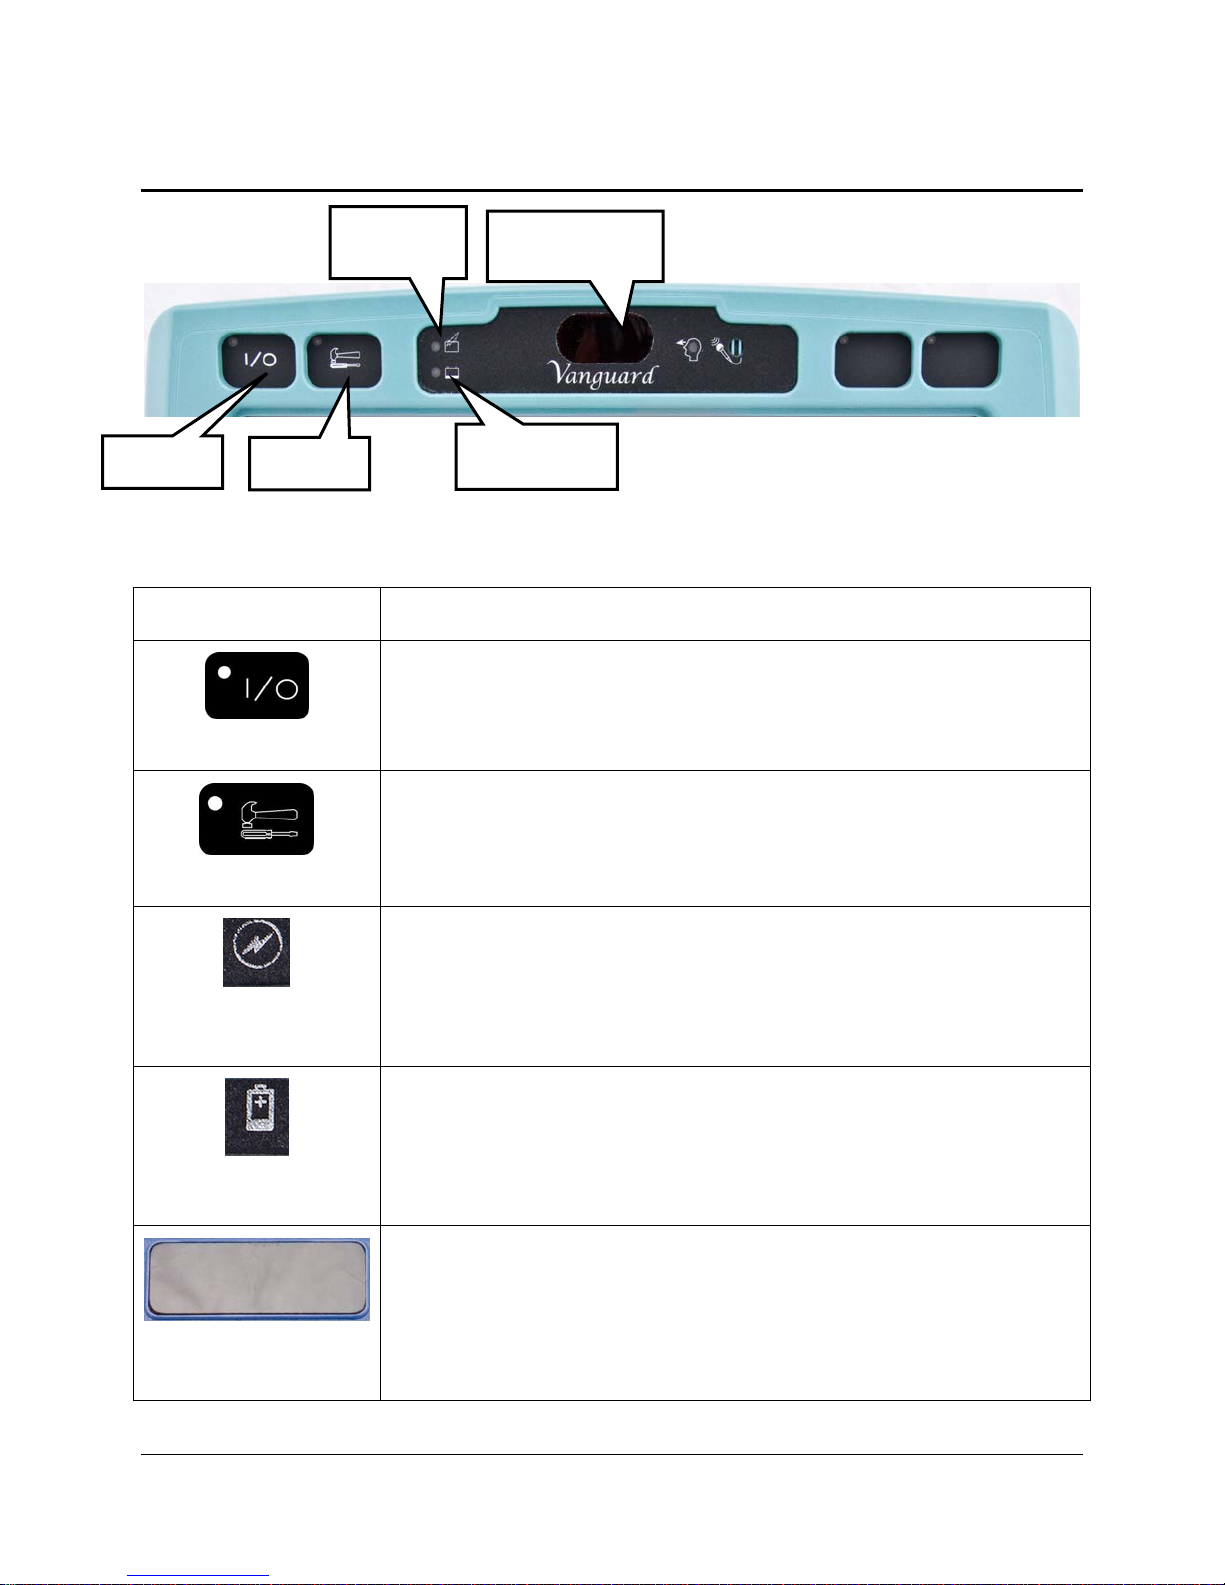
The Front Panel
ging
On/Off
Battery
Char
Headpointing
Window
Toolbox
Low Battery
KEY FUNCTION
Turns the device ON or OFF. If you turn the Vanguard off with this
ON/OFF
button, you must use it to turn the device back on.
Takes you to the Toolbox where you can use the system menus.
TOOLBOX
BATTERY
CHARGING
BATTERY LOW
HEADPOINTING
WINDOW
When you plug in the charger, the "Charging" light flashes. A rapid
flash indicates fast-charging; a slow flash indicates that the battery is
charged but it will continue to trickle-charge as long as the charger is
plugged in.
When this light flashes, the batteries need to be charged. Plug in the
charger.
If you are using a headpointer, this area tracks its movements
GETTING ACQUAINTED WITH YOUR VANGUARD PLUS
Vanguard Plus Manual
12
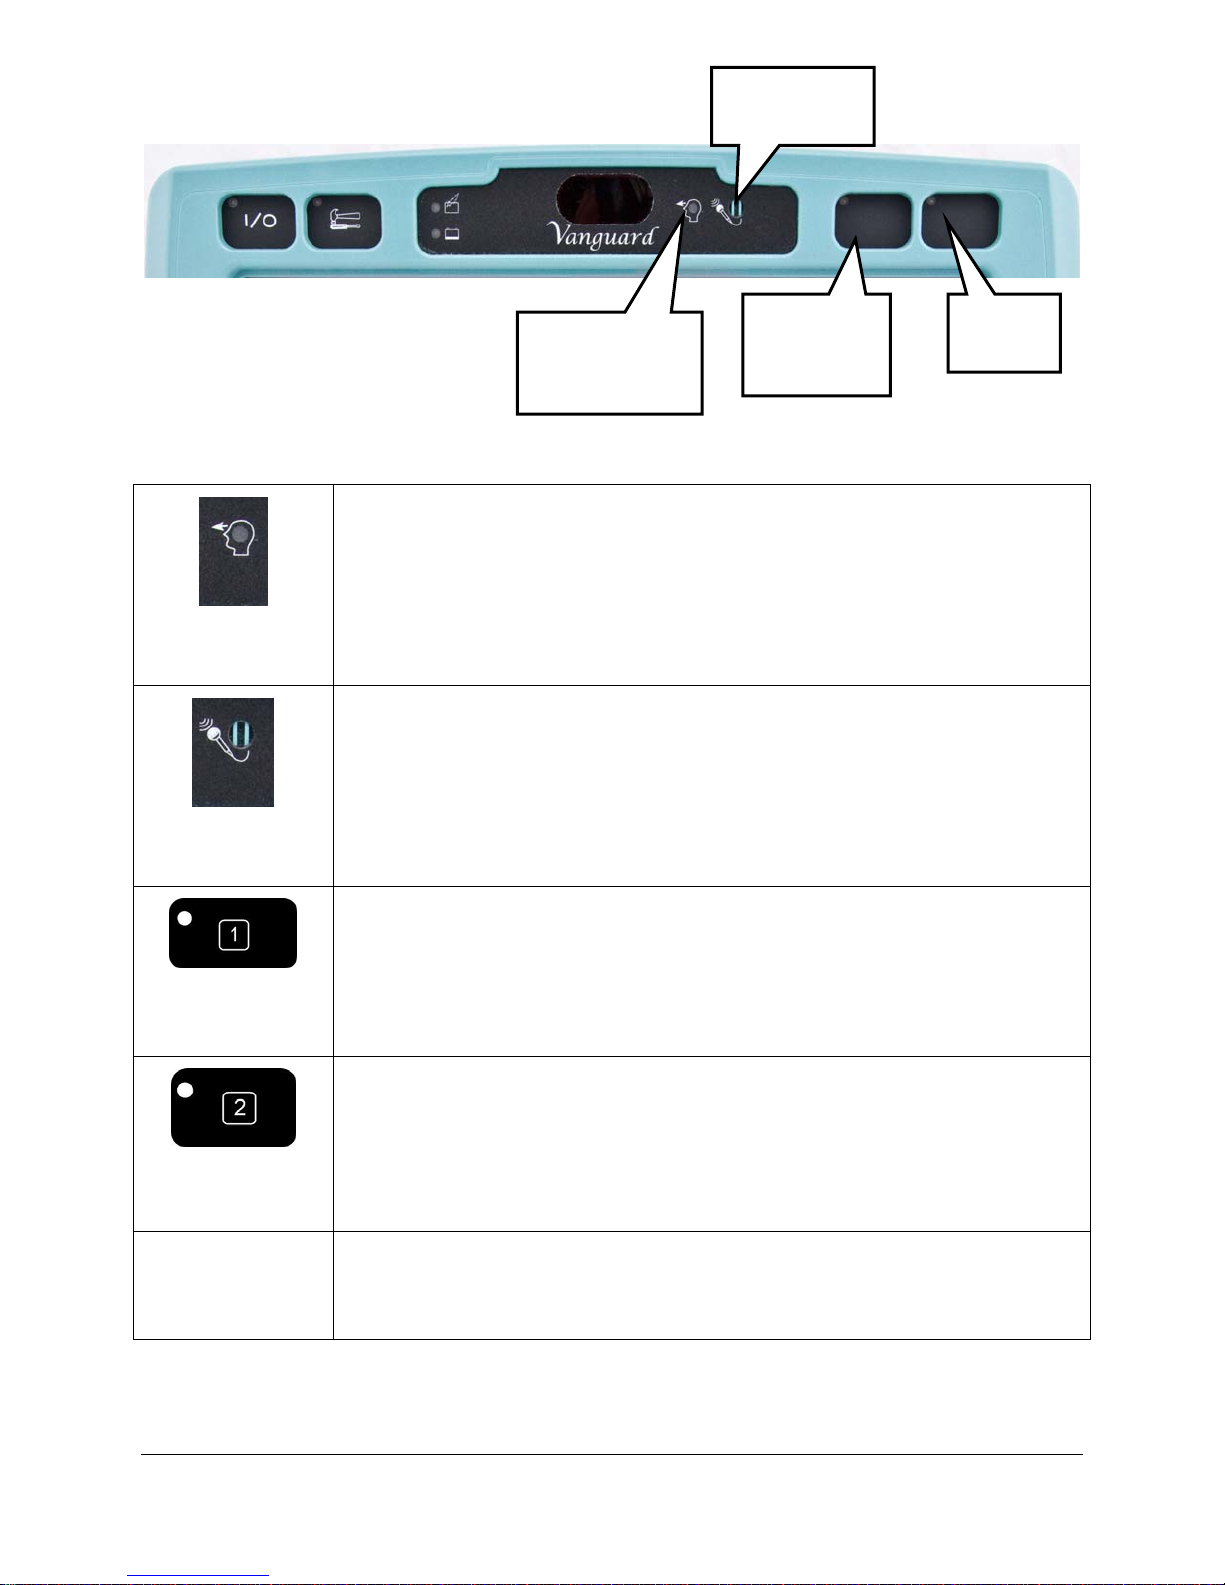
Recording
Microphone
TRACKER
HEADPOINTER
RECORDING
MICROPHONE
Tracker
Headpointer
Choose
Activity
Key
Set-up
key
indicator
This area follows the Tracker's movements. The small LED in the head
lights when the pointer is working correctly.
When you record messages, speak toward this area.
CHOOSE
ACTIVITY
SET-UP
*
*
Press this to toggle through your Activity Row.
*
This key allows you to program overlay keys without going to the Toolbox.
It works with the MODIFY PAGE, MODIFY ACTIVITY, ASSIGN
CORE KEYS and STORE menus and the Modify Item within an
Activity or Page menu.
Keys 1 and 2are User Defined keys. They have been pre-programmed for
you to perform some often-used functions. You can re-program them to do
whatever you wish. See page 166.
GETTING ACQUAINTED WITH YOUR VANGUARD PLUS
Vanguard Plus Manual
13
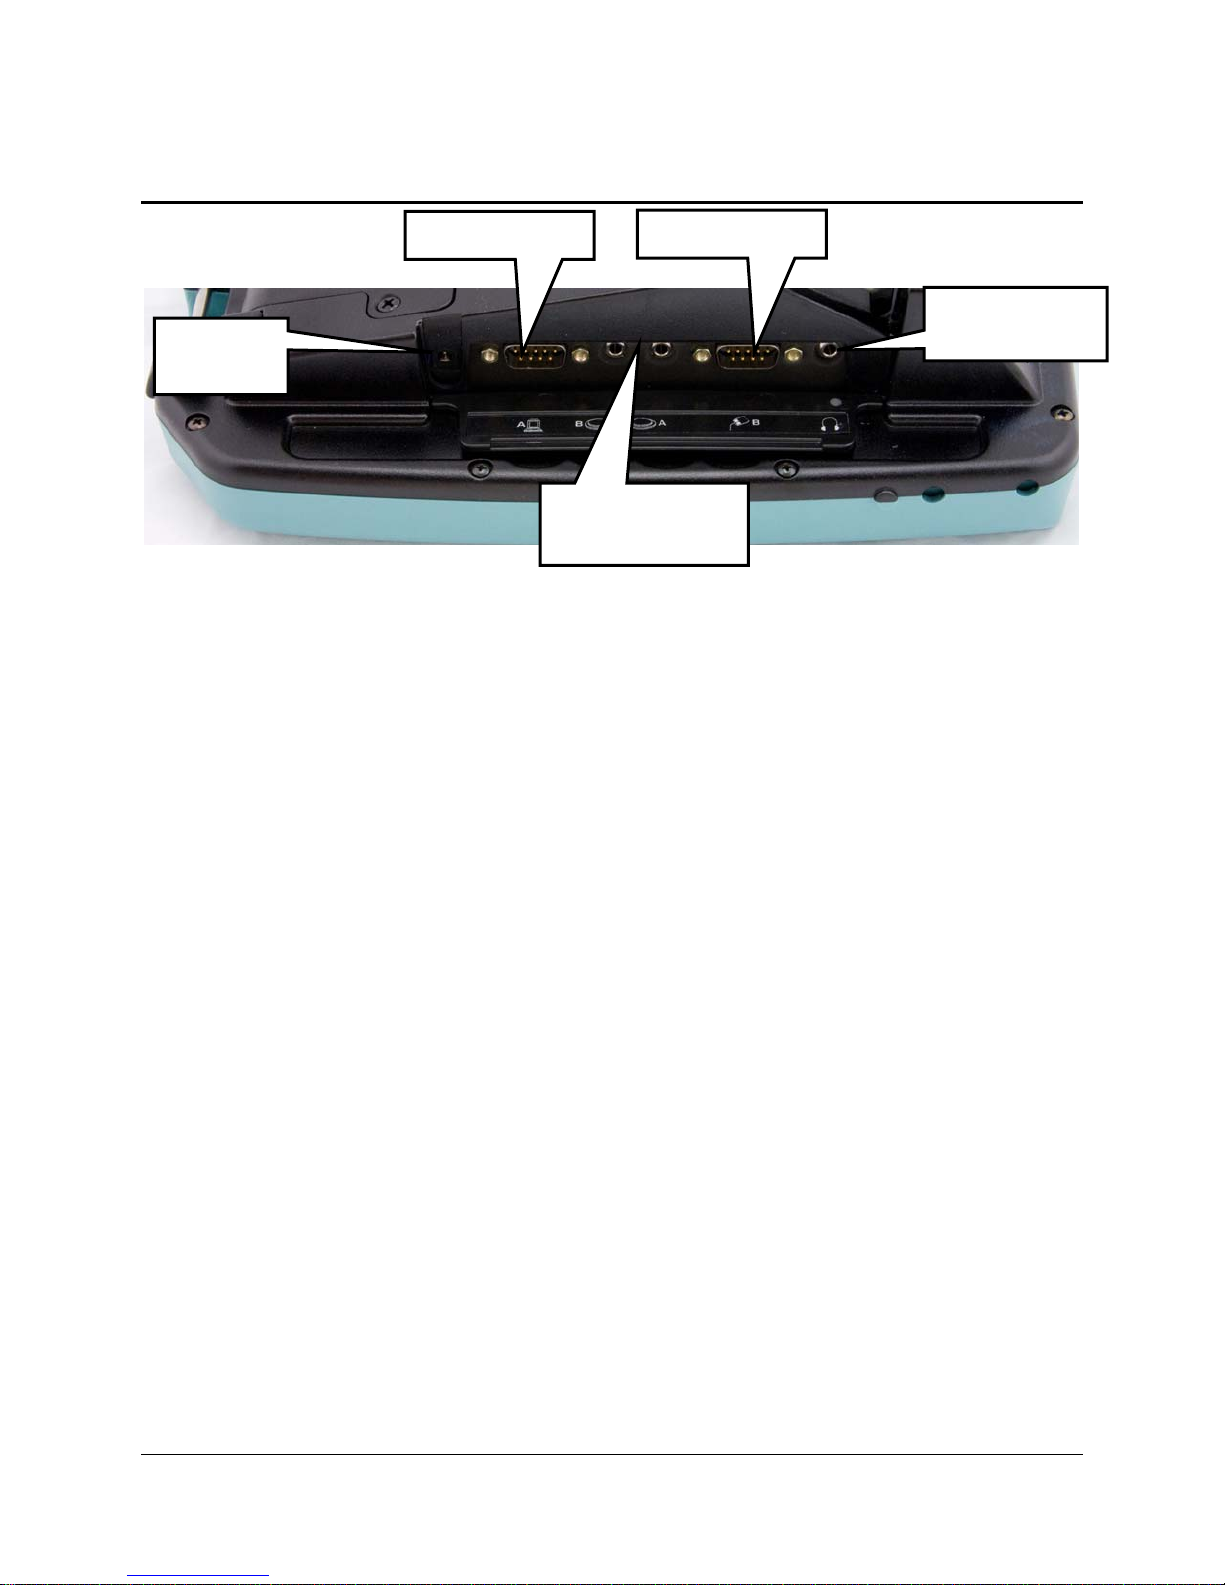
The Left Side Panel
Serial Port A
Battery
Charger
The Connectors from Left to Right:
Serial Port A
Serial Port B
Switch A and B
connectors
Headphones/
Line Out
Use a serial (null modem) cable to make memory transfers or connect to a computer or printer.
Switch A and B Connectors
Plug single or dual switches into these two connectors.
Serial Port B
Plug a non-USB mouse in here.
Headphone
Plug stereo headphones or amplified stereo speakers into this connector.
GETTING ACQUAINTED WITH YOUR VANGUARD PLUS
Vanguard Plus Manual
14

The Right Side Panel
USB cable
connector
Square USB Connector
Standard USB
connector
System Software Card
Reset
Button
Other Card Slots
For computer emulation connect a USB cable to this connector and the USB connector on your
computer.
Standard USB Connector
This may be used for an external headpointer, mouse, joystick, keyboard and memory transfers
with a USB flash drive.
Memory Card Slots
Behind this door (door is open in picture) is the card that contains your system software. Slot A
holds this card. Slot B is available for a PCMCIA card. Slot C is available for a Secure Digital
memory card for your personal use.
Reset Button
There is a small hole in the thin strip of foam to the right of the card slots. Straighten out a paper
clip and poke one end of it into this hole. Press the button at the bottom of the hole and release.
This will reset your device. You will lose any work that was not saved.
GETTING ACQUAINTED WITH YOUR VANGUARD PLUS
Vanguard Plus Manual
15

Top of the Vanguard
IR (infrared) Learning
and transmitting
Window
Learning Infrared Area
This is the area you use to teach remote control signals to your Vanguard. When the Vanguard is
sending remote control signals to control things like a TV or DVD player, this window must be
facing in the general direction of the object you want to control.
Speakers
The Vanguard's speakers are behind the grilles.
GETTING ACQUAINTED WITH YOUR VANGUARD PLUS
Vanguard Plus Manual
16
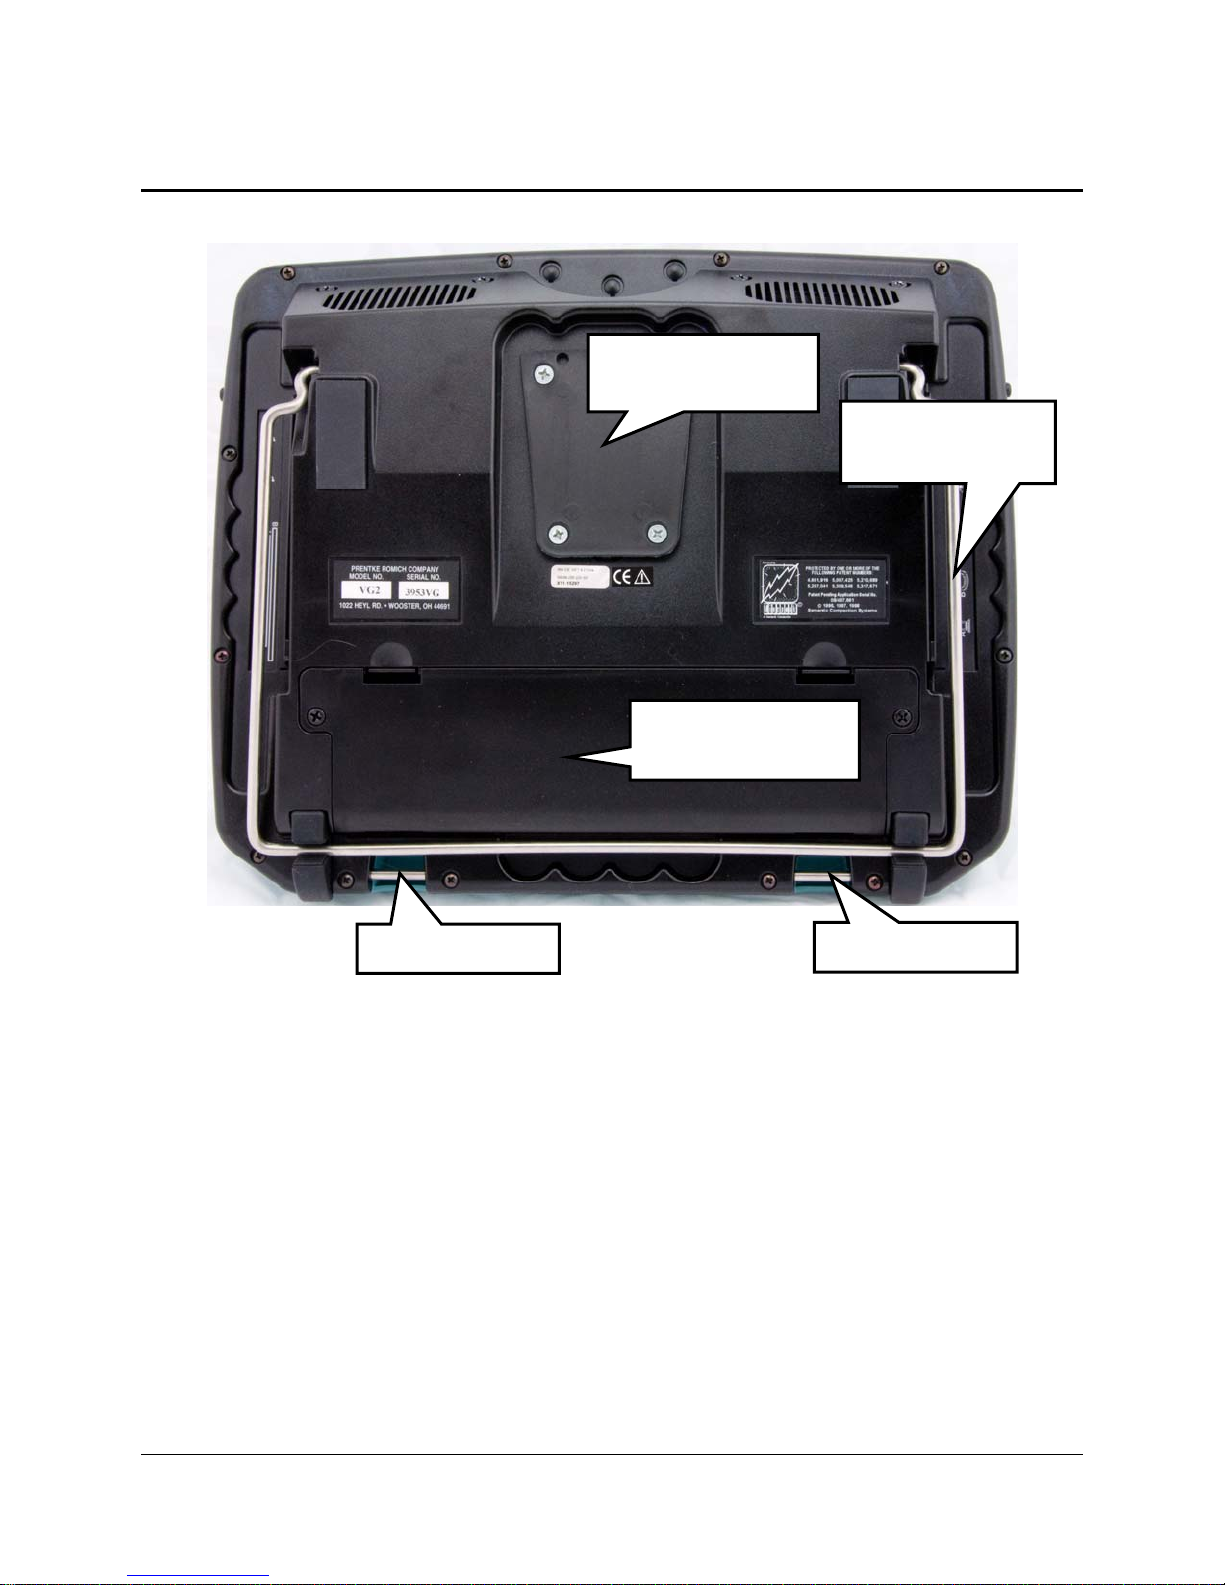
Back of the Vanguard
Wheelchair
Mounting Plate
Wire Table
Stand
Battery Door and
Compartment
Strap Holder
Strap Holder
Table Stand
Pull the stand out from the case. This allows you to set your device on a flat surface at an angle
that is good for viewing. If you want your device to sit at a lower or higher angle, remove the
table stand from the holes that hold it in place and place it in the second set of holes. The bottom
holes are for a lower angle; the top holes for a higher angle.
Wheelchair Mounting Plate
This molded plate fits the optional wheelchair mount. If you order the mount, you receive
directions for attaching the mount to the mounting plate.
Battery Door
Unscrew the screws in either side of the Battery Door. Push down on the two tables at the top of
the door and lift the door off. You should only have to remove this door if a service
technician from PRC asks you to.
GETTING ACQUAINTED WITH YOUR VANGUARD PLUS
Vanguard Plus Manual
17
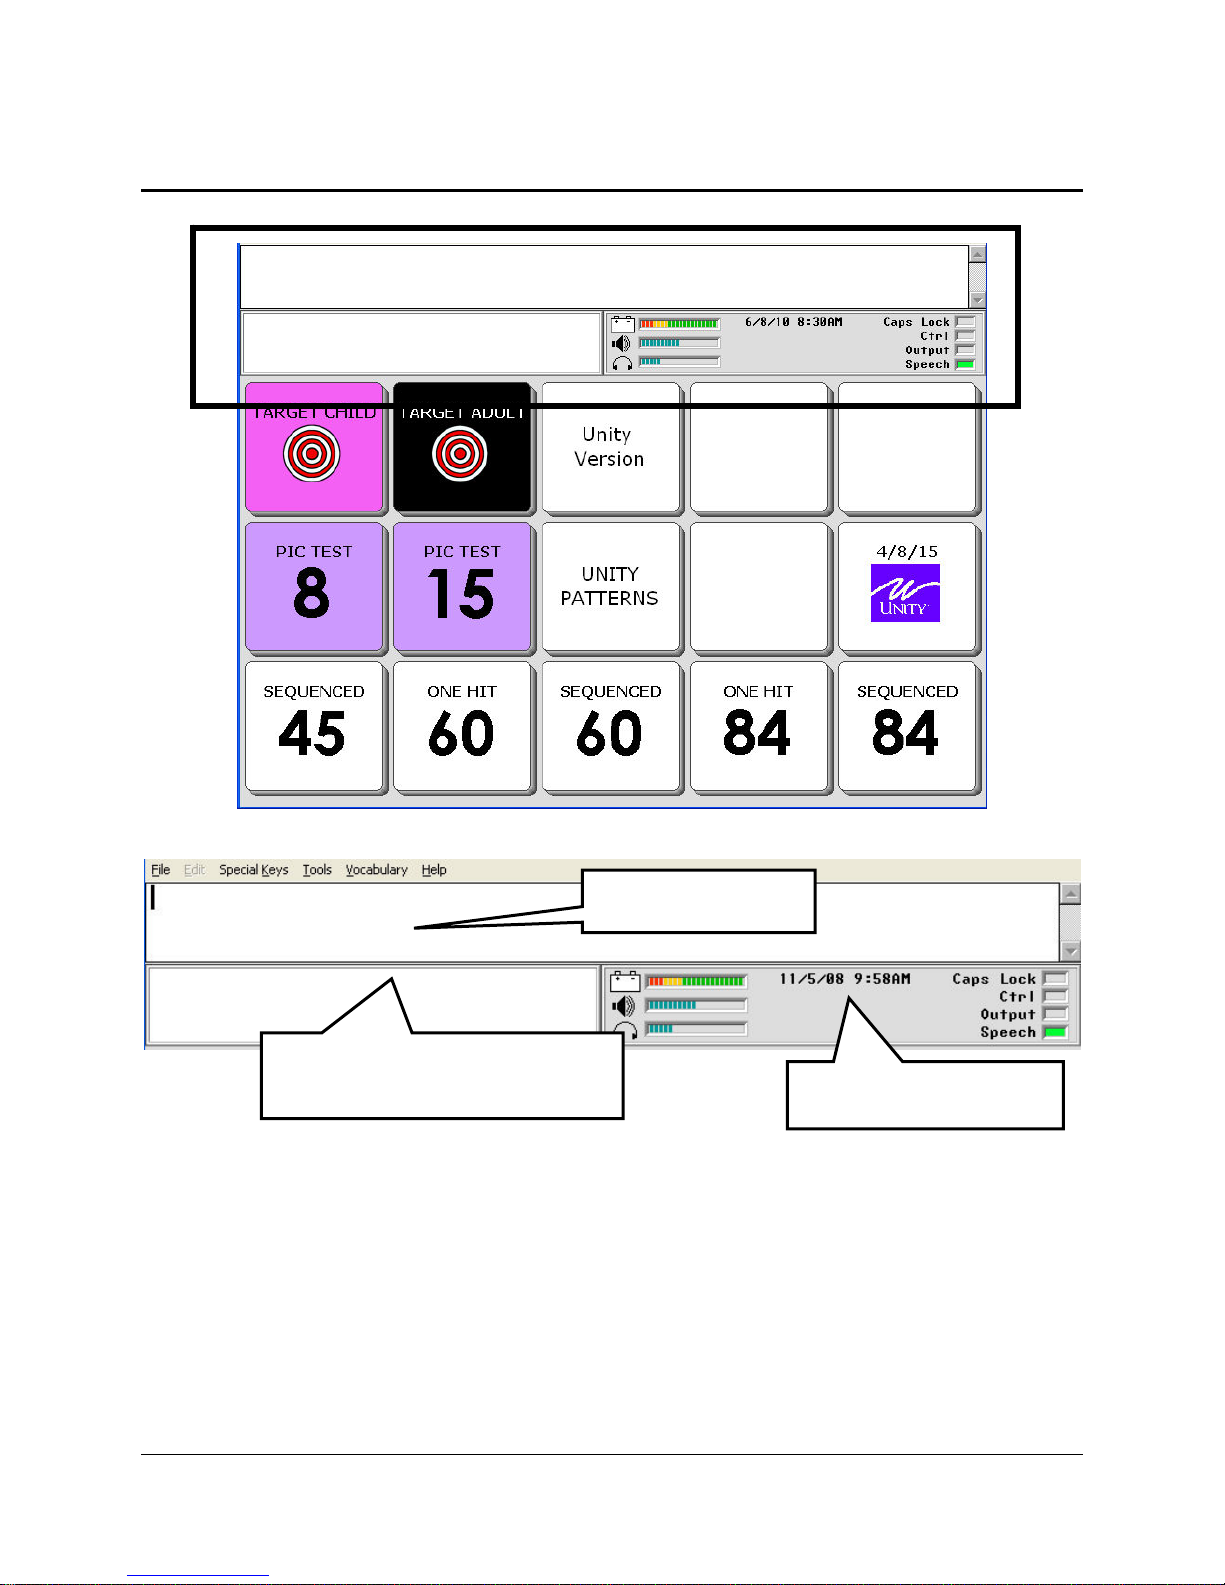
The Display Areas
Text Display Area
Icon Display Area (or Word
Prediction Display Area)
Status Display Area
Text Display Area
This is where you will see any text that appears, either from messages that you have retrieved by
selecting icon sequences or from typing in text. Touch this area and your device will speak any
text on the display.
Icon Display Area/Word Prediction List Area
This is where you will see the icons that you activate on your communication overlay or, if you
are using your spelling overlay and Word Prediction is On, you will see a list of predicted words.
GETTING ACQUAINTED WITH YOUR VANGUARD PLUS
Vanguard Plus Manual
18
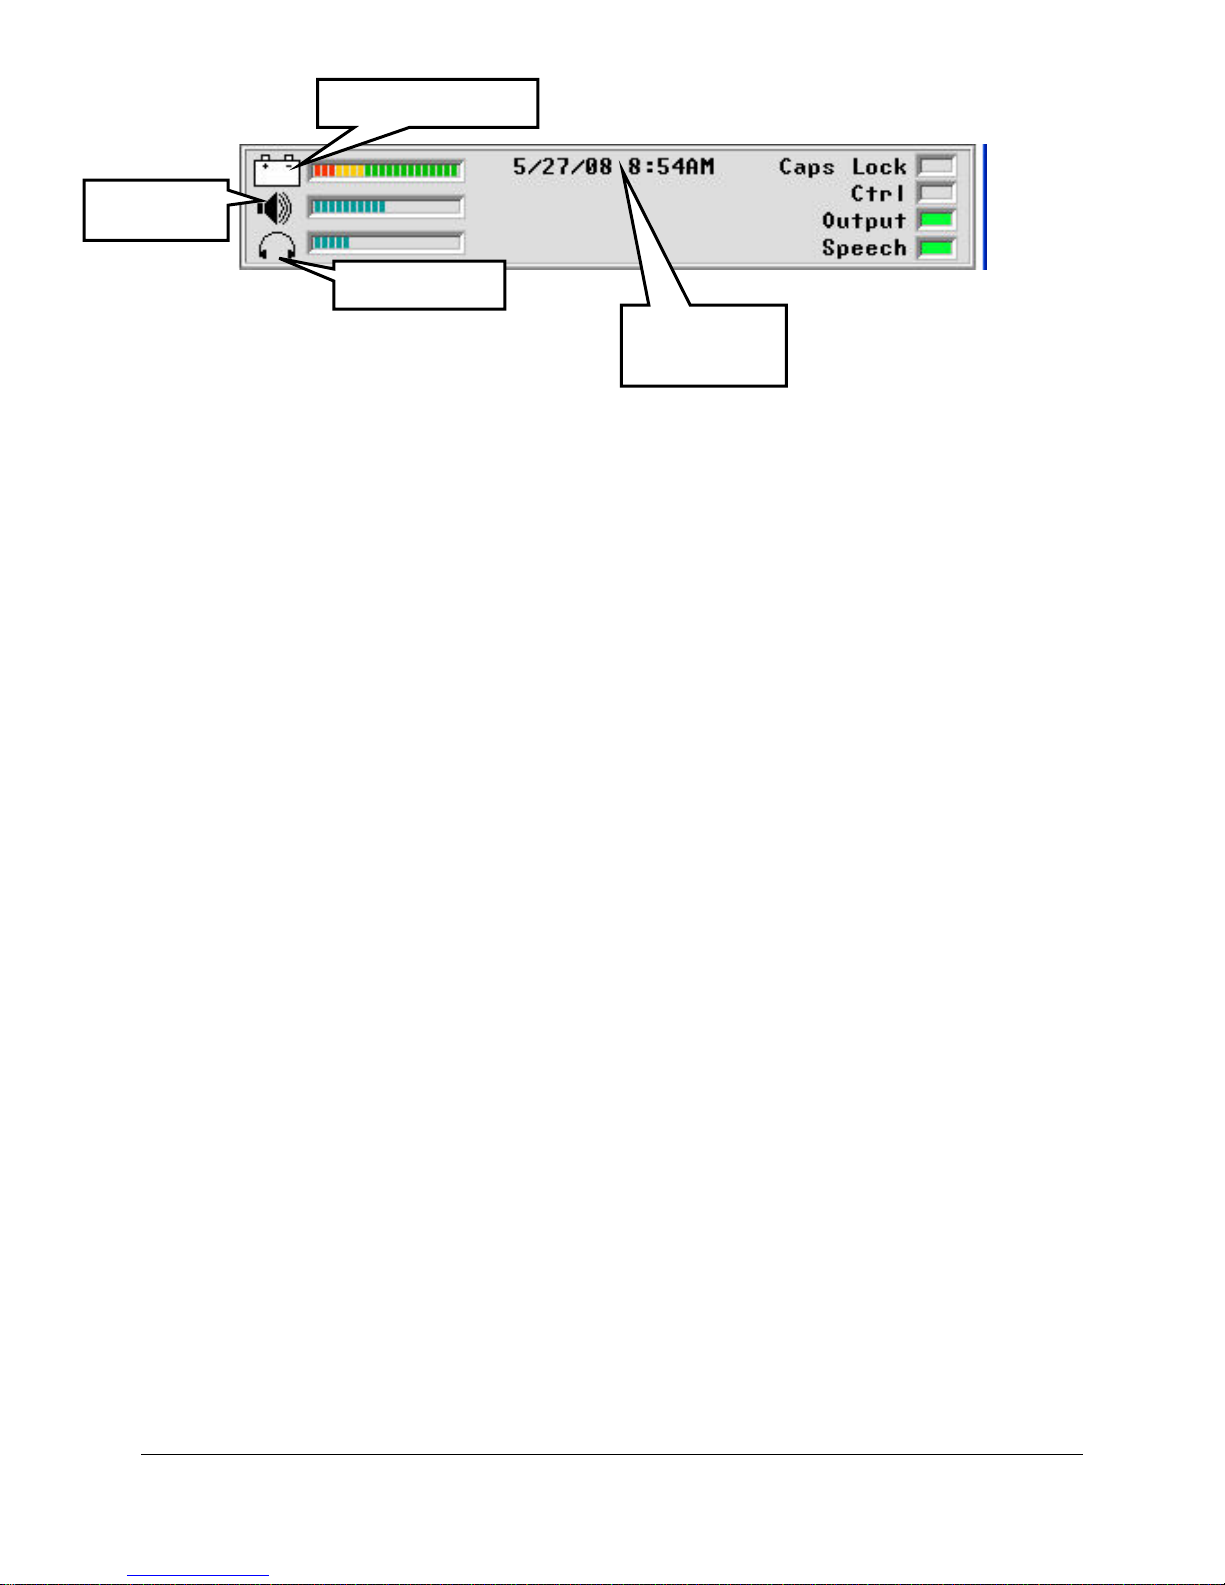
Speaker
Battery Status
Headphones
Status Display Area
Date &
Time
Date and Time
Displays the current date and time. Set this in the CLOCK MENU in the Toolbox.
Battery Bar Graph
This shows the status of the batteries. A FULL battery shows mostly green lines, with only a
few red and yellow lines. A LOW battery shows only red and yellow lines. Plug in the charger.
You cannot store when the battery is low.
An ALMOST DEAD battery shows only red lines. You will hear a warning beep that the
Vanguard is going to shut down. Plug in the charger.
Speaker Icon and Headphone Icon
These indicate speaker and headphone volume. When the lines fill up the bar graph, the volume
is at its loudest.
Caps Lock
When this is lit, you have turned Caps Lock on in your spelling overlay. All letters you type will
be in CAPITAL letters.
Note: You can use Caps Lock when storing messages for DECtalk
use Caps Lock with RealSpeak
™
voices.
©
speech voices. Do not
Ctrl
When this is lit, you are sending a CONTROL command.
Output
When this is lit, your Output option is On in the OUTPUT MENU. Anything you type, or any
messages you retrieve will appear on the Text Display Area of your device and will also be sent
to an external computer.
Speech
When this is lit, your device will speak anything that appears in the Text Display Area.
GETTING ACQUAINTED WITH YOUR VANGUARD PLUS
Vanguard Plus Manual
19
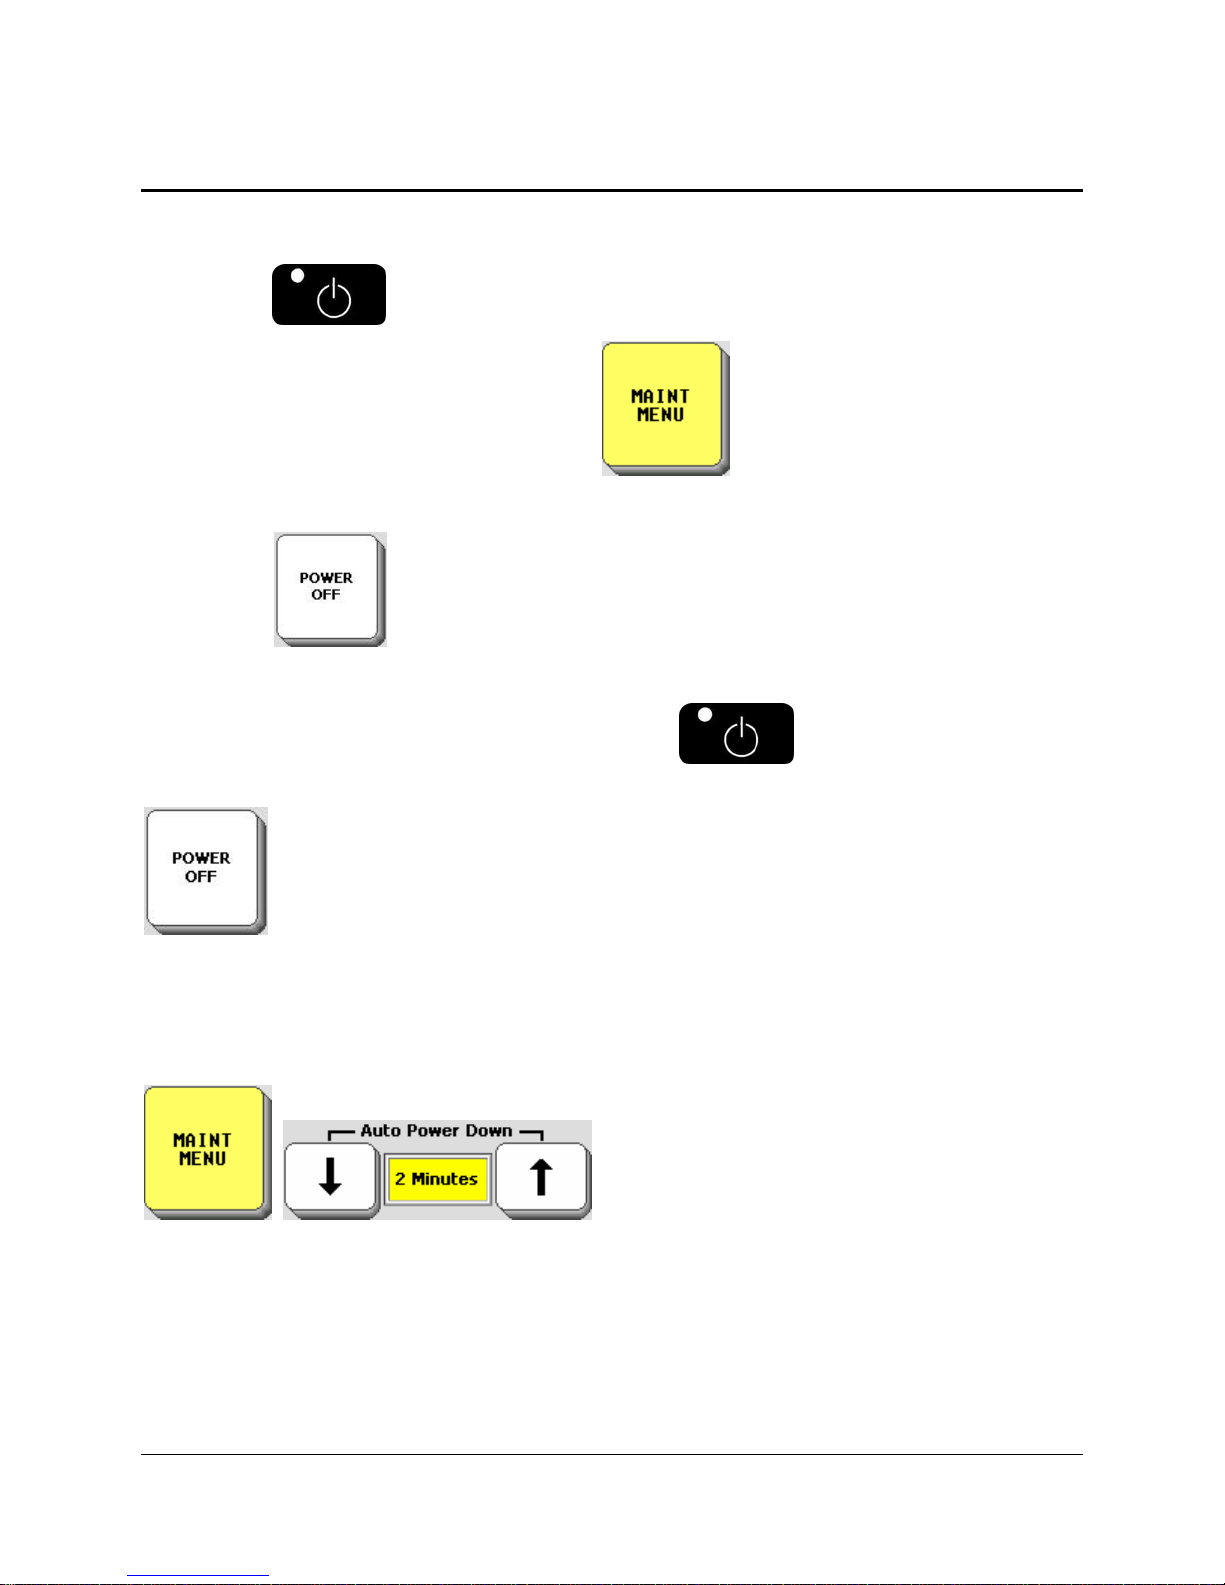
Different Ways to Turn your Device Off
You can turn your device ON and OFF by:
Pressing the ON/OFF button;
Selecting the Auto Power Down option in the MAINTENANCE MENU;
Selecting the POWER OFF key in the Toolbox.
When you turn the device off with the ON/OFF button , you must turn it back on
using with the ON/OFF button.
If you would like to be able to turn the device off yourself but can’t press the
ON/OFF button, you can go to the Toolbox and select POWER OFF or store the POWER
OFF tool on your communication overlay.
To turn the device back on simply tap on the screen or activate a switch.
The Auto Power Down option automatically turns the device off after the amount of time you
set has passed.
When your device is idle (no key activations) for 2, 5 or 10 minutes, the backlight will dim on
your display. Activate any key or switch to bring it back.
After ten minutes of dimmed backlight and no key activations, the screen goes dark. Activate
any key or switch to bring it back.
GETTING ACQUAINTED WITH YOUR VANGUARD PLUS
Vanguard Plus Manual
20

We recommend that you leave Auto Power Down set to On. You can select the amount of
time you want to use if 2 minutes is too fast for you.
If you change Auto Power Down to Off, the device will never turn Off unless you press the
ON/OFF button on the top of the case or activate the POWER OFF key in the Toolbox. If you
forget that you turned Auto Power Down to Off and the device never goes Off, the batteries will
eventually go dead.
Use POWER OFF or the ON/OFF button to properly shut down your device.
Troubleshooting Tip: If your device does not turn off or come back on as you expect
it to: Press and hold the ON/OFF button for ten seconds. The device should turn on (or off).
When your device turns off, it saves any storing and/or programming that you have
done up to that point. If you are doing a lot of storing/programming —perhaps setting up an
overlay—make sure the device turns Off periodically so that your work is saved.
GETTING ACQUAINTED WITH YOUR VANGUARD PLUS
Vanguard Plus Manual
21
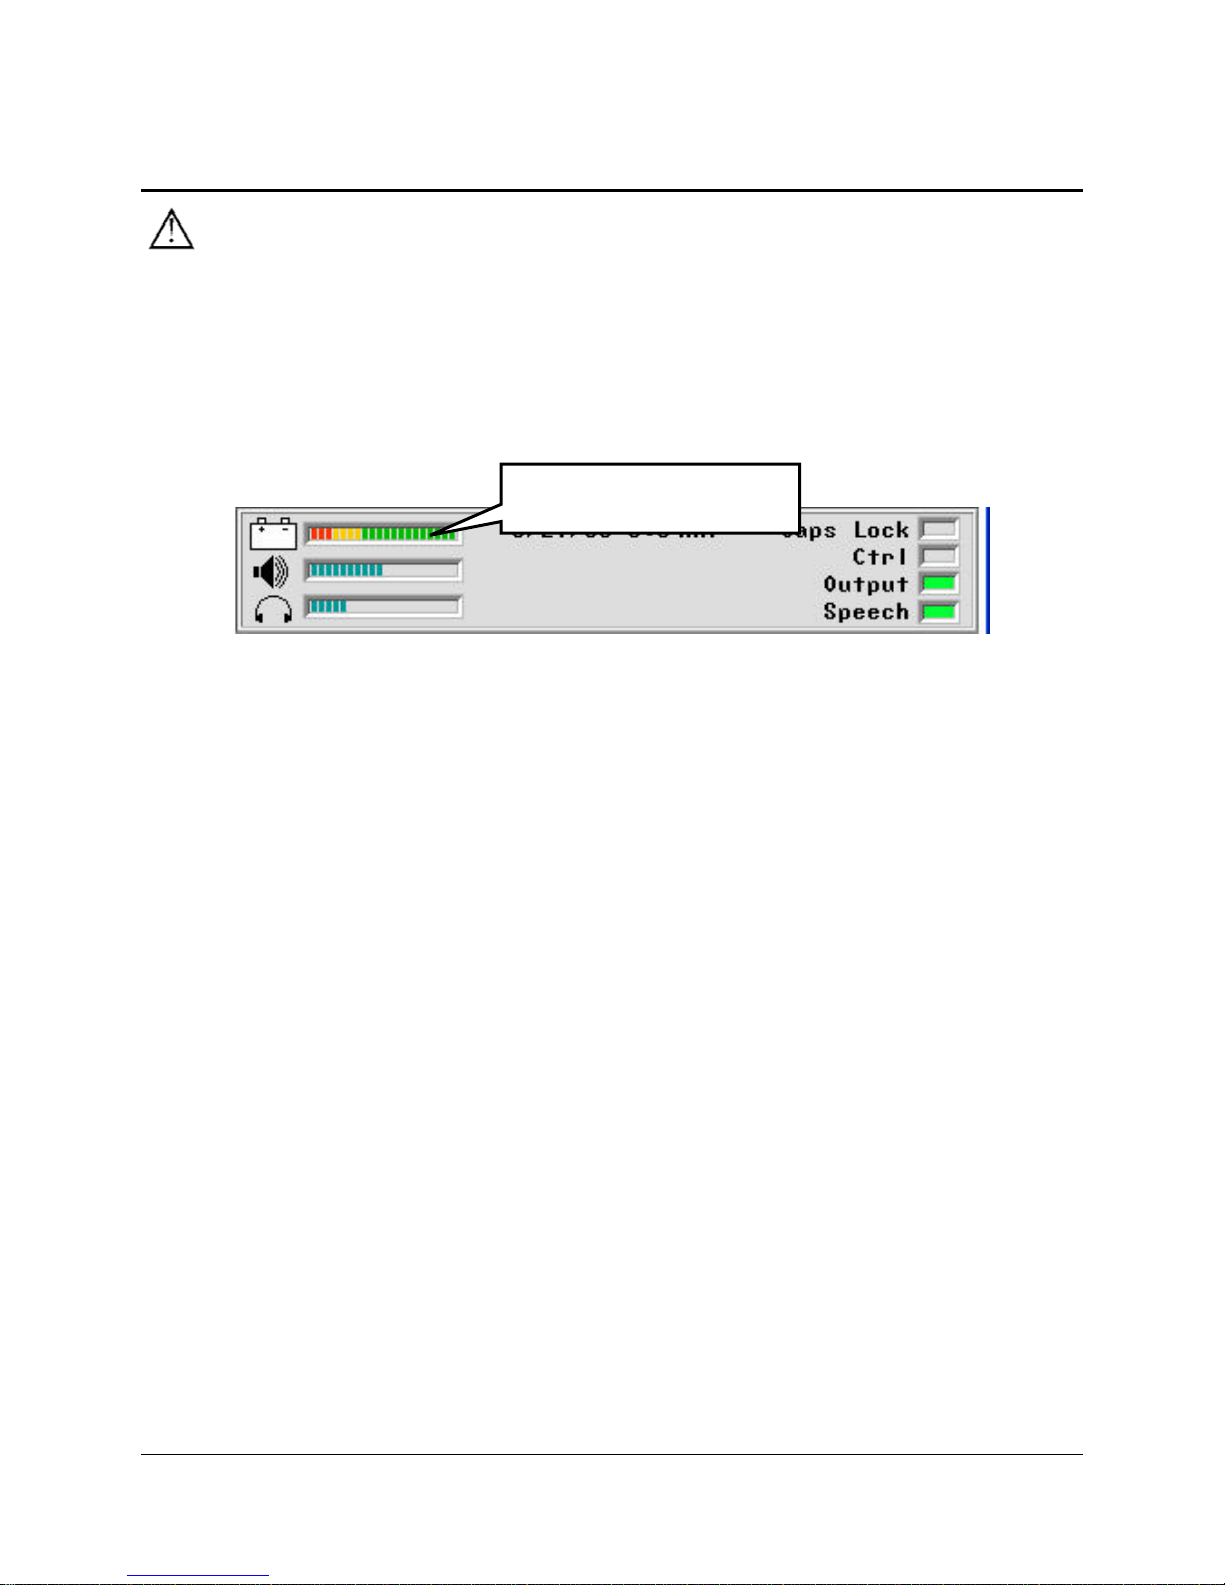
About the Batteries in your Vanguard
Always use the battery charger that came with your device. Any other charger may
damage your batteries.
If you plan to store your device for a month or more without using it: put the unit in
Shipping Mode by opening the MAINTENANCE MENU in the Toolbox and then selecting
the Shipping Mode option. Unplug the battery charger and store it in a safe place.
Check your battery status in the Status Display Area
Battery Status Indicator
The Battery Status bar graph in the Status Display Area on your screen gives you the following
information:
Full Battery: mostly green lines, a few red, a few yellow
Plug in Charger: no green lines at all
Nearly Dead: red lines only (plug in charger now)
Charger Plugged in: blue lines
Low Battery Warning
When the batteries in your device get low, you will hear a Low Battery Warning. This is a
two-toned running beep. When the Low Battery warning sounds, you can no longer do any
storing. The warning will continue to sound at intervals until the batteries are dead. When the
batteries are dead, the device powers down completely and you cannot use it.
You will also see the Low Battery LED blinking on the front of the case.
When you hear the Low Battery warning and/or see the blinking Low Battery LED, plug in the
battery charger. The LED to the left of the Low Battery LED will begin to blink. This LED
indicates that your charger is plugged in.
A complete charge, from dead battery to fully-charged battery, will take 6-10 hours, assuming
you do not use the device while it is charging. If you use the device during charging, it will take
8-12 hours to completely charge the batteries.
A fully-charged battery will last approximately 6-8 hours with normal use of your device.
GETTING ACQUAINTED WITH YOUR VANGUARD PLUS
Vanguard Plus Manual
22
The Touch Screen and the Exploration Wizard
Warning! The touch screen is a liquid crystal display (LCD) screen. Should the
display break (unlikely except under extreme circumstances) and you come into contact with the
liquid crystal, wash or rinse your skin thoroughly. Be careful to avoid splintered glass.
Do not use sharp, pointed objects on the touch screen. They will scratch the screen.
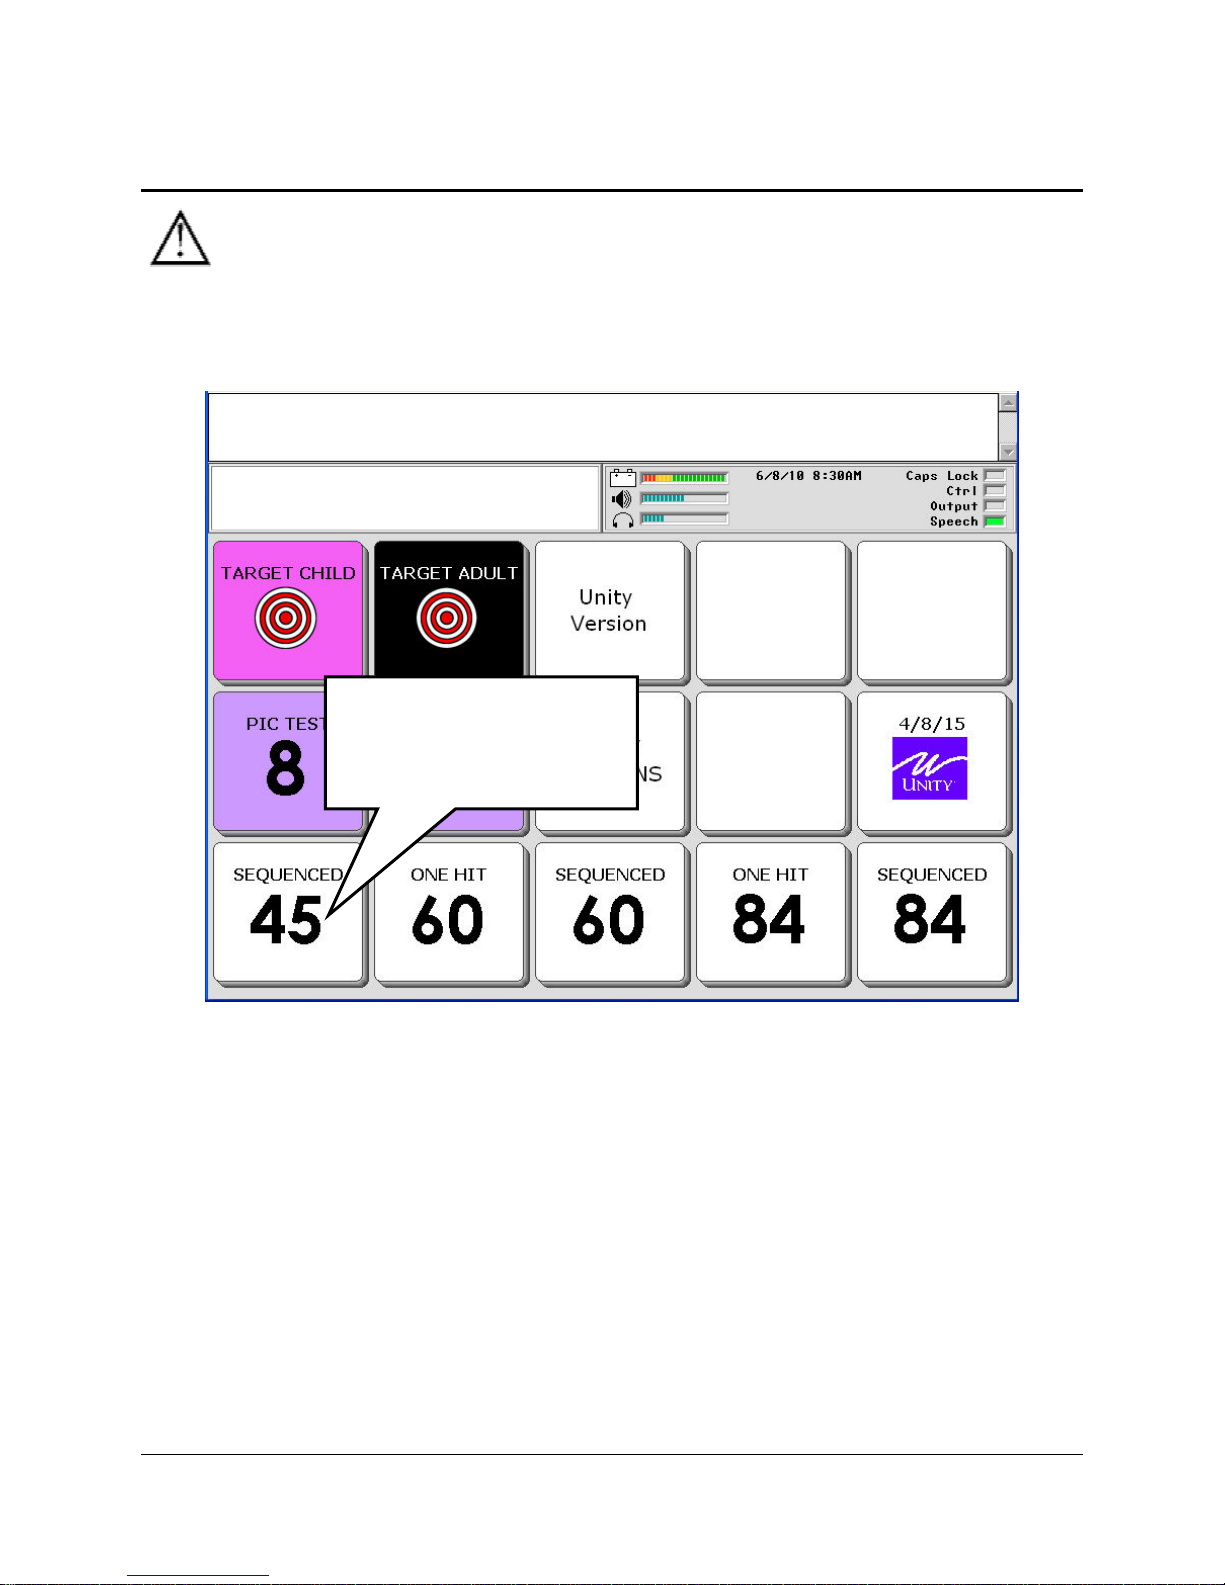
Select 45 Sequenced.
This is the overlay that is
used for examples in the
manual.
Note: Non-English speaking devices may have a different overlay.
The TARGET key allows you to explore key size options.
The PIC TEST keys show you how pictures are used to mean different things.
The UNITY PATTERNS key shows you how verbs, adjectives, nouns and pronouns are placed
on different overlays.
The 4/8/15 PAGES key allows you to view pages already set up with different key size
locations.
The bottom row of keys takes you to vocabulary overlays that you can use everyday for
communicating.
If you select one of the overlays, the software will take you directly to that overlay and you can
begin using it as your own. These overlays do not allow you to return to the Exploration Wizard.
GETTING ACQUAINTED WITH YOUR VANGUARD PLUS
Exploration Wizard
Vanguard Plus Manual
23
The TARGET, UNITY PATTERNS and 4/8/15 PAGES keys have Back or CORE keys
that allow you to return to the Exploration Wizard main page. The PIC TEST key does not have
a Back or CORE key. See below if you want to leave the PIC TEST pages.
If you select the PIC TEST key or an overlay from the bottom row and then decide you don't
want to use it, you can return to the Exploration Wizard by following these steps:
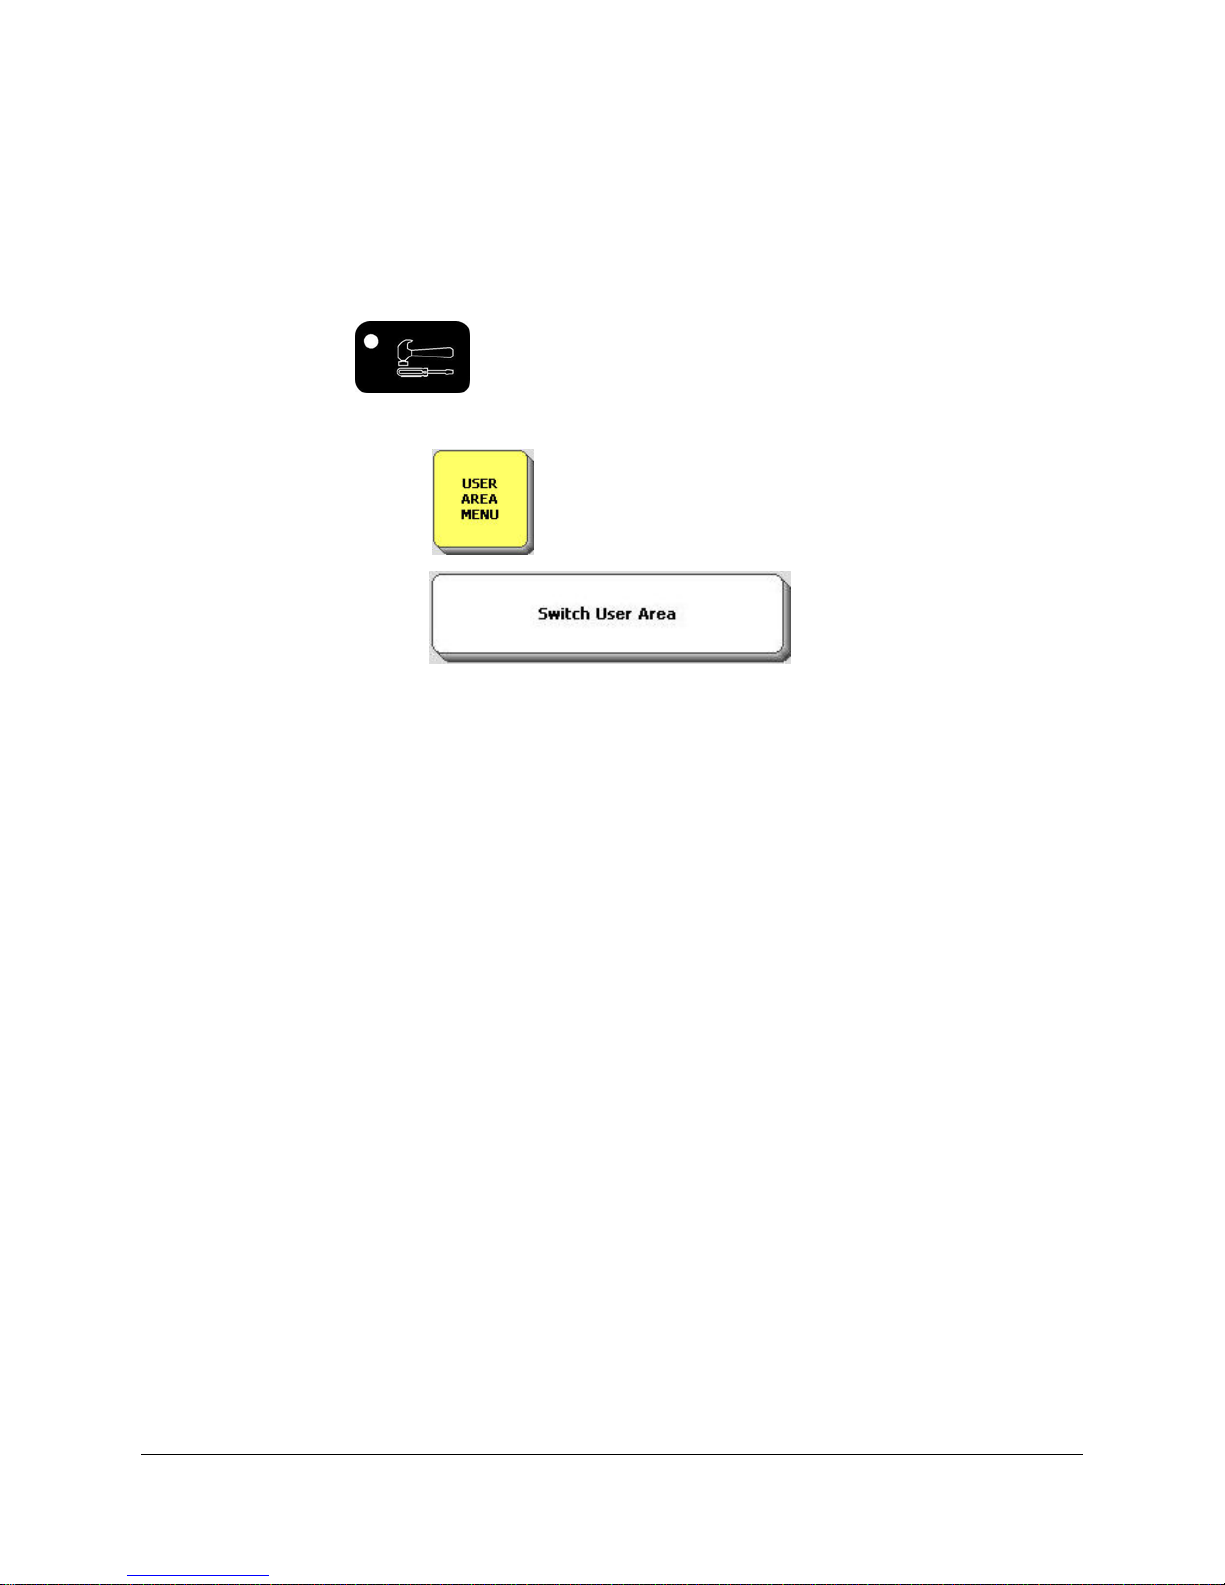
Select the TOOBOX key on the front of the case.
.
Select USER AREA MENU in the Toolbox.
Select the Switch User Area option.
Select Exploration Wizard (or you may select any User Area you might want to switch to.)
Select OK.
Select GO TO CORE.
You should be in the Exploration Wizard or the Area you selected.
Learn more about the USER AREA MENU beginning on page 36
GETTING ACQUAINTED WITH YOUR VANGUARD PLUS
Vanguard Plus Manual
24
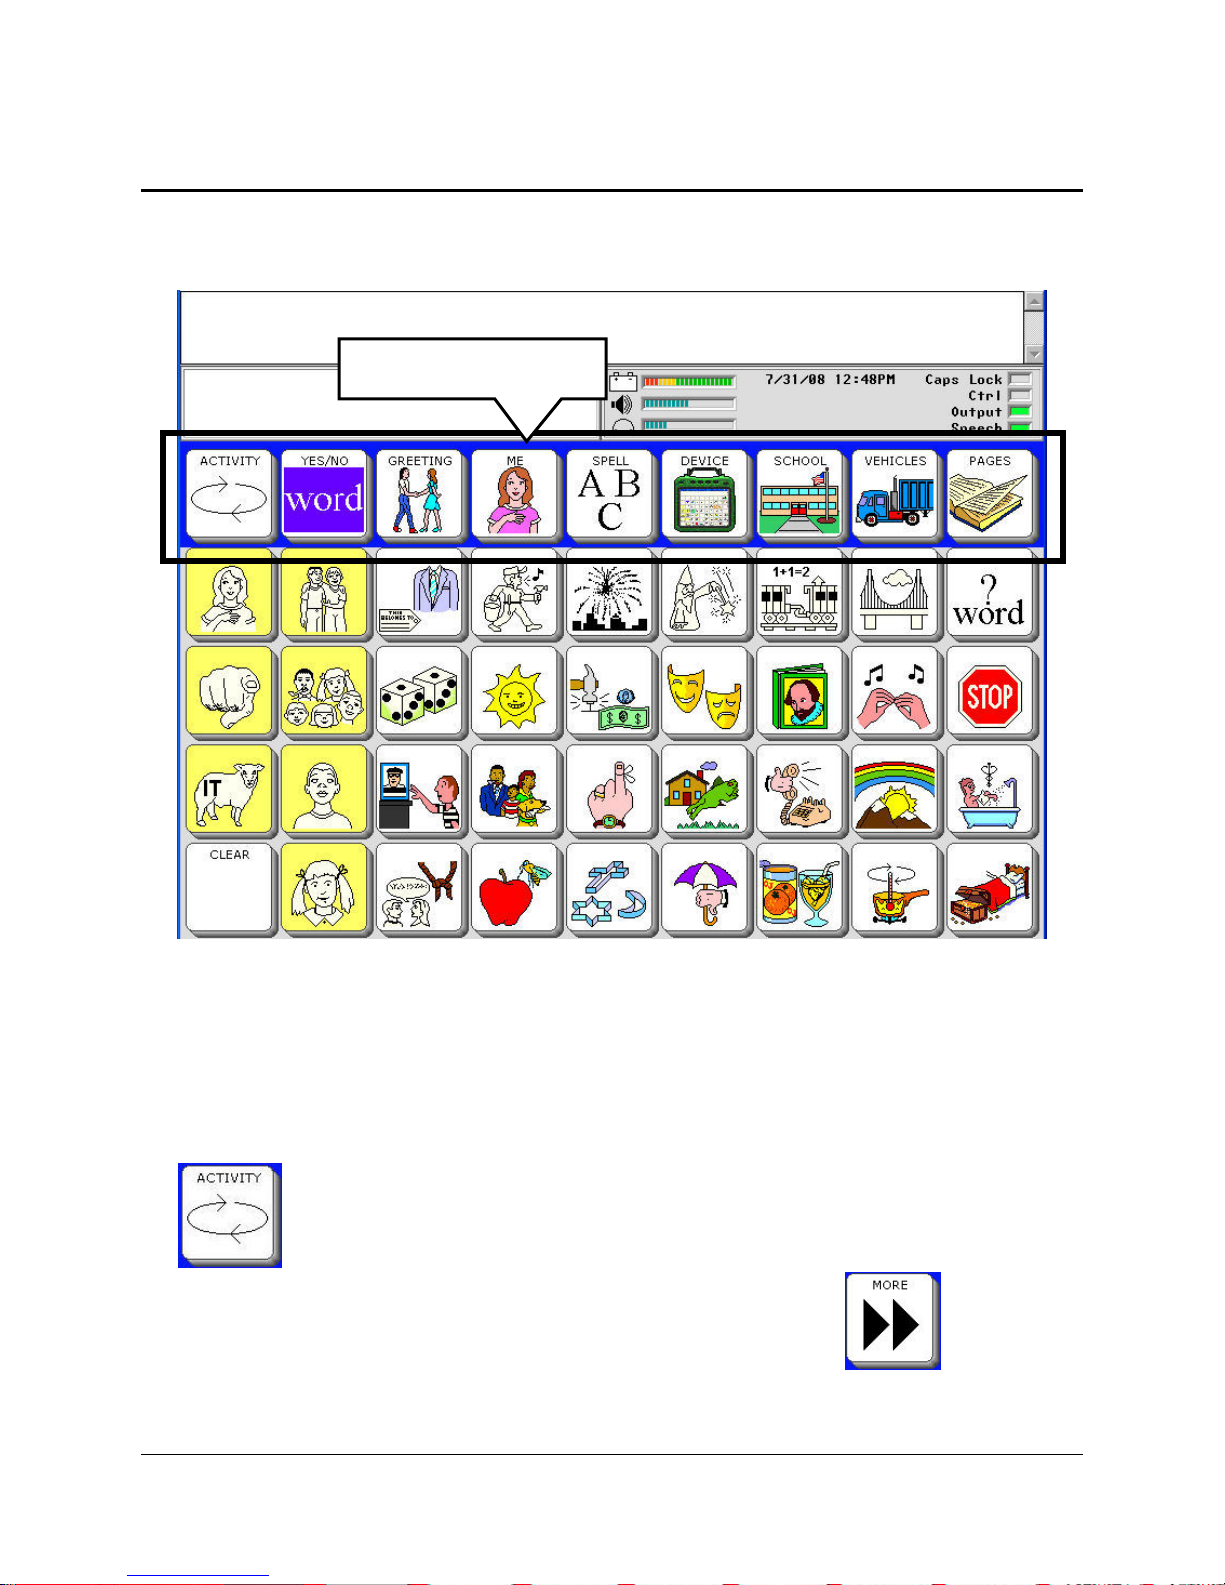
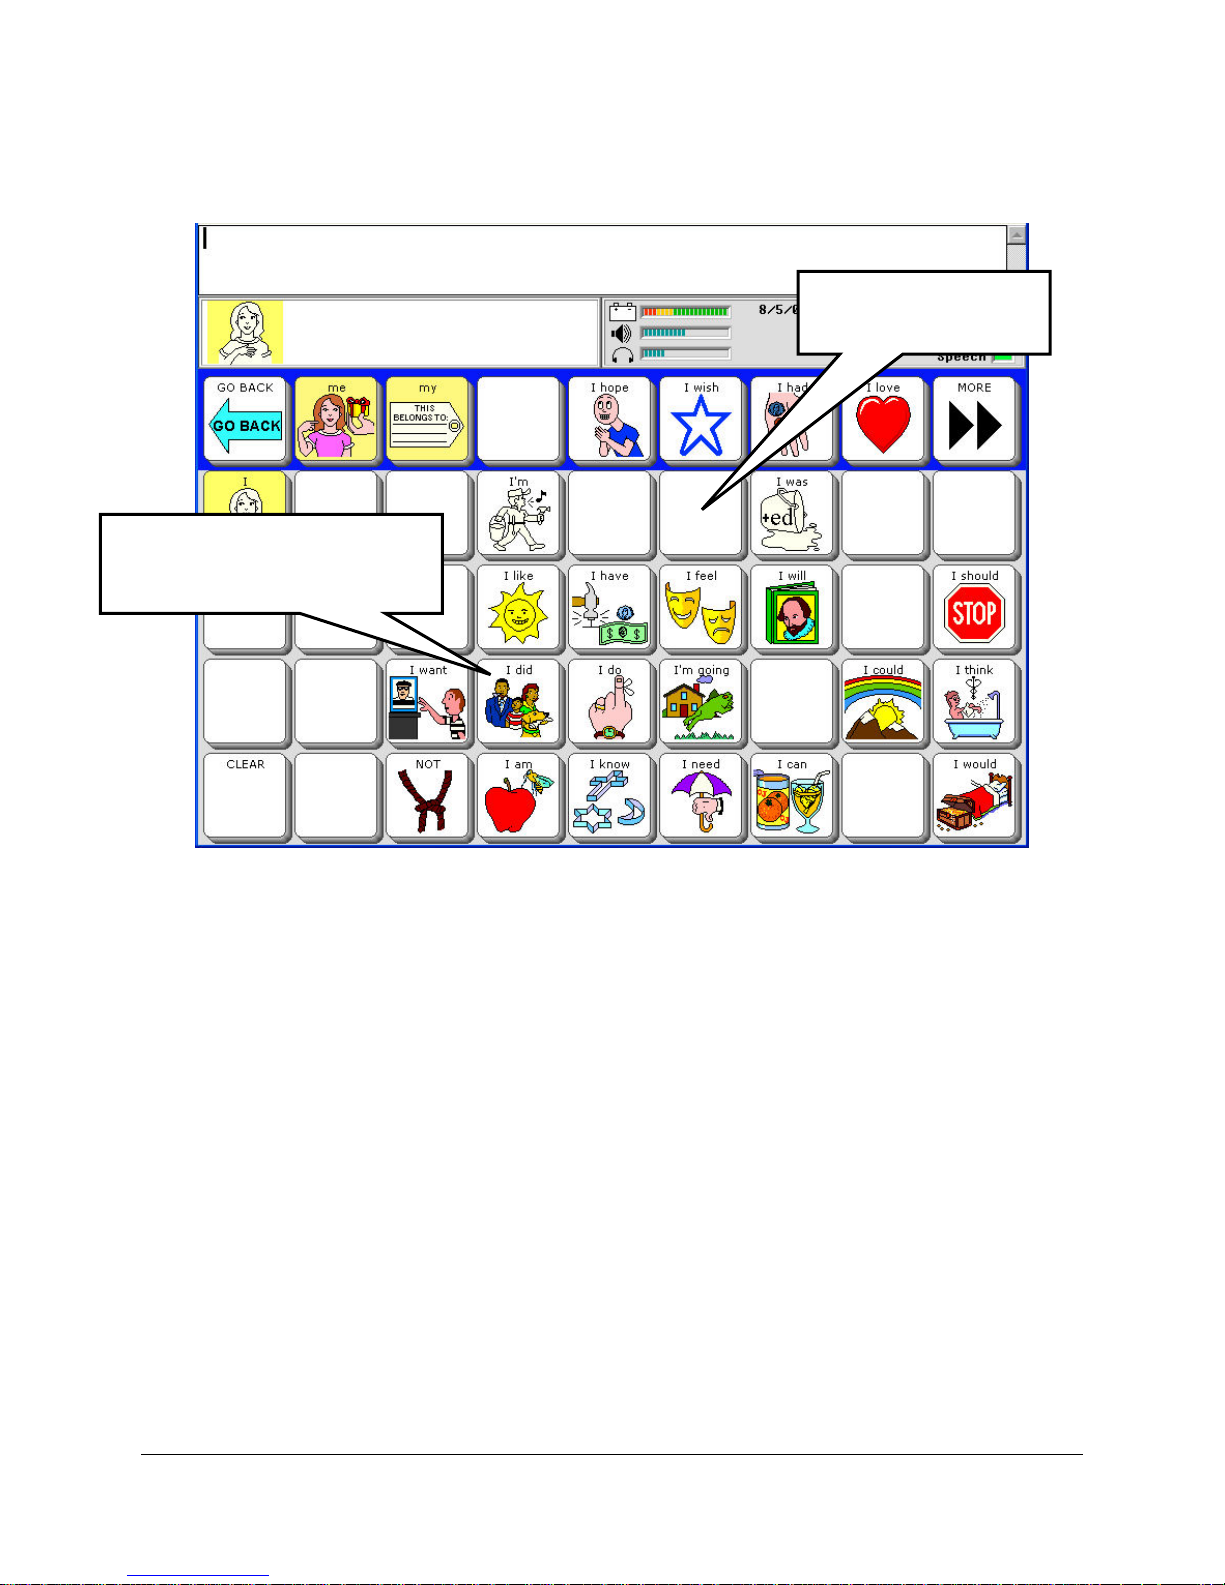
The Unity® 45 Sequenced Overlay
We will use the Unity® 45 Sequenced Overlay for examples in this manual. If you selected this
key from the Exploration Wizard, the overlay should now be visible on your touchscreen.
Activity Row
CORE
VOCABULARY
Right now you can activate a key by simply pressing on it. You do not have to press hard. A light
tap will do it. When you press a key you see that some keys become gray and others stay bright.
Press a bright key.
The device should speak a pre-stored message.
The top row of keys is the Activity Row. The first key down on the left is the ACTIVITY
key . Press this key to see more activities in the Activity Row. If you want to look at
some activities, press one of the keys in the Activity Row. Press MORE
if you want
GETTING ACQUAINTED WITH YOUR VANGUARD PLUS
Vanguard Plus Manual
25
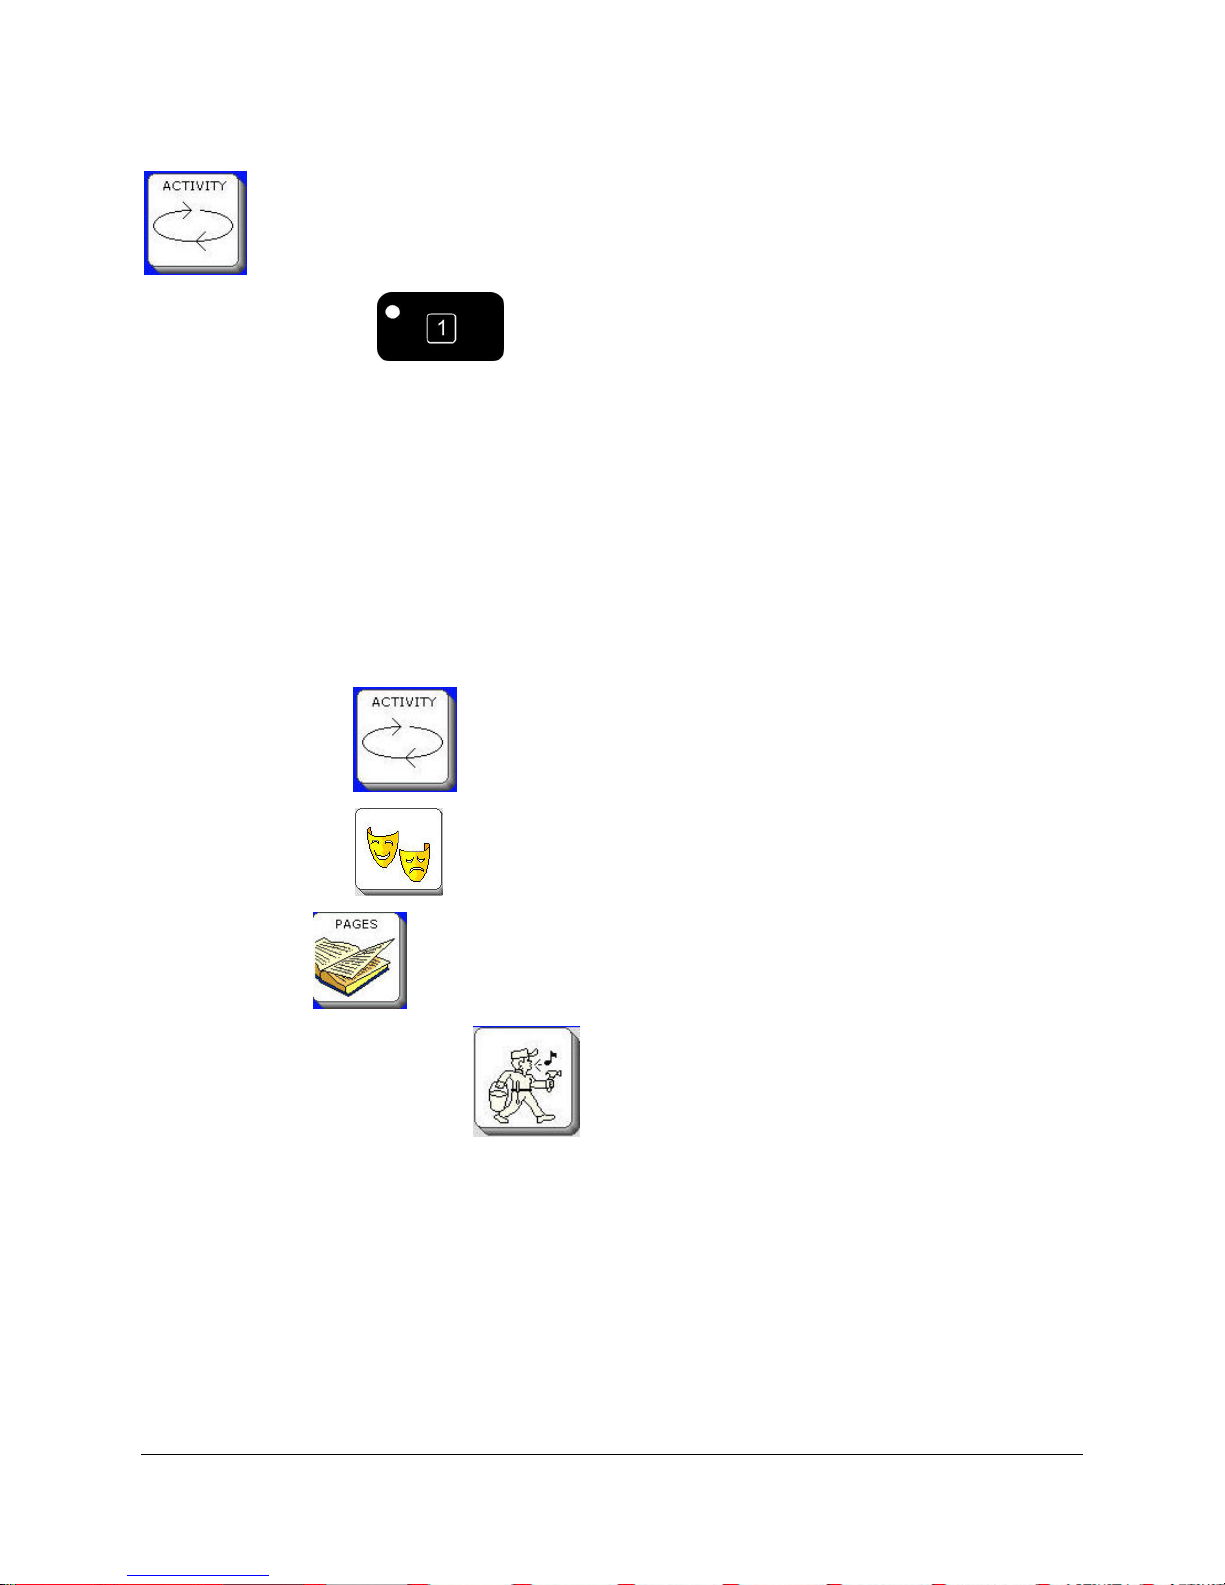
to see more keys in any activity. If you want to exit an Activity, press the ACTIVITY key
again.
You can also use the on the front of the case to see more activities.
The bottom four rows of keys contain the Core vocabulary. Core vocabulary is vocabulary that
you use all the time when speaking. The Core vocabulary icons are generally consistent
throughout the different Unity overlays.
Finding Keys
You can find any key on an overlay or in the Toolbox by using row and column locations.
For example, on the Unity® 45 sequenced overlay, there are 5 rows from the top to the bottom of
the overlay. There are 9 columns of keys from left to right across the overlay.
The ACTIVITY key is at location Row 1, Column 1.
The FEELINGS key is at Row 3, Column 6.
The PAGES key
The VERB (Mr. Action Man) key
is at Row 1, Column 9
is at Row 2 , Column 4
Using this method, you can find any key on any overlay.
If you use Auditory Scanning with a Blank overlay, your device uses the numbers 1-36 to
represent Core key locations. Activity Row keys are not numbered.
GETTING ACQUAINTED WITH YOUR VANGUARD PLUS
Vanguard Plus Manual
26
About Minspeak®
Your device uses Minspeak® to help you communicate.
Minspeak is a means of coding vocabulary to a small set of icons that are rich in meaning.
Minspeak’s use of icons taps into a person’s natural tendency to associate multiple meanings to
pictures. By coding a large vocabulary of words, phrases and whole messages using this small
set of icons, Minspeak offers many advantages:
it is logical in how it represents a person’s language;
it is easy to learn because it fits into a person’s natural ability to associate many meanings to
one picture;
it promotes language development by providing a rich vocabulary of words that you can
combine into sentences;
because the small set of icons remains the same on a single overlay, you can, with practice,
learn to recall your vocabulary automatically;
it promotes further language development by offering many opportunities for language-
learning experiences.
These advantages lead to the ultimate benefit of using Minspeak: it allows for and promotes
independent, effective communication.
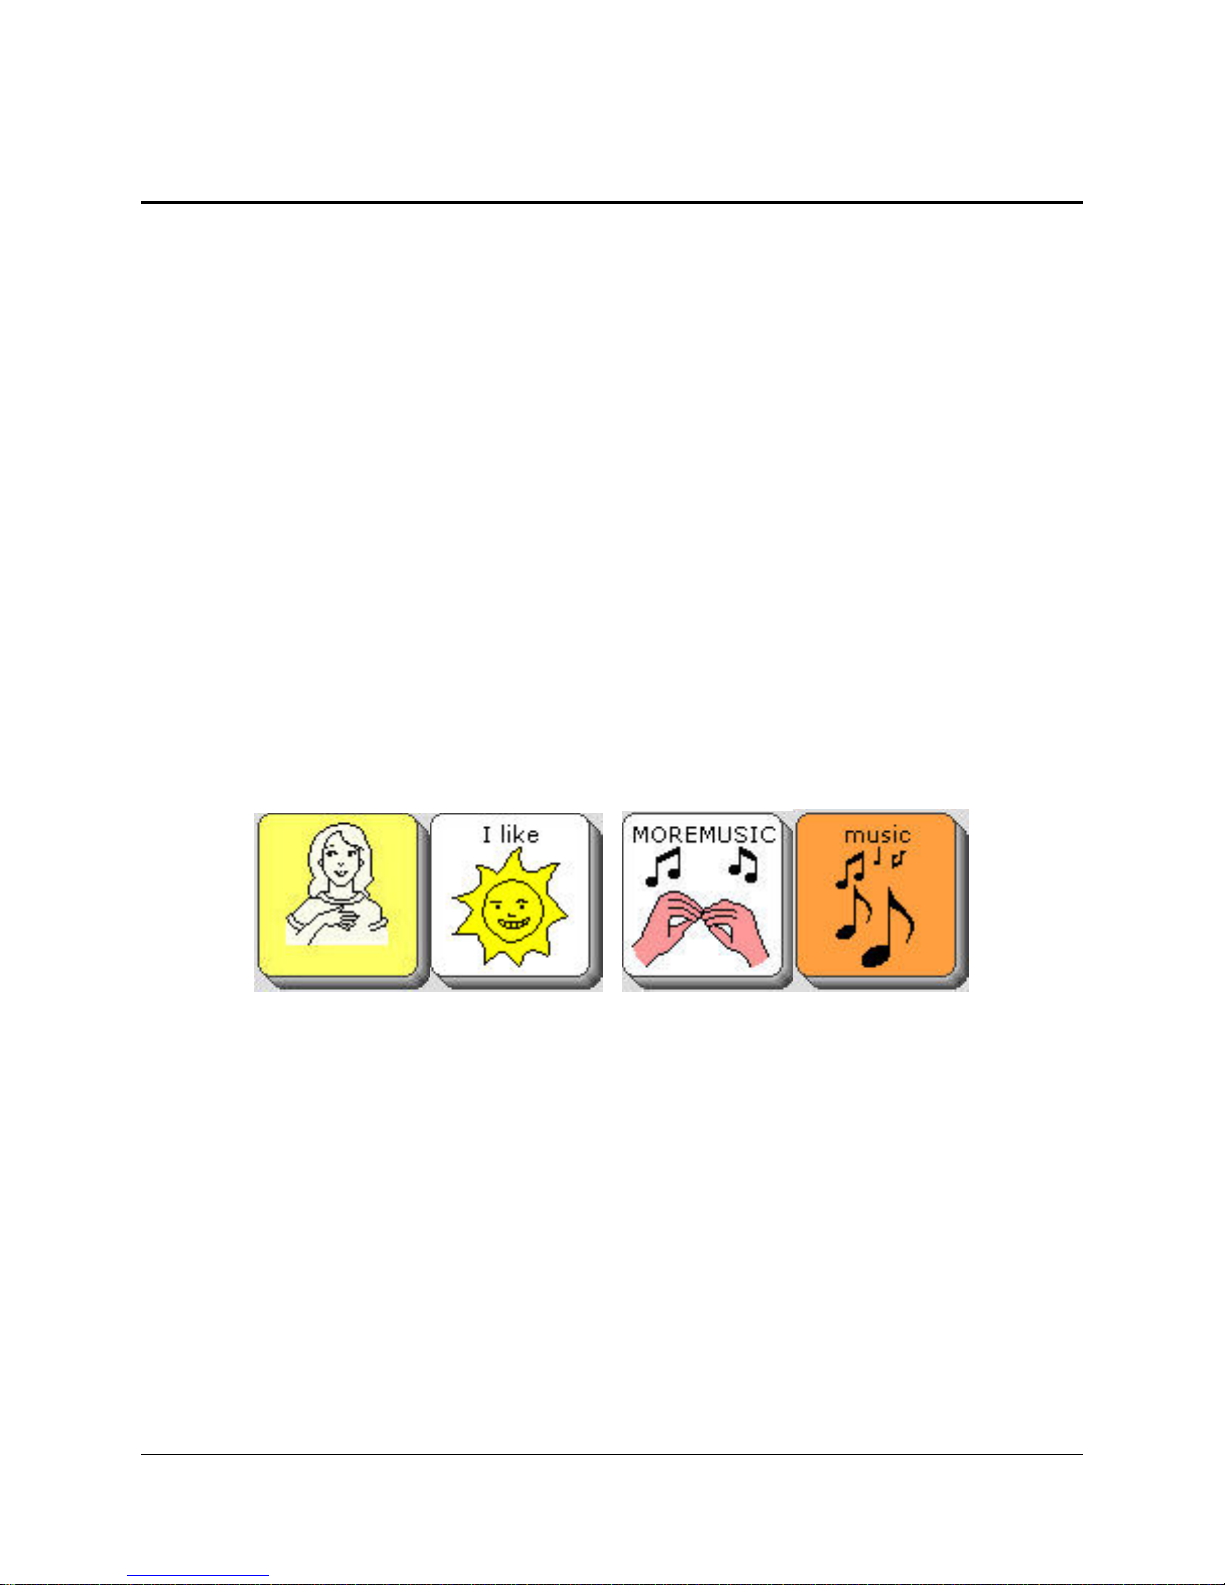
I like music
GETTING ACQUAINTED WITH YOUR VANGUARD PLUS
Vanguard Plus Manual
27
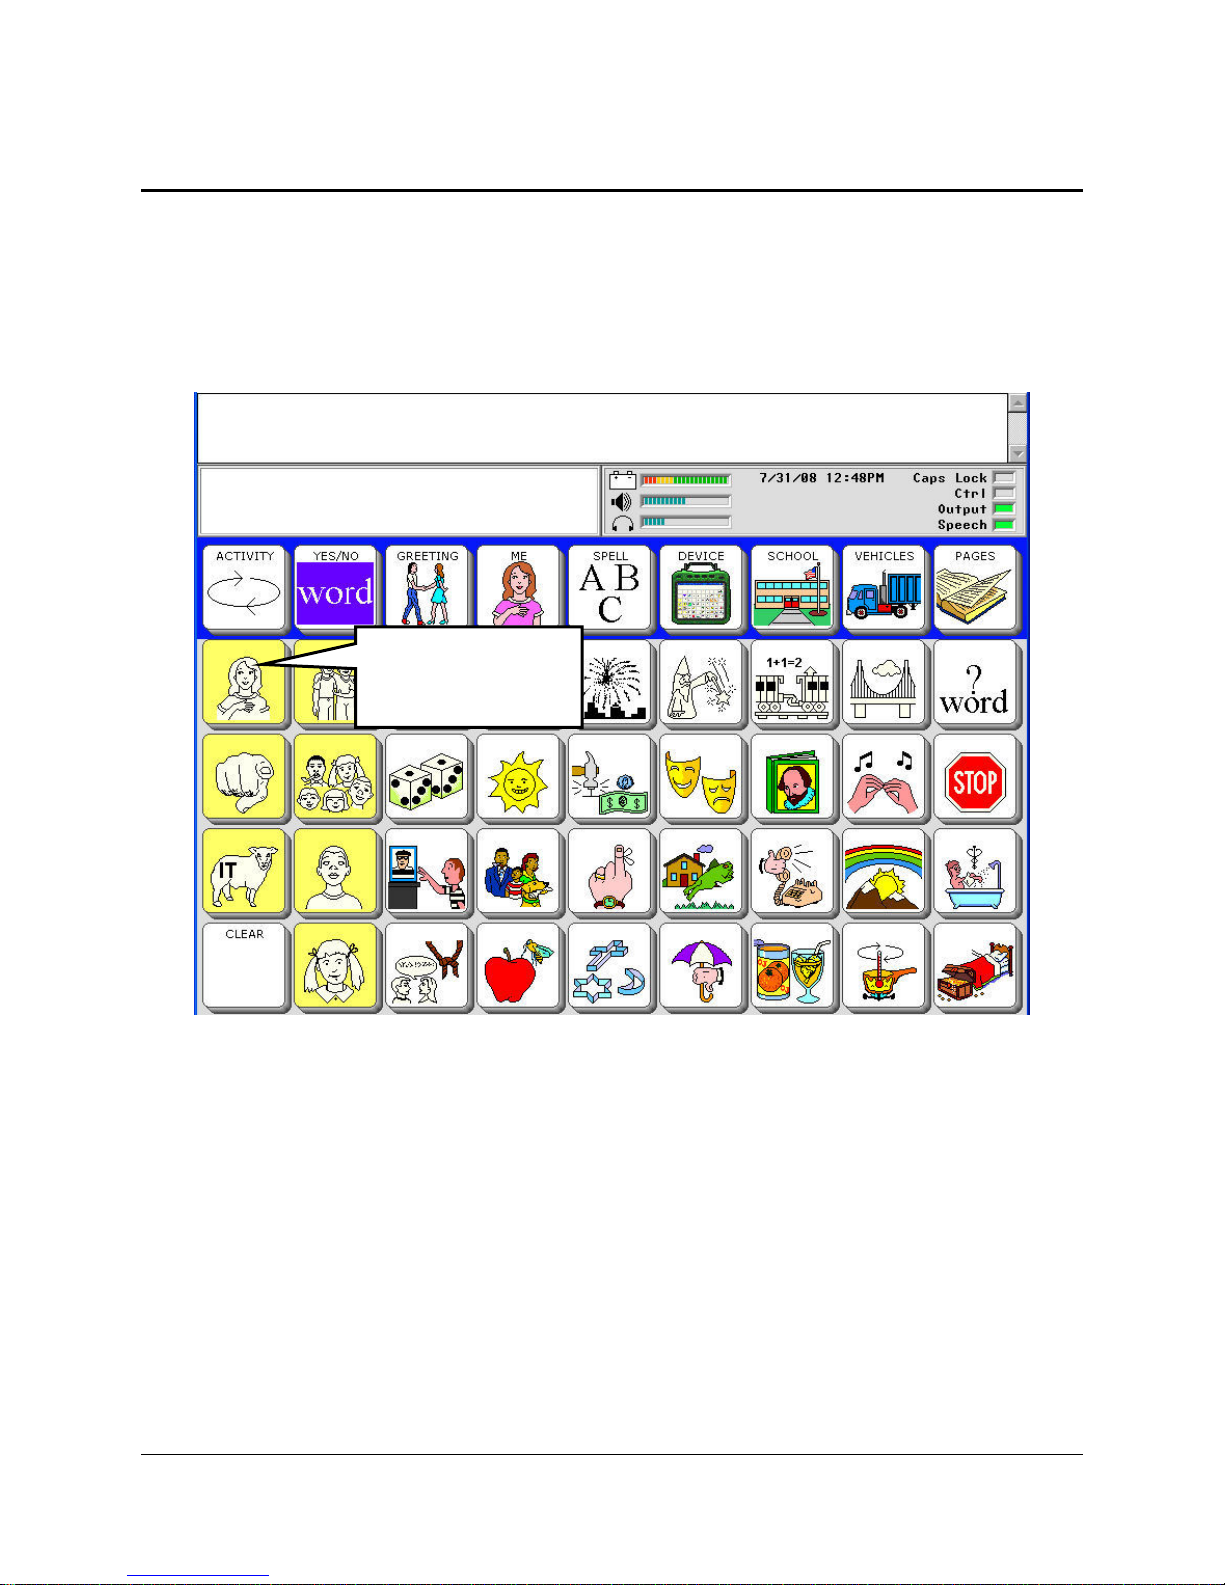
Icon Prediction Shows Where You Have Messages Stored
If you have pressed any keys on the screen, you have probably noticed that some keys on the
keyboard lost their icons and became blank. This is called Icon Prediction. The keys with
icons on them tell you that they are possible selections for messages that are part of the
vocabulary stored in your device. The blank keys offer no messages.
Select this key.
GETTING ACQUAINTED WITH YOUR VANGUARD PLUS
Vanguard Plus Manual
28
You see:
Bright keys with visible icons
will complete your message.
White keys will not
finish your message.
The icon for that key you selected will appear in the icon display area. Other keys on the overlay
will go blank. If you select one of the keys with an icon on it, its icon will appear in the icon
display area and the device will speak the message that is stored under the sequence you just
activated.
Once a message is spoken, the device returns to showing all the icons. When you press a key
again, some keys will remain bright and some will turn blank.
If you press a blank key, you will see the icon that belongs to that key in the icon display area but
no message is spoken. The overlay resets and all keys become bright again.
Icon Prediction is a good tool to use to help you learn your vocabulary.
GETTING ACQUAINTED WITH YOUR VANGUARD PLUS
Vanguard Plus Manual
29
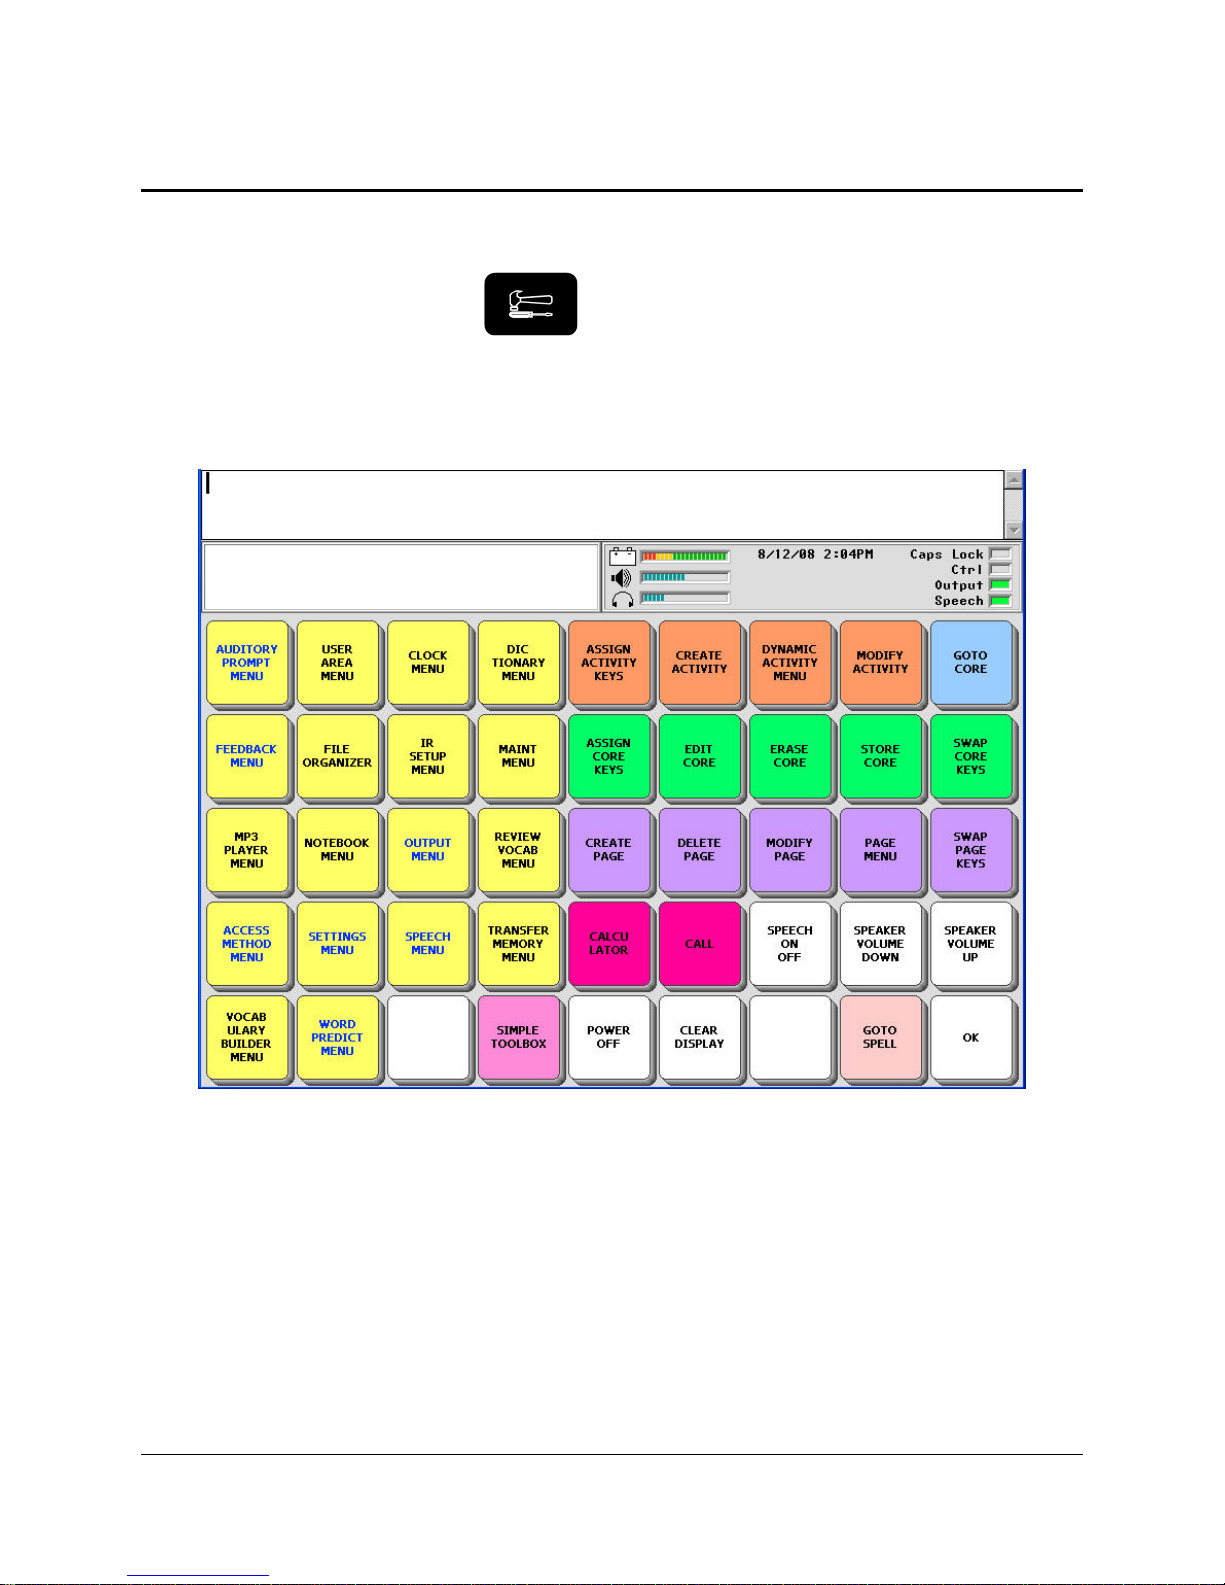
About the Color-Coded Toolbox
The Toolbox is an overlay that contains menus and single function keys. These menus and
functions will help you to make your device into one that is tailored to your specific needs.
Go to the Toolbox by pressing the Toolbox button on the front of the case.
The Toolbox keys are color-coded. Notice that System Menus, Pages, Activity keys, etc. are all
in different color groups to help you remember where the keys are and what they allow you to
do.
Activate the yellow FEEDBACK MENU. This menu allows you to choose the kind of
feedback you want from your device. Activate OK or CANCEL to exit the menu. OK saves any
changes you have made and exits the menu. CANCEL exits the menu without saving changes.
The USER AREA MENU allows you to choose a keyboard size, a communication overlay and
a spelling overlay. You can load a computer overlay from this menu.
You can go to your communication overlay (GO TO CORE) or the spelling keyboard Note:
You can store the Tool, GO TO TOOLBOX, under an icon sequence on your communication
overlay if you decide you want to have access to it on your overlay. See pages starting with 161
to learn about storing T
ools.
GETTING ACQUAINTED WITH YOUR VANGUARD PLUS
Vanguard Plus Manual
30
 Loading...