

Prentke Romich Company SpringBoard Operator's Manual

SpringBoard
Operator's Manual
PRENTKE ROMICH COMPANY
1022 Heyl Rd. • Wooster, Ohio 44691
Telephone: (330) 262-1984
Fax: (330) 263-4829
E-mail Address:
info@prentrom.com
Web Site Address: www.prentrom.com
Prentke Romich International
Minerva House, Minerva Business Park
Lynch Wood, Peterborough, Cambridgeshire
PE2, 6FT UK
Fax: +44 1733 391939
E-mail Address:
info@prentromint.com

Prentke Romich Company •1022 Heyl Rd. 0149 Wooster, Ohio 44691•(800) 2621984
SpringBoard Manual
13655v3.0
ii
Data can be uploaded from this unit to a personal computer for storage on a hard disk, floppy
diskette, or other storage medium. Be sure to make multiple copies of all-important data to protect
against accidental loss.
SpringBoard, Vantage, WordCore, Language Activity Monitor (LAM), Memory Transfer Interface (MTI) and Access Keys are
trademarks of Prentke Romich Company.
Unity® is a registered trademark in the United States and other countries.
Minspeak® is a registered trademark in the United States and other countries..
Non-English text-to-speech supplied by Elan Speech.
Windows. Microsoft Word, Microsoft Works and PowerPoint are registered trademarks of Microsoft, Inc.
Macintosh, PowerBook, AppleTalk and SerialKeys are registered trademarks of Apple Computer, Inc.
IBM is a registered trademark of International Business Machines.
Tracker is a trademark of Madentec, Inc.
Headpointing technology by Madentec
IntelliTools is a registered trademark of IntelliTools, Inc.
Paint Shop Pro software is copyrighted by JASC Software, Inc.Inmage Viewer/32 is shareware from SB Software.
Your device computer access overlays are based on the work Chris Beatty did for the MIKE product. Prentke Romich Company
gratefully acknowledges his contribution.
Digital photos of the devices courtesy of Doug Miller
ELECTRONIC INTERFERENCE INFORMATION
This device complies with Part 15 of the FCC Rules. Operation is subject to two conditions: (1) this device may
not cause harmful interference, and (2) this device must accept any interference received, including interference
that may cause undesired operation.
Warning! Changes or modifications to this product which are not authorized by Prentke Romich Company could
exceed FCC limits and negate your authority to use this product.
This equipment has been tested and found to comply with the limits for a Class B digital device, pursuant to Part
15 of the FCC Rules. These limits are designed to provide reasonable protection against harmful interference in
a residential installation. This equipment generates, uses and can radiate radio frequency energy and, if not
installed and used in accordance with the instructions, may cause harmful interference to radio communications.
However, there is no guarantee that interference will not occur in a particular installation. You can determine
whether this product is causing interference in your radio or television by turning this product off. If the
interference stops, it was probably caused by this product or one of its accessories. You can attempt to correct
the interference by using one or more of the following measures:
• Turn the television or radio antenna until the interference stops.
• Move this product to one side or the other of the television or radio.
• Move this product farther away form the television or radio.
• Plug this product into an outlet that is on a different circuit from the television or radio; that is, this product
should be controlled by different circuit breakers/fuses from the television or radio.
• If necessary, contact a Prentke Romich Company service technician for assistance.
This Class B digital apparatus meets all requirements of the Canadian Interference-Causing Equipment
Regulations. Cet appareil numérique de la classe B respect toutes les exigences du Règlement sur le matériel
brouiller du Canada.
CE ENVIRONMENTAL INFORMATION: Use: 0o - 45o C; Storage: (-20o) - 50o C; 95% maximum relative humidity
@ ambient temperatures less than 40
o
C.
CLASS 1 LED PRODUCT –The Tracker Headpointing option falls within the limits of a Class 1 LED product as
specified by CENELEC EN 60825-1, Amendments 1 and 2.
©Prentke Romich Company 2001-2005
All rights reserved. Under copyright laws this manual may not be copied, in
whole or in part, without the written consent of the Prentke Romich Company.

SpringBoard Manual
iii
END USER LICENSING AGREEMENT
Microsoft, Inc.
You have acquired a SpringBoard™ which includes software licensed by Prentke Romich
Company from Microsoft Licensing Inc. or its affiliates ("MS"), Those installed
software products of MS origin, as well as associated media, printed materials and
"online" or electronic documentation (software) are protected by international
intellectual property laws and treaties.
IF YOU DO NOT AGREE TO THIS END USER LICENSE AGREEMENT (EULA), DO NOT USE THE
DEVICE OR COPY THE SOFTWARE. INSTEAD, PROMPTLY CONTACT PRENTKE ROMICH
COMPANY FOR INSTRUCTIONS ON RETURN OF THE UNUSED DEVICE(S) FOR A REFUND.
ANY USE OF THE SOFTWARE, INCLUDING BUT NOT LIMITED TO USE ON THE DEVICE,
WILL CONSTITUTE YOUR AGREEMENT TO THIS EULA (OR RATIFICATION OF ANY
PREVIOUS CONSENT).
GRANT OF SOFTWARE LICENSE.
This EULA grants you the following license:
• You may use the SOFTWARE only on the SpringBoard.
• NOT FAULT TOLERANT. THE SOFTWARE IS NOT FAULT TOLERANT. PRC HAS
INDEPENDENTLY DETERMINED HOW TO USE THE SOFTWARE AND MS HAS RELIED
UPON PRC TO CONDUCT SUFFICIENT TESTING TO DETERMINE THAT THE SOFTWARE IS
SUITABLE FOR SUCH USE.
• NO WARRANTIES FOR THE SOFTWARE. THE SOFTWARE is provided "AS IS" and with all
faults. THE ENTIRE RISK AS TO SATISFACTORY QUALITY, PERFORMANCE,
ACCURACY, AND EFFORT (INCLUDING LACK OF NEGLIGENCE) IS WITH YOU. ALSO
THERE IS NO WARRANTY AGAINST INTERFERENCE WITH YOUR ENJOYMENT OF
THE SOFTWARE OR AGAINST INFRINGEMENT. IF YOU HAVE RECEIVED ANY
WARRANTIES REGARDING THE DEVICE OR SOFTWARE, THOSE WARRANTIES DO NOT
ORIGINATE FROM, AND ARE NOT BINDING ON, MS.
• Note on Java Support. The SOFTWARE may contain support for programs written
in Java. Java technology is not fault tolerant and is not designed, manufactured, or
intended for use or resale as online control equipment in hazardous environments
requiring fail-safe performance, such as in the operation of nuclear facilities,
aircraft navigation or communication systems, air traffic control, direct life
support machines, or weapons systems, in which the failure of Java technology
could lead directly to death, personal injury or severe physical or environmental
damage. Sun Microsystems, Inc. has contractually obligated MS to make this
disclaimer.
• No Liability for Certain damages. EXCEPT AS PROHIBITED BY LAW, MS SHALL
HAVE NO LIABILITY FOR ANY INDIRECT, SPECIAL CONSQUENTIAL OR
INCIDENTAL DAMAGES ARISING FROM OR IN CONNECTION WITH THE USE OR
PERFORMANCE OF THE SOFTWARE. THIS LIMITATION SHALL APPLY EVEN IF ANY
REMEDY FAILS OF ITS ESSENTIAL PURPOSE. IN NO EVENT SHALL MS BE LIABLE
FOR ANY AMOUNT IN EXCESS OF U.S. TWO HUNDRED FIFTY DOLLARS (U.S. $250.00).
• Limitations on Reverse Engineering, Decompilation and Disassembly. You may
not reverse engineer, decompile, or disassemble the SOFTWARE, except and only

SpringBoard Manual
iv
to the extent that such activity is expressly permitted by applicable law
notwithstanding this limitation.
• SOFTWARE TRANSFER ALLOWED BUT WITH RESTRICTIONS. You
may permanently transfer rights under this EULA only as part of a permanent sale
or transfer of the Device, and only if the recipient agrees to this EULA. If the
SOFTWARE is an upgrade, any transfer must also include all prior versions of
SOFTWARE.
EXPORT RESTRICTIONS. You acknowledge that SOFTWARE is subject to U.S.
export jurisdiction. You agree to comply with all applicable international and national
laws that apply to the
SOFTWARE, including U.S. Export Administration Regulations,
as well as end-user, end-use and destination restrictions issued by U.S. and other
governments.. For additional information see
http://www.microsoft.com/exporting/.

Before You Continue:
Release Shipping Mode and
Turn the SpringBoard ON.
To Turn the SpringBoard ON the first time:
1. Press and hold the button on the front of the
case for ten seconds.
2. Release the button. The SpringBoard will come on.
SpringBoard Manual
v
Attention! Consult accompanying documents.
Not intended to be an emergency call device or sole communication
device.
Warning!
When operating the SpringBoard in a medical environment, do not
use with any product that is not medically approved.
Warning!
Any mounts used should be fitted by a qualified person.
Failure to install the mounting system according to the
manufacturer's instructions may result in an injury to the user.
Important Note!
To achieve the best results from your communication aid,
keep it dry at all times.
See the Troubleshooting Section of this manual
for more information.
Recommendation
To Avoid Static Discharge: Turn the device Off
before you plug anything into or unplug anything from the device.
This includes switches and, especially, the battery charger.
SpringBoard Manual

TABLE OF CONTENTS
SpringBoard Manual
vii
Table of Contents
GETTING ACQUAINTED WITH THE SPRINGBOARD.................................11
Welcome to the SpringBoard™...................................................................................13
About the Front Panel of the SpringBoard.................................................................15
About the Touch Screen and the Default Overlay......................................................17
The Visor, Keyguard, Table Stand and Strap Holders ...............................................19
About the SpringBoard's Side Panels.........................................................................21
About the Back and Bottom of the SpringBoard........................................................23
About Auto Power Down, Power Off and the I/O Button..........................................25
Auto Power Down......................................................................................................27
About the SpringBoard's Batteries..............................................................................29
About Minspeak®.......................................................................................................31
An Example of Icon Associations..............................................................................33
About Selecting Your Own Minspeak Icons to Represent a Message.......................35
About Finding Keys.................................................................................................... 37
About the Toolbox......................................................................................................39
Change the Speaker and Headphone Volume.............................................................41
About the CALL Tool in the Toolbox........................................................................42
SETTING UP THE SPRINGBOARD ....................................................................43
About Setting Up the SpringBoard for Efficient Use.................................................45
About User Areas .......................................................................................................47
About Keyboard Sizes................................................................................................49
About the Communication Overlays ..........................................................................51
About Pages and Activities.........................................................................................53
Using the CHOOSE OVERLAY MENU...................................................................55
What are the Selection Techniques?........................................................................... 57
Using the SELECTION TECHNIQUE MENU..........................................................59
Keyboard ....................................................................................................................61
Headpointing ..............................................................................................................63
1-Switch......................................................................................................................65
2-Switch......................................................................................................................67
Joystick as a Selection Technique ..............................................................................69
Some Options in the SELECTION TECHNIQUE MENU ........................................71
Headpointing: Averaging ..........................................................................................73
Headpointing: Horizontal Adjustment and Vertical Adjustment...............................75

TABLE OF CONTENTS
SpringBoard Manual
viii
Headpointing: Color Pointer; Highlight Key............................................................77
Headpointing: Field of View.....................................................................................79
Using Other Headpointing Devices ............................................................................ 81
1-Switch—Scan Mode 1.............................................................................................83
1-Switch—Scan Mode 2.............................................................................................85
2-Switch—Scan Mode 1.............................................................................................87
2-Switch—Scan Mode 2.............................................................................................89
Scan Direction ............................................................................................................91
Scanning Speed...........................................................................................................93
Acceptance Time........................................................................................................95
Release Time ..............................................................................................................96
Activation Delay Gives You a Chance to Change Your Mind...................................97
Auto Repeat Rate........................................................................................................ 99
Predictive Selection ..................................................................................................101
Save Your Set-Up Settings.......................................................................................103
Copy the "Settings" Keys to Your Overlay..............................................................105
STORING MESSAGES.........................................................................................107
About Core Vocabulary and the Activity Key Vocabulary......................................109
About Digitized (Recorded) Speech.........................................................................111
Plan What You Want to Say.....................................................................................113
The SPEECH MENU Gives You Some Quality Control.........................................115
Record and Store a Core Vocabulary Message ........................................................117
Erase a Core Vocabulary Message ...........................................................................119
About Existing Activities .........................................................................................121
About Creating an Activity.......................................................................................123
Some Things to Remember When You Create or Modify Activities.......................125
Create a New Activity—An Example ......................................................................127
Dynamic Activities...................................................................................................129
Erase a Dynamic Activity Link; Review All Dynamic Activities...........................131
Modify An Already Existing Activity ......................................................................133
Copy Pages/Activities from your Current User Area to Another User Area............135
The REVIEW VOCABULARY MENU..................................................................137
Icon Tutor.................................................................................................................138
PERSONALIZE YOUR KEYBOARD AND OVERLAY ..................................139
About Personalizing Your Communication Keyboard and Overlay........................141
About Inserting Tools from the Toolbox on Your Overlay......................................143
To Store a Tool, use the INSERT TOOL Key on the Spelling Keyboard................145
Insert a Tool and Store it Under an Icon Sequence..................................................147
Assign a Tool to a Core Key on Your Communication Overlay..............................149
Erase the Tool and Restore the Original Icon...........................................................151
Hide a Core Vocabulary Key....................................................................................153
Swap Core Vocabulary Keys on Your Overlay........................................................155

TABLE OF CONTENTS
SpringBoard Manual
ix
About Custom Pages ................................................................................................157
Create a Custom Page...............................................................................................159
Go to Your Custom Page..........................................................................................161
Modify a Custom Page.............................................................................................163
Link a Page to another Page.....................................................................................165
Expand a User Area or Page.....................................................................................167
Using the SET-UP Tool............................................................................................169
About Auditory Prompts ..........................................................................................171
Erase Auditory Prompts............................................................................................173
The FEEDBACK MENU.........................................................................................175
Some Options in the FEEDBACK MENU...............................................................177
Icon Prediction Shows Where You Have Messages Stored.....................................179
Icon Message Label: Top, Bottom or Off................................................................181
Embellished Icons: On or Off..................................................................................183
The MAINTENANCE MENU Gives You Information about the SpringBoard......185
Speaking Tools.........................................................................................................187
Clear Display............................................................................................................189
TRANSFER MEMORY MENU AND MP3 PLAYER MENU..........................191
About Memory Transfers .........................................................................................193
Memory Transfer with a USB Flash Drive or Secure Digital Card..........................195
Importing Icons.........................................................................................................197
Load Icons from an MTI File ...................................................................................198
Save a Page/ Load a Page.........................................................................................199
PC Memory Transfer with a Serial Cable.................................................................200
Listening to Music with your SpringBoard..............................................................203
About the Options in the MP3 PLAYER MENU.....................................................205
Creating and Using Playlists.....................................................................................209
Three New Music Tools ...........................................................................................211
Using the Select Save Directory Option: Create a Playlist Directory......................212
Using the Select Save Directory Option: Create an MTI Directory........................213
About Importing Sound Files to Store on your Overlay...........................................215
Store a Sound File under an Icon or Icon Sequence on your Overlay......................216
USING A REMOTE CONTROL..........................................................................217
Using the SpringBoard as a Remote Control............................................................219
Remote Control Pages..............................................................................................221
Notes about Teaching Remote Control Signals to the SpringBoard.........................223
Teach Remote Control Signals to the SpringBoard..................................................225
Add a New Device to the IR SETUP MENU...........................................................227
Create a TV2 Page....................................................................................................229
Link the TV2 Page to other REMOTES Pages........................................................231
How to Store the TV2 Functions under Icon Sequences..........................................233
Delete a Device; Rename a Device..........................................................................235

TABLE OF CONTENTS
SpringBoard Manual
x
Add a New Function to an Existing Device .............................................................237
Delete a Function...................................................................................................... 239
Re-Learn Signals ......................................................................................................241
ON-OFF Control of Non-Remote Appliances: Using the X-10..............................243
The IR CAR Page.....................................................................................................245
USING A COMPUTER .........................................................................................247
About Computer Emulation......................................................................................249
The Computer Keys Page.........................................................................................251
The IBM Mouse Page...............................................................................................253
Computer Activities..................................................................................................255
APPENDICES.........................................................................................................257
Appendix A: All Tools List.....................................................................................258
Appendix B: Recalibrate the Touch Screen.............................................................267
Appendix C: Troubleshooting.................................................................................269
Appendix D: Instructions for Using the LAM (Language Activity Monitoring)....273
About the LAM Data................................................................................................ 276
Appendix E: Headphone and Speaker Jack.............................................................277
Appendix F: The Joystick Adapter..........................................................................278
INDEX.....................................................................................................................279
Index.........................................................................................................................281

GETTING ACQUAINTED WITH THE SPRINGBOARD
SpringBoard Manual
11
Getting Acquainted with the
SpringBoard
The SpringBoard
GETTING ACQUAINTED WITH THE SPRINGBOARD
SpringBoard Manual
12

GETTING ACQUAINTED WITH THE SPRINGBOARD
SpringBoard Manual
13
Welcome to the SpringBoard
™
Summary:
The SpringBoard is an augmentative communication aid that uses
Unity®, a Semantic Compaction™ language software system
designed for storage and retrieval of messages. It can be used
by anyone who, for whatever reasons, has difficulty speaking and
could benefit from an AAC system.
The SpringBoard is an entry-level augmentative/alternative
communication system that uses a combination of Unity and modern
technology for the storage and retrieval of messages. It has a number of
features that allow it to be used as an interactive communication system
in the many situations that individuals face.
Among the SpringBoard's powerful and user-friendly features are Icon
Prediction, Auditory Prompts, and the ability to store messages in
digitized (recorded) speech.
The Minspeak® language system provides a core of common words.
These words are used in almost every kind of communication situation.
Studies show that only 300 words account for 80% of what we say.
With the SpringBoard, these words are always available to the
communicator. The SpringBoard also uses a library of easily
recognizable icons (pictures) that allow you to quickly access words for
specific situations. Using the combination of these groups of words, the
SpringBoard can easily adapt to meet your changing communication
needs.
This operator's manual should be used to set up your SpringBoard.
Once your SpringBoard is set up the way you want it, keep the manual
handy to use as a reference.
The SpringBoard Handbook gives you a quick reference guide for using
some of the most popular SpringBoard tools.
GETTING ACQUAINTED WITH THE SPRINGBOARD
SpringBoard Manual
14
Headpointing
ON/OFF
Button
Recording
Microphone
TOOLBOX
Button
Choose
Activity
key
Set-Up
Ke
y
Battery
Charging
Low
Battery
SpringBoard Front Panel
About the Front Panel of the SpringBoard
O
ON/OFF: Press to turn the device On or Off.
V
When you plug in the charger, the LED (Light Emitting
Diode) will flash. A rapid flash indicates fast-charging; a slow flash
indicates that the battery is charged but it will continue to trickle-charge
as long as the charger is plugged in.
When the LED comes on, the batteries need to be charged.
Plug in the battery charger.
GO TO TOOLBOX: Press to go to the Toolbox. Press again
to go back where you were.
USER DEFINED Keys (2): The key next to the Toolbox key
is programmed for you as the CHOOSE ACTIVITY key. The last key is
programmed as the SET-UP key (see page 169). You may re-program
the keys with whatever commands or tools you wish.
Tracker™ Headpointing Infrared Window (IR)
Recording Microphone: this is the small hole to the left of the
headpointing window as you look at the case.
GETTING ACQUAINTED WITH THE SPRINGBOARD
SpringBoard Manual
15
Demonstration Overlay
ACTIVITIES ACTIVITIES
GETTING ACQUAINTED WITH THE SPRINGBOARD
SpringBoard Manual
16
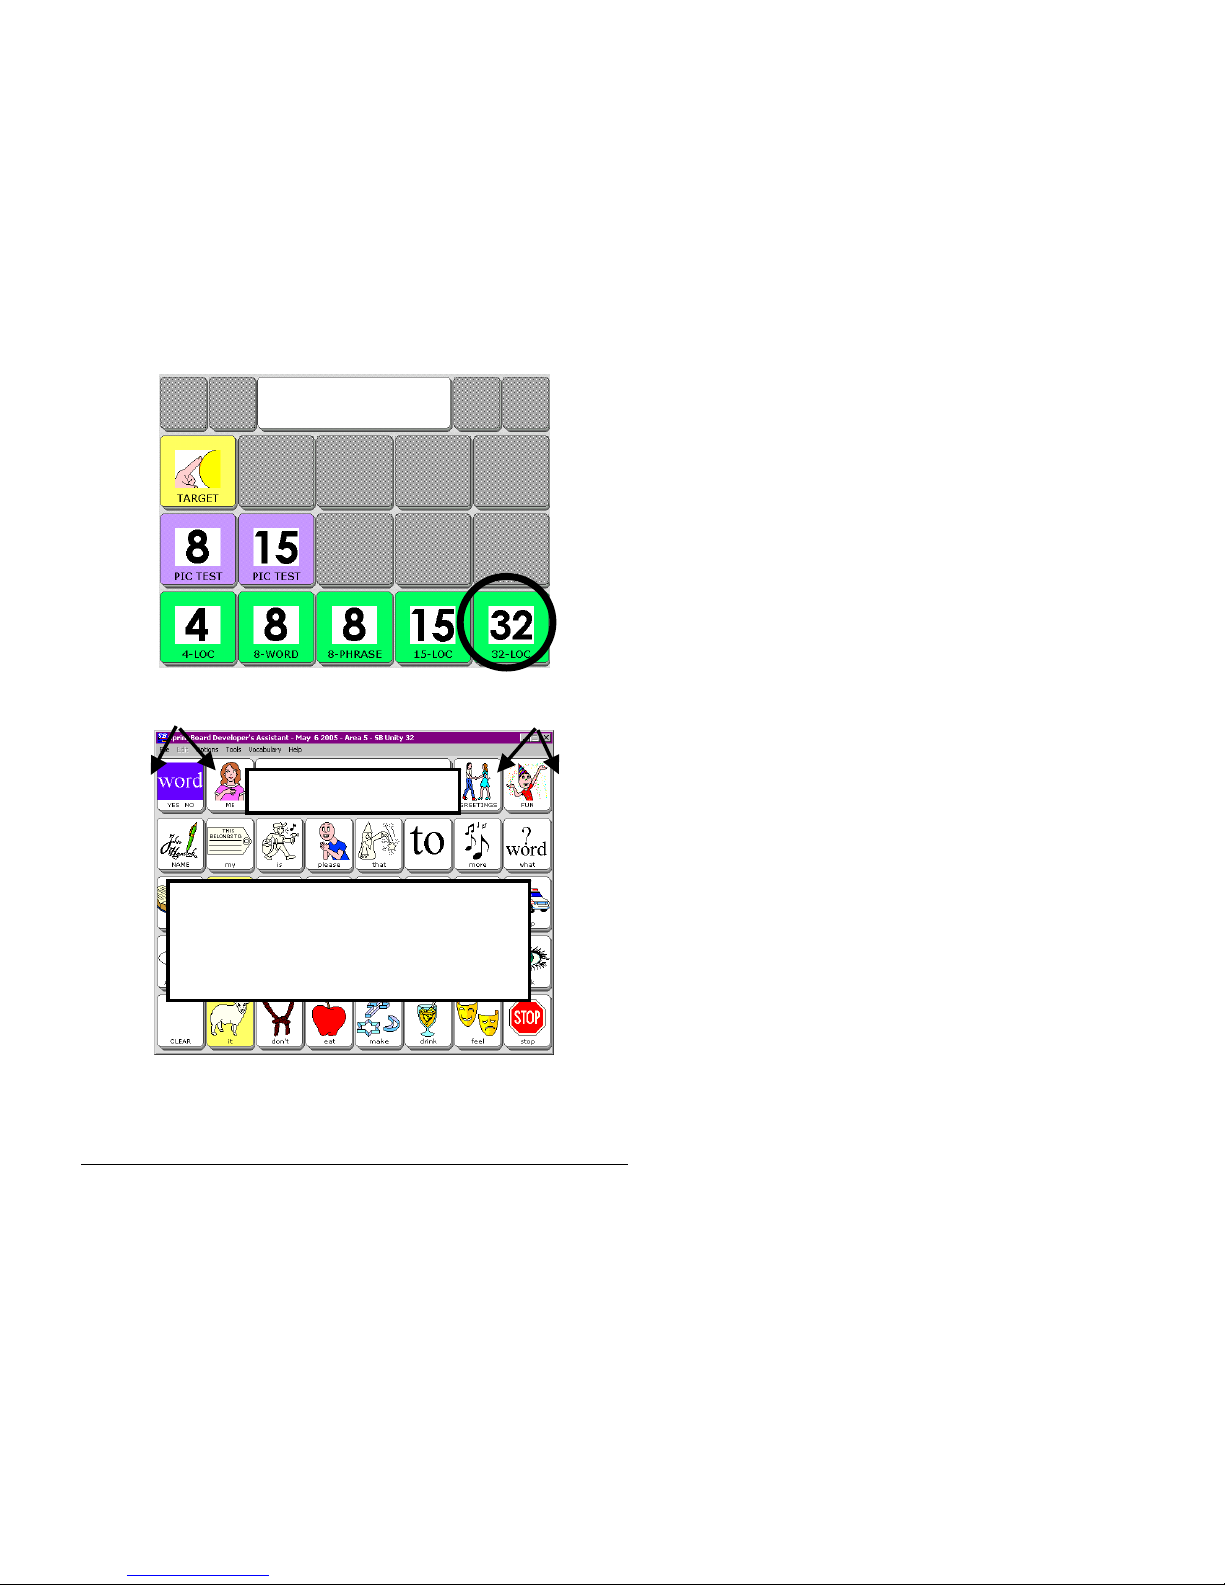
Unity® 32 Location Overlay
Text Display Area
32-Location Word Based
Overlay

About the Touch Screen and the Default
Overlay
Warning! The touch screen is a liquid crystal display (LCD)
screen. Should the display break (unlikely except under extreme duress)
and you come into contact with the liquid crystal, wash or rinse skin
thoroughly. Be careful to avoid splintered glass.
Do not use pointed objects on the touch screen. They will scratch
the screen. If you are unable to use your finger, use a stylus or some
kind of point-and-press device that has a blunt end.
Turn the SpringBoard On by pressing the
I
/
O
key on the front of
the case. In a few seconds you will see the Demonstration Overlay
screen. On non-English devices you may not see the Demonstration
Overlay. The SpringBoard will open in the 32 location overlay, instead.
This contains all the SpringBoard overlays, as well as areas for
demonstrating a switch, headpointer and the touch screen.
Select the 32-location word (32-WORD) option.
The top row of the display contains the Text Display Area and four
Activity keys. Activity keys are for special vocabulary that you use in
special circumstances.
The bottom three rows of keys contain the Core Vocabulary. Core
Vocabulary is vocabulary that you use all the time when speaking. The
Core Vocabulary icons are consistent throughout the different overlays.
Press the GIRL icon. Then press the SUN icon. Now press the Activity
icon that has the picture of a boy swimming. The Text Display Area
should show the words, "I like swimming." Did you see the Activity
Keys change when you pressed the SWIMMING icon?
GETTING ACQUAINTED WITH THE SPRINGBOARD
SpringBoard Manual
17
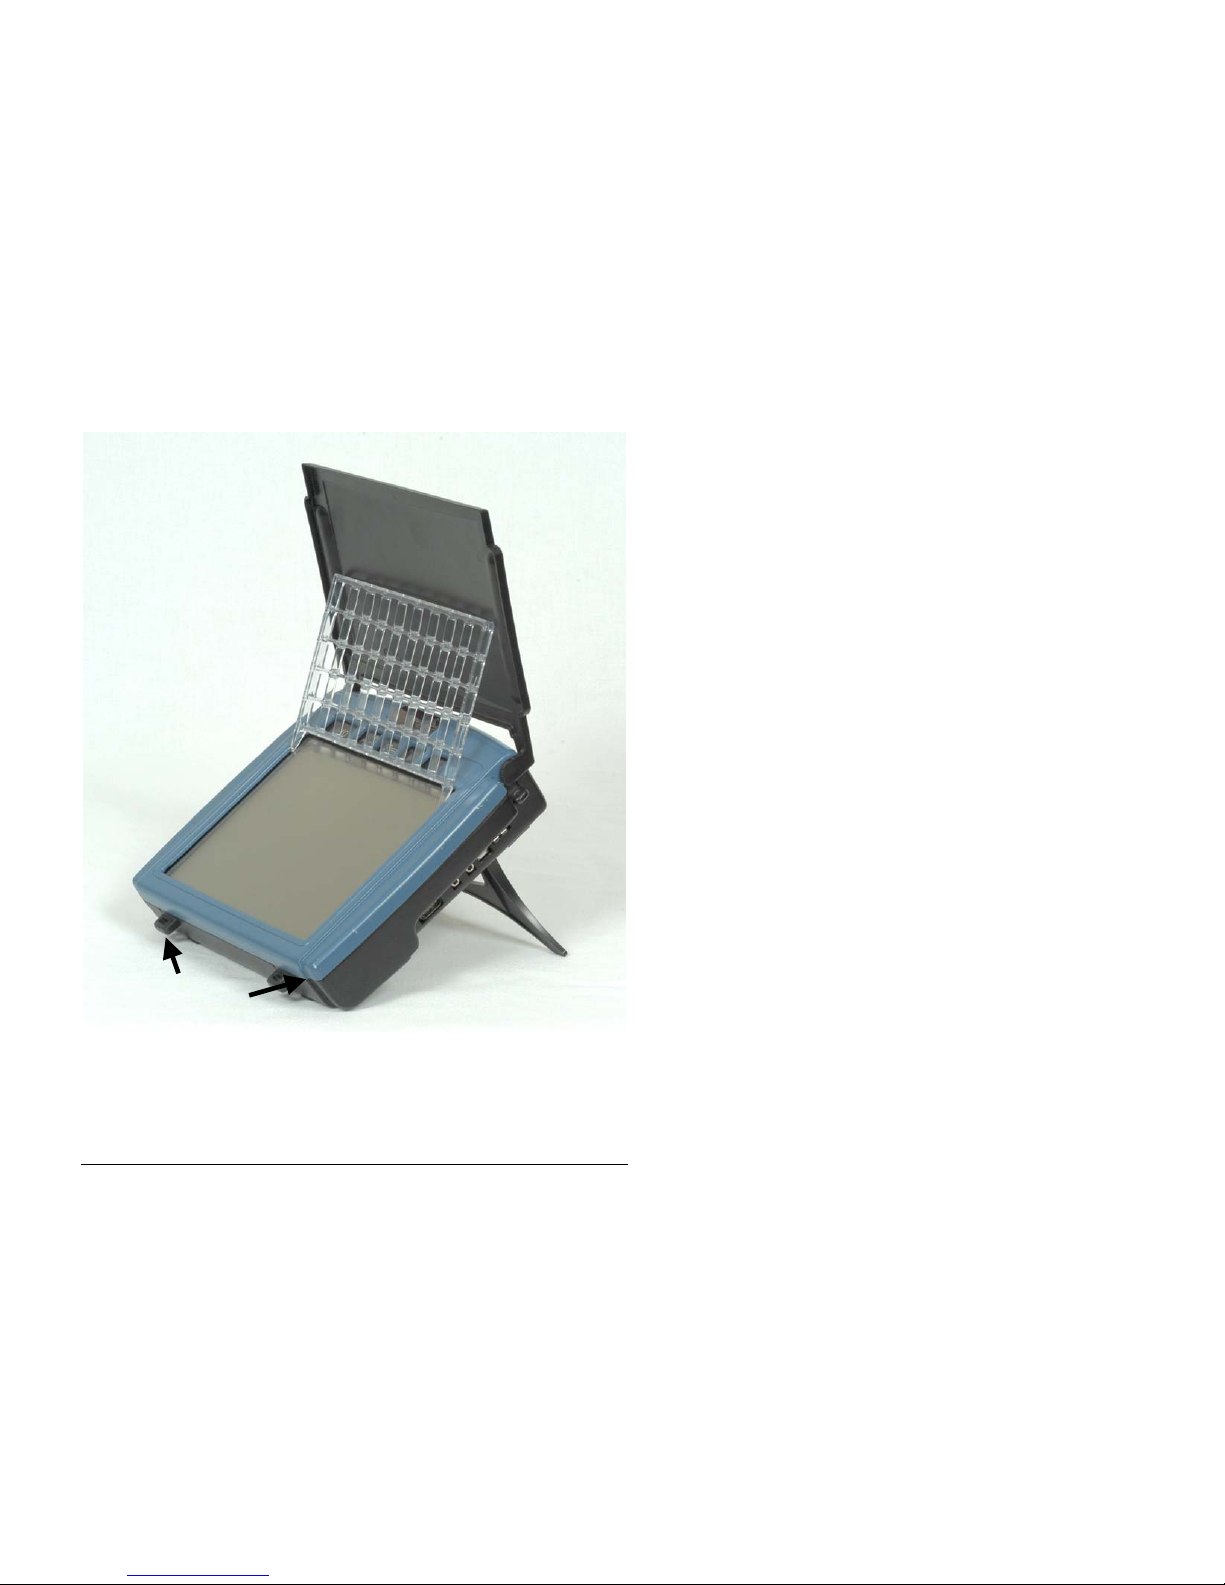
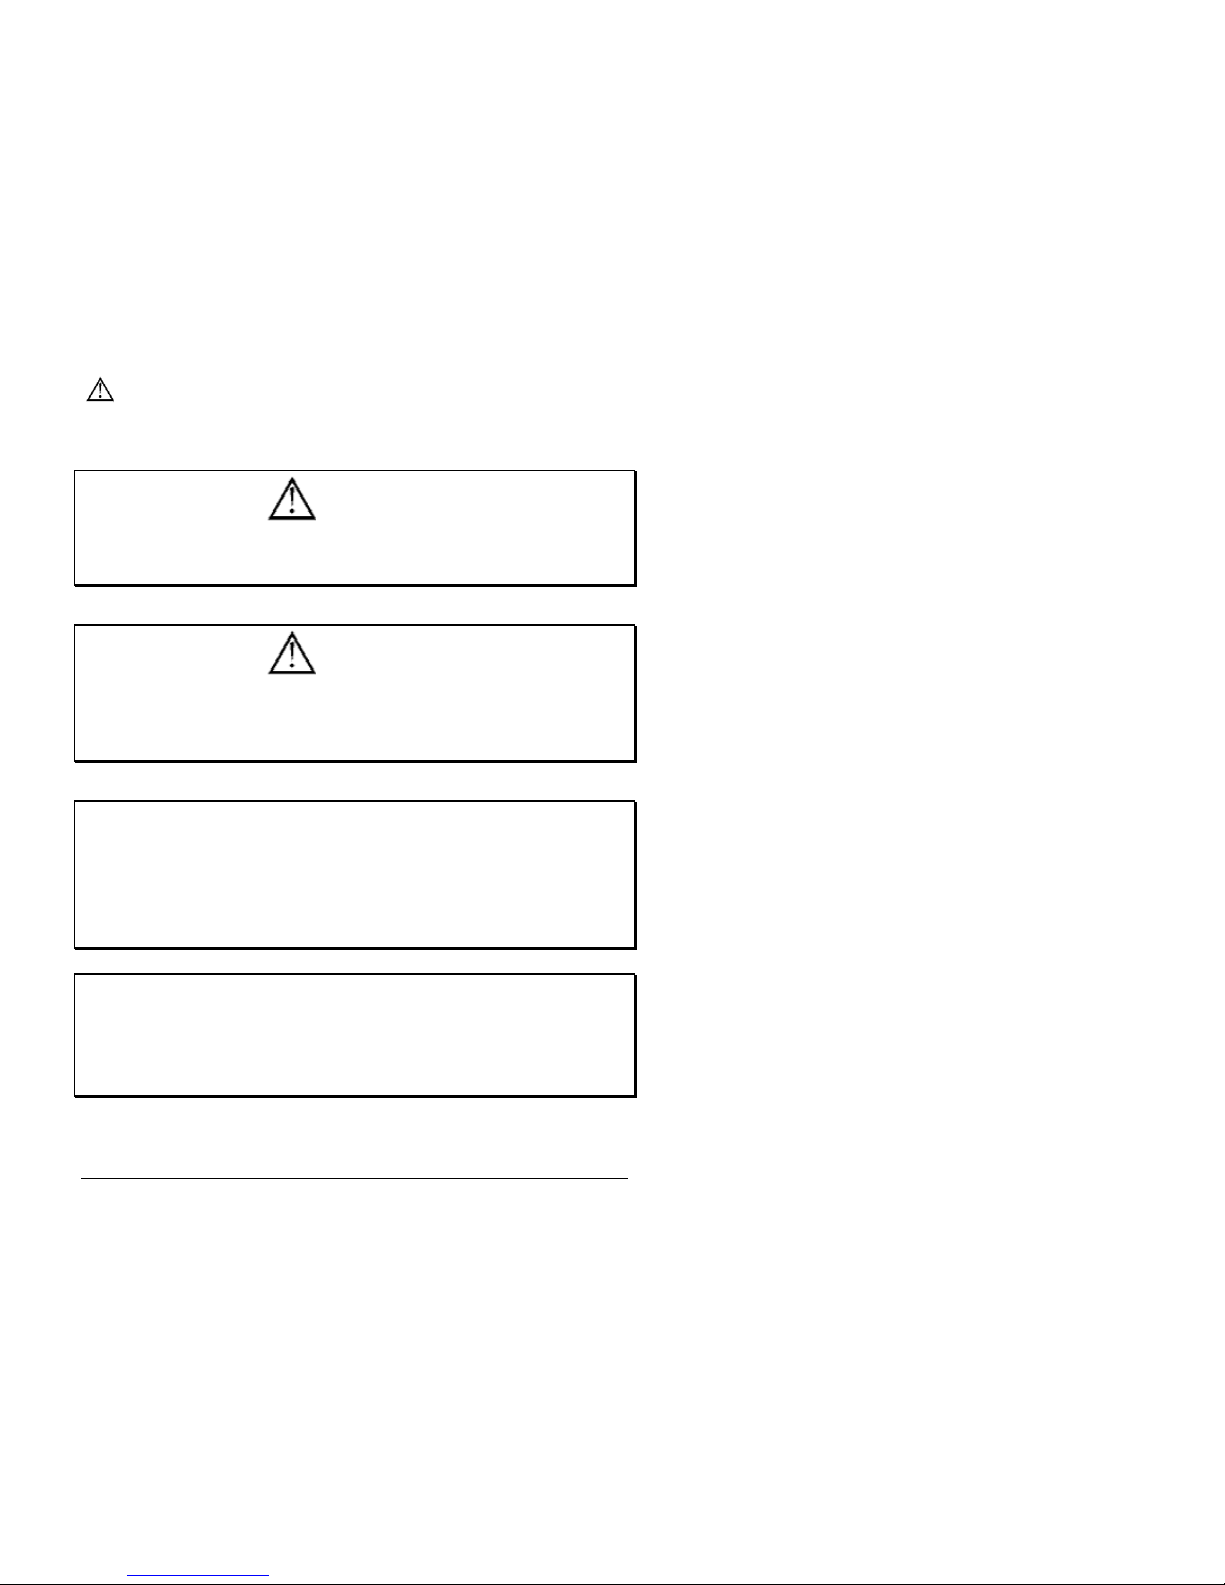
Visor
Keyguard
Table
Stand
Strap
Holders
SpringBoard with Visor, Keyguard, Table Stand
and Strap Holders
GETTING ACQUAINTED WITH THE SPRINGBOARD
SpringBoard Manual
18
The Visor, Keyguard, Table Stand and Strap
Holders
The Table Stand is part of your SpringBoard and is on the bottom of
the case. To use it, pull it out from the case and set the SpringBoard,
with table stand extended, on a flat surface.
Warning! The Table Stand is not designed as a carrying
device. Do not use it to carry the SpringBoard.
Pull the tablestand out from the SpringBoard. You can place it so the
SpringBoard sits at different angles.
The visor is a SpringBoard accessory.
When the visor is lowered it serves as a protective cover over the touch
screen. When it is raised, the visor helps to combat glare from various
light sources. To remove the visor, just pull each leg out of its hole on
the side of the case.
There are two strap holders on the bottom edge of the case and the top
edge of the case. You can clip the carry strap to these holders.
A 32, 15 or 8 location keyguard is an option you can purchase. The
keyguard fits over the Activity keys, the Text Display Area and the Core
vocabulary area. To attach the keyguard, bend in the top left and right
edges so that the top edge of the keyguard is slightly bowed. Slip the
small tab on the side of the keyguard into its corresponding hole on the
case. .
GETTING ACQUAINTED WITH THE SPRINGBOARD
SpringBoard Manual
19
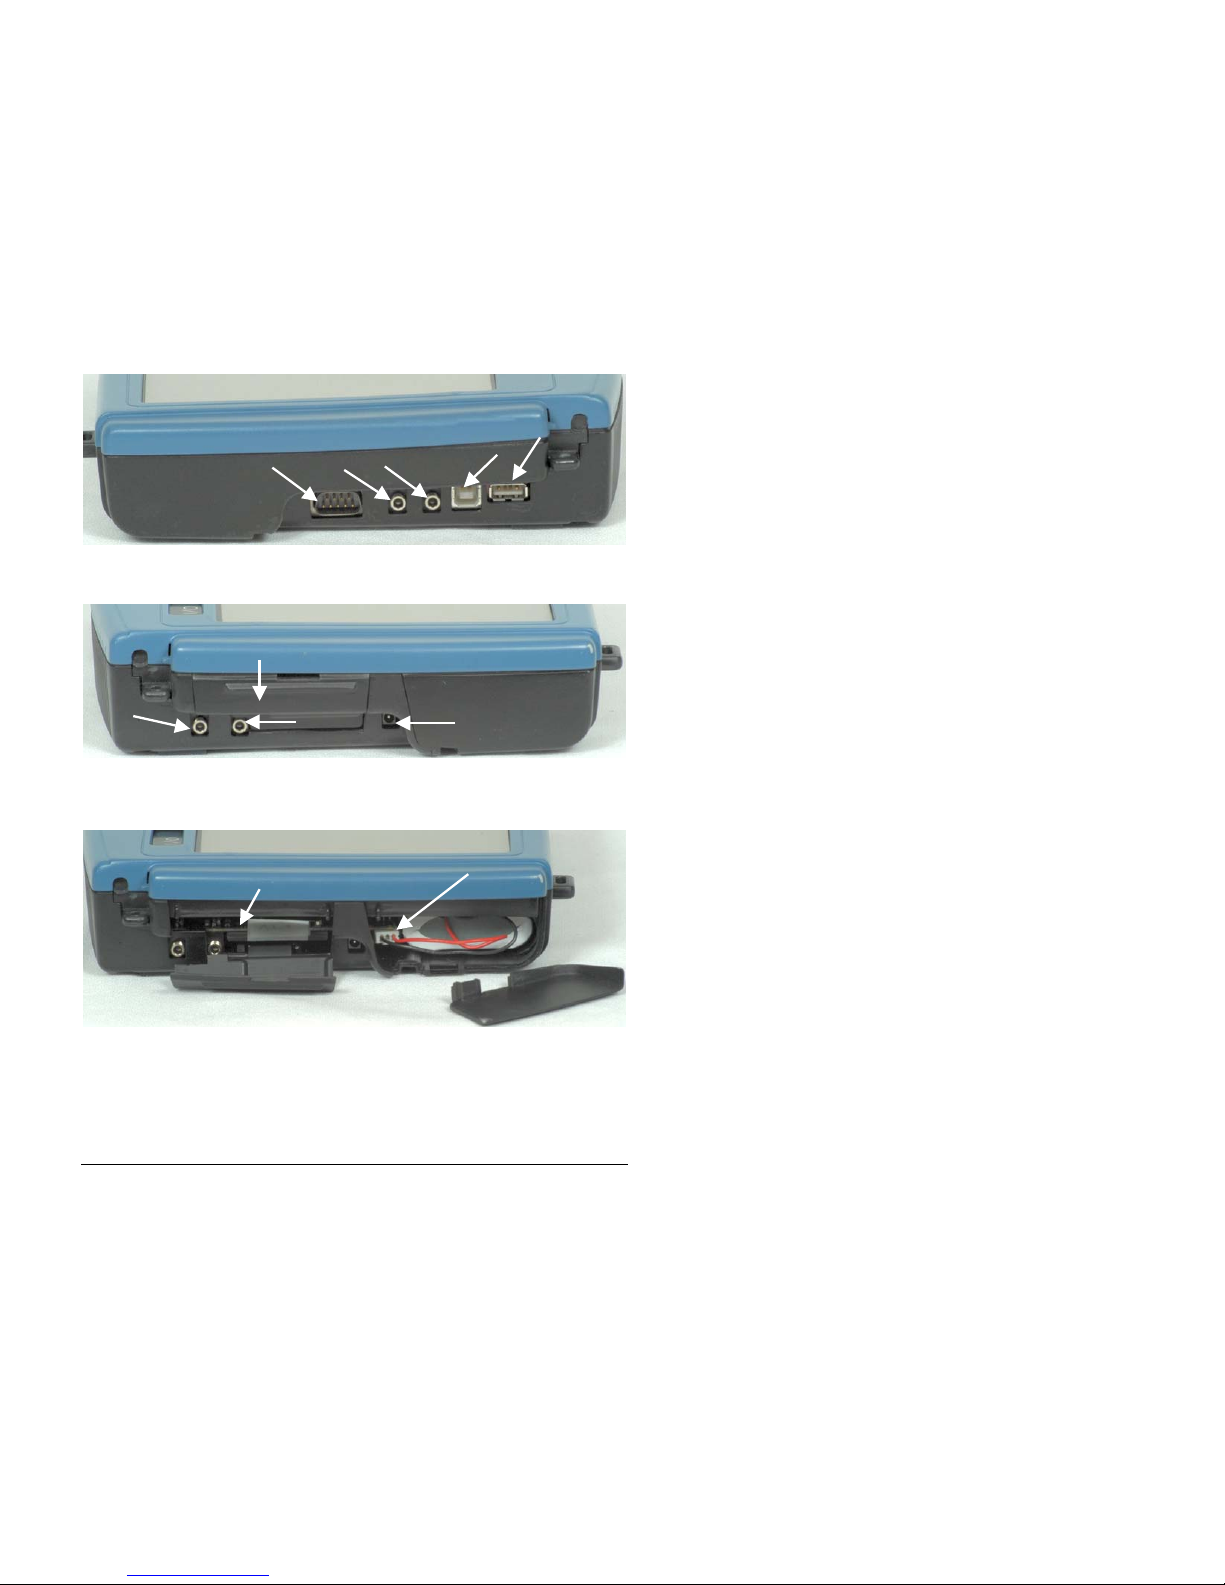
USB Port
USB Port
Serial
Switch A
Right Side of the SpringBoard
Memory Door
External
Microphone
Battery
Charger
Headphone/
Left Side of the SpringBoard
Battery
Card Slots
Left Side (open)
Connectors on the Sides of the SpringBoard
GETTING ACQUAINTED WITH THE SPRINGBOARD
SpringBoard Manual
20

GETTING ACQUAINTED WITH THE SPRINGBOARD
SpringBoard Manual
21
About the SpringBoard's Side Panels
Left Side Panel
BATTERY DOOR: This is on the corner near the bottom of the case. The
door catch is on the bottom of the case. To open the door, place the
device face down on a flat surface. Insert a small flat-head screwdriver
under the slot between the door and the catch and press down on the
catch. The door will pop open. When replacing the door, put the door in
first, then latch it in place.
BATTERY CHARGER: when you charge the batteries, plug one end of
the battery charger in here. Plug the other end into a working wall outlet.
MEMORY CARD DOOR: underneath this door is the card that contains
the system software for your device. To open the door, press down with
your thumb or a finger and pull out on the edge (or lip) at the top of the
door. To close the door, push in on the bottom part of the door. The
system card is in the bottom slot. The center slot will take a Secure
Digital card. The top slot will take PCMCIA card.
EXTERNAL MICROPHONE: Plug an external microphone in here.
HEADPHONE/LINE OUT Plug stereo headphones or stereo speakers in
here.
Right Side Panel
SERIAL PORT: Use this connector to connect to a computer
SWITCH A and SWITCH B: Plug a single or dual switch into either of
these jacks.
USB (2 ports): use the rectangular USB port for an external
headpointer, mouse, joystick or keyboard and for memory transfers with
USB flash drives or similar devices. The square USB port is for
computer emulation with a USB cable.
HEADPHONE/EXTERNAL SPEAKER: plug stereo headphones or
amplified stereo speakers into this connector.

STRAP HOLDERS
GETTING ACQUAINTED WITH THE SPRINGBOARD
SpringBoard Manual
22
IR LEARNING AND TRANSMITTING
WINDOW
MOUNTING
PLATE
TABLE STAND
Back/Bottom of SpringBoard

GETTING ACQUAINTED WITH THE SPRINGBOARD
SpringBoard Manual
23
About the Back and Bottom of the
SpringBoard
Summary:
Brief descriptions of what you will find on the back and the bottom
of the SpringBoard case.
On the top and bottom of the SpringBoard there are two strap holders.
Slip the small keyrings that are attached to your carry-strap clips into the
strap holders. Two more strap holders are on each side of the case near
the top.
There is a wheelchair mounting plate on the back of the SpringBoard.
This plate slips into the wheelchair mount to hold the SpringBoard
upright.
The Table Stand is also on the bottom of the case. To use it, pull it out
from the case and then set the SpringBoard on a flat surface.
The sending and receiving infrared window is on the top between the
speaker grilles. Use this window to teach remote control commands to
the SpringBoard and then to send the commands to your remote
controlled devices.
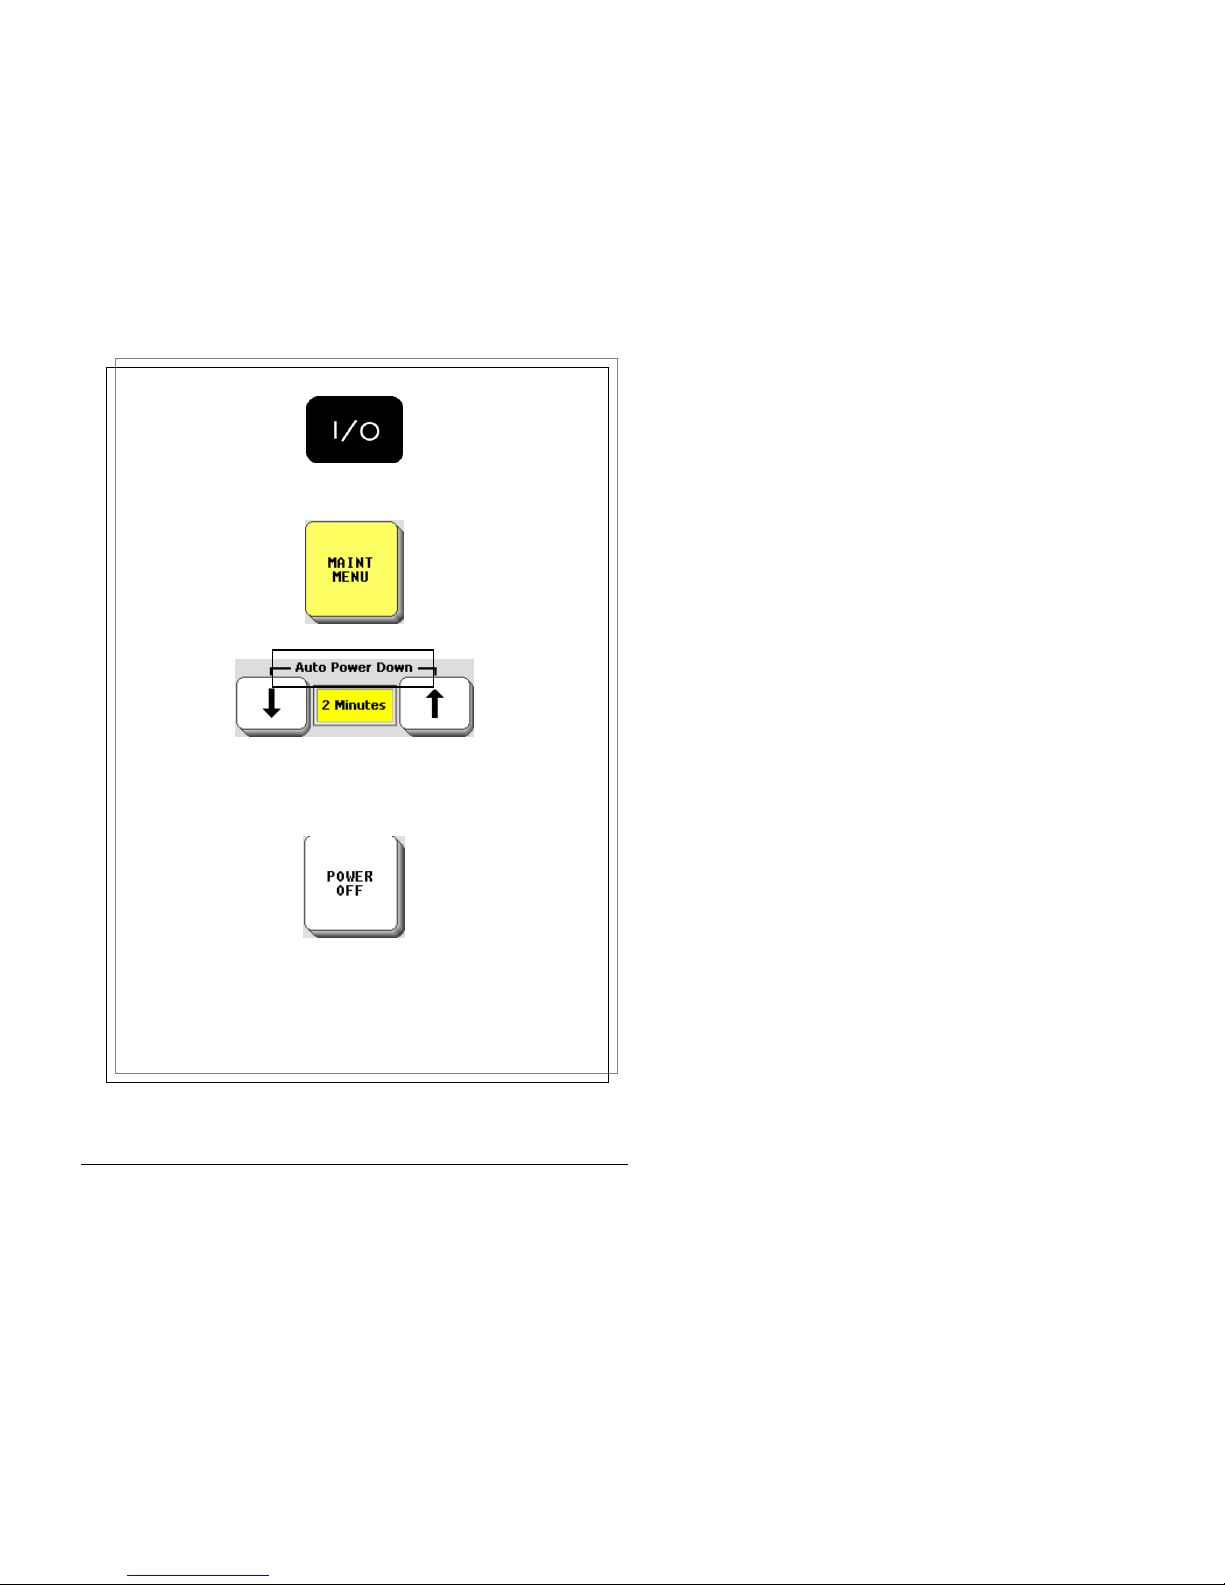
Turns the device ON and OFF
Default = 2 Minutes
Backlight automatically turns off after 2 minutes
if no activations are made. You can select 5 or 10 minutes.
Activate this key in the Toolbox or store it on your overlay.
Activate any key or switch to turn device back on.
Different Ways to Turn the SpringBoard Off
GETTING ACQUAINTED WITH THE SPRINGBOARD
SpringBoard Manual
24

About Auto Power Down, Power Off and the
I/O Button
Summary:
Use Auto Power Down, POWER OFF or the I/O button to turn the
SpringBoard Off. If you turn the device Off with the I/O button you
must turn it back On with this button.
Use the
I
/
O
(I/O) button to turn the SpringBoard On and Off. When
you turn the SpringBoard off with the I/O button, you have to turn it
back on using the I/O button.
If you forget, or are unable to press this button, the SpringBoard has an
"Auto Power Down" feature that automatically dims the backlight after
2 minutes if no activations have been made. (You can also select 5 or
10 minutes, but 2 minutes is the default). When you receive your
SpringBoard this feature is already set for you. To turn the SpringBoard
back on, just touch the display screen.
There is also a POWER OFF tool in the Toolbox. If you would like to
be able to turn the SpringBoard off yourself and can't press the I/O
button, you can move the POWER OFF tool to your communication
overlay. (See page 143-149 for information on how to move tools to
your overlay.)
When the SpringBoard turns off, it saves any storing and/or
programming that you have done up to that point. If you are doing a lot
of storing/programming —perhaps setting up an overlay—make sure the
SpringBoard turns Off periodically so that your work is saved!
GETTING ACQUAINTED WITH THE SPRINGBOARD
SpringBoard Manual
25
Auto Power Down
When Auto Power Down is on
and there are no key activations:
Select 2 minutes, 5 minutes or 10 minutes
before the backlight dims.
Activate any key or switch to bring it back.
After TEN MINUTES of dimmed backlight: the screen goes dark.
Activate any key or switch to bring it back.
After TWO HOURS: the device shuts down.
Activate any key or switch to bring it back.
This time it will take a few minutes to come back on.
How Auto Power Down Works
GETTING ACQUAINTED WITH THE SPRINGBOARD
SpringBoard Manual
26

GETTING ACQUAINTED WITH THE SPRINGBOARD
SpringBoard Manual
27
Auto Power Down
Summary:
Auto Power Down 2 minutes is the default setting. If two minutes
pass and you make no key activations, the backlight dims.
Activate a key or switch to bring it back. Auto Power Down is in
the MAINTENANCE MENU.
When you don't make any key activations for certain periods of time, the
SpringBoard is programmed to power down in stages. This helps to
conserve its batteries.
After two minutes, five minutes or ten minutes with no key
activations, the backlighting goes dim. Activate any key to turn it back
to bright.
Ten minutes after the backlighting goes dim, if you still have not made
any key activations, the backlighting turns off and the screen goes dark.
Activate any key to restore the backlighting and the screen.
After two hours of no key activations, the unit shuts down completely.
As usual, you can activate any key to turn the unit on. However, this
time the SpringBoard turns on as if you had pressed the I/O button on
the top of the case, so it takes a little longer to come on.
If you change Auto Power Down to Off, the SpringBoard will never turn
Off unless you press the I/O button on the top of the case or activate the
POWER OFF key in the Toolbox. If you forget that you turned Auto
Power Down to Off and the device never goes Off, the batteries will
eventually go dead. We recommend that you leave Auto Power
Down set to On.
Note: If you are using a headpointer and the SpringBoard turns Off,
you can activate a switch to turn it back on. The switch must be plugged
into the SpringBoard.
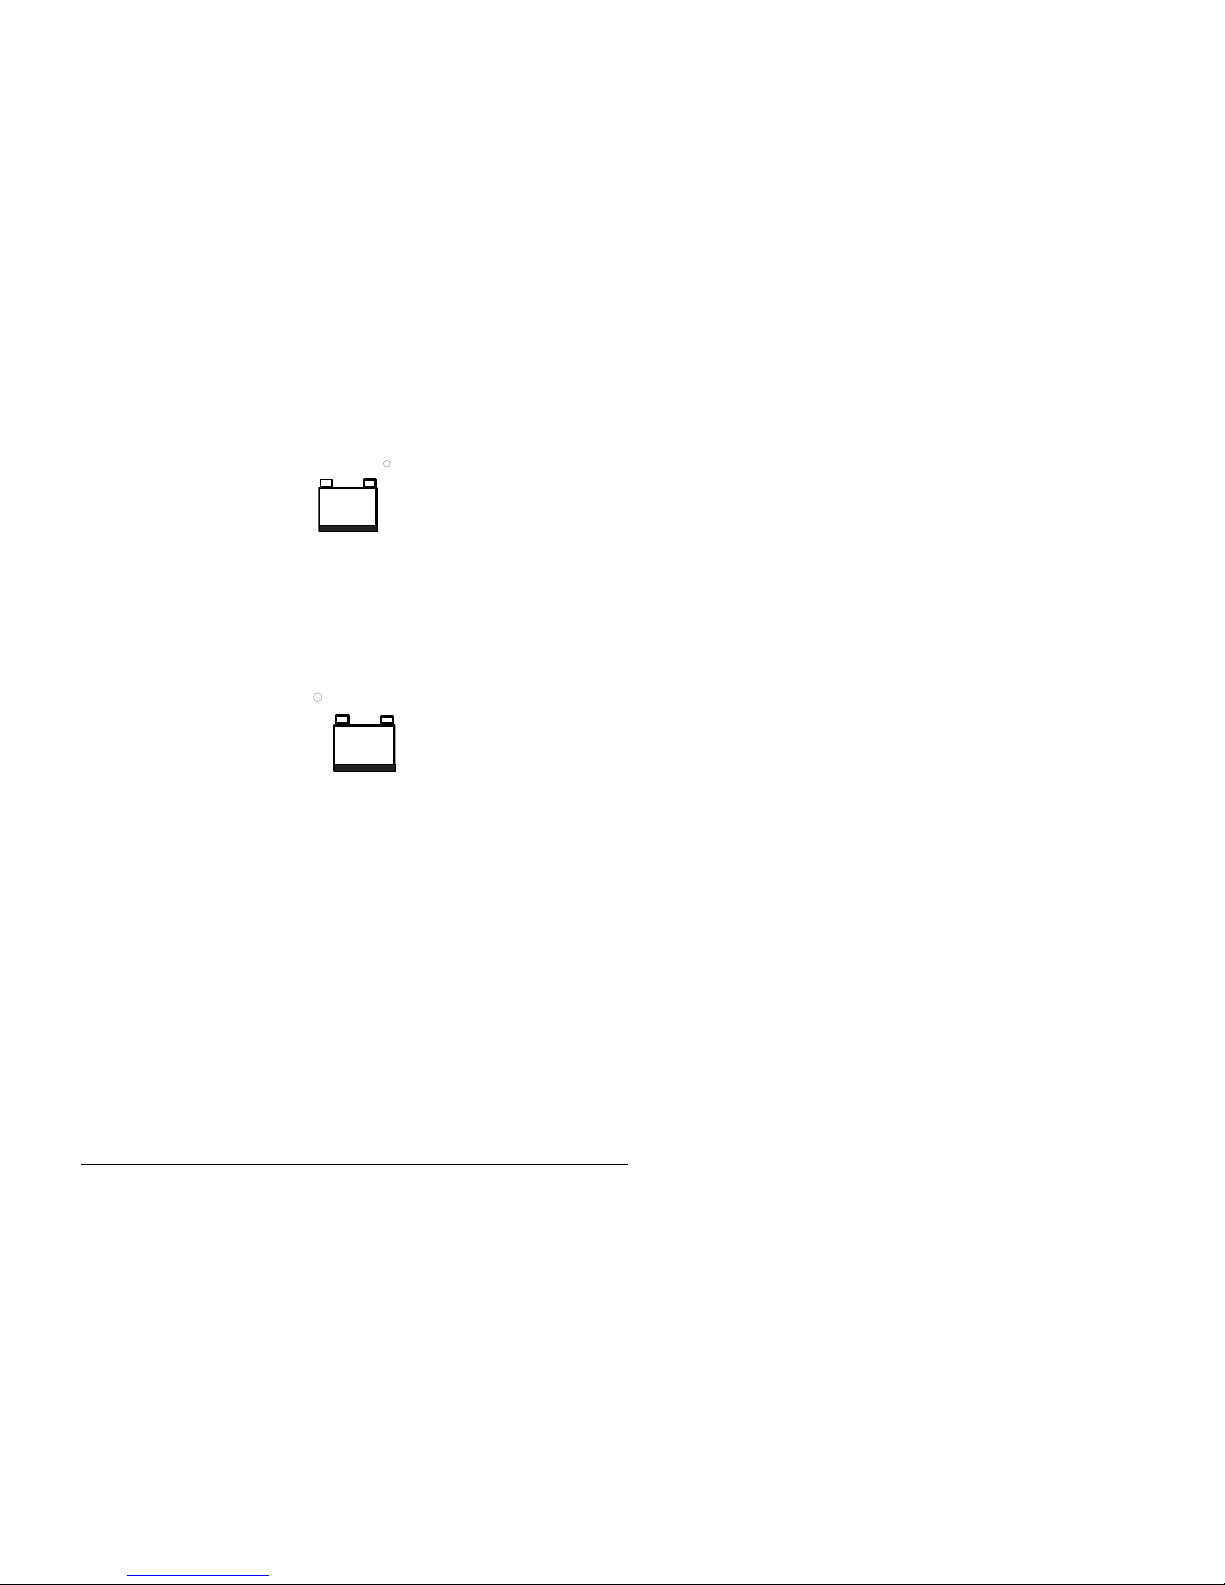
Keep your Battery Charger Handy!
The batteries are LOW when the LED next to this icon is lit
(on the front of the case).
Plug in the battery charger.
V
When the charger is plugged in:
Fast Flashing Red LED = the device is fast-charging.
Slow Flashing Red LED = the device is trickle-charging.
Trickle-Charging = batteries are fully charged but the
charger can remain plugged in.
About the Batteries
GETTING ACQUAINTED WITH THE SPRINGBOARD
SpringBoard Manual
28
About the SpringBoard's Batteries
Warning! Always use the battery charger that came with the
SpringBoard. Any other charger may damage your batteries.
Check your battery status in the Toolbox
The key at Row 5, Column 2 has icons on it for Battery Status, Speaker
Volume and Earphone Volume. The Battery Status bar graph gives you
the following information:
Full Battery: mostly green lines, a few red, a few yellow
Plug in Charger: no green lines at all
Nearly Dead: red lines only (plug in charger now)
Charger Plugged in: mostly blue lines
Low Battery Warning
When the batteries in your device get low, you hear a Low Battery
Warning. This is a two-toned running beep. The Low Battery LED on
the front of the case also turns on.
When the Low Battery warning sounds, you can no longer do
any storing. The warning will continue to sound at intervals until the
batteries are dead. When the batteries are dead, the device powers down
completely and you cannot use it. When you hear the Low Battery
warning, plug in the battery charger.
If you use your device during charging, it will take 8-12 hours to fully
charge a dead battery.
When the device is not in use during charging, it will take 6-10 hours
to fully charge a dead battery. A fully charged battery should last for 68 hours of normal use.
If you plan to store the SpringBoard for a month or more without
using it, unplug the batteries from the device. See the Troubleshooting
chapter for complete information.
GETTING ACQUAINTED WITH THE SPRINGBOARD
SpringBoard Manual
29
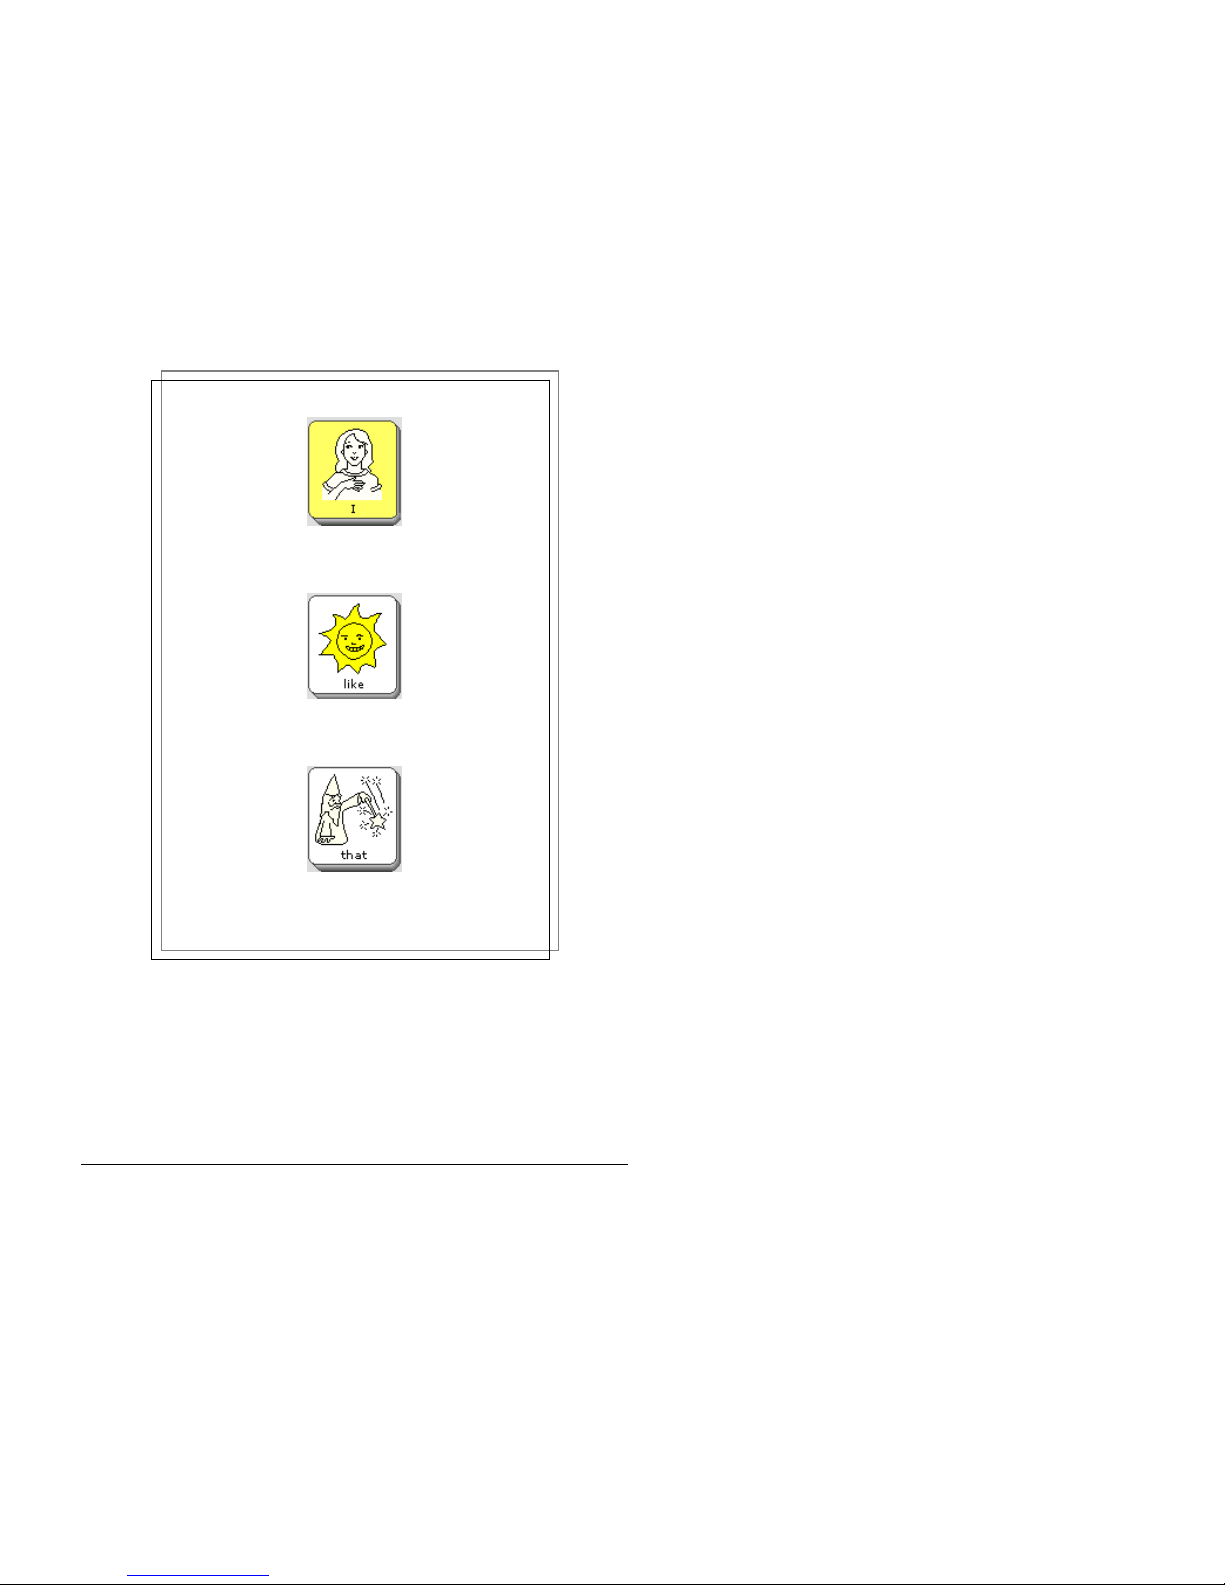
I
like
that
Minspeak® Icon Sequences
32-Location Overlay Unity
®
GETTING ACQUAINTED WITH THE SPRINGBOARD
SpringBoard Manual
30
 Loading...