

Page 1

Page 2

System Manual
Page 3

ii PREMIO System Manual
Copyright
PREMIO is a registered trademark of Premio Computer, Inc. All
other brands and product names are trademarks or registered
trademarks of their respective companies.
© 1997 by Premio Computer, Inc. All rights reserved.
Printed in Taiwan.
Version 2.0, September, 1997.
Disclaimers
PREMIO makes no representation or warranties, either expressed
or implied, with respect to the contents of this publication and
specifically disclaims the implied warranties of merchantability
or fitness for a particular purpose.
technical or editorial errors or omissions in this publication, or
for incidental or consequential damages resulting from the
furnishing, performance, or use of this publication. We reserve
the right to revise this publication and to make changes from
time to time in its contents without notification.
PREMIO shall not be liable for
Page 4

iii
Contents
GETTING STARTED ..................................................................1
Setting Up........................................................................2
Switches and Indicators.................................................3
UPGRADING ..............................................................................5
Opening the System Unit...............................................6
Installing an Expansion Card ........................................7
Installing Memory ...........................................................8
Installing a SIMM.................................................................8
Removing a SIMM................................................................9
Installing a DIMM ................................................................9
Removing a DIMM.............................................................10
Installing a Hard Drive ..................................................11
GETTING HELP........................................................................12
Troubleshooting ...........................................................12
Monitor Does Not Work.....................................................12
Keyboard Does Not Work...................................................13
Mouse Does Not Work........................................................13
System Unit Problems.........................................................14
Hard Disk Problems............................................................14
Page 5

iv PREMIO System Manual
Warranty Service.......................................................... 15
Technical Support........................................................ 15
PREMIO on the Internet............................................... 15
APPENDIX................................................................................16
Limited 3-Year Warranty.............................................. 16
FCC Standards............................................................. 18
Important Safety Instructions..................................... 19
Page 6
Getting Started
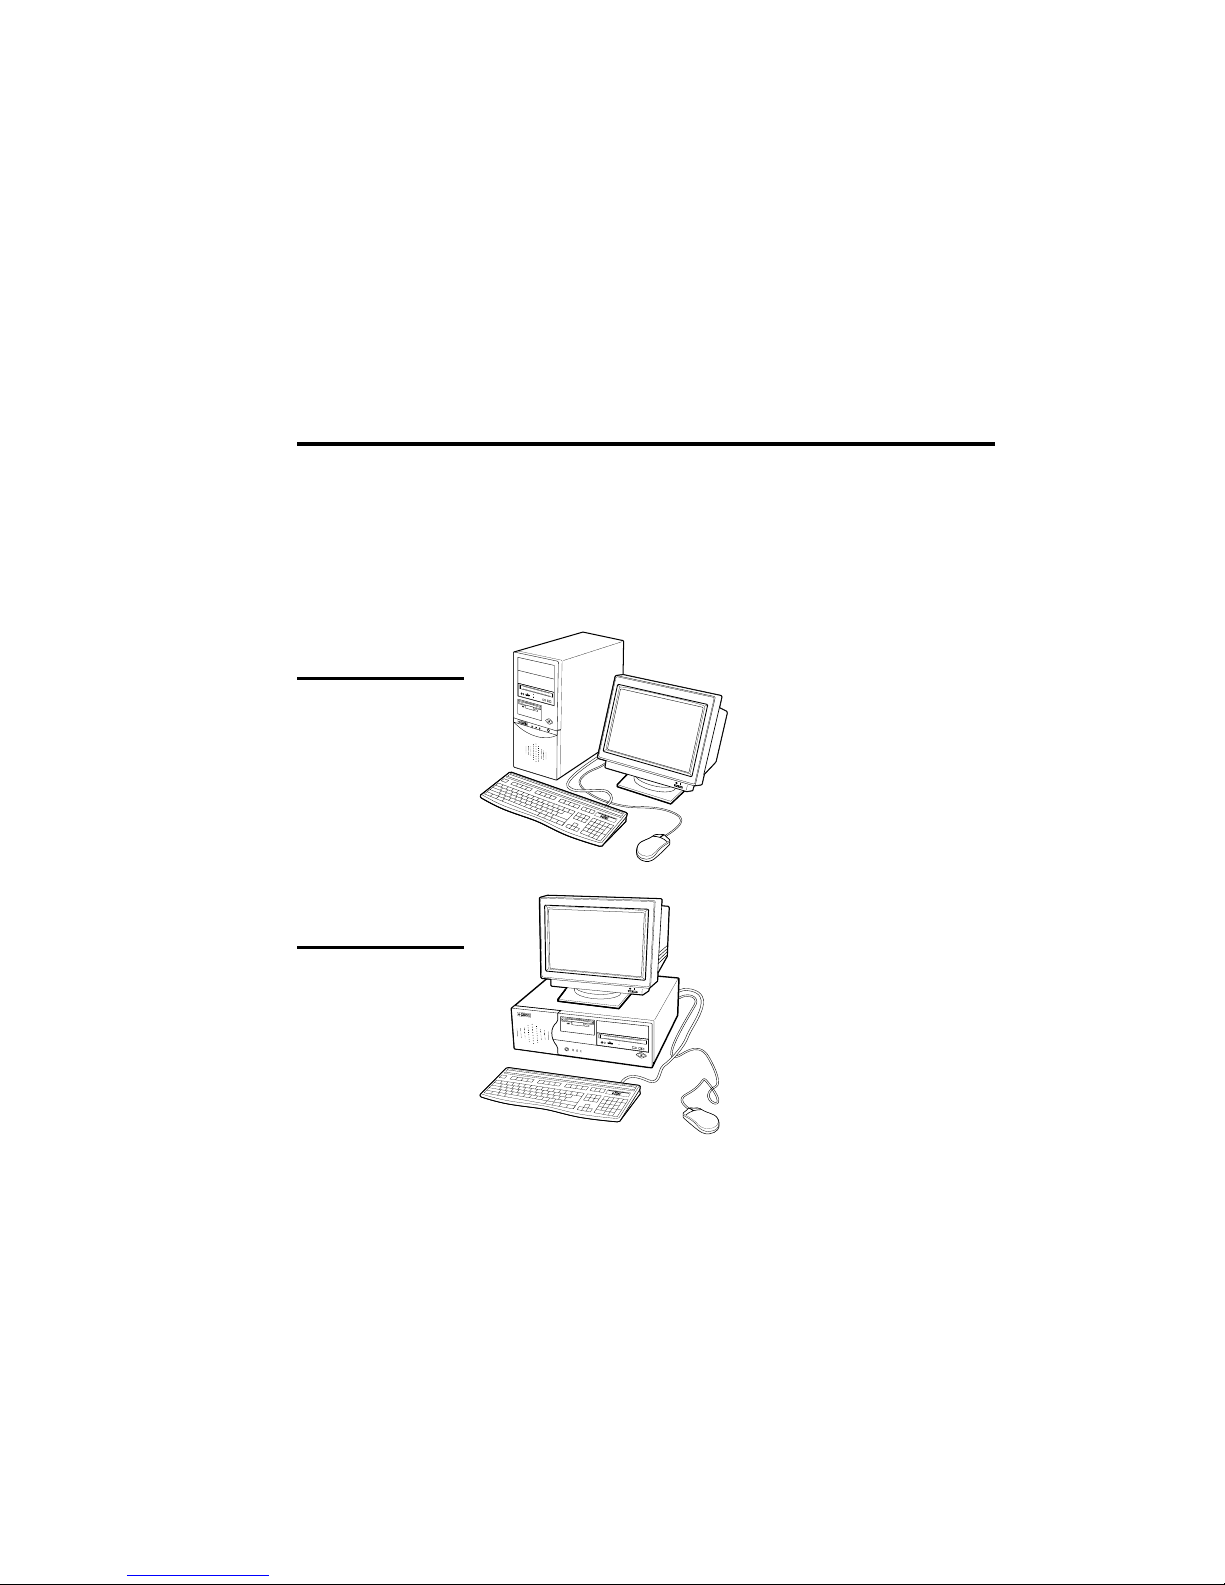
Your PREMIO® system consists of three components:
a mid-tower or desktop system unit
a keyboard
a mouse
Add your choice of monitor, and your system is ready to use.
System Unit
Mid-tower system
Mouse Keyboard
Desktop system
Keyboard
System Unit
Mouse
Page 7
2 PREMIO System Manual
Setting Up
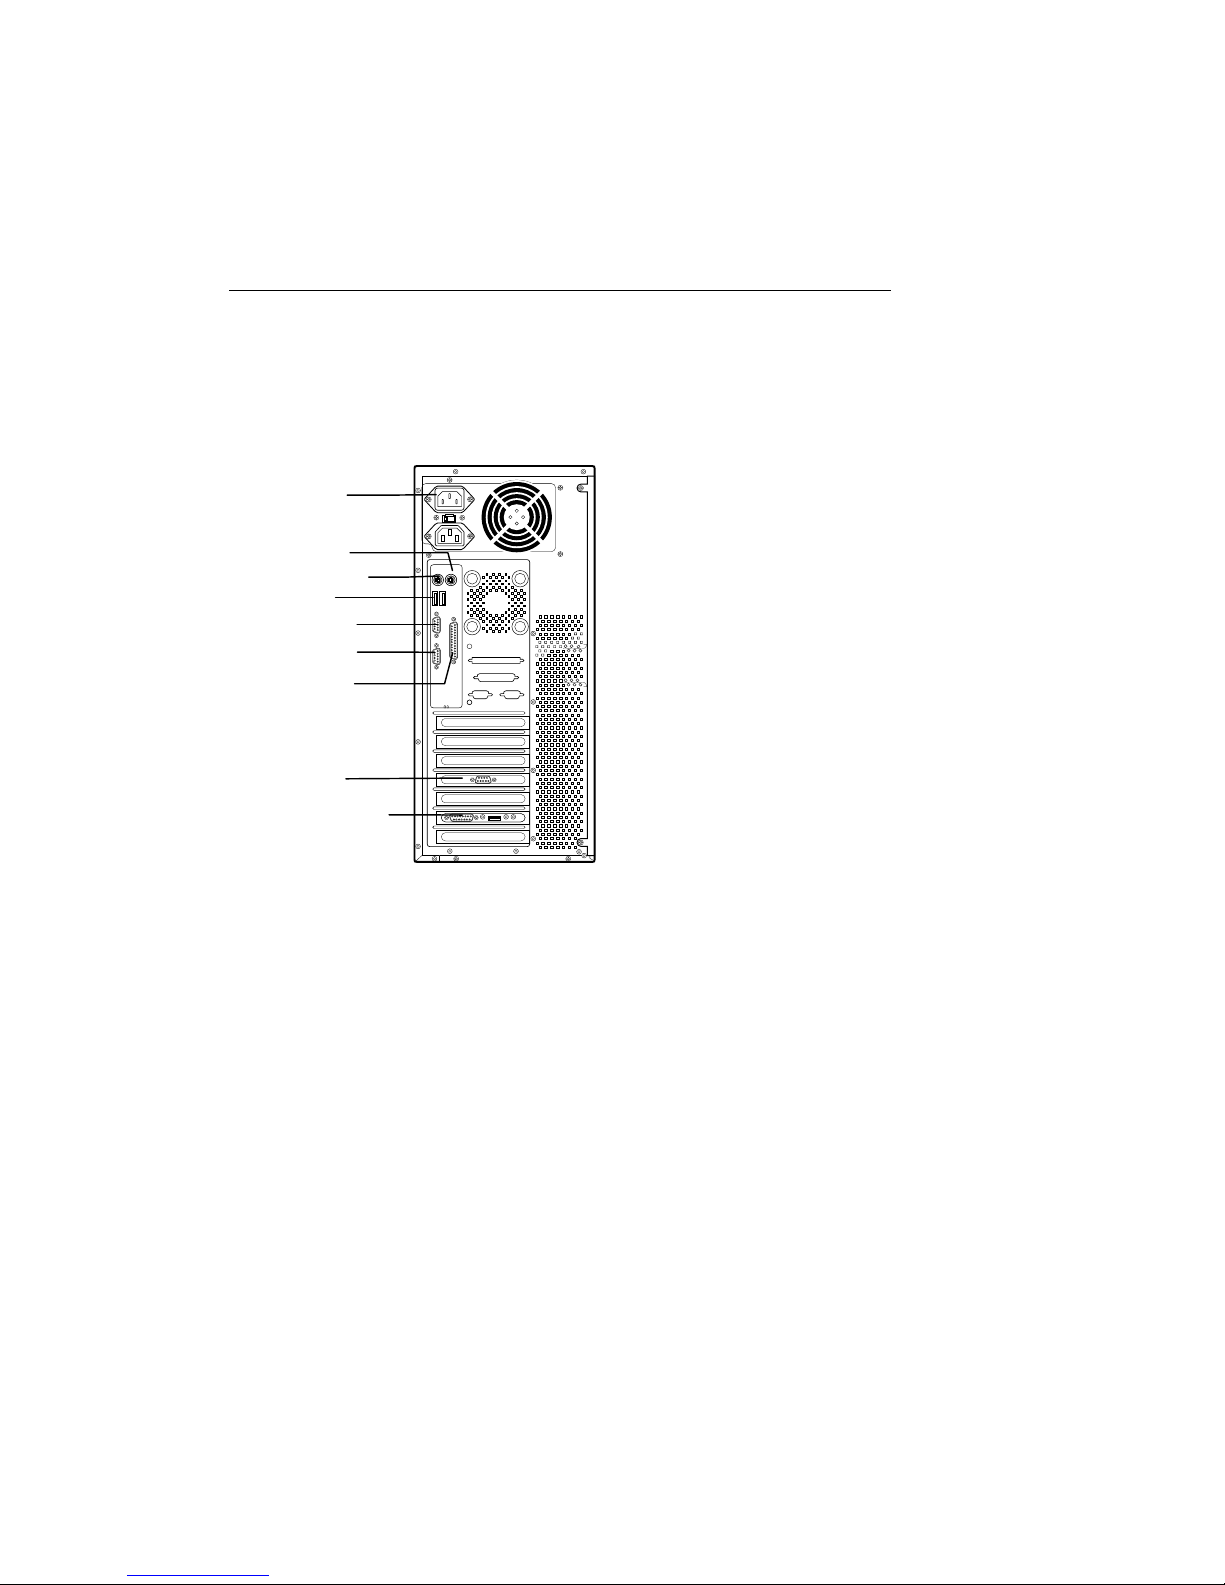
To set up your PREMIO system, simply connect your monitor,
the mouse, the keyboard, and any additional components you
want to use to the system unit.
Follow these easy steps:
Power Connector
Mouse Connector
Keyboard Connector
USB Connector
Serial-1 Connector
Serial-2 Connector
Parallel Connector
Video Connector
Sound Card Connectors
6 Plug your monitor’s power cord into a power outlet.
7 Attach the female end of the system power cord to the
PREMIO system is now ready to use. To start the system,
Your
turn on your monitor’s power switch and then press the system
power switch as shown on the next page.
1 Attach your monitor’s video cable
to the video connector.
2 Attach the mouse cable to the
mouse connector.
3 Attach the keyboard cable to the
keyboard connector.
4 Attach the cables for any
additional components, such as a
printer, scanner, or modem, to the
parallel, serial, or universal serial
bus (USB) connector, as directed
in the component’s manual.
5 If your system is equipped for
multimedia, attach your speakers
and microphone to the sound card
connectors.
system unit’s power connector, and then plug the other
end of the cord into a power outlet.
Page 8
Switches and Indicators 3
Switches and Indicators
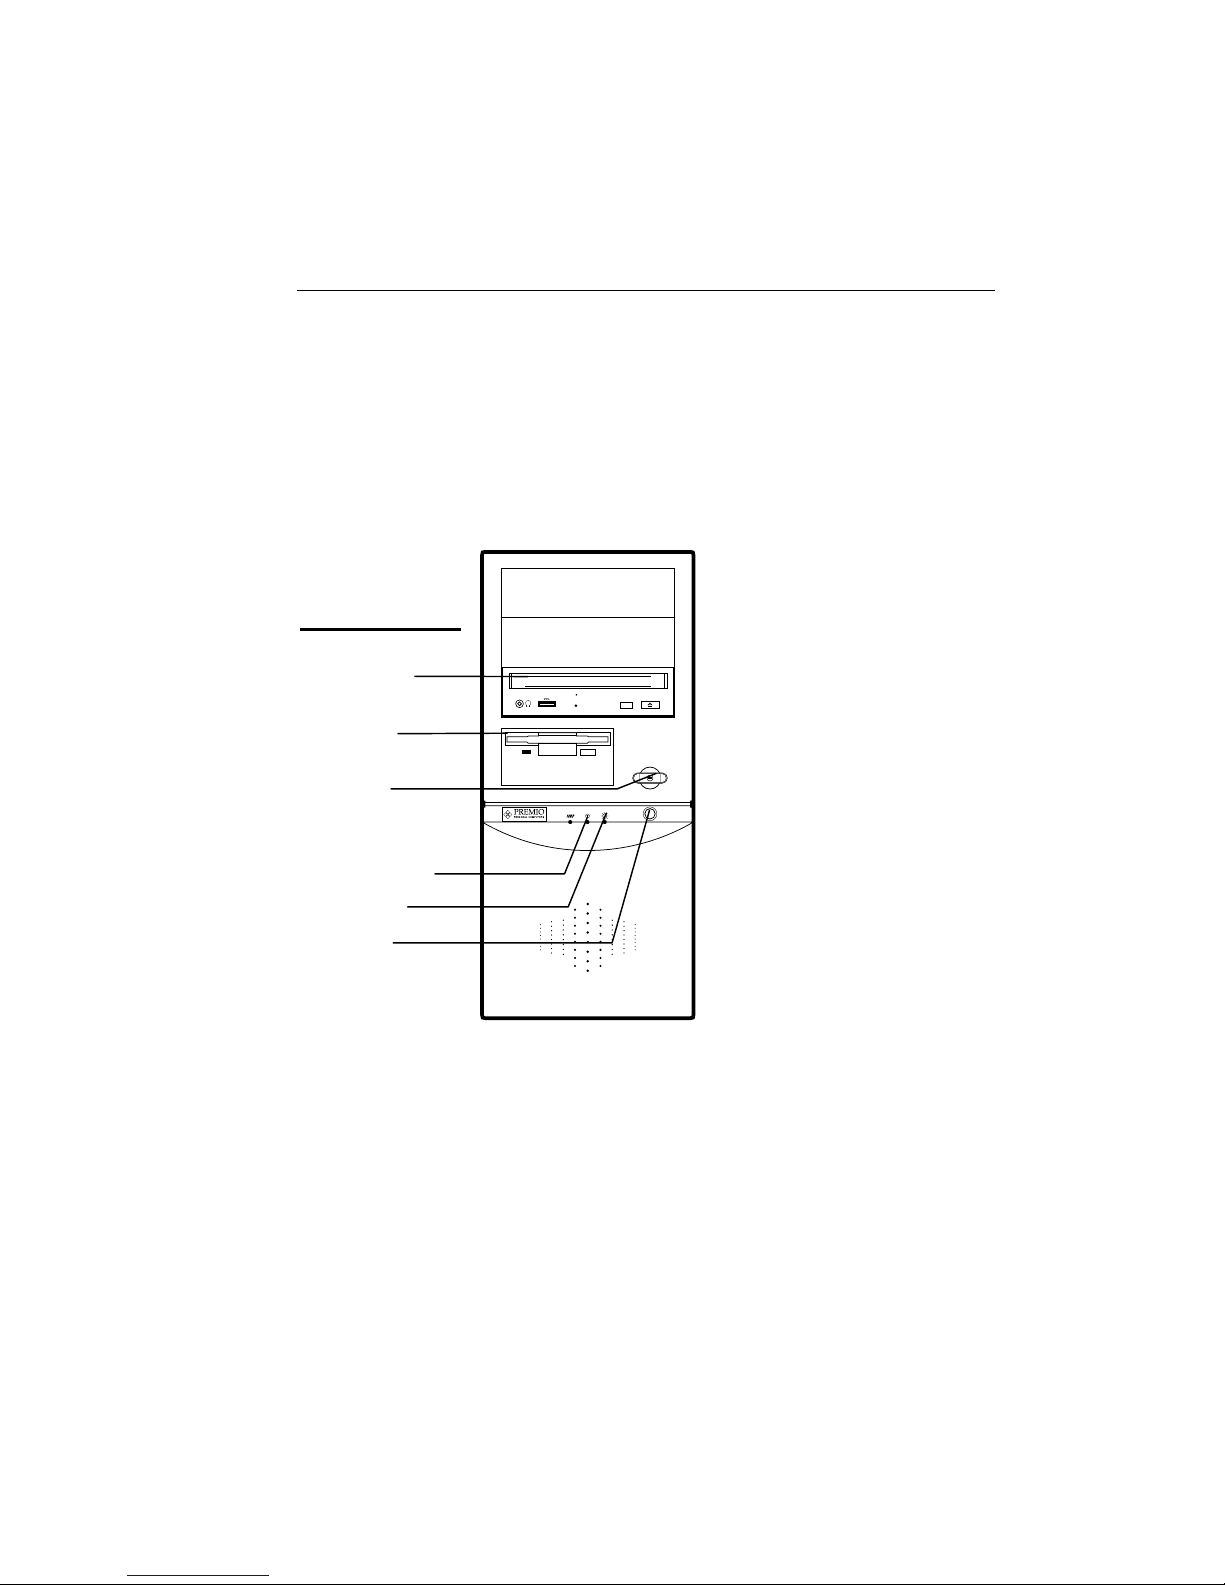
The system unit’s front panel provides access to the CD-ROM
and floppy drives, and to the system’s switches and indicator
lights.
The illustration below shows a mid-towe r system. If you have a
desktop system, turn to the illustration on the next page.
The CD-ROM drive reads
information on CDs.
Mid-tower system
CD ROM Drive
Floppy Drive
Power Switch
Hard Drive Indicator
Power Indicator
Reset Button
The floppy drive reads and
writes information on
diskettes.
The power switch turns the
system on and off.
The hard drive indicator
lights when the hard drive is in
use.
The power indicator lights
when the system is on.
The reset button restarts the
system.
Page 9
4 PREMIO System Manual
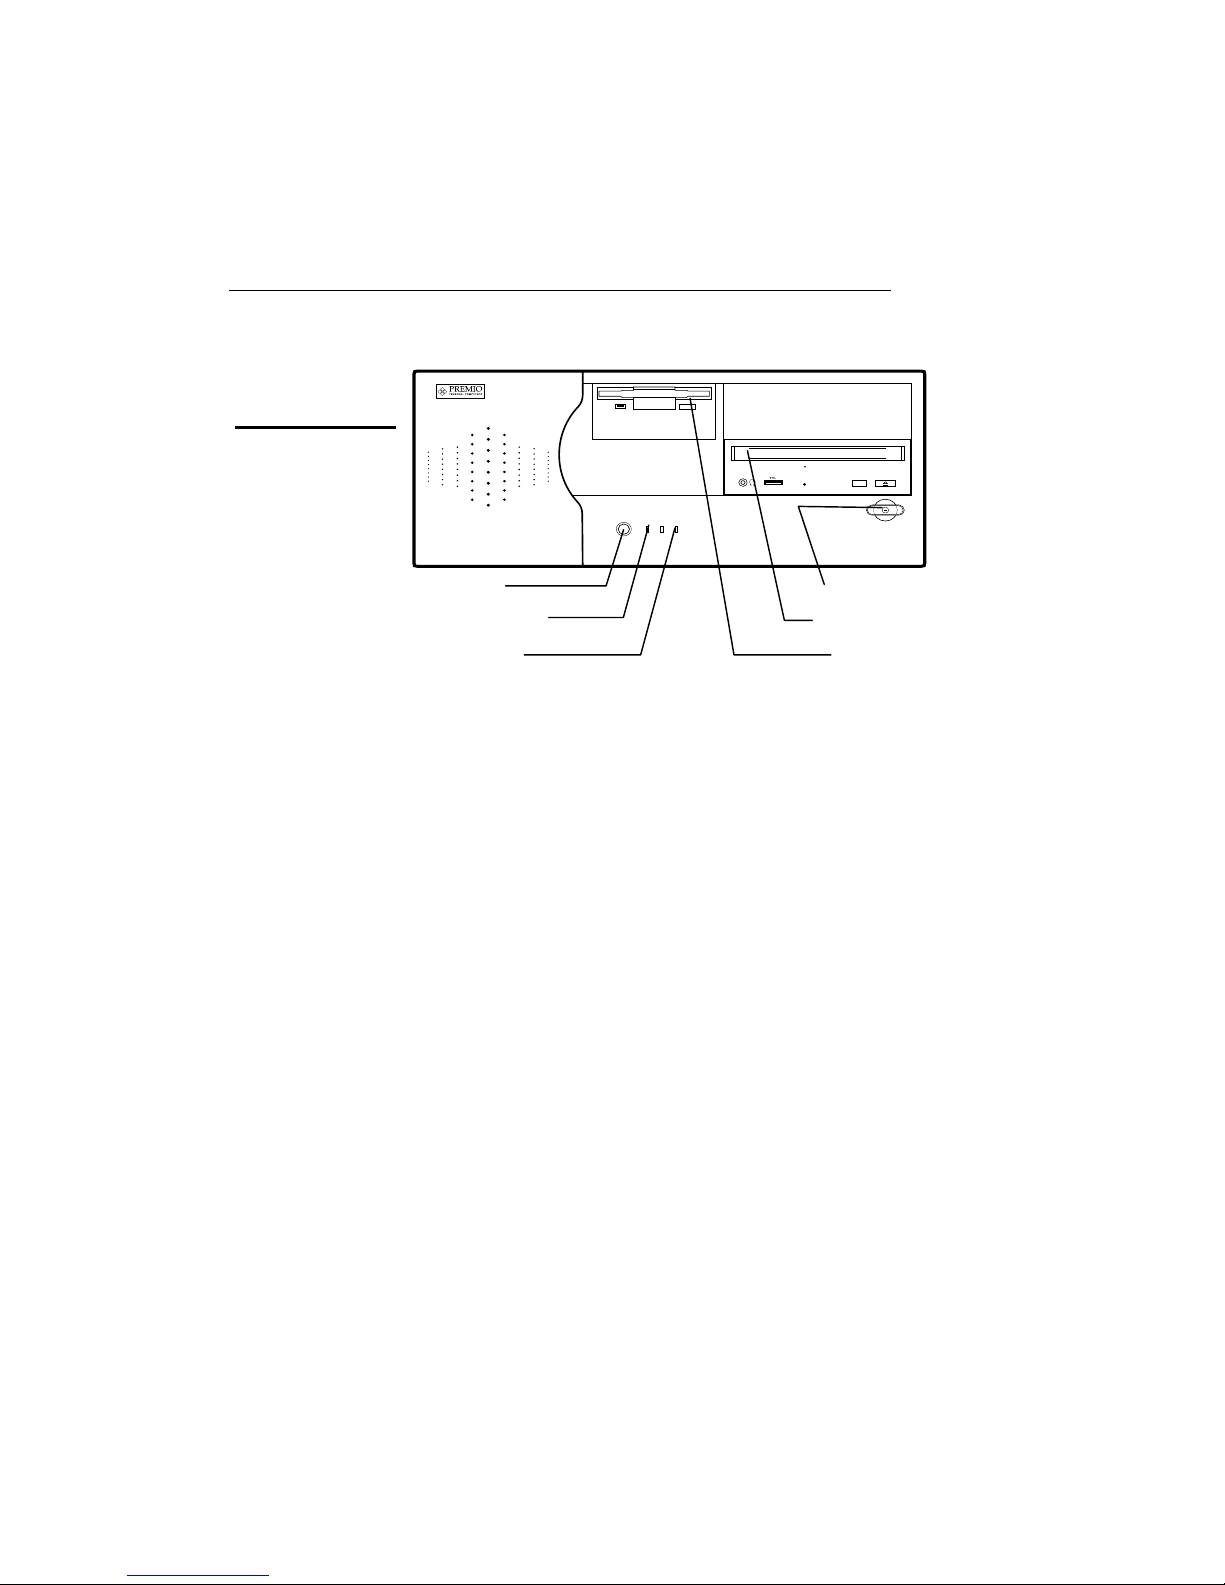
Desktop system
Reset Button
Hard Drive Indicator
Power Indicator
Power Switch
CD ROM Drive
Floppy Drive
The reset button restarts the system.
The hard drive indicator lights when the hard drive is in
use.
The power indicator lights when the system is on.
The power switch turns the system on and off.
The CD-ROM drive reads information on CDs.
The floppy drive reads and writes information on
diskettes.
Page 10

Upgrading
You can upgrade your PREMIO system with:
Expansion cards
More memo ry
An additional hard drive
To install an upgrade, you must open the system unit. Before
proceeding, read the important cautionary note below. Then
follow the steps on the next page.
Caution! Static discharge can cause permanent damage to
internal electronic components of your computer. Always use
the following precautions when working inside the system unit:
Wear a grounding wrist strap (available at most
electronics stores) when handling electronic components.
Do not remove a component from its antistatic packaging
until you are ready to install it.
Keep one hand in contact with the metal system case.
Page 11
6 PREMIO System Manual
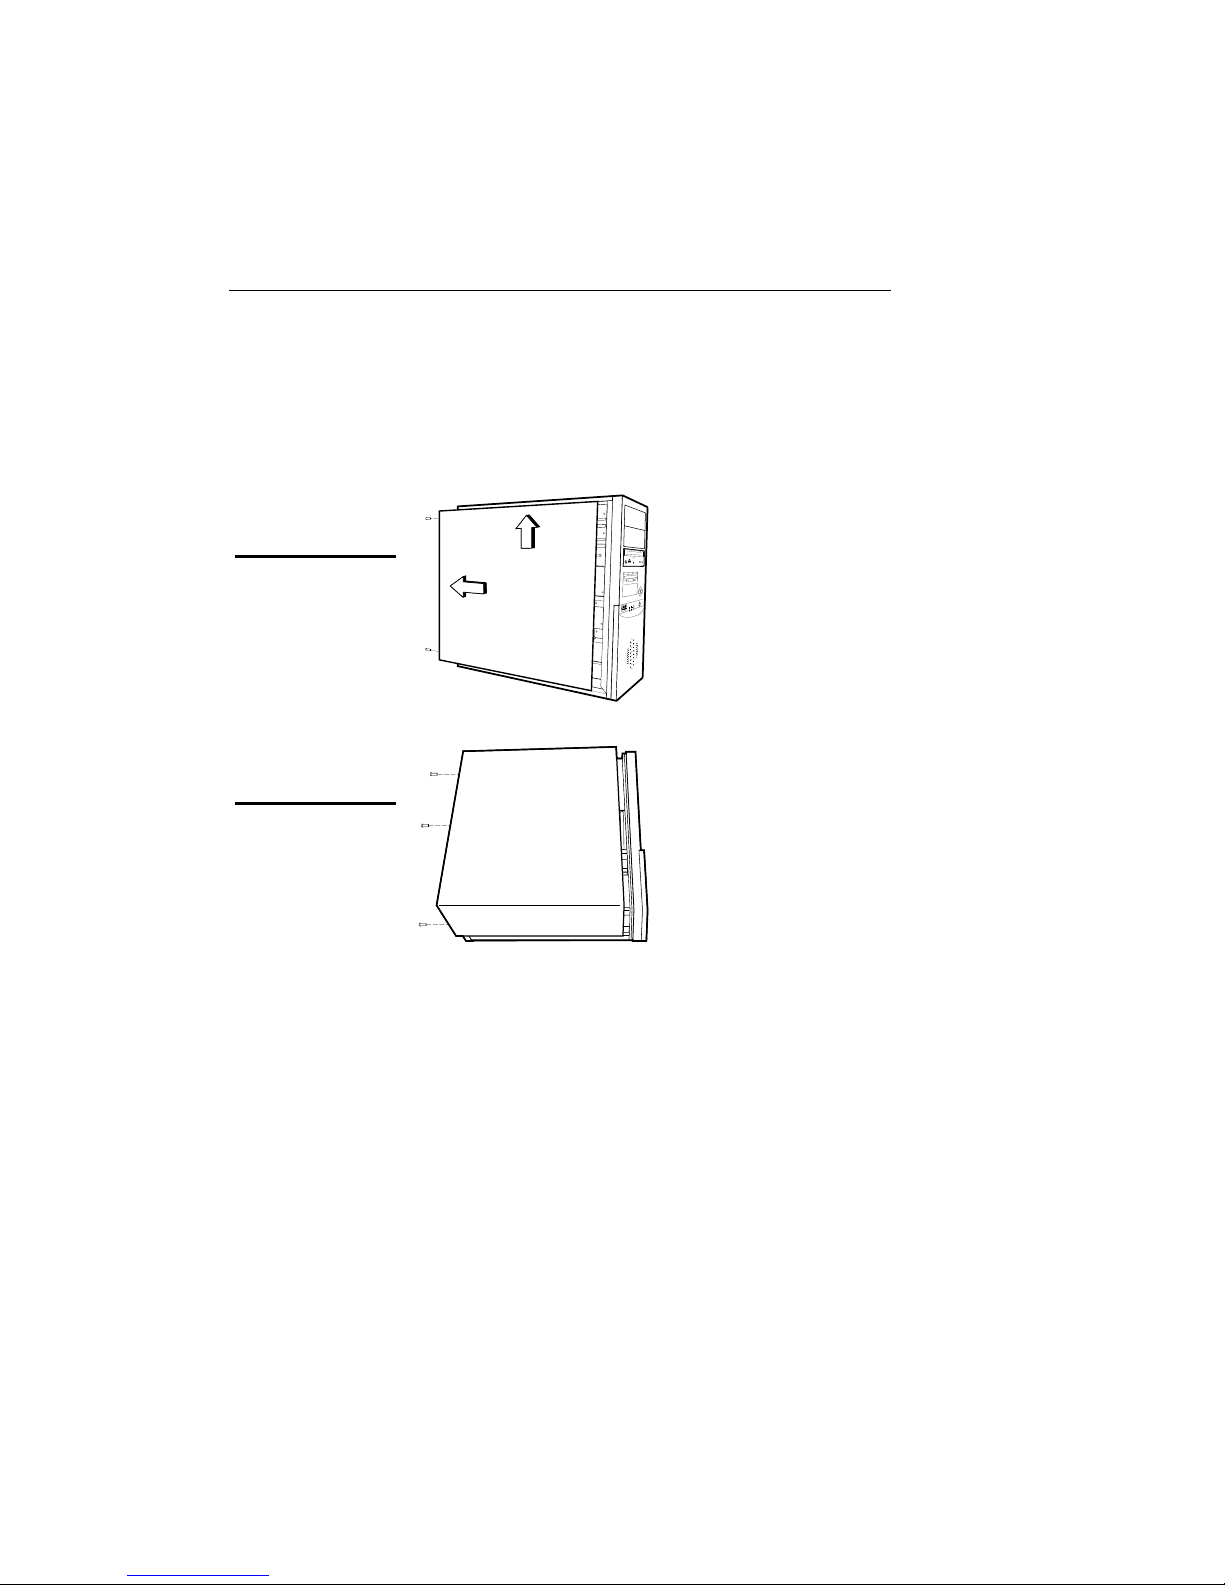
Opening the System Unit
Note Opening the system unit could affect your warranty.
Check with the dealer where you purchased your system before
opening the system unit.
To open the system unit, follow these steps
Mid-tower system
Desktop system
1 Turn off the system and
unplug the power cord.
2 Remove the screws securing
the side panel (mid-tower)
or case (desktop) at the rear
of the system unit.
3 Slide the side panel or case
up and to the rear, and
remove it.
Page 12
Installing an Expansion Card 7
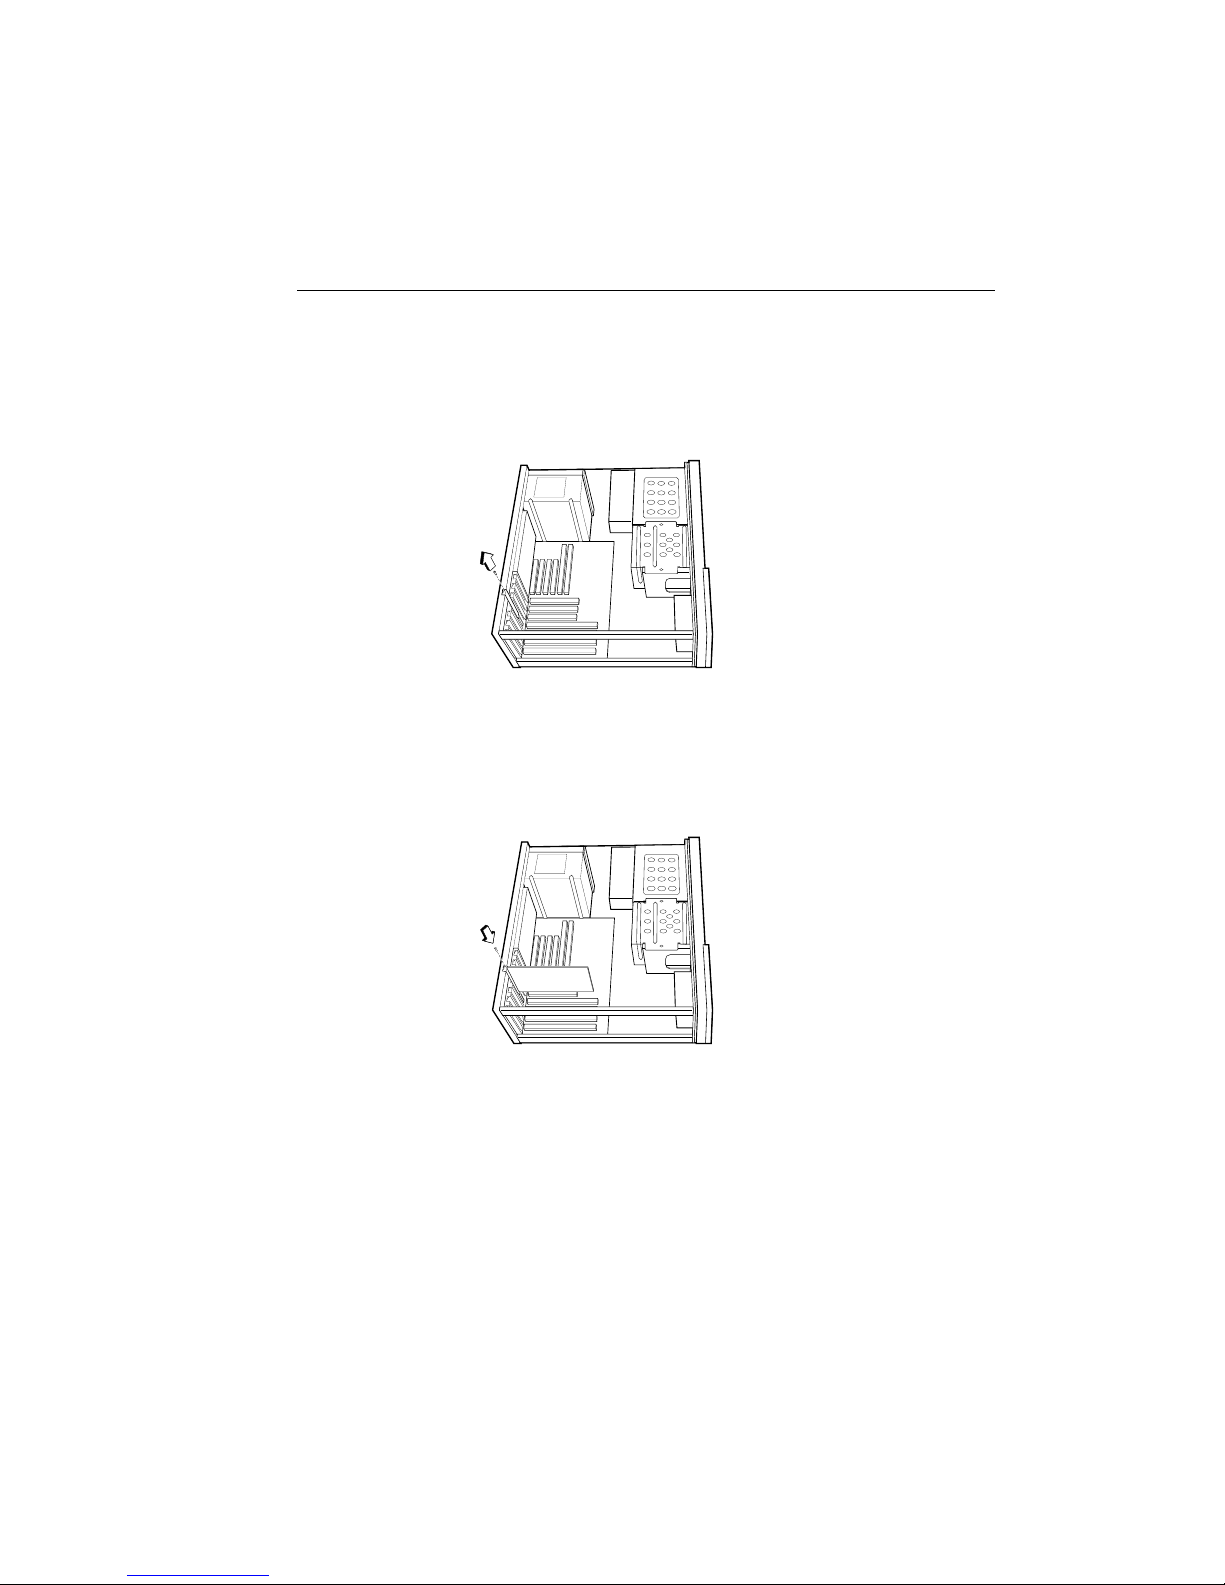
Installing an Expansion Card
To install an expansion card, open the system unit as described
on the
previous
page.
Then
follow
these
steps:
1 Remove the screw securing
the slot bracket cover for the
expansion slot you want to
use. Save the screw to secure the expansion card.
2 Insert the expansion card
firmly into the slot, making
sure it is seated completely.
3 Secure the card with the
saved screw.
Page 13

8 PREMIO System Manual
Installing Memory
Note For details on memory configuration, including the
placement and type of memory to use in your system, refer to
the motherboard user’s manual that came with your system.
Follow these general guidelines when adding memory:
Use only the same type of memory throughout. For
example, do not mix EDO and fast page memory.
SIMMs must be installed in pairs, and both SIMMs in the
pair must be the same size and speed. For example, do
not install one 16-MB and one 8-MB SIMM.
Installing a SIMM
To install a SIMM, follow these steps:
1 Insert the SIMM into the socket at a
45° angle. (SIMMs can be installed
only one way.)
2 Gently press the SIMM up into a
vertical position until it snaps into
place. The SIMM’s clips will hold it
firmly at a 90° angle when it is
properly installed.
Page 14
Installing Memory 9
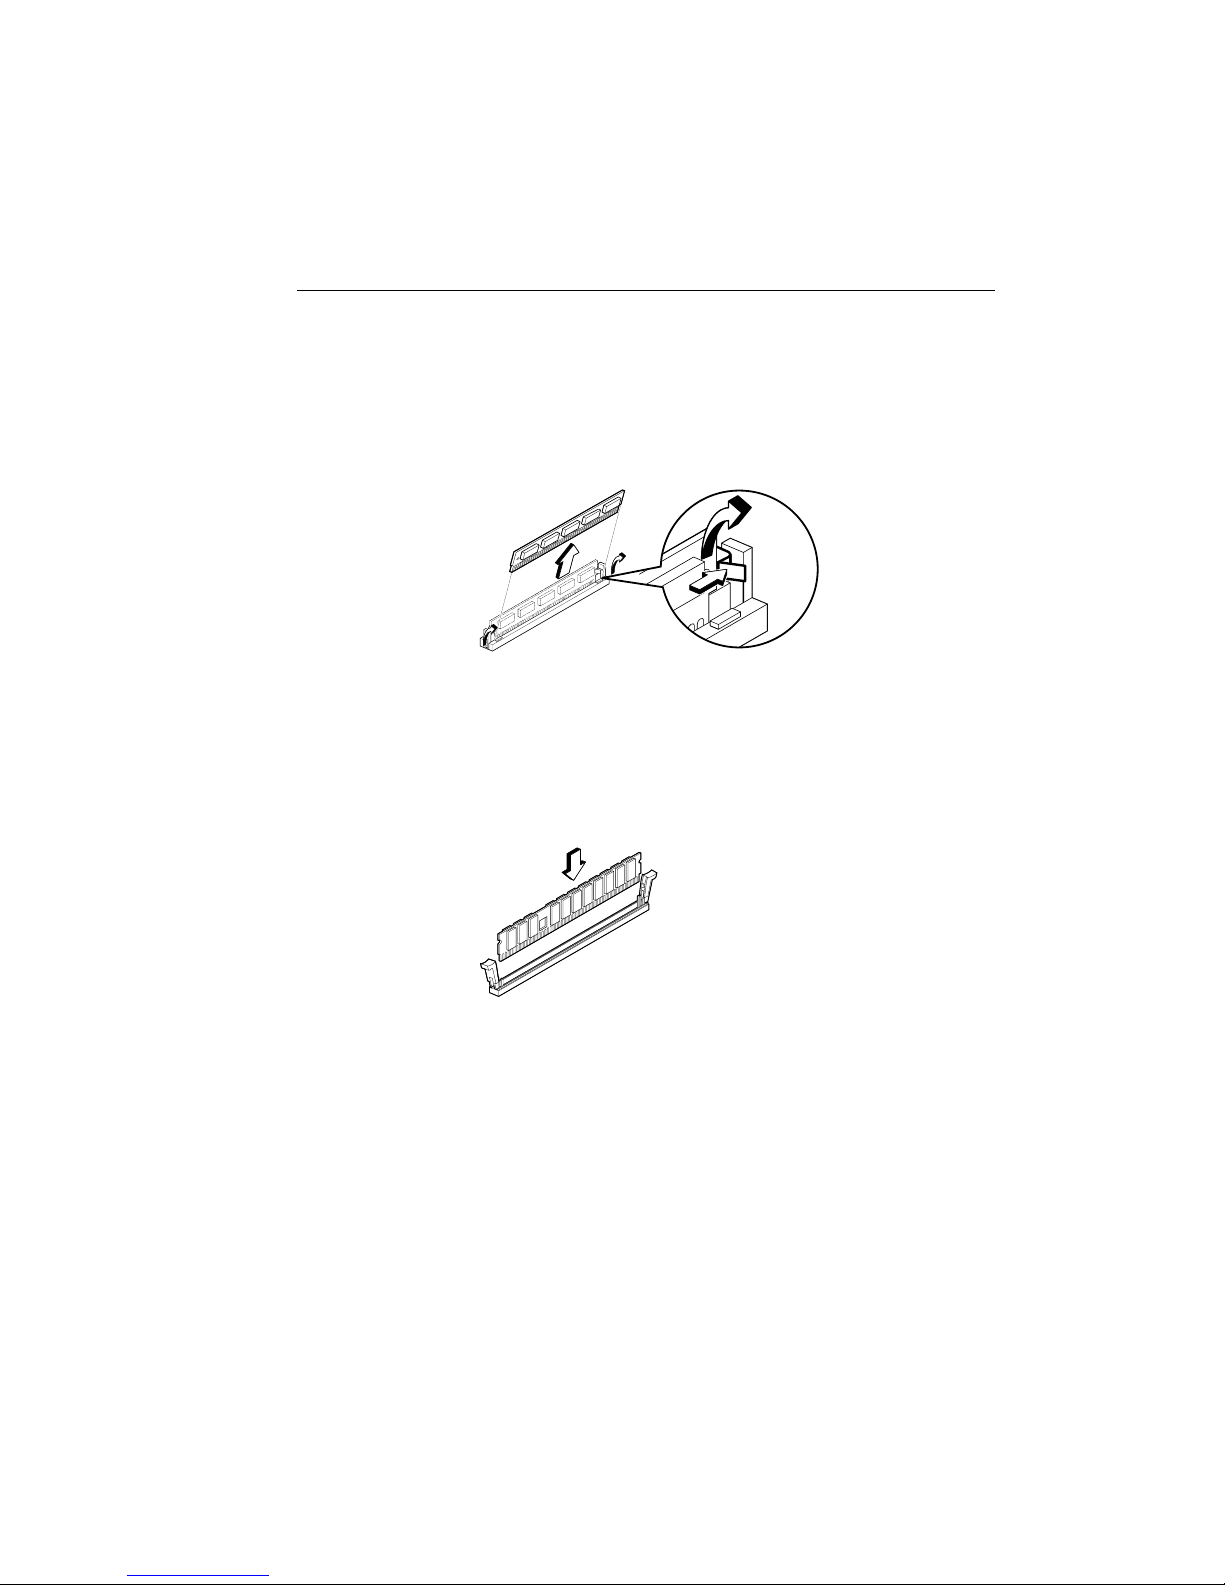
Removing a SIMM
To remove a SIMM, follow these steps:
1 Press the holding clips on both sides of the SIMM
outward to release it.
2 Tilt the SIMM to a 45° angle.
3 Pull the SIMM up and out of the socket.
Installing a DIMM
To install a DIMM, follow these steps:
1 Insert the DIMM vertically into the
socket. (DIMMs can fit into the slot
only one way.)
2 Push down on the DIMM to seat it,
and then raise the plastic clips at
either side to lock it in place.
Page 15
10 PREMIO System Manual
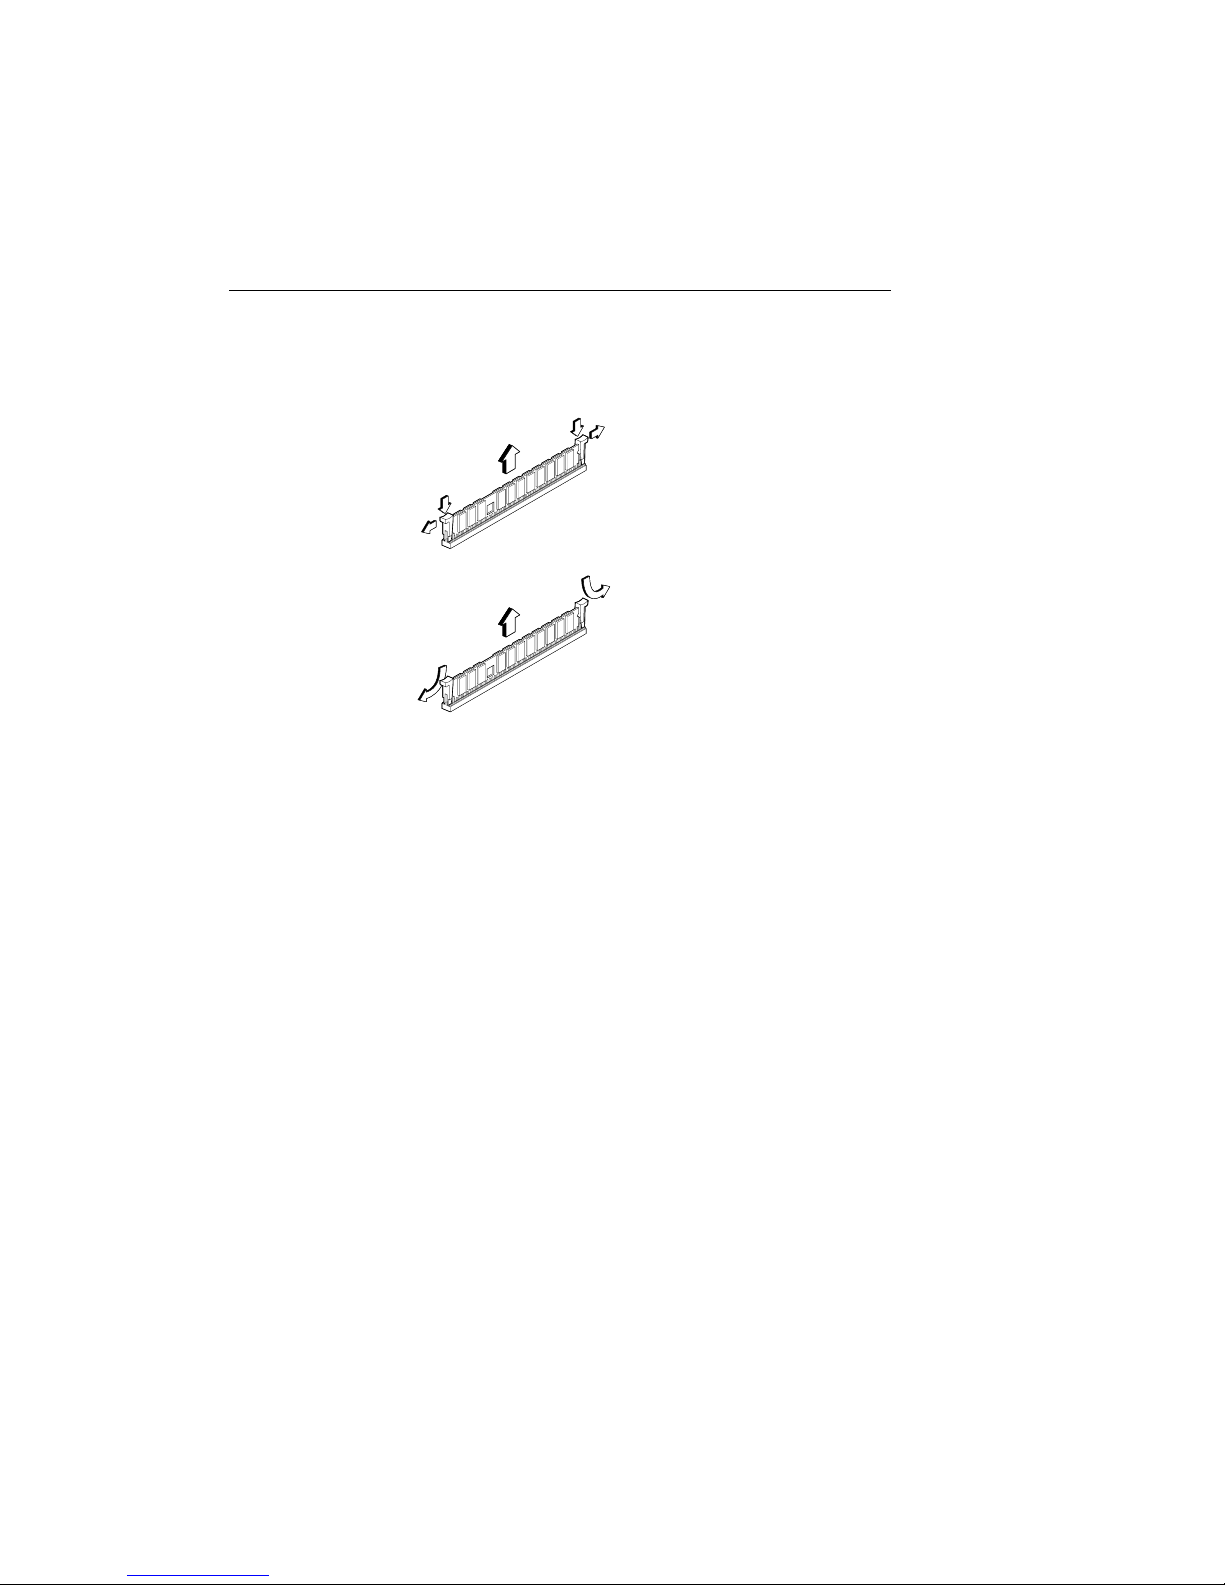
Removing a DIMM
To remove a DIMM, follow these steps:
1 Push down and out on the plastic
clips at either end to release
them.
2 Pull the DIMM up and out of the
socket.
Page 16
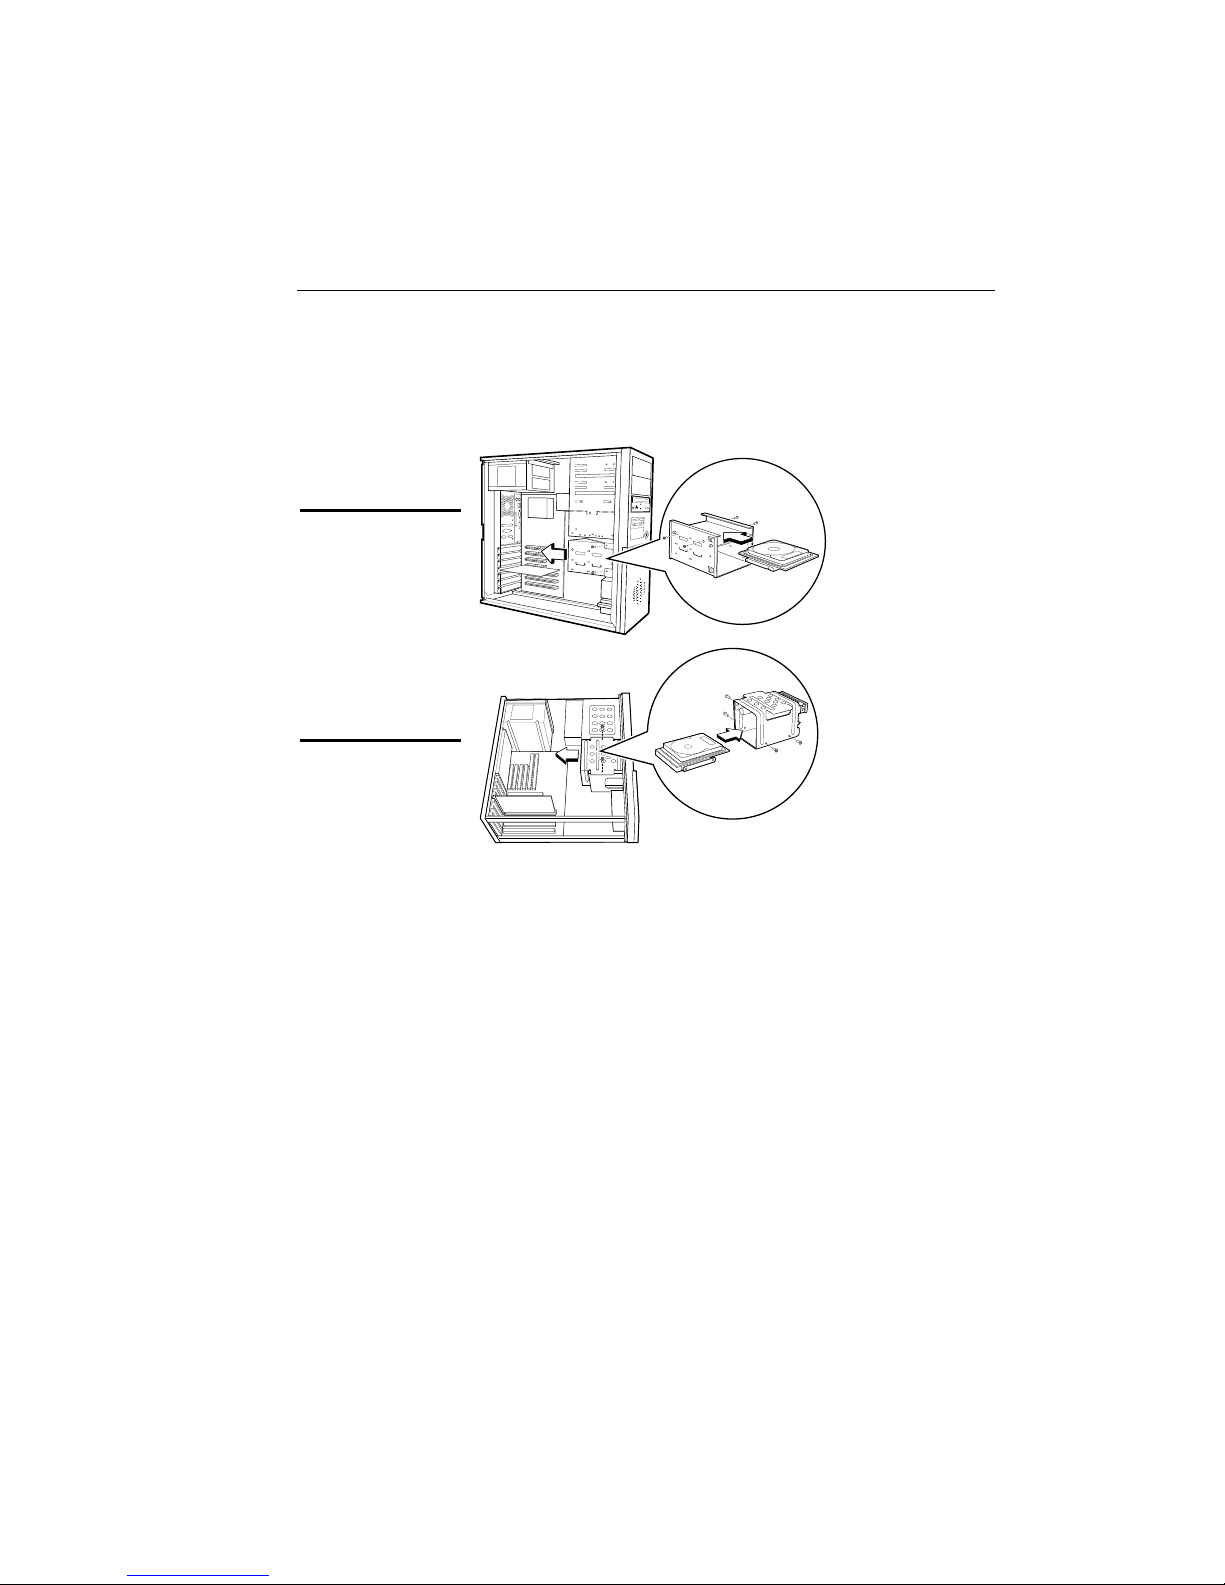
Installing a Hard Drive 11
Installing a Hard Drive
To install a hard drive in your system, follow these steps:
Mid-tower system
Desktop system
1 Disconnect the hard drive cable and power connector.
2 Remove the two screws securing the drive bay.
3 Slide the bay toward the rear of the system unit to
remove it.
4 Insert the new drive into an open position in the bay and
secure it with four screws.
5 Slide the bay back into the system unit and secure it with
two screws.
6 Connect the cables.
Page 17

Getting Help
Troubleshooting
Your PREMIO system is designed to provide years of troublefree performance. If you have a problem with your system, first
check the information in this section for a quick solution.
Monitor Does Not Work
If your monitor appears not to be working properly:
Check that the monitor’s power cable is securely attached
to the monitor and to an outlet that is receiving power.
Check that the monitor’s video cable is securely attached
to the monitor and to the system unit’s video card
connector.
Check that the monitor’s power switch is on.
Adjust the monitor’s brightness and contrast controls.
If possible, substitute another monitor that is in good
working order. If the substitute works, your monitor may
need repair or replacement.
Page 18

Troubleshooting 13
Keyboard Does Not Work
If the NumLock indicator in the upper right corner of the
keyboard does not light when the system powers up, or the
keyboard does not work:
Check that the keyboard cable is securely attached to the
system unit’s keyboard connector.
If possible, substitute another keyboard that is in good
working order. If the substitute works, your keyboard
may need replacement.
Mouse Does Not Work
If your mouse pointer does not move or move s erratically when
you move the mouse:
Check that the mouse cable is securely attached to the
mouse connector on the system unit.
Disassemble the mouse and clean the roller ball.
Page 19

14 PREMIO System Manual
System Unit Problems
The fan inside the system unit should make a low, steady sound
when operating properly. If the fan is totally silent:
Check that the system power cord is securely attached to
the back of the system unit and to a power outlet. Verify
that the outlet has power.
If possible, substitute another power cord that is in good
working order. If the substitute works, replace your
power cord.
If the fan makes excessive noise:
Turn off the system, open the system unit case, and
inspect the fan for any obstructions.
Turn on the system and listen closely to the fan. If the
noise comes from inside the fan housing, your power
supply may need replacement.
Hard Disk Problems
Your hard d i sk should make a slight whirring sound when
operating properly. If the disk is totally silent:
Turn off the system, open the system unit case, and check
that the power cable between the power supply and the
hard disk is securely attached at both ends. If it is, your
hard disk may be defective.
If the hard disk makes excessive noise:
Turn off the system, open the system unit case, and
remove the hard disk power cable connector from the
hard disk. Then turn the system back on. If the noise
disappears, your hard disk may be defective.
If you have more than one hard disk, repeat the same
procedure for each disk.
Page 20

Warranty Service 15
Warranty Service
If you have a problem with your PREMIO system that requires
service during the warranty period, contact the dealer where
you purchased your system. Yo ur d ealer will try to resolve the
problem for you. If your dealer cannot resolve the problem, you
can contact
Note To obtain warranty service, you must provide proof of
purchase, including the purchase date.
PREMIO directly at the address below.
Technical Support
You can contact PREMIO technical support at the following
address:
Premio Computer, Inc.
918 Radecki Court
City of Industry, CA 91748
Telephone: 800-568-6388
Fax: 626-839-3191
Email: [email protected]
PREMIO on the Internet
PREMIO maintains a web page on the Internet with the latest
information on
common problems, a Windows 95 troubleshooting guide, and
more. Visit our web page at:
http://www.premiopc.com
PREMIO products, updated drivers, answers to
Page 21

Appendix
Limited 3-Year Warranty
Premio Computer, Inc. warrants its line of PREMIO® computer systems
(hereinafter “Product”) to be free from defects in material and
workmanship for a period of three (3) years from the date of original
purchase from Premio Computer, Inc. or a Premio Computer, Inc.
authorized reseller. This warranty does not cover monitor and LCD
panels, nor third-party hardware and software wh ich has a separate
manufacturer’s warranty. Warranty for such third-party hardware and
software, if any, is subject to the third-party’s warranty policy.
PREMIO branded monitors are warranted as follows:
Three (3) year parts and labor except for CRT
One (1) year parts and labor for CRT
PREMIO branded LCD panels are warranted as follows:
One (1) year parts and labor
SERVICE UNDER WARRANTY
If this Product fails to be in good working order during this 3year warranty period (or specific period of time as noted
above), Premio Computer, Inc. will, at its option, repair or
replace the Product. Repair parts and/or replacement Products
may be either new or reconditioned at Premio Computer Inc.’s
discretion. The limited warranty does not include service to
repair damage from improper installation, abuse or
modifications to the Product not approved in writing by Premio
Computer, Inc. Any service repair outside the scope of this
limited warranty shall be at Premio Computer, Inc.’s or its
Authorized Service Provider’s rates and terms in effect.
This warranty is valid only within the United States and applies only
to Products which are new and in cartons which are unopened on the
date of purchase.
Page 22

Limited 3-Year Warranty 17
EXCLUSIONS FROM PREMIO, INC. LIMITED
WARRANTY PROGRAM
ALL OTHER EXPRESSED AND IMPLIED WARRANTIES FOR
THIS PRODUCT, INCLUDING THE WARRANTIES OF
MERCHANTABILITY AND FITNESS FOR A PARTICULAR
PURPOSE, ARE HEREBY DISCLAIMED. IF THIS PRODUCT IS
NOT IN GOOD WORKING ORDER AS WARRANTED ABOVE,
PREMIO COMPUTER, INC.'S SOLE AND EXCLUSIVE REMEDY
SHALL BE REPAIR OR REPLACEMENT AS STATED ABOVE.
IN NO EV ENT WILL PREMIO COMPUTER, INC. BE LIABLE TO
THE CUSTOMER OR ANY THIRD PARTY FOR ANY
DAMEAGES IN EXCESS OF THE PURCHASE PRICE OF THE
PRODUCT. THIS LIMITATION APPLIES TO DAMAGES OF ANY
KIND INCLUDING ANY DIRECT OR INDIRECT DAMAGES,
LOST PROFITS, LOST SAVINGS OR OTHER SPECIAL,
INCIDENTAL, EXEMPLARY OR CONSEQUENTIAL DAMAGES
WETHER ARISING OUT OF THE USE OF OR INABILITY TO
USE SUCH PRODUCT, EVEN IF PREMIO COMP UTER, INC. OR
AN AUTHORIZED PREMIO COMPUTER, INC.
REPRESENTATIVE OR DEALER HAS BEEN ADVISED OF THE
POSSIBILITY OF SUCH DAMAGES OR OF ANY CLAIM BY
ANY OTHER PARTY. SOME STATES DO NOT ALLOW THE
EXCLUSION OR LIMITATION OF INCIDENTAL OR
CONSEQUENTIAL DAMAGES FOR SOME PRODUCTS, SO THE
ABOVE LIMITATIONS OR EXCLUSIONS MAY NOT APPLY TO
YOU. PREMIO COMPUTER, INC. AUTHORIZED RESELLERS
AND SERVICE PROVIDERS/PARTNERS MAY BE CHANGED,
ADDED OR DELETED, WITHOUT NOTICE OR LIABILITY.
PREMIO COMPUTER, INC. DISCLAIMS ANY AUTHORIZED
RESELLERS AND SERVICE PROVID ER/PARTNER TO THE
PROGRAM. THIS WARRANTY GIVES YOU SPECIFIC LEGAL
RIGHTS AND YOU MAY ALSO HAVE OTHER RIGHTS WHICH
MAY VARY FROM STATE TO STATE.
Page 23

FCC Standards
The FCC (Federal Communications Commission) restricts the
amount of radiation and radio frequency emissions from
computing equipment .
This equipment generates and uses radio frequency energy and
if not installed and used properly in strict accordance with the
operation instructions, reference manuals, and the service
manual, may cause interference to radio or television reception.
This equipment can be tested and found to comply with the
limits for a Class B digital device pursuant to part 15 of the
FCC rules. There limits are designed to provide reasonable
protection against harmful interference in a residential
installation. This equipment generates, uses, and can radiate
radio frequency energy and, if not installed and used in
accordance with the instructions, may cause harmful
interference to radio communications. However, there is no
guarantee that interference will not occur in a particular
installation. If this equipment does cause harmful interference
to radio or television reception, which can be determined by
turning the equipment off and on, then the user is encouraged to
try to correct the interference by one or more of the following
procedures:
Reorient or relocate the receiving antenna.
Increase the separation between the equipment and
Connect the equipment into an outlet on a circuit
Consult the dealer or an experienced radio/TV technician
receiver.
different from that to which the receiver is connected.
for help.
Page 24

Important Safety Instructions 19
Important Safety Instructions
These instructions are provided by Underwriters Laboratories, Inc.
1. Read all of these instructions and save them for later reference.
2. Follow all warnings and instructions marked on the product.
3. Unplug this product from the wall outlet before cleaning. Do not
use liquid or aerosol cleaners. Use a damp cloth for cl eaning.
4. Do not use this product near water.
5. Do n ot place this product on an unstable cart, stand or table. The
product may fall, causing serious damage to the product.
6. Slots and openings on the cabinet and the back or bottom are
provided for ventilation. To ensure reliable operation of the
product and to protect it from overheating, do not block or cover
these openings. The openings should never be blocked by placing
the product on a bed, sofa, rug or other similar surface. This
product should never be placed near or over a radiator or heat
register. This product should not be placed in a built-in
installation unless proper ventilation is provided.
7. This product should be operated from the type of power source
indicated on the marking label. If you are not sure of the type of
power available, consult your dealer or local power company.
8. This product is equipped with a 3-wire grounding-typ e plug, a
plug having a third (grounding) pin. This plug will only fit into a
grounding-type power outlet. This is a safety feature. If you are
unable to insert t he plug into the o utlet, contact your electrician to
replace your obsolete o utlet. Do not defeat the safety purpose of
the grounding-type plug.
9. Do not allow anything to rest on the power cord. Do not locate
this product where the cord will be walked on.
10. If an extension cord is used with this product, make sure that the
total of the ampere ratings on the products plugged into the
extension cord do not exceed the extensi on cord ampere rating.
Also, make sure that the total of all products plugged into the wall
outlet does no t exceed 15 amperes.
11. Never push objects of any kind into this product through cabinet
slots as they may touch dangerous voltage points or short out
parts that could result in a risk of fire or electric shock. Never
spill liquid of any kind on the product.
Page 25

12. Except as explained elsewhere in this manual, don't attempt to
service this product yourself. Opening and removing those covers
that are marked “Do Not Remove” may expose you to dangerous
voltage points or other risks. Refer all servicing on those
compartments to service personnel.
13. Unplug this product from the wall outlet and refer servicing to
qualified service personnel under the following conditions:
A. When the power cord or plug is damaged or frayed.
B. If liquid has been spilled into the product.
C. If the product has been exposed to rain or water.
D. If the product does not operate normally when the operating
instructions are followed. Adjust only those controls that are
covered by the operating instructions since improper
adjustment of other controls may result in damage and will
often require extensive work by a qualified technician to
restore the product to normal operation.
E. If the product has been dropped or the cabinet has been
damaged.
F. If the product exhibits a distinct change in
performance, indicating a need for service.
Page 26

FCC Compliance Statement:
This equipment has been tested and found to
comply with limits for a Class B digital device,
pursuant to Part 15 of the FCC rules. These
limits are designed to provide reasonable
protection against harmful interference in
residential installations. This equipment
generates, uses, and can radiate radio
frequency energy, and if not installed and used
in accordan ce with the instruct ions, may cause
harmful interference to radio communications.
However, there is no guarante e that interference
will not occur in a particular installation. If this
equipment does cause interference to radio or
television equipment reception, which can be
determined by turning th e equi pment off and on, the user is e ncour aged to try t o
correct the interference by one or more of the following measures:
-Reorient or relocate the receiving antenna
-Move the equipment away from the receiver
-Plug the equipment into an outlet on a circuit different from that to which
the receiver is connected
-Consult the dealer or an experienced radio/television technician for
additional suggestions
You are cautioned that any change or modifications to the equipment not
expressly approve by the party responsible for compliance could void Your
authority to operate such equipment.
This device complies with Part 15 of the FCC Rules. Operation is subjected to
the following two conditions 1) this device may not cause harmful interference
and 2) this device must acc ept any interference received, including interference
that may cause undesired operation.
DECLARATION OF CONFORM I TY
Per FCC Part 2 Section 2. 1077(a)
Responsible Party Name: G.B. T . INC.
Address: 18305 Valley Blvd., Suite#A
LA Puent, CA 91744
Phone/Fax No: (818) 854-933 8/ (818) 854-9339
hereby declares that th e product
Product Name:
Model Number:
Mother Board
Conforms to the following specifications:
FCC Part 15, Subpart B, Section 15.10 7(a ) and Section 15.109(a),
Class B Digital Device
Supplementary Information:
This device complies with part 15 of t he FCC Rules. Operation is subject to the
following two conditions: ( 1) This device may not cause harmful
and (2) this device must accept any inference received, including
that may cause undesired ope ra tion.
Representative Person's Name: ERIC LU
Signature:
Date: Mar. 20, 2001
Eric Lu
GA-7ZX-H
Page 27
Declaration of Conformity
We, Manufacturer/Importer
(full address)
G.B.T. Technology Träding GMbH
Ausschlager Weg 41, 1F, 20537 Hamburg, Germany
declare that the product
( description of the apparatus, system, installation to which it refers)
Mother Boar d
GA-7ZX-H
is in conformity with
(reference to the specification under wh ich conformity is declared)
in accordance with 89/336 EEC-EMC Directive
EN 55011 Limits and methods of measurement EN 61000-3-2* Disturbances in supply system s cause d
of radio disturbance characteri stic s of
EN60555-2 by household appliances and similar
industrial, scientific and medi c al (ISM electrical equipment “Harmonics”
high frequency equipment
EN55013 Limits and methods of measurement EN61000-3-3* Disturbances in supply systems caused
of radio disturbance characteri stic s of
EN60555-3 by household appliances and similar
broadcast receivers and associated electrical equipment “Voltage fluctuations”
equipment
EN 55014 Limits and methods of measurement EN 50081-1 Gener ic emission standard Part 1:
of radio disturbance characteri stic s of Residual, commercial and li ght industry
household electrical applianc es,
portable tools and similar electrical
EN 50082-1 Generic immunity standard Part 1:
apparatus Residual, commercial and light industry
EN 55015 Limits and methods of measurement EN 55081-2 Generic emission standard Part 2:
of radio disturbance characteri stic s of Industrial environment
fluorescent lamps and luminaries
EN 55020 Immunity from radio interference of EN 55082-2 Generic immunity standard Part 2:
broadcast receivers and associated Industrial environment
equipment
EN 55022 Limits and methods of measurement ENV 55104 Immunity requirements for household
of radio disturbance characteri stic s of appliances tools and similar apparatus
information technology equipment
DIN VDE 085 5 Cabled distribution systems; Equipment EN 50091- 2 EMC requirements for uninterruptible
part 10 for receiving and/ or distribution from power systems (UPS)
part 12 sound and television si gnals
CE marking (EC conformity marking)
The manufacturer also declares the conformity of above mentioned product
with the actual required safety standards in accordance with LVD 73/23 EEC
EN 60065 Safety requirements for mains operated EN 60950 Safety for information technology equipment
electronic and related apparatus for including electrical business equipment
household and similar general use
EN 60335 Safety of household and similar EN 50091-1 General and Safety requirements for
electrical appliances uninterruptible power systems (UPS)
Manufacturer/Importer
Signature
:
Rex Lin
(Stamp)
Date : Mar. 20, 2001 Name : Rex Lin
Page 28

7ZX-H
AMD AthlonTM/DuronTM Socket A Processor
Motherboard
USER'S MANUAL
AMD AthlonTM/DuronTM Socket A Processor Motherboard
REV. 5.1 First Edition
R-51-01-010419
Page 29

Page 30

How This Manual Is Organized
This manual is divided into the following sections:
1) Revision History Manual revision information
2) Item Checklist Product item list
3) Features Product information & specification
4) Hardware Setup Instructions on setting up the motherboard
5) Performance & Block Diagram Product performance & block diagram
6) Suspend to RAM & Dual BIOS Instructions STR installation & Dual BIOS
7) @BIOSTM & EasyTuneIIITM @BIOSTM & EasyTuneIIITM introduction
8) BIOS Setup Instructions on setting up the BIOS
software
9) Appendix
General reference
Page 31

Page 32

Table Of Content
Revision History P.1
Item Checklist P.2
Summary of Features P.3
7ZX-H Motherboard Layout P.5
Page Index for CPU Speed Setup / Connectors / Panel and Jumper
Definition
P.6
Performance List P.22
Block Diagram P.23
Suspend to RAM Installation P.24
Dual BIOS Introduction (Optional) P.30
@BIOSTM Introduction P.37
EasyTuneIIITM Introduction P.38
Memory Installation P.40
Page Index for BIOS Setup P.41
Appendix P.72
Page 33

7ZX-H Motherboard
1
Revision History
Revision Revision Note Date
5.1 Initial release of the 7ZX-H motherboard user’s
manual.
Apr. 2001
The author assumes no responsibility for any errors or omissions that may appear in this
document nor does the author make a commitment to update the information contained herein.
Third-party brands and names are the property of their respective owners.
Apr. 19, 2001 Taipei, Taiwan, R.O.C
Page 34

Item Checklist
2
Item Checklist
The 7ZX-H motherboard
Cable for IDE / floppy device
CD (TUCD) for motherboard driver & utility
7ZX-H user’s manual
Page 35

7ZX-H Motherboard
3
Summary Of Features
Form Factor 30.5 cm x 22.8 cm ATX size form factor, 4 layers PCB.
CPU
AMD Athlon
TM
/DuronTM (K7) Socket A Processor
256K/64K L2 cache on die
Supports 600MHz ~ 1GHz and faster
Support 100/133MHz FSB
Chipset Apollo KT133A, consisting of:
VT8363A Memory/AGP/PCI Controller (PAC)
VT82C686B PCI Super-I/O Integrated Peripheral
Controller (PSIPC)
Clock Generator
ICW W230H
ICW W230H
100/102/104/106/108/110/112/133 MHz system bus speeds
Memory 3 168-pin DIMM sockets
Supports PC-100 / PC-133 SDRAM and VCM SDRAM
Supports up to 1.5GB DRAM
Supports only 3.3V SDRAM DIMM
I/O Control VT82C686B
Slots 1 AGP slot supports 4X mode & AGP 2.0 compliant
5 PCI slots supports 33MHz & PCI 2.2 compliant
1 AMR (Audio Modem Riser) slot
1 ISA slot (Optional)
On-Board IDE Supports PIO mode 3, 4, UDMA 33/ATA 66/ATA 100&
ATAPI CD-ROM
2 IDE bus master (UDMA 33 / ATA 66 / ATA 100) IDE
ports for up to 4 ATAPI devices
On-Board
Peripherals
1 floppy port supports 2 FDD with 360K, 720K, 1.2M,
1.44M and 2.88M bytes
1 parallel ports supports Normal/EPP/ECP mode
2 serial ports (COM A & COM B)
4 USB ports
1 IrDA connector for IR
Hardware Monitor CPU/System fan revolution detect
CPU/System temperature detect
System voltage detect
CPU overheat shutdown detect
To be continued…
Page 36

Summary of Features
4
PS/2 Connector
PS/2
Keyboard interface and PS/2 Mouse interface
On-Board Sound
AC’97 CODEC
Line In/Line Out/Mic In/AUX In/CD In/TEL/Game Port
BIOS Licensed AMI BIOS, 2M bit flash ROM
Support Dual BIOS (Optional)
Additional Features Support Wake-On-LAN (WOL)
Support Internal / External Modem Ring On
Support USB KB/MS Wake up from S3-S5
Includes 3 fan power connectors
Poly fuse for keyboard over-current protection
Support STR (Suspend-To-RAM) function
Support @BIOS™ and EasyTuneIII™
Page 37
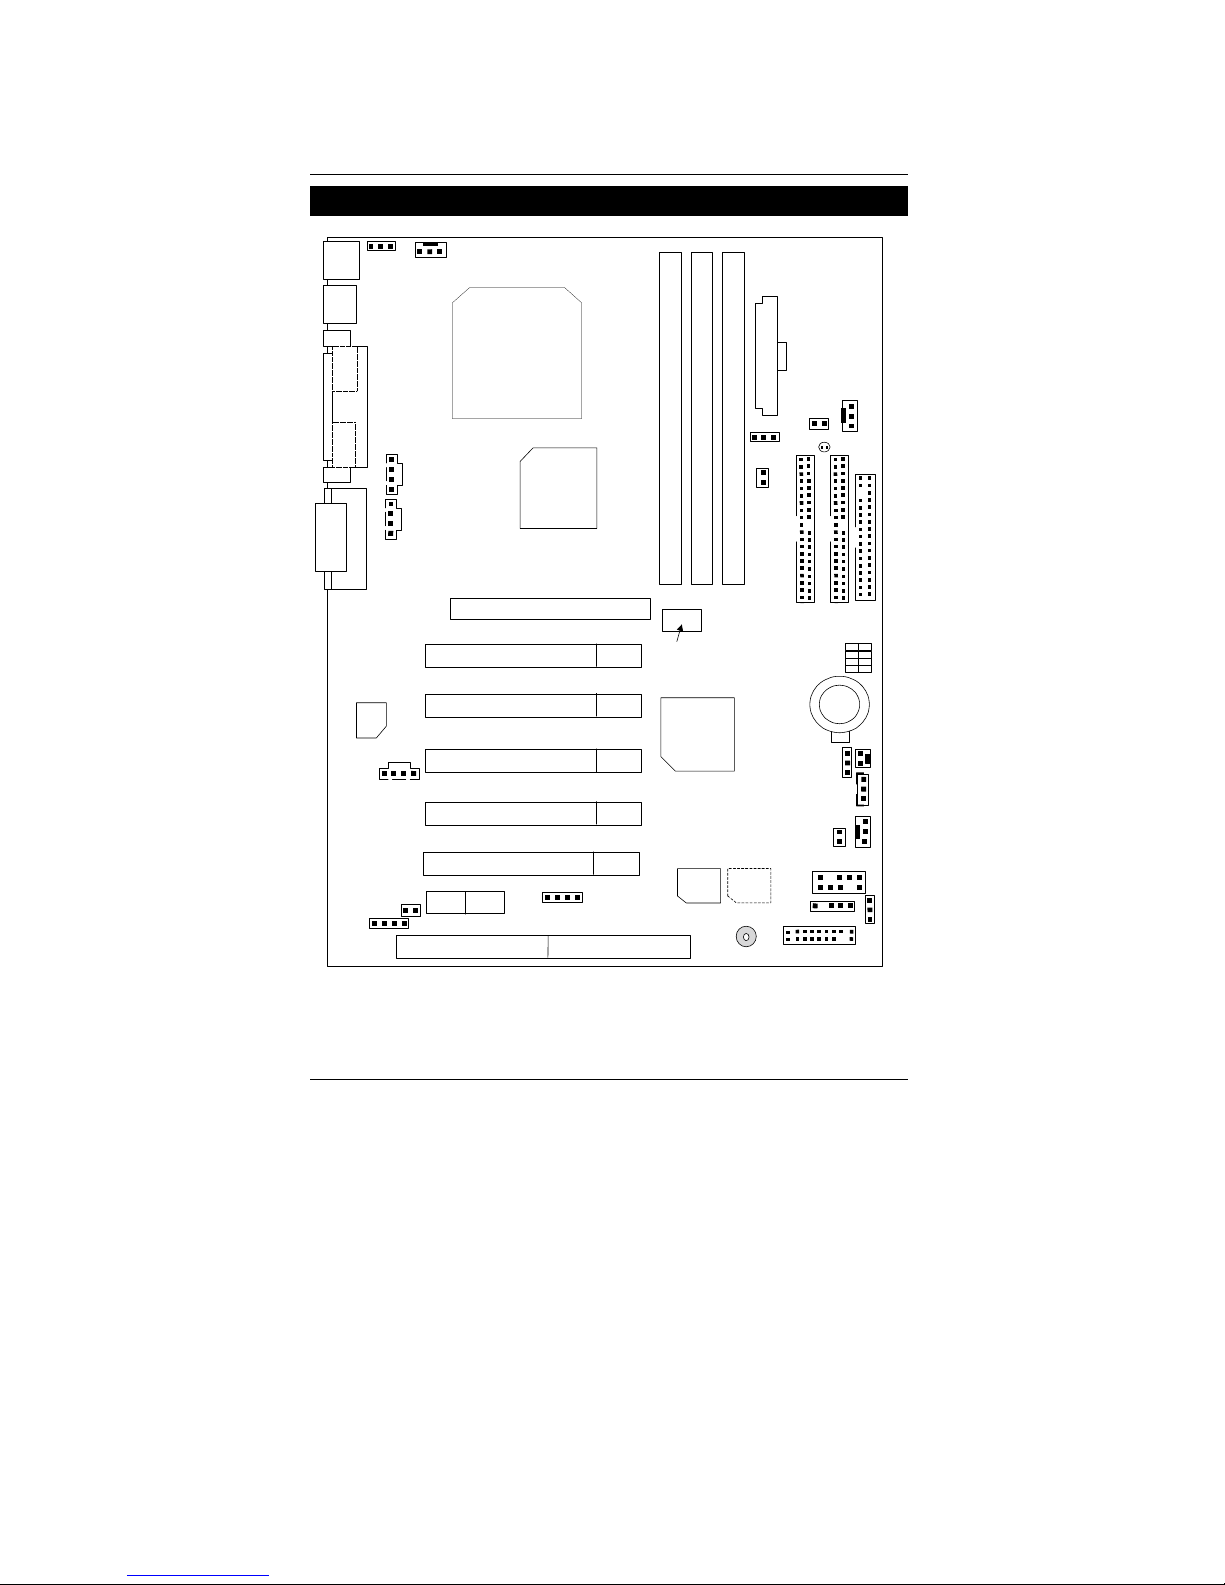
7ZX-H Motherboard
5
7ZX-H Motherboard Layou t
7ZX-H
PCI1
PCI2
Socket A CPU
VT82C
686B
VT8363A
GAME & AUDIO
COM B
COM A
LPT
PS/2
J3
J16
J15
J18
BAT1
J2
BZ1
FLOPPY
IDE2
IDE1
AGP 1
JP6
SW1
J11
LED1
J13
J12
J4
JP4
USB1
JP8
AMR
PCI3
AC97
USB2
DIMM3
JP7
A
TX POWER
DIMM2
DIMM1
PCI4
PCI5
ISA 1
MAIN
BIOS
BACK Up
BIOS
JP10
JP11
JP3
JP18
JP16
JP17
Clock
Generator
JP21
Page 38

7ZX-H Motherboard Layout
6
Page Index for CPU Speed Setup/Connectors/Panel and Jumper Definition
Page
CPU Speed Setup P.7
Connectors P.8
Game & Audio Port P.8
COM A / COM B / LPT Port P.8
USB 1 Connector P.9
USB 2 Connector P.9
PS/2 Keyboard & PS/2 Mouse Connector P.10
J3 (CPU Fan) P.10
JP6 (Power Fan) P.11
J2 (System Fan) P.11
ATX Power P.12
Floppy Port P.12
IDE 1(Primary) / IDE 2(Secondary) Port P.13
J16 (TEL) P.13
J15 (AUX_IN) P.14
J18 (CD Audio Line In) P.14
J13 (Ring Power On) P.15
J12 (Wake On LAN) P.15
JP8 / LED1 (STR LED Connector & DIMM LED) P.16
J4 (IR) P.16
Panel and Jumper Definition P.17
J11 (2x11 Pins Jumper) P.17
JP16/JP17/JP18 (AMR Select)[Optional] P.18
JP4 (Rear USB Device Wake Up Selection) P.18
JP7 (STR Function Enable) P.19
JP11 (Front USB Device Wake Up Selection) P.19
JP10 (BIOS Write Protection)[Optional] P.20
JP3 (Clear CMOS Function)[Optional] P.20
BAT1 (Battery) P.21
Page 39
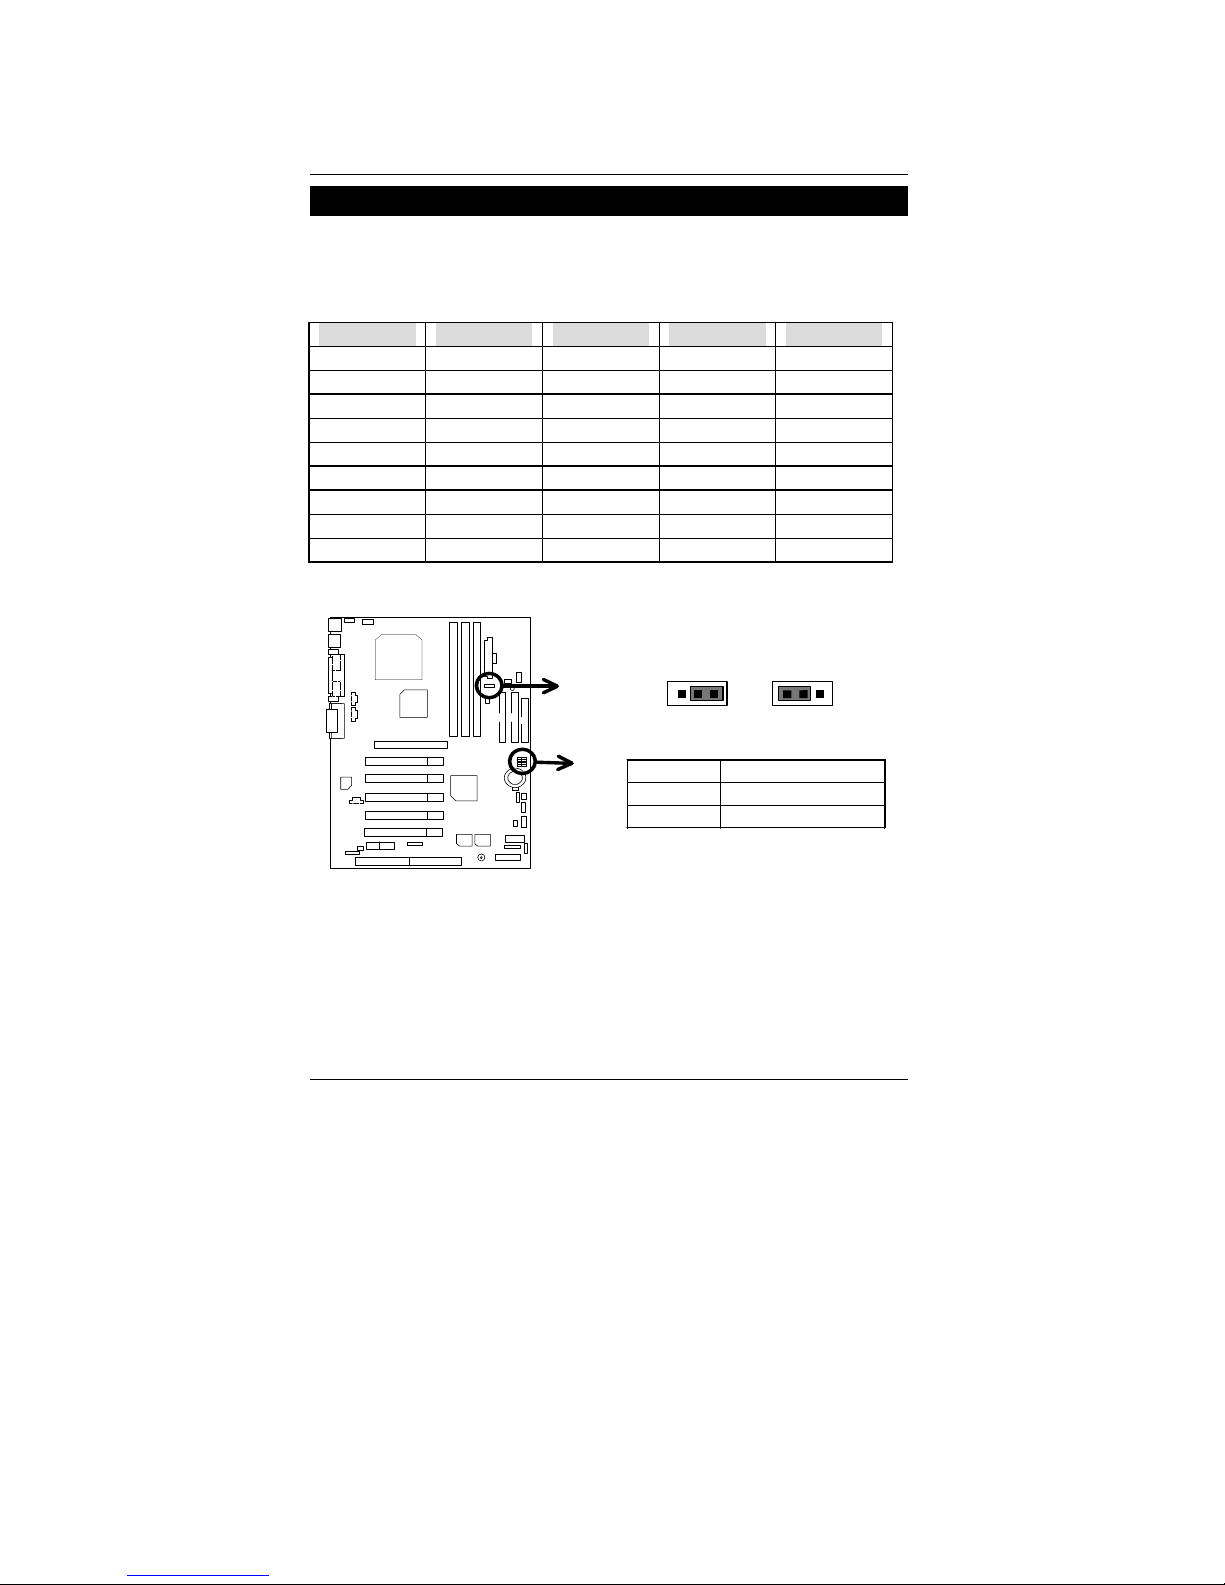
7ZX-H Motherboard
7
CPU Speed Setup
The system bus speed is selectable at 100~133MHz. The user can select the system bus speed
by DIP switch SW1 & JP21.
Set System Bus Speed
SW1:
O: ON / X: OFF
FSB 1 2 3 4
95 O O X X
100 0 X X X
102 0 0 0 X
104 X X X 0
106 0 X X 0
108 0 0 X 0
110 0 X 0 0
112 0 0 0 0
133 0 X 0 X
JP21: CPU Clock Frequency (Optional)
Pin No. Definition
1-2 close 133MHz
2-3 close 100MHz (Default)
JP21
SW1
1
1
133MHz
100MHz
(Default)
AMD CPU Heat Sink Installation:
Beware: Please check that the heat sink is in good contact with the CPU before you turn on your
system.
The poor contact will cause over heat, and might cause damage to your
processor.
Page 40
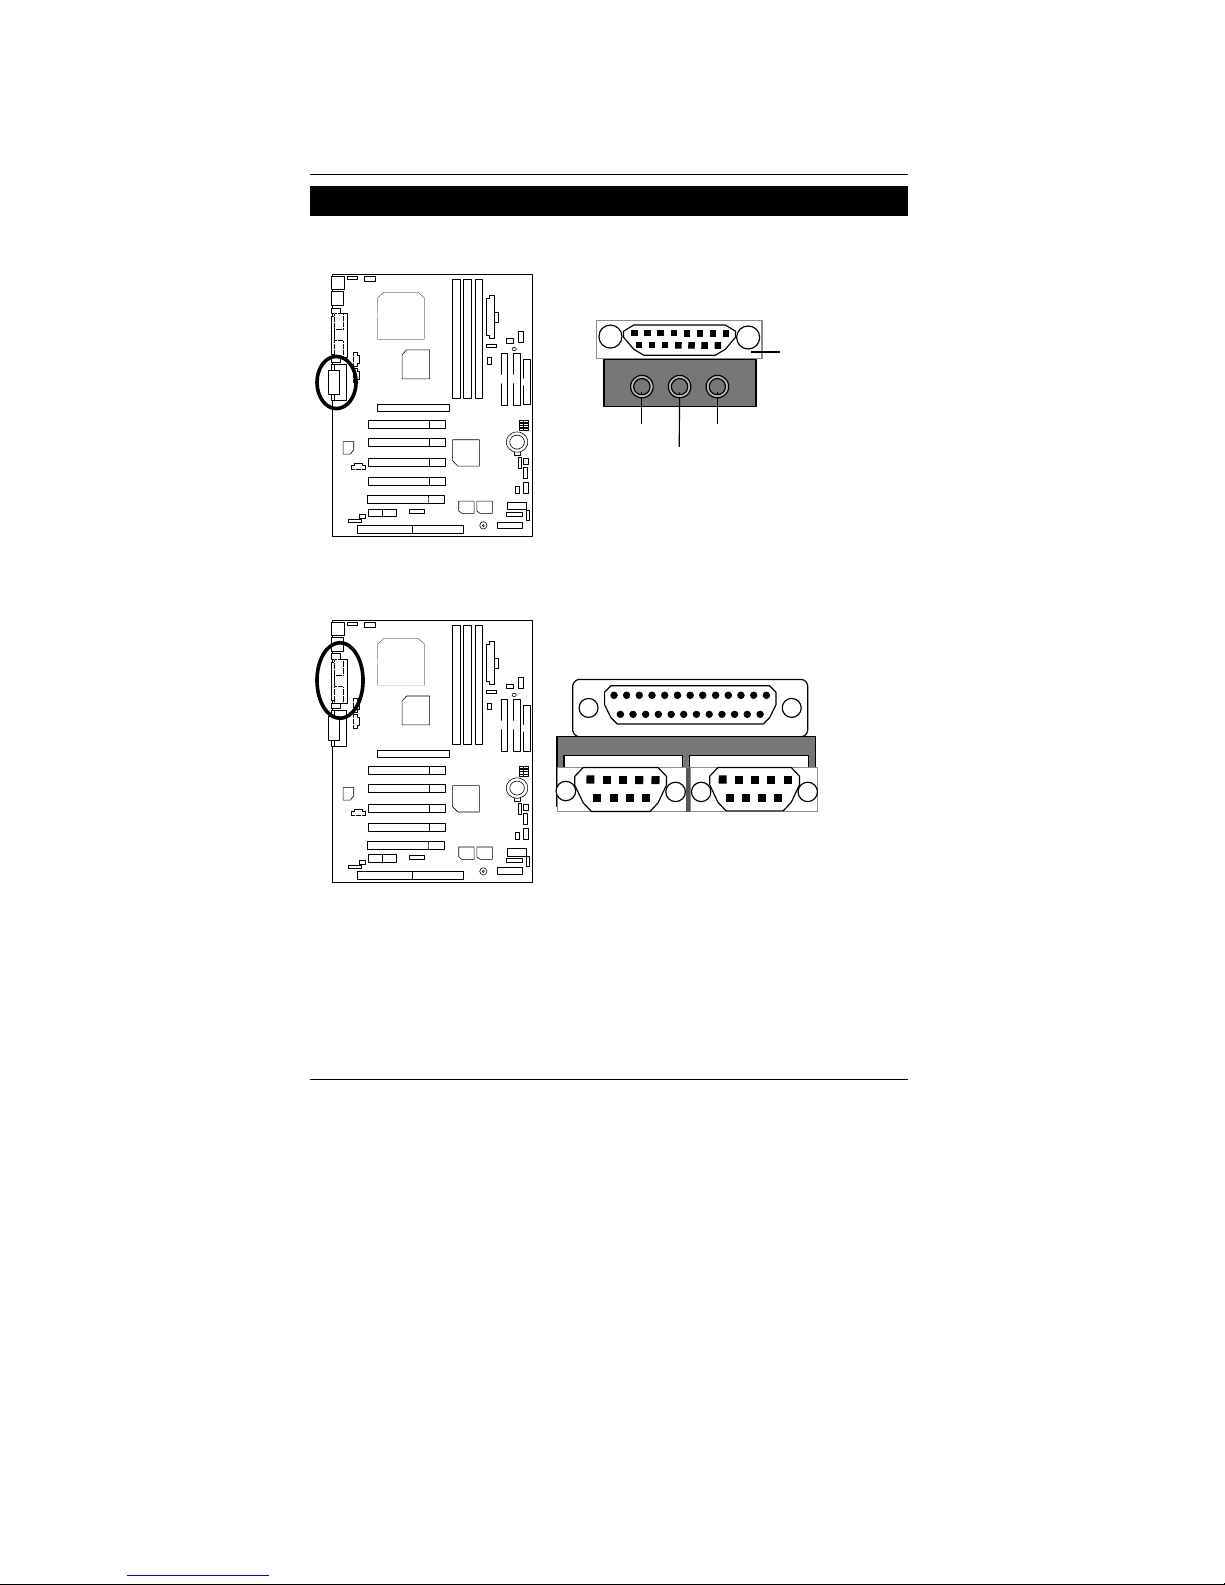
Connectors
8
Connectors
Game & Audio Port
MIC In
Game
Port
Line In
Line Out 1
COM A / COM B / LPT Port
COM A
LPT Port
COM B
Page 41
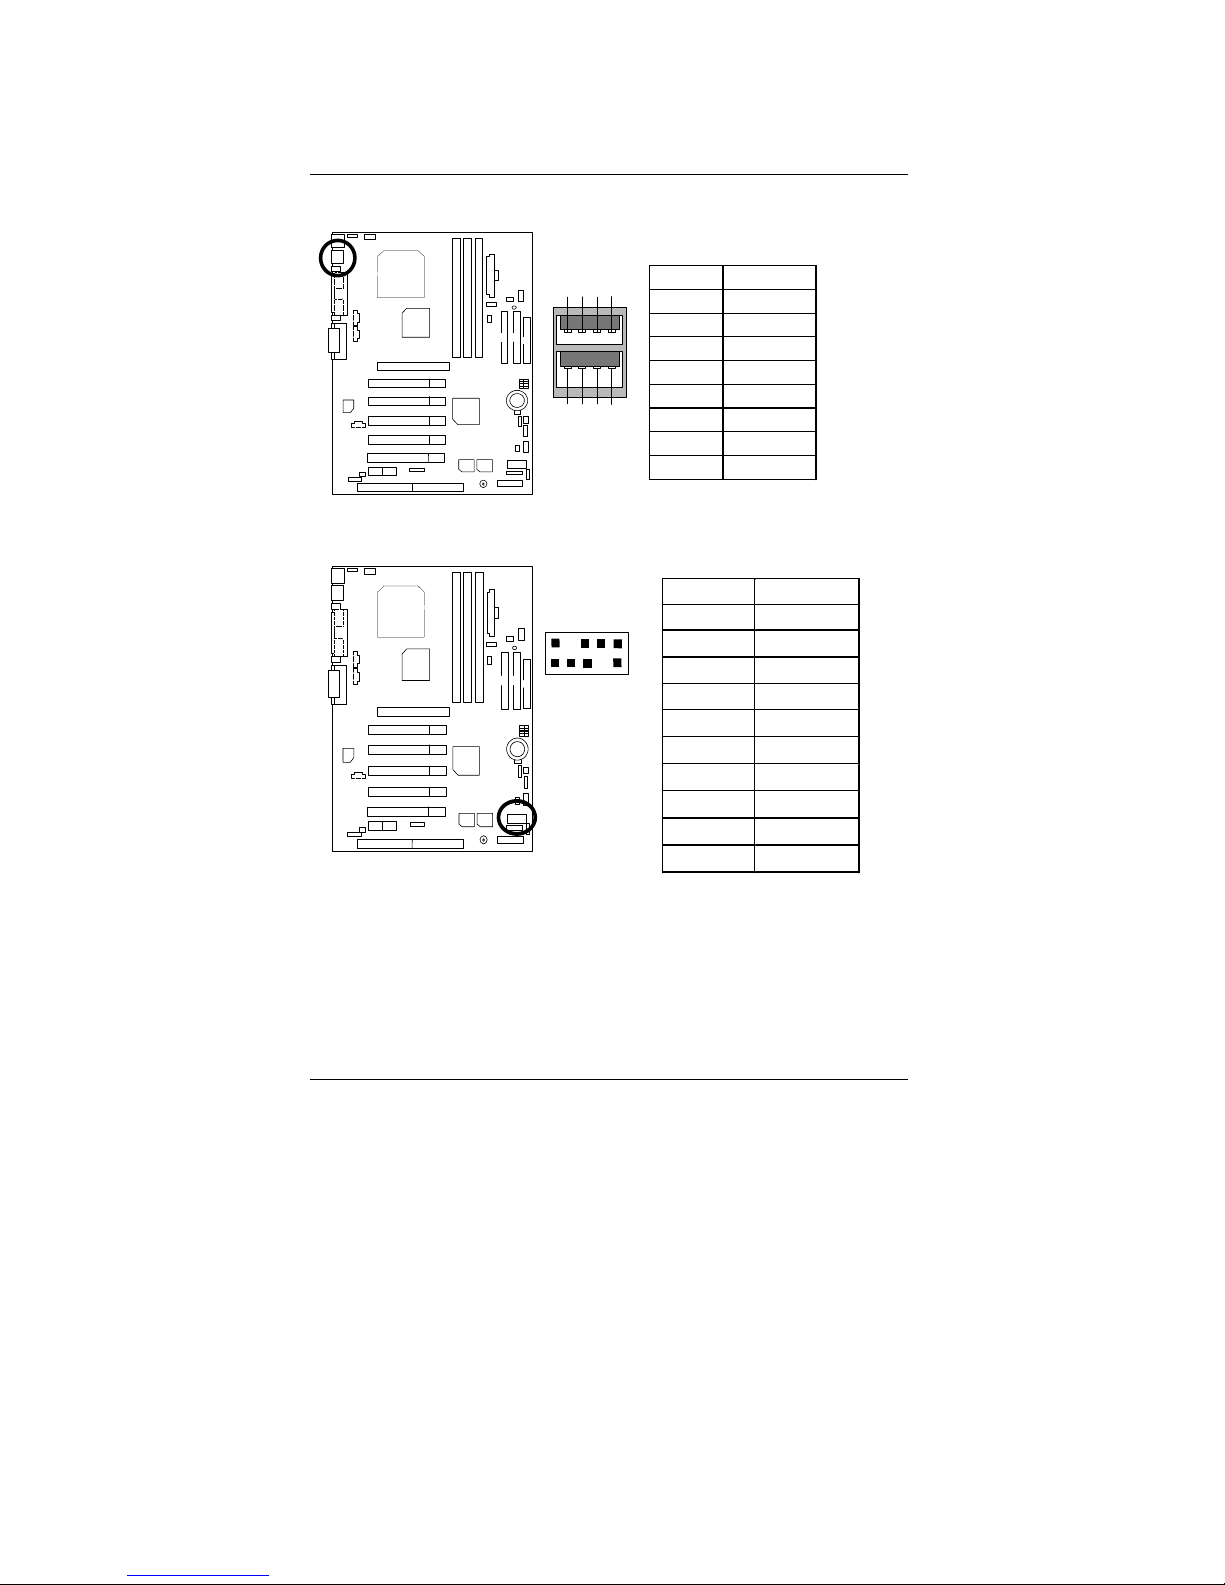
7ZX-H Motherboard
9
USB 1 Connector
Pin No. Definition
1 USB V0
2 USB D03 USB D0+
4 GND
5 USB V1
6 USB D17 USB D1+
8 GND
56
7
8
4
321
USB 2 Connector
Pin No. Definition
1 +5V
2 GND
3 USB D24 NC
5 USB D2+
6 USB D3+
7 NC
8 USB D39 GND
10 +5V
1
10
9
2
Page 42
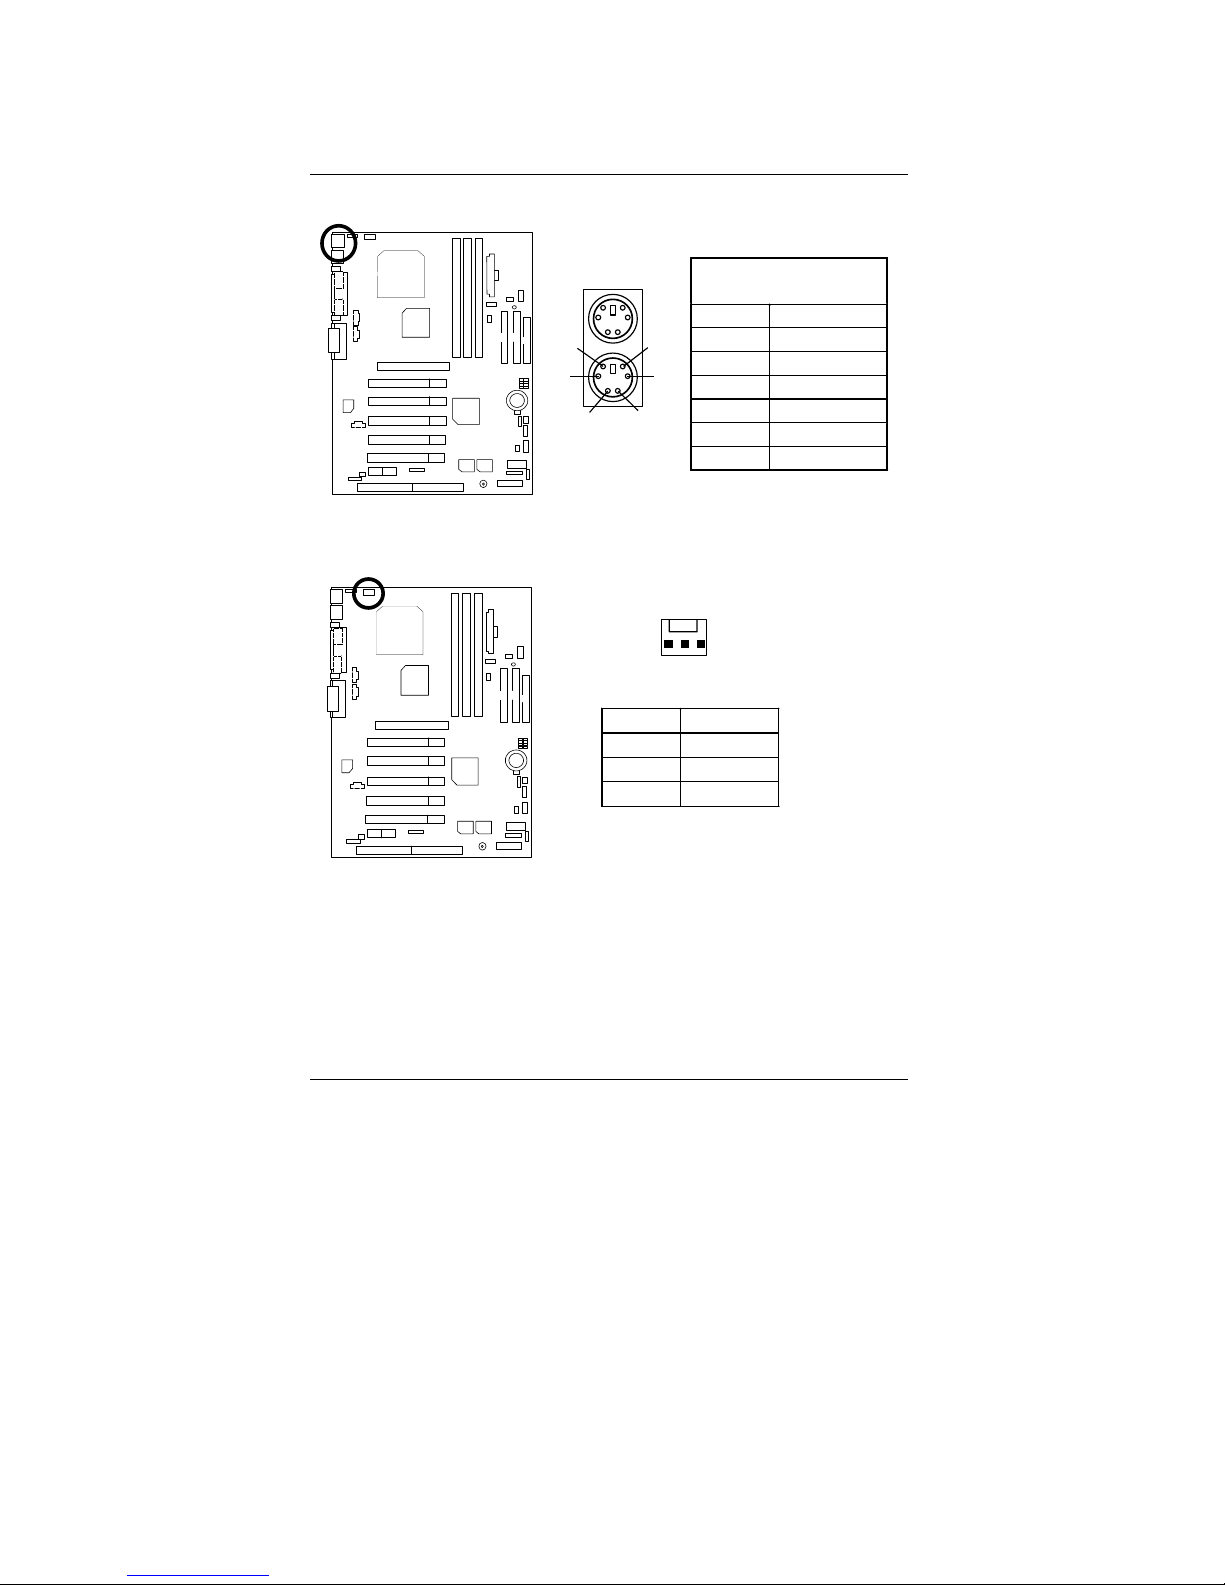
Connectors
10
PS/2 Keyboard & PS/2 Mouse Connector
PS/2
Mouse/Keyboard
Pin No. Definition
1 Data
2 NC
3 GND
4 VCC(+5V)
5 Clock
6 NC
PS/2 Keyboard
PS/2 Mouse
12
3
4
5
6
J3: CPU Fan
Pin No. Definition
1 Control
2 +12V
3 SENSE
1
Page 43
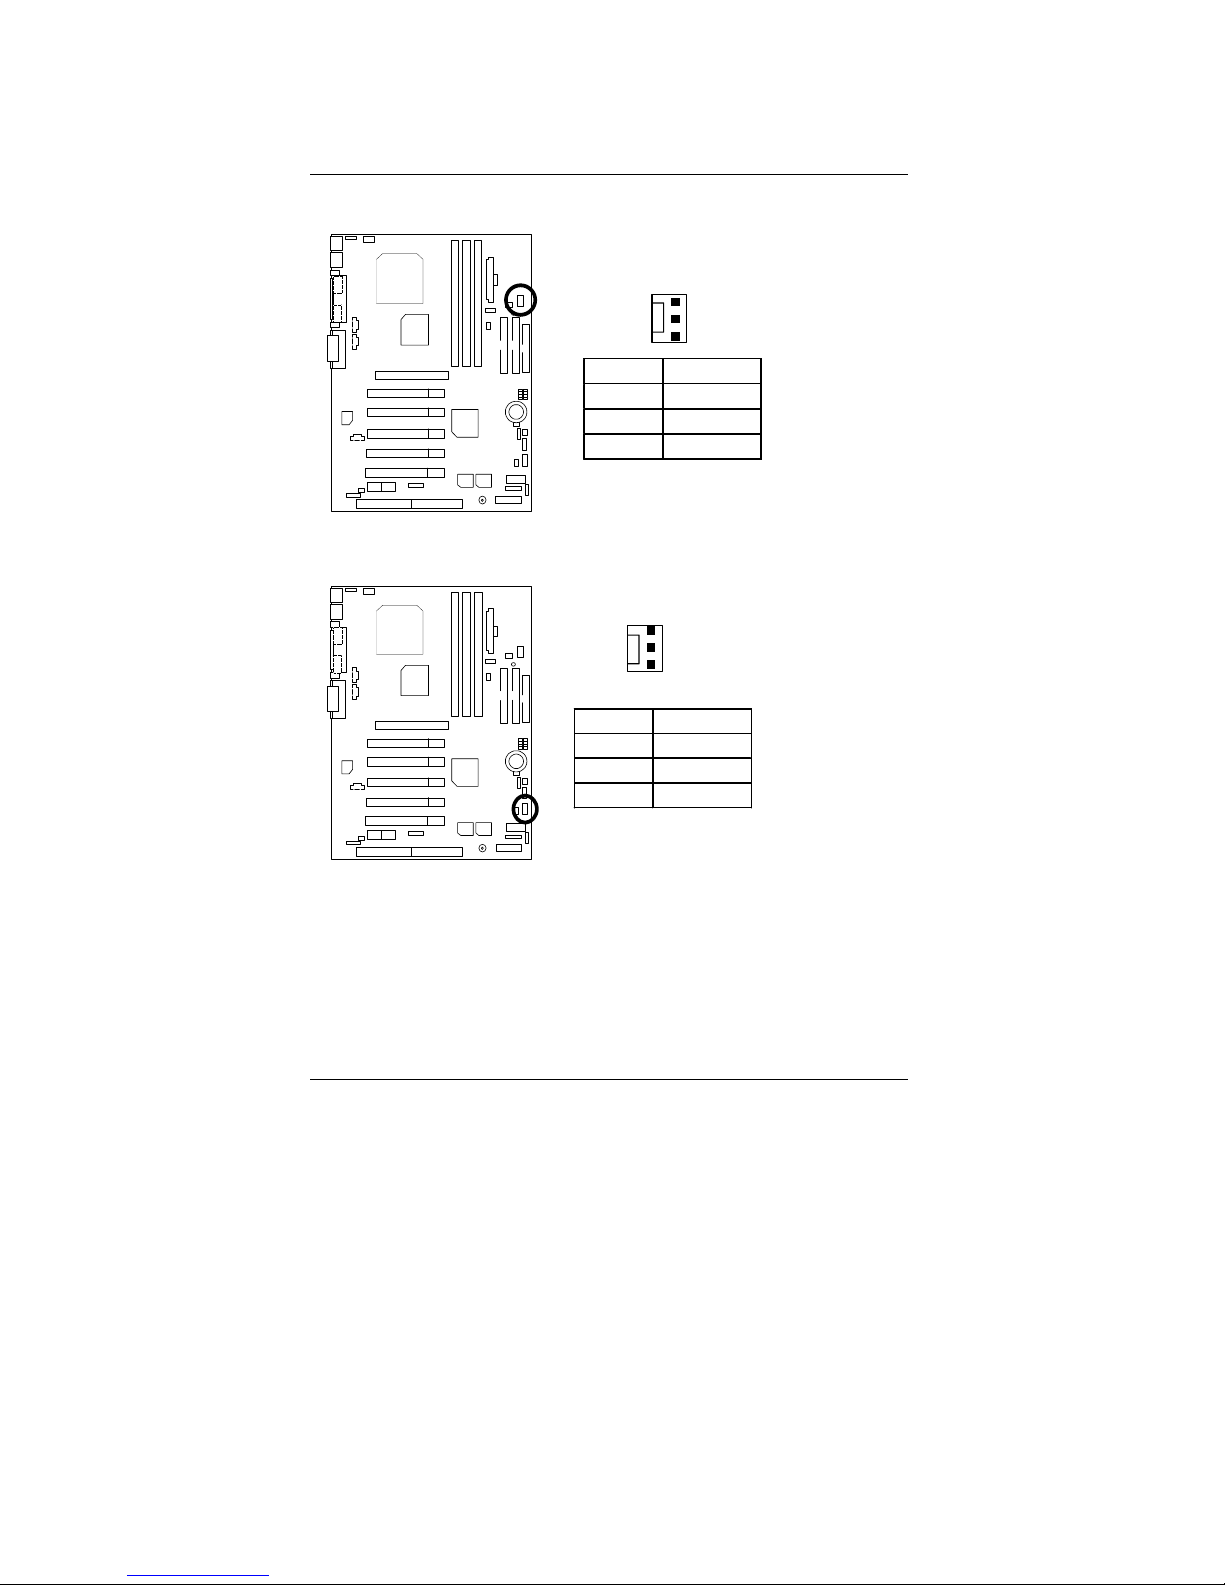
7ZX-H Motherboard
11
JP6: Power Fan
Pin No. De fin ition
1 Control
2 +12V
3 NC
1
J2: Sysem Fan
Pin No. Definition
1 Control
2 +12V
3 SENSE
1
Page 44
Connectors
12
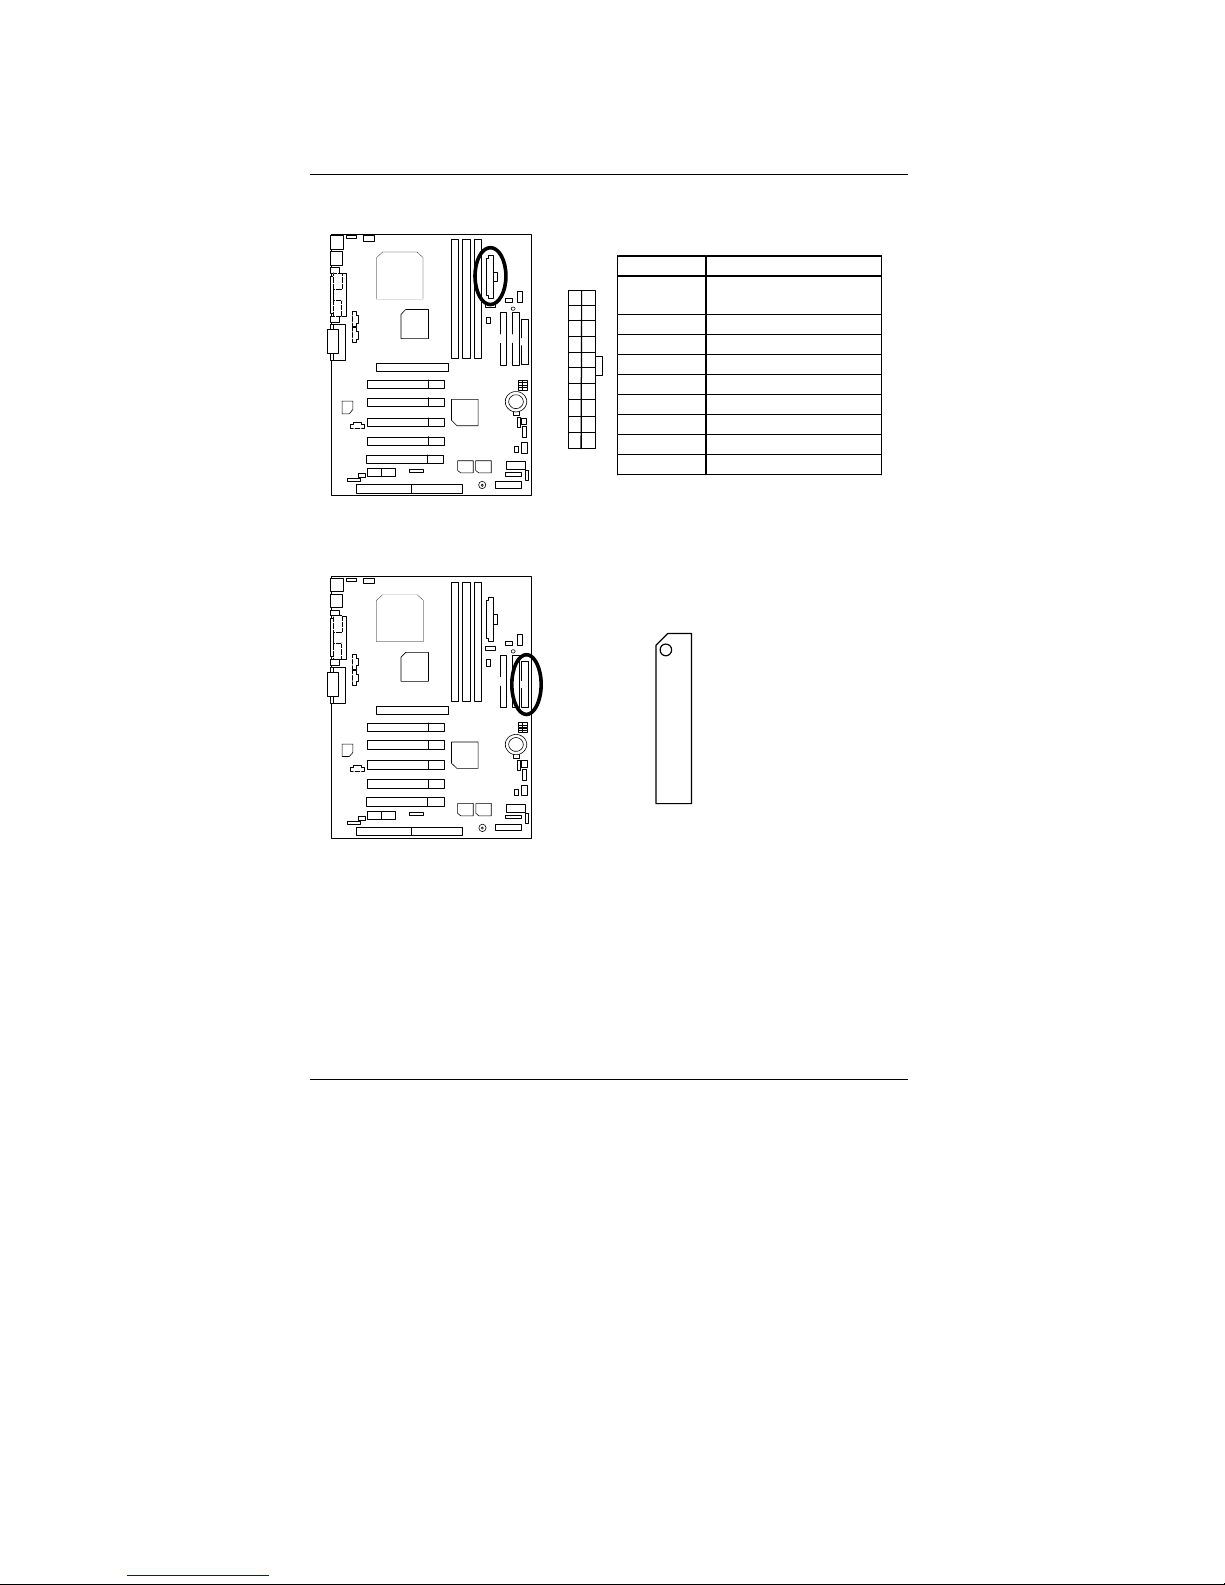
ATX Power
Pin No. Definition
3,5,7,13,
15-17
GND
1,2,11 3.3V
4,6,19,20 VCC
10 +12V
12 -12V
18 -5V
8 Power Good
9 5V SB (stand by+5V)
14 PS-ON (Soft On/Off)
2010
11
1
Floppy Port
Red Line
FDD1
Page 45
7ZX-H Motherboard
13
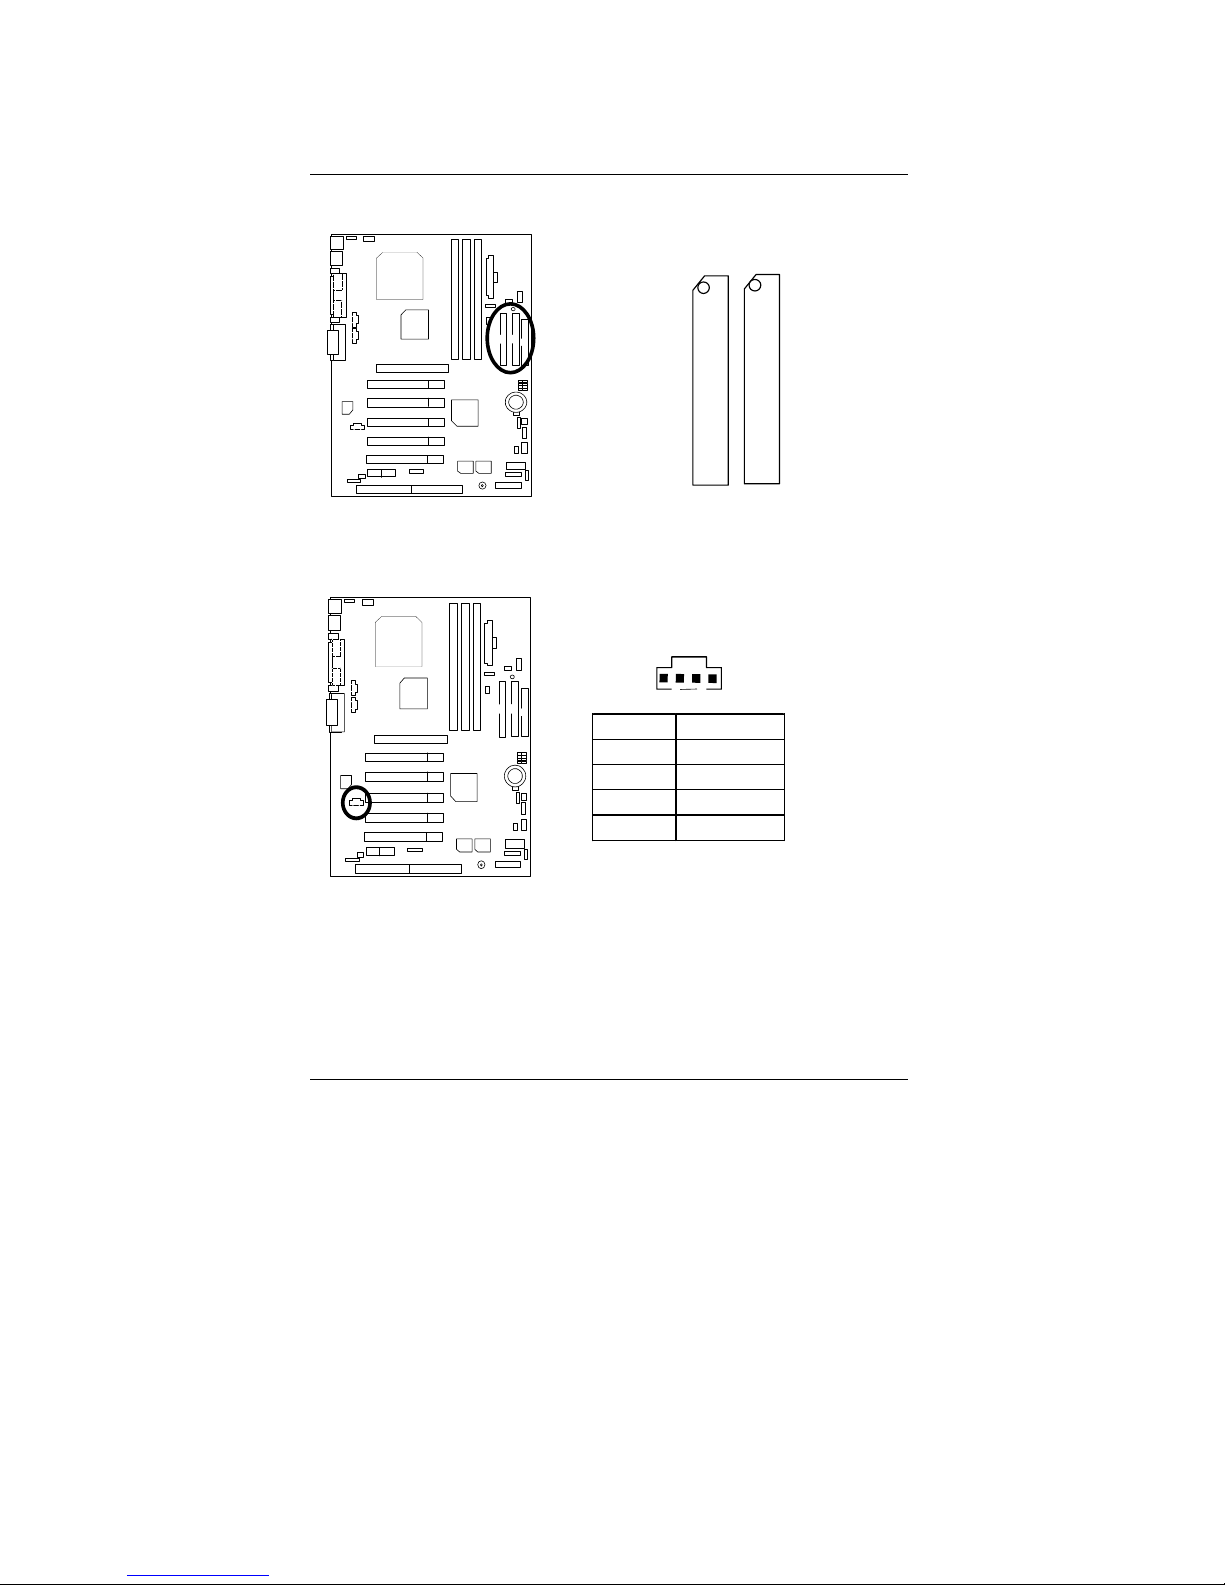
IDE1 (Primary), IDE2 (Secondary) Port
IDE 1 I DE 2
Red Line
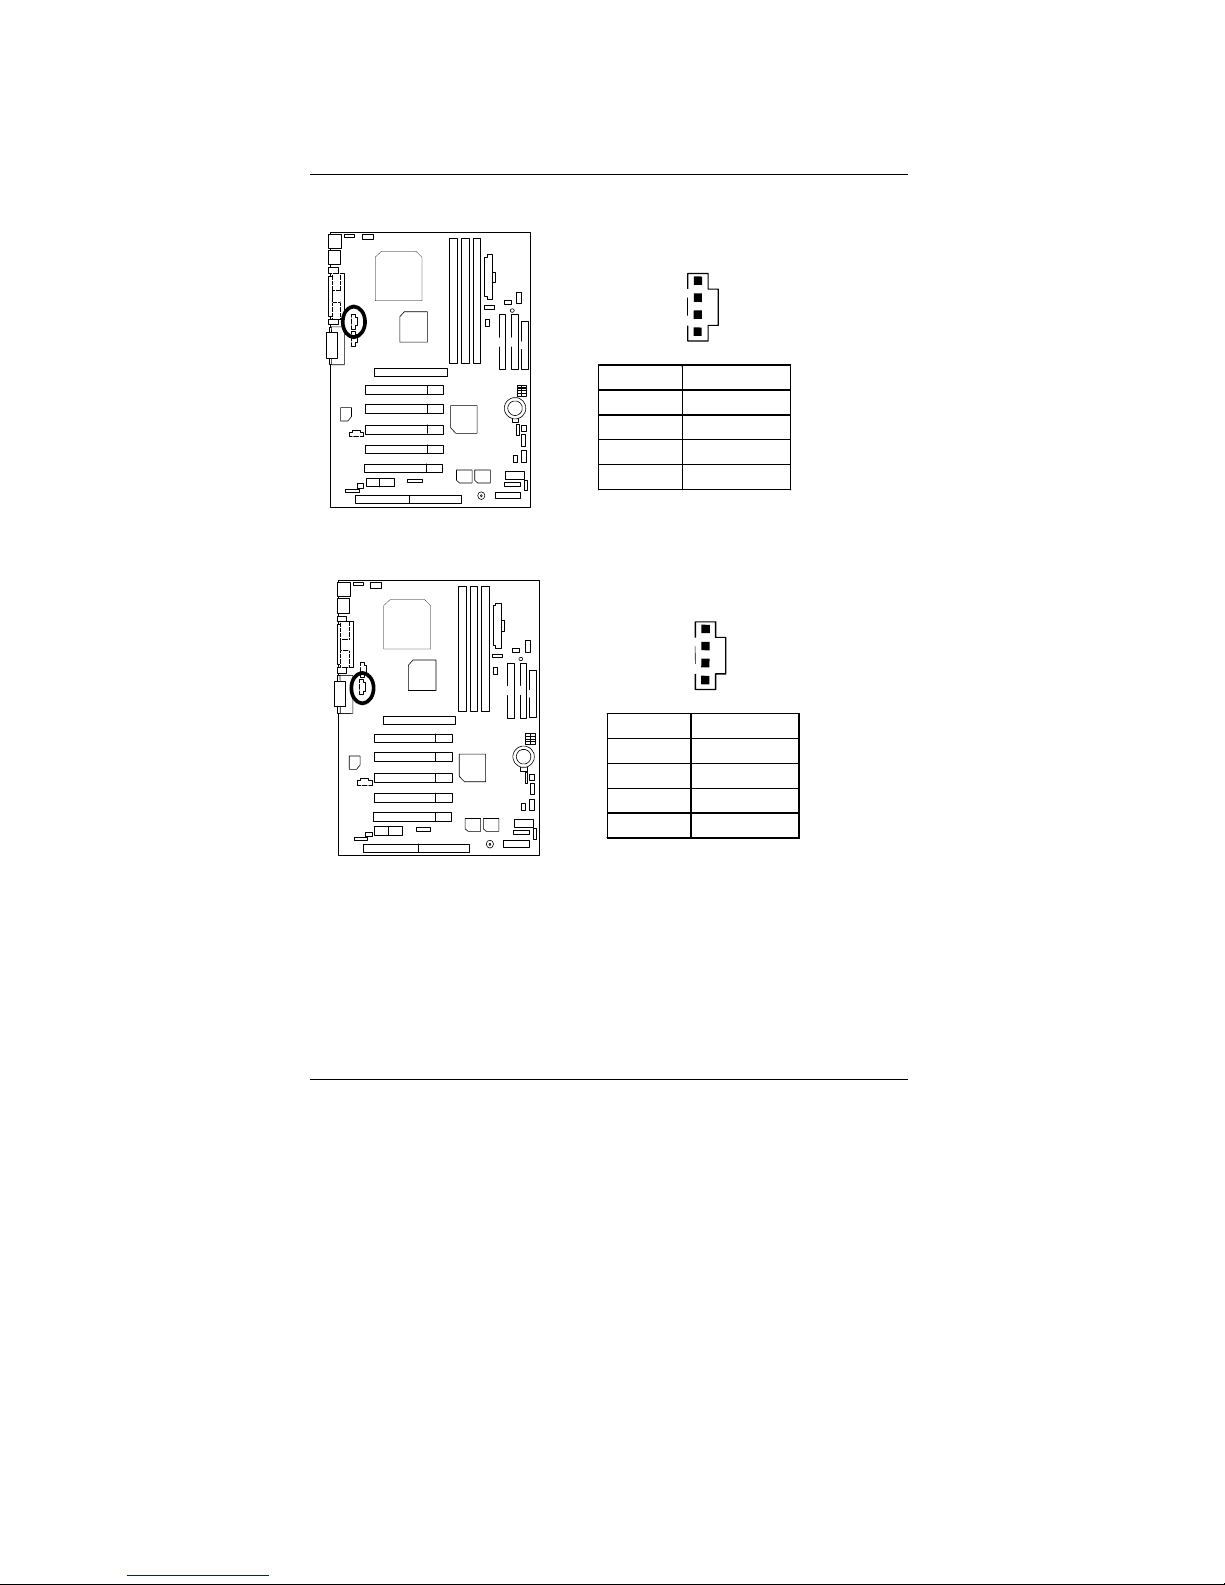
J16 TEL: The connector is for Modem with internal voice connector
Pin No. Definition
1 Signal-In
2 GND
3 GND
4 Signal-Out
1
Page 46
Connectors
14
J15: AUX_IN
Pin No. Definition
1 AUX-L
2 GND
3 GND
4 AUX-R
1
J18: CD Audio Line In
Pin No. Definition
1 CD-L
2 GND
3 GND
4 CD-R
1
Page 47
7ZX-H Motherboard
15
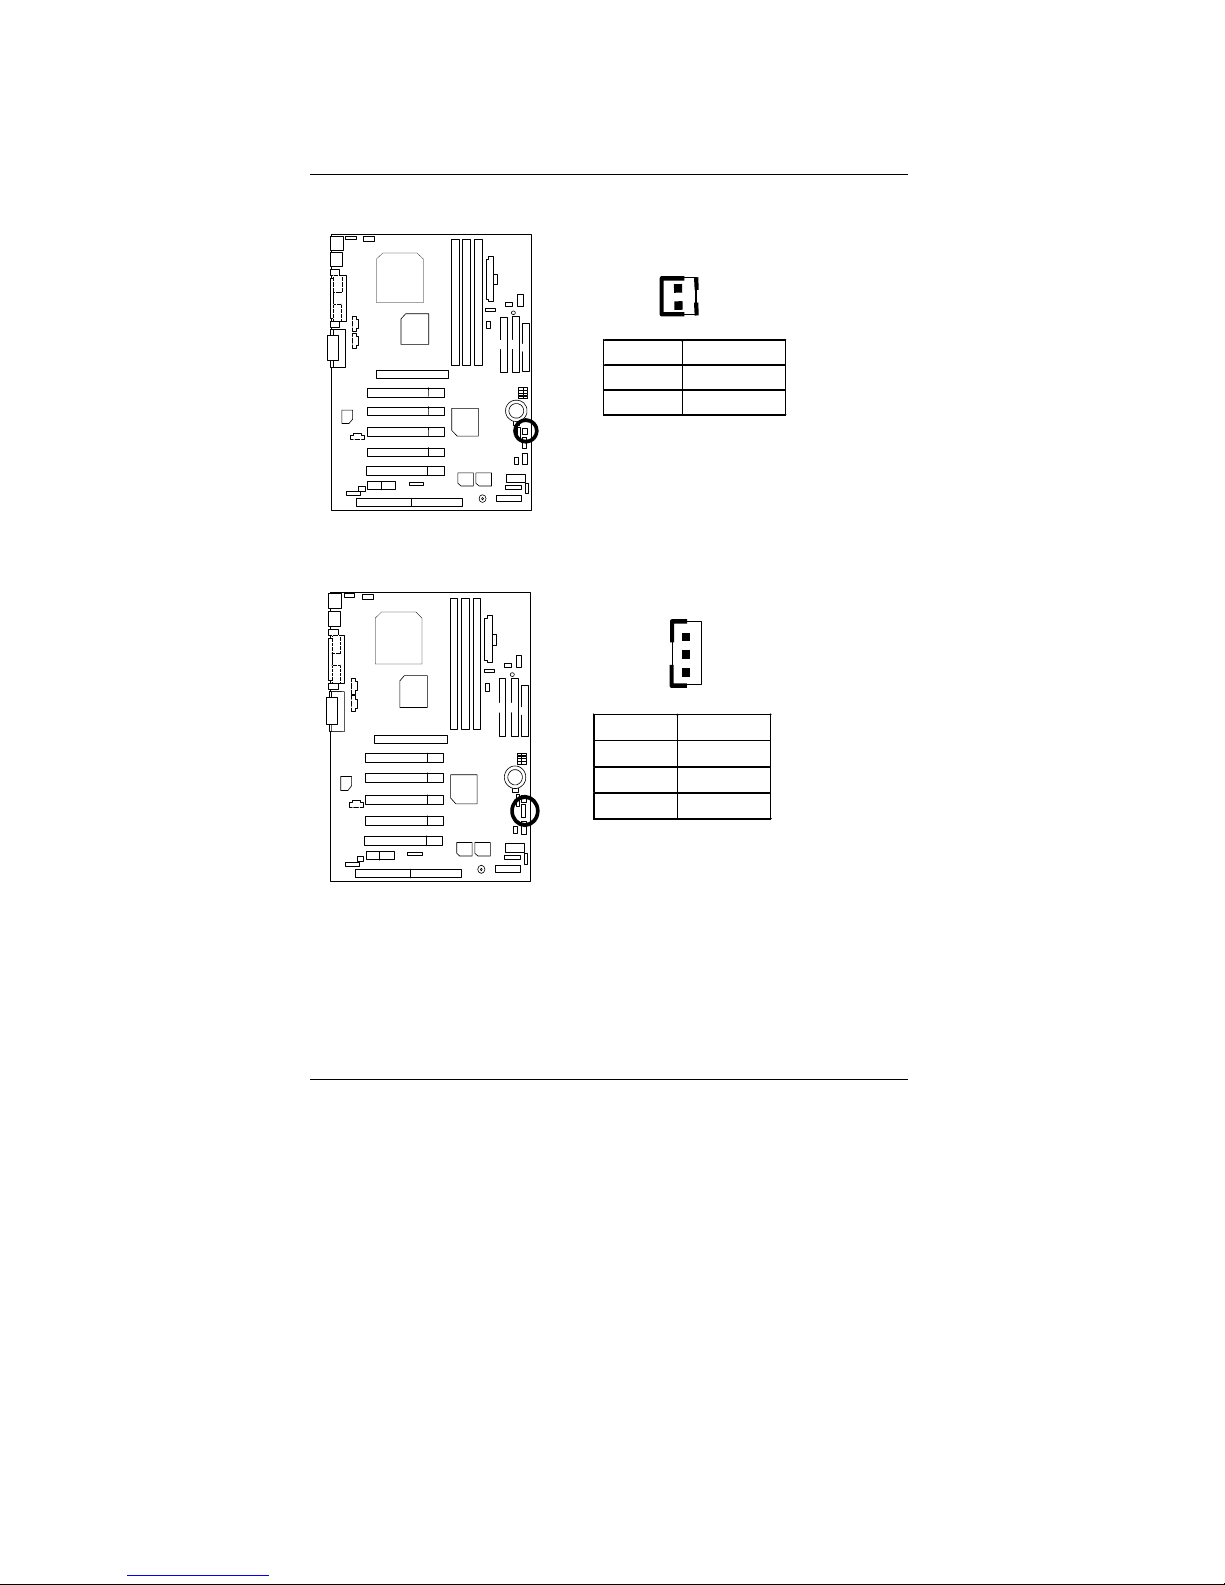
J13: Ring Power On (Internal Modem Card Wake Up)
Pin No. Definition
1 Signal
2 GND
1
J12: Wake On LAN
Pin No. Defin i tio n
1 +5V SB
2 GND
3 Signal
1
Page 48
Connectors
16
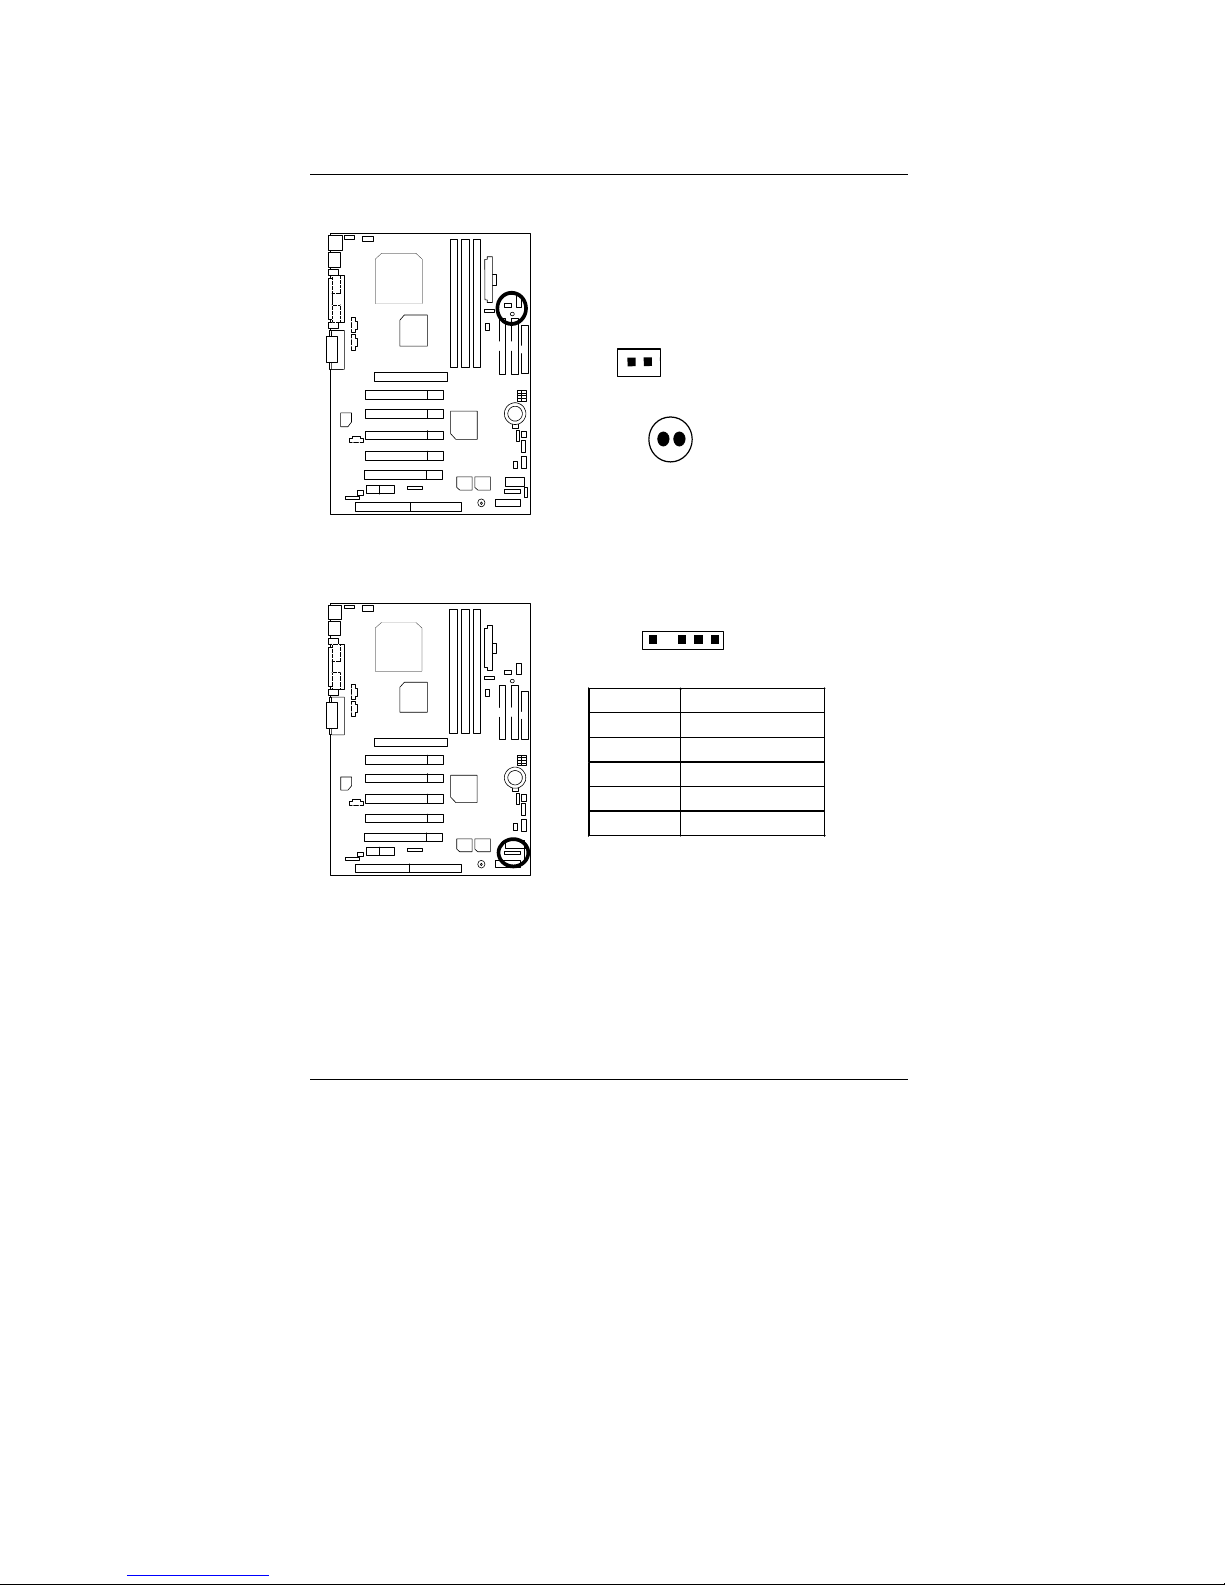
JP8 / LED1: STR LED Connector & DIMM LED
STR LED Connector External.
+ DIMM LED
1
J4: IR
Pin No. Definition
1 VCC (+5V)
2 NC
3 IR Data Input
4 GND
5 IR Data Output
1
Page 49
7ZX-H Motherboard
17
Panel And Jumper Definition
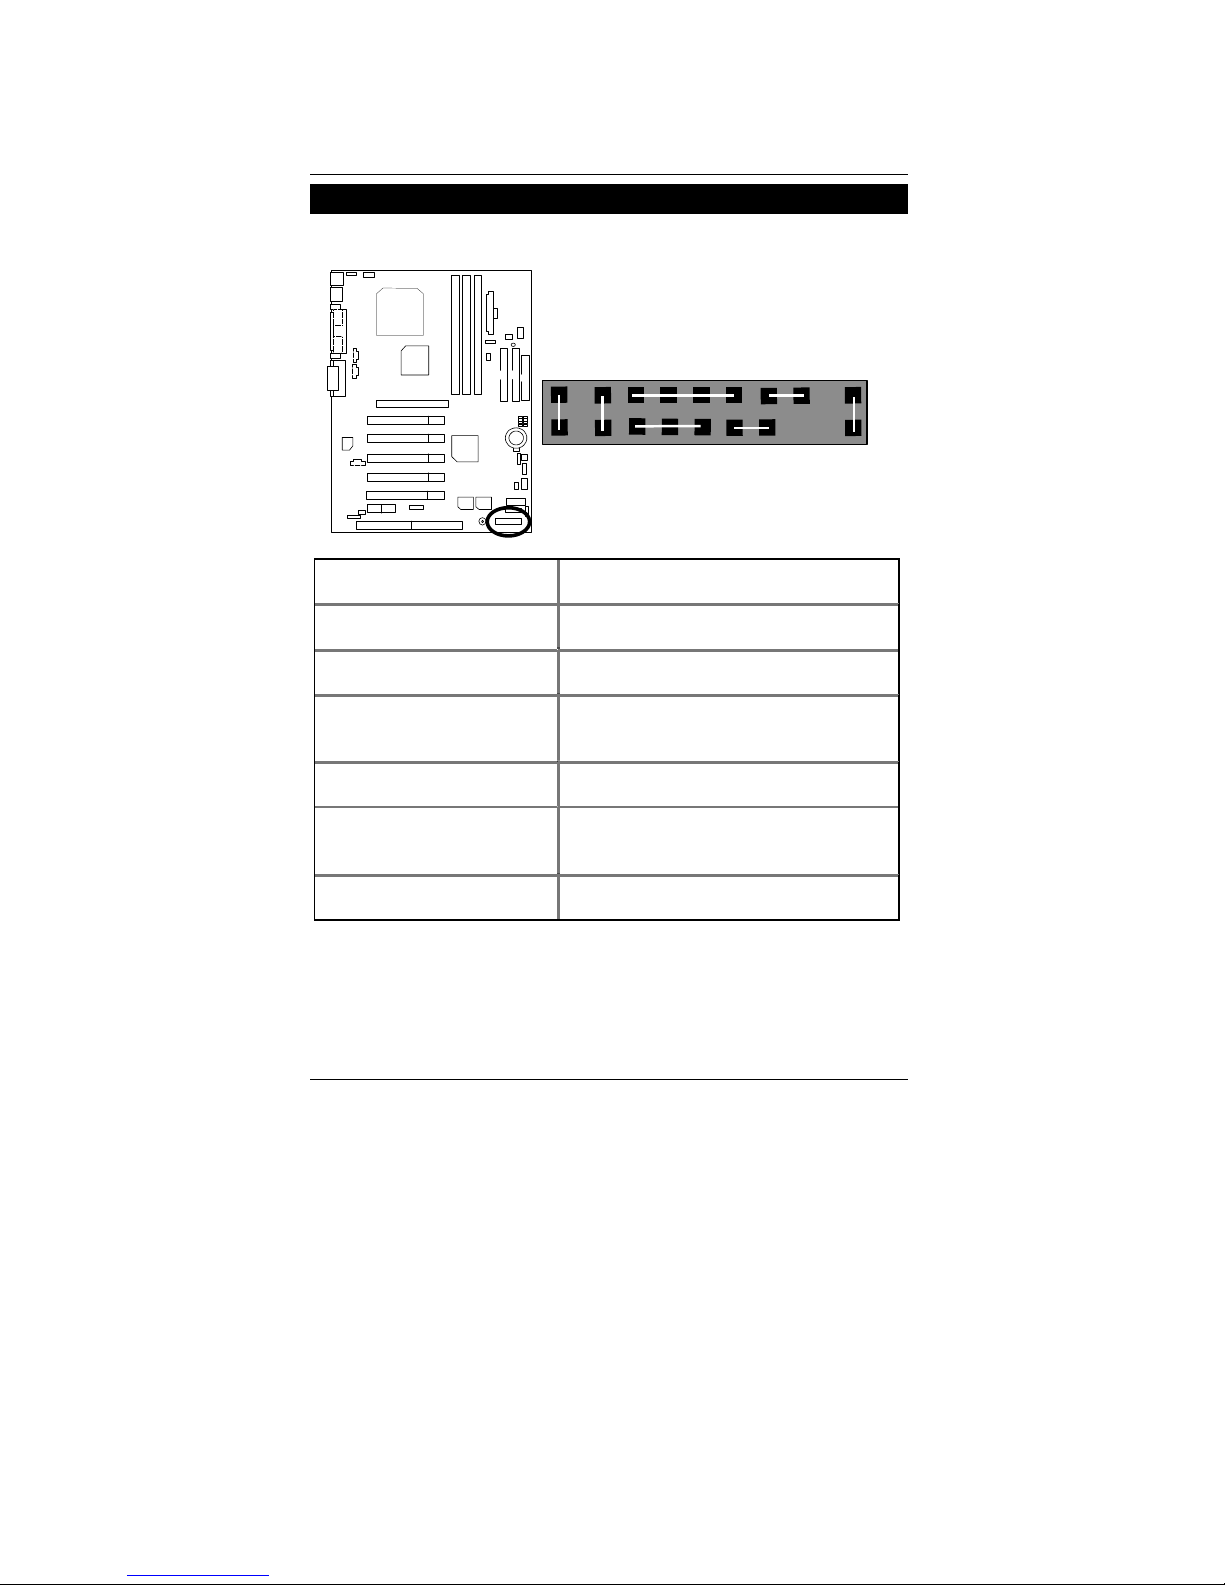
J11: 2x11 Pins Jumper
RE
GN
GD
PW
P−P−P+
S P K
HD
1
1
1
1
GN (Green Switch) Open: Normal Operation
Close: Entering Green Mode
GD (Green LED) Pin 1: LED anode(+)
Pin 2: LED cathode(−)
HD (IDE Hard Disk Active LED) Pin 1: LED anode(+)
Pin 2: LED cathode(−)
SPK (Speaker Connector) Pin 1: VCC(+)
Pin 2- Pin 3: NC
Pin 4: Data(−)
RE (Reset Switch) Open: Normal Operation
Close: Reset Hardware System
P+P−P−(Power LED)
Pin 1: LED anode(+)
Pin 2: LED cathode(−)
Pin 3: LED cathode(−)
PW (Soft Power Connector) Open: Normal Operation
Close: Power On/Off
Page 50
Panel and Jumper Definition
18
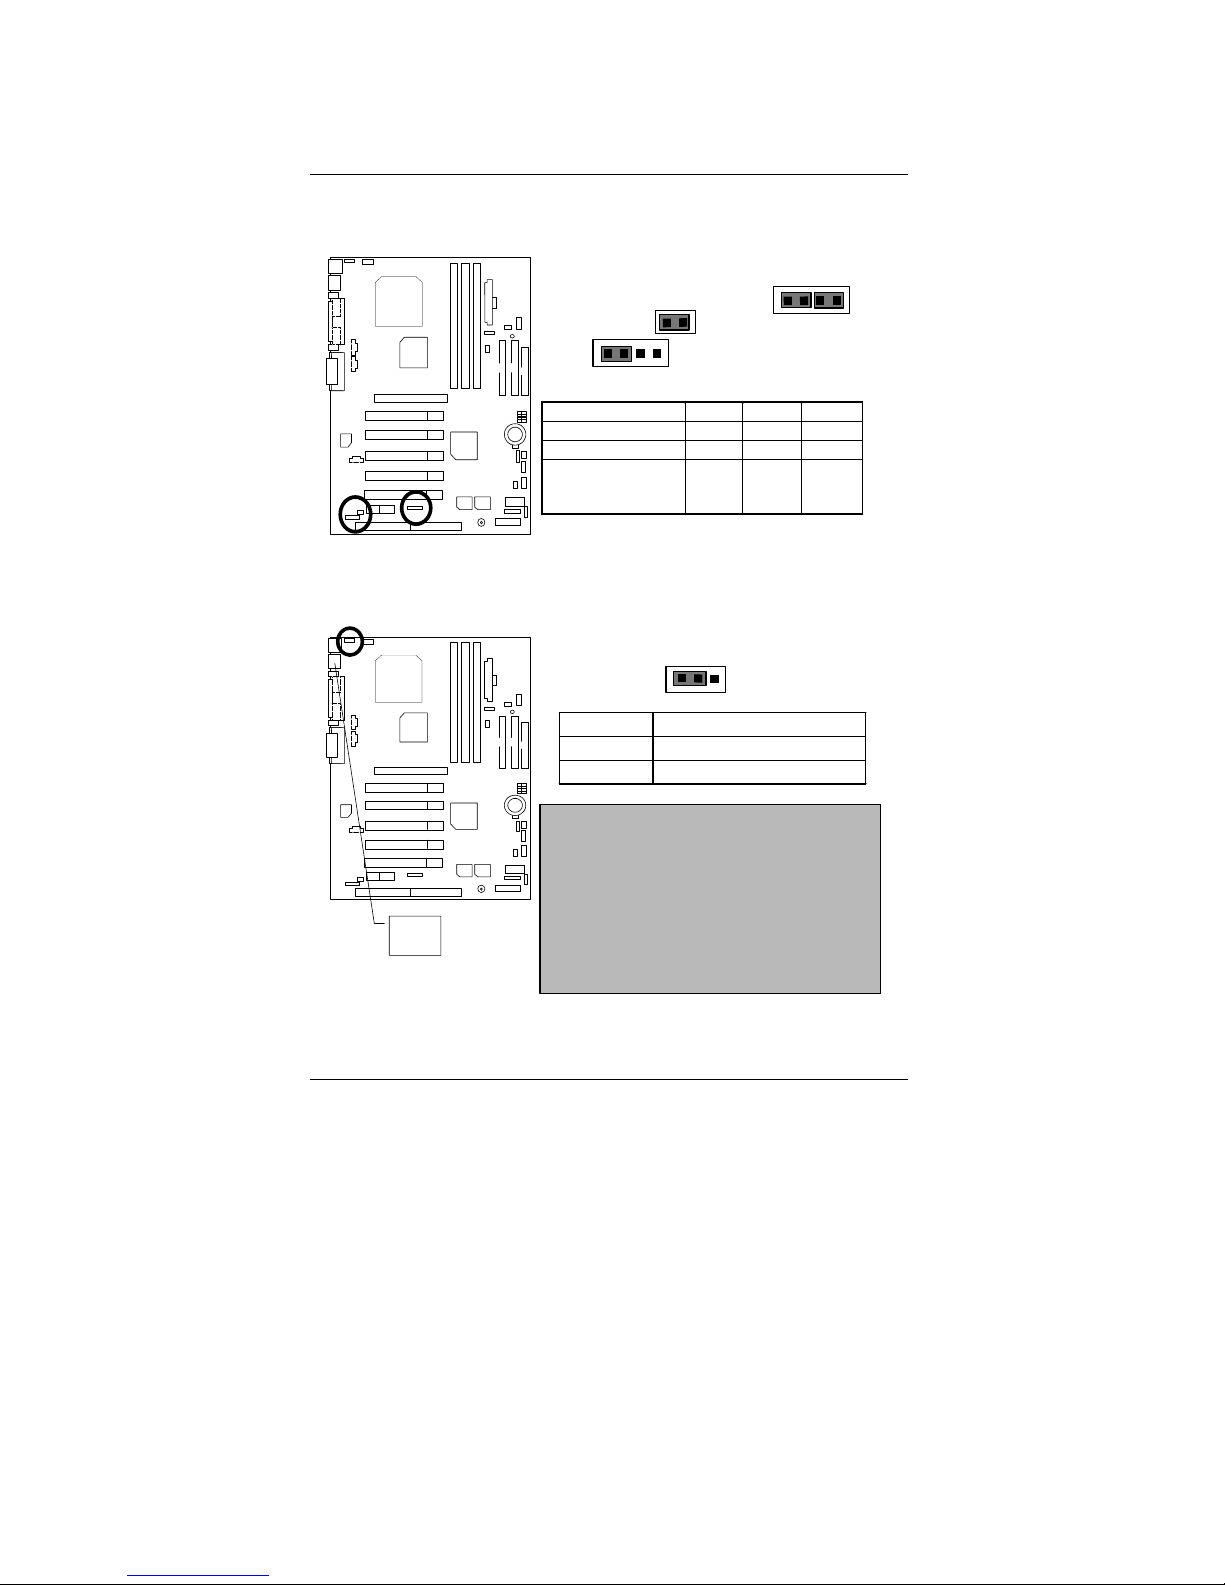
JP16 /JP17/JP18: AMR (Primary or Secondary) Select (Optional)
(AMR Audio Modem Riser)
JP16 JP17 JP18
Onboard AC97 ON 1-2 1-2
AMR (Pri mary) OFF 3-4 3-4
Onboard AC97+MR
(Secondary)
(Default)
ON 1-2
3-4
1-2
1
JP17
1
JP16
1
JP18
JP4: Rear USB Device Wake up Selection (USB Connector USB1)
Pin No. Definition
1-2 Close Nor m al (Def aul t)
2-3 Close USB Device Wake up
1
(If you want to use "USB Dev Wakeup From S3-S5"
function, you have to set the BIOS setting "USB Dev
Wakeup From S3-S5" enabled, and the jumper "JP4"
enabled).
*(Power on the computer and as soon as memory
counting starts, press <Del>. You will enter BIOS Setup.
Select the item "POWER MANAGEMENT SETUP", then
select "USB Dev Wakeup From S3-S5: Enabled".
Remember to save the setting by pressing "ESC" and
choose the "SAVE & EXIT SETUP" option.)
USB1
Page 51
7ZX-H Motherboard
19
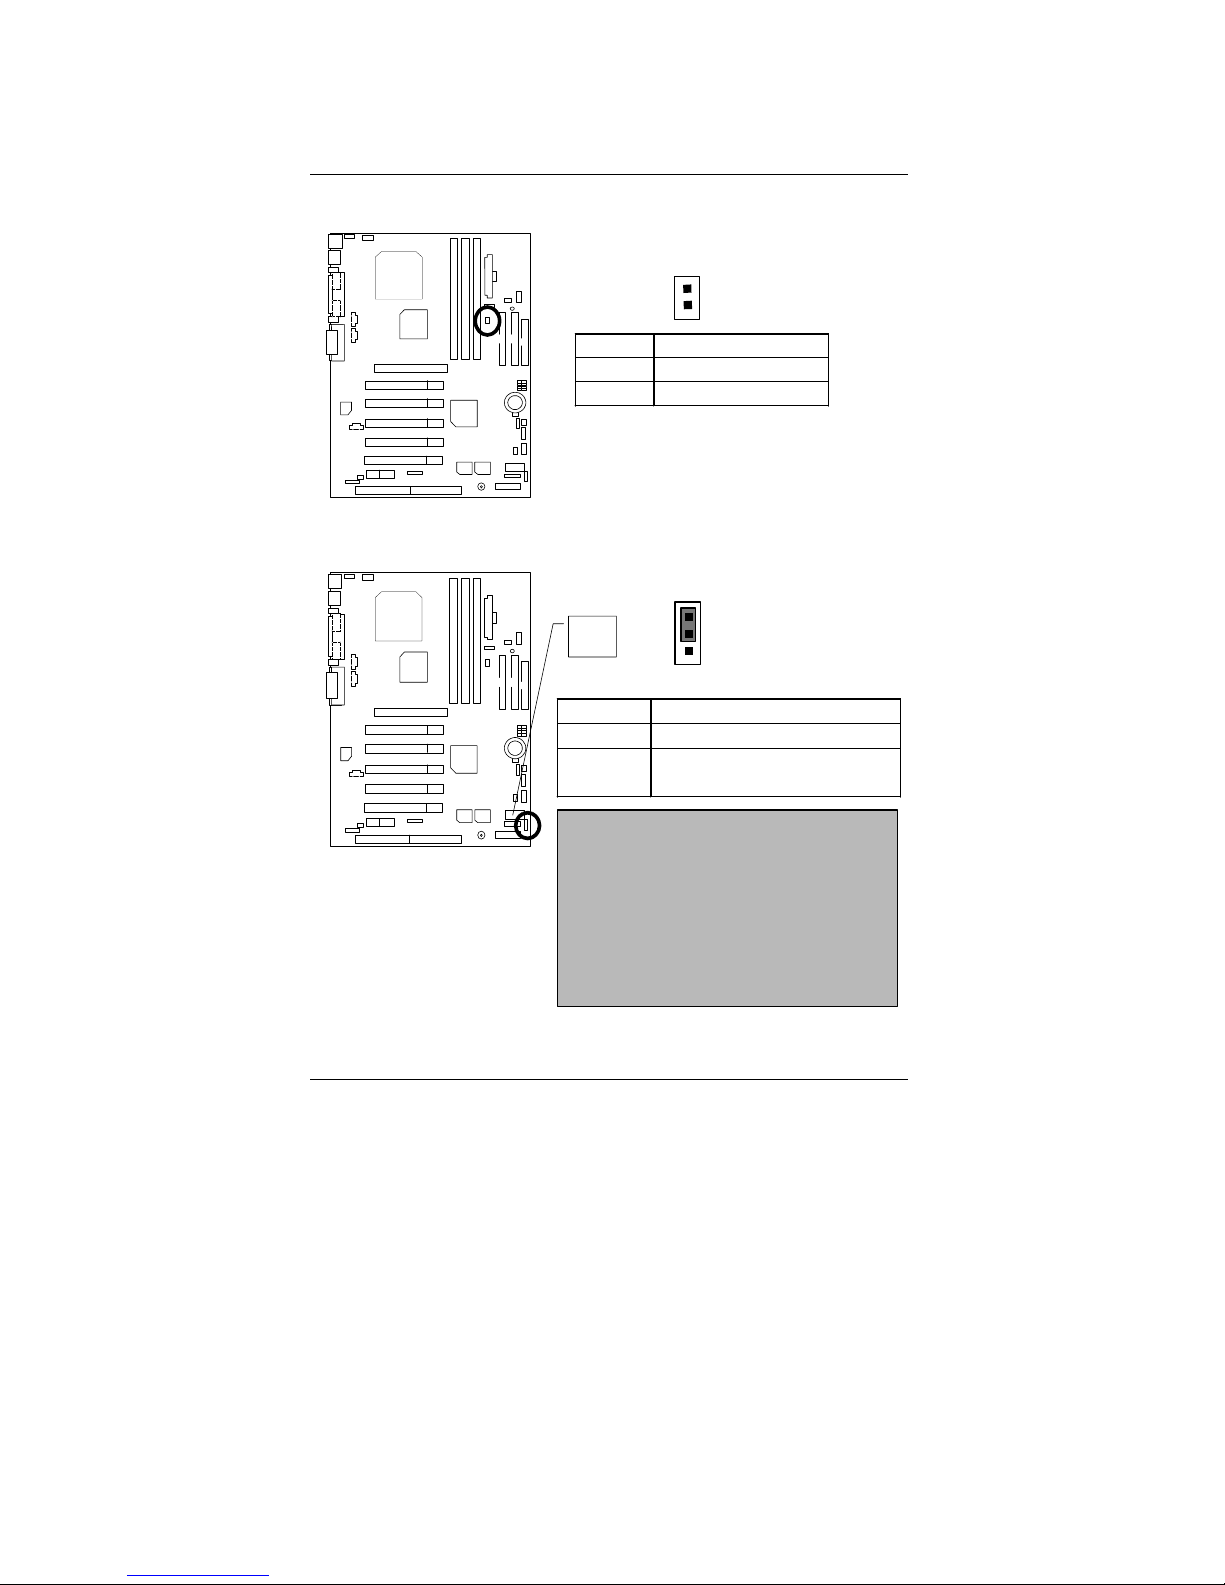
JP7: STR Function Enable
Pin No. Definition
Open Normal (Default)
Close STR Enabled
1
JP11: Front USB Device Wake up Selection (USB Port USB2)
1
Pin No. Definition
1-2 close Normal (Default)
2-3 close
Enabled Front USB Device
Wake up
USB2
(If you want to use "USB Dev Wakeup From S3-S5"
function, you have to s e t th e BIOS setting "US B D e v
Wakeup From S3-S5" enabled, and the jumper "JP11"
enabled).
*(Power on the computer and as soon as memory
counting starts, press <Del>. You will enter BIO S S etup.
Select the item "POWER MANAGEMENT SETUP", then
select "USB Dev Wakeup From S3-S5: Enabled".
Remember to save the setting by pressing "ESC" and
choose the "SAVE & EXIT SETUP" option.)
Page 52
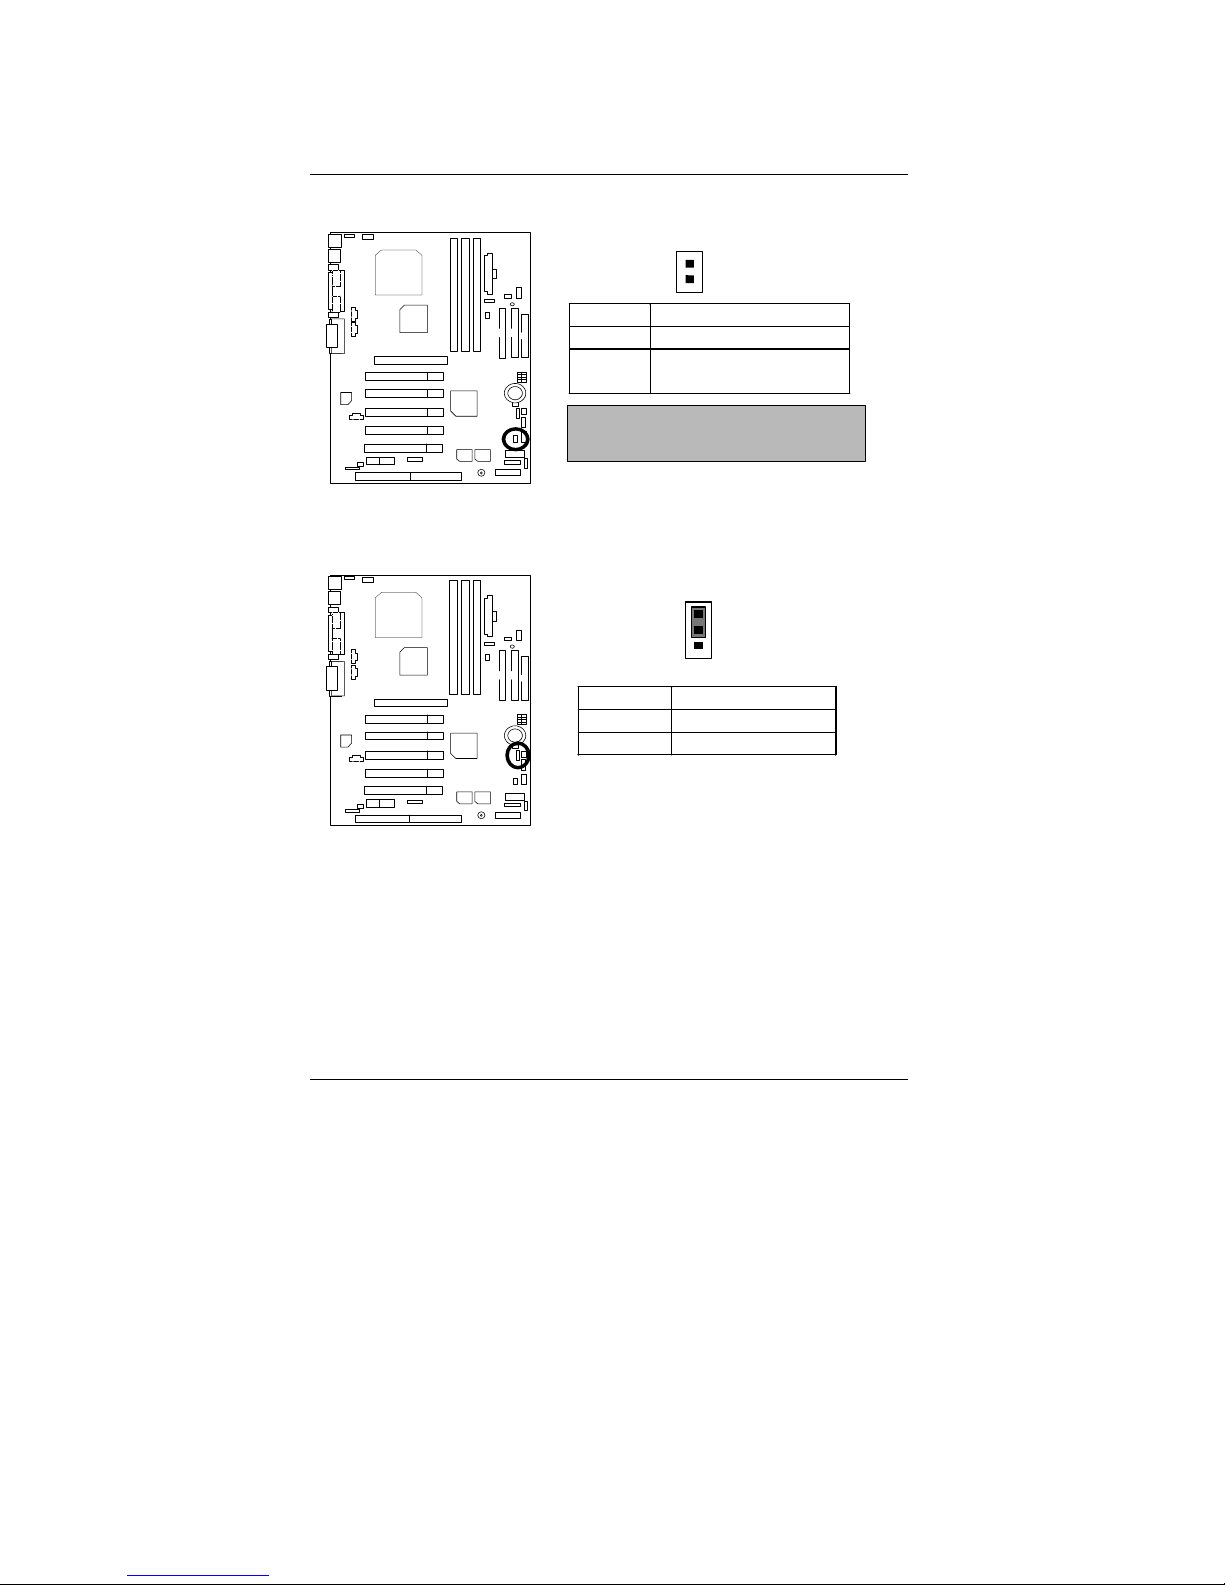
Panel and Jumper Definition
20
JP10: BIOS Write Protection (Optional)
Pin No. Definition
ON Write Protect Enable
OFF
Write Protect Disable
(Default)
1
Please Set Jumpe r JP10 to ”OFF” to enabled
BIOS Write Function when you update new BIOS
or new device
JP3: Clear CMOS Function (Optional)
Pin No . Definition
1-2 close Normal (Default)
2-3 close Clear CM OS
1
Page 53
7ZX-H Motherboard
21
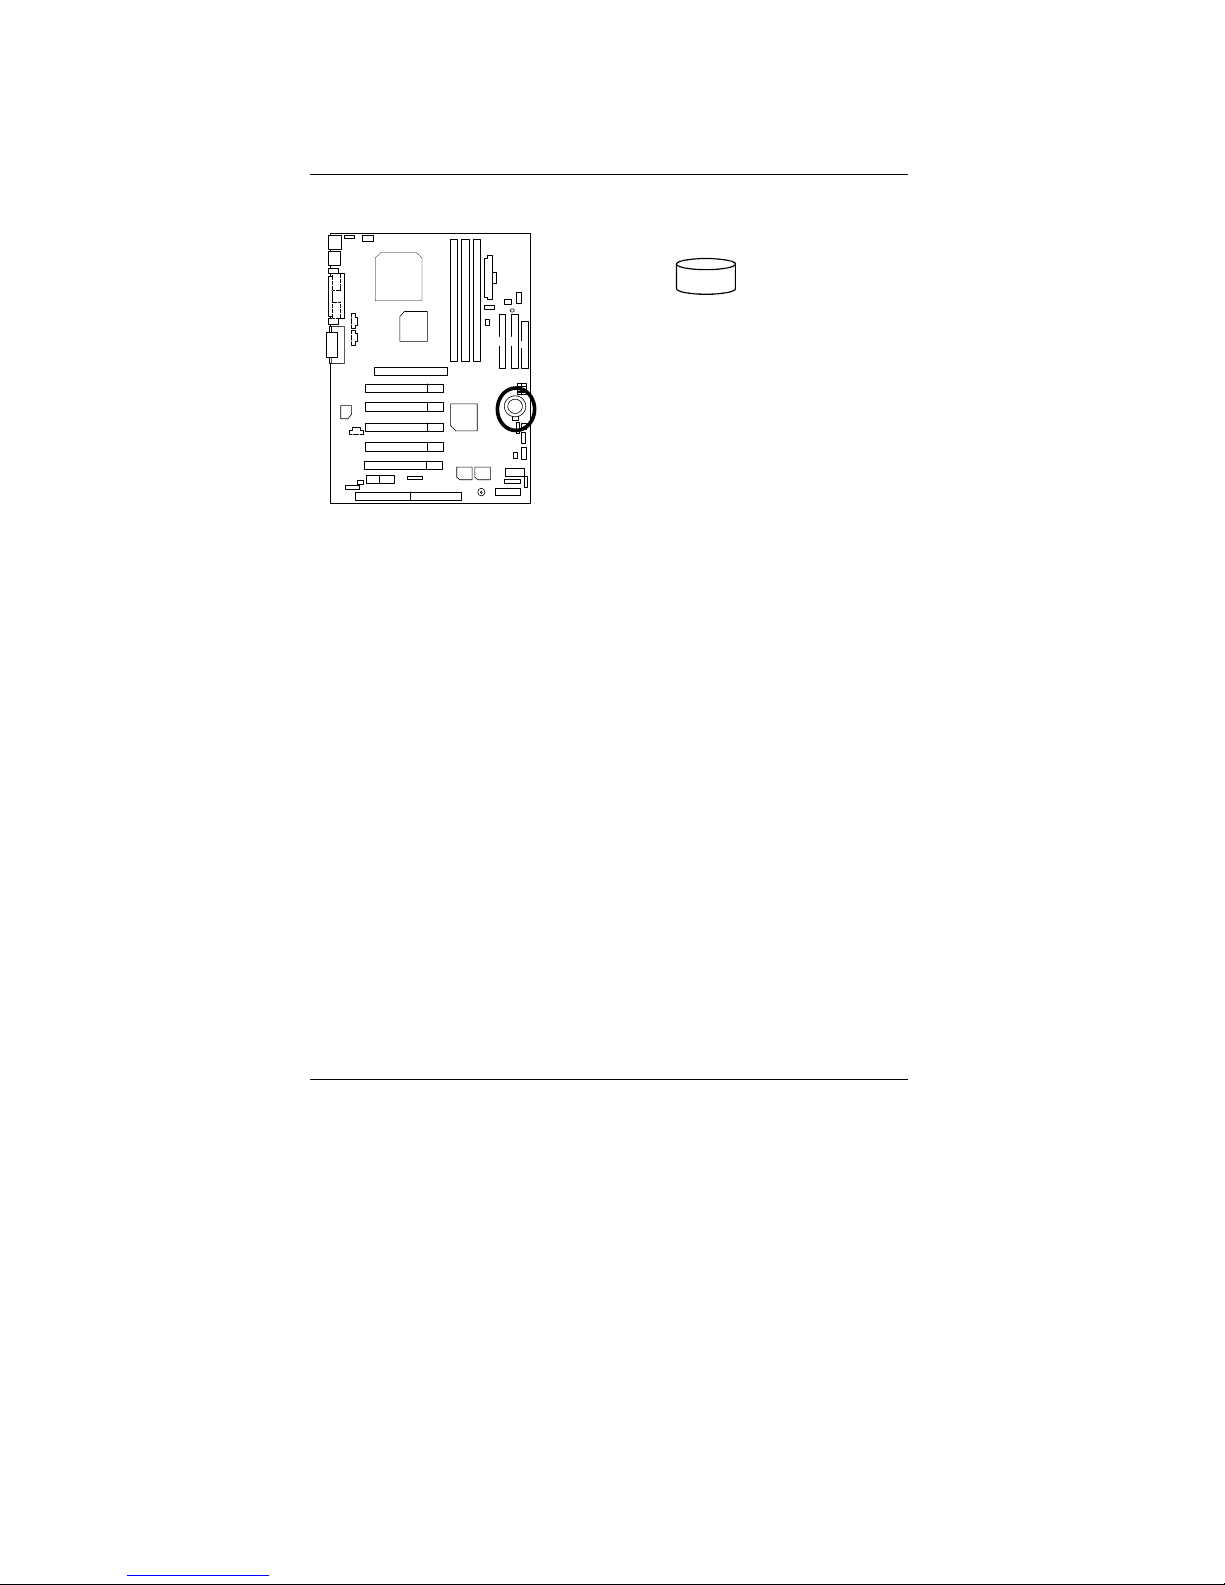
BA T1: Batt ery
+
CAUTION
Danger of explosion if battery
is incorrectly replaced.
Replace only with the sam e o r
equivalent type recommended
by the manufacturer.
Dispose of used batteries
according to the manu fac ture r’s
instructions.
Page 54

Performance List
22
Performance List
The following performance dat a list is the testing results of some popular bench mark testing
programs.
These data are just referred by users, and there is no responsibility for different testing data
values gotten by users. (The different Hardware & Software configuration will result in different
benchmark testing results.)
• CPU AMD Althon
TM
1200MHz, AMD DuronTM 900MHz
• DRAM (128x1) MB SDRAM (Winbond W986408CH-75)
• CACHE SIZE 384 KB included in Althon
TM
192 KB included in DuronTM
• DISPLAY GA-GF2000
• STORAGE Onboard IDE (Quantum AS30000AT 30GB)
• O.S. Windows 2000 + SP1 + DirectX8
• DRIVER
Display Driver at 1024 x 768 x 64k colors 75Hz.
TUCD ver.1.7
Processor
AMD
Althon
TM
1200MHz (100x12)
AMD Duron
TM
900MHz (100x9)
Winbench99
Business Disk Winmark 99 7500 7700
Hi-End Disk Winmark 99 15400 15200
Business Graphics Winmark 99 525 370
Hi-End Graphics Winmark 99 1170 881
Winstone 2001
Business Winstone 2001 42.3 31.7
Content Creative Winstone 2001
43.7 35.2
If you wish to maximize the performance of your system, please refer to the detail on P.50
Page 55
7ZX-H Motherboard
23
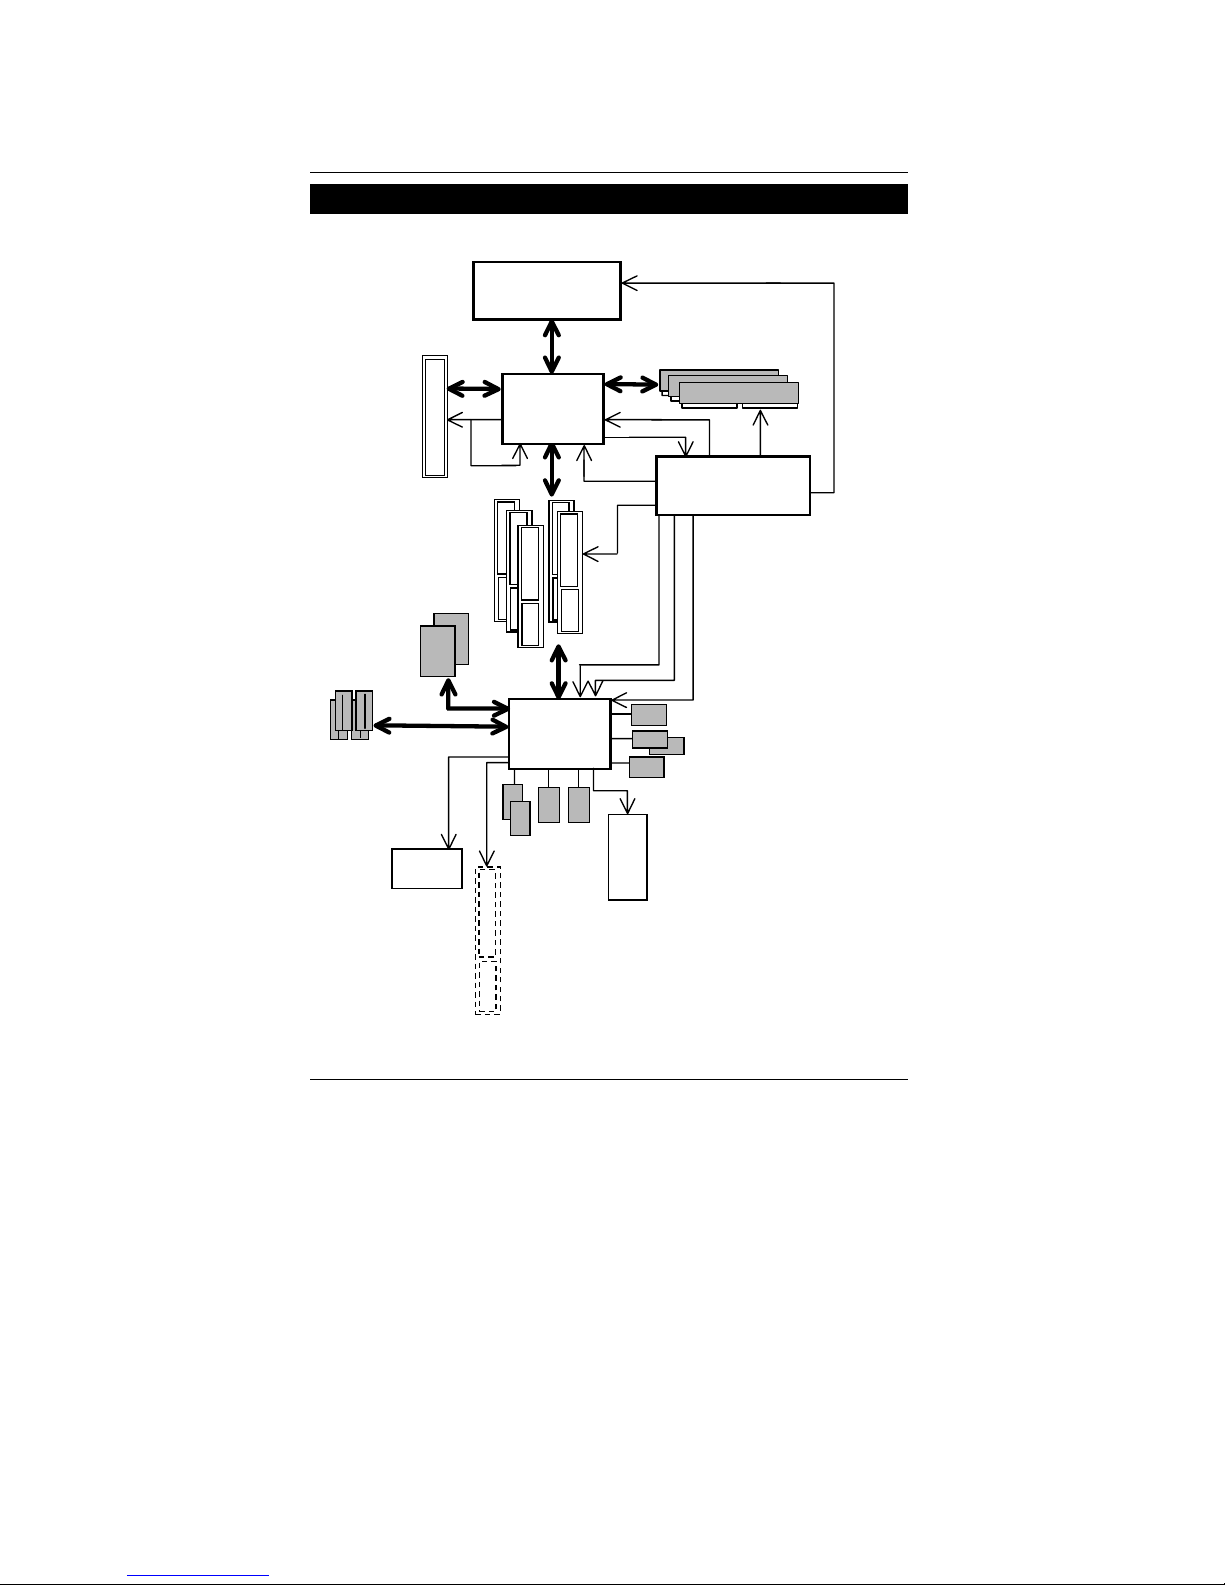
Block Diagram
100 / 133MHz
Socket A
VT8363A
System Bus
VT82C
686B
5 PCI
AGP
2X/4X
ICW W230H
4 USB Ports
ATA66/ATA100
IDE Channels
COM Ports
LPT Ports
PS/2
IR Floppy
Game Port
3.3V SDRAM
CPUCLK
33MHz
33MHz
100 / 133MHz
100 / 133MHz
33MHz
48MHz
66MHz
66MHz
14.318MHz
AMR
AC97
CODEC
ISA
Page 56

Suspend to RAM Installation
24
Suspend To RAM Installation
A.1 Introduce STR function:
Suspend-to-RAM (STR) is a Windo ws 98 ACPI sleep mode function. When recovering from
STR (S3) sleep mode, the system is able, in just a few seconds, to r etrieve the last “state” of
the system before it went to sleep and recover to that state. The “state” is stored in memory
(RAM) before the system goes to sleep. During STR sleep mode, your system uses only
enough energy to maintain critical information and system functions, primarily the system
state and the ability to recognize various “wake up” triggers or signals, respectively.
A.2 STR function Installation
Please use the following steps to complete the STR function installation.
Step-By-Step Setup
Step 1:
To utilize the STR function , the system must be in Windows 9 8 ACPI mode.
Putting Windows 98 into ACPI mode is fairly easy.
Setup with Windows 98 C D:
A. Insert the Windows 98 CD into your CD-ROM drive, select Start, and then Run.
B. Type (without quotes) “D:\setup” in the window provided. Hit the enter key or click OK.
C. After setup completes, remove the CD, and reboot your system
(This manual assumes that your CD-ROM device drive letter is D:).
Page 57
7ZX-H Motherboard
25
Step 2:
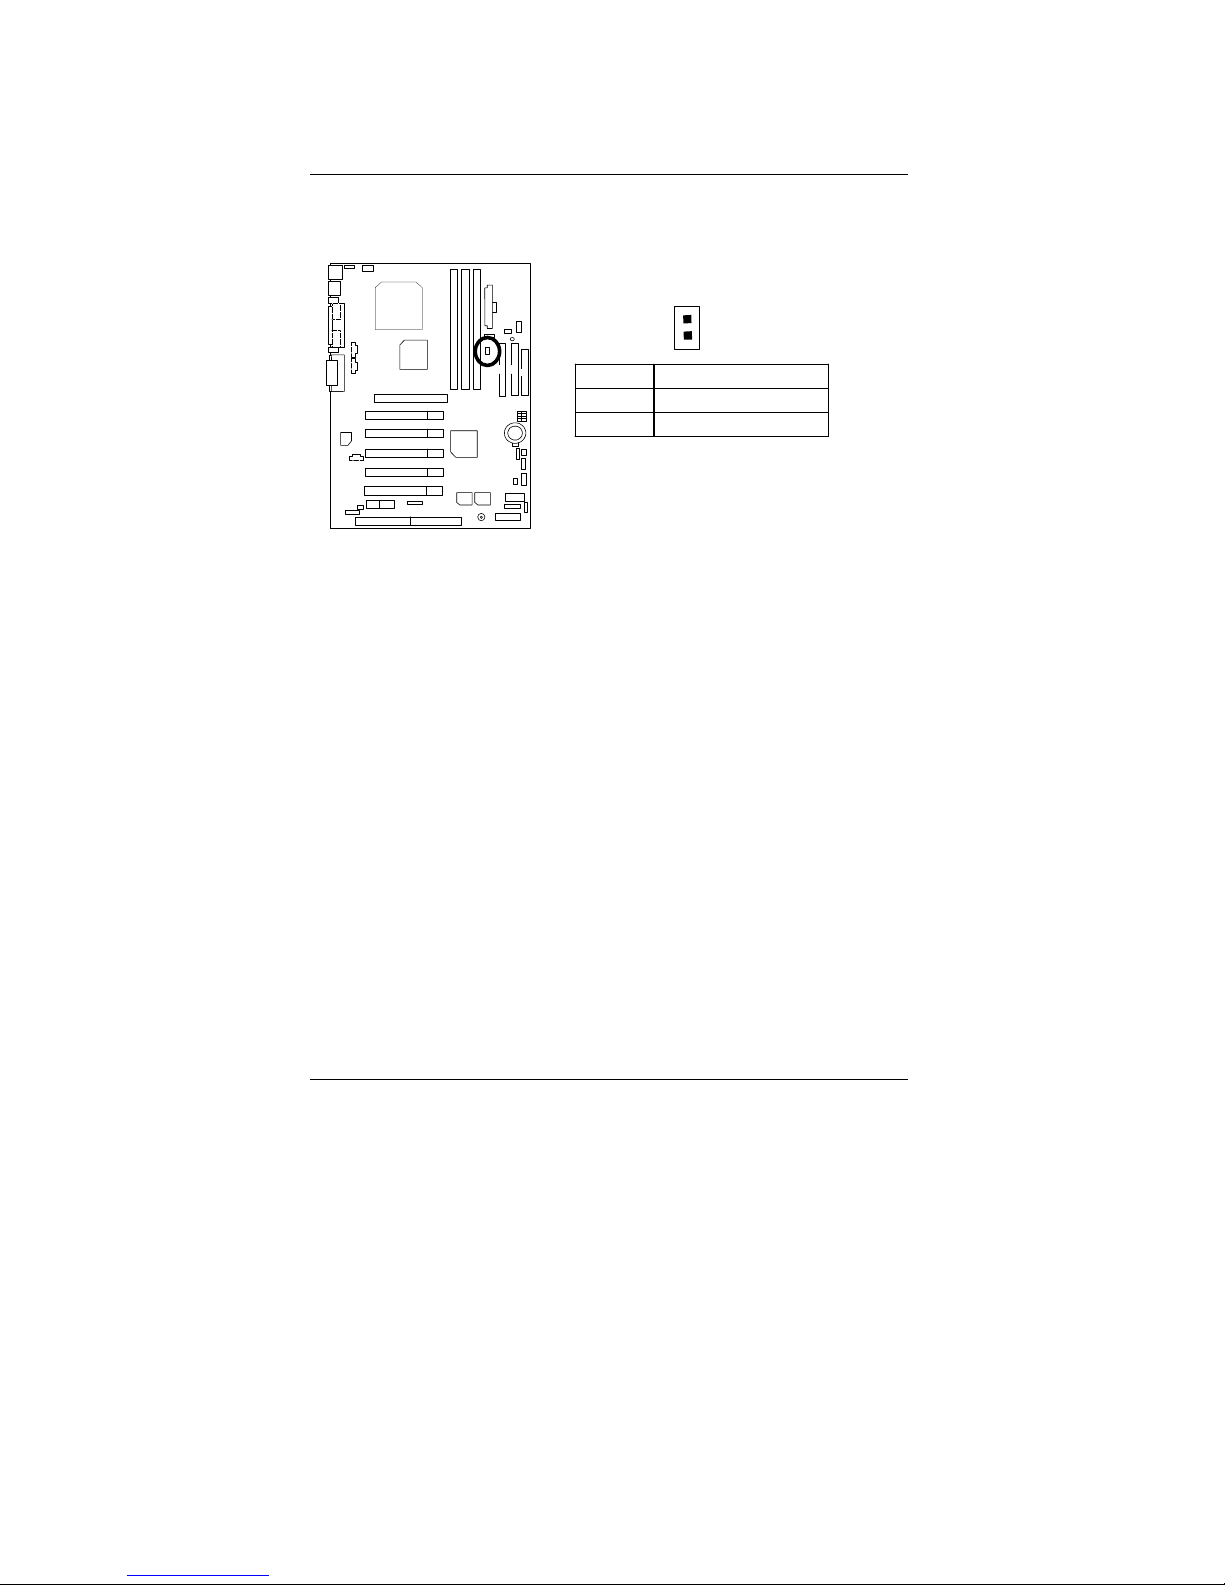
(If you want to use STR Function, please set jumper JP7 Closed.)
Pin No. Definition
Open Normal (Default)
Close STR Enabled
1
Step 3:
Power on the computer and as soon as memory counting starts, press <Del>. You will enter
BIOS Setup. Select the item “POWER MANAGEMENT SETUP”, then select “
ACPI Sleep
Type
: S3 / STR”. Remember to save the settings by pres sing "ESC" a nd choose the “SAVE
& EXIT SETUP” option.
Congratulation! You have completed the installation and now can use the STR function.
Page 58
Suspend to RAM Installation
26
A.3 How to put your system into STR mode?
There are two ways to accomplish this:
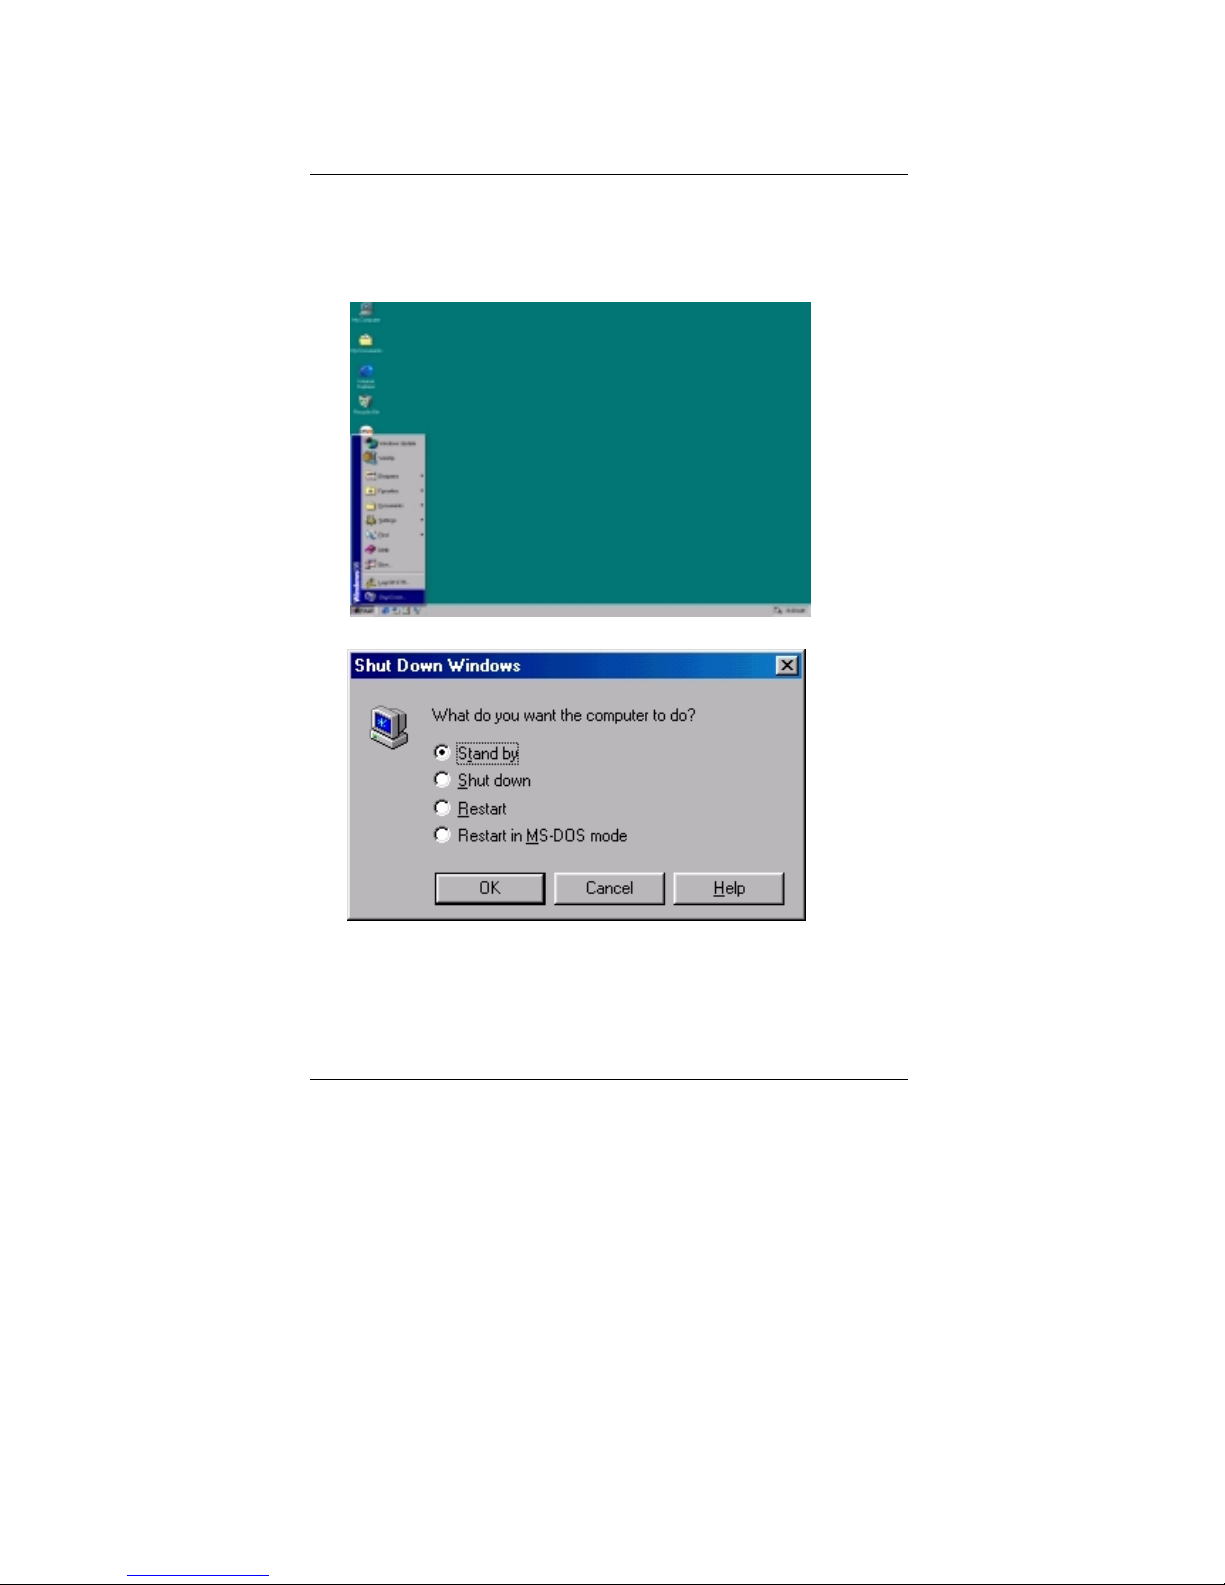
1. Choose the “Stand by” item in the “Shut Down Windows” area.
A. Press the “Start” button and then select “Shut Down”
B. Choose the “Stand by” item and press “OK”
Page 59
7ZX-H Motherboard
27
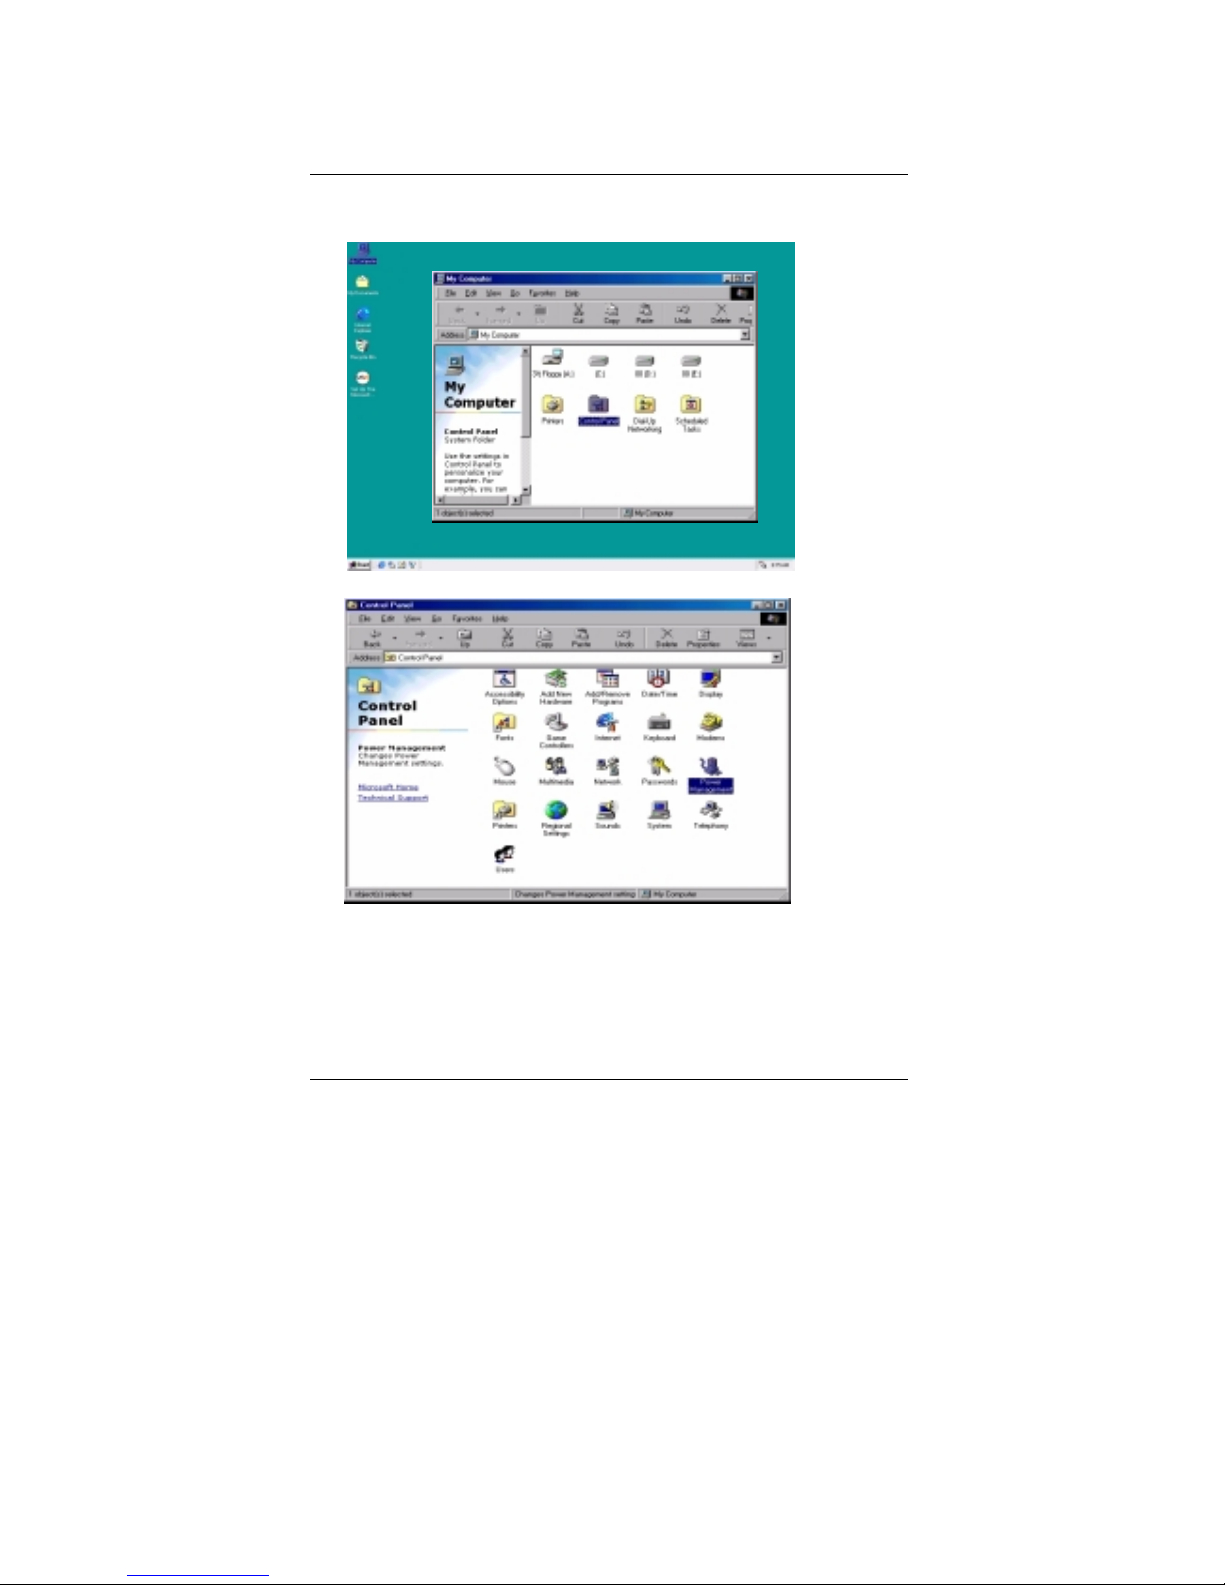
2. Define the system ”power on” button to initiate STR sleep mode:
A. Double click “My Computer” and then “Control Panel”
B. Double click the “ Power Management” item.
Page 60
Suspend to RAM Installation
28
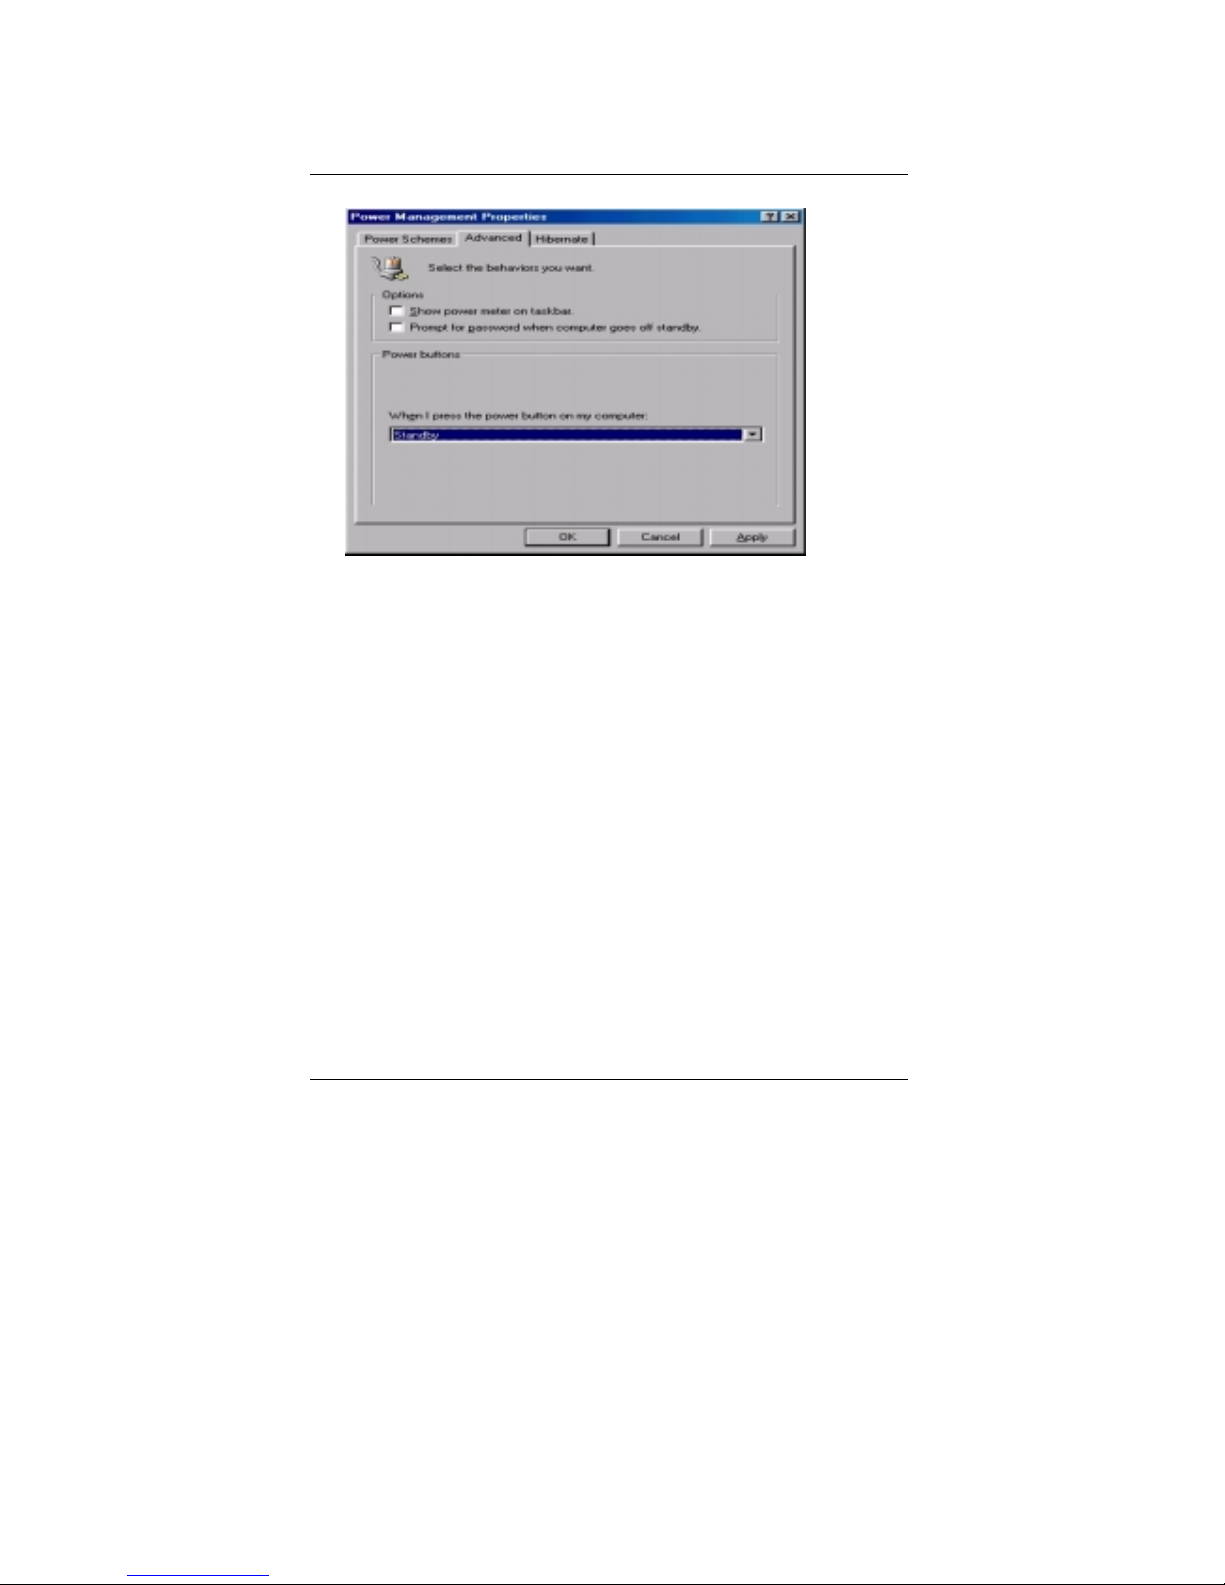
C. Select the “Advanced” tab and “Standby” mode in Power Buttons.
D. Restart your computer to complete setup.
Now when you want to enter STR sleep mode, just momentarily press the “Power on”
button.
A.4 How to recover from the STR sleep mode?
There are five ways to “wake up” the system:
1. Press the “Power On” button.
2. Use the “Resume by Alarm” function.
3. Use the “Modem Ring On” function.
4. Use the “Wake On LAN” function.
5. Use the “USB Device Wake Up” function.
Page 61
7ZX-H Motherboard
29
A.5 Notices:
1. In order for STR to function prop erly, several hard ware and software requirements must
be satisfied:
A. You r ATX power supply must comply with the ATX 2.01 spec ification (provide more
than 720 mA 5V Stand-By current).
B. Your SDRAM must be PC-100/PC-133 compliant.
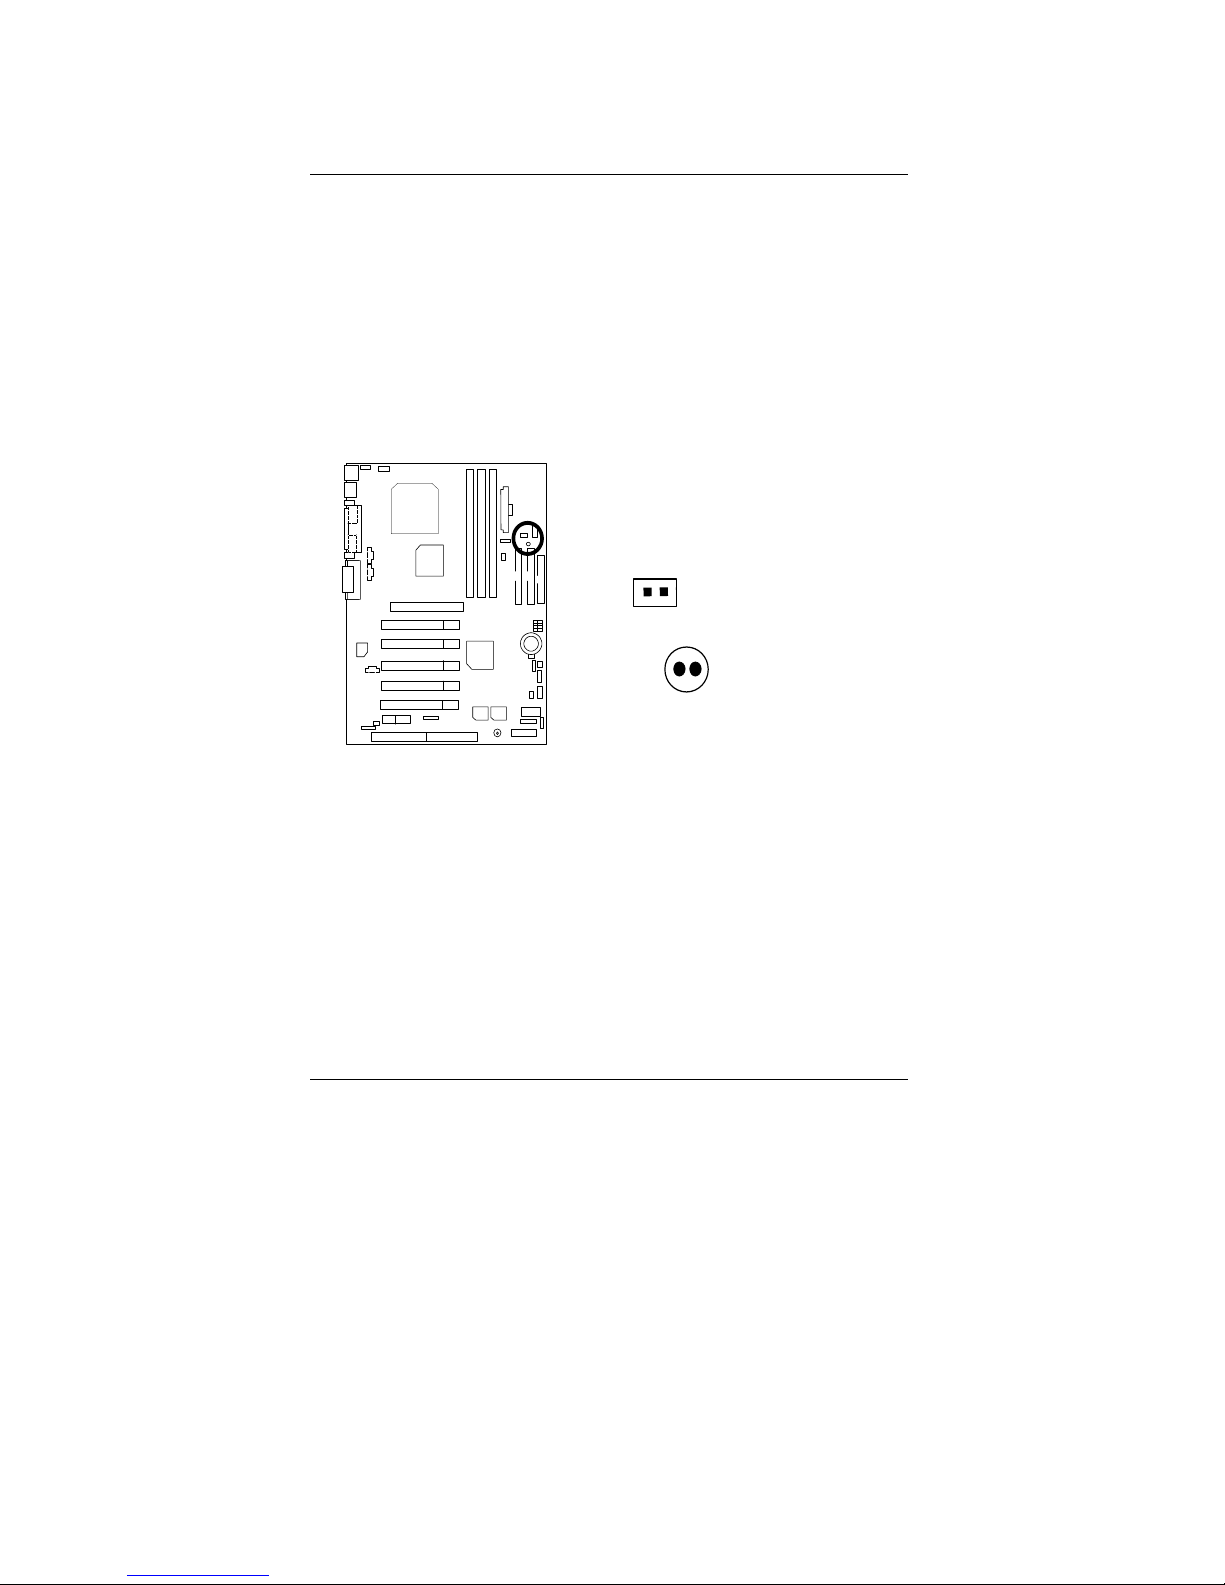
2. Jumper JP8 is provided to connect to the STR LED in your system chassis. [Your
chassis may not provide this feature.] The STR LED will be illuminated when your system
is in STR sleep mode.
STR LED Connector External.
+ DIMM LED
1
Page 62
Dual BIOS Introduction
30
Dual BIOS Introduction (Optional)
A. What is Dual BIOS Technology?
Dual BIOS means that there are two system BIOS (ROM) on the mother board, one is the
Main BIOS and the other is Backup BIOS. Under the normal circumstances, the system
works on the Main BIOS. If the Main BIOS i s c orrupt ed o r d amage d, the B ac kup BIOS c an
take over while the system is powered on. This means that your PC will still be able to run
stably as if nothing has happened in your BIOS.
B. How to use Dual BIOS?
a. Boot Screen
xxx xxx
Check System Health OK,
AMD-Athlon(tm)-650MHz (100x6.5)
Check NVRAM…
Wait…
Press F1 to enter Dual BIOS Utility. Press ESC to quit
( C ) American Megatrends Inc.,
62-0612-001199-00101111-071595-KT133-7ZX001-F
Press F1 to enter Dual BIOS Utility
American Release:06/12/2000
Megatrends AMIBIOS (C) 1999 American Megatrends
Page 63

7ZX-H Motherboard
31
b. AMI Dual BIOS Flash ROM Programming Utility
c. Dual BIOS Item explanation:
BIOS will auto detect:
Boot From : Main BIOS
Main ROM Type : SST 39SF020
Backup ROM Type : SST 39SF020
Wide Range Prot ection: Disable(Default), Enable
Status 1:
If any failure (ex. Update ESCD failure, checksum error or reset…) occurs in the Main
BIOS , just before the Operating System is loaded and after the power is on, and that
the Wide Range Protection is set to “Enable”, the PC will boot from Backup BIOS
automatically.
Status 2:
If the ROM BIOS on peripherals cards(ex. SCSI Cards, LAN Cards,..) emits
signals to request restart of the system after the user make any alteration on it, the
boot up BIOS will not be changed to the Backup BIOS.
AMI Dual BIOS Flash ROM Programming Utility
Boot From……………………….. Main BIOS
Main ROM Type………………… SST 39SF020
Backup ROM Type……………… SST 39SF020
Wide Range Protection Disable
Boot From Main BIOS
Auto Recovery Enable
Halt On Error Disable
Copy Main ROM Data to Backup
Load Default Settings
Save Settings to CMOS
PgDn/PgUp:Modify ↑↓:Move ESC:Reset F10:Power Off
Page 64

Dual BIOS Introduction
32
Boot From : Main BIOS (Default), Backup BIOS
Status 1:
The user can set to boot from main BIOS or Backup BIOS.
Auto Recovery : Enable(Default), Disable
When one of the Main BIOS or Backup BIOS occurs checksum failure, the working BIOS
will automatically reco ver the BIOS of checksum failur e.
(In the Power Management Setup of the BIOS Setting, if ACPI Suspend Type is set to
Suspend to RAM, the Auto Recovery will be set to Enable automatically.)
(If you want to enter the BIOS setting, please press “Del” key when the boot screen appears.)
Halt On Error : Disable(Default), Enable
If the BIOS occurs a checksum error or the Main BIOS occurs a WIDE RANGE
PROTECTION error and Halt On BIOS Defects set to Enable, the PC will show messages
on the boot screen, and the system will pause and wait for the user’s instruction.
If Auto Recovery: Disable, it will show <or the other key to continue.>
If Auto Recovery: Enable, it will show <or the other key to Auto Recover.>
Copy Main ROM Data to Backup
Backup message:
Are you sure to copy BIOS?
[Enter] to continue or [Esc] to abort …
The means that the Main BIOS works normally and could automatically recover the
Backup BIOS. Or the means that the Backup BIOS works normally and could
automatically recover the Main BIOS.
(This auto recovery utility is set by system automatically and can’t be changed by user.)
Page 65

7ZX-H Motherboard
33
DualBIOS
TM
Technology FAQ
GIGABYTE Technology is pleased to introduce DualBIOS technology, a hot spare for your
system BIOS. This newness “Value-added” feature, in a long series of innovations from
GIGABYTE, is available on GA-7ZX-H motherboard. Future GIGABYTE motherboards will also
incorporate this innovation.
What’s DualBIOSTM?
On GIGABYTE motherboards with DualBIOS there are physically two BIOS chips. For
simplicity we’ll call one your “Main BIOS” and the other we’ll call your “Backup” BIOS (your “hot
spare”). If your Main BIOS fails, the Backup BIOS almost automatically takes over on your
next system boot. Almost automatically and with virtually zero down time! Whether the
problem is a failure in flashing your BIOS or a virus or a catastrophic failure of the Main BIOS
chip, the result is the same - the Backup BIOS backs you up, almost automatically.
Page 66

Dual BIOS Introduction
34
I. Q: What is DualBIOSTM technology?
Answer:
DualBIOS technology is a patented technology from Giga-Byte Technology. The concept of this
technology is based on the redundancy and fault tolerance theory. DualBIOS
TM
technology
simply means there are two system BIOSes (ROM) integrated onto the motherboard. One is a
main BIOS, and the other is a backup BIOS. The mainboard will operate normally with the main
BIOS, however, if the main BIOS is corrupt or damaged for various reasons, the backup BIOS
will be automatically used when the system powered-On. Your PC will operate as before the
main BIOS was damaged, and is completely transparent to the user.
II. Q: Why does anyone need a motherboard with DualBIOS
TM
technology?
Answer:
In today’s systems there are more and more BIOS failures. The most common reasons are virus
attacks, BIOS upgrade failures, and/or deterioration of the BIOS (ROM) chip itself.
1. New computer viruses are being found that attack and destroy the system BIOS. They
may corrupt your BIOS code, causing your PC to be unstable or even not boot normally.
2. BIOS data will be corrupted if a power loss/surge occu rs, or if a user resets the system, or
if the power button is pressed during the process of performing a system BIOS upgrade.
3. If a user mistakenly updates their mainboard with the incorrect BIOS file, then the system
may not be able to boot correctly. This may cause the PC system hang in operation or
during boot.
4. A flash ROM's life cycle is limited according to electronic characteristics. The modern PC
utilizes the Plug and Play BIOS, and is updated regularly. If a user changes peripherals
often, there is a slight chance of damage to the flash
ROM.
With Giga-Byte Technology’s patented DualBIOS
TM
technology you can reduce the possibility of
hangs during system boot up, and/or loss BIOS data due to above reasons. This new
technology will eliminate valuable system down time and costly repair bills cause by BIOS
failures.
Page 67

7ZX-H Motherboard
35
III. Q: How does DualBIOSTM technology work?
Answer:
1. DualBIOSTM technology provides a wide range of protection during the boot up procedure. It
protects your BIOS during system POST, ESCD update, and even all the way to PNP
detection/assignment.
2. DualBIOS
TM
provides automatic recovery for the BIOS. When the first BIOS used during
boot up does not complete or if a BIOS checksum error occurs, boot-up is still possible. In
the DualBIOS
TM
utility, the "Auto Recovery" option will guarantee that if e ithe r the main BIOS
or backup BIOS is corrupted, the DualBIOS
TM
technology will use the good BIOS and correct
the wrong BIOS automatically.
3. DualBIOS
TM
provides manual recovery for the BIOS. DualBIOSTM technology contains a
built-in flash utility, which can flash your system BIOS from backup to main and/or visa versa.
There is no need for an OS-dependent flash utility program.
4. DualBIOS
TM
contains a one-way flash utility. The built-in one-way flash utility will ensure that
the corrupt BIOS is not mistaken as the good BIOS during recovery and that the correct
BIOS (main vs. backup) will be flashed. This will prevent the good BIOS from being flashed.
IV. Q: Who Needs DualBIOSTM technology?
Answer:
1. Every user should have DualBIOSTM technology due to the advancement of computer
viruses.
Everyday, there are new BIOS-type viruses discovered that will destroy your system BIOS.
Most commercial products on the market do not have solutions to guard against this type of
virus intrusion. The DualBIOS
TM
technology will provide a state-of-the-art solution to protect
your PC:
Case I.) Vicious computer viruses may wipe out your entire system BIOS. With a
conventional single system BIOS PC, the PC will not be functional until it is sent for repairs.
Case II.) If the "Auto Recovery" option is enable in the DualBIOS
TM
utility, and if a virus
corrupts your system BIOS,
the backup BIOS will automatically reboot the system and
correct the main BIOS.
Case III.) A user may override booting from the main system BIOS. The DualBIOS
TM
utility
may be entered to manually change the boot sequence to boot from the backup BIOS.
Page 68

Dual BIOS Introduction
36
2. During or after a BIOS upgrade, if DualBIOSTM detects that the main BIOS is corrupt, the
backup BIOS will take over the boot-up process automatically. Moreover, it will verify the
main and backup BIOS checksums when booting-up. DualBIOS
TM
technology examines the
checksum of the main and backup BIOS while the system is powered on to guarantee your
BIOS operates properly.
3. Power Users will have the advantage of having two BIOS versions on their mainboard. The
benefit is being able to select either version BIOS to suit the performance system needs.
4. Flexibility for high-end desktop PCs and workstation/servers. In the DualBIOS
TM
utility, the
option can be set, "Halt On When BIOS Defects," to be enable to halt your system with a
warning message that the mai n BIOS has been c orrupted. Most workstation/servers require
constant operation to guarantee services have not been interrupted. In this situation, the "Halt
On When BIOS Defects" message may be disable to avoid system pauses during normal
booting. Another advantage you gain from Giga-Byte’s DualBIOS
TM
technology is the ability to
upgrade from dual 2 Mbit BIOS to dual 4 Mbit BIOS in the futur e if extra BIOS storage is
need.
Page 69
7ZX-H Motherboard
37
@BIOS™ Introduction
Gigabyte announces @BIOS™
Windows BIOS live update utility
Have you ever updated BIOS by yourself? Or
like many other people, you just know what
BIOS is, but always hesitate to update it?
Because you think updating newest BIOS is
unnecessary and actually you don’t know how
to update it.
Maybe not like others, you are very experienced in BIOS updating and spend quite
a lot of time to do it. But of course you don’t like to do it too much. First, download
different BIOS from website and then switch the operating system to DOS mode.
Secondly, use different flash utility to update BIOS. The above process is not a
interesting job. Besides, always be carefully to store the BIOS source code correctly in
your disks as if you update the wrong BIOS, it will be a nightmare.
Certainly, you wonder why motherboard vendors could not just do something right
to save your time and effort and save you from the lousy BIOS updating work? Here it
comes! Now Gigabyte announces @BIOS
™
--the first Windows BIOS live update utility.
This is a smart BIOS update software. It could help you to download the BIOS from
internet and update it. Not like the other BIOS update software, it’s a Windows utility.
With the help of “@BIOS
™
’, BIOS updating is no more than a click.
Besides, no matter which mainboard you are using, if it’s a Gigabyte’s product*,
@BIOS
™
help you to maintain the BIOS. This utility could detect your cor rect
mainboard model and help you to choose the BIOS accordingly. It then downloads the
BIOS from the nearest Gigabyte ftp site automatically. There are several different
choices; you could use “Internet Update” to download and update your BIOS directly.
Or you may want to keep a backup for your current BIOS, just choose “Save Current
BIOS” to save it first. You make a wise choice to use Gigabyte, and @BIOS
™
update
your BIOS smartly. You are now worry free from updating wrong BIOS, and capable to
maintain and manage your BIOS easily. Again, Gigabyte’s innovative product erects a
milestone in mainboard industries.
For such a wonderful software, how much it costs? Impossible! It’s free! Now, if you
buy a Gigabyte’s motherboard, you could find this amazing software in the attached
driver CD. But please
remember, connected to internet at first, then you could have a
internet BIOS update from your Gigabyte
@BIOS
™
.
Page 70
EasyTuneIIITM Introduction
38
EasyTuneIII™ Introduction
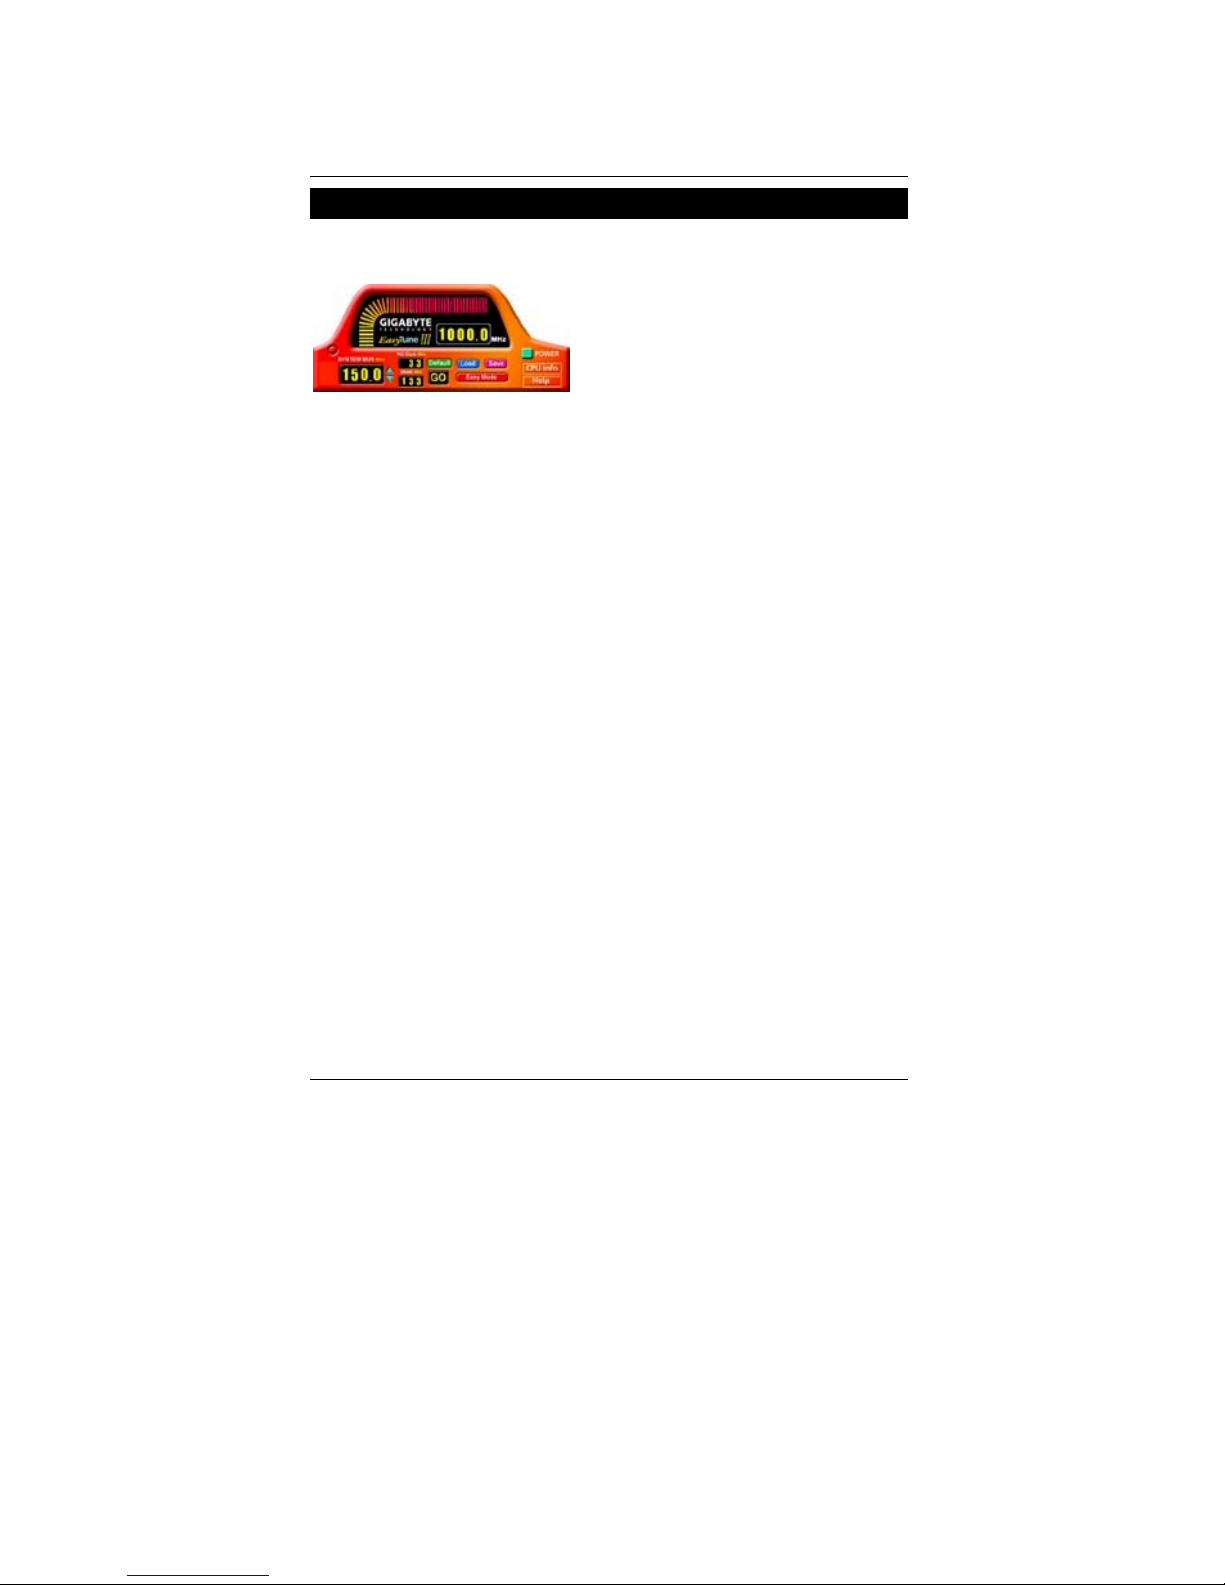
Gigabyte announces EasyTuneIII™
Windows overdrive utility
“Overdrive” might be one of the most
common issues in computer field. But have
many users ever tried it? The answer is
probably “no”. Because “overdrive” is thought to
be very difficult and includes a lot of technical
know-how, sometimes “overdrive” is even
considered as special skills found only in some
enthusiasts.
But as to the experts in “overdrive”, what’s the truth? They may spend quite a lot
of time and money to study, try and use many different hardware and software tools
to do “overdrive”. And even with these technologies, they still learn that it’s quite a
risk because the safety and stability of an “overdrive“ system is unknown.
Now everything is different because of a Windows overdrive utility
EasyTuneIII
™
--announced by Gigabyte. This utility has totally changed the gaming
rule of “overdrive”. This is the first overdrive utility suitable for both normal and power
users. Users can choose either “Easy Mode” or “Advanced Mode” to run “overdrive”
at their convenience. For users who choose “Easy Mode”, they just need to click
“Auto Optimize” to have auto and immediate CPU overclocking. This software will
then overdrive CPU speed automatically with the result being shown in the control
panel. If someone prefers to “overdrive” by oneself, there is also another choice.
Click “Advanced Mode” to enjoy “sport drive” class overclocking. In “Advanced
Mode”, one can change the system bus speed in small increments to get ultimate
system performance. And no matter which mainboard is used, if it’s a Gigabyte’s
product*, EasyTuneIII
™
helps to perform the best of system.
Besides, different from other traditional over-clocking methods, EasyTuneIII
™
doesn’t require users to change neither BIOS nor hardware switch/ jumper setting;
on the other hand, they can do “overdrive” at only one click. Therefore, this is a safer
way for “overdrive” as nothing is changed on software or hardware. If user runs
EasyTuneIII
™
over system’s limitation, the biggest lost is only to restart the computer
again and the side effect is then well controlled. Moreover, if one well-performed
system speed been tested in EasyTuneIII™, user can “Save” this bus speed and
“Load” it in next time. Obviously, Gigabyte EasyTuneIII
™
has already turned the
“overdrive” technology toward to a newer generation.
Page 71

7ZX-H Motherboard
39
This wonderful software is now free bundled in Gigabyte motherboard attached
driver CD. Users may make a test drive of “EasyTuneIII
™
” to find out more amazing
features by themselves.
For further technical information, please link to: http://www.gigabyte.com.tw
Note: For the latest version of EasyTuneIIITM, please visit our website.
Page 72
Memory Installation
40
Memory Installation
The motherboard has 3 dual inline memory module (DIMM) sockets. The BIOS will automatically
detects memory type and size. To install the memory module, just push it vertically into the
DIMM Slot .The DIMM module can only fit in one direction due to the two notch. Memory size
can vary between sockets.
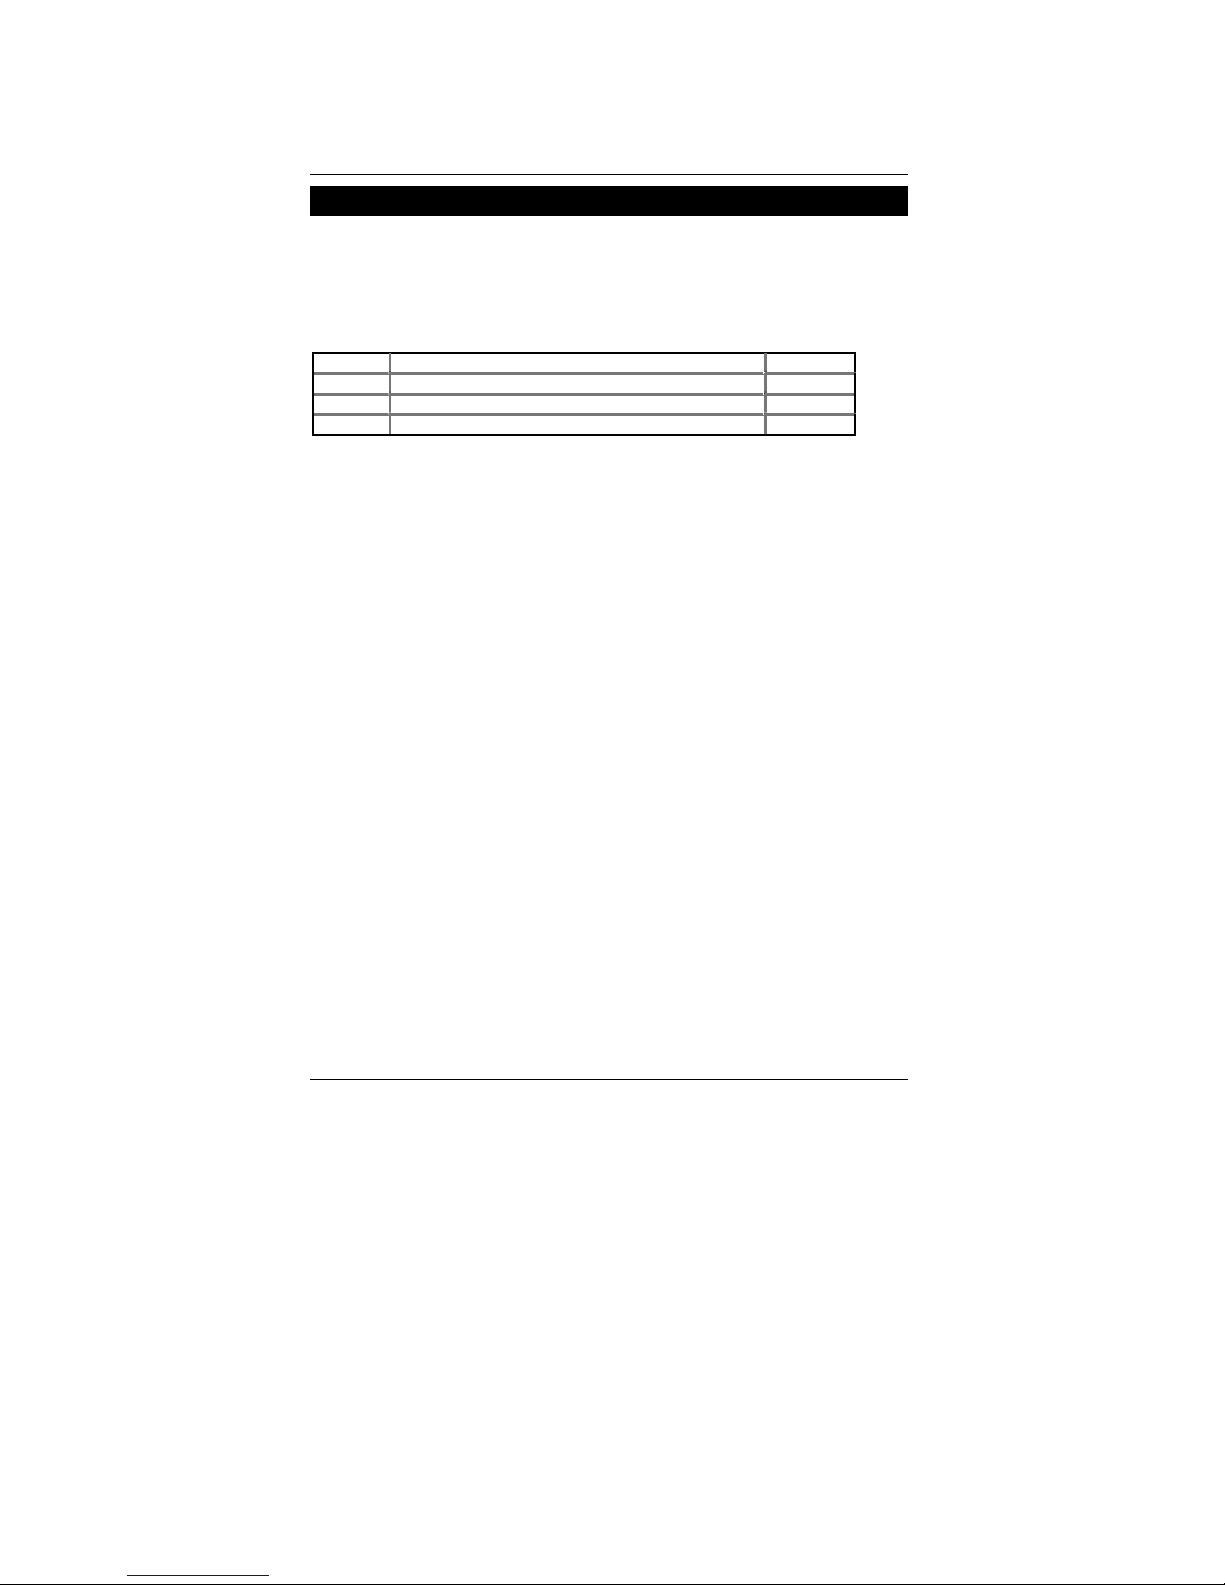
Install memory in any combination table:
DIMM 168-pin SDRAM DIMM Modul es
DIMM 1 Supports 16 / 32 / 64 / 128 / 256 / 512 MB X 1 pcs
DIMM 2 Supports 16 / 32 / 64 / 128 / 256 / 512 MB X 1 pcs
DIMM 3 Supports 16 / 32 / 64 /128 / 256 / 512 MB X 1 pcs
★Total System Memory (Max 1.5GB)
Page 73

7ZX-H Motherboard
41
Page Index for BIOS Setup Page
The Main Menu P.43
Standard CMOS Setup P.45
BIOS Features Setup P.48
Chipset Features Setup P.50
Power Management Setup P.54
PNP/ PCI Configuration P.57
Load BIOS Defaults P.60
Load Setup Defaults P.61
Integrated Peripherals P.62
Hardware Monitor & MISC Setup P.66
Supervisor Password / User Password P.68
IDE HDD Auto Detection P.69
Save & Exit Setup P.70
Exit Without Saving P.71
Page 74

BIOS Setup
42
BIOS Setup
BIOS Setup is an overview of the BIOS Setup Program. The program that allows users to
modify the basic system configuration. This type of information is stored in battery-backed
CMOS RAM so that it retains the Setup information when the power is turned off.
ENTERING SETUP
Power ON the computer and press <Del> immediately will allow you to enter Setup. If the
message disappears before you respond and you still wish to enter Setup, restart the system t o
try again by turning it OFF then ON or pressing the "RESET" bottom on the system case. You
may also restart by simultaneously press <Ctrl> − <Alt>− <Del> keys.
CONTROL KEYS
<↑> Move to previous item
<↓> Move to next item
<←> Move to the item in the left hand
<→> Move to the item in the right hand
<Esc> Main Menu - Quit and not save changes into CMOS
Status Page Setup Menu and Option Page Setup Menu - Exit current page
and return to Main Menu
<+/PgUp> Increase the numeric value or make changes
<-/PgDn> Decrease the numeric value or make changes
<F1> General help, only for Status Page Setup Menu and Option Page Setup
Menu
<F2> Reserved
<F3> Reserved
<F4> Reserved
<F5> Restore the previous CMOS value from CMOS, only for Option Page
Setup Menu
<F6> Load the default CMOS value from BIOS defa ult table, only for Option
Page Setup Menu
<F7>
Load the Setup Defaults
<F8> Reserved
<F9> Reserved
<F10> Save all the CMOS changes, only for Main Menu
Page 75

7ZX-H Motherboard
43
GETTING HELP
Main Menu
The on-line description of the highlighted setup function is displayed at the bottom of the screen.
Stat us Page Setup Menu / Option Page Setup Menu
Press F1 to pop up a small help wi ndow that describes the appropriate k eys to use and the
possible selections for the highlighted item. To exit the Help Window press <Esc>.
The Main Menu
Once you enter AMI BIOS CMOS Setup Utility, the Main Menu (Figure 1) will appear on the
screen. The Main Menu allows you to select from nine setup functions and two exit choices. Use
arrow keys to select among the items and press <Enter> to accept or enter the sub-menu.
Figure 1: Main Menu
•••• Standard CMOS Setup
This setup page includes all the items in standard compatible BIOS.
•••• BIOS Features Setup
This setup page includes all the items of AMI special enhanced features.
AMIBIOS SIMPLE SETUP UTILITY-VERSION 1.24b
( C ) 1999 American Megatrends, Inc. All Rights Reserved
STANDARD CMOS SETUP INTEGRATED PERIPHERALS
BIOS FEATURES SETUP HARDWARE MONITOR & MISC SETUP
CHIPSET FEATURES SETUP SUPERVISOR PASSWORD
POWER MANAGEMENT SETUP USER PASSWORD
PNP/PCI CONFIGURATION IDE HDD AUTO DETECTION
LOAD BIOS DEFAULTS SAVE & EXIT SETUP
LOAD SETUP DEFAULTS EXIT WITHOUT SAVING
ESC : Quit ↑↓←→ : Select Item (Shift) F2 : Change Color F5 : Old Values
F6 : Load BIOS Defaults F7: Load Setup Defaults F10: Save & Exit
Time, Date, Hard Disk Type, …
Page 76

BIOS Setup
44
•••• Chipset Features Setup
This setup page includes all the items of chipset special features.
•••• Power Management Setup
This setup page includes all the items of Green function features.
•••• PNP/PCI Configurations
This setup page includes all the configurations of PCI & PnP ISA resources.
•••• Load BIOS Defaults
Bios Defaults indicates the value of the system parameter which the system would be in
the safe configuration.
•••• Load Setup Defaults
Setup Defaults indicates the value of the system parameter which the system would be in
the most appropriate configuration.
•••• Integrated Peripherals
This setup page includes all onboard peripherals.
•••• Hardware Monitor & MISC Setup
This setup page is auto detect fan and temperature status.
•••• Supervisor password
Change, set, or disable password. It allows you to limit access to the system and Setup,
or just to Setup.
•••• User password
Change, set, or disable password. It allows you to limit access to the system.
•••• IDE HDD auto detection
Automatically configure hard disk parameters.
•••• Save & Exit Setup
Save CMOS value settings to CMOS and exit setup.
•••• Exit Without Saving
Abandon all CMOS value changes and exit setup.
Page 77

7ZX-H Motherboard
45
Standard CMOS Setup
The items in Standard CMOS Feat ures Menu (Figure 2) are divided in to 9 categories. Each
category includes no, one or more than one setup i tems. Use the arrows to highlight the i tem
and then use the <PgUp> or <PgDn> keys to select the value you want in each item.
Figure 2: Standard CMOS Setup
•••• Date
The date format is <Week> <Month> <Day>, <Year>.
Week The week, from Sun to Sat, determined by the BIOS and is display-only
Month The month, Jan. Through Dec.
Day The day, from 1 to 31 (or the maximum allowed in the month)
Year The year, from 1990 through 2099
AMIBIOS SETUP – STANDARD CMOS SETUP
( C ) 1999 American Megatrends, Inc. All Rights Reserved
Date (mm/dd/yyyy) : Fri Mar 9, 2001
Time (hh/mm/ss) : 10:36:24
TYPE SIZE CYLS HEAD PRECOMP LANDZ SECTOR MODE
Pri Master : Auto
Pri Slave : Auto
Sec Master : Auto
Sec Slave : Auto
Floppy Drive A: 1 . 44 MB 3 ½
Floppy Drive B: Not Installed
Boot Sector Virus Protection : Disabled
Base Memory : 640 Kb
Other Memory: 384 Kb
Extended Memory: 127Mb
Total Memory: 128Mb
Month: Jan – Dec ESC : Exit
Day: 01 – 31 ↑↓ : Select Item
Year : 1990– 2099 PU/PD/+/– : Modify
(Shift)F2 : Color
Page 78

BIOS Setup
46
•••• Time
The times format in <hour> <minute> <second>. The time is calculated base on the
24-hour military-time clock. For example, 1 p .m. is 13:00:00.
•••• Primary Master, Slave / Secondary Master, Slave
The category identifies the types of hard di sk from drive C to F that has been ins talled in
the computer. There are two types: auto type, and user definable type. User type is
user-definable; Auto type which will automatically detect HDD type.
Note that the specifications of your drive must match with the drive table. The hard disk will
not work properly if you enter improper information for this category.
If you select User Type, related information will be asked to enter to the following items.
Enter the information directly from the keyboard and press <Enter>. Such information
should be provided in the documentation form your hard disk vendor or the system
manufacturer.
CYLS. Number of cylinders
HEADS number of heads
PRECOMP write precomp
LANDZONE Landing zone
SECTORS number of sectors
If a hard disk has not been installed select NONE and press <Enter>.
•••• Floppy Drive A / Drive B
The category identifies the types of floppy disk dri ve A or drive B that has been instal led in
the computer.
None No floppy drive installed
360K, 5.25 in. 5.25 inch PC-type standard drive; 360K byte capacity.
1.2M, 5.25 in. 5.25 inch AT-type high-density drive; 1.2M byte capacity (3.5 inch
when 3 Mode is Enable).
720K, 3.5 in. 3.5 inch double-sided drive; 720K byte capacity
1.44M, 3.5 in. 3.5 inch double-sided drive; 1.44M byte capacity.
2.88M, 3.5 in. 3.5 inch double-sided drive; 2.88M byte capacity.
Page 79

7ZX-H Motherboard
47
•••• Boot Sector Virus Protection
If it is set to enable, the category will flash on the screen when there is any attempt to write
to the boot sector or partition table of the ha rd disk drive. The system will halt and the
following error message will appear in the mean time. You can run anti-virus program to
locate the problem.
Enabled Activate automatically when the system boots up causing a warning
message to appear when anything attempts to access the boot sector or
hard disk partition table
Disabled No warning message to appear when anything attempts to access the
boot sector or hard disk partition table. (Default Value)
•••• Memory
The category is display-onl y which is determined by POST (Power On Self Test) of the
BIOS.
Base Memory
The POST of the BIOS will determine the amount of base (or conventional)
memory installed in the system.
The value of the base memory is typically 512 K for systems with 512 K
memory installed on the motherboard, or 640 K for systems with 640 K or more
memory installed on the motherboard.
Extended Memory
The BIOS determines how much extended memory is present during the POST.
This is the amount of memory located above 1 MB in the CPU's memory
address map.
Other Memory
This refers to the memory located in the 640 K to 1024 K address space. This is
memory that can be used for different applications.
DOS uses this area to load device drivers to keep as much base memory free
for application programs. Most use for this area is Shadow RAM.
Page 80

BIOS Setup
48
BIOS Features Setup
Figure 3: BIOS Features Setup
••••
1st / 2nd / 3rd Boot Device
Floppy
Boot Device by Floppy.
ZIP A: / LS-120
Boot Device by ZIP A: / LS-120.
CDROM
Boot Device by CDROM.
SCSI
Boot Device by SCSI.
NETWORK
Boot Device by NETWORK.
IDE-0~IDE-3
Boot Device by IDE-0~IDE-3.
Disabled
Boot Device by Disabled.
USB FDD
Boot Device by USB FDD.
ATAPI ZIP C:
Boot Device by ATAPI ZIP C:.
AMIBIOS SETUP – BIOS FEATURES SETUP
( C ) 1999 American Megatrends, Inc. All Rights Reserved
1st Boot Device Floppy
2nd Boot Device IDE-0
3rd Boot Device CDROM
S.M.A.R.T. for Hard Disks Disabled
BootUp Num-Lock On
Floppy Drive Seek Enabled
Password Check Setup
ESC : Quit
↑↓→ ←
: Select Item
F1 : Help PU/PD+/-/ : Modify
F5 :Old Values (Shift)F2:Color
F6 : Load BIOS Defaults
F7 : Load SETUP Defaults
Page 81

7ZX-H Motherboard
49
••••
S.M.A.R.T. for Hard Disks
Enabled Enable S.M.A.R.T. Hard for Disks.
Disabled Disable S.M.A.R.T. Hard for Disks. (Default Value)
•••• Boot Up Num-Lock
On Keypad is number keys. (Default Value)
Off Keypad is arrow keys.
•••• Floppy Drive Seek
During POST, BIOS will determine if the floppy disk drive installed is 40 or 80 tracks. 360
type is 40 tracks while 720 , 1.2 and 1.44 are all 80 tracks.
Enabled BIOS searches for floppy disk drive to determine if it is 40 or 80 tracks.
Note that BIOS can not tell from 720, 1.2 or 1.44 drive type as they are
all 80 tracks. (Default Value)
Disabled BIOS will not search for the type of floppy disk drive by track number.
Note that there will not be any warning message if the drive installed is
360.
••••
Password Check
Setup Set Password Check to Setup. (Default Value)
Always Set Password Check to Always.
Page 82
BIOS Setup
50
Chipset Features Setup
Figure 4: Chipset Features Setup
•••• Top Performance
If you wish to maximize the performance of your system, set “Top Performance”
as “Enabled”.
Disabled Top Performance Disable. (Default Value)
Enabled Top Performance Enable.
•••• DRAM Frequency
Auto Set DRAM Frequency to Auto.
100MHz Set DRAM Frequency to 100MHz. (Default Value)
133MHz Set DRAM Frequency to 133MHz.
•••• SDRAM CAS# Latency
2 For Fastest SDRAM DIMM module.
3 For Slower SDRAM DIMM module. (Default Value)
Auto Detect SDRAM CAS# Latency by SPD.
AMIBIOS SETUP – CHIPSET FEATURES SETUP
( C ) 1999 American Megatrends, Inc. All Rights Reserved
*********DRAM Timing*** SDRAM Command Drive 24 mA
Top Performance Disabled Memory Address Drive 24 mA
DRAM Frequency 100MHz CAS# Drive 12 mA
SDRAM CAS# Latency 3 RAS# Drive 24 mA
AGP Fast Write Disabled
AGP Mode 4X
AGP Comp. Driving Auto
Manual AGP Comp. Driving DB
AGP Aperture Size 64MB
PCI Delay Transaction Enabled
USB Controller Enabled
USB Legacy Support Disabled
USB Port 64/60 Emulation Disabled
BIOS Flash Protection Disabled
DRAM Drive Strength Auto
ESC : Quit
↑↓→ ←
: Select Item
MD Bus Strength High F1 : Help PU/PD+/-/ : Modify
CAS Bus Strength High F5 :Old Values (Shift)F2:Color
Delay DRAM Read Latch 1.0ns F6 : Load BIOS Defaults
Memory Data Drive 8 mA F7 : Load SETUP Defaults
Page 83

7ZX-H Motherboard
51
•••• AGP Fast Write
Enabled Enable this function only if the AGP Card s upport Fast Write Function.
(Enable this function can increase AGP performance).
Disabled Disable this function. (Default Value)
•••• AGP Mode
4X Set AGP Mode to 4X. (Default Value)
1X Set AGP Mode to 1X.
2X Set AGP Mode to 2X.
•••• AGP Comp. Driving
Auto Set AGP Comp. Driving to Auto. (Default Value)
Manual Set AGP Comp. Driving to Manual.
If AGP Comp. Driving is Manual.
Manual AGP Comp. Driving: 00~FF
•••• AGP Aperture Size
4MB Set AGP Aperture Size to 4MB.
8MB Set AGP Aperture Size to 8 MB.
16MB Set AGP Aperture Size to 16 MB.
32MB Set AGP Aperture Size to 32 MB.
64MB Set AGP Aperture Size to 64 MB. (Default Value)
128MB Set AGP Aperture Size to 128 MB.
256MB Set AGP Aperture Size to 256 MB.
•••• PCI Delay Transaction
Enabled Enable Delay Transaction. (Default Value)
Disabled Disable Delay Transaction.
•••• USB Controller
Enabled Enable USB Controller. (Default Value)
Disabled Disable USB Controller.
Page 84

BIOS Setup
52
•••• USB Legacy Support
Keyboard/FDD Set USB Legacy Support Keyboard / Floppy.
KB/Mouse/FDD Set USB Legacy Support Keyboard / Mouse /Floppy.
Disabled Disable USB Legacy Support Function. (Default Value)
•••• USB Port 64/60 Emulation
Enabled To use USB mouse under Win NT environment, set USB Legacy
Support to KB/Mouse/FDD and USB Port 64/60 Emulation to
enabled.
Disabled Disable this Function. (Default Value)
•••• BIOS Flash Protection
Enabled BIOS Flash Write Protection.
Disabled Normal. (Default Value)
•••• DRAM Drive Strength
Auto Set DRAM Drive Strength Auto. (Default Value)
Manual Set DRAM Drive Strength Manual.
If DRAM Drive Strength is Manual, then you can adjust item below.
•••• MD Bus Strength
High Set MD Bus Strength High. (Default Value)
Low Set MD Bus Strength Low.
•••• CAS Bus Strength
High Set CAS Bus Strength High. (Default Value)
Low Set CAS Bus Strength Low.
•••• Delay DRAM Read Latch
1.0ns Set DRAM Read Latch Delay 1.0ns. (Default Value)
1.5ns Set DRAM Read Latch Delay 1.5ns.
0.5ns Set DRAM Read Latch Delay 0.5ns.
No delay Set DRAM Read Latch No delay.
•••• Memory Data Drive
6 mA Set Memory Data Drive 6 mA.
8 mA Set Memory Data Drive 8 mA. (Default Value)
Page 85

7ZX-H Motherboard
53
•••• SDRAM Command Drive
16 mA Set SDRAM Command Drive 16 mA.
24 mA Set SDRAM Command Drive 24 mA. (Default Value)
•••• Memory Address Drive
16 mA Set Memory Address Drive 16 mA.
24 mA Set Memory Address Drive 24 mA. (Default Value)
•••• CAS# Drive
8 mA Set CAS# Drive 8 mA.
12 mA Set CAS# Drive 12 mA. (Default Value)
•••• RAS# Drive
16 mA Set RAS# Drive 16 mA.
24 mA Set RAS# Drive 24 mA. (Default Value)
Page 86
BIOS Setup
54
Power Management Setup
Figure 5: Power Management Setup
•••• ACPI Sleep Type
S1/POS Set ACPI sleep type to S1. (Default Value)
S3/STR Set ACPI sleep type to S3.
• USB Dev Wakeup from S3-S5
Enabled Enable USB Dev Wakeup from S3-S5.
Disabled Disable USB Dev Wakeup from S3-S5. (Default Value)
•••• Suspend Time Out (Minute.)
Disabled Disable Suspend Time Out Function. (Default Value)
1 Enable Suspend Time Out after 1min.
2 Enable Suspend Time Out after 2min.
4 Enable Suspend Time Out after 4min.
8 Enable Suspend Time Out after 8min.
10 Enable Suspend Time Out after 10min.
20 Enable Suspend Time Out after 20min.
30 Enable Suspend Time Out after 30min.
40 Enable Suspend Time Out after 40min.
AMIBIOS SETUP – POWER MANAGEMENT SETUP
( C ) 1999 American Megatrends, Inc. All Rights Reserved
ACPI Sleep Type S1/POS RTC Alarm Date Every Day
USB Dev Wakeup from S3-S5 Disabled RTC Alarm Hour 00
Suspend Time Out(Minute) Disabled RTC Alarm Minute 00
Display Activity Ignore RTC A larm Sec ond 00
IRQ3 Monitor
IRQ4 Monitor
IRQ5 Ignore
IRQ7 Monitor
IRQ9 Ignore
IRQ10 Ignore
IRQ11 Ignore
IRQ13 Ignore
IRQ14
Monitor
IRQ15 Ignore
Soft-Off by Power Button
Instant-Off
System after AC Back Soft-Off
ESC : Quit
↑↓→ ←
: Select Item
Modem Use IRQ 4 F1 : Help PU/PD+/-/ : Modify
Resume On Ring/LAN Enabled F5 :Old Values (Shift)F2:Color
PME Event Wake Up Enabled F6 : Load BIOS Defaults
Resume On RTC Alarm Disabled F7 : Load SETUP Defaults
Page 87

7ZX-H Motherboard
55
50 Enable Suspend Time Out after 50min.
60 Enable Suspend Time Out after 60min.
•••• Display Activity
Ignore Ignore Display Activity. (Default Value)
Monitor Monitor Display Activity.
•••• IRQ 3~IRQ15
Ignore Ignore IRQ3 ~IRQ15.
Monitor Monitor IRQ3~IRQ15.
• Soft-off by Power Button
Instant-off The user press the power button once, he can turn off the system.
(Default Value)
Delay 4 sec Press power button 4 sec to Power off. Enter suspend if button is
pressed less than 4 sec.
• System after AC Back
Memory
When AC-power back to the system, the system will return to the
Last state before AC-power off.
Soft-Off When AC-power back to the system, the system will be in “Off” state.
(Default Value)
Full-On When AC-power back to the system, the system will be in ”On” state.
• Modem USE IRQ
3, 4, (Default Value) 5, 7, N/A
• Resume On Ring / LAN
Disabled Disable Resume On Ring / LAN.
Enabled Enable Resume On Ring / LAN. (Def ault Value)
• PME Event Wake Up
Disabled Disable PME Event Wake Up.
Enabled Enable PME Event Wake Up. (Default Value)
Page 88

BIOS Setup
56
•••• Resume On RTC Alarm
You can set “Resume On RTC Alarm” item to enabled and key in Data/time to power on
system.
Disabled Disable this function. (Default Value)
Enabled Enable alarm function to POWER ON system.
If the “Resume On RTC Alarm” is Enabled.
RTC Alarm Date: Every Day, 1~31
RTC Alarm Hour: 0~23
RTC Alarm Minute: 0~59
RTC Alarm Second: 0~59
Page 89
7ZX-H Motherboard
57
PNP/PCI C o n figura t i ons
Figure 6: PNP/PCI Configuration
•••• PnP OS Installed
Yes Enable PNP OS Installed function.
No Disable PNP OS Installed function. (Default Value)
•••• Reset Configuration Data
No Disable this function. (Default Value)
Yes Clear PnP information in ESCD & update DMI data.
• VGA Boot From
AGP Primary Graphics Adapter From AGP. (Default Value)
PCI Primary Graphics Adapter From PCI.
•••• PCI/VGA Palette Snoop
Enabled Fo r h a vi n g Video Card on ISA Bus and VG A Card on PCI Bus.
Disabled For VGA Card only. (Default Value)
AMIBIOS SETUP – PNP / PCI CONFIGURATION
( C ) 1999 American Megatrends, Inc. All Rights Reserved
PnP OS Installed
No
Reset Configuration Data
No
VGA Boot from AGP
PCI AGP Palette Snoop
Disabled
PCI Slot 1/5 IRQ Priority
Auto
PCI Slot 2 IRQ Priority
Auto
PCI Slot 3 IRQ Priority
Auto
PCI Slot 4 IRQ Priority
Auto
IRQ 3 PCI/PnP
IRQ 4 PCI/PnP
IRQ 5 PCI/PnP
IRQ 7 PCI/PnP
IRQ 9 PCI/PnP
IRQ 10 PCI/PnP
ESC: Quit
↑↓→ ←
: Select Item
IRQ 11 PCI/PnP F1 : Help PU/PD+/-/ : Modify
IRQ 14 PCI/PnP F5 :Old Values (Shift)F2:Color
IRQ 15 PCI/PnP F6 : Load BIOS Def aults
F7 : Load SETUP Defaults
Page 90

BIOS Setup
58
• PCI Slot 1,5 IRQ Priority
Auto The system will reserved a free IRQ for PCI slot 1 & 5 device.
(Default Value)
3 The system will reserved IRQ3 for PCI slot 1 & 5 device if no legacy
ISA device using IRQ3.
4 The system will reserved IRQ4 for PCI slot 1 & 5 device if no legacy
ISA device using IRQ4.
5 The system will reserved IRQ5 for PCI slot 1 & 5 device if no legacy
ISA device using IRQ5.
7 The system will reserved IRQ7 for PCI slot 1 & 5 device if no legacy
ISA device using IRQ7.
9 The system will reserved IRQ9 for PCI slot 1 & 5 device if no legacy
ISA device using IRQ9.
10 The system will reserved IRQ10 for PCI slot 1 & 5 device if no
legacy ISA device using IRQ10.
11 The system will reserved IRQ11 for PCI slot 1 & 5 device if no
legacy ISA device using IRQ11.
• PCI Slot 2 / 3 / 4 IRQ Priority
Auto The system will reserved a free IRQ for PCI slot 2 / 3 / 4 device.
(Default Value)
3 The system will reserved IRQ3 for PCI slot 2 / 3 / 4 device if no
legacy ISA device using IRQ3.
4 The system will reserved IRQ for PCI slot 2 / 3 / 4 device if no
legacy ISA device using IRQ4.
5 The system will reserved IRQ5 for PCI slot 2 / 3 / 4 device if no
legacy ISA device using IRQ5.
7 The system will reserved IRQ7 for PCI slot 2 / 3 / 4 device if no
legacy ISA device using IRQ7.
9 The system will reserved IRQ9 for PCI slot 2 / 3 / 4 device if no
legacy ISA device using IRQ9.
10 The system will reserved IRQ10 for PCI slot 2 / 3 / 4 device if no
legacy ISA device using IRQ10.
11 The system will reserved IRQ11 for PCI slot 2 / 3 / 4 device if no
legacy ISA device using IRQ11.
Page 91

7ZX-H Motherboard
59
•••• IRQ (3, 4, 5, 7, 9, 10, 11, 14, 15)
ISA/ EISA The resource is used by Legacy ISA device.
PCI / PnP The resource is used by PCI/ PnP device.
Page 92

BIOS Setup
60
Load BIOS Defaults
Figure 7: Load BIOS Defaults
•••• Load BIOS Defaults
BIOS defaults contain the most appropriate values of the system parameters that allow
minimum system performance.
AMIBIOS SIMPLE SETUP UTILITY-VERSION 1.24b
( C ) 1999 American Megatrends, Inc. All Rights Reserved
STANDARD CMOS SETUP INTEGRATED PERIPHERALS
BIOS FEATURES SETUP HARDWARE MONITOR & MISC SETUP
CHIPSET FEATURES SETUP SUPERVISOR PASSWORD
POWER MANAGEMENT SETUP USER PASSWORD
PNP/PCI CONFIGURATION IDE HDD AUTO DETECTION
LOAD BIOS DEFAULTS SAVE & EXIT SETUP
LOAD SETUP DEFAULTS EXIT WITHOUT SAVING
ESC : Quit ↑↓→← : Select Item (Shift) F2 : Change Color F5 : Old Values
F6 : Load BIOS Defaults F7: Load Setup Defaul ts F10: Save & Exit
Load BIOS Default except Standard CMOS Setup
Load BIOS Defaults (Y/N)? N
Page 93

7ZX-H Motherboard
61
Load Setup Defaults
Figure 8: Load Setup Defaults
•••• Load Setup Defaults
Selecting this field loads the factory defaults for BIOS and Chipset Features which the
system automatically detects.
AMIBIOS SIMPLE SETUP UTILITY-VERSION 1.24b
( C ) 1999 American Megatrends, Inc. All Rights Reserved
STANDARD CMOS SETUP INTEGRATED PERIPHERALS
BIOS FEATURES SETUP HARDWARE MONITOR & MISC SETUP
CHIPSET FEATURES SETUP SUPERVISOR PASSWORD
POWER MANAGEMENT SETUP USER PASSWORD
PNP/PCI CONFIGURATION IDE HDD AUTO DETECTION
LOAD BIOS DEFAULTS SAVE & EXIT SETUP
LOAD SETUP DEFAULTS EXIT WITHOUT SAVING
ESC : Quit ↑↓→← : Select Item (Shift) F2 : Change Color F5 : Old Va lues
F6 : Load BIOS Defaults F7: Load Setup Defaults F10: Save & Exit
Load Setup Default except Standard CMOS Setup
Load SETUP Defaults (Y/N)? N
Page 94

BIOS Setup
62
Integrated Peripherals
Figure 9: Integrated Peripherals
This item will be available when ”Serial PortB Mode” is set to IrDA or ASK IR.
♦ These eight items will not be shown when there is sound chip onboard.
• OnBoard IDE
Disabled Disable OnBoard IDE.
Both Both Primary & Secondary IDE channel will be enabled.
(Default Value)
Primary Only Primary IDE channel is enable.
Secondary Only Secondary IDE channel is enable.
• OnBoard Serial Port A
Auto BIOS will automatically setup the port A address. (Default Value)
3F8/COM1 Enable OnBoard Serial port A and address to 3F8.
2F8/COM2 Enable OnBoard Serial port A and address to 2F8.
3E8/COM3 Enable OnBoard Serial port A and address to 3E8.
2E8/COM4 Enable OnBoard Serial port A and address to 2E8.
Disabled Disable OnBoard Serial port A.
AMIBIOS SETUP – INTEGRATED PERIPHERALS
( C ) 1999 American Megatrends, Inc. All Rights Reserved
OnBoard IDE
Both
OnBoard Serial Port A
Auto
OnBoard Serial Port B
Auto
Serial PortB Mode
Normal
Duplex Mode
N/A
OnBoard Parallel Port
Auto
Parallel Port Mode ECP
Parallel Port DMA Auto
Parallel Port IRQ Auto
AC97 Audio Auto
MC97 Modem Auto
♦
OnBoard Legacy Audio
Enabled
♦Sound Blaster
Disabled
♦SB I/O Base Address
220h-22Fh
♦SB IRQ Se l ect
5
ESC: Quit
↑↓→ ←
: Select Item
♦SB DMA Select
1 F1 : Help PU/PD+/-/ : Mo d i fy
♦MPU-401
Disabled F5 :Old Values (Shift)F2:Color
♦
MPU-401 I/O Address
330h-333h
F6 : Load BIOS Defaults
♦
Game Port(200h-207h)
Enabled F7 : Load SETUP Defaults
Page 95

7ZX-H Motherboard
63
• OnBoard Serial Port B
Auto BIOS will automatically setup the port B address. (Default Value)
3F8/COM1 Enable OnBoard Serial port B and address to 3F8.
2F8/COM2 Enable OnBoard Serial port B and address to 2F8.
3E8/COM3 Enable OnBoard Serial port B and address to 3E8.
2E8/COM4 Enable OnBoard Serial port B and address to 2E8.
Disabled Disable OnBoard Serial port B.
• Serial Port B Mode
Normal Normal operation. (Default Value)
IrDA Onboard I/O chip supports IRDA
ASK IR Onboard I/O chip supports ASK IR.
• Duplex Mode
Half Duplex
IR Function Duplex Half.
N/A
Disable this function. (Default Value)
Full Duplex
IR Function Duplex Full.
• OnBoard Parallel port
378 Enable OnBoard LPT port and address to 378.
278 Enable OnBoard LPT port and address to 278.
3BC Enable OnBoard LPT port and address to 3BC.
Auto Set OnBoard LPT port to Auto. (Default Value)
Disabled Disable OnBoard LPT port.
• Parallel Port Mode
EPP Using Parallel port as Enhanced Parallel Port.
ECP Using Parallel port as Extended Capabilities Port. (Default Value)
Normal Normal Operation.
EPP+ECP Using Parallel port as Enhanced Parallel Port & Extended Capabilities
Port.
•••• Parallel Port DMA
Auto Set Auto to parallel port mode DMA Channel. (Default Value)
3 Set Parallel Port DMA to 3.
1 Set Parallel Port DMA to 1.
0 Set Parallel Port DMA to 0.
Page 96

BIOS Setup
64
•••• Parallel Port IRQ
7 Set Parallel Port IRQ to 7.
Auto Set Auto to parallel Port IRQ DMA Channel. (Default Value)
5 Set Parallel Port IRQ to 5.
•••• AC97 Audio
Auto BIOS will search AC97 Codec. If found, AC97 function will be enabled.
If no AC97 Codec found, AC97 function will be disabled. (Default Value)
Disabled Disable On Board AC’97 Audio.
•••• MC97 Modem
Auto BIOS will search MC97 Codec (AMR Modem Card). If found, MC97
function will be enabled. If no MC97 Codec found, MC97 function will be
disabled. (Default Value)
Disabled Disable On Board MC’97 Modem.
•••• OnBoard Legacy Audio
Enabled Enable OnBoard Legacy Audio. (Default Value)
Disabled Disable OnBoard Legacy Audio.
•••• Sound Blaster
Enabled Enable Sound Blaster.
Disabled Disable Sound Blaster. (Default Value)
•••• SB I/O Base Address
220h-22Fh Set SB I/O Base Address to 220h-22Fh. (Default Value)
280h-28Fh Set SB I/O Base Address to 280h-28Fh.
260h-26Fh Set SB I/O Base Address to 260h-26Fh.
240h-24Fh Set SB I/O Base Address to 240h-24Fh.
•••• SB IRQ Select
IRQ 5 / 7 / 9 / 10. (Default Value: 5)
•••• SB DMA Select
DMA 0 / 1 / 2/ 3. (Default Value: 1)
Page 97

7ZX-H Motherboard
65
•••• MPU-401
Enabled Enable MPU-401.
Disabled Disable MPU-401. (Default Value)
Ps. When Force Feedback joystick is used, MPU-401 needs to be Enable.
•••• MPU-401 I/O Address
330h-333h Set MPU-401 I/O Address to 330h-333h. (Default Value)
300h-303h Set MPU-401 I/O Address to 300h-303h.
310h-313h Set MPU-401 I/O Address to 310h-313h.
320h-323h Set MPU-401 I/O Address to 320h-323h.
•••• Game Port (200h-207h)
Disabled Disable Game Port (200h-207h).
Enabled Enable Game Port (200h-207h). (Default Value)
Page 98

BIOS Setup
66
Hardware Monitor & MISC Setup
Figure 10: Hardware Monitor & MISC Setup
•••• ACPI Shutdown Temp. (°
°°
°C / °°°°F)
(This function will be effective only for the operating systems that support ACPI Function.)
Disabled Disable ACPI Shutdown function. (Default Value)
60°C / 140°F Monitor CPU Temp. at 60°C / 140°F, if Temp. > 60°C / 140°F
system will automatically power off.
70°C / 158°F Monitor CPU Temp. at 70°C / 158°F, if Temp. > 70°C / 158°F
system will automatically power off.
80°C / 176°F Monitor CPU Temp. at 80°C / 176°F, if Temp. > 80°C / 176°F
system will automatically power off.
90°C / 194°F Monitor CPU Temp. at 90°C / 194°F, if Temp. > 90°C / 194°F
system will automatically power off.
•••• CPU Temperature (°
°°
°C / °°°°F)
Detect CPU Temperature automatically.
•••• System Temperature (°
°°
°C / °°°°F)
Detect System Temperature automatically.
AMIBIOS SETUP – HARDWARE MONITOR & MISC SETUP
( C ) 1999 American Megatrends, Inc. All Rights Reserved
ACPI Shut Down Temp. Disabled
CPU Temperature
32°C/89°F
System Temperature
32°C/89°F
CPU Fan Speed 7123 RPM
System Fan Speed 0 RPM
Vcore 1.76 V
Vdd 3.33 V
Vcc3 3. 27 V
+5.000V 4.97 V
+12.000V 12.18 V
ESC: Quit
↑↓→ ←
: Select Item
F1 : Help PU/PD+/-/ : Modify
F5 :Old Values (Shift)F2:Color
F6 : Load BIOS Defaults
F7 : Load Setup Defaults
Page 99

7ZX-H Motherboard
67
•••• CPU Fan Speed
Detect CPU Fan speed status automatically.
•••• System Fan Speed
Detect System Fan speed status automatically.
•••• Voltage (V) Vcore / Vdd / Vcc3 / +5V / +12V
Detect system’s voltage status automatically.
Page 100
BIOS Setup
68
Set Supervisor / User Password
When you select this function, the following message will appear at the center of the screen to
assist you in creating a password.
Figure 11: Password Setting
Type the password, up to six characters, and press <Enter>. You will be asked to confirm the
password. Type the password again and press <Enter>. You may also press <Esc> to abort the
selection and not enter a password.
To disable password, just press <Enter> when you a re prompt ed to enter pas sword. A message
“PASSWORD DISABLED” will appear to confirm the password being disable. Once the
password is disable, the system will boot and you can enter Setup freely.
The BIOS Setup program allows you to specify two separate passwords: a SUPERVISOR
PASSWORD and a USER PASSWORD. When disable, anyone may access all BIOS Setup
program function. When enable, the Supervisor password is required for entering the BIOS
Setup program and having full configuration fields, the User password is required to access only
basic items.
If you select “Always” at “Password Check” in BIOS Features Setup Menu, you will be
prompted for the password every time the system is rebooted or any time you try to enter Setup
Menu.
If you select “Setup” at “ Passwor d C h eck ” in BIOS Features Setup Menu, you will be prompted
only when you try to enter Setup.
AMIBIOS SIMPLE SETUP UTILITY-VERSION 1.24b
( C ) 1999 American Megatrends, Inc. All Rights Reserved
STANDARD CMOS SETUP INTEGRATED PERIPHERALS
BIOS FEATURES SETUP HARDWARE MONITOR & MISC SETUP
CHIPSET FEATURES SETUP SUPERVISOR PASSWORD
POWER MANAGEMENT SETUP USER PASSWORD
PNP/PCI CONFIGURATION IDE HDD AUTO DETECTION
LOAD BIOS DEFAULTS SAVE & EXIT SETUP
LOAD SETUP DEFAULTS EXIT WITHOUT SAVING
ESC : Quit ↑↓→← : Select Item (Shift) F2 : Change Color F5 : Old Values
F6 : Load BIOS Defaults F7: Load Setup Defaults F10: Save & Exit
Chang /Set /Disabled Password
Enter new supervisor password:
 Loading...