

Page 1
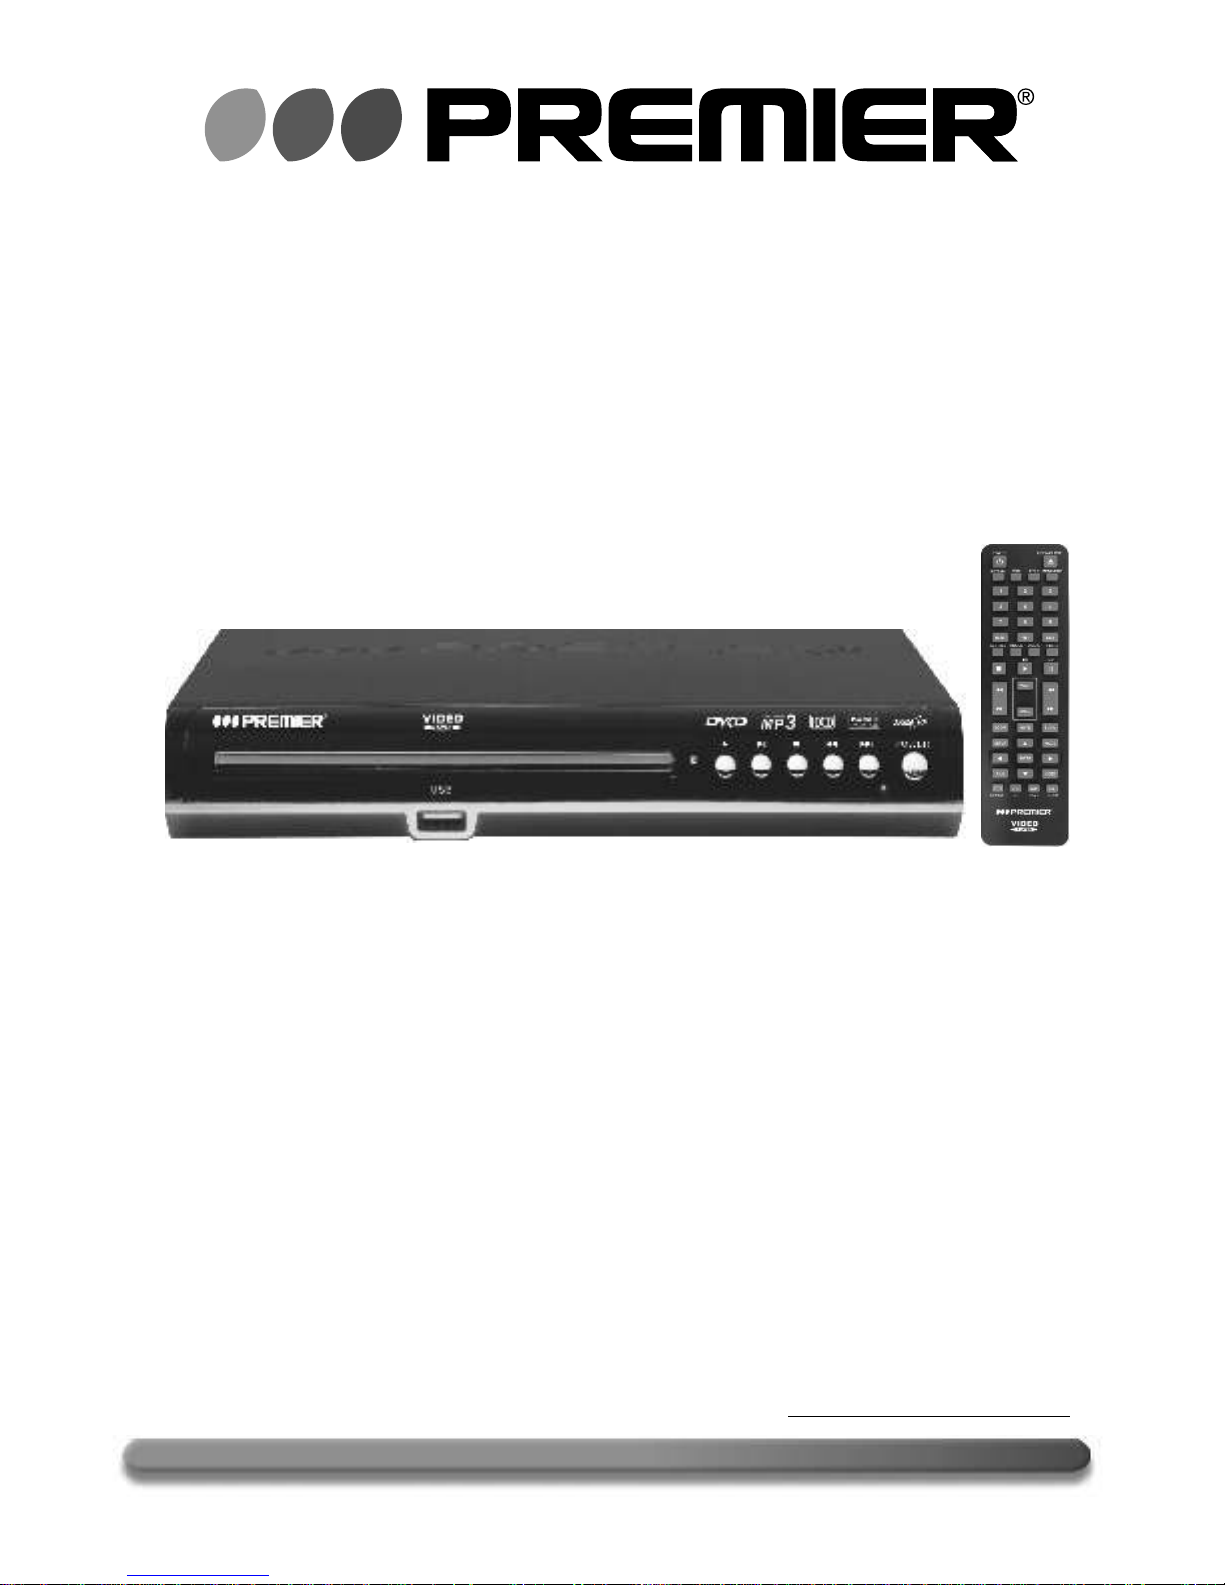
MANUAL DE INSTRUCCIONES
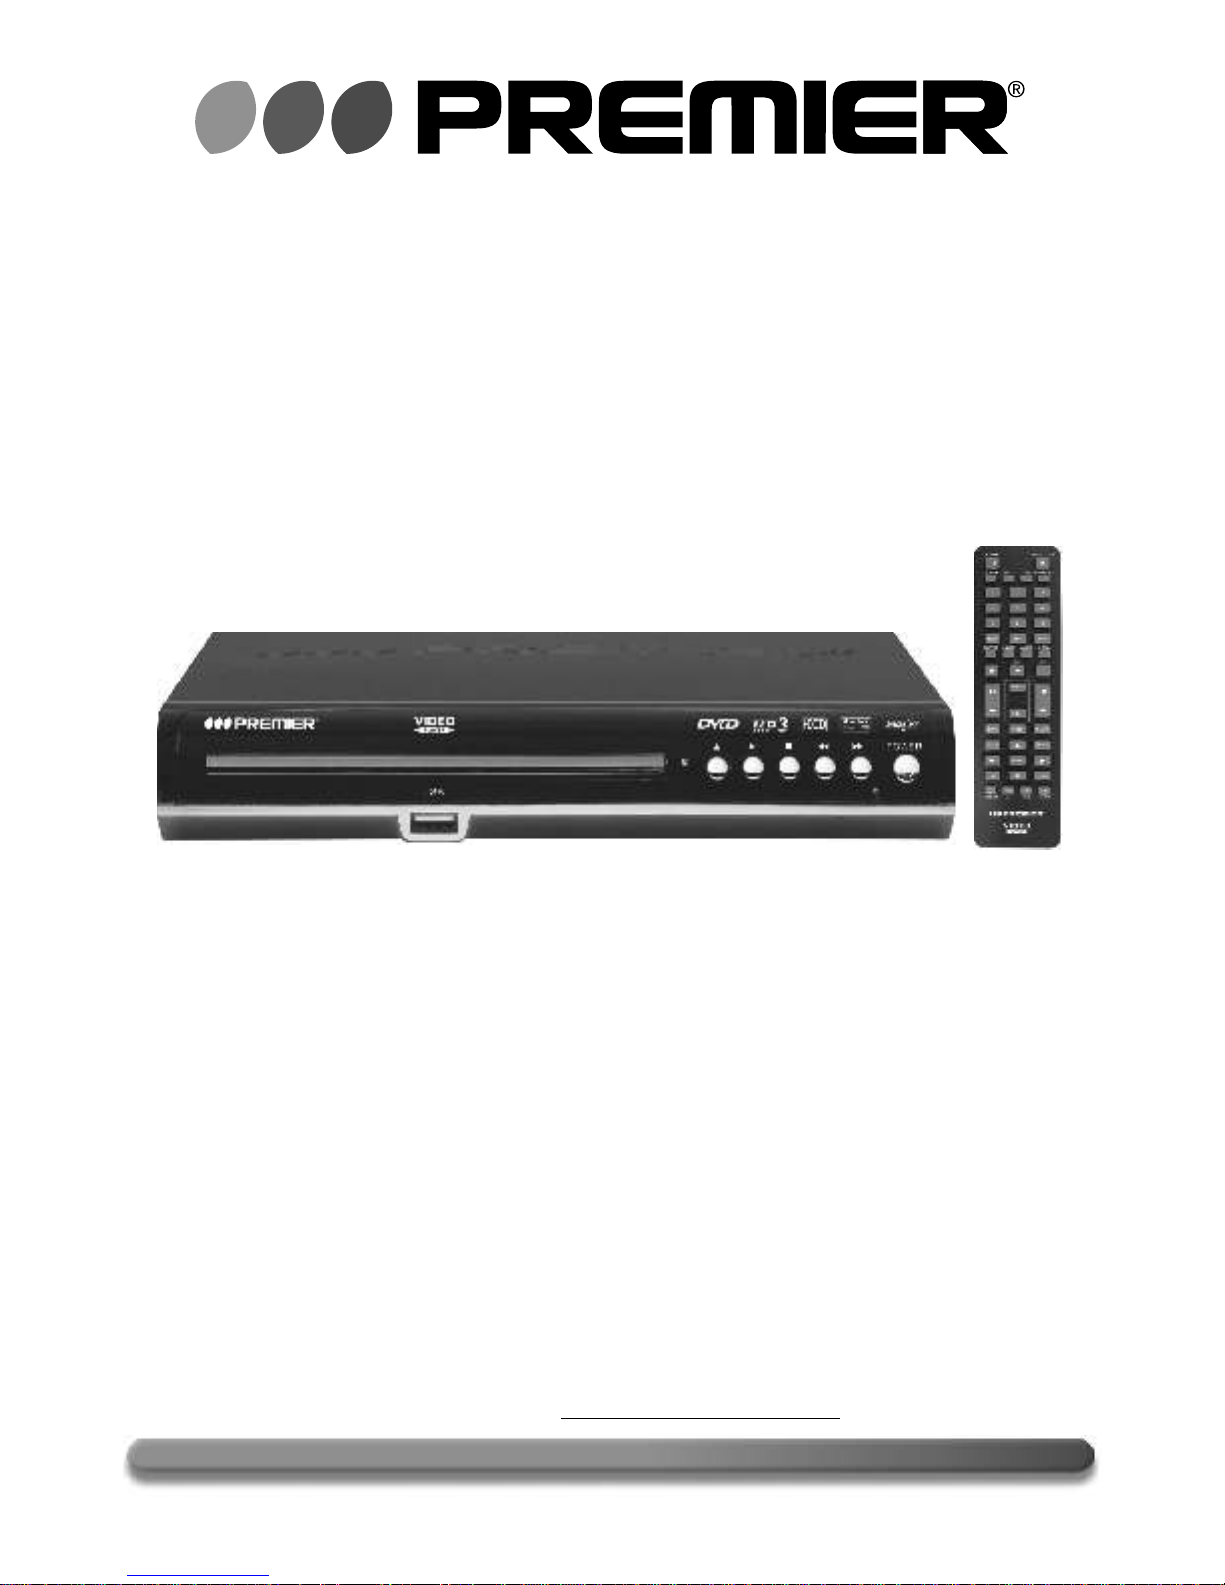
REPRODUCTOR DE VIDEO
SX-5322DU
Con el fin de que obtenga el mayor desempeño de su producto, por favor lea este manual
de instrucciones cuidadosamente antes de comenzar a utilizarlo, y guárdelo para su futura
referencia.Si necesita soporte adicional, no dude en escribir a: [email protected]
ESTIMADO CLIENTE
Page 2
P-1
ÍNDICE
FORMATOS
LIMPIEZA Y MANEJO DE LOS DISCOS
DESCRIPCIÓN DE LA UNIDAD
BATERÍAS DEL CONTROL REMOTO
DESCRIPCIÓN DEL CONTROL REMOTO
OPERACIÓN BÁSICA
OPERACIÓN ADICIONAL
REPRODUCIR UN DISCO MP3, JPEG
CONFIGURACIÓN
CONEXIÓN
RECOMENDACIONES
ACCESORIOS
ESPECIFICACIONES
2
2
2
2
3
3
5
7
7
9
9
10
10
PRECAUCIÓN
RIESGO DE CHOQUE
ELÉCTRICO , NO ABRA
Precaución: Para reducir el riesgo de choque eléctrico, no retire
la cubierta, no hay partes manipulables por el usuario al interior
de la unidad. Refiera todo mantenimiento o intervención técnica
a personal técnico calificado.
Este símbolo indica la existencia de voltaje peligroso al
interior de esta unidad, que constituye un riesgo de choque
eléctrico.
Este símbolo indica que hay importantes instrucciones de
operación y mantenimiento en la literatura que acompaña
a esta unidad.
LÍNEAS DE SERVICIO AL CLIENTE PREMIER
Venezuela:
Panamá:
Sitio Web:
E-mail:
0800 – ELECTRIC (353-2874)
300-5185
www.premiermundo.com
Nos reservamos el derecho de modificar las especificaciones, características y/u operación
de esta unidad sin previo aviso, con el fin de continuar las mejoras y desarrollo del mismo.
NOTA
Page 3
P-2
Tipo de
disco
FORMATOS
Logo
Contenido
Tamaño
del disco
Tiempo de reproducción
Video
-
Audio + Video
(Imágenes en
movimiento)
Audio + Video
(Imágenes en
movimiento)
Audio
CD de
Video
CD de
Audio
12cm
12cm
12cm
8cm
8cm
8cm
4 horas aprox. (Capa sencilla)
8 horas aprox. (Capa Doble)
80 minutos aprox. (Capa sencilla)
160 minutos aprox. (Capa Doble)
74 minutos aprox.
20 minutos aprox.
20 minutos aprox.
74 minutos aprox.
Nota:
Esta unidad también reproduce formato Kodak, Fuji, konica Picture-CD, Sistema de archivo de
CD-ROM ISO9660, Sistema de película CD-R ISO9660, Sistema de archivos CD-RW ISO9660.
LIMPIEZA Y MANEJO DE LOS DISCOS
No toque el lado de reproducción del disco, ya que un disco con huellas o suciedad no reproducirá
fielmente las imágenes y sonidos. Limpie el disco desde el centro hacia los bordes con un paño
suave. No use líquidos fuertes para limpiar el disco, ya que se dañara la superficie del disco.
No adhiera etiquetas en el lado de reproducción del disco.
DESCRIPCIÓN DE LA UNIDAD
BATERÍAS DEL CONTROL REMOTO
1.Abra el compartimiento de las baterías de la unidad.
2.Inserte dos baterías “AAA” y asegúrese que su polaridad es la correcta.
3.Cierre el compartimiento.
Notas:
La distancia de funcionamiento del control remoto es de 7 metros aproximadamente y el grado de
funcionamiento es de 30º.
Si no va a usar la unidad por un periodo de tiempo prolongado, retire las baterías del control remoto
para evitar filtraciones y corrosión del compartimiento.
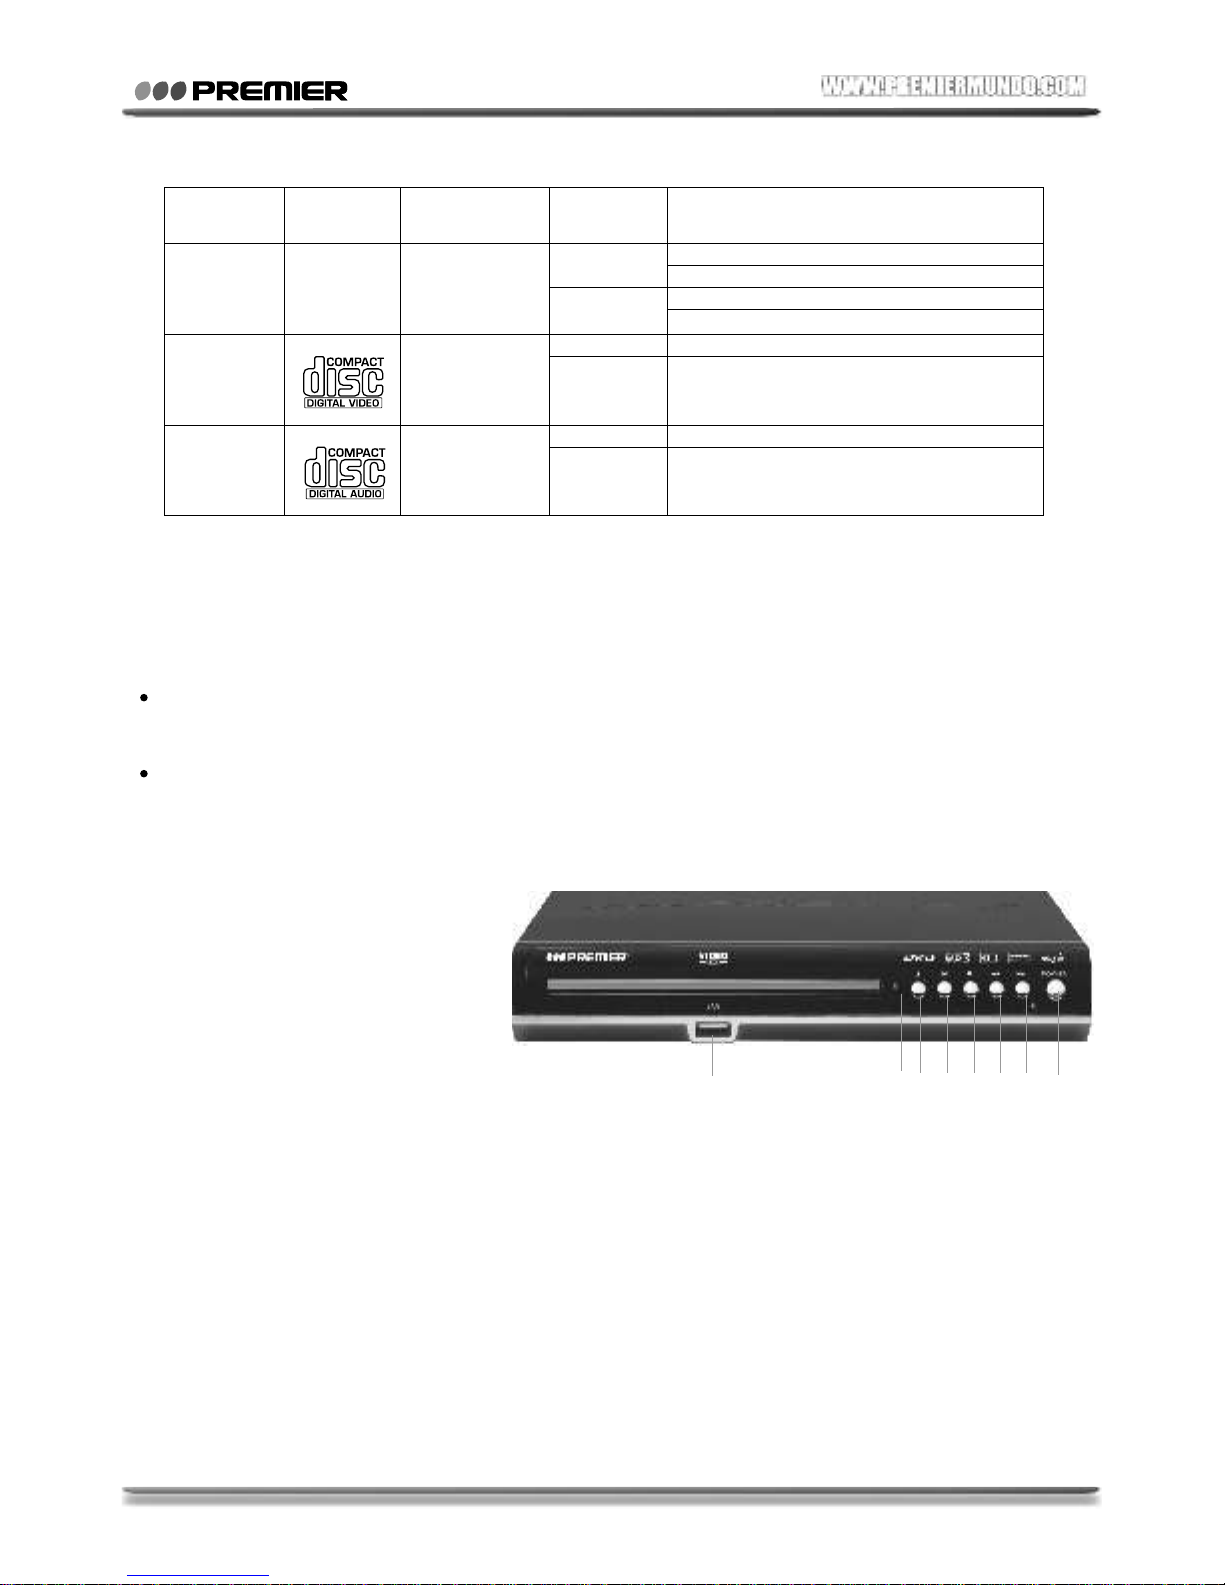
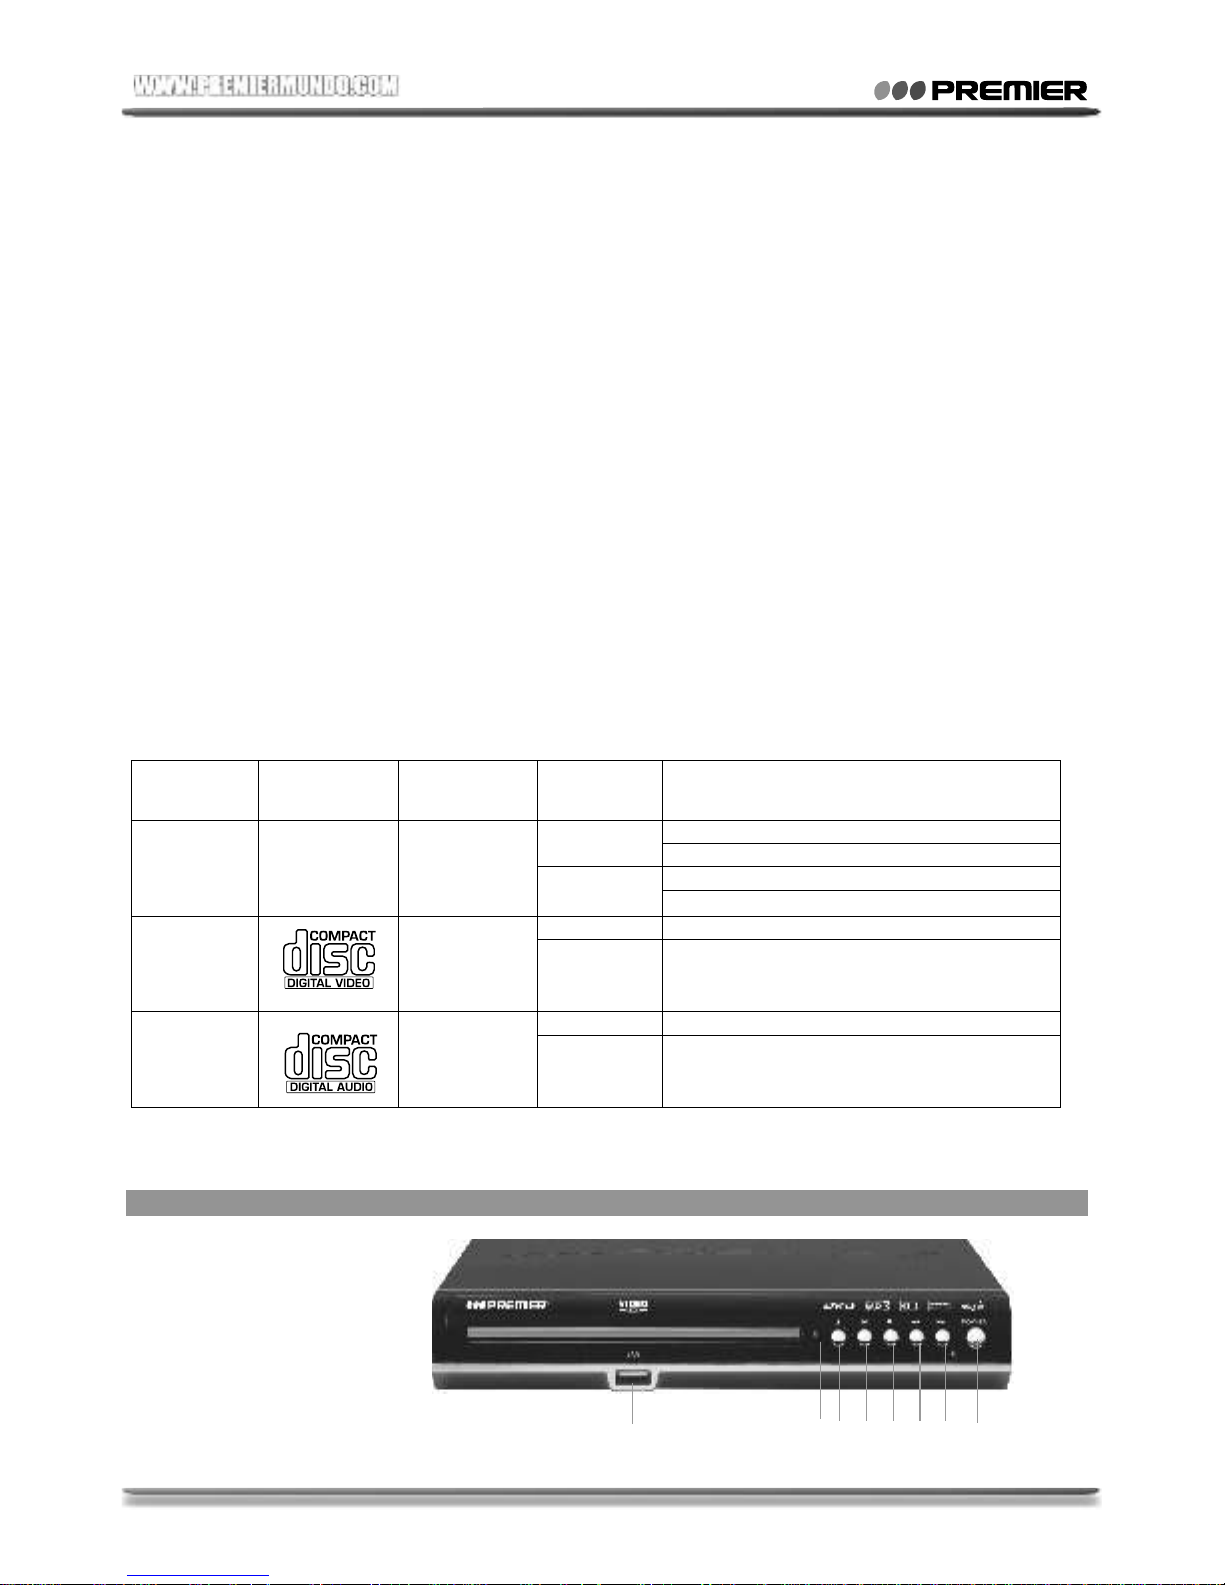
1. Potencia
2. Sensor del control remoto
3. Abrir / Cerrar bandeja del disco
4. Reproducir / Pausar
5. Puerto para Dispositivo USB
6. Detener
7. Anterior
8. Siguiente
3
4
6
7
8
1
5
2
Page 4
P-3
OPERACIÓN BÁSICA
1. Encender / Apagar la unidad:
Conecte la unidad al tomacorriente y presione el botón POWER (potencia) en la unidad o en el
control remoto.
2. Colocar un disco:
Presione el botón OPEN/CLOSE (Abrir / Cerrar) en la unidad o en el control remoto para abrir
la bandeja de discos de la unidad. Luego, inserte el disco suavemente en el compartimiento (Con el
lado etiquetado mirando hacia arriba). Los discos de lado doble tienen contenido en ambos lados,
por lo tanto puede colocar el disco mirando hacia arriba o hacia abajo.
Presione el botón OPEN/CLOSE (Abrir / Cerrar) para cerrar la bandeja. Luego, presione el botón
PLAY (Reproducir) ó ENTER (Ingresar) para reproducir el contenido del disco.
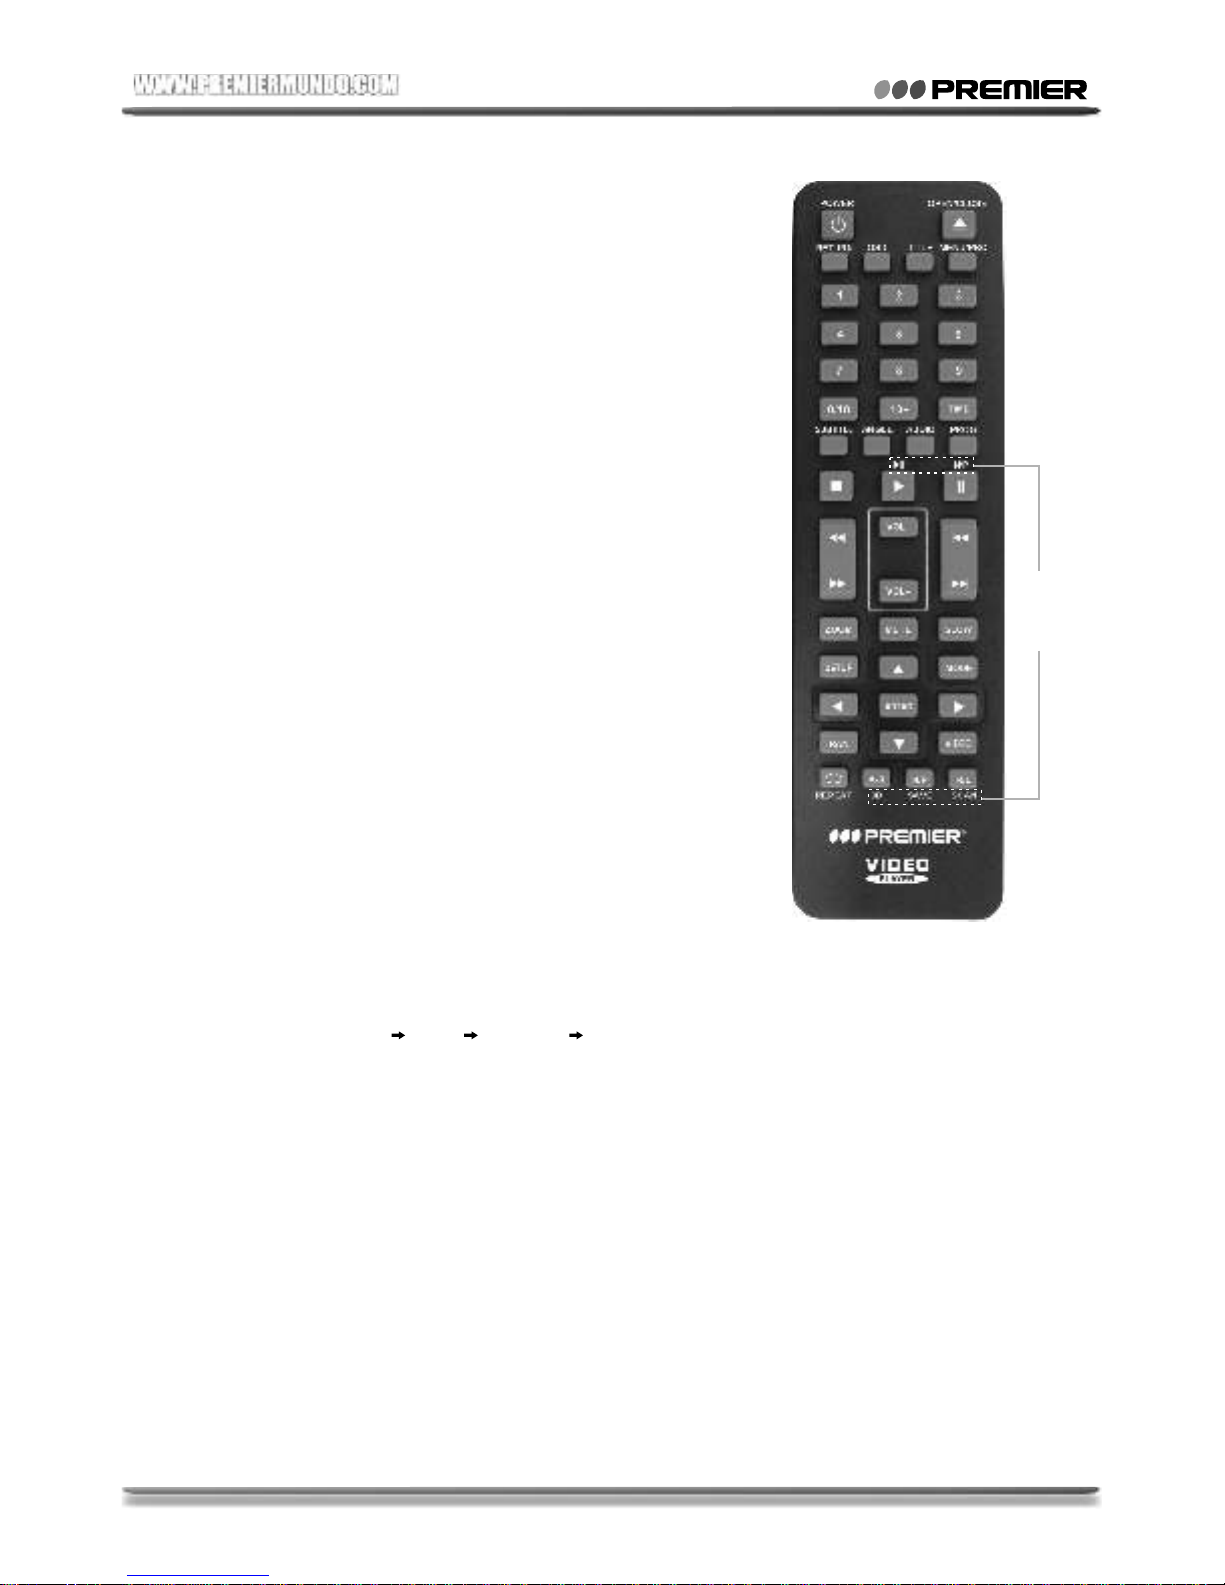
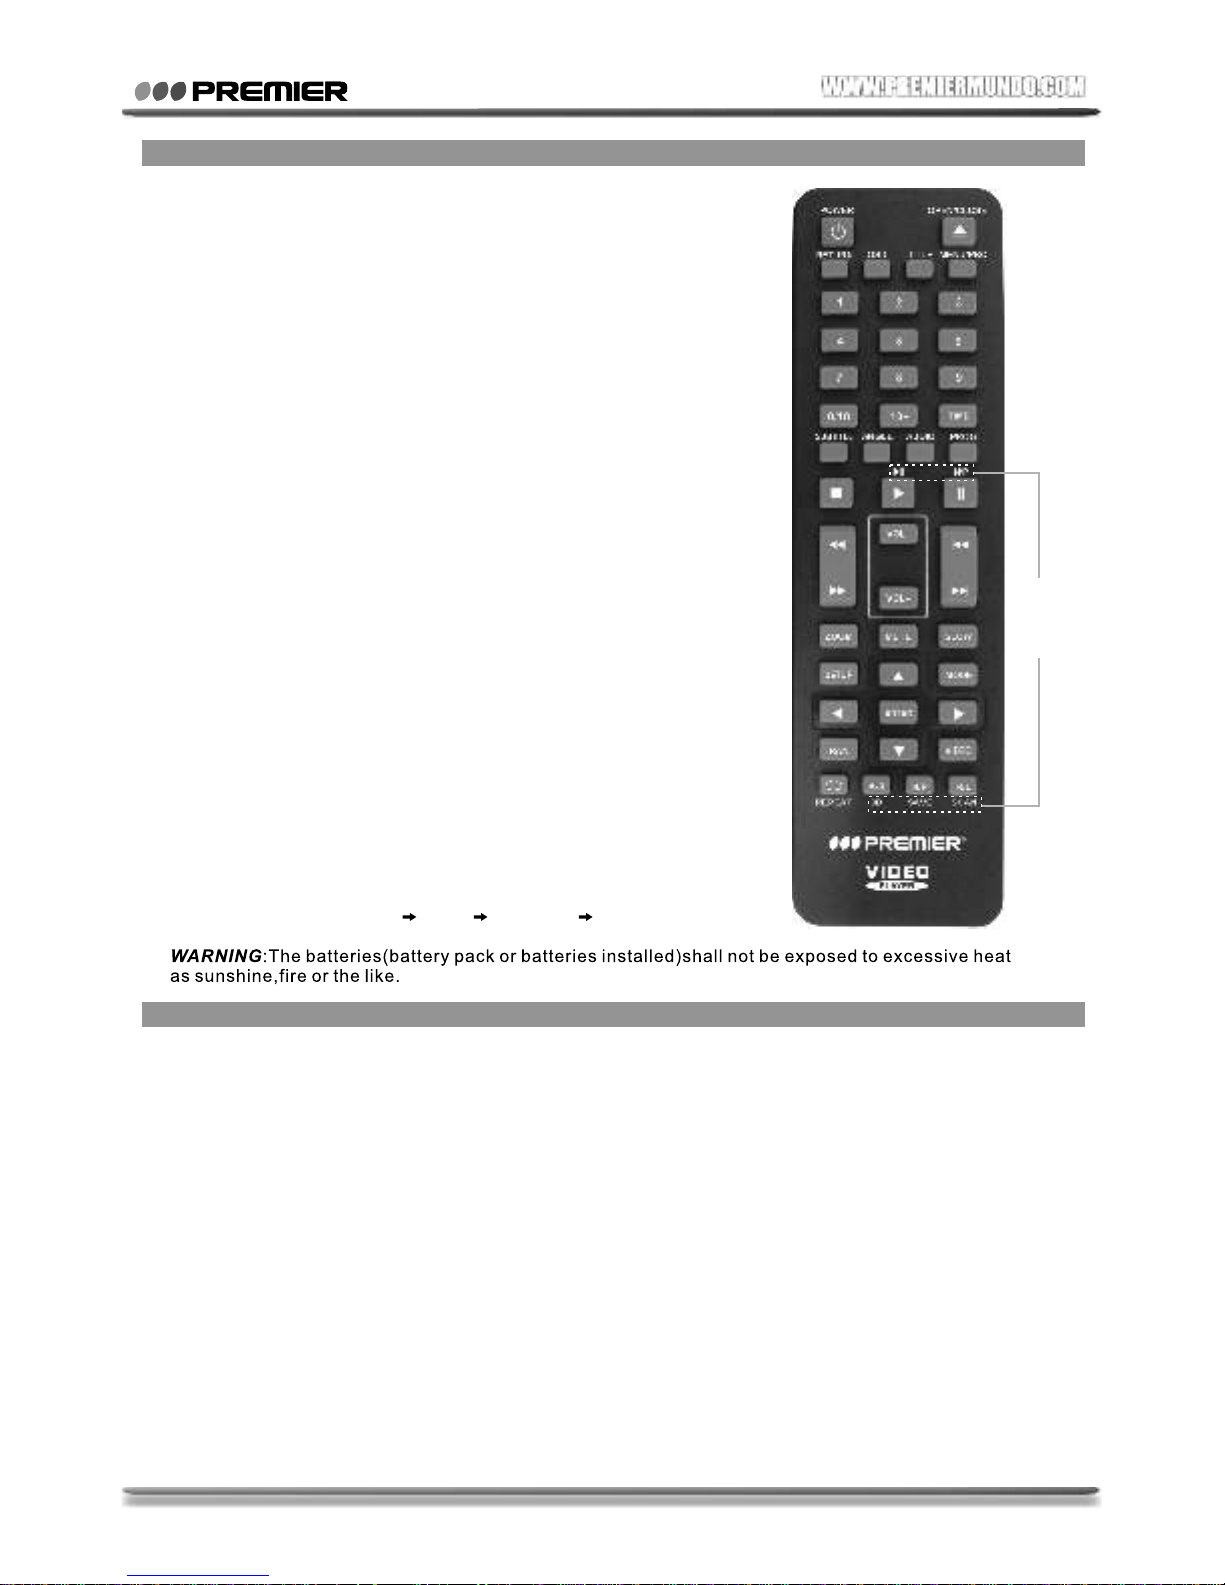
1.POWER: Encender / Apagar la unidad
2.OPEN/CLOSE: Abrir / Cerrar la bandeja del disco
3.SETUP: Menú de configuración
4.OSD: Menú de visualización
5.PROG: Menú de programa
6.TIME: Tiempo de búsqueda
7.REVERSE: Retroceso rápido
8.FWD: Adelantamiento rápido
9.PREIVIOUS: Ir al capitulo anterior durante la reproducción
10.NEXT: Saltar al siguiente capitulo durante la reproducción
11.SLOW: Cámara lenta
12.PLAY/PAUSE: Reproducir / Pausar la reproducción
13.N/P: Seleccionar entre NTSC, PAL, AUTO
14.STOP: Detener la reproducción
15.TITLE: Ingresar al menú de titulo para el disco de video
16.MENÚ/PBC: Menú de reproducción de video / Control de
reproducción
17.ANGLE: Acceder a varios ángulos de la película
18.AUDIO: Seleccionar idioma
19.SUBTITLE: Seleccionar subtítulos
20.A-B: Marcar un segmento entre A y B
21.L/R: Cambiar canal Mono
22.VOLUME +/-: Aumentar / Disminuir volumen
23.ZOOM: Agrandar áreas en una imagen
24.ENTER: Presione este botón para encender y apagar la unidad
25.MODE: Reproducción de video / Tarjeta(Opcional) / USB
26.RETURN: Ingresar al menú de titulo para VCD
27.RAN: Reproducción aleatoria
28.VIDEO:CVBS(Opcional YUV S-Video HDMI)
(Opcional)
Radio
Función
Page 5
Menú de reproducción: Presione el botón MENU (Menú) para que el menú de reproducción sea
mostrado en la pantalla. Luego, presione las flechas de dirección para desplazarse a través del
menú. Use también los botones numéricos para elegir una pista. Presione el botón ENTER
(Ingresar) ó PLAY (Reproducir) para ingresar al ajuste seleccionado o para aplicar los cambios
realizados.
Presione el botón STOP (Detener) una vez para pausar la unidad, presiónelo dos veces para
detener la reproducción por completo.
Nota: Con el fin de proteger el disco, antes de abrir la bandeja, presione el botón STOP para
detener la reproducción. Luego, abra la bandeja y retire el disco.
P-4
3. Reproducir un Disco:
El contenido de cada disco varía de acuerdo a como el disco fue autorizado y que características
se incluyeron.
Presione el botón deseado para realizar los ajustes correspondientes. Presione PLAY/PAUSE
(Reproducir/Pausar) para reproducir o pausar la reproducción.
a)
Reproducir Titulo: Durante la reproducción presione el botón TITLE (Titulo) para reproducir
desde el primer capitulo.
b)
Reproducción de secuencia: Cuando un disco VCD es cargado y la función PBC esta encendida,
una vez el botón PBC es presionado, la función se desactivara. Luego, la unidad puede reproducir
en secuencia cuando el botón PBC es presionado dos veces. PBC se activara.
Excepto para discos VCD, en modo detenido, cuando presione el botón de reproducción, la unidad
ingresara al modo de reproducción en secuencia. Esta función es efectiva con todos los discos
compatibles.
c)
d)
Reproducción de programa: Esta función le permite elegir el orden de los capítulos o pistas para
ser reproducidos. Presione el botón PROG (Programar) en el control remoto para ingresar a esta
opción.
Menú de programa: Cuando PBC este activo, esta función lo desactivara mientras los capítulos
o pistas son reproducidos en el orden programado.
Una vez selecciona el capitulo o pista, use los botones numéricos para elegir el orden de la
reproducción. Luego, presione el botón PLAY (Reproducir). Los capítulos o pistas serán
reproducidos en el orden programado.
Durante la reproducción programada, presione el botón PROG (Programar) para mostrar el
contenido programado en la pantalla. Presione el botón STOP (Detener) ó PLAY (Reproducir)
para reanudar la reproducción.
Notas:
Para borrar el orden programado, use las flechas para seleccionar “Clear All” (Borrar Todo), luego
presione ENTER (Ingresar).
Para modificar el orden programado, use las flechas para seleccionar “Modifying” (Modificar). Luego
ingrese el capitulo / Pista que desea programar
Page 6
P-5
OPERACIÓN ADICIONAL
1. Seleccionar una pista:
Presione los botones numéricos para seleccionar una pista. En VCD, durante la reproducción de
secuencia, presione los botones Anterior / Siguiente para seleccionar la pista.
Para seleccionar una pista de 1 a 10, presione el botón correspondiente (1-9, 10)
Para seleccionar un numero de pista superior a 10, presione el botón 10+. Por ejemplo,para
seleccionar 15, presione el botón 10+ y luego presione el botón 5.
Si la pista ingresada no esta disponible, la entrada no será valida.
Notas:
2. Saltar Pista:
Para saltar un capitulo, titulo ó pista en un disco, presione el botón NEXT (Siguiente) ó PREV (Anterior).
3. Adelantar / Retroceder rápidamente:
Presione los botones F.F (Adelantamiento Rápido) y F.R (Retroceso rápido) para adelantar o
retroceder la reproducción rápidamente. Al presionar cada vez el botón, se aumentara la velocidad
y luego regresara al modo de reproducción normal.
Durante reproducción MP3, el audio se cancelara mientras usa esta función.
4. Reproducción en cámara lenta:
Presione el botón SLOW (Cámara lenta) Para reproducir en cámara lenta. Cada vez que presione
el botón, la reproducción será en menor velocidad. Presione el botón cinco veces o presione PLAY
(Reproducir) para ir al modo de reproducción normal.
5. Pausar la reproducción:
Durante la reproducción, presión el botón PAUSE (Pausar) para pausar la reproducción,presione
el botón PLAY (Reproducir) para reanudar la reproducción.
En reproducción de secuencia VCD ó MP3, hay 3 modos de repetición: Apagado, Disco, Pista.
Presione el botón REPEAT (Repetir) para seleccionar uno de los anteriores modos de repetición.
En reproducción de Video, hay 4 modos de repetición: Apagado, Repetir todo, Repetir Titulo,
Repetir Capitulo. Presione el botón REPEAT (Repetir) para seleccionar uno de los anteriores
modos de repetición.
En modo de reproducción MP3, hay 4 modos de repetición: Todo, Carpeta, Archivo, Apagado.
Presione el botón REPEAT (Repetir) para seleccionar uno de los anteriores modos de repetición.
6. Repetir:
7. OSD:
Presione este botón para desplegar la información del disco en pantalla. Como por ejemplo, tipo
de disco, titulo (numero de pista y pistas restantes), tiempo transcurrido, tiempo restante, idioma,
subtítulos, etc. Presione de nuevo para salir de esta función.
8. Tiempo:
Puede usar la función de búsqueda para seleccionar un titulo, capitulo o numero de pista o ir al
punto especifico en el titulo.
Primero, presione el botón TIME (Tiempo) en el control remoto para seleccionar el menú de
búsqueda e ingresar al modo de edición. Luego, con las flechas de dirección seleccione el titulo,
capitulo, numero de pista, modo de repetición o la opción de tiempo.
Page 7
P-6
Luego, use los botones numéricos para ingresar al numero de pista, capitulo o titulo que desea
reproducir ó el tiempo al que desea ir en el titulo seleccionado. Presione el botón ENTER
(Ingresar) para ingresar a la reproducción. Por ejemplo, al ingresar 01:23:56, empezara a
reproducirse una hora, veinte tres minutos y cincuenta y seis segundos en el titulo. Si la entrada
numérica en invalida, aparecerá el mensaje “INVALID KEY” en pantalla.
Esta característica no funciona en modo de reproducción programada.
Si PBC esta encendido, este se apagara automáticamente cuando inicie la búsqueda de
reproducción
Cuando reproduzca discos MP3, JPEG, esta característica no funciona
Notas:
9. Subtítulos:
Presione el botón SUBTITLES (Subtítulos) en el control remoto para mostrar las opciones de
subtítulos en pantalla. Recuerde que esta función es valida si el disco trae la función de subtítulos
incorporada.
10. Ángulo:
Durante la reproducción de un disco, presione el botón ANGLE (Ángulo) en el control remoto y el
icono del ángulo aparecerá en pantalla. Esta función solo esta disponible en discos de video que
contengan diferentes ángulos de visualización.
11. Silenciar:
Presione el botón MUTE (Silenciar) para desactivar el audio de la unidad. Presione nuevamente
para restablecerlo. También puede restablecerlo presionando el botón VOL+/VOL-.
12. Zoom:
Esta función permite agrandar o reducir el tamaño de las imágenes de video. Para desplazarse a
través de la imagen presione el botón ZOOM repetidamente.
Active la función y elija las opciones de zoom requeridas
Esta opción no funciona cuando el menú del disco esta activo.
Use las flechas para desplazarse a través de la pantalla cuando la función Zoom es de 2, 3 ó 4.
Notas:
13. Repetir segmentos A-B
Con esta función puede programar la repetición entre dos puntos A y B.
Presione el botón A-B una vez para marcar el punto de inicio, presiónelo nuevamente para marcar
el punto final de repetición.
La reproducción iniciara entre esos dos puntos programados. Presione el botón A-B nuevamente
para cancelar la función de repetición por segmentos.
a)
b)
b)
14. Control de Volumen:
Ajuste el nivel de volumen desde su televisor o amplificador.
Presione VOL+/VOL- en el control remoto para amplificar o reducir el nivel de volumen.
a)
Page 8
P-7
REPRODUCIR UN DISCO MP3, JPEG
Coloque un disco MP3, JPEG en la bandeja de la unidad, la unidad lo reproducirá automáticamente.
La unidad reproducirá el primer archivo guardado en el disco. Use las flechas para seleccionar el
archivo que desea reproducir y para buscar entre carpetas.
Si esta reproduciendo una imagen JPEG, presione el botón RETURN (Regresar) para ir a la lista
de archivos.
Presione los botones numéricos para seleccionar el archivo que desea reproducir directamente.
CONFIGURACIÓN
1.Configuración General
a) Presione el botón SETUP (Configuración) para ingresar al menú principal.
b) Presione los botones Derecho e Izquierdo para moverse por los submenús, y los botones Arriba
y Abajo para ingresar al contenido de los submenús.
c) Presione el botón ENTER (Ingresar) o el botón derecho para seleccionar la opción deseada.
d) Presione el botón SETUP (Configuración) nuevamente para salir del menú de configuración.
2. Submenús disponibles:
a) Idioma
Idioma OSD
Idioma de Subtítulos
Idioma de Audio
Idioma de menú
Nota: El idioma preestablecido es el español.
b) Pantalla
Pantalla de TV
4:3PS- Pan & Scan (Pantalla Normal y Modo Scan)
4:3LB- Letter Box (Formato Buzón)
16:9- Wide (Pantalla Ancha)
Nota: El Ajuste preestablecido es 4:3PS
Tipo de TV
NTSC
PAL
AUTO
Nota: El ajuste preestablecido es NTSC
Salida de Video
CVBS
Marca de ángulo
Si el disco tiene función de ángulo, la pantalla mostrara las siguientes opciones:
ON: Activar la función
OFF: Desactivar la función
Page 9
P-8
Protector de pantalla
El protector de pantalla puede proteger la unidad de daños
ON: Activar el protector de pantalla
OFF: desactivar el protector de pantalla
Ultima memoria
Esta función le permite a la unidad recordar el ultimo momento que se detuvo la reproducción, de
tal manera que usted puede reanudar la reproducción desde ese punto la próxima vez que inicie
la unidad. Después de presionar STOP (Detener) una vez, presione el botón PLAY (Reproducir)
para regresar a ese punto.
ON: Activar la función
OFF: Desactivar la función
c) Audio
Salida Digital
OFF: Desactivar la función
BTS: Formato BTS
LPCM: Formato LPCM
Downmix
Nota: El ajuste preestablecido es STEREO
LT/RT: Esta opción permite que el sonido sea como el de un teatro en casa,
si el disco reproducido fue codificado en el formato digita Pro Logic.
STEREO: Elija esta opción para salida de audio de 2 canales.
Mono Dual (Izquierdo / Derecho)
Elija esta opción para configurar el modo de salida mono L y R.
Nota: El ajuste preestablecido es MIX-MONO
STEREO
L-MONO
R-MONO
MIX-MONO
Dinámico
Cuando “Salida de línea” es seleccionado, elija esta opción para ajustar el ratio de salida de línea
y obtener diferentes efectos. Si elige la opción FULL, el pico de audio será mínimo. Si elige la
opción OFF será máximo.
Nota: Estas opciones son validas con DOWNMIX apagado. El ajuste preestablecido es OFF
Salida LPCM
Elija esta opción para ajustar la salida LPCM: 48KHz ó 96KHz
Nota: El ajuste preestablecido es 48KHz
Karaoke
Ajuste de micrófono
Volumen de micrófono
Eco
Clave
Page 10
P-9
Parlante
Control parental
3D/EQ: Efecto de sonido de ecualización
Reverberación: Efecto de reverberación
Cambiar: Cambiar la contraseña. Ingrese la contraseña inicial (0000)
Parental: Elija la opción deseada
Restaurar
Contraseña inicial: 0000
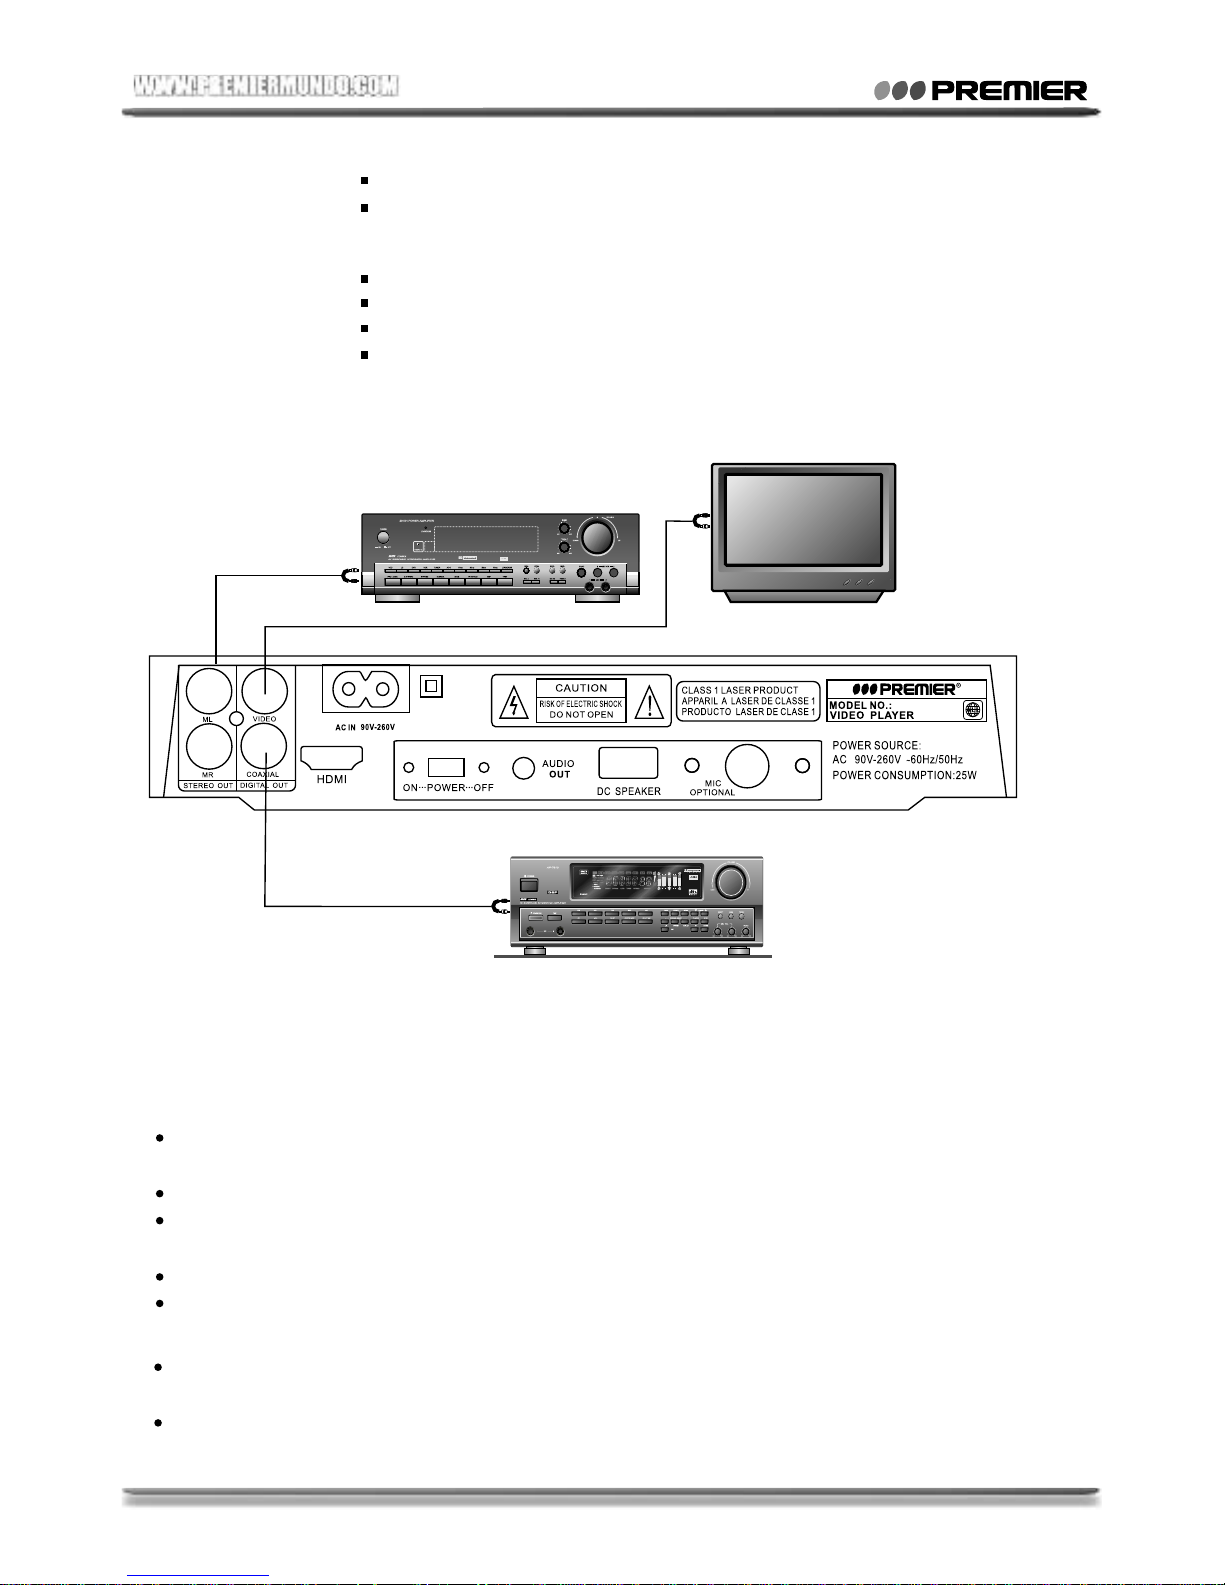
CONEXIÓN
Amplificador de 2 canales
Entrada AC-3
Salida de video
TV con Conector de escaneo progresivo
Amplificador de audio digital
Entrada optical coaxial
Con cables de señal de audio RCA, puede conectar la señal de audio entre la unidad y el
televisor ó los parlantes estéreo. Los conectores de la unidad ML (Izquierdo principal) y MR
(Derecho principal) son para la conexión a los canales de entrada de audio izquierdo y derecho
del televisor ó parlantes estéreo.
RECOMENDACIONES
Con el fin de proteger la unidad, después de apagarla, espere al menos 30 segundos antes
de encenderla nuevamente.
Cuando no use la unidad por periodos largos de tiempo. Desconéctela del tomacorriente.
Asegúrese que el voltaje del área corresponde al voltaje marcado en la unidad antes de
conectarla al tomacorriente.
Es probable que algunos discos no puedan ser leídos por la unidad debido al tipo de formato.
Si la unidad se detiene por accidente, apáguela y reiníciela nuevamente.
Advertencia!
Cuando el enchufe de la unidad es usado como dispositivo de desconexión, este debe ser
conectado en un lugar de fácil acceso.
La unidad no debe ser expuesta a líquidos o salpicaduras. Así mismo, no coloque objetos con
líquidos en su interior sobre la unidad.
SX-5322DU
Page 11
P-10
Reproductor de video
Control remoto
Manual de instrucciones
Cable AV
Micrófono
ACCESORIOS
Ancho de banda de la aguja:
Dispositivo USB soportado:
Sistema de señal:
Respuesta de Frecuencia:
Relación de señal a ruido:
Rango dinámico de audio:
Salida de Audio (Audio Digital):
Salida de video:
Fuente de potencia:
Consumo de potencia:
Peso:
ESPECIFICACIONES
Ancho de banda 650nm
8G
PAL/AUTO/NTSC
20Hz – 20000Hz +/-2.5dB
>=85dB Distorsión de audio + Ruido: <= -80dB (1KHz)
>=85dB (1KHz)
Salida promedio: 0.5Vp-p+/-20%, Sincronización negativa,
Carga: 75Ω
Salida Promedio: 1Vp-p+/-20%, Sincronización negativa,
carga: 75Ω
AC90V – 260V; 50/60Hz
<= 25 Vatios
Peso:<3Kg
Las personas y/o Marcas registradas en este manual de instrucciones no están afiliadas a Premier
Electric Japan Corp. y aparecen en este Manual con propósitos ilustrativos únicamente.
INSTRUCCIONES DE GRABACIÓN(Opcional)
DE VIDEO A DISPOSITIVO USB
1.Abra la bandeja del disco y coloque un disco en ella.
2.Conecte un dispositivo USB
3.Cierre la bandeja y después de haber leído el formato presione el botón de detener
4.Presione el botón de subtitulo en el control remoto
5.Presione ENTER para seleccionar el archivo que desea copiar
6.Luego presione el botón derecho para ir a la función de copiar y presione Enter luego . Elija el Item
USB o SD
7.Una vez termina el proceso de copiado, se podrá ver en la pantalla el mensaje de terminación.
8.Nota: si desconecta el dispositivo USB mientras se lleva a cabo el proceso, los archivos no se copiaran
DE JPEG A DISPOSITIVO USB
1.Abra la bandeja del disco y coloque un disco con formato JPEG en ella.
2.Conecte un dispositivo USB en la unidad.
3.Presione el botón de Detener. Luego el botón de Subtítulos.
4.Luego presione el botón Derecho para ir a la función de Copiar. Elija el ítem USB y presione Enter para
comenzar el proceso de copiado. Mientras los archivos se copian, no puede retirar el dispositivo USB.
5.Una vez termine el proceso de copiado, presione el botón de Subtítulos para ir al menú principal.
Nota: Si desconecta el dispositivo USB mientras se lleva a cabo el proceso, los archivos no se copiarán.
Page 12
SX-5322DU
INSTRUCTION MANUAL
VIDEO PLAYER
DEAR CUSTOMER
In order to achieve the best performance of your product, please read this instruction manual
carefully before using, and keep it for future reference.
If you need extra support, please write to [email protected]
Page 13
P-1
2. SPECIFICATIONS
1. SAFETY INFORMATION
NOTE
This unit may be submitted to changes in specifications, characteristics and/or operation
without prior notice to the user, in order to continue improving and developing its technology.
Pickup Wavelength
Support USB device
Signal System
Frepuency
Response
Signal-to-Noisy
Ratio
Audio Dynamic
Range
Audio output
Video output
(Digital audio)
Power Supply
Power Consumption
Weight
85dB
85dB(1KHz)
Wavelength: 650nm
PAL/AUTO/NTSC
20Hz ~ 20,000 Hz 2.5dB
- 80dB(1KHz)
Audio Distortion + Noise:
average output:
0.5 Vp-p 20%,Load: 75Ω
average output:
1Vp-p 20%, Negative sync, Load: 75Ω
AC90V ~ 260V; 50/60Hz
25W
<3Kg
<
<
<
<
Caution: To reduce the risk of electric shock do not open this device, there are not serviceable
parts for customer. Please refer any maintenance or repair to qualified personnel.
This sign means the existence of dangerous voltage at the inside of the unit, which states
a risk of electric shock.
This sign means that there are important instructions of operation and handling in the
manual that comes with this device.
RISK OF ELECTRIC
SHOCK,DO NOT OPEN
CAUTION
VIDEO TO USB device as back-up(Optional)
1. Open the disc tray and put a disc in it.
2. Connect a USB device.
3. Close the disc tray and after the unit has read the format press “Stop” button.
4. Press “Subtitle” button in the remote control.
5. Press “Enter” to select the file you want to copy.
6. Press “Right” button to go to the copy function and press “Enter”. Select USB or SD device.
7. Once the copy process is finished you may see in the screen the completion message.
8. Note: If the USB device is disconnected while the copy process is in progress, the files will not copy
JPEG TO USB device as back-up
Press open button insert the JPEG disk to VIDEO Player tray. Then insert a USB drive to USB device. Press
remote Control STOP button Then Press SUBTITLE button. Pls press ENTER to select your fav music or
movie, after your finish the selection. Press remote control RIGHT button go to COPY location then to USB
press ENTER button to Process. When the copy on the proceed you cannot move the USB drive.
After you copy finished press SUBTITLE to go to main menu .
Remarks : Above format are subtitle is cannot copy together. Pls note!
Page 14
P-2
3. NAME OF CONTROLS
VIDEO player Precaution:
VIDEO player/VCD2.0/VCD1.1/CBD/CD-ROM/CD-R/CD-RW/DVCD/SVCD/CD-DA/MP3/Picture-CD
This VIDEO player is capable of playing following types of discs:
VIDEO player
discs
1. VIDEO player
2. Remote Control
3. User Manual
4. AV Cord
5. Microphone
X1
X1
X1
X1
X1 (Optional)
Type of
Discs
Discs Mark Contents Disc Size
Maximum Playback Time
Approx. 4 hours (single sided disc)
VIDEO CD
Audio CDs
Audio+Video
(moving
pictures)
(moving
pictures)
Audio+Video
Audio
12cm
12cm
12cm
8cm
8cm
8cm
Approx. 8 hours (double sided disc)
Approx. 80 minutes (single sided disc)
Approx. 160 minutes (double sided disc)
Approx. 74 minutes
Approx. 20 minutes
Approx. 74 minutes
Approx. 20 minutes
Note! Unpack the unit carefully and make sure that all accessories are put aside.
Note! Preparing the Remote Control
1. Open the cover.
2. Insert two batteries (AAA), and make sure to match +and- (polarity) on the battery compartment.
3. Close the cover.
Distance: About 7m from the front of the remote sensor.
Angle: About 30°in each direction of the front of the remote sensor.
-
-
If you do not use the remote control for a long period of time, remove the batteries to avoid battery leakage.
Note! To ensure proper use of this product please read this User manual carefully and retain for future
reference.
Handling:
Cleaning:
Do not touch the playback side of the disc. And do not attach paper or tape to discs.
-
-
Fingerprints and dust on the disc cause picture and sound deterioration. Wipe the disc from the center
outwards with a soft cloth. Always keep the disc clean.
-
Do not use any type of solvent such as thinner, benzine, commercially avaliable cleaners or antistatic spray
for vinyl LPs. It may damage the disc.
Note! This player is also capable of playing Kodak, Fuji, Konica Picture-CD, CD-ROM ISO9660 File System,
CD-R ISO9660 Film System, CD-RW ISO9660 File System.
-
3
4
6
7
8
1
5
2
1.Power
2.Sensor
3.Open/Close
4.Play/Pause
5.USB Device
6.Stop
7.Prev
8.Next
Page 15
P-3
5. BASIC OPERATION
4. REMOTE CONTROL DESCRIPTION
1. Turn On the TV and Your VIDEO player
2. Place a Disc
Press the OPEN / CLOSE button on the remote controller or the front of the VIDEO player, and
Put the electric plug into the electric socket, and the red lamp on the front panel will be turned on.
Press the Power button on the player or the remote controller, and“Loading...”appears on the TV
screen.
“OPEN”appears on the screen. Then Place a disc gently into the tray with the disc’s label facing
up (double-sided discs have content on both sides, so you can place either side up), and press the
OPEN/CLOSE button again to close the disc tray, “CLOSE” appesrs on the TV screen, and the
player starts to read. Then the disc starts playing automatically. (Note: Of some certain type discs,
after reading out the type, the Play or Enter button should be pressed to start playing.)
3. Playing Discs
The contents of each disc menu vary according to how the disc was authored and what features are
included. The disc menu will be turned on for you to select, when Menu button pressed. Also play
and pause can be switched with the Pause button on the remote. Moreover, such as menu play, title
play, sequence play etc., These different play modes are offered.
(Optional)
Radio
function
Power - Power On/Off the
Open/Close - Open or Close VIDEO player
Setup - Bring up VIDEO player Setup Menu
OSD - Display Console Menu
Program - Bring up Program Menu
Time - Time Search
Reverse - Fast Reverse
Fwd - Fast Forward
Previous - Go back to the previous chapter during playback
Next - Skip to the next chapter during playback
Slow - Slow motion
Play/Pause - Begin disc play and select menu item
/Pause the playback
N/P - Select NTSC, PAL, AUTO
Stop - Stop playback
Title - Enter the title menu for VIDEO player disc
Menu/PBC - Bring up VIDEO player Menu/Playback Control
Angle - Use to access various camera angels on a VIDEO player
Audio - Select language
Subtitle - Select subtitle
Repeat - Repeat a chapter or title
A-B - Use to mark a segment to repeat between A and B
L/R - Change Mono chanel
Volume+/- Adjust volume
Zoom - Magnify areas within a picture
Enter - Press this button to turn on or off the player
Mode - To select VIDEO player/Card(Optional)/USB
Return - Enter the title menu for VCD disc
RAN - Random
VIDEO - CVBS(Optional YUV S-Video HDMI)
VIDEO player
Page 16
P-4
6. ADDITIONAL OPERATION
1. Selecting Tracks (compatible with VIDEO player, VCD, MP3 discs)
When playing a VIDEO player disc, press Numeic buttons on the menu or title page to select
tracks; During VIDEO player playback, you can input desired title directly.
a)
b)
As a VCD disc, during sequence playback, press Numeric buttons to select tracks.(During
Program playback and PBC is on, You can only press Prev/Next button to select)
a) Menu Play (compatible with VIDEO player, VCD2.0 discs)
Press Menu Button
TV screen displays the VIDEO player, Root Menu when a VIDEO player disc is loaded.
When a VIDEO player disc is loaded, you can press Arrow buttons to highlight the menu item you
want to choose; As VCD2.0, you can press Numeric buttons to select a track to play.
Press Enter or Play button, you can begin playing with the highlighted.
Return when playinga: When a VIDEO player disc is playing, press Menu (PBC) button, and you can
return to Root Menu; As VCD2.0, and PBC is on, press Menu (PBC) button, you can return to the menu.
Stop
In R. STOP state, the player remembers there you stopped, when you start playing the disc
again, the VIDEO player picked up where you left off.
2)
If you’re not going to use the VIDEO player for a long time, be sure to pull out the electric
plug from the socket.
b) Title Play (compatible with VIDEO player discs only)
During VIDEO player playback, press“TITLE”button to playback from the first chapter.
c) Sequence Play (compatible with VIDEO player ,VCD, MP3 discs )
d) Program Play (compatible with VIDEO player ,VCD, MP3 discs )
When a VCD 2.0 disc is loaded, VCD 2.0 menu will be displayed on the screen (when PBC is
off) (At this moment, press PBC button once to display current PBC state).
1)
3)
When you press Stop button for the first time, the player turns into PRE STOP state. At the same
time the TV screen appears“R. STOP”. To stop the player, press Stop twice.
In stop state, when you press Play, the player enters sequence playback mode.
For the disc protection, before you press Open / Close button to eject the disc tray when
playing, please press Stop button at first. After taking out the disc, press Open / Close
again to close the tray.
When a VCD disc is loaded and PBC is on, once PBC button pressed, PBC switches off.Then the
player can play in sequence playback mode; when PBC button pressed twice, PBC switches on.
Except for VCD discs, in the stop state, when press Play button, the player then enters sequence
playback mode. This feature is efective to all the compatible discs.
The Program Playback option allows you to enter the order in which you want chapters or tracks to
play. Press“PROG”button on the remote control to enter this option.
Program Menu:
If PBC is on, this operation will turn PBC off while the chapters / tracks plays in programmed order.
According to the highlight, use the Numeric buttons to enter the chapters / tracks in the order you
want them to play. Then press PLAY or use Arrow buttons to highlight the“PLAY”item and press
Enter. The chapters / tracks will play in the programmed order.
According to the Direction Indicator on the menu, you can press Arrow buttons to highlight where
you want to enter.
During Program Playback, if Program button pressed, the programmed order and the contents will
be displayed on the screen again, and the Program Playback will be stopped; Also you can press
STOP and PLAY to resume normal playback.
Notes:
To clear the programmed order, use Arrow buttons to highlight the“Clear All”item, then press
Enter.
To modify the programmed order, use Arrow buttons to highlight the modifying item and enter
the new chapter / track you want to program directly.
Page 17
P-5
2. Skipping Tracks (compatible with VIDEO player, VCD, MP3 discs)
If a VIDEO player disc is loaded, it varies according to how the disc was configured.
3. Multi speed Fast Motion Playback (compatible with VIDEO player, VCD, MP3 discs)
During VIDEO player playback, when Fast Forward Playback gets to the beginning of the next title/
chapter, it resumes normal playback; During VCD playback with PBC on, then Fast Forward Playback
gets to the beginning of the next track, it resumes normal playback.
During VIDEO player playback, when Fast Reverse Playback gets to the beginning of the playing title/
chapter, it resumes normal playback; During VCD playback with PBC on, then Fast Reverse Playback
gets to the beginning of the playing track, it resumes normal playback.
4. Multi speed Slow Motion Playback (compatible with VIDEO player, VCD, MP3 discs)
5. Freeze Frame and Frame Advance (compatible with VIDEO player, VCD, MP3 discs)
During VIDEO player, VCD playback, press“PAUSE”once to freeze playback; Press“PLAY”to
resume normao playback.
b)
6. Using the Repeat Feature (compatible with VIDEO player, VCD, MP3 discs)
In VIDEO player playback, press Repeat button again to turn on repeat mode.
c) When playing MP3 discs, Numeric buttons to select different tracks on current track list.
To select tracks from 1 to 10, press corresponding Numeric buttons(1-9,10)
Notes:
To select track above 10, press 10+ button. Foe example, to select the track 15, press 10+and
5 buttons.
If the selected tracks are not available, the input would be invalid.
To skip forward the beginning of the next title / chapter / track on a disc, press NEXT on the remote
or the front of the player.
To skip backward to the beginning of the preceding title / chapter / track on a disc, press PREV on
the remote or the front of the player.
b)
a)
When playing the last chapter / track on a VCD disc with PBC off, pressing Next button wil stop
the playback; When playing the first chapter / track, pressing PREV button will stop the playback;
When stop, pressing NEXT / PREV button will be invalid.
a)
b)
You can search in forward or reverse mode during playback.
Press the F.F button on the remote during playback to search through a disc, Press the button again
on the remote to search at the next speed. Fast Forward Playback has five speeds. With each
consecutive press of the button, the search speed increases. If you press the button six times, Fast
Forward Playback cycles back to the normal playback.
Press PLAY button to resume normal playback.
During MP3 playback, with the speed F.F x2 or higher, the player has no audio output.
Press the F.R button on the remote during playback to search through a disc, press the button again
on the remote to search at the next speed. Fast Reverse Playback has five speeds, With each
consecutive press of the button, the search speed increases. If you press the button six times, Fast
Reverse Playback cycles back to normal playback.
Press PLAY button to resume normal playback.
During Mp3 playback, with the speed F.R x2 or higher, the player has no audio output.
Press SLOW button when movie is playing, you can enter Slow Motion Playback mode.
Press the Slow button on the remote during playback, Press the button again on the remote to play
at the next speed. Slow Motion Playback has four speeds. With each consecutive press of the button,
the play speed decreases. If you press the button five times, Slow Motion Playback cycles back to
normal playback. Press “PLAY” button to resume normal playback.
a)
a)
b)
During MP3 playback, press PAUSE once to freese playback; Press PLAY button to resume
normal playback.
“ ” “ ”
While a disc is playing, press REPEAT button once, and the repeat banner appear to show current
repeat mode.
“ ”
Press the button again on the remote to turn to the next repeat mode. There are three repeat options:
Repeat Off, Disc, Track. With each consecutive press of the button, the repeat mode switches. If you
press the button four times, repeat mode cycles back to off.
In VCD or MP3 sequence playback mode, press “REPEAT” button again to turn on repeat mode.
There are four repeat options: Off, Repeat All, and Repeat Chapter. With each
consecutive press of the button, the repeat mode switches. If you press the button five times,
repeat mode cycles backs to Off.
Repeat Title
Page 18
P-6
7. Using the OSD Feature (compatible with VIDEO player ,VCD, MP3 discs)
a) Loading and playing VIDEO player (Five pages)
8. Using the Time Feature (compatible with VIDEO player ,VCD discs)
9. Subtitles (compatible with VIDEO player discs)
Press the Subtitle button on the remote once,and the subtitle info banner appears.
When a VIDEO player is recorded with subtitles, you can use the Subtitle feature to view the
subtitles on-screen. By default, subtitles are off. The info banner will display Subtitle Off.
C) In MP3 playback, press REPEAT button again to turn on repeat mode.“ ”
There are four repeat options: All, Folder, File, Off. With each consecutive press of the button,
the repeat mode witches. If you press the button five times, repeat mode cycles back to Off.
Press OSD button once to show the first page:
“Disc Type, Title* / *(the playing title / total titles), Chapter */ *(the playing chapter / total
chapter), Elapsed Time of the title, Repeat Mode”
Press the button again to show the second page:
“Disc Type, Language */ *(the serial number of playing language / the amount of optional
languages), Language Type, Audio type, Subtitle * / * (the serial number of playing subtitle
/ the amount of optional subtitle)”.
Press the button again to show the third page:
“Disc Type, Title Time, Elapsed Time of the title, Remain Time of the title”
Press the button again to show the fourth page:
“Disc Type, chapter Time, Elapsed Time of the chapetr, Remain Time of the chapter”
Press the button again to show the fifth page, the OSD menu fades out
b) Loading and playing VCD Discs(Four pages)
Press OSD button once to show the first page;
“
PBC”
Disc type, Track*/*(the playing track /total tracks), Elapsed time of the title, Repeat mode,
Press the button again to show the second page:
“Disc Type, Disc Time, Elapsed Time of the disc, Remain Time of the disc”
Press the button again to show the third page:
“Disc type, Disc Track Time, Elapsed Time of the disc, Remain Time of the disc”
Press the OSD button for the fourth time, the OSD menu fades out.“ ”
c) Loading and playing MP3 discs
Press OSD button once to show the first page:
“Disc type, Folder * / * (the playing folder / total folders), Elapsed Time of the Playing Track,
Repeat Mode”
Press OSD button once to show the second page:
“Single Time, Elapsed Time of the Playing Track, Remain Time of the Playing Track”
Press the“OSD”button again, the OSD menu fades out.
You can use Search feature to select a title / chapter / track number or go to a specific point in a title.
Firstly, press“TIME”button on the remote controller to bring up the search menu and enter the edit
state; Secondly, press Arrow buttons to highlight the title / chapter / track number / repeat mode or the
time option;Thirdly, use Numeric buttons to enter the title / chapter / track you want to play or the elapsed
time you want to go to in that title; At last, press “ENTER” button to start playback. For example,
entering 01:23:56 will start playback one hour, twenty-three minutes and fifty-six seconds into the title.
If the input number is illegal, the error information“INVALID KEY” will be displayed on the screen.
I. This feature does not work in Program Play Mode.
II. If PBC is on, it will turn off automatically when Search Playback starts.
III. When playing Mp3 / JPEG discs, Search Feature does not work.
Notes:
To display subtitles, press the SUBTITLE button again, The default language with its corresponding
serial number will be displayed in the info banner and subtitles will be displayed I that language> With
each consecutive press of the Subtitle button, the subtitle switches. For example, “Subtitle 01/04:
English”(the availability of the subtitles are dependent). To turn subtitles off, press the Subtitle button
until :“Subtitle Off” is displayed.
“ ”
Page 19
P-7
10. Changling the Camera Angle (compatible with VIDEO player discs)
Dufing disc playback, press Angle on the remote once, and the angle icon appears.
Some VIDEO player discs comtain multiple angles of a particular scene of sequence, so you can
use the Angle feature to view.
11. Mute the Audio Output (compatible with VIDEO player ,VCD, MP3 discs)
12.Zoom In the Video Image (compatible with VIDEO player ,VCD, JPEG discs)
13. Repeat a Specific Segment on the Disc that You Define (compatible with VIDEO player ,VCD, MP3 discs)
14. Volume control (compatible with VIDEO player ,VCD, MP3 discs)
When playing a VIDEO player disc, you can repeat a specific segment only in one title/chapter.
During VIDEO player PCM output playback, this feature does not work.
Notes:
Press the Angle button again go to the next camera angle. If multiple camera angles are available,
the Angle icon displays the current angle number and the number of angles available.
This feature is disc-dependent. If no additional camera angles are available, the Input Invalid
logo will be displayed.
“ ”
Pressing the MUTE button allows you to reduce sound to an inaudible level, and MUTE will
be displayed on the screen. Press the button again or press the VOL+/- button to return to the normal
condition.
“ ” “ ”
Notes:
When mute, the microphone also has no audio output.
If the player playback disc without sound, please try to press MUTE button to resume.“ ”
a) The zoom function allows you to enlarge or zoom out the video image and to pan though the image.
Press Zoom repeatedly to activate the function and choose the required zoom factor.
This feature does not work when the Disc Menu appears.
Notes:
b) Use the arrow buttons to pan across the screen when the zoom factor is 2,3 or 4.
a) During the normal or fast motion playback, press the A-B button once and Repeat A- will “ ”
appear on the screen. This indicates the start of the loop to be repeated.
b) During the normal or fast motion playback, press A-B again and Repeat A-B will appear on
the screen. It indicates the end of the loop.
“ ”
Looping will run from set point A to set point B until you turn off Repeat.
c) Press A-B again to cancel A-B loop mode
When playing a VCD disc, you can repeat a specific segment only in one track. When the
next track begins, A-B Repeat turns off automatically.
a) You can press the Volume button on the front of TV set or the amplifier to control the sound level.
b) Pressing the VOL+ button on the remote allow you to amplify the sound level; Pressing VOL- will
reduce the sound level.
Place a MP3 / JPEG disc into the tray, and the player will auto search the directories saved MP3 / JPEG
files. After searching, it will auto go to the first directory saved MP3 files(to the disc cotaining both MP3
and jpeg files; To the disc containing single type of files, it will auto go to the first directory) and play the
first song in the directory(“01:” is highlighted). The screen displays as the picture below:
Use the Arrow buttons to enter the Directory Region and highlight the desired directory, then the first
track under it starts playback; also you can use the Arrow buttons to enter the File Region and select
the file you want to play.
Notes:
I. Press the LEFT and RIGHT arrow buttons, you can activate Directory Region, File Region “ ” “ ”
And File Switch Region separately.
II. For the disc with MP3 and JPEG files, when playing a JPEG picture, press the Return button to
Return to JPEG list.
III. You can press the Numeric buttons to select the file you want to play.
Notes: When playing a disc with MP3 files, video cannot be output while only digital audio can
IV. When a picture playing or pausing, press the Menu button, the screen will go back to menu.
7. PLAYING MP3 AND JPEG DISCSION
Page 20
P-8
Press the “SETUP” button, the main setup menu appears.
When the main menu displayed, the VIDEO player system will auto pause.
a)
1. General Steps of Setup Menu
Notes:
If your preferred language isn’t available, the disc’s defanlt language will be played. The
default language of your VIDEO player is Spanish.
b) DISPLAY
TV DISPLAY
Normal/PS (Pan & Scan): Choose this setting if your VIDEO player is connected to a normal
ratio TV. You can fill the movie to the entire screen of yout TV. This might mean that parts of
the picture (the left and right edges) won’t be seen.
Normal/LB (Letter Bos): Choose this setting if your
ratio TV connector. You'll see the movies in their original aspect ratio(height-to width ratio).
You'll see the entire frame of the movie, but it will take up a smaller portion of the screen
vertically. The movie might appear with black bars at the top and bottom of the screen.
VIDEO player is connected to a normal
Wide: Choose this setting if your VIDEO player is connected to a wide screen TV. If you
choose this setting and you don’t have a wide screen TV, the images on the screen may
appear distorted due to vertical compression.
Thedefault setting is Normal/PS.
8. THE SETUP MENU SYSTEM
b)
c)
d)
Press the Left and Right arrow buttons to highlight the icon of the desired page, the press the
Down or Right arrow button to activate that page; For example, if you want to setup the video
page, press“RIGHT”to highlight the video icon, the video page will be displayed on the screen.
Press the Down arrow button to highlight the desired option. Press Enter or press Right to select,
the choices of that option appear on the right; For example, press the Down arrow button to
highlight the option, then press“ENTER”to select, the brightness choices appear on the right.
Press“SETUP” again to exit Setup Menu.
Notes:
When setup, the pressing of the following buttons will turn off the setup menu, while the choices
that have been changed will be saved: N/P, Subtitle, F.F, F.R, VOL +/-, PBC, Title, Return, Play,
Stop, Resume, Pause, Next, Prev, S.F., S.R, Zoom, Time, Program, Repeat, A-B, Angle, Ianguage,
Soundtrack, 3D, Mute, Setup.
2. Setup Items Introduction
a) LANGUAGE
Highlight the OSD LANGUAGE option, and press the Arrow buttons to choose the OSD language
you prefer. Press“ENTER”to confirm, and it will display OSD in that language. There are multi
languages for your choices.
Highlight the SUBTITLE option, and press the Arrow buttons to choose the audio language you
prefer. Press“ENTER”to confirm, If the disc you are playing has that language available, it
will output audio in that language. There are multi languages for your choices, and you can also
choose“SUBTITLE OFF”.
Highlight the AUDIO option, and press the Arrow buttons to choose the subtitle language you
prefer. Press“ENTER”to confirm, If the disc you are playing has that language available, it
will displays subtitles in that language; There are multi languages for your choices, and you can
also choose“AUTOMATIC” to let the player to search the audio language by itself.
Highlight the DISC option, and press the Arrow buttons to choose the menu language you prefer.
Press“ENTER”to confirm, If the disc you are playing has that language available, it will displays
menu in that language. There are multi languages for your choices, and you can also choose
“AUTOMATIC” to let the player to search the audio language by itself.
Page 21
P-9
According to the Color System of the TV, you can choose the TV System.
NTSC: Choose this settings if your VIDEO player is connected to a NTSC TV.
PAL: Choose this settings if your VIDEO player is connected to a PAL TV.
AUTO: Choose this settings if your VIDEO player is connected to a multi-system TV.
The default setting is NTSC.
TV TYPE
SCREEN SAVER
LAST MEMORY
If the screen saver is on, when your is in Stop, Open, of No Disc state,or there
is a frame frozen for a while, the screen saver will be displayed. This feature can protect the
screen from damage.
VIDEO player
It can record the last playback moment when you stop your
same VIDEO player next time, you can continue to play the last playback moment by pressing
the button directly. Press“STOP”button during playback. Then press “PLAY” button.
VIDEO playback. When playing the
ANGLE MARK
If the disc has camera angle function, the screen will show the angle mark.
ON: Choose this setting to activate the angle mark.
OFF: Choose this setting to cancel the angle mark.
The default setting is OFF
C) AUDIO
DIGITAL OUTPUT
There are a few types of output format for digital output:
The default setting is OFF.
The default setting is OFF.
ON: Choose this setting to activate the Last memory function.
OFF: Choose this setting to cancel the Last memory function.
ON: Choose this setting to activate the screen saver.
OFF: Choose this setting to cancel the screen saver.
THE default setting is ON.
OFF: Choose this setting to switc off the function.
BTS: Choose this setting to choose BTS format.
LPCM: Choose this setting to choose LPCM format.
The default setting is STEREO.
DOWNMIX
LT/RT: Choose this setting, it will be sound like in a movie theatre if the original movie the
disc was recorded from was encoded in the Pro Logic Digital format.
STEREO: Choose this setting for 2-channel sound playing stereo signal output.
DUAL MONO (LEFT + RIGHT)
Choose this option to setup the L and R mono output mode. There are four modes in this option:
STEREO, L-MONO, R-MONO, and MIX-MONO. It is mainly used in karaoke mode.
The default setting is MIX-MONO.
DYNAMIC: When“LINE OUT”is selected, choose this setting to adjust the line out ratio and
get different effect. If adjusting to FULL, the audio signal peak value will be the minimun; while
adjusting to OFF, maximum.
The default setting is OFF.
Notes: This option will be validated when the DOWNMIX OFF.
LPCM OUTPUT (Optional)
Choose this option to set the LPCM output:48kHz or 96kHz.
The default setting is 48kHz.
Page 22
P-10
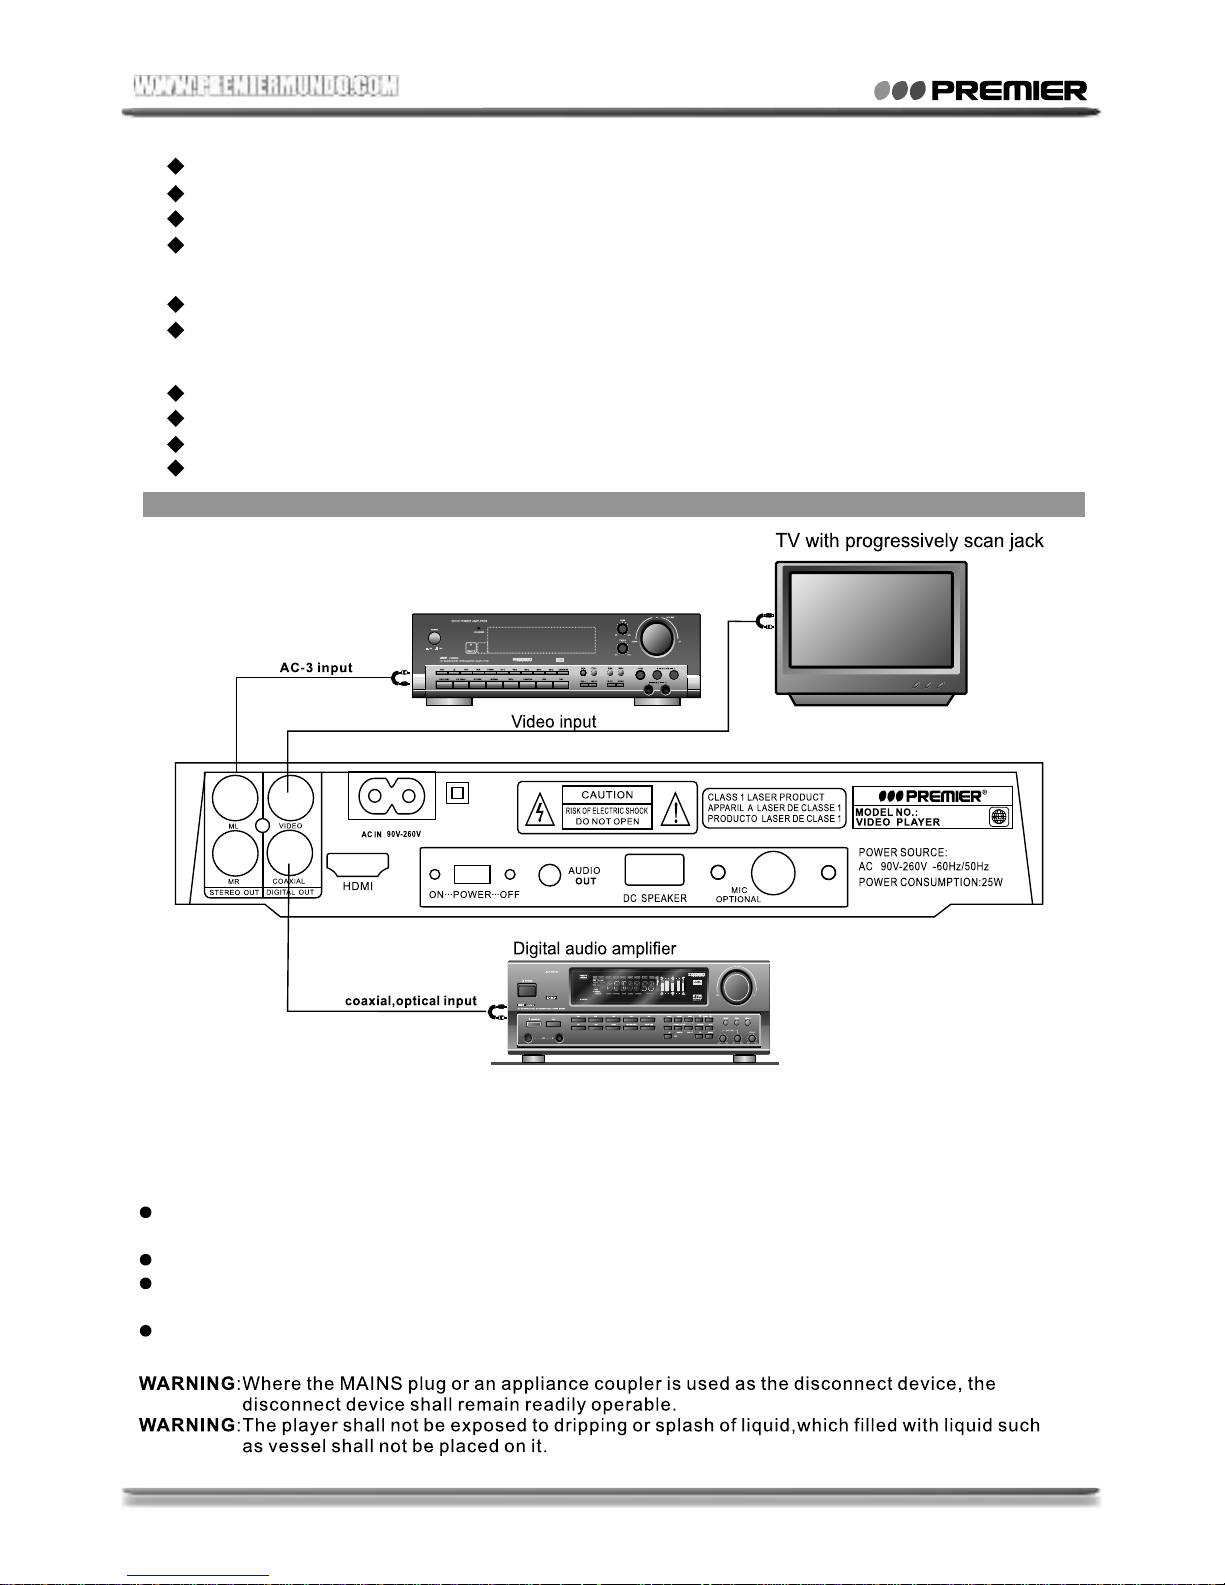
2-Channal amplifier
CONNECTING THE AUDIO SIGNAL BETWEEN THE VIDEO PLAYER AND TV. OR STEREO SPEAKERS
With RCA audio signal cables, you can connect the audio signal between the VIDEO player to TV or stereo
speakers. ML (main left) & MR (main right jacks of the VIDEO player are for connection to the L & R audio-in
jacks of the TV. Or stereo speakers.
REFERENCE:
To protect your VIDEO player, the interval between two consecutive Power button operations
must be above 30 seconds.
No using for a period of time, please pull out the plug from the electric socket.
The player should be operated only on condition that the type of power supply corresponds to the
marking label. Otherwise, it doesn’t workor even be damaged.
The player may not be compatible with some encrypted discs.
If the player stops playback by accident, please power it on again.
9. CONNECTION
MIC SET: Choose the mic mode, OFF of Auto.
d) KARAODE
e) SPEAKER
f) PARENTAL
MIC VOLUME: Choose the volume level
ECHO: Choose the echo sound level
KEY: Choose the key effect level
3D/EQ: Choose the sound equalization effect.
Reverberation: Choose the reverberation effect.
CHANGE: Change the password. Input the current password first, and then apply a new password.
PARENT: There are swveral options.
DERAULT: Choose this to restore the parental setting.
INITIALSETUP IS: 0000
SX-5322DU
 Loading...