

Page 1
MANUAL DE INSTRUCCIONES
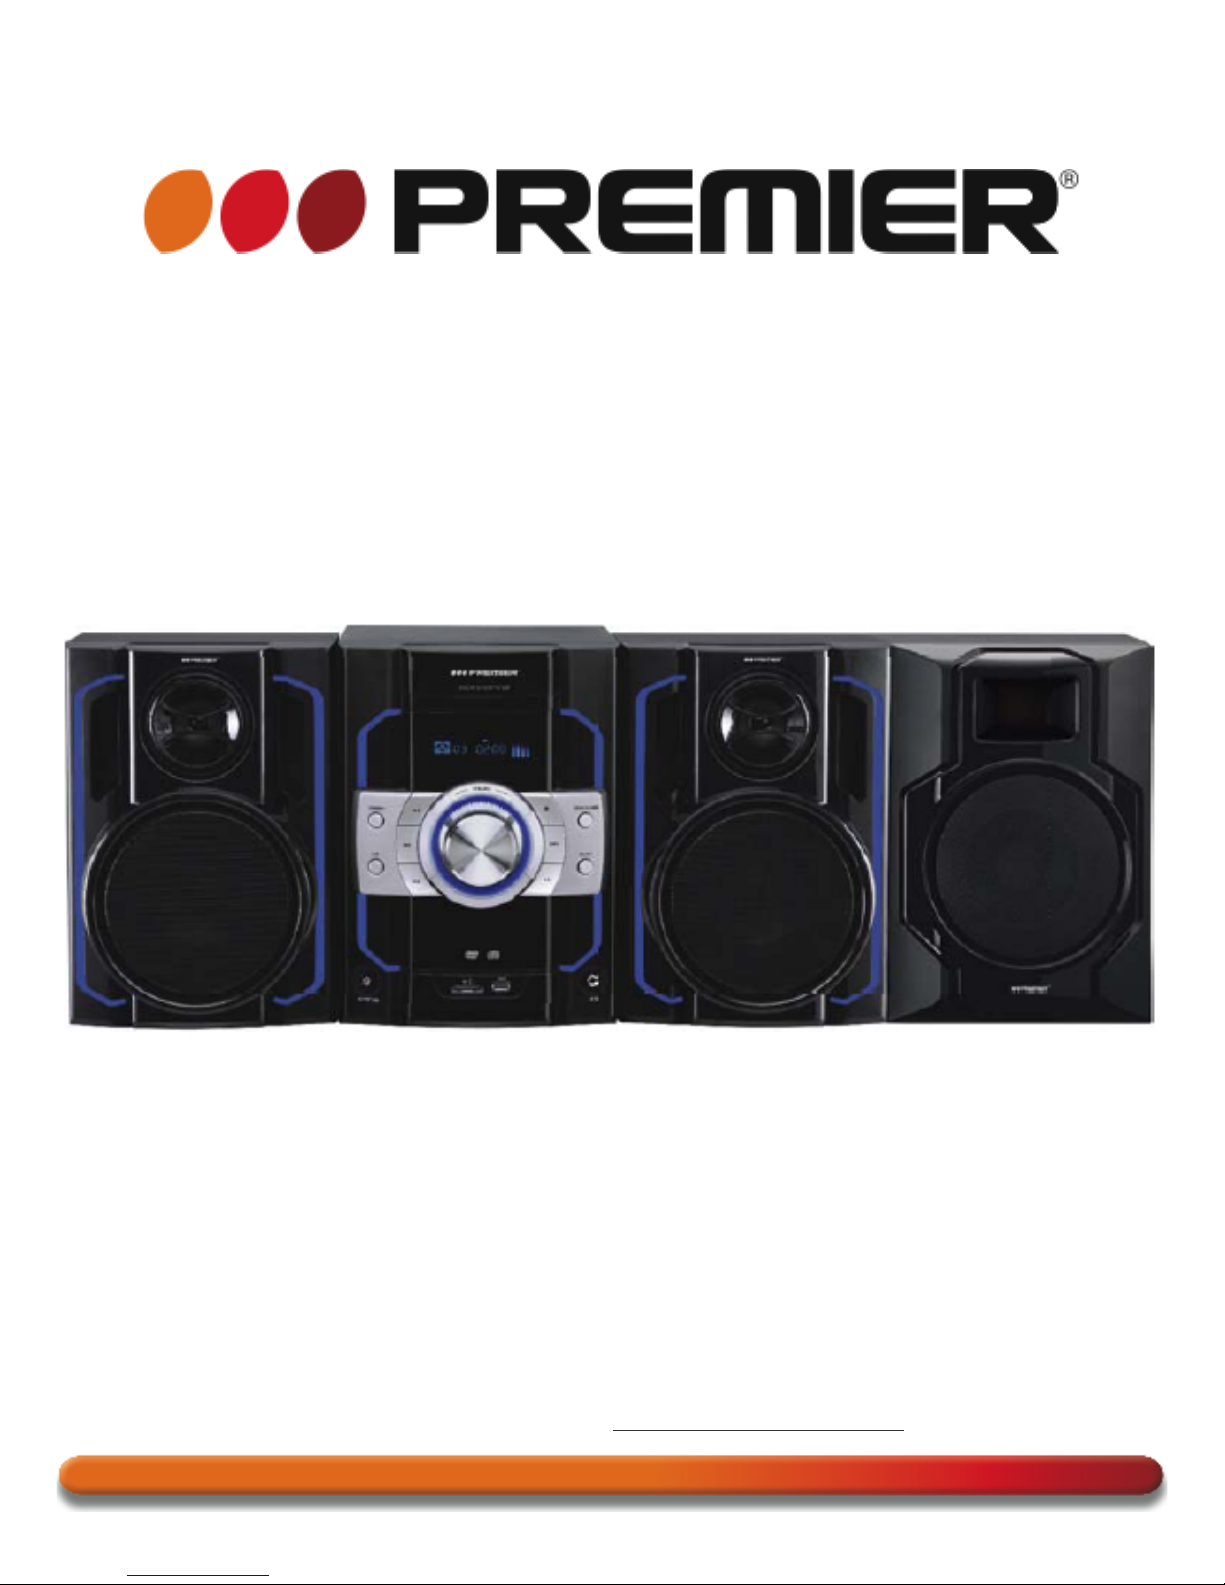
MINI-COMPONENTE C/DVD Y USB/SD
SX-4659DSD
ESTIMADO CLIENTE
Con el fin de que obtenga el mayor desempeño de su producto, por favor lea este manual de
instrucciones cuidadosamente antes de comenzar a utilizarlo, y guárdelo para su futura referencia.
Si necesita soporte adicional, no dude en escribir a: [email protected]
Page 2
Pagina 1
PRECAUCIÓN
RIESGO DE CHOQUE
ELÉCTRICO , NO ABRA
Precaución: Para reducir el riesgo de choque eléctrico, no retire
la cubierta, no hay partes manipulables por el usuario al interior
de la unidad. Refiera todo mantenimiento o intervención técnica
a personal técnico calificado.
Este símbolo indica la existencia de voltaje peligroso al
interior de esta unidad que constituye un riesgo de choque
eléctrico.
Este símbolo indica que hay importantes instrucciones de
operación y mantenimiento en la literatura que acompaña a
esta unidad.
LÍNEAS DE SERVICIO AL CLIENTE PREMIER
Venezuela:
0800 – ELECTRIC (353-2874)
Panamá:
300-5185
Sitio Web:
www.premiermundo.com
E-mail:
NOTA
Nos reservamos el derecho de modificar las especificaciones, características y/u operación de esta
unidad sin previo aviso, con el fin de continuar las mejoras y desarrollo del mismo.
Page 3

Pagina 2
ÍNDICE
!
CARACTERÍSTICAS ................................................................................................................................. 3!
INSTRUCCIONES DE SEGURIDAD ......................................................................................................... 3!
ACCESORIOS ........................................................................................................................................... 4!
FORMATOS SOPORTADOS .................................................................................................................... 4!
PANEL FRONTAL ..................................................................................................................................... 5!
PANEL POSTERIOR ................................................................................................................................. 5!
CONEXIÓN ................................................................................................................................................ 6!
CONEXIÓN DEL SISTEMA DE VIDEO .................................................................................................. 6!
CONEXIÓN DEL SISTEMA DE AUDIO ................................................................................................. 7!
ENTRADA DE LÍNEA (CONECTOR AUX/MP3) .................................................................................... 8!
OPERACIÓN DEL MENÚ .......................................................................................................................... 8!
PAGINA DE CONFIGURACIÓN GENERAL .......................................................................................... 8!
CONFIGURACIÓN DE AUDIO ............................................................................................................... 9!
CONFIGURACIÓN DE DECODIFICADOR DIGITAL ........................................................................... 10!
CONFIGURACIÓN DE VIDEO ............................................................................................................. 10!
PAGINA DE PREFERENCIA ................................................................................................................ 10!
OPERACIÓN DEL CONTROL REMOTO ................................................................................................ 12!
INSTALACIÓN DE LAS BATERÍAS ..................................................................................................... 12!
DESCRIPCIÓN ..................................................................................................................................... 13!
OPERACIÓN DE SINTONIZACIÓN ........................................................................................................ 16!
REPRODUCCIÓN DE CD DE IMAGEN KODAK .................................................................................... 17!
REPRODUCCIÓN DE DISCOS MP3/MPEG4 ......................................................................................... 17!
REPRODUCIR TARJETA DE MEMORIA Y USB ................................................................................... 18!
REPRODUCCIÓN DE KARAOKE ........................................................................................................... 18!
EXTRACCIÓN DE CD ............................................................................................................................. 18!
SOLUCIÓN DE PROBLEMAS ................................................................................................................ 19!
ESPECIFICACIONES .............................................................................................................................. 20!
DIAGRAMA DE CIRCUITOS ................................................................................................................... 21!
Page 4

Pagina 3
CARACTERÍSTICAS
Por favor lea este manual de instrucciones antes de realizar las conexiones y operar la unidad.
Conserve este manual para futuras referencias.
Esta es una unidad domestica de nueva generación la cual produce imágenes de alta calidad y efecto
de audio Hi-Fi. Su rendimiento es mucho mejor que cualquier previo equipo de video.
• MPEG, LPCM, PCM, etc. Decodificador de audio digita.
• Hi-Fi, Procesador digital de audio de 96kHz/24 bit.
• Actualización de software inteligente
• Salida de video de componentes de alta resolución.
• Salida de audio digital coaxial.
• Compatible con DVD, DVD-R, DVD+R, DVD-RW, DVD+RW, VCD, DVCD, CD, CD-R, MP3,
MPEG4, CD DE IMÁGENES KODAK, ETC.
• Con puerto USB y ranura para tarjetas.
• Sistema servo integrado de alta, Decodificación en tecnología de chip sencillo, Alta confiabilidad y
estabilidad y súper corrección de error.
• Control remoto de funcionalidad completa
• Sintonizador de radio estéreo AM/FM
• Amplificador de alta calidad
• Función de extracción de CD
INSTRUCCIONES DE SEGURIDAD
• No abra el gabinete de la unidad. Remita todo arreglo y reparación a personal de servicio técnico
calificado.
• Apague la unidad cuando no la este usando. Apáguela y desconéctela del tomacorriente cuando no
vaya a usar la unidad por un periodo de tiempo prolongado.
• No instale la unidad en un lugar cercano a fuentes de calor o a los rayos directos del sol.
• No instale la unidad en lugares expuestos a la lluvia o humedad. Así mismo, evite exponerla a
goteos o salpicaduras y evite colocar objetos, tales como vasos con líquidos sobre la unidad.
• Coloque la unidad en un superficie horizontal, firme y con una buena ventilación. No bloquee las
salidas de ventilación, ya que esto puede causar mal funcionamiento y sobrecalentar la unidad.
• Este manual es solo una guía para el usuario, no un criterio para configuración.
• Cuando el enchufe de la unidad es usado como dispositivo de desconexión, este debe permanecer
accesible.
• Use solo accesorios autorizados por el fabricante.
Advertencia: las baterías no deben ser expuestas a fuentes de calor, los rayos directos del sol ó a
fuego.
Precaución: Hay riesgo de explosión si las baterías se encuentran incorrectamente colocadas. Coloque
baterías solo del mismo tipo o equivalente.
Page 5
Pagina 4
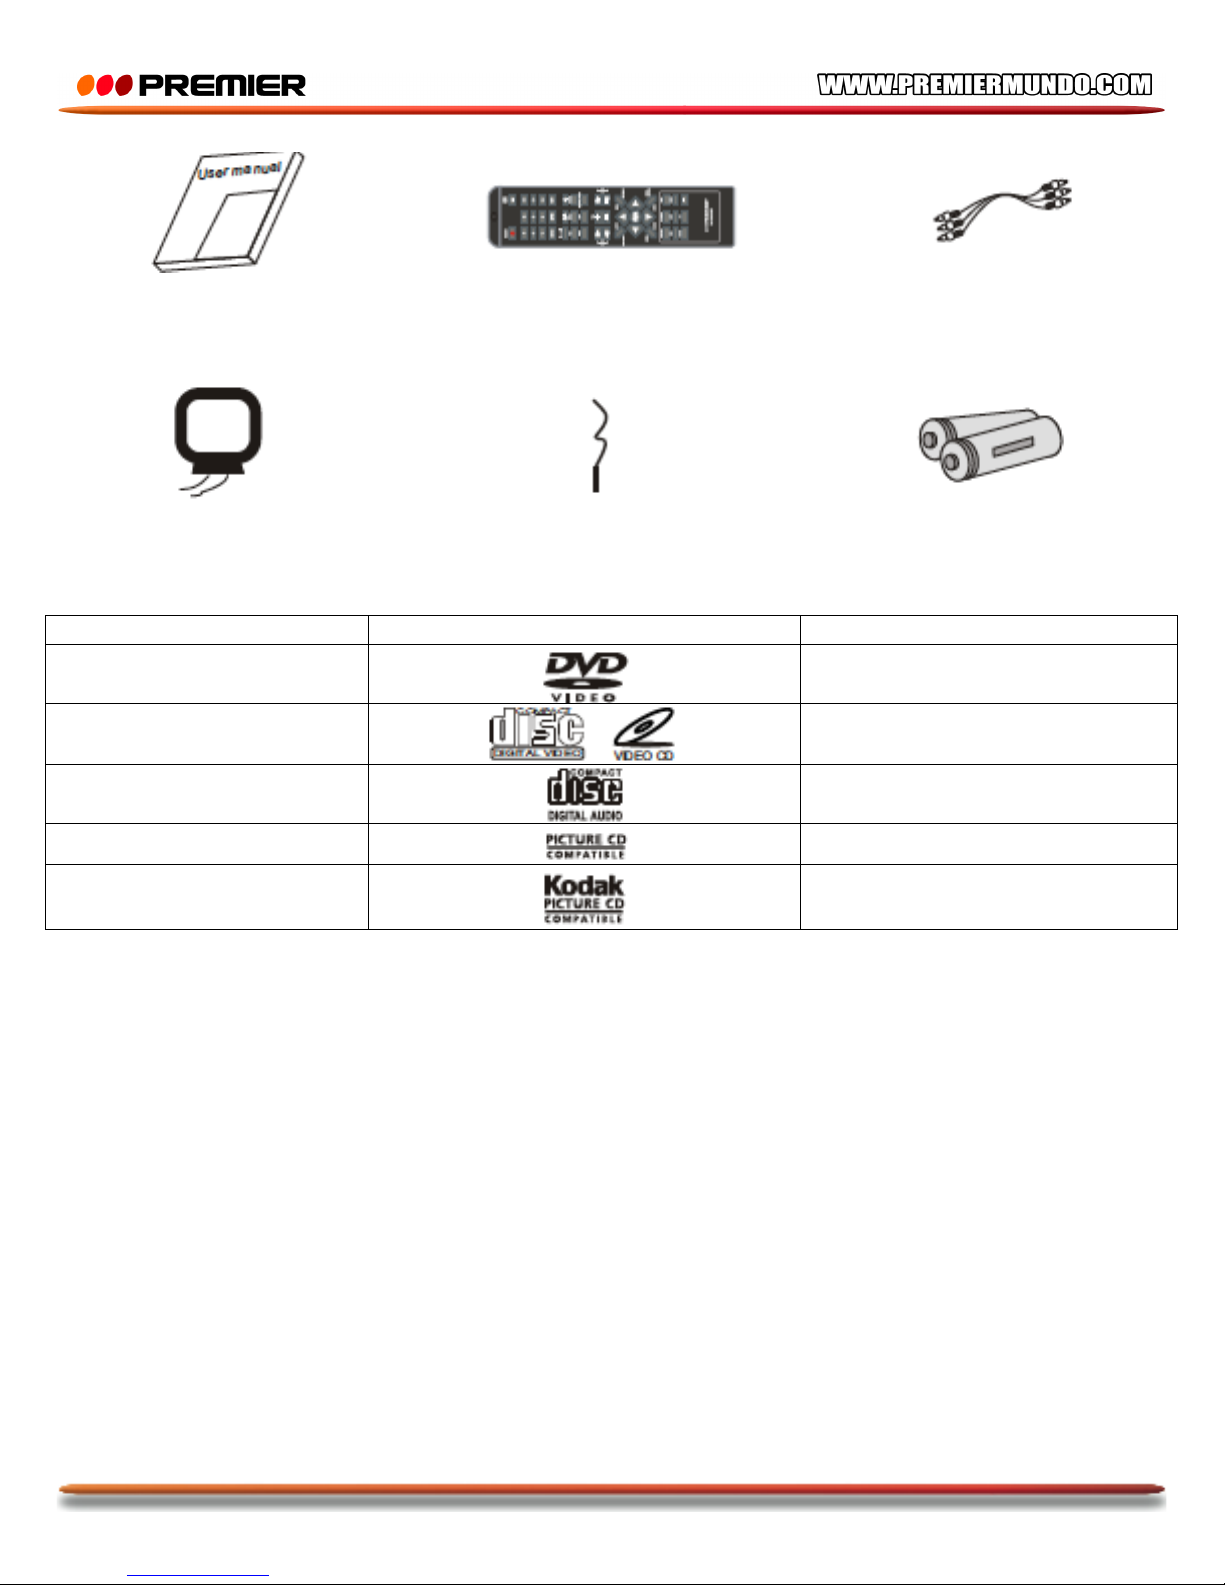
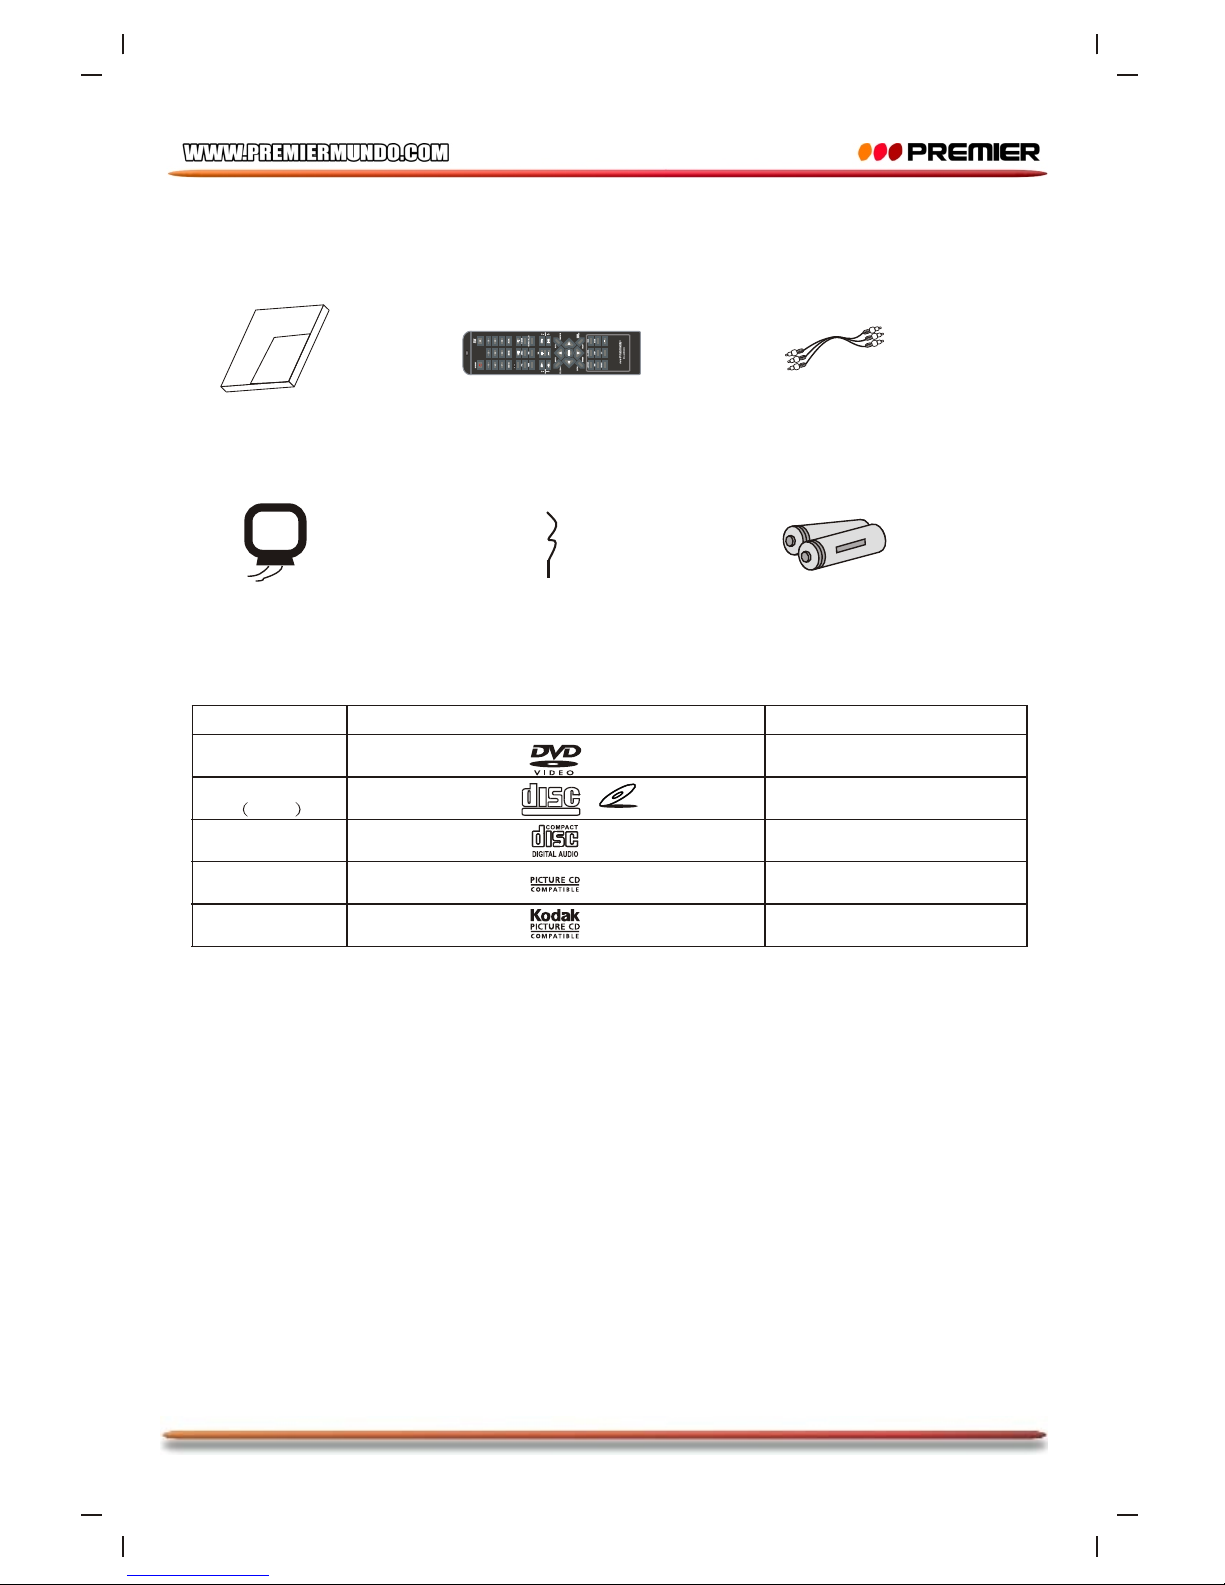
ACCESORIOS
FORMATOS SOPORTADOS
Tipo de discos
Símbolo
Contenidos
DVD
Audio + Video
VCD
Audio + Video
CD-DA
Audio
CD de imagen
CD de fotos JPEG
CD de imagen KODAK
Foto Electrónica
Manual de
instrucciones
Control
Remoto
Cable A/V
Antena AM
Antena FM
Baterías
Page 6
Pagina 5
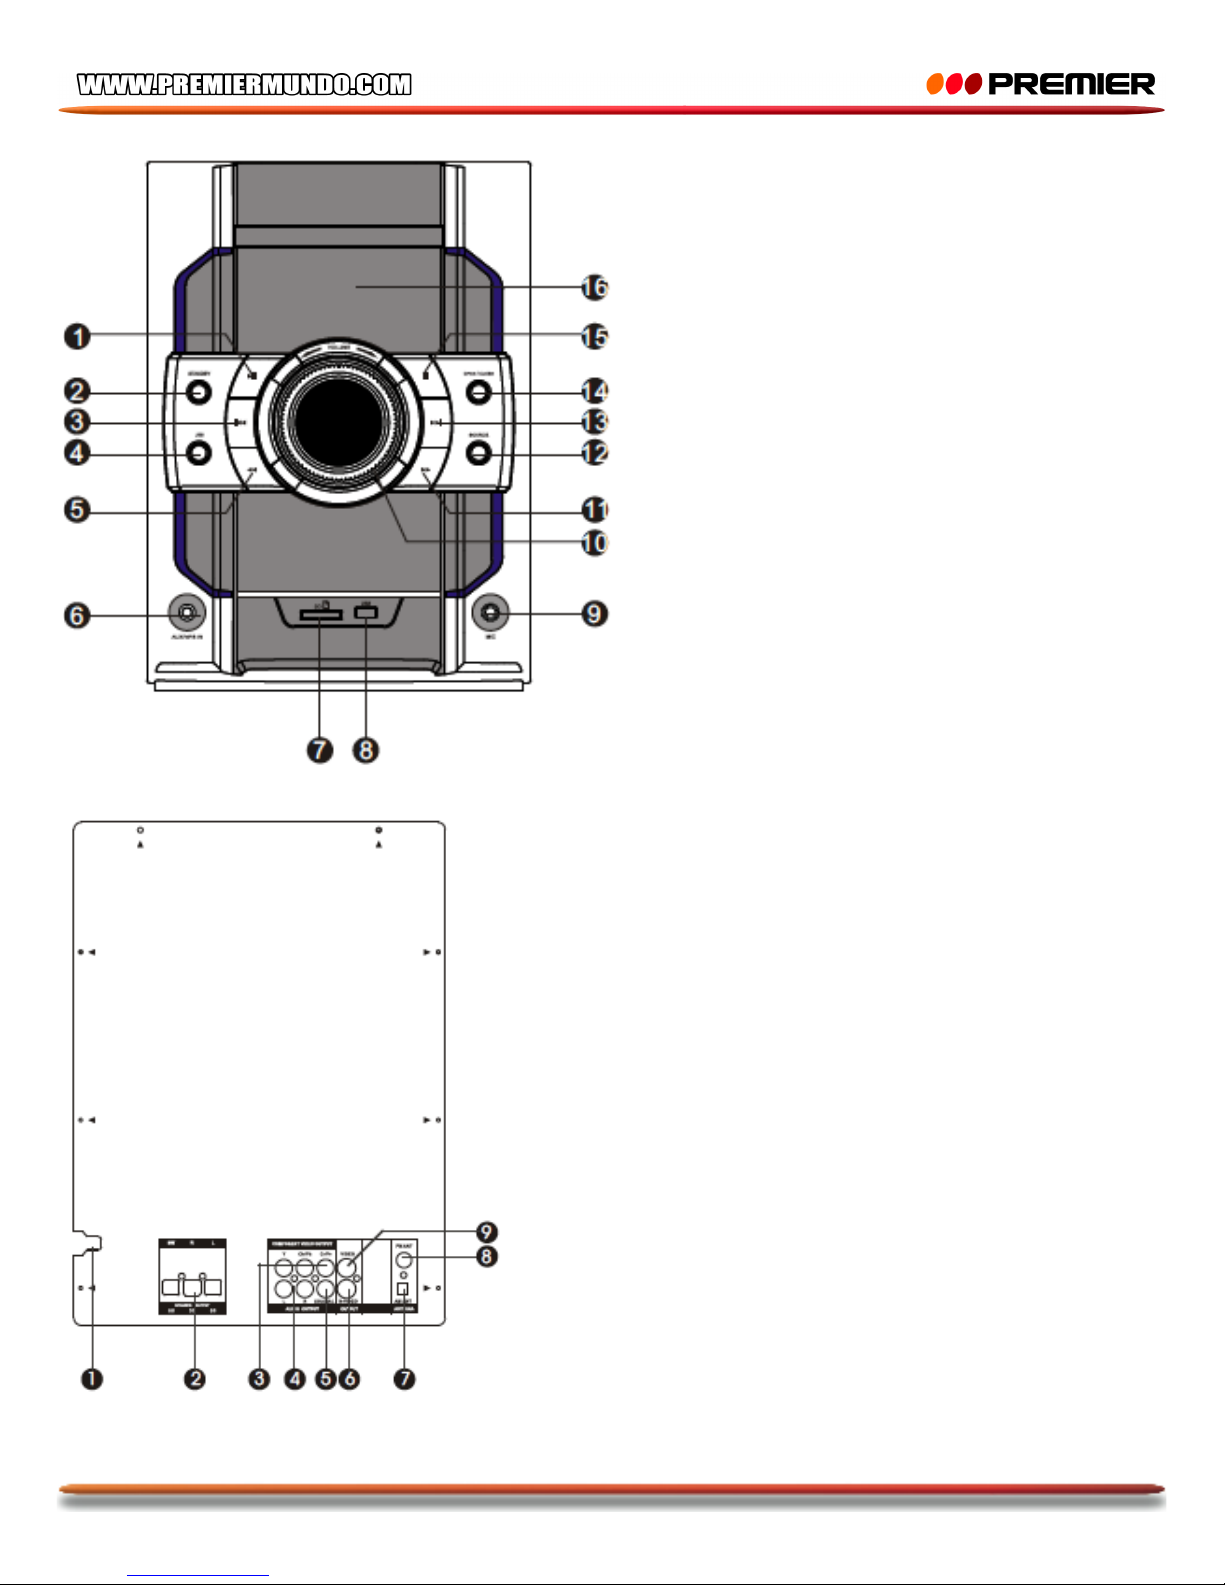
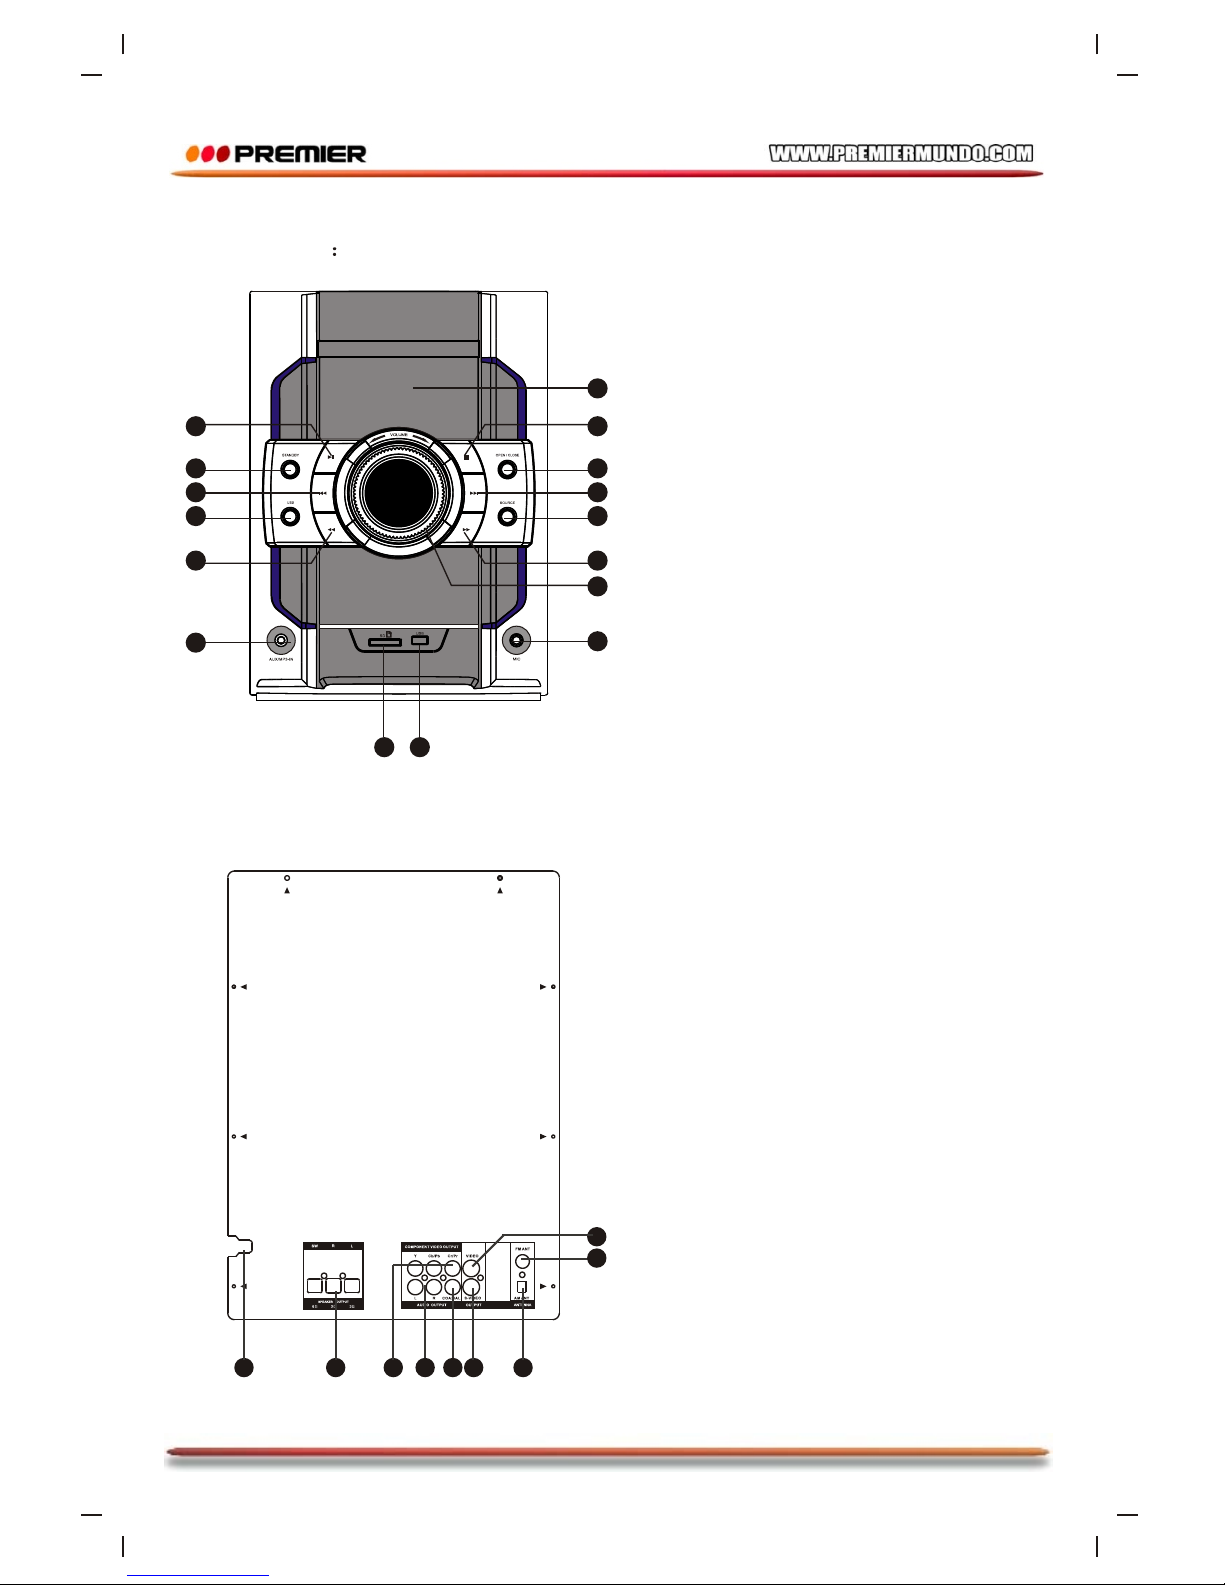
PANEL FRONTAL
PANEL POSTERIOR
1. REPRODUCIR / PAUSAR
2. ENCENDIDO / APAGADO (STANDBY)
3. ANTERIOR (PREVIUOS)
4. USB
5. RETROCESO RÁPIDO
6. CONECTOR AUX/MP3
7. RANURA PARA TARJETA DE
MEMORIA
8. PUERTO USB
9. CONECTOR PARA MICRÓFONO
10. PERILLA DE VOLUMEN
11. ADELANTAMIENTO RÁPIDO
12. FUENTE (SOURCE)
13. SIGUIENTE
14. ABRIR / CERRAR
15. DETENER
16. PANTALLA
1. Entrada AC
2. Salida de parlante
3. Salida de video de componentes
4. Salida de audio de canal L/R
5. Salida de Audio Digital Coaxial.
6. Salida de Video-S
7. Conector de Antena FM
8. Conector de Antena AM
9. Salida de video compuesto
Page 7
Pagina 6
CONEXIÓN
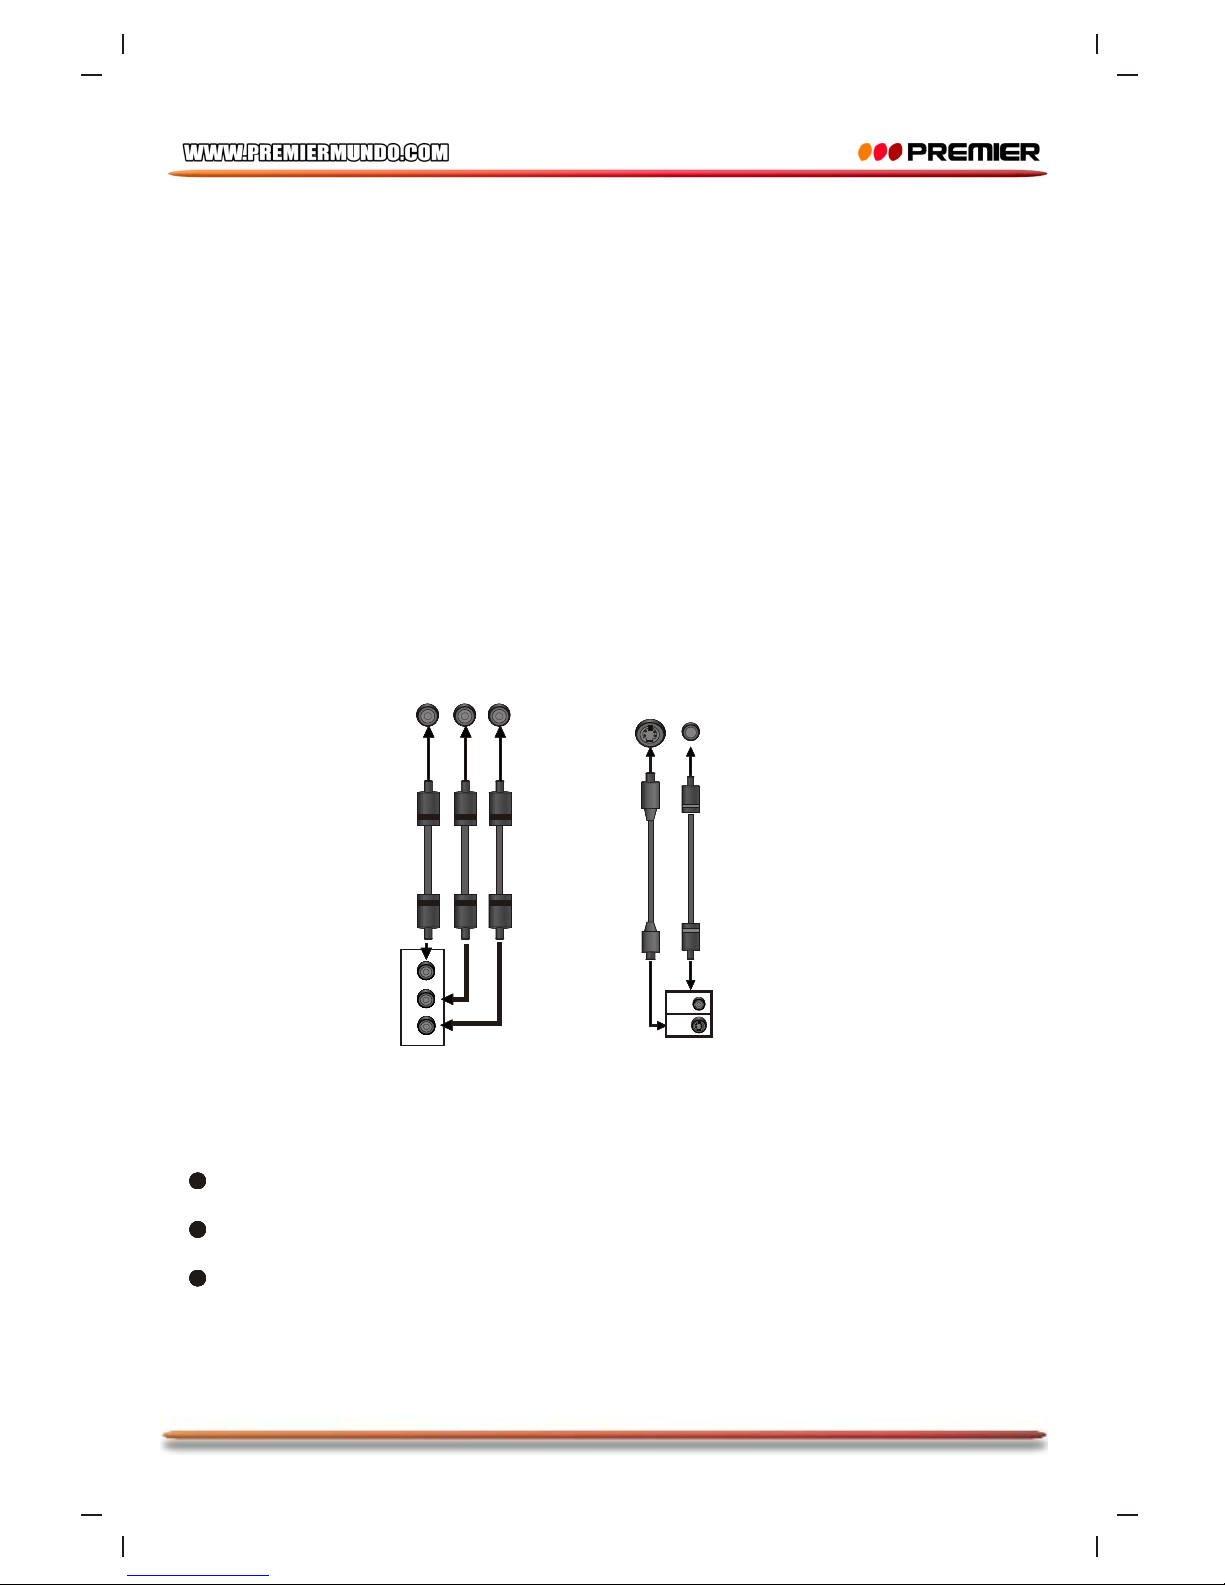
CONEXIÓN DEL SISTEMA DE VIDEO
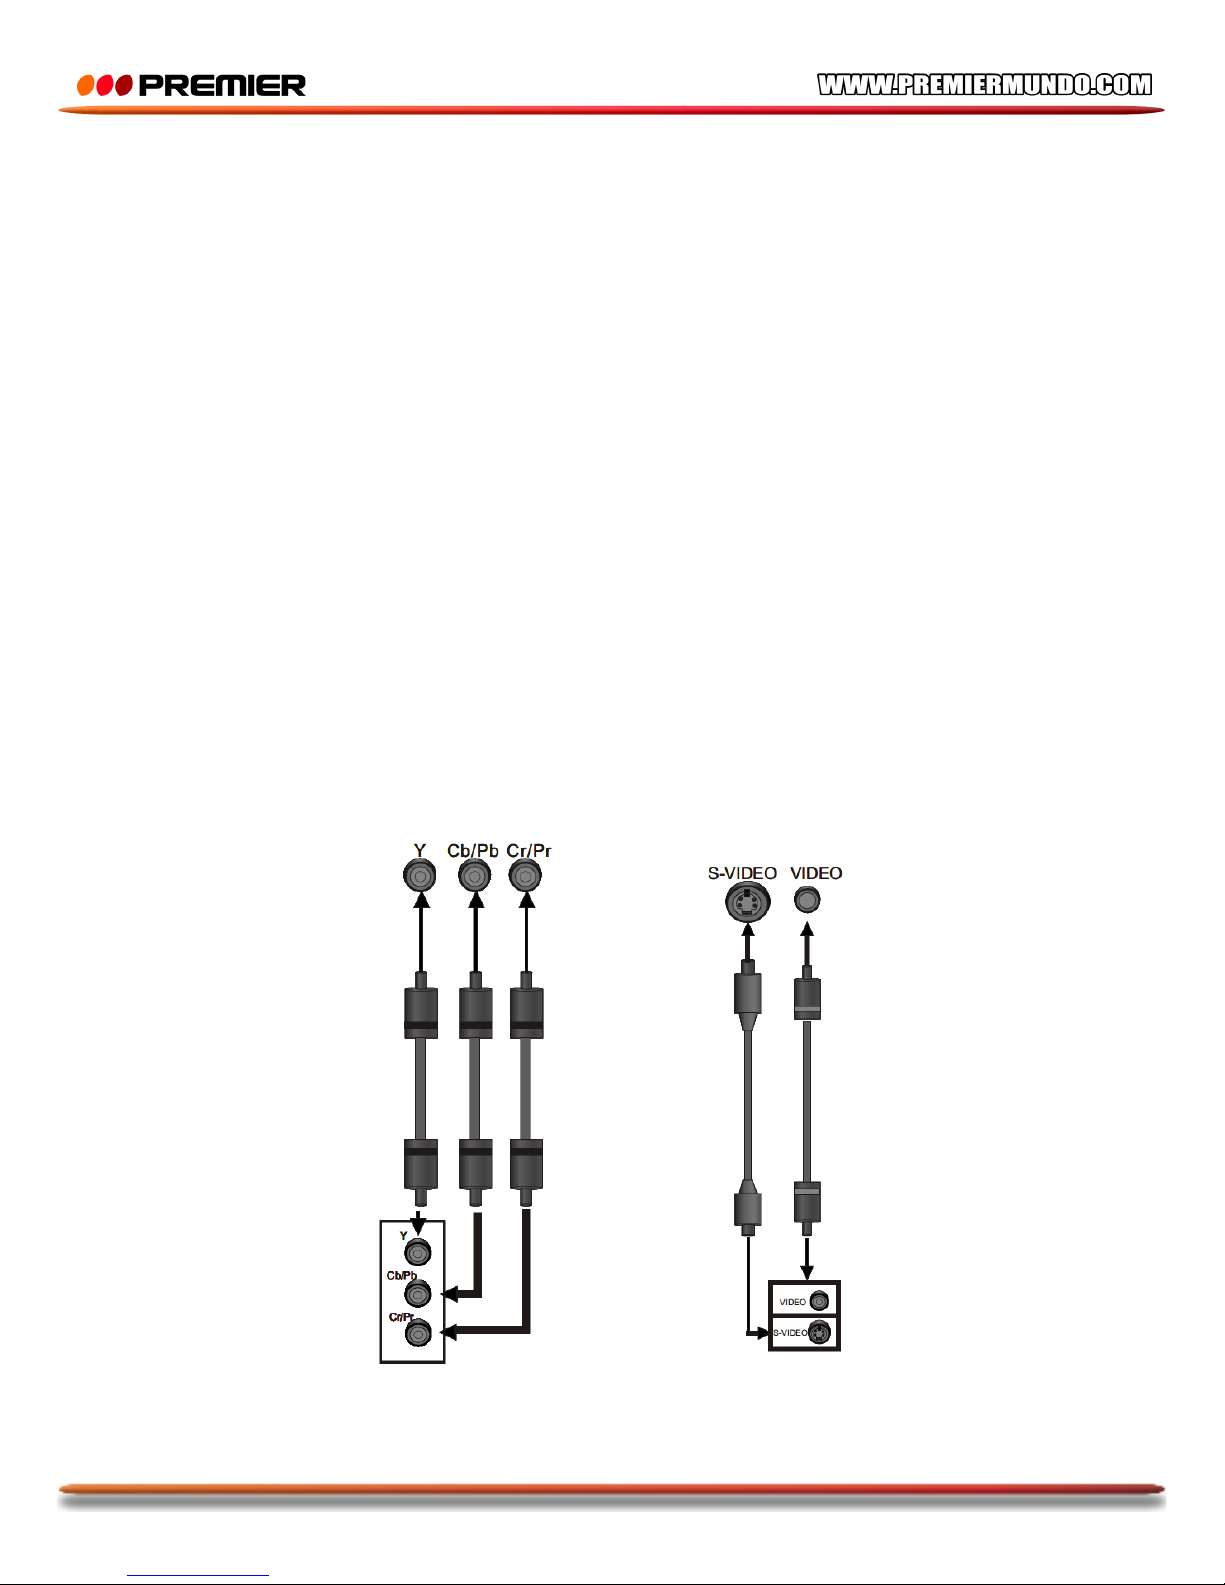
La siguiente salida de video esta disponible para esta unidad.
Video compuesto
Use el conector amarillo de un cable AV para conectar la salida de video compuesto de esta unidad a la
entrada de video de un TV / Monitor.
Video-S
Use un cable de video-S para conectar la salida de video-S de esta unidad a la entrada correspondiente
de un TV / Monitor.
Video de componentes
Use un cable de 3 hilos para conectar las salidas de componentes de esta unidad a la entradas
correspondientes de un TV / Monitor.
NOTA:
• De las anteriores salidas de video, el de componentes es el mejor, la salida de Video-S en buena y
la de Video Compuesto de la estándar. Use la mejor conexión de video disponibles.
• No realice todas las conexiones anteriores al mismo tiempo, ya que la imagen producida se vera
afectada.
• Solo cuando la configuración de video se ajusta a la actual conexión del sistema de video la unidad
produce la salida de video correspondiente.
ENTRADA DE VIDEO DE TV / MONITOR
Entrada de video de componente
Entrada de video compuesto
Entrada de Video-S
Salida de video de componente
Salida de Video-S y de video
compuesto
Page 8
Pagina 7
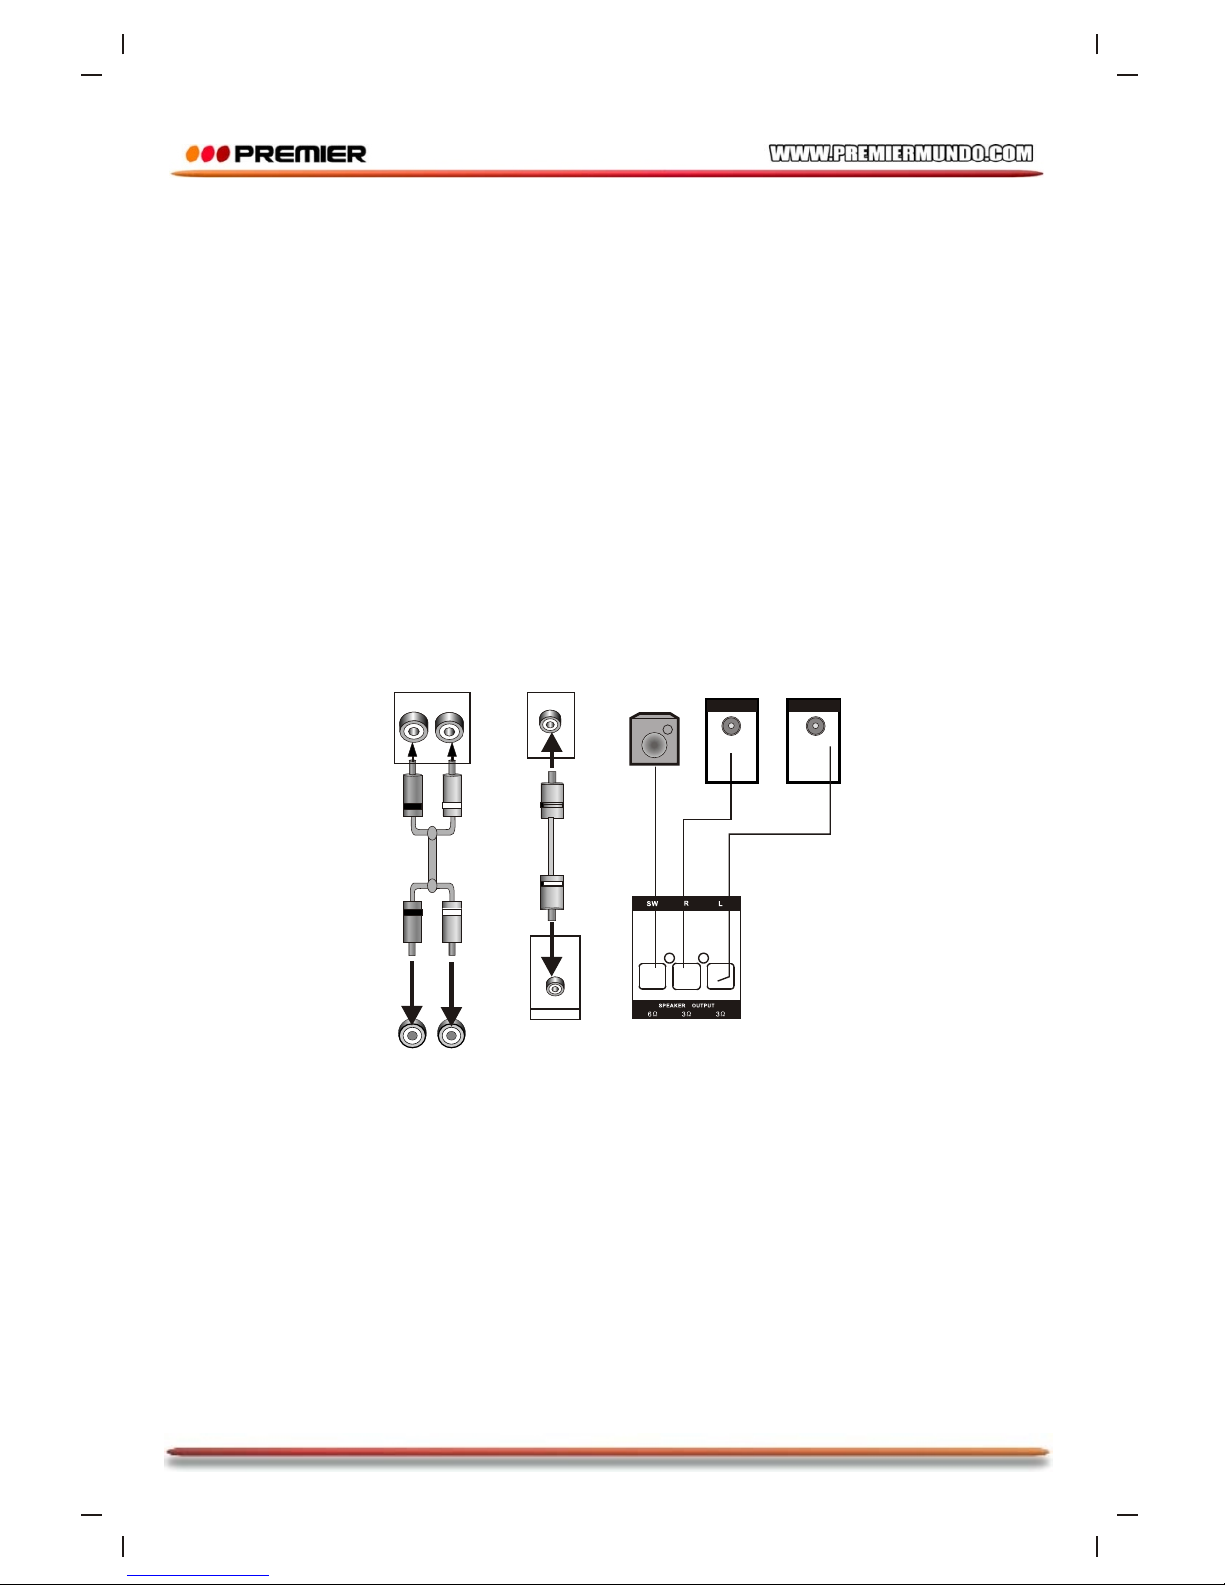
CONEXIÓN DEL SISTEMA DE AUDIO
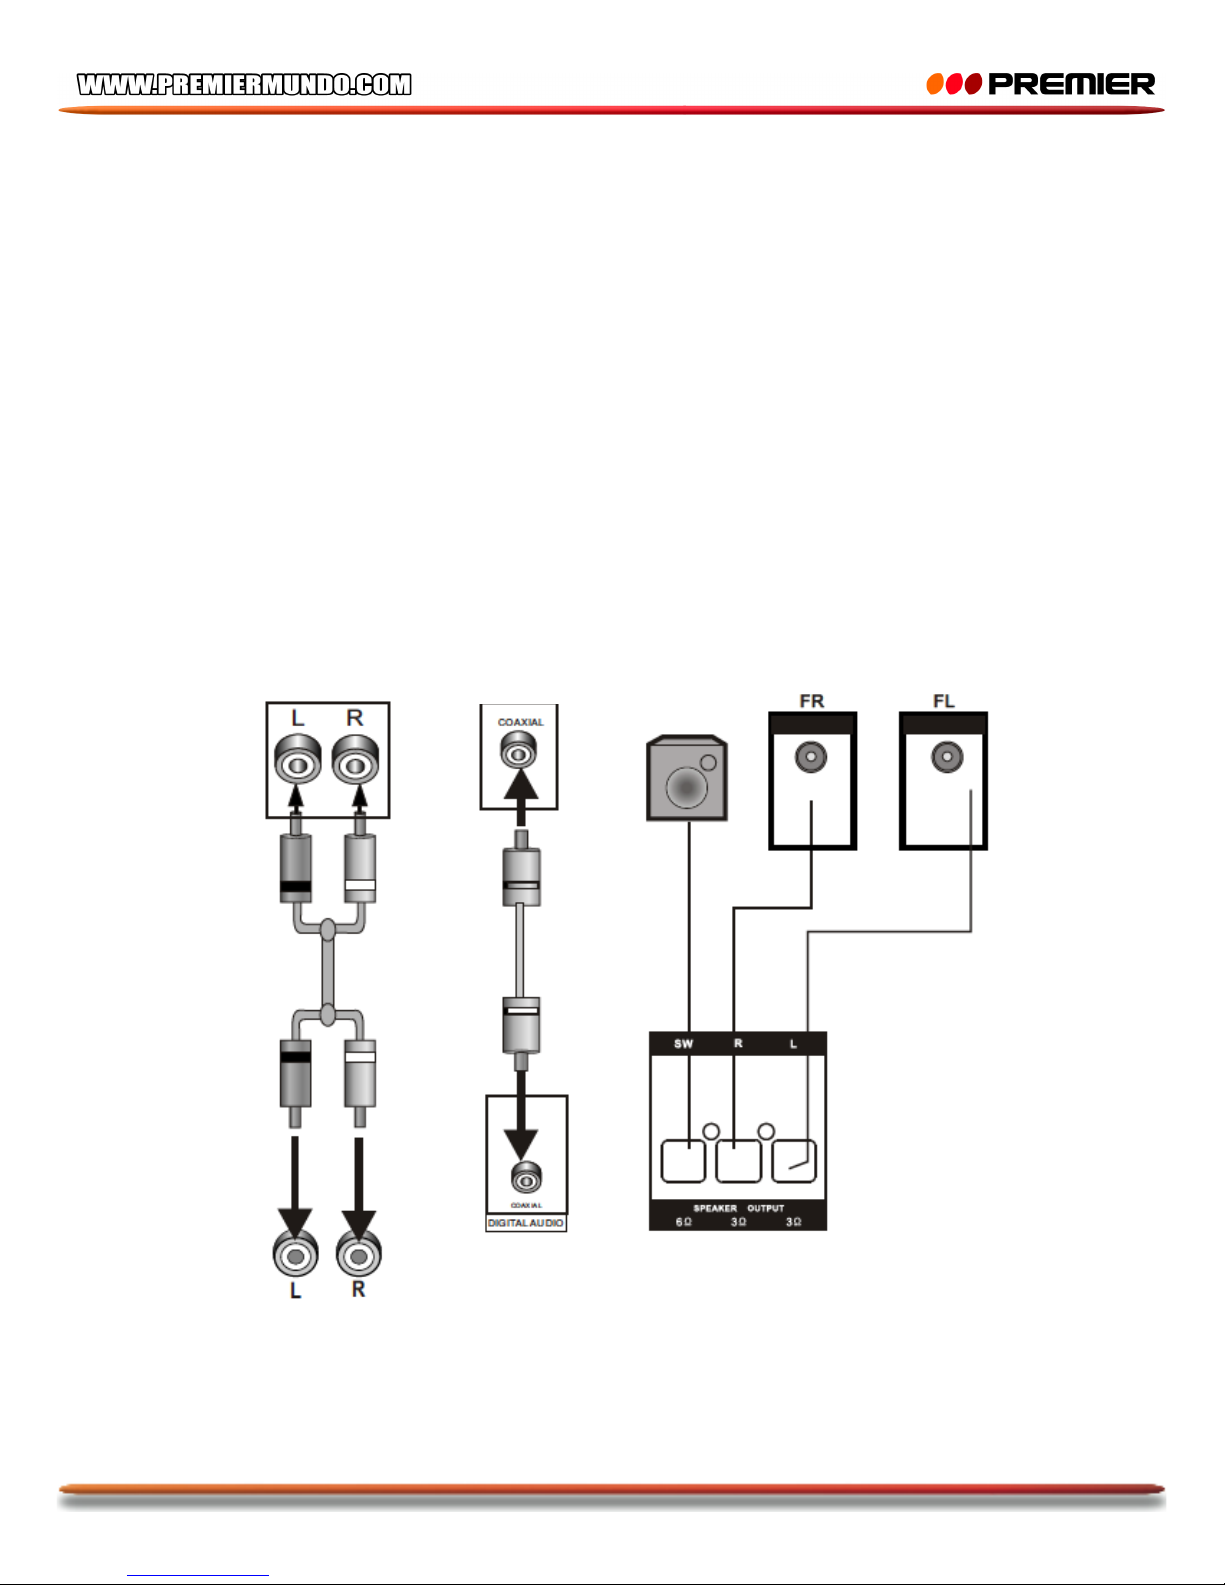
Esta unidad tiene dos salidas de audio, análoga y digital.
La salida de audio análoga es de dos canales. El audio digital sale de la coaxial, y la calidad de sonido
es mucho mejor que el audio análogo.
Salida de 2 canales
Use un par de cables de audio (rojo para derecha / blanco para izquierda) para conectar la entrada de
audio del TV o amplificador AV a la salida de audio de esta unidad.
Audio digital coaxial
Use el cable coaxial especificado para conectar la salida coaxial de esta unidad a la entrada coaxial del
amplificador de potencia.
Salida de parlante
Use cable de parlante para conectar la terminal de salida del parlante de esta unidad a los parlantes
correspondientes.
NOTA: los ajustes de audio deben ajustarse a la practica de conexiones del sistema de audio.
ENTRADA DEL TV / MONITOR
Entrada de audio
digital
Entrada de audio
2CH
Parlante
Salida de Parlante
Salida Coaxial
Salida de audio 2CH
SALIDA DE LA UNIDAD
Subwoofer
Page 9
Pagina 8
ENTRADA DE LÍNEA (CONECTOR AUX/MP3)
Esta unidad tiene un grupo de terminales de entrada de audio externas. ENTRADA DE LÍNEA. Puede
ingresar las señales de audio estéreo análogo de dispositivos externos tales como VCD, CD, VCR,
Reproductor MP3, etc. A través de las terminales de entrada de audio externas.
Después de que las conexiones han sido correctamente realizadas, presione los botones “SOURCE”
(Fuente) / “SOURCE SELECT” (Selección de fuente) para intercambiar a AUX/MP3 y disfrutar de audio
desde un dispositivo externo conectado.
NOTA: los ajustes de audio deben ajustarse a la practica de las conexiones del sistema de audio.
OPERACIÓN DEL MENÚ
• En modo DVD, presione el botón “SETUP” (Configuración) en el control remoto para ingresar al
menú de configuración.
• Presione los botones de dirección para seleccionar un ítem. El submenú del ítem
seleccionado será mostrado inmediatamente.
• Presione los botones de dirección para seleccionar un ítem que desee ajustar, luego
presione ENTER (Ingresar) para ingresar y presiónelo nuevamente para confirmar los ajustes ó
presione el botón para cancelar.
• Luego puede presionar los botones de dirección , para continuar ajustando los otros ítems
del submenú.
• Presione el botón “SETUP” de nuevo para salir del menú de configuración.
PAGINA DE CONFIGURACIÓN GENERAL
Pantalla del TV:
Si la unidad esta conectada a un TV convencional, seleccione 4:3 “Panscan” ó 4:3 “Letter Box” (Pantalla
ancha); la imagen 4:3 será mostrada en la pantalla completa en su relación de aspecto original.
• 4:3 “Panscan”: la imagen de pantalla ancha será mostrada en la pantalla en su relación de aspecto
original, con algunas partes en la derecha e izquierda cortadas.
• 4:3 “Letterbox” (pantalla ancha): la imagen de pantalla ancha será mostrada en su relación de
aspecto original con bandas negras en la parte superior e inferior de la pantalla.
Si la unidad es conectada a un TV de pantalla ancha, seleccione 16:9 ó compresión de ancho.
• 16:9 : la imagen de pantalla ancha será mostrada en pantalla completa en su relación de aspecto
original mientras que la imagen 4:3 será extendida horizontalmente para que quepa en la pantalla.
• Compresión de ancho: la imagen de pantalla ancha será mostrada en pantalla completa es su
relación de aspecto original, lo mismo ocurre con la imagen 4:3 pero con bordes negros en los lados
derecho e izquierdo de la pantalla.
Marca de ángulo:
Active esta función. Cuando un disco codificado con multi ángulos de cámara es reproducido, la marca
de ángulo se mostrara en la pantalla. Luego, puede ver el video en diferentes ángulos presionando el
botón “ANGLE” en el control remoto. Desactive esta función si lo desea.
NOTA: Para usar esta función, es necesario que el disco cuente con múltiples ángulos de cámara.
Page 10

Pagina 9
Idioma OSD: (Idioma de información en pantalla)
Ajuste el idioma de información en pantalla con esta función.
Subtítulos:
Active esta función. Cuando un disco codificado con esta función es reproducido, aparecerán en la
pantalla los subtítulos. Desactive la función para esconder los subtítulos.
NOTA: Para usar esta función, es necesario que el disco cuente con la función de subtítulos.
Protector de pantalla:
ON (Encendido): si la imagen permanece inmóvil en la pantalla, por ejemplo, si un disco es pausado,
detenido, etc, por algunos minutos, un protector de pantalla aparecerá. Presionando cualquier botón,
excepto STANDBY, el protector de pantalla se quitara.
OFF (Apagado): deshabilita la función de protector de pantalla.
Ultima memoria
ON (Encendido): durante la reproducción ó en modo de pausa si la bandeja de la unidad es abierta ó se
apaga la unidad, esta recordara el ultimo tiempo de reproducción. La próxima vez, cuando usted inserte
el mismo disco y cierre la bandeja para cargar el disco, la unidad lo reproducirá desde el punto
memorizado.
OFF (Apagar): deshabilita esta función de ultima memoria.
CONFIGURACIÓN DE AUDIO
Configuración de audio análogo:
Downmix:
• LT/RT: el audio de 5.1 canales es mezclado en el canal izquierdo y el canal derecho y se emite a
través del parlante FL y FR respectivamente.
• Estéreo: el audio de 5.1 canales es mezclado en la señal estéreo y se emite a través del parlante FL
y FR.
Configuración de audio digital
• Salida digital:
SPDIF/OFF: no habrá salida de señal de audio digital. (Coaxial apagado)
SPDIF/RAW: la señal de audio digital estará es su formato RAW.
SPDIF/PCM: la salida de señal de audio digital estará en formato PCM. Normalmente este modo es
usado para señales de CD de audio.
• Salida LPCM:
Cuando una salida digital es ajustada a SPDIF/PCM, este ítem esta disponible.
Seleccione un numero de muestra para la salida de audio digital. Hay dos opciones, 48KHz y 96KHz.
NOTA: algunos amplificadores no soportan muestras de 96KHz, lo cual afectara la salida coaxial.
HDCD (Alta Definición Digital Compatible)
HDCD es un proceso de codificación / decodificacion patentado para la entrega de todos los detalles de
sonido de CDs HDCD codificados.
Puede ajustar el filtro digital a 2x, 1x o apagado.
Page 11
Pagina 10
Configuración de karaoke
• Configuración de micrófono
Micrófono: ajuste este ítem en ON/OFF para el ajuste el interruptor ON/OFF del micrófono conectado.
Volumen de micrófono: ingrese a este ítem, luego use los botones de dirección para ajustar el
volumen del micrófono. Luego presione el botón ENTER para confirmar la selección.
Nivel de Eco: ingrese a este ítem, luego use los botones de dirección para ajustar el nivel de
eco del micrófono. Luego presione ENTER para confirmar su ajuste.
CONFIGURACIÓN DE DECODIFICADOR DIGITAL
Mono dual
• Estéreo: la salida de audio de la unidad del canal izquierdo y el canal derecho es a través del
parlante FL y FR respectivamente.
• L-Mono: Solo la salida de audio del canal izquierdo a través del parlante FL y FR.
• R-Mono: Solo la salida de audio del canal derecho a través del parlante FL y FR.
• Mix-Mono: la salida de señal de audio promedio del canal izquierdo y el canal derecho a través del
parlante FL y el parlante FR.
Dinámico:
Cuando mira películas con un alcance dinámico amplio en bajo volumen, por ejemplo en la noche,
puede ajustar el valor dinámico para evitar la perdida de detalles de sonido debido al bajo volumen.
CONFIGURACIÓN DE VIDEO
Salida de video
CVBS: ajuste la salida de video a Video-S si la conexión de Video-S es usada.
YUV: ajuste la salida de video en formato de video de componente análogo si la salida de video de
componente es usada.
YPbPr: ajuste la salida de video como señales YUV progresivo si la salida de video componente es
usada.
NOTA:
• Si prefiere el video compuesto, haga solo la conexión de video compuesto. La salida de video
compuesto esta siempre activa para cualquier opción que elija en esta entrada de ajustes.
• Si el ajuste de video difiere de la conexión de video actual (Excepto el video compuesto), puede
obtener una mala imagen en el TV. Es ese caso, necesita restablecer estos ajustes para un
apropiado modo de salida de video o presione V-MODE en el control remoto hasta que la imagen de
salida se vuelva normal.
Ajuste de color
• Nitidez: hay tres opciones: Alta, media y baja
• Brillo, contraste, matiz y tinte: ingrese estos ítems respectivamente, use los botones para
ajustar el valor, luego presione ENTER para confirmarlo.
PAGINA DE PREFERENCIA
Si no hay discos en la bandeja de discos, la bandeja de discos esta abierta o el disco esta en modo
detenido, esta función es disponible.
Page 12

Pagina 11
Tipo de TV
Esta unidad soporta NTSC (National Television System Commite) y PAL (Phase Alternating Line).
• PAL: si el TV conectado esta en sistema PAL-M, el cual es usado en China, Hong Kong y Europa,
etc, seleccione este modo.
• AUTO: si el TV conectado es multi sistema, seleccione este modo. El formato de salida en señal de
video estará de acuerdo con la señal de video del disco.
• NTSC: si el TV conectado es un sistema NTSC, el cual es usado en Taiwan, America y Canadá, etc,
seleccione este modo.
NOTA: si se selecciona un modo incorrecto, la calidad de la imagen será muy baja. En tal caso, se
debe cambiar la opción del modo para arreglar el error.
PBC (Control de reproducción)
ON: Activa la función PBC. Cuando reproduzca un disco codificado con función PBC, tal como un VCD
2.0, etc, presione el botón PBC para regresar al menú PBC.
OFF: deshabilita la función PBC.
NOTA: la función solo trabaja con discos codificados con la función PBC, tal como VCD 2.0, etc.
DVD, VCD1.1, CD-DA y Discos MP3 no tienen la función PBC.
Audio, Subtitulo y Menú del disco
Seleccione un idioma de audio, subtitulo y menú del disco en este ítem.
También puede hacer la selección de audio usando el botón AUDIO y el idioma de subtítulos con el
botón SUBTITLE en el control remoto.
NOTA: si el idioma seleccionado no esta disponible para el actual disco reproducido, la configuración
por defecto del disco permanecerá habilitada.
Control parental
Esta función le permite al usuario ajustar la clasificación de las películas que pueden ser vistas. Una
clasificación de películas mas alta que el nivel ajustado por el bloqueo parental no podrá ser vista. Es
necesario introducir la contraseña correcta para restablecer el nivel. La contraseña preestablecida por
fabrica es 0000.
NOTA: esta función solo esta disponible para discos con control parental
Configuración de contraseña
• Modo de contraseña: puede activar o desactivar la función de contraseña en este ítem.
NOTA: debe introducir la contraseña correcta y presionar el botón ENTER antes de cambiar la opción
en este ítem. La contraseña preestablecida es 0000.
• Contraseña: puede restablecer la contraseña en este ítem.
NOTA: la contraseña preestablecida (0000) esta siempre activa, aun cuando la contraseña ha sido
restablecida.
Ajuste preestablecido
Restaure todos los ajustes preestablecidos, excepto los ajustes en modo de contraseña y control
parental.
Page 13
Pagina 12
OPERACIÓN DEL CONTROL REMOTO
• Inserte las baterías en el compartimiento del control remoto.
• Coloque el control remoto apuntando al sensor remoto de la unidad. El control remoto debe estar a
una distancia de 8 metros desde el sensor y en un ángulo de 30 grados del lado derecho e
izquierdo.
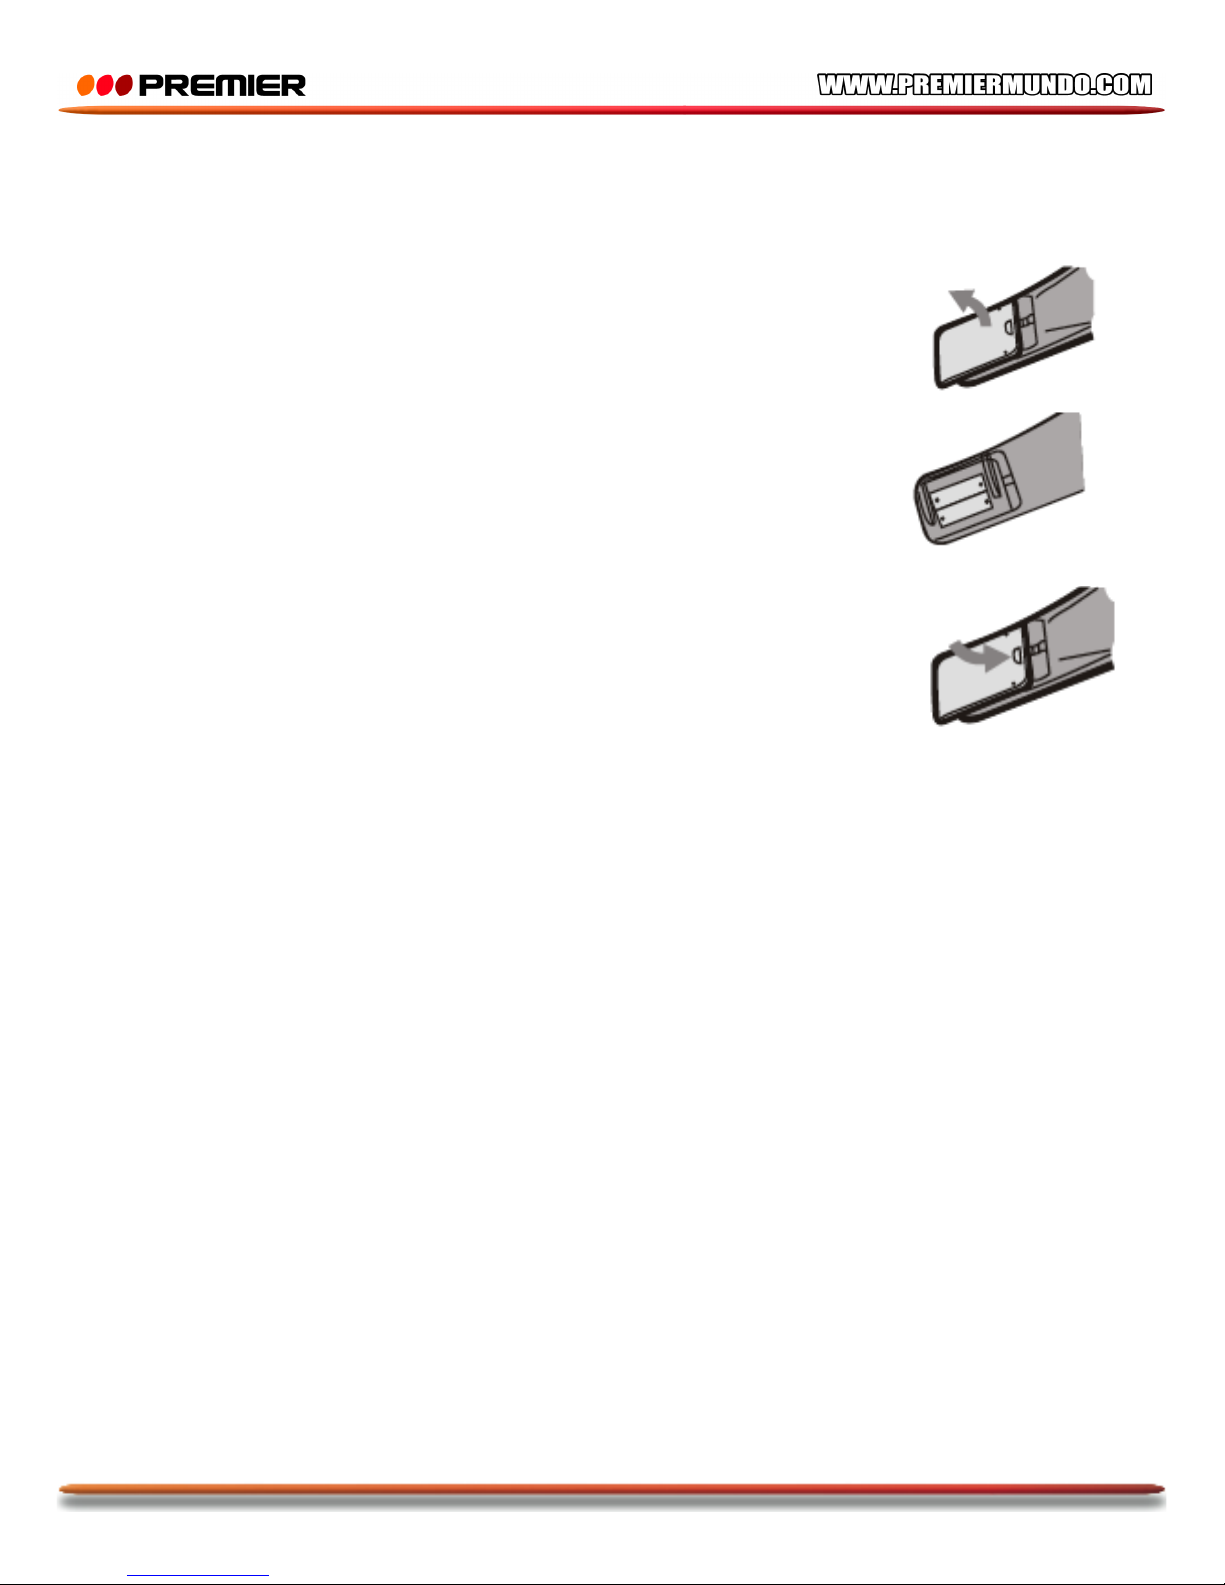
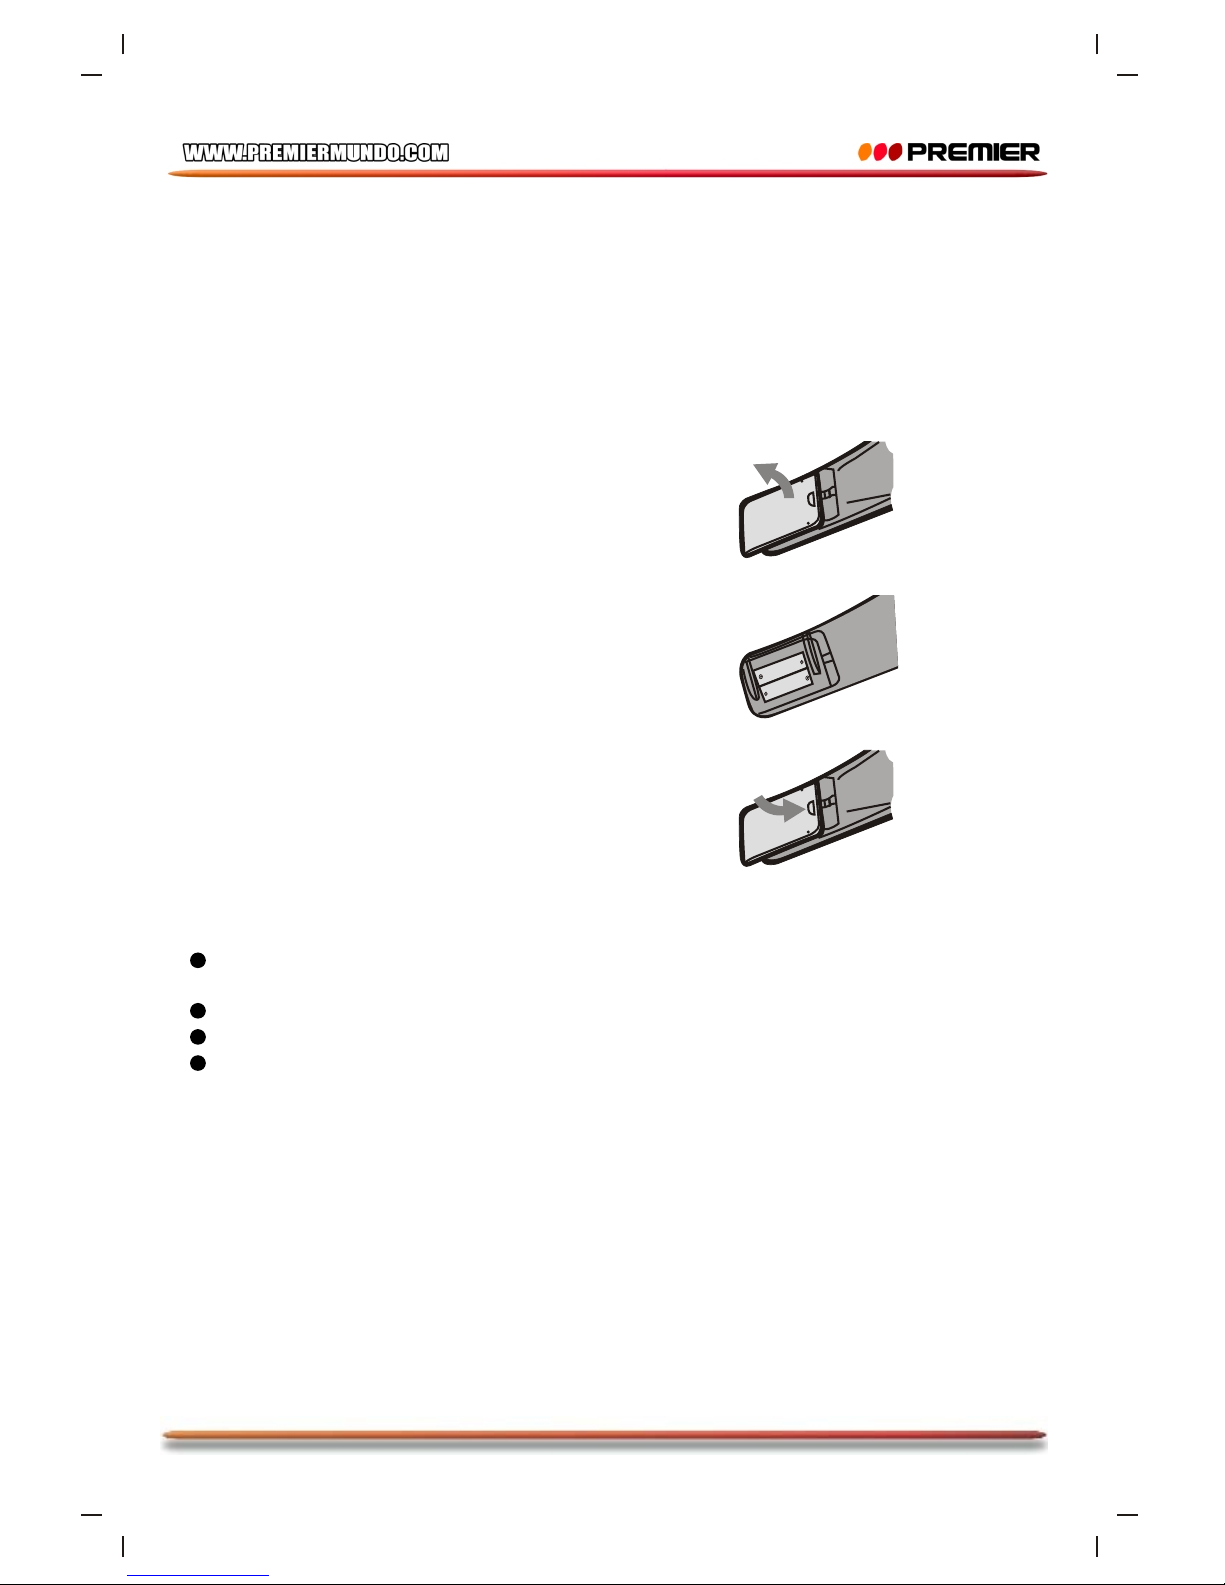
INSTALACIÓN DE LAS BATERÍAS
1. Remueva la cubierta de las baterías en la parte posterior del control
remoto
2. Inserte dos baterías AAA/1.5V en el compartimiento de las baterías del
control remoto, asegurándose de su polaridad (+ / -), tal y como lo indica la
parte interna del compartimiento.
3. Coloque nuevamente la cubierta.
NOTA:
• Remueva las baterías del compartimiento cuando no vaya a usar el control remoto por un periodo
de tiempo prolongado.
• No mezcle baterías nuevas con usadas o diferentes tipos de baterías.
• Las baterías gastadas pueden tener fugas y dañar severamente el control remoto
• Deposite las baterías siguiendo las normas medio ambientales de su localidad.
Page 14
Pagina 13
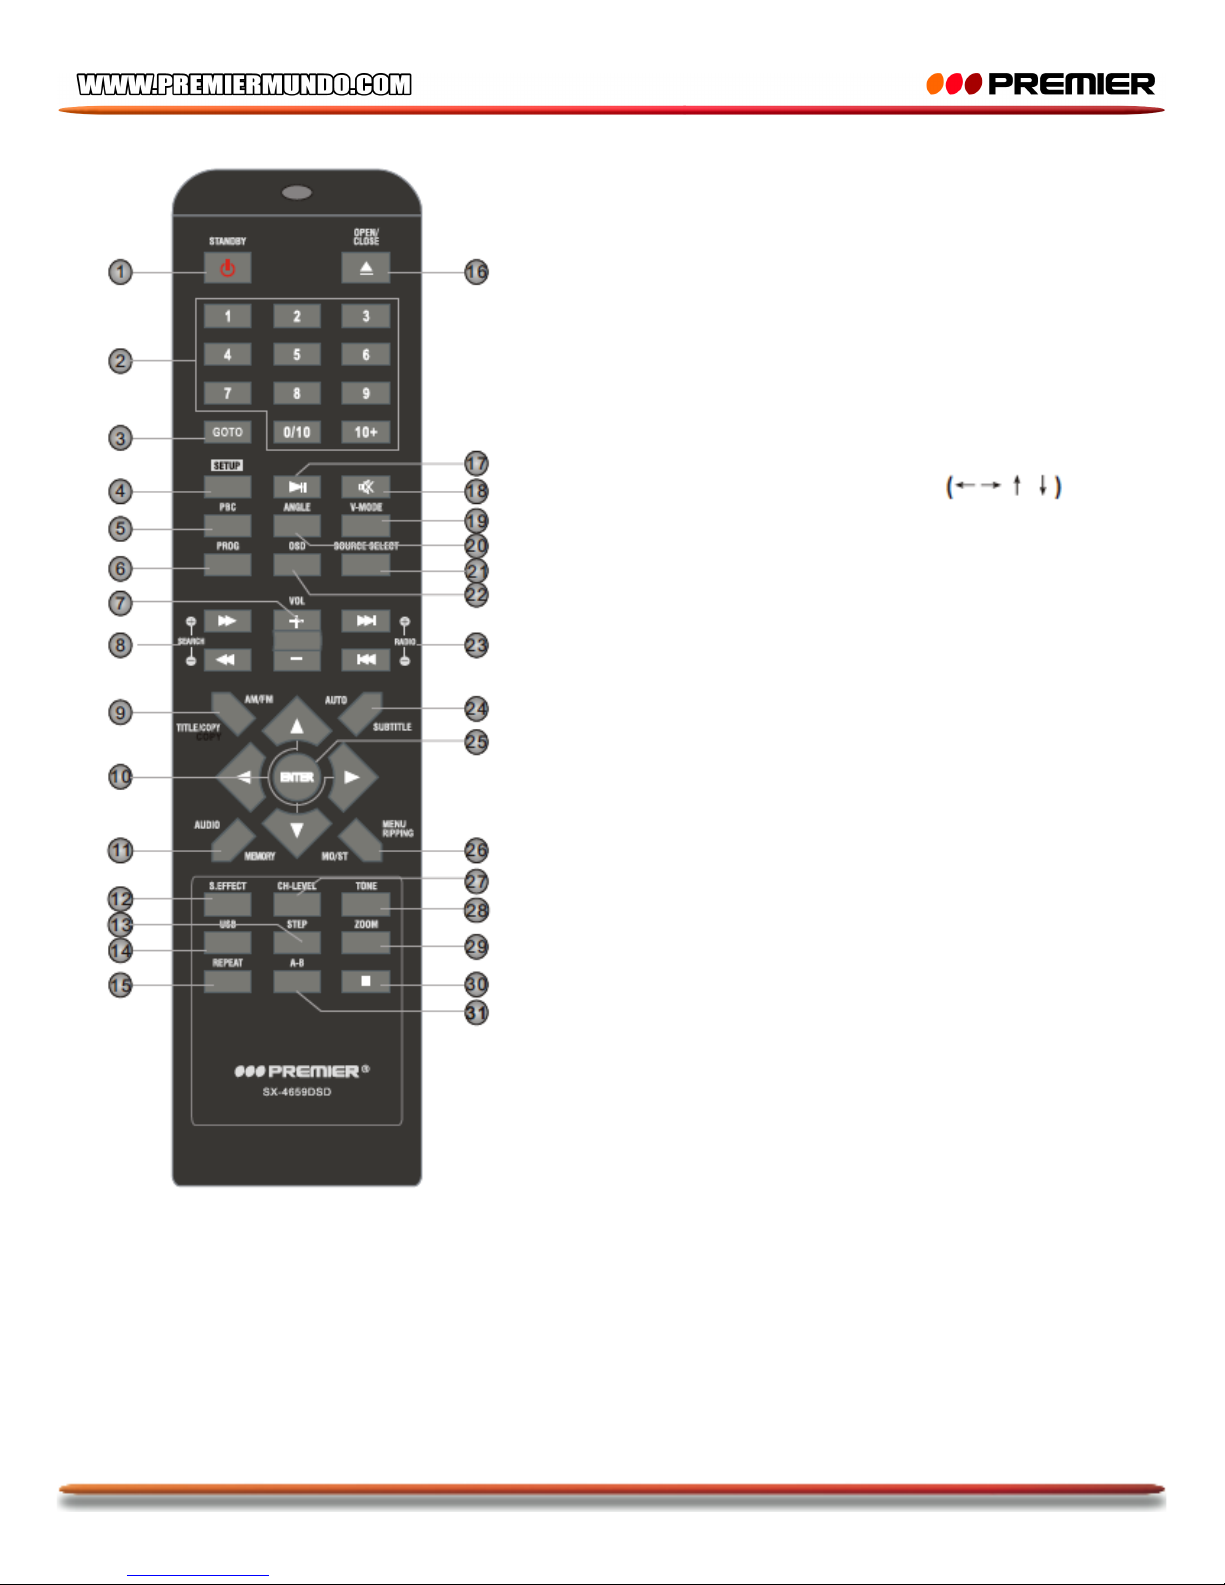
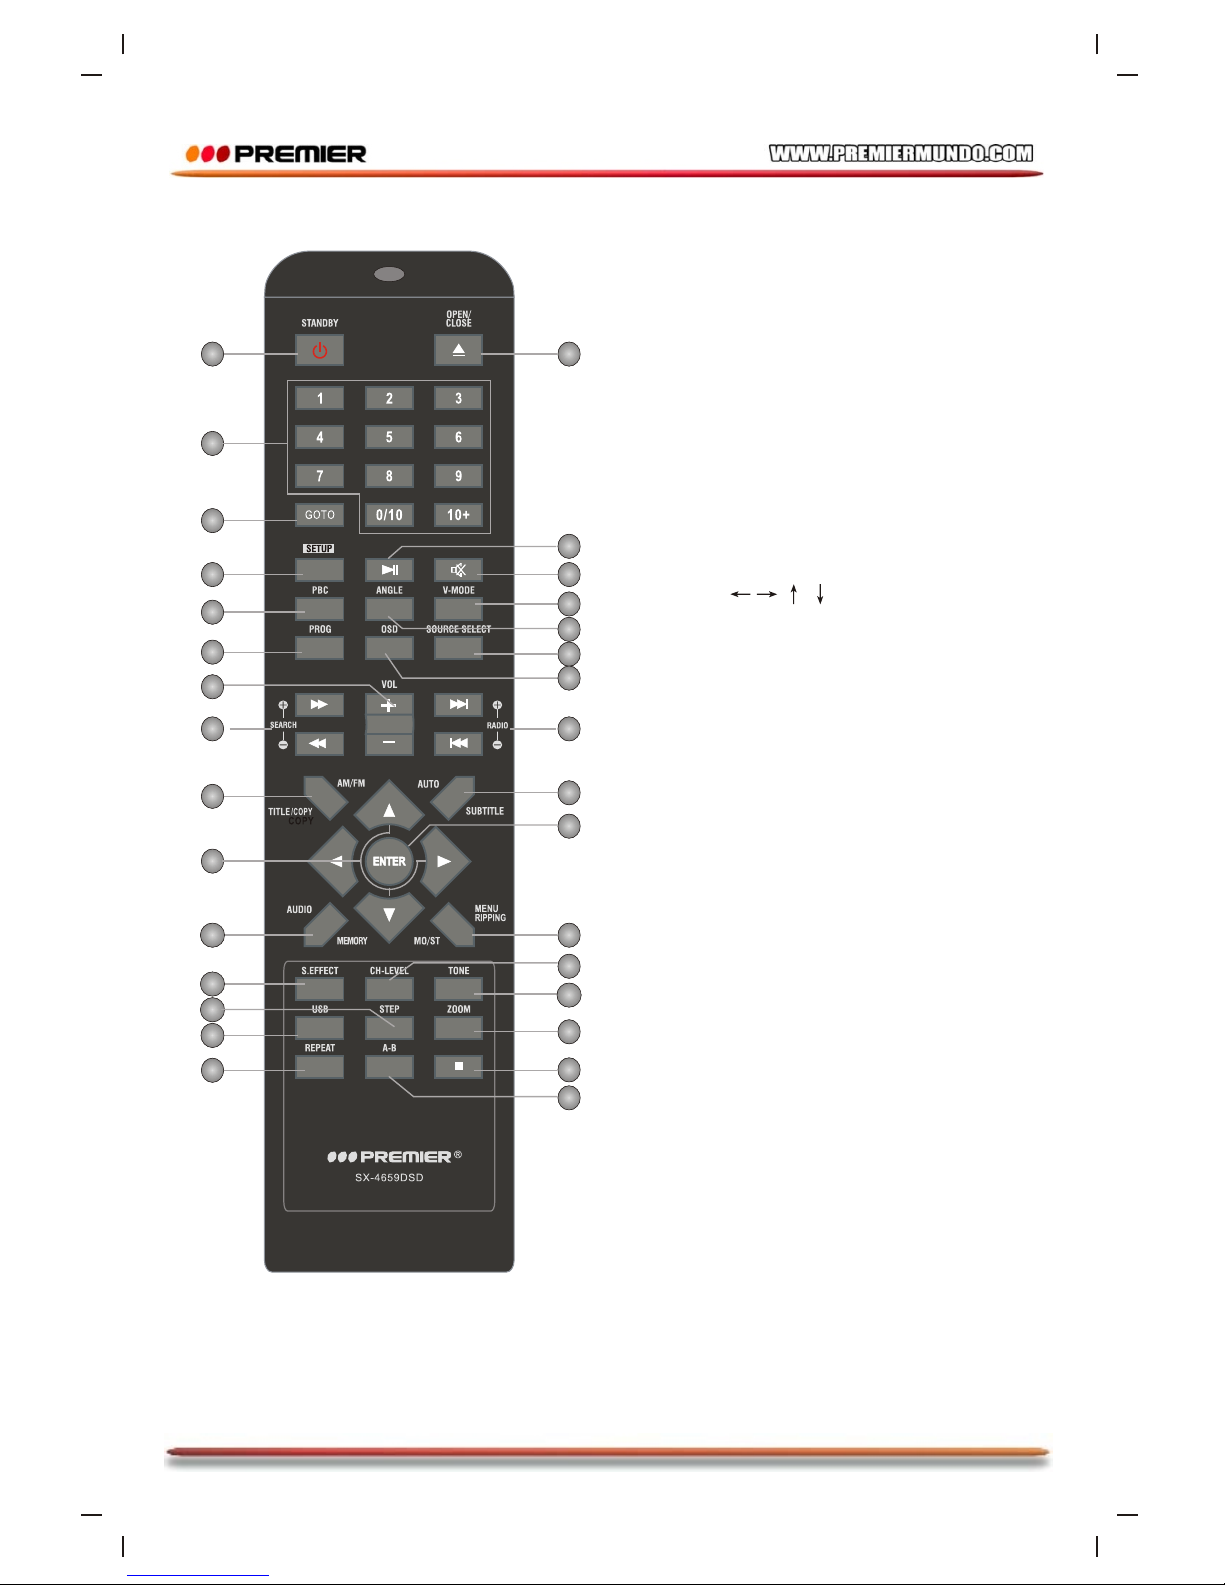
DESCRIPCIÓN
1. ENCENDER / APAGAR LA UNIDAD
(STANDBY)
2. BOTONES NUMÉRICOS
3. GOTO
4. CONFIGURACIÓN (SETUP)
5. PBC
6. PROGRAMA (PROGRAM)
7. VOLUMEN +/-
8. ADELANTAMIENTO Y RETROCESO RÁPIDO
9. TITULO / AM / FM
10. BOTONES DE DIRECCIÓN
11. AUDIO / MEMORIA
12. EFECTO DE SONIDO
13. REPRODUCCIÓN PASO A PASO (STEP)
14. USB
15. REPETIR
16. ABRIR / CERRAR
17. REPRODUCIR / PAUSAR
18. SILENCIAR
19. V-MODE
20. ÁNGULO (ANGLE)
21. SELECCIÓN DE FUENTE (SOURCE SELECT)
22. OSD
23. SIGUIENTE / ANTERIOR / RADIO +/-
24. AUTO / SUBTÍTULOS
25. INGRESAR (ENTER)
26. MENÚ / MO / ST
27. CH-LEVEL
28. TONO
29. ZOOM
30. DETENER
31. REPETICIÓN A-B
Page 15

Pagina 14
DESCRIPCIÓN
Standby: Encender la unidad / Poner la unidad en modo Standby.
NOTA: estando en modo Standby la unidad consume una cantidad mínima de electricidad, pero
asegura que los componentes de la unidad operen de manera mas eficiente al momento de inicial el
funcionamiento.
Fuente / Selección de fuente: presione repetidamente para seleccionar una fuente de señal entre
DVD, Sintonizador AM/FM y entrada de línea.
USB: Presione este botón para cambiar al modo USB y memoria SD, ó para regresar al modo de DVD.
Abrir / Cerrar: presione este botón para abrir / cerrar la bandeja del disco.
Botones numéricos: Pueden ser usados para ingresar los números correspondientes o hacer la
selección de una pista o un capitulo de un disco, etc.
ENTER (Ingresar): presione para ingresar un ítem en el menú o para confirmar su operación, etc
Botones de dirección: Puede usarlos para moverse por el menú, para ajustar el valor de un ítem, etc.
Configuración: presiónelo para ingresar / salir del menú de configuración.
GOTO: durante la reproducción, presiónelo para ingresar al menú GOTO. En el menú, use los botones
de dirección “Arriba” y “Abajo” para seleccionar y ajustar un ítem presione el botón ENTER para
editarlo, luego con los botones numéricos ingrese una pista, tiempo del disco, tiempo de la pista,
capitulo, titulo, tiempo del capitulo ó tiempo del titulo específicos para ir directamente. Presiónelo de
nuevo para salir del menú.
Programa: Presione este botón para ingresar / salir del menú de programa, con el cual puede
reproducir el contenido de un disco en el orden deseado.
En el menú de programa, use los botones de dirección, digite los números y presione el botón ENTER
para hacer la lista programada, luego mueva los botones a “START” (Empezar) y presione el botón
ENTER para iniciar la reproducción programada.
Durante la reproducción programada, presione este botón para ingresar al menú de programa, “STOP”
aparecerá, presione el botón ENTER para cancelar la reproducción programada.
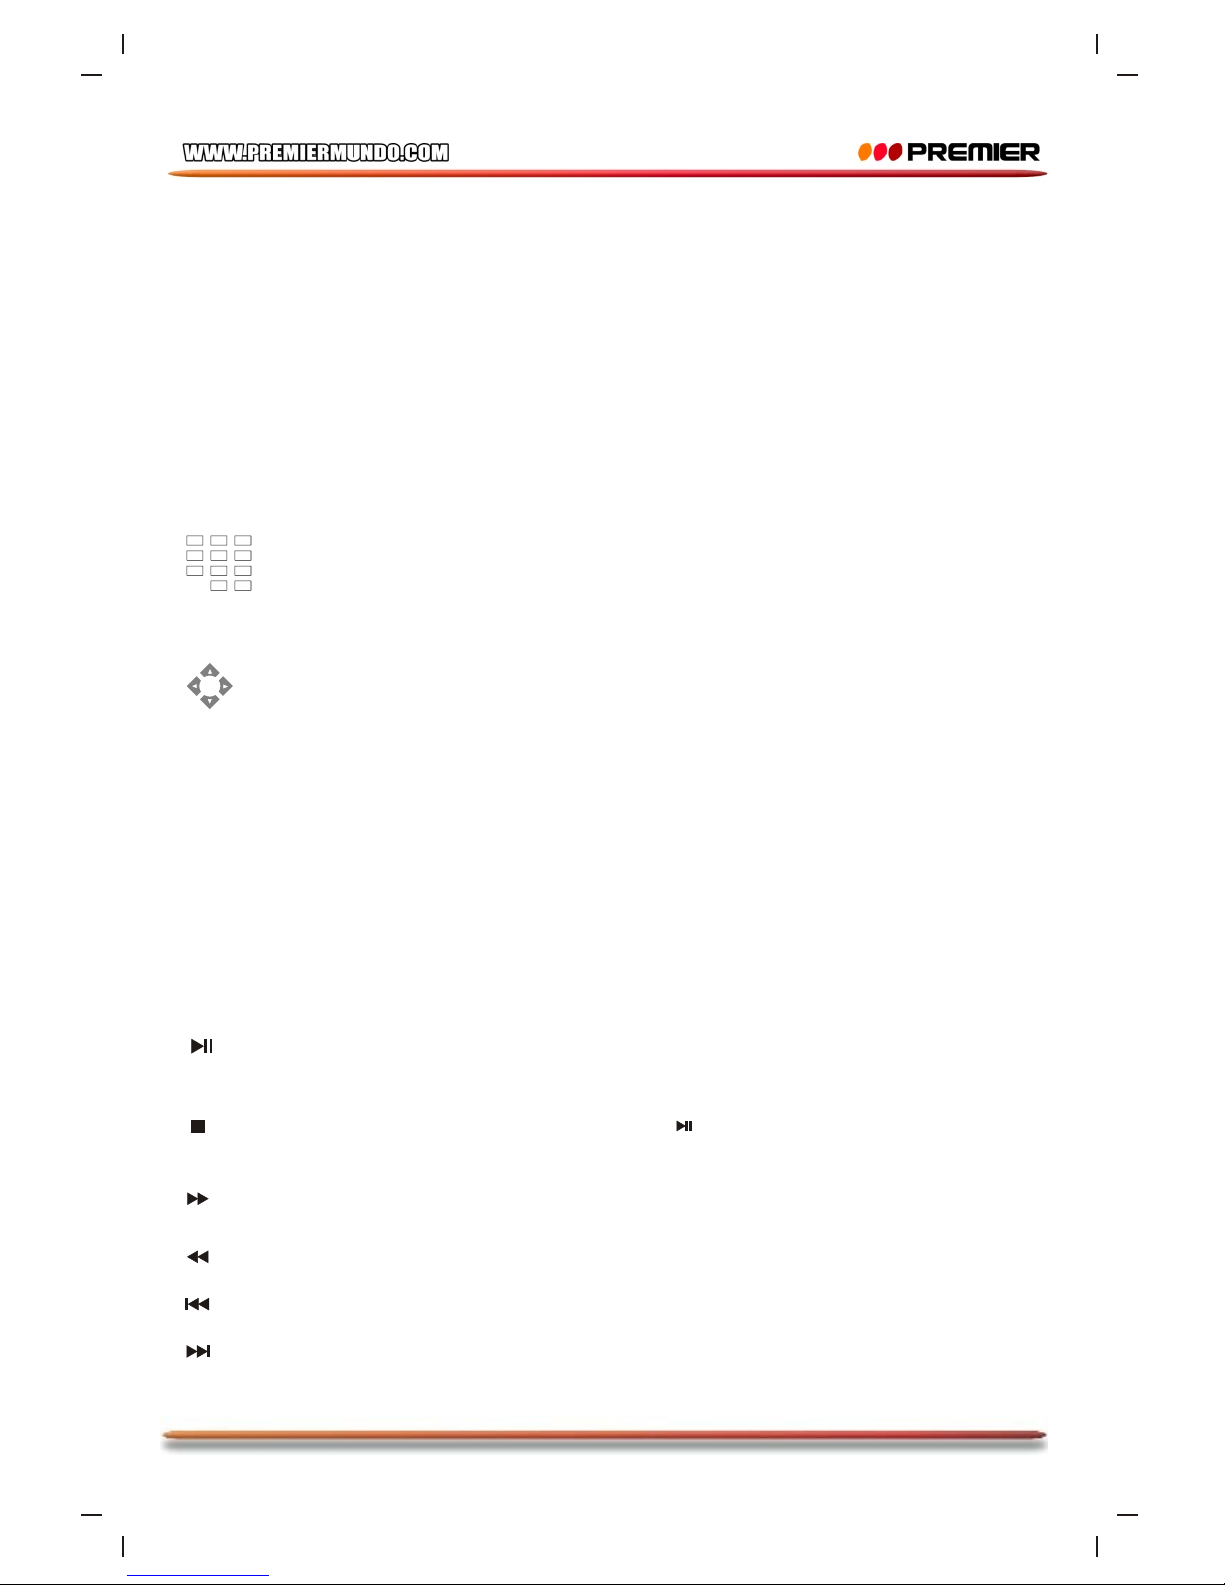
Reproducir / Pausar: presione una vez para pausar la reproducción. Presiónelo nuevamente para
regresar al modo de reproducción normal. También puede presionar el botón de adelantamiento rápido,
retroceso rápido, paso a paso, para regresar al modo de reproducción normal.
Detener: presione una vez para pausar la reproducción, y luego presione el botón Reproducir / Pausar,
para regresar al modo de reproducción normal. Presione el botón dos veces para detener por completo
la reproducción, el disco regresara al punto inicial de reproducción.
Adelantamiento rápido: presione repetidamente este botón para adelantar rápidamente la
reproducción a diferentes velocidades.
Page 16

Pagina 15
Retroceso rápido: presione repetidamente este botón para retroceder rápidamente la reproducción a
diferentes velocidades.
Anterior: presione este botón para saltar al anterior capitulo / pista.
Siguiente: presione este botón para saltar al siguiente capitulo / pista.
“STEP” (paso a paso): presione repetidamente para avanzar marco por marco. Presione el botón
Reproducir / Pausar para regresar al modo de reproducción normal. (Aplica para DVD, VCD, Discos
MPEG4, etc)
Silenciar: presione una vez para desactivar el volumen momentáneamente. Presiónelo nuevamente
para activarlo.
Volumen +/-: presione este botón para ajustar el nivel de volumen de la unidad.
Repetir: presione este botón repetidamente para cambiar el modo de repetición.
NOTA: para VCD2.0, etc, esta función es invalida cuando la función de PBC esta activada)
Repetición A-B: con esta función puede repetir una sección especifica del disco.
Cuando un disco (DVD, VCD, CD, MP3 o MPEG4) este siendo reproducido, presione este botón para
marcar el punto de inicio (Punto A) y presiónelo de nuevo para marcar el punto final (Punto B). Luego la
unidad reproducirá esa sección una y otra vez. Presione el botón por tercera vez para cancelar la
función y regresar al modo de reproducción normal.
NOTA: los puntos A y B deben estar en el mismo titulo / pista.
CH-LEVEL: Presione para seleccionar un canal o el volumen general, luego use los botones de
VOLUMEN+/- para ajustar el volumen del canal seleccionado o el volumen general.
Selección de efecto: presione repetidamente para intercambiar el efecto de sonido ó para desactivarlo.
Tono: presiónelo para seleccionar Bajos ó Agudos, luego use los botones de VOLUMEN+/- para ajustar
los valores de los bajos ó agudos.
Titulo: presione para ingresar al menú del titulo de disco de DVD.
Menú: presiónelo para ingresar al menú principal del disco.
PBC: cuando un disco PBC codificado es reproducido, presiónelo para activa ó desactivar la función
PBC (Control de reproducción).
NOTA: VCD2.0, etc, tiene función PBD. DVD, VCD1.1, CD-DA y Disco MP3 no tiene función PBC)
Subtitulo: presione repetidamente para cambiar los subtítulos o para desactivar la función.
NOTA: esta función solo puede activarse con discos codificados que tengan subtítulos)
OSD: presione repetidamente para cambiar o esconder la información relativa del disco.
Audio: presione repetidamente para seleccionar los idiomas de audio proporcionados por el disco (Para
Page 17

Pagina 16
DVD).
Presione repetidamente para cambiar los canales de audio proporcionados por el disco (L-Mono, RMono, MIX-Mono y estéreo)
Ángulo: presione para cambiar los ángulos de visión
NOTA: esta función solo puede activarse con discos codificados que tengan multi ángulos
V-MODE: presione repetidamente para cambiar los modos de salida de video
ZOOM: Presione para aumentar y disminuir la escena. En modo Zoom, los botones de dirección
pueden ser usados para moverse a través de la imagen.
NOTA: aplica para DVD, VCD, MPEG4, etc)
Extracción de CD: Presione para acceder o quitar el menú de extracción de CD.
Copiar: presione para copiar desde un disco multi formato a un dispositivo USB.
OPERACIÓN DE SINTONIZACIÓN
Los siguientes botones son usados en el modo de sintonización. Presione el botón Fuente (SOURCE) /
Seleccionar fuente (SOURCE SELECT) para seleccionar un modo de sintonización.
AM/FM: presione este botón para cambiar entre el modo AM y FM
MO/ST: presione para cambiar entre recepción de señal mono o estéreo en modo FM.
Memoria: después de sintonizar una nueva frecuencia, presione el botón Memoria (MEMORY), luego
seleccione una estación preferida ingresando los números correspondientes para guardarla como una
estación preestablecida.
AUTO: presione este botón para realizar auto exploración automática por las estaciones radiales.
Detener: durante auto exploración, presione este botón para detener el proceso.
Botones numéricos: en modo de sintonización, los botones numéricos pueden ser usados para
seleccionar una estación preestablecida.
Por ejemplo, presione [0] y [2] para seleccionar la segunda estación y; presione [1] y [5] para
seleccionar la estación numero 15.
Búsqueda +/-: presione para sintonizar (Incrementar/Disminuir) la frecuencia manualmente.
NOTA: en modo de sintonización, los botones VOLUMEN+/-, CH-LEVER, MUTE (Silenciar), TONE
(Tono) y S.EFFECT (Selección de efecto), están activos.
Page 18

Pagina 17
REPRODUCCIÓN DE CD DE IMAGEN KODAK
• Coloque el CD de imagen en la bandeja del disco, luego la unidad cargara el disco
automáticamente.
• Presione el botón DETENER para ingresar al modo miniatura para pre visualizar las imágenes.
En el modo miniatura, use los botones de dirección y ENTER para realizar la selección de Presentación
de diapositivas, MENÚ, ANTERIOR ó SIGUIENTE en la parte inferior de la pantalla.
Presentación de diapositivas: inicia la reproducción de presentación de diapositivas.
Menú: ingresa al menú del instrucciones para la función del control remoto. En el menú, presione el
botón ENTER para cambiar a la siguiente pagina del menú y de nuevo para salir del menú de
instrucciones.
ANTERIOR/SIGUIENTE: cambia a la pagina siguiente/anterior.
• Introducción de función de las teclas del control remoto
DETENER: ingresa al modo miniatura para pre visualizar las imágenes
ZOOM: durante la reproducción, presione el botón ZOOM y luego presione los botones Adelantamiento
/ Retroceso rápido para acercar ó alejar la imagen. Cuando la imagen esta agrandada, presione los
botones de dirección para moverse a través de la imagen. Presione el botón ZOOM nuevamente para
salir.
SIGUIENTE / ANTERIOR: salta a la siguiente ó anterior imagen durante la reproducción.
REPRODUCIR / PAUSAR: presione para pausar la reproducción, presione nuevamente para regresar
al modo de reproducción normal.
Botones de dirección (Izquierdo / Derecho): rota la imagen hacia la derecha o izquierda durante la
reproducción.
Botones de dirección (Arriba / Abajo): crea una imagen espejo horizontal o vertical.
REPRODUCCIÓN DE DISCOS MP3/MPEG4
Inserte un disco MP3/MPEG4 en la unidad, luego un menú de contenido aparecerá en la pantalla.
Operación del menú:
Use los botones de dirección (Arriba / Abajo) para seleccionar una carpeta o un archivo, luego presione
el botón ENTER para ingresar a la carpeta o reproducir el archivo seleccionado. Puede usar también los
botones numéricos para hacer la selección de una carpeta para ingresar o de un archivo para
reproducir.
En el menú de contenido, presione el botón de dirección Izquierdo para regresar al menú principal.
Presione los botones Siguiente / Anterior para cambiar a la pagina siguiente o anterior del menú.
[PROG.]: presione repetidamente para cambiar entre modo de reproducción de carpeta y modo de
reproducción de lista de archivos.
[MENÚ]: durante la reproducción de un disco MPEG4, presione para ingresar al menú de contenido.
NOTA: durante la reproducción, los botones ADELANTAMIENTO y RETROCESO RÁPIDO,
REPRODUCIR / PAUSAR, DETENER, REPETIR, REPETICIÓN A-B, VOLUMEN +/-, SILENCIAR, CHLEVEL, TONO, etc, están activados.
Page 19
Pagina 18
REPRODUCIR TARJETA DE MEMORIA Y USB
• Inserte un dispositivo USB en el puerto de la unidad, luego presione el botón USB para ingresar al
modo USB y reproducir los archivos. Presione el botón USB nuevamente para regresar al modo
DVD.
• Inserte una tarjeta SD, MS ó MMC en la ranura para tarjetas de la unidad, luego presione el botón
USB para acceder a la tarjeta de memoria conectada y reproducir los archivos. Presione el botón
USB nuevamente para regresar al modo DVD.
NOTA:
• En caso de que la unidad falle cuando inserte una tarjeta de memoria SD o un dispositivo USB,
apague la unidad, desconéctela del tomacorriente y desconecte el dispositivo USB o la tarjeta SD
de la unidad.
Luego encienda la unidad, y esta regresara al modo normal.
• Para el modo de reproducción, refiérase a REPRODUCCIÓN DE DISCOS MP3/MPEG4.
• Su una dispositivo USB y una tarjeta de memoria son insertados al mismo tiempo en la unidad,
presione el botón USB y presiónelo dos veces para seleccionar la tarjeta de memoria. Presiónelo
por tercera vez para regresar al modo DVD.
Nota: La unidad puede soportar dispositivos USB de hasta 16GB y tarjetas SD de hasta 8GB.
REPRODUCCIÓN DE KARAOKE
• Ajuste el micrófono en la posición ON (Encendido) y ajuste el volumen de micrófono a un nivel bajo
en el menú de configuración de karaoke.
• Inserte el micrófono en el conector del panel frontal de la unidad.
• Ajuste el nivel de micrófono de nuevo si se requiere y el nivel de Eco en el menú de configuración
del karaoke.
• Coloque un disco karaoke en la bandeja de la unidad. Presione el botón AUDIO para incluir o
eliminar la voz del cantante original.
Ahora puede disfrutar del karaoke!
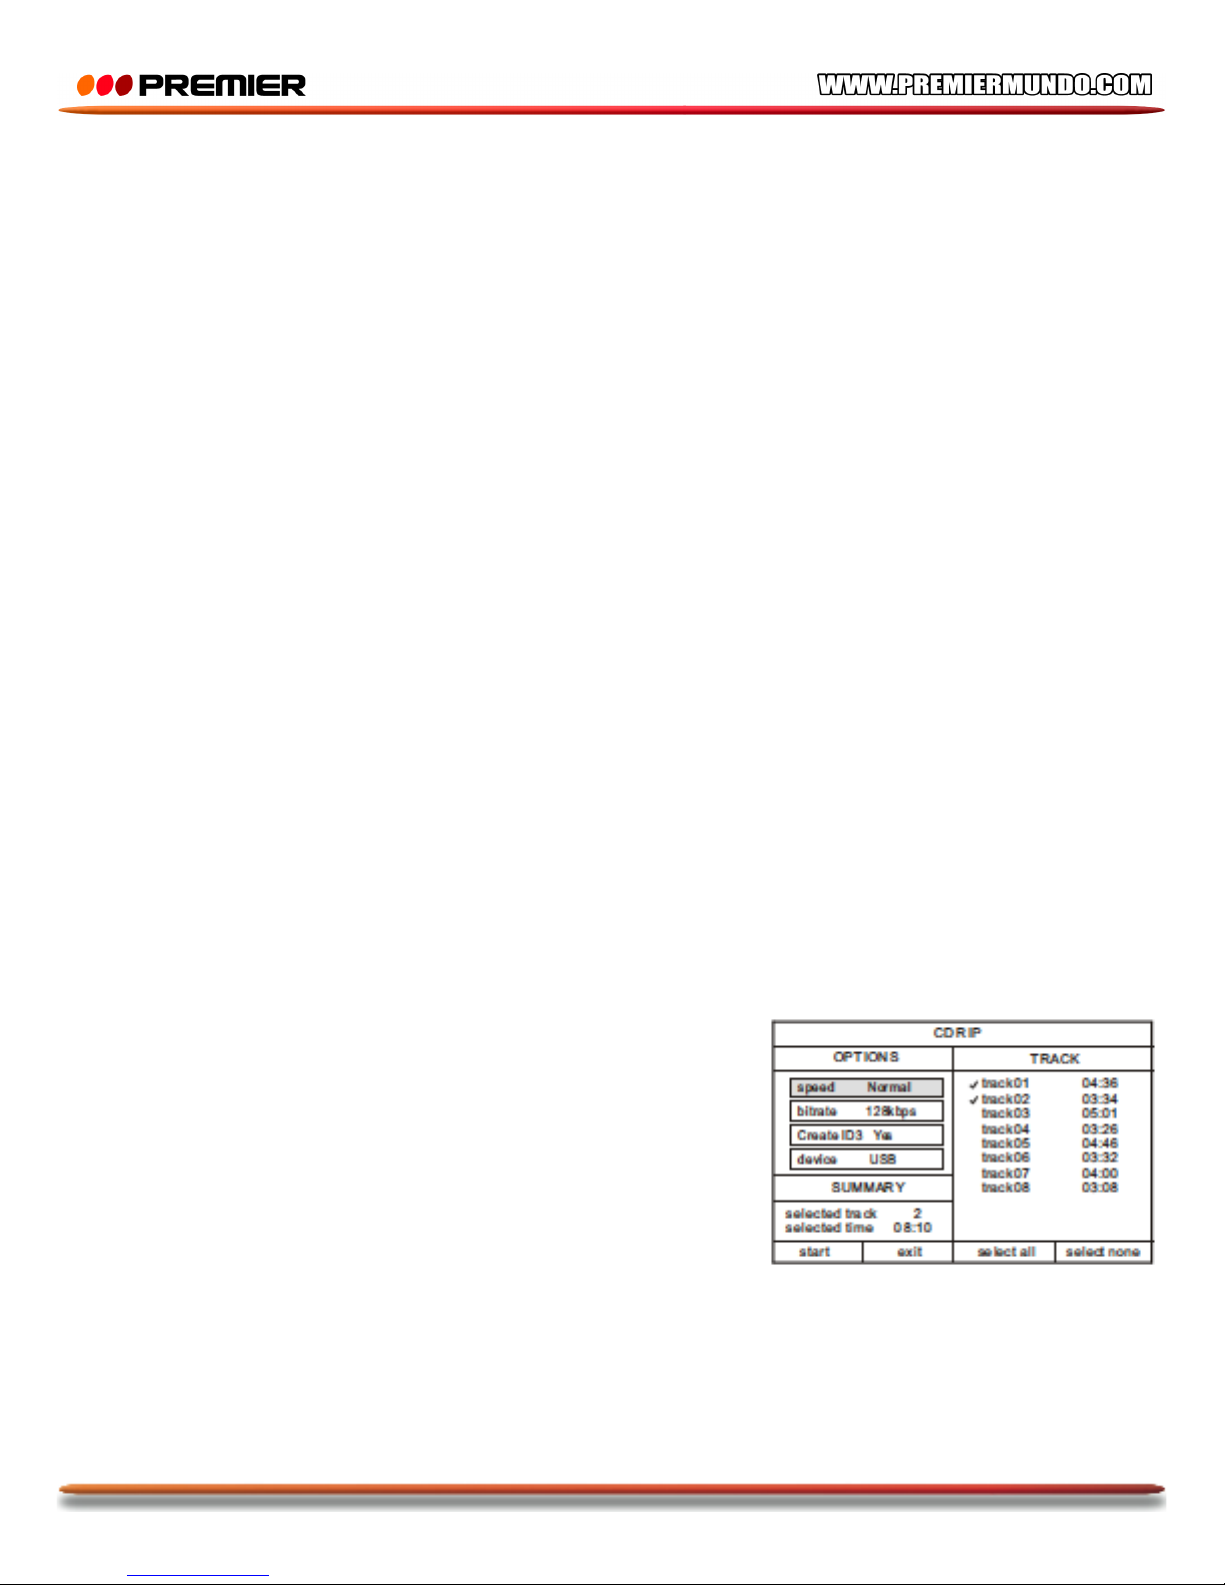
EXTRACCIÓN DE CD
La Extracción de CD es un proceso de copiado de audio desde
un disco CD/HDCD y guardado el contenido de audio en un
formato MP3 de audio digital comprimido.
Con esta función es posible copiar las pistas de un CD/HDCD a
un dispositivo USB conectado.
• Coloque el CD/HDCD en la bandeja de discos de la unidad e
inserte un dispositivo USB en el puerto y presione el botón
RIPPING (Extracción) en el control remoto para mostrar el
menú de extracción de CD. Use los botones de navegación
para moverse por el menú.
En la ventana de pistas, todas las pistas del disco son mostradas. Seleccione la pista que desea copiar
al dispositivo conectado, y luego presione el botón ENTER para confirmar la selección. Si desea
cancelar la selección, elija la pista y seleccione el botón ENTER nuevamente.
Page 20
Pagina 19
Seleccione “Seleccionar todo” si desea copiar todas las pistas del disco, y luego presione el botón
ENTER. Seleccione “Seleccionar ninguna” para cancelar todas las selecciones de las pistas.
En la ventana de opciones, ajuste la velocidad deseada de extracción, la tasa de bits, habilite o
deshabilite la opción te etiquetas ID3. Al finalizar la selección presione el botón ENTER para confirmar.
Después de finalizar los ajustes, presione START (Iniciar) y
presione el botón ENTER para iniciar el procedimiento de
extracción de CD.
Si desea cancelar el procedimiento, presione EXIT, luego
presione ENTER o solo presione el botón RIPPING en el
control remoto.
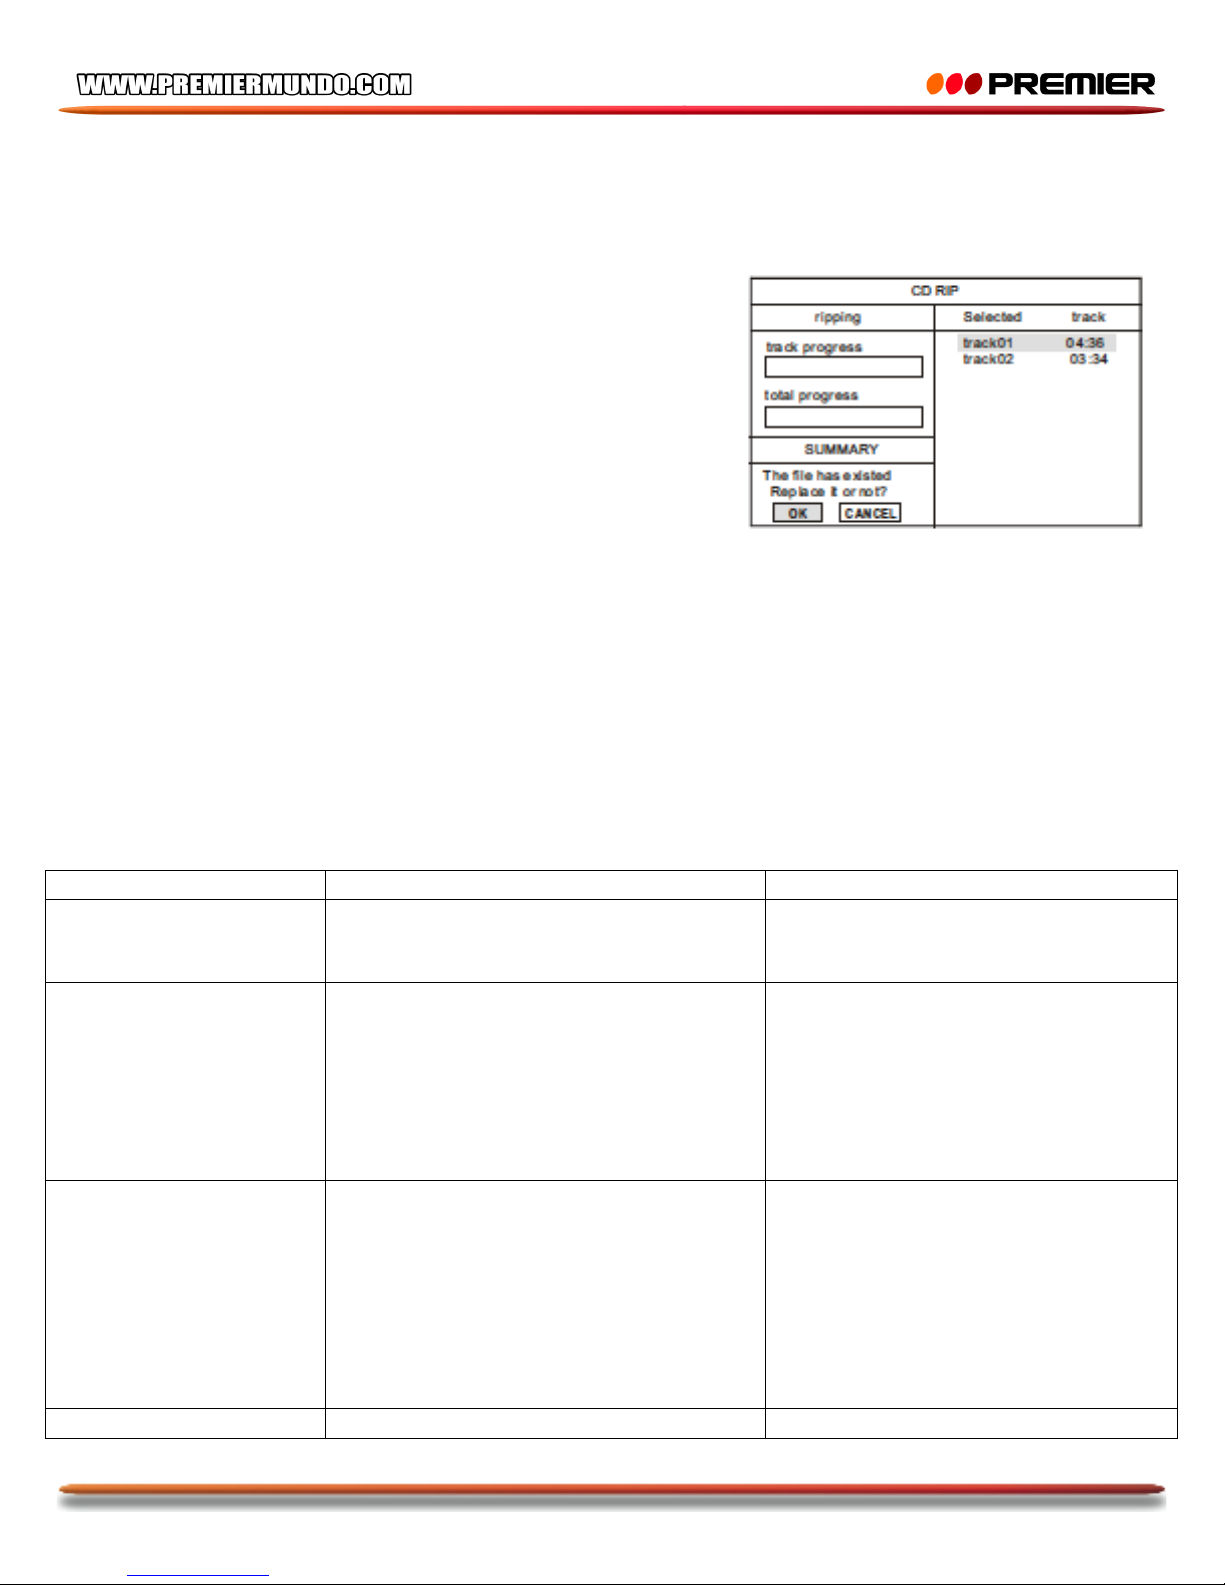
Luego de iniciarse el proceso de extracción se abre otro menú,
en el cual se muestra la barra de progreso de la pista y la
barra de progreso total.
Las pistas extraídas serán guardadas en una carpeta creada automáticamente por el sistema en el
dispositivo USB conectado.
Si hay una pista que comparte el mismo nombre con una pista de la misma carpeta, el sistema mostrara
un cuadro con la advertencia, presione ENTER para reemplazar la pista existente por la que esta
siendo copiada. Presione CANCEL para quitar y puede seleccionar crear otra carpeta en el dispositivo
conectado para extraer esa pista.
Si desea crear otra carpeta en el dispositivo USB conectado, debe abrir la bandeja de discos y cerrarla
de nuevo. Después de eso, las pistas serán guardadas en una nueva capeta guardada.
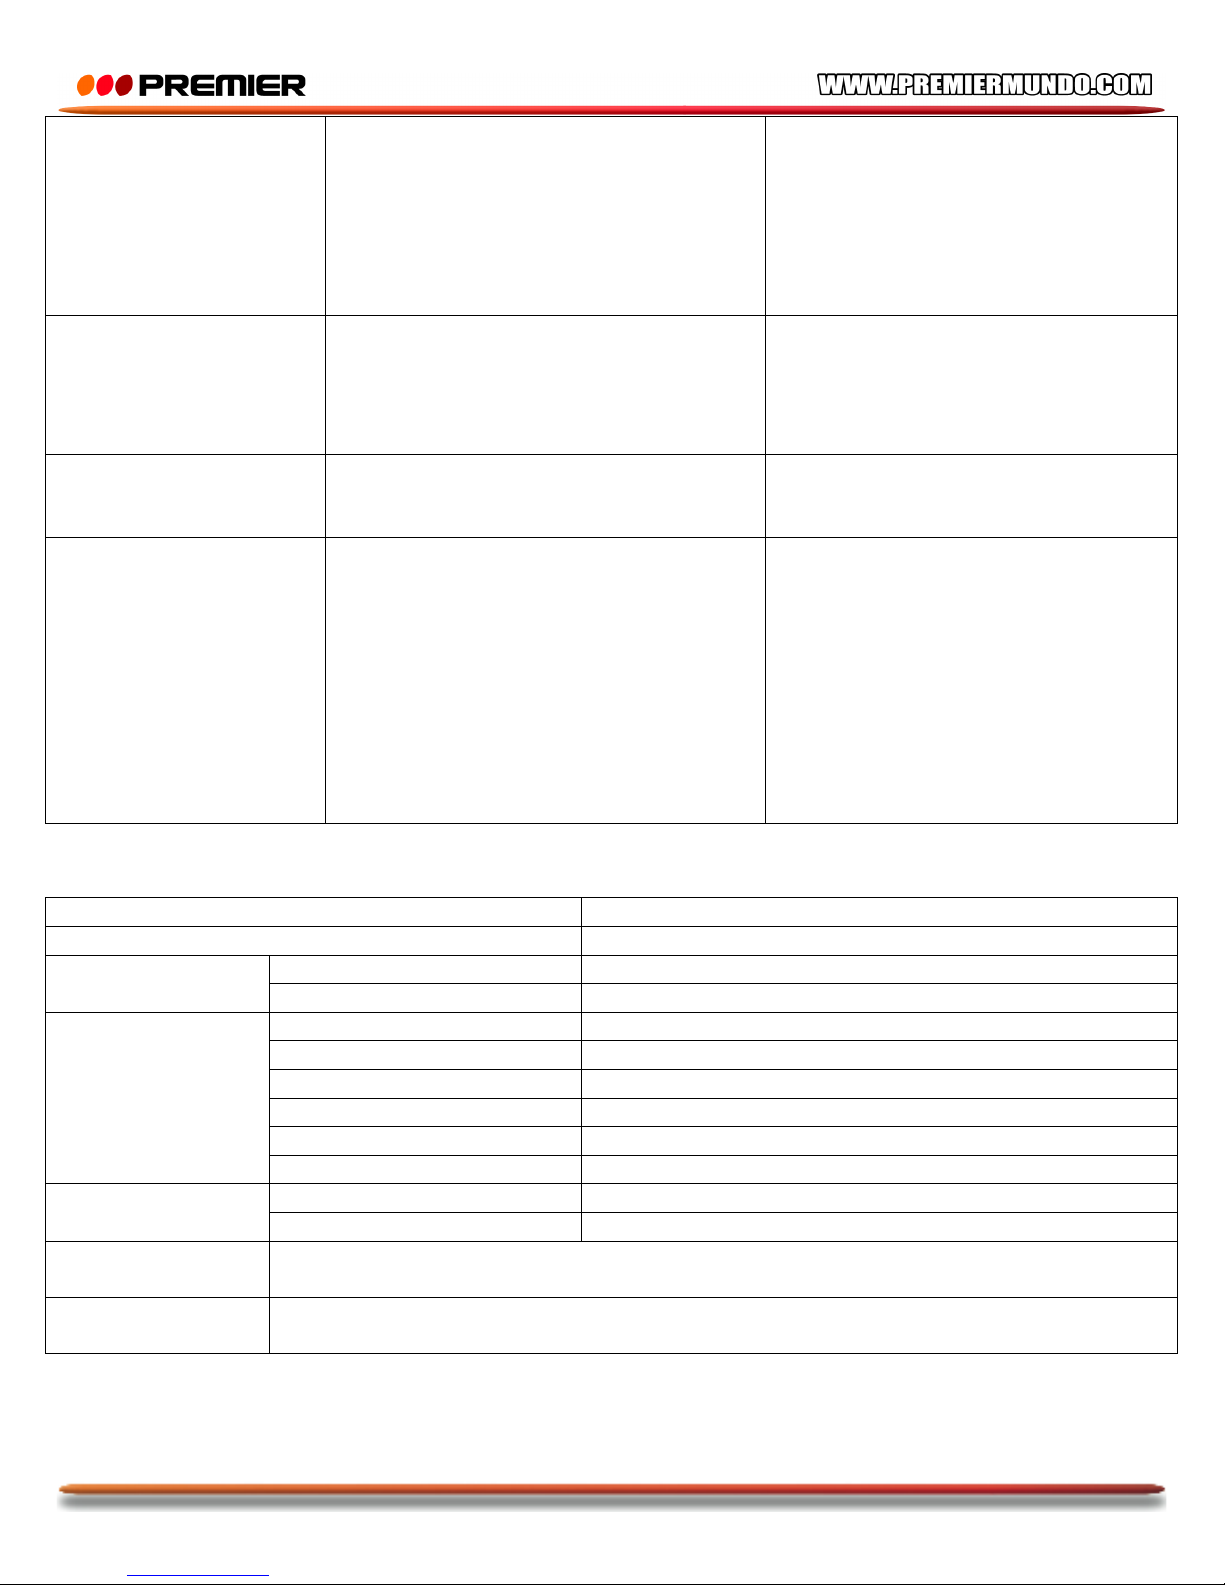
SOLUCIÓN DE PROBLEMAS
Problema
Posible causa
Posible solución
No enciende
El cable de energía no esta conectado
al tomacorriente ó no esta conectado
de manera segura.
Verifique que el cable de energía
este conectado de manera correcta
No hay imagen o esta
distorsionada.
• El modo de entrada de video del
TV conectado no esta ajustado
correctamente.
• El modo de salida de video de esta
unidad no esta ajustado
correctamente
• Ajuste adecuadamente el modo
de salida de video. Presione el
botón V-MODE repetidamente
hasta que la imagen se vuelva
normal.
• Conecte el cable de video de
manera correcta
No hay sonido o el
sonido esta
distorsionado
• Los cables de audio no están
conectados correctamente.
• El volumen esta ajustado en el
nivel mas bajo
• El sonido esta apagado.
• El disco esta en modo de
adelantamiento / retroceso rápido.
• Conecte los cables de audio de
manera correcta.
• Suba el nivel de volumen.
• Presione el botón MUTE en el
control remoto para activar el
volumen de la unidad.
• Presione el botón Reproducir /
Pausar
No reproduce un disco
• El disco fue colocado en la bandeja
• Verifique que el disco fue
Page 21
Pagina 20
de manera incorrecta.
• La clasificación del disco es mayor
que la configurada en la función de
control parental.
• La unidad no es compatible con el
disco.
• El disco esta sucio.
colocado de manera correcta en
la bandeja (Con el lado
etiquetado hacia arriba)
• Cambie los ajustes en el ítem de
control parental.
• Limpie el disco.
Si La unidad falla
cuando un dispositivo
USB o una tarjeta de
memoria es insertada
en la unidad.
El dispositivo USB conectado o la
tarjeta de memoria probablemente no
esta certificada.
La unidad no puede reproducir un
dispositivo o una tarjeta de memoria
no certificada.
Los botones en la
unidad no funcionan
La unidad esta siendo interferida con
electricidad estática, etc.
Apague y desconecte la unidad.
Luego conéctela nuevamente y
enciéndala.
El control remoto no
funciona
• No hay batería en el control
remoto.
• La batería esta gastada.
• El control remoto no esta
apuntando hacia el sensor remoto
de la unidad.
• El control remoto esta fuera de su
área de funcionamiento.
• La unidad esta apagada
• Instale dos baterías AAA/1.5 en
el compartimiento de la unidad.
• Reemplace las baterías por
unas nuevas.
• Apunte hacia el sensor remoto
de la unidad.
• Asegúrese que el control remoto
esta dentro de el área de
funcionamiento.
• Encienda la unidad.
ESPECIFICACIONES
Fuente de poder:
AC100-240V, 50/60Hz
Consumo de energía
200 Vatios
Ambiente de
funcionamiento
Temperatura
-10~+40ºC
Humedad relativa
5%~90%
Salida de disco
Sistema TV
PAL/NTSC
Rango de frecuencia
20Hz~20KHz
Relación S/N
>80dB (1Khz)
Rango dinámico
≥70dB (1KHz)
THD+Ruido
≤-60dB (1KHz)
“WOW FLUTTER”
Por debajo del limite de la medida de aparatos
Sintonizador
Rango de frecuencia AM
530-1710Hz
Rango de banda FM
87.5-108MHz
Salida de potencia
de parlantes
50V x 2 + 100V
Respuesta de
frecuencia
+/-1.5dB (20Hz – 20KHz)
Page 22
Pagina 21
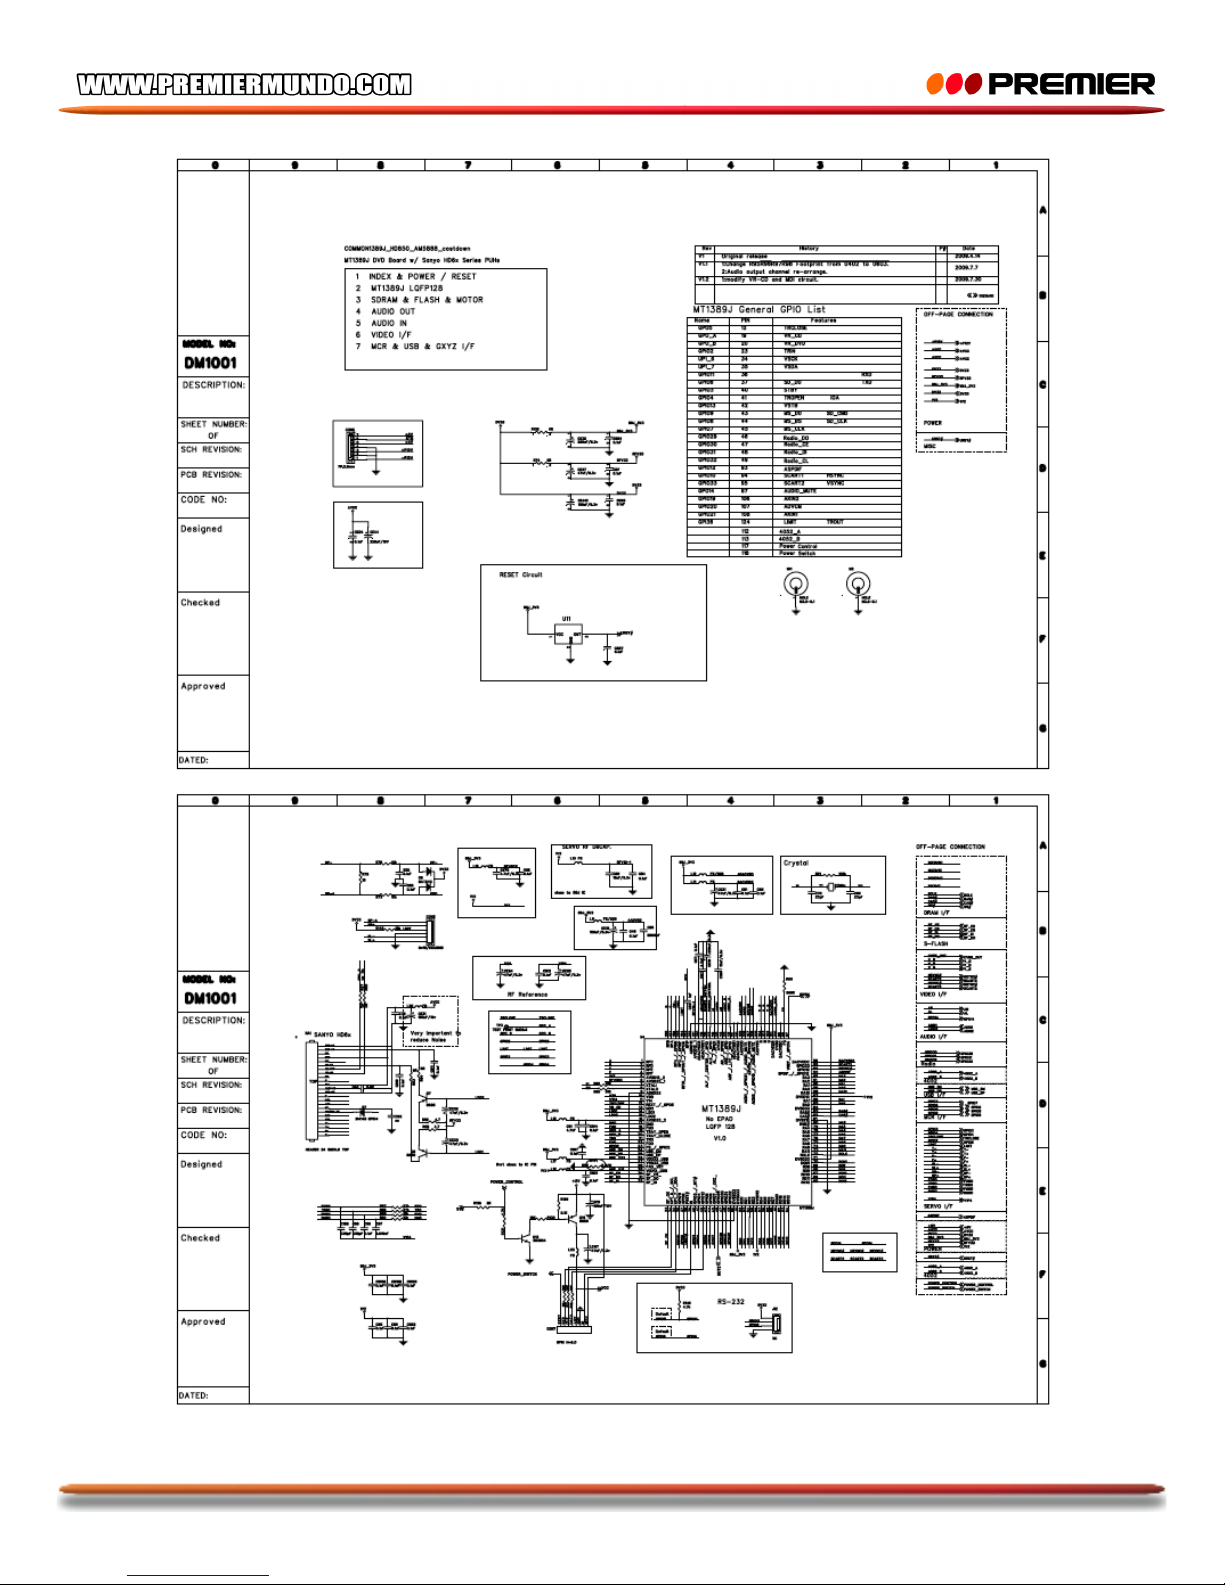
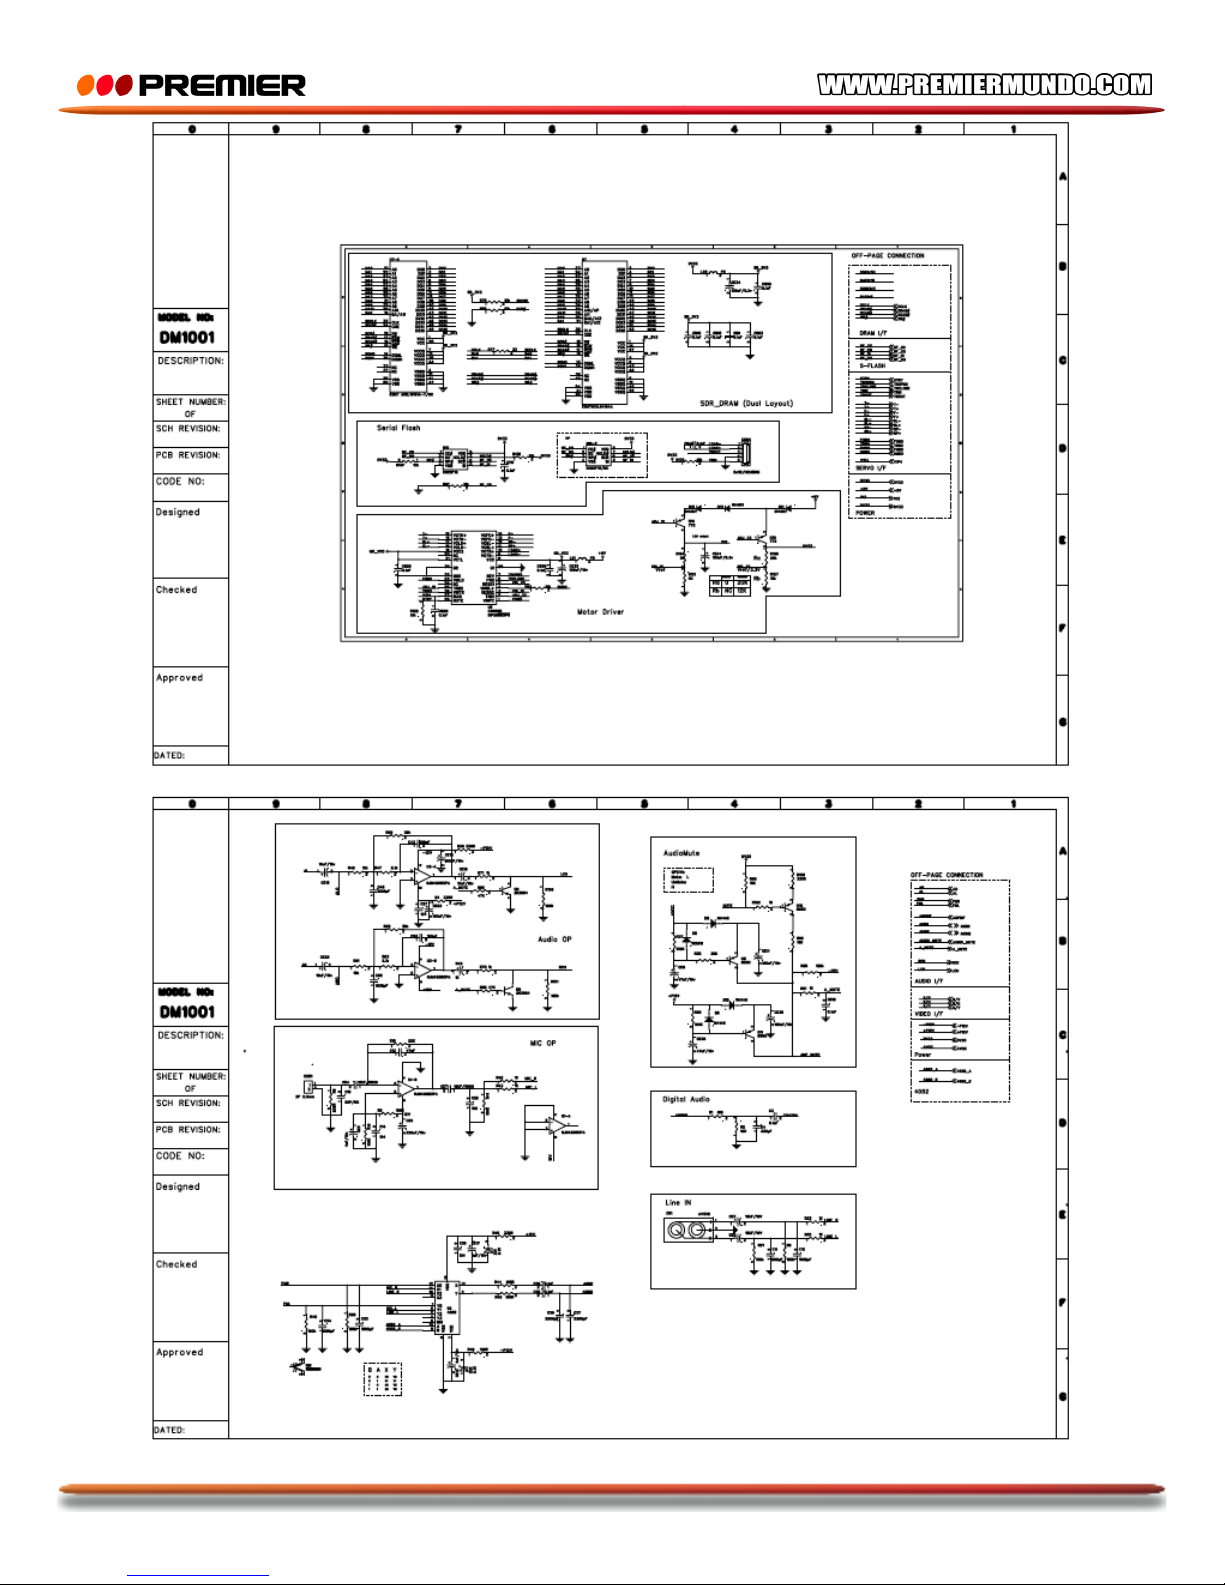
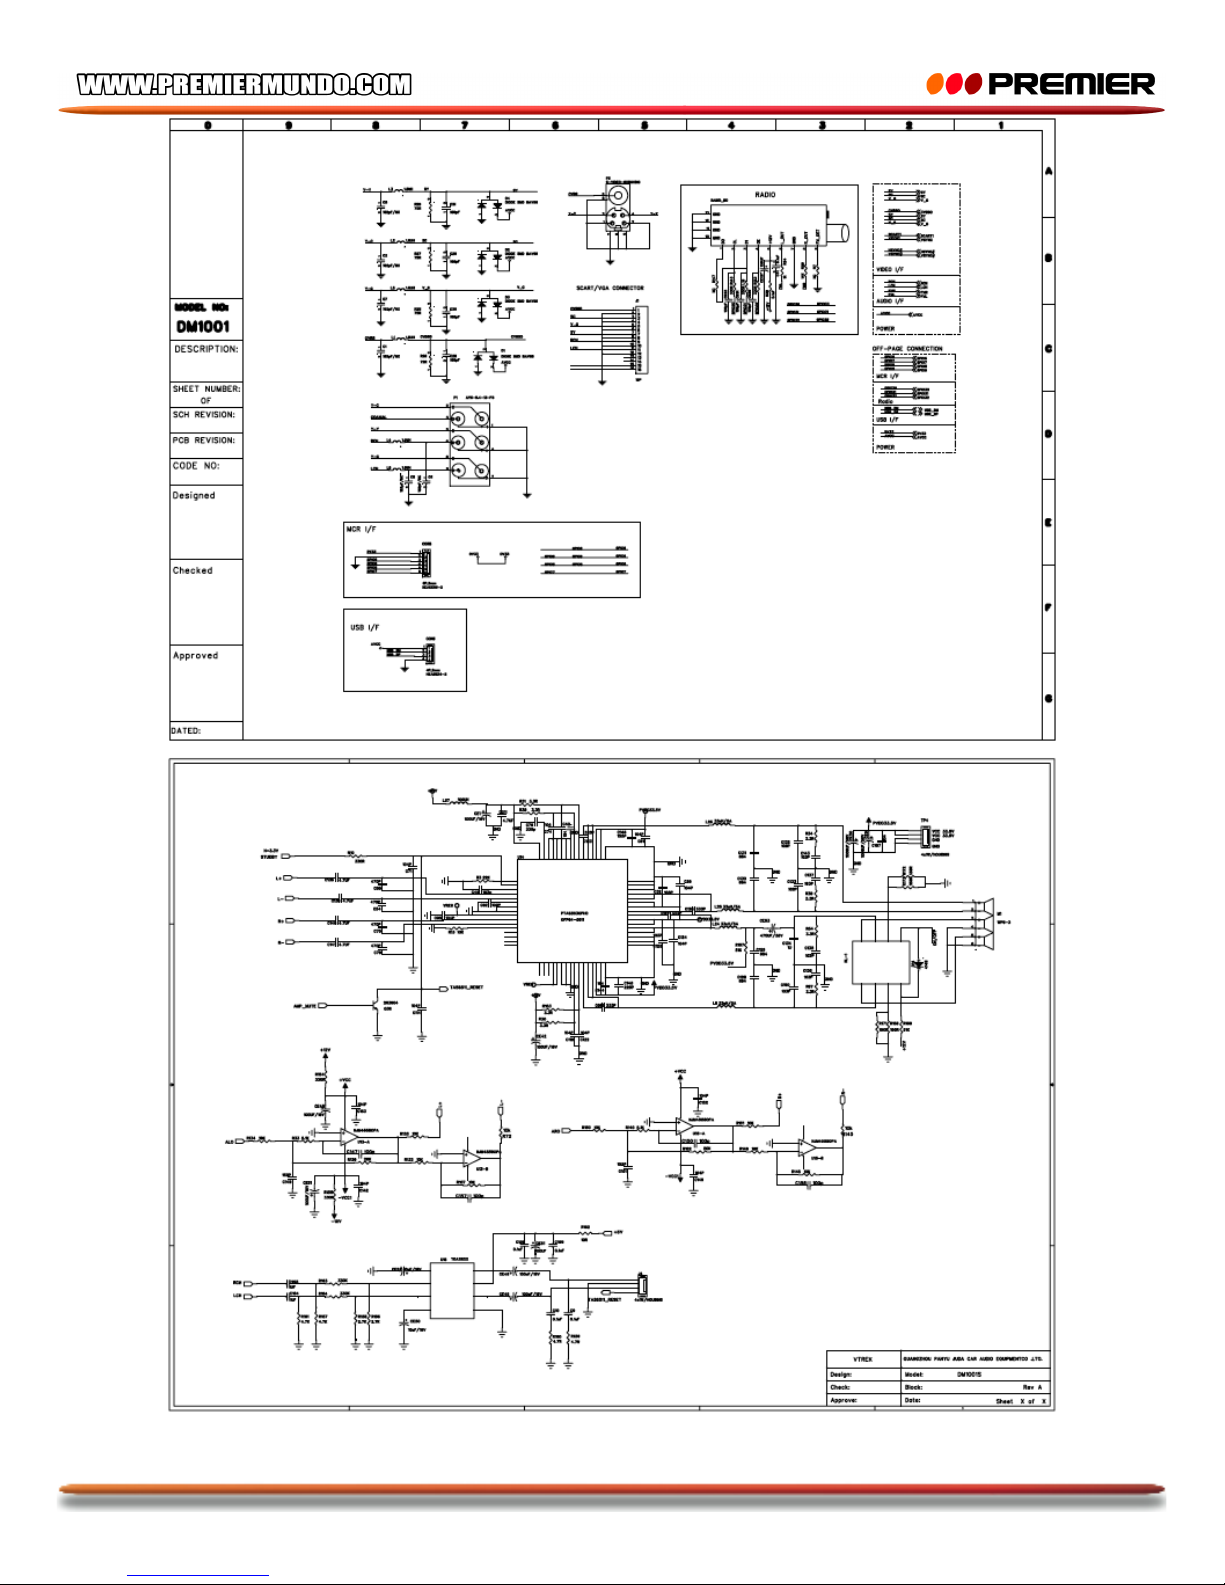
DIAGRAMA DE CIRCUITOS
Page 23
Pagina 22
Page 24
Pagina 23
Page 25
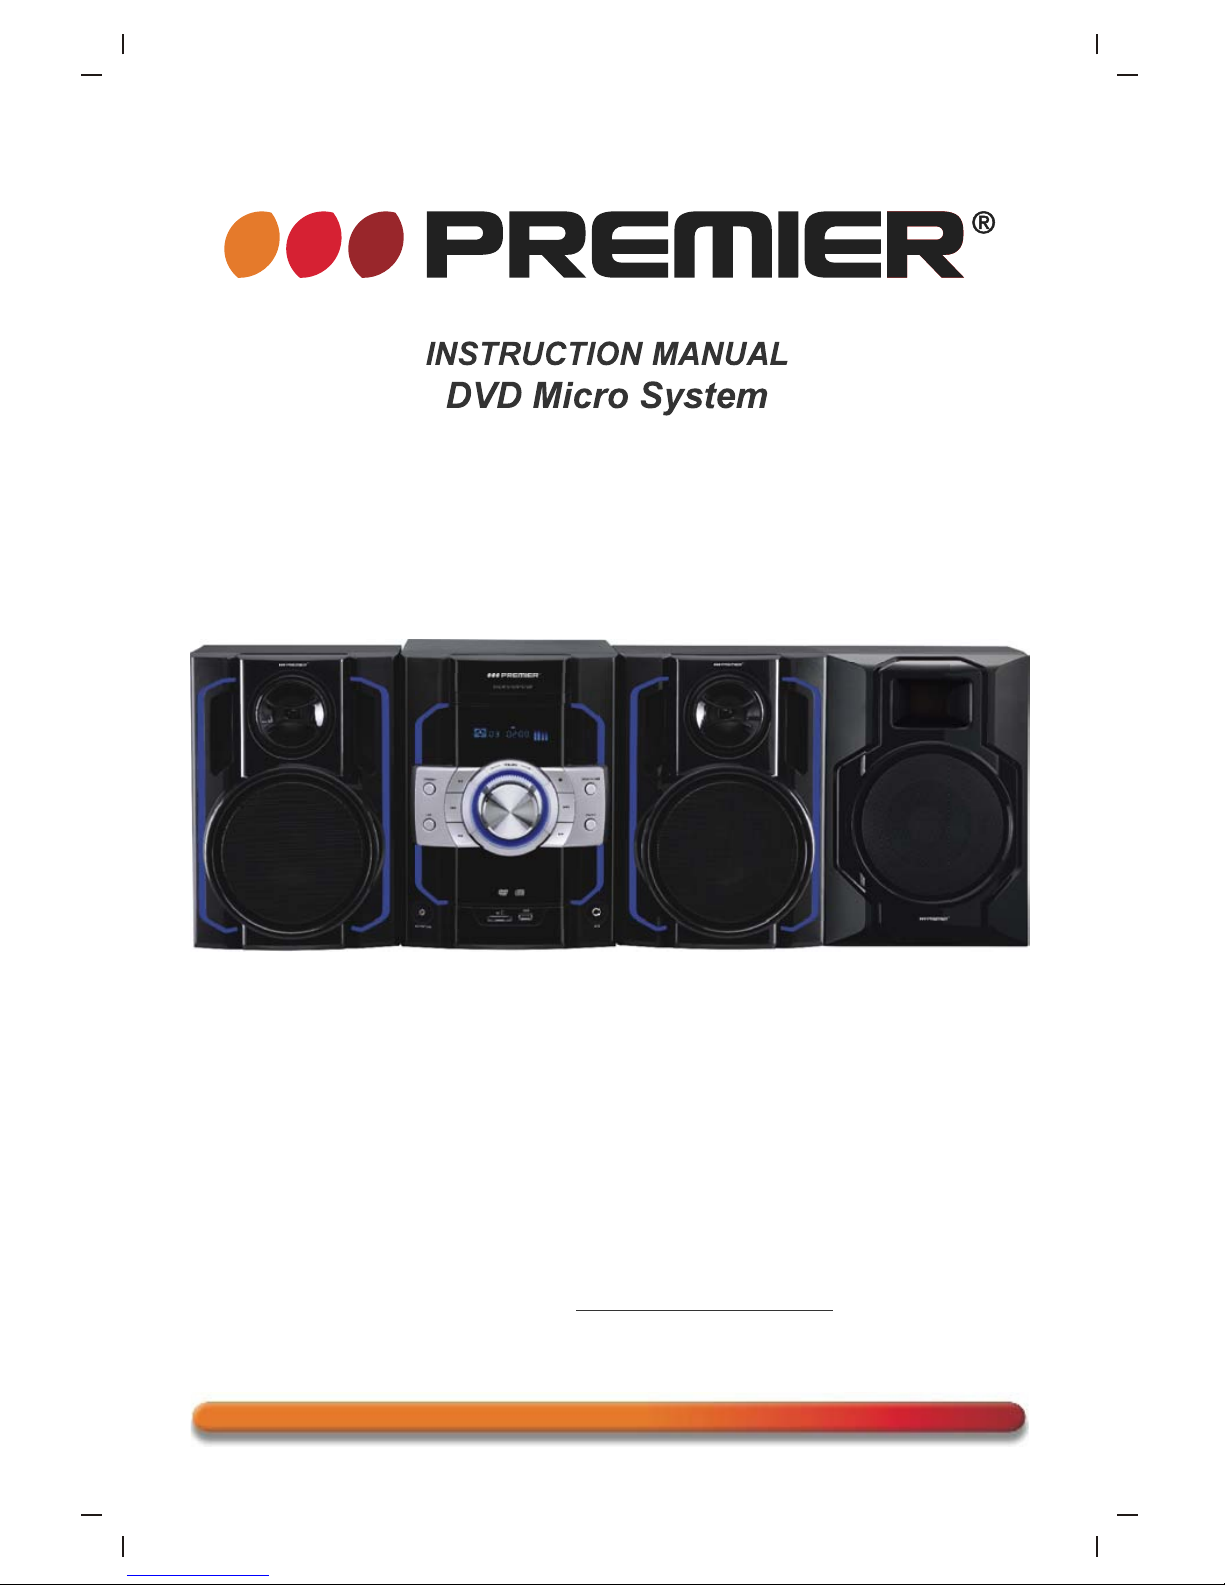
SX-4659DSD
DEAR CUSTOMER
In order to achieve the best performance of your product, please read this instruction
manual carefully before using, and keep it for future reference.
If you need extra support, please write to [email protected]
Page 26

Page 27
NOTE
This unit may be submitted to changes in specifications, characteristics
and/or operation without prior notice to the user, in order to continue
improving and developing its technology.
PREMIER CUSTOMER SERVICE
Venezuela:
Panama:
Website
E-mail:
0800 ELECTRIC (353-2874)
300-5185
www.premiermundo.com
[email protected]
Page 1
Page 28

Contents
Page 2
Contents.........................................................................................2
Features.........................................................................................3
For your Attention............................................................................4
Accessories....................................................................................5
Panel.............................................................................................6
Connection..................................................................................7-8
System Setup............................................................................9-12
Remote Control........................................................................13-14
Remote Control Function...........................................................15-17
Basic Playback.........................................................................18-20
Troubleshooting............................................................................21
Specification.................................................................................22
Page 29
Features
Page 3
Thanks for your purchase of our product. Please read through this manual
before making connections and operating this product. Retain this manual for
future reference.
DVD player is a domestic video player of new generation which produces
high quality pictures and Hi-Fi audio effect. Its performance is much better
than that of any previous home video equipment. As the best signal source ,
will give you the uppermost enjoyment!
it
Hi-fi, 96kHz/24bit audio digital processor.
Software intelligent upgrade.
High-resolution component video output, support the future video
equipment.
Coaxial digital audio output.
Compatible with DVD, DVD-R, DVD+R, DVD-RW, DVD+RW, VCD, DVCD,
CD, CD-R, MP3, MPEG4, KODAK PICTURE CD, etc.
With USB slot and memory card slot
High integrated servo system, decoding on single-chip technology, high
reliability and stability, and super error- correction.
Full function remote control.
AM/FM stereo radio tuner.
High quality amplifier.
CD ripping function.
Built-in MPEG, LPCM, PCM etc. digital audio decoder.
Page 30
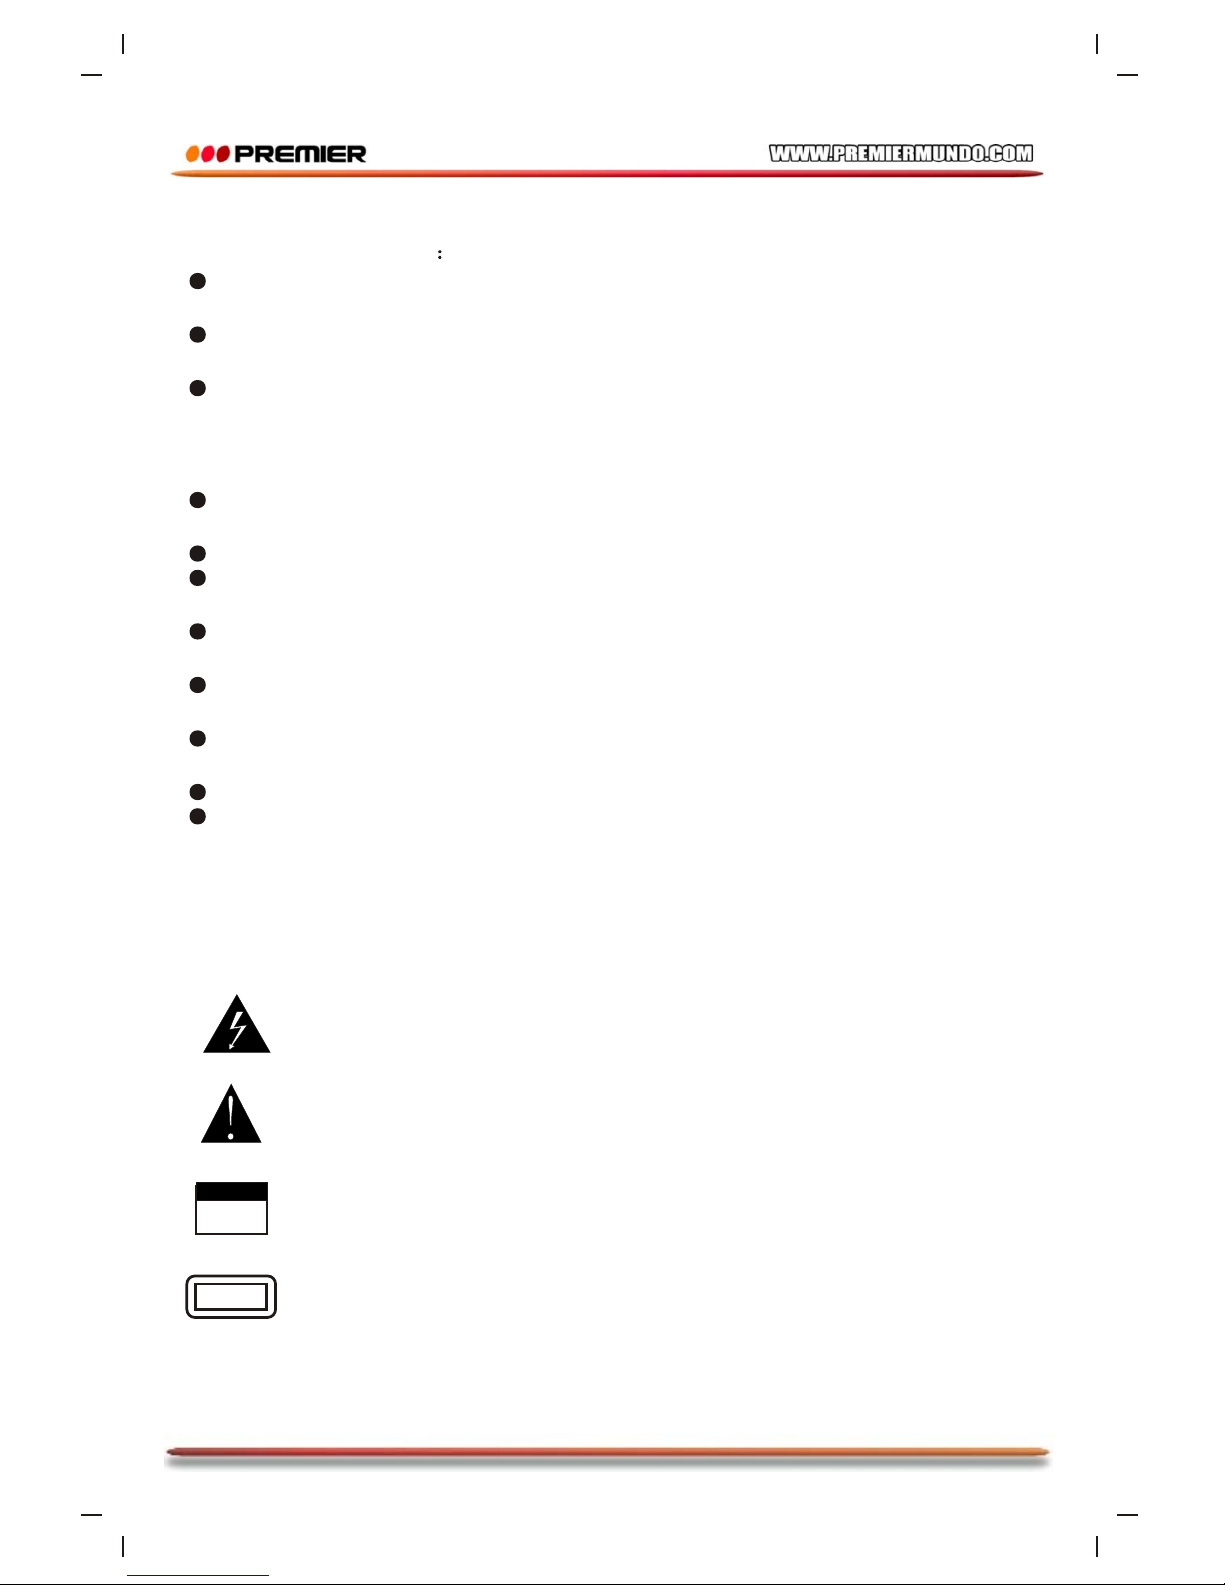
To reduce the risk of electric shock or fire, do not open the cover.
Refer servicing to qualified service personnel.
This mark indicates this unit belongs to class 1 laser product. The
laser beam may produce radiation harm if in direct contact with the
human body.
IMPORTANT NOTES
The lightning flash is intended to alert the user to the presence of
dangerous voltage within the product's enclosure, and touching the
internal components may result in a risk of electric shock to persons.
The exclamation mark is intended to alert the user to the presence of
important operating instructions.
CLASS 1
LASER PRODUCT
RISK OF ELECTRIC SHOCK
DO NOT OPEN
CAUTION
CAUTIONCAUTION
Page 4
Please read through this manual before making connections and operating
this product. Retain this manual for future reference.
Don't open the cabinet of this unit. No user-serviceable parts inside. Refer
servicing to qualified personnel only.
Switch off the unit when you don't use it. Switch off the unit and disconnect
it from the AC power supply when it is not being used for a long time. (Plug, as
the disconnected device entirely with power source, should keep in easy-tooperation in daily life.)
Don't install the unit in a place exposed to heating sources or direct
sunshine.
Don't install the unit in a place exposed to moisture or rain.
The apparatus shall not be exposed to dripping or splashing and any object
filled with liquids, such as vases shall not be placed on it.
Install the unit on a horizontal, flat and firm surface with good ventilation.
Never block the vents which will cause malfunction resulted from overheating.
Use a soft and clean cloth to clean the outside of the unit . Never clean it
with chemicals or detergent.
This book is only a guide for user's operation, not a criterion for
configuration.
Only use attachments/accessories specified by the manufacturer.
Where the Mains plug is used as the disconnect device, the disconnect
device shall remain readily operable.
WARNING: The batteries shall not be exposed to excessive heat such as
sunshine, fire or the like.
CAUTION: Danger of explosion if battery is incorrectly replaced.Replace only
with the same or equivalent type.
For your Attention
Page 31
Symbol Contents
Audio + Video
DVD
Disc types
Audio + Video
Audio
Video-CD
VCD
CD-DA
JPEG Photo CD
Picture CD
COMPACT
DIGITAL VIDEO
VIDEO CD
Electronic Photo
Kodak
Picture CD
Playable Disc and Media Types:
Package Contents
FM antenna
A/V cable
User manual
User
m
anua
l
Remote control
AM antenna
Page 5
Batteries
Accessories
Page 32
22 44 665533 77
88
99
11
Front Panel
Page 6
Panel
1 PLAY/PAUSE
2 STANDBY
3 PREVIOUS
4 USB
5 FAST REWIND
6 AUX/MP3 INPUT
7 MEMORY CARD SLOT
8 USB SLOT
9 MICROPHONE SOCKET
10 MASTER VOLUME KNOB
11 FAST FORWARD
12 SOURCE
13 NEXT
14 OPEN/CLOSE
15 STOP
16 DISPLAY SCREEN
Rear Panel
1 AC INPUT
2 SPEAKER OUTPUT
3 COMPONENT VIDEO OUTPUT
4 L/R CHANNEL AUDIO OUTPUT
5 COAXIAL DIGITAL AUDIO OUTPUT
6 S-VIDEO OUTPUT
7 AM ANTENNA JACK
8 FM ANTENNA JACK
9 COMPOSITE VIDEO OUTPUT
87
9
14
11
16
10
13
15
12
6
2
5
3
1
4
Page 33
Page 7
VIDEO SYSTEM CONNECTION
S-Video
Component Video
The following video outputs are available for this unit .
Use an S-Video cable to connect the S-Video output of this unit to the S-video
input of a TV/monitor.
Use a 3-core AV cable to connect the component outputs of this unit to the
corresponding inputs of a TV/monitor.
Composite Video
Use the yellow plug of an AV cable to connect the composite video output of this
unit to the video input of a TV/monitor.
NOTE:
Of the video outputs above, component is the best, S-VIDEO is better and the
composite video is standard. Use the best available video connection.
Do not make all the connections above at one time, otherwise the produced
pictures will be affected.
Only when the video settings conform to the actual video system connections
does the player produce the corresponding video output. (Please refer to the
Video Setup in System Setup).
DVD Player Video Output
TV/Monitor Video Input
Component Video Input
Page 7
VIDEO SYSTEM CONNECTION
S-Video
Component Video
The following video outputs are available for this unit .
Use an S-Video cable to connect the S-Video output of this unit to the S-video
input of a TV/monitor.
Use a 3-core AV cable to connect the component outputs of this unit to the
corresponding inputs of a TV/monitor.
Composite Video
Use the yellow plug of an AV cable to connect the composite video output of this
unit to the video input of a TV/monitor.
NOTE:
Of the video outputs above, component is the best, S-VIDEO is better and the
composite video is standard. Use the best available video connection.
Do not make all the connections above at one time, otherwise the produced
pictures will be affected.
Only when the video settings conform to the actual video system connections
does the player produce the corresponding video output. (Please refer to the
Video Setup in System Setup).
DVD Player Video Output
TV/Monitor Video Input
Component Video Input
Page 7
VIDEO SYSTEM CONNECTION
S-Video
Component Video
The following video outputs are available for this unit .
Use an S-Video cable to connect the S-Video output of this unit to the S-video
input of a TV/monitor.
Use a 3-core AV cable to connect the component outputs of this unit to the
corresponding inputs of a TV/monitor.
Composite Video
Use the yellow plug of an AV cable to connect the composite video output of this
unit to the video input of a TV/monitor.
NOTE:
Of the video outputs above, component is the best, S-VIDEO is better and the
composite video is standard. Use the best available video connection.
Do not make all the connections above at one time, otherwise the produced
pictures will be affected.
Only when the video settings conform to the actual video system connections
does the player produce the corresponding video output. (Please refer to the
Video Setup in System Setup).
DVD Player Video Output
TV/Monitor Video Input
Component Video Input
Y
Page 7
VIDEO SYSTEM CONNECTION
S-Video
Component Video
The following video outputs are available for this unit .
Use an S-Video cable to connect the S-Video output of this unit to the S-video
input of a TV/monitor.
Use a 3-core AV cable to connect the component outputs of this unit to the
corresponding inputs of a TV/monitor.
Composite Video
Use the yellow plug of an AV cable to connect the composite video output of this
unit to the video input of a TV/monitor.
NOTE:
Of the video outputs above, component is the best, S-VIDEO is better and the
composite video is standard. Use the best available video connection.
Do not make all the connections above at one time, otherwise the produced
pictures will be affected.
Only when the video settings conform to the actual video system connections
does the player produce the corresponding video output. (Please refer to the
Video Setup in System Setup).
DVD Player Video Output
TV/Monitor Video Input
Component Video Input
Y
Cb/Pb
Cr/Pr
Page 7
VIDEO SYSTEM CONNECTION
S-Video
Component Video
The following video outputs are available for this unit .
Use an S-Video cable to connect the S-Video output of this unit to the S-video
input of a TV/monitor.
Use a 3-core AV cable to connect the component outputs of this unit to the
corresponding inputs of a TV/monitor.
Composite Video
Use the yellow plug of an AV cable to connect the composite video output of this
unit to the video input of a TV/monitor.
NOTE:
Of the video outputs above, component is the best, S-VIDEO is better and the
composite video is standard. Use the best available video connection.
Do not make all the connections above at one time, otherwise the produced
pictures will be affected.
Only when the video settings conform to the actual video system connections
does the player produce the corresponding video output. (Please refer to the
Video Setup in System Setup).
DVD Player Video Output
TV/Monitor Video Input
Component Video Input
Y
Cb/Pb
Cr/Pr
Page 7
VIDEO SYSTEM CONNECTION
S-Video
Component Video
The following video outputs are available for this unit .
Use an S-Video cable to connect the S-Video output of this unit to the S-video
input of a TV/monitor.
Use a 3-core AV cable to connect the component outputs of this unit to the
corresponding inputs of a TV/monitor.
Composite Video
Use the yellow plug of an AV cable to connect the composite video output of this
unit to the video input of a TV/monitor.
NOTE:
Of the video outputs above, component is the best, S-VIDEO is better and the
composite video is standard. Use the best available video connection.
Do not make all the connections above at one time, otherwise the produced
pictures will be affected.
Only when the video settings conform to the actual video system connections
does the player produce the corresponding video output. (Please refer to the
Video Setup in System Setup).
DVD Player Video Output
TV/Monitor Video Input
Component Video Input
Y
Cb/Pb
Cr/Pr
Page 7
VIDEO SYSTEM CONNECTION
S-Video
Component Video
The following video outputs are available for this unit .
Use an S-Video cable to connect the S-Video output of this unit to the S-video
input of a TV/monitor.
Use a 3-core AV cable to connect the component outputs of this unit to the
corresponding inputs of a TV/monitor.
Composite Video
Use the yellow plug of an AV cable to connect the composite video output of this
unit to the video input of a TV/monitor.
NOTE:
Of the video outputs above, component is the best, S-VIDEO is better and the
composite video is standard. Use the best available video connection.
Do not make all the connections above at one time, otherwise the produced
pictures will be affected.
Only when the video settings conform to the actual video system connections
does the player produce the corresponding video output. (Please refer to the
Video Setup in System Setup).
DVD Player Video Output
TV/Monitor Video Input
Component Video Input
Y
Cb/Pb
Cr/Pr
Y Cb/Pb Cr/Pr
Component Video Output
Composite Video and
S-Video Output
Page 7
VIDEO SYSTEM CONNECTION
S-Video
Component Video
The following video outputs are available for this unit .
Use an S-Video cable to connect the S-Video output of this unit to the S-video
input of a TV/monitor.
Use a 3-core AV cable to connect the component outputs of this unit to the
corresponding inputs of a TV/monitor.
Composite Video
Use the yellow plug of an AV cable to connect the composite video output of this
unit to the video input of a TV/monitor.
NOTE:
Of the video outputs above, component is the best, S-VIDEO is better and the
composite video is standard. Use the best available video connection.
Do not make all the connections above at one time, otherwise the produced
pictures will be affected.
Only when the video settings conform to the actual video system connections
does the player produce the corresponding video output. (Please refer to the
Video Setup in System Setup).
DVD Player Video Output
TV/Monitor Video Input
Component Video Input
Y
Cb/Pb
Cr/Pr
Y Cb/Pb Cr/Pr
Component Video Output
Composite Video and
S-Video Output
VIDEO
S-VIDEO
Page 7
VIDEO SYSTEM CONNECTION
S-Video
Component Video
The following video outputs are available for this unit .
Use an S-Video cable to connect the S-Video output of this unit to the S-video
input of a TV/monitor.
Use a 3-core AV cable to connect the component outputs of this unit to the
corresponding inputs of a TV/monitor.
Composite Video
Use the yellow plug of an AV cable to connect the composite video output of this
unit to the video input of a TV/monitor.
NOTE:
Of the video outputs above, component is the best, S-VIDEO is better and the
composite video is standard. Use the best available video connection.
Do not make all the connections above at one time, otherwise the produced
pictures will be affected.
Only when the video settings conform to the actual video system connections
does the player produce the corresponding video output. (Please refer to the
Video Setup in System Setup).
DVD Player Video Output
TV/Monitor Video Input
Component Video Input
Y
Cb/Pb
Cr/Pr
Y Cb/Pb Cr/Pr
Component Video Output
Composite Video and
S-Video Output
VIDEO
S-VIDEO
Page 7
VIDEO SYSTEM CONNECTION
S-Video
Component Video
The following video outputs are available for this unit .
Use an S-Video cable to connect the S-Video output of this unit to the S-video
input of a TV/monitor.
Use a 3-core AV cable to connect the component outputs of this unit to the
corresponding inputs of a TV/monitor.
Composite Video
Use the yellow plug of an AV cable to connect the composite video output of this
unit to the video input of a TV/monitor.
NOTE:
Of the video outputs above, component is the best, S-VIDEO is better and the
composite video is standard. Use the best available video connection.
Do not make all the connections above at one time, otherwise the produced
pictures will be affected.
Only when the video settings conform to the actual video system connections
does the player produce the corresponding video output. (Please refer to the
Video Setup in System Setup).
DVD Player Video Output
TV/Monitor Video Input
Component Video Input
Y
Cb/Pb
Cr/Pr
Y Cb/Pb Cr/Pr
Component Video Output
Composite Video and
S-Video Output
VIDEO
S-VIDEO
VIDEO
S-VIDEO
Composite Video and
S-Video Input
Connection
Page 34
Page 8
Connection
The player has both analogue and digital audio output. The analogue audio is
two channel. The digital audio is outputted from the coaxial, and sound quality
is much better than the analogue audio.
2ch output
Use a pair of audio cable (red for right/white for left) to connect the audio input
of the TV or AV amplifier to the audio output of this unit .
Use the specified coaxial cable to connect the coaxial output of this unit to the
coaxial input of power Amplifier
Coaxial Digital Audio
AUDIO SYSTEM CONNECTION
Speaker output
AUX/MP3 IN
Use speaker cables to connect the speaker output terminals of this unit to the
corresponding speakers.
This unit has a group of extra audio input terminals, i.e. AUX IN. You can
input the analogue stereo audio signals from extra devices such as VCD, CD,
VCR, MP3 player, etc through the extra audio input terminals.
After the connections have been correctly made, press [SOURCE]/[SOURCE
SELECT] to switch to AUX IN to enjoy the audio from the connected extra
device.
/MP3
/MP3
NOTE: The audio settings should conform to the practical audio system
connections. Please refer to the Audio Setup in System Setup.
DIGITAL AUDIO
COAXIAL
COAXIAL
Coaxial Output
Digital Audio Input
2CH Audio Output
2CH Audio Input
TV/Monitor Input
DVD Output
DIGITAL AUDIO
COAXIAL
COAXIAL
Digital Audio Input
TV/Monitor Input
DIGITAL AUDIO
COAXIAL
COAXIAL
Digital Audio Input
TV/Monitor Input
R
L
L
R
Speaker
Speaker output
Subwoofer
FRFR FLFL
Page 35

Page 9
System Setup
MENU OPERATION
1. In DVD mode, press [SETUP] on the remote control to display the setup menu.
2. Press [ ]/[ ] to select an item. The submenu of the selected item will be displayed
below instantly.
3. Press [ ]/[ ] to select an item you desire to set in the submenu, then press [ENTER]
/[ ]to enter. Use [ ]/[ ] to select an option, then press [ENTER] to confirm it, or press
[ ] to cancel.
4. Then you can press [ ]/[ ] to continue to set other items in the submenu.
5. Press [ ] to go back to the superior menu of the current one.
6. Press [SETUP] again to exit the setup menu.
1 GENERAL SETUP PAGE
1.1 TV DISPLAY
If the unit is connected to a conventional TV set, select 4:3 PANSCAN or 4:3
LETTERBOX. The 4:3 image will be displayed in full screen in its native aspect ratio.
4:3 PANSCAN: The wide-screen image will be displayed on the screen in its native
aspect ratio with some part on the left and right cut off.
4:3 LETTER BOX: The wide-screen image will be displayed in its native aspect ratio with
black bands on the upper and lower sections of the screen.
If the unit is connected to a wide-screen TV set, select 16:9 or WIDE SQUEEZE.
16: 9: The wide-screen image will be displayed in full screen in its native aspect ratio
while the 4:3 image will be stretched out horizontally to fit in the screen.
WIDE SQUEEZE: The wide-screen image will be displayed in full screen in its native
aspect ratio and so does the 4:3 image but with black borders on the left and the right side.
1.2 ANGLE MARK
Set this item to ON. When a disc encoded with multiple camera angles is playing, the
angle mark will display on the screen. Then you can view the video of different camera
angles by pressing [ANGLE] on the remote control.
Set this item to OFF to disable this function.
NOTE: This function only works with those discs encoded with multiple camera angles.
1.3 OSD LANGUAGE (On-Screen Display Language)
Set the on-screen display language in this item.
1.4 CLOSED CAPTIONS
Set this item to ON. When a disc encoded with closed captions, the closed captions will
be shown on the screen. Set this item to OFF to hide it.
You can also press [SUBTITLE] on the remote control to show or hide the closed captions.
NOTE: This function only works with those discs encoded with closed captions.
1.5 SCREEN SAVER
ON: If the image remains motionless on the screen, for example the disc is paused,
stopped etc, for several minutes, a screen saver will appear on the screen. You can press
any key or button except [STANDBY] to wake it up.
OFF: Disable the screen saver function.
Page 36

Page 10
System Setup
1.6 LAST MEMORY
ON: During playback or in the paused status each time you open the disc tray or turn off
the player, the unit will memorize the last playback time. Next time when you insert the
same disc and close the disc tray to load the disc, the unit will play from the memorized
point.
OFF: Disable the last memory function.
2 AUDIO SETUP PAGE
2.1 ANALOG AUDIO SETUP
2.1.1 DOWNMIX
LT/RT: The 5.1-channel audio is mixed into left channel and right channel and is output
via the FL and FR speaker respectively.
STEREO: The 5.1-channel audio is mixed into stereo signal and is output via the FL and
FR speaker.
NOTE: This function only applies to the
2.2. DIGITAL AUDIO SETUP
2.2.1 DIGITAL OUTPUT
SPDIF/OFF: There will be no digital audio signal output. (Coaxial off)
SPDIF/RAW: The digital audio signal output will be in its raw format. Normally, this m ode
is used for
SPDIF/PCM: The digital audio signal output will be in PCM format. Normally, this mode is
used for audio CD signals.
2.2.2 LPCM OUTPUT
When DIGITAL OUTPUT is set to SPDIF/PCM, this item is available.
Select a sample rating for the digital audio output. There are two options, 48KHz and
96KHz.
NOTE: Some amplifiers don't support 96KHz sampling which will affect the coaxial output.
2.3 HDCD(High Definition Compatible digital)
HDCD (High Definition Compatible digital) is a patented encode/decode process for
delivering the full richness and details of the sound from HDCD-encoded CDs.
You can set the digital filter to 2x, 1x or off.
2.4 KARAOKE SETUP
2.4.1 MIC SETUP
2.4.1.1 MIC
Set this item to ON/OFF to switch on/off the connected microphone.
2.4.1.2 MIC VOL
Enter this item, then use direction key [ ]/[ ] to adjust the microphone volume. Then
press [ENTER] to confirm you adjustment.
2.4.1.3 ECHO LEVEL
Enter this item, then use direction key [ ]/[ ] to adjust the microphone echo level. Then
press [ENTER] to confirm you adjustment.
AC -3 encoded 5.1-channel discs.
Digital 5.1 signals.
Page 37

Page 11
System Setup
3 DIGITAL DECOLDER SETUP
ENCODER
3.1 DUAL MONO
STEREO: The player outputs the left-channel audio and right-channel audio via the FL
and FR speaker respectively.
L-MONO: The player outputs the left-channel audio only via both the FL and FR speaker.
R- MONO: The player outputs the right-channel audio only via both the FL and FR
speaker.
MIX- MONO: The player outputs the average signal of the left-channel and right-
channel audio via the FL speaker and the FR speaker.
NOTE: This function only applies to the AC -3 encoded 2-channel discs.
3.2 DYNAMIC
When you watch films with large dynamic scope in low volume, for example at night, you
can adjust the dynamic value up to avoid losing sound details resulting from the low
volume.
4 VIDEO SETUP PAGE
4.1 VIDEO OUTPUT
CVBS: Set video output to S-Video if the S-Video connection is made.
YUV: Set video output in analog component video format if the component video outputs
are used.
Y Pb Pr: Set video output as progressive YUV signals if the component video outputs
are used.
NOTE: If the composite video is your favorite, just make composite video connection
only. The composite video output is always active whichever option you choose in this
setting entry.
If the video setting differs from the actual video connection (except composite video),
you may get no image or very poor image on the TV. In such case, you need to reset this
setting item for an appropriate video output mode or press [V-MODE] on the remote
control until the output image becomes normal.
4.2 COLOR SETTING
4.2.1 SHARPNESS
There are three options (HIGH, MEDIUM and LOW) for you to choose in this item.
4.2.2 BRIGHTNESS, CONTRAST, HUE and TINT
Enter these items respectively, use direction key [ ]/[ ] to adjust the value, then press
[ENTER] to confirm it.
5 PREFERENCE PAGE
If there's no disc in the disc tray, the disc tray is open or the disc in the disc tray is
stopped, this item is available.
Page 38

Page 12
System Setup
5.1 TV TYPE
This product supports both NTSC (National Television System Committee) and PAL
(Phase Alternating Line) television broadcasting standards.
PAL: If the connected TV is PAL system which is used in China, Hongkong and Europe,
etc, select this mode. The video signal of a NTSC disc will be output in PAL format.
AUTO: If the connected TV is multi system, select this mode. The output format of the
video signal will be in accordance with the video signal of the disc.
NTSC: If the connected TV is NTSC system which is used in Taiwan, America and
Canada, etc, select this mode. The video signal of a PAL disc will be output in NTSC
format.
NOTE: If a wrong selection is made, the viewing image will be very poor. In such case,
you are supposed to change the option in this item to fix the error.
5.2 PBC (Play Back Control)
ON: Activate the PBC function. When playing a disc encoded with PBC function such as
VCD 2.0 etc, press [PBC] to return to the PBC menu.
OFF: Disable the PBC function.
NOTE: This function only works with those discs encoded with PBC function such as VCD
2.0 etc.
DVD, VCD1.1, CD-DA and M P3 disc have no PBC menu.
5.3 AUDIO, SUBTITLE and DISC MENU
Select a preferred audio language, subtitle language and disc menu language in these
items.
You can also make selection of the audio language by using the [AUDIO] and the subtitle
language by the [SUBTITLE] on the remote control.
NOTE: If the selected language is not available for the currently playing disc, the disc's
default setting will remain enabled
5.4 PARENTAL
This item allows the user to set a maximum rating of the movies that can be viewed.
Movies rated higher than the level set for the parental lock can not be viewed. What's
more, to key in the correct password is needed to reset the level. The default password is
0000.
NOTE: This function only works with those discs with parental function.
5.5 PASSWORD SETUP PAGE
5.5.1 PASSWORD MODE
You can switch on/off the password function in this item.
NOTE: You must key in the correct password and press [ENTER] to confirm before you
change the option in this item. The default password is 0000.
5.5.2 PASSWORD
You can reset the password in this item.
NOTE: The default password (0000) is always active even if the password has been
reset.
5.6 DEFAULT
Restore all the default settings except the settings in PASSWORD MODE and
PARENTAL item.
Page 39
Page 13
Insert the batteries into the remote control. Point the remote control at the
remote sensor on the front panel. The remote control works within a distance of
about 8 metres from the sensor and within an angle of about 30 degrees from
the left and right side.
Note:
Remove the batteries when you do not intend to use the remote control for a
long time.
Do not mix new and used batteries, or different types of batteries.
Weak batteries can leak and severely damage the remote control.
Be environmentally friendly and dispose of batteries according to your
government regulations.
Remote Control Operation
Battery Installation
Remove the battery compartment cover
on the back of the remote control.
Load two AAA/1.5V batteries into the
battery compartment making sure that
the batteries have been inserted with the
correct polarities matching the symbols +,
- as indicated inside the battery
compartment.
Replace the cover.
Remote Control
Page 40
2
21
10
23
24
6
31
30
26
28
12
27
1
3
4
5
9
25
15
29
14
13
11
16
22
20
17
18
19
7
8
31
Page 14
Remote Control
1. STANDBY
2. DIGIT KEYS
3. GOTO
4. SETUP
5. PBC
6. PROGRAM
7. VOLUME+/-
8. FAST FORWARD/REWIND
SEARCH+/-
9. TITLE/COPY/AM/FM
10. DIRECTION KEYS
()
11. AUDIO/ MEMORY
12. SOUND EFFECT
13. STEP
14. USB
15. REPEAT
16. OPEN/CLOSE
17. PLAY/ PAUSE
18. MUTE
19. V-MODE
20. ANGLE
21. SOURCE SELECT
22. OSD
23. NEXT/PREVIOUS
RADIO+/-
24. AUTO/ SUBTITLE
25. ENTER
26. MENU/ MO/ST/RIPPING
27. CH-LEVEL
28. TONE
29. ZOOM
30. STOP
31. A-B REPEAT
Page 41
Press to temporarily pause a playback. Press it again to resume the playback.
Or, press to resume the normal playback from the fast forward, fast reverse,
frame-by-frame playback, etc.
Press repeatedly for fast forward playback in different speeds.
Press repeatedly for fast reverse playback in different speeds.
Press to skip to the previous chapter/track.
Press to skip to the next chapter/track.
Press once to pause a playback, then press [ ] to continue the playback;
Press it twice to stop a playback and the disc will be reset to the starting point.
Page 15
Remote Control Function
OPEN/CLOSE:Press to open /close the disc tray.
STANDBY:
Note: Being in the standby mode uses a minimal amount of electricity, but ensures that
the components of the unit operate at maximum efficiency from the moment you start.
Switch on the unit. /Put the unit in standby mode.
SETUP:Press to enter/exit the setup menu.
The digit keys can be used to input the corresponding numbers or make
selection of a track or a chapter of a disc, etc.
55
66
8 8 99
10+10+
0/100/10
22
33
11
44
77
99
GOTO:During playback, press to enter the GOTO menu. In the menu, use the direction
key [UP]/[DOWN] to select a setting item and press [ENTER] to enter the editing state,
then with the digit keys input a specific track, disc time, track time, chapter, title, chapter
time or title time to go to directly. Press it again to exit the GOTO menu.
PROGRAM:Press this button to enter/exit the program menu with which you can
playback the contents of a disc in your desired order.
In the program menu, use the direction keys, digit keys and [ENTER] to make a program
list, then move the highlight to START and press [ENTER] to start program playback.
During program playback, press this button to enter the program menu and the STOP is
highlighted, press [ENTER] to cancel program playback.
ENTER:Press to enter an item in the menu or to confirm your operation etc.
The direction keys can be used to move the highlight or adjust the value of an item
in the menu .
SOURCE/SOURCE SELECT:Press repeatedly to select a signal source among DVD,
TUNER(AM/FM) and AUX/MP3 IN.
USB:Press to switch to the available extra signal source USB and memory card,or to
return to the DVD mode.
Page 42

Press to temporarily switch off the sound . Press it again to switch it on.
VOLUME+/-:Press [VOLUME +/-] to adjust the volume.
REPEAT:Press repeatedly to switch the repeat modes.
(Note: For VCD2.0, etc, this function is invalid when PBC function is activated.)
A-B:You can repeat a specific section of a disc with this button.
When a disc (DVD, VCD, CD, MP3 or MPEG4) is currently playing, press this button to
mark down the starting point (A) and press it again to mark down the ending point (B). Then,
the unit will playback this section over and over again. Press it for the third time to cancel
A-B repeat and resume to the normal playback.
Note: Points A and B must be in the same title/ track.
STEP:Press repeatedly to advance the video frame by frame. Press [ ] to resume the
normal playback. (Applies to DVD, VCD, MPEG4 discs etc)
Page 16
TITLE:Press to enter the title menu of the playing DVD disc.
MENU:Press to access the root menu of the disc.
SUBTITLE:Press repeatedly to switch the subtitles or switch off the subtitle function.
(Note: This function only works with those discs encoded with subtitles.)
OSD:Press repeatedly to switch or hide the relative information of the playing disc.
AUDIO:
Press repeatedly to select the audio languages provided by the disc (for DVD).
Press repeatedly to switch the audio channels (LEFT MONO, RIGHT MONO, MIX-MONO
and STEREO) provided by the disc (for VCD).
ANGLE:Press to switch the viewing angles.
(Note: This function only works with those discs encoded with multiple camera
angles.)
PBC:When a PBC encoded disc is currently playing, press to activate/ disable the PBC
(Play Back Control) function. (Note: VCD 2.0, etc. have PBC function while DVD, VCD1.1,
CD-DA and MP3 disc have no PBC function.)
CH-LEVEL:Press to select a channel or the overall volume, then use
[VOLUME+]/[VOLUME-] to adjust the volume of the selected channel or the overall
volume.
S.EFFECT:Press repeatedly to switch the sound effects or switch off the sound effect.
Note: You are recommended to switch off the sound effect when playing a 5.1
channel disc so that to obtain the real 5.1 effect.
ENCODER
TONE:Press to select BASS or TREBLE, then use [VOLUME+/-] to adjust the value of
bass or treble.
Remote Control Function
Page 43
Page 17
ZOOM:Press to zoom in/out the scene. In zoomed-in mode, the direction keys
can be used to move the zooming center. (Note: Applies to DVD, VCD, MPEG4,
etc.)
RIPPING:Press to access or quit the CD ripping menu. For details of CD ripping,
please refer to CD RIPPING in PLAYBACK chapter.
COPY:Press to copy from a multi-format disc to USB, for details, please refer to
USB DRIVE PLAYBACK in Basic Playback chapter.
V-MODE:Press repeatedly to switch the video output modes.
Remote Control Function
MEMORY:After tuning in a new frequency, press [MEMORY], then select a
preferred station by inputting the corresponding numbers to save it as a preset
station.
In tuner mode, the digit keys can be used to select a preset station.
For example, press [0] and [2] to select the 2nd station; press [1] and [5]
to select the 15th station.
NOTE: In tuner mode, [VOLUME+/-], [CH-LEVEL], [MUTE], [TONE] and
[S.EFFECT] buttons are also active. For details, please refer to the remote
control function introduction of the DVD part in this chapter.
The following buttons are used in tuner mode. Press [SOURCE]/[SOURCE
SELECT] to select tuner mode.
MO/ST:Press to switch between Mono and Stereo
in FM mode.
reception of the broadcast
signal
AUTO:Press to do auto scanning for the broadcasting radio channels.
SEARCH+/-:Press to fine tune (increase/decrease) the frequency manually.
RADIO+/-:Press to skip to the next/previous preset station.
55
66
88 99
10+10+
0/10 0/10
22
33
11
44
77
99
During auto scanning, press to stop the process.
AM/FM:Press to switch between the AM mode and the FM mode.
Tuner Operation
Page 44

Insert an MP3/MPEG4 disc into the player; then a content menu will display on
the screen.
MENU OPERATION:
Use the direction key [ ]/[ ] to select a folder or a file, then press [ENTER] to
enter the selected folder or play the selected file. You can also use the digit
keys to make selection of a folder to enter or a file to play.
In the content menu, press [ ] to return to the upper menu; press [ ]/[ ] to
turn over to the previous/next the menu page.
[PROG]: Press repeatedly to switch between FOLDER playback mode and
FILELIST playback mode.
[MENU]: During playback of an MPEG4 disc, press to return to the content
menu.
NOTE: During playback, [ ], [ ], [ ], [ ](press to stop the playback),
[REPEAT], [A-B], [VOLUME+/-], [MUTE], [CH-LEVEL], [TONE], etc. are valid.
Please refer to the remote control function introduction in this chapter for
details.
MP3/MPEG4 DISC PLAYBACK
KODAK PICTURE CD PLAYBACK
Place a kodak picture CD in the disc tray; then the unit will load the disc
automatically.
Press [ ] to enter the thumbnail mode to preview the pictures.
In the thumbnail mode, use the direction keys to select a picture, then press
[ENTER] to start the playback from the selected picture.
In the thumbnail mode, use the direction keys and [ENTER] to make selection
of the Slide Show, Menu, Prev or Next at the bottom of the screen.
Slide Show: Start slide show playback.
Menu: Enter the instruction menu for remote key function. In the menu, press
[ENTER] to turn over to the next menu page and again to exit the instruction
menu.
PREV/NEXT: Turn over to the previous/next page.
Remote key function introduction
[PROG]: Switch the transition effects.
[ ]: Enter the thumbnail mode to preview the pictures.
[ZOOM]: During playback, press [ZOOM] repeatedly to zoom in/out the
picture. When the picture is zoomed in, the direction keys can be used to move
the picture. Press [ZOOM] again to exit the picture-zooming mode.
[ ]/[ ]: Skip to the next/ previous picture during playback.
[ ]: Press to pause a playback, press it again to resume the playback.
[ ]/[ ]: Rotate the picture counterclockwise/ clockwise during the playback.
[ ]/[ ]: Creates a vertical or horizontal mirror image.
Page 18
Basic Playback
Page 45

Page 19
Basic Playback
KARAOKE PLAYBACK
Set the item MIC to ON and set the MIC VOL to a low level in the karaoke
setup menu.
Insert a microphone into the microphone socket on the front panel.
Adjust the microphone volume again if required and the echo to your desired
level in the karaoke setup menu.
Place a karaoke disc in the disc tray. Press [AUDIO] to include or eliminate
the original singing voice.
Now, you can enjoy the karaoke singing!
Insert a USB drive in the USB slot, then press [USB] to enter the connected
USB drive and you can playback the readable files in it. Press [USB] again to
switch back to DVD mode.
Insert an SD, MS or MMC card into the memory card slot, then press [USB] to
access the connected memory card and you can playback the readable files in
it. Press [USB] again to return to DVD mode.
NOTE:
In case the player breaks down when you insert a USB drive or a memory card
into the player, turn off the player, disconnect the power cord from the AC outlet
and unplug the USB drive or/and the memory card from the player. Then, power
on the player again. The player will resume the normal status.
For playback operation, please refer to MP3/MPEG4 DISC PLAYBACK in this
chapter.
If a USB drive and a memory card are inserted in the player at the same time,
press [USB] once to select USB and press it twice to select the memory card.
Press it for the third time to return to the DVD mode.
Insert a USB and put a multi-format disc in DVD player , press [COPY] button,
use direction key [ ]/[ ] then press [ENTER] to select a file, Use direction keys
and move the highlight on [COPY] option,press [ENTER] once to enter to [USB]
mode and press it again to select [NEXT] option, press it for third time to start
copy. Press [USB] to see the files in the USB drive .
[ALL SELECT] and [ALL UNSELECT] option are used for select or unselect all
files in the multi-format disc.
[EXIT]:move the highlight on it then press [ENTER] or [COPY] to exit the copy
menu .
If a USB drive and a memory card are inserted in the player at the same time,
press [USB] once to select USB and press it twice to select the memory card.
Press it for the third time to return to the DVD mode. the maxium memory of USB
disk 16GB and SD card supported is 8GB.
USB DRIVE AND MEMORY CARD PLAYBACK
Page 46
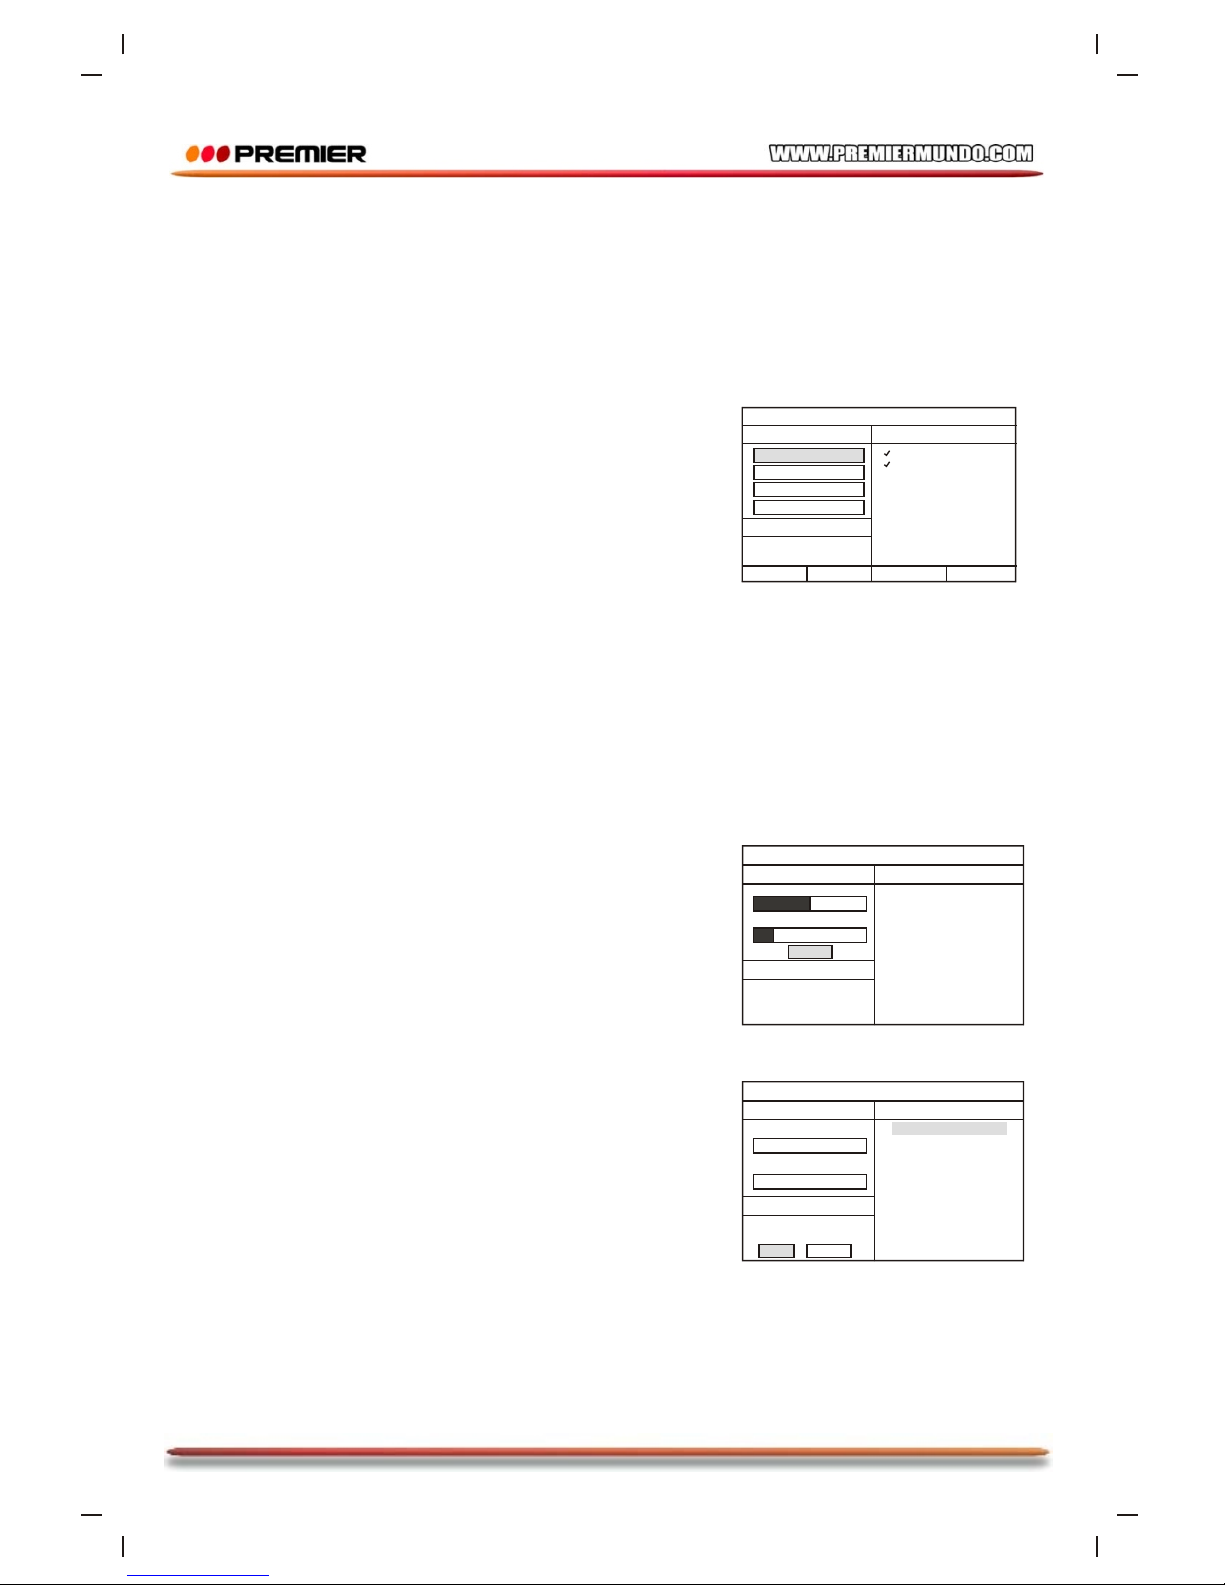
track progress
ripping
CD RIP
SUMMARY
The file has existed
Replace it or not?
track01 04:36
track02 03:34
total progress
OK CANCEL
Selected track
CANCEL
track progress
ripping
CD RIP
SUMMARY
now ripping
track 01/02
Selected track
track01 50%
track02 03:34
total progress
speed Normal
OPTIONS
CD RIP
SUMMARY
selected track 2
selected time 08:10
start
exit
select all select none
track01 04:36
track02 03:34
track03 05:01
track04 03:26
track05 04:46
track06 03:32
track07 04:00
track08 03:08
bitrate 128kbps
Create ID3 Yes
device USB
TRACK
Page 20
Basic Playback
CD ripping is a process of copying audio from a CD/HDCD disc and saving the audio
content into the compressed digital audio format MP3.
With this function, you can copy the tracks of a CD/HDCD disc to the connected USB drive.
Place a CD or HDCD disc in the disc tray and insert a USB drive into the player. Press
[RIPPING] on the remote control to display the CD Ripping menu. Use the direction keys
to navigate the cursor in the menu.
CD RIPPING
In the Track window, all the tracks of the disc and their
playback time are listed. Highlight the track that you want
to copy to the connected storage device, then press
[ENTER] to make selection; highlight it again and press
[ENTER] to cancel the selection. Highlight Select all and
press [ENTER] to select all the tracks in the disc. Highlight
Select none and press [ENTER] to cancel all the selection
of tracks.
In the Summary window, you can check the information of
the number of the selected tracks and the total playback
time of selected tracks.
In the Options window, set your desired ripping speed, ripping bitrate, set Created ID3 to
YES to do ripping along with the ID3 information if available or NO to disable this function.
Highlight these setting entries respectively, then press [ENTER] to switch the options.
After you finished setting, move the highlight to START and press [ENTER] to begin the
ripping procedure.
If you want to cancel, move the highlight to EXIT, then press [ENTER] or just press
[RIPPING] on the remote control to exit the procedure.
After the CD ripping procedure begins, the system will
proceed to the next menu page.
In Ripping window, there are a track progress bar and a
total progress bar showing how much the ripping
procedure for the current track has been done and how
much the total task has been finished respectively.
During ripping, the option CANCEL is highlighted, so
whenever you want to cancel ripping, just press [ENTER].
The ripped tracks from CD or HDCD discs will be stored in
a folder created automatically by the system in the
connected USB drive. If the selected track shares the
same file name with the existing one in that folder, the
system will pop up a dialogue box to warn you of that.
Press [ENTER] to continue and replace the existing one
with the selected track. Select option Cancel to quit. And
you can choose to create another folder in the connected
USB drive for ripping this track.
Create a new folder for ripping
If you want to create another folder in the connected USB
drive to save the ripped tracks, you need to open the disc
tray and then close it. The tracks ripped afterwards will be
saved in a newly created folder.
Page 47
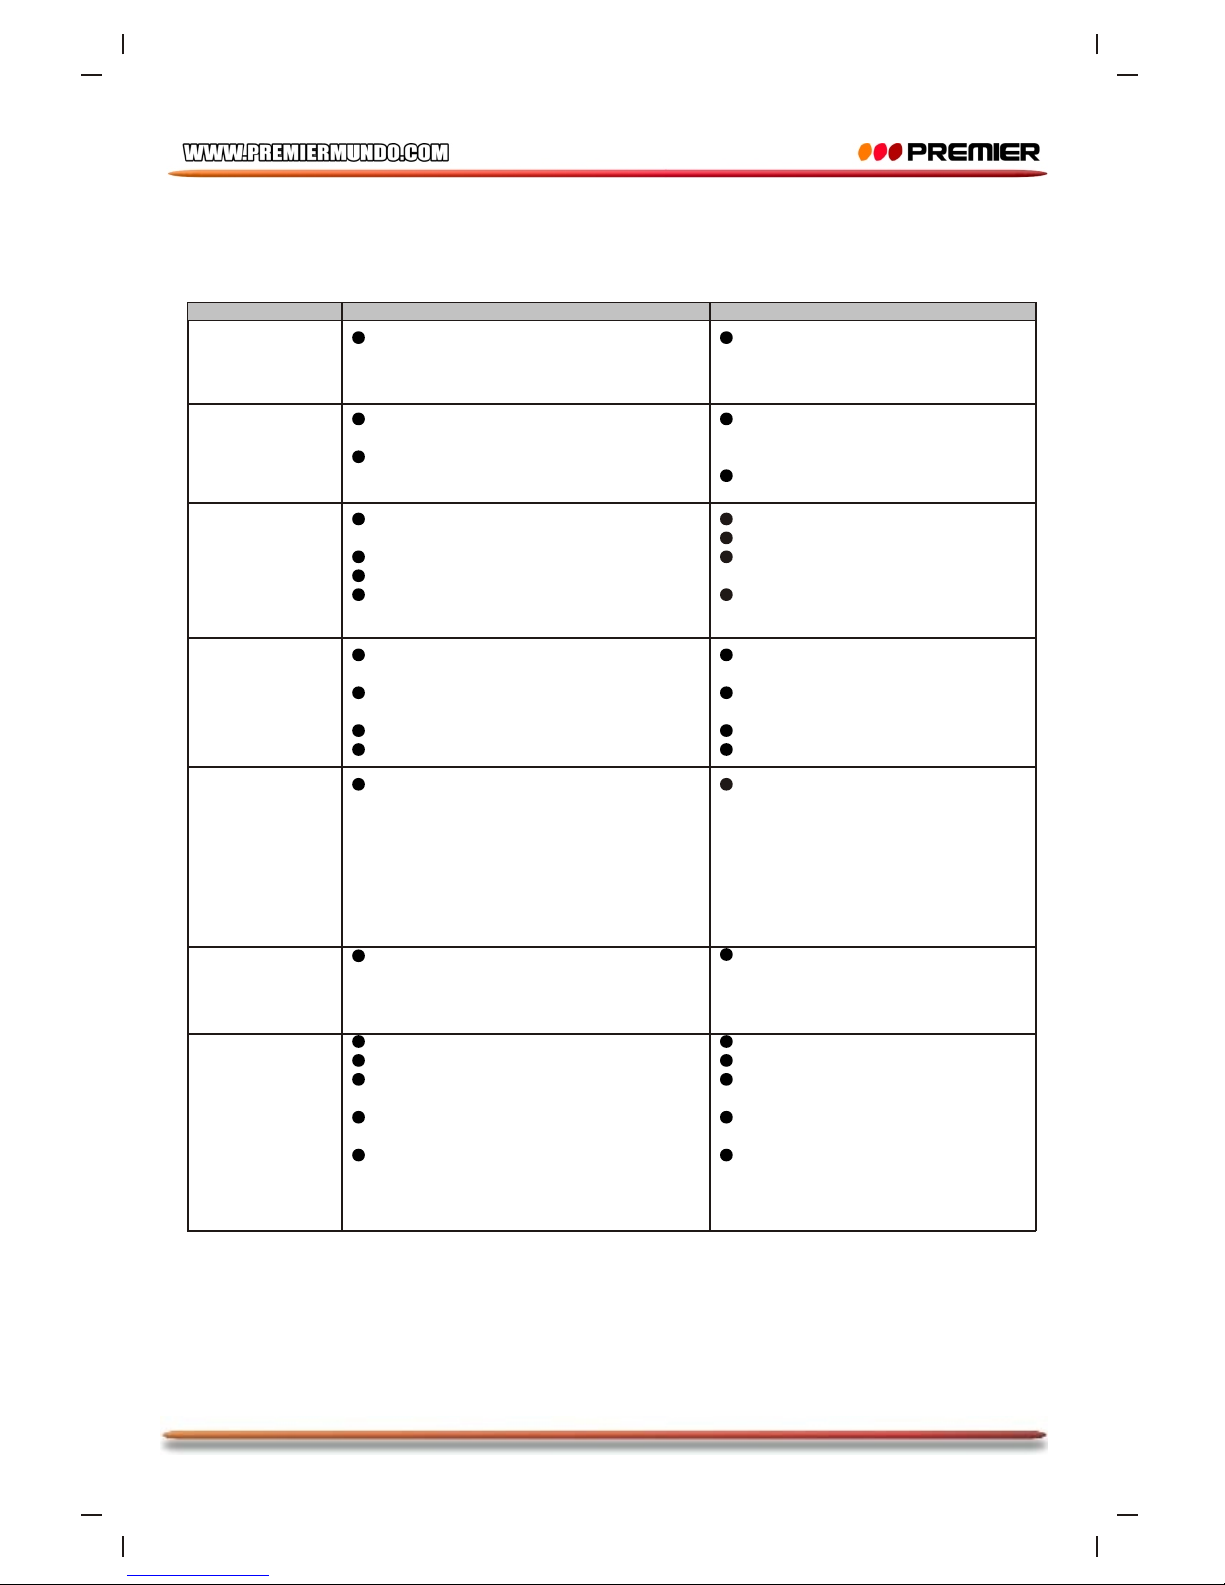
Before resorting to maintenance service, please kindly check by yourself
with the following chart.
The player
breaks down
when a USB
drive ormemory
card is inserted
into the player.
The connected USB drive or the
memory card is probably not of a
certified one.
The player cannot play any uncertified
USB driveand memory card.In case the
player breaks down, turn it off,
disconnect the power cord from the AC
outlet and unplug the USB drive or /and
the memory card from the player. Then,
power on the player again. The player
will resume thenormal status.
The AC power cord is not connected to
the power supply or is not connected to a
power supply securely.
Please check that the AC power cord
is connected securely.
Picture
There is no picture
or the picture is
distorted.
Set an appropriate video output
mode.Press [V-MODE] repeatedly until
the picture becomes normal again.
Connect the video cable securely.
Sound
There is no sound
or the sound is
distorted.
The audio cables aren't connected
securely.
The volume is set at the lowest level.
The sound is switched off.
The disc is in fast forward/rewind
playback.
Connect the audio cables securely.
Turn up the volume.
Press [MUTE] on the remote control
to switch on the sound.
Press [PLAY/PAUSE].
The remote
control does not
function.
There is no battery in the remote control.
The batteries are out of charge.
The remote control isn't pointed to the
remote sensor.
The remote control is out of its working
area.
The unit is shut down.
Install two AAA/1.5V batteries in it.
Replace the batteries with new ones.
Make sure that the remote control is
pointed to the remote control sensor.
Make sure the remote control is
within the working area.
Switch off the unit and disconnect it
from the AC outlet. Then power on the
unit again.
The buttons on
the unit doesn't
work.
Switch off and unplug the player.
Then connect the plug to the power
supply and switch it on again.
Unable to play a
disc
This disc is placed in the disc tray in a
wrong way.
The rating of the disc is higher than the
rate set in the parental control item.
The unit isn't compatible with the disc.
The disc is dirty.
Check that the disc is placed in the
disc tray with its label side upwards.
Reset the settings in the parental
controlitem.
/
Clean the disc.
No Power
Symptom Cause(s)
Remedy
The unit is being interfered with static
electricity etc.
Video input mode of the connected TV
isn't correctly set.
Video output mode of this unit isn't
correctly set.
Page 21
Troubleshooting
Page 48
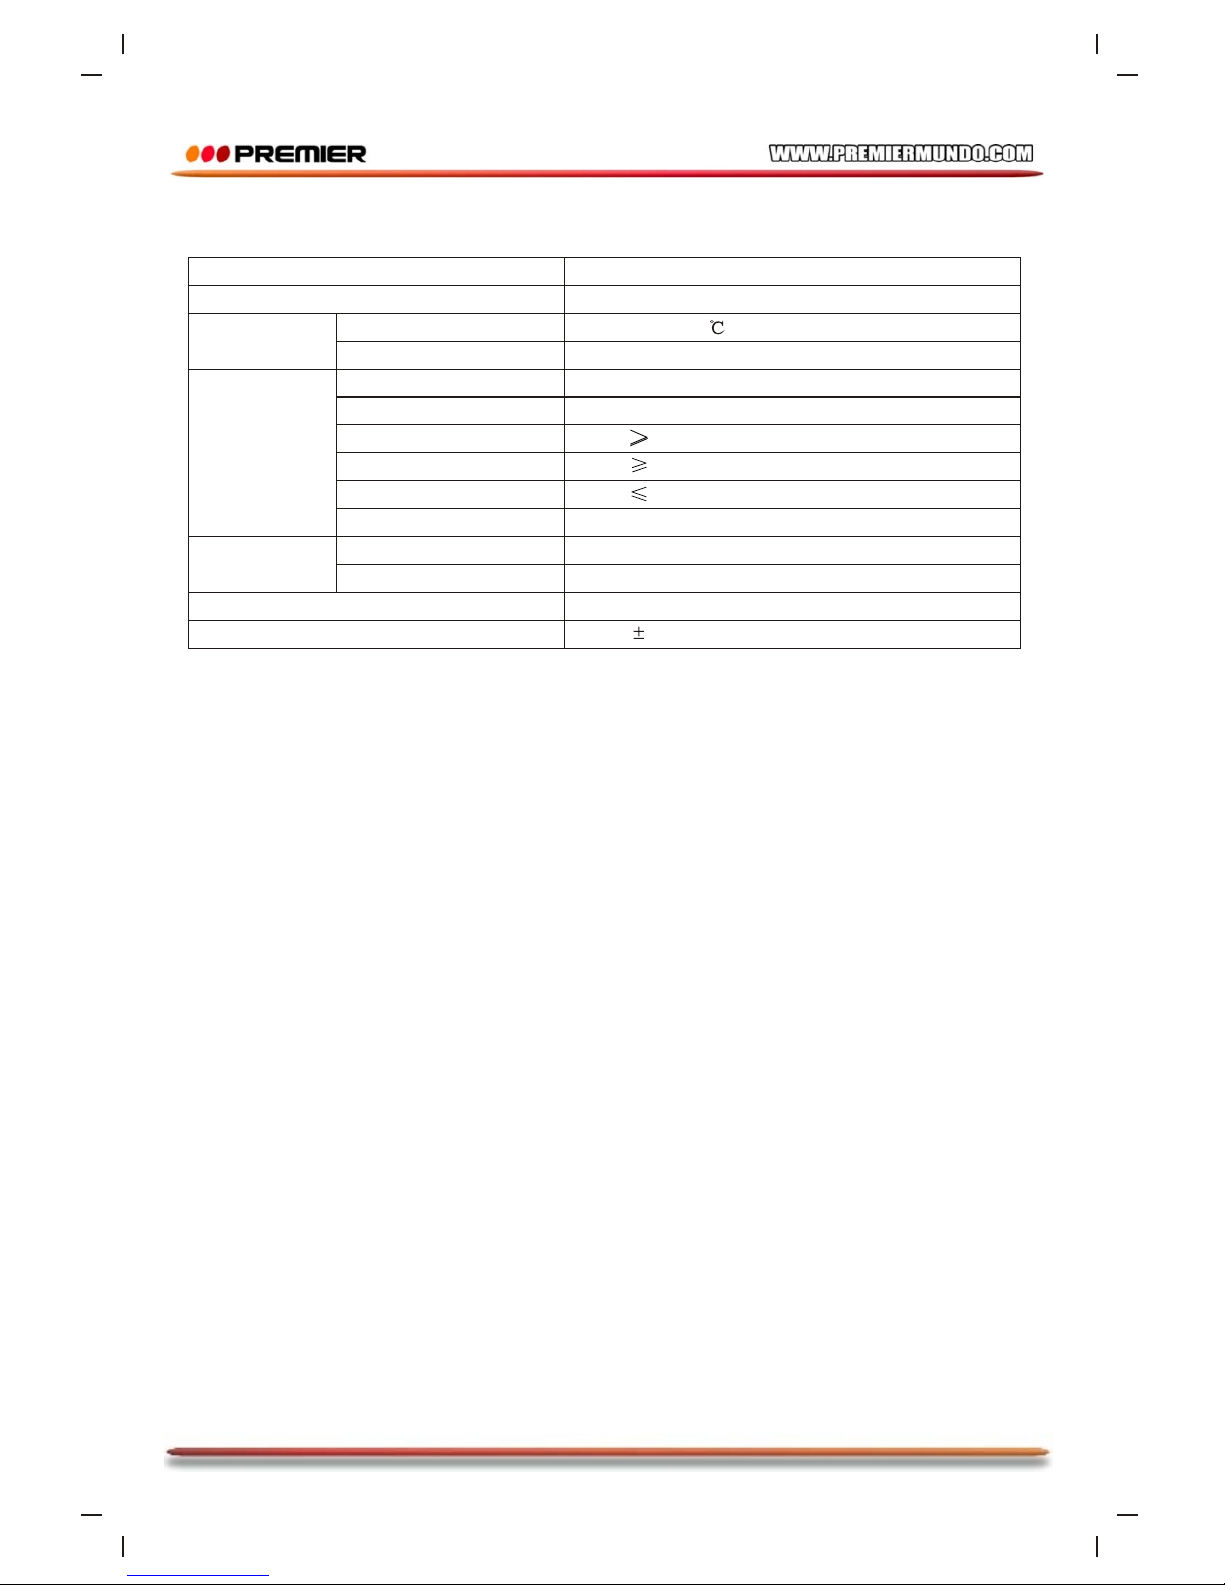
Page 22
Specifications
Power supply
Working
environment
Temperature
Relative humidity
TV System
Frequency Range
Dynamic Range
THD+NOISE
WOW FLUTTER
FM band Range
Power output of speakers
Power consumption
AC~100-240V, 50/60Hz
-10~+40
5%~90%
PAL/NTSC
20Hz~20KHz
80dB(1KHz)
70dB(1KHz)
-60dB(1KHz)
Below the limit of apparatus measure
530 KHz~1710
87.5~108MHz
50W x 2+100W
1.5dB(20Hz~20KHz)
200W
Disc output
Tuner
Frequency response
AM frequency Range
S/N A weight
Page 49
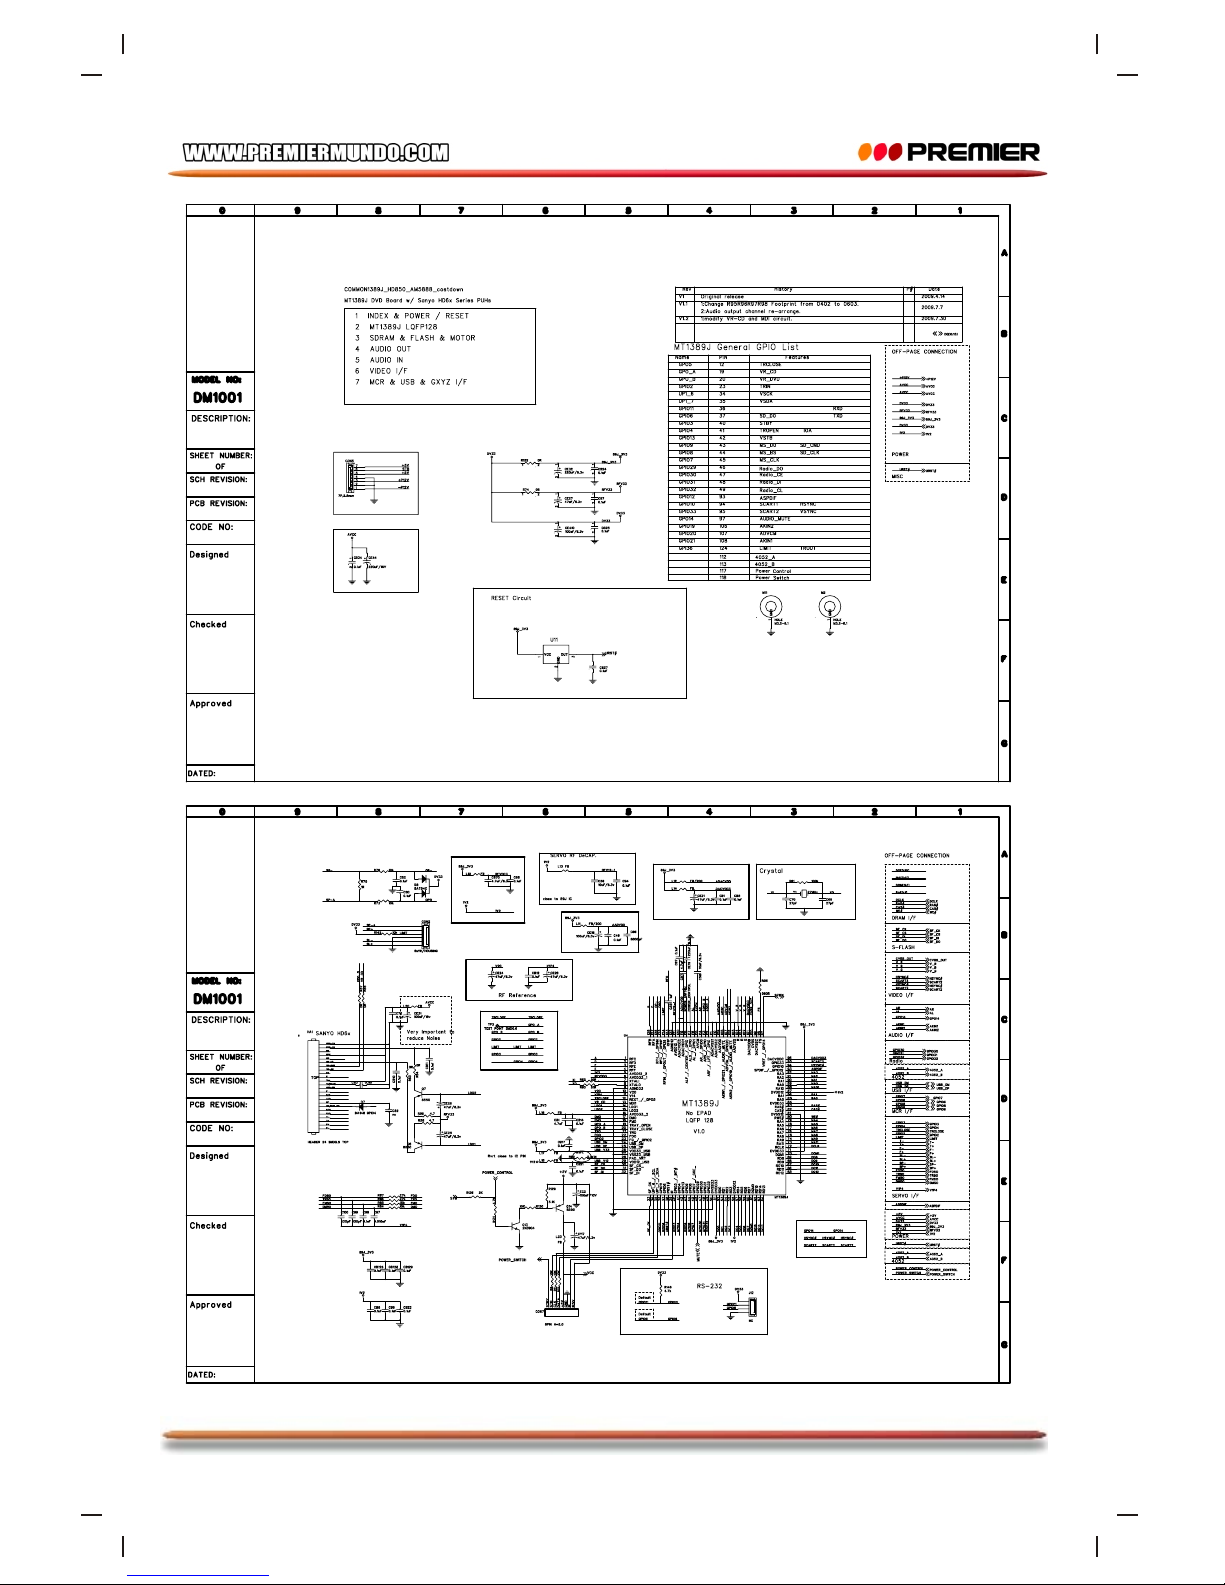
Page 23
Page 50
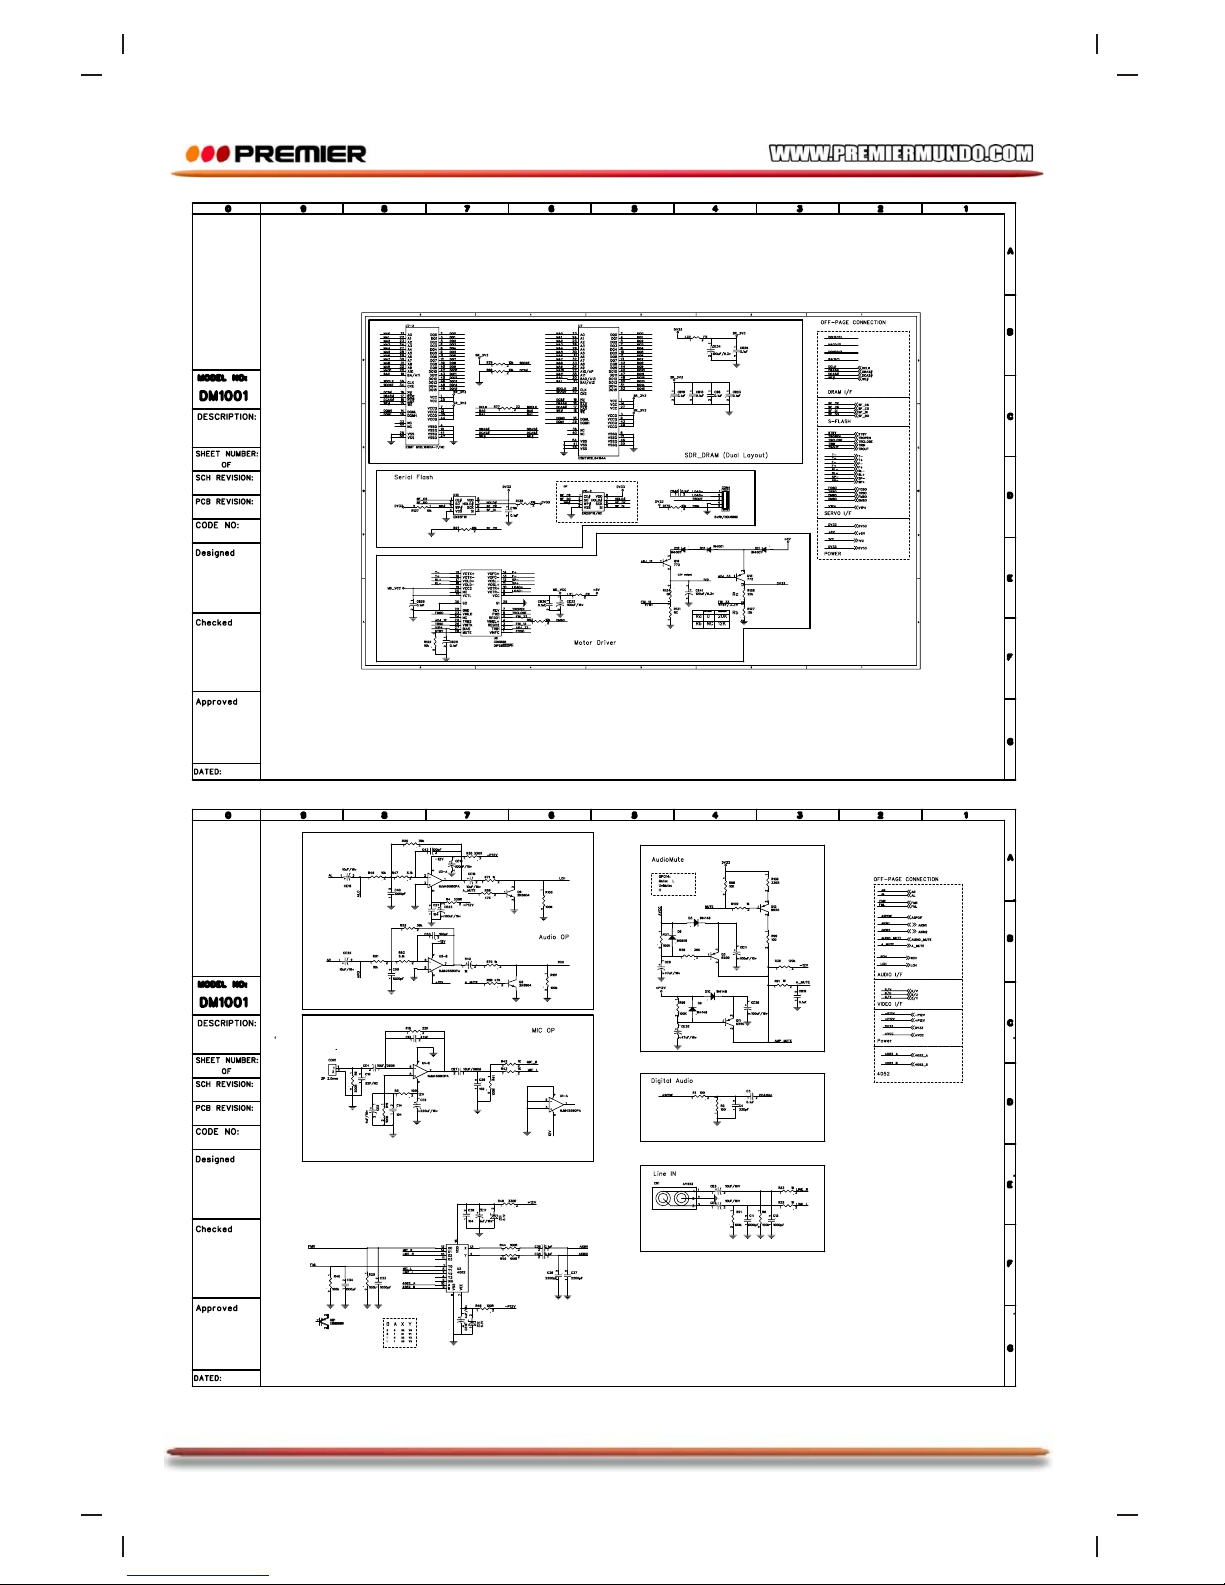
Page 24
Page 51
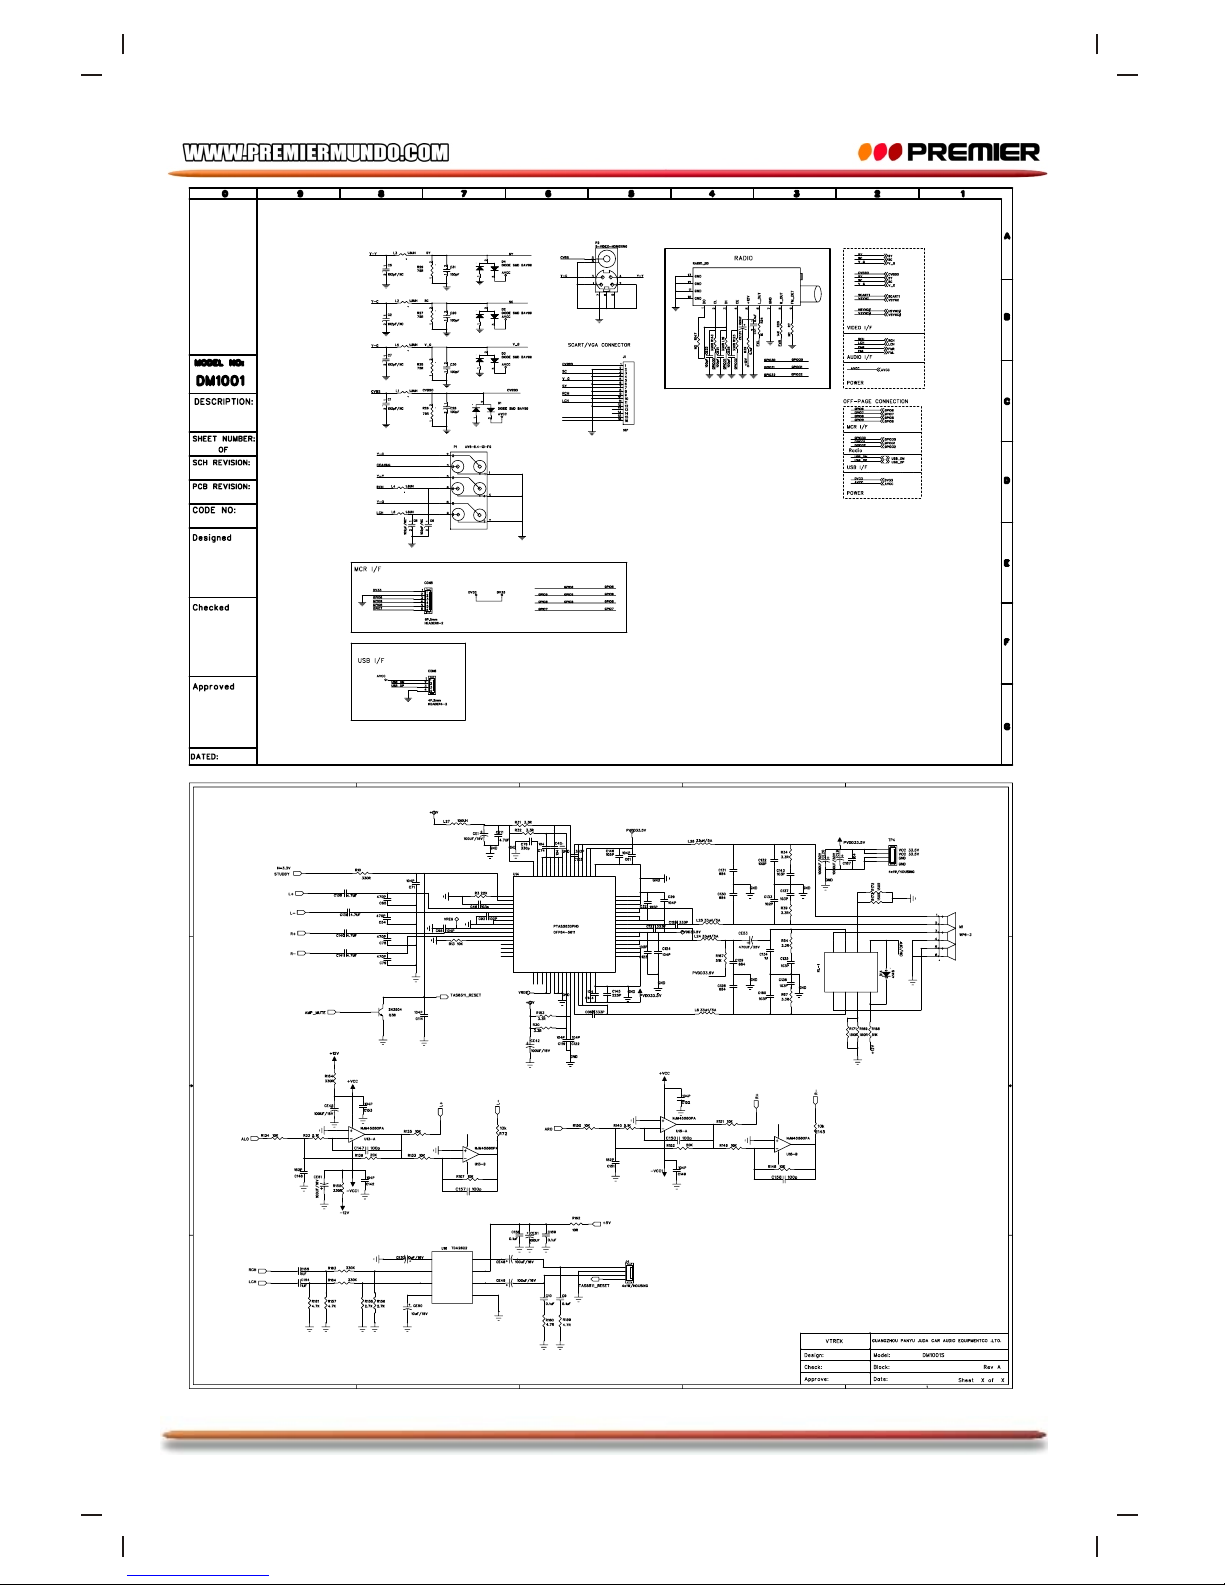
Page 25
 Loading...