

Page 1
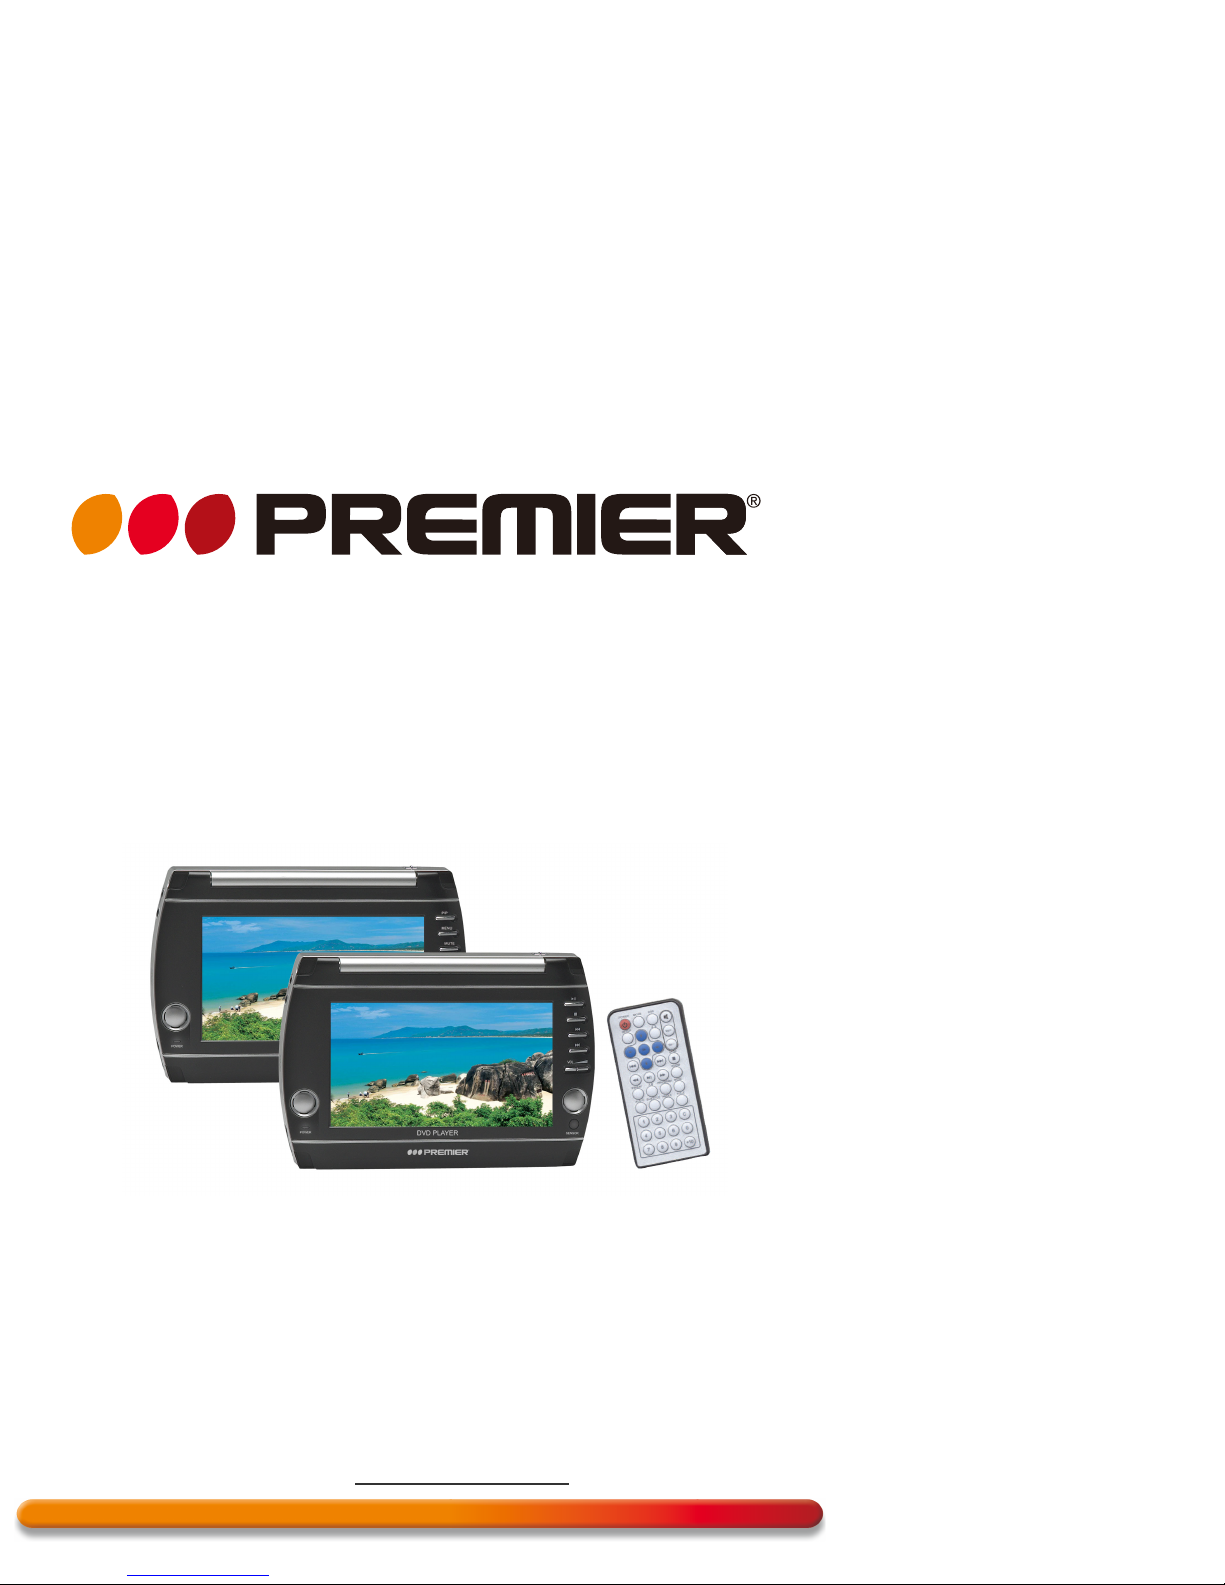
INSTRUCTION MANUAL
PORTABLE DVD PLAYER
SX-2735TFT
DEAR CUSTOMER
Congratulations for your purchase!
Please read this manual carefully, and keep it for future reference.
If you need extra support, please write to [email protected]
Page 2

1
Page 3

2
CONTENT
• PRECAUTIONS ................................................................................................. 4
• CAUTIONS ON USING THIS PLAYER ............................................................ 7
• PORTABLE DVD ACCESSORIES ................................................................... 9
• TECHNICAL DATA ........................................................................................... 9
• SPECIFICATION ............................................................................................... 10
Types of discs playable on this player
Portable dvd specifications
Monitor accessories and specifications
• PARTS NAME AND FUNCTION ...................................................................... 12
Part in the front of the player
Keypad in the player
Part in the front of the monitor
Keypad in the monitor
Part in the back of the player
Part in the right side of the player
Part in the left side of the player
Part in the top of the player.
Part in the back of the monitor.
Part in the left side of the monitor.
Remote control unit
• USING REMOTE CONTROL UNIT ................................................................... 20
Precautions before using remote control unit
Range
Install battery for remote control unit
• USING THE BATTERY ..................................................................................... 22
Precautions before using the battery
Battery storage.
Battery life
Using the battery
Installing and removing the battery
Recharging the battery by using ac-dc adapter.
Cautions when charging the battery
• CONNECTING THE PLAYER TO OTHER COMPONENTS ............................ 25
Connecting to ac-dc adapter
Connecting earphone
Connecting to usb storage
Connecting to memory card.
Page 4

3
CONTENT
Connecting to a tv set
Connecting to an amplifier.
Connecting to an active speaker system.
Connecting to an audio/video player
System if you want the unit as a monitor
Connect to a monitor
• BASIC OPERATIONS ....................................................................................... 32
Turning on/off the main unit.
Placing disc.
Playing discs
Removing discs
Mode settings (brightness/contrast/ Color/tft display mode/tft reverse Mode/
av out/in mode)
Stopping the playing
Pausing the disc
Scanning forward and backward
Repeat playing the disc
Zoom playing
Program playing
Using OSD
Selecting a sub-title
Selecting an audio
Selecting an angle
Playing audio files and jpeg disc
Playing the file storing in a usb storage
Playing the file storing in a memorycard.
• MAIN UNIT SETTINGS ..................................................................................... 40
Selecting a tv system
Setting screen saver
Selecting a tv scale
Setting parent lock
Setting parent lock level
Default setting
Selecting
a osd language
Selecting an audio language
Selecting a subtitle language
Select a menu language
• TROUBLE SHOOTING ..................................................................................... 46
• IMPORTANT USER INFORMATION ................................................................ 47
• IMPORTANT SAFETY INFORMATION ........................................................... 48
Page 5
4
PRECAUTIONS
Thank you for purchasing Portable DVD player. Please read this manual carefully
before operating and reserve it for future reference. It will be helpful to you if you
encounter any operational problem.
Warning
To reduce the risk of fire or electric shock, do not expose this appliance to rain
or moisture, dripping or splashing and that no objects filled with liquids, such
as vases, shall be placed on the apparatus. Dangerous high voltages are present
inside the enclosure. Do not open the cabinet. Refer servicing to qualified
personnel only.
Attention
To prevent
electric shock, match wide blade of plug to wide slot, fully insert.
LASER:
This Digital Video Disc player employs a Laser System.To ensure proper use of this
product, please read this owner s manual carefully and retain for future reference.
Should the unit require maintenance, contact an authorized service location -see
service procedure.
Use of controls, adjustments or the performance of procedures other than
those
specified may result in hazardous radiation exposure.
To prevent direct exposure to laser beam, do not try to open the enclosure.
Visible and invisible laser radiation when open and interlocks defeated.
Do not stare into beam.
LASER
Type
Semiconductor laser GaAIAs
Wave length 650 nm/780 nm
Output Power 5
mW
Beam divergente 60 degree
CLASS 1
LASER
PRODUCT
Page 6
5
PRECAUTIONS
WARNING
TO REDUCE THE RISK OF FIRE OR ELECTRIC SHOCK, DO NOT EXPOSE THIS
APPLIANCE TO RAIN OR MOISTURE.
CAUTION
Use of controls or adjustments or performance of proceduresthose specified
may result in hazardous radiation exposure.
CAUTION
RISK OF ELECTRIC SHOCK. DO NOT OPEN
TO REDUCE THE RISK OF ELECTRIC SHOCK, DO NOT REMOVE COVER (OR
BACK). NO USER SERVICEABLE PARTS INSIDE. REFER SERVICING TO
QUALIFIED SERVICE PERSONNEL.
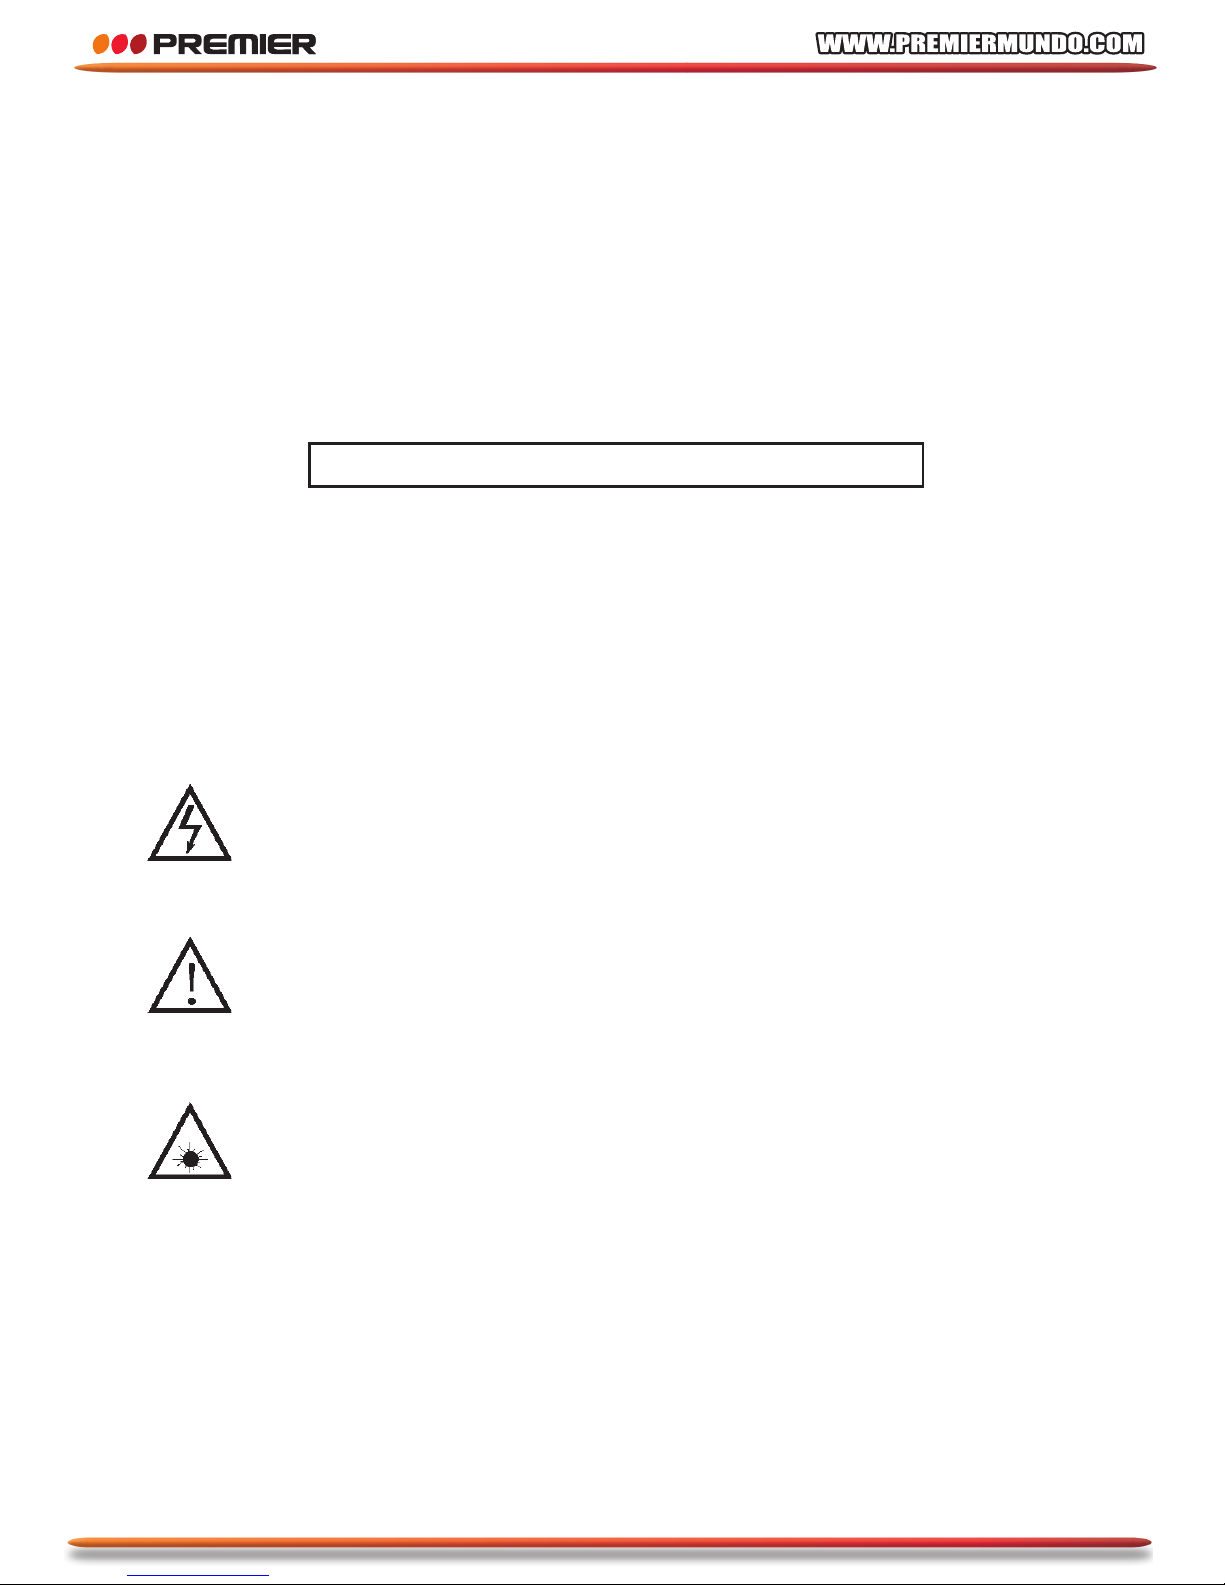
The lightning flash with arrowhea d symbol, with in an
equilateraltriangle, is intended to alert user to the presence of
uninsulated”dangerous voltage” within the product enclosure that
may beof sufficient magnitude to constitute a risk of electric shock
to persons.
The exclamation point within an equilateral triangle is intended to
alert the user to the presence of imporant operating andmaintenance
(servicing) instruction in the literature accompanying the appliance
CAUTION
INVISIBLE LASER RADIATION WHEN OPEN AND INTERLOCK
FAILED OR DEFEATED. AVOID DIRECT EXPOSURE TO LASER
BEAM.
Page 7
6
PRECAUTIONS
MACROVISION
This product incorporates copyright protection technology that is protected by U.S.
patents and other intellectual property rights. Use of this copyright protection
technology must be authorized by Macrovision, and is intended for home and other
limited viewing uses only unless otherwise authorized by Macrovision. Reverse
engineering or disassembly is prohibited.
FCC NOTICE
This device complies with part 15 of the FCC Rules. Operation is subject of the
following two conditions: (1) this device may not cause harmful interference, and (2)
this device must accept any interference received, including interference that may
cause undesired operation.
Page 8

7
CAUTIONS ON USING THIS PLAYER
Do not move the player during playback
During playback, the disc spins at high speed, so do not lift or move the player.
Doing so may damage the disc.
Transporting the player
When transporting the player be sure to remove the disc and turn off the power, then
unplug the power cord .
Place of installation
Select a stable place near the TV or stereo system to which you are going to connect
the player. Do not place the player on top of a TV or color monitor. Install the player
away from cassette decks or other devices which are easily affected by magnetic
forces.
Do not place objects on top of the player
Do not place any objects on top of the player.
Turn off the power when not using the player
If the player is connected to your TV but not in use then switch the power off this will
prevent interference with your normal TV picture. Noise problems may also be
experienced if used near a radio.
Special note regarding use of player in vehicles:
• Unit must not be used when the vehicle is moving at all.
• Most countries and states have laws which prohibit or severely restrict the use of
the player in vehicles while driving.
• Do not leave the player or the battery pack in places where the temperature is
extremely low (about-10! or lower) or extremely high (about 60! or higher), such as
inside the passenger cabin or trunk in midsummer. Doing so may warp the
outer
case or reduce the performance or quality of the battery pack.
When carrying on planes
Heed the airline company’s rules.
When carrying in hospitals
Heed the hospital’s rules.
Page 9

8
CAUTIONS ON USING THIS PLAYER
When using with car power cable in cars
Please turn on the engine and then connect with the car power cable for using.
Cleaning the player
Normally clean the player using a soft, dry cloth. For tough dirt, apply some neutral
detergent diluted in 5 to 6 parts water to a soft cloth, wring out thoroughly, wipe off
the dirt, then wipe the player with a dry cloth. Note that alcohol, thinner, benzene,
insecticides, etc., may cause the print or coating to peel off. Also avoid leaving
rubber or plastic products in contact with the player for long periods of time, as this
may damage the cabinet. When using chemically treated cloths, read the cloth’s
instructions carefully. Always unplug the
power cord from the power
outlet before cleaning the player.
To clean dirt off the liquid crystal display, wipe the display gently with a soft, dry
cloth (such as an eyeglass cleaning cloth). Note that leaving water droplets on the
display for long periods of time may result in discoloration or stains. For tough dirt,
use a commercially available liquid crystal display cleaner.
Copyrights
Unauthorized duplication, broadcast, public performance or rental of discs is prohibited
by law.
Page 10
•• •• •• •• •• •• •• •• •••
•
•• •• ••
•
•• •• •• •• ••
•
• •• ••
•• •••••
••
•
O•
K
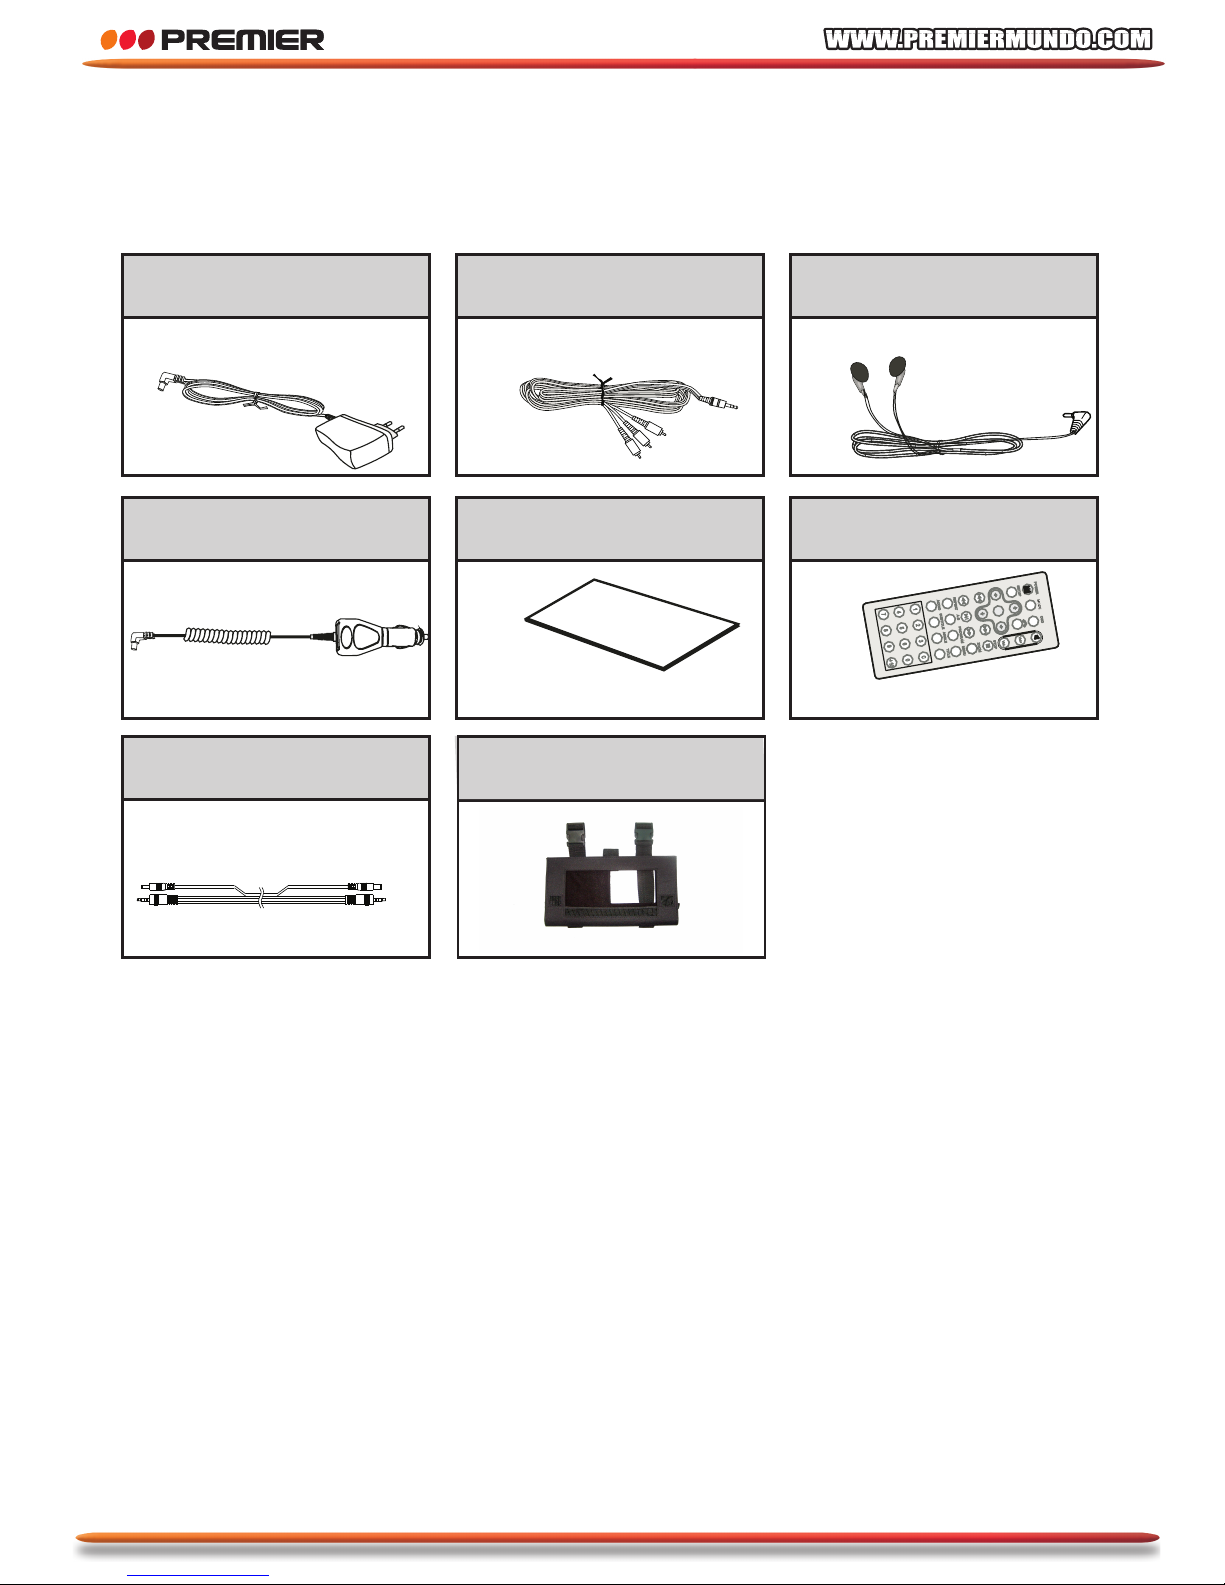
PORTABLE DVD ACCESSORIES
After unpacking, check that all the accessories listed below are included
AC/DC ADAPTER
AV CABLE EAR PHONE
CAR POWER CABLE
(OPTIONAL)
CARD-TYPE REMOTE
CONTROL UNIT
AC&DC CABLE
(OPTIONAL
HEADREST BAG
)
OPERATING
INSTRUCTIONS
TECHNICAL DATA
- 7’ tft 16:9 lcd screen and dvd-player
- Usb and sd/mmc multi-media cardreader
- Pal / ntsc compatible
- Plays dvd, mpeg4, dvd-r/+r, dvd-rw/+rw, cd, cd-r, mp3, vcd/svcd, jpeg
- Audio-video in-out / 12 volt dc in-out / earphones out
- Headrest supports
- 2 sets of earphones
- Full function remote control
- 12v car cord adaptor
- AC100-AC240V AC/DC adaptor
- DC 6 x “AA” size rechargeable batteries (batteries included)
9
Page 11
10
PORTABLE DVD SPECIFICATIONS
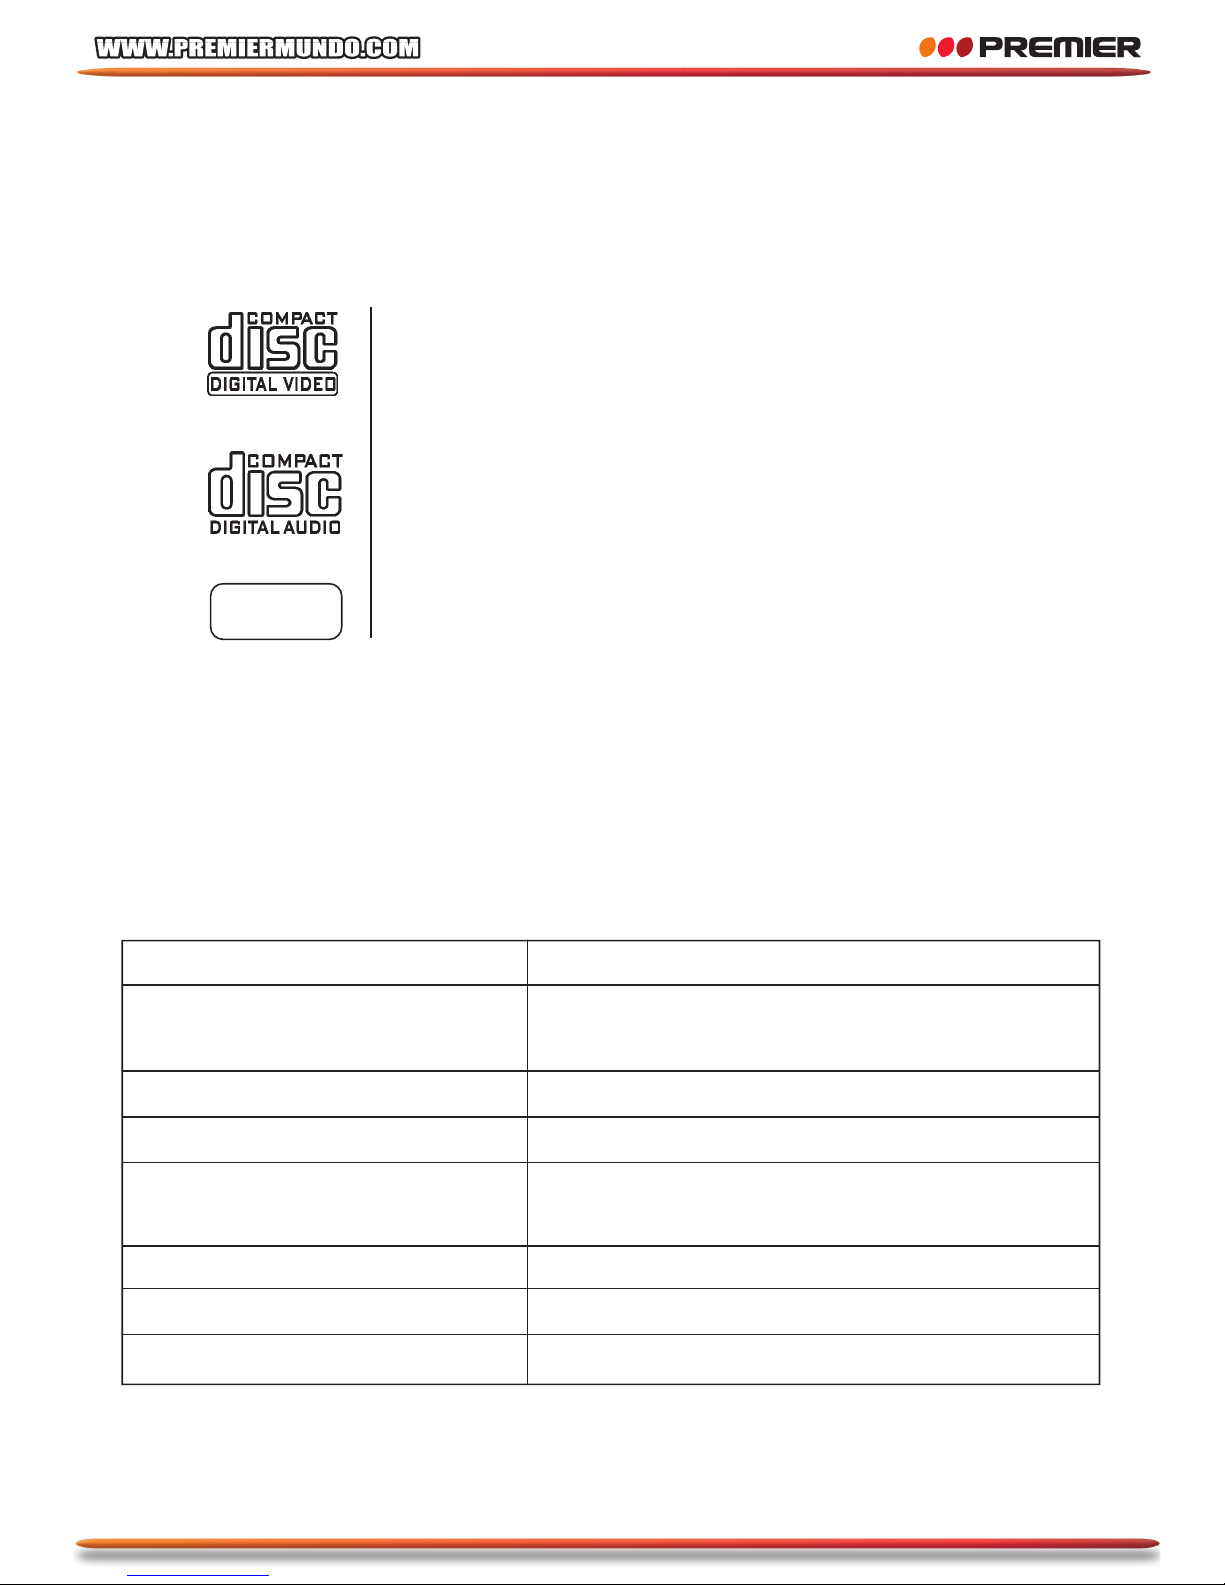
The discs listed on the below can be played on this player without any adapter.
Video CDs 8 cm / 12 cm
Audio CDs 8 cm / 12 cm
CDs JPG 8 cm / 12 cm
Noted: Don’t using the disc that is scratched seriously
Specifications
Disc type DVD Video / VideoCD CD-DA / JPEG
Audio output LINE OUT (20Hz-20kHz)
Earphone output
Video output Video output: 1.0Vpp / 75ohm
LCD panel 7” color TFT
Power AC-DC adapter 12V/1.2A
battery Rechargeable AA 1.2V
Unit size 220 mm X 150 mm X 34.5 mm
Weight 665 g
Working temperature 5°C~45°C
J P G
Page 12
11
•
• •
•
• •• •• •• • • •• •• ••
• • • • •
• • • •
•••• • ••
• •• •• •
• • • •• •• •• •
• •
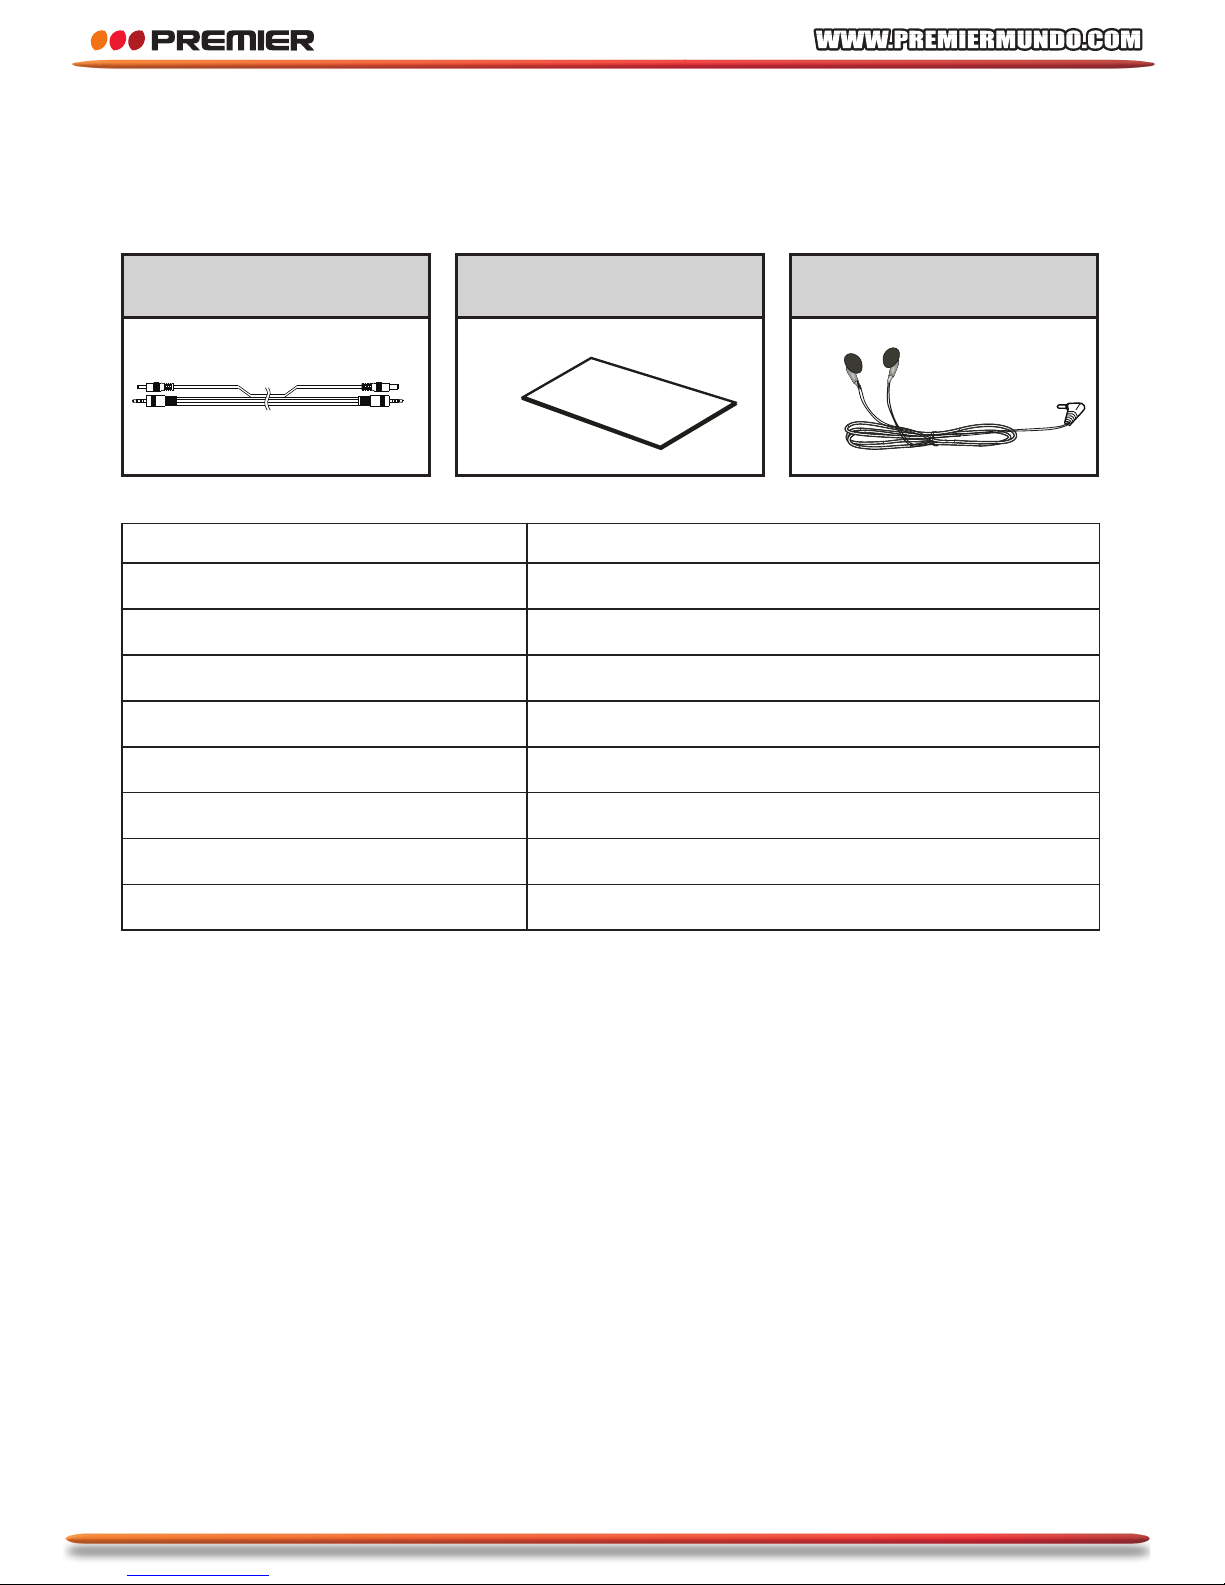
MONITOR ACCESSORIES AND SPECIFICATIONS
After unpacking, check that all the accessories listed below are included.
AC&DC Cable
(optional)
Operating instructions
(this manual)
Ear phone
Specifications
Audio input 1Vrms – 2Vrms
Video input 1.0 Vpp / 75 ohm
Power CC 12V / 0.6°
Earphone output 20 Hz - 20 kHz
LCD panel TFT colori 7"
Unit size 220 mm X 150 mm X 34.5 mm
Weight 470 g
Working temperature 5°C ~ 45°C
Page 13
12
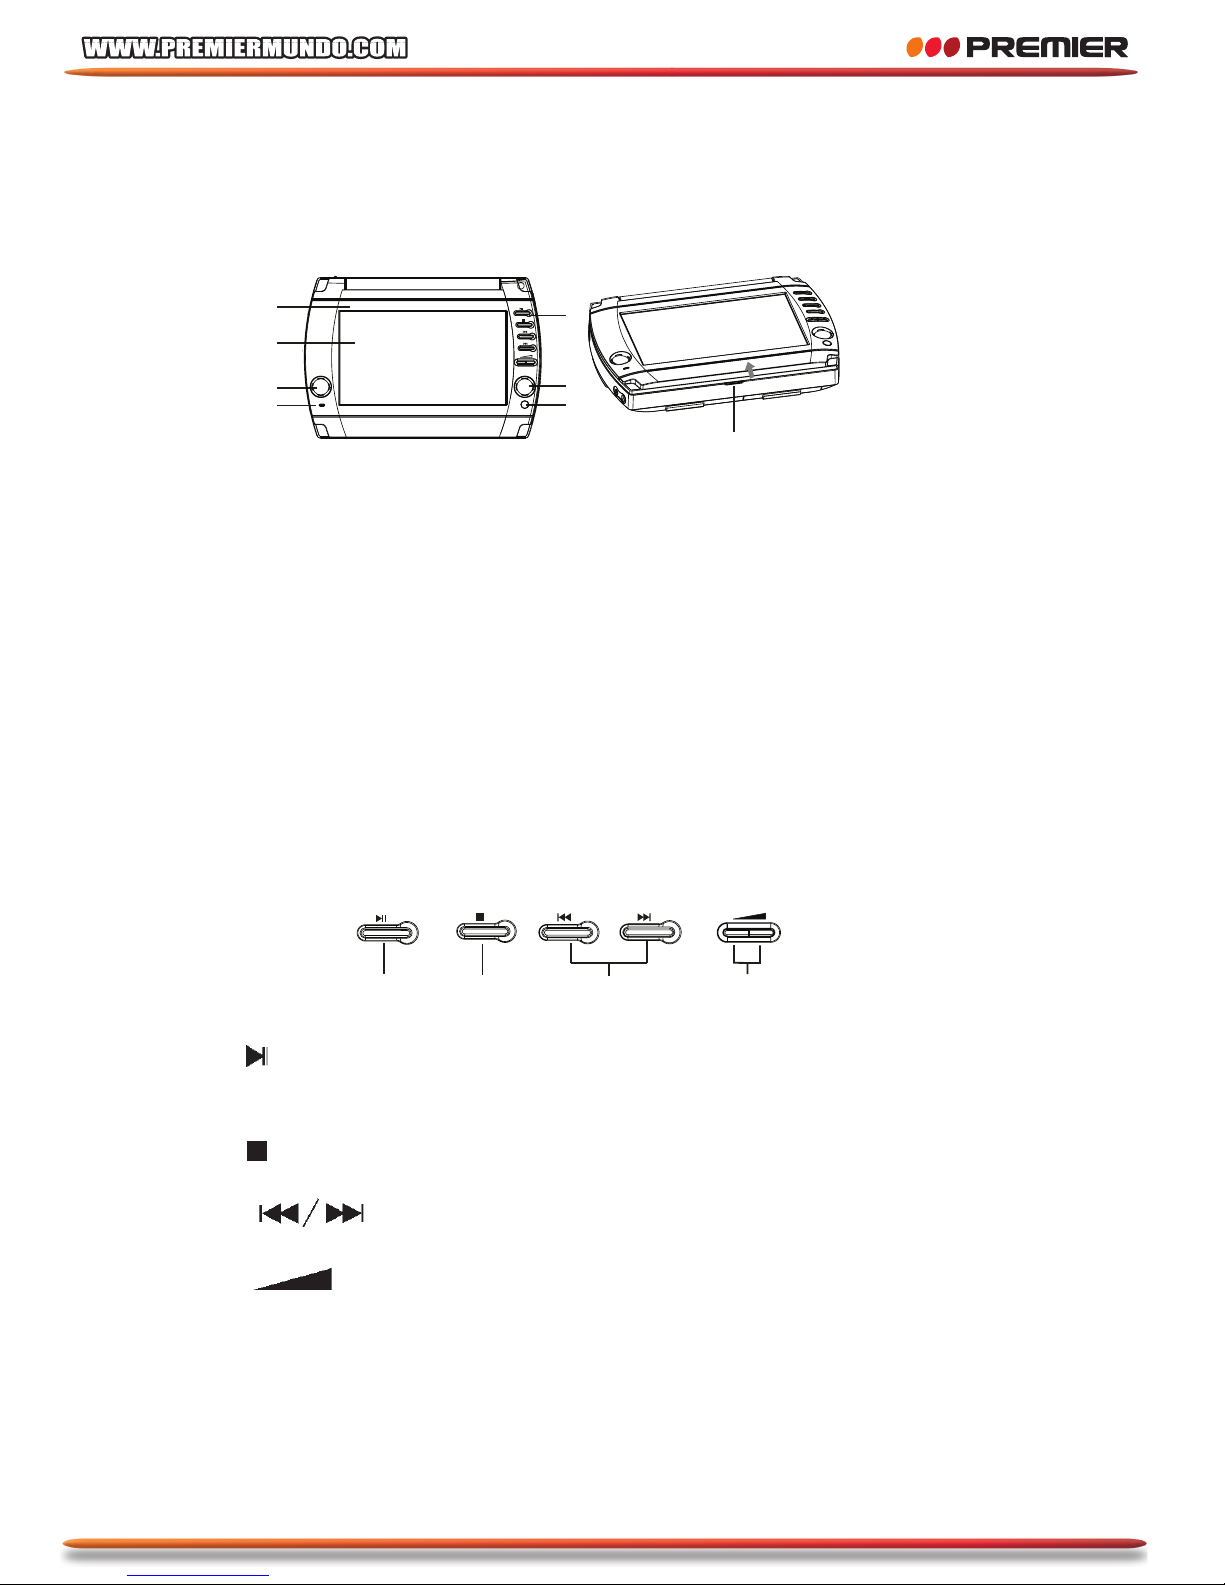
PORTABLE DVD PARTS NAME AND FUNCTION
Part in the front of the player
1. TFTcover
2. LCD display
3. Speakers
4. Control keypad
5. IRreceiver window
6. Power LED indicator
• LEDlight: Power switch is on
• LEDoff: Power switch is off
7. Open TFT cover
Pull the part according to the direction then open the TFT cover.
Keypad in the main unit
1. Button
• Press this to play disc. When press this in the play mode, pause mode is set.
Press again to resume playback.
2. Button
• Press this to stop play mode
3. Buttons
• Using these buttons to scan backward or forward through the tracks or chapters.
4. Button
• Press these buttons to increase/decrease the volume when the main unit is in
play mode.
1
2
3
4
5
3
6
7
1
2
3
4
Page 14
13
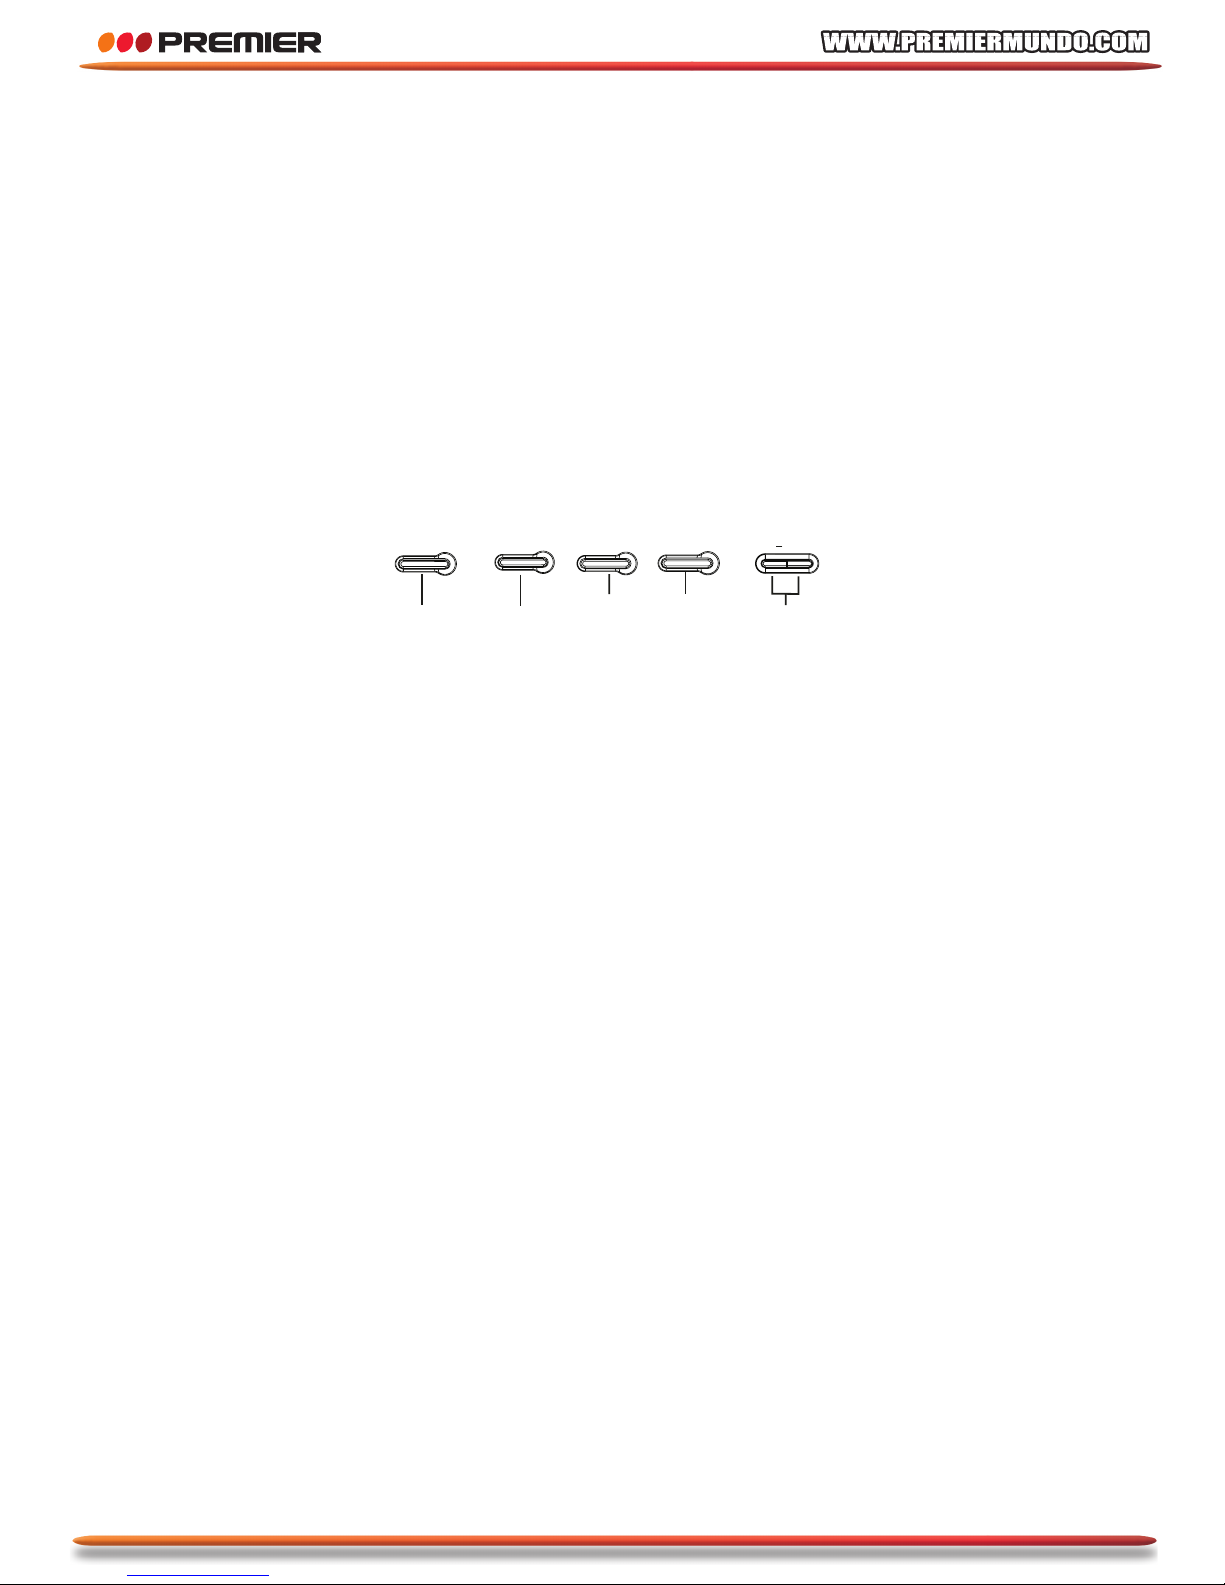
MONITOR PARTS NAME AND FUNCTION
Part in the front of the monitor
1. LCD display
2. Speakers
3. Control keypad
4. Power LED indicator
• LED light: Power switch is on
• LED off: Power switch is off
Keypad in the monitor
1. P/P Button
• Press the button to set BRIGHT or PASTEL or VIVID or STANDARD or
NORMAL.
2. MENU Button
• Press the button to select Brightness, Contrast,color,then use M-/M+ buttons
to adjust.
3. MUTE Button
• Press the button to mute the audio output.
4. MODEButton
• Press the button to select screen NORMAL L TO R or NORMAL R TO L or
REVERSE L TO R or REVERSE R TO L,then use M-/M+ buttons to adjust
5. V- /V+ Buttons
• Press these buttons to increase/decrease the volume when the monitor
is in play mode.
• Press these buttons to adjust Brightness,Contrast,Color.
• Press these buttons to adjust screen mode.
1
2
3
5
4
P /P
M ENU
MUTE
MODE
V
/ V +
Page 15
14
UK
1
1
2
PORTABLE DVD PARTS NAME AND FUNCTION
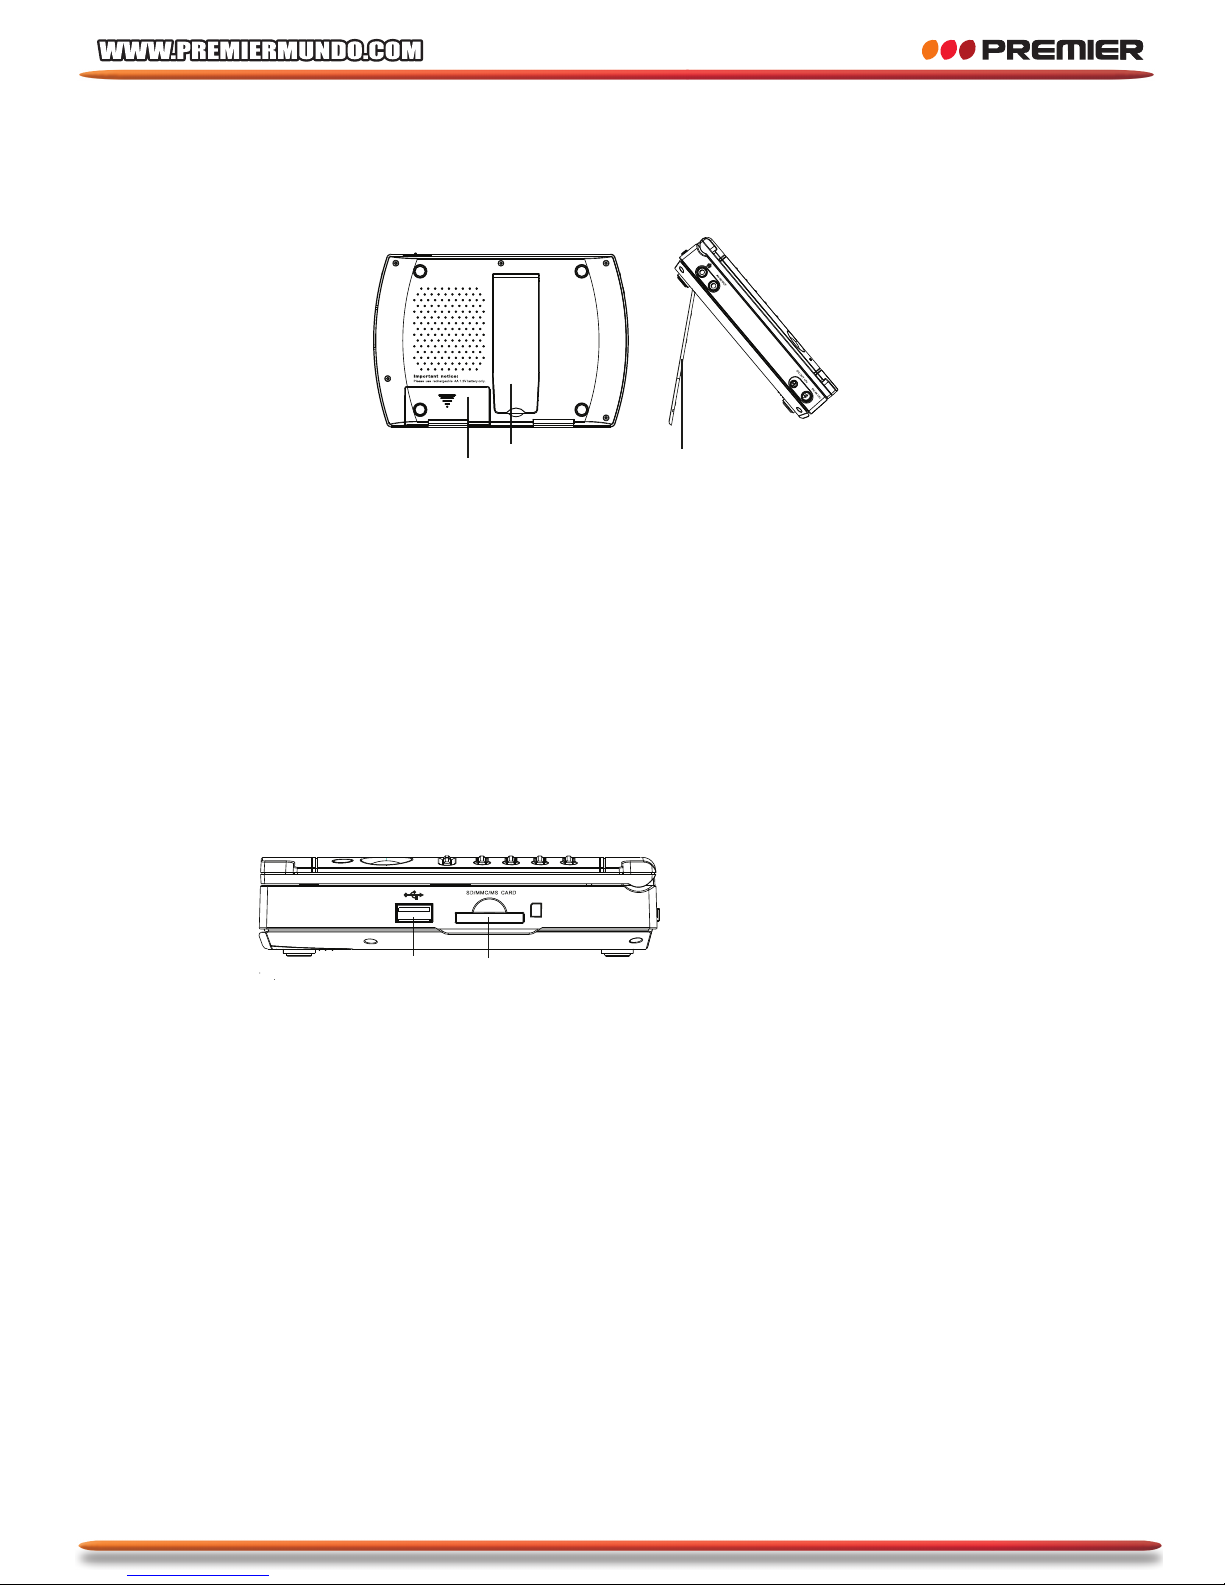
Part in the back of the player
1. Support
Pull out the support to the proper position in order to let the unit stand.
2. Battery cover
Open the battery cover and place six rechargeable LR-06 NiMH 1.2V/1800mAH
batteries into it.
Part in the right side of the player
1. Memory card socket (optional)
Suit for SD/MMC/MS card reader
2. USB(1.1)socket (optional) connecting USB storage
2
1
Page 16
15
PORTABLE DVD PARTS NAME AND FUNCTION
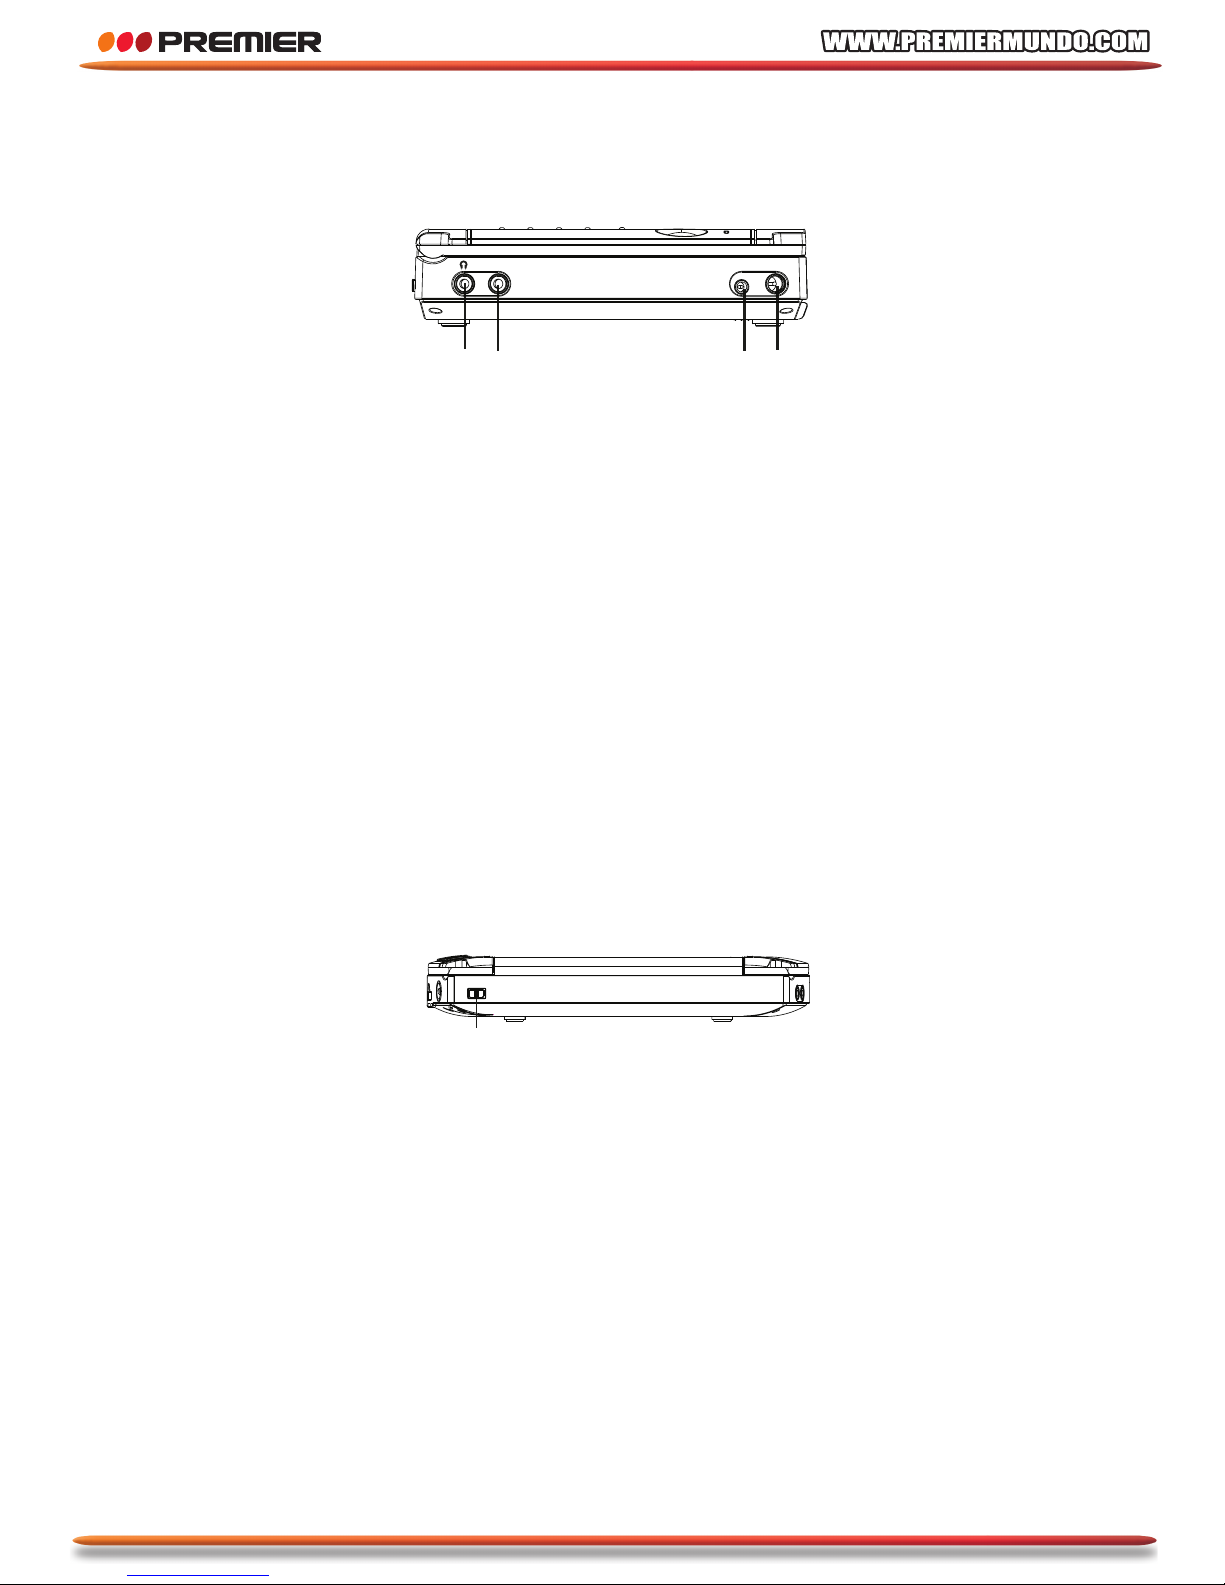
Part in the left side of the player
1. Earphone jack,
Connecting to earphone.
2. Audio/Video input or output,
input/output audio/video signal.
3. 12V DC output
Connecting to the monitor.
4. 12V DC input
Connecting to the AC-DC adapter or car
adapter.
Part in the top of the player
1. Power switch
Turn ON/OFF the unit.
•O •N •/ •O •F •F
1
1
2
3
4
•A•V• •I •N•/ •O•U •T
•D•C• •O •U•T• •1 •2•V
•D•C• •I •N• •1•2 •V
Page 17
16
PORTABLE DVD PARTS NAME AND FUNCTION
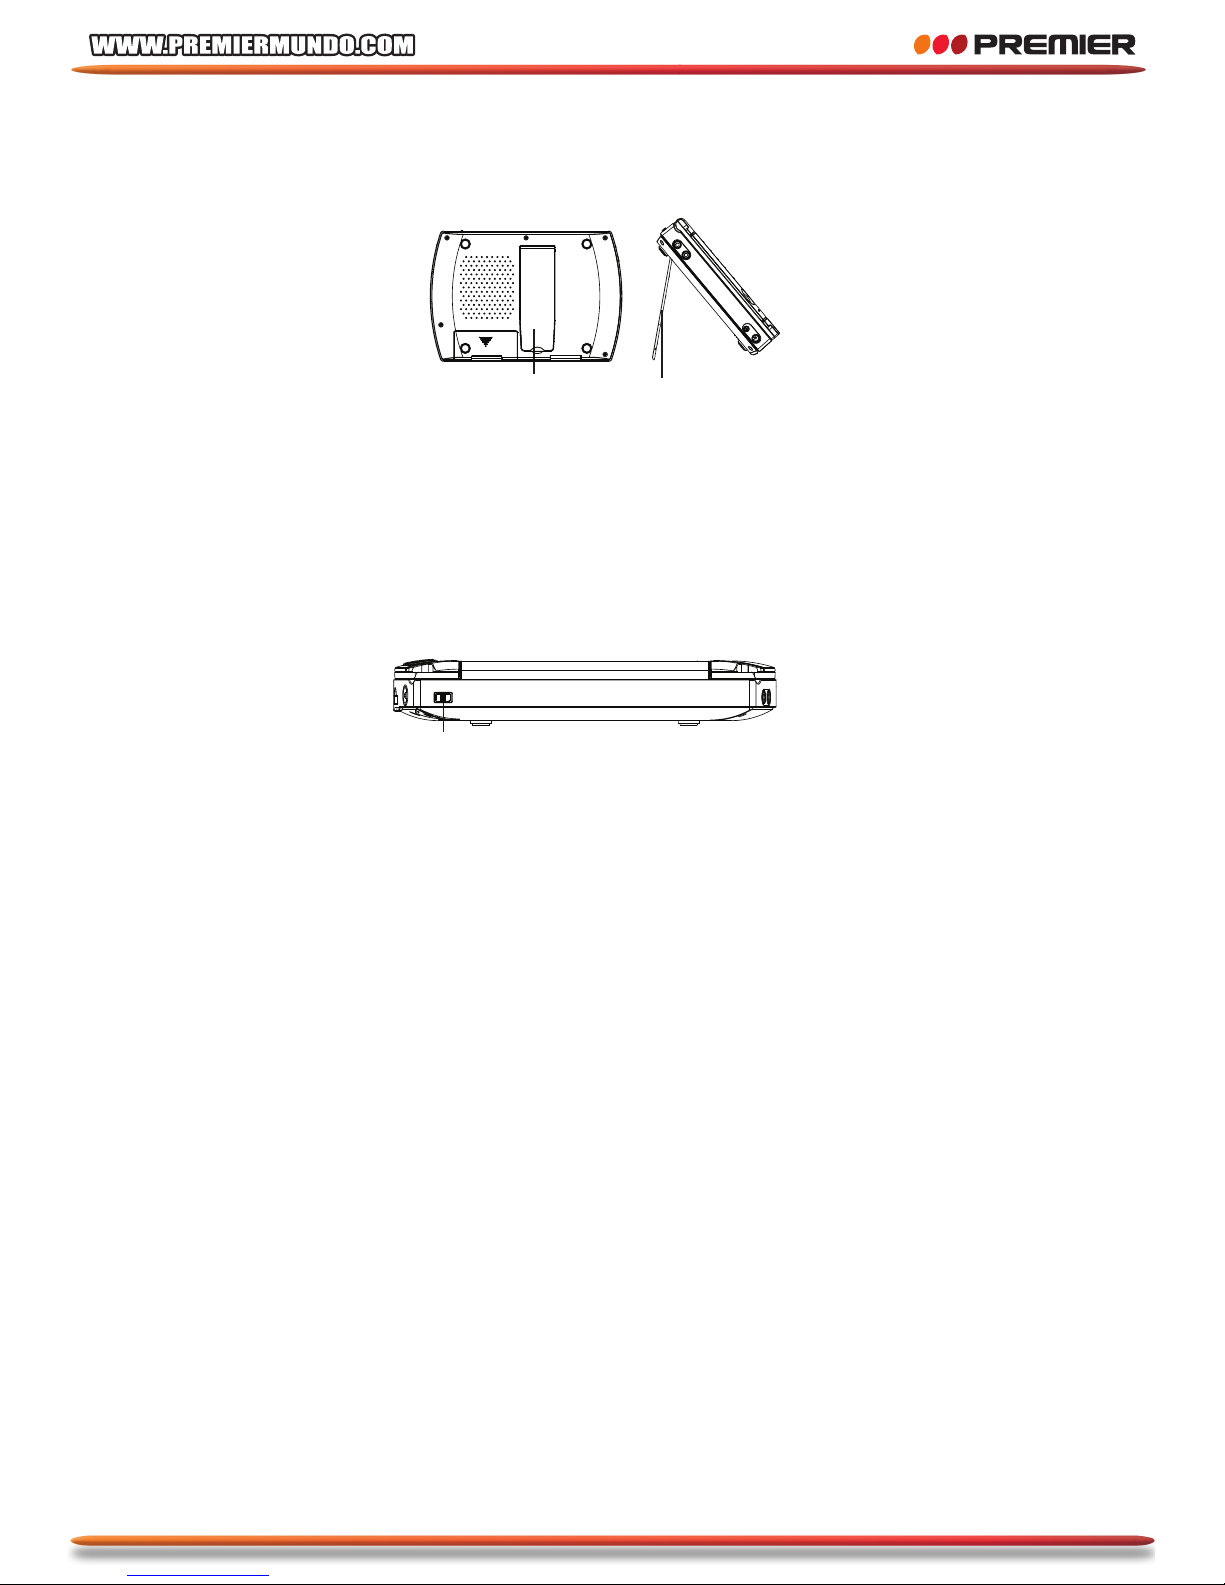
Part in the back of the monitor
1. Support
Pull out the support to the proper position in order to let the unit stand.
Part in the top of the monitor
1. Power switch
Turn ON/OFF the unit
• Push power switch to ON to turn on the monitor when the unit is power,
power indicator led light.
• Push power switch to OFF to turn off the monitor,power indicator led off.
1
1
•O•N•/•O•F•F
1
Page 18
17
PORTABLE DVD PARTS NAME AND FUNCTION
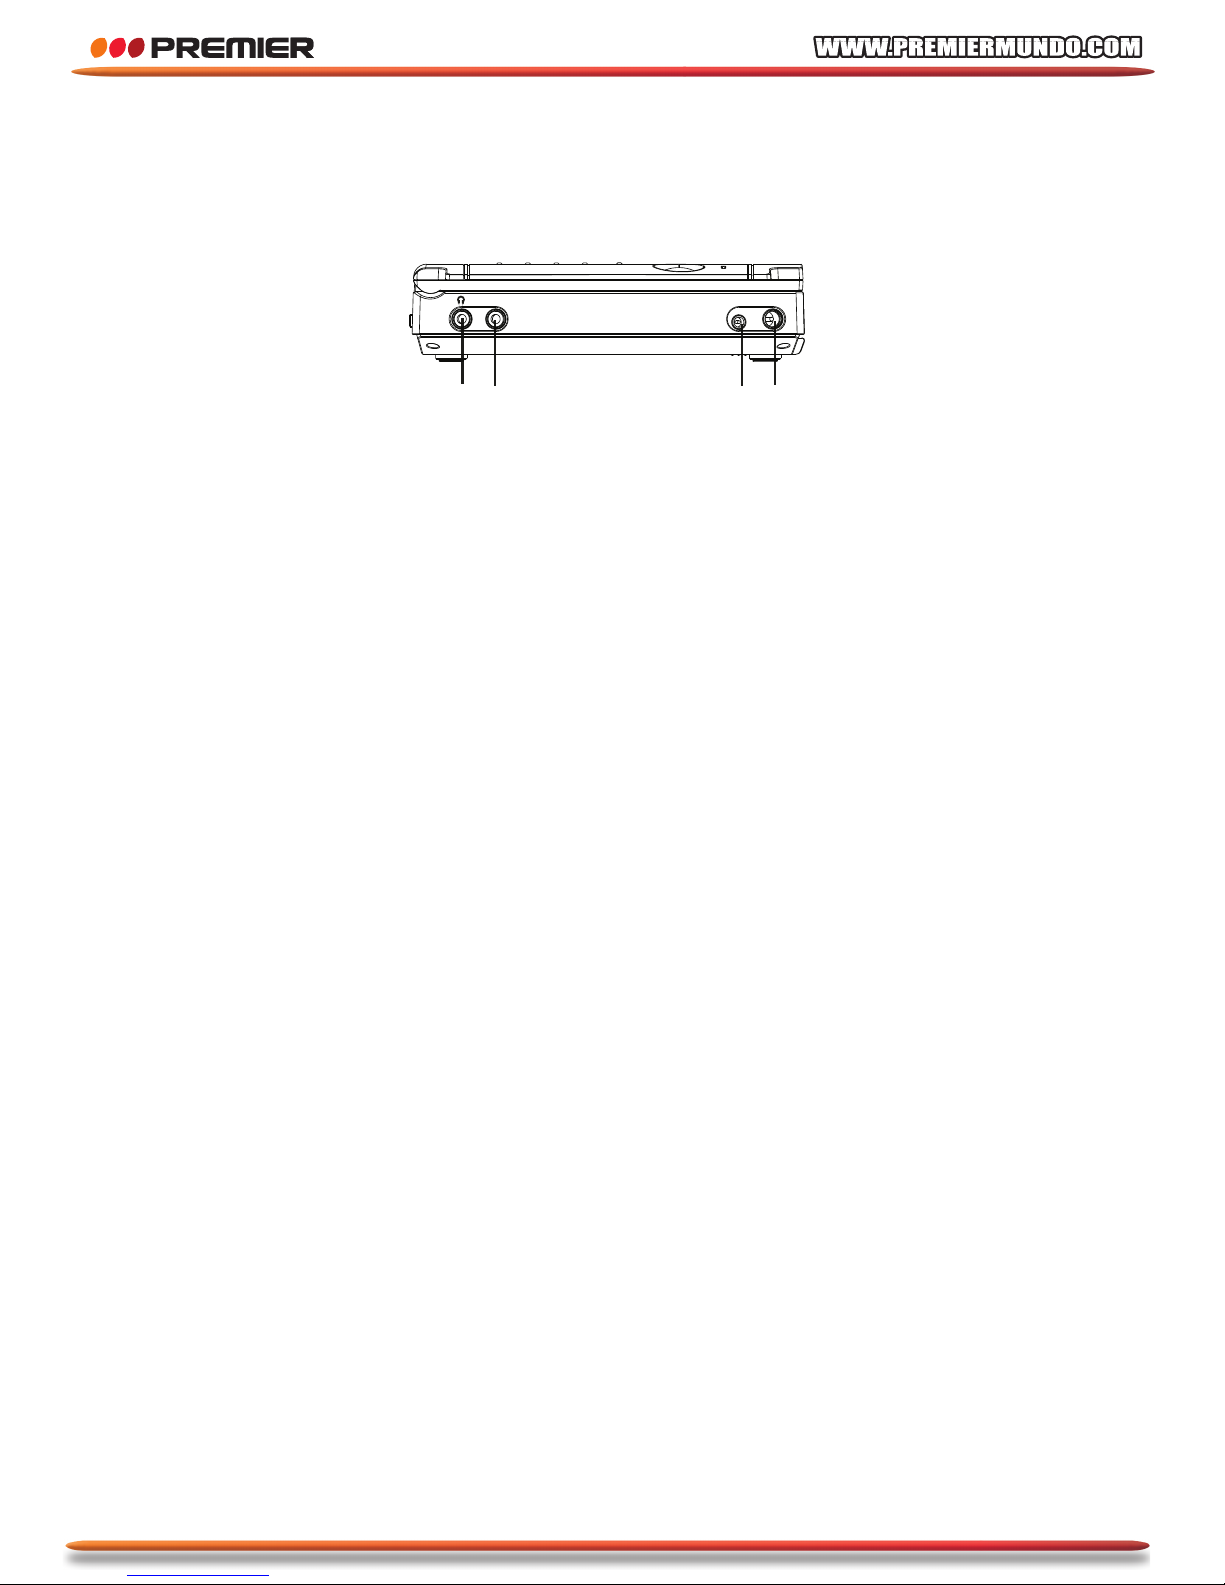
Part in the left side of the monitor
1. Earphone jack connecting to earphone.
2. Audio/Videoinput
Input audio/video signal.
3. 12V DC output.
4. 12V DC input.
Connecting to the DVD Player.
1
2
3
4
•A•V• •I•N
•D•C• •O•U•T• •1•2•V
•D•C• •I•N• •1•2•V
Page 19
18
PORTABLE DVD PARTS NAME AND FUNCTION
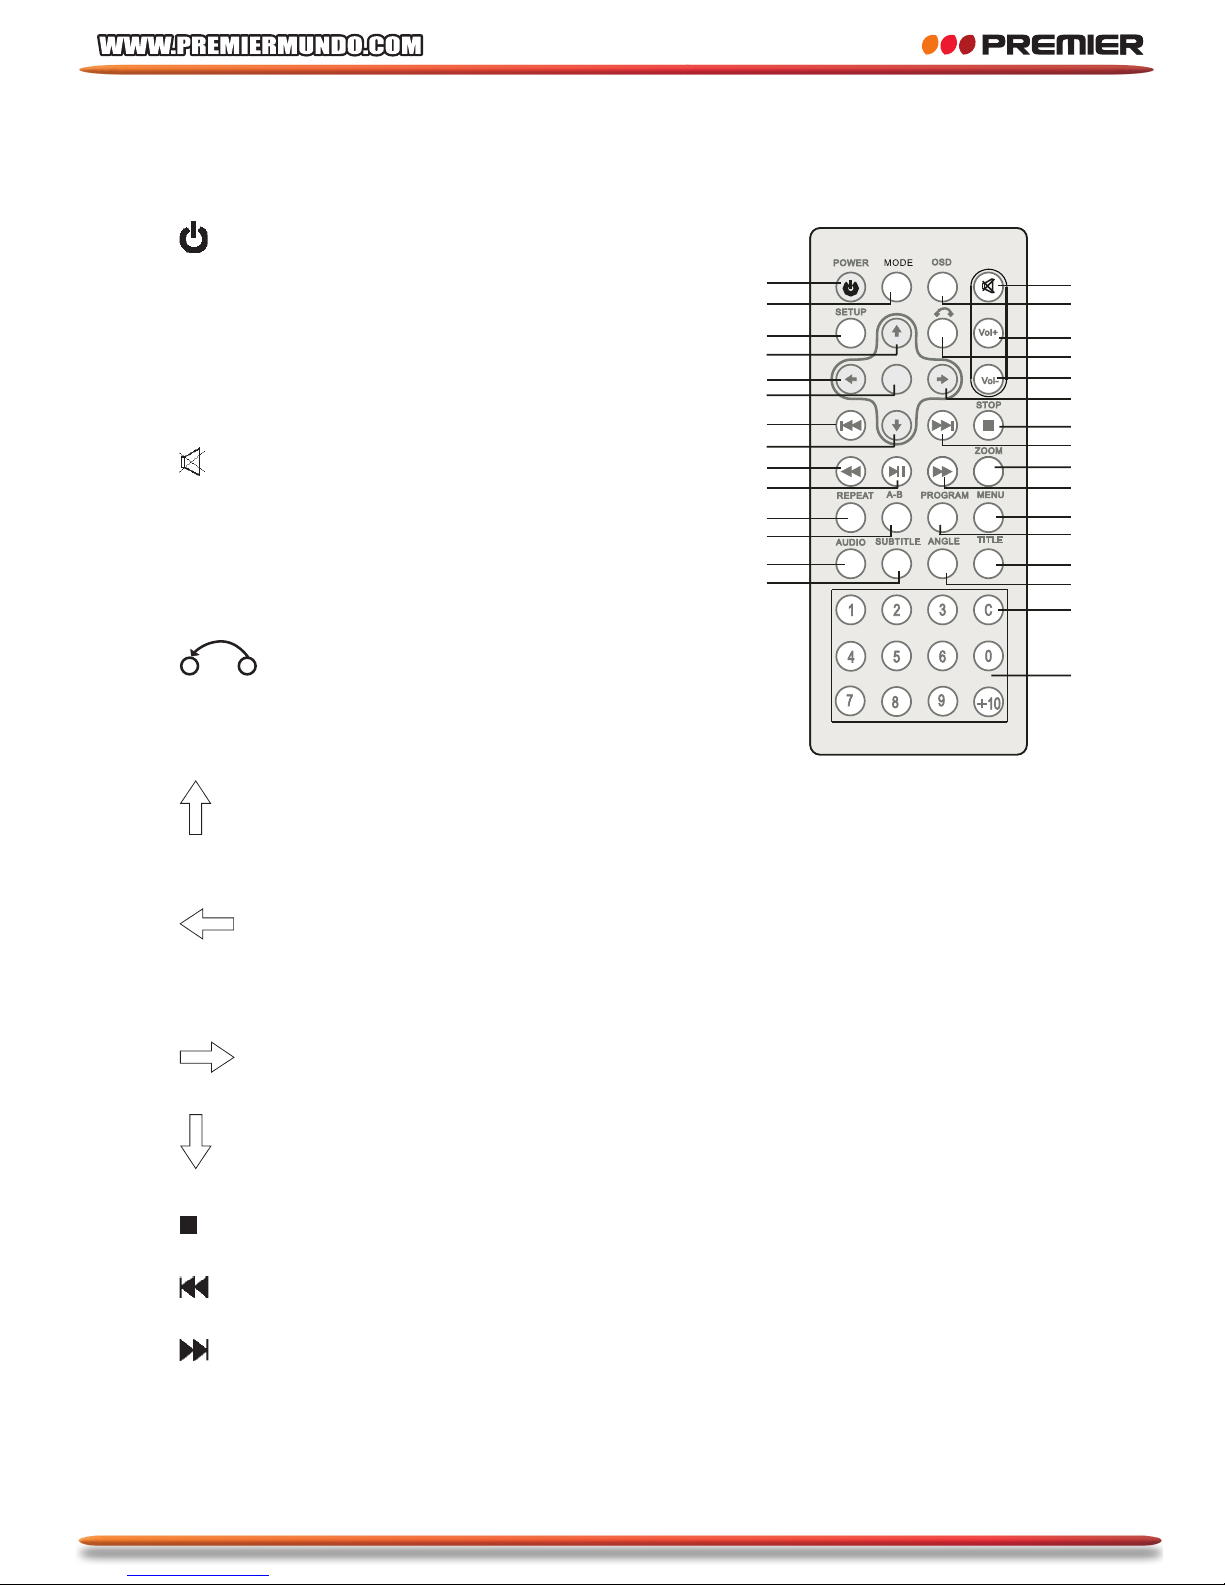
Remote control
1.
Power on/off the unit
2. MODE
Press this to switch LCD mode
3. OSD
Press this buttons to displaythe disc and
playing information in the LCD
4.
Switch off the speakers or earphone
5. VOL+
Increasing the volume
6. VOL-
Decreasing the volume
7.
Return to menu.
8. SETUP
Set up menu when the unit in play mode
9.
Moving cursor Up
10.
Moving cursor let
11. OK
this to confirm settings
12.
Moving cursor Right
13.
Moving cursor down
14.
Stop playing disc
15.
Skip previous track/chapter
16.
Skip next track/chapter
17. ZOOM
Zooming the picture
•O•K
1
2
3
4
5
6
7
8
11
12
9
10
15
16
13
14
19
20
17
18
23
24
21
22
26
25
27
28
29
30
Page 20
19
PORTABLE DVD PARTS NAME AND FUNCTION
18.
Press this to fast backward play when the unit in play mode
19.
Press this to fast forward play when the unit in play mode
20.
Press this to play or pause Displaying DVD title
21. REPEAT
DVD: repeat play the title, chapter
VCD,CD: repeat the track or whole disc
22. A - B
Press this to set A point, press again to set B point, then the
unit playing from A to B repeated.
Press 3’ rd to cancel the A-B play
23. AUDIO
DVD: selecting audio language
VCD or CD: Selecting the audio channel
24. SUBTITLE
Selecting sub-title
25. MENU
Menu play
26. PROGRAM
Programming the play sequence
27. TITLE
Display DVD title
28. ANGLE
Press this to select the DVD angle
29. C
Clearing the digit that is just input
30. DIGIT INPUT
Page 21
20
USING REMOTE CONTROL UNIT
Precautions before using remote control unit
• Please pull out the PVC when the remote control unit is first using
• Don’t drop or step on the remote control unit or subject it to shocks
• Note that it may not be possible to operate the main unit if there are obstacles
between it and the remote sensor.
• Don’t expose the remote sensor to strong light.
• Using the remote control unit within the specified operating range.
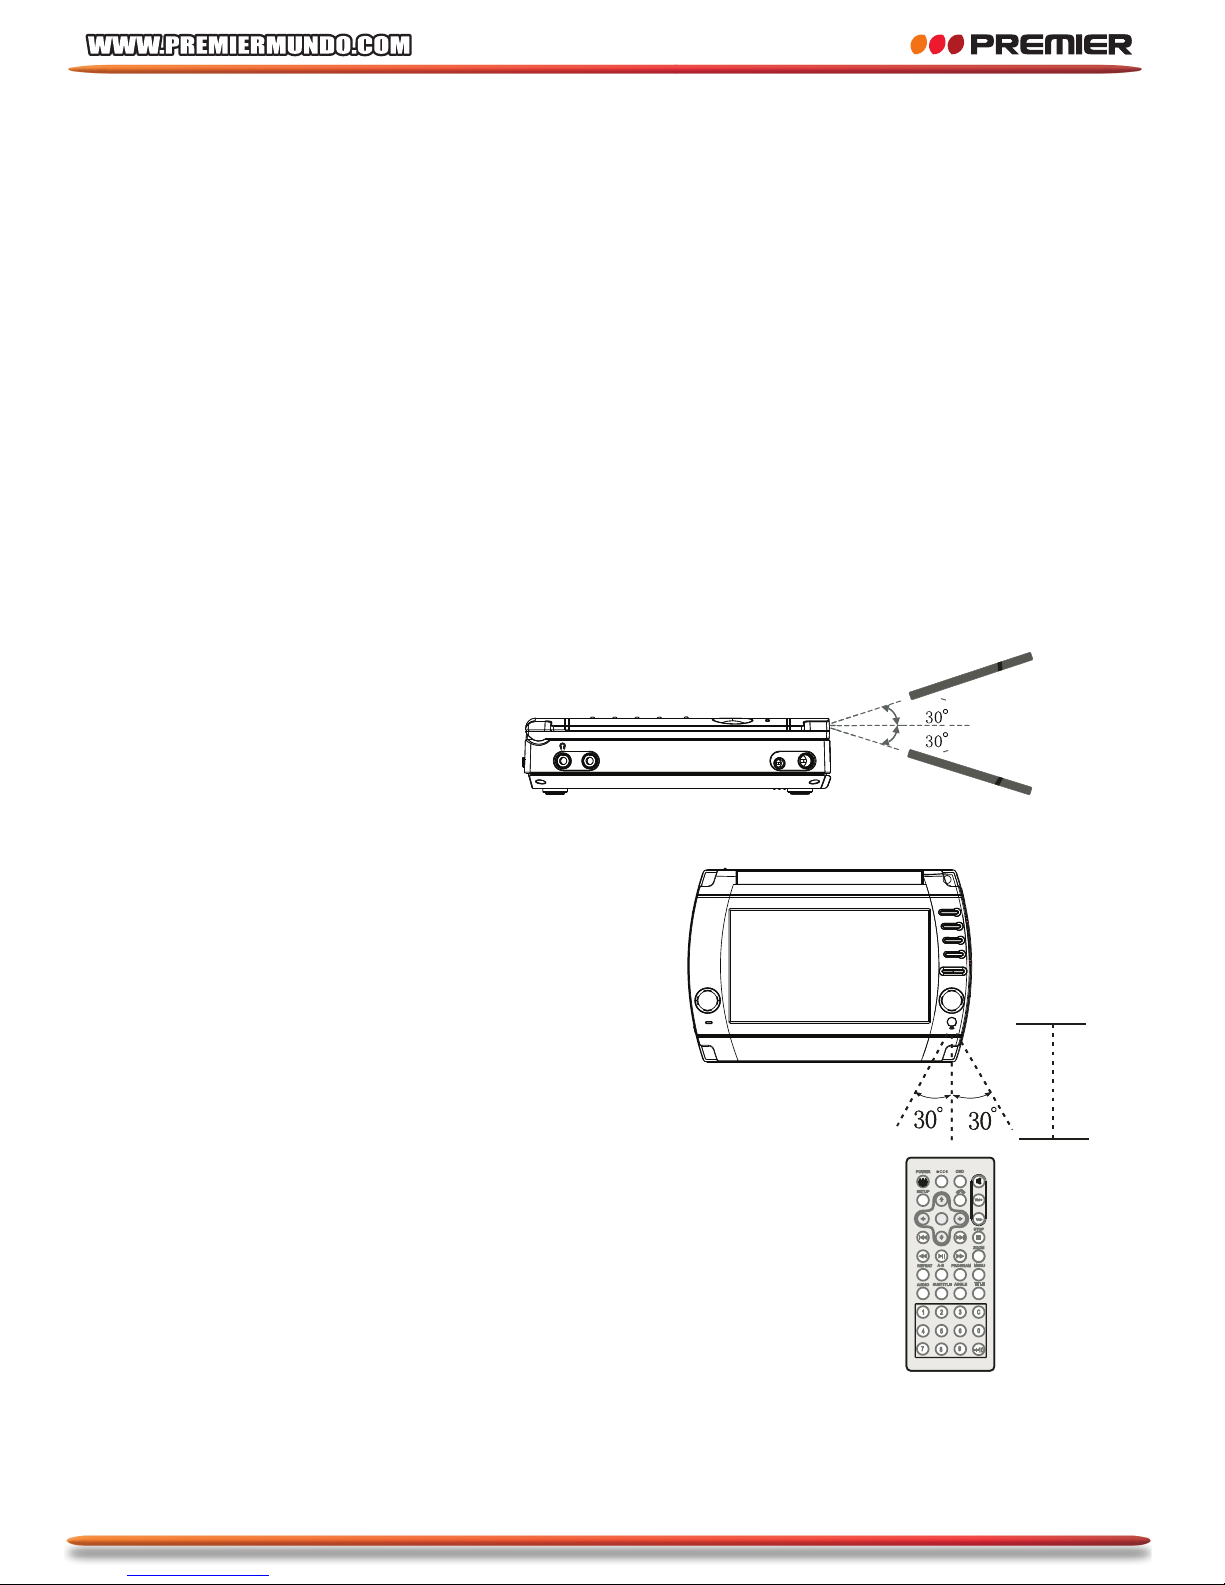
Remote control unit operating range
(1) Horizontal: ± 30°
(2) Vertical: ± 30°
(3) Distance: 5m
•A•V• •I•N•/•O•U•T
•D•C• •O•U•T• •1•2•V
•D•C• •I•N• •1•2•V
•A•V• •I•N•/•O•U•T
•D•C• •O•U•T• •1•2•V
•D•C• •I•N• •1•2•V
<5|s
•O•K
Note:
Most of the player’s functions can be performed
from OK the remote control unit. Some operations,
however, only be performed from the main unit.
Page 22
21
USING REMOTE CONTROL UNIT
Replacing the battery
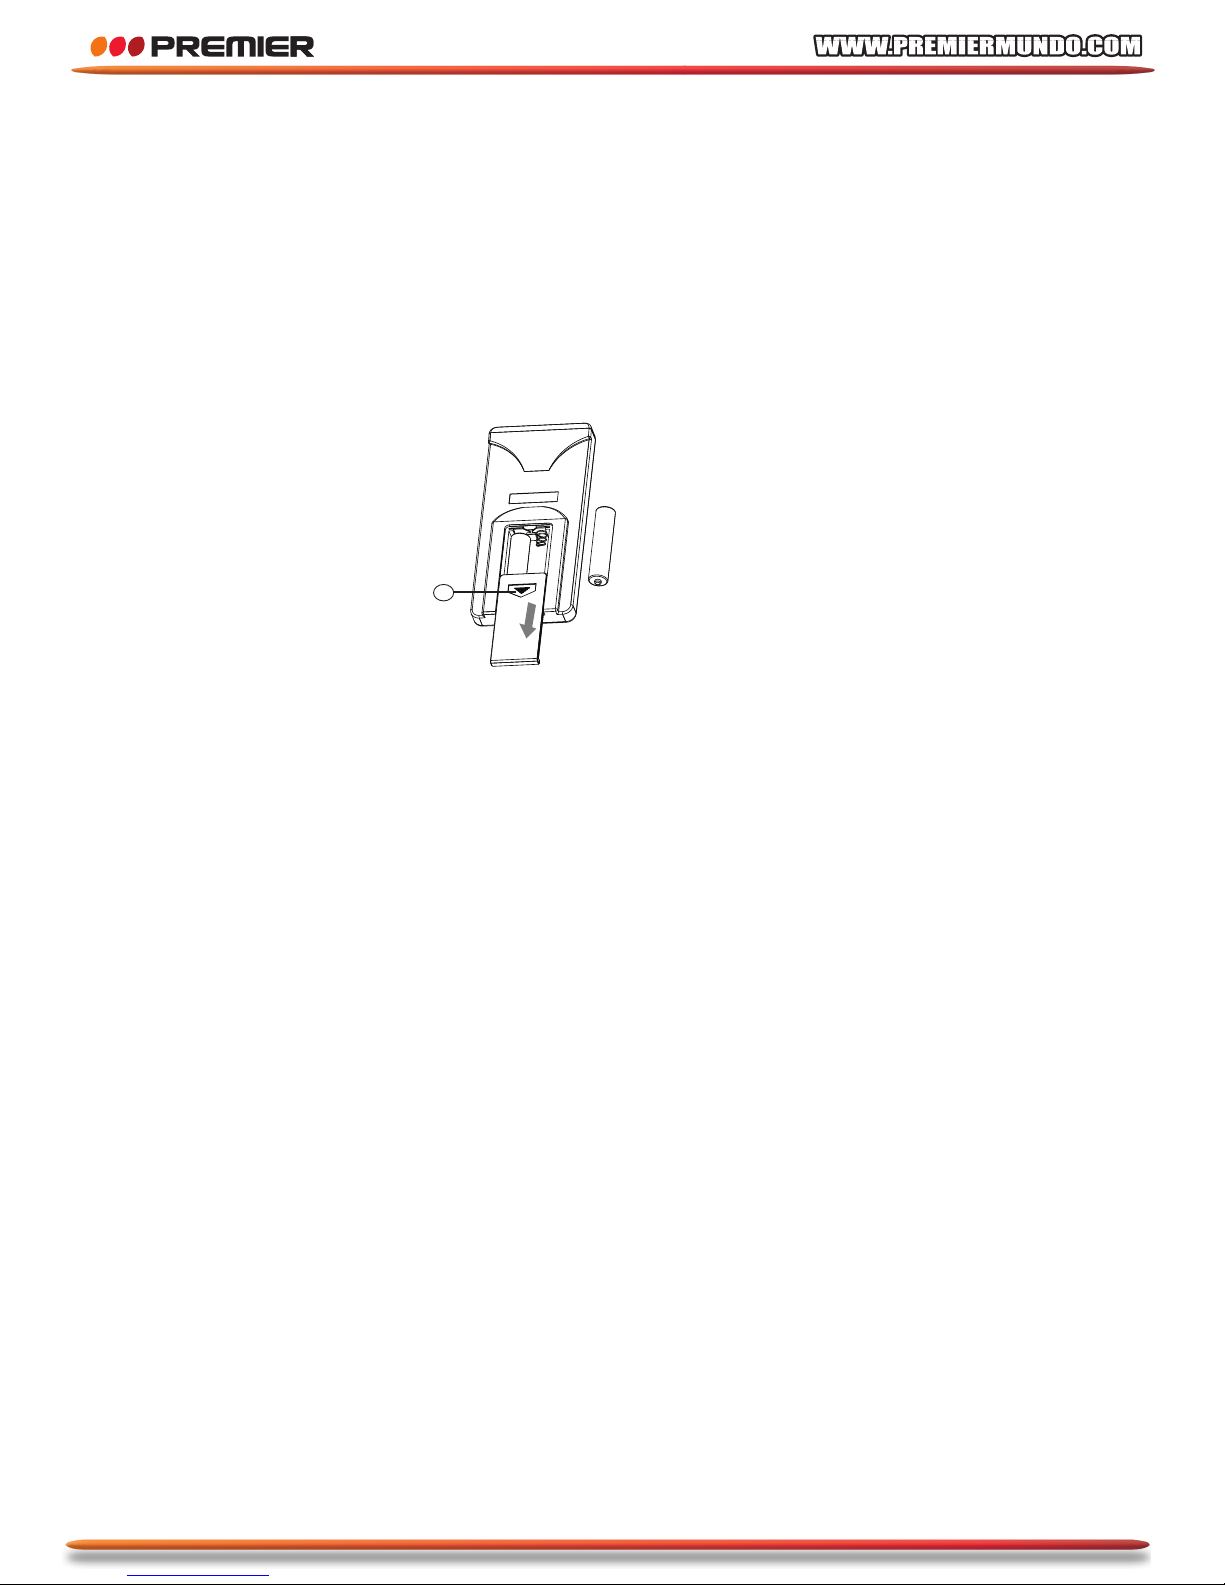
1. Place your finger nails onto A on the diagram below, push (A) according to the
direction, then open the battery cover .
2. Remove the old battery, then insert the new battery into the battery holder with the
+ side correctly.
3. Fit the battery holder back to its place.
Note: To prevent leakage of fluid from the battery, remove the battery when not
using the remote control unit for long periods of time (one month or more).
If the battery leaksfluid, carefully wipe it out of the battery case, then change
to a new battery.
R03 "AAA"1. 5V batter y
A
R03"AAA”1.5V battery
Page 23

22
USING THE BATTERY
Precautions before using the battery
• Please fully charge the battery unit before using it for the first time.The rechargeable
time is about 12-15 hours.
• When the battery unit is recharged in a hot environment, it may not recharge fully
• The battery unit becomes hot after recharging, but this is not malfunction.
• To prevent leakage of fluid from the battery, remove the battery when not using
the unit for long periods of time(one month or more). If the battery leaks fluid,carefully
wipe it out of the battery case, then change to new batteries.
Battery storage
• Please place the battery in a proper environment (15°C 25°C). To avoid place the
battery in a hot or lower temperature environment.
• Please recharge one time every year if the battery is not used in a long time.
Battery life
• The battery unit can be used for about 300 cycles of recharging and operations,
though this is variable depending on the operating conditions.
Using the battery
• The main unit can be playing over 1.5 hours if the battery is fully recharged.
• The picture may be unstable if the battery power is not enough.
Page 24
23
USING THE BATTERY
Installing and removing the battery
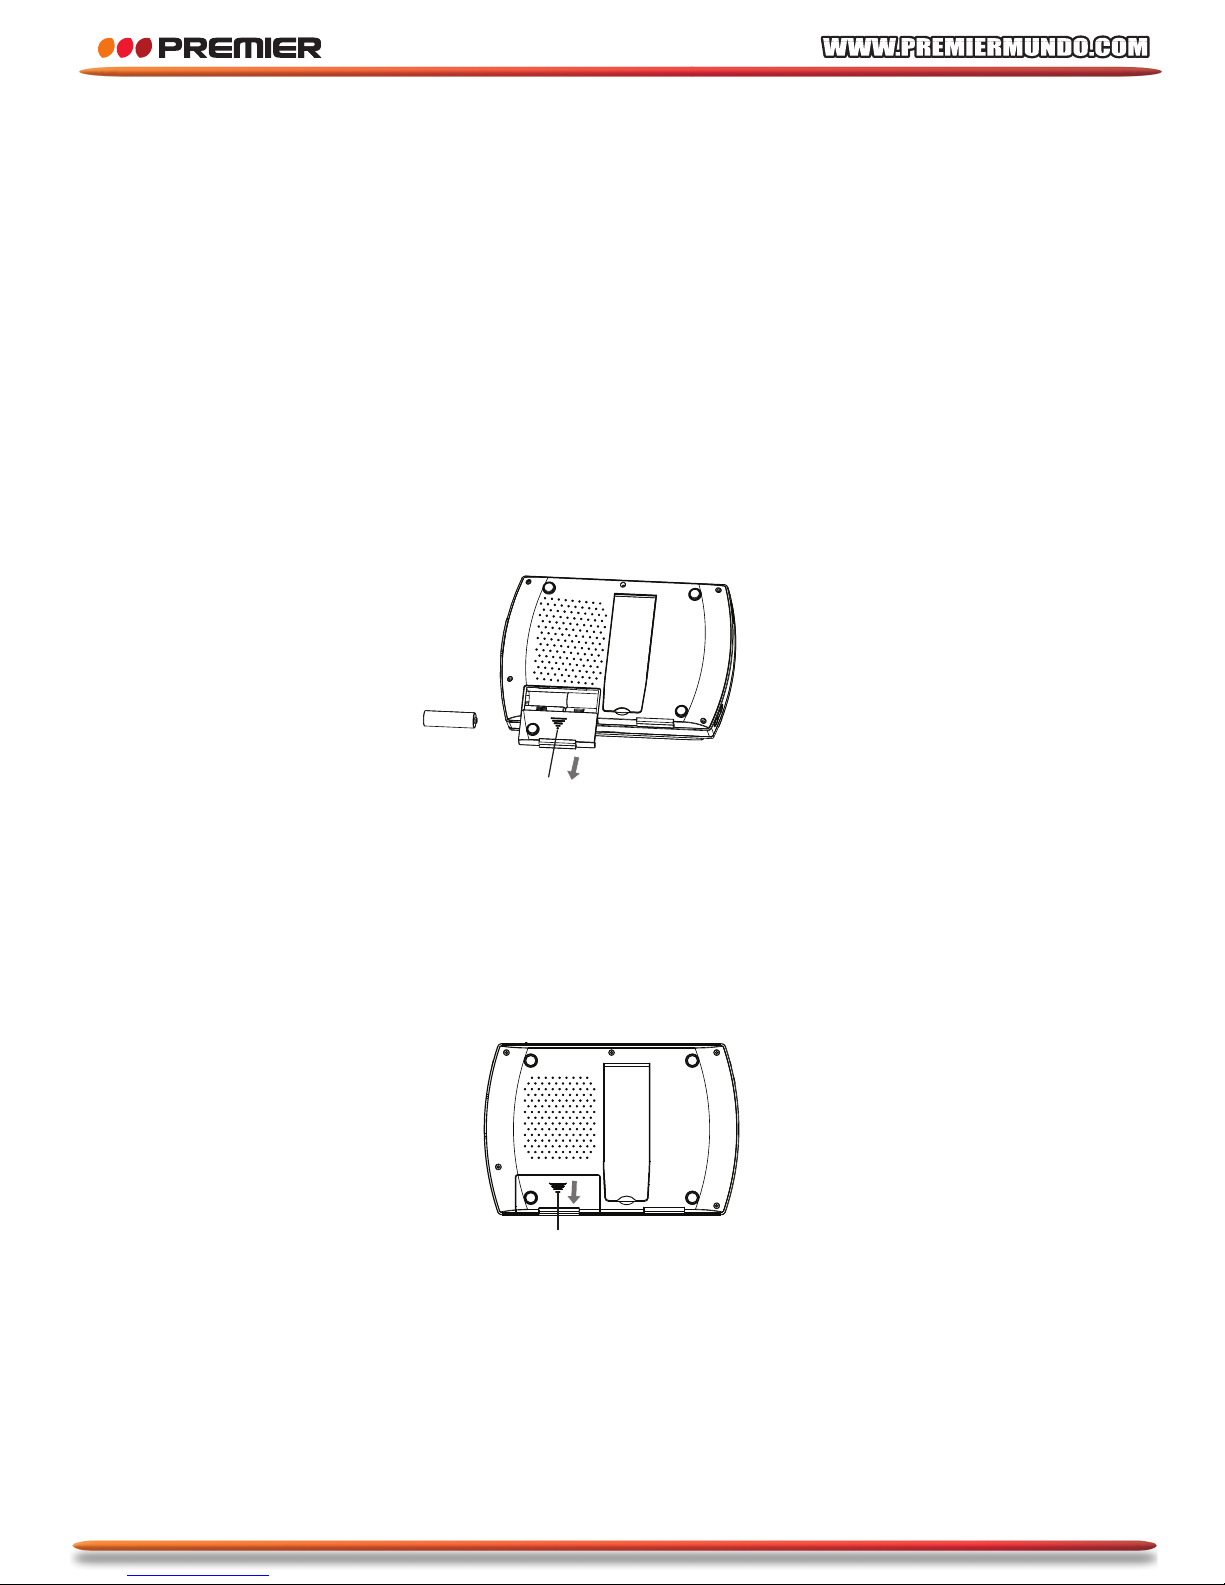
1. Please install the battery as following:
(1) Push A of the battery cover (back of the player) according to the direction;
(2) Place the battery into the battery slot, make sure that + sideof the battery is
connected to the battery slot correctly;
(3) To tighten the battery cover.
Note: Please use rechargeable AA 1.2V / 1800mAh(up) battery only.
2. Please removing the battery as following:
(1) Turn off the player;
(2) To push A according to the direction;
(3) Take out the battery.
A
A
Page 25
24
USING THE BATTERY
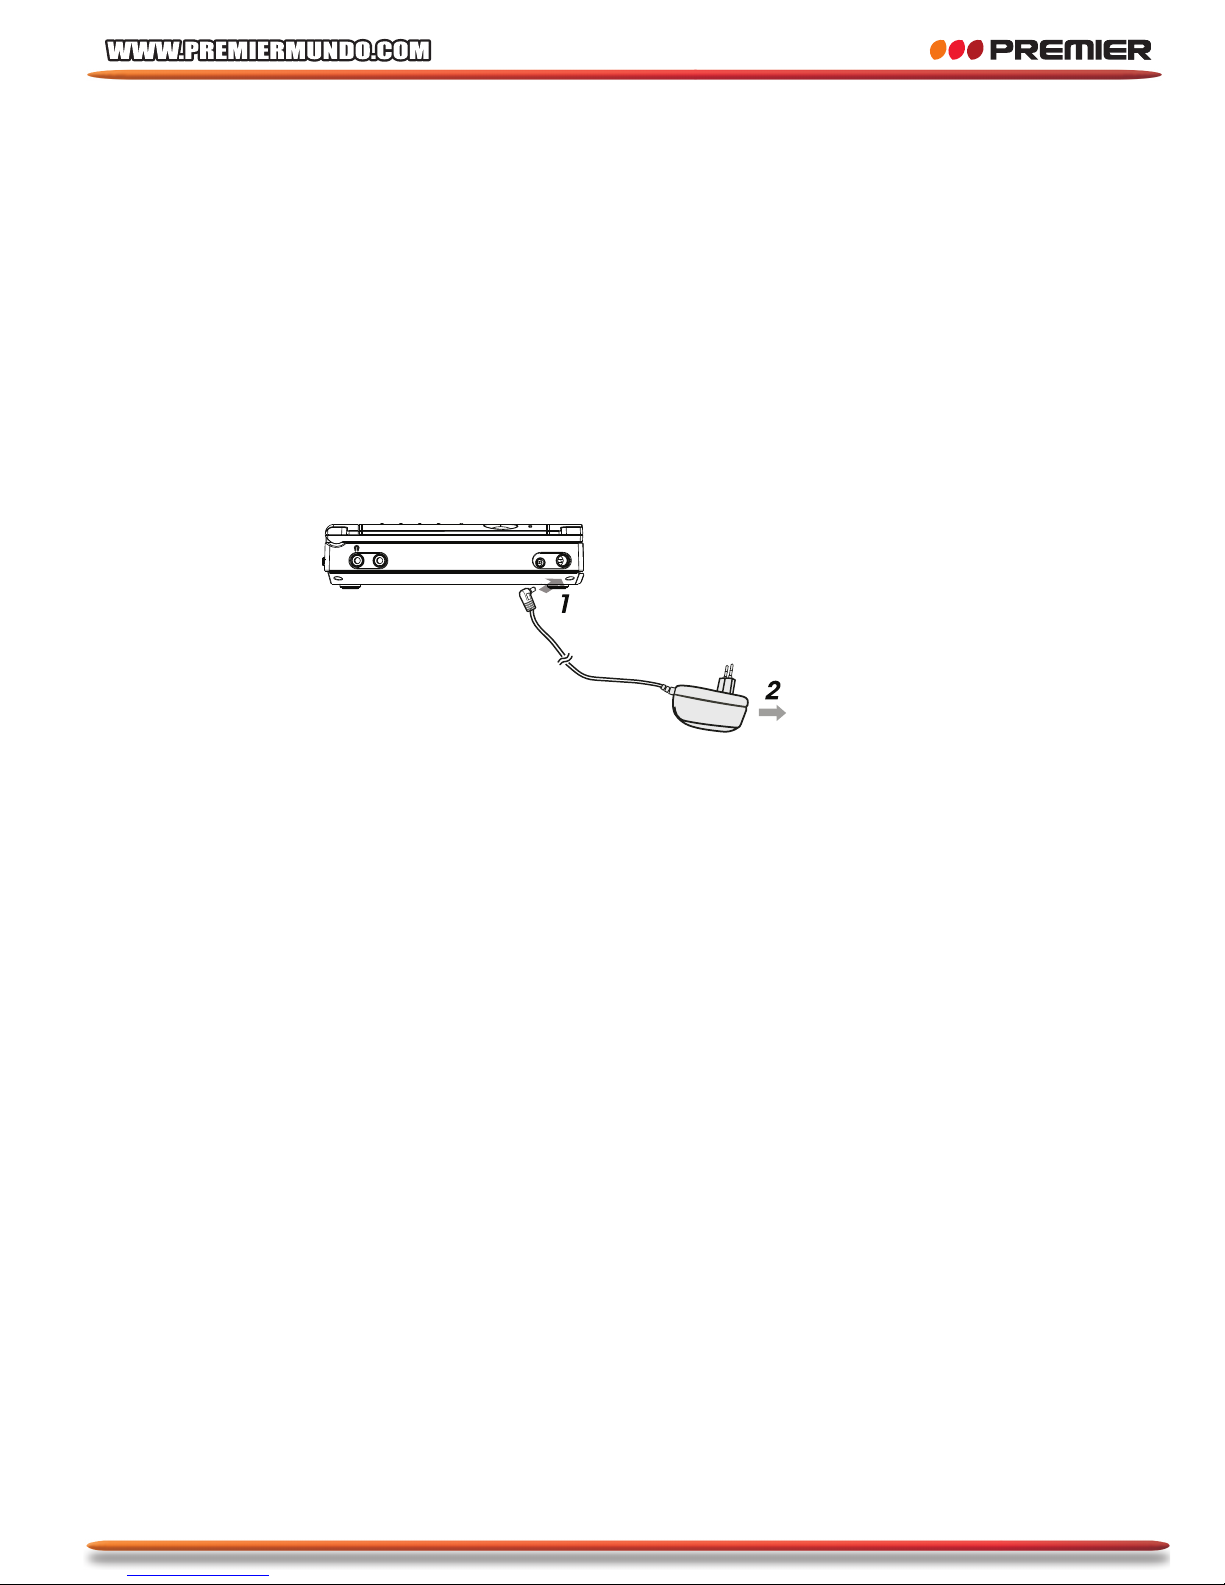
Recharging the battery by using AC-DC adapter
Please recharge the battery as following:
1. Install the battery
2. Connect the AC-DC adapter to the player
• The charging time is around 16 hours
Cautions when charging the battery
• The temperature during recharging affects the recharging efficiency.
• Recharging is most efficient between temperatures of 10°C..30°C.
• To protect the battery unit, do not recharge a fully charged battery unit repeatedly.
Repeated overcharging the battery may deteriorate the battery performance.
• When the battery unit is hot, it may take longer than usual time for recharging or
may sometimes be unable to be recharged. Wait for the battery unit to cool down
before retrying recharging.
•A•V• •I•N•/•O•U•T
•D•C• •O•U•T• •1•2•V
•D•C• •I•N• •1•2•V
Page 26
25
•A•V• •I •N•/ •O•U •T
•D•C• •O •U•T• •1 •2•V
•D•C• •I •N• •1•2 •V
CONNECTING THE PLAYER TO OTHER COMPONENTS
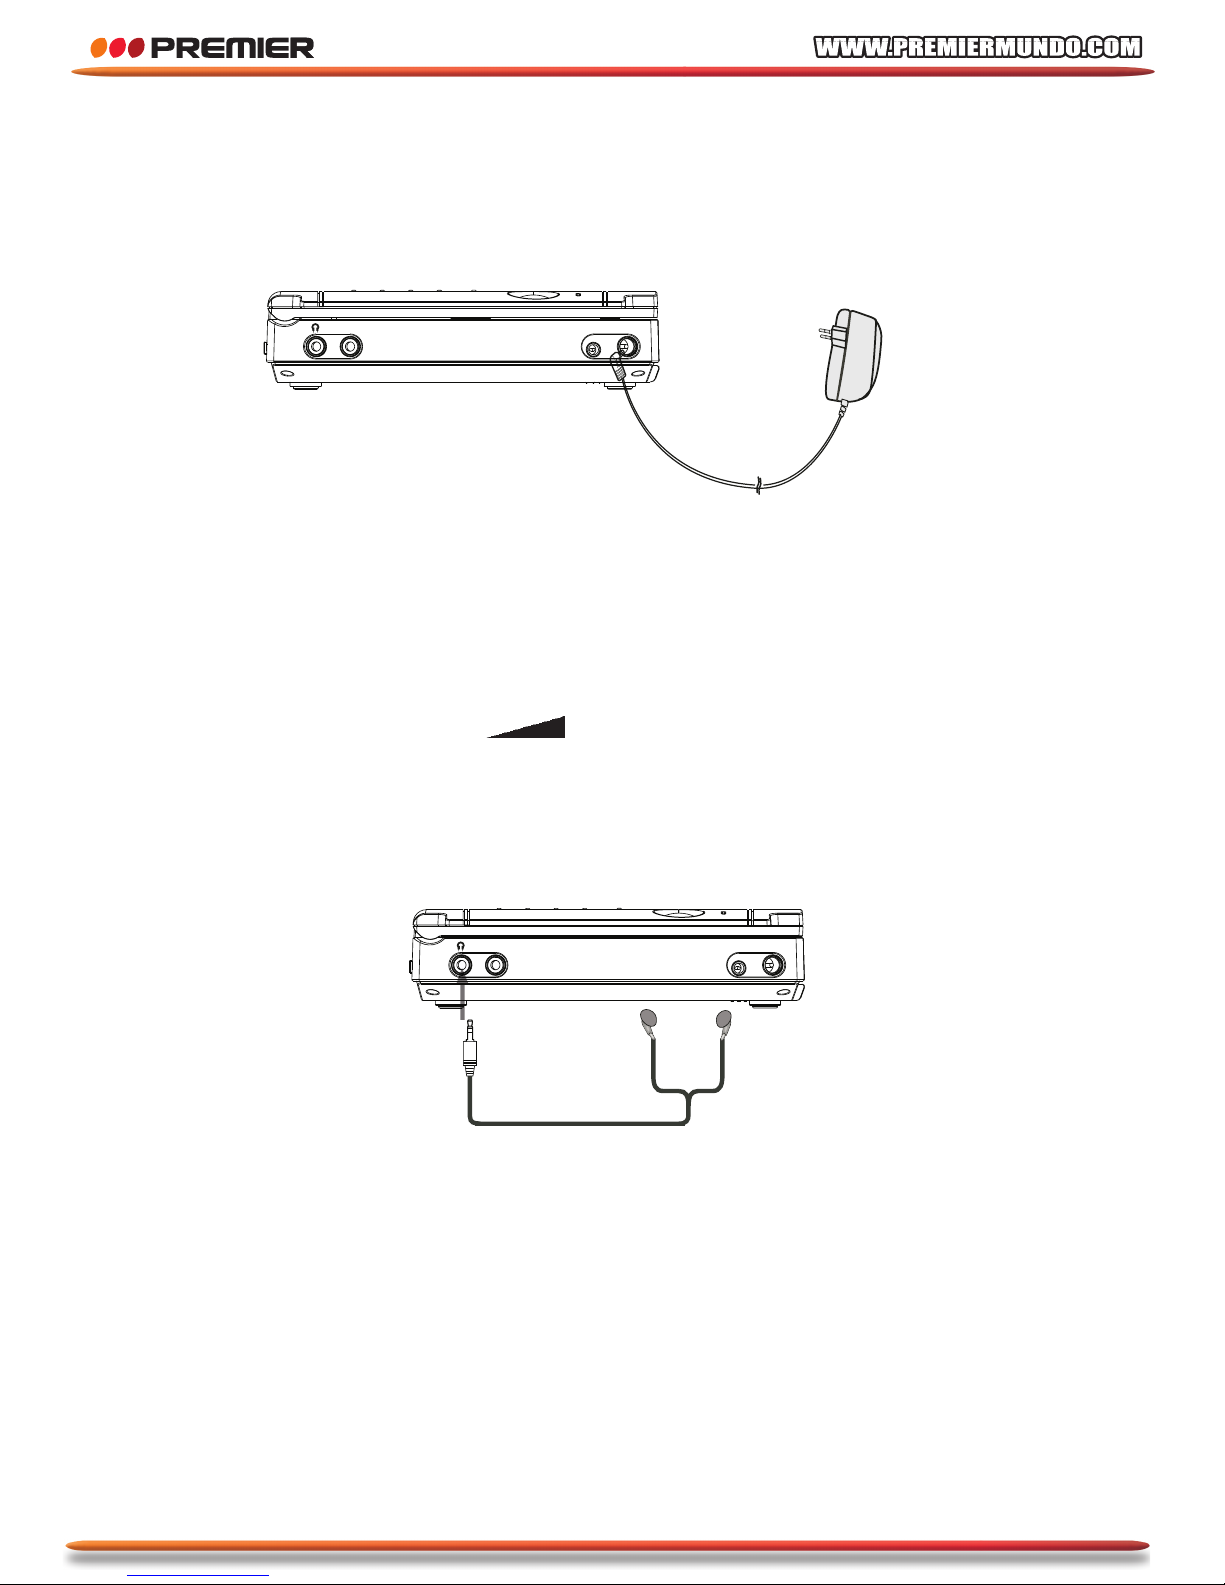
Connecting to AC-DC adapter
1. Please plug the AC-DC adapter to AC power socket;
2. Connecting the DC output of adapter to DC in of the main unit
Note: AC-DC adapter specification: DC 12V/1.2A
Please using the adapter that is the standard accessory of the main unit.
Connecting earphone
•
Connect the earphone plug securely to left side the earphone jack on the main
unit.
•
To listen to the audio, using to adjust the volume to a comfortable level. To
earphone jack.
Note: Please do not use DTS disc. Strong noise is produced when DTS discs is
played.
Note: Insert the earphones plug securely.
No sound will be heard unless the earphones are securely connected.
•A•V• •I •N•/ •O•U •T
•D•C• •O•U•T• •1•2•V
•D•C• •I•N• •1•2•V
Main Unit right side
To earphone jack Earphone
Page 27
26
CONNECTING THE PLAYER TO OTHER COMPONENTS
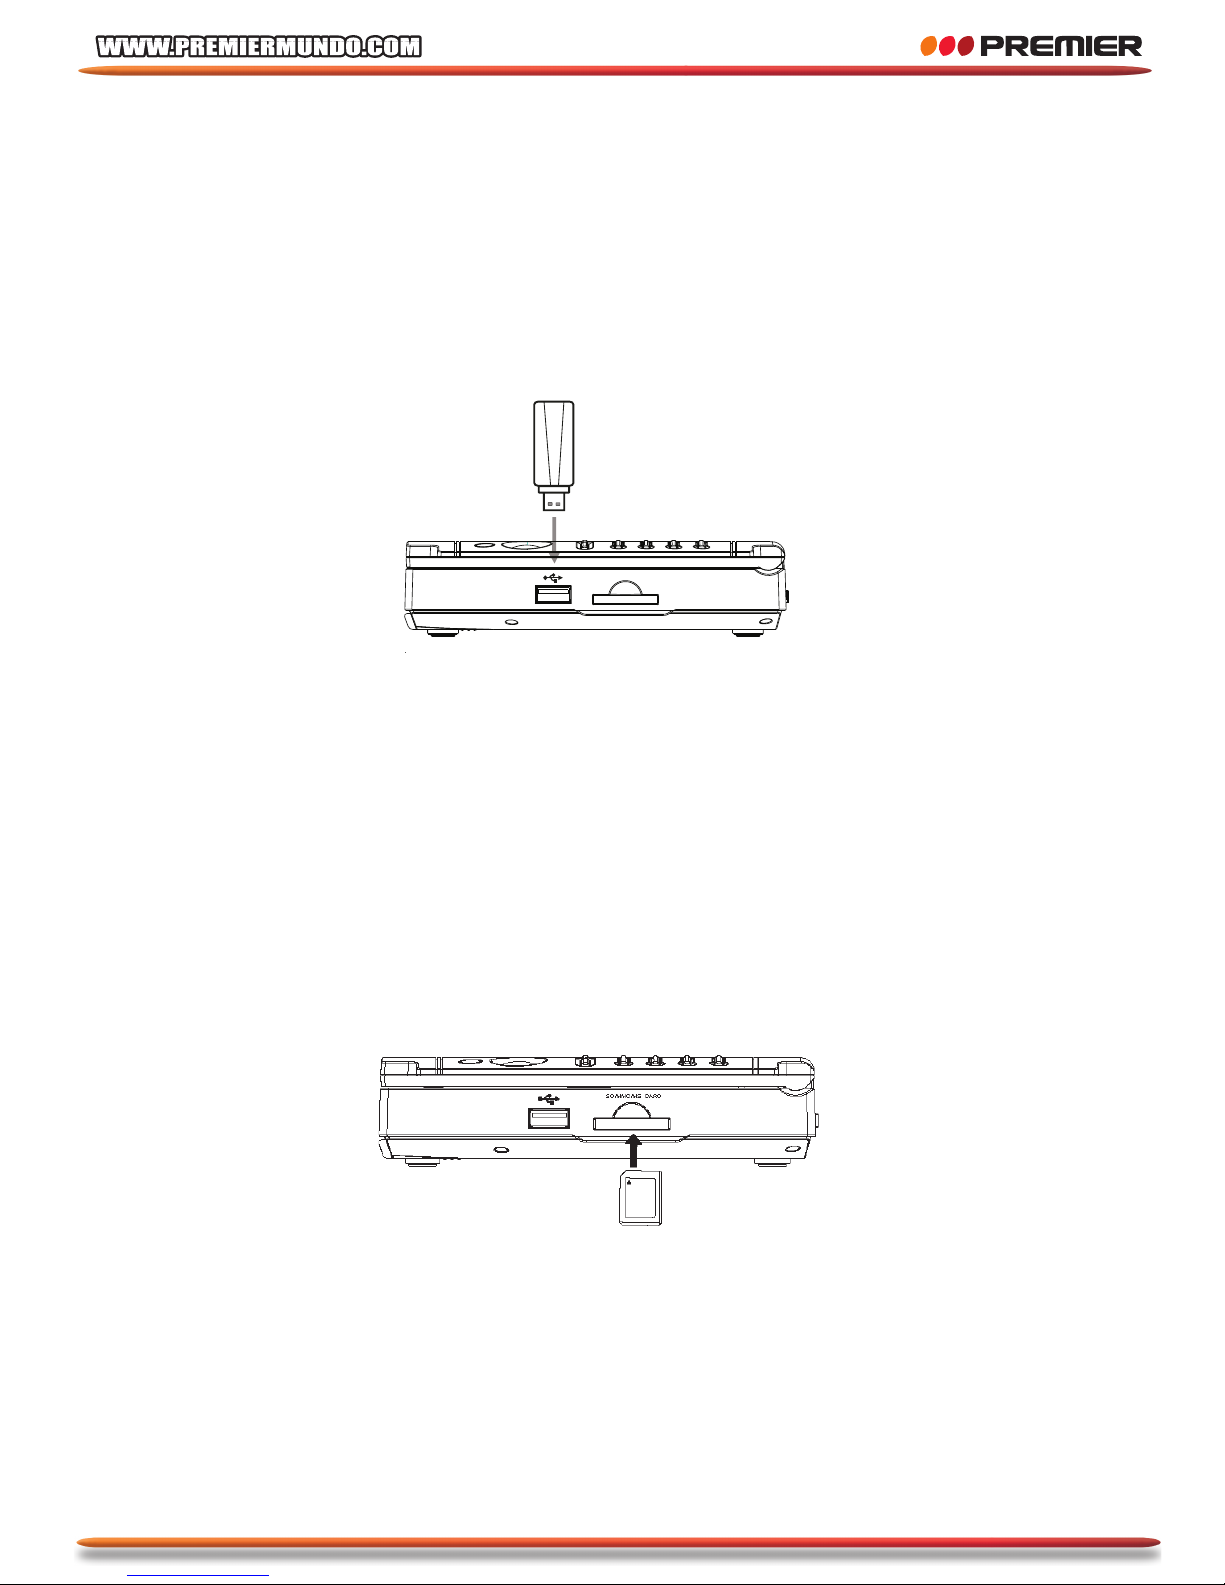
Connecting to USB storage (optional)
1. Please connect the USB storage to the USB terminal of the main unit.
2. The main unit can be read the USB storage contents in the automatically.
Note: The USB terminal of the main unit support USB 1.1 only.
The main unit can read the contents of USB storage when there is no disc
in the main unit.
Connecting to memory card (SD / MMC / MS) (optional)
1. Please insert the memory card to the memory socket of the main unit
2. The main unit can be read the contents in the memory card automatically
Note: Please insert the memory card in right direction.
The main unit can read the contents of memory card when there is no disc
in the main unit.
•S•D•/•M•M•C•/•M•S• • •C•A•R•D
USB storage
Main Uni t righ t
side
Memory card
Page 28
27
CONNECTING THE PLAYER TO OTHER COMPONENTS
Precautions
Make sure the player is turned Off before making connections
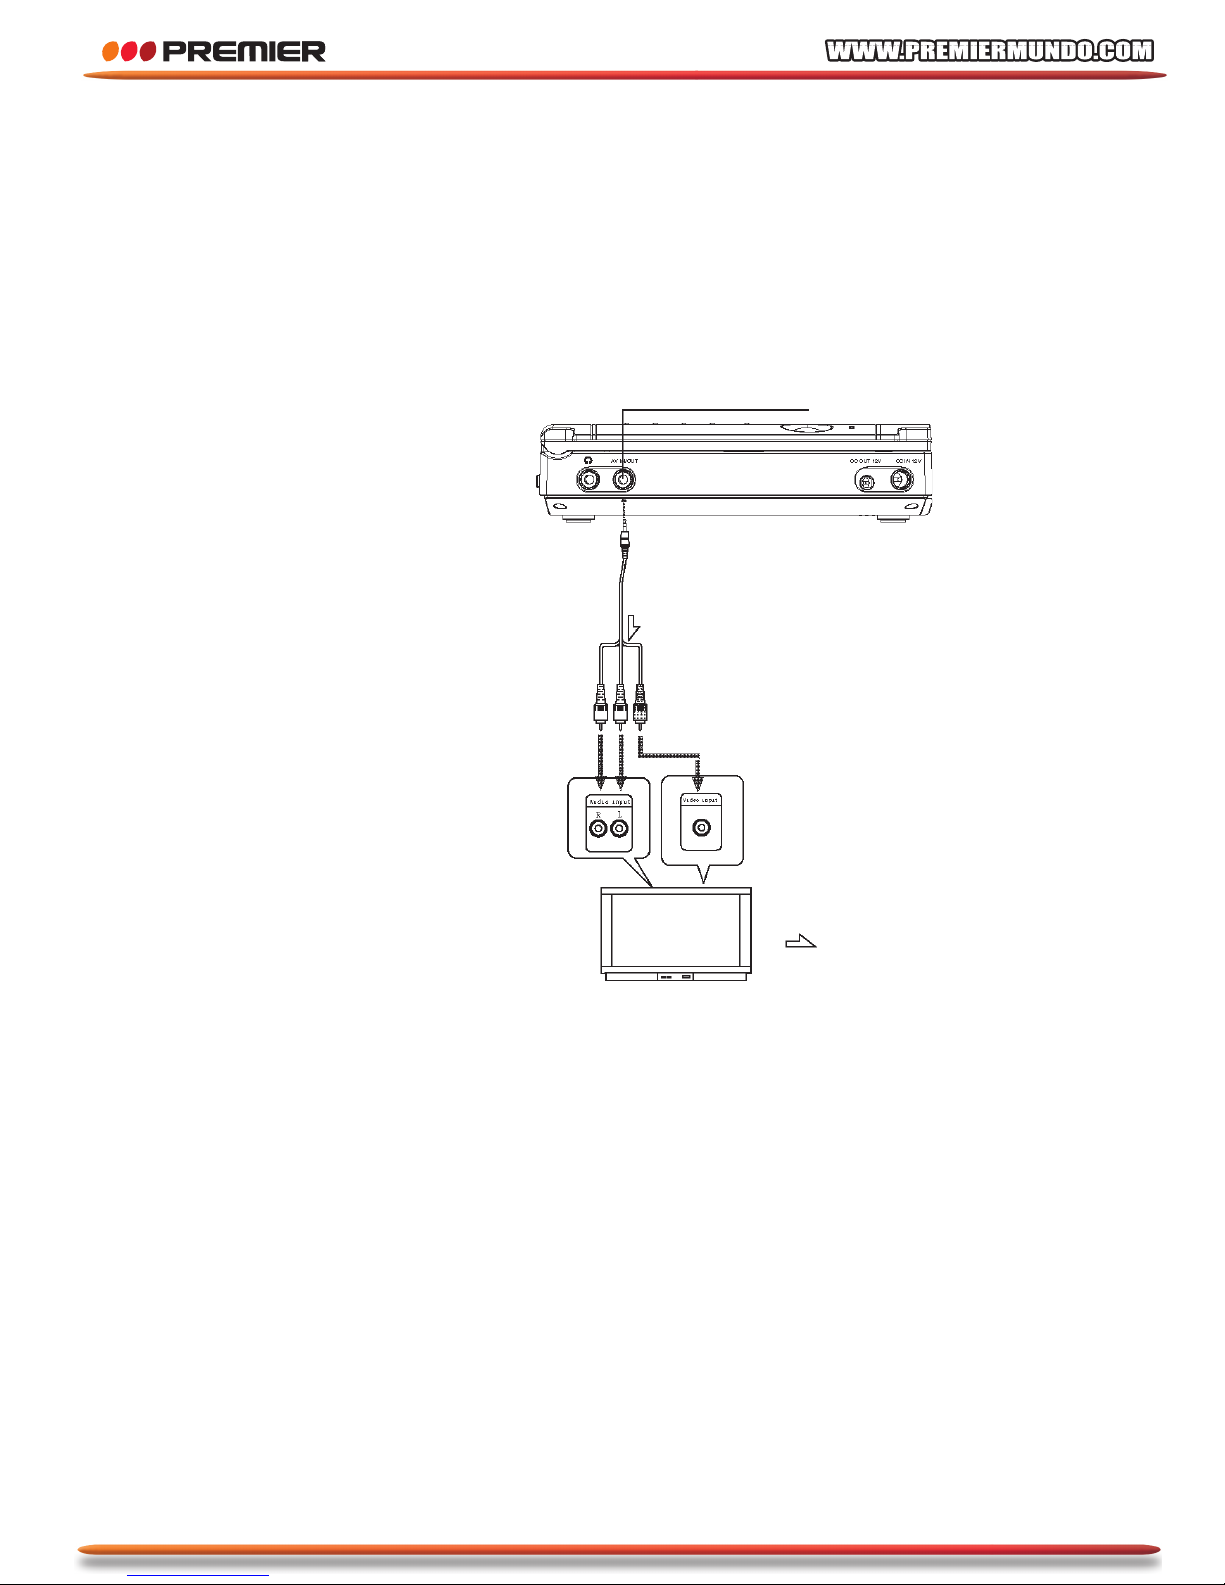
Connecting to a TV
Note:
Please set the main unit to AV
output mode.
Audio/video output/input
Main unit
left side
Black
Video / audio cable (included)
To video input jack (yellow)
To audio input L jack (white)
To audio input R jack (red)
TV Signal flow
Page 29
CONNECTING THE PLAYER TO OTHER COMPONENTS
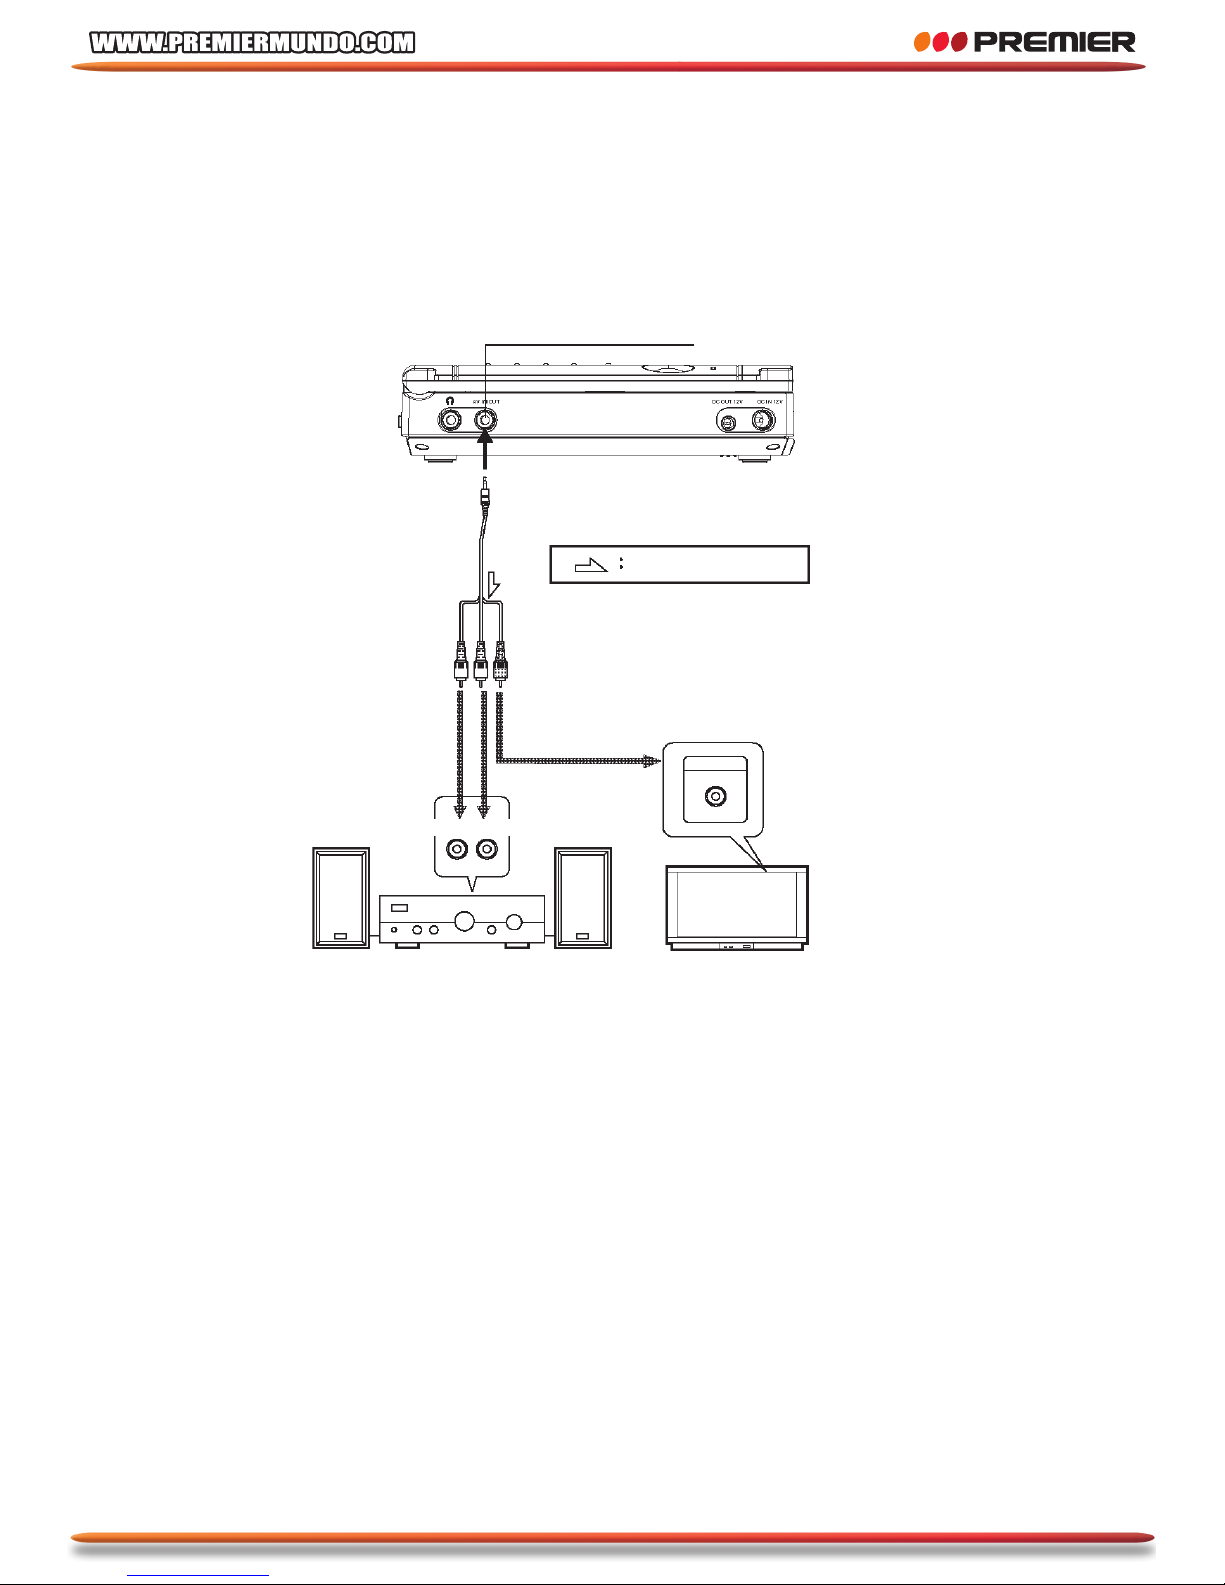
Connecting to a digital amplifier
Note:
Do not play DVDs when the audio settings are not correct.
Or may cause strong noise and damage your speakers.
Audio/video output/input
Main unit
left side
Black
Video / audio
cable(included)
White / Red / Yellow
To digital audio input
jack
Video input
Audio input
TV
Left
Right
Signal flow
28
Page 30
29
CONNECTING THE PLAYER TO OTHER COMPONENTS
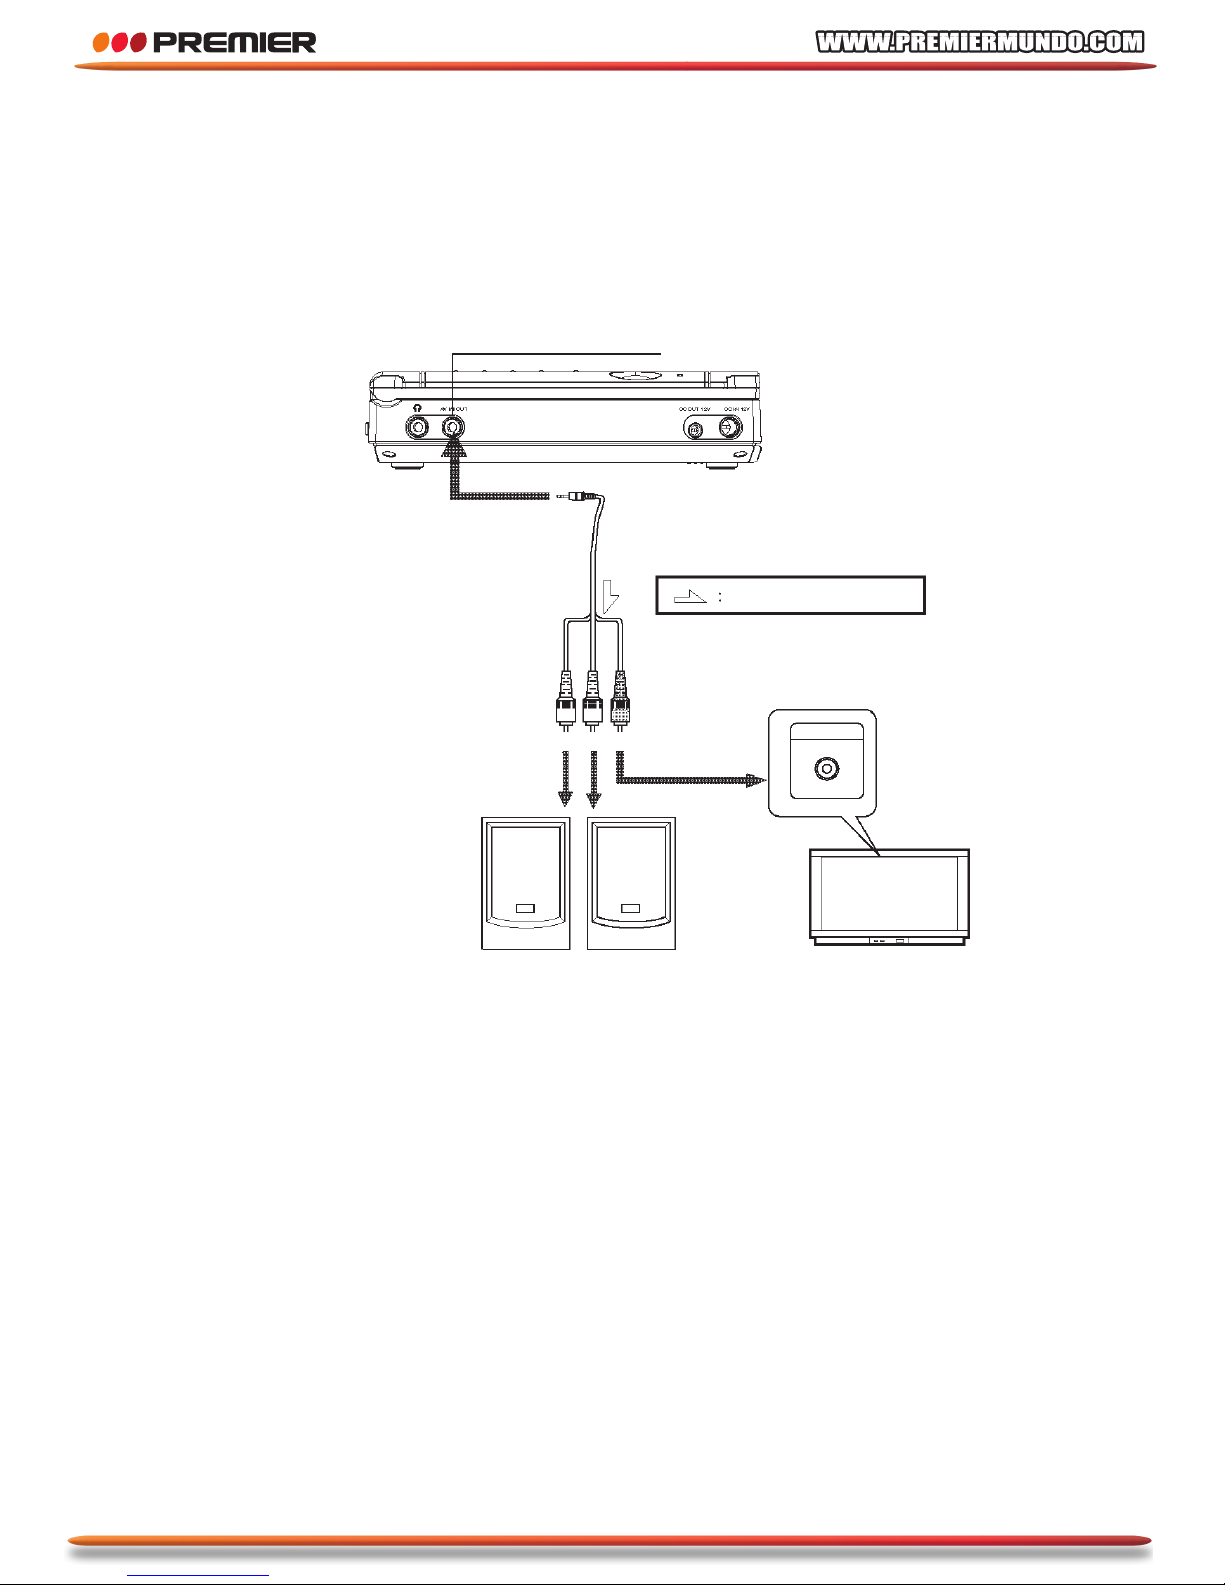
Connecting to active speaker systems
Note:
Please set the main unit to AV output mode.
Audio/video output/input
Main unit left side
Black
Video/audio cable
(included)
Signal flow
To Audio input jack
To video input jack
White / Red / Yellow
Video input
Left Right
Active speaker systems
TV
Page 31
30
CONNECTING THE PLAYER TO OTHER COMPONENTS
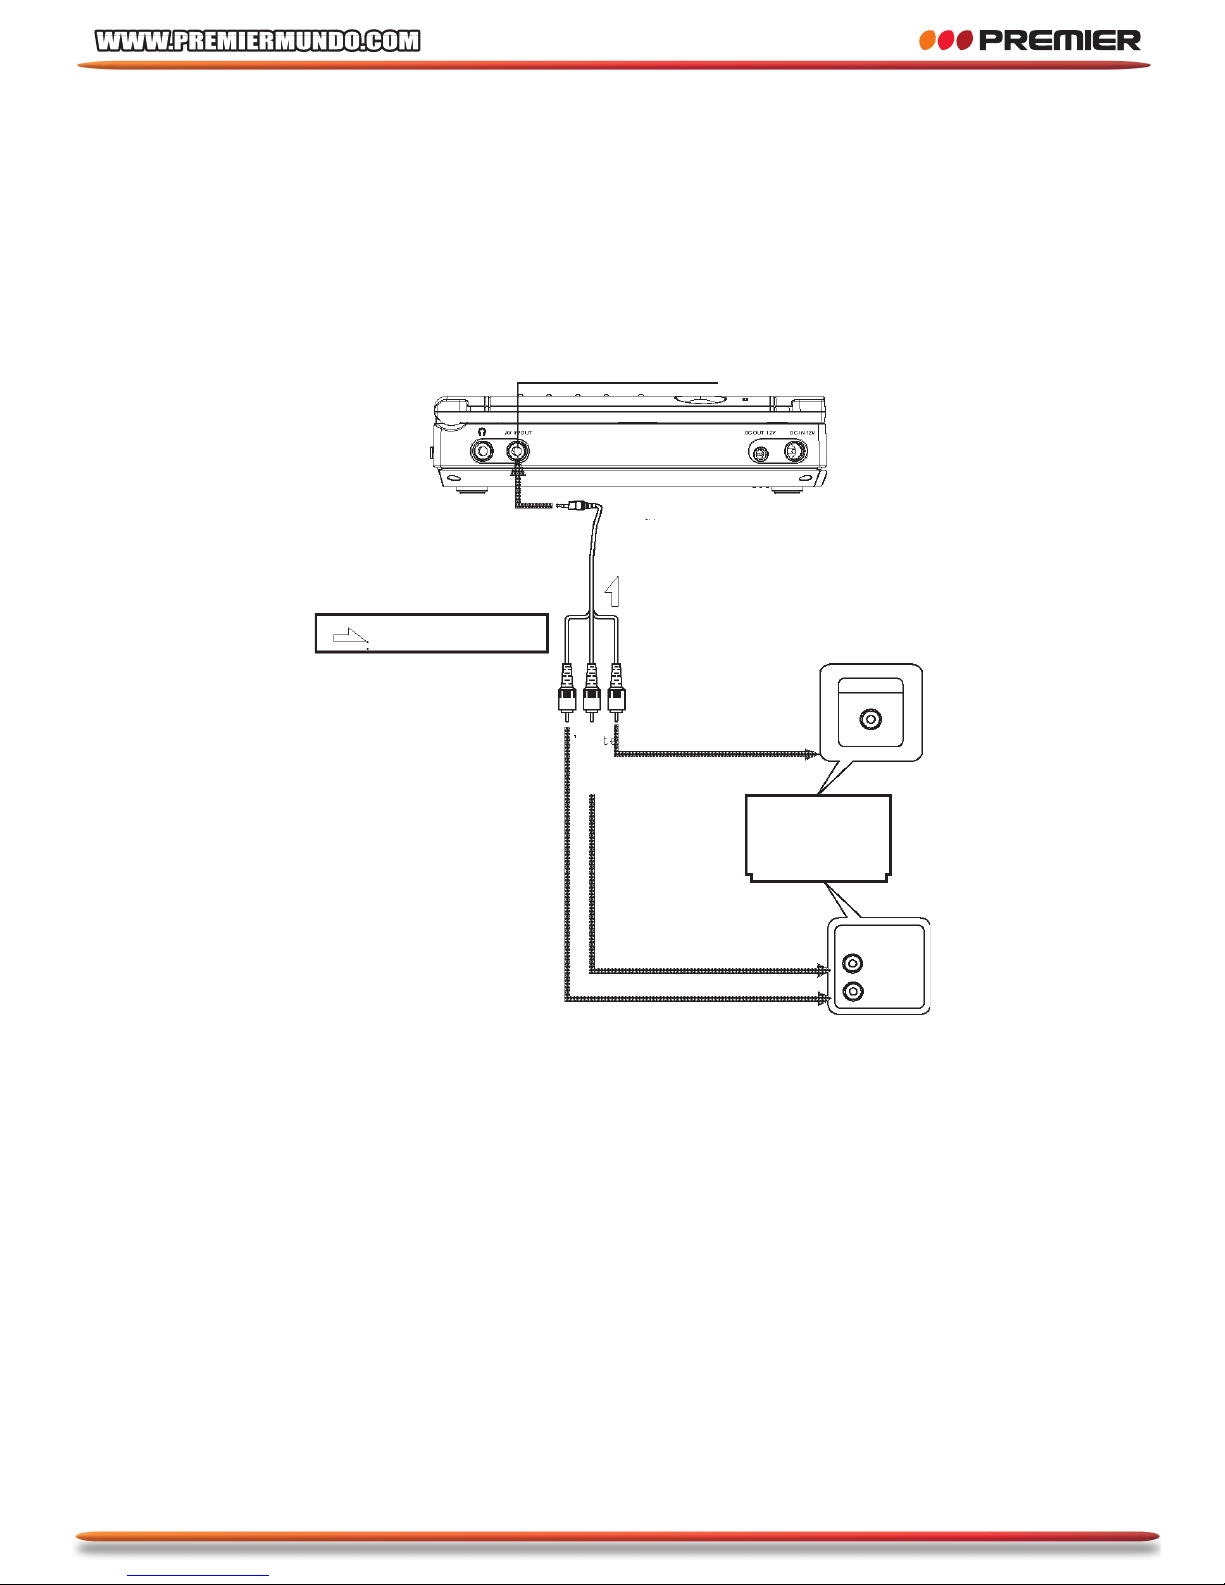
Connecting to a Audio/Video player system if you want
the unit as a monitor
Note:
Please set the main unit to AV input mode.
Audio/video output/input
Main unit left side
Black
Video/audio cable (included)
Signal flow
Red
To Video Output
jacks
Video Out
To Audio Output jacks
Connect to AV
system video
output
AV SYSTEM
Audio Out
L
R
etihW
Yellow
Page 32
31
CONNECTING THE PLAYER TO OTHER COMPONENTS
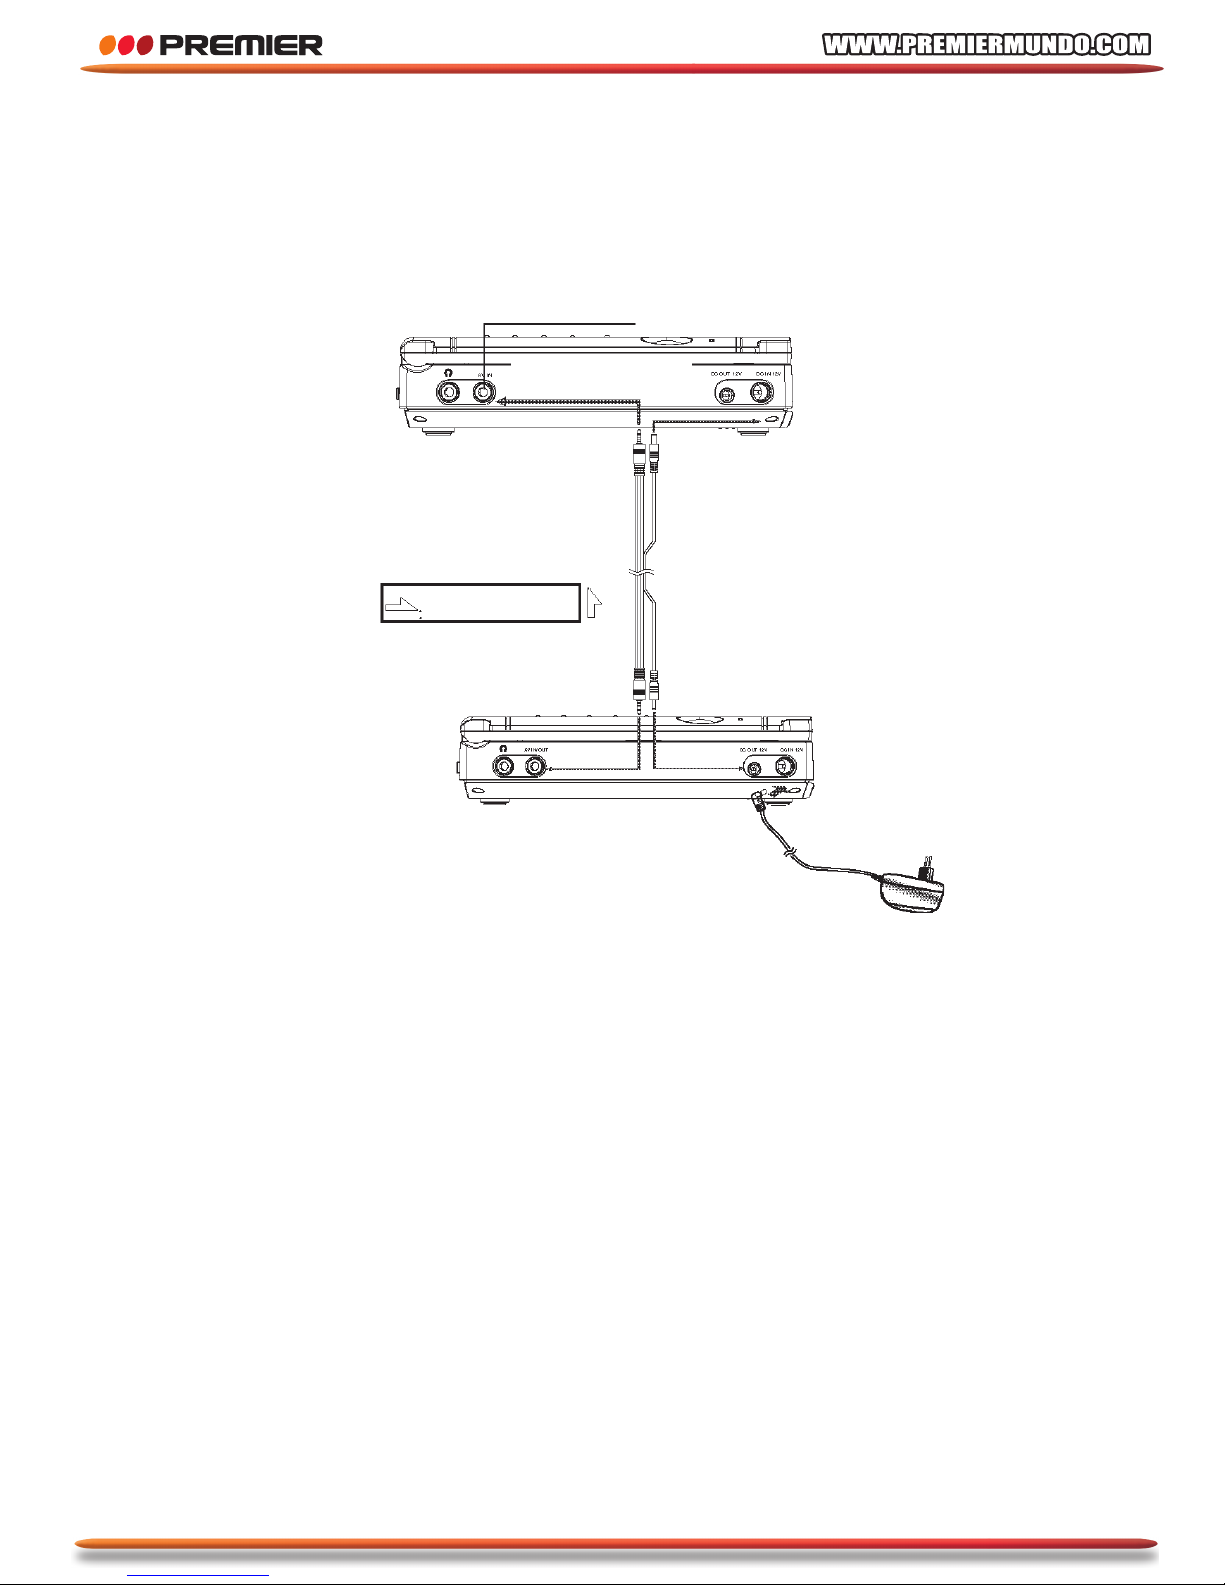
Connecting to a monitor
Note:
Please set the main unit to AV input mode.
Audio/video input
Monitor left side
To DC IN jack
AC&DC cable
(included)
Signal flow
The main unit left side
To audio/
video input
jack
To DC out
jack
AC-DC adapter
To audio/video
input jack
Page 33
32
BASIC OPERATIONS
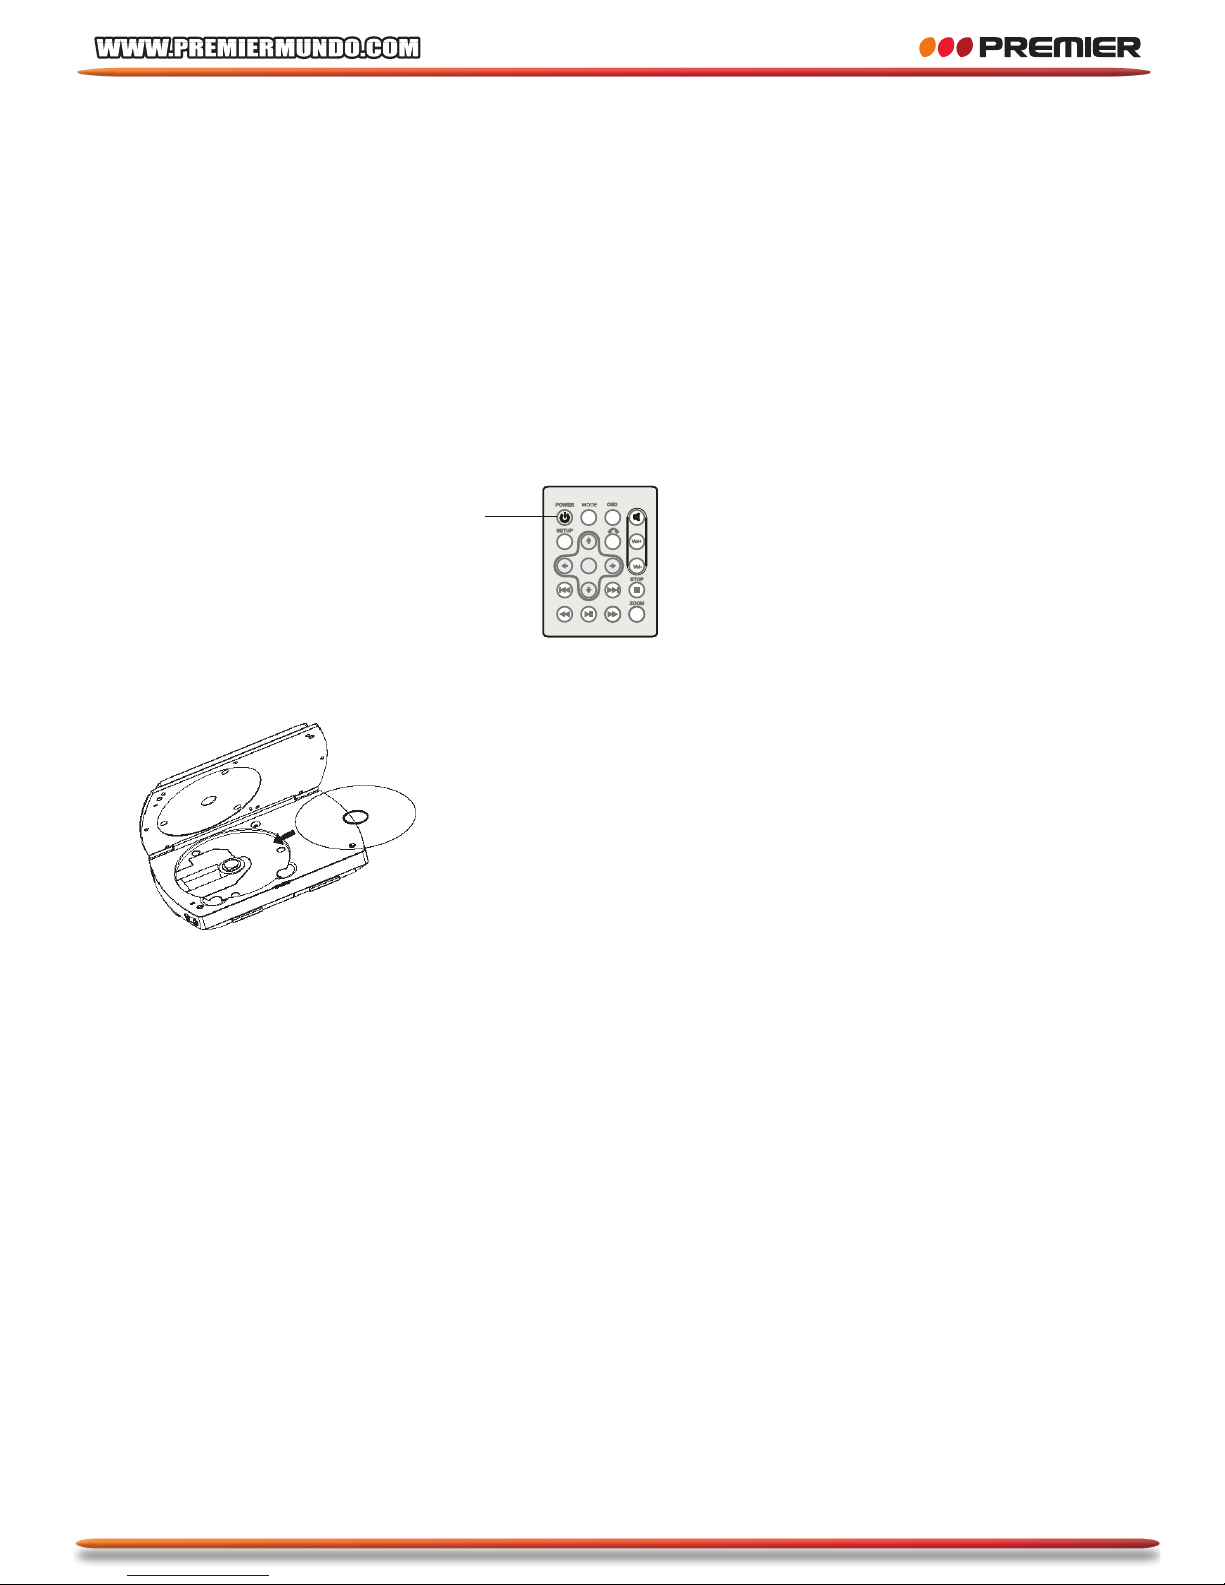
Turning on/off the main unit
1. Turn power on
• Push power switch to ON (main unit) to turn on the unit when the unit is powered,
power indicator led light.
2. Turn power off
• Press POWER (remote control unit) or push power switch to OFF (main unit)
to turn off the unit, power indicator led off.
Placing discs
•O•K
POWER
1. Power on the player
2. Open the TFT cover
3. Placing the disc
4. Close the TFT cover
Note: Please place the disc carefully
Please don’t use the bad disc
Playing discs
1. Reading disc, there are the DVD/VCD/CD showing in the LCD
2. The disc will be played automatically
3. Press PLAY to start to play
Page 34
33
BASIC OPERATIONS
Removing disc
1. Press STOP to stop play
2. Open the TFT cover
3. Take out the disc
4. Close the TFT cover
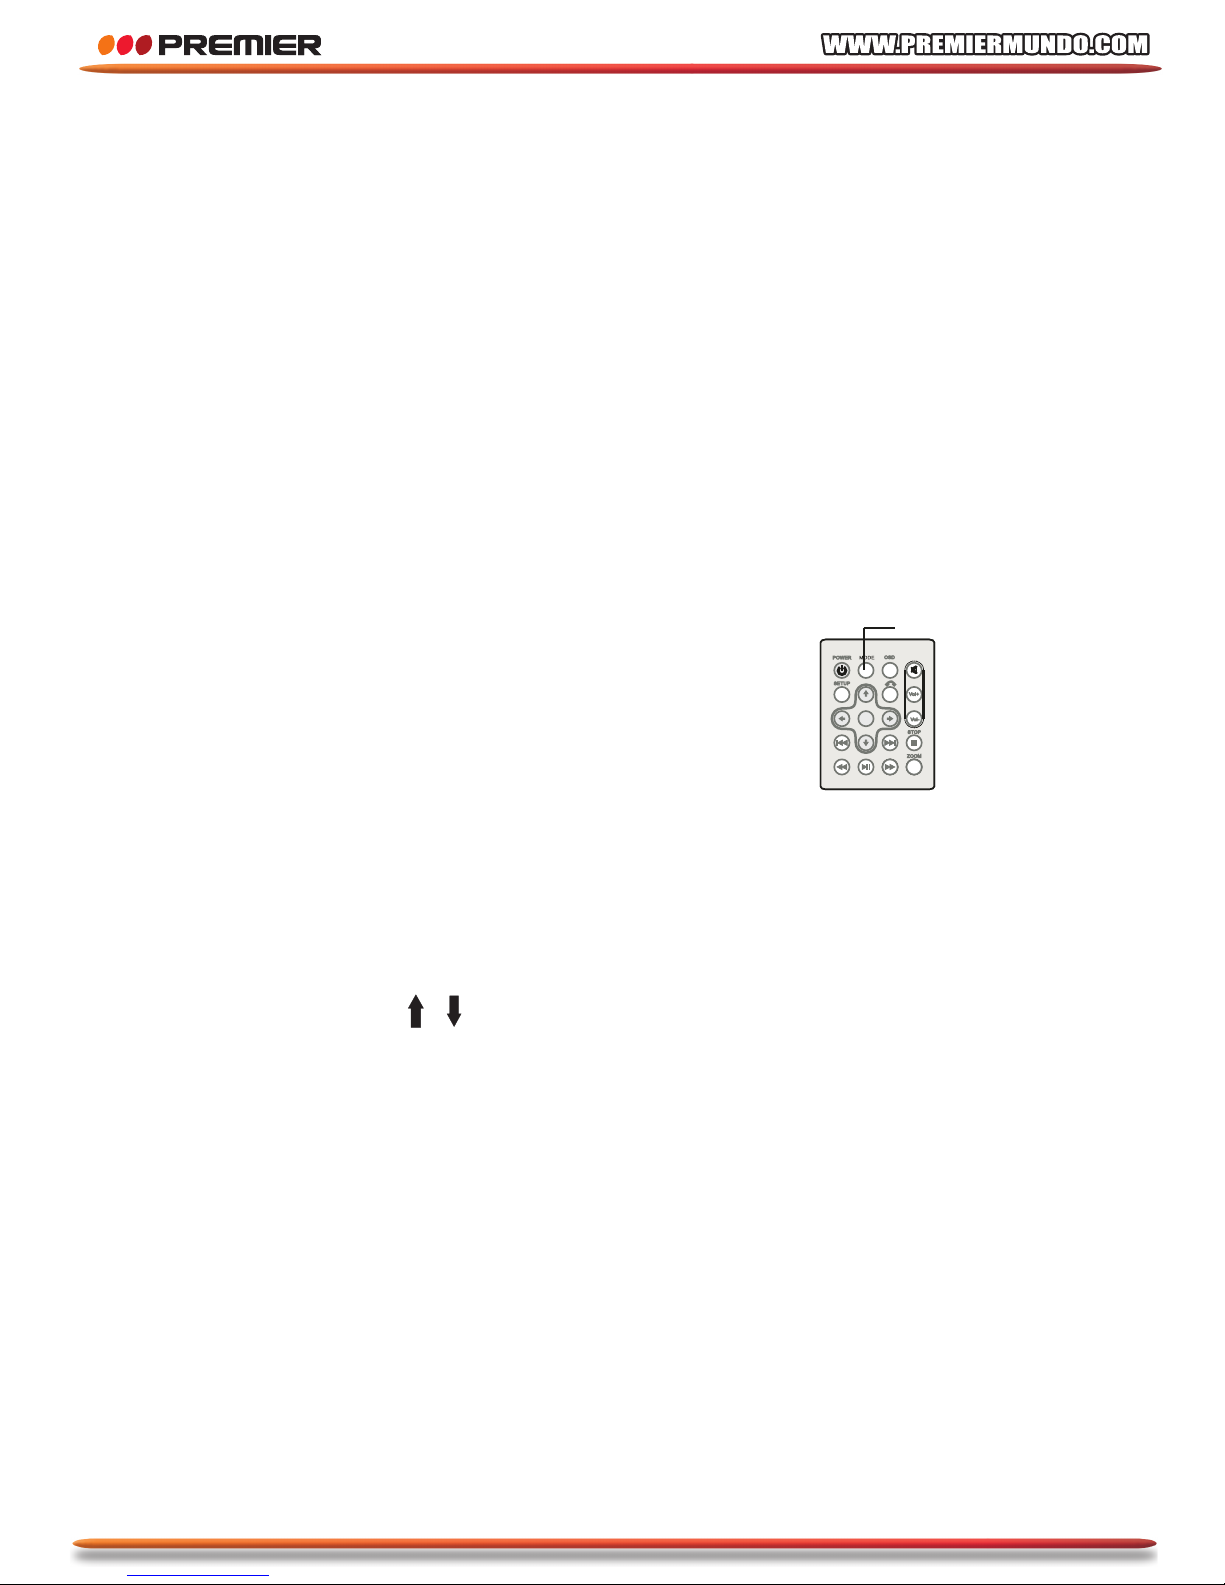
Mode settings Brightness / Contrast / Color / TFT display
mode / TFT Reverse mode / AV out/in mode (optional)
Please press MODE (remote control unit) to select a suitable mode for your favourite
when the main unit is in play mode.
1. Press MODE, setting brightness;
2. Press MODE, setting contrast;
3. Press MODE, setting color;
4. Press MODE, setting LCD display mode;
5. Press MODE, setting reverse mode;
6. Press MODE, setting AV output/input
mode(optional)
• The unit will stop play the disc when it is in AV input mode
• Please do not connect signal input when the unit is in AV output mode
• AV output mode is default mode.
Note: Please press
/ (In the remote control unit) to adjust.
•O•K
MODE
Page 35
34
BASIC OPERATIONS
Stopping the playing
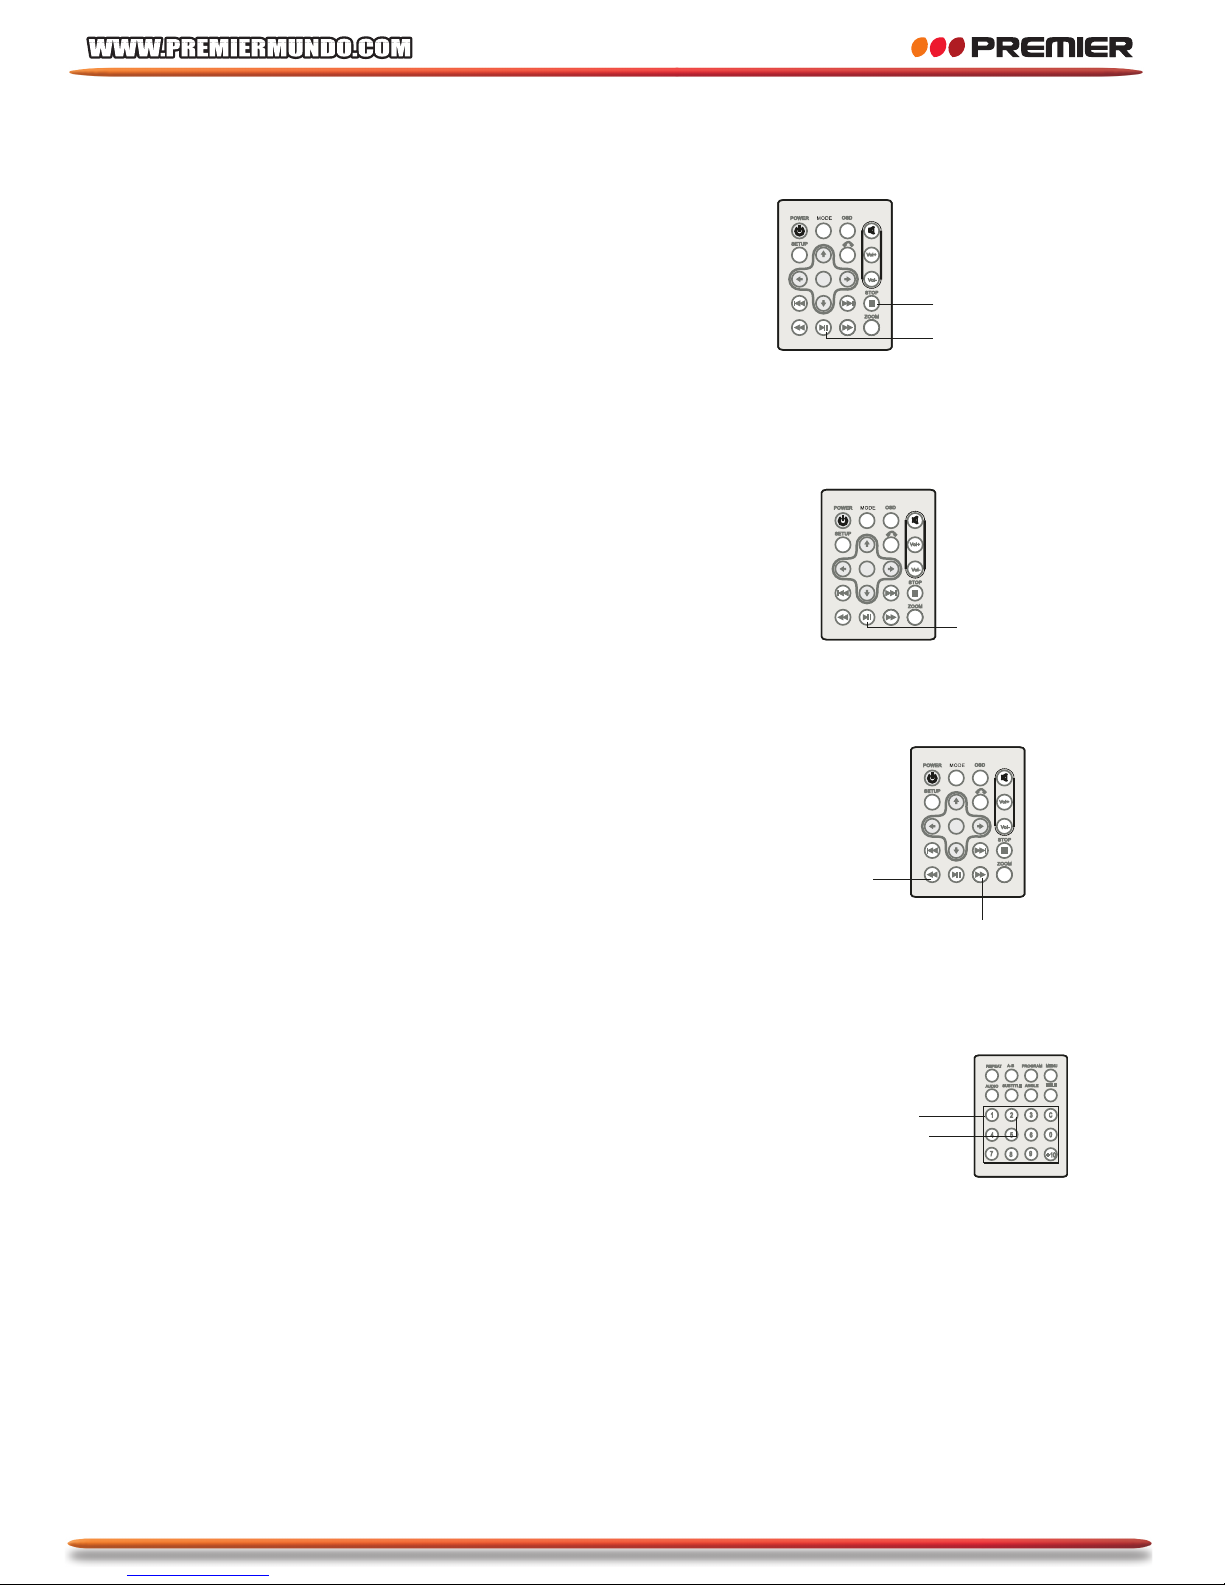
1. Press STOP to pause the playing, the unit can
memorize the play point
2. Press PLAY to continues play from the pausing point
3. Press STOP to stop the disc
Note: The unit can not play to continues playing for some disc.
Pausing the disc
1. Press PLAY/PAUSE to pause the playing when
playing
2. Press PLAY/PAUSE to continues playing
Scanning forward and backward
1. Press (remote control unit) 1.5 seconds to fast the
playing when playing in forward/backward direction;
2. Change the playing speed to X2, X4, X8, X20 and
normal for every pressing REV/FWD in the remote
control unit.
Repeat playing the disc
1. A-B play mode
• Press A-B, the LCD will show Repeat A-
• Press A-B again, the main unit will repeat the
play from A to B.
• Press A-B again, the unit repeat will resume
normal “A-B “playing.
•O•K
STOP
PLAY
•O•K
PLAY /
PAUSE
•O•K
REW
FWD
REPEAT
A-B
Page 36
35
•O•K
BASIC OPERATIONS
2. Repeat playing the title, chapter or track
• Press REPEAT to select the title, chapter or track when the unit is in play mode
• DVD: title, chapter; VCD or CD: track.
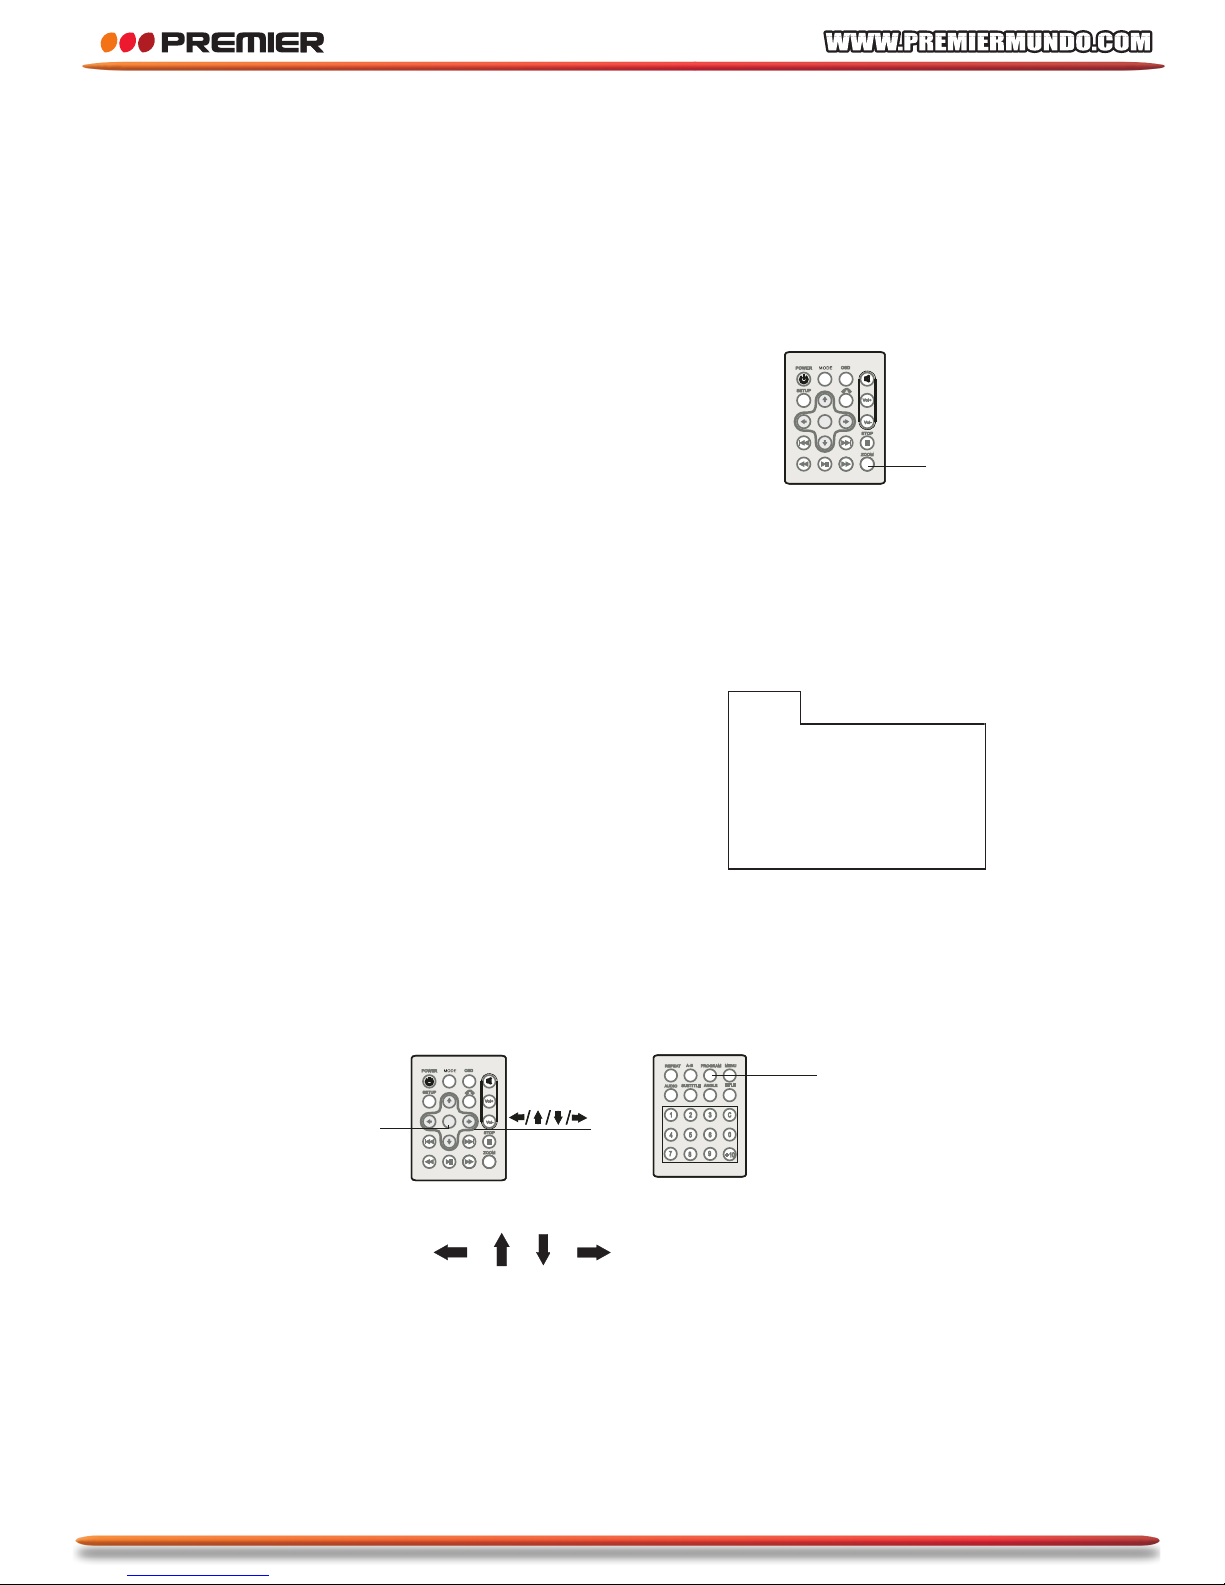
Zoom playing
• Press ZOOM every times, the picture will change
to 2X, 3X, 4X, 1/2X, 1/3X, 1/4X and normal.
Program playing
The main unit may play the list according to the following program list:
1. Press PROGRAM, the menu will be shown in the LCD
Hint :
• T is for Title, C is for Chapter for DVD disc.
• T for track for CD,VCD
Note: There is no title, chapter or track for some disc.
2. Using digit and cursor
/ / / to select the list what you want. See the
picture.
•O•K
ZOOM
PROG
TC TC TC
1 --- : --- 5 --- : --- 9 --- : --2 --- : --- 6 --- : --- 10 --- : --3 --- : --- 7 --- : --- 11 --- : --4 --- : --- 8 --- : --- 12 --- : ---
Play Clear Exit
OK
Program
Page 37
36
•O•K
BASIC OPERATIONS
3. Using the cursor key to move the cursor to the
PLAY icon, and press
OK to start to play the list
4. Using the cursor key to move the cursor to the
CLEAR icon, and press OK to clear the play
list.
5. Press PLAY/PAUSE or select the EXIT icon and
press OK to exit program menu.
Note:
• The program list will be cancel when the main unit is power off or eject the
disc.
• There is no program function for some disc.
• The unit can not play the list if you select the item that does not exit in the
disc.
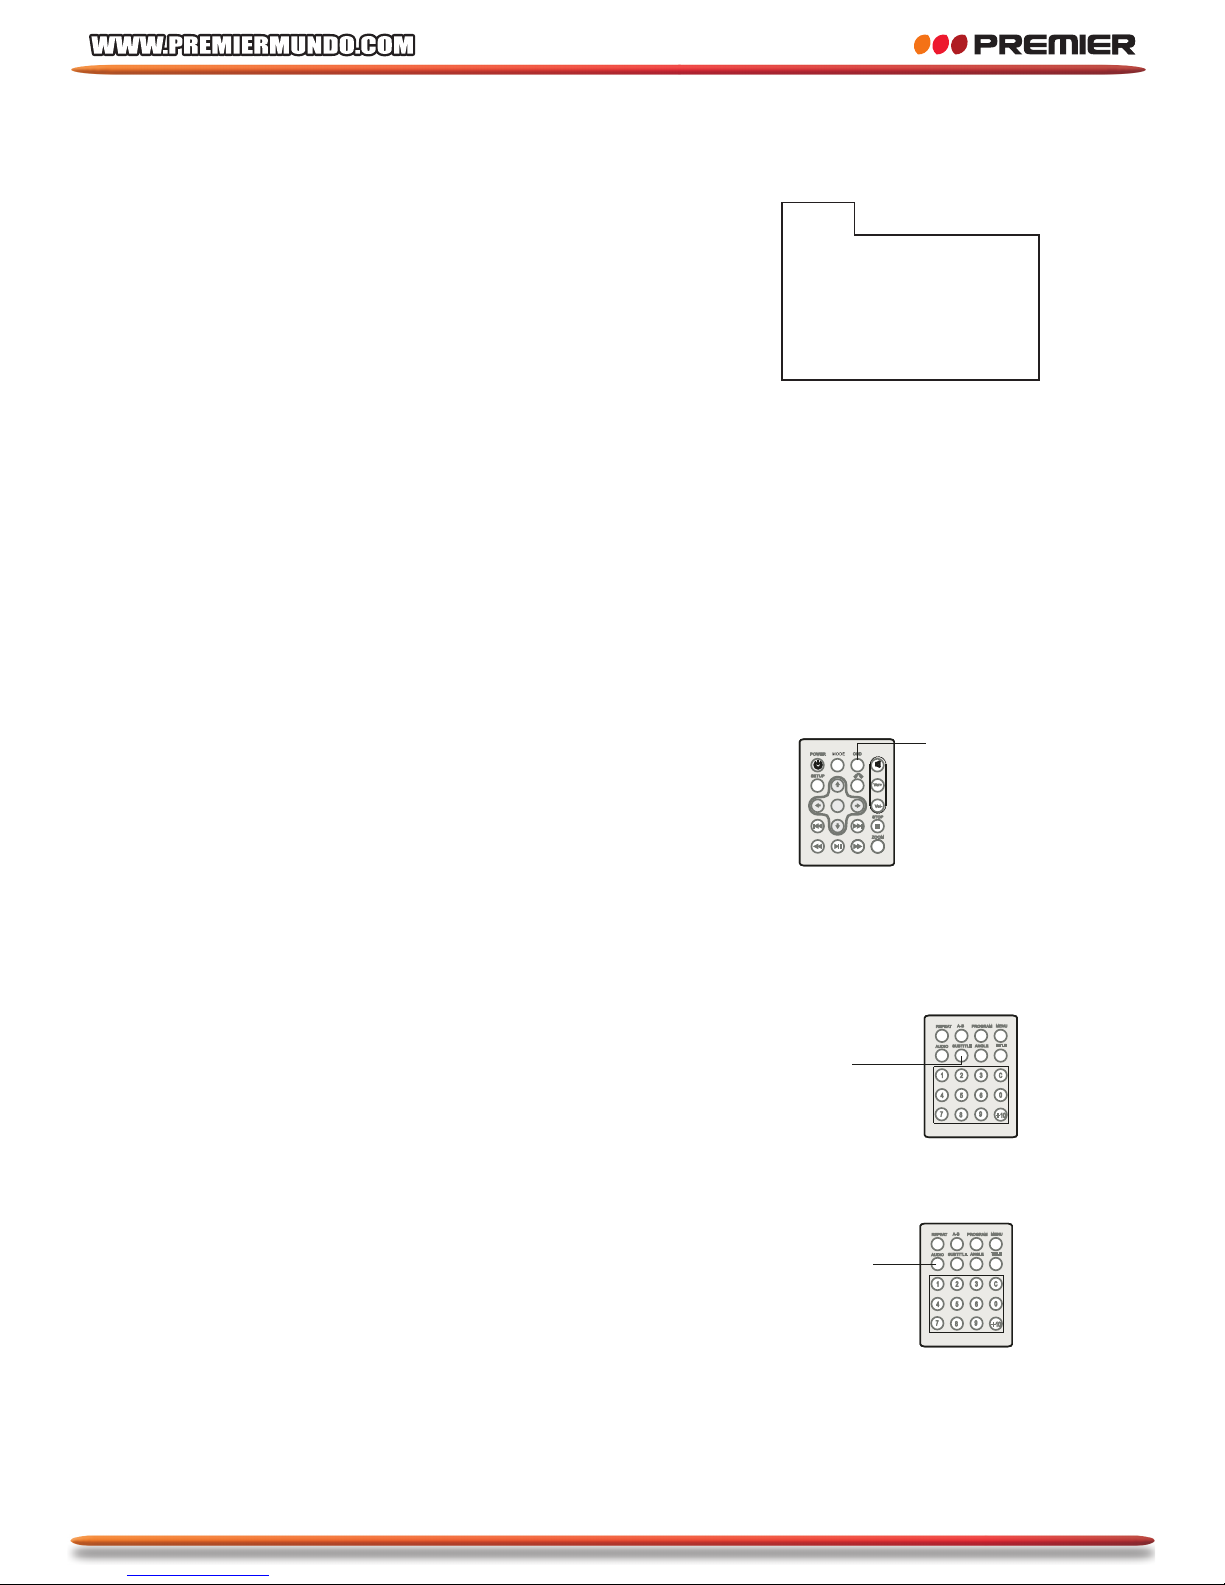
Using OSD
1. Press OSD to show the play and disc
information in the LCD when the main unit is in
play mode
2. Press OSD again to disable the information
display
Selecting a sub-title
Press SUBTITLE to select the sub-title when the
main unit is in play mode
Selecting an audio
1. Press AUDIO to select the audio language
when the main unit is in play mode for DVD
disc
2. Press AUDIO to select the audio channel when
the main unit is in play mode for VCD, CD disc.
PROG
TC TC TC
1 01 : 001 5 --- : --- 9 --- : --2 02 : 002 6 --- : ---10 --- : --3 --- : --- 7 --- : --- 11 --- : --4 --- : --- 8 --- : --- 12 --- : ---
Play Clear Exit
OSD
Subtitle
Audio
Page 38
37
BASIC OPERATIONS
Selecting an angle
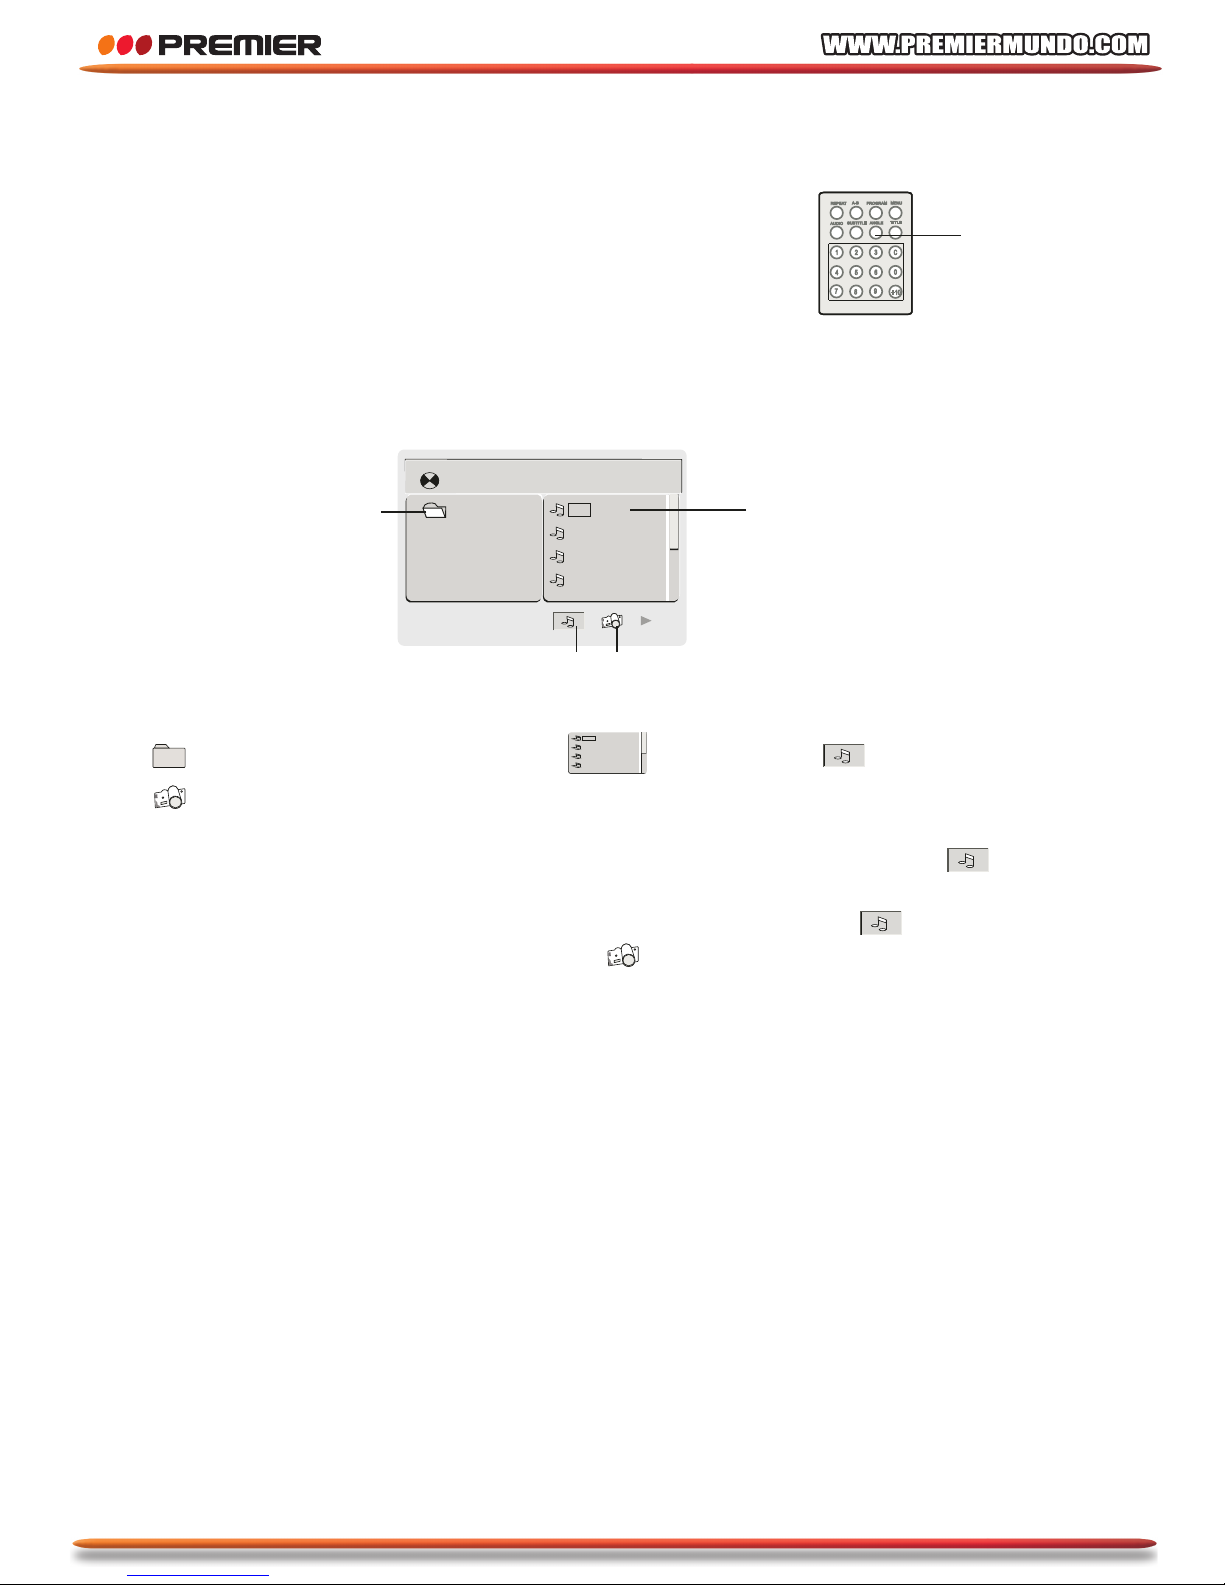
Press ANGLE to select the play angle when the
main unit is in play mode for DVD disc, there is no
function for other disc.
Playing audio files and (JPEG) disc
1. Directory 2.
•••••••••••
01. 1001
02. 1002
03. 1003
04. 1004
File 3. Mp3 Icon
4.
JPEG Icon
• Using the cursor key to move the cursor to the directory, file, icon
or JPEG
icon.
• Selecting icon and press OK if you want to play audio files
, selecting JPEG
icon and press OK if you want to play
JPEG.
• Selecting a file and press OK if you want to play the file.
• Press PLAY/PAUSE to play sequence.
• Press A-B to repeat A-B playing.
Note: The LCD will be off if there is no operation on the unit over 3 minutes
when playing CD.
LCD will be on for any operation on the unit .
Angle
[ MP3_1] 1001. MP 3
01. MP 3_1
01. 1001
02. 1002
03. 1003
04. 1004
1 2
3 4
Page 39
38
BASIC OPERATIONS
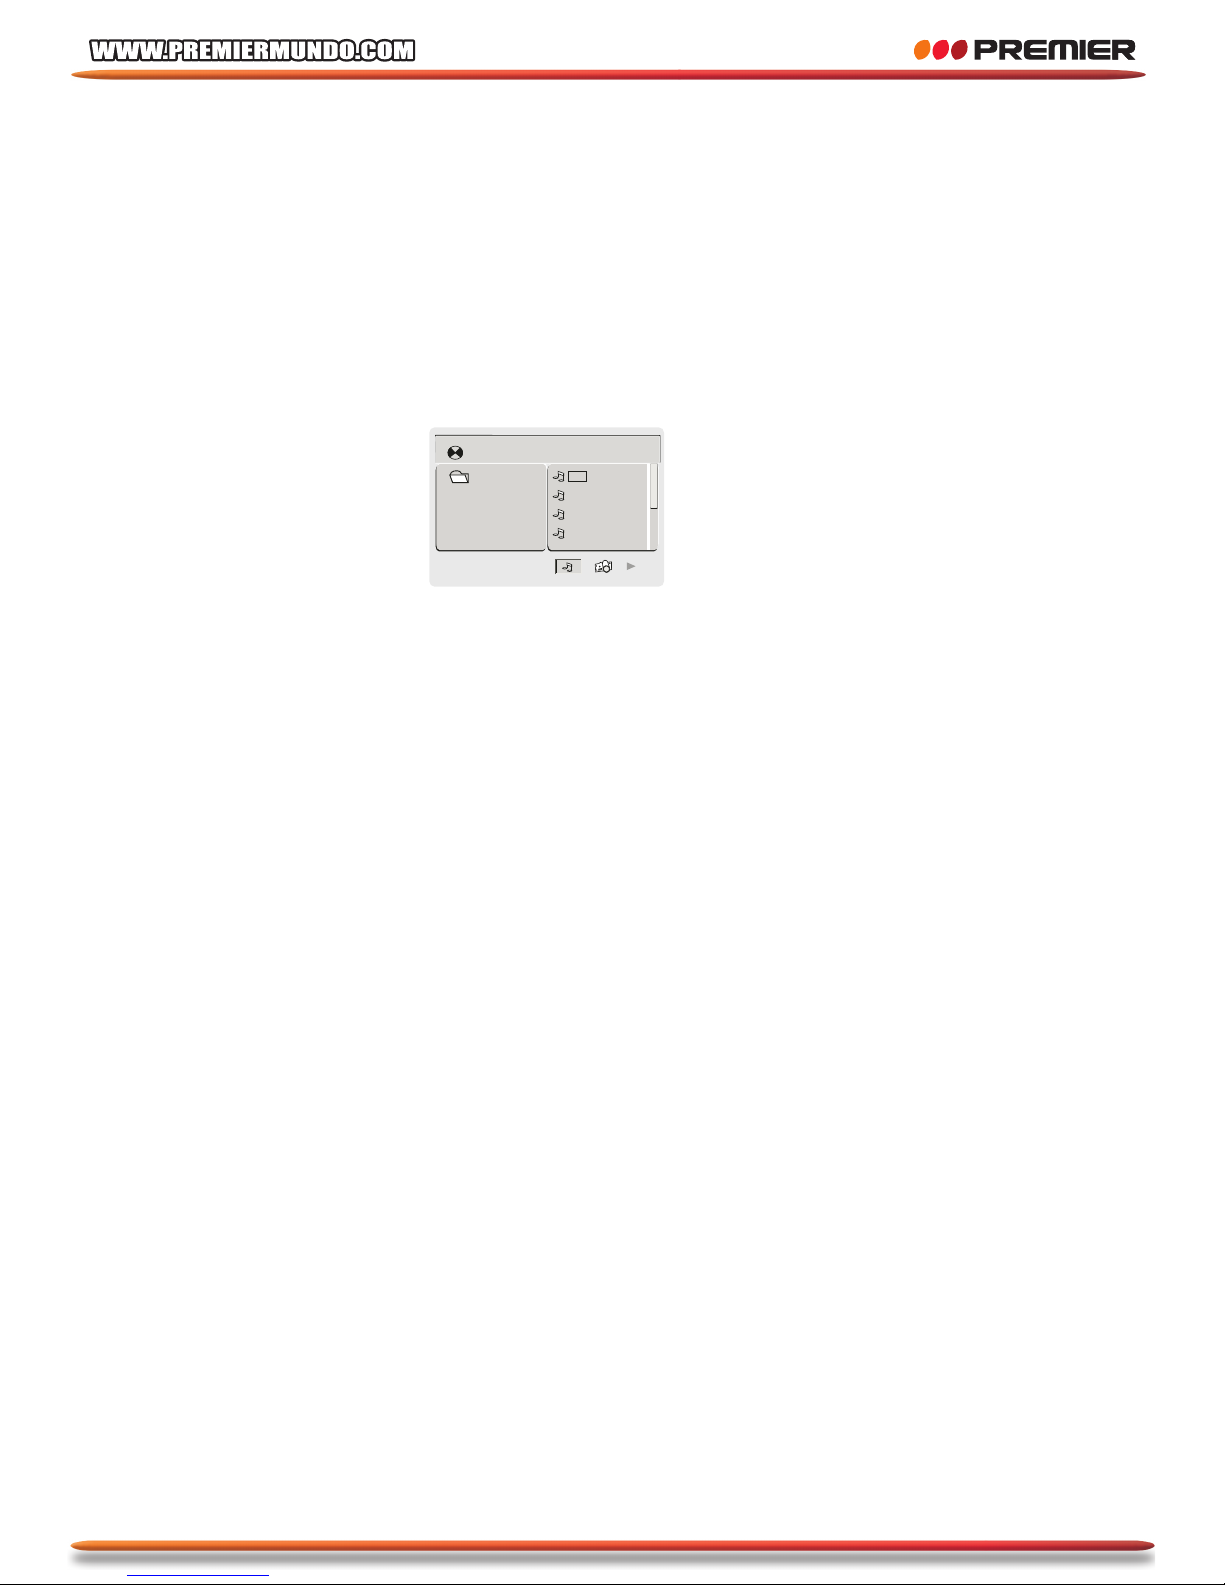
Playing the file storing in a USB storage (optional)
Connecting the USB storage to the USB socket of the main unit, the file stored in the
storage will be read automatically.
1. Power on the unit, connecting the USB storage to USB socket. (in no disc mode)
2. ”READ USB” will be shown in LCD and the files will be display in the LCD when
the unit finished the reading.
3. Operation is like play audio file or JPEG file
4. Please remove the USB storage directly when do not play the USB storage
The audio, video and JPEG file can be play in this unit
Note: USB in this unit is USB 1.1
The unit must be in no disc mode when play the file stored in the USB
storage
[MP3_1] 1001.MP3
0 1 . M P 3 _ 1
0 1 . 1 0 0 1
0 2 . 100 2
0 3 . 100 3
0 4 . 1 0 0 4
Page 40
39
BASIC OPERATION
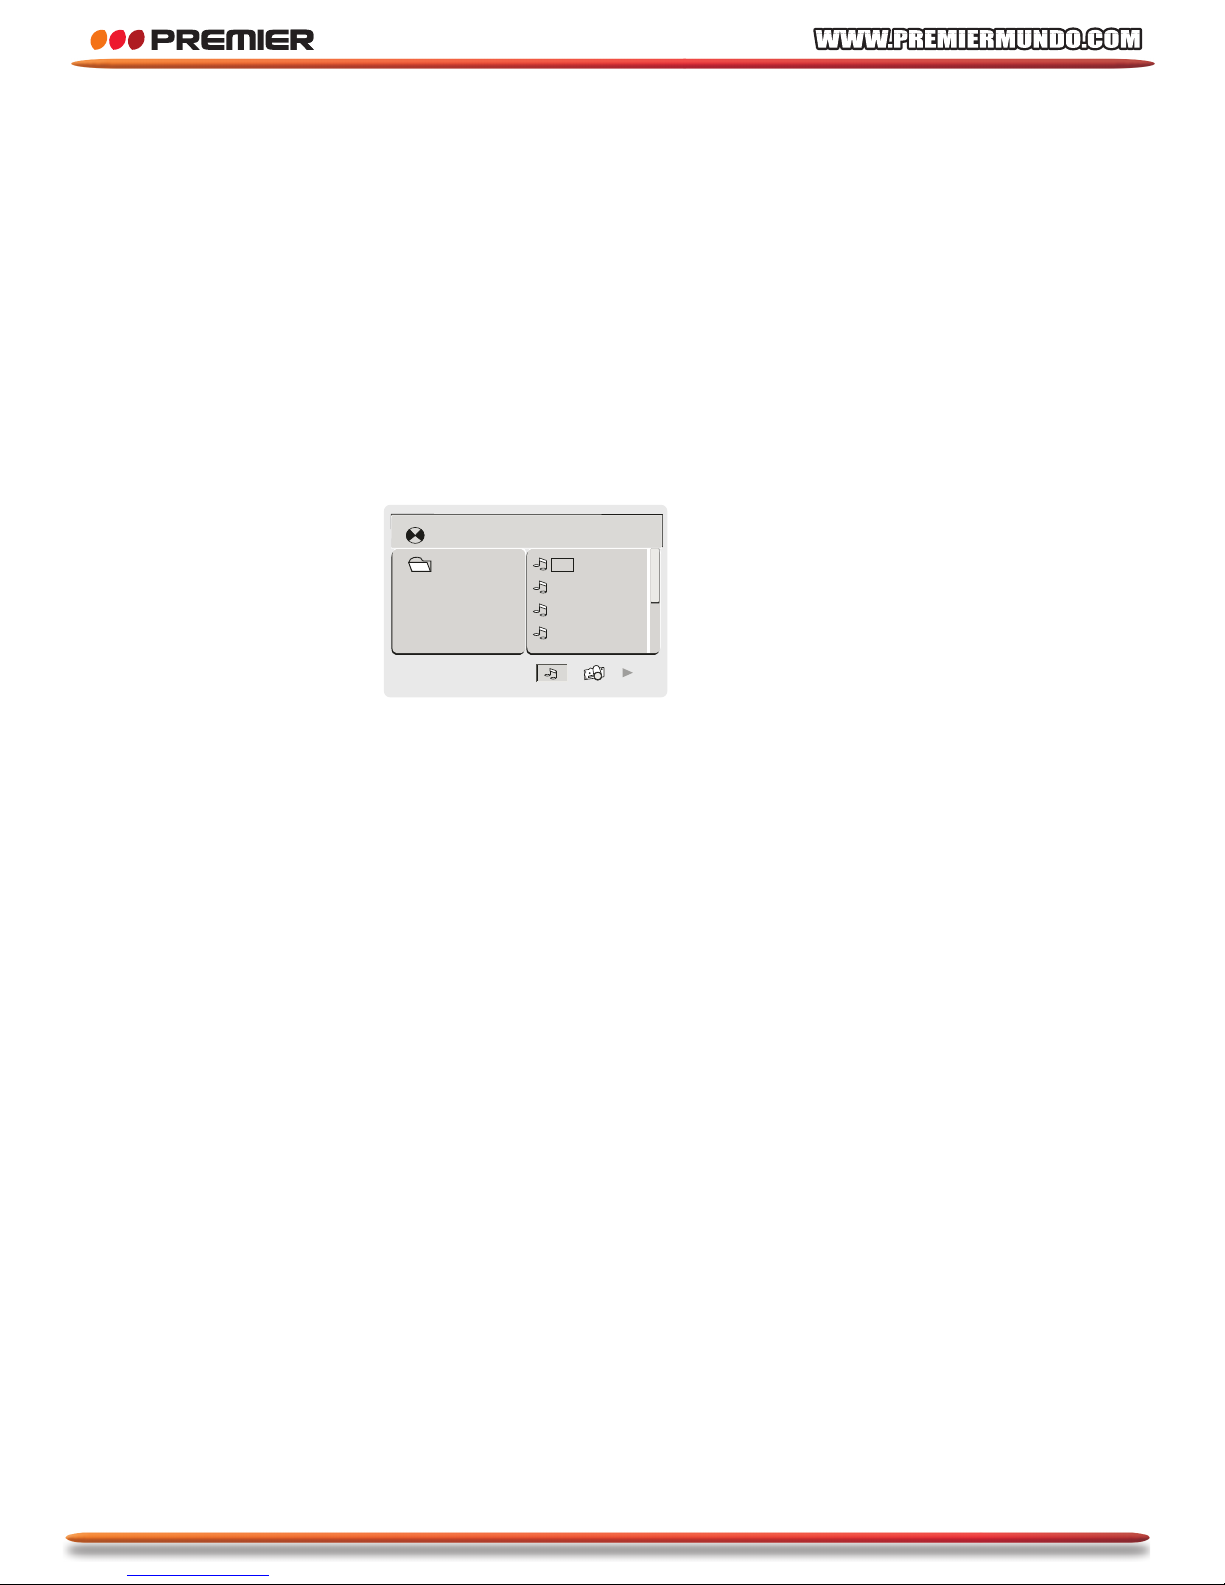
Playing the file storing in a memory card (optional)
Please insert the card (SD,MMC and MS) in to the socket. The file will be played
automatically.
1. Power on the unit, inserting the card in to the socket. (in no disc mode)
2. ”READ CARD” will be shown in LCD and the files will be display in the LCD when
the unit finished the reading.
The SD , MMC and MS can be read in this unit
Note: The unit must be in no disc mode when play the file stored in the card
[MP3_1] 1001. MP3
01. MP 3 _ 1
01. 1 001
02. 1002
03. 1003
04. 1 004
Page 41
40
MAIN UNIT SETTINGS
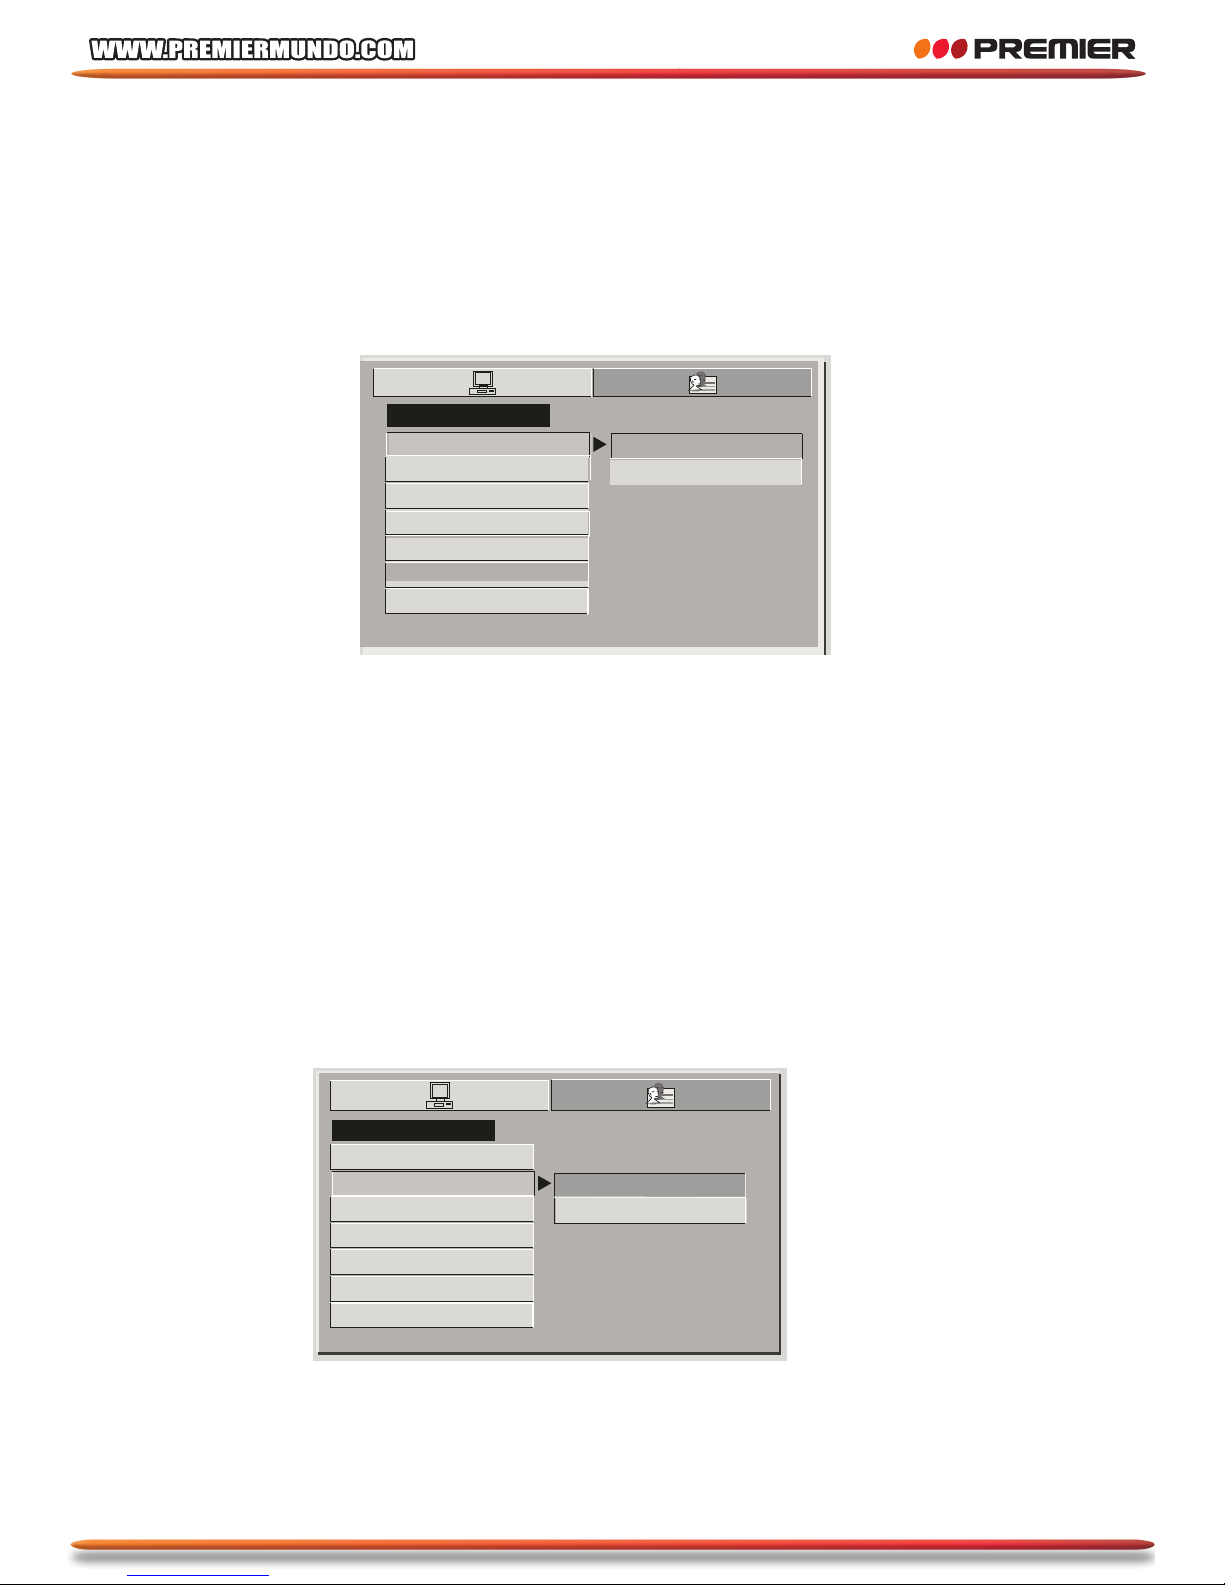
Selecting a TV system
Please select the proper video signal system if you want to see on a TV set.
• NTSC: please select this item when TV set. is NTSC system TV set
• PAL: please select this item when TV set is PAL system TV set
• Default:NTSC
Note: The picture may be a grey picture if the system is not correctly set.
Setting screen saver
This function can save the TFT life if he unit stay in stop, no disc over 1 minutes.
• ON: screen saver enable
• OFF: screen saver disable
• Default: ON
SYSTEM SETUP
TV SYSTEM
SCREEN SAVER
TV TYPE
PASSWORD
RATING
DEFAULT
EXIT SETUP
NTSC
PAL
SYSTEM SETUP
TV SYSTEM
SCREEN SAVER
TV TYPE
PASSWORD
RATING
DEFAULT
EXIT SETUP
ON
OFF
Page 42
41
MAIN UNIT SETTINGS
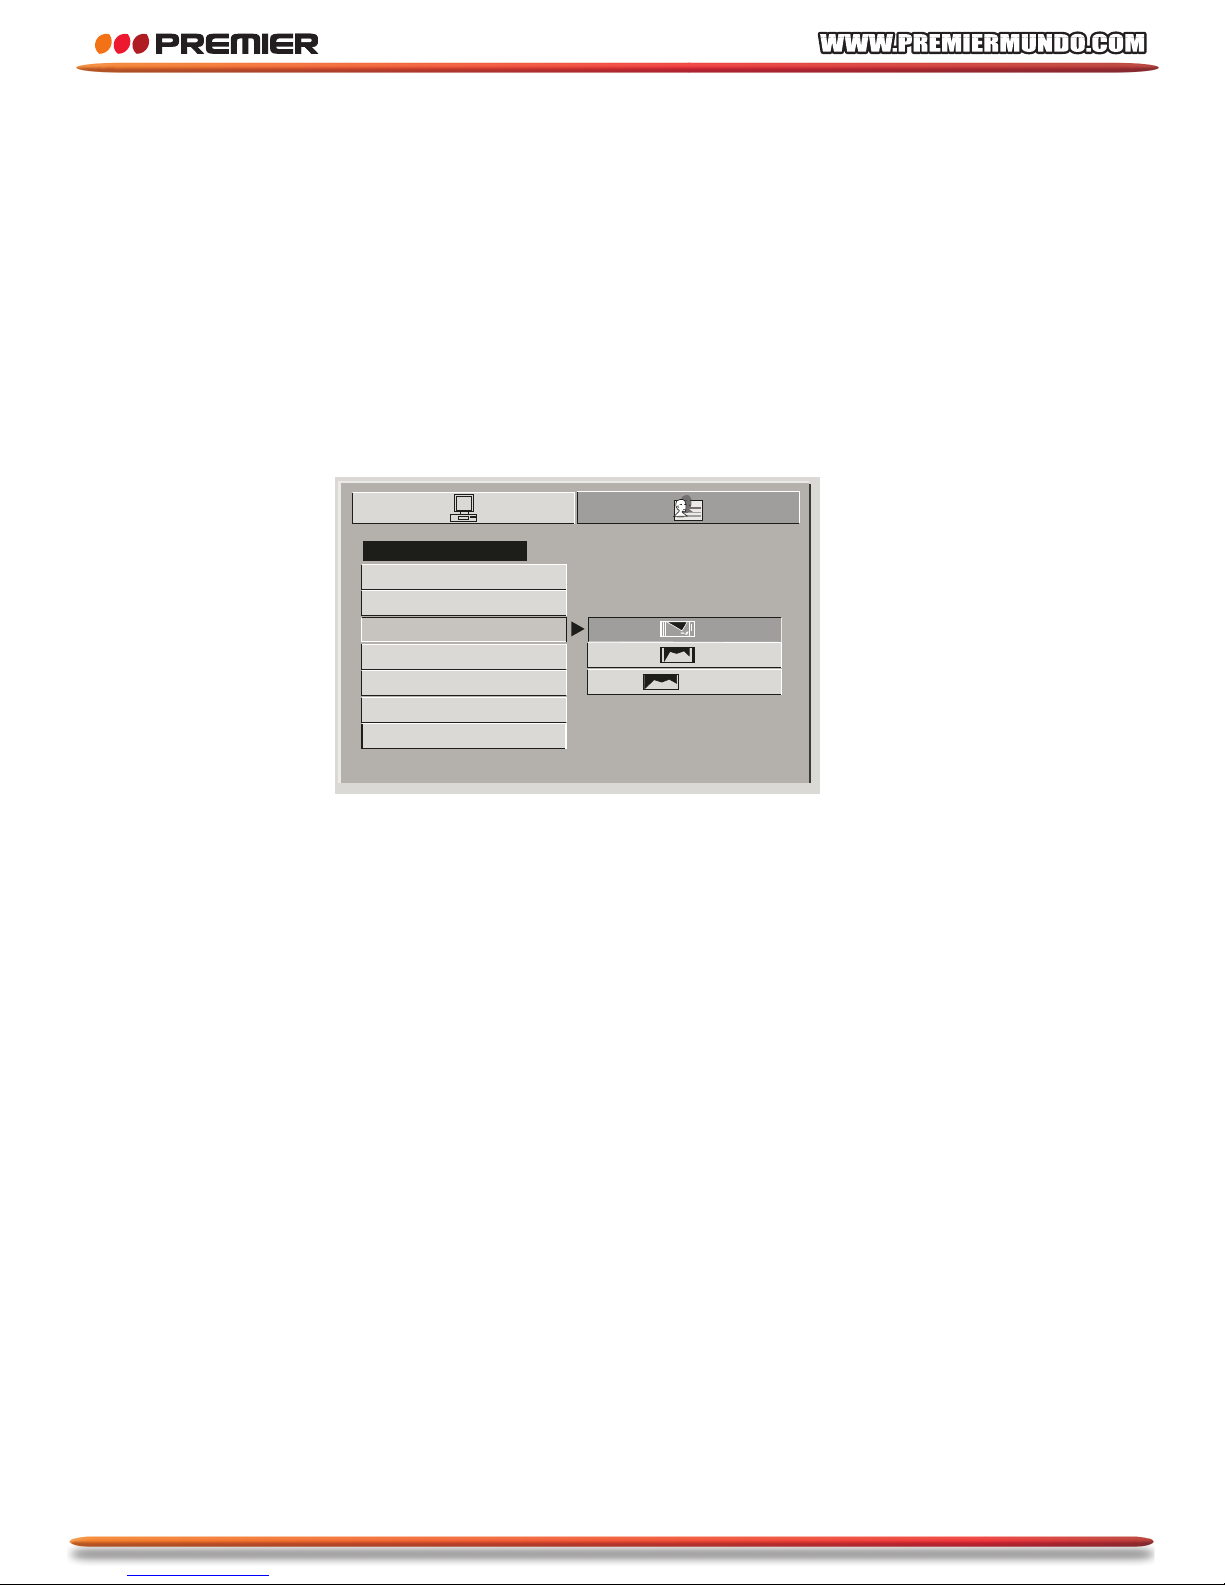
Selecting a TV scale
16:9: Please select this item when connecting this unit to a 16:9 TV set.
4:3 L/B: Please select this item when connecting this unit to a normal TV set.
4:3 P/S: Please select this item when connecting this unit to a normal TV set.
Note: Picture scale is depending the disc.
4: 3LB
16: 9
•/
•/
4: 3PS
•/
SYSTEM SETUP
TV SYSTEM
SCREEN SAVER
TV TYPE
PASSWORD
RATING
DEFAULT
EXIT SETUP
Page 43
42
MAIN UNIT SETTINGS
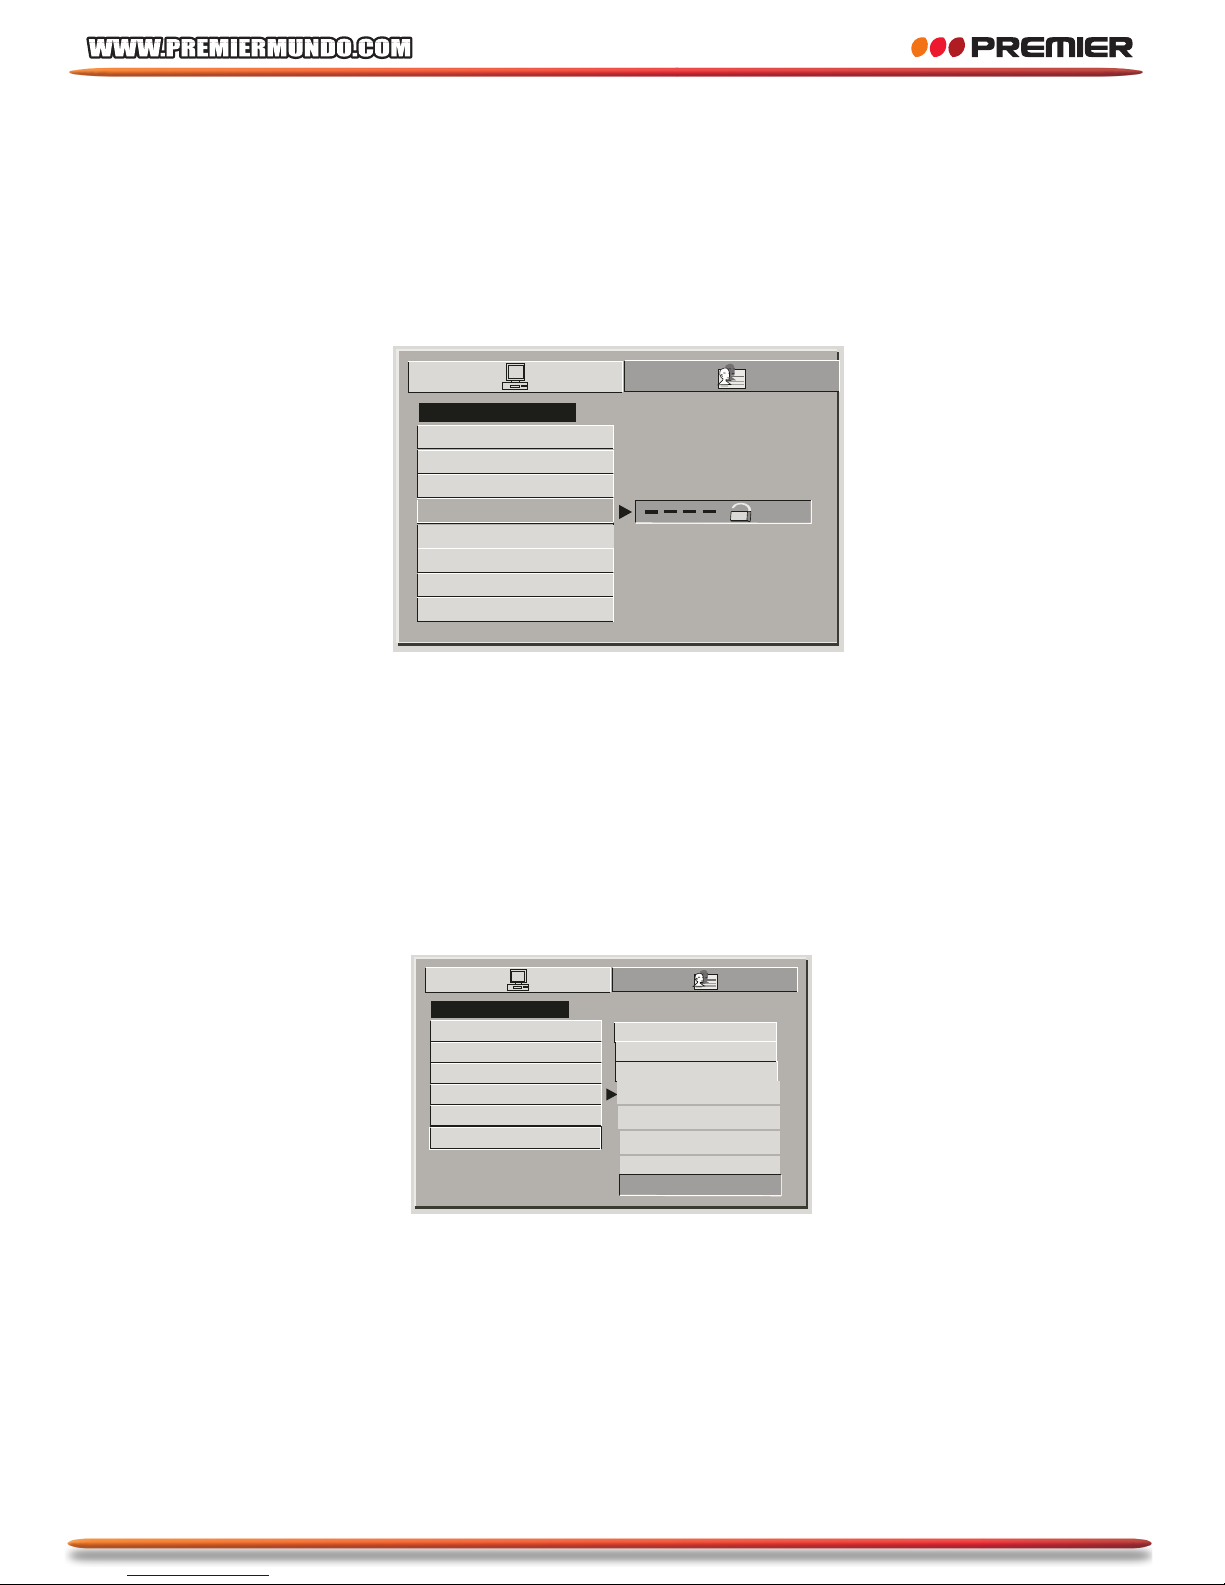
Setting parent lock
1. Default setting: 0000
2. When unlock, new parent lock can be input and select the parent lock level.
Setting parent lock level
This setting can control the unit play parent lock DVD disc.
• Level is divided into 8 level
• Selecting “ADULT”, the lock is cancel
• Default: “ADULT”
Note: The parent lock level can not be set if the parent lock is locked.
•• Qœ•• [• •• SU
SYSTEM SETUP
TV SYSTEM
SCREEN SAVER
TV TYPE
PASSWORD
RATING
DEFAULT
EXIT SETUP
SYSTEM SETUP
PASSWORD
TV TYPE
SCREEN SAVER
TV SYSTEM
EXIT SETUP
DEFAULT
1 KID SAFE
6 R
5 PG-R
4 PG 13
3 PG
2 G
8 ADULT
7 NC-17
Page 44
43
MAIN UNIT SETTINGS
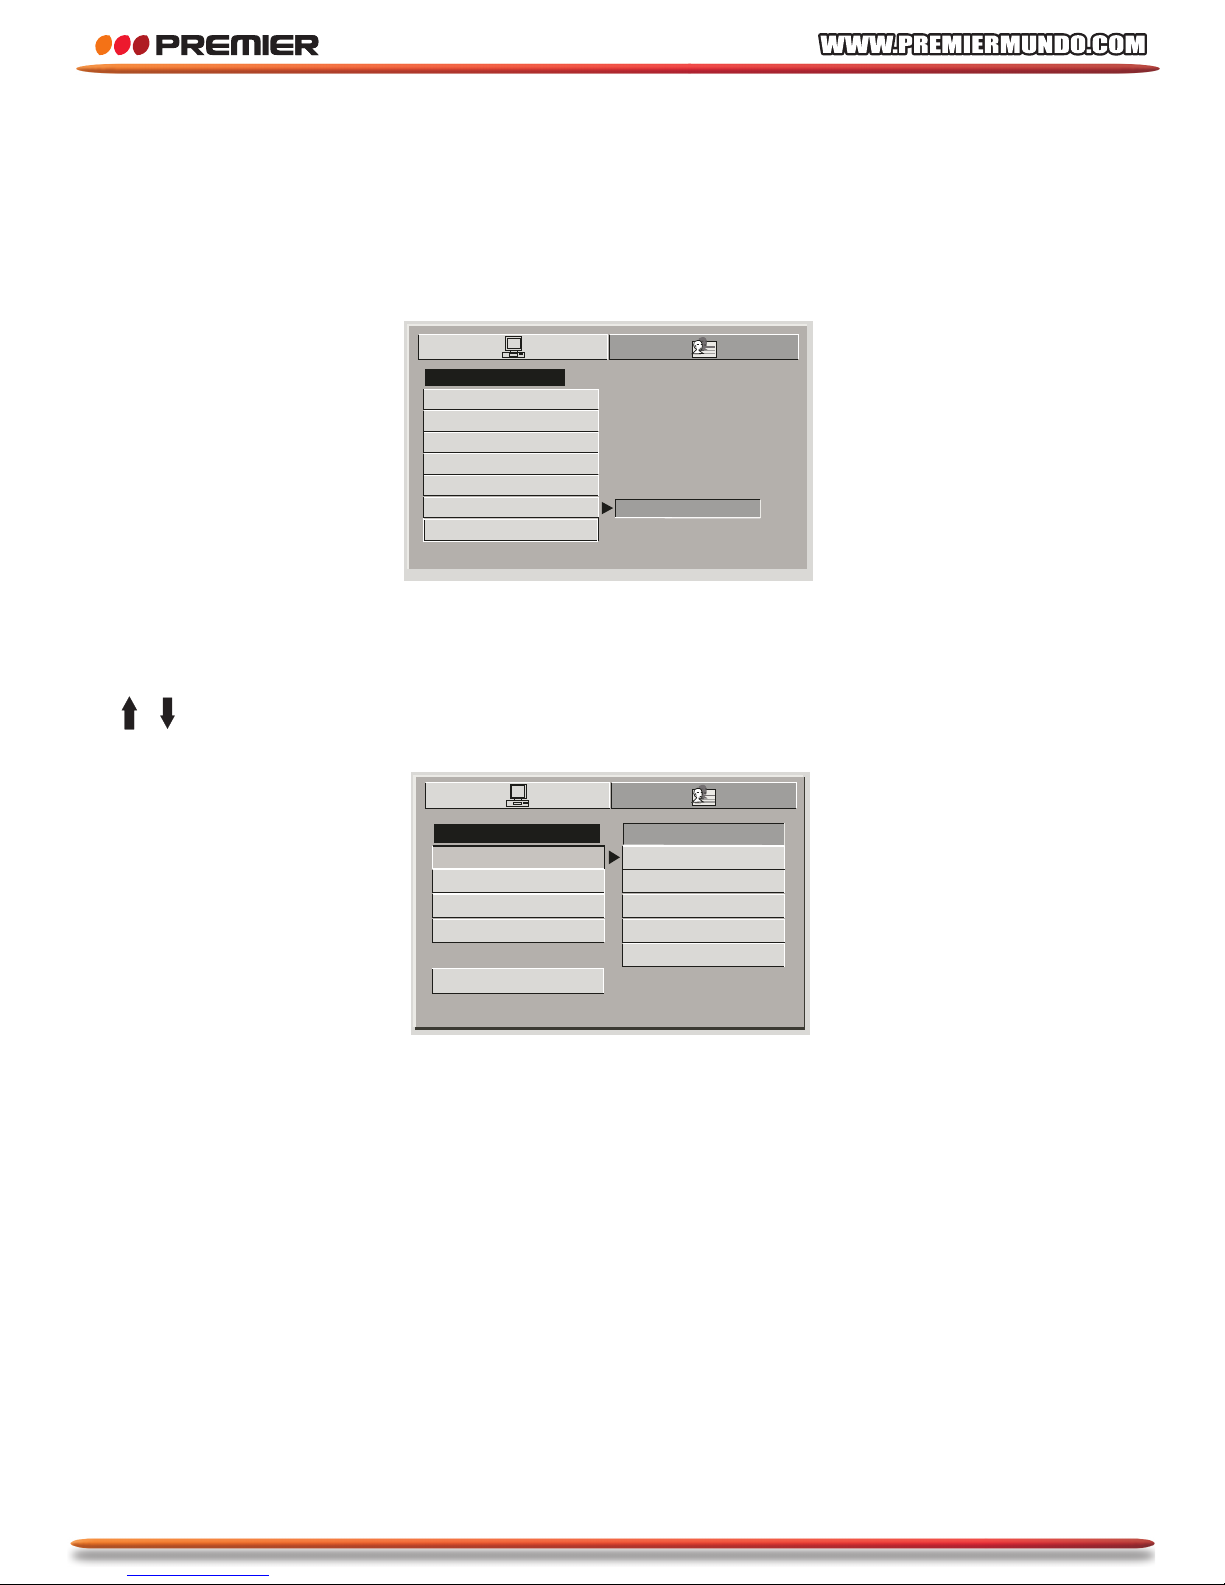
Default setting
• To restore the factory setting, please select this item and press OK
Selecting a OSD language
Please enter the OSD language select menu, use cursor key to move the cursor
/ to the language what you want and press OK .
LANGUAGE SETUP
MENU LANG
SUBTITLE LANG
AUDIO LANG
ODS LANGUAGE
EXIT SETUP
ENGLISH
FRENCH
SPANISH
GERMAN
CHINESE
PORTOGUESE
SYSTEM SETUP
PASSWORD
TV TYPE
SCREEN SAVER
TV SYSTEM
EXIT SETUP
DEFAULT
RESTORE
RATING
Page 45
44
MAIN UNIT SETTINGS
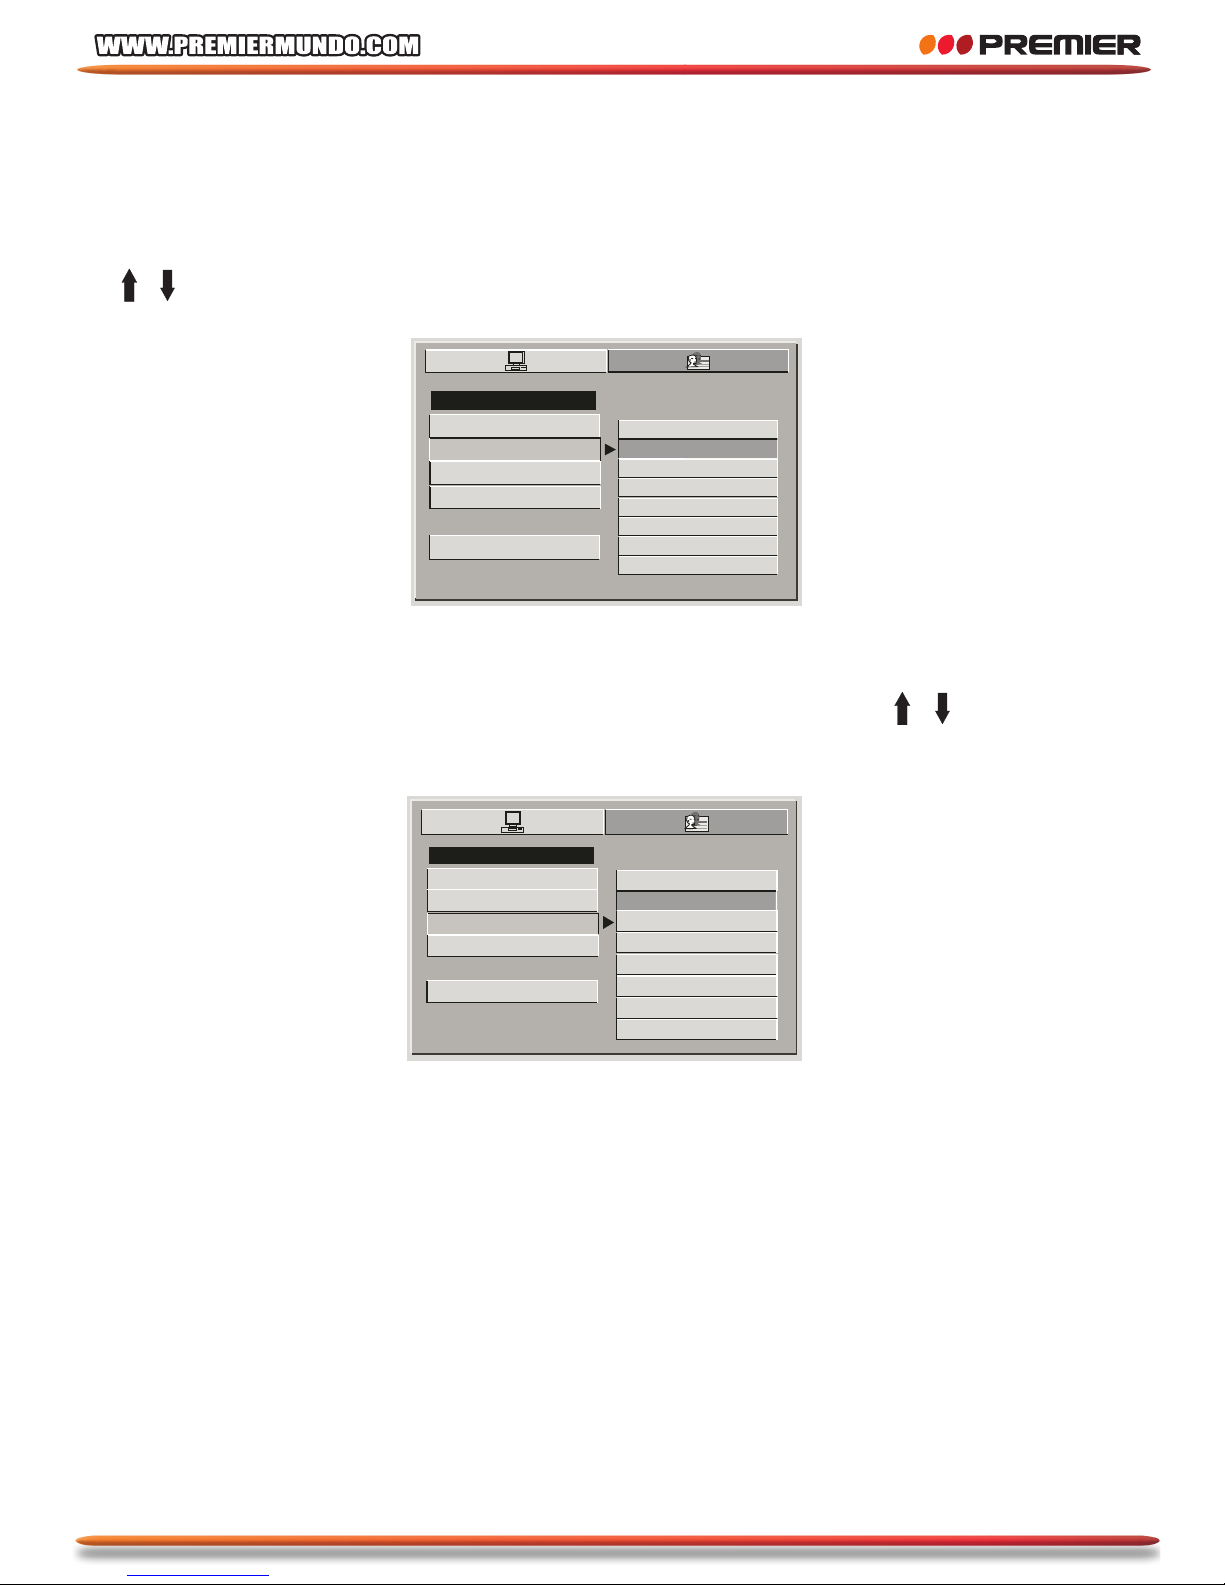
Selecting a audio language
Please enter the audio language select menu, use cursor key to move the cursor
/ to the language what you want and press OK .
Selecting a sub-title language
Please enter the sub-title language select menu, use cursor key / to move the
cursor to the language what you want and press OK .
LANGUAGE SETUP
MENU LANG
SUBTITLE LANG
AUDIO LANG
ODS LANGUAGE
EXIT SETUP
CHINESE
SPANISH
FRENCH
JAPAN
ENGLISH
PORTOGUESE
LATIN
GERMAN
LANGUAGE SETUP
MENU LANG
SUBTITLE LANG
AUDIO LANG
ODS LANGUAGE
EXIT SETUP
CHINESE
SPANISH
FRENCH
JAPAN
ENGLISH
PORTOGUESE
OFF
GERMAN
Page 46
45
MAIN UNIT SETTINGS
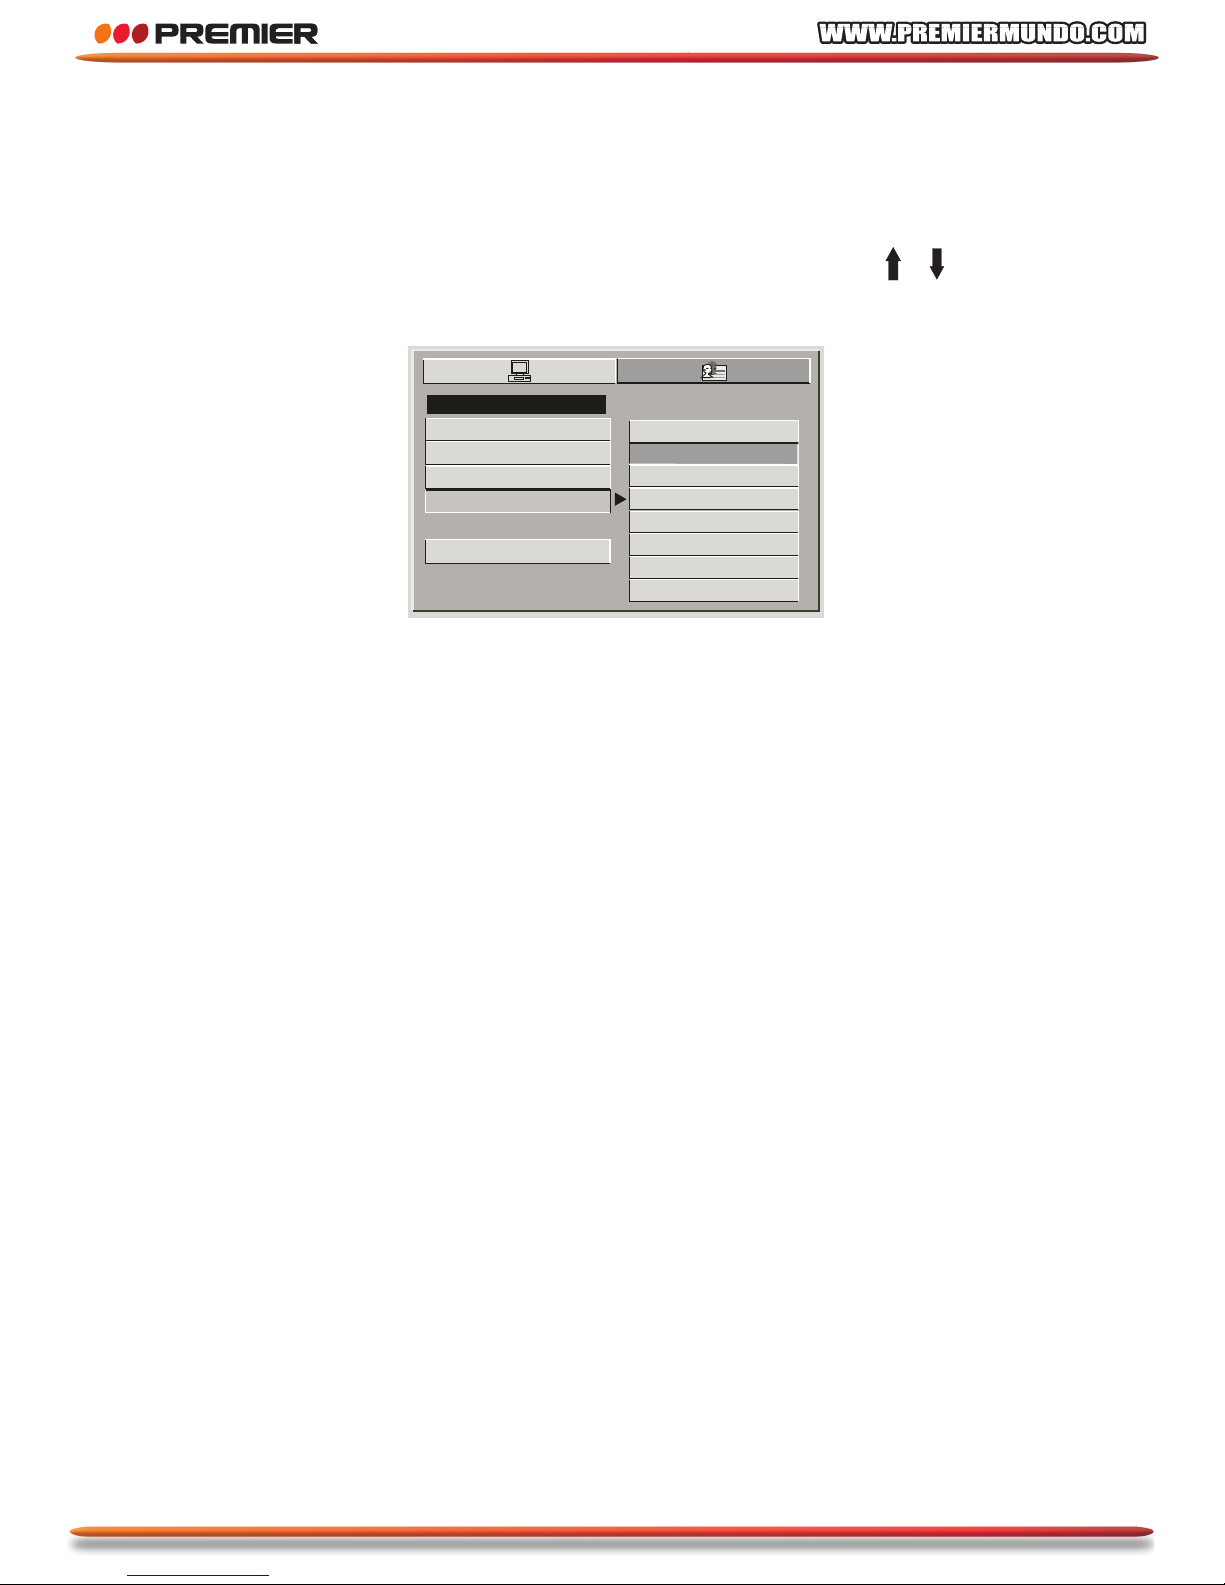
Select a menu language
Please enter the menu language select menu, use cursor key / to move the
cursor to the language what you want and press OK.
Note: The language will be the disc default language if the language you want is
not visible Default language: English
LANGUAGE SETUP
MENU LANG
SUBTITLE LANG
AUDIO LANG
ODS LANGUAGE
EXIT SETUP
CHINESE
SPANISH
FRENCH
JAPAN
ENGLISH
PORTOGUESE
LATIN
GERMAN
Page 47
46
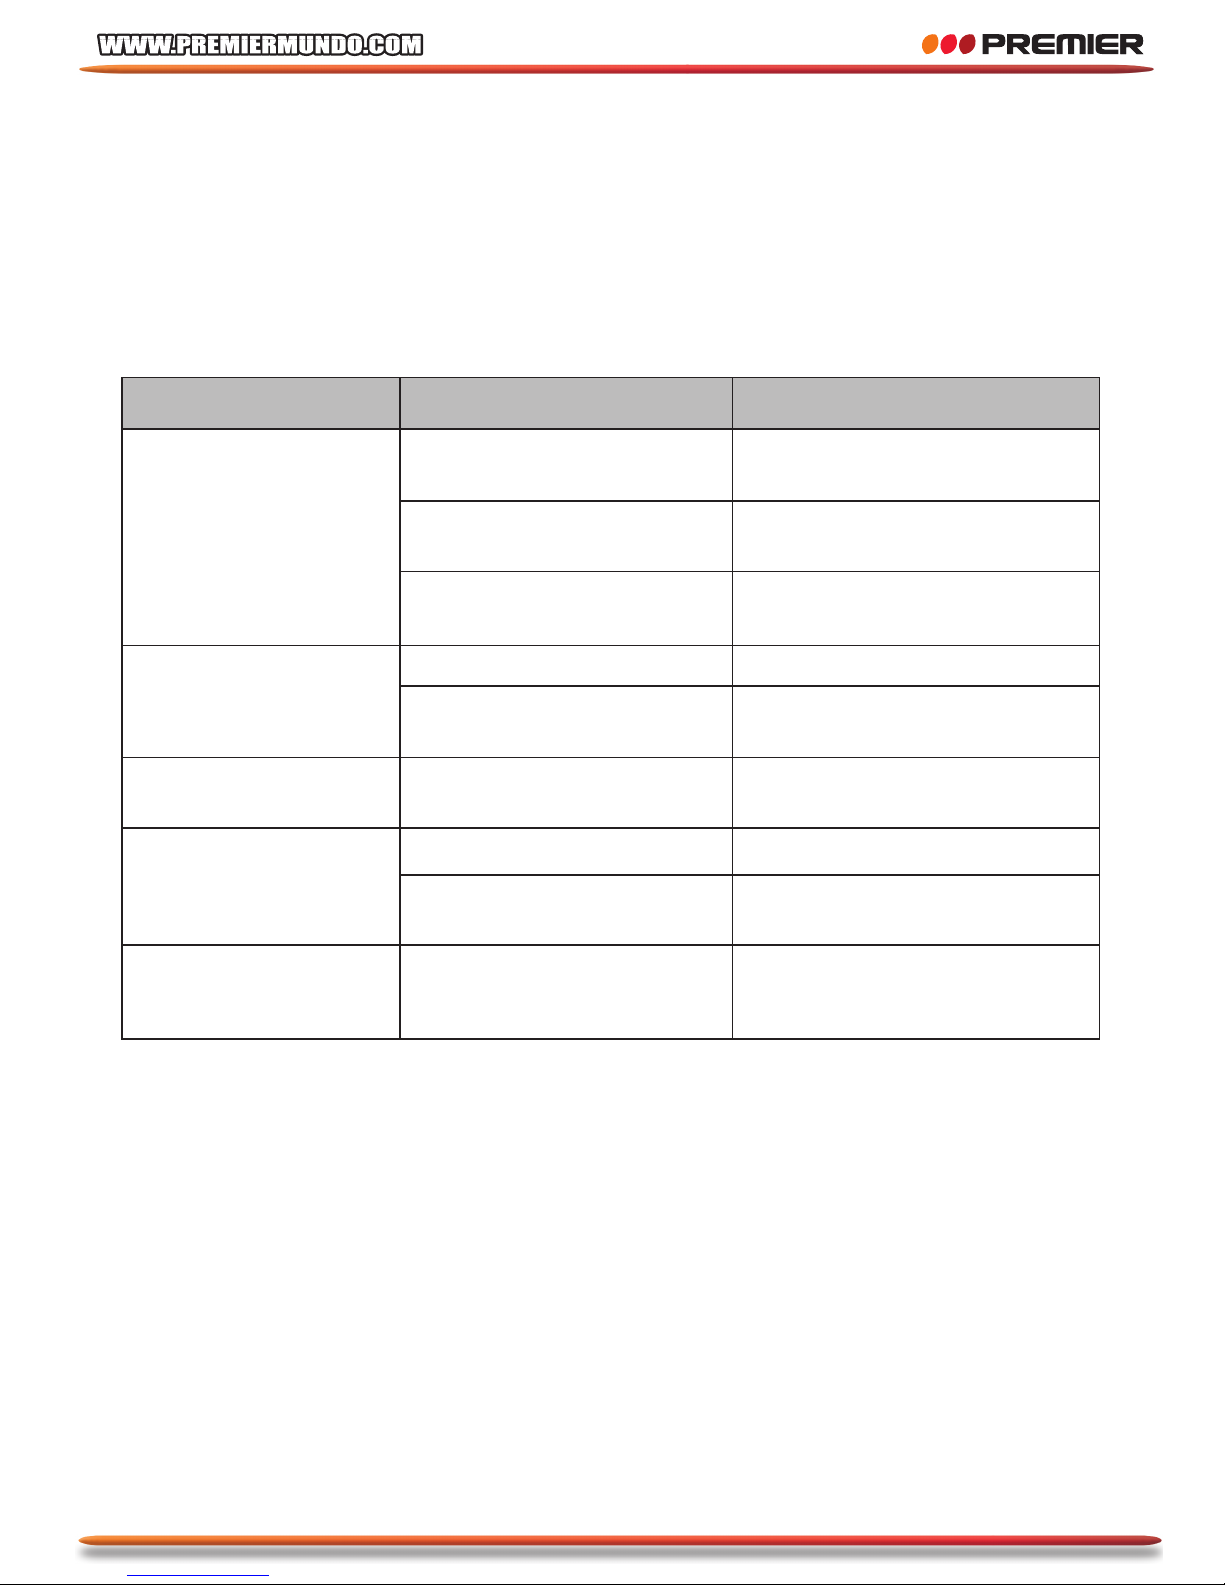
Disc can not play
No picture in TV
Speaker no sound
No sound in TV
or amplifier
Different volume for
DVD/CD disc
Disc error
Disc dirty or scratch
Area code error
Cable loosen
Setting error
Earphone in use
Cable loosen
Connecting cable error
Disc recording in different
way
Place disc in right direction
Using good disc
Using right area code disc
Insert the cable again
Set TV or this unit correctly
Removing earphone
Insert the cable again
Connecting cable correctly
Adjust volume level
PROBLEM POSSIBLE REASON SOLUTION
TROUBLE SHOOTING
Trouble shooting
Please refer the following instruction when there are some problem with this unit. If
the problem still exit, please consult your nearest service center.
Page 48
47
IMPORTANT USER INFORMATION
This product conforms to European Directive 2002/96/EC.
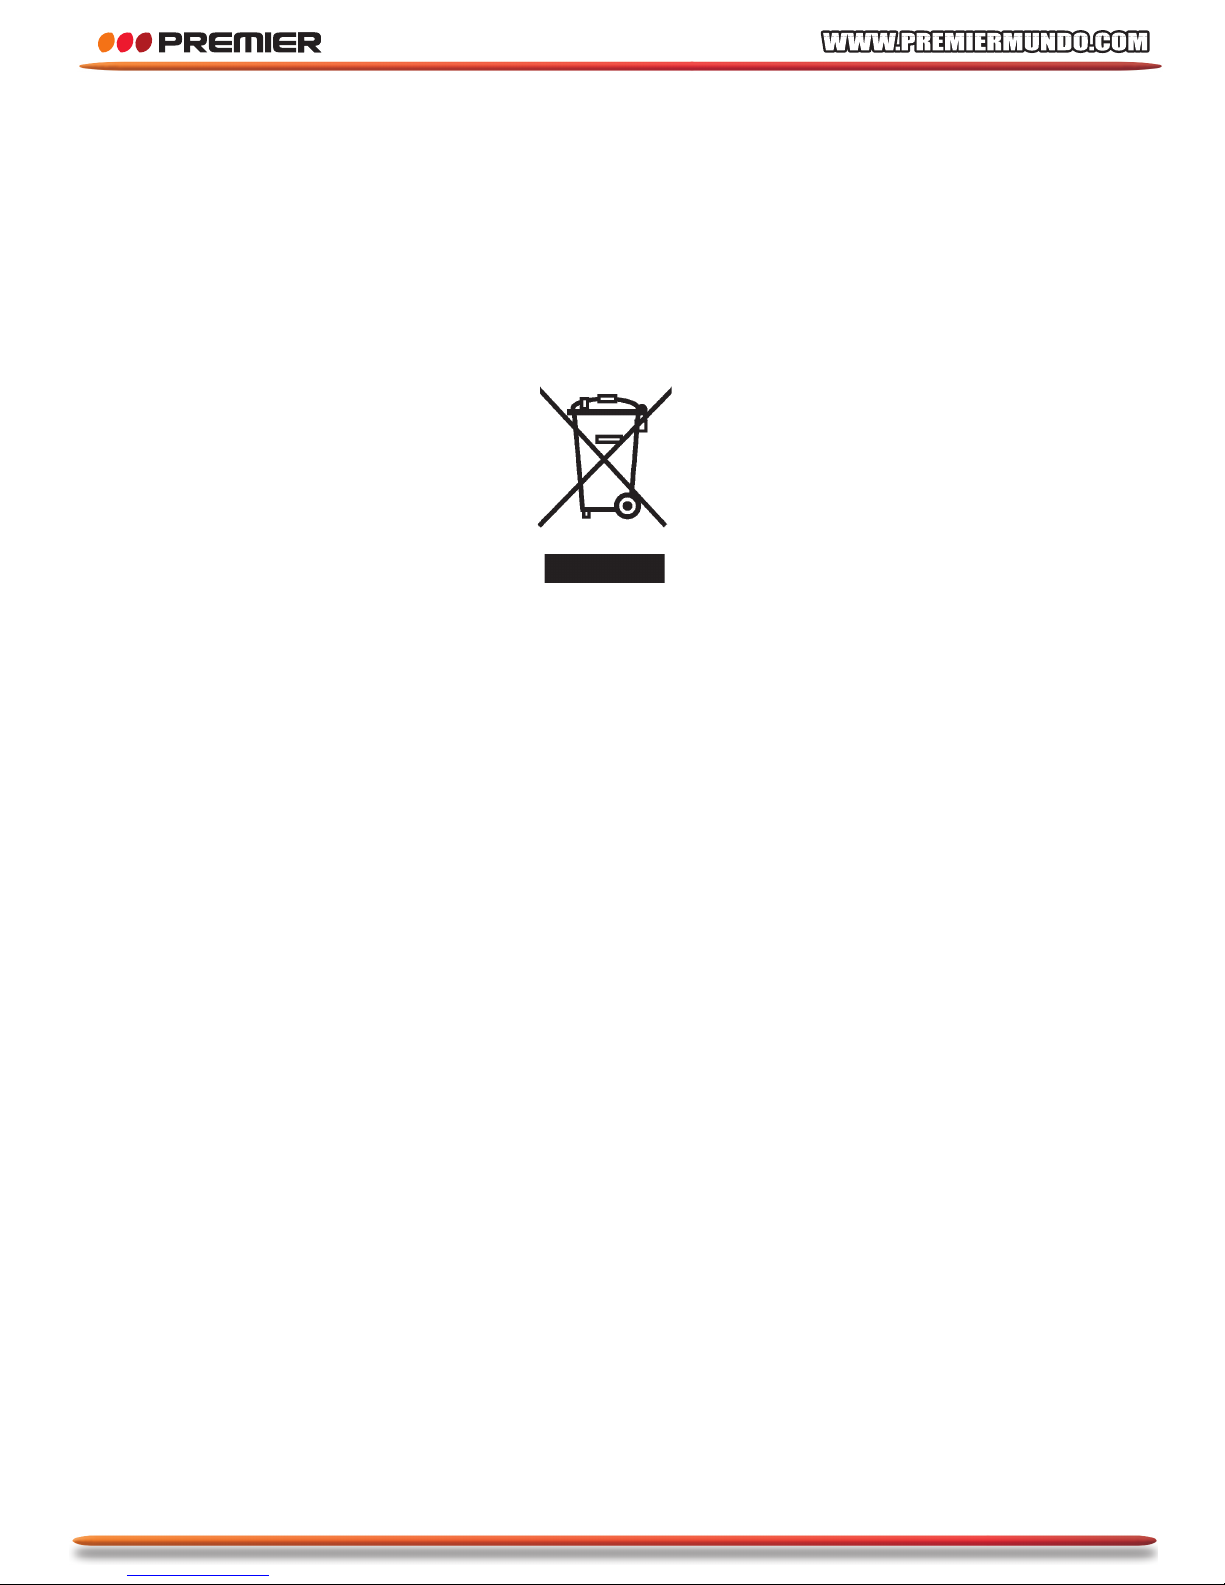
This appliance bears the symbol of the barred waste bin. This indicates that, at the end of its
useful life, it must not be disposed of as domestic waste, but must be taken to a collection
centre for waste electrical and electronic equipment, or returned to a retailer on purchase of a
replacement.
It is the user’s responsibility to dispose of this appliance through the appropriate channels at
the end of its useful life. Failure to do so may incur the penalties established by laws governing
waste disposal.
Proper differential collection, and the subsequent recycling, processing and environmentally
compatible disposal of waste equipment avoids unnecessary damage to the environment and
possible related health risks, and also promotes recycling of the materials used in the appliance.
For further information on waste collection and disposal, contact your local waste disposal
service, or the shop from which you purchased the appliance.
Manufacturers and importers fulfil their responsibilities for recycling, processing and
environmentally compatible disposal either directly or by participating in collective systems.
Page 49
48
IMPORTANT SAFETY INFORMATION
DISC USAGE INFORMATION
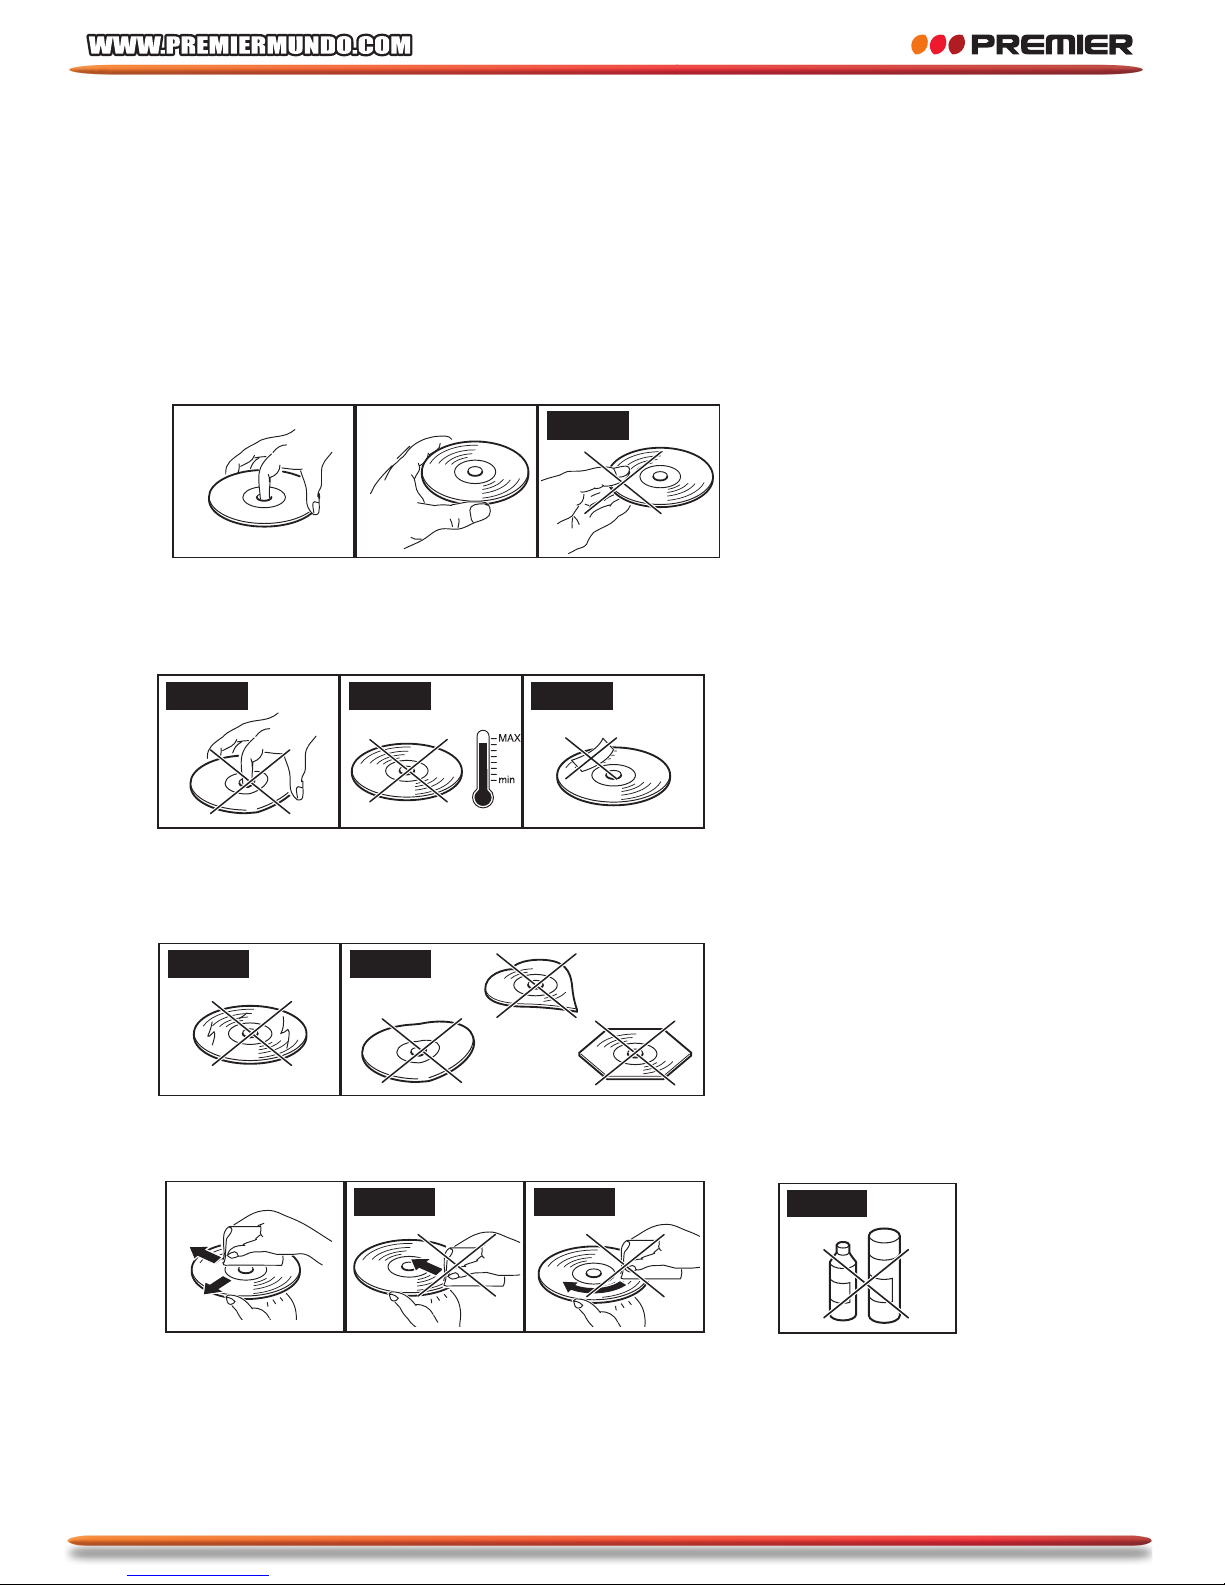
Video disc contains high-density compressed data that needs proper handling.
MAINTENANCE CD
- Hold the CD with fingers.
- Hold the disc’s outer edge and/or the center spindle hole.
- Do not touch the CD surface.
- Do not bend or press the CD.
- Do not expose the CD to direct sunlight or heating sources.
- Store CD in cabinet vertically, in dry condition.
- Please do not stick any labels on its surface.
- Avoid playing scratched or distorted disc as they can cause damage to the system.
- Avoid playing disc with irregular shapes as they may not be played by the system
and can cause damage.
NO!
NO!NO!NO!
NO!NO!
NO!
NO!
NO!
Prevent exposure to:
- Direct sunlight. / Heat or exhaust from a heating device. / Extreme humidity.
CLEANING CD
- Clean the CD surface with a soft, dry cleaning cloth.
- Wipe the disc surface gently, radically, from center toward the outer edge.
- Do not apply thinner, alcohol chemical solvent, or sprays when cleaning. Such
cleaning fluids will permanently damage the disc surface.
Page 50
49
IMPORTANT SAFETY INFORMATION
CONDENSATION
Condensation may form inside this player under following conditions:
• If warm air comes in contact with any cold parts inside the player;
• If the player is located in a room with high humidity;
When condensation forms inside the player, the player may not operate correctly.
If this occurs, leave the player at room temperature until the inside of the player
becomes dry and operational.
OTHER INFORMATIONS
Page 51
50
OTHER INFORMATIONS
 Loading...