

Page 1
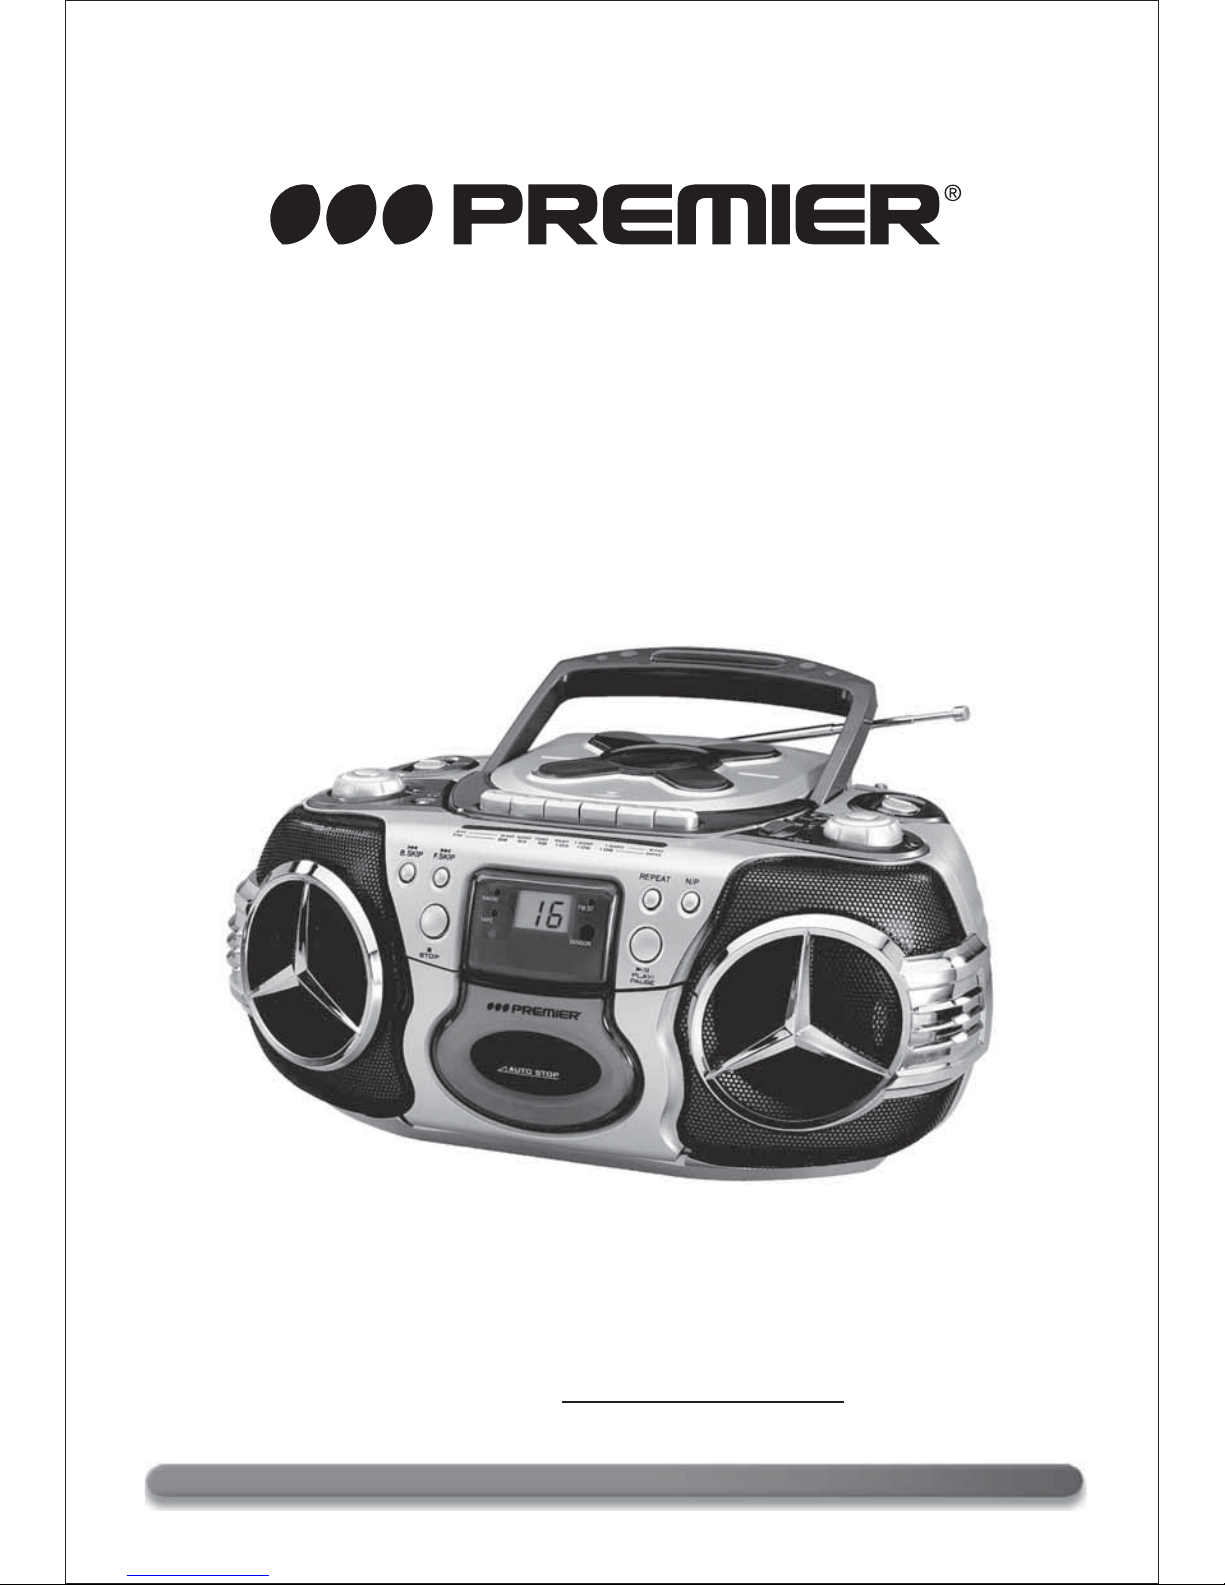
INSTRUCTION MANUAL
Radio-Cassette Recorder W/DVD & USB
SX - 2558DU
DEAR CUSTOMER
In order to achieve the best performance of your product, please read this instruction manual
carefully before using, and keep it for future reference.
If you need extra support, please write to [email protected]
Page 2
WWW.PREMIERMUNDO.COM
Page 1
CAUTION
RISK OF ELECTRIC
SHOCK, DO NOT OPEN
PREMIER CUSTOMER SERVICE
Venezuela:
0800 – ELECTRIC (353-2874)
Panama:
300-5185
Website:
www.premiermundo.com
E-mail:
NOTE
Caution: To reduce the risk of electric shock do not open this
device, there are not serviceable parts for customers. Please
refer any maintenance or repair to qualified personnel.
This sign means the existence of dangerous voltage at the
inside of the unit, which states a risk of electric shock.
This unit may be submitted to changes in specifications, characteristics and/or operation without prior
notice to the user, in order to continue improving and developing its technology.
This sign means that there are important instructions of
operation and handling in the manual that comes with this
device.
Page 3
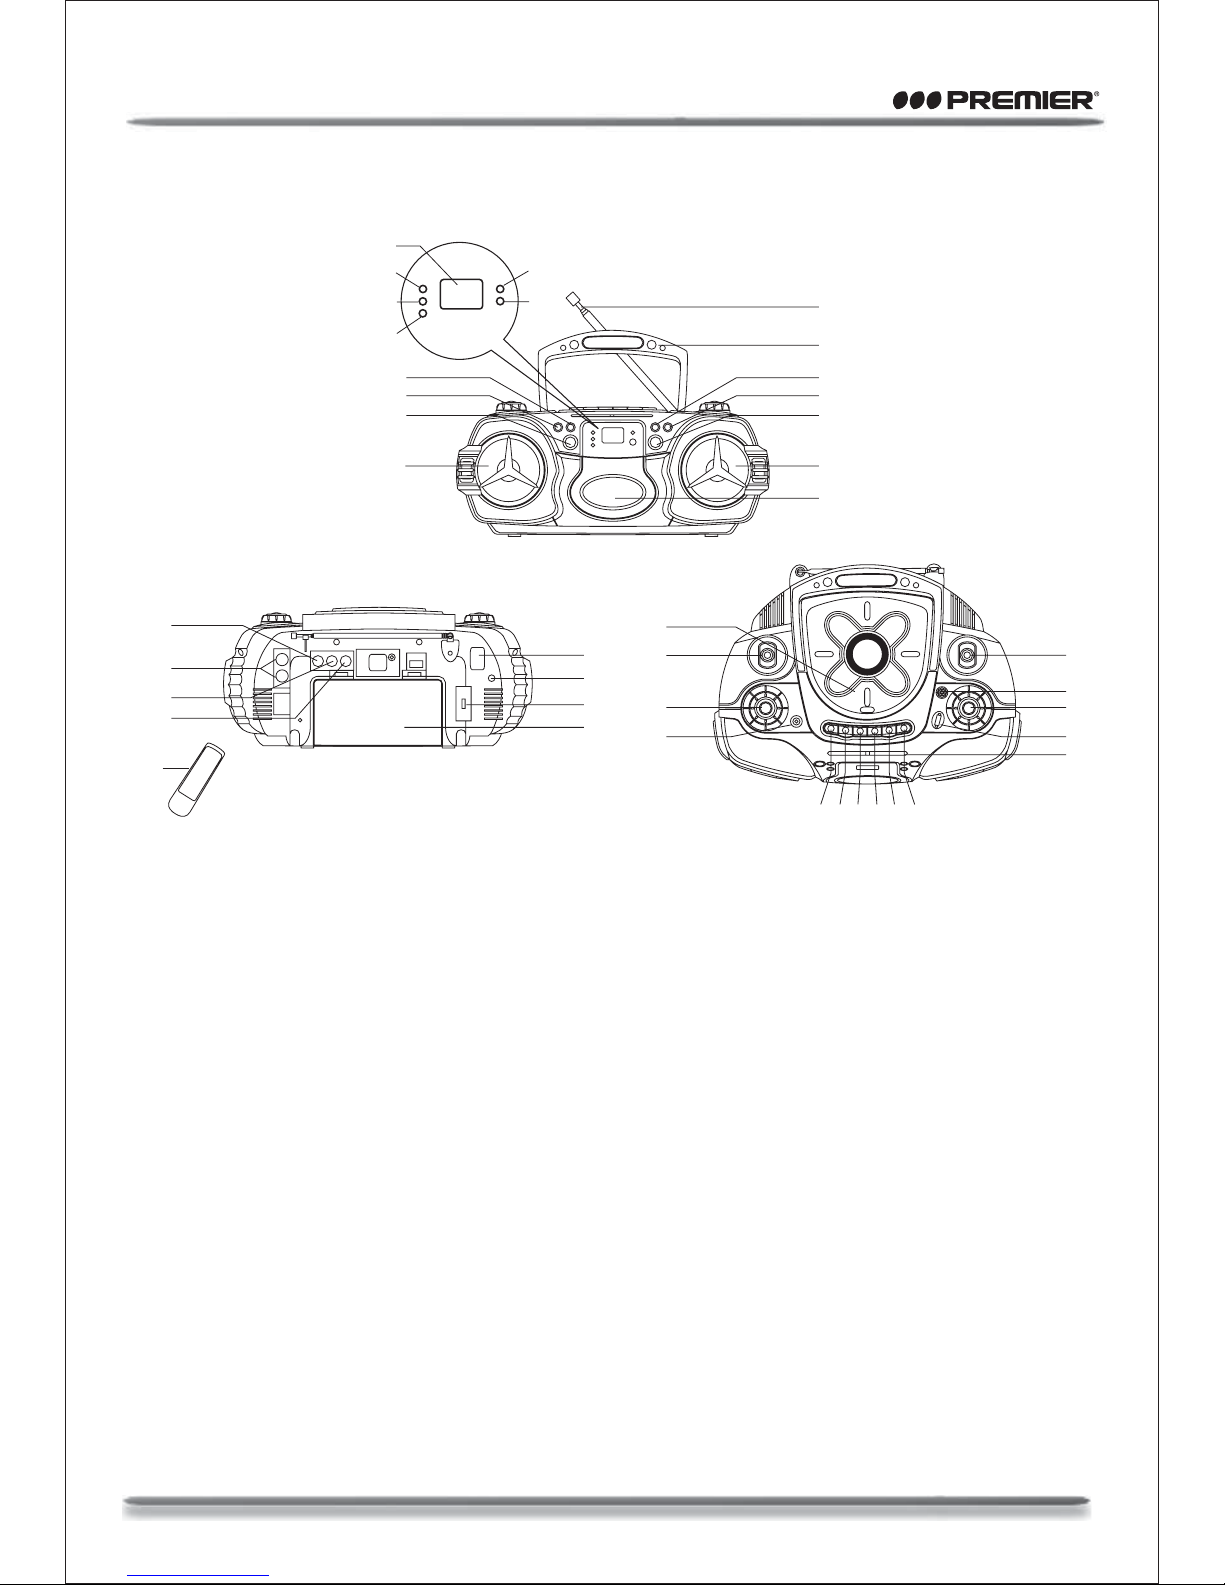
LOCATION OF CONTROLS
SPEAKER
STOP BUTTON
BACKWARD SKIP BUTTON
FORWARD SKIP BUTTON
DVD / VCD / MP3 / CD / USB INDICATOR
TAPE INDICATOR
RADIO INDICATOR
LCD DISPLAY
ROD ANTENNA
HANDLE
FM STEREO INDICATOR
REPEAT BUTTON
PAL / NTSC BUTTON
PLAY / PAUSE BUTTON
CASSETTE DOOR
ROTARY VOLUME CONTROL
FUNCTION SELECTOR
CD DOOR
BAND SELECTOR
RECORDING MIC
TUNING CONTROL
1.
2.
3.
4.
5.
6.
7.
8.
9.
10.
11.
12.
13.
14.
15.
16.
17.
18.
19.
20.
21.
USB PORT
TUNING SCALE AND POINTER
CASSETTE RECORDING BUTTON
CASSETTE PLAY BUTTON
CASSETTE REWIND BUTTON
CASSETTE F.FWD BUTTON
CASSETTE STOP/EJECT BUTTON
CASSETTE PAUSE BUTTON
HEADPHONE JACK
REMOTE SENSOR
VIDEO OUT
AUDIO OUT "R" CHANNEL
AUDIO OUT "L" CHANNEL
BATTERY COMPARTMENT
AC INPUT SOCKET
REMOTE CONTROL
EXTERNAL MICROPHONE INPUT
JACK (MIC 1, MIC 2)
VOLTAGE SELECTOR
DC JACK
22.
23.
24.
25.
26.
27.
28.
29.
30.
31.
32.
33.
34.
35.
36.
37.
38.
39.
40.
37
9
10
1
36
40
39
35
19
21
20
23
22
16
17
18
30
2928 272625 24
1
2
3
4
15
12
13
33
34
32
38
5
631
7
11
8
14
WWW.PREMIERMUNDO.COM
Page 2
Page 4
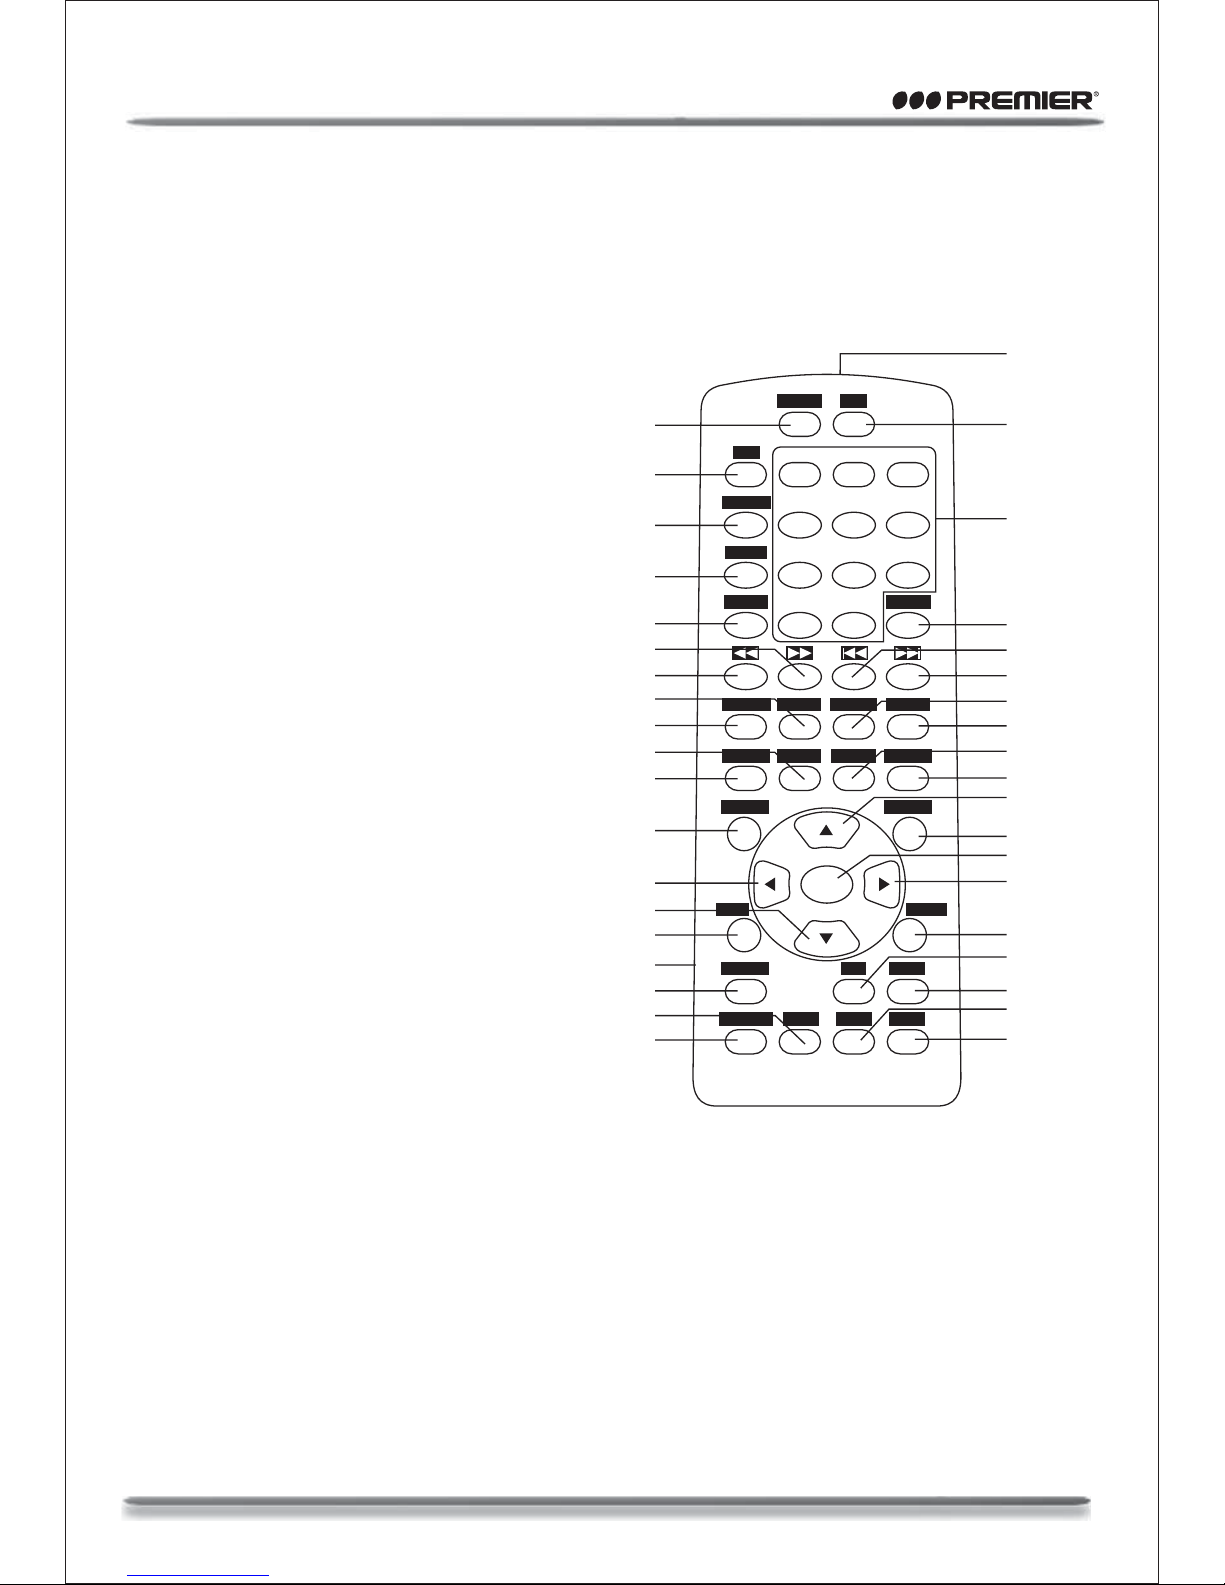
REMOTE CONTROLS
LIGHT TRANSMITTER
REPEAT A-B BUTTON
NUMBER BUTONS
GOTO BUTTON
SKIP BACKWARD BUTTON
SKIP FORWARD BUTTON
RANDOM BUTTON
STOP BUTTON
SLOW MOTION BUTTON
DISPLAY (REMAIN TIME) BUTTON
DIRECTION UP BUTTON
TITLE BUTTON
ENTER BUTTON
DIRECTION RIGHT BUTTON
MENU BUTTON
L/R BUTTON
VOLUME UP BUTTON
MUTE BUTTON
VOLUME DOWN BUTTON
PROGRAM BUTTON
CLEAR BUTTON
RETURN BUTTON
BATTERY COMPARTMENT
PBC BUTTON
DIRECTION DOWN BUTTON
DIRECTION LEFT BUTTON
SETUP BUTTON
RESUME BUTTON
STEP BUTTON
PLAY / PAUSE BUTTON
ZOOM BUTTON
REVERSE SCAN BUTTON
FORWARD SCAN BUTTON
SOURCE BUTTON
ANGLE BUTTON
SUBTITLE BUTTON
PAL / NTSC BUTTON
REPEAT BUTTON
1.
2.
3.
4.
5.
6.
7.
8.
9.
10.
11.
12.
13.
14.
15.
16.
17.
18.
19.
20.
21.
22.
23.
24.
25.
26.
27.
28.
29.
30.
31.
32.
33.
34.
35.
36.
37.
38.
WWW.PREMIERMUNDO.COM
Page 3
REPEAT A-B
N/P
SUBTITLE
123
456
78
10/0 10+
9
ANGLE
SOURCE
PLAY/PAUSE
ZOOM STOPRANDOM
STEP SLOW DISPLAYRESUME
SETUP
RETURN R/L VOL +
VOL –MUTECLEARPROGRAM
PBC MENU
ENTER
TITLE
GOTO
1
2
3
4
5
6
7
8
9
10
11
12
13
14
15
16
17
18
19
20
21
22
23
24
25
26
27
28
29
30
31
32
33
34
35
36
37
38
Page 5
IMPORTANT SAFETY INSTRUCTIONS
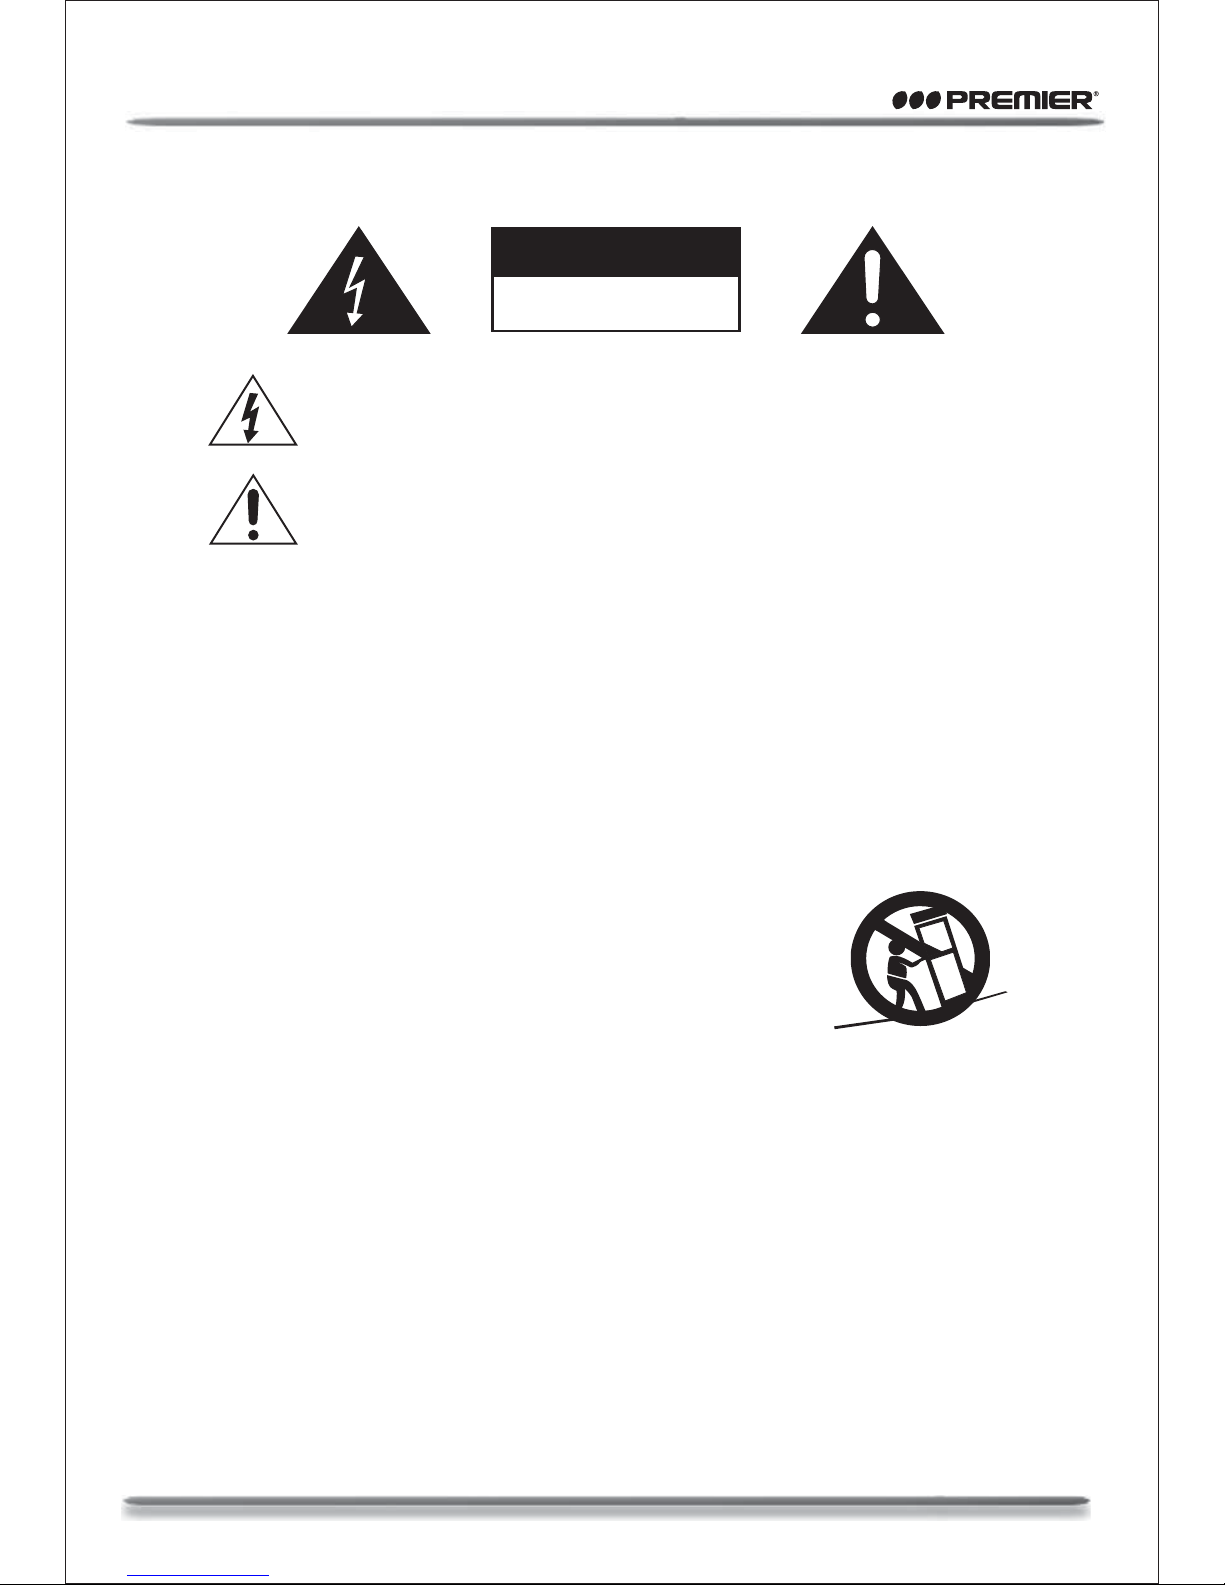
The lightning flash with arrowhead symbol within an equilateral triangle is intended to
alert the user to the presence of uninsulated dangerous voltage within the productís
enclosure that may be of sufficient magnitude to constitute a risk of electric shock to
persons.
The exclamation point within an equilateral triangle is intended to alert the user to the
presence of important operating and maintenance (servicing) instructions in the literature accompanying the appliance.
CAUTION
RISK OF ELECTRIC SHOCK
DO NOT OPEN
READ INSTRUCTIONS - All the safety and operating instructions should be read before the product is
operated.
RETAIN INSTRUCTIONS - The safety and operating instructions should be retained for future reference.
HEED WARNINGS - All warnings on the product and in the operating instructions should be adhered
to.
FOLLOW INSTRUCTIONS - All operating and use instructions should be followed.
CLEANING - Unplug this product from the wall outlet before cleaning. Do not use liquid cleaners or
aerosol cleaners. Use a damp cloth for cleaning.
ATTACHMENTS -
Do not use attachments not recommended by the product manufacturer as they
may cause hazards.
WATER AND MOISTURE - Do not use this product near water - for example, near a bath tub, wash
bowl, kitchen sink, or laundry tub; in a wet basement; or near a swimming pool; and the like.
ACCESSORIES - Do not place this product on an unstable cart, stand, tripod,
bracket, or table. The product may fall, causing serious injury to a child or
adult, and serious damage to the product. Use only with a cart, stand, tripod,
bracket, or table recommended by the manufacturer, or sold with the product.
Any mounting of the product should follow the manufacturerís instructions, and
should use a mounting accessory recommended by the manufacturer.
A Product and Cart Combination Should Be Moved with Care - Quick stops,
excessive force and uneven surfaces may cause the product and cart combination to overturn.
VENTILATION - Slots and openings in the cabinet are provided for ventilation and to ensure reliable
operation of the product and to protect it from overheating, and these openings must not be blocked or
covered. The openings should never be blocked by placing the product on a bed, sofa, rug or other
similar surface. This product should not be placed in a built-in installation, such as a bookcase or rack,
unless proper ventilation is provided or the manufacturerís instructions have been adhered to.
POWER SOURCES - This product should be operated only from the type of power source indicated
on the marking label. If you are not sure of the type of power supply to your home, consult your
product dealer or local power company. For products intended to operate from battery power, or other
sources, refer to the operating instructions.
GROUNDING OR POLARIZATION - This product may be equipped with a polarized alternating-cur
rent line plug (a plug having one blade wider than the other). This plug will fit into the power outlet only
one way. This is a safety feature: If you are unable to insert the plug fully into the outlet, try reversing
the plug. If the plug should still fail to fit, contact your electrician to replace your obsolete outlet. Do
not defeat the safety purpose of the polarized plug.
1.
2.
3.
4.
5.
6.
7.
8.
9.
10.
11.
WWW.PREMIERMUNDO.COM
Page 4
Page 6
12.POWER-CORD PROTECTION -
Power-supply cords should be routed so that they are not likely to be
walked on or pinched by items placed upon or against them, paying particular attention to cords at
plugs, convenience receptacles, and the point where exit from the product.
13.NONUSE PERIODS -
The power cord of the product should be unplugged from the outlet when left
unused for long periods of time.
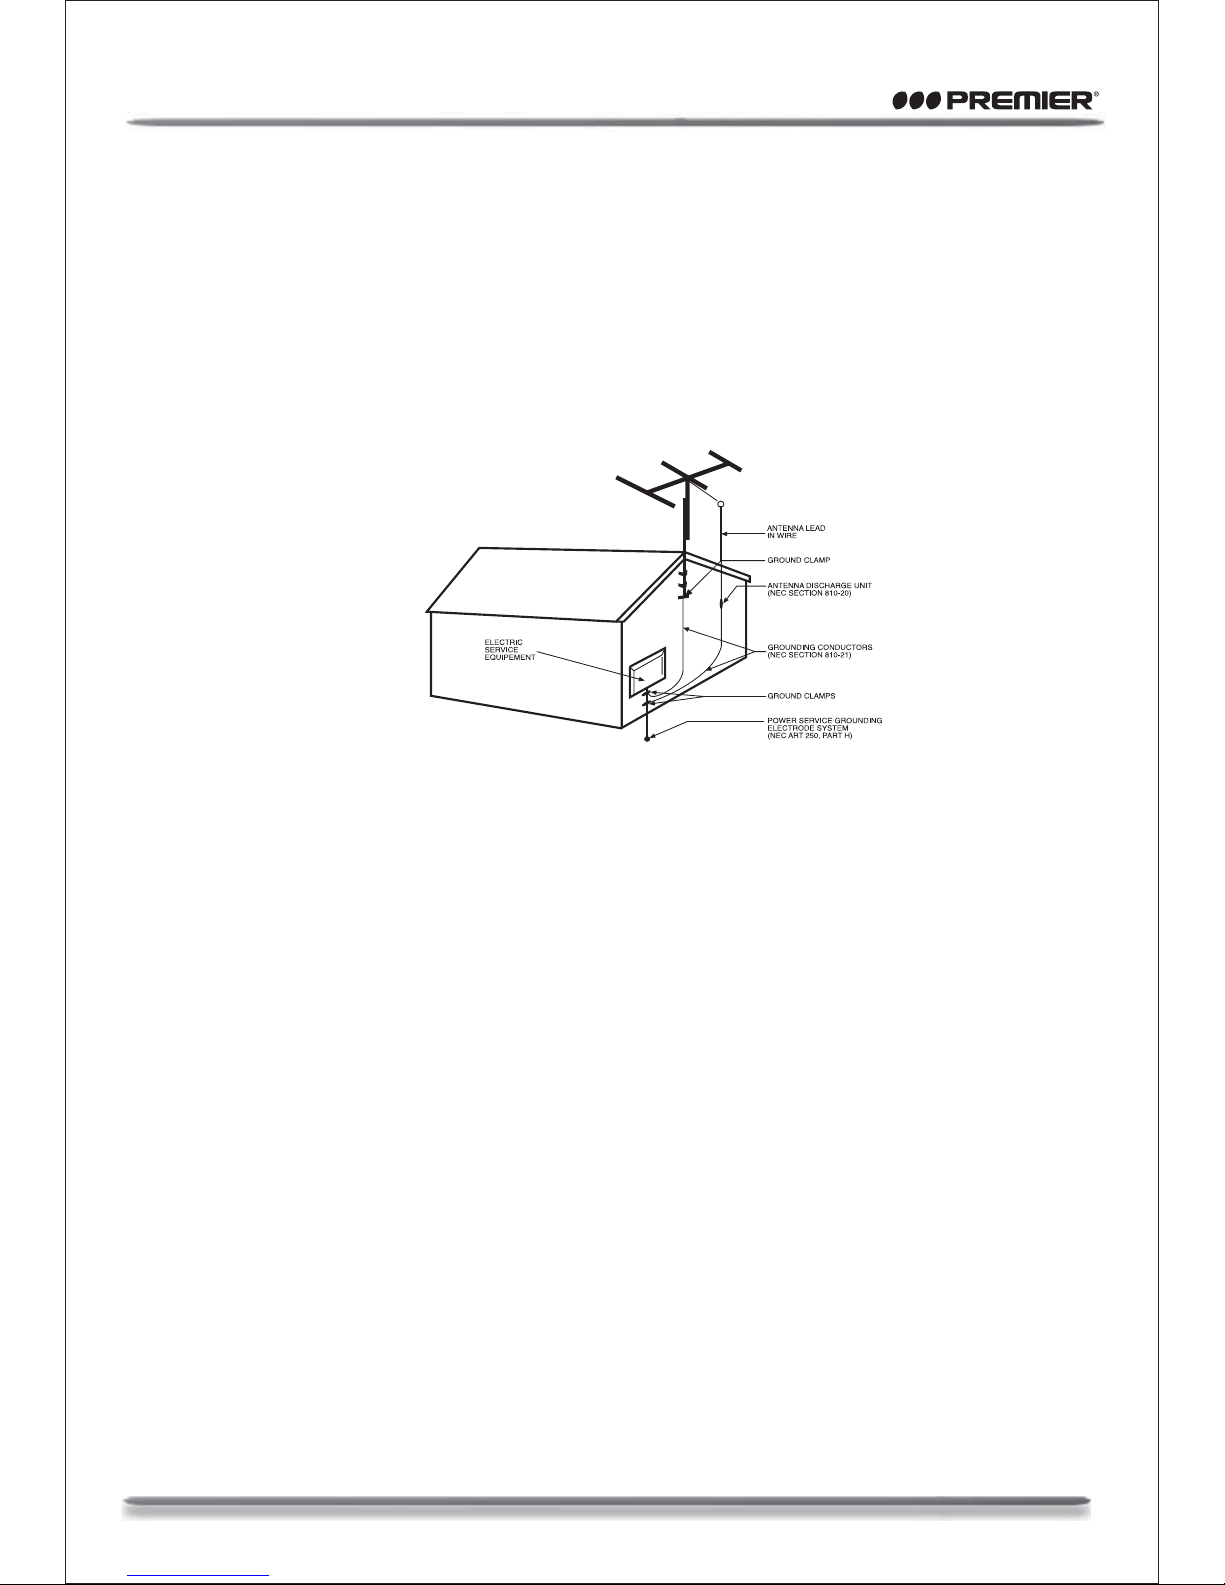
14. OUTDOOR ANTENNA GROUNDING -
If an outside antenna or cable system is connected to the
product, be sure the antenna or cable system is grounded so as to provide some protection against
voltage surges and built-up static charges. Article 810 of the National Electrical Code, ANSI/NFPA 70,
provides information with regard to proper grounding of the mast and supporting structure, grounding
of the lead-in wire to an antenna discharge unit, size of grounding conductors, location of antennadischarge unit, connection to grounding electrodes, and requirements for the grounding electrode.
See Figure 1.
S2898A NEC – NATIONAL ELECTRICAL CODE
FIGURE 1
EXAMPLE OF ANTENNA GROUNDING
AS PER NATIONAL
ELECTRICAL CODE
15.LIGHTENING -
For added protection for this product during a lightening storm, or when it is left unat
tended and unused for long periods of time, unplug it from the wall outlet and disconnect the antenna
or cable system. This will present damage to the product due to lightening and power-line surges.
16. POWER LINES -
An outside antenna system should not be located in the vicinity of overhead power
lines or other electric light or power circuits, or where it can fall into such power lines or other electric
light or power circuits, or where it can fall into such power lines or circuits. When installing an outside
antenna system, extreme care should be taken to keep from touching such power lines or circuits as
contact with them might be fatal.
17.OVERLOADING -
Do not overload wall outlets, extension cords, or integral convenience receptacles
as this can result in a risk of fire or electric shock.
18.OBJECT AND LIQUID ENTRY -
Never push objects of any kind into this product through openings as
they may touch dangerous voltage points or short-out parts that could result in a fire or electric shock.
Never spill liquid of any kind on the product.
19.SERVICING -
Do not attempt to service this product yourself as opening or removing covers may
expose you to dangerous voltage or other hazards. Refer all servicing to qualified service personnel.
20.DAMAGES REQUIRING SERVICE -
Unplug this product from the wall outlet and refer servicing to
qualified service personnel under the following conditions.
a)When the power-supply cord or plug is damaged.
b)If liquid has been spilled, or objects have fallen into the product.
c)If the product has been exposed to rain or water.
d)If the product does not operate normally by following the operating instructions. Adjust only those
controls that are covered by the operating instructions as an improving adjustment of other controls
may result in damage and will often require extensive work by a qualified technician to restore the
product to its normal operation.
e)When the product exhibits a distinct change in performance - this indicates a need for service.
WWW.PREMIERMUNDO.COM
Page 5
Page 7
PRECAUTIONS FOR UNIT
•
Insert one end of the supplied power cord into the AC IN jack located at the rear of the unit, and the
other end into the wall outlet.
PLACEMENT
OPERATING THE PLAYER ON AC POWER
• Put the unit where ventilation is good enough to prevent overheating.
• Never put the unit in direct sunlight or near heat sources.
• Put the unit horizontally, never put any heavy object on the unit.
• To protect the pickup, do not put the unit where there is much dust. If there is dust on the pickup, use
a cleaning disc to clean it.
• Refer to the operation instructions of the cleaning disc you bought.
CONDENSATION
Moisture will appear on the pickup lens in the following cases:
• The unit is suddenly moved from a cold place to a warm place.
• The unit is put in a room with a heater, or in cold air from an air - conditioner.
• Use the unit in a humid place. In these cases, the unit cannot work. Unload the disc and leave the unit
on for about one hour evaporates the water.
CLEANING
• Use soft cloth with a little neutral detergent to wipe the cabinet, panel and controls. Never use abra
sive paper, polishing powder or solvent like alcohol and gasoline.
PRECAUTIONS FOR DISCS
•
•
•
•
•
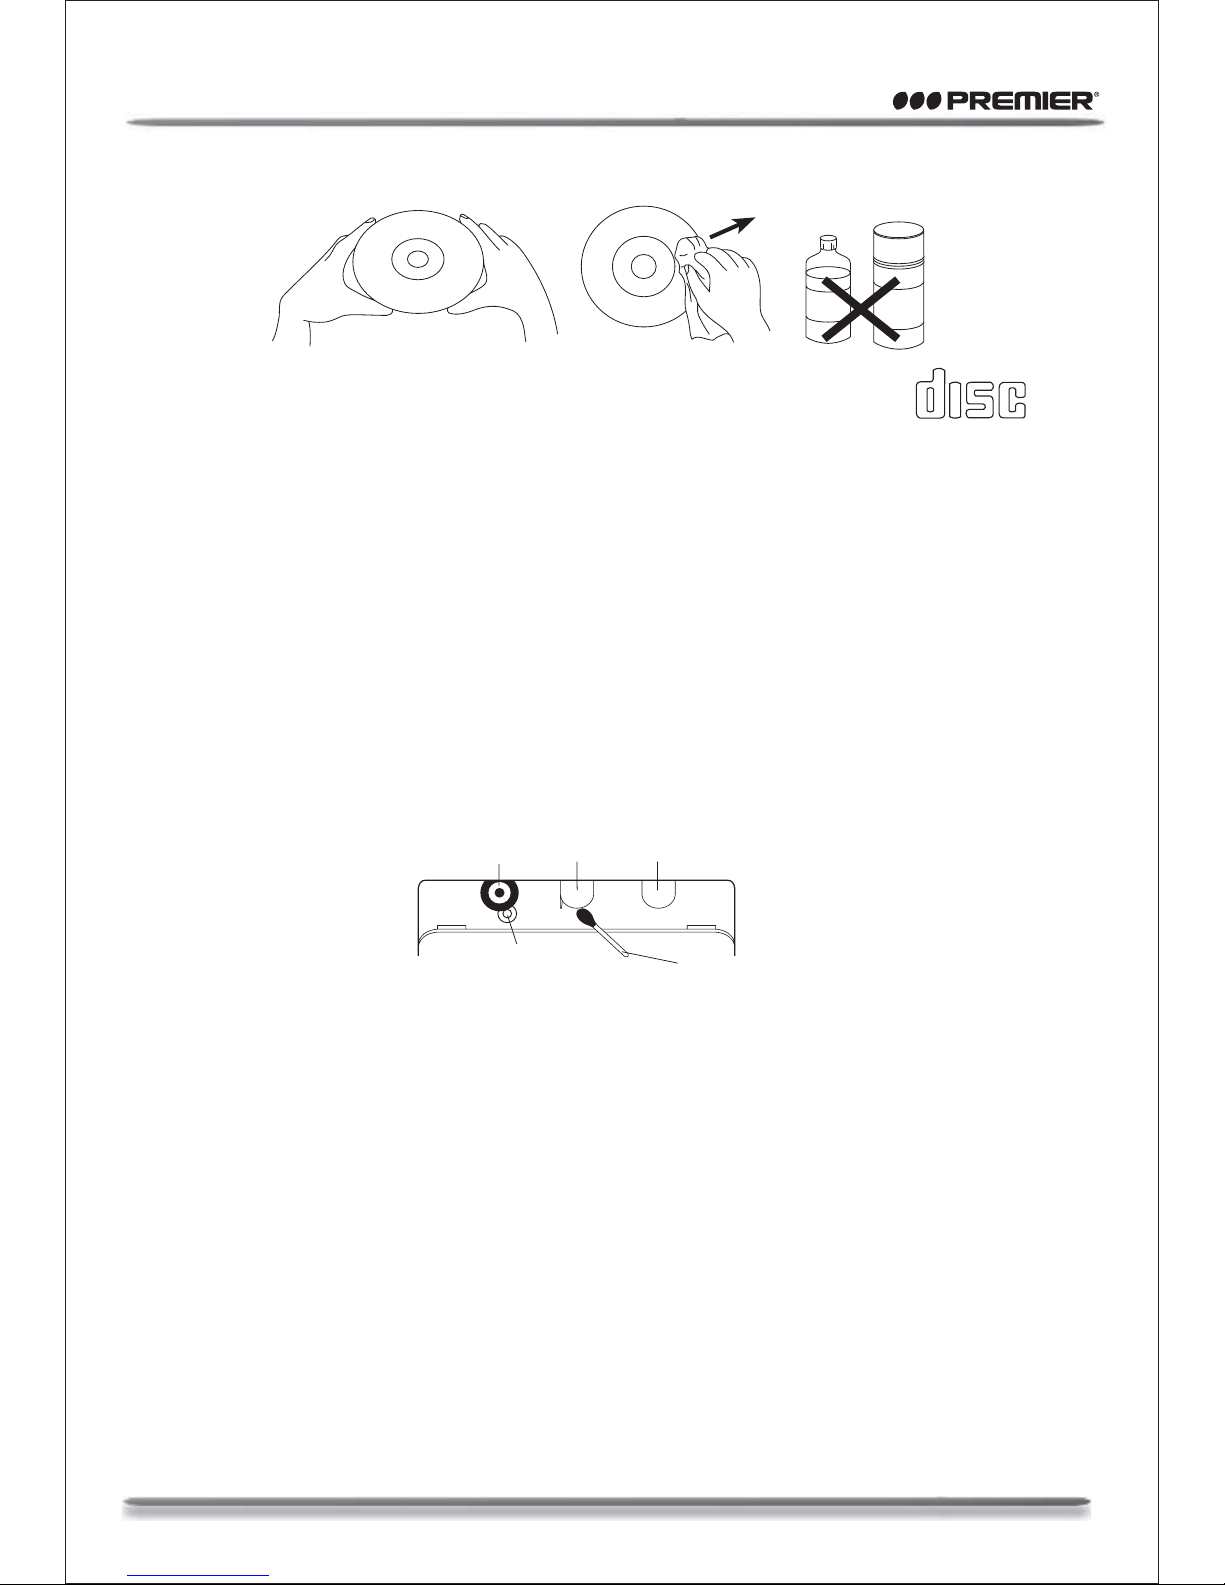
Treat the compact disc carefully. Handle the compact disc only by its edges. Never allow your fingers
to come in contact with the shiny, unprinted side of the compact disc.
Do not attach adhesive tape, stickers, etc. to the compact disc label.
Clean the compact disc periodically with a soft, lint-free, dry cloth. Never use detergents or abrasive
cleaners to clean the compact disc. If necessary, use a CD cleaning kit.
If a compact disc skips or gets stuck on a section of the compact disc, it is probably dirty or
damaged (scratched).
When cleaning the compact disc, wipe in straight lines from the center of the compact disc to the
outer edge of the compact disc. Never wipe in circular motions.
CARING FOR COMPACT DISCS
21.REPLACEMENT PARTS -
When replacement parts are required, be sure the service technician has
used replacement parts specified by the manufacturer or have the same characteristics as the original
part, Unauthorized substitutions may result in fire, electric shock or other hazards.
22. SAFETY CHECK -
Upon completion of any service or repair to this product, ask the service technician
to perform safety checks to determine that the product is in proper operating condition.
23.HEAT -
The product should be situated away from heat sources such as radiators, heat registers,
stoves or other products (including amplifiers) that produce heat.
WWW.PREMIERMUNDO.COM
Page 6
Page 8
B
E
N
Z
E
N
E
C
L
E
A
N
E
R
•
•
•
•
This unit is designed to play only compact discs bearing the identification logo as
shown here. Other compact discs may not confirm to the CD standard and may not
play properly.
Compact discs should be stored in their cases after each use to avoid damage.
Do not expose compact discs to direct sunlight, high humidity, high temperature, or dust, etc.
Prolonged exposure or extreme temperatures can warp the compact disc.
Do not stick or write anything on either side of the compact disc. Sharp writing instruments, or the ink
may damage the surface.
C
O
M
PA
C
T
D
IG
ITA
L A
U
D
I
O
To prevent fire or shock hazard, disconnect your unit from the AC power source when cleaning.
The finishing on your unit may be cleaned with a dust cloth and cared for as other furniture. Use caution
when cleaning and wiping the plastic parts.
Mild soap and a damp cloth may be used on the front panel.
Periodic cleaning of the tape heads, capstan and pinch roller is necessary to maintain good sound
reproduction. Clean them after every 100 hours of use or less if playback has deteriorated. Use a cotton
swab moistened with head cleaning solution or ispropyl alcohol, then wipe dry with another swab.
NOTE: Never use metal objects on or near the tape heads. Do not allow any cleaning material to fall
into the tape assembly.
CLEANING THE UNIT
Pinch Roller
R/P
Head
Erase
Head
Capstan
Cotton Swab
WWW.PREMIERMUNDO.COM
Page 7
Page 9
CONNECTING THE POWER
RADIO OPERATION
1.
2.
3.
4.
5.
Select the FUNCTION switch to the "RADIO" position.
Set the Band switch to the desired band position.
Turn in desired radio station.
Adjust the VOLUME, if necessary.
To turn off the radio, set the FUNCTION switch to the "TAPE" position.
Before connecting the unit to an AC Outlet, check that the operating VOLTAGE of the unit is identical with the
VOLTAGE of your Local Power Supply.
Connect the supplied AC Power Cord to the AC Socket at the back of unit.
When the AC Power Cord is plugged into the Batteries are automatically disconnected.
AC POWER OPERATION
The unit cannot be operated by battery when the AC power cord is connected.
Open the battery cover and put the batteries as indicated inside the battery compartment.
BATTERY OPERATION
Follow these precautions when using batteries in this device:
1.
2.
3.
4.
5.
Use only the size and type of batteries specified.
Be sure to follow the correct polarity when installing the batteries as indicated in the batteries
compartment.
Do not mix different types of batteries together (e.g. Alkaline and Carbon-zinc) or old batteries with fresh
ones.
If the device is not to be used for a long period of time, remove the batteries to prevent damage or injury
from possible battery leakage.
Do not try to recharge batteries not intended to be recharged; they can overheat and rupture. (Follow
battery manufacturer's directions)
BATTERY PRECAUTIONS
WWW.PREMIERMUNDO.COM
Page 8
Page 10
1.
2.
3.
4.
5.
Select the FUNCTION switch to the "TAPE" position.
Insert the cassette into the Cassette Compartment.
Press the PLAY button to play a tape loaded.
Adjust the VOLUME, if necessary.
Press the STOP/EJECT button to stop the tape play.
*PAUSE button is used for temporarily stopping the tape during recording or playback.
PLAYBACK
1.2.To fast forward or rewind, press Fast Forward or Rewind button.
Press the STOP/EJECT button to stop fast winding as the tape ended, in order to prevent damage to the
cassette tape.
FAST WINDING
CASSETTE OPERATION
The quality and condition of the cassette tapes used will have a direct effect on the performance of this unit.
Low quality tapes tend to break and stretch, and a broken tape can easily become en-tangled in the drice
mechanism, causing major damage. Stretched tapes will run at un-even speeds and will distort anything
recorded on them.
•
•
•
Use only well-known brands of tape.
Use of C-120 (120 minutes) cassettes is not recommended. The extreme thinness of this tape may result
in breakage or other problem.
Check to ensure there are no loose layers of tape visible through the cassette center windows. Tighten
these loose layers with a pencil or ball-point pen before inserting the cassette into the unit.
CASSETTE TAPE SELECTION
Within Recording, no volume adjustment is necessary, recording level is automatically set.
RECORDING
CASSETTE RECORDER OPERATION
1.
2.
3.
4.
5.
6.
7.
8.
9.
Select the FUNCTION switch to "Radio" position.
Set the Band switch to the desired band position.
Turn in desired radio station.
Insert the cassette into the Cassette Compartment.
Press the PAUSE button.
Press the RECORD button.
Release the PAUSE button to begin recording.
Adjust the VOLOUME, if necessary.
To stop recording, press STOP/EJECT button. When the tape operate to the end recording will be stop
automatically.
RECORDING FROM THE BUILT-IN RADIO
WWW.PREMIERMUNDO.COM
Page 9
Page 11
1.
2.
3.
4.
5.
6.
7.
8.
9.
10.
11.
Select the FUNCTION switch to "CD" position.
Press the OPEN button to open the CD door.
Load a CD with label side upward the CD compartment and close the CD door and the player plays all
the tracks once (continuous Play).
Press the STOP ( ) button to stop playing the CD.
Insert the cassette into the Cassette Compartment.
Press the PAUSE button.
Press the RECORD button.
Press the play/pause button ( ) to start playing.
Release the PAUSE button to begin recording. You can also record audio signal from exteranl
microphone.
Adjust the VOLUME, if necessary.
To stop recording, press STOP/EJECT button. When the tape operate to the end recording will be stop
automatically.
RECORDING FROM DISCS
1.
2.
3.
4.
5.
6.
Select the FUNCTION switch to Tape (Radio off) position.
Insert a cassette tape into the Cassette Compartment.
To avoid feedback between the speaker and the built in recording microphone, set the Volume Control in
the minimum position.
Press the Record button.
Recording can be achieved via built in microphone.
To stop recording, press Stop/Eject button. When the tape operate to the end, recording will be stop
automatcially.
RECORDING FROM THE BUILT IN RECORDING MICROPHONE
WWW.PREMIERMUNDO.COM
Page 10
Page 12
Open the CD door
WWW.PREMIERMUNDO.COM
Page 11
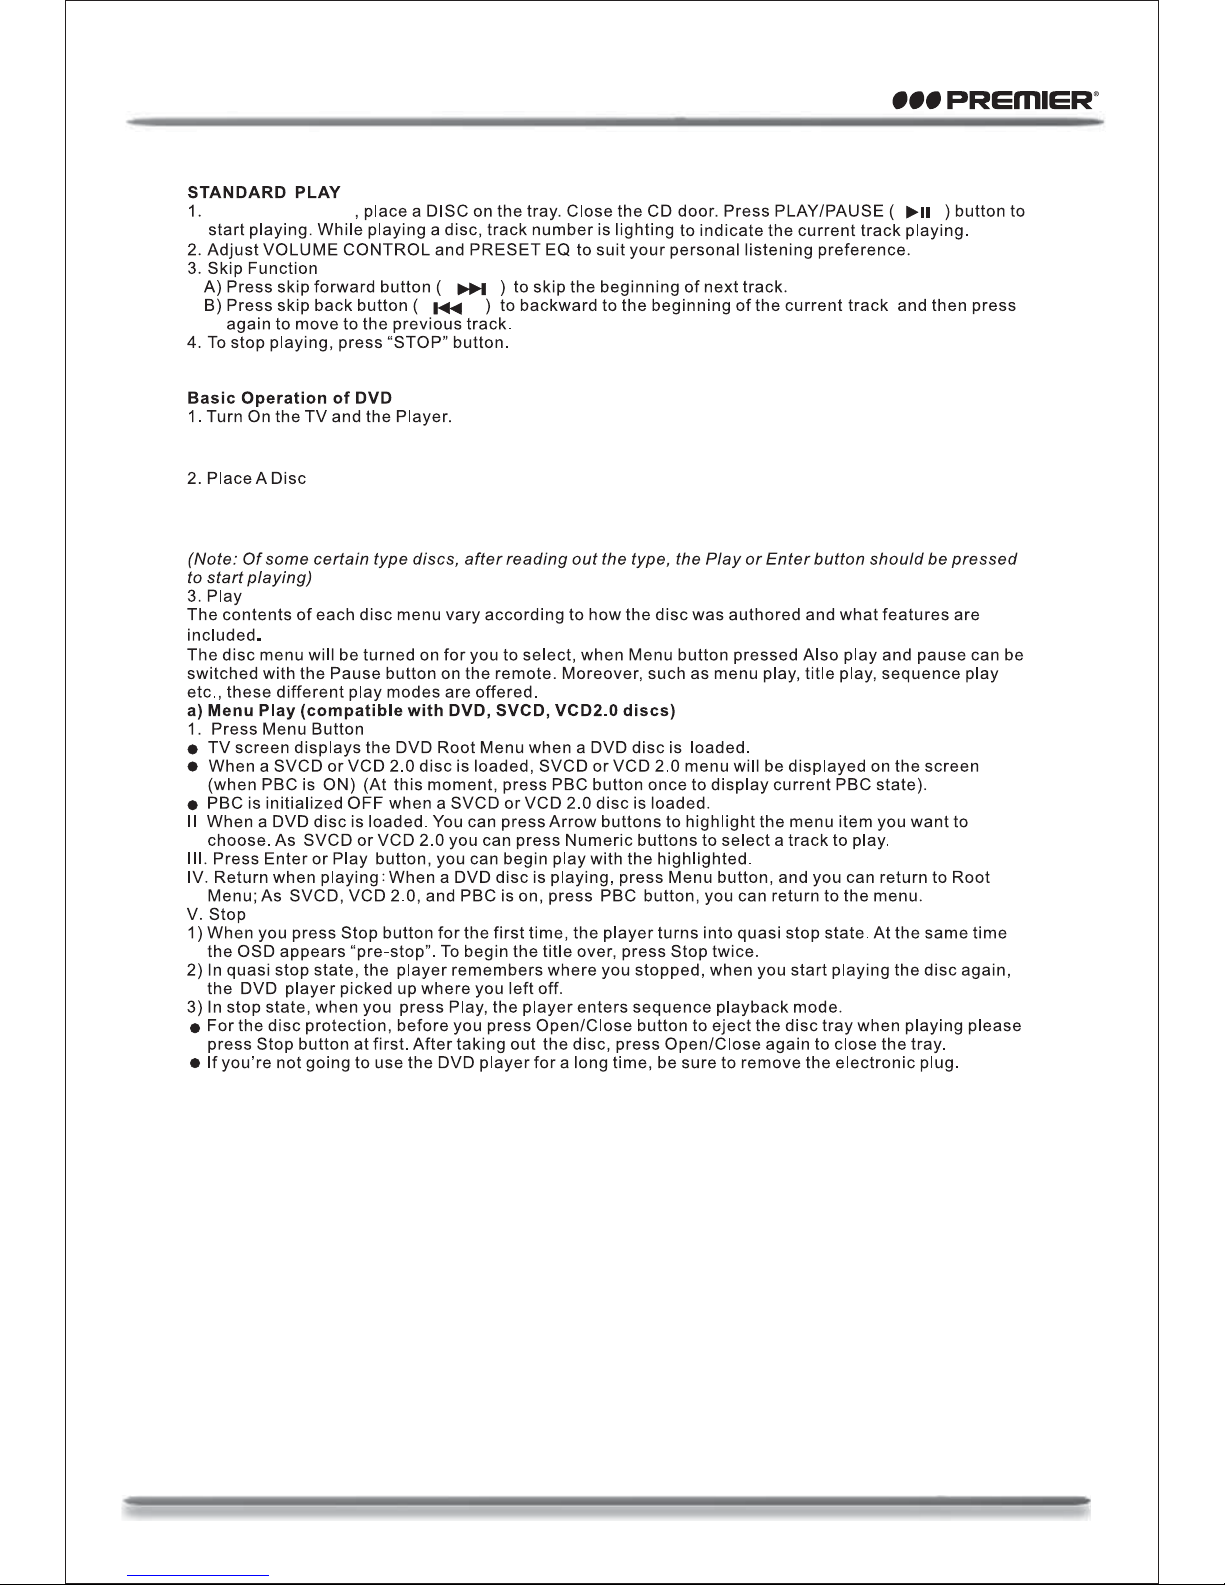
Set the function switch to “DVD/VCD/MP3/CD/USB” position to turn on the unit. “Reading” appears on the TV
screen. If there hasn’t a disc in the DVD player, “No disc” will be displayed on the screen.
Open the CD door, “OPEN” appears on the screen. Then place a disc gently into the tray with the disc’s label
facing up and press the Open/Close button again to close the disc tray. “Close” appears and the player
starts to read. Then the disc starts playing automatically.
Page 13
WWW.PREMIERMUNDO.COM
Page 12
DivX,
DivX,
Page 14
WWW.PREMIERMUNDO.COM
Page 13
DivX,
DivX,
DivX,
DivX,
Page 15
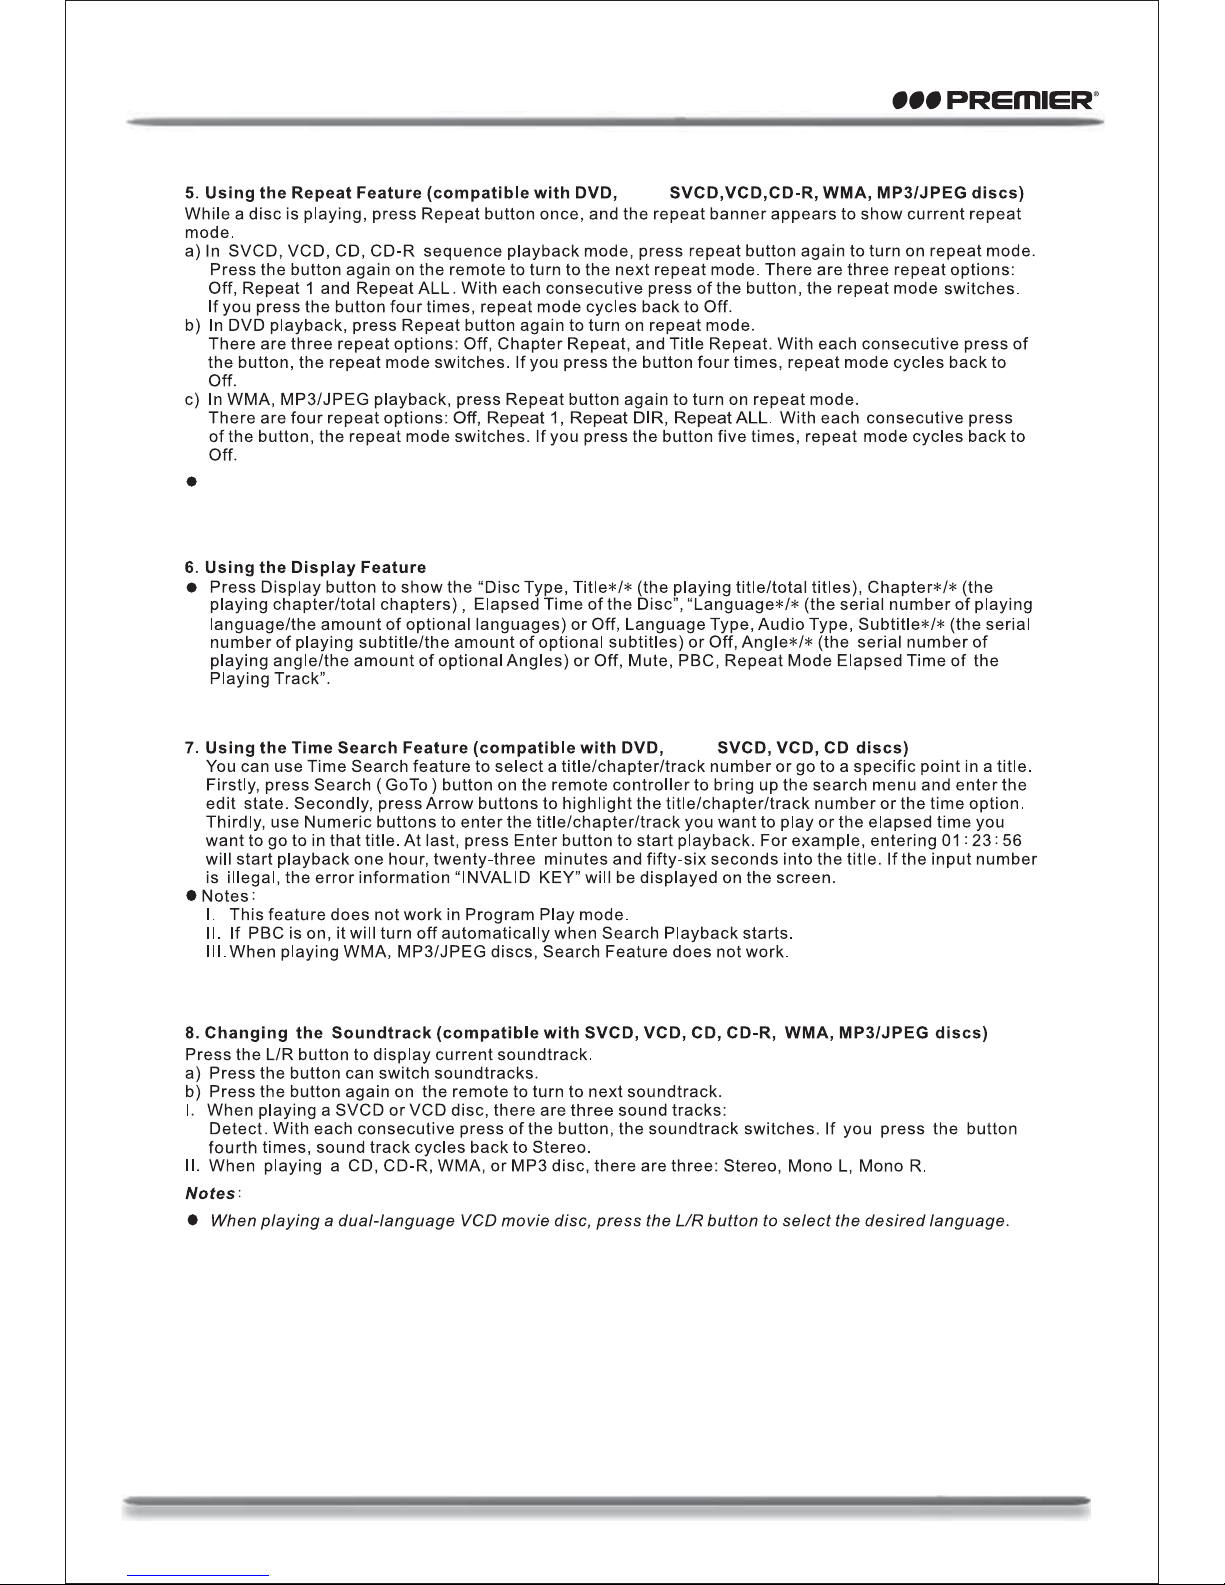
When the unit is in 'CHAPTER REPEAT' and 'TITLE REPEAT' mode, press any numeric and program
button, it will return to REPEAT OFF mode.
Stereo, Mono L and Mono R
WWW.PREMIERMUNDO.COM
Page 14
DivX,
DivX,
Page 16
9.
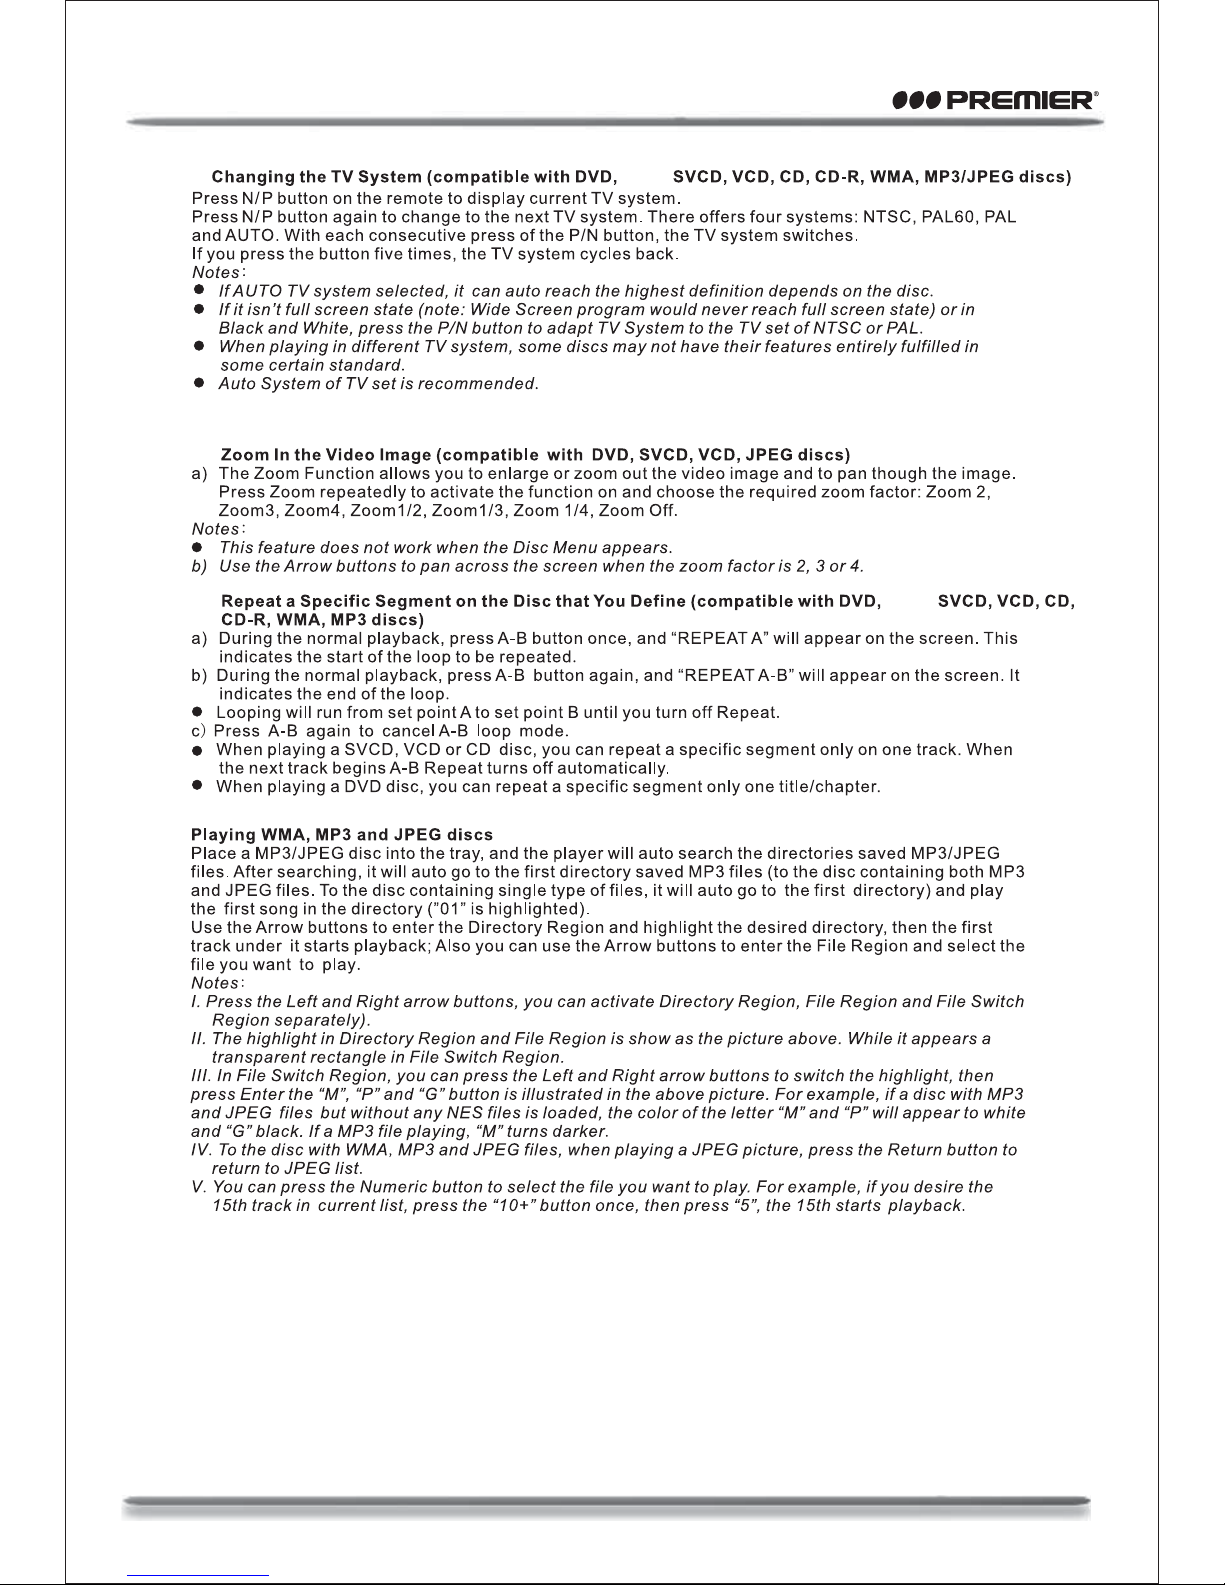
10. Press MUTE key to mute the sound, press again to restore the sound level previously set.
11.
12.
WWW.PREMIERMUNDO.COM
Page 15
DivX,
DivX,
Page 17
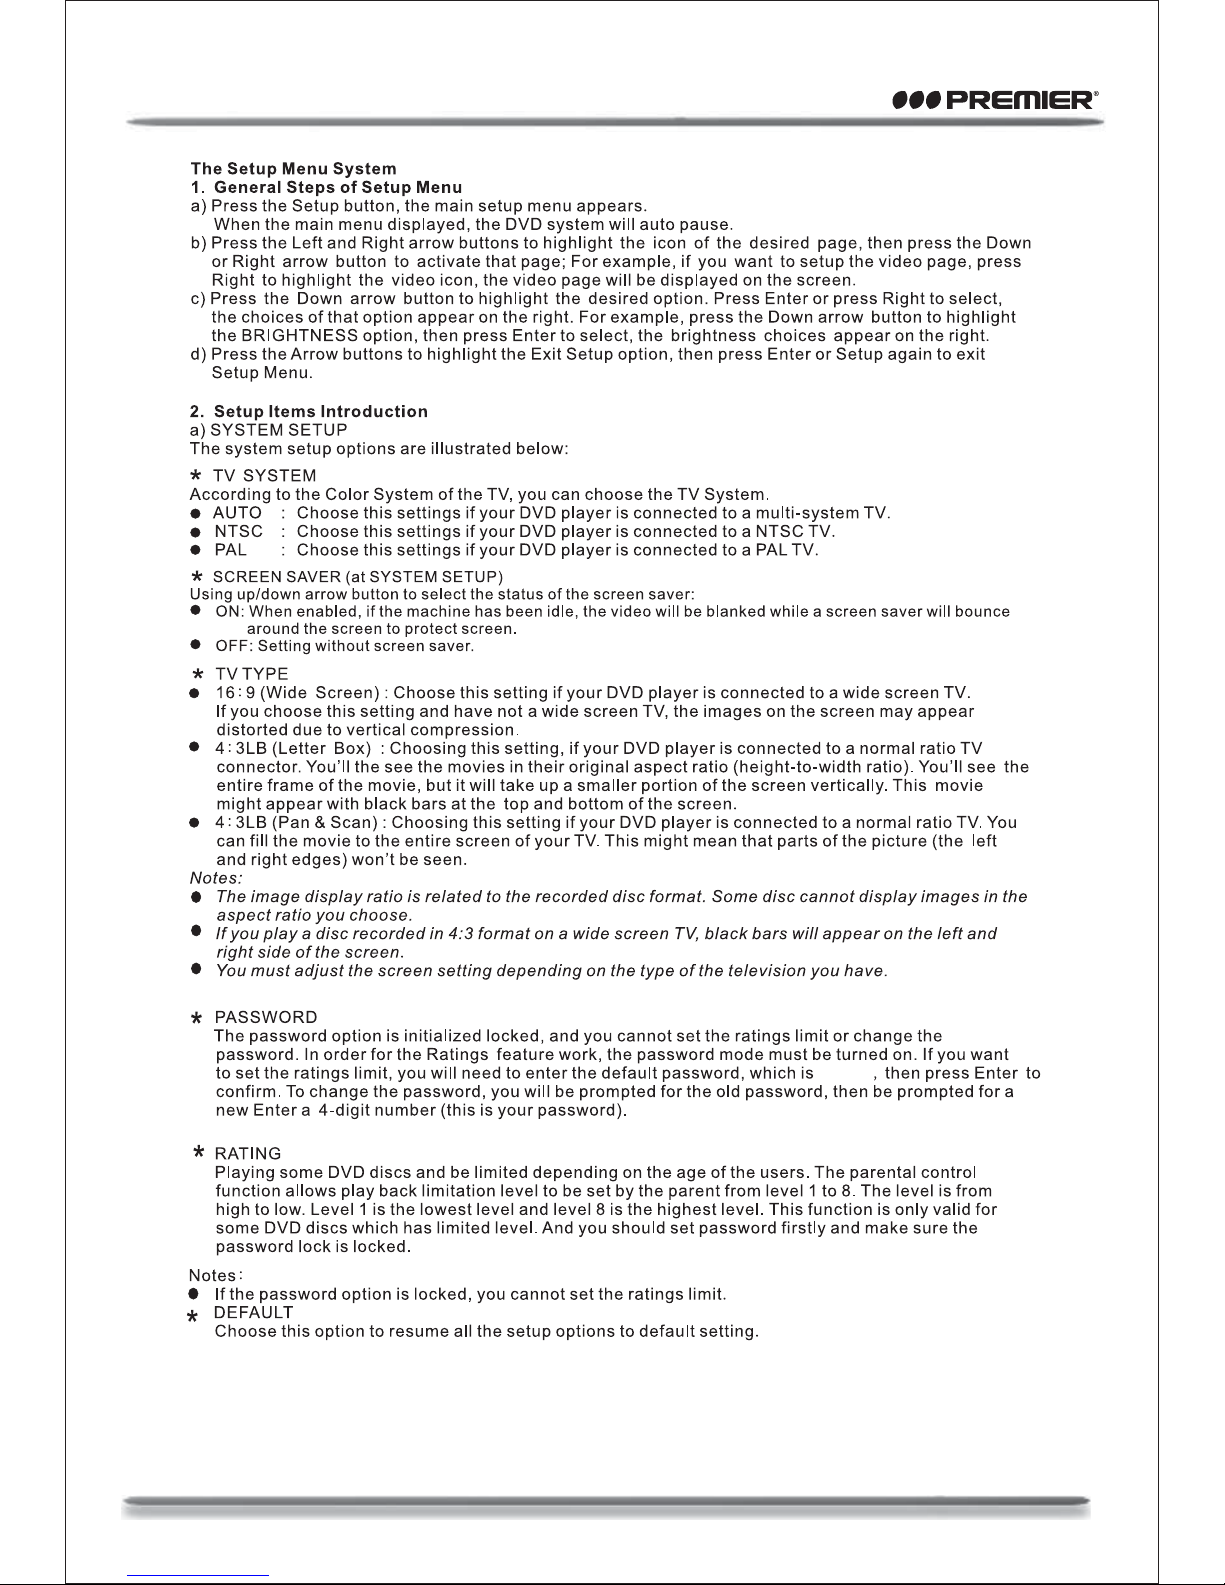
"0000"
WWW.PREMIERMUNDO.COM
Page 16
Page 18
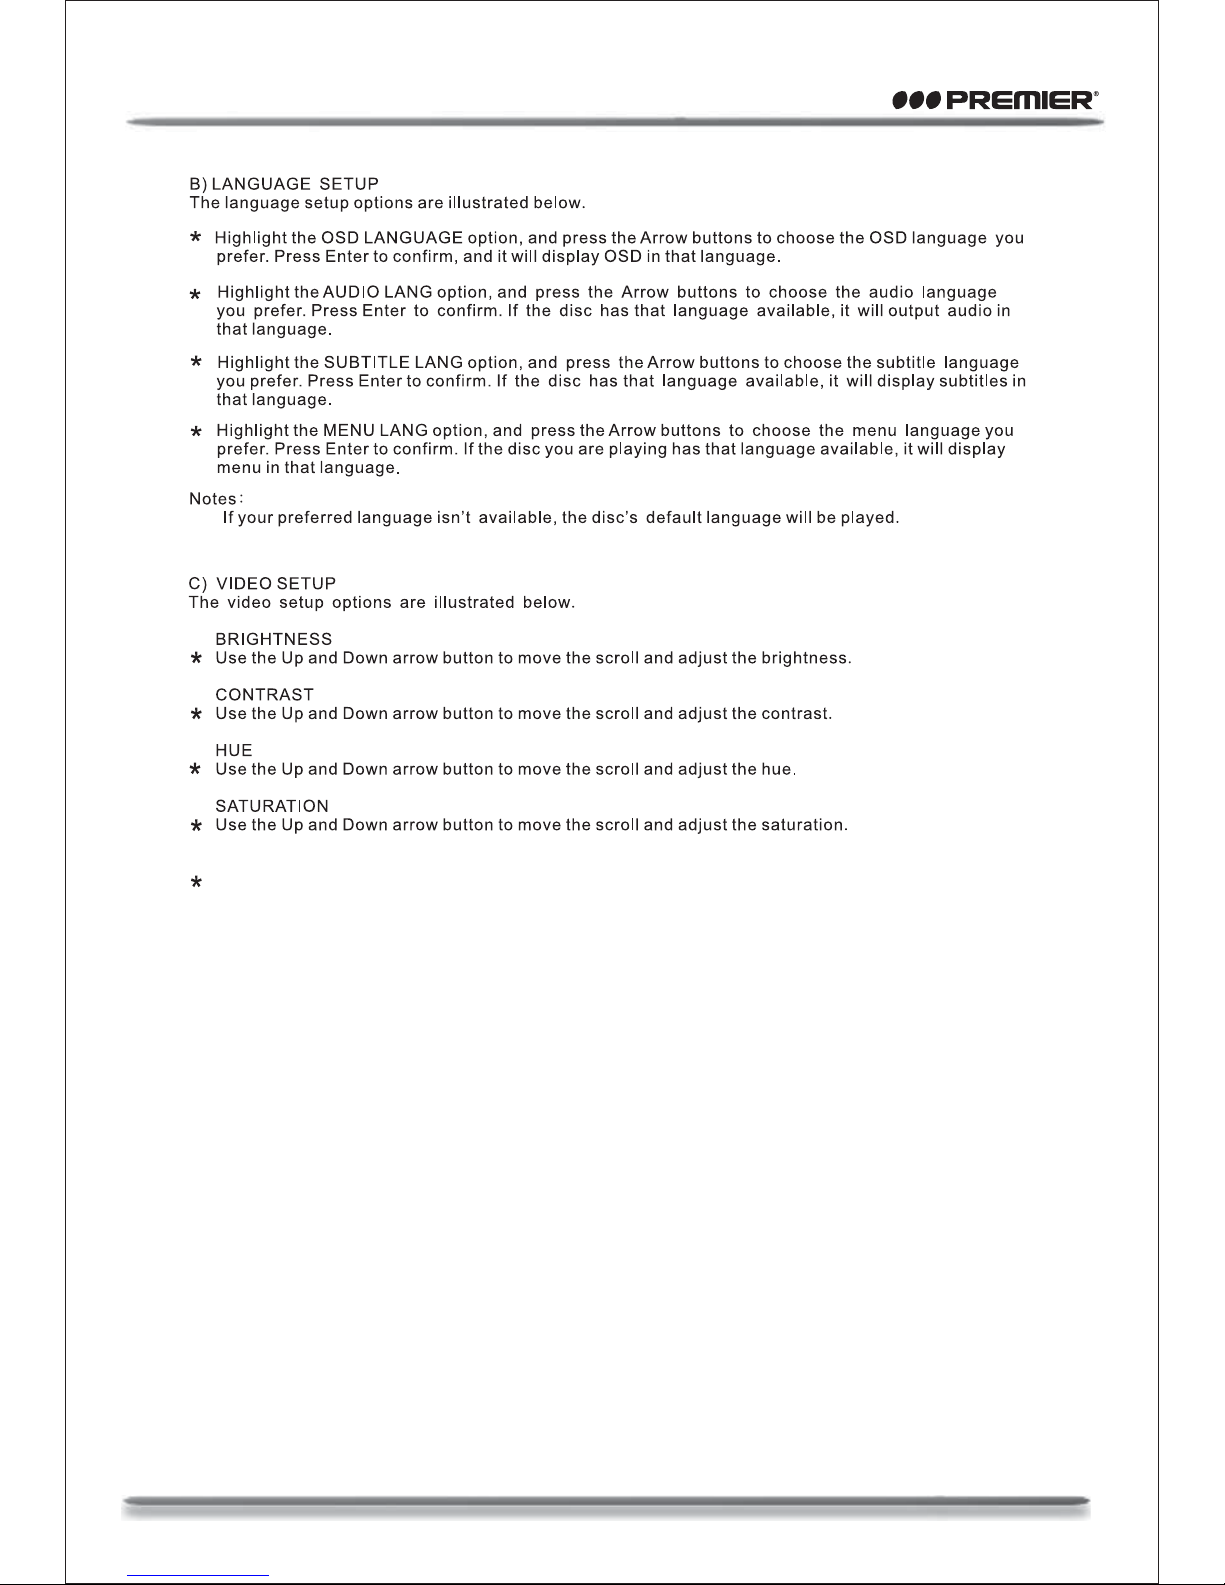
WWW.PREMIERMUNDO.COM
Page 17
SHARPNESS
Use the Up and Down arrow button to move the scroll and adjust the sharpness.
ENJOY KARAOKE
1.
2.
3.
4.
5.
6.
7.
Set the “FUNCTION SWITCH” to “DVD/VCD/CD/MP3”. position.
Connect the microphone to ‘MIC JACK”.
Press the “PLAY/PAUSE” button on the unit or the remote control to start playing.
Press the “SET UP” button on the remote control and move to ‘AUDIO SET UP” column by
using the “DIRECTION” button.
By using the “DIRECTION” button to move to “KEY” column and select your favourite key.
By using the “DIRECTION” button to move to “ECHO” column and select your favourite echo
effect.
By using the “DIRECTION” button to move to “MIC VOL” column and select your microphone
sound level.
Page 19
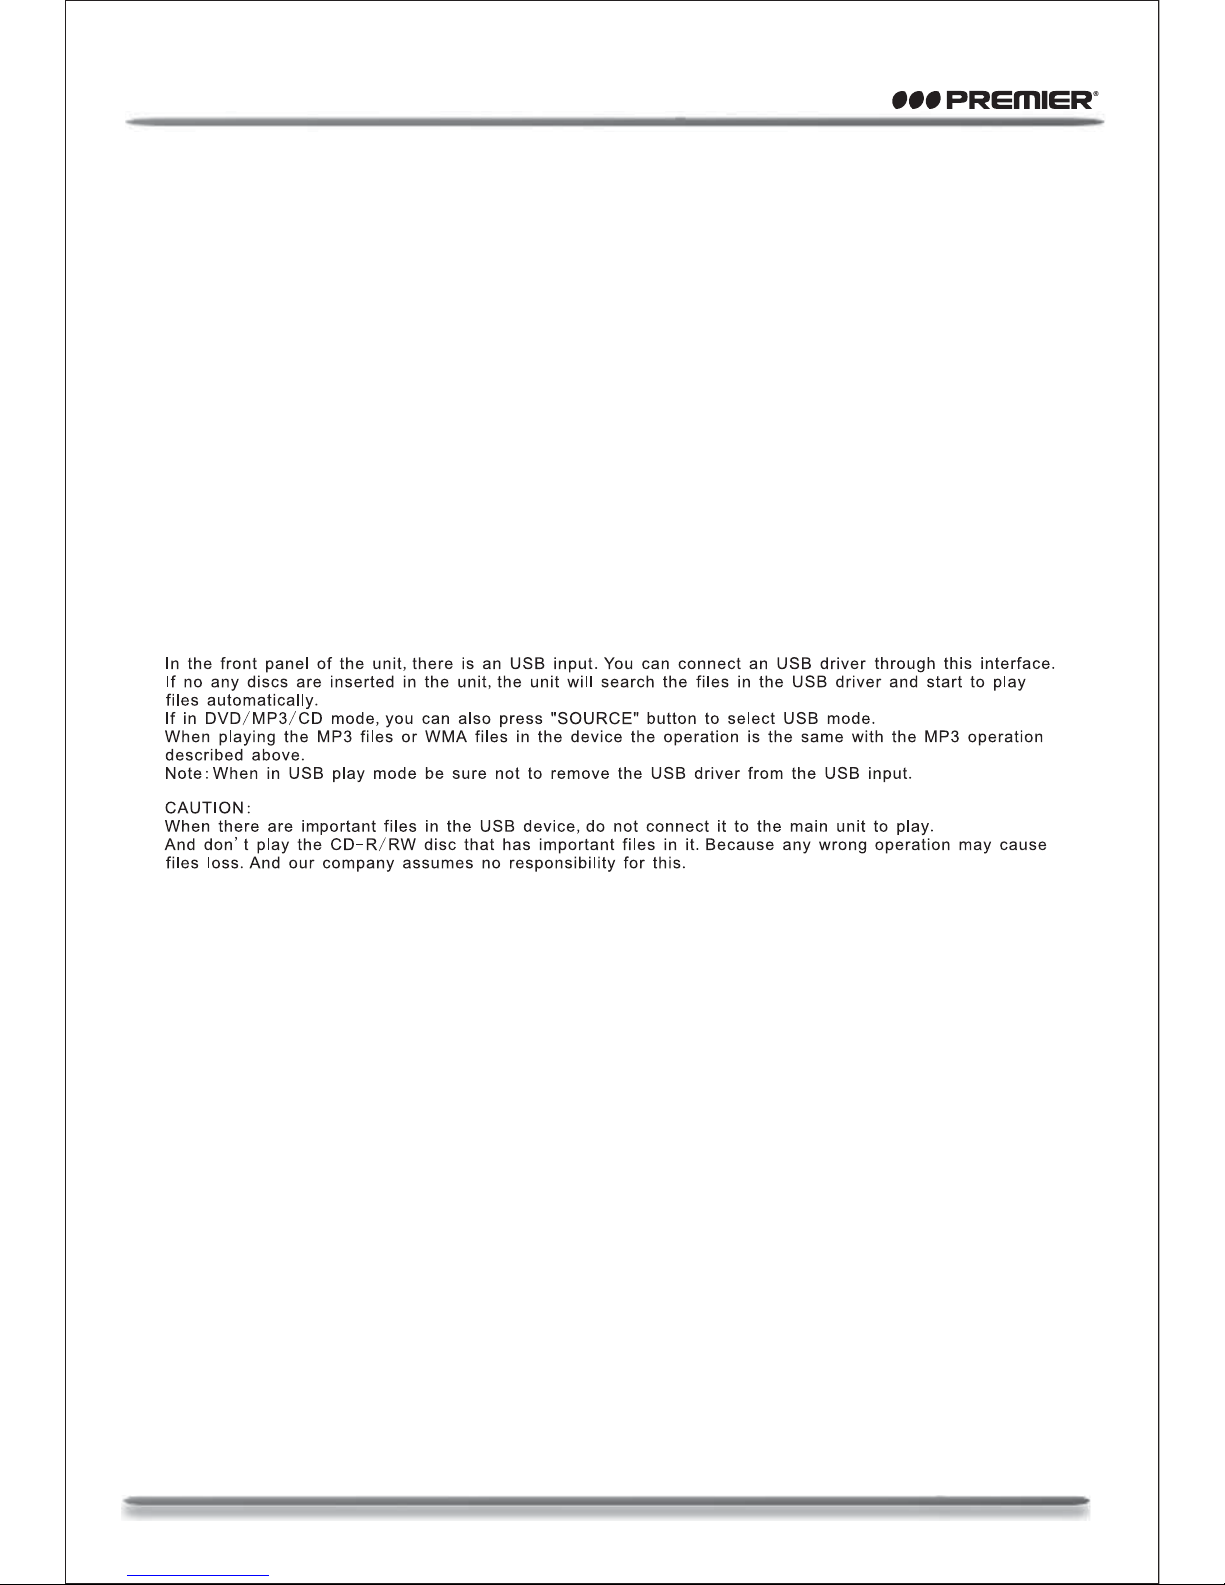
CD Ripping
You can save the songs from CD disc to USB driver by the following steps.
1.
2.
3.
4.
5.
6.
7.
8.
9.
10.
After encoding, all the songs will be changed to MP3 format and save into your USB driver.
By using AV cable to connect the unit with the TV.
Set the “FUNCTION SWITCH” to “DVD/VCD/CD/MP3/USB” position.
Insert the USB driver into the unit.
Open the CD door and place the CD disc.
Close the CD Door, the unit will read the CD disc automatically.
Press the “SUBTITLE” button on the remote control.
By using the “DIRECTION” button on the remote control to move to “TRACKS” column then using
“DIRECTION” button and press “ENTER” button to select your favourite songs saving to the USB
driver . (Without setting the above step, all the tracks will be saved to the USB driver.)
By using the “DIRECTION” button on the remote control to move to “START” column and press
“ENTER” button to begin saving.
By using the “DIRECTION” button on the remote control to move to “CHANGE SPEED” position and
press “ENTER” button to select your favourite saving speed or use the “DIRECTION” button to move
to “CANCEL” position and press “ENTER” button to stop saving.
By using the “DIRECTION” button on the remote control to move to “QUIT” column and press
“ENTER” button to cancel all the settings.
REMOTE HANDSET OPERATION
RMS: 2.5 WATTS X 2
Slide the battery cover to remove it. Insert two batteries (size AAA.) correctly so that the + and – polarities
match the polarity diagrams inside the battery compartment.
•
•
•
•
•
•
About hallf a year of normal operation can be expected when using the general batteries.
When the batteries are exhausted, the commander should no longer operate the system. Replace both
batteries with new ones.
When the commander is not to be use for a long time, remove the batteries to avoid damage caused by
battery leakage or corrosion.
Avoid keeping the commander in extremely hot or humid locations.
Between remote control and remote sensor there should be no obstacle and have to within 30º range.
The remote control’s operating distance is about 0.2m to 6m away from the remote sensor.
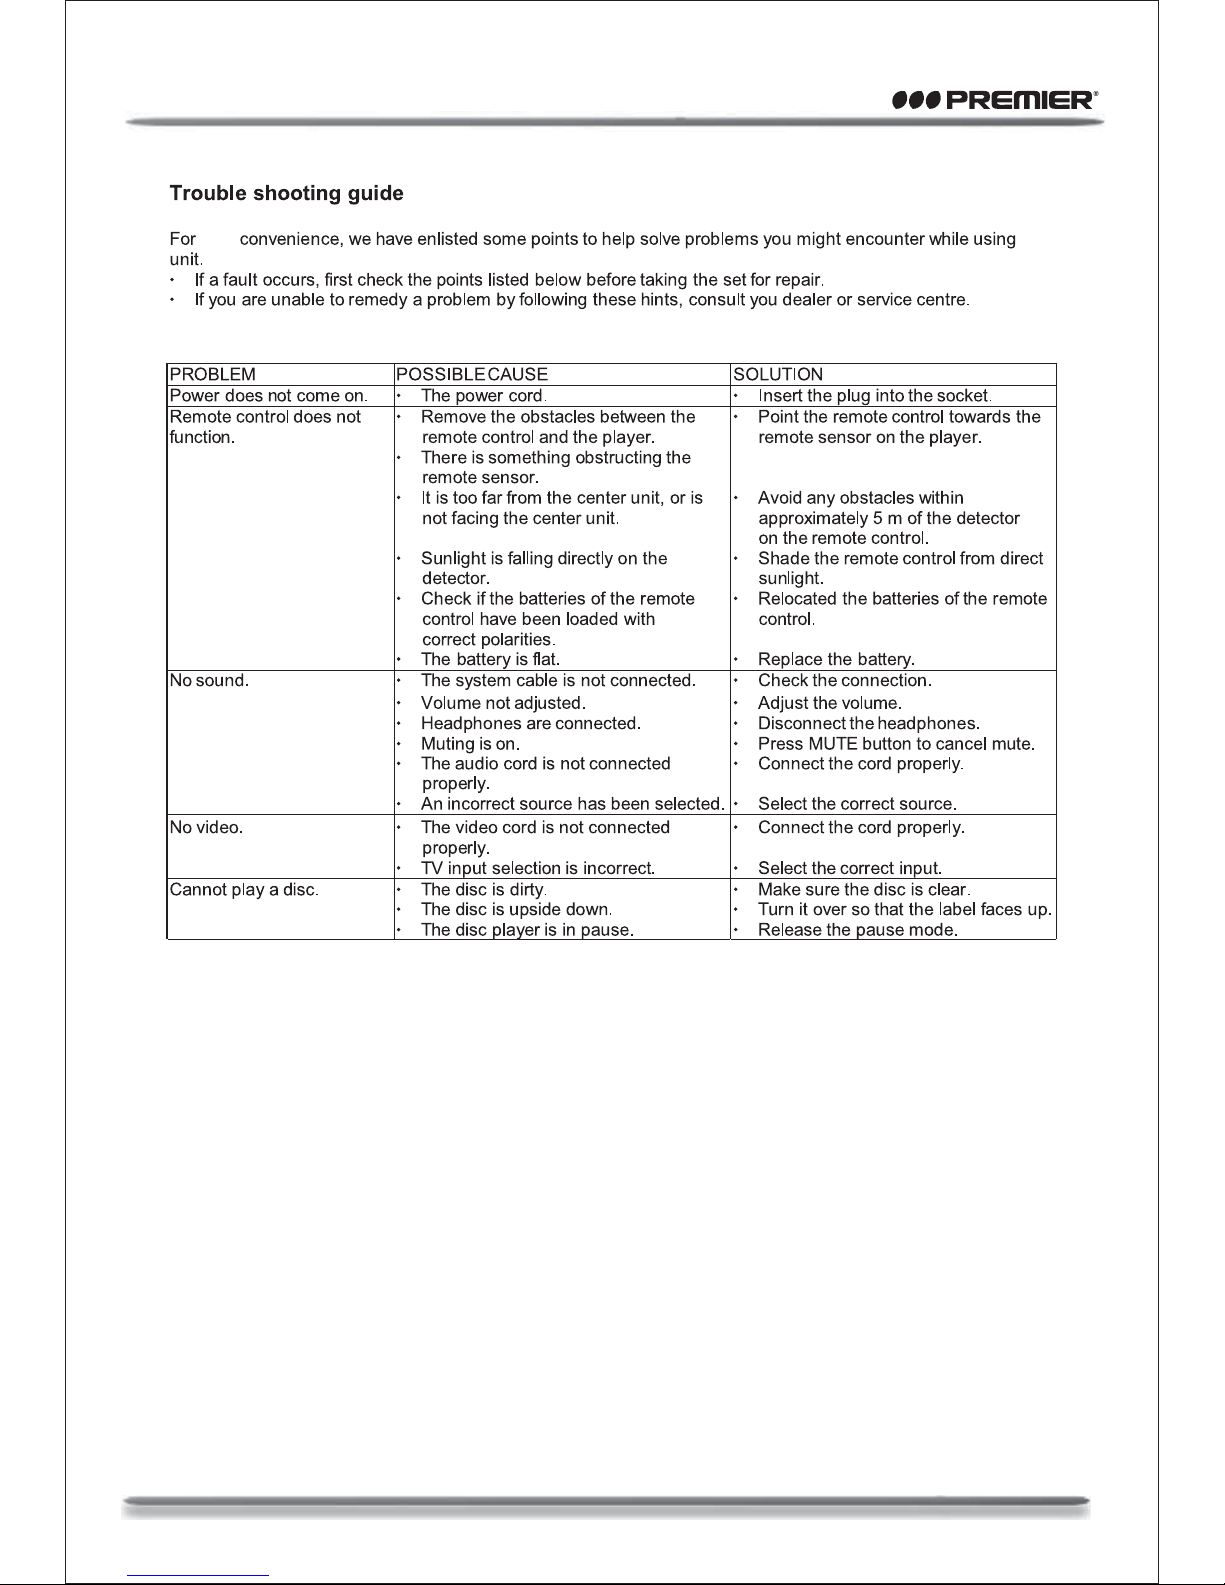
USB PLAY OPERATION
WWW.PREMIERMUNDO.COM
Page 18
The max. memory size of USB device which can be supported is 16 GB.
Page 20
your the
WWW.PREMIERMUNDO.COM
Page 19
Page 21
WWW.PREMIERMUNDO.COM
Page 20
 Loading...