

Page 1
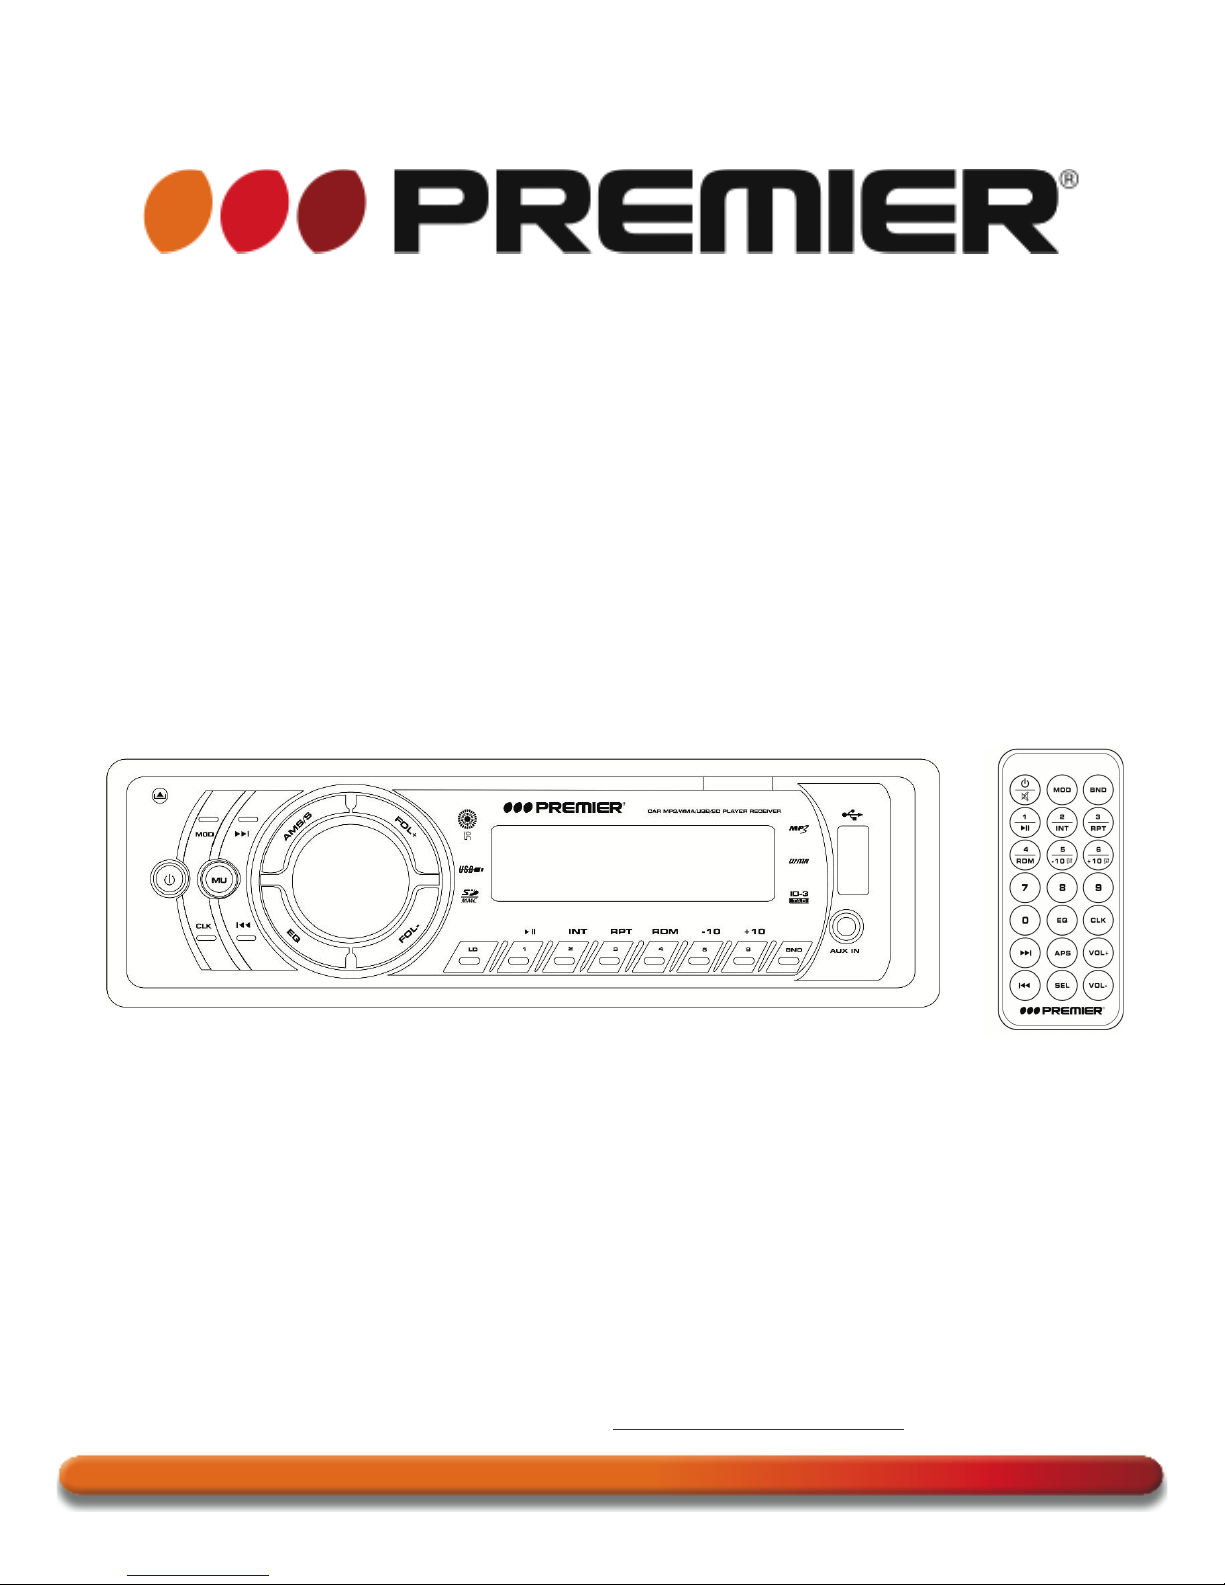
MANUAL DE INSTRUCCIONES
CAR-AUDIO C/MP3 Y USB / SD
SCR-4637USID
ESTIMADO CLIENTE
Con el fin de que obtenga el mayor desempeño de su producto, por favor lea este manual de
instrucciones cuidadosamente antes de comenzar a utilizarlo, y guárdelo para su futura referencia.
Si necesita soporte adicional, no dude en escribir a: [email protected]
Page 2
P-1
ÍNDICE
DESCRIPCIÓN .......................................................................................................................................... 2!
FUNCIONES PRINCIPALES ..................................................................................................................... 4!
OPERACIÓN GENERAL ........................................................................................................................... 4!
OPERACIÓN DEL RADIO ......................................................................................................................... 5!
OPERACIÓN DE MP3 ............................................................................................................................... 5!
PANEL FRONTAL EXTRAÍBLE ................................................................................................................ 6!
INSTALACIÓN DE LA UNIDAD ................................................................................................................ 7!
DIAGRAMA DE CABLEADO .................................................................................................................... 8!
RESOLUCIÓN DE PROBLEMAS ............................................................................................................. 9!
ESPECIFICACIONES ................................................................................................................................ 9!
LÍNEAS DE SERVICIO AL CLIENTE PREMIER
Venezuela:
0800 – ELECTRIC (353-2874)
Panamá:
300-5185
Sitio Web:
www.premiermundo.com
E-mail:
NOTA
Nos reservamos el derecho de modificar las especificaciones, características y/u operación de este
producto sin previo aviso, con el fin de continuar las mejoras y desarrollo del mismo.
Page 3
P-2
DESCRIPCIÓN
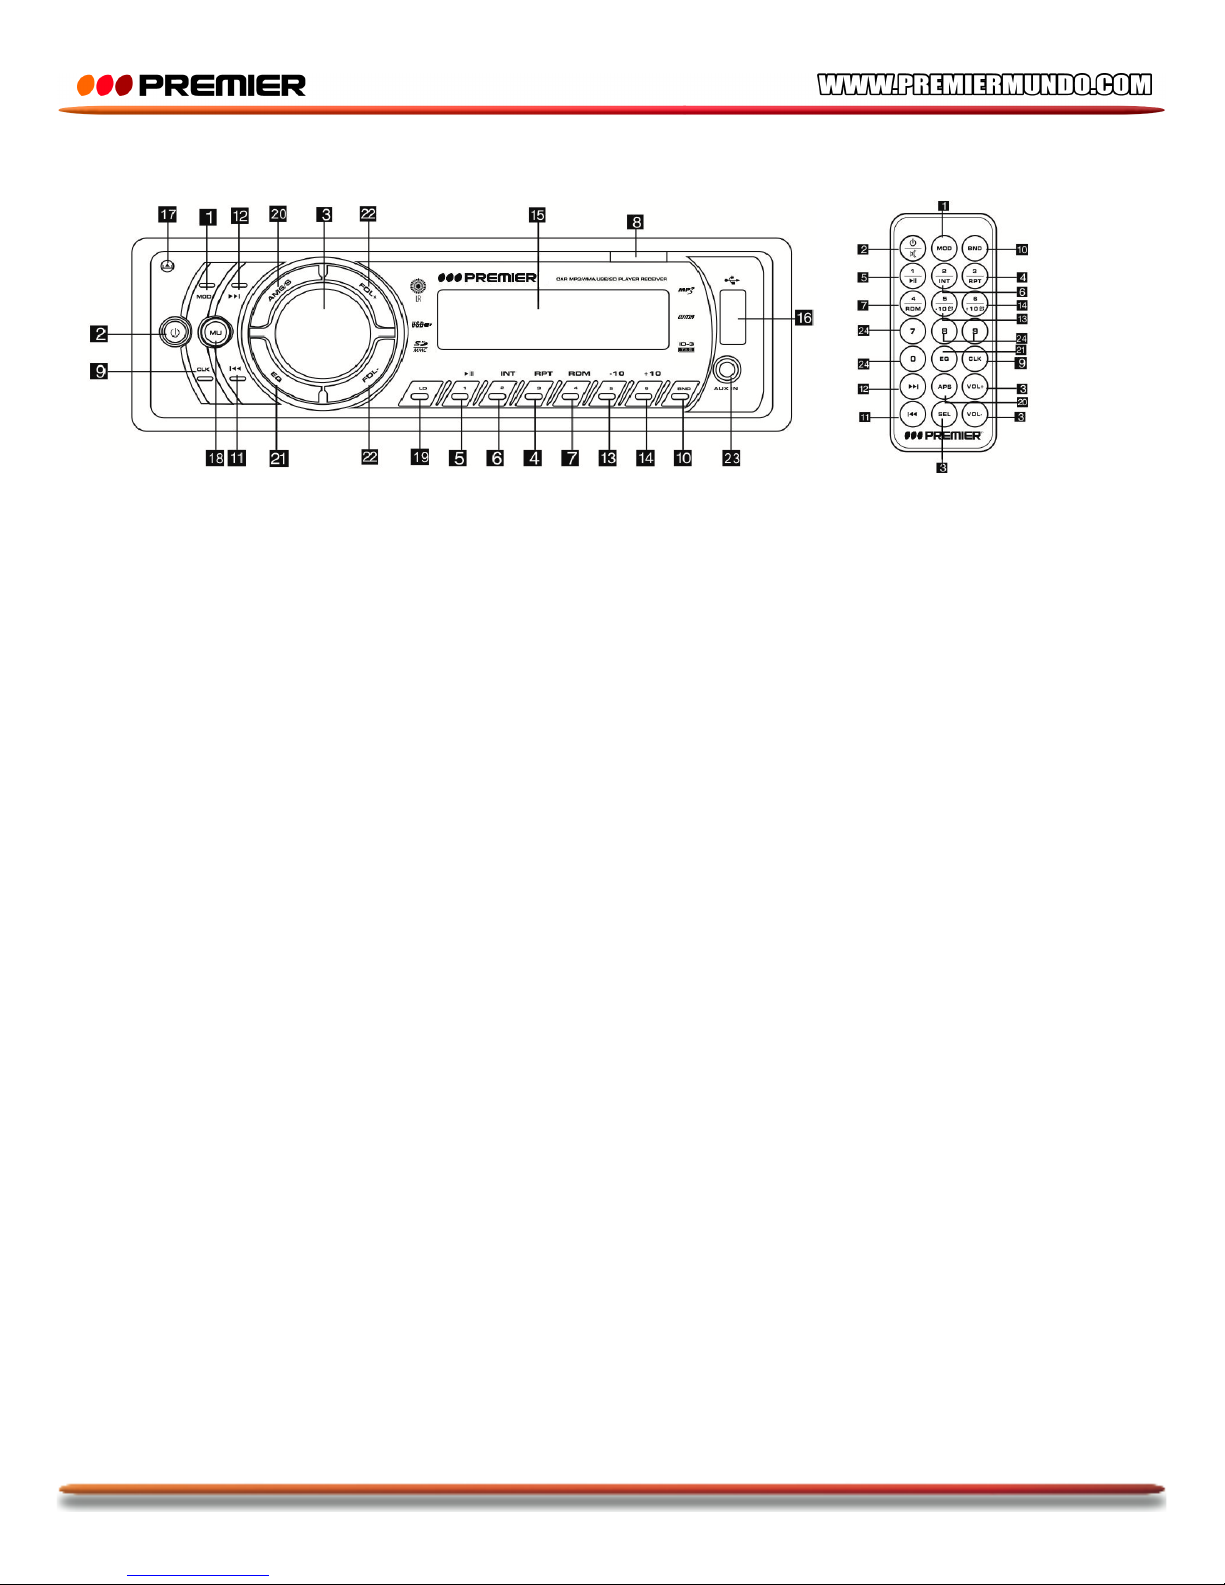
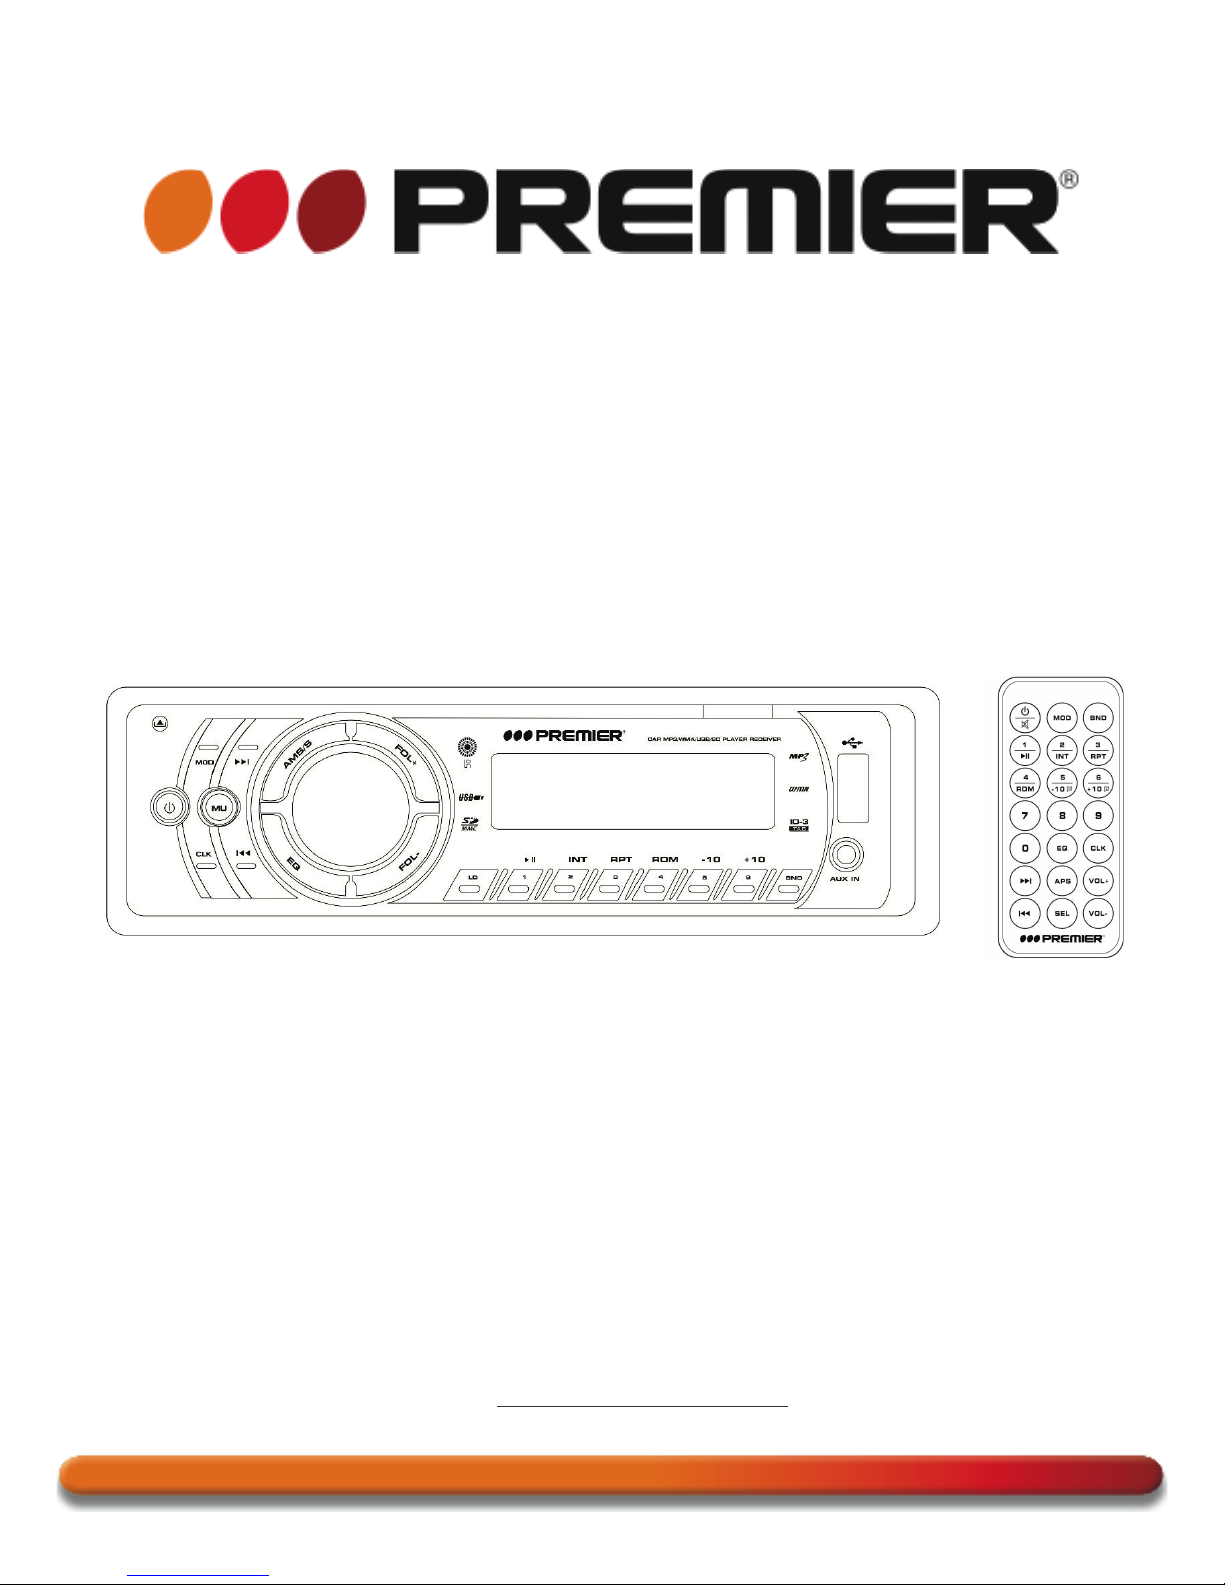
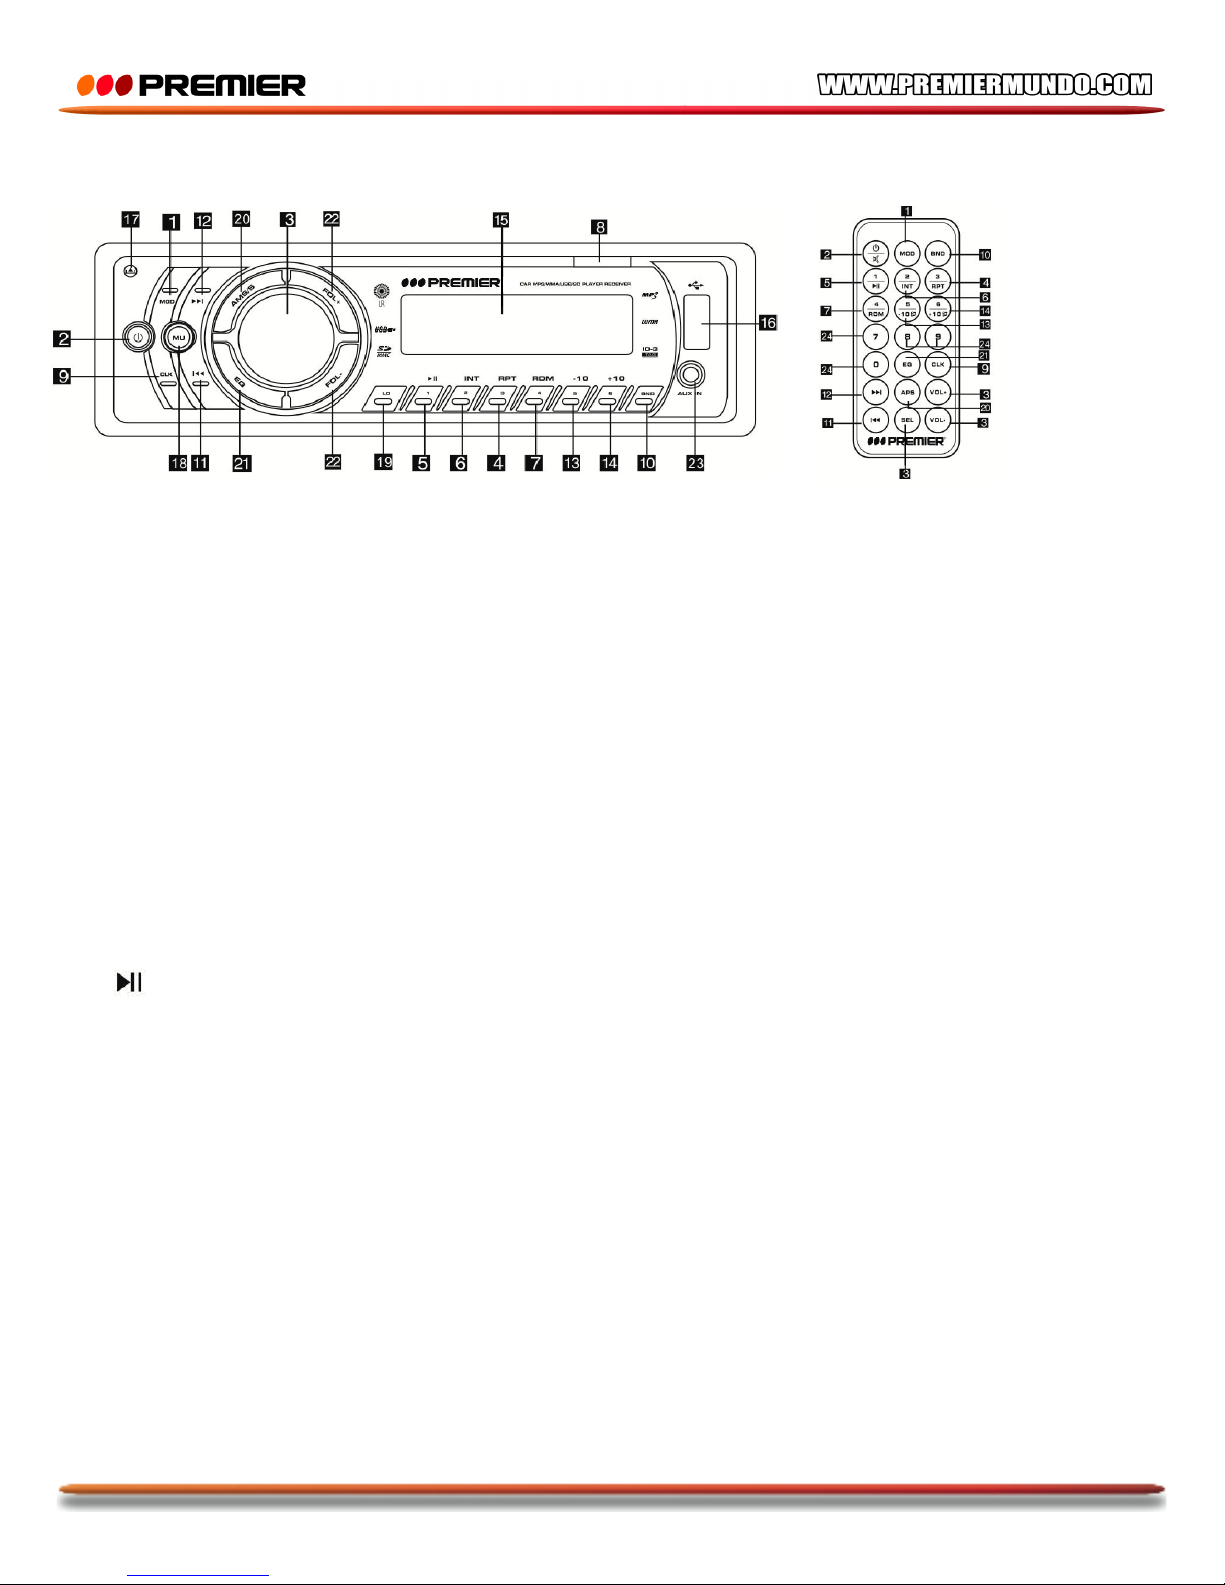
1. MODO
Presione este botón para cambiar entre las funciones de radio y MP3/WMA. (Radio, USB, SD, Auxiliar)
2. ENCENDER
Presione este botón para encender y apagar la unidad.
3. VOLUMEN / SELECCIÓN DE CONTROL
En el modo normal utilice este botón para aumentar y disminuir el volumen. Presione el botón varias
veces para tener acceso a las siguientes funciones: volumen, graves, agudos, desvanecedor, loud, DX,
ST.
4. 3 / REPETICIÓN
En el modo MP3 utilice este botón para repetir una canción.
5. 1 / PLAY/PAUSA
En el modo MP3 presione este botón para iniciar la reproducción y pausarla.
6. 2 / INTRODUCCIÓN
En el modo MP3 presione este botón para reproducir los primeros 10 segundos de cada pista.
7. 4 / REPRODUCCIÓN ALEATORIA
En el modo MP3 presione este botón para reproducir las canciones de manera aleatoria.
8. RANURA SD/MMC
Conecte una tarjeta SD/MMC a esta ranura para reproducir canciones MP3/WMA.
9. RELOJ
Presione este botón para mostrar y ajustar la hora.
10. BANDA
En el modo de radio presione este botón para cambiar entre los modos FM1, FM2, FM3, AM1, AM2.
Page 4

P-3
11-12. ANTERIOR Y SIGUIENTE
Utilice estos botones para cambiar de pistas hacia adelante y hacia atrás.
13. 5 / BOTÓN -10
En el modo MP3 presione este botón para regresar 10 canciones de una sola vez.
14. 6 / BOTÓN +10
En el modo MP3 presione este botón para avanzar 10 canciones de una sola vez.
15. PANTALLA LCD
Muestra la hora y las funciones seleccionadas.
16. RANURA USB
Conecte un dispositivo USB para reproducir archivos MP3.
17. PANEL FRONTAL
Presione el panel para retirarlo.
18. SILENCIADOR
Presione este botón para cancelar el sonido de las canciones. Presione de nuevo para activarlo.
19. LOUD
Utilice este botón para activar la función Loud la cual brinda realce al sonido. La pantalla LCD mostrará
un icono cuando la función este activa.
20. APS
Presione el botón APS (o AMS/S) para que la unidad busque las estaciones radiales con mayor
potencia y las guarde automáticamente en los botones de memoria 1 a 6.
21. ECUALIZACIÓN
Elija una opción de ecualización: Clásica, Pop, Rock, Flat, Plano.
22. FOL+/FOL-
Selección de carpeta.
23. CONECTOR AUXILIAR
Aquí puede conectar un dispositivo auxiliar a la unidad.
24. BOTONES NUMÉRICOS
Utilice los botones numéricos en el control remoto para ir directamente a las pistas.
Page 5

P-4
FUNCIONES PRINCIPALES
• Soporte para USB, Tarjeta SD/MMC y disco duro portátil.
• Soporte para formatos de audio: MP3/WMA
• Soporte para cargar un teléfono celular por medio de la ranura USB.
• La unidad solo soporta los sistemas de archivo FAT16 o FAT32.
• No formatee el archivo de sistema cuando esté dando formato a la USB o tarjeta SD/MMC.
• La unidad dispositivos USB y Tarjetas SD/MMC con un tamaño máximo de 32GB.
OPERACIÓN GENERAL
ENCENDER/APAGAR
Presione el botón de encendido para encender la unidad y nuevamente para apagarla.
CANCELAR SONIDO
Presione el botón silenciador para cancelar el sonido; presione y mantenga para activarlo.
MODOS
• Conecte un dispositivo USB o tarjeta SD/MMC mientras la unidad esta en modo de radio. La unidad
cambiará a modo de USB/SD/MMC.
• Si la unidad tiene conectado un dispositivo USB, al conectar una tarjeta SD/MMC cambiará a modo
SD/MMC.
• De manera contraria, si la unidad tiene conectada una tarjeta SD/MMC, al conectar un dispositivo
USB cambiará a modo USB.
• La unidad volverá a modo de radio cuando se desconecten estos dispositivos.
• Presione el botón Modo para cambiar de modo cuando un dispositivo USB o tarjeta SD/MMC esté
conectado. El modo USB es el modo preestablecido al encender la unidad.
HORA
1. Presione el botón Reloj para mostrar la hora en la unidad. La pantalla LCD regresará al modo
normal después de 5 segundos.
2. Para cambiar la hora presione y mantenga el botón Reloj hasta que la hora parpadee en la pantalla.
Luego utilice el botón de volumen +/- para ajustar la hora. Presione el botón de Selección para
confirmar. Ahora ajuste los minutos de la misma manera. Para confirmar presione de nuevo el botón
de Selección.
MODO DE AUDIO
• Utilice la perilla de volumen para aumentar y disminuir el nivel.
• Presione el botón de selección de audio para ajustar las funciones volumen, graves, agudos,
desvanecedor, loud, DX, ST.
• Presione y mantenga el selector de audio para activar la función de ecualizador.
(Nota: si la función de ecualizador esta activa, no se podrán configurar los graves y los agudos)
Page 6

P-5
OPERACIÓN DEL RADIO
BANDA
• Presione el botón Banda para cambiar entre las opciones FM1, FM2, FM3, AM1, AM2.
• Presione y mantenga el botón APS (o AMS/S) para que la radio busque las estaciones radiales más
fuertes y las guarde en los números de memoria 1 a 6.
• En el modo FM se pueden guardar 18 estaciones, 6 en cada modo FM.
• En el modo AM se pueden guardar 12 estaciones, 6 en cada modo AM.
• Cuando las estaciones radiales estén guardadas presione el botón numérico correspondiente.
SINTONIZACIÓN
Utilice los botones anterior y siguiente para moverse a través de las estaciones radiales. Presione y
mantenga para avanzar rápidamente a través de las estaciones. Si desea guardar una estación radial
presione y mantenga uno de los números 1 a 6.
OPERACIÓN DE MP3
• La unidad puede leer los archivos de música que se encuentren en un dispositivo USB y tarjeta
SD/MMC al conectarse a la unidad.
• Cuando la unidad esté reproduciendo archivos desde el dispositivo USB, se observará el ícono USB
en la pantalla, y cuando lo esté haciendo desde la tarjeta SD/MMC, se verá el ícono SD en pantalla.
• Cuando el tipo de archivo sea MP3, se verá el ícono MP3 en la pantalla. Si el tipo de archivo es
WMA se verá el ícono de WMA en la pantalla.
• Utilice los botones anterior y siguiente para moverse a través de las pistas.
En el modo de reproducción de MP3 utilice los botones 1 a 6 de la siguiente manera:
• Botón 1: Pausa y activa la reproducción.
• Botón 2: Introducción. Reproduce los primeros 10 segundos de cada canción. Presione de nuevo
para cancelar la función.
• Botón 3: Repetición. Presione este botón para repetir una canción o todas las pistas, y una vez más
para cancelar.
• Botón 4: Reproducción aleatoria.
• Botón 5: Regresa 10 pistas
• Botón 6: Adelanta 10 pistas.
ETIQUETAS ID3
Si esta función está disponible, la pantalla mostrará la siguiente información:
• Nombre de la canción y tipo de archivo
• Título
• Artista
• Directorio
O usted también puede hacer un escaneo sobre esta información presionando el botón Banda.
Page 7
P-6
En el modo MP3/WMA, presione el botón AMS/S en la unidad o APS en el control remoto para activar el
modo de búsqueda de pistas con los siguientes métodos:
Utilice los botones numéricos para introducir un número (desde la unidad o el control remoto) o gire la
perilla para seleccionar la pista que desee. Por ejemplo, usted está escuchando la primera canción y
quiere ir a la 59. Presione el botón AMS/S o APS, y en la pantalla LCD aparecerá el mensaje
“Búsqueda de Pista” (TRK SCH). Gire la perilla para seleccionar el número de 0 a 9. Seleccione
entonces, en este ejemplo, el número 5. Espere tres segundos; la unidad irá al segundo dígito. Luego
presione el número 9 o gire la perilla para seleccionar este número. Presione el botón de Selección para
que la unidad vaya a la pista 59.
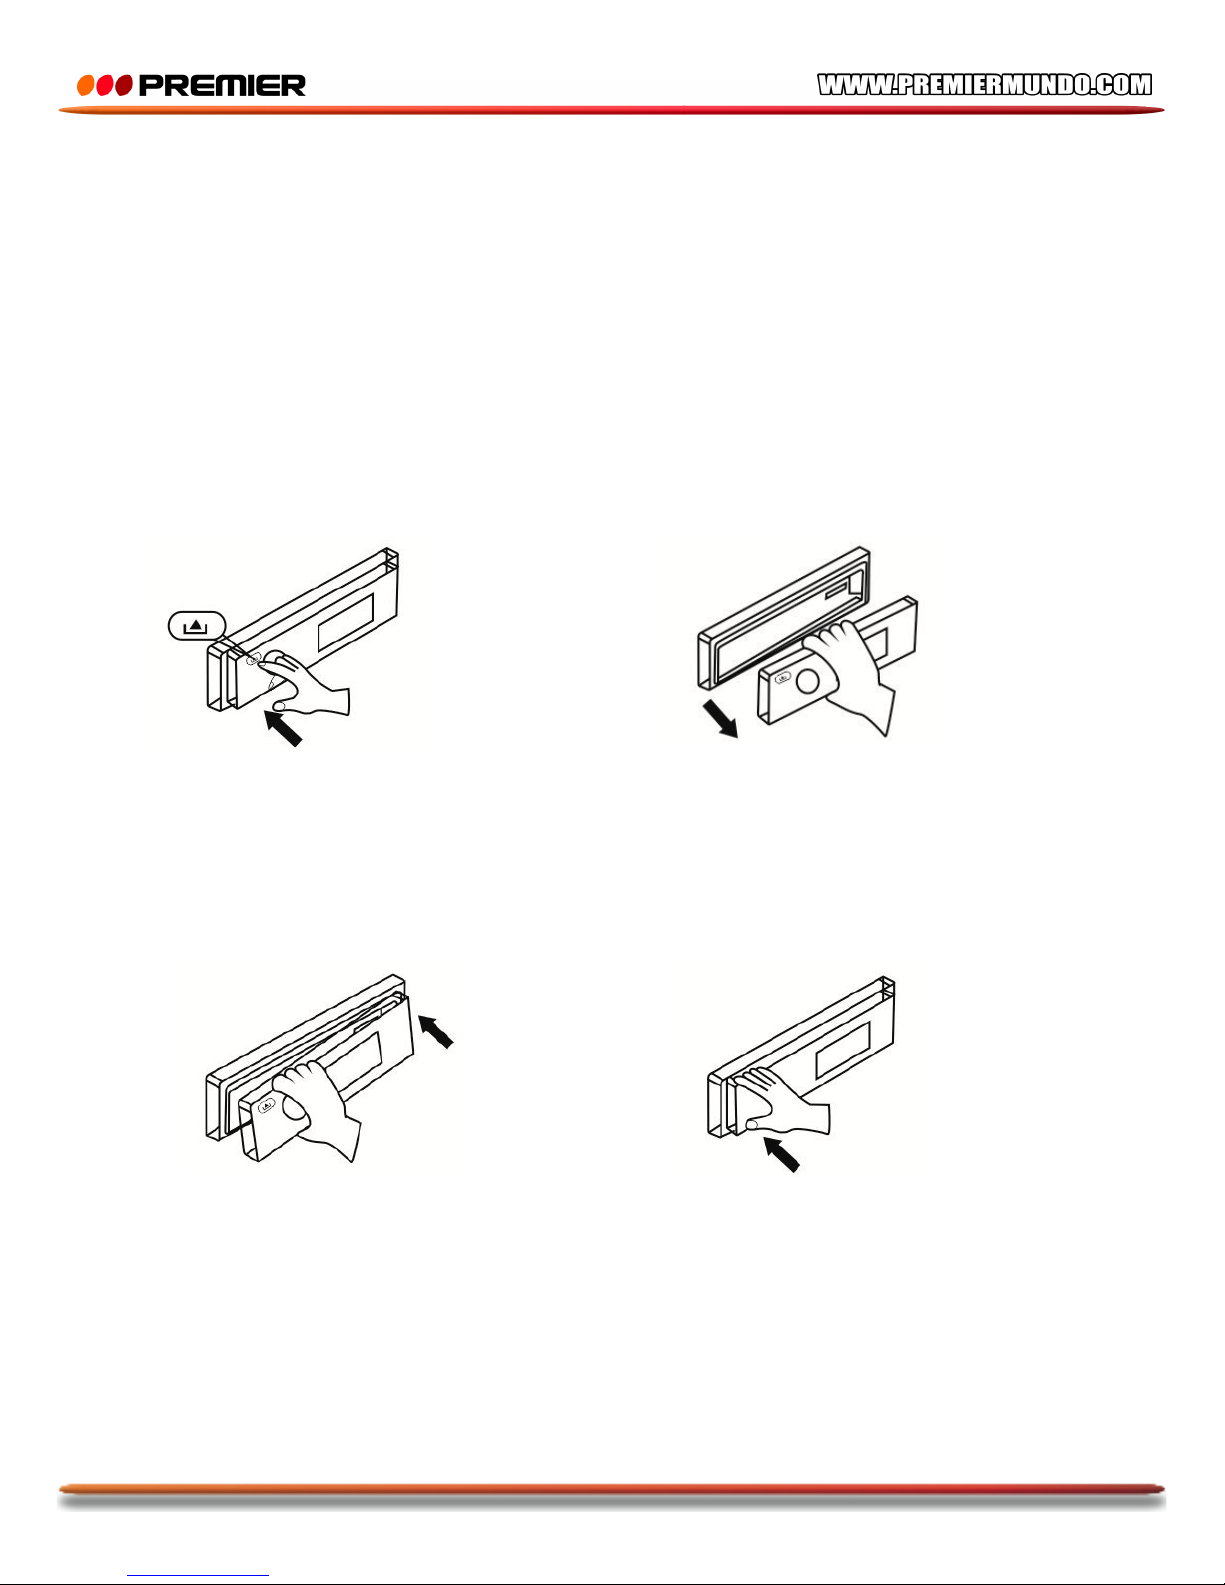
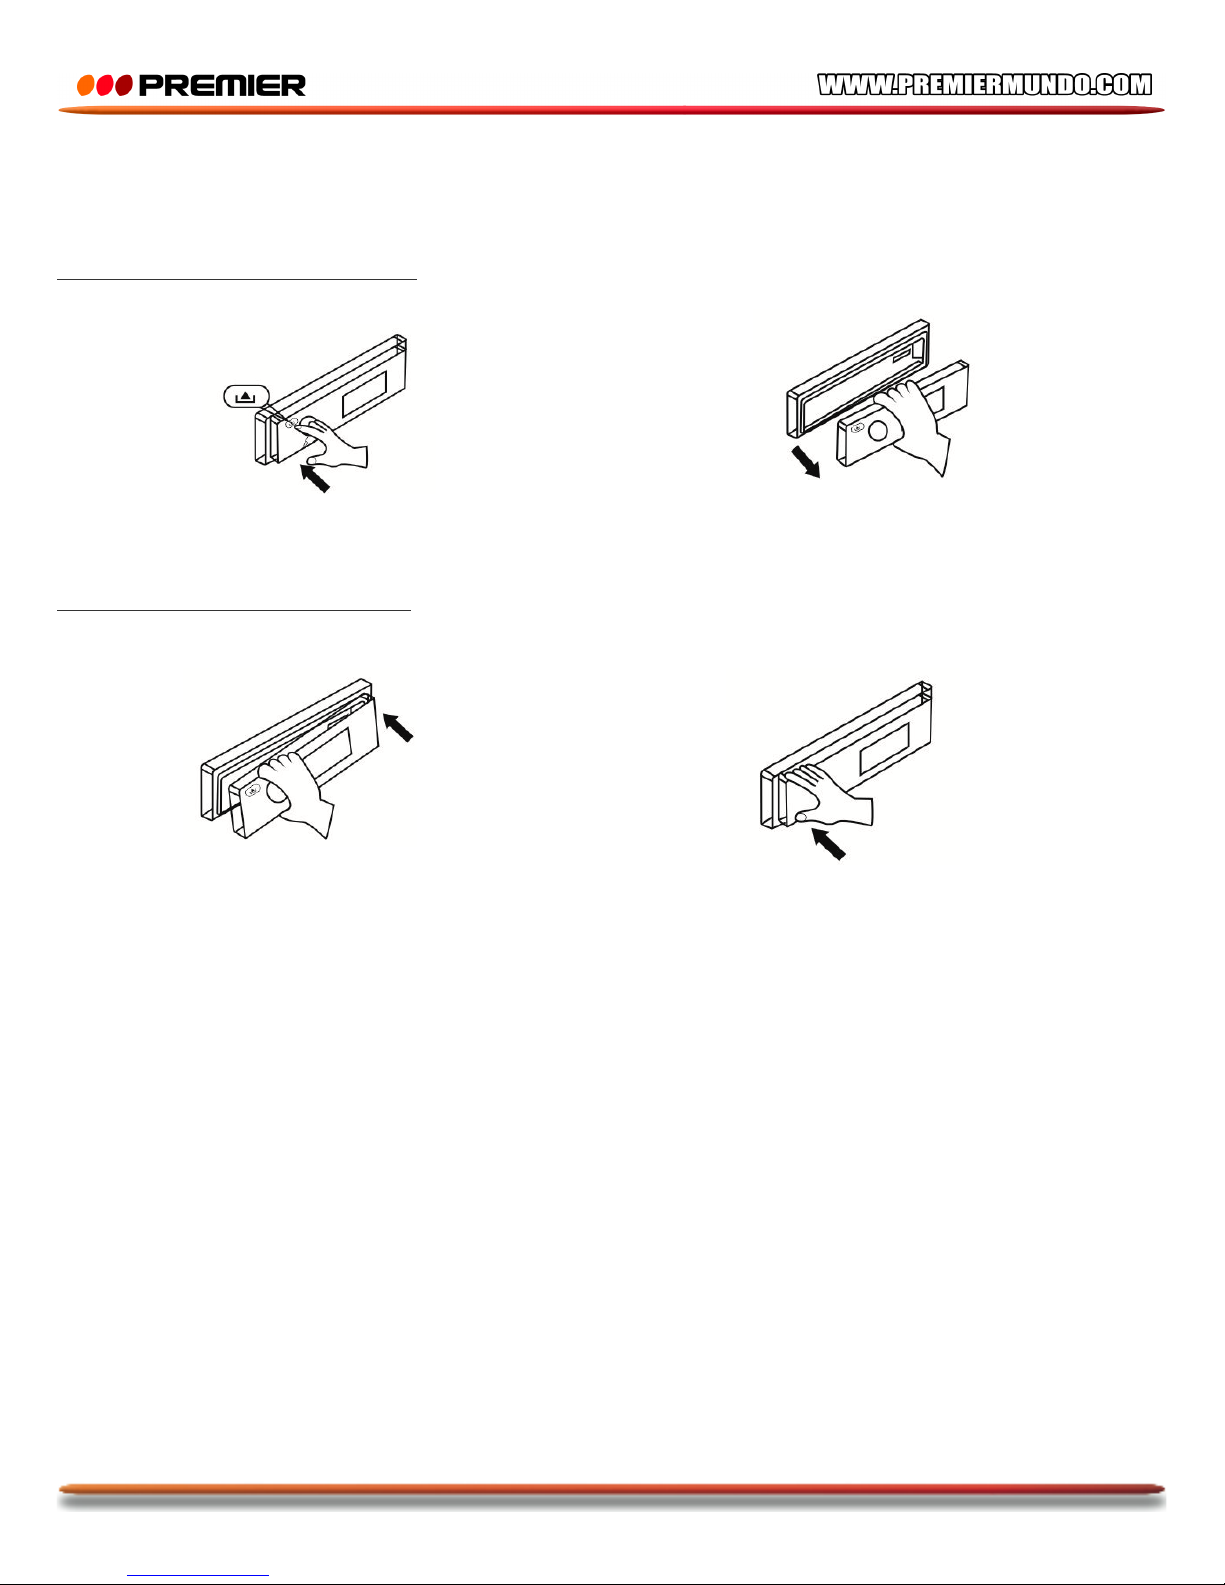
PANEL FRONTAL EXTRAÍBLE
RETIRAR EL PANEL
PONER EL PANEL
Presione el botón de liberación.
Retire el panel.
Inserte el lado derecho del panel.
Presione el panel hasta escuchar un pequeño ‘clic’.
Page 8
P-7
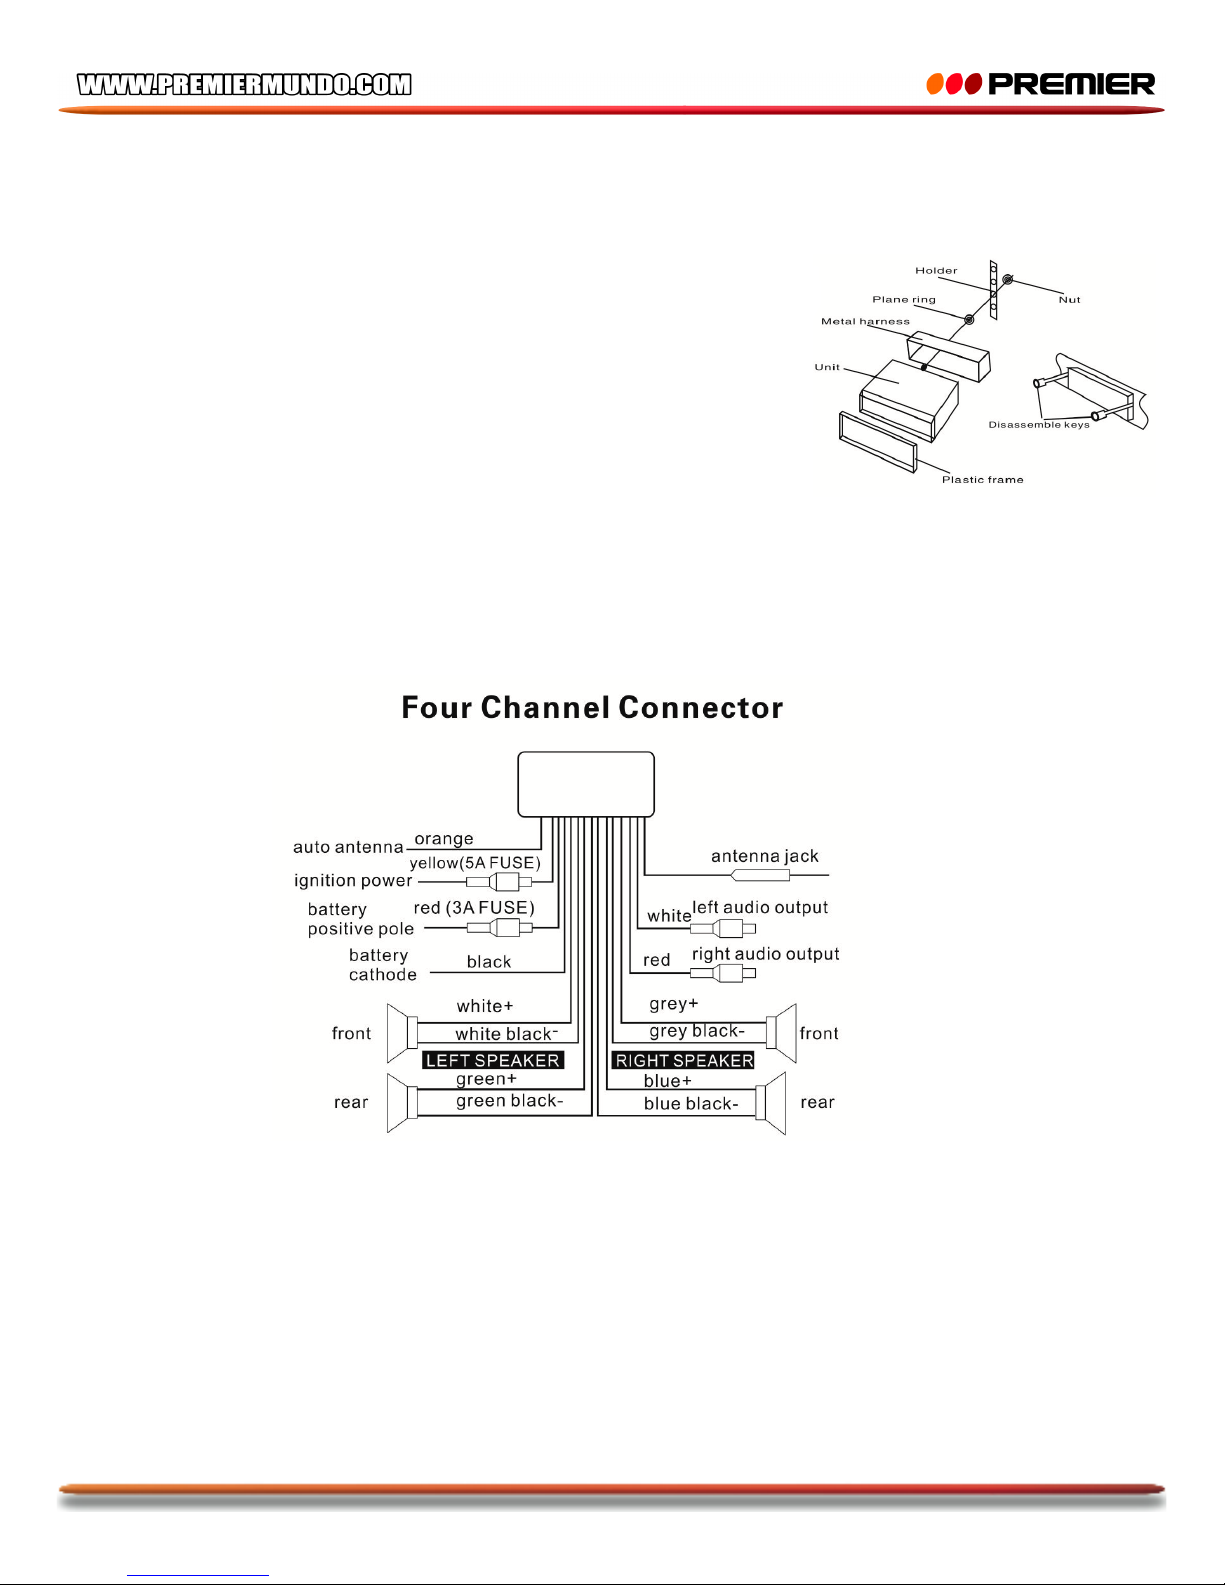
INSTALACIÓN DE LA UNIDAD
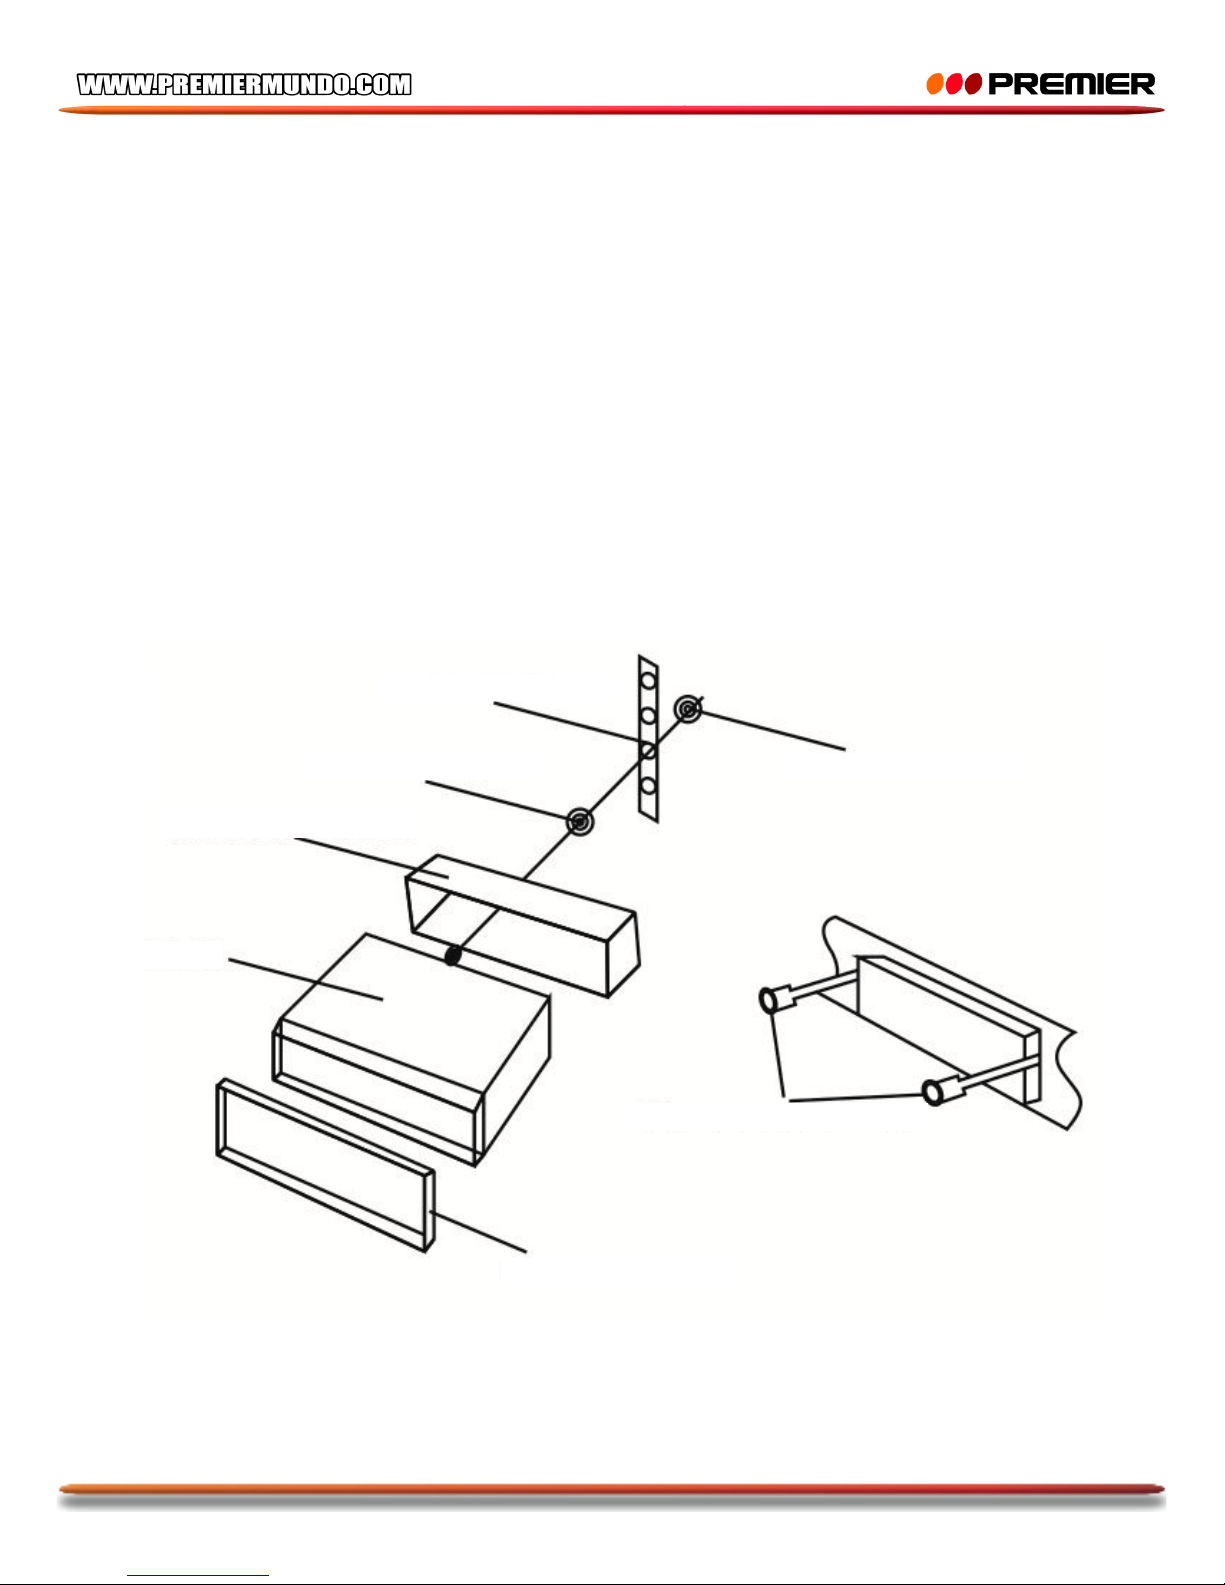
La carcasa de la unidad tiene un diseño antirrobo para mayor seguridad. Tenga en cuenta las
siguientes instrucciones de instalación.
1. Empuje la placa de montaje contra el chasis hasta que encaje.
2. Introduzca la unidad en el tablero y luego empuje la unidad hacia el chasis hasta que quede
bloqueado.
Nota
Elija una ubicación donde la unidad no interfiera con la función normal de manejar.
Antes de completar la instalación de la unidad conecte los cables temporalmente y asegúrese de que
estén bien conectados y que la unidad funciona adecuadamente.
Para una instalación segura utilice las piezas de montaje suministradas por el fabricante.
RETIRAR LA UNIDAD
Introduzca las llaves suministradas en las ranuras a ambos lados de la unidad hasta que hagan ‘clic’. Al
halar las llaves se hace posible el retiro de la unidad del tablero.
Unidad
Arnés Metálico
Anillo Plano
Soporte
Tuerca
Marco Plástico
Llaves de desmontaje
Page 9
P-8
DIAGRAMA DE CABLEADO
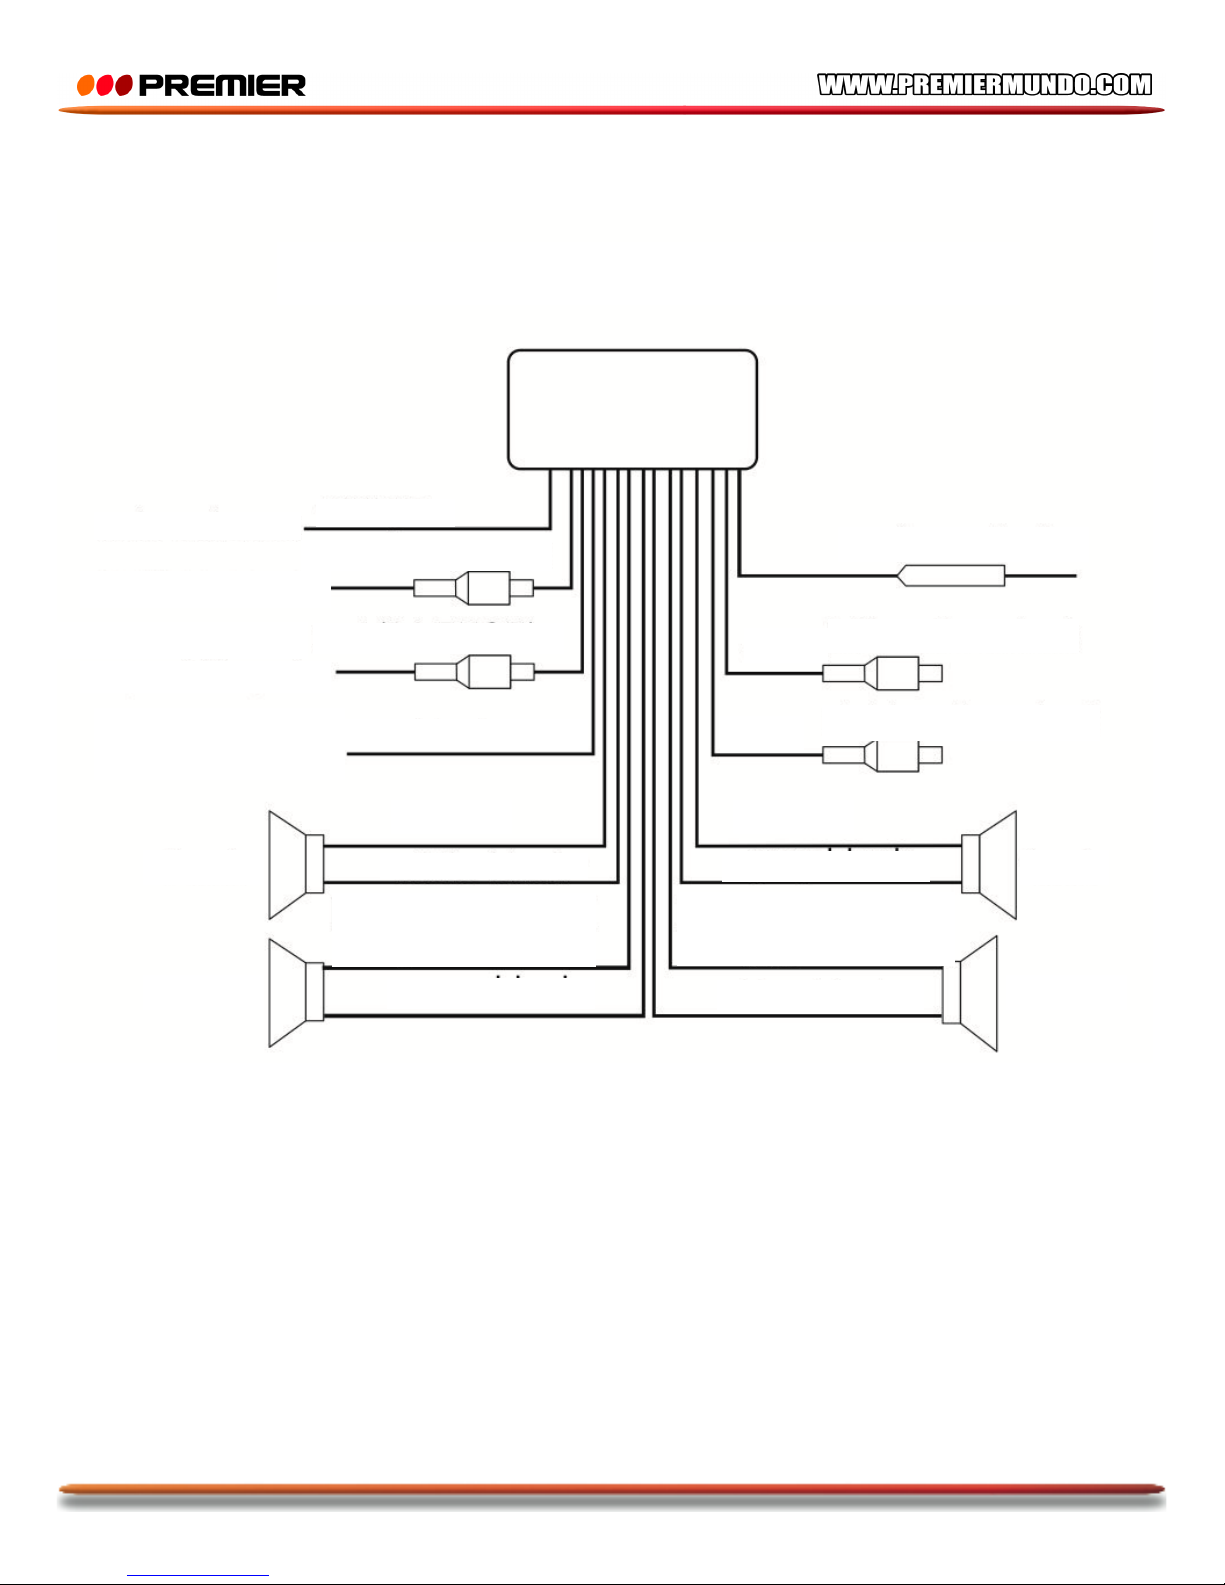
naranja
antena del auto
amarillo (fusible 5A)
ignición
batería
rojo (fusible 3A)
polo positivo
negro
cátodo de batería
conector de antena
salida izquierda de audio
blanco
salida derecha de audio
rojo
blanco +
gris +
frontal
posterior
posterior
frontal
blanco negro -
gris negro -
azul negro -
verde negro -
PARLANTE IZQUIERDO
verde +
PARLANTE DERECHO
AZUL +
CONEXIÓN DE CUATRO CANALES
Page 10
P-9
RESOLUCIÓN DE PROBLEMAS
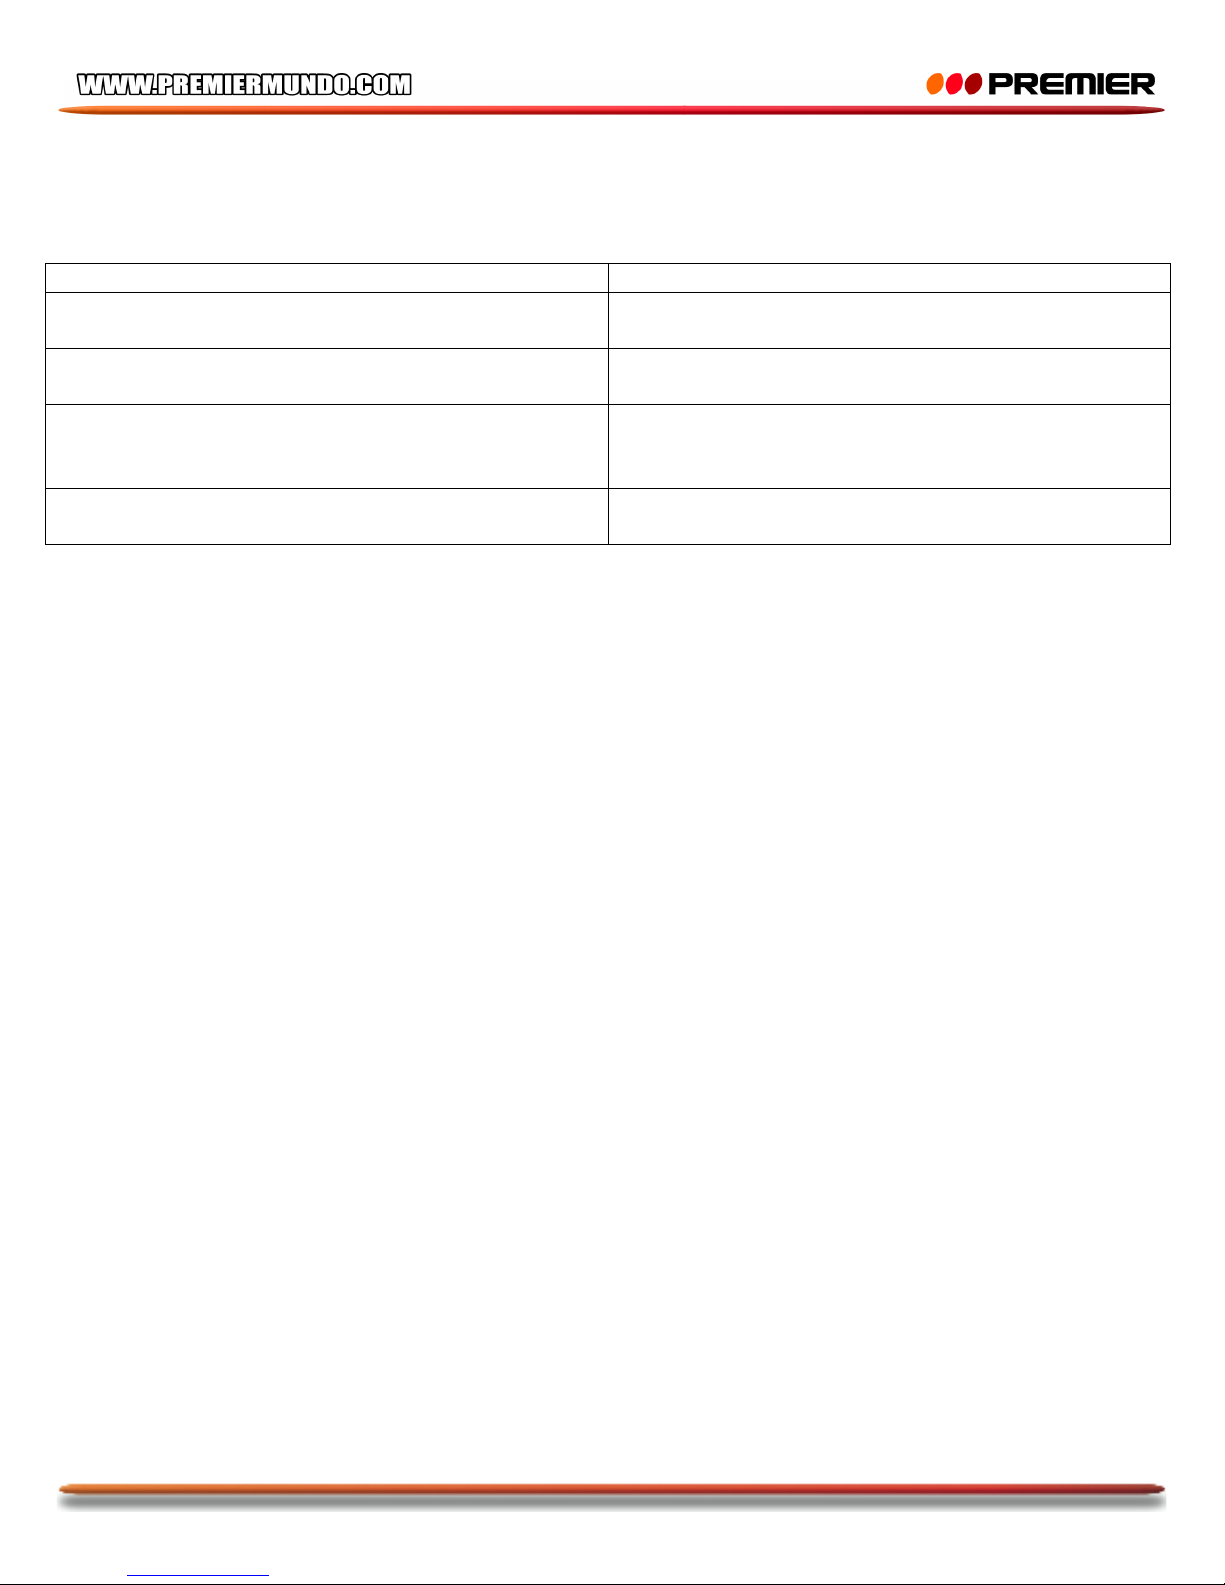
Esta lista es para ayudarle a resolver problemas simples que pueden presentarse en el uso del
producto. Por favor léala y verifique estos puntos antes de solicitar ayuda de personal de servicio
técnico autorizado.
PROBLEMA
CAUSA Y SOLUCIÓN
La unidad no enciende
Verifique las conexiones de los cables y si el
fusible se ha quemado
No hay sonido
Verifique las conexiones de los cables y que el
volumen no esté al mínimo
La radio no funciona al igual que la selección
automática de estaciones
Verifique que la antena esté conectada y que el
lugar donde se encuentre tenga buena recepción
de señal
La unidad está encendida pero el reproductor no
funciona
El formato de reproducción de los archivos es
diferente a MP3 o WMA.
ESPECIFICACIONES
GENERAL
Suministro de energía 12V DC
Conexión a Tierra Electrodo Negativo
Tamaño de la Instalación 178 x 120 x 50 mm
Peso 0.65 kg
Temperatura de Operación -20ºC - +60ºC
AUDIO
Potencia de Salida 4 x 7 Watts
Impedancia 4 Ohm – 8 Ohm
RADIO FM
Rango de Frecuencia 87.5 – 108MHz
Sensitividad 10dB (S/N30 dB) ≤ 15dB
RADIO AM
Rango de Frecuencia 520 – 1710 KHz
Sensitividad 30dB (S/N 20dB)
Page 11
P-10
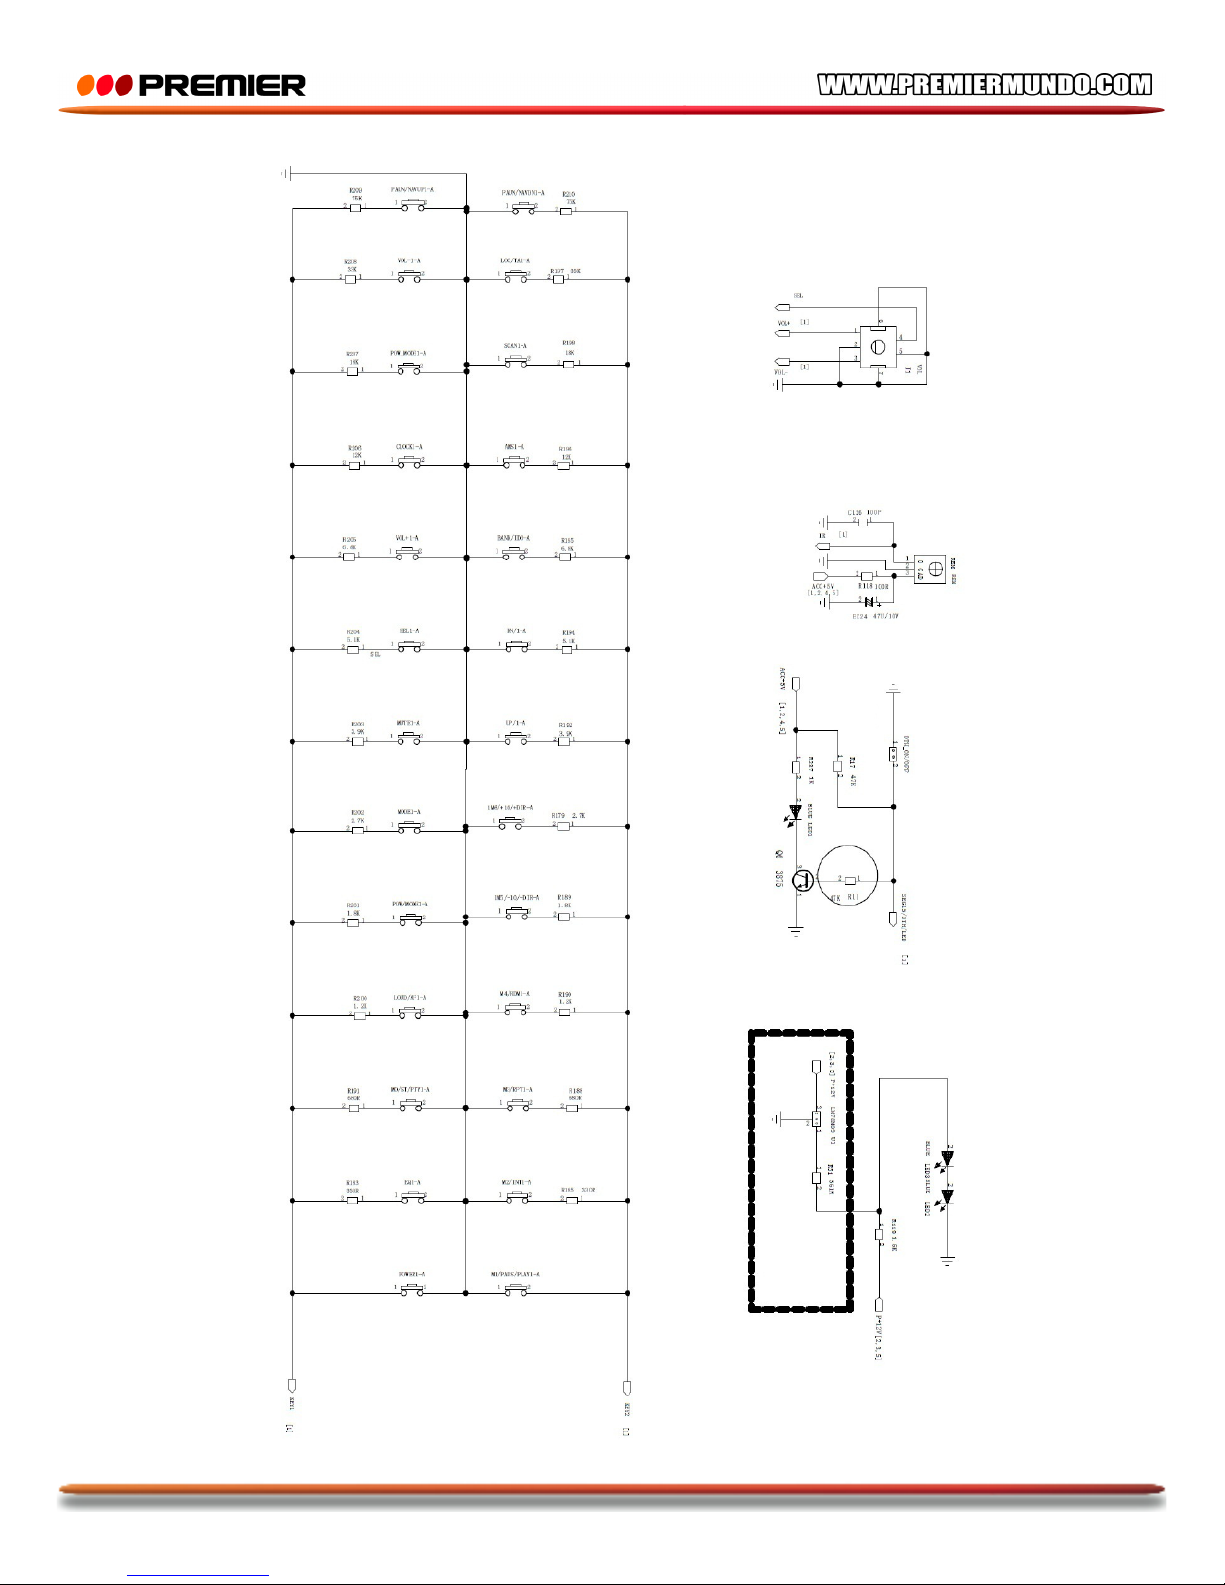
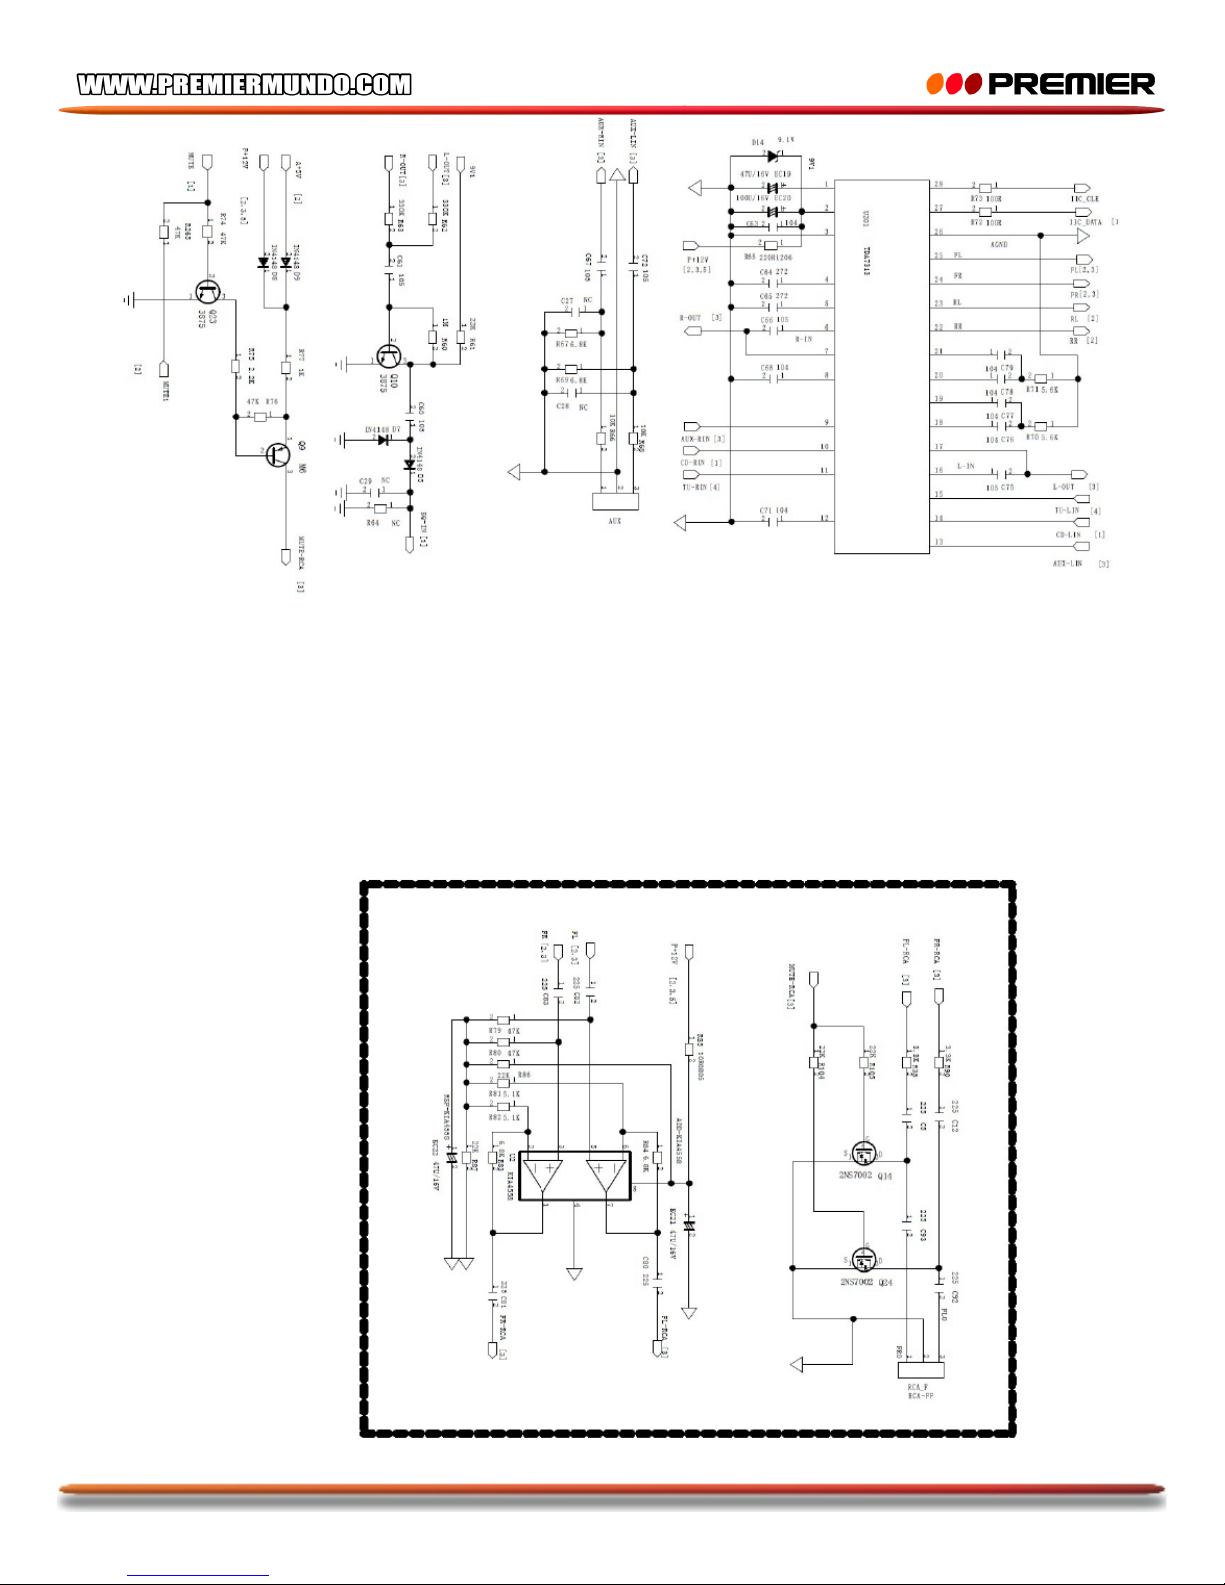
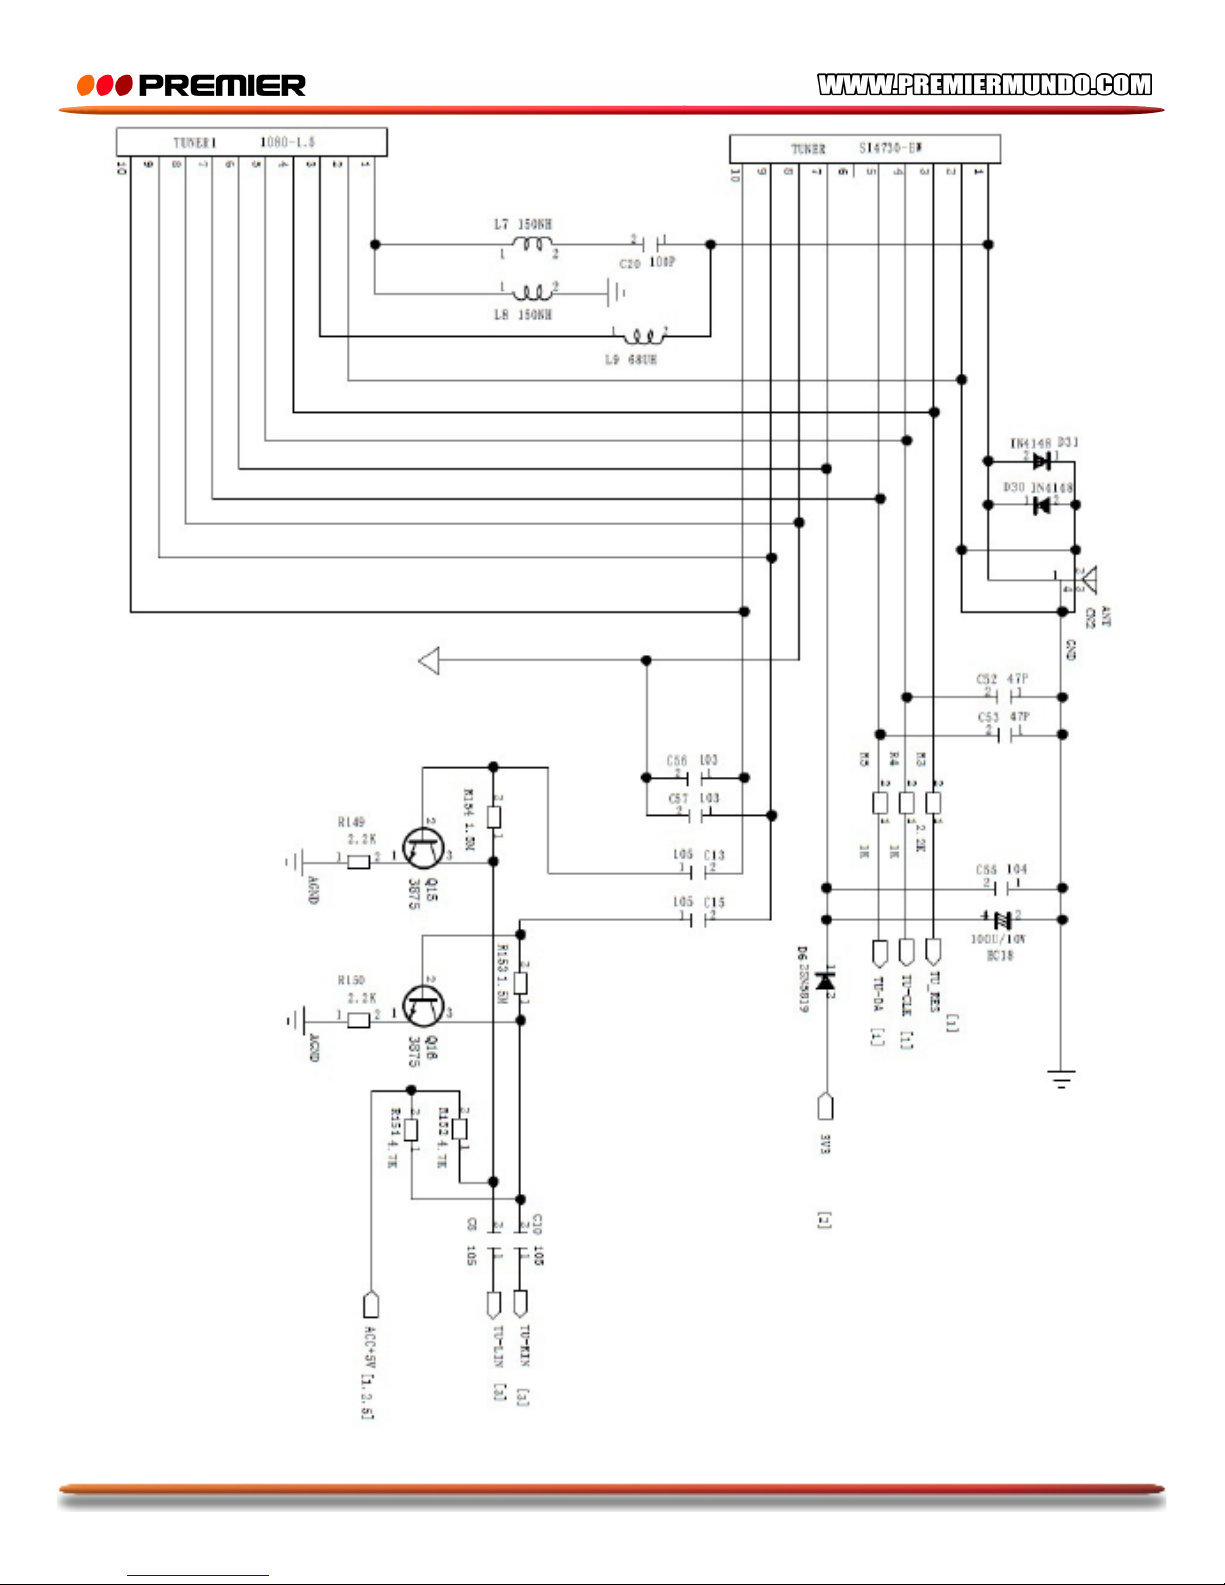
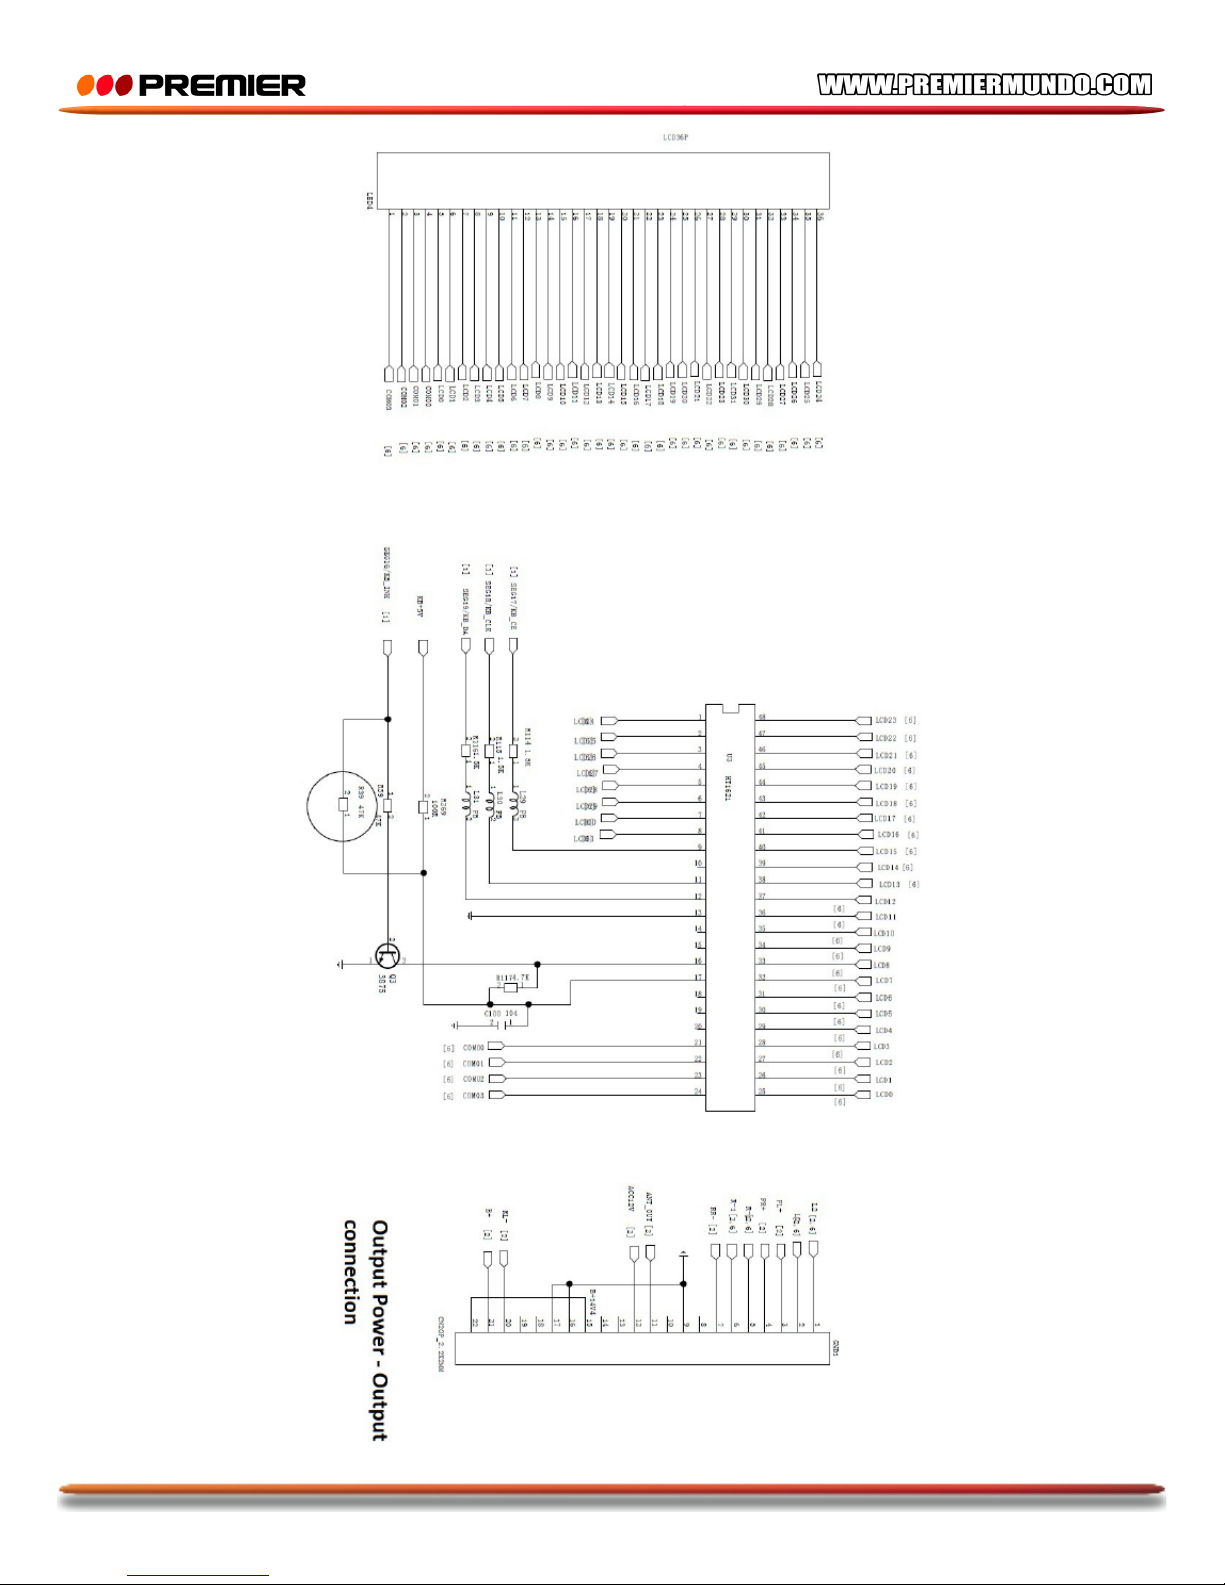
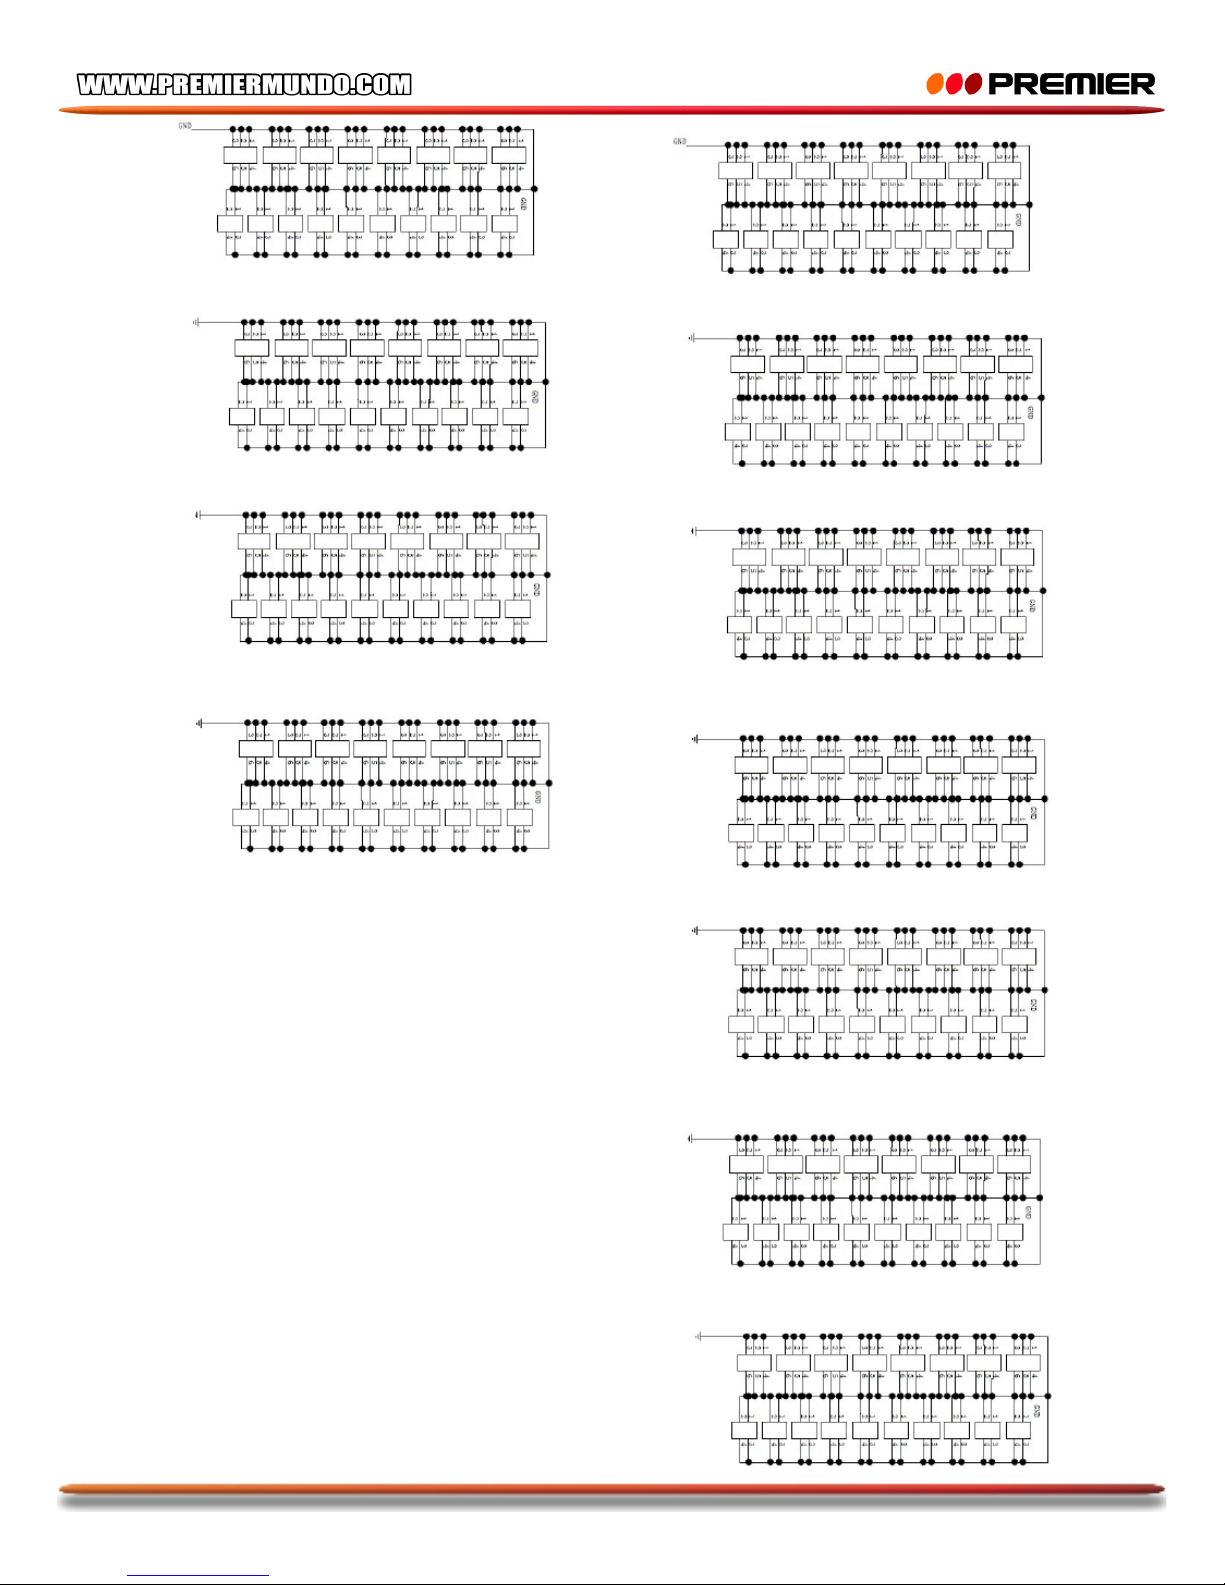
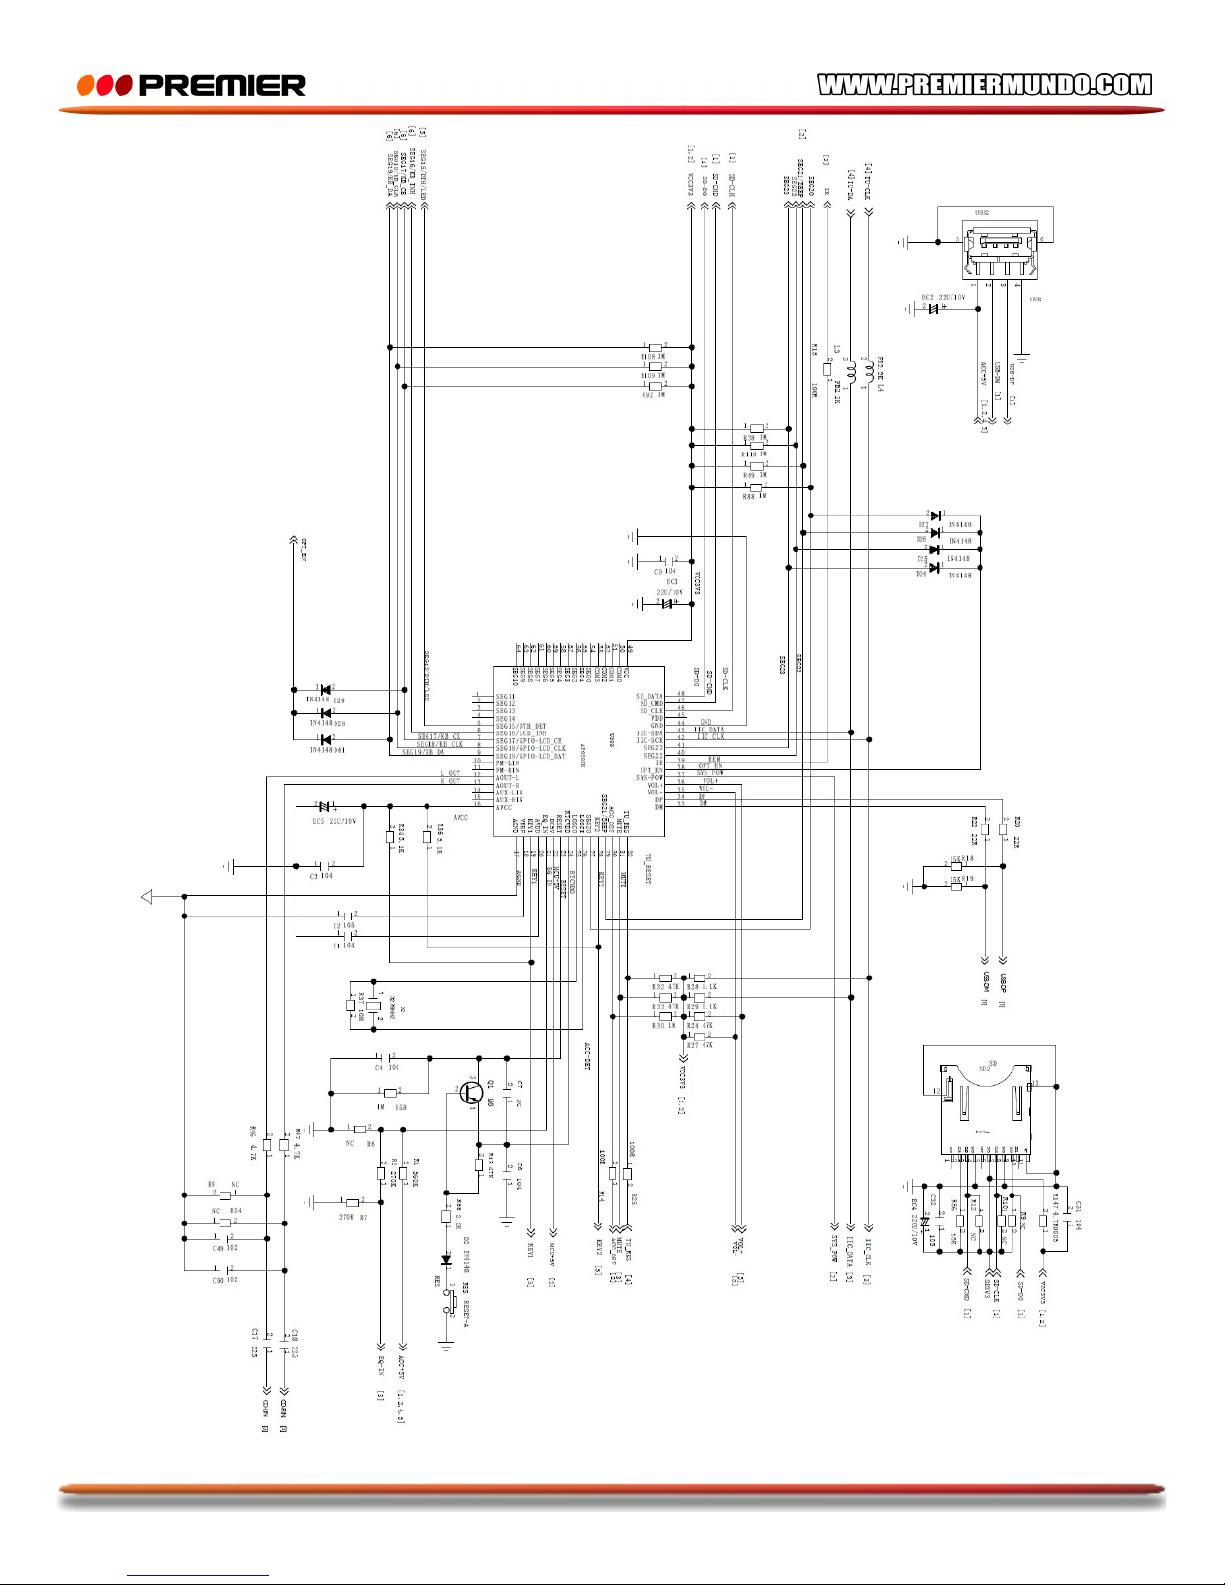
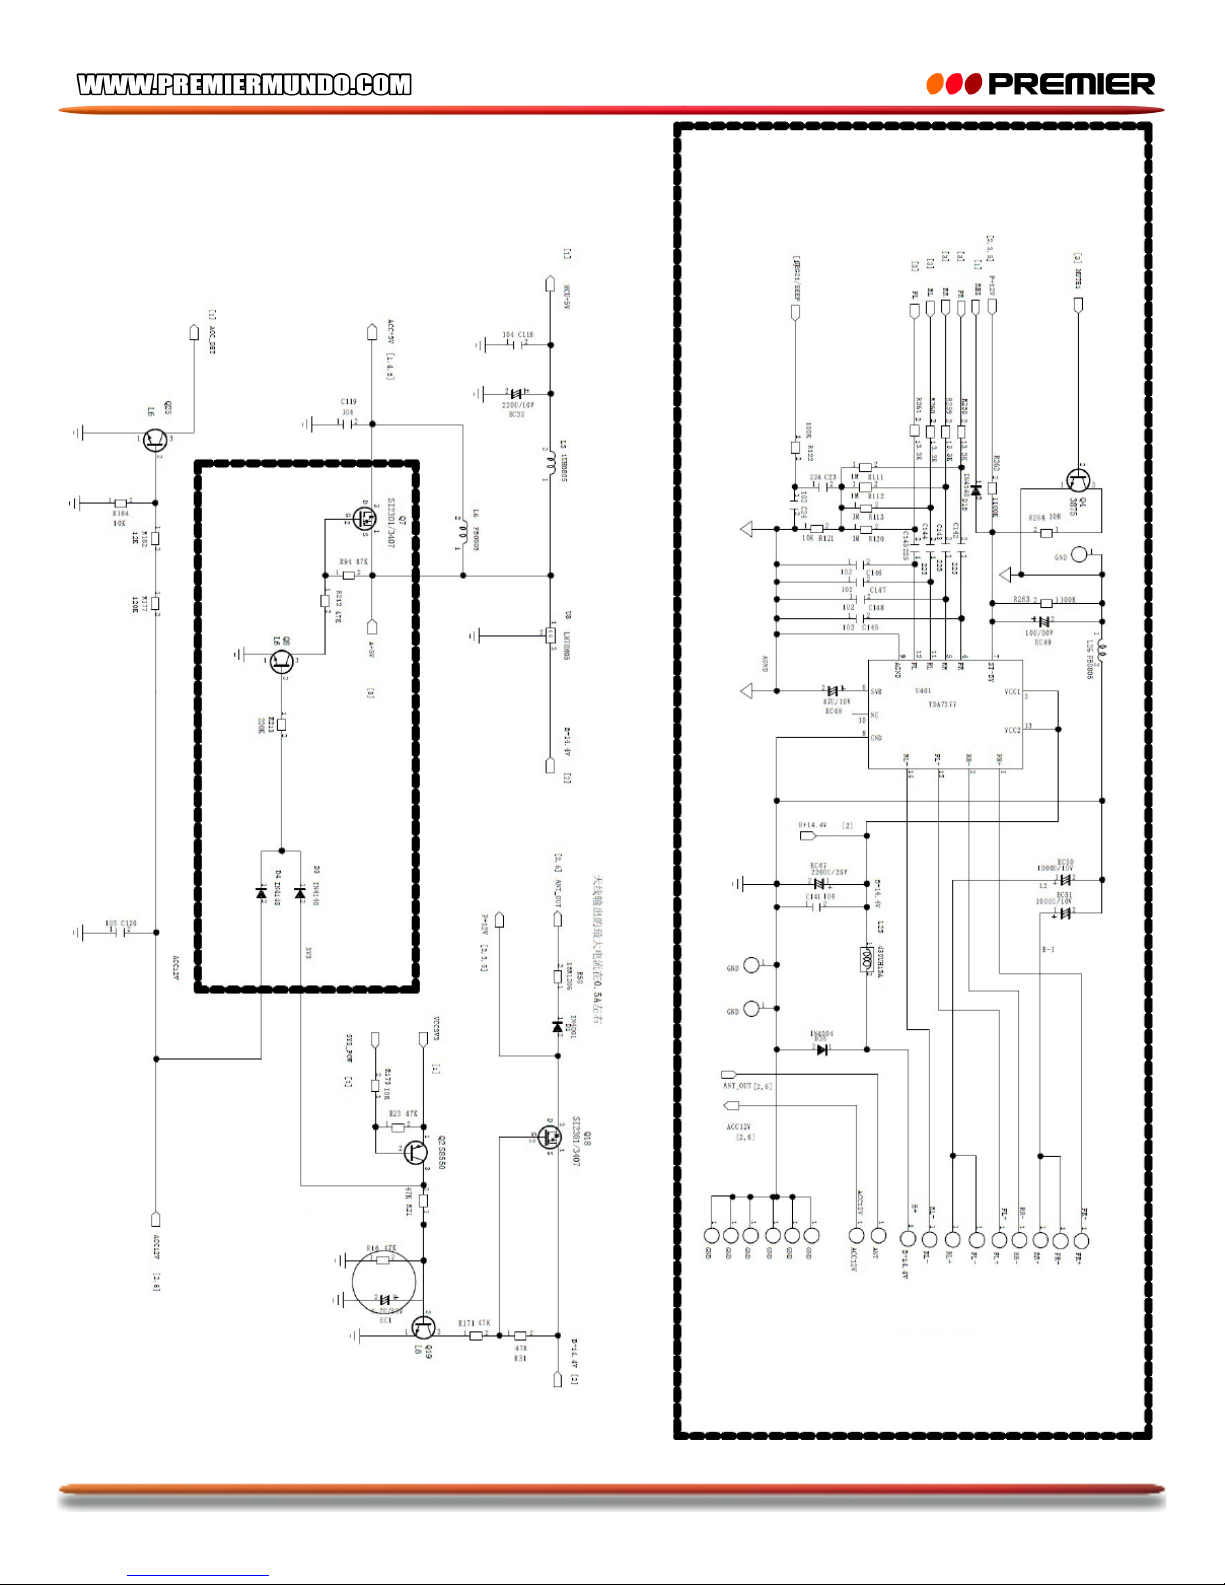
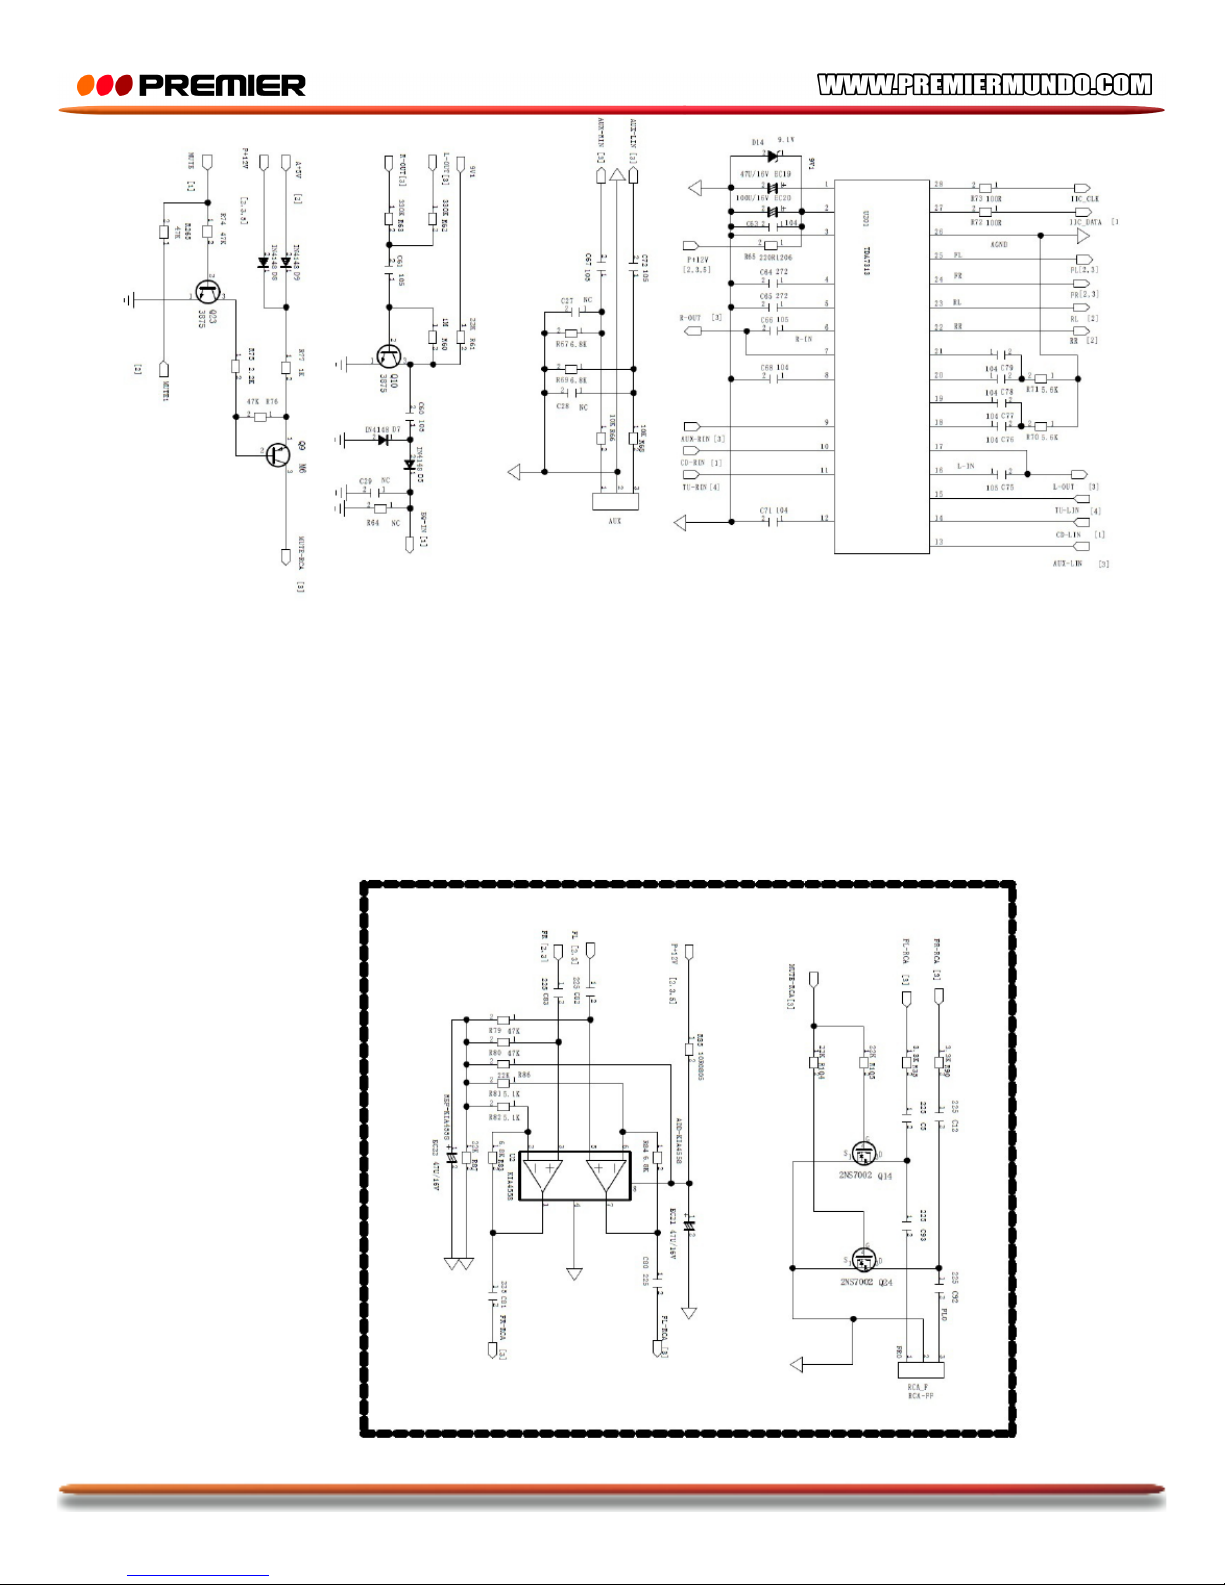
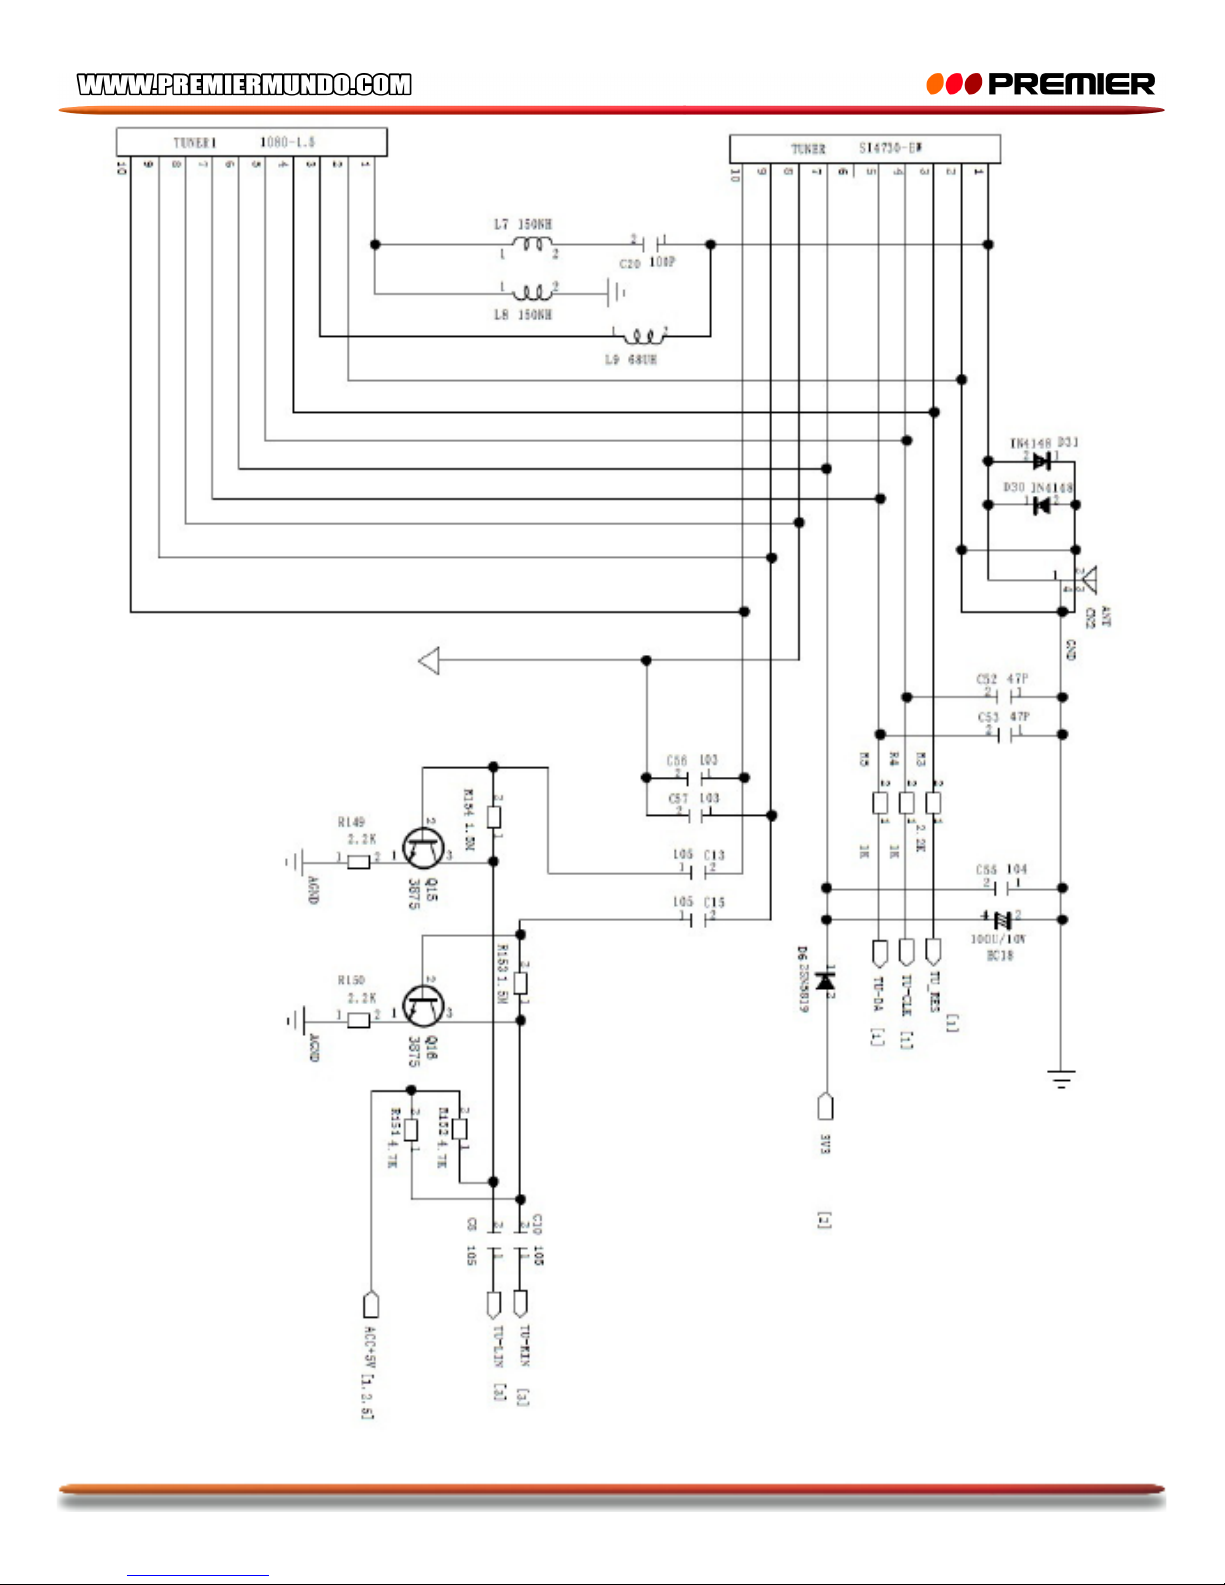
DIAGRAMA DE CIRCUITOS
Page 12
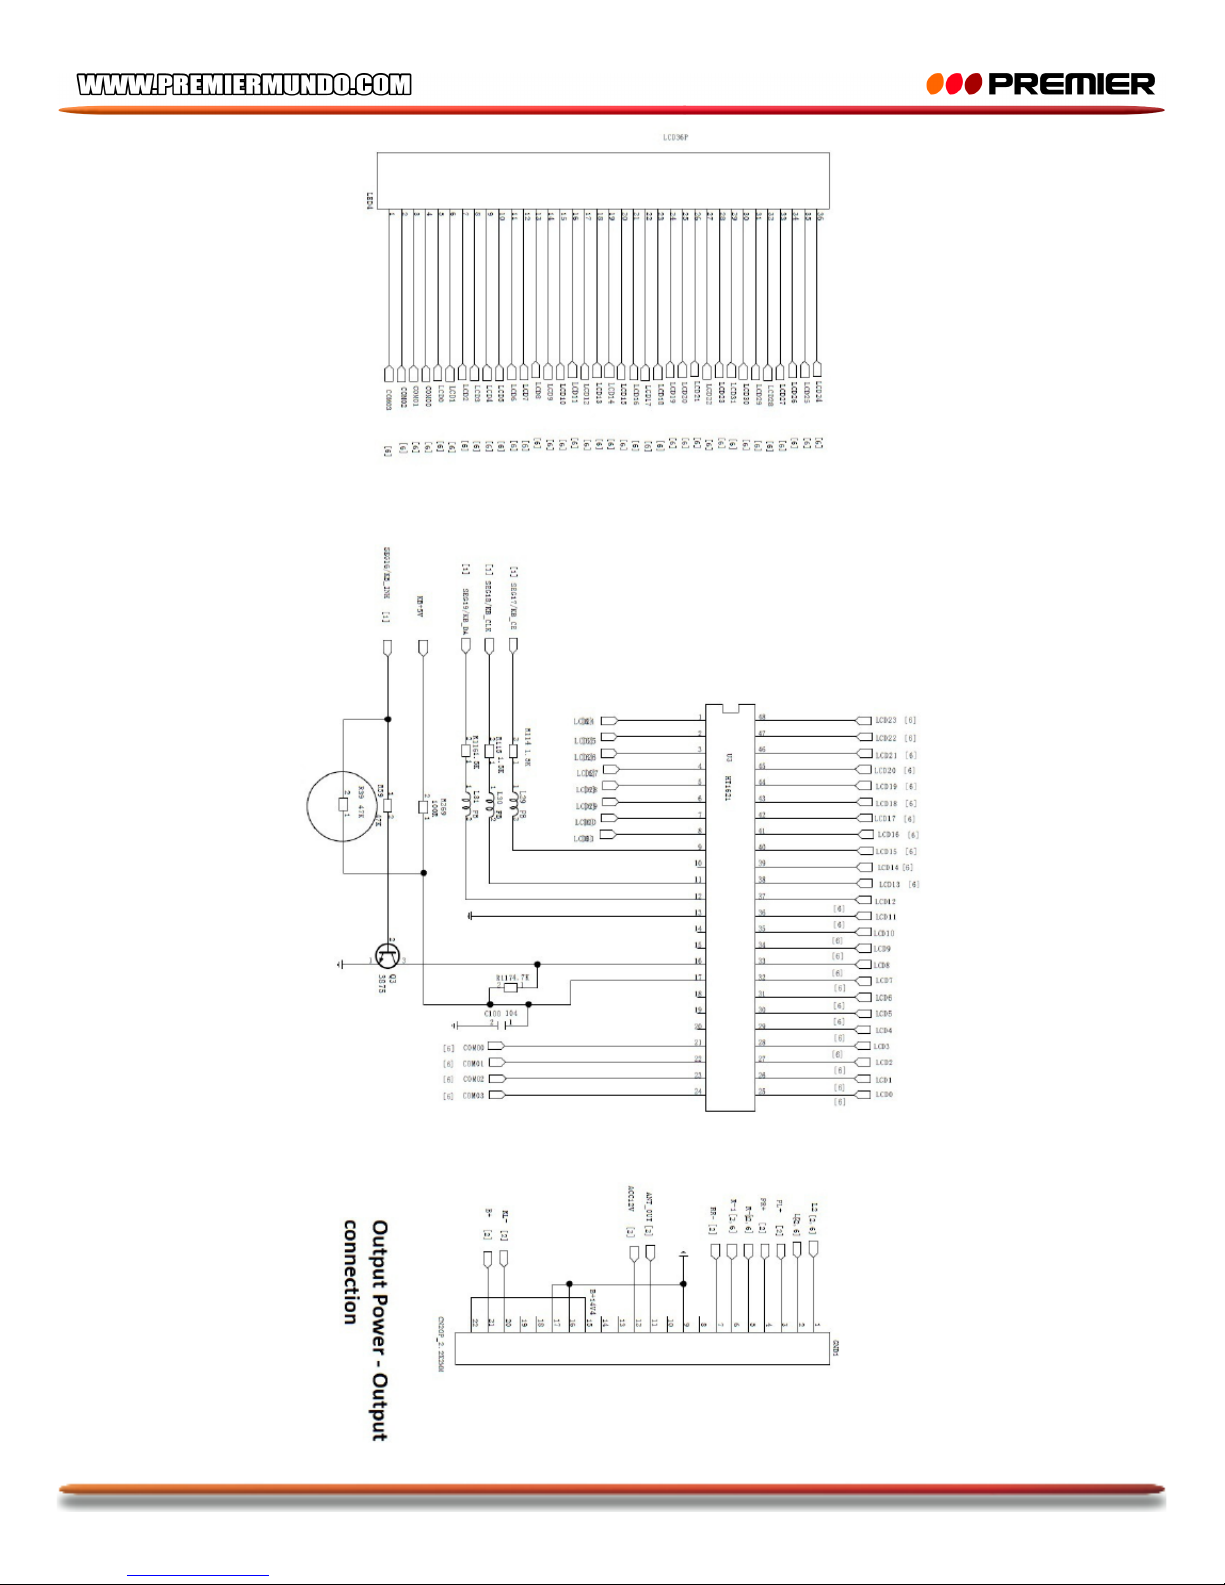
P-11
Page 13
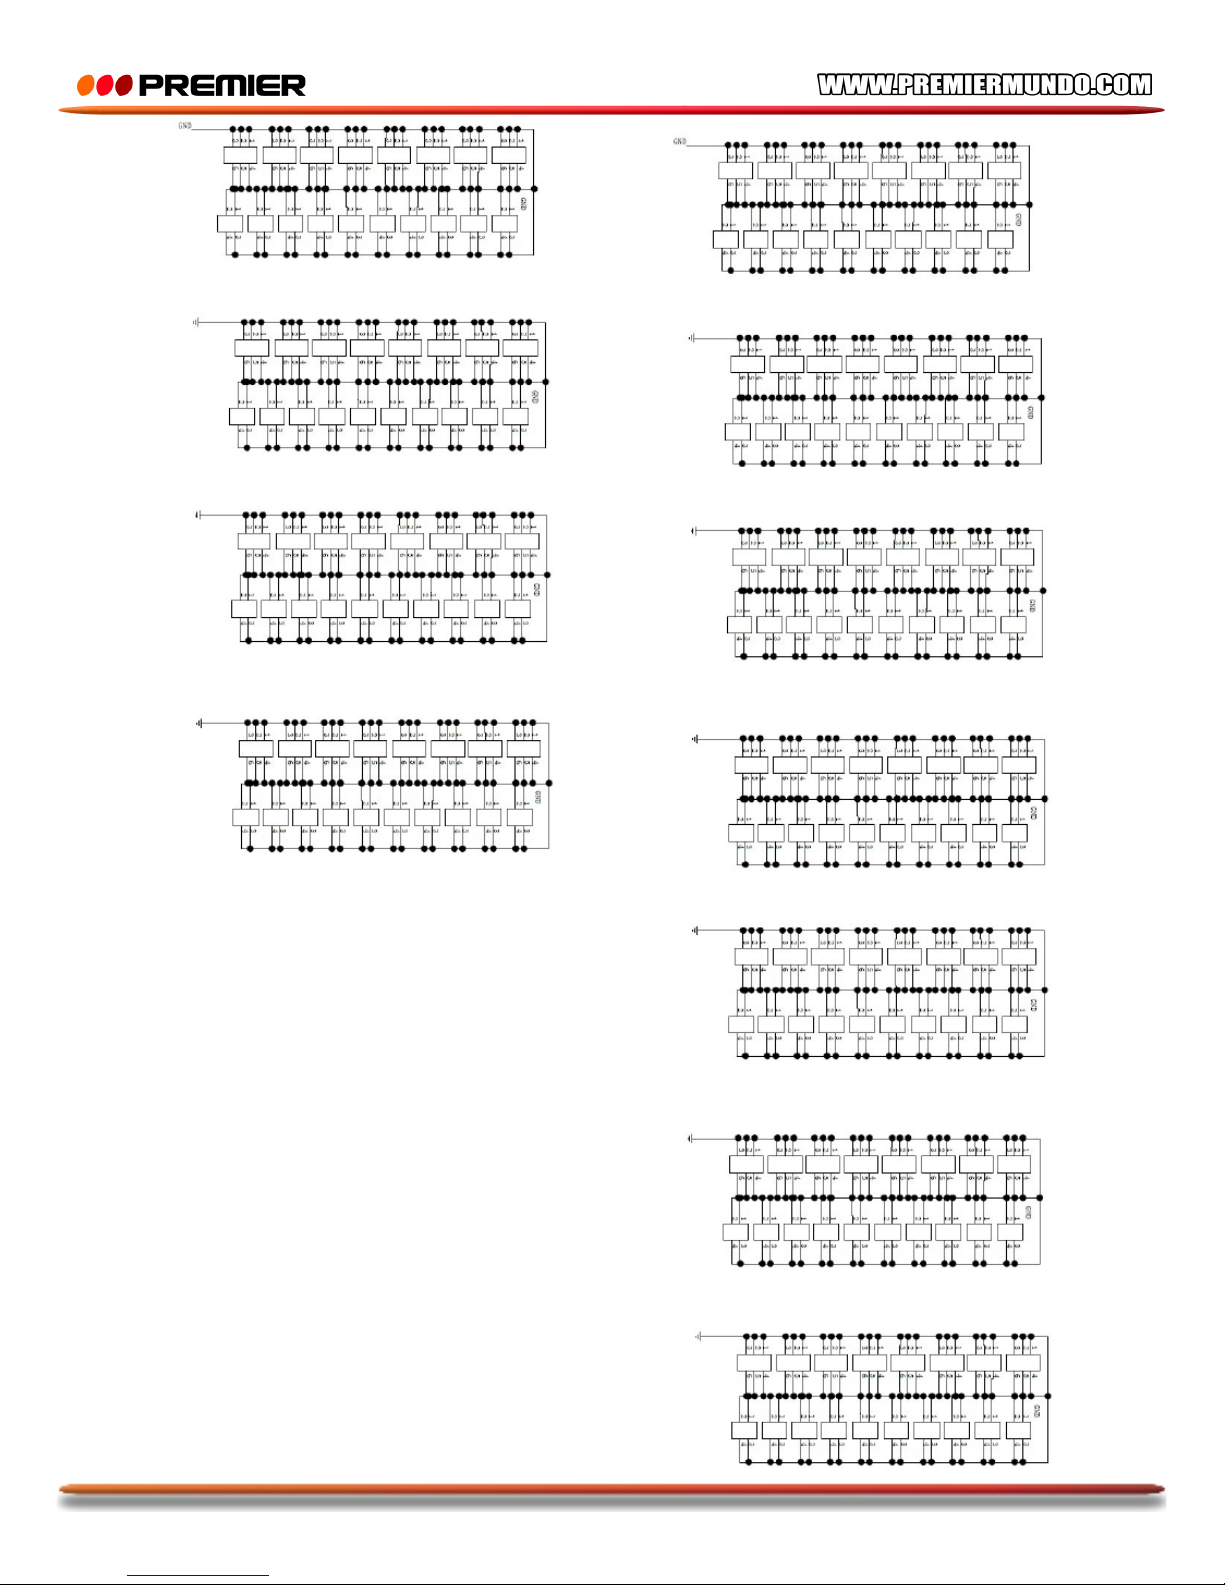
P-12
Page 14
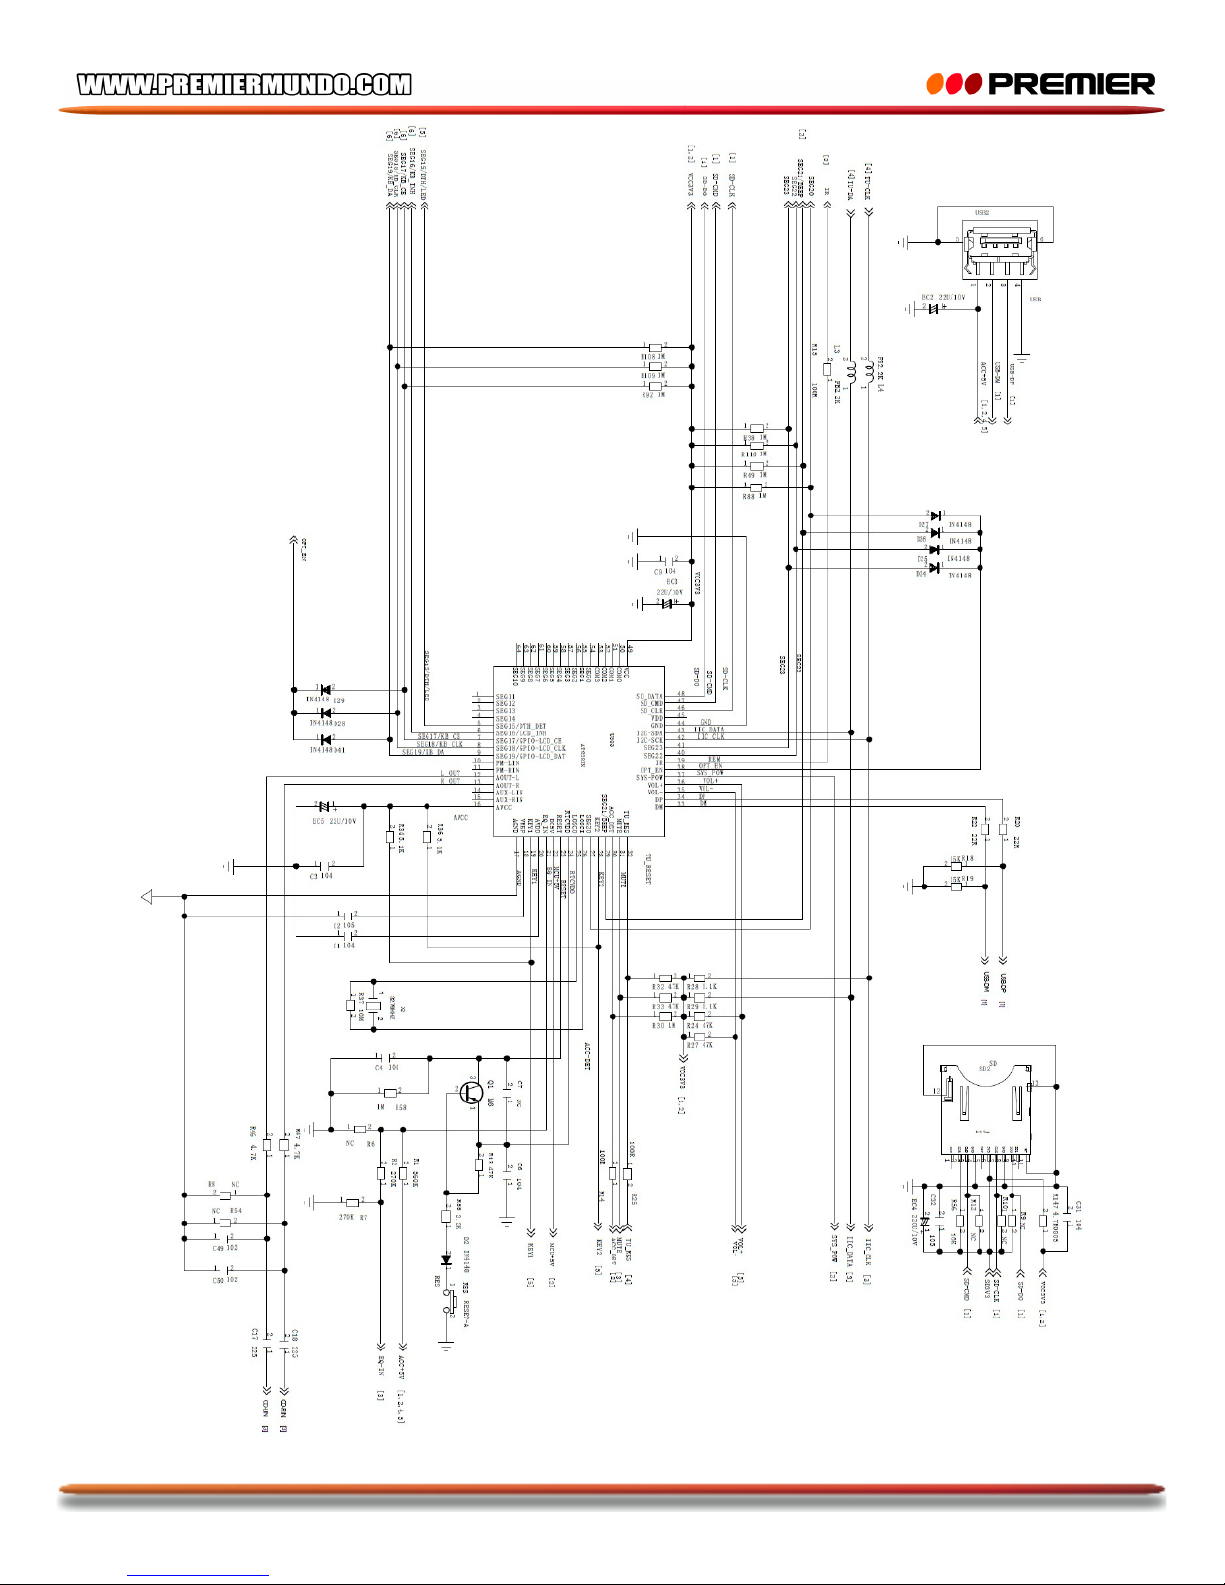
P-13
Page 15
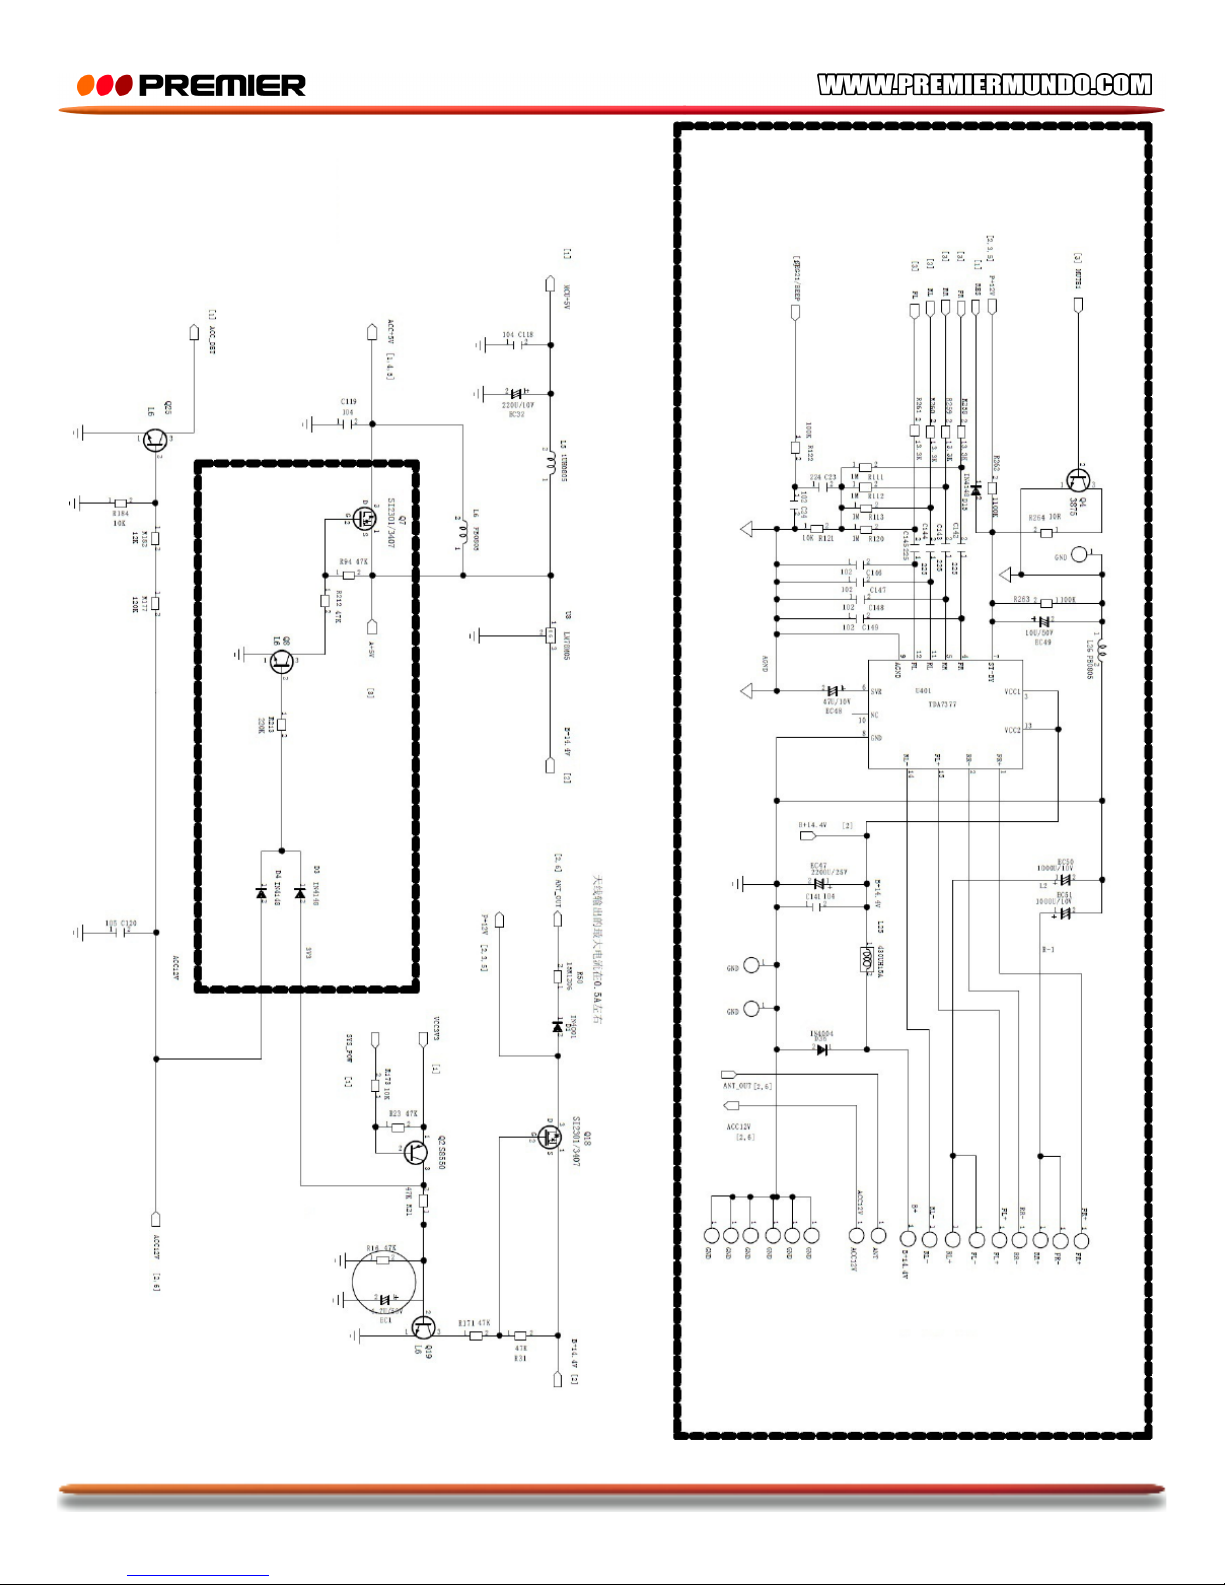
P-14
Page 16
P-15
Page 17
P-16
Page 18

Page 19
INSTRUCTION MANUAL
CAR-AUDIO W/MP3 & USB / SD
SCR-4637USID
DEAR CUSTOMER
In order to achieve the best performance of your product, please read this instruction manual carefully
before using, and keep it for future reference.
If you need extra support, please write to [email protected]
Page 20
P-1
PREMIER CUSTOMER SERVICE
Venezuela:
0800 – ELECTRIC (353-2874)
Panama:
300-5185
Website
www.premiermundo.com
E-mail:
NOTE
This unit may be submitted to changes in specifications, characteristics and/or operation without prior
notice to the user, in order to continue improving and developing its technology.
Page 21
P-2
Key Function:
1. MOD Button
Press to change between Radio function and MP3/WMA function. (Radio-USB-SD-Aux In).
2. Power Button
Press to turn on. Press again to turn off.
3. Volume / Select Control
In normal mode, use this knob to increase/decrease the volume level. To access various sound
parameters, press this button to cycle through the following adjustable settings:
VOLUME > BASS > TREBLE > BALANCE > FADER > LOUD > DX > ST
4. 3/RPT Button
In MP3 mode, press to repeat the song.
5. 1/ Button
In MP3 mode, press to pause the playback. Press again to resume playback.
6. 2/INT Button
In MP3 mode, press to listen the first 10 seconds of each song.
7. 4/RDM Button
In MP3 mode, press to play songs randomly.
8. SD/MMC Slot
Insert any SD/MMC card into this slot MP3/WMA song playback.
9. CLK Button
Press to display and to adjust the time.
10. Band Button
In radio mode, press to change among FM1-FM2-FM3-AM1-AM2.
Page 22
P-3
11/12. Forward or backward button
In MP3 mode, press to backward or forward one song.
13. 5/-10 Button
In MP3 mode, press this button to rewind backward 10 songs at one time.
14. 6/+10 Button
In MP3 mode, press this button to fast forward 10 songs at one time.
15. LCD Display
Display the clock and other selected functions.
16. USB Slot
Insert any USB MP3 playback device into this slot for MP3/WMA song playback.
17. Detached panel button
Press to take away the detachable panel.
18. Mute Button
Press once to temporarily mute down the volume.
19. Loud Button
Press to activate LOUD function. Loud icon will be shown on the display when it is activated.
20. APS Button (AMS/S button on the unit)
Press APS or AMS/S button, it will scan the strongest stations automatically and store them into 1-6
memory knobs.
21. EQ Button
Equalization select function (CLASSIC, POP, ROCK, JAZZ, FLAT).
22. FOL+/FOL- Button
Folder selection function.
23. Aux In Function
Choose to connect and play any compatible external audio equipment.
24. Number knobs on remote control
Main Function:
• Support USB & SD/MMC Card, Portable hard disk.
• Support Audio file format: MP3/WMA
• Support Mobile charging with USB Slot
This unit only supports FAT16 or FAT32 file system.
Page 23
P-4
Please do not format its file system when formatting the USB, SD/MMC card.
This unit can supports the USB/SD/MMC Card with max. memory size of 32GB.
Basic Control:
1. Power switch / Mute
1) Press PWR button to turn on the unit. Press again to turn off the unit.
2) Press MUTE button to mute down the sound, press and hold this button again to release from
MUTE mode and recover previous volume level.
2. Mode button
1) Plug in USB/SD/MMC Card under radio mode, this unit will change to USB/SD/MMC card
mode;
2) Plug in SD/MMC card under USB mode, this unit will change to SD/MMC card mode;
3) Plug in USB under SD/MMC card mode, this unit will change to USB mode.
4) This unit will change to radio mode when USB/SD/MMC card is removed.
5) Press MOD button to change the mode when USB/SD/MMC card is plugged in. USB mode is
preseted when switching on the unit.
3. Time display and setting
1) Time will be displayed after slightly press the CLK button.
The LCD display will return back to its original display after 5 seconds.
2) Press and hold CLK button to set the time, time on the display will be blinking. Then slightly
rotate the rotary knob or VOL-/VOL+ on the remote control to set the hour. Press SEL to
confirm the hour setting.
3) Then rotate the rotary knob or VOL-/VOL+ on remote control again to set the minute. To
confirm the time setting, simply by pressing SEL button.
4. Audio mode selector
1) Rotate audio mode selector to increase/decrease the volume level.
2) Press audio mode selector, “VOL, BAS, TRE, BAL, FAD, LOUD, DX, ST” on the display, then
rotate the audio mode selector to increase/decrease the volume, bass, treble, balance, fader,
loud on/off, DX/LOC, stereo/mono.
3) Press and hold the audio selector to activate the equalization function and on select desired
audio mode. DSP mode, Classic, Rock, Flat, Pop repeat in circulation.
Note: If EQ is on, unit will not be able to control BASS & TREBLE function.
Radio Control
1. Band Control
1) Press BND button to select the band, repeatedly to cycle through 5 radio band:
FM1 – FM2 – FM3 – AM1 – AM2
2) Hold and press AMS/S button or APS button, the radio will scan up all the strongest station
and preset automatically in 1-6 number keys.
In FM mode, 18 stations can be stored from FM1-FM3 mode;
In AM mode, 12 stations can be stored from AM1-AM2 mode.
Press any number button to enjoy the stored station.
2. Tuning Button
Press to auto tune the desire radio station, press and hold the button again, manual
Page 24
P-5
tuning will be activated. It will resume to auto tuning automatically. To store the station, press and
hold any 1-6 number button.
MP3 Control
1. This unit can read the files which found in USB/SD/MMC card by plugging it into the slots.
2. When it is playing the tracks from USB, USB icon is found on the display.
3. When it is playing the tracks from SD/MMC card, SD icon is found on the display.
4. When the file type is MP3; then MP3 icon is found on the display.
5. When the file type is WMA; then WMA icon is found on the display.
6. Press fast forward to go to next track and press rewind backward to rewind to the previous track.
7. When MP3 is playing, press “1” number button to pause it and to resume it by pressing “1” again.
8. Press “2” number button to listen to the first 10 seconds of each song. Press again to cancel.
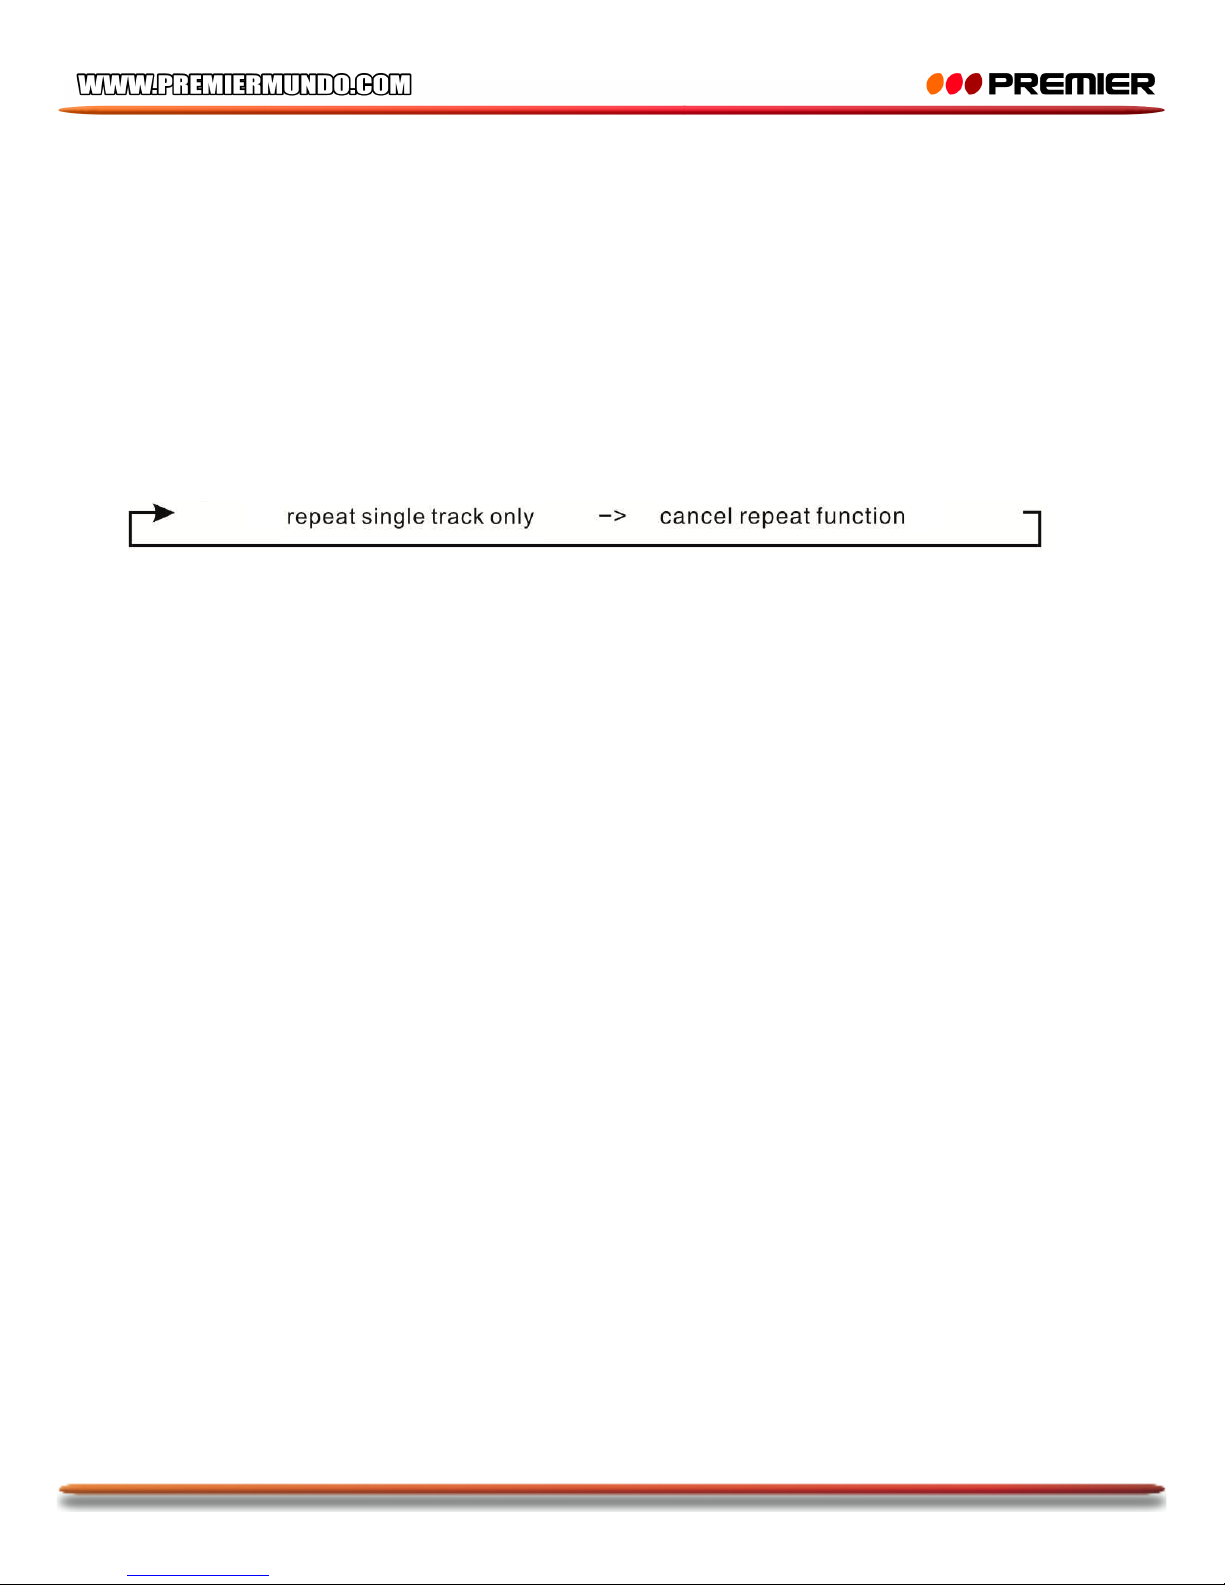
9. Press “3” number button to start or cancel the repeat function.
The cycle is:
The factory default is repeat all tracks. Then press “3” number button to repeat single track only.
Press again to cancel single track repeat.
10. Press “4” number button to play all the MP3 files randomly. Press again to cancel.
11. Press “5” number button to play the previous 10 tracks.
12. Press “6” number button to play the next tracks.
ID3 TAG
1. If The MP3/WMA file is available with ID3 TAG. The following information will be shown on LCD
display automatically.
~ Song name with file type
~ Title
~ Artist
~ Directory
Or you may have a quick scan about track information which you are playing by pressing BND
button.
2. During MP3/WMA mode, press AMS/S button on the unit or APS button on remote control to
activate the track search mode, with below methods:
~ Press the number button (either from the unit or the remote) or rotate the rotary knob to select
the desired track. For example, you are now playing the first song and you want to swift to track
59, press AMS/S or APS button, “TRK SCH” will be found on the LCD display, Then rotate the
rotary knob to select from the number “0”,”1”,”2”,”3”,”4”,”5”,”6”,”7”,”8”,”9” to select “5” or press “5”
on the unit or remote; so that the first digit “5” will be found on LCD Display. Then wait for 3
seconds, it will move to the second digit automatically; then again rotate the rotary knob or press
number knob on remote; so that the second digit “9” will be found on the LCD Display.
To confirm your selection, press “SEL” button.
~ You may always cancel your track selection by pressing AMS/S button on the unit or APS
button on remote.
Page 25
P-6
DETACHABLE CONTROL PANEL
Removing the detachable panel
1. Press the button to release the panel. 2. Pull out the panel and take it away
Attaching the detachable panel
1. Insert right side of the panel. 2. Push the whole panel up.
Until a “click” sound is heard.
Installation
The unit has anti theft locked box design, please follow the below installation instruction:
1. Push the trim plate against the chassis until it is fitted.
2. Insert the unit into the dashboard then push the unit into the metal chassis until it is locked.
Attention:
1. Choose the mounting location where the unit will not interface with the normal driving function of
the driver.
2. Before completing the unit installation, connect the wiring temporality and make sure it is all
connected up properly and the unit and system work properly.
3. For safe installing, use the mounting hardware provided by the manufacturer.
Removal:
Page 26
P-7
Insert the levers supplied with the unit into the grooves at both sides of the unit until they click. Pulling
the levers makes it possible to remove the unit from the dashboard.
DISASSEMBLY AND ASSEMBLY INSTRUCTIONS
Assembly instructions
Connect the unit harness with lock and push them together inside,
insert the unit harness into instrument panel,
and push the player into the metal harness until it is locked.
If the assemble angle is above 30, the unit may not work properly.
The installation place should not affect the driver’s normal
operations or injure the passengers when the car is braked suddenly.
Disassembly instructions
Take the plastic frame off, and insert the keys into the holes in the face panel, then pull the keys hard to
take player out of the instrument panel.
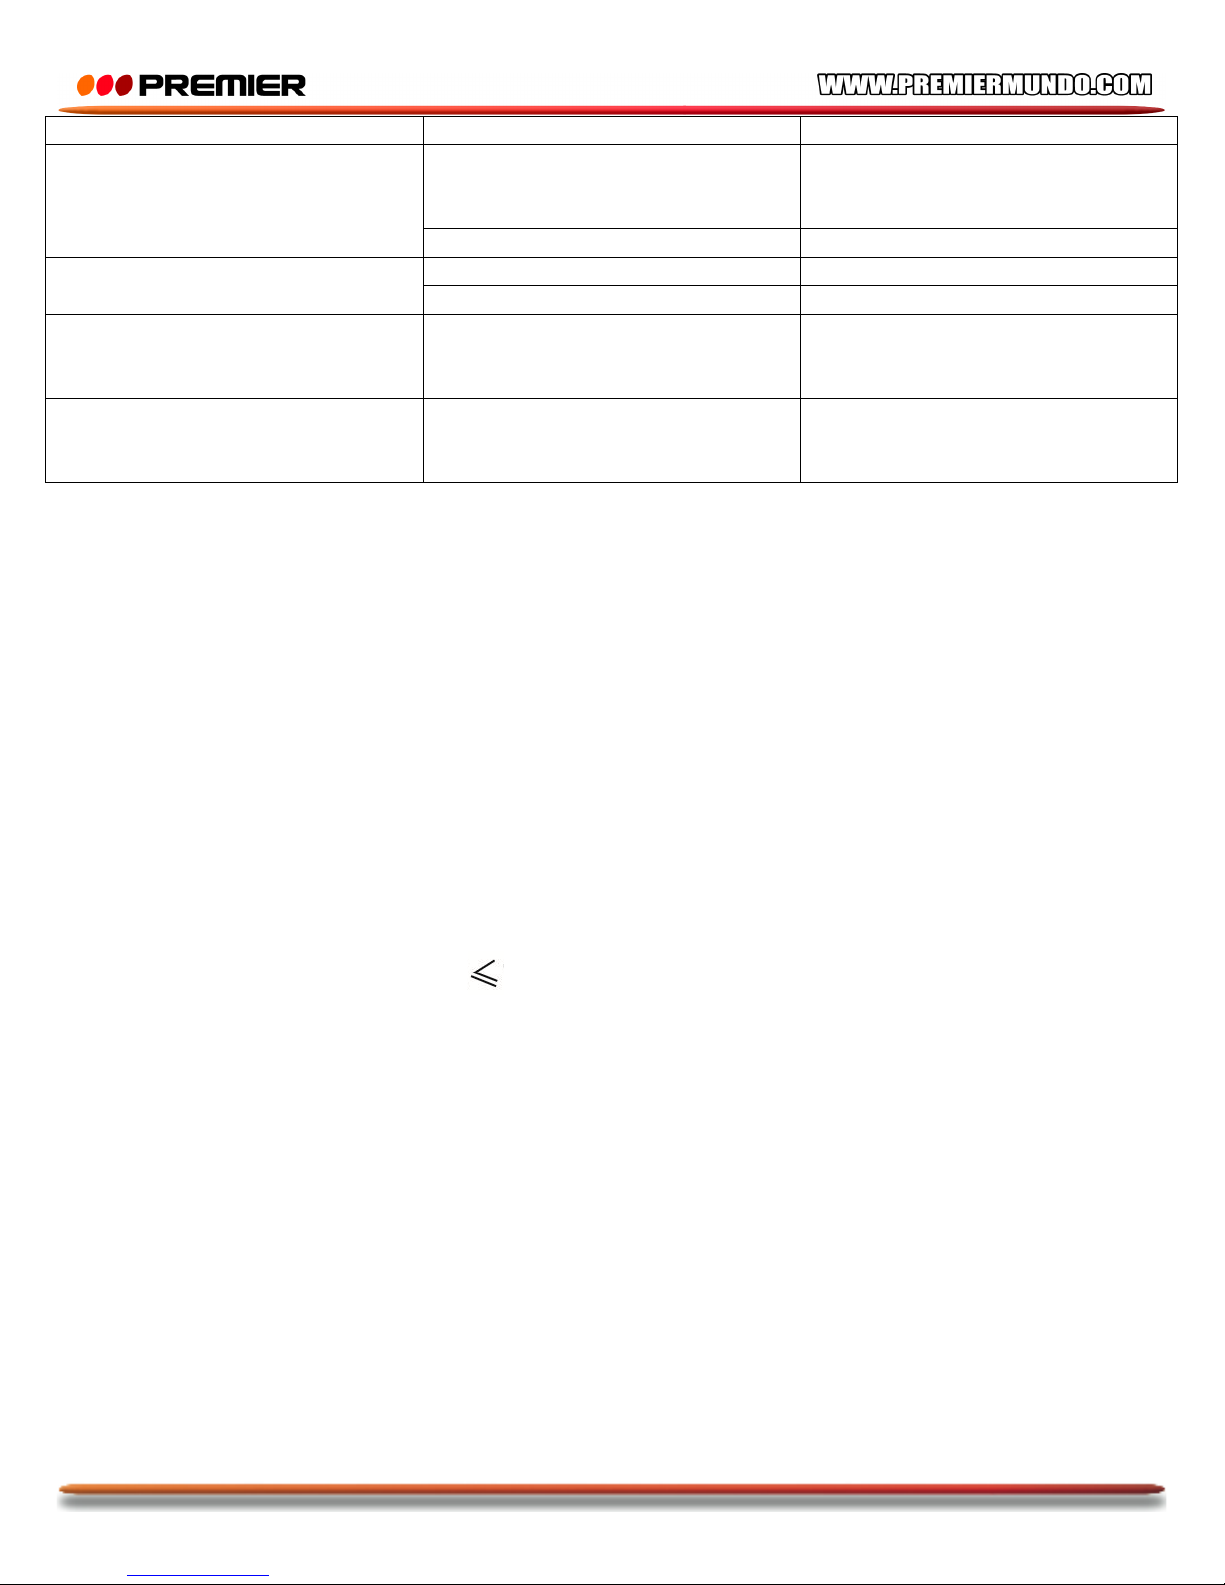
Trouble Shooting
Page 27
P-8
Symptom
Cause
Solution
No Power
Speaker cable is disconnected.
Poor power connection.
Check to see that all the power
and speaker leads are securely
connected.
The fuse is burnt out.
Replace the fuse.
No Sound
Volume is set to the minimum.
Adjust volume to a desired level.
Wiring is not proper.
Check wiring connection.
The radio doesn’t work, and the
radio station automatic selections
do not work.
The antenna cable is not
connected, or the signal is too
weak.
Select the station in manual
mode. Insert the antenna cable
firmly.
The player is on, but it doesn’t
play any track.
The file format is not MP3/WMA
format.
Make sure the songs you store in
the USB or SD card are
MP3/WMA format.
Specifications
Power – 12V DC
Ground System – Negative Electrode
Maximum Current – 5A (MAX)
Installation Size (L*W*H) – 178 X 120 X 50mm
Weight – 0.65 kg
Working Temperature - -20C ~ +60C
Audio
High Power Output – 4x7 Watts
Speaker impedance – 4 Ohms ~ 8 Ohms
FM Tuning
Frequency Range – 87.5 – 108 MHZ
Usable Sensitivity – 10dB (S/N 30 dB) 15 dB
AM Tuning
Frequency Range – 520 – 1710 KHZ
Usable Sensitivity – 30dB (S/N 20DB)
Page 28
P-9
Page 29
P-10
Page 30
P-11
Page 31
P-12
Page 32
P-13
Page 33
P-14
Page 34
P-15
Page 35

 Loading...