

Page 1
MANUAL DE INSTRUCCIONES
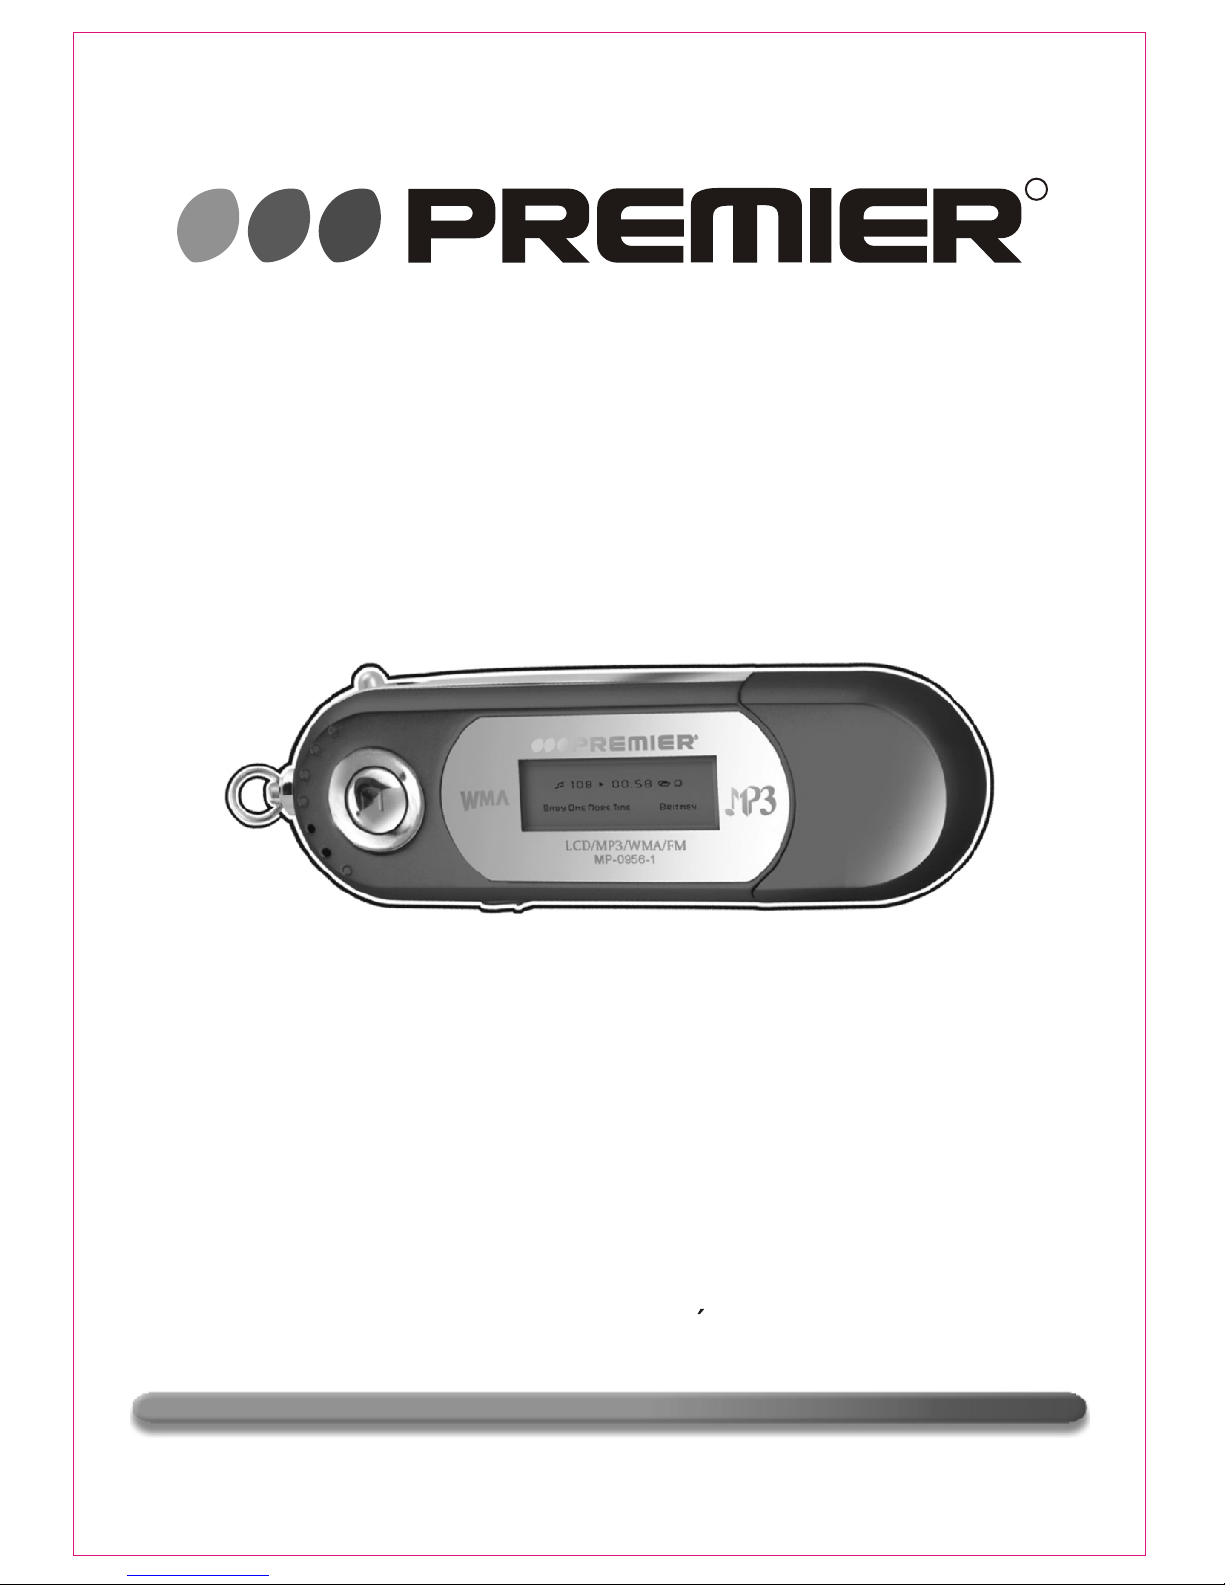
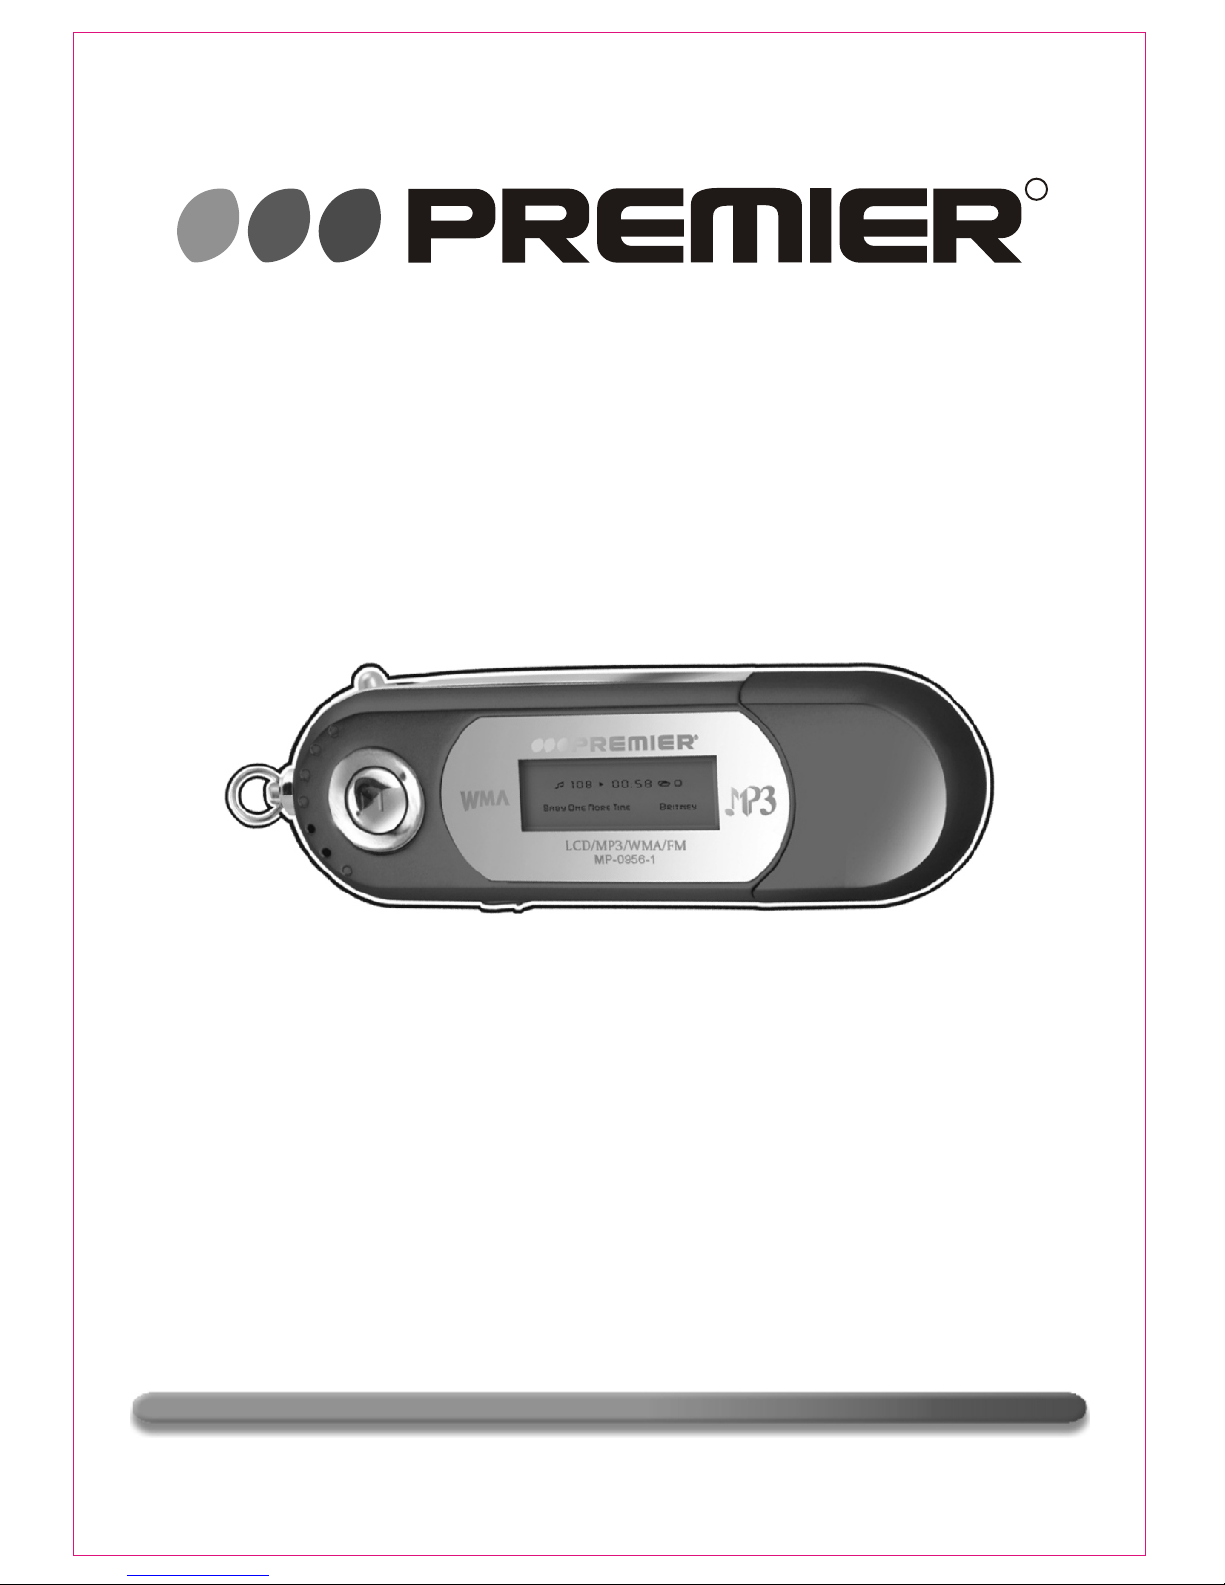
REPRODUCTOR DE MP3
MP-0956-1 / MP-0957-2 / MP-0958-5 / MP-0959-1G
R
ESTIMADO CLIENTE
Felicitaciones por su compra!
Por favor lea cuidadosamente este manual, y guardelo para su futura referencia.
Si necesita soporte adicional, no dude en escribir a: [email protected]
Page 2
WWW.PREMIERMUNDO.COM
WWW.PREMIERMUNDO.COM
WWW.PREMIERMUNDO.COM
WWW.PREMIERMUNDO.COM
CONTENIDO
PRECUACIONES
1. CARACTER STICAS
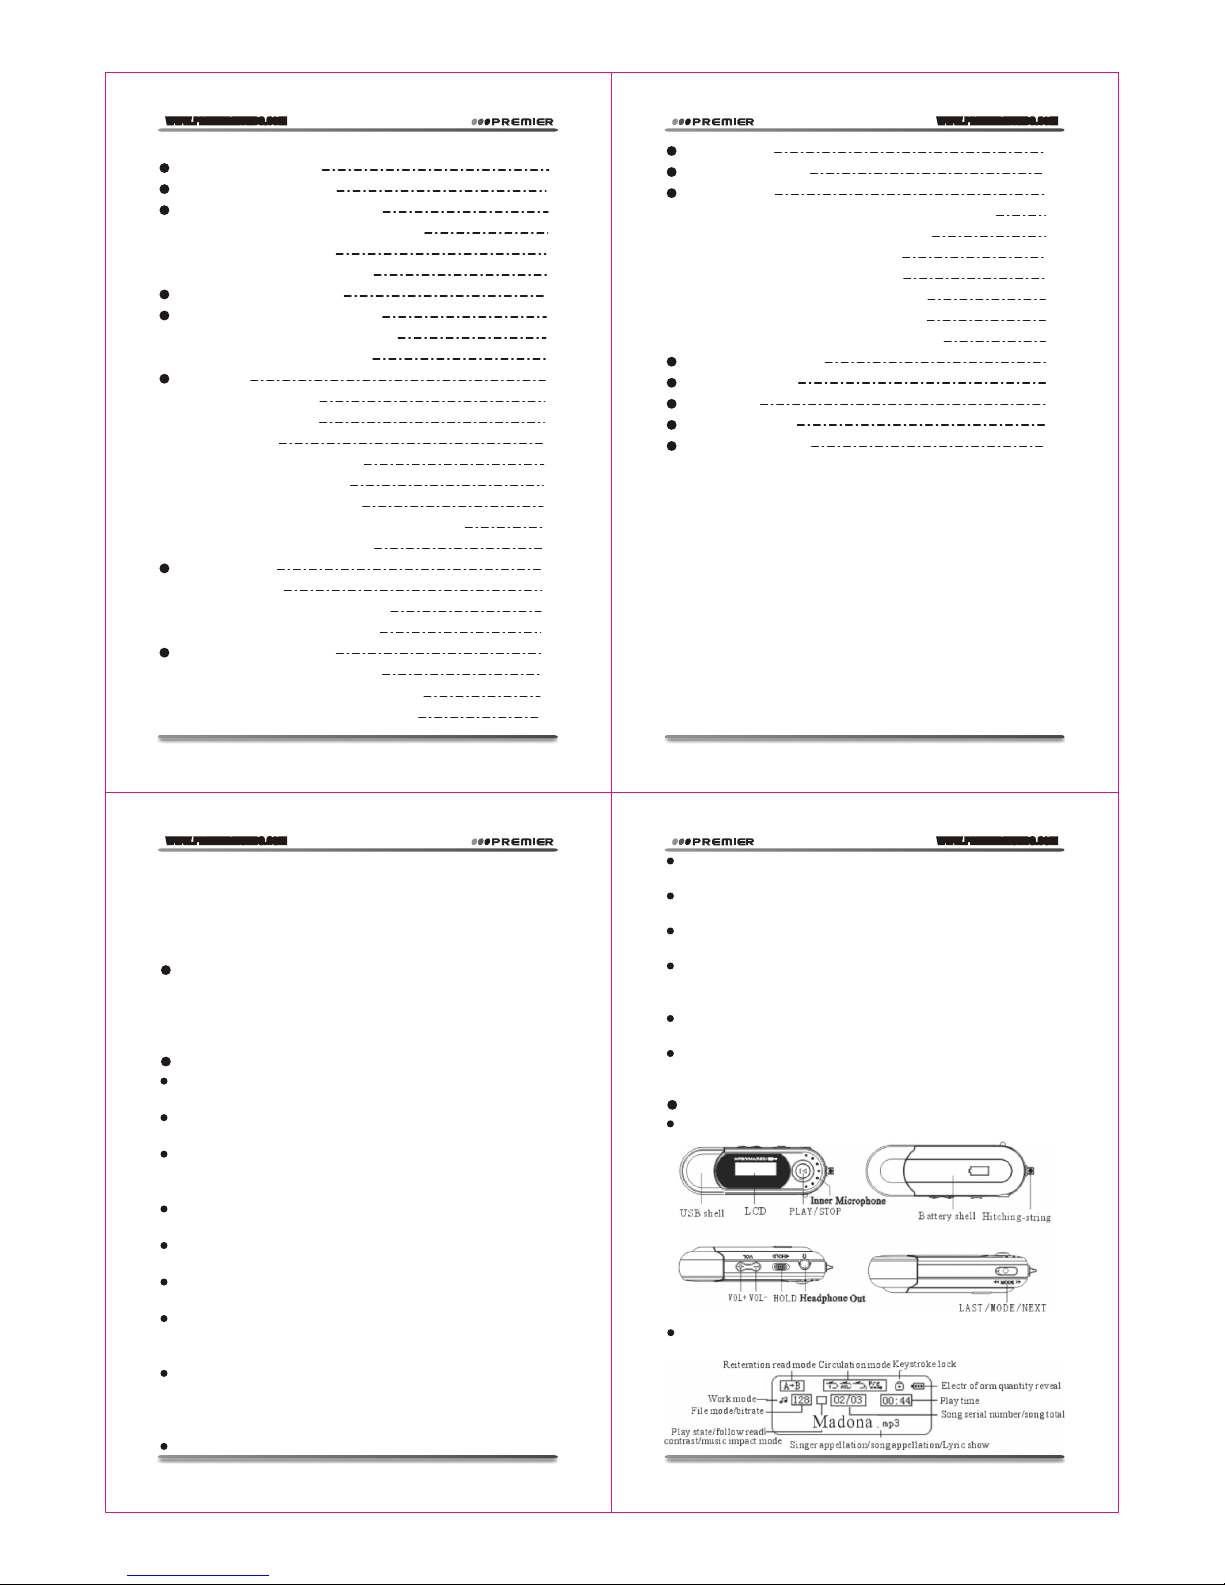
2. DESCRIPCION DE LA UNIDAD
2.1.PANTALLA
2.2.BOTONES
2.3.OPERACION BASICA
3. USO DE LOS CONTROLES
3.1.DEFINICION DE LOS BOTONES
3.2.DEFINICION DE LAS PULSACIONES
4. REPRODUCCION DE MUSICA
4.1.OPERACIONES SIMPLES
4.2.VISUALIZ ACION SINCRONIZADA DE LAS LETRAS DEL TEMA
4.3.UTILIZACION DE LOS ARCHIVOS DE LETRAS
4.4.UBICACION DE LOS ARCHIVOS DE LETRAS
5. GRABACION DE VOZ
5.1.GRABACION EN EL MODO "RECORDING MODE"
5.2.SELECCION DEL TIPO DE GRABACION
5.3.RERODUCCION DE ARCHIVOS GRABADOS
6. CONVERSION DE ARCHIVOS
6.1.CONVERSION DE ARCHIVOS DE FORMATO ACT A FORMATO
WAV
7. RADIO FM
8. CONFIGURACION DEL SISTEMA
8.1.ENTRAR AL MENU DE CONFIGURACION
8.2.PARAMETROS
8.3.INSTUCCIOES DE USO
9. UTILIZACION DEL DISCO USB
10. ACTUALIZACION DEL REPRODUCTOR
11. OTRAS CONFIGURACIONES
12. BORRADO DE ARCHIVOS (SUBMENU STOP)
13. RECOMENDACIONES
13. 1.FUNCION DE ZONA PRIVADA
PROBLEMAS Y SOLUCIONES
ESPECIFICACIONES
PRECAUCIONES
1.No use este aparato en ambientes demasiado calientes, humedos
o polvorientos.
2.Evite golpear impactar el equipo con cuerpos solidos.
3.Recargue la bater a cuando:
El s mbolo de nivel de la bater a este vac o: " ".
El equipo se apaga automaticamente o si se apaga al poco rato de
haberlo encendido.
No funcionan los botones.
4.No use el equipo en ambientes demasiado secos para evitar la
estatica.
5.No desconecte el reproductor de la computadora mientras
este formateando, cargando o descargando archivos ya que
podr a producirse un error en el programa.
6.Si esta usando el reproductor como una unidad de disco,
asegurese de hacer copias de seguridad de sus archivos, ya que
cualquier error podr a danarlos y la compan a no asumira ninguna
responsabilidad al respecto. (Puede usar el equipo sin bater as
mientras este conectado a la computadora, con el fin de evitar
fallas debido a cortes repentinos de energ a mientras se este
formateando, cargando o descargando archivos).
7.El indicador de memoria del reproductor indica la cantidad de
memoria utilizada. Habitualmente existe una diferencia de hasta
10MB entre el calculo de memoria realizado por la computadora y
el equipo (dependiendo del modelo).
1. CARACTERISTICAS
Diseno moderno y atractivo.
Perfil largo y diseno ergonomico que lo hace agradable al contacto
con la mano.
Compatible con varios formatos de audio.
MP1, MP2, MP3, WMA, WMV, ASF, WAV, etc.
Firmware actualizable.
Con el fin de mejorar la funcionalidad del reproductor, el software
de actualizacion puede descargarse desde nuestro sitio en Internet.
Radio FM estereo
La radio incorporada cuenta con la funcion de busqueda automa
tica y manual de radioemisoras y dispone de una memoria para
almacenar hasta 40 estaciones (20 en cada formato).
Disco USB
Puede usar el reproductor como un disco extra ble para su PC y
grabar archivos de manera normal, accediendo a la unidad de
"Disco extra ble" ubicado en "Mi PC". Los usuarios de sistemas
operativos Windows 2000 o superior no necesitan instalar el
controlador.
Zona privada
Mediante los programas que se incluyen con el reproductor,
puede dividir el disco en dos zonas: una publica y otra privada.
Esta ultima sera encriptada de tal manera que su informacion
quedara protegida.
Grabacion / Repeticion
Puede guardar los archivos de audio de voz en formato ACT o WAV
despues de grabarlos a traves del microfono. Tambien es posible
de ejecutar comparaciones totales o parciales y repeticiones
digitales sobre una frase dada.
Siete tipos de ecualizacion
Natural, Rock, Pop, Clasica, Soft, Jazz y DBB.
Siete colores de fondo
Puede elegir entre siete colores para el fondo de la pantalla.
Varios modos de reproduccion
Normal, cantante, album, repetir el album, reproduccion aleatoria
y busqueda.
Hora de apagado
Puede configurar la hora de apagado y el tiempo de apagado
automatico para ahorrar energ a.
Menu animado
Menus completamente animados acompanando los caracteres
para que disfrute mucho mas de su equipo.
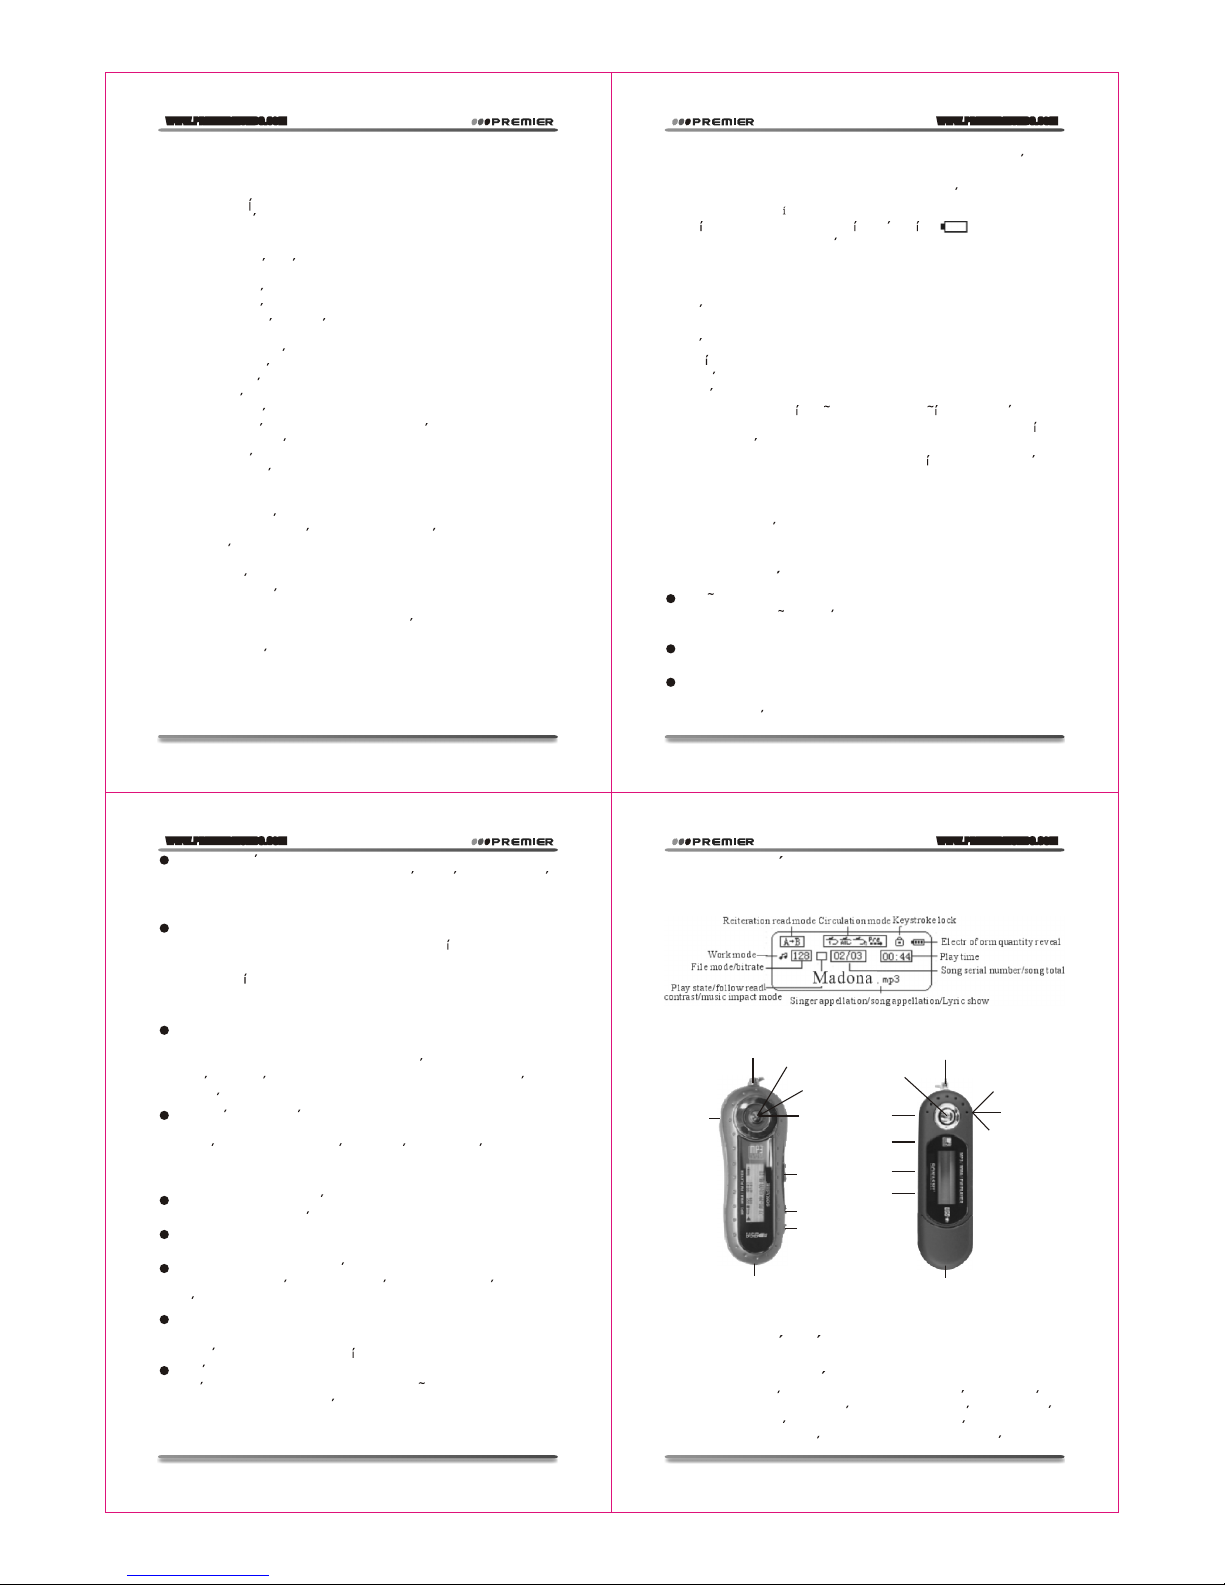
2.2. BOTONES
HANG-RING
PLAY/STOP
FASTFORWARD
(UPWARD)
MODE
(MIDDLE)
FASTBACKWARD
(DOWNWARD)
USB
VOL-
VOL+
HOLD
EARPHONE
HANG-RING
EARPHONE
USB
VOL-
VOL+
HOLD
FASTFORWARD
(UPWARD)
MODE
(MIDDLE)
FASTBACKWARD
(DOWNWARD)
USB: Conecte a la computadora mediante el cable USB.
2. DESCRIPCION DE LA UNIDAD
2.1 PANTALLA
2.3. OPERACION BASICA
INGRESANDO AL MENU
Presione el boton MENU para ingresar al menu. Cada menu
(ingrese haciendo una pulsacion larga sobre el boton MENU) esta
dividido en submenus (ingrese presionando el boton MENU), tanto
en el modo de reproduccion como estando la reproduccion detenida.
Pagina 1
Pagina 3
Pagina 2
Pagina 4
Page 3
WWW.PREMIERMUNDO.COM
WWW.PREMIERMUNDO.COM
WWW.PREMIERMUNDO.COM
WWW.PREMIERMUNDO.COM
NAVEGACION (BROWSE)
Navegue y seleccione archivos y opciones del menu.
Avance o retroceda rapidamente los archivos en reproduccion.
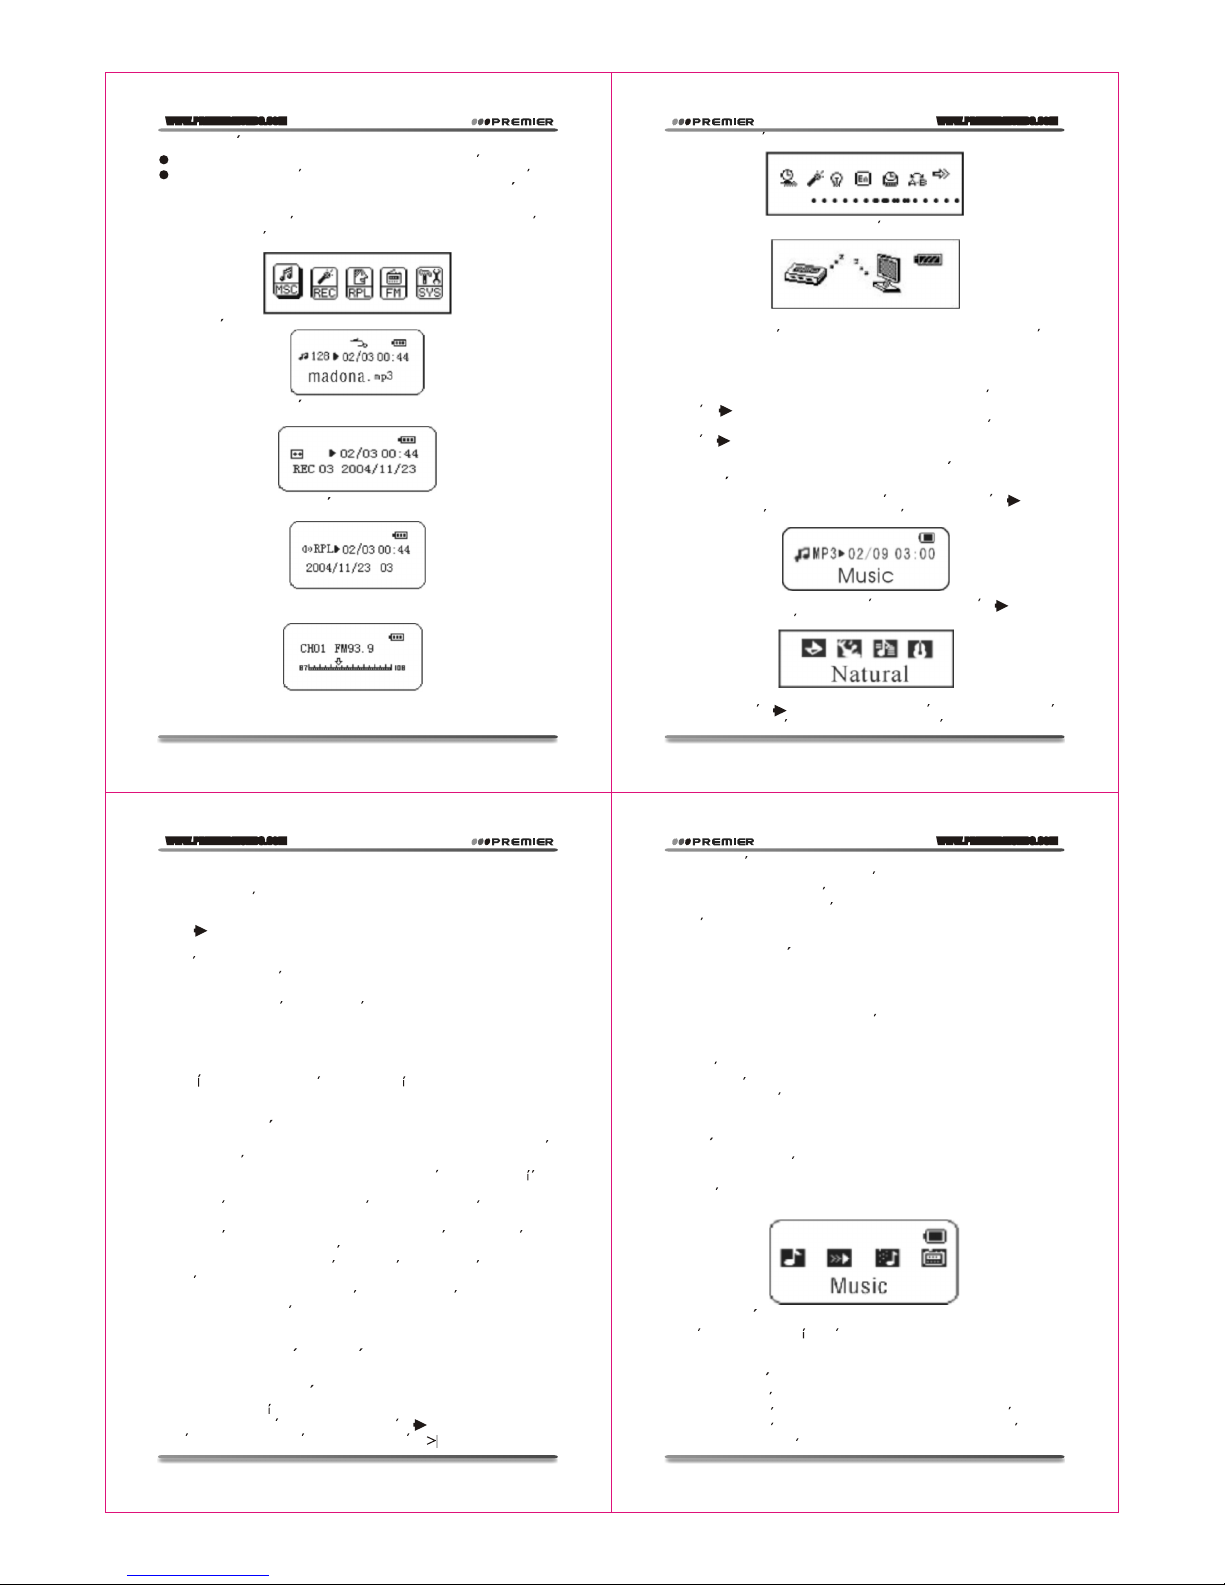
INGRESAR A LAS DISTINTAS FUNCIONES DEL MENU
PRINCIPAL
Estando en el menu principal (ingrese haciendo una pulsacion
larga sobre el boton MENU)
MODO MUSICA
MODO DE GRABACION
MODO DE REPRODUCCION
MODO FM
CONFIGURACION DE SISTEMA
MODO USB DURANTE LA CONEXION CON LA COMPUTADORA
AJUSTAR EL VOLUMEN
Presione el boton VOL+ para aumentar el volumen y el boton
VOL - para disminuir el volumen.
ENCENDER / APAGAR
Estando el reproductor apagado, haga una pulsacion larga sobre
el boton para encenderlo.
Estando el reproductor encendido, haga una pulsacion larga sobre
el boton para apagarlo.
REPRODUCIR O DETENER LA REPRODUCCION: SALIR DEL
SUBMENU
Estando en el modo de reproduccion, presione el boton para
salir del submenu e iniciar la reproduccion.
Estando en el modo de reproduccion, presione el boton para
detener la reproduccion.
GRABAR / PAUSAR
Presione el boton para pausar la grabacion. Haga una pulsacion
larga sobre este boton para detener la grabacion.
3. USO DE LOS CONTROLES
3.1. DEFINICION DE LOS BOTONES
1. : Encender / Reproducir / Detener
2.VOL+, VOL - : Ajustar el volumen
3.Boton MODE:
a) Presione el boton MODE (adelante) para saltar a la siguiente
pista o avanzar a velocidad.
B) Presione el boton MODE (atras) para saltar a la pista anterior o
retroceder a velocidad.
4.HOLD : Bloquea los botones para evitar que sean presiona dos accidentalmente.
5.USB :Puerto USB.
6.AUD FONOS: Salida estandar para aud fonos.
3.2. DEFINICION DE LAS PULSACIONES
Existen cuatro tipos de pulsaciones sobre los botones: pulsacion
larga, pulsacion corta, mantener presionado y presionar.
Exepto que se especifique lo contrario, el metodo de pulsac on
primario es "presionar".
Pulsacion corta: Presione el boton para que la accion se produzca
de inmediato.
Pulsacion larga: Mantenga presionado el boton durante mas de
1.2 segundos para que la accion se realice.
Presionar: Presione el boton. La accion se realizara cuando libere
el boton presionado.
Mantener presionado: La accion se desarrollara mientras mantenga presionado el boton, por ejemplo, para adelantar o retroceder.
4. REPRODUCCION DE MUSICA
4.1. OPERACIONES BASICAS
1. Conecte los aud fonos.
2. haga una pulsacion larga sobre el boton para entrar al modo
Musica y a continuacion presione el boton para iniciar la
reproduccion.
3. Cambiar de pista: Presione el boton MODE para cambiar a la pista
anterior y presione el boton NEXT para cambiar a la siguiente pista.
4. Volumen: Presione el boton VOL+ para aumentar el volumen y el
boton VOL - para disminuir el volumen.
4.2.VISUALIZACION SINCRONIZADA DE LAS LETRAS DEL
TEMA
Este reproductor es compatible con los archivos de letra "*.LRC"
los que le permite ver las letras de las canciones de manera
sincronizada durante la reproduccion.
4.3. USO DE LOS ARCHIVOD DE LETRAS
Asegurese que el archivo de letra tenga el mismo nombre que el
archivo de musica. Por ejemplo:
El archivo de musica se llama: Karen Carpenter-Yesterday.mp3.
El archivo de letra debe llamarse: Karen Carpenter-Yesterday.lrc.
4.4. COMO SABER SI HAY UN ARCHIVO DE LETRA
Si el archivo de musica corresponde con un archivo de letra, el
icono ubicado en la esquina superior izquierda de la pantalla
cambiara por el siguiente:
Si se encuentra un archivo de letra:
5. GRABACION DE VOZ
Asegurese que la bater a este bien cargada antes de grabar.
El reproductor puede almacenar hasta 99 archivos en cada carpeta.
5.1. GRABACION EN EL MODO "RECORDING MODE"
1. Ingrese al menu principal.
2. Presione el boton NEXT para elegir el modo de grabacion.
3. Presione el boton MODE para entrar al modo de grabacion.
La pantalla mostrara lo siguiente:
Pagina 5
Pagina 7
Pagina 6
Pagina 8
Page 4
WWW.PREMIERMUNDO.COM
WWW.PREMIERMUNDO.COM
WWW.PREMIERMUNDO.COM
WWW.PREMIERMUNDO.COM
4. Presione el boton para iniciar la grabacion.
El archivo grabado se almacenara en la carpeta actual ubicada en
el submenu "Recording stop" del directorio principal del disco.
Si el mensaje "Full space" aparece en la pantalla, significa que la
memoria esta llena y no podra grabar mas archivos hasta que borre
algunos.
Si el mensaje "Full directory" aparece en la pantalla, significa que
ya ha almacenado 99 archivos en el directorio y debera elegir otro.
5.2. ELEGIR EL MODO DE GRABACION
1. Ingrese a la interfase de grabacion.
2. Presione el boton MODE para entrar al submenu de grabacion.
3. Presione el boton NEXT para elegir un modo de grabacion en el
submenu "Recording type". Presione el boton MODE para entrar
a la interfase del modo de grabacion.
4. Presione el boton NEXT para elegir el modo de grabacion
apropiado y presione MODE para confirmar.
TIPOS DE GRABACION
Quality Recording: formato Wav de alta calidad.
Long time recording: formato Act, calidad estandar.
Quality sound control: formato Wav (la grabacion se detendra
automaticamente cuando no haya sonido)
Long time sound control: formato Act.
5.Presione el boton para iniciar la grabacion.
5.3. REPRODUCCION DE ARCHIVOS GRABADOS
1. Ingrese al menu principal.
2. Presione el boton AVANZAR para elegir la opcion "Play mode".
3. Presione el boton MODE para ingresar al menu.
4. Presione el boton para iniciar la reproduccion.
5.Seleccion de archivo grabado
Presione el boton RETROCEDER para saltar al anterior archivo.
Presione el boton AVANZAR para saltar al siguiente archivo.
6.Control de volumen
Presione el boton VOL+ para aumentar el volumen y el boton
VOL - para disminuir el volumen.
6. CONVERTIR FORMATO DE ARCHIVO
6.1. CONVERTIR ARCHIVOS ACT A WAV
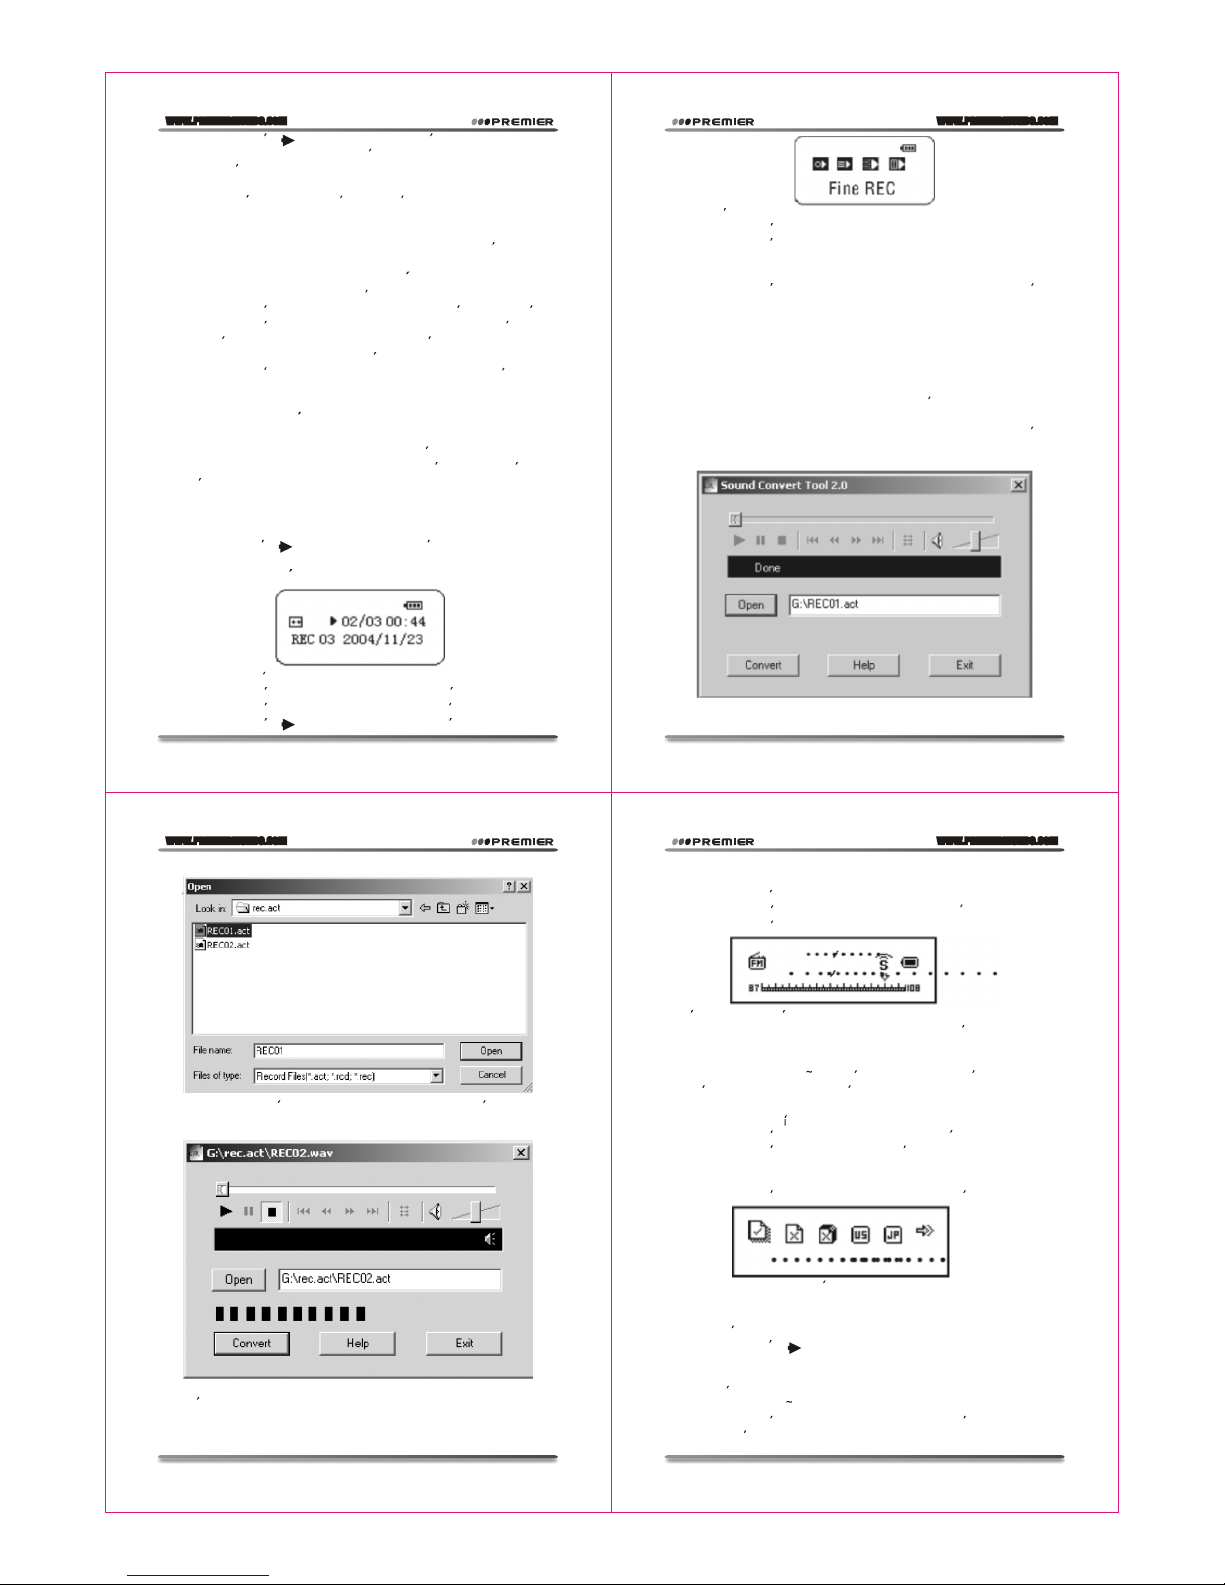
Para convertir archivos en formato ACT a WAV, use el programa
utilitario que se incluye en el CD de instalacion del reproductor.
1.Ejecute el programa "Sound Converter" y haga clic en el boton
"Open".
2.Elija los archivos ACT que desee convertir.
3.Haga clic en el boton "Convert" para iniciar la conversion a formato
WAV.
Ademas de poder convertir archivos en formato ACT a WAV, el
reproductor puede reproducir archivos WAV y MP3.
7. RADIO FM
1. Ingrese al menu principal.
2. Presione el boton AVANZAR para elegir la opcion "FM Mode".
3. Presione el boton MODE para entrar al modo "FM Mode".
4. Busqueda automatica
Mantenga presionado por unos segundos el boton AVANZAR o
RETROCEDER hasta que el reproductor comience a buscar
radioemisoras avanzando o retrocediendo 100KHz en el dial. Una
vez localizada una senal, la busqueda se detendra. Para detener
la busqueda, presione el boton AVANZAR o RETROCEDER.
5.Afinador de sinton a
Presione el boton RETROCEDER: retrocedera 100Khz en el dial.
Presione el boton AVANZAR: avanzara 100Khz en el dial.
6.Almacenar radioemisoras en la memoria
Presione el boton MODE para entrar al submenu FM.
Vuelva a presionar el boton MODE para almacenar la radioemisora.
7.Escuchar una radioemisora almacenada
Si hay mas de una radioemisora almacenadas en la memoria,
presione el boton para cambiar a la siguiente frecuencia
almacenada de manera secuencial.
8.Grabacion interna
Pued e grabar la senal de radio mientras sintoniza una radioemisora.
Presione el boton MODE para entrar al submenu FM y elija un tipo
de grabacion entre "Quality recordint" o "Long time recording". En
Pagina 9
Pagina 11
Pagina 10
Pagina 12
Page 5
WWW.PREMIERMUNDO.COM
WWW.PREMIERMUNDO.COM
WWW.PREMIERMUNDO.COM
WWW.PREMIERMUNDO.COM
Ese momento se iniciara la grabacion de la senal de radio. Para
detener la grabacion, presione el boton MODE.
9.Control de volumen
Presione el boton VOL+ para aumentar el volumen y el boton
VOL - para disminuir el volumen.
Puede almacenar hasta 20 radioemisoras tanto en la seccion
"common frequency" como en la seccion "Japanese frequency".
Para borrar radioemisoras de la memoria, refierase a la seccion
"Borrar archivos" en la pagina 22.
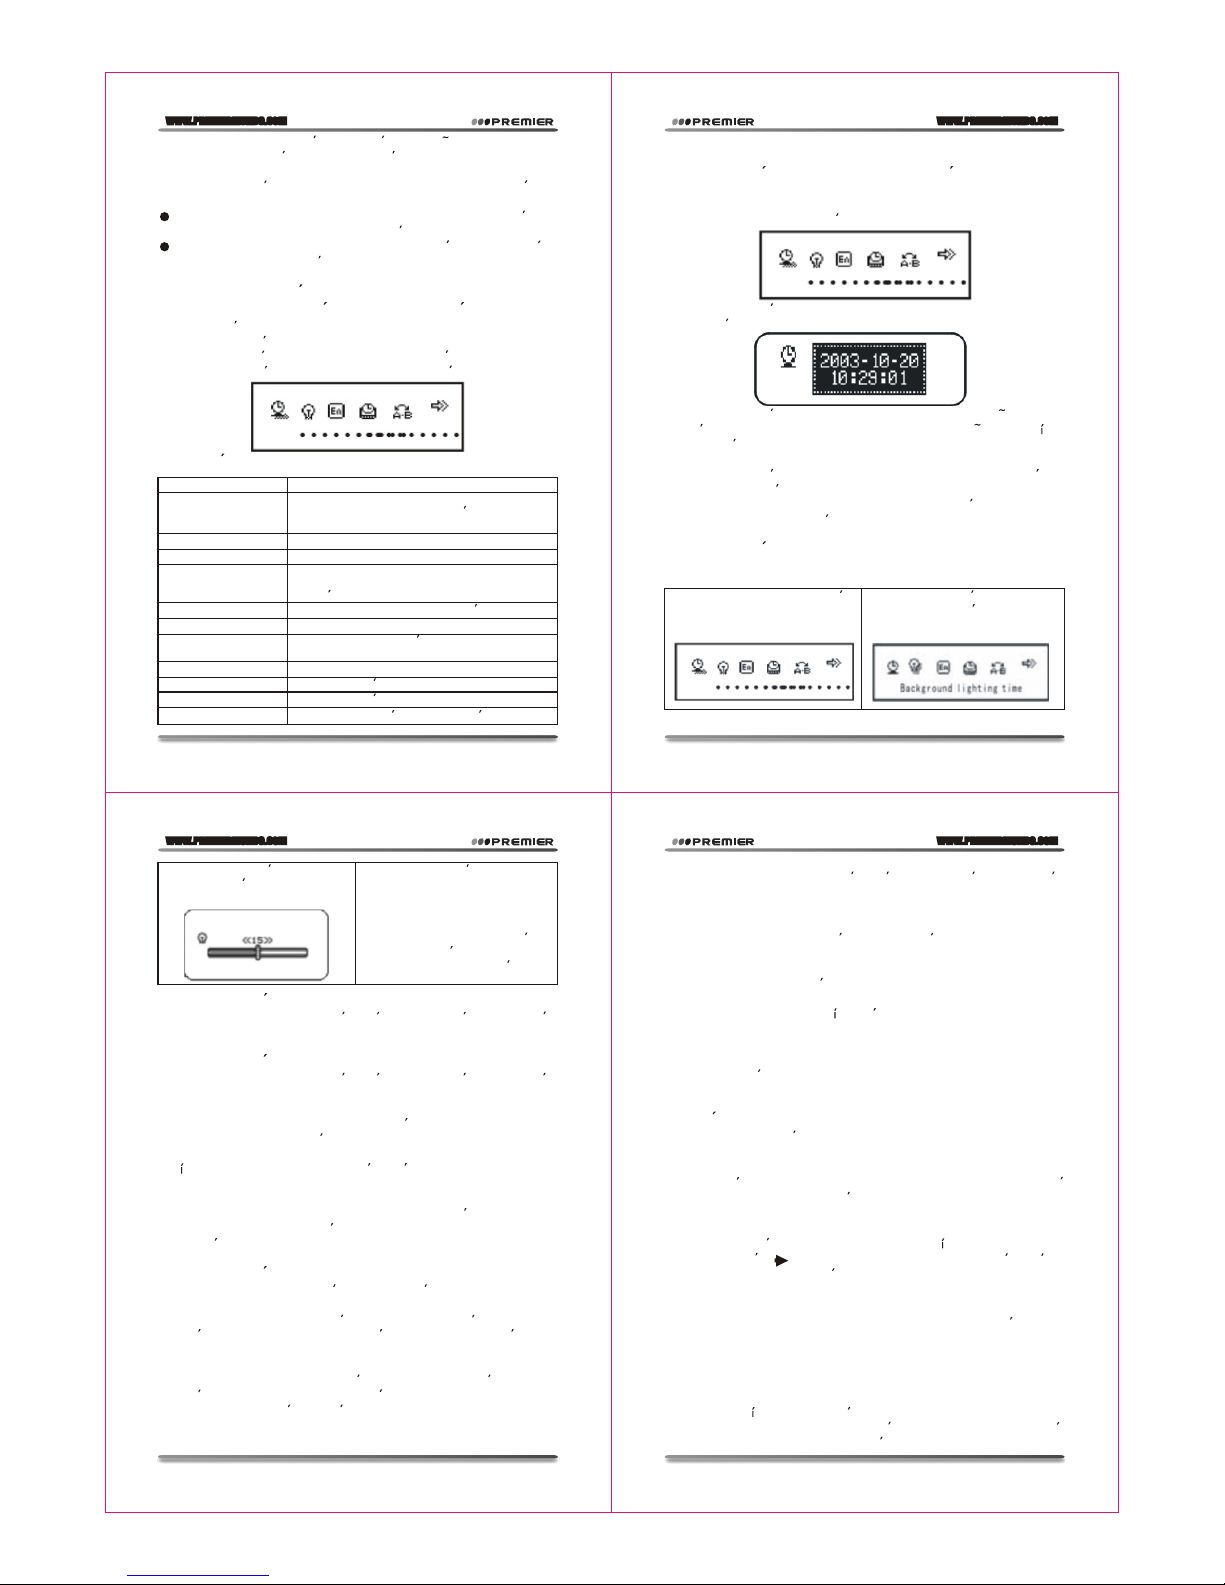
8. CONFIGURACION DEL SISTEMA
8.1. INGRESAR AL MENU DE CONFIGURACION
En este menu puede configurar varias opciones del sistema.
1. Ingrese al menu principal.
2. Presione el boton AVANZAR para elegir la opcion "System setting".
3. Presione el boton MODE para ingresar al menu.
8.2. PARAMETROS
Recording time
Ajusta la fecha y hora de los archivos grabados
Background lighting
time
Cantidad de segundos que deben transcurrir
sin que se ejecute ninguna accion antes de
que se active el fondo de pantalla.
Background light mode
Le permite elegir el color del fondo de pantalla.
Language options
Para cambiar el idioma.
Shutdown setting
Cantidad de segundos que deben transcurrir
antes de que el equipo se apague
automaticamente.
Repeting setting
Para configurar el tipo de repeticion.
Contrast
Para ajustar el contraste de la pantalla.
Online mode
Para configurar la opcion de "zona privada" del
disco.
Storage status
Firmware version
Mustra la version del Firmware del reproductor.
Firmware scalation
Mustra la version del Firmware del reproductor.
Exit
Para salir del menu de configuracion.
Para ver el estado de la memoria.
8.3. INSTRUCCIONES DE USO
CONFIGURACION DEL TIEMPO DE GRABACION
"RECORDING TIME"
1. Interfase de la configuracion del sistema
2. Presione el boton MODE para entrar a la interfase de tiempo de
grabacion.
3. Presione el boton VOL+ para cambiar el valor de los anos (el
boton VOL - disminuye el valor). Los campos de "ano / mes / d a"
empezaran a parpadear.
4. Presione el boton AVANZAR para aumentar el valor de los nu
mero (use el boton RETROCEDER para disminuir el valor).
5. Al terminar de ajustar los valores, presione el boton MODE para
confirmar y salir del menu.
CONFIGURACION DEL TIEMPO DE LA PANTALLA DE FONDO
(BACKGROUND LIGHTING)
1) Interfase de la configuracion
del sistema
2) Presione el boton AVANZAR
para elegir la opcion "Background
lighting time"
3) Presione el boton MODE paa
entrar al menu del fondo de
pantalla.
4) Presione el boton AVANZAR o
RETROCEDER para ajustar la
hora.
5) Al terminar la configuracion,
presione el boton MODE para
confirmar y salir del menu.
CONFIGURACION DEL IDIOMA
Para instrucciones de operacion refierase a la seccion "Cofiguracion
del tiempo del fondo de pantalla".
CONFIGURACION DE APAGADO
Para instrucciones de operacion refierase a la seccion "Cofiguracion
del tiempo del fondo de pantalla".
"Power saving mode" le permite configurar el tiempo en segundos
que debe transcurrir sin que ninguna accion se realice antes de que
el equipo se apague automaticamente.
El d gito "0" significa que esta funcion esta desactivada.
"Sleep mode" le permite configurar el tiempo en minutos que debe
transcurrir antes de que el equipo se apague automaticamente. El
tiempo de apagado se borrara. Si es necesario, vuelva a configuarar
esta opcion.
CONFIGURACION DE REPETICIONES
Para las instrucciones, refierase a la seccion "Efectos de sonido".
"Manual mode": Elija esta opcion para que la repeticion no se pause
automaticamente luego de la repeticion de un segmento y salo se
pueda pausar forma manual.
"Automatic mode": Elija esta opcion para que la repeticion se pause
automaticamente luego de la repeticion de un segmento (Usado
para la lectura en ingles, sin musica).
CONTRASTE
Para ins trucciones de operacion refierase a la seccion "Cofiguracion
del tiempo del fondo de pantalla".
MODO ONLINE
Para las instrucciones, refierase a la seccion "Efectos de sonido".
Algunos sistemas operativos (versiones anteriores Windows2000
SP4) no permiter usar dos letras para asignar un mismo disco, por
lo tanto, para usar la funcion de "zona privada" debe elegir el disco
con la letra que le haya sido asignado, como "Single common disk"
o "Single encrypted disk". As podra ver el disco que elija en la
computadora.
ESTADO DE ALMACENAMIENTO
El valor numerico representa la capacida total de la memoria y el
porcentaje es representa la cantidad de espacio utilizado.
VERSION DEL FIRMWARE
Le muestra la version del Firmware instalado en el reproductor.
ACTUALIZACION DEL FIRMWARE
Este menu le permite actualizar el Firmware. Ingrese a este menu
antes de realizar la actualizacion.
CONSEJOS
Presione el boton MODE para configurar los tems. Seguidamente
presione el boton para salir de la interfase. Esta funcion esta
disponible en todos los menus.
9. USO DEL DISCO USB
Este dispositivo puede ser usado como un disco USB estandar. Es
compatible con los sistemas operativos Windows98 (debe instalar
el controlador), Windows 2000 o superior (sin necesidad de instalar
el controlador), MacOS 10.3 o superior y Linux RedHat 8.0 o superior.
El equ ipo dispone de un microgenerador, por lo que no es necesario
el uso de bater as mientras esta conectado al puerto USB. Estando
en el modo de espera, presione el boton MODE para volver al menu
principal y elegir el modo de operacion.
Pagina 13
Pagina 15
Pagina 14
Pagina 16
Page 6
WWW.PREMIERMUNDO.COM
WWW.PREMIERMUNDO.COM
WWW.PREMIERMUNDO.COM
WWW.PREMIERMUNDO.COM
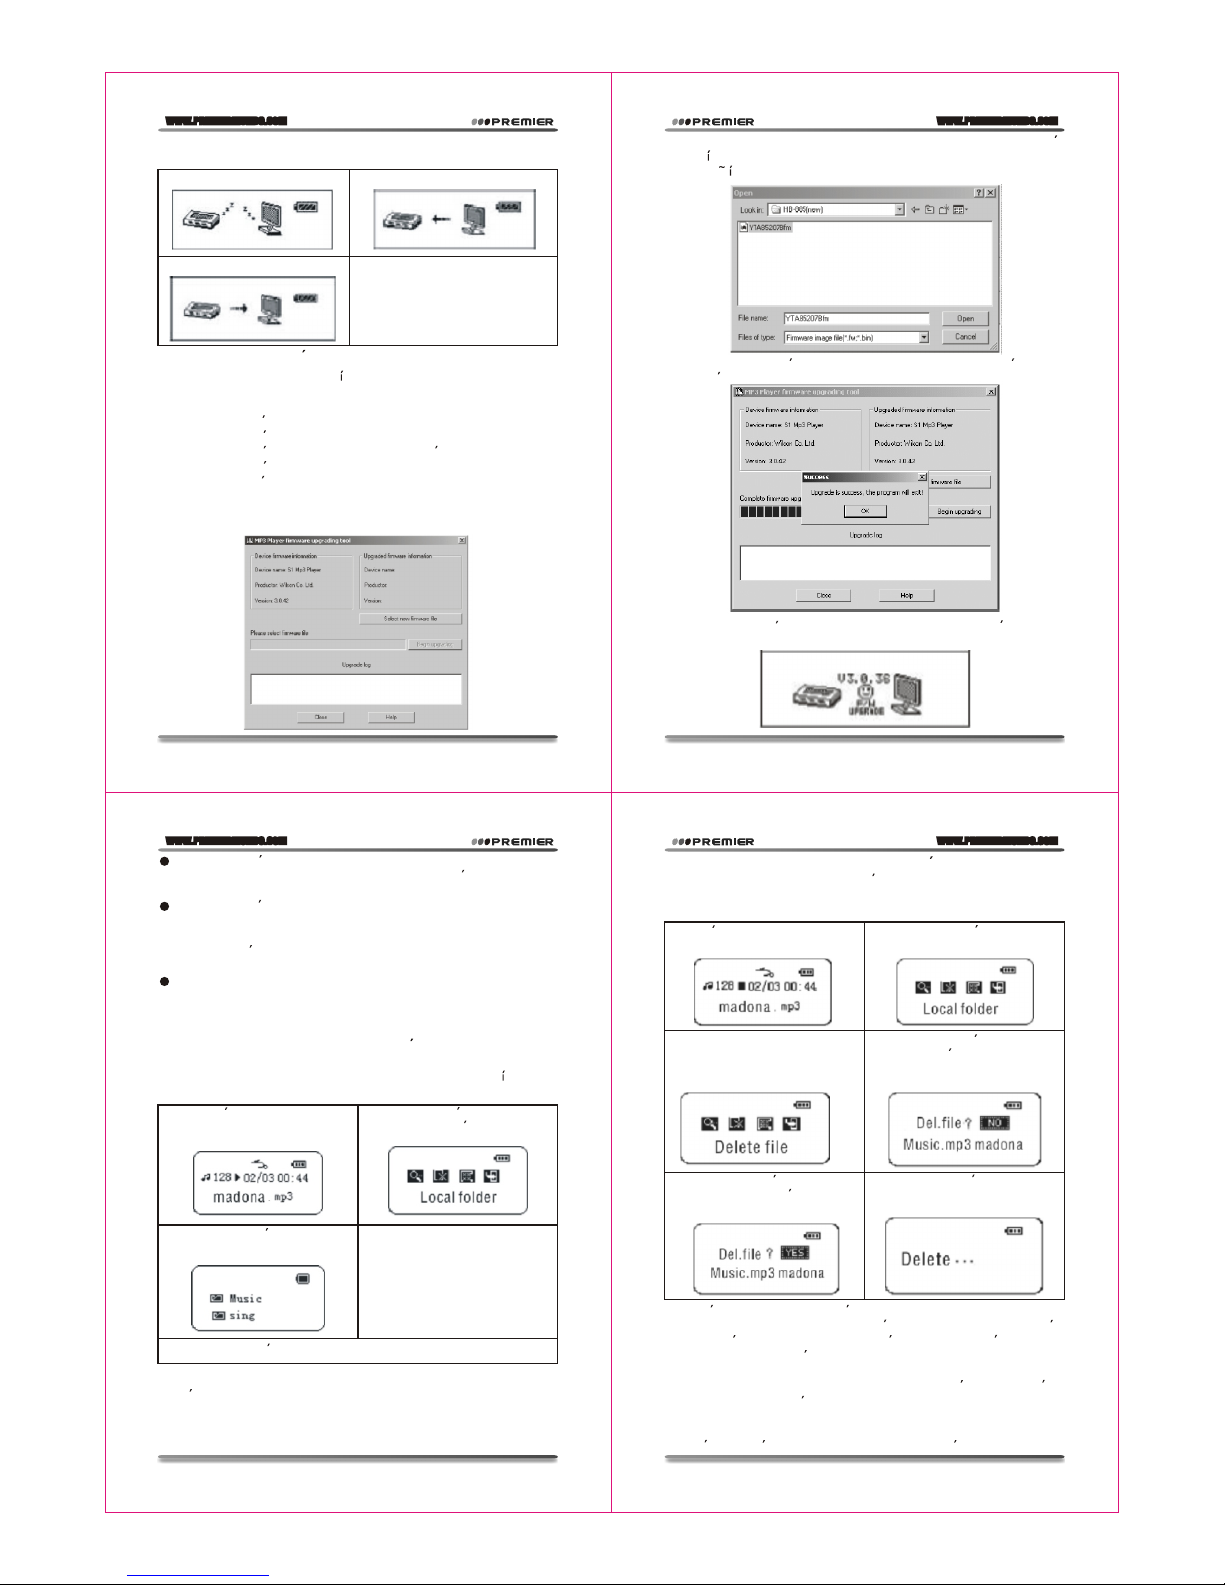
Este equipo soporta el modo "En suspenso".
Una vez conectado a la computadora, dispone de tres modos:
1) Modo de espera
2) Durante la descarga de archivos
3) Durante la carga de archivos
10. ACTUALIZACION DEL REPRODUCTOR
Puede usar el software inclu do con el reproductor para actualizar
o mantener el Firmware.
1. Ingrese al menu principal.
2. Presione el boton NEXT para elegir "System setting".
3. Presione el boton MODE para entrar al menu "System setting".
4. Presione el boton NEXT para elegir "Firmware escalation" o
presione el boton MODE.
5. Conecte el reproductor a la computadora.
6. Ejecute el programa "MP3 Player Update" desde la PC y haga clic
en "Select the new version of firmware file".
7. Elija el nuevo Firmware (que se encuentra en el CD de instalacion
inclu do con el equipo, o que puede descargar del website de la
compan a).
8. Haga clic en el boton "Beging upgrading". La actualizacion se
iniciara.
9. Si la actualizacion ha sido exitosa, la pantalla mostrara lo
siguiente:
La actualizacion del Firmware mejora y optimiza el rendimiento
del reproductor. Si no actualiza el Firmware podra seguir usando
el reproductor de manera normal.
La actualizacion del Firmware, realizada de manera incorrecta,
puede provocar fallas de funcionamiento del reproductor. Antes
de actualizar el Firmware, lea las instrucciones detenidamente.
Esta operacion debe ser realizada por personas calificadas para
tal efecto.
El Firmware de este producto no sirve para otros equipos ni
viceversa.
11. OTRAS CONFIGURACIONES
CAMBIAR DE DIRECTORIO (Submenu Stop)
Puede elegir distintos directorios para almacenar los archivos,
de tal manera que pueda organizarlos en distintas categor as. Este
reproductor soporta hasta nueve niveles de subdirectorios.
1) Submenu "Stop" (Este ejemplo
es tomado del modo reproduccion,
pero se aplica al modo grabacion)
2) Presione el boton MODE para
entrar al submenu.
3) Presione el boton MODE para
entrar al directorio.
4) Use los botones AVANZAR o
RETROCEDER para elegir el
contenido del directorio.
5) Presione el boton MODE para confirmar y salir del directorio.
NOTA: Cualquier directorio puede ser usado para almacenar archivos
de musica o archivo grabados de voz y no es necesario colocarlos
en directorios diferentes.
La opcion "Delete All" eliminara todos los archivos del directorio
actual. Por ejemplo, si elije esta opcion en el modo de reproduccion,
se eliminaran todos los archivos de musica, pero no seran borrados
los archivos de grabacion de voz.
La interfase para eliminar radioemisoras FM es mas sencilla y solo
debe realizar el paso numero 3 para eliminar una radioemisora.
Para eliminar los archivos de la computadora, desconecte el cable
USB solo despues de haber realizado la extraccion del dispositivo
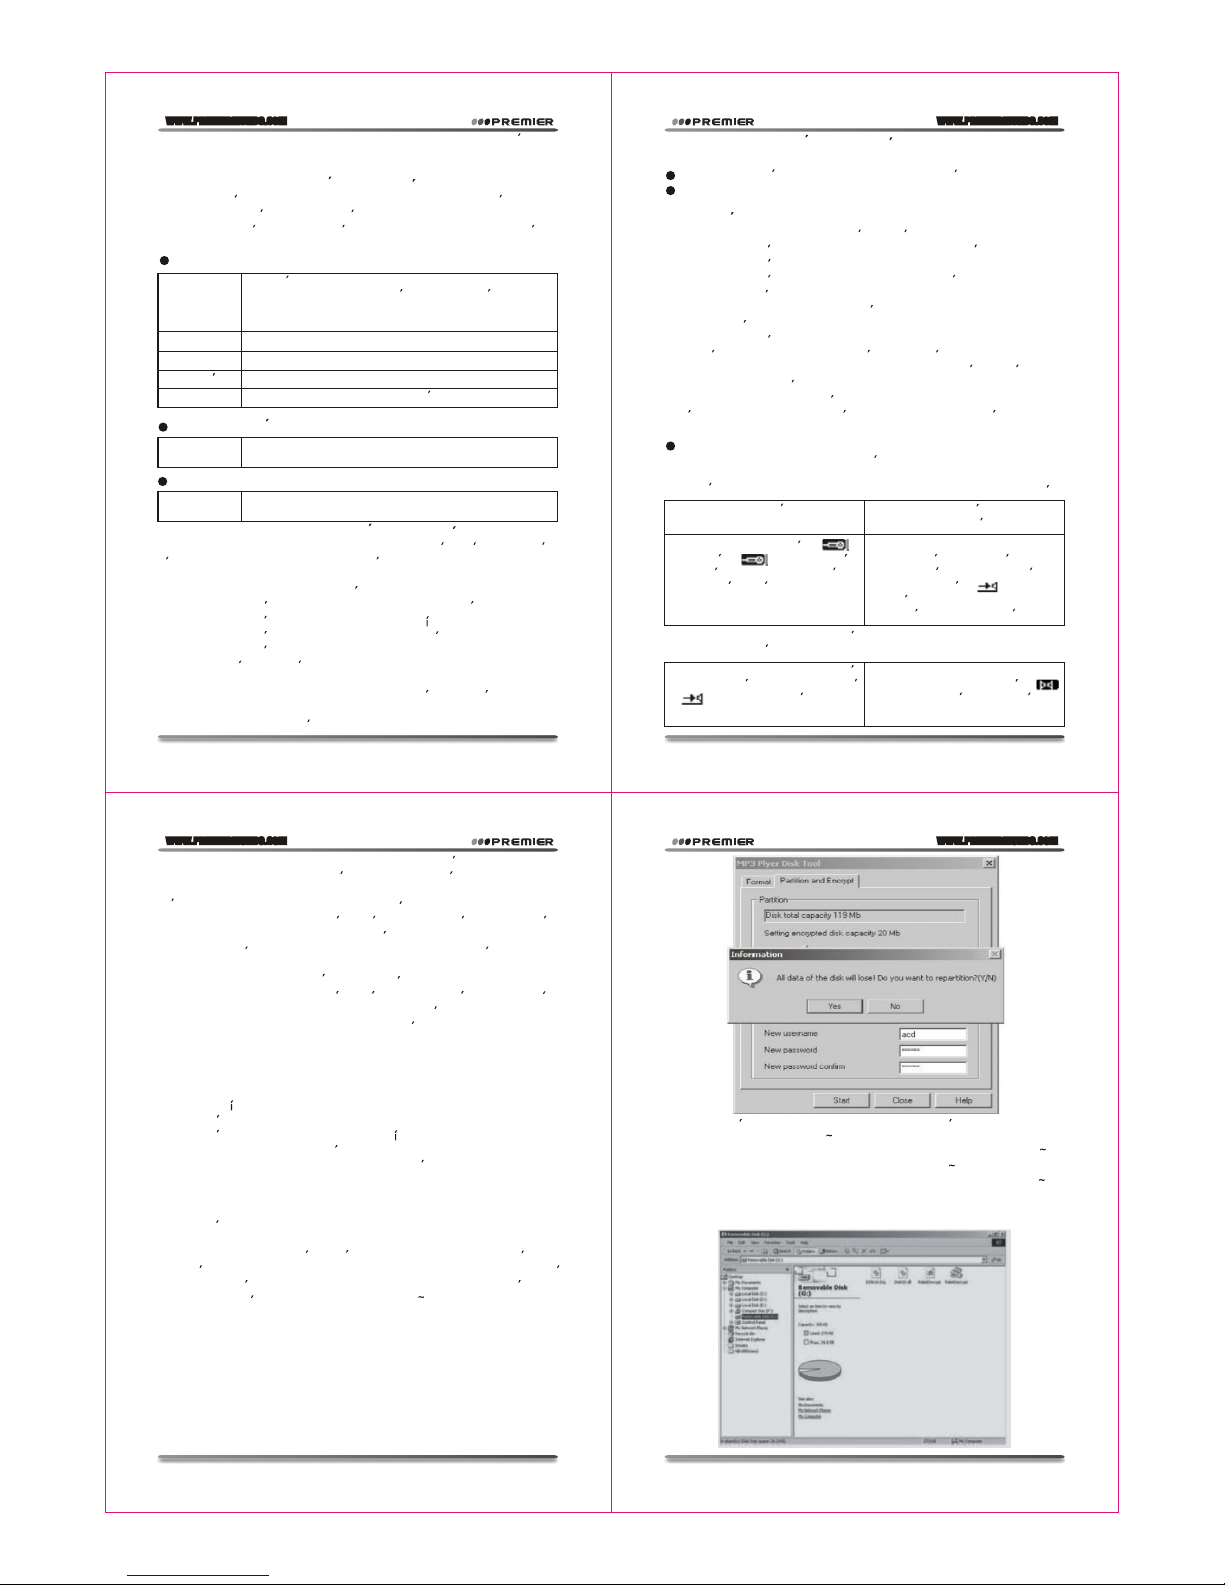
12. BORRAR ARCHIVOS (Submenu Stop)
Tanto en el modo de reproduccion como en el modo FM, puede
eliminar los archivos o las estaciones de radio almacenadas en la
memoria.
1) Menu "Stop" (No en el modo
FM)
2) Presione el boton MODE para
entrar al submenu.
3) Use los botones AVANZAR o
RETROCEDER para elegir
"A single file" (un archivo) o
"All files" (todos los archivos).
4) Presione el boton MODE para
entrar al menu "Delete".
5) Presione el boton AVANZAR
para cambiar la opcion "No" a
"Yes".
6) Presione el boton MODE para
confirmar y borrar lo seleccionado.
Pagina 17
Pagina 19
Pagina 18
Pagina 20
Page 7
WWW.PREMIERMUNDO.COM
WWW.PREMIERMUNDO.COM
WWW.PREMIERMUNDO.COM
WWW.PREMIERMUNDO.COM
de manera segura, de otra forma, los archivos no se eliminaran
completamente.
MODO DE REPRODUCCION (Submenu Play)
En este menu puede elegir distintos modos de reproduccion, por
ejemplo, repeticion y reproduccion aleatoria.
La primera opcion en este menu es "Play mode". Elija esta opcion
para reproducir los archivos de manera normal.
REPETICIONES (Repeat)
VELOCIDAD DE REPRODUCCION (Submenu Play)
Puede elegir distintas velocidades de reproduccion (mas lento o mas
rapido), sin que el sonido cambie. (Solo para archivos MP3).
1. Ingrese al modo de reproduccion:
2. Presione el boton MODE para ingresar al submenu "Play".
3. Presione el boton AVANZAR para elegir el tem "Play speed".
4. Presione el boton MODE para entrar al menu "Play spedd".
5. Presione el boton AVANZAR para aumentar la velocidad de
reproduccion o el boton RETROCEDER para disminuirla.
NOTA: El cambio de velocidad de reproduccion afectara a todos los
archivos que se reproduzcan en adelante, hasta que vuelva a
cambiar esta configuracion.
Normal
Despues de haberse reproducido todos los archivos
de un directorio, se iniciara la reproduccion de los
archivos del directorio siguiente, hasta que todos los
archivos hayan sido reproducidos.
Repeat one Repite el mismo tema.
Folder
Reproduce todos los archivos de un directorio.
Repeat folder
Repite todos los archivos de un directorio.
Repeat all Repite todos los archivos de musica.
REPRODUCCION ALEATORIA (Shuffle)
Random
Reproduce los archivos de un directorio en orden
aleatorio.
INTRO
Intro
Reproduce los primeros 10 segundos de cada archivo
en el directorio.
MODO DE REPETICION (Submenu Play)
Presione el boton REC/A-B para entrar al menu.
Siga las siguientes instrucciones
REPETICION A-B
1.Ingrese al modo de reproduccion de musica o grabaciones.
2.Presione el boton MODE para ingresar al submenu "Play".
3.Presione el boton AVANZAR para elegir "Repeat mode".
4.Presione el boton MODE para ingresar al menu "Repeat mode".
5.Presione el boton AVANZAR para definir el punto "A" del segmento
a repetir. El icono "B" parpadeara en la pantalla esperando la
confirmacion del punto "B".
6.Presione el boton AVANZAR para definir el punto "B". El icono
dejara de parpadear y se iniciara la repeticion del segmente
delimitado entre los puntos "A" y "B" y se detendra despues de
haber repetido el numero de veces determinado. Para redefinir el
punto "A", presione el boton RETROCEDER. Para determinar el
numero de repeticiones refierase a la siguiente seccion de este
manual.
Use los botones VOL+ o VOL - durante las repeticiones para
variar la velocidad de reproduccion.
FUNCION DE SEGUIMIEN TO (No disponible durante la reproduccion)
1) Inicie la repeticion A-B 2) Presione el boton AVANZAR
para entrar al menu
3) El icono de repeticion " "
cambiara a " " y se iniciara la
grabacion de voz. La duracion de
la grabacion sera igual al
segmento A - B.
4) Una vez alcanzado el tiempo
de grabacion se iniciara la
reproduccion de la grabacion. El
icono cambiara a " ". Presione
el boton AVANZAR para activar
la funcion de comparacion.
En este estado, Presione el boton RETROCEDER para volver al
modo de repeticion A-B.
1) Una vez que ingrese a la funcion
de comparacion el icono cambiara
a " " y se reproducira el archivo
original.
2) Una vez reproducido el archivo
original, el icono cambiara a " "
y se reproducira la grabacion de
la voz.
Para volver al modo "Seguimiento", presione el boton RETROCEDER.
Para salir del modo de repeticion, presione el boton MODE.
NUMERO DE REPETICIONES (Submenu Play)
Para instruccion es de operacion refierase a la seccion "Cofiguracion
del tiempo del fondo de pantalla". El numero de repeticiones
determina el numero de veces que el segmento A-B sera repetido.
INTERVALO DE REPETICION (Submenu Play)
Para instruccion es de operacion refierase a la seccion "Cofiguracion
del tiempo del fondo de pantalla". En este menu puede definir el
espacio de tiempo entre una y otra repeticion (en segundos).
13. RECOMENDACIONES
ZONA PRIVADA
La mayor a de los reproductores MP3 son usados para compartir
informacion; sin embargo, es posible que no desee mostrar cierta
informacion a terceros, lo cual le obligar a a borrar previamente sus
archivos personales. La funcion de "Zona Privada" ("Private space")
con que cuenta este reproductor es la solucion perfecta a este
inconveniente.
Puede dividir el disco USB en dos particiones y proteger una de
ellas (vera dos unidades de disco con letras diferentes en la
computadora. Los usuarios de Windows 2000 deben tener instalado
el SP4, de otra manera solo vera una unidad de disco y debera elegir
la opcion "Single common disk" o "Single encrypted disk" en el menu
de configuracion del sistema) . De esta manera, su informacion
privada quedara protegida por una contrasena.
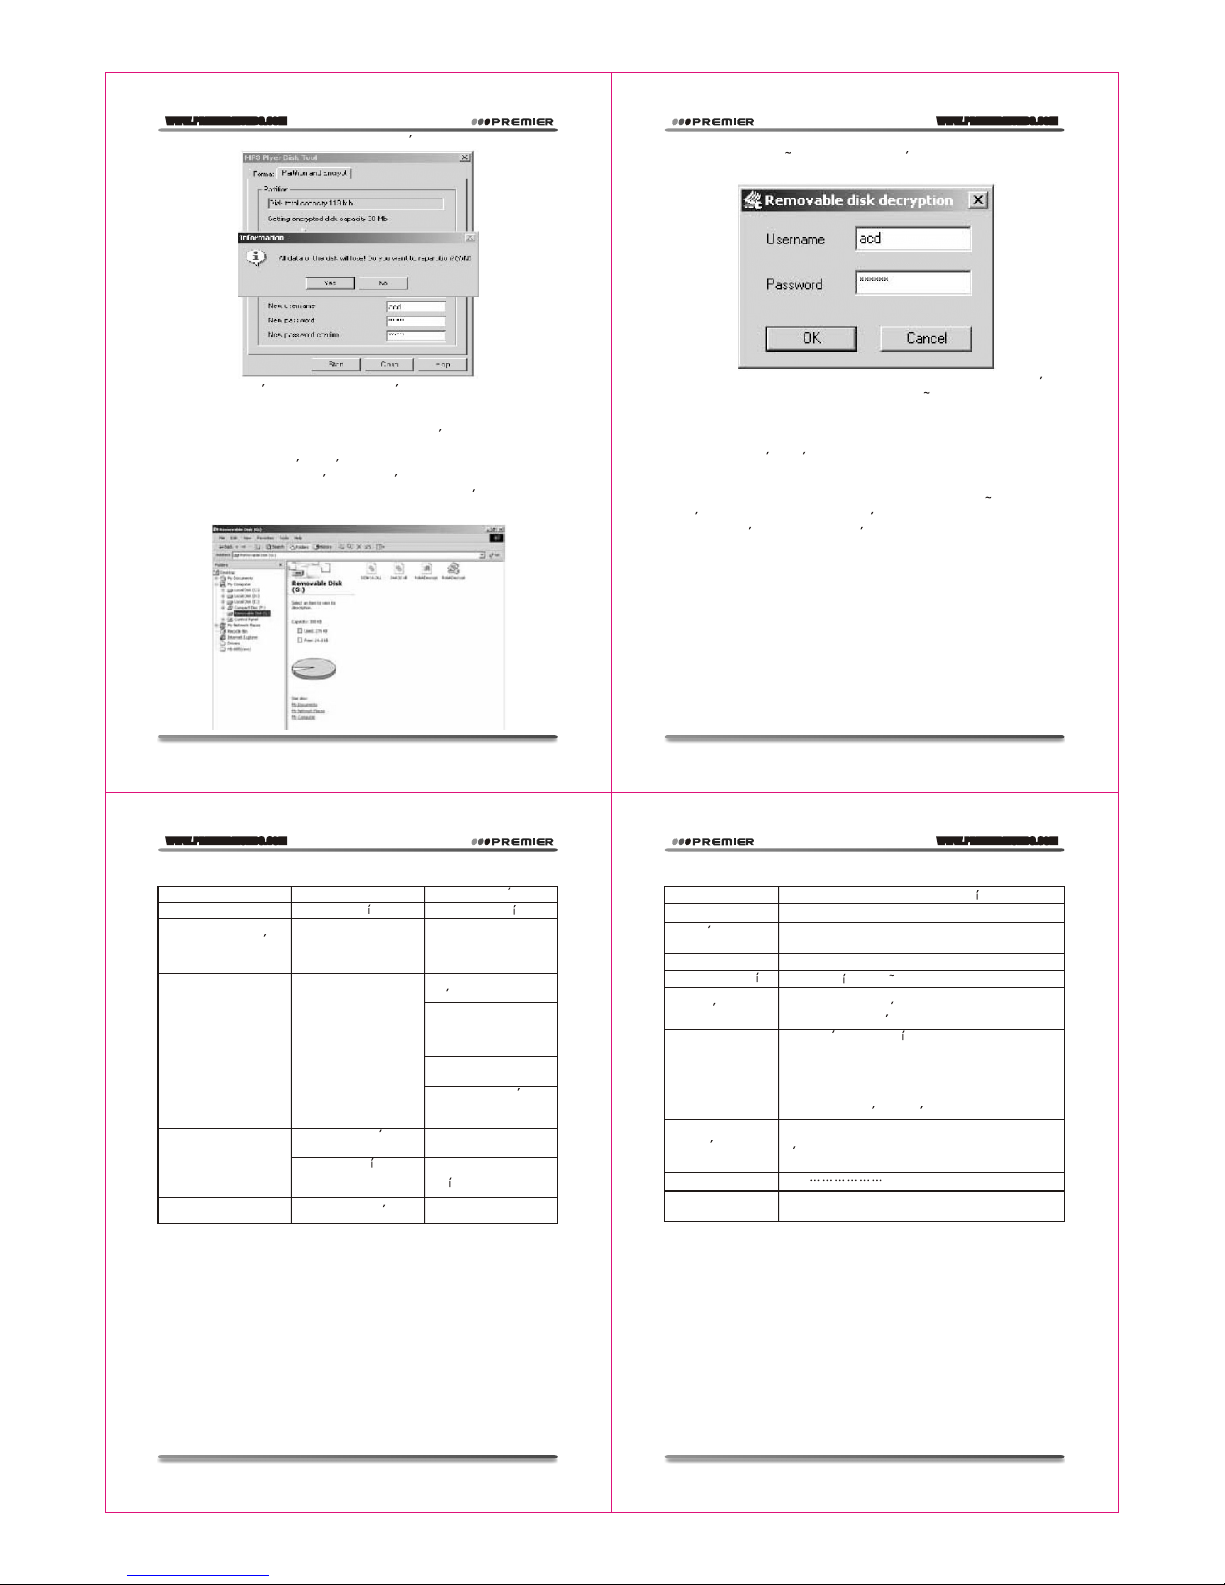
1. Conecte el reproductor a la computadora.
2. Ejecute el programa "Disk Tool" que se incluye con el CD del
reproductor.
3. Encontrara la utilidad de formateo. Elija la opcion "Partitioning and
encryption". Elija el tamano que desee para el disco privado.
Introduzca un nombre de usuario (User name) y una contrasena
(New passwor d). Vuelva a ingresar la contrasena para confirmarla
(New password con password). Vuelva a ingresar la contrasena
para confirmarla (New password confirmation) y haga clic en
"Start" para iniciar el particionamiento.
Pagina 21
Pagina 23
Pagina 22
Pagina 24
Page 8
WWW.PREMIERMUNDO.COM
WWW.PREMIERMUNDO.COM
WWW.PREMIERMUNDO.COM
WWW.PREMIERMUNDO.COM
4. Una vez concluido el proceso, aparecera la siguiente pantalla:
5.Presione el boton "OK". Se le solicitara reiniciar la computadora.
Confirme para reiniciar.
6.Una vez reiniciada la computadora encontrara dos unidades de
disco. (Los usuarios de sistemas operativos anteriores a
Windows 2000SP4 solo veran un disco). Haga clic sobre el disco
privado (el segundo). En el encontrara tres archivos. Dos de ellos
ocultos y el tercero es un archivo ejecutable, que solo ocupan
300K de espacio.
7.Inicie el archivo "RdiskDecrypt.exe" e ingrese su nombre de
usuario y contrasena en el cuadro de dialogo para acceder al disco
y poder copiar archivos en el.
8.Cada vez que conecte el reproductor a la computadora debera
ingresar su nombre de usuario y contrasena para tener acceso al
disco.
NOTA: Al particionar el disco o al volver a juntar las particiones,
toda la informacion sera borrada. Antes de proceder, haga una copia
de seguridad de todos sus archivos.
CUIDADO: No olvide su nombre de usuario y contrasena, ya que no
podra usar el disco privado y tendra que juntar las particiones, con
lo cual perdera toda su informacion.
PROBLEMAS Y SOLUCIONES
Dimensiones y peso
31mm x 0mm x 7mm / 25g (sin bater as)
Pantalla
Matriz (128 x 32) LCD. Fondo de 7 colores o sencillo.
Conexion a la
computadora
USB 1.1 de alta velocidad.
(Lectura: 1000Kb; escritura: 750Kb)
Memoria EMS
Memoria Flash: 128M
Fuente de energ a
Grabacion
Frecuencia de rastreo 8KHz
Formato de grabacion WAV (32Kbps) ACT (8Kbps)
Tiempo de grabacion: 35H (ACT, Flash 128M)
MP3
Salida maxima de aud fonos (L)10mW + (R )
10MW (32 Ohm)
Flujo de bit MP3: 5Kbps a 320Kbps
Flujo de bit WMA: 5Kbps 192Kbps
Respuesta de frecuencia: 20Hz a 20KHz
SNR: 90dB
Nivel de distorsion: No mas de 0.05%
FM inalambrico
Rango de frecuencia: 76MHz
96MHz / 87MHz / 108MHz
Numero de canales de memoria 20 + 20
SNR 45dB
Formato de audio
MP1 [T9]
ESPECIFICACIONES TECNICAS
PROBLEMA
CAUSA
SOLUCION
El equipo no enciende
No hay energ a
Cambie la bater a
No se puede apagar el
equipo cuando esta
conectado a la
computadora
Desconecte el
reproductor de la
computadora para poder
apagarlo.
No puedo descargar los
archivos
Verifique que el sistema
de la computadora es
compatible con el
reproductor.
Formatee el reproductor
y vuelva a intentar.
No hay sonido
Hay unos aud fonos
conectados a la
computadora.
Conecte bien los
aud fonos [T8]
Verifique que el sistema
este bien instalado.
Revise la conexion entre
el reproductor y la
computadora.
El volumen esta muy
bajo
Suba el volumen.
No se puede grabar
La memoria esta llena
Elimine algunos
archivos
1.5V. Bater as tamano AAA.
Sistemas operativos
compatibles
Windows 98SE/ME/2K/XP
Pagina 25
Pagina 27
Pagina 26
Pagina 28
Page 9
R
INSTRUCTION MANUAL
PRODUCT NAME
MP-0956-1
DEAR CUSTOMER
Congratulations for your purchase!
Please read this manual carefully, and keep it for future reference.
If you need extra support, please write to [email protected]
Page 10
WWW.PREMIERMUNDO.COM
WWW.PREMIERMUNDO.COM
WWW.PREMIERMUNDO.COM
WWW.PREMIERMUNDO.COM
Pagina 1
Pagina 3
Pagina 2
Pagina 4
Pronouncement items
Function summarization
Get to know the musical player
Outward appearance and keystroke
Screen display signal
Electricity quantity display
Basic function operation
Keystroke operation definition
Keystroke operation definition
Keystroke action definition
Play music
Operation program
Sound-effect mode
Sound record
Record in recording mode
Choose recording types
Play recording documents
Transform ACT recording files into WAV
Use FM radio set(optional)
System setting
How to get in
Each parameter item synopsis
Detailed applying directions
Electron documentation
Use telephone book function
Telephone book file set up and edit
Telephone introduction and educe
Catalogue
3
3
4
4
4
5
5
7
7
7
7
7
8
9
9
10
10
10
12
13
13
14
14
16
17
17
20
This Mp3 player represents a new generation of MP3 players, supporting MP1, MP2, MP3, WMA, WMV, ASF, WAV and other music
file formats. its excellent sound effect, high reliability and graceful
appearance match well with each other. It can be called the first-class
works. We whole-heartedly wish that it could bring you super
enjoyment of the digital time.
Pronouncement items
Thank you for your purchase.
Please read this manual carefully before using your new player.
Contents in this manual may change possibly for better service.
We have the right to make changes to this manual without notice.
Function summarization
Exquisite pronouncement design, fashionable anti-rubbing nanom-
eter lens decorations.
Support many kinds of audio frequency patterns, such as MP1, Mp2,
MP3,WMA,WMV,ASF,WAV and other musical formats.
Firmware upgrade function, offer latest upgrade software download
in the website, realize this machine's expansion of the function
upgrade.
FM stereo receiving, the function of strong automatic or manual
searching radio station, let you receive the programmed easily.
Telephone books function, Facility shortcut, Let's your address
list in side.
Electron documentation super long letter note function you can hold
not read article copy move HD.
Without driving U-disk function, no need of managing program, it
can pass on data, no need of install driver in WIN 2000 system or
over it.
"Unusual degree space"disk mode, using the subsidiary tools, you
can divide the disk of this machine into two disks and encipher one
of them, hide the space ,and prevent this part from seeing and reading,
so as to hide the secret.
Backlight display in blue with time setting.
You can record through the microphone and save them as the voice
documents of WAV and ATC mode.
Section or contrast re-reading, realizing the true digital re-reading
function.
Seven timbre balance ware, natural, rock, popular, classical, soft,
jazz, and DBB.
Several playing mode, common mode, single -song cycle, catalogue
playing, catalogue cycle, total cycle, stochastic playing and
skimming playing.
Fixed time shutting -off you can set the sleeping and electricity saving mode so as to use it more conveniently.
With the full and audio visual animation menu with corresponding
words, you can use it with high proficiency.
Get to know the musical player
Outward appearance and keystroke
Screen display signal
Use USB disk
Upgrade the player
Other settings
Choose different catalogues (stop sub-menu)
Delete documents (stop sub-menu)
Playing mode (play sub-menu)
Playing speed (play sub-menu)
Re-reading mode (play sub-menu)
Re-reading times (play sub-menu)
Re-reading interval (play sub-menu)
Key recommendation
USB drive install
Difficulties
Follow accessory
Technical criterion
20
21
23
23
24
25
25
26
27
27
27
30
31
31
32
Page 11
WWW.PREMIERMUNDO.COM
WWW.PREMIERMUNDO.COM
WWW.PREMIERMUNDO.COM
WWW.PREMIERMUNDO.COM
Pagina 5
Pagina 7
Pagina 6
Pagina 8
Basic function operation
Enter the menu
You can enter all kinds of menus through pressing the MODE key.
The menu is divided into the main menu (long time press the mode key
to enter when is stopping), the playing sub-menu (short time press) and
the sub-menu in the stop situation (press the key for a short time)
Browsing operation
Choose the skimming songs and the menu items.
Fast forward and fast backward while playing.
Entry distinctness features mode
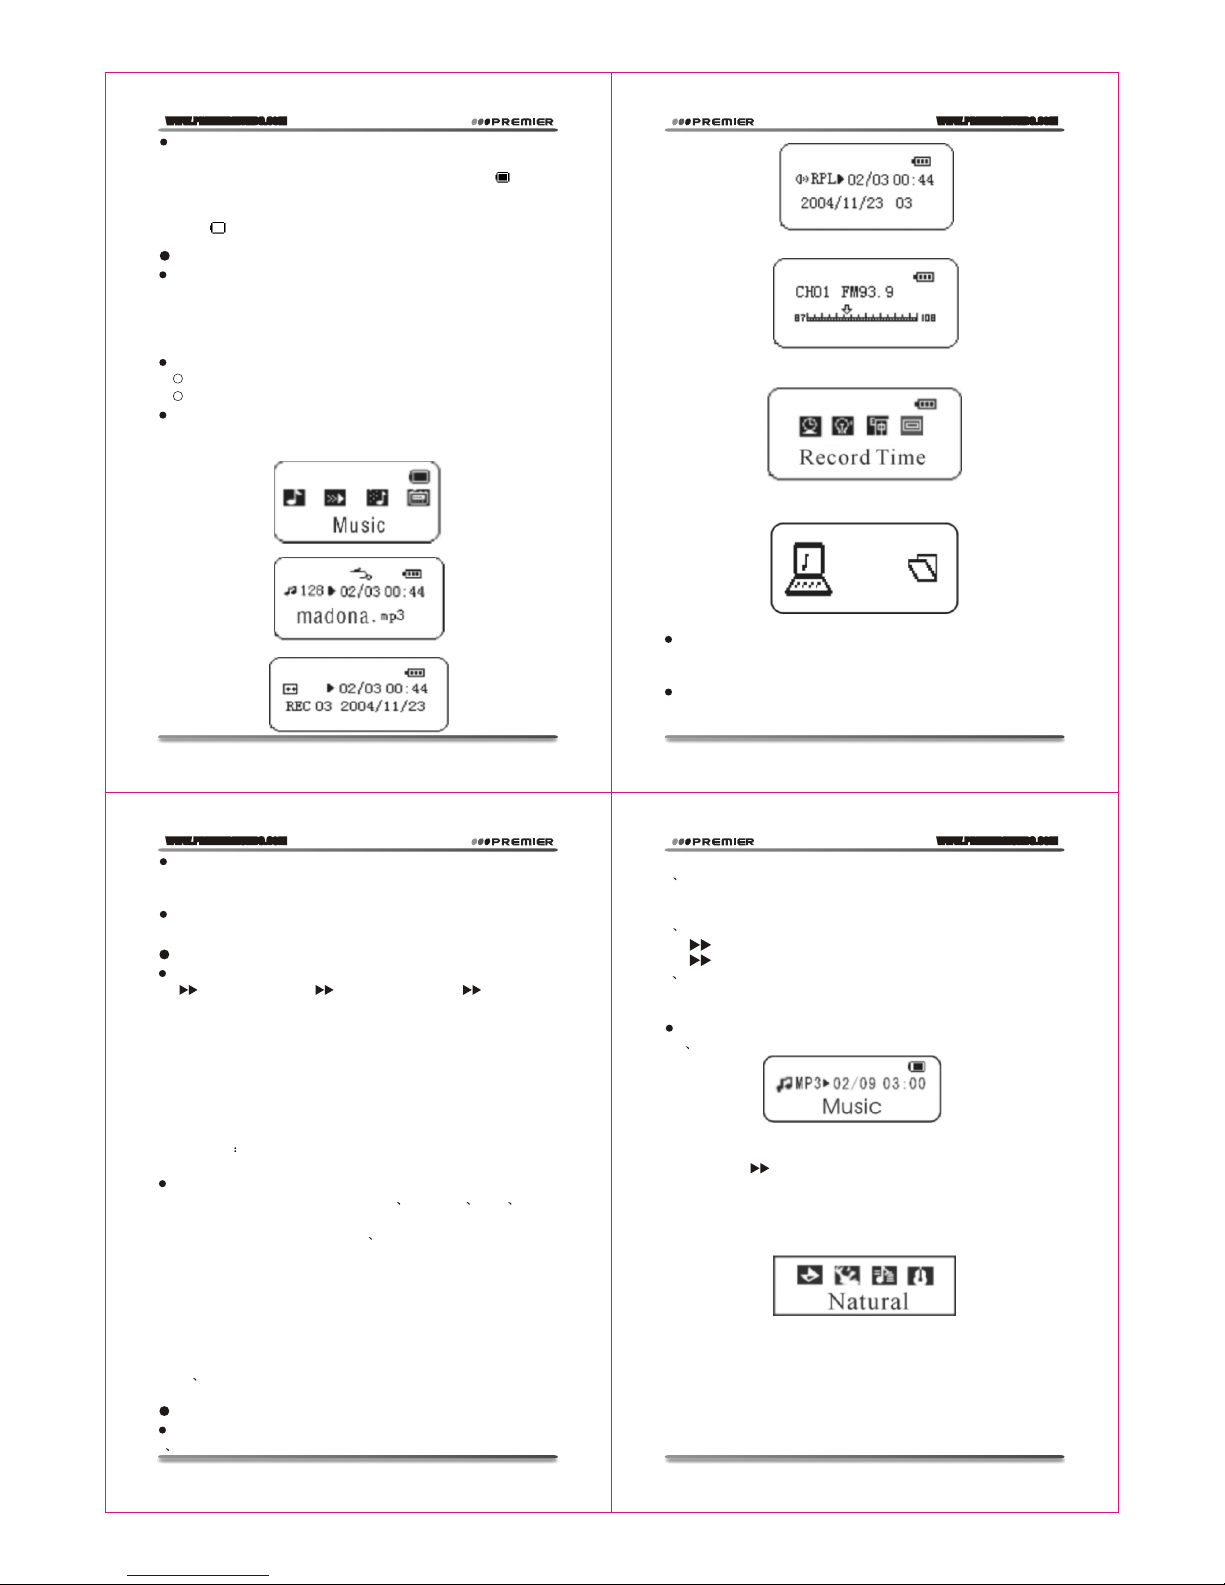
From the main menu you will enter different function mode.
Main menu: (long press mode button)
Musical mode:
Recording mode:
Sound mode:
FM mode (Optional):
Volume adjustment
Press the VOL- key for a short time to turn down the volume and the
VOL+ key for a time to turn up the volume.
Turn on / Turn off
Press the PLAY key for a long time to turn on or turn off the mp3
player
System setting:
Enter the USB mode through the connection with PC:
Keystroke operation
Keystroke operation definition
- Express Forward; - Express Backward; - Play/Pause
1."Play/Pause": Power ON/PLAY/STOP/OFF.
2."Mode": General confirmation button.
3."VOL+": Increase volume. Speed up.
4."VOL-": Decrease volume. Speed down.
5."Forward": Next one. Fast Forward. Next
6."Backward": Previous one. Fast Backward. Last
7."USB": USB plug.
8."Earphone jack": Standard earphone connector.
9."HOLD" Press lock key.
10. "REC": Come into recording mode.
Keystroke action definition
Keystroke action comprise short press long press press single
press four genus handle means.
Back expect in particular explain all belong to short press.
Short press: press once Keystroke. At once become effective.
Long press: press once Keystroke. Excess 1.2 second don't leave
go of just go into effect, and that just once.
Single: press once keystroke. As far as leave go of time moment
just go into effect.
Press: Press once keystroke unto leave goes of process. Business
take definite frequency time after time goes into effect. For example :
"next last".
Play music
Operation program
1 Connect to the headphone and plug the headphone jack into the
4 Control the volume
VOL+: increase the volume
VOL-: decrease the volume
Sound-effect mode:
1 While playing the music
2. Press the Mode Key for a short time to enter the sub-menu of
playing.
3. Push the key to choose.
4.Press the Mode Key for a short time to enter the choice menu of
Sound-effect mode and choose the menu
Item about Sound-effect mode.
Sound effect mode choose:
5. All the Sound-effect illustration (EQ):
Natural
Rock
Pop
Classical
Soft
Jazz
DBB
Mp3 player's headphone jack. Now you have succeeded in connection.
2 Press the PLAY key for a long time to start up the player and enter
the musical mode. Then you should press the PLAY key for a short
time to play the music.
3 Choose the music
: Choose the previous song
: Choose the next song
Play/Pause
In the Music mode press the "Play/Pause" button to playback the
music.
Record/stay (short control). Stop record (long control)
Record status. Short press Play. Stop record.
Electricity quantity display
This mp3 player employs the control of nine-level electricity quantity.
When the electricity quantity is 1.5V, the display shows .
With the time up, the display of the electricity quantity will reduce.
When the battery is almost used up, the battery mode will change into
blank . You should change the battery in time.
Page 12
WWW.PREMIERMUNDO.COM
WWW.PREMIERMUNDO.COM
WWW.PREMIERMUNDO.COM
WWW.PREMIERMUNDO.COM
Pagina 9
Pagina 11
Pagina 10
Pagina 12
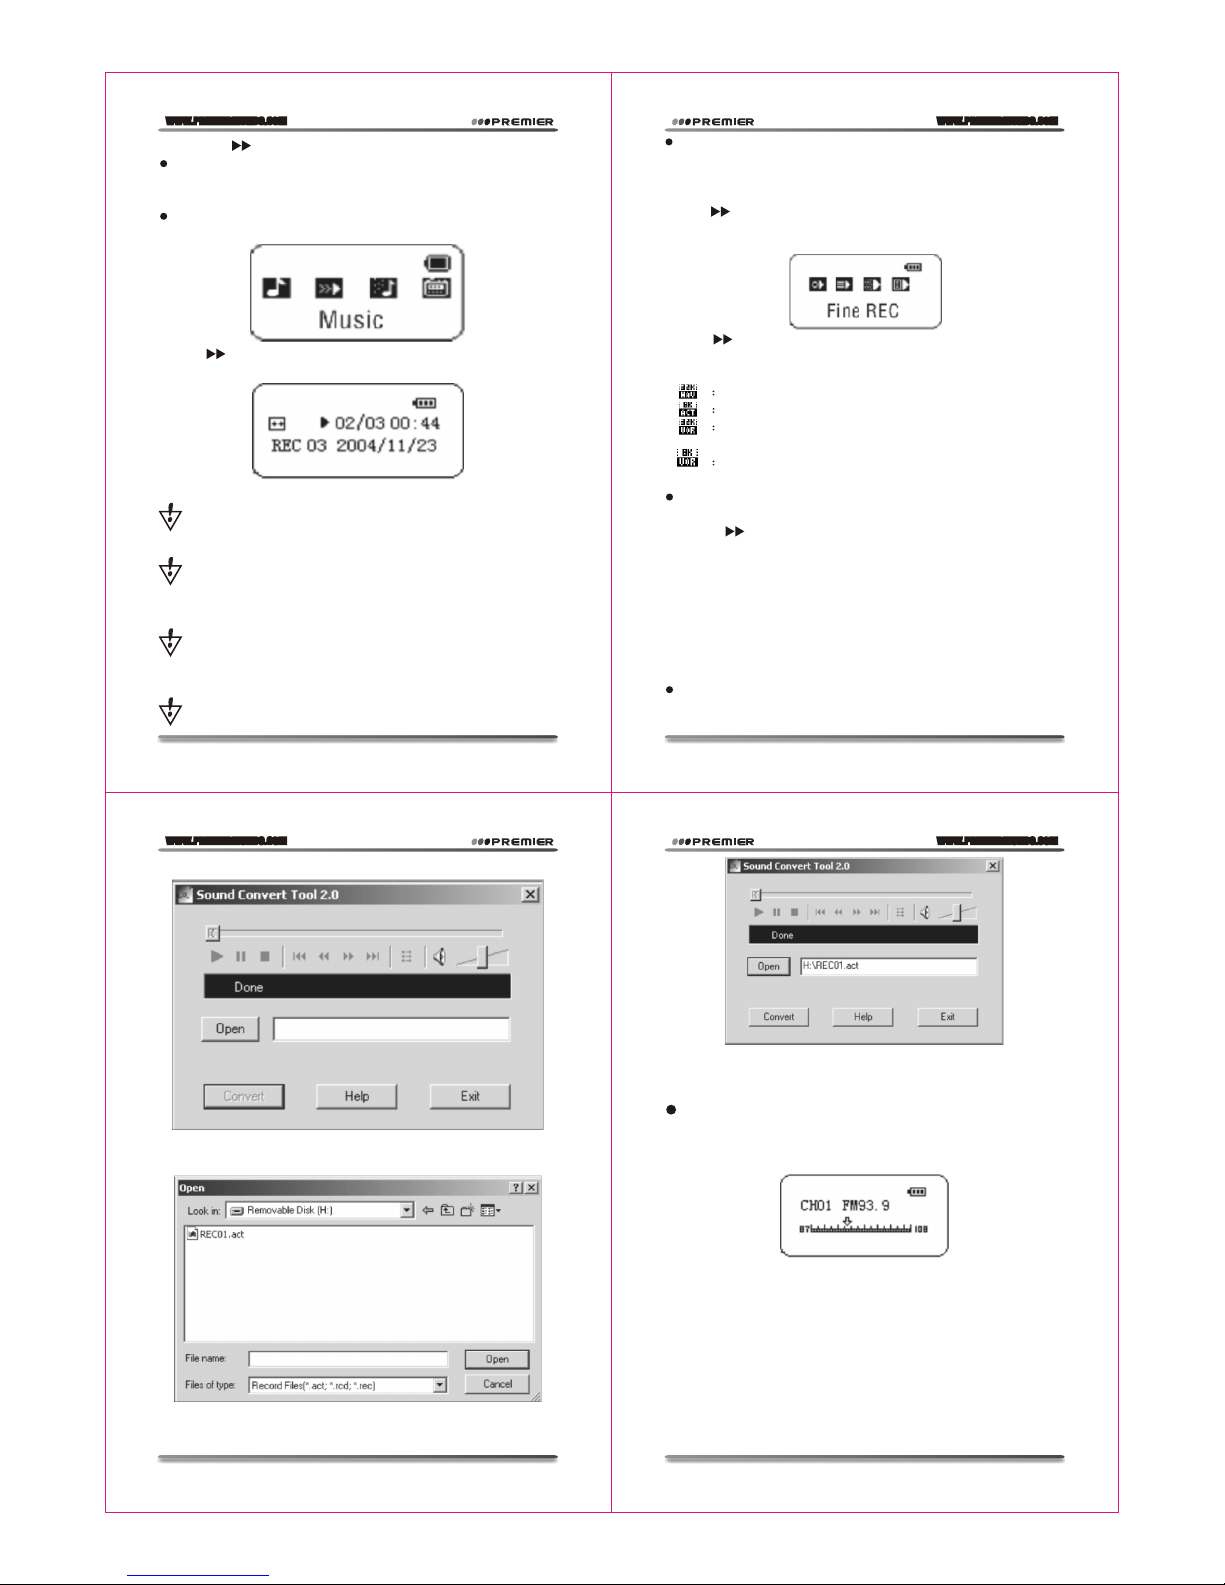
2. Push to choose the recording mode.
3. Press the Mode Key for a short time to enter the recording mode.
4. Press the Play Key for a short time to start recording.
Recorded file can be saved either in the root directory or in the
sub-directory.
If you get the message "Disk full" on the screen, that means there
is not enough space to save the recorded file, you should delete the file
to get the space.
If you get the message "Directory full" on the screen, that means
that the recorded files quantity exceeded 99, you should save the recorded file to another directory.
Record process respond "Play" key.
4. Push to choose the suitable Recording Type and Press the Mode
Key for a short time to confirm the chosen type.
Recording Type
High-grade record.wav format. Timbre good.
Long time record.act format. Timbre commonly.
High-grade voice control. Wav format. (Voice control
record. Doesn't voice)
Long time voice control. act format.
5. Press the Play Key to start recording.
Play recording documents
1.Enter the main menu.
2. Push to choose playing mode.
3. Press the Mode Key to enter the Playing Mode Interface.
4. Re-press the Play Key to start playing
5. Choose record documents.
Last key: choose front singleton record file
Next key: choose singleton record file
6. Command volume
VOL+: enhance volume
VOL-: reduce volume
Transform ACT recording files into WAV
The ACT format recorded in this player can be converted into WAV
format through the additional installing program.
1.Run "Sound Converter " program , and click "Open"button..
2. Choose the ACT file that will be converted.
3. Click "Convert" button, and it will be converted into WAV file.
Besides the function of converting the ACT into WAV, this tool can
play WAV and MP3 files.
Use FM radio set (Optional)
1. Enter the main menu
2. Push the NEXT Key to choose the "Receiving Mode"
3. Press the Mode Key for a short time to enter the "Receiving Mode".
4. Automatic Searching
Press the "Last/Next" button for 2 seconds (long time press), the
player will auto search for the next Radio station with the 100KHz
increment forward or backward, it will not stop until the a clear radio
station has been found. If you want to cancel the auto search, just press
the "Last/Next" button again.
5. Fine Tuning
Push the Last Key: single step backward for 100KHz
Push the Next Key: single step forward for 100KHz.
6. Save the searched frequency
Press the Mode Key for a short time to enter the FM sub-menu and
Choose recording types
1. In recording stopping interface
2. Press the Mode Key for a short time to enter the recording sub menu:
3. Push , choose Recording Type Sub-menu item Press the Mode
Key for a short time to enter this item.
Record type choose interface:
6. Push the key to choose and press the Mode key to confirm.
Sound record
Record please insures have enough Battery.
Display sustains every list file save.
Record in recording mode
1. Enter main menu:
Page 13
WWW.PREMIERMUNDO.COM
WWW.PREMIERMUNDO.COM
WWW.PREMIERMUNDO.COM
WWW.PREMIERMUNDO.COM
Pagina 13
Pagina 15
Pagina 14
Pagina 16
re- press the Mode Key for a short time to save this broadcasting
station.
7. Receive the saved broadcasting station
If there is one or more saved broadcasting station, you can press the
Play key for a short time to receive backward in sequence.
8. Inner recording function
You can record the programs you like while listening to the
broadcasting station programs Press the Mode Key for a short time to
enter FM sub-menu to choose high quality recording or long time
recording and you can record the present program in the recording file.
Press the Mode Key for a short time to quit recording.
9. Control the volume:
VOL+: increase the volume
VOL-: decrease the volume
: You can save up to 20 radio stations in your MP3 player.
: To delete the radio station please refers to the section Delete file
below.
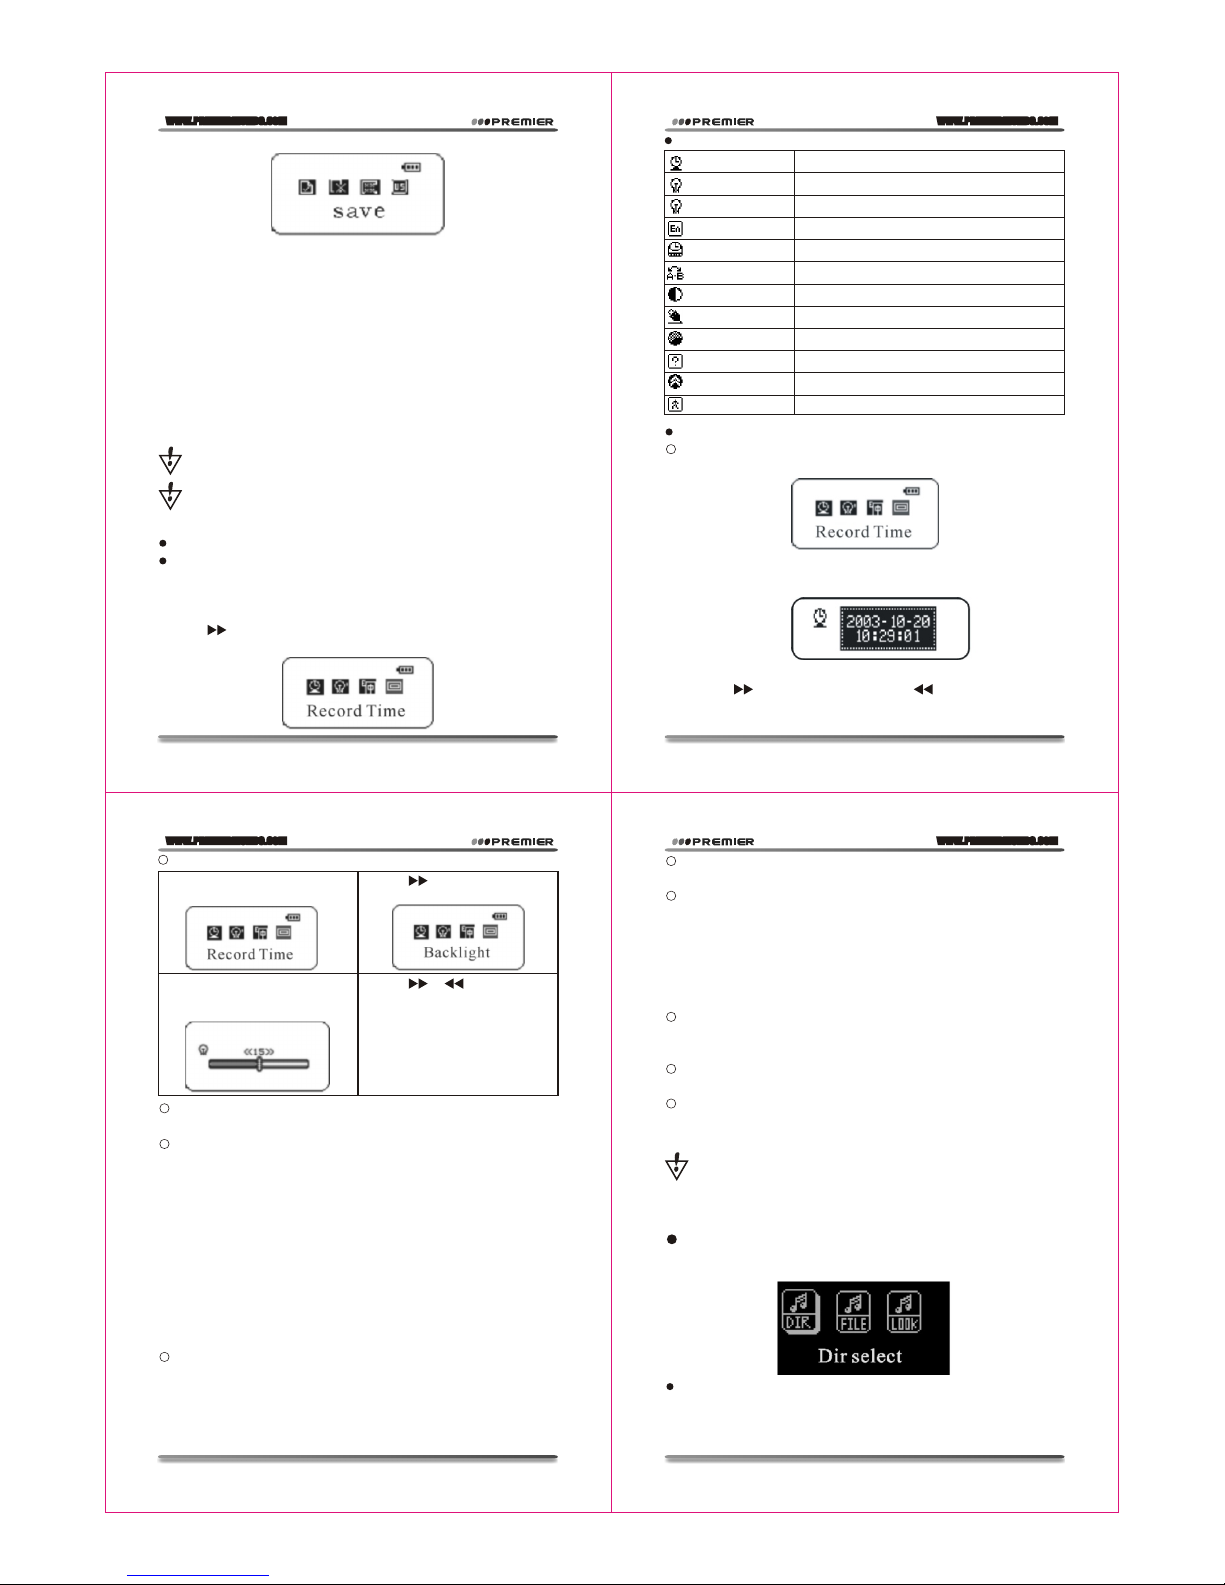
System setting
How to get in
You can set the system parameter here and each item will change
with the upgrade of the firmware.
1. Enter the main menu
2. Push to choose the system setting.
3. Push the Mode Key for a short time to enter the system setting
Each parameter item synopsis
(Record Time) Sets the date and time of the recorded files.
(Back Light) Sets the timing of the backlight.
(Back Light Mode) Sets backlight color
(Language) Sets the language
(Power off) Sets the time of the auto-power off.
(Replay Mode) Sets the Replay mode.
(Contrast) Sets the Contrast of your LCD
(Online Mode) Sets the function of the MP3 removable disk
(Memory Info) Checks capacity of the flash memory
(Firmware Version) Displays the date of the current firmware version
(Firmware Update) Use this setting for the firmware update
(Exit) Exit the submenu
Detailed applying directions
Recording time Setting
1. System setting Interface
2. Press the Mode Key for a short time to enter the time recording
interface.
Recording Time:
3.Press "VOL+" (VOL-) to select the date and time.
4.Press the button to increase or press to decrease.
5.Having finished adjusting the time, Press the "Mode" button to
confirm.
"Backlight time" enactment
Language choice's Setting
Operation systems consult" sound effect mode" enactment
Shut down Setting
Please refer to the operation method on the time setting in poor light.
The Electricity -saving Mode means: You can set such a time (unit:
second). In the state of stopping, it is calculated from no keystroke. The
mp3 player is shut down automatically to save the electricity when the
time is up. The number 0 means this function is shut down.
Sleeping Mode means: You can set such a time (unit: second) In no
matter what state, it is calculated from no keystroke. The mp3 player
is shut down automatically when the time is up and this is used for
listening to music before sleeping. Caution: The Sleeping Mode is
valid only once after setting .The set time will be cleared automatically after shutting down. If you need that function, set it again please.
Re-reading Setting
Refer to the operation about Sound-effect Mode.
The Manual Mode means: A-B re-reading cannot punctuate automatically. Only the synthetic setting can do it. The Automatic Mode
means that A-B re-reading can do it automatically. (It is used for
EnglishReading in the state of no music.)
1.System Setting Interface 2. Push to choose the
"backlight time".
3. Press the Mode Key for a short
time to enter the time interface in
backlight
4. Push / to regulate the
time.
5. After that please press the Mode
Key to make sure to quit.
Contrast Regulation
Refer to the tine setting in the poor light.
Online mode
Refer to the setting of Sound-effect Mode.
Some operation systems (the edition before Windows 2K SP4) can't
support the USB disk with two drive letters. So now you need choose
to use which disk (single common disk or single encrypted disk) after
using the function of unusual degree space. The chosen disk will be
displayed after connecting to the computer.
Memory State
The numbers here means the total capacity of the disk and the
percentage shows the space rate that is used.
Firmware Edition
You can see the present Firmware Edition in the player.
Firmware Upgrade
It is the interface for upgrading the Firmware. Enter this interface
before firmware upgrade.
Press the Mode Key for a short time after setting the items and you
can press the Play Key for a short time to quit the menu. The Play Key,
which has the function of quitting the menu, is valid to all the menus.
Electron documentation
Enter main menu, Push Next key choose electron documentation.
Press Mode key enter next menu:
Choose catalogue: choose remove disk root directory.
Press Mode key enter "choose catalogue" interface. Pass press next
and last choose you need read file catalogue, press Mode key exit
Last menu. If you need read file in the remove disk root directory.
Follow desuetude choose catalogue.
Page 14
WWW.PREMIERMUNDO.COM
WWW.PREMIERMUNDO.COM
WWW.PREMIERMUNDO.COM
WWW.PREMIERMUNDO.COM
Pagina 17
Pagina 19
Pagina 18
Pagina 20
Choose file consult" choose catalogue mode" enactment.
Push Next key choose "file read". Press Mode notarizes, you can
read you choose file, in the read time. Pass press Next key or Last key
make time thumb.
Use telephone book function
How to lookup telephone message
Enter main menu: Push Next key choose telephone, press Mode key
enter telephone book, Embody menu as follows:
1.Browse TEL
2.Import Tel File
3.Export Tel File
4.Exit
Push NEXT key choose "Browse TEL", press MODE key enter:
Push NEXT key choose you need lookup object. Press MODE key
exit interface.
Browse TEL, Browse import playing telephone book file, and inside
include Name, E-mail, Mobile telephone, QQ, Telephone, FAX, and
communication tool note. (Thereunto must storage import telephone
book can enter this function, when system read anything telephone
book file, system destined to hint: without file, press MODE key exit.)
Import tell file: Use the function you can hold user at the computer
making finer telephone book file import update display.
Export tell file: Use this function can hold notes in the disk teleph-
one book datum export and create file. User in the computer can use
furnish tool aim at Process edit.
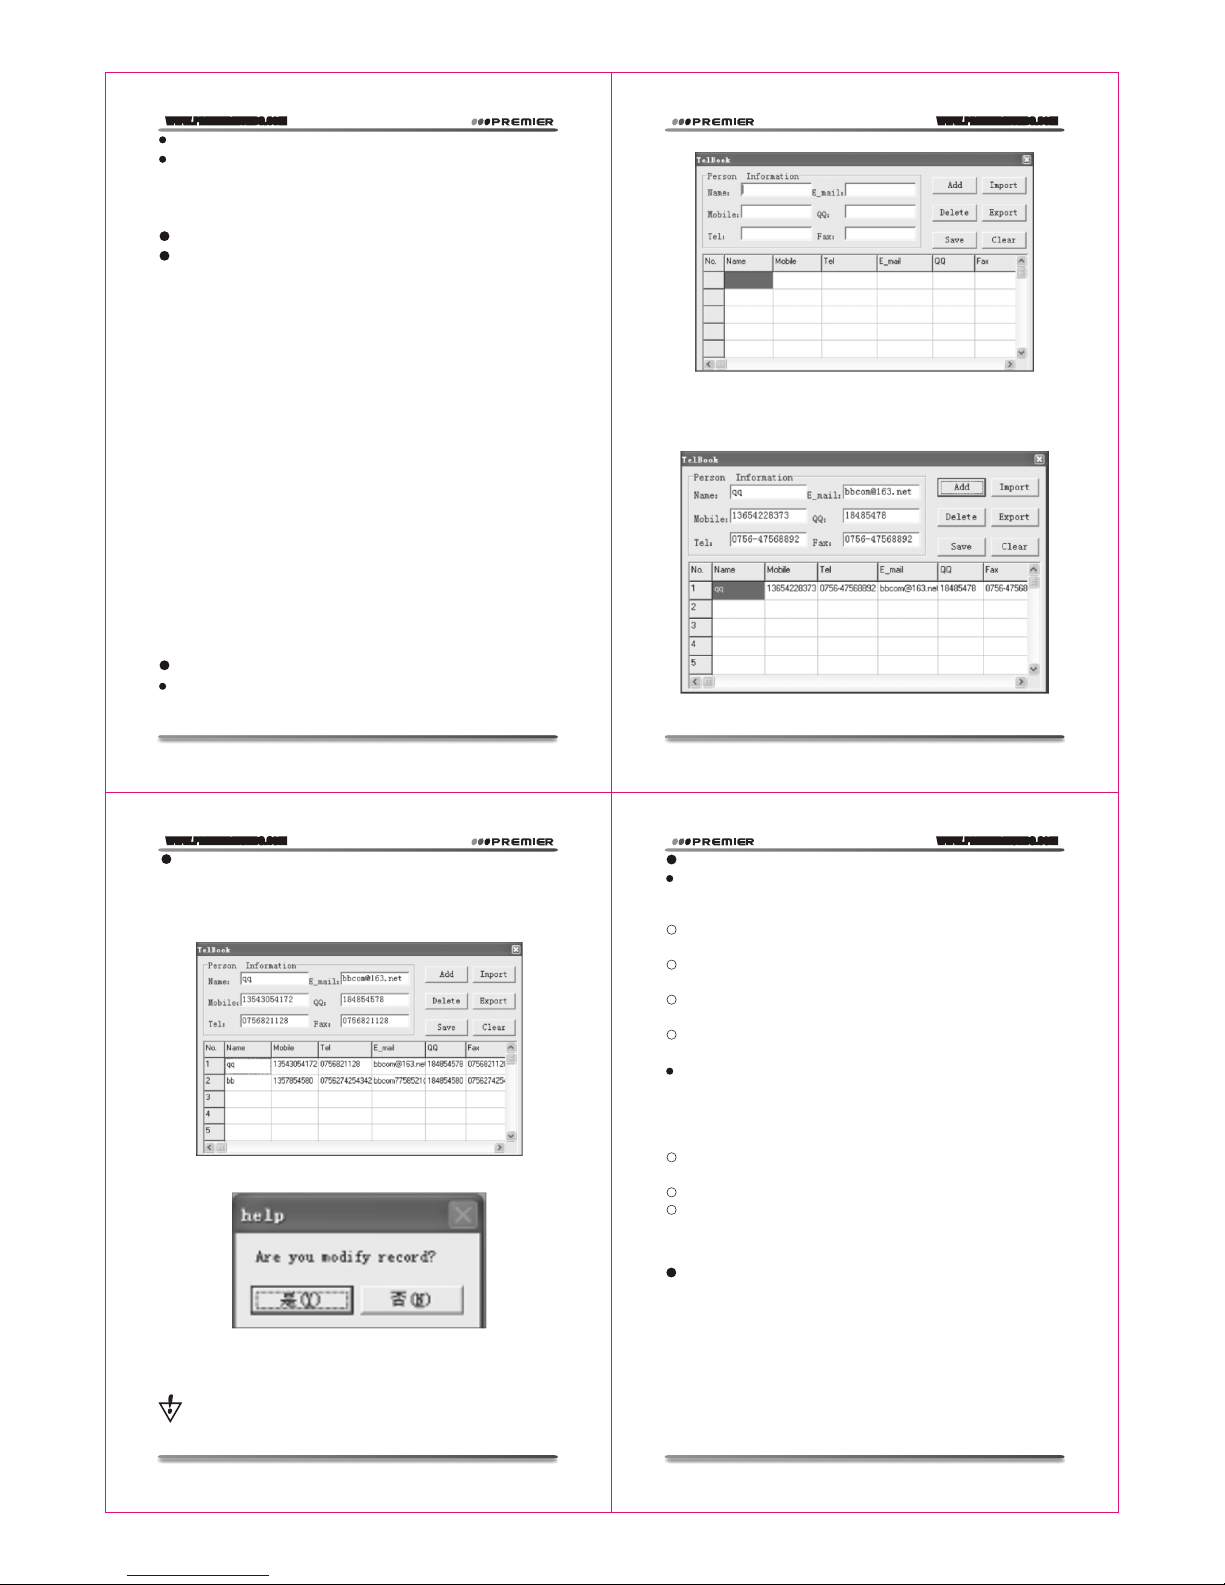
Telephone book file set up and edit
Edit telephone book file
The disk set up telephone book file can through follow accessory
install program saddlebag set up.
1.Move "Telbook_Ch" program. Push "open" key.
3.Push save key, disk will appear one file name is "TELBOOK" file.
Here telephone book file already set up.
2.According to dialog box clew input correspond message, Push "Add"
key again. Here system will hold you infilling individual message
record in list. If you need add individual message, repeat handle
will do.
Telephone book edit
If you input error message, you can use hereinafter handle enter
modification.
1.Push you need modification individual message ubiety register cote.
Here individual message will appear this cote having register item.
2.In the individual message modification, Push "Add" key, system
will clew:
3.Push "yes" this item already modification. This is note cote will
appear one and the same name two piece note, and message
homology.
If modification is name, the will add one piece differ name's note,
hereinbefore handle follow Naught.
Telephone introduction and educe
Introduction telephone book
Use this function hold user in computer facture telephone book file
introduction renewal till disk, Idiographic step as follows:
Use afford telephone edit tool Telbook.exe facture telephone book
datum save make Telbook.bin file.
Plug into USB line, would Telbook.bin file to copy disk root
directory.
Open disk enter telephone book function and enter introduction
telephone book option.
Notarize anon shall just copy introduction Telbook.bin file
thereinto content introduction insert disk.
Educe telephone book
Use this function can hold deposited in disk telephone book educe
and make file, use on the computer Can use afford tool aim at Process
edit,
Idiographic step as follows:
Open disk enter telephone book function and enter educe telephone
book option.
Notarize anon shall disk inside telephone book datum educe.
Plug into USB line, In the root directory can locate Telbook.bin file
namely educe telephone book file, copy anon, user can aim at Process
edit.
Use USB disk
This MP3 player can be used as a USB disk. There is no need to
install any driver (with exception of Windows 98) under Windows
2000/XP, Mac OS 10.3 or above, Linux Reseat 8.0 or above.
The MP3 player can use the USB port power, so when it is connected
to the PC the battery is not used. If you want to playback the music when
MP3 player is connected to the computer, during the "wait mode" press
the "Mode" button, and then you will enter the main menu.
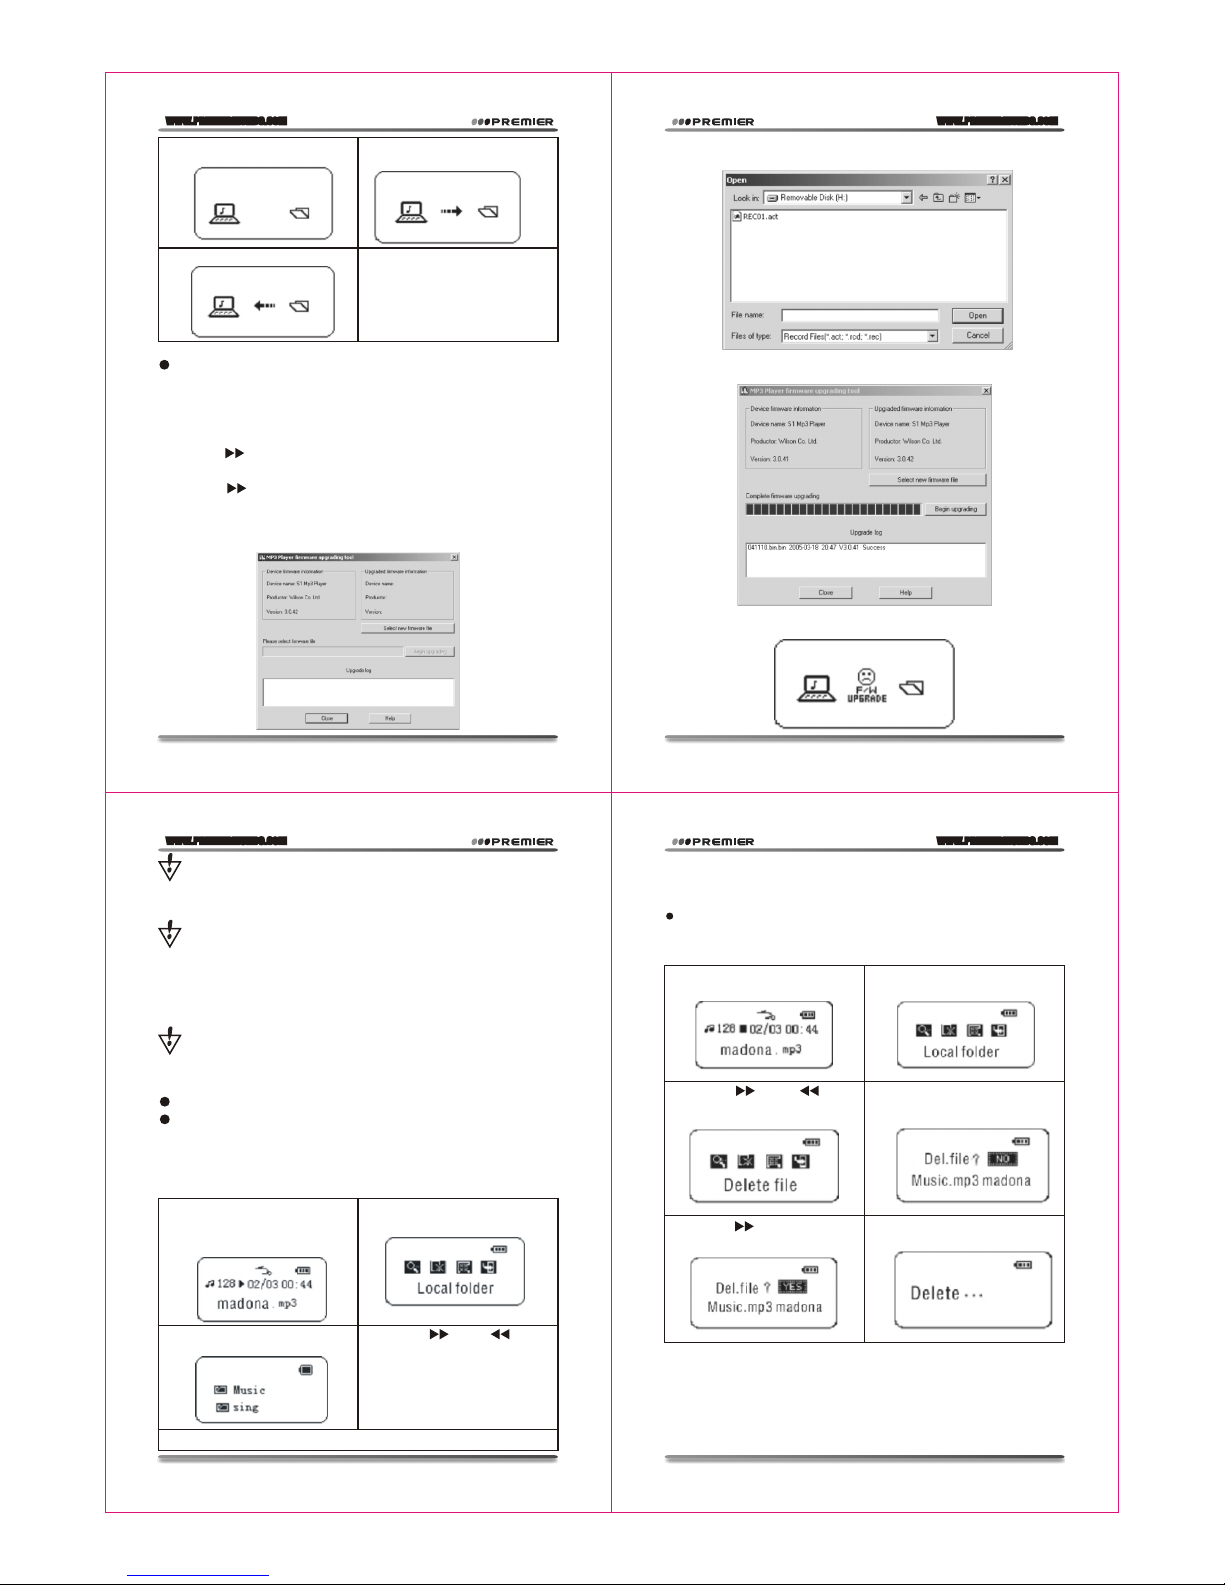
After connection with the PC has been established, there are three
kinds of MP3 modes, which are shown on the screen in the following
way:
Page 15
WWW.PREMIERMUNDO.COM
WWW.PREMIERMUNDO.COM
WWW.PREMIERMUNDO.COM
WWW.PREMIERMUNDO.COM
Pagina 21
Pagina 23
Pagina 22
Pagina 24
1.Waiting Situation
2. In the process of downloading
the data
Upgrade the player
Your MP3 player can be updated use the utility software supplied
with it. To upgrade the MP3 player firmware please, follow the steps
below:
1. Enter main menu
2. Push the to choose the system setting.
3. Press the Mode Key for a short time to enter the system setting.
4. Push the to choose the firmware upgrade.
5. Connect the player to PC.
6. Run the upgrading tool of PC "MP3 Player Update", then click the
button " Choosing the new edition hard files".
3. Sending the data
7. Choose the new firmware program (You can find it in the CD of the
computer or download it in the seller's website)
8. Click the button "Starting to upgrade"; the system will begin the
upgrade.
9. If you have done the upgrade successfully, the player will hints the
following:
Firmware upgrade is the function for promoting and optimizing
the player. If you don't use it, the common run of the player itself will
not be affected.
Firmware update used in a wrong way might damage your MP3
player! Before updating please, read the instruction carefully. Make
sure that the uploaded file does correspond to your model of the MP3
player. The person performing update is supposed to have some
experience in working with computers.
The firmware upgrade software of this player cannot apply to other
players, vice versa.
Other settings
Choose different catalogues (stop sub-menu)
It is possible to use a different directory rather than the root directory
for the recording or music playback. The MP3 player can support up
to 9 directories, which the MP3 can use to playback files in there. To
do that please, follow the steps below
1.In the stopping interface (the
example here is the Music Mode,
recording and playing can choose
the directory)
2. Press Mode Key to enter the
stopping sub-menu.
3. Re-press the Mode Key to enter
the directory choice interface.
4. Push the or the to
choose in the directory.
5. Mode Key to confirm the chosen directory.
Caution: You can set the corresponding individual directory. About
Music Mode, Recording Mode and Playing Mode. That means these
three modes are not in the same directory.
Delete documents (stop sub-menu)
In music mode expand. Sound mode, and FM mode all can delete
comparatively file and keep broadcasting station.
The choice "Delete All" will delete all the files in the selected
directory for the chosen mode (e.g. if the MP3 is in the "Music mode"
it will delete all the music files, but not the other ones, such as recorded
files)
In FM Radio you can delete the pre-saved radio station in a similar
fashion.
1. In the stopping interface.
(FM naught stop interphase)
2. Press Mode Key to enter the
stopping sub-menu
3. Push the or the and
choose the single file or all files
in the menu
4. Press Mode Key for a short time
to enter Deleting interface
5. Push the to change "NO"
to "YES".
6. Push the Mode Key to confirm
and then begin to delete.
Page 16
If you prefer to delete the files from your PC when MP3 is connected to the USB port, make sure you use the Safely Remove Device
wizard of Windows before you unplug the MP3 player from the USB
port. Otherwise some data might get corrupted.
Playing Mode (Playing the sub-menu)
When playing music and recorded files, different play modes can
be selected. (Such as repeat, shuffle, etc.)
The first option in Play Submenu is Play Mode. The player will play
files according to the mode selected.
Playing speed (play sub-menu)
You can choose different playing speed (Becoming quicker or slower)
when playing the music (only for MP3 formats) and recording files.
But the tone and sound will not change.
1 During the music playing.
2. Press the Mode Key for a short time to enter the playing sub-menu.
3. Push the to choose the item of playing speed menu.
4. Press the Mode Key for a short time to enter the menu of the choice
of playing speed.
5. Push the to accelerate the playing, push the Last Key to slow
down the playing.
Normal
Repeat One
Repeat playing one single song
Folder
Play all the music in the playing folder.
Repeat Folder
Repeat play file inside having music.
Repeat All
REPEAT
SHUFFLE
Random
INTRO
Intro
Nonce list song plays done with. Carry over play after
one list music, unto play done with having file stop.
Repeat playing the music in the directory
Play the music in the present folder randomly
Play the first ten seconds of all the music in the
present folder in sequence.
Caution: Tempo Rate set is suitable to each music files till it is
changed
Re-reading Mode (Playing the sub-menu)
Get into through playing the sub-menu.
A-B Re-reading
1. At Music Mode or Voice Mode
2. Press the Mode Key for a short time to enter the play sub-menu.
3. Push the to select "replay".
4. Press the Mode Key for a short time to enter the re-reading mode
Push the to confirm the starting point -A.
Push the to confirm the starting point -B.
5. Press the key, confirm the A, in the picture appearance B, wait
confirm the B.
6. Press the key, confirms the B.
The re-reading sign A-B is firm. The mp3 player begins to play
repeatedly between the point of A and B. Reaching the set times, it
will quit the Re-reading Mode. You can press the to re-confirm the
point A in this mode. (About the playing times, you should refer to the
re-reading times in the next chapter.)
In the re-reading mode: Repeat mode. You can press VOL+ or
VOL- to set the playing speed directly.
The function of reading along ( the voice mode do not
have this function )
Push the to come back to the A-B re-reading state at this time.
The contrast function(the voice mode do not have this
function )
1. The mp3 player is re-reading
the A-B.
2. Push the to enter the
re-reading mode.
4. When the time is up, it plays the
original voice, and the sign
changes into . You can push
the to enter the contrast
function at this time.
3. The re-reading sign A-B is
changed into the reading alone
sign . The mp3 player begins
to record the users' voices. The
time length is the re-reading time
of the former A-B.
Push the to come back to the state of the re-reading function
now.
In above these three states, you can press the Mode Key for a short
time to quit re-reading mode.
Re-reading times (play sub-menu)
Refer to the time setting of background light.
The re-reading times determine to quit after how many times of the
A-B re-reading.
Re-reading interval (play sub-menu)
Refer to the time setting of background light.
The re-reading interval determines how long the halt time is between
this playing and the previous one (unit: Second).
Key recommendation
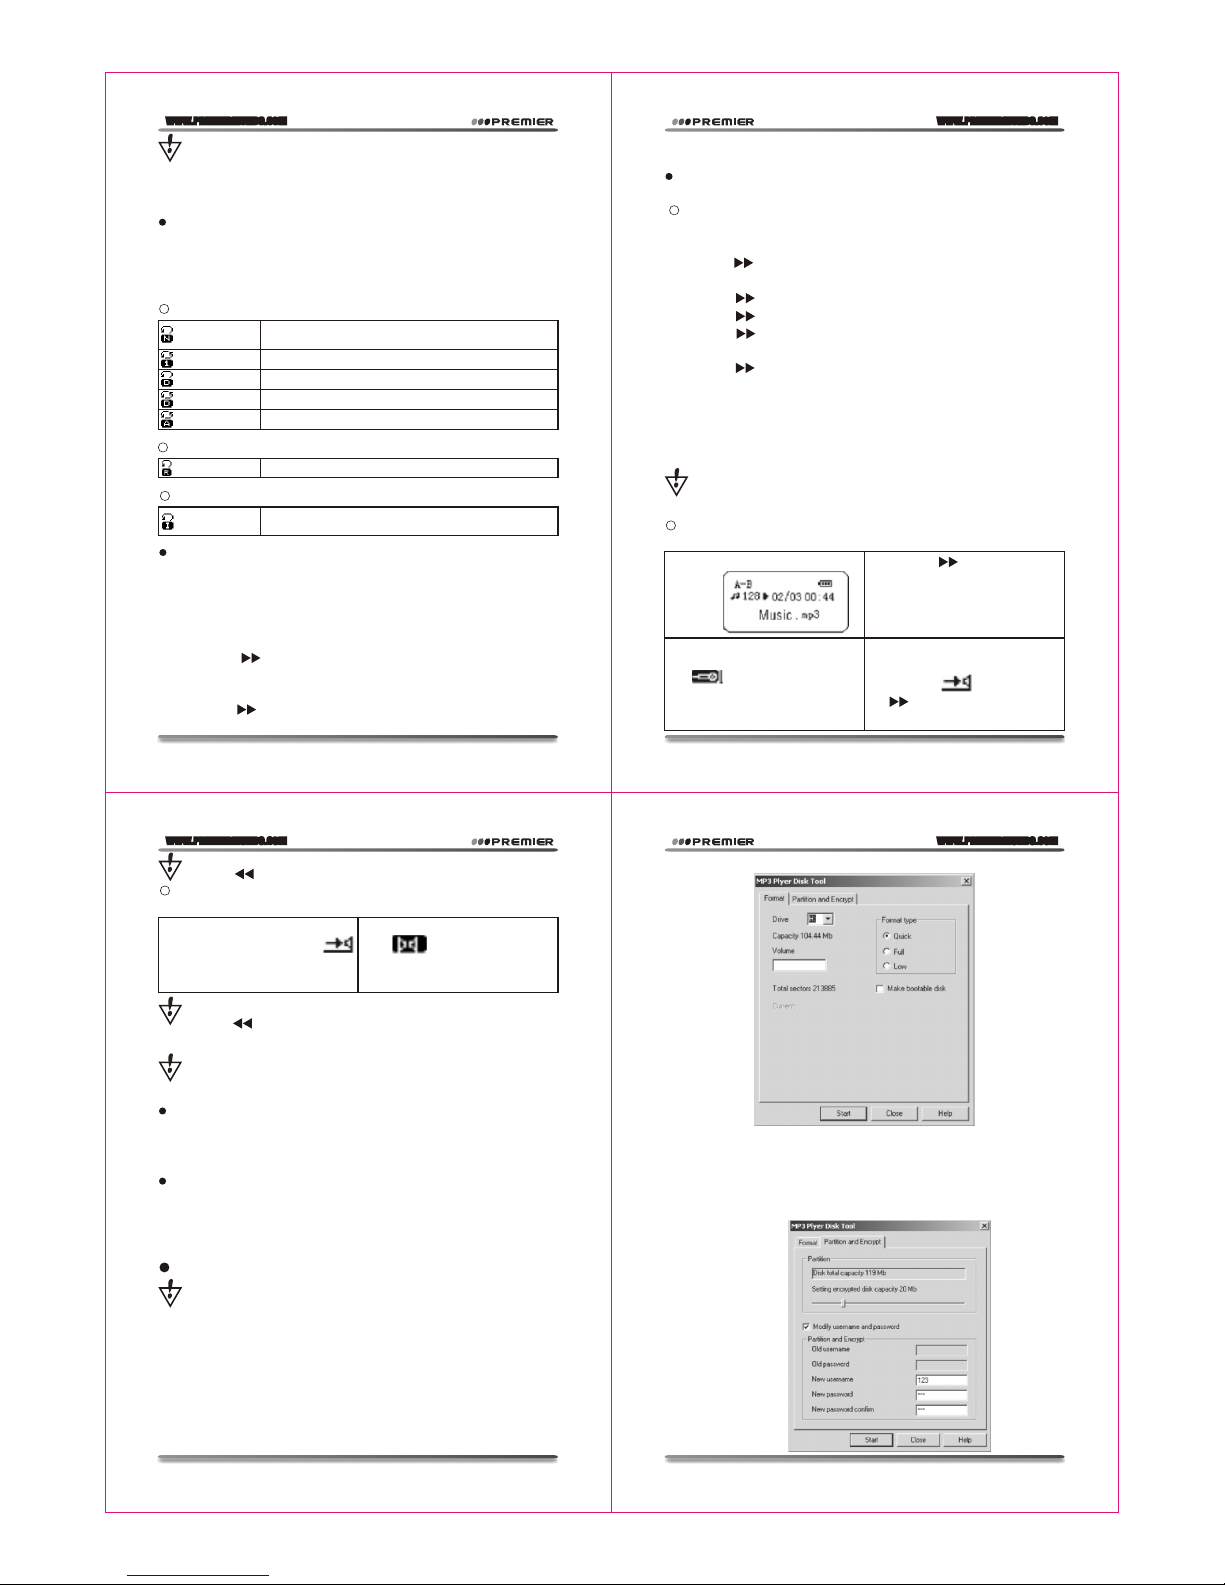
Unusual Degree Space Function
With the supplied utility you can divide the MP3 player into two
sections (public and encrypted). Under Windows 2000 SP4 and above
you will see 2 disks in this case. Under older operating systems only
one removable disk will be seen on your computer. If you still want to
see the other, you should enter the "SYS" menu of your MP3 player
and select "Multi Drive" for "Online Mode". To encrypt the MP3 player
please, follow the steps below:
1. Connect the player with the computer.
1. Entering the contrast function,
the re-reading sign shows as ,
the original voice is played at
this time.
2. After that, the sign is changed
into . The reading along
voice of the users is played.
2. Run the installing program kit in this mp3 player MP3 Player Disk
Tool.
3. First you will see formatted tool, choose "division and encrypting "
item please. Choose a suitable capacity for the encrypted disk and pick
up the use r name or password . Input the user name in "New User Name"
and input the password in " New Password ". Input the same password
in "New Password Confirmation". Click the "Start" button, and then
the division begins.
WWW.PREMIERMUNDO.COM
WWW.PREMIERMUNDO.COM
WWW.PREMIERMUNDO.COM
WWW.PREMIERMUNDO.COM
Pagina 25
Pagina 27
Pagina 26
Pagina 28
Page 17
WWW.PREMIERMUNDO.COM
WWW.PREMIERMUNDO.COM
WWW.PREMIERMUNDO.COM
WWW.PREMIERMUNDO.COM
Pagina 29
Pagina 31
Pagina 30
Pagina 32
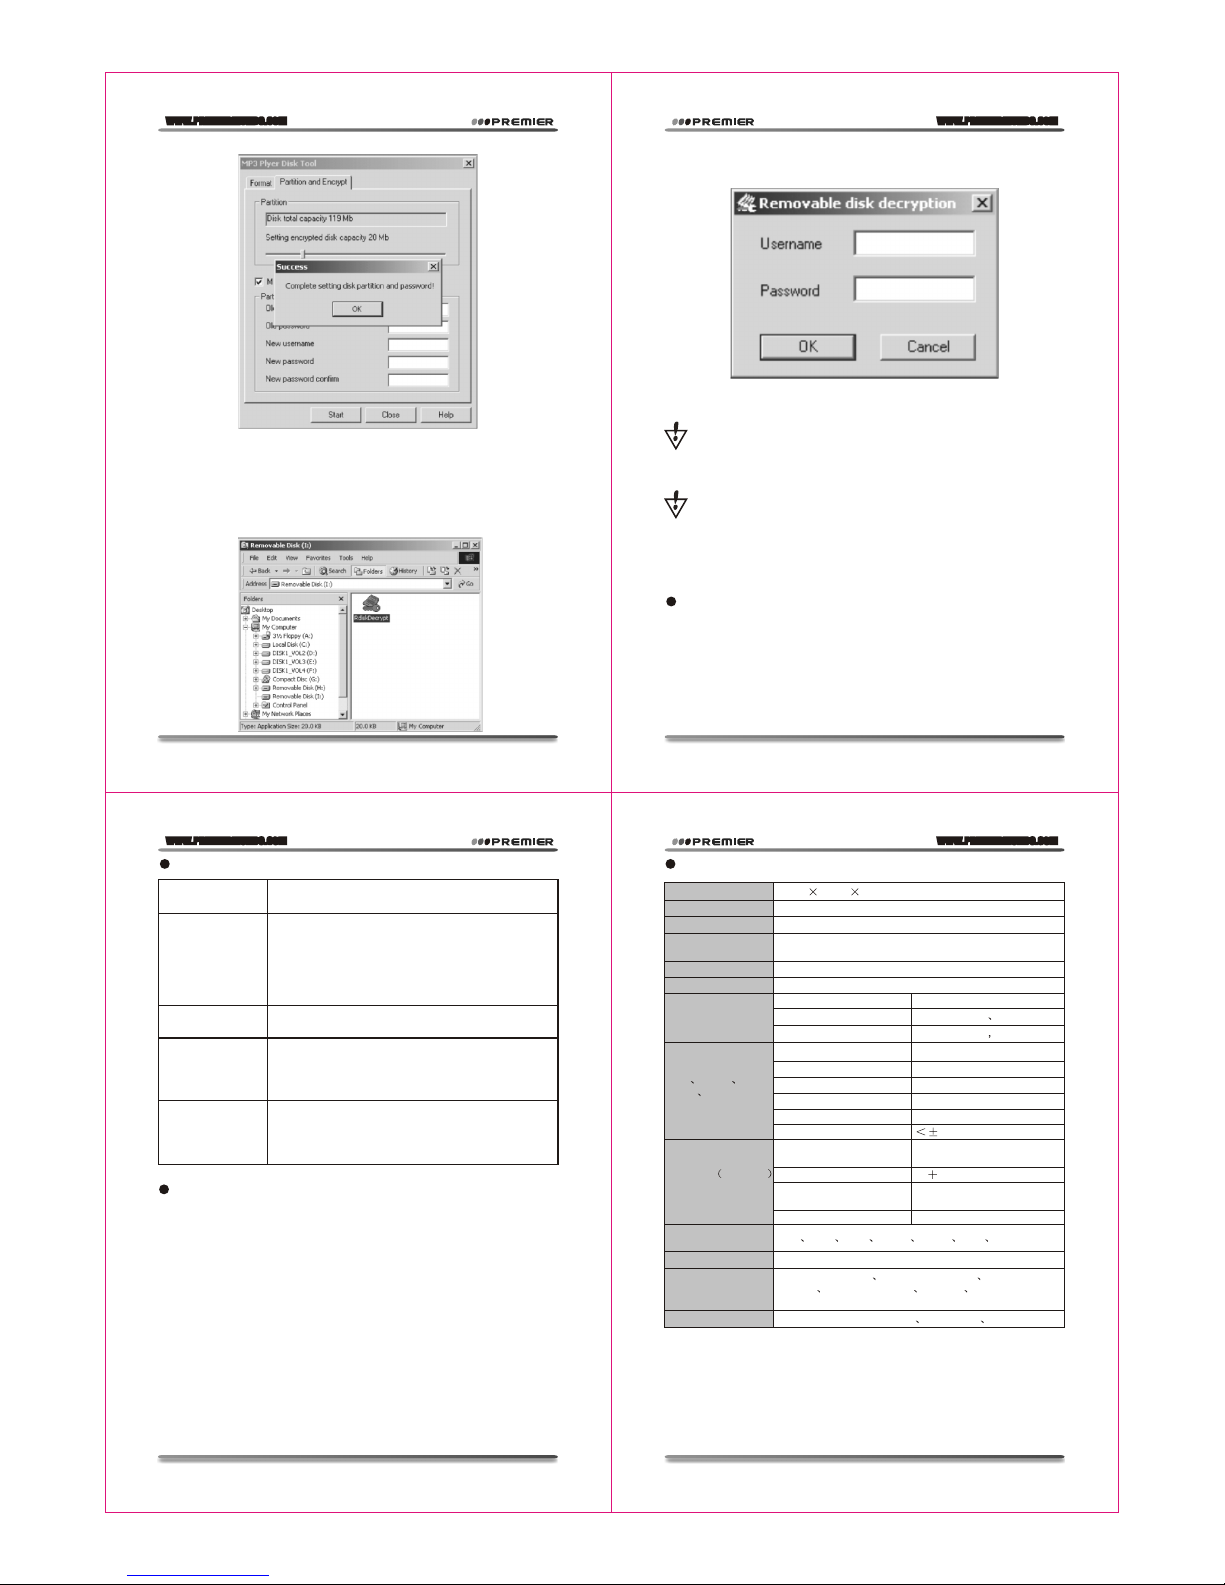
4. The division finishes, the hints are the following.
5. The computer hints new startup after "Confirmation", and confirms
this process.
6. You can see two drive letters after startup (You can only see one
drive letter in the edition before Windows 2k Sp4). You will see three
files, two of them are hidden, and one is executed file after clicking
the encrypted disk. The space of the disk is only 300K.
7. Run the executed file "RdiskDecrypt.exe" and input the user name
and the password in the dialog box. If correct, the disk can be entered
and you can copy files into it.
8. Connecting the mp3 player with the computer each time, you should
input the user name and the password to enter the encrypted disk.
Note: If you want to encrypt the disk in the way described above,
please, first backup your files, all the data will be lost after the
encryption.
Warning: Don't forget your password and the user name;
otherwise you won't be able to use your disk. In case the password is
lost, you can only format the disk to regain the access, but then all your
files will be lost.
USB drive install
Install
Caution:
1. At FM radiogram state, don't join USB.
2. At WINDOWS98 system. Maybe appear join USB fixture cannot
up to snuff handle or disk symbol not reveal phenomena: here, please
open install disk file straight double click setup.exe press clue on
install instanter OK.
Difficulty question
Download of
music files fails.
No Power
Check whether the battery have been inserted
properly.Check whether the player is turned ON.
No sound is heard
from headphone.
Check whether Volume is set "0" and connect the
headphone plugs firmly.
Check whether the headphone plug is dirty.
Corrupted MP3 may make a static noise and the
sound may cut off. Make sure that the music files
are not corrupted.
Characters in LCM
are corrupted
Check whether the right language has been
selected.
FM Reception is
poor.
Adjust the position of the headphone and player.
Turn off the power of other electric devices near
the player.
The headphone may be used as the antenna.
Check whether USB cable is damaged and is
connected properly
Check whether driver is installed correctly.
Check whether the player's memory is full.
Technology specification
Follow accessory
USB line one
Headphone one
Direction one
Installation CD one
AAA Battery one
Appearance Size
Weight
Screen Lattice
Join the computer
CPU Flashing Memory
Power Supply
Recording
Record format
Record time
MP3 WMA
WMV ASF
MP3 bit rate
WMA, WMV, ASF bit rate
Frequency response
Signal to Noise ratio
Distortion
FM radio Optional
Channel Number
The biggest output power
of the headphone
SNR
Music formats
supported
Temperature range
Language support
Operating system
96mm 30mm 22mm
30g(Without the battery)
(96*26) LCD Screen blue color background
128M-256M-512M
10 hours
Rate
8KHz
WAV(32K bps) ACT(8K bps)
35 hours(ACT 128M Flash)
Earphone max power
(L)10mW+(R)10mW(32Ohm)
8K bps - 320K bps
5K bps - 384K bps
20Hz- 20KHz
85dB
0.05%
The range of receiving
frequency
76MHz - 90MHz /
87MHz - 108MHz
20 20
(L)10mW+(R)10mW
(32Ohm)
45dB
MP1 MP2 MP3 WMA WMV ASF WAV
-5 ~ +40 Degree
Windows98/SE/ME/2K/XP Mac OS 10 Linux 2.4.2
Remark: Mp3 player design and spec may change without notice.
MP3.1CD-696A
Full Speed USB1.1 Read speed (MAX): 1000K byte/s
Write speed (MAX): 800k byte/s
Simplified Chinese Simplified English Complex
Chinese Complex English German French rank eight
country language.
 Loading...