

Premier GIF00-16347 User Manual
Wireless Fence
GIF00-16347 | Product Manual
Have questions about your Wireless Fence or need training tips for your pet?
Our Customer Care representatives are here to help you.
Call our USA-based Customer Care Center at
+1 (866) 381-2785
USA & Canada: Mon–Fri 8am–8pm EST | Sat 9am–5pm EST
This product includes a one year warranty.
Call, click, or chat with us before you return your product.
premierpet.com

Important Safety Information
Explanation of Attention Words and Symbols used in this guide
This is the s afety alert sy mbol. It is used to alert you to potential personal injury hazards. Obey all safety mes sages that follow this s ymbol to avoid possible injury or death.
WAR NING indicates a hazardous situation which, if not avoided, could result in death or serious injury.
CAUTION, used with the safety alert symbol, indicates a hazardous situation which, if not avoided, could result in minor or moderate injury.
CAUTION, used without the safety alert symbol, indicates a hazardous situation which, if not avoided, could result in harm to your pet.
NOTICE is used to address safe use practices not related to personal injury.
• Do not use this product if your dog is prone to ag gressive behavior. Aggressive dogs can cause severe injury or death to their owners and others. If you are not sure that this
product is right for your dog, please talk to your veterinarian or a certified trainer.
• Risk of electric shock. Use the fence transmitter indoors in dry location only.
• Risk of explosion if battery is replaced by an incorrect type. Do not short circuit, mix old and new batteries, dispose of in fire, or expose to water. When batteries are stored or
disposed, they must be protec ted from shorting. Dispose of used batteries properly.
This Premier Pet™ Wireless Fence is NOT a solid barrier. The system is designed to act as a deterrent to remind pets by static correction to remain in the boundary established. It
is impor tant that you reinforce training with your pet on a regular basis. Since the tolerance level to static correction varies from pet to pet, Radio Systems Corporation CANNOT
guarantee that the system will, in all cases, keep a pet within the established boundary. Not all pets can be trained to avoid crossing the boundary! Therefore, if you have reason
to believe that your pet may pose a danger to others or harm himself if he is not kept from crossing the boundaries, you should NOT rely solely upon the Premier Pet™ Wireless
Fence to confine your pet. Radio Sys tems Corporation shall NOT be liable for any property damage, economic loss or any consequential damages, sustained a s a result of any
animal crossing the boundary.
• This product is not a toy. Keep it away from the reach of children.
Proper fit of the receiver collar is important. A receiver collar worn for too long or made too tight on the pet’s neck may cause skin damage, ranging from redness to pressure
ulcers. This condition is commonly known as bed sores.
• Avoid leaving the r eceiver collar on the dog fo r more than 12 hours pe r day.
• When possible reposition the receiver collar on the pet’s neck every 1 to 2 hours.
• Check the fit to prevent excessive pressure; follow the instructions in this manual.
• You may need to trim the hair in the area of the contact points. Never shave the dog’s neck; this may lead to a rash or infection.
• Never connect a leash to the receiver collar; it will cause excessive pressure on the contact points.
• When using a separate collar for a leash, don’t put pressure on the receiver collar.
• Wash the dog’s neck area and the contact points of the receiver collar weekly with a damp cloth.
• Examine the contact area daily for signs of a rash or a sore.
• If a rash or sore is found, discontinue use of the receiver collar until the skin has healed.
• If the condition persists beyond 48 hours, see your veterinarian.
• For additional information on bed sores and pressure necrosis, please visit our website.
• Proper training of your pet is essential to successfully using the system. During the first 2 weeks of training, do not use the system without direct super vision of your pet.
• Always remove your dog’s receiver collar before performing any fence transmitter testing.
• The receiver collar should not be on your dog when the system is tested. If it is, your pet may receive an unintended correction.
• The boundary zone must be tested whenever an adjustment is made to the fence transmitter setting to prevent unintended corrections to your pet.
• Remove the receiver collar from your pet when indoors to avoid activation of the receiver collar.
• If you use a collar and leash for training, be sure the extra collar does not put pressure on the contact points.
• Never remove power from the system when the receiver collar is on the pet. This may activate the receiver collar.
Radio Systems Corporation recommends the use of an Uninterruptible Power Supply (UPS) for use with your wireless fence. Should the power go out at your home, your pet will
be unprotected. Power outages can be unpredictable, and the use of a UPS will provide you with some time to properly restrain your pet.
In rare instances, if your pet is near the boundary at the tim e when the power fails, it is possible that your pet will receive a correction. This correction will stop after a 30 second
timeout period ha s been reached. This is due to the operation of the collar: the collar is activated by the absence of the containment signal.
While results will vary depending on the UPS manufacturer’s specifications the following are typical examples to guide your choice of UPS:
• Using a 400 VA UPS a consumer should expect 3 hour s of backup time.
• Using a 900 VA UPS a consumer could expect 8 hours of backup time.
If settings below ma ximum fence size are used, additional backup time will result. At minimum fence size settings backup time may be more than two times the backup time
estimated at maximum fence size.
• To prevent an unintended correction, after the boundary flags have been placed, be sure to set the static correction on the receiver collar back to level 1, tone-only.
• Do not place any thing on the top of the fence transmitter or cover any ventilation holes. This may overheat the fence transmitter and cause early transmit failure.
• Do not place fence transmitter in a closet or any other confined, unventilated area.
• Do not place fence transmitter on or near a metal sur face.
+1 (866) 381-27852

TABLE OF CONTENTS
What’s Included 4
How It Works 4
Key Definitions 5
Set Up the Transmitter 6
Prepare the Receiver Collar 6
Adjust the Pet Area to Desired Size 8
Transmitter Range Chart 9
Record Your Settings 9
Place the Boundary Flags 9
Fit the Receiver Collar 10
Training Guide 11
Wireless - To - Go 11
FREQUENTLY ASKED QUESTIONS 12
Terms of Use and Limitation of Liability 16
Warranty 16
Perchlorate Battery 17
Battery Disposal 17
Compliance 17
Mounting Template 19
premierpet.com 3
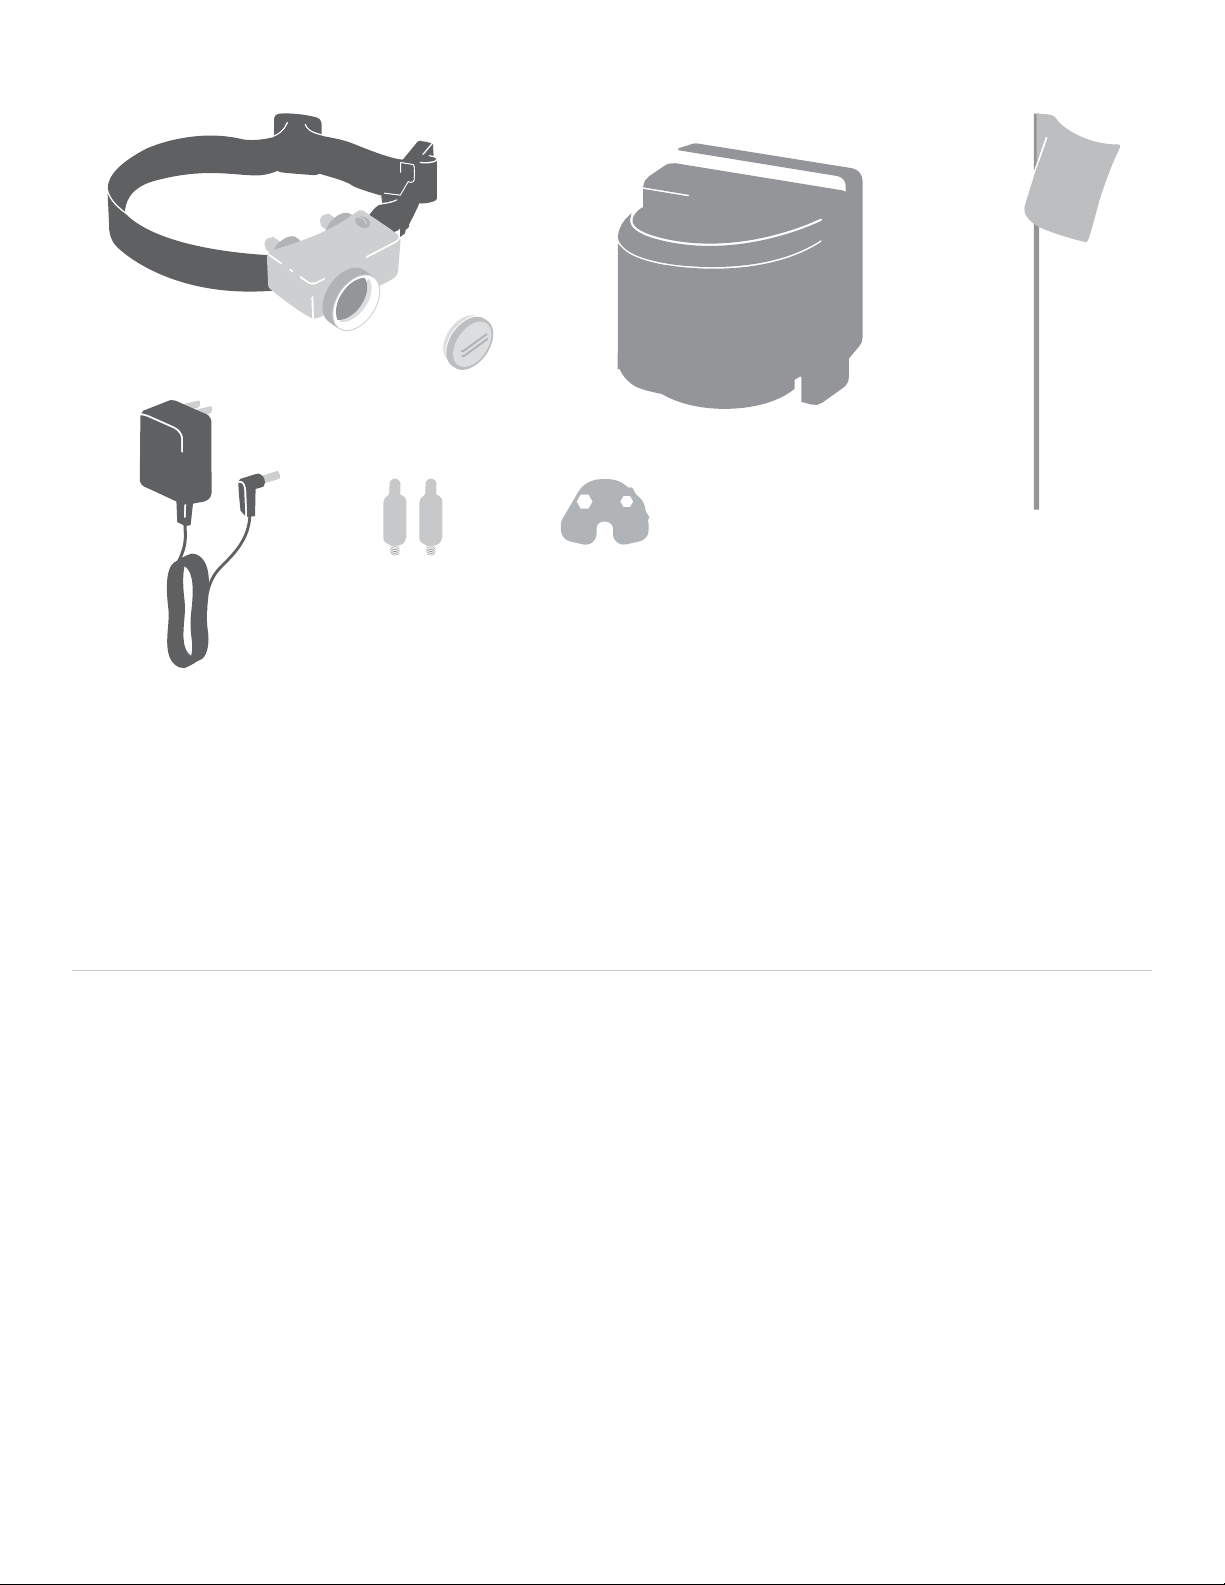
What’s Included
Boundary Flags (50)
Power
Adaptor
Fence Transmitter
Test Light
Tool
Battery
(GAC11-16351)
Receiver Collar
Long
Contact Points
Items You May Need
• Pliers
• Scissors
• Lighter
• Drill & mounting hardware
• Tape measure
• Non-metallic collar and leash
Set up and training help: www.premierpet.com
How It Works
The Premier Pet™ Wireless Fence has been proven safe, comfortable, and eective for pets over 8 lb. The
system works by transmitting a radio signal up to 90 ft. in all directions. You temporarily define the pet area with
boundary flags for a visual aid in training your pet. Your pet wears a receiver collar with contact points that touch
his neck, and, once trained, is allowed to roam freely in the pet area. When your pet reaches the boundary zone,
the receiver collar gives a warning beep before delivering a safe static correction through the contact points to
get his attention until he returns to the pet area.
+1 (866) 381-27854
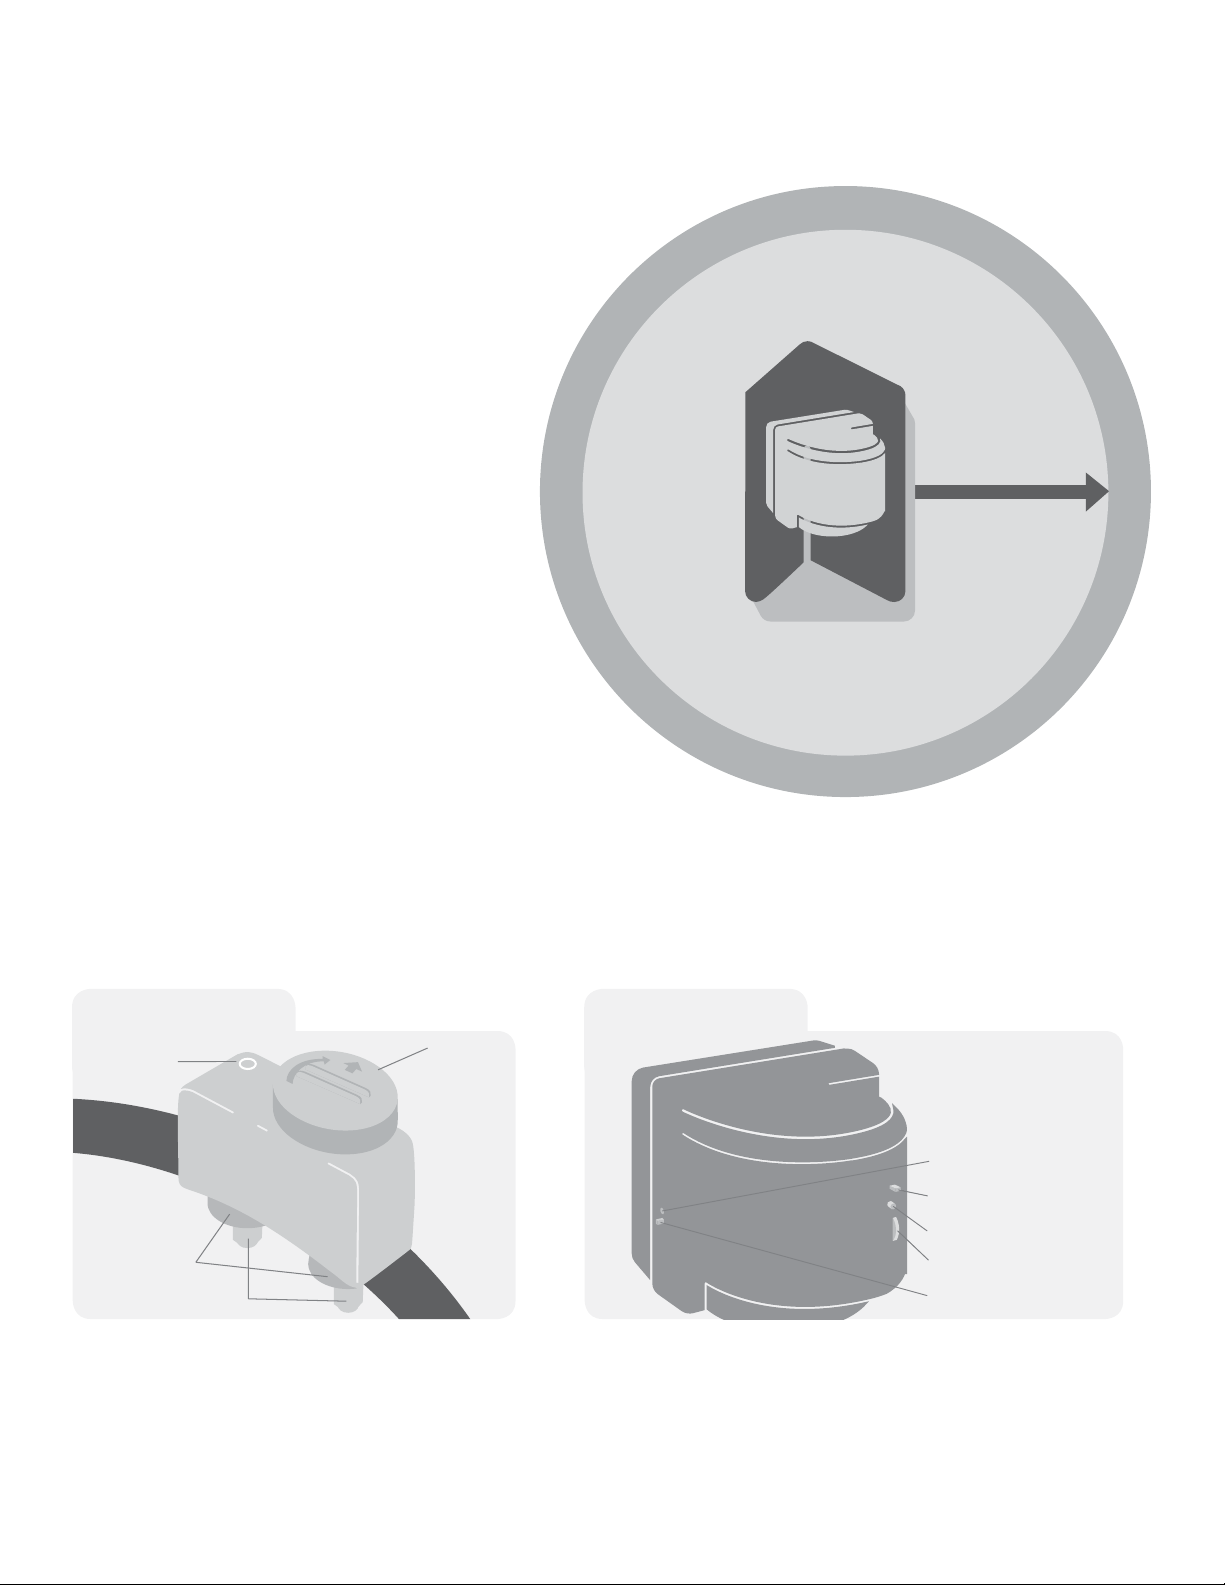
Key Definitions
Contact Points
Receiver
Indicator Light
Washers
Battery
Fence Transmitter: Transmits the radio signal and is the center of the pet area.
Pet Area: Distance from the fence transmitter where your pet can roam freely.
Boundary Zone: 2 to 3 ft. wide area outside
the pet area where your pet’s receiver collar
will begin to beep and then begin to deliver a
static correction.
NOTE: The correction will start in the boundary
zone and continue anywhere beyond the pet
area. The receiver collar is equipped with a safety
time-out feature that will stop correcting after 30
seconds if your pet remains outside the pet area.
Receiver Collar: Receives the radio signal from
the fence transmitter.
Correction level Button: Adjusts the level of
static correction your pet receives outside the
pet area.
Receiver Indicator Light: Indicates the level of
correction at which the receiver collar is set. This
light also serves as a low battery indicator.
Contact Points: Deliver the safe static
correction when your pet moves into the
boundary zone.
Power Jack: Where the power adapter plugs
into the fence transmitter.
Boundary Switch/Range: Adjust according to
the size of the pet area desired.
NOTE: Adjusting the switch does not change the level of static correction on the receiver collar.
Power Light: Indicates when the fence transmitter is on.
Boundary Control Dial: Adjusts the distance from the fence transmitter to the boundary zone.
NOTE: Adjusting the dial does not change the level of static correction on the receiver collar.
PET AREA
Note: In many
neighborhoods,
nearby property lines
may limit how large
the Pet Area can be.
Fence
Transmitter
Maximum
90 ft. range
(45 average steps)
B
O
U
N
D
A
R
Y
Z
O
N
E
Receiver Collar
Fence Transmitter
Power Jack
Boundary Switch/Range
Power Light
Boundary Control Dial
On/O Switch
premierpet.com 5
Set Up the Transmitter
Wal l
Mount
Tabletop
3 ft.
Power
Jack
Power
Switch
BOUNDARY
CONTROL
7
8
8
Range Gamme
Réglage des
limites
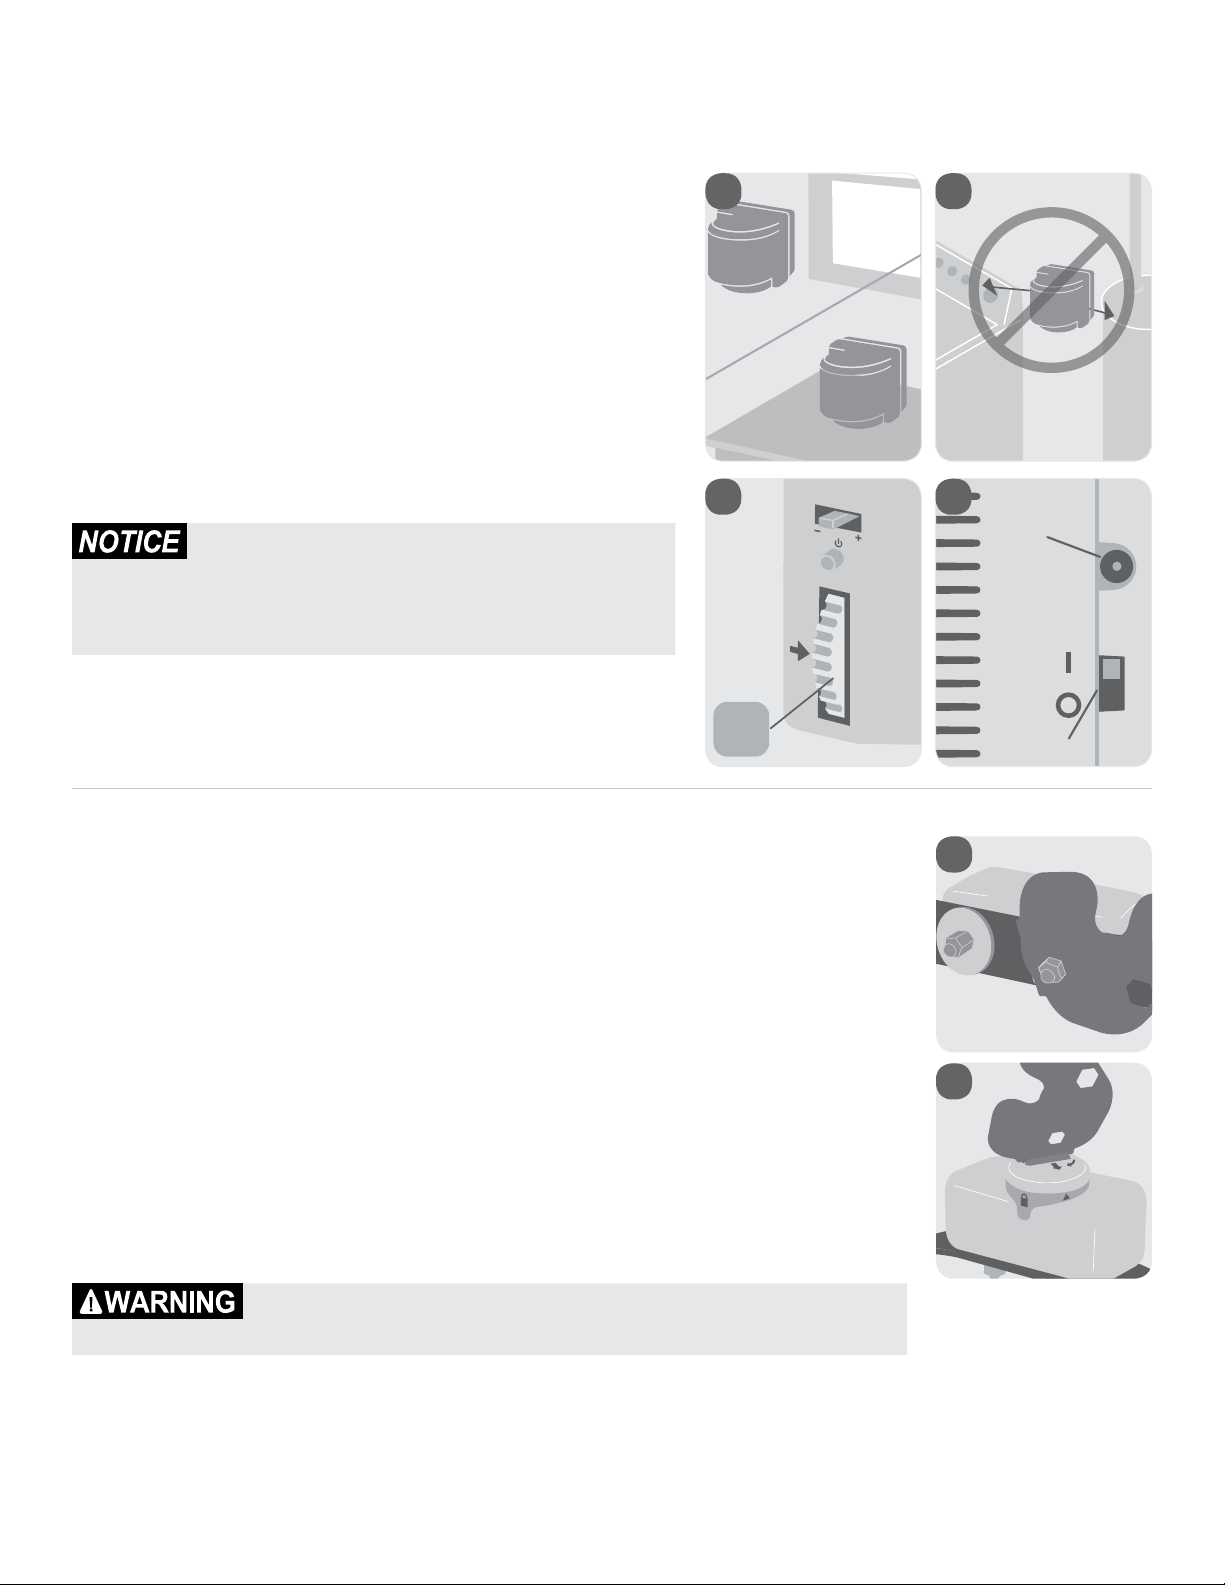
Important: You may need to move the transmitter several times before determining the final location.
The fence transmitter is located at the exact center of the pet area.
Place the fence transmitter:
• At least 2 ft. above the floor located on the ground floor of
your home.
• In a dry, well ventilated, protected area.
• In an area where temperatures do not fall below -10°F (-23°C).
• On a non-metal table/hard surface (to ensure proper
ventilation) or mount on a wall (1A). A mounting template is
included on the back of this guide.
• At least 3 ft. from large metal objects, as these items may
reduce the size and shape of your pet area (1B). Placing the
transmitter inside a metal building or shed can reduce the
maximum range of the system.
• Do not place any thing on top of fence transmitter or cover any
ventilation holes. This may overheat the fence transmitter and cause
early transmit failure.
• Do not place fence transmitter in a closet or any other confined,
unventilated area.
• Do not place fence transmitter on or near a metal sur face.
To maximize your pet area, make sure the boundary switch/
range is on High (+) and the boundary control dial is set to 8 (1C).
Plug power adapter into power jack and a standard outlet. Turn
the fence transmitter on (1D).
1A
1C
1B
1D
Prepare the Receiver Collar
Your receiver collar comes with short contact points installed. Use the long contact
points for pets with long or thick hair. Tighten the contact points using the test light
tool (2A) one-half turn beyond finger tight. Check the tightness weekly.
Insert and Remove the Receiver Collar Battery
NOTE: Do not install the battery while the receiver collar is on your pet.
This receiver collar utilizes a replaceable battery (GAC11-16351). This unique battery is
designed to make battery replacement easier and increase water protection.
To insert the battery, align the symbols on the battery (arrow) and receiver collar
(tr i ang l e) (2B). Use the edge of the test light tool (2B) to turn the battery clockwise
until the arrow lines up with the lock symbol on the housing.
To remove or replace the battery, turn the battery counter-clockwise using the edge
of the test light tool (2B). DO NOT attempt to cut into or pry open the battery. Be sure
to discard the used battery properly. When removing the old battery from the receiver
collar, discharge all power by holding the static level button down until the light is no
longer illuminated. Replace with a new battery.
A replacement battery (GAC11-16351) can be found at many retailers. Contact the Customer Care Center or visit
our web site at www.premierpet.com to locate a retailer near you.
Risk of explosion if batteries are replaced by an incorrect t ype. Do not short circuit, mix old and new
batteries, dispose of in fire, or expose to water. When batteries are stored or disposed, they must be
protected from shor ting. Dispose of used batteries properly.
+1 (866) 381-27856
2A
2B
 Loading...