

Page 1
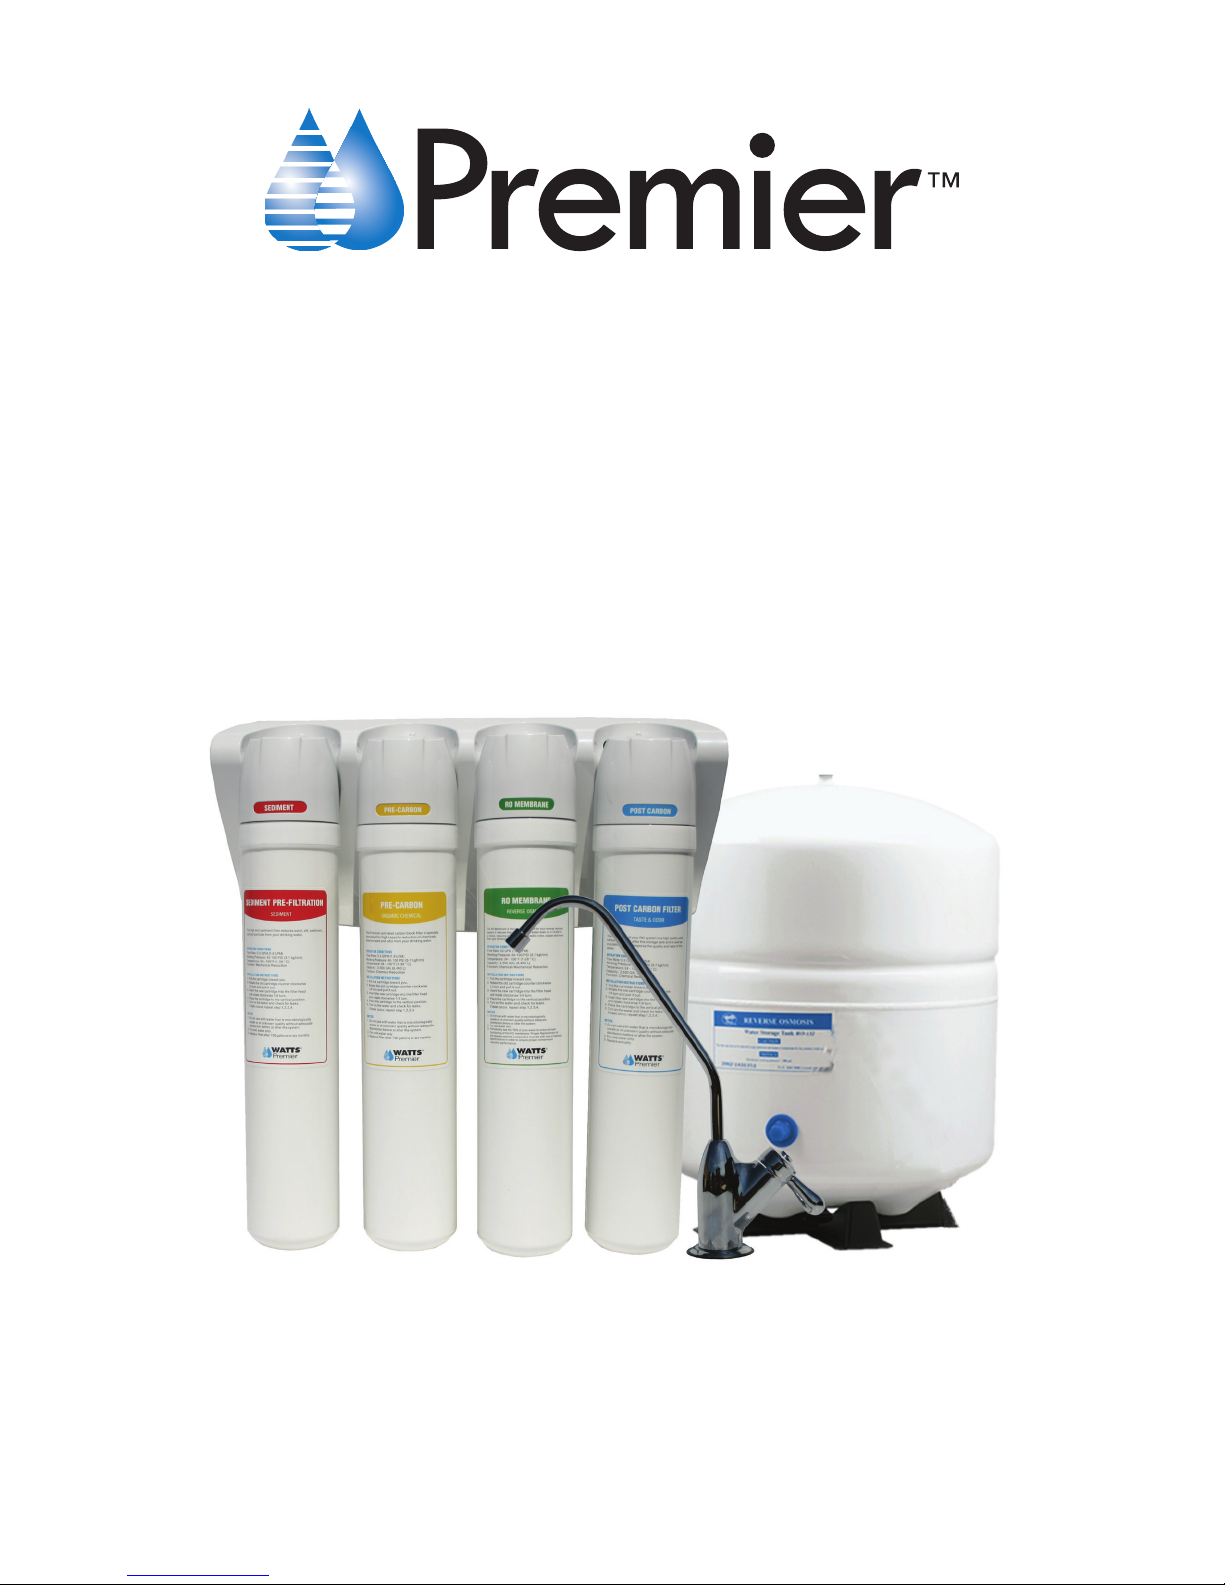
INSTALLATION, OPERATION AND MAINTENANCE MANUAL
Please read carefully before proceeding with installation. Your failure to follow any attached instructions
or operating parameters may lead to the product’s failure.
Warning
Save manual for future reference
Model: EZ-RO 4
Refer to enclosed warranty for operating parameters to ensure proper use with your water supply.
Premier, Inc. 8716 W Ludlow Drive Suite #1 Peoria, AZ 85381
Phone: 800-752-5582 www.premierH2o.com Fax: 623-866-5666
P/N 199484
Page 1
Manual Edition: 11/10/10
Page 2

Thank you for your purchase of a state of the art Premier Reverse Osmosis (RO) water treatment system. Water quality
concerns are becoming more of a focus for the public. You may have heard about contaminants in the drinking water such
as Arsenic, Perchlorate, Chromium, Cryptosporidium or Giardia. There may also be some local water issues such as high
levels of Lead and Copper. This Premier water treatment system has been designed and tested to provide you with high
quality drinking water for years to come. The following is a brief overview of the system.
Your Reverse Osmosis System:
Osmosis is the process of water passing through a semi permeable membrane in order to balance the concentration of
contaminants on each side of the membrane. A semi permeable membrane is a barrier that will pass only certain particles
like clean drinking water, but not other particles like arsenic and lead.
Reverse osmosis uses a semi permeable membrane; however, by applying pressure across the membrane, it concentrates
contaminants (like a strainer) on one side of the membrane, producing crystal clear water on the other. This is why RO
systems produce both clean drinking water and rinse water that is ushed from the system. This reverse osmosis system also
utilizes carbon block ltration technology, and can therefore provide a higher quality drinking water than carbon ltration
systems alone.
Your system is a four stage RO which is based upon separate treatment segments within the one complete water ltration
system. These stages are as follows:
Stage 1 – Sediment lter, recommended change 6 months.
The rst stage of your RO system is a ve micron sediment lter that traps sediment and other particulate matter
like dirt, silt and rust which affect the taste and appearance of your water.
Stage 2 – Carbon lter, recommended change 6 months.
The second stage contains a 5 micron carbon block lter. This helps ensure that chlorine and other materials that
cause bad taste and odor are greatly reduced.
Stage 3- Membrane, recommended change 2-5 years.
Stage three is the heart of the reverse osmosis system, the 50GPD (Gallons Per Day) RO membrane. This semi
permeable membrane will effectively remove TDS, Sodium and a wide range of contaminants such as Percholate,
Chromium, Arsenic, Copper, Lead as well as Cysts, such as Giardia and Cryptosporidium. Because the process of
extracting this high quality drinking water takes time, your RO water treatment system is equipped with a storage
tank.
Stage 4- Carbon post lter, recommend change 12 months.
The nal stage is a high quality carbon lter. Drinking water enters this lter after the water storage tank and it is
used as a nal polishing lter.
Note: Filter & Membrane life may vary based upon local water conditions and/or use patterns.
System Maintenance
Just because you can not taste it, does not mean that it is not there. Contaminants such as Lead, Chromium and Arsenic are
undetectable to the taste. Additionally, over time if you do not replace the lter elements, other bad tastes and odors will
be apparent in your drinking water.
It is important to change out your lters at the recommended intervals as indicated in this system manual. When replacing
the lter elements, pay special attention to any cleaning instructions. Should you have any further questions please refer to
our web site at www.premierH2o.com or call our customer service department at 1-800-752-5582.
Page 2
Page 3

** Before installation, please take a moment to ll out the warranty card on page 23.
With proper installation and maintenance, this system will provide you with high quality water for years to come.
All of Premier’s water enhancement products are rigorously tested by independent laboratories for safety and
reliability. If you have any questions or concerns, please contact our customer service department at 1-800-7525582 (outside USA 480-675-7995) or refer to our on-line troubleshooting guide at www.premierH2o.com.
System Overview................................................................................................................................... 2
Table of Contents................................................................................................................................... 3
Operational Parameters ........................................................................................................................ 4
Table of Contents
Contents of Reverse Osmosis System .................................................................................................. 4
Tools Recommended For Installation .................................................................................................... 4
Drill a Hole for the Faucet in a Porcelain Sink ....................................................................................... 5
Punch a Hole for the Faucet in a Stainless Steel Sink .......................................................................... 5
Faucet Installation ................................................................................................................................. 6
Adapt-a-Valve Installation ...................................................................................................................... 7
Drain Saddle Installation ....................................................................................................................... 7
Drill hole and Connect 3/8” Black Tube from Faucet to the Drain Saddle ............................................. 8
How To Use Quick Connect Fittings For Tubing Connections ............................................................... 8
Connection on the back of the Reverse Osmosis System .................................................................... 9
Green Tube Connection ........................................................................................................................ 9
Blue Tube Connections ......................................................................................................................... 9
Connect Green tube to the Adapt-a-Valve ............................................................................................ 9
Reverse Osmosis Module Mounting.................................................................................................... 10
Red Tube Connection (From RO FAUCET To The RO Module) ......................................................... 10
Tank Ball Valve Installation .................................................................................................................. 10
Blue Tube Connection (From The RO Module to TANK) ..................................................................... 10
Start-up Instructions .............................................................................................................................11
Changing The Filter Cartridges ........................................................................................................... 12
Annual Sanitization ............................................................................................................................. 13
Procedure for Extended Non-Use ....................................................................................................... 13
Check Air Pressure in the Tank .......................................................................................................... 14
Parts List ............................................................................................................................................ 14
Trouble Shooting ................................................................................................................................. 15
Performance Data Sheet ..................................................................................................................... 16
Arsenic Fact Sheet .............................................................................................................................. 17
Nitrate-Nitrite Test Instruction .............................................................................................................. 18
Other Products from Premier.......................................................................................................... 19-21
Warranty Registration ..................................................................................................................... 22-24
Service Record .................................................................................................................................... 25
Limited Warranty ................................................................................................................................. 26
Page 3
Page 4
Operational Parameters
Installation must comply with state and local plumbing regulations. This system is intended to
be installed on the cold water line only.
Operating Temperatures: Maximum 100°F (37.8°C) Minimum 40°F (4.4°C)
Operating Pressure: Maximum 85 psi (6.0 kg/cm
pH Parameters: Maximum 11 Minimum 2
Iron: Maximum 0.2 ppm
TDS (Total Dissolved Solids) < 1800 ppm
Turbidity < 5 NTU
Hardness: Recommended hardness not to exceed 10 grains per gallon, or 170ppm. System will
operate with hardness over 10 grains but the membrane life may be shortened. Addition of a water
softener may lengthen the membrane life.
Water Pressure: The operating water pressure in your home should be tested over a 24 hour
period to attain the maximum pressure. If the incoming water pressure is above 85 psi a pressure
regulator is recommended and if over 100 psi then a pressure regulator is required.
2
) Minimum 40 psi (2.80 kg/cm
2
)
Copper Tubing: Reverse Osmosis water should not be run through copper tubing as the purity of
the water will leach copper causing an objectional taste in water and pin holes may form in the tubing.
Premier supplies speciality lters (part number 107008) that can be used if copper tubing follows the
Reverse Osmosis unit. Be sure to follow any state or local regulations during installation.
Contents of Reverse Osmosis (RO) System
1 Tank - White 2 Blue Tube 1/4”
1 RO Module (complete with lters) 1 Green Tube 1/4”
1 Parts Bag
1 Faucet Bag
1 Manual
If any of the items are missing please contact Premier prior to installing.
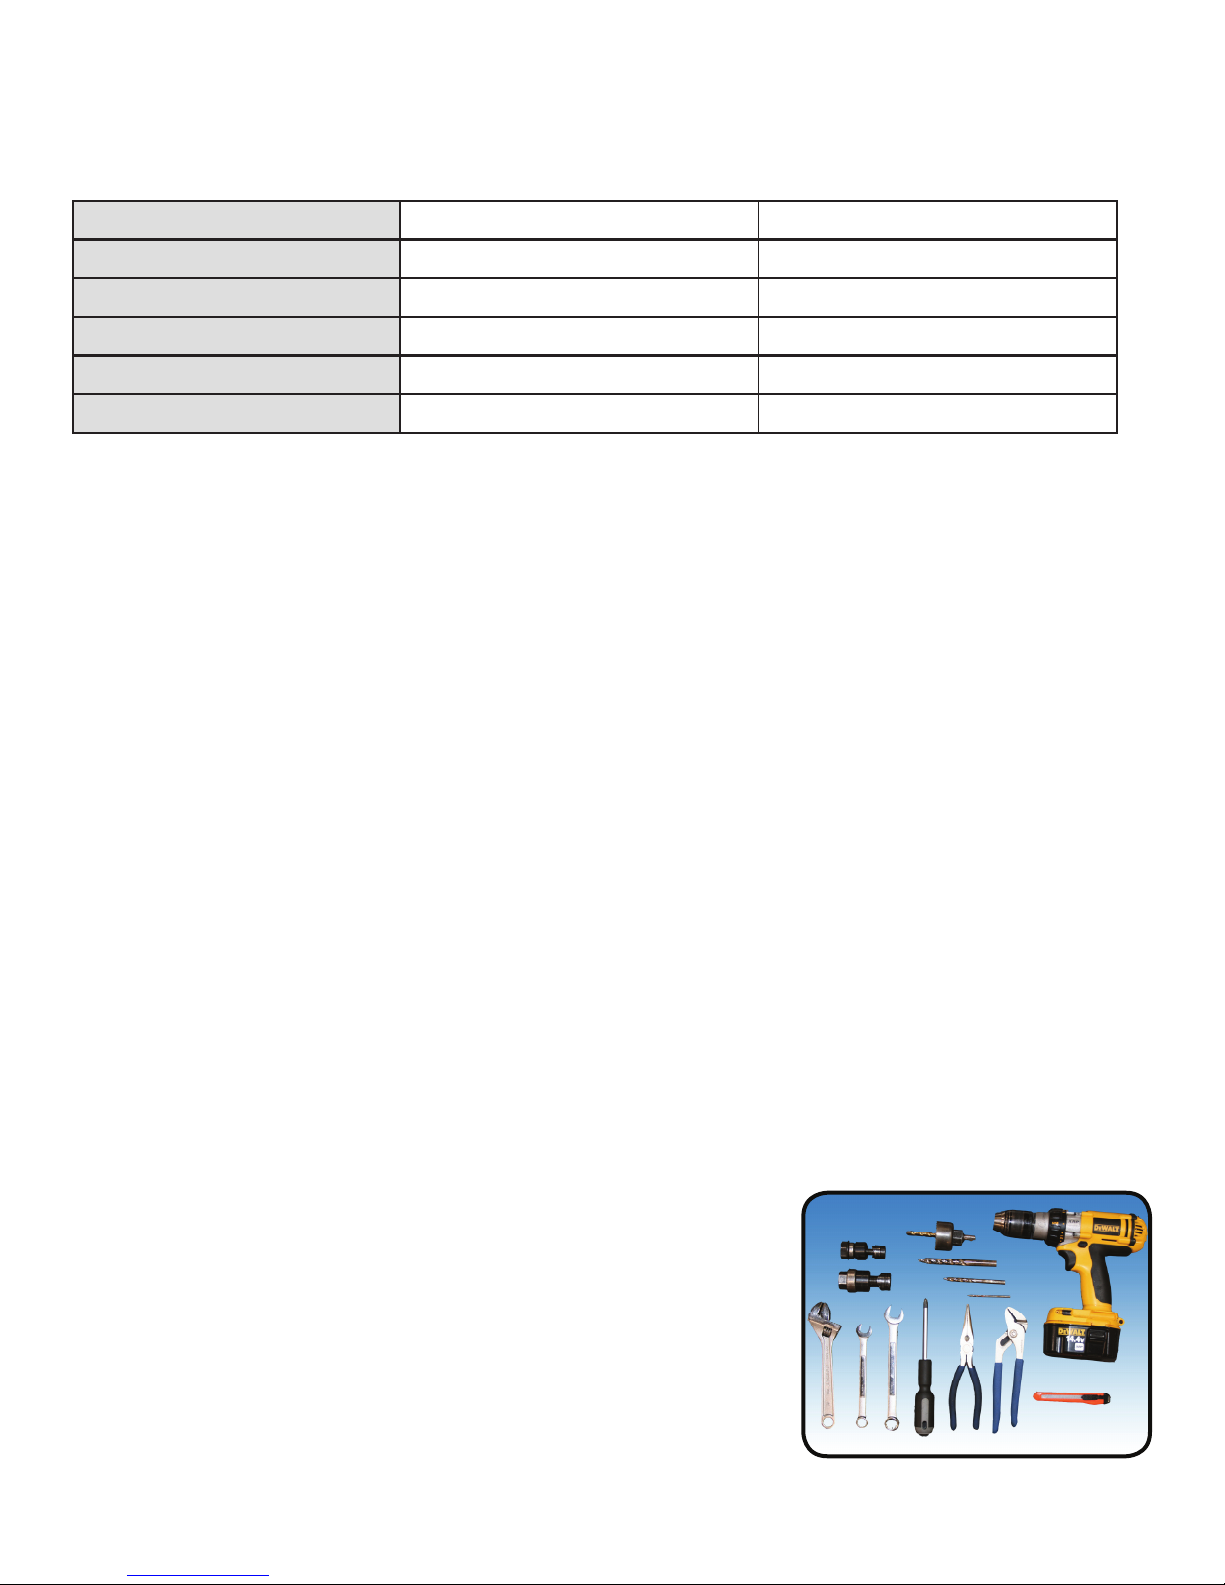
Tools Recommended For Installation
√ 1 1/4" Hole Saw Bit for Faucet opening
√ Round Knock out Punch for Stainless Sinks 1 ¼”
√ Adjustable Wrench
√ Sharp Knife
√ 1 / 2" Open End Wrench
√ Phillips Screw Driver
√ Needle Nose Pliers – Adjustable Pliers
√ Electric Drill
√ 1/4" & 3/8" Drill Bits
Page 4
Page 5
Drill a Hole for the Faucet in a Porcelain Sink
Note:
Most sinks are pre drilled with 1 ½” or 1 ¼” diameter hole that you can use for your
RO faucet. (If you are already using it for a sprayer or soap dispenser, see step 1)
Step 1
Porcelain sinks are extremely hard and can crack or chip easily.
Use extreme caution when drilling. Premier accepts no responsibility for
damage resulting from the installation of faucet.
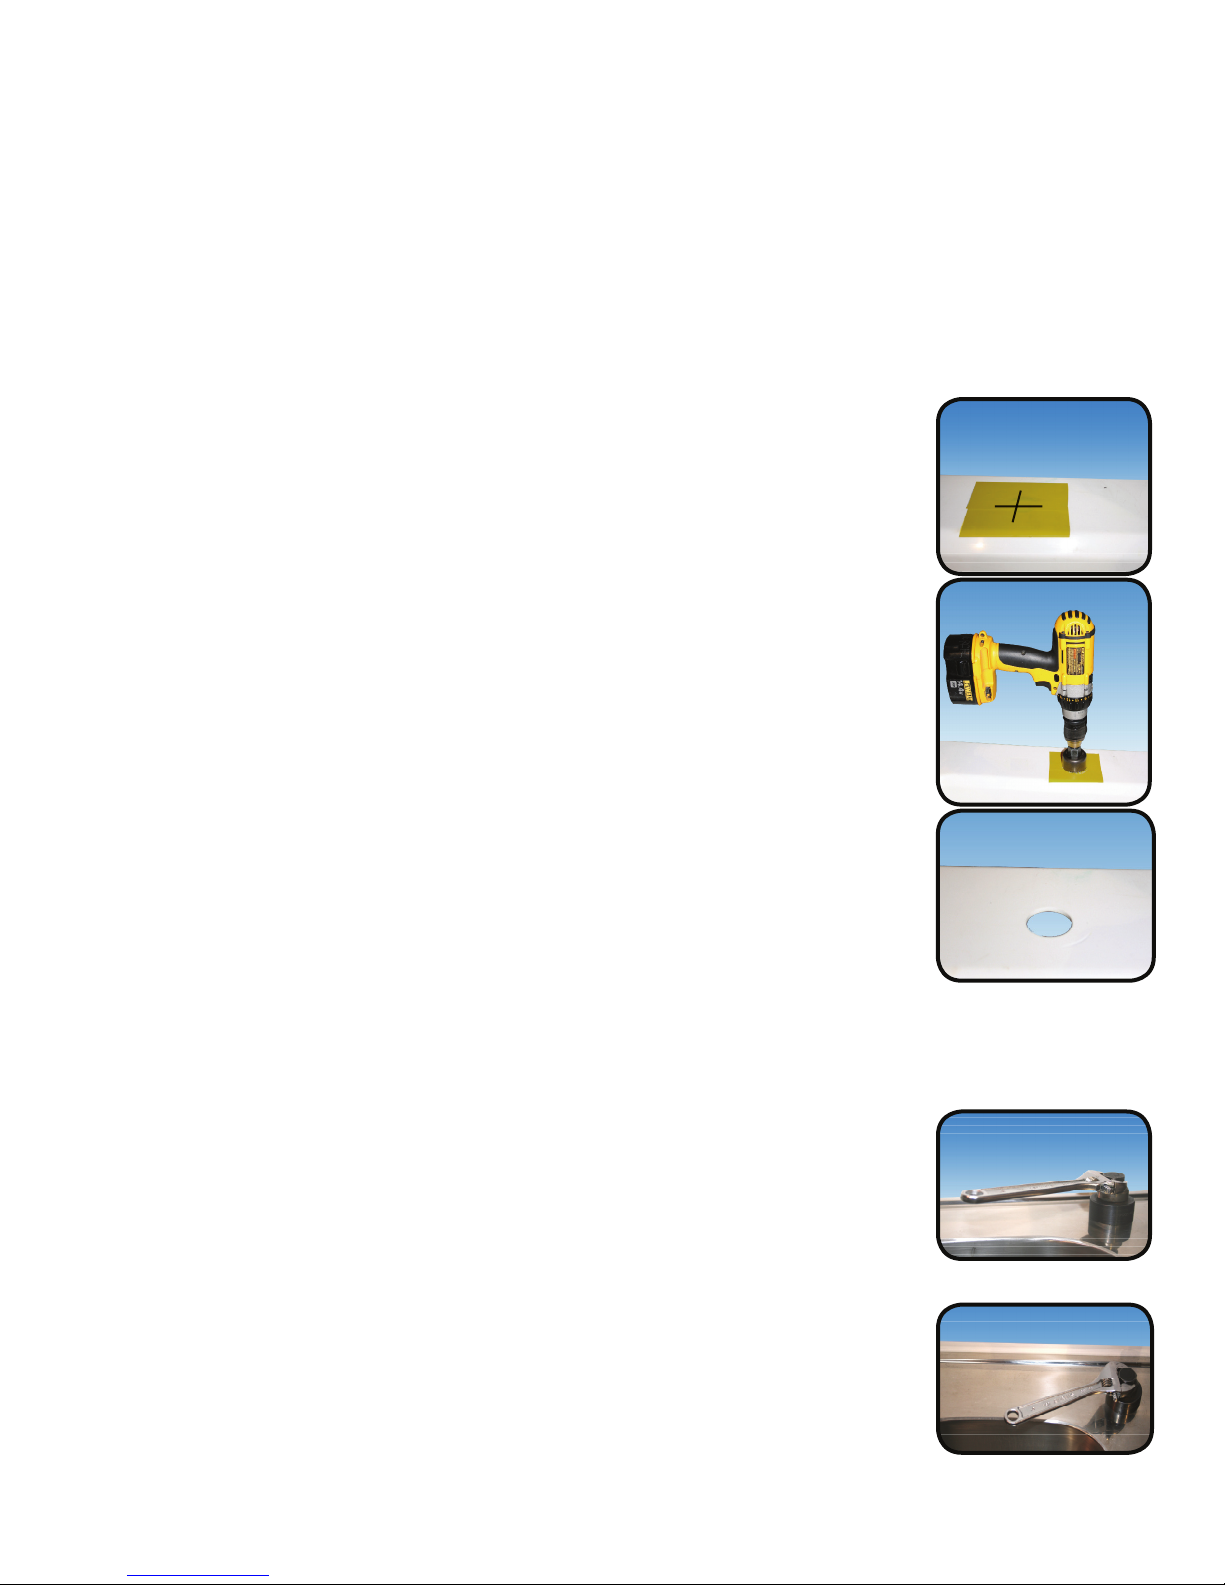
Determine desired location for the RO faucet on your sink and place
a piece of masking tape on over where the hole is to be drilled. Mark
the center of the hole on the tape.
Step 2
Using a variable speed drill set on the slowest speed, drill a 1/8“ pilot
hole through both porcelain and metal casing of sink at the marked
center of the desired location. Use lubricating oil or liquid soap to keep
the drill bit cool (If drill bit gets hot it may cause the porcelain to crack
or chip).
Step 3
Using a 1 ¼” hole saw, proceed to drill the large hole. Keep drill speed
on the slowest speed and use lubricating oil or liquid soap to keep the
hole saw cool during cutting.
Step 4
Make sure the surroundings of the sink are cooled before mounting the
faucet to the sink after drilling and remove all sharp edges.
Punch a Hole for the Faucet in a Stainless Steel Sink
Note:
Step 5
If mounting faucet to a Stainless Steel Sink you will need a 1 ¼”
Hole Punch. The faucet opening should be centered between the
back splash and the edge of the sink, ideally on the same side as
the vertical drain pipe.
Drill a ¼” pilot hole. Use a 1/2” Hole Punch and an adjustable wrench to
punch the hole in the sink. Change to the 1 ¼” Hole Punch to enlarge
the hole.
The faucet can now be installed.
Page 5
Page 6
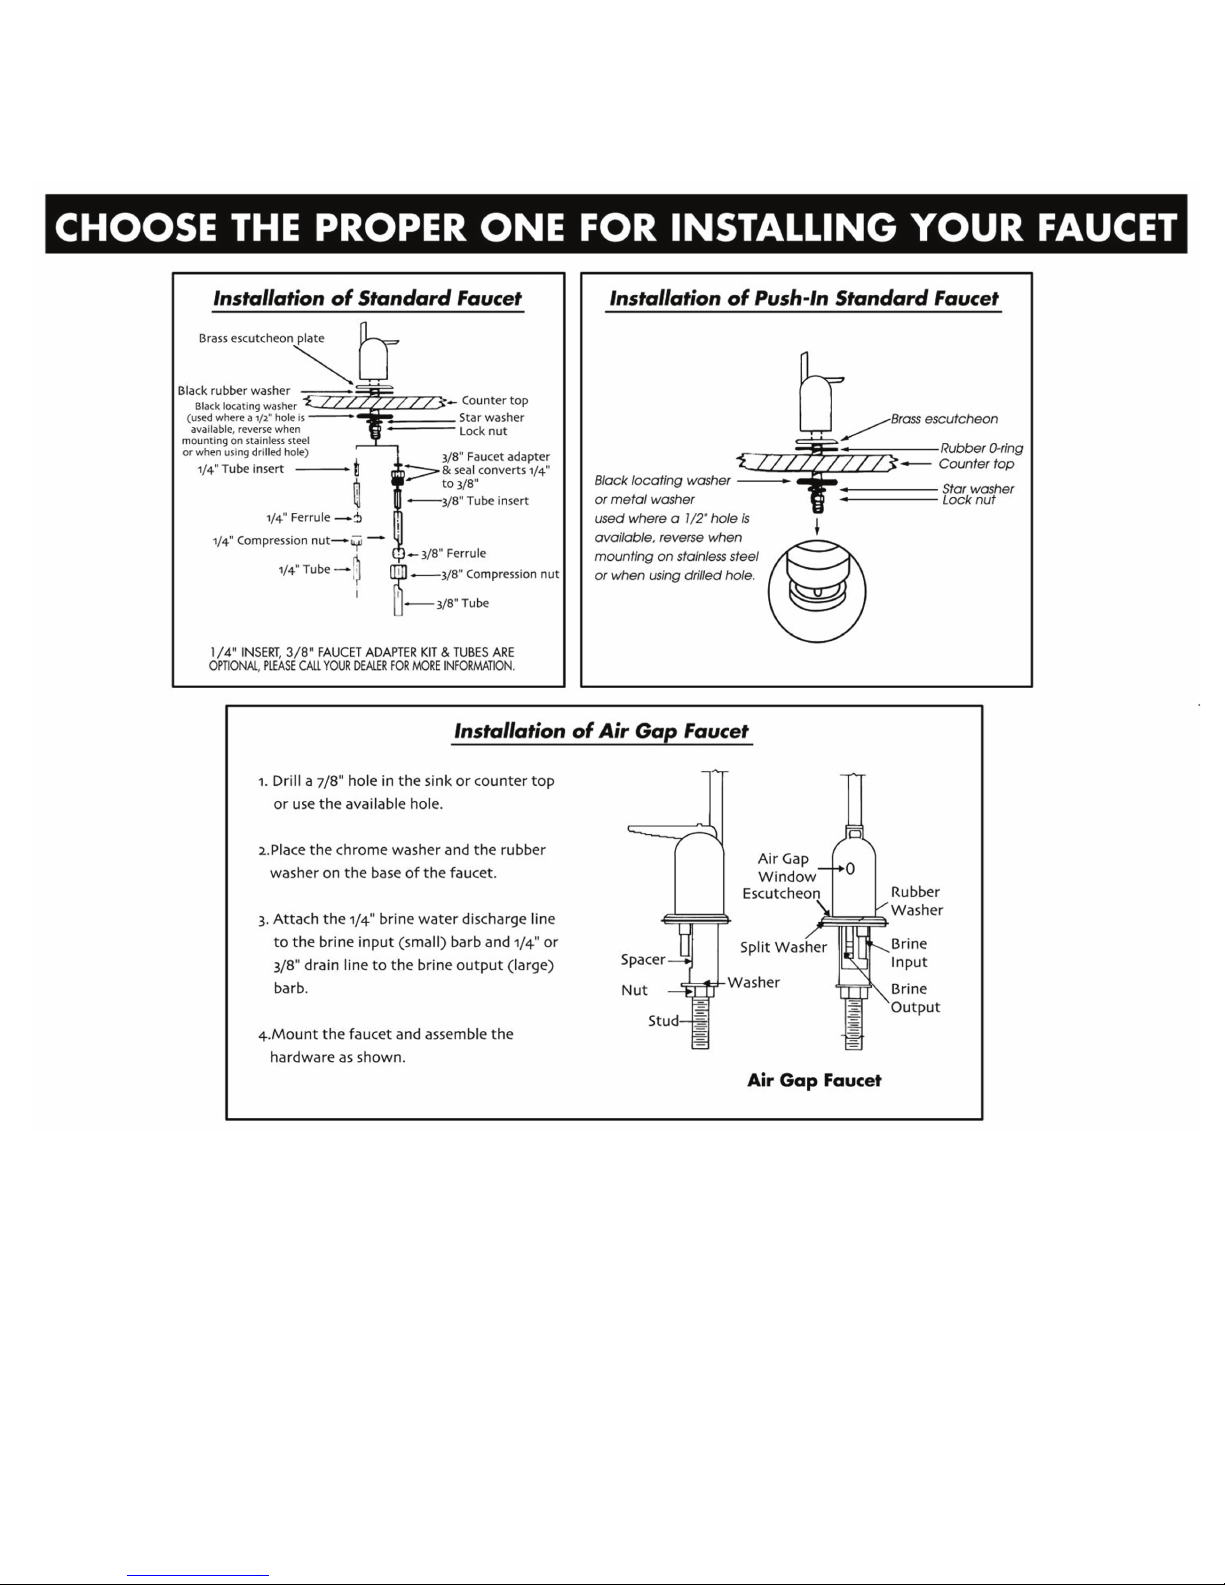
Faucet Installation (Actual RO Faucet may vary)
Step 6
Feed both the red and black tubing through the pre drilled hole in the sink/counter until faucet
is seated.
Step 7
Locate one of the two 1/4” blue tubes in the box. In the faucet parts bag locate a compression
nut, plastic ferrule sleeve and a plastic tube insert. To assemble - place the compression nut
on the open end of the blue tube rst, then the plastic ferrule sleeve small tapered end of
sleeve must point to the end of tube, push the white plastic insert into the end of blue tubing
with the ferrule sleeve, insert the blue tube into the faucet stem and tighten compression nut.
DO NOT overtighten nut.
Page 6
Page 7
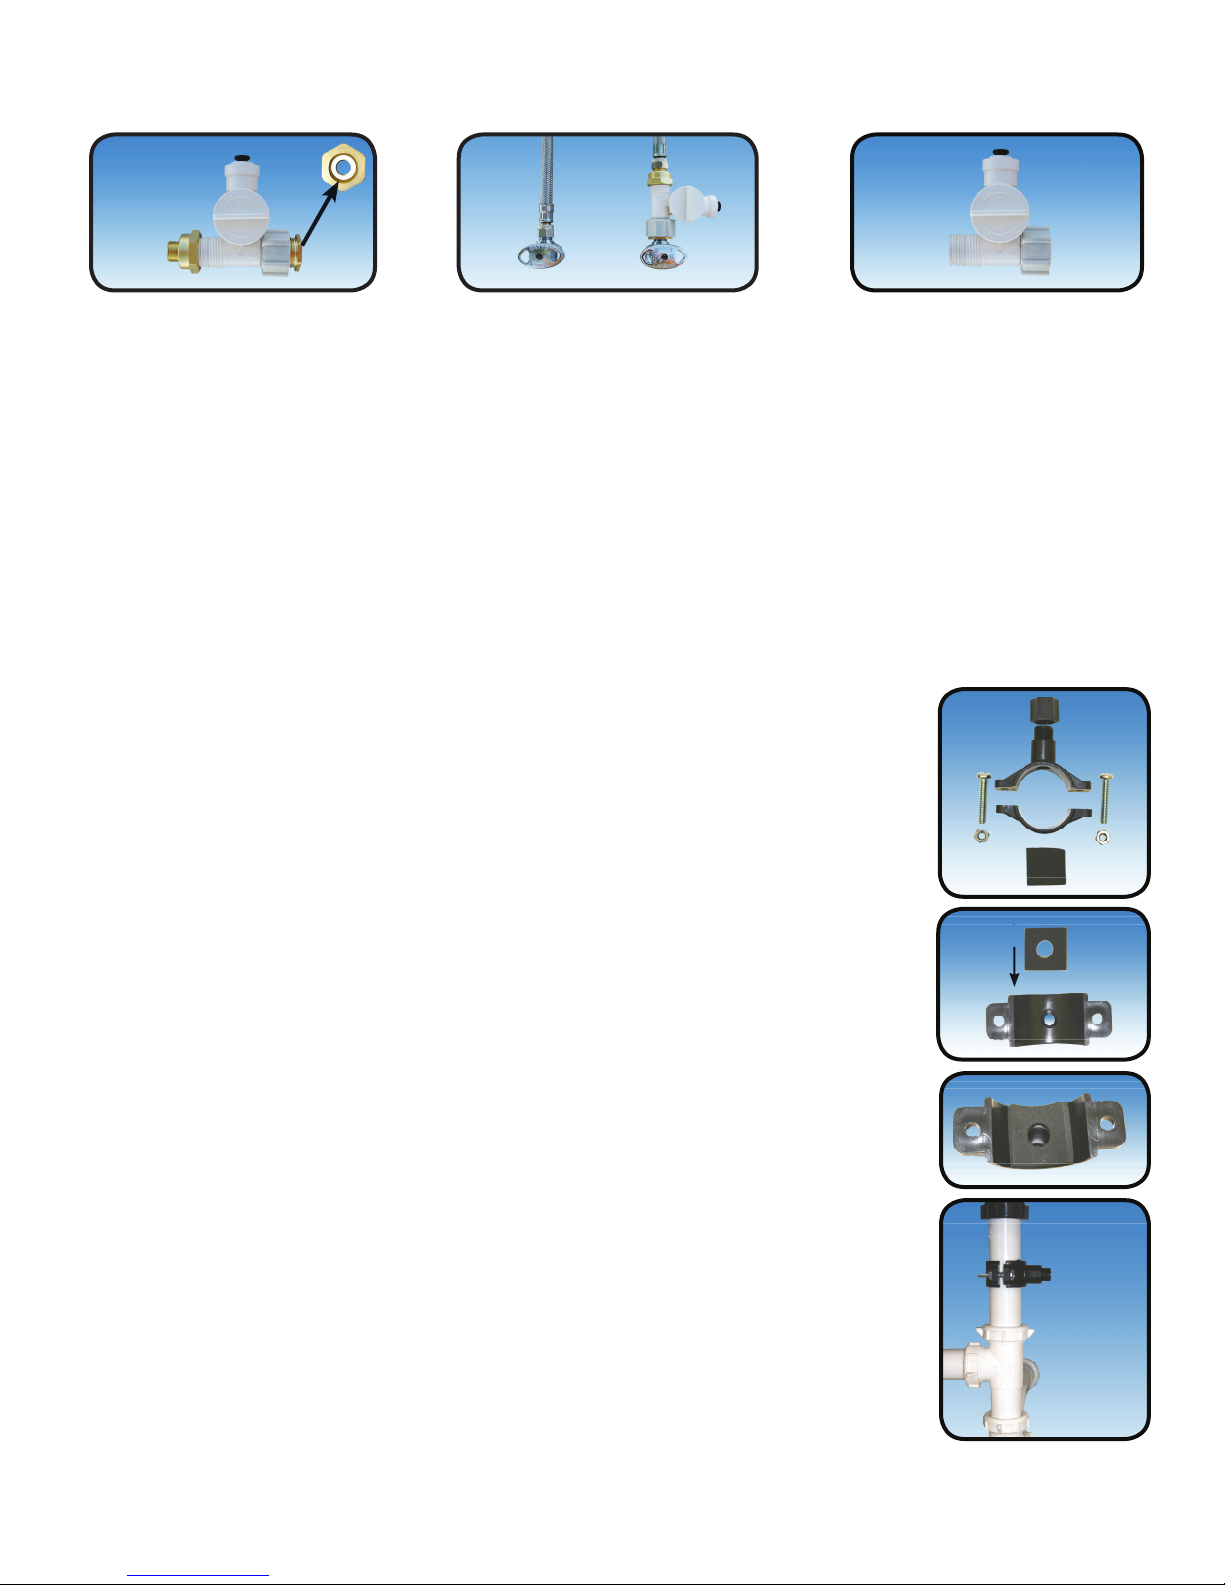
Adapt-a-Valve Installation - Part# 134007
*
Conguration for 3/8”
(With Brass Fittings)
*Use White Washer
Step 8
Step 9
Turn off the cold water supply to the faucet by turning the angle stop valve completely off.
Attach the adapt-a-valve as illustrated in the three photos above, choosing the conguration
that ts your plumbing. (When attaching the adapt-a-valve to straight pipe threads, use Teon
tape on the threads without the rubber washer.)
Caution:
Water supply line to the system must be from the cold water supply line only.
Hot water will severely damage your system.
Hot
Supply
Cold
Supply
Conguration for 1/2”
(Without Brass Fittings)
Drain Saddle Installation - Part# 164016
Drain Saddle ts standard 1 ¼” – 1 ½” drain pipes
Caution:
Step 10
Step 11
Step 12
If you have a garbage disposal, do not install the drain saddle near it.
Installation of the drain saddle must be either above the garbage disposal, or
if a second sink drain is available, install it above the cross bar on the second
drain. Installation of the drain saddle near a garbage disposal may cause
the drain line to plug. If no other installation of drain line is available, Premier
offers drain line installation kit (part number 164020) that can be used with
garbage disposals.
Gather the pieces of the drain saddle:
1 Black compression nut 1 Semicircle bracket with opening
2 Screws 1 Foam gasket
2 Nuts for screws 1 Semicircle bracket
The small square black foam gasket with a circle cut out of the middle
must be applied to the inside of the drain saddle. Remove sticky tape
backing and stick to the drain saddle as shown.
The drain saddle must be mounted at least 1 ½” above the nut of the
P-trap or cross bar from the garbage disposal to insure proper drainage.
Assemble the drain saddle around the drain pipe at the best available
location. Using Phillips screw driver tighten screws evenly and securely
on both sides of the drain saddle. Keep the plastic compression nut off
at this time.
Caution:
Do not over tighten the screws. It may crack the drain saddle.
Page 7
Page 8
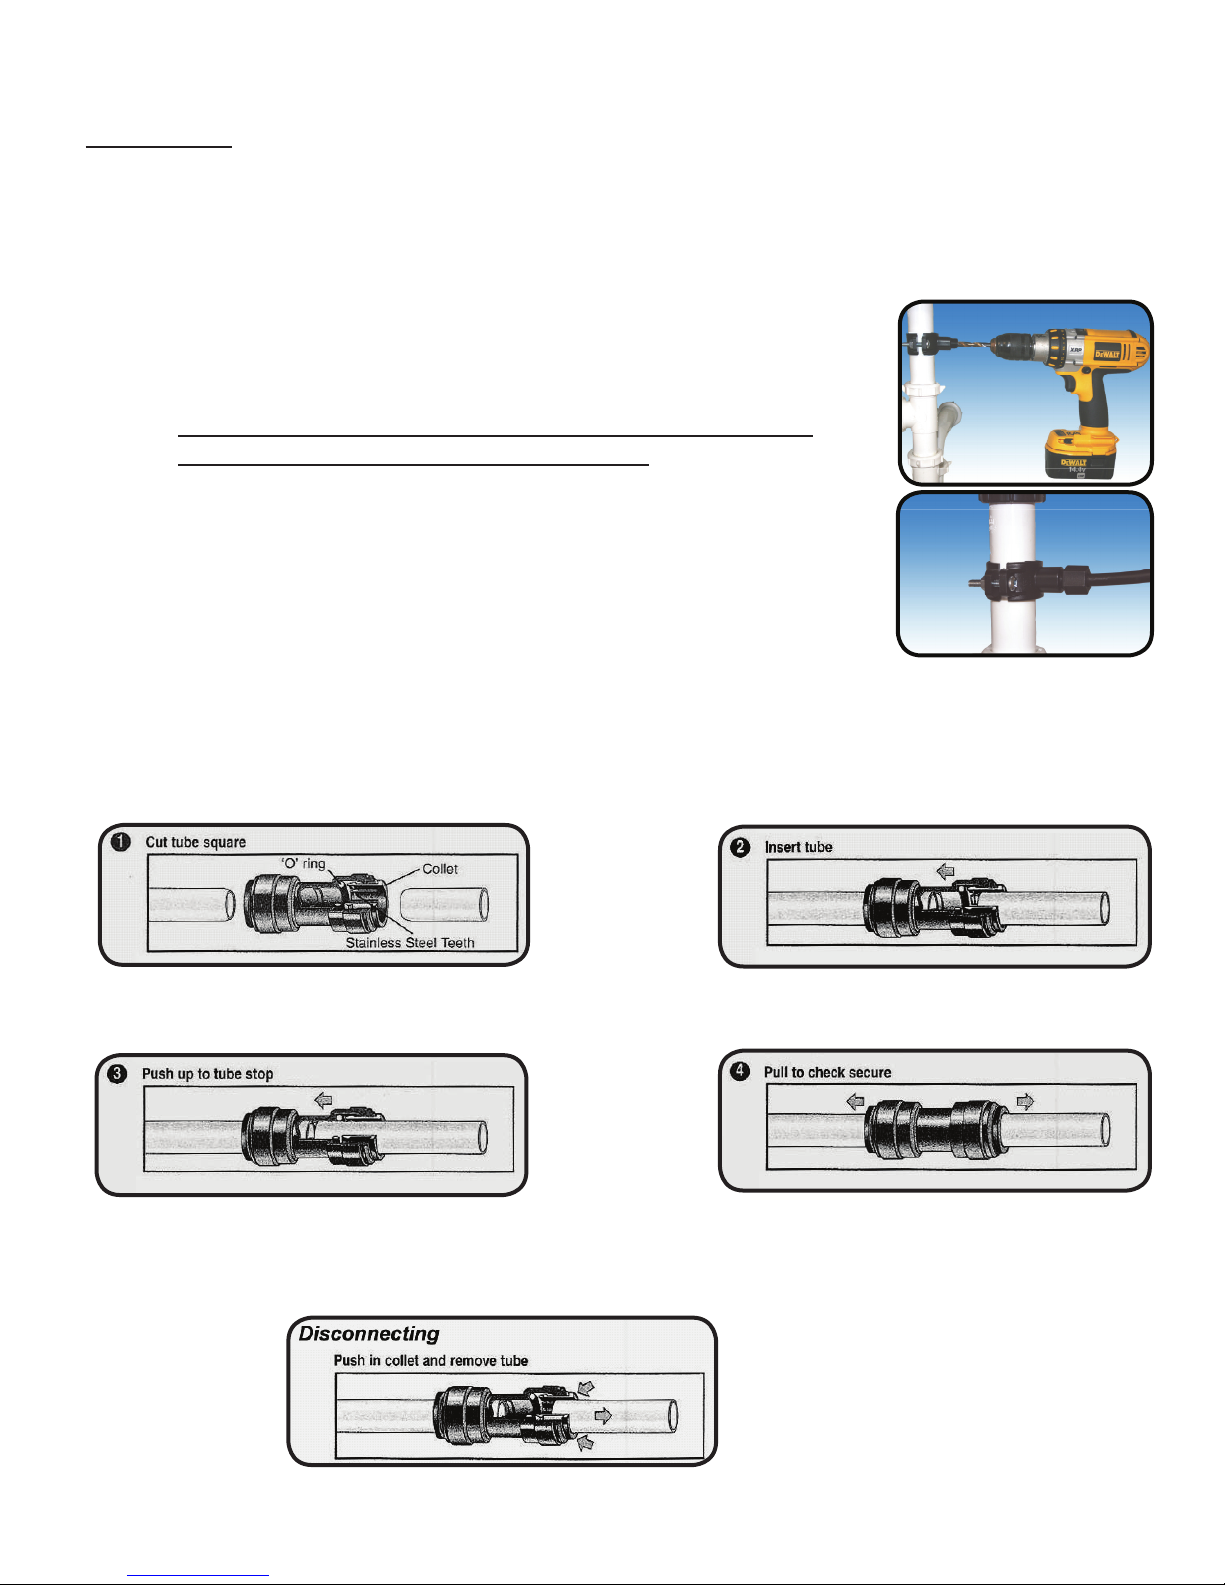
Drill Hole and Connect 3/8” Black Tube from Faucet to the Drain
IMPORTANT:
The black 3/8” drain tube must be as SHORT and STRAIGHT as possible to the drain
saddle, making a downward slope from faucet to drain saddle to allow for proper
Step 13
Caution:
Step 14
Step 15
drainage. This is a gravity fed line and if there is any bend or dip in the tube, the rinse
water will not ow into the drain properly. Water may back up and come out the air
gap hole in the back of the faucet.
With the drain saddle secured onto the drain pipe, using a 1/4”
drill bit installed in your electric drill, insert the drill bit through the
opening in the drain saddle and drill through the drain pipe.
It is very important to keep the drill centered to prevent
damage of the drain saddle while drilling.
Measure the 3/8” black tube from faucet to the drain saddle on the
drain pipe and make a straight cut to the correct length.
Slip black tube through black compression nut. Insert black tube
into the opening in the drain saddle and hand tighten the black nut,
and add 1/4 turn with a wrench.
How To Use the Quick Connect Fittings on the RO Module
To make a connection, the tube is simply pushed into the tting. The unique patented John Guest®
locking system holds the tube rmly in place without deforming it or restricting ow.
It is essential that the outside diameter be free of score
marks and that burrs and sharp edges be removed before
inserting into tting.
Push the tube into the tting, to the tube stop. The collet
(gripper) has stainless steel teeth which hold the tube
rmly in position while the O-ring provides a permanent
leak proof seal.
Fitting grips before it seals. Ensure tube is pushed into
the tube stop.
Pull on the tube to check that it is secure. It is a good practice
to test the system prior to leaving site and /or before use.
To disconnect, ensure the system is depressurized before
removing the tube. Push in collect squarely against face
of tting. With the collet held in this position, the tube can
be removed. The tting can then be reused.
Page 8
Page 9
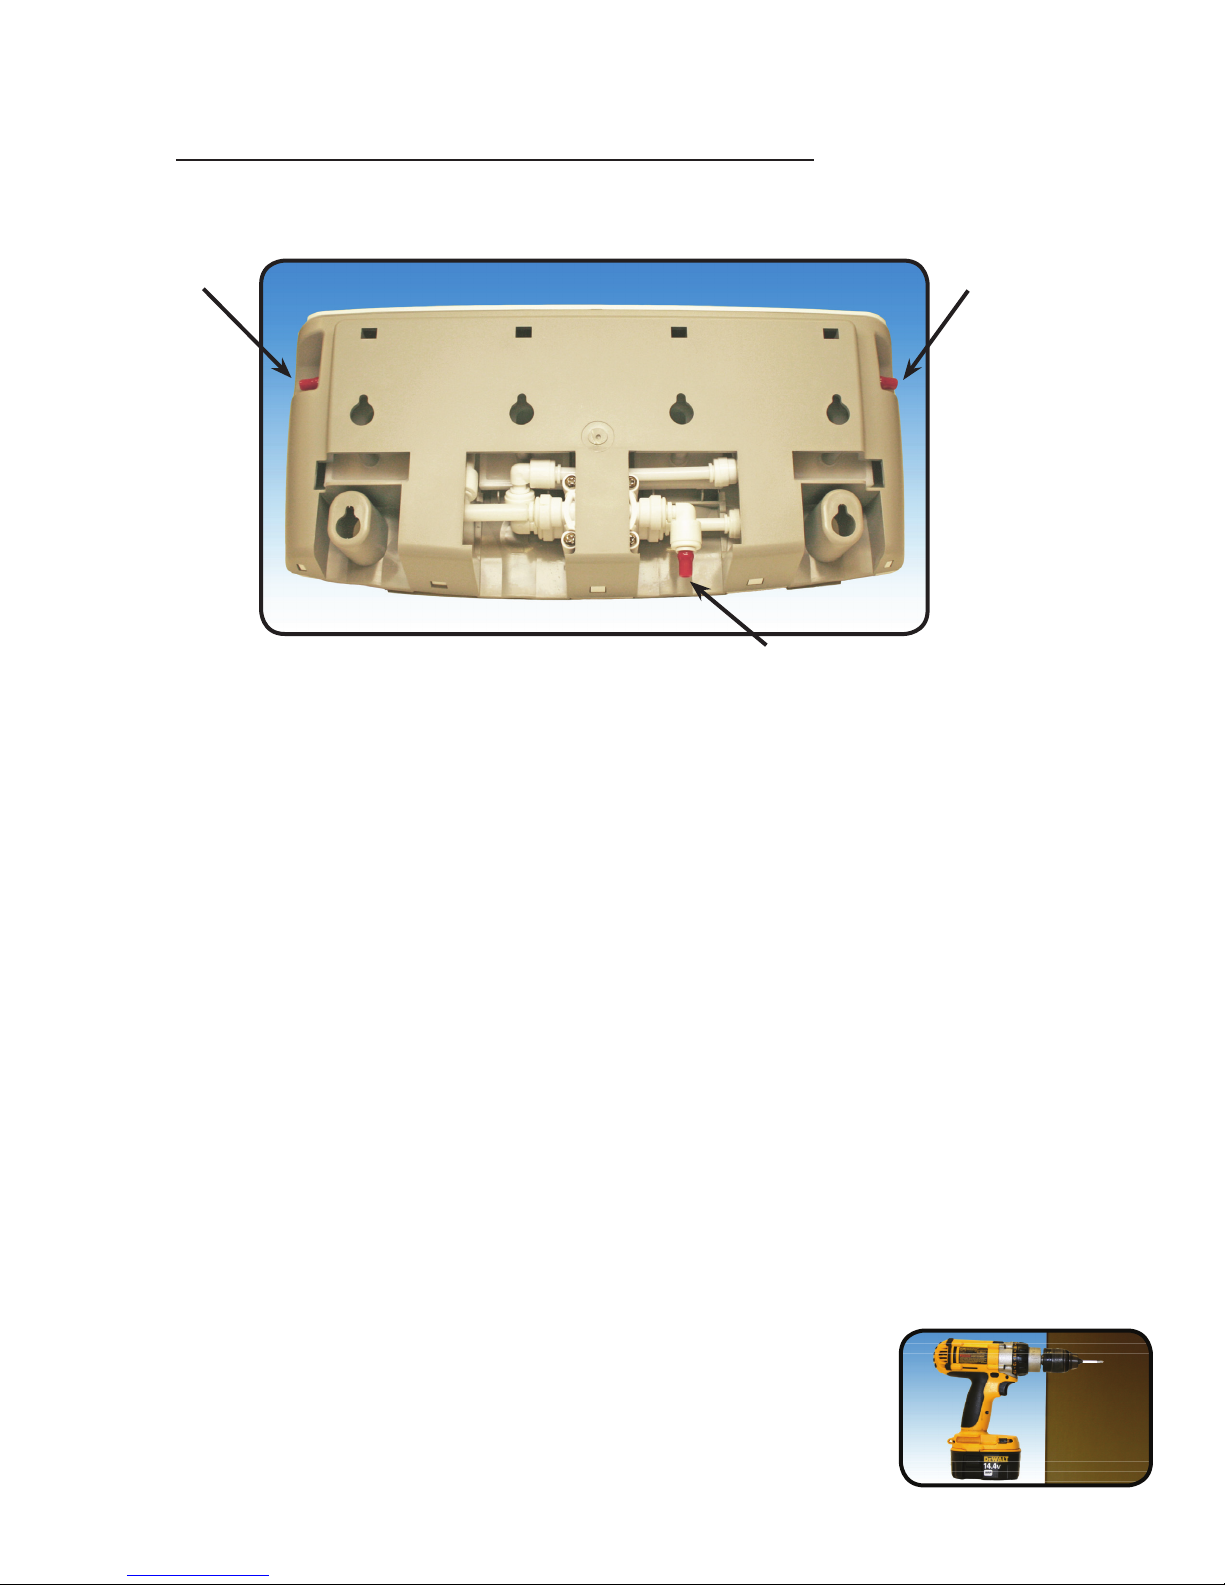
Connections on the back of the Reverse Osmosis System
NOTE
1/4” Blue Tube Connection -
to RO Faucet
* Remove Red protective plugs before tube installation!
1/4” Green Tube Connection -
to Adapt-a-Valve
1/4” Blue Tube Connection - to RO TANK
Green Tube Connection
Step 16
Locate the 1/4” green tubing in the box. Located on the back side of the RO system are
three 1/4” quick connect ttings. Connect one end of the green tube to the tting behind the
Sediment Filter head (Red Label) by pushing rmly into the tting. (See Picture Above)
Blue Tube Connections
Step 17
Locate the second 1/4” blue tube in the box. Connect this 1/4” blue tube to the 1/4” quick
connect elbow tting located on the back side of the RO system directly behind the PreCarbon lter head (Yellow Label) by pushing rmly into the tting. Connect the 1/4” blue
tube from the RO Faucet to the 1/4” quick connect tting located on the back side of the
RO system behind the Post-Carbon lter head (Blue Label) by pushing rmly into the tting.
(See Picture Above)
Connect Green tube to the Adapt-a-Valve
Step 18
Insert the green tube attached to the RO system into the ¼” Quick Connect opening on the
adapt-a-valve until it stops. Approximately 3/4” of the tube should insert into the adapt-a-valve
tting.
Reverse Osmosis Module Mounting
Step 19 Determine best location for the RO module to be mounted to allow
for future system maintenance. The parts bag has 2 self tapping
screws. Using an electric drill with a Phillips bit, screw them into
the cabinet wall 9.25” apart and 12” from the bottom of the cabinet.
Page 9
Page 10
Red Tube Connection (From RO FAUCET To The RO Module)
Step 20
The RO Membrane (Green Label) has a 1/4” quick connect tting located on the bottom of
the cartridge. Remove the red protective cap and insert the 1/4” quick connect elbow stem
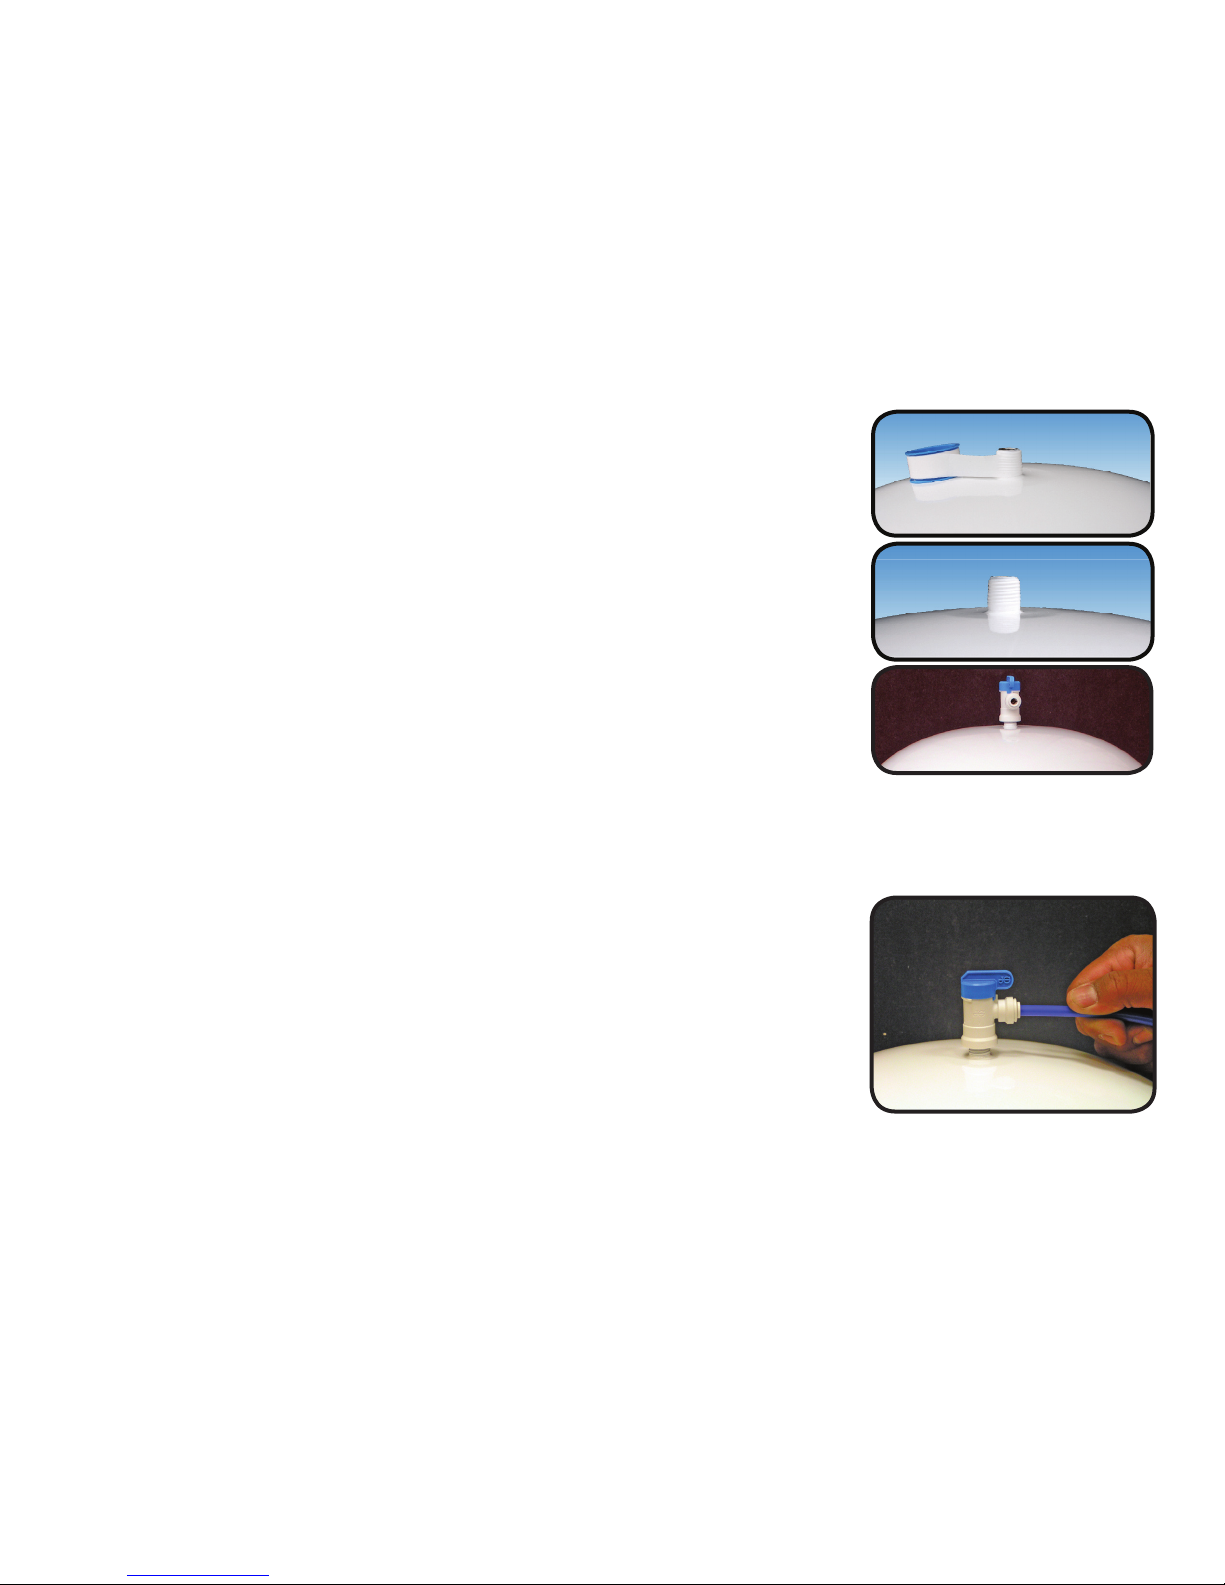
Tank Ball Valve Installation - Part#: 134018
located on the end of the 1/4” red faucet tubing into the 1/4” quick connect tting on the
bottom of the RO membrane lter (Green Label) making sure it is pushed in all the way to
the tube stop.
Step 21
Step 22
Teon tape must be applied in a clockwise direction. Wrap
(7 to 12 turns) around the male pipe threads (MPT) on the
stainless steel tting on top of the tank.
Thread the quick connect ball valve (supplied in the parts bag)
onto the stainless steel connector on the tank.
Note: Do not over-tighten plastic connections.
Blue Tube Connection (From The RO Module To TANK)
Step 23
Position tank in desired location. Stand it upright or lay it on its
side (using the black plastic stand). Locate the open end of the
1/4” blue tube connected earlier to the elbow on the back of the
RO unit behind the Pre-Carbon lter (Yellow Label). Insert the
tube into the quick connect tting on the tank ball valve. Make
sure the tube is pushed in all the way to the tube stop.
(See Picture to the Right)
Note: Set the blue ball valve knob in-line with the blue tube, this is the “open” position.
Page 10
Page 11

Congratulations!
You have completed the installation of new your Reverse Osmosis system.
Start up Instructions
Step 1
Step 2
Turn on the incoming cold water at the angle stop valve. Open the needle valve on the brass
Adapt-a-Valve by turning counter clockwise. Check the system for leaks and tighten any tting
as necessary. Make sure that the ball valve on top of the storage tank is in the open position
- blue handle is in line with the blue tube.
(Check frequently over the next 24 hours to ensure no leaks are present).
If you have connected your RO system to a refrigerator / ice maker, make sure the ice maker
is off (do not allow water to ow to the ice maker) until ushing (Step 5) is complete and the
tank has been allowed to completely ll. Connection from the RO to the ice maker system
should have an in-line valve installed before the ice maker so it can easily be closed to prevent
water owing to the ice maker during start up and periodic maintenance. Your RO tank must
be allowed to ll up fully in order for the ice maker system to work properly.
Please Follow the Startup Instructions.
Step 3
Open the RO faucet and leave it open until water begins to trickle out (it will come out
slowly).
Step 4
Close the RO faucet allowing the storage tank to ll with water. It may take 4 to 6 hours to
ll the tank completely depending on the production capability of the membrane, local water
temperature and water pressure.
Note:
Step 5
During the ll period you may hear water trickling due to the Reverse Osmosis Process.
After the Tank has lled, open the RO Faucet to ush the tank completely. You will know that
the tank is empty when the ow rate from the RO faucet is down to a trickle. Repeat this step
two more times. The fourth tank can be used for drinking.
The ushing process should take about a day to complete.
Note:
Flushing of the tank 3 times is only necessary during the initial startup and after replacing the
membrane.
Don’t Forget To Register!
Register by mail, phone, fax or internet. Premier uses this information only to provide a lter
change reminder notice. Pre-lters should be changed every 6 months and the Post Carbon
lter annually. You may register your warranty via our web site at
www.premierH2o.com or call 1-800-752-5582 (within USA only) / FAX#: 623-866-5666.
For Warranty card Please see page 23-24.
Page 11
Page 12

Changing The Filter Cartridges
Your RO module is equipped with valved heads which will automatically turn off the water supply to
each lter when the lter is released, thus you do not need to turn off the incoming water supply at the
Adapt-a-Valve. The RO faucet must be off when lters are replaced. To make the removal of the lter
cartridges easier, the heads & cartridges may be swiveled up to 90 degrees as shown in the pictures below.
6 Month System Maintenance
Replace:
√ One sediment lter (Red Label P/N: 114105)
√ One carbon pre-lter (Yellow Label P/N: 114106)
Annual Maintenance -
Replace:
Tip:
Note:
Step 1
Step 2
Step 3
Note:
(Sanitization Recommended See PG.13)
√ One sediment lter (Red Label P/N: 114105)
√ One carbon pre-lter (Yellow Label P/N: 114106)
√ One carbon post-lter (Blue Label P/N: 114107)
This is a good time to check the air pressure in your storage
tank. For instructions please see page 14.
Flush rst tank full after completing the annual maintenance.
Place a towel under the RO module to catch any excess water that
may drip out from the lters during the changeover.
To remove a lter cartridge: Twist lter cartridge counter
clockwise until cartridge pops out of the lter head.
To install a lter cartridge: Remove the seal cap and insert the
cartridge into the valved head twisting it clockwise until full seated.
To reset the electronic monitor during replacement of lters, simply
slide out the battery from the base of the faucet and reinsert.
This reverse osmosis system contains a replaceable component (the RO membrane) which is critical to the
efciency of the system. Replacement of this reverse osmosis membrane should be with one of identical
specications as dened by Premier to assure the same efciency and contaminant reduction performance.
Membrane Replacement (2 - 5 Years)
√ One Membrane (50 GPD Green Label P/N: 114110)Replace:
Membranes have a life expectancy between 2 and 5 years, depending on the incoming water conditions
and the amount the RO system is used. This reverse osmosis membrane is critical for effective reduction of total
dissolved solids (TDS). The product water should be tested periodically to verify that the system is performing
satisfactorily.
Normally, a membrane would be replaced during a semiannual or annual lter change. However, if at any
time you notice a reduction in water production or an unpleasant taste in the reverse osmosis water, it could be
time to replace the membrane. Premier recommends replacing the membrane when TDS reduction falls below
75%.
A water sample may be sent to Premier for a free diagnosis of your membranes performance. To send
a water sample, use 2 clean containers and ll 1/2 cup of tap water in one container and 1/2 cup of RO water in
2nd container. Clearly label each sample. Send the samples to the address listed on the cover of this manual
attention “Water Samples”. Premier will test the water and mail or call you with the results.
Page 12
Page 13
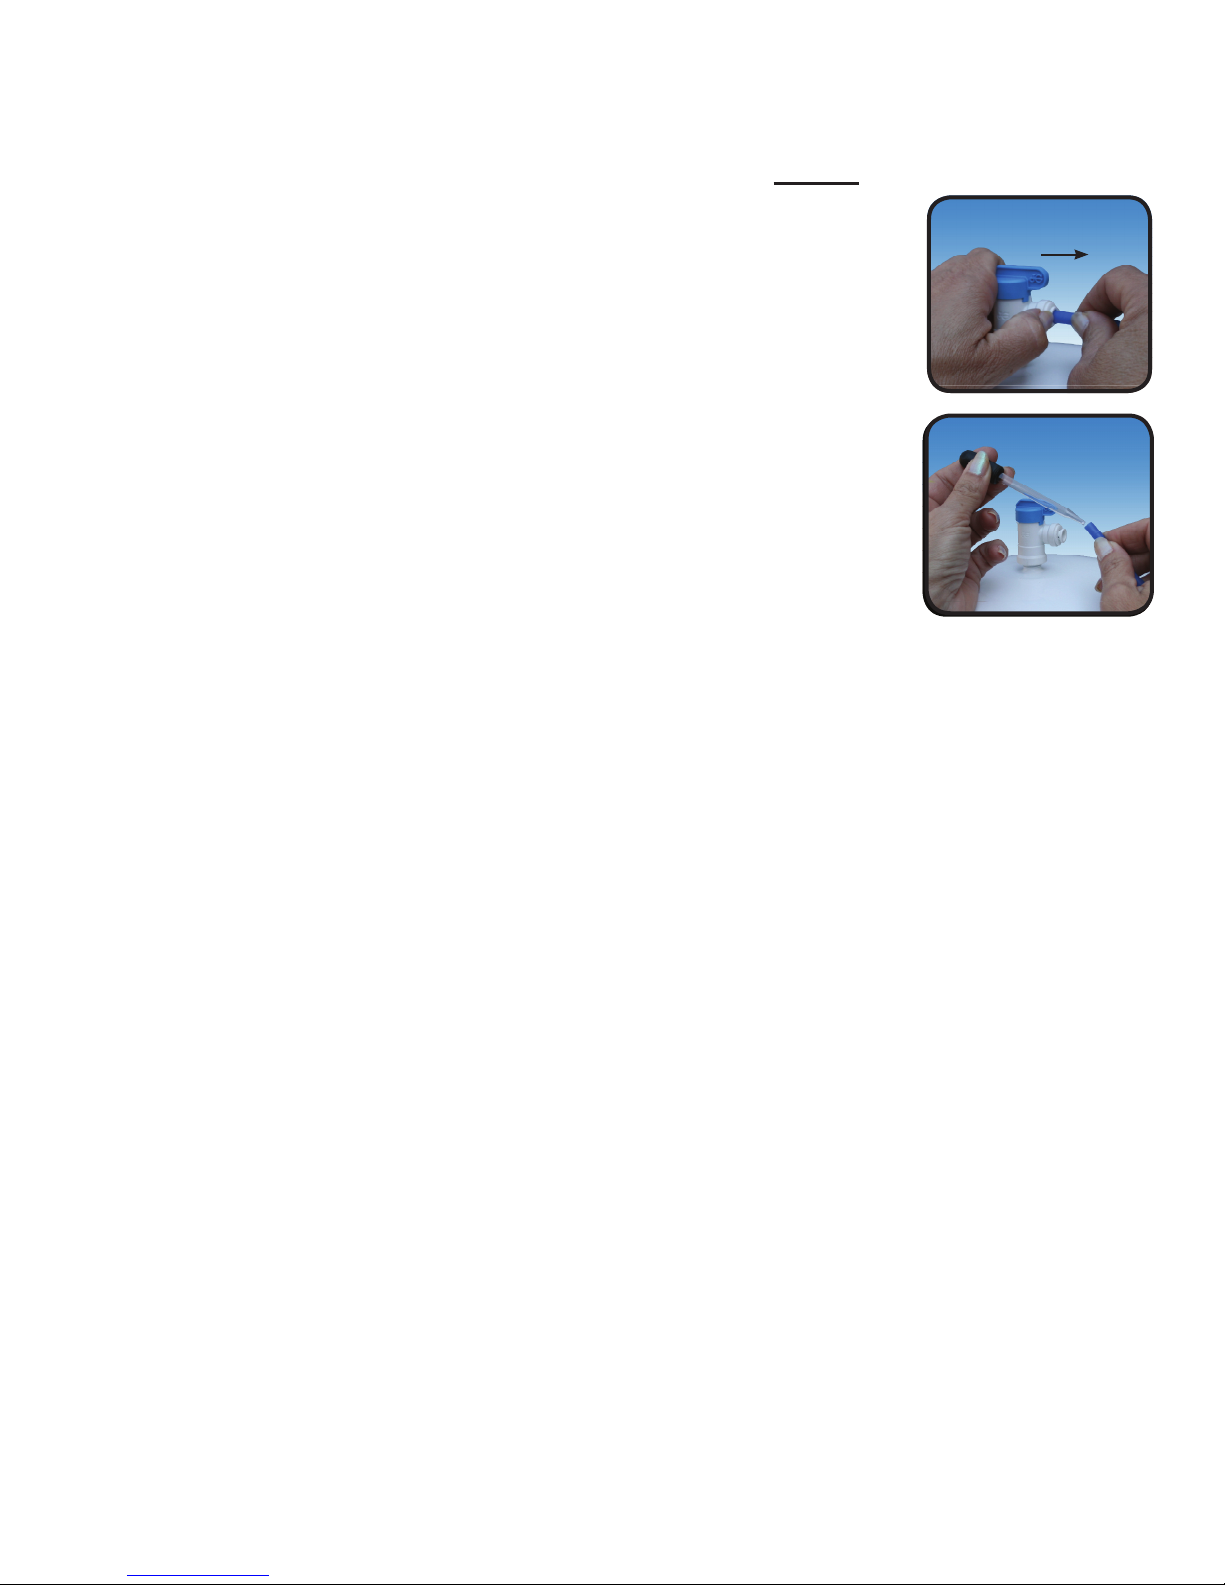
Annual Sanitization
Note:
Step 1
Sanitization procedure should be performed before a lter change.
Turn off the water supply to your RO system by turning the “T” on the
adapt-a-valve clockwise 1/4” turn and open the RO faucet to drain the
storage tank.
Step 2 Disconnect the blue tube from the ball valve on the storage tank (see
page 9 for quick connect tting use instructions).
Step 3
Using a clean eye dropper insert ½ teaspoon of hydrogen peroxide or
common household bleach into the blue tube. This will ow into the
tank once water is turned back on to unit. Reattach blue tube to the
ball valve. Follow start up procedure and drain the rst two full tanks
of water.
Procedure for Extended Non-Use (More than 2 months)
Step 1
Step 2
Note:
Step 4
Step 5
Turn off the water supply to your RO system by turning the “T” on the adapt-a-valve clockwise
1/4 turn and open the RO faucet to drain the storage tank. Once the storage tank is empty,
remove all lter cartridges (order not important), place them into a sealed plastic bag and
store in your refrigerator.
To Restart System:
Reinstall all lters on to the RO unit. Filters are color coded to match the lter heads they
snap in to. Refer to page 12 step three for cartridge installation procedure.
Open the Adapt-a-Valve by turning it counter clockwise 1/4 turn.
(Check frequently over the next 24 hours to ensure no leaks are present).
If you have connected your RO system to a refrigerator / ice maker, make sure the ice
maker is off (do not allow water to ow to the ice maker) until the tank has been allowed
to completely ll.
Open the RO faucet and leave it open until water begins to trickle out (it will come out
slowly).
Close the RO faucet allowing the storage tank to ll with water. It may take 3 to 5 hours to
ll the tank completely depending on the production capability of the membrane, local water
temperature and water pressure.
Step 6
After the Tank has lled, open the RO Faucet to ush the tank completely. You will know that
the tank is empty when the ow rate from the RO faucet is down to a trickle. The second tank
can be used for drinking.
Page 13
Page 14
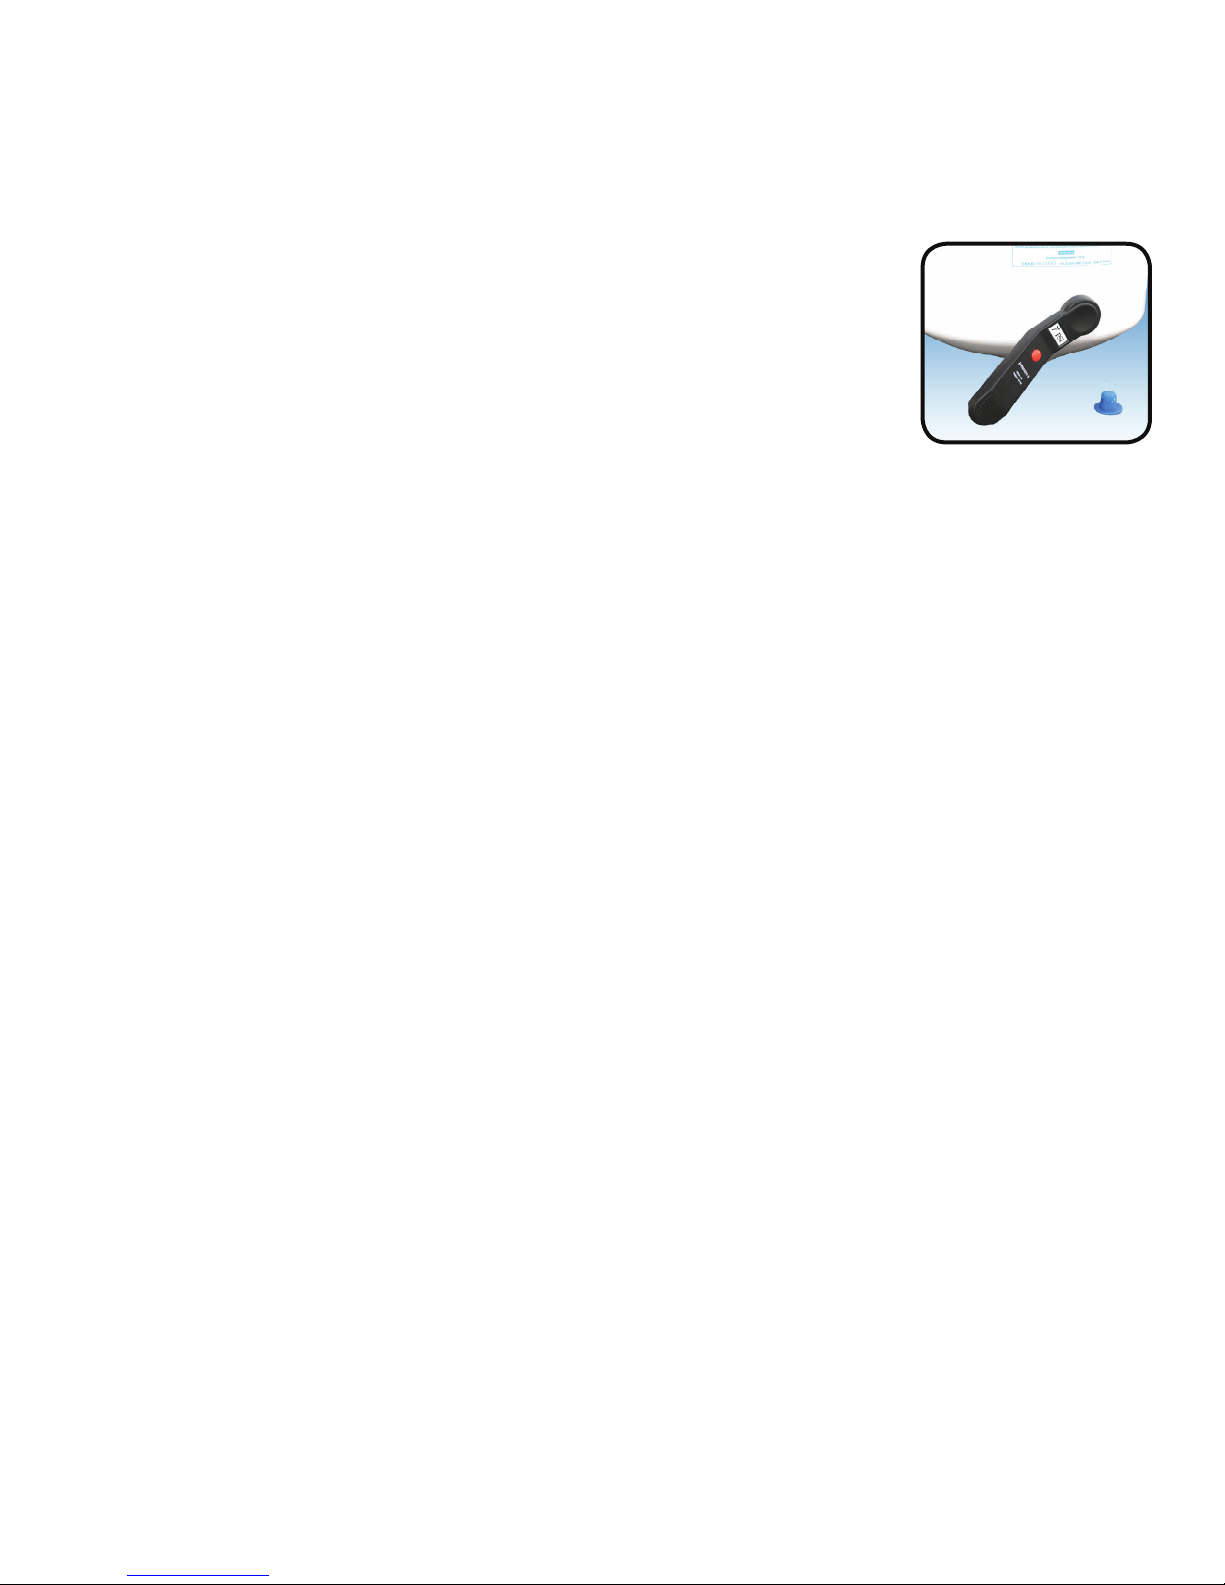
Check Air Pressure in the Tank
Important:
Check air pressure only when tank is empty of water!
Check air pressure in the storage tank when you notice a decrease in available water from
the RO system. Air can be added with a bicycle pump using the schrader valve that is
Step 1
Step 2
located on the lower side of the tank behind a blue plastic cap.
Turn off the incoming water supply to the RO by turning the needle
valve on the adapt-a-valve clockwise until it stops. (Follow the green
tube away from the RO system to nd the adapt-a-valve.)
Open the RO Faucet and allow water to drain from the tank until it is
completely empty.
Tip:
Step 3
When water from the RO faucet slows to a trickle, with the faucet still in the open
position, you may add air to the tank to purge any left over water, this will ensure that
the tank is completely empty.
Once all water in the tank is purged, check air pressure using an air pressure gauge, it
should read between 5 - 7 PSI. (Digital air pressure gauge is recommended)
Parts List
Item # Part # Description
1 119007 TANK-3 GALLON-METAL-WHITE
2 560080 ADAPT-A-VALVE KIT
3 116001 FAUCET-AG-CHR
4 134018 TANK-VALVE-BALL-ELB-1/4QCX1/4F
5 164016 DRAIN SADDLE 3/8” - KIT
6 119028 TANK STAND
7 610109 1/4” GREEN TUBING - 4FT
8 610113 1/4” BLUE TUBING - 2 X 4FT
9 610103 3/8” BLUE TUBING - 4FT
10 400048 3/8” BLACK TUBING - 3FT
Page 14
Page 15
TROUBLE SHOOTING
Problem Cause Solution
1. Low/Slow Production Low Water Pressure Assure a minimum of 40 psi incoming water pressure.
Premier sells a booster pump if home water pressure is
low. Make sure water supply is turned on and Adapta
Valve is all the way open.
Crimps in tubing Check tubing and straighten or replace as necessary.
Clogged pre-lters Replace pre-lters.
Fouled membrane Replace membrane.
2. Milky colored Water Air in system Air in the system is a normal occurrence with initial
start up of the RO system. This milky look will
disappear during normal use within 1-2 weeks. If
condition reoccurs after lter change, drain tank 1 to 2
times.
3. Water constantly Low water pressure See #1 Above
running, unit will not
shut off Crimp in supply tube Check tubing and straighten or repair as necessary.
High water pressure Check incoming water pressure to make sure it does
not exceed 80 psi. A pressure relief valve may be
necessary.
High pressure in Tank Empty storage tank of water. Set tank air pressure
between 5-7 psi. See previous page.
Low Pressure in Tank Use a Digital Air Gauge for best results. The empty
tank pressure should be 5-7 psi. See page 14.
4. Noise / Water from faucet Crimp or restriction Check tubing and straighten or repair as necessary.
vent hole or noise from in drain line Straighten all drain lines. Clear blockage. Cut off any
drain. Excess tubing
Drain tube clogged Caused from dishwasher or garbage disposal.
Disconnect the 3/8” black line at the drain, clean the
3/8” black line out with a wire, then reconnect. Blowing
air through the line will not always remove the clog.
5. Small amount of water in System starting up Normally it takes 3-5 hours to ll tank. Note: low
storage tank incoming water pressure and/or temperature can
drastically reduce production rate.
Low water pressure See #1 above.
To much air in tank Tank air pressure should be 5-7 psi when empty of water.
If below 5 psi add air or bleed if above 7 psi.
Check only when tank is empty of water.
See previous page.
6. Water leaks from the lter / Not properly seated Re-insert the lter / membrane cartridge.
membrane cartridge.
7. Low water ow from faucet Check air pressure in tank Use a Digital Air Gauge for best results. The empty
tank pressure should be 5-7 psi. See page 14.
Page 15
Page 16
Premier Inc.
8716 W. Ludlow Drive Suite #1
Peoria, AZ 85381 USA
California Certication # 07-1882
EZ-RO4
GENERAL USE CONDITIONS:
1. System to be used with municipal or well water sources treated and tested on regular basis to insure bacteriological safe quality. DO NOT use with water that
is microbiologically unsafe or unknown quality without adequate disinfection before and after the system. Systems certied for cyst reduction may be used on
disinfected water that may contain lterable cysts.
2. This system is acceptable for treatment of inuent concentrations of no more than 27 mg/L nitrate and 3 mg/L nitrite in combination measured as N and is
certied for nitrite/nitrate reduction only for water supplies with a pressure of 280 kPa (40 psig) or greater. If your water supply is under 40 psi Premier recomends
the use of a RO booster pump for proper operation.
3. Operating Temperature: Maximum: 100°F (40.5°C) Minimum: 40° (4.4°)
4. Operating Water Pressure: Maximum: 85 psi (6.0kg/cm2) Minimum: 40 psi (2.8kg/cm2)
5. pH 2 to 11
6. Maxiumum Iron present in incoming water supply must be less than 0.2 ppm.
7. Hardness of more than 10 grains per gallon (170 ppm) may reduce RO membrane life expectancy.
8. Recommend TDS (Total Dissolved Solids) not to exceed 1800 ppm.
Description Change time Frame Cost
Sediment Pre-lter: #114105 6 Months $ 9.95
Carbon Pre-lter: #114106 6 Months $15.95
Post Carbon lter #114107 12 Months $15.50
50 GPD R.O. Membrane: #114110 2 to 5 years $99.00
* All Prices Subject to change without notice
RECOMMENDED REPLACEMENT PARTS AND CHANGE INTERVALS:
Note: Depending on incoming feed water conditions replacement time frame may vary.
This system has been tested according to ANSI 58 for reduction of the substances listed below. The concentration of the indicated substances in water entering
the system was reduced to a concentration less than or equal to the permissible limit for water leaving the system as specied in ANSI 58. This system has been
tested for the treatment of water containing pentavalent arsenic (also known as As (V), As (+5), or arsenate) at concentrations of 0.30 mg/L or less. This system
reduces pentavalent arsenic, but may not remove other forms of arsenic. This system is to be used on water supplies containing a detectable free chlorine residual
at the system inlet or on water supplies that have been demonstrated to contain only pentavalent arsenic. Treatment with chloramine (combined chlorine) is not
sufcient to ensure complete conversion of trivalent arsenic to pentavalent arsenic, Please see the Arsenic Facts section of the Performance Data Sheet for further
information.
Avg. In. Avg. Eff. % Reduction pH Pressure Max Eff. Inf. challenge Max Allowable
(mg/L) (mg/L) mg/L concentration concentration
mg/L mg/L
Arsenic (Pentavalent) .310 0.001 99.6% 7.24 50psi 0.002 0.30±10% 0.010 mg/L
Barium Reduction 9.2 0.08 99.0% 7.64 50psi 0.12 10.0±10% 2.0
Cadmium Reduction 0.031 0.0004 98.0% 7.49 50psi 0.0008 0.03±10% 0005
Chromium (Hexavalent) 0.30 0.002 99.0% 7.24 50psi 0.004 0.03±10% 0.1
Chromium (Trivalent) 0.30 0.001 99.0% 7.64 50psi 0.002 0.03±10% 0.1
Copper Reduction 3.2 0.02 99.0% 7.40 50psi 0.04 3.0±10% 1.3
Cysts 92,000#/ml 3 #/ml 99.99% 7.44 50psi 18 minimum 50,000/mL N/A
Fluoride Reduction 8.7 0.19 97.0% 7.24 50psi 0.3 8.0±10% 1.5
Lead Reduction 0.15 0.002 98.8% 7.39 50psi 0.005 0.15±10% 0.0107
Nitrate 27 3.8 86.0% 7.24 50psi 4.3 27.0 ±10% 10.0
Nitrite 3.1 0.41 86.0% 7.24 50psi 0.46 3.0 ±10% 1.0
Nitrate + Nitrite 30 4.2 86.0% 7.24 50psi 4.8 30.0 ±10% 10.0
Perchlorate 0.14 0.003 97.0% 7.39 50psi 0.005 mg/L 0.10±10% 0.006
Radium 226/228 25pCi/L 5pCi/L 80.0% 7.24 50psi 5pCi/L 25pCiL±10% 5pCiL
Selenium 94.85 <0.2 97.0% 7.24 50psi <0.2 0.10±10% 0.05
TDS 741 22 97.0% 7.28 50psi 26.0 750±40mg/L 187
Turbidity 11.3 0.1 99.0% 7.43 50psi 0-1 11±1mg/L 0.5NTU
Recovery - 15.77% Daily Production Rate - 18.43 GPD Efciency - 8.82%
Depending on water chemistry, water temperature, and water pressure Premier’s R.O. Systems production and performance will vary.
Efciency rating means the percentage of the inuent water to the system that is available to the user as reverse osmosis treated water under
operating conditions that approximate typical daily usage. Recovery rating means the percentage of the inuent water to the membrane portion
of the system that is available to the user as reverse osmosis treated water when the system is operated without a storage tank or when the
storage tank is bypassed. There is an average of 4 gallons of reject water for every 1 gallon of product water produced.
REFER TO OWNER’S INSTALLATION/SERVICE MANUAL FOR FURTHER MAINTENANCE REQUIREMENTS AND WARRANTY
INFORMATION.
Phone: 480-675-7995 Fax: (623) 866-5666 Email: [email protected]
Page 16
Page 17

Arsenic Fact Sheet
Arsenic (As) is a naturally occurring contaminant found in many ground waters. Arsenic
in water has no color, taste or odor. It must be measured by an arsenic test kit or lab test.
Public water utilities must have their water tested for arsenic. You can obtain the results
from your water utility contained with in your consumer condence report. If you have
your own well, you will need to have the water evaluated. The local health department
or the state environmental health agency can provide a list of test kits or certied labs.
There are two forms of arsenic: pentavalent arsenic (also called As (V), As (+5)) and
trivalent arsenic (also called As (III), As (+3)). In well water, arsenic may be pentavalent,
trivalent, or a combination of both. Although both forms of arsenic are potentially hazardous
to your health, trivalent arsenic is considered more harmful than pentavalent arsenic.
RO systems are very effective at removing pentavalent arsenic. A free chlorine residual
will rapidly convert trivalent arsenic to pentavalent arsenic. Other water treatment
chemicals such as ozone and potassium permanganate will also change trivalent arsenic
to pentavalent arsenic. A combined chlorine residual (also called chloramine) where it
does convert trivalent arsenic to pentavalent arsenic, may not convert all the trivalent
arsenic in to pentavalent arsenic. If you get your water from a public water utility, contact
the utility to nd out if free chlorine or combined chlorine is used in the water system.
This Premier reverse osmosis system is designed to remove up to 98% of pentavalent
arsenic. It will not convert trivalent arsenic to pentavalent arsenic. Under laboratory
standard testing conditions, this system reduced 0.30 mg/L (ppm) pentavalent arsenic
to under 0.010 mg/L (ppm) (the USEPA standard for drinking water). Actual performance
of the system may vary depending on specic water quality conditions at the consumer’s
installation. In addition to the independent laboratory standard testing conditions Premier
has conducted additional eld testing on our reverse osmosis units to determine trivalent
arsenic reduction capabilities. Based upon Premier eld testing, it has been determined
that the RO units are capable of reducing up to 67% of trivalent arsenic from the drinking
water.
This reverse osmosis system contains a replaceable component critical to the efciency
of the system. Replacement of the reverse osmosis component should be with one of
identical specications, as dened by the manufacturer, to ensure the same efciency
and contaminant reduction performance. Specic component identication and ordering
information can be found in the maintenance section of this manual, by phone at 1-800752-5582 or online at www.premierH2o.com
Page 17
Page 18
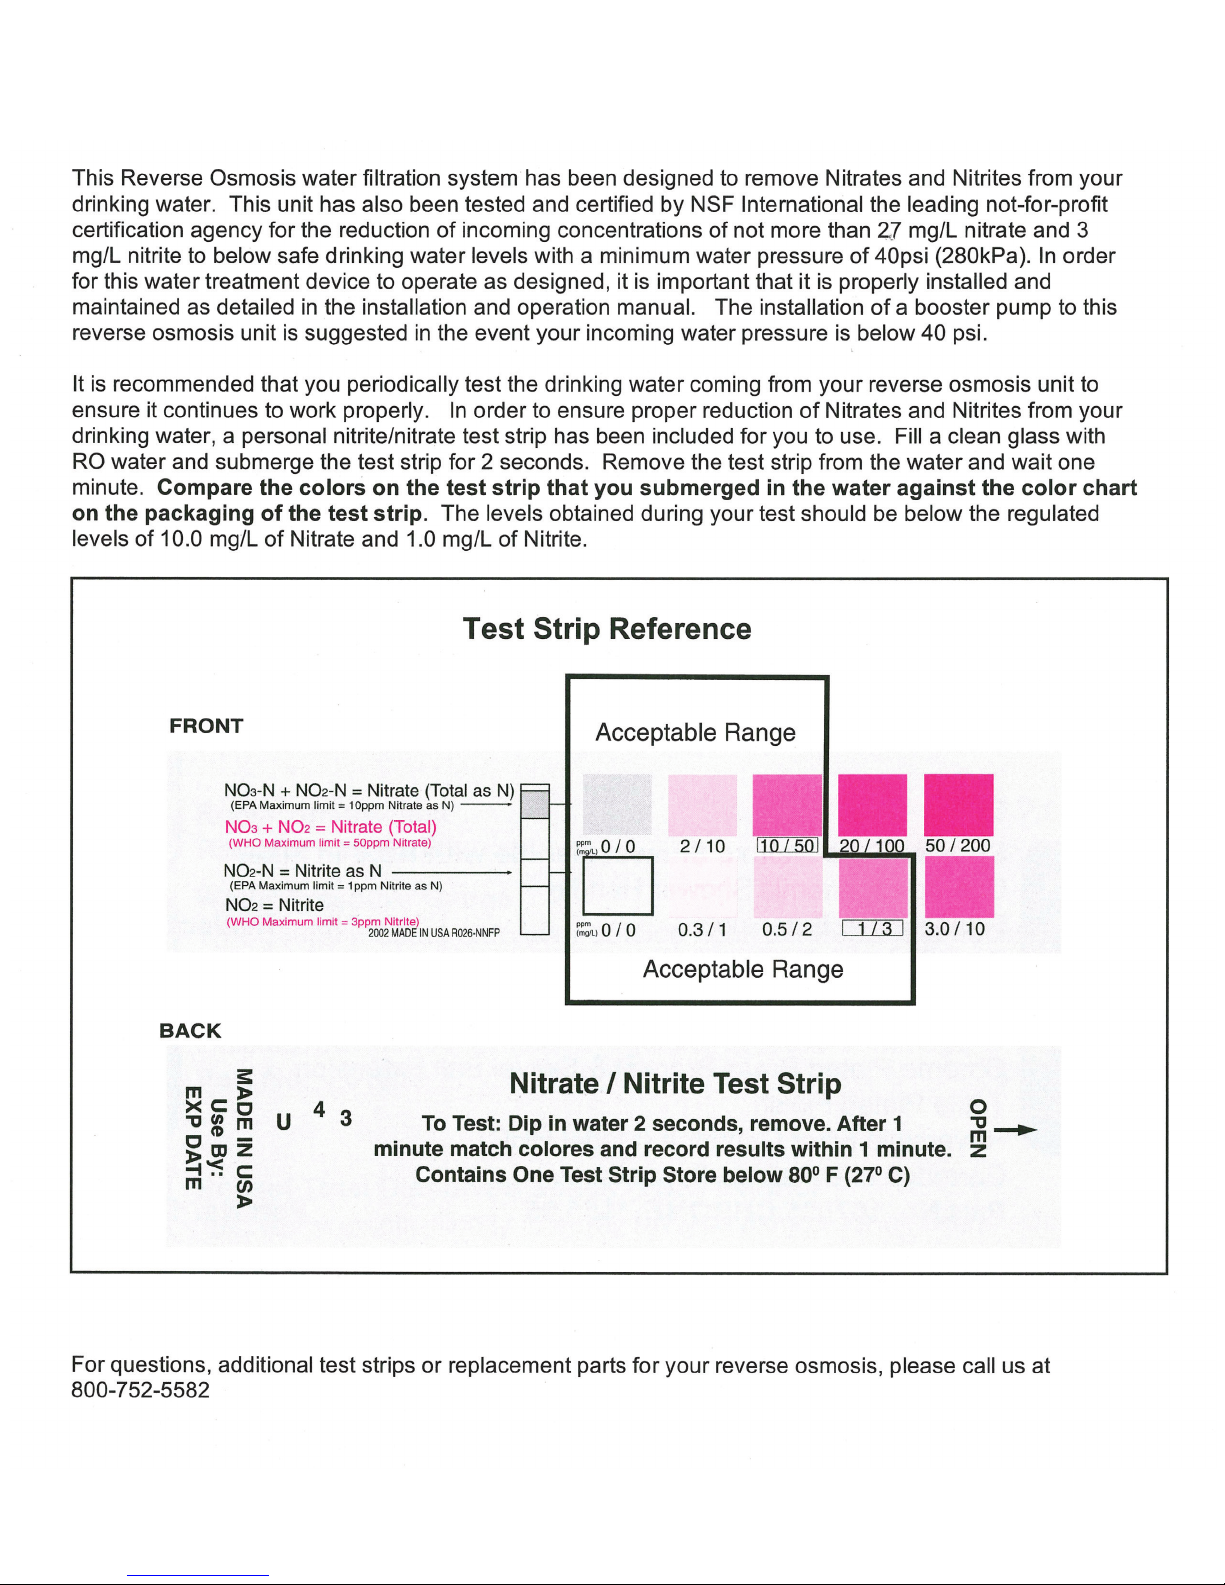
Nitrate / Nitrite Test Instruction
Page 18
Page 19
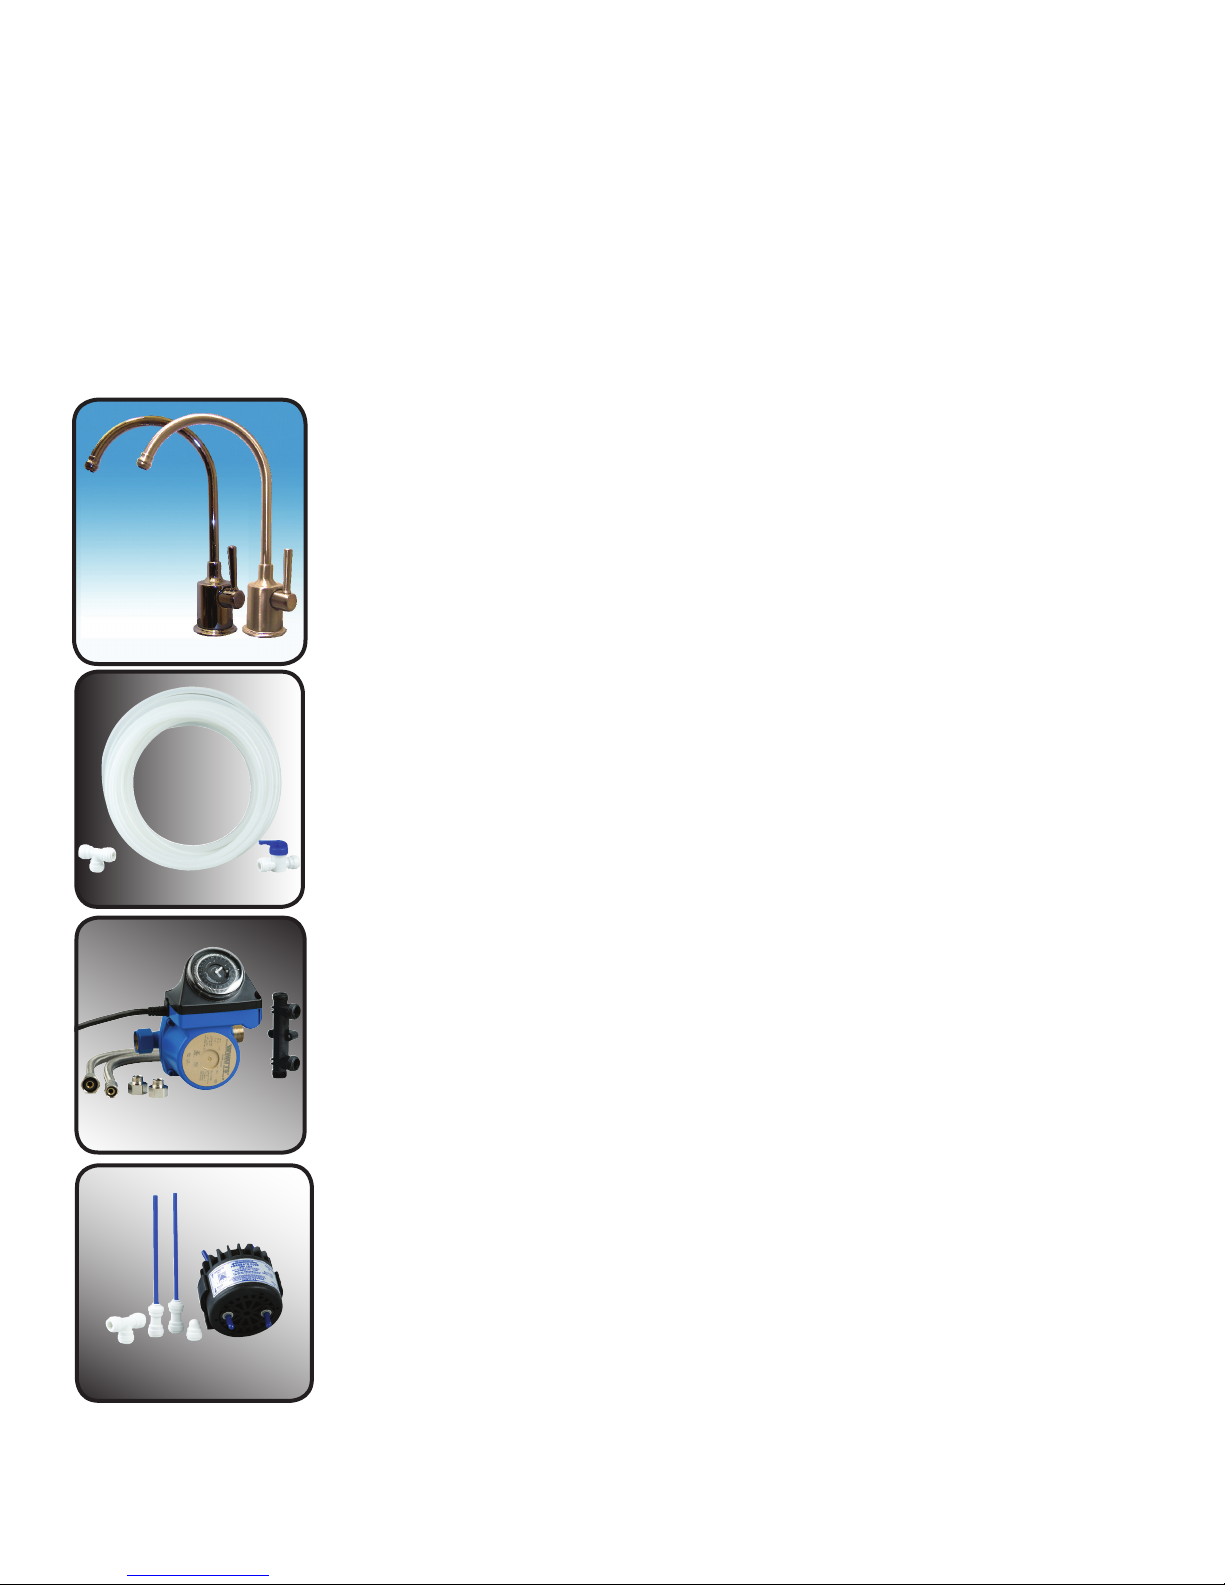
Other Products from Premier
Premier has other ne water ltration products and accessories to enhance your water and to
compliment your existing RO System. Listed on the next several pages are only a few of the items we
offer. Visit our web site at www.premierH2o.com or call our Customer Service Representatives at
1-800-752-5582 (inside USA) 1-480-675-7995 (outside USA) for more products.
Premier sells a lter change kit which includes all replacement lters needed.
Call 1-800-752-5582 or buy on-line at www.premierH2o.com.
Top Mount Faucets
These attractively designed faucets feature a long reach spout to compliment
all styles of kitchen decor. The unique top mount design allows for easy above
counter installation. The Monitored version of this faucet has an LED light that
turns red to notify you for lter replacement. Tubing Included!
Part No. 116091 - Chrome (Non-Monitored) *$47.95 each
116095 - Brushed Nickel (Non-Monitored) *$52.95 each
116094 - Chrome (Monitored) *$57.95 each
116093 - Brushed Nickel (Monitored) *$62.95 each
Reverse Osmosis Ice Maker Connection Kit
Connect your RO-Pure system to your refrigerator!
The ice maker kit includes parts needed for typical installation, includes;
30 feet of 3/8” tubing, an in-line ball valve and ttings.
Part No. 500010 *$ 16.95/ea
Premier Hot Water Recirculation System
Bring convenience and savings to your home, giving you hot water instantly at
every faucet when you need it. This unique product is easy to install and not
only provides you with the convenience of hot water when you need it, but also
saves an average of over 15,000 gallons per year!
Part No. 500800 *$229.99 each
PERMEATE PUMP KIT
Using only the available energy from the brine water (otherwise lost to the
drain), the pump forces product water into the storage tank. This process
effectively reduces membrane back pressure to less than 5 psi and allows the
membrane to maximize its use of the available feed pressure.
· Fills product tank up to 4 times more rapidly · Reduces waste water by as much as 80%
· Lowers “TDS creep” · NSF approved (Standard 58)
Part No. 560041 *$65.95/ea
*All prices subject to change without notice.
Page 19
Page 20
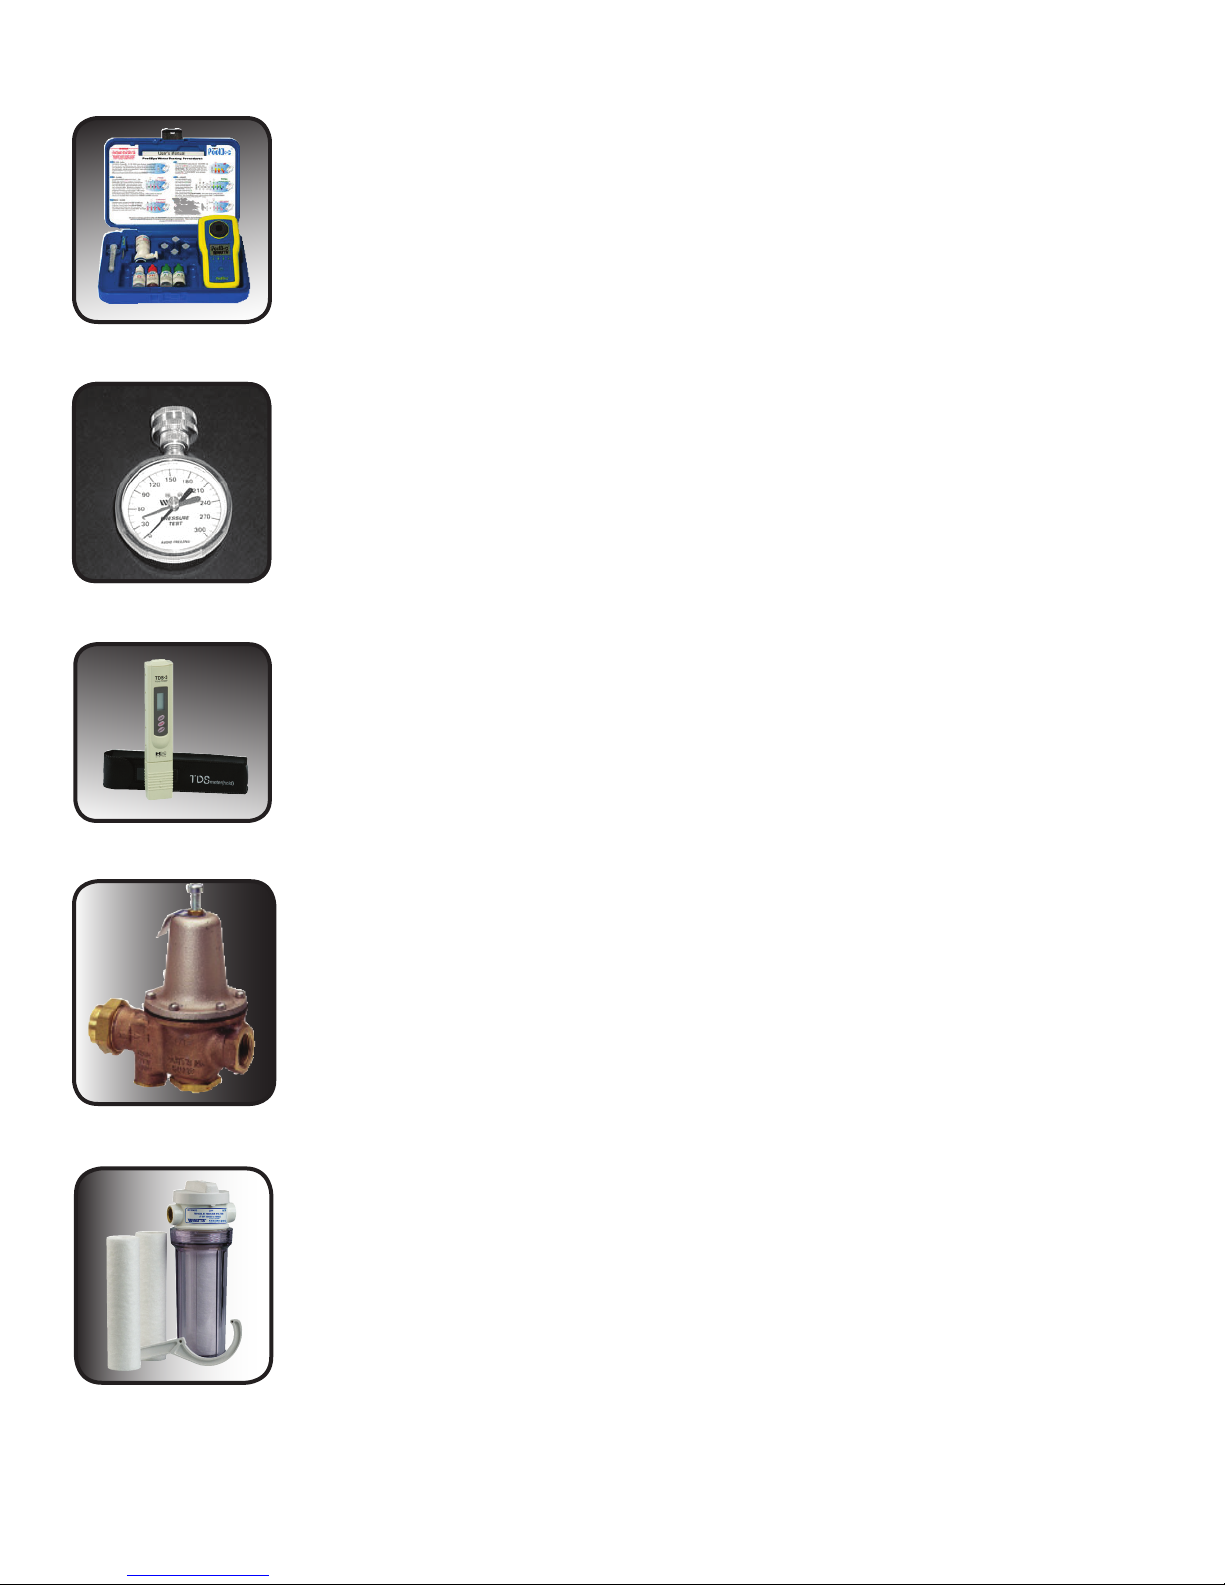
Pool Doc Pool & Spa Water Tester
PoolDocTM accurately measures pool and spa chemistry and provides
instructions on how to bring the pool/spa back into balance.
Part No. 164040 *$189.99/ea
Water Pressure Gauge
This gauge mounts onto your outside hose connection to accurately show your
home’s water pressure up to 300 psi. A red needle shows peak overnight
pressure, which may exceed readings during the day. High pressure readings
may indicate the need for a pressure regulator to prevent damage to appliances.
Part No. 261003 *$11.50/ea
Pocket Total Dissolved Solids (TDS) Monitor
Test water electronically to verify reverse osmosis membrane effectiveness.
Carrying case included.
Part No. 273001 *$39.95/ea
Whole House High Performance Water Pressure Regulator
Provides water pressure control solutions for residential, commercial, and industrial applications. Offers durability and years of continuous trouble free operation.
Part No. 107001 *$69.95 each
Whole House Filter
Great for sediment problems such as in well water supply or areas where dirt
and rust particles are a problem. Includes three 50 micron sediment lters and
wrench
(3/4” ports)
Part No. 500223 *$42.95/ea
Replacement lter
Part No. 304007 *$ 4.50/ea
* All prices subject to change without notice.
Page 20
Page 21
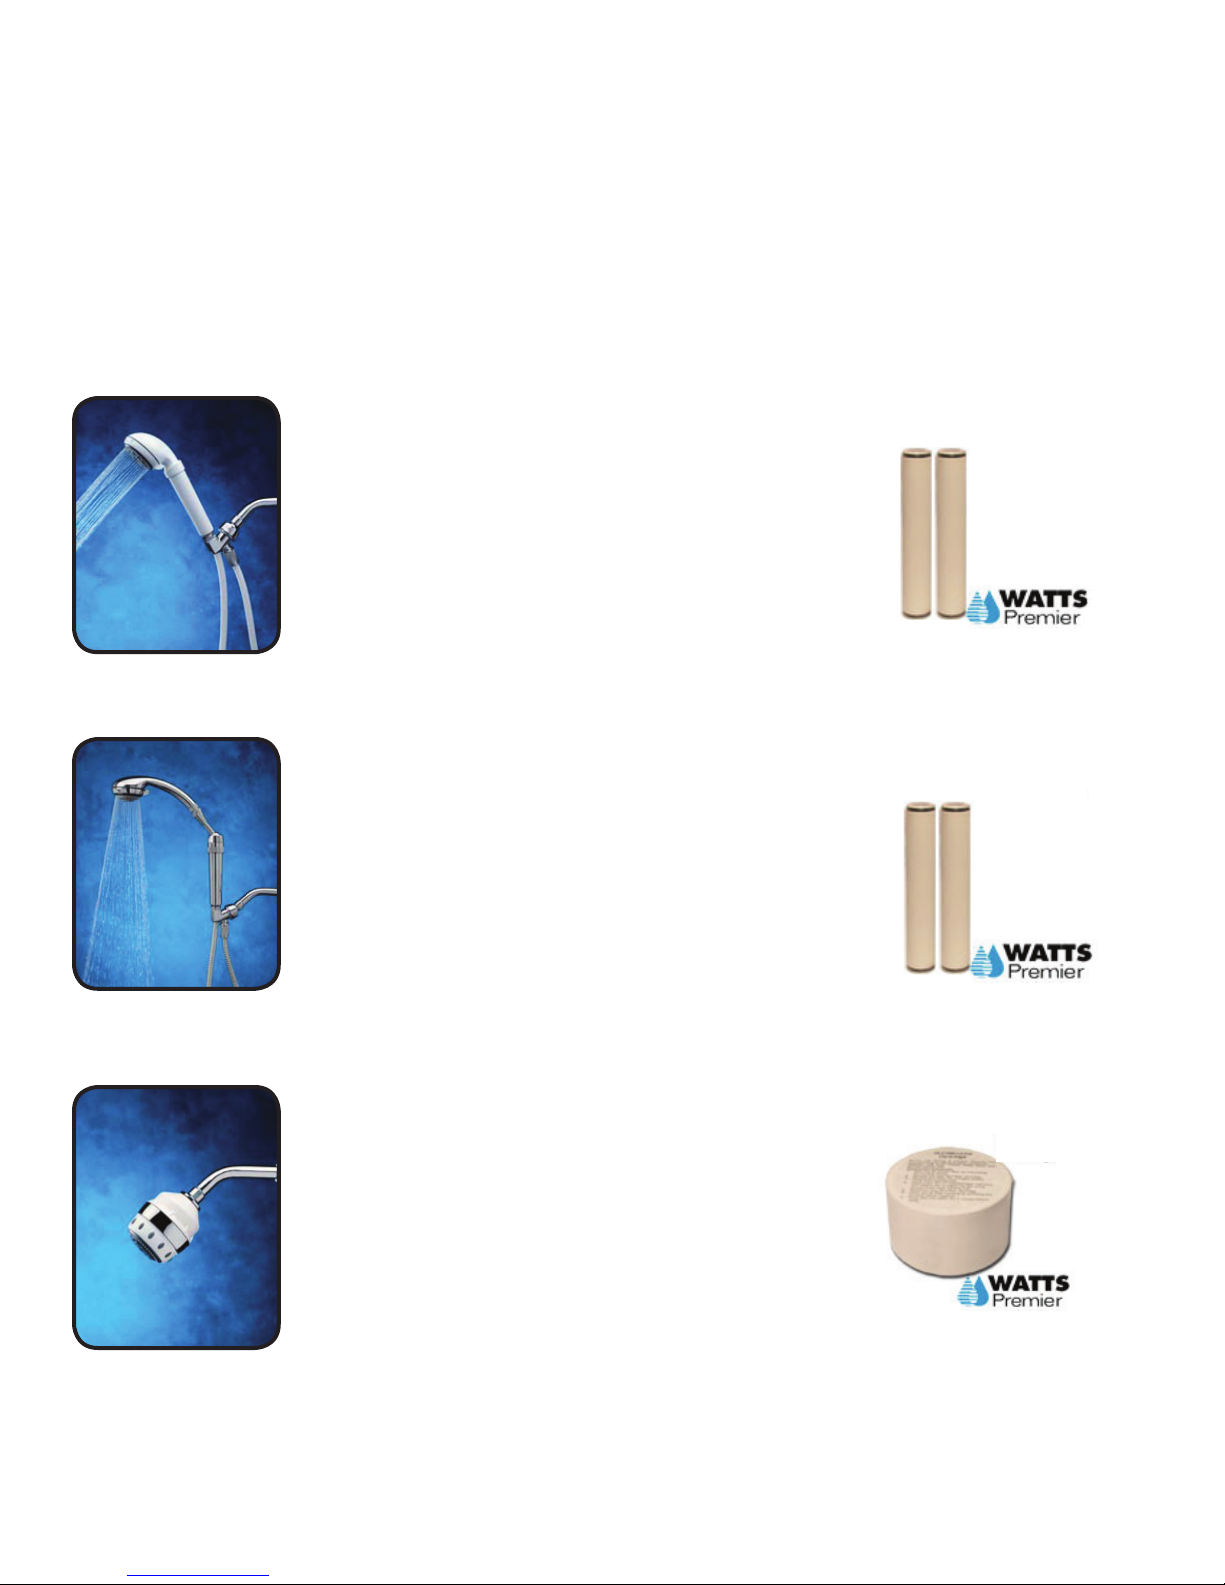
Removing chlorine from your shower
Special Chlorgon & KDF media – More effective then carbon medias with
hot water applications in the removal of the following.
√ Free Chlorine (CL-)
√ Combined Chlorine (Sodium Hypochlorite)
√ Hydrogen Sulde (Rotten egg smell)
√ Plus, its pH balanced.
Deluxe Shower Handle with Built in Filter Replacement lters 2PK
5-Way Massaging Spray
72” Reinforced Hose
High Strength Bracket
Triple Plated Finish
Reversible Filter Cartridge (Model HHC)
Cartridge Life Rating: 3 months
√ Iron oxide (rust water)
√ Dirt, sediment
√ Odors
Part No. 107070 WHITE *$38.95
Part No. 107091 CHROME *$44.95
Part No. 107092 GOLD *$44.95
Part No. 107075 *$15.95/pk
Shower Falls Deluxe Shower Handle with Built in Filter
Curved Ergonomic Shower Handle Replacement lters 2PK
Filter Handle Extension
Dual Swivel Adjustment
Ultra Deluxe 5 Way Massaging Spray
72” Reinforced Hose
Chrome Plated Brass Bracket & Swivel Ball Extension
Triple Plated Finish
Reversible Filter Cartridge (Model HHC)
Cartridge Life Rating: 3 months
Part No. 107095 CHROME *$55.95
Part No. 107075 *$15.95/pk
All-In-One reversible High-Flow Filter Replacement lter
Deluxe 5-Way Massaging Spray
Soft-Touch Adjustment Pads
Anti-Scaling Spray Nozzle
High Strength Housing
Triple Plated Finish
Cartridge Life Rating: 6 months
Part No. 107098 White/Chrome *$39.95 Part No. 107080 *$13.95/ea
Visit our website www.premierH2o.com for a larger selection.
*All prices subject to change without notice.
Page 21
Page 22
WARRANTY REGISTRATION
Thank you for selecting Premier for your water ltration needs.
4 Ways to Register
Premier Inc. is concerned for the safety of your personal information. Premier collects personal information when you register with Premier. This
information is stored in our data base and we do not rent, sell, or share personal information with other people or nonafliated companies. We
reserve the right to send you certain types of communications such as direct mail, email, or by telephone relating to our products or products that
you have purchased. We limit access to your personal information to those employees who will directly provide you with services or products in
order to do their jobs. We want to offer you four ways to communicate with us. 1.Online, 2.Fax, 3.Telephone, and 4. Mail the form below. By
registering your product you will receive the full benet of our warranty. Premier will also send you a semiannual lter change reminder beginning
six months from date of installation. To insure the highest quality of your water, lters should be replaced every 6 months. If you have any questions or comments please give us a call at 1-800-752-5582 M-F 8:00am -5:00pm MST.
1. On-line at www.premierH2o.com
Register your product on-line and receive a 5% discount on your next on-line order, Plus receive reduced shipping.
2. Call in your information 1-800-752-5582
Call and we will enter your information.
3. Fax in your information 623-866-5666
Fax this form directly to us.
Registering
will insure you
receive Watts
FREE
4. Mail in the information.
Please complete the form below. Mail to: Premier
8716 W. Ludlow Dr. Suite #1
Peoria, AZ 85381
Filter
Reminder
Notice
Iowa Department of Public Health - Sales in Iowa require this to be completed,
signed and returned. These signatures will be retained on le for two years.
First Name:_________________________ Last Name:____________________________
Address: ________________________________________ City: ____________________
State: _______________________________________ Zip Code: ___________________
Country: USA CANADA MEXICO OTHER ____________
Phone # ______-__________ -__________ Email Address: ______________________
Date of Purchase: ___________________ Date of Install: _______________________
Installed By: SELF Plumbing Professional Where Purchased: ____________
Model Number: _______________________ Serial Number: ____ - __________
XXXXX
XXXXXX
-
Premier, Inc. 8716 W Ludlow Drive Suite #1 Peoria, AZ 85381
Phone: 800-752-5582 www.premierH2o.com Fax: 623-866-5666
Page 22
Page 23
WARRANTY REGISTRATION
Please Fill out and keep for your Records
First Name:_________________________ Last Name:____________________________
Address: ________________________________________ City: ____________________
State: _______________________________________ Zip Code: ___________________
Country: USA CANADA MEXICO OTHER ____________
Phone # ______-__________ -__________ Email Address: ______________________
Date of Purchase: ___________________ Date of Install: _______________________
Installed By: SELF Plumbing Professional Where Purchased: ____________
Model Number: _______________________ Serial Number: ____ - __________
XXXXXX
XXXXX
-
Iowa Department of Public Health - Sales in Iowa require this to be completed, signed and returned.
These signatures will be retained on le for two years.
Insert into envelope and return to Premier
Premier
8716 W. Ludlow Dr. Suite #1
Peoria, AZ 85381
Page 23
Page 24
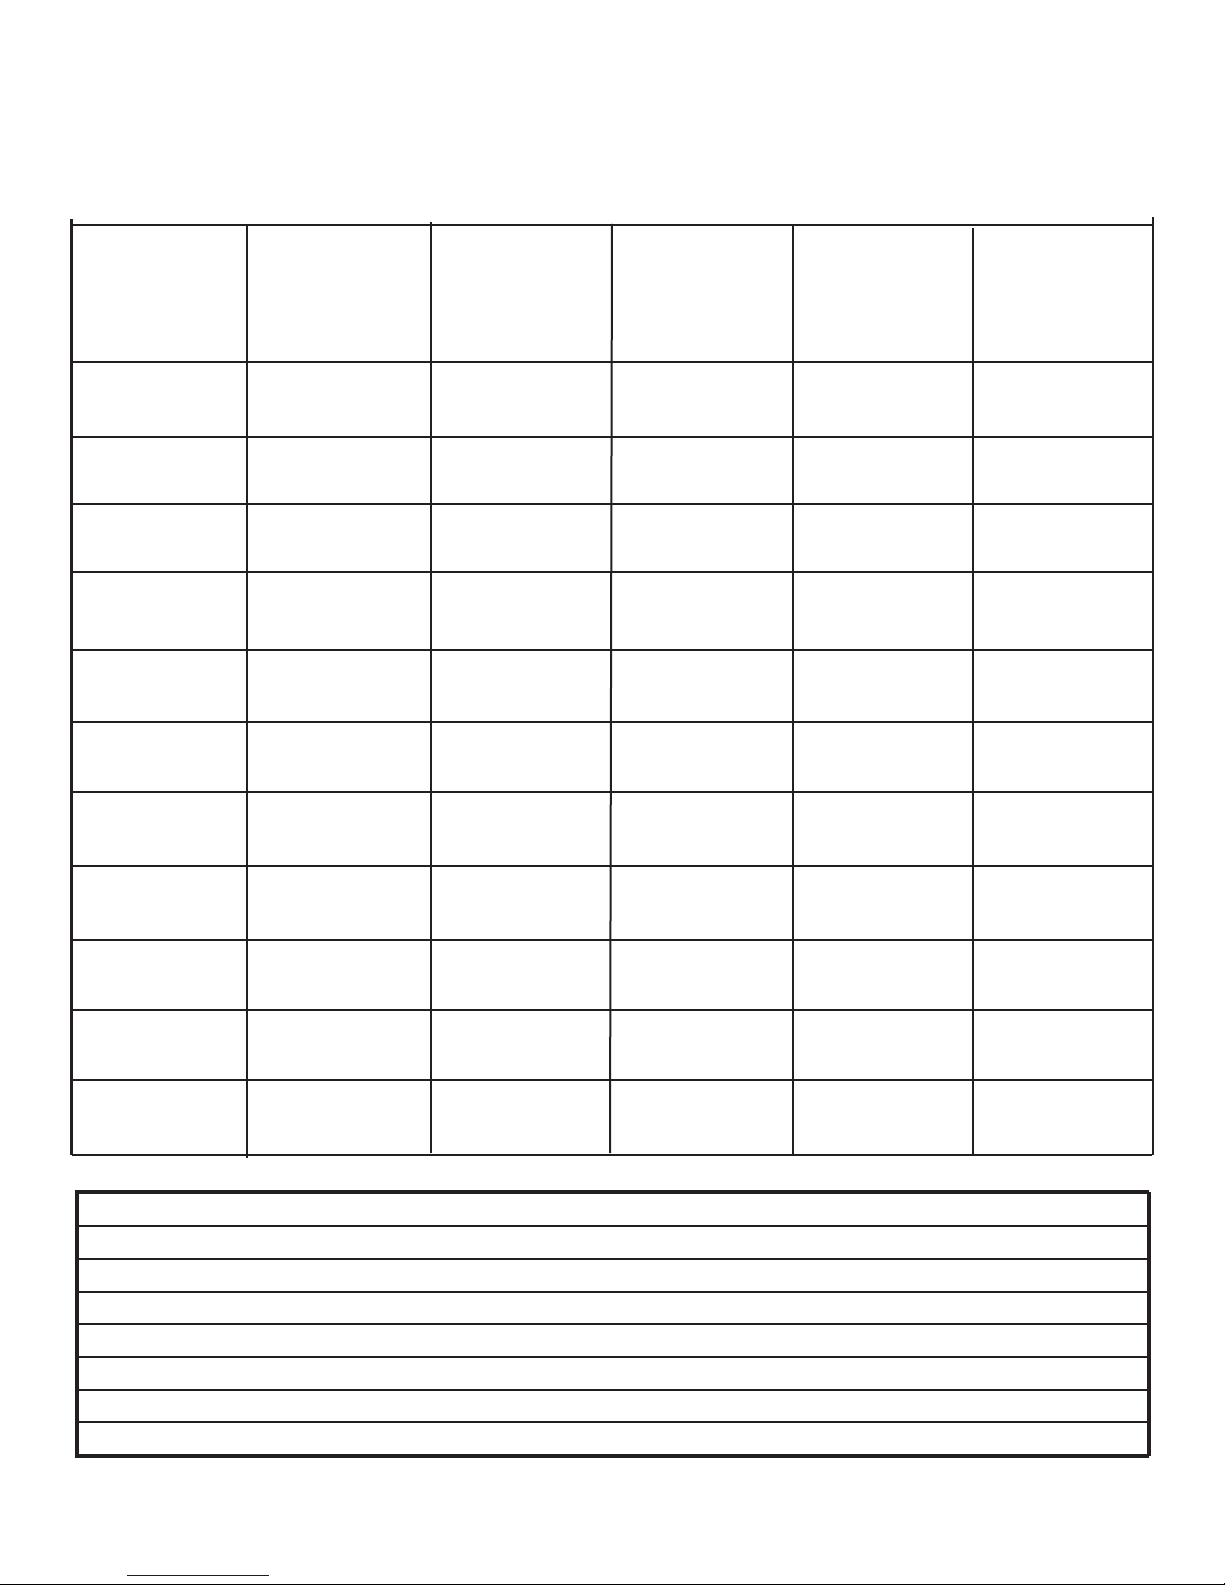
Service Record
Model Number:__________ Serial Number:___________
Date of Purchase:__________ Date of Install:___________ Installed by:_____________
Date
Sediment
Filter
(6 months)
Carbon
Pre-Filter
(6 months)
Membrane
(2-5 years)
Carbon
Post-Filter
(12months)
NOTES:
Page 24
Page 25

Page 25
Page 26
Limited Warranty
What your Warranty Covers:
If any part of your Premier Reverse Osmosis System is defective in workmanship (excluding replaceable lters and
membranes), return unit after obtaining a return authorization (see below), less tank, within 3 years of original retail
purchase, Premier will repair or, at Premier’S option, replace the system at no charge.
How to obtain Warranty Service:
For warranty service, call 1-800-752-5582 for documentation and a return authorization number. Once the return
authorization number has been created, ship your Reverse Osmosis unit (less tank) to our factory, freight and insurance
prepaid, with proof of date of original purchase. Include a note stating the problem experienced and include your name,
address and your return authorization number. No returns will be accepted with out the proper return authorization
number. Premier will repair it, or replace it, and ship it back to you prepaid.
What this warranty does not cover:
This warranty does not cover defects resulting from improper installation, (contrary to Premier’s printed instructions),
from abuse, misuse, misapplication, improper maintenance, neglect, alteration, accidents, casualties, re, ood, freezing,
environmental factors, water pressure spikes or other such acts of God.
This warranty will be void if defects occur due to failure to observe the following conditions:
1. The Reverse Osmosis System must be hooked up to a potable municipal or well cold water supply.
2. The hardness of the water should not exceed 10 grains per gallon, or 170 ppm.
3. Maximum incoming iron must be less than 0.2 ppm.
4. The pH of the water must not be lower than 2 or higher than 11.
5. The incoming water pressure must be between 40 and 85 pounds per square inch.
6. Incoming water to the RO cannot exceed 105 degrees F (40 degrees C.)
7. Incoming TDS/Total Dissolved Solids not to exceed 1800 ppm.
8. Do not use with water that is micro biologically unsafe or of unknown quality without
adequate disinfection before or after the system.
This warranty does not cover any equipment that is relocated from the site of its original installation.
This warranty doe not cover any charges incurred due to professional installation.
This warranty does not cover any equipment that is installed or used outside the United States of America and Canada.
LIMITATIONS AND EXCLUSIONS:
Premier WILL NOT BE RESPONSIBLE FOR ANY IMPLIED WARRANTIES, INCLUDING THOSE OF
MERCHANTABILITY AND FITNESS FOR A PARTICULAR PURPOSE. PREMIER WILL NOT BE RESPONSIBLE
FOR ANY INCIDENTAL OR CONSEQUENTIAL DAMAGES, INCLUDING TRAVEL EXPENSE, TELEPHONE
CHARGES, LOSS OF REVENUE, LOSS OF TIME, INCONVENIENCE, LOSS OF USE OF THE EQUIPMENT, AND
DAMAGE CAUSED BY THIS EQUIPMENT AND ITS FAILURE TO FUNCTION PROPERLY. THIS WARRANTY
SETS FORTH ALL OF PREMIER’S RESPONSIBILITIES REGARDING THIS EQUIPMENT.
OTHER CONDITIONS:
If PREMIER chooses to replace the equipment, Premier may replace it with reconditioned equipment. Parts used in
repairing or replacing the equipment will be warranted for 90 days from the date the equipment is returned to you or
for the remainder of the original warranty period, whichever is longer. This warranty is not assignable or transferable.
YOUR RIGHTS UNDER STATE LAW:
Some states do not allow limitations on how long an implied warranty lasts, and some states do not allow the exclusion
or limitation of incidental or consequential damages, so the above limitations or exclusions may not apply. This warranty
gives you specic legal rights, and you may have other legal rights which vary from state to state.
Page 26
 Loading...