

Page 1
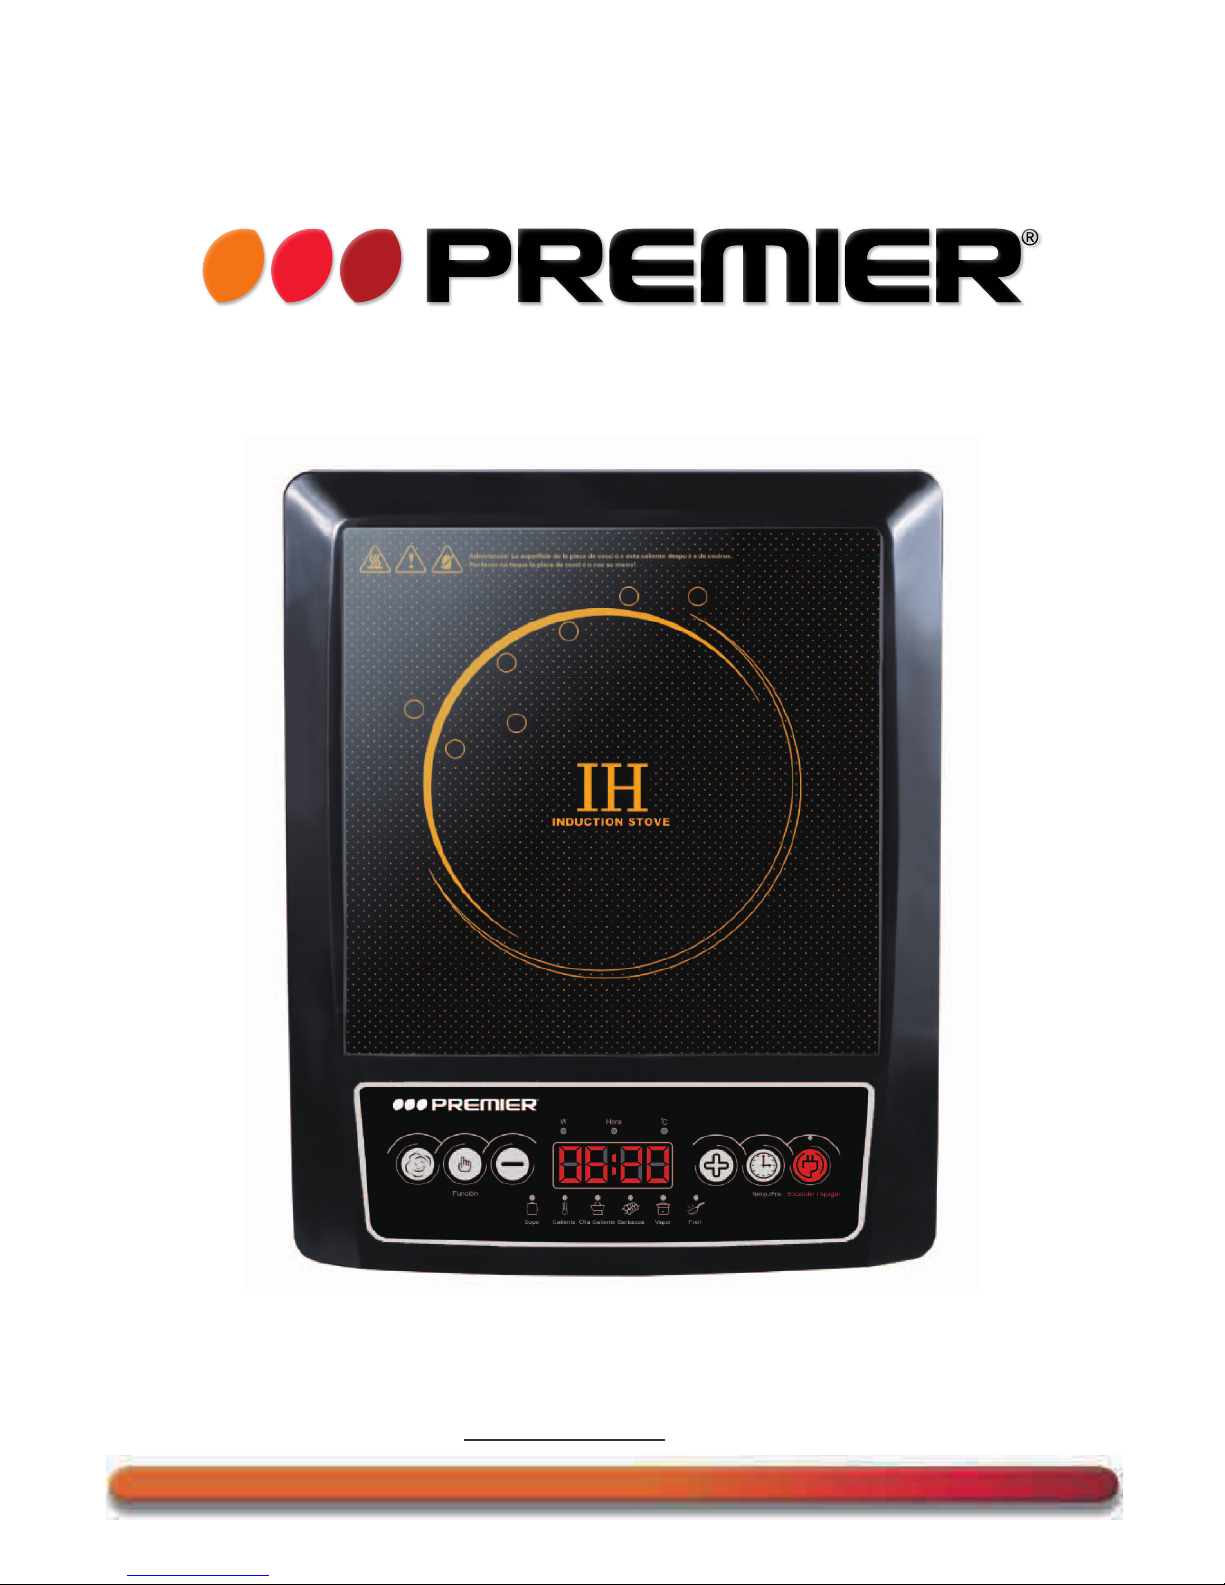
INSTRUCTION MANUAL
INDUCTION STOVE
ED-4704IC
DEAR CUSTOMER
In order to achieve the best performance of your product, please read this instruction manual carefully
before using, and keep it for future reference.
If you need extra support, please write to
Page 2
P-1
CAUTION
RISK OF ELECTRIC
SHOCK, DO NOT
OPEN
Caution: To reduce the risk of electric shock do not open
this device, there are not serviceable parts for customers.
Please refer any maintenance or repair to qualified
personnel.
This sign means the existence of dangerous voltage at
the inside of the unit, which states a risk of electric shock.
This sign means that ther
e are important instructions of
operation and handling in the manual that comes with this
device.
PREMIER CUSTOMER SERVICE
NOTE
This unit may be submitted to changes in specifications, characteristics and/or
operation without prior notice to the user, in order to continue improving and
developing its technology.
Venezuela:
0800 – ELECTRIC (353-2874)
Panama:
300-5185
SitWe eb :
www.premiermundo.com
E-mail:
Page 3

Induction cooker working principle...................................................................................................Page 2
Specification.....................................................................................................................................Page 2
Parts name.......................................................................................................................................Page 2
Function diagram..............................................................................................................................Page 3
Operation and usage........................................................................................................................Page 4
Cautions...........................................................................................................................................Page 6
Cleanness&maintenance................................................................................................................Page 7
Usable and Non-usable cooking utensils.........................................................................................Page 7
Trouble shooting..............................................................................................................................Page 8
Technical Data.................................................................................................................................Page 9
1-P
Page 4
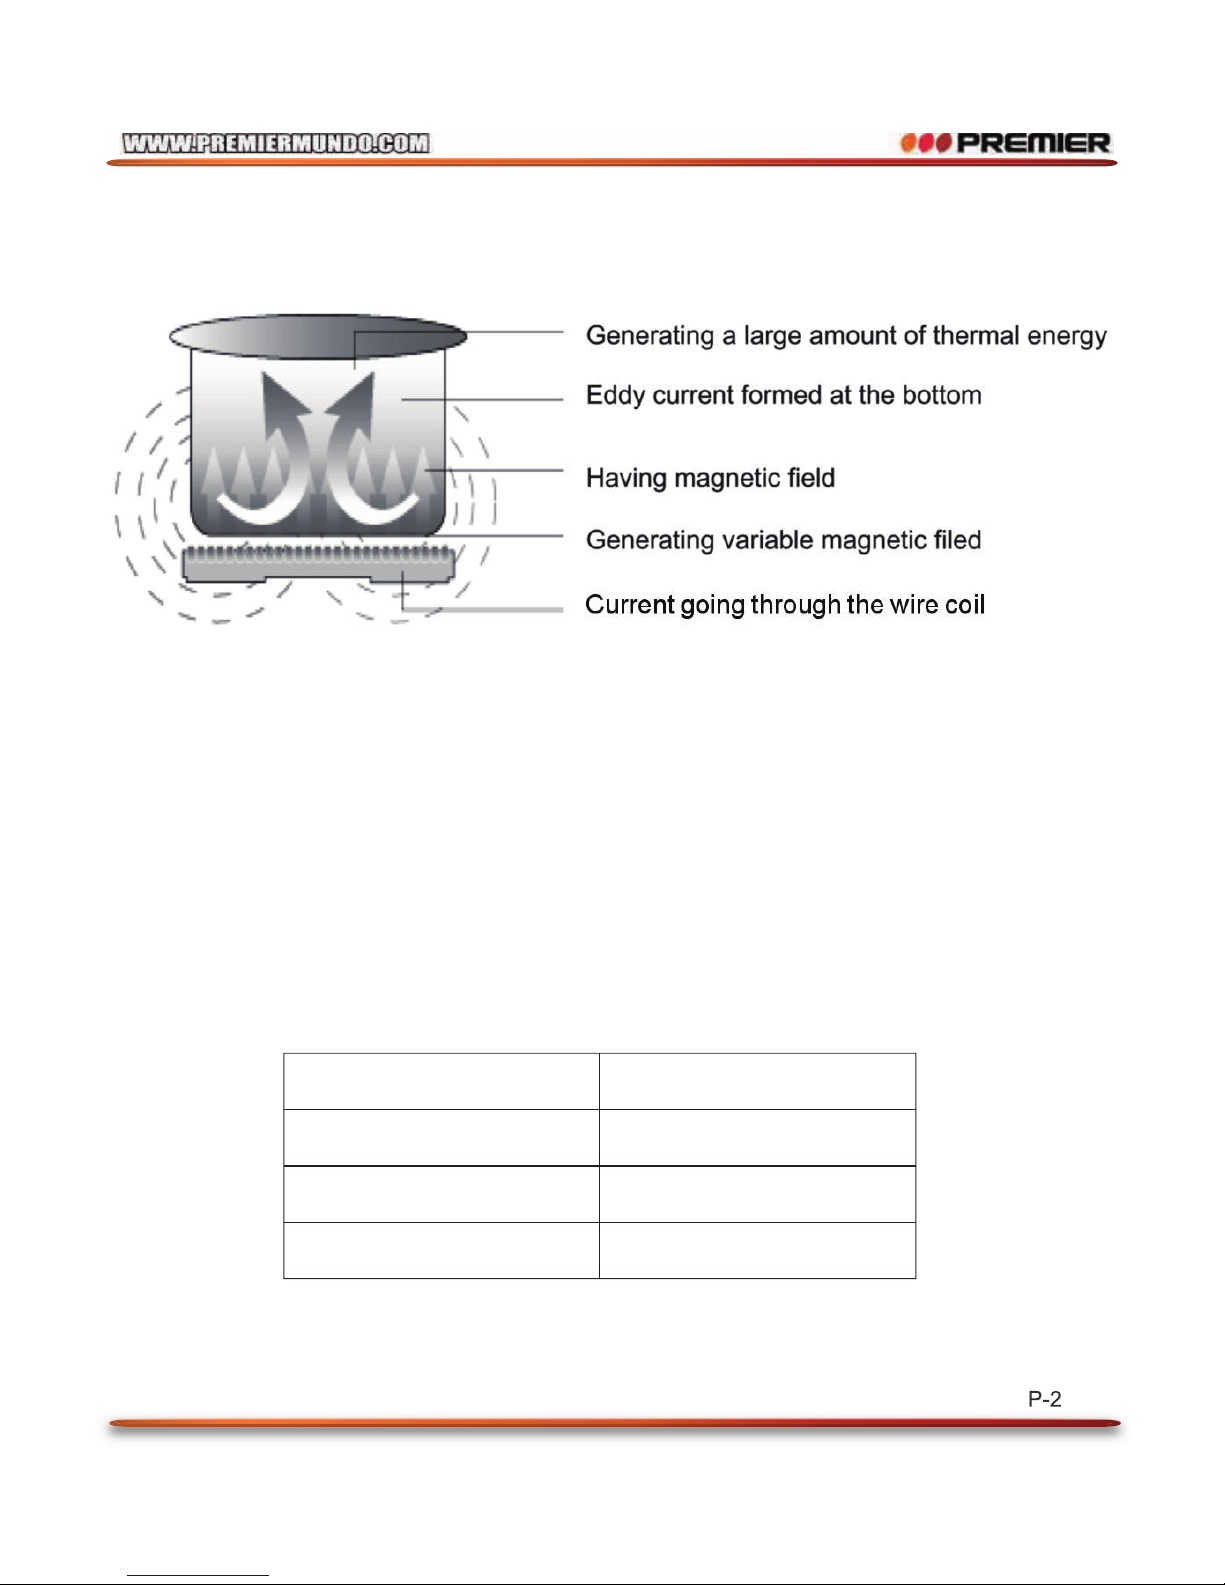
INDUCTION COOKER WORKING PRINCIPLE
2-P
SPECIFICATION
The induction cooker is mainly based on the principle of electromagnetic induction technology.
Current generates variable magnetic field after running through the wire coil. Eddy current is
generated at the bottom when the magnetic field induces the cooker plate. A large amount of thermal
energy produced can heat the bottom quickly, thus heating up the food very fast, with thermal
efficiency up to 94.36%.
Model No. ED-4704IC
Power Supply 220V~50HZ
MAX Power 2000W
Temperature A djustment 60℃~270℃
Page 5
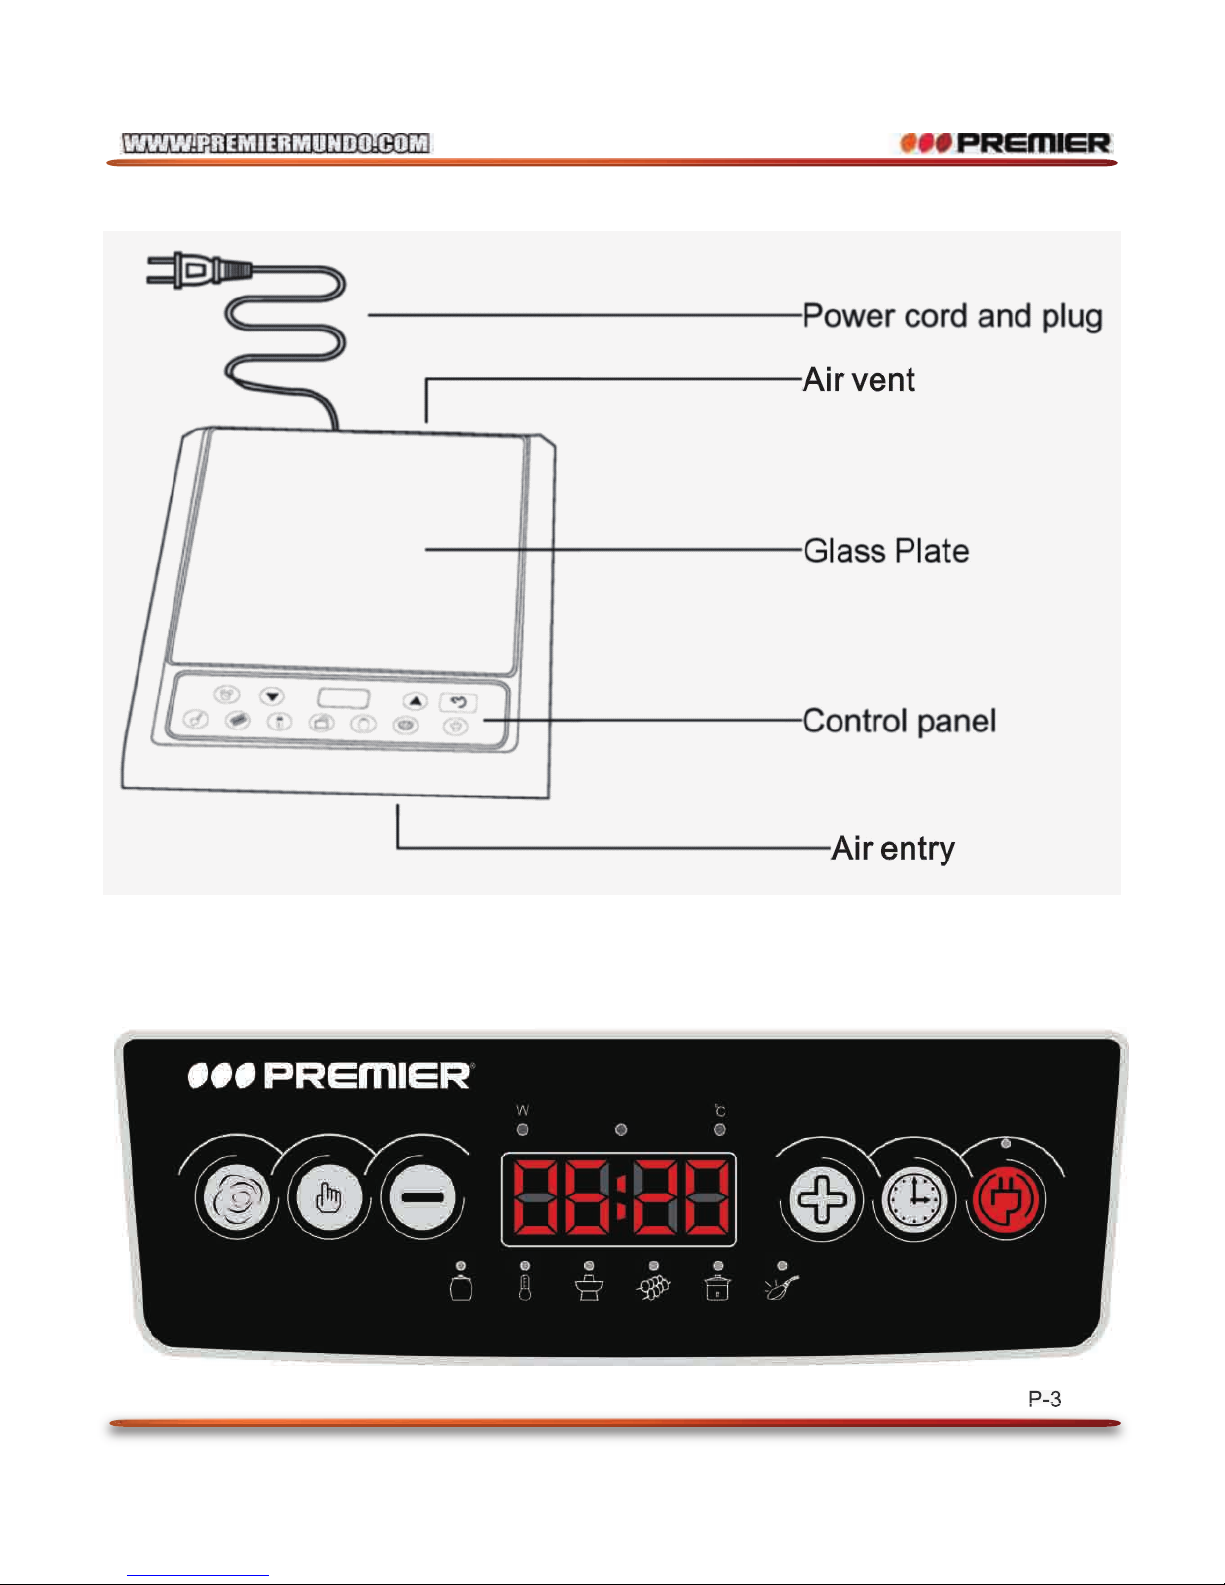
PARTS NAME
P-3
FUNCTION DIAGRAM
Hora
Función
Sopa Caliente Olla Caliente Barbacoa Vapor Freír
Temp./Pre. Encender / Apagar
Page 6

After inserting plug into electrical out, the indicator of “on/off” will light, after 5 seconds with
the sound. It will show that the induction cooker have connected with the electrical source and
ready to work.
Put the suitable cooking utensils (with food) in the center of panel, choose any of function
according to cooking as needful:
Hot pot: Touch the key of “On/off”, and then touch the function “Hot pot”, the indicator light
of “Hot pot” will light. Which means the function of “Hot pot” will unseal, it display with
2000W. During use this function, according to requirement, there are 8 levels for your
adjust of firepower by touch the key of “Up” or “Down”. This function is also the pre-set
function when touch the key of “on/off”. With the cooking function requirement, you also
can timer by touch the key of “Up” or “Down”. You can timer from 1 minute to 3 hours.
Barbecue: Touch the key of “Barbecue” to choose the function of “Barbecue”, the
indicator light of “Barbecue” will light. Which means the function of “Barbecue” will unseal,
it displays with 160. During use this function, according to requirement, there are 8
levels for your adjust of temperature by touch the key of “+” or “-”. With the cooking
function requirement, you also can timer by touch the key of “+” or “-”.
Soup: Touch the key of “Soup” to choose the function of “Soup”, the indicator light of
“Soup” will light. Which means the function of “Soup” will unseal, it display with 1300W.
During use this function, according to requirement, there are 8 levels for your adjust of
firepower by touch the key of “+” or “-”. With the cooking function requirement, you also
can timer by touch the key of “+” or “-”.
Warm: Touch the key of “Warm” to choose the function of “Warm”, the indicator light of
“Warm” will light. Which means the function of “Warm” will unseal, it displays with 80.
During use this function, you can not adjust the temperature and power. But you can timer
by touch the key of “+” or “-”.
Steam: Touch the key of “Steam” to choose the function of “Steam”, the indicator light of
“Steam” will light. Which means the function of “Steam” will unseal. During use this
function, you can’t adjust the power and temperature by touch the key of “Up” or “Down”.
But with the cooking requirement, you can adjust the time by touch the key of “Up” or
“Down” from 1 minute to 3 hours.
OPERATION AND USAGE
P-4
“Down” from 1 minute to 3 hours.
1.
2.
2.1
2.2
2.3
2.4
2.5
Page 7

1. You cannot set timing off and cannot adjust power & temperature for automatic cooking function.
2. For manual cooking function power or temperature adjustment and timing off setting are available.
3. Overheat Protection: The unit is equipped with overhear protection.
If the pot or pan gets too hot, the unit will switch off automatically, the buzzer can give out an alarm.
Should this happen, wait for some minutes and cool it down. After that, the unit will work without
problem.
4. This appliance is liable to get hot during use.
Notice
Stir-fry: Touch the key of “Stir-fry” to choose the function of “Stir-fry”, the indicator light of
“Stir-fry” will light. Which means the function of “Stir-fry” will unseal, it display with 270℃.
During use this function, according to requirement, there are 8 levels for your adjust of
temperature by touch the key of “Up” or “Down”. With the cooking function requirement,
you also can timer by touch the key of “Up” or “Down”. You can timer from 1 minute to 3
hours.
Timer / Pre.: After touch the key of “Timer / pre.”, according to needed, you can adjust the
time by touch the key of “+” or “-”. One touch will increase or decrease 1 minute. It will
automatic increase or decrease 10 minutes by key-touch on “+” or “-” fixedly. After pre-set
the time, it will decrease with count down. The induction cooker will automatically turn off
when it is shown “0”. (The longest timer is 3 hours)
Timer / Pre.: Before using the induction cooker, touch the key of “Timer / Pre.”. According
to needed, you can adjust the time by touch the key of “+” or “-”. One touch will increase
or decrease 1 minute. It will automatic increase or decrease 10 minutes by key-touch on
“+” or “-” fixedly. After schedule the time, it will decrease with count down. The induction
cooker will automatically turn off when it is shown “0”. (The longest timer is 24 hours. The
unit will begin to work automatically once time count down finishes.
P-5
2.6
2.7
2.8
After finishing cooking, please turn off the power source then pull out of socket.
Page 8

1. Do not plug with wet hands.
2. Do not plug into a socket where several other appliances are plugged in.
3. Do not plug into a socket which Ampere load is less than 10A.
4. Do not use if the plug cord is damaged or power plug does not fit the socket safely.
5. Do not modify the parts, or repair the by yourself.
6. Do not use the unit near flame or wet places.
7. Do not use where children can easily touch the unit, do not allow children to use the unit by
themselves.
8. Do not place the unit on unstable surfaces.
9. Do not move the unit when the pot or the pan is on it.
10. Do not hear the pot empty or overheat the pot.
11. Do not place metallic objects such as knives, forks, spoons, lids, cans, and aluminum foils on the
top plate.
12. Use the unit with sufficient space around it, When unit working, it must be placed at least 10cm
from the wall. Keep the front side and either right or left side of the unit clear.
13. Do not use the unit on carpet or tablecloth (vinyl) or any other low-hear–resistant article.
14. Do not place a sheet of paper/silver paper between the pot/pan and the unit. The paper may get
burnt.
15. Do not break the surface, if the surface cracked, switch off immediately and take it to the
qualified service center.
16. Do not block air intake or exhaust vent.
17. Do not touch the top plate right after removing the pot or the pan, as the top plate will still be very
hot.
18. Do not place the unit near to the objects which are affected by magnet, such as: watches, radios,
televisions automatic-backing cards and cassette tapes.
19. Qualified technicians must replace the power cord.
CAUTIONS
P-6
Page 9
1. Please shut off the power and pull out the plug before your cleaning.
2. Clean the unit until it cools down completely.
3. To remove dirt, please select litmus less detergent.
4. After remove dirt, please use neat wet cloth to clean the unit.
5. Do not clean by water directly, water gets inside may cause malfunction.
6. Make the ceramic plate and pan clean before cook, otherwise, dirt after charring is very difficult to
clean and the plate may get discoloration.
7. You may clean air vent/air entry’s dirt by vacuum cleaner to suck up or by cotton, if there is dirt
with oil, add a little litmus less detergent with toothbrush to clean.
8. Don’t uses caustic impregnates to clean. It may damage the cooker by chemical reaction.
9. Do not use benzene, thinner scrubbing brush or polishing powder to clean the induction cooker.
CLEANNESS & MAINTENANCE
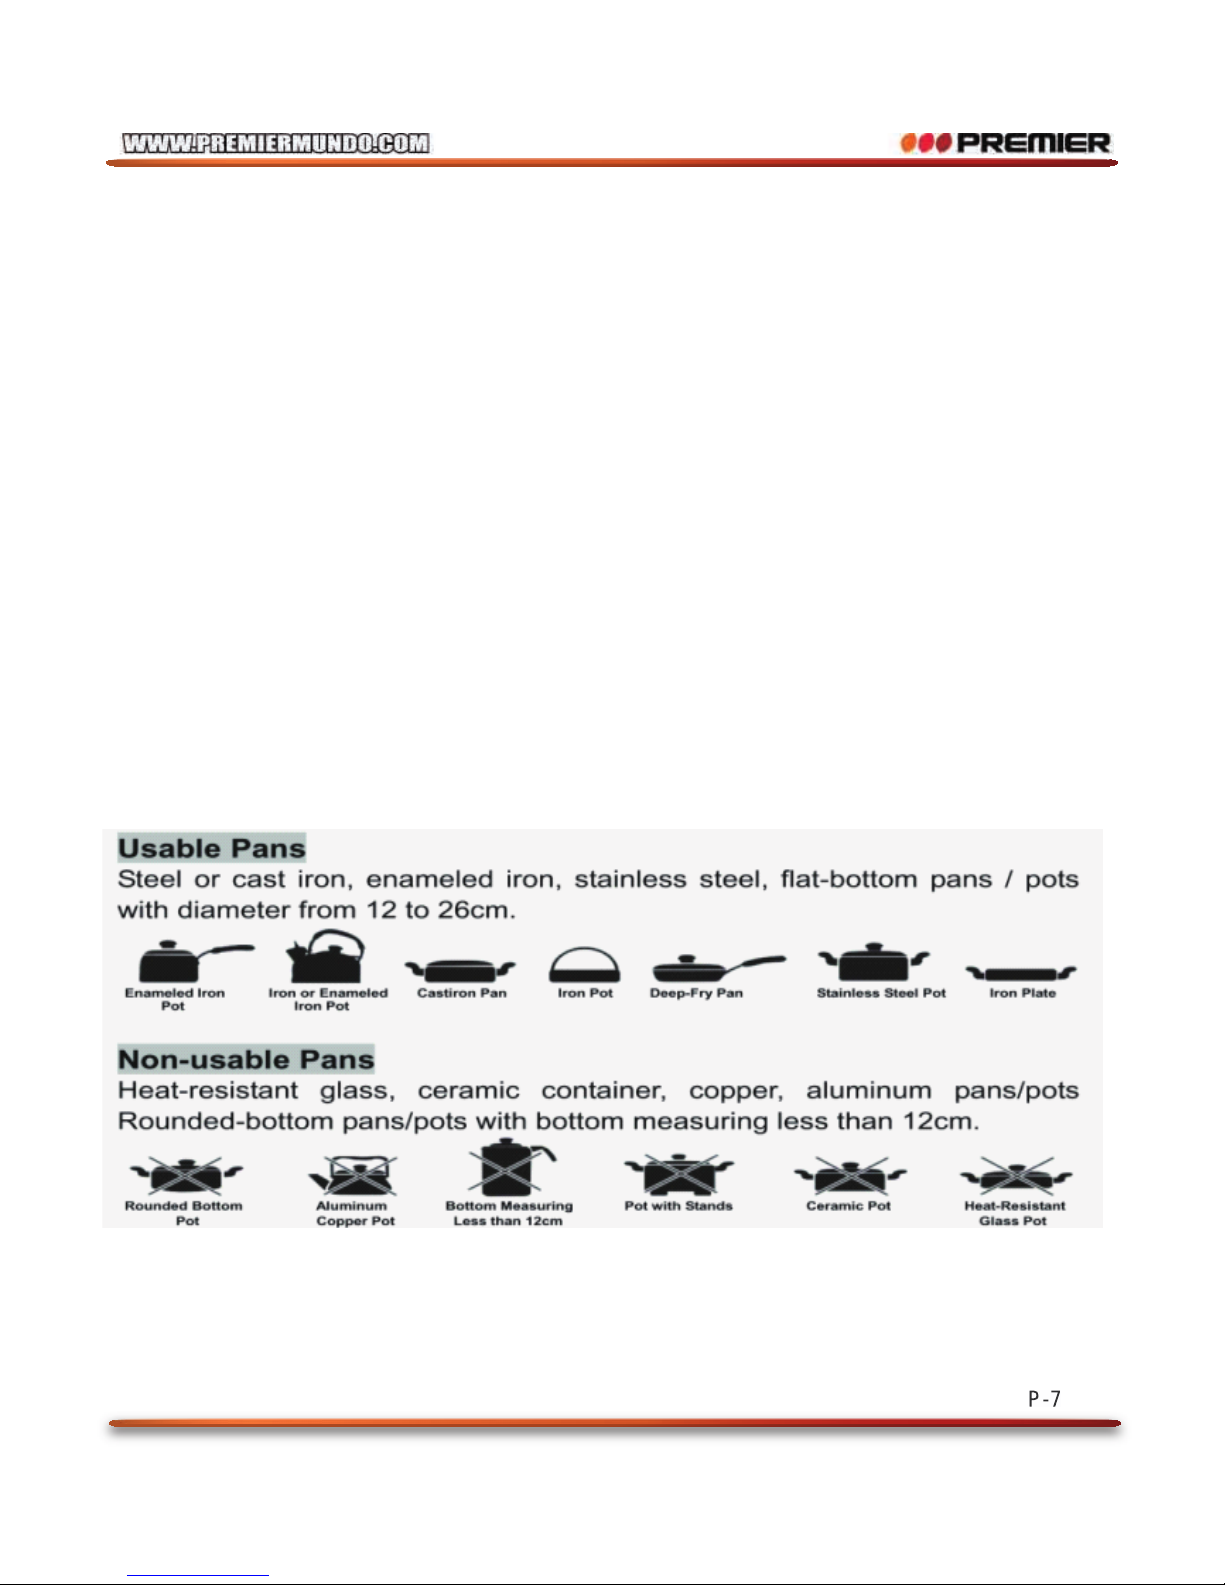
USABLE AND NON-USABLE COOKING UTENSILS
P-7
Page 10
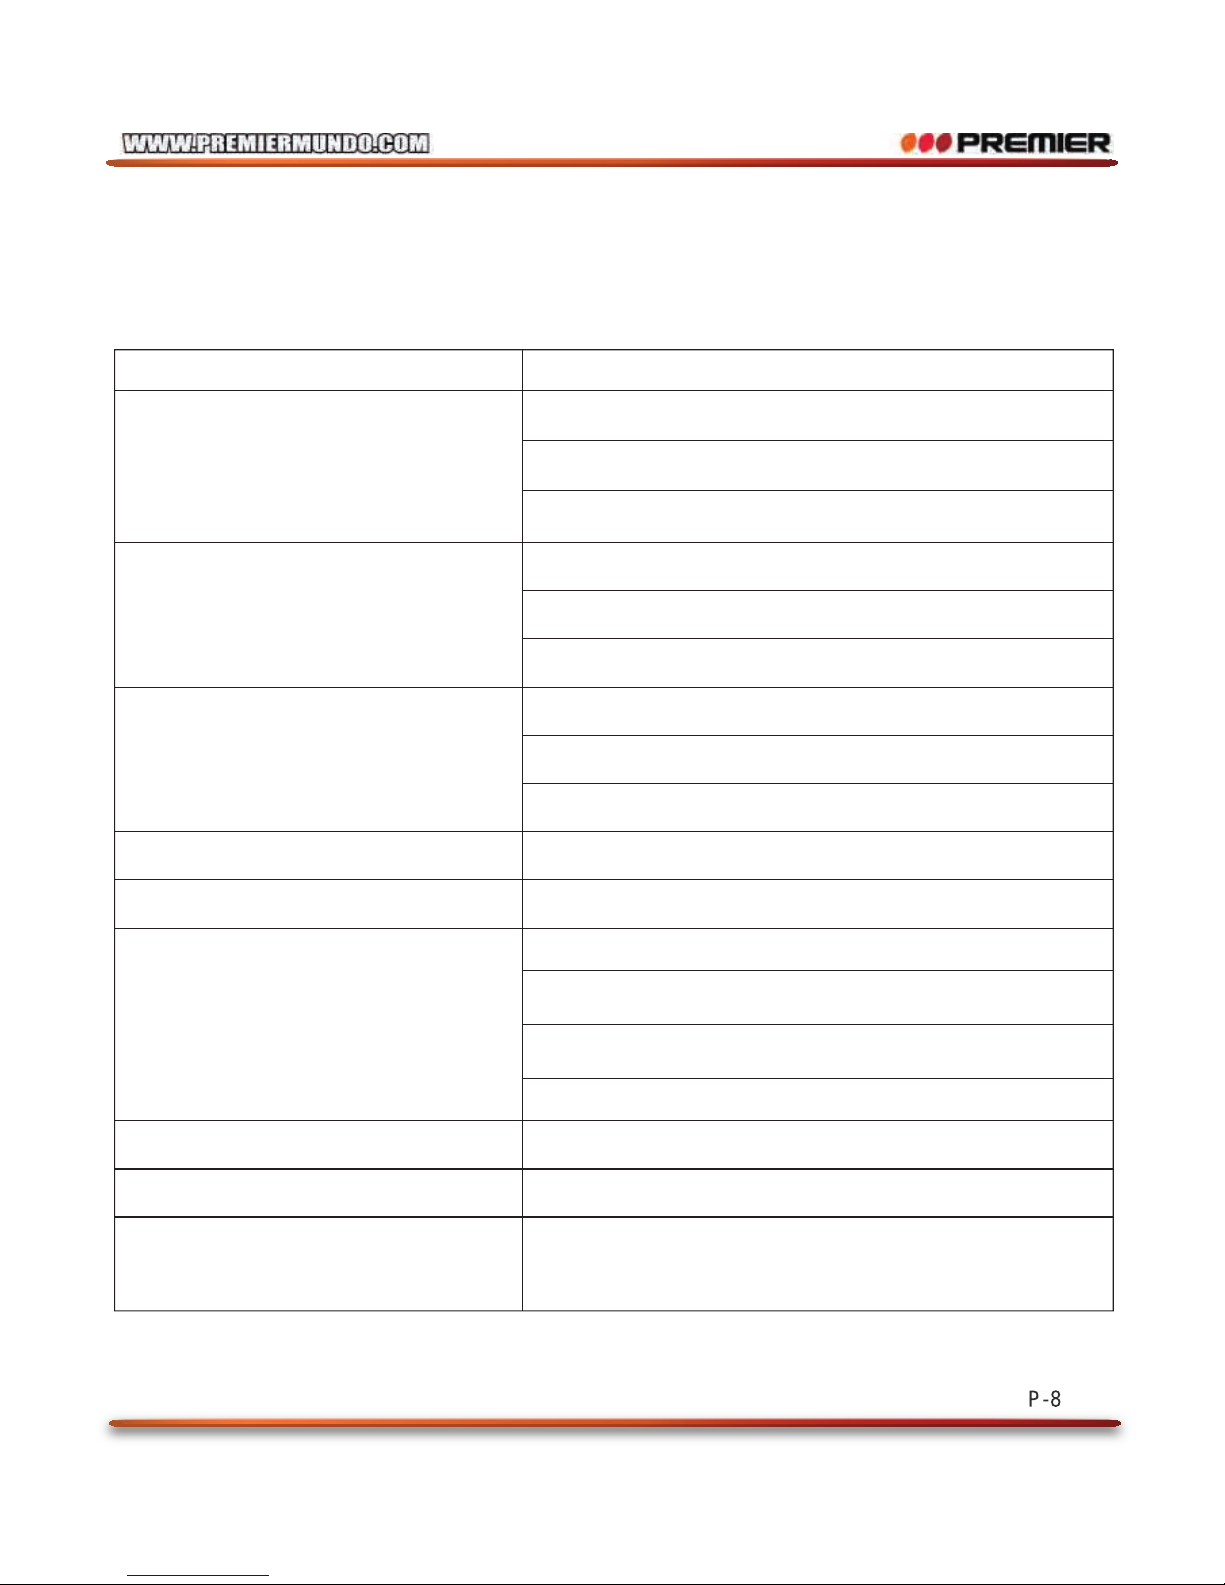
TROUBLE SHOOTING
P-8
If there is anything wrong with the induction cooker, please check it as following before sending to
repair.
Malfunction Disposal
Once the plug is connected with power
supply, again there is no warning sound
and the indicator light of “on/off” didn’t
light.
When it is automatically turn off after 60
seconds with warning sound
Whether the plug desquamate or not
Whether the power supply switch or the fuse short circuit or not
Whether the pot is flat to put on the central surface of panel or not
Whether the diameter of pot bottom is over 12cm or not
Whether the voltage is over low or not
Please check whether the plug is unsteady and breakdown or not
Whether the electric wire is too small or not
Whether the voltage is over high or not
Whether the temperature of pot is over high or not
Whether the temperature is too high or not
Whether the vent and the aspirator is block up or not, and the fan
is running or not
It is heat preservation, and the temperature reach to the preset
temperature
It is the self-protection; please wait for ten minutes to check it again.
The thermostat of pot is short circuit
The thermistor of radiator is short circuit
Whether the bottom of pot is flat on the induction cooker or not,
or the indicate light of heat is light or not
Whether the pot is fit for the induction cooker or not
Whether the power failure or not
“ E0”
“ E1”
“ E2”
“ E3”
“ E5”
“ E6”
(Heat preservation) the
temperature can't control
Page 11
8-P
10A-AC250V
F1
100uH
L2
AC 50Hz~60Hz
L
N
~-+
D15SB80DB
82Ω
R39
10K
R27
10
R26
20K
R16
S8550
Q4
H20R1202
IGBT
5uF-DC400V
C2
0.3uF1200V
C3
LOUTLIN
350uH ±10%
L3
2.0uF-AC275V
C1
+18V
3K
R31
220uF-25V
C17
6.8uF-50V
C13
+18V
S8050
Q3
200K 1/2W
R6
10Ω-1W
R28
104M
C21
5.8K.F
R8
200K 1/2W
R9
3.24K.F
R17
200K 1/2W
R11
6.8K.F
R15
D10
2A102J
C24
47K
R14
2.87K.F
R12
3K
R24
FAN(+18V)
+5V
+18V
FAN(+18V)
+5V
1
7
6
LM339
U2B
14
9
8
LM339
U2C
13
11
10
LM339
U2D
10
R25
104M
C22
3K
R21
3K
R22
100K- ±5%
IGBT_NTC
SS8050
Q2
(1:950)
T1
UF4007
D7
UF4007
D4
BYV26C
D6
1N4007
D3
221
C28
BZ
100K- ±5%
POT_NTC
-+
18V
FAN
1N4007
D1
1N4007
D2
4.7uF-400V
C4
47uF-25V
C6
+5V
SOURCE
1
SOURCE
2
FB
3
VDD
4
DRAIN
5
DRAIN
6
DRAIN
7
DRAIN
8
VIPER 12AU1
==
EE-13
L4
223M
C14
18V-0.5W
Z1
300K
R38
20K
R19
D13
D14
2A104J
C5
200K 1/2W
R4
104M
C11
10K.F
R3
D15
200K 1/2W
R2
+5V
100uF-16V
C7
470uF-10V
C8
+18V
+5V
+5V
P94/CIN
1
P95
2
P96
3
AVDD
4
P70/INT0/PC/EC
5
AVSS
6
P65/AD6
7
P64/AD5
8
P63/AD4
9
P62/AD3
10
P61/XIN
11
P60/XOUT
12
P71/INT1/RESET
13
P73/INT3
14
PC1/PWM1
15
PC2/PWM2
16
P90/AD1
17
P91/AD2
18
P92/AD7
19
P93/AD8
20
EM78P5841N
U3
+5V
1
2
NTC
3
NTC1
+18V2CTRL
1
FAN
P654P613P64
5
PC1
1
P62
8
GND
2
+5V7P63
6
P9510P96
9
CON10
1.6mH 300uH
+5V
6.8uF-50V
C12
200K 1/2W
R1
2J102J
C19
102
C25
+5V
1N4148
D12
1N4148
D9
3K
R13
10K
R35
+5V
6.8K
R5
82Ω
R23
+5V
Vin
3
GND
2
Vout
1
78L05U4
1N4148*4
D12
20K
R20
2K
R18
203
VR1
430K 1/2W
R7
200K 1/2W
R10
221
C27
221
C23
221
C26
2
312
5
4
LM339
U2A
空
NTC2
47uF-16V
C10
+18V
104M
C18
+5V
104M
C20
EI1-19
1N4007
D11
PB01GND2PA03PA24PC45+5V
6
CON6P
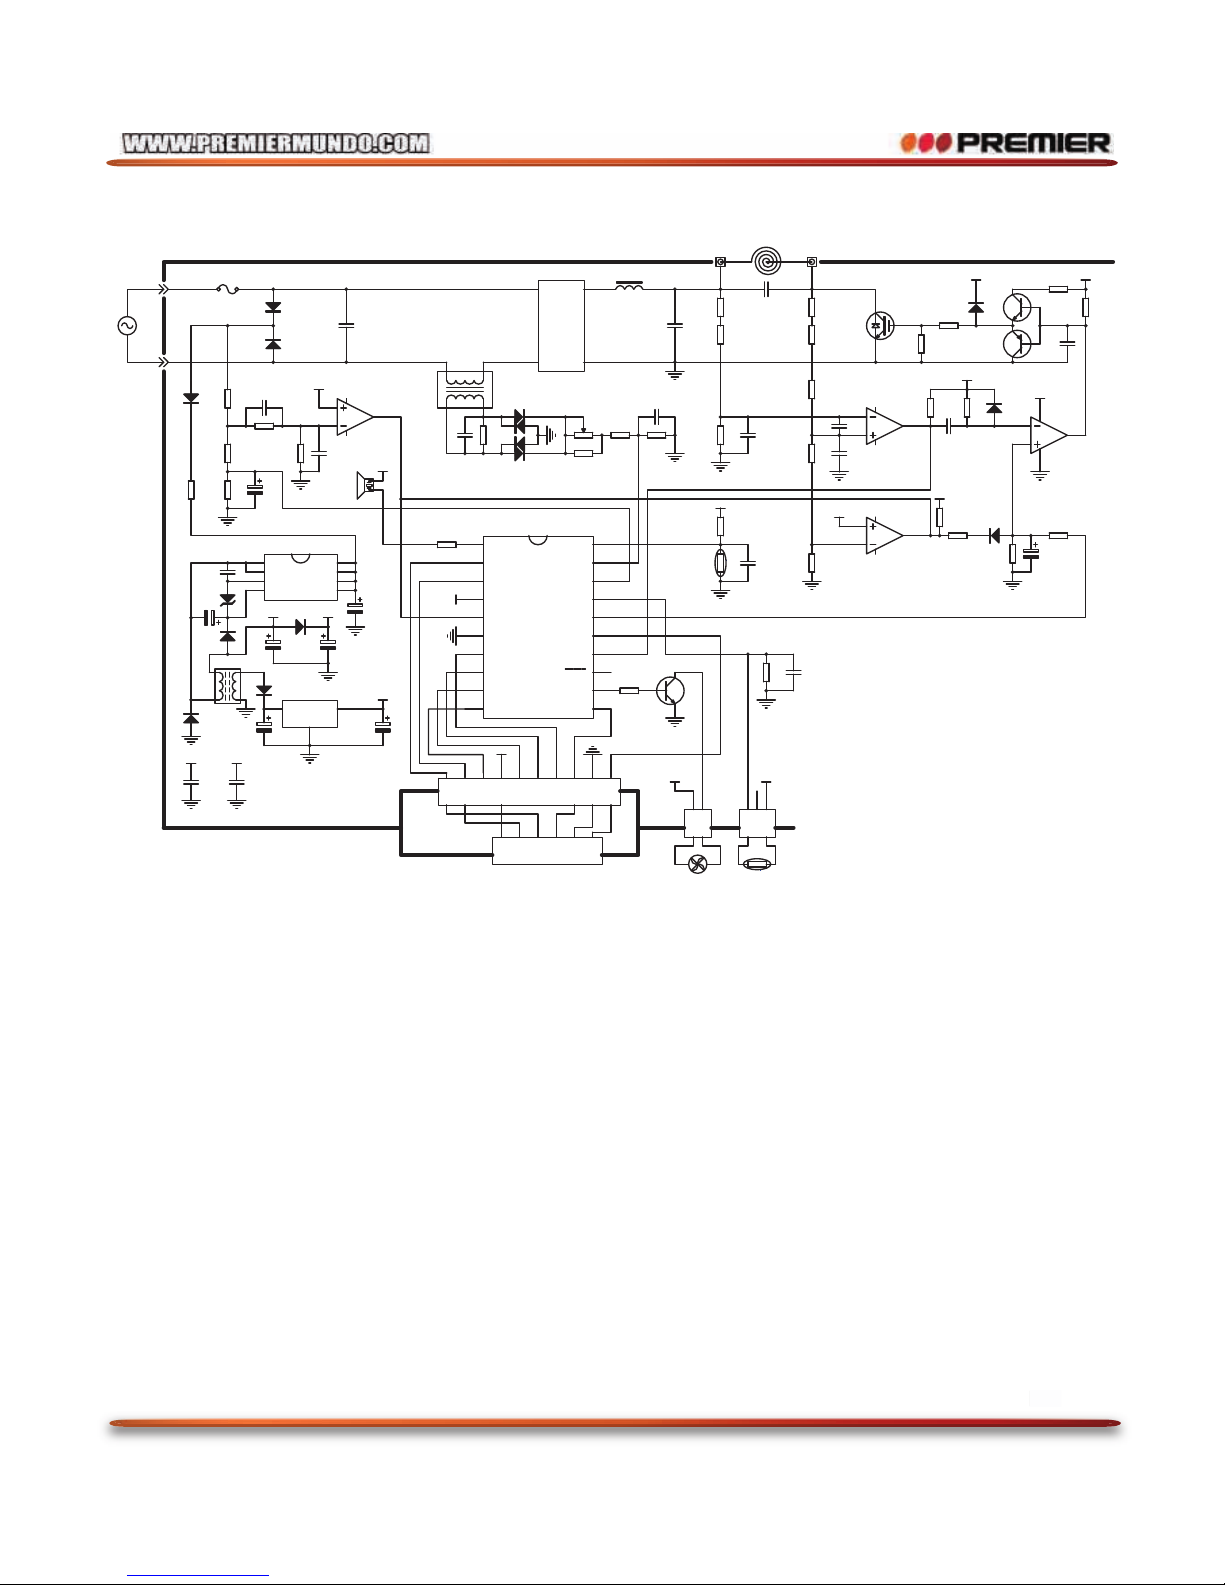
TECHNICAL DATA
P-9
 Loading...