

Page 1
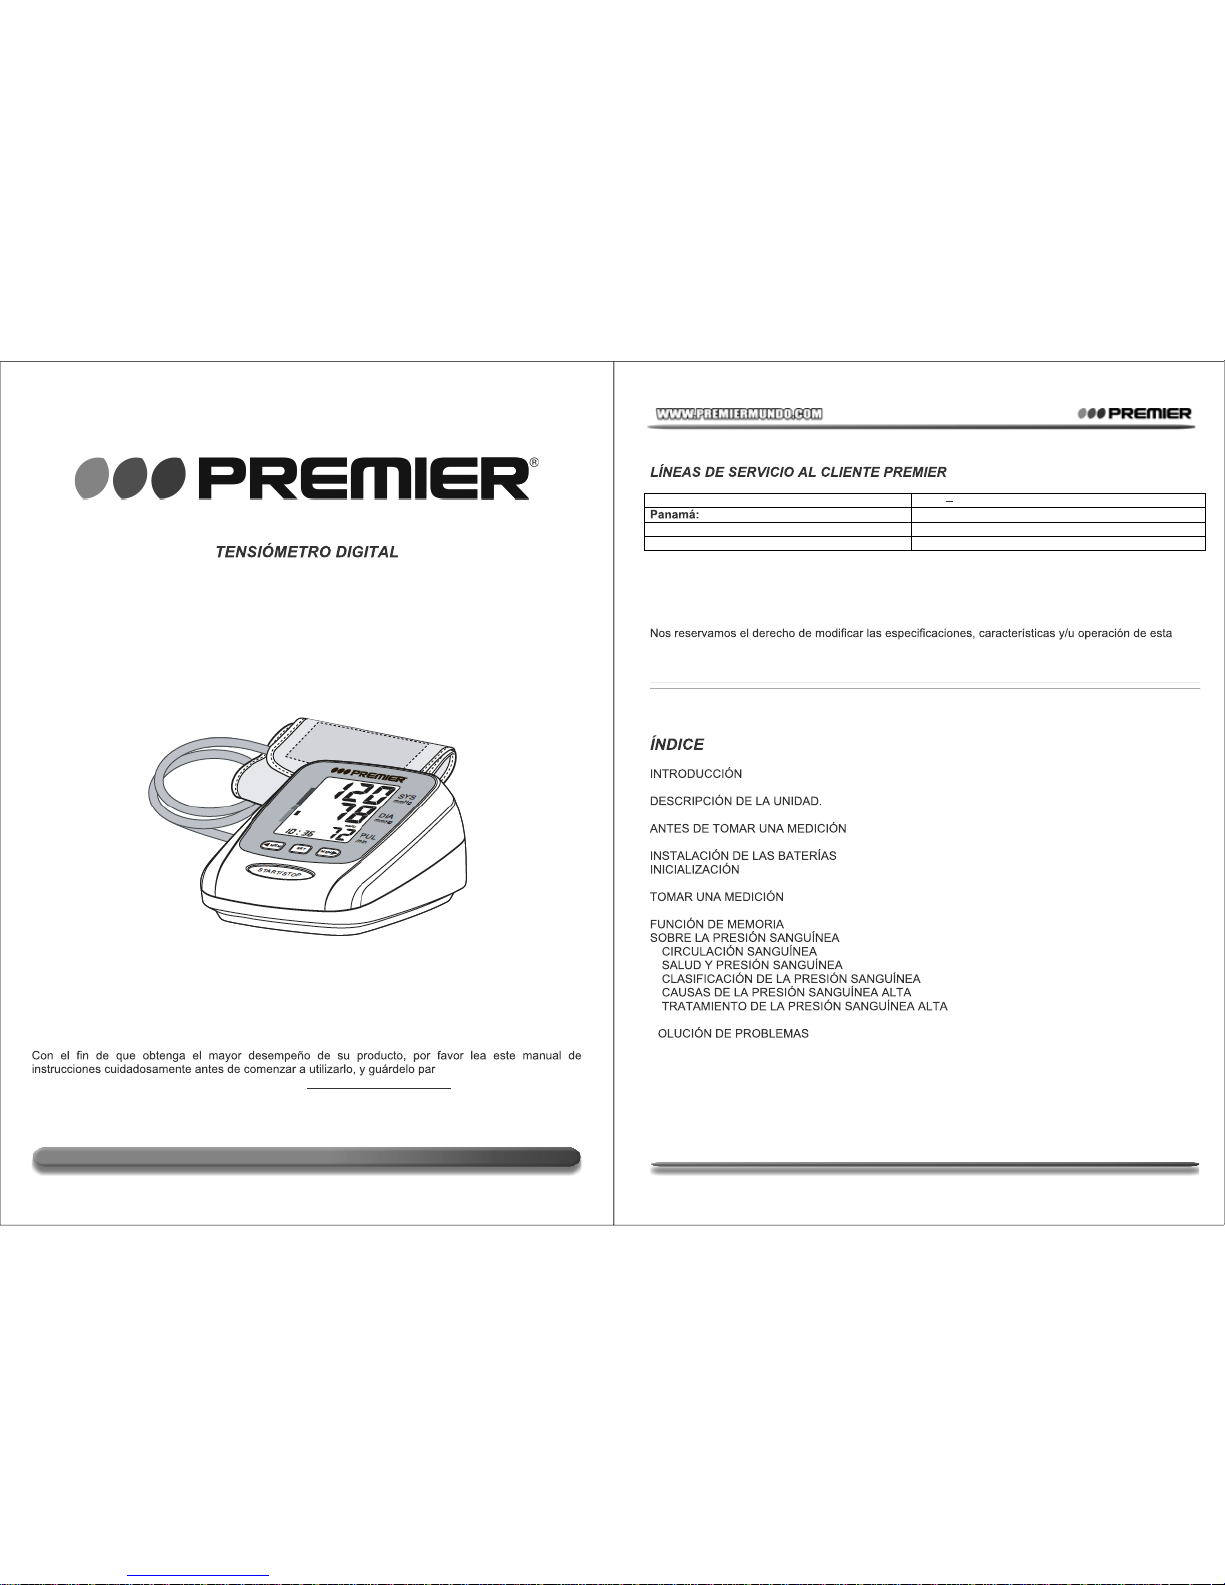
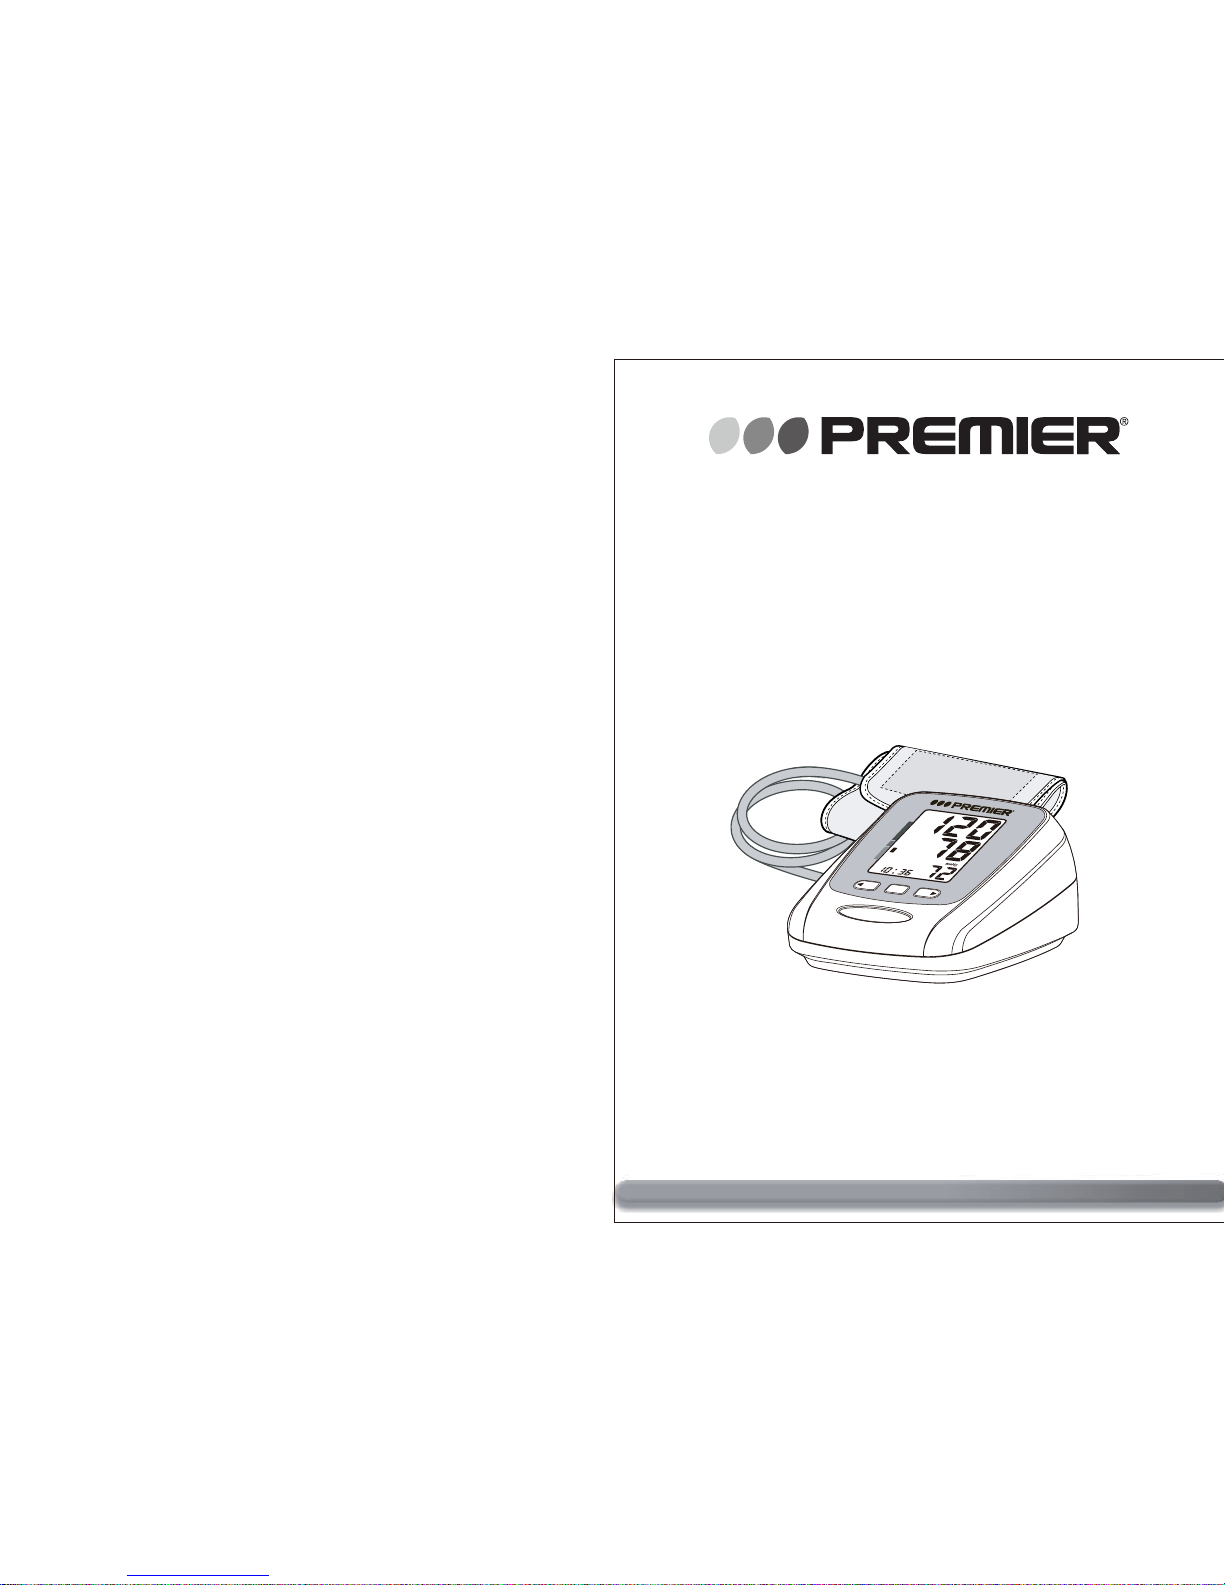
MANUAL DE INSTRUCCIONES
BP-3946
ESTIMADO CLIENTE
a su futura referencia.
Si necesita soporte adicional, no dude en escribir a:
P-1
Venezuela: 0800 ELECTRIC (353-2874)
300-5185
NOTA
unidad sin previo aviso, con el fin de continuar las mejoras y desarrollo del mismo.
....................................................................................................................................... 2
INSTRUCCIONES DE SEGURIDAD.........................................................................................................
2
............................................................................................................... 3
INDICADORES DE LA UNIDAD................................................................................................................
4
....................................................................................................... 5
RECOMENDACIONES AL USAR LA UNIDAD.........................................................................................
5
..........................................................................................................
6
........................................................................................................................................ 7
USO DEL BRAZALETE.............................................................................................................................
8
........................................................................................................................ 10
INSTRUCCIONES PARA CONDICIONES ESPECIALES.......................................................................
10
........................................................................................................................
11
........................................................................................................
12
..............................................................................................................
12
.......................................................................................................
12
...............................................................................
13
..................................................................................
13
....................................................................... 13
INDICADORES DE ERROR....................................................................................................................14
S ................................................................................................................. 14
CUIDADO Y MANTENIMIENTO.............................................................................................................. 14
ESPECIFICACIONES.............................................................................................................................. 15
OBSERVACIONES.................................................................................................................................. 15
Page 2
P-2
lo-
INSTRUCCIONES DE SEGURIDAD
Lea este manual de usuario antes de usar la unidad.
proveedor de salud.
Evite usar celulares cerca de la unidad, ya que esto puede producir un mal funcionamiento.
correctos.
No intente reparar los componentes de la unidad.
No use la unidad en lugares donde haya gas inflamable
2002/96/EC
La unidad, accesorios y su empaque deben ser depositados en un lugar ade
P-3
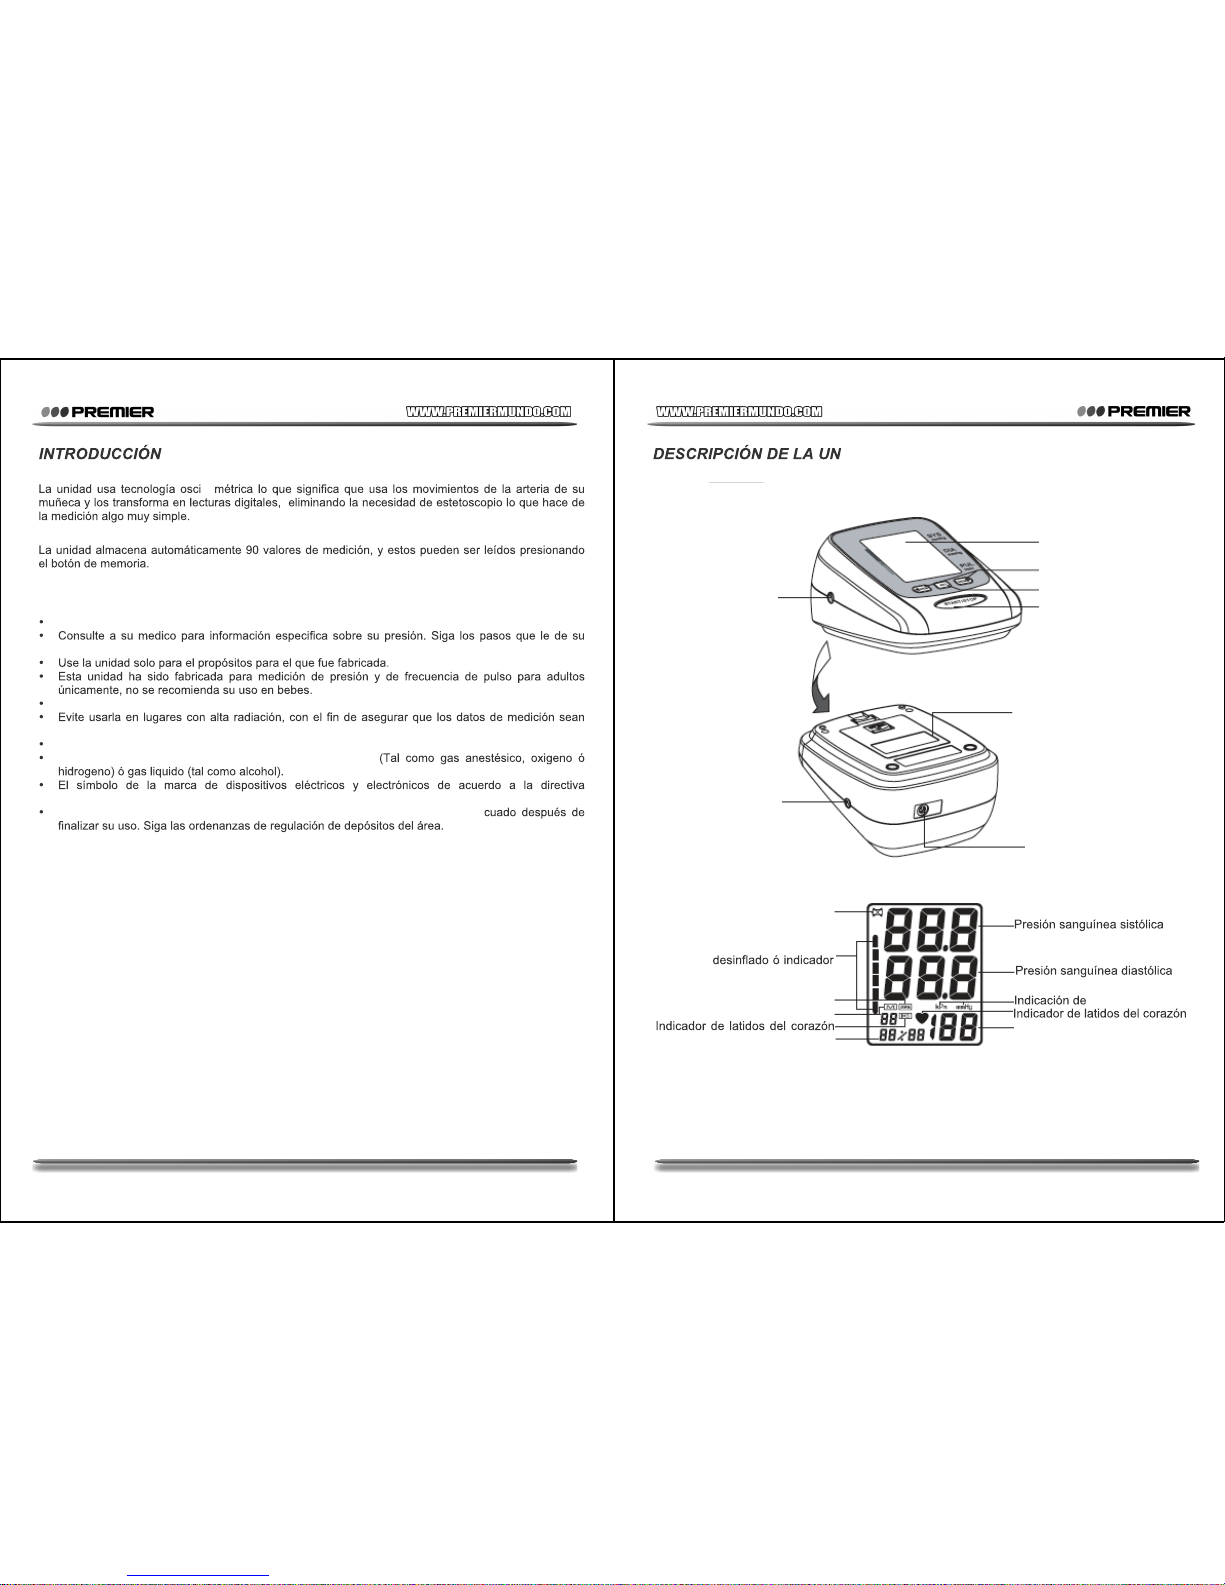
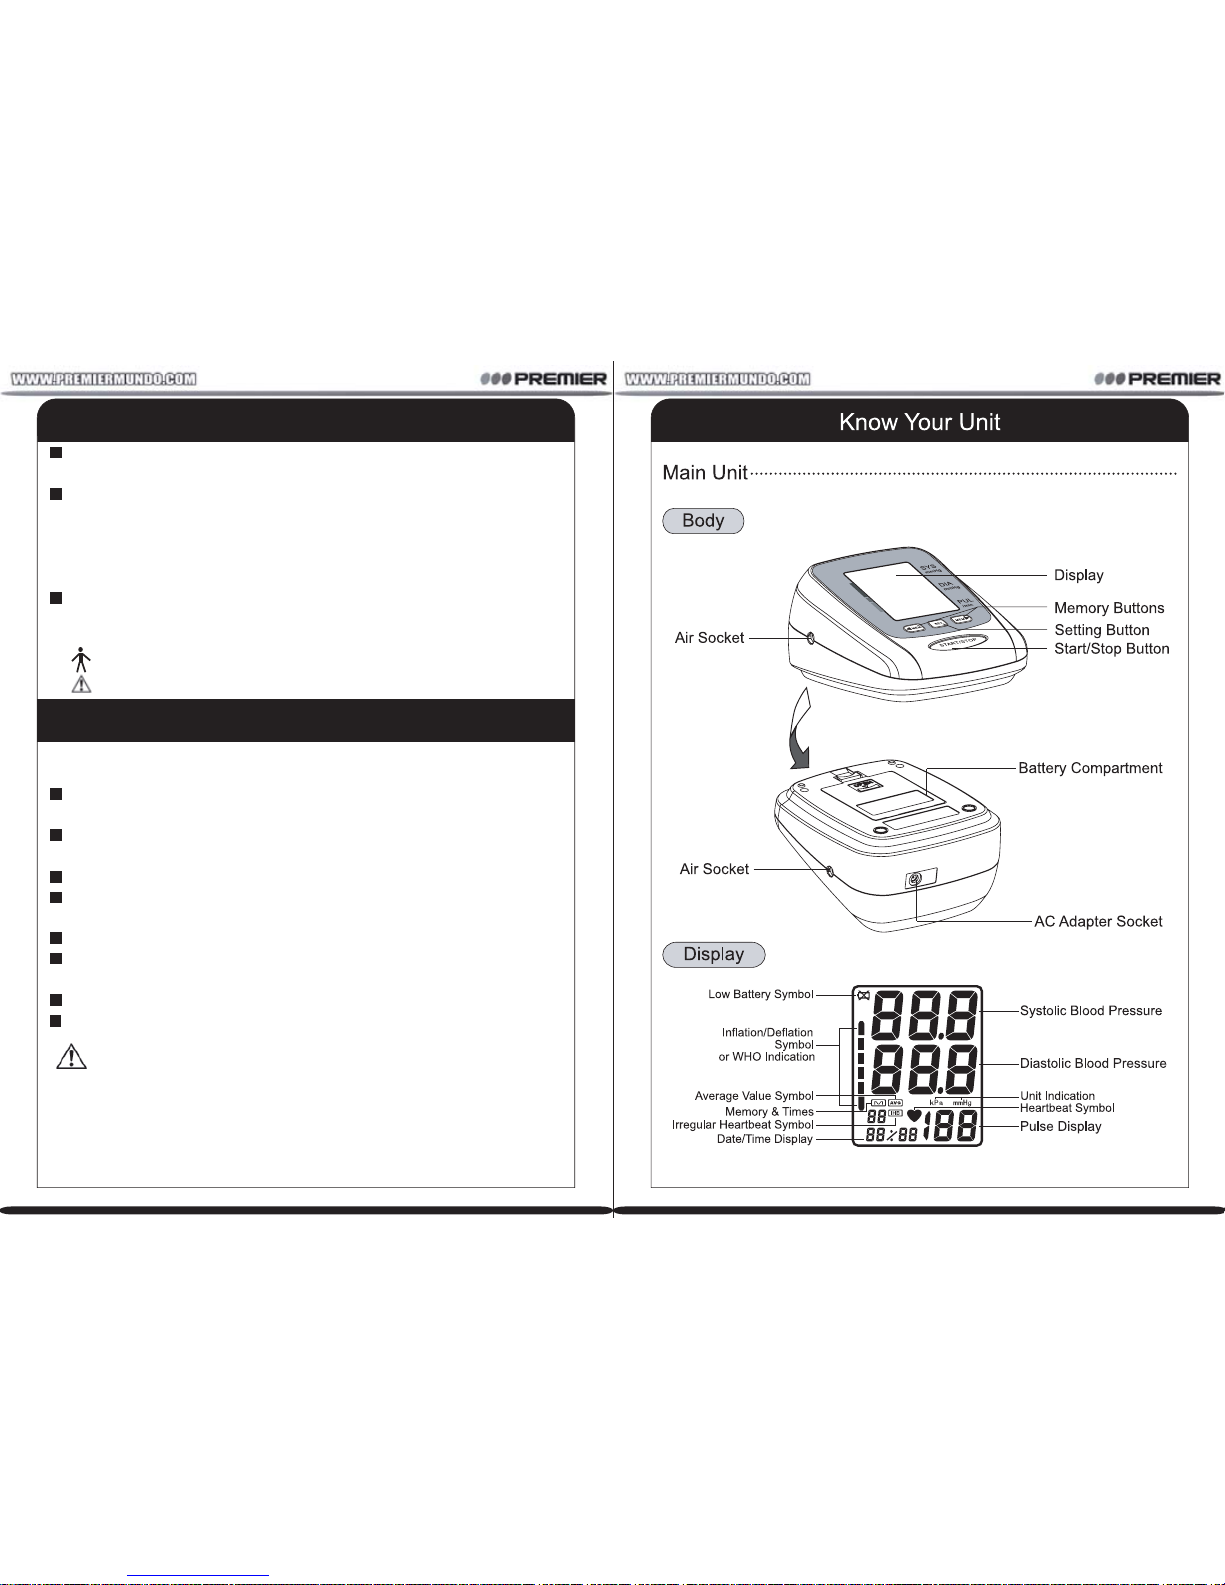
IDAD.
CUERPO
Pantalla
Conector de Aire
Boton de Memoria
Indicador de bateria baja
Indicador de valor promedio
Indicador de inflado y
WHO
Indicador de pulso
irregulares
unidad
Boton de Ajustes
Boton iniciar / Detener
Compartimiento de las
baterias
Conector para adaptador AC
PANTALLA
Tiempo y fecha en pantalla
Conector de Aire
Memoria y tiempos
Page 3
P-4
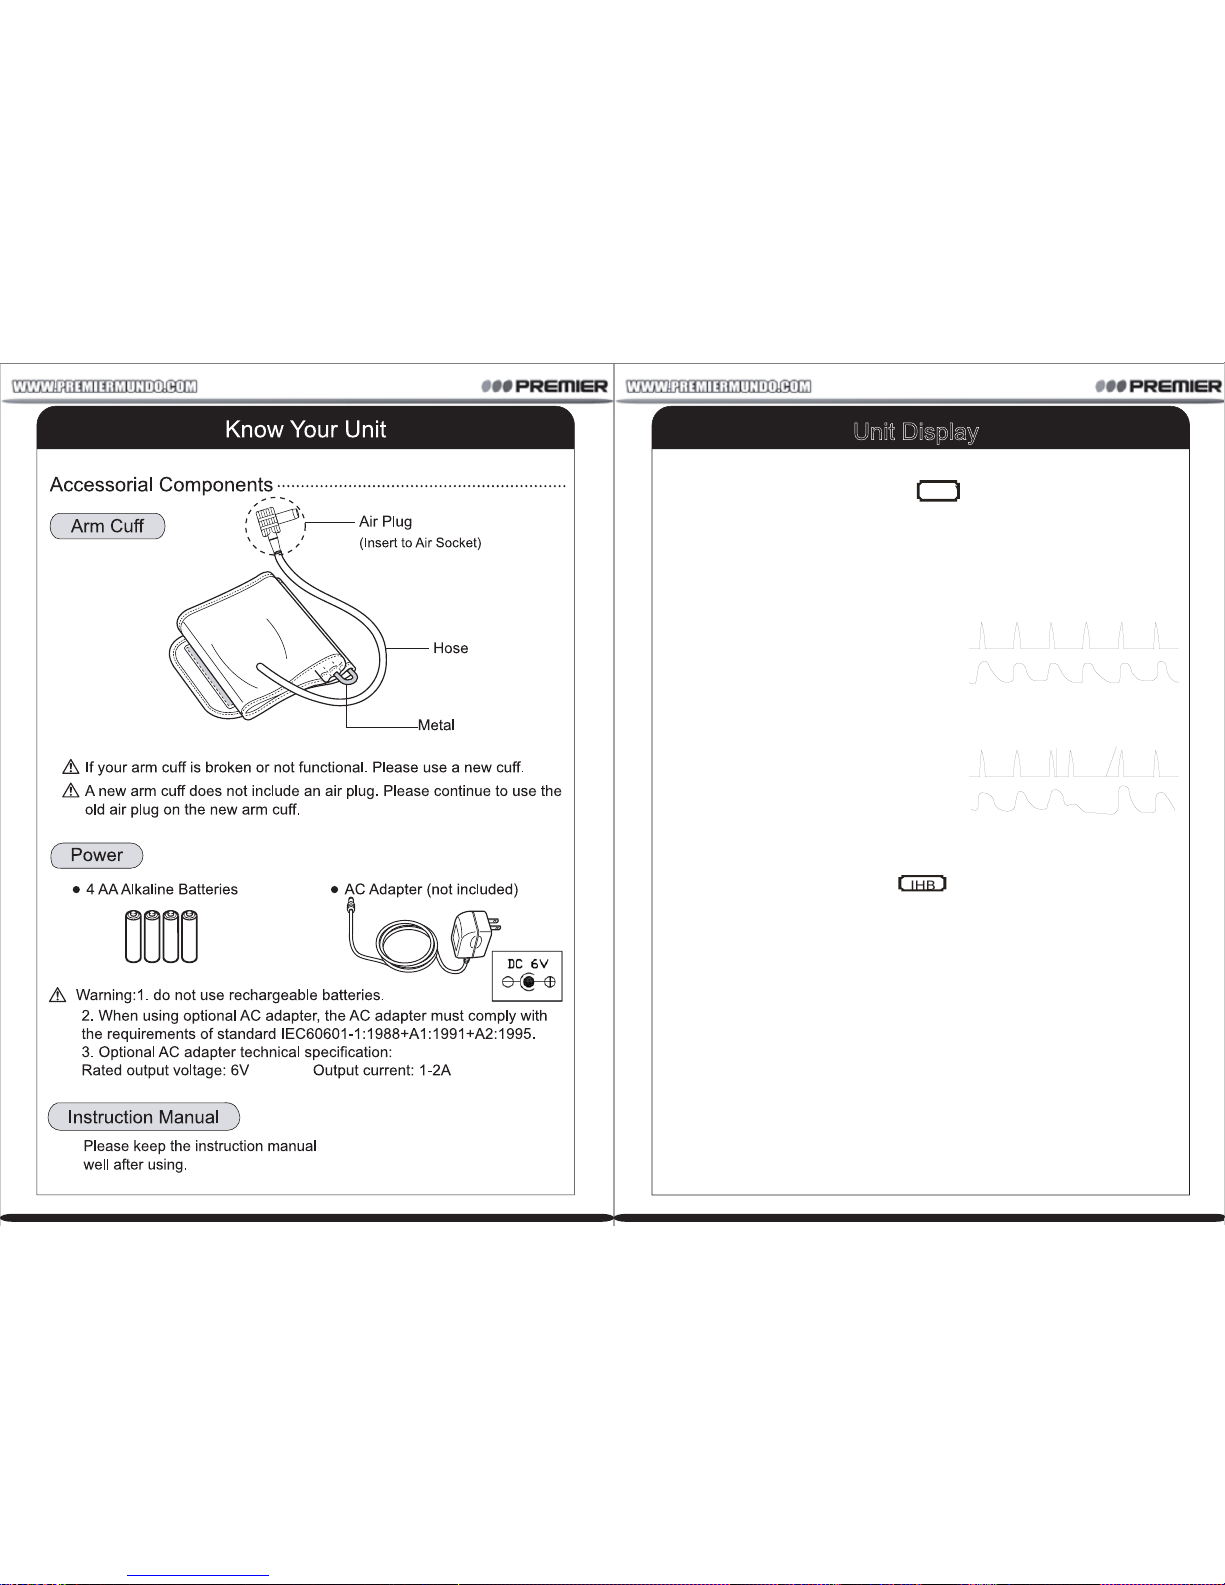
Si e
encuentra en perfecto estado.
FUENTE DE PODER
Adaptador AC (No incluido)
1.
2. Cuando use un adaptador AC (Opcional), este debe corresponder con las normas requeridas
IEC60601-1: 1988+A1: 1991+A2: 1995.
3.
salida: 1-
INDICADORES DE LA UNIDAD
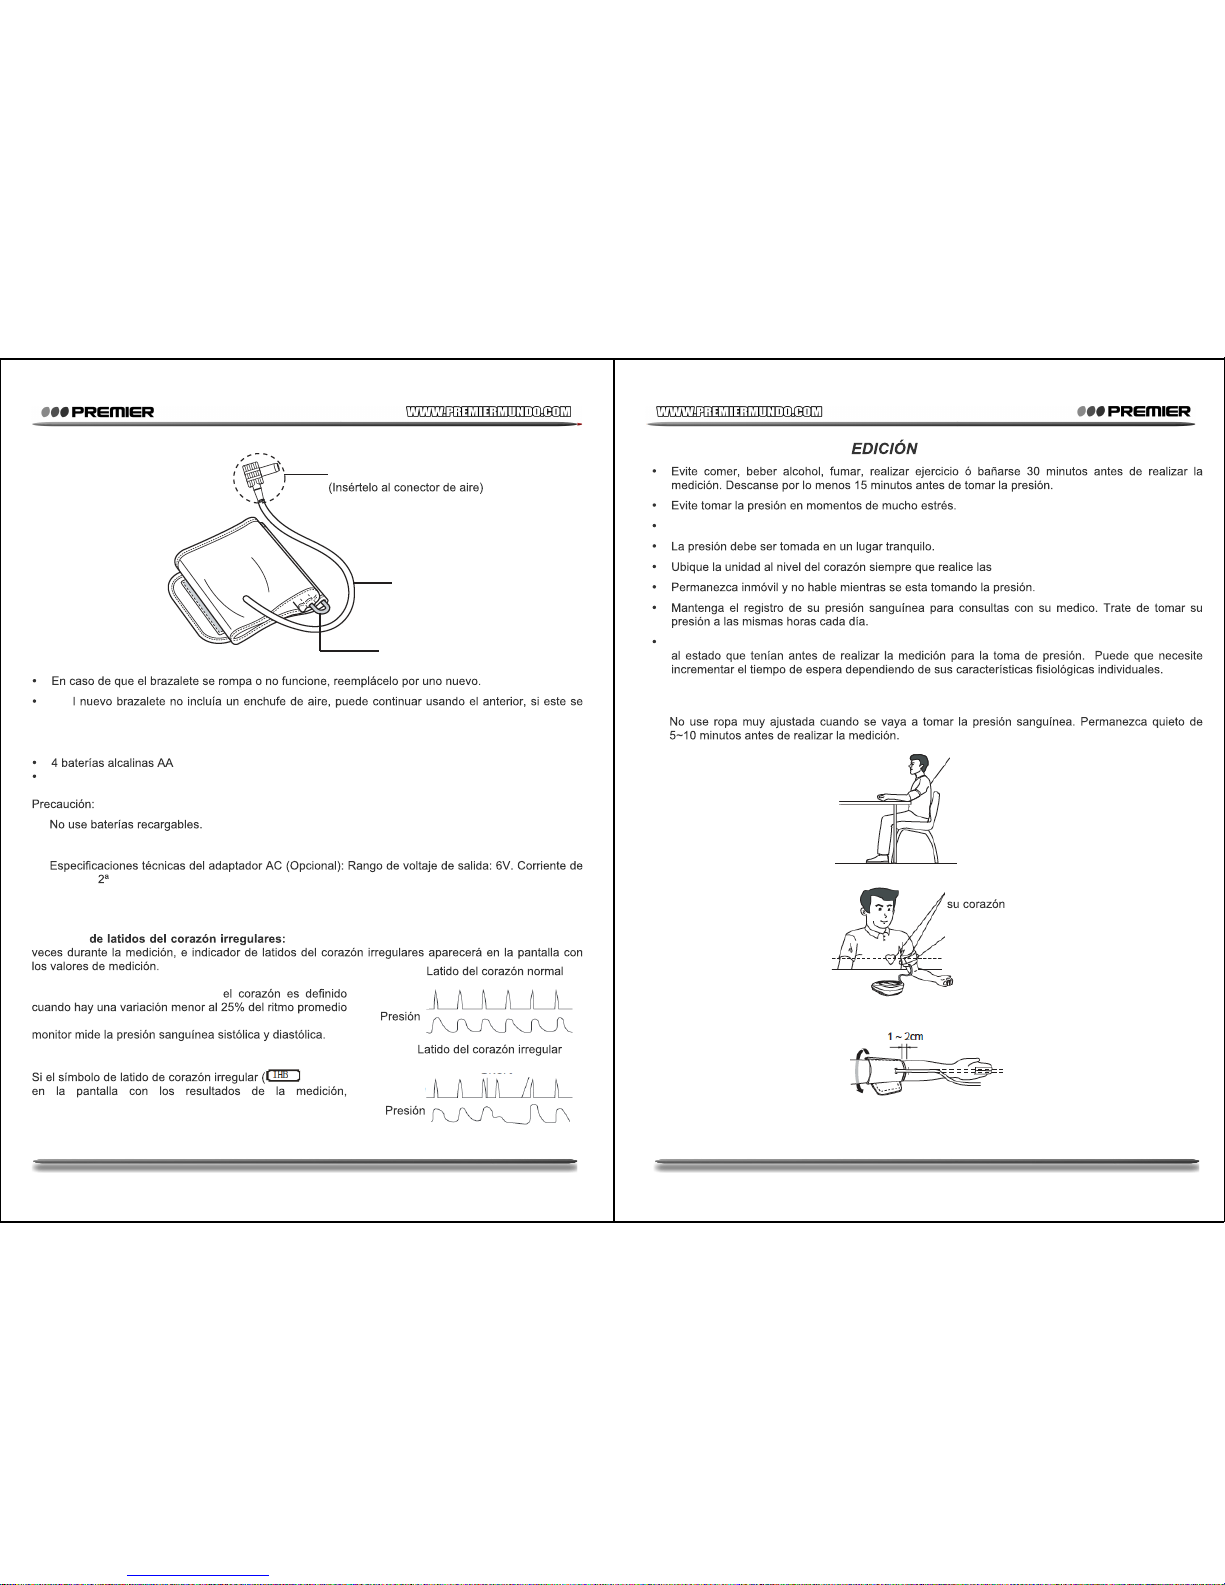
Indicador Cuando la unidad detecta un ritmo irregular dos o mas
Un ritmo irregular en los latidos d
o 25% mas que el ritmo promedio detectado mientras el
)aparece
recomendamos que consulte a su medico.
Manguera
Metal
BRAZALETE
Pulso
arterial
arterial
Pulso
Corto
Largo
Enchufe de aire
P-5
ANTES DE TOMAR UNA M
El brazalete puede ser puesto en el brazo izquierdo o derecho.
mediciones.
Espere 30 y 60 segundos entre mediciones. El tiempo de espera permite que las arterias regresen
RECOMENDACIONES AL USAR LA UNIDAD
1.
2. Coloque el brazalete directamente sobre su piel.
3. La manguera debe estar ubicada en el interior del brazo. La parte inferior del brazalete debe estar
aproximadamente en 1~2Cm sobre su codo.
4. Envuelva el brazalete alrededor de su brazo. No son permitidos mas de dos dedos de distancia
entre el brazalete y su brazo.
Altura adecuada
En el mismo nivel de
Postura adecuada
Mantenga su cuerpo
recto y relajado
Uso correcto
coloque el brazalete
sobre su piel.
Page 4
P-6
5.
6.
brazalete se desinfle completamente.
1.
2.
polaridad.
3.
NOTA
:
la pantalla de la unidad.
a unidad.
P-7
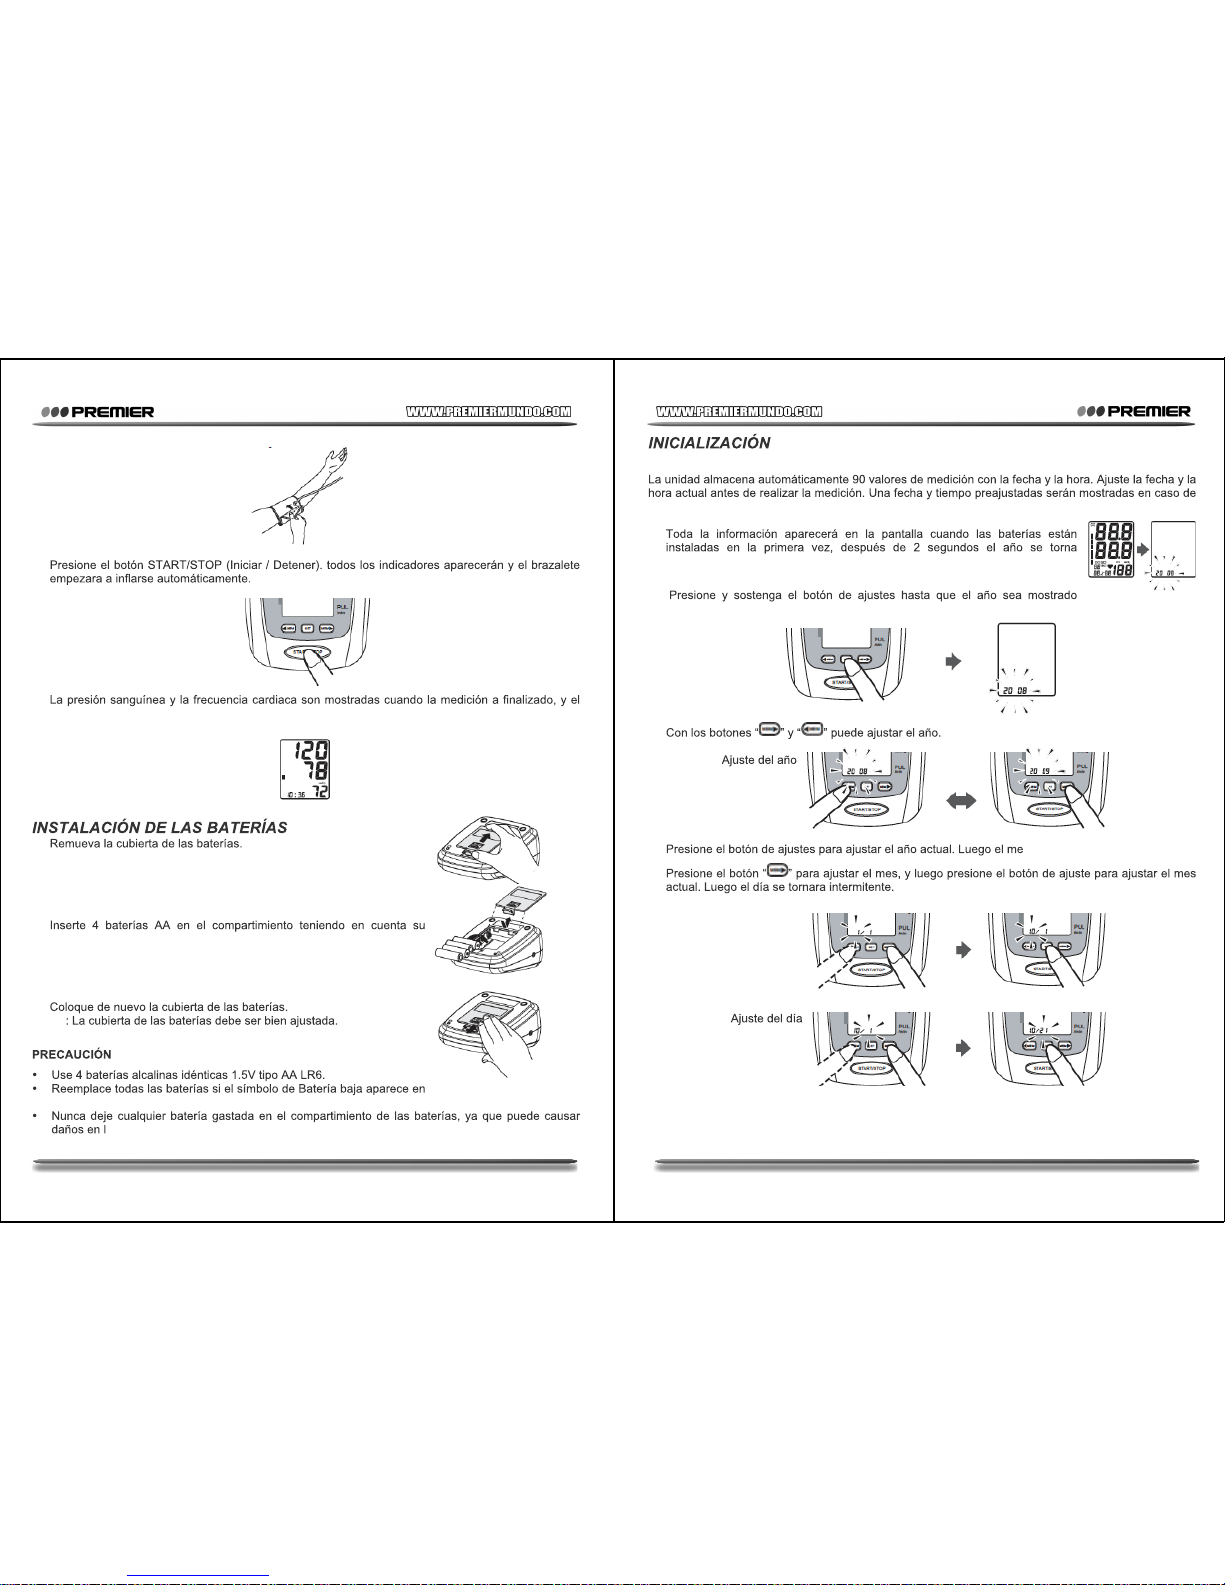
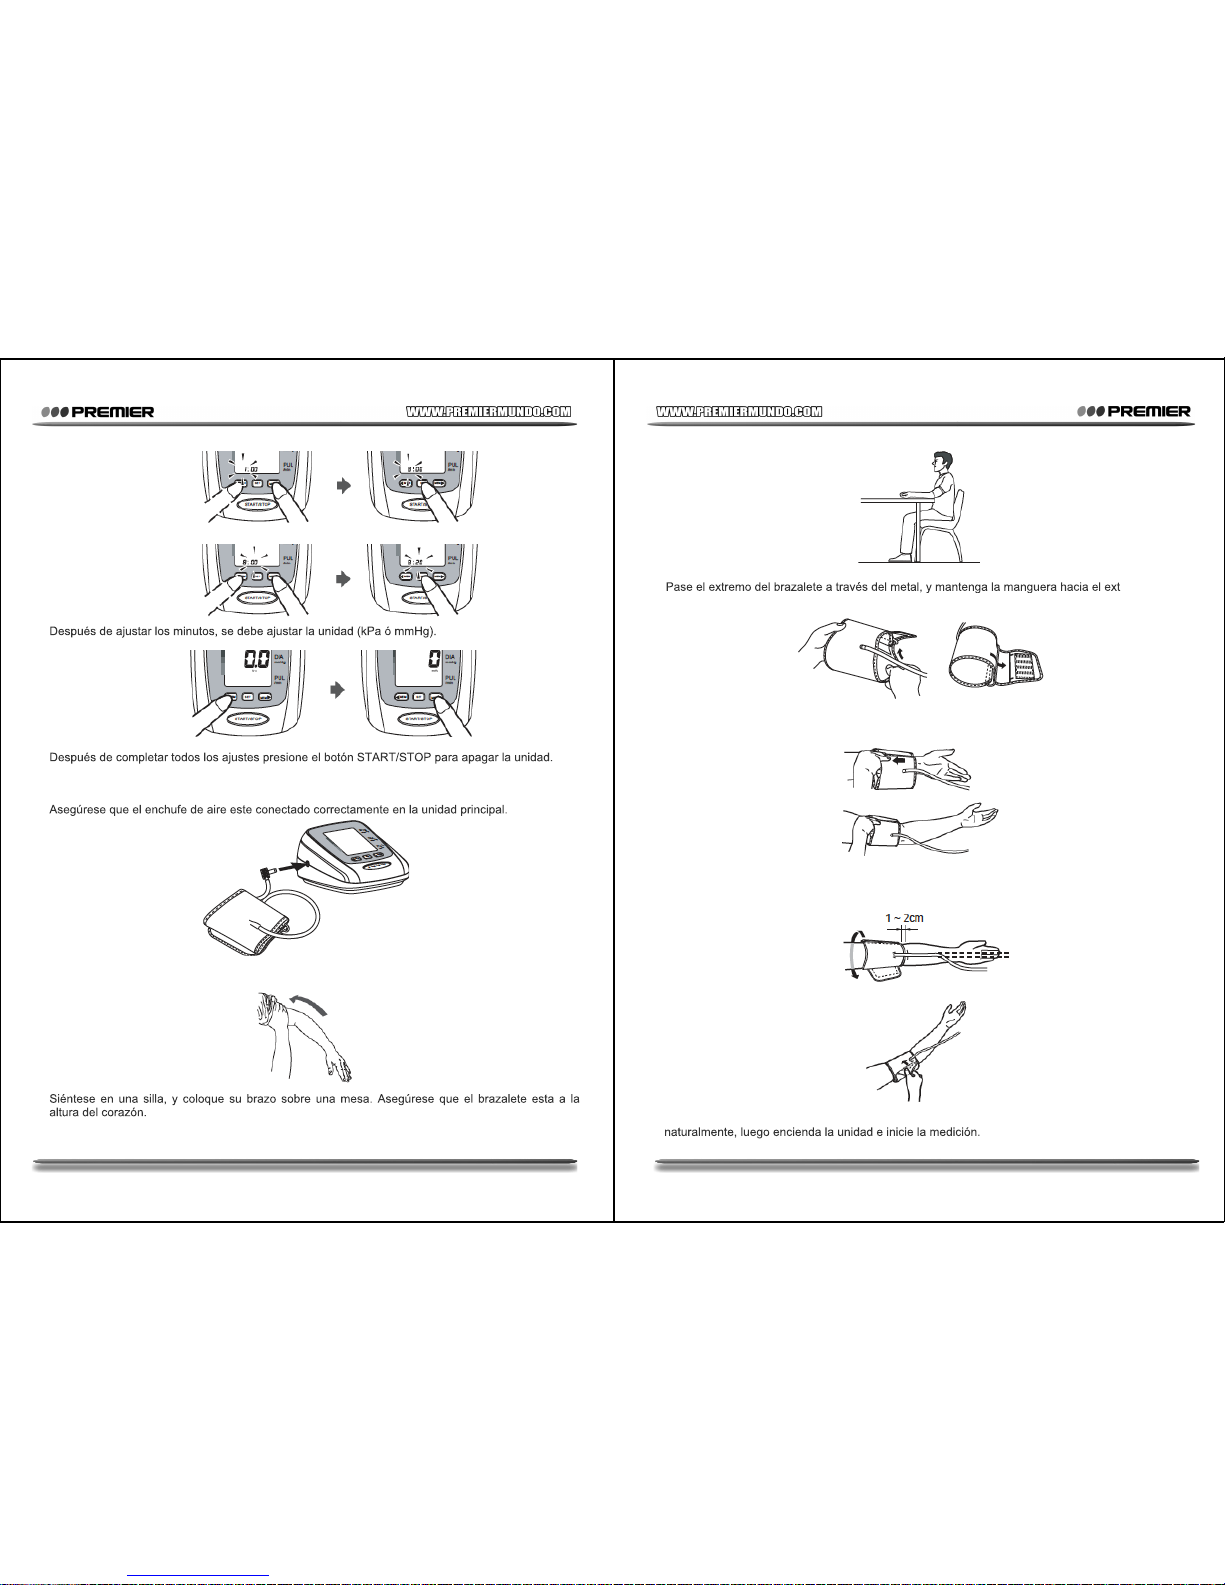
Ajustar la fecha y hora
que no haya ajustado la fecha y la hora actual.
1.
intermitente en la pantalla. Esto es para recordarle que la fecha y la hora
deben ser ajustadas.
2.
cuando la unidad se haya apagado.
3.
4. s se tornara intermitente.
5.
6. Ajuste la hora y los minutos usando los pasos anteriores.
Ajuste del mes
Page 5
P-8
7.
8.
USO DEL BRAZALETE
1.
2. Coloque el brazalete directamente sobre la piel.
3.
Ajuste de la hora
Ajuste de los minutos
Ajuste de la unidad
P-9
4.
erior.
5. Coloque el brazalete en su brazo.
6. La manguera debe estar ubicada en el interior del brazo. La parte inferior del brazalete debe estar
aproximadamente en 1~2Cm sobre su codo.
7. Envuelva el brazalete alrededor de su brazo.
8. Tenga su brazo relajado, y mantenga la palma de su mano hacia arriba y sus dedos curveados
Page 6
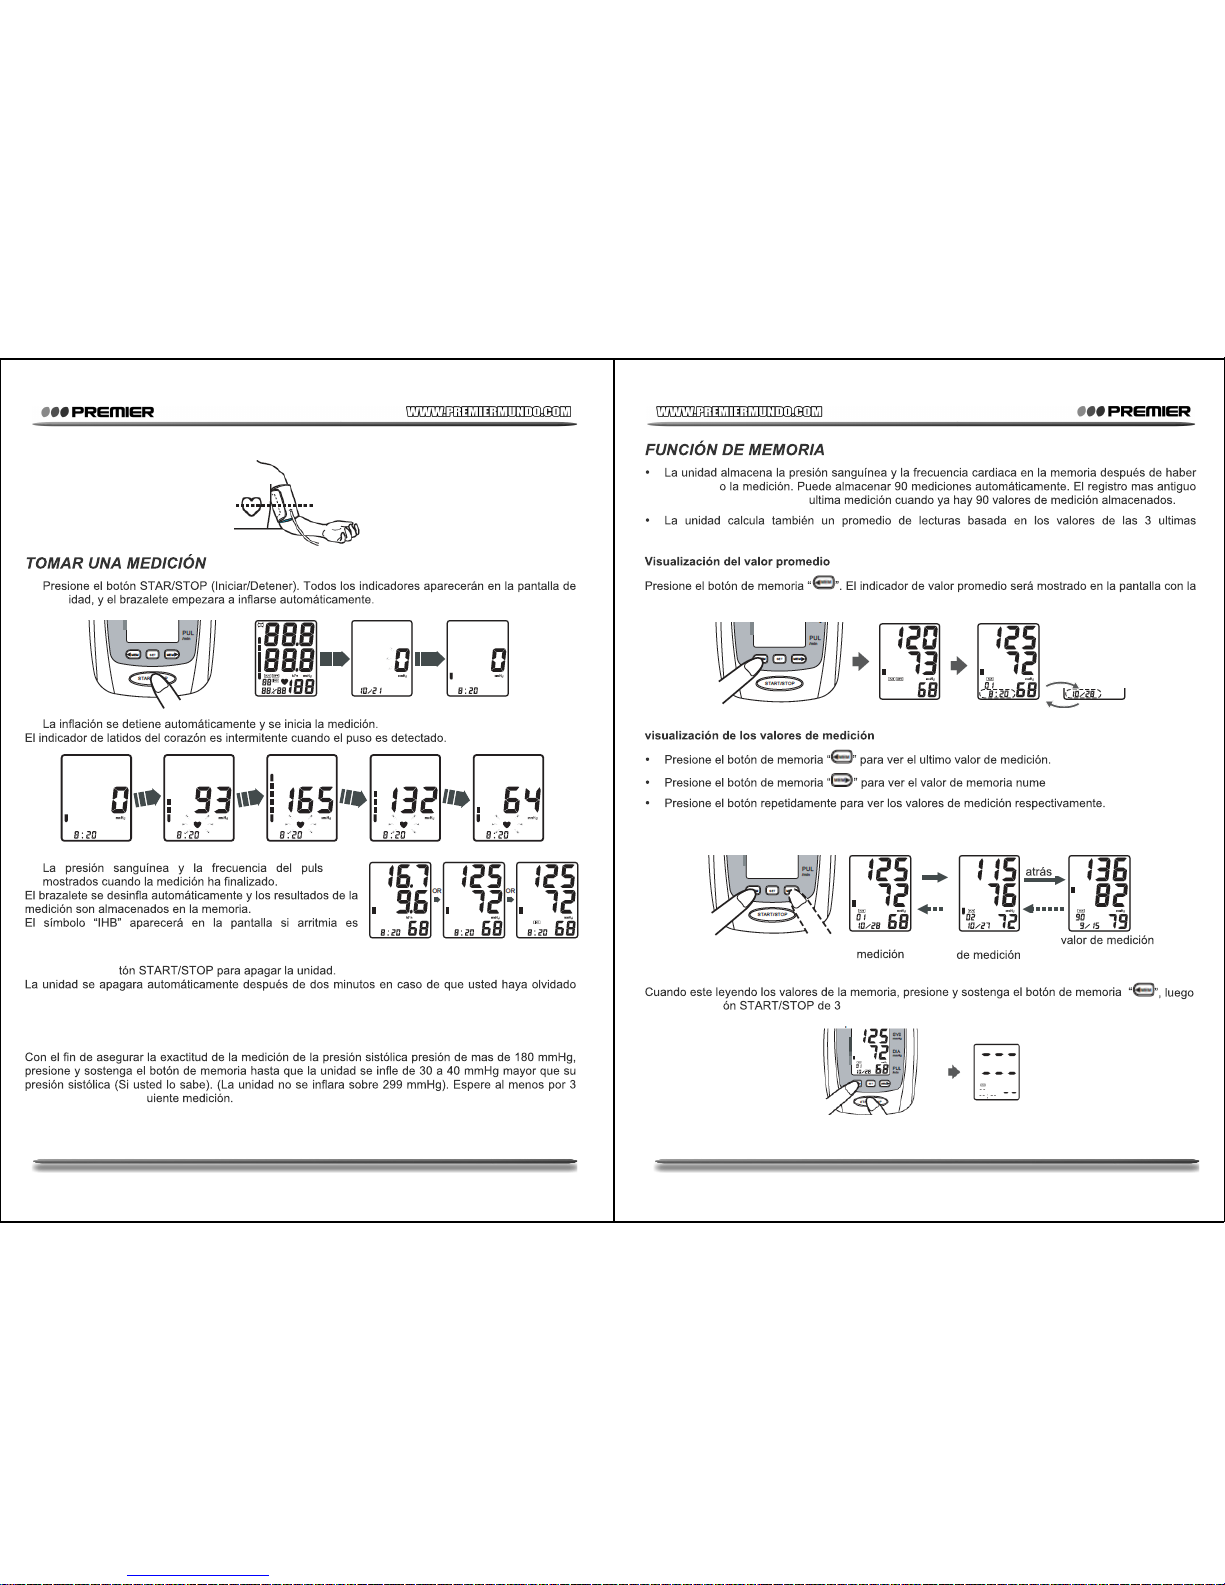
1.
la un
2.
3. o son
detectada en la pantalla.
4. Presione el bo
apagarla.
INSTRUCCIONES PARA CONDICIONES ESPECIALES
minutos antes de la sig
Indicador
kPa
Indicador
mmHg
Indicador IHB
completad
es borrado para guardar la
mediciones tomadas.
lectura promedio.
ro 90.
Borrar Los Valores Almacenados En La Memoria
presione el bot -4 segundos.
ultimo valor de
segundo valor
numero 90
Hacia
Hacia
delante
P-10 P-11
Page 7
P-12
A
por la r
neos reduciendo la elasticidad de
graves, como el infarto de miocardio y accidente cerebrovascular. Por estas razones es muy importante
encuentra en un rango normal.
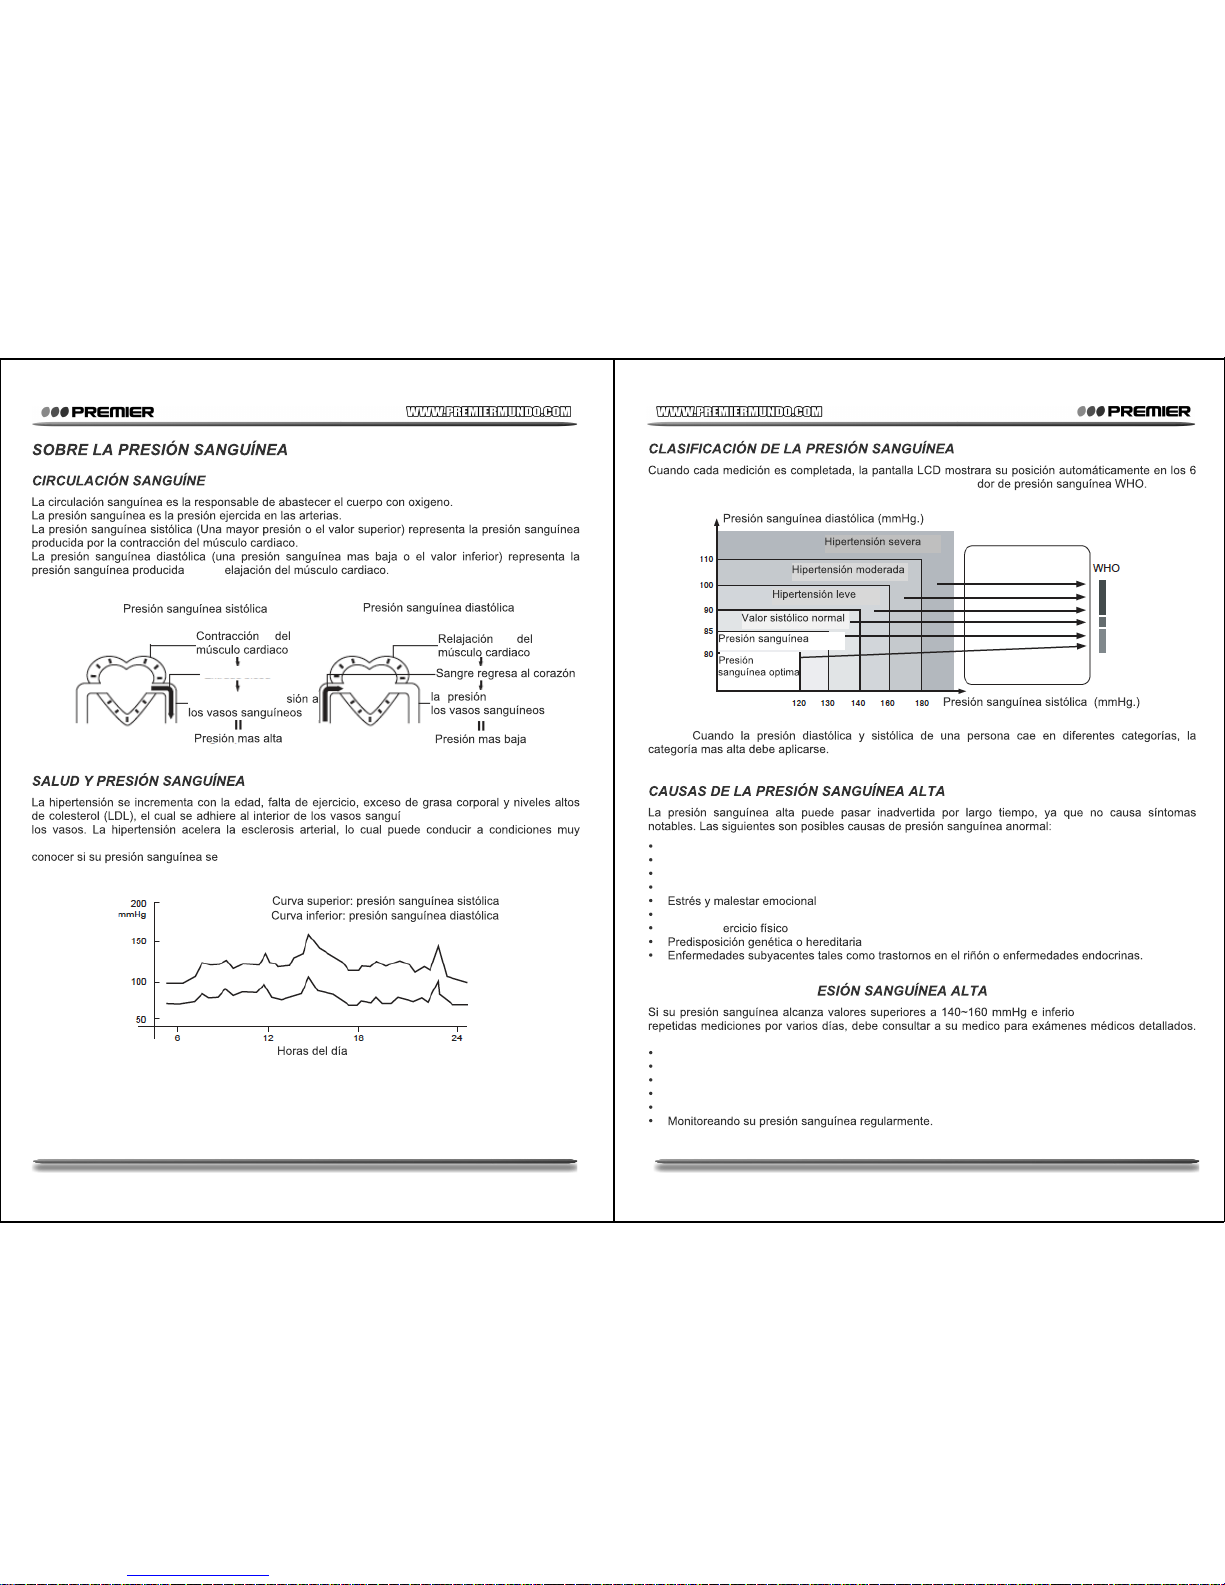
Salida de sangre
Aumento de la pre
disminuye a
P-13
segmentos de la barra indicadora la cual corresponde al indica
NOTA:
Sobrepeso
Nivel de colesterol alto
Fumar
Consumo de alcohol excesivo
Consumo de sal excesivo
Falta de ej
TRATAMIENTO DE LA PR
res a 90~95 mmHg en
Puede ayudar los tratamientos prescritos por su medico de la siguiente manera:
Perdiendo peso y bajando su nivel de colesterol.
Reduciendo el consumo de alcohol.
Reduciendo las cantidades de sal en los alimentos.
No fumando.
Haciendo ejercicio regularmente.
(Valor objetivo)
normal
Rojo
Amarillo
Azul
Page 8
P-14
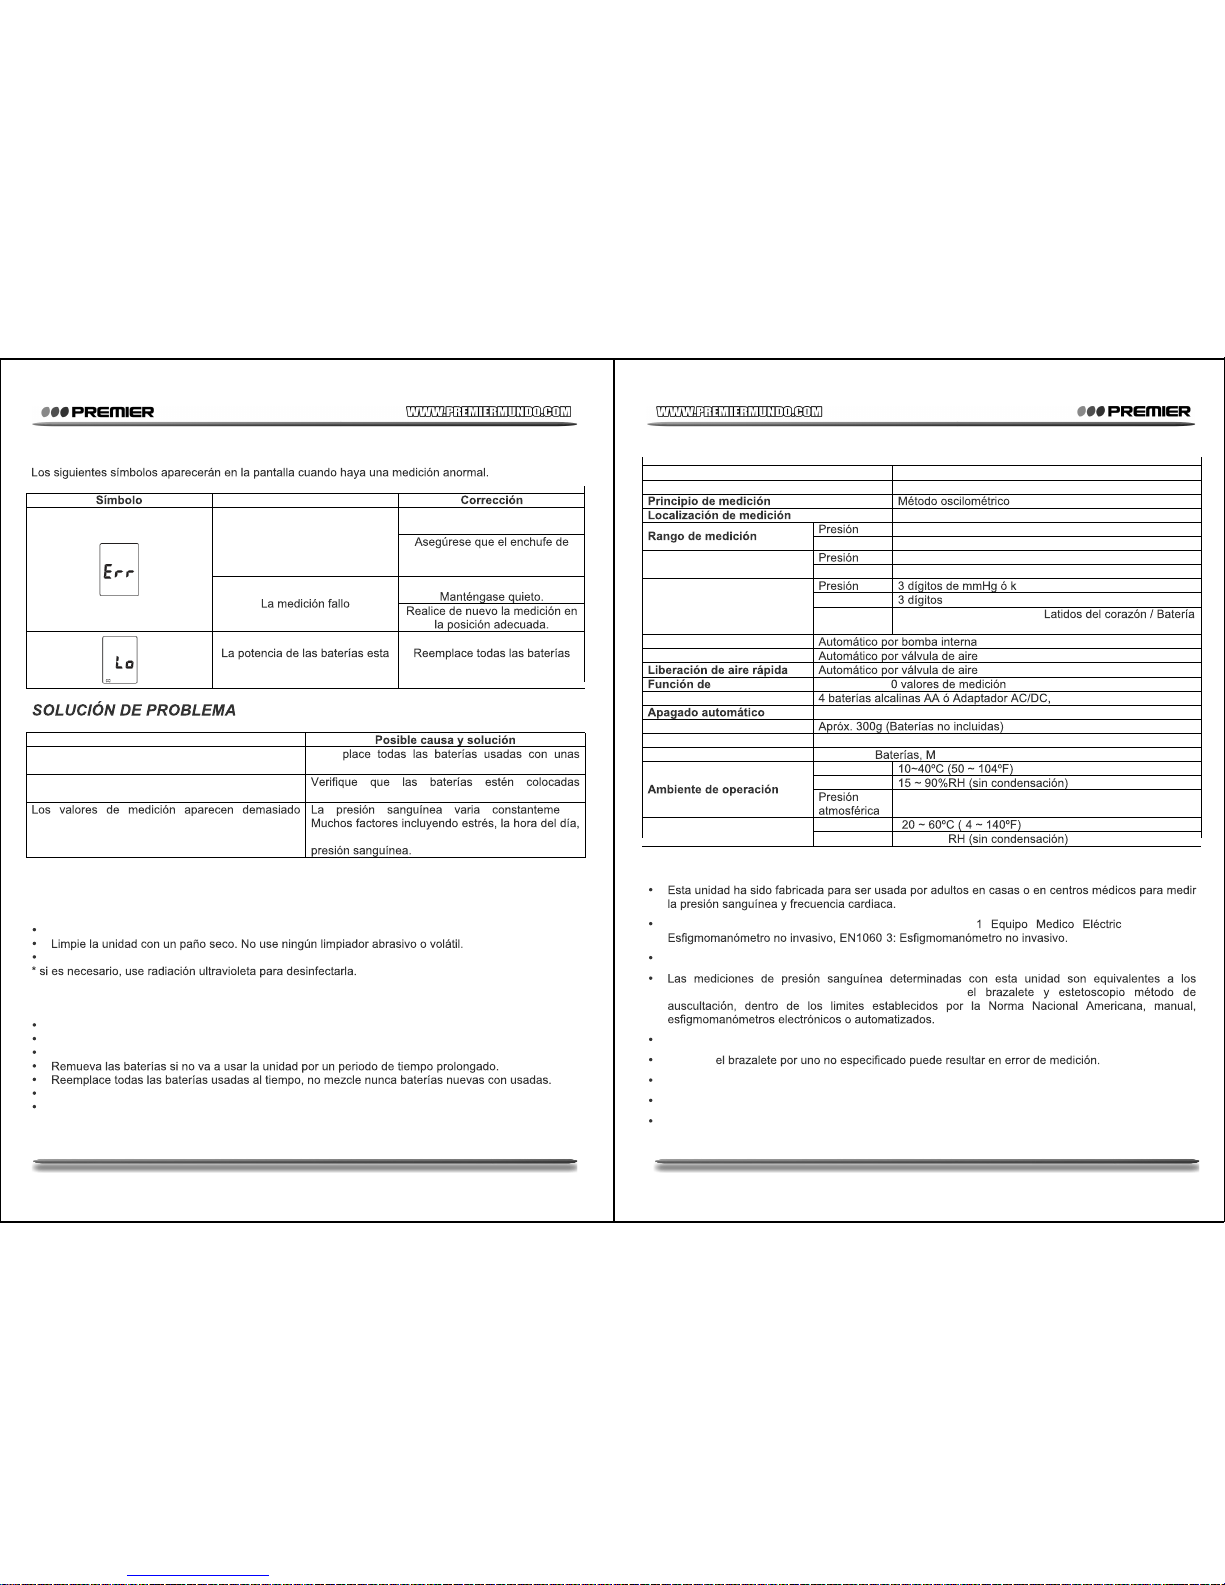
INDICADORES DE ERROR
Causa
Envuelva el brazalete
correctamente
Se ha producido un error al inflar
el brazalete.
aire esta instalado correctamente
en la unidad
No mueva su brazo y su cuerpo.
muy baja usadas con unas nuevas.
S
Problema
No enciende Reem
nuevas.
No aparecen los indicadores en la pantalla
correctamente
altos o demasiado bajos
nte.
como fue envuelto el brazalete, pueden afectar su
CUIDADO Y MANTENIMIENTO
CUIDADO
Mantenga la unidad en su estuche mientras no la use.
Nunca sumerja la unidad en agua o en cualquier otro liquido.
MANTENIMIENTO
No limpie la unidad ni sus accesorios con detergentes o productos abrasivos.
No moje el brazalete con agua
Guarde la unidad en un lugar limpio y seco. No la exponga a humedad o a los rayos directos del sol.
Use la unidad de acuerdo con lo especificado en este manual
Use solo accesorios autorizados por el fabricante.
P-15
ESPECIFICACIONES
Modelo No. BP-3946
Pantalla Pantalla digital LCD
Brazo superior
0 a 299 mmHg (0~39.9 kPa)
Pulso 40 a 199 Pulsos/min
+/-3 mmHg (0.4 Kpa)
Exactitud
Pulso +/-5% de lectura
Pa
Pulso
Indicador LCD
Indicador
Memoria / Promedio / IHB /
baja, etc.
Inflado
Desinflado
memoria Memoria de 9
Fuente de poder D.C 6V
En 2 minutos
Peso de la unidad principal
Brazalete Brazalete suave
Accesorios Brazalete, anual de instrucciones
Temperatura
Humedad
105 ~ 80 kPa
Temperatura - -Ambiente de
almacenamiento
Humedad 10 ~ 95%
OBSERVACIONES
La unidad satisface los requerimientos de IEC60601- o, EN1060-1:
-
Esta unidad ha pasado la prueba EMC.
obtenidos por un observador entrenado utilizando
El riesgo del paciente y el usuario puede bajar a un nivel aceptable.
Cambiar
La ley federal restringe la venta de esta unidad por la orden de un medico.
Esta unidad no debe ser usada cerca de inflamantes mixtos.
Puede que en condiciones de uso o almacenamiento inadecuados, se reduzca el rendimiento de la
unidad.
Page 9
MEM
SET
MEM
START /STO P
SYS
mmHg
DIA
mmHg
PUL
/min
INSTRUCTION MANUAL
Blood Pressure Monitor
DEAR CUSTOMER
In order to achieve the best performance of your product,
please read this instruction manual carefully before using,
and keep it for future reference.
If you need extra support, please write to
BP-3946
Page 10
Introduction .................................................................................3
Important Safety Notes ...............................................................3
Know Y our Unit
---- Main Unit ...............................................................................4
---- Accessorial Components ......................................................5
Unit Display.................................................................................6
Before Taking A Measurement ....................................................7
Quick Reference Guide ..............................................................8
Battery Installation / Replacement ..............................................9
Initialization
---- How to Set the Date and Time ...........................................10-11
Proper Use of the Arm Cuff .....................................................12-13
Take a Measurement ................................................................14
Use the Memory Function ........................................................15
About Blood Pressure
---- Blood Circulation .................................................................16
---- Health and Blood Pressure .................................................17
---- Classification of Blood Pressure .........................................17
Exceptional Situations
---- Error Indicators ...................................................................18
---- Eliminate Fault ....................................................................18
Care and Maintenance .............................................................19
Specifications ...........................................................................20
Statement .................................................................................21
PREMIER CUSTOMER SERVICE
Venezuela: 0800 – ELECTRIC (353-2874)
Panama: 300-5185
Website www.premiermundo.com
E-mail: [email protected]
P-2P-1
Table of Contents
NOTE
This unit may be submi ed to changes in speci?ca ons,characteris cs
and/or opera on without prior no ce tothe user, in order to con
nue
improving and developing its technology.
Page 11
Important Safety Notes
Introduction
Do not use the equipment where flammable gas (such
as anesthetic gas, oxygen or hydrogen ) or flammable
liquid (such as alcohol) are present
Read all information in the instruction manual and any other literature
included in the box before using the unit.
Contact your physician for specific information about your blood pressure.
Follow the instructions of your healthcare provider.
Operate the unit only as intended. Do not use for any other purpose.
The unit is intended to use in measuring blood pressure and pulse rate
for adult only, not recommended for neonatal baby.
Do not use a cellular phone near the unit. It may result in operational failure.
Please avoid using in high radiant area in order to make your measuring
data correctly.
Do not plug or unplug the adapter power cord with wet hands.
Do not disassemble or attempt to repair the unit or components.
To assure the correct use of the product basic safety measures should
always be followed including the precautions listed below:
Thank you for purchasing Fully Automatic Upper Arm Style Digital
Blood Pressure Monitor.
The unit uses the oscillometric method of blood pressure measurement.
It means the unit detects the movement of your blood through your
brachial artery, and converts your blood pressure into a digital reading.
The unit is simple to use because a stethoscope is not needed while
using an oscillometric monitor.
The unit stores automatically 90 sets of measurement values with the
measuring date and time in the memory. You can read the stored data
conveniently by pressing the memory buttons.
Attention, consult ACCOMPANY DOCUMENTS
Type B applied part
P-4P-3
Page 12
Unit Display
Irregular Heartbeat Symbol( )
When the unit detects an irregular rhythm two or more time during the
measurement, the irregular heartbeat Symbol will appear on the display
with the measurement values.
An irregular heartbeat
rythm is defined as
a rhythm that varies
by less than 25% from
the average rhythm or
25% more than the
average rhythm
detected while the
monitor is measuring
the systolic and
diastolic blood pressure.
If the Irregular Heartbeat Symbol( IHB ) displays with your measurement
results, we recommend you consult your physician
Follow the directions of your doctor.
Normal Heartbeat
Irregular Heartbeat
Pulse
Pulse
Short Lon
g
Blood
pressure
Blood
pressure
IHB
P-6P-5
Page 13
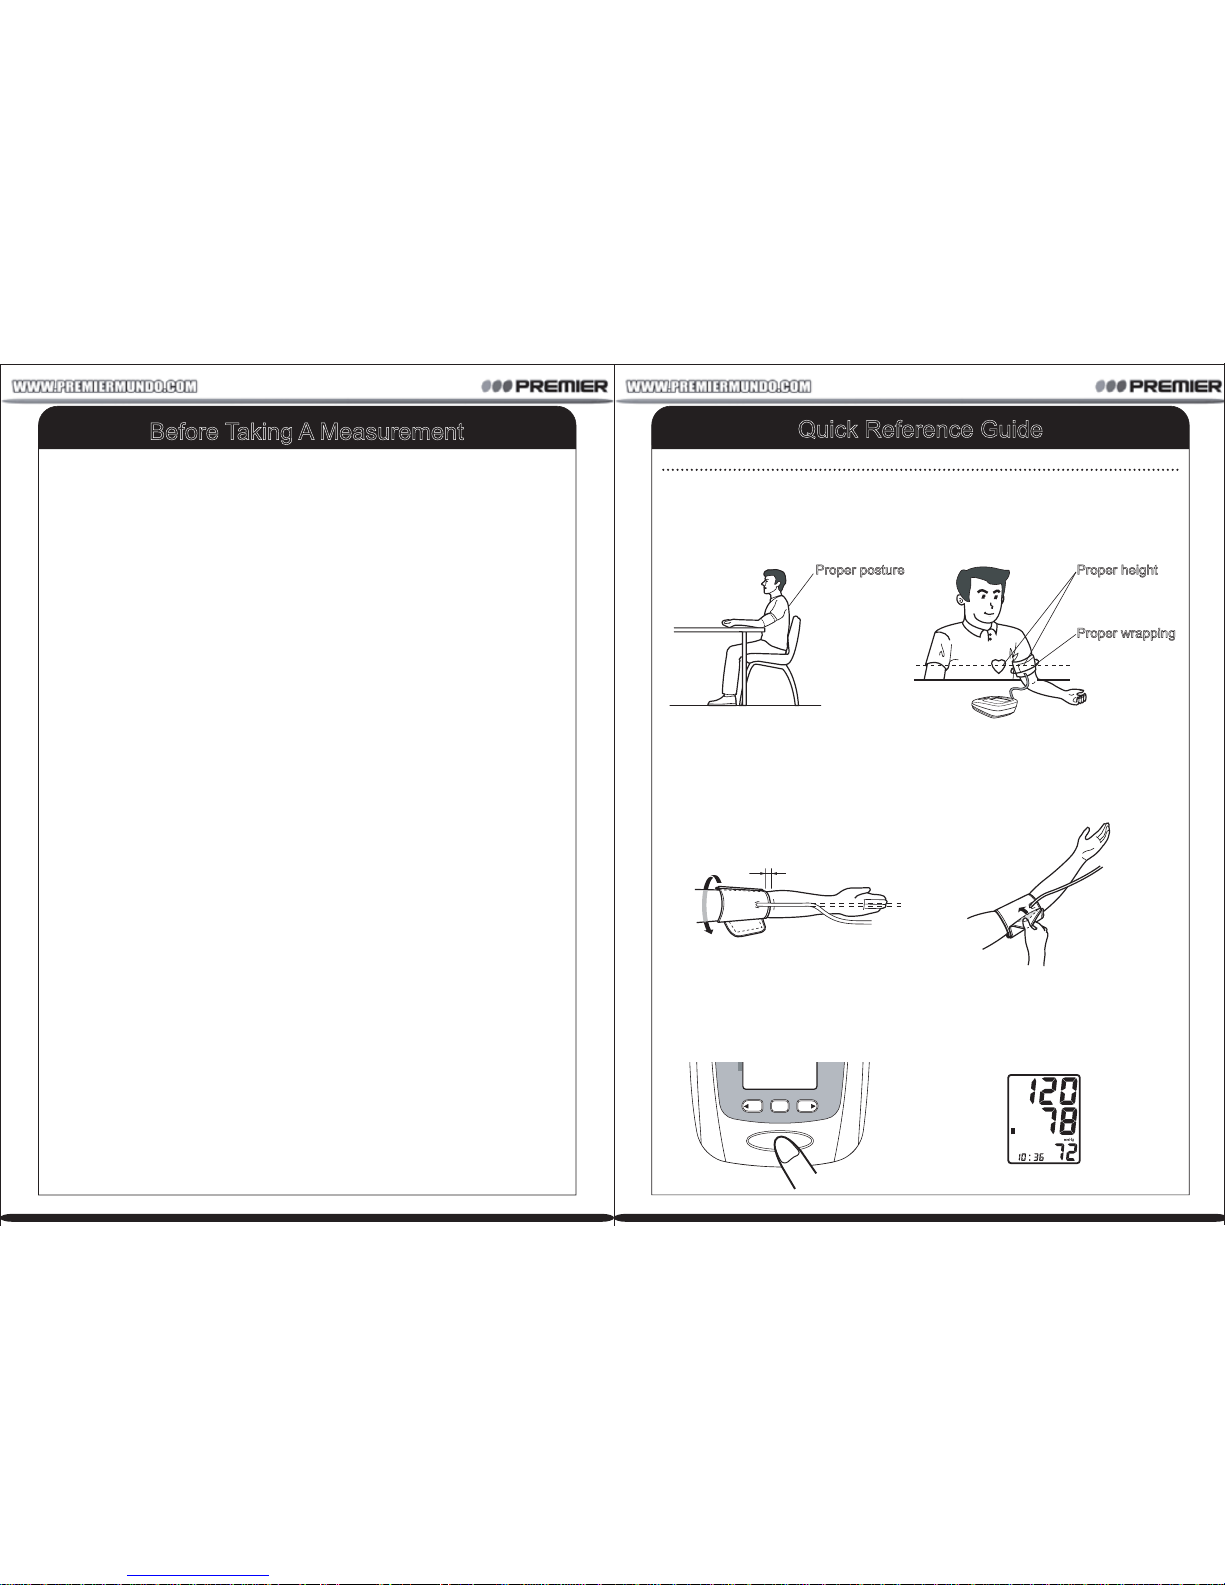
Quick Reference Guide
KINGYIELD
SYS
mmHg
DIA
mmHg
PUL
/min
START/STOP
MEM
SET
MEM
6. The blood pressure and pulse
rate are displayed when the
measurement completed, and the
arm cuff deflates completely.
5. Press the START/STOP button. All
symbols appear, then the cuff starts
to inflate automatically.
1 ~ 2cm
4.Wrap the cuff properly around
your upper arm. Not more than
2-finger-room allowed between the
cuff and your arm.
3. The hose runs down the inside of
your arm. The bottom of the cuff
should be approximately 1~2cm
above your elbow.
Proper height
At the same level
as your heart.
Proper wrapping
Wrap the cuff tightly
on the skin.
Proper posture
Keep your body
straight and
relaxing.
2. Remove all clothes from your
upper arm allowing the cuff to fit
directly on the skin.
1. Please take off thick clothing and
keep yourself quiet for 5~10 minutes
before taking a measurement.
Before Taking A Measurement
1. Avoid eating, drinking, alcohol, smoking, exercsing and bathing for 30
minutes before takinga measurement. Rest for at least 15 minutes before
taking the measurement.
2. Stress raises blood pressure. Avoid taking measurements during stressful
times.
3. The cuff can be applied to your left or right wrist.
4. Measurements should be taken in a quiet place.
5.Position the unit at heart level throughout the measurement.
6. Remain still and do not talk during the measurement.
7. Keep a record of your blood pressure and pulse readings for your
physician. A single measurement does not provide an accurate indication
of your trueblood pressure. You need to take and record several readings
over a period of time. Try to measureyour blood pressure at the same time
each day for consistency.
8. Wait 30~60 seconds between measurements.
The wait time allows the arteries to return to the condition prior to taking the
blood pressure mesurement.You may need to increase the wait time
depending on you individual physiological characteristics.
P-8P-7
Page 14
Initialization
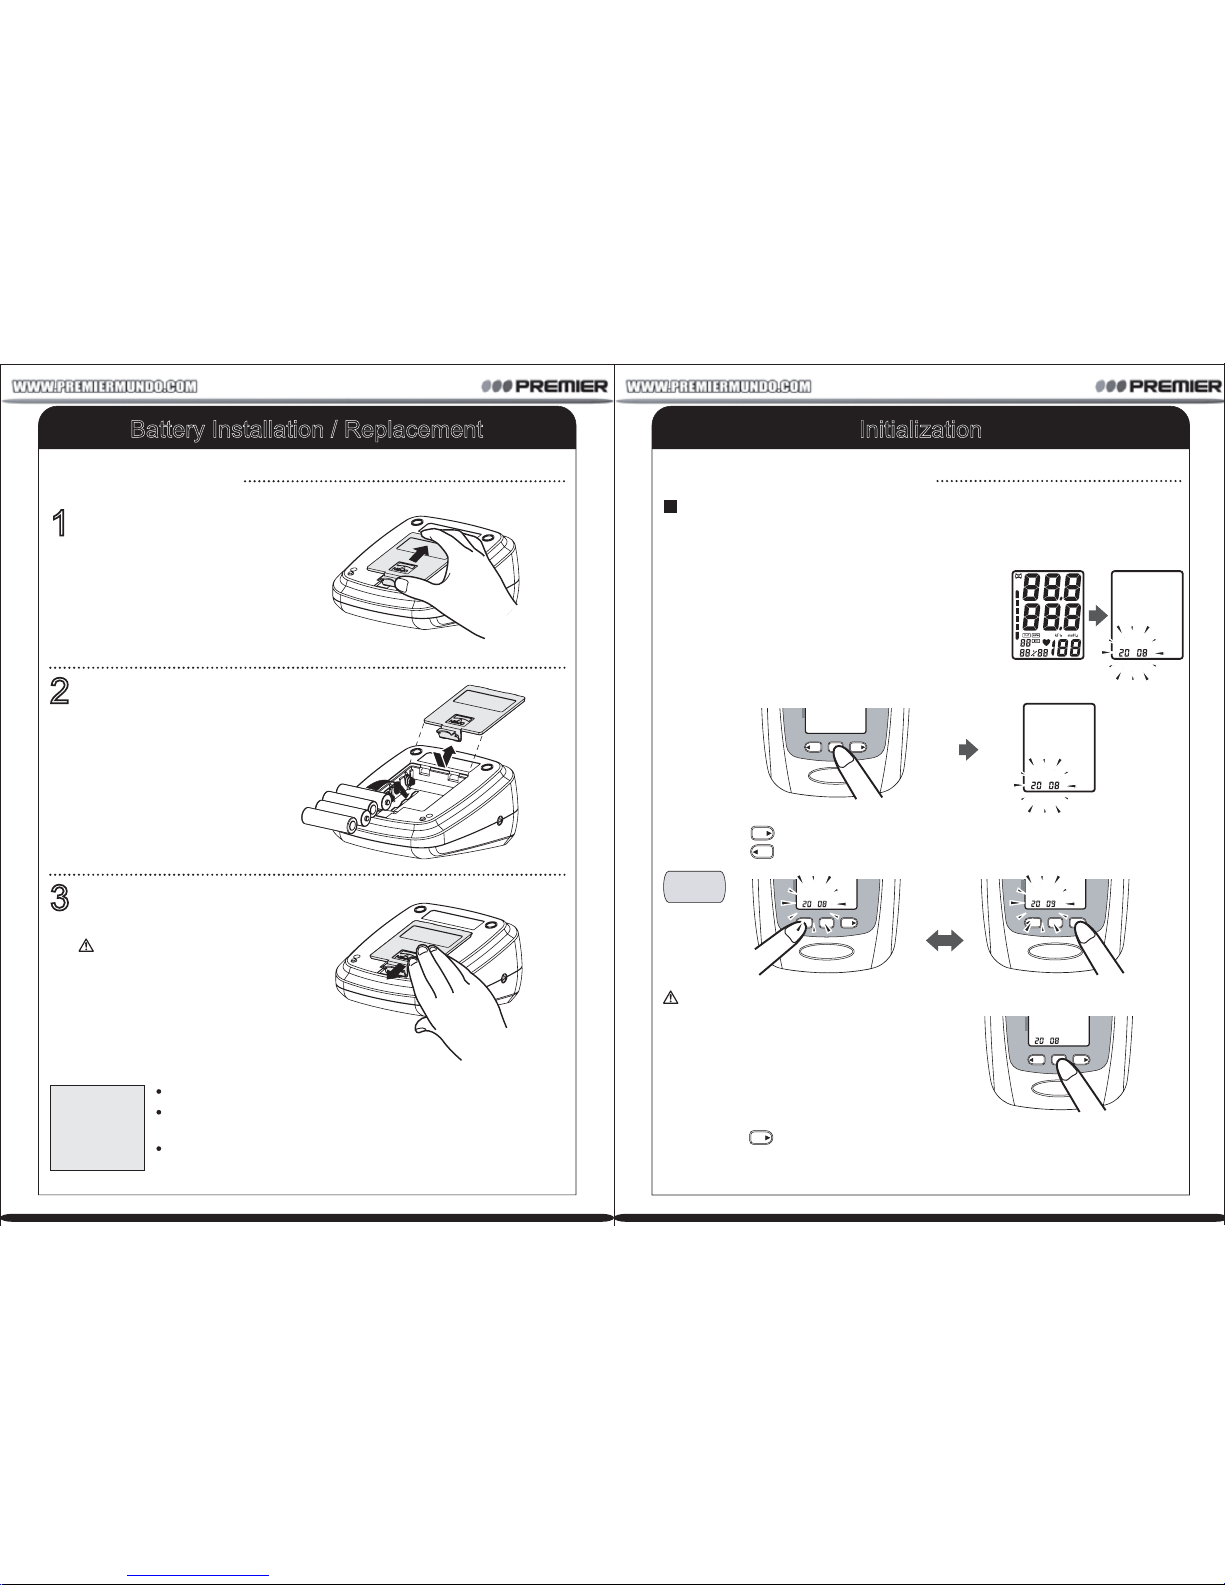
5.Press the memory up button to increase one month.
Press the Setting button to set the current month.
After that the day flashes on the display.
MEM
KINGYIELD
SYS
mmHg
DIA
mmHg
PUL
/min
START/STOP
MEM
SET
MEM
4.Press the Setting button to set the
current year.
After that the month flashes on the
display.
The year can be set between 2008 and 2030. When the display reaches
to 2030, it will return to 2008.
KINGYIELD
SYS
mmHg
DIA
mmHg
PUL
/min
START/STOP
MEM
SET
MEM
KINGYIELD
SYS
mmHg
DIA
mmHg
PUL
/min
START/STOP
MEM
SET
MEM
Year
Setting
3. Press the memory up button to increase one year.
Press the memory down button to decrease one year.
MEM
MEM
KINGYIELD
SYS
mmHg
DIA
mmHg
PUL
/min
START/STOP
MEM
SET
MEM
2. Long press the setting button until the year is
displayed when the unit powered off.
1. All informations will appear on the display when
the batteries are installed at the first time, after
2 seconds the year flashes on the display.
This remind you to set the date and time.
The unit automatically stores 90 sets measurement values with the date
and time. Set the unit to the current date and time before taking a
measurement for the first time. A default date and time will display if the
current date and time is not set.
How to Set the Date and Time
Battery Installation / Replacement
Use four identical 1.5V alkaline batteries type AA LR6.
Replace all of the batteries if the symbol of low battery
appears on the display.
Never leave any low battery in the battery compartment
since they may leak and cause damage to the unit.
Caution!
The battery cover will be
closed tight when you hear
a clicking sound.
3
Replace the battery cover.
Insert four AA powerful
batteries into the
compartment and ensure
each battery is in the
proper direction.
2
Remove the battery
cover from the battery
compartment.
1
How to Install Battery
P-10P-9
Page 15
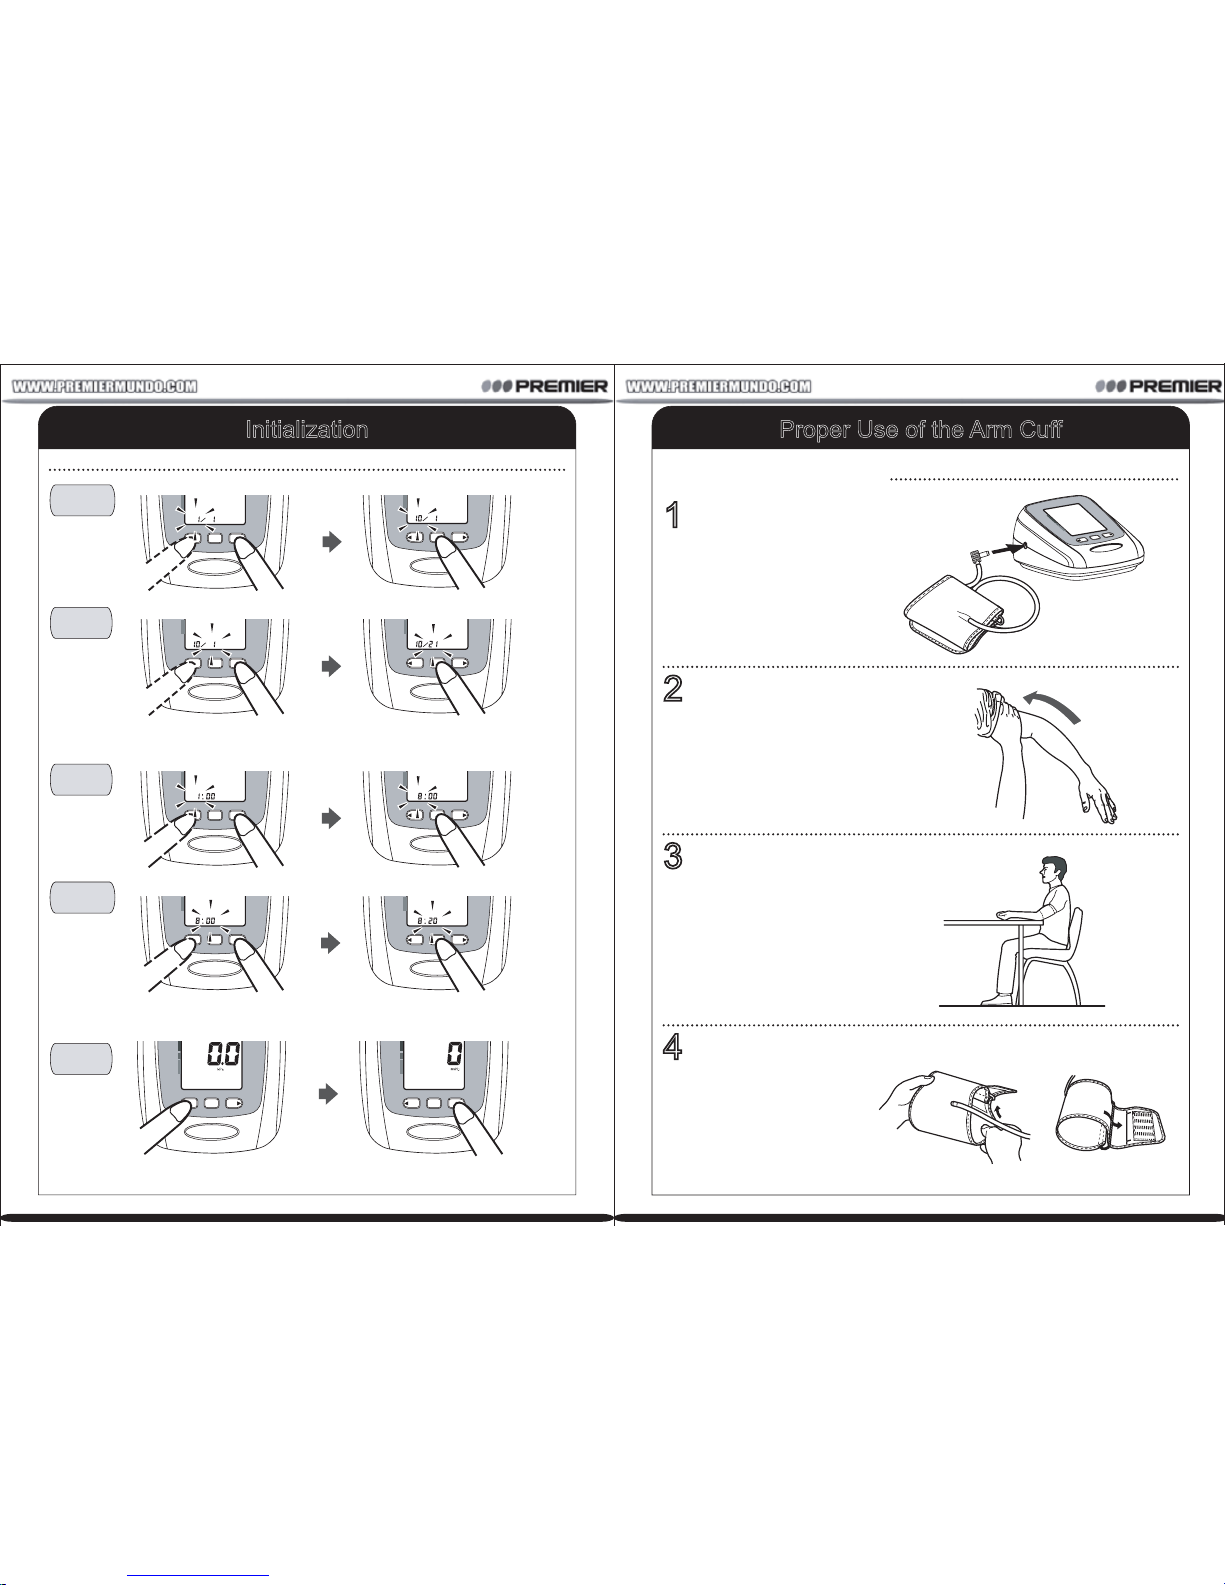
Proper Use of the Arm Cuff
4
Pass the end of the
cuff through the
metal, and keep the
hose outward.
Sit in a chair with your
feet flat on the floor.
Place your arm on a
table so as to level the
cuff to your heart.
3
Remove all clothes
from your upper arm
allowing the cuff to fit
directly on the skin.
2
START/STOP
M
EM
SET
M
E
M
SYS
mmH
g
DIA
mmHg
P
U
L
/
min
Make sure the air plug
is inserted properly in
the main unit.
1
How to Use the Arm Cuff
8. After completing all the settings, press the START/STOP button to shut off.
KINGYIELD
SYS
mmHg
DIA
mmHg
PUL
/min
START/STOP
MEM
SET
MEM
KINGYIELD
SYS
mmHg
DIA
mmHg
PUL
/min
START/STOP
MEM
SET
MEM
Unit
Setting
7. After setting the minute, next step to select display unit (kPa or mmHg).
KINGYIELD
SYS
mmHg
DIA
mmHg
PUL
/min
START/STOP
MEM
SET
MEM
KINGYIELD
SYS
mmHg
DIA
mmHg
PUL
/min
START/STOP
MEM
SET
MEM
Minute
Setting
KINGYIELD
SYS
mmHg
DIA
mmHg
PUL
/min
START/STOP
MEM
SET
MEM
KINGYIELD
SYS
mmHg
DIA
mmHg
PUL
/min
START/STOP
MEM
SET
MEM
Hour
Setting
6. Setting the hour and minute by using the same way.
KINGYIELD
SYS
mmHg
DIA
mmHg
PUL
/min
START/STOP
MEM
SET
MEM
KINGYIELD
SYS
mmHg
DIA
mmHg
PUL
/min
START/STOP
MEM
SET
MEM
Day
Setting
KINGYIELD
SYS
mmHg
DIA
mmHg
PUL
/min
START/STOP
MEM
SET
MEM
KINGYIELD
SYS
mmHg
DIA
mmHg
PUL
/min
START/STOP
MEM
SET
MEM
Month
Setting
Initialization
P-12P-11
Page 16
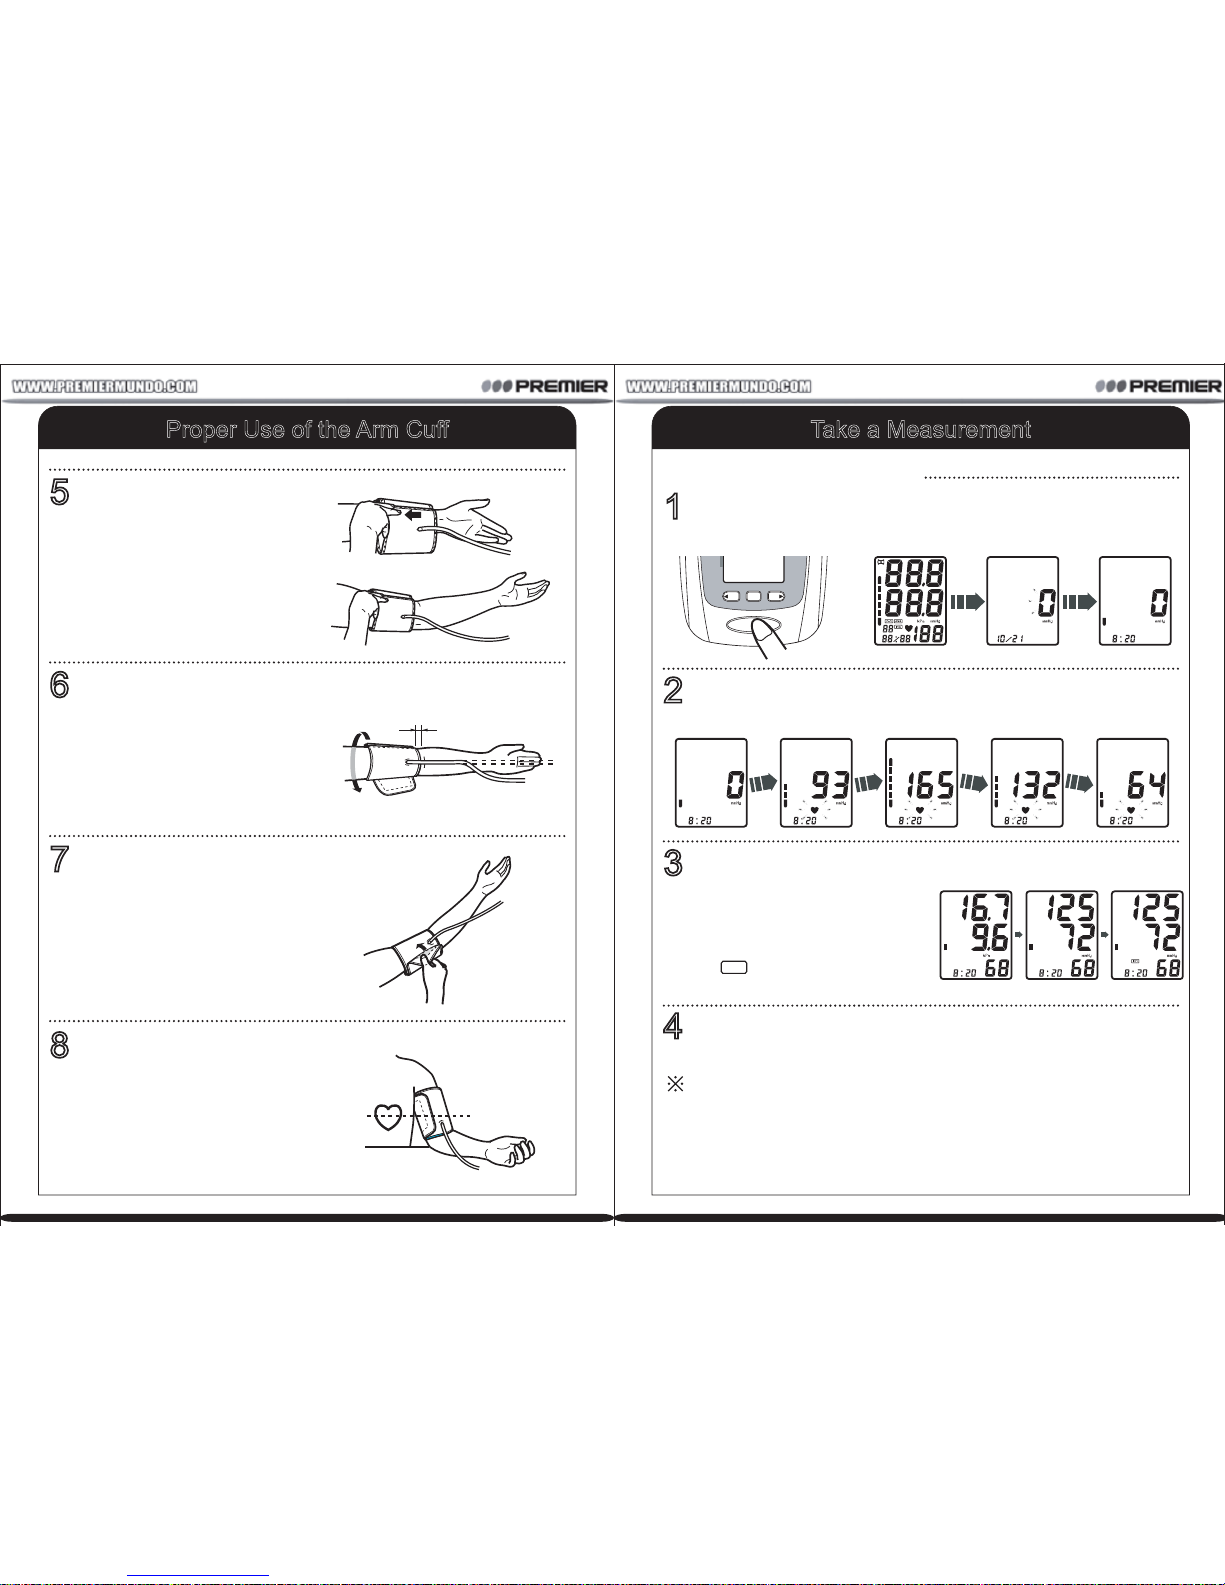
Take a Measurement
In order to accelerate the measurement time for the systolic pressure more
than 180 mmHg, press and hold the memory button until the unit inflates 30
to 40 mmHg higher than your suspected systolic pressure if you know. (
The unit will not inflate above 299 mmHg).
Please rest for at least 3 minutes before taking the next measurement.
INSTRUCTIONS FOR SPECIAL CONDITIONS
The unit will automatically turn off after 2 minutes if you have forgotten to turn off it.
4
Press the START/STOP button to turn off the unit.
"IHB" display
"mmHg" display
"kPa" display
OROR
The cuff is deflated automatically, and all
of the measurement results are stored in
the memory with date and time.
The symbol will be displayed if
arrhythmia is detected.
IHB
3
The blood pressure and pulse rate are displayed when the
measurement completed.
Inflation stop automatically and the measurement is started.
2
The heartbeat symbol flashes once a pulse is detected.
KINGYIELD
SYS
mmHg
DIA
mmHg
PUL
/min
START/STOP
MEM
SET
MEM
All display symbols appear on the screen. The cuff starts to inflate automatically.
Press the START/STOP button.
1
How to Take a Measurement
Proper Use of the Arm Cuff
8
Have your upper arm
relax, keep your palm
upward and your fingers
curving naturally, then
turn on the unit and start
to measure.
Wrap the cuff properly
around your upper arm.
Not more than
2-finger-room allowed
between the cuff and
your arm.
7
1 ~ 2cm
The hose runs down the
inside of your arm. The
bottom of the cuff should
be approximately 1~2cm
above your elbow.
6
5
Put your arm through the
loop, and pull it up to the
position of your upper
arm.
P-14P-13
Page 17
About Blood Pressure
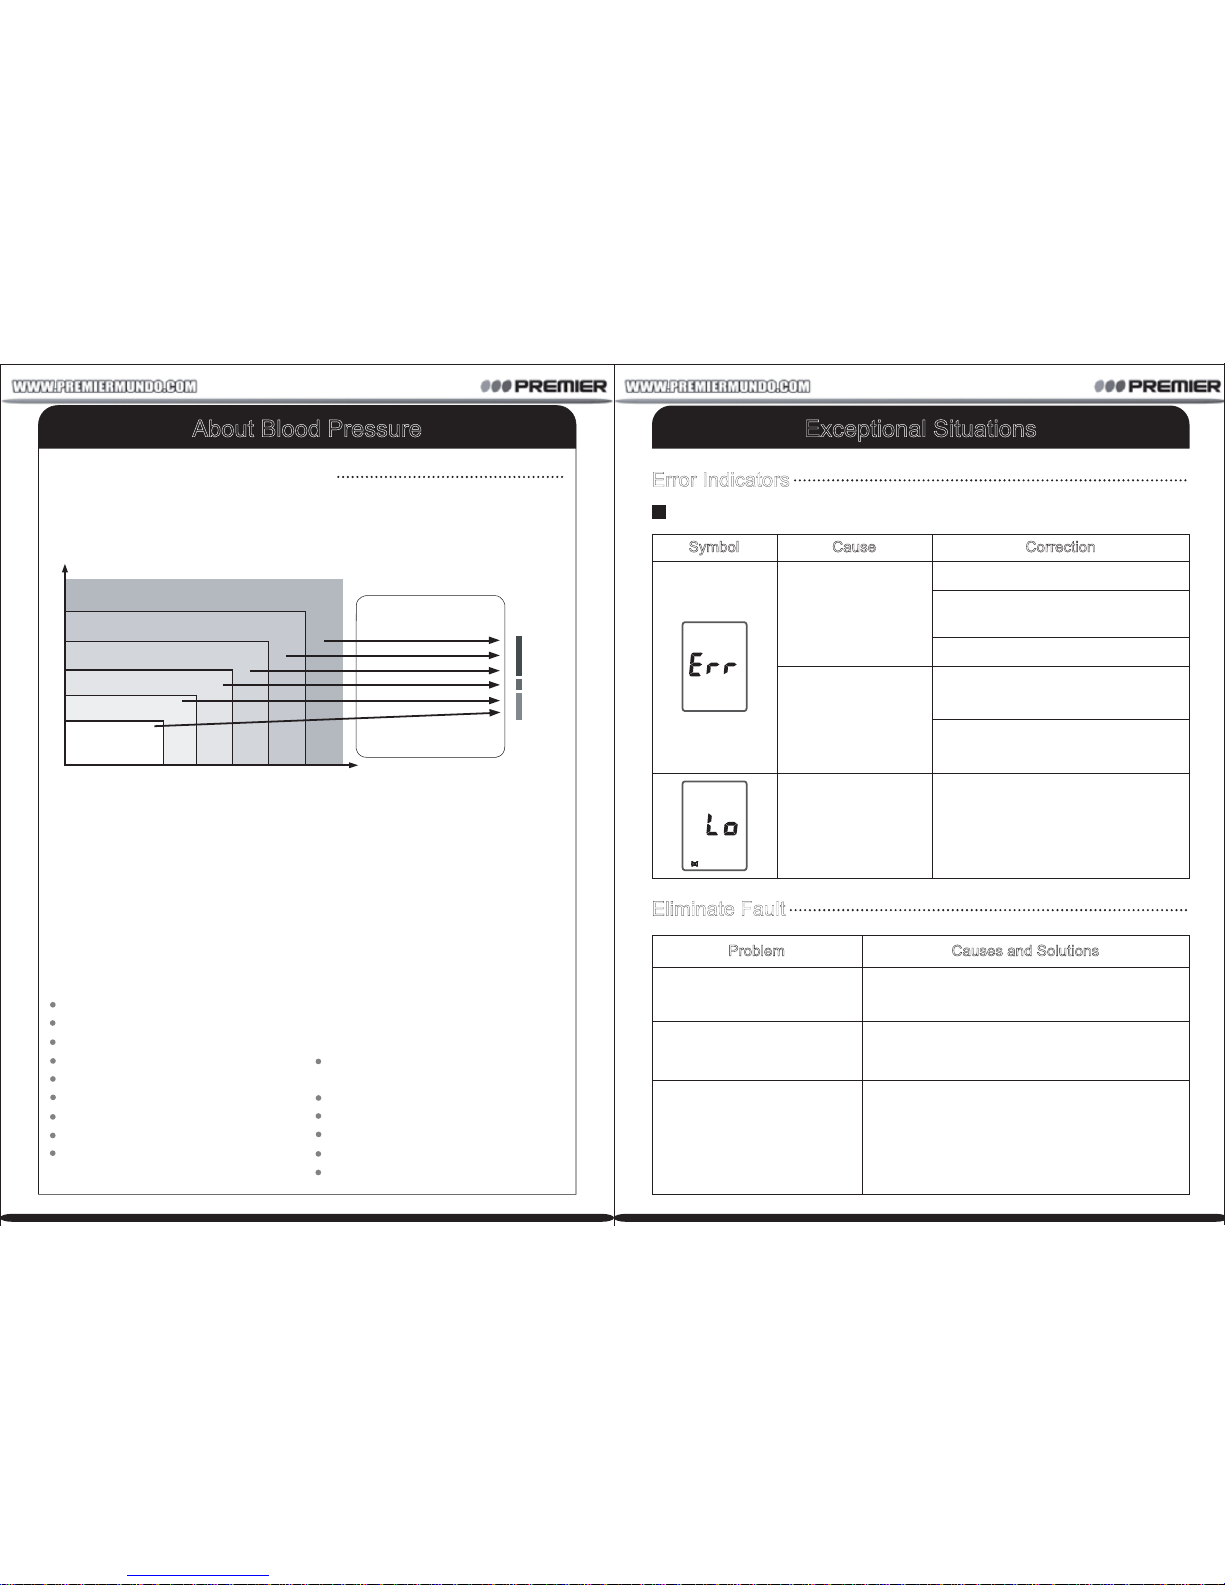
The incidence of hypertension increases with age. In addition, a lack of
exercise, excess body fat and high levels of cholesterol (LDL), which sticks to
the inside in blood vessels, reduces elasticity of these vessels. Hypertension
accelerates arterial sclerosis which can lead to very serious conditions such
as stroke and myocardial infarction. For these reasons it is very important to
know whether the blood pressure is within a healthy range. Blood pressure
fluctuates from minute to minute, throughout the day.Therefore it is essential
to take regular measurements to help you identify an average blood pressure.
1862412
Time of day
Lower curve: diastolic blood pressure
Upper curve: systolic blood pressure
50
100
200
mmHg
150
Health and Blood Pressure
Lower pressure
Relaxation of the
heart muscle
Pressure decreased
to the blood vessel
Blood return heart
Higher pressure
Contraction of
the heart muscle
Pressure increased
to the blood vessel
Extrude blood
Systolic Blood Pressure Diastolic Blood Pressure
The blood circulation is responsible for supplying the body with oxygen.
Blood pressure is the pressure exerted on the arteries.
The systolic blood pressure value (higher pressure or top value) represents
the blood pressure produced by contraction of the heart muscle.
The diastolic blood pressure value (lower pressure or lower value) represents
the blood pressure produced by relaxation of the heart muscle.
Blood Circulation
Use the Memory Function
KINGYIELD
SYS
mmHg
DIA
mmHg
PUL
/min
START/STOP
MEM
SET
MEM
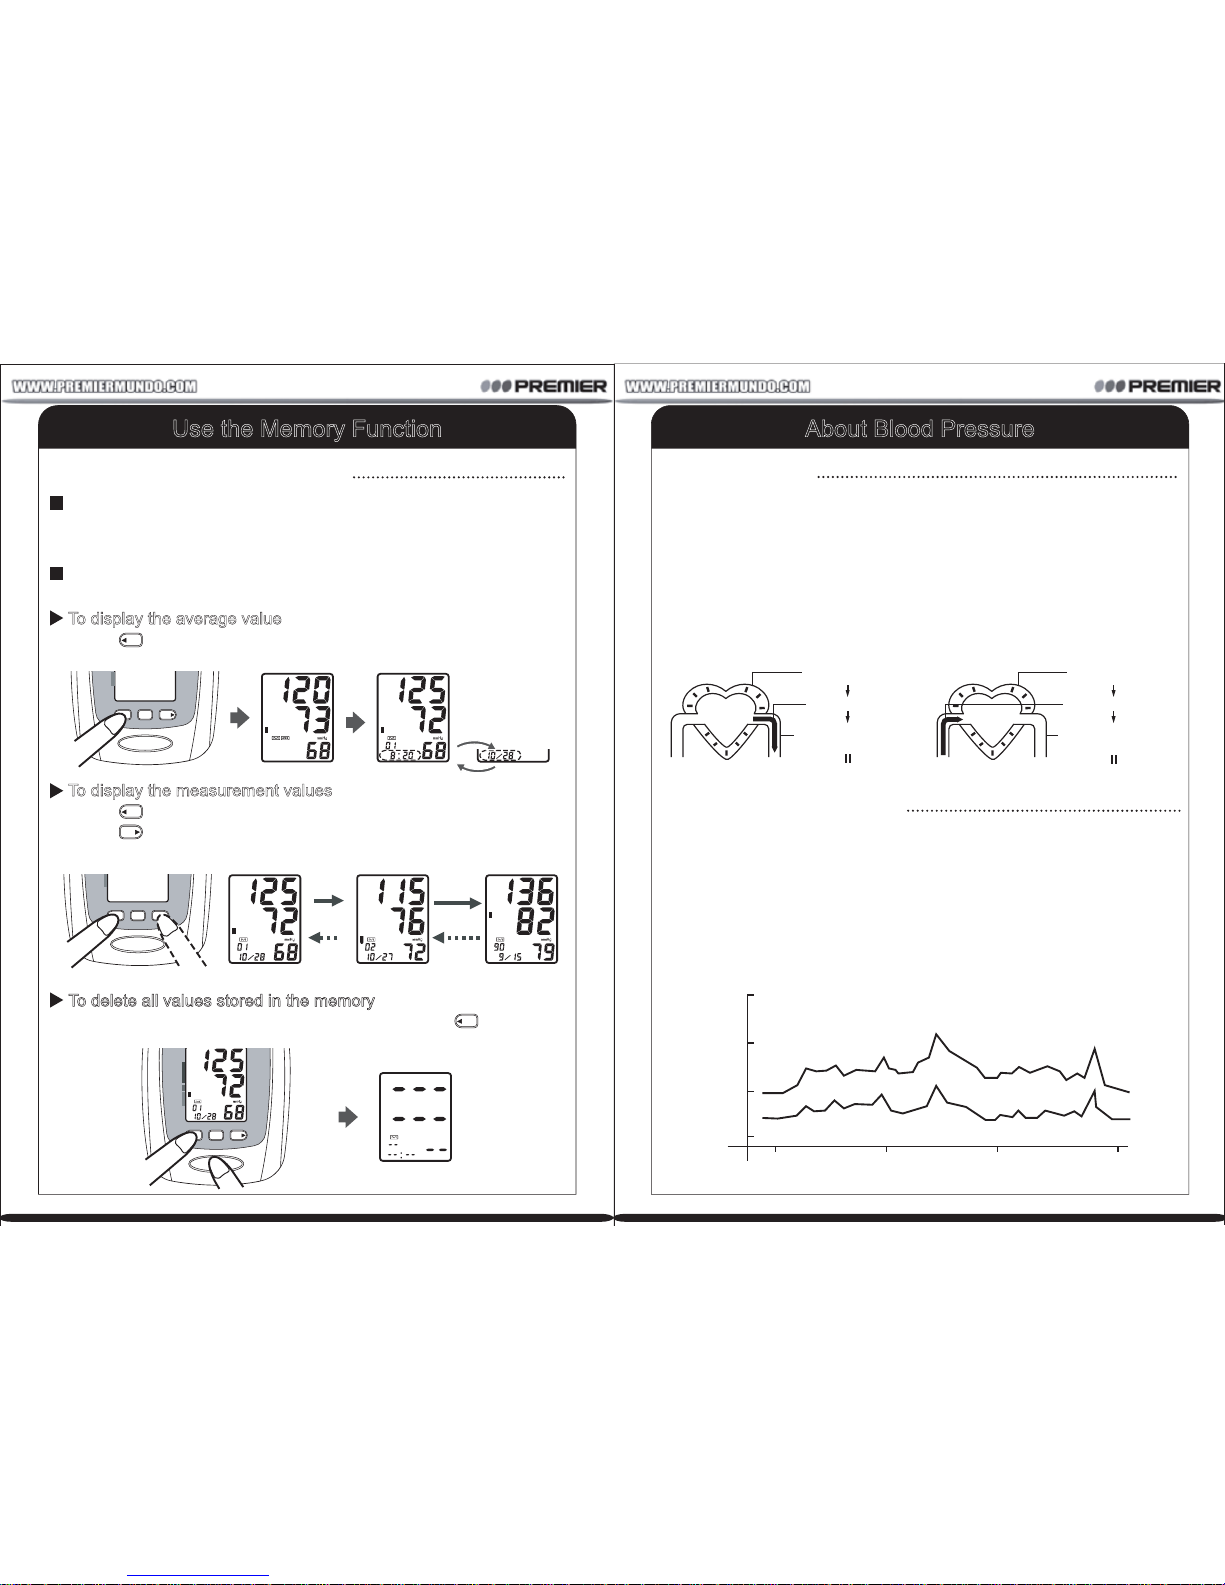
To delete all values stored in the memory
When reading the measurement values, press and hold the memory
down button, then press START/STOP button for about 3-4 seconds.
MEM
The 90st latest
measurement value
The 2st latest
measurement value
The 1st latest
measurement value
Forward
Backward
KINGYIELD
SYS
mmHg
DIA
mmHg
PUL
/min
START/STOP
MEM
SET
MEM
To display the measurement values
Press the memory down button to view the latest measurement value.
Press the memory up button to view the oldest measurement value.
Press the button repeatedly to display the next value.
MEM
MEM
Alternating display
KINGYIELD
SYS
mmHg
DIA
mmHg
PUL
/min
START/STOP
MEM
SET
MEM
To display the average value
Press the memory down button. The average value symbol will display
on the screen with the average reading.
MEM
The unit stores the blood pressure and pulse rate in the memory after
completing a measurement every time. It can automatically store 90 sets
of measurement values. The oldest record is deleted to save the latest
measurement value when more than 90 sets.
The unit also calculates an average reading based on the values of the
latest 3 times measurement taken.
How to Use the Memory Function
P-16P-15
Page 18
Exceptional Situations
Problem Causes and Solutions
No display appears on the
display screen.
No power.
Measurement values
appear too high or too low.
Check the battery installation for proper
placement of the batteries polarities.
Replace all the worn batteries with 4 new
ones.
Blood pressure varies constantly. Many
factors including stress, time of day, how
you wrap the cuff, may affect your blood
pressure. Review the sections "Proper Use
of the Arm Cuff" and "Take a Measurement".
Eliminate Fault
Symbol Cause Correction
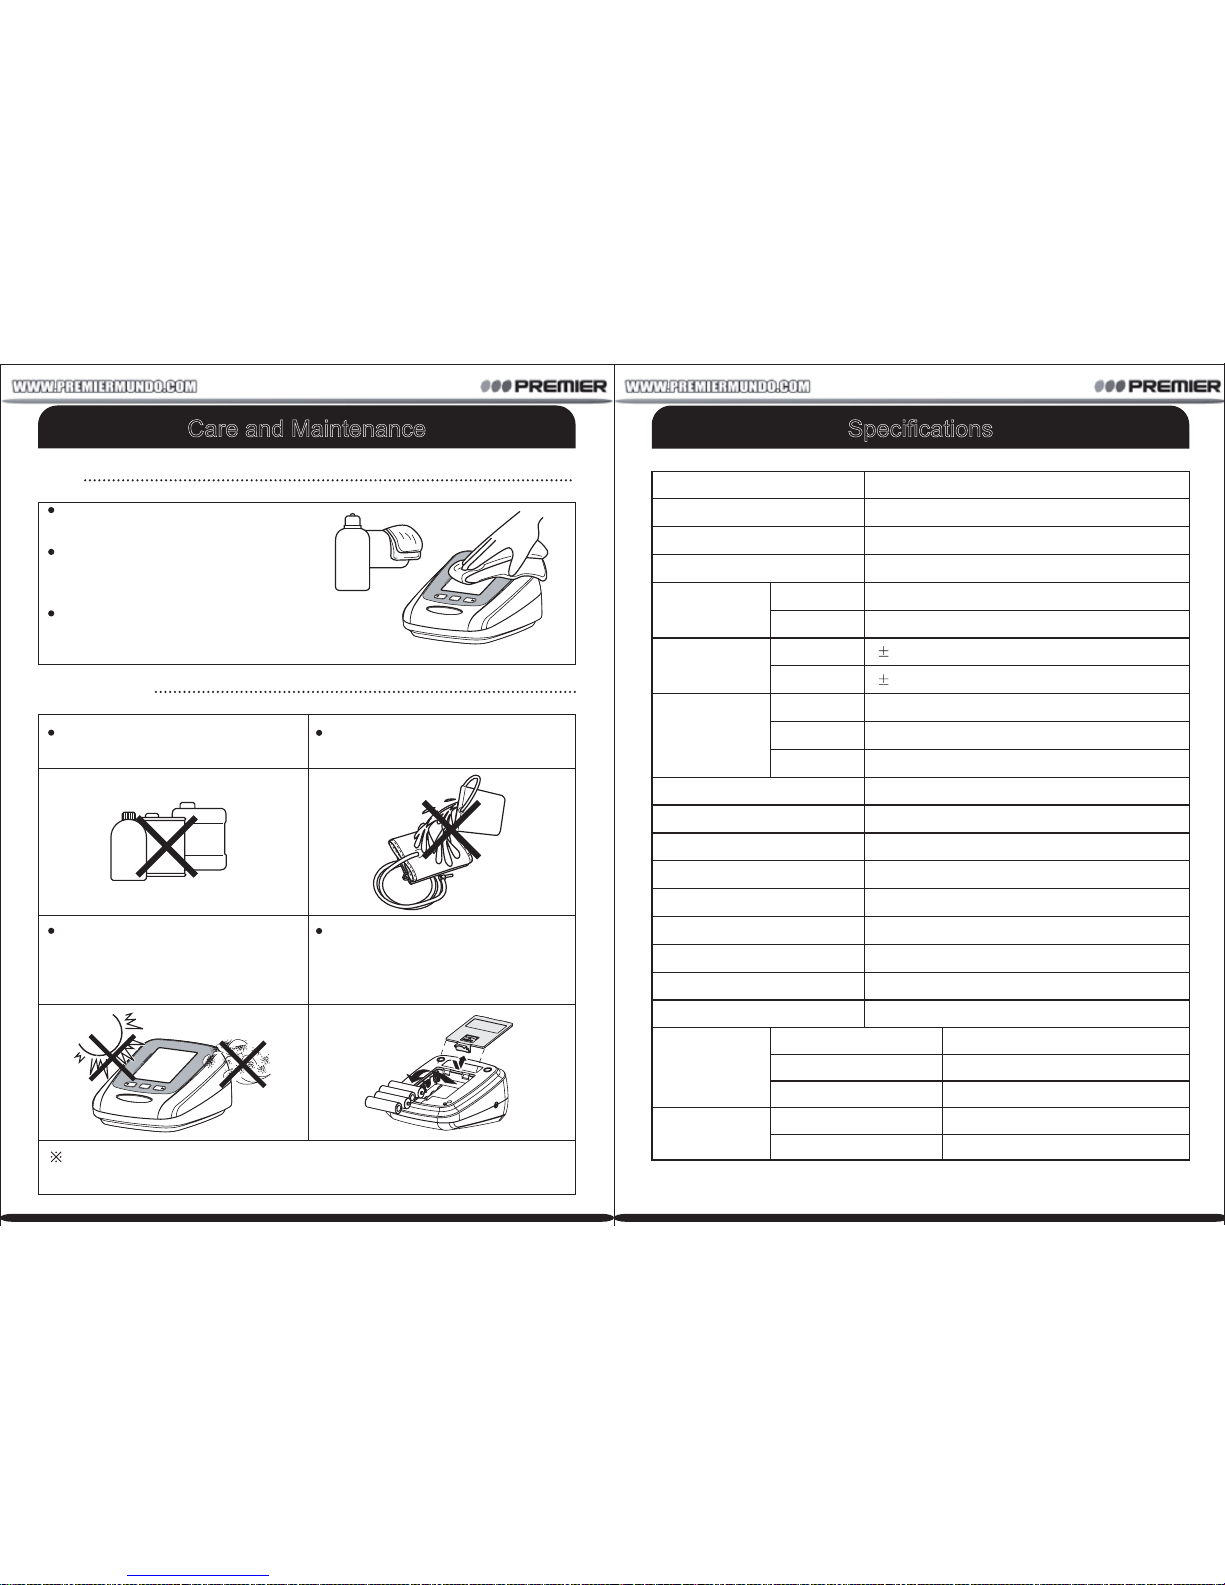
When the batteries
power are too low.
The course of
inflating appears
error.
When measurement
fails.
Replace all of the worn batteries
with new ones.
Wrap the cuff properly.
Make sure that the air plug is
properly inserted in the unit.
Inflate over again after ensuring.
Measure over again according to
correct way.
Do not move your arm and body,
and keep quiet.
The following symbol will appear on the display when measuring abnormal.
Error Indicators
About Blood Pressure
If your blood pressure reaches upper
values of 140~160 mmHg and lower
values of 90~95 mmHg in repeated
measurements over several days, you
should consult your doctor for detailed
medical examination. You can assist
the treatment prescribed by your
doctor in the following ways:
Loose weight and lower your
cholesterol level;
Reduce the consumption of alcohol;
Reduce the intake of salt;
Stop smoking;
Take regular exercise;
Monitor your blood pressure.
Treatment of High
Blood Pressure
Overweight;
High cholesterol level;
Smoking;
Excessive alcohol consumption;
Stress and emotional upset;
Excessive consumption of salt;
Lack of physical exercise;
Genetic / hereditary predisposition;
Underlying illnesses, such as kidney
disorders or endocrine disturbance.
High blood pressure can go unnoticed
for a long time, since it doesn't cause
noticeable symptoms. The following
are all possible causes of abnormally
high blood pressure:
Symptoms of High
Blood Pressure
*Note!
When a person’s systolic and diastolic pressures fall into different
categories, the higher category should apply.
WHO
Red
Yellow
Blue
80
85
90
100
110
Diastolic Blood Pressur (mmHg)
120 130 140 160 180
Systolic Blood Pressure (mmHg)
Optimal
blood pressure
(target value)
Normal blood pressure
Normal systolic value
Mild hypertension
Moderate hypertension
Severe hypertension
After each measurement is completed, the LCD display will show your
position automatically on the six segments of the bar indicator which
corresponds to WHO Blood Pressure Indicator.
Classification of Blood Pressure
P-18P-17
Page 19
Pressure
Pulse
Pressure
Pulse
Pressure
Pulse
Symbol
Measurement
Range
Accuracy
LCD
Indication
Operating
Environment
Storage
Environment
Model No.
Display
Measurement Localization
Measuring Principle
Cuff
Memory Function
Inflation
Power Source
Rapid Air Release
Automatic Power-Off
Main Unit Weight
Deflation
Accessorial Components
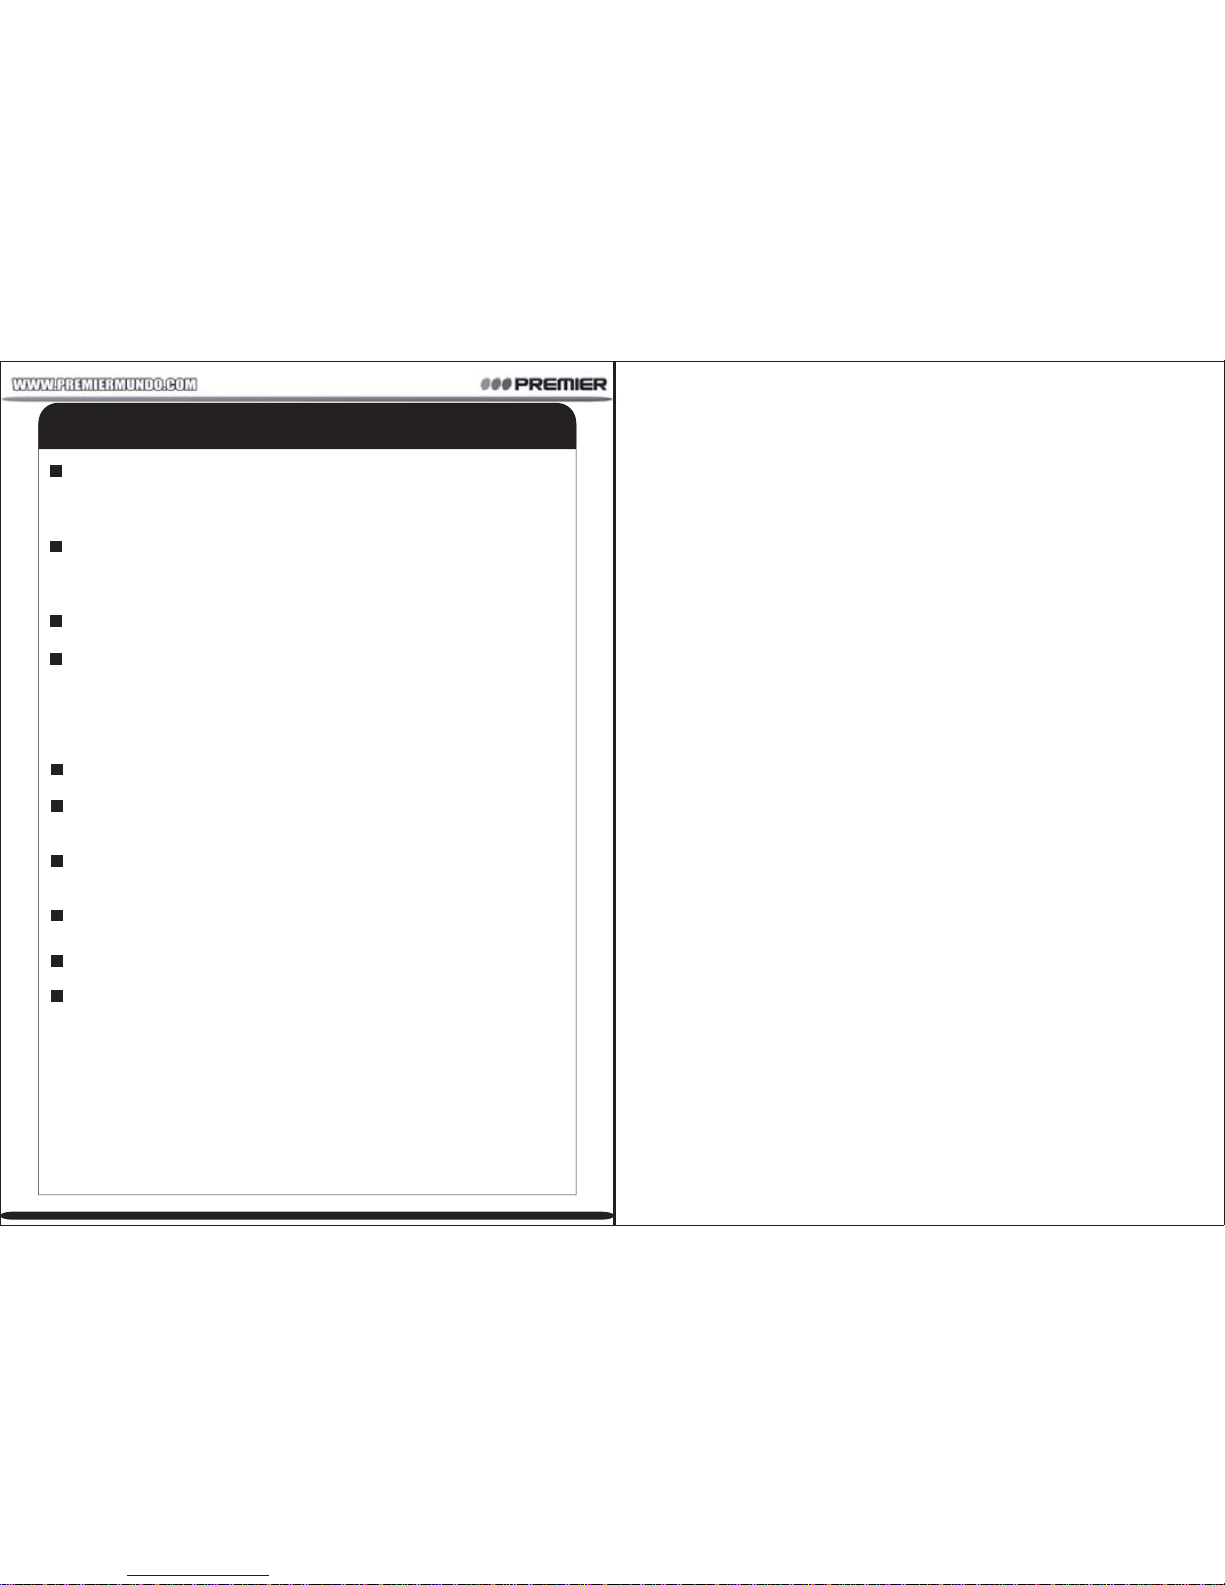
0 ~ 299 mmHg (0 ~ 39.9 kPa)
40 ~ 199 Pulses/min
3 Digits Display of mmHg or kPa
3 mmHg (0.4 kPa)
5% of reading
3 Digits Display
Memory/Average/IHB/Heartbeat/Low Battery, etc.
BP-3946
LCD Digital Display
Upper Arm
Oscillometric Method
Memory 90 Sets of Measurement Values
Automatic by Internal Pump
Automatic by Air Valve
4 AA Alkaline Batteries or AC/DC Adapter; D.C. 6V
In 2 Minutes
Automatic by Air Valve
Soft Arm Cuff
Approx. 300g (Batteries not included)
Cuff, Batteries, Instruction Manual
Temperature
Humidity
Temperature
Humidity
Barometric Pressure
10 ~ 40 °C (50 ~ 104 °F)
15 ~ 90%RH (Noncondensing)
-20 ~ 60 °C (-4 ~ 140 °F)
10 ~ 95%RH (Noncondensing)
105 ~ 80 kPa
Specifications
Care and Maintenance
Do not clean the body and cuff with
naphtha, thinner or gasoline etc.
Do not wet the cuff or attempt to
clean the cuff with water.
Store the unit in a clean and dry
location. Do not subject the unit to
extreme hot or cold temperature,
humidity and direct sunlight.
Remove the batteries if the unit will
not be used for 3 months or longer.
Always replace all of the batteries
with new ones at the same time.
Use the unit consistent with the instructions provided in this manual.
Use only authorized parts and accessories.
M
EM
S
E
T
M
E
M
S
T
A
R
T
/S
T
O
P
SY
S
mm
H
g
D
I
A
mm
H
g
P
U
L
/
m
i
n
naphtha
thinner
gasoline
Maintenance
ME
M
SET
MEM
S
T
A
R
T
/S
T
OP
KINGYIELD
SYS
mmHg
DIA
mmHg
PUL
/min
Keep the unit in the storage case
when not in use.
Clean the unit with a soft dry cloth.
Do not use any abrasive or volatile
cleaners.
Never immerse the unit or any
components in water.
Care
※If needed, please use ultraviolet radiation for disinfection.
P-20P-19
Page 20
Statement
The intended use: The unit is intended to be used by adults at home or
medical centre to measure blood pressure and pulse rate from the upper
arm.
The unit satisfies the requirements of IEC60601-1 Medical electrical
equipment,EN1060-1:Non-invasive sphygmomanometer,EN1060-3:
Non-invasive sphygmomanometer
The unit has passed the EMC Test.
Blood pressure measurements determined with this device are equivalent
to those obtained by a trained observer using the cuff/stethoscope
auscultatory method,
within the limits prescribed by the American National Standard, Manual,
electronic, or automated sphygmomanometers.
The risk of patient and user can be lowered to acceptable level.
Substitution of a cuff different from that supplied might result in
measurement error.
Specifications are subject to change without notice due to improvements in
performance.
Federal law restricts this device to sale by or on the order of a physician.
Equipment not suitable for use in the presence for flammable mixtures
The unit might not meet its performance specifications if stored or used
outside the following spcified temperature and humity ranges
P-21
VER:A00
 Loading...