

Page 1
30cm (12”) DESK FAN
MMOODDEELL:: PPDDFF11221144BB
Please read this instruction manual before
operating and keep safe for future reference.
IMPORTANT SAFETY INSTRUCTIONS
CAUTION: Read and follow all instructions before operating this fan.
Use the fan only as described in this manual. Misuse may cause a fire or
an electrical shock.
• Do not operate the fan with a damaged power cord or plug, after it
malfunctions, has been dropped or damaged. If the power cord is
damaged it must be replaced by the manufacturer or a qualified
service engineer to avoid a hazard.
• Close supervision is necessary when this fan is used near children
and pets.
• Always turn the fan off after use, before cleaning, or moving location
• Do not insert fingers or other objects into the fan guard.
• Do not operate the fan in areas where petrol, paint or other flammable
liquids are used or stored.
• Do not place the fan near an open flame, cooking or heating
appliance, or hot surface.
• This fan is not intended for use in wet or damp locations. Never locate
the fan in an area where it may fall into a bath or other water
container.
• This fan should not be operated outside.
• Always use on a dry, level surface.
• Do not let the power cord hang over the edge of a table or counter.
• Arrange the cord away from an area where it may be tripped over.
• Never place the power cord under a carpet or rug.
• To disconnect from the power supply, grip the plug and pull from the
power socket. Never pull by the cord.
• Do not hang or mount the fan on a wall or ceiling.
• Do not operate if the fan guard is removed or damaged.
• This product is designed for household and light commercial use
ONLY
SAVE THESE IMPORTANT SAFETY
INSTRUCTIONS
Page 2
BS PLUG WIRING
Wiring Instructions: Should it be necessary to change the plug please
note the wires in the mains lead are coloured in accordance with the
following code :
BLUE - NEUTRAL
BROWN - LIVE
As the colours of the wires in the mains lead of this appliance may not
correspond with the coloured markings identifying the terminals in your plug,
proceed as follows:
1. The BLUE wire is the NEUTRAL and must be connected to the terminal
which is marked with the letter N or coloured BLACK.
2. The BROWN wire is the LIVE and must be connected to the terminal
which is marked with the letter L or coloured RED.
3. NEITHER WIRE must be connected to the terminal which is marked with
the letter E, the earth symbol , coloured GREEN OR
GREEN/YELLOW.
4. Always ensure that the cord grip is positioned and fastened correctly.
If a 13A (BS 1363) fused plug is used it must be fitted with a 3A (BS 1362)
fuse. If in doubt consult a qualified electrician.
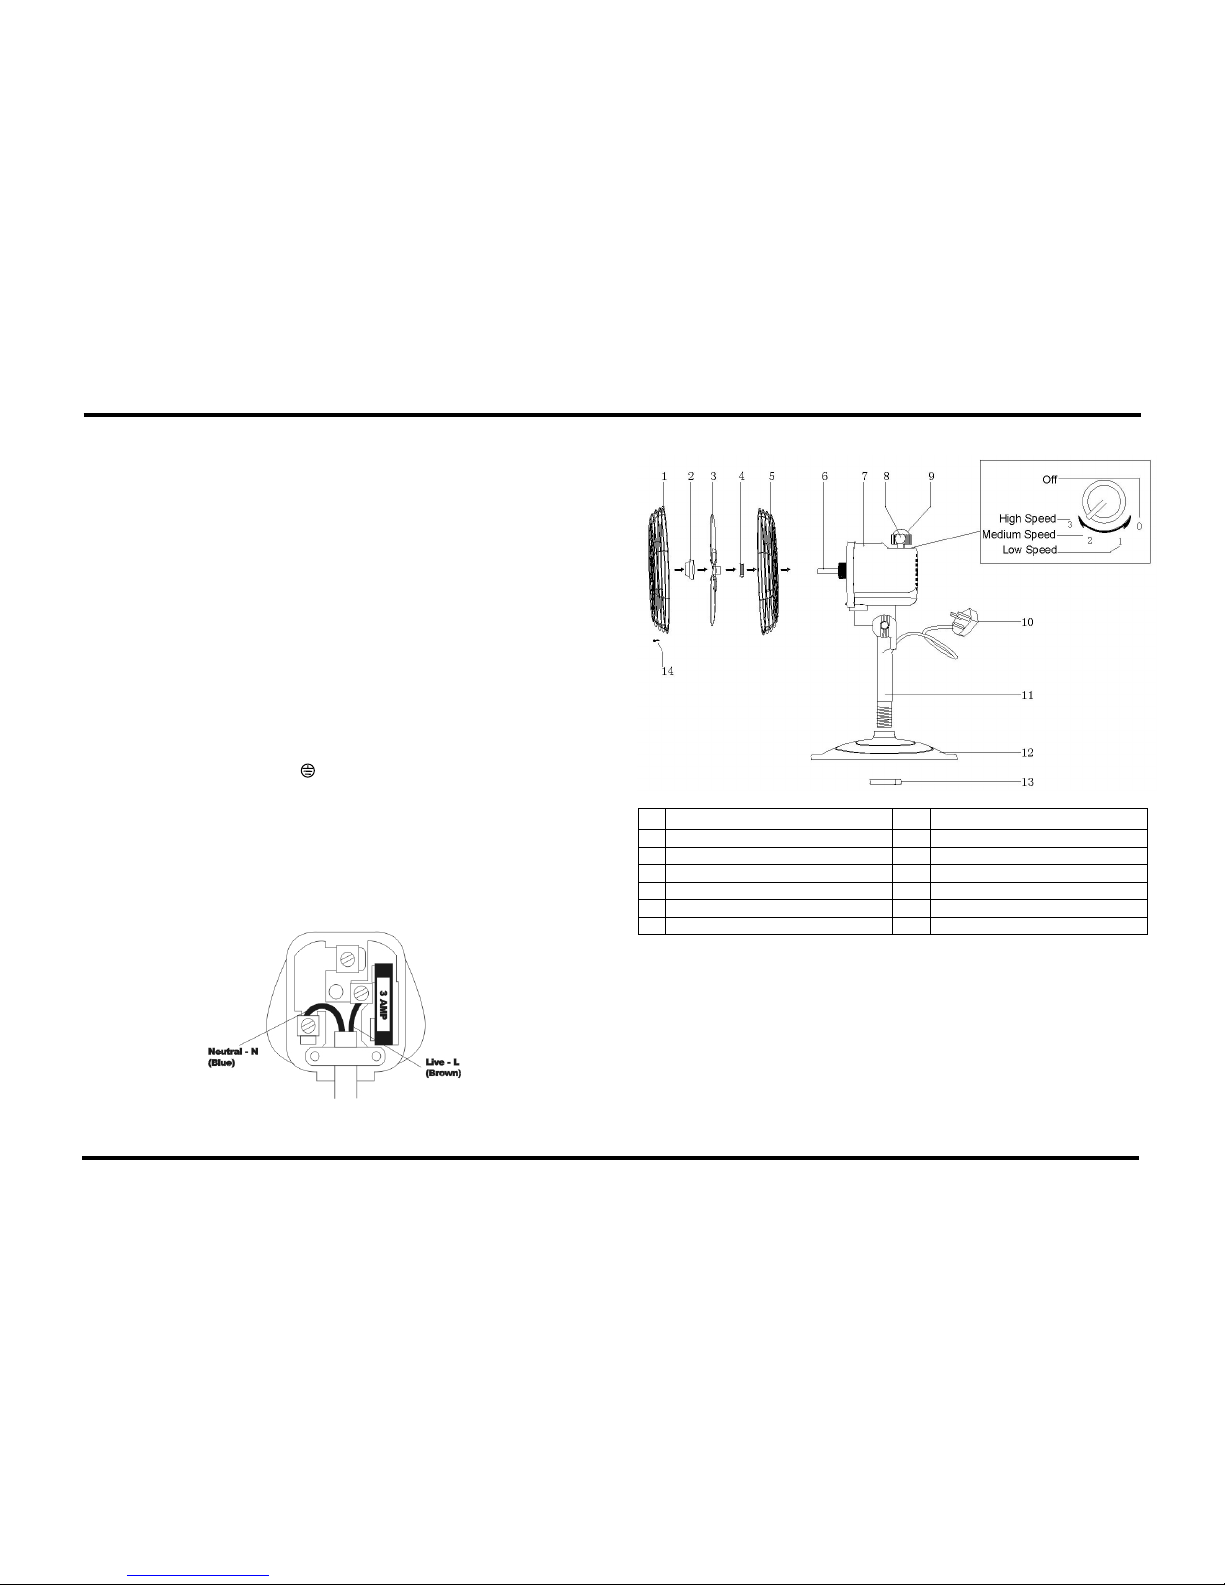
Wiring for a 13 Amp Plug (BS1362)
.
ASSEMBLY INSTRUCTIONS
1. Front grille 8. Oscillation knob
2. Fan blade nut 9. Rotary speed control switch
3. Fan blade 10. Power cord
4. Securing nut 11. Main pillar
5. Rear grille 12. Base
6. Motor shaft 13. Pillar nut
7. Motor housing 14. Grille screw
The grilles, fan blades and the main body of the fan are packed separately to
protect your fan from damages during transportation.
Be sure your fan is unplugged from the mains supply before proceeding.
• Insert the main pillar (11) into the hole of the fan base (12), tighten with
the base and pillar nut (13).
• Remove the rear grille securing nut (4) from the motor cover and secure
the rear grille (5) to the motor cover using the three pins and fasten with
rear grille securing nut (4).
Page 3

• Push the fan blade (3) onto the motor shaft (6) until the fan blade is fully
seated. For models with shaft pins, push the fan blade onto the motor
shaft by matching the slots on the rear of the blade with the shaft pin.
• Secure the blade with the fan blade nut (2). The blade nut must be
tightened by turning it COUNTER-CLOCKWISE. Check that the fan blade
rotates freely by turning it with your hand.
• Open the securing clips around the front grille (1) and loosen the grille
screw and nut at the bottom of the front grille. Position the front grille hook
on the uppermost part of the rear grille. Push the hook down and press
rim of the front grille onto the rear grille. Close all clips around and tighten
the grille screw (14).
OPERATION
• Plug into an electrical socket (220-240V~ 50Hz).
• To switch the fan ON, turn the rotary speed control switch (9) to position
1, 2, or 3 position as desired.
• To make fan oscillate, push down the oscillation knob (8) located on the
top of the motor housing. This causes the flow of air to be directed
around the room.
• To stop the fan from oscillating, pull up on the oscillation knob.
CLEANING
• Before cleaning turn the fan off and unplug from the power supply.
• To clean the fan use a soft cloth to wipe off any dust. If the fan is very
dirty use a damp cloth and wipe dry. Do not use any cleaning
detergents, sprays or other chemicals, as they will damage the fan.
• Store the fan in the original packaging in a ventilated dry area.
• The motor bearings are perman ently sealed and do not require
additional lubrication.
SPECIFICATION
Power: 45W
Voltage: 220-240V ~ 50Hz
N.W: 3.2 kgs
G.W: 3.8 kgs
SERVICE & WARRANTY
• For your convenience, reco rd the complete model number and product
(located on the Product Identification Plate), the date you purchased the
product, and attach your purchase receipt as proof of purchase.
• To ensure your product is covered by warranty, the complete faulty product
together with your purchase receipt should be returned to your retailer.
ONE (1) YEAR LIMITED WARRANTY
Save This Warranty Information
EHS (International) Ltd. Guarantees this product free from defects in
materials and workmanship for a period of one (1) year.
Should this unit be operated under conditions other than those
recommended, at voltages other than the voltage indicated on the unit,
or any attempts made to service or modify the unit, will render this
WARRANTY VOID. The product you buy may sometimes differ slightly
from illustration. This warranty is in addition to, and does not affect, you
r
statutory rights
Should you have a problem with this product, please call our Help Desk
on: (0870) 742 5021.
This product has been manufactured to comply with EEC Directives 73/23/EEC and
89/336/EEC
Waste electrical products should not be disposed of with household waste. Please
recycle where facilities exist. Check with your Local Authority or retailer for
recycling advice.
EHS, Manchester, M17 1RN
EHS 02/07
 Loading...