

Page 1
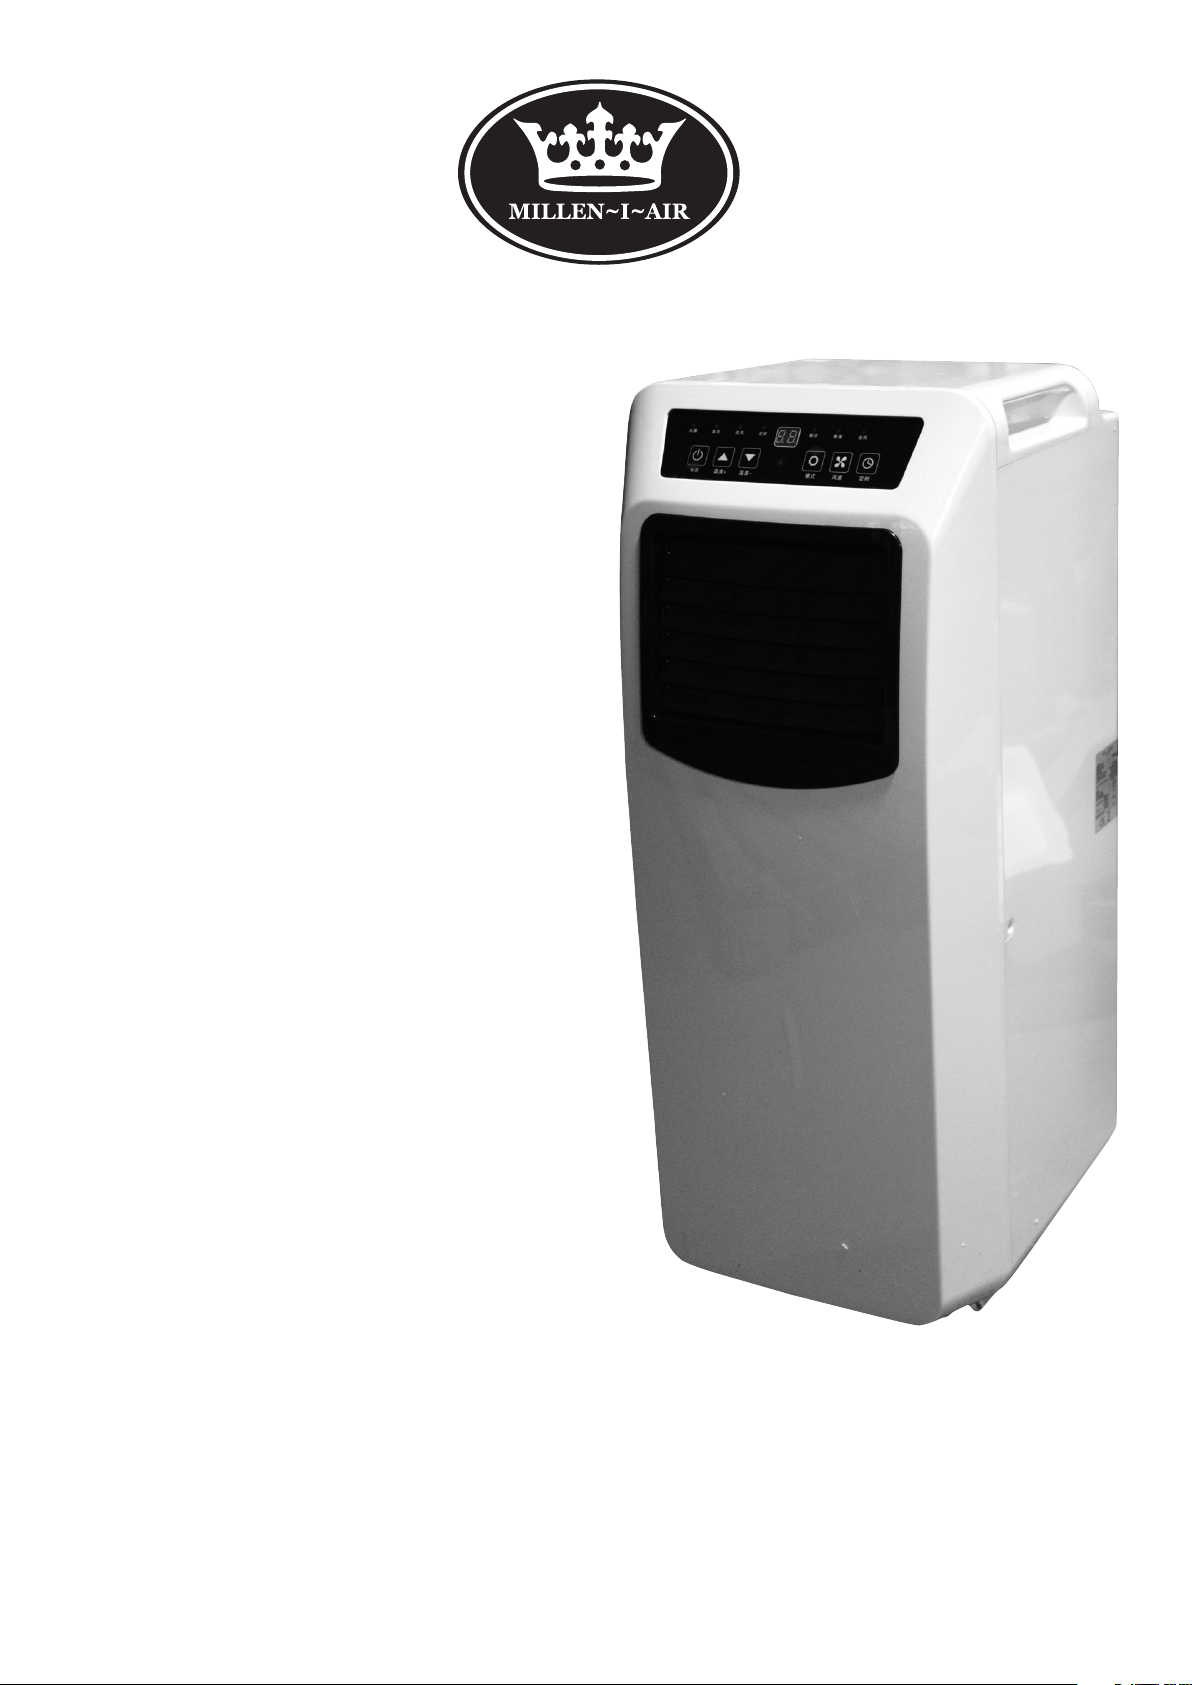
EH1806 - 2.6kW (9000BTU)
Mobile Portable Local Air
Conditioner With Remote
Control and Timer
EH1808 - 3.5kW (12000BTU)
Mobile Portable Local Air
Conditioner With Remote
Control and Timer
User Manual
Please Retain for Future Reference
Page 2

IMPORTANT
Installer and Users please note:
These instructions should be read carefully and left with the user of the product for future reference.
BEFORE USE
• Inspect the product (including its cable and plug) for any signs of damage; If the product is damaged in
anyway do not use it and contact your supplier immediately.
• The product contains a refrigerant gas, so it must be kept upright at all times.
• After unpacking wait 3 hours for the refrigerant gas to stabilise before use.
• Insert 2 x AAA batteries (not supplied) into the battery compartment of the remote control.
PRODUCT SAFETY
•This appliance can be used by children aged from 8 years and above and persons with reduced physical,
sensory or mental capabilities or lack of experience and knowledge if they have been given supervision
or instruction concerning use of the appliance in a safe way and understand the hazards involved
• Children shall not play with the appliance
• Cleaning and user maintenance shall not be made by children without supervision.
• For indoor use only
• Do not use in bathrooms, wet rooms or other damp locations
• Do not use this product with an extension lead
• Use of this product in boats, caravans, mobile homes or other similar locations is forbidden
• There must be a minimum 300mm safe area around the sides and 1200mm above the product that is
clear of obstructions and ammable materials
• Do not place the mains lead beneath a carpet or rug
• Do not use this appliance in locations where paint, petrol or other ammable liquids are used or stored
• Please ensure the appliance is switched o and unplug when not in use.
• Do not use the appliance for other than its intended use.
• Do no insert any object into the appliance through the grilles. This may damage the product or result in
overheating or electric shock.
• Only use this product on a at, stable surface.
• Do not leave this product unattended when in use.
• For domestic use only.
• There are no user serviceable parts in this product.
• Allow to cool down before moving.
• Do not use under curtains or close to soft furnishings.
• Replace the water pad every 6 months or more frequently if required.
• Check the product for any signs of Algae, mould or bacterial growth before use. Do not use until
cleaned and removed.
• Do not leave water in this product for prolonged periods of time
• Do not move or knock this product while in use. Risk of Electrical Shock
• Disconnect the product from the mains before emptying the unit
• This appliance is tted with an overload cut-out which will operate if the motor overheats or is stalled. If
this happens, disconnect from the mains supply immediately and allow the motor to cool down
• Do not use if incorrectly tted
• Do not obstruct the air intakes and exhaust vents on this appliance.
• Do not cover.
• This product must only be used and transported in an upright position.
• Do not use in areas with high concentrations of dust or bre particles.
• This unit must be switched o and disconnected from the mains before the tank is emptied or lters
cleaned.
Page 3
PARTS
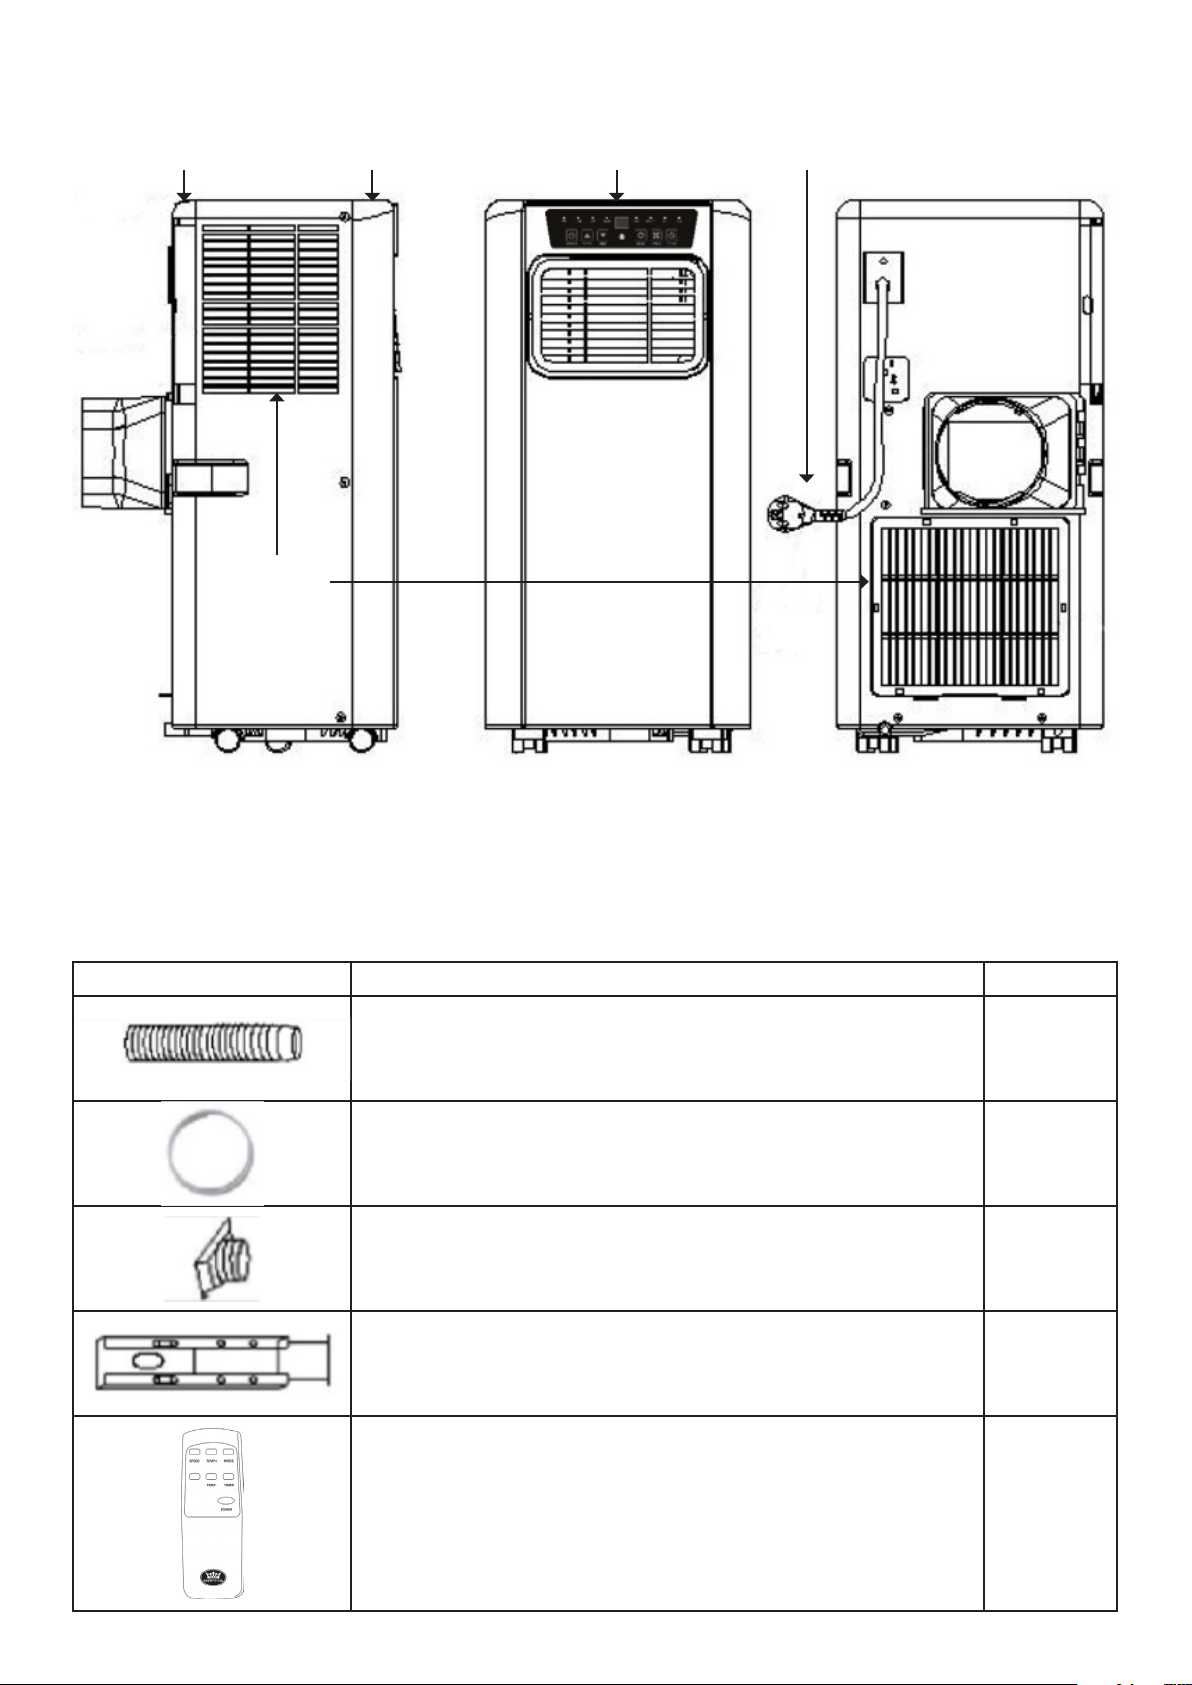
g. 1
Rear Cover
Front Cover Operation Panel Power Cable
Air Inlet
Water
Drain
Side View Front View Rear View
ACCESSORIES
Image Part Name Qty
Exhaust Hose 1
Fixing Clip 1
Square Fixing Clip 1
Mounting Board 1
Remote Control (Requires 2 x AAA batteries, not supplied) 1
Page 4
FUNCTIONS AND FEATURES
2
A
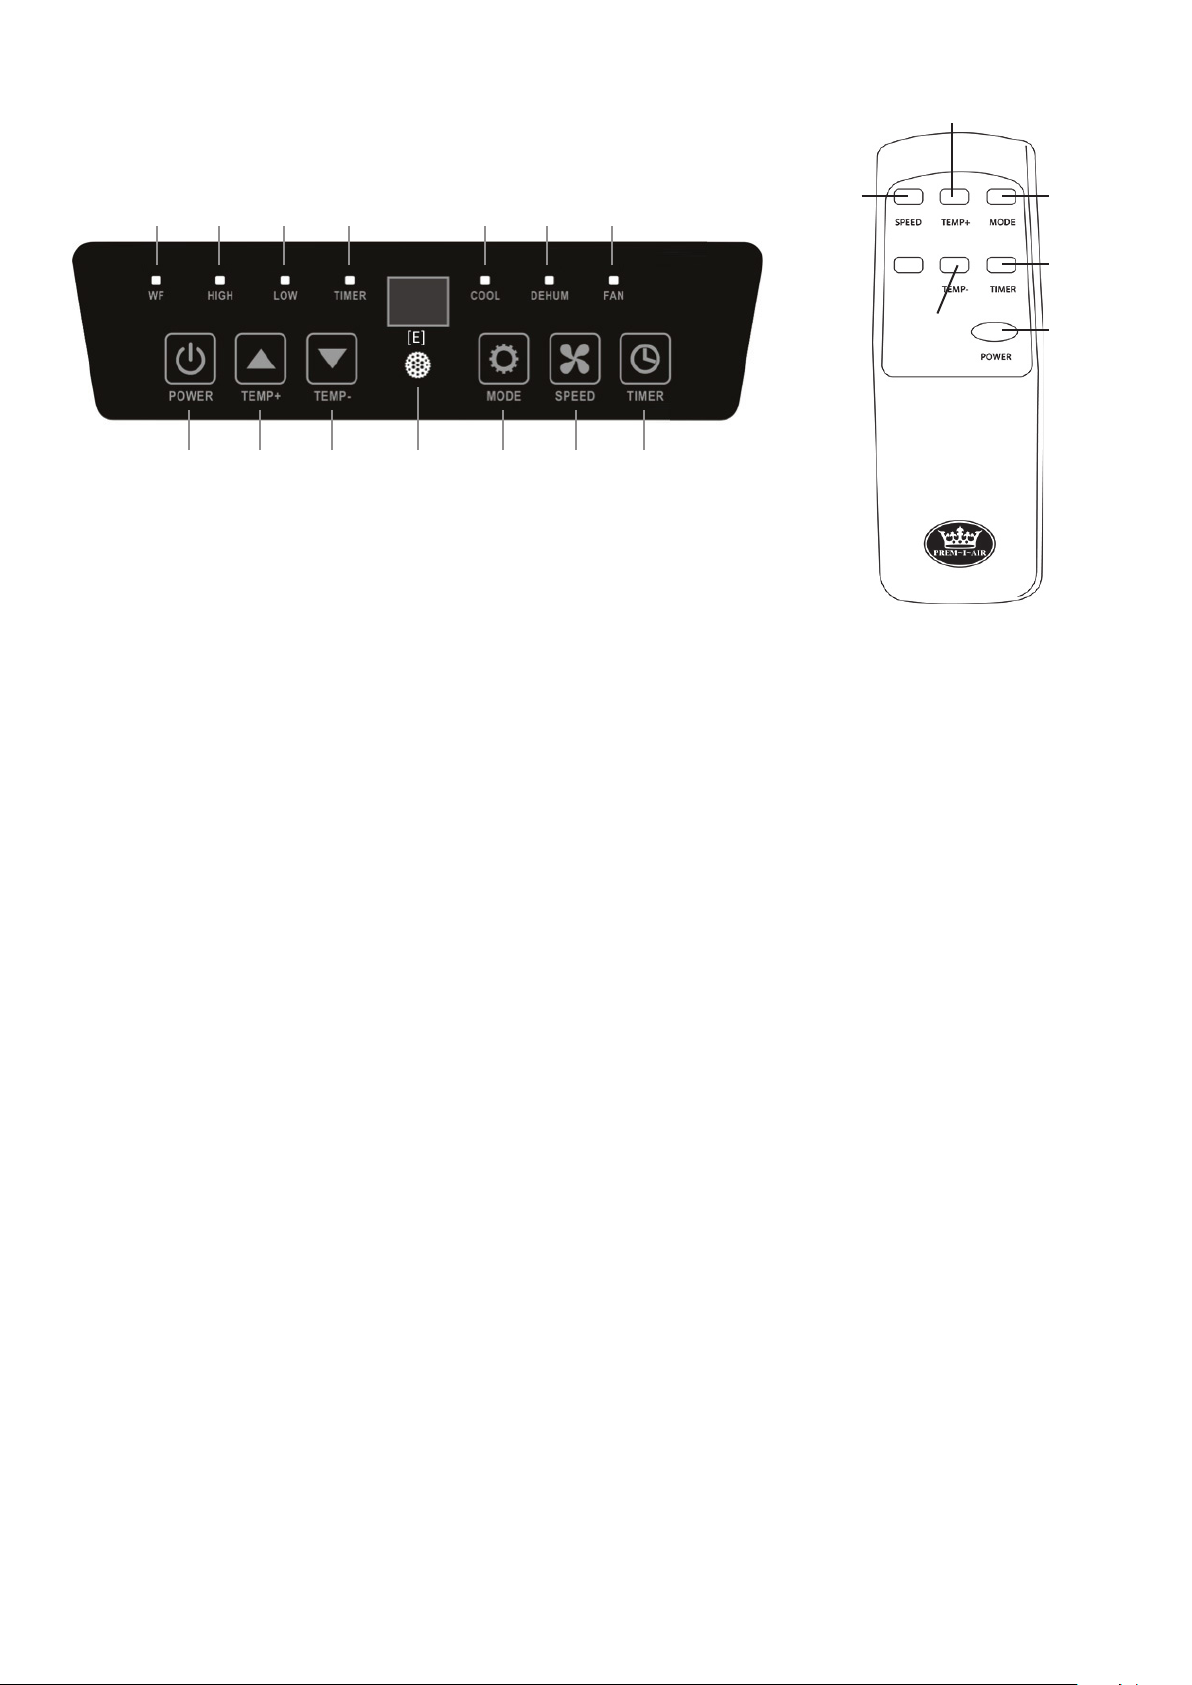
Fig. 2 Fig. 3
1. Power: Switches the unit on/o
2. Temperature Set + (Timer +): Increase the temperature by 1°C or increase the timer by 1 hour
3. Temperature Set - (Timer -): decreases the temperature by 1°C or decreases the timer by 1 hour
4. LED window: Shows set temperature/time/error code
5. Mode button (press to cycle between cooling, dehumidier and ‘fan only’ settings)
6. Fan speed adjustment (cooling and fan settings only): Press to cycle high and low fan setting.
7. Timer On/O: Pressing this allows the timer to be set (see description below)
B
1
C
2
D
3
4
E
F
5
G
6
7
6
3
5
7
1
Note: Switching the product on at the mains puts the product automatically into standby mode.
MODES
Air Conditioning (Cooling)
1. Press the POWER button [1] to switch on
2. Press the MODE button [5] until the cooling Icon appears in the LED Window.
3. Using the TEMP+ and TEMP- buttons [2][3], select the required temperature on the display
(between 16-31°C) Note: This product will not cool when the ambient temperature is below 18°C
or above 35°C (24-12 WB).
4. Use the SPEED button [6] to select between low and high setting to adjust the cooling eect
Note: To maximise the eciency of the air conditioner, ensure all doors and windows are closed in the
room (other than where the ventilation housing takes the heat away).
Dehumidication
1. Press the POWER button [1] to switch on
2. Press the MODE button [5] until the dehumidier function is selected.
3. The room temperature will be automatically set to 2°C below the current room temperature
(between 16-31°C)
4. The fan speed will automatically be set to Low
Page 5

MODES (CONTINUED)
Fan only
1. Press the POWER button [1] to switch on
2. Press the MODE button [5]
3. Select the required fan speed
Timer On/O
The air conditioner contains a delay timer function, that can be used to switch the unit on or o after a
desired interval.
1. Delay Start
1.1. Before setting the timer, you must rst switch the unit on and set it to the
conguration you will require after the timer has ran
1.2. Once the unit has been set, press the POWER button [1] to enter standby mode
1.3. Press the TIMER button [7] and the LED indicator will display a ashing ‘01’
1.4. Using the TEMP+ and TEMP- buttons [2][3], set the number of hours you want to delay
the start for (01 – 24)
1.5. Once the LED indicator displays the correct time delay, hold the TIMER button [7] until
the LED display stops ashing: the delay timer is now set
2. Delay Stop
2.1. Once the unit has been set up in the required conguration, press the TIMER button [7]
and the LED indicator will display a ashing ‘01’
2.2. Using the TEMP+ and TEMP- buttons [2][3], set the number of hours you want to delay
the shut down for (01 – 24)
2.3. Once the LED indicator displays the correct time delay, hold the TIMER button [7] until
the LED display stops ashing: The delay timer is now set
INSTALLATION
Before Switching on
1. Carefully place the unit in the desired position within a room you wish to cool. The unit must be
placed in a clear space with at least 300mm around the sides of the unit and at least 1200mm
above. Do not place the unit near curtains or soft furnishing as these are re risks. The air inlets
and outlets must be kept COMPLETELY clear of obstructions at all times. Failure to keep the
intakes clear can lead to a risk of overheating often leading to damage to the product and
potential re risk.
2. Fit the supplied hose to the unit using the square xing adaptor and clip. The other end of the
hose should be placed outside of the area to be cooled through an open window or door. To
maximise the cooling eect, the gap in the door or window should be minimised however the
hose must not be crushed. The hose can be expanded up to a maximum length of 1.5m.
3. For rooms with sash windows and extra adaptor is supplied to allow the window to be closed.
Page 6
WATER TANK
When in Air conditioning and dehumidication mode this unit may collect a small about of moisture
which will need to be removed from time to time. If the collection tank lls up completely the tank full
level indicator on the control panel ([A], Figure 2) will illuminate and the unit will stop working until it has
been emptied. To empty follow these instructions:
1. Switch the unit o and UNPLUG from the mains supply completely.
2. Locate the drain plug on the back of the product as shown in Figure 1
3. Place a large deep tray under the drain plug and remove the cap and bung to allow the water
to escape.
4. When all water has drained from the system replace the drain plug and cap securely.
For more permanent installations an 18mm tube can be tted (ensure the pipe runs downhill away from
the product)
MAINTENANCE AND CLEANING
1. Cleaning the Air Filters
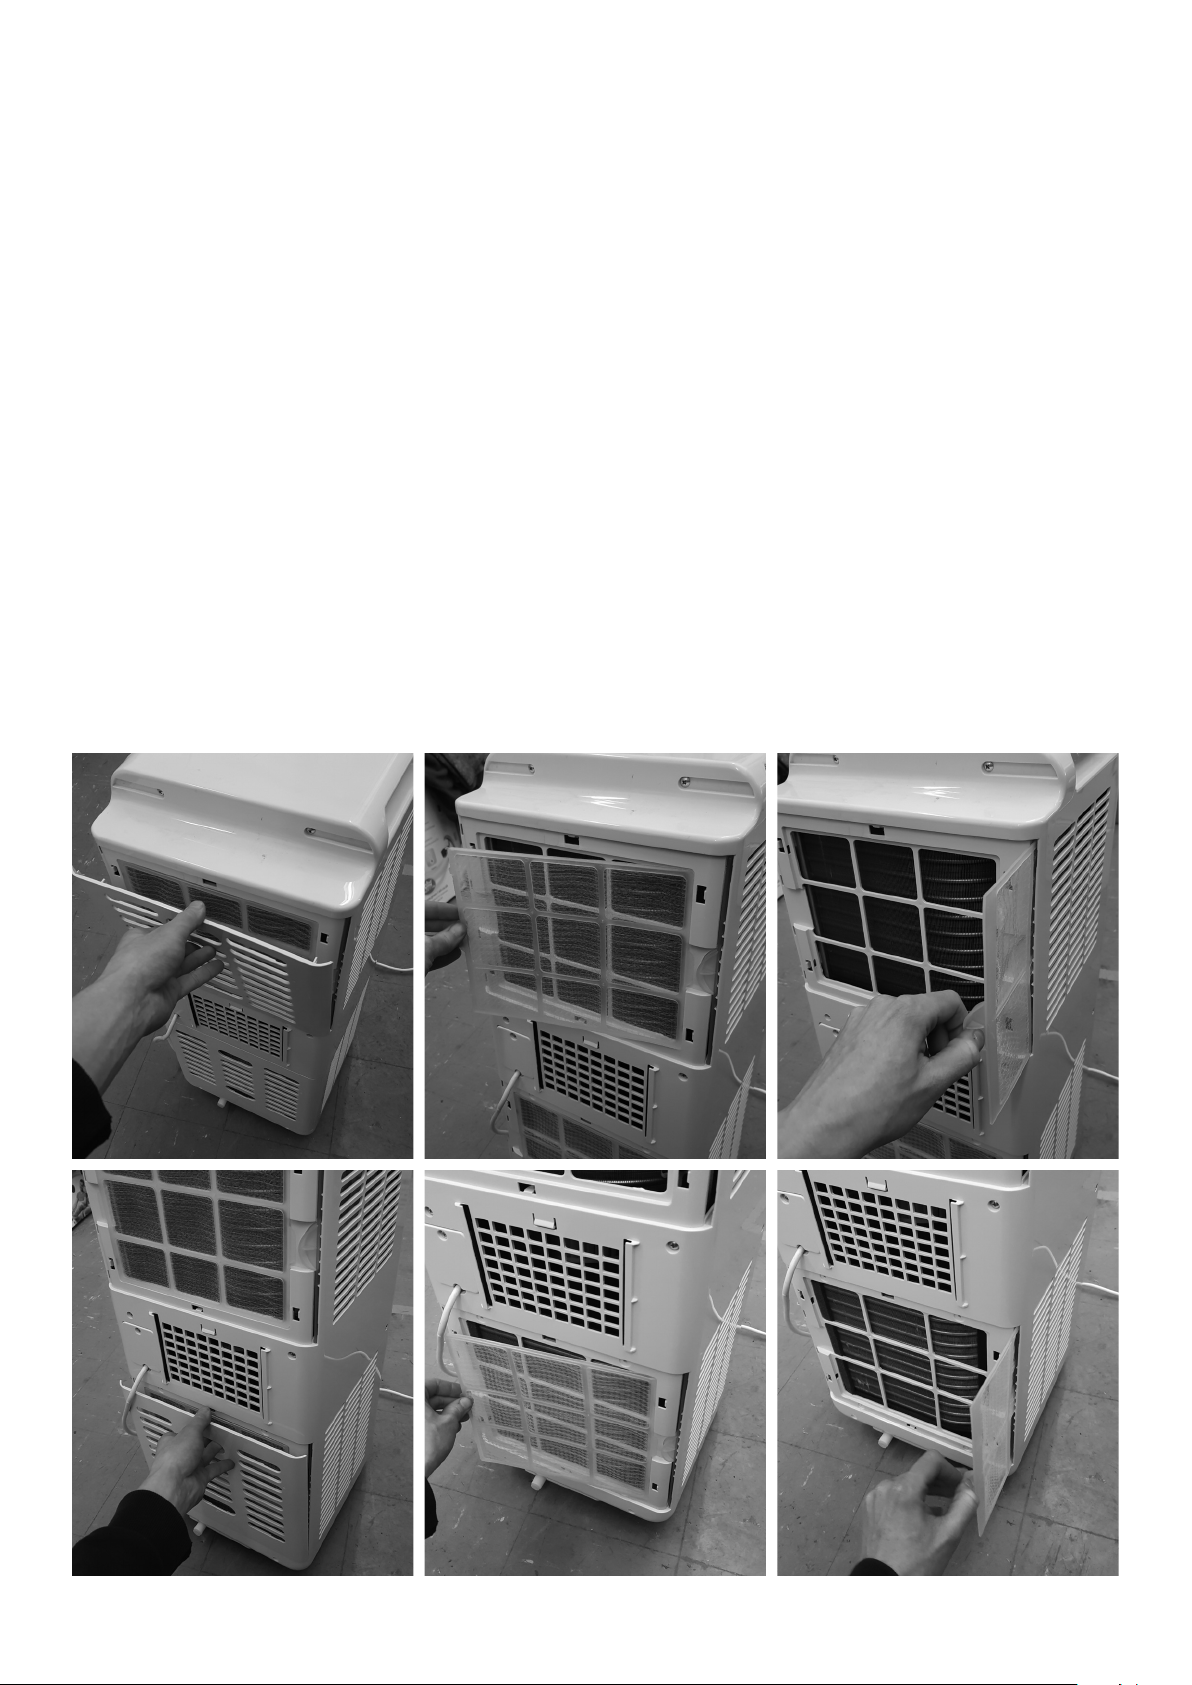
This product contains 4 air lters (Figure 4) which must be kept clean and free of dust and
particulates at all time. They should be cleaned every 3 months or more frequently if required.
Fig. 4
Page 7
MAINTENANCE AND CLEANING CONTINUED
1. Cleaning the Air Filters (Continued)
1.1. Make sure the unit is switched o and disconnected from the mains.
1.2. Unclip the retain grills from the side and back of the product and pull out the 4 air
lters (2 per side).
1.3. Clean the air lters with warm water and dry o.
1.4. Replace the air lters and grills.
2. Cleaning the unit
2.1. Make sure the unit is switched o and disconnected from the mains.
2.2. Using a slightly damp cloth clean the unit.
2.3. Air vents can be cleaned using a dry brush such as a paint brush
2.4. Do not use any chemical or heavy detergent based cleaning products.
STORAGE
1. Disconnect from the mains supply completely
2. Drain the tank using the above instructions
3. Allow the unit to dry out for 24 hours before storage
4. Remove pipe from rear of the unit.
5. Store in an upright position in a warm dry room
TROUBLESHOOTING
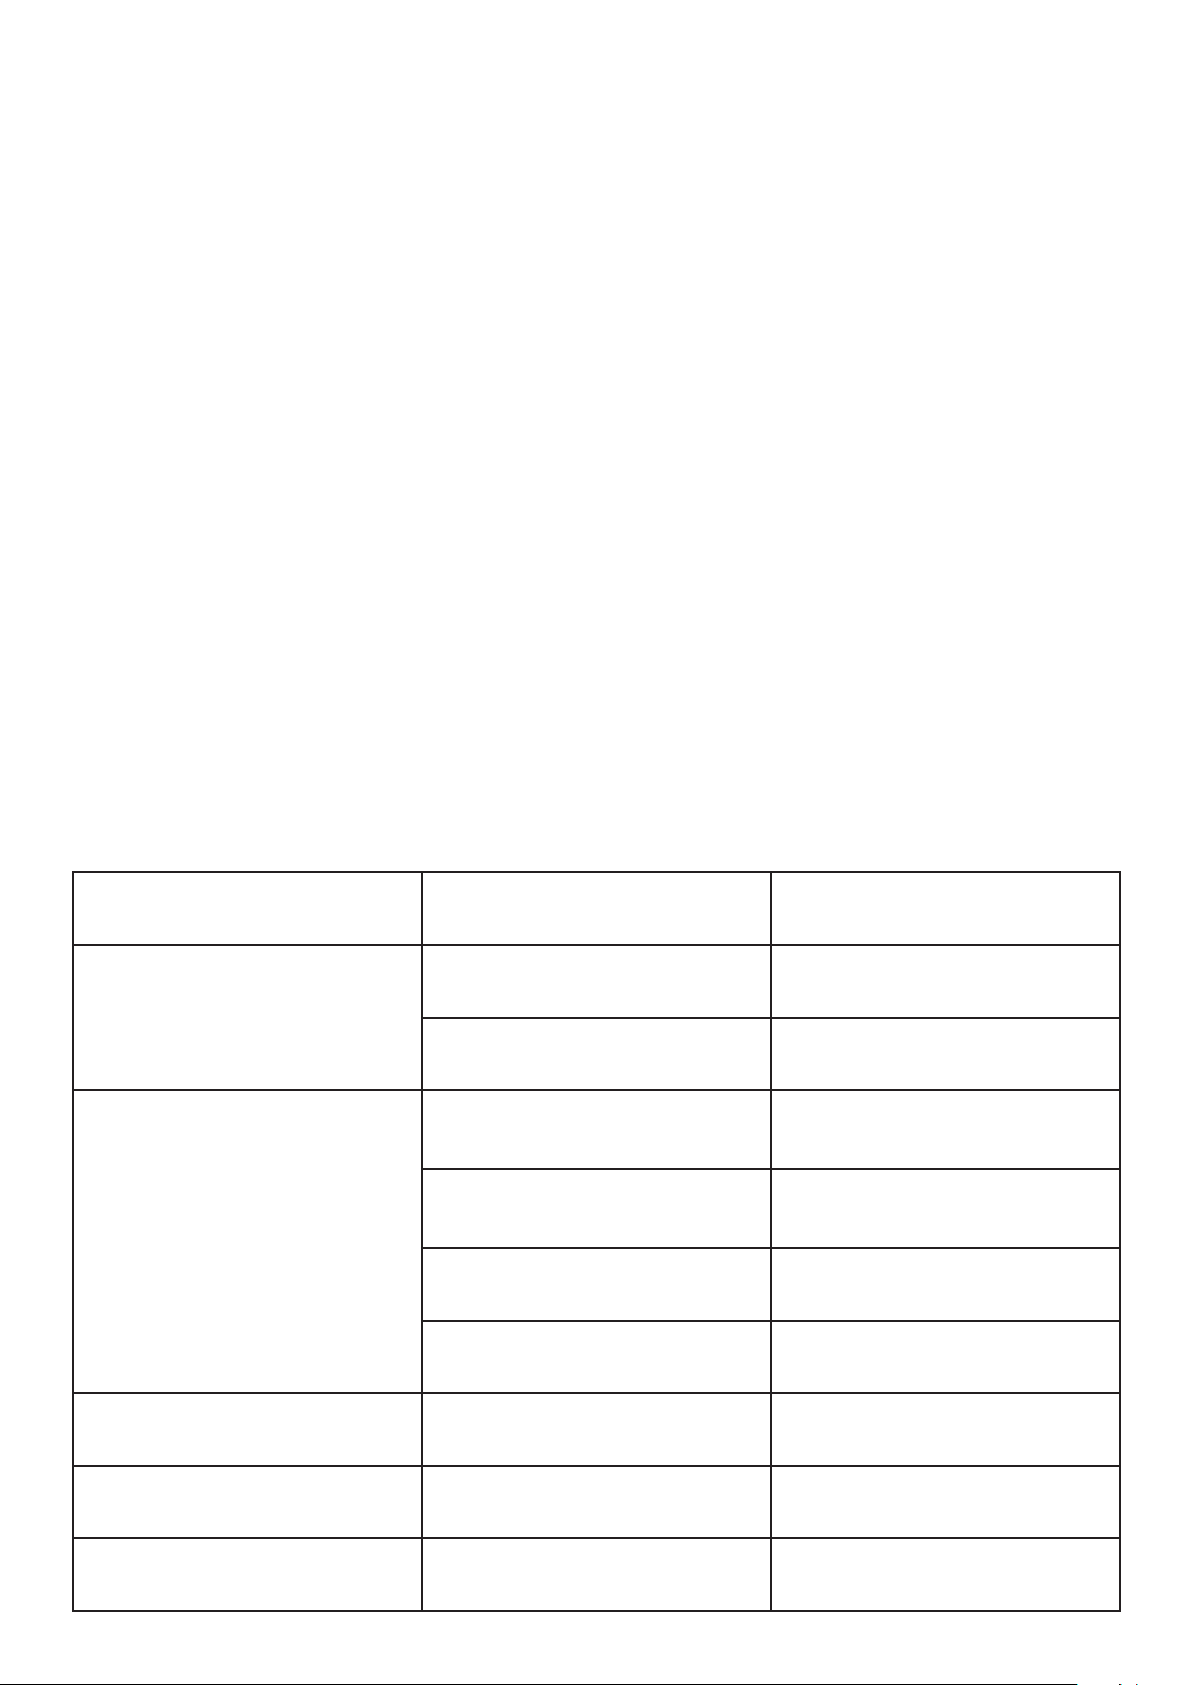
Problem Possible Causes Possible Remedies
Unit does not start to work when
pressing on button
Unit is on but is not cooling enough
Water full tank lamp blinks and water
tank is full
Room temperature is lower than the
setting on the unit
The room is too big for the unit (heat
source in the room or too many
windows)
The end of the exhaust hose is not
outside of the room or is blocked
Temperature setting is too high Reset the temperature
Air inlet is blocked Clean air inlet
Empty water tank
Reset the temperature
Add extra air conditioning
Unblock the hose or make sure the
other end of the hose is positioned
outside of the room
Noisy The ground is not level
E0 code displays in the LED window Room temperature sensor has failed Contact your supplier
E2 code displays in the LED window Water tank is full Drain o water
Make sure the unit is on a at, level
surface
Page 8
GENERAL SAFETY REQUIREMENTS
Domestic wiring must be tested periodically by a qualied electrician at least once every 10 years or at
every change of occupancy.
For oce and retail premises, and buildings such as village halls, the wiring must be inspected at least
once every 5 years.
It is recommended that all building be tted with smoke alarms (it is mandatory for new buildings).
TESTING
When used in an oce environment, we recommend that this product should be safety-tested yearly by
a qualied electrician (PAT Tested).
We recommend that it is PAT tested regularly when used in a domestic environment.
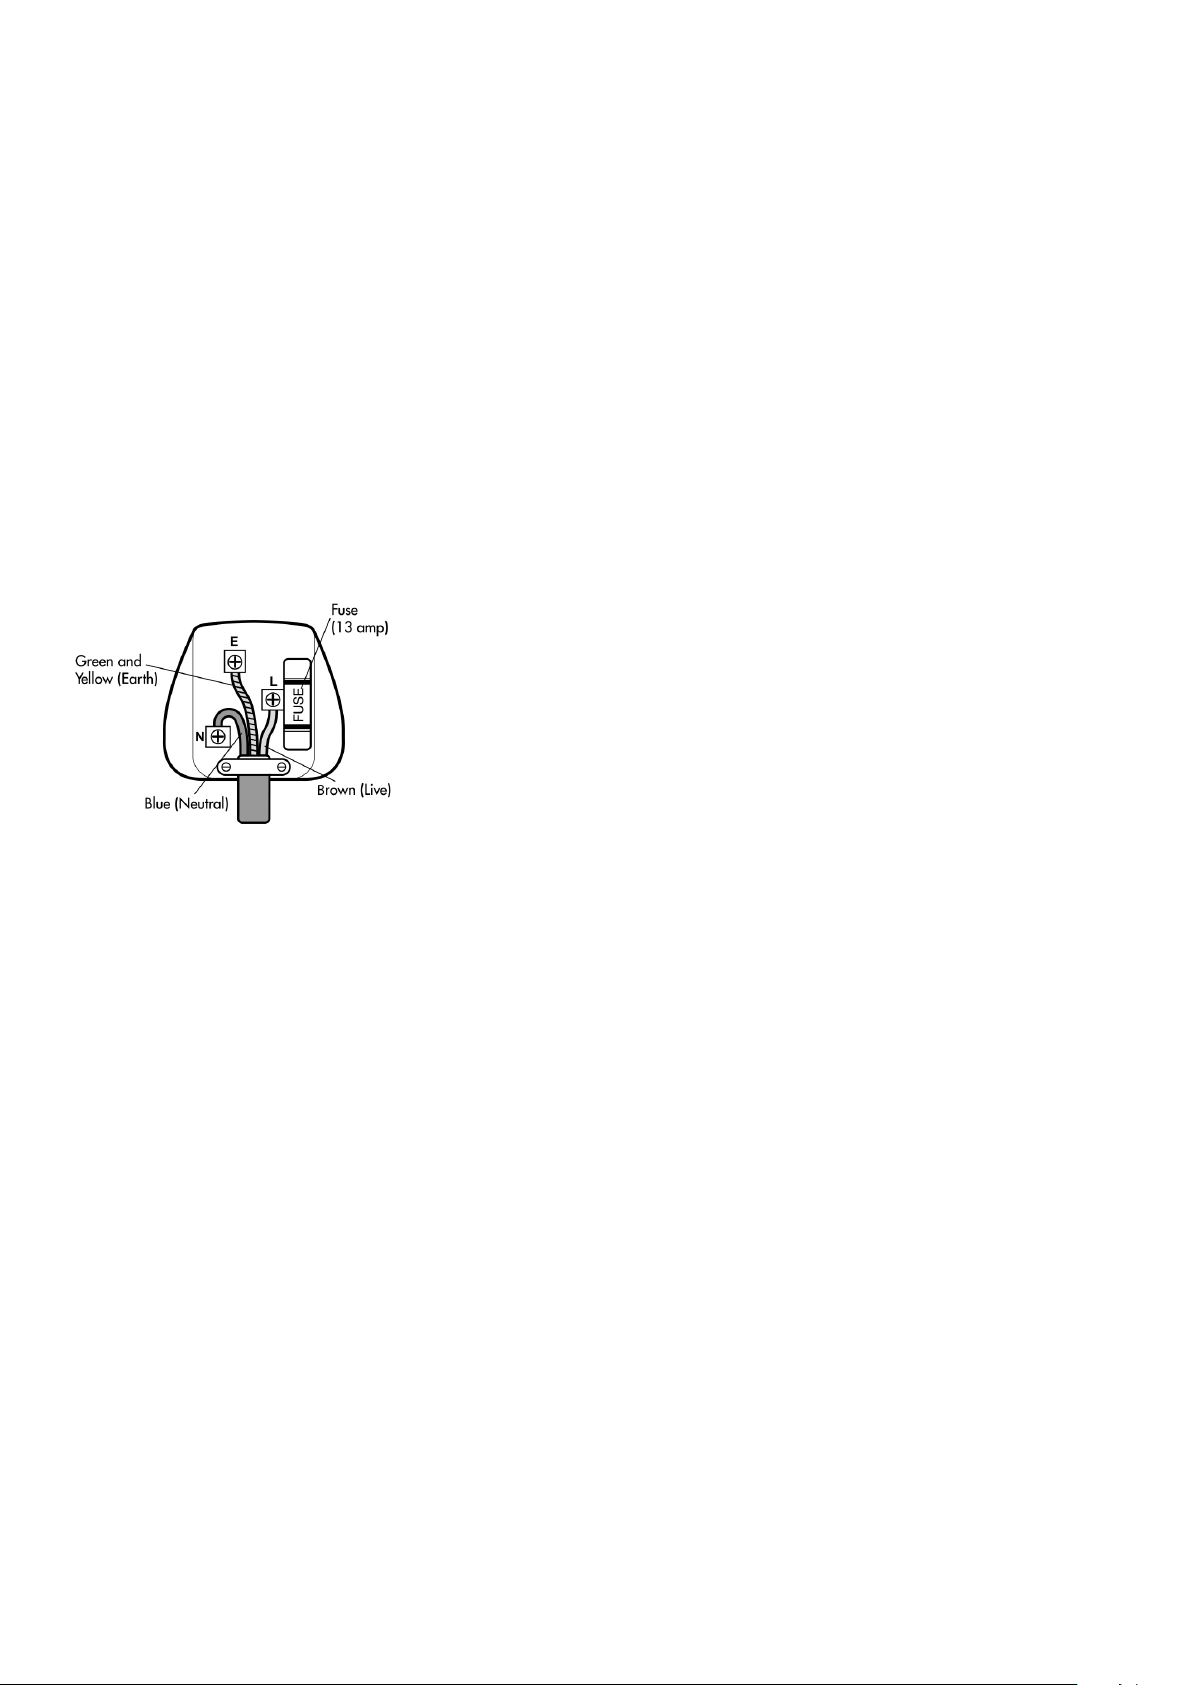
If the mains lead is damaged, it must be replaced by the manufacturer or an authorised service centre. If
the mains plug needs to be replaced, proceed as follows:
• Connect the brown wire to the terminal labelled “L”
• Connect the blue wire to the terminal labelled “N”
• Make sure that the cord-grip is positioned correctly (over the outer
sheath of the cable) and it fully tightened.
• If the plug is tted with a fuse other than 13A, then please replace
with an approved fuse of the correct value.
OPERATING COSTS
At time of going to press, the average cost of electricity is £0.15 per unit (kilowatt-hour). The amount you
are being charged will be shown on your electricity bill. At this cost, the EH1806 will cost £3.52 per day
to run on the “High Speed” setting and the EH1808 will cost £4.50 per day to run on the “High Speed”
setting.
DISPOSAL AND RECYCLING
You must not dispose of this appliance with domestic household waste.
Most local authorities have specic collection system for appliances and disposal is free of charge to the
end-user. When replacing an existing appliance with a similar new appliance your retailer may take the
old appliance for disposal.
Page 9
TECHNICAL SPECIFICATION
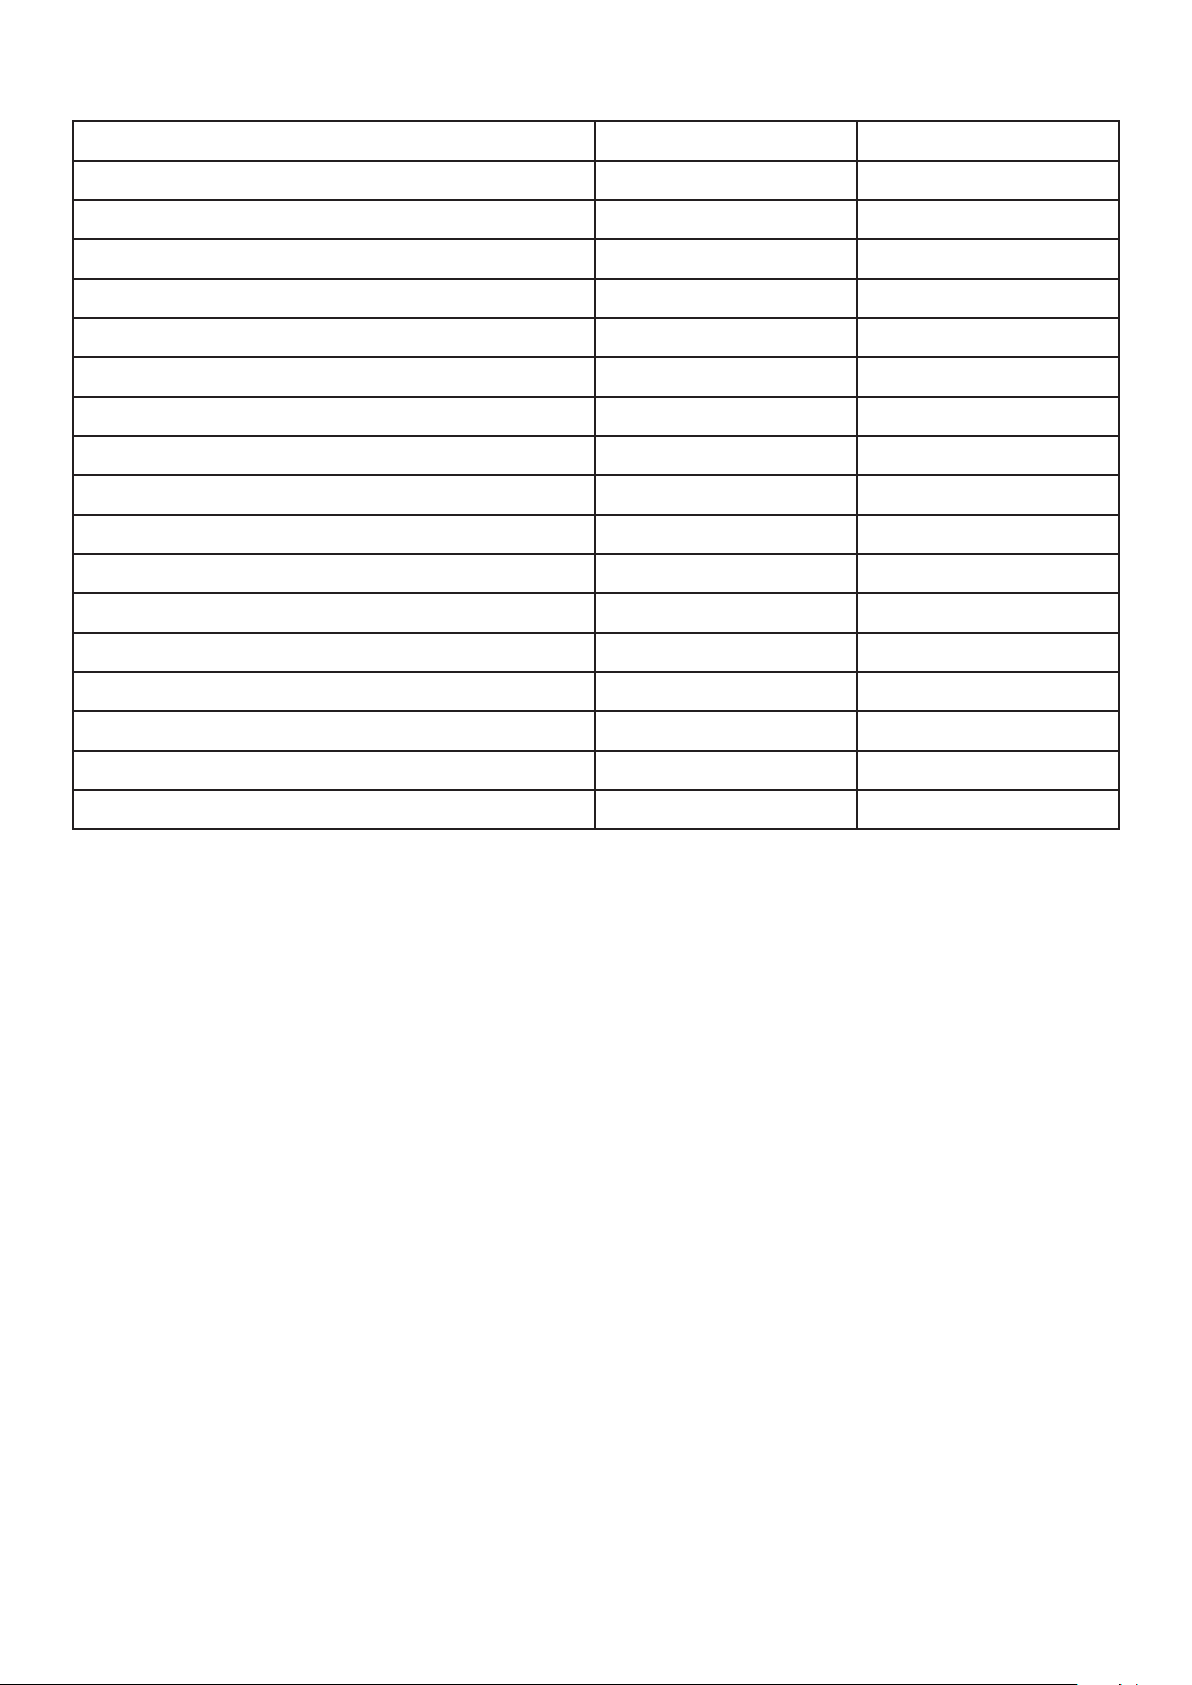
EH1806 EH1808
Cooling Capacity (Btu/h) 9000 12000
Power Supply 230V~ 230V~
Rated Cooling Input (W) 980 1250
Rated Current Cooling (A) 4.4 5.6
EER For Cooling (W/W) 2.6 2.6
Moisture Removal (L/h) 1 1.4
Air Circulation (m3/h) 320 380
Noise Level (dB) (Low) 55 55
Noise Level (dB) (High) 65 65
Product Dimensions (mm) 680x330x280 794x364x320
Packaging Dimensions (mm) 890x370x320 850x566x384
Refrigerant (Type/Charge) R410A/290g R410A/430g
Net Weight (kg) 19 26
Gross Weight (kg) 21 28
Application Area (m2) <16 16-22
Fan Speeds 2 2
Louvres Manual Manual
Prem-i-Air guarantees the product free from defects in materials and workmanship for a period of twelve
months.
Should this appliance be operated under conditions other than those recommended, at voltages other
than the voltage indicated on the appliance, or any attempts made to service or modify the appliance,
then the warranty will be rendered void.
The product you buy may sometimes dier slightly from illustrations. This warranty is in addition to, and
does not aect, your statutory rights.
Our guarantee is administered by our retailers.
If your product arrives damaged, you must contact the retailer from whom you bought it. The retailer’s
contact details will be on the invoice that arrived with the product, or on the e-mail you received when
you placed the order. Do not contact Prem-i-air, only your retailer can arrange a replacement.
If your product fails within the guarantee period, rstly read the “fault nding” section of this manual,
because temperature and weather conditions can aect the performance of certain products. If the
product needs to be repaired or replaced, you must contact the retailer from whom you bought it.
The retailer’s contact details will be on the invoice that arrived with the product, or on the e-mail you
received when you placed the order.
If you have just received your product and require technical help in using it, please call our Help Desk on
(0845) 459 4816
If you have any other technical queries about the product, please call our Help Desk on (0845) 459 4816.
Prem-i-Air Appliances Ltd.,
Lancots Lane, Sutton,
St. Helens, Merseyside.
WA9 3EX
website: www.prem-i-air.com
 Loading...