

Page 1
EH1361
11-Fin Oil-Filled Radiator
with fan heater
Additional fan heater for instant heat
3 Heat settings
Adjustable thermostat
24-hour timer
Convenient built-in carrying handle
Castors for ease of mobility
Safety overload cut-out
2 year guarantee
Page 1
Page 2
IMPORTANT
Installer and Users please note:
These instructions should be read carefully and left with the
user of the product for future reference.
BEFORE USE
Inspect the product including its cable and plug for any signs
of damage. If the product is damaged, DO NOT use it, and
contact your supplier immediately.
INSTALLATION
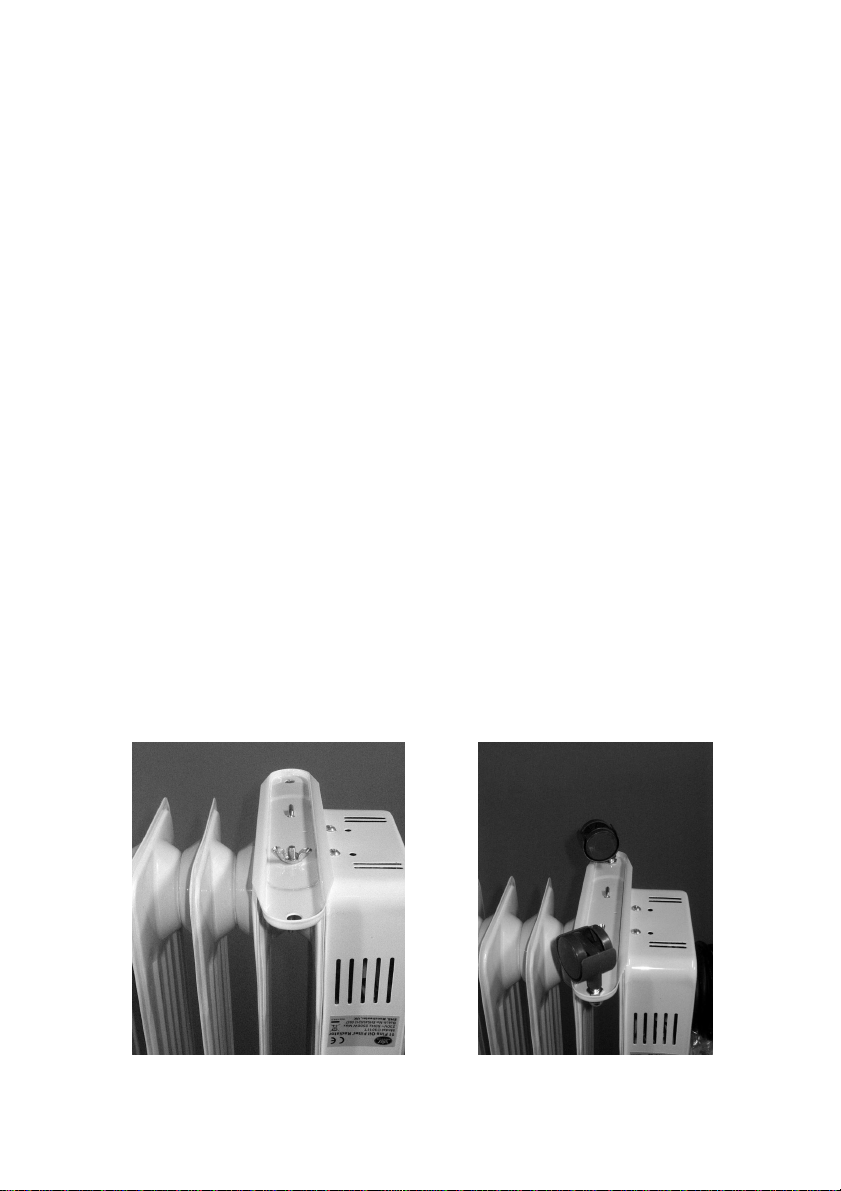
Attaching the feet.
Turn the heater upside down and place on a flat surface.
Hook the U-shaped brackets between the first and second
fins (from each end).
Push the ends of the U-shaped bracket through the holes in
the castor bracket.
Fix the wing nut to the threads on one end of the U-shaped
bracket, and tighten. The castor bracket should fit neatly
between the two fins.
Attach the castors to the holes in the ends of the castor
brackets using the dome-nuts.
Return the heater to the upright position.
Page 2
Page 3

PRODUCT SAFETY
• This appliance is not intended for use by persons (including
children) with reduced physical, sensory or mental
capabilities, or lack of experience and knowledge, unless
they have been given supervision or instruction concerning
use of the appliance by a person responsible for their safety.
• Children should be supervised to ensure that they do not
play with the appliance
• Place the EH1361 on a firm flat surface.
• Ensure that there is at least 300 mm (1') between the sides
of the heater and any flammable materials
• Ensure that there is at least 900 mm (3') from the top of the
heater and any flammable materials.
• Do not place on soft surfaces.
• Do not cover. This symbol shown on the casing of
the heater means that the heater should not be
covered.
• For indoor use only
• Not suitable for use in boats, caravans or similar locations.
• Do not use this appliance in the immediate surroundings of
a bath, shower or swimming pool.
• Do not place the mains lead beneath a carpet or rug.
• Do not use the heater in locations where paint, petrol or
other flammable liquids are used or stored.
• Do not use the heater without the feet attached.
Page 3
Page 4

OPERATION
Plug the mains lead into a 13 Amp mains socket.
If connecting via an extension lead, make sure that the lead
is rated at 13 Amps or more, and that it is fully unwound.
Switch the unit on at the mains socket.
Move the 3-position switch on the timer to the "I" position
Use the rotary power control switches on the side to select
the required operation:
• O = OFF
• I = Low Heat (1000 W)
• II = Medium heat (1100 W)
• III = High Heat (2100 W)
For an additional 400 W of heat, or to provide heat whilst the
main heater reaches normal operating temperature, switch
on the fan heater using the rocker switch on the front panel
beneath the fan grille.
When the main heater has reached normal operating
temperature, the fan heater may be switched off to reduce
noise, or left running to provide an additional 400 W of heat.
Unplug the heater from the mains when not in use.
USING THE THERMOSTAT
The thermostat can be use to regulate the room temperature.
Turn both switches on (high heat), and rotate the
temperature control fully clockwise.
The heater will then operate at maximum output. When the
desired temperature is reached, rotate the temperature
control anticlockwise until a click is heard. The heater will
then switch on and off to keep the room at the desired
temperature. The indicator light will show that this is
happening.
Either the low, medium or high heat setting can be used, with
or without the additional fan heater.
Page 4
Page 5

USING THE TIMER
The numbers around the timer dial show the time in 24-hour
clock.The timer is controlled by the plastic segments - each
segment represents 15 minutes. Move the segment outwards
if the heater should be ON for that time period, or inwards
towards the centre of the dial if it should be OFF.
Rotate the dial clockwise until the arrowhead at the right of
the dial points to the current time.
To use the heater in timed mode, it should be permanently
connected to the mains supply. If the power is disconnected,
the clock will stop.
To operate the heater in timed mode, the three position
switch within the dial should be in the centre position. If it is in
the "I" position, the heater will be permanently ON. If it is in
the "O" position, the heater will be permanently OFF.
OPERATING COSTS
At time of going to press, the average cost of electricity is
£0.12 per unit (kilowatt-hour). The amount you are being
charged will be shown on your electricity bill.
At this cost, the EH1361 will cost £0.12 per hour to run on the
"low heat " setting, and £0.13 per hour to run on the "medium
heat" setting or £0.25 per hour to run on the "high heat"
setting, with the thermostat set to its maximum, with an extra
£0.05 per hour, if the additional fan heater is used.
If the thermostat is used to regulate the temperature the
operating costs will be lower, depending on the room
temperature.
MAINTENANCE
Before cleaning, turn the heater off, and disconnect from the
mains supply. The heater may then be cleaned using a damp
cloth with a drop of washing-up liquid to remove any dust or
dirt from the case. Do no use stronger detergents or solvents
as these may damage the plastic.
Page 5
Page 6
This heater is filled with a precise quantity of special oil.
Repairs requiring the opening of the oil container are only to
be made by the manufacturer or his service agent who
should be contacted if there is an oil leak.
Using a dry 1" (25 mm) paint-brush, remove any dust from
the grilles.
If the mains lead is damaged, it must be replaced by the
manufacturer or an authorised service centre. If the mains
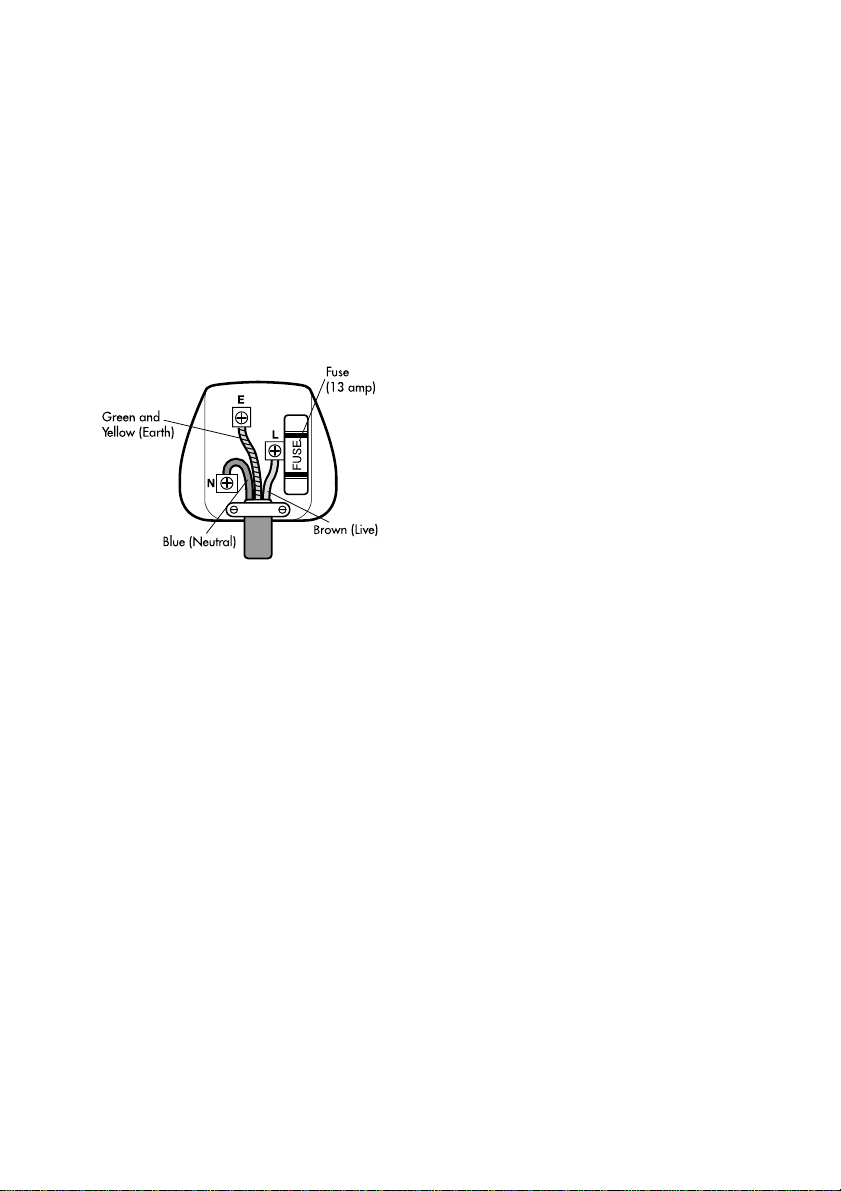
plug needs to be replaced, proceed as follows:
• Connect the brown wire to the
terminal labelled "L".
• Connect the blue wire to the
terminal labelled "N".
• Connect the green/yellow wire
to the terminal labelled with the
earth symbol or "E".
• Make sure that the cord-grip is
positioned correctly (over the
outer sheath of the cable) and it
fully tightened.
PAT TESTING.
When used in an office environment, this product must be
safety-tested yearly by a qualified electrician (PAT Tested) in
order to comply with the Electricity at Work Regulations.
We recommend that it is PAT tested regularly when used in a
domestic environment.
GENERAL SAFETY REQUIREMENTS
Domestic wiring must be tested periodically by a qualified
electrician at least once every 10 years or at every change of
occupancy.
For office and retail premises, and buildings such as village
halls, the wiring must be inspected at least once every 5
years. It is recommended that all building be fitted with
smoke alarms (it is mandatory for new buildings).
Page 6
Page 7

DISPOSAL AND RECYCLING
You must not dispose of this appliance with domestic
household waste.
Most local authorities have specific collection system for
appliances and disposal is free of charge to the end-user.
When replacing an existing appliance with a similar new
appliance your retailer may take the old appliance for
disposal.When scrapping the heater, follow the regulations
for the disposal of oil
FAULT-FINDING
If the EH1361 is not operating, proceed as follows:
Check that the mains plug is firmly in the socket, and that the
socket is switched ON.
Check that at least one of the power control switches is
switched ON.
If the built-in timer is not being used, check that the three-
position switch within the timer dial is in the "I" position.
If the built-in timer is being used, check that the dial shows
the correct time.
The EH1361 also has a overload protection device to prevent
overheating. If this operates, disconnect the heater from the
mains supply, and remove any objects on or adjacent to the
heater that could have caused the overheating. Wait 10
minutes, and reconnect to the mains supply.
The EH1361 is also fitted with a tip-over switch which
disconnects the power if the heater falls over. If the heater is
not operating, make sure that it is standing vertically.
If the heater still does not function, or the overload protection
device operates again, consult an authorised service agent.
Page 7
Page 8

TECHNICAL SPECIFICATION
Dimensions: 520×250×640 mm
Weight: 13.9 kg
Power supply: 230 V ~
Power consumption: 2500 W
Operating current: 11 A
SERVICE WARRANTY
Prem-i-Air guarantees the product free from defects in
materials and workmanship for a period of twelve months.
This Elite product is guaranteed for a further twelve months
subject to the enclosed registration card being completed
and returned to the address printed on it, or the registration
form being completed on-line at www.prem-i-air.com
Should this unit be operated under conditions other than
those recommended, at voltages other than the voltage
indicated on the unit, or any attempts made to service or
modify the unit, then the warranty will be rendered void.
The product you buy may sometimes differ slightly from
illustrations. This warranty is in addition to, and does not
affect, your statutory rights.
If you have any problems with this product, please call our
Help Desk on (0845) 459 4816.
Prem-i-Air Appliances Ltd.,
Lancots Lane,
Sutton,
St. Helens,
Merseyside.
WA9 3EX
website: www.prem-i-air.com
Page 8
 Loading...