

Page 1

Page 1
EH0468
3.5kW (12000 BTU/hour)
Local Air Conditioner
Climatiseur Local
Page 2
Page 2
IMPORTANT
Installer and Users please note:
These instructions should be read carefully and left with the user of the product
for future reference.
BEFORE USE
Inspect the product including its cable and plug for any signs of damage. If the
product is damaged, DO NOT use it, and contact your supplier immediately. The
appliance contains a refrigerant gas, so must be kept upright at all times. After
unpacking wait 3 hours for the refrigerant gas to stabilise before use.
INSTALLATION
Stand the EH0468 on a firm, flat, level surface.
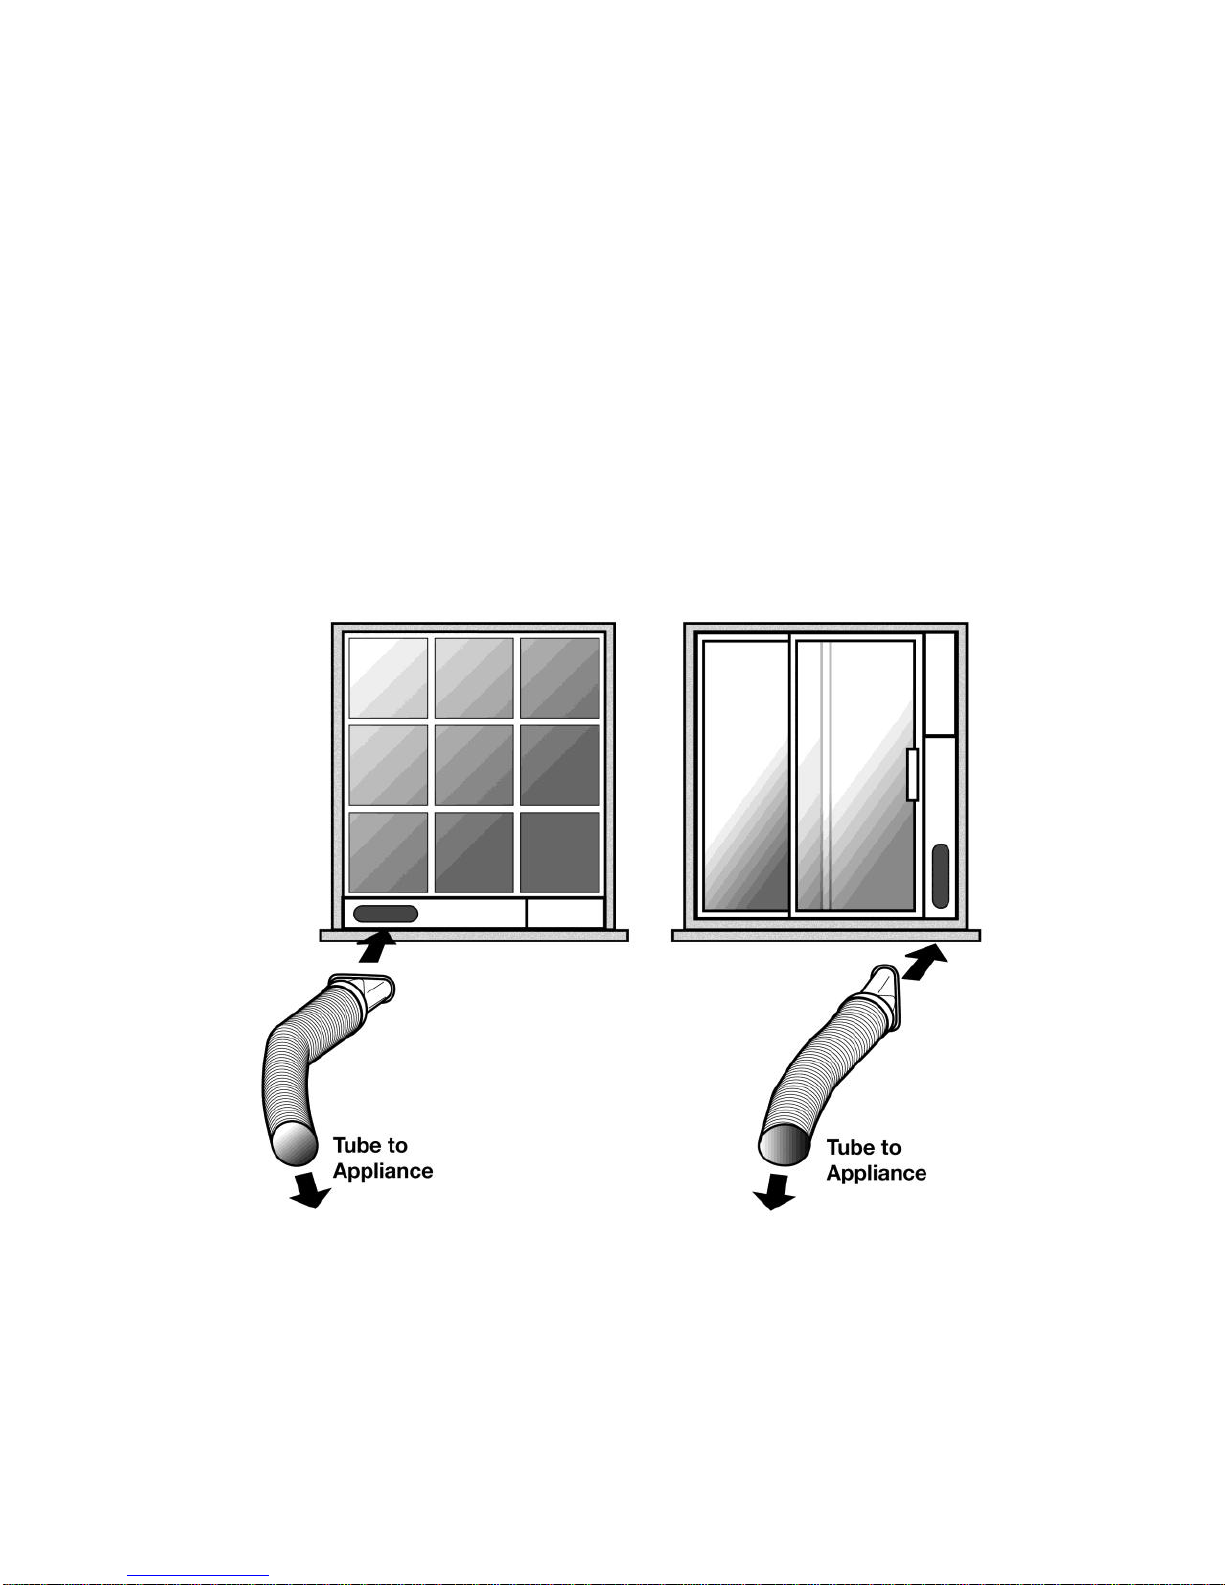
Connect the exhaust hose as follows: expand a small section of the end, and
screw into the indoor adaptor; then slide the indoor adaptor into the slot at the
back of the unit. Expand a small section of the other end of the hose, and screw
into the fish-tail-shaped adaptor.
Slide the two-part window adaptor to the correct length to fit the window. Close
the window as far as possible to keep the window adaptor in place. Clip the fishtail shaped adaptor into the obround aperture in the window adaptor.
Keep the hose as straight as possible, avoid dips where the moisture from the
exhaust air can condense and fill the tube with water. Do not allow the hose to be
crushed.
Page 3
Page 3
The hose can be expanded up to 1.8 m long, but the shorter it is the more
efficiently the EH0468 will operate. Do not extend the hose, or replace with
another type of hose.
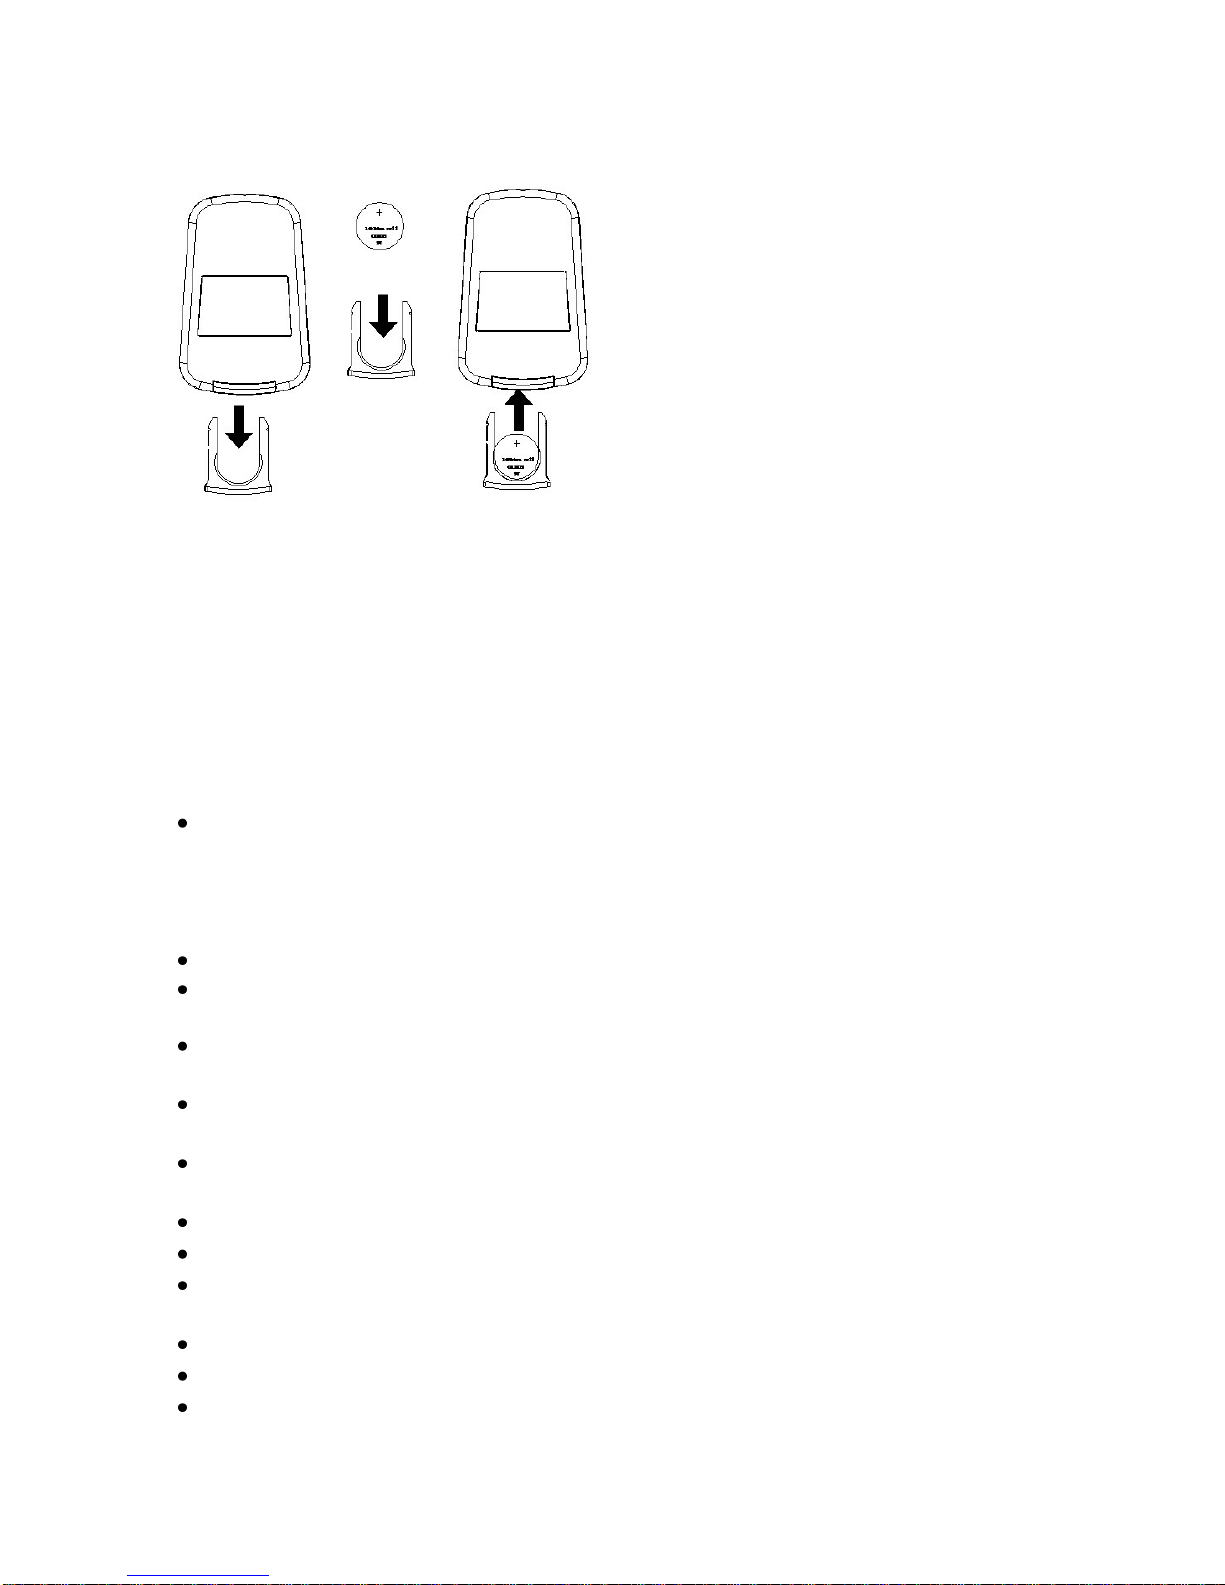
Fit one CR2032 battery to the remote
control, observing the correct polarity.
Do not attempt to recharge the battery.
Do not dispose of the battery in a fire,
as it will explode.
Do not use any other type of battery.
GENERAL SAFETY REQUIREMENTS
Domestic wiring must be tested periodically by a qualified electrician at least
once every 10 years or at every change of occupancy.
For office and retail premises, and buildings such as village halls, the wiring must
be inspected at least once every 5 years.
It is recommended that all building be fitted with smoke alarms (it is mandatory
for new buildings).
PRODUCT SAFETY
This appliance can be used by children aged from 8 years and above
and persons with reduced physical, sensory or mental capabilities or lack of
experience and knowledge if they have been given supervision or instruction
concerning use of the appliance in a safe way and understand the hazards
involved.
Children shall not play with the appliance.
Cleaning and user maintenance shall not be made by children without
supervision.
Place the appliance on a firm flat surface. Ensure that the it is kept upright at
all times
Ensure that there is at least 300mm (1') between the sides of the appliance
and any flammable materials
Ensure that there is at least 900mm (3') from the top of the appliance and
any flammable materials.
Do not place on soft surfaces.
Do not cover.
Do not obstruct the air intakes and exhausts.
For indoor use only
Not suitable for use in boats, caravans or similar locations.
Do not use in bathrooms, or in wet locations.
Do not place the mains lead beneath a carpet or rug.
Page 4

Page 4
Do not use the appliance in locations where paint, petrol or other flammable
liquids are used or stored.
Always transport and store in an upright position.
Do not allow the appliance to fall over when there is water in the bucket.
PAT TESTING.
When used in an office environment, this product must be safety-tested yearly by
a qualified electrician (PAT Tested) in order to comply with the Electricity at Work
Regulations.
We recommend that it is PAT tested regularly when used in a domestic
environment.
OPERATION
Leave the appliance in an upright position for 3 hours before first use.
Plug the mains lead into a 13 Amp mains socket (unless permanently installed)
If connecting via an extension lead, make sure that the lead is rated at 13 Amps
or more, and that it is fully unwound.
Switch the unit on at the mains socket.
ON/OFF Button: Press the "ON/OFF" button to start the unit. The Power
indicator illuminates when the appliance is ON. There will be a short delay (of
about a minute) before the appliance starts to operate.
"MODE" Button: Select the mode by pressing the "MODE" button. The available
modes are:
Automatic mode: either heats or cools as required to maintain the
selected room temperature. Then use the TEMP+ and TEMP˜ buttons to
select the desired room temperature. When the temperature reaches the desired
temperature, the compressor will stop, and the fan will continue to run.
Cooling mode: cools if the room temperature is above the selected
temperature.Then use the TEMP+ and TEMP˜ buttons to select the
desired room temperature. When the temperature reaches the desired
temperature, the compressor will stop, and the fan will continue to run.
Dehumidifying mode: removes humidity, but does not affect room
temperature. The fan operates at its lowest speed. For best results, do not
use the exhaust tube, but fit a permanent drainage pipe to the drain outlet as
shown on page 7.
Fan mode: circulates the air, but does not affect room temperature or
humidity.
Heating mode: heats if the room is temperature is below the selected
temperature. Then use the TEMP+ and TEMP˜ buttons to select the
desired room temperature. When the temperature reaches the desired
temperature, the compressor will stop, and the fan will continue to run. Heating
performance reduces if the outdoor temperature falls below 7 °C
Page 5
Page 5
"SPEED" Button: Set the fan speed using the fan speed control.
In all modes except dehumidifying mode. The fan speed can be low, medium or
high. The fan speed is indicated by the speed of the segments on the windmill
symbol on the LED display.
TEMP+ and TEMP˜ buttons:
Use the + and ˜ buttons to select the desired room temperature. The temperature
can be set to any temperature from 16 °C to 31 °C. Selecting a lower
temperature whilst heating, or a higher temperature whilst cooling will reduce
power consumption.
SWING button: Press the "SWING" button to turn the oscillation of the louvres
on or off.
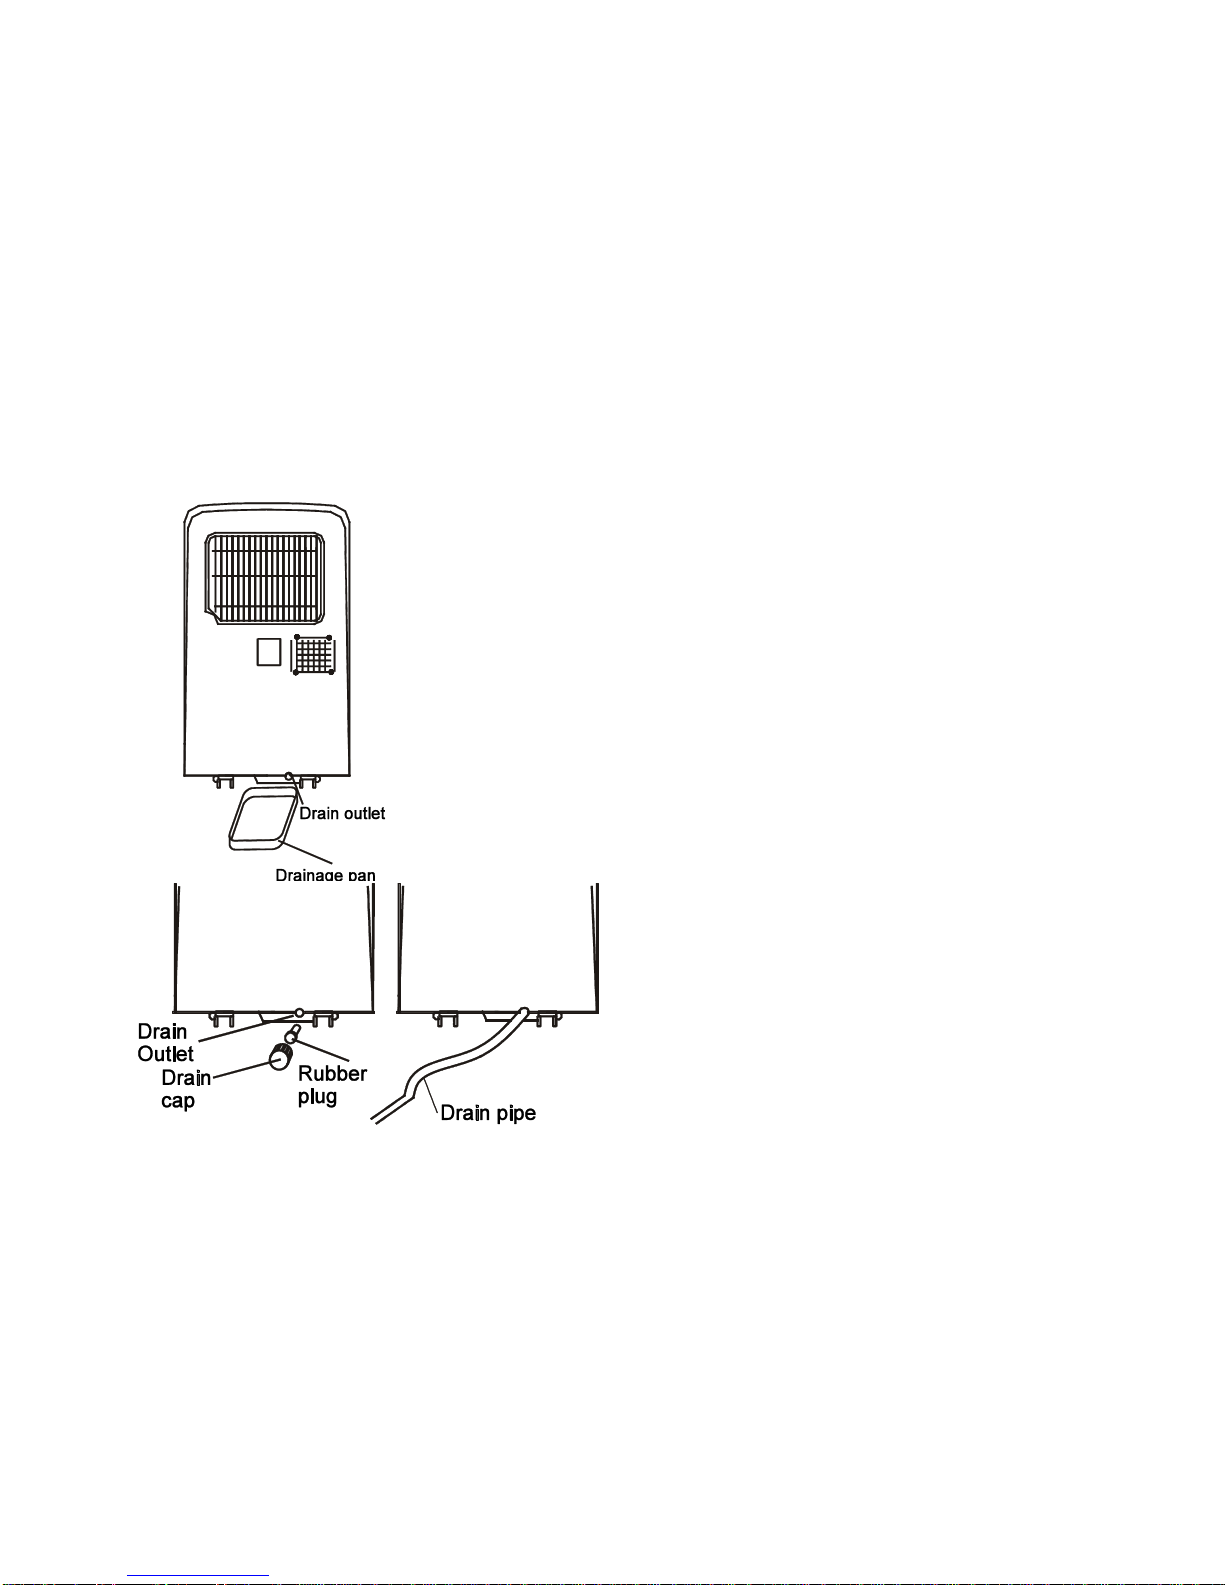
If the "WATER FULL" indicator lights, the condensate
water tank is full. This should only happen very rarely, as
most of the water collected is evaporated and sent down
the exhaust air tube.
To empty the water, switch the unit off by pressing the
ON/OFF button, wait for three minutes, and then
disconnect from the mains supply. Place a drainage pan
underneath the drain outlet plug (an the bottom of the unit,
at the back in the centre). Withdraw the bung, and allow
the water to drain into the drainage pan. Replace the bung,
and reconnect the unit to the mains supply.
The water should be disposed of down a drain.
To avoid the need to empty the water,
a permanent drain tube may be fitted
as shown: use a piece of 18mm
diameter tube (not supplied) and run
the pipe to a drain, making sure that it
runs downhill all the way.
Unplug the EH0468 from the mains
when not in use.
END OF SEASON STORAGE.
Before putting the appliance into storage, empty all water from the drain, and run
the appliance on "fan only" mode for a few hours to dry the inside thoroughly.
Clean the filter, unplug the mains cable, and store the appliance in its original box
in an upright position. Remove the battery from the remote control.
Page 6

Page 6
USING THE TIMER
The timer can set the unit to run for a selected time (between 1 and 24 hours)
and then turn OFF.
Or, it can set the unit to wait for a selected time (between 1 and 24 hours) before
turning ON.
To select timed turn-off press the timer button whilst the unit is switched ON.
Then adjust the time using the + and – buttons for the number of hours' delay
before switching off.
To select timed turn-off press the timer button whilst the unit is switched OFF
(connected to the mains supply but switched OFF using the ON/OFF button).
Then adjust the time using the + and – buttons for the number of hours' delay
before switching on.
To cancel the timer, press the TIMER button again.
USING THE REMOTE CONTROL
The heating, cooling, dehumidifying and fan modes are selected in exactly the
same way as using the control panel on the main unit.
OPERATING COSTS
At time of going to press, the average cost of electricity is £0.12 per unit (kilowatthour). The amount you are being charged will be shown on your electricity bill.
At this cost, the EH0468 will cost £0.15 per hour to run in heating, cooling or
dehumidifying modes, and £0.05 per hour to run in the fan-only mode.
To minimise the power used (and reduce operating costs):
Make sure that the filter is kept clean.
Make sure that the air intakes and exhausts are not obstructed.
Keep doors and windows closed to prevent conditioned air from escaping,
and to prevent exhaust air from re-entering the room.
Use blinds to prevent direct sunlight reaching the room.
Set the temperature higher whilst cooling, or lower whilst heating.
MAINTENANCE
Before cleaning, turn the appliance off, and disconnect from the mains supply.
The appliance may then be cleaned using a damp cloth with a drop of washingup liquid to remove any dust or dirt from the case. Do no use stronger detergents
or solvents as these may damage the plastic.
Cleaning the filter:
The filter is located on the back panel of the appliance. Unclip to remove, then
remove dust and dirt using a vacuum cleaner. The filter should be cleaned every
two weeks to maintain optimum performance.
Using a dry 1" (25mm) paint-brush, remove any dust from the grilles.
If the mains lead is damaged, it must be replaced by the manufacturer or an
authorised service centre. If the mains plug needs to be replaced, proceed as
follows:
Page 7

Page 7
Connect the brown wire to the terminal
labelled "L".
Connect the blue wire to the terminal
labelled "N"
Connect the green/yellow wire to the
terminal labelled with the earth symbol
or "E".
Make sure that the cord-grip is
positioned correctly (over the outer sheath of the cable) and it fully tightened.
FAULT-FINDING
If the EH0468 is not operating, proceed as follows:
Check that the mains plug is firmly in the socket, and that the socket is switched
ON.
When the unit if switched on there will be a delay of about 3 minutes before it
starts to operate.
• Unit stops running:
Mains supply is disconnected or has failed
Target temperature has been reached.
Timer has been set.
Water tank is full (WATERFULL indicator will illuminate)
• In cooling mode, no cool air is produced:
Room temperature is lower than set temperature
The unit is defrosting (this will take a few minutes, and afterwards, it will resume
operation)
Filter is blocked
• Cooling is poor on hot days
Too much direct sunshine is heating the room
Windows or doors are open allowing hot air into the room
A lot of people in the room (each person contributes about 75W of heating)
Electrical equipment in the room producing heat
• Heating is poor on cold days
The heat pump can only heat effectively when the outdoor temperature is above
7 °C
• Remote control does not work:
Check that the battery is correctly installed, and is not exhausted.
Make sure that the remote control is pointed towards the main unit when being
used.
FAULT CODES
If any error codes appear on the display, contact your local service agent.
E0: Room temperature sensor failure
Page 8

Page 8
DISPOSAL AND RECYCLING
You must not dispose of this appliance with domestic household waste.
Most local authorities have specific collection system for appliances and disposal
is free of charge to the end-user.
When replacing an existing appliance with a similar new appliance your retailer
may take the old appliance for disposal.
This air conditioner contains R410a refrigerant gas. At the end of its life the
disposal of this product must be in accordance with local regulations.
TECHNICAL SPECIFICATION
Dimensions: 370×400×760 mm
Weight: 27.4 kg
Power supply: 230V ~
Power consumption (cooling): 1330 W
Power consumption (heating): 1320 W
Operating current (cooling): 6.1 A
Operating current (heating): 6.0 A
Heating capacity: 3500 W
(12000 BTU/hour)
Cooling capacity: 3500 W
(12000 BTU/hour)
Dehumidifying capacity: 36 litres/day
Operating temperature (cooling): 16—32 °C
Operating temperature (heating): 7—27 °C
Air flow: 350 m3/h
Refrigerant: R410a (330 g)
Page 9

Page 9
IMPORTANT
Installateurs et Utilisateurs, veuillez noter:
Ces instructions doivent être lues attentivement et conservées pour une
éventuelle future consultation.
AVANT UTILISATION
Inspectez le produit y compris le câble et la prise. Si le produit est endommagé,
NE L’UTILISEZ PAS, et contactez immédiatement votre revendeur.
INSTALLATION
Si vous utilisez le EH0468 pour chauffer ou rafraîchir la pièce, vous devez utilisez
le tuyau d’évacuation. Pour la déshumidification, le tuyau d’évacuation n’est pas
nécessaire.
Placez le EH0468 sur une surface plane, stable et de niveau.
Pour connecter le tuyau d’évacuation, élargissez un peu l’extrémité du tuyau et
vissez dedans l’adaptateur intérieur puis glissez l’adaptateur intérieur dans la
fente à l’arrière de l’appareil. Elargissez un peu l’autre extrémité du tuyau, et
vissez dans l’adaptateur en forme de queue de poisson et passez l’adaptateur
par une fenêtre ouverte.
Gardez le tuyau le plus droit possible, évitez les creux où l'humidité de l'air peut
se condenser et remplissez le tube avec de l'eau. Vérifiez que le tuyau n’est pas
écrasé.
Page 10

Page 10
Le tuyau peut être étendu jusqu'à 1,80 m de long, mais plus il est court mieux
l’appareil fonctionnera. Ne rallongez pas le tuyau ou ne remplacez par un autre
type de tuyau.
Mettez une pile CR2032 dans la télécommande, en respectant la polarité.
CONSIGNES DE SECURITE
Cet appareil peut être utilisé par des enfants âgés de 8 ans et plus et par
des personnes dont les capacités physiques, sensorielles ou mentales sont
diminuées ou manquant d'expérience ou de connaissances uniquement
sous la surveillance d'un adulte qui leur aura appris à utiliser l'appareil et leur
aura expliqué les risques encourus.
Les enfants ne doivent pas jouer avec l'appareil.
Placez le EH0468 sur une surface plate et stable.
Respectez une distance minimum de 300mm entre les côtés du radiateur et
tout matériau inflammable.
Respectez une distance minimum de 900mm entre le haut de l’appareil et
tout matériau inflammable.
Ne le placez pas sur une surface molle.
Ne le couvrez pas. Un symbole situé sur le radiateur vous le rappelle.
Pour utilisation à l’intérieur uniquement.
Ne convient pas à une utilisation dans les bateaux, les caravanes ou
endroits similaires.
N’utilisez pas l’appareil dans une salle de bains ou une pièce humide.
Ne passez pas le cordon d’alimentation sous une moquette ou un tapis.
N’utilisez pas le radiateur dans des endroits où de la peinture, de l’essence
ou d’autres liquides inflammables sont utilisés ou stockés.
N’utilisez pas l’appareil sans les pieds fournis.
CONSIGNES GENERALES DE SECURITE
Le câblage doit être testé périodiquement par un électricien qualifié
au moins une fois tous les 10 ans ou à chaque changement d’occupation.
Pour les bureaux et les locaux de vente au détail ainsi que les bâtiments publics,
le câblage doit être inspecté au moins une fois tous les 5 ans.
Il est conseillé d’équiper tous les bâtiments avec un détecteur de fumée (il est
obligatoire pour les nouveaux bâtiments).
Page 11

Page 11
FONCTIONNEMENT
Laissez l'appareil reposer en position verticale pendant 3 heures minimum avant
de l'utiliser.
Branchez le cordon d'alimentation dans une prise secteur (à moins qu‹il soit
installé de façon permanente). Si vous vous connectez via une rallonge, assurezvous que l'intensité de passage du courant peut supporter 13 ampères, et qu'elle
est entièrement déroulée.
Bouton ON/OFF: Appuyez sur le bouton ON/OFF pour allumer l'appareil. Le
témoin lumineux est allumé quand l'appareil fonctionne. Il se passe environ une
minute avant que l'appareil commence à fonctionner.
Les modes disponibles sont:
Mode Automatique: Utilisez les boutons TEMP+ et TEMP- pour
sélectionner la température désirée dans la pièce. Quand la température
atteint le niveau désiré, le compresseur s'arrête et le ventilateur continue
à fonctionner.
Mode Refroidissement: refroidit si la température de la pièce est
inférieure à la température sélectionnée.
Mode Déshumidification: Le ventilateur fonctionne à sa vitesse la plus
faible. Pour de meilleurs résultats, n'utilisez pas le tuyau d'évacuation
mais installez un tuyau de drainage permanent raccordé à l'égout.
Mode Ventilation: fait circuler l’air, mais n’affecte pas la température
de la pièce ou l’humidité.
Mode Chauffe: Réchauffe si la température de la pièce est inférieure à
la température sélectionnée.
Utilisez les boutons TEMP+ et TEMP- pour sélectionner la température
désirée dans la pièce. Quand la température atteint le niveau désiré, le
compresseur s'arrête et le ventilateur continue à fonctionner. Le chauffage est
moins performant quand la température extérieure descend sous 7°C.
La vitesse du ventilateur peut être faible, moyenne ou élevée.
Utilisez les boutons + et - pour sélectionner la température désirée dans la pièce.
Bouton "SPEED": Permet de régler la vitesse du ventilateur. Peut s'utiliser dans
tous les modes sauf la déshumidification. La vitesse de ventilation peut être
faible, moyenne ou élevée. La vitesse de ventilation est indiquée par les
segments du moulin à vent présents sur l'affichage à LED.
Bouton "SWING": Appuyez sur le bouton SWING pour activer ou désactiver
l'oscillation des persiennes.
Page 12

Page 12
Si le témoin lumineux "WATER FULL"
s’allume, cela signifie que le réservoir est
plein. Pour vider l'eau, éteignez l'appareil en
appuyant sur le bouton ON /OFF, attendez
trois minutes, puis débranchez l'alimentation
secteur. Cela ne devrait se produire que très
rarement, car la plupart de l'eau recueillie est
évaporée et sort par le tuyau d'évacuation.
Placez un bac de drainage sous la prise de
sortie du drain (à l'arrière et au centre de
l’appareil).
Retirez le bouchon et laissez l'eau s'écouler
dans le plateau de drainage. Replacez le
bouchon puis rebranchez l'unité à
l'alimentation secteur.
L'eau doit être éliminée dans un égout.
Pour éviter d'avoir besoin de
vider l'eau, vous pouvez utiliser
un tuyau de drainage permanent
comme indiqué ci-contre :
utilisez un morceau de tube de
18mm de diamètre (non fourni)
et raccordez-le à un égout en
vérifiant qu'il soit bien tout le
long dirigé vers le bas.
Débranchez le EH0468 du
secteur lorsqu'il n'est pas utilisé.
RANGEMENT EN FIN DE SAISON
Avant de ranger l'appareil, videz toute l'eau et laissez l'appareil fonctionner en
mode ventilateur pendant quelques heures pour sécher complètement l'intérieur.
Nettoyez le filtre, débranchez le câble d'alimentation et rangez l'appareil dans
son emballage d'origine en position verticale.
Enlevez les piles de la télécommande.
UTILISATION DU PROGRAMMATEUR
Le programmateur permet de faire fonctionner l’appareil pendant une durée
déterminée (entre 1 et 24 heures) au delà de laquelle il s’éteint.
Il est également possible de programmer l’appareil pour qu’il s’allume à un
moment donné (entre 1 et 24 heures) .
Pour sélectionner l’heure à laquelle il doit s’arrêter, appuyez sur le bouton du
programmateur pendant que l’appareil est allumé.
Page 13

Page 13
Puis réglez l’heure à l’aide des boutons + et – pour régler le nombre d’heures qui
vont s’écouler avant que l’appareil ne s’éteigne.
Pour sélectionner l’heure à laquelle il doit s’allumer, appuyez sur le bouton du
programmateur pendant que l’appareil est éteint (connecté au réseau électrique
mais sur OFF ). Puis réglez l’heure à l’aide des boutons + et – pour régler le
nombre d’heures qui vont s’écouler avant que l’appareil ne s’allume.
Pour désactiver la minuterie, appuyez sur la touche TIMER.
UTILISATION DE LA TELECOMMANDE
Les modes chauffage, refroidissement, déshumidification et ventilateur peuvent
être sélectionnés exactement de la même manière qu’à l'aide du panneau de
contrôle sur l’appareil.
MAINTENANCE
Avant de le nettoyer, éteignez l’appareil puis débranchez-le.
Il peut être nettoyé à l’aide d’un chiffon humide avec une goutte de liquide
vaisselle pour enlever la poussière ou la saleté.
N’utilisez pas de détergents ni de solvants puissants car cela pourrait
endommager le plastique.
Nettoyage du filtre : Le filtre est situé sur le panneau arrière de l'appareil.
Déclipsez-le pour l'enlever puis enlevez la poussière et la saleté avec un
aspirateur. Le filtre doit être nettoyé toutes les deux semaines pour maintenir une
performance optimum.
Utilisez un pinceau de 25mm pour enlever la poussière sur les grilles.
Si le cordon d’alimentation est abîmé, il doit être remplacé par un technicien
qualifié ou le fabricant.
Si vous devez changer la prise du cordon d’alimentation, procédez comme suit :
• Connectez la câble marron sur la borne étiquetée "L".
• Connectez le câble bleu sur la borne étiquetée "N".
• Connectez le câble vert/jaune sur la borne étiquetée "E" ou portant le symbole
terre.
• Assurez-vous que la prise est positionnée correctement (sur la gaine extérieure
du câble) et bien serrée.
CONTROLE ET TEST REGULIER
Lorsqu'il est utilisé dans un bureau, ce produit doit être testé régulièrement
chaque année par un électricien qualifié (test PAT) afin d’être en conformité avec
les normes de conformité et sécurité électriques et le règlement de travail.
Lorsque l’appareil est utilisé dans un environnement domestique, il est
également recommandé de le contrôler régulièrement.
Page 14

Page 14
ELIMINATION ET RECYCLAGE
Vous ne devez pas jeter cet appareil avec les ordures ménagères.
La majorité des autorités locales possèdent un système de collecte spécifique
pour ce type d’appareils et l’élimination est gratuite pour le consommateur final.
Lorsque vous voulez remplacer l’appareil existant par un nouvel appareil
similaire, votre revendeur doit reprendre votre ancien appareil et se charger du
recyclage.
Ce climatiseur contient du gaz réfrigérant R410a.
À la fin de sa vie, l'élimination de ce produit doit être faite conformément aux
réglementations locales.
IDENTIFICATION DES PANNES POSSIBLES
Si le EH0468 ne fonctionne pas, procédez comme suit :
Vérifiez que la prise de l ‘appareil est fermement insérée dans la prise murale et
que cette dernière fonctionne correctement.
Lorsque vous allumez l’appareil, vous devez patienter environ 3 minutes avant
que celui-ci ne commence à fonctionner.
L’appareil cesse de fonctionner :
La température sélectionnée a été atteinte.
Le programmateur est activé.
L'alimentation est débranchée ou est défectueuse. Le réservoir d'eau est plein
(témoin lumineux allumé).
En mode refroidissement, l’appareil ne produit pas d’air froid:
La température de la pièce est inférieure à la température réglée.
L’appareil est en dégivrage (cela prendra quelques minutes, puis il reprendra son
fonctionnement ).
Le filtre est bloqué.
La télécommande ne fonctionne pas :
Vérifiez que la pile est placée correctement et n’est pas usée.
Dirigez bien la télécommande vers l’appareil
Le refroidissement est faible lors des journées de forte chaleur.
Trop de lumière directe du soleil réchauffe déjà la pièce. Les fenêtres ou les
portes sont ouverts. Il y a beaucoup de monde dans la pièce (chaque personne
produit 75W de chaleur). La pièce possède des équipements électriques qui
produisent de la chaleur.
Chauffage faible lors des journées froides:
La pompe à chaleur peut chauffer efficacement quand la température extérieure
est supérieure à 7°C.
Page 15

Page 15
CODES D’ANOMALIES
Si un code d'erreur apparaît sur l'affichage, contactez votre revendeur local.
E0: Défaillance du capteur de température
CARACTERISTIQUES TECHNIQUES
Dimensions: 370×400×760 mm
Poids : 27,4 kg
Alimentation : 230V AC
Consommation (Refroidissement): 1330W
Consommation (Chauffage) : 1320W
Courant Electrique (Refroidissement): 6.1A
Courant Electrique (Chauffage): 6.0A
Capacité de Chauffe : 3500W
Capacité de Refroidissement : 3500W
Capacité de Déshumidification : 36 litres/jour
Température de Fonctionnement (Refroidissement): 16–32°C
Température de Fonctionnement (Chauffage): 7–27°C
Circulation de l’Air: 350 m3/h
Réfrigérant: R410a (330 g)
Page 16

Page 16
SERVICE WARRANTY
Prem-i-Air guarantees the product free from defects in materials and
workmanship for a period of twelve months.
Should this unit be operated under conditions other than those recommended, at
voltages other than the voltage indicated on the unit, or any attempts made to
service or modify the unit, then the warranty will be rendered void.
The product you buy may sometimes differ slightly from illustrations. This
warranty is in addition to, and does not affect, your statutory rights.
If you have any problems with this product, please call our Help Desk on (0845)
459 4816.
Prem-i-Air Appliances Ltd.,
Lancots Lane, Sutton,
St. Helens, Merseyside.
WA9 3EX
website: www.prem-i-air.com
GARANTIE
Prem-i-Air garantit le produit contre tout défaut de matériaux et de fabrication
pour une période de douze mois.
Lorsque l'appareil fonctionne dans des conditions autres que celles qui sont
recommandées, à des tensions autres que la tension indiquée sur l'appareil, ou
toute tentative faite pour réparer ou modifier l'appareil conduiront à l’annulation la
garantie.
Le produit que vous avez acheté peut légèrement différer de l’illustration.
Cette garantie est un plus et n’affecte pas vos droits légaux.
Si vous rencontrez des problèmes sur cet appareil, veuillez contacter notre
service technique au 01.30.34.48.60.
Prem-I-Air Appliances Ltd
Z.A. du Bel Air
17 D rue de Creil
95340 BERNES-SUR-OISE
Site Internet : www.prem-i-air.com
 Loading...