


CPU
TWBZ-01-1805-0296
PREMAX
P8-V56(RW)
65-RWP800-H3531
Operating Instruction
Please read these instructions before operating
your set and retain them for future reference.
RWP900-H35
LED COLOR TV
Model:PM-LED2032
PM-LED2043

Operating Instruction
Please read these instructions before operating
your set and retain them for future reference.
RWP900-H35
LED COLOR TV
Model:PM-LED2032
PM-LED2043

PRECAUTION
Note If the manual is inconsistent with the product,please refer to the actual product.

WARNING
Using cabinets or stands recommended by the manufacturer of the television set.
Only using furniture that can safely support the television set.
Ensuring the television set is not overhanging the edge of the supporting
furniture.
Not placing the television set on tall furniture (for example, cupboards or
bookcases)without anchoring both the furniture and the television set to a
suitable support.
Not placing the televisions set on cloth or other materials that may be located
between the television set and supporting furniture.
Educating children about the dangers of climbing on furniture to reach the
Television set or its controls.
Never place a television set in an unstable location. A television set may fall,
causing serious personal injury or death. Many injuries,particularly to children,
can be avoided by taking simple precautions such as:
If your existing television set is being retained and relocated,the same
considerations as above should be applied.
IMPORTANT INFORMATION
Using cabinets or stands recommended by the manufacturer of the television.
Only using furniture that can safely support the television.
Ensuring the television is not overhanging the edge of the supporting furniture.
Not placing the television on tall furniture (for example, cupboards or
Bookcases)without anchoring both the furniture and the television to a Suitable
Support.
Not standing the televisions on cloth or other materials placed between the
television and supporting furniture.
Educating children about the dangers of climbing on furniture to reach the
television or its controls.
If a television is not positioned in a sufficiently stable location,it can be potentially
hazardous due to falling.Many injuries,particularly to children, can be avoided
by taking simple precautions such as:

CAUTION
Danger of explosion if battery is incorrectly replaced.
Replace only with the same or equivalent type.
Batteries shall not be exposed to excessive heat such as sunshine, fire or the
like.
Used batteries should not be thrown into the garbage can, please leave them
at an appropriate depot.
CAUTION
Where the MAINS plug or an appliance coupler is used as the disconnect
device, the disconnect device shall remain readily operable.
CAUTION
These servicing instructions are for use by qualified service personnel only.
To reduce the risk of electric shock, do not perform any servicing other than
that contained in the operating instructions unless you are qualified to do so.
Attention:
Motionless picture might cause permanent destruction to the display.
Be sure not to display motionless picture on the LED TV for more than
2 hours, because it would cause picture remnants to appear, which is
called "screen burns". To avoid such picture remnants, please decrease
the "contrast" and "brightness" of the display when displaying motionless
picture.
While watching TV program in 4:3 size mode for a long time, there would .
be traces on the edge of the screen's left, right and center parts because
of different transmition of the light on the screen.Similar impact on the
screen will occur when playing DVD or connecting games control. Products
destroyed by these reasons can't be guaranteed for maintenance.
It might cause picture remnants to display electronic games and motionless .
picture of PC more than a period of time.To avoid such effect, please
decrease the "contrast" and "brightness" when displaying motionless
picture.

Place the TV on a firm and flat surface,leaving a space of at lease 10cm around
the set and 30cm from the top of the set to the wall or cabinet.Ensure the TV is
positioned close to the wall to avoid it falling when pushed.
10cm 30cm 10cm 10cm
When you turning the TV set,do not hold the top side of the TV set ,you should
hold the bottom side .
When you lifting the TV set,do not use one hand to handle it,you should lift the
TV set by two hands.

CONTENTS
1
LED COLOR TV
1. Connection and Preparation of TV..................................................
1.1 Accessories ...........................................................................
1.2 Installation of Stand................................................................
1.3 Keys and Interfaces.................................................................
1.4 Remote Control.......................................................................
1.5 Installation of Batteries............................................................
2. Basic Operation............................................................................
2
2
2
3
4
5
5
2.1 Power ON/OFF ..........................................................(Optional)
2.2 Setting of Standby Mode..........................................................
2.3 Selection of Input Mode...........................................................
2.4 Menu Option Adjustment..........................................................
2.5 Menu Functions......................................................................
2.5.1 CHANNEL Function.....................................................................
2.5.2 PICTURE Function....................................................................
2.5.3 SOUND Function........................................................................
2.5.4 TIME Function...........................................................................
2.5.5 OPTION Function.......................................................................
5
5
5
6
7
7
8
9
10
10
2.6 Screen Menu .........................................................................
2.7 Multimedia ............................................................................
2.7.1 MEDIA Function ........................................................................
2.7.2 USB Function...........................................................................
2.7.3 PHOTO.....................................................................................
2.7.4 MUSIC......................................................................................
2.7.5 MOVIE......................................................................................
2.7.6 TEXT........................................................................................
3. Technical Specification................................................................
4. Supported Signal Modes..............................................................
5. Simple Troubleshooting ..............................................................
11
11
11
12
12
12
13
14
15
16
17
1.Connection and Preparation of TV
1.1 Accessories
User Manual
Remote Control
Battery(UM-4/R03P/AAA)
Wall Mount Kit (Pre-assembled)(Optional)
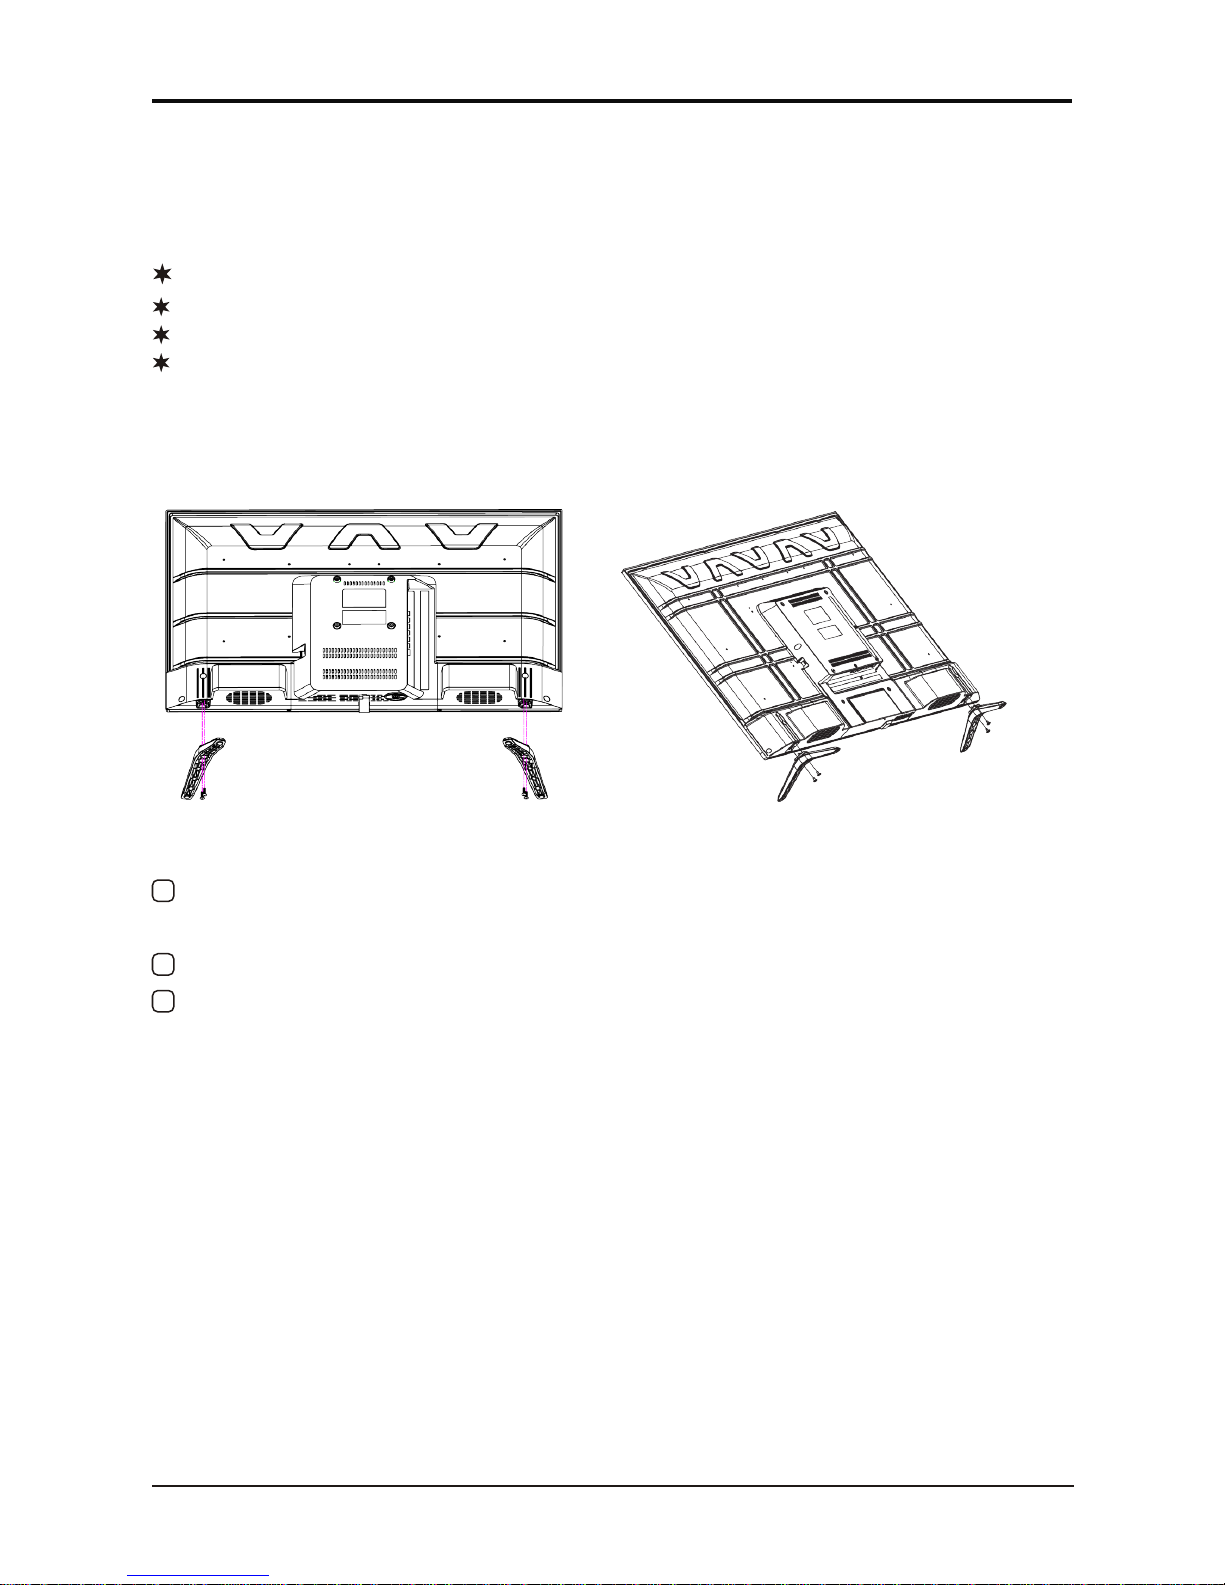
1.2 Installation of Stand
1 Place the TV with the front panel facing downwards on the soft cloth or soft
pads on a desk.
2 Insert the stand into the bottom socket of the TV.
3 Insert the screws into the sockets and tighten them.
2
LED COLOR TV
(For the physical structure, please refer to the real object)
PM-LED2032
PM-LED2043

The design and specification takes actual
products as the standard
1.3 Keys and Interfaces
3
LED COLOR TV
or or
or
1. Remote sensor window
2. Power indicator
3. Speaker
4. Menu key
5. Program + key
6. Program - key
7. Volume + key
8. Volume - key
9. Source key
10. Standby key
11. Power plug input
13.HDMI1
14.HDMI2
15.PC(VGA) input
16. PC AUDIO input
17. RF input
18.YPbPr input
19.AV input
20.USB1/USB2
21.EARPHONE output
12.COAXIAL output
12
13
14 15
16
20
1918
Y
Pb
Pr
VIDEO
L R
USB1
EARPHONE
AV IN
YPbPr IN
USB2
HDMI1 HDMI2
PC(VGA)
PC AUDIO
F INR
COAXIAL
17
21
5V---500mA

LED COLOR TV
e
y
28.CH :Select the channel forward.
29.CH :Select the channel backward.
MENU
EXIT
SOURCE

5
1.5 Installation of Batteries
1 Open the back lid of the remote control.
2 Install two 7#(AAA)1.5V batteries.
Ensure the correct polarity of the batteries.
3 Cover the back lid.
Please take out of the batteries from the remote
control for long time of no use.
If the remote control doesn't work properly,
please carry out the following checks.
- Check the TV is turned on.
- Check the polarity of the batteries are correct.
- Check the batteries are not drained.
- Check the power supply is normal or the power cord
is correctly connected.
- Check there are no special fluorescent light or neon
light around.
LED COLOR TV
(Here is only the sketch, please in kind prevail)
2. Basic Operation
2.1 Power ON/OFF(Optional)
- Connect the power cord to the A C input. Insert the power cord into the
appropriate socket.
- Press the Power switch to switch on the TV, then press P ower button to
turn on the unit.
- Press the Power switch again to switch off the TV.
Note: After switch off the TV, please don t immediately re-open the power
switch ,should be delayed one minute more to re-open the power switch.
2.2 Setting of Standby Mode
- Press (
) button to turn on the unit.
- Press ( ) button again to return the display to standby mode. The
power indicator turns red.
- Be sure not to set your TV in standby mode for a long period of time.
2.3 Selection of Input Mode
This set has different signal source modes, you may continue to press the
Source button to select a signal source.
’

When there is no signal from the selected source, the warning m essage will be
Displayed as per illustration. Either change the channel i n TV mode or press
Source button to change source.
When selecting the signal source, the screen will display the information.
2.4 Menu Option Adjustment
After you have installed the batteries into the remote control, you will
need to set some preferences on the LED TV, using the menu system.
- The buttons for menu option adjustment include: M enu,
,
,
,
Enter buttons.
- Press the Menu button to open the OSD Menu, then press
button to select
the pages. the pages are displayed in the following sequence (circular display):
1
2
3
4
5
NO SIGNAL
PAL BG
TV mode
PICTURE
SOUND
TIMECHANNEL
OPTION
Press the Menu button to display the menu system.
Press button to select the menu pages.
Press
,
button to select an item.
Press
, button to select or adjust a setting.
If you do not make a selection within 10 seconds, the menu will close A utomatically.
6
Press the Menu button to return or exit OSD menu.
LED COLOR TV
6
Note: CHANNEL is only for TV .
”“
,
,
1

2.5 Menu Functions
7
LED COLOR TV
2.5.1 CHANNEL Function
Adjustment of the CHANNEL
1 Press the Menu button, and then press
or button to the " CHANNEL " item.
2
Press or button to highlight the
"Auto Tuning","ATV Manual Tuning",
"Programme Edit", then press E NTER
button to change the setting.
3
Press the Menu button to return or exit.
In the "CHANNEL" menu,select " Auto
Tuning " and then press E NTER button
to auto search and store the channels.
to seach down from the
In the " CHANNEL " menu,select " ATV
Manual Tuning " and then press ENTER
Button to change the setting.
Current CH
Color system
Sound System
Fine-Turn
AFC
Search
Set the channel number
Select the color system
PAL/SECAM/NTSC
Select the sound system
(DK/BG/M/N/I)
Adjust the frequency of the
Automatic Fine tuning.
Press
channel finely.
current frequency, and press to search up.
Current CH 1
Color System PAL
Sound System DK
Fine-Tune 49.75MHZ
AFC Off
Search
+
Menu
ATV ManualTuning
Channel Tuning
TV : 5Programme(s)
44%... 433.75MHZ (TV)
Menu
(All the initial setting of menu, please consult the actual object.
User manual only detailedly describe how to operate the device)
CHANNEL
AutoTuning
ATV ManualTuningATV ManualTuning
Programme EditProgramme Edit
Move
Menu
Exit
ENTER

LED COLOR TV
8
b u t t o n t o change the setting.
" Program edit " and then press ENTER
In the " CHANNEL" menu ,select
/
The four colored key is the shortcut key for
programming the channel.
First
P
Press the button to e nter th e r ename
Press the button to set the channel
Press the button to skip the select channel.
(YourTV set will skip the channel automatically
when using CH+/- to view the channels.)
Green
Yellow
Blue
press to highlight the channel you
want to d e l e te or rename or move or skip, then:
ress the button t o d elete t he c hannel.
Red
Fav
Add or Delete the channel to your faverate list.
state, th en p r e s s
to select the word you
/
want to change, and to select word.
/
to moving state. T h e n p r e ss to move it
/
to the position you want to put.
2.5.2 PICTURE Function
Adjustment of the PICTURE.
1
Press the Menu button, and then press
or
button to the " PICTURE " item.
2
Press
or button to highlight the
"Picture Mode" , "Color Temperature " ,
" Noise Reduction "
item and then press
ENTER button to
enter Sub-menu.
3
adjust different setting.
4
Press the Menu button to return or exit.
In Sub-menu Press button to
or
to change the setting.
In the " PICTURE" menu,select "Picture
Mode" and then press
ENTER
Button
ENTER
5050
5050
Medium

LED COLOR TV
9
2.5.3 SOUND Function
Adjustment of the SOUND
1
2
3
4
the setting:
In the PICTURE menu,select Color Temperature "" " "
and then press
ENTER
button to change
Color Temperature
"Cool","Medium","Warm".
the setting:
In the PICTURE menu,select oise Reduction " " "N "
and then press
ENTER
button to change
Noise Reduction
"Off","Low","Middle","High".
the setting:
In the " SOUND " menu,select " Sound Mode "
and then
button to change
Sound Mode
"Standard","Music",
or
"Movie","Sports","User"
Surround Sound off
Press the Menu button, and then press
or
button to the "SOUND" item.
Press
or button to highlight the
"Sound Mode" , " B alance" , " Auto V olume " ,
button to enter
Sub-menu.
In Sub-menu Press button to
adjust different setting.
Press the Menu button to return or exit.
or
then press
ENTER
"Surround Sound"
press
ENTER
Enter

10
LED COLOR TV
2.5.4 TIME Function
Adjustment of the TIME
1
Press the Menu button, and then press
2
Press
or button to highlight the
" Sleep Timer ","Auto Sleep" or "OSD Timer"
enter sub-menu.
3
adjust different setting.
4
Press the Menu button to return or exit.
In Sub-menu Press
or
button to
ENTER
item and then press
or
button to the " TIME " item.
button to
2.5.5 OPTION Function
the setting.
Adjustment of the OPTION
1
Press the Menu button, and then press
or
button to the "OPTION" item.
2
Press
or button to highlight the
"OSD Language","Aspect Ratio",
3
4
Press the Menu button to return or exit.
"Key Lock",
"Reset"
In Sub-menu Press button to
Adjust
or
In the "OPTION" menu,select " OSD Language"
and then press
ENTER
button to change
OSD Language English
Aspect Ratio 16:9
Blue Screen On
Key Lock Off
Reset
Software Update(USB)
OPTIONOPTION
MoveMove
MenuMenu
ExitExit
item and
then press
"Software Update(USB)",
or
Sub-menu.
OSD Language
"Blue Screen",
button to enter
ENTER
different setting.
Aspect Ratio
In the "OPTION" menu,select "Aspect Ratio"
and then press ENTER button to change the setting.
ENTER
Sleep Timer off
ENTER

2.7 Multimedia
2.7.1 MEDIA Function
A. Support multimedia file:
B. USB don't connect PC.
C. Compatible USB devices: The format is FAT or FAT32.
D. We cannot guarantee compatibility (operation and/or bus power) with all USB
mass storage devices and assumes no responsibility for any loss of data that
may occur when connected to this unit.
Multimedia data Format
Image JPEG; BMP; PNG
Music MP3
Video MPEG-1(.DAT/.MPG)
MPEG-2(.MPG/.VOB)
MPEG-4(.AVI/.MP4)
Digital movies
TXT .txt
Please update formats for all file types (audio, photo, video)
11
LED COLOR TV
Note:the Screen Menu is available in PC mode.Those items are set to adjust the
pc screen.
Adjust the internal signal phase.
Phase
Adjust the internal sampling clock rate.
Clock
Shift the screen left or right.
Vertical Pos.
Horizontal Pos.
Shift the screen up or down.
Automatically adjust Clock,Phase,
H-Position, and V-Position settings.
Auto Adjust
Press to highlight one of the following options,then press ENTER or to
select it
/
2.6 SCREEN MENU
ENTER

12
2.7.2 USB Function
Adjustment of the USB
Press the SOURCE button, and then
press or button to highlight the
MEDIA item a nd t hen p ress E NTER
button.
Press or button to highlight the
PHOTO , MUSIC , MOVIE , TEXT
item and then press ENTER button.
Press the SOURCE button to return or
exit.
1
2
3
2.7.3 PHOTO
A.Press or to select folder or file, press ENTER button to enter next
folder ,press RECALL to return previous folder.
B.Press or to select the PHOTO that you want,press ENTER button
to select playlist than press button to play.
C.Press Display button to the media item.
D. Press or button to highlight the media and than press ENTER button.
LED COLOR TV
Music off
Play/pause Previous, Next, Stop, Repeat ALL, Music Off, Playlist, Info. .
Rotate,Rotate, Zoom In, Zoom Out, Move View.
2.7.4 MUSIC
A.Press or to select folder or ile, press ENTER button to enter next folder,
press RECALL to return previous folder.
B.Press or to select the MUSIC that you want,press ENTER button to select
playlist than press button to play.
C.Press Display button to the media item.
D.Press or button to highlight the media and than press ENTER button

13
LED COLOR TV
Playlist, Info. , Goto Time.
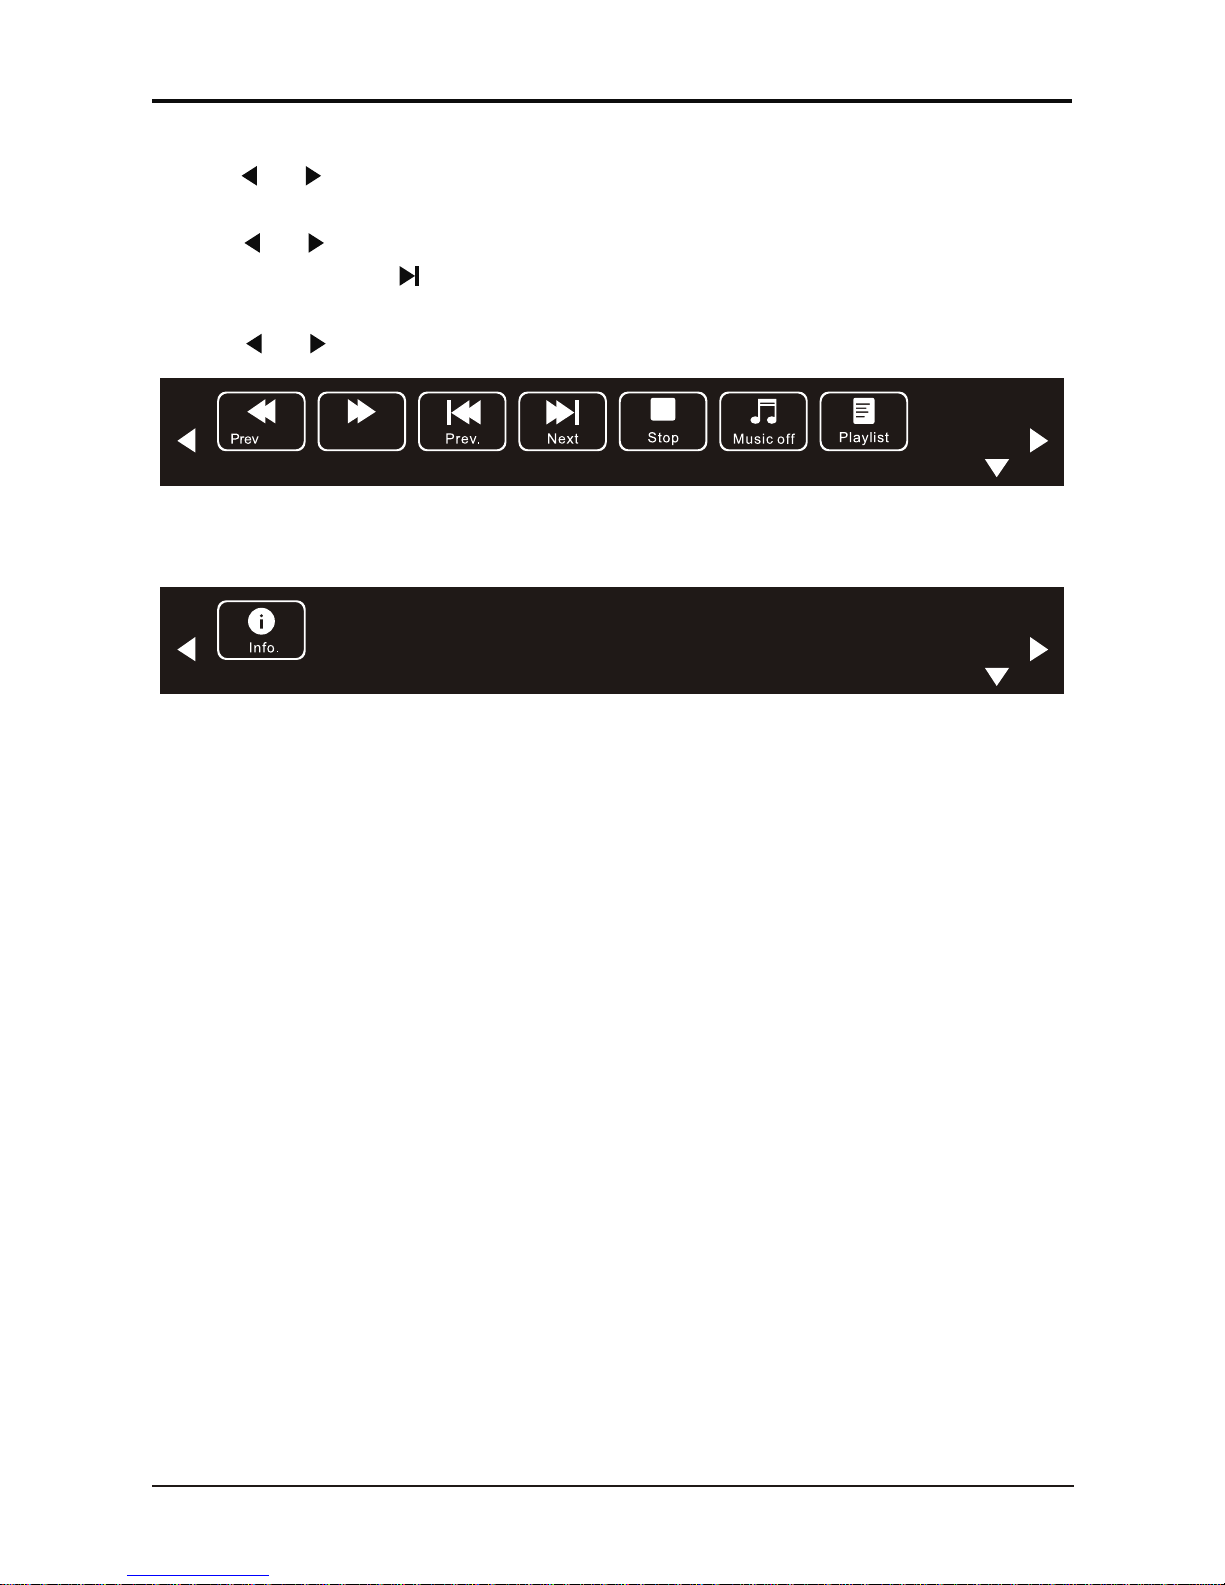
2.7.5 MOVIE
A.Press or to select folder or ile, press ENTER button to enter next folder ,
press RECALL to return previous folder.
B.Press or to select the MOVIE that you want,press ENTER button to select
playlist than press button to play.
C.Press Display button to the media item.
D.Press or button to highlight the media and than press ENTER button
Play/pause Fast Backward, Fast Forward,Previous,Next, Stop,Repeat ALL,MUTE.
Play/pause,Fast Backward, Fast Forward,Previous, Next, Stop, Repeat ALL,Set A/B
Playlist,Info. , Slow Fw, Step Fw, Goto Time, Zoom In, Zoom Out, Aspect Ratio
Move View.
14
LED COLOR TV
2.7.6 TEXT
A.Press or to select folder or ile, press ENTER button to enter next folder,
press RECALL to return previous folder.
B.Press or to select the TEXT that you want,press ENTER button to select
playlist than press button to play.
C.Press Display button to the media item.
D.Press or button to highlight the media and than press ENTER button
Prev Page, Next Page, Previous, Next, Stop, Music Off, Playlist, Info. .
Page Next Page

15
3.Technical Specification
Note:the specification shown above may change without notice for quality
improvement.
LED COLOR TV
Note:the specification shown above may change without notice for quality
improvement.
PAL B/G D/K I,SECAM B/G D/K
Product Model
Aspect Ratio
Power Supply
Power Consumption
TV System
Audio Output Power
(Internal)
Working Temperature
Working Humidity
16:9
AC 100-240V~,50/60Hz
8Wx2
20% ~ 80% Non-condensing
0C~40C
Input Terminal
Output Terminal
Antenna Input
USB Input
HDMI Input
VGA Input
PC AUDIO Input
Audio Input ( L/R)
Video Input
YPbPr Input
RJ45 Input
CI card In
SCART In/Output
DC In (12V)
Earphone
Audio Line Out( L/R)
Video Output
Optical
Coaxial out
x 1
x 2
x 1
x 1
x 1
x 1
NO
NO
NO
NO
NO
x 1
x 1
NO
NO
x 2
x 1
PM-LED2032
60W
Screen Size
32 diagonal
PM-LED2043
43 diagonal
75W

16
4. Supported Signal Modes
A.VGA Mode
Note: You re suggested to use the VGA connecting cord of not more than 5
meters to ensure the appropriate picture quality.
B.YPbPr Mode
Resolution
480i
480p(720x480)
576i
576p(720x576)
720p(1280x720)
1080i
1080P(1920x1080)
59.94
59.94
50.00
50.00
50.00
60.00
50.00
60.00
60.00
50.00
15.734
31.468
15.625
31.25
37.50
45.00
28.13
33.75
67.50
56.25
Horizontal Frequency (Khz) Vertical Frequency (Hz)
C.HDMI Mode
Resolution Horizontal Frequency (Khz) Vertical Frequency (Hz)
480p
576p
720P
1080i
1080P(1920x1080)
59.94
50.00
60.00
60.00
60.00
31.468
31.25
45.00
33.75
67.50
-When the signal received by the Display exceeds the allowed range, a
warning message will appear on the screen.
-You can confirm the input signal format onscreen.
LED COLOR TV
Resolution Horizontal Frequency (Khz) Vertical Frequency (Hz)
640 x 480
800 x 600
1024 x 768
60.00
56.25
60.00
60.00
60.00
60.00
31.50
35.16
37.90
48.40
47.85
67.50
Memo
1920x 1080
Full HD panel only
1366x 768

17
5. Simple Troubleshooting
If the display fails or the performance changes dramatically, check the display
in accordance with the following instructions. Remember to check the periphe rals
to pinpoint the source of the failure.
Power cannot be turned
on.(Power indicator
does not light.)
No Input Signal
message appears.
The remote control does
not function properly.
Flashing spots or stripes
appear on the screen.
Image colour or quality
deteriorates.
Screen position and
size are incorrect.
Image or colour is
incorrect.
Display warning
message.
Solution
-Check that both ends of the power cable are
plugged into the socket appropriately and the wall
socket is operational
-Check that the signal line is connected properly.
-Check that the power of the relevant peripherals is
turned on.
-Check that the Input option that has been selected
matches with the input signal.
-Check the batteries are not drained.(Use new
batteries.)
-Check that the remote control is within the operating
range.
-Check that the remote control is pointed to the
remote control window on the display.
-Check that there are no obstacles between the
remote control and the remote control window.
-Check that there are no emission (Car, HV cable or
Neon lamp) or other possible interference sources.
-Check that all the video settings are adjusted
appropriately, such as brightness, contrast, colour
etc.
-For more information about video settings, refer
to OSD Functions in Chapter 2.
-Check that the screen position and size is adjusted
appropriately.
-Check that the signal line is connected properly.
-When connecting to a PC, you can change the
resolution of the PC to acquire the correct image.
The discrepancy of the PC output signal may affect
the display of the image.
-Check that the input signal line is properly fixed.
-Select the correct input signal.
-For more information, refer to Supported Signal
Modes in Chapter 4.
Symptom
LED COLOR TV
 Loading...