


PM-LED2032-T2


Contents
IMPORTANT SAFETY INSTRUCTIONS . . . . ... . . . . . . . . ... ..... ... ............. . 2
SAFETY INFORMATION . . . . ... . . . . . . . . ........... ....................... . . . 3
What is Included/TV Placement Setup . . . . ... . . . . . . . . ........... ............. 4
Unit and Accessories
TV Stand Installation/Removal . . . . ... . . . . . . . . ... ..... ... ............... 4
Wall Mounting . . ... . . ... .... . . ... ... ..... ...... . . . . . . . . . . . . . . . . . . . . . . 4
GETTING STARTED ... . ... . . . . . . . . ........................................ . 5
Front/Back View . . . . ... . . . . . . . . ...................................... 5
Button Functions . . . . ... . . . . . . . . ...................................... 5
Connecting to External Devices ... . ... . . . . . . ............... . . . . . . . . . . . . . . . ..7
Connecting external devices to your LED TV . . . . ... . . . . . . . . ..............7
REMOTE CONTROL ... . ... . . . . . . ............... . . . . . . . . . . . . . . . . . . . . . . . . . . . . 8
Basic Operations . . . . ... . . . . . . . . ...................................... 8
Install the Batteries . . . . ... . . . . . . . . .................................... 9
SETTINGS ... ..... . . . . . ............... .......... . . . . . . . . . . . . . . . . ......... 10
TV OPERATION AND SYSTEM SETUP...................................
Menu Function Description... . ... . . . . . . ............... . . . . . . . . . . . . . . .
SOUND Menu... . ... . . . . . . ............... . . . . . . . . . . . . . . . . . . ......
Photo Menu ... . ... . . . . . . ............... . . . . . . . . . . . . . . . . . . . . . . . ..
TROUBLESHOOTING . . . . . ... . . . . . . ................................... . . . . 27
SPECIFICATIONS ...... . . . . . . ............................................. 28
. . . . ... . . . . . . . . ... ..... ... .......................
. . . ............... . . . . . . . . . . . . . . . . . . . . . . ......
10Initial Setup . . . . ... . . . . . . . . ... ..... ... ....................... . . . . . . . .
10
11
12Select Input Source... . ... . . . . . . ............... . . . . . . . . . . . . . . . . . . .
13Main Menu ... . ... . . .
13Picture Menu... . ... . . . . . . ............... . . . . . . . . . . . . . . . . . . . . . . . .
15
17Channel Menu ... . ... . . . . . . ............... . . . . . . . . . . . . . . . . . . . . . . .
20Applications ... . ... . . . . . . ............... . . . . . . . . . . . . . . . ...... . . .
23SETUP Menu ... . ... . . . . . . ............... . . . . . . . . . . . . . . . .........
25Media OPERATION ... . ... . . . . . . ............... . . . . . . . . . . . . .... . . . . .
25
26Movie Menu ... . ... . . . . . . ............... . . . . . . . . . . . . . . . . . . . . . ....
26Music Menu ... . ... . . . . . . ............... . . . . . . . . . . . . . . . . . . . . . . ...
28Specifications ... . ... . . . . . . ............... . . . . . . . . . . . . . . . . . ..... . . . .
28Multimedia Playback Format ... . ... . . . . . . .................... . . . . . . . .
28Remote Control ... . ... . . . . . . ............... . . . . . . . . . . . . . . . . ... . . . . .
4
1

Important Safety Instructions
• Read these instructions – All the safety and operating instructions should be read
before this product is operated.
• Keep these instructions – The safety and operating instructions should be retained
for future reference.
• Heed all warnings – All warnings on the appliance and in the operating instructions
should be adhered to.
• Follow all instructions – All operating and use instructions should be followed.
• Do not use this apparatus near water – The appliance should not be used near water
or moisture – for example, in a wet basement or near a swimming pool, and the like.
• Clean only with dry cloth.
• Do not block any ventilation openings. Install in accordance with the manufacture’s
instructions.
• Do not install near any heat sources such as radiators, heat registers, stoves, or other
apparatus (including amplifiers) that produce heat.
• Do not defeat the safety purpose of the polarized or grounding plug. A polarized
plug has two blades with one wider than the other. A grounding plug has two blades
and a third grounding prong. The wide blade or the third prong is provided for your
safety. If the provided plug does not fit into your outlet, consult an electrician for
replacement of the obsolete outlet.
• Protect the power cord from being walked on or pinched particularly at the plugs,
convenience receptacles, and at the point where they exit from the apparatus.
• Only use attachments/accessories specified by the manufacturer.
• Use only with the cart, stand, tripod, bracket, or table specified
by the manufacturer, or sold with the apparatus. When a cart or
rack is used, use caution when moving the cart/apparatus
combination to avoid injury from tip-over.
• Unplug the apparatus during lightning storms or when unused for
long periods of time.
• Refer all servicing to qualified personnel. Servicing is required when the apparatus
has been damaged in any way, such as pow
has been spilled or objects have fallen into the apparatus has been exposed to rain
or moisture, does not operate normally, or has been dropped.
• Please keep the unit in a well-ventilated environment.
• WARNING: To reduce the risk of fire or electric shock, do not expose this apparatus
to rain or moisture. The apparatus shall not be exposed to dripping or splashing and
that objects filled with liquids, such as vases, shall not be placed on apparatus.
• WARNING: The wall socket plug is used as disconnect device, the disconnect device
shall remain readily operable.
• WARNING: The batteries shall not be exposed to excessive heat such as sunshine,
fire or the like.
er supply cord or plug is damaged, liquid
CA UT IO N
RISK OF ELECTRICAL SHOCK
DO NOT OPEN
• This lightning flash with arrowhead symbol within an equilateral triangle is intended
to alert the user to the presence of non-insulated “dangerous voltage” within the
product’s enclosure that may be of sufficient magnitude to constitute a risk of
electric shock.
• To reduce the risk of electric shock, do not remove cover (or back) as there are no
user-serviceable parts inside. Refer servicing to qualified personnel.
• The exclamation point within an equilateral triangle is intended to alert the user to
the presence of important operating and maintenance instructions in the literature
accompanying the appliance.
• This equipment is a Class II or double insulated electrical appliance. It does not
require a grounded connection.
2

Safety Information
To ensure reliable and safe operation of this equipment, please read carefully all the
instructions in this user guide, especially the safety information below.
Electrical safety
• The TV set should only be connected to a main power supply with voltage that
matches the label at the rear of the product.
• To prevent overload, do not share the same power supply socket with too many
other electronic components.
• Do not place any connecting wires where they may be stepped on or tripped
over.
• Do not place heavy items on them, which may damage the leads.
• Hold the main plug, not the wires, when removing from a socket.
• During a thunderstorm or when not using the television for long periods, turn off
the power switch on the back of the television.
• Do not allow water or moisture to enter the TV or power adapter. Do not use in
wet, moist areas, such as bathrooms, steamy kitchens or near swimming pools.
• Pull the plug out immediately, and seek professional help if the main plug or
cable is damaged, liquid has spilt onto the set, if accidentally exposed to water
or moisture, if anything accidentally penetrates the ventilation slots or if the set
does not work normally.
• Do not remove the safety covers. There are no user serviceable parts inside.
Trying to service the unit yourself is dangerous and may invalidate the product’s
warranty.
Only qualified personnel should service this apparatus.
• To avoid battery leakage, remove exhausted batteries from the remote control, or
when not using for a long period.
• Do not break open or throw exhausted batteries in a fire.
Physical safety
• Do not block ventilation slots in the back cover. You may place the TV in a
cabinet, but ensure
• Do not tap or shake the TV screen, this may damage the internal circuits. Take
good care of the remote control.
• To clean the TV use a soft dry cloth. Do not use solvents or petroleum based
fluids.
• Do not install near any heat sources such as radiators, heat registers, stoves or
other apparatus (including amplifiers) that produce heat.
• Do not defeat the safety purpose of the polarized or grounding-type plug. A
polarized plug has two blades with one wider than the other. A grounding type
plug has two blades and a third grounding prong, the wide blade, or the third
prong is provided for your safety. If the provided plug does not fit into your
outlet, consult an electrician for replacement of the obsolete outlet.
• Protect the power cord from being walked on or pinched particularly at plugs.
• Unplug the apparatus during lightning storms or when unused for long periods.
• Refer all servicing to a qualified service personnel. Servicing is required when
the apparatus has been damaged in any way, such as power-supply cord or plug
is damaged, liquid has been spilled, or objects have fallen into the apparatus,
has been exposed to rain or moisture, does not operate normally, or has been
dropped.
at least 5 cm (2”) clearance all around.
3

What is Included/TV Placement Setup
Unit and Accessories
POWER
MUTE
AUDIO
RETURN
SLEEP
SOURCE
MENU
INFO
EXIT
OK
VOL
CH
P.SIZE
GUIDE
P.MODE
S.MODE
FAV
DTV/RADIO
SUBTITLE
CH.LIST
GOTO
STOP REPEATTEXT
Remote Control
TV Set
with Batteries
TV Stand Installation/Removal
User’s Manual
PM-LED2032-T2
Stand Support
Base Stand
4Screws
200mm
100mm
Four mounting holes
(size M6 screw)
Screws(2)
4*15BBH 4*15BBH
Screws(2)
Wall Mounting
The TV is provided with mounting holes for a VESA approved wall mounting bracket
(NOT SUPPLIED). The VESA mounting pattern is 200 x 100mm. Remove the screws
holding the base to the base bracket and lift the base away (do not remove the base
mounting brackets). Mount the VESA bracket using 4 x M6 x 10 isometric threaded
screws (not supplied). Do not use screws longer than 10 mm; damage will occur to
the internal components.
Caution: Your new TV is heavy; please consult with a professional wall mount installer
to perform this installation.
4

Getting Started
Front/Back View
Button Functions
1. POWER: Turn on TV/Standby
2. SOURCE: Audio/Video input source selection
3. MENU: Open settings menu
4. VOL-: Decrease volume
5. VOL+: Increase volume
6. CH-: Previous channel
7. CH+: Next channel
8. IR RECEIVER: Receives infrared signals from the remote control
9. INDICATOR LED: Status indicator
5
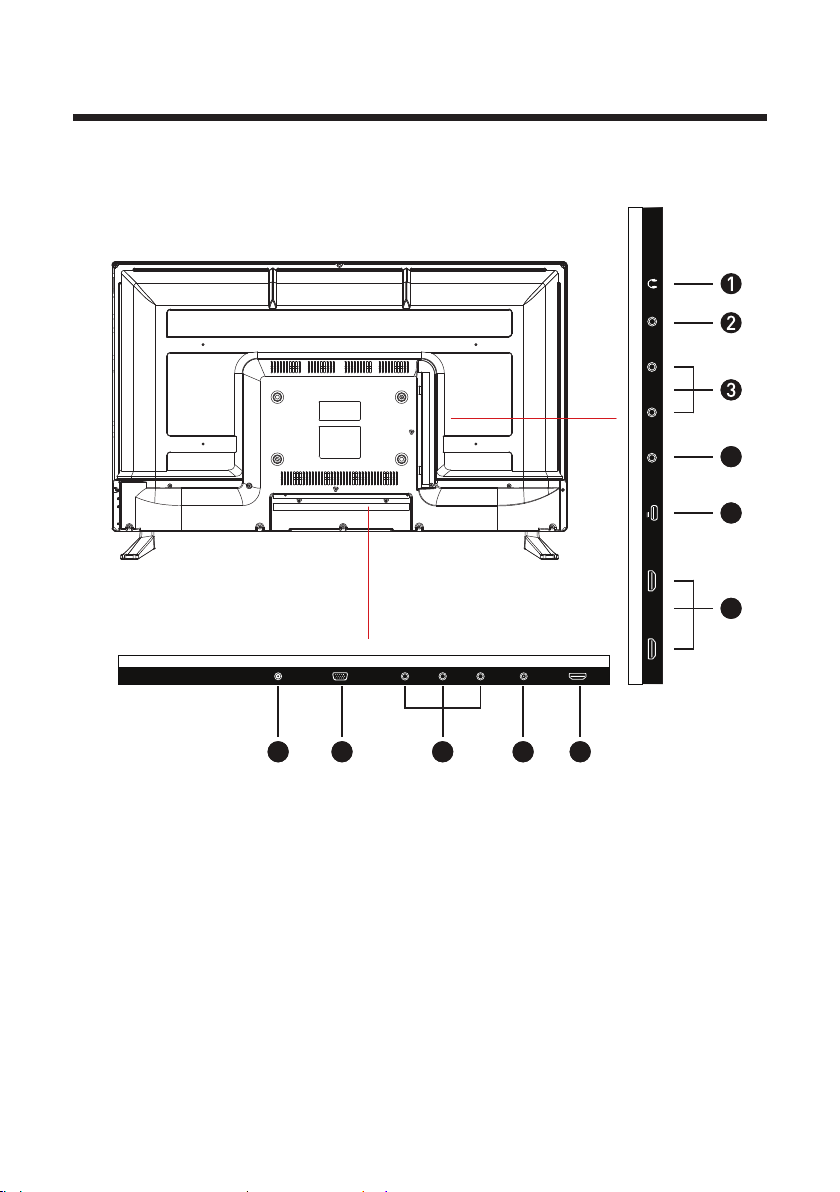
VIDEO AUDIOL RUSB HeadphoneCOAXIALHDMI2 HDMI1
4
HEADPHONES1.
COAXIAL2.
3. AUDIO IN L/R: Stereo
audio input
4. VIDEO: Video input
5. USB
5V 0.5A
5
6
HDMI3VGAPC AUDIO RFY Pb Pr
678910
6. HDMI
RF: Antenna connection
7.
8. YPbPr: Connect to the YPbPr video
output terminal of the DVD
VGA: PC video input
9.
PC AUDIO: Connect it to the audio
10.
output terminal of the PC
6

Connecting to External Devices
Connecting external devices to your LED TV
VIDEO AUDIOL RUSB HeadphoneCOAXIALHDMI2 HDMI1
5V 0.5A
HDMI3VGAPC AUDIO RFY Pb Pr
Audio
cable
VHF/UHF
antenna
cable
cable TV
company
VGA
RF Coaxial
cable
Component
cable
cable receiver/satellite box
7
HDMI
cable
Composite
cable
Remote Control
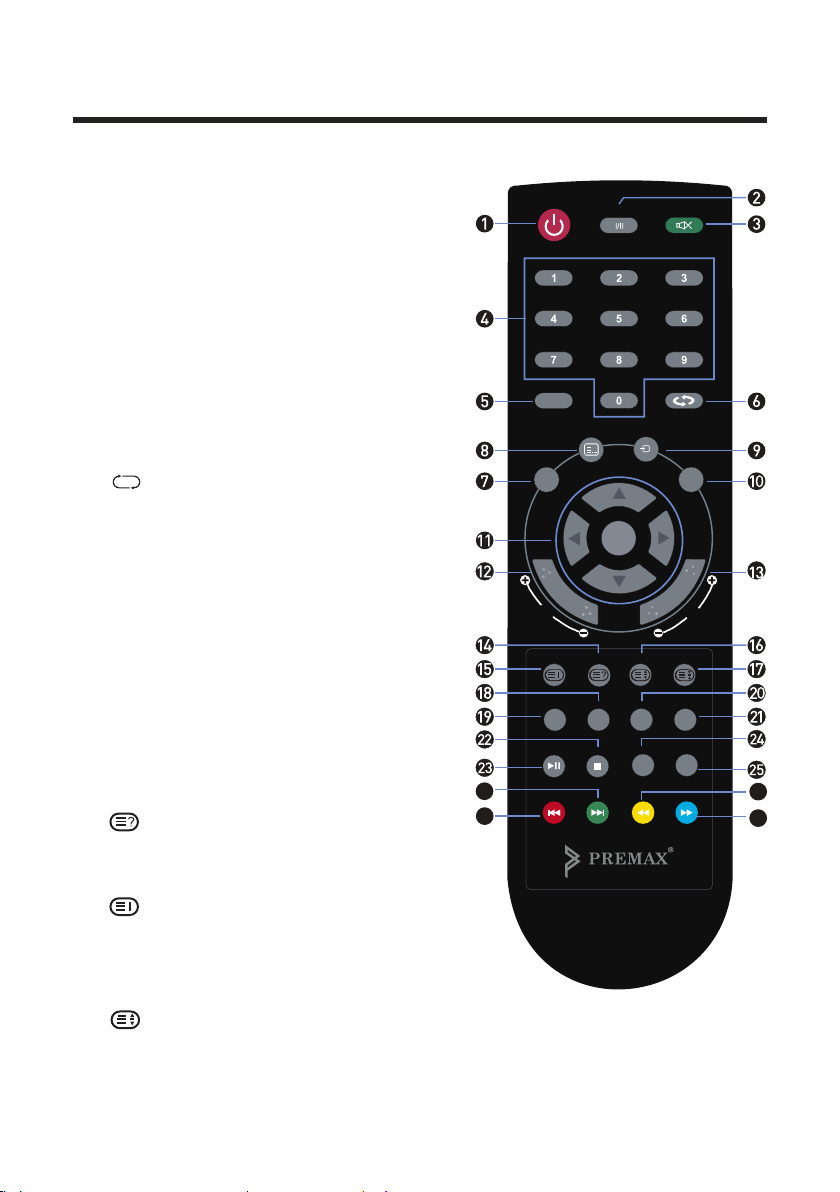
Basic Operations
1. POWER: Turn on the TV/Standby.
AUDIO: Switch the audio channel when
2.
DVD or multimedia playing.
I/II: In the TV condition, press this button
to select the stereo mode.
3. MUTE: Mute or restore the sound.
4. NUMBER KEYS: Change the channel
directly.
SLEEP: Auto Power Off Timer.
5.
RETURN: Return mode.
6.
: Return to the previous channel tuned.
7. EXIT: Exit the Menu.
8. MENU: Show Menu.
SOURCE: Press to change signal source.9.
10. INFO: Show information about the current
program.
11. NAVIGATION KEYS (Up, Down, Left,
Right and OK): To move in the menus and
confirm settings.
12. VOL: Increase and decrease volume.
13. CH: Next and Previous channel.
14. S. MODE: Setting audio options.
Reveals hidden information such as the
answers to a quiz in TELETEXT mode.
15. P. MODE: Output image mode selection.
Displays the main index in Teletext
mode.
16. P.SIZE: Press to select the different picture
size.
Displays the top, buttom or all of page.
POWER
SLEEP
EXIT
VOL
P.MODE
CH.LIST
AUDIO
MENU
OK
S.MODE
DTV/RADIO
STOP REPEATTEXT
26
27
SOURCE
P.SIZE
FAV
MUTE
RETURN
INFO
CH
GUIDE
SUBTITLE
GOTO
28
29
8

17. GUIDE: Show the Electronic Program Guide.
Freeze a multi-page changing on Teletext mode.
18. DTV/RADIO:
mode.
19. CH.LIST: Show the list of channels.
20. FAV: Show the list of favourite channels.
21. SUBTITLE:
22. STOP/ :
23. TEXT: Turns on and off the Teletext function.
: Play/Pause.
24. REPEAT:
GOTO: Play from the desired location.
25.
: Next file or chapter.26.
: Previous file or chapter.27.
28.
29.
: Fast rewind playback.
: Fast forward playback.
or EPG OSD mode.
In DTV mode, press DTV/RADIO button to enter DTV or RADIO
Select subtitle of media video file. (needs the support of disk or flie)
Stop playback.
Repeat mode.
Press the appropriate colour to direct access functions in TELETEXT
Install the Batteries
If the remote control fails to operate the TV functions, replace the batteries in the
remote control.
1. Open the battery cover.
2. Insert two size-AAA batteries. (Place the batteries with their terminals
corresponding to the (+) and (-) indications in the battery compartment.)
3. Replace the cover.
9
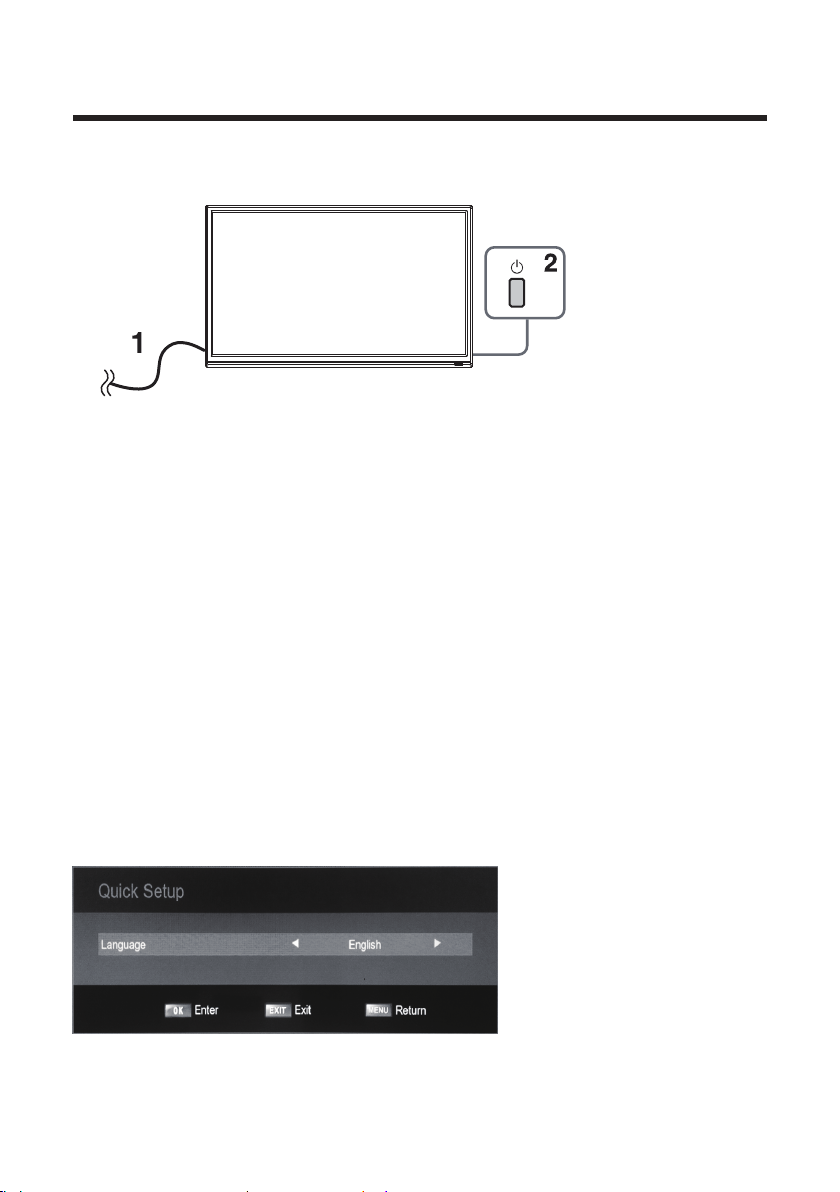
Settings
Initial Setup
1. Connecting your TV on the poweroutlet;
2. Press the POWER button on the remote to turn on the TV in green for the LED light.
CAUTION:Always disconnect the TV from the power outlet when the TV will
not be used for a long period of time. The POWER button on the front panel is only
used for switching the TV into standby, it does not disconnect the device from the
main voltage. To completely disconnect the main voltage, please remove the power
plug from the socket.
3. Press the key▼/▲/◄ / ►and following the picture as bellow to operate the subject.
NOTE:
The picture is for reference only.
TV OPERATION AND SYSTEM SETUP
Auto Install
When you power on the TV first,you can find the follow menu,it will guide you to do some
simple settings.
1 Language
User can press ◄/► button to select the OSD language.
And then press ENTER to enter the next step page.
10

2 Country
User can press ◄/► button to select the country.
And then press ENTER to enter the next step page.
3 DTV
Type User can press ◄/► button to select the DTV Type: Cable(DVB-C) or Terrestrial(DVB-T).
And then press ENTER to enter the next step page.
4 Subtitle and Audio Language settings
Press ▲/▼ button to select the item, and then press ◄/► button to select the options.
11

User can set the primary and secondary subtitle language, primary and secondary audio
language on this options.
And then press ENTER to enter the next step page.
5 Auto Tuning
If you set the DTV type to Terrestrial,you will find the follow menu for search the channel.
Press ▲/▼ button to select the item, and then press ◄/► button to select the options.
Tuning Mode
User can press ◄/► button to select the Tuning Mode: DTV/ ATV/ DTV and ATV.
Select Input Source
Press SOURCE button to display the input source list;
Press ▲/▼ button to select the input source you want to watch;
Press ENTER button to enter the input source;
12

Main Menu
Press MENU button to display the MAIN OSD MENU;
Press◄/►buttonto select the MENU you want;
Press ENTER button or ► button to enter the sub menu,
Press ▲/▼ button to select the option and then press ENTER button to enter the submenu,
press ◄/► button to adjust the value or press ◄/► button to select in the sub menu;
You can press MENU button to save and return back to the previous menu, and press
button to exit the entire menu.
Picture Menu
The picture is for a reference only; the actual item is the standard.
Press MENU button to display the main menu.
Press ▲/▼ button to select Picture in the main menu, and then press ENTER button to enter.
13

1. Press ▲/▼ button to select the option that you want to adjust in the Picture menu,
and then press ENTER button or ► button to enter.
2. Press ◄/► button to adjust or press ▲/▼ button to select.
And press ENTER button to select the sub menu.
3. After finishing your adjustment, press MENU button to save and return back to the previous
menu, and press EXIT button to exit the entire menu.
Picture Mode
Press ▲/▼ button to select Picture Mode, then press ENTER button to enter and
press ◄/► button to select. (Available Picture Mode: User, Dynamic, Standard, Mild)
You only can change the value of brightness, contrast, sharpness, color, when the picture is in
User mode.
TIPS: You can press P-MODE button on the remoter control again and again to change the
picture mode directly.
Contrast
Press ▲/▼ button to select Contrast, then press ENTER button to enter and press ◄/► button
to adjust. Then press MENU button to return back the previous menu directly.
Brightness
Press ▲/▼ button to select Brightness, then press ENTER button to enter and press ◄/► button
to adjust. Then press MENU button to return back the previous menu directly.
Colour
Press ▲/▼ button to select Colour, then press ENTER button to enter and press ◄/► button to
adjust. Then press MENU button to return back the previous menu directly.
Tint
Press ▲/▼ button to select Tint, then press ENTER button to enter and press ◄/► button to
adjust. Then press MENU button to return back the previous menu directly.
Sharpness
Press ▲/▼ button to select Sharpness, then press ENTER button to enter and press ◄/►
button to adjust. Then press MENU button to return back the previous menu directly.
14

Contrast Booster
Press ▲/▼ button to select Contrast Booster, then press ENTER button to enter and press ◄/►
button to select On ,Off,High,low,middle. Then press MENU button to return back the previous
menu directly.
Colour Temperature
Press ▲/▼ button to select Colour Temperature, then press ENTER button to enter and ◄/►
button to select Normal, Cool, Warm.
DNR
Press ▲/▼ button to select DNR, and then press ENTER button to enter and ◄/► button to
select Off, Low, Middle, High, Auto.
Cinema
Press ▲/▼ button to select Cinema Mode, and then Press ◄/►button to select. (Available
Cinema: Auto, 4:3, Wide, Panorama).
TIPS: You can press ASPECT button on the remoter control to change the aspect mode directly.
SOUND Menu
The picture is for a reference only; the actual item is the standard.
Press MENU button to display the main menu.
Press ◄/► button to select Sound in the main menu, and then press ENTER button to enter.
15

1. Press ▲/▼ button to select the option that you want to adjust in the Sound menu, then press
ENTER button to enter.
2. press◄/►button to adjust or press ▲/▼ to select, and press ENTER button to select submenu.
3. After finishing your adjustment, Press MENU button to save and return back to the previous
menu, or press EXIT button to exit the entire menu.
Soundmode
Press ▲/▼ button to select Soundmode, and then press ENTER button to enter.
And then press ◄/► button to select. (Available Sound mode: User, Standard, Music, Movie).
You can change the value of bass and treble, Balance and EQ, when the sound is in User mode.
TIPS: You can press S-MODE button on the remote control to change the Sound Mode directly.
Bass
Press ▲/▼ button to select Bass, then press ENTER or ► button to enter and press ◄/► button
to adjust. It can only be adjusted under user mode.Then press MENU button to return back the
previous menu directly.
Treble
Press ▲/▼ button to select Treble, then press ENTER button to enter and press ◄/► button to
adjust. It can only be adjusted under user mode Then press MENU button to return back the
previous menu directly.
Balance
Press ▲/▼ button to select Balance, then press ENTER button to enter and press ◄/► button
to adjust. Then press MENU button to return back the previous menu directly.
Surround
Press ▲/▼ button to select Surround, and then press ENTER button to enter and press ◄/►
button to select ON or OFF.
AVL
Press ▲/▼ button to select AVL, and then press ENTER button to enter and press ◄/►button
to select ON or OFF.
Digital Audio Output
Press ▲/▼ button to select Digital Audio Output, then press ENTER button to enter and
press ◄/► button to select. (Available SPDIF mode: OFF, PCM, AUTO)
16

Audio Description
Then press ENTER button or ► button to enter the menu in the DTV source.you can open the
audio description and adjust the Mixing Level.
Then press ENTER button or ► button to enter and press◄/►button to adjust, then press
MENU button to return back the previous menu directly.
Channel Menu
The picture is for a reference only; the actual item is the standard.
Press MENU button to display the main menu.
Press ◄/► button to select Channelin the main menu, and then press ENTER button to enter.
17

1. Press ▲/▼ button to select the option that you want to adjust in the APPLICATIONS menu,
and then press ENTER button to enter.
2. Press ◄/► button to select and press ENTER button to select the sub menu.
3. After finishing your adjustment, press MENU button to save and return back to the previous
menu, or press EXIT button to exit the entire menu.
Channel Edit
Press ▲/▼ button to select Channel Edit, and then press ENTER button to play the channel
selected. The menu will appear as follows:
Hot Key Description:
Press RED button to delete the channel selected.
PressGREEN buttonto move down the channel.
Press YELLOWbuttonto lock the channel.
Press BLUE button to skip the channel selected.
PressFAVbuttonto set the favorites channels.
Press CH +/- buttonto o turn the page.
Country
Press ▲/▼ button to select Country, and then press ◄/►button to select which area you stay.
DTV Type
Press ▲/▼ button to select DTV Type, then press ◄/► button to select. (Available DTV
Type: Cable, Terrestrial)
Auto Tuning
Press ▲/▼ button to select Auto Tuning, and then press ENTER button to enter (When the
System Lock is on, please input the PIN code to unlock).
18

Select to open the auto searching page, and press Enter button to start the scan.
ATV Manual Tuning
Press ▲/▼ button to select ATV Manual Tuning, and then press ENTER button to start the scan.
DTV Manual Tuning
Press ▲/▼ button to select DTV Manual Tuning, and then press ENTER button to start the scan.
19
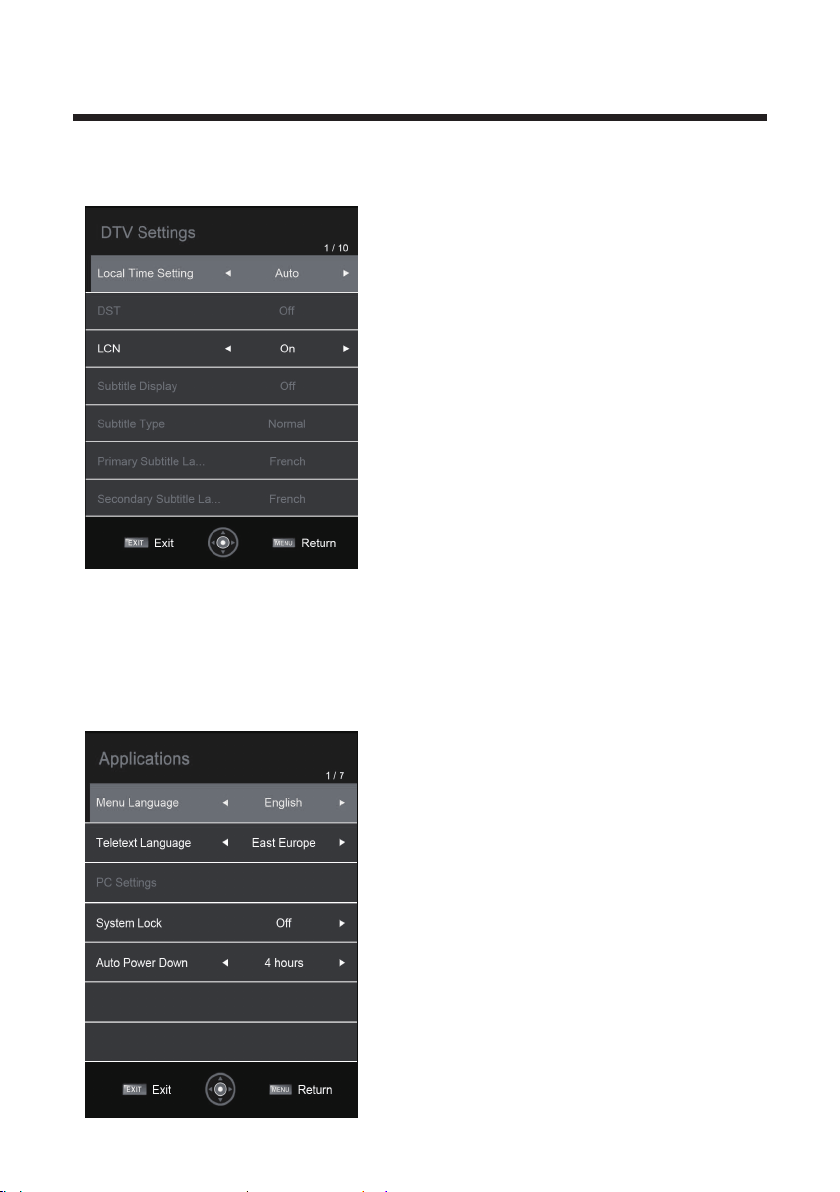
DTV Settings
Press ▲/▼ button to select DTV Settings, and then press ENTER button to enter the sub menu.
User can set the local time settings, DST, LCN, subtitle and audioon this options.
Applications
The picture is for a reference only; the actual item is the standard.
Press MENU button to display the main menu.
Press ◄/► button to select Applications in the main menu, and then press ENTER or ► to enter.
20

1. Press ▲/▼ button to select the option that you want to adjust in the PREFERENCES menu,
then press ENTER to enter.
2. Press ◄/►button to adjust or press ▲/▼button to select.
3. After finishing your adjustment, press MENU button to save and return back to the previous
menu and press EXIT button to exit the entire menu.
Menu Language
Press ▲/▼ button to select Menu Language, then press ENTER or ► button to enter the sub
menu, then press ▲/▼ button to select, then press ENTER or ► button to confirm.
Teletext Language
Press ▲/▼ button to select Teletext Language, then press ENTER or ► button to enter the sub
menu, then press ▲/▼ button to select, then press ENTER or ► button to confirm.
PC Settings
Press ▲/▼ button to select PC Settings, then press ENTER to enter the sub menu,
Then Press ► to enter, then press ENTER or ► to confirm. (When the PC signal is connected).
System Lock
Press ▲/▼ button to select System Lock, then press ENTER button to enter enter the sub
menu with the password “0000”:
21
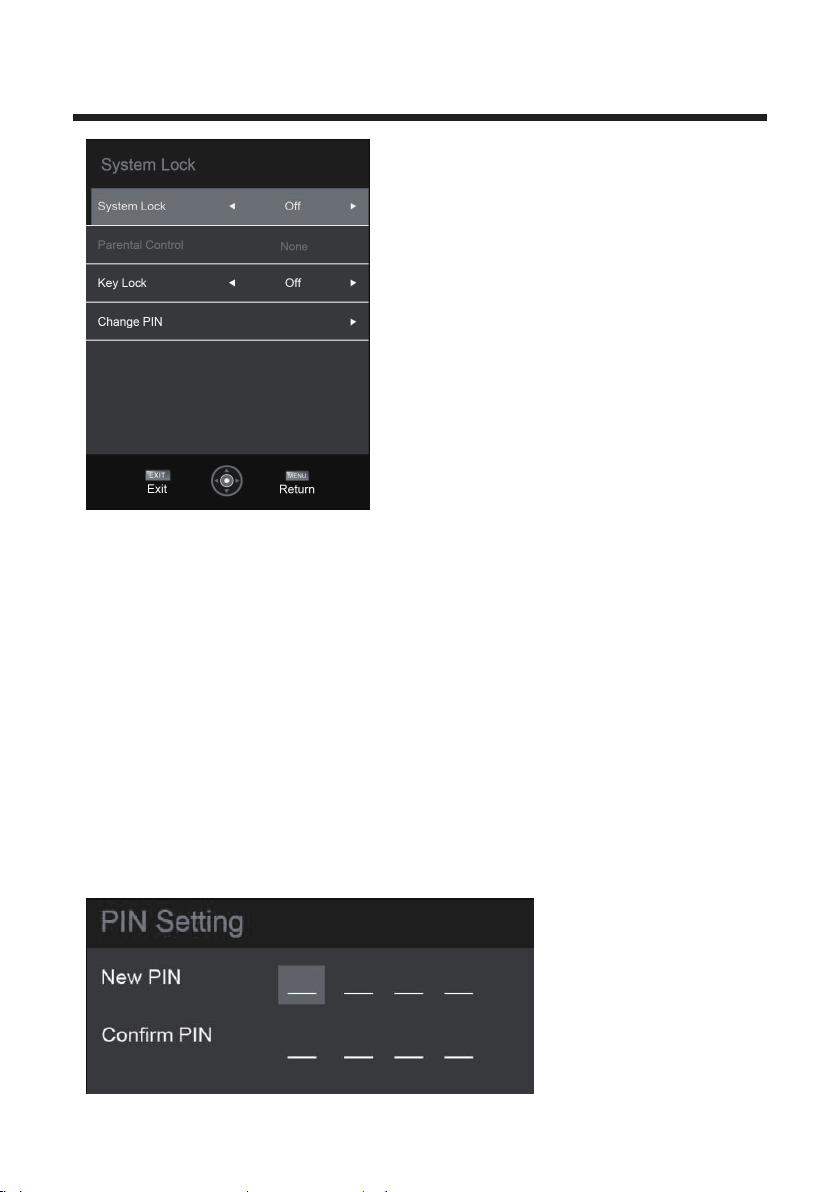
System Lock
Press ▲/▼ button to select System Lock, then press ◄/► button to select ON or OFF.
Parental Control
Press ▲/▼ button to select Parental Control, then press ENTER or ► button to enter the sub
menu. Then press ◄/► button to select Rate (From4-17, or None). Then press ENTER or ►
button to confirm.
Key Lock
Press ▲/▼ button to select Key Lock, then press ENTER button to enter and press ◄/►button to
select ON or OFF.
Change Pin
Press ▲/▼ button to select Change Pin Code, then press ENTER to enter and Change Pin Code
menu will appear as follows:
22

Input old password at “Old Password”, (if the old password is incorrect, the password will not be
allowed to modify.) Input new password at “New Password”. Input new password again at
“Confirm New Password”, if new password and confirm new password consistent, the
successfully updated menu will appear a few second, otherwise, the menu will display the
password mismatch.
Auto Power Down
Press ▲/▼ button to select Auto Power Down and press ◄/► button to select Off/ 1 hour/ 2 hour
/3 hour/4 hour.
SETUP Menu
The picture is for a reference only; the actual item is the standard.
Press MENU button to display the main menu.
Press ◄/► button to select Setup in the main menu, then press ENTER to enter.
1. Press ▲/▼ button to select the option that you want to adjust in the Setup menu, then
press ENTER or ► button to enter.
2. Press ◄/►button to adjust or press ▲/▼button to select.
3. After finishing your adjustment, press MENU button to save and return back to the previous
menu and press EXIT button to exit the entire menu.
OSD Timer
Press ▲/▼ button to select OSD Timer, and then Press ◄/►button to select. (Available OSD
Timer: 10 S, 20 S, 30S, 40S, 50S, 60S, off), then press ENTER button to confirm.
Blue Screen
Press ▲/▼ button to select Blue Screen, then press ◄/► to select On or Off.
Then press ENTER to confirm.
23
Sleep Timer
Press ▲/▼ button to select Sleep Timer, and then Press ◄/►button to select. (Available Sleep
Timer: 00:15, 00:30, 01:00, 01:30, 02:00, 03:00, off), then press ENTER button to confirm.
Location
Press ▲/▼ button to select Location, and then Press ◄/►button to select Home or Store, then
press ENTER button to confirm.
Quick Setup
Press ▲/▼ button to select Quick Setup, and then Press then press ENTER button to enter the
sub menu, enter the password if locked, and then you can quickly make some basic settings of
the TV. As follows:
Reset TV
Press ▲/▼ button to select Reset TV, and then press ENTER to enter the sub menu, enter the
password if locked, and then you can restore factory settings.
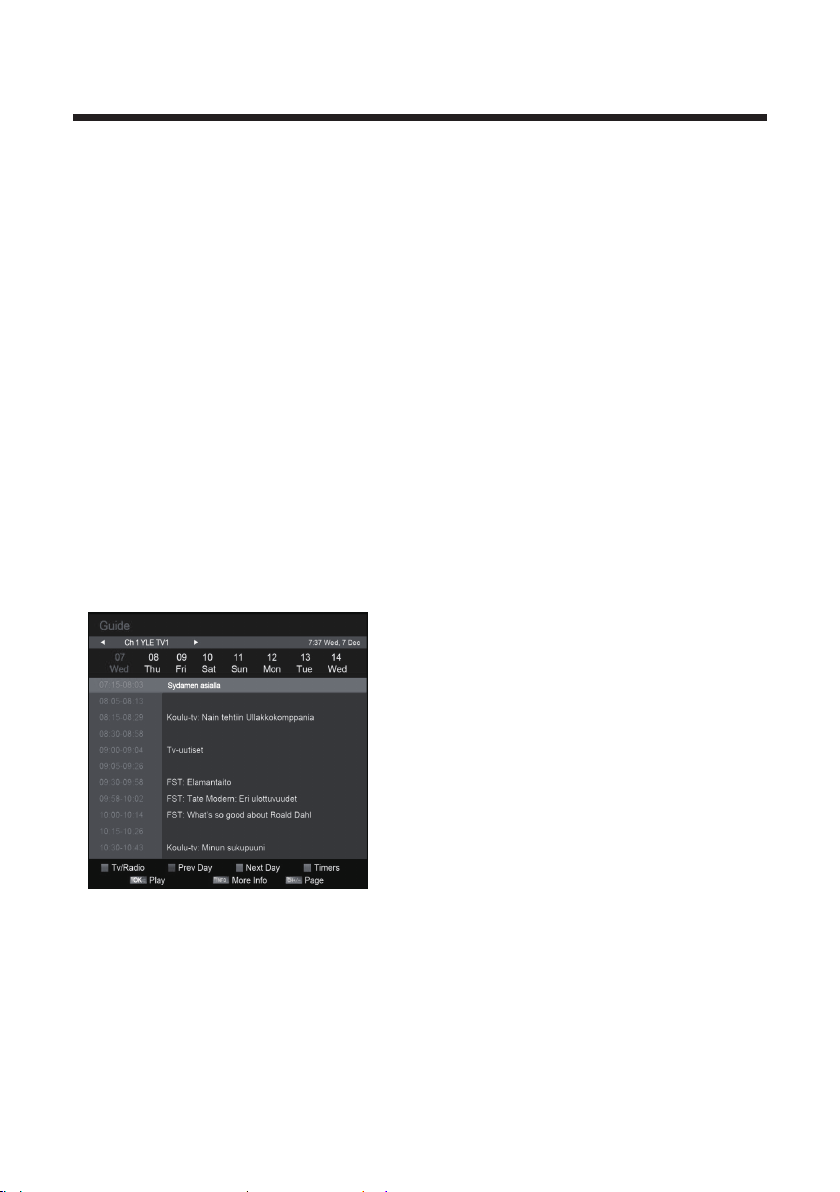
Guide
Press EPG button on the remote to display the EPG programmers list, and then press ◄/►
button to display different channel EPG info. As follows:
Hot Key Description:
Press RED button to switch the TV or Radio channel.
PressGREENbuttonto select prev day program info.
Press YELLOWbuttonto select next day program info.
Press BLUE button to enter the schedule list menu.
PressFAVbuttonto set the favorites channels.
Press CH buttonto show the next page program info.
PressEnterbuttonto enter the schedule menu,you can set the record task.
Press CH +/- buttonto show the next page program info.
24

MEDIA OPERATION
The picture is for a reference only; the actual item is the standard.
Note: Before operation MEDIA menu, Plug in USB device or memory card, then press SOURCE
button to set the Source to Media.
Press ▲/▼ button to select MEDIA in the Source Menu, and then press ENTER or ► to enter.
You can also enter the Media by pressing MEDIA button on the remote control.
1. Press ▲/▼ button to select the option that you want to adjust in the Media menu, then press
ENTER or ► button to enter.
2. Press ◄/►button to adjust or press ▲/▼button to select.
3. After finishing your adjustment, press MENU button to save and return back to the previous
menu and press EXIT button to exit the entire menu.
Photo
The picture is for a reference only; the actual item is the standard.
Press ◄/►button to select Photo in the main menu, and then press ENTER button to enter.
Press EXIT button to return back to the previous menu.
Press ▲/▼ to select the photos, press ENTER or ►║ button to view.
25

Movie
The picture is for a reference only; the actual item is the standard.
Press ◄/►button to select Movie in the main menu, then press ENTER button to enter.
Press EXIT button to return back to the previous menu.
Press ▲/▼button to select the folder that you want to view.
Press ENTER button to select the sub folder.
Music
The picture is for a reference only; the actual item is the standard.
Press ◄/►button to select Music in the main menu, and then press ENTER button to enter.
Press EXIT button to return back to the previous menu.
Press ▲/▼button to select the sonny you want to listen, and then press ENTER or ►║ or ►
button to play.
Press ◄ button to return back to the previous menu.
26
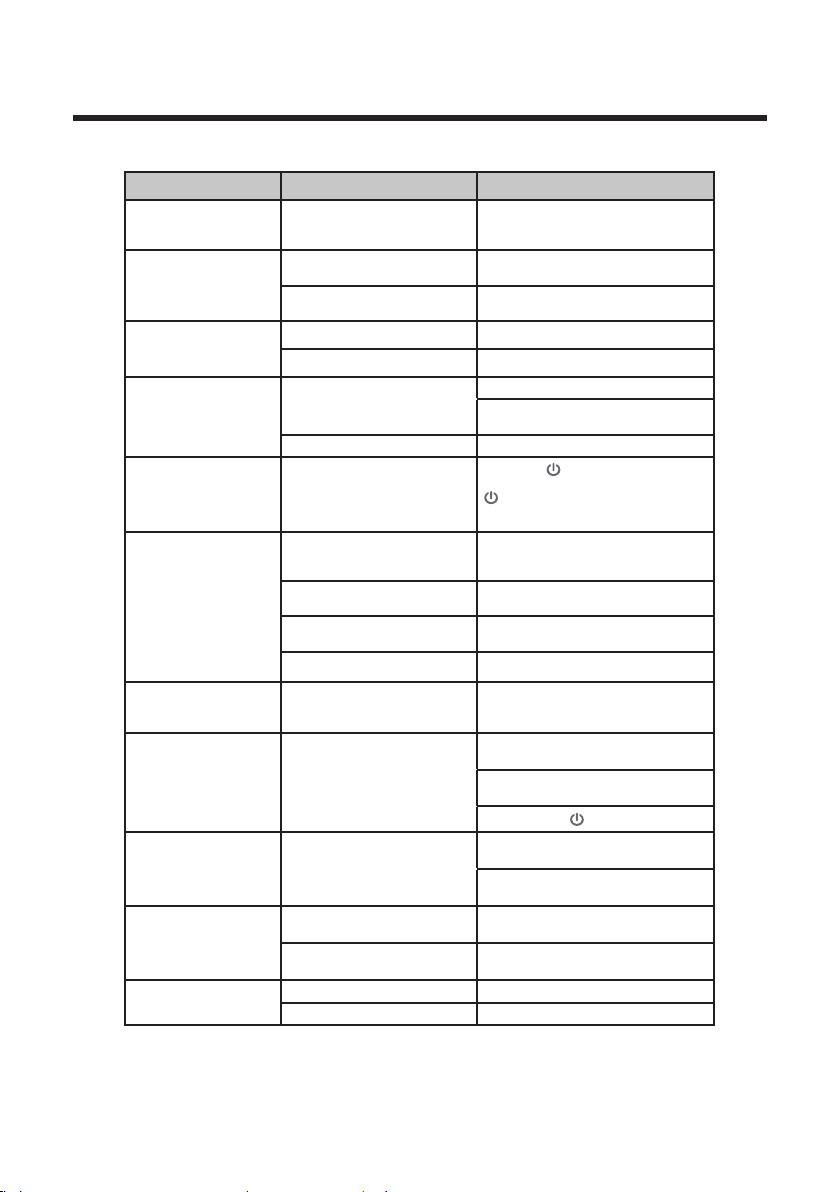
Troubleshooting
If the device performance fails, check whether the detected problem is in the
following table. If your device still fails, contact customer service.
SYMPTOM POSSIBLE CAUSE REMEDY
TV – No signal input
connected, loose or
disconnected.
Remote Control
Distance is short,
no control.
TV
Display is faint.
TV
Display image does
not fill the screen.
TV
Unable to operate
the TV
Static and sound
noise.
TV image is better,
but has noise.
No image. No sound. Power plug is loose,
TV image has
stripes.
TV image has
shadows.
TV has no sound. Volume setting is too low. Adjust volume to proper level.
Signal cable is loose or not
connected.
Receiver of remote control
is covered.
The battery energy of the
remote control is too low.
Adjustment is incorrect. Use auto-adjustment function.
Display mode is incorrect. Use recommended mode.
Adjustment is incorrect. Use auto-adjustment function.
Display mode is incorrect. Use recommended mode.
Exterior influence, for
example lighting, static
electricity and so on, which
might disturb the
operation of the TV.
Antenna cable connector is
loose, cable is damaged.
Antenna cable type is not
correct.
Direction or position of
antenna is incorrect.
Signal is weak. Attempt to use signal amplifier.
Antenna cable connector
is loose, cable is damaged.
power cord does not
connect well.
Signal is exposed to
interference, such as a car,
neon light, electric blower,
etc.
TV signal is reflected by
valley or building.
Direction of antenna is
incorrect.
Sound is muted. Press MUTE to deactivate mute.
normal
Ensure signal cable is not loose
or disconnected. Reattach and try
again.
Ensure the remote receiver is not
obstructed.
Change the batteries.
Enter PICTURE to adjust the
horizontal and vertical position.
Press the button to tum off
electrical source, then press the
button to turn on the TV again
after 1-2 minutes.
Check the antenna cable
connector plug for secure
connection and any damage.
Check antenna cable type (VHF/
UHF).
Adjust the direction or position of
antenna.
Check the antenna cable
connector plug for secure
connection and any damage.
Check to ensure power cord is
connected.
Press POWER on panel or
remote control.
Check if the
Do not use an electric blower
around unit.
Adjust antenna cable direction
to reduce interference.
Use a high-directional antenna.
Adjust direction of the antenna.
button is on.
CAUTION: Do not allow your TV screen to display the same image for an extended
period of time. Please set up a screen protection procedure. If a high-contrast picture
remains on the TV screen for a long time, this picture could burn the image onto the
screen. Usually the burnt image will disappear gradually when you turn off the TV’s
power. However, this damage cannot be repaired.
27
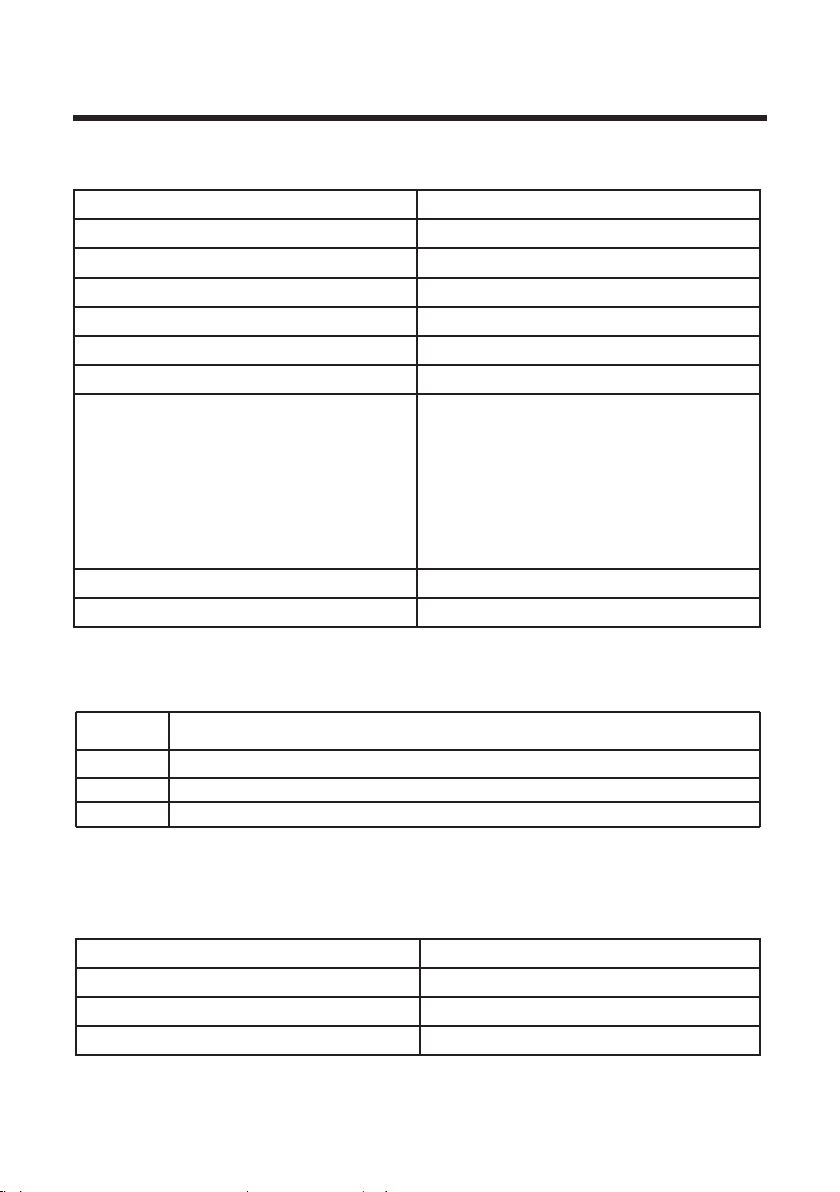
Specifications
Specifications
TV System
Maximum
Brightness
Static Contrast
Response Time
Consumption
Power Supply
Connectivity
Data Interface
Supported System Files
DVB-T2
1366x768
180 cd/m2
3000:1
8.5 ms
<65W
AC 100-120V- 50/60Hz
Composite Video Input
Component Video Input
PC Video Input (VGA)
PC Audio Input
HDMl input x 3
RF Antenna Input
Headphones Output
Coaxial Output
USB
FAT32 and FAT16
Multimedia Playback Format
Multimedia
Categories
Video
Music
Photo
.avi/.mpg/.mpeg/.vob/.mp4/.mov/.mkv/.ts
.aac/.mp2/.mp3/.m4a
.jpg/.jpeg/.bmp/.png
File Extension
Remote Control
Signal Type
Control Distance
Control Angle
Power Supply
Infrared
8 meters
30° (Horizontal)
AAA 1.5V x 2
28
 Loading...