

Page 1
The Architectural Loudspeaker:
Overall Cut-Out (Diameter x Depth)K-K-
K-8SWd 8"In-Ceiling/Wall- Frameless Subwoofer 9-7/8"diameter 8-5/8"x3-7/8"
Model
Congratulations! You have purchased a high quality subwoofer.
When matched to comparable electronic equipment, expect years
of high delity sound. We are constantly striving to provide the very
best value in quality audio products.
The following manual is designed to give you, the installer or owner, basic
information as to the speaker’s installation and operation. It is beyond
the scope of this manual to go into all the details that must be taken into
consideration in a sophisticated high delity system. When installing
the wiring and speakers it is important to adhere to all local codes
and regulations. Consulting a professional can help to maximize your
system’s performance.
If you have any questions regarding this speaker which are not answered
by this manual, contact your local dealer for assistance. For the most
current information please visit www.preference-audio.com.
SHIPPING DAMAGE
Each speaker is thoroughly tested before it leaves the factory. However,
in shipment, accidents may occur. Please inspect your speakers carefully
when you receive them to ensure there is no damage. If there is, please
notify your supplier immediately. If you received your speakers by public
transportation, report the damage at once to the shipping company.
GENERAL DESCRIPTION
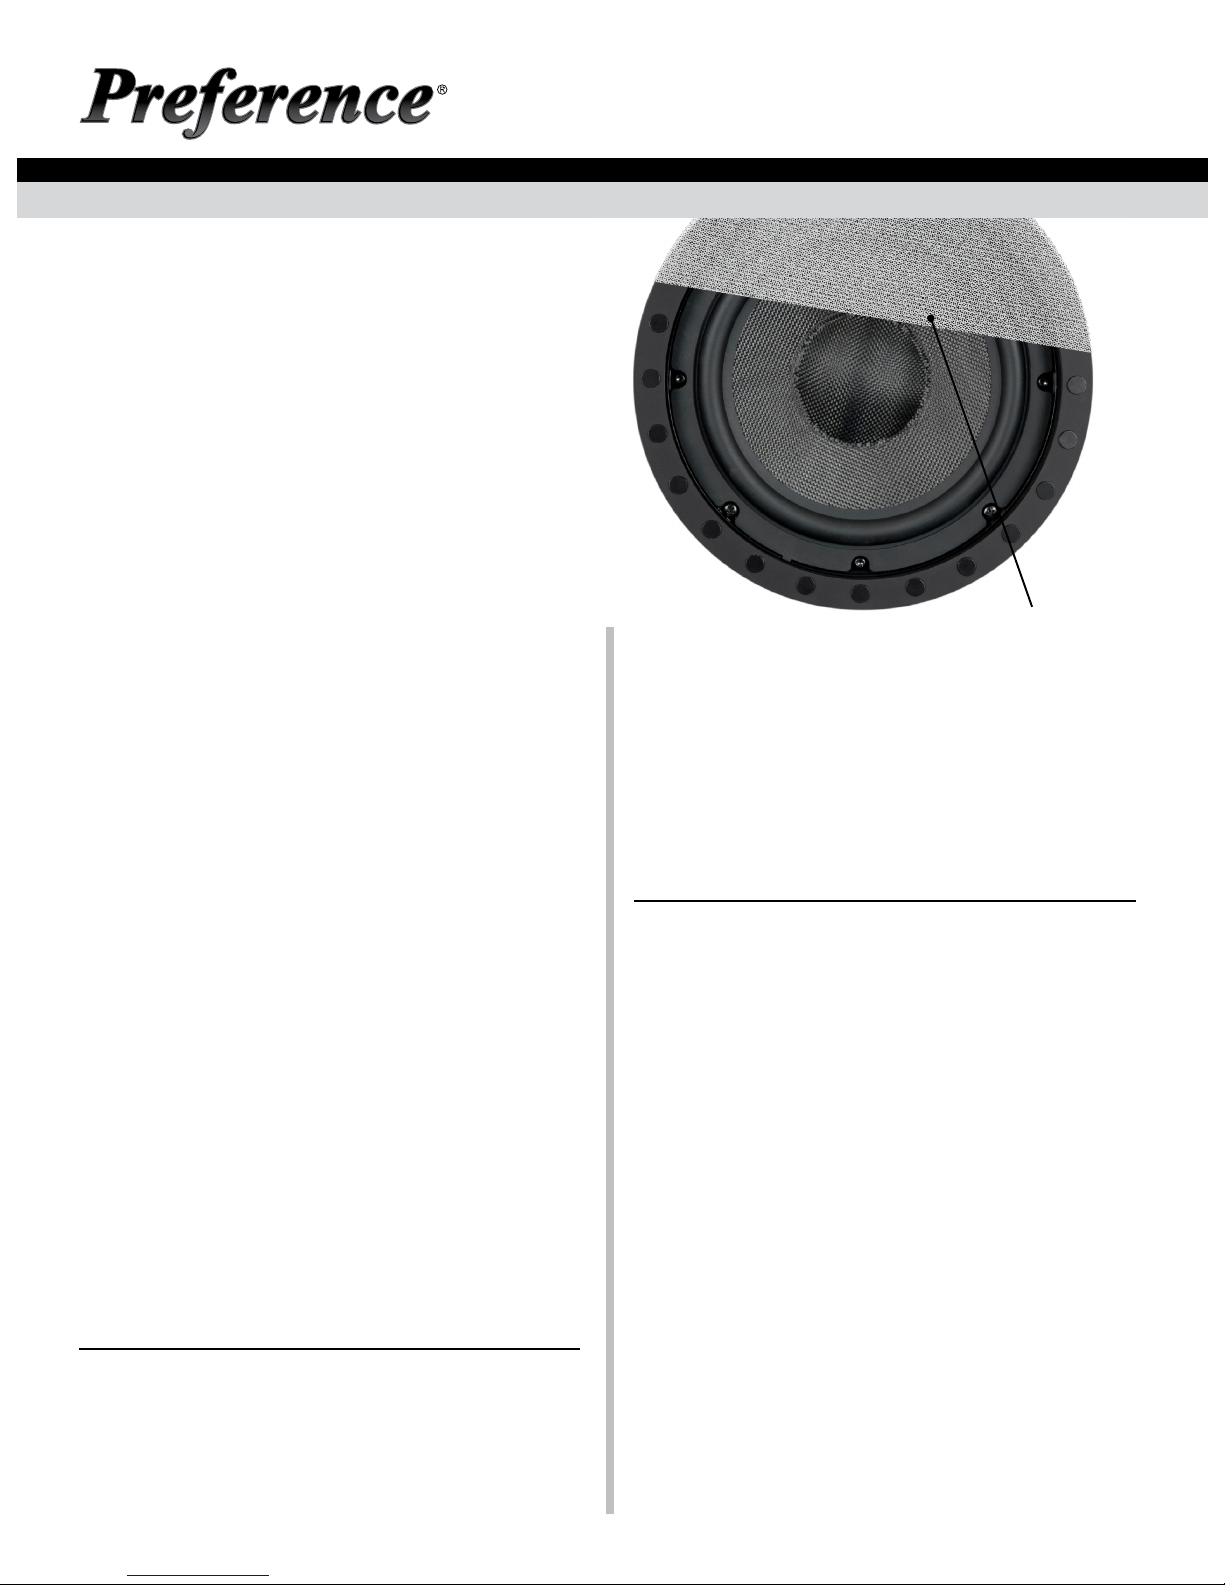
The K-8SWd subwoofer is a passive speaker that utilizes a speciallydesigned shallow cone made from a blend of woven Kevlar & Glass-ber.
It uses a linear long-throw motor to achieve high efciency and high
output in a compact design that ts in walls utilizing standard “2x4”
construction. The term “passive” means that it does not contain its own
amplier. It must be driven from a dedicated amplier or connected
in parallel with a primary listening speaker using a passive crossover,
(not supplied). The woofer is optimized for maximum output and low
frequency extension in our frameless mounting system. The K-8SWd is
designed to be used individually or in multiples depending on room size
and listening needs. For aesthetic compatibility, the subwoofer is shipped
with the same round and square micro-perforated grilles that are used on
our frameless in-wall/ceiling speakers.
GETTING STARTED
The remaining portion of this manual is split into two sections. The rst
section provides basic step-by-step installation instructions. The second
section provides an overview of some important elements of subwoofer
placement, connection, amplication, conguration, and painting. We
recommend that you familiarize yourself with both these sections before
you begin the installation.
If you will be painting your grilles then leave them in their plastic bags
until needed to protect them from dust and oil contamination.
INSTALLATION
MINIMUM TOOLS REQUIRED
#2 Phillips Head Screw Driver or Drill-Driver w/#2 Phillips bit
Wire Cutter / Stripper
Other Possible Tools
Tape Measure, Pencil, Ladder, Drywall Saw, Stud-Finder,
Flashlight, Tape, etc.
frameless grille
PROCEDURE
If pre-construction brackets were used, skip to step 5
1. Determine subwoofer location and check for obstructions
2. Mark and cut hole for subwoofer
3. Check speaker t
4. Run Wire
5. Prepare the cavity for the subwoofer
6. Prepare wire for connection and connect it to the sub
7. Insert subwoofer into hole and tighten toggles
8. Install grille, test and adjust system
K-8SWd
INSTALLATION GUIDE
For 8" K-8SWd In-Ceiling / Wall Subwoofer
1. If the subwoofer locations have not yet been established then do so now.
The SUBWOOFER TIPS & TECHNIQUES section of this manual provides
information useful for optimizing the placement.
Assess the ceiling or wall area for possible concealed obstructions such
as wiring, plumbing, heating ducts, etc. For the ceiling, this is best done
through an attic crawl space if available. Absence of a crawl space will
require greater study of observable clues and may possibly require the use
of inspection holes and inspection tools (camera, mirror, ashlight, etc.). Use
a “stud nder” to locate the positions of the joists or studs.
The cardboard speaker template can be used as a visual aid for aesthetically
optimizing the placement. Use a push-tack or tape to temporarily hold it
into place.
We recommend that the edge of the speaker holes be at least ¾" (19mm)
away from joists or studs where there is a seam in the sheetrock to ensure,
that the integrity of the sheetrock is maintained.
NOTE: Innite bafe subwoofers should not share the same internal wall
space as other innite bafe speakers. While it is ok for two subwoofers
to share the same cavity, other speakers should be isolated with blocking
or a large region of dense acoustic material. The same applies to conned
ceiling-spaces. The exception is large attic spaces where the volume of air is
large and there will be no cross-coupling between speakers.
It is also recommended that you avoid mounting subwoofers immediately
adjacent to in-ceiling lighting. This will help to reduce unwanted vibrations.
Page 2
2. Once the speaker locations are established, draw the speaker cut-out with
either the plastic compass that is provided or remove the outer ring from
the cardboard template and draw a circle around this inner cardboard disk.
Instructions for using the template are printed on the speaker template.
Note: The hole diameters for the various speakers are marked on the
compass. The K-8SWd has mounting dimensions of 8-5/8" (219mm)
diameter and 3-7/8" (98mm) depth.
Using the proper tool, cut the appropriate sized hole in the wall. On drywall,
clean cuts can be made with a drywall saw. Cut the hole to the inside of the
drawn circle.
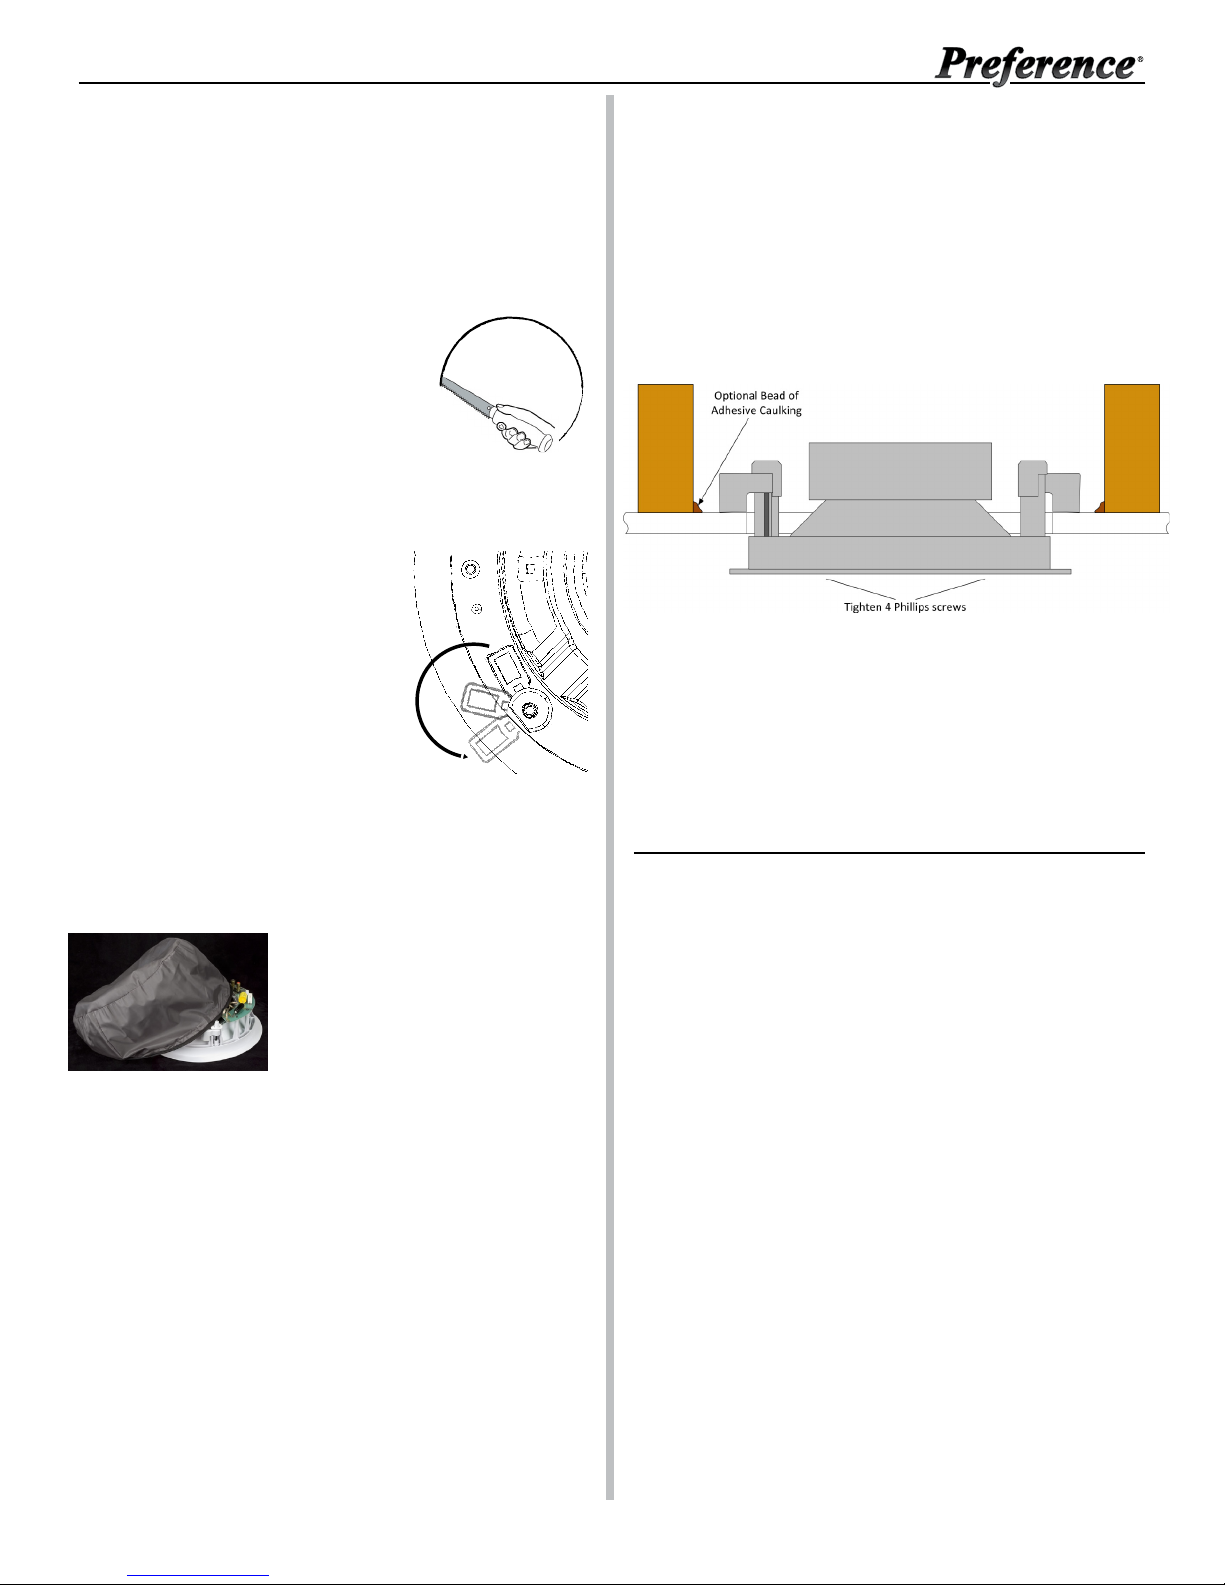
3. As the drawing below shows, the speakers utilize
Toggle Clamps which, after tightening, hold the
speakers in place. Ensure that the toggle clamps
are rotated into their “Home” position so they will
clear the edge of the cut-out. Note: The speakers
are shipped with the toggles in their Home position.
Verify that the subwoofer ts properly into the cut-out. If the hole should
have been cut a little too large the ange on the speaker should cover this.
Remove the speaker from the hole.
4. If the speaker cable has not yet been run, do so
now that you have access to the ceiling or wall's
interior. Note: It is outside the scope of this
manual to detail this portion of the installation.
5. To aid in speaker performance, a brous
material, such as berglass or other nonammable acoustic material, may be placed
behind the speaker. If the wall or ceiling space
has blown or loose insulation, it is important
to prevent the insulation from entering the back of the speaker. This can be
accomplished by placing a sufciently large batt of berglass insulation or
similar structured material behind the speaker. For in-ceiling installations
where blown insulation is present, a fabric barrier such as our Insu-Flate®
ISF-147 can be placed behind the speaker. The ISF-147 is an acoustically
transparent fabric cover specically designed to protect the back of the
speaker and prevent debris from interfering
with its proper operation.
For in-wall installations where the walls are
4" (100mm) deep, if insulation is present then
it will be necessary to clear all the insulation
from behind the subwoofer’s magnet.
Placing a rigid enclosure behind the speakers can be done but the enclosure
should be large enough not to degrade the performance of the speaker. Rigid
enclosures of less than 0.75 cuft (21 liters) should be stuffed with acoustic
insulation such as berglass.
Where building codes require a re-rated back box, please contact us or your
dealer for assistance in selecting a suitable enclosure.
One other preparation that can be done, but is not required, is to run a bead
of adhesive caulking at the interface of the drywall and the studs or joists on
either side of the subwoofer opening. For new construction, the drywall can
be bonded to the studs or joists at the time of construction. The adhesive
caulking helps to ensure the most robust installation for the best possible
bass.
6. Once the speaker cable has been run and the cavity prepared, pull the end
of the cable out of the speaker cut-out, strip back a section of the jacket as
needed, and then expose ½" (13mm) of each conductor.
INSTALLATION
SPEAKER PLACEMENT
Placement of in-ceiling or in-wall subwoofers should be carefully considered.
Ideally, they should be located where they will provide the best possible
sound and meet one’s aesthetic requirements. It is beyond the scope
of this publication to discuss all of the various aspects of subwoofer
placement. However, this section contains information to guide you in
making good choices. Please contact a professional for assistance if you are
uncomfortable with the planning or installation process.
The K-8SWd is optimized for use in small to mid-size home theaters and
distributed audio systems where the room size is approximately 3000 cubic
feet (85m^3) or less. In most cases we recommend two woofers for small
home theater systems and 4 woofers for larger and/or loud applications.
For distributed audio systems, a single woofer may be sufcient for smaller
rooms and where the volume will not be loud. For mid-size rooms 2 woofers
is a better option. For higher volume levels, 4 woofers should be used.
At the most fundamental level, the task of a subwoofer is to energize the
room with low frequency sound. It is most efcient at doing this when
located at a room’s corners, (where three surfaces meet). Therefore one
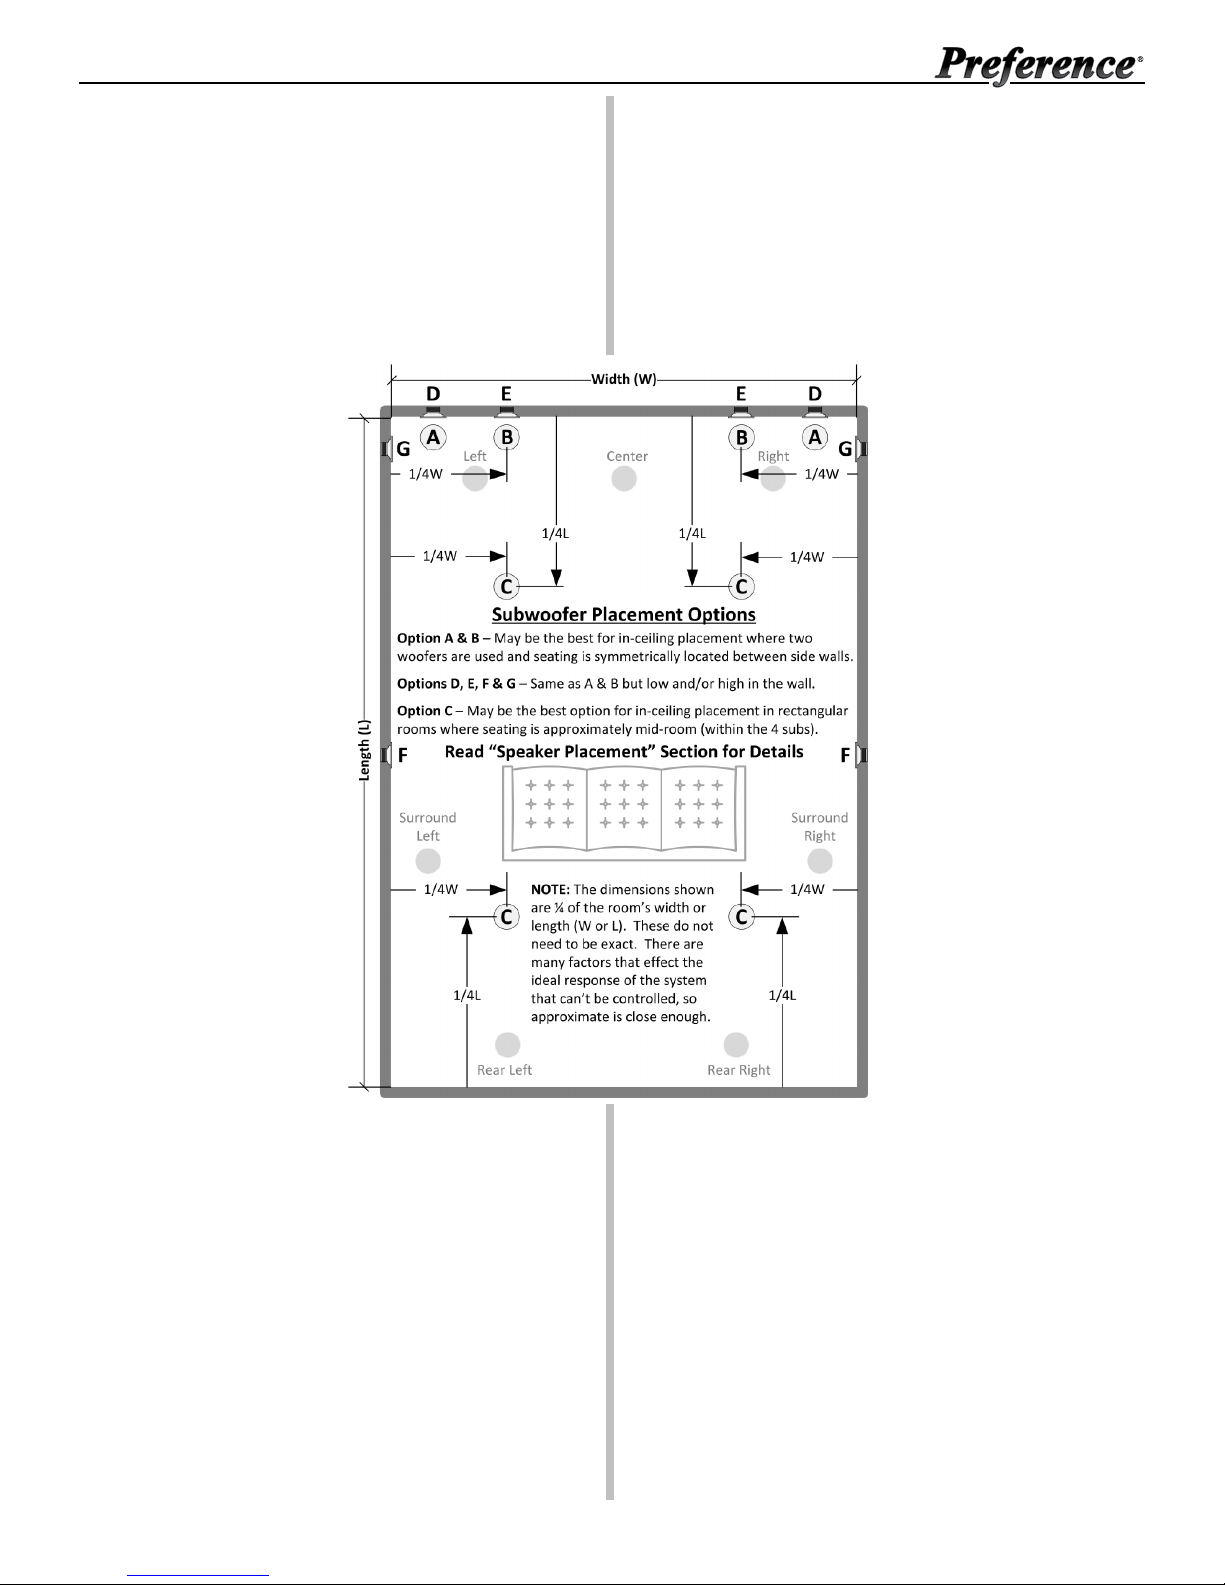
of the best places for subwoofers is within 36 inches of a corner. (Options
A, D & G) in the placement drawing. Avoid placing them immediately
adjacent to openings such as hallways and entries to other rooms. Also,
avoid placing them in a wall space or conned ceiling space that is shared
with another innite bafe speaker. It is ok if two subwoofers share the
same wall or conned ceiling space.
Another placement option is to install the subwoofers a distance of ¼ the
R
O
T
A
T
E
H
o
m
e
Connect the wire conductors to the terminals on the back of the subwoofer
by depressing each spring terminal, inserting the wire into the hole, and
releasing the terminal. Use care to observe the proper polarity (+ & -).
Speakers wired out of phase will exhibit an apparent loss of bass response.
The red terminal is positive (+) and black negative (–).
7. Insert the speaker into the hole and tighten the four toggle screws. As you
start to turn each screw the toggle clamps will rotate outward to engage
the ceiling or wall material as shown. CAUTION: DO NOT OVER-TIGHTEN
THE CLAMPS. Too much torque may damage the toggle, causing the
speaker not to seat securely. A snug t is all that is necessary to assure
proper performance. If using a drill with a clutch, the lowest clutch setting
that will turn the screw is usually enough torque.
8. Attach the grille of your choice and adjust the system controls to optimize
the bass performance.
Should you need to remove the grille, pull the grille forward at its edge. This
can usually be done with one’s ngers but using a thin tool at the edge can
aid in lifting the grille forward. Initially there will be signicant resistance
because the grilles are magnetically attached with numerous powerful
neodymium magnets.
ISF-147
SUBWOOFER TIPS & TECHNIQUES
Page 3
SUBWOOFER TIPS & TECHNIQUES
room width from the corners. (Options B, C, & E) This works well when there
are symmetrically parallel walls of similar composition to the left and right
of the subwoofers. The placement of the subwoofers can be in the ceiling
or the walls. Though the subwoofers will be less efcient at transferring
energy to the room at these locations (compared to corners), the bass will
likely be more uniform at different listening positions across the width of the
room. This arrangement is likely the best option when Auto Room Calibration
systems are not employed.
If the listening room is rectangular in shape, then four woofers can be
arranged in a central rectangular pattern in the ceiling. (Option C) Of the
suggested locations, this location is the least efcient at transferring energy
to the room. However, the advantage
is that it can help to provide more
uniformity in the bass reproduction
within the boundaries of the subwoofers.
This option is likely best for mid-room
seating where there are multiple rows
and where Auto Room Calibration
systems are not employed.
Option F is also a consideration because
the woofers are close to the seating
area, but it lacks the advantages of
corner loading and ¼ wavelength
spacing.
A few more notes on placement:
Mirroring the placement of Options A,
B D, E, & G at the back of the room is a
way to increase the system output. It
is also reasonable to place subwoofers
behind furniture. The effect on the
output should be small as long as there
is sufcient space (>1in, 25mm) to allow
the subwoofer to radiate its energy and
the furniture is not so large as to trap the
energy. With that said, a china cabinet is
probably not the best piece of furniture
to place in front of a subwoofer.
Finally, if the application is a modern
home theater, then run the Auto Room
Calibration system on your AV receiver.
See the EQUALIZATION section on
this page.
PASSIVE CONNECTION
These subwoofers should ideally be driven by a dedicated amplier but
they have enough sensitivity (efciency) to be used passively in a “passive
sub-sat” arrangement when a passive crossover is employed. The term
passive means that the subwoofer is connected in parallel with the main
set of listening speakers, (referred to as satellites), hence the term “passive
sub-sat.” In a “passive sub-sat” arrangement two subwoofers are required,
(one for each audio channel). Optimizing a passive sub-sat system requires
greater skill and knowledge than an active system and it is recommended
that a qualied expert be employed for this type of application.
In an active sub-sat system (not passive) the subwoofer is driven by a
separate amplier, independent of the amplier that drives the main satellite
speakers. Home theater receivers almost always utilize an active sub-sat
conguration.
AMPLIFICATION
Depending on the system requirements, the K-8SWd subwoofer will perform
well with ampliers rated from 50 to 150 Watts RMS at 4 ohms. (Note: The
K-8SWd is a 4 ohm subwoofer, the power rating of the amplier should be
considered at 4 ohms and not at 8 ohms unless the subs are connected
in series.) Though the subwoofer is rated for 150W, please be aware
that damage can be done by ampliers of even moderate power if the
subwoofer and/or amplier are continuously overdriven for long periods of
time. If you should hear distortion at high listening levels then the volume
should be reduced.
For most installations it is recommended that a dedicated subwoofer
amplier (such as our Model 500) be used to drive the subwoofer(s). The
K-8SWd subwoofers can also be driven by an ordinary stereo amplier.
However, conventional stereo ampliers almost always lack subsonic
lters* that are incorporated within
dedicated subwoofer ampliers
(like the Model 500). When using a
conventional stereo amplier greater
care must be exercised to ensure
the woofers are not overdriven with
subsonic program material.
*Subsonic lters are used to
reduce the excursion of the woofer
below frequencies which the
woofer can effectively operate and
that would overdrive the woofer at
high listening levels.
Since the K-8SWd was designed to
operate down to 30Hz, a subsonic
lter should be applied around 35Hz to
ensure the best possible performance
and highest output capability. If your
amplier lacks a subsonic lter then
in many cases a passive lter can be
added at the input. Please contact
us or your dealer for information on
suitable lters.
EQUALIZATION
It is common now for home theater
receivers to include digital signal
processing that performs Automatic
Room Calibration. These systems
perform a number of different
measurements and adjustments,
including equalization. Within a limited
seating area, these can be very effective
at improving the overall system
performance and the quality of the bass. However, not all algorithms work
well and in some cases their success depends of the expertise of the person
setting up the system and their ability to recongure the settings. If you
utilize the Auto Room Calibration system on your receiver and you discover
that it sounds worse afterwards, then we recommend that you restore the
factory default settings and consult an expert to work out the issues.
Note: Equalization can not be used to correct every location in the room
simultaneously. If you optimize the bass for the middle or any other
location in the room then it will not be accurate at many other locations.
That is the nature of the environment.
CROSSOVER
Since this is a subwoofer, it has a limited range of frequencies which it
designed to reproduce. The function of the crossover is to direct the various
frequencies to their proper destinations. Frequencies that are suitable
for the subwoofer are directed to the sub and other higher frequencies
are directed to the main speakers (satellites). If this subwoofer is part of a
Page 4
SUBWOOFER TIPS & TECHNIQUES
home theater and driven actively with a separate amplier then the crossover function
will be handled by the AV receiver. For most installations, whether the K-8SWd is
part of a distributed audio system or a home theater, we recommend a crossover
frequency of 80Hz ±20Hz.
WIRING
To achieve maximum performance from your new subwoofer(s) we strongly suggest the use
of good quality CL-2 or CL-3 rated audio cable. We recommend that the cable be at least 16
gauge or larger for runs of over 50 feet (15m) and that the cable meet your local codes and
regulations. Allow about 2½ feet (0.8m) of free cable at the speaker cut-out and sufcient
length at the other end to reach the electronics. Having to add extra cable later can be
tedious and time consuming.
Avoid bundling speaker cables parallel to electrical cables for extended lengths. Though
the impedance is low and the likelihood of interference low, this may help reduce hum
and RF interference. When securing the cable, use care not to staple or nail the electrical
conductors. Doing so could result in a short that might damage the electronics.
When connecting your speakers, make sure proper polarity (phasing) is maintained. Simply
put, this means being sure the same wire which is hooked to the positive terminal of the
amplier has its other end hooked to the positive terminal of the speaker. It is important to
check this on all speakers. If the connections on one of the speakers are reversed, (out of
phase) the quality of the bass will be impaired.
If you have multiple subwoofers we recommend that each one be wired with its
own dedicated speaker cable. This ensures the greatest exibility for connection
and amplication.
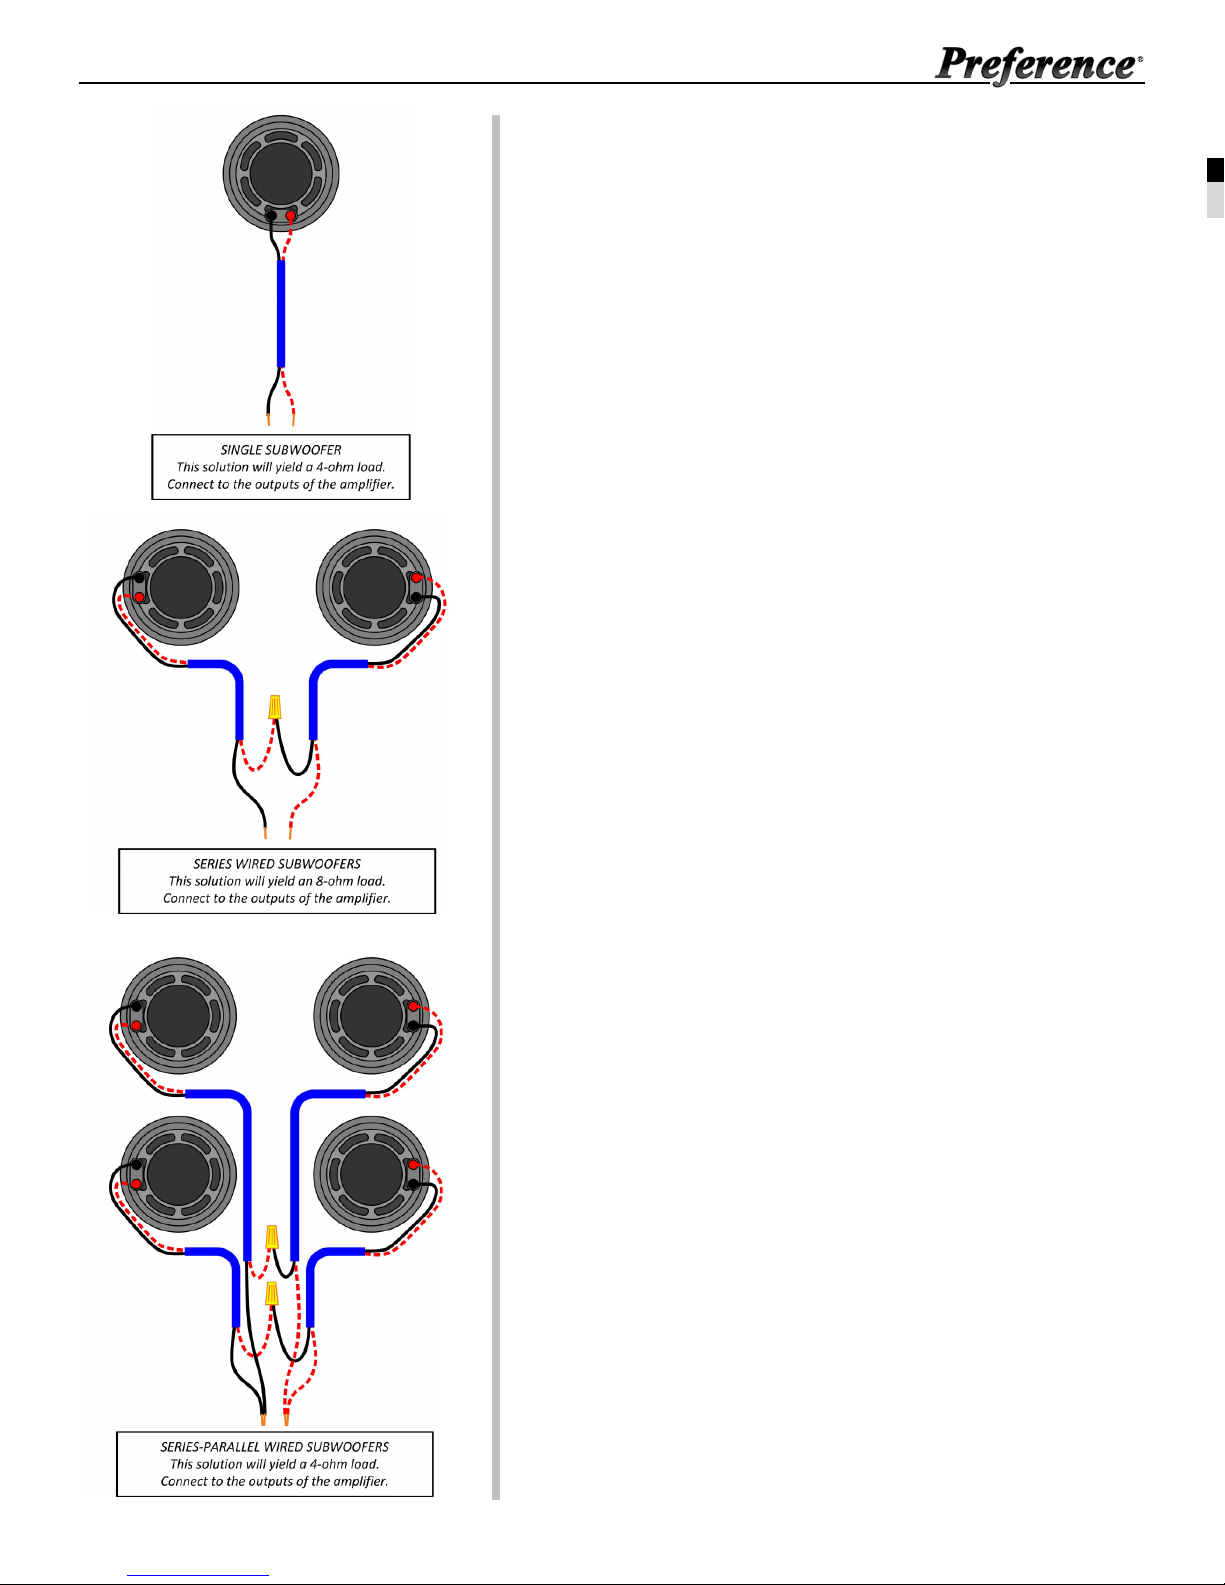
Multiple woofers can be wired in series, parallel, or series/parallel congurations. Please
refer to the illustrations showing the various wiring congurations on this page.
PAINTING THE GRILLES
If you will be painting your grilles then leave them in their plastic bags until needed to protect
them from dust and oil contamination.
The grilles can be painted using multiple light coats of spray paint. Do not paint the
grilles with a brush or roller. Custom color spray paints are available in different sheens
to match most surfaces. Contact us or your dealer for information. Certain types of paint
will require thinning to avoid clogging the grille’s perforations. It is not necessary or
recommended to remove the scrim cloth from the back of the grille prior to painting.
It can’t be reapplied once removed.
Follow the directions that are supplied with your paint. In addition to the paint
supplier’s instructions we suggest the following techniques be employed to ensure the
best possible nish.
»» Ensure the work area is protected from overspray and that it is clean and clear of
dust before beginning. A light mist of paint can be applied to the protected work
surface and allowed to dry before painting the grilles. This can help to keep loose dust
particles from becoming airborne while painting.
»» Apply the paint to the front and edges of the grilles from several directions by either
turning the grilles or moving around the grilles while painting. This will provide more
uniform coverage.
»» Begin spraying to one side of the grille and then move the steady spray over the grille
as you work your way around it. This helps to ensure that you have a steady smooth
spray that is free from large spatter that sometimes occurs when the spray is rst
initiated. Stop the spray in the same way, by moving the spray away from the grille.
»» Use a few light coats and allow sufcient time for the paint to dry before handling.
preference-audio.com
[email protected]
 Loading...