

Page 1
www.predia.nl
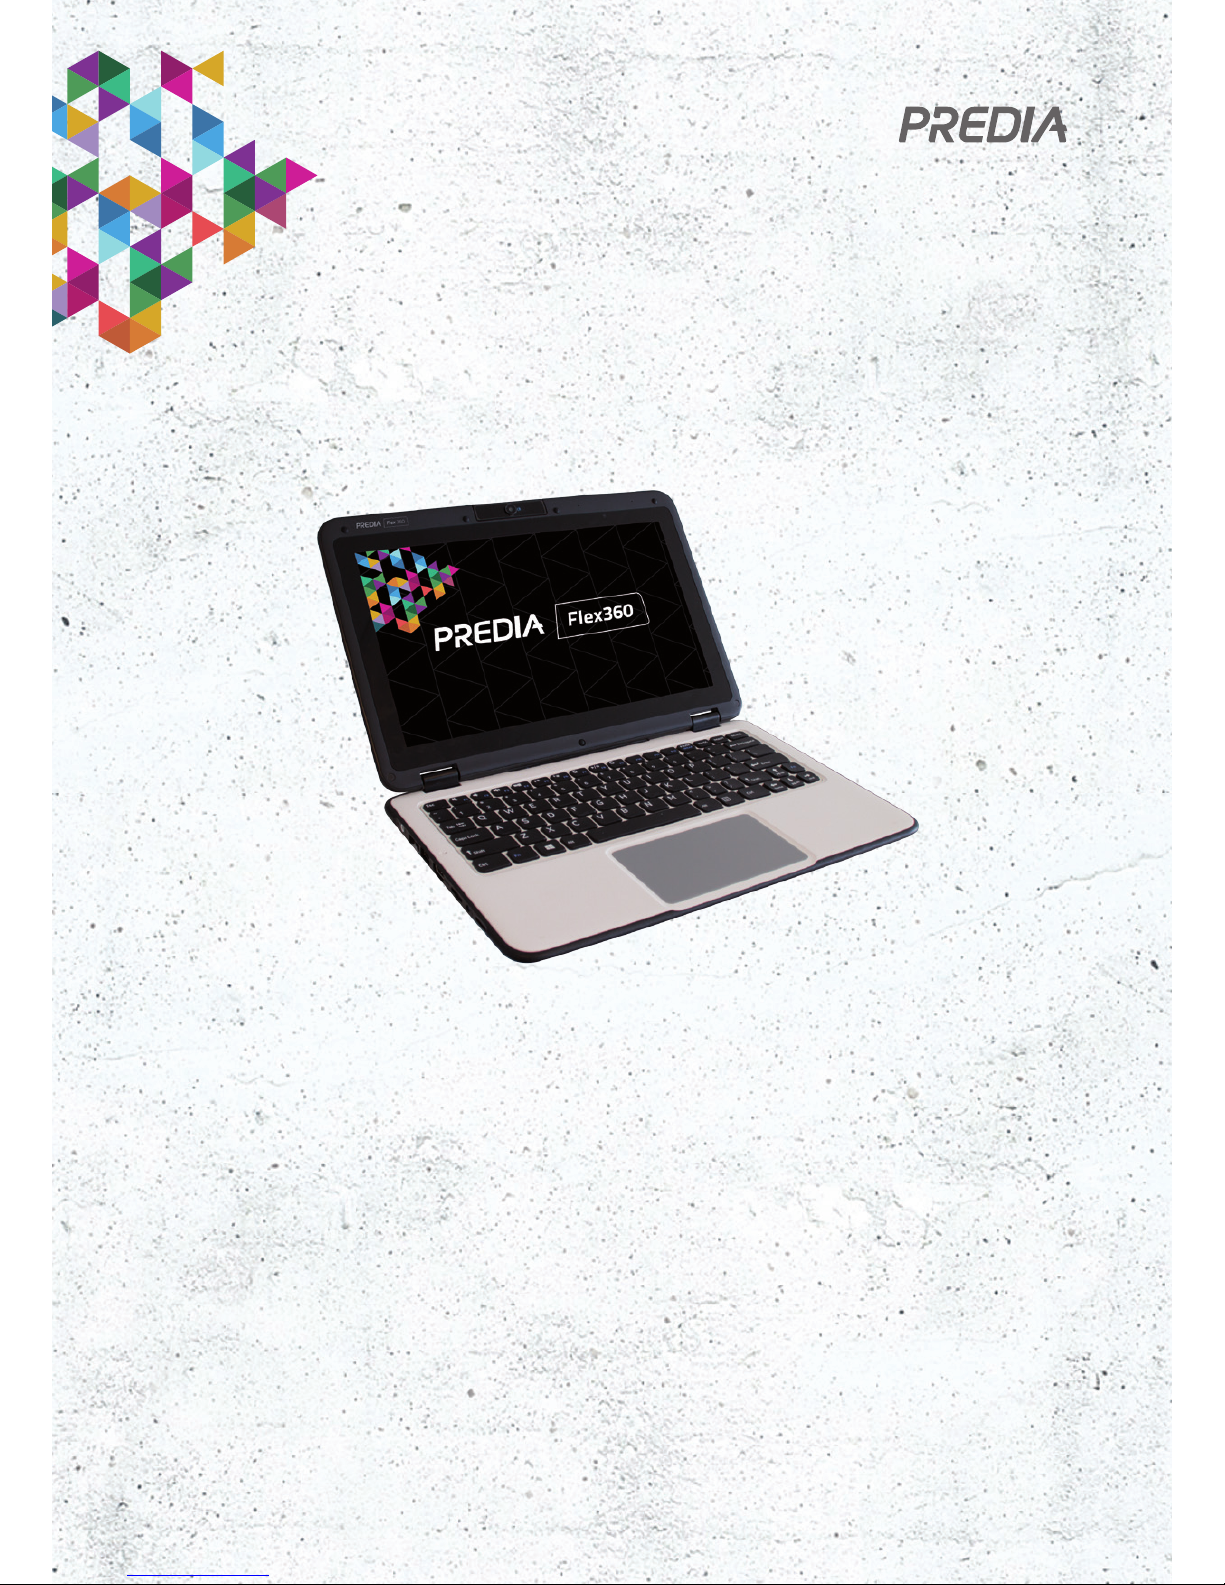
Predia Flex360
User Guide
Page 2

User Guide Predia Flex360
2
FCC Declaration of Conformity
This device complies with Part 15 of the FCC Rules. Operation is subject to the following two
conditions: (1) this device may not cause harmful interference, and (2) this device must accept any
interference received, including interference that may cause undesired operation.
This equipment has been tested and found to comply with the limits for a Class B digital device,
pursuant to part 15 of the FCC Rules. These limits are designed to provide reasonable protection
against harmful interference in a residential installation. This equipment generates, uses and
can radiate radio frequency energy and, if not installed and used in accordance with the instructions, may cause harmful interference to radio communications. However, there is no guarantee
that interference will not occur in a particular installation. If this equipment does cause harmful
interference to radio or television reception, which can be determined by turning the equipment
off and on, the user is encouraged to try to correct the interference by one or more of the following
measures:
• Reorient or relocate the receiving antenna.
• Increase the separation between the equipment and receiver.
• Connect the equipment into an outlet on a circuit different from that to which the receiver is
connected.
• Consult the dealer or an experienced radio/TV technician for help.
For questions related to the EMC performance of this product, contact:
Elitegroup Computer Systems Co., Ltd
No.239, Sec. 2, Ti Ding Blvd., Taipei, Taiwan 11493
886-2162-1177
Regulatory Compliance
Information
Page 3

User Guide Predia Flex360
3
Canadian Department of Communications Compliance Statement
This digital apparatus does not exceed the Class B limits for radio noise emissions from digital
apparatus set out in the Radio Interference Regulations of the Canadian Department of Communications. This device complies with Industry Canada licence-exempt RSS standard(s). Operation
is subject to the following two conditions: (1) this device may not cause interference, and (2) this
device must accept any interference, including interference that may cause undesired operation of
the device.
Le présent appareil numerique német pas de bruits radio électriques dépassant les limites
applicables aux appareils numériques de la classe B prescrites dans le Réglement sur le broullage
radioélectrique édicté par le ministére des Communications du Canada. Le présent appareil est
conforme aux CNR d’Industrie Canada applicables aux appareils radio exempts de licence.
L’exploitation est autorisée aux deux conditions suivantes : (1) l’appareil ne doit pas produire de
brouillage, et (2) l’utilisateur de l’appareil doit accepter tout brouillage radioélectrique subi, même
si le brouillage est susceptible d’en compromettre le fonctionnement.
CE Mark. Declaring compliance to all the applicable European Union (EU) directives.
For CE mark related questions:
Elitegroup Computer Systems Co., Ltd
No.239, Sec. 2, Ti Ding Blvd., Taipei, Taiwan 11493
886-2162-1177
Page 4
User Guide Predia Flex360
4
French SAR/DAS
Votre ordinateur a un DAS. Pour plus d’informations, voir le portail radiofréquences-santeenvironnement: www.radiofrequences.gouv.fr
In the European Union, this symbol indicates that this product including battery must
not be disposed of with household waste. It is your responsibility to hand it over to a
designated collection point for the recycling of waste electrical and electronic equipment.
For more information, please contact your local waste collection center or the point of
purchase of this product.
Japan VCCI Statement
Taiwan battery recycling:
Translation - please recycle batteries
Page 5
User Guide Predia Flex360
5
Attention: Teachers, Parents and Adult Supervisors
This product is an educational tool designed for school children, ages 6 and up. There must be
supervision by an adult on school children under 10 when using this laptop. It is a must to have a
thorough explanation to students on safe and proper handling of the laptop, power supply, battery
pack, and power cord.
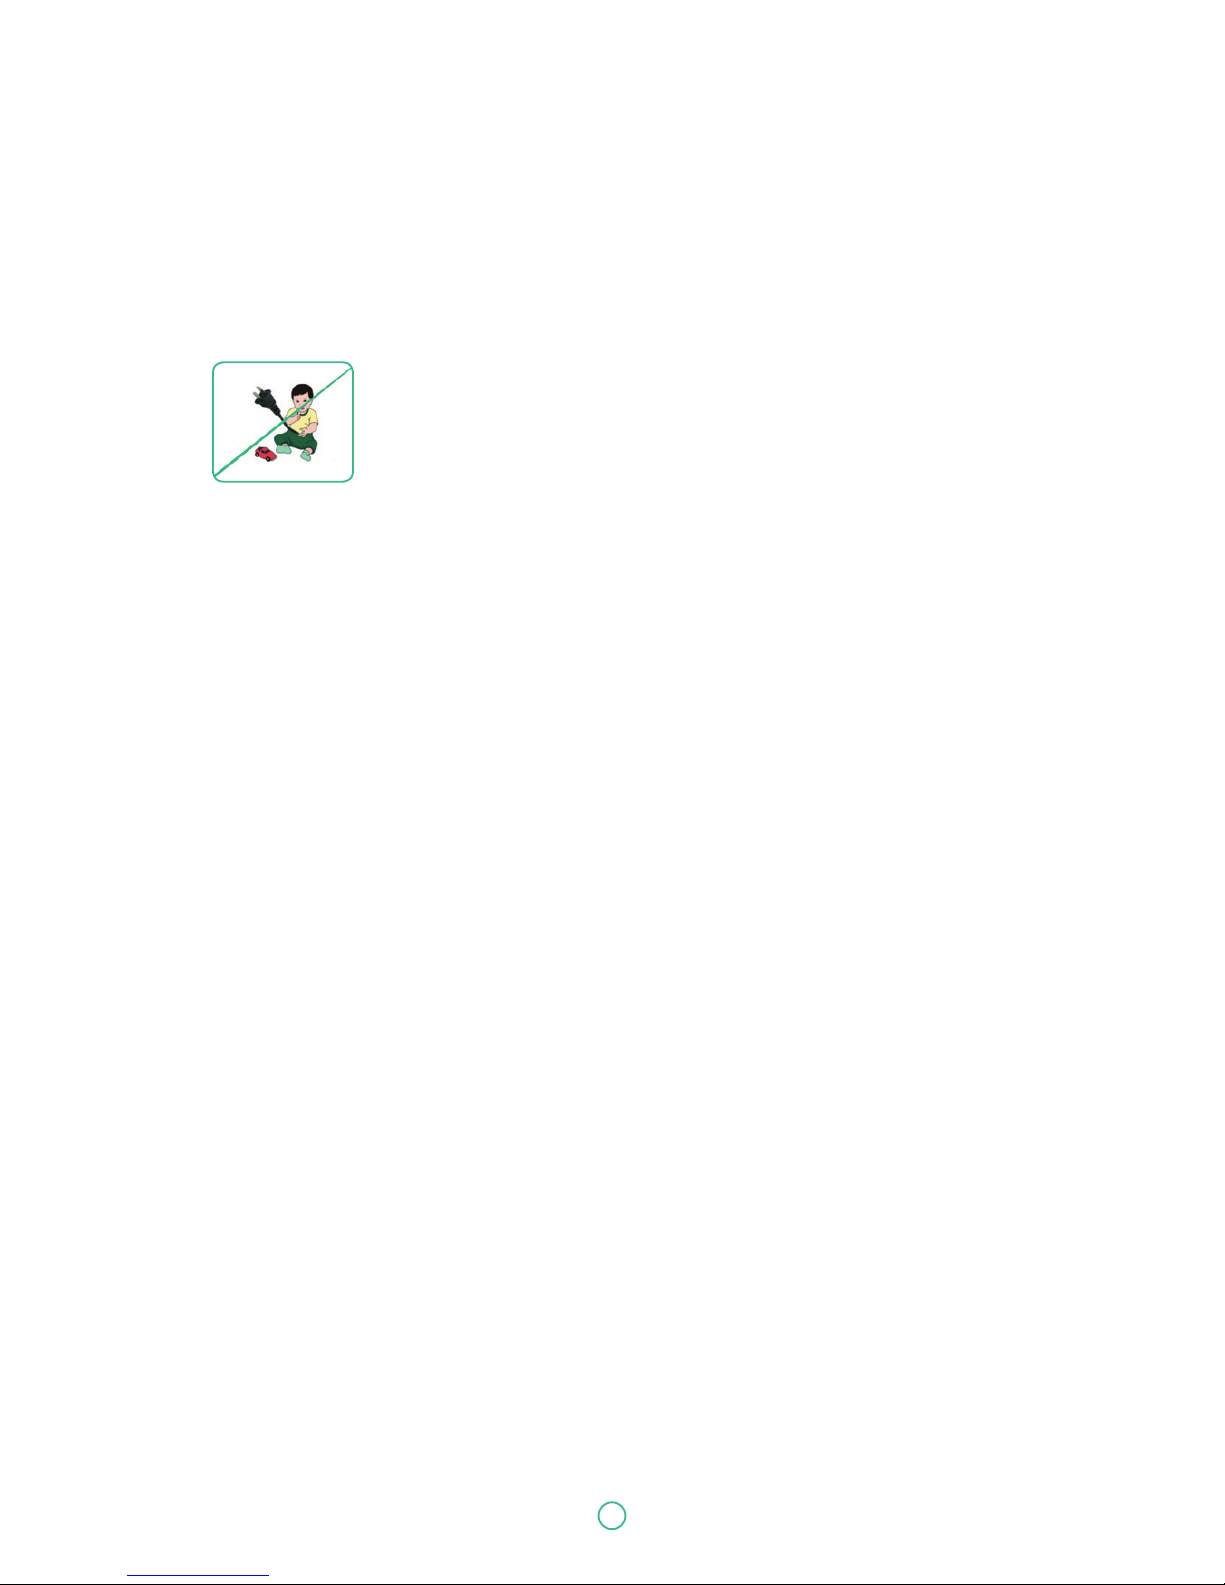
Be sure to keep the power cord away from
younger children
Please ensure that students understand the following:
As with all electrical products, precautions should be observed during handling and use to prevent
electric shock. The power supply (adapter) should not be handled by the children.
Emphasize to students that this device is an educational tool and not a toy. The computer, power
supply, battery pack or power cord should not be dropped, crushed, stepped on or otherwise abused.
Ensure students understand the safe and proper handling of power cord and power supply.
Misuse could result in serious injury.
The teacher, parent or adult supervisor should periodically inspect the computer; power supply and
power cord for damage and replace it, if necessary.
Students should report any damage or loose parts to their teacher, parent or adult supervisor,
immediately.
Do not leave the PC plugged in or "on"when enclosed in a non-vented container, such as a school
backpack, as overheating may occur.
It is recommended that students should take a 5 minute break every 30 minutes of use.
Page 6
User Guide Predia Flex360
6
Attention: Teachers, Parents and Adult Supervisors
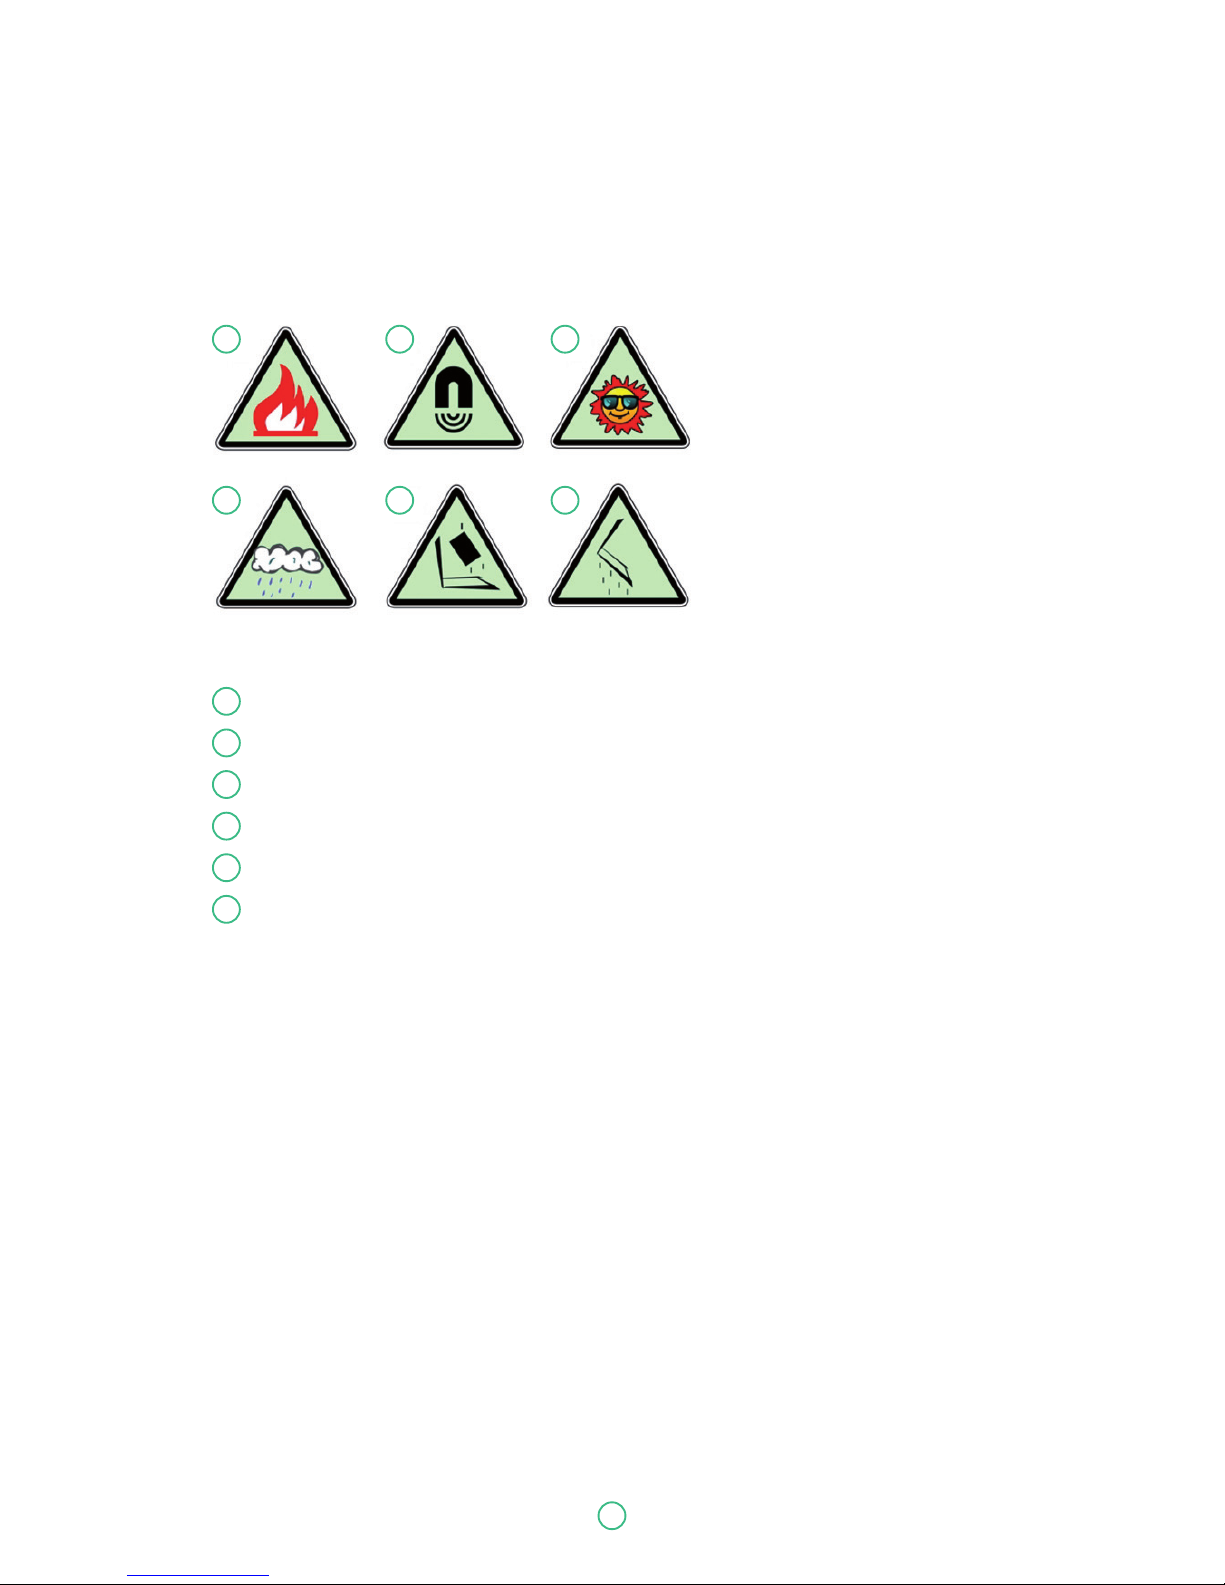
The following are lists of precautionary measures the students must understand before using this
computer inside the classroom or home environment:
Do not place near the fire or other sources of heat.
Do not expose to magnetic fields.
Do not expose to direct sunlight.
Do not expose to rain or moisture.
Do not place heavy objects to add heavy pressure on the computer.
Do not drop the computer.
Caution
Risk of explosion if battery is replaced by an incorrect type. Dispose of used batteries according to
the instruction.
Attention
Risque d’explosion si la batterie est remplacée par un type incorrect. Recyclez les batteries usagées selon les instructions.
It is recommended to use this computer in an environment where the ambient temperature is no
more than 35° C.
1
1
2
2
3
3
4
4
5
5
6
6
Page 7

User Guide Predia Flex360
7
1. Getting to know your computer .................................................................................................... 9
Package contents ................................................................................................................................................................................................................................ 9
Layout ........................................................................................................................................................................................................................................................... 10
Views .............................................................................................................................................................................................................................................................. 10
Function keys .........................................................................................................................................................................................................................................13
Folding the keyboard .................................................................................................................................................................................................................. 14
2. Using your computer ..................................................................................................................................................... 15
Powering ON/OFF .......................................................................................................................................................................................................................... 15
Powering on your computer ............................................................................................................................................................................................... 15
Powering on for the first time ......................................................................................................................................................................................... 15
Powering off your computer .............................................................................................................................................................................................. 16
Putting your computer into sleep mode .............................................................................................................................................................. 16
Waking up your computer .................................................................................................................................................................................................... 17
Basic touchpad operations .................................................................................................................................................................................................. 17
Basic touchscreen operations .......................................................................................................................................................................................... 18
3.Windows Interface .................................................................................................................................................................. 19
Desktop and virtual desktop experience ............................................................................................................................................................. 19
Taskbar ........................................................................................................................................................................................................................................................ 20
Start menu .............................................................................................................................................................................................................................................. 20
Search box - Cortana ................................................................................................................................................................................................................... 21
App shortcuts area ........................................................................................................................................................................................................................ 22
Notification area ............................................................................................................................................................................................................................... 22
4. Setup and Connection ................................................................................................................................................. 23
Settings screen ................................................................................................................................................................................................................................... 23
Windows Activation ...................................................................................................................................................................................................................... 23
Setup Your Microsoft Account .......................................................................................................................................................................................... 24
Replacing Desktop with Start screen ....................................................................................................................................................................... 24
Pin and unpin your app ............................................................................................................................................................................................................. 25
Pinning an App to Start menu or taskbar ........................................................................................................................................................... 25
Removing an App ............................................................................................................................................................................................................................. 25
Wireless LAN ......................................................................................................................................................................................................................................... 25
Enabling wireless connection ............................................................................................................................................................................................ 25
Connecting to a wireless LAN ............................................................................................................................................................................................ 26
Micro SD Card Slot ........................................................................................................................................................................................................................... 26
To insert your micro SD card ............................................................................................................................................................................................... 26
Contents
Page 8

User Guide Predia Flex360
8
To remove your memory card ........................................................................................................................................................................................... 26
Connecting an External Device ......................................................................................................................................................................................... 27
Connecting to the USB port ................................................................................................................................................................................................. 27
Connecting to the HDMI port ............................................................................................................................................................................................. 27
5. Battery ............................................................................................................................................................................................................................. 28
Charging your battery ................................................................................................................................................................................................................. 28
Inspecting your battery status ......................................................................................................................................................................................... 29
6. Windows Help and Troubleshooting ........................................................................ 29
Troubleshooting ................................................................................................................................................................................................................................. 30
7. Specification ................................................................................................................................................................................................ 33
Page 9
User Guide Predia Flex360
9
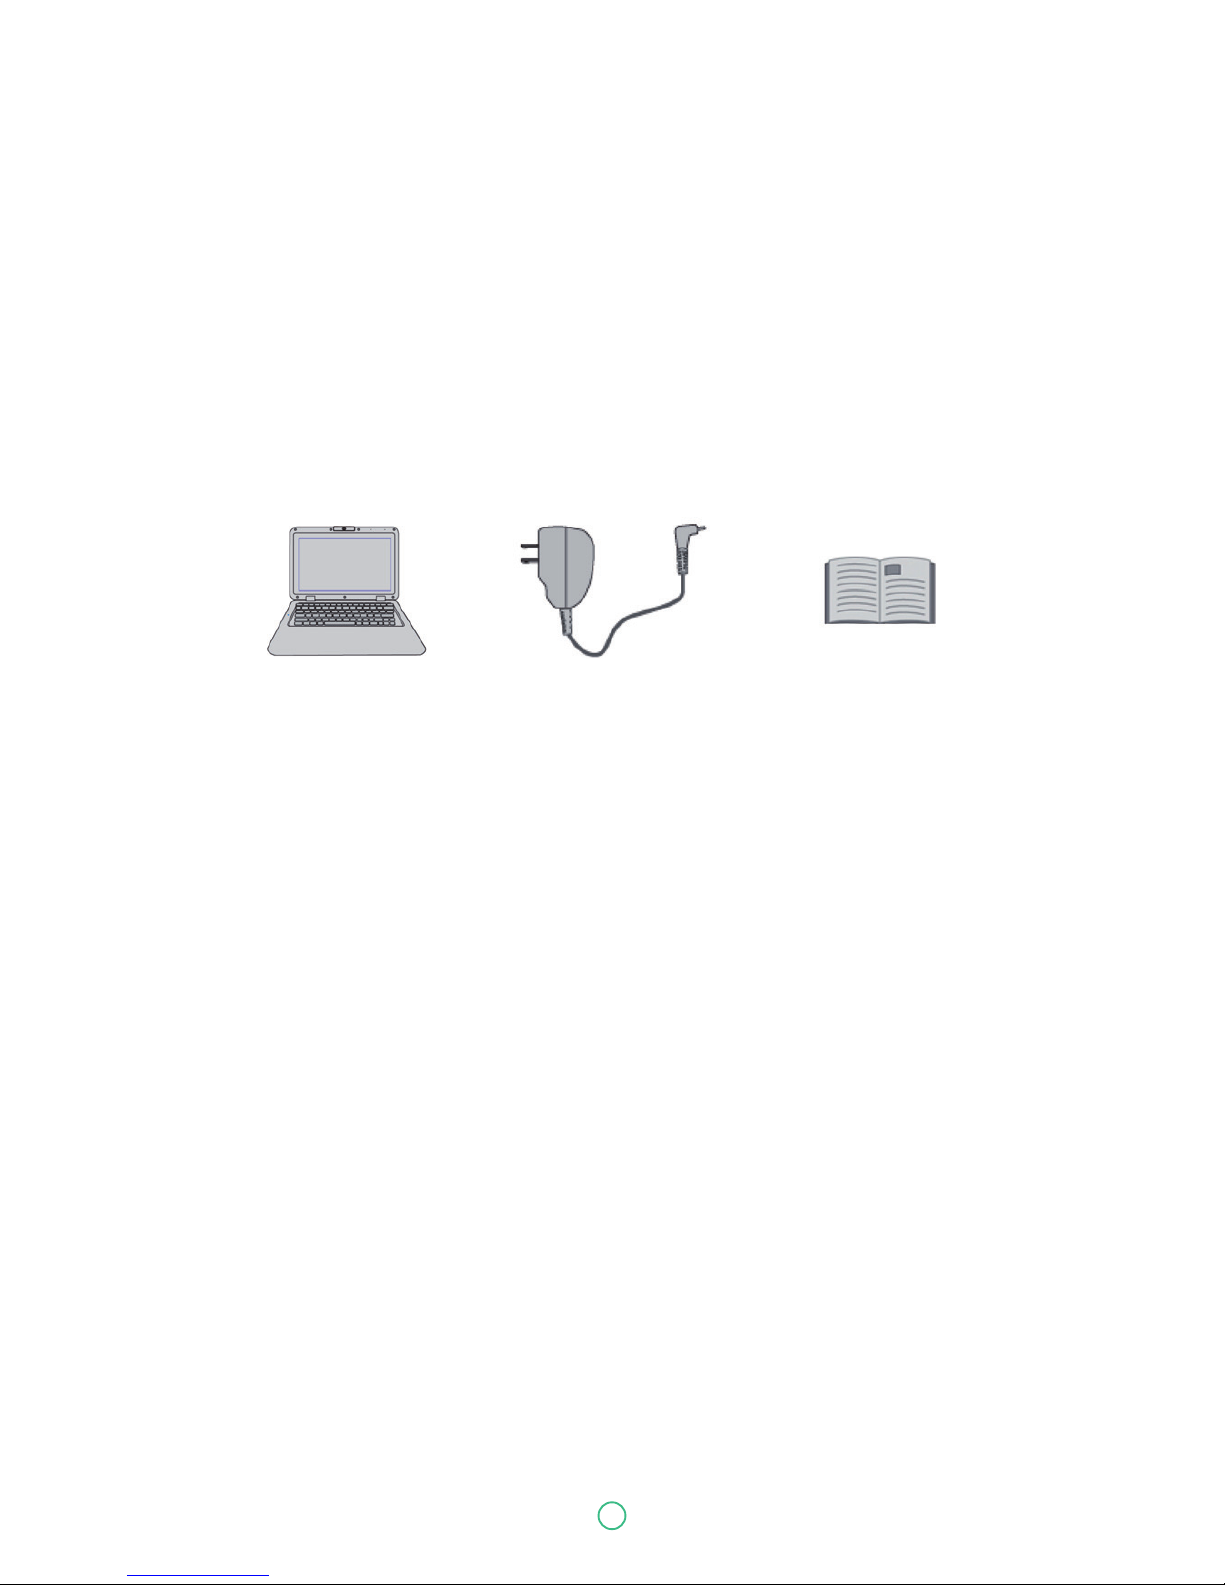
Package contents
Carefully unpack your box and take out the items listed below. If any of the items are missing or
damaged, please contact your dealer immediately:
1. Getting to know
your computer
One laptop One AC adapter This manual
Page 10
4
User Guide Predia Flex360
10
Layout
Views
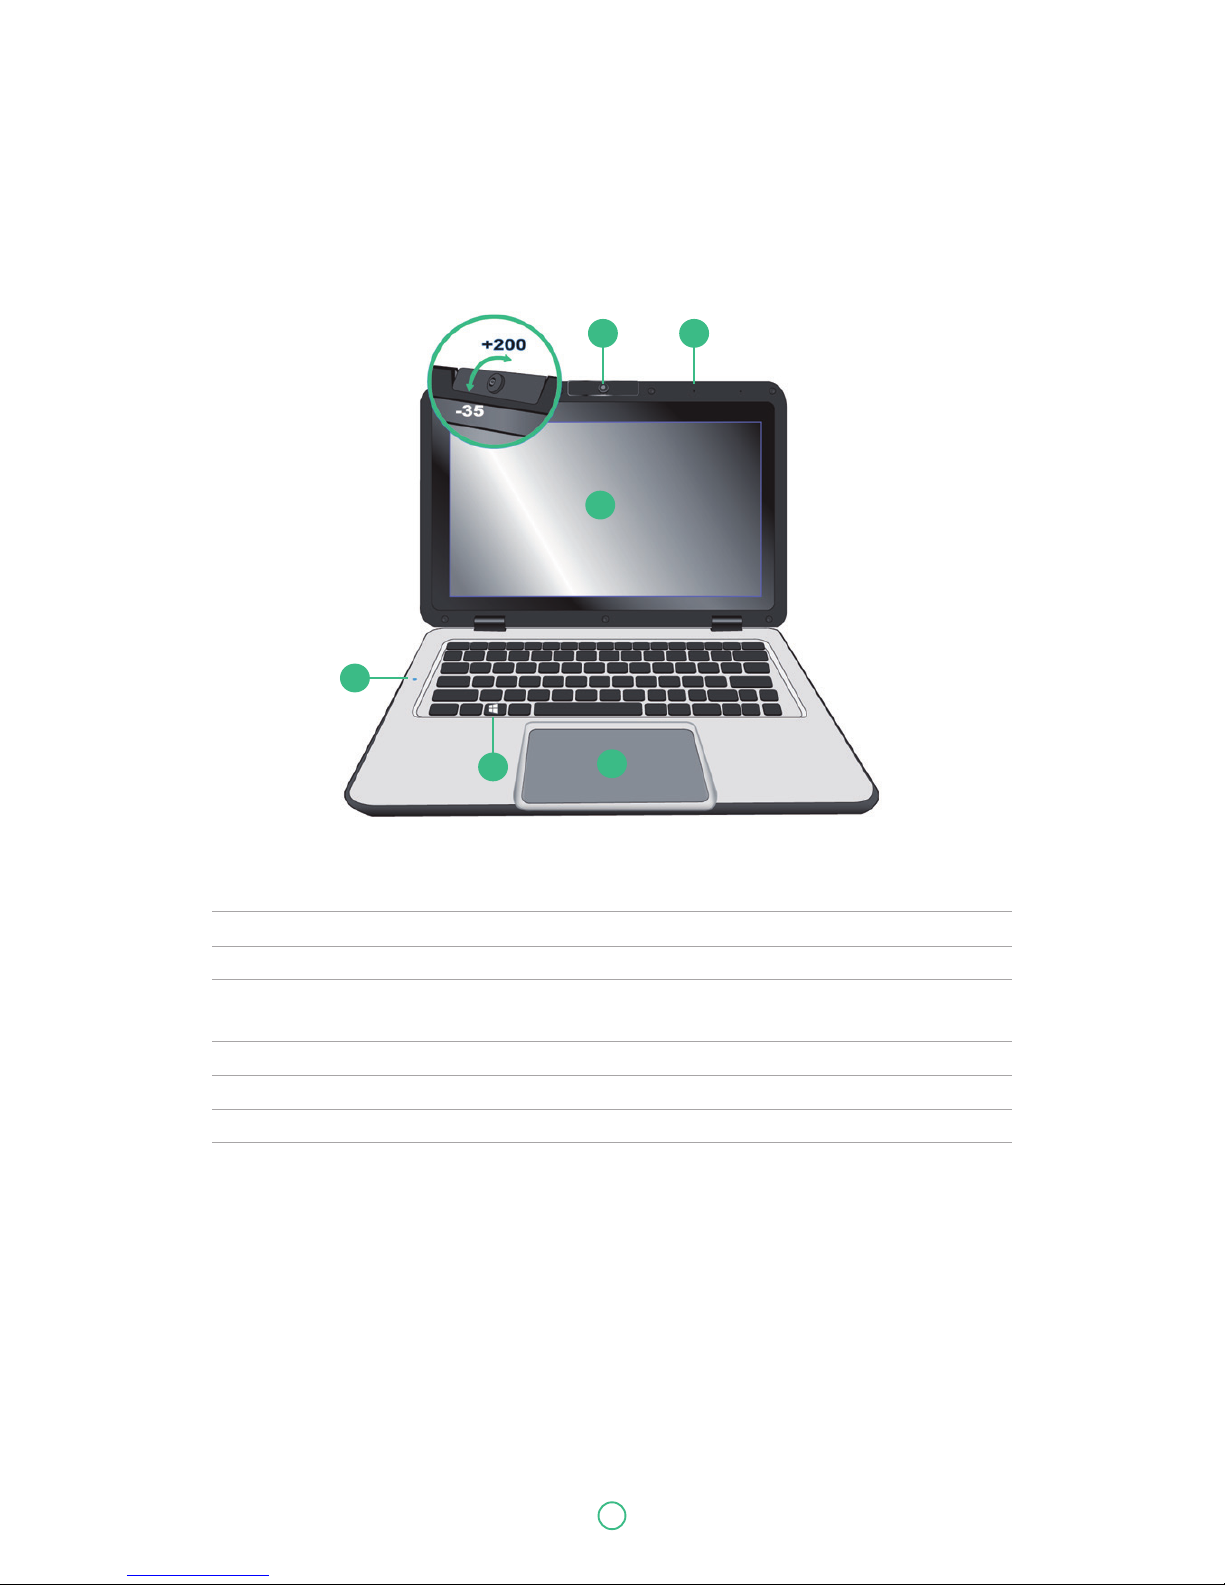
Front
No. Name Function
1 Front facing camera Often for taking self-portraits as well as for video conferencing.
2 Microphone Mainly for sound and speech recording
3 Touchscreen The main display of your laptop and a see-touch device. You can
look at it and also touch it with your fingers to control it.
4 Windows key Press here to open the Start menu.
5 Touchpad Allows you to control your system using figure gestures
6 Caps-Lock Lights up in blue when the caps lock is ON
1 2
3
5
6
Page 11
User Guide Predia Flex360
11
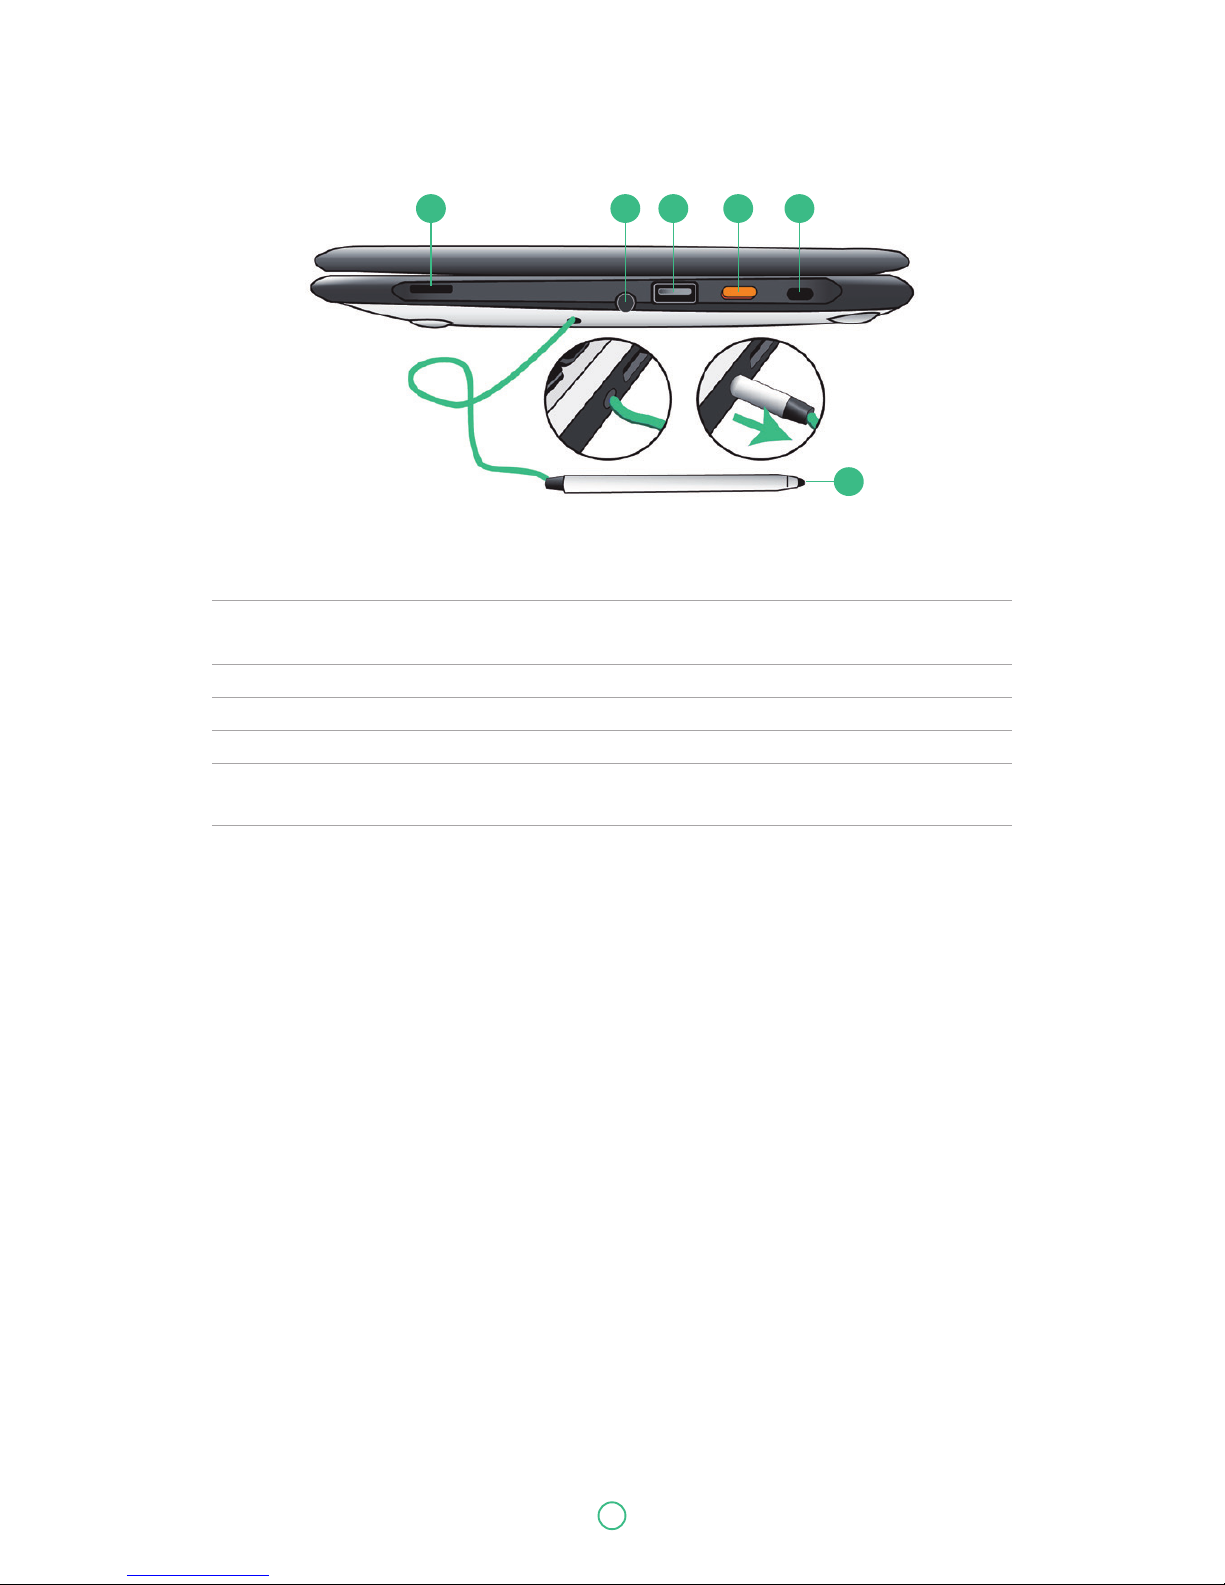
No. Name Function
1 Speaker The sound system has two speakers for playing music, notification
sounds, and other audio data.
2 Stylus hole This is where you rest the provided stylus.
3 USB 2.0 port Plug your USB devices here.
4 Power button Press it to power on/off your laptop.
5 Kensington lock slot You can attach a Kensington lock here to attach a cable from your
laptop to a stationary object such as table.
6 Stylus Use it to perform touch operations and typing comfortably as if
you were doing them with your own fingers.
Right
1 2 3 4 5
6
Page 12
User Guide Predia Flex360
12
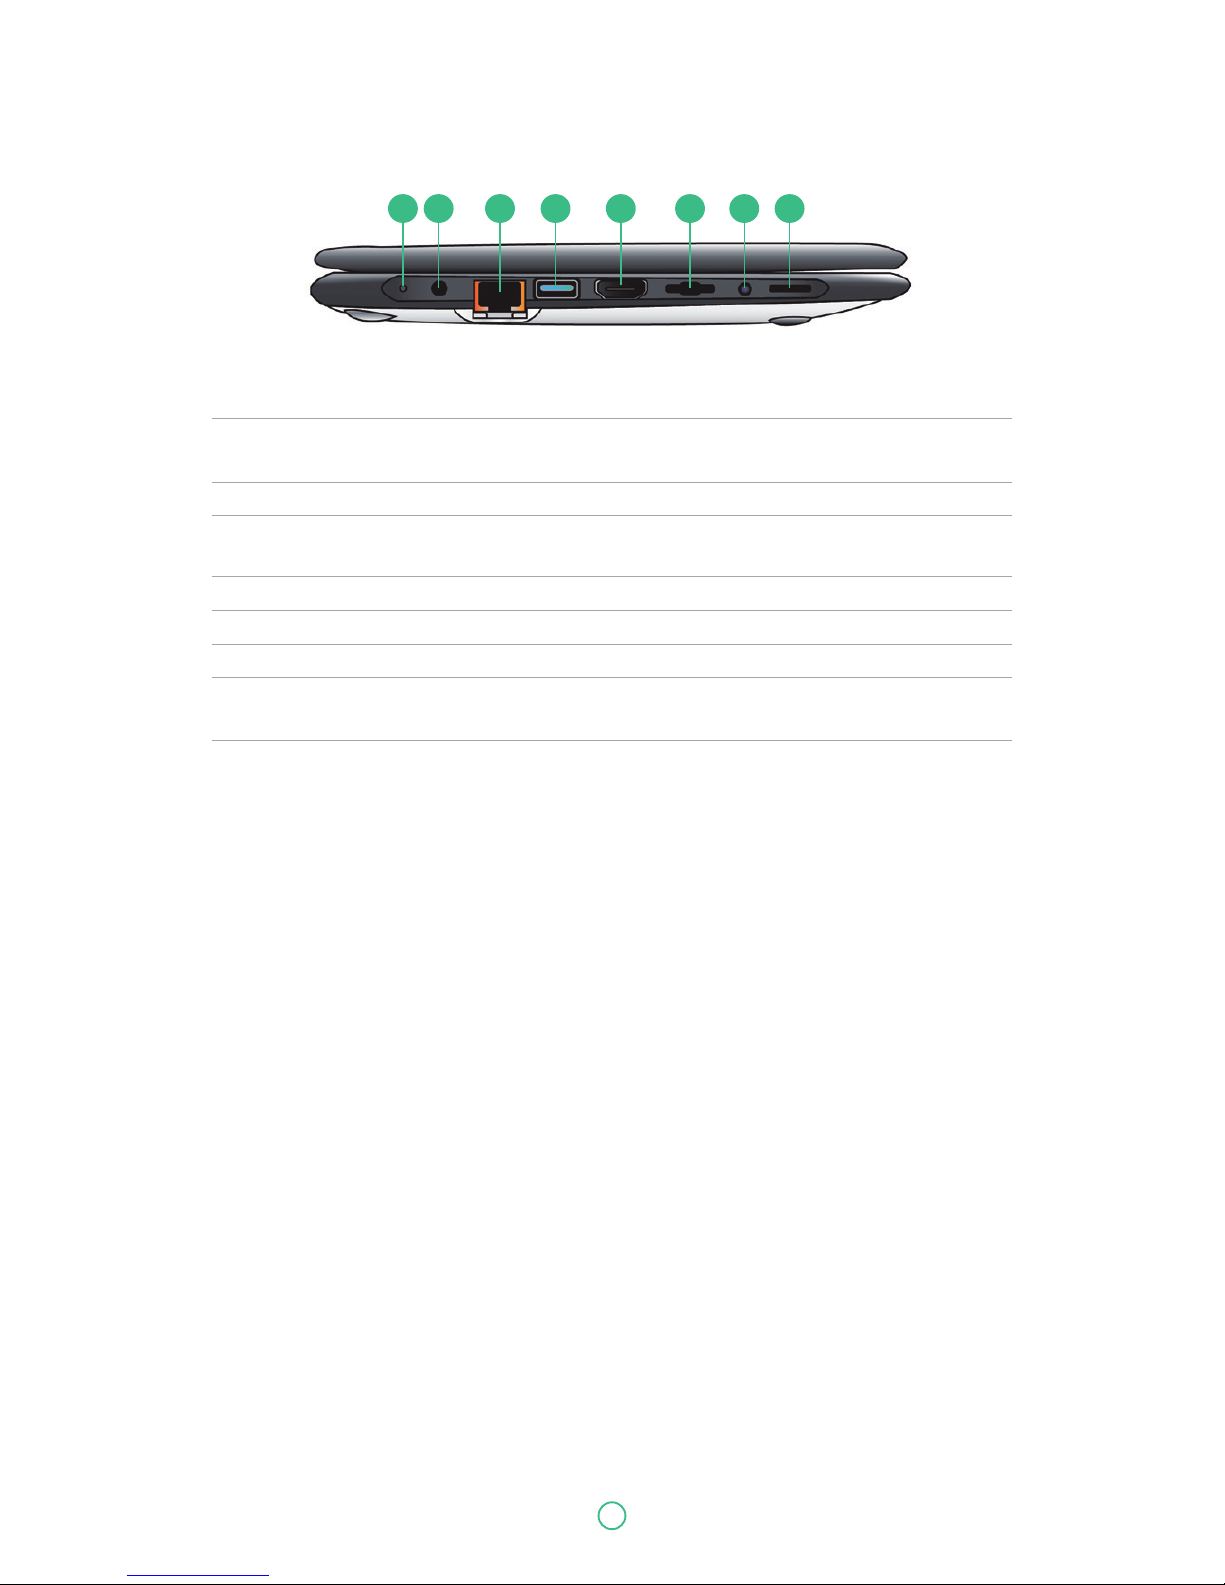
No. Name Function
1 Charging indicator It shows the charging status of your laptop. It shows blue when
the battery is fully charged.
2 DC-in Plug the adapter to charge the battery.
3 RJ-45 LAN port Plug your RJ-45 network cable to connect your laptop
to a wired network.
4 USB 3.0 port Plug your USB devices here.
5 HDMI port Plug your HDMI-capable monitor here.
6 Micro SD card slot Plug your micro SD card here
7 Combo Audio jack for Plug your 3.5mm headphone here.
microphone/headphone
8 Speaker The sound system has two speakers for playing music,
notification sounds, and other audio data.
Left
1 2 3 4 5 6 7 8
Page 13
13
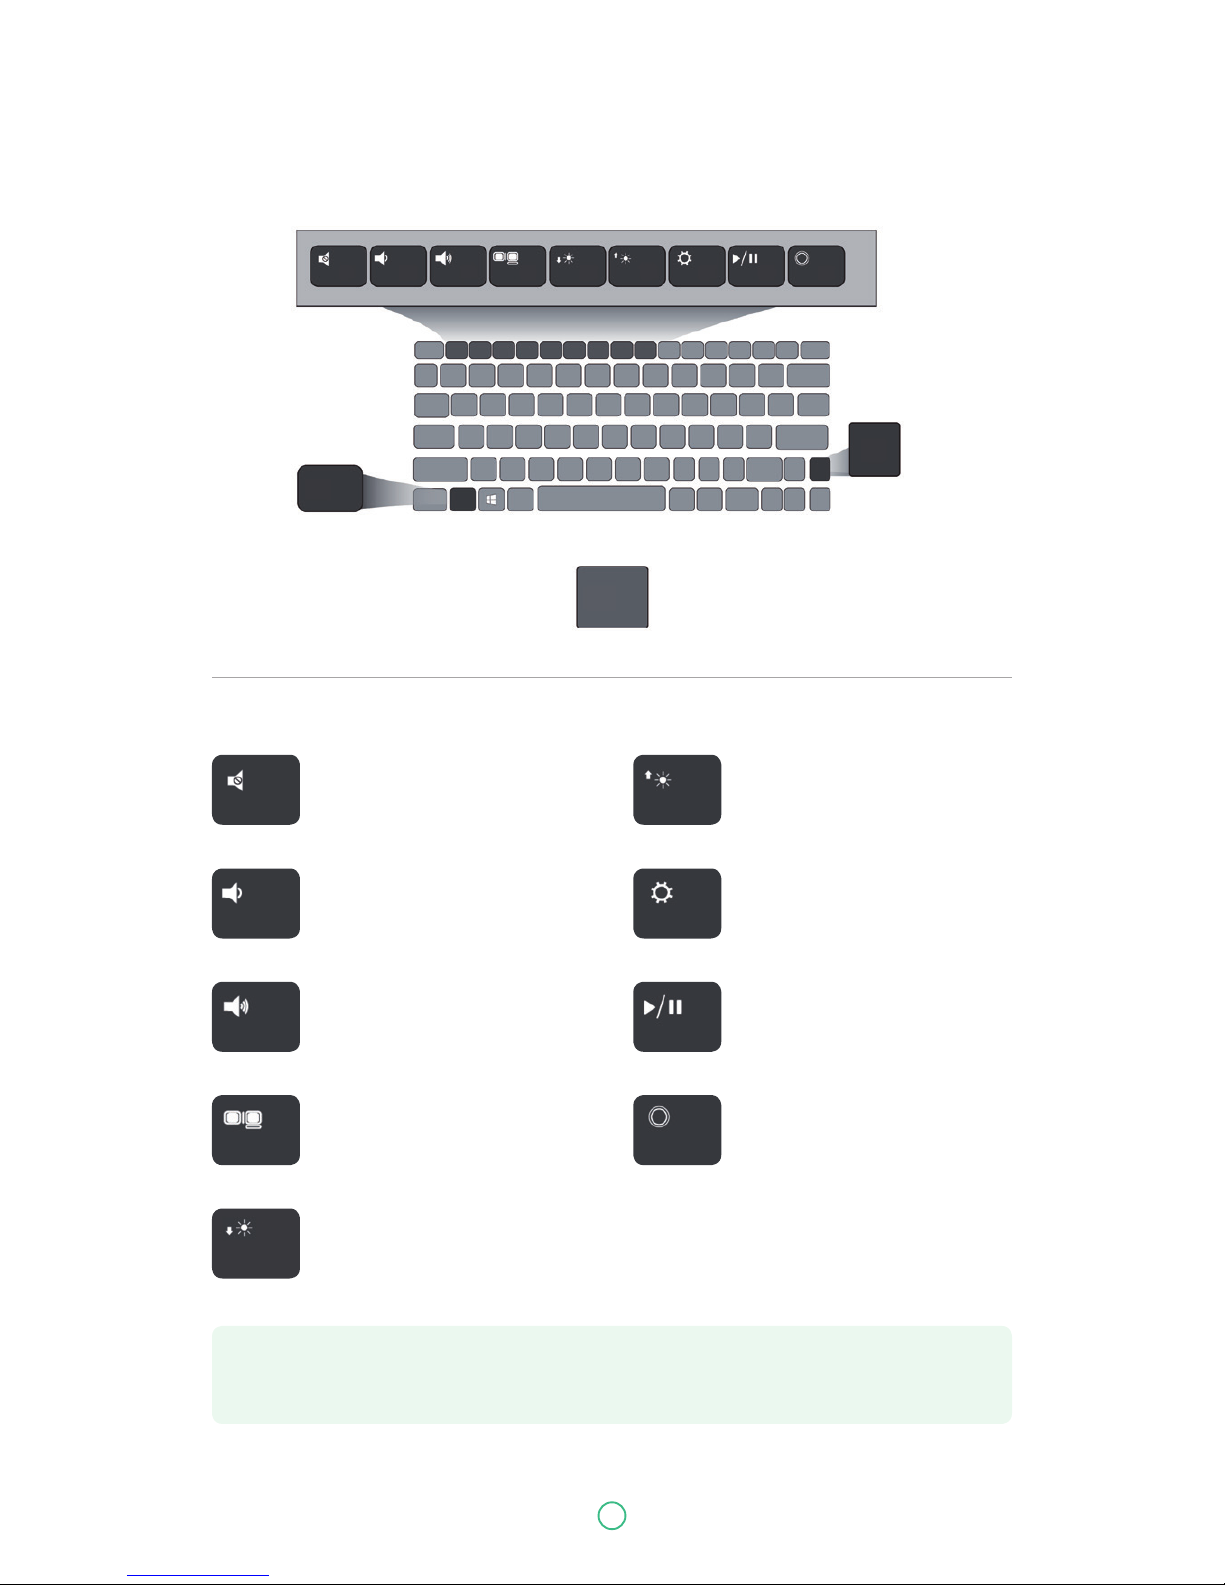
Function keys
F1
Fn
Fn
Fn
F2 F3 F4 F5 F6 F7 F8 F9
Mute or unmute your system Increases the display brightness
Decreases the volume level Open the Settings screen
Increases the volume level
Switches display output between
your display, external monitor (if
connected) and both
Decreases the display brightness
Play or Pause
Push here to talk to Cortana,
if available
F1 F6
F2 F7
F3
F4
F5
F8
F9
User Guide Predia Flex360
Note: If your software uses some of the function keys to perform dedicated functions, you
can perform the function by pressing "Fn" plus the desired function key.
Page 14
14
Folding the keyboard
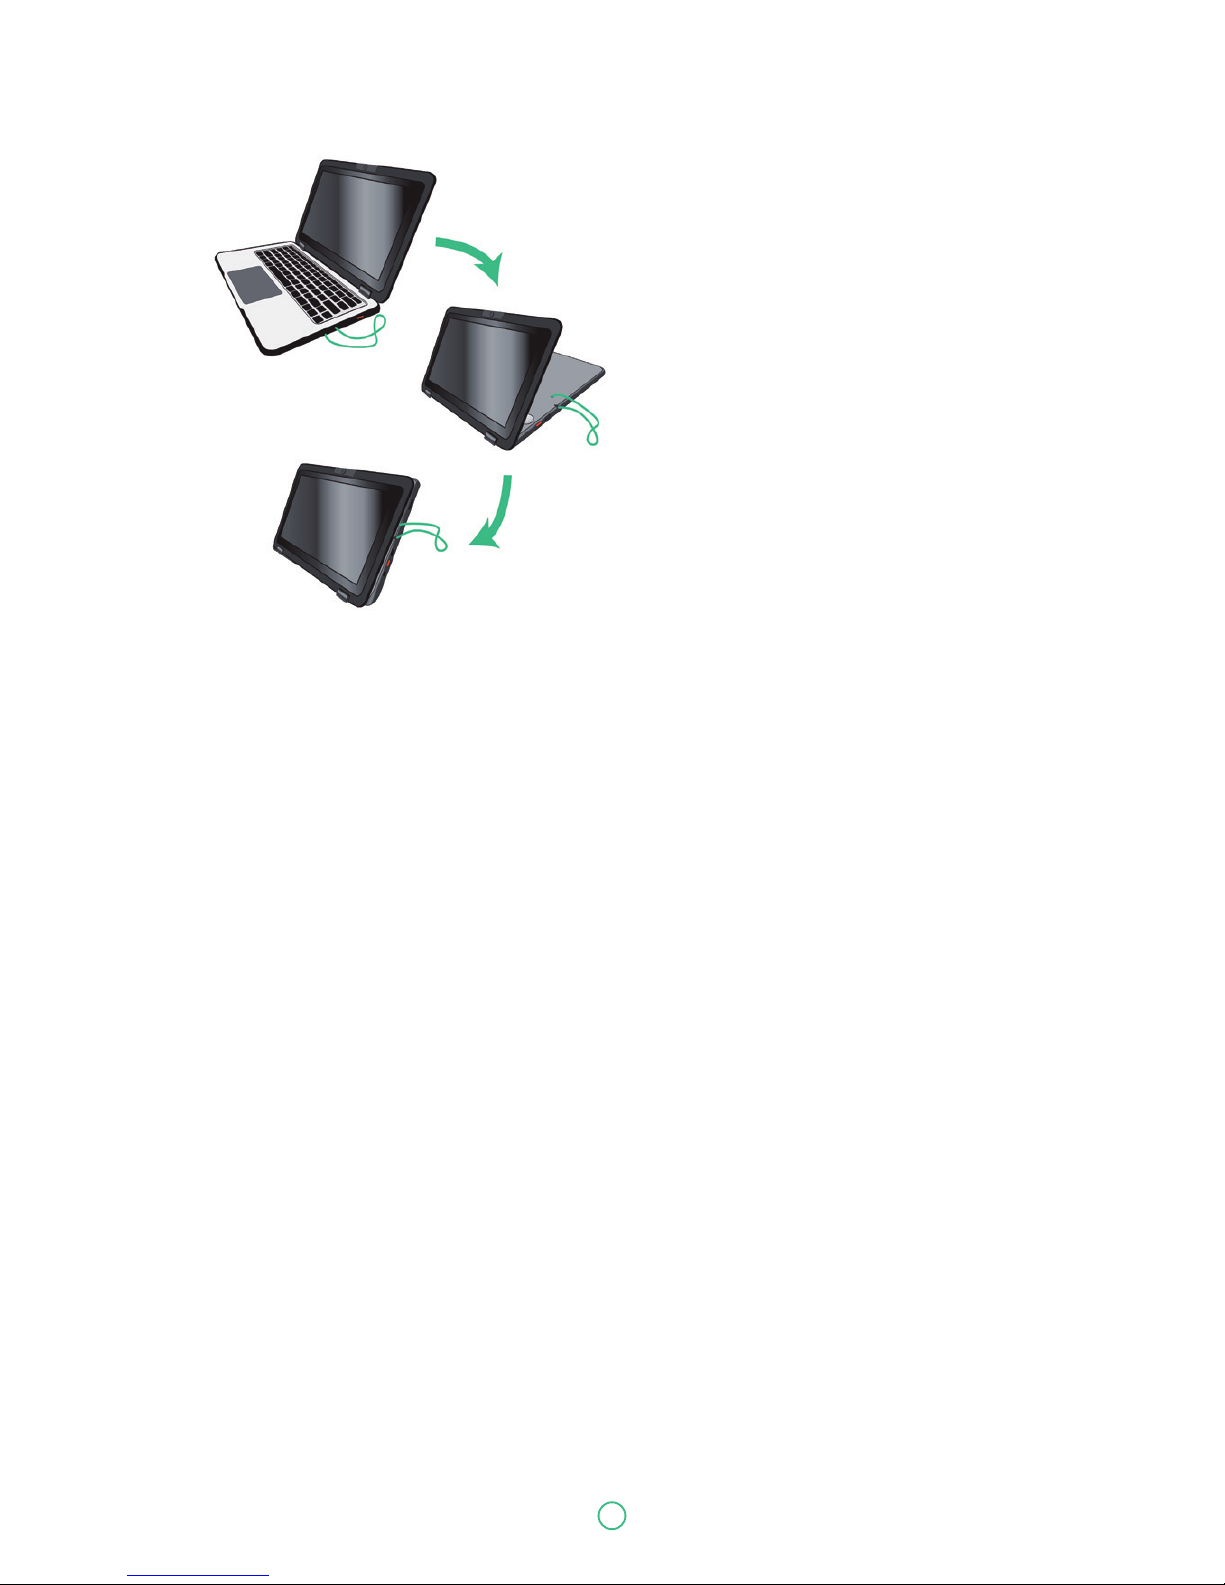
This laptop supports a swiveling 11.6-inch
touchscreen that can be used in several
different ways. Opening the device as a
standard laptop gives you access to the
keyboard and touchpad, while folding the
keyboard behind the screen turns it into
a tablet. You also can prop the notebook’s
screen up in stand mode, which is ideal for
viewing videos and presentations.
User Guide Predia Flex360
Page 15
15
User Guide Predia Flex360
Powering On/Off
Powering on your computer
1. If this is the first time you turn this computer on, connect the
AC adapter and fully charge the battery.
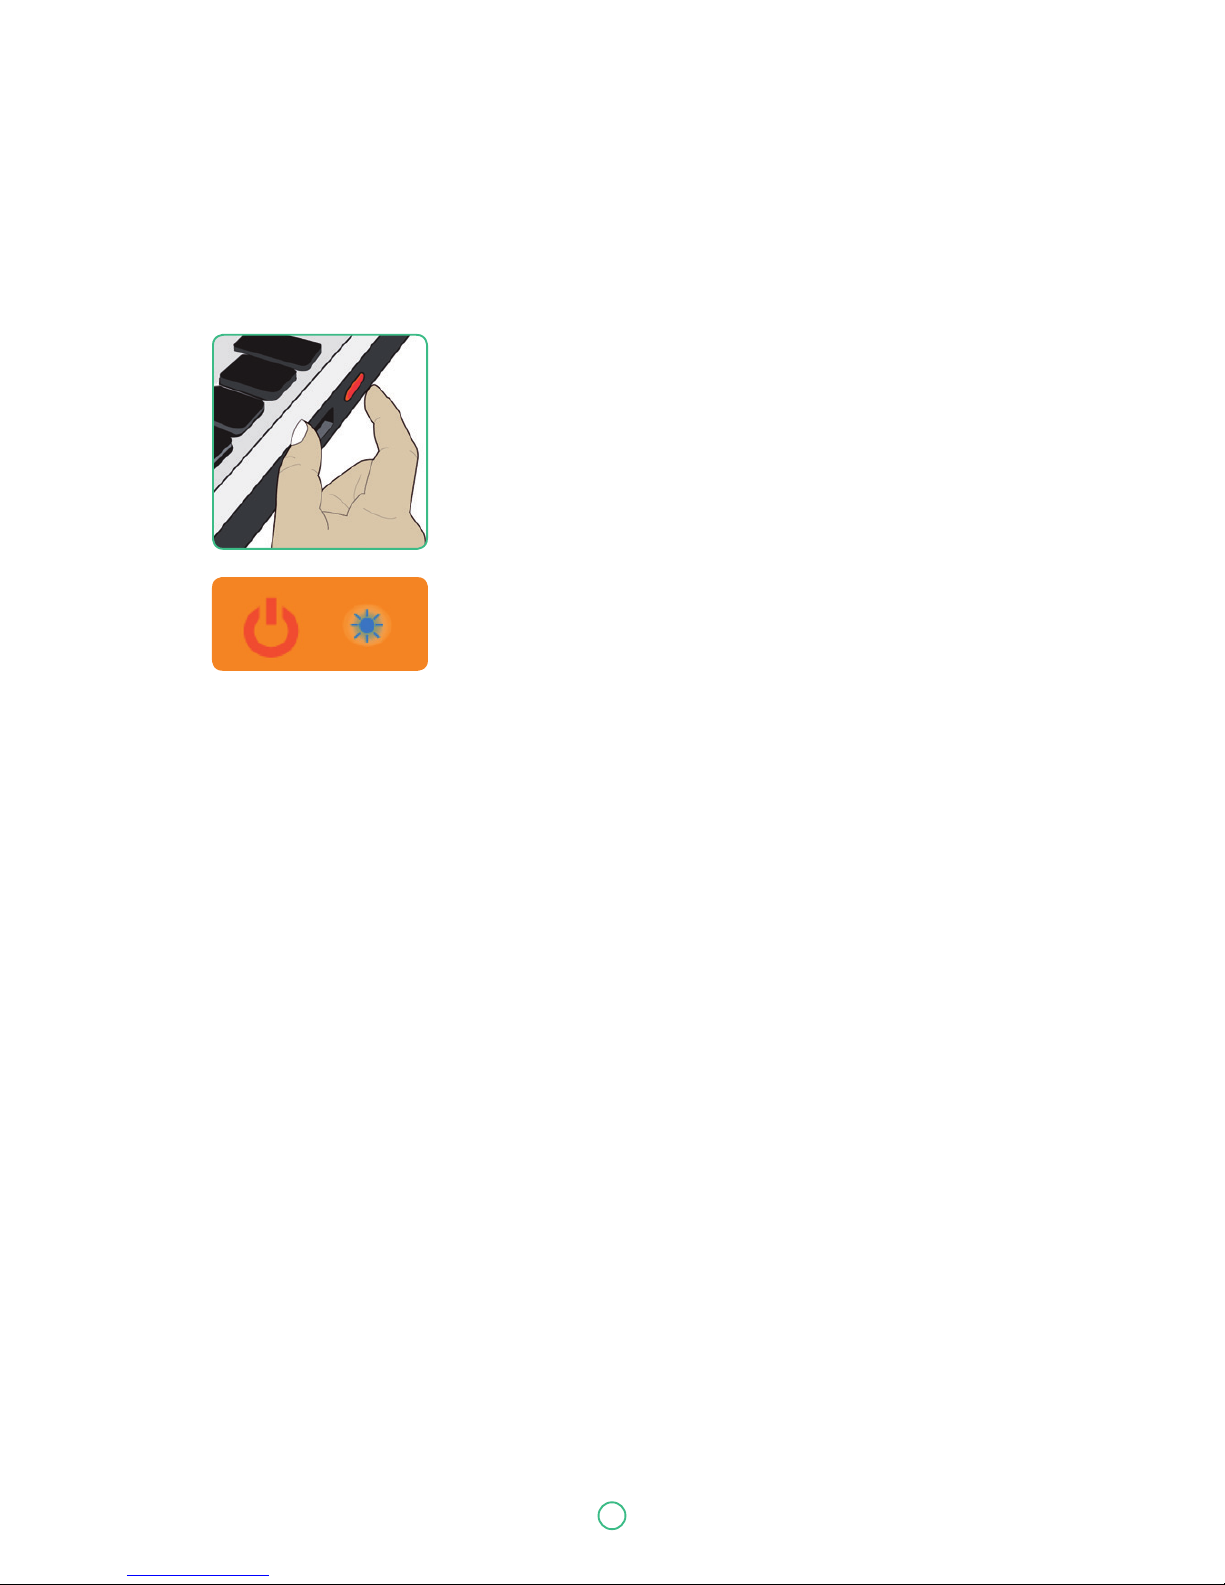
2. Press the power button (normally 1 to 2 seconds). You shall see
the power indicator on the button lights up in blue.
2. Using your computer
Powering on for the first time
The laptop will require you to do the initial setup, which including:
• Activate your Windows 10
• Sign in to or create your Microsoft account
• Setup a wireless connection and more
Please follow the instruction to complete the initial setup.
Page 16
16
User Guide Predia Flex360
Powering off your computer
Save all your data before powering your computer off.
To power off your system, following the steps below:
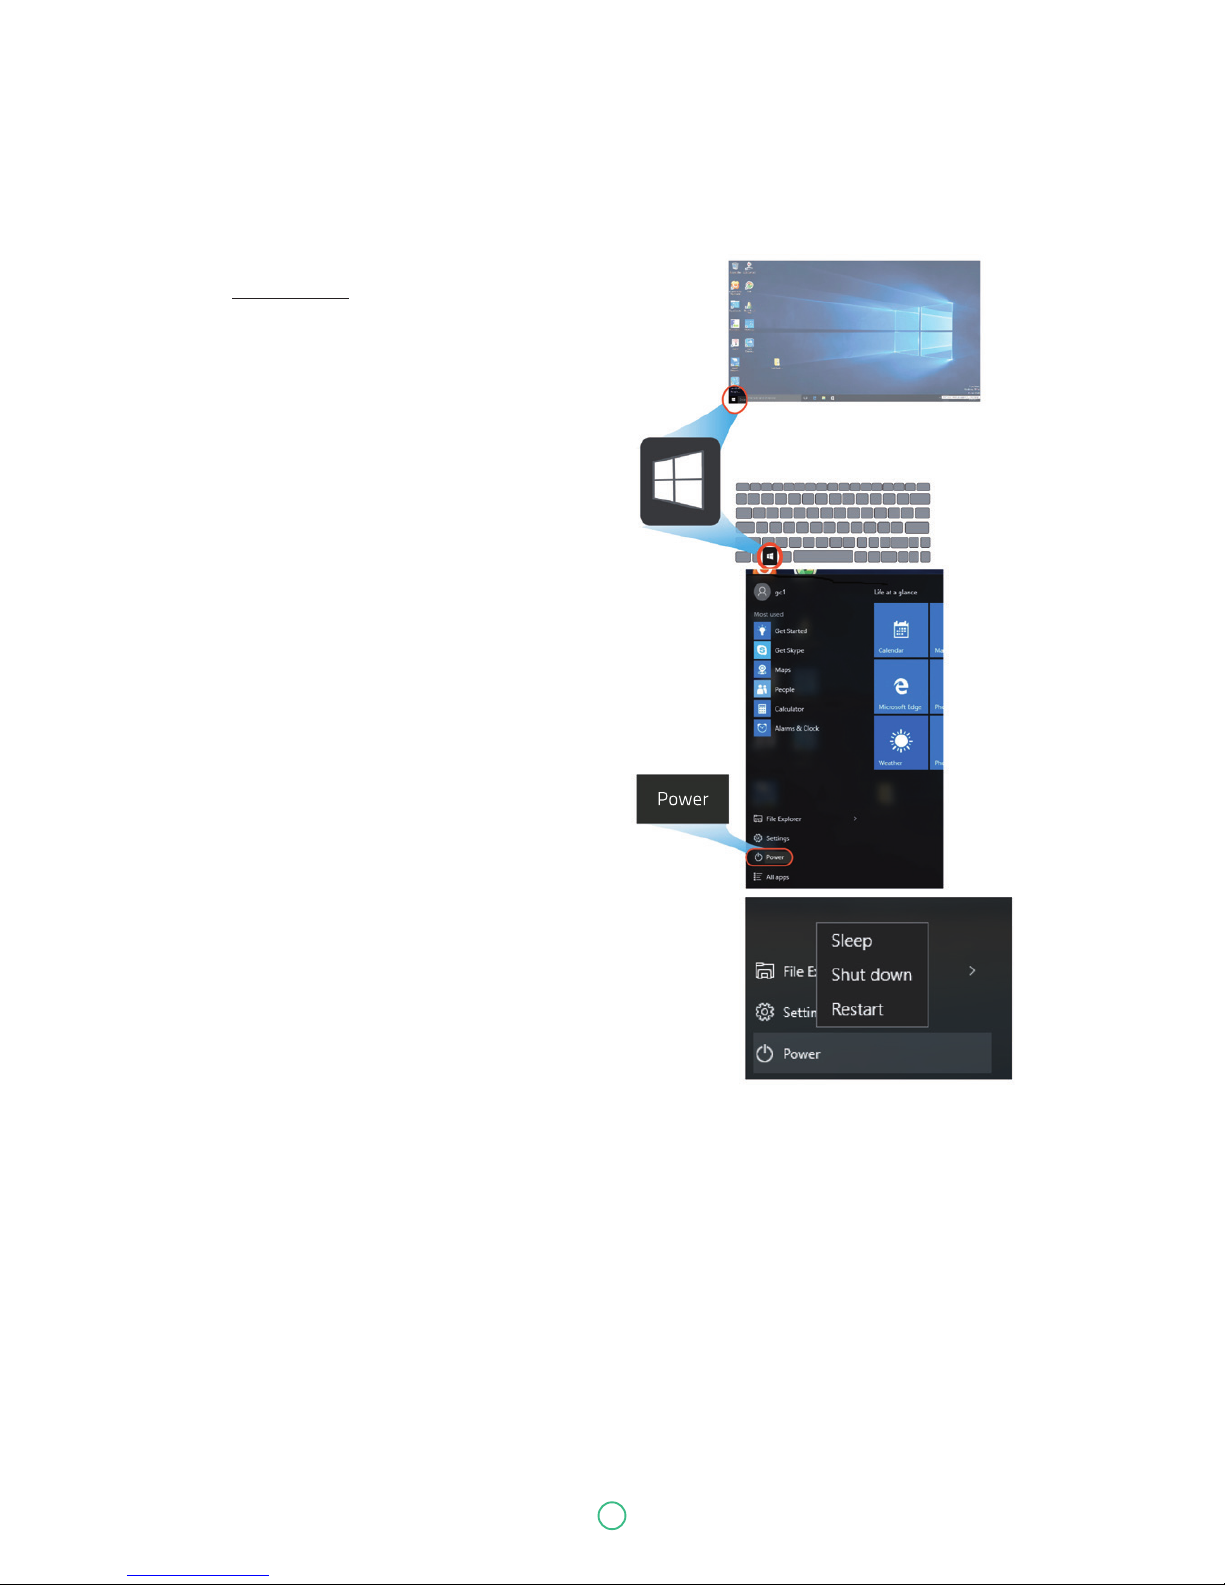
A. By Start menu
1. Click the Windows icon in the low-left
corner of the Desktop. Or, press on
the Windows key in the keyboard.
2. In the Start menu,
click <Power> option, as shown on
the right.
3. Select <Shut down> from the power option
menu, as shown on the right.
Putting your computer into sleep mode
When you will be away from your computer for a short time, put the computer to sleep.
Do one of the following:
• Close the display panel
• Press the power button briefly one time.
• Open the Start menu and then select <Power> → <Sleep>.
When the laptop is in its sleep mode, the power indicator’s light turns into breathing blue.
Page 17
17
User Guide Predia Flex360
Waking up your computer
Do one of the following:
A: Pressing the power button briefly one time.
B: Pressing any key on the keyboard, tapping the touchpad, or opening the display panel.
Note: It is recommended that you put your computer to sleep before you move it. Moving
your computer while the hard disk is spinning can sometimes damage the hard disk, causing
loss of data.
Basic touchpad operations
The touchpad works like a traditional mouse. With it, you can move the cursor and perform
left-click, right-click, double-click actions. However, the actual available actions are
application dependent.
Action name Explanation
Left-clicking (or Clicking) Tap once on the touchpad surface or press once on the low-left
corner of the touchpad.
Right-clicking Press once on the low-right corner of the touchpad.
Dragging Press and continue to hold down the left corner and then move
(drag) your finger across the touchpad surface.
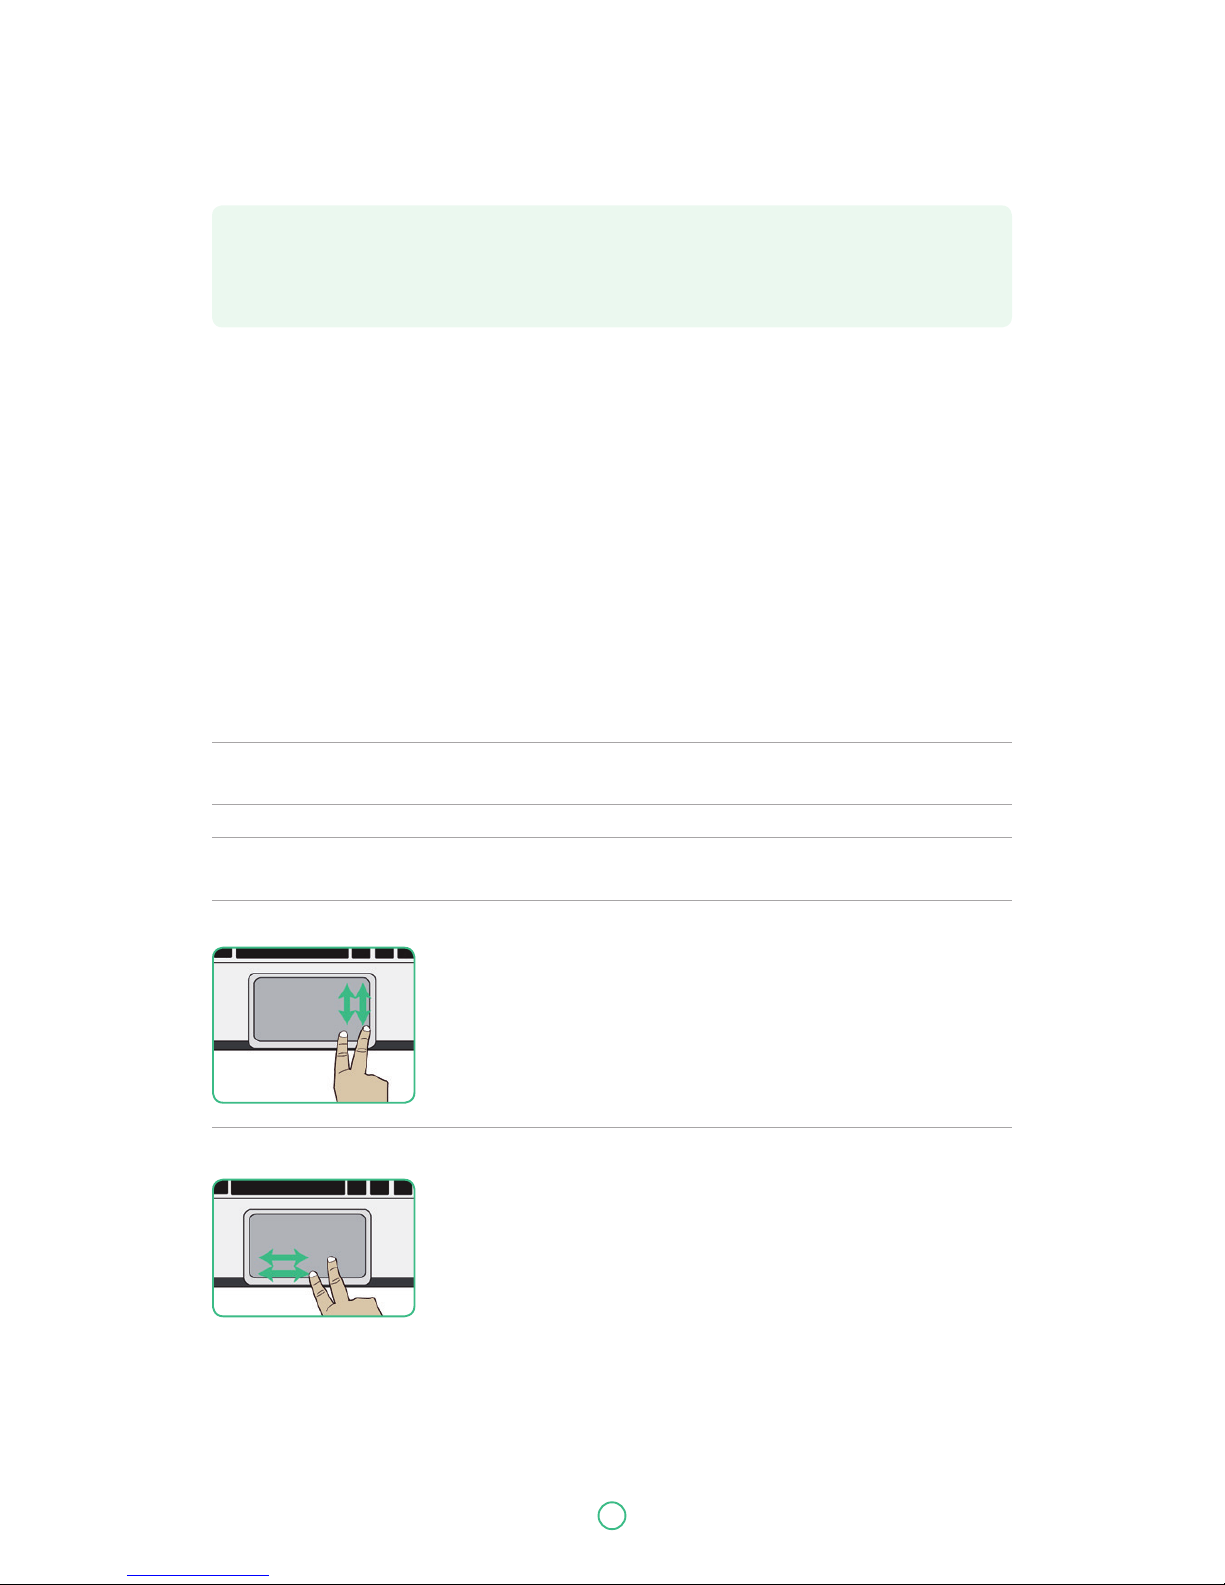
Vertical scrolling
Drag two fingers up or down on the touchpad.
Horizontal scrolling
Drag two fingers left or right on the touchpad.
Page 18
18
User Guide Predia Flex360
Basic touchscreen operations
When you fold your laptop into a tablet, it is ideal for you to use your fingers
or the stylus pen to perform many actions on it.
• Don’t use sharp objects to touch the screen. Or, the screen may be damaged or scratched.
• Don’t touch the touchscreen with a conductive material. It may cause a malfunction.
• The supporting functions are application dependent.
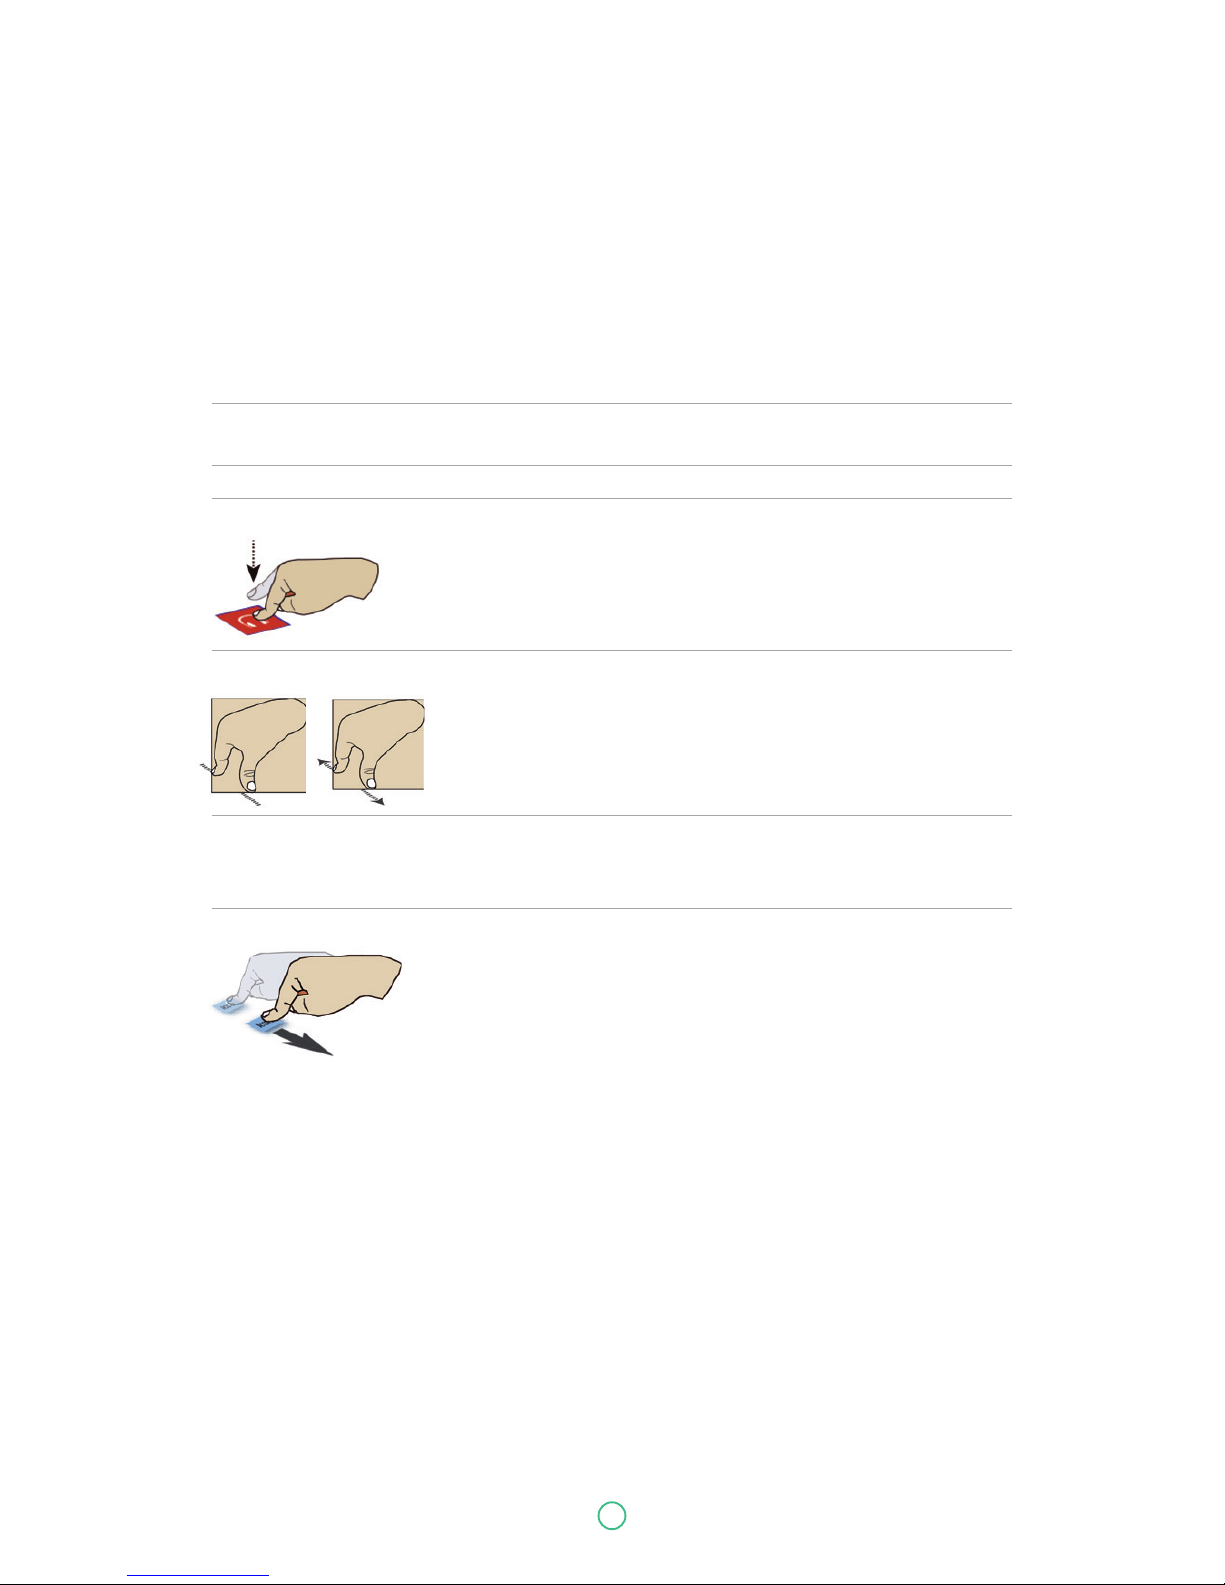
Gesture name Explanation
Tap Touch once on an item to start an app, open a link, or perform an
optional function. This is similar to a left-click with a mouse.
Double-tap Slightly press twice with your finger to select an item.
Press and hold Press and leave your finger on an item. This brings up detailed
information or opens a menu with more options for the item.
This is similar to a right-click with a mouse.
Pinch Move two fingers together or apart while touching the screen.
This is to zoom in and out on visual apps, such as pictures and maps.
Rotate Place two or more fingers on an item and then turn your hand. This
enables you to turn an object. (Note: Not all items can be rotated,
depending upon the app.)
Slide Drag your finger across the screen. This can scroll through lists and
pages, and can also move an object or be used to draw or write,
depending upon your apps.
Page 19
19
User Guide Predia Flex360
Desktop and virtual desktop experience
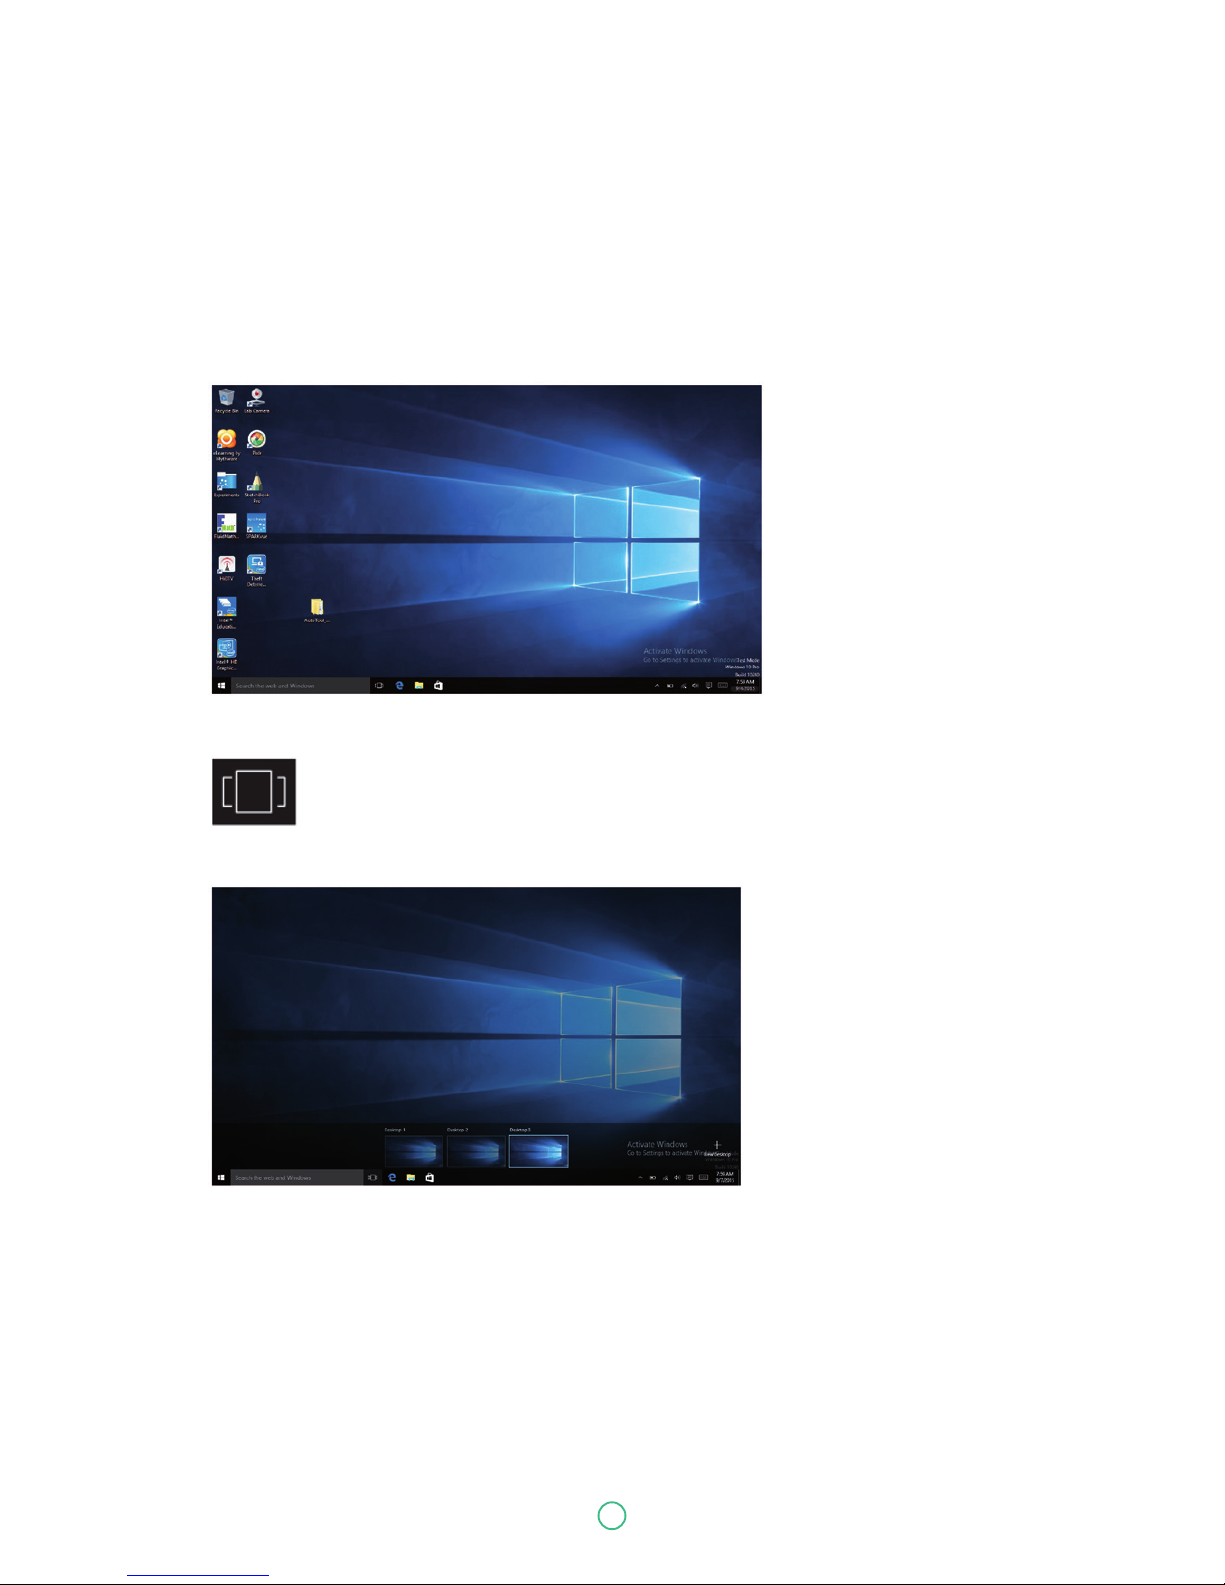
The Desktop screen is as shown below and natively provides virtual desktop feature.
To launch the feature you can click the app icon as shown on the left or just press
Window key and TAB key of your keyboard in the same time.
3. Windows Interface
Page 20
20
User Guide Predia Flex360
Taskbar
The black bar on the bottom of the desktop is called Taskbar. It provides
several key features and they are:
• Start menu
• Search box
• App shortcuts area
• Notification area
Start menu
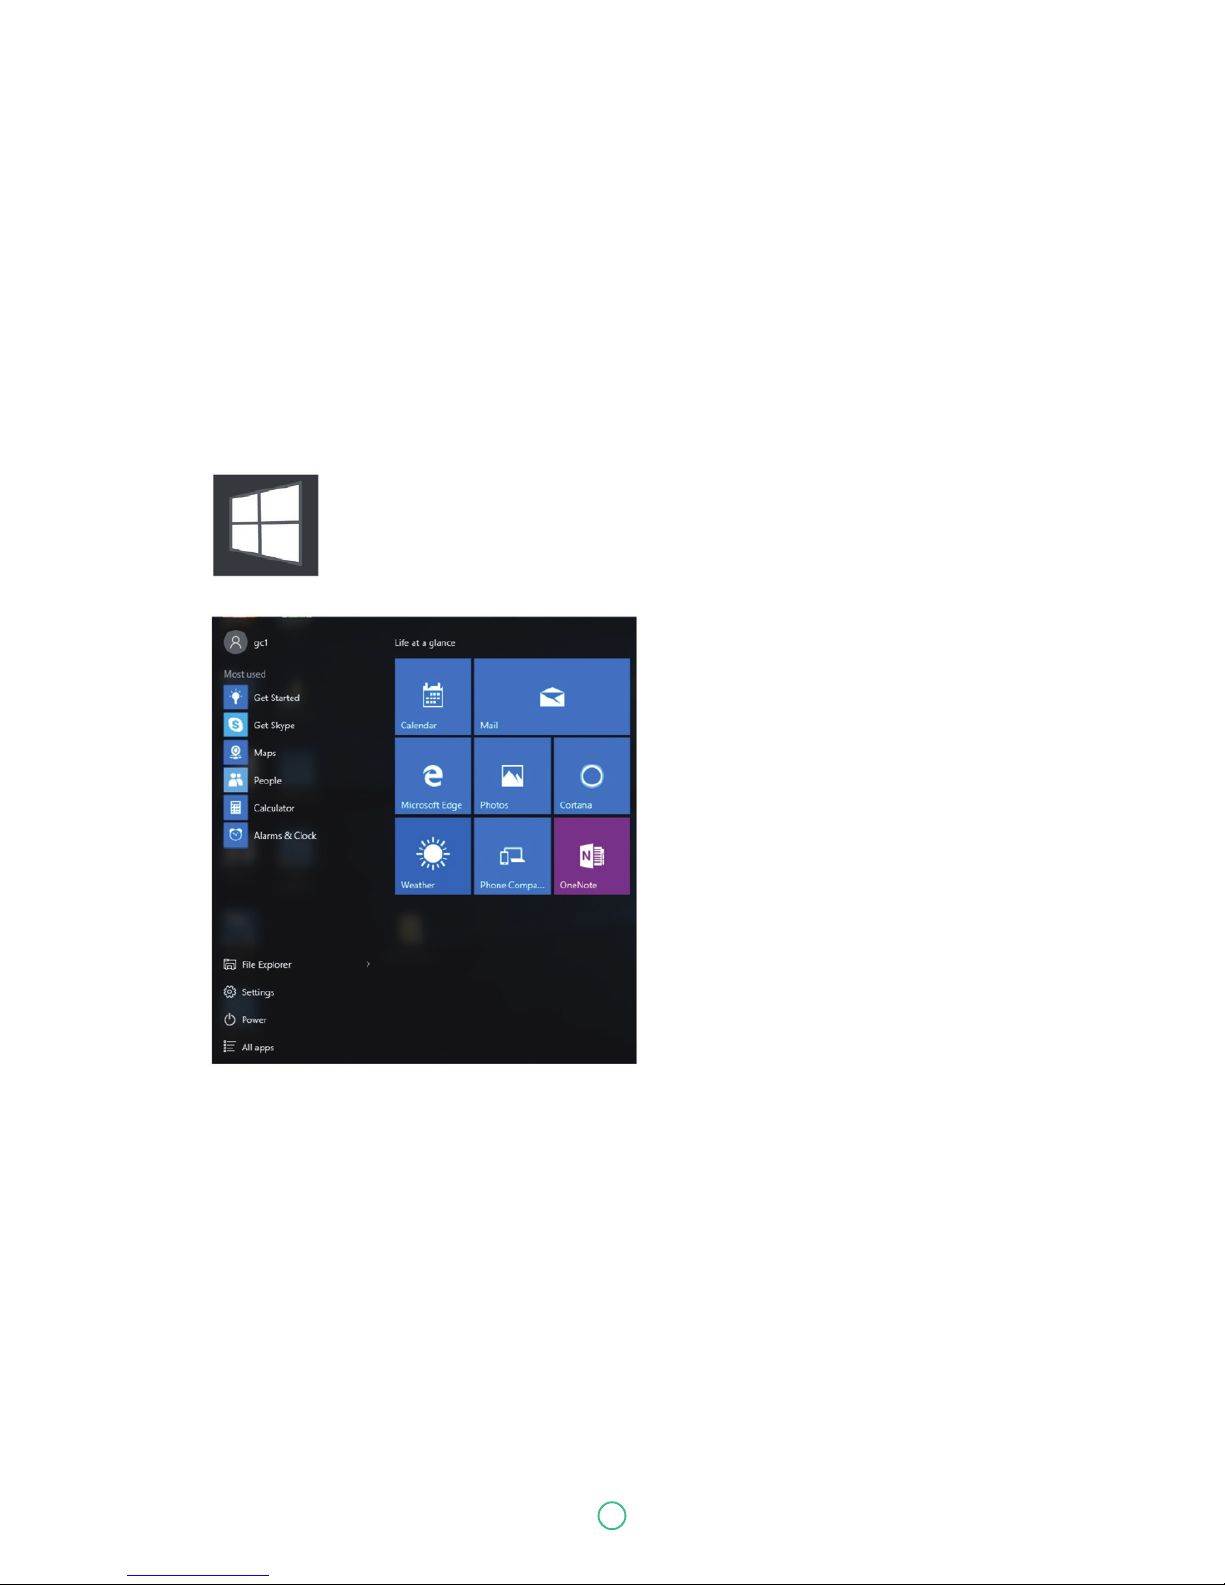
To open the Start menu, you can either click on the windows icon (which is also
known as Start button) located at the left end of the taskbar or press once on the
windows key of the keyboard. And the Start menu will appear, as shown below.
For how to setup this menu, please refer to page 8.
Page 21
21
User Guide Predia Flex360
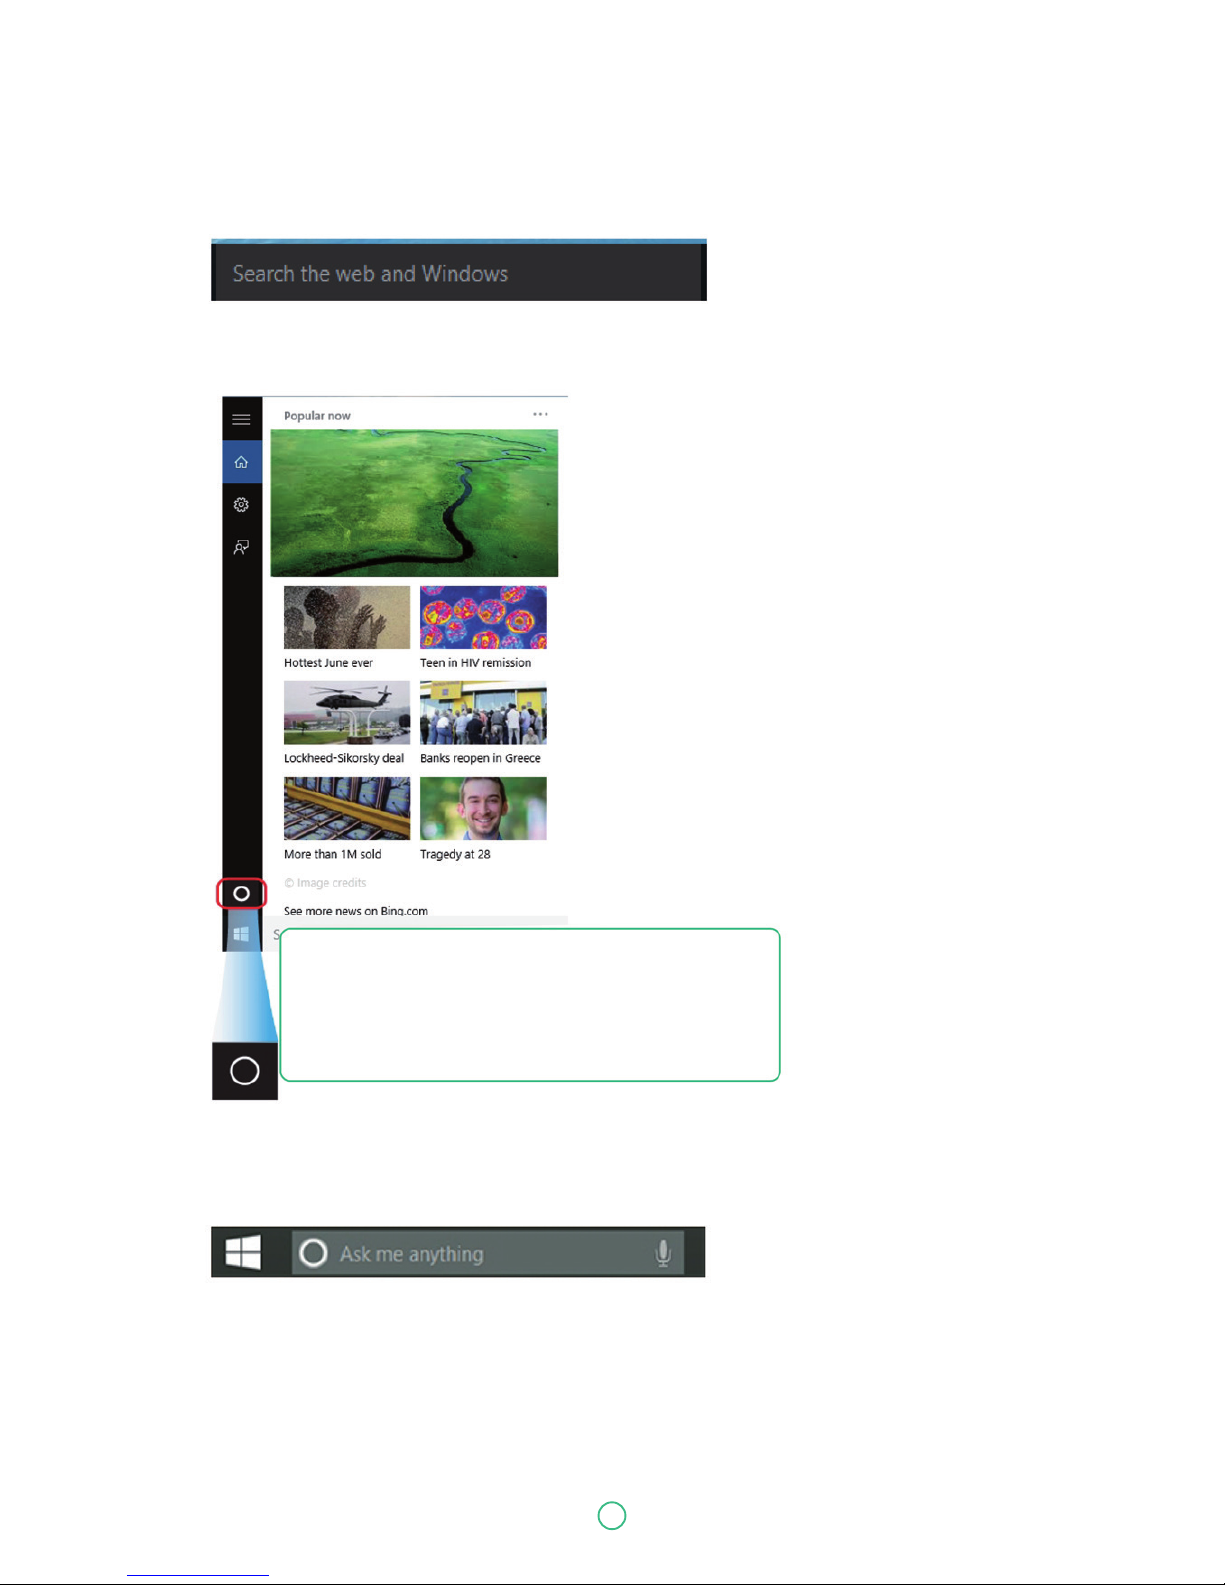
Search box - Cortana
Next to the Start menu is the search box, as shown below.
When you select this box, a window will pop out as shown below.
After you setup the Cortana settings, the search box will look like
This is the Cortana icon. Cortana is a new virtual assistant
built into your Windows 10. Click here to finish the setup
and you can control Cortana with either keyboard or voice
commands, and use it to perform intelligent searches
and more.
Page 22
22
User Guide Predia Flex360
App shortcuts area
In this area, you can put the shortcuts of your frequently used apps. For how to arrange this area,
please refer to p. 8.
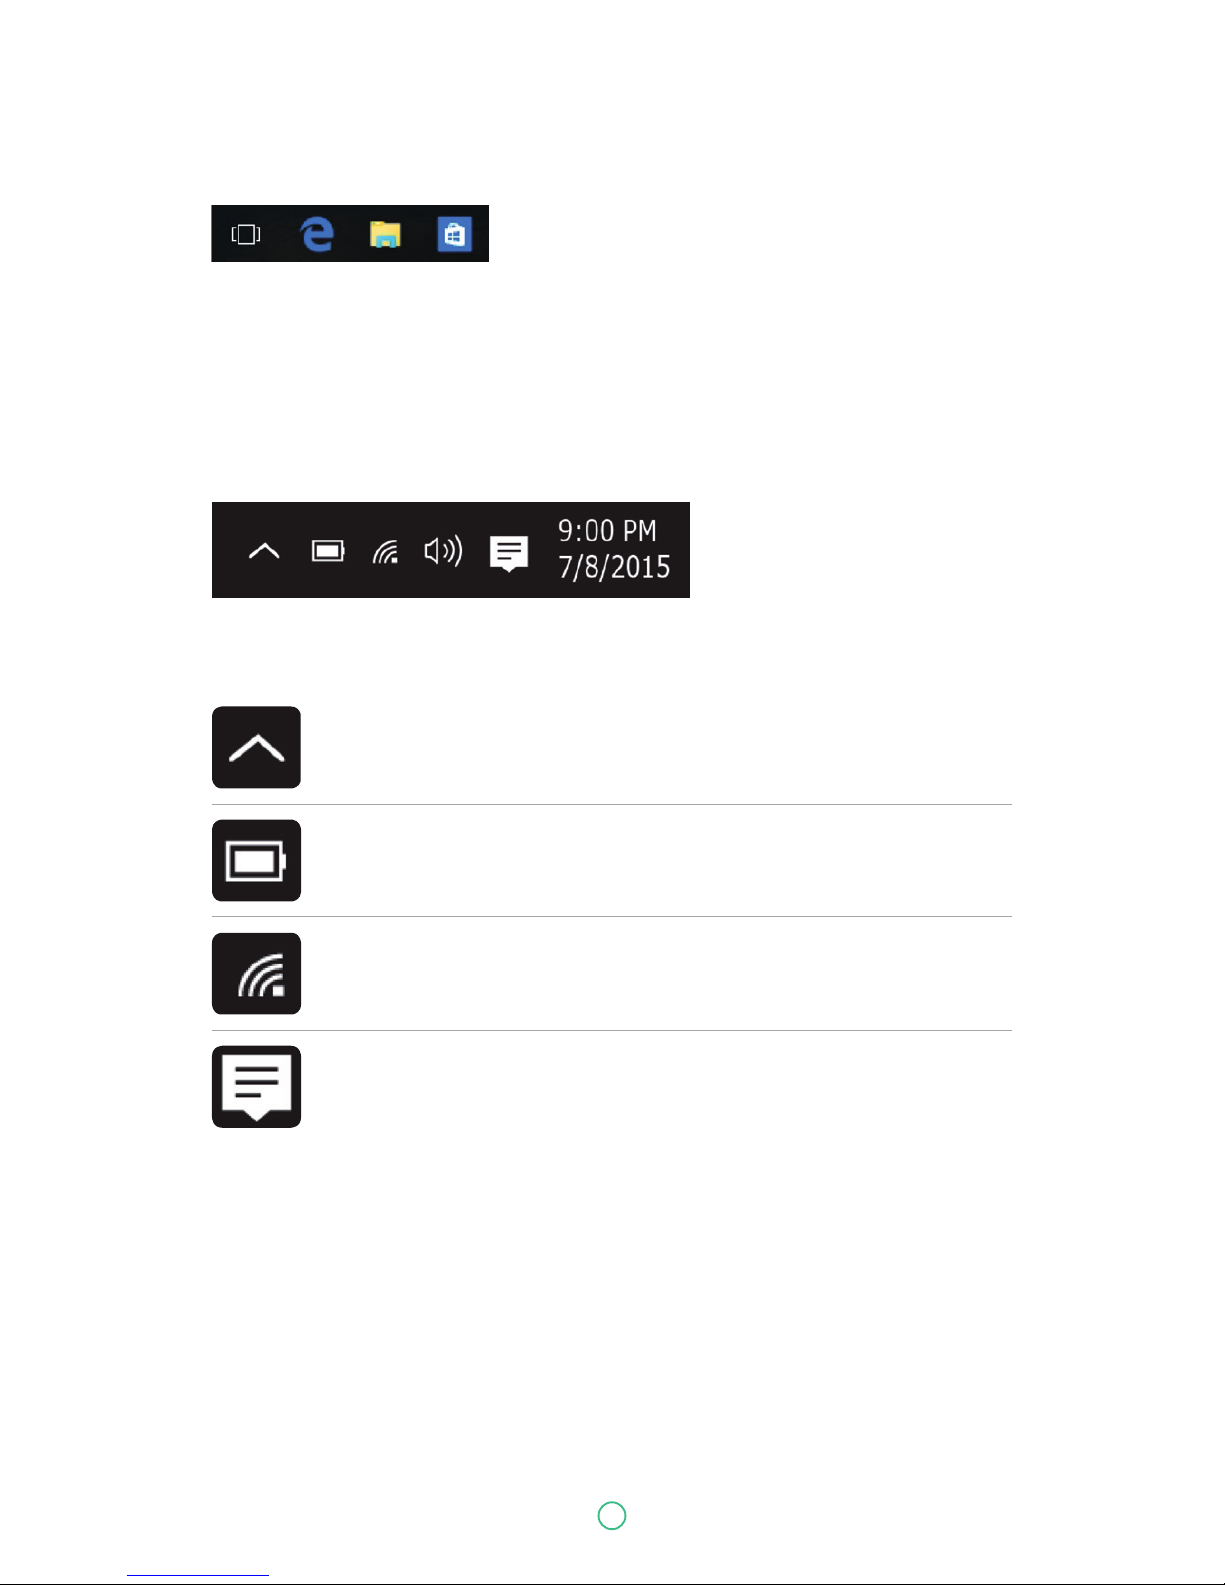
Notification area
The right part of the taskbar holds several icons that show you the status of your laptop, as shown
below.
This is an area called Notification Area, where
Click here to show more hidden status icons.
Shows you the current battery status.(For detail, please refer to page 11)
Shows you the status of your wireless network connection.
Click here to show the system notifications and several shortcuts.
Page 23
23
User Guide Predia Flex360
4. Setup and Connection
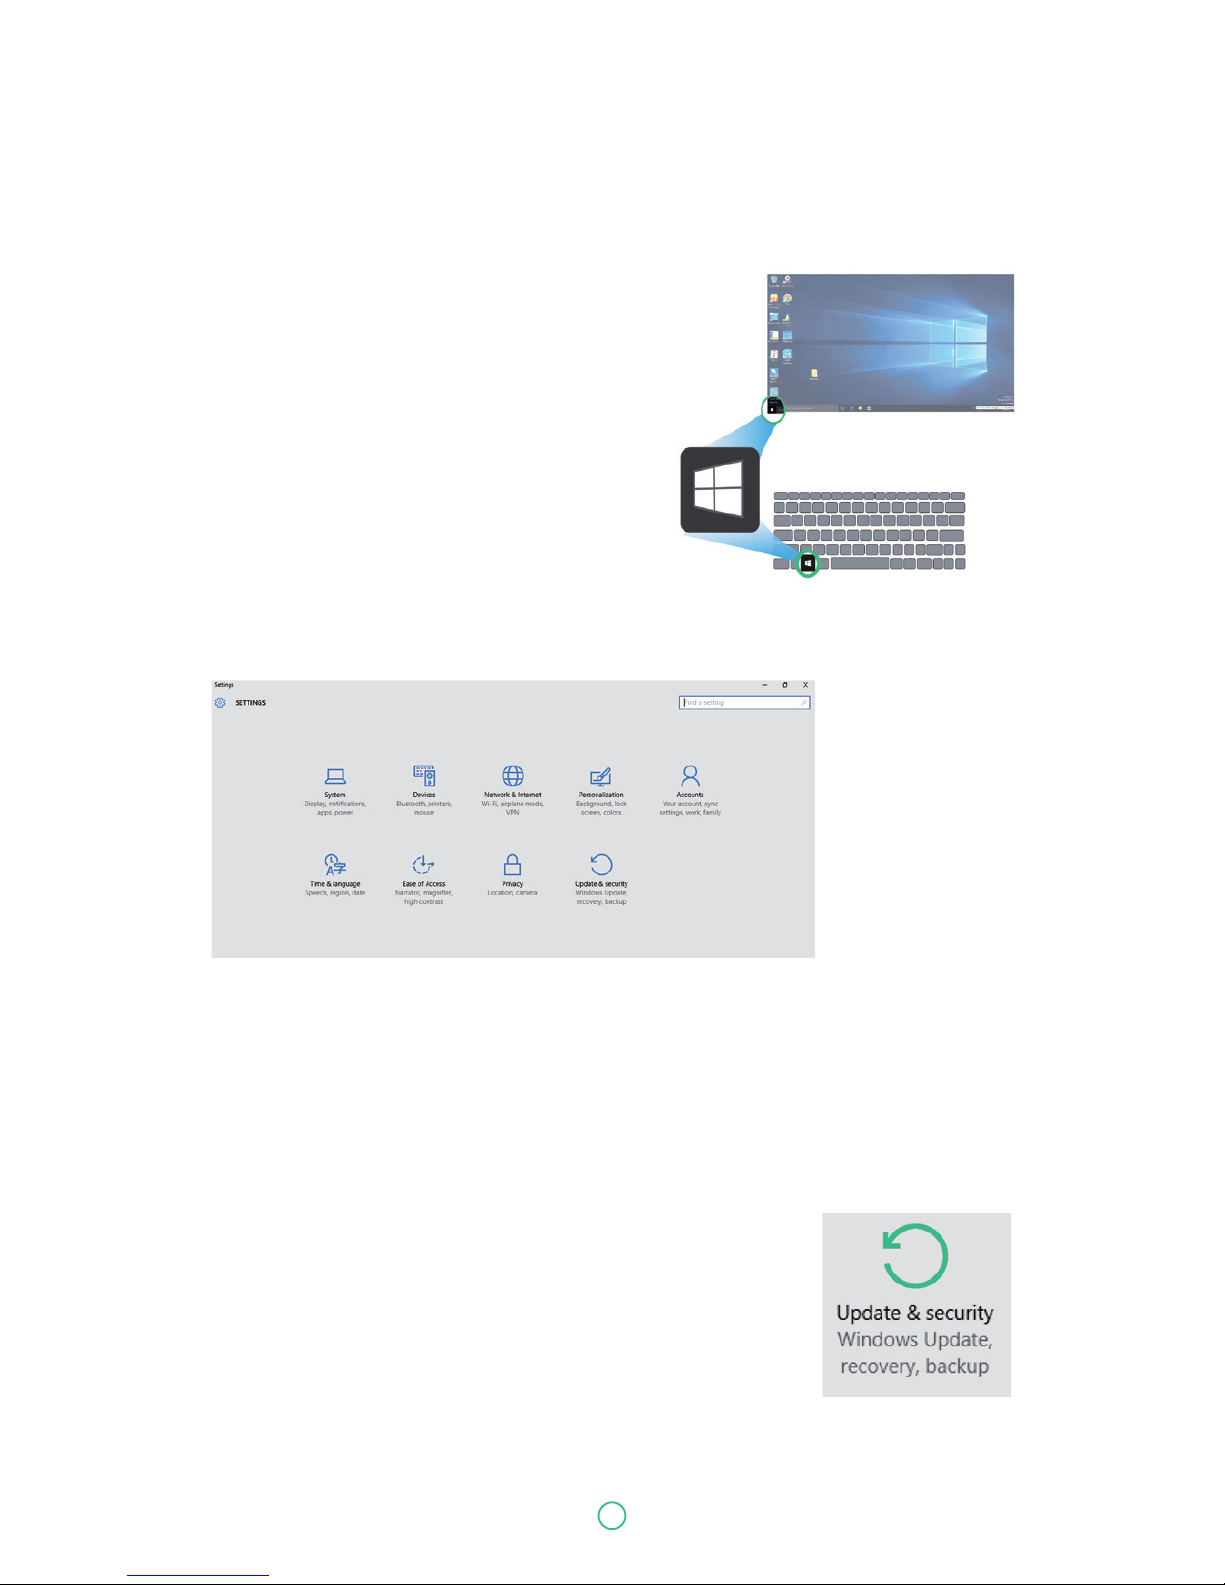
Settings screen
To access to the Settings screen:
1. Click the Windows icon in the low-left corner of
the Desktop. Or, press on the Windows key in
the keyboard.
2. Select <Settings>.
This will open the Settings screen, as shown below
Windows Activation
To use all features of your Windows laptop, you may need to activate your Windows system.
Follow the following steps to register and activate your Windows.
1. Open the Start menu and click <Settings >
2. Click <Update & security>
3. Select <Activate>.
4. Follow the instructions to activate your windows.
Page 24
24
User Guide Predia Flex360
Setup your Microsoft account
To share files or settings with other devices running Windows 10, you need to setup a Microsoft
Account. Furthermore, if you want to download or purchase apps from the Microsoft Store, such
Microsoft Account is required.
To setup your Microsoft account
1. Open the Settings screen and select <Accounts>
2. Select <Your account >
3. Select <Sign in with a Microsoft account instead>.
4. Follow the instruction to register your account information.
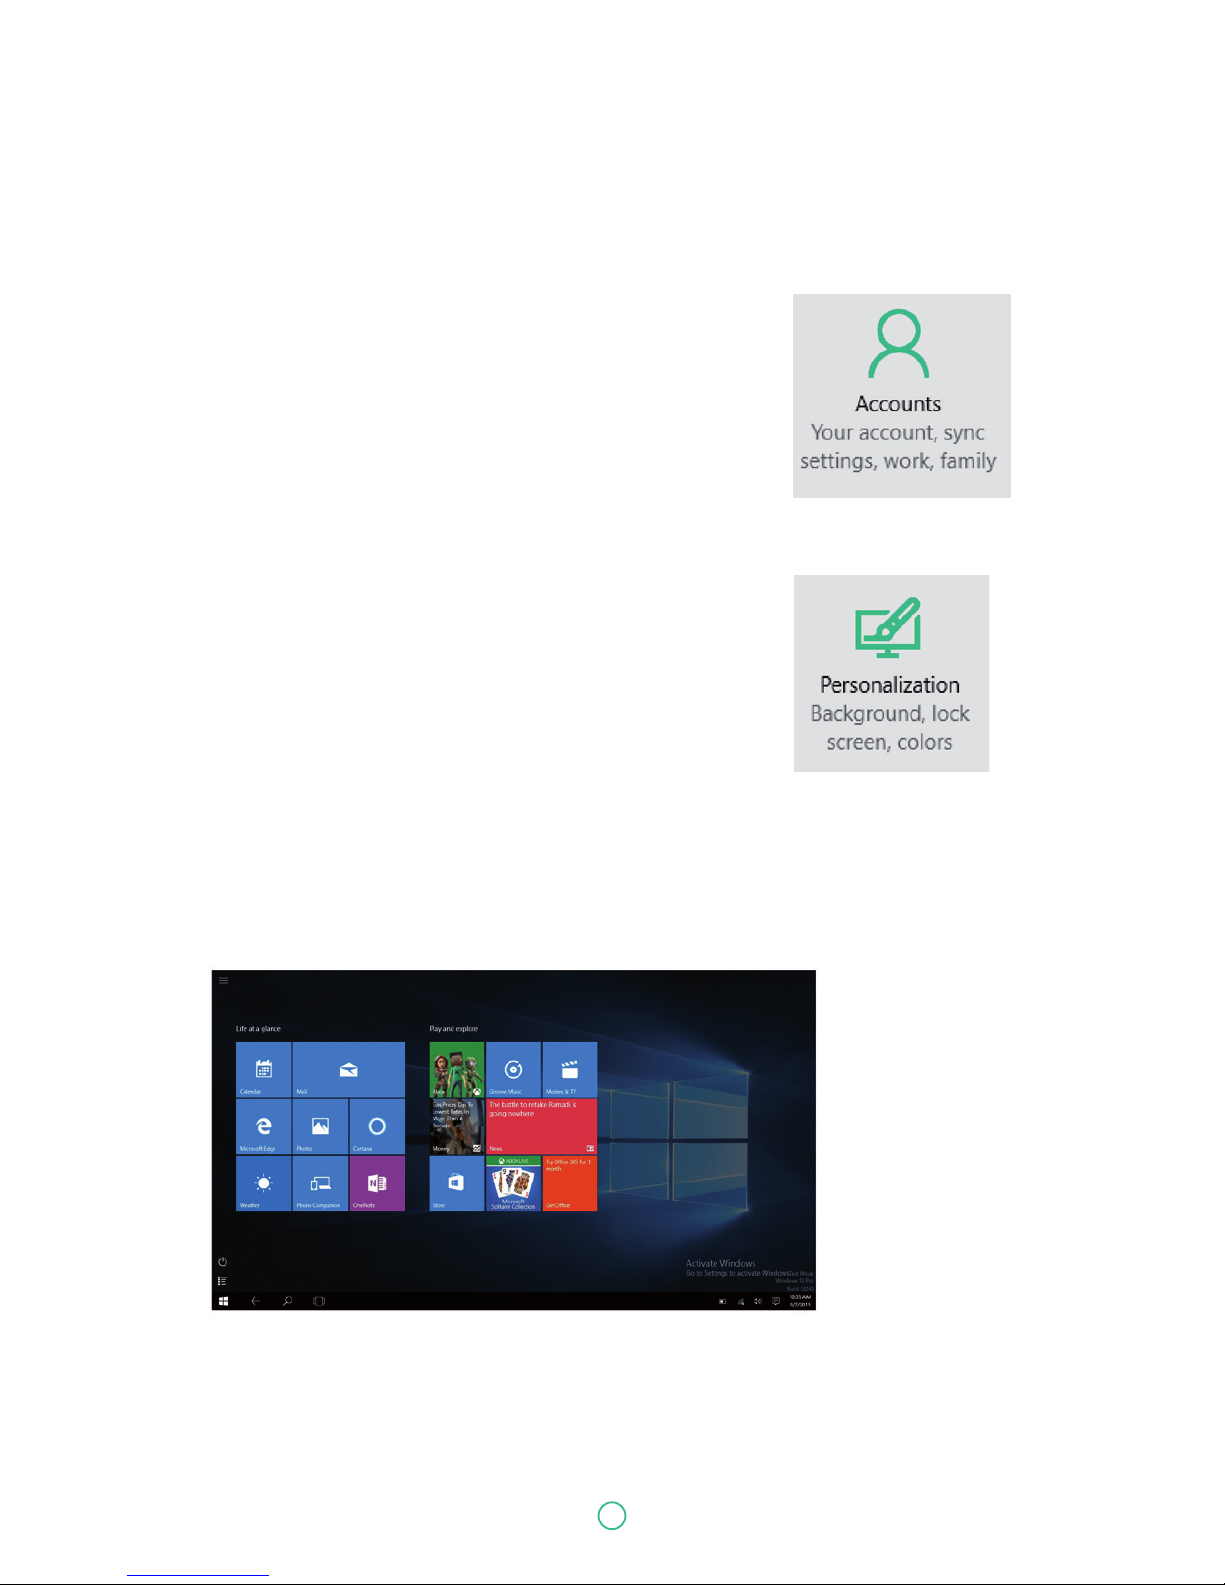
Replacing Desktop with Start screen
If you are more familiar with the interface similar to the Start screen
introduced in Windows 8 series, you can set your laptop to show the
Start screen instead of the Desktop every time when you power on
your laptop. To do so, do the following steps:
1. Open the Settings screen.
2. Select <Personalization>.
3. In the Personalization screen, enable the option <Use Start full screen>.
After these steps, you will see the Start screen every time you turn on your laptop,
as shown below.
Page 25
25
User Guide Predia Flex360
Pin and unpin your app
Pinning an App to Start menu or taskbar
To add an app:
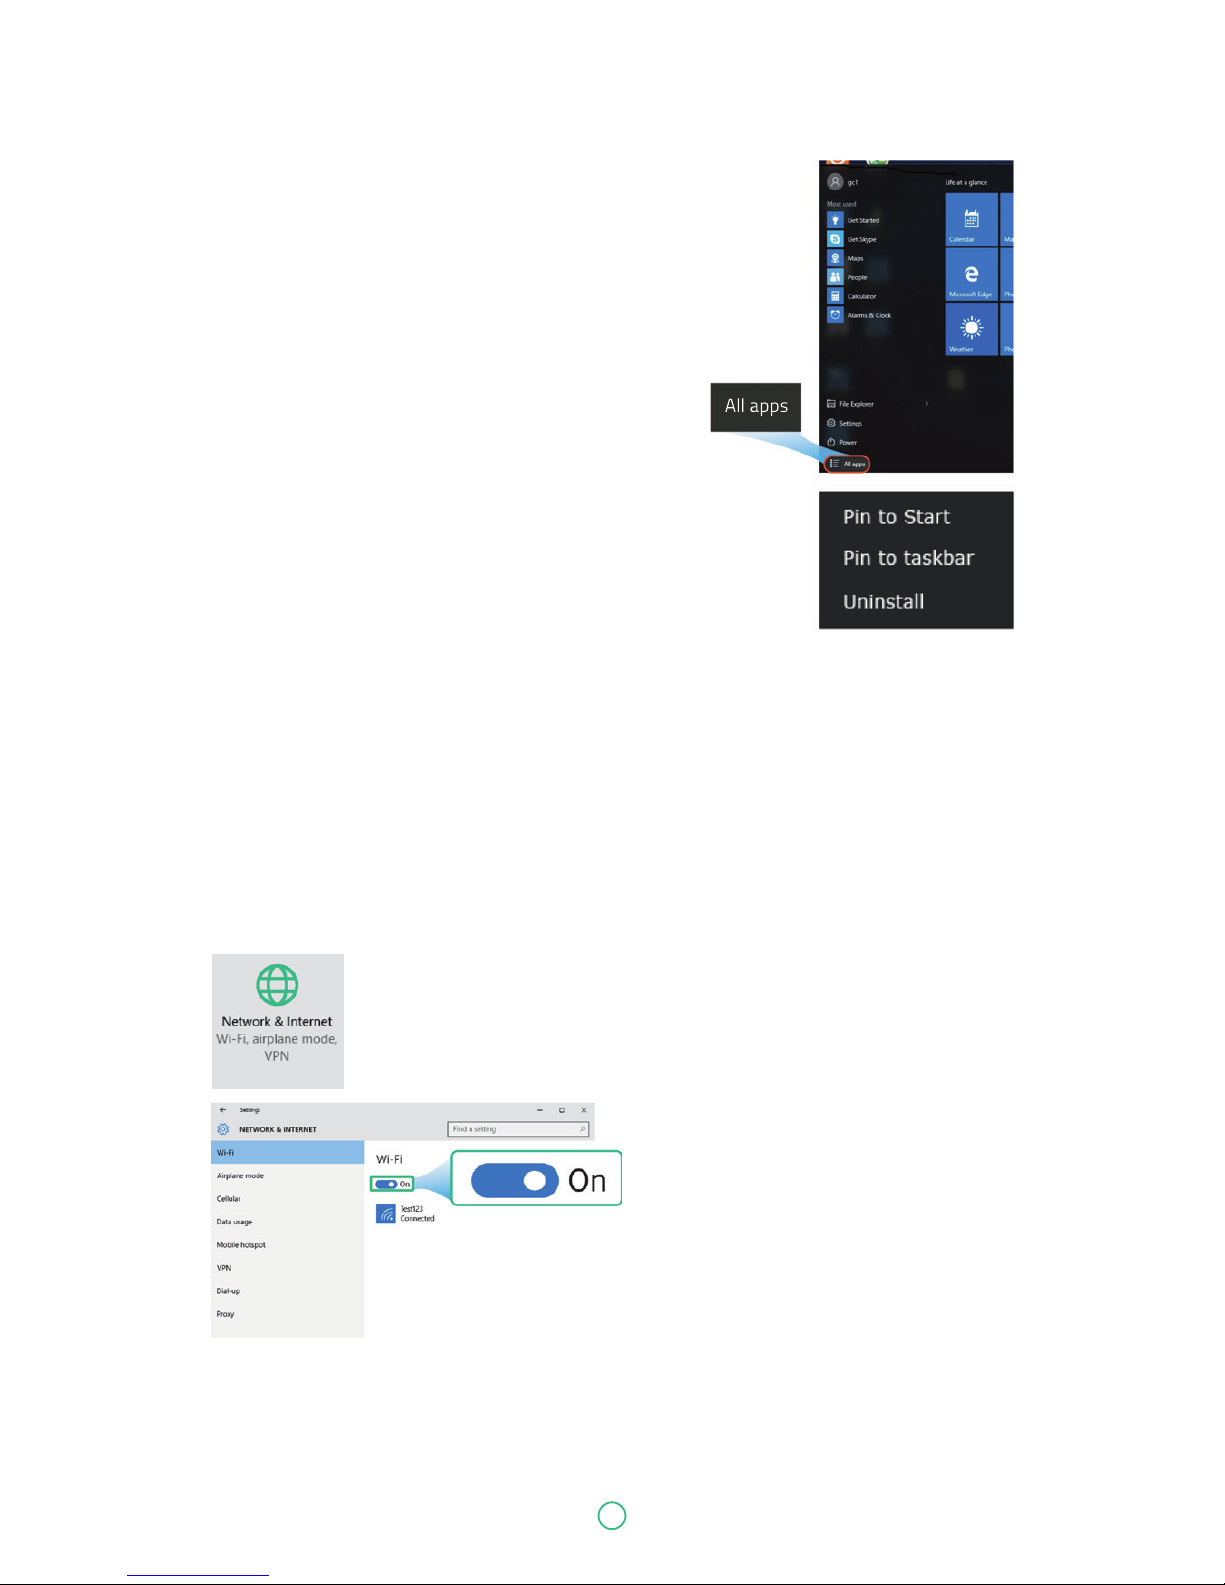
1. Open the Start menu and
select <All Apps> .
2. Right-click on the app that you
want to appear on your Start menu or
taskbar, and an option menu appears.
3. Click <Pin to Start> or <Pin to taskbar>to add
the app to your Start menu or taskbar.
Removing an App
To remove an app:
1. Right click the app that you want to remove from your Start menu or taskbar.
2. Click <Unpin from Start> or <Unpin from taskbar> to remove it from your Start menu or taskbar.
Wireless LAN
Enabling wireless connection
1. Open Settings menu and select <Network & Internet>.
2. Select <Wi-Fi> and set the function to ON, as shown below.
3. Make sure you have switched the Airplane mode off. To confirm that Airplane mode is disabled,
go to the desktop and check the notification area. If you see an airplane icon displayed on the
lower right, please disable the Airplane mode first.
Page 26
26
User Guide Predia Flex360
Connecting to a wireless LAN
Once the wireless has been enabled, the computer automatically scans for available wireless
networks and displays them in the wireless LAN network list. To connect to your desired wireless
network, click the network’s name in the list, and then click Connect.
Micro SD Card Slot
You can utilize your micro SD cards as removable disks and conveniently exchange data with
digital devices such as a digital camera, digital camcorder, MP3, etc.
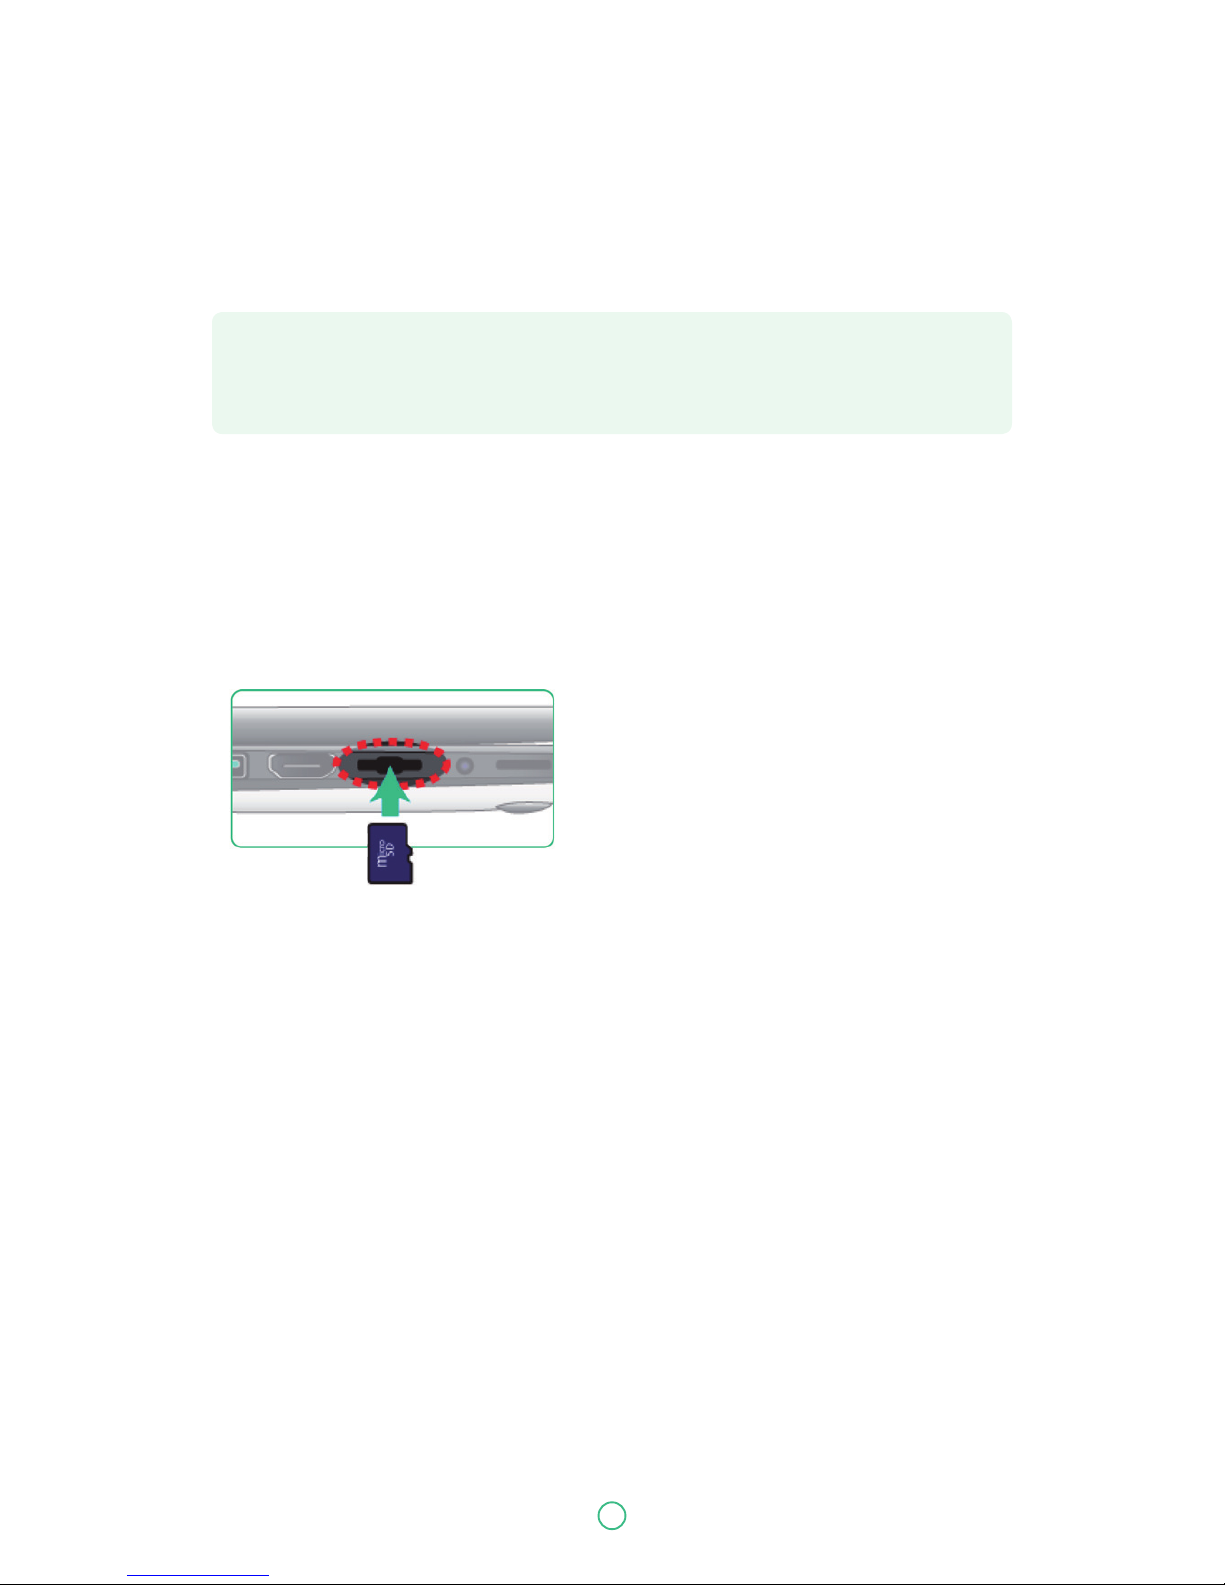
To insert your micro SD card
1. Insert the micro SD card into the card slot as shown below.
2. Follow the message on the screen, and choose to open and view files.
3. A Windows Explorer runs and shows all the folders and files in the micro SD cards, and you can
save, move and delete data as you are handling a storage device.
To remove your memory card
1. Press the card and release. The card will pop up.
2. Pull the card out by holding the end of the card.
Note: Some networks require a network security key or password for connection.
If necessary, ask the network administrator or the Internet service provider (ISP) for
the required information.
Page 27
27
User Guide Predia Flex360
Connecting an external device
Connecting to the USB port
Your computer comes with one USB 2.0 port and one USB 3.0 port compatible with USB devices.
Once you plug a USB device into a USB port on your computer, Windows automatically loads a
driver for that device. After the driver has been loaded one time, you can disconnect and reconnect
the same device without performing any additional steps.
Note: If Windows requires you to install the driver before connecting, check the
documentation provided by the device’s manufacturer before connecting the device.
Note: If your USB device uses a power cord, connect the device to a power source before
connecting it.
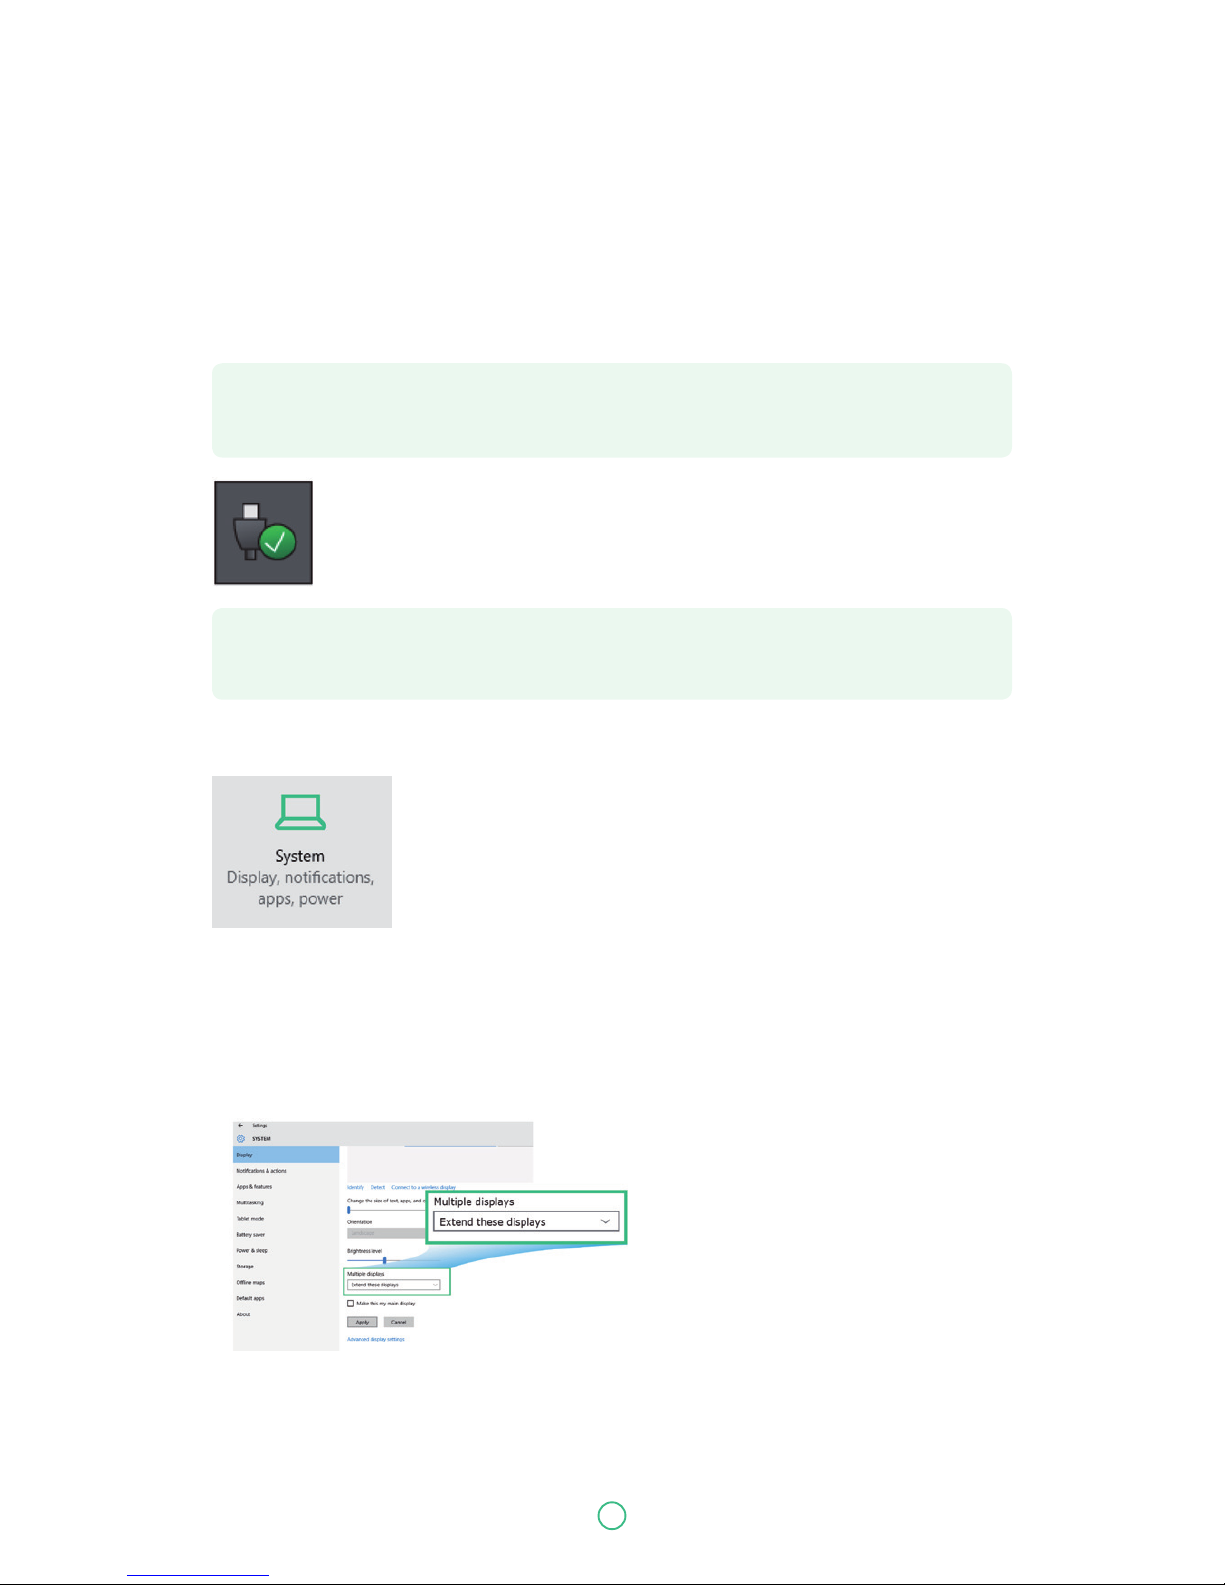
To disconnect a USB storage device, make sure you click the Safely Remove
Hardware icon (as shown on the left) in the notification area of the taskbar to
remove the device before disconnecting.
Connecting to the HDMI port
You can connect an external display device such as a monitor, TV, projector, etc., only if such device has a HDMI port. By doing so, you have a wider
view when you give a presentation or watch a video or movie.
1. Power off the external device.
2. Locate the HDMI port on your computer.
3. Connect one end of your HDMI cable to the port, and the other end to the HDMI port on the
external device.
4. Power on the external device. When connecting a TV, you may need to configure your TV to
external device mode.
5. Open the Settings screen, select <System>and then <Display>.
6. Click <Multiple displays> to open the drop-down list.
7. From the list, select your desired monitor mode.
8. Click <Apply> and confirm your setting.
Page 28
28
User Guide Predia Flex360
5. Battery
Charging your battery
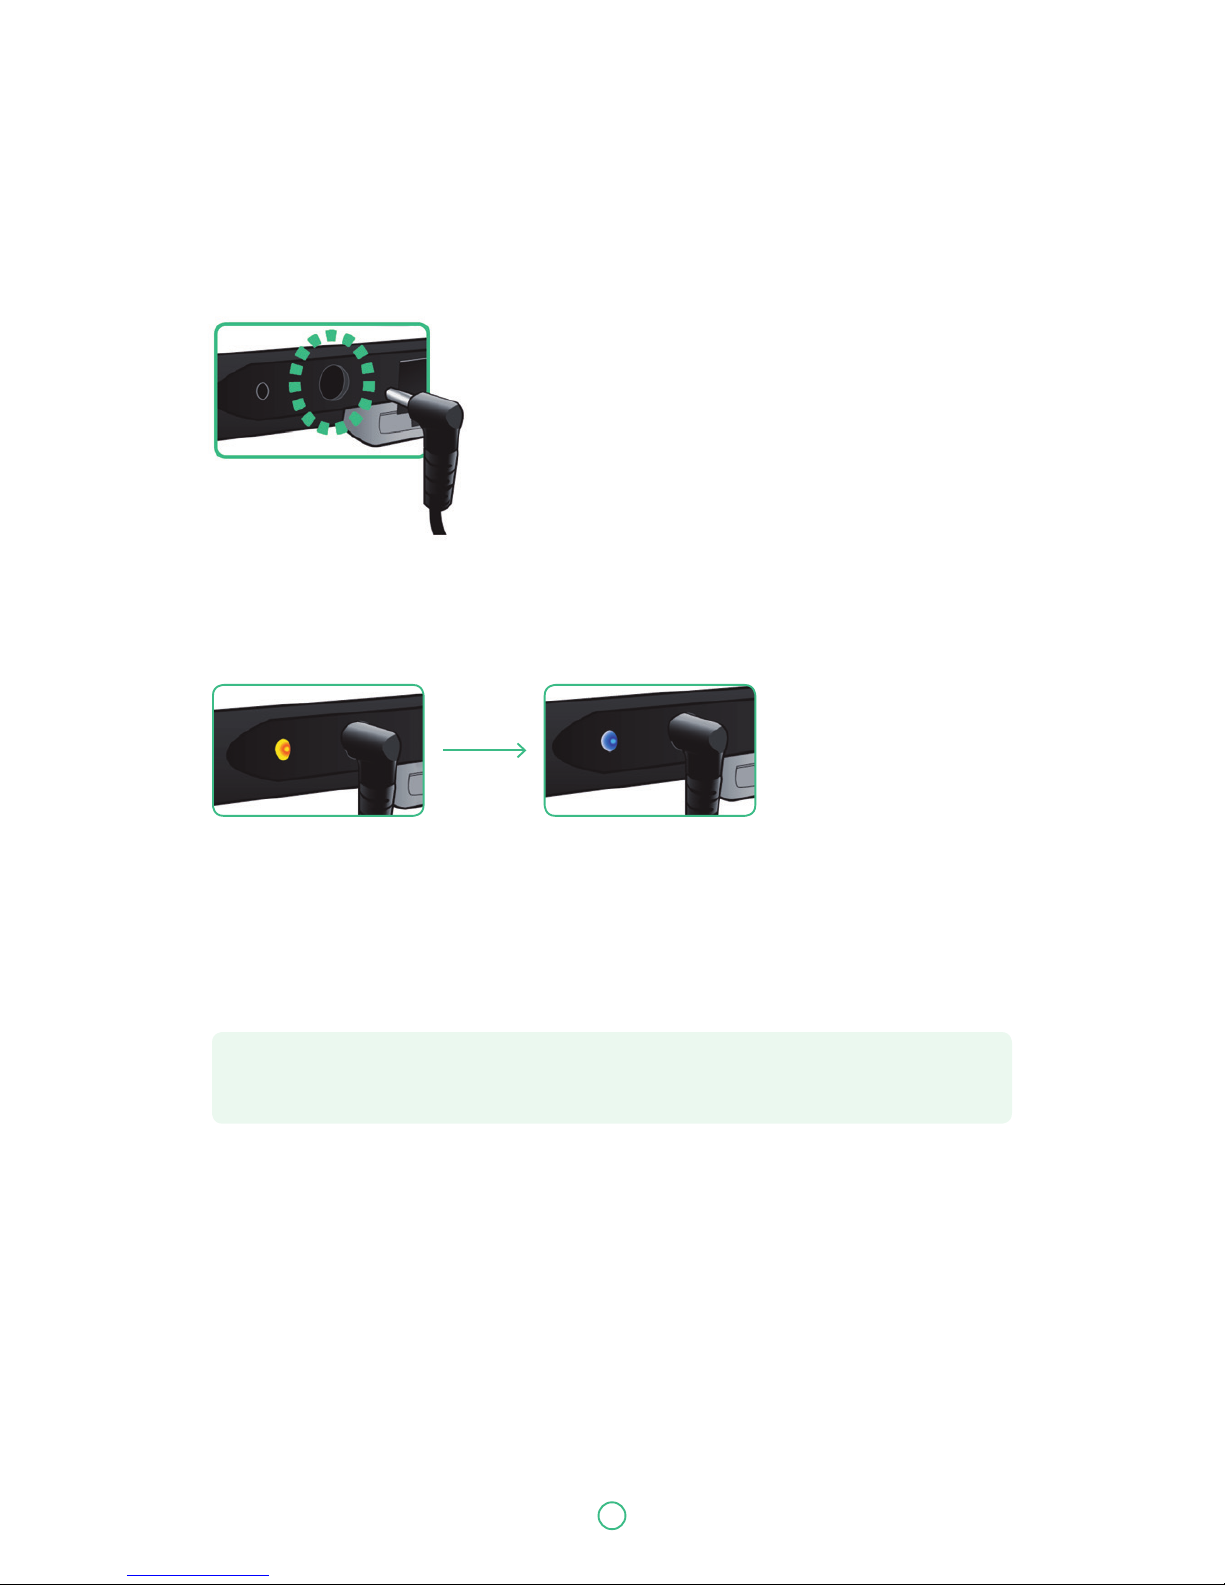
1. Plug the adapter into the DC-in, which you can find on the
left side of your laptop.
2. Plug the adapter into a wall-socket.
3. You shall see the battery indicator lights up in orange.
4. When the battery is fully charged, the battery indicator will turn into blue.
While system is off, it takes around 5 hours to fully charge the battery. After fully charged, the
battery Life reaches 6 hours on full HD video playback.
Note: If the remaining power in your battery capacity is 90% or above, plugging the adapter
will not fully charge your battery.
Page 29
29
User Guide Predia Flex360
Inspecting your battery status
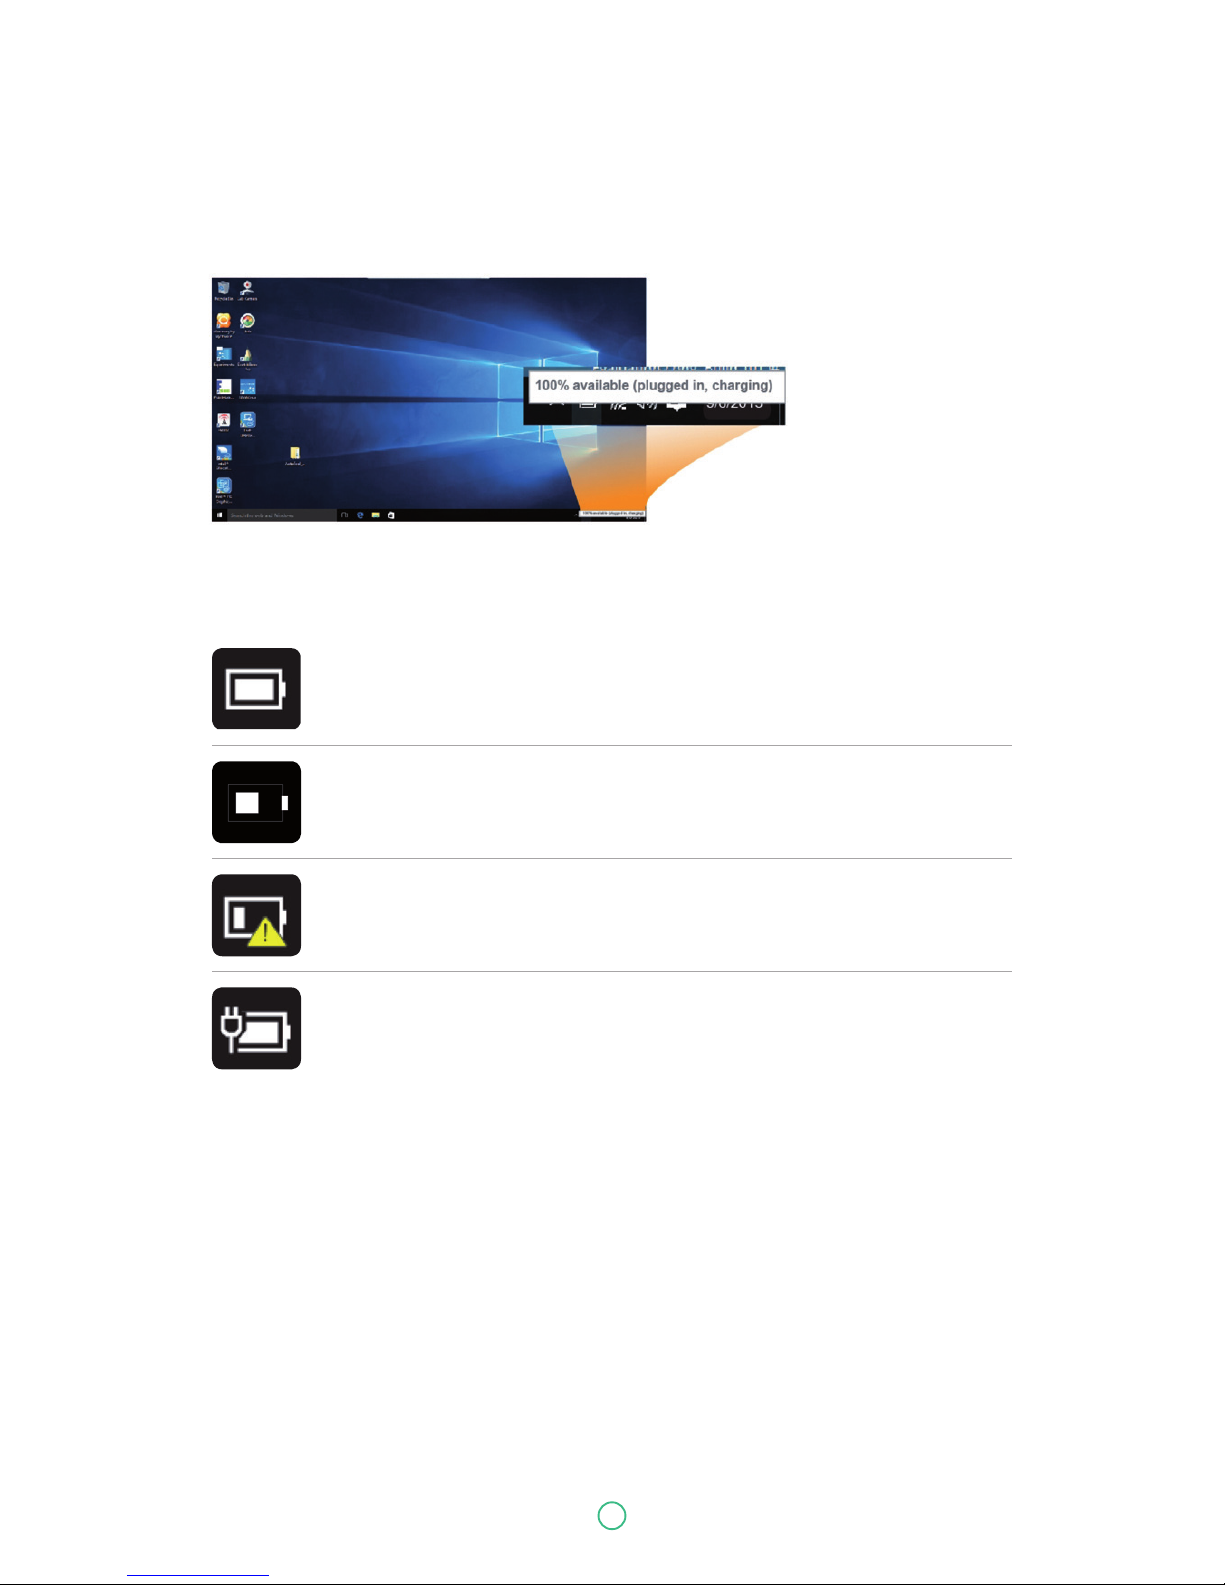
In Desktop, move the cursor to the battery icon in the taskbar. A pop-up dialog box appears and
shows you the remaining battery percentage, as shown below.
The battery icon reveals the status of your battery, which described as below.
Battery is fully charged
Battery is starting to drain
Battery is about to completely drain, and you should using your computer and
charge it at once
Battery is being charged
A battery is an expendable supply, so when using it over a long time, the capacity/battery life is
shortened. If the battery life is reduced to under half of its initial time, we recommend purchasing
a new battery.
When not using the battery for a long time, store the battery after charging it to 30-40% of its
capacity. This extends the battery life time.
Page 30

30
User Guide Predia Flex360
6. Windows Help and
Troubleshooting
Troubleshooting
This section describes some common problems and suggested solutions, and ways to recover your
computer from a crash.
Be aware that the problems and solutions described here are meant only as a guide. They are not
definitive problem solving techniques. For certain problems, you might need help from your reseller or your service provider.
When you observe a problem, stop operation immediately, because taking further action might result in data loss or damage. Take a note of what the system is doing and what actions you performed before the problem occurred. Provide detailed information to your service provider for quicker
problem resolution.
For about any problem, follow these steps:
1. Restart your laptop.
2. Check your Wi-Fi connection.
3. Reset your Wi-Fi connection.
4. Plug your laptop to a wall socket to charge it for at least one hour.
Page 31

31
User Guide Predia Flex360
Screen problems
Sleep problems
When I turn on the computer,
nothing appears on the screen.
My screen goes blank while
the computer is on.
The critical low-battery error
message appears, and
the computer turns off
The computer enters sleep mode
immediately after Power-on.
The computer does not return
from sleep mode and the computer does not work.
• If the screen is blank, make sure that:
- The AC adapter is connected to the computer and the
power cord is plugged into a working electrical outlet.
- The computer power is on. (Press the power button 6
seconds to force the power off, and power it on again.)
• If these items are properly set, and the screen remains
blank, have the computer serviced.
• Your laptop is in its sleep mode. Do one of the following
to resume from sleep mode:
- Press any key on the keyboard for 2 to 3 seconds.
- Press the power button.
- Press the windows key button.
• The battery power is getting low. Connect the AC adapter
to the computer.
• Make sure that the battery is charged.
- The operating temperature may be too hot. Move to a
cooler environment and try to wake the computer.
• If your computer is in sleep mode, connect the AC adapter
to the computer, then press the key button or the power
button.
• If your computer is powered-off, connect the AC adapter
to the computer, then press the power button to resume
operation.
Page 32

32
User Guide Predia Flex360
Display problem
Sound problems
Other problems
The screen is blank.
The screen is unreadable
or distorted.
Incorrect characters appear
on the screen.
No sound can be heard from the
speaker even when the volume is
turned up.
Your computer does not respond.
The connected external device
does not work.
• Do the following:
- If you are using the AC adapter, or using the battery, and
the battery status indicator is on, press Fn+F11 to make
the screen brighter.
- Press the power button to resume from sleep mode.
- If the problem persists, follow the solution in the next
problem "The screen is unreadable or distorted."
• Make sure that:
- The screen resolution and color quality are correctly set.
- The monitor type is correct.
• Are the operating system or programs installed correctly?
If they are installed and configured correctly, have the
computer serviced.
• Make sure that:
- The Mute function is off.
- The combo audio jack is not being used.
- Speakers are selected as the playback device.
• To turn off your computer, press and hold the power but-
ton for 6 seconds or more. If the computer still does not
respond, remove the AC adapter.
• Your computer might lock when it enters sleep mode du-
ring a communication operation. Disable the sleep timer
when you are working on the network.
• Do not connect or disconnect any external device cables
other than USB while the computer power is on. Otherwise, you might damage your computer.
• When using a high power consumption external device
such as an external USB optical disk drive, use an external
device power adapter. Otherwise, the device may not be
recognized.
Page 33

33
User Guide Predia Flex360
7. Specification
Tablet
Processor
Memory
Storage
Dimension
Weight
Wireless
Touchscreen
Cameras
Battery
• Intel® SOC Celeron® Processor: N3000/N3010
• 2 GB/4GB
• DDR3L single channel, 1600MT/s (max.)
• Single 2.5" 7mm SATA HDD/SSD
• 5400rpm
• 320GB/500GB
• SSD 128GB
• 307 x 206.5 x 25.9mm
• 1.56 kg
• AW-NB177NF
- Wi-Fi 802.11 B/G/N (2.4GHz)
- Bluetooth 4.0 LE
• AW-CM217
- Wi-Fi 802.11 a/b/g/n/ac
- Bluetooth 4.0 LE
- Miracast support
• TFT Color LCD, LED Backlight
• 11.6" with 1366 X 768 (HD)
• 10 point touch
• Windows 10 desktop certified touch solutions
• 2.0M, w/o flash LED
• Resolution support 2M (4:3 format) still image and HD720P (1280x720,16:9)
motion image.
• Rotate angle: -35 ~ +200deg.
• 2cell ,5200mAh with 1S2P
Page 34

34
User Guide Predia Flex360
Input/Output
Speaker & Mic
Language
AC adapter
• 1 x DC-in jack
• 1 x USB 2.0 port
Supports USB Charger Function
• 1 x USB 3.0 port
• 1x HDMI port
• 1x RJ-45 LAN port
• 1x Micro SD Card slot
• 1 x combo Audio jack
Speaker :
• Build-in 2 Speakers (1.5 W)
Microphone:
• one digital microphone (Default)
• English
• Spanish
• Portuguese
• Arabic
• Turkish
• Russian
• Simplified Chinese
• Thai
• Greek
• Hungarian
• Traditional Chinese
• German
• Hebrew
• Italian
• Latin Spanish
• Brazil Portuguese
• French
• DC Output: 12V/24W
• Input Voltage: From 100-240VAC Nominal
• Input Frequency: From 50-60Hz.
• Model no:
- APD: WA-24Q12FU-EAAJ
Page 35

35
User Guide Predia Flex360
Certification
Safety &
Environment
Others
EMC • CE
• FCC
• NCC
RF • FCC&SAR / R&TTE
• UL / CB
• CCC / CEL
• WEEE
• RoHS (Restriction of Hazardous Substances, EU directive 2011/65/EU)
• HDMI 1.4a
• UL 696
• CPSIA
• Vibration test: MIL-STD-810F/EN-60068
• Drop test: MIL-STD-810F/GB/ T4857 (70 cm)
• Acoustic test: ISO3745/ISO7779
• Water Resistance 100cc on keyboard and A, B face
• Dust proof IP4 on A, B face only.
 Loading...