

Page 1
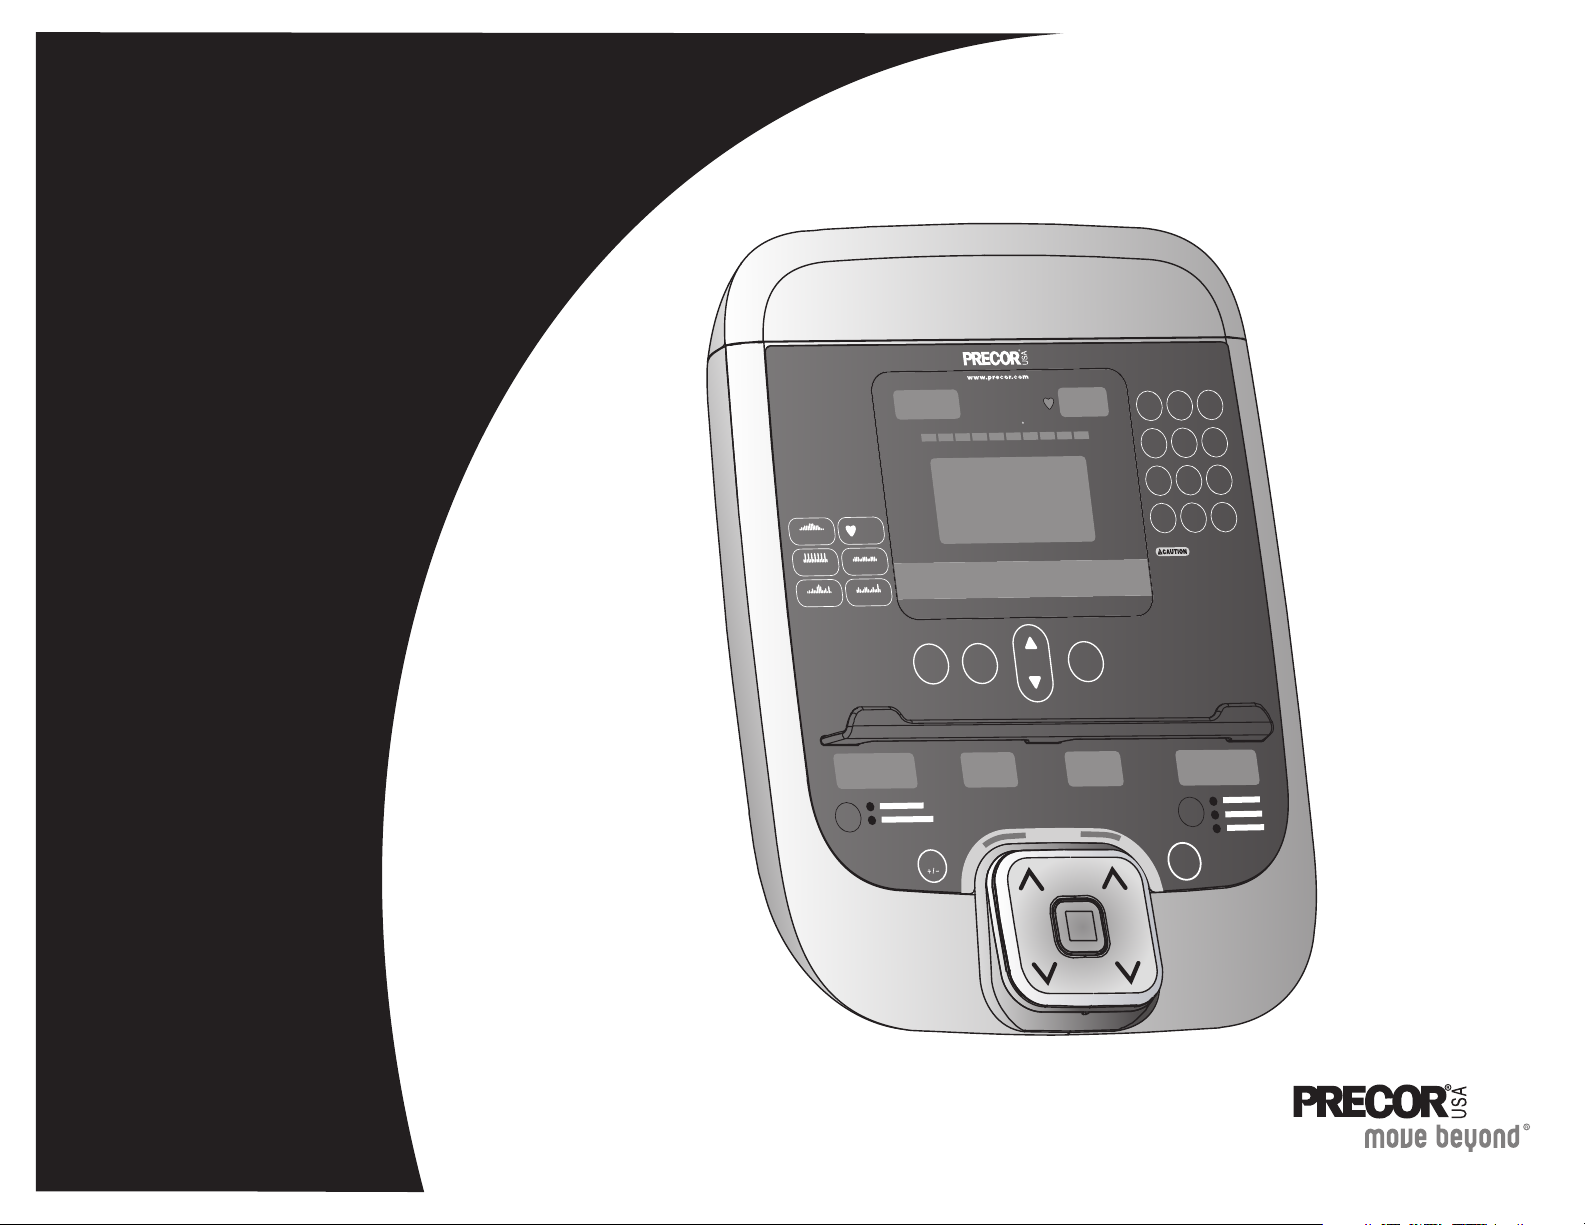
OPTIONS
BACK
OK
HEART RATE
ENTER
CLEAR
123
456
789
0
PROGRAMS
WARMUP FATBURN CARDIO PEAK HIGH
SmartRate
CALORIES
MANUAL
WEIGHT LOSS
HEART
RATE
PERFORMANCE
INTERVAL
VARIETY
Before beginning any tness
program, see your physician for a thorough physical
examination. Seek advice from your physician to learn the
target heart rate appropriate for your tness level. Do not
allow children or those unfamiliar with its operation on or
near this equipment. Read the product owner's manual or
consult a qualied instructor before operating this
equipment. Improper use of this equipment can result in
serious injury. If you feel pain, faintness, or dizziness,
stop exercising immediately.
QUICK
START
TIME
PAUSE/
RESET
Product Owner's Manual
Commercial Products
Treadmills:
• 946i
•956i
• 966i
Ellipticals:
•EFX546i
•EFX556i
• EFX576i
Cycle:
• 846i
Climber:
•776i
Page 2

Page 3

Important Safety Instructions
When using Precor equipment, always take basic precautions,
including the following:
y
Read all instructions before using the equipment. These
instructions are written to educate patrons and other users in
the proper use of the equipment.
y
Other sections in this manual provide more details of safety
features. Be sure to read these sections and observe all safety
notices.
y
Before beginning any fitness program, make sure all users see a
physician for a complete physical examination.
Il est conseillé de subir un examen médical complet avant
d’entreprendre tout programme d’exercise. Si vous avez des
étourdissements ou des faiblesses, arrêtez les exercices
immédiatement.
DANGER
WARNING
Before cleaning it, always unplug the
equipment from its power source to reduce
the risk of electric shock. Before cleaning
self-powered equipment, disconnect the
optional power adapter.
To reduce the risk of burns, fire, electric shock,
or injury, take the following precautions:
y
Do not allow children or people unfamiliar with its operation on
or near the equipment. Do not leave children unsupervised
around the equipment.
y
Never leave the equipment unattended when it is plugged in.
Unplug the equipment from the power source when it is not in
use, before cleaning it, and before providing authorized service.
Note: The optional power adapter is considered an electrical
power source for self-powered equipment.
y
Keep all electrical components away from liquids to prevent
shock.
y
Assemble and operate the equipment on a solid, level surface.
Locate the equipment a few feet from walls or furniture.
y
Maintain the equipment in good working condition. Refer to
Maintenance.
y
If you plan to move the equipment, obtain help and use proper
lifting techniques. For more information, refer to Moving the
Equipment.
y
Use the equipment only for its intended purpose as described in
this manual. Do not use accessory attachments that are not
recommended by the manufacturer, as such attachments may
cause injuries.
Product Owner's Manual: Important Safety Instructions 1
Page 4

y
Never operate the equipment if it is damaged, not working
properly, when it has been dropped, or has been immersed in
water. Return the equipment to a service center for examination
and repair.
y
Keep the power cord or optional power adapter and plug away
from heated surfaces.
y
Do not operate the equipment where aerosol (spray) products
are being used or where oxygen is being administered.
y
Do not use outdoors.
y
Do not attempt to service the equipment yourself except to
follow the maintenance instructions found in this manual.
y
Never drop or insert objects into any opening. Keep hands away
from moving parts.
y
Do not set anything on the stationary handrails or handlebars,
display console, or covers. Place liquids, magazines, and books
in the appropriate receptacles.
Safety Code
The club owner or manager has the option to enable the safety
code. The code involves entering four number keys in sequence. If
the correct keys are not pressed within two minutes, further user
access is denied. For more information, refer to Treadmill Safety
Features and Club Features.
Safety Approval
When identified with the ETL-c logo, the equipment has been
tested and conforms to the requirements of
CAN/CSA-E-335-1/3-04, EN 60335-1: 2002 Safety of Household
and Similar Electrical Appliances. This equipment is a Class S/B or
C certified machine according to applicable EN957 standards.
Product Owner's Manual: Important Safety Instructions 2
Page 5

Educating Users
Product Recycling and Disposal
Take time to educate users on the safety instructions found in both
the User’s Reference Manual and Product Owner’s Manual.
Explain to your club or facility patrons that they should:
y
Hold onto a stationary handrail or handlebar while stepping onto
the equipment or when getting comfortably seated on the cycle.
y
Face the display at all times.
y
Hold on to a stationary handrail or handlebar with one hand
whenever reaching with the other hand to touch the display
keys.
y
On treadmills: straddle the running belt and attach the safety
clip to clothing at waist level before touching the display.
Important: For safety, make sure users step onto the running
belt while it is moving at or below 1 mile per hour (1 kilometer
per hour).
Hazardous Materials and Proper Disposal
This equipment must be recycled or discarded according to
applicable local and national regulations.
Product labels, in accordance with European Directive
2002/96/EC concerning waste electrical and electronic equipment
(WEEE), determine the framework for the return and recycling of
used equipment as applicable throughout the European Union. The
WEEE label indicates that the product is not to be thrown away,
but rather reclaimed upon end of life per this Directive.
In accordance with the European WEEE Directive, electrical and
electronic equipment (EEE) is to be collected separately and to be
reused, recycled, or recovered at end of life. Users of EEE with the
WEEE label per Annex IV of the WEEE Directive must not dispose
of end of life EEE as unsorted municipal waste, but use the
collection framework available to customers for the return,
recycling, and recovery of WEEE. Customer participation is
important to minimize any potential effects of EEE on the
environment and human health due to the potential presence of
hazardous substances in EEE. For proper collection and treatment,
refer to Obtaining Service.
The self-powered equipment has an internal battery which contains
materials that are considered hazardous to the environment. Proper
disposal of the battery is required by federal law.
If you plan to dispose of your equipment, contact Precor
Commercial Products Customer Support for information regarding
battery removal. Refer to Obtaining Service.
Product Owner's Manual: Important Safety Instructions 3
Page 6

Radio Frequency Interference (RFI)
European Applications
Federal Communications Commission, Part 15
This equipment has been tested and found to comply with the limits
for a Class A digital device, pursuant to Part 15 of the FCC Rules.
These limits are designed to provide reasonable protection against
harmful interference in a commercial installation. The equipment
generates, uses, and can radiate radio frequency energy and, if not
installed and used in accordance with the owner’s manual
instructions, may cause harmful interference to radio
communications.
WARNING
Per FCC rules, changes or modifications not
expressly approved by Precor could void the
user’s authority to operate the equipment.
Industry Canada
This Class A digital apparatus complies with Canadian ICES-003.
Cet appareil numérique de la classe A est conforme à la norme
NMB-003 du Canada.
This product is compliant to:
y
2004/108/EC Electromagnetic Compatibility Directive.
y
2006/95/EC Low Voltage Directive.
y
2002/95/EC Restriction of Hazardous Substances Directive.
This product conforms to the requirements of the European
Council Directive 89/336/EEC, 2004/108/EC Electromagnetic
Compatibility and has been tested to the following standards:
y
EN55022, Limits & Methods of Measurement of Radio
Interference, Information Technology Equipment.
y
EN55024, Immunity of Information Technology Equipment.
This product also conforms to the requirements of the European
Council Directive 73/23/EEC, 2006/95/EC Low Voltage Directive
and has been tested to the following standard:
y
IEC 335-1, EN60335-1 Safety of Household and similar
Electrical Appliances.
ATTENTION: Haute Tension
Débranchez avant de réparer
Product Owner's Manual: Important Safety Instructions 4
Page 7
Treadmill Grounding Instructions
The treadmill must be grounded. If the equipment malfunctions or
breaks down, grounding provides a path of least resistance for
electric current, which reduces the risk of electrical shock. The
treadmill has a power cord having an equipment-grounding
conductor and a grounding plug. The plug must be inserted into an
outlet that is properly installed and grounded in accordance with all
local codes and ordinances. Failure to properly ground the treadmill
could void the Precor Limited Warranty.
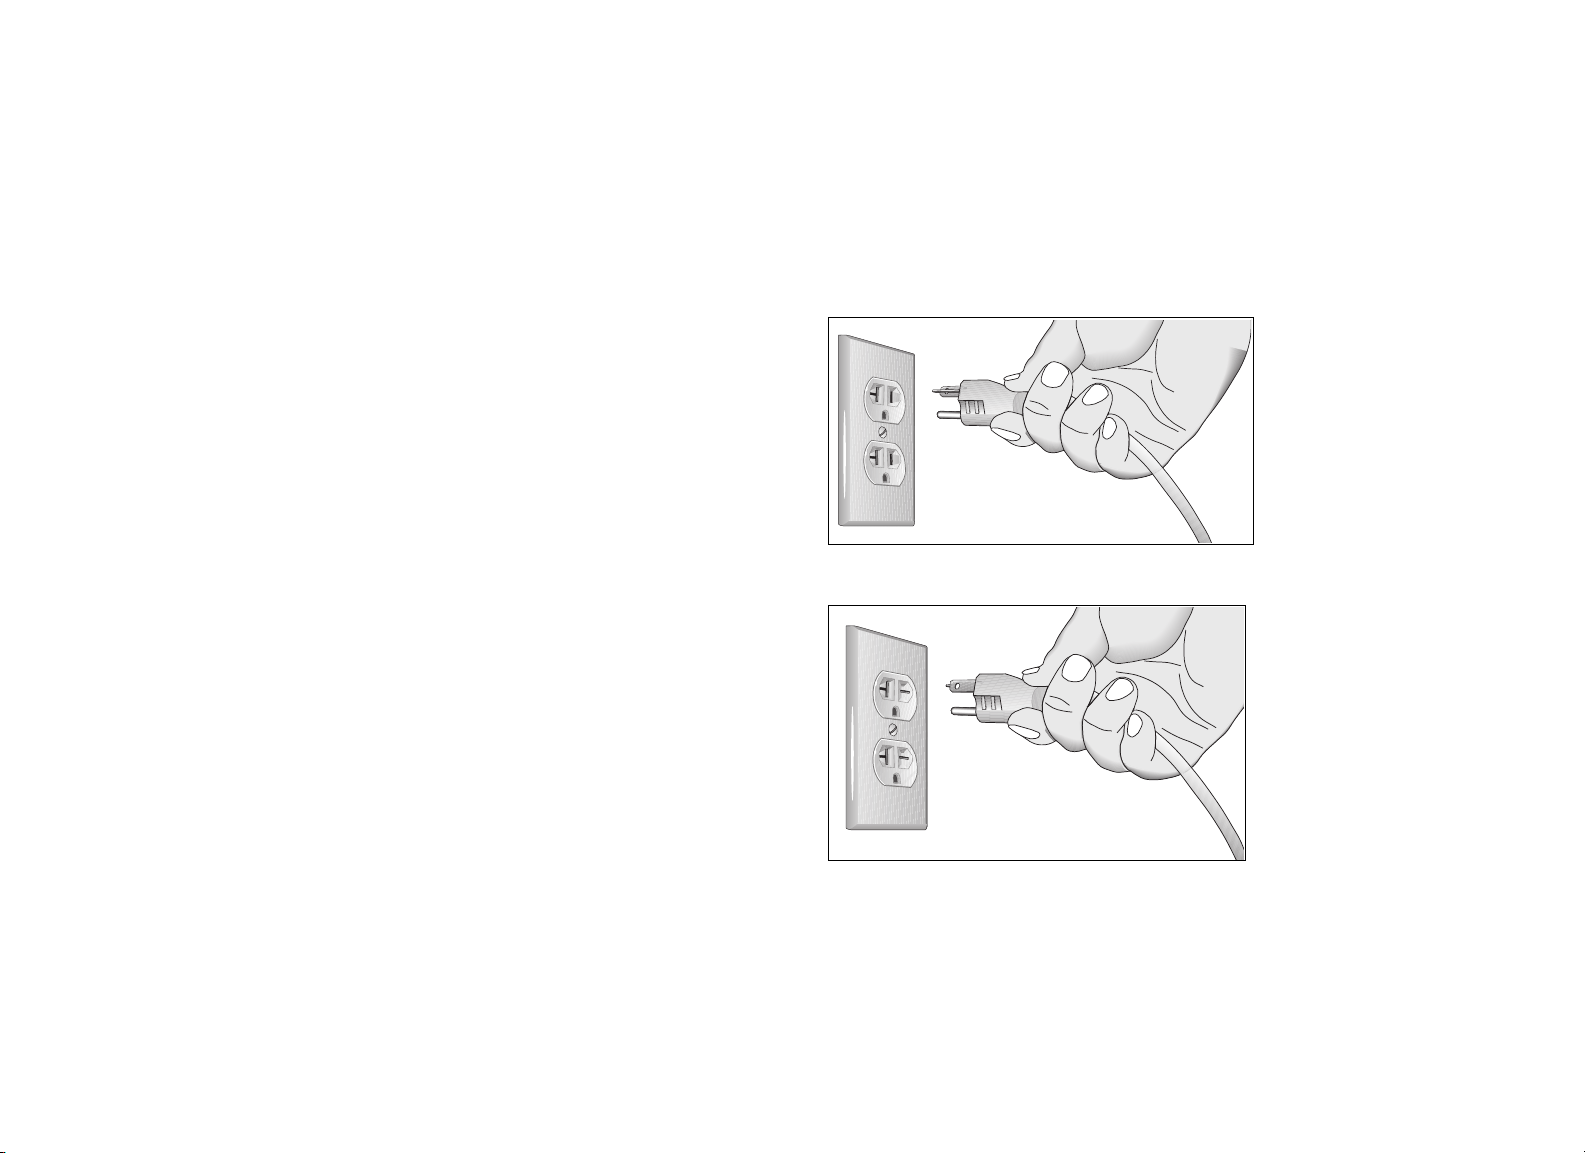
120 V and 240 V Equipment Designated
for U.S. Markets
The treadmill must be connected to a dedicated, grounded circuit.
A 20-amp dedicated circuit is recommended. The equipment’s
grounding plug looks like the plug shown in one of the following
figures. The power outlet must have the same configuration as the
plug. No adapter should be used with this product.
DANGER
Improper connection of the equipment-grounding
conductor can result in a risk of electric shock.
Check with a qualified electrician or service
person if you are in doubt as to whether the
equipment is properly grounded. Do not modify
the plug provided with the treadmill. If it does not
fit the outlet, get a proper outlet installed by a
qualified electrician.
Figure 1: 120-volt power plug
Figure 2: 240-volt power plug
Product Owner's Manual: Important Safety Instructions 5
Page 8

Obtaining Service
Model #: _______ Base Serial #: _______________________
You should not attempt to service the equipment except for
maintenance tasks described in this manual. For information about
product operation or service, see the Precor web site at
www.precor.com. Should you need more information regarding
customer support numbers or a list of Precor authorized service
centers, visit the Precor web site at www.precor.com/corp/contact.
For future reference, write the model, serial number, and date of
purchase for all your equipment in the space provided. The serial
number is printed on a label located near the power cord
connection (treadmills) or receptacle (self-powered equipment).
Display Serial #: _______________________
Date purchased: _______________________
Model #: _______ Base Serial #: _______________________
Display Serial #: _______________________
Date purchased: _______________________
Model #: _______ Base Serial #: _______________________
Display Serial #: _______________________
Date purchased: _______________________
Model #: _______ Base Serial #: _______________________
Display Serial #: _______________________
Date purchased: _______________________
Product Owner's Manual: Important Safety Instructions 6
Page 9

Table of Contents
Important Safety Instructions............................................1
Safety Code.....................................................................................2
Safety Approval .............................................................................. 2
Educating Users............................................................................. 3
Hazardous Materials and Proper Disposal............................... 3
Product Recycling and Disposal ................................................3
Radio Frequency Interference (RFI)...........................................4
European Applications..................................................................4
Treadmill Grounding Instructions ...............................................5
Obtaining Service ..........................................................................6
Treadmill Safety Features ..................................................8
Entering the Safety Code.............................................................8
Using the Safety Clip.....................................................................8
Turning the Treadmill On and Off...............................................9
Weight Limit ....................................................................................9
Location............................................................................................9
Self-Powered Features......................................................10
Informational Displays Prior to Shutdown...............................10
Symptoms of a Low Battery.......................................................11
Using the Optional Power Adapter..........................................11
The Optional Power Adapter Kit...............................................12
Replacing the Battery..................................................................12
Club Features.......................................................................13
Club Programming Tips..............................................................14
Accessing Club Programming Mode and
Changing the Settings................................................................16
Treadmill: Selecting Safety Code Protection.........................19
Choosing a Language.................................................................20
Selecting a U.S. Standard or Metric Display......................... 20
Setting an Exercise Session Time Limit..................................21
Setting a Pause Time Limit........................................................22
Setting a Cool-Down Time Limit ..............................................22
Treadmill: Determining the Club Speed Limit .......................23
Treadmill: Setting an Incline Limit ............................................23
Treadmill: Accessing Performance Programs.......................24
Treadmill: Changing Remote Control Access.......................25
EFX: Changing the Auto-Level Setting...................................26
Cycle: Setting a Resistance Range......................................... 27
Creating a Custom Program .....................................................28
Informational Displays.................................................................29
User ID Entry with CSAFE Equipment....................................32
Maintenance.........................................................................33
Daily Inspection............................................................................33
Daily Cleaning............................................................................... 33
EFX: Cleaning the Ramp............................................................ 34
Storing the Chest Strap ............................................................. 34
Treadmill: Checking the Alignment of the Running Belt.....35
Treadmill: Adjusting the Running Belt..................................... 36
Upright Cycle: Adjusting the Seat Tilt.....................................37
Recumbent Cycle: Realigning the Seat..................................38
Moving the Equipment................................................................39
Long-Term Storage .....................................................................39
Precor Commercial Equipment
Limited Warranty.................................................................41
Product Owner's Manual: Table of Contents 7
Page 10

Treadmill Safety Features
Before allowing users on Precor equipment, review the Important
Safety Instructions found at the beginning of this manual. You
should also teach your patrons how to safely use the equipment
following the guidelines in Educating Users.
Entering the Safety Code
When the equipment is shipped from the factory, the safety code
protection feature is disabled. If you wish to enable the safety code,
refer to Club Features. Inform users that the equipment requests a
safety code to help prevent unauthorized use. When users select a
program or press QUICKSTART at the PRECOR banner, the
following prompt appears:
Using the Safety Clip
Instruct users how important it is to use the safety clip while
exercising on the treadmill. Instruct them on how to attach it to their
clothing near their waistline. If any complications occur, a strong
tug on the safety lanyard will stop the running belt.
If the safety switch trips while users are exercising, have them
reattach the safety clip, press the SPEED up key or QUICKSTART
and reenter the safety code, if necessary.
Note: The treadmill retains users’ workout statistics if they resume
their workout within the limit set for pause mode.
ENTER SAFETY CODE TO UNLOCK MACHINE
Users have two minutes to press the following number key
sequence and continue their workout: 1, 2, 3, 4.
Important: Tell users to hold onto the handrail with one hand
before entering the safety code with the other hand.
If the correct keys are pressed, the program selection process
begins. If the code is incorrect, the display prompts the user to
reenter the code after a 2-minute time out.
Note: On the treadmill, a 3-second countdown appears on the
display, and then the running belt starts moving. Refer to Workout
Options in the User’s Reference Manual.
Product Owner's Manual: Treadmill Safety Features 8
Figure 3: Attaching the safety clip
Safety Clip
Lanyard
Page 11

Turning the Treadmill On and Off
Location
To turn the treadmill On and Off, use the power switch located
beneath the hood, near the power cord receptacle.
Important: When it is not being used, turn the treadmill Off.
Weight Limit
You should not allow runners over 350 lb. (160 kg) or walkers
heavier than 500 lb. (225 kg) on the treadmill.
It is important to keep the area around the treadmill open and free
from encumbrances such as other equipment. The minimum space
requirement needed for user safety and proper maintenance is
three feet wide by six feet deep (one meter wide by two meters
deep), directly behind the running belt.
Product Owner's Manual: Treadmill Safety Features 9
Page 12

Self-Powered Features
On self-powered equipment, the battery initializes and displays the
Precor banner when a user starts exercising. A minimum rate of
motion must be maintained for the banner to appear, as shown in
the following table. When a person meets the requirements, the
power that is generated allows the equipment to function properly.
Table 1. Minimum requirements for operation
Equipment Rate of Motion
AMT 56 strides per minute (SPM)
EFX 40 strides per minute (SPM)
Climber 30 steps per minute
Cycle 20 revolutions per minute (RPM)
Informational displays appear when the battery is low or when the
rate of motion drops below the minimum requirements. The display
explains what to do to retain power. If the messages are ignored,
the equipment begins shutdown procedures to maintain the charge
of the battery. Refer to Informational Displays Prior to Shutdown.
Informational Displays Prior to Shutdown
The equipment saves its battery charge by moving into a shutdown
mode. If the user does not maintain the minimum rate of motion, a
30-second shutdown process begins.
Dots appear in the display and all key presses are ignored. If no
movement is detected or the rate of motion remains below the
minimum, the dots steadily disappear as the countdown continues.
Note: The user can resume exercising if he or she begins before
the countdown period elapses.
Important: If the equipment is connected to a CSAFE master
device, a slightly different scenario occurs. When ten seconds
remain before the equipment shuts off, the exercise session ends.
RESETTING
disconnects from the CSAFE master device. All key presses are
ignored.
appears in the display while the equipment
An optional power adapter can be purchased and provides
sustained power to the equipment. If you plan to change the club
settings, the power adapter is highly recommended. To purchase
the optional power adapter, check with your dealer. Refer to
Obtaining Service.
Product Owner's Manual: Self-Powered Features 10
Page 13

Symptoms of a Low Battery
Using the Optional Power Adapter
If no one has used the equipment for an extended period of time,
the battery may need recharging.
Symptoms of a low battery include:
y y A flickering or erratic display
User and program information is lost once the user stops
exercising. No workout summary or notification of pending
shutdown occurs.
Important: To maintain a constant power source, use the optional
power adapter.
After connecting the power adapter to the equipment, plug the
opposite end into the appropriate power source 120 V or 240 V.
CAUTION: When the optional power adapter is in use, make sure
that the power supply cord does not create a safety hazard. Keep
it out of the way of traffic and moving parts. If the power supply
cord or power conversion module is damaged, it must be
replaced.
The display functions differently when the power adapter is
connected. Because the power adapter provides a constant source
of power, a user can pause for brief periods without initiating
shutdown procedures. When the pause time limit expires and the
user has not resumed exercising, the display returns to the Precor
banner. Refer to Setting a Pause Time Limit. To learn how to install
the power adapter, refer to The Optional Power Adapter Kit.
Product Owner's Manual: Self-Powered Features 11
Page 14

The Optional Power Adapter Kit
Replacing the Battery
If you purchase the optional power adapter, you must also
purchase the internal cable kit. The kit supplies the cable, bracket,
and fasteners that connect the power adapter to the lower
electronics board.
CAUTION: The internal cable kit must be installed by authorized
service personnel. Do not attempt installation on your own as
you could void the Precor Limited Warranty. For more
information, refer to Obtaining Service.
Once the internal cable kit is installed, you can plug the optional
power adapter into the equipment. Plug the opposite end into the
appropriate power source for your equipment 120 V or 240 V.
Review the safety instructions found at the beginning of this manual
before using the power adapter.
The equipment’s battery is built to last for a long time. However, if
you feel that the battery may need replacing, check with an
authorized service technician. Refer to Obtaining Service.
CAUTION: The battery stored inside the equipment contains
hazardous materials and must be disposed of according to
Hazardous Waste Regulations. Refer to Hazardous Materials
and Proper Disposal.
Product Owner's Manual: Self-Powered Features 12
Page 15

Club Features
These next few pages explain how to customize the equipment for
your club or facility and view useful product information. All these
features remain hidden to the patrons and can only be accessed
using special key presses. Read this section if you want to:
y
Enable or disable the safety code (treadmill)
y
Change the display to a different language
y
Change the display to show U.S. standard or metric
measurements
y
Set the maximum exercise and pause times
y
Set a cool-down time limit
y
Set the maximum speed and incline (treadmill)
y
Enable or disable hidden programs or remote access (treadmill)
y
Change the auto-level setting (EFX)
y
Set the resistance range (cycle)
y
Customize a program
y
View the odometer
y
Display the number of hours the equipment has been in use
y
View the software versions and part numbers
y
Display the serial number
y
Check the program usage and error logs
Note: To review the club programming prompts and factory
default settings that can be changed through club programming
mode, refer to the following table.
Product Owner's Manual: Club Features 13
Page 16

Club Programming Tips
y
Always start at the Precor banner.
y
Electrical power must be supplied. For self-powered equipment,
a constant power source is available if you use the optional
power adapter, otherwise you will have to maintain the minimum
rate of motion. Refer to Self-Powered Features. If you plan to
program self-powered equipment, purchasing the optional
power adapter is highly recommended.
Note: If you do not use the optional power adapter during club
programming mode, and the rate of motion falls below the
minimum requirements, no warning is given when the equipment
moves into its 30-second shutdown procedure.
y
The club programming mode is accessed by pressing the
RESET key at the Precor banner. The remaining key presses
must occur quickly and without pause.
Note: Treadmill keys that can be used interchangeably in club
programming mode are: PAUSE/RESET and the red STOP
button. On the EFX, the CLEAR and ENTER keys perform
specific functions, but the number keypad is disabled once you
enter club programming mode.
y
The changes made in club programming mode become the
default settings whenever the display resets to the Precor
banner.
Product Owner's Manual: Club Features 14
Page 17

Table 2. Club custom features and settings
Equipment Club Programming Prompt Factory Default
Setting
Treadmill
All *
All *
All *
All *
All *
Treadmill
Treadmill
Treadmill †
Treadmill
SAFETY CODE
SELECT LANGUAGE
SELECT UNITS
SET MAX WORKOUT TIME
SET MAX PAUSE TIME
SET COOL DOWN TIME
SET SPEED LIMIT
SET INCLINE LIMIT
HIDDEN PROGRAMS
REMOTE SPEED
Disabled
English Several languages affect the display prompts. Choose one.
U.S. Two standard units of measure affect the display prompts. Choose between U.S. or Metric.
60 minutes
120 seconds
5 minutes Cool-down time limits range from 0 to 5 minutes.
Maximum speed
available.
Maximum grade
possible.
Hide programs Two options are available: Show Programs or Hide Programs. Choose one.
Disabled
CONTROL
EFX576i,
EFX546i
Cycle
SET CROSSRAMP
AUTO-LEVEL
SET RESISTANCE
Mid-level of ramp
incline range
High
RANGE
All †
Treadmill †
SET CUSTOM PROGRAM 1
SET CUSTOM PROGRAM
Random profile
Random profile
2
Changes you can make
An enabled safety code requires a 4-digit entry code before users can access any exercise
programs.
Exercise session time limits range from 1 to 240 minutes. NO LIMIT is accessible beyond
240 minutes.
Pause time limits range from 1 to 120 seconds (2 minutes). Restrictions exist for
self-powered units.
Refer to Treadmill: Determining the Club Speed Limit.
Refer to Treadmill: Setting an Incline Limit.
A computer must be connected through the CSAFE port to enable this feature and change
the speed or incline for a specific user.
This prompt only appears on EFX units which have adjustable ramps. Settings range from 1
to 20. Refer to EFX: Changing the Auto-Level Setting.
Settings range from High, Medium, and Low. Refer to Cycle: Setting a Resistance Range.
Modify the program profile. Refer to Creating a Custom Program.
Modify the program profile. Refer to Creating a Custom Program.
* This feature is available in all Precor equipment.
† This program is not available on the 946i treadmill, EFX546i, and EFX556i.
Note: If a user changes the language or unit of measure during an exercise session, the display resets to the club preferences when a user’s workout ends.
Product Owner's Manual: Club Features 15
Page 18

Accessing Club Programming Mode and Changing the Settings
Read the Club Programming Tips to identify useful information
about customizing your Precor equipment.
To access the available menus and change the program settings,
perform the following steps:
At the Precor banner, press the following keys in sequence
1.
without pausing between selections:
RESET, 5, 6, 5, 1, 5, 6, 5
Note: A PAUSE/RESET key appears on some products and
functions the same as the RESET key.
The club programming prompts appear sequentially and in a
menu format. The following table describes which keys to use in
club programming mode.
Table 3. Club Programming Mode keys
Key Description Function
▲
or ▼
OK OK key
BACK BACK key
RESET
Navigational arrow
keys
RESET key or
PAUSE/RESET key
Moves you through the programs
and selections.
Lets you choose or accept the
displayed selection.
Returns to the previous menu level
without saving any changes.
Exits Club Programming Mode
and returns to the Precor banner.
Note: The number keypad is disabled once you enter club
programming mode.
Product Owner's Manual: Club Features 16
Page 19
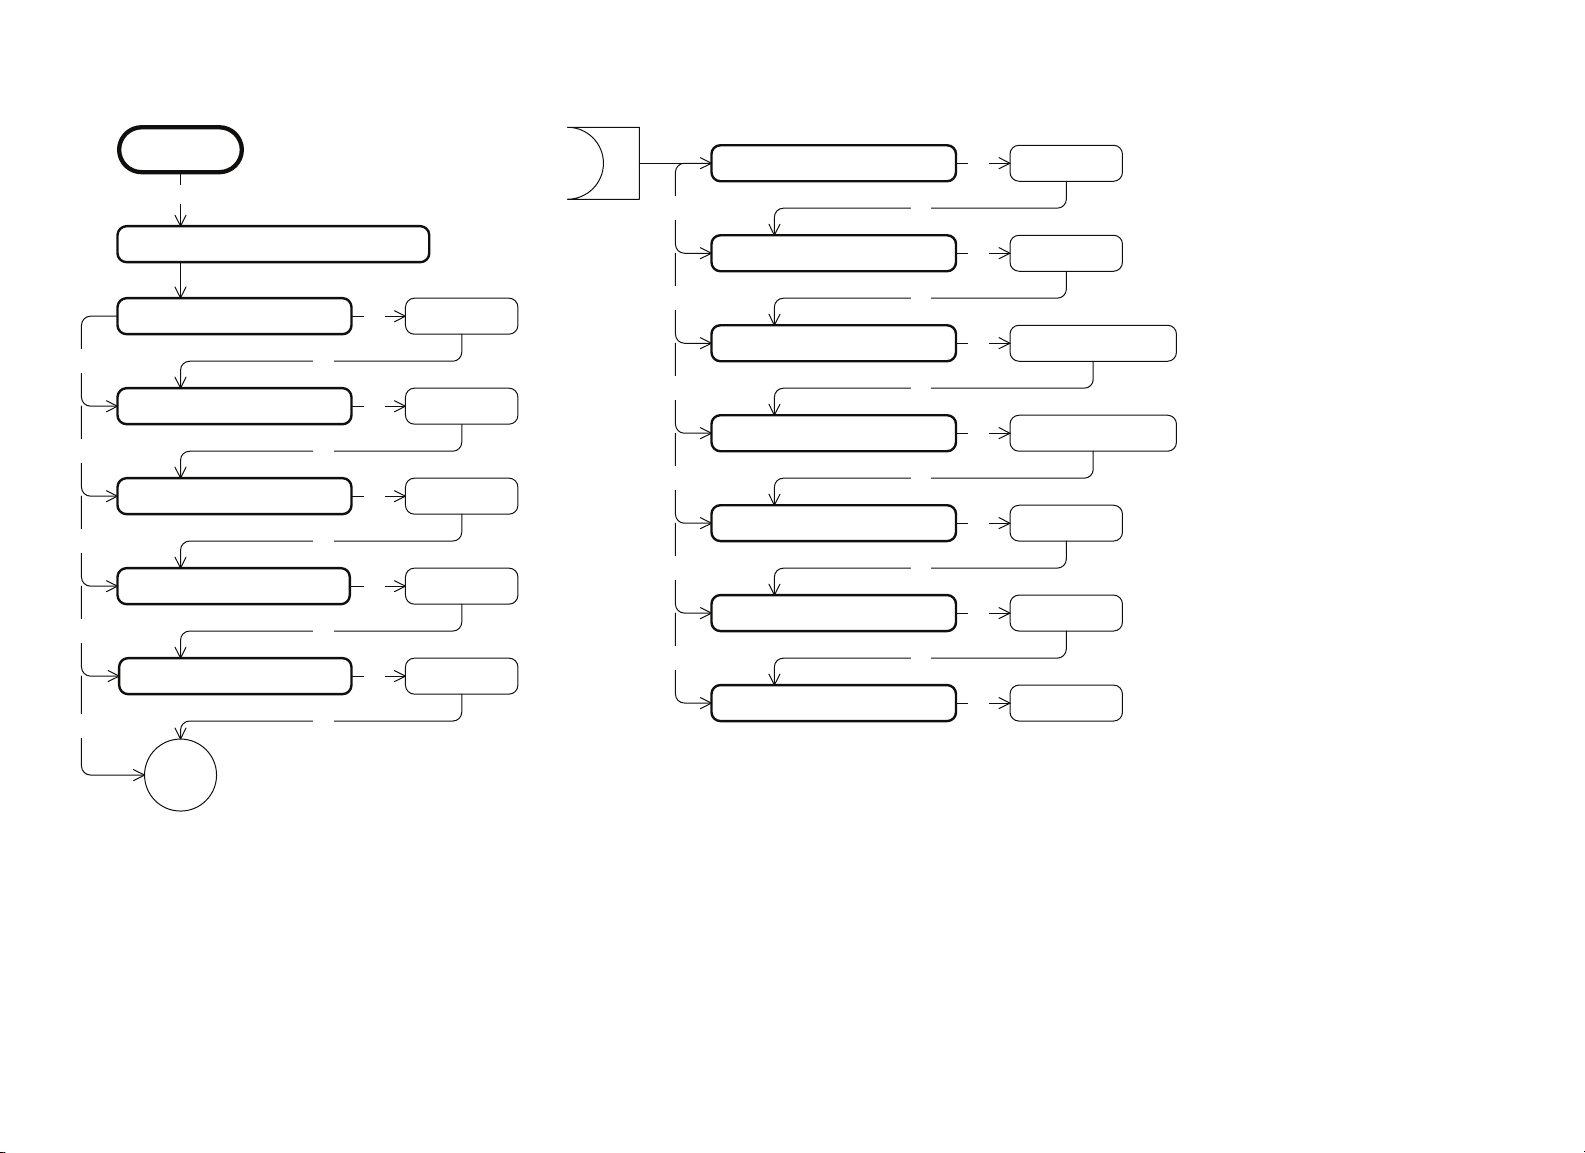
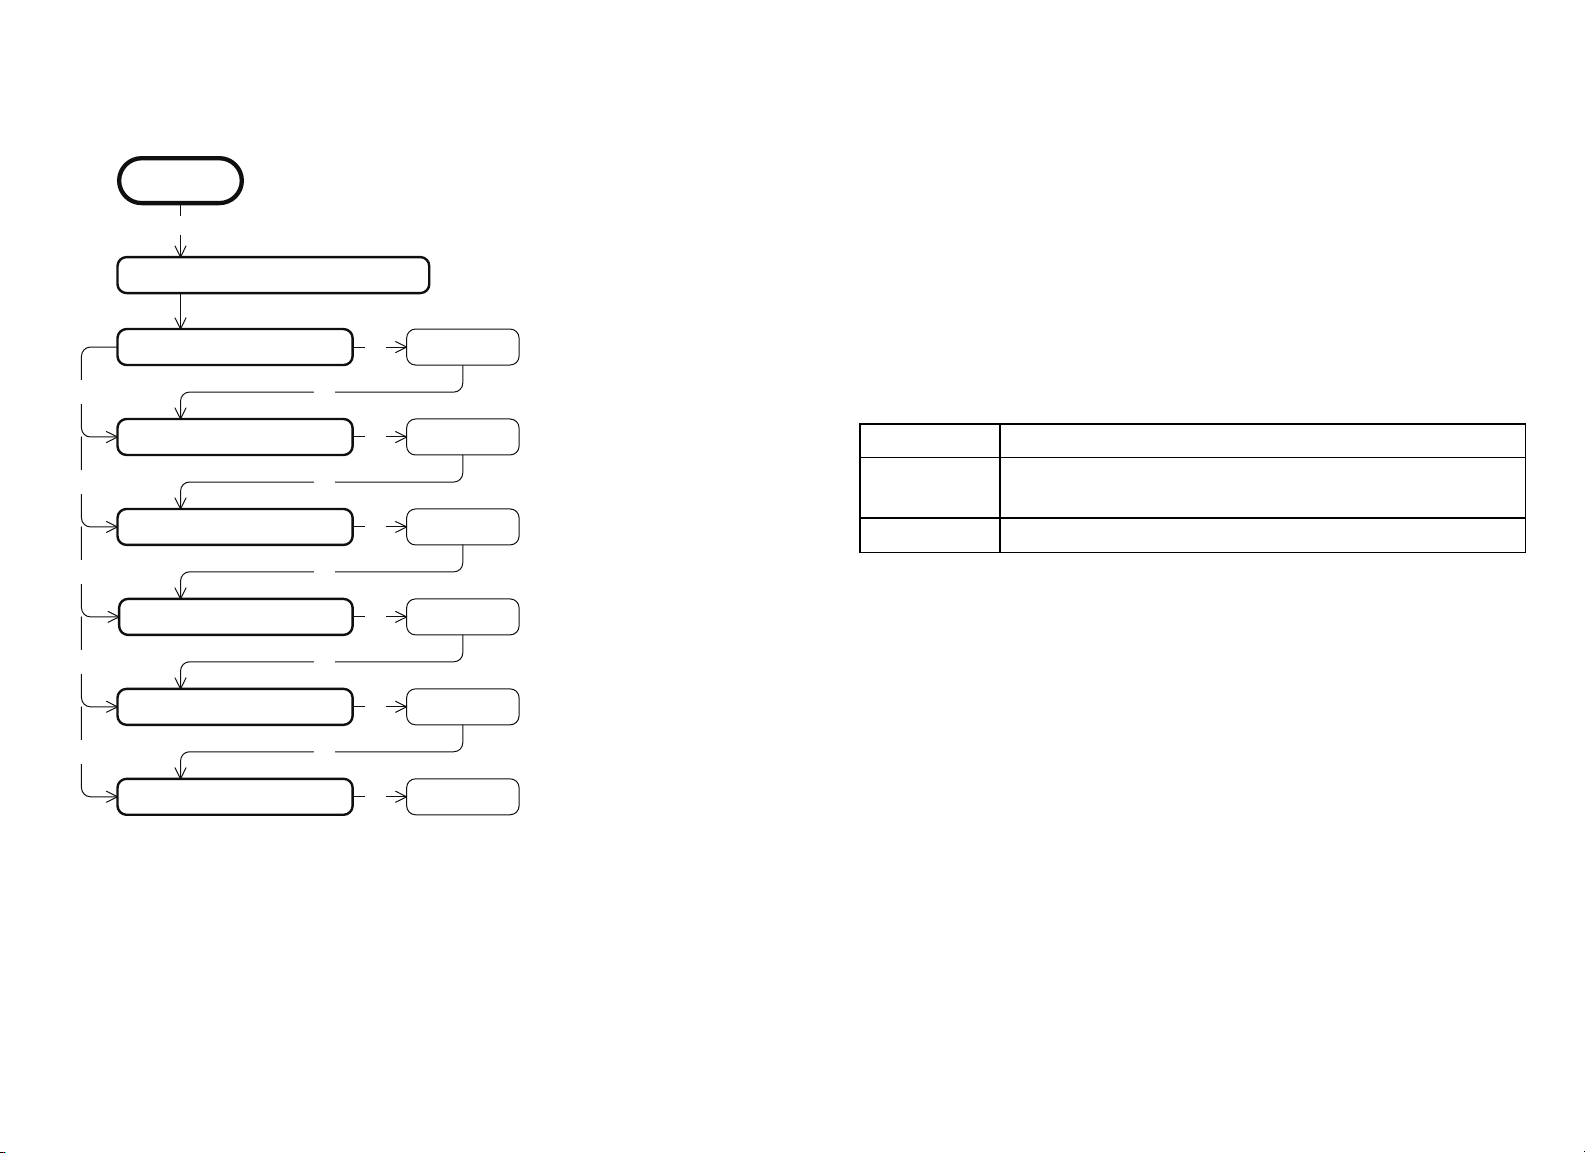
Use the following flowchart to navigate through the menu settings on treadmills.
PRECOR
PAUSE/RESET, 5, 6, 5, 1, 5, 6, 5
DIAGS – SET CLUB PARAMETERS
SAFETY CODE [ DISABLED]
▼
SELECT LANGUAGE
▼
SELECT UNITS
▼
SET MAX WORKOUT TIME
▼
SET MAX PAUSE TIME
▼
OK
OK
OK
OK
OK
OK
OK
OK
OK
OK
[ ENGLISH]
[ U.S.]
[ 60 MIN]
[ 120 SEC.]
SET COOL DOWN TIME [ 5 MIN.]
▼
SET SPEED LIMIT
▼
SET INCLINE LIMIT
▼
HIDDEN PROGRAMS*
▼
REMOTE SPEED CONTROL
▼
SET CUSTOM PROGRAM 1*
▼
SET CUSTOM PROGRAM 2*
OK
OK
OK
OK
OK
OK
OK
OK
[ 16.0 MPH]
OK
OK
OK
OK
OK
[ INCLINE 15.0]
[ HIDE PROGRAMS]
[ DISABLED]
[ RANDOM]
[ RANDOM]
* This program is not available on the 946i treadmill.
Product Owner's Manual: Club Features 17
Page 20
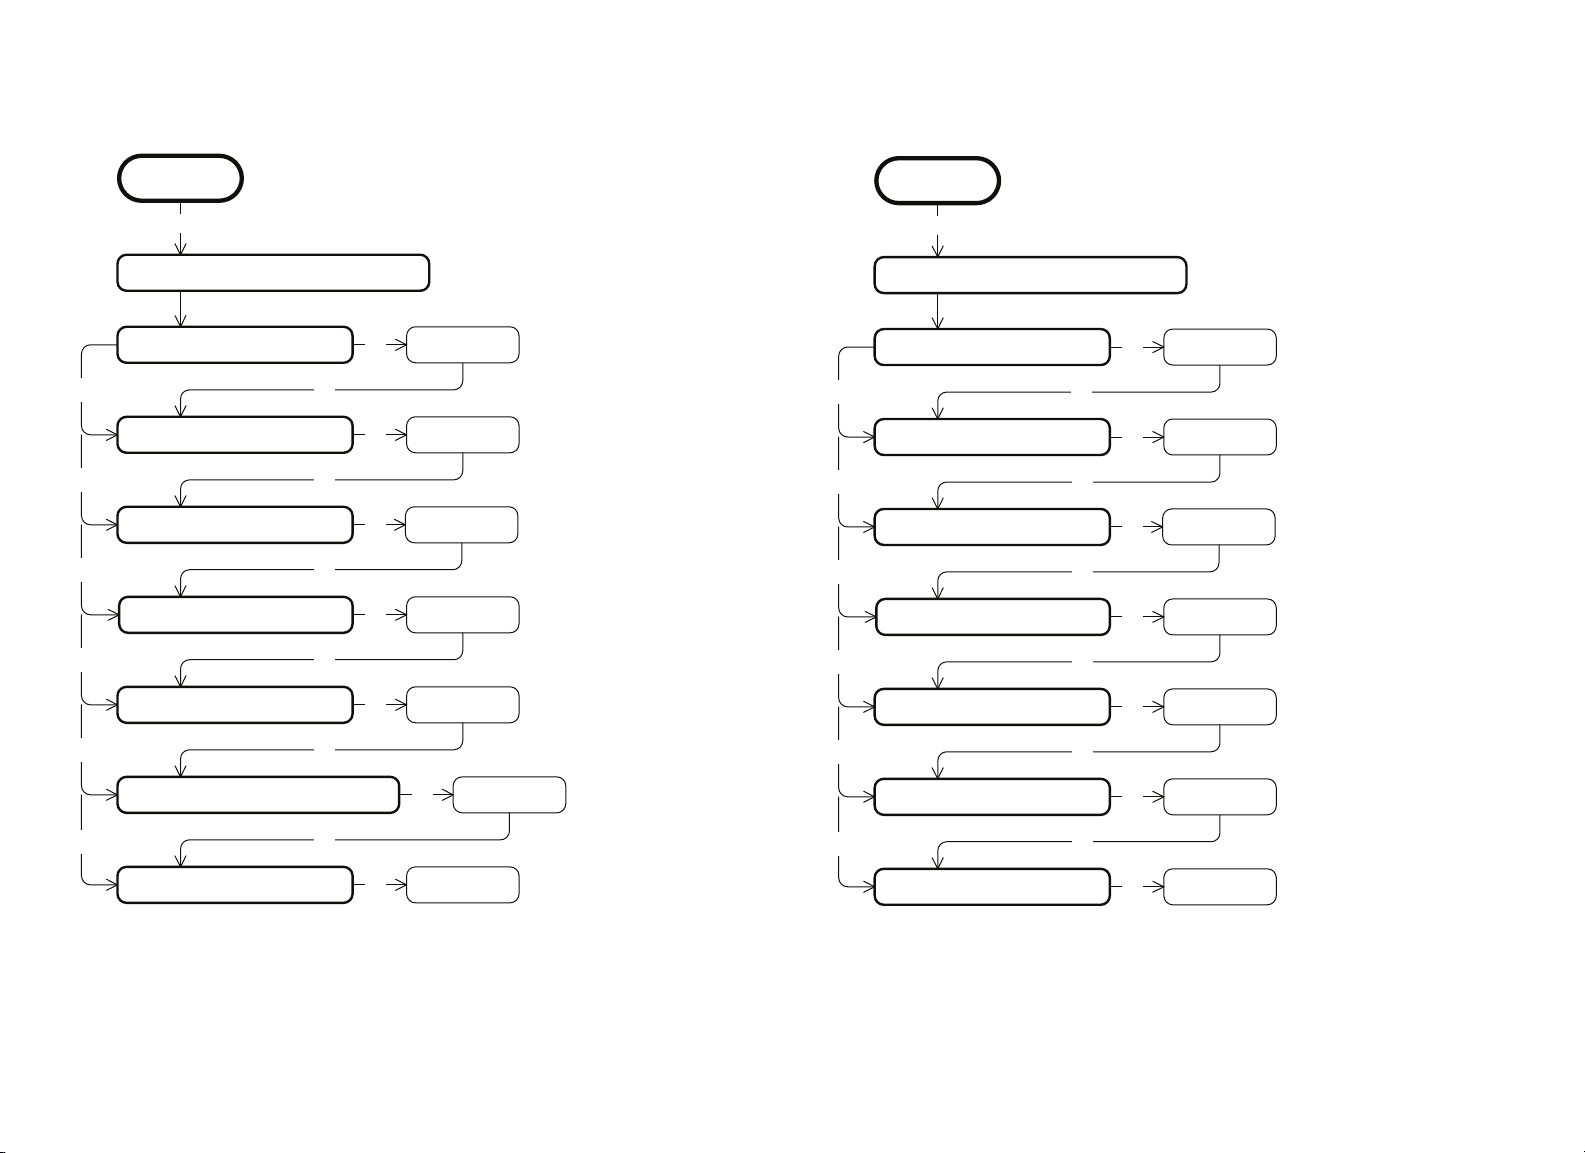
Use the following flowchart to navigate through the menu settings
on ellipticals.
Use the following flowchart to navigate through the menu settings
on cycles.
PRECOR
RESET, 5, 6, 5, 1, 5, 6, 5
DIAGS – SET CLUB PARAMETERS
SELECT LANGUAGE
▼
SELECT UNITS
▼
SET MAX WORKOUT TIME
▼
SET MAX PAUSE TIME
▼
SET COOL DOWN TIME
▼
OK
OK
OK
OK
OK
OK
OK
OK
OK
OK
[ ENGLISH]
[ U.S.]
[ 60 MIN]
[ 120 SEC.]
[ 5 MIN.]
PRECOR
RESET, 5, 6, 5, 1, 5, 6, 5
DIAGS – SET CLUB PARAMETERS
SELECT LANGUAGE
▼
SELECT UNITS
▼
SET MAX WORKOUT TIME
▼
SET MAX PAUSE TIME
▼
SET COOL DOWN TIME
▼
OK
OK
OK
OK
OK
OK
OK
OK
OK
OK
[ ENGLISH]
[ U.S.]
[ 60 MIN]
[ 120 SEC.]
[ 5 MIN.]
OK
OK
[ XRAMP 10]
[ RANDOM]
OK
OK
OK
[ HIGH]
[ RANDOM]
SET RESISTANCE RANGE
▼
SET CUSTOM PROGRAM 1
SET CROSSRAMP AUTO-LEVEL
▼
SET CUSTOM PROGRAM 1*
OK
* This program is not available on the EFX546i and EFX556i.
Product Owner's Manual: Club Features 18
Page 21
Use the following flowchart to navigate through the menu settings
on climbers.
Treadmill: Selecting Safety Code Protection
PRECOR
RESET, 5, 6, 5, 1, 5, 6, 5
DIAGS – SET CLUB PARAMETERS
SELECT LANGUAGE
▼
SELECT UNITS
▼
SET MAX WORKOUT TIME
▼
SET MAX PAUSE TIME
▼
SET COOL DOWN TIME
▼
SET CUSTOM PROGRAM 1 [ RANDOM]
OK
OK
OK
OK
OK
OK
OK
OK
OK
OK
OK
[ ENGLISH]
[ U.S.]
[ 60 MIN]
[ 120 SEC.]
[ 5 MIN.]
When the equipment is shipped from the factory, the safety code
protection feature is disabled. If you enable the safety code, your
patrons will need to enter four number keys in sequence to begin
their exercise session and, on the treadmill, start the running belt. If
the correct keys are not pressed within two minutes, further access
is denied. For more information, refer to Entering the Safety Code.
1. At the
SAFETY CODE
prompt, press OK. Use the navigational
arrow keys to alternate between the two selections.
Setting Description
ENABLED
Causes the safety code prompt to appear prior to a
workout and when returning from pause mode.
DISABLED
Does not require a safety code to operate.
CAUTION: Do not assume the equipment is safe because of
safety code protection. Never leave children unsupervised
around the equipment.
2. When you are ready, press OK to accept the displayed setting
and move to the next feature. For further options, refer to the
table in Accessing Club Programming Mode and Changing the
Settings.
Product Owner's Manual: Club Features 19
Page 22

Choosing a Language
Selecting a U.S. Standard or Metric
The equipment can display user prompts, text, and user entries in
several different languages. When the equipment is shipped from
the factory, it is set to display English.
Note: Programming prompts are not affected by language
selection. The prompts in this section continue to appear in
English.
1.
At the
SELECT LANGUAGE
prompt, press OK. Use the
navigational arrow keys to choose a language.
2.
When you are ready, press OK to accept the displayed setting
and move to the next feature. For other options, refer to the table
in Accessing Club Programming Mode and Changing the
Settings.
Display
The equipment can display measurements in either Metric or U.S.
Standard. The default factory setting is to display U.S. Standard. To
change this setting, perform the following steps:
1.
At the
arrow keys to select a unit of measure (US or
CAUTION: If you change the Unit of Measure display on a
treadmill, be sure to check the speed setting to verify that it is
correct. Refer to Treadmill: Determining the Club Speed
Limit.
2.
When you are ready, press OK to accept the displayed setting
and move to the next feature. For other options, refer to the table
in Accessing Club Programming Mode and Changing the
Settings.
SELECT UNITS
prompt, press OK. Use the navigational
METRIC
).
Product Owner's Manual: Club Features 20
Page 23

Setting an Exercise Session Time Limit
You can limit how long a user can exercise on the equipment. For
example, if you set the time limit to 20 minutes, users can only enter
a session time between 1 and 20 minutes.
Note: The automatic cool-down period is appended to the end of
any time-based program, so adjust the time limit accordingly.
The exercise session times available are between 1 and 240
minutes.
Note: The Military Performance Programs will not complete if the
maximum exercise time limit is less than 40 minutes. Set the
maximum session time above 40 minutes if you have allowed users
to access these programs. Refer to Treadmill: Accessing
Performance Programs.
You can also let a user exercise indefinitely by selecting
NO LIMIT
However, you will need to instruct users that once they select a
program, they must press the TIME +/- key. A workout time blinks
in the display. They need to use the Number Keypad to type in 240,
press the up arrow key to display
NO LIMIT
, and then press OK.
.
1.
At the
SET MAX WORKOUT TIME
prompt, press OK. Use the
navigational arrow keys to change the displayed time limit.
Note: When you press and hold a navigational arrow key, the
number increments by five, for example, 1, 5, 10, 15, 20. When
you tap an arrow key, the number increments by one.
2.
When you are ready, press OK to accept the displayed setting
and move to the next feature. For other options, refer to the table
in Accessing Club Programming Mode and Changing the
Settings.
Product Owner's Manual: Club Features 21
Page 24

Setting a Pause Time Limit
Setting a Cool-Down Time Limit
You can limit how long a user can pause while exercising on the
equipment by entering a time between 1 and 120 seconds (two
minutes). For example, if you set a pause time limit of 60 seconds,
the display automatically resets to the Precor banner if no
movement is detected and no key press occurs for one minute.
Important: The optional power adapter must be connected on
self-powered equipment to establish a definitive pause time limit. If
the optional power adapter is not attached and the rate of motion
drops below the minimum requirements, the equipment begins its
30-second shutdown, effectively eliminating pause mode. Refer to
the table in Self-Powered Features.
1.
At the
SET MAX PAUSE TIME
prompt, press OK. Use the
navigational arrow keys to change the time limit. Choose
between 1 and 120 seconds (two minutes).
2.
When you are ready, press OK to accept the displayed setting
and move to the next feature. For other options, refer to the table
in Accessing Club Programming Mode and Changing the
Settings.
You can limit how long a user cools down after exercising on the
equipment by entering a time between 0 and 5 minutes.
Important: It is highly recommended that you set the cool-down
period at or above three minutes. It takes time for a user’s heart
rate to return to a resting state after vigorous exercise. An effective
cool-down period also reduces the amount of lactic acid in muscle
tissue.
1.
At the
SET COOL DOWN TIME
prompt, press OK. Use the
navigational arrow keys to display the available time limits.
Choose between 0 and 5 minutes. The default setting is 5
minutes.
2.
When you are ready, press OK to accept the displayed setting
and move to the next feature. For other options, refer to the table
in Accessing Club Programming Mode and Changing the
Settings.
Product Owner's Manual: Club Features 22
Page 25

Treadmill: Determining the Club Speed
Treadmill: Setting an Incline Limit
Limit
You can set a maximum speed for the treadmill. This limits how fast
the running belt moves and, consequently, the number of speed
settings that are available to the user. The speed is displayed in
miles per hour (mph) or kilometers per hour (kph) depending upon
the units of measure (U.S. standard or Metric) selected earlier. The
speed ranges from 0.5 to 16 mph (0.8 to 25.5 kph).
Important: If you select a number that limits the miles per hour,
your change will not affect the kilometers per hour (and vice
versa). The treadmill does not convert the speed entered in mph
(U.S. standard) to kph (Metric). It stores separate numbers for the
different units of measure. To enter both values, you must first
reset the display to the appropriate unit of measure, and then
change the speed limit in this program. Refer to Selecting a U.S.
Standard or Metric Display.
1.
At the
navigational arrow keys to select the desired running belt speed
limit.
2.
When you are ready, press OK to accept the displayed setting
and move to the next feature. For other options, refer to the table
in Accessing Club Programming Mode and Changing the
Settings.
SET SPEED LIMIT
prompt, press OK. Use the
You can set the maximum grade (percent of incline) for the
treadmill. This limits the degree of incline and, consequently, the
number of incline settings that are available to the user. The
available range is:
Treadmill Percent of Incline
C956i 0 to 15% grade
C966i -3 to 15% grade
1.
At the
SET INCLINE LIMIT
prompt, press OK. Use the
navigational arrow keys to select the desired grade.
2.
When you are ready, press OK to accept the displayed setting
and move to the next program. For other options, refer to the
table in Accessing Club Programming Mode and Changing the
Settings.
Product Owner's Manual: Club Features 23
Page 26

Treadmill: Accessing Performance
If you wish to change this setting, perform the following steps:
Programs
Note: This feature is not available on the 946i treadmill.
Several performance-based programs on the treadmill can be
hidden from the user’s view and, consequently, be unavailable
during an exercise session. These programs are shown in the
following list:
Gerkin Fitness Test, USAF PRT, NAVY PRT, ARMY PFT, USMC
PFT, Federal Law Enf. PEB.
If you keep the default factory setting, the Track and 5K programs
are available to the user through the PERFORMANCE key.
1. Press OK to review the current
HIDDEN PROGRAMS
selection.
Use the navigational arrow keys to alternate between the two
selections.
Setting Description
SHOW
PROGRAMS
HIDE
PROGRAMS
Causes all the Performance Programs listed above
to appear. The user can access each program
through the PERFORMANCE key on the display.
Hides the Performance Programs listed above and
makes them inaccessible to the user. However, the
Track and 5K programs remain available and are
accessed when a user presses the
PERFORMANCE key.
2. When you are ready, press OK to accept the displayed setting
and move to the next program. For other options, refer to the
table in Accessing Club Programming Mode and Changing the
Settings.
Product Owner's Manual: Club Features 24
Page 27

Treadmill: Changing Remote Control Access
1.
At the
REMOTE SPEED CONTROL
prompt, press OK. Use
the navigational arrow keys to alternate between the two
selections.
Important: To affect this setting, the treadmill must be connected
to a computer and you will need to be familiar with CSAFE
commands.
When you enable this program, you can set a user’s speed and
incline through a computer software program which interfaces with
the CSAFE port on the treadmill.
The default factory setting is set to
DISABLED
. To change this
setting, perform the following steps:
Setting Description
ENABLED
DISABLED
Lets you set the speed and incline for individual users
and their selected program using CSAFE commands
through a computer connection.
Disconnects remote access so you cannot use the
remote capabilities of a CSAFE connection. You
would also use this setting when the treadmill is not
connected to a computer.
2. When you are ready, press OK to accept the displayed setting
and move to the next program. For other options, refer to the
table in Accessing Club Programming Mode and Changing the
Settings.
Product Owner's Manual: Club Features 25
Page 28

EFX: Changing the Auto-Level Setting
You can set a specific ramp incline so that the EFX automatically
returns to it at the end of a workout session. Whatever incline you
set, the EFX ramp returns to the setting if a user continues
pedaling, once the program session has ended, and presses
RESET to return to the Precor banner.
Note: This setting is available on equipment with adjustable ramps.
Important: If you use this feature, connecting the optional power
adapter is recommended. Instruct users about the auto-leveling
feature and ask that they hold onto a stationary handrail with one
hand while the equipment automatically moves to the set incline.
1.
At the
2.
XRAMP
displays only show a number without prefacing it with
SET CROSSRAMP AUTO-LEVEL
prompt, press OK.
n appears, where n is the ramp incline setting. Some
XRAMP
Use the navigational arrow keys to select the desired ramp
incline setting from 1 to 20.
3.
When you are ready, press OK to accept the displayed setting
and move to the next feature. For other options, refer to the table
in Accessing Club Programming Mode and Changing the
Settings.
.
Product Owner's Manual: Club Features 26
Page 29

Cycle: Setting a Resistance Range
You can set a low, medium or high range of resistance on the
recumbent or upright cycles. Within each setting, 25 levels of
resistance are available, but the chosen setting affects the overall
resistance range.
Physical therapy conditioning is an example where you might use
this programming feature. If a user has an injury that needs low
levels of resistance, you might set the resistance range to low to
make sure that the user does not induce further injury by exceeding
your recommended levels of resistance.
The following table provides short descriptions of each group.
Table 4. Resistance range settings on cycles
Setting Description
HI or
HIGH
MED or
MEDIUM
Provides the full range of resistance available. If an upright
cycle user chooses the high-end resistance levels, the cycle
provides enough resistance to simulate sprinting or hill
climbing for users wishing to stand on the upright cycle. It
also provides enough resistance for elite riders that are
capable of spinning at high speed with high resistance.
Provides approximately two thirds of the resistance that is
available within the high group setting. Club owners may
want to select the medium range for recumbent cycles. Since
users cannot stand on recumbent cycles, less resistance is
needed by the average (non-elite) user. A medium range may
provide more comfort. It also allows users to make easier
resistance changes in the preset programs.
LO or
LOW
1.
At the
navigational arrow keys, to choose
MED
2.
When you are ready, press OK to accept the displayed setting
Provides approximately one third of the resistance that is
available within the high group setting. The low range may be
appropriate in special situations where poorly conditioned
users are anticipated. The low range is not recommended for
the club environment.
SET RESISTANCE RANGE
prompt, press OK. Use the
LOW, MEDIUM
or
HIGH (LO
, or HI on some equipment).
and move to the next feature. For other options, refer to the table
in Accessing Club Programming Mode and Changing the
Settings.
Product Owner's Manual: Club Features 27
,
Page 30

Creating a Custom Program
Note: This feature is not available on the 946i treadmill, EFX546i
and EFX556i.
When you design a custom program, you are preprogramming the
program profile.
1.
At the
program profile appears in the display and a blinking column
indicates your starting point.
Note: Two custom programs are available on the treadmill. All
other Precor products contain one custom program. The prompt
indicates which one you have accessed. For example,
CUSTOM PROGRAM 1
are selecting the first custom program. If you have a treadmill
and wish to select the second custom program, press the down
arrow key on the navigational keypad, before pressing OK in
step 6.
SET CUSTOM PROGRAM
scrolls across the display to indicate you
prompt, press OK. The
SET
Table 5. Custom Program keys
Equipment Key Description
Treadmill INCLINE keys
EFX
Cycle
Climber
4.
When the column height is set, press the down arrow key on
CROSSRAMP
keys
RESISTANCE
keys
RESISTANCE
keys
Changes the column height and
affects the Custom Program incline.
Changes the column height and
affects the Custom Program ramp
incline.
Changes the column height and
affects the Custom Program pedal
resistance.
Changes the height of the column
and affects the Custom Program
step resistance.
the navigational keypad, to move to the next column. You can
press the up arrow key to move back and change earlier
columns as needed.
5.
2.
When the Custom Program profile appears, press the down
arrow key on the navigational keypad, to select the column you
wish to change.
3.
To change the height of the column, refer to the following table.
Continue adjusting the profile for each column.
6.
When you are ready, press OK to save the program profile and
return to the Precor banner.
Note: If you prefer to exit the program without saving changes to
the custom profile, press BACK.
Product Owner's Manual: Club Features 28
Page 31

Informational Displays
The equipment provides information about its use (odometer and
hour meter), as well as software versions and part numbers, serial
number, usage log, and error log. In general, you would only access
this information if directed to do so by Precor Customer Support.
To navigate through the informational displays, use the following
flowchart. Descriptions for these displays are shown in the
following table.
Note: If your product has a PAUSE/RESET key, use it in place of
the RESET key called out in the flowchart.
PRECOR
RESET, 6, 5
DIAGS – INFORMATIONAL DISPLAY
ODOMETER
▼
HOUR METER
▼
U-BOOT SW
▼
U-BASE SW
▼
LOWER SW
▼
OK
BACK
OK
BACK
OK
BACK
OK
BACK
OK
BACK
###
###
#####-###
#####-###
#####-###
#####-###
SER. NUMBER
▼
USAGE LOG [ PROGRAM]
▼
ERROR LOG
BACK
OK
BACK
OK
BACK
OK
BACK
[# ERRORS]
OK
[ ERROR]
HOLD TO
CLEAR ERRORS
QUICKSTART
Product Owner's Manual: Club Features 29
Page 32

Table 6. Informational Displays
Product Display Description
All
All
All
All
All
534i, 532i,
AMT
AMT
All
All
All
ODOMETER
HOUR METER
U-BOOT SW
U-BASE SW
LOWER SW
METRICS BOARD SW PART NUMBER
STRIDE DIAL SW PART NUMBER
SER. NUMBER
USAGE LOG
ERROR LOG
The odometer value correlates to the type of Precor product and the standard of units, U.S. or
Metric, selected in the club programs.
Treadmill shows the number of cumulative miles or kilometers logged to date.
EFX or AMT shows the number of total strides logged to date.
Cycle shows the number of total revolutions logged to date.
Climber indicates the number of floors climbed.
The number of hours that the equipment has been in use. The equipment tracks the elapsed
minutes, but the value that appears is truncated to the nearest full hour.
Upper board application software part number and version.
Note: Some displays show
Upper base application software version.
Note: Some displays show
Lower application software version.
Note: Some displays show
Metrics board software part number and version.
Stride dial software part number.
The serial number is helpful when you contact Customer Support. You can also find the serial
number located on a label on the front hood (treadmills) or optional power receptacle (self-powered
equipment) if one does not appear in the display.
Note: Some displays show
The software logs the number of times each program has been used and displays the associated
cumulative minutes. The usage log is helpful in determining user preferences in program selection.
The error log displays any error codes that may have been detected by the software. Copy the error
code information to paper so you can provide it to Customer Support, if needed. Be sure to copy it
exactly as shown. Refer to Error Log.
UPPER BOOT SW PART NUMBER
UPPER BASE SW PART NUMBER
LOWER BASE SW PART NUMBER
SERIAL NUMBER
.
.
.
.
Product Owner's Manual: Club Features 30
Page 33

Error Log
Erasing the Error Log
Quick access to the informational display is available if error
messages have appeared on the display and have been recorded
in the error log. This feature is usually reserved for service
personnel. At the Precor banner, press and hold RESET for 4
seconds. If
DIAGS - INFORMATION DISPLAY
or
ERROR LOG
appears, press OK.
If no errors are logged,
STOP KEY
or
STUCK KEY
appears.
When you release the key, the Precor banner returns.
Note: On treadmills, the red STOP button can be used instead of
the PAUSE/RESET key.
When you no longer need the error log information, you may erase
all entries in the error log by pressing the QUICKSTART key while
any error description is scrolling across the display. Continue to
maintain light pressure on the key until the message,
CLEAR ERRORS
released,
NO ERRORS
, scrolls off the display. When the key is
appears on the display, which indicates the
HOLD TO
error log has been deleted.
Important: You cannot retrieve the error log once you have deleted
it. You may want to resolve any issues you are experiencing with
the equipment before erasing the error log.
When you are ready, press RESET to return to the Precor banner.
Product Owner's Manual: Club Features 31
Page 34

User ID Entry with CSAFE Equipment
The equipment is fully compatible with CSAFE protocols. When the
equipment is connected to a CSAFE master device, the user is
prompted to press ENTER and begin an identification process.
The user ID is displayed as five zeros and indicates the starting
point. The following table describes key functions while in CSAFE
mode.
Table 7. CSAFE access keys
Keypad Description
A message appears on the display and indicates when the user ID
is accepted by the CSAFE master device. Once program selection
is complete, the user can begin exercising.
To review information about CSAFE specifications, visit the web
site at: www.fitlinxx.com/csafe
If you have questions or need technical support, refer to Obtaining
Service.
Number keypad
CLEAR or
BACK
ENTER or OK Submits the user ID.
RESET or
PAUSE/RESET
Use the number keys to enter a user ID. The number
that is pressed appears on the right. As the user
continues, the numbers fill in the display from right to
left. When all five numbers are in place, the user must
press ENTER or OK to submit the user ID.
Erases individual numbers in the user ID from right to
left.
Note: User ID entry is bypassed when the user enters
five zeros. No workout statistics are recorded.
Resets the display to the banner.
Product Owner's Manual: Club Features 32
Page 35

Maintenance
It is important to perform the minor maintenance tasks described
below. Failure to maintain the equipment as described in this
section could void the Precor Limited Warranty.
DANGER
To reduce the risk of electrical shock, always
unplug the equipment from its power source (an
optional power adapter in the case of
self-powered equipment) before cleaning it or
performing any maintenance tasks.
Daily Cleaning
Precor recommends the equipment be cleaned before and after
each exercise session. Use mild soap and water to dampen a
clean, soft cloth and wipe all exposed surfaces. This helps remove
dust and dirt.
CAUTION: Do not use any acidic cleaners. Doing so will weaken
the paint or powder coatings and void the Precor Limited
Warranty. Never pour water or spray liquids on any part of the
equipment. Allow the equipment to dry completely before using.
Daily Inspection
Look and listen for slipping belts, loose fasteners, unusual noises,
worn or frayed power cords, and any other indications that the
equipment may be in need of service. If you notice any of these,
obtain service.
On treadmills, check for worn, frayed or missing safety lanyards.
Replace missing or worn safety lanyards immediately. Make sure
users attach the safety clip to their clothing before exercising on
the treadmill.
Important: If you determine that the equipment needs service,
disconnect any power connections and move the equipment away
from the exercising area. Place an OUT OF SERVICE sign on it
and make sure all patrons and users know that they must not use
the equipment.
To order parts or to contact a Precor authorized service provider in
your area, refer to Obtaining Service.
Frequently vacuum the floor underneath the equipment to prevent
the accumulation of dust and dirt, which can affect the smooth
operation of the equipment. Use a soft nylon scrub brush to clean
the running belt on treadmills or the grooves on equipment with
foot pedals.
CAUTION: On treadmills, as you clean the hood or side rails, be
aware of the handrail extensions so you do not inadvertently hit
your head or injure yourself.
Product Owner's Manual: Maintenance 33
Page 36

EFX: Cleaning the Ramp
Storing the Chest Strap
Whenever the ramp becomes soiled, clean the exposed surfaces of
the ramp and roller wheels by taking the following steps.
Note: If your equipment has a ramp cover, remove it before
performing the following steps. Refer to the EFX Assembly Guide.
1.
Moisten a clean, soft cloth in a mild solution of soap and water.
2.
Position one foot pedal at the top of the ramp (the other will
automatically be positioned at the bottom).
3.
Clean the exposed portions of the ramp.
4.
Gently lift the roller wheels. Rotate each wheel while wiping it
with the clean, soft cloth.
5.
Switch the foot pedal position and finish cleaning the ramp.
If you purchased the optional heart rate chest strap, store it in a
place where it remains free of dust and dirt (for example, in a closet
or drawer). Be sure to protect the chest strap from extremes in
temperature. Do not store it in a place that may be exposed to
temperatures below 32° F (0° C).
To clean the chest strap, use a sponge or soft cloth dampened in
mild soap and water. Dry the surface thoroughly with a clean towel.
Product Owner's Manual: Maintenance 34
Page 37

Treadmill: Checking the Alignment of the Running Belt
Proper belt alignment allows the belt to remain centered and
ensures smooth operation. Realigning the belt takes a few simple
adjustments. If you are unsure about this procedure, call Precor
Customer Support. Refer to Obtaining Service.
CAUTION: Special care must be taken when aligning the running
belt. Turn Off the treadmill while adjusting or working near the
rear roller. Remove any loose clothing and tie back your hair. Be
very careful to keep your fingers and any other object clear of the
belt and rollers, especially in front of the roller and behind the
deck. The treadmill will not stop immediately if an object
becomes caught in the belt or rollers.
1.
Make sure that the running surface is level. To operate correctly,
the treadmill needs to be as level as possible. If needed, the rear
feet can be adjusted to level the treadmill (refer to the Assembly
Guide).
5.
Press the SPEED up key until the display shows a speed of
3 mph (5 kph).
CAUTION: If you hear any chafing or the running belt appears
to be getting damaged, stop the running belt immediately by
pressing the red STOP button. Contact Precor Customer
Support.
6.
Walk around to the rear of the equipment and observe the belt
for a few minutes. The belt should run centered along the
running bed. If the belt drifts off center, you must make
adjustments. Refer to Treadmill: Adjusting the Running Belt.
Important: Failure to align the belt may cause the belt to tear or
fray, which is not covered by the Precor Limited Warranty.
7.
To stop the running belt, press the red STOP button.
8.
Turn the treadmill Off.
2.
Turn the equipment On.
3.
Stand beside the treadmill and press QUICKSTART.
4.
If needed, enter the safety code by pressing the number keys in
sequence: 1, 2, 3, 4.
The running belt starts automatically after a 3-second
countdown appears on the display.
Product Owner's Manual: Maintenance 35
Page 38

Treadmill: Adjusting the Running Belt
If you are unsure about adjusting the running belt, call Precor
Customer Support (refer to Obtaining Service).
CAUTION: For your safety, use the power switch to turn Off the
treadmill before making any adjustments. Do not adjust the
running belt when someone is standing on the equipment.
1. Locate the right belt adjustment bolt in the rear end cap of the
treadmill as shown in the following figure.
Figure 4: Location of the adjustment bolt
To determine left and right, stand at the rear of the treadmill and
face the display. Make all belt adjustments on the right rear
corner bolt using the hex key provided.
y
If the belt is off center to the LEFT, turn the adjusting bolt ¼
turn counterclockwise, which moves the running belt to the
right.
y
If the belt tracks off center to the RIGHT, turn the bolt ¼ turn
clockwise; this moves the belt to the left.
Important: Do not turn the adjusting bolt more than ¼ turn at a
time. Overtightening the bolt can damage the treadmill.
2.
Recheck the alignment of the running belt by repeating the
steps found in Treadmill: Checking the Alignment of the
Running Belt.
Product Owner's Manual: Maintenance 36
Page 39

Upright Cycle: Adjusting the Seat Tilt
To adjust the seat tilt on an upright cycle, take the following steps.
1. Use a ¹¹⁄₁₆-inch (17 mm) box-end wrench or crescent wrench to
loosen the nut beneath the seat as shown in the following figure.
Figure 5: Loosen nut to adjust seat tilt
2.
Adjust the seat tilt (forward or backward) as shown in the
following figure.
Figure 6: Tilt the seat forward or backward
3.
Wrench tighten the nut
4.
Apply pressure to the seat and make sure that it does not move.
Readjust and retighten the nut, if needed.
Product Owner's Manual: Maintenance 37
Page 40

Recumbent Cycle: Realigning the Seat
If the seat rocks side-to-side, you need to realign the center wheel
underneath the seat. Adjustment screws are located on the left
side of the seat rail.
To remove seat wobble (side-to-side movement), take the following
steps.
1.
Obtain a ³⁄₁₆-inch and ⁵⁄₁₆-inch hex key.
2.
Use the ³⁄₁₆-inch hex key to loosen the two adjustment screws as
shown in the following figure.
3.
Use the ⁵⁄₁₆-inch hex key to turn the wheel lock adjustment key
clockwise ¼ turn as shown in the following figure. This process
realigns the center wheel inside the top rail. Leave the ⁵⁄₁₆-inch
hex key in place while you tighten the adjustment screws with
the ³⁄₁₆-inch hex key.
Figure 8: Wheel lock adjustment
4. Remove the hex keys and check that the seat no longer rocks
side-to-side. If the rocking movement continues, you need to
repeat steps 2 and 3.
Figure 7: Loosen the two adjustment screws
Product Owner's Manual: Maintenance 38
Page 41

Moving the Equipment
Long-Term Storage
It is important, if you plan to move the equipment, that you obtain
adult help and use proper lifting techniques. The equipment is very
heavy. Take advantage of the roller wheels on the equipment when
moving it to a new location.
Important: The plastic end cap, on the treadmill, is specifically
designed for lifting. To avoid injury to yourself or damage to the
equipment, ask for help in placing the treadmill where you plan to
use it. Place a hand under each end of the end cap and, using
proper lifting techniques, lift the rear of the treadmill so that it rolls
on its front wheels.
When the equipment is not in use for any length of time, make sure
it is turned Off (treadmill only) and the power cord or optional
power adapter (self-powered equipment) is unplugged from its
power source and is positioned so that it will not become damaged
or interfere with people or other equipment.
Product Owner's Manual: Maintenance 39
Page 42

Notes:
Product Owner's Manual: Maintenance 40
Page 43

Precor Commercial Equipment Limited Warranty
PLEASE READ THESE WARRANTY TERMS AND CONDITIONS CAREFULLY
BEFORE USING YOUR PRECOR INCORPORATED PRODUCT. BY USING
THE EQUIPMENT, YOU ARE CONSENTING TO BE BOUND BY THE
FOLLOWING WARRANTY TERMS AND CONDITIONS.
Limited Warranty.
Precor Incorporated warrants all new Precor products to be free from defects in
materials and manufacture for the warranty periods set forth below. The warranty
periods commence on the invoice date of the original purchase. This warranty
applies only against defects discovered within the warranty period and extends
only to the original purchaser of the product. Parts repaired or replaced under
the terms of this warranty will be warranted for the remainder of the original
warranty period only. To claim under this warranty, the buyer must notify Precor
or your authorized Precor dealer within 30 days after the date of discovery of any
nonconformity and make the affected product available for inspection by Precor
or its service representative. Precor’s obligations under this warranty are limited
as set forth below.
Warranty Periods and Coverage.
Commercial Cardiovascular Products, also known as C-Series Products,
(excluding StretchTrainer, Strength Products).
Seven years frame, five years display face assembly, three years motor
controller, one year durable wear parts, two years parts, one year labor.
For treadmills, five years drive motor.
For self-powered ellipticals and bikes, one year battery.
For InSite, one year parts and labor.
Labor coverage for options as defined below.
StretchTrainer
Five years frame, two years parts, 90 days upholstery, no labor.
Strength Products (S3.45 and S3.25 only)
Ten years frame; three years bearings, guide rods, cams, pulleys; one year belts,
cables, hand grips, miscellaneous parts; 90 days upholstery; no labor.
Options / Accessories / Battery-powered or Self-Operated Devices
Many options or accessories have components that are connected internally or
mounted inside the electronic console. The following guidelines determine the
warranty for these components. If the internal components are installed by the
factory or by an authorized dealer as part of the original sale and delivery, they
have a warranty that is identical to the warranty of the equipment in which they
are connected or mounted. If the internal components are not installed by the
factory or by an authorized dealer as part of the original sale and delivery, they
have a 90 days parts and labor limited warranty. All components that are not
internally connected have a 90 days parts only limited warranty. Satisfactory
proof of purchase is required in all cases.
Conditions and Restrictions.
This warranty is valid only in accordance with the conditions set forth below:
1. The warranty applies to the Precor product only while
a. it remains in the possession of the original purchaser and proof of
purchase is demonstrated,
b. it has not been subjected to accident, misuse, abuse, improper service,
or non-Precor modification.
c. claims are made within the warranty period.
2. Certain products are warranted for standard commercial use only (defined
as use in non-fee paying clubs or facilities and less than 6 hours daily use.
Unapproved use voids the warranty. Current standard commercial products
include C936i, C932i, EFX524i, EFX534i.).
3. This warranty does not cover damage or equipment failure caused by
electrical wiring not in compliance with electrical codes or Precor owner’s
manual specifications, or failure to provide reasonable and necessary
maintenance as outlined in the owner’s manual.
4. Except in Canada, Precor does not pay labor outside the United States.
5. Warranties outside the United States and Canada may vary. Please contact
your local Dealer for details.
Product Owner's Manual: Precor Commercial Equipment Limited Warranty 41
Page 44

This Limited Warranty shall not apply to:
1. Software (PROM) version upgrades.
2. Normal wear and tear, consumables and cosmetic items, including, but not
limited to the following: grips, seats, and labels.
3. Repairs performed on Precor equipment missing a serial number or with a
serial tag that has been altered or defaced.
4. Service calls to correct installation of the equipment or instruct owners on
how to use the equipment.
5. Pickup and delivery involved with repairs.
6. Any labor costs incurred beyond the applicable labor warranty period.
Disclaimer and Release.
The warranties provided herein are the exclusive warranties given by Precor and
supersede any prior, contrary or additional representations, whether oral or
written. ANY IMPLIED WARRANTIES, INCLUDING THE WARRANTY OF
MERCHANTABILITY OR FITNESS FOR A PARTICULAR PURPOSE THAT
APPLY TO ANY PARTS DESCRIBED ABOVE ARE LIMITED IN DURATION TO
THE PERIODS OF EXPRESS WARRANTIES GIVEN ABOVE FOR THOSE
SAME PARTS. PRECOR HEREBY DISCLAIMS AND EXCLUDES THOSE
WARRANTIES THEREAFTER. Some States do not allow limitations on how long
an implied warranty lasts, so the above limitation may not apply to you. PRECOR
ALSO HEREBY DISCLAIMS AND EXCLUDES ALL OTHER OBLIGATIONS
OR LIABILITIES, EXPRESS OR IMPLIED, ARISING BY LAW OR OTHERWISE,
WITH RESPECT TO ANY NONCONFORMANCE OR DEFECT IN ANY
PRODUCT, INCLUDING BUT NOT LIMITED TO: (A) ANY OBLIGATION,
LIABILITY, RIGHT, CLAIM OR REMEDY IN TORT, WHETHER OR NOT
ARISING FROM THE NEGLIGENCE OF PRECOR OR ITS SUPPLIERS
(WHETHER ACTIVE, PASSIVE OR IMPUTED); AND (B) ANY OBLIGATION,
LIABILITY, RIGHT, CLAIM OR REMEDY FOR LOSS OF OR DAMAGE TO ANY
EQUIPMENT. This disclaimer and release shall apply even if the express
warranty set forth above fails of its essential purpose.
Exclusive Remedies.
For any product described above that fails to conform to its warranty, Precor will
provide, at their option, one of the following: (1) repair; (2) replacement; or
(3) refund of the purchase price. Precor Limited Warranty service may be
obtained by contacting the authorized dealer from whom you purchased the item.
Precor compensates Servicers for warranty trips within their normal service area
to repair commercial equipment at the customer’s location. You may be charged
a trip charge outside the service area. THESE SHALL BE THE SOLE AND
EXCLUSIVE REMEDIES OF THE BUYER FOR ANY BREACH OF WARRANTY.
EXCLUSION OF CONSEQUENTIAL AND INCIDENTAL
DAMAGES.
PRECOR AND/OR ITS SUPPLIERS SHALL HAVE NO OBLIGATION OR
LIABILITY, WHETHER ARISING IN CONTRACT (INCLUDING WARRANTY),
TORT (INCLUDING ACTIVE, PASSIVE, OR IMPUTED NEGLIGENCE AND
STRICT LIABILITY), OR OTHERWISE, FOR DAMAGE TO THE EQUIPMENT,
PROPERTY DAMAGE, LOSS OF USE, REVENUE OR PROFIT, COST OF
CAPITAL, COST OF SUBSTITUTE EQUIPMENT, ADDITIONAL COSTS
INCURRED BY BUYER (BY WAY OF CORRECTION OR OTHERWISE) OR
ANY OTHER INCIDENTAL, SPECIAL, INDIRECT, OR CONSEQUENTIAL
DAMAGES, WHETHER RESULTING FROM NONDELIVERY OR FROM THE
USE, MISUSE OR INABILITY TO USE THE PRODUCT. This exclusion applies
even if the above warranty fails of its essential purposes and regardless of
whether such damages are sought for breach of warranty, breach of contract,
negligence, or strict liability in tort or under any other legal theory. Some states
do not allow the exclusion or limitation of incidental or consequential damages,
so the above limitation may not apply to you.
This warranty gives you specific legal rights, and you may also have other rights,
which vary from state to state.
Complete this portion and keep for your records.
Purchased From: _______________________________________
(Dealer or store name)
Phone Number: _______________________________________
(Dealer or store telephone number)
Product/Model: : _______________________________________
(For example: EFX534i or C966i)
Serial Number: : _______________________________________
(The serial number is found on the shipping container.)
Effective 27 March, 2006
P/N 36286-112
Product Owner's Manual: Precor Commercial Equipment Limited Warranty 42
Page 45

Thank You and Welcome to Precor
STAMP
HERE
Precor Incorporated
20031 142nd Avenue NE
PO Box 7202
Woodinville, WA 98072-4002
Fold along dotted line and tape closed before mailing.
If you have questions or need additional information, contact
your local dealer or call Precor Commercial Products Customer
Support at 888-665-4404.
To allow us to serve you better, please take a
few moments to complete and return your warranty registration.
YOU MAY ALSO REGISTER ONLINE AT
www.precor.com/warranty
We are confident that you will be pleased with your purchase and
that your new Precor equipment will help satisfy your customers’
fitness needs, while helping you meet your business goals.
PLACE
COMM.
Page 46

❑ Internet ❑ News report or product review ❑ Club/fitness magazine advertisement
❑ Trade/consumer magazine article ❑ Other ________________________________________________________
What factors MOST influenced your decision to purchase this product (choose up to three):
❑ Precor reputation ❑ Prior product experience ❑ Design/appearance ❑ Value for the price
❑ Special product features ❑ Warranty ❑ Service ❑ Rebate or sale price
How did you FIRST become aware of this product (choose only one):
❑ Authorized Precor dealer ❑ Precor sales representative ❑ Trade show/conference
Which best describes this purchase (check all that apply):
❑ First Precor product ❑ Replaces a Precor product of the same type
❑ Replaces same type of product – different brand ❑ Enhancement to equipment already owned
TELL US ABOUT YOUR PURCHASE
What other Precor equipment do you currently offer (check all that apply):
❑ EFX ❑ Cycle ❑ StretchTrainer
❑ Treadmill ❑ Stair Climber ❑ Strength Machine ❑ Other ______________________________
❑ Treadmills ❑ Ellipticals ❑ Cycles ❑ Stair Climbers ❑ Rowing Machines ❑ Other _____________
What other brands of cardio equipment do you currently offer (check all that apply):
❑ Life Fitness ❑ Tr u e ❑ Cybex ❑ StarTrac ❑ Other ______________________________
What percentage of floor space do you allocate for cardio equipment?
❑ 0% to 20% ❑ 20% to 40% ❑ 40% to 60% ❑ 60% to 80% ❑ 80% to 100%
What type of equipment makes up your cardio offering (check all that apply)?
How many members do you have?
❑ Less than 100 ❑ 100 – 500 ❑ 500 – 1000 ❑ 1000 – 2000 ❑ 2001 +
❑ Mr.
❑ Mrs.
❑ Ms.
Add additional sheets of paper or register online at www.precor.com/warranty
TELL US ABOUT YOUR FACILITY
The serial number is located on the shipping box and on the product.
Product Serial Number(s):
Month
Date of Purchase:
TELL US ABOUT YOUR NEW PRECOR PRODUCTS
TM
Your Business Email Address
Area Code
Facility Telephone Number
State
Contact Person — First Name
Name of Facility
❑ #: ______ Treadmill ❑ #: ______ Stair Climber
❑ #: ______ Cycle ❑ #:______ Strength Station
❑ #: ______ StretchTrainer
Day
Year
Please indicate the type and number of products purchased:
❑ #: ______ Elliptical Fitness CrossTrainer (EFX
Purchased from (Dealer name):
P/N 45622-101 Effective 30 June 2002
Zip CodeCity
Last Name
Apt./SuiteFacility Address
Please detach and mail in the warranty registration within ten days of purchase.
TM
®
)
Page 47

Page 48

Precor, C, CrossRamp, EFX, M, Move Beyond, and SmartRate are registered trademarks of Precor Incorporated.
Crosstrainer, QuickStart, and StretchTrainer are trademarks of Precor Incorporated.
Copyright 2008 Precor Incorporated.
Specifications subject to change without notice.
www.precor.com
Precor Incorporated
20031 142nd Ave NE
P.O. B ox 72 0 2
Woodinville, WA USA 98072-4002
1-800-347-4404
NOTICE:
Precor is widely recognized for its innovative, award winning designs of exercise equipment. Precor aggressively
seeks U.S. and foreign patents for both the mechanical construction and the visual aspects of its product design.
Any party contemplating the use of Precor’s product designs is hereby forewarned that Precor considers the
unauthorized appropriation of its proprietary rights to be a very serious matter. Precor will vigorously pursue all
unauthorized appropriation of its proprietary rights.
POM C-L 48995-107, en
Warranty # 36286-112, en
Registration Card# 45622-101, en
03 March 2008
Page 49

946i
956i
966i
User's Reference Manual
Commercial Treadmills
Page 50

Page 51

Important Safety Instructions
When using Precor equipment, always take basic precautions,
including the following:
y
Read all instructions before using the equipment. These
instructions are written for your safety and to protect the
equipment.
y
Other sections in this manual provide more details of safety
features. Be sure to read these sections and observe all safety
notices.
y
Take time to discuss proper safety and exercise equipment
etiquette with the fitness facility manager.
y
Before beginning any fitness program, see your physician for a
complete physical examination.
Il est conseillé de subir un examen médical complet avant
d’entreprendre tout programme d’exercise. Si vous avez des
étourdissements ou des faiblesses, arrêtez les exercices
immédiatement.
y
Do not overexert yourself or work to exhaustion. If you feel any
pain or abnormal symptoms, stop your workout immediately and
consult your physician.
y
For safety, hold onto a stationary handrail or handlebar while
using the equipment.
y
Keep your body and head facing forward. Never attempt to turn
around on the equipment.
y
Do not rock the equipment. Do not stand on the handrail(s),
display console, or hood.
y
Use care when getting on or off the treadmill. Always grasp the
handrail when stepping on the running belt and keep the initial
speed at or below 1 mile per hour (mph) or 1 kilometer per hour
(kph). Never step off the treadmill while the running belt is
moving.
y
Before the running belt begins moving (before your workout),
and after it stops (at the end of your workout), straddle the
running belt by placing your feet firmly on the right and left trim
strips.
y
The safety clip must be attached at waist level before your
workout. A lanyard connects the safety clip to the red STOP
button on the display console. If you encounter difficulties, a
strong tug on the lanyard stops the running belt.
y
Do not allow children or people unfamiliar with its operation on
or near the equipment. Do not leave children unsupervised
around the equipment.
y
Wear proper exercise clothing and shoes for your workout and
avoid loose clothing. Do not wear shoes with heels or leather
soles. Check the soles of your shoes and remove any dirt and
embedded stones. Tie long hair back.
User's Reference Manual: Important Safety Instructions 1
Page 52

Safety Code
Obtaining Service
The fitness facility you are using has the option to enable a safety
code. The code involves entering four number keys in sequence. If
the correct keys are not pressed within two minutes, further access
is denied and the running belt will not move. For more information,
refer to Entering the Safety Code.
The fitness facility manager can help you with most questions
regarding the equipment. For additional information about product
operation or exercise routines, refer to the Precor web site at
www.precor.com.
User's Reference Manual: Important Safety Instructions 2
Page 53

Table of Contents
Important Safety Instructions............................................1
Safety Code.....................................................................................2
Obtaining Service ..........................................................................2
Treadmill Safety Features ..................................................5
Using the Safety Clip.....................................................................5
Entering the Safety Code.............................................................6
Using the Stationary Handrails....................................................6
Turning the Treadmill On and Off...............................................6
Heart Rate Features .............................................................7
Important Use and Safety Information....................................... 7
Wearing a Chest Strap.................................................................9
Using the Touch-Sensitive Grips..............................................10
Using SmartRate ..........................................................................10
Exercise to Your Target Heart Rate .........................................12
Heart Rate Analysis .....................................................................12
Troubleshooting Heart Rate.......................................................13
Display Console...................................................................14
More Information about the Upper Display ............................16
More Information about the Center Display...........................18
More Information about the Lower Display ............................18
Keypads..........................................................................................20
Workout Options.................................................................25
Choosing QUICKSTART ........................................................... 26
Selecting a Program....................................................................27
Storing Workout Statistics ........................................................28
Setting Display Preferences Before Exercising....................29
Cooling Down After a Workout................................................30
Pausing During a Workout or the Cool-Down Period.........30
Ending a Workout........................................................................ 31
Programs...............................................................................32
Choosing a Program................................................................... 32
Program Tips.................................................................................32
Manual Program...........................................................................33
Interval Program ...........................................................................34
Random Program.........................................................................35
Cross Country Program .............................................................35
966i/956i Gluteal Programs .....................................................36
966i/956i Custom Programs....................................................36
Heart Rate Programs ..................................................................36
Weight Loss Programs...............................................................39
Track Program ..............................................................................40
5K Program ................................................................................... 40
Fitness Tests.................................................................................41
User's Reference Manual: Table of Contents 3
Page 54

Exercise Session .................................................................43
Changing Programs in Mid-session.........................................43
Changing the Workout Time .....................................................44
Addressing Your Weight and Age...........................................44
Adjusting Program Goals...........................................................45
Adjusting Your Target Heart Rate............................................46
Changing Your Workout Display Options..............................46
Changing the Units of Measure................................................48
Selecting a Language .................................................................48
User's Reference Manual: Table of Contents 4
Page 55

Treadmill Safety Features
The treadmill is equipped with certain items that, when used
properly, help sustain an enjoyable workout. These items include:
y
Safety clip
y
Safety code
y
Handrails
y
Power switch
Important: Before exercising, review the Important Safety
Instructions found at the beginning of this manual.
Using the Safety Clip
Attach the safety clip to your clothing before each workout. A tug
on the lanyard trips the safety switch inside the display console and
stops the running belt.
Safety Clip
If the safety switch trips while you are exercising, the running belt
stops and the treadmill assumes you are pausing your workout. To
resume exercising, take the following steps:
1.
Reattach the safety clip to your clothing.
2.
Straddle the running belt.
3.
Press QUICKSTART.
Important: Hold onto the handrail when you step onto the
running belt and while you adjust the speed.
4.
Enter the safety code (if necessary).
Note: The facility can set a limit on the amount of time you can
pause during a workout. Check with the manager to find out
about the pause time limit. If you exceed the time limit, the
display returns to the Precor banner.
Lanyard
Figure 1: Attaching the safety clip
User's Reference Manual: Treadmill Safety Features 5
Page 56

Entering the Safety Code
Turning the Treadmill On and Off
The fitness facility has the option to require a safety code. If the
safety code prompt appears, press the following number keys
sequence:
1,2,3,4.
An asterisk appears on the display with each key press. Hold onto
the handrail and straddle the running belt. The running belt starts
moving after a 3-second countdown.
Note: If the correct keys are not pressed within two minutes or you
press more than four numbers, the Precor banner appears on the
display and the running belt does not move.
Using the Stationary Handrails
To maintain your balance, always grasp a stationary handrail when
you step on or off the equipment and when you use the keypads.
To learn more about the touch-sensitive grips, refer to Heart Rate
Features.
To turn the treadmill On and Off, use the power switch located
beneath the hood, near the power cord receptacle. Refer to the
following figure.
Figure 2: Power switch location
User's Reference Manual: Treadmill Safety Features 6
Page 57

Heart Rate Features
CALORIES
HEART RATE
Important Use and Safety Information
109
SmartRate
WARMUP FATBURN CARDIO PEAK HIGH
Heart rate and SmartRate® features are available when you wear
the chest strap or grasp both touch-sensitive grips. When a
heartbeat is detected, the HEART RATE display shows your heart
rate and, if your age has been entered, the SmartRate LED blinks
and indicates your target zone.
Read the following before using the heart rate or SmartRate
features.
y
Consult your physician before engaging in any vigorous
exercise. Do not use the heart rate programs until authorized by
your physician.
y
Know your heart rate and your physician-recommended heart
rate target zone. Individual heart rates vary according to several
physiological factors and may not correspond directly with the
following figure.
y
Always face forward on the equipment and use the stationary
handrail or handlebars for balance.
User's Reference Manual: Heart Rate Features 7
Page 58

Heart Rate Target Zones
200
190
180
170
160
150
140
130
120
Yo ur Heart Rate
110
100
90
80
70
20 25 30 35 40 45 50 55 60 65 70 75
Figure 3: Heart rate target zones
Recommended Cardiovascular Zone
Recommended Weight Loss Zone
Yo ur Age
High
Peak
Cardio
Fat Burn
Warmup
y
After you put on the chest strap, face the display console for a
minimum of 15 seconds. This allows the receiver in the console
to recognize the signal from the chest strap.
y
If Hr blinks in the HEART RATE display, it is detecting a signal,
but has not yet determined your heart rate. Make sure the chest
strap is positioned properly around your chest and against your
skin.
y
If you prefer to use the touch-sensitive grips, grasp both and
wait five to ten seconds. Make sure both hands are moist (not
dry).
y
When a signal is detected, a number flashes in the
HEART RATE display and indicates your heart rate.
y
The calculation used for the heart rate target zone is:
(220 minus your age) multiplied by a percent.
For example:
Warmup range: (220 minus your age) multiplied by 55%
Peak range: (220 minus your age) multiplied by 85%
User's Reference Manual: Heart Rate Features 8
Page 59

Wearing a Chest Strap
During a workout, the heart rate features appear on the display
when you wear a chest strap. To receive an accurate reading, the
chest strap needs to be in direct contact with your skin.
1. Carefully dampen the back of the strap with tap water Refer to
the following figure.
Note: Do not use deionized water. It does not have the proper
minerals and salts to conduct electrical impulses.
Figure 4: Moisten chest strap
3.
Make sure that the chest strap is right side up, lies horizontally
across your chest, and is centered in the middle of your chest.
Refer to the following figure.
Figure 6: Fasten chest strap
After you put on the chest strap, face the display console for a few
seconds. This allows the receiver in the console to recognize the
signal from the chest strap.
2. Adjust the strap and fasten it around your chest. The strap
should feel snug, not restrictive. Refer to the following figure.
Figure 5: Adjust chest strap
User's Reference Manual: Heart Rate Features 9
Page 60

Using the Touch-Sensitive Grips
Using SmartRate
While exercising, you must grasp both touch-sensitive grips for a
minimum of five to ten seconds to transmit your heart rate to the
display. Refer to the following figure.
Figure 7: Touch-sensitive grips
Usually, the concentration of salts in a person’s perspiration
provides enough conductivity to transmit a signal to the receiver
inside the display console. However, some people, because of
body chemistry or erratic heart beats, cannot use the
touch-sensitive grips. A chest strap may provide better results.
Important: While exercising, do not wear a chest strap and grasp
the touch-sensitive grips at the same time. Using both features may
cause erratic heart rate readings.
The SmartRate feature helps you monitor and maintain your heart
rate in the target zone best suited to your specific needs. When a
heart rate signal is detected, a single LED blinks and indicates the
zone that your heart rate is in.
Important: To use the SmartRate feature, you must enter your age.
If you were not prompted for your age during program selection,
press the OPTIONS key and enter your weight and age. Refer to
Addressing Your Weight and Age.
The 10 LEDs in the SmartRate display are color-coded. Pulsating
orange LEDs indicate you are exercising outside the recommended
heart rate target zone. Green LEDs indicate when you are
exercising within the recommended fat burn or cardio fitness zones.
The following table shows the percents used in calculating the
heart rate target zones. While your heart rate remains within these
zones, the corresponding light blinks and provides a visual cue.
CAUTION: Your heart rate should never exceed 85% of your
maximum aerobic heart rate or go above PEAK. If it does,
immediately reduce the intensity of your workout to return your
heart rate to your physician-recommended target zone.
User's Reference Manual: Heart Rate Features 10
Page 61

Table 1. Heart rate target zones and SmartRate LEDs
Heart Rate Zone
Percent
Below 50 First Orange WARMUP
50 to 54 Second Orange WARMUP
55 to 59 Third Green FAT BURN
60 to 64 Fourth Green FAT BURN
65 to 69 Fifth Green FAT BURN
70 to 74 Sixth Green CARDIO
75 to 79 Seventh Green CARDIO
80 to 84 Eighth Green CARDIO
85 to 87 Ninth Orange PEAK
Above 87 Tenth Orange HIGH
LED Lit LED Blinking Zone Label
The SmartRate indicator lights do not blink when:
y y You do not wear or improperly position the chest strap. Or, you
fail to grasp both touch-sensitive grips for five to ten seconds.
You do not enter your age during an exercise session.
For example, pressing QUICKSTART at the Precor banner
causes the Manual Program to begin. Your age has not been
entered and is considered a null value. Your heart rate will
appear in the HEART RATE display when you hold onto the
touch-sensitive grips or wear a chest strap, but none of the
SmartRate LEDs blink because the appropriate calculations
have not been made.
Note: You can remedy this situation by pressing the OPTIONS
key and entering your weight and age. Refer to Addressing Your
Weight and Age.
User's Reference Manual: Heart Rate Features 11
Page 62

Exercise to Your Target Heart Rate
Heart Rate Analysis
A dedicated window displays your heart rate while you exercise. To
view your heart rate (beats per minute) on the display, either wear a
chest strap or grasp both touch-sensitive grips.
The Precor web site (www.precor.com) has several suggestions for
workouts with varying levels of intensity. It provides many workout
details that include the appropriate target heart rate.
The equipment includes one or more heart rate programs that let
you exercise based on a specified target heart rate. As you
exercise, the programs monitor your heart rate and automatically
maintain it within a few beats per minute of your selected target. To
use these programs, press the PROGRAMS – HEART RATE key.
For more information, refer to Programs.
Every time you complete a program using the chest strap or
touch-sensitive grips, the display provides a heart rate analysis after
the workout summary. Refer to Ending a Workout.
Your average heart rate appears followed by the maximum heart
rate achieved during your workout. A third display appears, if you
entered your age, and indicates the amount of time your heart rate
remained between the target zones shown.
The heart rate analysis is based on how often your heart rate signal
is received while exercising. If you use the chest strap, the average
heart rate will be more accurate than if you occasionally grasp the
touch-sensitive grips.
User's Reference Manual: Heart Rate Features 12
Page 63

Troubleshooting Heart Rate
The following table may help you understand and troubleshoot
erratic heart rate readings.
Important: A heart rate can only be detected when the Precor
heart rate receiver is properly installed in the display. A user must
wear the chest strap or grasp both touch-sensitive grips.
Table 2. Erratic heart rate readings
What
appears
on the
display
Nothing
HR or Hr
Cause What to do
The heart rate receiver is
not installed or it has
been disconnected.
A signal is being
detected through the
chest strap or the
touch-sensitive grips, but
a valid heart rate is not
yet established.
Call Customer Support. Refer to
Obtaining Service.
Be sure that the chest strap is
moist, centered, and in direct
contact with your skin. If you are
using the touch-sensitive grips,
continue to grasp both of them.
Wait a few moments for your
heart rate to appear.
Note: To conduct electrical impulses from a user’s heart, both
touch-sensitive grips must be grasped firmly for five to ten seconds.
Usually, the concentration of salts in a person’s perspiration
provides enough conductivity to transmit a signal to the receiver in
the display console. However, because of body chemistry or erratic
heartbeats, some people cannot use the touch-sensitive grips. A
chest strap may provide better results.
User's Reference Manual: Heart Rate Features 13
Page 64

Display Console
Before beginning any
fitness program, see your physician for a
thorough physical examination. Seek advice
from your physician to learn the target heart
rate appropriate for your fitness level. Do not
allow children or those unfamiliar with its
operation on or near this equipment. Read
the product owner's manual or consult a
qualified instructor before operating this
equipment. Improper use of this equipment
can result in serious injury. Before
exercising, attach the safety clip to your
clothing. Do not stand on the belt when
starting the treadmill. Do not attempt to turn
around on the moving belt. Keep hands and
clothing away from the belt and rear roller. If
you feel pain, faintness, or dizziness, stop
exercising immediately.
PROGRAMS
MANUAL
INTERVAL
VARIETY
HEART
RATE
WEIGHT LOSS
PERFORMANCE
TIME ELAPSED
TIME REMAINING
CALORIES
966i
SmartRate
WARMUP FATBURN CARDIO PEAK HIGH
INCLINE
0% INCLINE
DECLINE
BACK
OPTIONS
E
N
I
L
C
N
I
HEART RATE
123
456
789
ENTERCLEAR
0
OK
DISTANCE
PACE
S
P
E
E
D
PAUS E/
RESET
AVERAGE SPEED
QUICK
START
User's Reference Manual: Display Console 14
Page 65

CALORIES display: The estimated cumulative number of
calories being burned appears.
Center display and the PROGRAMS keypad: When you
press a PROGRAMS key, the program profile appears in the
upper display and the program name appears in the center
display. During your session, additional information appears
in the center display depending on program and user
selections.
Number keys: During an exercise session, use the number
keys to answer prompts or update information. If the
entertainment option is attached, the number keys act as TV
channel controls.
Upper display: Initially shows the Precor banner. It changes
to the program profile when you select a program or press
QUICKSTART. A blinking column in the profile indicates
your position.
Navigational arrow keys: These keys let you display
exercise information prior to selecting it with the OK key.
Navigational keys: These keys let you display or change
exercise information and end your session. For more
information, refer to Navigational Keypad.
Left selection key: Press the key to select which item you
wish to display during your session. Indicator lights appear
next to the item that is displayed. You can perform the same
Lower display: While you exercise, four sets of numbers
show information about your session.
function with the Right selection key.
Right selection key
QUICKSTART: Press QUICKSTART to begin your workout
immediately.
INCLINE & SPEED keys: Use these keys to adjust the
incline or speed.
Red STOP button: Press to pause or end a workout.
User's Reference Manual: Display Console 15
Page 66

More Information about the Upper Display
CALORIES
966i
SmartRate
WARMUP FATBURN CARDIO PEAK HIGH
INCLINE
0% INCLINE
DECLINE
The upper display includes the CALORIES, HEART RATE,
SmartRate, and a program profile display. The following
descriptions explain what appears in the displays.
CALORIES—indicates the estimated cumulative number of calories
being burned.
HEART RATE—displays your heart rate when you wear a chest
strap or grasp both touch-sensitive grips. Refer to Heart Rate
Features.
HEART RATE
SmartRate—displays your heart rate as a blinking segment which
indicates the zone your heart rate is in when you enter your age and
wear a chest strap or grasp both touch-sensitive grips. Use this
display as a visual aid to keep your heart rate in your preferred
zone. Refer to Using SmartRate.
Program profile—appears during your exercise session. A blinking
segment in the profile indicates your position. In most programs,
the INCLINE setting affects the column height as shown in the
following figures. The profile raises or lowers according to which
INCLINE key is pressed.
Column height Incline settings
13 — 15
10 — 12.5
8 — 9.5
6 — 7.5
4 — 5.5
3 — 3.5
2 — 2.5
1 — 1.5
0 — 0.5
Figure 8: Column height in the 956i program profile
User's Reference Manual: Display Console 16
Page 67

The range of incline differs on the 966i treadmill. The height
remains at 15%, but you can choose a descending grade up to a
minus 3%. Refer to the following figure.
Column height Incline settings
13 — 15
10 — 12.5
8 — 9.5
6 — 7.5
4 — 5.5
3 — 3.5
1 — 2.5
0
0.5 —
-0.5 — - 3
Figure 9: Column height in the 966i program profile
Ten dots display the range of incline on the 946i treadmill. Refer to
the following figure.
Column height Incline settings
13 — 15
11 — 12.5
9 — 10.5
7 — 8.5
5 — 6.5
4 — 4.5
3 — 3.5
2 — 2.5
1 — 1.5
0 — 0.5
Figure 10: Column height in the 946i program profile
User's Reference Manual: Display Console 17
Page 68

More Information about the
More Information about the
Center Display
CALORIES
966i
SmartRate
WARMUP FATBURN CARDIO PEAK HIGH
INCLINE
0% INCLINE
DECLINE
The center display presents the program name when you select a
program. During an exercise session, the center display becomes a
message bar showing additional information depending on user
selections and program interludes. For more information about the
selections that can appear in this display, refer to Exercise Session.
HEART RATE
Lower Display
TIME ELAPSED
TIME REMAINING
QUICK
START
S
P
E
E
D
PAUSE/
RESET
E
N
I
L
C
N
I
The lower display provides information about your workout session.
Pressing the keys beneath each window affects what appears in
the displays. Each display provides information about your workout
statistics and is described in the list below.
Note: If you choose to rest a book or magazine on the display, you
can still view these workout statistics.
DISTANCE
PACE
AVERAGE SPEED
User's Reference Manual: Display Console 18
Page 69

TIME ELAPSED and TIME REMAINING
TIME ELAPSED—displays time in minutes and seconds and
indicates the amount of time you have been exercising.
When you exceed 60 minutes during a single session, the
display converts to hours and minutes.
Note: The fitness facility can place limits on workout time.
TIME REMAINING—shows the amount of time remaining in
a workout. If the selected time is less than 60 minutes, the
display shows time in minutes and seconds. If you select a
time greater than 60 minutes, the display reflects hours and
minutes until the countdown reaches 60 minutes, at which
time the display reverts to minutes and seconds.
Note: If you select a
REMAINING display appears blank. Press the left selection
key if you wish to display elapsed time.
NO LIMIT
time goal, the TIME
INCLINE
INCLINE—displays the percentage of incline or decline
during your workout. The INCLINE keys affect the lift and let
you set an incline between 0% and 15% (956i/946i) and a
minus 3% to 15% (966i). The values displayed can change
in 0.5% increments.
SPEED
SPEED—displays the running belt speed in miles per hour
(mph) or kilometers per hour (kph). The running belt speed
ranges between 0.5 and 16 mph (0.8 to 25 kph) on the 95
and 966i treadmills. The 946i has a range of 0.5 to 12 mph
(0.8 to 20 kph). The speed can be changed in 0.1
increments using the SPEED keys.
Note: You can press the SPEED down key to stop the
running belt. When 0 appears in the SPEED display, the
running belt stops.
.5 6i
DISTANCE, PACE, and AVERAGE SPEED
DISTANCE—shows linear distance in either miles or
kilometers. The distance is calculated based on your speed.
PACE—displays your target speed in minutes and seconds
per mile (or kilometer). For example, the number
indicates that your pace (speed at which you are moving) is
4 minutes and 23 seconds per mile.
AVERAGE SPEED—indicates the average speed associated
with your workout.
4:23
User's Reference Manual: Display Console 19
Page 70

Keypads
Use the keypads to enter your exercise session selections and
display preferences.
Distinct keypads exist on the display and are discussed in this
section:
y
Lower Display keypad and the selection keys
y
Navigational keypad in the center of the display
y
PROGRAMS keypad
y
Number keypad with the ENTER and CLEAR keys
Lower Display Keypad and the Selection Keys
TIME ELAPSED
TIME REMAINING
QUICK
START
S
P
E
E
D
PAUSE/
RESET
E
N
I
L
C
N
I
Figure 11: Lower Display keypad and the Selection keys
Left selection key: Every time you press this key, the
display reflects either the amount of time elapsed since you
began your exercise session or it shows the time remaining.
An LED lights and indicates which information is being
displayed.
DISTANCE
PACE
AVERAGE SPEED
TIME +/-: You can change the workout time while you are
exercising, by pressing the TIME +/- key. A blinking number
appears in the display. You can change the number using
the navigational arrow keys or enter a different time using
the number keys. Refer to Changing Your Workout Display
Options.
User's Reference Manual: Display Console 20
Page 71

INCLINE: Press and hold an INCLINE key to increase or
decrease the incline from 0% to 15% (956i or 946i) or from
minus 3% to positive 15% (966i) in 0.5% increments.
Changes to the incline are not immediate. It takes time for
the lift to reach the target incline shown on the display.
PAUSE/RESET: This key has several functions during an
exercise session. Press it once to enter pause mode. Press
it again to display a workout summary. Press it a third time to
end your session and return to the Precor banner. Refer to
Pausing During a Workout or the Cool-Down Period.
QUICKSTART: Press QUICKSTART to start your exercise
session immediately using the Manual Program. Refer to
Choosing QUICKSTART.
STOP: A firm tap on the red STOP button slows the running
belt to a stop and the treadmill enters pause mode. To
Right selection key: Every time you press this key, the
display reflects the distance traveled since you began your
exercise session, your current pace, or your average speed.
An LED lights and indicates which information is being
displayed.
resume, press QUICKSTART and enter the safety code, if
necessary. Refer to Pausing During a Workout or the
Cool-Down Period.
SPEED: Press and hold a SPEED key to increase or
decrease the running belt speed in 0.1 increments.
When you press a SPEED key, a target speed appears in
the display. The running belt speed changes to meet the
target, but the change occurs gradually so the transition is
smooth.
User's Reference Manual: Display Console 21
Page 72

Navigational Keypad
PROGRAMS Keypad
PROGRAMSPROGRAMS
BACK
OPTIONS
OK
BACK: When the BACK key is pressed it causes the
display to return to the previous menu level.
OPTIONS: The OPTIONS key is a multi-functional key.
It lets you customize the display and set exercise
session goals: time, calories, or distance. You can set
your preferences prior to selecting a program or after
you are already engaged in exercising. Refer to Setting
Display Preferences Before Exercising or Changing
Your Workout Display Options.
Up and Down Arrows: These keys present the
available selections and affect what appears on the
display. Throughout this manual they are referred to as
the navigational arrow keys.
HEART
MANUAL
INTERVAL
VARIETY
PERFORMANCE
RATE
WEIGHT LOSS
The PROGRAMS keypad provides access to all the exercise
programs. Press the center of the key to view the top level program
in its menu. Pressing the key again displays the next program in the
menu, if one is available, as shown in the following table. For a
description of each program, refer to Programs.
Note: Use the OK key to confirm your selection. For more
information, refer to Workout Options.
OK: Use the OK key to confirm responses to specific
prompts.
User's Reference Manual: Display Console 22
Page 73

Table 3. Available programs
PROGRAMS key Program Menu 946i 956i 966i
MANUAL
INTERVAL
VARIETY
HEART RATE
WEIGHT LOSS
MANUAL
1 - 1 INTERVAL
1 - 2 INTERVAL
1 - 3 INTERVAL
CUSTOM INTERVAL
RANDOM
1 CROSS COUNTRY
2 CROSS COUNTRY
CROSS COUNTRY
1 GLUTEAL
2 GLUTEAL
1 CUSTOM
2 CUSTOM
†
BASIC HRC
CUSTOM WEIGHT LOSS HRC
WEIGHT LOSS HRC
HEART HEALTH HRC
ENDURANCE HRC
SPEED HRC
CUSTOM WEIGHT LOSS HRC
WEIGHT LOSS HRC
1 AEROBIC
†
†
†
†
†
9 9 9
9 9 9
9 9
9 9
9 9 9
9 9
9 9
9
9 9
9 9
9 9
9 9 9
†
9 9 9
9 9 9
†
9 9 9
9 9 9
9 9
9
9
9
9
9
PROGRAMS key Program Menu 946i 956i 966i
PERFORMANCE
* The fitness facility can limit access to the fitness tests.
† Use of chest strap or the touch-sensitive grips is required.
AEROBIC
TRACK
5 K
GERKIN FITNESS TEST*
USAF PRT*
NAVY PRT*
ARMY PFT*
USMC PFT*
FEDERAL LAW ENF. PEB*
9
9 9
9 9 9
9 9 9
9 9
9 9
9 9
9 9
9 9
User's Reference Manual: Display Console 23
2 AEROBIC
9 9
Page 74

Number Keypad
123
The CLEAR and ENTER keys provide the following functions:
CLEAR: Use the CLEAR key to remove the last number being
displayed.
ENTER: Use the ENTER key to accept the number being displayed.
456
789
ENTERCLEAR
0
The number keypad has several functions depending on what is
connected to the equipment.
Connection Description
Computer
(CSAFE
compatible)
Entertainment
Option
Nothing
If a computer is attached to the CSAFE connection on
the equipment, the number keypad lets you enter your
user ID and answer other setup prompts.
If an entertainment option is connected to the display,
the number keypad acts as a remote control which you
use to select the available channels. You can also enter
number values in answer to exercise session prompts.
Whether or not peripheral devices are attached to the
equipment, the keypad lets you enter number values in
answer to exercise session prompts. You need to press
ENTER or OK to confirm the selection.
Note: The OK and ENTER keys are usually interchangeable and
provide the same function when no peripheral devices are attached
to the equipment. However, when answering prompts that originate
from a CSAFE device or computer connection, use the ENTER key.
User's Reference Manual: Display Console 24
Page 75

Workout Options
CAUTION: Before beginning any fitness program, see your
physician for a complete physical examination. Know your
physician-recommended heart rate target zone.
1.
Turn the treadmill On. The Precor banner scrolls across the
display.
2.
Hold on to a handrail while stepping on to the treadmill.
6.
Select one of the following options:
Option... Steps...
To start exercising
immediately
To select a program
• • Use the QUICKSTART key.
Refer to Choosing QUICKSTART.
• • Press a PROGRAMS key.
Refer to Selecting a Program.
3.
Face the display and then straddle the running belt by placing
your feet on the trim strips provided.
4.
Attach the safety clip to your clothing.
5.
Grip a handrail with one hand to steady yourself.
To enter a user ID
To set display preferences or
program goals
• • Use the ENTER key.
Refer to Storing Workout
Statistics.
• • Use the OPTIONS key.
Refer to Setting Display
Preferences Before Exercising.
Important: If the safety code is enabled, you will need to enter
a code to begin your workout. At the safety code prompt, press
the following number key sequence: 1, 2, 3, 4. If you make a
mistake, press any key a few times to reset to the safety code
prompt, or wait two minutes for the banner to return.
User's Reference Manual: Workout Options 25
Page 76

QUICK
START
Choosing QUICKSTART
1. While the Precor banner scrolls, press QUICKSTART to begin
the Manual Program.
QUICKSTART applies the following defaults:
Prompts Default Value
Program Manual
Time Fitness Facility setting
3.
Hold onto a handrail and straddle the running belt.
A 3-second countdown appears on the display, and then the
running belt starts moving.
4.
Step on to the running belt with the speed at or below 1 mph or
1 kph and begin your workout. Use the SPEED up key to
increase the speed of the running belt.
Note: To use the SmartRate feature, you need to specify your
age and wear a chest strap or grasp both touch-sensitive grips.
When a program begins, press OPTIONS and follow the
prompts to enter your weight and age. You can use navigational
arrow keys or the number keypad to change the blinking
prompts. Press OK to confirm your selections.
Weight 150 lb (68 kg)
Age 0
2.
If needed, enter the safety code by pressing: 1, 2, 3, 4.
An asterisk appears on the display with each entry.
User's Reference Manual: Workout Options 26
Page 77

Selecting a Program
PROGRAMSPROGRAMS
4.
Step on to the running belt with the speed at or below 1 mph or
1 kph and begin your workout. Use the SPEED up key to
increase the speed of the running belt.
MANUAL
INTERVAL
VARIETY
HEART
RATE
WEIGHT LOSS
PERFORMANCE
1.
While the Precor banner scrolls, press one of the PROGRAMS
keys, and then press OK. For a description of each program,
refer to Programs.
2.
If needed, enter the safety code by pressing: 1, 2, 3, 4.
An asterisk appears on the display with each entry.
3.
Hold onto a handrail and straddle the running belt.
A 3-second countdown appears on the display, and then the
running belt starts moving.
You may be able to exercise indefinitely in any program (except
5K, distance and calorie goal programs, and performance
fitness tests). Once you begin a program, press the TIME +/key. A workout time blinks in the display. Use the number
keypad to type in 240, and then press the up arrow key to
display
NO LIMIT
. Press OK. The fitness facility can set limits
for workout, pause, and cool-down times. So, selecting an
unlimited workout time may not be allowed. Check with your
fitness facility manager.
If you choose this option, the automatic cool-down period is
eliminated. You will need to incorporate a cool-down period by
accessing the Manual Program.
Note: To use the SmartRate feature, you need to specify your
age and wear a chest strap or grasp both touch-sensitive grips.
When a program begins, press OPTIONS and follow the
prompts to address your weight and age. You can use
navigational arrow keys or the number keypad to change the
blinking number prompts. Press OK to confirm your selection.
User's Reference Manual: Workout Options 27
Page 78

Storing Workout Statistics
Many fitness facilities connect Precor equipment to a computer so
you can easily retrieve your workout statistics and determine how
well you are meeting your fitness goals. If you are interested in
maintaining workout statistic information, ask the manager to create
a user account and a user ID for you. A user ID entry is required to
store your statistics.
Note: If the display is blank, make sure that the equipment is turned
On. If the Precor banner appears, the equipment is not connected
to a computer. Refer to Selecting a Program or Choosing
QUICKSTART.
If the equipment is connected to a computer, the following
appears:
CHOOSE QUICKSTART, ENTER, OR A PROGRAM TO BEGIN
To save the statistics generated during your exercise session, take
the following steps:
1.
Press ENTER.
2.
Use the number keypad to specify your 5-digit user ID. If you
make a mistake, press the CLEAR key and reenter the correct
number.
3.
When your user ID is shown, press ENTER.
A message appears and indicates when the user ID is accepted
by the computer.
4.
To begin your exercise session, select a program. Refer to
Selecting a Program.
Note: To bypass the user ID entry, press ENTER while all five
zeros appear in the user ID field. The statistics generated during
your exercise session will not be added to your file.
User's Reference Manual: Workout Options 28
Page 79

Setting Display Preferences Before Exercising
While the Precor banner scrolls, you have the opportunity to set
display preferences and program goals.
3.
Follow the prompts on the display and return to the Precor
banner.
Menu Option Preferences Effect
GOAL TIME, CALORIES, or
DISTANCE
Sets the program
goal.
Once you set your preferences, you have a 5-second window to
select a program. If you do not select a program from the
PROGRAMS menu or press QUICKSTART within the 5-second
window, the preferences return to the fitness facility settings.
1.
As the Precor banner scrolls, press OPTIONS. Continue to
press the key to view the menu options.
2.
Use the navigational arrow keys to display each menu option or
preference. Press OK to select it.
LANGUAGE ENGLISH, DEUTSCH,
ESPANOL, FRANCAIS,
NEDERLANDS,
PORTUGUES,
RUCCKIJJ, and
ITALIANO.
UNITS U.S. or METRIC
Causes the display
messages and
prompts to appear in
the chosen language.
Determines which
units of measure
appear on the display.
Note: The selections that you make prior to a workout reset to
the fitness facility settings once your program or the pause time
limit ends.
User's Reference Manual: Workout Options 29
Page 80

Cooling Down After a Workout
Pausing During a Workout or the
Incorporate a cool-down period into your workout to help lower
your heart rate and minimize muscle stiffness or soreness.
When you complete a program with a time limit or specified goal,
you automatically enter a cool-down period. The settings change to
help reduce the intensity of your workout.
Note: You cannot switch to a different program, goal, or workout
time during the cool-down period. Any pressure on the
PROGRAMS keys is ignored.
A workout summary appears at the end of the cool-down period.
Refer to Ending a Workout.
A cool-down period will not be appended to your exercise session
if the following occurs:
y
The fitness facility allows an unlimited time goal. A user must
enter a time goal of
NO LIMIT
to access this option. Refer to
Selecting a Program.
y
The fitness facility sets a cool-down time of zero, which
eliminates the cool-down phase.
Cool-Down Period
Press the red STOP button or the PAUSE/RESET key to pause
anytime during a workout or during a cool-down period. The pause
mode is limited to two minutes or less. If you do not resume
exercising during that time, the display returns to the banner.
1.
To pause, press the red STOP button or the PAUSE/RESET
key.
2.
To resume exercising from pause mode, press QUICKSTART or
the SPEED up key.
3.
If needed, enter the password by pressing: 1, 2, 3, 4.
An asterisk appears on the display with each entry.
Note: When you pause, you can change your program selection or
display options. Refer to Changing Programs in Mid-session and
Changing Your Workout Display Options.
y
You exit a program before completing it.
If you specify an unlimited time or the fitness facility removed the
cool-down phase, remember to incorporate a cool-down period at
the end of your exercise session.
User's Reference Manual: Workout Options 30
Page 81

Ending a Workout
CAUTION: Hold on to a handrail when you near the end of your
exercise session. The incline automatically recalibrates to a
default grade. If the lift is moving, wait until it stops before
stepping off the treadmill.
The running belt stops when you complete the automatic
cool-down period. After the running belt stops, time stops accruing.
The workout summary appears and shows your cumulative workout
statistics including warm-up and cool-down periods. You can
review your statistics for two minutes before the display
automatically resets to the Precor banner.
If you hold onto the touch-sensitive grips or wear a chest strap
while exercising, a heart rate analysis appears during the workout
summary. Refer to Heart Rate Analysis.
If you choose to exercise with no set time limit, you must manually
end a program by pressing the red STOP button or the
PAUSE/RESET key. You can also press the SPEED down key until
the speed is reduced to zero and the running belt stops.
To stop the running belt or end a workout session, do the following:
1.
Grasp a handrail with one hand.
2.
Press the red STOP button or the PAUSE/RESET key with your
other hand. The treadmill enters pause mode.
3.
Press PAUSE/RESET to view the workout summary.
While
WORKOUT SUMMARY
scrolls across the display, press
the selection keys to highlight more statistics.
4.
Press PAUSE/RESET again to return to the Precor banner.
Note: The red STOP button and the PAUSE/RESET key can be
used interchangeably.
User's Reference Manual: Workout Options 31
Page 82

Programs
This section describes the programs available on the equipment.
Use this section as a reference tool to better understand each
program’s purpose.
Choosing a Program
Choosing a program depends on your goals. If you are a beginner
or returning to regular exercise, you can start a cardio-conditioning
program to slowly return your body to a comfortable level of
exercise. If you have been exercising and feel that you have an
intermediate or advanced fitness level, you probably have
established goals. The Precor web site (www.precor.com) can give
you many ideas about fitness routines and advice from the experts.
Several of the exercise choices on the equipment are
preprogrammed with recommended settings. However, you have
the option to override the suggested settings, with some
exceptions. If changes are not allowed, a message scrolls across
the display explaining your options.
If your level of exertion becomes too great, reduce your level of
intensity by overriding each upcoming segment in the program
profile. When you complete a program that contains a time limit or
goal period, an automatic cool-down period begins.
Program Tips
y
Begin at the Precor banner and choose a program by pressing
PROGRAMS or QUICKSTART. Hold onto a handrail as the
running belt begins moving after a 3-second countdown. Refer
to Workout Options.
y
A blinking column indicates your position as you progress
through a program.
y
Prior to choosing a program, you may press the OPTIONS key
to access goal, language, or units of measure settings. After
pressing OK to confirm new settings, you must select a program
within five seconds for the changes to become effective. Refer
to Setting Display Preferences Before Exercising.
y
To use the SmartRate feature, you need to specify your age and
wear a chest strap or hold on to the touch-sensitive grips. For
more information, refer to Changing Your Workout Display
Options.
y
In some programs, an unlimited time setting may be an available
option. Refer to Selecting a Program.
User's Reference Manual: Programs 32
Page 83

y y The fitness facility can set limits on workout, pause, and
cool-down times and customize other aspects of your exercise
session. Check with your manager to learn if any limits are in
place that might affect your program selections.
Manual Program
To pause during a program, press PAUSE/RESET. Refer to
Pausing During a Workout or the Cool-Down Period.
The Manual Program profile, available by pressing the MANUAL
key, begins as a flat line. You control incline and speed using the
INCLINE or SPEED keys. The program profile reflects any changes.
The blinking column indicates your position in the program.
A cool-down period occurs automatically when you end your
workout. An exception to the cool-down period exists if the fitness
facility allows it. Refer to Cooling Down After a Workout for more
information.
Note: To use the SmartRate feature, you need to specify your age
by pressing the OPTIONS key and following the display prompts.
To change the workout time, press the TIME +/- key. Refer to
Changing the Workout Time.
User's Reference Manual: Programs 33
Page 84

Interval Program
The Interval Programs, available by pressing the INTERVAL key, are
among the best for conditioning your cardiovascular system. Each
program raises and lowers your level of exertion repeatedly for the
specified period of time.
Three programs let you choose the rest and work intervals
according to your training regimen.
Note: Only the first program is available on the 946i treadmill.
Interval Program Rest Duration Work Duration
1-1 Interval 2 minutes 2 minutes
1-2 Interval 2 minutes 4 minutes
1-3 Interval 2 minutes 6 minutes
Custom Interval (966i) user specified user specified
Initially, the rest interval is set to 0% grade and 1 mph or 1 kph. The
work interval is set at a 3% grade and the speed remains at 1 mph
or 1 kph.
While exercising, you can vary the speed and change the preset
incline using the INCLINE or SPEED keys. The settings are
repeated throughout the remainder of the program.
Note: Incline changes are limited to +/ 5% grade variance from
-
the previous incline level.
The display lets you know when the speed or incline levels are
about to change, and indicates the levels of the next interval.
A Custom Interval Program is available on the 966i. It lets you
specify the time durations for the rest and work intervals.
User's Reference Manual: Programs 34
Page 85

Random Program
The Random Program can be accessed by pressing the VARIETY
key. Every time the Random program is selected, a different
program profile appears. The columns that appear in the program
profile show the preprogrammed incline. You can override the
preprogrammed incline at any time using the INCLINE keys.
The running belt speed is completely under your control. You can
adjust the pace by pressing the SPEED keys.
Cross Country Program
The two Cross Country Programs, available by pressing the
VARIETY key, are designed to provide a more realistic terrain as if
you were running or walking in the outdoors. Review the profiles to
determine the ascent and descent levels of each program.
Note: Only the first program is available on the 946i treadmill.
The goal in a Cross Country Program is time, but if you prefer a
distance goal, you can press the OPTIONS key. Refer to Changing
Your Workout Display Options. Once you select a distance goal,
the TIME REMAINING recalculates based on the speed of the
running belt.
Anytime during a workout, you can override the incline settings by
pressing the INCLINE keys. The remaining profile columns change
accordingly. The changes are saved and applied throughout the
remainder of the program. You can adjust the pace by pressing the
SPEED keys.
User's Reference Manual: Programs 35
Page 86

966i/956i Gluteal Programs
The two Gluteal Programs, available by pressing the VARIETY key,
are designed to exercise the gluteal muscles. The incline is
preprogrammed. Review the profiles to determine the ascent and
descent levels of each program.
Anytime during a workout, you can override the incline settings by
pressing the INCLINE keys. The remaining profile columns change
accordingly. The changes are saved and applied throughout the
remainder of the program. To change the pace, use the SPEED
keys.
966i/956i Custom Programs
The two Custom Programs, available by pressing the VARIETY key,
provide variable preprogrammed inclines. Fitness personnel in the
fitness facility have the option to create a profile customized for its
patrons.
Heart Rate Programs
The Heart Rate Programs let you set a target for your heart rate.
These programs adjust the incline and speed to maintain your heart
rate within two beats per minute of the target heart rate while you
exercise. To use these programs, you must enter your age and
wear a chest strap so your heart rate can be monitored throughout
the session.
Important: Consult your physician to determine the appropriate
target heart rate for your age and fitness level. If your physician
recommends a different target heart rate than the one that appears
on the display, use the navigational arrow keys to change the
target heart rate once you finish the warm-up period. Do not
exercise over the recommended range.
Similar to other treadmill programs that have preprogrammed
inclines, you can override the incline settings using the INCLINE
keys. The changes are applied to the remaining profile. To change
the pace, use the SPEED keys.
User's Reference Manual: Programs 36
Page 87

Heart Rate Program Tips
The Heart Rate Programs enhance your overall cardiovascular
fitness levels to help you achieve your weight loss and fitness
goals. Read through the following tips before selecting a program.
These tips provide general information regarding how the programs
function. The following table briefly explains the available programs.
For more information and exercise suggestions, refer to the Precor
web site at www.precor.com.
y
Each program provides a 3-minute warm-up period. During this
time, you may change the incline or speed, but you cannot
change the goal setting.
y
You can press the SPEED keys to adjust the speed and press
the navigational arrow keys to change the target heart rate
during your exercise session. The display lets you know when
changes to either are about to occur.
Note: Changing the target heart rate or speed affects the
treadmill’s ability to maintain your target heart rate in the
preferred zone. It takes time for the treadmill to readjust the
incline so that your heart rate remains on target.
y
In several of the programs, the workout time is automatically set.
To adjust the time, press the TIME +/- key and use the
navigational arrow keys followed by OK to change the workout
time.
Note: When your target heart rate is achieved or the 3-minute
period elapses, the warm-up period ends and the program
begins, at which point, you may change to a distance or calorie
goal.
y
Each program automatically adjusts the incline to keep your
heart rate at the selected target. After the warm-up period,
pressing the INCLINE keys no longer affects the incline motor.
Check the SmartRate display to see if you are maintaining your
preferred zone. Check the HEART RATE display to determine
your actual heart rate. For information about understanding your
target heart rate, refer to Heart Rate Features.
Note: A fixed time exists for the Custom Weight Loss HRC
Program, so you cannot change it. The 966i Heart Health,
Endurance, and Speed HRC Programs have a minimum workout
time of 15 minutes.
y
If you wish to quit a heart rate program, you can make a
mid-session transfer to another program. If you try to return or
transfer mid-session to a heart rate program, messages scroll
across the display stating your options.
y
A cool-down period is automatically added to the end of each
program.
If you are having difficulty with the heart rate features, talk to your
fitness facility manager.
User's Reference Manual: Programs 37
Page 88

Table 4. Heart Rate Programs
Equipment Program Description
966i, 956i,
946i
966i, 956i,
946i
966i, 956i,
946i
966i
966i
966i Speed HRC
Basic HRC
Custom Weight
Loss HRC
Weight Loss
HRC
Heart Health
HRC
Endurance
HRC
This program enhances your overall cardiovascular fitness level by keeping your heart rate within the recommended cardio zone based
on your age. You must enter your age and hold onto the touch-sensitive grips or wear a chest strap while exercising.
This 28-minute program lets you set the rest and work target heart rates for seven 4-minute intervals. The recommended target heart
rates appear on the display and are based on the Fat Burn scale. You must enter your age and hold onto the touch-sensitive grips or
wear the chest strap while exercising. Use the SPEED keys to change the speed for the rest or work intervals. Use the INCLINE keys to
change your target heart rate. When you make changes, the program repeats the settings for the remaining intervals. Note that you
cannot make a mid-session change to this program.
This program automatically adjusts the speed and incline to help you achieve weight loss and improve endurance. After the 3-minute
warm-up period, heart rate readings are taken every minute and the speed or incline is adjusted to keep you in the appropriate target
zone. You must enter your age and wear a chest strap while exercising. A time goal can be set between 15 and 90 minutes, but the
fitness facility can override the higher range and require a shorter duration.
This program provides intervals between 3–10 minutes which maintain your heart rate in the higher cardiovascular range. If you have
been exercising regularly, you might use this program to increase your metabolic rate, strengthen your heart muscle and improve
endurance. With subsequent workouts, you will increase fat burning and your aerobic capacity. Similar to the Weight Loss HRC, heart
rate readings are taken at specific intervals and the speed or incline is adjusted to keep you in the appropriate target zone. You must
enter your age and wear a chest strap while exercising. A time goal can be set between 15 and 90 minutes, but the fitness facility can
override the higher range and require a shorter duration.
As the name implies, this program is a high-intensity session. It provides rest interval durations that are increased two-fold and applied
to the work interval. The rest interval maintains your heart rate in the fat burn zones while the work interval increases the incline (or
speed) to raise and maintain your heart rate in the cardio zones. You must enter your age and wear a chest strap while exercising. A
time goal can be set between 15 and 90 minutes, but the fitness facility can override the higher range and require a shorter duration.
The work interval time is limited to 20 minutes or less.
This program can be used to increase your anaerobic threshold power. If you do not know the difference between aerobic and
anaerobic capacity, do not use this program. Check with a personal trainer or facilities personnel. The first interval in this program starts
in the Peak zone. The second interval adjusts the incline (or speed) to maintain your heart rate between 80% and 65% of your target
zone. The program repeats the settings for the remaining intervals. You must enter your age and wear a chest strap while exercising. A
time goal can be set between 15 and 90 minutes, but the fitness facility can override the higher range and require a shorter duration.
The work interval time is limited to 9 minutes or less.
User's Reference Manual: Programs 38
Page 89

Weight Loss Programs
The Weight Loss Programs begin with a warm-up period similar to
the heart rate programs, except that the target heart rate is set in
the lower fat burn range during the rest intervals. During the work
intervals, the target heart rate is initially set to 220 minus age
multiplied by 70%. The display lets you know when the incline
levels are about to change.
For the ideal weight loss range, your heart rate should remain
between 55% and 70% of your maximum aerobic heart rate. If you
wear a chest strap or grasp both touch-sensitive grips, you can use
SmartRate as a visual cue.
The Custom Weight Loss HRC and Weight Loss HRC Programs
are described in the table in Heart Rate Program Tips. Two
additional programs are available and include:
AEROBIC
.
1 AEROBIC
and
2
Each program provides varying incline levels to induce fat burn and
weight loss conditioning. Review the profiles to determine which
program is appropriate for your level of fitness.
If you are using an Aerobic Program, you can override the incline
settings for each column by pressing the INCLINE keys. The
changes raise or lower the columns on the remaining portion of the
program profile. You can adjust the pace by press the SPEED keys.
Note: The word
AEROBIC
without numbers appears on the 946i
display.
User's Reference Manual: Programs 39
Page 90

Track Program
The Track Program can be accessed by pressing the
PERFORMANCE key. An oval track appears on the display. One
lap around the track represents 440 yards (400 meters). A blinking
LED moves counterclockwise and indicates your position on the
track. You control incline and speed. The
REMAINING
display, found in the OPTIONS menu, shows the
remaining time required to complete the current lap based on your
current speed.
SEGMENT TIME
5K Program
The 5K Program, available by pressing the PERFORMANCE key, is
a good distance to run or walk depending on your level of fitness.
The distance is fixed at five kilometers (3.1 miles) and cannot be
changed. The incline is preprogrammed. You can change the
speed and override the preprogrammed incline using the SPEED or
INCLINE keys.
User's Reference Manual: Programs 40
Page 91

Fitness Tests
A variety of fitness tests are available on the equipment, but the
fitness facility has the option to remove the program selections
from the PERFORMANCE key menu. If you do not see the fitness
tests as part of your program selections, ask the facility manager.
Fitness Test Tips
Read through the following tips before selecting a fitness test.
y
Sit and rest for at least five minutes prior to taking the test.
y
You must wear the chest strap throughout the Fitness Test. If
the heart rate reception is erratic, incorrect readings can occur
and terminate the test.
y
You must enter your age, and in some cases, your gender and
the altitude to begin a fitness test.
y
The red STOP button and the PAUSE/RESET key are enabled
during the fitness tests. The SPEED keys are also enabled
during the fitness tests, with the exception of the Gerkin Fitness
Test.
y
You cannot change the distance or time goals or change to
another program while in the midst of taking a fitness test.
y
If you press the red STOP button or the PAUSE/RESET key
during the test, the test ends and the display indicates the test
was not completed.
y
Cool-down periods are appended to the end of each test.
Fitness Test Scores
When you finish a fitness test, a fitness score appears on the
display as part of the workout summary. Check with the facility
manager to compare your score with the appropriate fitness
indexes. The test results can help you gauge the effectiveness of
your current exercise routine and tailor it to meet your fitness goals.
y
The test provides a 3-minute warm-up period. During this time,
you may change the incline or speed. When your target heart
rate is achieved or the 3-minute period elapses, the warm-up
period ends and the test begins.
Important: If you need to stop the running belt to regain control
or reduce your heart rate, please do so. You can retake the
fitness test later. Complete the cool-down period and retake the
fitness test later.
User's Reference Manual: Programs 41
Page 92

Table 5. Fitness Tests
Equipment Fitness Test Description
966i, 956i Gerkin Fitness Test
966i, 956i
966i, 956i NAVY PRT
966i, 956i ARMY PFT
966i, 956i USMC PFT
966i, 956i
USAF Physical Fitness
Test (PRT)
Federal Law Enforcement
Physical Efficiency Battery
(PEB)
This test provides a means of comparing your fitness level with the official fitness test of the International Association of
Firefighters (IAFF). It is written using the Gerkin Protocol, which is the basis for the official IAFF fitness test and part of their
Wellness and Fitness Initiative.
During the test, the treadmill gradually increases the incline and speed in specific stages. The keypads are disabled. The test
ends if no heart rate is detected for 15 seconds, you surpass your target heart rate (85% of your maximum aerobic heart rate),
or you complete the 13-minute time limit. Whatever stage you are at when the test ends determines your aerobic capacity and
establishes your VO2 max. Once you complete the test, a fitness score appears as part of the workout summary.
Use it to compare to IAFF standards.
This program has a set distance and a set incline at 1% grade. Throughout the test you can adjust the speed using the
SPEED keys. All other keypads are disabled. Once you complete the test, a fitness score appears as part of the workout
summary. Use it to compare to Air Force standards.
This program has a set distance and a set incline at 1% grade. Throughout the test you can adjust the speed using the
SPEED keys. All other keypads are disabled. Once you complete the test, a fitness score appears as part of the workout
summary. Use it to compare to Navy standards.
This program has a set distance and a level incline. Throughout the test you can adjust the speed using the SPEED keys. All
other keypads are disabled. Once you complete the test, a fitness score appears as part of the workout summary. Use it to
compare to Army standards.
This program has a set distance and a level incline. Throughout the test you can adjust the speed using the SPEED keys. All
other keypads are disabled. Once you complete the test, a fitness score appears as part of the workout summary. Use it to
compare to U.S. Marine Corps standards.
This program has a set distance and a level incline. Throughout the test you can adjust the speed using the SPEED keys. All
other keypads are disabled. Once you complete the test, a fitness score appears as part of the workout summary. Use it to
compare to Federal Law Enforcement standards.
User's Reference Manual: Programs 42
Page 93

Exercise Session
This section describes how to access the following attributes
through the use of the navigational keypad. Any display selections
set during the course of your exercise session are reset to the
fitness facility settings when you end your session and return to the
Precor banner.
While exercising, you can:
y
change the program you are using
y
change the workout time
y
enter your weight and age
y
choose between time-, distance-, or calorie-type goals
y
reset your target heart rate
y
display more workout statistics
y
choose between U.S. standard and Metric units of measure
Changing Programs in Mid-session
You can change programs in the middle of a session by selecting a
new program from the PROGRAMS key menu. All accumulated
workout statistics are transferred to the new program as you
continue exercising.
Certain programs are not available for mid-session transfers due to
set goals and program preferences. If this occurs, a message
scrolls across the display.
y
display messages and prompts in a different language
Note: Prior to selecting a program, you can select preferences for
program goals, language and units of measure. Refer to Setting
Display Preferences Before Exercising.
User's Reference Manual: Exercise Session 43
Page 94

Changing the Workout Time
Addressing Your Weight and Age
To change the duration of your program, take the following steps:
1.
Press TIME +/-.
2.
A workout time blinks in the display. Use the navigational arrow
keys or the number keys to adjust the time.
3.
Press OK.
A message scrolls across the display indicating that the new
workout time has been accepted.
The fitness facility can limit the duration of exercise sessions and
certain programs have fixed time goals which do not allow
adjustments. If your attempt to change the workout time is not
accepted, display messages scroll and indicate the reasons.
Your age must be entered to activate the SmartRate display and to
properly use the heart rate and weight loss programs. To enter or
change your weight or age during an exercise session, take the
following steps:
1.
Press OPTIONS.
2.
The prompt,
WEIGHT/AGE
appears. Press OK.
Note: If the weight and age are already entered, the
WEIGHT/AGE
prompt will not appear as part of the OPTIONS
menu.
3.
Use the number keys or navigational arrow keys to adjust the
blinking weight prompt and then, press OK.
4.
Use the number keys or navigational arrow keys to adjust the
blinking age prompt and then, press OK.
A message scrolls across the display indicating that your weight
and age have been accepted.
User's Reference Manual: Exercise Session 44
Page 95

Adjusting Program Goals
To designate a distance, calories, or time goal while exercising take
the following steps:
1.
Press OPTIONS, and then press the down key on the
navigational keypad until
Note: If a program has a preset goal such as distance in the 5K
Program or 28 minutes in the Weight Loss HRC Program,
GOAL
2.
Press OK.
3.
Press OPTIONS again or the down key on the navigational
may not appear as part of the OPTIONS menu.
keypad to select between
4.
When you are ready, press OK to select the displayed goal.
Selection Description
TIME
DISTANCE
CALORIES
A time-based goal is the setting for all programs. If you
want to exercise for a set time, select this goal.
A distance-based goal lets you select a set distance
between 1 and 50 miles or kilometers (km).
A calories-based goal lets you exercise until you reach
a set calorie amount between 1 and 1000.
GOAL
appears.
TIME, CALORIES
, or
DISTANCE
.
5.
A blinking number appears indicating that the system is ready
for adjustments to the goal. Use the number keys or navigational
arrow keys to change the setting.
6.
When you are ready, press OK. If the program you are using
allows changes to goal settings, a prompt scrolls across the
display indicating that your selection has been accepted. The
TIME REMAINING display changes according to the goal being
set.
Note: Several programs on the treadmill are preset with
distance or time goals and cannot be changed. If you try to
change one, a brief message appears indicating that your
attempt failed.
User's Reference Manual: Exercise Session 45
Page 96

Adjusting Your Target Heart Rate
Changing Your Workout Display
Your target heart rate can be adjusted anytime during your exercise
session by taking the following steps:
1.
Press OPTIONS, and then press the down key on the
navigational keypad until
2.
Press OK.
3.
A blinking number appears indicating the suggested target heart
TARGET HR
appears.
rate based on your age. Use the number keys or navigational
arrow keys to change the setting.
4.
When you are ready, press OK.
Important: Consult your physician to determine the appropriate
target heart rate for your age and fitness level. If your physician
recommends a different target heart rate than the one that
appears on the display, change the target heart rate to match
your physician’s recommendation. Do not exercise over the
recommended range.
Options
During an exercise session, the display becomes a message bar. It
can show additional workout statistics depending on user
selections accessed through the OPTIONS menu.
To display more workout statistics or choose one among them, take
the following steps:
1.
Press OPTIONS, and then press the down key on the
navigational keypad until
2.
Press OK.
3.
Scroll through all the available workout statistic displays by
continually pressing the down key on the navigational keypad.
Refer to the following table.
4.
When you are ready, press OK to select a displayed metric or
display the entire menu consecutively, by selecting
Note: To remove a scrolling statistic from the message bar, you
need to re-enter the OPTIONS menu and select a different
workout statistic display or select
MORE METRICS
OFF
.
appears.
SHOW ALL
.
User's Reference Manual: Exercise Session 46
Page 97

Table 6. Workout statistics using OPTIONS or METRICS key
Equipment Menu Description
All
All
All
AMT, climber
Treadmills
All
All
All
All
All
All
AMT
Climber,
treadmills
Treadmills
All
All
% COMPLETE
TIME IN ZONE
SEGMENT TIME
REMAINING
AVERAGE
SPEED
AVERAGE
SPEED
CALS/MIN
CALS/HR
WATTS
METS
TARGET HR
AVG HEART
RATE
STRIDE LENGTH
ELEVATION GAIN
PACE
SHOW ALL
OFF
Shows how much of the program goal you have completed.
Displays the total time that your heart rate is within the range of 55% to 84% of your target heart rate.
Indicates the amount of time, in minutes and seconds, that remain in the highlighted column of the profile before the next
column begins blinking.
Displays the average strides per minute.
Displays the average miles or kilometers per hour. The number that appears is determined by dividing the total distance
traveled by the elapsed time.
Displays the approximate number of calories burned per minute.
Displays the approximate number of calories burned per hour.
Shows your current energy expenditure level.
Shows the metabolic units associated with your current energy expenditure level, derived from the calories per minute value
and adjusted for your weight.
Shows the current target heart rate setting.
Displays your average heart rate. The number is based on systematic sampling taken while you are exercising. A chest strap will
give you a more accurate heart rate average than if you occasionally use the touch-sensitive grips. If no heart rate reading
occurred during your exercise session, an analysis will not appear in the workout summary.
Shows the current length of your stride in inches or centimeters.
Presents the cumulative steps (climber) or incline (treadmills) converted into elevation gained over the course of the program.
Displays your target speed in minutes and seconds per mile (or kilometer). For example, the number
pace (speed at which you are moving) is 4 minutes and 23 seconds per mile.
Presents all the workout statistics in this menu in consecutive order.
Stops scrolling the workout statistics, found in this table, across the message bar.
4:23
indicates that your
User's Reference Manual: Exercise Session 47
Page 98

Changing the Units of Measure
Selecting a Language
Display measurements can appear in either Metric or U.S.
Standard. To change this setting, perform the following steps:
1.
Press OPTIONS, and then press the down key on the
navigational keypad until
2.
Press OK.
UNITS
scrolls across the display and is replaced by
one of two options:
3.
Toggle between the two options by pressing the down arrow
U.S.
UNITS
or
METRIC
appears.
.
key on the navigational keypad.
4.
When you are ready, press OK to select the displayed unit of
measure. A message scrolls across the display indicating that
the unit of measure has changed.
You can choose to display text messages in several different
languages. To select a different language before or during an
exercise session, take the following steps:
1.
Press OPTIONS, and then press the down key on the
navigational keypad until
2.
Press OK.
LANGUAGE
scrolls across the display and is replaced by one
LANGUAGE
appears.
of several language options.
3.
Scroll through the available language options by continually
pressing the down key on the navigational keypad.
4.
When you are ready, press OK to select the displayed
language. A message scrolls across the display indicating that
the language has been changed.
User's Reference Manual: Exercise Session 48
Page 99

946i/956i/966i Commercial Treadmills
Product Specifications
946i 956i 966i
Length 79 in (204 cm) 88 in (224 cm) 88 in (224 cm)
Width 34 in (86 cm) 35 in (89 cm) 35 in (89 cm)
Height 59 in (150 cm) 64 in (163 cm) 64 in (163 cm)
Weight 331 lb (150 kg) 508 lb (231 kg) 508 lb (231 kg)
Shipping weight 346 lb (157 kg) 549 lb (249 kg) 549 lb (249 kg)
Running surface 56 in x 22 in
(142 cm x 56 cm)
Motor 4.0 hp
Peak duty
Power 120/240 VAC
50/60Hz
Speed 0.5–12 mph
(1–20 kph)
60 in x 20 in
(153 cm x 51 cm)
4.0 hp
Peak duty
120/240 VAC
50/60Hz
0.5–16 mph
(1–25.5 kph)
60 in x 20 in
(153 cm x 51 cm)
4.0 hp
Peak duty
120/240 VAC
50/60Hz
0.5–16 mph
(1–25.5 kph)
Incline 0–15% grade 0–15% grade -3%–15% grade
Frame Powder-coated steel Powder-coated steel Powder-coated steel
Regulatory
Approvals
FCC, ETL, CE,
EN957
FCC, ETL, CE,
EN957
FCC, ETL, CE,
EN957
Product Features
CSAFE Compatible
Entertainment Option Available
Heart Rate Telemetry
QuickStart
SmartRate
TM
®
Touch Heart Rate
Safety Code
Programs
946i 956i 966i
Manual ✓✓✓
Interval
1-1 Interval ✓✓✓
1-2 Interval ✓✓
1-3 Interval ✓✓
Custom Interval ✓
Varie ty
Random ✓✓✓
1 Cross Country ✓✓✓
2 Cross Country ✓✓
1 Gluteal ✓✓
2 Gluteal ✓✓
1 Custom ✓✓
2 Custom ✓✓
Heart Rate
Basic HRC* ✓✓✓
Custom Weight Loss HRC* ✓✓✓
Weight Loss H RC ✓✓✓
Heart Health HRC* ✓
Endurance HRC* ✓
Speed HRC* ✓
Weight Loss
Custom Weight Loss HRC* ✓✓✓
Weight Loss H RC ✓✓✓
1 Aerobic ✓✓✓
2 Aerobic ✓✓
Performance
Tr ack ✓✓✓
5 K ✓✓✓
Gerkin Fitness Test ✓✓✓
USAF PRT ✓✓
Navy PRT ✓✓
Army PFT ✓✓
USMC PFT ✓✓
Federal Law Enf. PEB ✓✓
Electronic Readouts
% Complete
Average Heart Rate*
Average Speed
Calories
Calories per Hour
Calories per Minute
Distance
Elevation Gain
Goal
Heart Rate*
Heart Rate Analysis*
Incline
Language
Maximum Heart Rate*
METS
Pace
Profile
Segment Time Remaining
SmartRate*
Speed
Target Heart Rate
Time
Time Elapsed
Time in Heart Rate Zone*
Time Remaining
Units
Watts
Workout Summary
✳ Use of a chest strap or the touch-
sensitive grips is required.
Page 100

Precor Incorporated
20031 142nd Ave NE
P.O. B ox 72 0 2
Woodinville, WA USA 98072-4002
Precor, C, CrossRamp, EFX, M, Move Beyond, and SmartRate are registered trademarks of Precor Incorporated.
Crosstrainer, Crosstraining, QuickStart, and StretchTrainer are trademarks of Precor Incorporated.
Copyright 2008 Precor Incorporated.
Specifications subject to change without notice.
www.precor.com
NOTICE:
Precor is widely recognized for its innovative, award winning designs of exercise equipment. Precor aggressively seeks
U.S. and foreign patents for both the mechanical construction and the visual aspects of its product design. Any
party contemplating the use of Precor’s product designs is hereby forewarned that Precor considers the unauthorized
appropriation of its proprietary rights to be a very serious matter. Precor will vigorously pursue all unauthorized
appropriation of its proprietary rights.
9x6i URM 49004-106, en
03 March 2008
 Loading...