

Page 1

EC
USA
R
eddy current technology by Precor Incorporated
850
Owner’s Manual
Professional
Cycle
Page 2

Safety Information
Before beginning any fitness program, you should have a complete physical
examination by your physician.
Read and observe the following safety guidelines when using the EC850
Professional Cycle:
• Read the Owner’s Manual and follow all instructions. These instructions
were written to ensure your safety and to protect the cycle.
Note for Club Owners: To ensure the proper use and safety of the EC850
cycle, make sure that all users review this manual. Please make this
manual a part of your training program.
• Assemble and operate the cycle on a solid, level surface.
• Never allow children on the cycle. Never allow children to play unsupervised near the machine. Serious injury could occur due to a child’s curiosity
or interest in the moving parts of the cycle.
• Check the cycle before each use. Never use the cycle if it is not completely
assembled or is damaged in any way.
• Keep hands away from moving parts.
• Do not use the EC850 if you weigh over 300 pounds. The weight limit for
this cycle is 300 pounds.
• Wear proper exercise clothing and shoes for your workout—no loose
clothing. Do not wear shoes with heels or leather soles. Tie long hair back.
• Use care when getting on and off the cycle. Do not rock the machine. Do
not stand or climb on the handlebars or electronic console.
• Do not use accessory attachments that are not recommended by the
manufacturer—such attachments might cause injuries or damage the unit.
• Make sure that the seat is securely fastened before using.
• Do not overexert yourself or work to exhaustion.
• Stop your workout immediately if you feel any pain or abnormal symptoms,
and consult your physician.
By following the above precautions and using good common sense, you will
have many safe and pleasurable hours of healthful exercise with your Precor
EC850 Professional Cycle.
Page 3

Table of Contents
Before You Begin .......................................................... 4
1
About this Manual ........................................................................ 4
Setting Up the EC850 Professional Cycle................... 5
2
3
4
Installation Requirements ............................................................ 5
Interconnecting Cycles ................................................................ 5
Using the Club Setting Program .................................................. 6
Using the EC850 Professional Cycle........................... 8
Understanding the Electronic Console. ....................................... 8
Adjusting the Seat ....................................................................... 11
Adjusting the Handlebars ............................................................ 12
Turning the Cycle ON and OFF................................................... 13
Using Manual Mode (Workout Program 0) .................................. 13
Exercising on the EC850 Cycle ................................................... 14
Designing a Customized Course ................................................. 17
Getting the Most Out of Your Workout........................ 19
How Hard Should I Exercise?...................................................... 20
5
How Long Should I Exercise? ..................................................... 21
How Often Should I Exercise?..................................................... 21
Maintaining the EC850 Professional Cycle ................ 22
Cleaning the Cycle ...................................................................... 22
Using the Diagnostic Program..................................................... 22
Getting Service ............................................................................ 25
Page 4

Before You Begin
1
Congratulations on purchasing one of the most advanced cycles available—the
Precor EC850 Professional Cycle. Built to the exacting standards of the health
club environment, the EC850 Professional Cycle can withstand the rigors of
daily club use with little maintenance.
The easy-to-use electronic console allows users to simply climb on and begin
cycling. The chosen course is displayed on the three-dimensional course
simulator along with the rider’s position on the course. Throughout the workout,
the electronics continually display statistics about distance travelled, pedal
RPM, time remaining in the program, and fitness score. With the electronic
pacer, users can easily maintain their intensity and judge their progress.
To maximize the use of the EC850 Professional Cycle, please study this
manual thoroughly.
About this Manual
Inside this manual, you will find instructions for installing and using the EC850
Professional Cycle. You will also find an explanation of aerobic conditioning
and suggestions for developing an EC850 fitness program.
The manual uses the following conventions for identifying special information:
Note: Contains additional information that applies to the preceding text.
Important: Indicates information to which you should pay special attention.
CAUTION: Indicates steps or information necessary to prevent harm to
yourself or damage to the equipment.
page 4
Page 5

Setting Up the EC850 Professional Cycle
2
The EC850 Professional Cycle comes fully assembled. You simply need to
follow the installation requirements listed in this section and place the cycle in
the appropriate location.
The cycle has a unique program that lets you determine which language and
measurement system appears on the electronic console display. You can
choose one of three languages: French, German, or English, and select either
U.S. Standard or Metric as the measurement system. The Club Setting Program
also enables you to limit workout time on the cycle so more people can use it.
Instructions on how to use the program are found in this section.
Installation Requirements
Follow the installation requirements below when installing the cycle.
install the cycle according to the following guidelines, you could void the Precor
warranty.
• Set up the EC850 cycle on a solid, flat surface.
• Use the appropriate voltage outlet and grounding as specified on the
cycle. The EC850 cycle is available in both 120-volt and 220-volt models.
Refer to the cycle’s identification label to determine the voltage and frequency that your cycle needs.
If you do not
CAUTION: Do not use a non-grounded outlet. Electrical damage might
occur if the EC850 cycle is connected to an improper power source.
Interconnecting Cycles
You can connect up to eight EC850 cycles together in a “daisy chain” fashion
which eliminates the need for additional wall outlets.
To connect the cycles together, take the following steps:
1. Locate the outlet on the front of the cycle next to the ON/OFF power switch.
2. Connect the appropriate power cord from the outlet to the next cycle in line.
Caution: Do not use the outlet located on the front of the cycle for anything
other than interconnecting EC cycles. Do not connect treadmills or other
electrical appliances to this outlet.
page 5
Page 6

Using the Club Setting Program
The Club Setting Program lets you customize your cycle with the following
features:
• Language—The words displayed on the electronic console can appear in
one of the three languages (French, German, or English). Typically, on the
cycle you buy, the language is preset to English.
• Workout time—You can set a workout time limit between 2 and 60
minutes. For example, if a club owner sets the maximum workout time to
20 minutes, the cycle would allow users to specify a workout time from 2
to 20 minutes. Users could not specify a workout time longer than 20
minutes. When you buy the cycle, it is set to a maximum workout time of
60 minutes.
• Measurement system—You can choose between U.S. Standard or
Metric. Typically, the cycle you buy is set to U.S. Standard.
Accessing the Club Setting program requires combining specific keys on the
electronic console. This design helps secure the cycle from unauthorized
access and changes.
To use the Club Setting program, take the following steps:
1. Make sure that the cycle is located in an appropriate place and plugged in.
2. If the cycle is turned OFF, turn it ON using the ON/OFF power switch. This
switch is located on the front of the cycle, near the power cord.
3. To display the initial start-up prompt, press the ON key.
Note: If the cycle is already ON and EC850 is scrolling across the bottom
of the display. You can press any key and the initial start-up prompt,
“Choose Workout Program” will appear.
4. When the start-up prompt “Choose Workout Program” appears, access
the Club Settings program by simultaneously pressing and holding the ON
and keys for a minimum of 5 seconds.
5. Release both keys when the Club Settings screen appears on the console.
6. At the “Enter Language Selection” prompt, specify the language you want
by using the and keys. Press ENTER/RESET when the desired
language is displayed. The Club Setting screen appears as shown in
Diagram 1.
page 6
Page 7
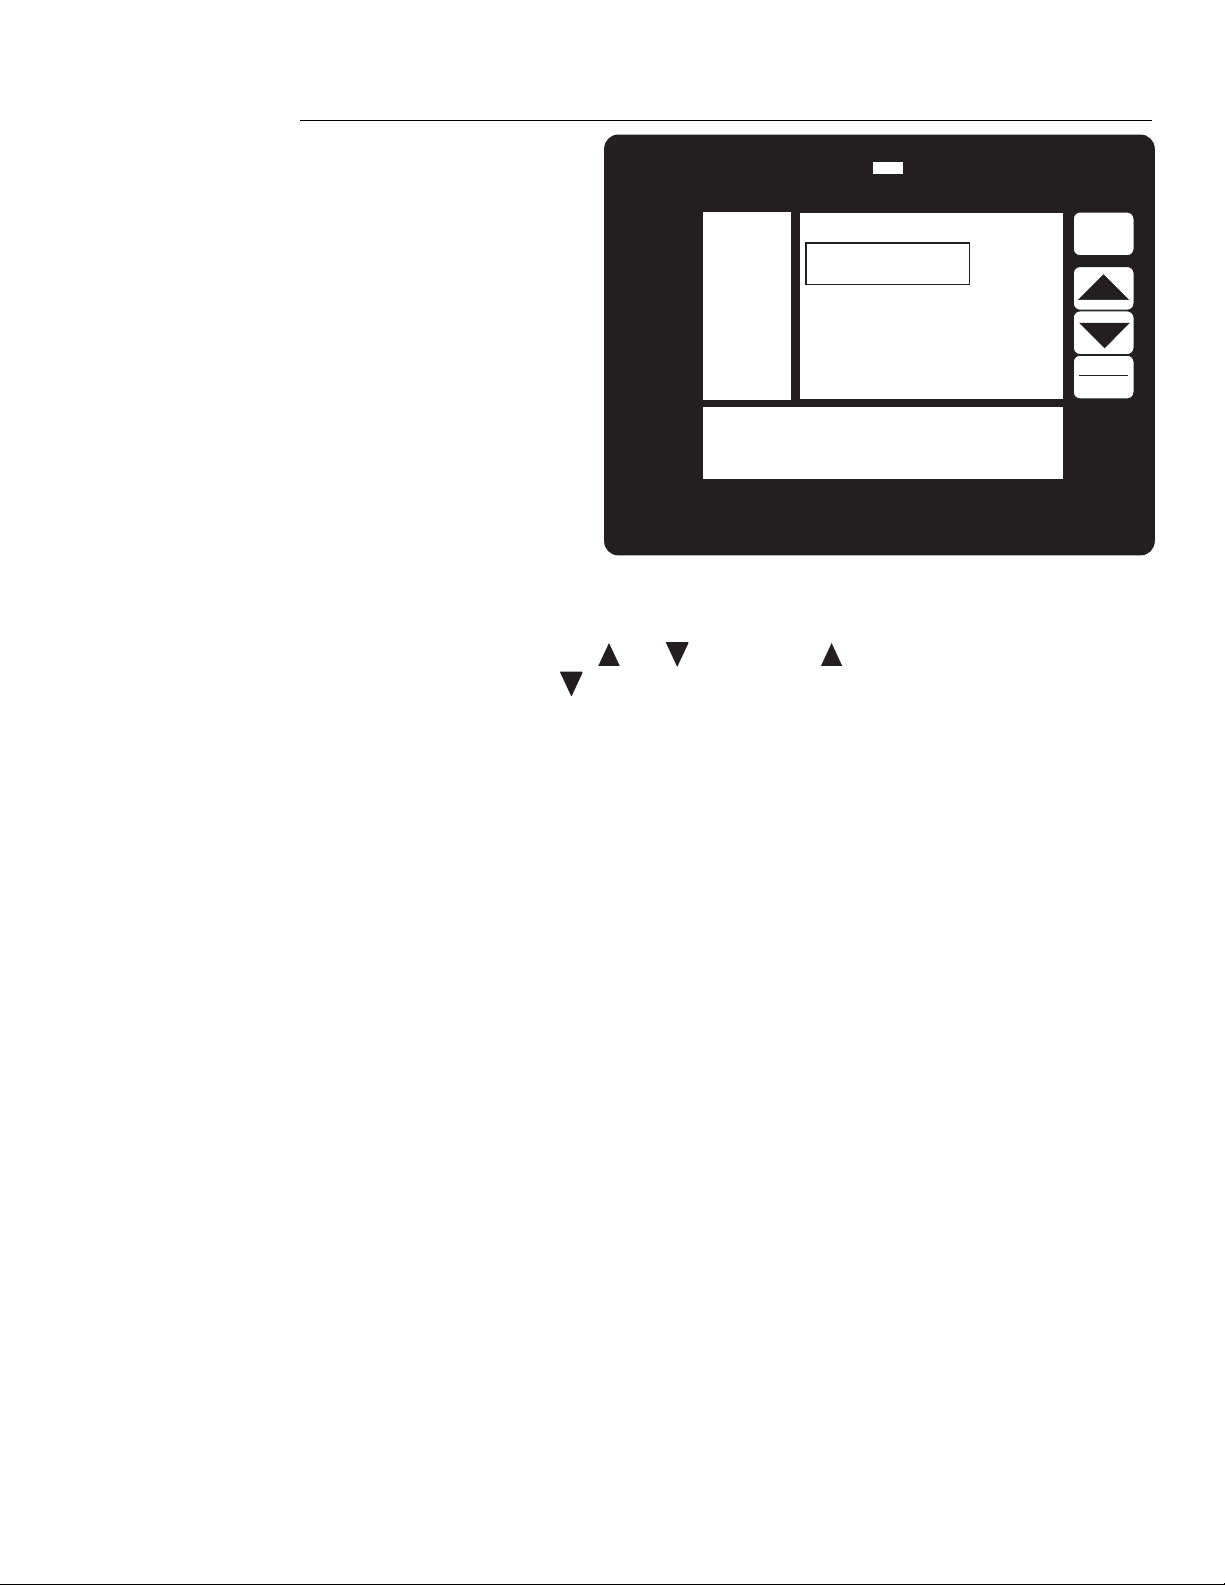
Diagram 1
Club Settings
screen
EC
Program, Level
Pedal RPM
Fitness Score
Watts
Calories per Hour
Distance
Time
Caution: If you feel faint or dizzy, stop pedaling
7. At the “Enter Club Time Limit” prompt, specify the maximum workout time
by using the and keys. Use the key to raise the time displayed;
Use the key to lower the time displayed.
eddy current technology by Precor Incorporated
Club Settings
Enter Club Time Limit
30:00
850
ON
ENTER
RESET
The cycle provides a maximum workout time of 60 minutes. You can
change the settings and limit workout sessions to any one of the following:
2, 4, 6, 8, 10, 12, 14, 16, 18, 20, 24, 28, 30, 40, 50, 60 minutes.
When the desired time limit appears, press the ENTER/RESET key.
8. At the “Enter Machine Units” prompt, use the arrow keys to select
the measurement system, either U.S. Standard or Metric, then press
ENTER/RESET.
The “Choose Workout Program” prompt appears and the cycle is ready
for use.
page 7
Page 8

Using the EC850 Professional Cycle
3
The EC850 Professional Cycle is designed so users can work out without
instruction or training. The directions on the console and the prompts on the
screen will guide a user through the entire workout session. Before the cycle is
used, however, we recommend familiarizing yourself with it so it will be used
safely and effectively. This section covers the following information:
• an overview of the features provided on the electronic console
• information about adjusting seat height
• information about adjusting the handlebars
• instructions for turning the cycle on and off
• an explanation about using the cycle in manual mode (workout program 0)
• instructions for exercising on the cycle
• instructions for designing a customized exercise program (two custom
courses can be designed—workout programs 8 and 9)
Understanding the Electronic Console
Once the EC850 cycle is set up, it is ready to use. There are no complex
instructions to follow or mandatory programming steps required to operate the
cycle. Simply select one of the 10 workout programs, then specify how hard and
how long you want to work. As you exercise, the electronic console provides
motivation and presents constant feedback about your progress.
A screen-saver feature causes the console displays to disappear 2 minutes
after a workout program ends. If you stop exercising and take more than a 2
minute break, your workout session ends and the screen-saver feature produces blank window displays. While the left and right window displays remain
blank, “EC850 Press any button to begin exercise” appears and scrolls
across the bottom window display.
Diagram 2 illustrates the EC850 electronic console. Its keys and displays are
explained on the following pages.
page 8
Page 9

Diagram 2
EC850
Electronic
console display
Program, Level
Pedal RPM
Fitness Score
Watts
Calories per Hour
Distance
Time
EC
eddy current technology by Precor Incorporated
Caution: If you feel faint or dizzy, stop pedaling
850
ON
ENTER
RESET
Keypad
Left Display
Window
The electronic console keypad has four keys:
ON: When starting a workout, press the ON key and the initial start-up prompt,
“Choose Workout Program” appears on the display.
and keys: Use the arrow keys to move through the selections that
appear on the console’s display.
ENTER/RESET: Press this key to choose the displayed value or selection. After
you press ENTER/RESET, the electronics will remember what you specified
and continue to the next function or prompt.
If you are using a specific program during a workout and want it to end, press
ENTER/RESET. Your Performance Summary appears. To cancel the program
and return to the initial start-up prompt, press ENTER/RESET again. The startup prompt, “Choose Workout Program” appears on the display. You can then
begin another exercise program or end your workout.
The left display on the electronic console provides information about your
workout session:
Program: Indicates the workout program selected for an exercise session. You
can choose between 0 and 9 by using the arrow keys.
Level: Shows the selected effort level, from 1 to 9. The higher the number you
select, the more resistance you receive. You can change the effort level anytime during a workout by using the arrow keys to increase or decrease the
resistance.
page 9
Page 10

Pedal RPM: Shows pedal speed in revolutions per minute (RPM). Use this
display to determine
exercise intensity
(how hard you are working out) at any
given moment.
Fitness Score: Shows a fitness score from 1 to 100 percent. The fitness score
is associated with the pacer and helps you determine whether or not you are
using the correct exercise level. To maintain a 100% fitness score you must
finish the program at the same time as the pacer. You will exceed 100% if you
finish ahead of the pacer and be below 100% if you finish behind the pacer.
If you can easily maintain a 100 percent fitness score, you might want to
choose a more challenging workout next time. However, if you have difficulty
maintaining a high enough score, you might want to choose a lower exercise
level.
Watts: Indicates the amount of energy currently being expended.
Calories per Hour: Indicates the number of calories burned per hour. Use this
display, along with Calories Used and Pedal RPM, to determine
intensity
(how hard you are working out) at any given moment.
exercise
Calories Used: Provides the number of calories burned in the workout. The
cycle determines calories based on a 160 pound rider, so if your weight is
different, you should use the displayed information only as a reference.
Right Display
Window
Distance: Shows how far you have travelled, in either miles or kilometers. Use
this information to measure
total work
accomplished during a workout.
Time: Lists the amount of time remaining on the course you are using. Use this
display to pace yourself during a workout.
Goal Setting: Indicates the anticipated targets the user will achieve at the
selected program or effort level. The goals you set are affected by the speed,
workload, and time of your workout session. When you enter a time after the
“Enter Workout Time” prompt, the display “Your Goals Are” appears in the left
window display and provides the basis for your workout and performance
summary.
The right display window on the electronic console prompts you to enter specific
information, graphically displays a pacer, and provides information about
incline:
Pace Tempo: Provides a tempo for you to follow. The pacer provides motivation and helps you maintain exercise intensity. During a workout, if you change
the effort level, the pace tempo changes to reflect the new level.
While you workout, the console displays a roadway with two triangles, one on
each side of the centerline. The shaded triangle on the left side is the pacer; the
triangle on the right side represents you.
page 10
If your speed remains even with the pacer, the triangles remain the same size.
If you are behind the pacer, the pacer appears to move ahead and become
smaller in size. When your speed is greater than the pacer’s, the triangle that
Page 11

Bottom Display
Window
represents you appears to move ahead and become smaller in size.
Hill Profile: Appears in the upper right-hand corner of the screen. It provides a
graphic representation of the current grade of incline in the course. Below this
window, you will see a number that represents the relative effort level of that
part of the course. A “1” represents the easiest and a “9” represents the most
difficult level.
Performance Summary: Appears at the end of your workout. The workout
statistics appear as a percent of your goals and indicate whether or not you met
the goals you set for the total calories burned, distance covered, and time
elapsed. Review your workout statistics to determine how well you did.
Program Profile: The course profile that appears in the bottom window display
corresponds to the program you selected. As you proceed through your workout, the left portion of the profile becomes shaded indicating the course segments you have already completed.
Adjusting the Seat
Before starting a workout, you should position the seat properly to avoid strain
on your knees. Take the following steps to adjust seat height.
Photo 1
A 10 to 15
degree bend
1. To check for proper seat position, sit on the seat of the cycle with both feet
in the pedals (make sure that the balls of your feet are centered on the
pads). The knee of the extended leg should be slightly bent, 10 to 15
Proper leg position
degrees (see Photo 1).
2. If you need to adjust the seat, dismount and hold the post underneath the
seat with one hand. With the other hand, pull out the seat post adjustment
page 11
Page 12

Photo 2
Seat post
adjustment pin
Adjusting the seat
pin located on front of the seat post (see Photo 2).
3. Slide the seat post up or down into the desired position.
4. Release the seat post adjustment pin.
CAUTION: Make sure that the seat is securely in place before using
the cycle for a workout.
5. Before sitting on the cycle, press down firmly on the seat to make sure no
slippage occurs and the pin is properly seated in the appropriate hole.
6. Sit on the cycle’s seat again and, if necessary, follow steps 2 through 5 to
readjust the seat height.
Adjusting the Handlebars
You can adjust the handlebars on the EC850 within a six inch adjustment span
to provide the most comfortable ride possible.
To adjust the handlebars, take the following steps:
1. Sit on the cycle with your hands on the handlebars. You should be in a
relaxed, comfortable riding position.
2. If you need to adjust the handlebars, dismount and locate the lever on the
right side of the console column.
page 12
3. Loosen the handlebar shaft by turning the lever counterclockwise.
4. Place your hands on the lower flat portion of the handlebars (one of each
Page 13

side of the handlebar shaft).
5. Pull the handlebars toward you to decrease the distance between the seat
and the handlebars. (Slide the handlebars in the opposite direction to
increase the distance).
Note: You can increase or decrease the distance between the seat and the
handlebars within a 6 inch span. You cannot pull the handlebar shaft
completely out of the console column because a safety bar holds the shaft
in place.
6. When you feel that the handlebars are in the proper position, tighten the
lever by turning it clockwise.
Important: Do not sit on the seat and adjust the handlebars. Be sure the
handlebars are secure before you mount the cycle.
7. Sit on the cycle in a comfortable riding position with your hands on the
handlebars. If necessary, follow steps 2 through 6 to readjust the handlebars.
Turning the Cycle ON and OFF
Use the ON//OFF power switch to turn the cycle ON and OFF. This switch is
located on the front of the cycle, near the power cord. It takes about 45 seconds
for the electronic console displays to appear after the cycle has been turned ON
and you press the ON key.
Use the ON//OFF power switch to turn OFF the cycle when it is not being used
for any length of time. For example, have the cycle turned OFF during nonbusiness hours.
Using Manual Mode (Workout Program 0)
In addition to choosing a preprogrammed or custom course, you can choose
manual mode. Manual mode is the same as the workout program “0,” which lets
you control your effort level while the program is in progress.
After you select program “0,” the program’s course profile appears in the bottom
window display and shows a flat, constant course. The Hill Profile appears in
the upper right corner of the right window display and indicates an incline level
of 5. Use the arrow keys to change your effort and incline levels; as you change
the levels, the segments in the profiles also change.
• A low level profile represents the least amount of effort required and the
lowest number of calories burned.
• A high level profile represents the highest amount of effort required and the
greatest number of calories burned.
page 13
Page 14

As you proceed through your workout, the left portion of the course profile
becomes shaded indicating the course segments you have already completed.
Exercising on the EC850 Cycle
This section explains how to exercise on the cycle. The EC850 comes with
seven preprogrammed courses. These courses differ in the “terrain” you cover.
Each course includes warm-up and cool-down intervals appropriate to the total
course length.
All seven preprogrammed courses can be performed at any of the nine effort
levels. To select the effort level appropriate for your level of fitness, start with
level 1 (beginner exercise). If you receive a score of 100 percent, continue to
the next highest level. Each time you receive a 100 percent score, you should
advance to the next effort level for a more challenging workout.
Note: The fitness score is associated with the pacer and helps you determine
whether or not you are using the correct exercise level. To maintain a 100%
fitness score you must finish the program at the same time as the pacer. You
will exceed 100% if you finish ahead of the pacer and be below 100% if you
finish behind the pacer.
In addition to the preprogrammed courses, you can choose a custom course
that you or the club owner has designed. Two custom courses can be created
(for instructions, see
can also select manual mode (program 0) which lets you control your effort
level while the program is in progress.
Once you have answered the start-up prompts and started exercising in a
workout program, you can exit the program by pressing ENTER/RESET.
Pressing this key cancels the program. The cycle displays your Performance
Summary, then the initial start-up prompt.
CAUTION: Before beginning any fitness program, you should have a
complete physical examination by your physician.
To exercise on the cycle, take the following steps:
1. Check to see that the cycle is turned ON. If it is turned OFF, turn it ON
using the ON/OFF power switch. This switch is located on the front of the
cycle, near the power cord.
2. Sit on the cycle. Make sure that your weight is balanced and your feet are
positioned securely, with the balls of your feet centered on the pads. You
might need to adjust the seat and handlebars to comfortable positions.
(Refer to
Adjusting the Seat
Designing a Customized Course
and
Adjusting the Handlebars
later in this section). You
for instructions.)
page 14
3. Press the ON key. The initial start-up prompt, “Choose Workout Program”
Page 15

appears.
Note: If the cycle is already ON and EC850 is scrolling across the bottom of
the display. You can press any key and the initial start-up prompt, “Choose
Workout Program” will appear.
4. Once the “Choose Workout Program” prompt appears, select a program
using the arrow keys.
Select from the seven preprogrammed courses, two custom courses, or
Diagram 3
Profiles of the
preprogrammed courses
1
3
2
4
56
User Program 2; can be customized
78
User Program 1; can be customized
90
Manual Mode; can be changed
page 15
Page 16

manual mode (program 0). To help you select from the preprogrammed
courses, Diagram 3 illustrates the course profiles.
Note: You might want to remember or write down the program number. By
specifying the same number again you can repeat the workout.
5. When the desired workout program number is displayed, press ENTER/
RESET.
6. If the “Choose Effort Level” prompt appears, specify the effort level or
resistance you prefer by pressing the arrow keys.
This prompt will not
appear if you chose program 0 in Step 4.
Nine different effort levels are available:
1 Beginner exercise 6 Heavy exercise
2 Beginner weight loss 7 Light competition
3 Weight loss 8 Moderate competition
4 Light exercise 9 Heavy competition
5 Moderate exercise
Note: To repeat the exact workout again, you need to specify the same
effort level number in addition to the program number.
7. Once the desired effort level number appears, press ENTER/RESET. The
“Enter Workout Time” prompt appears.
8. Use the arrow keys to specify how long you want to work out. The displays
in the left window (Calories Used, Distance, and Time) change as you scroll
through the units of time. When the desired amount of time is displayed,
press ENTER/RESET.
The Club Settings program lets club owners limit the length of time allowed
for a workout. When specifying a workout time, you can choose any time up
to, but not longer than, this limit. For example, if the time limit is at 30
minutes, you can set a workout time from 2 to 30 minutes. You cannot
specify a workout time longer than 30 minutes.
After you enter a workout time, the Goal Setting display “Your Goals Are”
appears in the left window showing the target amounts you can achieve
with the workout selected.
9. To start your workout, begin pedaling.
During a workout, you can change your effort level using the arrow keys.
Doing this affects how hard you work, but does not change the profile of the
course unless you are using Manual mode (program 0).
10. Continue your workout until the program ends. Maintain your exercise
intensity by pedaling with the pacer.
Note: We do not recommend exercising faster than the pacer since it is
provided to help you work out. If you want a more difficult exercise session,
select a different program or a higher effort level.
page 16
11. When the selected exercise program ends, review your performance
Page 17

summary.
We recommend that you keep track of your workouts by writing them down.
This way you can monitor your progress toward your fitness goals and also use
the information as a reference in planning interesting and challenging workouts
in the future.
Designing a Customized Course
The EC850 Professional Cycle lets you design two custom courses: program
“8” and program “9.” To access these courses, you need to press a specific
combination of keys on the electronic console. This design helps secure the
cycle from unauthorized access and changes.
To design a custom course, take the following steps:
1. Check that the cycle is turned ON. If it is turned OFF, turn it ON using the
ON/OFF power switch. This switch is located on the front of the cycle, near
the power cord.
2. Press the ON key. The initial start-up prompt, “Choose Workout Program”
appears.
Diagram 4
Note: If the cycle is already ON and EC850 is scrolling across the bottom of
the display. You can start pedaling, press the and keys, or press
ENTER/RESET and the initial start-up prompt, “Choose Workout Pro-
gram” will appear.
User
Programming
screen
Program, Level
Pedal RPM
Fitness Score
Watts
Calories per Hour
Distance
Time
EC
eddy current technology by Precor Incorporated
8
User
Progam 1
Caution: If you feel faint or dizzy, stop pedaling
User Progamming
1
Adjust Item
Select Item
Select Item
850
ON
ENTER
RESET
page 17
Page 18

3. Access the User Programming screen by pressing and holding ON and
simultaneously for a minimum of 5 seconds.
4. Release both keys when you see the User Programming screen. In the
upper left-hand window, “User Program 1” will be highlighted as shown in
Diagram 4.
Note: User Program 1 represents program 8 and User Program 2 represents program 9.
5. Make sure that the program name you want to modify is shown in the left
window display. To select the other program, press the key.
Note: If you accidentally press the key when selecting a program name,
continue to press the key and cycle through all 24 segments in the
course profile until the highlight returns to the program name.
6. Press the key to move the cursor to the course profile window.
7. Begin modifying the profile as desired. The highlighted segment of the
profile indicates your position. Any changes that you make occur only in the
highlighted segment of the profile.
• Press the key to change the height of the profile in the highlighted
segment area. Repeatedly pressing the key, cycles you through all
the heights allowed. For example, when the maximum height is displayed, another push of the key returns the profile to the lowest
height.
Keep in mind as you specify heights that 1 represents the lowest
resistance and 9 represents the greatest resistance. To help you, the
window in the upper right-hand window shows the incline of the current
selection.
• Press the key to move to the next segment of the profile. Each
page 18
Page 19

Getting the Most Out of Your Workout
4
Once you reach the 24th segment, the cursor moves from profile view to
program name, and the program name is highlighted.
8. If desired, modify the other program by returning to Step 5.
9. When you are finished, press ENTER/RESET to save your changes.
The initial start-up prompt, “Choose Workout Program,” appears and the
cycle is ready to use.
A workout on the EC850 Professional Cycle provides excellent and efficient
cardiovascular conditioning, while strengthening and toning all the major muscle
groups in the lower body. Darkened areas in Diagram 5 indicate the muscles
worked.
To get the most out of each workout, a general understanding of the principles
behind aerobic training is invaluable. The best source of information is your
specialty fitness dealer. In addition to providing information on which exercise
Diagram 5
Muscles exercised
during an EC850
workout
1. Trapezius
2. Deltoid
3. Pectorals
4. Rhomboids
5. Triceps
6. Biceps
7. Latissimus Dorsi
8. Forearm Flexors/
Extensors
9. Abdominals
10. Erector Spinae
11. Gluteals
12. Hip Flexors
13. Quadriceps
14. Hamstrings
15. Gastrocnemius/
Soleus
16. Peroneus Longus/
Brevis
equipment is best for your individual needs, your fitness dealer can provide
profile consists of 24 segments.
1
2
3
6
9
8
12
13
16
5
14
15
16
1
2
4
7
10
8
11
page 19
Page 20

Diagram 6
Training zones
advise on training, technique, and exercise physiology. Your dealer can also
recommend good books on these subjects.
To help you get started in planning and carrying out your fitness program, this
section provides some basic information on aerobic exercise—such as how
hard you should workout, how long each session should be, and how often you
need to exercise to benefit from a regular program.
How Hard Should I Exercise?
Studies show that to achieve the benefits of aerobic exercise, it is necessary to
work out hard enough to raise your heart rate to a certain minimum level, called
the “training zone.” Your training zone depends on your age and level of fitness.
Refer to Diagram 6 to determine your training zone. Keep in mind that this zone
is an approximation, to be used as a guideline—individual heart rates vary
according to several physiological factors. To determine your training zone, or
HEART RATE TRAINING ZONES
200
180
170
140
195
175
166
136
190
171
162
133
185
166
157
130
180
175
Advanced
162
157
Intermediate
153
149
Beginner
126
123
170
153
145
119
165
148
140
115
160
144
136
112
155
139
132
108
150
135
128
105
145
131
123
102
MAXIMUM ATTTAINABLE HEART RATE
100 %
90%
85%
70%
757065605550454035302520
YOUR HEART RATE
200
190
180
170
160
150
140
130
120
110
100
90
80
YOUR AGE
target heart rate, find your age and fitness level on the diagram, and then find
the line where they intersect. For example, if you are 35 years old, your training
heart rate at the intermediate fitness level is 157 beats per minute. Remember
this number—this is the pulse rate you should try to maintain as you work out.
page 20
To determine your heart rate, take your pulse at a place that you can reach
easily and comfortably while you exercise. Typical places for measuring heart
rate are directly over the heart on the left side of the chest, on either side of the
Page 21

neck, over the temple, or on the thumb side of either wrist. Wherever you
measure your pulse, make sure that you use your index and middle fingers—
not your thumb. Your thumb has a strong pulse which can affect your heart rate
reading.
Once you locate your pulse, look at a clock with a second hand, and count the
beats for six seconds. Multiply that number by 10 to determine the total number
of beats per minute. For example, if you count 14 beats over six seconds, the
total number of beats per minute is 140. Compare the total number of beats
with your training zone as identified in Diagram 6. If necessary, increase or
decrease your activity to bring your heart rate into your training zone. You can
regulate how hard you (and your heart) work by choosing different effort levels.
Remember—your heart rate is the definitive measure of how hard you are
working.
Regardless of your fitness level, avoid doing too much too soon. Selecting too
hard a course or too high an effort level are common errors. Give yourself time
to become familiar with your cycle and to improve your fitness level. Then you
can gradually increase the effort level or course difficulty to make your workouts
more challenging.
How Long Should I Exercise?
The length of each exercise session depends on your fitness level. Exercise
physiologists have determined that, to attain cardiovascular benefits from
exercise, you should maintain your heart rate in its training zone for at least 15
minutes. This is in addition to your warm-up time, and does not include cool
down. You should always allow several minutes to bring your heart rate into
your training zone, by starting out slowly and gradually increasing work level.
Similarly, use several minutes of light exercise after the workout to bring your
heart rate down to near resting level.
The higher your fitness level, the longer you should maintain your heart rate in
the training zone (between 20 and 30 minutes). Beginners should always start
slowly, and gradually increase their sessions to 20 minutes or more.
How Often Should I Exercise?
Research indicates that aerobic sessions of 20 minutes or more should be done
at least three to five times a week to obtain significant cardiovascular benefits.
Most experts agree that sensible eating habits and regular aerobic exercise are
the keys to weight control and fitness. A recent study, which tracked several
subjects over a period of years, conclusively showed that exercise, not dieting,
is the key factor to long-term weight loss.
page 21
Page 22

Maintaining the EC850 Professional Cycle
5
Because of its advanced design, the EC850 cycle requires little maintenance
beyond periodic cleaning, which is explained in this section. Keep in mind that,
as owner of this machine, you are solely responsible for its maintenance.
If you encounter problems with the cycle, follow the instructions in
Diagnostic Program
can help you troubleshoot problems.
CAUTION: Unplug the cycle from the power outlet before performing any
maintenance tasks, such as cleaning.
Cleaning the Cycle
Clean the outer cabinet using normal over-the-counter products made for
cleaning plastic and rubber. Do not use these products on the electronic console since they will scratch its surface.
Clean the surface of electronic console with a damp sponge or soft cloth. You
can use mild soap and warm water (not hot) to clean the console. Dry the
surface thoroughly with a clean towel.
Important: Do not pour liquids on the electronic console and take special care
when cleaning the electronic console display to avoid scratching its surface.
. This program performs some basic diagnostic routines that
Using the
page 22
Using the Diagnostic Program
The EC850 cycle provides a Diagnostic program to help you troubleshoot most
problems that might arise. When you first access this program, it automatically
tests the operation of the main computer functions. If these functions pass, you
can test the operation of the keys and the speed sensor, Hall 1. If any test fails,
the EC850 cycle must be serviced. See
Note: The speed sensor, Hall 2, is not used on the EC850 cycle.
Accessing the Diagnostic program requires pressing a specific combination of
keys on the electronic console. This design helps secure the cycle from unauthorized access and changes.
To access the Diagnostic program, take the following steps:
1. If the cycle is turned off, turn it ON using the ON/OFF power switch.
Getting Service
for details.
Page 23

2. Press the ON key. The initial start-up prompt, “Choose Workout Program”
appears. (The display may take a minute to appear.)
Note: If the cycle is already ON and EC850 is scrolling across the bottom of
the display, press any key and the initial start-up prompt will appear.
3. When the “Choose Workout Program” prompt appears, access the
Diagnostic program by simultaneously holding down the ON and ENTER/
RESET keys for a minimum of 5 seconds.
4. Release the keys when you see the Diagnostic screen as shown in
Diagram 7.
Diagram 7
Diagnostic
screen
Program, Level
Pedal RPM
Fitness Score
Watts
Calories per Hour
Distance
Time
EC
eddy current technology by Precor Incorporated
Diagnostics
VIP Pass
VRAM Pass
RAM Pass
ROM 1 Pass
ROM 2 Pass
NVram Pass
Caution: If you feel faint or dizzy, stop pedaling
EC 850 V1.6
Hail Effect Inputs
*-Input High
HAL 1*
HAL 2*
Press Enter Three Times to Exit
850
ON
ENTER
RESET
ON
ENTER
RESET
5. Watch the screen as the Diagnostic program automatically executes six
tests. These tests check the operating condition of several of the main
computer functions. All six of these tests must succeed before the displays
in the right and bottom windows appear.
VID (Video)
VRAM (Video RAM)
RAM (System RAM)
ROM1
ROM2
NVRAM (Non-volatile RAM)
6. Using the Diagnostic screen, test the keypad operation by pressing each
key and watching the right window display.
The display has a graphic representation of the four keys. When you press
a key and it is operating correctly, the corresponding box will highlight. If the
box does not highlight when a key is pressed, or if the box remains highlighted after the key is released, the electronic console overlay might be
defective.
page 23
Page 24

7. Test the Hall 1 speed sensor by SLOWLY moving the pedals. Continue
pedaling for about 1 minute. The asterisk to the right of “Hall 1” will blink on
and off if the sensor is working correctly. If the asterisk stays solid, the cycle
needs servicing. Please note that only Hall 1 is used; ignore Hall 2.
8. To exit the Diagnostic program, either turn the cycle OFF then ON, or press
ENTER/RESET three times. In either case, the initial start-up prompt,
“Choose Workout Program,” appears.
Getting Service
Do not attempt to service an EC850 cycle yourself except for the maintenance
and diagnostic tasks described in this manual. The EC850 cycle does not
contain any user-serviceable parts.
To contact a Precor Commercial Products Customer Service Representative,
call 1-800-347-4404.
page 24
Page 25

Appendix A. Specifications
Chassis
Welded steel uni-frame construction
Readouts
Multi-functional motivational digital display:
• Program and level selection
• Pedal RPM
• Fitness score
• Watts (resistance level)
• Calories/hour
• Calories used
• Distance
• Time (in minutes)
• Hill profile
• Motivational pacer
Display Panel Programming Modes
• Seven computer-stored aerobic programs
• Two open channels to design personal programs
• Manual program
• Race/cruise interval training program (9 gradually-progressing levels)
• Standard program features 2-60 minutes in user-selectable and selfprogramming modes
• Automatically determines user’s time, calories, and distance goals
• Provides periodic feedback to goals completed during workout
Specifications
Handlebar Adjustment: Range adjustment 6 inches
Seat adjustment height: From 34 to 45 inches
Length: 50 inches
Width: 24 inches
Weight: 135 pounds
Power requirements: 110/220VAC, 60/50 Hz
Shipping weight: 145 pounds
page 25
Page 26

R
Precor Incorporated
P.O. Box 3004
Bothell, WA USA 98041-3004
USA
Precor is a registered trademark of Precor Incorporated.
© 1991 Precor Incorporated
Specifications subject to change without notice.
1-800-4-PRECOR
P/N 33269-102
7/92
 Loading...