

Page 1

COMMERCIAL PRODUCTS DIVISION
Precor Handrail Option Kit
Fits Precor C944, C942, C940, M9.45, M9.41s Treadmills
Thank you for purchasing the Precor Handrail Option Kit. Each kit comes
complete with all the hardware required to install a handrail on one side of the
treadmill. If you wish handrails on both sides of the treadmill, you must order two
(2) option kits. When you receive the Handrail Option kit, check its contents with
the list below:
Note: If you purchase both handrails, check the contents of both kits with the list
below:
Handrail Option Kit Contents
One handrail
One upper end clamp
One upper center clamp
Three large bolts (two 5/16 - 18 x 2.5 and one 1/4 - 20 x 2.5)
One star washer
One nut plate
One lower clamp
One 5/32" hex key
One 3/16" hex key
Note: To assemble the handrail(s), you will need a Phillips head screwdriver.
ASSEMBLY INSTRUCTIONS
The assembly of each handrail is the same on opposite sides of the treadmill. To
properly install the handrail(s) on your unit, take the following steps:
CAUTION: Turn OFF the unit and unplug it from the power source before
installing the handrail(s).
Page 2
COMMERCIAL PRODUCTS DIVISION
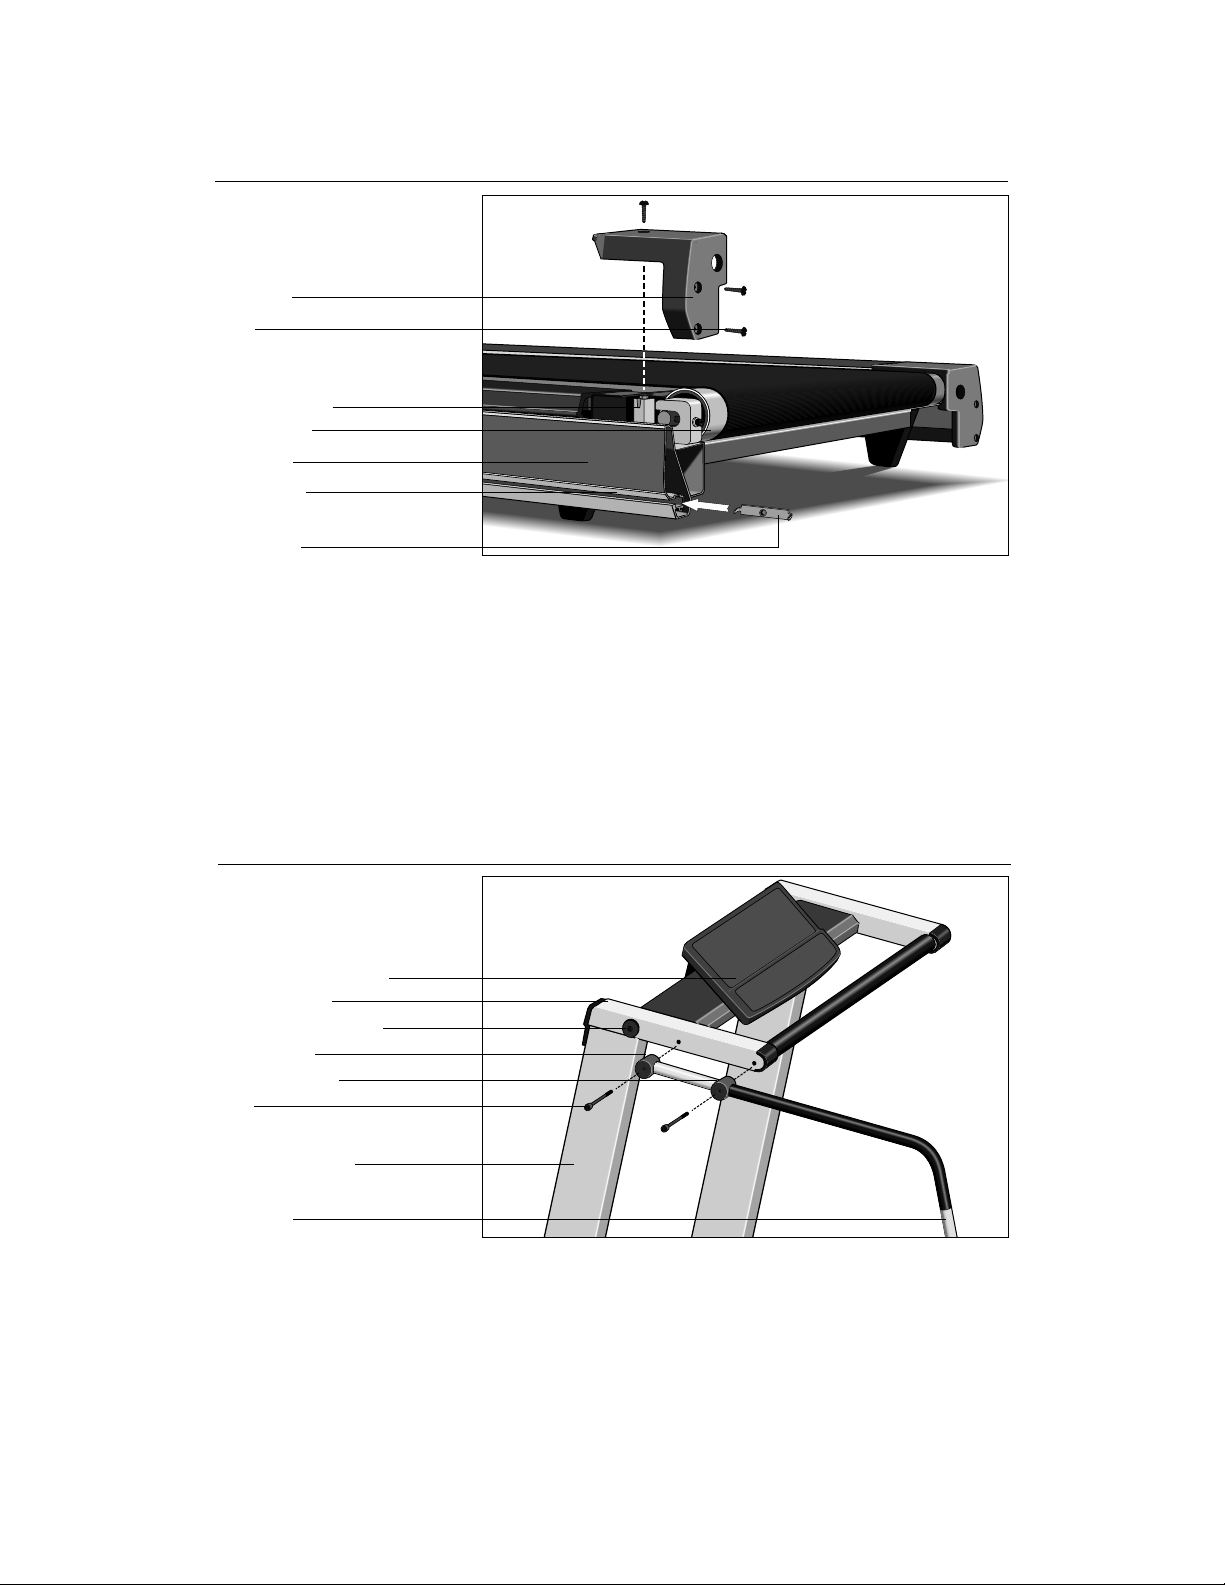
Diagram 1
Installing the nut plate
into the guide rail.
End cap
Bolt
Finger guard
Rear roller
Side rail
Guide rail
Nut plate
1. To properly mount the lower handrail clamp, you need to install a nut plate
into the guide rail. Remove the end cap from the rear of the treadmill using
a Phillips head screwdriver. See Diagram 1.
Important: If you are installing both handrail options, avoid misalignment of
the finger guard by sliding the nut plate into position on one side of the
treadmill and replace the end cap before removing the other end cap.
2. With the nut plate installed and the end cap replaced, move to the front of
the treadmill.
Diagram 2
Attaching the front
section of the handrail.
Electronic console
Upper frame
Handrail end cover
End clamp
Center clamp
Bolt
Upright support
Handrail
3. Locate the end covers on the upper handrails. See Diagram 2. Using the
3/16" hex key remove the two rear handrail end covers (the “covers” are
large black washers). Discard the covers and the bolts. Replacement bolts
and clamps are in this option package.
Important: If you are installing both handrail options, install a handrail on
one side before proceeding to the other side of the treadmill. Attach the front
portion of the handrail first. This helps you determine where to position the
lower handrail clamp.
Page 3

COMMERCIAL PRODUCTS DIVISION
4. Place the center clamp on the front portion of the handrail, followed by an end
clamp. See Diagram 2. Align the two clamps with the handrail mounts on the
upper frame.
5. Insert a bolt through each clamp. See Diagram 2. Using the supplied 3/16"
hex key, screw each bolt through the handrail until the clamp is snug against
the upright support. Do not fully tighten the bolts until you have installed the
lower end of the handrail.
Diagram 3
Attaching the lower handrail
and handrail clamp.
Handrail
Nut plate
Lower handrail clamp
6. To mount the lower portion of the handrail, locate the lower handrail clamp,
star washer, and lower handrail clamp bolt. Refer to Diagram 3 while taking
the following steps:
a. Slide the handrail nut plate along its guide rail until the hole in the nut
b. Put one star washer on the lower handrail clamp bolt. For ease of
c. Place the lower portion of the handrail into the clamp and align the bolt
d. Pick up the bolt set aside in step 6b. and insert the bolt through the lower
e. Guide the lower handrail clamp onto the nut plate. Slide the clamp and
Note: If you are installing both handrail options, perform the following
steps on one side of the treadmill before proceeding to the other side.
plate is aligned with the handrail mounting hole.
assembly, set the bolt on the floor near the nut plate.
hole.
handrail clamp and handrail mounting hole.
nut plate along the guide rail to find the equilibrium point.
Page 4

COMMERCIAL PRODUCTS DIVISION
f. To secure the handrail inside the clamp, use the 5/32" hex key provided.
Do not overtighten the bolt or damage may occur to the clamp.
Note: After extensive use, vibrations from the treadmill may cause the
bolts to loosen. You may need to periodically inspect the bolts and, if
necessary, tighten both the upper and lower handrail clamp bolts using
the hex keys provided.
g. Return to the upper handrail clamps and securely tighten the bolts using
the 3/16" hex key.
Note: If you are installing both handrails, repeat assembly steps 1 through
6 to attach the handrail to the other side of the treadmill.
Precor Incorporated
P.O. Box 3004
Bothell, WA USA 98041-3004
Precor is a registered trademark of Precor Incorporated.
“C” is a trademark of Precor Incorporated.
©1996 Precor Incorporated.
Specifications subject to change without notice.
1-800-4-PRECOR
P/N 36643-102
8/96
 Loading...