

Page 1

955541%11/15% 1% %
!
SpeedTube!Operations!Quick!Reference!Manual!
!
!
!
!
!
!
!
!
!
Page 2

955541%11/15% 2% %
Contents!
SpeedTube™%Setup%......................................................................................................................................%3%
SpeedTube™%Operation%...............................................................................................................................%3%
Vacuum%Setting%....................................................................................................................................%3%
Swath%Calibration%........................................................................................................................................%3%
SpeedTube™%Cover,%Housing,%and%Belt%Removal%.........................................................................................%4%
SpeedTube%Crop%Change%.............................................................................................................................%7%
Annual%Maintenance%...................................................................................................................................%8%
!
!
!
!
!
!
!
!
!
!
!
!
!
!
!
%
%
%
%
%
!
Page 3

955541%11/15% 3% %
SpeedTube™!Setup!!
%
SpeedTube%is%automatically%detected%by%the%20/20%SeedSense%monitor%and%requires%no%specific%
setup.%Simply%plug%the%SpeedTube%harness%into%the%SpeedTube%module%and%the%SpeedTube%will%
be%ready%for%operation%after%initial%updates.%%
%
SpeedTube™!Operation!!
%
SpeedTubes%will%operate%anytime%the%Master%Plant%or%a%single%Section%Plant%switch%is%active%on%
the%Cab%Control%Module.%If%the%planter%is%not%moving%(lifted%or%lowered),%SpeedTubes%will%
operate%at%a%minimum%belt%speed.%To%deactivate%SpeedTube%operation,%the%Master%Plant%and%all%
three%Section%Plant%switches%must%be%off%as%shown%below%in%figure%A.%
%
%
Figure%A%
%
Vacuum!Setting!
%
Increased%vacuum%is%sometimes%necessary%when%operating%SpeedTube%at%higher%speeds.%This%
will%reduce%the%likelihood%that%seeds%will%drop%off%the%disk%due%to%rough%ride%before%reaching%the%
feeder%wheels.%%%
%
Swath!Calibration!
%
Swath%“Run%Cal”%cannot%be%performed%with%SpeedTube%installed.%Operators%should%start%with%
the%default%value%for%both%“Start%Seeding%Delay”,%“Stop%Seeding%Delay”,%and%“Calibration%Meter%
Speed”.%Once%you%have%begun%to%plant,%dig%for%seeds%and%make%manual%adjustments%to%the%
“Start%and%Stop%Seeding%Delay”%values%if%needed.%Confirm%GPS%offsets%are%correct%before%
adjusting%“Start%and%Stop%Seeding%Delay”%values.%%
%
%
%
%
%
%
%
%
Page 4
955541%11/15% 4% %
SpeedTube™!Cover!and!Belt!Removal!
%
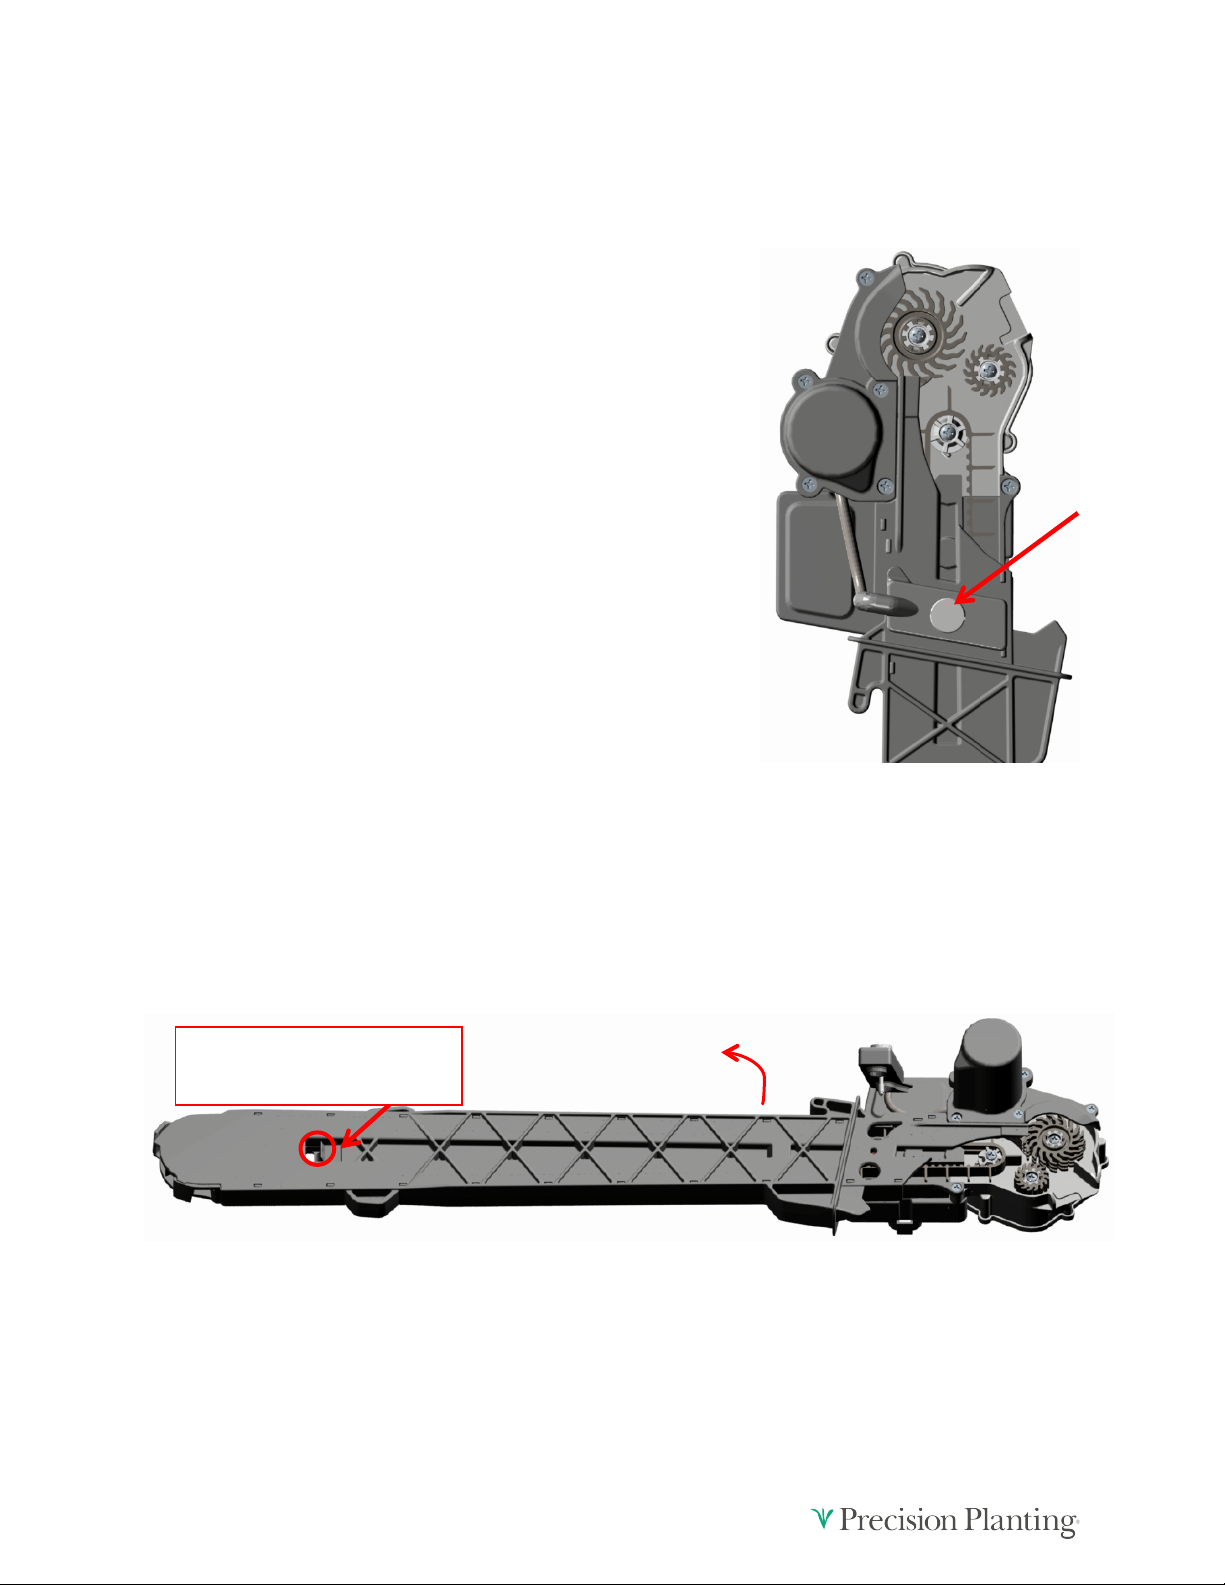
Note:!The!belt!cover!can!be!removed!to!gain!access!to!the!belt!and!other!internal!
components!for!inspection,!removal,!and!cleaning.!
%
%
%
%
%
%
%
%
Step!1!
Remove%the%sensor%transmitter%using%the%hand%knob.%Move%
the%sensor%to%the%side.%Refer%to%figure%1-1.%
%
%
%
%
%
%
%
%
%
%
%
Step!2!
Remove%the%SpeedTube%belt%cover.%Push%up%on%the%belt%cover%near%the%sensor%removed%in%step%
1,%while%simultaneously%releasing%the%lower%cover%retaining%tab.%Rotate%the%cover%away%from%the%
SpeedTube%belt%housing.%Refer%to%figure%1-2a%and%1-2b.%
%
%
Push%tab%toward%bottom%of%
SpeedTube%to%release%
Figure%1-1%
Figure%1-2a%
Page 5
955541%11/15% 5% %
%
%
%
%
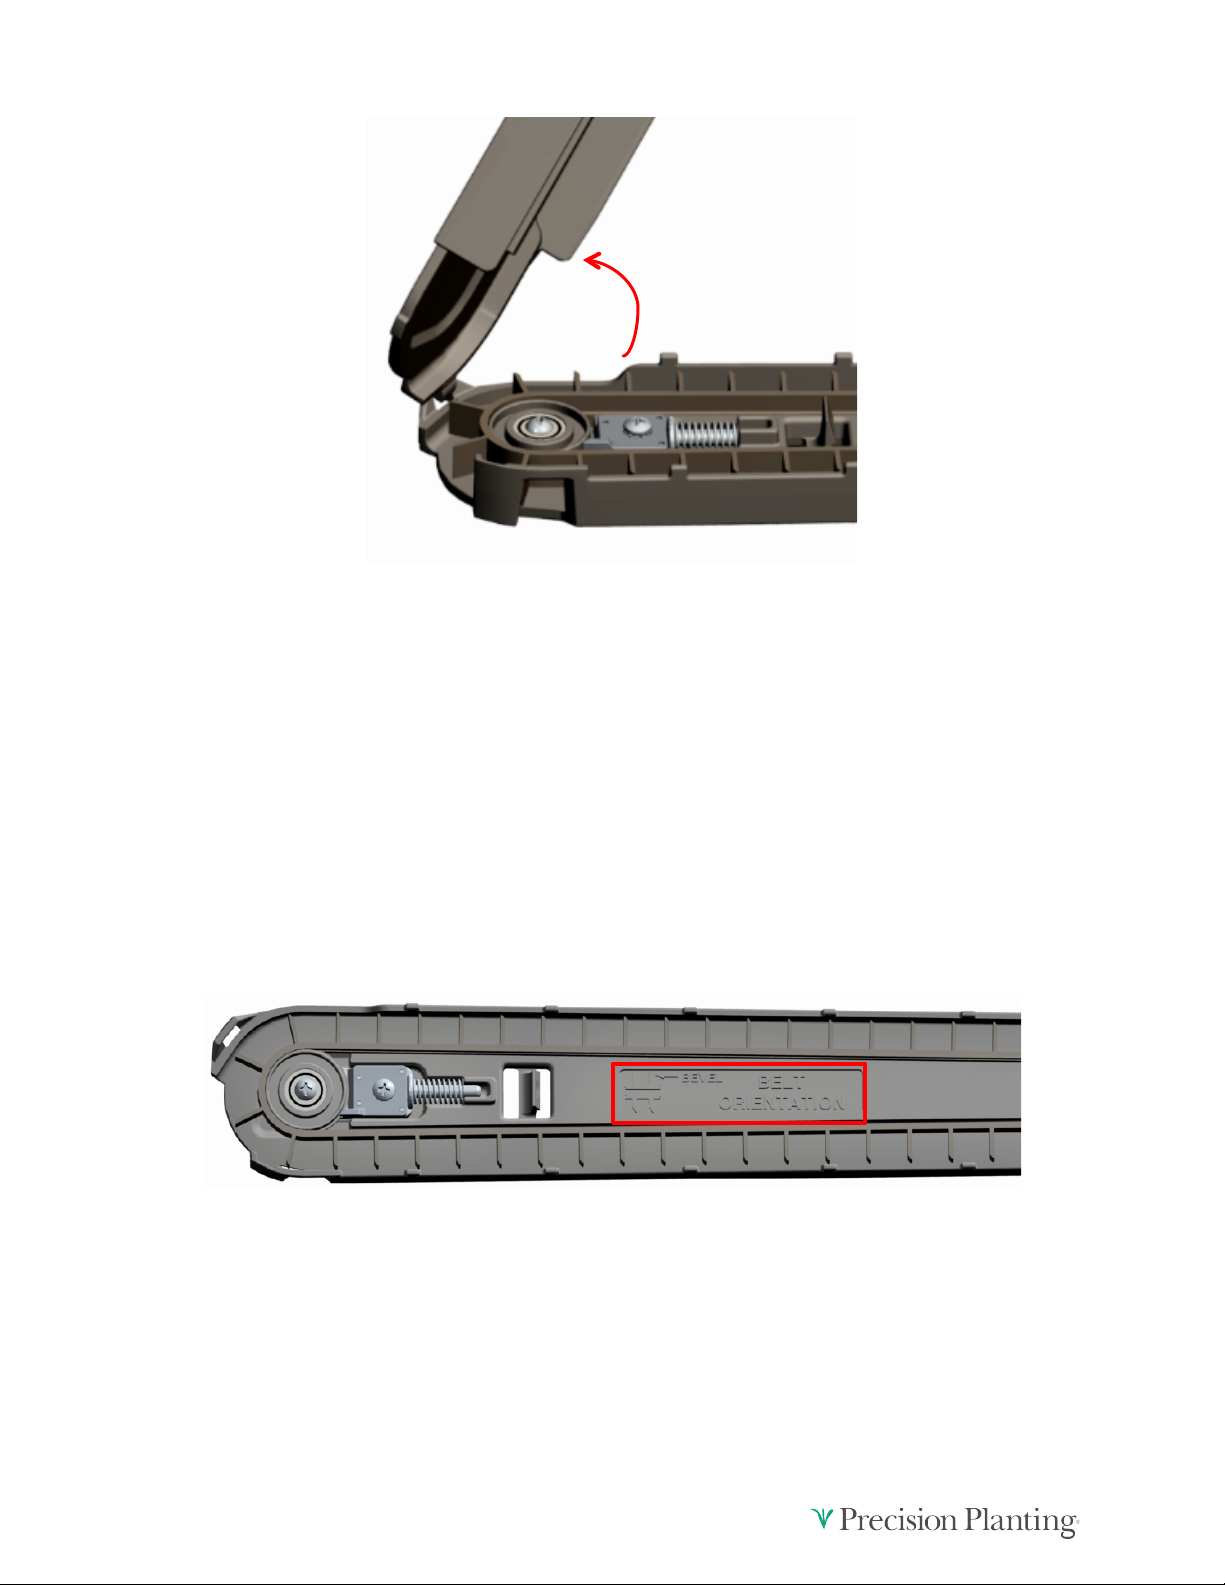
Step!3!
Remove%the%belt%by%rotating%it%by%hand%and%rolling%it%off%the%bottom%idler%pulley.%Remove%from%
the%top%drive%pulley.%
%
Step!4!
Re-install%the%belt%by%placing%it%around%the%top%drive%pulley.%%Ensure%it%is%fully%seated.%Rotate%the%
belt%by%hand%and%roll%it%onto%the%bottom%idler%pulley.%Rotate%the%belt%back%and%forth%to%check%
alignment%and%smooth%operation.%
%
Note:!When!Re-installing!the!belt,!take!notice!of!the!flight!orientation.!Reference!the!diagram!
molded!into!the!SpeedTube!housing!for!correct!orientation.!Refer!to!figure!1-4.!
!
%
%
%
%
%
%
%
%
%
%
%
Figure%1-2b%
Figure%1-4%
Page 6
955541%11/15% 6% %
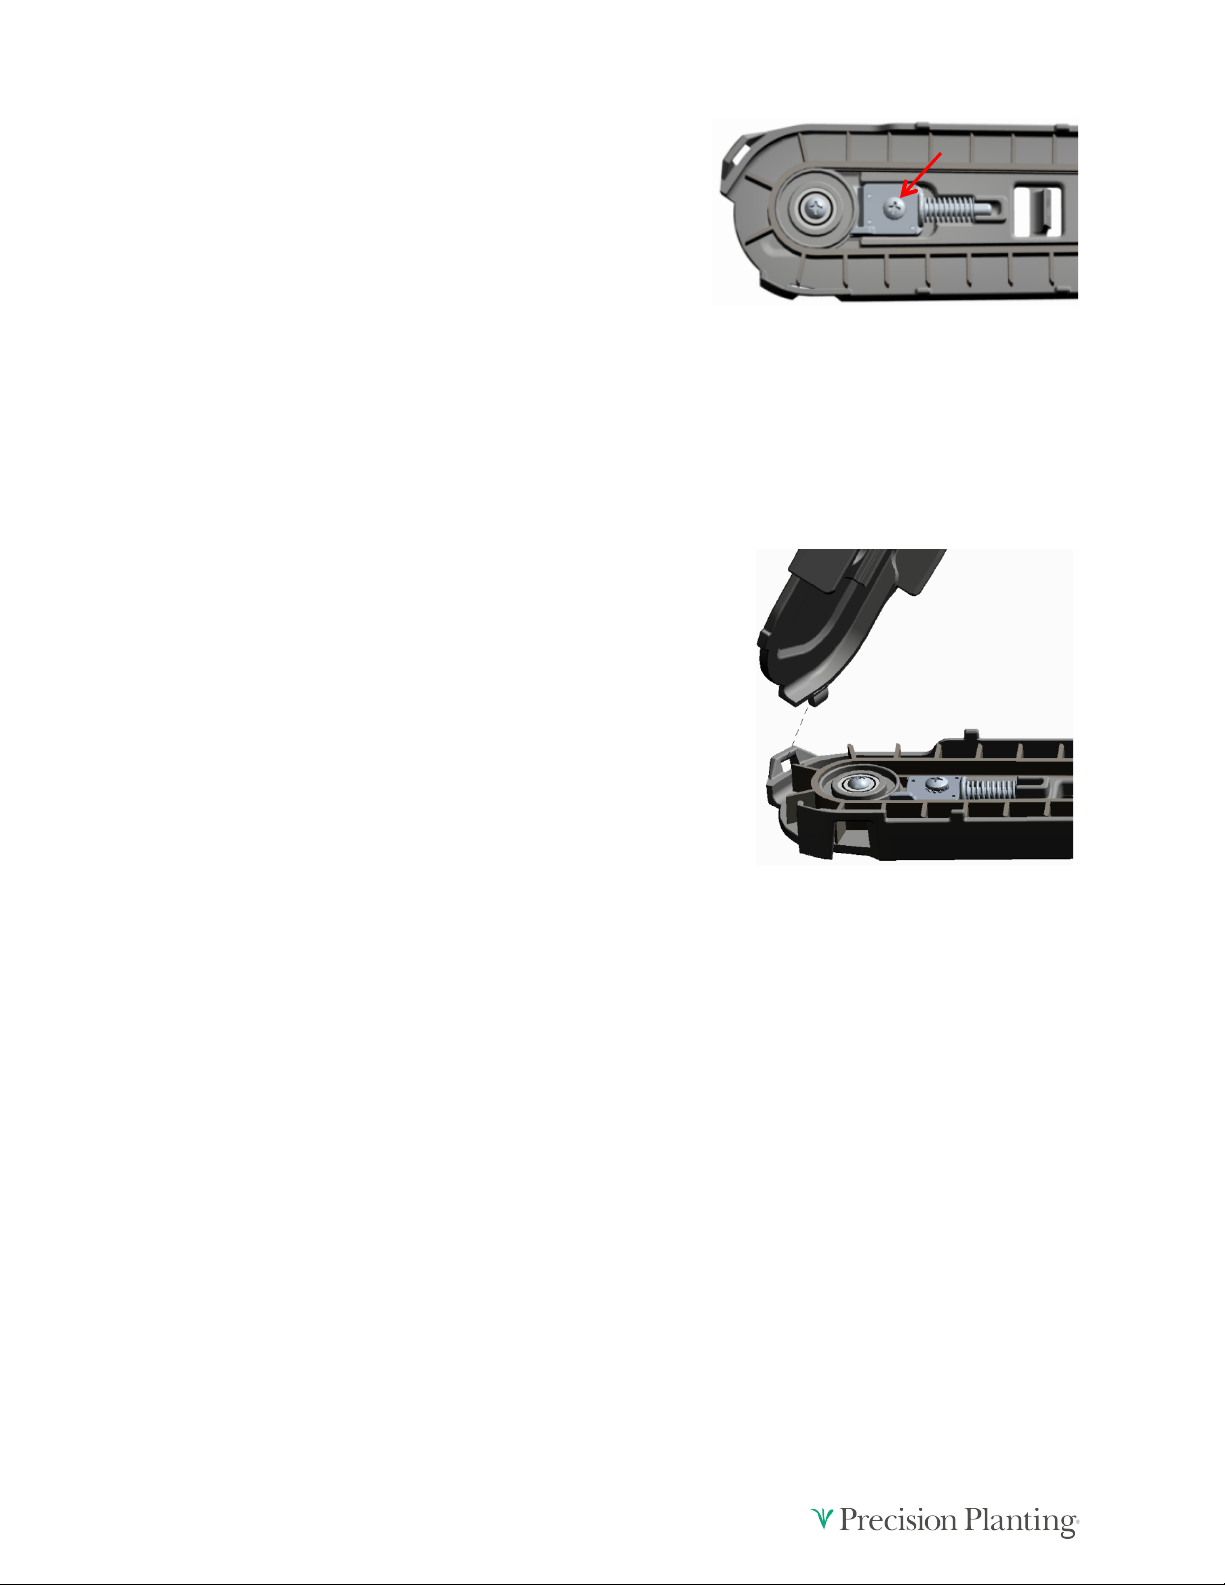
Step!5!
To%re-set%the%tension%for%the%new%belt,%loosen%the%
tension%bracket%retaining%screw%and%ensure%the%bracket%
is%free%from%debris%and%can%move%freely.%%Refer%to%figure%
1-5.%
%
%
%
%
%
%
Step!6!
Roll%the%belt%back%and%forth%by%hand.%The%coil%spring%will%provide%the%appropriate%tension%to%the%
belt.%Re-tighten%the%tension%bracket%retaining%screw.%%
%
%
%
%
Step!7!
Re-install%the%belt%cover.%Confirm%the%hook%on%the%bottom%of%
the%cover%is%inserted%in%the%latch%on%the%belt%housing%as%
shown%in%figure%1-7.%Press%the%cover%down%around%the%lower%
retaining%clip.%A%“click”%should%be%heard,%confirming%the%
cover%is%secured%to%the%housing.%Re-install%the%sensor.%
%
%
%
%
%
%
%
%
%
%
%
%
%
%
%
%
%
%
%
%
%
%
%
%
Figure%1-5%
Figure%1-7%
Page 7
955541%11/15% 7% %
SpeedTube!Crop!Change!!
(Corn!to!Soybeans)!
%
Note:!Meter!crop!kits!will!also!need!to!be!changed!when!switching!crops.!
%%%%%%%%%%%
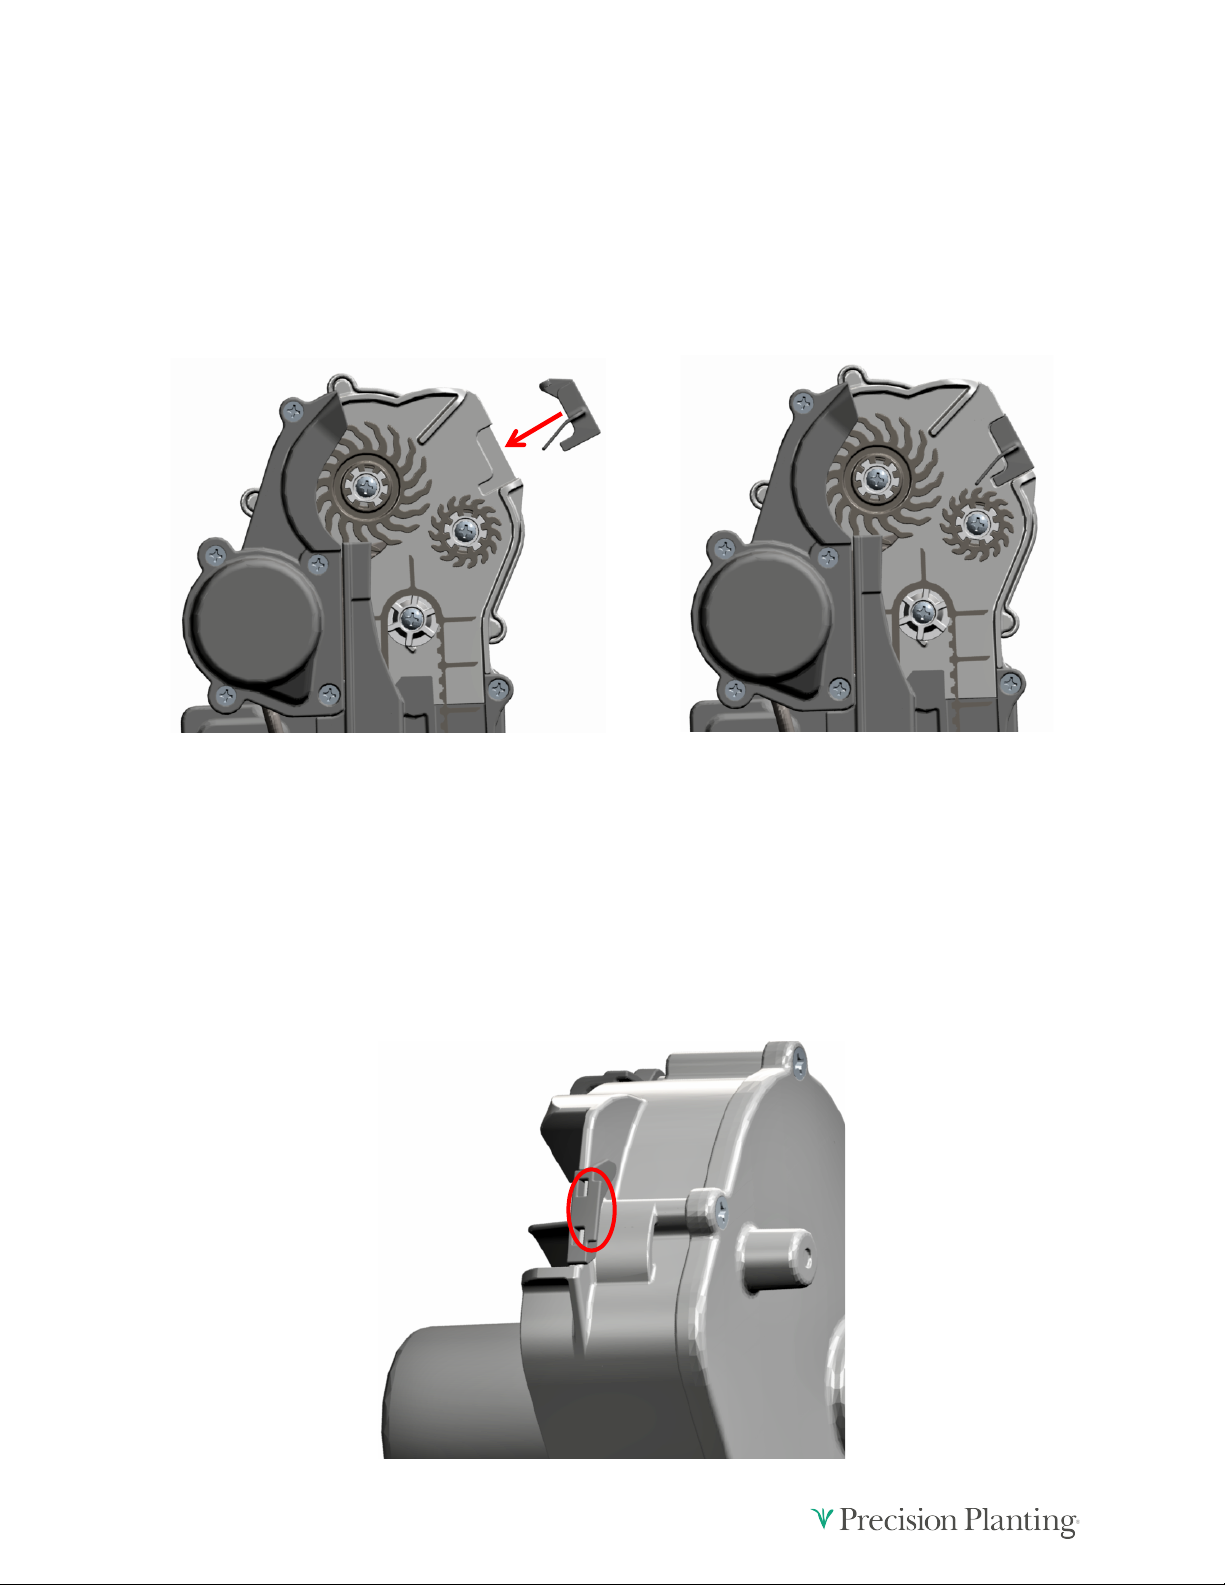
Step!1!
Install%the%soybean%deflector%by%snapping%it%into%the%cavity%on%the%gearbox%housing.%The%small%
feeder%wheel%will%stay%installed.%Refer%to%figure%2-1.%
%%%%%%%%%%%%%%% %
%
%
%
%
%
%
%
Step!2!
To%switch%back%to%corn,%simply%remove%the%soybean%deflector.%Pull%out%and%away%on%the%rear%tab.%
Refer%to%figure%2-2.%
%
%
Figure%2-1%
Figure%2-2%
Page 8

955541%11/15% 8% %
%
Annual!Maintenance!
%
Check%these%items%on%an%annual%basis%to%mainta in%op tim um %p erfo rm an ce.%
%
• Remove%belt%from%each%SpeedTube%during%off%season.%
• Reset%belt%tension%before%next%planting%season.%%
• Check%feeder%wheels%for%wear%and%replace%as%necessary.%
• Inspect%overall%SpeedTube%fo r%an y%da m ag e%or%in crea se d%w ea r%(ho us ing,%se nso r%len ses ,%belt%
pulleys,%etc.)%
• Check%opening%disks%and%guards%for%accelerated%wear.%It%is%best%practice%to%replace%guard%when%
replacing%opening%disks.%
• If%power%washing%th e%p lante r%at%end%of%season,%it%is%recommended%to%first%remove%SpeedTubes.%
Compressed%air%or%lower%pressure%water%is%recommended%for%cleaning%SpeedTubes.%
• Check%row%unit%for%any%loose%hardware,%specifically%parallel%arm%fasteners.%
%
For%more%details%on%SpeedTube™,%refer%to%the%complete%SpeedTube%Operators%Manual%(955424)%
available%at%http://cloud.precisionplanting.com/pubs.%
%
%
 Loading...