

Page 1
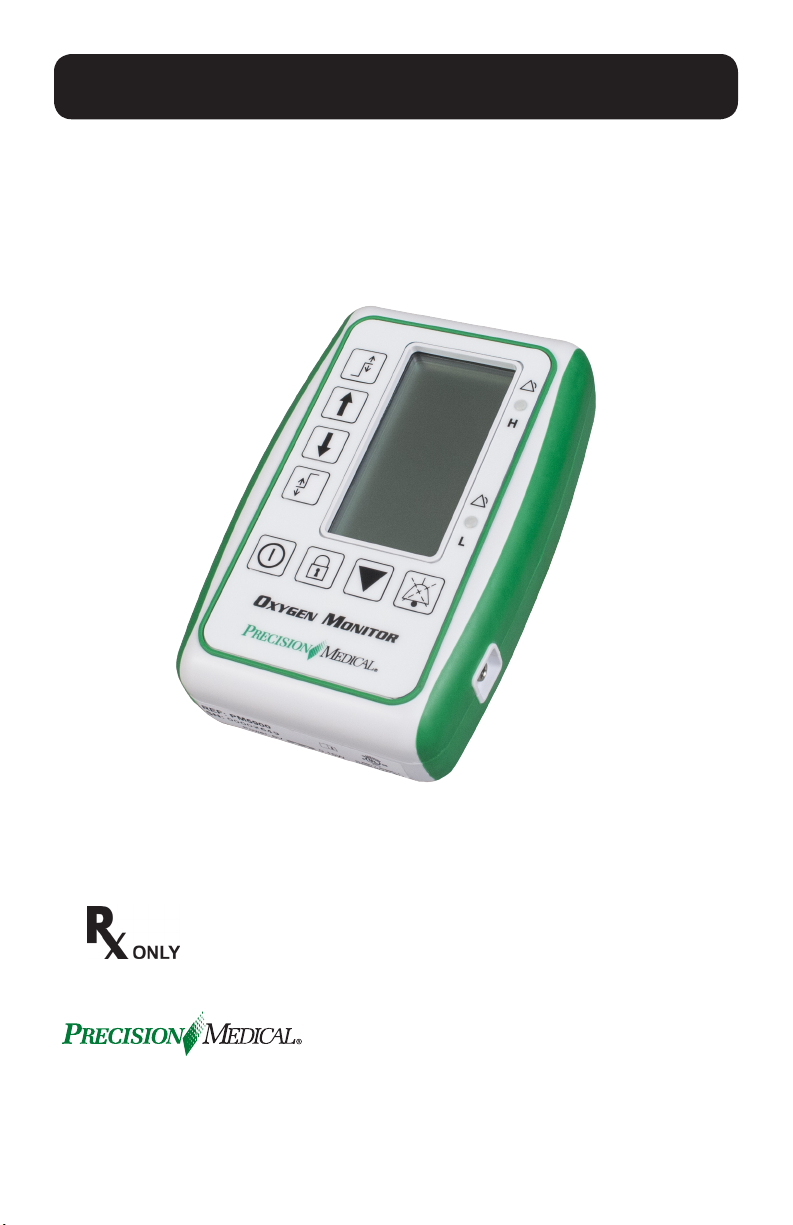
USER MANUAL
Oxygen MOnitOr
Model: PM5900
SAVE THESE INSTRUCTIONS
(For latest revision, go to www.precisionmedical.com)
Federal (USA) law restricts this device to sale
by or on the order of a physician.
Tel: (+001) 610-262-6090
Fax: (+001) 610-262-6080
300 Held Drive Toll Free Tel: 800-272-7285
Northampton Pa 18067 (USA) Toll Free Fax: 800-353-1240
ISO 13485 Certied www.precisionmedical.com
Page 2

CONTENTS
RECEIVING/INSPECTION ....................................................................... 2
INTENDED USE ....................................................................................... 2
OPERATOR PROFILE ............................................................................. 2
READ ALL INSTRUCTIONS BEFORE USING ........................................ 2
SAFETY INFORMATION - WARNINGS AND CAUTIONS ....................... 3
SPECIFICATIONS .................................................................................... 5
COMPONENT DESCRIPTION ................................................................. 6
OXYGEN MONITOR IDENTIFICATION .............................................. 6
OXYGEN MONITOR LCD DISPLAY IDENTIFICATION ...................... 8
OXYGEN SENSOR COMPONENT IDENTIFICATION ....................... 9
BATTERY INSTALLATION .....................................................................10
BATTERY INSTALLATION DIAGRAM ..............................................10
OPERATING INSTRUCTIONS ............................................................... 10
QUICK SETUP GUIDE .......................................................................11
SENSOR INSTALLATION ..................................................................11
CALIBRATION ....................................................................................12
EFFECTS OF TEMPERATURE: ..............................................................12
EFFECTS OF HUMIDITY: .......................................................................13
EFFECT OF PRESSURE: .......................................................................13
EFFECTS OF ANESTHETIC GASES: ...................................................13
ALARMS ................................................................................................. 14
TO SET ALARM: ............................................................................... 14
ALARM SITUATION: ......................................................................... 15
CLEANING ............................................................................................. 15
MAINTENANCE ..................................................................................... 16
SENSOR REPLACEMENT ............................................................... 16
BATTERY REPLACEMENT ..............................................................16
RETURNS .............................................................................................. 16
DISPOSAL INSTRUCTIONS ..................................................................16
TROUBLESHOOTING ........................................................................... 17
ALARM CONDITIONS ............................................................................ 18
REPLACEMENT PARTS ........................................................................ 18
ACCESSORIES...................................................................................... 18
Oxygen
MOnitOr
1
Page 3
RECEIVING/INSPECTION
Remove the Precision Medical Oxygen Monitor from the packaging
and inspect for damage. If there is any damage, DO NOT USE and
contact your Provider.
INTENDED USE
Precision Medical, Inc. Oxygen Monitor provides continuous,
direct monitoring of oxygen mixtures in a wide variety of medical
applications such as anesthesiology (e.g., anesthesia machines),
respiratory devices (e.g., respirators, ventilators, pediatric incubators),
and oxygen therapy (e.g., oxygen tents).
OPERATOR PROFILE
The oxygen monitor is to be used by trained healthcare professionals
under the supervision, or on the order, of a physician in a hospital (or
other clinical setting). The Precision Medical, Inc. Oxygen Monitor is not
intended for transport use. This device is not an oxygen supply source.
READ ALL INSTRUCTIONS BEFORE USING
This manual instructs a Professional to install and operate the Oxygen
Monitor. This is provided for your safety and to prevent damage to the
Oxygen Monitor. If you do not understand this manual, DO NOT USE
the Oxygen Monitor and contact your Provider.
SAFETY INFORMATION - WARNINGS AND CAUTIONS
DANGER
WARNING
CAUTION
CAUTION
Indicates an imminently hazardous situation which, if
not avoided, will result in death or serious injury.
Indicates a potentially hazardous situation which, if not
avoided, could result in death or serious injury.
Indicates a potentially hazardous situation which, if not
avoided, may result in minor or moderate injury.
Used without the safety alert symbol indicates a
potentially hazardous situation which, if not avoided,
may result in property damage.
Direct current.
PM5900 WITH RESPECT TO ELECTRICAL SHOCK,
FIRE AND MECHANICAL HAZARDS ONLY IN
ACCORDANCE WITH UL60601-1, IEC60601-1,
CAN/CSA C22.2 NO. 601.1
Oxygen
2
MOnitOr
Page 4
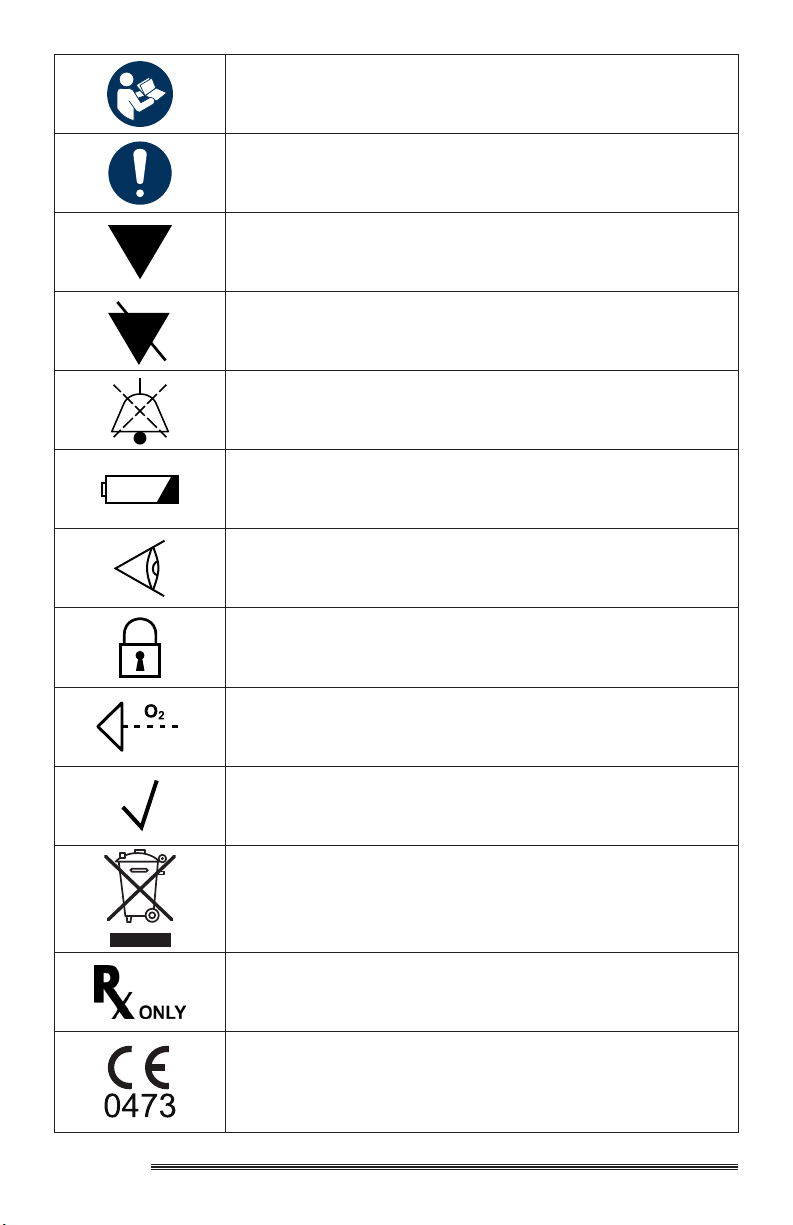
Follow instructions for use
General Mandatory Action Sign
Calibration
Calibration Failed
Audio Alarm Paused
Low Battery
Check
Locked
Oxygen
MOnitOr
Oxygen Sensor
Pass
This device may contain electrical components that
are hazardous to the environment. DO NOT dispose
device into standard trash. Contact your local waste
management for disposal of Electronic Equipment.
Caution! U.S. Federal Law restricts this device to sale
by or on the order of a physician.
Symbol indicates the device complies with the
requirements of Directive 93/42/EEC concerning
medical devices and all applicable International
Standards. (On CE marked devices ONLY)
3
Page 5
DANGER
This product is not intended as a life-sustaining or lifesupporting device.
WARNING
• Only trained, qualified medical personnel under the direct
supervision of a licensed physician should operate the Oxygen
Monitor.
• Use this Oxygen Monitor only for its intended use as described
in this manual.
• Medical Oxygen should meet the requirements of USP.
• Always follow ANSI and CGA standards for Medical Gas
Products, Flowmeters, and Oxygen Handling.
• The Oxygen Monitor should be serviced by a qualified hospital/
dealer service technician, or by Precision Medical, Inc.
• DO NOT obstruct the alarm grill on the back of the Oxygen
Monitor.
• DO NOT use near any type of flame or flammable/ explosive
substances, vapors or atmosphere.
• DO NOT allow an excess length of cable near the patient’s
head or neck, this could result in strangulation. Secure excess
cable to bed rail or suitable object.
• DO NOT use Oxygen Monitor with a cable that appears worn,
cracked or has damaged insulation.
CAUTION
• The Oxygen Monitor contains magnetic, ferrous material that
may affect the results of an MRI.
• Store the Oxygen Monitor in a clean, dry area when not in use.
• DO NOT use if dirt or contaminants are present on or around
this Oxygen Monitor or connecting devices.
• DO NOT smoke in an area where oxygen is being
administered.
• DO NOT clean with aromatic hydrocarbons.
• DO NOT steam autoclave.
• DO NOT gas sterilize with (EtO) Ethylene Oxide.
• DO NOT immerse Oxygen Monitor or Sensor in liquid.
Oxygen
4
MOnitOr
Page 6

SPECIFICATIONS
Base Device Specications
Dimensions (Monitor without cable and sensor attached):
Length: 1.72” (4.36 cm)
Width: 3.56” (9.04 cm)
Height: 5.44” (13.82 cm)
Cable Length: 10 ft. (3.05m) (fully extended)
Weight:
Device Weight: 1.11 lbs (0.50 kg)
(includes: monitor, sensor, batteries and cable)
Shipping Weight: 1.64 lbs (0.75 kg)
Operating Conditions:
Temperature: 50ºF- 113ºF (10ºC - 45ºC)
Altitude: Sea Level to 8000 feet
Storage Conditions:
Temperature: 5°F - 122°F (-15°C- 50°C)
Humidity: 0 - 95% non-condensing
Mode of Operation: Continuous
Electrical Classication: Internally powered Medical Electrical equipment
Power Requirements: 4, AA Alkaline Batteries (4 x 1.5 Volts) 6 VDC
Battery Life: approximately 2000 hours
(continuous use non-alarm condition)
Diverter Fitting: ts industry standard, 15 mm “T” adapter
Measurement Range: 0.0 - 100%
Resolution: 0.1 Increments
Accuracy & Linearity: ± 1% of full scale at constant temperature, R.H. and
pressure when calibrated at full scale
Total Accuracy: ± 2.5% Actual Oxygen Level over full operating
temperature range
Response Time: 90% of nal value in less than 12 seconds at
77°F (25ºC)
Warm-up Time: none required
Oxygen
MOnitOr
5
Page 7
Low Battery Indication:
Alarm System: high/low alarms, respective ashing red LEDs and
Low Alarm Range: *15% - 99% Oxygen
High Alarm Range: 18% - 100% Oxygen
Low battery icon displayed on graphics
screen, and audible alarm
graphics, 68db audible alarm @ 1 meter
(*Requires extra action to set below 18%)
High Alarm
De-Activation Setting:
Alarm Accuracy: Displayed value +/- 0.1
Patient Contact: Indirect contact via gas passing through sensor
Above 100% (“---” will appear )
sampling site.
Sensor Specications
Sensor Type Precision Medical 504877 galvanic oxygen sensor
(fuel cell)
Expected Sensor Life > 1,000,000 O2 % Hours
Specications are subject to change without notice.
COMPONENT DESCRIPTION
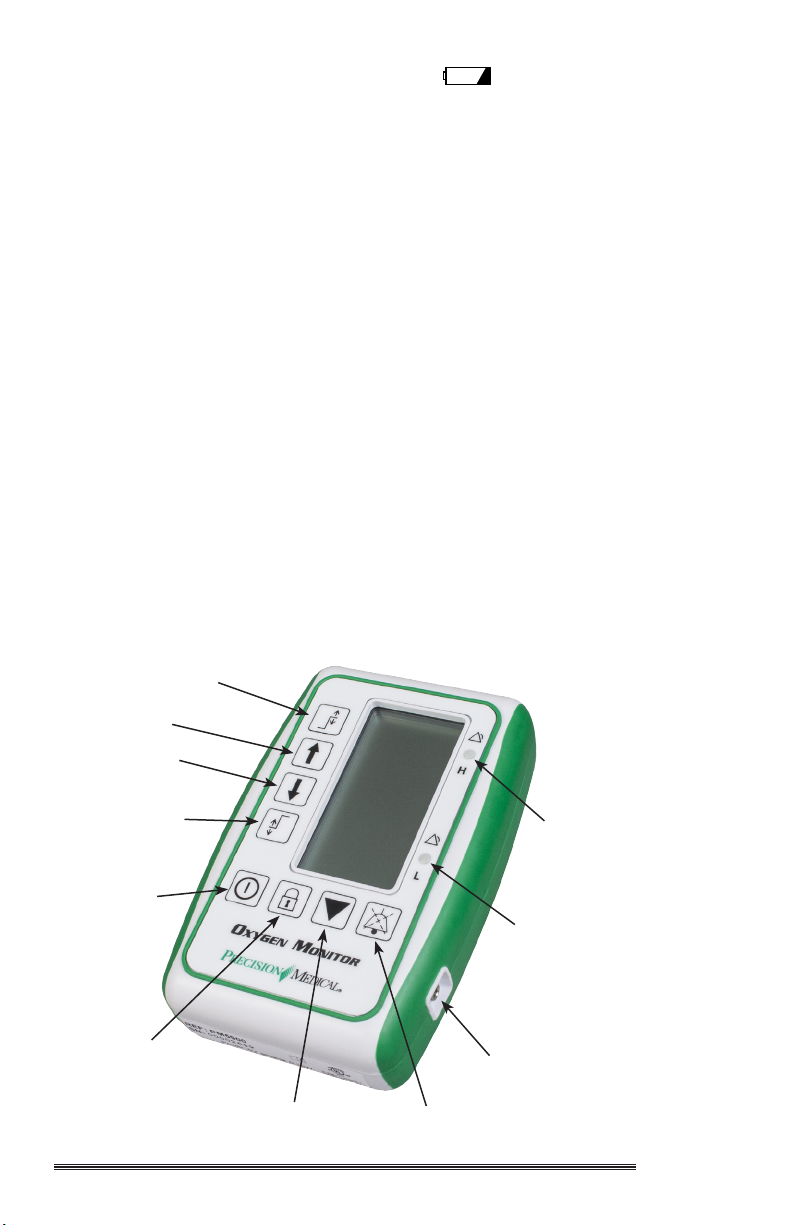
OXYGEN MONITOR IDENTIFICATION
High Alarm Set
Up
Down
Low Alarm
Set
High Alarm LED
On/OFF
Lock / Unlock
Calibrate
Low Alarm LED
Sensor Cable Connector
Audio Alarm Paused
6
Oxygen
MOnitOr
Page 8
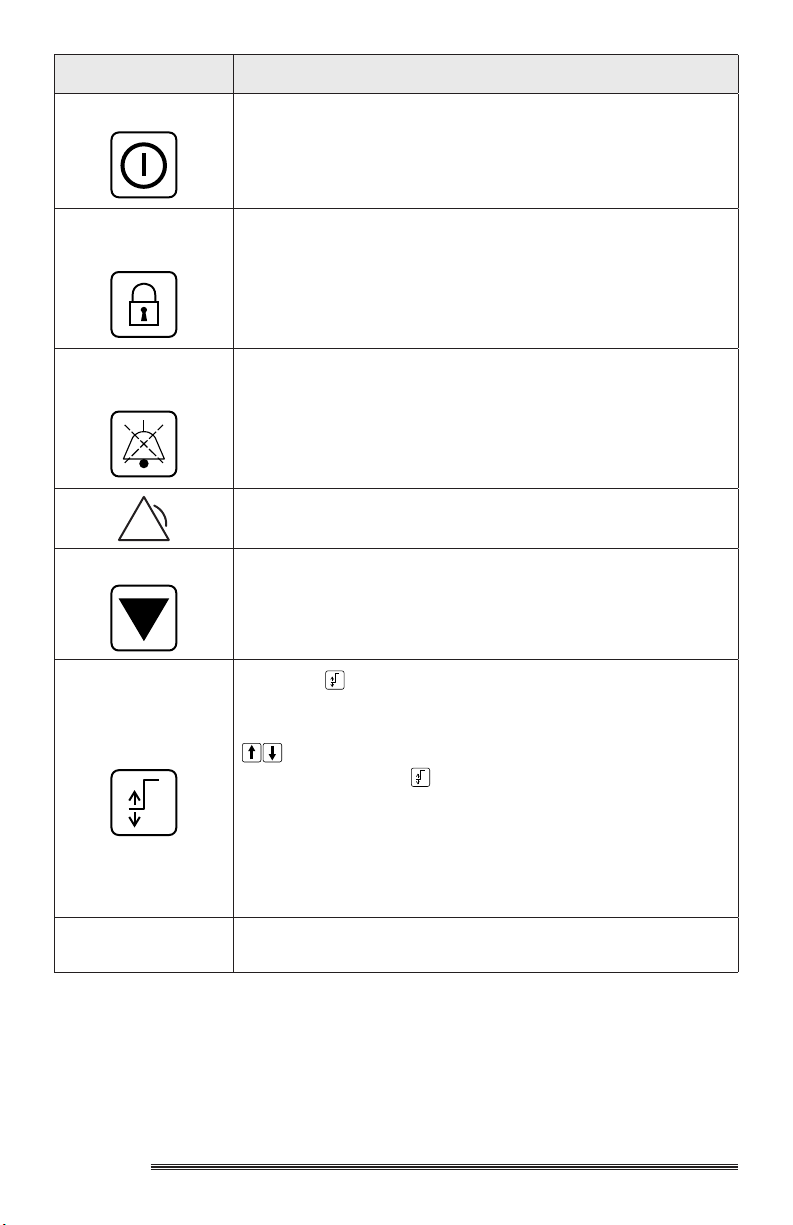
ITEM NAME DESCRIPTION
Power Key
Lock / Unlock
Key
Alarm Silence
Key
Calibration Key
Low Alarm Key
Low Alarm LED
The Power Key turns the Oxygen Monitor ON and
OFF. The Lock/Unlock Key must be pressed to unlock
the Oxygen Monitor, before being powered OFF.
Pressing the Lock/Unlock Key will “Unlock” the keypad,
so changes in the stored settings can be made. When
pressing the key to “Lock” the Oxygen Monitor disables
the key pad, and no changes can be made.
In alarm condition, pressing the Audio Alarm Paused
Key will deactivate the audible alarm for 120 seconds.
The visual alarm will continue to display.
General Alarm
Pressing the Calibration Key calibrates the Oxygen
Monitor with air or oxygen.
Pressing Low Alarm Key when the keypad is
unlocked, the Low Alarm set point will ash. The Low
Alarm setting can be adjusted with the
UP/DOWN keys. When the Low Alarm value is
changed, pressing the key will save the setting. The
Oxygen Monitor will also save the setting and revert
to normal operation if no keys are pressed within 10
seconds. The Low Alarm Set is adjustable down to
18% Oxygen.
NOTE: Factory Preset = 18% Oxygen.
During a Low Alarm condition, the red LED will ash
accompanied by the triple pulse audible alarm.
Oxygen
MOnitOr
7
Page 9
ITEM NAME DESCRIPTION
Pressing the High Alarm Key when the keypad
is unlocked, the high alarm set point will flash. The
high alarm setting can be adjusted with the
DOWN keys. When the high alarm value is changed,
pressing the key will save the setting. The Oxygen
High Alarm Key
Monitor will also save the setting and revert to normal
operation if no keys are pressed within 10 seconds.
The High Alarm Set is adjustable up to 100% Oxygen.
To disable the HIGH Alarm, raise the HIGH Alarm
setting above 100%. Dashes (---) will be displayed next
to the UP key on the LCD display.
NOTE: When the High alarm is disabled dashes (---)
will appear next to the UP key on the LCD display,
the Low alarm will still function.
NOTE: Factory Preset = 50% Oxygen.
UP/
High Alarm LED
Up / Down
Keys
Sensor Cable
Connector
During a High Alarm condition, the red LED will flash
accompanied by the triple pulse audible alarm.
The Up/Down Keys are used in conjunction with the
alarm set keys. Pressing either of these keys will
change the alarms set points by 1% increments or 5%
if held down continuously.
Cable Interface connection between Oxygen Monitor
and Oxygen Sensor Cable.
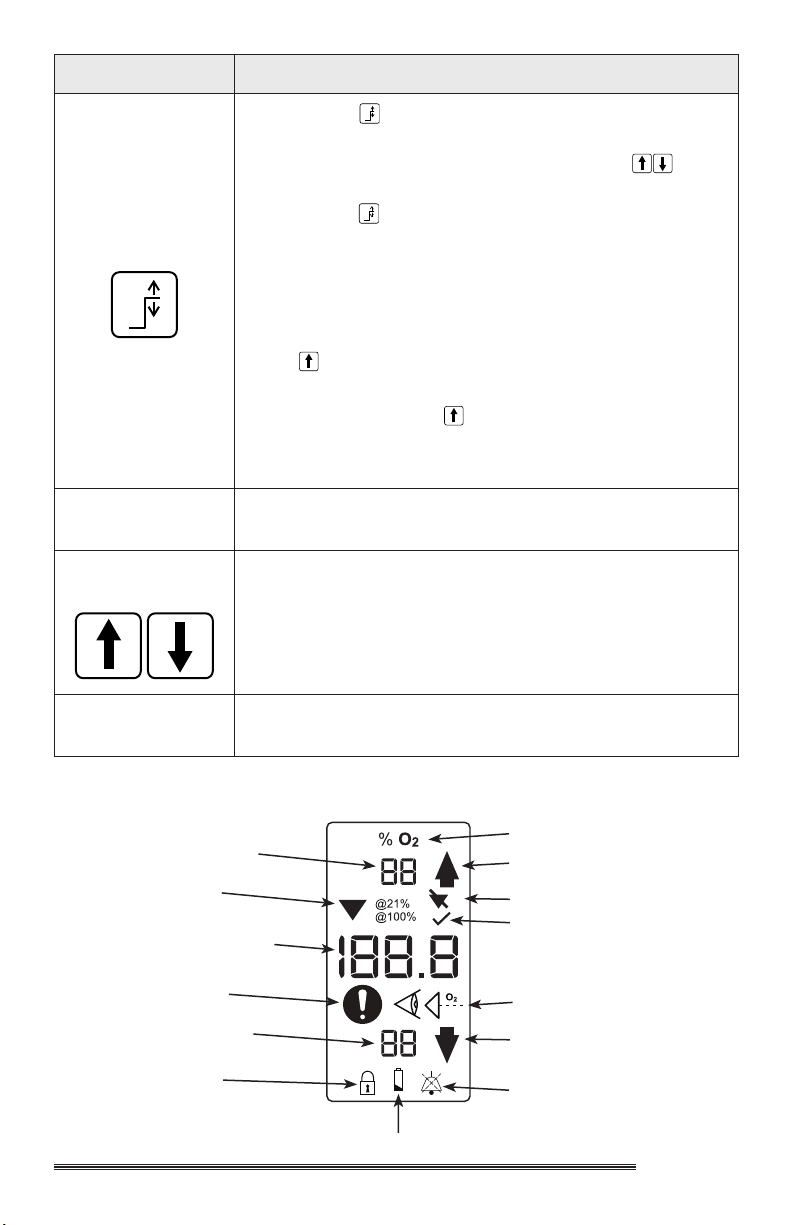
OXYGEN MONITOR LCD DISPLAY IDENTIFICATION
Measured Gas
High Alarm Set Point
Calibration Mode
Oxygen Concentration
Mandatory Action
Low Alarm Set Point
Locked Indicator
High Alarm Indicator
Calibration Failed
Passed
Check Sensor
Low Alarm Indicator
Audio Alarm Paused
Low Battery Indicator
8
Oxygen
MOnitOr
Page 10
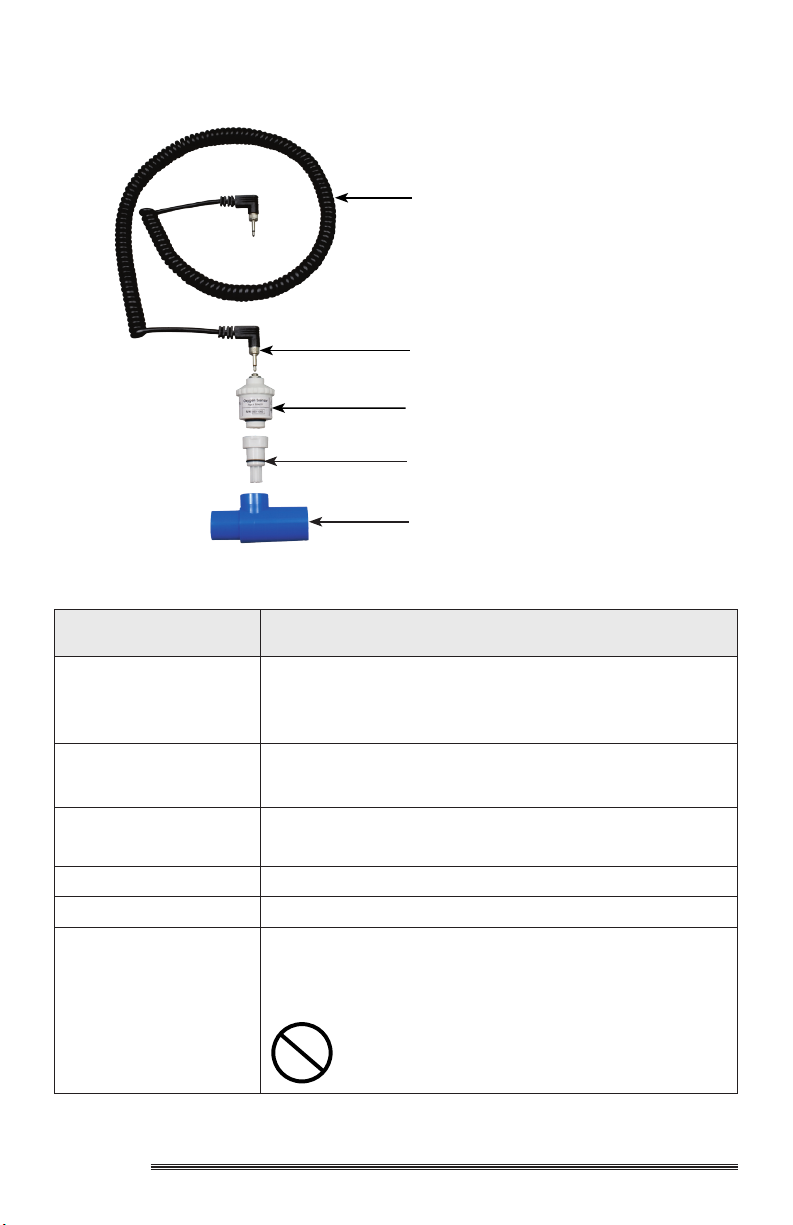
OXYGEN SENSOR COMPONENT IDENTIFICATION
2
Coiled Cable
Locking Ring
Oxygen Sensor
Diveter Fitting
Tee Adaptor
ITEM NAME DESCRIPTION
Coiled Cable with
Male Plugs
Plugs at each end
of the Coiled Cable.
Locking Ring
Oxygen Sensor Galvanic Oxygen Sensor
Diverter Fitting Fitting used to connect to the Oxygen Source.
Tee Adaptor
Oxygen
MOnitOr
The Coiled Cable allows the Sensor to be positioned
up to 10 ft from the side of the Oxygen Monitor. There
are Male
Male Plug has a Locking Ring and must be engaged
when in use.
Male Plugs have a Locking Rings and must be
engaged when in use.
The Tee Adaptor is used to connect the Oxygen
Sensor and Diverter Fitting to an oxygen pathway
circuit.
Note: The Tee Adaptor is intended for
single patient use only.
9
Page 11
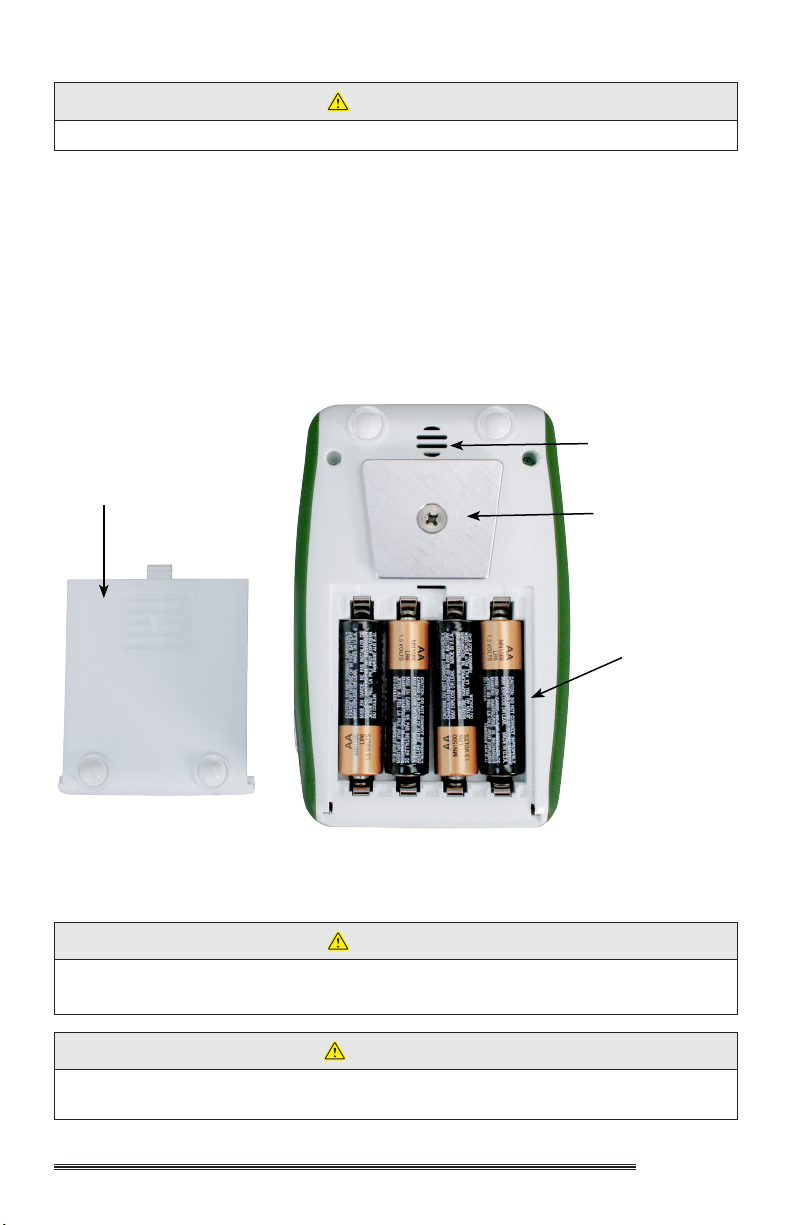
BATTERY INSTALLATION
CAUTION
Use ONLY AA Alkaline Batteries.
1. Press down the center, top edge of the battery cover and slide down.
2. Remove old batteries, if applicable.
3. Install 4 AA Alkaline Batteries, and follow the diagram stamped in the
bottom of the battery compartment.
4. Slide the battery cover back into position until the cover snaps on to the
Monitor.
BATTERY INSTALLATION DIAGRAM
Alarm Grill
Battery Compartment Cover
Mounting Block
AA Batteries (x4)
OPERATING INSTRUCTIONS
CAUTION
Inspect the Oxygen Monitor, Sensor and Cable for visual damage
before use, DO NOT USE if damaged.
WARNING
Read this User Manual before installing or operating the
Oxygen Monitor.
10
Oxygen
MOnitOr
Page 12

QUICK SETUP GUIDE
1. Install 4 AA Alkaline Batteries.
2. Connect the Oxygen Sensor and Diverter Fitting.
3. Connect the Coiled Cable.
4. Calibrate the Oxygen Monitor.
5. Set the High/Low Alarms.
SENSOR INSTALLATION
CAUTION
• Inspect the Oxygen Sensor and Diverter Fitting for visual damage or
electrolyte leakage before use. DO NOT USE if damaged.
• Use ONLY an Oxygen Sensor specied by Precision Medical, Inc.
• The Oxygen Sensor should not be used in the presence of ammable
anesthetics such as Diethyl Ether or Cyclopropane
WARNING
• DO NOT attempt to open or repair the Oxygen Sensor.
• The Sensor electrolyte is corrosive, and contains lead.
• DO NOT let it come in contact with the skin. If it does, ush affected
area with water.
• Check the Sensor regularly for leaks. If the Sensor is leaking, replace
with NEW Sensor. Leaking or used Sensors should be handled and
disposed of in accordance with local regulations.
• An MSDS is available from Precision Medical, Inc.
• If the Oxygen Sensor is used in breathing circuits, the Diverter must be
attached to the Sensor and must be used with the Tee Adapter.
• The Oxygen Sensor must be installed before the Oxygen Monitor can
be operated.
1. Screw the Diverter to the bottom of the Oxygen Sensor, tighten until snug.
2. If using the Tee Adapter, attach to the Diverter.
3. Insert the one end of the Coiled Cable into the top of the Sensor, and
secure by tightening the Locking Ring, until snug.
4. Insert the other end of the Coiled Cable into the Sensor Cable Connection
located on the right side of the Oxygen Monitor. Secure it in place by
tightening the Locking Ring, until snug.
5. Wait approximately 20 minutes for the NEW Sensor to stabilize to the
environment.
6. Calibrate the Oxygen Monitor with the NEW Sensor.
Oxygen
MOnitOr
11
Page 13

CAUTION
1. Calibrate the Oxygen Monitor before each use, and when replacing the
Oxygen Sensor or the batteries.
2. The Precision Medical Oxygen Monitor can only be calibrated accurately
using 100% Oxygen or 20.9% Oxygen (Room Air). Using any other
concentration will result in inaccurate readings.
3. Air calibration is not recommended unless the Sensor can be exposed
to a known source of clean air. Hospital room air is often enriched with
excess oxygen.
4. Calibrate the Oxygen Monitor at a pressure and flow similar to your clinical
application.
5. Before calibrating the Oxygen Monitor, the oxygen concentration readout
should be stable and not drifting more than 0.2%.
6. DO NOT calibrate the Oxygen Monitor in humidified gas, as water vapor
makes the oxygen concentration appear lower than the actual value.
CALIBRATION
1. Place the Sensor with Diverter and Plastic Tee attached into the gas
stream of 100% USP Oxygen or room air. The highest accuracy is
achieved when using 100% USP Oxygen at a constant pressure and
ow.
2. Wait at least 20 seconds or more for the oxygen to purge the line.
3. Turn the Oxygen Monitor “ON” by pressing the POWER key.
4. Let the oxygen concentration display stabilize, the readout should not drift
more than 0.2%.
5. Press the key to UNLOCK the keys.
6. Press the CAL key. The display will show “@ 21%” or “@ 100%”
oxygen. When “DONE” appears, the calibration is complete. The Oxygen
Concentration will be displayed in a gas percent value. Press
LOCK/UNLOCK to save the calibration data. If no keys are pressed
within 3 seconds, the setting will be saved, and the keypad will be locked.
7. Remove the Oxygen Sensor from the oxygen supply and conrm that the
display reads between 19-22% Oxygen in room air.
EFFECTS OF TEMPERATURE
To minimize temperature effects:
1. In a breathing circuit, place the Oxygen Sensor upstream of the heater.
2. Allow time for the Oxygen Sensor to stabilize to its new room
temperature.
3. Perform the calibration procedure at a temperature close to or similar to
your clinical application
Oxygen
12
MOnitOr
Page 14
EFFECTS OF HUMIDITY:
High Moisture levels will dilute the oxygen concentration, decreasing the
concentration of oxygen being monitored by the Oxygen Sensor.
High humidity can cause condensation to collect on the Oxygen Sensor,
obstructing the passages and reducing the effectiveness of the Oxygen
Sensor.
CAUTION
To reduce the effects of humidity on the Sensor:
• DO NOT USE the Oxygen Sensor in environments with greater than
95% humidity.
• Place the Oxygen Sensor upstream from the humidier in a breathing
circuit.
EFFECT OF PRESSURE:
CAUTION
The Oxygen Monitor is no equipped with automatic barometric
pressure compensation.
When the Oxygen Sensor is placed in a breathing circuit, the alternating
“breathing” pressure cycles will be sensed as an increase in oxygen
concentration. The concentration is not actually changing, but it appears to
be due to the change in pressure.
The following recommendation is provided to reduce the chances of pressure
causing false readings.
Calibrate the Precision Medical Oxygen Monitor using 100% Oxygen or room
air at the same pressure and ow as the gas to be monitored.
EFFECTS OF ANESTHETIC GASES:
ANESTHETIC
AGENT
Helium 50%, Balance Oxygen 0%
Nitrous Oxide
Carbon Dioxide
Halothane 4% <1.5% Oxygen*
Enurane 5% <1.5% Oxygen*
Isourane 5% <1.5% Oxygen*
Sevourane 5% <1.5% Oxygen*
Desurane 15% <1.5% Oxygen*
Test mixture = 30% O2, balance 70% N2O except where noted.
CONCENTRATION
80%, Balance Oxygen 0%
10%, Balance Oxygen 0%
TEST
Oxygen
MOnitOr
13
Oxygen
CONCENTRATION
ERROR
Page 15
* Errors may vary based on concentrations and exposure times.
These results meet or exceed the requirements of ISO 7767 and
DIN EN 12598.
CAUTION
The Oxygen Sensor should not be used in the presence of ammable
anesthetics such as Diethyl Ether or Cyclopropane.
ALARMS
The Precision Medical Oxygen Monitor will store the HIGH/LOW alarm
settings in memory after the Oxygen Monitor is turned “OFF”.
The Oxygen Monitor is designed to prevent crossing of the HIGH/LOW alarm
settings. The LOW alarm cannot be set above the HIGH alarm and the High
alarm cannot be set below than the LOW alarm.
Operator’s Position - Visual alarms are best viewed at a distance of 3 feet
(1m) or less from the Oxygen Monitor along with the following conditions;
– the Operator has a visual acuity of 0 on the logMAR scale or 6-6
(20/20) vision(corrected if necessary),
– the viewpoint is at the Operator’s Position or at any point within an
angle of 30° to the axis horizontal to the centre of the plane of the
monitoring display, and
– the ambient luminance in the range of 100 lx to 1 500 lx.
TO SET ALARMS
WARNING
Do Not set alarm limits to extreme values that can render the alarm
system useless.
1. With the Power key ON.
2. Press the LOCK/UNLOCK key.
3. To set the HIGH Alarm: Press the HIGH ALARM SET key once.
Press the
displayed next to the Up arrow in the upper right corner of the display.
Continuously pressing the arrow keys will move the value in increments
of 5. Press the HIGH ALARM SET key to save the setting. Flashing
Number indicates the Number can be changed. If no keys are pressed
for 10 seconds, the setting will be saved and the Oxygen Monitor will
revert to locked mode.
4. To set the LOW Alarm: Press the LOW ALARM SET key once. Press
the
next to the Down arrow in the lower right corner of the display.
UP and DOWN arrow keys until the desired value is
UP and DOWN arrow keys until the desired value is displayed
Oxygen
14
MOnitOr
Page 16
Continuously pressing the arrow keys will move the value in increments
of 5. Press the LOW ALARM SET key to save the setting. Flashing
Number indicates the Number can be changed. If no keys are pressed
for 10 seconds, the setting will be saved and the Oxygen Monitor will
revert to locked mode.
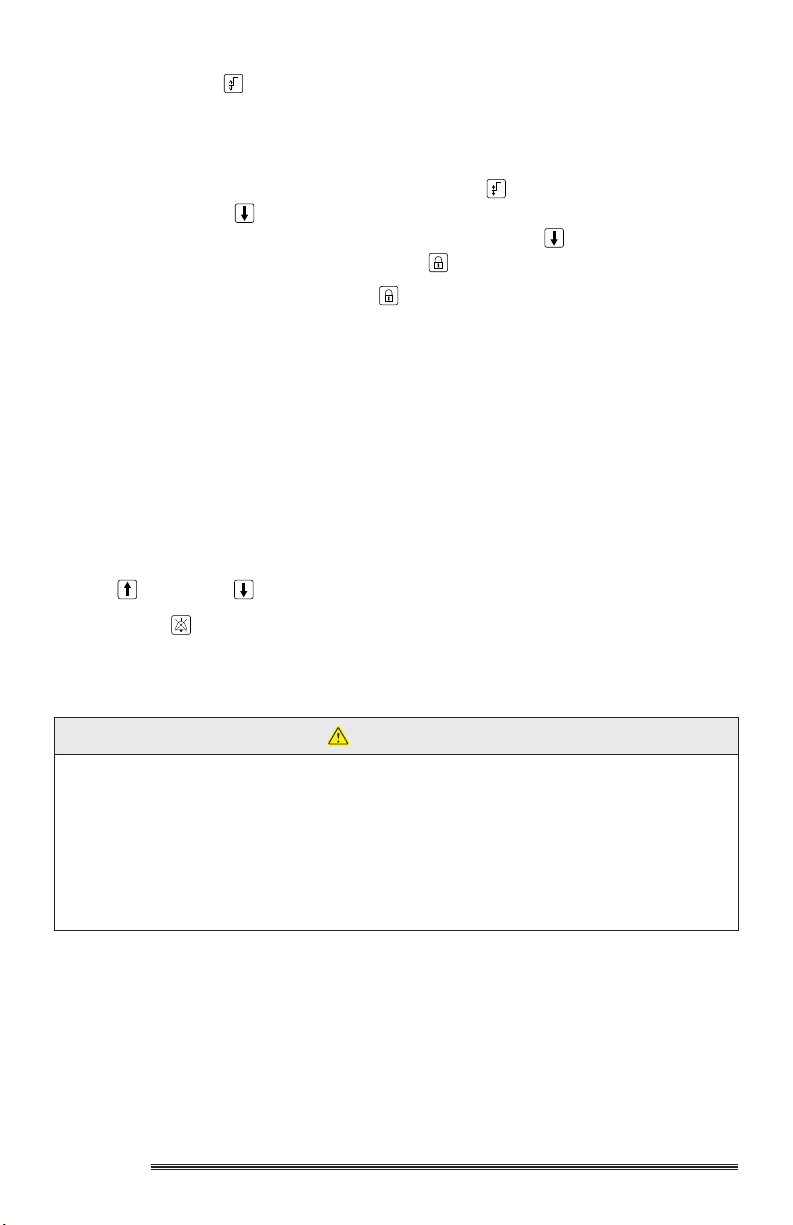
To set the LOW Alarm below 18%: Press the LOW ALARM SET key
once. Press the DOWN arrow key until 18% is displayed. Press and
hold the LOCK/UNLOCK key down and press the DOWN arrow key
to set the lower limit and then release LOCK/UNLOCK key.
5. Lock the display by pressing the LOCK/UNLOCK key.
6. To disable the HIGH Alarm, raise the HIGH Alarm setting above 100%.
“---” will be displayed next to the Up arrow on the display. The LOW
alarm will still function while the HIGH alarm is disabled.
ALARM SITUATION:
During a HIGH or LOW alarm.
1. Triple pulse alarm sounds.
2. LED will flash.
3. Alarm Low/High set point will flash.
4. UP or DOWN Arrow will turn dark.
Pressing the Alarm Silent key will deactivate the audible alarm for 120
seconds. If the alarm exists after 120 seconds, the alarm will sound again.
CLEANING
CAUTION
• DO NOT steam autoclave.
• DO NOT immerse the Oxygen Monitor into any liquid.
• DO NOT use any strong solvent or abrasive cleaners.
• DO NOT allow any liquid to enter the Oxygen Monitor or the Oxygen
Sensor; this will damage the Oxygen Monitor or Oxygen Sensor and
will void the Warranty.
1. Disconnect all connections before cleaning.
2.
Clean exterior surfaces of the Oxygen Monitor and Coiled Cable with a
cloth dampened with mild detergent and water.
3. Wipe dry with a clean cloth.
Oxygen
MOnitOr
15
Page 17

MAINTENANCE
SENSOR REPLACEMENT
Reference “SENSOR INSTALLATION”
CAUTION
Sensor Replacement must be performed by a Qualied Medical
Personnel.
BATTERY REPLACEMENT
Replace batteries when
Reference “BATTERY INSTALLATION”.
(Low Battery) is displayed.
RETURNS
Returned products require a Returned Goods Authorization (RGA) number,
contact Precision Medical, Inc. All returns must be packaged in sealed
containers to prevent damage. Precision Medical, Inc. will not be responsible
for goods damaged in transit. Refer to Precision Medical, Inc. Return Policy
available on the Internet, www.precisionmedical.com.
DISPOSAL INSTRUCTIONS
The Oxygen Monitor may contain electrical components that are hazardous
to the environment. DO NOT dispose device into standard trash.
The Oxygen Monitor contains internal batteries. Batteries contain materials
which can contaminate the environment when improperly disposed of.
The Oxygen Sensor contains lead. DO NOT dispose sensor into standard
trash. Dispose in accordance with the local regulations.
Contact your local waste management for disposal of Electronic Equipment.
16
Oxygen
MOnitOr
Page 18

TROUBLESHOOTING
If the oxygen monitor fails to function, consult the Troubleshooting Guide. If
the problem cannot be solved by using Troubleshooting Guide, consult your
Provider.
Problem Probable Cause Remedy
Low Battery Indicator
is displayed with a 30
second chirp alarm
Check Sensor appears on
display with a continuing
pulsing alarm
New Oxygen Sensor
responds slowly or seems
to drift
Oxygen Sensor does
not react to changes in
oxygen concentration
Triple Pulse Alarm and
ashing LED
Keys inoperable
(Power ON)
No Display / LCD screen
will not power ON
“SERVICE NEED”
on the display
“
CAL FAIL” appears on
the display
appears
1. Battery voltage too
low
1. Cable connections
are not secure
2. Oxygen Sensor not
functioning
3. Using Oxygen Sensor
other than Precision
Medical Oxygen
Sensor
1. Oxygen Sensor has
NOT temperature
stabilized
1. Condensation on the
Oxygen Sensor
2. Non functioning
Oxygen Sensor
1. Oxygen readings are
outside the High/Low
Alarm limits
2. Loss of Air or Oxygen
Supply
1. The keypad is Locked 1. Unlock the keypad
1. Dead Batteries
2. Battery installed
incorrectly
1. Electronic malfunction 1. Oxygen Monitor must be
1. Improper or wrong
Oxygen Sensor
2. Improper Air / Oxygen
source
3. Non functioning
Oxygen Sensor
1. Replace with 4 NEW AA
alkaline batteries
1. Make sure cable
connections are secure
and locking rings are tight
2. Replace with New
Precision Medical
Oxygen Sensor
3. Attach New Precision
Medical Oxygen Sensor
1. Wait approximately 20
minutes for Oxygen
Sensor to stabilize with
the environment, and
then recalibrate the
Oxygen Monitor
1. Remove Condensation
2. Replace with New
Precision Medical
Oxygen Sensor
1. Adjust the High/Low Alarm
setting to be above/below
the oxygen value being
displayed
2. Reconnect the Air or
Oxygen Supply
1. Check and replace with 4
New AA alkaline batteries
2. Check that batteries are
installed in the proper
position (+/-)
serviced
1. Recalibrate the Oxygen
Monitor
2. Check the Air / Oxygen
source
3. Replace with New
Precision Medical
Oxygen Sensor
Oxygen
MOnitOr
17
Page 19

ALARM CONDITIONS
Alarm Condition Alarm Meaning Corrective Action
High alarm LED ashing
and auditable beep
Low alarm LED ashing
and auditable beep
Low Battery symbol on
and O2 displays “- - -“
instead of a value.
Oxygen Sensor symbol on.
Measured O2
concentration is higher
than the high alarm set
point.
Measured O2
concentration is lower
than the low alarm set
point.
The voltage output of
the installed batteries
is low and will require
replacement soon.
Oxygen Sensor failure • Replace O2 sensor
• Adjust O2 concentration
source to prescribed
dose.
• Set high alarm to
prescribed limit.
• Adjust O2 concentration
source to prescribed
dose.
• Set low alarm to
prescribed limit.
• Replace all batteries with
new batteries.
• Recalibrate O2 Monitor
REPLACEMENT PARTS
Description Part #
User Manual 505127
Precision Medical Oxygen Sensor with Diverter 504877
Tee Adaptor 505126
Extendible Cable 504937
AA Alkaline Battery (4 Pack) 505124-4
Rubber Feet (4) 505122-4
Battery Cover 504909
V Block 505010
Diverter 505344
ACCESSORIES
Description Part #
Monitor Wall Mount Bracket 505189
Monitor Vertical Pole Mount Clamp 505013
Monitor Horizontal Pole Mount Clamp 505014
Dove tail Bracket 505012
Dove tail Bracket Screw 505712
Orders for replacement parts should include the part number, if available and the
model and serial number of the instrument for which the parts are intended.
Oxygen
18
MOnitOr
Page 20

LIMITED WARRANTY
AND
LIMITATION OF LIABILITY
Precision Medical, Inc. warrants that the Oxygen Monitor, (the Product), will be free of defects in
workmanship and/or material for the following period:
Two (2) years from shipment.
Should any failure to conform to this warranty appear within the applicable period, Precision
Medical, Inc. shall, upon written notication thereof (received by Precision Medical, Inc. within 30
days of the customer’s discovery of the alleged defect), along with return of the Product at the
customer’s expense and substantiation that the goods have been stored, installed, maintained
and operated in accordance with Precision
Medical, Inc.’s instructions and standard industry practice, and that no modications, substitutions,
or alterations have been made to the goods, correct such defect by repair or replacement
(at Precision Medical, Inc.’s option) at its own expense.
Precision Medical, Inc. Warrants the 504877 Oxygen Sensor included with the
PM5900 Oxygen Monitor to be free from defects in material and workmanship for a period of
sixteen (16) months, from date of shipment. Should any failure to conform to this warranty
appear within the applicable period, Precision Medical, Inc. shall, upon written notication thereof
(received by Precision Medical, Inc. within 30 days of the customer’s discovery of the alleged
defect), along with return of the sensor at the customer’s expense and substantiation that the
sensor has been stored, installed, maintained and operated in accordance with Precision Medical,
Inc.’s instructions and standard industry practice, and that no modications, substitutions, or
alterations
have been made to the sensor, correct such defect by repair or replacement (at Precision
Medical, Inc.’s option) at its own expense. Should a sensor require repair or replacement due
to said defects, the sensor is warranted only for the remainder of the original sensor warranty
period. A sensor shall not be considered defective for failure to function beyond its normal
estimated consumption capacity/rates, and this warranty does not cover normal wear due to
consumption beyond the sensor’s estimated O2% hours.
ORAL STATEMENTS DO NOT CONSTITUTE WARRANTIES.
The representatives of Precision Medical, Inc. Or any retailers are not authorized to make oral
warranties about the merchandise described in this warranty, and any such statements shall not
be relied upon and are not part of the contract for sale.
Thus, this writing is a nal, complete and exclusive statement of the terms of the warranty for the
products covered by the applicable contract.
THIS WARRANTY IS EXCLUSIVE AND IS IN LIEU OF ANY WARRANTY OF MERCHANTABILITY,
FITNESS FOR A PARTICULAR PURPOSE OR OTHER WARRANTY OF QUALITY, WHETHER
EXPRESS OR IMPLIED.
Precision Medical, Inc. shall not under any circumstances be liable for special, incidental
or consequential damages including but not limited to lost prots, lost sales, or injury to person
or property. Correction of non-conformities as provided above shall constitute fulllment of all
liabilities of Precision Medical, Inc. whether based on contract, negligence, strict tort or otherwise.
Precision Medical, Inc. reserves the right to discontinue manufacture of any product or change
product materials, designs, or specications without notice.
Precision Medical, Inc. reserves the right to correct clerical or typographical errors without penalty.
505127 Rev10 5/15 (?M) Printed in USA
 Loading...