

Page 1
Portable Oxygen Concentrator
Page 2

Owner’s Record
The Model [REF] and Serial Number [SN] label are located on the bottom of the
device. Record the Model and Serial Number in the space provided below. This will
be helpful if you need to contact Precision Medical about your POC in the future. For
the latest information, visit us at www.precisionmedical.com.
Model: ___________________________________________________________
Serial No.: _________________________________________________________
Date of Purchase: ___________________________________________________
Provider Contact: ___________________________________________________
Page 3

Contents
Device Overview .................................................. 1
About Your Live Active Five Portable Oxygen
Concentrator (POC) ................................................. 1
Intended Use and Indications............................... 1
User Profile ................................................................ 1
Contraindications ..................................................... 1
General ................................................................. 2
Unpacking / Inspection ......................................... 2
Symbols ..................................................................... 3
Warnings ................................................................... 4
Features .................................................................... 5
Control Panel / Component Descriptions ...... 5
Power Options....................................................... 6
Accessories and Replacement Parts ..................7
Accessories .............................................................7
Replacement Parts ................................................7
Setup .................................................................... 9
Powering the POC .................................................. 9
Installing the Battery ............................................ 9
Charging the Battery - In Device ...................... 9
Reading the Battery Gauges ............................10
Battery Removal ....................................................11
External AC Power ...............................................11
External DC Power ..............................................12
Carry Bag Use and Setup .................................... 13
To Place the POC into its carry bag ................14
Removing the Carry Bag ...................................14
Installing Carry Handle and/or
Shoulder Strap .....................................................14
Cleaning the Carry Bag .....................................14
Usage ..................................................................15
Location and Operating Position .......................15
Connecting / Positioning the Nasal Cannula ..15
Removing the Cannula from the Outlet .........16
Powering On the POC .........................................16
Adjusting the Pulse Setting ..............................16
Start-up Period ..................................................... 17
Reading the Display Screens ..............................17
Breathing with the POC .......................................18
Operating the POC with the Quiet Option ......18
Turning the POC Off .............................................18
Battery Life and Recommended Battery
Management ...........................................................18
Traveling with the POC .........................................19
Recommended Preventative Maintenance ...20
Service Life .............................................................20
Cleaning the Case ................................................20
Cleaning the Air Inlet Filter
and Replacement ..................................................20
Replacing the Air Outlet Filter ............................21
Cleaning and Disinfection between Users .....21
After Use ............................................................22
Storage ....................................................................22
Disposal ...................................................................22
Troubleshooting ................................................23
Technical Alerts .....................................................23
Shut Down Alerts ..................................................26
Technical Data ................................................... 27
Specifications .........................................................27
General ..................................................................27
Regulatory Listings ...............................................28
Electromagnetic Compliance (EMC) ................29
Guidance and manufacturer’s declaration -
electromagnetic immunity ................................29
Limited Warranty ..............................................32
Page 4

Device Overview
About Your Live Active Five Portable Oxygen Concentrator (POC)
The Live Active Five POC uses a molecular sieve and vacuum pressure swing adsorption
methodology to produce the oxygen gas output. Ambient air enters the device, is filtered
and then compressed. This compressed air is then directed into nitrogen adsorbing sieve
beds. Concentrated oxygen exits the opposite end of the sieve bed and is directed into
an oxygen reservoir from which it is delivered to the user.
The oxygen purity level of the output gas ranges from 87% to 95.5%. The oxygen is
delivered to the user through the use of a nasal cannula. A pulse dose delivery method
is used. The device detects the start of user inhalation and delivers a measured pulse
of oxygen. No further oxygen is delivered until the next user inhalation is detected. The
volume of oxygen delivered each minute is a fixed amount based on the selected pulse
flow setting. The volume of each oxygen pulse will vary with the user’s breath rate such
that the fixed minute volume is maintained.
Intended Use and Indications
The Precision Medical Inc. Live Active Five (POC) (the device) is intended to provide
supplemental oxygen to persons requiring oxygen therapy. The device can be used in
home, institution, vehicle and for transportable use.
User Profile
The Live Active Five POC is to be used by a trained patient and/or caregiver in or outside
the home that requires prescribed supplemental oxygen.
The user should have a visual acuity of 0 on the log Minimum Angle of Resolution (log
MAR) scale or 6/6 (20/20), corrected if necessary.
The user should not have a hearing impairment that would prevent them from hearing
the device alerts.
The user must be able to read and understand the supplied user manual in the language
it is written.
Contraindications
This device is not intended to use while sleeping.
This device is not to be used for support or to sustain life.
This device is intended to provide supplemental oxygen only. An alternate source of
oxygen shall always be available.
This device is not intended for newborn and infant use.
This device is not appropriate for any user who would experience adverse health
consequences as a result of a temporary interruption in oxygen therapy.
This device should only be used when prescribed by a physician. The use of nonprescribed oxygen therapy can be hazardous.
Users who are unable to communicate discomfort while using this device may require
additional monitoring.
Users with hearing and/or sight impairment(s) may need assistance while using this device.
Users who breathe from their mouths or through an oxygen mask should not use this device.
1
Page 5
General
Unpacking / Inspection
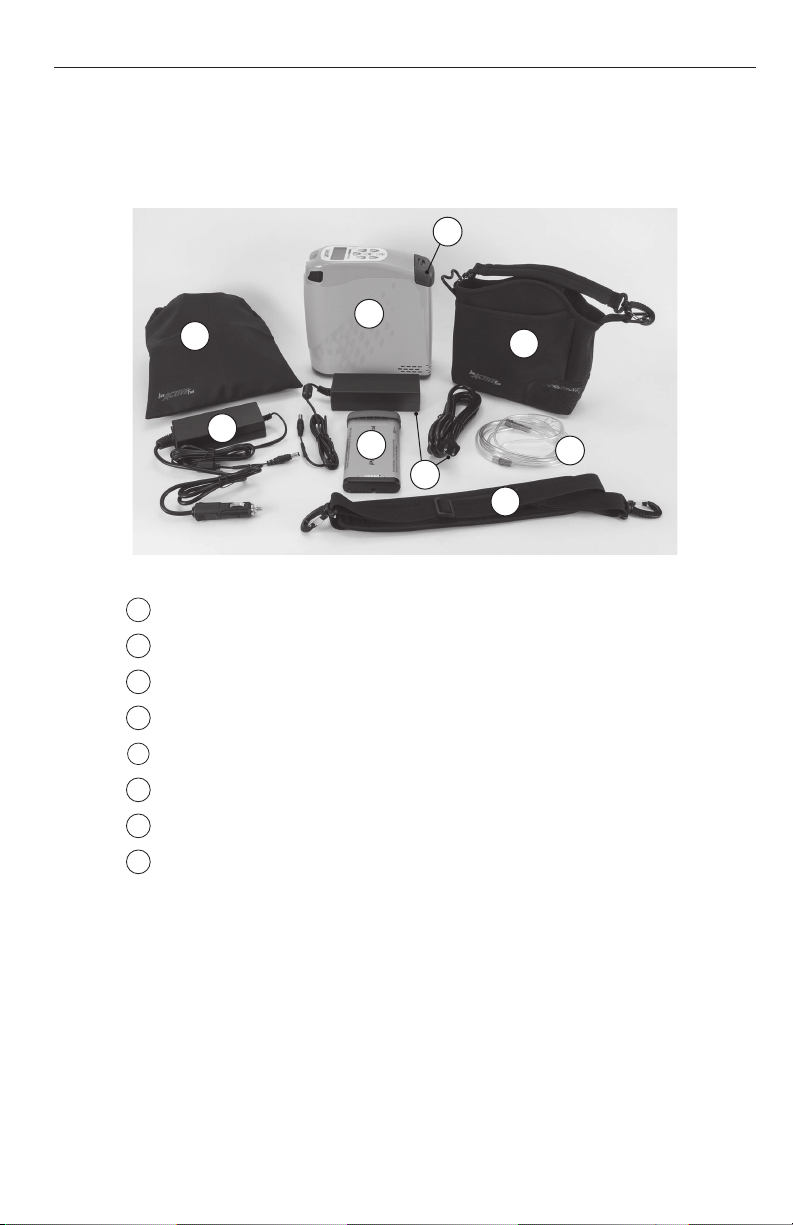
Remove contents from packaging and inspect for damage. If there is any damage, DO
NOT USE and contact your Provider. The POC package includes the following:
C
B
A
D
F
C*
H
G
E
A
Accessories Carry Bag (508623)
B
Live Active Five POC (PM4155)
C
Lithium Ion Battery (508561) *Extra Battery with Power Bundle
D
POC Carry Bag (508567)
E
Adjustable Shoulder Strap (Included with POC Carry Bag)
F
DC Car Adapter (508558)
G
AC Power Adapter with AC Power Cord (508660)
H
Nasal Cannula (504833)
2
Page 6

Symbols
WARNING
Indicates that personal safety
of the patient may be involved.
Disregarding a warning could
result in significant injury.
General Warning Sign Follow Instructions
if not avoided, may result in
for Use
CAUTION
Indicates a potentially
hazardous situation which,
minor or moderate injury.
General Mandatory
Action Sign
No Smoking No Oil or Grease No Open Flame (POC)
Do Not Incinerate
(Battery)
No Disassembly
General Alert Pause Alert Direct Current
CAUTION
Used without the safety alert
symbol indicates a potentially
hazardous situation which,
if not avoided, may result in
property damage.
Symbol for DO NOT
MR Unsafe
An item marked
unsafe is known to
pose hazards in all MR
environments.
Type BF Applied Part Class II Equipment Date of Manufacture Manufacturer
Power Off-Standby The manufacturer of this device
has determined it conforms to
all applicable FAA acceptance
criteria for POC carriage and use
on board aircraft.
This device may contain electrical
components that are hazardous to
the environment. DO NOT dispose
device into standard trash. Contact
your local waste management for
disposal of electronic equipment.
Protected from touch by
fingers and objects greater
than 12 millimeters. Protected
from direct sprays of water up
Recycle The POC, gas pathways,
components and accessories
do not contain any natural
rubber latex.
to 15° from the vertical.
3
Page 7

Warnings
WARNING
Precision Medical Inc, and your equipment
provider are accountable for ensuring the
compatibility of the POC and all of the parts or
accessories used.
Use of accessories or replacement parts not
listed in this User Manual may cause adverse
effects to basic safety or essential performance
of the device and will void warranty.
If you are unable to understand the warnings,
cautions or instructions, contact a health
care provider or technical personnel before
attempting to use this device.
If you feel discomfort or are experiencing a
medical emergency while undergoing oxygen
therapy, seek medical assistance immediately to
avoid harm.
In the event of an alert condition or if you are
experiencing any signs of discomfort, connect to
another oxygen source. Contact your Provider
and/or Healthcare Professional immediately.
Users unable to communicate discomfort will
require additional monitoring to convey the
information about the discomfort and or the
medical urgency to the care giver to avoid harm.
A risk of fire is associated with the use of
oxygen, and is likely to result in fire or death.
Do not use the device or accessories near any
type of flame, sparks or flammable/explosive
substances.
Smoking during use of oxygen therapy is
dangerous and is likely to result in facial burns
or death. Do not allow smoking within close
proximity of the device. If you intend to smoke,
turn the device off, remove the cannula and
leave the room where the cannula and the
device are located.
Oxygen makes it easier for a fire to start and
spread. Do not leave the nasal cannula on
combustible materials such as bed coverings,
chair cushions, etc. If the device is turned on, but
not in use; the oxygen will make the materials
flammable. Turn the device off when not in use
to prevent oxygen enrichment.
Use of this device at an altitude above 10,000 ft
(3048 m) or outside a temperature range of 41°F
to 104°F (5°C to 40°C) or a relative humidity
above 90% may adversely affect the flow rate
and the percentage of oxygen and consequently
the quality of the therapy.
The electrical cord and/or tubing could present a
tripping or strangulation hazard.
Keep away from children and pets.
The device must be used in dry conditions. Do
not submerge, operate under water, bathe or
swim while in use.
Wind or strong draught can adversely affect
accurate delivery of oxygen therapy. Examples:
Using this device beside an open window, in
front of a fan, or in the back seat of an open
convertible car can affect the accuracy of
oxygen delivery.
If a prescribing Healthcare Professional has
determined that an interruption in the supply
of oxygen, for any reason, may have serious
consequences to the user, an alternative source
of oxygen should be available for immediate use.
DO NOT operate the POC without the inlet
filter or while that filter is wet to prevent
damage to the device.
The device, its parts or accessories do not
contain known phthalates which are classified as
carcinogenic, mutagenic or toxic.
ALWAYS confirm your prescribed flow setting
before use and monitor on a frequent basis.
ALWAYS keep some distance from walls,
furniture, and especially curtains that could
prevent adequate airflow to the device.
ALWAYS use parts recommended by the
manufacturer to ensure proper function and to
avoid the risk of fire and burns.
DO NOT lubricate fittings, connections,
tubing, or other accessories of the device
to avoid the risk of fire and burns. Use only
water-based lotions or salves that are oxygencompatible before and during oxygen therapy.
Never use petroleum or oil-based lotions or
salves.
DO NOT cover or obstruct device ventilation.
The air inlets and outlets require proper
ventilation.
DO NOT disassemble or attempt to repair.
There are no user serviceable parts inside.
Contact Precision Medical, Inc. for service.
DO NOT modify this device.
DO NOT reach for the device if it has fallen
into water. Unplug immediately if device has
fallen into water.
DO NOT use a humidifier bottle with this
device.
DO NOT use while sleeping.
4
Page 8
Features
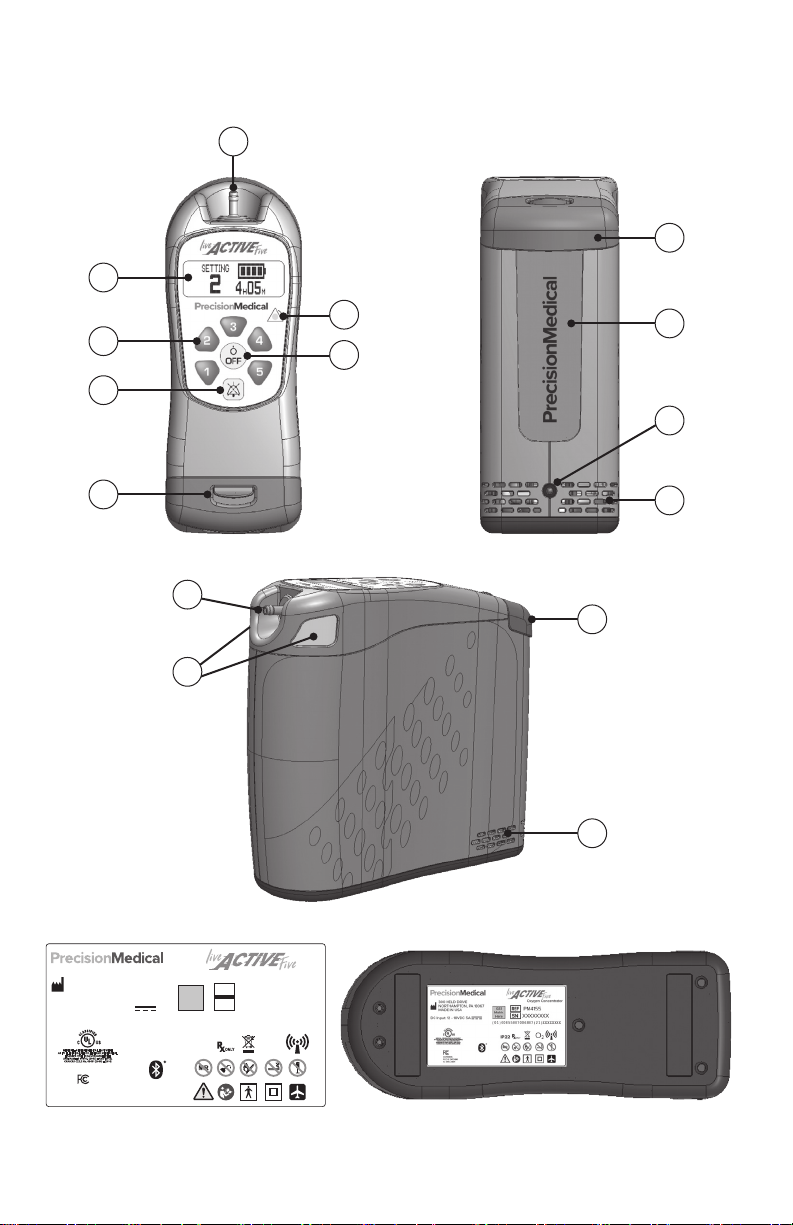
Control Panel / Component Descriptions
A
B
H
E
C
F
I
D
J
G
K
A
H
L
K
300 HELD DRIVE
NORTHAMPTON, PA 18067
MADE IN USA
DC Input: 12 - 18VDC 5A
MEDICAL - GENERAL MEDICAL EQUIPMENT
AS TO ELECTRICAL SHOCK, FIRE AND MECHANICAL
HAZARDS ONLY IN ACCORDANCE WITH
ANSI/AAMI ES 60601-1 (2005) + AMD (2012),
CAN/CAS C22.2 No. 60601 (2008) + (2014)
CONTAINS:
FCC ID: ZAT26M1
IC: 451H-26M1
GS1
Matrix
Here
(01)00855887006887(21)XXXXXXXX
REF
SN XXXXXXXX
IP22
Oxygen Concentrator
PM4155
O
2
The Model [REF] and Serial Number [SN] label are located on the bottom of the device.
5
Page 9

A
Oxygen Outlet Fitting - Connects the nasal cannula to the device.
Display Screen - Displays pulse setting, power and battery status, and alert
B
messages.
Pulse Selection Buttons (1 - 5) Refer to Adjusting the Pulse Setting in Usage
C
for more details.
D
Paused Alert Button - Press to mute the audible signal.
Alert Indicator - The yellow light indicates abnormal operating conditions. Refer
E
to Alert Conditions in Troubleshooting for more details.
F
Off Button - Press to turn device off.
G
Battery Latch - Slide back to release Battery from device.
H
Battery Handle - Used to lift the Battery out of the device.
I
Battery - Used for portable power.
External Power Connector - Used to connect an external power source to the
J
device.
K
Air Outlet - Air Outlet from the device.
Air Inlet with Filter - Air inlet to the device, located on left and right sides of
L
Oxygen Outlet Fitting (A)
Power Options
Battery: When fully charged, a single battery supplies power for more than 6 hours. Alert
signals occur when the battery is nearing depletion. Refer to Technical Alert Conditions
in Troubleshooting section and Charging the Battery in Setup section.
AC Power Adapter: The AC power adapter allows the device to be connected to a wall
outlet. Use of the AC power adapter will allow the device to operate and simultaneously
charge an installed battery. Refer to Charging the Battery in Setup section.
DC Car Adapter: The DC car adapter allows the device to be connected to 12-volt
DC auxiliary outlet. Use of the DC car adapter allows the device to operate and
simultaneously charge an installed battery. Refer to Charging the Battery in Setup
section.
Note: The DC car adapter requires an 8 amp minimum circuit. Check your vehicles
owner’s manual to ensure the circuit can provide 8 amps.
6
Page 10
Accessories and Replacement Parts
WARNING
Use of accessories or replacement parts not listed in this User Manual may cause
adverse effects to basic safety or essential performance of the device and will void
warranty.
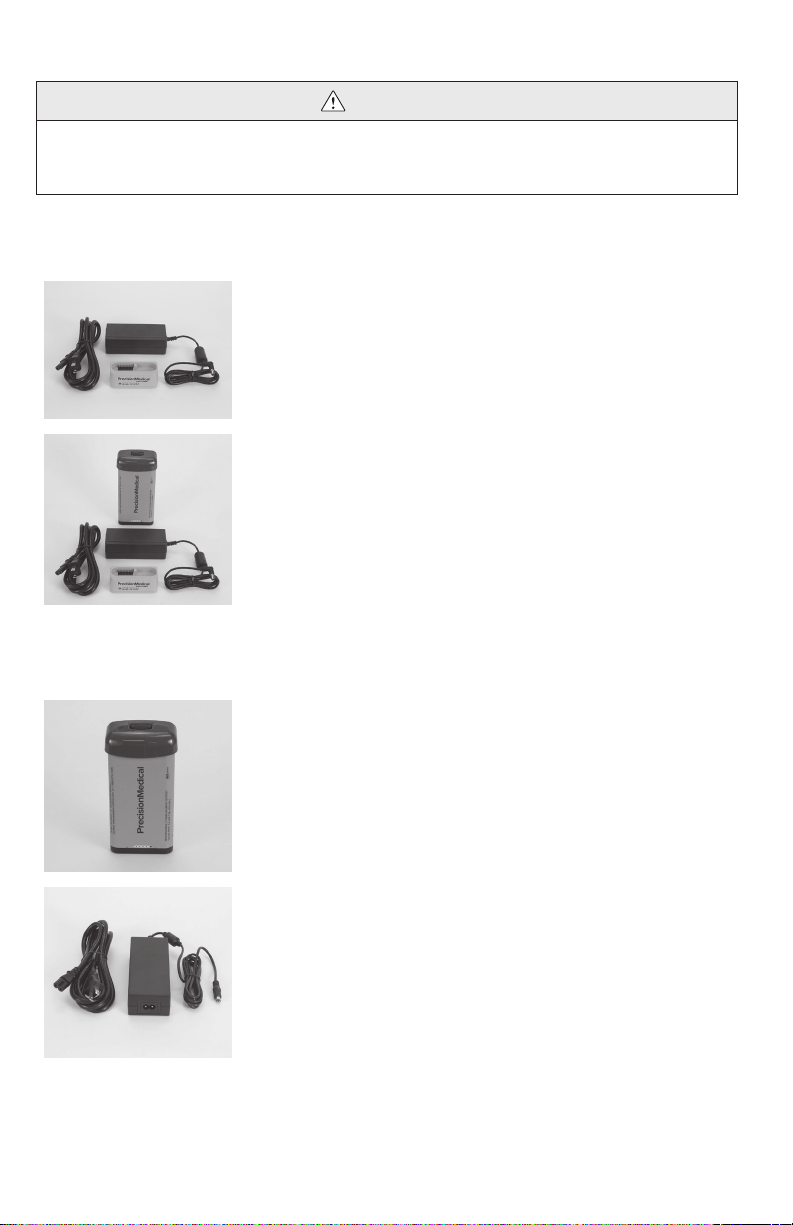
Accessories:
Live Active Five Battery Charger with AC Power Adapter –
508649
You can quickly charge additional Live Active Five Lithium Ion
Batteries in just 2 hours using the compact and versatile Live
Active Five Battery Charger.
Live Active Five Battery Charger Bundle with AC Power
Adapter and Battery – 508650
The Live Active Five Battery Charger Bundle comes with one
Live Active Five Lithium Ion Battery so you can always have
a charged battery ready to go. Additional batteries can be
purchased separately.
Replacement Parts:
7
Live Active Five Lithium Ion Battery – 508561
Purchase additional Live Active Five Lithium Ion Batteries.
Each battery provides more than 6 hours of duration.
Live Active Five AC Power Adapter with AC Power Cord –
508660
No more moving the power cords from room to room.
Purchase an extra set to keep in your bedroom, living room
or car.
Page 11
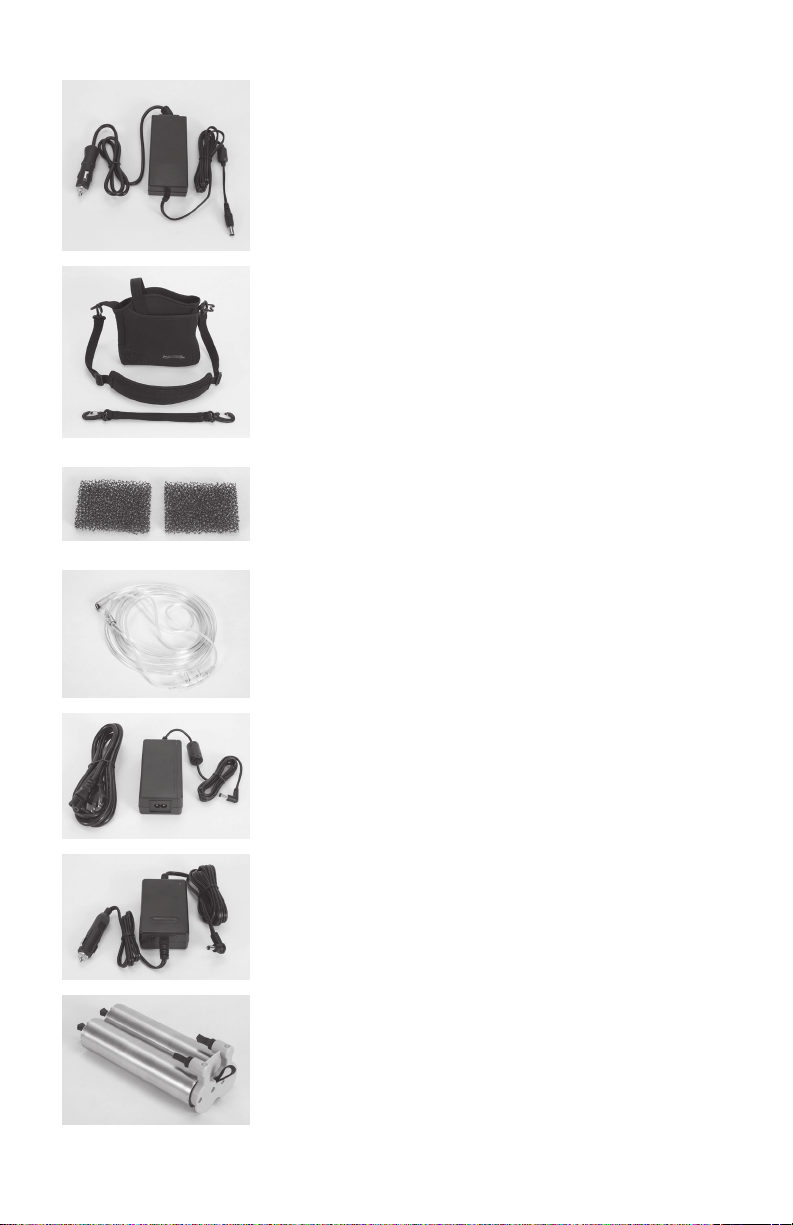
Live Active Five DC Car Adapter – 508558
The Live Active Five DC Car Adapter is designed for use with
your Live Active Five POC. The DC cord allows you to power
your concentrator and charge the battery simultaneously
from a standard DC car outlet in your car, RV or boat.
Carry Bag with Shoulder Strap and Handle – 508567
The Live Active Five Carry Bag allows you to wear the device
over the shoulder or cross body for the most comfortable
hands-free experience.
Inlet Filters (x10) - 508587-10
Like all filters, sometimes they just need to be replaced.
Keep your Live Active Five POC running at its peak
performance with a new set of inlet filters. Also available in
packs of 30.
Nasal Cannula – 504833
Nasal cannula should be rated adult high-flow to ensure
proper patient usage and oxygen delivery.
Battery Charger AC Power Adapter with AC Power Cord –
508699
The AC power adapter with AC power cord is used to power
the Live Active Five battery charger in any electrical wall
outlet.
Battery Charger DC Power Adapter – 506750
The optional DC power adapter is used to power the Live
Active Five battery charger in a car, RV or boat.
Sieve Bed Replacement – 508697
The sieve bed replacement provides a quick and simple way
to service your Live Active Five POC without having to send
in for service.
8
Page 12

Setup
Follow these instructions to ensure safe operation of the device.
Note: The device, its parts and accessories are intended for use by a single user and
should be cleaned / disinfected before use on a new user.
Powering the POC
CAUTION
Ensure battery is fully charged prior to first use.
When the battery is near depletion, replace the battery with a charged battery or
connect the POC to an AC or DC power source.
Installing the Battery
The device comes equipped with a single rechargeable lithium ion battery. The battery
can be removed and installed while the device is plugged into an external power source.
1. Slowly lower battery straight down into the battery compartment. Press down until a
click is heard. An audible beep confirms the battery is installed properly.
Charging the Battery - In Device
The battery must be charged in the device prior using. To charge the battery, perform the
following steps:
1. Install the battery.
2. Connect AC power to the device.
3. Monitor the battery charge level and charge until full.
4. Disconnect the AC power adapter from the device. The device is ready for portable
use.
Refer to the Installing Battery, External AC Power, Reading the Battery Gauge
sections for more information.
9
Page 13
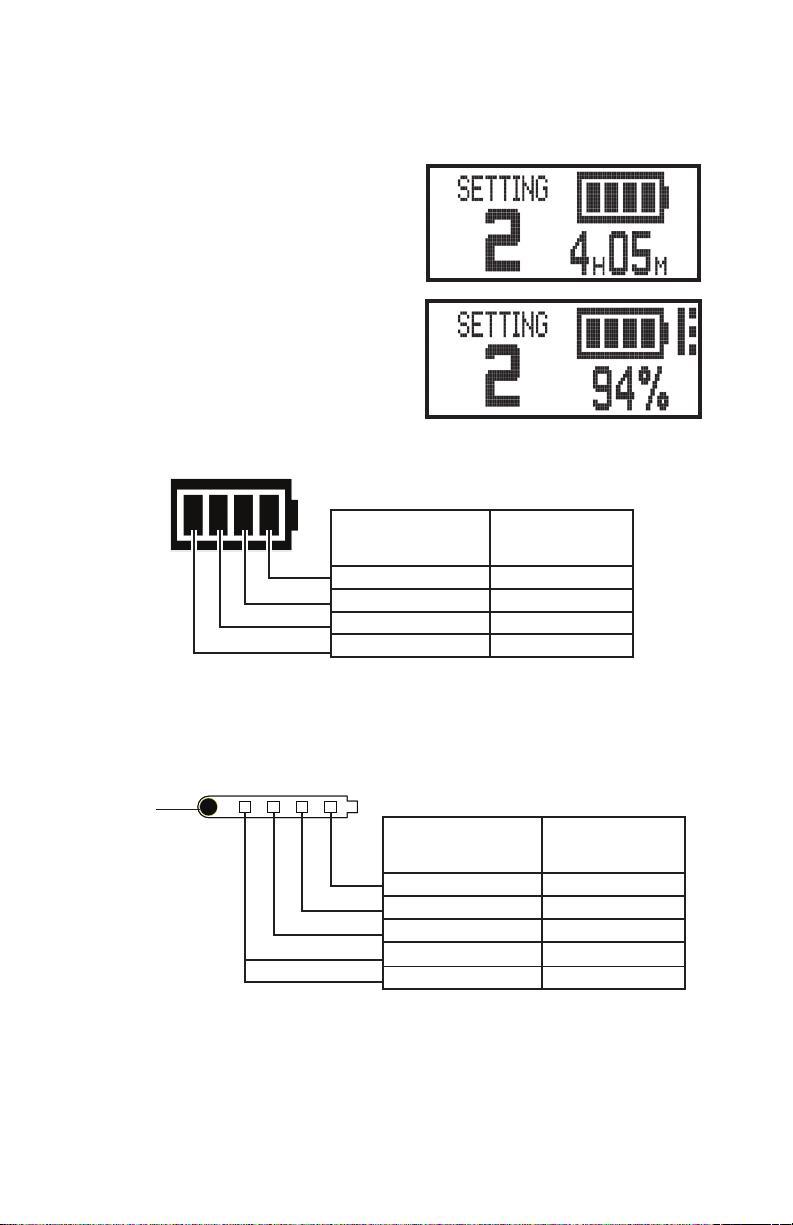
Reading the Battery Gauges
Installed Battery
The battery gauge on the display shows the status of the installed battery.
Battery time remaining with the
device running without external
power (may take up to 3 minutes to
display).
Battery charge level with the
device running and external power
connected. Blinking segment
indicates charging level.
Number of Lit
Segments
Charge Level
4 76% - 100%
3 51% - 75%
2 26% - 50%
1 1% - 25%
Uninstalled Battery
The battery gauge located on the battery itself indicates the charge level by the number
of illuminated segments when the Test button is pressed.
Push
to
Test
Number of Lit
Segments
Charge Level
4 76% - 100%
3 51% - 75%
2 26% - 50%
1 ≤10% - 25%
1 - blinking below 10%
10
Page 14
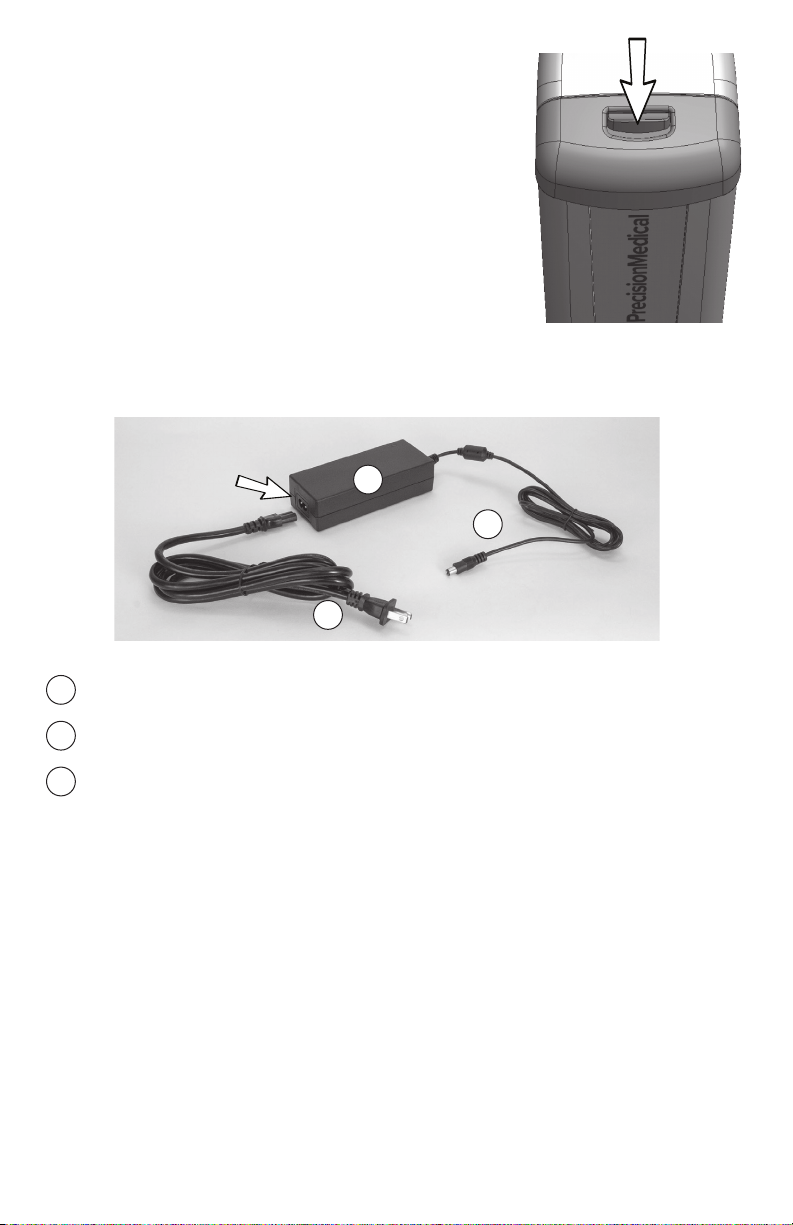
Battery Removal
With an external power source connected, the battery can be
removed without affecting the operation of the device. If not
connected to an external power source, first power off the
device.
To remove the battery, pull latch until the battery disengages.
Lift battery out of the device.
Refer to Shut Down Alerts in Troubleshooting section.
External AC Power
B
C
A
A
AC Power Cord (Connects to AC Power Adapter and Wall Outlet)
B
AC Power Adapter
C
Power Output Plug (Plugs into device)
The AC power adapter allows the POC to be connected to an AC wall outlet. Use of the
AC power adapter will allow the device to be operated and simultaneously charge the
battery. Complete the following steps to connect the AC power adapter to the device:
1. Attach the AC power cord (A) to the AC power adapter (B).
2. Insert the power output plug (C) into the external power connector on the device.
3. Insert plug into an AC wall outlet.
Note: Do not wrap cords around power supply for storage.
Do not drive, drag or place objects over cord.
11
Page 15
External DC Power
CAUTION
Operating the device without the engine running may drain the vehicle’s battery.
Ensure the 12-volt Accessory Jack is adequately fused for the device power
requirements. The accessory jack should have a minimum 8 Amp (96 Watts) fuse.
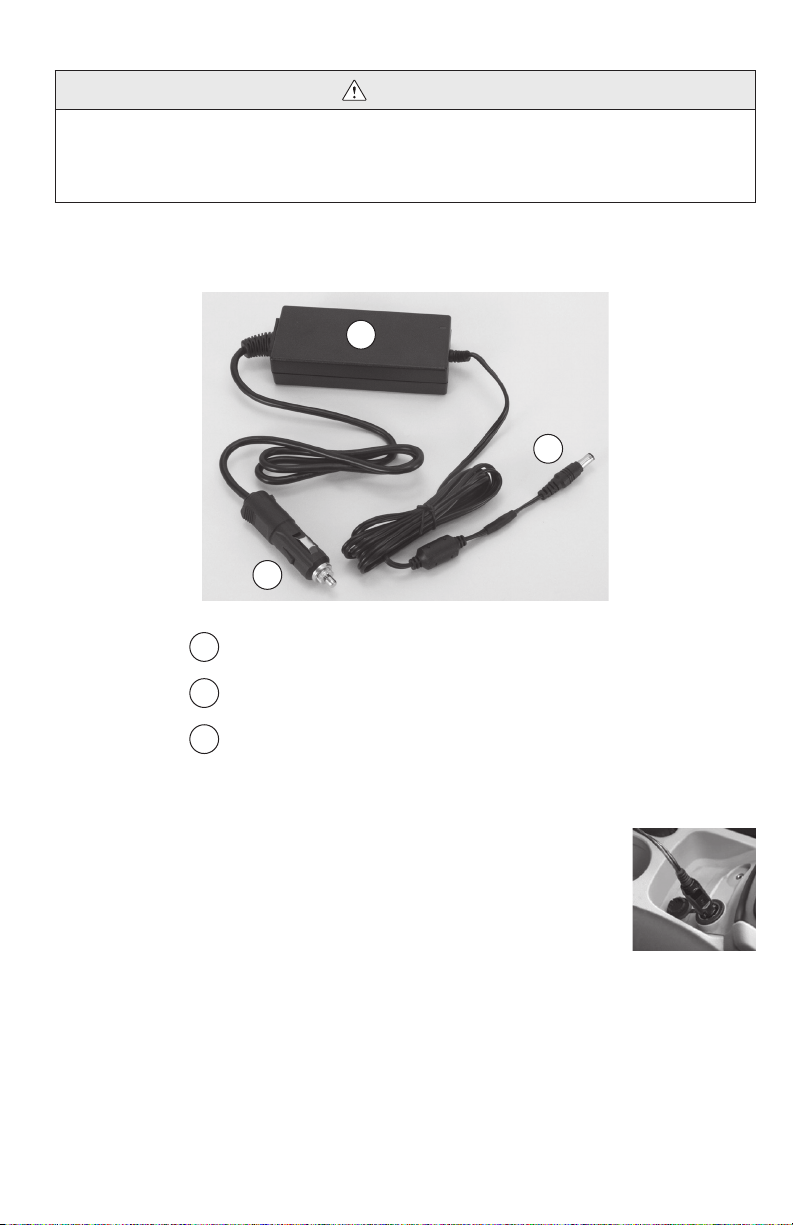
E
F
D
D
DC Power Plug (Plugs into DC outlet in vehicle)
E
DC Power Adapter
F
Power Output Plug (Plugs into device)
The DC power plug allows the POC to be connected to a 12-volt DC
outlet in an automobile, boat, motor home, etc. Use of the DC power
adapter allows the device to be operated and simultaneously charge
the battery. Complete the following steps to connect the DC power to
the device:
1. Insert the power output plug (F) into the external power input
connector on the device.
2. Insert the DC power plug (D) into a 12-volt DC outlet after the automobile (boat,
motor home, etc.) is running.
12
Page 16
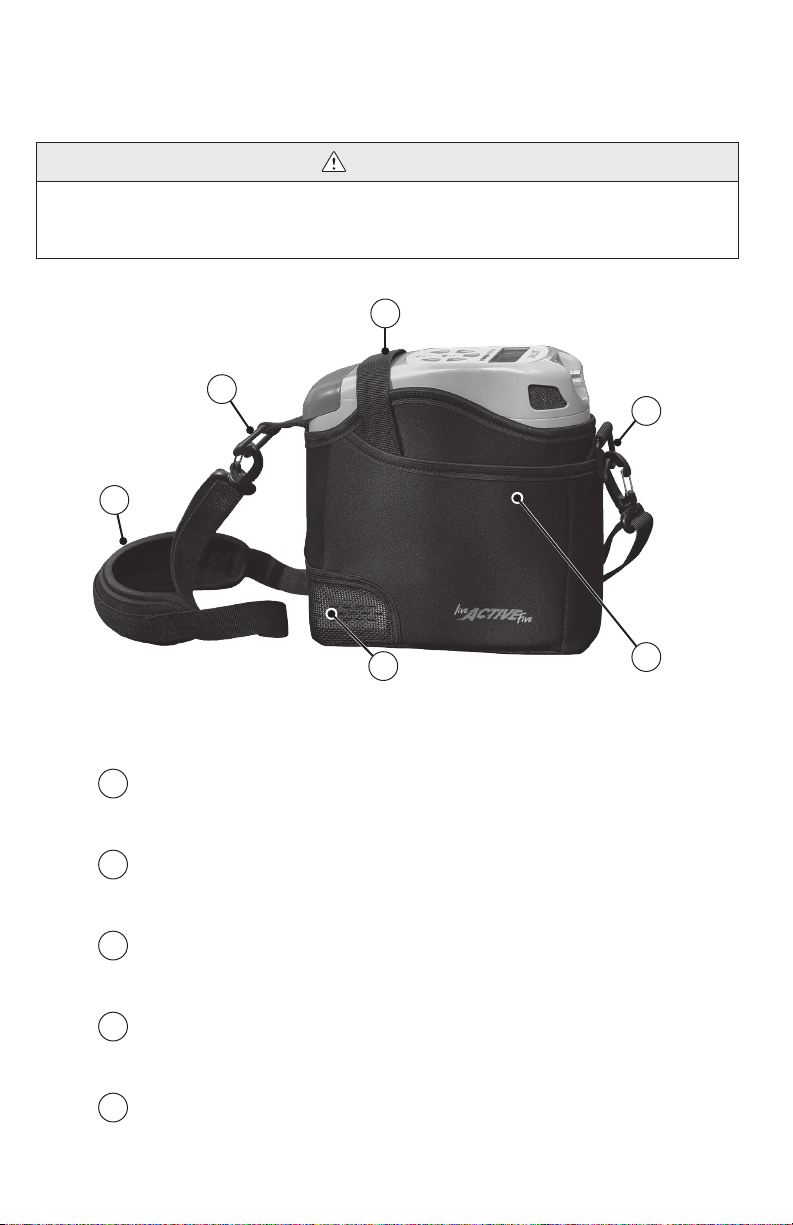
Carry Bag Use and Setup
The carry bag allows you to take your device with you as you go about your normal daily
activities. It protects the POC and can be used with either the carry handle or shoulder
strap when using the device.
WARNING
If the device is not placed in the carry bag properly, the air inlets and outlets will be
blocked causing the device to overheat during operation and shut off.
To ensure device is properly ventilated, install into Carry Bag as shown.
A
E
E
D
C
Retaining Strap
A
Used to secure the device in the Carry Bag.
Pockets
B
Pockets are located on both sides of the Carry Bag to store the
Cannula, an extra Battery and the User Manual.
Air Outlet
C
When the device is correctly placed in the Carry Bag, the Air
Outlets will be visible through the mesh screen.
Shoulder Strap
D
Allows the Carry Bag to be configured as a messenger bag.
‘W’ Rings
E
Located at the front and rear of the Carry Bag for easy attachment
of the Shoulder Strap.
13
B
Page 17
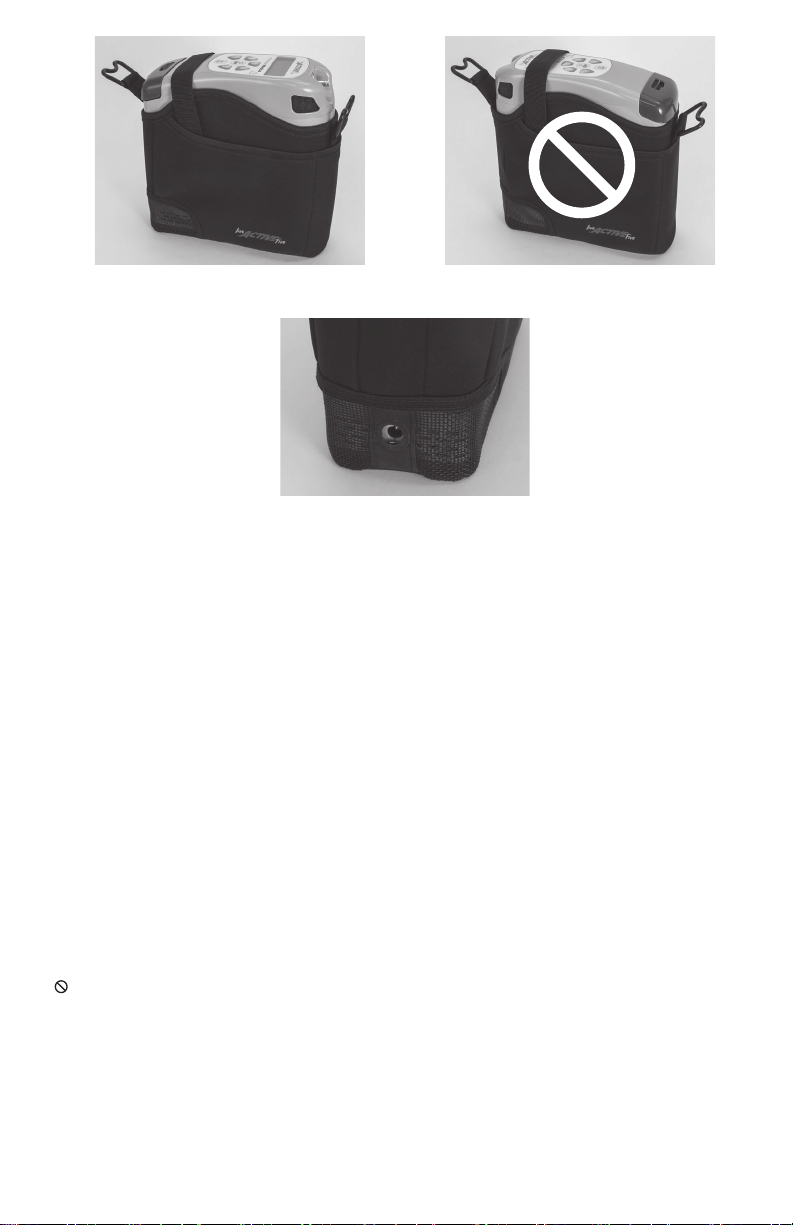
Correct placement in Carry Bag
Incorrect placement in Carry Bag
Correct positioning of outlets and
external power input connector
To Place the POC into its Carry Bag
1. Insert the device into the top of the carry bag and pull the bag up around it. Check to
ensure that the air inlets and outlets and external power input connector align with
their openings in the carry bag.
2. Place the retaining strap over the device and secure the strap in place.
Removing the Carry Bag
1. Ensure the device is turned off and disconnected from external power.
2. Unsecure the retaining strap.
3. Remove the device from the carry bag.
Installing Carry Handle and/or Shoulder Strap
The carry bag can be configured as a shoulder bag or cross body using the shoulder
strap.
1. Attach shoulder strap clips to front and back ‘W’ rings.
2. Adjust shoulder strap to desired length.
3. Position the strap on your shoulder or cross body with the cannula facing forward.
Cleaning the Carry Bag
DO NOT machine wash or machine dry the carry bag.
1. Turn off device.
2. Remove the device from the carry bag.
3. Using a damp cloth or sponge, wipe the carry bag with mild detergent and water.
Rinse thoroughly using a clean cloth.
4. Allow the carry bag to air dry after cleaning and before using.
14
Page 18

Usage
DO NOT use this device or optional accessories without first completely reading and
understanding the instructions.
DO NOT use this product in any way other than described in the specifications and
intended use sections.
Location and Operating Position
The POC is intended to be used in dry locations. Use the device in a well ventilated
location free of pollutants and fumes.
Display and visual alerts are best viewed at a distance of 3 feet (1m) or less under the
following conditions:
• the user shall be able to see the display screen to view alert screen.
• the device air inlets and outlets shall not be obstructed or blocked.
Connecting / Positioning the Nasal Cannula
Improperly placed cannula may inhibit the device from sensing respiratory efforts of
the user and may not trigger the device.
1. Remove the cannula from its packaging.
2. Connect the cannula to the device’s oxygen outlet fitting. Ensure the connection is
secured.
3. Place the cannula over your ears and position the prongs in your nose as instructed
by your health care provider or cannula manufacturer.
4. The user cannula is intended for single user use only.
Note: For best performance, a high flow adult nasal cannula is recommended to ensure
proper patient usage and oxygen delivery.
OR
You should be able to hear and feel the pulsed flow of gas with each breath. If you do not
feel the gas pulse, check the cannula connection for leaks.
CAUTION
For proper oxygen flow, be sure that cannula is not kinked or obstructed before or
during use.
If user is unable to trigger the device, switch to an alternate oxygen source and contact
your Provider.
15
Page 19
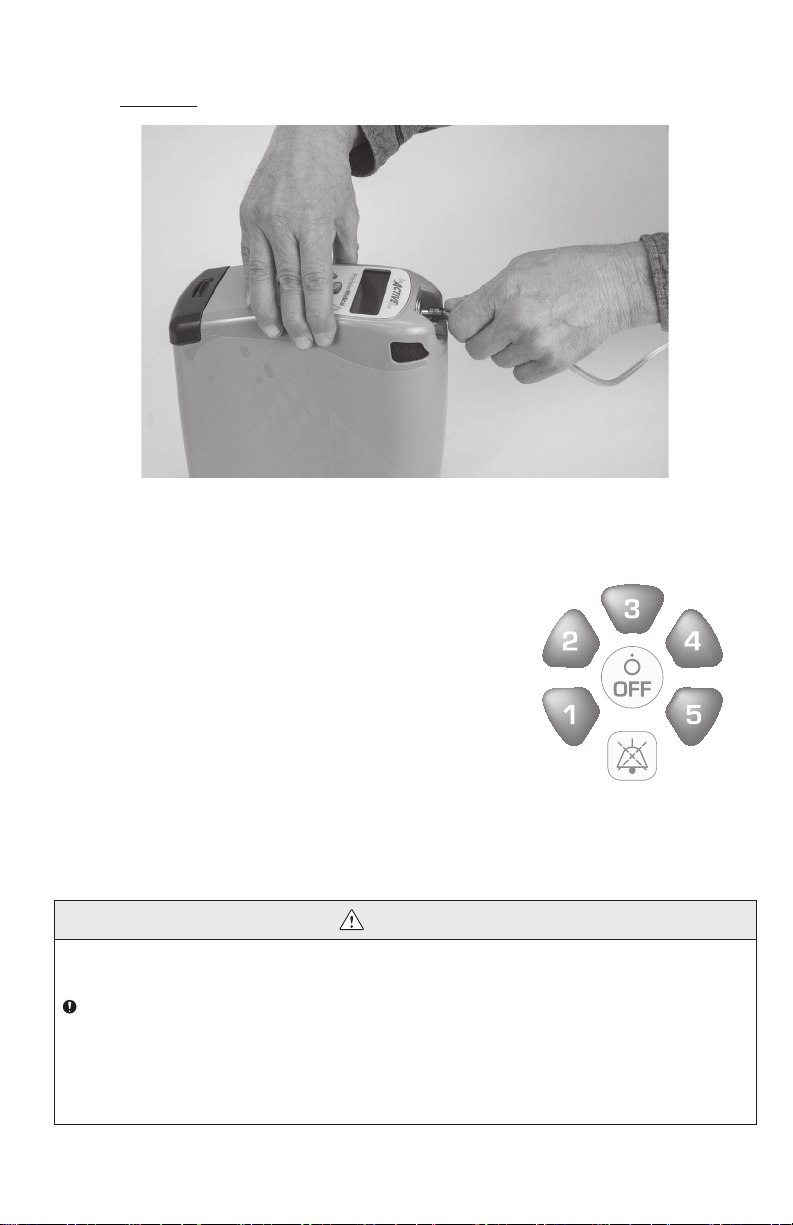
Removing the Cannula from the Outlet
To remove the cannula from the device outlet, firmly hold top of device and pull and twist
cannula clockwise.
Powering On the POC
1. To turn on the device, press and release the
prescribed pulse setting number (1 - 5).
2. An audible signal will beep and all indicators will light
up for approximately two seconds. This sequence
ensures all indicators are functioning properly.
Adjusting the Pulse Setting
While the device is running, press the desired button (1-5) to adjust the pulse setting. The
selection is made when an audible beep is heard and the pulse setting is displayed on
screen.
WARNING
The oxygen delivery setting has to be determined for each user individually with the
configuration of the equipment to be used, including accessories.
ALWAYS confirm prescribed dose before administering to user and monitor on a
frequent basis.
The settings of other models or brands of oxygen therapy equipment may not
correspond with the settings of the Live Active Five POC. The settings of the device
may not correspond with continuous flow oxygen.
16
Page 20
Start-up Period
Note: Ensure battery is fully charged prior to first use.
CAUTION
Before each use, verify all connections are tight.
Inspect the device for visual damage before use, DO NOT USE if damaged.
Prior to operation, ensure the air inlet and outlets on the device are clear. Any blockage
can inhibit performance.
A visual and audible alarm will display and sound momentarily after the device has been
powered on. “PRECISION MEDICAL” followed by device Serial Number and Hours of
Operation will appear on the display while the device starts up. The display will then
indicate the selected setting and the battery percentage remaining. During a 2 minute
start-up, oxygen concentration is building. If stored outside the operating temperature
range it may take up to 1 hour to meet operating temperature range.
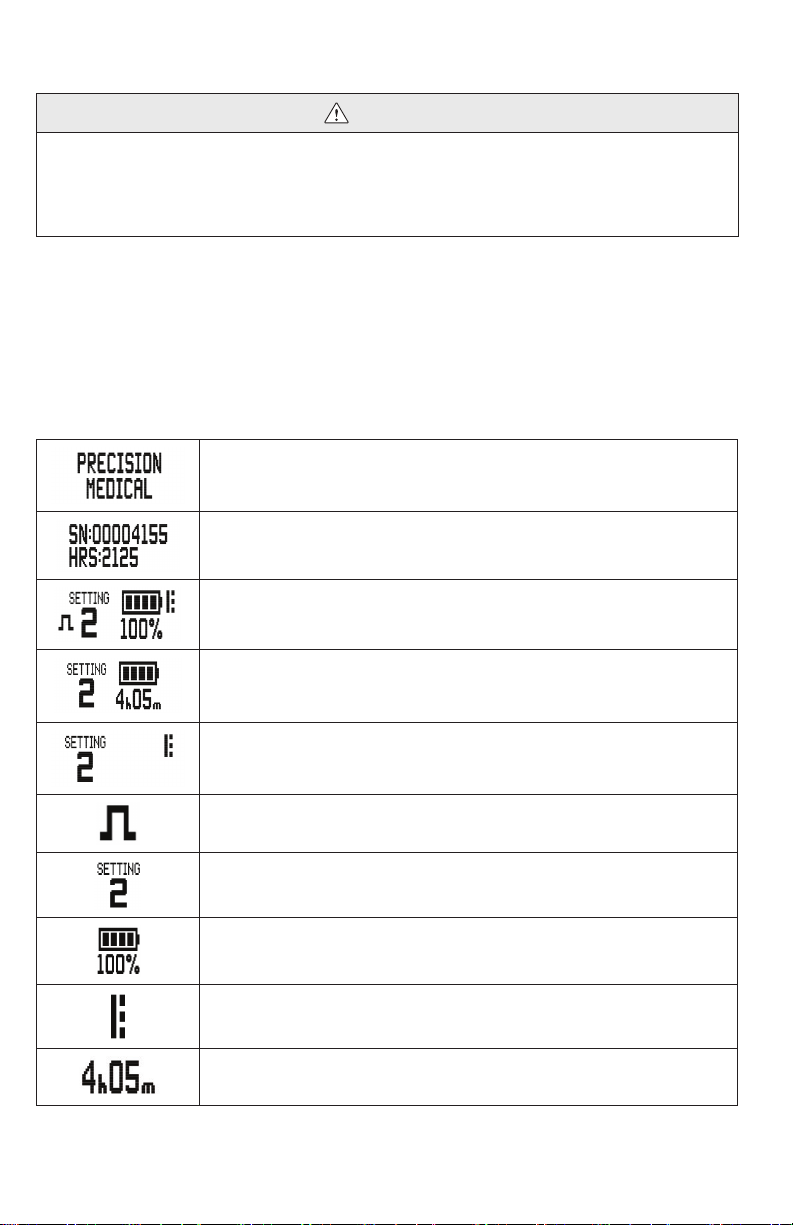
Reading the Display Screens
Precision Medical welcome screen shown when the device is first
powered on.
The device serial number and hours of operation.
Home screen displaying device pulse setting, battery charge level,
and external power connected.
Home screen displaying device pulse setting, battery time
remaining (may take up to 3 minutes to display) and no external
power connected.
Home screen displaying device pulse setting, no battery installed,
and external power connected.
Display icon to indicate a pulse delivery of oxygen.
Display icon to indicate current device pulse setting.
Display icon to indicate the level of charge on the installed battery.
Display icon to indicate an external DC power source is connected
to the device.
Display icon to indicate approximate run time remaining in hours
“h” and minutes “m”.
17
Page 21
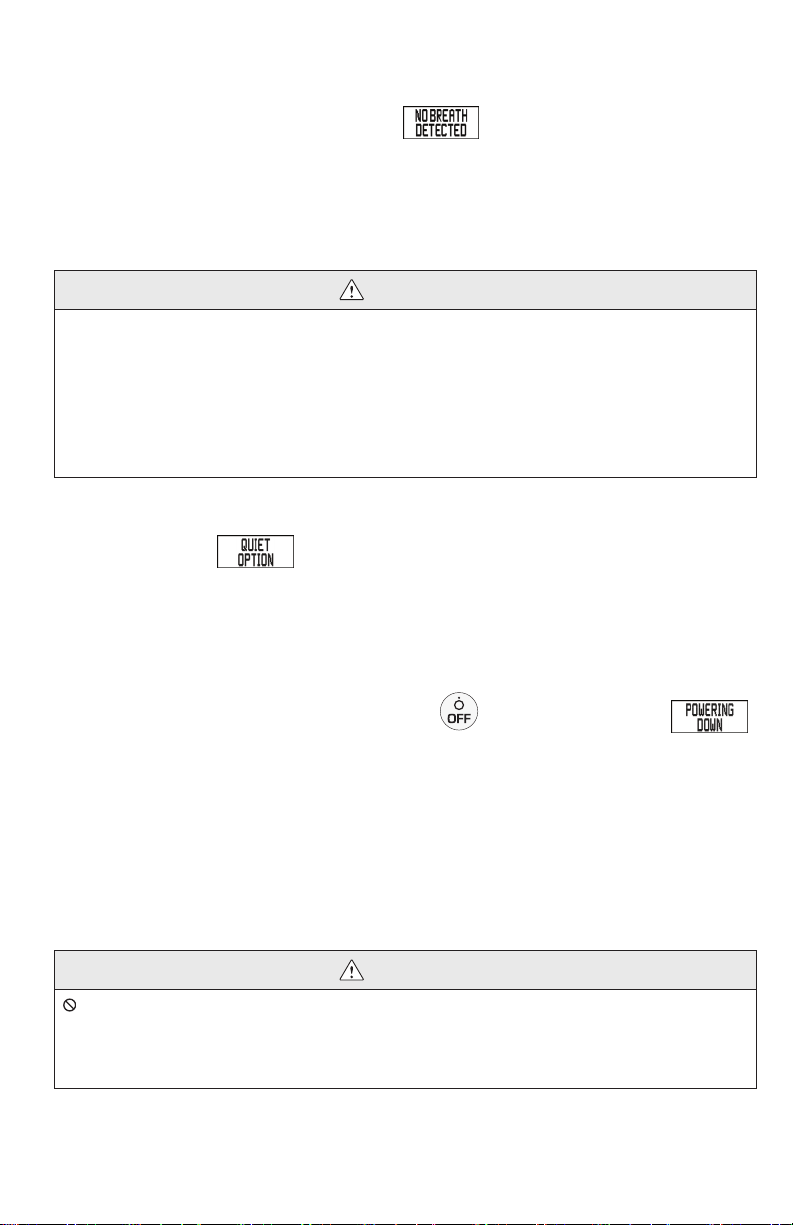
Breathing with the POC
As you breathe through the nasal cannula, a pulse of oxygen will be delivered and
display each time the unit senses an inhalation.
If no breath is detected for 60 seconds, the
will enter into auto pulse delivery. Operating in auto pulse delivery, the device will deliver
20 pulses per minute at the current selected settings.
Once a breath is detected, the device will exit auto pulse delivery.
alert will display and the device
Operating the POC with the Quiet Option
WARNING
The Quiet Option setting on the device mutes audible alerts. Should the device
encounter an alert condition, only visual alerts and a flashing yellow LED will be
displayed.
In the event the device visually alerts for “No Breath Detected” while the Quiet Option
is enabled, the device will enter into auto breath delivery.
If an alert condition occurs that requires user action, the device will automatically exit
the Quiet Option.
1. Turn on the device.
2. Press and hold the prescribed setting again for 3 seconds, then release. The “Quiet
Option” screen
3. The Quiet Option will exit if one of the following actions are taken:
• Selecting a different setting.
• Turning the device off.
will alternate between Home Screen.
Turning the POC Off
1. To turn off the device press the OFF button until “Powering Down”
is shown on the display screen.
2. The power down sequence takes approximately 3 seconds.
Battery Life and Recommended Battery Management
To ensure the battery(s) maintain their optimal charge level, utilize the AC power adapter
whenever you have access to a wall outlet. Utilize the DC car adapter whenever you are
in a vehicle.
WARNING
DO NOT use or leave the device or battery in excessive heat or cold for extended
periods of time.
Allow plenty of air to circulate around the device so that the battery is kept as cool as
possible when in use and when charging.
18
Page 22

CAUTION
Battery depletion will result in a loss of supplemental oxygen. To ensure proper
supplemental oxygen delivery during a power outage:
• Plug your device into an alternate power source.
• Have an alternate source of oxygen available that does not require a power source.
When you receive your POC, fully charge the battery before portable use.
Keep your battery fully charged when using the device on a daily basis.
Always ensure the device battery is charged as soon as possible after it becomes
discharged. The battery may be permanently degraded if left fully discharged for an
extended length of time.
Battery(s) should be maintained at two illuminated bars worth of charge if not using the
device on a daily basis.
Storing a battery with a full charge may degrade its useful life. Recharge or discharge to
two bars (50%) if you are going to store your device for longer than one month.
If using multiple batteries, make sure that each battery is labeled (1, 2, 3) and rotate on a
regular basis. Batteries should not be left dormant for more than 90 days at a time.
Traveling with the POC
Precision Medical has determined the Live Active Five POC conforms to all applicable
Federal Aviation Administration (FAA) acceptance criteria for POC carriage and use on
board aircraft.
When making flight arrangements, many U.S. airlines require advanced notice if you plan
on using a POC while on board the aircraft.
Prior to the flight, ensure your Live Active Five is clean and in good working condition.
Bring enough charged batteries with you to power your Live Active Five for at least 150%
of the expected duration of your flight, including ground time before and after the flight,
security screenings, connections and possible delays.
FAA regulations require that all spare batteries be individually wrapped and protected to
prevent short circuits. Spare batteries can only be carried on board in carry on baggage.
19
Page 23

Recommended Preventative Maintenance
The device is specifically designed to minimize routine preventive maintenance.
Except for tasks described in this manual, only trained personnel should perform
preventive maintenance or performance adjustments on the device and its equipment.
Users should contact your provider or Precision Medical for service.
Service Life
The expected life for the device is 5 years. The sieve beds and batteries have an
expected life of 1 year. The expected service life can vary according to frequency and
intensity of use.
Cleaning the Case
WARNING
Prior to cleaning, ensure the device is turned off, unplug any external power sources
and remove battery.
DO NOT spray or apply any cleaners directly onto the case.
DO NOT place any liquids on or near the device. If any liquid gets on the device,
immediately turn OFF, unplug device from the electrical outlet, remove Battery and
connect to another oxygen source.
DO NOT use harsh and/or flammable chemicals to clean the device.
DO NOT use the device until it is thoroughly dry.
1. Connect to an alternate oxygen source.
2. Turn off the device.
3. Unplug any external power source before cleaning.
4. Clean exterior surfaces of the device with a cloth dampened with mild detergent.
5. Wipe and allow device to air dry. Note: When not in use, store the device in a clean
dry area free from grease, oil and other sources of contamination.
Cleaning the Air Inlet Filter and Replacement
1. Remove the filter.
2. Wash filter with mild detergent. Rinse thoroughly with water and allow to dry
completely.
3. Once filter is dry, replace the filter into the case.
4. To purchase additional Air Inlet Filters 508587 contact your provider or Precision
Medical.
20
Page 24

Replacing the Air Outlet Filter
CAUTION
Replace with Precision Medical Inc Outlet Filter 508583 only.
The outlet filter is intended to protect the user from small particles in the oxygen gas flow.
This filter is conveniently located behind the removable cannula outlet fitting. Precision
Medical recommends only trained personnel replace the filter between users.
1. Remove cannula.
2. Using a clean hex (Allen) wrench, carefully remove the outlet by unscrewing it
counter-clockwise.
3. The filter will be visible in the rear of the outlet once it is removed.
4. Remove the filter, and inspect the outlet to make sure it is free of debris.
5. Install a replacement filter.
6. Carefully screw the outlet fitting back into the recess clockwise. Take care to
squarely screw the nozzle fitting into the threads. Do not over tighten.
Cleaning and Disinfection between Users
WARNING
The POC, its parts, and accessories should be cleaned/disinfected before use on a
new user.
The nasal cannula cannot be cleaned and should be disposed.
To prevent infection and eliminate possible pathogen exchange between users due
to contamination, cleaning and disinfection of the device and its accessories shall be
performed by qualified personnel when used between users.
1. Remove battery and disconnect all external power from the device.
2. Dispose of and replace all accessories not suitable for multiple users including
cannulas and oxygen tubing.
3. Clean all exterior surfaces using Super Sani-Cloth germicidal disposable wipes
or equivalent. Remove all visible contamination from the external surfaces of
the device, battery and accessories. Be sure to closely inspect and remove
contamination from seams and recesses on the device that may trap contaminants.
Wipe with clean paper towel to remove debris.
4. After all visible contamination is removed; use a second germicidal wipe to
thoroughly wet the surfaces of the device and accessories. Allow to remain wet for 4
minutes. Use additional wipes if needed to assure surfaces are wetted continuously
for 4 minutes.
5. Allow device to air dry completely.
6. Inspect the device for visible contamination. Repeat cleaning/disinfection process if
necessary.
21
Page 25
After Use
Storage
1. Remove battery prior to storage. Refer to Battery Life and Recommended Battery
Management section.
2. Store the POC and battery(s) in a cool, dry area.
i
Refer to storage conditions in Specifications in Technical Data section.
Disposal
This device may contain substances that could be harmful to the
environment and must be disposed of properly.
Follow local governing ordinances and recycling plans regarding disposal
of the device and accessories.
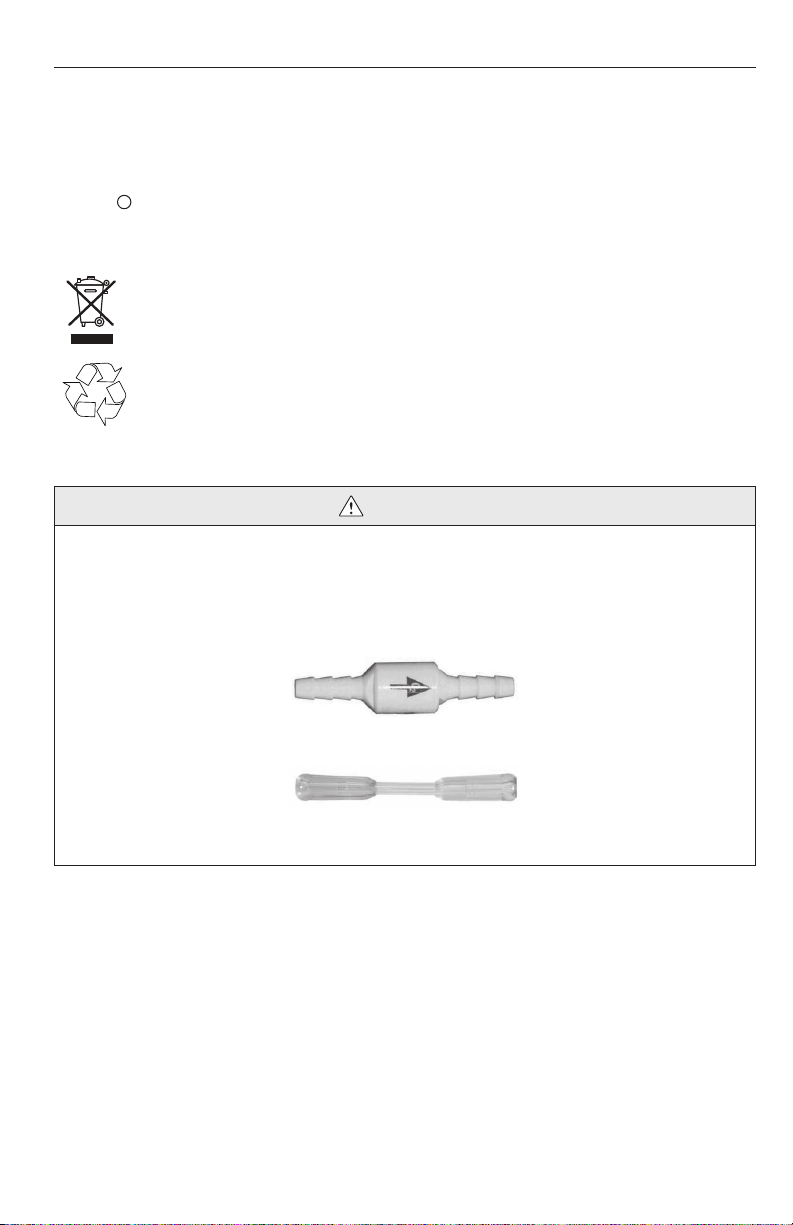
WARNING
ISO 80601-2-69 (Standard for Oxygen Concentrators) highly recommends that the user
cannula that delivers gas to the user from the oxygen concentrator should include a
Fire Stop Check Valve to stop the flow of gas towards the user in the case that the
cannula becomes ignited. The Fire Stop Check Valve should be located as close to the
user as reasonably practicable.
Fire Stop Check Valve - Precision Medical Part # 507706
2” Tubing Connector - Precision Medical Part # 507707
22
Page 26

Troubleshooting
Technical Alerts
WARNING
Failure to resolve an alert condition may cause the device to shut down.
Technical Alerts Description
The device monitors various internal components and compares them to acceptable
limits. An alert is generated when the acceptable limit has been exceeded.
Alerts are classified as Low Priority Technical Alert Conditions. An alert requires the user
to perform an action. The user is notified of an alert condition by an audible beep every
16 seconds and flashing yellow LED light.
When an alert condition occurs, the user may press the Paused Alert button
silence the alert and switch the LED alert indicator from flashing to continuous for a 5
minute silence period. During this silence period, if the alert condition is corrected, the
LED alert indicator will turn off.
If the condition persists, the alert will reoccur and the user can push the Paused Alert
button again. This cycle will repeat until the alert condition is corrected.
If an additional alert condition occurs during the silence period, the silence period ends
and the alert indicator LED will flash along with an audible beep.
The specific condition that generated the alert is available by viewing the alert fault code
in the Display Screen.
If operating outside the “Operating Environment Ranges” (Refer to the Specifications
section of the manual), an alert may occur and the POC may shut down.
to
23
Page 27
WARNING
DO NOT disassemble or attempt to repair. There are no user serviceable parts
inside. Contact your Provider or Precision Medical, Inc. for service.
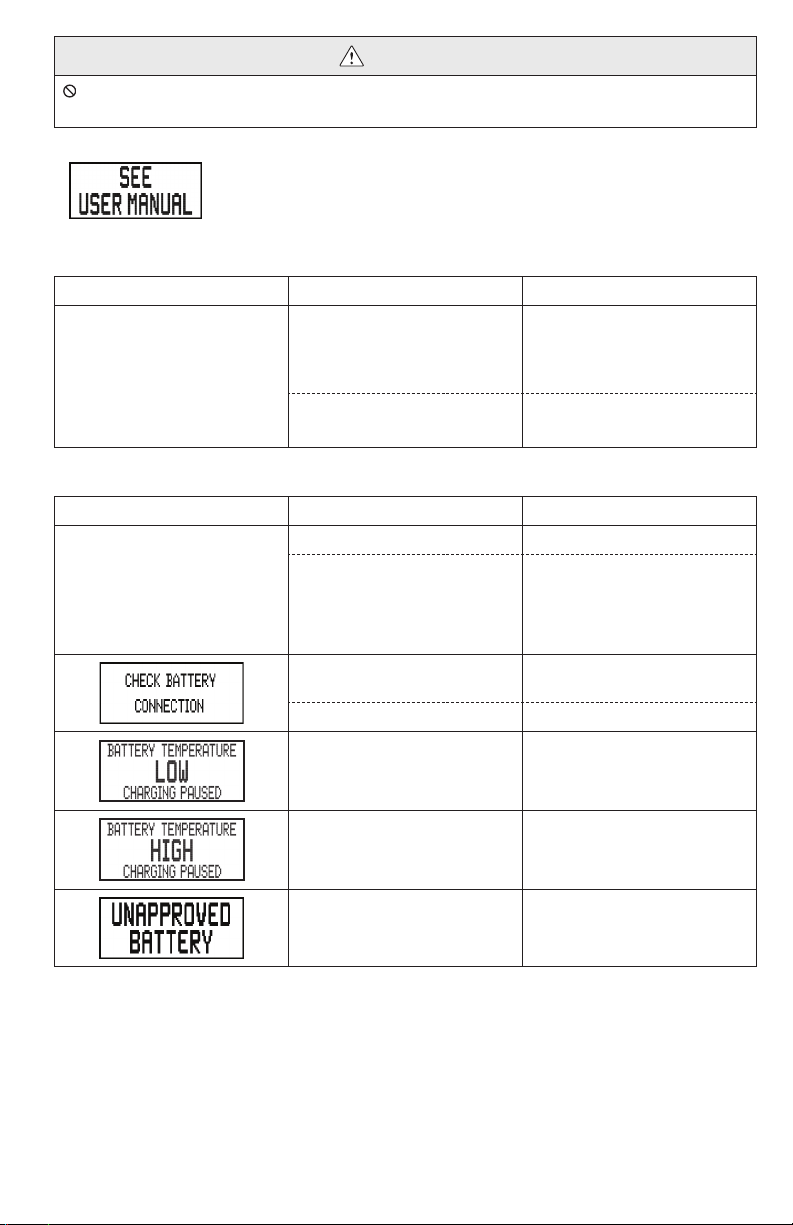
If the device fails to operate properly, refer to the following charts
for possible causes and solutions. If necessary, contact your
Provider or Precision Medical, Inc.
POC Does Not Turn On or Does Not Stay On
Symptom Probable Cause Solution(s)
Check battery power level.
Device begins to operate
when powered on, but soon
powers back off.
Battery power level is too low.
Battery not fully seated.
Battery Issues
Symptom Probable Cause Solution(s)
The external power icon is
illuminated, but the battery
charge level indicator is not
flashing when the device
is plugged into an external
power source.
Defective battery. Replace with new battery.
External power source is faulty,
or there is a loose connection.
Battery is not fully seated.
Defective Battery. Replace with new battery.
Battery is below the
recommended temperature
range for safe charging.
If low, replace with charged
battery or connect external
power source
Reseat battery by removing
and reinstalling.
Check connections on external
power sources.
Reseat battery by removing
and reinstalling.
Allow battery to warm to room
temperature and try again.
Battery is above the allowed
temperature range for safe
charging.
Battery is not a Precision
Medical approved battery.
Allow battery to cool to room
temperature and try again.
Use only Precision Medical
Battery (508561).
24
Page 28
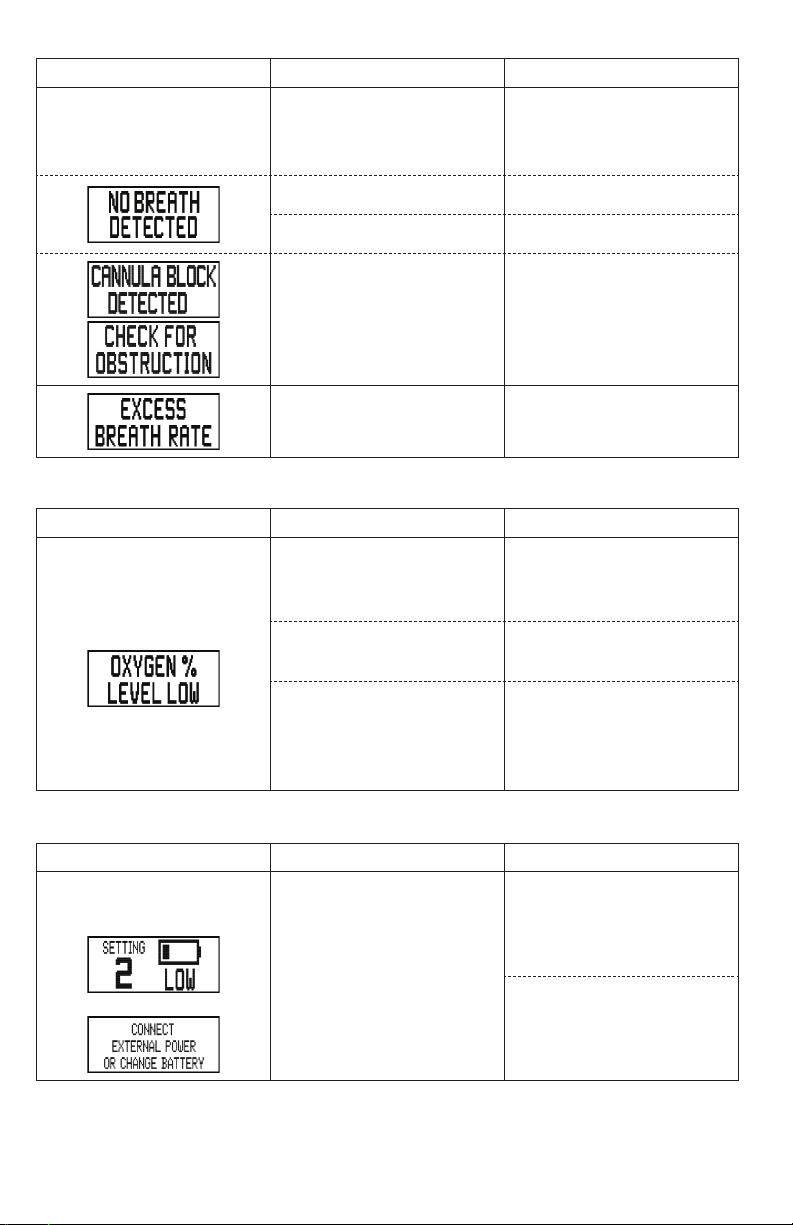
POC Pulse Delivery Alerts
Symptom Probable Cause Solution(s)
Device does not deliver a
pulse of oxygen when the user
inhales.
Cannula tubing kinked,
blocked or twisted.
User breathing from mouth. Inhale through nose.
Cannula is discounted. Connect cannula.
Cannula tubing kinked,
blocked or twisted.
Make sure the tubing is
connected properly to the
oxygen outlet port and that it is
free of any obstructions.
Make sure the tubing is
connected properly to the
oxygen outlet port and that it is
free of any obstructions.
User breath rate exceeds 40
breaths per minute.
Reduce breath rate.
Oxygen Concentration Output is Low
Symptom Probable Cause Solution(s)
Wait 10 minutes for the unit
Device is warming up.
Sieve beds are at end of life
cycle.
Device malfunctioning.
to deliver oxygen at the
prescribed concentration.
Install new Sieve Bed
Replacement (508697)
If the condition persists,
change to an alternate oxygen
source and contact your home
care provider or Precision
Medical.
Battery is Near Depletion
Symptom Probable Cause Solution(s)
Device is producing one of the
following visual alerts.
The installed battery is low and
needs to be charged.
Replace installed battery with a
fully charged battery.
Connect device to an external
power source.
25
Page 29
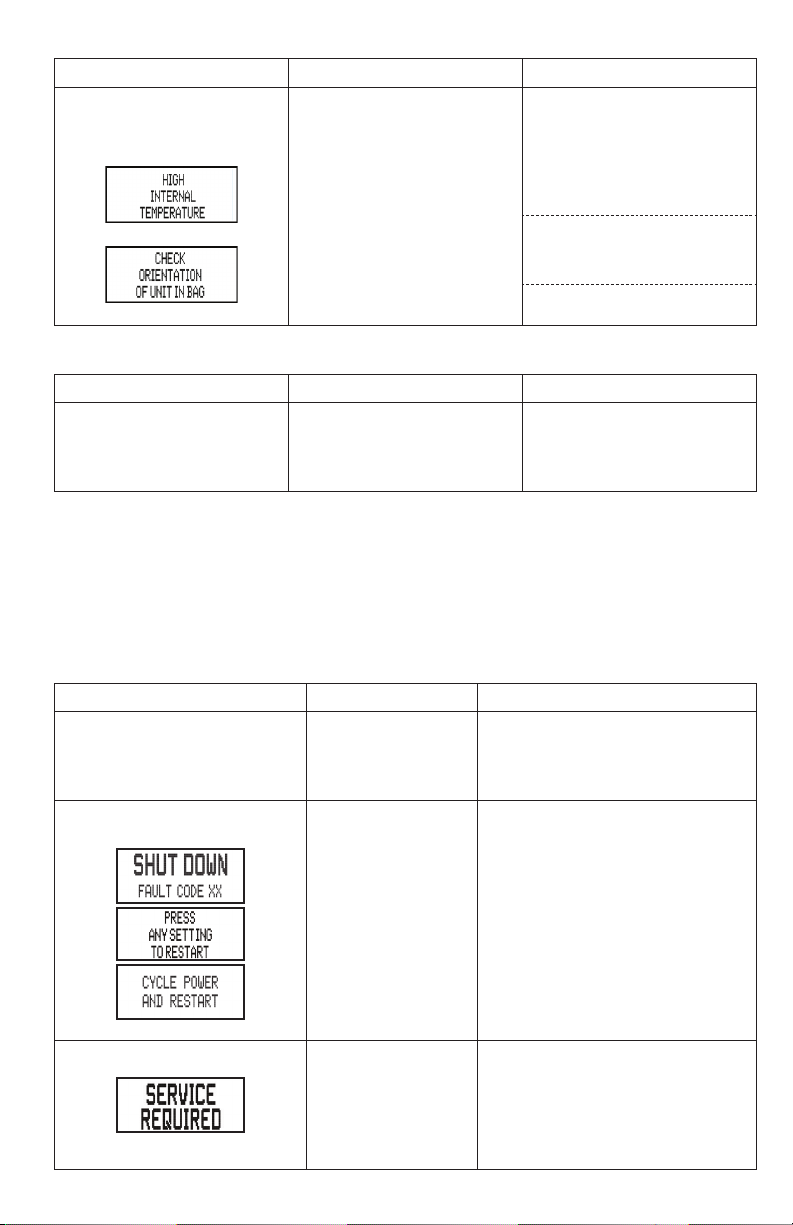
Device Overheats
Symptom Probable Cause Solution(s)
Device is producing the visual
alert:
Device air inlets or outlets may
be blocked.
Move any objects that may be
blocking the device. Connect
to an alternate oxygen source.
Turn off the device and allow
it to cool before continuing to
use.
Check that the device is
placed in the carry bag
correctly.
Clean or replace inlet filters.
Display Not Working
Symptom Probable Cause Solution(s)
Blank Display / Device Shuts
Down
Electrostatic discharge Unplug device from external
power. Remove battery. Wait
minimum of 1 minute. Re-insert
battery. Turn device on.
Shut Down Alerts
The device shuts down when the alert conditions in this section occur.
Symptom Probable Cause Solution(s)
“SHUT DOWN FAULT CODE XX”
appears on screen. One audible
beep every 16 seconds YELLOW
alert indicator flashing.
“SHUT DOWN FAULT CODE XX”
appears on screen.
Technical Alert
If your screen displays a fault code,
the device will instruct you to press
any button to restart.
If your screen displays a fault code,
follow directions on the screen. You
will be instructed to press any setting
to restart device or cycle power and
restart device. If instructed to cycle
power, remove battery and external
power. Reinstall battery and external
power into device. Press setting to
restart.
If there are 5 unsuccessful restart
attempts in less than 5 minutes,
service of the device will be required.
Connect to an alternative oxygen
source and contact your home care
provider or Precision Medical.
26
Page 30

Technical Data
Specifications
General
When measuring any published tolerance, be sure to consider the uncertainty of the
measurement of the measuring equipment.
Gas volume and flow rate specifications for gas delivered to the user are expressed at
STPD (standard temperature and pressure, dry).
Electrical Requirements: AC to DC Power Supply:
Input: 100–240 VAC, 50–60 Hz, <2.0A
Output: 18Vdc up to 5.56A
DC to DC Power Supply: (Automotive)
Output: 18Vdc up to 6.67A
Device Battery: 14.8 Vdc, 6.4 Ah, 94.7 Wh
Operating Environmental Conditions: Operating Temperature: 41°F to 104°F (5°C to 40°C)
Relative Humidity: 15–90% non-condensing relative
humidity, water vapor pressures up to 1.48 in Hg (50
hPa)
Storage and Transport Temperatures: -13°F to 158°F (-25°C to 70°C)
Storage and Transport Humidity: Up to 90% non-condensing relative humidity for
temperatures of 41°F to 95°F (5°C to 35°C)
Water vapor pressure up to 1.48 in Hg (50 hPa) for
temperatures greater than 95°F (35°C)
Operating Altitude: Up to 10,000 ft (3048 m) above sea level
Operating Atmospheric Pressure: 700–1060 hPa
Breath Rate: 15 - 40 BPM (breaths per minute) without reduction of
bolus minute volume.
Delivered Oxygen Pulse Volumes: Setting 1: 220 mL/min (±15%)
Setting 2: 440 mL/min (±15%)
Setting 3: 660 mL/min (±15%)
Setting 4: 880 mL/min (±15%)
Setting 5: 1000 mL/min (±15%)
Oxygen Purity: 87% to 95.5%
After initial start-up period, at any flow settings,
at standard ambient temperature, humidity and
atmospheric pressure.
Start-up Time: ≥ 87% Oxygen Concentration < 2 min*
Trigger Sensitivity: < -0.45 cmH2O
Maximum Outlet Pressure: 12 psi (83 kPa)
Approximate Battery Duration: Setting 1 - 6.5 Hours
Setting 2 - 4.3 Hours
Setting 3 - 2.7 Hours
Setting 4 - 2.0 Hours
Setting 5 - 1.5 Hours
Charge Time: Charge time will vary based on the setting.
27
Page 31

Sound Pressure Level: < 40 dBA (Setting 2)
Sound Power Level: < 48 dBA (Setting 2)
Audible Signal Sound Pressure Level: > 55 dBA
Dimensions: 8.4 in high x 3.2 in wide x 8.5 in deep
(21.4 cm high x 8.3 cm wide x 21.6 cm deep)
Weight: 5.0 lbs (2.2 kg) with single battery and no carry bag
Electrical Classification: Class II Electrical Shock Protection, Type BF Applied
Part, Continuous Operation
Ingress Protection Rating: IP22
Applied Parts: Cannula/Oxygen Tubing, Oxygen Outlet Port, Carry Bag
Expected Service Life of the Device: 5 Years
*May vary based on age of device. Specifications are subject to change without prior notice.
Regulatory Listings
The Live Active Five POC has been designed, tested and certified to the following
regulatory standards:
ANSI/AAMI 60601-1; Ed: 3.1
IEC 60601-1-2: 2014
CAN/CSA 22.2 No. 60601–1
ISO 80601–2–69
IEC 60601–1–6
IEC 60601–1–8
IEC 60601–1–11
RTCA DO 160G
ISO 80601–2–67
Volatile Organic Compound (VOC) and Particulate Requirements
The oxygen delivered from the live device meets the following requirements for
particulate levels, VOC levels, carbon monoxide levels, carbon dioxide levels and ozone
levels.
ISO 18562-2: Particulate Matter
ISO 18562-3: VOC Levels
21 CFR 801.415: Ozone Levels
EPA NAAQS: Carbon Monoxide Levels
OSHA Permissible Exposure Limits: Carbon Dioxide Levels
Standard Test Method for Determination of Volatile Organic Chemicals in
Atmospheres (Canister Sampling Methodology)
28
Page 32
Electromagnetic Compliance (EMC)
Guidance and manufacturer’s declaration - electromagnetic immunity
The Live Active Five POC is intended for use in the electromagnetic environment
specified below. The user of the device should make sure it is used in such an
environment.
Immunity Test IEC 60601
Conducted RF
IEC 61000-4-6
Radiated RF
IEC 61000-4-3
Electrostatic
discharge (ESD)
IEC 61000-4-2
Electrical fast
transient/burst
Test Level
3 Vrms
150 kHz to 80
MHz
3 Vrms
80 MHz to
2.7GHz
± 8 kV contact
± 15 kV air
± 2 kV for
power supply
lines
Compliance
Level
3 Vrms
3 V/m
± 8 kV contact
± 15 kV air
± 2 kV for
power supply
lines
Electromagnetic
Environment - Guidance
Portable and mobile RF communications
equipment should be used no closer to any
part of the device, including cables, than
the recommended separation distance
calculated from the equation applicable to
the frequency of the transmitter.
Recommended separation distance:
d=1.2 √P 150 kHz to 80 MHz
d=1.2 √P 80 MHz to 800 MHz
d=2.3 √P 800 MHz to 2.5 GHz
Where P is the maximum output power
rating of the transmitter in watts (W)
according to the transmitter manufacturer
and d is the recommended separation
distance in meters (m). Field strengths from
fixed RF transmitters, as determined by
an electromagnetic site survey a, should
be less than the compliance level in each
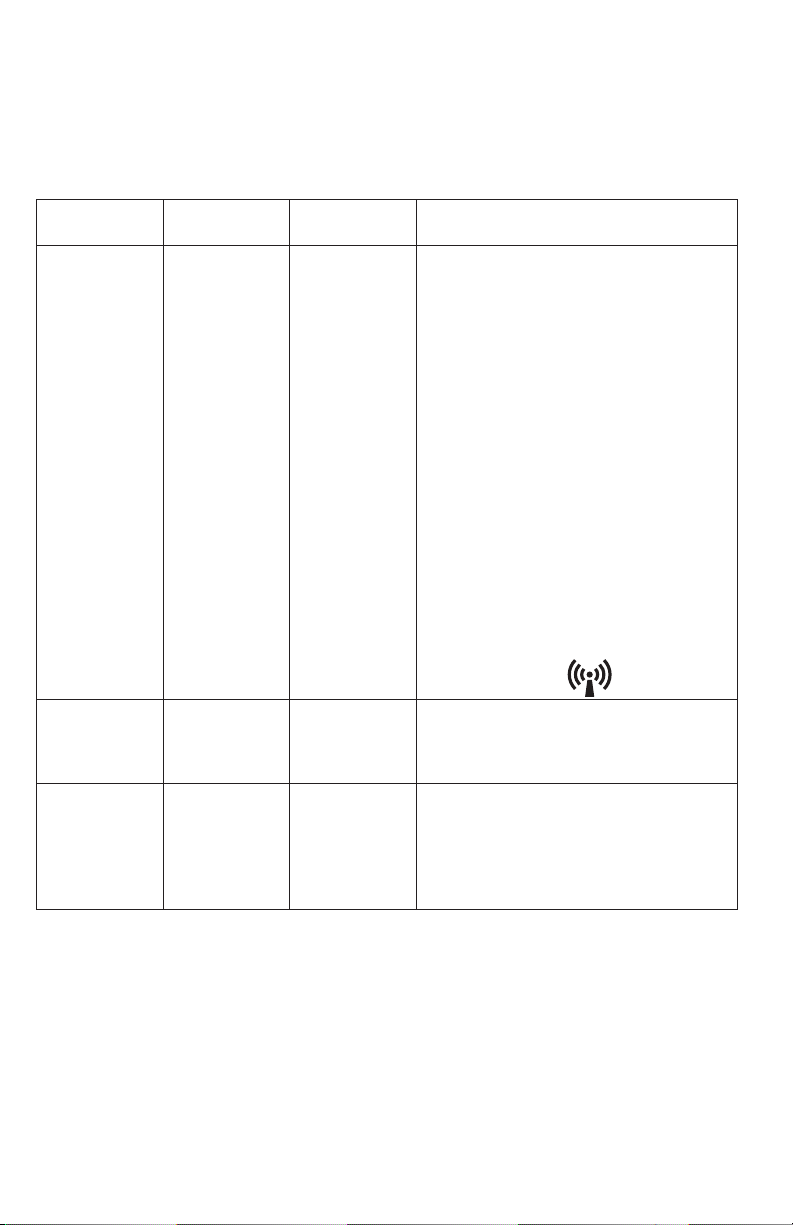
frequency range b. Interference may occur
in the vicinity of equipment marked with the
following symbol:
Floors should be wood, concrete or
ceramic tile. If floors are covered with
synthetic material, the relative humidity
should be at least 30 %.
Mains power quality should be that of a
typical commercial or hospital environment.
EC 61000-4-4
29
± 1 kV for input/
output lines
± 1 kV for input/
output lines
Page 33

Immunity Test IEC 60601
Surge
Test Level
± 1 kV line(s) to
line(s)
Compliance
Level
± 1 kV line(s) to
line(s)
Electromagnetic
Environment - Guidance
Mains power quality should be that of a
typical commercial or hospital environment.
IEC 61000-4-5
Voltage
dips, short
interruptions
and voltage
variations on
power supply
input lines
IEC 61000-4-11
Power
frequency
(50/60 Hz)
magnetic field
IEC 61000-4-8
± 2 kV line(s) to
earth
<5% UT (>95%
dip in UT) for
0.5 cycle
40% UT (60%
dip in UT) for
5 cycles
70% UT (30%
dip in UT) for
25 cycles
3 A/m 3 A/m Power frequency magnetic fields should be
± 2 kV line(s) to
earth
<5% UT (>95%
dip in UT) for
0.5 cycle
40% UT (60%
dip in UT) for
5 cycles
70% UT (30%
dip in UT) for
25 cycles
Mains power quality should be that of a
typical commercial or hospital environment.
If the user of the [ME EQUIPMENT or ME
SYSTEM] requires continued operation
during power mains interruptions, it is
recommended that the [ME EQUIPMENT
or ME SYSTEM] be powered from an
uninterrupted power supply or a battery.
at levels characteristic of a typical location
in a typical hospital or home environment.
At 80 MHz and 800 MHz, the higher frequency range applies.
These guidelines may not apply in all situations. Electromagnetic
propagation is affected by absorption and reflection from structures,
objects, and people.
UT is the a.c. main voltage prior to application of the test level.
a: Field strength from fixed transmitters, such as base stations for radio (cellular/cordless)
telephones and land mobile radios, amateur radio, AM and FM radio broadcast
and TV broadcast cannot be predicted theoretically with accuracy. To assess the
electromagnetic environment due to fixed RF transmitters, an electromagnetic site
survey should be considered. If the measured field strength in the location in which
the device is used exceeds the applicable RF compliance level above, the device
should be observed to verify normal operation. If abnormal performance is observed,
additional measures may be necessary, such as re-orienting or relocating the device.
b: Over the frequency range 150 kHz to 80 MHz, the field strengths should be less than
3V/m.
30
Page 34

Recommended Separation Distances between Portable and Mobile RF
Communications Equipment and this Device:
This device is intended for use in an electromagnetic environment in which radiated RF
disturbances are controlled. The user of the device can help prevent electromagnetic
interference by maintaining a minimum distance between portable and mobile RF
communications equipment (transmitters) and this device as recommended below,
according to the maximum output power of the communications equipment.
Rated Maximum Power
Output of Transmitter
(W)
0.01 0.1 2 0.1 2 0.23
0.1 0.38 0.38 0.73
1 1.2 1.2 2.3
10 3.8 3.8 7. 3
100 12 12 23
Separation Distance According to Frequency of Transmitter (M)
150 kHz to 80 MHz
d=1.2√P
80 MHz to 800 MHz
d=1.2√P
800 MHz to 2.5 GHz
d=2.3√P
For transmitters rated at a maximum output power not listed above, the recommended
separation distance d in meters (m) can be estimated using the equation applicable to
the frequency of the transmitter, where P is the maximum output power rating of the
transmitter in watts (W) according to the transmitter manufacturer.
At 80 MHz and 800 MHz, the separation distance for the higher
frequency range applies.
The guidelines may not apply in all situations. Electromagnetic
propagation is affected by absorption and reflection from structures,
objects, and people.
Guidance and Manufacturer’s Declaration – Electromagnetic Emissions
The Live Active Five POC is intended for use in the electromagnetic environment
specified below. The user of the device should assure that it is used in such an
environment.
Emissions Test Compliance Electromagnetic Environment - Guidance
RF emissions
CISPR 11
RF emissions
CISPR 11
Harmonic Emissions
IEC 61000-3-2
Voltage fluctuations/ flicker
emissions IEC 61000-3-3
31
Group 1 The device uses RF energy only for its
Class B The device is suitable for use in all
Class A
Complies
internal function. Therefore its RF emissions
are very low and not likely to cause any
interference in nearby equipment.
establishments, including domestic
establishments and those directly connected
to the public low-voltage power supply
network that supplies buildings used for
domestic purposes.
Page 35

Precision Medical Limited Warranty
Precision Medical, Inc. (PMI) warrants that the Live Active Five Portable Oxygen Concentrator (the
Product) and Accessories will be free from defects in materials and workmanship for the following
period:
Product Period
Live Active Five Portable Oxygen Concentrator 3 Years
Battery 1 Year
Sieve Bed 1 Year
Accessories
Live Active Five Battery Charger 1 Year
Battery, Power Adapters and Cords 1 Year
Sieve Bed Replacement 1 Year
Cannulas, Tubing, Filters, Carry Bag, Accessory Bag No Warranty
All warranties begin as of date of shipment of the Product and/or Accessories
from PMI to the Durable Medical Equipment (DME) provider or End User as
applicable. For all product warranty claims:
Product provided by or purchased from DME – contact DME;
Product purchased directly from PMI – contact PMI
No warranty is made with respect to normal wear and tear or damage due to neglect, misuse, accident,
physical damage, or alteration of the product or accessories.
Failure to operate the product or accessories in accordance with PMI’s User Manual shall void this
Limited Warranty. Upon receipt of the product, Purchaser shall fully inspect each item.
Any claim must be made in writing by contacting PMI Customer Service following the discovery
of a purported defect and within the warranty period. If necessary, PMI will issue a Return Goods
Authorization (RGA). Products returned without an RGA may be refused and returned at Purchaser’s
expense.
The sole remedy for any such defect(s) in the product shall be either the repair or replacement as
determined by PMI.
Customer is responsible for shipping costs back to PMI. The product should be shipped in the original
packaging. Lithium ion batteries and products containing Lithium ion batteries require special labeling.
Contact PMI for additional information. PMI is not responsible for damages during shipping.
PMI’s standard repair charges shall apply for products returned for repair that are not covered
under warranty. In the event of a return under warranty within the applicable period, PMI shall, upon
written notification thereof and substantiation that the goods have been stored, installed, maintained
and operated in accordance with PMI’s instructions and standard industry practice, and that no
modifications, substitutions, or alterations have been made to the goods, correct such defect by
suitable repair or replacement at its own expense.
Representatives of PMI or any retailers are not authorized to make oral warranties about the
merchandise described in this contract, and any such statements shall not be relied upon and are not
part of the contract for sale. Thus, this writing is a final, complete and exclusive statement of the terms
of this contract.
This warranty is exclusive and is in lieu of any warranty of merchantability, fitness for a particular
purpose or other warranty of quality, whether express or implied.
PMI shall not under any circumstances be liable for special, incidental or consequential damages
including but not limited to lost profits, lost sales, or injury to person or property. Correction of nonconformities as provided above shall constitute fulfillment of all liabilities of PMI whether based on
contract, negligence, strict tort or otherwise. PMI reserves the right to discontinue manufacture of any
product or change product materials, designs, or specifications without notice.
Any additional action to enforce any provision of this Limited Warranty may be commenced only in the
state or federal courts of Pennsylvania and exclusive jurisdiction of the Commonwealth of Pennsylvania.
PMI reserves the right to correct clerical or typographical errors without penalty.
This warranty is not transferable. Retain original receipt for valid proof of purchase.
For warranty or repair service contact PMI customer service at [email protected]
32
Page 36

300 Held Drive • Northampton, PA 18067 USA
800-272-7285 • precisionmedical.com
508573 8/19 (??) Printed in USA
 Loading...