

Page 1
FURNACE/COIL to PLENUM
TRANSITION KIT
Included in the Plenum Transition KIT:
(4) Sheet Metal
(each 26” x 14”)
(40) Sheet Metal Screws (1) Sheet Metal Screw Bit
WARNING :
DO NOT ATTEMPT TO INSTALL
FURNACE PIPING/VENTING OR OTHER
DANGEROUS EQUIPMENT IF YOU ARE
NOT A CERTIFIED PROFESSIONAL.
(8) S-Drives
(1) 12” Sheet Bender
IMPORTANT: The furnace and AC coil installion should be completed by a licensed and experienced profes-
sional HVAC Installer. For safety, ALL venting or gas pipe work must be completed by a trained and experienced installer in this type of work, observing all local codes. Also be sure to wear safety glass and gloves
when handling the sharp edges of the sheet metal.
Tools needed:
(1) Flathead Screwdriver or
Screwgun
(1) Hammer
or Rubber Mallet
(1) Pliers
(1) Sheet Metal Snips
(1) Straight Edge
(1) Measuring Tape or Ruler
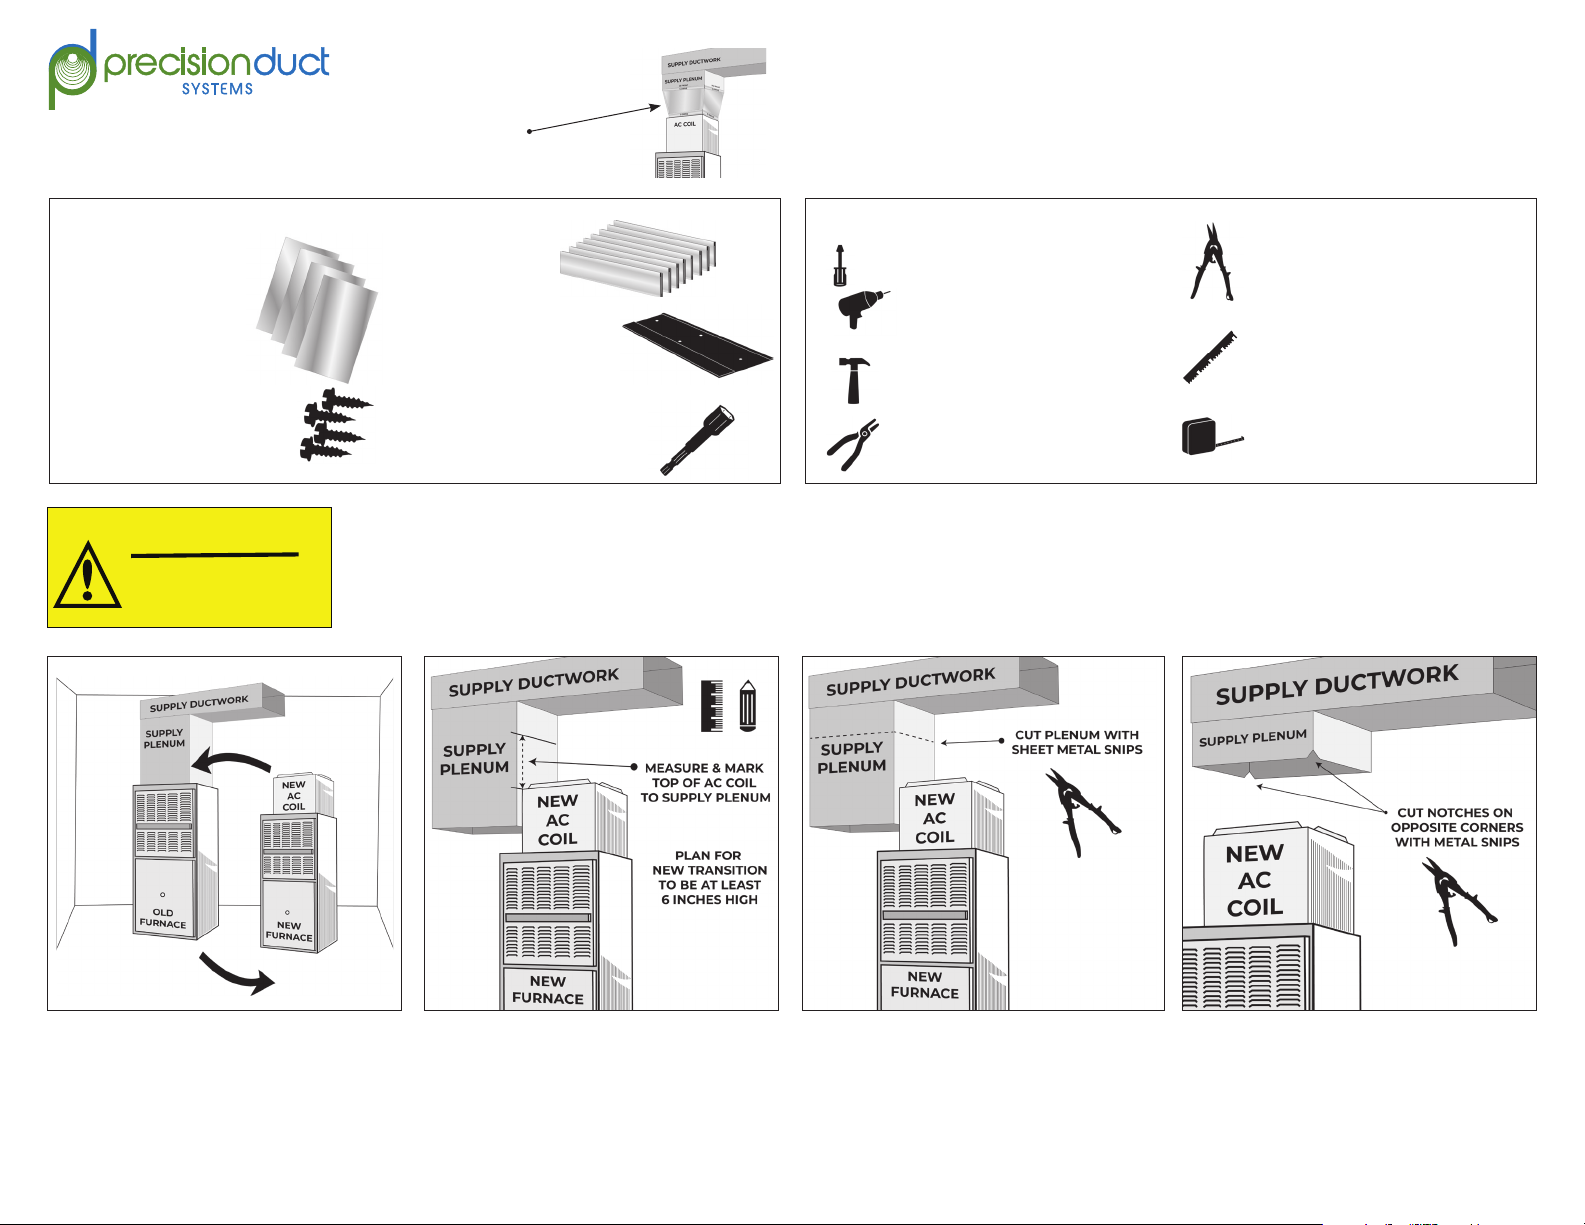
STEP 1 Remove old furnace and move
the new furnace and air conditioner
coil (AC Coil) next to the supply
plenum.
PAGE 1
STEP 2 Measure distance from the
top of the AC Coil to the supply
plenum, adding extra height for a
6-inch minimum transition height.
The maximum height is 14 inches.
STEP 3 With sheet metal snips, cut
the excess plenum to t the new
equipment. Center the equipment
into place under the supply plenum.
STEP 4 Notch (cut a small triangle)
on 2 opposite corners with the metal
snips the height of a single S-Drive
or about 1.5 inch heigh. This aids in
sliding the S-Drives into place in later
steps.
Page 2
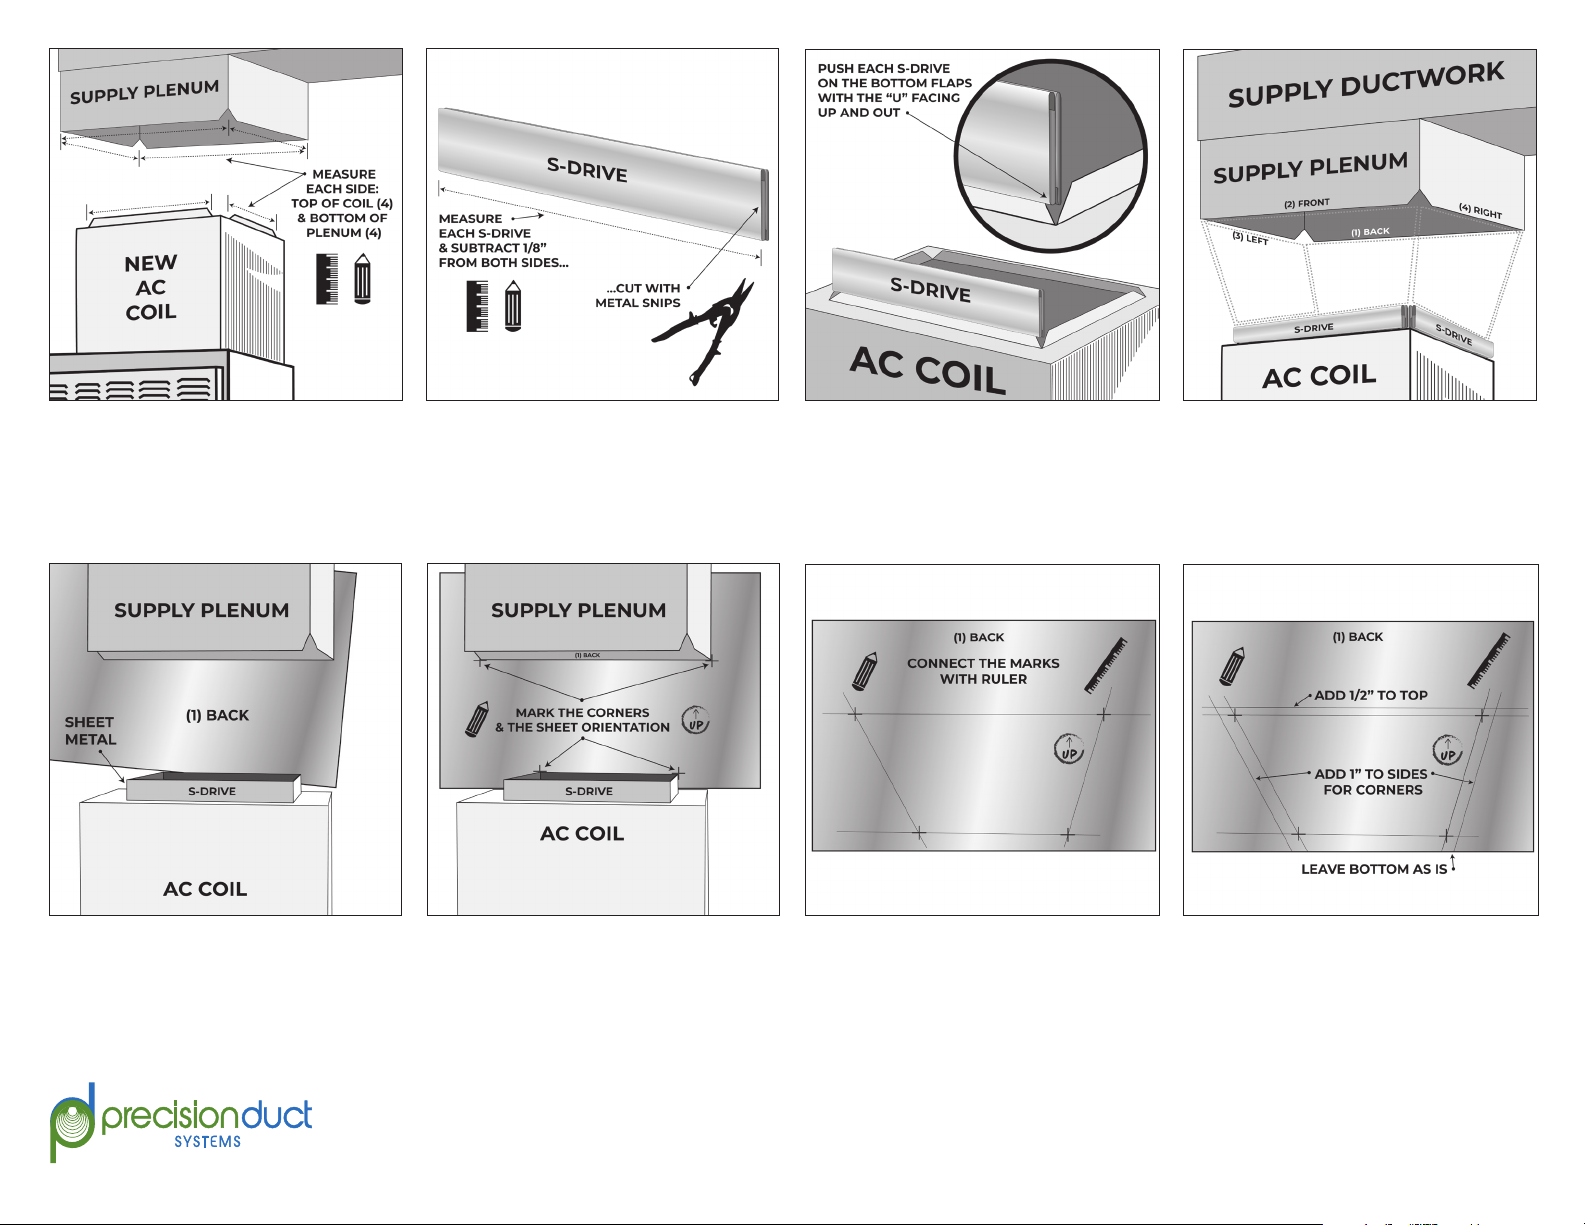
STEP 5 Measure the length of each
edge for both the top of the AC coil
and the bottom of the supply ple-
num. The 8 S-Drives will be tted on
these edges to hold the sheet metal.
STEP 6 When cutting each S-Drive,
subtract 1/8 inch from each side for
allowance on the corner joints. NOTE:
The metal snips may crush the ends.
Use a screwdriver to gently open.
STEP 7 Place each S-Drive on the lip
on top of the new AC coil, as shown.
Repeat for all 4 sides along the bottom with the “U” shaped channel on
the outside for each side.
STEP 8 Prepare to measure the sheetmetal sides by noting the (1) back,
followed by the (2) front. Then the (3)
left side, nishing with the (4) right
side.
STEP 9 Starting with the back of the
AC coil, place a piece of sheet metal
from the kit centered and upright,
resting on the top of the coil.
STEP 10 Mark the 4 corners, both
vertically and horizontally where the
sheet metal will intersect with the
furnace and supply plenum. Be sure
to mark the orientation of the sheet
metal so when it’s take down for
cutting, it goes back facing the same
direction.
STEP 11 Draw a straight line from
each corner mark to form a box.
STEP 12 Add an additional 1” to the
sides and 1/2” to the top to allow for
corner overlaps. Leave the bottom
line as is.
PAGE 2
Page 3
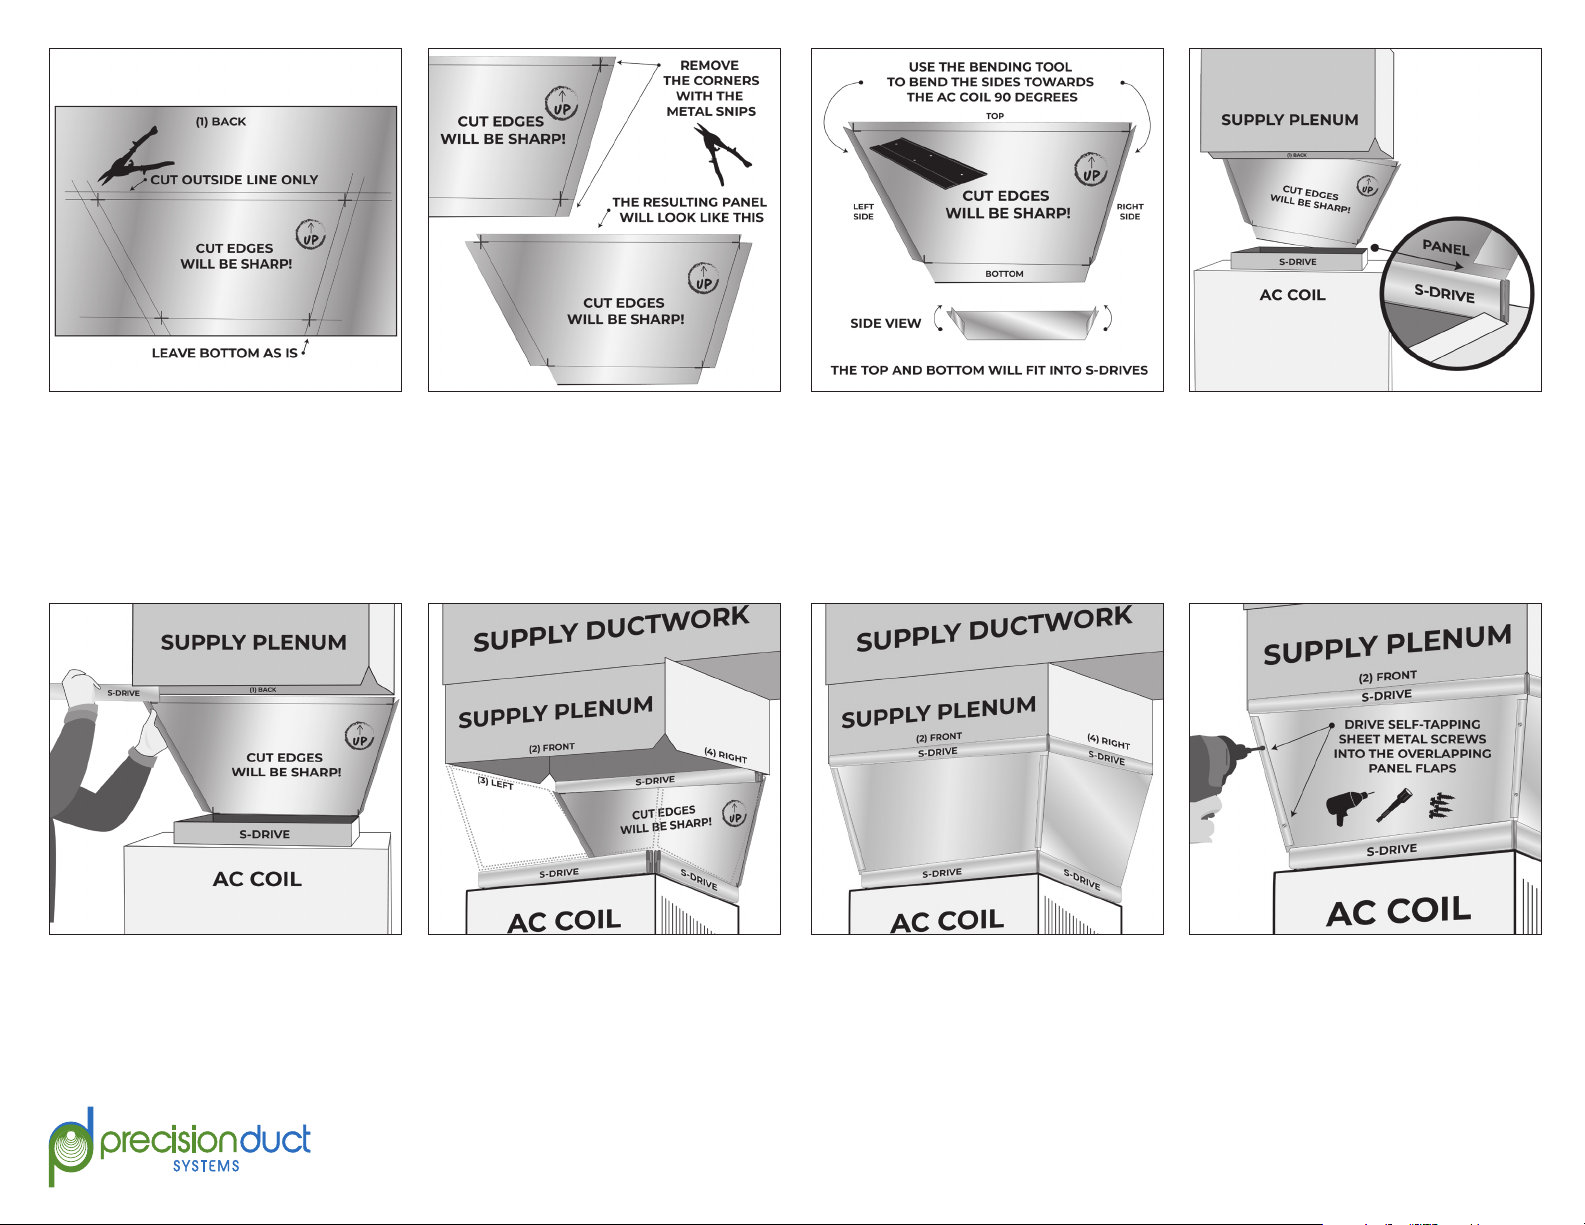
STEP 13
With the metal shears, cut along the
outside lines along the sides and top.
Do not cut the bottom line!
CAUTION: The cut metal edges are
sharp! Wear gloves to protect hands.
STEP 14
The last cuts are the notches from the
4 corners. Simply cut out the square
that remains in each corner.
STEP 15
Using the included 12 inch sheet metal bending tool, bend the sides up 90°
inwards towards the AC coil.
STEP 16
Slide the bottom of the cut panel
into the bottom S-Drive on the back
of the AC coil.
STEP 17
Slide the top S-Drive into the top
from the side. Gently tap the S-Drive
into position with a hammer or mallet
if necessary.
STEP 18
Continue with the (2) Front next,
followed by the (3) left side, nishing with the (4) right side, repeating
STEPS 9 to 17 for each side.
STEP 19
As each completed panel is assembled, be sure to lay the side piece
aps over the front and back panel
aps, for a proper seal.
STEP 21
To complete the install, seal all the corners with silicon sealant or foil tape.
Your AC coil to plenum transition kit is installed and complete!
STEP 20
Using the sheet metal screws and
a screw gun, drive 2 self tapping
screws into each of the overlapping
side seams.
PAGE 3
 Loading...