

Page 1

SNOOPER MODEL PD865
MODBUS
®
SERIAL INPUT
Instruction Manual
Modbus® RTU Master, Slave, or Snooper Mode
6-Digit Display, 0.56" (14 mm) High, Red LEDs, Sunlight Readable
Linear, Square Root, or Programmable Exponent
16-Point Linearization
Maximum/Minimum Display
Type 4X, NEMA 4X, IP65 Front
Universal Power Supply 85-265 VAC
12-36 VDC/12-24 VAC Power Option
2 or 4 Relays + 4-20 mA Output Options
24 VDC Transmitter Power Supply Option
RS-485 Serial Communications
Proxy Polling for up to 8 Process Variables
PRECISION DIGITAL CORPORATION
89 October Hill Road • Holliston, MA 01746 USA
Tel (800) 343-1001 • Fax (508) 655-8990
www.predig.com
Page 2

PD865 Snooper Modbus Serial Input Meter Instruction Manual
Disclaimer
The information contained in this document is subject to change
without notice. Precision Digital makes no representations or
warranties with respect to the contents hereof; and specifically
disclaim any implied warranties of merchantability or fitness for a
particular purpose.
!
CAUTION: Read complete
instructions prior to
installation and operation
of the meter.
Warning
This product is not recommended for life support applications or
applications where malfunctioning could result in personal injury or
property loss. Anyone using this product for such applications does
so at his/her own risk. Precision Digital Corporation shall not be held
liable for damages resulting from such improper use.
Limited Warranty
Precision Digital Corporation warrants this product against defects in
material or workmanship for the specified period under
“Specifications” from the date of shipment from the factory. Precision
Digital’s liability under this limited warranty shall not exceed the
purchase value, repair, or replacement of the defective unit.
Registered Trademarks
All trademarks mentioned in this document are the property of their
respective owners.
©2010-2012 Precision Digital Corporation. All rights reserved.
WARNING: Risk of
electric shock or
personal injury.
www.predig.com
2
Page 3

PD865 Snooper Modbus Serial Input Meter Instruction Manual
Table of Contents
INTRODUCTION ------------------------------------------------------------------------------------ 6
ORDERING INFORMATION -------------------------------------------------------------------- 6
SPECIFICATIONS --------------------------------------------------------------------------------- 7
General ------------------------------------------------------------------------------- 7
Operating Modes ----------------------------------------------------------------- 8
Programmable Features for Master Mode -------------------------------- 9
Serial Communications --------------------------------------------------------- 9
Display Functions -------------------------------------------------------------- 10
Relays ------------------------------------------------------------------------------ 11
Isolated 4-20 mA Transmitter Output ------------------------------------ 12
COMPLIANCE INFORMATION -------------------------------------------------------------- 13
Safety ------------------------------------------------------------------------------- 13
SAFETY INFORMATION ----------------------------------------------------------------------- 13
INSTALLATION ----------------------------------------------------------------------------------- 14
Unpacking ------------------------------------------------------------------------- 14
Panel Mounting ------------------------------------------------------------------ 14
MOUNTING DIMENSIONS -------------------------------------------------------------------- 15
Connections ---------------------------------------------------------------------- 16
Connector Labeling ---------------------------------------------------------- 16
Power Connections ---------------------------------------------------------- 17
Serial Connections ----------------------------------------------------------- 18
Relay Connections ----------------------------------------------------------- 19
Switching Inductive Loads -------------------------------------------------- 19
4-20 mA Output Connections ---------------------------------------------- 21
SETUP AND PROGRAMMING --------------------------------------------------------------- 22
Front Panel Buttons and Status LED Indicators --------------------- 23
Display Functions and Messages ----------------------------------------- 24
Main Menu ------------------------------------------------------------------------ 29
Setting Numeric Values ------------------------------------------------------ 29
Meter Setup ----------------------------------------------------------------------- 30
Operating Modes (nmode) ---------------------------------------------------- 30
Master Mode (nmastr) ------------------------------------------------------ 31
Proxy Polling Mode ---------------------------------------------------------- 32
Slave Mode (Slave) --------------------------------------------------------- 34
Snooper Mode (Snoopr) ---------------------------------------------------- 35
Serial Communications (SEriAL) ----------------------------------------- 36
Program Menu (Prog) ------------------------------------------------------- 36
Setting the Display Decimal Point (disp..dp) --------------------------- 37
3
Page 4

PD865 Snooper Modbus Serial Input Meter Instruction Manual
Setting the Float Decimal Point (Flot..dp) ------------------------------ 37
Scaling the Display Value (scale) --------------------------------------- 38
Setting the Relay Operation (relay) ------------------------------------ 39
Relay and Alarm Operation ------------------------------------------------ 42
Scaling the 4-20 mA Analog Output (Aout) ---------------------------- 49
Setting Up the Password (pass) ------------------------------------------- 50
Locking the Meter ------------------------------------------------------------ 50
Unlocking the Meter ---------------------------------------------------------- 51
Advanced Features Menu ---------------------------------------------------- 52
Advanced Features Menu & Display Messages ---------------------- 53
Display Math Function (func) --------------------------------------------- 54
Noise Filter (filter) -------------------------------------------------------- 55
Noise Filter Bypass (bypass) ---------------------------------------------- 55
Low-Flow Cutoff (CutofF) -------------------------------------------------- 55
Analog Output Programming (aoutpr) ---------------------------------- 56
4-20 mA Output Calibration ------------------------------------------------ 57
Display Intensity (d-inty) -------------------------------------------------- 58
Information (info) ------------------------------------------------------------ 58
OPERATION --------------------------------------------------------------------------------------- 59
Master and Slave Connections -------------------------------------------- 59
Maximum/Minimum Readings ---------------------------------------------- 62
TROUBLESHOOTING -------------------------------------------------------------------------- 63
Determining Software Version --------------------------------------------- 63
Reset Meter to Factory Defaults ------------------------------------------- 63
Factory Defaults & User Settings ----------------------------------------- 64
Troubleshooting Tips --------------------------------------------------------- 68
SLAVE MODE REGISTER TABLE ---------------------------------------------------------- 69
Register Table Notes ---------------------------------------------------------- 79
Register Bit Assignment Tables ------------------------------------------- 81
4
Page 5

PD865 Snooper Modbus Serial Input Meter Instruction Manual
Table of Figures
Figure 1: Panel Cutout and Mounting ............................................... 14
Figure 2: Meter Dimensions – Side View .......................................... 15
Figure 3: Case Dimensions – Top View ............................................ 15
Figure 4: Connector Label: 4 Relays, 4-20 mA Out & 24 V Supply 16
Figure 5: Power Connections ............................................................ 17
Figure 6: RS-485 Connection ............................................................ 18
Figure 7: Standard and Optional Relay Connectors........................ 19
Figure 8: AC and DC Loads Protection ............................................ 19
Figure 9: Low Voltage DC Loads Protection .................................... 20
Figure 10: 4-20 mA Output Powered by Meter ................................. 21
Figure 11: 4-20 mA Output Powered Externally ............................... 21
Figure 12: PD865 Slave & Snooper Connected to a Master ............ 59
Figure 13: PD865 Master Connected to a Smart Sensor & Chart
Recorder .............................................................................................. 59
Figure 14: PD865 Master Connected to a PD765 Meter ................... 60
Figure 15: PD865 Master & Snoopers Connected to Multivariable
Level Transmitters ............................................................................. 60
Figure 16: PD865 Master & Snoopers Connected to Level and
Temperature Sensors......................................................................... 61
5
Page 6

PD865 Snooper Modbus Serial Input Meter Instruction Manual
INTRODUCTION
The PD865 Snooper Modbus Serial Input Meter can be programmed as a
Modbus RTU Master, Slave, or Snooper. As a Master, the PD865 reads a
slave device, scales the data from it, displays the result, and operates the
internal relays and 4-20 mA output. The PD865 Master mode is capable of
polling up to 8 process variables (Proxy polling feature); it displays PV1 and
allows other PD865s in Snooper mode to read any of the variables being
polled by the Master. As a Slave, it is controlled by a master device. The
data sent to it by the master is scaled, displayed, and used to operate the
relays and 4-20 mA output. As a Snooper the PD865 listens to the Modbus
traffic and picks up a specific register or registers being polled by a Master
device from a specific slave device and processes the data being read.
The PD865 Snooper is housed in a shallow-depth 1/8 DIN panel meter
enclosure that features a NEMA 4X front panel. Data is displayed on an
adjustable intensity, six-digit seven-segment LED display. The Snooper can
be powered from 85-265 VAC or 12-36 VDC. It comes standard with 2
relays and is available with 2 additional relays and 4-20 mA output as
options.
ORDERING INFORMATION
85-265 VAC*
Model
PD865-6R2-06 2 relays
PD865-6R5-16
PD865-6R7-16
PD865-7R5-06 2 relays, 4-20 mA output
PD865-7R7-06 4 relays, 4-20 mA output
*All models may be powered from AC or DC. See Specifications for details.
Accessories
Model Description
PDA7485-I RS-232 to RS-422/485 Isolated Converter
PDA7485-N RS-232 to RS-422/485 Non-Isolated Converter
PDA8485-I USB to RS-422/485 Isolated Converter
PDA8485-N USB to RS-422/485 Non-Isolated Converter
PDX6901 Suppressor (snubber): 0.01 µF/470Ω, 250 VAC
Enclosures
**Enclosures available for 1-10 meters. Visit our website for details.
12-36 VDC*
Model
NEMA 4 & explosion-proof enclosures**
Plastic, steel, stainless steel & cast aluminum
Installed
2 relays, 4-20 mA output/24 V
transmitter supply
4 relays, 4-20 mA output/24 V
transmitter supply
6
Page 7

PD865 Snooper Modbus Serial Input Meter Instruction Manual
SPECIFICATIONS
Except where noted all specifications apply to operation at +25°C.
General
Input/Output Modbus RTU over RS-485
DISPLAY Six digits, 0.56" (14 mm) high, red LED. Displays from
DISPLAY
UPDATE RATE
OVERRANGE Values greater than the highest Input value programmed
UNDERRANGE Values less than the Input 1 value cause the display to
PROGRAMMING
METHODS
RECALIBRATION Only required for the 4-20 mA output. Calibrated at the
MAX/MIN
DISPLAY
PASSWORD Programmable password restricts modification of
NON-VOLATILE
MEMORY
POWER AC: 85-265 VAC, 50/60 Hz
REQUIRED FUSE
ISOLATED
TRANSMITTER
POWER SUPPLY
ISOLATION 4 kV input/output-to- powe r line
-199999 to 999999, automatic leading zero blanking.
Master: 10/second to once every 25.5 seconds
Slave/Snooper: Dependent on master device (e.g. PLC)
cause the display to flash
-199999
flash
Four front panel buttons, or via Modbus registers.
factory. Recalibration is recommended at least every
12 months.
Max/min readings are stored until reset by the user or
when power to the meter is turned off. User can reset by
front panel pushbuttons or via Modbus registers.
programmed settings.
All programmed settings are stored in non-volatile memory
for a minimum of ten years, with or without power.
DC: 90-265 VDC
Optional: 12-36 VDC, 12-24 VAC
999999
Model Watts
PD865-6R2-06 6
PD865-6R5-16 8
PD865-6R7-16 15
PD865-7R5-06 10
PD865-7R7-06 10
UL Recognized, 5 A max, slow-blow; up to 6 meters
may share one fuse.
One transmitter power supply (Optional)
24 VDC 10% @ 200 mA max. (-1 option)
500 V input-to-output or output-to-24 VDC supply
7
Page 8

PD865 Snooper Modbus Serial Input Meter Instruction Manual
ENVIRONMENTAL Operating temperature range: -40 to 65°C
CONNECTIONS Removable screw terminal blocks accept 12 to 22 AWG
ENCLOSURE 1/8 DIN, high impact plastic,
MOUNTING 1/8 DIN panel cutout required. Two panel mounting
TIGHTENING
TORQUE
OVERALL
DIMENSIONS
WEIGHT 8.0 oz (227 g) (2 relays)
WARRANTY 3 years parts and labor
Storage temperature range: -40 to 85°C
Relative humidity: 0 to 90% non-condensing
wire.
UL 94V-0, color: gray
bracket assemblies provided
Screw terminal connectors: 4.5 lb-in (0.5 Nm)
2.45" x 4.68" x 4.19" (62 mm x 119 mm x 106 mm)
(H x W x D)
9.7 oz (275 g) (4 relays, 4-20mA Output & 24 V supply)
Operating Modes
MASTER Processes data read from a Modbus RTU slave device
SLAVE Processes data sent to it from a Modbus RTU master
SNOOPER Listens to the Modbus traffic and picks up a specific register
(only one process variable at a time can be displayed on
the master).
Proxy polling feature: Polls up to 8 process variables from
up to 8 slave devices. The Master processes and displays
PV1 and allows other PD865s in Snooper mode to read any
of the variables being polled.
device.
or registers being polled by a Master device from a specific
slave device and processes the data being read.
Note: The relays and the 4-20 mA output are functional in
all modes.
8
Page 9

PD865 Snooper Modbus Serial Input Meter Instruction Manual
Programmable Features for Master Mode
FUNCTION CODE Select which Modbus function code (03 or 04) to use in
NUMBER
OF PVs
SLAVE ID Assign the slave ID or address (1-247) containing the
REGISTER
NUMBER
DATA TYPE Select the data format that the slave device uses. Select
POLL TIME 0.1 to 25.5 sec. Time between read-commands (Master
SLAVE
RESPONSE
TIMEOUT
reading the slave device.
Select the number of process variables to be polled by the
Master (PV1-PV8).
process variables to be displayed (Slave ID for PV1-8).
5 digit: 30001-39999 or 40001-49999
6 digit: 300001-365536 or 400001-465536
Specifies which register(s) to read in the slave device.
Range is dependent on Function Code selection (04 or 03)
and digits selection (5 or 6).
PV2-PV8: Select 1 register for Short integer or 2 registers
for Long integer and Floating point data types.
between Short integer (2 byte) and Long integer (4 byte) or
floating point (4 byte), Signed or Unsigned (integer only)
and byte order (big-endian vs. little-endian).
mode) or listening-time window (Snooper mode).
0 to 25.4 seconds X3 (76.2 sec). Time allowed for the slave
to respond to a command. Programming 0 disables the
timeout. This setting is used by Master and Slave modes.
Serial Communications
SLAVE ID
OR ADDRESS
BAUD RATE 300 – 19,200 bps
DATA 8 bit (1 start bit, 1 or 2 stop bits)
PARITY None, even, or odd. 1 or 2 stop bits selectable for None.
BYTE-TO-BYTE
TIMEOUT
TURN AROUND
DELAY
1 – 247. Specifies the ID or address of the slave device
(Master or Snooper mode) or the address of the PD865
(Slave mode).
0.01 – 2.54 seconds
Less than 2 ms (fixed)
9
Page 10

PD865 Snooper Modbus Serial Input Meter Instruction Manual
Display Functions
INTENSITY 1 to 8. To optimize viewing based on ambient lighting
DISPLAY
DECIMAL POINT
FLOAT
DECIMAL POINT
MATH
FUNCTIONS
MULTIPOINT
SCALING
NOISE FILTER Programmable from 2 to 199 (0 will disable filter)
BYPASS 0.2 to 99.9% of full-scale.
CUTOFF
conditions.
Up to five decimal places:
ddd . ddd,
Select the number of decimals to use for the floating point
data expected from the slave or master device (this is
independent from the display decimal point selection).
Linear, square root, or programmable exponent (0.50000
to 2.99999).
2 to 16 points.
0 to 999999. 0 disables cutoff.
dddd . dd, ddddd .d, or dddddd
d . ddddd, dd .dddd,
10
Page 11

PD865 Snooper Modbus Serial Input Meter Instruction Manual
Relays
RATING Standard: 2 relays, SPST (Form A)
ELECTRICAL
NOISE
SUPPRESSION
DEADBAND 0-100% of full scale, user selectable
HIGH OR LOW
ALARM
RELAY
OPERATION
RELAY RESET User selectable via front panel buttons or Modbus control
Automatic reset only (non-latching)
TIME DELAY 0 to 199 seconds, on and off delays
FAIL-SAFE
OPERATION
COMMUNICATIONS BREAK
AUTO
INITIALIZATION
Fail-safe operation: relay coil is energized in non-alarm condition. In case of
power failure, relay will go to alarm state.
Optional: 2 relays, SPDT (Form C)
All relays are rated 3 A @ 30 VDC or 3 A @ 250 VAC,
resistive loads.
A suppressor (snubber) should be connected to each relay
contact switching inductive loads to prevent disruption to
the microprocessor’s operation. Recommended suppressor
value: 0.01 µF/470 , 250 VAC (PDX6901).
User may program any alarm for high or low trip point.
Automatic (non-latching)
Latching
Pump alternation control (up to 4 relays)
Automatic + manual reset at any time (non-lat ching)
Manual reset only, at any time (latching)
Manual reset only after alarm condition has cleared (latching)
Automatic reset: Relays will automatically reset when the
input passes the reset point.
Manual reset: Front panel ACK button. Pressing ACK
resets all manually resettable relays.
Programmable and independent for each relay
Programmable
Independent for each relay
No change, Relay on, or Relay off.
Controls the condition the relay goes to when a slave
device does not reply (Available also in Slave mode v1.1 &
up).
When power is applied to the meter, relays will reflect the
state of the input to the meter.
11
Page 12

PD865 Snooper Modbus Serial Input Meter Instruction Manual
Isolated 4-20 mA Transmitter Output
CALIBRATION Factory calibrated for 4-20 mA
SCALING RANGE 1.000 to 23.000 mA for any display range.
ACCURACY ± 0.1% F.S. ± 0.004 mA
TEMPERATURE
DRIFT
EXTERNAL LOOP
POWER SUPPLY
OUTPUT LOOP
RESISTANCE
24 VDC
35 VDC (external)
DATA
SOURCE
OVERRANGE Programmable mA output for overrange condition.
UNDERRANGE Programmable mA output for underrange condition.
COMMUNICA-
TIONS BREAK
MAXIMUM
OUTPUT
MINIMUM
OUTPUT
Reverse scaling allowed.
50 PPM/C from 0 to 65C ambient
35 VDC maximum
Power supply Minimum Maximum
10 700
100 1200
Display Value, Maximum Display Value, Minimum Display
Value, or Modbus Register.
Programmable mA output when a slave device does not
reply within the Slave Response Timeout (Available also in
Slave mode v1.1 & up).
Programmable absolute maximum mA output desired.
Programmable absolute minimum mA output desired.
12
Page 13

PD865 Snooper Modbus Serial Input Meter Instruction Manual
COMPLIANCE INFORMATION
Safety
UL LISTED USA and Canada
UL FILE NUMBER E160849
FRONT PANEL UL Type 4X, NEMA 4X, IP65; panel gasket provided
UL 508 Industrial Control Equipment
SAFETY INFORMATION
Warning!
!
CAUTION: Read complete
instructions prior to
installation and operation
of the meter.
Hazardous voltages exist within enclosure.
Installation and service should be performed only by
trained service personnel.
13
WARNING: Risk of
electric shock or
personal injury.
Page 14

PD865 Snooper Modbus Serial Input Meter Instruction Manual
INSTALLATION
There is no need to remove the meter from its case to
complete the installation, wiring, and setup of the meter.
Unpacking
Remove the meter from box. Inspect the packaging and
contents for damage. Report damages, if any, to the carrier.
If any part is missing or the meter malfunctions, please contact
your supplier or the factory for assistance.
Panel Mounting
Prepare a standard 1/8 DIN panel cutout – 3.622" x 1.772" (92 mm
x 45 mm). Refer to Figure 1 for more details.
Clearance: allow at least 4" (102 mm) behind the panel for wiring.
Panel thickness: 0.04" - 0.25" (1.0 mm - 6.4 mm).
Recommended minimum panel thickness to maintain Type 4X
rating: 0.06" (1.5 mm) steel panel, 0.16" (4.1 mm) plastic panel.
Remove the two mounting brackets provided with the meter (back-off
the two screws so that there is ¼" (6.4 mm) or less through the
bracket. Slide the bracket toward the front of the case and remove).
Insert meter into the panel cutout.
Install mounting brackets and tighten the screws against the panel.
To achieve a proper seal, tighten the mounting bracket screws
evenly until meter is snug to the panel along its short side. DO NOT
OVER TIGHTEN, as the rear of the panel may be damaged.
Figure 1: Panel Cutout and Mounting
14
Page 15

PD865 Snooper Modbus Serial Input Meter Instruction Manual
MOUNTING DIMENSIONS
Figure 2: Meter Dimensions – Side View
865SideViewDim
Figure 3: Case Dimensions – Top View
15
Page 16

PD865 Snooper Modbus Serial Input Meter Instruction Manual
Connections
All connections are made to removable screw terminal connectors
located at the rear of the meter.
Use copper wire with 60°C or 60/75°C insulation
for all line voltage connections. Observe all
safety regulations. Electrical wiring should be
!
Caution!
Connector Labeling
The connectors’ label, affixed to the meter, shows the location of all
connectors available with requested configuration.
performed in accordance with all applicable
national, state, and local codes to prevent
damage to the meter and ensure personnel
safety.
Figure 4: Connector Label: 4 Relays,
4-20 mA Out & 24 V Supply
16
Page 17

PD865 Snooper Modbus Serial Input Meter Instruction Manual
Power Connections
Power connections are made to a two-te rminal co nnecto r labeled
POWER in Figure 2. The meter will operate reg ardless of DC pola rity
connection. The + and - symbols are only a suggested wiring con ven tion.
POWER CONNECTOR
1
2
+-
Recommended External
Fuse: 1 A, 250 V Slow Blow
Figure 5: Power Connections
AC or DC
POWER
17
Page 18

PD865 Snooper Modbus Serial Input Meter Instruction Manual
Serial Connections
The PD865 is connected to an RS-485 bus with up to 32 nodes. For
systems consisting of more than 32 nodes, RS-485 repeaters are
necessary. Wiring connections to the PD865 are made via the three
position screw terminal connector labeled RS-485. Please refer to the
EIA-485 standard for complete specifications for balanced digital multipoint communications. The use of shielded twisted pair cable is
recommended to protect the data signals from electrical interference.
For long wire runs it is good practice to terminate the bus at both ends
with a resistor connected between D+ and D- that matches the
characteristic impedance of the cable. A typical termination resistor
value is 120 Ω.
RS-485 Connector
D+ D- G
1 2 3
Data +
Data Common
Shield
Twisted-Pair
Figure 6: RS-485 Connection
For point-to-point (non-multipoint) serial communications with RS-232
data communications equipment (e.g. a personal computer), an RS-232
to RS-485 converter (e.g. the Precision Digital PDA7485) is required.
When using the PDA7485, connect the PD865 according to the
PDA7485 wiring diagram for a two wire RS-485 application.
18
Page 19

PD865 Snooper Modbus Serial Input Meter Instruction Manual
Relay Connections
Connections to the two, standard Form A relays, are made to the
connector labeled RLY1 and RLY2. See Figure 5. Connections to the
two optional Form C relays are made to the six-terminal connector
labeled RELAY3 and RELAY4.
Figure 7: Standard and Optional Relay Connectors
Switching Inductive Loads
The use of suppressors (snubbers) is strongly recommended when switching
inductive loads to prevent disrupting the microprocessor’s operation. The
suppressors also prolong the life of the relay contacts. Suppression can be
obtained with resistor-capacitor (RC) networks assembled by the user or
purchased as complete assemblies. Refer to the following circuits for RC network
assembly and installation:
L
O
A
or
D
Figure 8: AC and DC Loads Protection
Choose R and C as follows:
R: 0.5 to 1 for each volt across the contacts.
C: 0.5 to 1 µF for each amp through closed contacts.
Notes:
1. Use capacitors rated for 250 VAC.
2. RC networks may affect load release time of solenoid loads. Check to
confirm proper operation.
3. Install the RC network at the meter's relay screw terminals. An RC network
may also be installed across the load. Experiment for best results.
4. For low voltage DC loads, place a diode across the load with a reverse
breakdown voltage two to three times the circuit voltage and a forward
current at least as large as the load current. Shown in
Figure 9
19
Page 20

PD865 Snooper Modbus Serial Input Meter Instruction Manual
L
O
A
D
Figure 9: Low Voltage DC Loads Protection
RC Networks Available from Precision Digital
RC networks are available from Precision Digital and should be applied to each
relay contact switching an inductive load. Part number: PDX6901.
Note:
Relays are de-rated to 1/14th HP (50 watts) with an inductive load.
20
Page 21

PD865 Snooper Modbus Serial Input Meter Instruction Manual
4-20 mA Output Connections
Connections for the 4-20 mA transmitter output are made to the
connector terminals labeled “mA OUT, I-, I+”. The 4-20 mA output may
be powered from an internal power supply (optional) or from an external
power supply.
24V OUT
P+
P-
21
mA OUT RLY2 RLY1
I- I+ NO COM NO COM
12
3 4 5 6
Remote Display,
+
Chart Recorder,
etc.
-
Figure 10: 4-20 mA Output Powered by Meter
mA OUT RLY2 RLY1
I- I+ NO COM NO COM
12
Remote Display,
Chart Recorder,
etc.
External
Power
Supply
+-
+
-
Figure 11: 4-20 mA Output Powered Externally
3 4 5 6
21
Page 22

PD865 Snooper Modbus Serial Input Meter Instruction Manual
SETUP AND PROGRAMMING
There is no need to recalibrate the 4-20 mA
output (when installed) as received from the
factory.
T he 4-20 mA output is factory calibrated
prior to shipment. The calibration equipment is
certified to NIST standards.
Overview
There are no jumpers involved in the meter setup procedure.
Setup and programming is done through the front panel buttons.
After power and signal connections have been completed and verified,
apply power to the meter.
22
Page 23

PD865 Snooper Modbus Serial Input Meter Instruction Manual
Front Panel Buttons and Status LED Indicators
Button
Symbol
Description LED Status
Menu
Right arrow/Reset
Up arrow/Max
Enter/Ack
1 Alarm 1
2 Alarm 2
3 Alarm 3
4 Alarm 4
S Set point indicator
R Reset point indicator
Press the Menu button to enter or exit the Programming Mode at
any time.
Press the Right arrow button to move to the next digit during digit
programming.
Press the Up arrow button to scroll through the menus, decimal
point, or to increment the value of a digit.
Press the Enter/Ack button to access a menu, to accept a setting, or
to acknowledge a relay.
Press and hold the Right arrow and the Menu buttons, for three
seconds, to access the Advanced features of the meter (Tip: press
and hold Right arrow first then Menu).
See page 62 to display maximum and minimum readings.
23
Page 24

PD865 Snooper Modbus Serial Input Meter Instruction Manual
Display Functions and Messages
The meter displays various functions and messages during
setup/programming and operation. The following table shows the
displayed functions and messages with their action/setting description.
Display Parameter Action/Setting
nmodE
nmAStr
FunCod
Fun 03
Fun 04
Pv.nbr
SLAv.Id
Id-Pv1
Id-Pv2
Id-Pv3
Id-Pv4
Id-Pv5
Id-Pv6
Id-Pv7
Id-Pv8
rEG.nbr
Reg.Pv1
Reg.Pv2
Reg.Pv3
Mode
Master
Function
Code
Function
Code 03
Function
Code 04
Number of
PVs
Slave ID
PV1 ID
PV2 ID
PV3 ID
PV4 ID
PV5 ID
PV6 ID
PV7 ID
PV8 ID
Register
Number
PV1
Register
PV2
Register
PV3
Register
Enter the Mode menu.
Select Master Mode.
Enter the Function Code menu for Master or
Snooper mode.
Use Function Code 03 to read slave device.
Use Function Code 04 to read slave device.
Enter the Number of PVs to be read from the
slave device(s).
Enter the Slave ID menu for Master and Snooper
modes. Enter the Slave ID or address for Slave
mode.
Enter the Slave ID or address for PV1.
Enter the Slave ID or address for PV2.
Enter the Slave ID or address for PV3.
Enter the Slave ID or address for PV4.
Enter the Slave ID or address for PV5.
Enter the Slave ID or address for PV6.
Enter the Slave ID or address for PV7.
Enter the Slave ID or address for PV8.
Enter the Register Number menu.
Enter the Register Number for PV1.
Enter the Register Number for PV2.
Enter the Register Number for PV3.
24
Page 25

PD865 Snooper Modbus Serial Input Meter Instruction Manual
Display Parameter Action/Setting
Reg.Pv4
Reg.Pv5
Reg.Pv6
Reg.Pv7
Reg.Pv8
1-reg
2-reg
5 dig
6 dig
Data.1
Short
Long
Float
bcd
binary
unSigd
SignEd
1234
4321
PV4
Register
PV5
Register
PV6
Register
PV7
Register
PV8
Register
1 Register
2 Registers
Reg. Numb.
digits
Data Type
Short
Integer
Long
Integer
Floating
Point
BCD
Binary
Unsigned
Signed
Byte Order
Byte Order
Enter the Register Number for PV4.
Enter the Register Number for PV5.
Enter the Register Number for PV6.
Enter the Register Number for PV7.
Enter the Register Number for PV8.
Select 1 register for the assigned PV (short
integer).
Select 2 registers for the assigned PV (long,
float).
Select either 5 (x0001-x9999) or 6 (x00001x65536) digits for the Register Number by
pressing the Right arrow in Register Number
menu.
Enter the Data type menu for PV1.
Select Short Integer as the data type to be read
from the slave device (PV1).
Select Long Integer as the data type to be read
from the slave device (PV1).
Select Floating Point as the data type to be read
from the slave device (PV1).
Select BCD format for Short or Long integers.
Select Binary format for Short or Long
integers.
Select Unsigned Binary format for Short or Long
integers.
Select Signed Binary format for Short or Long
integers.
Select big-endian byte order.
Select little-endian byte order.
25
Page 26

PD865 Snooper Modbus Serial Input Meter Instruction Manual
Display Parameter Action/Setting
2143
3412
T-PoLL
t-rESP
Slave
Snoopr
Serial
Baud
300
600
1200
2400
4800
9600
19200
PArity
no
1 Stop
2 Stop
Even
odd
t-byte
Prog
Byte Order
Byte Order
Poll Time
Slave
Response
Timeout
Slave
Snooper
Serial
Baud
300 baud
600 baud
1200 baud
2400 baud
4800 baud
9600 baud
19200 baud
Parity
No parity
1 Stop bit
2 Stop bits
Even parity
Odd parity
Byte-to-byte
timeout
Program
Select byte-swapped big-endian byte order. Not
available for Short integer.
Select byte-swapped little-endian byte order. Not
available for Short integer.
Enter the time between read commands. In other
words, how often the display is updated in
Master mode or how long to wait for data in
Snooper mode.
Enter the time allowed for a slave device to
respond to a command.
This setting is applicable to Master and Slave
modes.
Select Slave mode.
Select Snooper mode.
Enter Serial menu.
Enter the Baud rate menu.
Select 300 baud for all serial communications.
Select 600 baud for all serial communications.
Select 1200 baud for all serial communications.
Select 2400 baud for all serial communications.
Select 4800 baud for all serial communications.
Select 9600 baud for all serial communications.
Select 19200 baud for all serial communications.
Enter the Parity menu.
Select No parity.
Select 1 stop bit with no parity
Select 2 stop bits with no parity
Select Even parity.
Select Odd parity.
Enter the timeout value allowed between
received bytes.
Enter the Programming menu.
26
Page 27

PD865 Snooper Modbus Serial Input Meter Instruction Manual
Display Parameter Action/Setting
Disp.dp
FLot.dP
Scale
inP 1
dis 1
save ?
RELaY
RLY1
Act1
Auto
A-nman
LatCH
Lt-CLr
Altern
oFF
Set1
rSt1
FaiLSF
FLS 1
on
off
DeLAY
Display
Decimal
Point
Float
Decimal
Point
Scale
Input
Point 1
Display
Point 1
Save?
Relay
Relay1
Action1
Automatic
Auto-
manual
Latching
Latching-
cleared
Alternate
Off
Set1
Reset1
Fail-safe
Fail-safe1
On
Off
Delay
Set the decimal point position for the display.
This is independent from float decimal point.
Select the decimal point for the expected floating
point data.
Enter the Scaling menu.
Enter the Input value for point 1. Up to 16 points
can be entered in Linear mode.
Enter the Display value for point 1. Up to 16
points can be entered in Linear mode.
Press Enter to save scaling data. Press Menu to
exit without saving.
Enter the Relay menu.
Relay 1 setup. Similar menus for Relays 2 to 4
are not shown here.
Set relay 1 action (automatic, latching, etc.).
Set relay for automatic reset.
Set relay for automatic + manual reset any time.
Set relay for latching operation.
Set relay for latching operation with manual reset
only after alarm condition has cleared.
Set relays for pump alternation control.
Disable relay and front panel status LEDs.
Disable relay fail-safe operation.
Program set point for Relay 1.
Program reset point for Relay 1.
Enter Fail-safe menu.
Set relay 1 fail-safe operation. Similar menus for
Relays 2 to 4 are not shown here.
Enable fail-safe operation.
Disable fail-safe operation.
Enter Time Delay menu.
27
Page 28

PD865 Snooper Modbus Serial Input Meter Instruction Manual
Display Parameter Action/Setting
DLY 1
on 1
oFF 1
break
break1
no act
oFF
on
Aout
diS 1
out 1
diS 2
out 2
pass
unloC
loCd
999999
-199999
Relay 1
Delays
Relay 1
On Delay
Relay 1
Off Delay
Communica
tions Break
Action
Relay 1
Break
Action
No Action
Off Action
On Action
Analog
Output
Scaling
Display 1
Output 1
Display 2
Output 2
Password
Unlocked
Locked
Flashing
display
Enter relay 1 time delay setup. Similar menus for
Relays 2 to 4 are not shown here.
Set relay 1 On time-delay.
Set relay 1 Off time-delay.
Enter Communications Break menu.
Enter Relay 1 Break Action. Similar menus for
Relays 2 to 4 are not shown here.
No change in Relay state when Communications
Break detected.
Relay turns off when Communications Break
detected.
Relay turns on when Communications Break
detected.
Enter the Analog Output Scaling menu.
Program the first Display value for the Analog
Output.
Program the first Output value that corresponds
to the Display 1 value for the Analog Output.
Program the second Display value for the
Analog Output.
Program the second Output value that
corresponds to the Display 2 value for the
Analog Output.
Enter the Password menu.
Meter is unlocked.
Program password to lock meter.
Meter is locked.
Enter password to unlock meter.
Overrange condition and
Underrange conditions.
28
Page 29
PD865 Snooper Modbus Serial Input Meter Instruction Manual
Main Menu
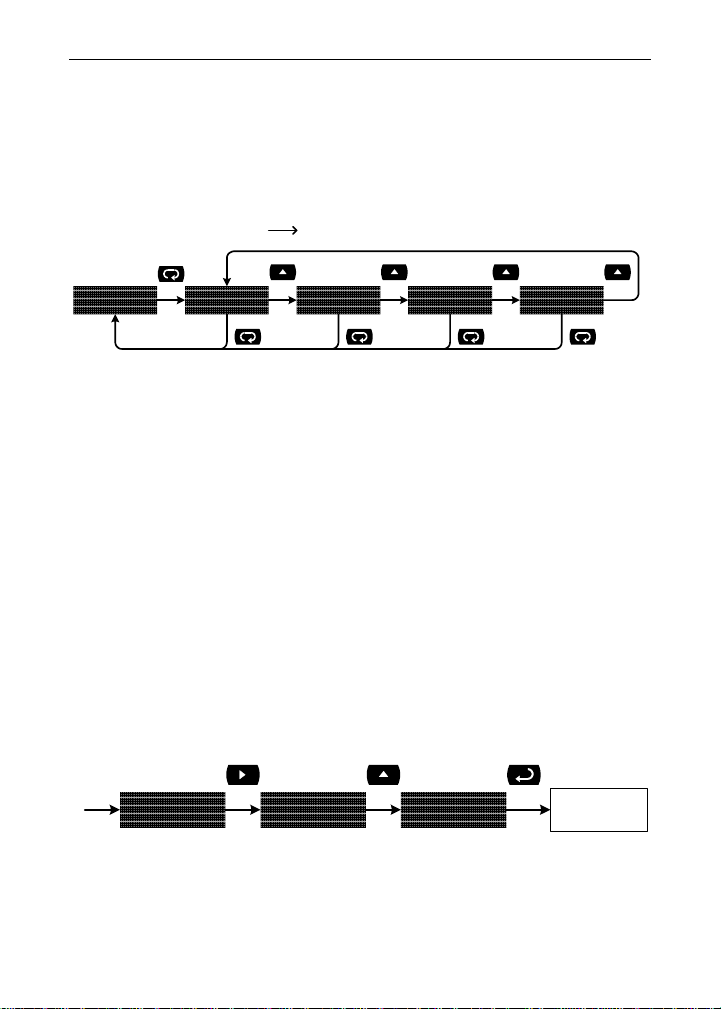
The main menu consists of the most commonly used functions: Mode,
Serial, Program, and Password.
Press Menu button to enter Meter Programming then press Up
arrow button to scroll through the main menu.
Run Program
9865 nmode serial prog pass
Press Menu at any time, to exit and return to Meter Run. Changes
made to settings prior to pressing Enter/Ack are not saved.
Changes to the settings are saved to memory only after pressing
Enter/Ack.
The display automatically moves to the next menu every time a
setting is accepted by pressing Enter/Ack.
Setting Numeric Values
The numeric values are set using the Right and Up arrow buttons.
Press Right arrow to select next digit and Up arrow to increment digit
value.
The digit being changed is displayed brighter than the rest.
Press the Enter/Ack button, at any time, to accept a setting or Menu
button to exit without saving changes. Pressing Menu to exit while
entering Scaling data does not save any of the Scaling data.
Select
Next Digit
04.00 04.00 05.00
If a digit cannot be changed because it will cause an out of range value,
the next digit will be selected automatically.
Go to the Program-Decimal Point menu to select the decimal point.
Increment
Digit Value
29
Accept
Setting
Next Menu
Item
Page 30
PD865 Snooper Modbus Serial Input Meter Instruction Manual
Meter Setup
Operating Modes (nmode)
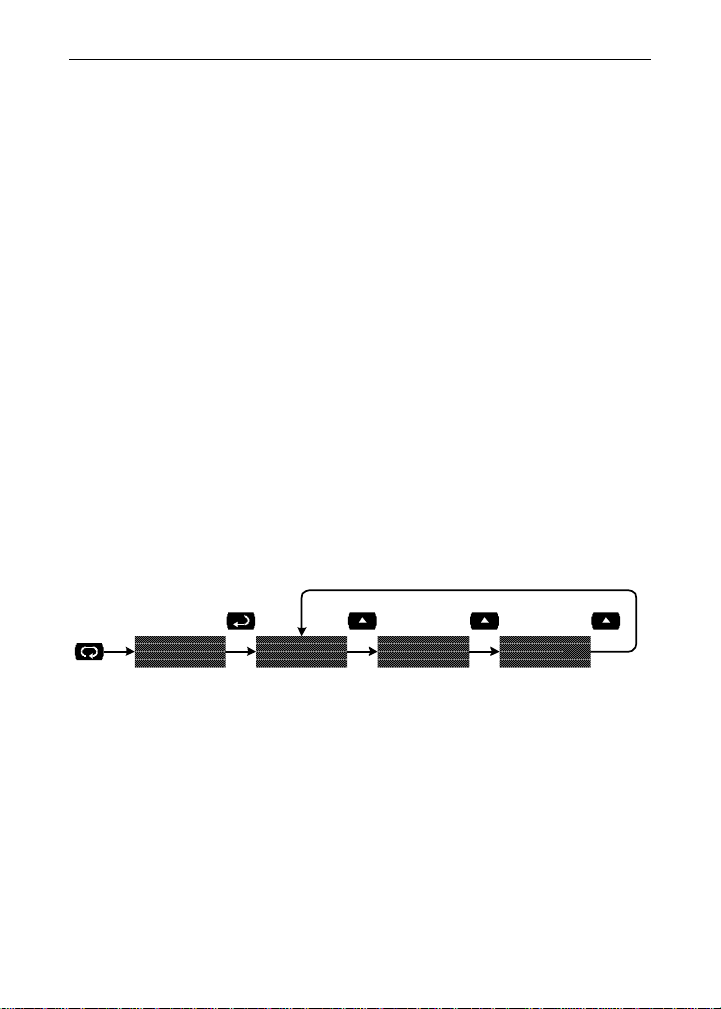
The Mode menu is used to select how the meter is to function:
1. Master: Reads a slave device, scales the data from it, displays the
result, and operates the relays and 4-20 mA output.
Proxy polling feature: The Master polls from 1 to 8 process
variables from 1 to 8 slave devices. The Master processes and
displays PV1 and allows other PD865s in Snooper mode to
read any of the variables being polled.
2. Slave: Read and controlled by a master device (PLC, DCS, etc).
The data sent to it by the master is scaled, displayed, and used
to operate the relays and 4-20 mA output. All parameters are
accessible via the Slave Mode Register Table on page 69.
3. Snooper: Listens to the Modbus traffic and picks up a specific
register or registers being polled by a Master device from a
specific slave device and processes the data being read.
The Master mode requires additional parameter selection to specify how
the slave device is to be read and how to interpret the data.
Press Menu to enter Meter Programming. Press the Enter/Ack button
to access any menu or press Up arrow button to scroll through choices.
Press the Menu button to exit at any time and return to Meter Run.
nmode nmastr slave SnooPr
30
Page 31
PD865 Snooper Modbus Serial Input Meter Instruction Manual
Master Mode (nmastr)
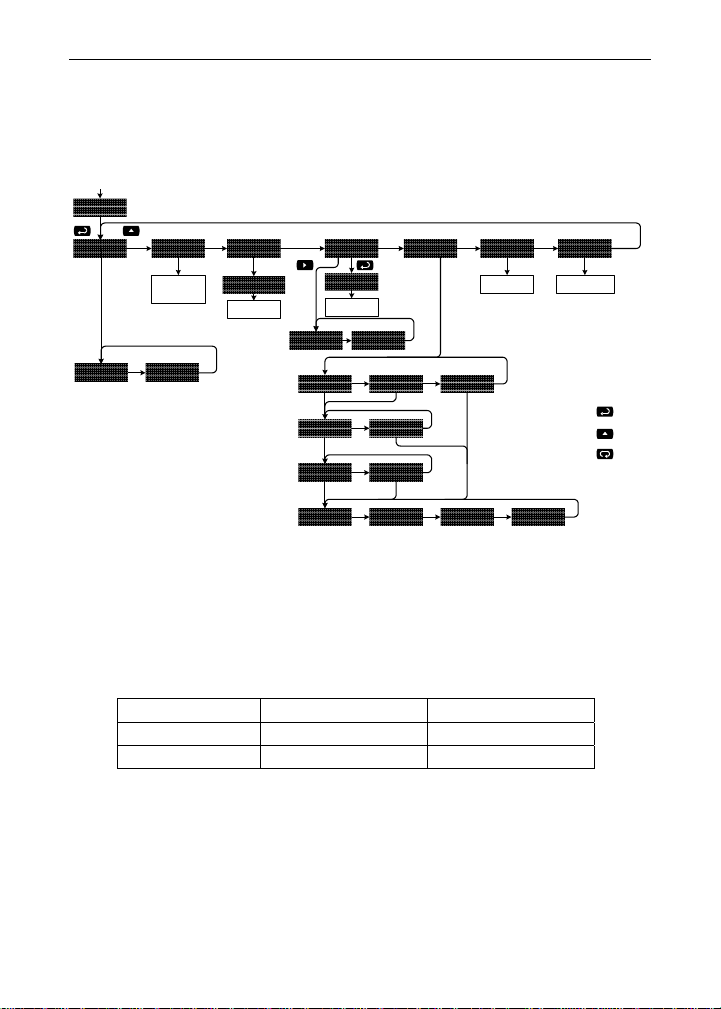
The Master mode contains the following submenus: select which
Function Code to use, the number of PVs to poll, the slave IDs and
register numbers, the type and format of data for PV1, the slave Polling
time and Response timeout.
nmastr
funCod
PU.nbr
Enter Number
of Process
Variables
fun 03 fun 04
SLAv.1d
1 d-pv1
Enter Slave ID
for PV1
reg.nbr
data.1
reg.Pv1
Enter Register
Number Value
5 dig 6 dig
short long float
binary bcd
t-poll
Enter Polling
Time Value
Press Right Arrow to display and
change the setting for the number of
digits used for the Register Number.
t-resp
Enter Response
Timeout Value
Press Enter/Ack to
Make Selections
Press Up Arrow to
Scroll Through Choices
Press Menu to Exit at
any Time
unsigd signed
1234 4321 2143 3412
The last two Byte-Order settings are not
available for Short Integer data types.
The Master ignores the decimal point setting for most slave devices that
specify a Short or Long integer. For example, a slave that is displaying
12.34 is read as 1,234. Floating point data may or may not utilize the
decimal point. Refer to the slave’s operating manual to make sure.
The Register Number range is based on the Function Code and the
number of digits selected. See the following table.
Function Code 5 Digit 6 Digit
03 40001 – 49999 400001 – 465536
04 30001 – 39999 300001 – 365536
31
Page 32
PD865 Snooper Modbus Serial Input Meter Instruction Manual
Proxy Polling Mode
Proxy Polling mode is enabled when a number greater than 1 is entered
in the PUnbr (number of PV's) menu. In this mode, the PD865 acts as a
Master and polls up to an additional 7 slave devices, enabling other
PD865s, operating in Snooper mode, to read and display that polled
data. In Proxy Polling mode, the PD865 Master always displays PV1,
the first value polled.
The baud rate for polling more than 2 variables should be set to be
greater than 4800 bps. A faster baud rate will produce fewer
communication errors and breaks.
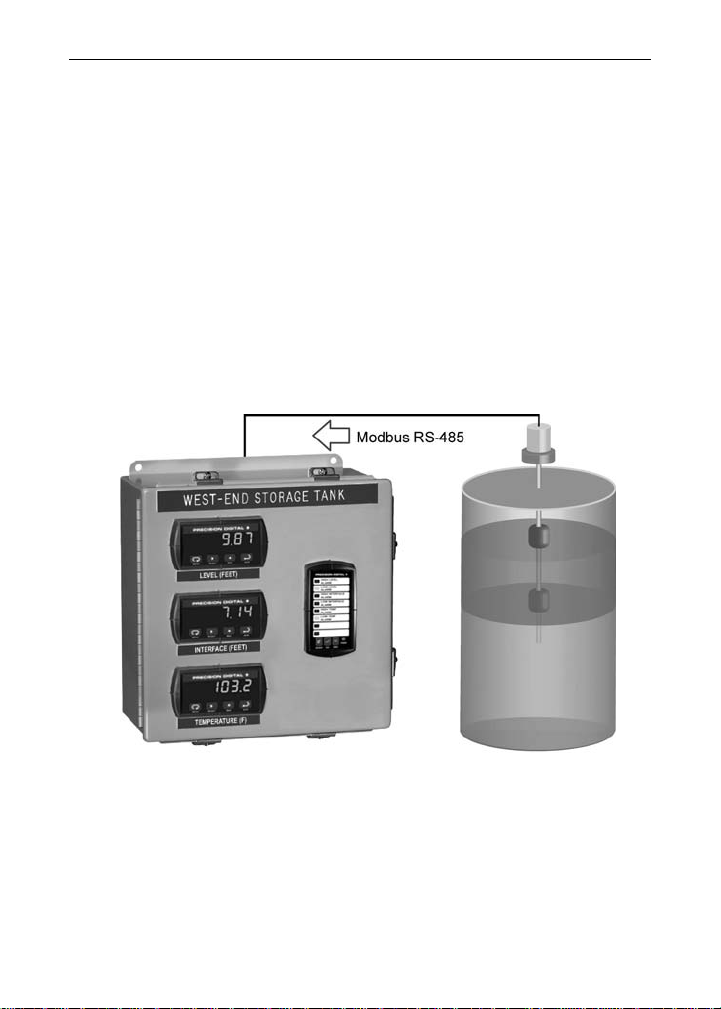
Application Using Proxy Polling
In this application we have a system consisting of an MTS M-Series
multivariable level gauge connected to three PD865s displaying Pro duct
Level, Interface Level, and Average Temperature.
Register Numbers & Process Variables
30001 (40001) - Product Level
30003 (40003) - Interface Level
30017 (40017) - Average Temperature
32
Page 33

PD865 Snooper Modbus Serial Input Meter Instruction Manual
The following table shows the system setup for the MTS M-Series
gauge, the PD865 Master, and the two PD865 Snoopers:
Parameter
PD865
Master
PD865
Snooper 1
PD865
Snooper 2
Mode Master Snooper Snooper
Function Code 04 04 04
Number of PVs 3 N/A N/A
Slave ID 247 247
PV1 247
PV2 247
PV3 247
Register Number 30003 30017
Reg.PV1 30001
Reg.PV2 30003 (2 Reg.)
Reg.PV3 30017 (2 Reg.)
Data Type
Long integer
Long Long
Binary, Signed
Byte Order 1234 1234 1234
Polling Time 2.0 sec 10.0 sec 10.0 sec
Slave Response
5.0 sec N/A N/A
Timeout
Baud 4800 4800 4800
Parity No No No
Byte-to-Byte
0.01 sec 0.01 sec 0.01 sec
Timeout
Decimal point 2 places 2 places 2 places
Input 1 -199999 -199999 -199999
Display 1 -1999.99 -1999.99 -1999.99
Input 2 999999 999999 999999
Display 2 9999.99 9999.99 9999.99
33
Page 34
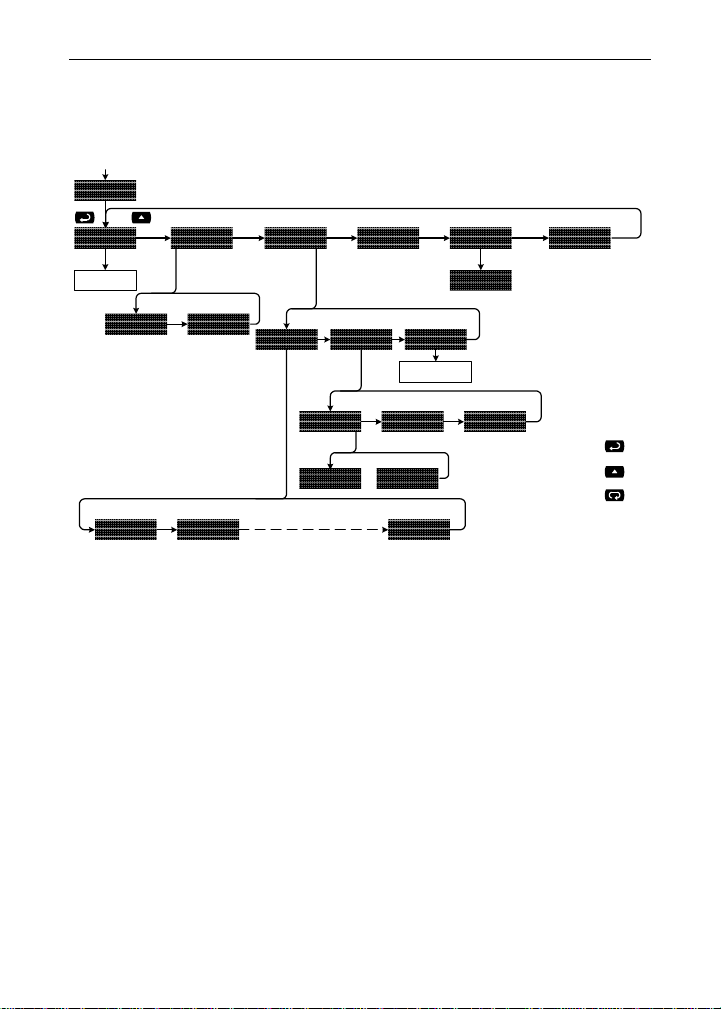
PD865 Snooper Modbus Serial Input Meter Instruction Manual
Slave Mode (Slave)
The Slave mode is capable of accepting Long and Float data types.
Refer to the Slave Mode Register Table for details of all the predefined
parameters.
slave
SLAv.1d
Enter Slave ID
or Address
data.1
long float
serial prog pass nmode
baud parity t-byte
1 stop 2 stop
300 600 19200
unloC
Press Right Arrow to display and
change the setting for the number of
digits used for the Register Number.
Enter byte-to-byte
Timeout Value
no even odd
Press Enter/Ack to
Make Selections
Press Up Arrow to
Scroll Through Choices
Press Menu to Exit at
any Time
34
Page 35
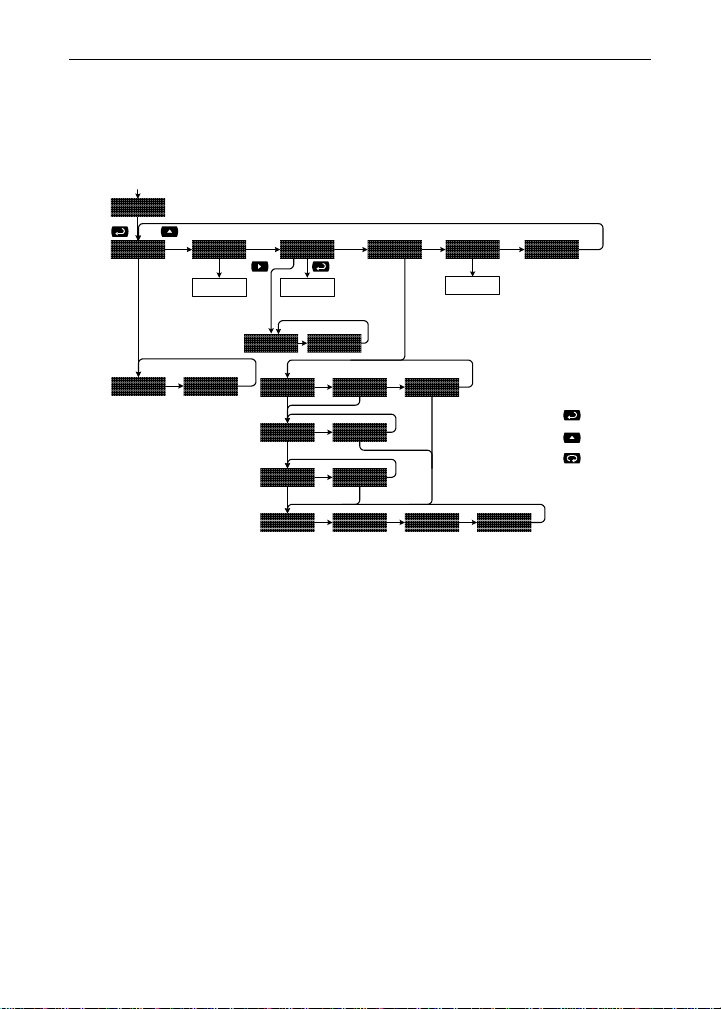
PD865 Snooper Modbus Serial Input Meter Instruction Manual
Snooper Mode (Snoopr)
The Snooper mode is used to listen to data being transmitted on the
bus. Multiple Snoopers can be connected to the RS-485 bus and
display any process variable. The same process variable can be
displayed in multiple locations.
Snoopr
funCod
SLAv.1d
Enter Process
Variable Value
fun 03 fun 04
reg.nbr
Enter Register
Number Value
data.1
5 dig 6 dig
short long float
binary bcd
Enter Polling
Time Value
Press Right Arrow to display and
change the setting for the number of
digits used for the Register Number.
t-respt-poll
Press Enter/Ack to
Make Selections
Press Up Arrow to
Scroll Through Choices
Press Menu to Exit at
any Time
unsigd signed
1234 4321 2143 3412
The last two Byte-Order settings are not
available for Short Integer data types.
Notes:
1. To minimize the possibility of communication errors and
communication break conditions, use a poll time of 5 seconds or
more with slow baud rates (e.g. 4800 bps or less).
2. The poll time for meters set up for Snooper mode must be greater
than the Master’s poll time. This setting corresponds to the time
window during which the Snooper listens to the bus for a reply by
the slave device being polled by the master device. As soon as the
Snooper detects a new reply on the bus, the display is updated. If
there is no reply within the Poll Time setting, the Snooper goes into
communications break condition.
3. The Slave Response Timeout (t-resp) setting is not applicable to
the Snooper mode.
35
Page 36
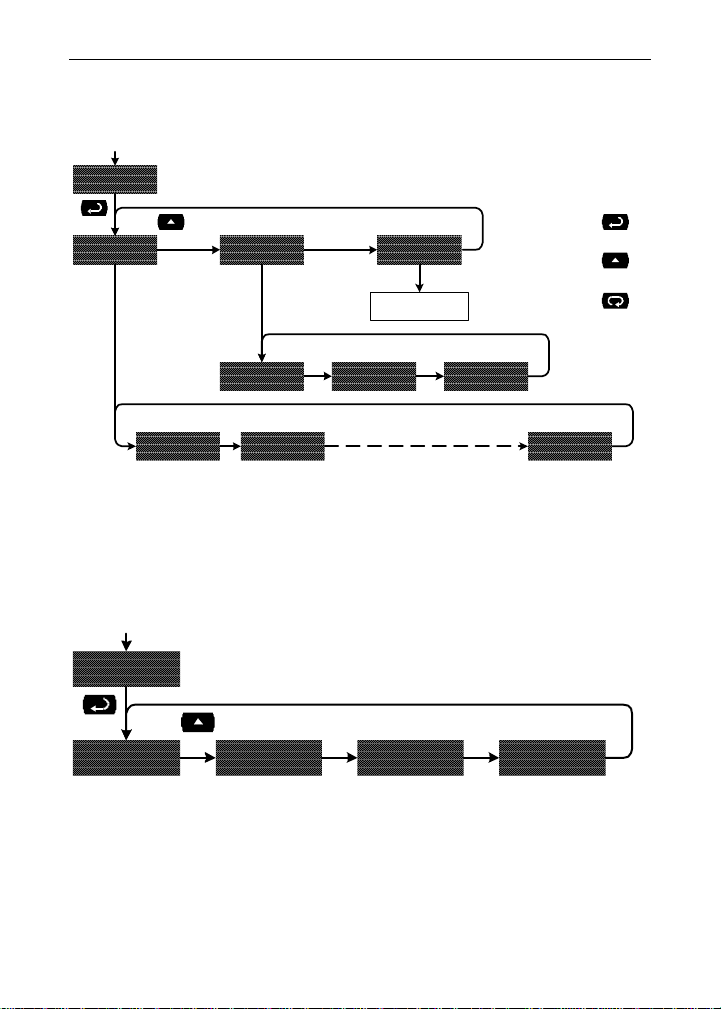
PD865 Snooper Modbus Serial Input Meter Instruction Manual
Serial Communications (SEriAL)
The meter has an RS-485 interface. The baud rate, parity, and byte-tobyte timeout can be programmed.
Serial
Press Enter/Ack to
Make Selections
baud
parity
t-byte
Enter byte-to-byte
Timeout Value
Press Up Arrow to
Scroll Through
Choices
Press Menu t o Ex it
at any Time
no even odd
300 600
19200
Program Menu (Prog)
The Programming menu contains the menus for Display Decimal Point
(diSP.dp), Scale, Relays, and Analog Output (4-20 mA).
Note: If Float data type has been selected, the program menu also
contains a Float Decimal Point (
FLot.dp
) selection.
prog
diSP.dP scALE relay aout
36
Page 37

PD865 Snooper Modbus Serial Input Meter Instruction Manual
Setting the Display Decimal Point (disp..dp)
Decimal point may be set one to five decimal places or with no decimal
point at all. Pressing the Up arrow moves the decimal point one place to
the right until no decimal point is displayed, and then it moves to the
leftmost position. The decimal point is programmable only for the
Display Value.
diSP.dp
dddddd ddddd.dd.ddddd
Setting the Float Decimal Point (Flot..dp)
If floating point data type is selected, the Float Decimal Point menu is
available. Select the number of decimals to correspond to the expected
floating point data; the numbers to right of the LSD will be ignored by
the meter.
FLot.dP
dddddd ddddd.dd.ddddd
Example:
If you have a number such as 12.3456, you have to tell the meter how
many digits to the right are of interest to you. In this case selecting 4
places will make use of all the digits. For most applications the display
decimal point will be set accordingly (i.e. 4 places).
If 2 decimal places are selected, the number 12.3456 is displayed as
12.35; notice that the number is rounded up.
37
Page 38
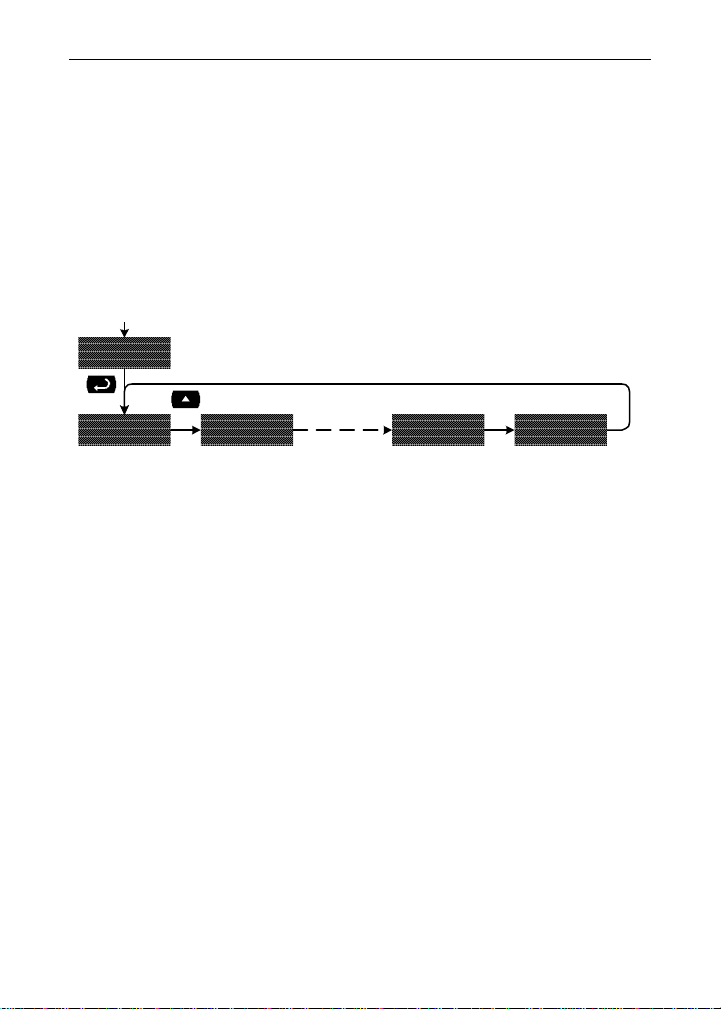
PD865 Snooper Modbus Serial Input Meter Instruction Manual
Scaling the Display Value (scale)
The data that the meter receives can be scaled to display in engineering
units. Input 1 must be less than Input 2; Input 2 must be less than Input
3; etc (known as monotonic values). Press Menu after all changes have
been made. The display will flash Save ?. Press Enter to save the
changes or Menu to exit without saving. When the Linear function is
selected, up to 16 points may be programmed to handle non-linear data.
Only two points are available for either the Square Root or
Programmable Exponent functions. See the Advanced Features/Display
Math Function menu on page 54 for more information.
Scale
inp 1 dis 1 dis 16inp 16
Only the programmed number of points will be shown
in the menu. The range is from 2 to 16 points.
The display will alternate between Error and aa--bb if two inputs have
the same value or are not monotonic, where AA and bb represent the
two erroneous input points. Undesired operation may occur if the error
is not corrected. Correct the error by either changing one of the inputs in
question or changing the number of points to exclude an erroneous
input point.
Note: Data that is outside the working Input range will cause an out
of range condition. For example, if 4 points are programmed,
data less than Input 1 will cause an underrange and data
greater than Input 4 will cause an overrange.
38
Page 39
PD865 Snooper Modbus Serial Input Meter Instruction Manual
Setting the Relay Operation (relay)
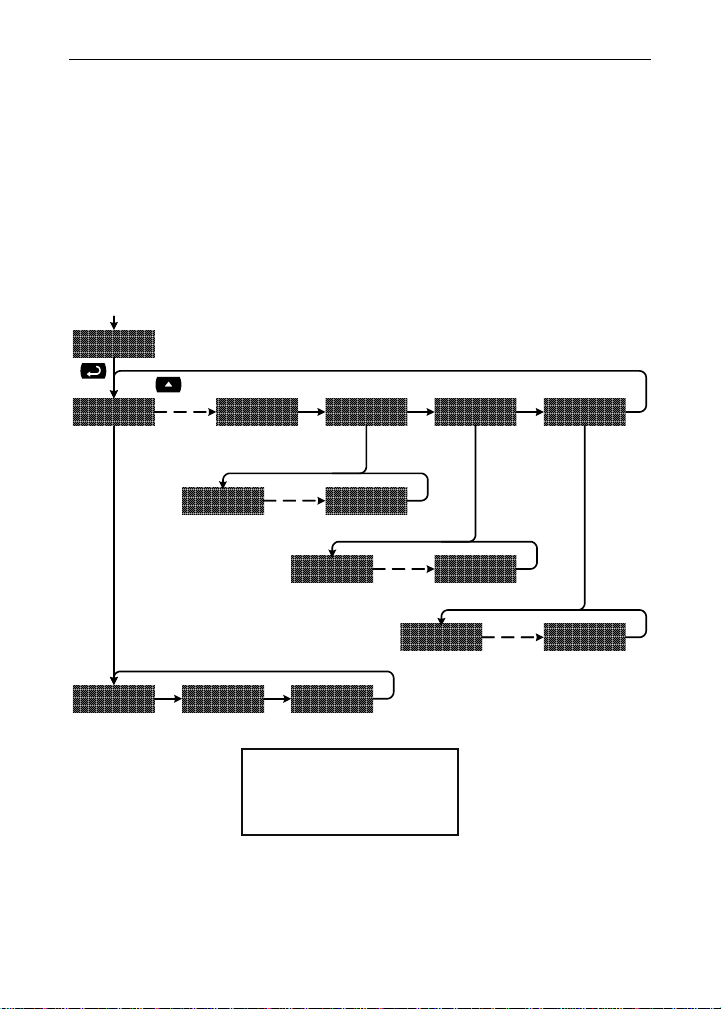
This menu allows you to set up the operation of the relays:
1. Relay action: Automatic reset only, Automatic + manual reset,
Latching, Latching with Clear, Pump alternation control, Off.
2. Set point
3. Reset point
4. Fail-safe operation: On, Off.
5. Time delay: On delay, Off delay (both 0-199 seconds).
6. Communications Break Action: No Action, Off, On.
relay
DelayRely 1 failsfRely 4 break
Same Menus for Relays
2 to 4 as Relay 1
Fls 1 Fls 4
Dlay 1 Dlay 4
Act 1 Set 1 Rset 1
Refer to page 24 for a
description of Display
Functions and Messages
39
break1 break4
Page 40
PD865 Snooper Modbus Serial Input Meter Instruction Manual
Setting the Relay Action
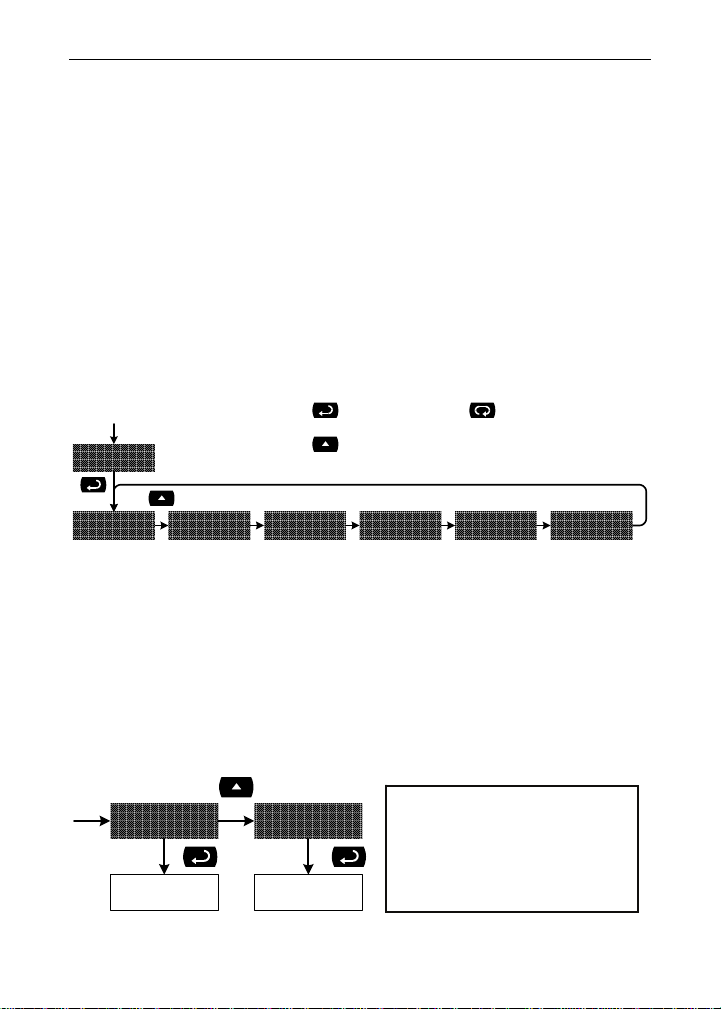
The relays Action menu allows the user to set up the operation of the
relays. The relays may be set up for any of the following modes of
operation:
1. Automatic reset (non-latching)
2. Automatic + manual reset at any time (non-latching)
3. Latching (manual reset only, at any time)
4. Latching with Clear (manual reset only after alarm condition
has cleared)
5. Pump alternation control (automatic reset only)
6. Off (relay and status LED disabled)
The following graphic shows the action menu for relay 1. Relays 2 to 4
are set up in a similar fashion.
From Relay 1
Menu
Act 1
Press Enter/Ack to
Make Selections
Press Up Arrow to
Scroll Through
Choices
Press Menu to
Exit at any Time
auto A-nman latCh Lt-Clr
altern off
Programming Set and Reset Points
High alarm indication: program set point above reset point.
Low alarm indication: program set point below reset point.
The deadband is determined by the difference between set and reset
points. Minimum deadband is one display count. If set and reset points
are programmed the same, relay will reset one count below set point.
The following graphic shows the Set/Reset point menu for relay 1. The
menu is similar for relays 2 to 4.
Quick Points
Set 1 Rset 1
Press Up arrow and Menu
at the same time to access
Enter Set Point
Value
Enter Reset
Point Value
set/reset points quickly.
40
Page 41
PD865 Snooper Modbus Serial Input Meter Instruction Manual
Setting Fail-Safe Operation
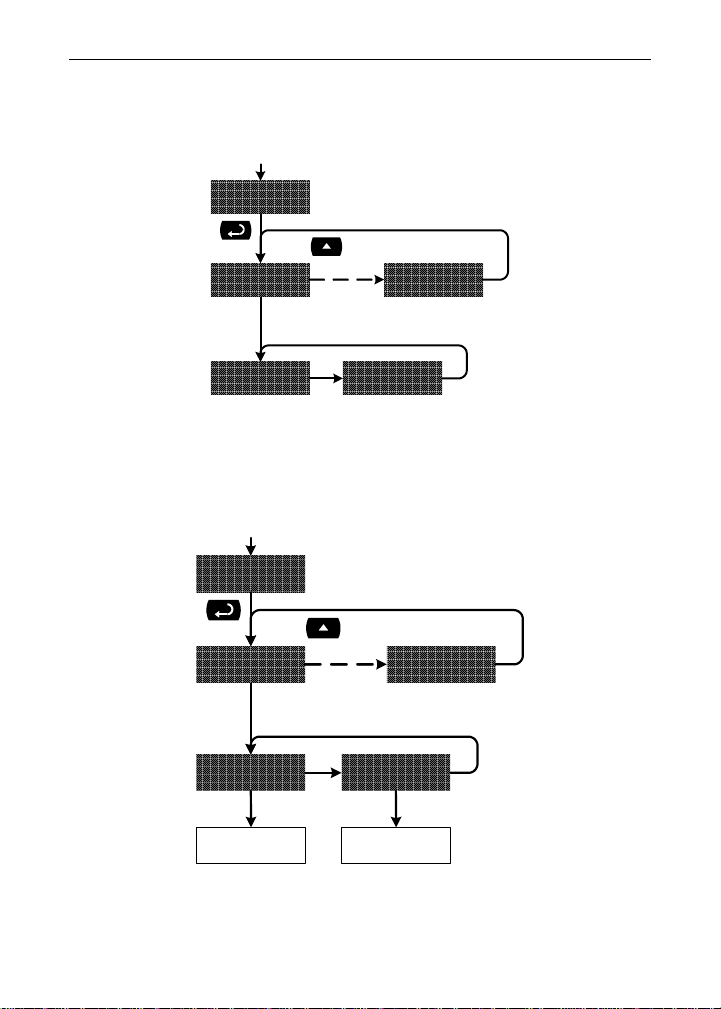
The fail-safe operation is set independently for each relay. Select on to
enable or select off to disable fail-safe operation.
failsf
Fls 1 Fls 4
Same Menus for Relays
2 to 4 as Relay 1
on off
Programming the On and Off Time Delays
Each relay has an On and Off time delay that may be programmed
between 0 and 199 seconds. The relays will transfer only after the
condition has been maintained for the corresponding time delay.
delay
Dlay 1 Dlay 4
Same Menus for Relays
2 to 4 as Relay 1
on 1 off 1
Enter On-Delay
Value
Enter Off-Delay
Value
41
Page 42
PD865 Snooper Modbus Serial Input Meter Instruction Manual
Relay and Alarm Operation
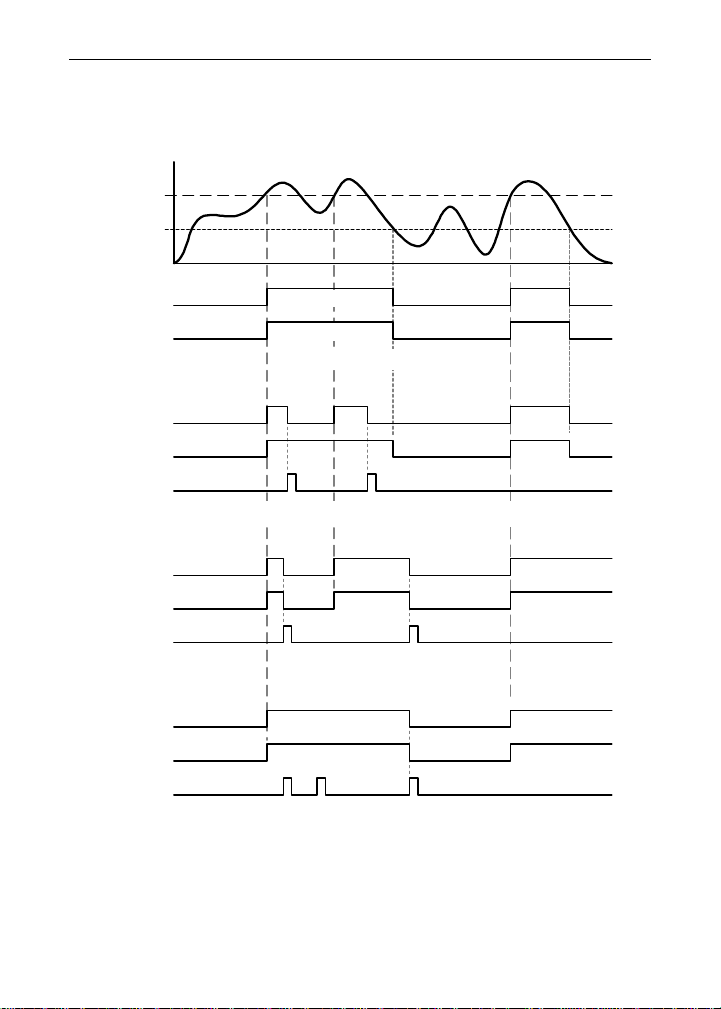
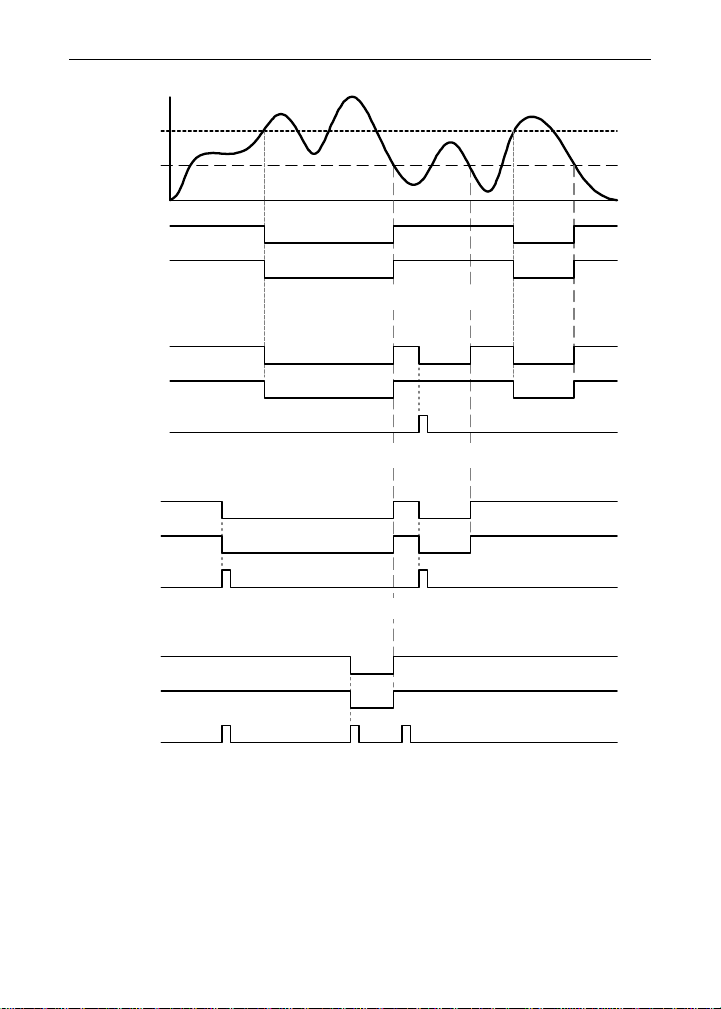
The following graphs illustrate the operation of the relays, status LEDs,
and Acknowledge (ACK) button.
High Alarm Operation (Set > Reset)
Input
Set
Reset
Relay
LED
de-energized
off
energized
on
Automatic (non-latching)
Relay
LED
ACK
pressed
Automatic or Manual (non-latching)
Relay
LED
ACK
pressed
Manual (latching)
Relay
LED
ACK
pressed
Manual only after passing below Reset (latching)
In Manual mode, ACK can be pressed anytime to turn the relay "off".
For the relay to turn back "on", the signal must go below the set point,
and then go above it.
42
Page 43
PD865 Snooper Modbus Serial Input Meter Instruction Manual
Low Alarm Operation (Set < Reset)
Input
Reset
Set
Relay
LED
energized
on
de-energized
off
Automatic (non-latching)
Relay
LED
ACK
pressed
Automatic or Manual (non-latching)
Relay
LED
ACK
pressed
Manual (latching)
Relay
LED
ACK
pressed
Manual only after passing above Reset (latching)
In Manual mode, ACK can be pressed anytime to turn the relay "off".
For the relay to turn back "on", the signal must go above set point, and
then go below it.
43
Page 44
PD865 Snooper Modbus Serial Input Meter Instruction Manual
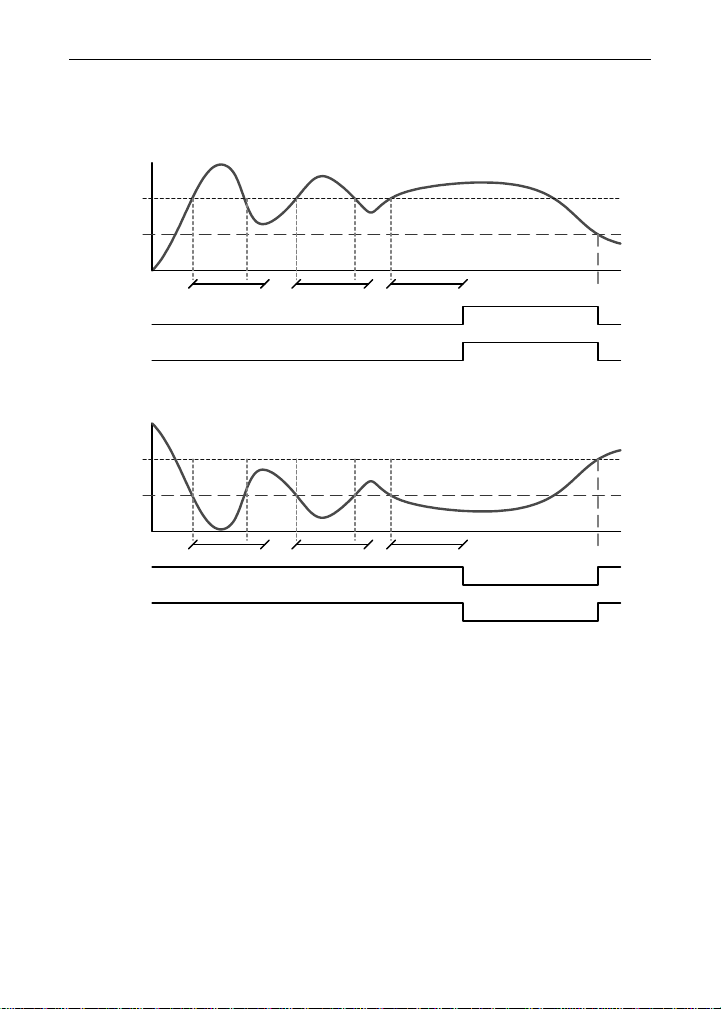
Time Delay Operation
The following graphs show the operation of the time delay function.
Input
Set
Reset
<Tdelay <Tdelay >=Tdelay
Relay
LED
*
On Time Delay
Input
Set
Reset
<Tdelay <Tdelay >=Tdelay
Relay
LED
*
Off Time Delay
If the signal crosses the set point, the On time delay timer starts and the
relay trips when the time delay has elapsed. If the signal drops below
the set point (high alarm) before the time delay has elapsed, the On
time delay timer resets and the relay does not change state. The same
principle applies to the Off time delay.
* Note: The LED is not affected by Time Delay when “Automatic or
Manual” reset mode is selected. Rather the LED follows the set
and reset points.
44
Page 45
PD865 Snooper Modbus Serial Input Meter Instruction Manual
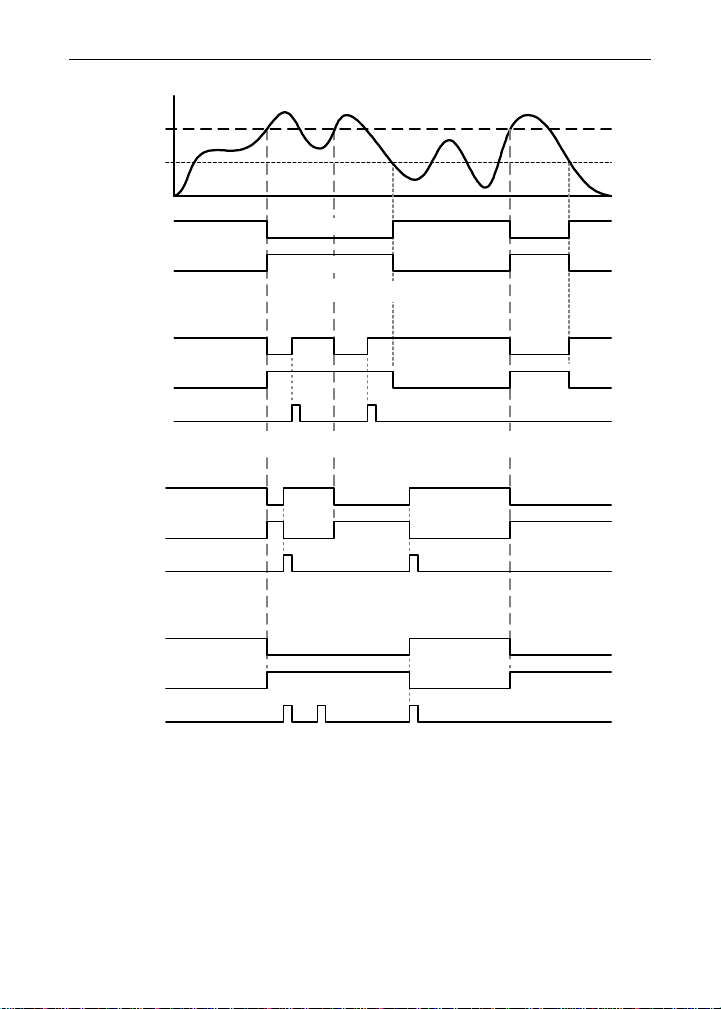
High Alarm with Fail-Safe Operation (Set > Reset)
Input
Set
Reset
Relay
LED
energized
off
de-energized
on
Automatic (non-latching)
Relay
LED
ACK
pressed
Automatic or Manual (non-latc h in g)
Relay
LED
ACK
pressed
Manual (latching)
Relay
LED
ACK
pressed
Manual only after passing below Reset (latching)
Fail-safe operation: relay coil is energized in non-alarm condition. In case of
power failure, relay will go to alarm state.
45
Page 46
PD865 Snooper Modbus Serial Input Meter Instruction Manual
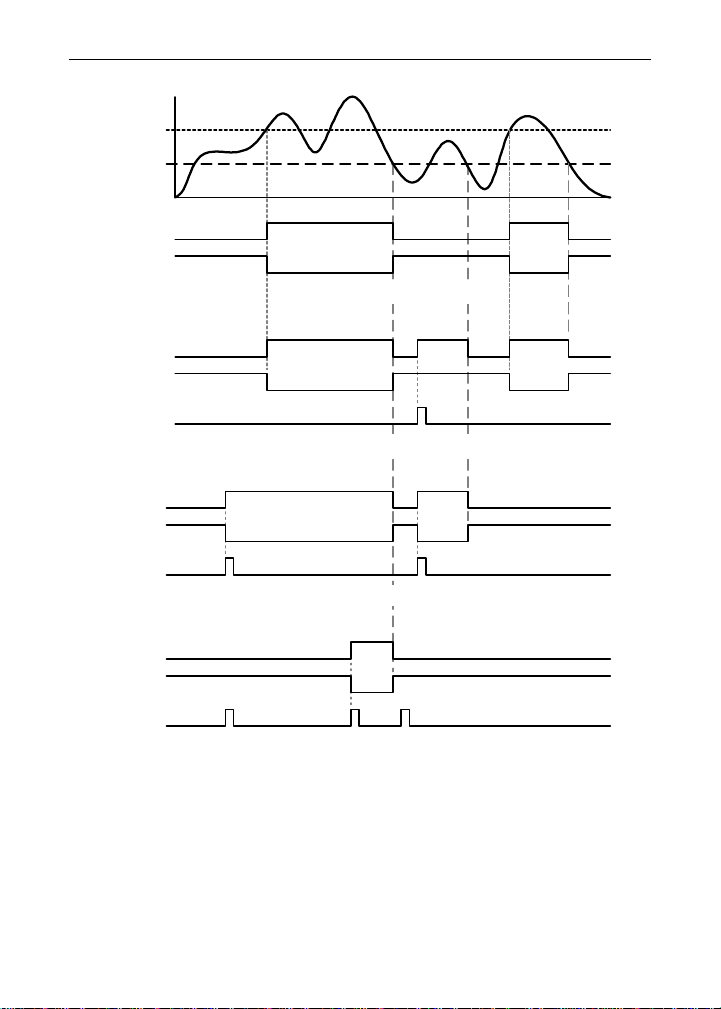
Low Alarm with Fail-Safe Operation (Set < Reset)
Input
Reset
Set
Relay
LED
de-energized
on
energized
off
Automatic (non-latching)
Relay
LED
ACK
pressed
Automatic or Manual (non-latching)
Relay
LED
ACK
pressed
Manual (latching)
Relay
LED
ACK
pressed
Manual only after passing above Reset (latching)
Fail-safe operation: relay coil is energized in non-alarm condition. In case of
power failure, relay will go to alarm state.
46
Page 47
PD865 Snooper Modbus Serial Input Meter Instruction Manual
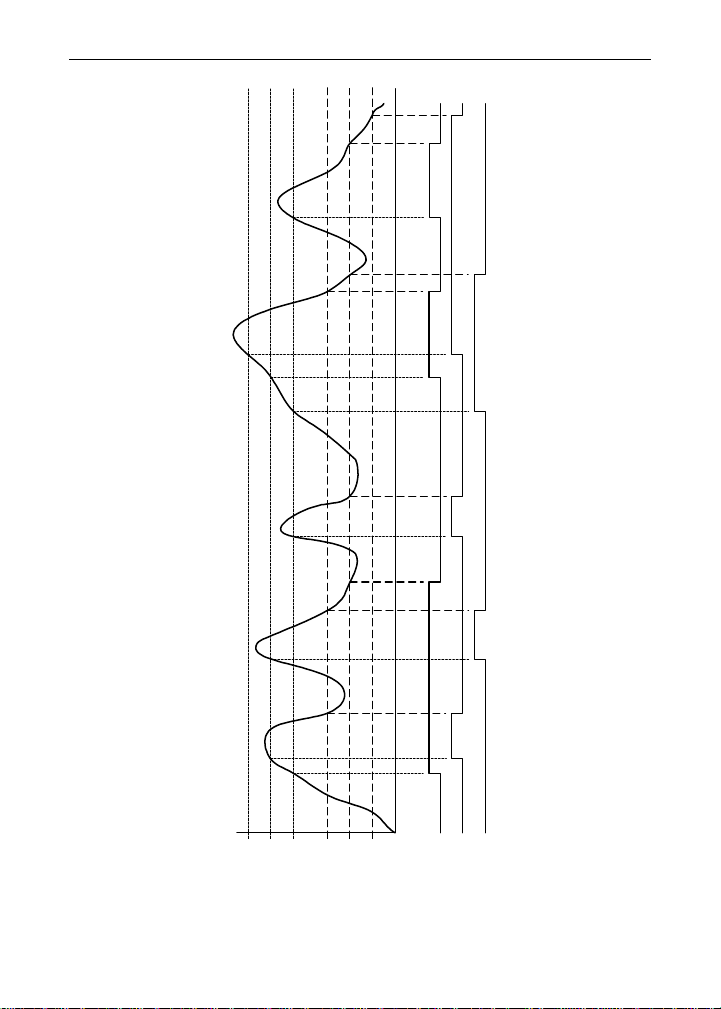
Pump Alternation Example for 3 Relays
Input
1. LEDs indicate the relay status.
Relay 1
Relay 2
Relay 3
Relay1 Set
Relay2 Set
Relay3 Set
Relay3 Reset
Relay2 Reset
Relay1 Reset
2. Any combination of 2 to 4 relays are available for alternating pump control.
Notes:
47
Page 48
PD865 Snooper Modbus Serial Input Meter Instruction Manual
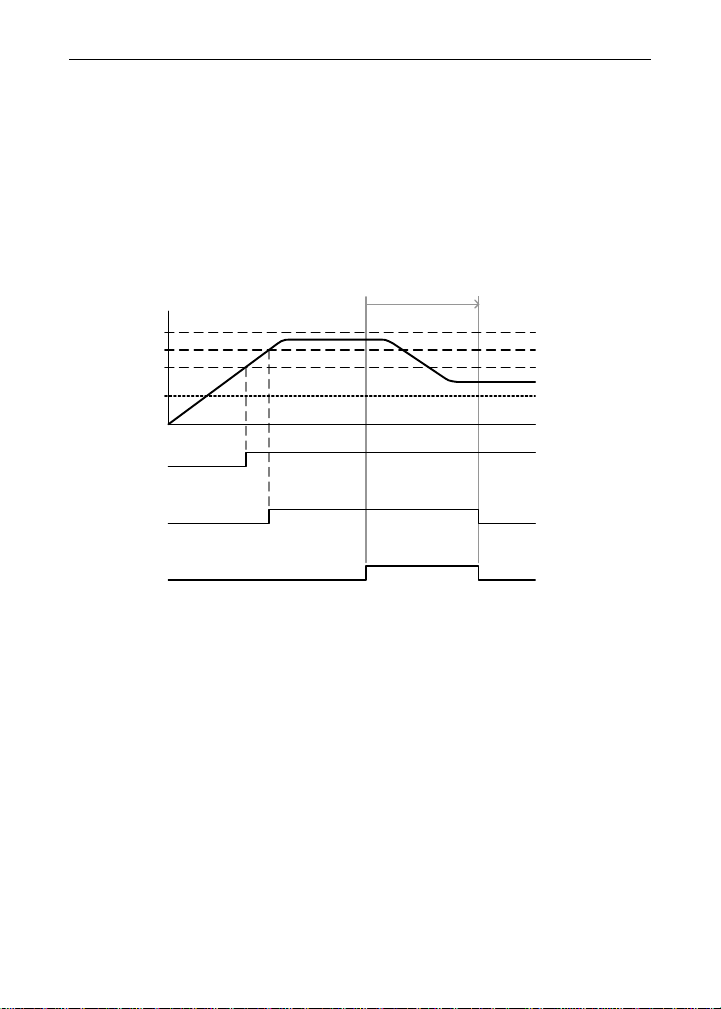
Relay Operation After Communications Break
When a Master meter fails to receive a reply from the slave it is called a
Communications Break. The relays can be programmed to react to this
event by going On, Off, or No Action. After communications is restored
the relays are turned off or on based on their operating mode and their
set and reset points, without regard to their prior state. This is similar to
the auto initialization on power up. Below is a diagram showing three
examples.
The same is true for a meter set up to operate in Snooper mode.
Relay 3 Set
Relay 2 Set
Relay 1 Set
Relay 1 to 3
Reset
Input
Communications
Break
No Serial
Communications
Communications
Restored
Relay 1
Manual mode
Relay 2
Manual mode
Relay 3
Auto mode
de-energized
energized
48
Communications
Break: No Actio n
Communications
Break: Relay "on "
Communications
Break: Relay "on "
Page 49
PD865 Snooper Modbus Serial Input Meter Instruction Manual
Scaling the 4-20 mA Analog Output (Aout)
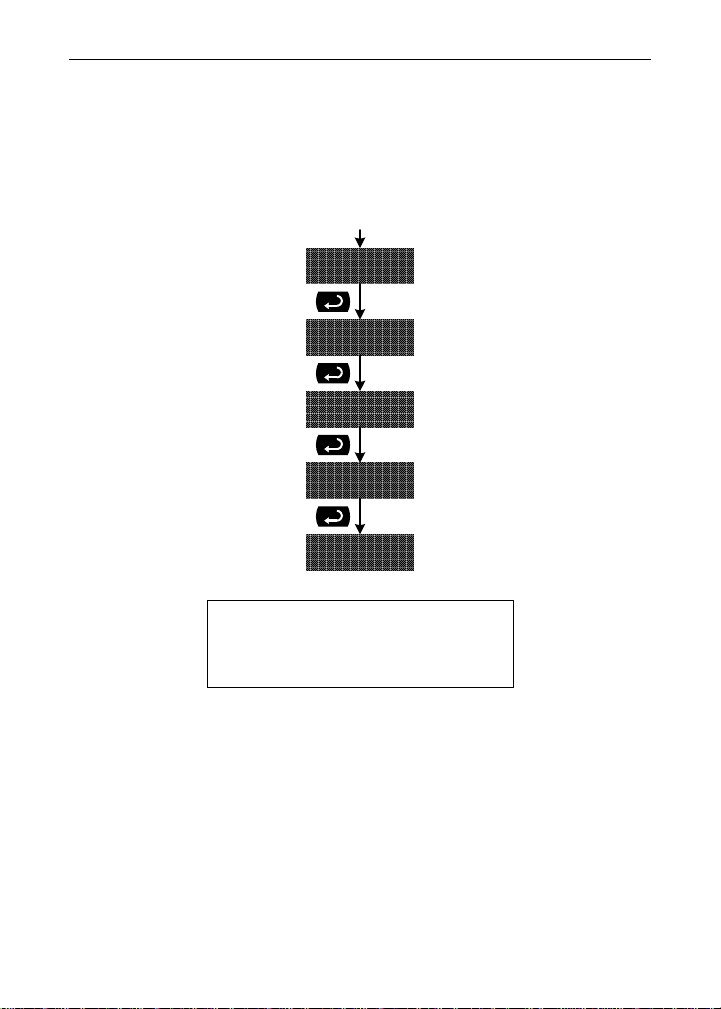
The 4-20 mA analog output can be scaled to provide a 4-20 mA signal
for any display range selected. No equipment is needed to scale the
analog output; simply program the display values to the corresponding
mA output signal.
aout
Dis 1
out 1
Dis 2
out 2
For instructions on how to program
numeric values see Setting
Numeric Values, page 29.
49
Page 50
PD865 Snooper Modbus Serial Input Meter Instruction Manual
Setting Up the Password (pass)
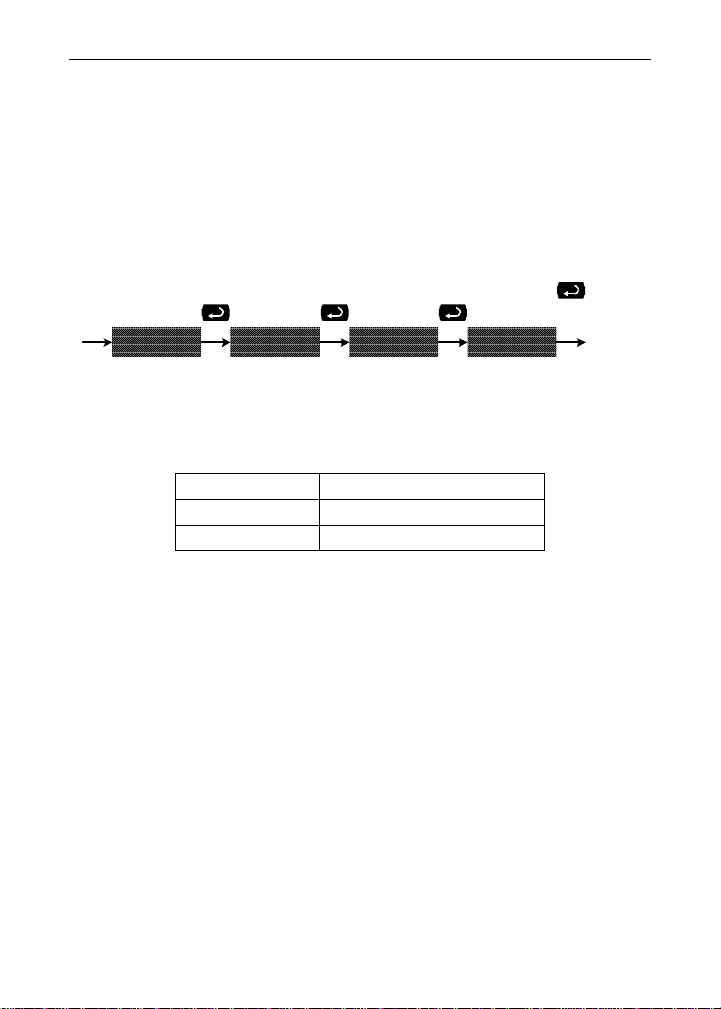
The Password menu is used to program a four-digit password to
prevent unauthorized changes to the programmed parameter settings.
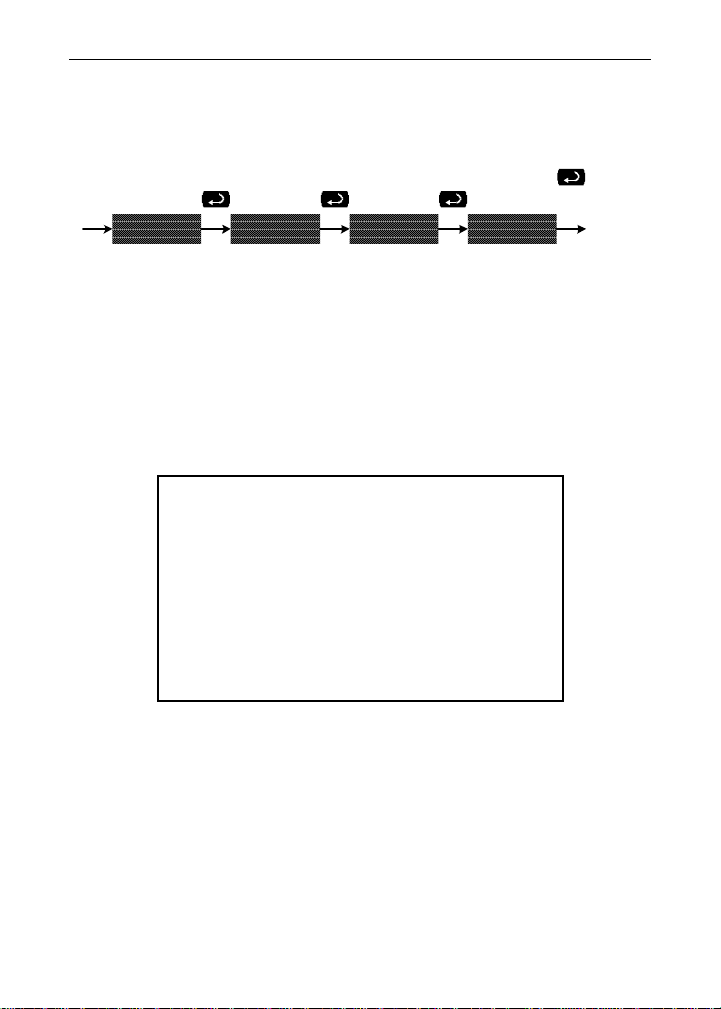
Locking the Meter
Enter the Password menu and program a four-digit password.
For instructions on how to program numeric values see Setting Numeric
Values, page 29.
or
3 seconds
pass unloC loCd0000
Program
Password
Record the password for future reference. If appropriate, it may be
recorded in the space provided.
Model:
Serial Number:
Password: __ __ __ __
Return
to Run
50
Page 51
PD865 Snooper Modbus Serial Input Meter Instruction Manual
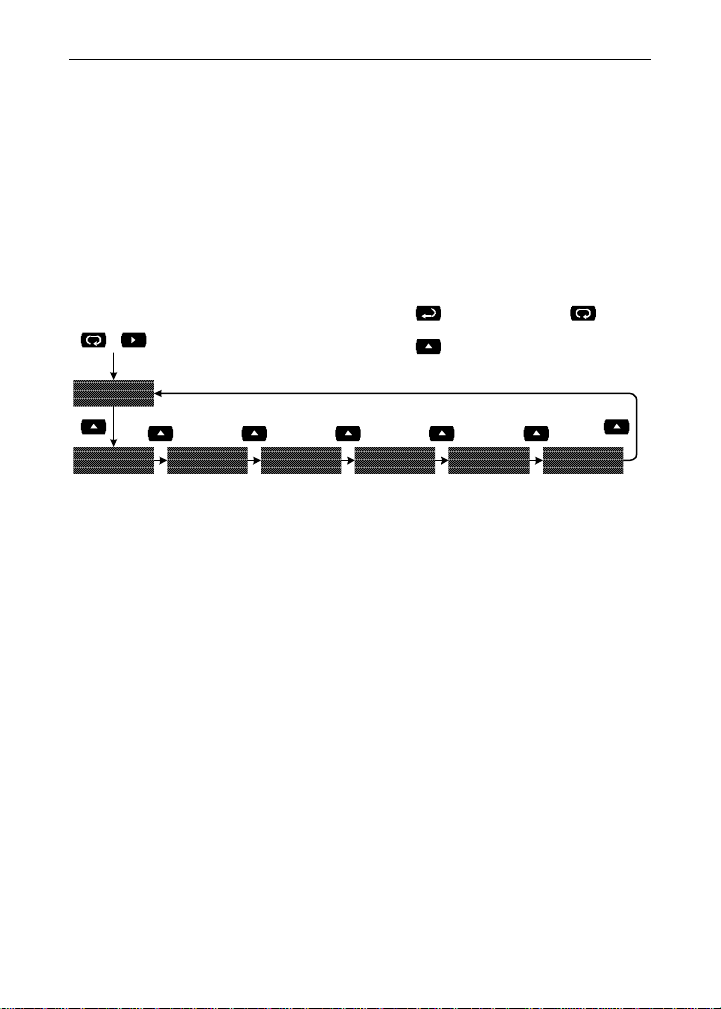
Unlocking the Meter
If the meter is password protected, the correct password must be
entered in order to make changes to the parameter settings.
or
3 seconds
pass loCd unloC0000
Enter
Password
Return
to Run
Entering the correct four-digit number sets the password to 0000,
disabling the protection.
Changes to the programmed parameter settings are allowed only with
the password set to 0000.
If the password entered is incorrect, the meter displays (Locked) for
about two seconds, then it returns to Meter Run. To try again, press
Enter/Ack while the Locked message is displayed.
Forgot the Password?
The password may be disabled by the following
procedure:
1. Note display reading prior to pressing the Menu
button. Ignore decimal point and sign.
2. Access the Password menu, add 2 to the noted
reading and enter that number as the password
(e.g. display reading = -1.23, password = 0125).
51
Page 52
PD865 Snooper Modbus Serial Input Meter Instruction Manual
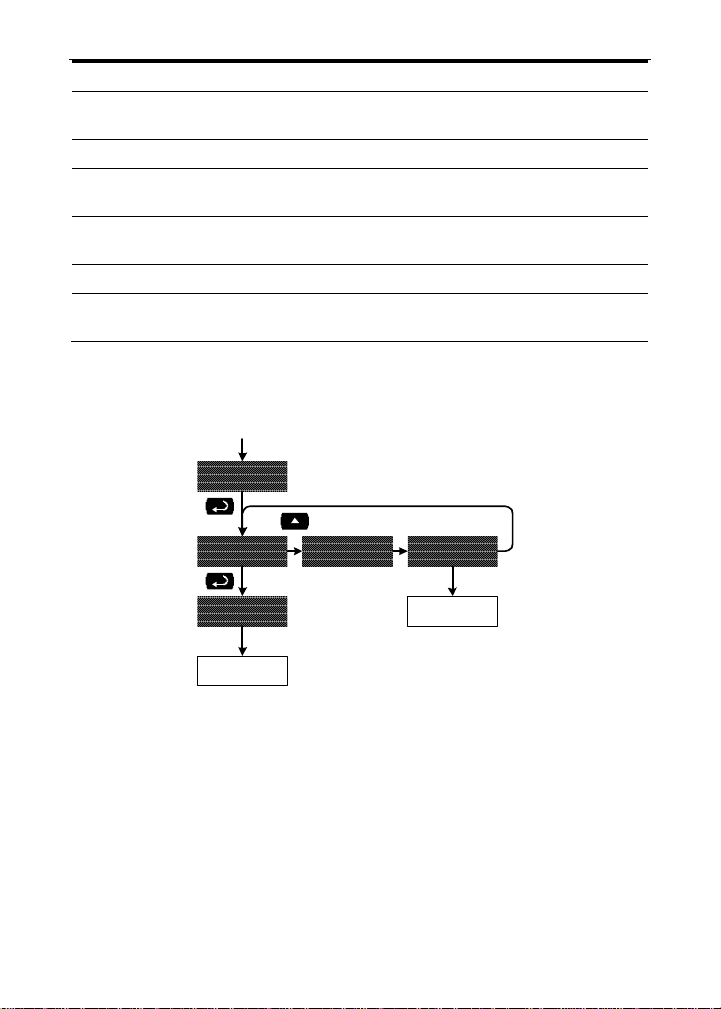
Advanced Features Menu
To simplify the setup process, functions not needed for most
applications are located in the Advanced Features menu: Display
Function, Noise Filter, Noise Filter Bypass, Cutoff, Analog Output
Programming, Display Intensity, and Information.
Press and hold the Right arrow and Menu buttons for three
seconds to access the Advanced Features. (Tip: press and hold the
Right arrow button first, then the Menu button). Press the Up arrow
button to scroll through the advanced features menu.
Press and hold
for 3 seconds
Press Enter/Ack to
Make Selections
Press Up A rrow t o
Scroll Through
Choices
Press Menu to Ex it
at any Time
funC
filter bypass Cutoff aoutpr D-inty info
Press Menu at any time, to exit and return to Meter Run. Changes
made to settings prior to pressing Enter/Ack are not saved.
Changes to the settings are saved to memory only after pressing
Enter/Ack.
The display automatically moves to the next menu every time a
setting is accepted by pressing Enter/Ack.
52
Page 53

PD865 Snooper Modbus Serial Input Meter Instruction Manual
Advanced Features Menu & Display Messages
Display Parameter Action/Setting
funC
Linear
no Pts
SQuare
Prog E
FiLtEr
bYPASS
CutofF
aoutPr
SourCE
diSP
nmAX
nmin
reg
O-rang
U-rang
break
nmaX
Function
Linear
Number of Points
Square Root
Programmable
Exponent
Filter
Bypass
Cutoff
Analog Output
Program
Analog Output
Data Source
Display Source
Maximum
Display Source
Minimum Display
Source
Register Source
Overrange
Underrange
Communications
Break
Max Analog
Output
Enter Display Function menu.
Select Linear Display Function.
Enter the number of points for Linear Display
Function (2 to 16).
Select Square Root Display Function.
Select Programmable Exponent Display
Function. Programmable from 0.50000 to
2.99999.
Set noise filter value.
Set filter bypass value.
Set low-flow cutoff value.
Enter Analog Output Programmable
parameters menu.
Enter Analog Output Data Source menu.
Select Display for Analog Output Data
Source.
Select Maximum Display value for Analog
Output Data Source.
Select Minimum Display value for Analog
Output Data Source.
Select Modbus Register for Analog Output
Data Source.
Enter the Analog Output value for an
Overrange condition.
Enter the Analog Output value for an
Underrange condition.
Enter the Analog Output value when
Communications Break is detected.
(Available also in Slave Mode v1.1 & up).
Enter the maximum value allowed for the
Analog Output.
53
Page 54
PD865 Snooper Modbus Serial Input Meter Instruction Manual
Display Parameter Action/Setting
nmin
CALib
nman
Auto
d-inty
info
Min Analog
Output
Calibration
Manual
Automatic
Display Intensity
Information
Enter the minimum value allowed for the
Analog Output.
Enter the Analog Output Calibration menu.
Perform a manual calibration on the Analog
Output.
Perform an automated calibration on the
Analog Output.
Set the display intensity.
Display software version and S/N
information.
Display Math Function (func)
The input data can be scaled using one of three selectable functions:
Linear, Square Root, or Programmable Exponent.
funC
linear square Prog e
No pts
Enter Number
of Points
Enter Exponent
Linear: The Linear function can be programmed to have from 2 to
16 points.
The Square Root and Programmable Exponent functions have 2
points.
The Programmable Exponent can be programmed from 0.50000 to
2.99999. Setting it to 0.50000 is the same as selecting the Square
Root function.
54
Page 55

PD865 Snooper Modbus Serial Input Meter Instruction Manual
Noise Filter (filter)
Most applications do not require changing this parameter. It is intended
to help attain a steady display with an unsteady (noisy) input data.
The field selectable noise filter averages any minor or quick chan ges in
the input data and displays the reading with greater stability.
Increasing the filter value will help stabilize the display, however this will
reduce the display response to changes on the input data.
The filter level may be set anywhere from 2 to 199.
Setting the filter value to zero disables the filter function, and the bypass
setting becomes irrelevant.
Noise Filter Bypass (bypass)
The meter can be programmed to filter small input changes, but allow
larger input changes to be displayed immediately, by setting the bypass
value accordingly.
If the input signal goes beyond the bypass value, it will be displayed
immediately with no averaging done on it.
The noise filter bypass value may be set anywhere from 0.2 to 99.9.
Increasing the bypass value may slow down the display response to
changes on the input signal.
Low-Flow Cutoff (CutofF)
The low-flow cutoff feature allows the meter to be programmed so that
the often unsteady output from a differential pressure transmitter, at low
flow rates, always displays zero on the meter.
The cutoff value may be programmed from 0 to 999999. When the input
data is below the cutoff value, the meter will display zero. Programming
the cutoff value to zero disables the cutoff.
55
Page 56
PD865 Snooper Modbus Serial Input Meter Instruction Manual
Analog Output Programming (aoutpr)
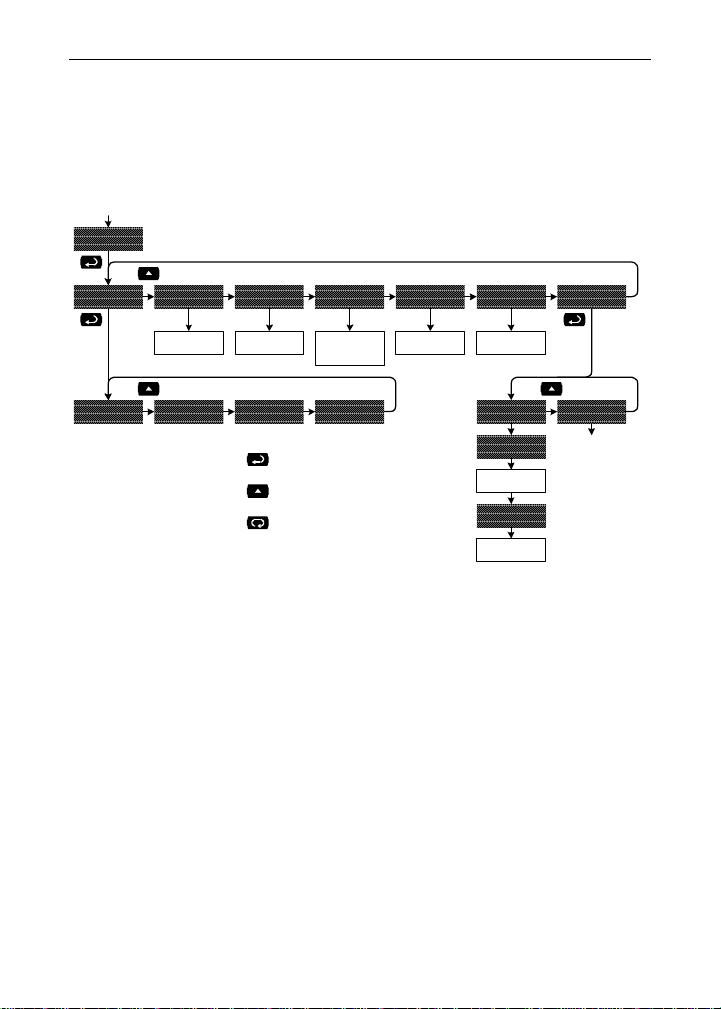
The 4-20 mA analog output can be programmed for its source of data,
overrange and underrange, absolute max and min output, and
communications break values. It can also be calibrated manually or
automatically.
Aoutpr
sourCe O-rang U-rang break nmax
Enter Over-range
disp nmax
Press En te r/ Ack to
Make Selections
Press Up Arro w to
Scroll Through Choices
Press Menu to Exit at
Val ue
Enter Under-range
any Time
Value
Enter
Communication-
Break Value
nmin reg
Comm unication-Break menu
*
available only in Master Mode.
Enter Ma xim u m
Output Val ue
nmin
Enter Mi ni m um
Output V alue
nman auto
4 nma
Enter Actual
4 mA Value
20 nma
Enter Actual
20 mA Val ue
Calib
Factory Use
Only!
The overrange and underrange values are the values that will be
output when the display shows an overrange or underrange
condition.
The max and min values are the absolute limits for the 4-20 mA
output.
The communications break value determines the mA output when a
slave fails to reply to a command within the Response time.
For calibration instructions, see 4-20 mA Output Calibration,on
page 57.
*
56
Page 57

PD865 Snooper Modbus Serial Input Meter Instruction Manual
4-20 mA Output Calibration
There is no need to recalibrate the 4-20 mA output when
first received from the factory.
T he 4-20 mA output is factory calibrated prior to shipment.
The calibration equipment is certified to NIST standards.
The 4-20 mA output can be calibrated in the field. A calibrated digital
meter with an input range of at least 25 mA and a resolution of 1 μA is
recommended.
!
If an uncalibrated meter or a meter with less resolution is used,
the calibration of the 4-20 mA output could be adversely affected.
4-20 mA Output Calibration Procedure
1. Wire the PD865 4-20 mA output to a current loop that includes a
power supply (internal or external 12 to 24 VDC), and the current
input on the digital meter.
2. Turn on all devices. Allow for a 15 to 30 minute warm-up.
3. Go to the Advanced Features menu, and navigate to the Analog
Output (Aout)/Calibration (Calib) menu and press Enter. Select
Manual calibration (nmAn) and press Enter.
4. The display will show 4 nmA. The PD865 mA output should now
be close to 4 mA. Press Enter and the display will show 04.0000.
Enter the actual value read by the digital meter and press Enter.
5. The display will show 20 nmA. The PD865 mA output should now
be close to 20 mA. Press Enter and the display will show
20.0000. Enter the actual value read by the digital meter and
press Enter.
6. The PD865 will now calculate the calibration factors and store
them.
57
Page 58
PD865 Snooper Modbus Serial Input Meter Instruction Manual
Display Intensity (d-inty)
The Display Intensity function allows the selection of eight levels of
intensity for various lighting conditions.
D-inty
int1 int8int2
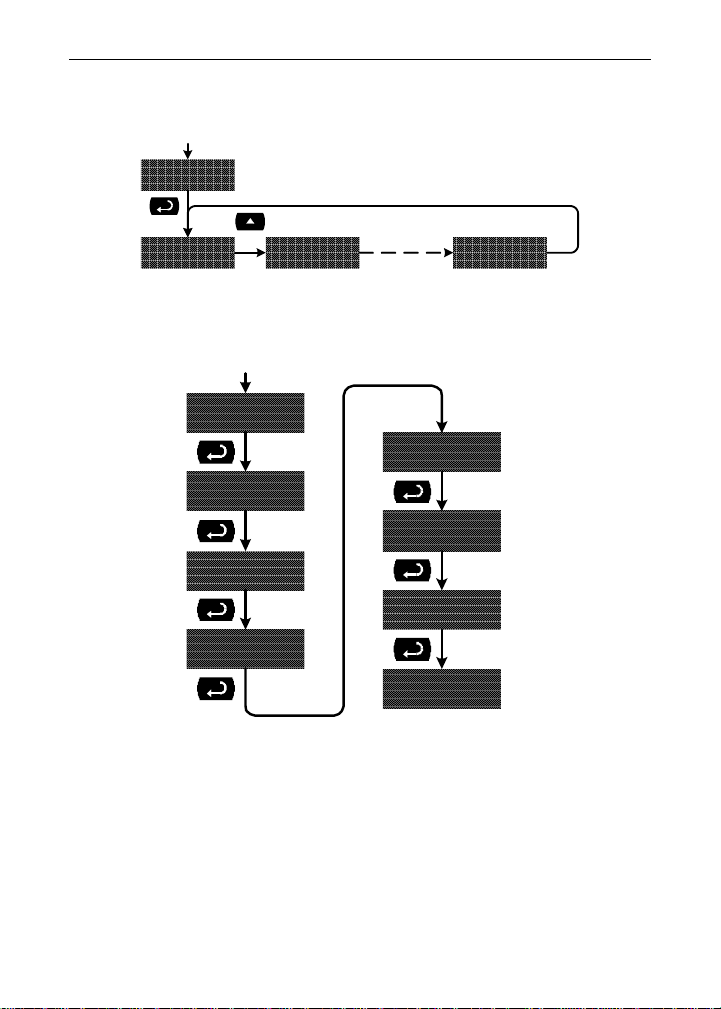
Information (info)
The Information menu shows the firmware, version, and serial numbers.
info
Sn
sft055
*
0803
*
ver
1234
01.000
*
5678
Th ese num bers ar e f or il l ustrat ion only . Act ual
*
values may vary from t hose sh own. The serial
nu m ber c an be up to 16 characters long.
The serial number only displays numbers. If non-numeric characters are
present, they will be displayed as underlines.
*
*
58
Page 59
PD865 Snooper Modbus Serial Input Meter Instruction Manual
OPERATION
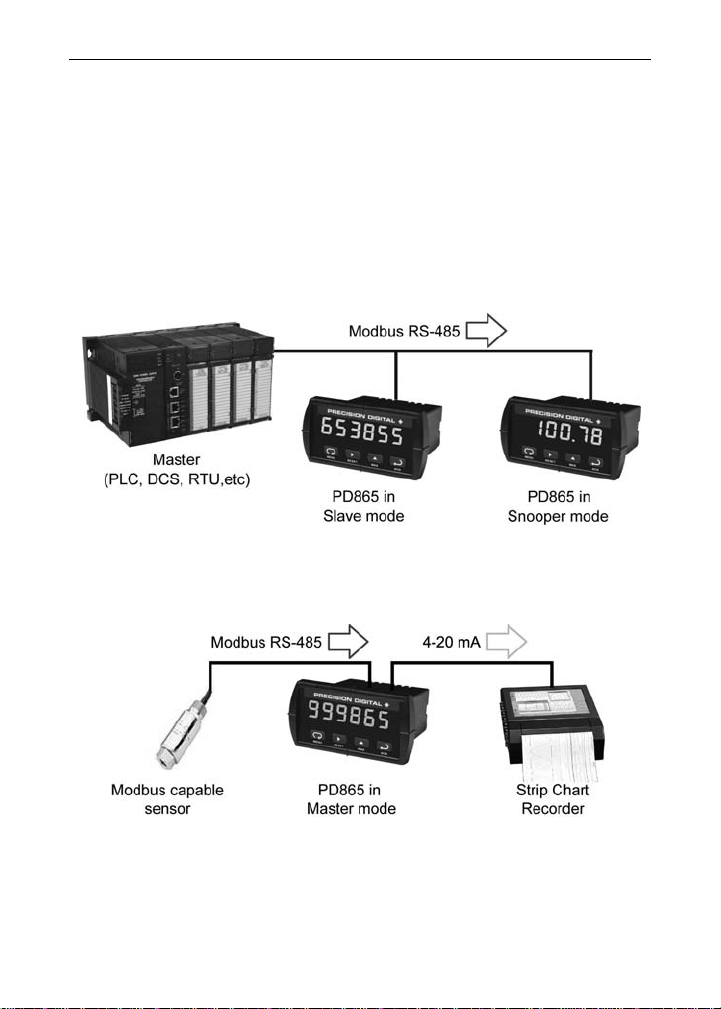
The PD865 meter is capable of operating as a Modbus Master, Slave or
Snooper. As a Slave, the PD865 requires connection to a Master
device: PLC, DCS, etc. As a Master, the PD865 interfaces up to eight
slave devices. As a Snooper it can be connected anywhere in the
RS-485 bus to read any of the variables being requested by the Master
device.
Master and Slave Connections
The following figures show a few possible connection schemes.
Figure 12: PD865 Slave & Snooper Connected to a Master
Figure 13: PD865 Master Connected to a Smart Sensor & Chart
Recorder
59
Page 60
PD865 Snooper Modbus Serial Input Meter Instruction Manual
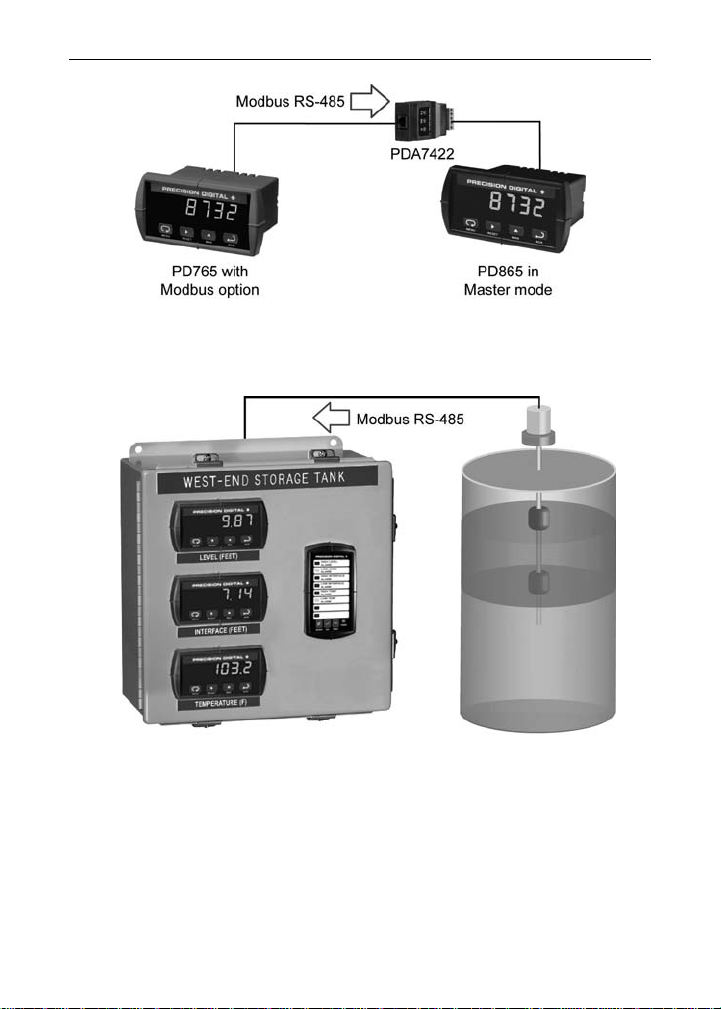
Figure 14: PD865 Master Connected to a PD765 Meter
Figure 15: PD865 Master & Snoopers Connected to Multivariable
Level Transmitters
60
Page 61
PD865 Snooper Modbus Serial Input Meter Instruction Manual
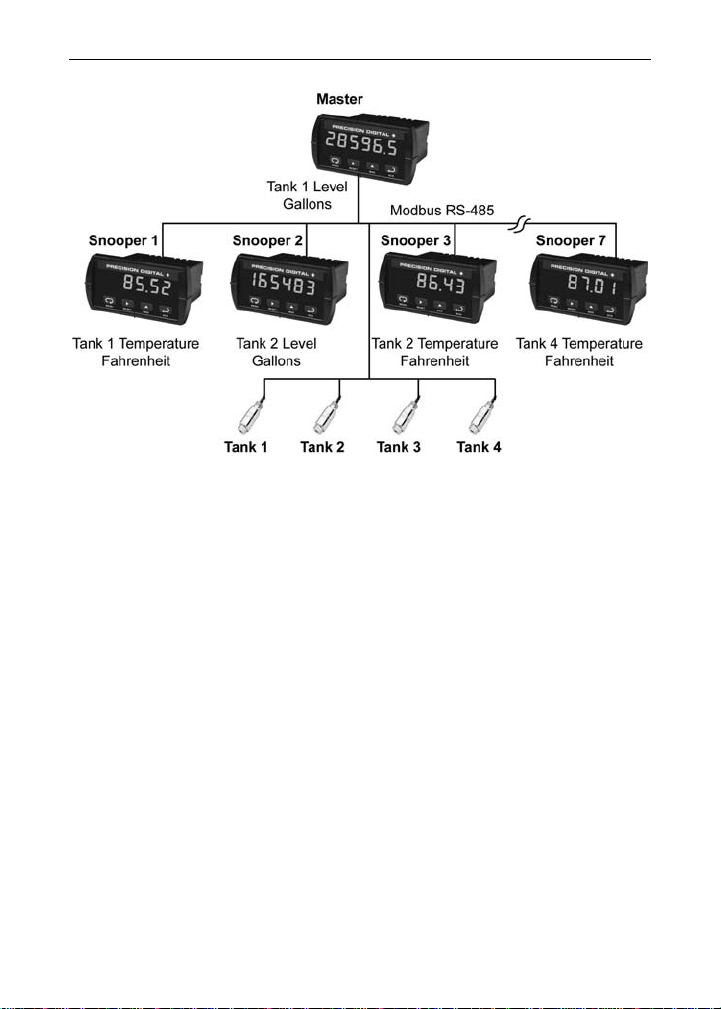
Figure 16: PD865 Master & Snoopers Connected to Level and
Temperature Sensors
61
Page 62
PD865 Snooper Modbus Serial Input Meter Instruction Manual
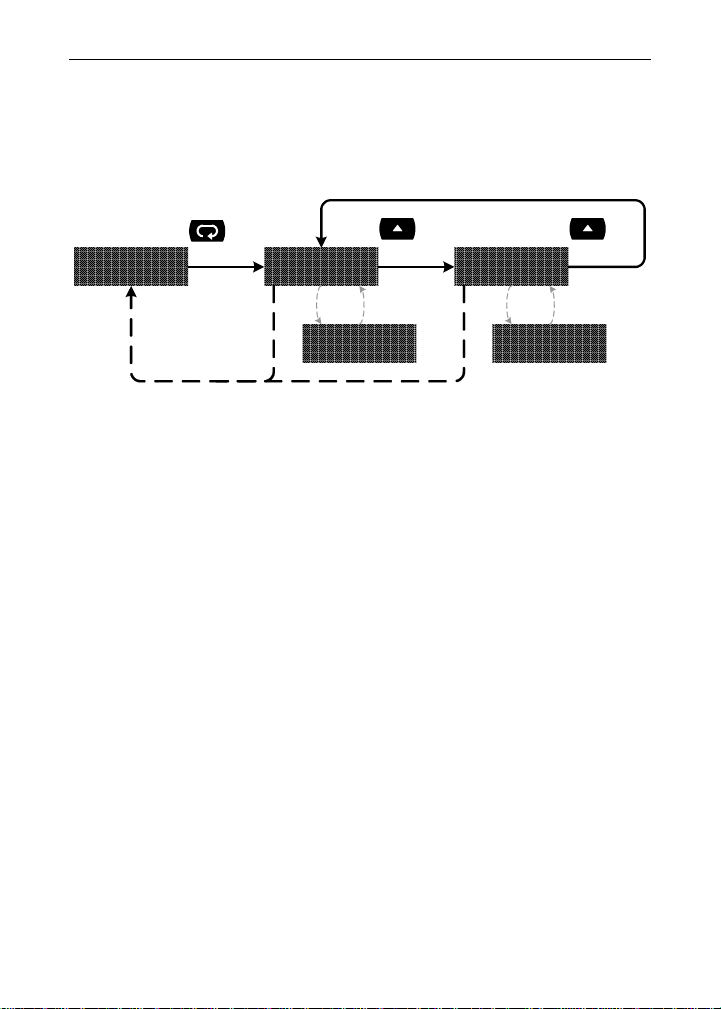
Maximum/Minimum Readings
The primary function of the front panel buttons during operation is to
display the maximum and minimum readings reached by the process or
temperature inputs.
Present
Reading
2468 Hi lo
9865 201
10 Sec Time Out
1. Press Up arrow/Max button to display maximum reading since the
last reset/power-up. The display will switch between Hi and the
reading.
2. Press Up arrow/Max again to display the minimum reading since
the last reset/power-up. The display will switch between Lo and the
reading.
3. Press Enter/Ack to hold Max/Min display reading, the meter will
continue to track new Max/Min readings.
4. If Enter/Ack is not pressed, the Max/Min display reading will time
out after ten seconds and the meter will return to display the actual
reading.
5. To reset the Max/Min value, press the Right arrow/Reset button
while the Max/Min is being displayed. This will reset it to the
present reading.
62
Page 63
PD865 Snooper Modbus Serial Input Meter Instruction Manual
TROUBLESHOOTING
If the meter is not working as expected, refer to the troubleshooting tips
on page 68.
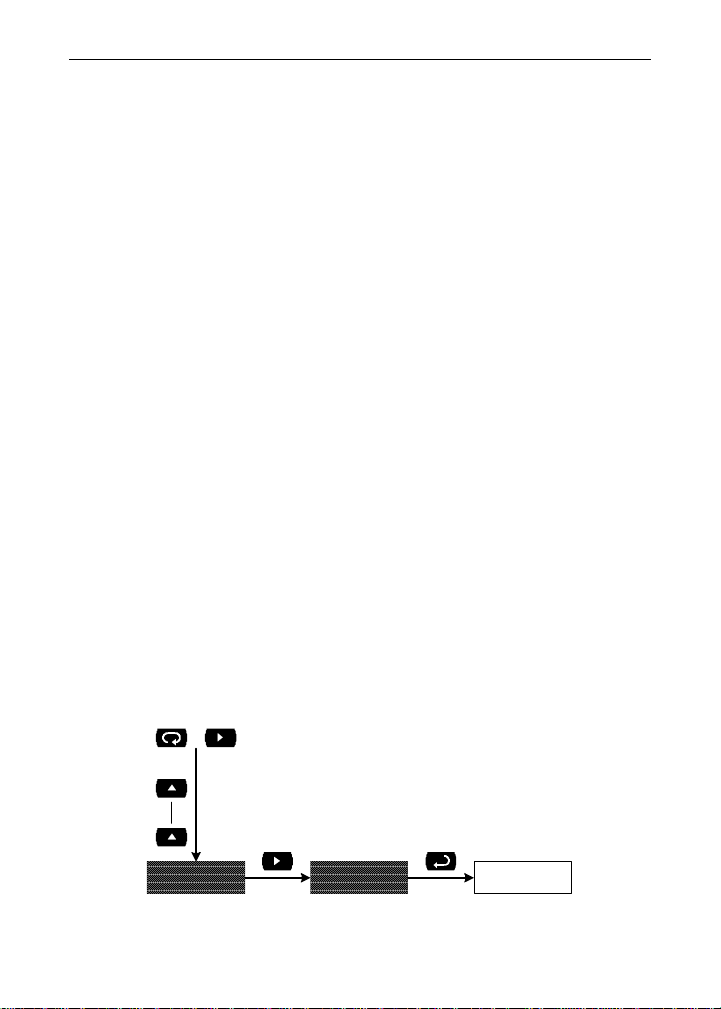
Determining Software Version
To determine the software version of the meter:
1. Go to the Information menu (info) in the Advanced Features
menu and press the Enter/Ack button.
2. Press Enter/Ack to access the software number (SFT), version
(UER), and serial number (Sn) information. Write down the
information as it is displayed. Continue pressing Enter/Ack until
all the information is displayed.
Reset Meter to Factory Defaults
When the parameters have been changed in a way that is difficult to
determine what is happening, it might be better to start the setup
process from the factory defaults.
Instructions to load factory defaults:
1. Enter the Advanced features menu. See Advanced Features Menu,
page 52.
2. Press Up arrow several times to go to the Information menu.
3. Press and hold Right arrow/Reset for five seconds, then press
Enter/Ack when display flashes reset.
Note: If Enter/Ack is not pressed within three seconds, display
returns to meter Run.
4. The meter loads the factory default settings, and goes through an
initialization sequence (same as on power-up).
Press and hold
for 3 seconds
info
Press and hold
for 5 seconds
Flashing
Display
reset
63
Meter
Reinitializes
Page 64

PD865 Snooper Modbus Serial Input Meter Instruction Manual
Factory Defaults & User Settings
The following table shows the factory setting for most of the
programmable parameters on the meter. Next to the factory setting, the
user may record the new setting for the particular application. Note that
all settings are loaded with a default value, even though some settings
may not be used. For example, the Slave mode is the default setting,
but all of the Master mode settings have their default values loaded.
Model: ______________ S/N: _______________ Date: _________
Parameter Display Default Setting User Setting
Mode
Function Code
Number of PVs
Slave ID PV1
Register
Number PV1
Data Type
Byte Order
Polling Time
Slave Response
Timeout
Baud
Parity
Byte-to-byte
timeout*
Display decimal
point
Input 1
Display 1
Input 2
Display 2
nmode
FunCode
Pv.nbr
Id-Pv1
Reg.Pv1
Data.1
1234
t-poll
t-resp
baud
parity
t-byte
dddd.dd
inp 1
dis 1
inp 2
dis 2
Master
03
1
247
40001
(5 digit)
Short integer
(Binary & Signed)
Big-endian
2.0 second
5.0 second
2400
Even
0.01 second
2 places
-199999
-1999.99
999999
9999.99
64
Page 65

PD865 Snooper Modbus Serial Input Meter Instruction Manual
Parameter Display Default Setting User Setting
Input 3
Display 3
Input 4
Display 4
Input 5
Display 5
Input 6
Display 6
Input 7
Display 7
Input 8
Display 8
Input 9
Display 9
Input 10
Display 10
Input 11
Display 11
Input 12
Display 12
Input 13
Display 13
Input 14
Display 14
Input 15
Display 15
Input 16
inp 3
dis 3
inp 4
dis 4
inp 5
dis 5
inp 6
dis 6
inp 7
dis 7
inp 8
dis 8
inp 9
dis 9
inp 10
dis 10
inp 11
dis 11
inp 12
dis 12
inp 13
dis 13
inp 14
dis 14
inp 15
dis 15
inp 16
300.00
300.00
400.00
400.00
500.00
500.00
600.00
600.00
700.00
700.00
800.00
800.00
900.00
900.00
1000.00
1000.00
1100.00
1100.00
1200.00
1200.00
1300.00
1300.00
1400.00
1400.00
1500.00
1500.00
1600.00
65
Page 66

PD865 Snooper Modbus Serial Input Meter Instruction Manual
Parameter Display Default Setting User Setting
Display 16
Relay 1 Action**
Relay 1
Failsafe**
Relay 1
On-Delay**
Relay 1
Off-Delay**
Relay 1 Break
Action**
Relay 1 Set
Relay 1 Reset
Relay 2 Set
Relay 2 Reset
Relay 3 Set
Relay 3 Reset
Relay 4 Set
Relay 4 Reset
4-20 mA Scale:
Display 1
4-20 mA Scale:
Output 1
4-20 mA Scale:
Display 2
4-20 mA Scale:
Output 2
Password
dis 16
act 1
fls 1
on 1
off 1
break1
Set 1
RSt 1
Set 2
RSt 2
Set 3
RSt 3
Set 4
RSt 4
dis 1
out 1
dis 2
out 2
pass
1600.00
Automatic
Off
0 seconds
0 seconds
Relay goes on
70.00
60.00
100.00
90.00
130.00
120.00
160.00
150.00
0.00
4.000 mA
200.00
20.000 mA
0000 (unlocked)
66
Page 67

PD865 Snooper Modbus Serial Input Meter Instruction Manual
Advanced Features
Display
Function
Number of
Points
Filter
Bypass
Cutoff
4-20 mA:
Data Source
4-20 mA:
Overrange
4-20 mA:
Underrange
4-20 mA:
Comm. Break
4-20 mA:
Maximum
4-20 mA:
Minimum***
Display intensity
Notes:
* The byte-to-byte timeout setting might be updated automatically
depending on the baud rate selected and the previous timeout setting.
The minimum timeout allowed is saved to memory if a lower value is
entered (e.g. If user enters 0.00 with a baud rate of 300, 0.06 is saved).
** These defaults are the same for all four relays.
*** The guaranteed minimum output for the 4-20 mA is 1.000 mA. Lower
values may be possible, but are not guaranteed.
funC
no pts
filter
bypass
CutofF
sourCe
O-rang
U-rang
break
nmax
nmin
inty
Linear
2
0
0.2%
0.00 (disabled)
Display value
21.000 mA
3.000 mA
21.000 mA
23.000 mA
0.000 mA
Level 6
67
Page 68

PD865 Snooper Modbus Serial Input Meter Instruction Manual
Troubleshooting Tips
Symptom Check/Action
No display at all.
Not able to change setup or
programming, LoCd is displayed.
Meter displays error message
during scaling (error).
Master displays a different value
than PD865 display.
PD865 Master displays a different
value than slave device.
PD865 Snooper mode going into
communication break
Display alternates between:
1. Hi and a number
2. Lo and a number
Display flashes -199999.
Display flashes 999999.
Display response is too slow.
Relay operation is reversed.
Relay and status LED do not
respond to signal.
Meter is not communicating.
Meter display occasionally jumps
to another value.
The display locks up or the meter
does not respond at all.
Other symptoms not described
above
Check power at power connector.
Check fuses (not supplied).
Meter is locked, enter correct four-digit
password to unlock.
Check input points for similar values.
Check master data type setting. Make
sure it matches the PD865 data type
found in the Register Table.
Check PD865 data type setting. Make
sure it matches the slave data type.
Increase baud rate and/or poll time.
Press Menu to exit Max/Min display
readings.
The data is less than the Input 1 value.
Use a lower value for Input 1.
The data is greater than the last Input
point value. Use a higher value for the
last Input point.
Check filter and bypass values.
Check:
1. Fail-safe in Setup menu.
2. Wiring of relay contacts.
Check:
1. Relay action in Setup menu.
2. Set and reset points.
Check:
1. Serial cabling (swapped lines).
2. Slave ID, parity, and baud rate.
Check that the polling time is not too
fast for the chosen baud rate. For
example, a polling time of 0.1 seconds
is too fast for 2400 baud.
Cycle the power to reboot the
microprocessor.
Call Technical Support for assistance.
68
Page 69
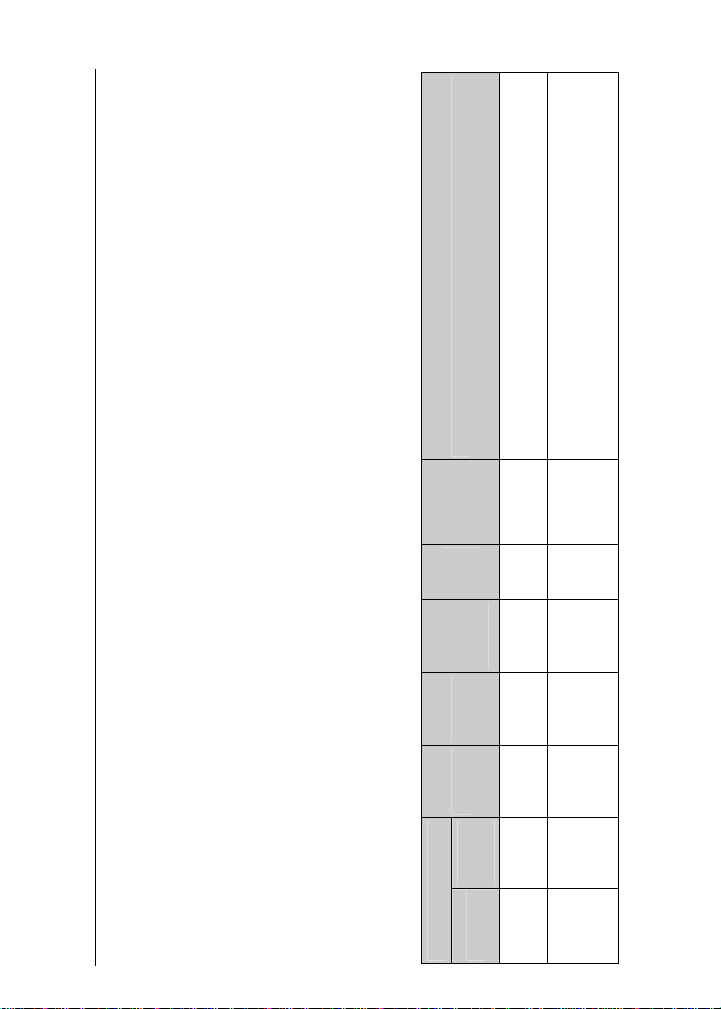
Comments
Represents the display value without the decimal point. Decimal
point setting in 40013.
Represents the Maximum display value, excluding the decimal
point, since last power up or Max. Value reset. Decimal point
setting in 40013. Writing any value will reset the max to the
present display value.
Serial Input Meter Instruction Manual: Register Table
PD865 Snooper Modbus
Code(s)
Function
3
Data
or
Limits
Name Access
Relay acknowledge.
value, Serial settings, Unit address, byte-to-byte timeout, Number of scaling points, Slave Response
timeout, Poll Time, Brightness, Bypass, Cutoff, Filter, Float decimal point.
Communications Break value, Display Value 1, Display Value 2, Output 1, Output 2, Data (mA/bits), and
gain & offset calibration factors.
1
Register
SLAVE MODE REGISTER TABLE
40001 – 40008: Process Value (PV), Max PV, Min PV, relay status, reset max & min Display value, Alarm & Relay status,
40009 – 40027: Initialize meter, Lock, Mode, Data Type, Display Decimal point, Linear/Square Root/Exponent, Exponent
40101 – 40128: Relays; Set & Reset points, Operating Mode, Turn-on & Turn-off delays.
40301 – 40317: 4-20mA output; Mode, Over-range value, Under-range value, Maximum allowed, Minimum allowed,
49201 – 49215: Reserved for user data.
40401 – 40464: Input and Display values for 2 – 16 point scaling.
49101 – 49116: Product ID, Firmware Version, and Manufacturing Serial Number.
Long 03, 04, 16
Type
2
+999999
-199999 to
Read
Display
(0000–
40001 –
Write
value
40002
0001)
-199999 to
Read
Maximum
2 – 3
40003 –
Range
0 – 1
(hex)
Address
Number
69
Long 03, 04, 16
+999999
Write
value
Display
0003)
(0002–
40004
Page 70
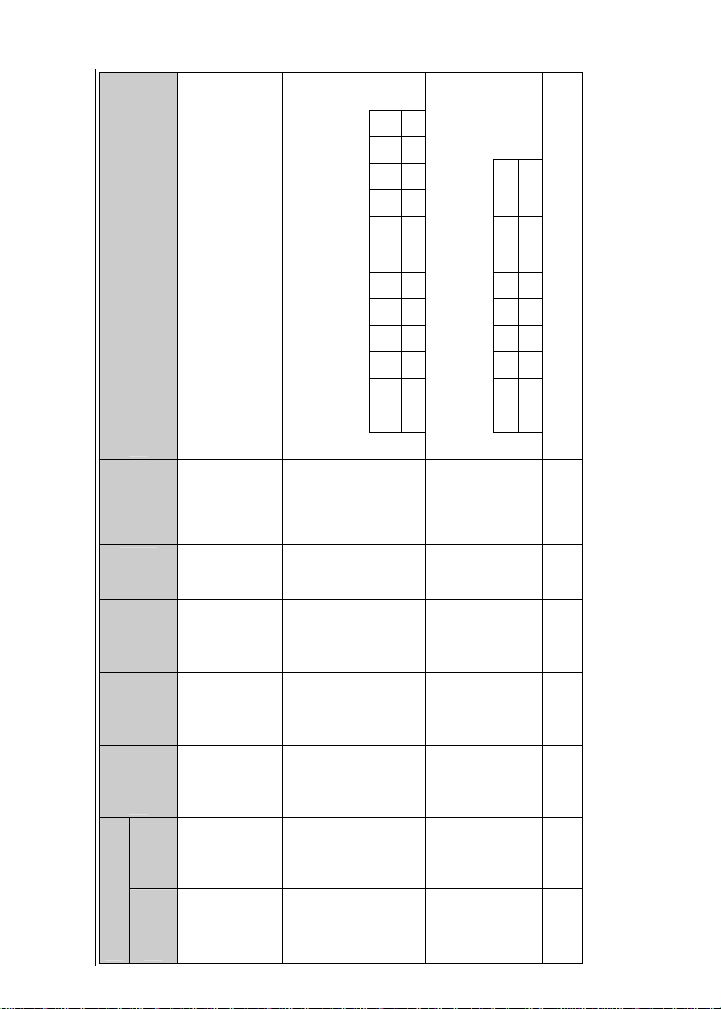
A
A
A
A
A
A
A
A
1
Rly
2
Rly
3
Rly
4
Rly
0000
lm
Comments
Represents the Minimum display value, excluding the decimal
point, since last power up or Min. Value reset. Decimal point
setting in 40013. Can be written to any value between –199999 to
+999999. Writing any value will reset the max to the present
display value.
Read alarm status and energized/non-energized status of relays.
Alarms are read only; the upper byte is ignored for writes. Writing
to a relay is only possible when the relay is in the Disabled mode.
Alm = Alarm. Rly = Relay.
Code(s)
Function
3
Data
Type
2
or
Limits
Range
Serial Input Meter Instruction Manual: Register Table
Name Access
Long 03, 04, 16
+999999
-199999 to
Read
Write
value
Display
Minimum
03, 04,
Bits
1 = In
Alarm
Write
Read both,
Relay
Alarm and
1
lm
2
lm
3
lm
4
15 - 12 11 10 9 8 7 - 4 3 2 1 0
0000
Clear Relay n alarm condition. Set bit equal to 1 to acknowledge.
Only has effect on relays programmed to allow manual
acknowledging.
06
1 = relay
energized
Relays
Status
Alm = Alarm.
Bits 06
0x0000
to 0x0F00
Write
Only
Alarm
acknowled
ge
0000 0000
lm
1
lm
2
lm
3
lm
4
15 - 12 11 10 9 8 7 - 4 3 - 0
0000
Write 0xFF00 to reinitialize the meter. Writing any other data has
no effect.
70
Integer 06
initialize.
0xFF00 to
Write
Only
meter
Initialize
1
Address
Register
PD865 Snooper Modbus
Number
4 – 5
0005)
(hex)
(0004–
40005 –
40006
6
(0006)
40007
7
(0007)
40008
8
(0008)
40009
Page 71

Comments
See note 4.
This register can be read or written in Slave mode only. The mode
can be changed from Slave to Master or Snooper. See Table 6.
This Register is reserved for future use. Reading returns 0xffff and
writing to it has no effect.
See Bit Assignment Table 1.
See Bit Assignment Table 2. Selecting Square Root or Exponent
forces Register 40015 (number of points) to be 2.
Number of scaling points. This cannot be changed if the Transfer
Function is set to Square Root or Exponent.
16
16
03, 04, 06,
(Packed
0x0000 to
Read
03, 04, 06,
BCD)
Word;
bit flags
Not
0x9999
applicable
Read
Write
Write
Code(s)
Function
3
Data
Limits
Serial Input Meter Instruction Manual: Register Table
or
Integer
Type
2
Range
03, 04, 06,
Word;
Not
Read
16
bit flags
applicable
Write
03, 04, 06,
0 to 5 Integer
Read
16
16
16
03, 04, 06,
03, 04, 06,
0 to 2 Integer
2 to 16 Integer
Read
Write
Read
Write
Write
Long 03, 04, 16 If Square Root is selected, this value is ignored.
0.5 to
Read
This is the timeout between bytes of a Modbus frame. It is
automatically changed to 1.5 * character time when the baud rate
is changed.
16
03, 04, 06,
2.99999
0 to 2.54 Integer
Read
Write
Write
71
Name Access
1
Register
PD865 Snooper Modbus
Lock
Mode
selection
Data Type
9
10
(0009)
(hex)
Address
40010
Number
11
(000A)
40011
(000B)
40012
Point
Display
Decimal
12
(000C)
40013
Transfer
Function
13
(000D)
40014
Number of
14
Points
(000E)
15 – 16
40015
40016 –
Byte-to-
Exponent
0010)
(000F –
40017
byte
17
40018
timeout
(0011)
Page 72

Comments
Corresponds to 0.0 to 25.5 seconds X3. Used in Slave mode as the
waiting time for new PV data.
Corresponds to 0.1 to 25.5 seconds. 0 is not allowed. Polling time
has to be greater than or equal to slave response time. Master
mode only.
8 is the brightest level.
Corresponds to 0.2 to 99.9%. If the input steps greater than the
bypass value, it will be displayed immediately, with no filtering
occurring. The number represents percent of full-scale. No effect if
filter = 0.
Display filtering. 0 = no filtering.
New = old + ((new - old)/Filter)
Represents the display value without the decimal point. A value of
000000 disables the cutoff.
See Bit Assignment Table 3.
Master mode: the address of the slave being read.
Slave mode: the PD865 address.
16
16
16
16
16
03, 04, 06,
03, 04, 06,
03, 04, 06,
03, 04, 06,
2 to 999 Integer
Read
03, 04, 06,
0, 2 to 199 Integer
0 to 999999 Long 03, 04, 16
Read
Write
Read
Write
Code(s)
Function
3
Data
Type
2
or
Limits
Serial Input Meter Instruction Manual: Register Table
0 to 255 Integer
Range
Read
Write
1 to 255 Integer
Read
1 to 8 Integer
Read
Write
Write
16
03, 04, 06,
bits
Integer:
Not
applicable
Read
Write
Write
03, 04, 06,
1 to 247 Integer
Read
16
72
Write
Name Access
1
Register
PD865 Snooper Modbus
40026
Settings
(0019)
Unit
26
40027
Address
(001A)
Slave
Timeout
Response
18
(0012)
(hex)
Address
40019
Number
LED
Poll Time
brightness
19
20
(0013)
40020
21
(0014)
40021
Bypass
(0015)
40022
Filter
22
(0016)
23 – 24
40023
Cutoff
(0017 –
40025
40024 –
Serial
25
0018)
Page 73

Function
Data
Limits
Comments
3
or
Code(s)
Type
2
Range
See Bit Assignment Table 1 for operating modes and bit
assignments.
16
03, 04, 06,
0 to 5 Integer
Relay 1 parameters. Set and reset points represent the display value without the
03, 04, 16
Long
(Set &
Reset)
999999
-199999 to
decimal point. See Bit Assignment Table 4 for operating modes and bit
assignments.
06,16
03, 04,
Long
bits
Word:
Integer
Integer
0
0 to 199
0 to 199
Bits 4, 2, 1,
Relay 2 parameters. Set and reset points represent the display value without the
decimal point. See Bit Assignment Table 4 for operating modes and bit
assignments.
06,16
03, 04,
03, 04, 16
Long
Long
(Set &
Reset)
999999
Bits 6, 5
-199999 to
bits
Word:
Integer
Integer
0
0 to 199
0 to 199
Bits 4, 2, 1,
73
Bits 6, 5
Serial Input Meter Instruction Manual: Register Table
1
Register
PD865 Snooper Modbus
Name Access
Address
Read
Write
Float
Point
Decimal
27
(hex)
40028
Number
Set-point
(001B)
100 – 101
Reset-point
0065)
(0064 –
Read
Write
delay
Turn-on
Turn-off
0067)
(0066 –
102 – 103
To
40101
40107
delay
Mode
104 (0068)
105 (0069)
Break
Comm.
106 (006A)
Set-point
Reset-point
006C)
(006B –
107 – 108
Turn-on
109 – 110
40108
Read
delay
Write
(006D –
To
delay
Mode
Turn-off
006E)
111 (006F)
40114
Break
Comm.
112 (0070)
113 (0071)
Page 74
Function
Data
Limits
Comments
3
or
Relay 3 parameters. Set and reset points represent the display value without the
decimal point. See Bit Assignment Table 4 for operating modes and bit
assignments.
06,16
03, 04,
Code(s)
Type
2
Range
03, 04, 16
Long
Long
(Set &
Reset)
999999
-199999 to
bits
Word:
Integer
Integer
0
0 to 199
0 to 199
Bits 6, 5
Bits 4, 2, 1,
-199999 to
999999
Relay 4 parameters. Set and reset points represent the display value without the
decimal point. See Bit Assignment Table 4 for operating modes and bit
03, 04,
03, 04, 16
Long
Long
Integer
Integer
(Set &
Reset)
0 to 199
0 to 199
assignments.
06,16
bits
Word:
0
Bits 4, 2, 1,
Selects output option and where the data source for the 4-20mA
output. See Bit Assignment Table 5.
16
03, 04, 06,
bits
Integer:
Not
Bits 6, 5
applicable
74
Serial Input Meter Instruction Manual: Register Table
1
Register
PD865 Snooper Modbus
Name Access
Address
Number
(hex)
Set-point
Reset-point
0073)
(0072 –
114 – 115
Turn-on
116 – 117
40115
Read
Write
delay
(0074 –
To
delay
Mode
Turn-off
0075)
118 (0076)
40121
Break
Comm.
119 (0077)
120 (0078)
Set-point
Reset-point
007A)
(0079 –
121 – 122
Turn-on
123 – 124
40122
Read
delay
(007B –
To
Write
delay
Mode
Turn-off
007C)
125 (007D)
40128
Break
Comm.
127 (007F)
126 (007E)
Read
4-20mA out
300
40301
Write
– Mode
(012C)
Page 75

Comments
Corresponds to 0.000 to 23.999 mA. Because of hardware
variations, the actual output range is designed to be at least 1.000
to 23.000 mA.
Corresponds to 0.000 to 23.999 mA. Because of hardware
variations, the actual output range is designed to be at least 1.000
to 23.000 mA.
Corresponds to 0.000 to 23.999 mA. Because of hardware
variations, the actual output range is designed to be at least 1.000
to 23.000 mA.
Corresponds to 0.000 to 23.999 mA. Because of hardware
variations, the actual output range is designed to be at least 1.000
to 23.000 mA.
Corresponds to 0.000 to 23.999 mA. Because of hardware
variations, the actual output range is designed to be at least 1.000
to 23.000 mA.
4-20mA output scaling. Represents the display value without the
decimal point.
Limits
Serial Input Meter Instruction Manual: Register Table
1
Register
PD865 Snooper Modbus
Function
3
Data
or
Name Access
Address
16
03, 04, 06,
Code(s)
Type
2
0 to 23999 Integer
Range
Read
Write
–
Overrange
4-20mA out
301
(012D)
(hex)
40302
Number
16
03, 04, 06,
0 to 23999 Integer
Read
Write
–
value
Underrang
4-20mA out
302
(012E)
40303
e value
16
03, 04, 06,
0 to 23999 Integer
Read
Write
value
4-20mA out
– Maximum
303
(012F)
40304
allowed
16
03, 04, 06,
0 to 23999 Integer
Read
Write
value
– Minimum
4-20mA out
304
(0130)
40305
16
03, 04, 06,
Long 03, 04, 16
0 to 23999 Integer
Read
Write
Break
allowed
– Comm.
4-20mA out
305
(0131)
40306
+999999
-199999 to
Read
Write
value
Value 1
– Display
4-20mA out
0133)
(0132 –
306 – 307
40308
40307 –
75
Page 76

Comments
4-20mA output scaling. Represents the display value without the
decimal point.
4-20mA output scaling. mA output at Display Value 1.
Corresponds to 0.000 to 23.999 mA.
4-20mA output scaling. mA output at Display Value 2.
Corresponds to 0.000 to 23.999 mA.
If 4-20mA output mode is set to “Serial Comm., mA” (0x83) this
register is in μA. Due to hardware variations, the actual output
range is at least 1.000 to 23.000 mA. If 4-20mA output mode is set to “Serial Comm., bits” (0x84), this
register is in DAC bits. See Bit Assignment Table 5.
16
16
03, 04, 06,
0 to 23999 Integer
Read
4-20mA out
310
03, 04, 06,
0 to 23999 Integer
Read
Write
Write
– Output 1
– Output 2
4-20mA out
311
(0136)
(0137)
Code(s)
Function
3
Data
or
Limits
Serial Input Meter Instruction Manual: Register Table
Name Access
1
Address
Long 03, 04, 16
Type
2
+999999
-199999 to
Range
Read
Write
Value 2
– Display
4-20mA out
0135)
(hex)
(0134 –
308 – 309
16
03, 04, 06,
Integer
or
0 to 23999
0 to 65535
Read
Write
or
mA
– Data in
Data in bits
4-20mA out
312
(0138)
4-20mA output gain calibration factor to convert mA to DAC
counts.
Float 03, 04, 16
on
Ideal =
hardware.
Dependent
Read
Write
–
DAC
calibration:
4-20mA out
013A)
(0139 –
313 – 314
76
2.85.
Gain
Register
PD865 Snooper Modbus
40310
40311
40309 –
Number
40312
40313
40314 –
40315
Page 77

Comments
–
–
4-20mA output offset calibration factor to convert mA to DAC
counts.
Input values for the scaling of 2 to 16 data points.
Number of points set in Register 40015.
Display values for the scaling of 2 to 16 data points.
Number of points set in Register 40015.
Code(s)
Function
3
Data
Type
2
or
Limits
Range
Serial Input Meter Instruction Manual: Register Table
Name Access
1
(hex)
Address
Register
PD865 Snooper Modbus
Number
Float 03, 04, 16
on
hardware.
Dependent
Read
Write
–
DAC
calibration:
4-20mA out
013C)
(013B –
315 – 316
40317
40316 –
Ideal = 0.
Offset
Long 03, 04, 16
to
999999
-199999
Read
Write
to
Input 1
Input 16
401
0191)
(0190 –
400
40402
40401 –
433
to
01AF)
(01B0 –
(01AE –
430 – 431
432
to
40432
40431 –
40433 –
-199999
Display 1
01B1)
40434
Long 03, 04, 16
to
Read
to
to
to
Write
999999
Display 16
462 – 463
40463 –
(01CE –
40464
03, 04 8 characters indicating the product firmware number
ers
ASCII
charact
Not
applicable
Only
Read
Product
Identifier
9103
01CF)
9100 –
(238C –
To
49101
49104
77
238F)
Page 78
Comments
16 (max) characters indicating the manufacturing serial number
information.
This block of registers is reserved for user data.
Limits
Serial Input Meter Instruction Manual: Register Table
1
Register
PD865 Snooper Modbus
Function
3
Data
or
Name Access
Address
Code(s)
Type
2
Number
Range
(hex)
03, 04 8 characters indicating the firmware version number
ers
ASCII
charact
Not
applicable
Only
Read
Version
Firmware
9107
2393)
9104 –
(2390 –
To
49105
49108
03, 04
ers
ASCII
charact
Not
applicable
Only
Read
Number
Mfg. Serial
9115
239B)
9108 –
(2394 –
To
49109
49116
Integer,
9200 –
Long
User
9215
49201
03, 04, 06, 16
or
Defined
User Data Read Write
(23F0 –
to
49216
bits
Word:
23FF)
78
Page 79

PD865 Modbus Snooper Serial Input Meter Instruction Manual
Register Table Notes
Note 1. Although there are no specific 3x registers listed, all 4x Registers are
Note 2. Limits or Range: Writing a value that is outside the parameters
Note 3. Data Types:
mirrored into 3x register space, and are therefore capable of being
read by Modbus function 04 (Read Input Registers). Register
addresses in Modbus messages are referenced to zero (0), while
Register numbers are referenced to one (1). For example, Register
number 40100 is sent in the Modbus message as 0x0063 (100-1 = 99
≡ 63 hex). If two addresses are shown separated by a “ – ”, they form
a register pair to make the parameter into a 4-byte (32 bit) value.
range will force it to be limited to the closest value within the range.
For example; if the range is -1.99 to +1.99 and the value sent is 3.21,
the value used is 1.99, or if -4.00 is sent, the value used will be -1.99.
Exceptions are noted in the comments.
Data format is highest byte first.
Word = 16 bit
Integer = -32768 to 32767
Long = -2,147,483,648 to 2,147,483,647
Float = IEEE floating point format, 4 bytes
”Display decimal point setting in 40013.” These values represent the
number without regard to the decimal point. The decimal point setting
can be found in Holding Register 40013. For example, if the number
12.34 is displayed, a read of 40001-40002 will return 1234
(0x000004D2). Register 40013 will contain 2 (0x0002) to indicate a
decimal point setting of two places to the right of the decimal point.
Examples using integer and long (register values are
shown in hexadecimal):
Displayed
Process Value
1.234 0000 04D2 0003
12.34 0000 04D2 0002
123.4 0000 04D2 0001
-123.4 FFFF FB2E 0001
Register
40001 - 40002
Register
40013
79
Page 80

PD865 Modbus Snooper Serial Input Meter Instruction Manual
Float decimal point setting is found in Holding Register 40028.
Examples using Float (register values are shown in hexadecimal):
Displayed
Process Value
1.234 3F9D F3B6 0003
12.34 4145 70A4 0002
123.4 42F6 CCCD 0001
-123.4 C2F6 CCCD 0001
Note 4. A read of the Lock register will return 0x0000 if the meter is unlocked,
otherwise it will return 0xFFFF to indicate a locked meter. To unlock,
the correct lock number must be written, which will then clear the lock
number to 0x0000. If the wrong lock number is written, the reply will
return 0xFFFF. If the correct lock number is written, the reply will be
0x0000. An unlocked meter can be locked by writing any non-zero
value (from 1 to 9999).
Note 5. For the complete floating point standard, see IEEE 754-
1985 Standard for Binary Floating-Point Arithmetic.
Register
40001 - 40002
Register
40013
80
Page 81

PD865 Modbus Snooper Serial Input Meter Instruction Manual
Register Bit Assignment Tables
Table 1. Display Decimal Point and Float Decimal Point
Bit(s) 15 – 3 2 – 0
Description 0 – 0 Decimal
0 = dddddd
1 = ddddd.d
2 = dddd.dd
3 = ddd.ddd
4 = dd.dddd
5 = d.ddddd
6 = dddddd
7 = dddddd
Table 2. Transfer Function
The exponent is programmable from 0.5 to 2.99999.
Bit(s) 15 – 2 1 – 0
Description 0 – 0 Transfer Function
00 = Linear
01 = Square Root
10 = Exponent
81
Page 82
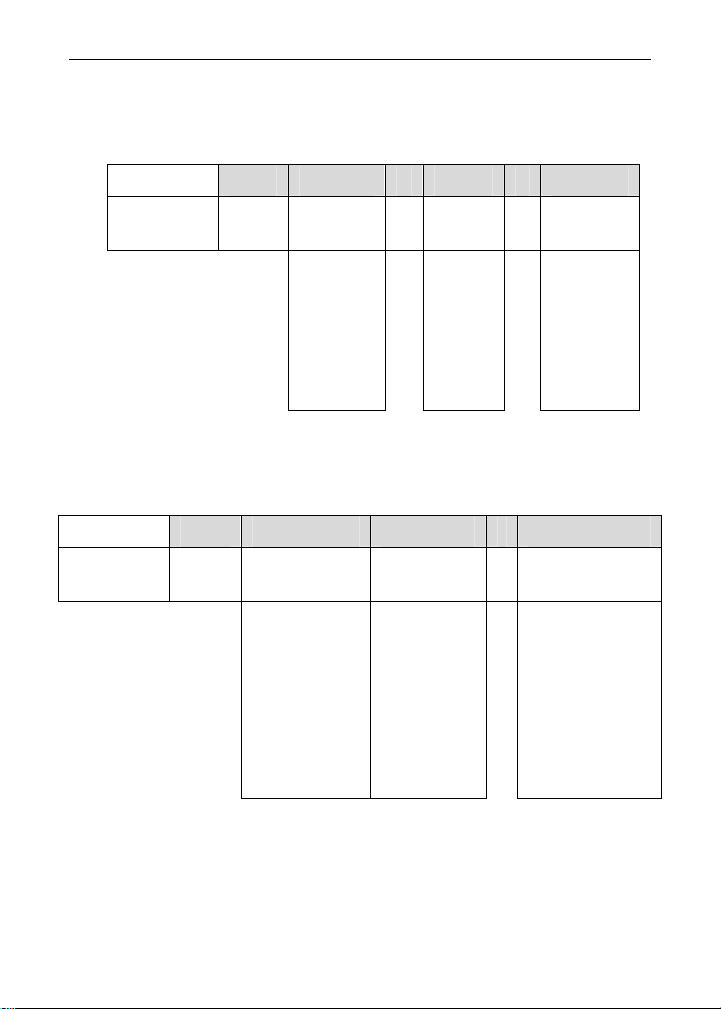
PD865 Modbus Snooper Serial Input Meter Instruction Manual
Table 3. Serial Settings
Note that the Bus Type is not implemented in either hardware or
firmware in this version.
Bit(s) 15 – 8 7 6 5 – 4 3 2 – 0
Description 0 – 0 Bus Type 0 Parity 0 Baud
0 = 300
0 = RS232
or
RS422
1 = RS485
0 = None
1 = Odd
2 = Even
3 = Even
1 = 600
2 = 1200
3 = 2400
4 = 4800
5 = 9600
6 = 19200
7 = 9600
Table 4. Relay Configuration (40107, 114, 121, 128)
When a relay has been disabled, it can be directly controlled using
Register 40007.
Bit(s) 15 – 7 6 – 5 4 3 2 – 0
Description 0 – 0 Comm. Break Fail-safe 0 Mode
0 = Auto
1 = Auto/Manual
2 = Manual
0 = No Action
1 = On
2 = Off
0 = Normal
1 = Fail-safe
3 = Manual with
Reset
4 = Alternating
Pump
5 = Unused
6 = Unused
7 = Disabled (off)
82
Page 83

PD865 Modbus Snooper Serial Input Meter Instruction Manual
Table 5. 4-20mA Output Modes
For the Serial Communications sources: Register 40313 holds the
data, either as μA (0 to 23999 Ξ 0.000 to 23.999 mA) or DAC bits (0
to 65535). The DAC (Digital to Analog Converter) used for the 4-20
mA generation is updated whenever data is written to Register
40313.
For any of the Display value sources: The DAC is updated when the
Display value is updated.
The actual 4-20 mA range is limited due to component tolerances,
but is guaranteed by design to be at least from 1.000 to 23.000 mA.
Bit(s) 15 – 3 2 – 0
Description 0 – 0 4-20 mA Data Source
0 = Display value
1 = Max Display value
2 = Min Display value
3 = Serial Communications: mA.
4 = Serial Communications: bits.
5 to 7 = Unused.
Table 6. Mode Selection (40011)
Bit(s)
Description
7 6 – 4 3 2 1 – 0
5 or 6
Digit
Register
0 = 5 digit
(x0001
x9999)
1 = 6 digit
(x00001
x65536)
0 – 0
Function
Code
0 = 03
1 = 04
(Master/
Snooper)
0 Mode
83
0 = Master
1 = Slave
2 = Snooper
3 = Defaults to
Master
Page 84

PD865 Modbus Snooper Serial Input Meter Instruction Manual
How to Contact Precision Digital
For Technical Support:
Call: (800) 610-5239 or (508) 655-7300
Fax: (508) 655-8990
Email: [email protected]
For Sales Support or to place an order:
Call: (800) 343-1001 or (508) 655-7300
Fax: (508) 655-8990
Email: [email protected]
For the latest version of this manual please visit:
www.predig.com
LIM865_E
SFT055 Ver 1.1 & up
01/12
 Loading...