

Page 1

PD154 & PD158
VIGILANTE
Instruction Manual
®
II ANNUNCIATORS
• 8 Field Selectable Sequences
• All Common ISA Sequences
• 4 or 8-Point (Channel) Monitoring
• Free Replaceable Message Labels
• Type 4X, NEMA 4X
• Universal Power Supply 85-265 VAC
• 12-36 VDC/12-24 VAC Power Option
• Built-In 85 dB Horn
• 2 SPDT Relays
•
24 VDC Isolated Power Supply (AC Models)
Multiple-Unit First-Out Indication
•
• 3 Pushbutton Operation
• Sunlight Readable Indic ation
PRECISION DIGITAL CORPORATION
, IP65 Front
Monitor
up to 8
Inputs!
Find Quality Products Online at: [email protected]
www.GlobalTestSupply.com
Page 2

PD154 & PD158 Vigilante® II Annunciators Instruction Manual
INTRODUCTION
The Vigilante® II is a multipurpose panel mounted alarm annunciator. It
has 8 field selectable alarm sequences, including all common ISA
sequences. The alarm channels accept normall y open, normally closed,
NPN open collector transistor, and logic level inputs. Three front panel
pushbuttons are used during sequence operation to silence the horn,
acknowledge the first out alarm, and reset cleared channels as required
by the sequences.
The Vigilante II has two SPDT relays that can be used for additional
external alarm indication, additional audible devices, or for process control.
The isolated 24 VDC power supply available on 85-265 VAC models
can be used to power additional devices and external indicators.
Disclaimer
The information contained in this document is subject to change without
notice. Precision Digital makes no representations or warranties with respect
to the contents hereof, and specifically disclaims any implied warranties of
merchantability or fitness for a particular purpose.
Registered Trademarks
Vigilante® II is a registered trademark of Precision Digital Corporation. All other
trademarks mentioned in this document are the property of their respective
owners.
© 2010-2016 Precision Digital Corporation. All rights reserved.
ORDERING INFORMATION
85-265 VAC*
Model
PD154-6R2-1 PD154-7R2-0 Vigilante® II 4-Point Annunciator
PD158-6R2-1 PD158-7R2-0 Vigilante® II 8-Point Annunciator
*All models may be powered from AC or DC, see Specifications for details.
Enclosures and Accessories
Model # of
PDA2500-V 1 - 6 Plastic NEMA 4X Enclosure Through Door
PDA2522 2 Plastic NEMA 4X Enclosure; 1(V) 1(H) Through Door
PDA2600-V 1 - 6 Stainless Steel NEMA 4X Enclosure Through Door
PDA2622 2 SS NEMA 4X Enclosure; 1(V) 1(H)
PDA2700-V 1 - 6 Steel NEMA 4 Enclosure
PDA2722 2 Steel NEMA 4 Enclosure; 1(V) 1(H)
PDA2801 1 Plastic NEMA 4X Enclosure
PDX6901 Snubber 0.01ȝF, 470ȍ, Flexible Leads
12-36 VDC*
Description
Model
Description Mounting
Units
Through Door
Through Door
Through Door
Through Cover
2
Find Quality Products Online at: [email protected]
www.GlobalTestSupply.com
Page 3

PD154 & PD158 Vigilante® II Annunciators Instruction Manual
A
A
QUICK SETUP GUIDE
The following overview details how to set up the annunciator for most
common uses.
Sequence Selection
The two most common sequences are ISA A and ISA F2A. Select the
sequence using the four-position s witch on the rear of the unit above the
signal connector. For complete sequence de tails, see page 30.
ISA
ISA F2
NO/NC Inputs
Each input can be set for normally open (NO) or normally closed (NC)
contacts. Each input channel is programmed individually. The default
setting is for all inputs to be NO.
To set inputs to NC:
1. Press and hold ACK and RESET for 3 seconds until all LEDs
cycle.
2.
Press ACK
ACK is not pr essed within 3 seconds, the unit will return to run
mode.
3. Press ACK again within 3 seconds of release. If ACK is not
pressed within 3 seconds, the unit will return to
The LED for the channel being programmed will display brightly on or
off. All other channel indication LEDs will be at low intensity to indicate
programming mode.
4. Press the RESET pushbutton to turn LED 1 off for a NO input,
or on for a NC input for channel 1.
5. Press ACK to accept the input type and program channel 2.
6. Repeat steps 4 and 5 for all input channels.
Press and hold ACK for five seconds to return to normal
7.
operation with the programmed input types.
Find Quality Products Online at: [email protected]
within 3 seconds of release. All LEDs will blink. If
run mode.
3
www.GlobalTestSupply.com
Page 4

PD154 & PD158 Vigilante® II Annunciators Instruction Manual
Basic Connections
All connections are made to removable screw terminal connectors
located at the rear of the instrument. For complete connection
details, see page 12.
Use copper wire with 60°C or 60/75°C insulation for all
line voltage connections. Observe all safety regulations.
Electrical wiring should be performed in accordance with
all applicable national, state, and local codes to prevent
damage to the instrument and ensure personnel safety.
Connector Labeling
The connectors label, affixed to the instrument, sho ws the location of all
connectors available with requested configuration. See Figure 2, page
12.
Power Connections
Power connections are made to a two-terminal co nne ctor labeled
POWER. The instrument will ope rate regardl ess of DC pola rity
connection. The + and - symbols are only a sug ges ted w iring con ven tion.
Signal Connections
Input signal connections are made to a 14-terminal connector at
terminals labeled INPUT CHANNELS. The COM (common) terminal is
the return for all input channels.
Normally Open (NO) or Normally Closed (NC) Switches
All channels are initially set for normally open contacts. Each contact is
wired across an input cha nnel an d com mon .
Relays and 24 V Output Connections
Relay connections are made to a six-terminal connector labeled
RELAY1, RELAY2. The COM (common) terminals of the relays should
not be confused with the COM (common) terminal of the signal
connector. The 24 VDC output is available at the connector labeled 24V
OUT, next to the relays connector.
Additional Information
For additional setup and wiring information, please see the complete
details further in this manual.
4
Find Quality Products Online at: [email protected]
www.GlobalTestSupply.com
Page 5

PD154 & PD158 Vigilante® II Annunciators Instruction Manual
Table of Contents
INTRODUCTION ------------------------------------------------------------ 2
ORDERING INFORMATION --------------------------------------------- 2
QUICK SETUP GUIDE ---------------------------------------------------- 3
Sequence Selection -------------------------------------------------------------- 3
NO/NC Inputs ---------------------------------------------------------------------- 3
Basic Connections --------------------------------------------------------------- 4
SPECIFICATIONS ---------------------------------------------------------- 7
General ------------------------------------------------------------------------------- 7
Inputs --------------------------------------------------------------------------------- 8
Relays -------------------------------------------------------------------------------- 8
COMPLIANCE INFORMATION ----------------------------------------- 9
SAFETY INFORMATION ------------------------------------------------ 10
INSTALLATION ------------------------------------------------------------ 11
Unpacking ------------------------------------------------------------------------- 11
Panel Mounting ------------------------------------------------------------------ 11
Connections ---------------------------------------------------------------------- 12
Connector Labeling ---------------------------------------------------------- 12
Power Connections ---------------------------------------------------------- 12
Signal Connections ---------------------------------------------------------- 13
Relays and 24 V Output Connections ----------------------------------- 14
Switching Inductive Loads -------------------------------------------------- 15
External Pushbutton Connections ---------------------------------------- 16
Multiple Unit First-Out Indication Connections ------------------------ 16
SETUP AND PROGRAMMING ---------------------------------------- 17
Front Panel Pushbuttons and Status LED Indicators -------------- 18
Full Function Test -------------------------------------------------------------- 19
Multiple Unit First-Out Indication ----------------------------------------- 19
Shared Front Panel Buttons ------------------------------------------------ 19
Annunciator Sequence Selection ----------------------------------------- 20
Sequence Programming ---------------------------------------------------- 20
Sequence Descriptions ----------------------------------------------------- 20
Normally Open/Normally Closed Input Setup ------------------------- 21
Programming NO/NC Inputs ----------------------------------------------- 21
NO/NC Programming Example ------------------------------------------- 22
Relay Operation ----------------------------------------------------------------- 23
Relay 1 Operation ------------------------------------------------------------ 23
Relay 2 Operation ------------------------------------------------------------ 23
Relay Fail-Safe ---------------------------------------------------------------- 23
5
Find Quality Products Online at: [email protected]
www.GlobalTestSupply.com
Page 6

PD154 & PD158 Vigilante® II Annunciators Instruction Manual
Programming Relay Fail-Safe --------------------------------------------- 23
Relay Fail-Safe Programming Example -------------------------------- 24
Relay Operation Overview ------------------------------------------------- 25
Audible Horn Enable/Disable ----------------------------------------------- 26
Enabling/Disabling Silence Option --------------------------------------- 26
No Lock-In Sequence Option ----------------------------------------------- 27
Reset to Factory Defaults ---------------------------------------------------- 27
MOUNTING DIMENSIONS ---------------------------------------------- 28
TROUBLESHOOTING ---------------------------------------------------- 29
FULL SEQUENCE DESCRIPTIONS ---------------------------------- 30
Features ------------------------------------------------------------------------ 30
Sequence Condition Descriptions ---------------------------------------- 30
LED Condition Descriptions ------------------------------------------------ 30
ISA Sequence A ----------------------------------------------------------------- 31
Relay Operation ----------------------------------------------------------------- 31
ISA Sequence F2A ------------------------------------------------------------- 32
ISA Sequence F1A ------------------------------------------------------------- 33
ISA Sequence F3A ------------------------------------------------------------- 34
Sequence F3A Switch Positions ------------------------------------------ 34
Input Follower Indication ---------------------------------------------------- 36
ISA Sequence M ----------------------------------------------------------------- 36
ISA Sequence F1M ------------------------------------------------------------- 37
ISA Sequence F2M ------------------------------------------------------------- 38
EU DECLARATION OF CONFORMITY ----------------------------- 39
Table of Figures
Figure 1. Panel Cutout and Mounting ............................................... 11
Figure 2. Connector Labeling for PD158-6R2-1 ............................... 12
Figure 3. Power Connections ............................................................ 12
Figure 4. NO/NC Contact Inputs ........................................................ 13
Figure 5. Open Collector NPN Transistor Inputs ............................. 14
Figure 6. Relay & 24 V Output Connections ..................................... 14
Figure 7. AC and DC Loads Protection............................................. 15
Figure 8. Low Voltage DC Loads Protection .................................... 15
Figure 9. External Pushbutton Connections .................................... 16
Figure 10. System with Multiple Units Share First-Out ................... 17
Figure 11. Shared Pushbutton Connections .................................... 19
Figure 12. DIP Switch Location ......................................................... 20
Figure 13. Case Dimensions – Side View ......................................... 28
Figure 14. Case Dimensions – Top View .......................................... 28
6
Find Quality Products Online at: [email protected]
www.GlobalTestSupply.com
Page 7

PD154 & PD158 Vigilante® II Annunciators Instruction Manual
SPECIFICATIONS
Except where noted all specifications apply to operation at +25°C.
General
DISPLAY PD154; Four red LED channel/point indicators.
PD158; Eight red LED channel/point indicators.
One green LED power indicator.
ALARM
MESSAGES
PROGRAMMING
METHODS
NOISE FILTER 40 ms debounce on inputs (including SIL, ACK, and RST).
SHARED FIRST-
OUT SYSTEMS
NON-VOLATILE
MEMORY
POWER
OPTIONS
FUSE Required external fuse: UL Recognized, 5 A max, slow
Custom printed adhesive clear labels.
Area: PD154, 1.25" x .60" (32 mm x 15 mm), 4 messages
PD158, 1.25" x .25" (32 mm x 6 mm), 8 messages
User specified size and length, up to 4 lines (PD154) or 2
lines (PD158) of 14 characters of size 9 fonts.
Rear 4-position switch for sequence selection and horn
operation. Three front panel pushbuttons for NO/NC input
selection, sequence options, and sequence operation.
1 ms unit-to-unit delay. Maximum of 200 units in the
shared first-out system.
All programmed settings are stored in non-volatile memory
for a minimum of ten years if power is lost.
85-265 VAC, 50/60 Hz
90-265 VDC, 20 W max
or 12-36 VDC, 12-24 VAC, 6 W max
blow. Up to 6 annunciators may share one 5 A fuse
ISOLATED
POWER SUPPLY
ISOLATION 4 kV input/output-to- powe r line .
OVERVOLTAGE
CATEGORY
ENVIRONMENTAL Operating temperature range: -40 to 65°C
CONNECTIONS Removable screw terminal blocks for 12 to 22 AWG wire.
ENCLOSURE 1/8 DIN, high impact plastic, UL 94V-0, front color: black
MOUNTING 1/8 DIN panel cutout required. Two panel mounting
TIGHTENING
TORQUE
OVERALL
DIMENSIONS
24 VDC ± 10% @ 200 mA max
Standard on 85-265 VAC powered units only.
Installation Overvoltage Category II:
Local level with smaller transient overvoltages than
Installation Overvoltage Category III
Storage temperature range: -40 to 85°C
Relative humidity: 0 to 90% non-condensing
bracket assemblies provided.
Screw terminal connectors: 5 lb-in (0.56 Nm)
4.68" x 2.45" x 4.19" (62 mm x 119 mm x 106 mm)
(H x W x D)
7
Find Quality Products Online at: [email protected]
www.GlobalTestSupply.com
Page 8

PD154 & PD158 Vigilante® II Annunciators Instruction Manual
WEIGHT 9.6 oz (272 g)
WARRANTY 3 years parts & labor
EXTENDED
WARRANTY
1 or 2 years, refer to the Price List for details.
Inputs
INPUT TYPES NO or NC switches: No external excitation required
Open collector transistor (NPN):
Open circuit voltage approximately 3.3 VDC
Logic Levels: LOW = 0 to 0.9 VDC
HIGH = 2.4 to 28 VDC
UPDATE RATE 41 ms following alarm state; 1 ms for alarm state clear
SEQUENCES Input follower, ISA Sequences A, F1A, F2A, F3A, M, F1M,
F2M and F3M per ISA Standard ISA-18.1-1979 R2004.
SEQUENCE
OPTIONS
A, F1A, F2A, F3A, M, F1M, F2M, and input follower with
selectable options -1 (silence pushbutton), -4 (no lock-in),
and -6 (no horn) per ISA Standard ISA-18.1-1979 R2004.
Relays
RATING 2 SPDT (Form C); rated 3 A @ 30 VDC or 3 A @ 250 VAC
resistive load; 1/14 HP @ 125/250 VAC for inductive loads
ELECTRICAL
NOISE
SUPPRESSION
RELAY
OPERATION
FAIL-SAFE
OPERATION
A suppressor (snubber) should be connected to each relay
contact switching inductive loads to prevent
disruption to the microprocessor’s operation.
Recommended suppressor value: 0.01 μF/470 Ω, 250 VAC
(PDX6901).
Relay 1: Alarm state until alarm is acknowledged.
Relay 2: Alarm state while any channel indicating alarm
condition.
Programmable
Independent for each relay
Note: In fail-safe mode, relay coil is energized in non-alarm
condition. In case of power failure, relay will go to alarm
state.
8
Find Quality Products Online at: [email protected]
www.GlobalTestSupply.com
Page 9

PD154 & PD158 Vigilante® II Annunciators Instruction Manual
COMPLIANCE INFORMATION
Safety
UL LISTED USA and Canada
UL 508 Industrial Control Equipment
UL FILE NUMBER E160849
FRONT PANEL UL Type 4X, NEMA 4X, IP65; panel gasket provided
LOW VOLTAGE
DIRECTIVE
EN 61010-1:2010
Safety requirements for measurement, control, and
laboratory use
Electromagnetic Compatibility
EMISSIONS
Radiated
Emissions
AC Mains
Conducted
Emissions
IMMUNITY
RFI - Amplitude
Modulated
EN 55022:2010
Class A ITE emissions requirements
Class A
Class A
EN 61326-1:2013
Measurement, control, and laboratory equipment
EN 61000-6-2:2005
EMC heavy industrial generic immunity standard
80 -1000 MHz 10 V/m 80% AM (1 kHz)
1.4 - 2.0 GHz 3 V/m 80% AM (1 kHz)
2.0 - 2.7 GHz 1 V/m 80% AM (1 kHz)
Electrical Fast
±2kV AC mains, ±1kV other
Transients
Electrostatic
±4kV contact, ±8kV air
Discharge
RFI - Conducted
AC Surge
Surge
Power-Frequency
10V, 0.15-80 MHz, 1kHz 80% AM
±2kV Common, ±1kV Differential
1KV (CM)
30 A/m 70%V for 0.5 period
Magnetic Field
Voltage Dips
Voltage
40%V for 5 & 50 periods
70%V for 25 periods
<5%V for 250 periods
Interruptions
9
Find Quality Products Online at: [email protected]
www.GlobalTestSupply.com
Page 10
PD154 & PD158 Vigilante® II Annunciators Instruction Manual
SAFETY INFORMATION
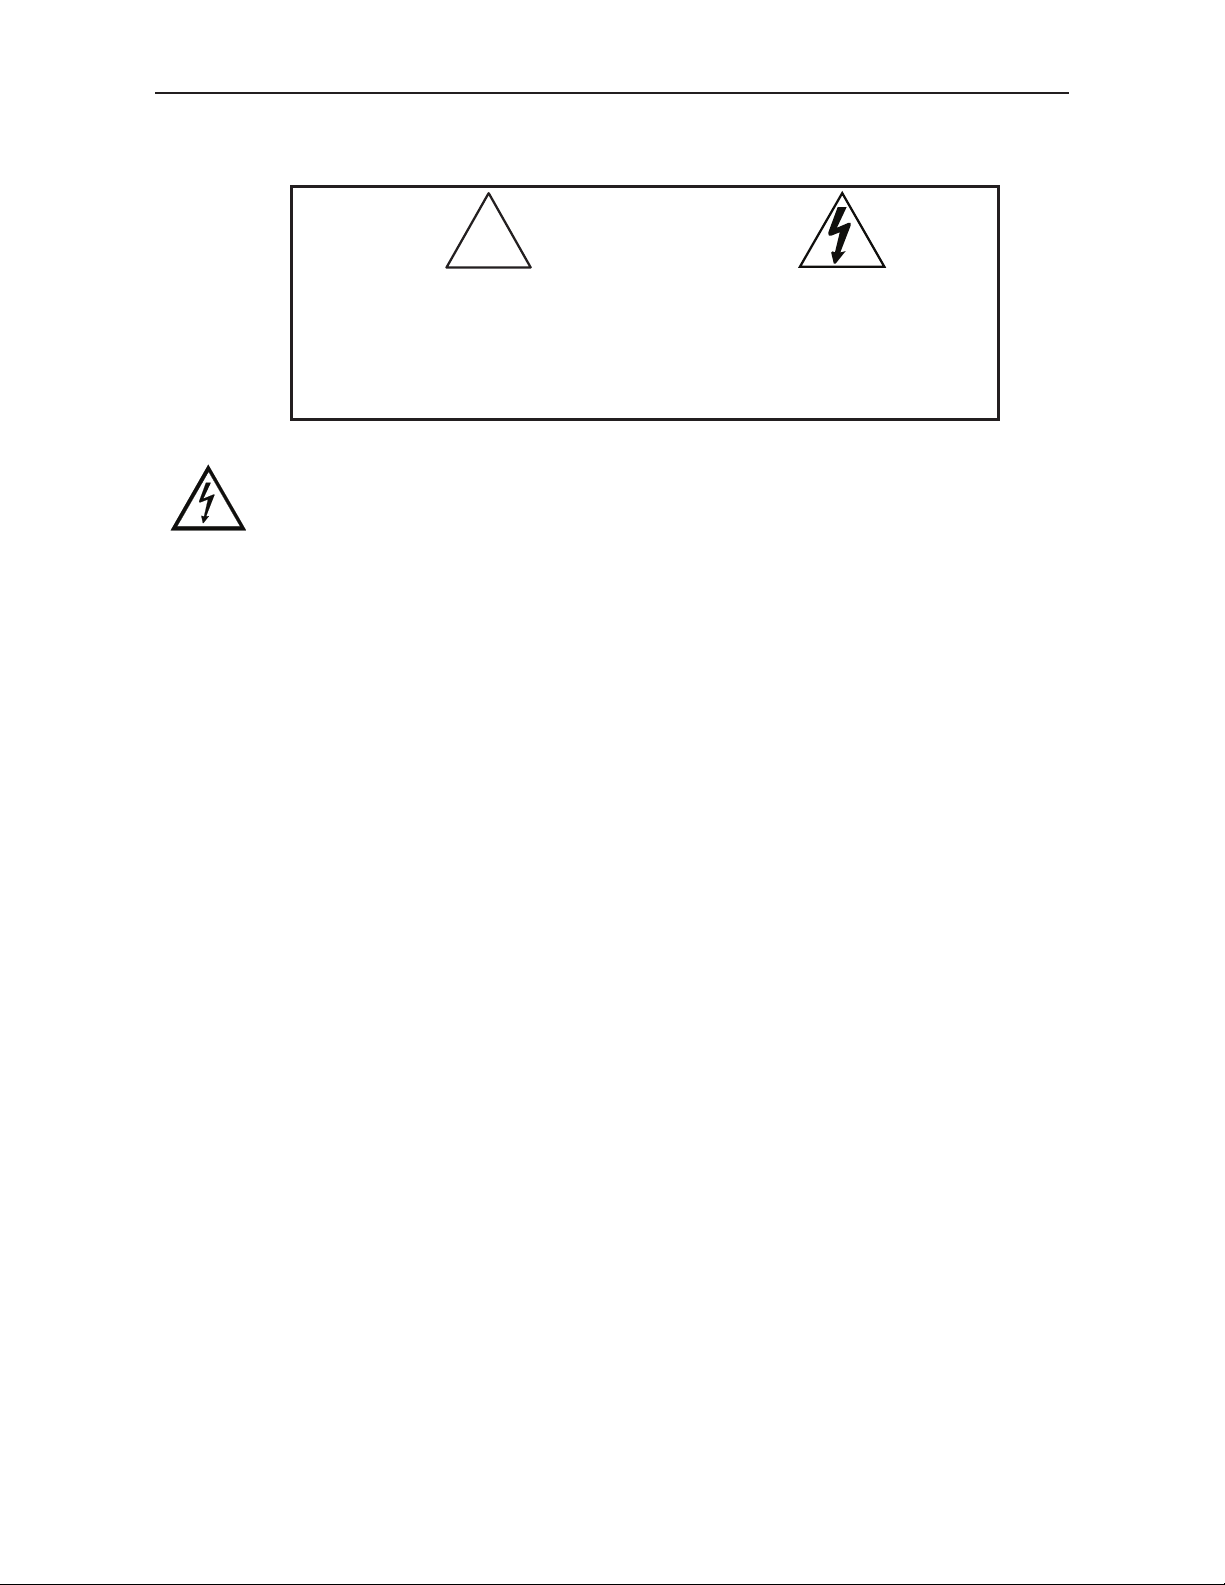
!
CAUTION: Read complete
instructions prior to
installation and operation
of the instrument.
WARNING
Hazardous voltages exist within enclosure. Installation and service
should be performed only by trained service personnel.
WARNING: Risk of
electric shock.
10
Find Quality Products Online at: [email protected]
www.GlobalTestSupply.com
Page 11
PD154 & PD158 Vigilante® II Annunciators Instruction Manual
INSTALLATION
There is no need to remove the instrument from its case to
complete the installation, wiring, and setup.
Unpacking
Remove the instrument from box. Inspect the packaging and
contents for damage. Report damages, if any, to the carrier.
If any part is missing or the unit malfunctions, please contact
your supplier or the factory for assistance.
Panel Mounting
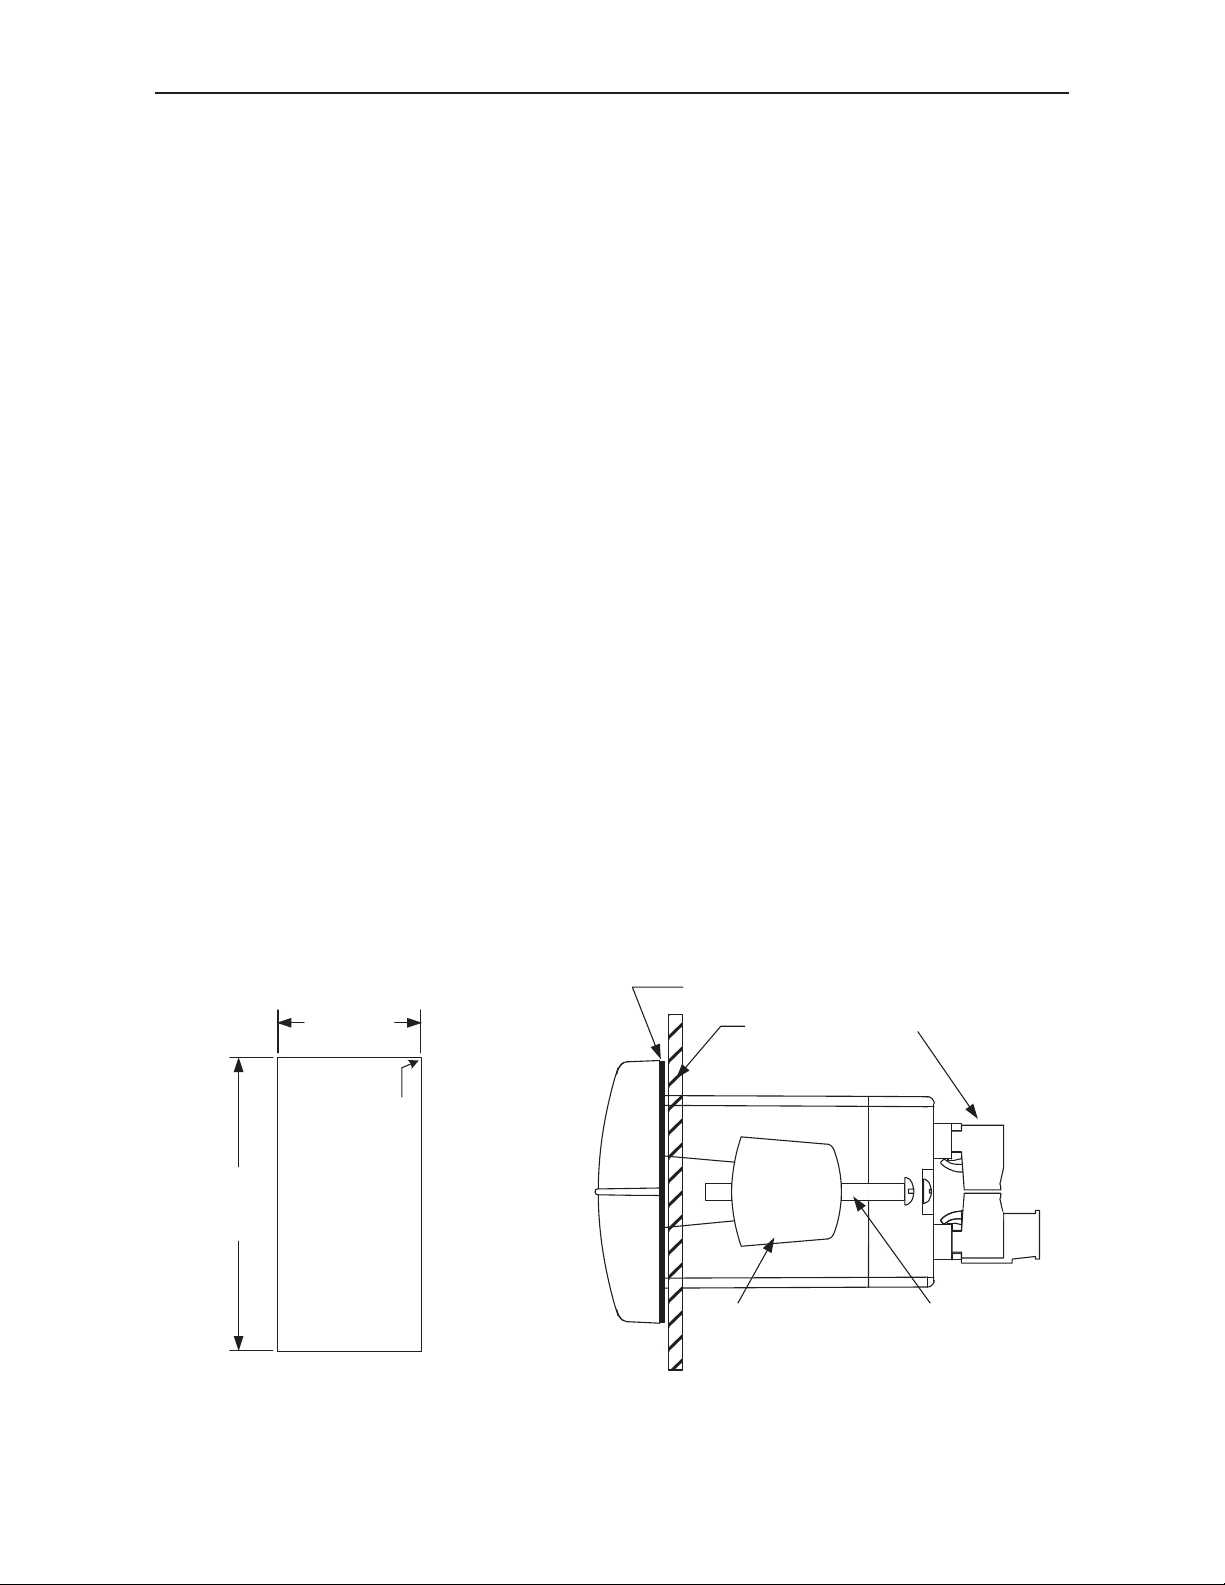
• Prepare a standard 1/8 DIN vertical panel cutout – 1.772 " x 3.622”
(45 mm x 92 mm). Refer to Figure 1 for more details.
• Clearance: allow at least 4" (102 mm) behind the panel for wiring.
• Panel thickness: 0.04" - 0.25" (1.0 mm - 6.4 mm).
Recommended minimum panel thickness to maintain Type 4X
rating: 0.06" (1.5 mm) steel panel, 0.16" (4.1 mm) plastic panel.
• Remove the two mounting brackets provided with the meter (back-off
the two screws so that there is ¼" (6.4 mm) or less through the
bracket. Slide the bracket toward the front of the case and remove).
• Insert the unit into the panel cutout.
• Install mounting brackets and tighten the screws against the panel.
To achieve a proper seal, tighten the mounting bracket screws
evenly until the front is snug to the panel along its short side. DO
NOT OVER TIGHTEN, as the rear of the panel may be damaged.
Gasket
Panel
Mounting
Bracket
Removable
Connectors
Mounting
Screw
3.622"
A
(92mm)
B
1.772"
(45mm)
Square Corners
to 0.060"
(1.5mm)
Max Radius
Panel Cutout
to DIN 43700
Tolerances:
A: +0.032 (+0.8mm)
-0.000 (-0.0mm)
B: +0.024 (+0.6mm)
-0.000 (-0.0mm)
Top ViewFront View
Figure 1. Panel Cutout and Mounting
11
Find Quality Products Online at: [email protected]
www.GlobalTestSupply.com
Page 12
PD154 & PD158 Vigilante® II Annunciators Instruction Manual
Connections
All connections are made to removable screw terminal connectors
located at the rear of the instrument.
Use copper wire with 60°C or 60/75°C insulat ion
for all line voltage connections. Observe all safety
regulations. Electrical wiring should be performed
in accordance with all applicable natio nal, state,
and local codes to prevent damage to the
instrument and ensure personnel safety.
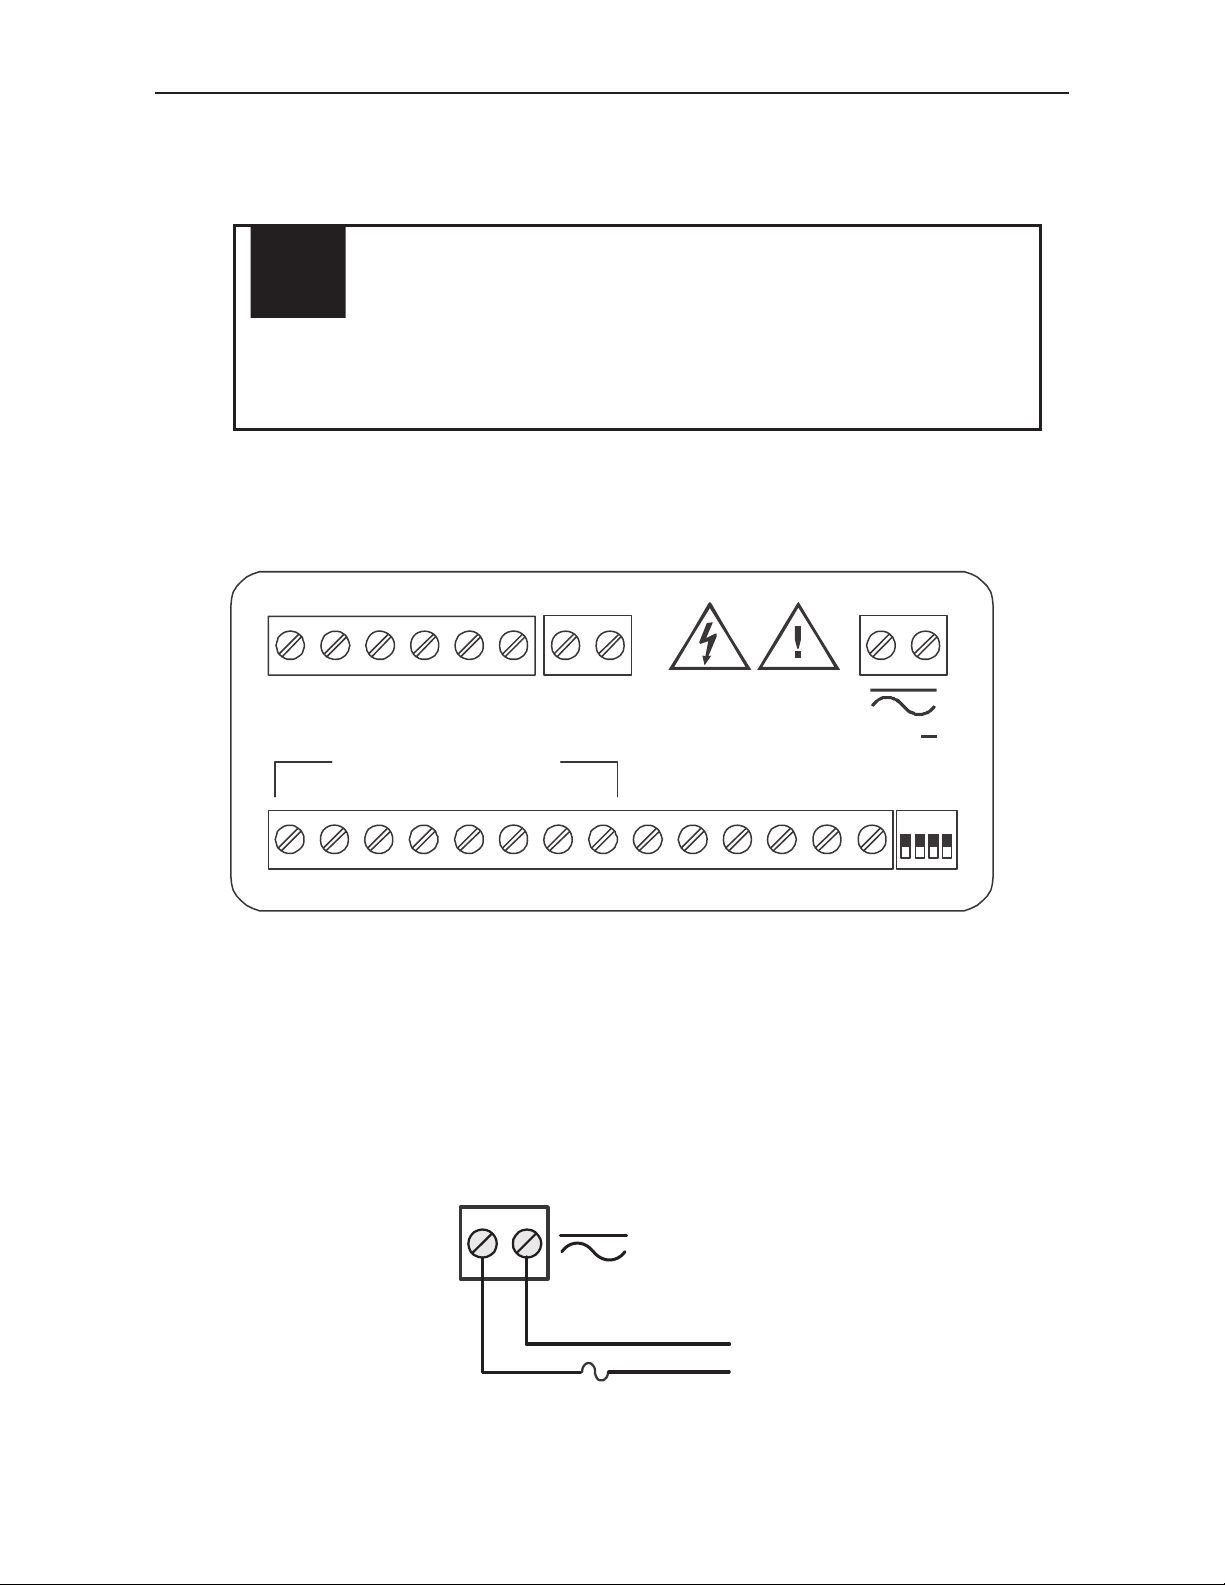
Connector Labeling
The connectors label, affixed to the instrument, sho ws the location of all
connectors available with requested configuration.
RELAY2 RELAY1
CNONO NC NC C
24V OUT
P+ P-
POWER
+
INPUT CHANNELS
6587 4
213 COM ACK RST
SIL
FI FO
12 43
DW1837
OFF
ON
Figure 2. Connector Labeling for PD158-6R2- 1
Power Connections
Power connections are made to a two-terminal co nne ctor labeled
POWER on Figure 2. The instrument will operate regardless of DC
polarity connection. The + and - sy mbols are on ly a sugge sted w iring
convention.
POWER CONNECT OR
+-
AC or DC
POWER
Recommended External Fus e :
5 A max, Slow Bl ow
Figure 3. Power Connections
12
Find Quality Products Online at: [email protected]
www.GlobalTestSupply.com
Page 13
PD154 & PD158 Vigilante® II Annunciators Instruction Manual
Signal Connections
Input signal connections are made to a 14-terminal connector at
terminals labeled INPUT CHANNELS on Figure 2. The COM (common)
terminal is the return for all types of input signals.
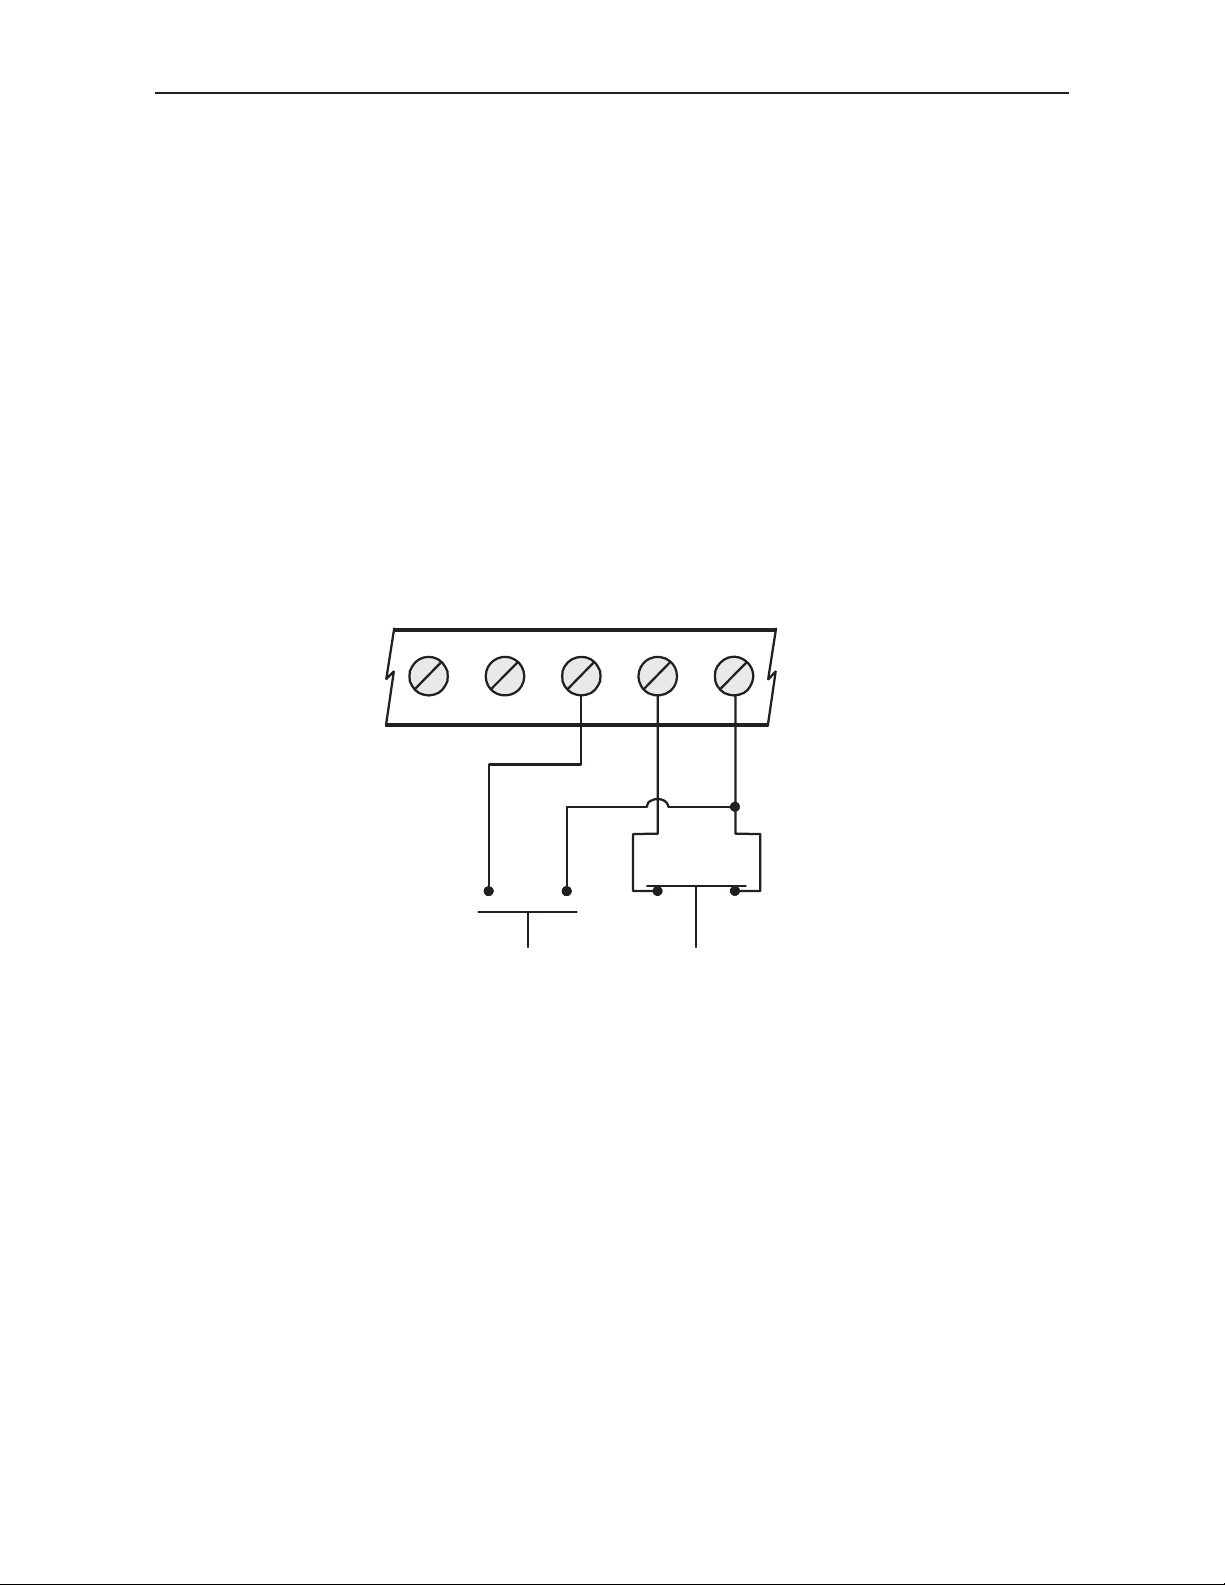
Normally Open (NO) or Normally Closed (NC) Switches
The following figure sh ow s an exampl e of normal ly open or no rmally
closed contact inputs.
Programming a channel for a normally open or no rmally closed con tact is
done with the front pane l pushbu tton s (see page 21). All channels are
initially set for normally open con tacts. Ea ch con tact is wired acro ss an
input channel and common .
SIGNAL CONNECTOR
CH3 CH1CH2CH4
NO
CONTACT
COM
NC
CONTACT
Figure 4. NO/NC Contact Inputs
Open Collector NPN Transistor
Each transistor collector is connected to a separate input channel and all
emitters connected to common. Al l channels are facto ry set for tran si stor
inputs normally in the cutoff or “off” state. For normally active/saturation
state or “on” transistors, prog ram inpu ts for normal ly cl osed input
operation; see page 21.
Open circuit voltage is approximately 3.3 VDC provided by a 47 kȍ
internal pullup resi sto r.
The following figure shows an example of open collector NPN transistor
inputs.
13
Find Quality Products Online at: [email protected]
www.GlobalTestSupply.com
Page 14

PD154 & PD158 Vigilante® II Annunciators Instruction Manual
SIGNAL CONNECTOR
CH3 CH1CH2CH4
E
B
COM
C
EC
B
Transistor
NPN
Figure 5. Open Collector NPN Transistor Inputs
Logic Level Inputs
Each logic level input is connected to an input channel with common as
the return.
Logic level inputs are factory set for normally high active logic level inputs.
For normally low inpu t logic levels, program inputs for no rmally closed
input operation, see page 21.
Logic Level Low: 0 to 1 .4 VDC
Logic Level High: 1.5 to 28 VDC
Input Impedance: App roximately 47 kȍ
Relays and 24 V Output Connections
Relay connections are made to a six-termin al connector labeled
RELAY1, RELAY2 on Figure 2. The COM (common) terminals of the
relays should not be confused with the COM (common) terminal of the
signal connector. The 24 VDC output is available at the connector
labeled 24V OUT, next to the relays connector.
RELAY 2 RELAY 1
NC NCCNO CNO
Figure 6. Relay & 24 V Output Connections
24V OUT
P+ P-
14
Find Quality Products Online at: [email protected]
www.GlobalTestSupply.com
Page 15
PD154 & PD158 Vigilante® II Annunciators Instruction Manual
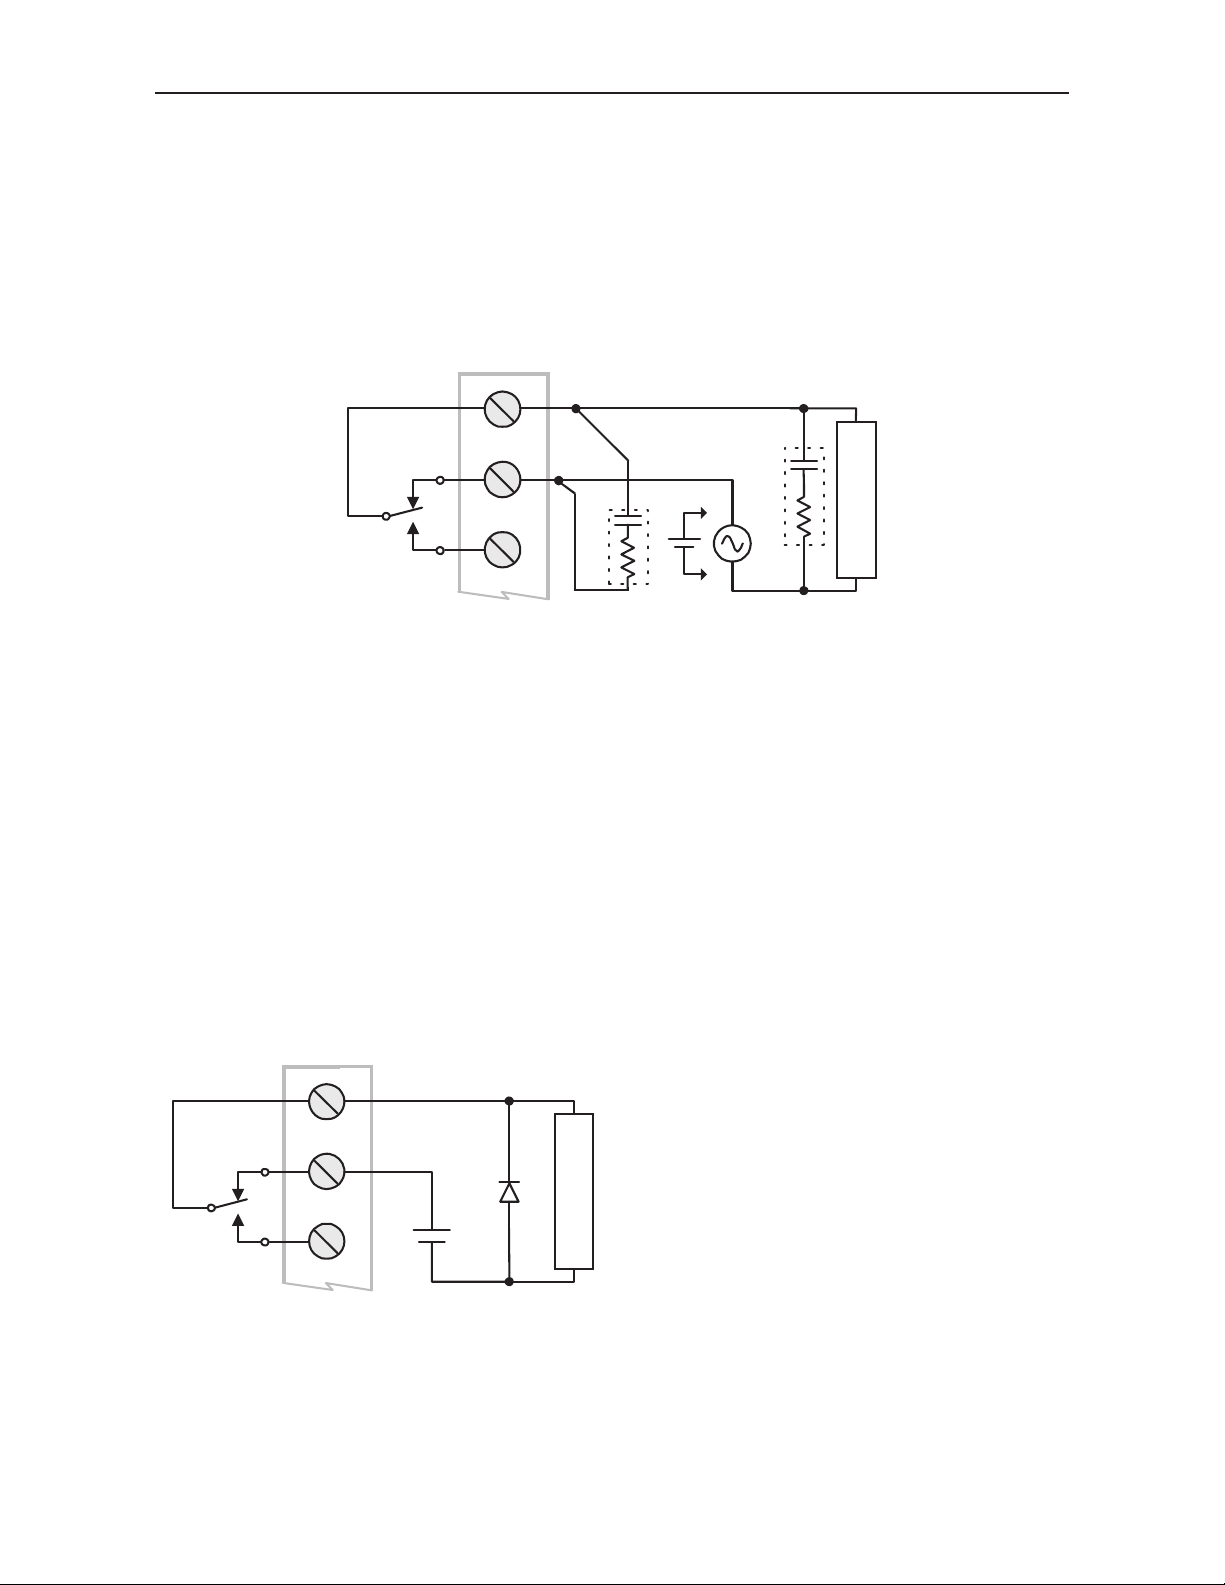
Switching Inductive Loads
The use of suppressors (snubbers) is strongly recommended when switching
inductive loads to prevent disrupting the microprocessor’s operation. The
suppressors also prolong the life of the relay contacts. Suppression can be
obtained with resistor-capacitor (RC) networks assembled by the user or
purchased as complete assemblies. Refer to the following circuits for RC network
assembly and installation:
RELAY 1
C
NC
NO
C
R
C
+
R
-
L
O
A
D
Figure 7. AC and DC Loads Protection
Choose R and C as follows:
R: 0.5 to 1
C: 0.5 to 1 μF for each amp through closed contacts
Notes:
1. Use capacitors rated for 250 VAC.
2. RC networks may affect load release time of solenoid loads. Check to
confirm proper operation.
3. Install the RC network at the meter's relay screw terminals. An RC network
may also be installed across the load. Experiment for best results.
Ω for each volt across the contacts
RELAY 1
Use a diode with a reverse
C
NC
NO
+
-
L
O
A
D
breakdown voltage two to
three times the circuit
voltage and forward current
at least as large as the load
current.
Figure 8. Low Voltage DC Loads Protection
RC Networks Available from Precision Digital
RC networks are available from Precision Digital and should be applied to each
relay contact switching an inductive load. Part number: PDX6901.
15
Find Quality Products Online at: [email protected]
www.GlobalTestSupply.com
Page 16
PD154 & PD158 Vigilante® II Annunciators Instruction Manual
External Input Types
The external Silence (SIL), Acknowledge (ACK), and Reset (RST)
inputs may be: contacts (i.e. pushbuttons, relay contacts, etc.), open
collector inputs (OC), or TTL signals. However, throughout this manual,
the term “pushbutton” is used to describe these external inputs. Please
refer to the chart below for signal logic.
External Input Type Active When
Switch/Contact Closed
Open Collector (OC) On
TTL Low
External Pushbutton Connections
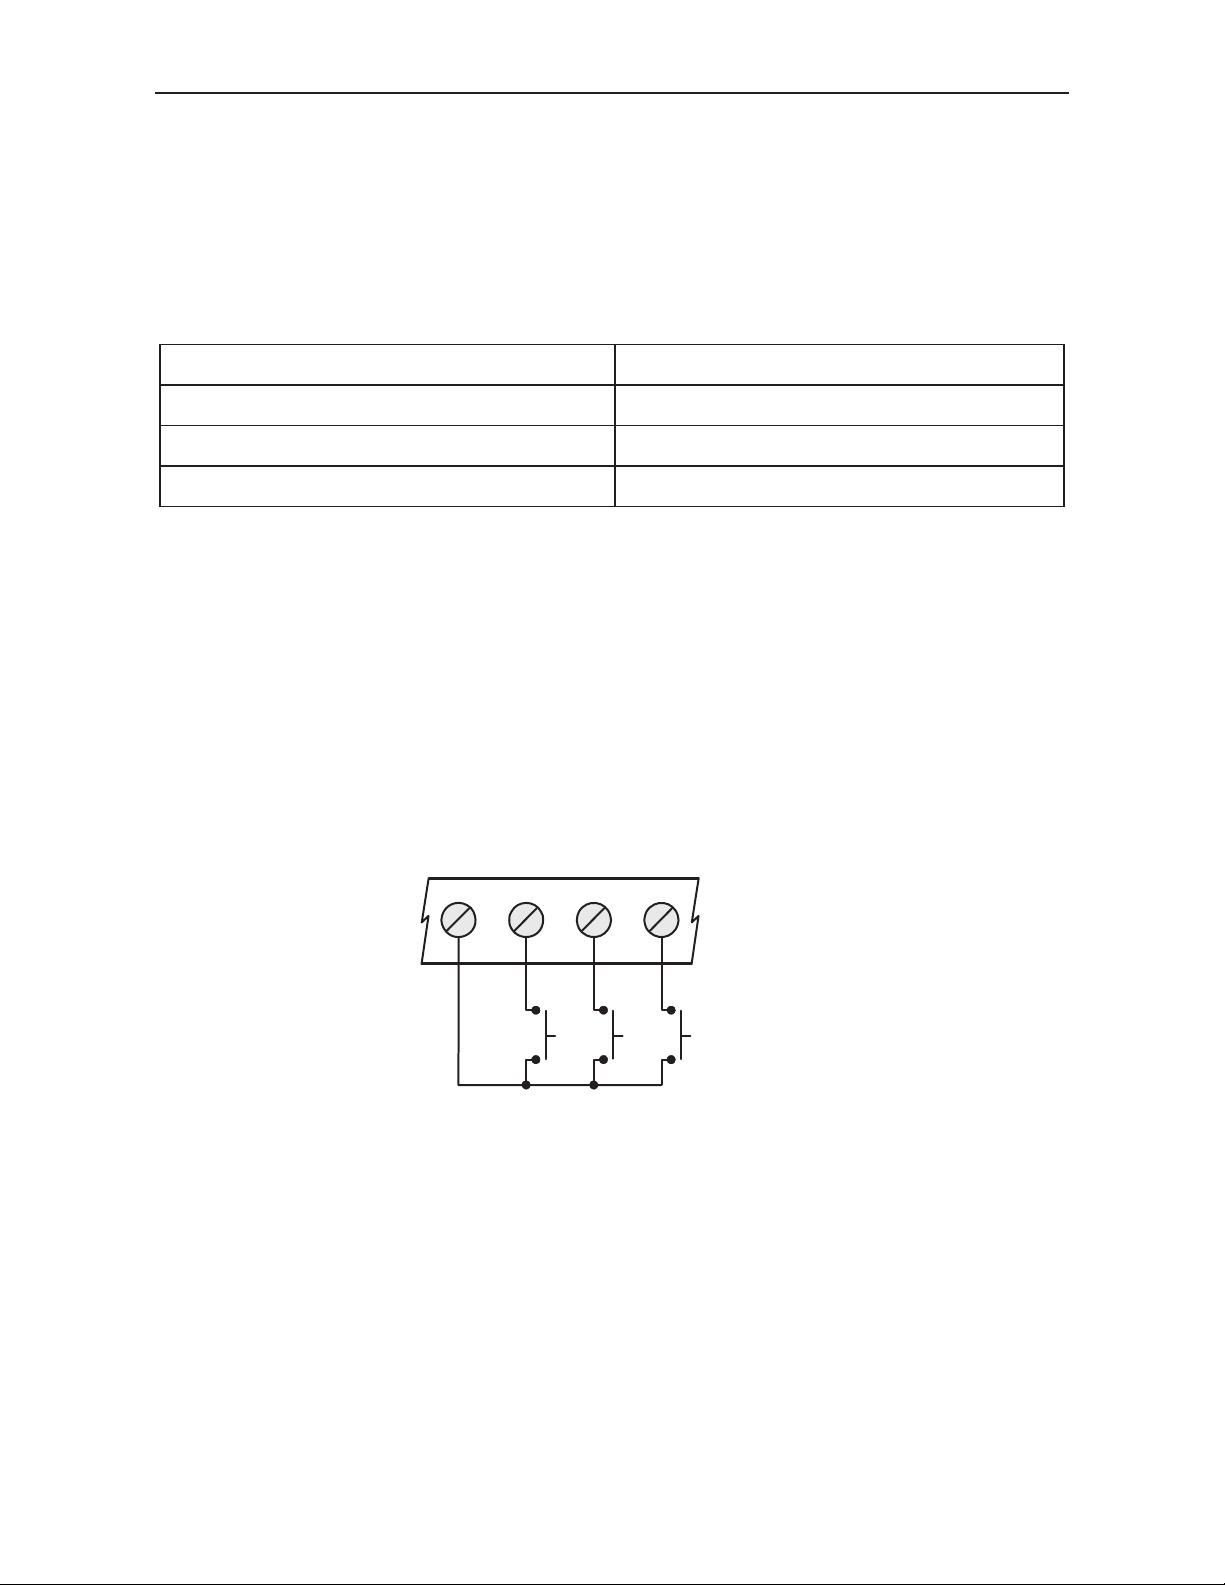
The front panel pushbuttons may also be triggered with pushbuttons
connected to the signal connector terminals shown in Figure 2. Switch
SIL to common for the silence pushbutton, ACK to common for the
acknowledge pushbutton, and RST to common for the reset pushbutton.
The following figure shows external pushbutton wiring connections. Do
not wire-short the external pushbutton contacts to common.
INPUT CONNECTOR
SIL
RSTACKCOM
Push-
Buttons
Figure 9. External Pushbutton Connections
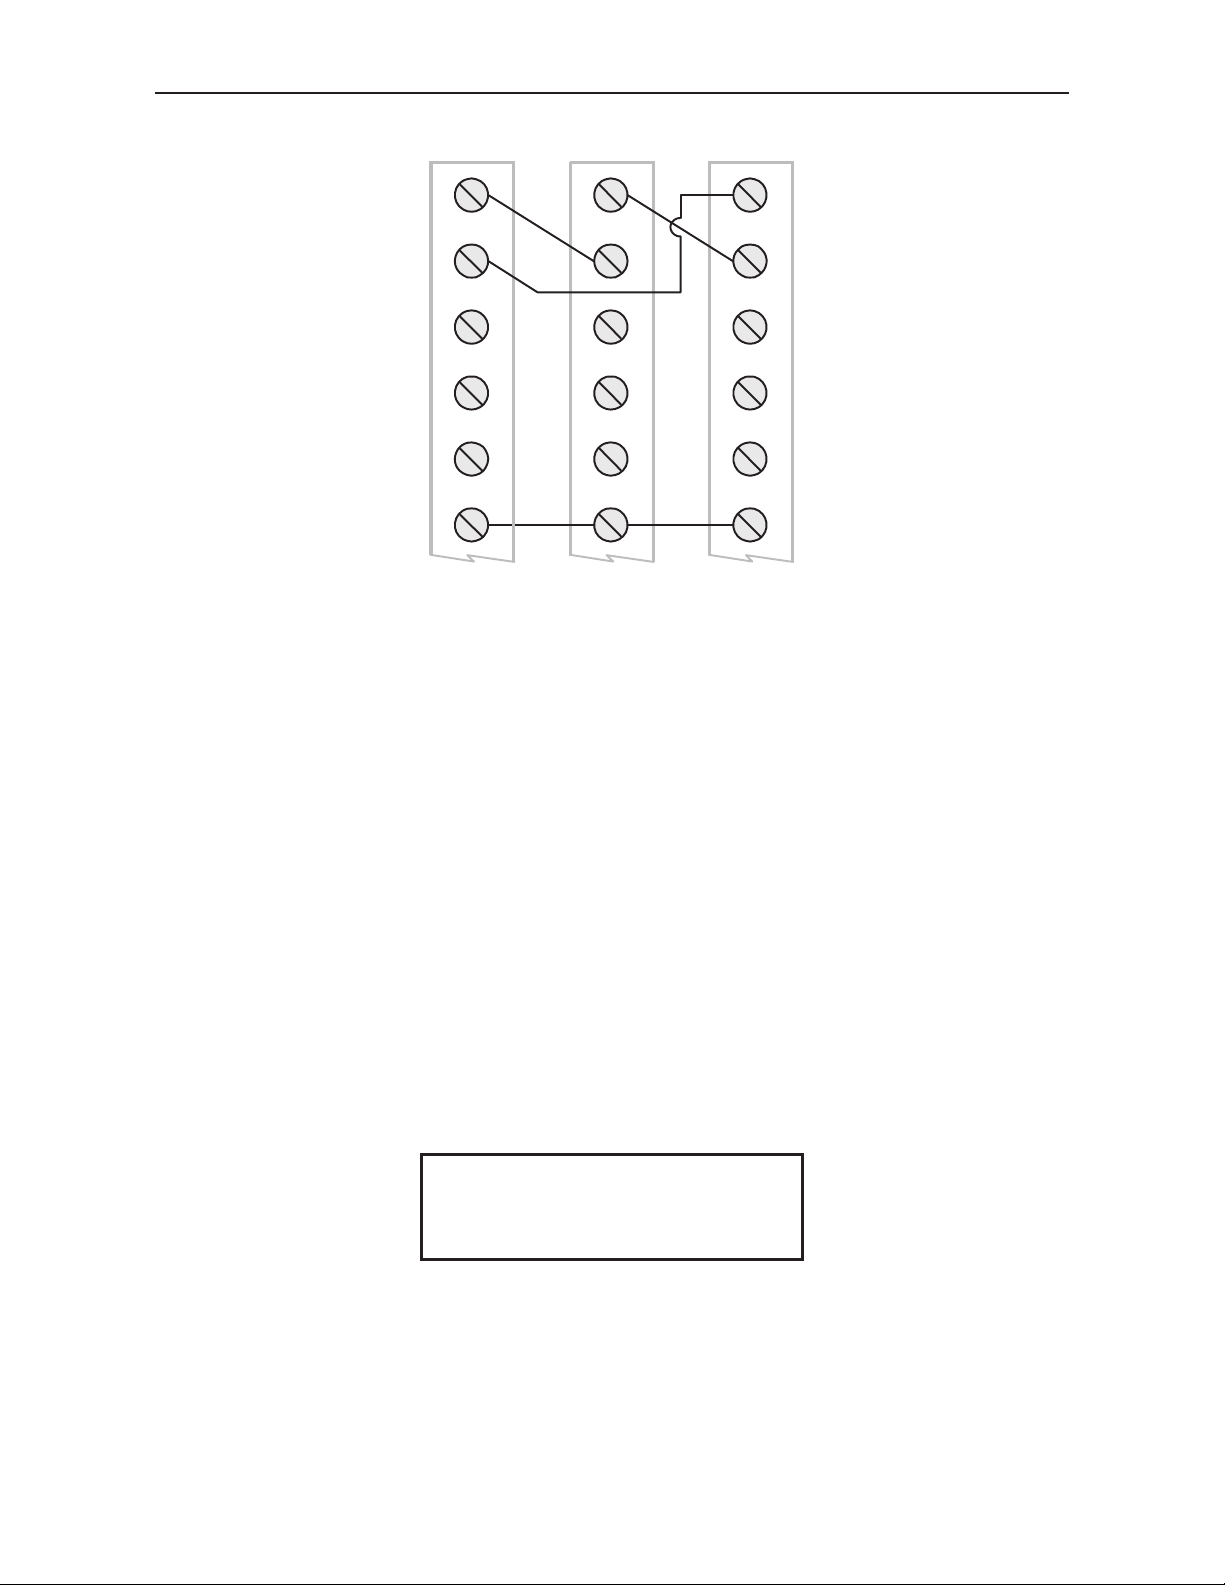
Multiple Unit First-Out Indication Connections
Multiple PD158 and PD154 units can keep a single first-out channel
indicated for all connected units. An unlimited number of units may be
connected. It is recommended that all units follow the same sequence.
The following figure show s shared first-ou t indica tion wirin g connection s
for 3 units. Up to 2 00 units may be connected for first-out indication.
16
Find Quality Products Online at: [email protected]
www.GlobalTestSupply.com
Page 17
PD154 & PD158 Vigilante® II Annunciators Instruction Manual
UNIT 1 UNIT 3
FO
FI
RST
ACK
SIL
COM
UNIT 2
FO
FI
RST
ACK
SIL
COM
Figure 10. System with Multiple Units Share First-Out
SETUP AND PROGRAMMING
FO
FI
RST
ACK
SIL
COM
Overview
There are no jumpers involved in the setup process of the an nunciator.
The sequence selector switch, located on the rear of the annunciator
above the signal connector must be set accordingly for ann unciator
sequence desired.
Normally open or normally closed input setup, relay fail-safe, and
additional sequence options are programme d with the front panel
pushbuttons.
After power and signal connections have been completed and ver ified,
and the sequence selector switch has been set appropriately, apply
power to the annunciator.
For a Quick Setup Guide
go to page 3
17
Find Quality Products Online at: [email protected]
www.GlobalTestSupply.com
Page 18
PD154 & PD158 Vigilante® II Annunciators Instruction Manual
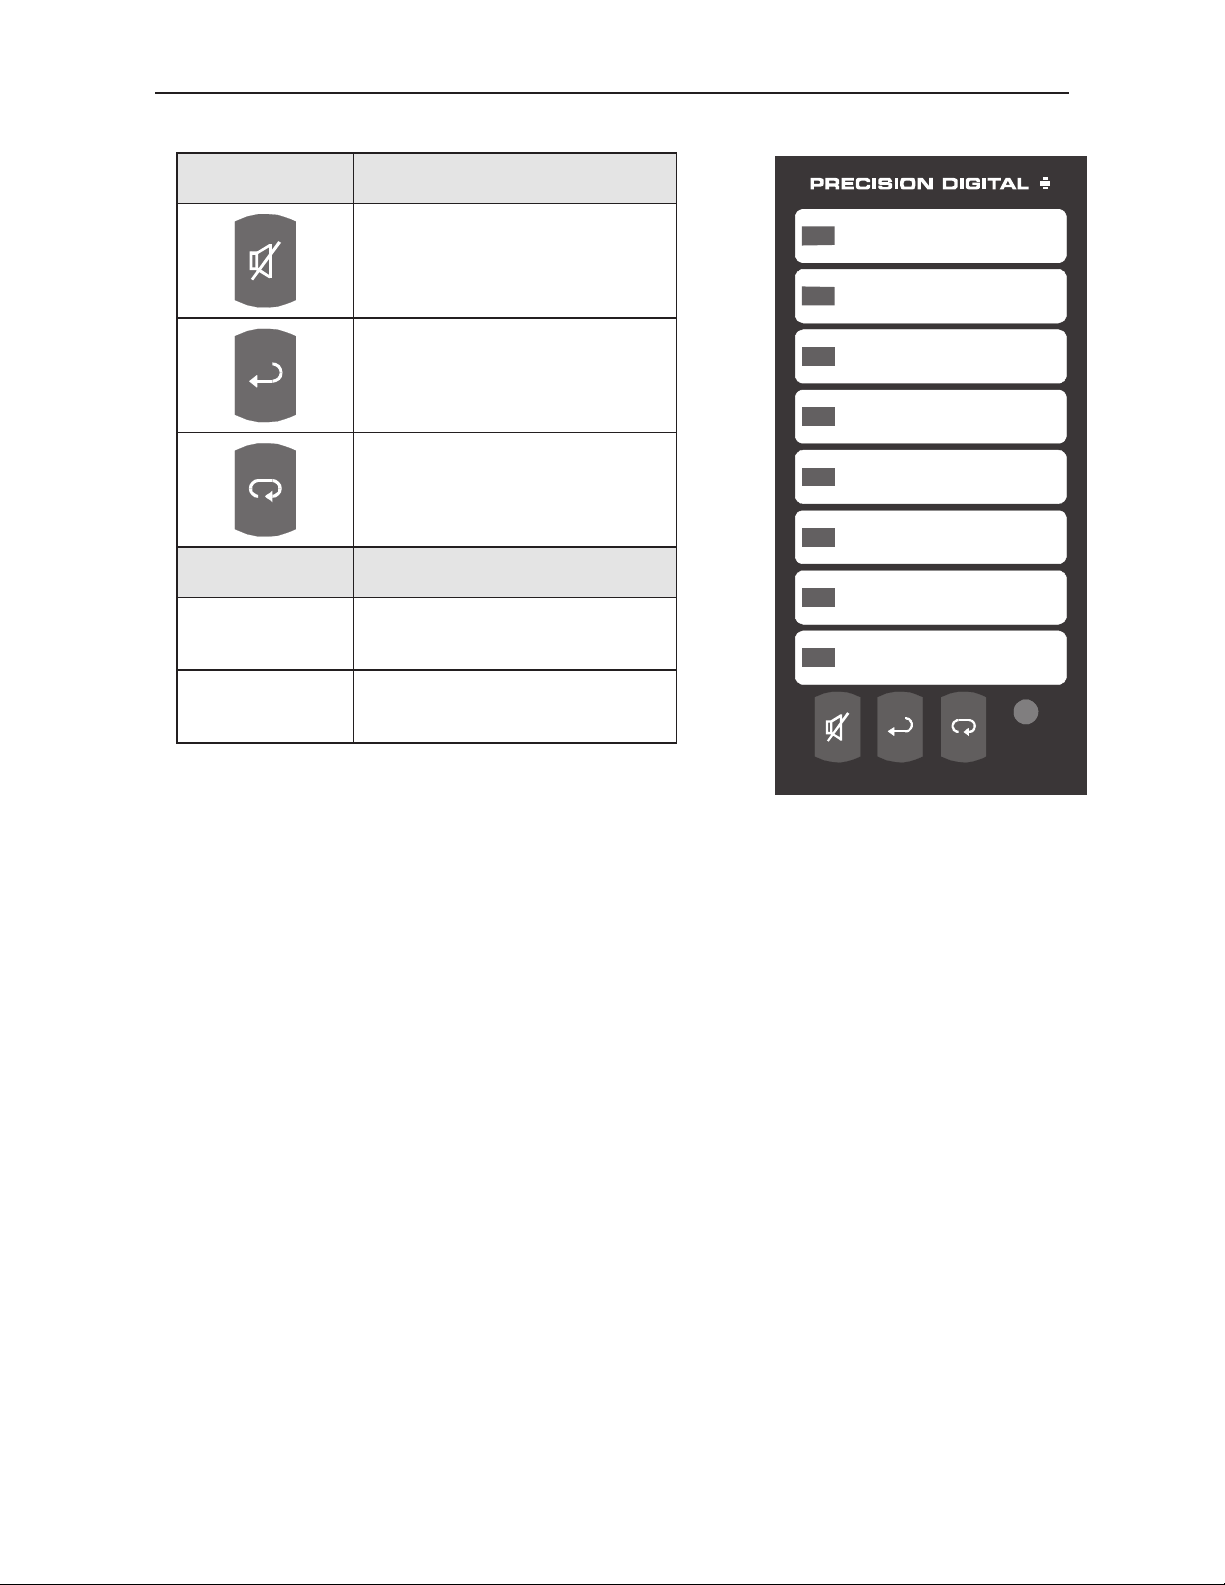
Front Panel Pushbuttons and Status LED Indicators
Button Description
Silence Horn
Acknowledge
Alarm
Reset Clear
Input Channels
LED Description
Red
Indicators
Channel status
1
indicators
Green
Indicates power is on.
Indicator
1. Quantity 4 red LED on the PD154
Quantity 8 red LED on the PD158
SILENCE ACK RESET
POWER
Pushbutton Descriptions
SILENCE
Silences the audible alarm without affecting the indicati on sequence
states. This pushbutton may be disabled (see page 26).
ACK (Acknowledge)
Acknowledges alarmed channels. See selected sequence details for
complete function description (see page 30).
RESET
Resets all acknowledged channels. This button is not used on ISA
sequences A, F1A, and F2A, which reset acknowledged channels
automatically. See selected sequence detail s for complete function
description (see page 30).
LED TEST (SILENCE & ACK)
Press and release the SILENCE and ACK pushbuttons to flash the
channel indicator LEDs for a lamp test.
18
Find Quality Products Online at: [email protected]
www.GlobalTestSupply.com
Page 19
PD154 & PD158 Vigilante® II Annunciators Instruction Manual
Full Function Test
Press and hold SILENCE and ACK for 5 seconds to perform a function
test. This tests the sequence operation and hardware by simulating
alarm inputs that are cleared in the normal sequence progr ession.
During the function test, all channels enter a simulated alarm state for 3
seconds. All LEDs, pushbuttons, relays, and the audible alarm will
follow the selected sequence as if the simulated alarm inputs were real.
After 3 seconds, the alarms may be cleared as normal for the selected
sequence.
Multiple Unit First-Out Indication
If multiple Vigilante II annunciators are connected for multiple unit
shared first-out indication (see page 16), only one input from all
connected devices will display as a first-out alarm.
Each individual annunciator will acknowledge and reset the channels on
that unit using the pushbuttons on that unit, and independent of all other
connected units. Only the unit displaying the first-out will sound the
audible alarm.
It is recommended that all connected units be set for the same first-out
sequence.
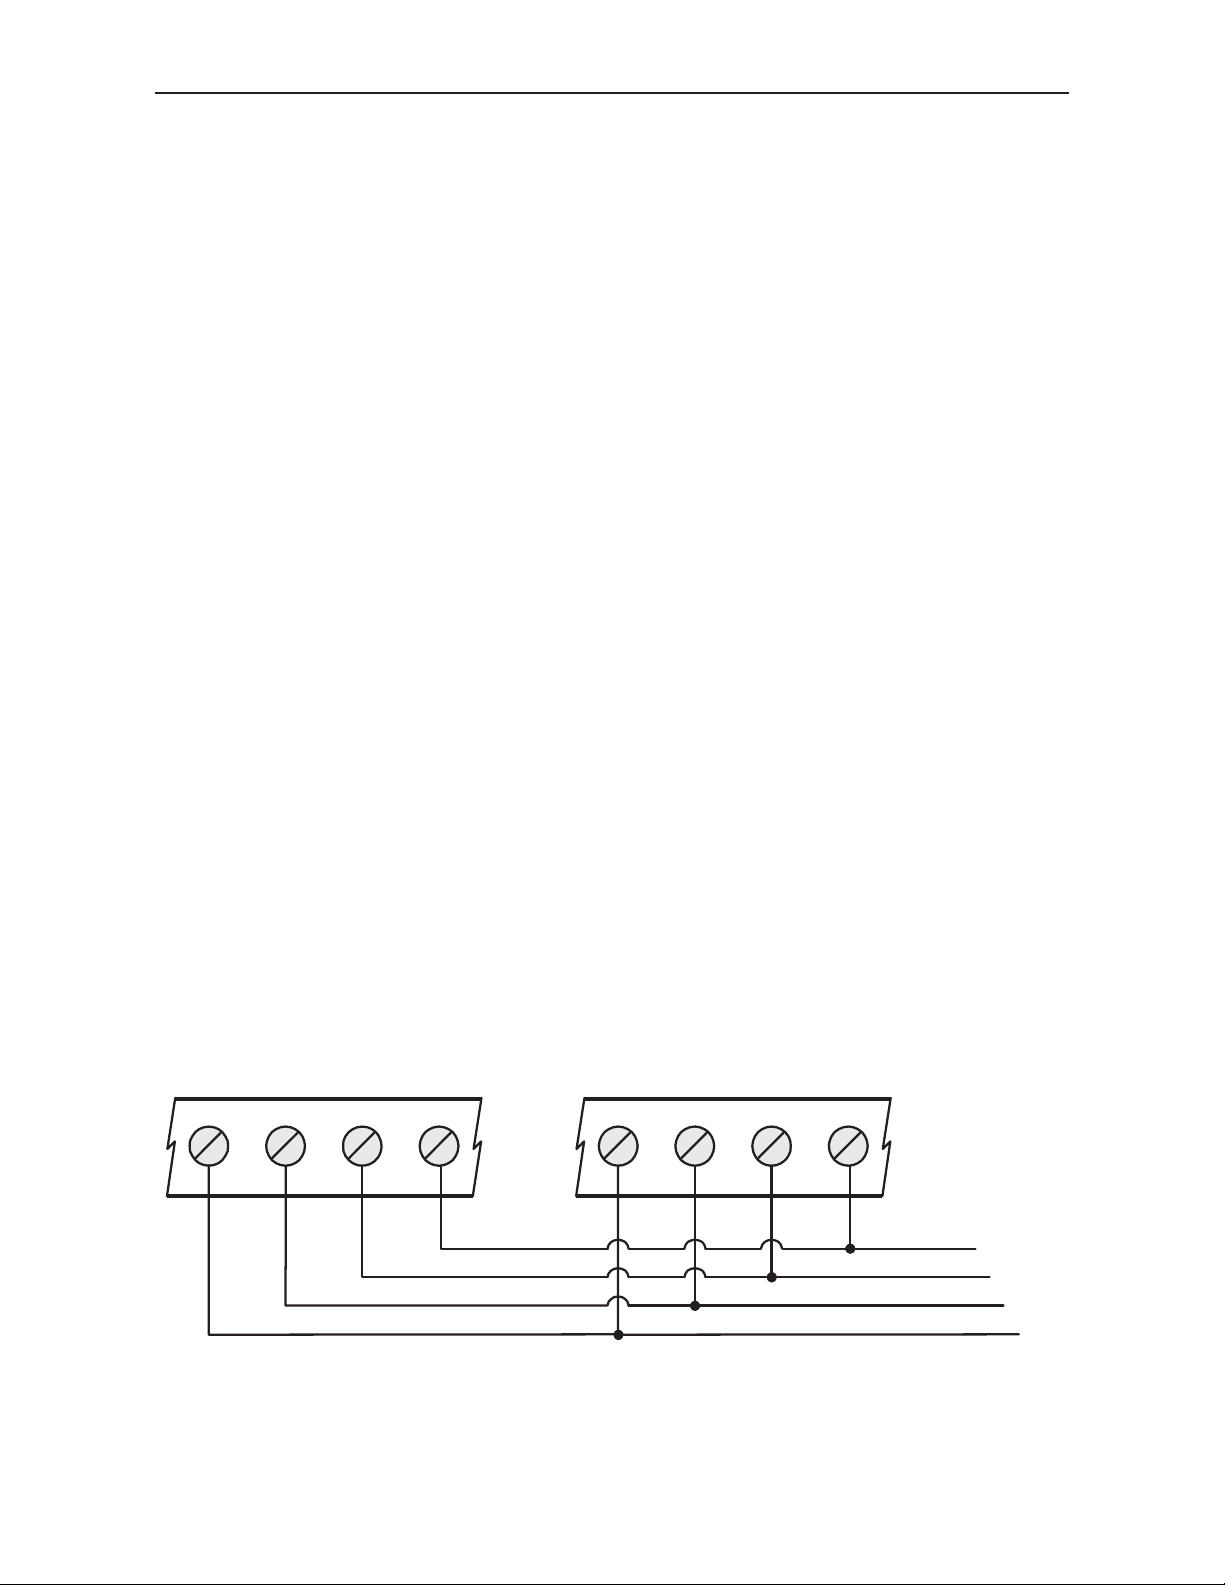
Shared Front Panel Buttons
To control all the units from any of the front panels, connect the SIL,
ACK, RST, and COM terminals on each unit.
UNIT 1
SIGNAL CONNECTOR
SIL RSTACKCOM SIL RSTACKCOM
SIGNAL CONNECTOR
UNIT 2
Figure 11. Shared
Find Quality Products Online at: [email protected]
www.GlobalTestSupply.com
Pushbutton Connections
19
Page 20

PD154 & PD158 Vigilante® II Annunciators Instruction Manual
A
r
Annunciator Sequence Selection
The alarm sequence is selected with the DIP switch located above the
signal connector.
Changing sequences while the unit is on will
restart the unit.
Sequence Selector Switch
Sequence Programming
Set switches to the positions shown
below for the desired sequence. The
annunciator will immediately
automatically restart and operate with
the new sequence.
Figure 12. DIP Switch
Location
ISA A* ISA F 2A* ISA F1
Followe
ISA M ISA F1M ISA F2M
ISA F3A
*Common sequences available on other Precision D igital Annunciators
Sequence Descriptions
See Page 30 for complete sequence descriptions.
20
Find Quality Products Online at: [email protected]
www.GlobalTestSupply.com
Page 21

PD154 & PD158 Vigilante® II Annunciators Instruction Manual
Normally Open/Normally Closed Input Setup
Each input channel is independently progr ammed for a normally open or
normally closed input. All channels are initially programmed at the
factory for normally open inputs.
Alarm Conditions for normally open inputs:
1. A closed contact between an input channel and common
will cause an alarm condition.
2. An “on” or active transistor bet ween an input channel and
common will cause an alarm condition.
3. An active logic level low on an input channel will cause an
alarm condition.
Alarm Conditions for normally closed inputs:
1. An open contact between an input channel and common
will cause an alarm condition.
2. An “off” or cutoff state transistor bet ween an input channel
and common will cause an alarm condition.
3. An active logic level high or no supplied active logic level
on an input channel will cause an alarm condition.
Programming NO/NC Inputs
1. Press and hold ACK and RESET for 3 seconds until all LEDs
cycle, then release
2.
Press ACK
3. Press ACK
4. Press the RES
within 3 seconds of release while LEDS cycle.
within 3 seconds of release while LEDs blink.
ET pushbutton to turn LED 1 off for a NO input,
or on for a NC input on input channel 1.
5.
Press ACK to accept the i
nput type and program channel 2.
6. Repeat steps 4 and 5 for all input channels.
7. Press and hold ACK for five seconds to return to normal
operation with the programmed input types.
During programming, the LED for the channel being programmed will
display as either off or brightly on. All other LEDs will be dim.
The green power LED will blink slowly to indicate the unit is in NO/NC
setup mode. The unit will automatically leave setup mode if no
pushbutton is pressed for 3 minutes.
1
1
1
The unit will automatically leave setup mode if steps 2 and 3 are not followed.
21
Find Quality Products Online at: [email protected]
www.GlobalTestSupply.com
Page 22
PD154 & PD158 Vigilante® II Annunciators Instruction Manual
K
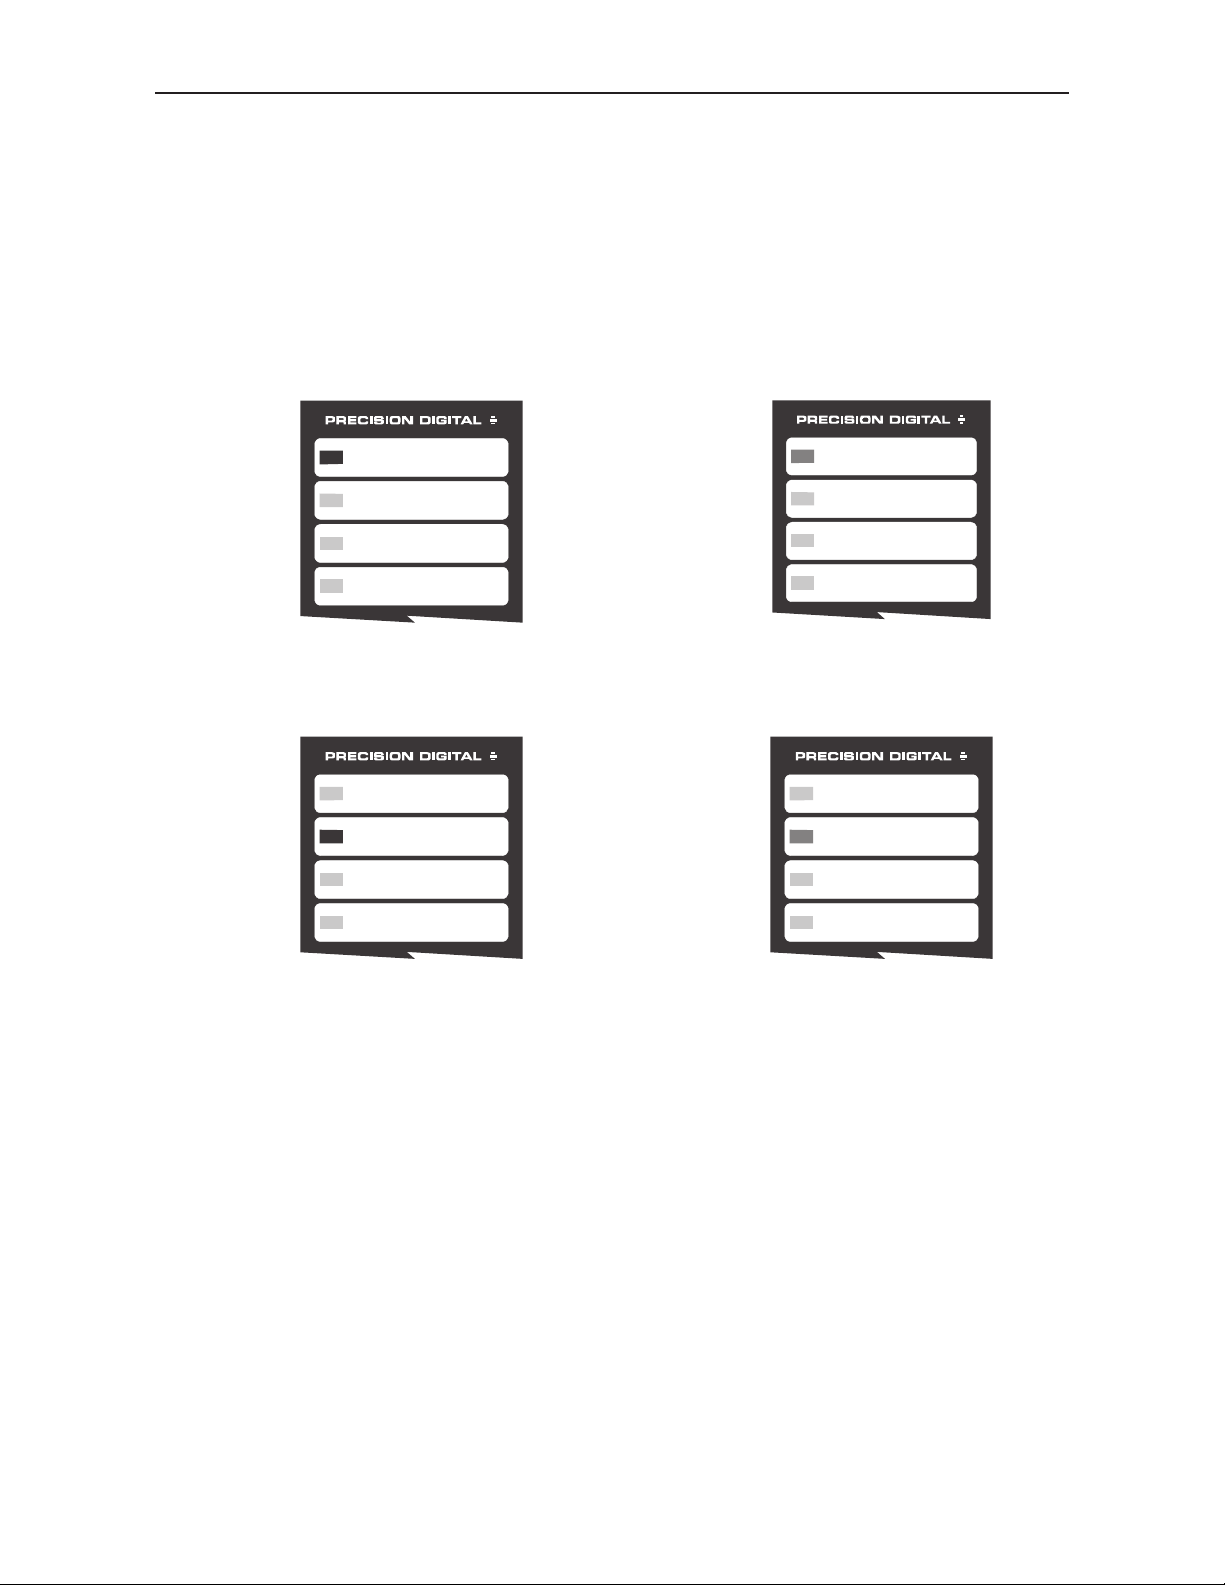
NO/NC Programming Example
The following is an example of NO/NC setup. Input channel 1 and 2 are
changed from the default settings of NO to be NC inputs.
1. Press and hold ACK and RESET for 3 seconds. When all
LEDs cycle, release.
2. Press ACK within 3 seconds. All LEDs blink in unison.
3. Press ACK again while LEDs blink
4. LED 1 will be off indicating a
NO input for channel 1. All
other LEDs will be dim.
5. Press RESET to change LED 1
from off to on, setting
channel 1 for a NC input.
6. Press AC
setting and proceed to program
channel 2.
to confirm the NC
7. Press RESET to change LED 2
from off to on, setting
channel 2 for a NC input.
8. Press ACK to confirm the NC setting and program channel 3.
9. Press and hold ACK for five seconds to return to normal
operation.
22
Find Quality Products Online at: [email protected]
www.GlobalTestSupply.com
Page 23

PD154 & PD158 Vigilante® II Annunciators Instruction Manual
Relay Operation
Relays 1 and 2 have standard functionality as defined below.
Relay 1 Operation
Relay 1 enters alarm state when there is a new alarm. This
relay will clear when the alarm is acknowledged, generally by
pressing the ACK pushbutton.
Relay 2 Operation
Relay 2 enters alarm state when any channel displays in alarm
state. This relay will clear when all indication LEDs are cl eared.
Relay Fail-Safe
In fail-safe operation, a relay coil is energized in non-alarm
condition. In case of power failure, relays will go to alarm state.
Fail-safe operation is set independently for each relay.
Programming Relay Fail-Safe
1. Press and hold ACK and RESET for 3 seconds. When all
LEDs cycle, release.
2. Press RESET within 3 seconds of release while LEDs cycle.
3. Press RESET wi
4. Press the RES
thin 3 seconds of release while LEDs blink.
ET pushbutton to turn LED 1 off for normal
operation, or on for fail-safe operation of Relay 1.
5.
Press ACK to accept the t
ype of operation for Relay 1.
6. Press the RESET pushbutton to turn LED 2 off for normal
operation, or on for fail-safe operation of Relay 2.
Press ACK to accept the t
7.
ype of operation for Relay 2.
8. Press and hold ACK for five seconds to return to operation.
During programming, LEDs 1 through 4 will light. The LED being
programmed will display as either off or brightly on. The other 3 LEDs
will be dim. On a PD158, LEDs 5 through 8 will be off.
The green power LED will blink quickly to indicate the unit is in the
advanced programming mode. The unit will automatically le ave setup
mode if no pushbutton is pressed for 3 minutes.
1
1
Note: LED 3 and 4 are used for the silence pushbutton enable/disable
option (see page 26) and no lock-in option (see page 26)
1
The unit will automatically leave setup mode if steps 2 and 3 are not followed.
23
Find Quality Products Online at: [email protected]
www.GlobalTestSupply.com
Page 24
PD154 & PD158 Vigilante® II Annunciators Instruction Manual
K
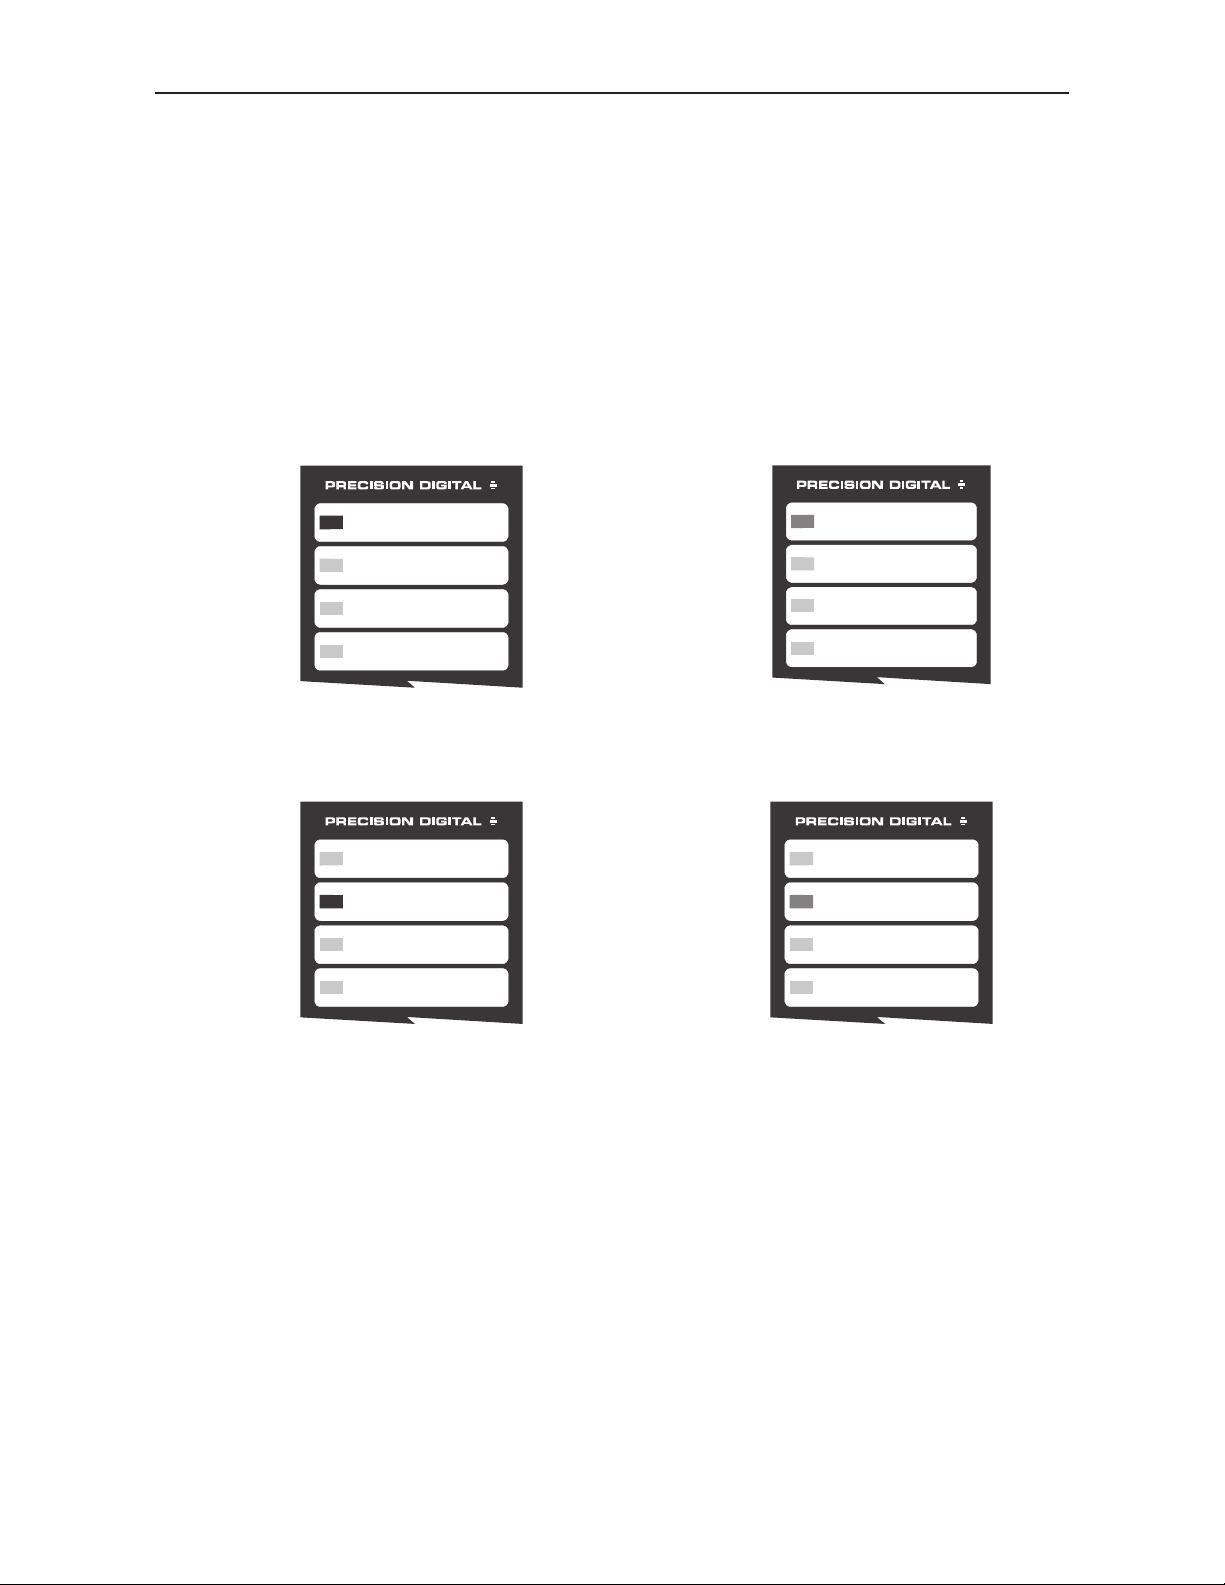
Relay Fail-Safe Programming Example
The following is an example of relay fail-safe setup. Relays 1 and 2 are
changed from the default settings of normal operation to fail-safe
operation.
1. Press and hold ACK and RESET for 3 seconds. When all
LEDs cycle, release.
2. Press RESET within 3 seconds of release while LEDs cycle.
All LEDs blink in unison.
3. Press RESET again within 3 seconds while LEDs blink
4. LED 1 will be off indicating
normal operation of relay 1.
LEDs 2 through 4 will be dim.
5. Press Reset to change LED 1
from off to on, setting relay 1
for fail-safe operation.
6. Press AC
setting for relay 1and proceed
to program relay 2.
to confirm the
7. Press RESET to change LED 2
from off to on, setting relay 2
for fail-safe operation.
8. Press ACK to confirm the setting for relay 2.
9. Press and hold ACK for 5 seconds to return to normal
operation.
Note: LEDs 3 and 4 are used for the silence pushbutton enabl e/disable
option (see page 26) and no lock-in option (see page 26)
24
Find Quality Products Online at: [email protected]
www.GlobalTestSupply.com
Page 25

PD154 & PD158 Vigilante® II Annunciators Instruction Manual
Relay Operation Overview
The following figure illustrates the operation of the relays.
ON
Relay 1
OFF
NORMAL
ON
Relay 2
OFF
ON
Relay 1
OFF
FAIL-SAFE
ON
Relay 2
OFF
Occurance
Relay On: Relay is energized
Alarm
ACK
Pressed
Alarms
Cleared
Relay Off: Relay is de-energized.
Alarm Occurrence: A new alarm occurs when there is no previous
unacknowledged alarm.
ACK Pressed: The Acknowledge pushbutton is pressed,
acknowledging the alarm.
Alarms Cleared: All LED indicators are cleared of alarm state indication
25
Find Quality Products Online at: [email protected]
www.GlobalTestSupply.com
Page 26

PD154 & PD158 Vigilante® II Annunciators Instruction Manual
Audible Horn Enable/Disable
The annunciator contains an audible internal horn. This horn may be
disabled with the rear-mounted switch located ab ove the signal
connector. To enable the horn, move switch 4 to the ON position. To
disable the horn, move switch 4 to the OFF position.
Sequence F2A
Horn Enabled
Sequence F2A
Horn Disabled
Enabling/Disabling Silence Option
ISA sequence option 1, Silence Pushbutton, includes a sil ence
pushbutton. This option may be disabled, removing any effects of the
silence pushbutton or silence pushbutton ext erna l contact. This option is
enabled by factory default.
Silence Pushbutton Enable/Disable
1. Press and hold ACK and RESET for 3 seconds until all LEDs
cycle, then release.
1
2. Press RESET within 3 seconds of release while LEDs cycle.
3. Press RESET within 3 seconds of release while LEDs blink.
1
4. Press the ACK pushbutton twice until LED 3 is either off or
brightly on.
5. Press the RESET pushbutton to turn LED 3 off to disable the
silence pushbutton or brightly on to en able the silence
pushbutton.
6. Press ACK to accept the silence pushbutton setting.
7. Press and hold ACK for five seconds to return to normal
operation.
The green power LED will blink quickly to indicate the unit is in the
advanced programming mode. The unit will automatically le ave setup
mode if no pushbutton is pressed for 3 minutes.
Note: LED 1 and 2 are used for relay fail-safe setup (see page 23)
1
The unit will automatically leave setup mode if steps 2 and 3 are not followed.
26
Find Quality Products Online at: [email protected]
www.GlobalTestSupply.com
Page 27

PD154 & PD158 Vigilante® II Annunciators Instruction Manual
No Lock-In Sequence Option
ISA sequence option 4 no lock-in, may be adde d to any sequence.
Momentary alarms will clear without the ACK pushbutton. Sequenc es A,
F1A, F2A, and F3A will automatically clear any momentary alarm.
Sequences M, F1M, and F2M will clear all momentary alarms when the
RESET pushbutton is used, regardless of what channels have
previously been acknowledged with ACK.
Selecting No Lock-In Operation
1. Press and hold ACK and RESET for 3 seconds until all LEDs
cycle, then release.
1
2. Press RESET within 3 seconds of release while LEDs cycle.
3. Press RESET within 3 seconds while LEDs blink.
1
4. Press the ACK pushbutton three times until LED 4 is either off
or brightly on.
5. Press the RESET pushbutton to turn LED 4 off to disable the
no lock-in option or on to enable the no lock-in option.
6. Press ACK to accept the option setting.
7. Press and hold ACK for five seconds to return to operation.
The green power LED will blink quickly to indicate the unit is in the
advanced programming mode. The unit will automatically le ave setup
mode if no pushbutton is pressed for 3 minutes.
Note: LED 1 and 2 are used for relay fail-safe setup (see page 23), and
LED 3 is used for silence pushbutton enable/disa ble (see page 26).
1
The unit will automatically leave setup mode if steps 2 and 3 are not followed.
Reset to Factory Defaults
1. Hold the ACK and RESET pushbuttons for 3 seconds until all
red LEDs cycle. Release once the LEDs begi n to cycle.
2. Press and hold the RESET button for 5 seconds. If the RESET
button is not pressed within 3 seconds of releasing ACK and
RESET, the unit will return to run mode without reset.
3. Reset the 4-position switch on the rear of the control to the
indicated default settings.
Factory Default
Switch Positions
27
Find Quality Products Online at: [email protected]
www.GlobalTestSupply.com
Page 28
PD154 & PD158 Vigilante® II Annunciators Instruction Manual
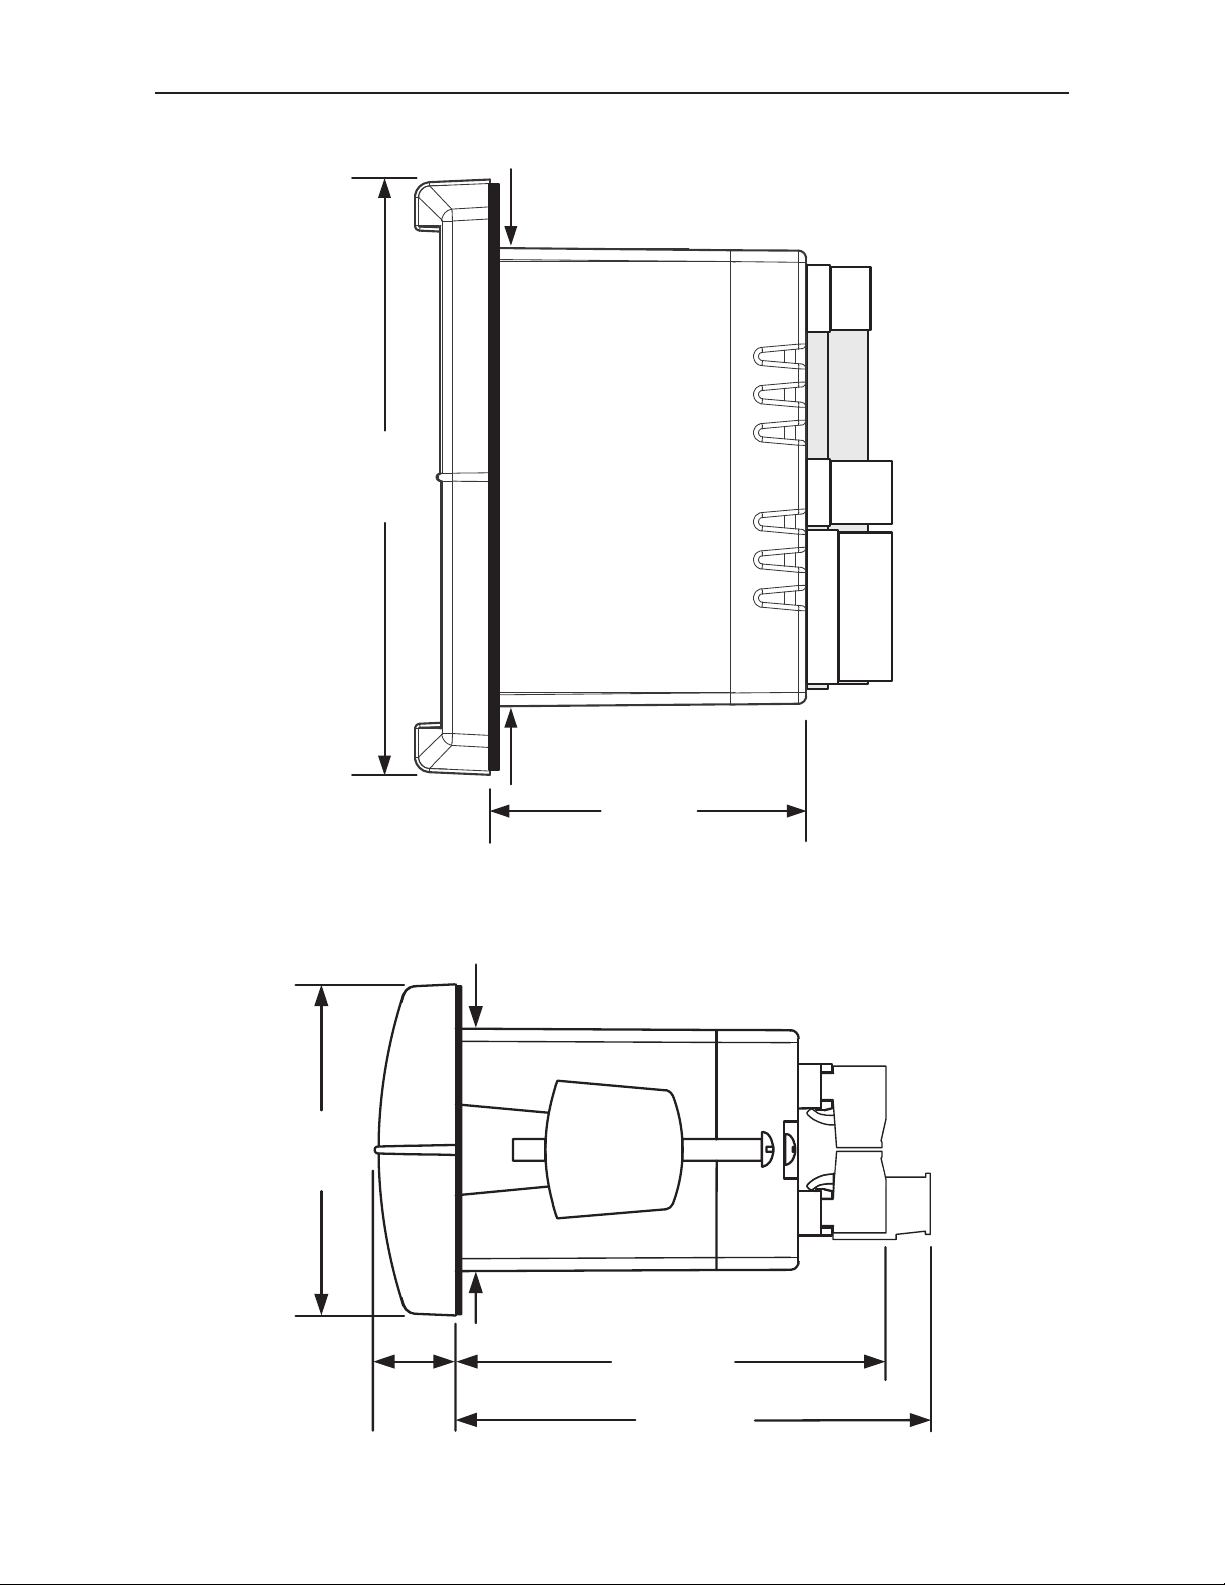
MOUNTING DIMENSIONS
3.61"
(92mm)
4.68"
(119mm)
Figure 13. Case Dimensions – Side View
2.45"
(62mm)
0.59"
(15mm)
2.50"
(64mm)
1.76"
(45mm)
3.2"
(81mm)
3.6"
(91mm)
Figure 14. Case Dimensions – Top Vi
ew
28
Find Quality Products Online at: [email protected]
www.GlobalTestSupply.com
Page 29

PD154 & PD158 Vigilante® II Annunciators Instruction Manual
TROUBLESHOOTING
If the annunciator is not working as expected, refer to the
recommendations below.
Troubleshooting Tips
Symptom Check/Action
Power LED off
Audible alarm does not sound
when alarm state detected
Power light blinks and
channel/point indicators flash
intermittently when powered up.
Display sequence does not
function as expected.
If the display locks up or the unit
does not respond at all
Relay operation is reversed
Other symptoms not described
above
Check power at power connector
Check:
1. Rear switch position 4 is ON.
2. No external pushbutton contacts
on the input connector are shorted.
Check that no external pushbutton
contacts on the signal connector are
shorted to common.
Check:
1. Verify sequence selection as
shown on page 20.
2. Check that no external pushbutton
contacts on the input connector
are shorted.
Cycle the power to restart the
microprocessor.
Check:
1. Fail-safe settings as shown on
page 23.
2. Wiring of relay contacts
Call Technical Support for
assistance.
To reset unit to factory default settings of sequence F2A-1, first out
indication with silence and acknowledge pushbuttons with automatic
reset, see page 27.
29
Find Quality Products Online at: [email protected]
www.GlobalTestSupply.com
Page 30

PD154 & PD158 Vigilante® II Annunciators Instruction Manual
FULL SEQUENCE DESCRIPTIONS
The following section describes the operation of the various sequences
available in the Vigilante
Features
Acknowledge Pushbutton: Momentary alarms will not clear until the
alarmed channels have been acknowledg ed with the ACK pushbutton.
This will also reset the first out indication. Used in all ISA sequences.
Automatic Reset: Acknowledged momentary alarms will clear
automatically when the inputs return to normal. The automatic reset is
present in all automatic (A) sequences.
First-Out Indication: The sequence provides a distinct visual indication
for the first channel to alarm.
First-Out Reset Pushbutton: Resets the first-out display and assigns
the first-out channel to display as a subsequent alarm without any other
changes to the sequence. The next alarm input will be a new first-out
alarm. Used only in sequence F3A.
®
II alarm annunciator.
Reset Pushbutton: Acknowledged momentary alarms will only clear
when reset with the RESET pushbutton. Used in any manual reset (M)
sequence.
Sequence Condition Descriptions
The following terms are used in describing the sequence behavior in the
following tables:
Alert: The input is in alarm state, and the channel has not been
acknowledged with the ACK pushbutton.
Acknowledge: The alarm state is acknowledged with the ACK
pushbutton. This will restart the first-out indication.
First Out Reset (F3A Only): The RESET pushbutton is used to reset
the first-out indication only.
Normal: Inputs are in the normal state.
LED Condition Descriptions
1st Pt: Indicates the behavior of the first-out channel only.
Next Pt: The behavior of subsequent alarm channels; channels that
enter the alarm state after the first-out alarm.
30
Find Quality Products Online at: [email protected]
www.GlobalTestSupply.com
Page 31
PD154 & PD158 Vigilante® II Annunciators Instruction Manual
A
p
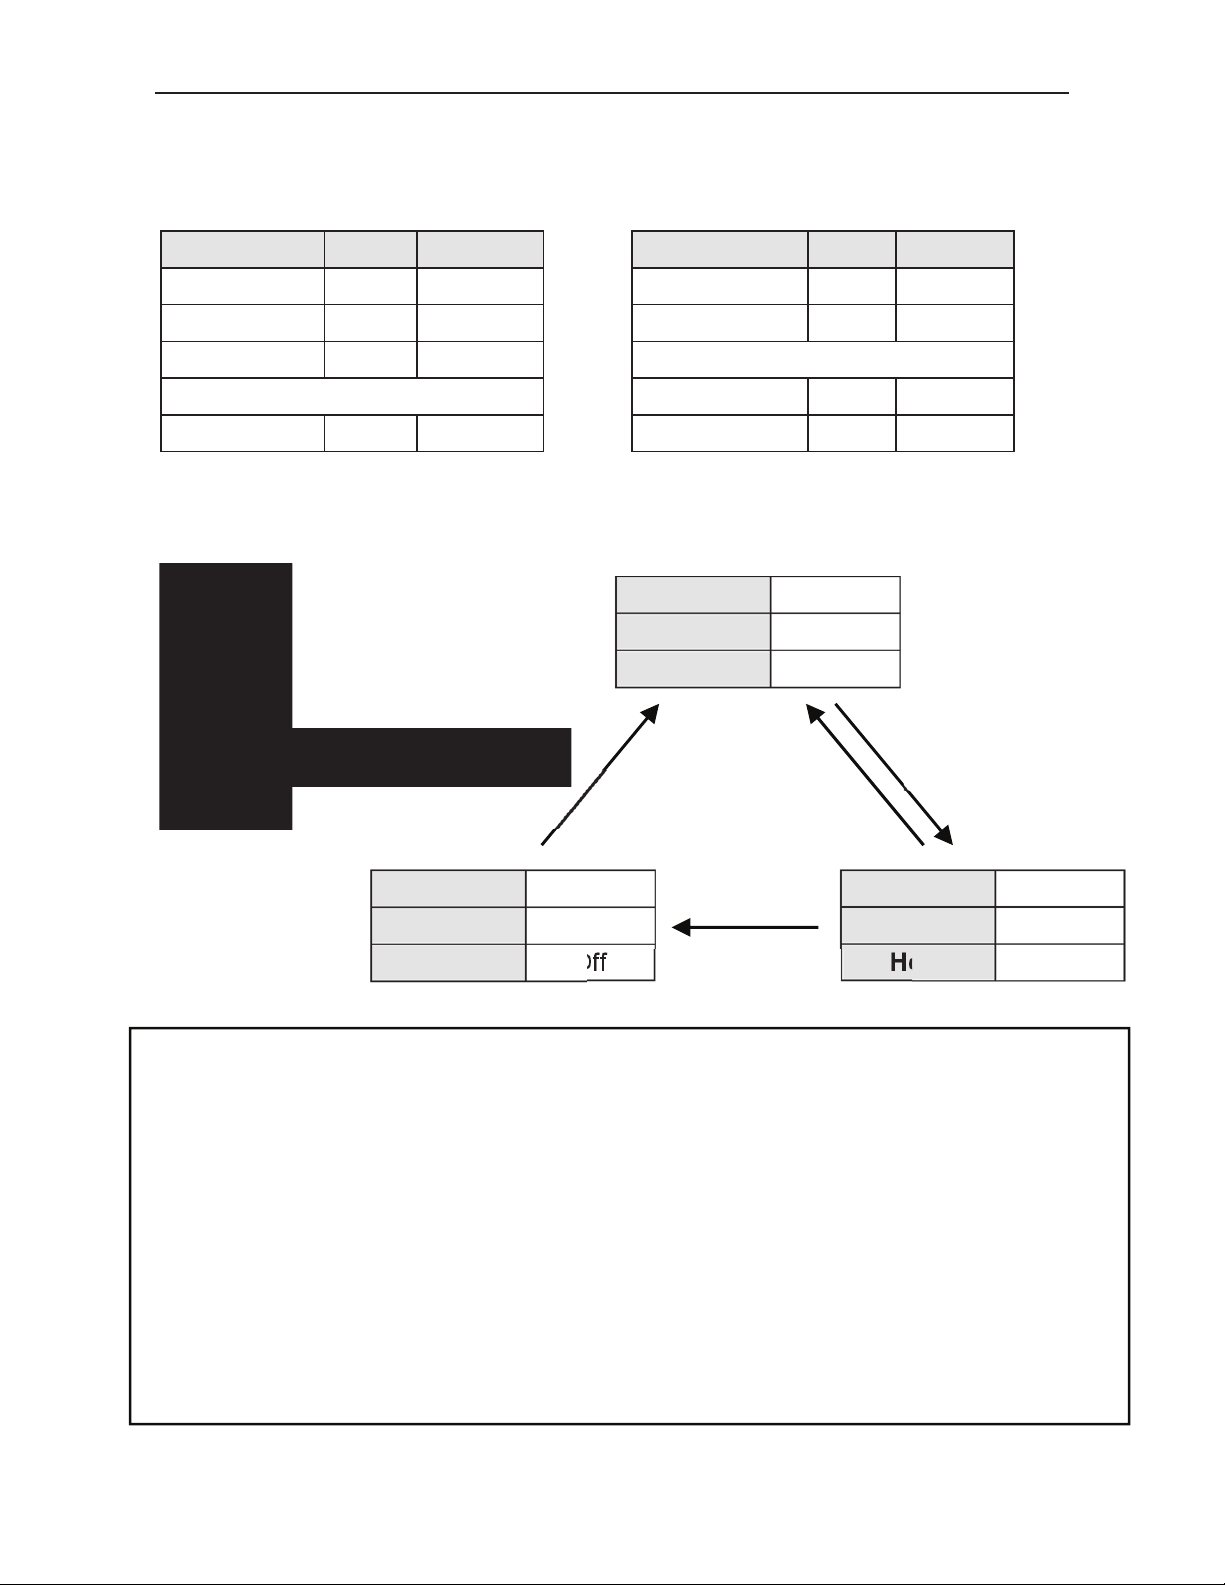
ISA Sequence A
Acknowledge Pushbutton and Automatic Reset
Momentary Alarm Maintained Alarm
Condition LED Horn Condition LED Horn
Normal
Alert
Normal
ACK Pushbutton
Acknowledge
Off Off
Flash On
Flash On ACK Pushbutton
Off Off
Normal
Alert
Acknowledge
Normal
Off Off
Flash
Steady Off
Off Off
On
Sequence A Sequence A Flowchart
Switch Positions
Condition Normal
LED Off
Horn Off
Return
to Normal
Ack when
uts Normal
In
larm Condition
Condition Alert
LED Steady
Horn Off
Ack
Pressed
Condition Alert
LED Flash
Horn On
Relay Operation
For complete details on relay function, see page 23.
Relay 1: Operation
Relay 1 enters alarm state when there is a new alarm. This relay will clear
when the alarms are acknowledged.
Relay 2 Operation
Relay 2 enters alarm state when any channel displays in alarm state. This
relay will clear when all indication LEDs are cleared.
31
Find Quality Products Online at: [email protected]
www.GlobalTestSupply.com
Page 32
PD154 & PD158 Vigilante® II Annunciators Instruction Manual
p
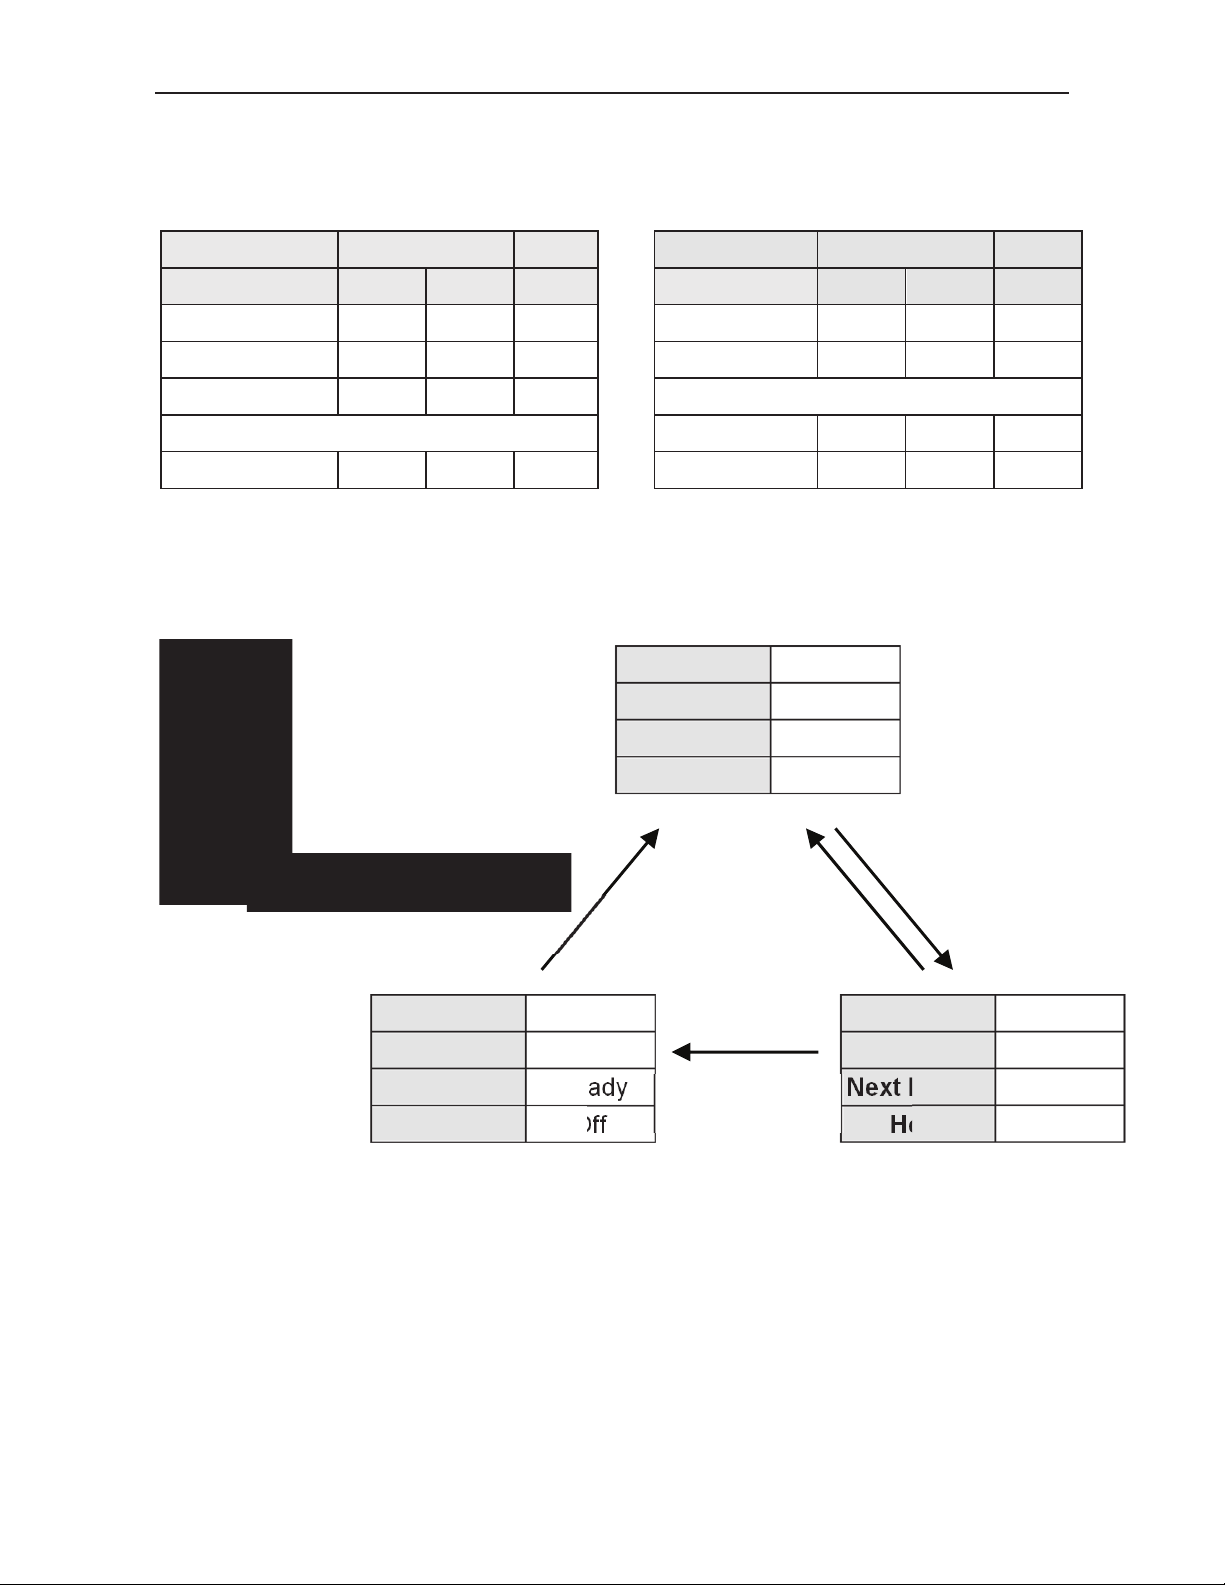
ISA Sequence F2A
First-Out Indication with Acknowledge Pushbutton and Automatic Reset
Momentary Alarm Maintained Alarm
Condition LED Horn Condition LED Horn
Normal
Alert
Normal
ACK Pushbutton
Acknowledge
1st Pt Next Pt 1st Pt Next Pt
Off Off Off
Flash Steady On
Flash Steady On ACK Pushbutton
Off Off Off
Normal
Alert
Acknowledge
Normal
Off Off Off
Flash Steady On
Steady Steady Off
Off Off Off
Sequence F2A Sequence F2A Flowchart
Switch Positions
Condition Normal
1st Pt LED Off
Next Pt LED Off
Horn Off
Return
to Normal
Ack when
uts Normal
In
Alarm Condition
Condition Alert
1st Pt LED Steady
Next Pt LED Steady
Horn Off
Ack
Pressed
Condition Alert
1st Pt LED Flash
Next Pt LED Steady
Horn On
32
Find Quality Products Online at: [email protected]
www.GlobalTestSupply.com
Page 33
PD154 & PD158 Vigilante® II Annunciators Instruction Manual
A
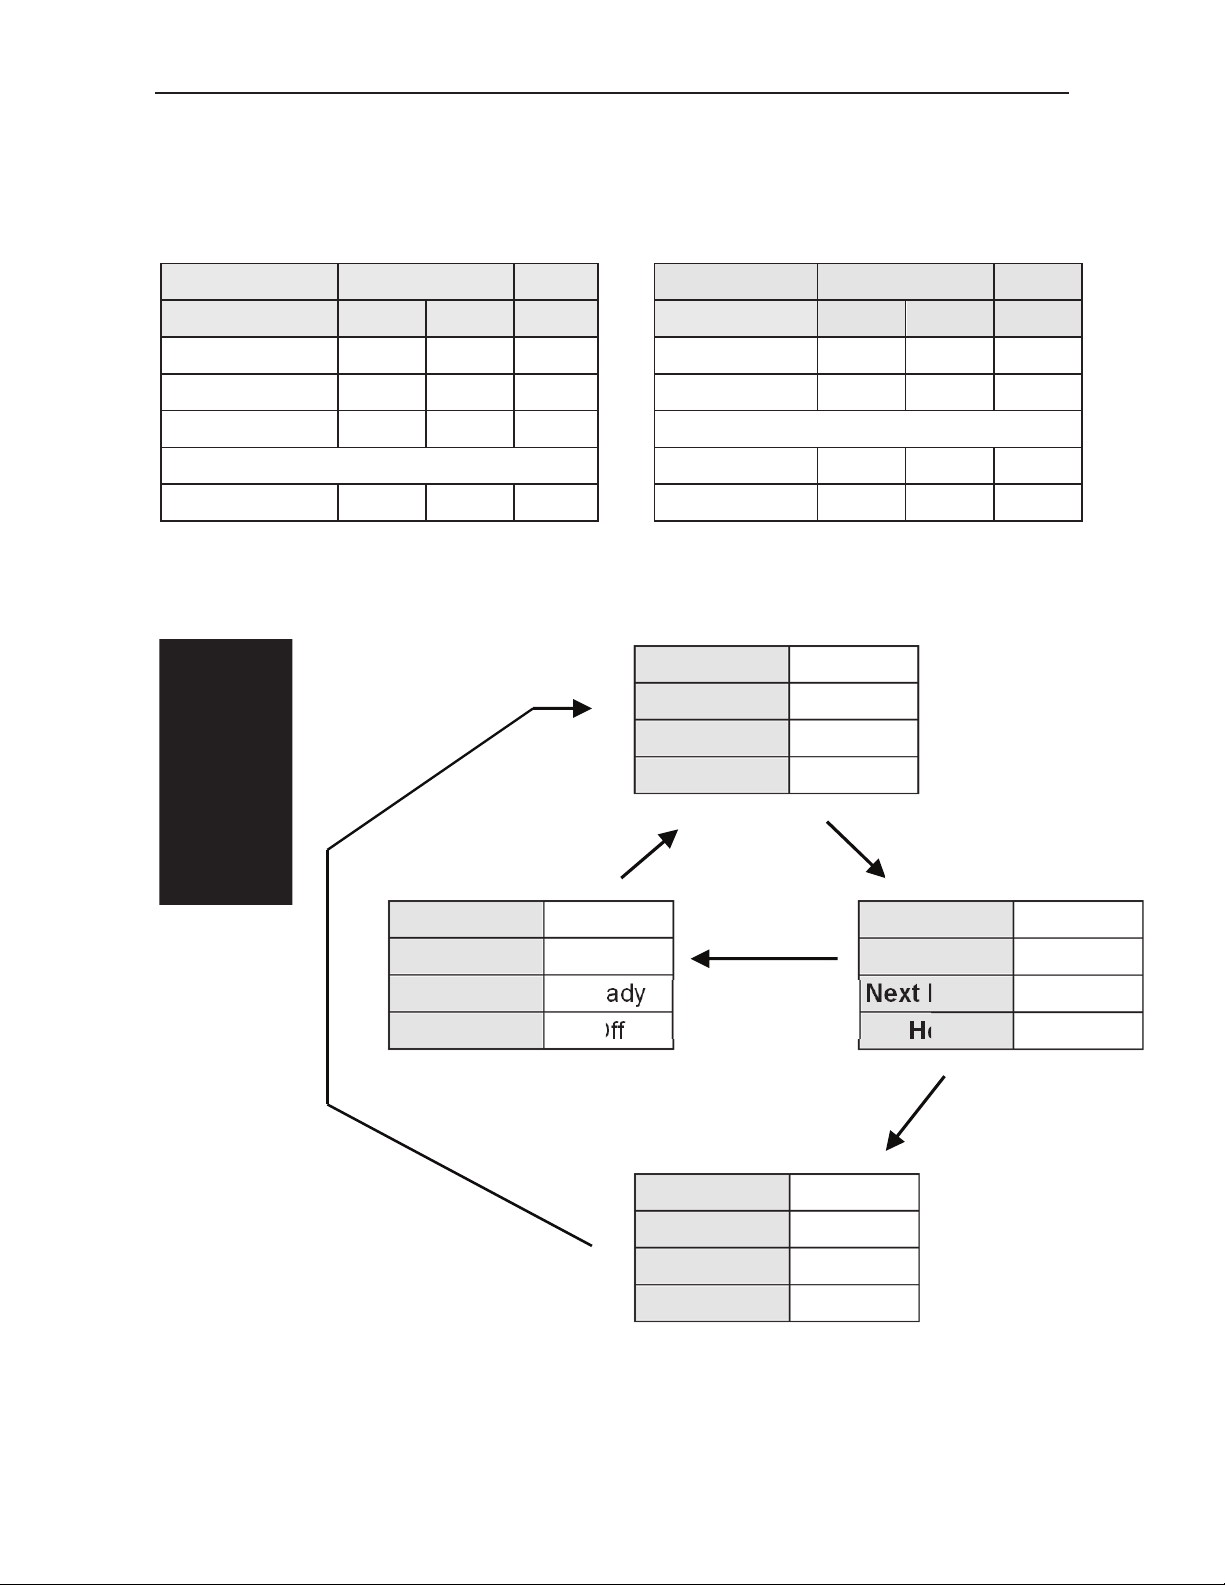
ISA Sequence F1A
First-Out Indication with Acknowledge Pushbutton, No Lock-In of
Subsequent Alarms, and Automatic Reset
Momentary Alarm Maintained Alarm
Condition LED Horn Condition LED Horn
1st Pt Next Pt 1st Pt Next Pt
Normal
Alert
Normal
ACK Pushbutton
Acknowledge
Off Off Off
Flash Steady On
Flash Off On ACK Pushbutton
Off Off Off
Normal
Alert
Acknowledge
Normal
Off Off Off
Flash Steady On
Steady Steady Off
Off Off Off
Sequence F1A Sequence F1A Flowchart
Switch Positions
Condition Normal
1st Pt LED Off
Next Pt LED Off
Horn Off
Return
to Normal
Condition Alert
1st Pt LED Steady
larm Condition
Condition Alert
1st Pt LED Flash
Next Pt LED Steady
Horn Off
Condition Normal
1st Pt L D Flash
Ack
Pressed
Find Quality Products Online at: [email protected]
www.GlobalTestSupply.com
Next Pt LED Off
Horn On
33
Ack
Pressed
Next Pt LED Steady
Horn On
Return
to Normal
Page 34
PD154 & PD158 Vigilante® II Annunciators Instruction Manual
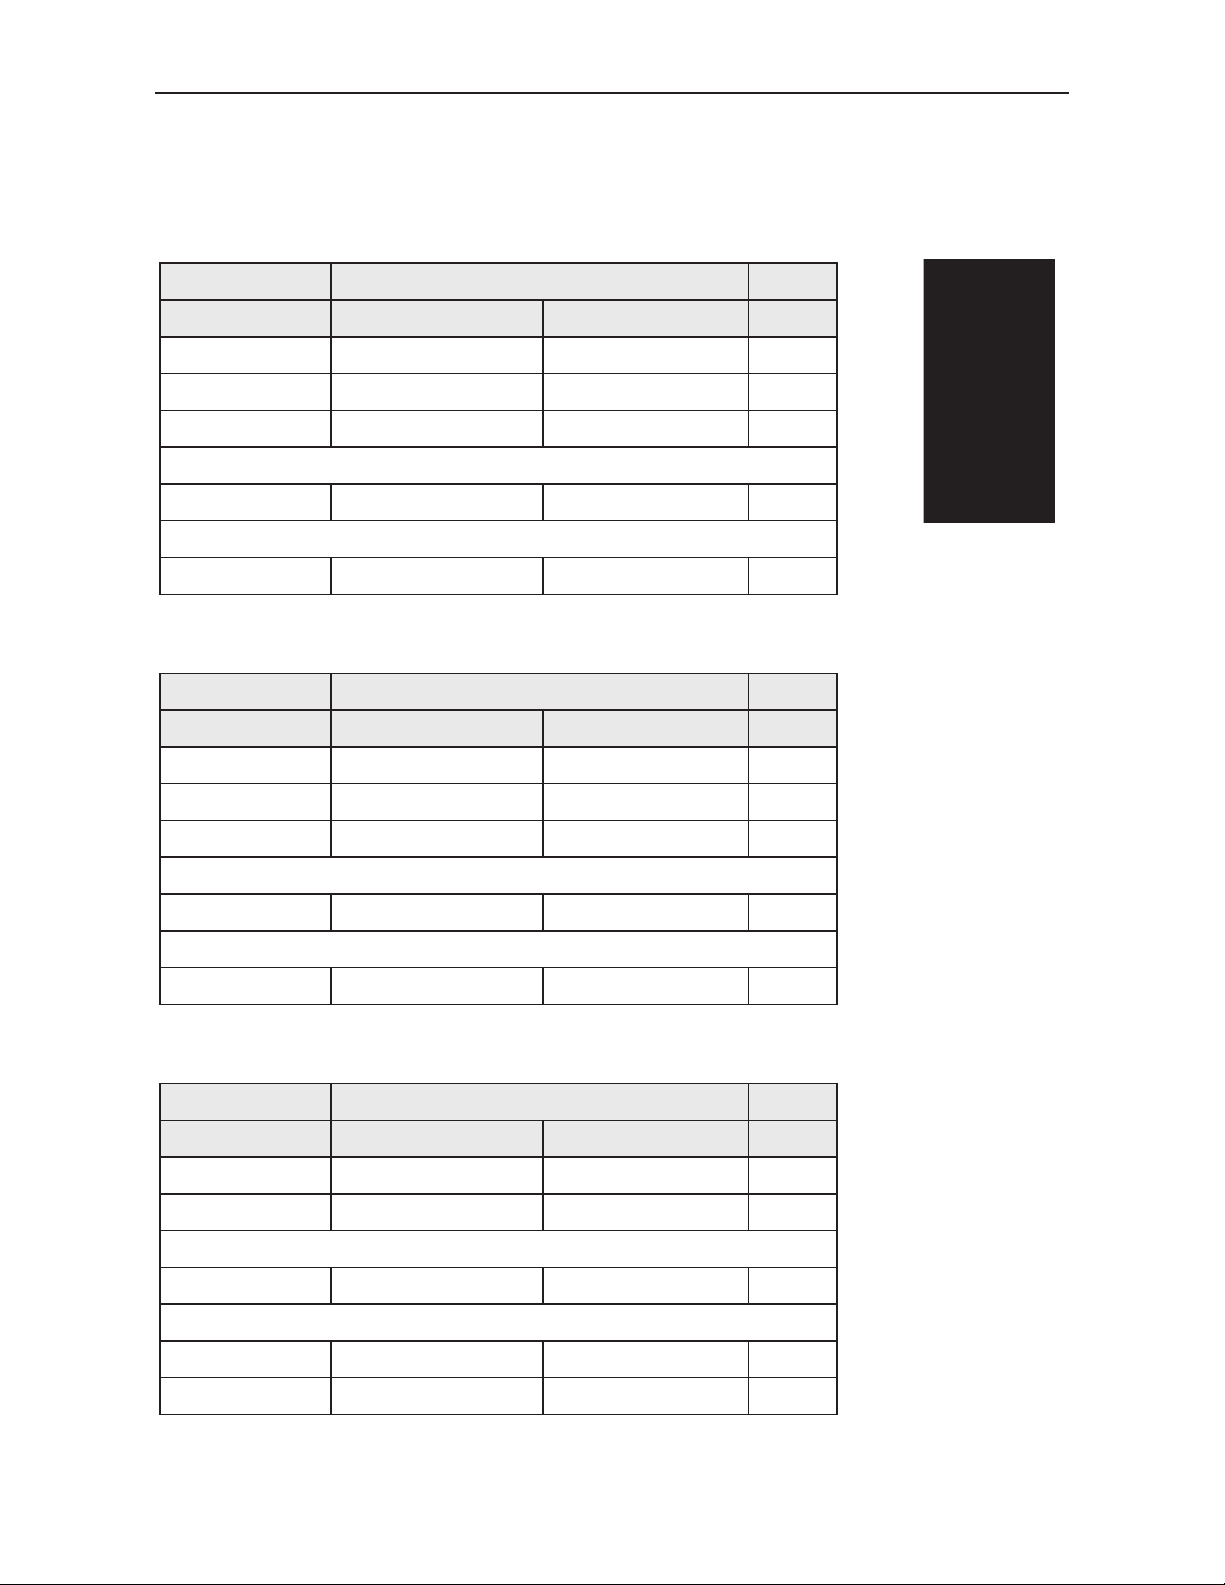
ISA Sequence F3A
First-Out Indication with Acknowledge Pushbutton, Automatic Reset,
and First-Out Reset Pushbutton
Momentary Alarm (RESET before ACK)
Condition LED Horn
Normal
Alert
Normal
1st Out Reset
Acknowledge
Intermittent Flash Fast Flash On
Intermittent Flash Fast Flash On
1st Pt Next Pt
Off Off Off
RESET Pushbutton
Fast Flash Fast Flash On
ACK Pushbutton
Off Off Off
Momentary Alarm (ACK before RESET)
Condition LED Horn
Normal
Alert
Normal
Intermittent Flash Fast Flash On
Intermittent Flash Fast Flash On
1st Pt Next Pt
Off Off Off
ACK Pushbutton
Sequence
F3A
Switch
Positions
Acknowledge
Reset
Slow Flash Off Off
RESET Pushbutton
Off Off Off
Maintained Alarm (RESET before ACK)
Condition LED Horn
Normal
Alert
1st Out Reset
Acknowledge
Normal
Intermittent Flash Fast Flash On
1st Pt Next Pt
Off Off Off
RESET Pushbutton
Fast Flash Fast Flash On
ACK Pushbutton
Steady Steady Off
Off Off Off
34
Find Quality Products Online at: [email protected]
www.GlobalTestSupply.com
Page 35
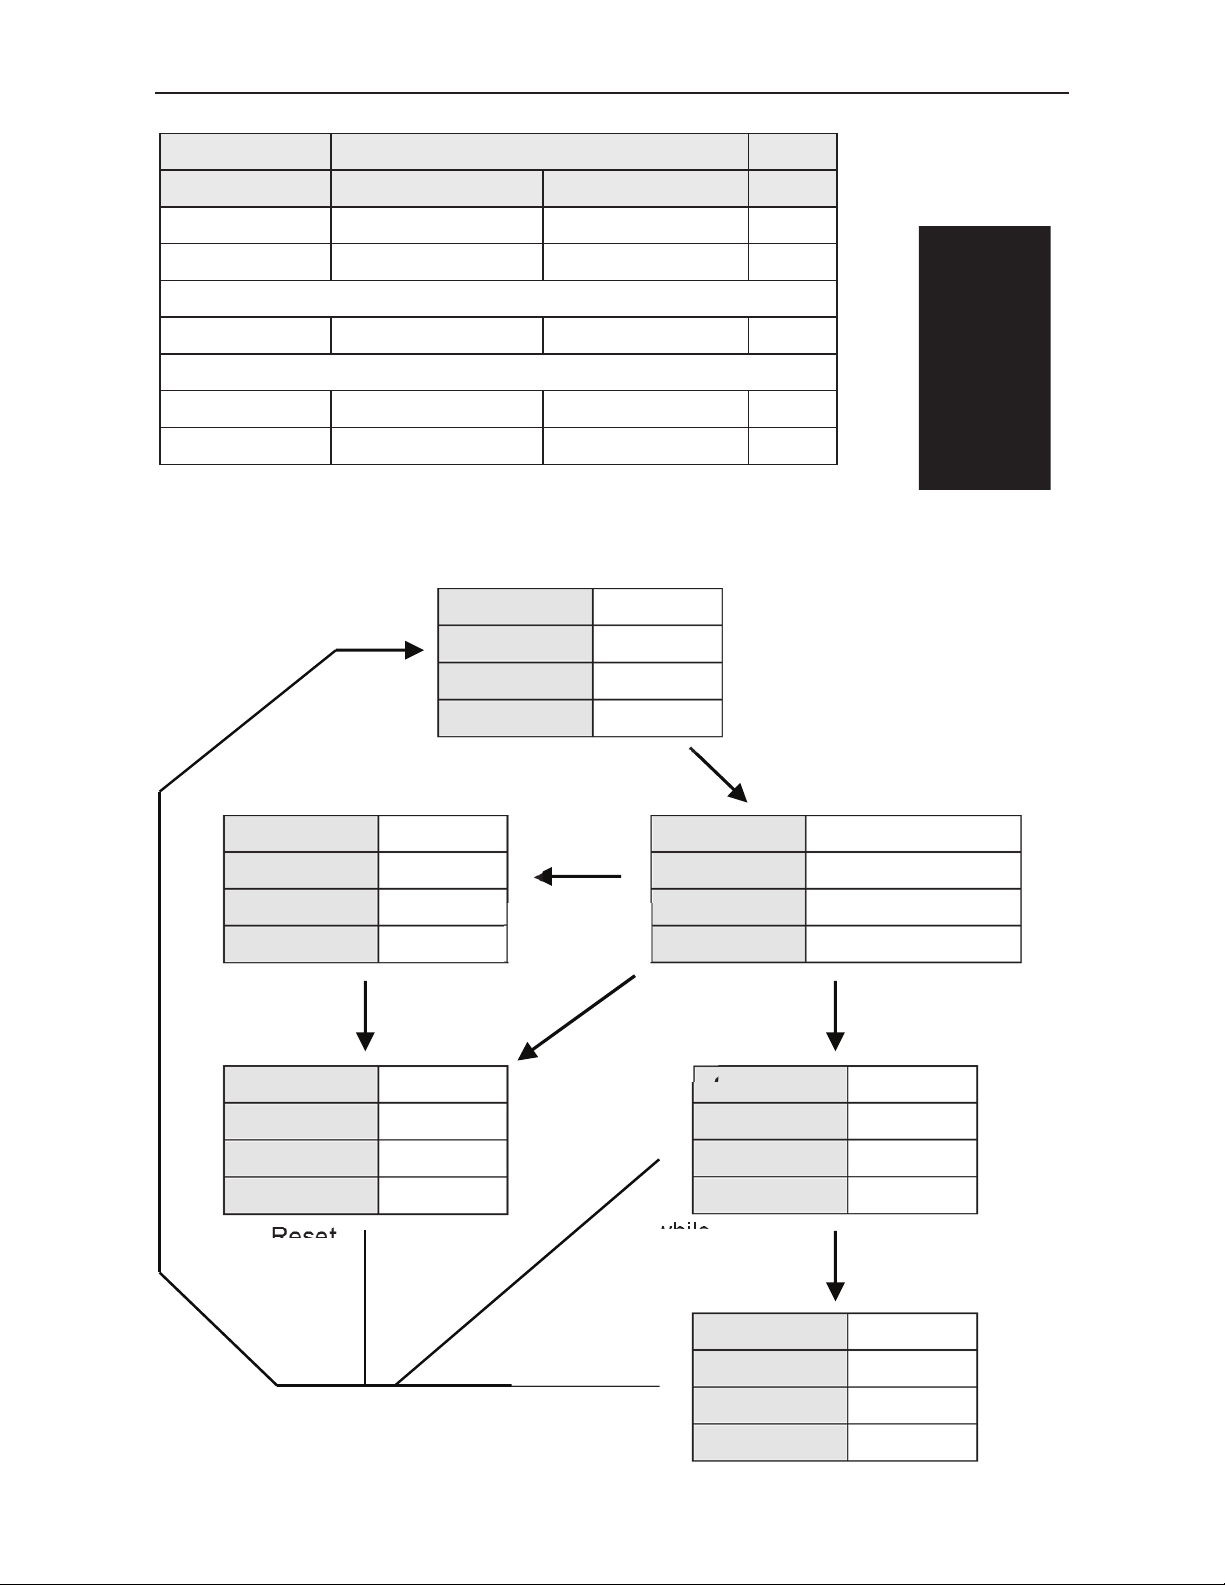
PD154 & PD158 Vigilante® II Annunciators Instruction Manual
A
Maintained Alarm (ACK before RESET)
Condition LED Horn
Normal
Alert
Acknowledge
1st Out Reset
Normal
Intermittent Flash Fast Flash On
1st Pt Next Pt
Off Off Off
ACK Pushbutton
Slow Flash Steady Off
RESET Pushbutton
Steady Steady Off
Off Off Off
Sequence F3A Flowchart Sequence F3A
Switch Positions
Condition Normal
1st Pt LED Off
Next Pt LED Off
Horn Off
larm Condition
Condition Alert
1st Pt LED Slow Flash
Next Pt LED Steady
Horn Off
Return
to Normal
Condition Normal
1st Pt LED Slow Flash
Next Pt LED Off
Horn Off
Reset
Pressed
Ack while
Alarmed
Ack while
Normal
Ack while
Return
to Normal
Condition Alert
1st Pt LED Intermittent Flash
Next Pt LED Fast Flash
Horn On
Reset
Pressed
Condition Any
1st Pt LED Fast Flash
Next Pt LED Fast Flash
Horn On
Normal
Ack while
Alarmed
Condition Alert
1st Pt LED Steady
Next Pt LED Steady
Horn Off
35
Find Quality Products Online at: [email protected]
www.GlobalTestSupply.com
Page 36
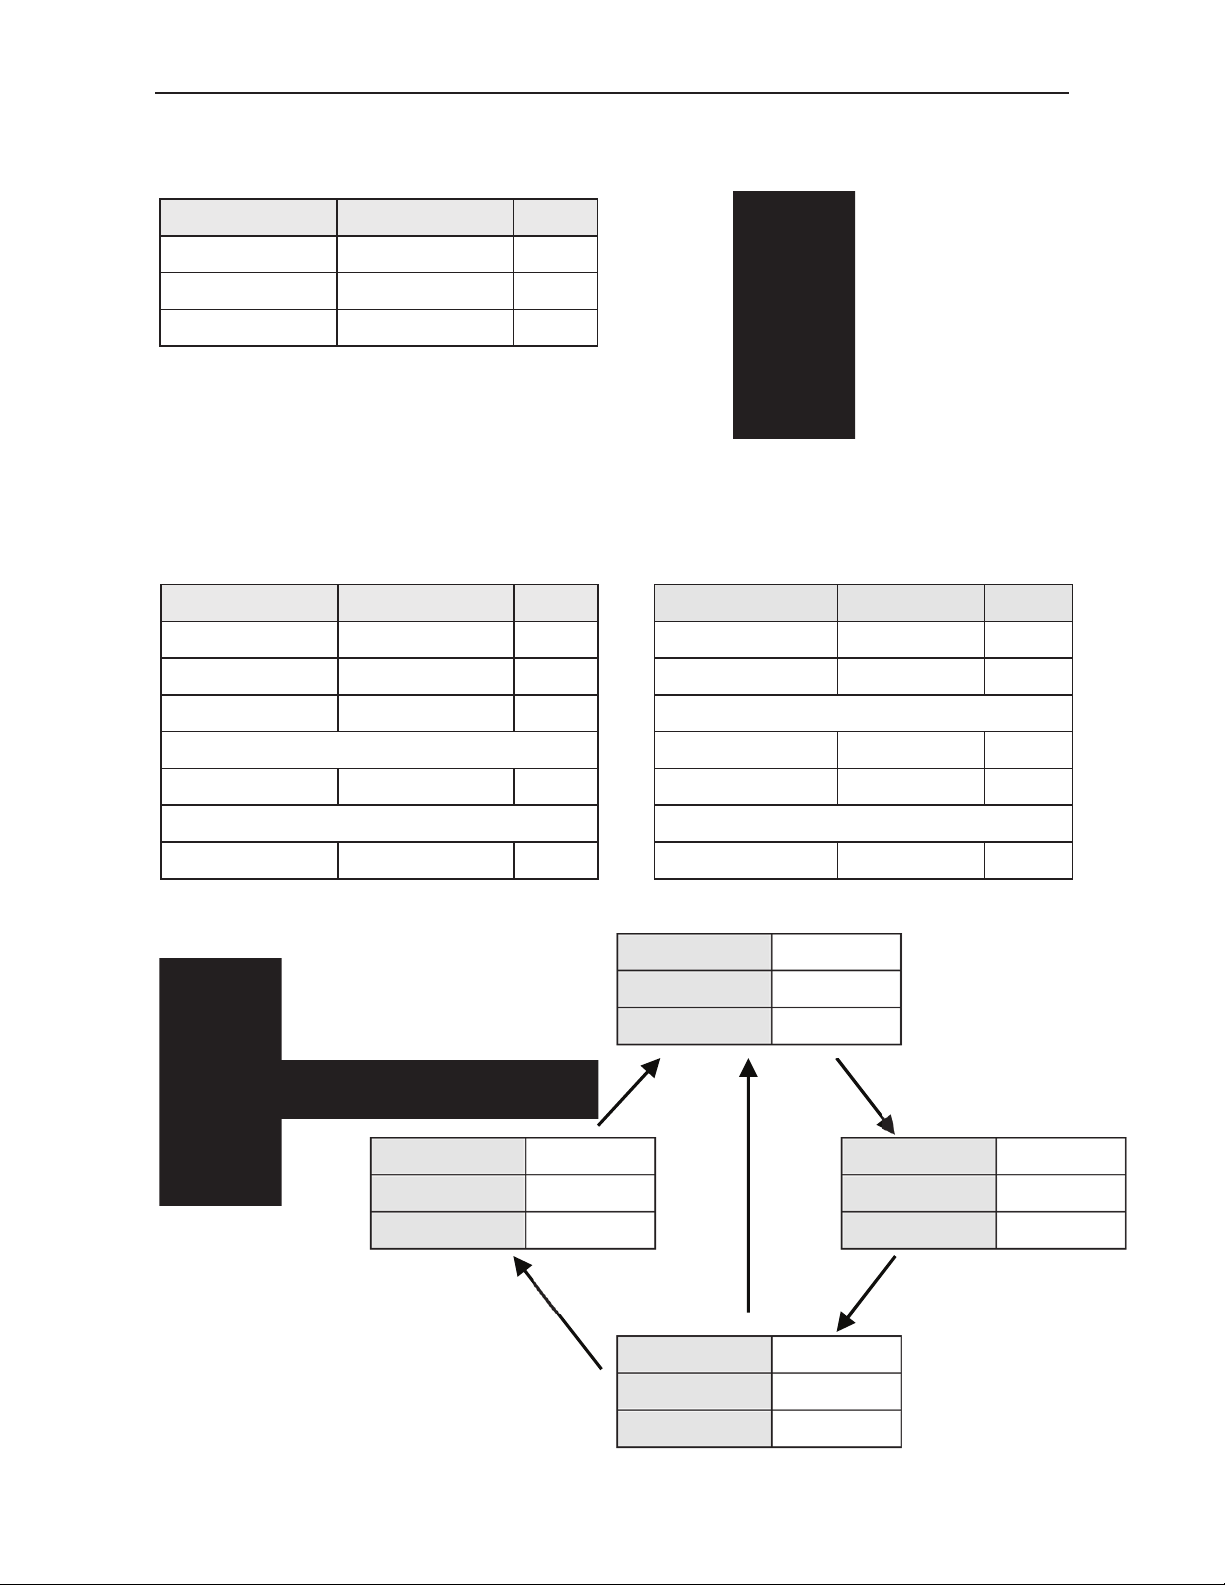
PD154 & PD158 Vigilante® II Annunciators Instruction Manual
Ack
Input Follower Indication
Simple Indication Switch Positions
Condition LED Horn
Normal
Alert
Normal
Off
Steady On
Off
Off
Off
ISA Sequence M
Acknowledge and Reset Pushbuttons
Momentary Alarm Maintained Alarm
Condition LED Horn Condition LED Horn
Normal
Alert
Normal
ACK Pushbutton
Acknowledge
RESET Pushbutton RESET Pushbutton
Off
Flash On
Flash On ACK Pushbutton
Steady Off
Off
Normal
Alert
Acknowledge
Normal
Off Off
Flash On
Steady Off
Steady Off
Reset
Off
Off
Normal
Off Off
Sequence M Sequence M Flowchart
Switch Positions
Reset while
Normal
Condition Alert
LED Steady
Horn Off
Reset while
Alarmed
Condition Normal
LED Off
Horn Off
Alarm Condition
Condition Alert
LED Flash
Horn On
Reset while
Normal
Pressed
Condition Any
LED Steady
Horn Off
36
Find Quality Products Online at: [email protected]
www.GlobalTestSupply.com
Page 37
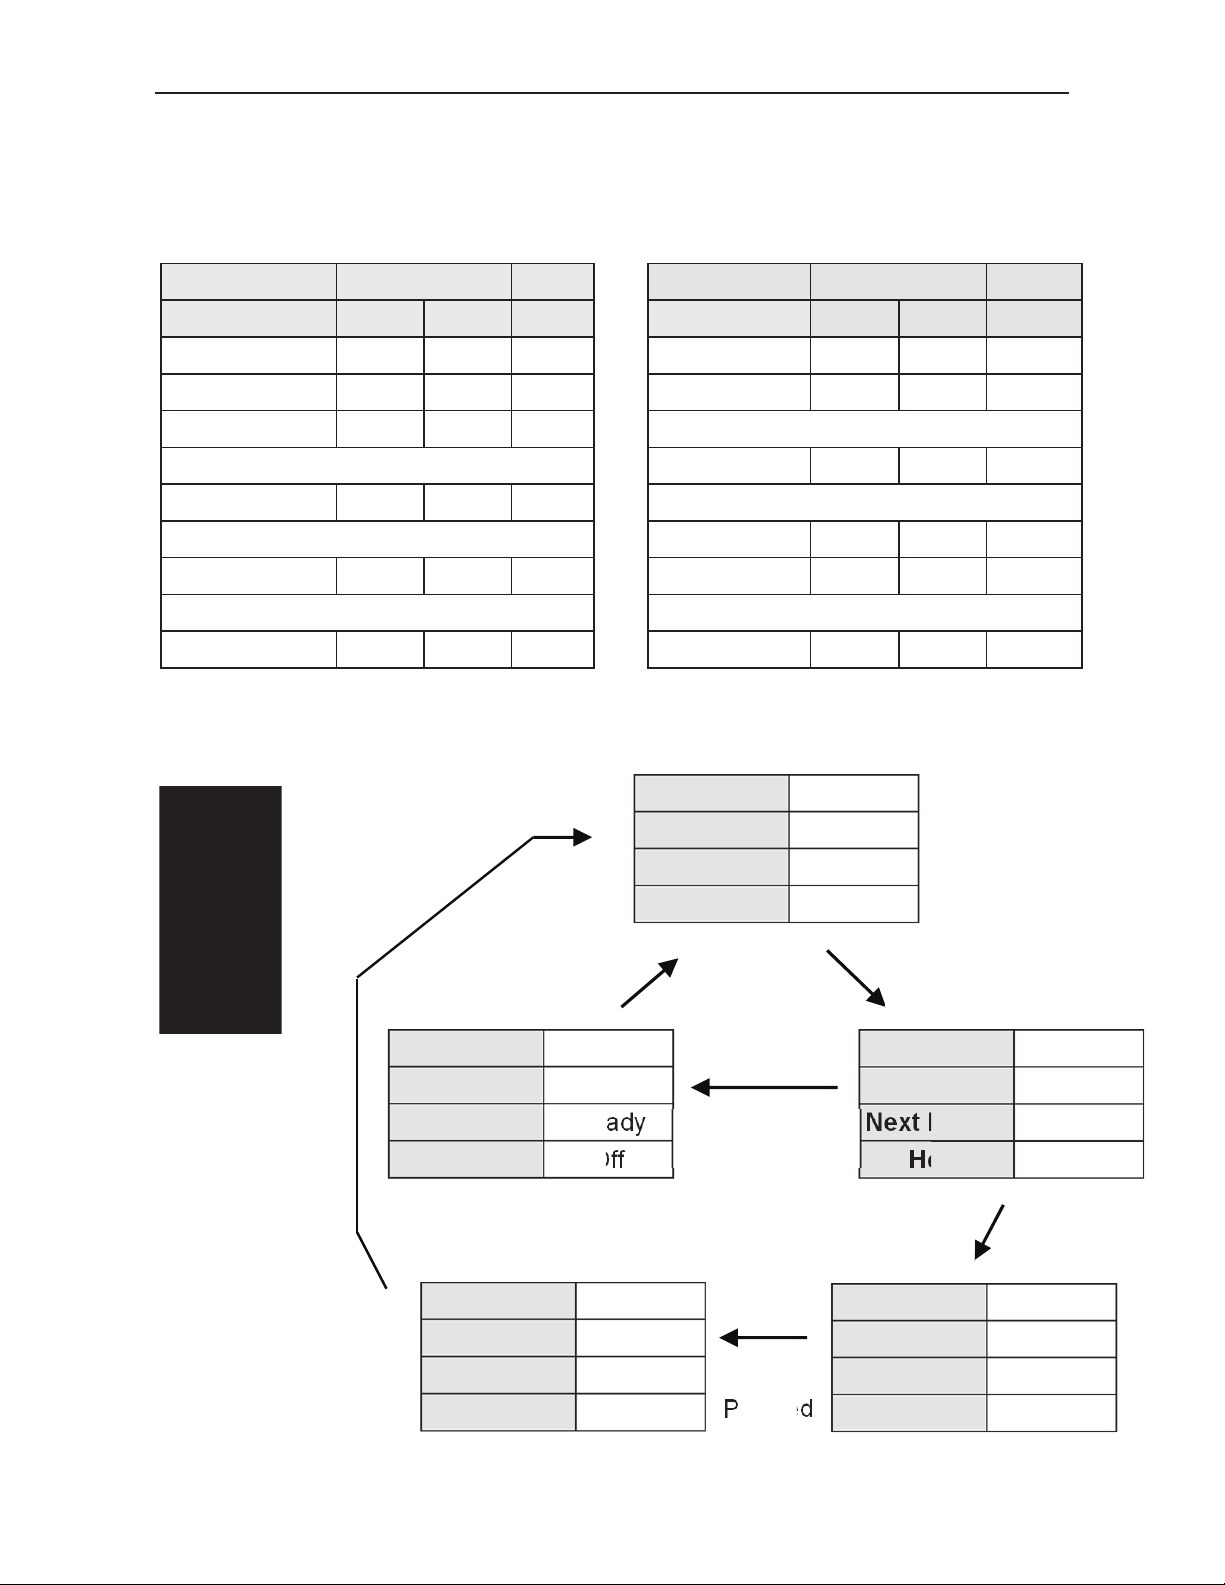
PD154 & PD158 Vigilante® II Annunciators Instruction Manual
A
ISA Sequence F1M
First-Out Indication with Acknowledge and Reset Pushbuttons,
and No-Lock-In of Subsequent Alarms
Momentary Alarm Maintained Alarm
Condition LED Horn Condition LED Horn
Normal
Alert
Normal
RESET Pushbutton
Reset
ACK Pushbutton
Acknowledge
RESET Pushbutton
Normal
1st Pt Next Pt 1st Pt Next Pt
Off Off Off
Flash Steady On
Flash Steady On RESET Pushbutton
Flash Off On ACK Pushbutton
Steady Off Off
Off Off Off
Normal
Alert
Alert
Acknowledge
Normal
Normal
RESET Pushbutton
Off Off Off
Flash Steady On
Flash Steady On
Steady Steady Off
Steady Steady Off
Off Off Off
Sequence F1M Sequence F1M Flowchart
Switch Positions
Condition Normal
1st Pt LED Off
Next Pt LED Off
Horn Off
Reset while
Normal
larm Condition
Reset
while
Normal
Condition Alert
1st Pt LED Steady
Next Pt LED Steady
Horn Off
Condition Normal
1st Pt LED Steady
Next Pt LED Off
Horn Off
Ack
Pressed
Ack
Pressed
Condition Alert
1st Pt LED Flash
Next Pt LED Steady
Horn On
Reset while
Normal
Condition Normal
1st Pt LED Flash
Next Pt LED Off
Horn On
37
Find Quality Products Online at: [email protected]
www.GlobalTestSupply.com
Page 38
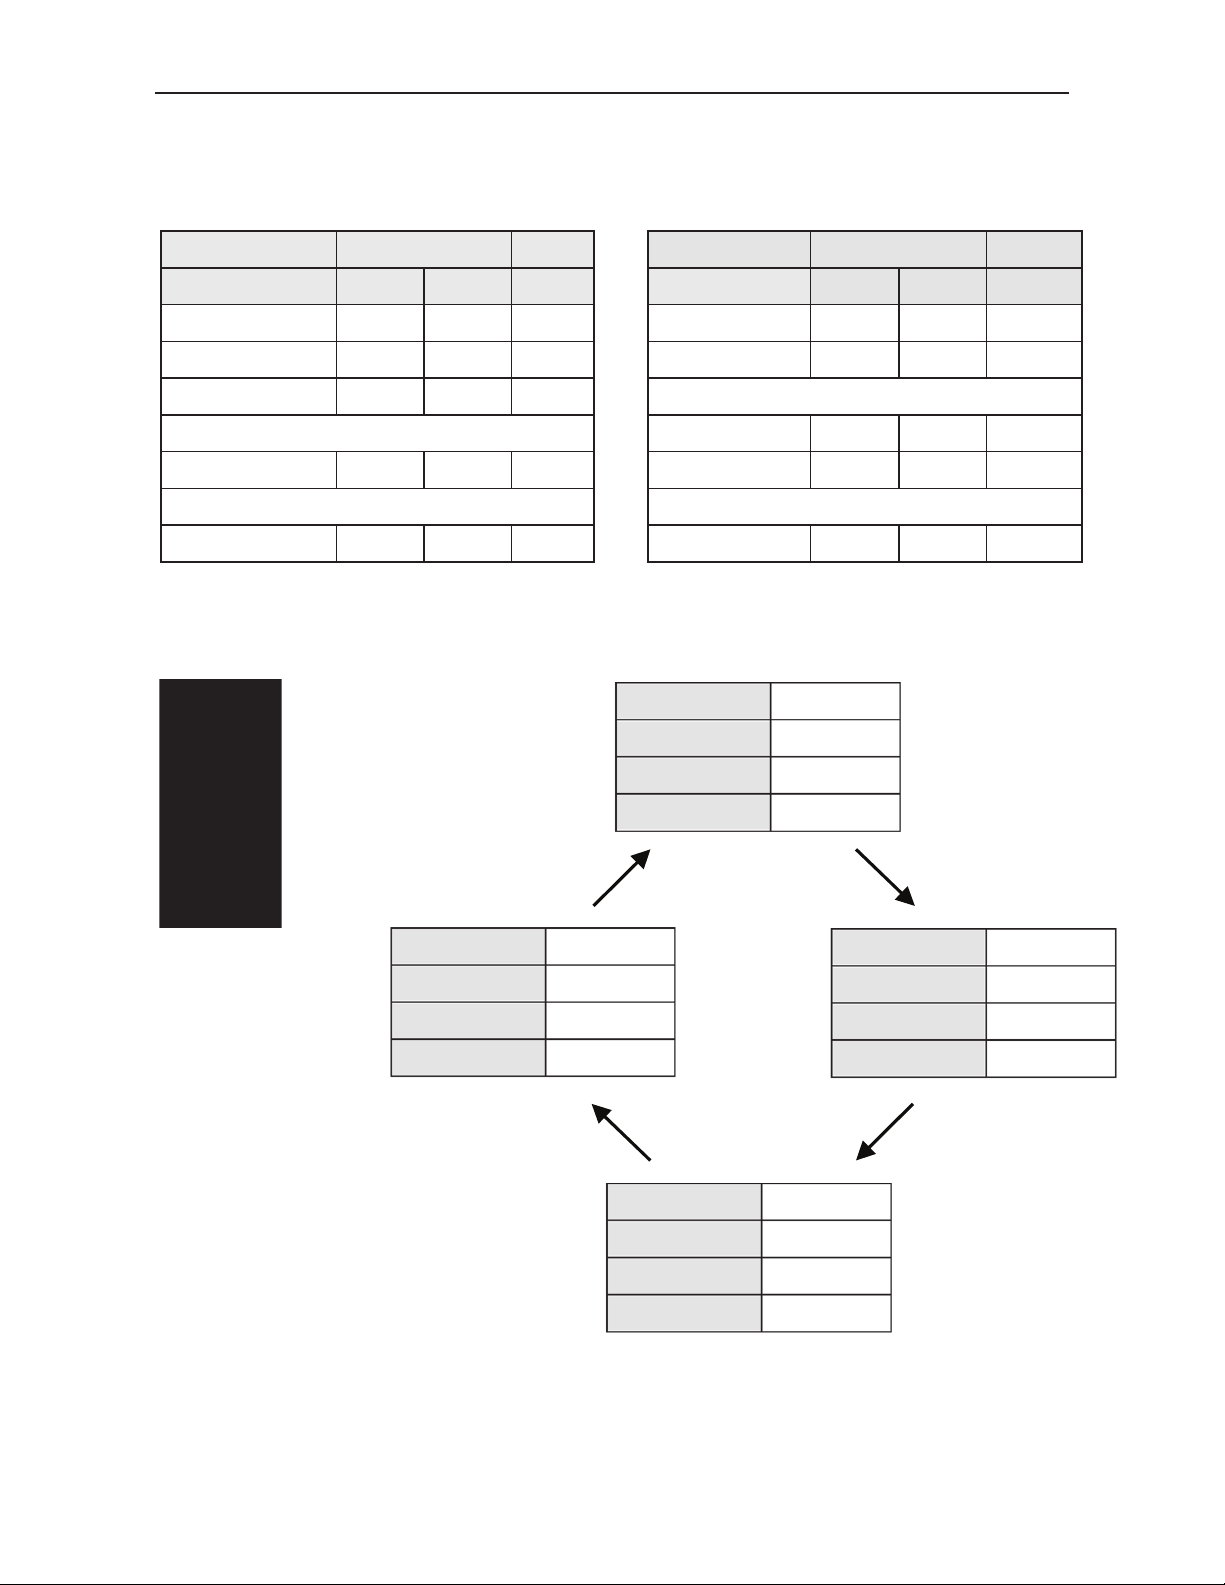
PD154 & PD158 Vigilante® II Annunciators Instruction Manual
t
A
ISA Sequence F2M
First-Out Indication with Acknowledge and Reset Pushbuttons
Momentary Alarm Maintained Alarm
Condition LED Horn Condition LED Horn
1st Pt Next Pt 1st Pt Next Pt
Normal
Alert
Normal
ACK Pushbutton
Acknowledge
RESET Pushbutton RESET Pushbutton
Reset
Off Off Off
Flash Steady On
Flash Steady On ACK Pushbutton
Steady Steady Off
Off Off Off
Normal
Alert
Acknowledge
Normal
Normal
Off Off Off
Flash Steady On
Steady Steady Off
Steady Steady Off
Off Off Off
Sequence F2M Sequence F2M Flowchart
Switch Positions
Condition Normal
1st Pt LED Off
Next Pt LED Off
Horn Off
Rese
while Normal
larm Condition
Condition Normal
1st Pt LED Steady
Next Pt LED Steady
Horn Off
Return
to Normal
Condition Any
1st Pt LED Steady
Next Pt LED Steady
38
Condition Alert
1st Pt LED Flash
Next Pt LED Steady
Horn On
Ack Pressed
Horn Off
Find Quality Products Online at: [email protected]
www.GlobalTestSupply.com
Page 39
EU DECLARATION OF CONFORMITY
Issued in accordance with ISO/IEC 17050-1:2004.
We,
Precision Digital Corporation
233 South Street
Hopkinton, MA 01748 USA
as the manufacturer, declare under our sole responsibility that the product(s),
Model PD154 & PD158 Vigilante
to which this declaration relates, is in conformity with the European Union Directives shown
below:
2014/35/EU Low Voltage Directive
2014/30/EU EMC Directive
2011/65/EU RoHS Directive
This conformity is based on compliance with the application of harmonized or applicable
technical standards and, when applicable or required, a European Union notified body
certification.
Standards:
EN 55022:2003
EN 61000-6-2:2001
EN 61010-1:2001
EN 61326:2006
The standards EN 55022:2003, EN 61000-6-2:2001, EN 61010-1:2001, and EN
61326:
checked against the harmonized standards EN 55022:2010, EN 61000-6-2:2005, EN
61010-1:2010, and EN 61326:2013 and there were no major technical changes affecting
the latest technical knowledge for the products listed above.
20
06 are no longer harmonized. The requirements of these standards have been
®
Series
Product Markings:
Signed for and on behalf of Precision Digital Corporation:
Name: Jeffrey Peters
Company: Precision Digital Corporation
Titl
e: President
Date: 04/20/2016
Document No: DoC PD158 {042016}
Find Quality Products Online at: [email protected]
www.GlobalTestSupply.com
Page 40

PD154 & PD158 Vigilante® II Annunciators Instruction Manual
LIM158_E
SFT043 Ver 1.0 & up
04/16
Find Quality Products Online at: [email protected]
www.GlobalTestSupply.com
 Loading...