

Page 1

45
Welcome to your
®
Sleep Number
u 3000 model
assembly instructions inside
Bed
80
Page 2

35
70
Page 3

55
Welcome and
Congratulations
Welcome and Congratulations,
™
Congratulations on your purchase of The Sleep Number Bed by Select Comfort
about to join more than 5 million people who’ve traded their innerspring mattresses for
the most innovative sleep surface ever. The technology behind the SLEEP NUMBER® bed
is one that recognizes the unique sleeping needs of every individual, which vary according
to comfort preference, body type, height, weight, sleeping position, and other health and
lifestyle factors. By creating a fully personalized sleep surface, your new Sleep Number® bed
offers you customized comfort that can significantly improve your sleep quality.
You’ll enjoy years of the latest generation of sleep comfort and technology in your
Sleep Number
has repeatedly earned us the Consumers Digest Best Buy award. Sleep Number® bed owners
like you have made us the No.1 bedding retailer year after year, as ranked by Furniture/Today.
®
bed. Our commitment to constant innovation, value and customer satisfaction
! You’re
We invite you to tell your friends and neighbors about this revolutionary product that can
help them attain the most comfortable sleep possible. When your referral results in a purchase,
you’ll earn valuable rewards* that will make it easier for you to add another Sleep Number®
bed to your home and ensure improved sleep for your children or your guests.
We thank you for your purchase and wish you years of personal comfort and restful sleep.
William R. McLaughlin
President & CEO
My Sleep Number® is 55
* See Owners’ COMFORT CLUB® Rewards on page 38.
1
Page 4

WHAT’S INSIDE
u Foundation Assembly ....................................pg 3
u Mattress Assembly .........................................pg 11
u Firmness Control
u Mattress Care .................................................pg 31
u Accessories .....................................................pg 33
u Warranty and Comfort Club
u Comfort Club
™
System .............................pg 23
®
......................... pg 35
®
Rewards ................................. pg 38
2
Page 5
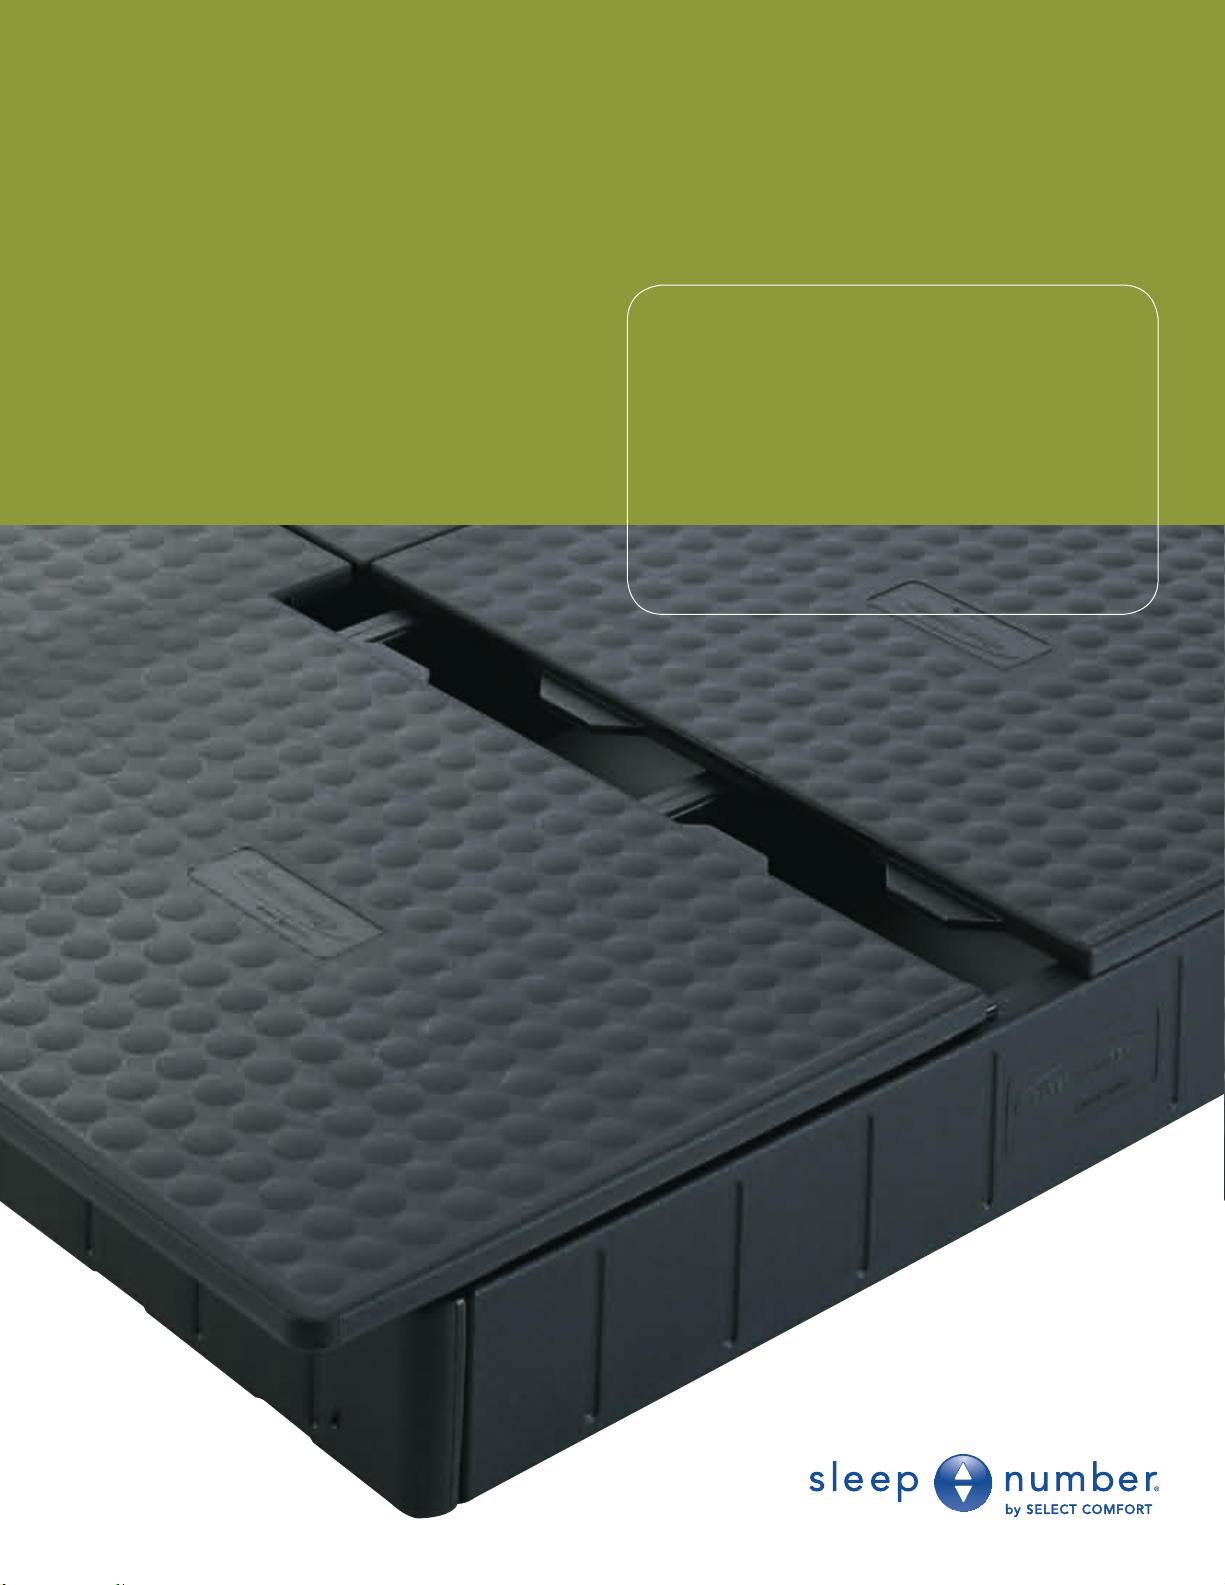
Foundation
Assembly
Note: Texture and surface appearance may vary.
3
Page 6

Foundation
Assembly
If you are missing any items
listed on the following page,
please e-mail Customer
Service at customerservice@
selectcomfort.com or call
1.800.472.7185
TROUBLESHOOTING
For answers to some common
questions regarding your
foundation, see the Frequently
Asked Questions at the end
of this section.
BEFORE YOU BEGIN
u Carefully check the contents of your foundation boxes
u Decide where to put your new bed
u Make sure there’s an electric power source nearby
for use with your Firmness Control™ System
u Assemble your bed frame if you have one
Your foundation should be assembled directly onto your bed frame
or on the floor. Some bed frames have slats that run from one side
of the bed to the other. If your bed frame has slats, position the slats
evenly to support the foundation. If your bed frame has fewer than
three slats, we recommend adding additional slats to ensure
adequate support for your foundation.
Caution: With some styles of bed frames, the foundation length
may extend beyond the frame’s support legs. This situation makes it
possible for the frame to tip when significant weight is placed at the
foot of the bed. Please use caution when sitting or placing weight
on the foot of the bed when using these types of frames.
“ I assembled the Sleep Number
bed by myself. My wife was in
doubt at first, but, after sleeping
one night, she said it was magic
how well she slept without back
pain. Now we sleep longer and
more comfortably than on any
previous mattress we’ve owned.”
- C. Clark Shedd, Tucson, AZ
4 5
u King foundation
The King foundation consists of two Twins side by side. Complete
the assembly of one unit, assemble the second, then place side by
side on the bed frame.
Page 7
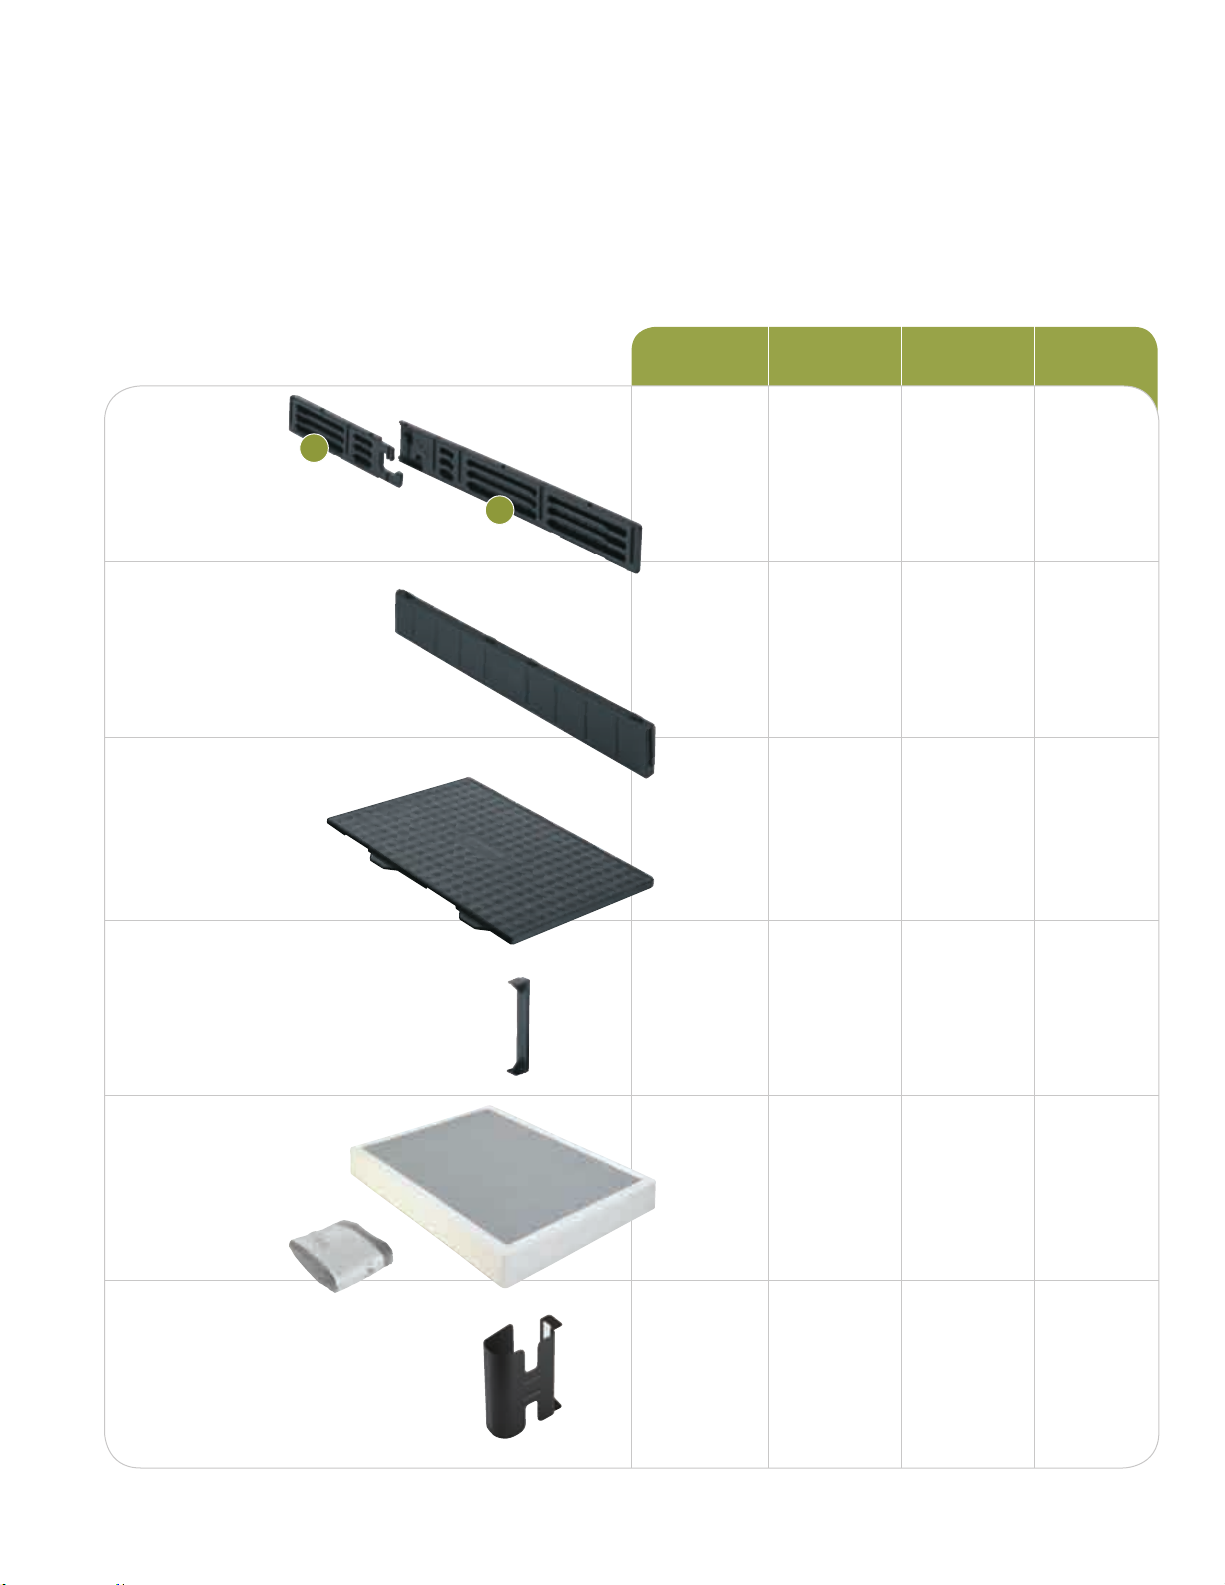
CONTENTS
Carefully check the contents of your foundation boxes
and compare with the list below. Each component is
clearly labeled with the part name and part number.
B
QUANTITY
Twin Full Queen King
Side Rails
Support /End Beams
Texture and surface appearance may vary
Deck Panels
Texture and surface appearance may vary
Pin Components
A
2 each 2 each 2 each 4 each
6 6 6 12
2 4 4 4
2 2 2 4
Fabric Coverlet
Packaged in the
mattress box
Shown as packaged
Expanded Queen only
Corner Brackets
Packaged in the mattress box
1 1 1 1
0 0 4 0
Page 8
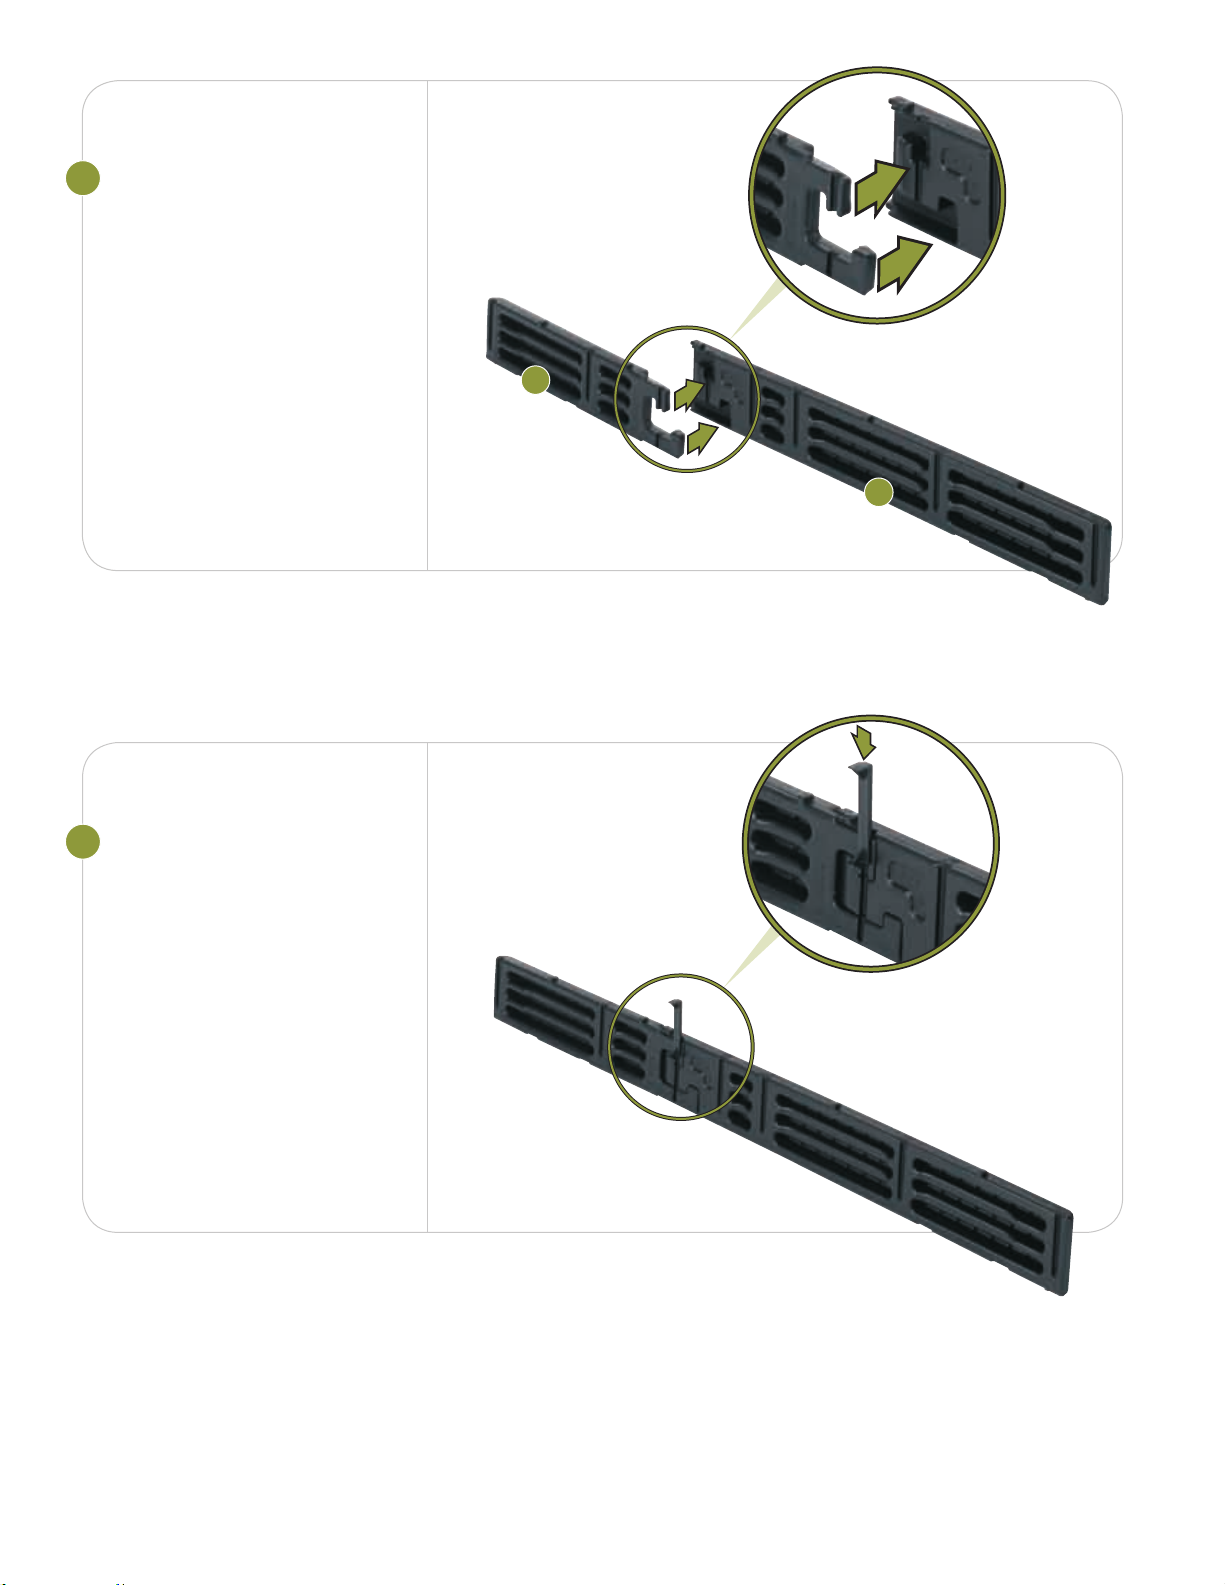
1
CONNECT SIDE RAILS
Push the components labeled
A side rail and B side rail
together.
Joints fit tightly. Push firmly.
B
A
2
INSERT PIN
Slide pins in, “T” end up.
Push firmly.
6
Page 9
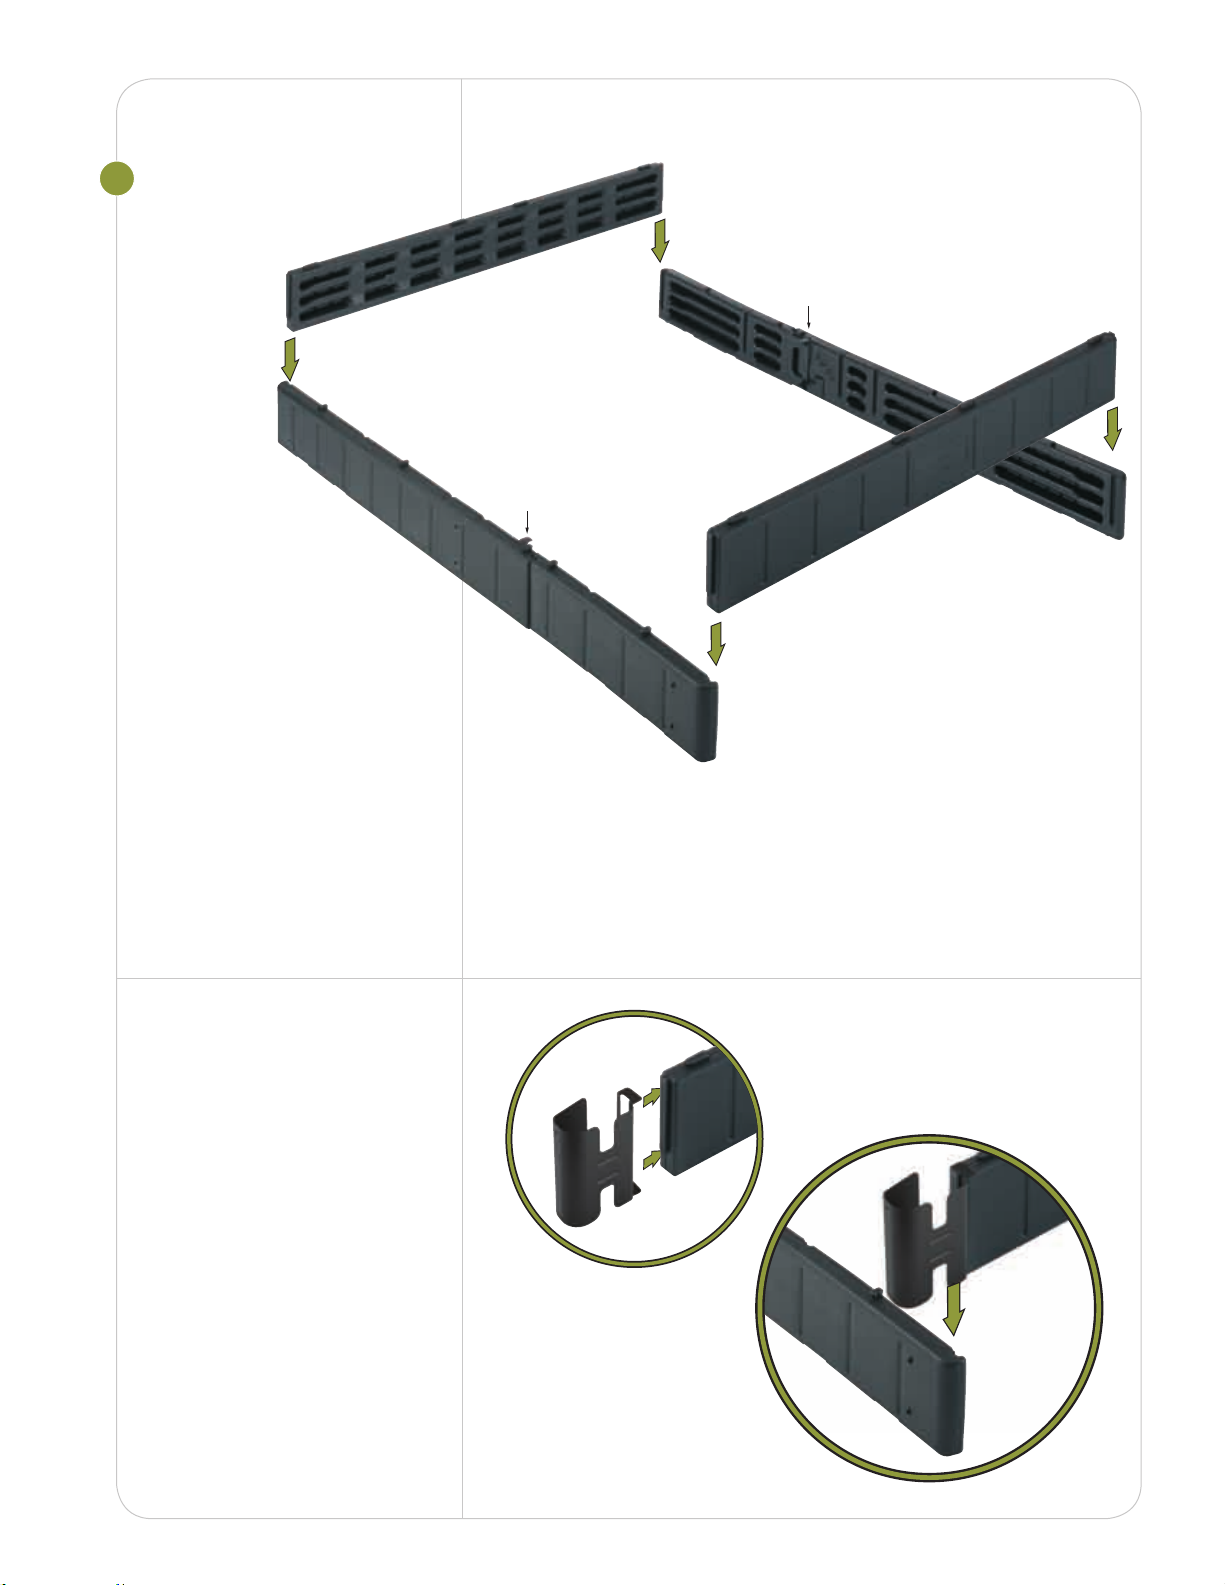
3
Pin
Pin
INSERT SUPPORT/
END BEAMS
For Twin, Queen and
Eastern King models:
– insert support beams
with tabs up and textured
side out.
For Full and California
King models:
– insert labeled end beams
followed by remaining
support beams with tabs up.
Joints fit tightly. Push firmly
until top is flush.
Expanded Queen
models only
Attach a corner bracket over
each end before connecting
to the side rail.
7
Page 10
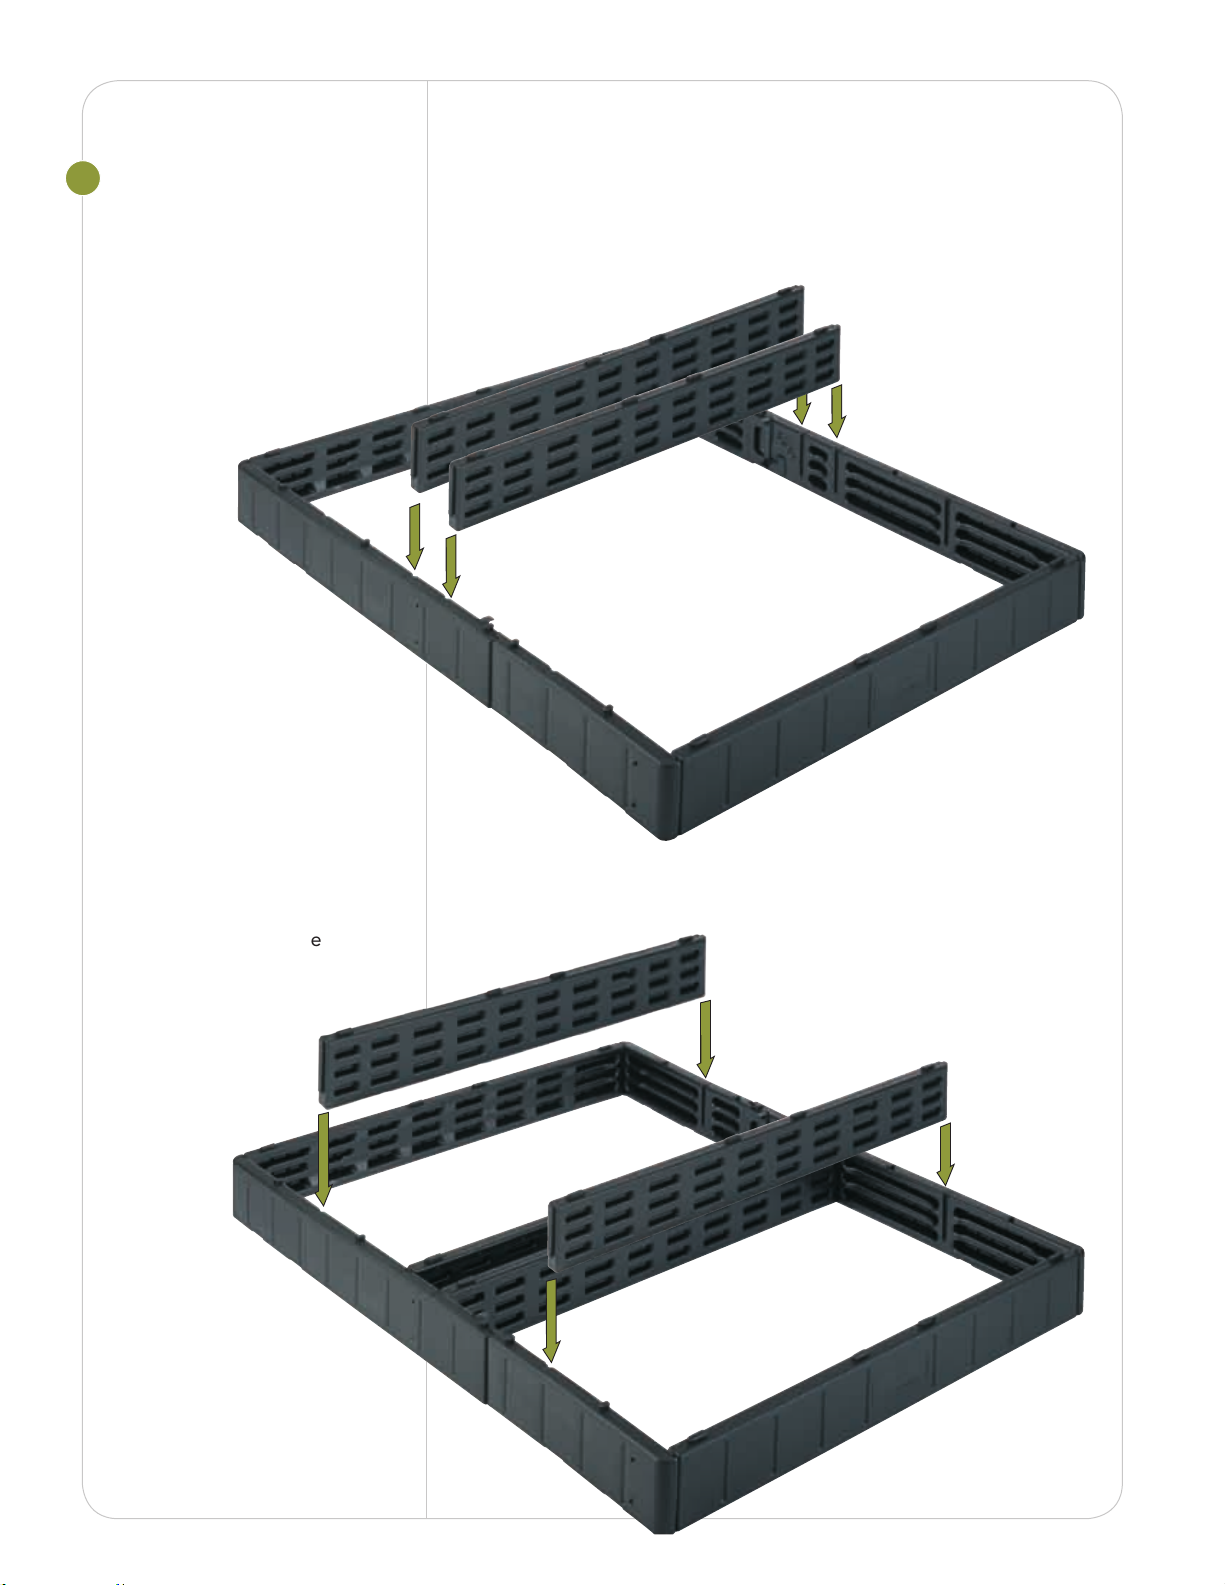
4
A
B
A
B
A
B
A
B
INSERT SUPPORT
BEAMS
Tabs up, match “A” end with
“A” groove; match “B” end
with “B” groove.
Joints fit tightly, push firmly
until top is flush.
Slide the remaining
support beams into the
next set of channels.
8 9
Page 11
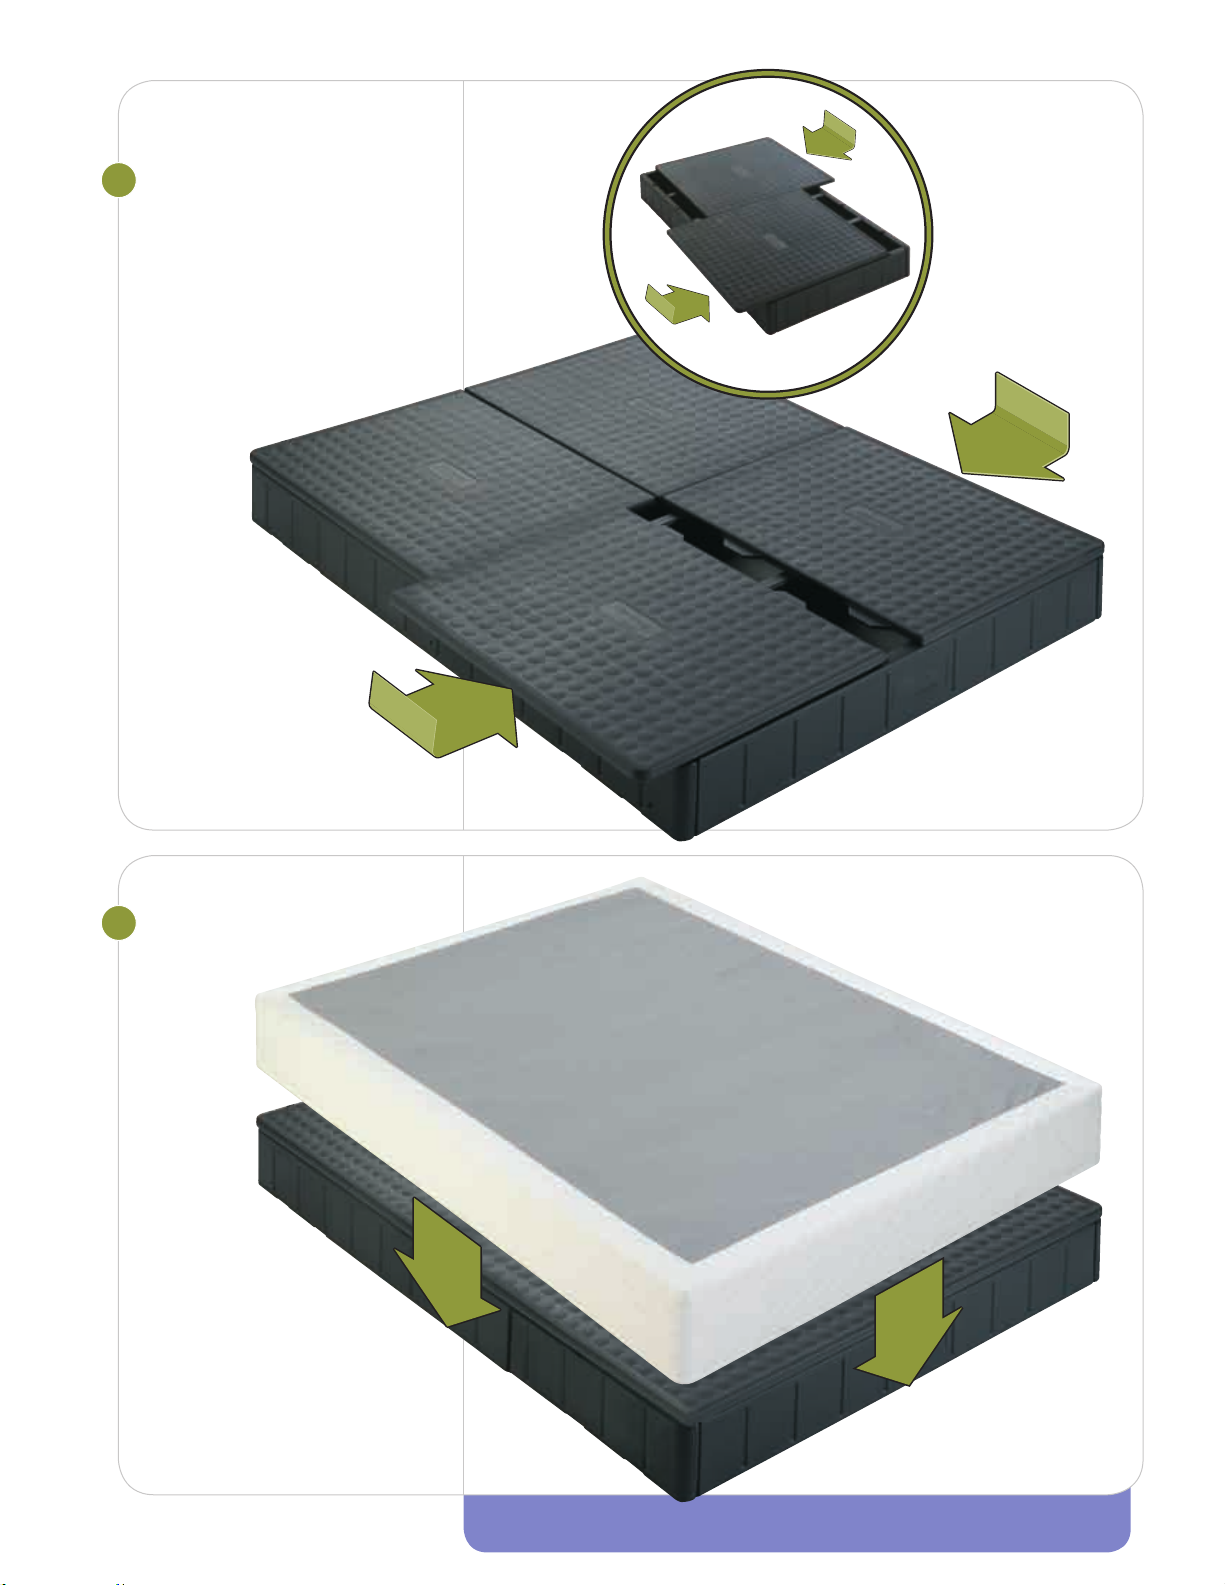
5
PLACE DECK PANELS
Slide panels in until they are
flush on sides.
Panels fit snugly, do not force.
Queen shown
Reminder
King foundation
consists of two
Twins side by side.
Twin shown
6
PUT ON COVERLET
Work on carefully, one
corner at a time, position
seam at head of bed.
Expanded Queen coverlet will
go over the corner brackets.
YOU’RE DONE! NEXT STEP u MATTRESS ASSEMBLY
Page 12

Foundation
Frequently
Asked Questions
What if I can’t get my
center support beams
flush with the side rails?
How can I get my pins
in all the way?
What can I do if I can’t
get the deck panels to
lay flat?
Make sure the letter on the center support beam matches the side rail.
For example, the end of the center beam labeled “A” should connect
to the side rail with the “A” on it. Additional force may be required.
All pins are wider at one end and narrower at the other end. Make
sure the “T” end is up and the narrow end goes into the side rail first.
You may need to use a bit of force to get it in place.
First, make sure all the pins and beams are flush. Then, set the deck
panel over the notches. You should then be able to slide the panel
into place.
Where is the hardware
for the footboard and
headboard brackets?
If you still have questions or need assistance, look for answers on our Web site
sleepnumber.com or please call Customer Service at 1.800.472.7185
10 11
The same hardware for attaching the legs to the foundation is used for
attaching the brackets. Align the bracket with the holes for the leg bolts.
Attach the leg per the instructions.
Page 13
Mattress
Assembly
Page 14

Mattress
Assembly
If you are missing any items
listed on the following page,
please e-mail Customer
Service at customerservice@
selectcomfort.com or call
1.800.472.7185
TROUBLESHOOTING
For answers to some common
questions regarding your
mattress, see the Frequently
Asked Questions at the end
of this section.
BEFORE YOU BEGIN
u Carefully check the contents of your mattress boxes
u Orientation
These instructions refer to “left” and “right” as if you are standing
at the head of the bed looking toward the foot of the bed.
u Using a Surge Protector
While the Firmness Control™ System may be plugged directly into
a wall outlet, we recommend using a surge protector to guard
against unexpected power surges. We recommend using a surge
protector that is listed to UL® 1449 with a clamping voltage of
330 volts, and a joule rating of 700 or higher.
Please note: Your 20-Year Limited Warranty does not cover damage
to the Firmness Control™ System due to a power surge, regardless
of the source. See the Limited Warranty on page 37 for more details.
“ This is the first time in three
years that I slept through the
entire night without getting up
two or three times. I’m thrilled
and amazed! Unbelievable! I wish
we had purchased your sleeping
system years ago.”
- Keith Fisher, Jackson, MI
12 13
Page 15
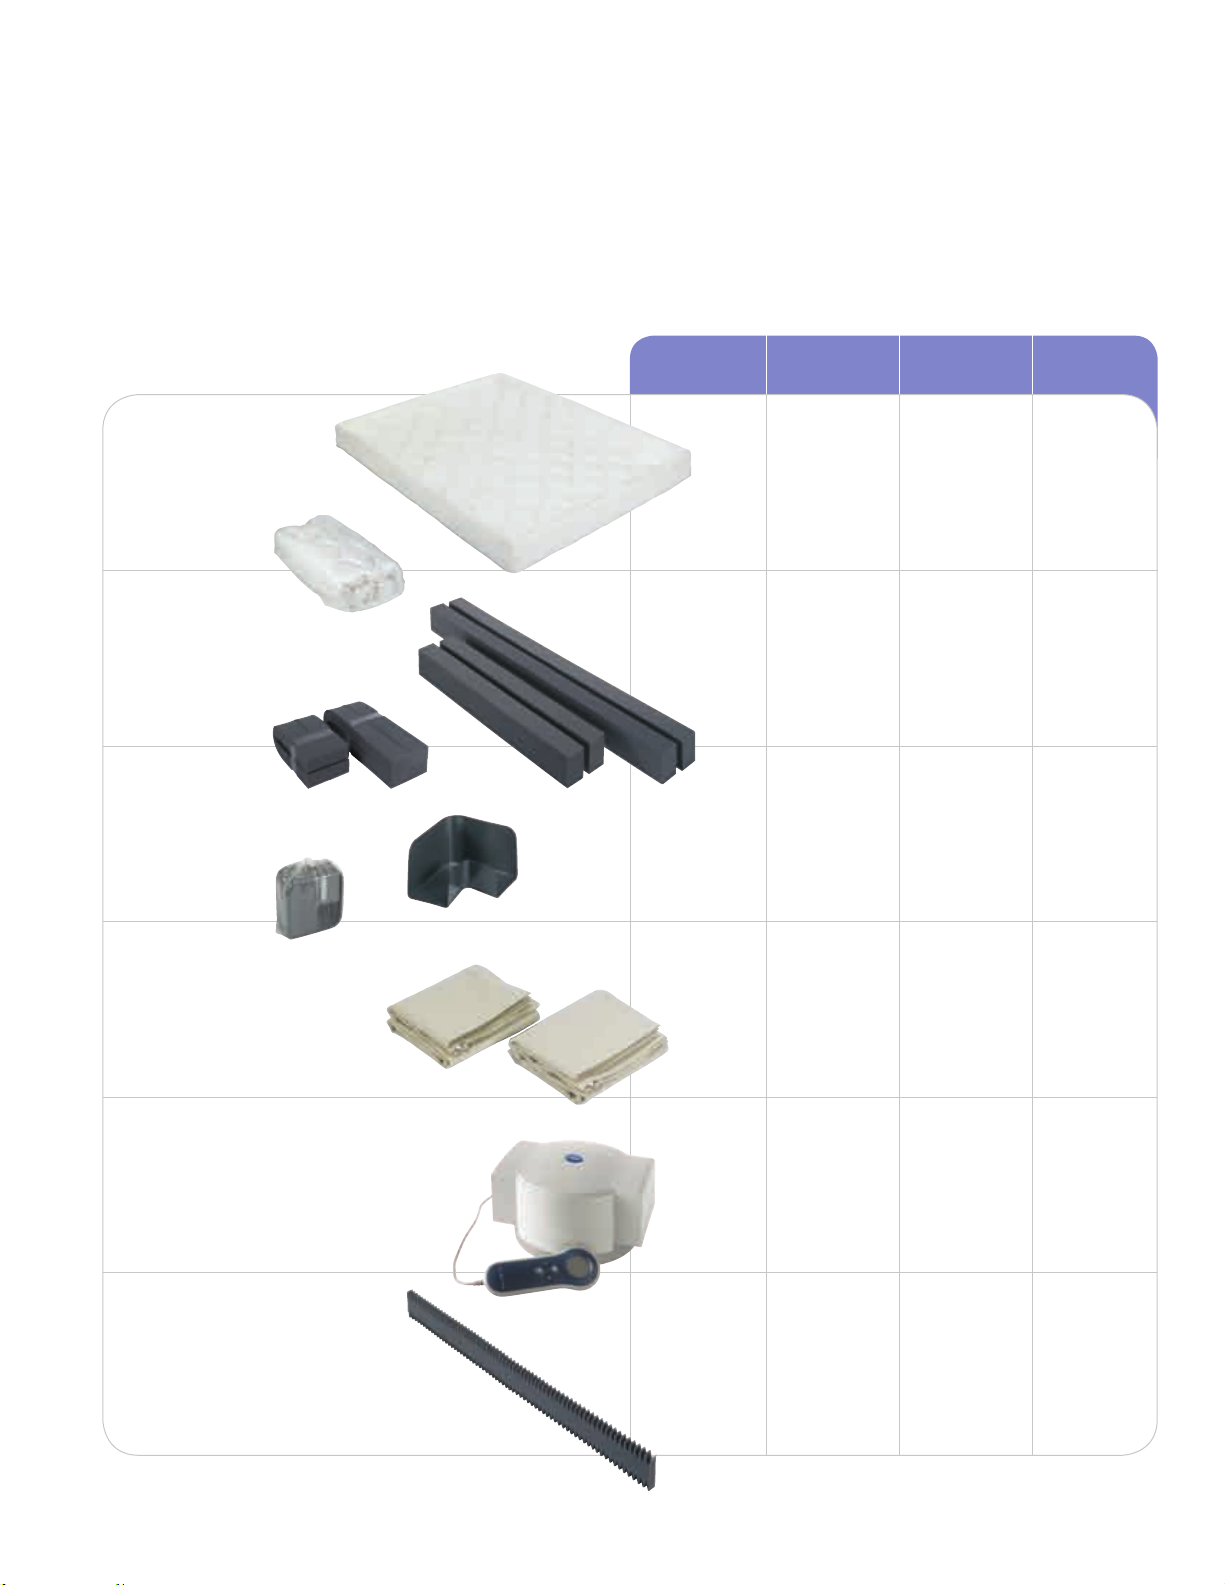
CONTENTS
Carefully check the contents of your mattress boxes
and compare with the list below. Each component is
clearly labeled with the part name and part number.
Mattress Cover
Color and pattern will
vary by model
Shown as packaged
QUANTITY
Twin Full/Queen Dbl/Queen King
Single Chamber Dual Chamber
1 1 1 1
Foam Border Walls
Two long and two short
Shown as packaged
Corner Lock™
System
Shown as packaged
Air Chambers
Firmness Control
™
System with Remotes
Remotes may vary
4 4 4 4
4 4 4 4
1 1 2 2
1 1 1 1
Center Foam Wall
Dual Chamber models only
0 0 1 1
Page 16
1
)PMFT
)PMFT
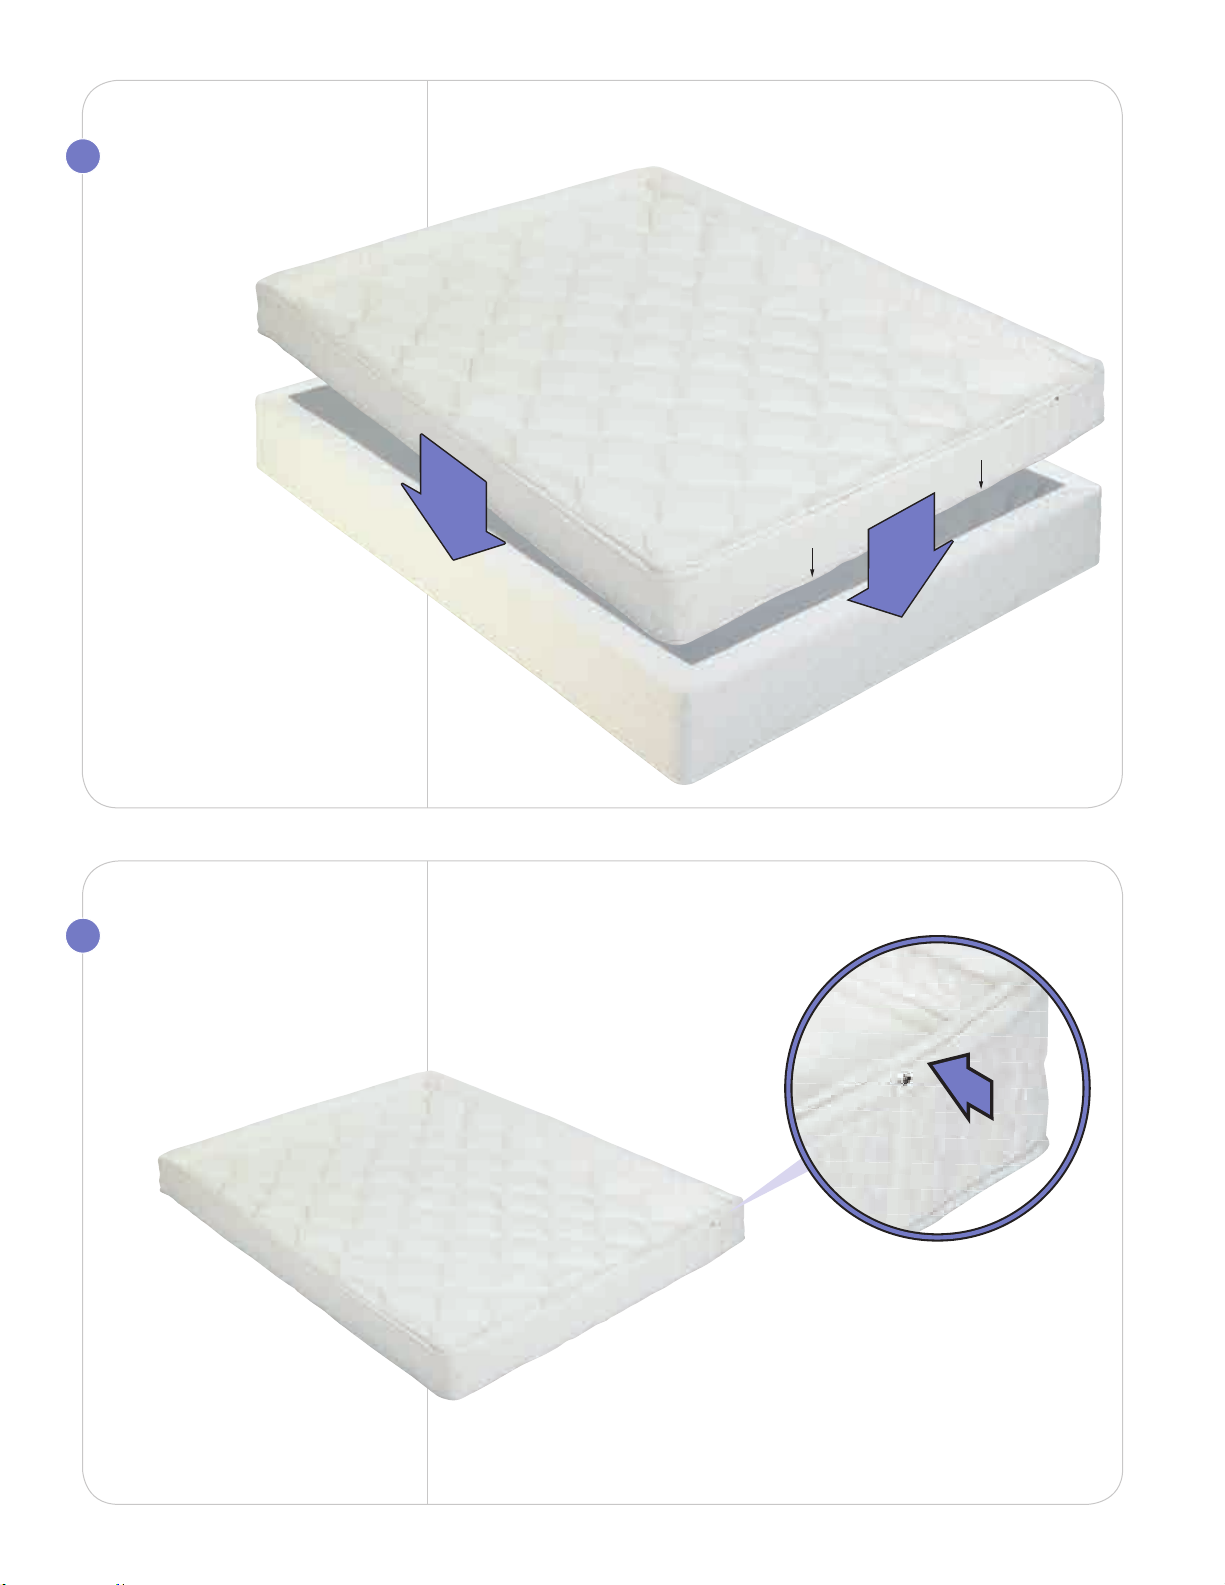
POSITION MATTRESS
COVER
Place on foundation
or on existing
bed platform.
Foot
Color and pattern may vary.
Make sure the holes
in the bottom of the cover
are at the head of the bed.
2
UNZIP MATTRESS
COVER
Set cover aside.
Head
14
Page 17
3
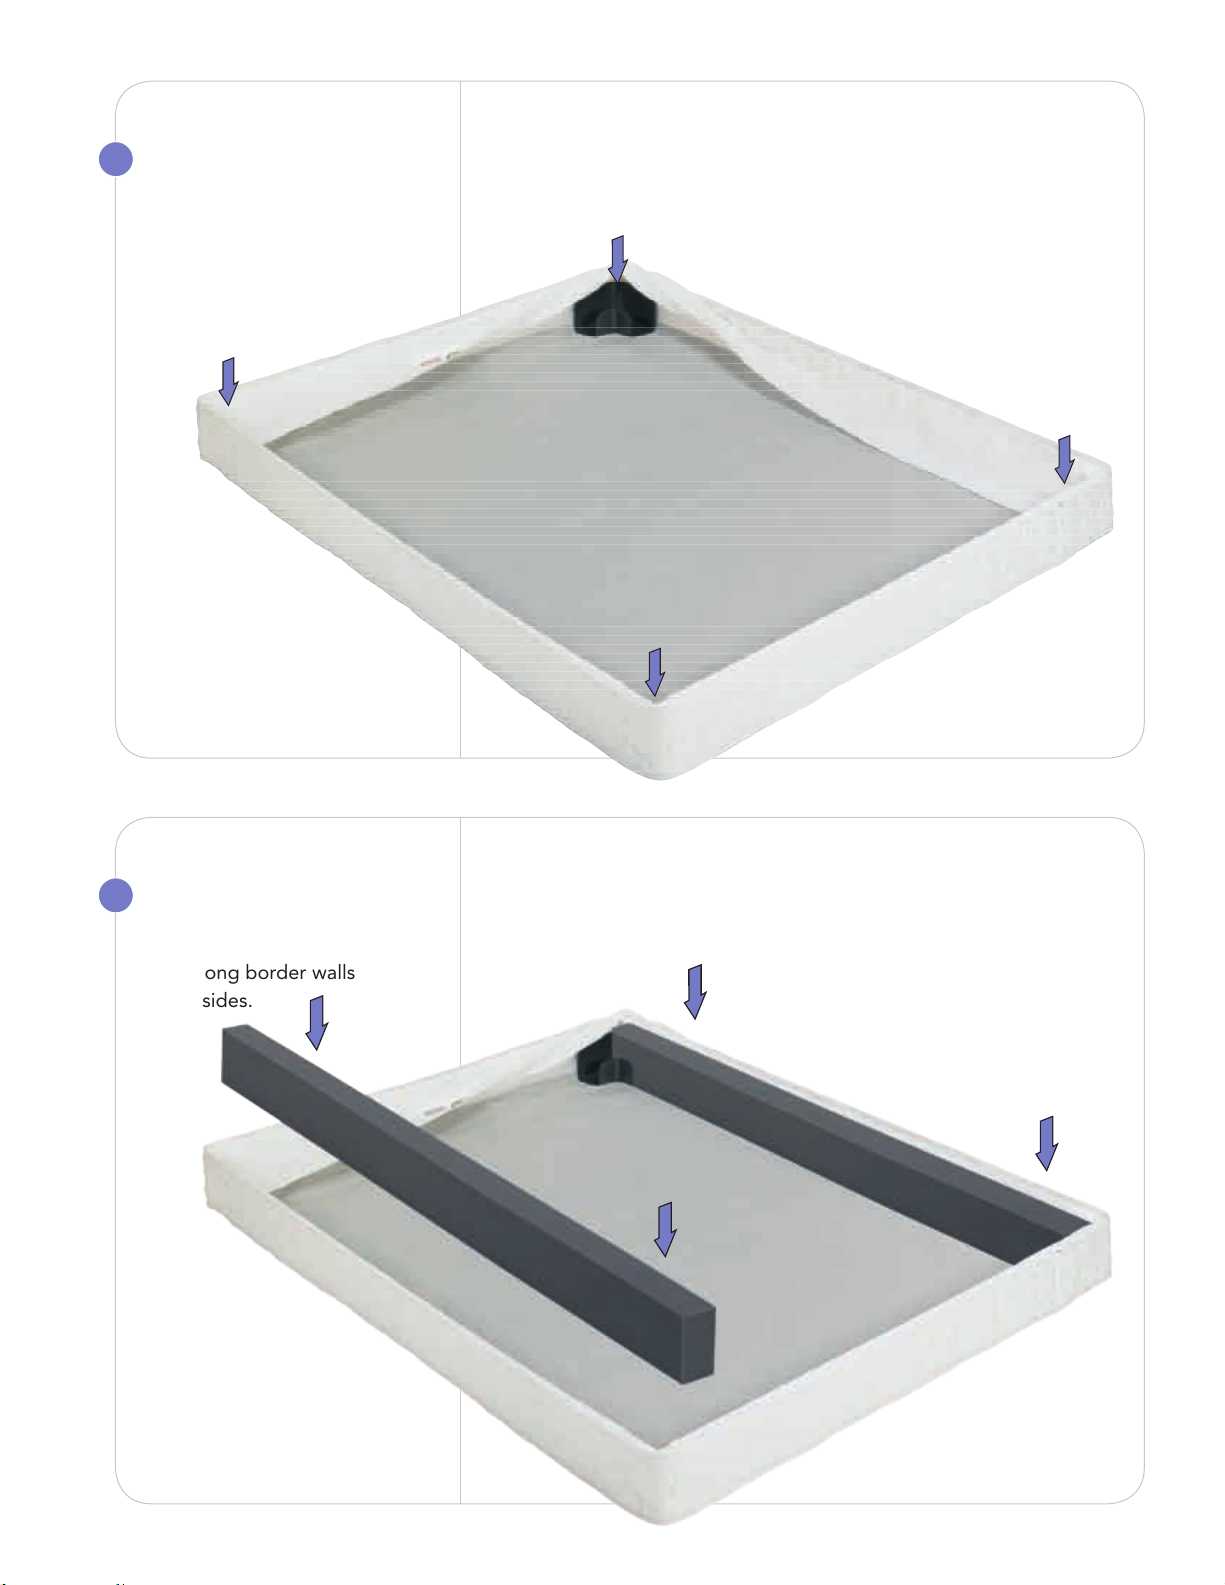
PLACE CORNER
LOCKS
Place one in each corner.
Corner locks must go under
the border wrap.
4
INSTALL FOAM
BORDER WALLS
Place long border walls
along sides.
15
Page 18
5
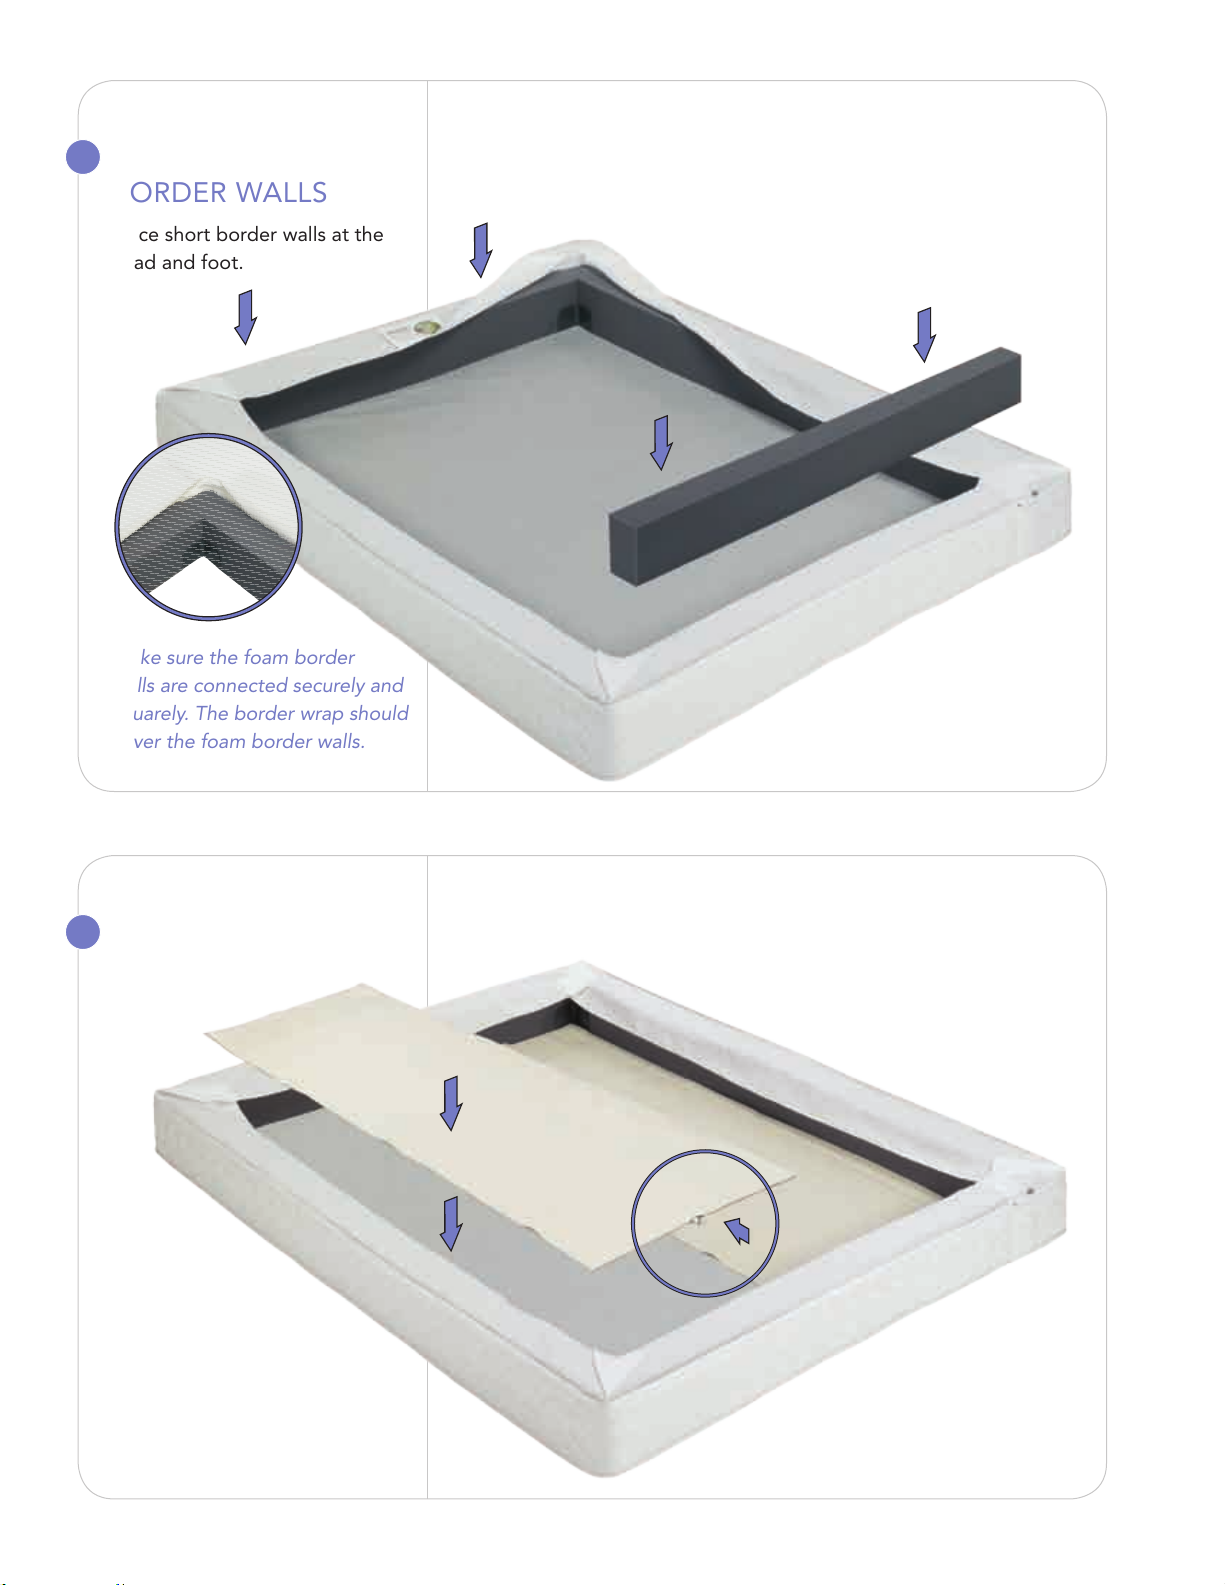
INSTALL FOAM
BORDER WALLS
Place short border walls at the
head and foot.
Foot
Make sure the foam border
walls are connected securely and
squarely. The border wrap should
cover the foam border walls.
6
INSTALL AIR
CHAMBERS
Head
Place air chambers so the
hose connectors face the
head of the bed, and lay on
bottom when inflated.
Dual chambers shown
16
Page 19
7
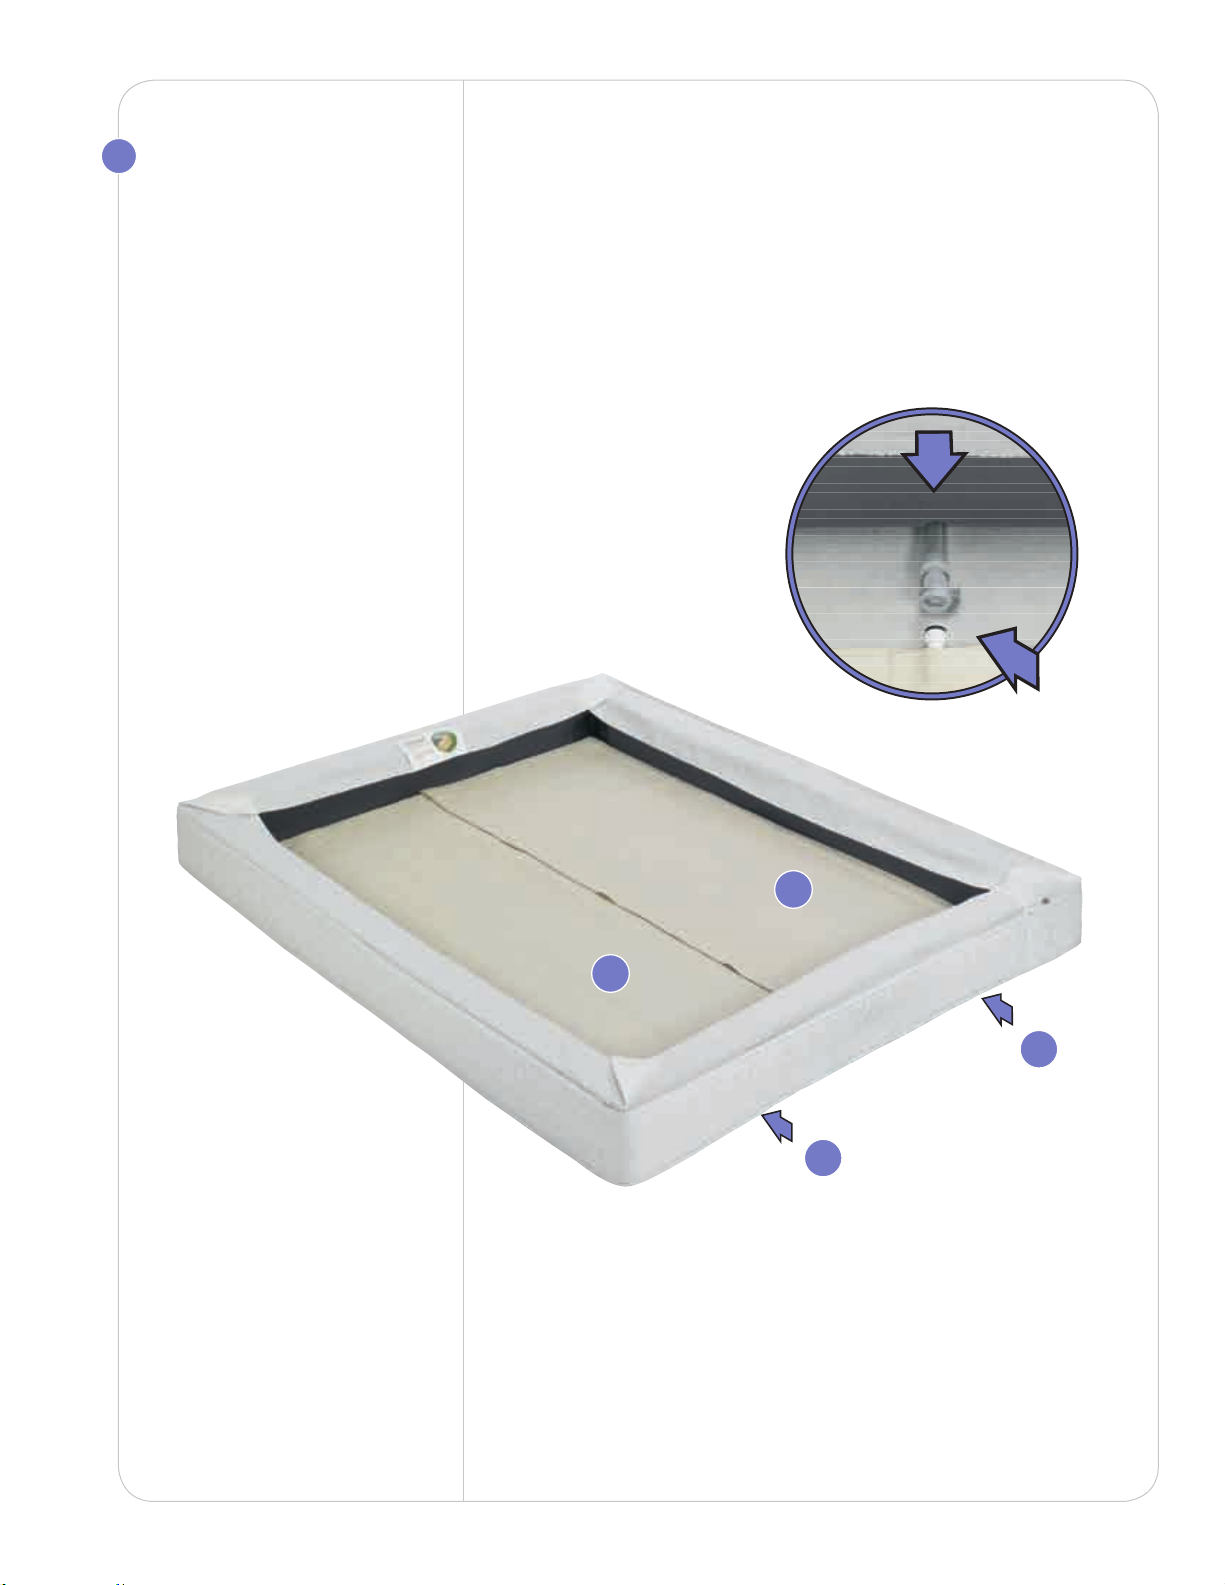
CONNECT FIRMNESS
CONTROL™ SYSTEM
Place the Firmness Control™
System on the floor at the
head of the bed and plug in
the power cord.
Key Step:
Pass the hose marked ”L”
through the hole on the left
side of the mattress cover and
connect to the left air chamber.
Press hose connections
together until they click.
Then complete the right side.
Foot
R
L
R
Head
L
17
Page 20
8
INFLATE AIR
CHAMBER(S)
Using remote, inflate air chamber.
For dual chamber models,
repeat for second air chamber.
Insert center foam wall
between the two chambers.
9
VERIFY BORDER
WRAP POSITIONING
Position the border wrap
over foam border walls and
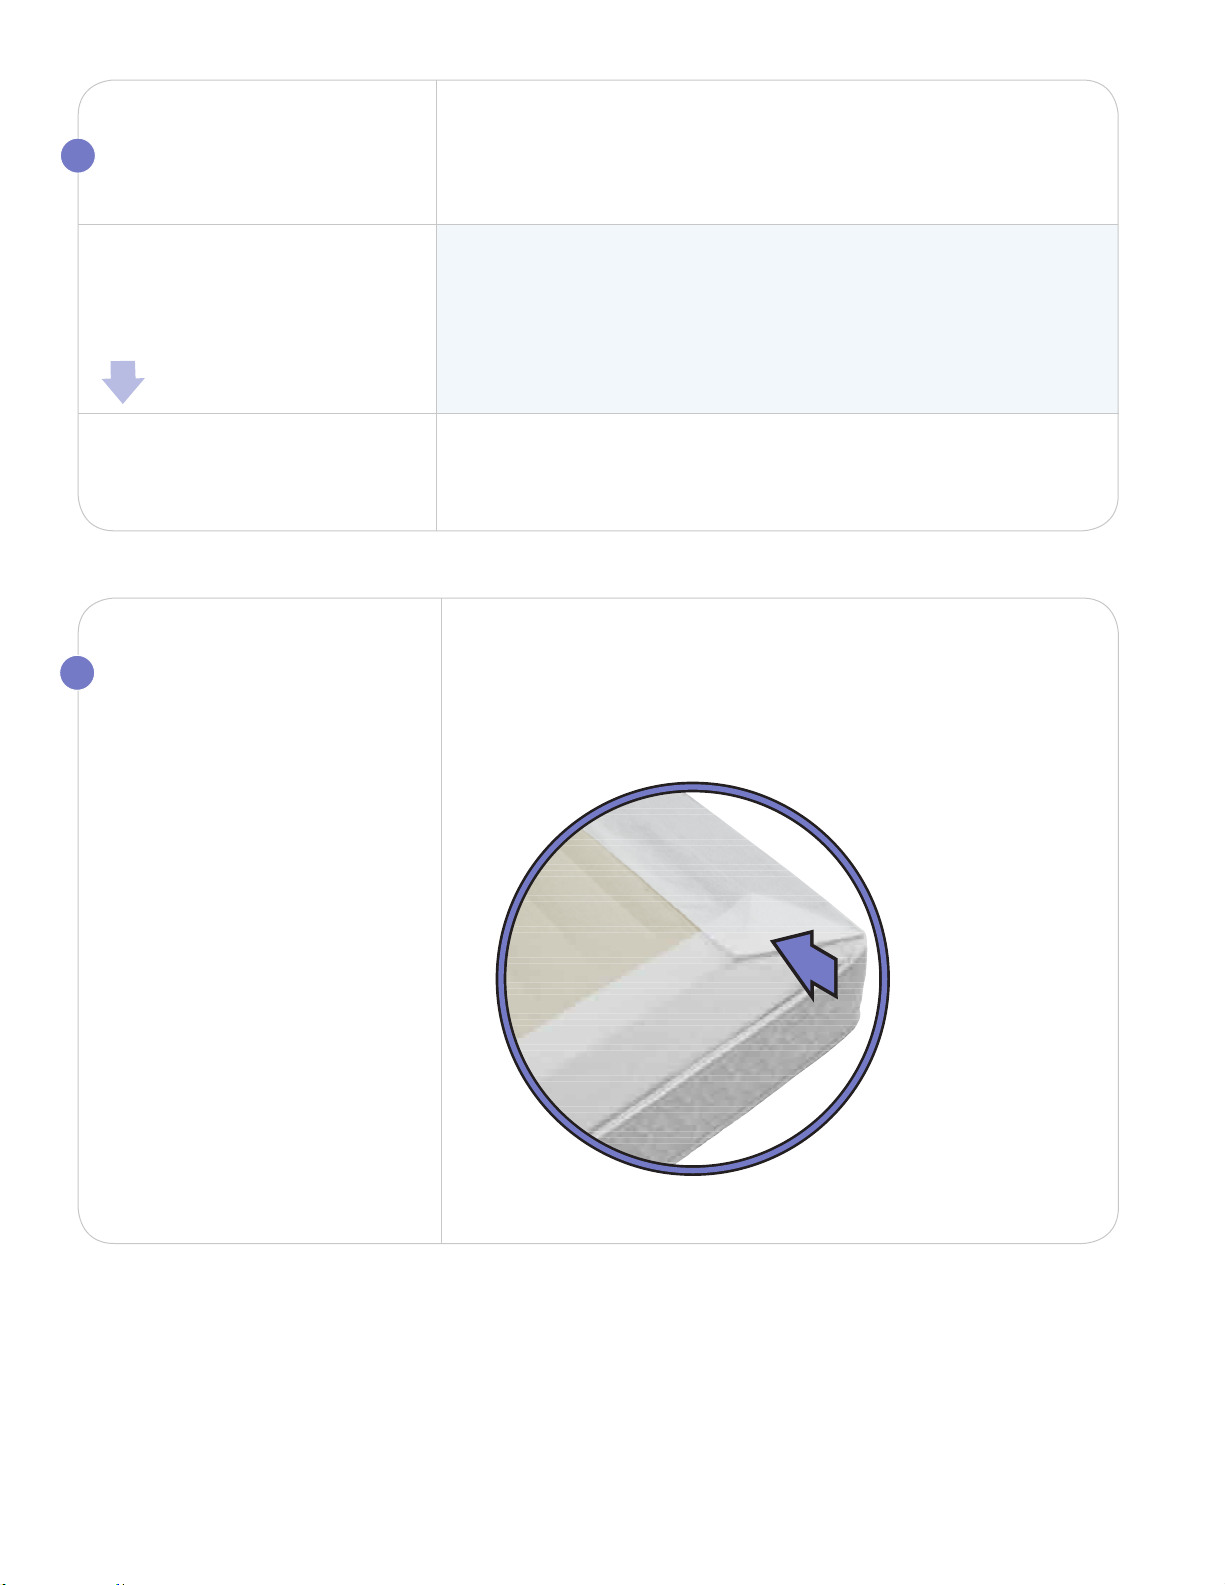
air chambers as shown.
If using a digital SLEEP NUMBER® remote, press L or R
to activate and select a side.
Press and hold the firmer button to inflate
the mattress.
Important Notice: To ensure compliance with federal and state
flammability requirements, the border wrap must be positioned
correctly within the mattress as shown in the steps below.
18
Page 21
10
MATTRESS COVER
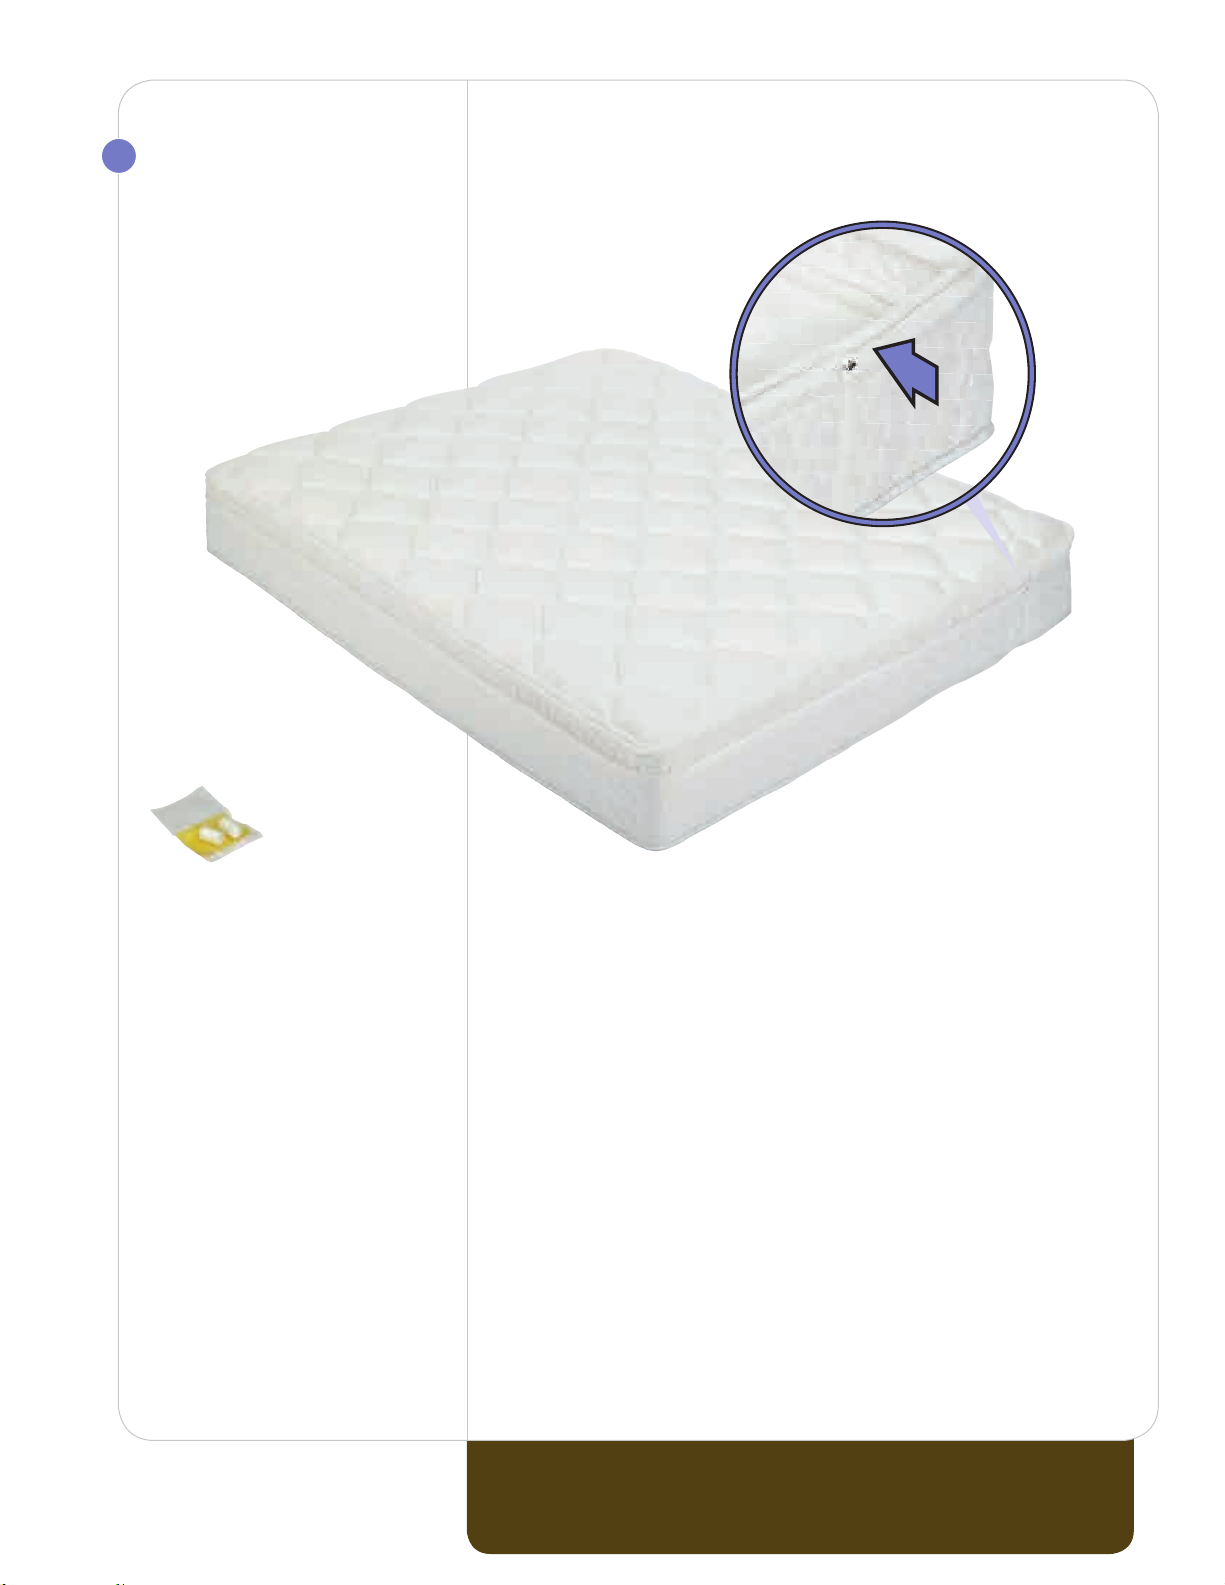
Zip the top of the
mattress cover.
Store air chamber caps inside
mattress at head of bed.
Color and pattern may vary.
YOU’RE DONE! NEXT STEP u
THE FIRMNESS CONTROL™ SYSTEM
19
Page 22

Mattress
Frequently
Asked Questions
Where are the caps
for air chamber(s)?
And where should
I store them?
What do I do if the
Firmness Control™
System doesn’t run?
What if I feel like I’m
rolling toward the edge
or toward the center of
the mattress?
The caps are in the Firmness Control™ System box. Please
store these in the mattress cover in case you should ever want to
disassemble your bed and temporarily cap your air chamber(s).
Make sure the power cord is securely plugged into the Firmness Control™
System and the wall outlet. Check to see if the power cord is plugged into
an outlet that has power and is not connected to an on/off wall switch.
Although rare, these sensations could potentially be experienced
if one side of the mattress is set quite firm and the other side quite
soft. Call Customer Service for a remedy to this situation if it is
bothersome to you.
What if I notice a rubber
smell from the air
chamber?
20
The odor you may smell is non-toxic and will fade over time.
To minimize the smell, allow the air chamber to air out for a few hours
and then lay a couple of dryer sheets on top of the air chamber.
Page 23

Will my bed deflate if
there is a power surge or
power loss?
No, your mattress will maintain its firmness. To protect your Firmness
Control™ System, we do recommend using a surge protector.
The mattress is losing air.
What should I do?
The air loss could be caused by either the air chamber or the Firmness
Control™ System. To determine which component is causing the air loss,
follow these troubleshooting steps:
• Inatethesideofthebedthatislosingairtothepreferredrmness.Ifusinga
®
digital SLEEP NUMBER
at a setting of 40, inflate the bed to 45).
• Locatethecaps,andcapthesideofthebedthatislosingair.The
assembly instructions suggested storing the air chamber caps in the
mattress cover, at the head of the bed, where the zipper starts/ends.
• Leavetheairchambercappedforatleasteighthours.Itispreferable
to cap it overnight while sleeping on it.
• ContactCustomerServicewiththeresultsofthetroubleshooting.They
will facilitate a component replacement under the terms of the warranty.
remote, set it to your setting plus five (i.e., if you sleep
21
Page 24

Mattress
Frequently
Asked Questions
Why are there body
impressions on the
mattress cover?
For the best looking, most crisp appearance, customers
should fully inflate the mattress (100 if using a digital Sleep Number®
remote). If going to full inflation does not help with body impressions
in the cover, the quilted top can be removed and shaken to restore
some of the loft to the fiberfill. In addition, a vacuum nozzle may be
used to fluff the cover in areas where the fibers have settled from use.
Body impressions in a normal innerspring mattress would be an
indication that the spring support is compressing or breaking down.
The Sleep Number® bed uses air to support your body. Since air
cannot break down, you receive the same support after years of
use as you do on the first day of use.
Please contact Customer Service with further questions.
If you still have questions or need assistance, look for answers on our Web site
sleepnumber.com or please call Customer Service at 1.800.472.7185
22
Page 25
Control
Firmness
™
System
23
Page 26

Firmness
™
Control
System
If you are missing any items
listed on the following page,
please e-mail Customer
Service at customerservice@
selectcomfort.com or call
1.800.472.7185
TROUBLESHOOTING
For answers to some common
questions regarding your
Firmness Control™ System, see
the Frequently Asked Questions
at the end of this section.
“ I had forgotten what it feels
like to wake up feeling good and
with energy. Sleeping on the
Sleep Number bed has made
a big difference. Thank you for
making me feel good again.”
THINGS TO REMEMBER
u Reasons to alter the firmness of your bed
- strained muscles
- back pain
- weight change
- pregnancy
- sunburn
- new sleep position
as well as
- to facilitate getting out of bed, if needed
- to achieve a fuller bed appearance
u Dual Adjustability
If you purchased a dual chamber model, you have the ability to
personalize each side of your SLEEP NUMBER® bed. Since no two
body types are the same, each sleep partner should find their
own comfort level.
If your model came with one remote for a dual chamber bed,
the “L” button on the remote corresponds to the left side of the
bed (left is determined when lying on your back on the bed).
- Vicky Hendricks, Hartford, KY
24
Page 27
WHAT IS A SLEEP NUMBER® SETTING?
Your Sleep Number® is a setting between 0–100 that represents the ideal combination of mattress
comfort, firmness and support for your body, giving you the best night’s sleep possible.
YOUR SLEEP NUMBER® SETTING
When you shopped for The Sleep Number Bed by Select Comfort™, you may have discovered your
Sleep Number® setting. You should use this as a starting point when setting the firmness of your Sleep Number®
mattress. If you don’t have your Sleep Number® setting, this section will take you through the process of finding
your Sleep Number® setting and will provide you with additional information about your Sleep Number® bed.
If you don’t already have your Sleep Number® setting or if you would like to experiment with finding a different
Sleep Number® setting, use the instructions below.
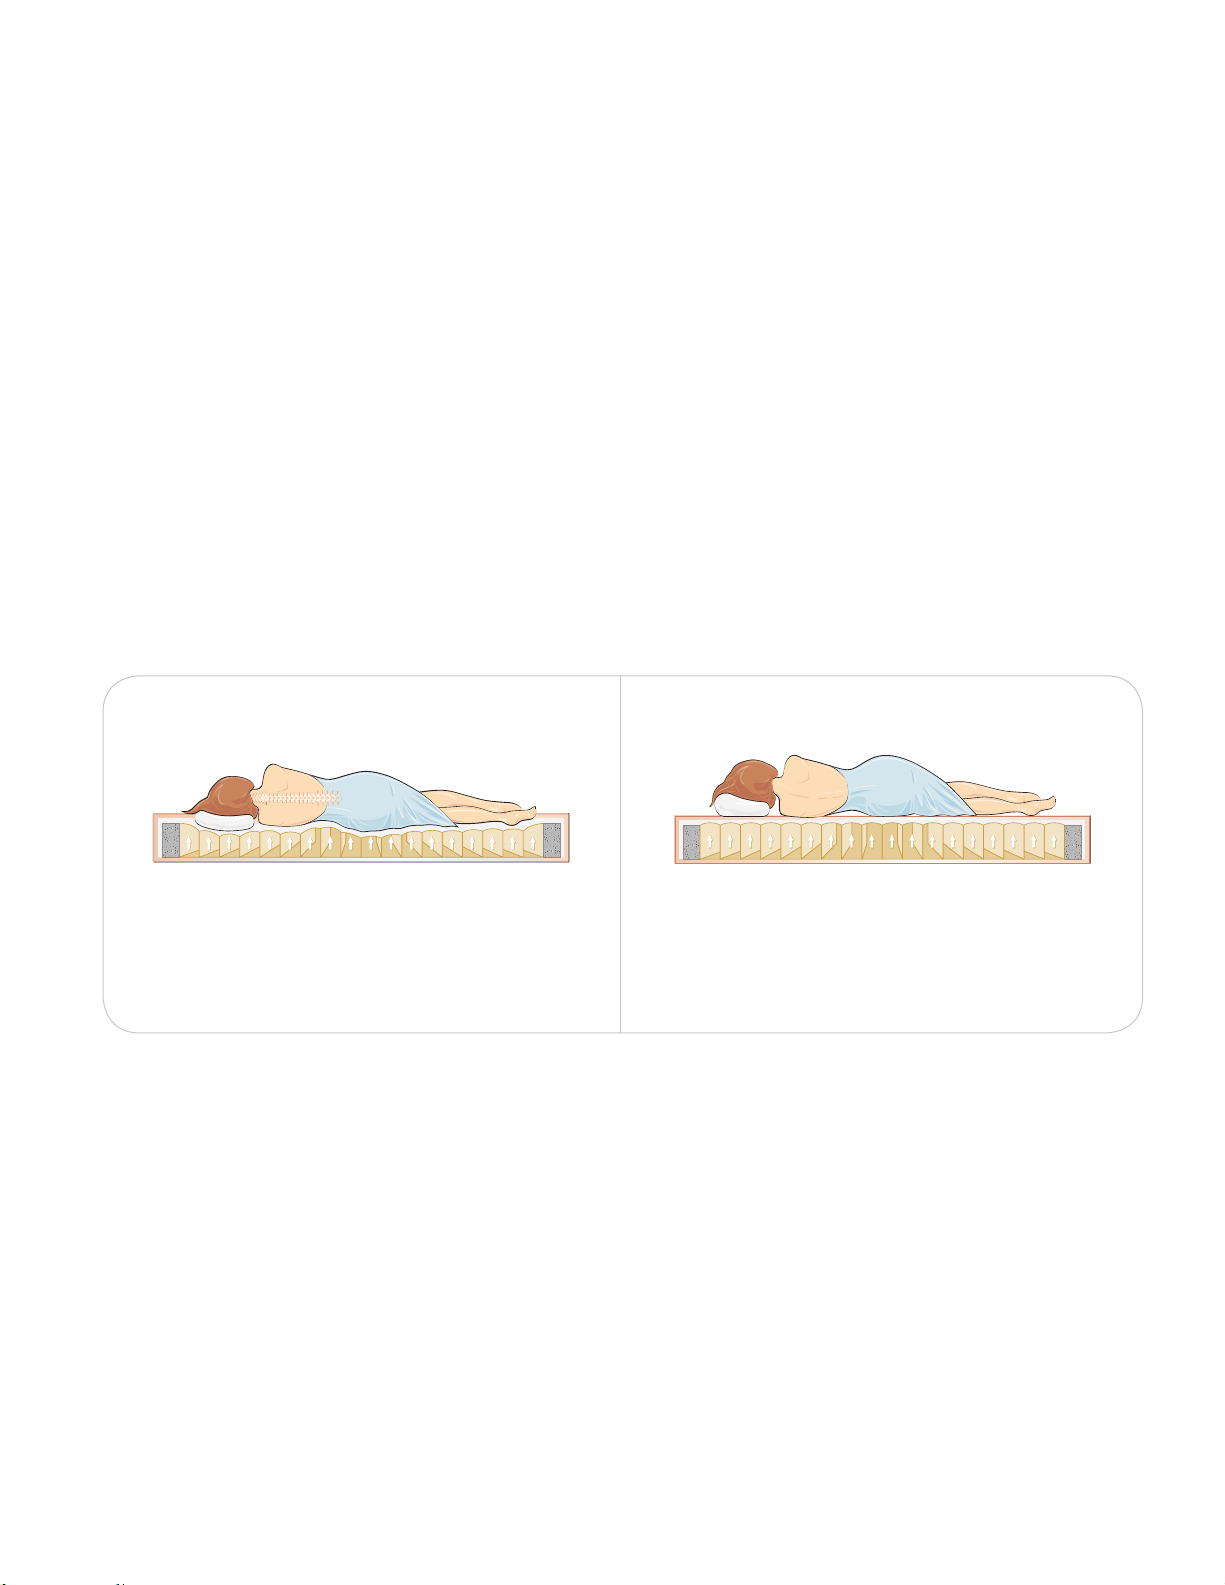
EVALUATING YOUR COMFORT LEVEL
As you are customizing the Sleep Number® bed for your optimum comfort level, you will want to evaluate your
sleep position and determine how you feel as compared to the diagrams below, then make adjustments to your
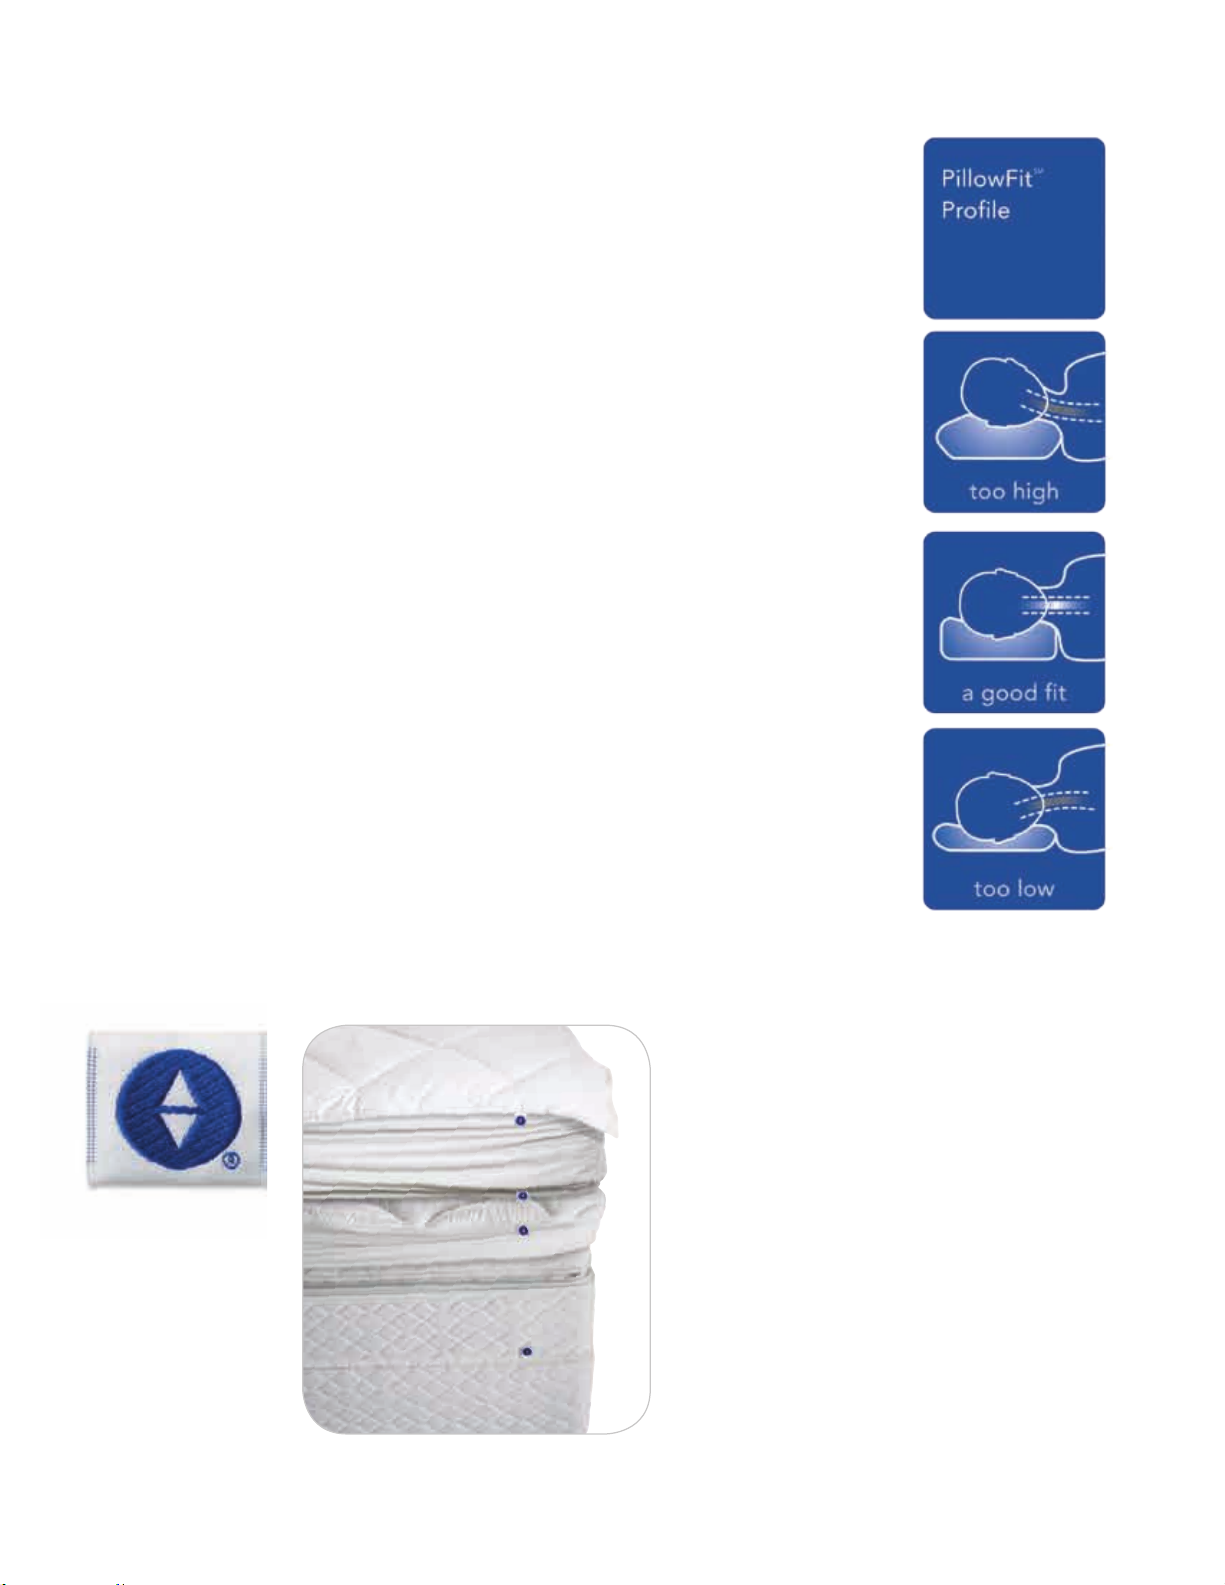
firmness or pillow if needed. Your pillow should help keep your body aligned properly, otherwise it may interfere
with your ability to sleep comfortably. Visit sleepnumber.com or one of our stores to get a PillowFitSM profile and
see the extensive selection of innovative pillows we carry for all sleep positions and fill preferences.
RIGHT WRONG
•Neckandbackarealignedinthesamepositionas
when you are upright.
•Nodiscomfortatshoulderandhippressurepoints.
•Youfeelthemattresssupportthesmallofyourback
(back sleepers) or the curve of your side (side sleepers).
•Bodyalignmentisnotstraight.
•Yourpillowmakesyourheadtiltatanangleto
the rest of your body.
•Youfeeldiscomfortfrompressureatyourneck,
shoulders, back, hips or legs.
GIVE IT TIME
It sometimes takes several nights of sleeping at different settings to discover your ideal Sleep Number®. If you
would like to experiment further with your Sleep Number® setting, you may want to consider keeping a sleep
journal. When you have found a Sleep Number® setting where you feel comfortable, log this number into your sleep
journal. Try to sleep at this Sleep Number® setting for a minimum of five nights, adjusting in increments of 5 or 10
only. It will take your body that long to become accustomed to a new sleep surface. After five nights, reevaluate
your comfort level and log the new setting into your sleep journal, adding comments if helpful. Repeat the process
until you have found the perfect setting for you.
If, after trying four different Sleep Number® settings, you have not found your ideal Sleep Number® setting and
would like additional assistance, go to sleepnumber.com and click on Customer Center or call 1.800.472.7185
to reach a Customer Service Representative. Our trained Customer Service Representatives may be able to
recommend adjustments, make suggestions or pinpoint concerns that might be contributing to less than ideal
comfort. Improving your sleep is our expertise.
25
Page 28
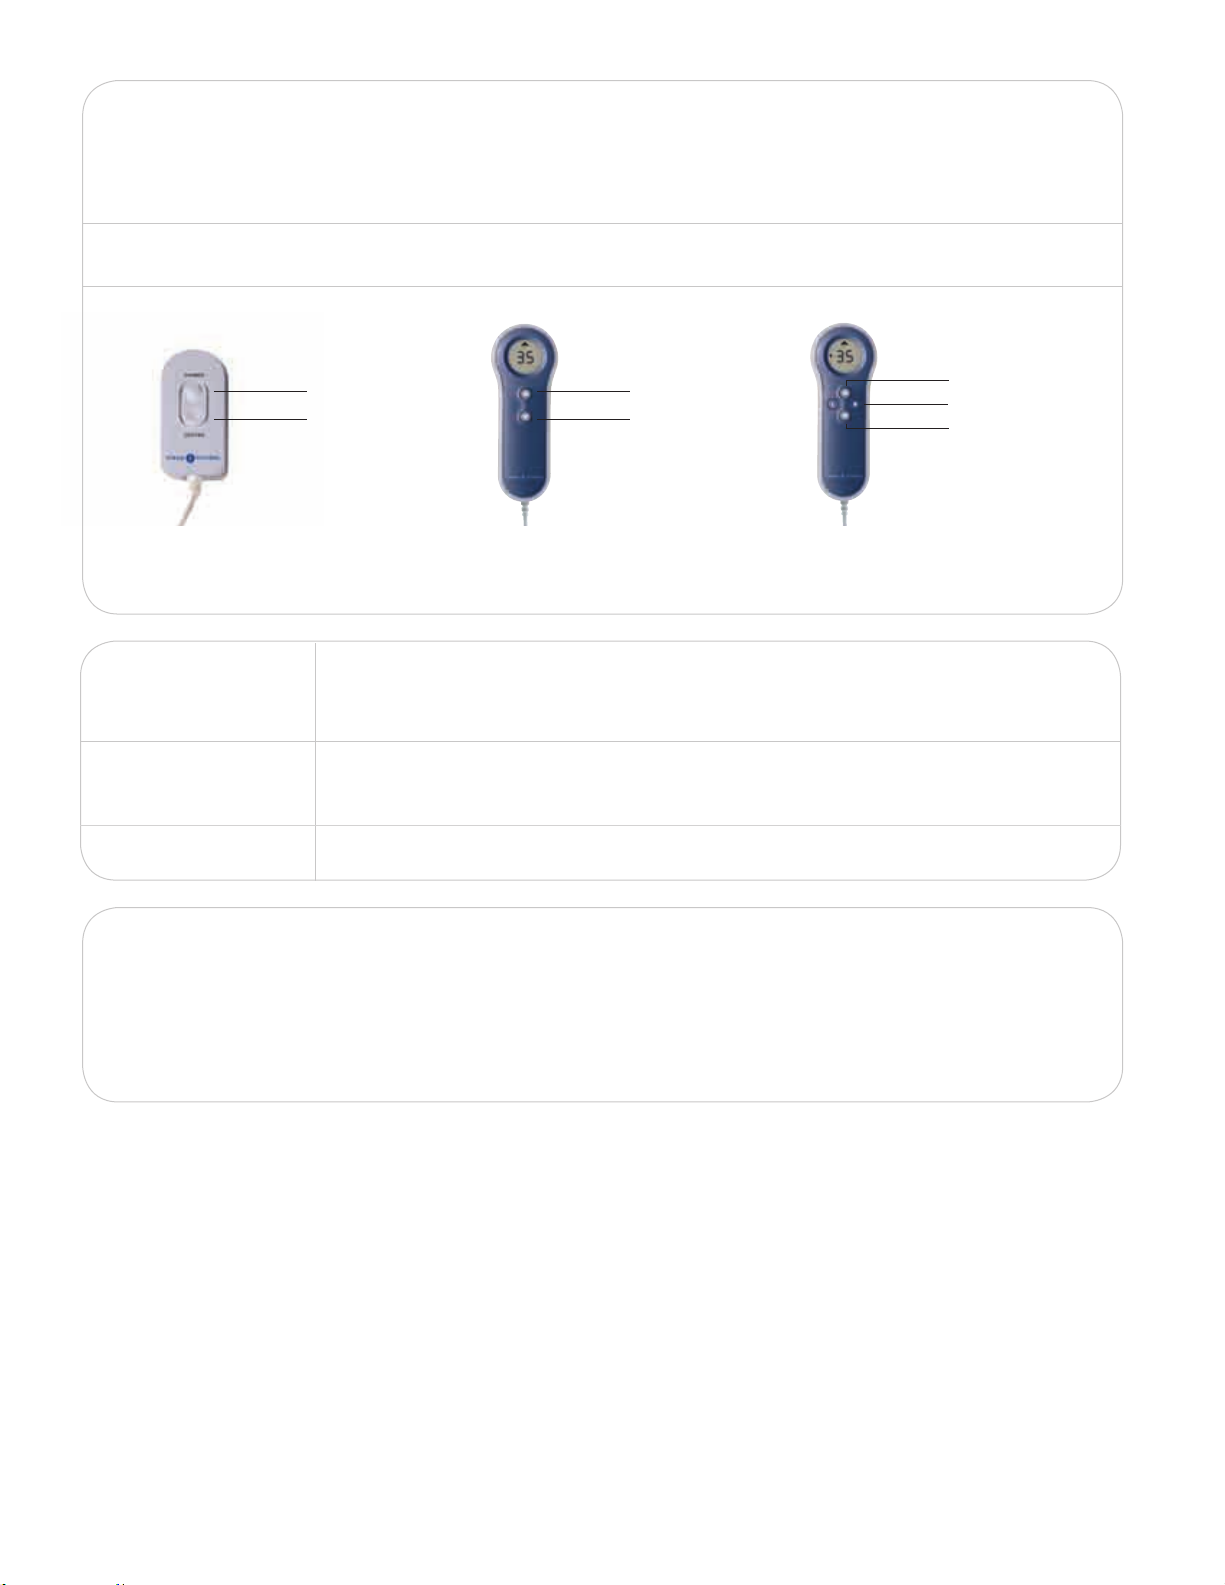
IDENTIFY YOUR REMOTE
AND ITS FUNCTIONS
3000 wired 3000 wired
Firmer
Softer
wakes when any
button is pressed
BUTTON
3000 Firmer
Softer
3000 wired
Single Chamber
Firmer
Softer
wakes when any
button is pressed
FUNCTION
Press and hold down buttons to make the bed softer or firmer until
comfortable, then release.
Dual Chamber
Firmer
Side
Softer
wakes when L or R
button is pressed
Side (L) and (R)
Class B Device Statement: (Section 15.105 (b) of the FCC Rules) “Note: This equipment has been tested and found to comply with the limits for a Class B digital device, pursuant
to part 15 of the FCC Rules. These limits are designed to provide reasonable protection against harmful interference in a residential installation. This equipment generates, uses,
and can radiate radio frequency energy and, if not installed and used in accordance with the instructions may cause harmful interference to radio communications. However, there is
no guarantee that interference will not occur in a particular installation. If this equipment does cause harmful interference to radio or television reception, which can be determined
by turning the equipment off and on, the user is encouraged to try to correct the interference by one or more of the following measures:
• Reorient or relocate the receiving antenna.
• Increase the separation between the equipment and receiver.
• Connect the equipment into an outlet on a circuit different from that to which the receiver is connected.
• Consult the dealer or an experienced radio/TV technician for help.
This device complies with Part 15 of the FCC Rules. Operation is subject to the following two conditions: (1) this device may not cause harmful interference, and (2) this device must
accept any interference received, including interference that may cause undesired operation.
Press to choose a side, it will display the previous SLEEP NUMBER® setting.
26
Page 29

FINDING YOUR SLEEP NUMBER® SETTING
u Step 1
- Lie on one side of the Sleep Number® bed in your normal sleep position,
holding your remote.
u Step 2
- Evaluate your comfort level.
u Step 3
- If you have a dual chamber model press L or R to choose a side.
u Step 4
- Press and hold the firmer or softer buttons and let the bed adjust. Repeat
until you have reached your desired level of comfort. If you’ve upgraded
to a digital remote, your new Sleep Number® setting will be displayed.
u Step 5
- Your setting will be displayed for five seconds.
u Step 6
- Try this Sleep Number® setting for a minimum of five nights, then reevaluate
and make adjustments accordingly.
SLEEP NUMBER
®
STUDY
As you can see, Sleep Number® bed owners
find comfort at all settings from 0–100, however
the majority of sleepers find their Sleep Number®
setting between 35–50.
Percent of people at sleep setting
Sleep Number® setting
27
Page 30

Firmness
™
Control
System
Frequently
Asked Questions
Will my bed deflate if
there is a power surge
or power loss?
What do I do if the
™
Firmness Control
System doesn’t run?
Why does my
Sleep Number®
setting change?
No, your mattress will maintain its firmness. To protect your Firmness
Control™ System, we recommend using a surge protector.
Make sure the power cord is securely plugged into the wall outlet. Check
to see if the power cord is plugged into an outlet that has power and is not
connected to an on/off wall switch. If the Firmness Control™ System still will
not function, call Customer Service.
There are several factors that can contribute to the fluctuations in
a SLEEP NUMBER® setting. A Sleep Number® setting is based on the
combination of body weight, volume of air in the air chamber and
sleep position.
• Temperature:Anincreaseordecreaseintemperaturecancausechangesinthe
®
Sleep Number
setting to increase.
setting. A heated mattress pad will cause the Sleep Number®
28
• BarometricPressure:Changesinatmosphericpressurerelatedtoweatherand
®
altitude can cause your Sleep Number
™
• Weight:TheFirmnessControl
means a higher Sleep Number
is distributed will affect the reading.
• SleepPosition:Themoreconcentratedtheweightis,thegreaterchancethe
®
Sleep Number
distributed throughout the chamber more, it is more likely that the Sleep Number
setting will be lower (i.e., when you lie on your back or stomach).
setting will be higher (i.e., when you lie on your side). When it is
System acts similarly to a scale; more weight
®
setting. In addition, the way that the weight
setting to change.
®
Page 31

Sleep
Journal
CommentsSleep Number® setting Number of nights
29
Page 32

CommentsSleep Number® setting Number of nights
30
Page 33

25
Mattress
Care
60
31
Page 34

MATTRESS CARE
The cover of your SLEEP NUMBER® mattress may be spot cleaned
with carbonated water. Do not dry clean the mattress cover or
put it in a washing machine. Also, please do not apply stain guard,
as it may cause yellowing of the fabric.
Select Comfort is a leader in the industry in the use of materials
designed to inhibit the growth of allergens or microorganisms
that, in rare circumstances, can form inside any mattress, bedding,
pillow or upholstered product.
Advanced antimicrobial safeguards are incorporated into every
Sleep Number® bed. Key components of the mattress have been
treated to protect the bed from contaminants such as mold,
mildew and bacteria growth. The unique, zip-open design of
the Sleep Number® bed allows you to easily open, ventilate
or vacuum if you choose.
In rare instances under the right conditions, mold or mildew can
form inside many types of mattresses, bedding or upholstered
products. Should this condition occur in your mattress, please
contact our customer service department so we can work with
you to return your bed to factory-fresh condition.
TRANSPORTING YOUR SLEEP NUMBER® BED
Your Sleep Number® bed is lighter than any conventional bed,
making it much easier to move.
Moving it yourself
• Thefoundationshouldalwaysbedisassembled.Bagallhardware
so that it is not lost.
• Thecoverandfoamshouldallbedoublebaggedtopreventstains.
• Thechambersshouldbedeatedandboxedtopreventpossible
abrasions and other damage.
™
• TheFirmnessControl
by some sort of packing material if the original box is not available.
• Theremote,capsandinstructionsshouldbetucked
in the box with the pump to prevent them from being lost.
sing a moving company
U
System should be packed in a box, surrounded
Creating a Healthy
Sleep Environment
An estimated 50 million Americans suffer
from allergies, and the bedroom presents some
especially difficult challenges. A few simple
steps you can take to create a healthy sleep
environment include:
• Useadehumidiertoreduceanypotential
mold or mildew growth. Keep humidity
levels under 60 percent.
• Useahigh-qualitymattresspadtoprotect
your mattress from moisture. You may want
to consider a waterproof mattress pad if
you perspire heavily while sleeping.
• Useallergencoversonpillowsand
mattresses to reduce dust mites, which can
trigger allergies and asthma. Wash bedding
weekly in hot water.
• Vacuumthebedroomregularly,usingahigh
quality vacuum cleaner such as one with
a HEPA filter, one that does deep cleaning,
or a central vacuum system.
• Wait20-30minutesbeforemakingyour
bed each morning, turning the covers back
and allowing the mattress to air out for a bit.
• Ifpossible,avoidplacingyourbedonan
outside wall or above an air conditioning
or heating vent, which can cause condensation
and increase the likelihood of mold growth in
many mattresses.
• Youcouldalsouseahigh-qualityelectronic
air purifier to remove additional airborne
particulates from the bedroom.
• Thefoundationshouldalwaysbedisassembled.Bagallhardware
so that it is not lost.
• Themattresscanbefullyinated,cappedoff,andshouldbepackaged
in a mattress box for moving.
™
• TheFirmnessControl
material, and transported in a manner where it will be exposed to
minimal shock and vibration.
32
System should be packed in a box, with packing
• Pleasenote:OzonegeneratorsARENOT
recommended for use in the same room
®
with the Sleep Number
degrade components of the bed over time.
bed, as they can
Page 35

Accessories
33
31
Page 36
PERSONALIZED COMFORT FROM
SM
HEAD TO TOE
WITH EXCLUSIVE
SELECT COMFORT® ACCESSORIES
Pillows
Our sleep-position pillows are available in memory foam, Intralux®
comfort material, 100% down, down blend or down-alternative fills. You’ll
be amazed at the difference a perfectly fitted pillow can make. We can
fit you with a comfortable, supportive pillow that fits your sleep position,
unique shape, and mattress firmness or SLEEP NUMBER® setting.
Blankets and Comforters
Experience all-season comfort with products designed to meet the
different warmth needs of every sleeper. Dual warmth items allow
couples to further customize their sleep.
Sheet Sets
Custom designed to fit your Sleep Number® bed, our sheet sets are
available in pima cotton sateen, luxurious Supima® cotton and our
finest Egyptian cotton. Available in a variety of colors.
Mattress Pads
Protect your investment with our high-quality mattress pads, and add
a layer of comfort and breathability to your Sleep Number® bed.
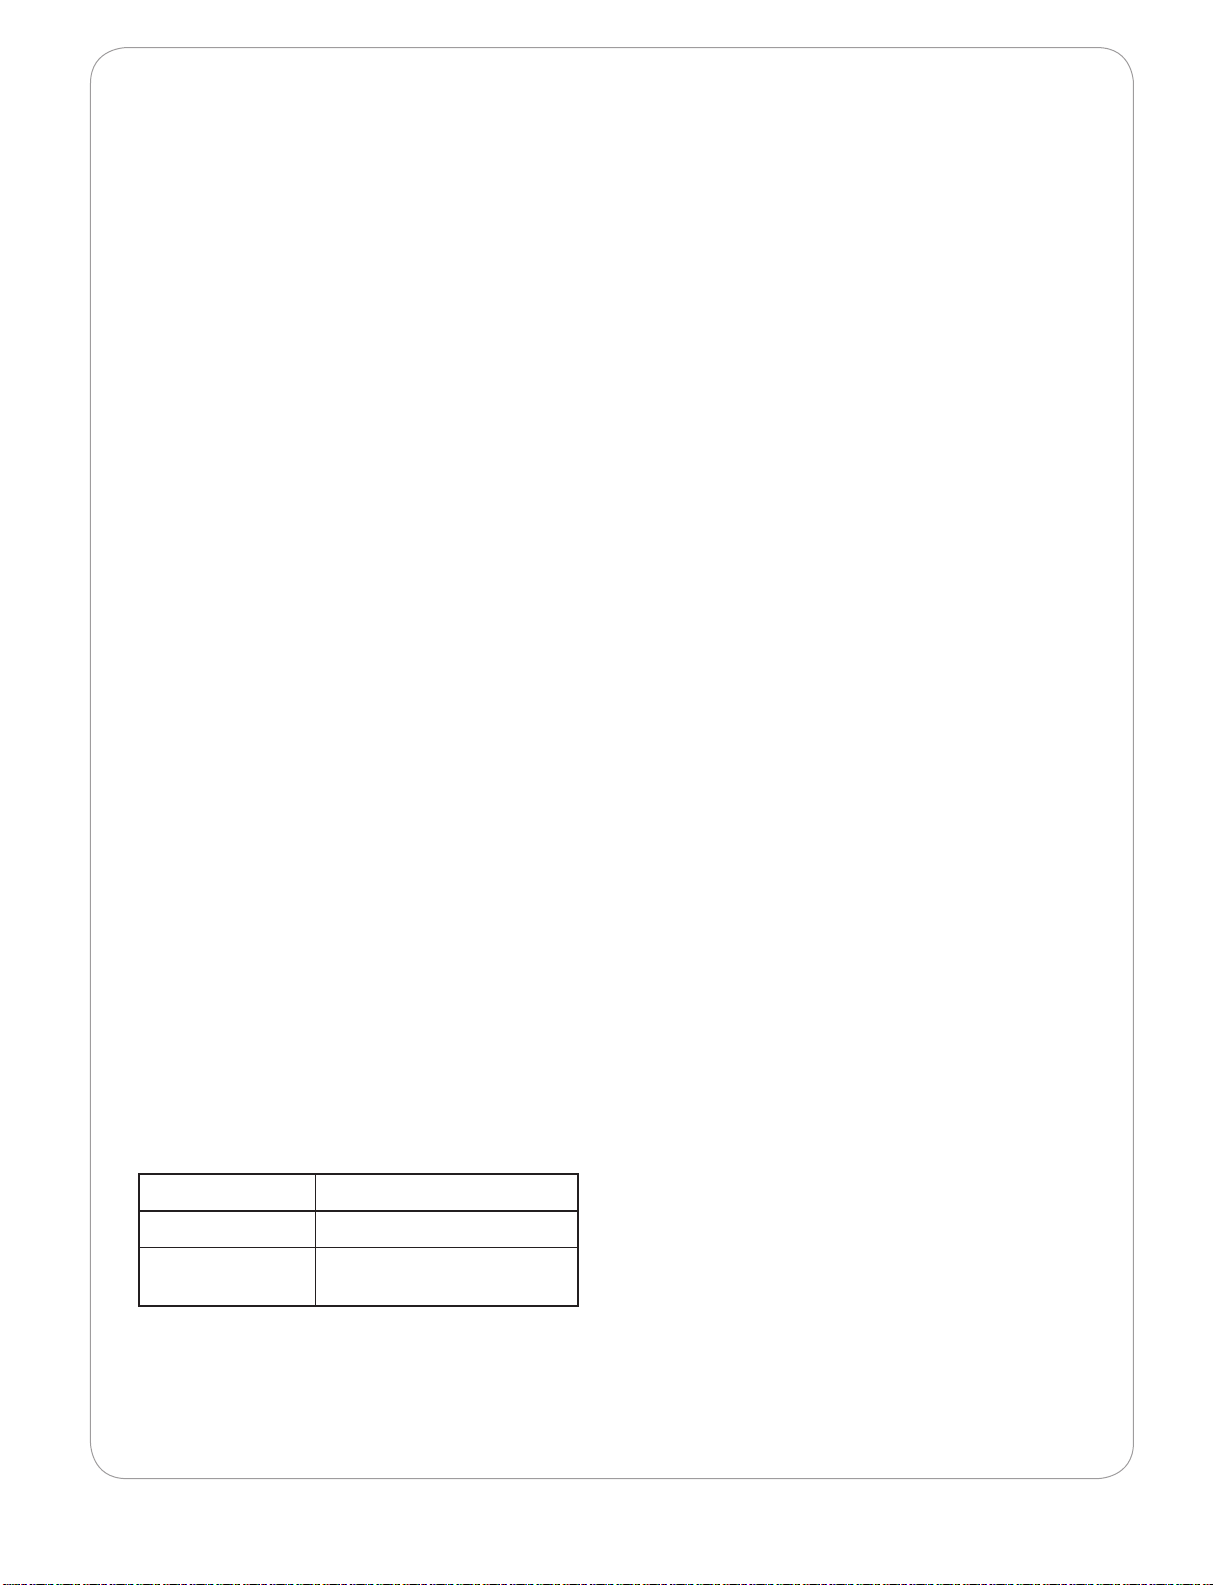
LOGICTM LABEL
The LogicTM Label takes guesswork out of
where to start making your bed. Instead
of trying to fit mattress pads or sheets
around the wrong bed corners and coming
up short, you’ll be guided with a simple
visual cue that perfectly positions all your
Sleep Number® bedding. Each bedding
accessory carries a small label to match
the one featured at the end of your
Sleep Number® bed—your bed linens
will be positioned correctly when all the
labels align.
34
Page 37

Warranty and
Comfort Club
80
®
35
Page 38

“ We love our bed. Now all
of our friends are getting
Sleep Number beds and they
love them too. I just received
an email from a friend who
purchased a King Sleep Number
bed and finally found relief
from his back pain. What more
can we say than ‘Thank You’ for
this fabulous product. We’ll
never stop recommending
your beds.”
- Jolie C., Homewood, IL
DEFECTIVE OR DAMAGED COMPONENTS
If any component of the mattress or foundation is found to be defective
in materials or workmanship within first two years of the original purchase
date, they will be replaced by Select Comfort at no cost to you. Within the
first two years, all shipping charges to replace a defective component will be
covered by Select Comfort. If any component of the mattress or foundation
is found to be defective in materials or workmanship after two years from
the original purchase date, the terms of the Limited Warranty will apply.
After two years from the date of purchase, you will be responsible for the
cost of shipping the defective component back to Select Comfort and any
related costs. Contact our Customer Service Department at 1.800.472.7185
for troubleshooting assistance and if you need to process the replacement
order. We recognize the fact that components may break, become soiled
or unusable and may not be covered under the warranty. As long as you
own our bed and can provide proof of purchase, you can purchase
replacement components. All component sales are final and carry a 2-Year
Limited Warranty from the purchase date. Product discounts and accessory
promotions do not apply to components. Call our Customer Service
department for current pricing and to process the component purchase.
RETURN POLICY
We hope you are completely satisfied with your SLEEP NUMBER® bed,
but if you decide to return the bed during the In-Home Trial, contact
Customer Service before packing your bed. All merchandise being
returned must be in good condition and be given a Return Merchandise
Authorization number from Customer Service, which will expire 30 days
from date of issue. All refunds will be issued to the original method of
payment within approximately 15 business days after all products have
been received at Select Comfort. All shipping and incidental charges to
return the bed are the customer’s responsibility.
36
Page 39
LIMITED WARRANTY COMFORT CLUB
What is covered:
• Select Comfort warrants that your mattress and/or
foundation will be free from defects in materials
and workmanship for a period of 20 years from the
original purchase date.
• Warranty is limited to product repair or
replacement only.
What is not covered:
• Conditions arising from normal wear and tear.
(Conditions arising from normal wear and tear include,
but are not limited to: mattress cover compression,
foam compression, or discoloration of components.)
• Damage from tampering with any component or
™
from opening the Firmness Control
System.
• Damage from misuse or abuse of the warranted
product or component.
• Damage from laundering or dry-cleaning.
• Acts of God, such as but not limited to lightning
damage.
What you must do:
• Return the warranted product or component in sanitary
condition to an authorized SELECT COMFORT
center. Select Comfort will incur the cost of shipping up
to two years after the original purchase date; after two
years, the return shipping to Select Comfort will be at
the customer’s expense.
• Please telephone our Customer Service Department at
1.800.472.7185 to locate the nearest authorized service
center and arrange for the return of the warranted
product or component.
®
service
What we will do:
• Select Comfort, at its option, will repair or replace the
defective product or component at a cost to the original
purchaser based on the following table. The “price”
is the price of the defective product or component at
the time the warranty claim is made, or the price of
a comparable product or component if the original
product or component is no longer in production.
Years after purchase date Original purchaser’s cost
Up to 2 years
2-20 years
• For example, if a warranty claim arises 12 years after
the original purchase date, the cost to the original
purchaser would be 68% of the price (that is, 20% plus
4% for each of the 12 years) and Select Comfort would
be responsible for the remaining 32% of the price.
No Cost
20% plus 4% of price for each year
from original purchase date.
• Select Comfort reserves the right to substitute
products or components of equal or better quality,
and to use or deliver refurbished products or
components in the repair or replacement of any
product under this Limited Warranty.
What will void this warranty:
• Tampering with any component or opening the
Firmness Control
• Misuse or abuse of the warranted product
or component.
• Sale, transfer or other disposal of the warranted
product or component.
™
System and its hand control unit.
Limitations:
• Your exclusive remedy, IN LIEU OF ALL INCIDENTAL, SPECIAL OR CONSEQUENTIAL DAMAGES,
INCLUDING FOR NEGLIGENCE, is limited to
repair or replacement of any product or component
deemed to be defective under the terms and conditions
stated above. Select Comfort will bear no other
damages or expenses.
• Customer maintains responsibility for installation of
parts replaced under terms of the warranty.
• Select Comfort reserves the right to refuse to repair
or replace any product or component that is returned
in an unsanitary condition.
• This Limited Warranty applies only to the product
as used in the United States and Canada. It is not
applicable in U.S. territories or other countries.
• This Limited Warranty is non-transferable.
• Repair or replacement of a product or component
under the terms of this Limited Warranty in no way
lengthens the Limited Warranty period.
• ANY IMPLIED WARRANTIES APPLICABLE TO THIS
PRODUCT, INCLUDING ANY WARRANTIES OF
MERCHANTABILITY OR FITNESS FOR A PARTICULAR
PURPOSE, ARE LIMITED IN DURATION TO THE
DURATION OF THIS WRITTEN LIMITED WARRANTY.
Some states do not allow the exclusion or limitation
of incidental or consequential damages, or limitations
on how long an implied warranty lasts, so the above
limitations may not apply to you. This warranty gives
you specic legal rights and you may also have other
rights, which vary from state to state.
All claims relating to the Limited Warranty of
Select Comfort
contacting Customer Service at 1.800.472.7185
or writing to Select Comfort Customer Service,
6105 Trenton Lane North, Minneapolis, MN 55442.
®
products should be made by
37
Page 40

It’s amazing how many SLEEP NUMBER® bed purchasers are referred to
us by family and friends! Chances are you will soon be telling someone
about the difference the Sleep Number® bed has made in your life. We
appreciate it when owners like you help us spread the word to others about
our revolutionary bed. It is our company’s mission to improve lives by
Revolutionizing the Way America SleepsSM— one bed at a time.
Tell Your Family and Friends and Earn Rewards!
As an owner, you are eligible to participate in our Owners-Only rewards
program. Every time someone you refer purchases The Sleep Number Bed
by Select ComfortTM, you can earn Comfort Club® Reward Certificates!
These certificates can be redeemed any time you shop with us — on
accessories such as pillows or mattress pads, or even toward the purchase
of another bed! Call 1.800.422.4204 for details.
Tell Us Why You Like Your Bed
We’d love to hear why you like your new Sleep Number® bed. If you have any comments about the product
Tear page from manual, fold and mail.
u
and service you received, or suggestions as to how we might serve you better, please fill out the form on this
page and send it in.
®
REWARDS
Please tell us why you like your new Sleep Number Bed by Select ComfortTM.
Comments:
Name Email
Address Bed model purchased
City/State/Zip Your Sleep Number® setting
Phone May we reprint your comments? Y N
38
Page 41
Another satisfied
3M DIVISION
PROJECT NAME
2982 CLEVELAND AVE N
ST PAUL MN 55113-9579
OR
®
Sleep Number
bed owner
NO POSTAGE
NECESSARY
IF MAILED
IN THE
UNITED STATES
BUSINESS REPLY MAIL
FIRST-CLASS MAIL PERMIT NO.6 MINNEAPOLIS, MN
POSTAGE WILL BE PAID BY ADDRESSEE
SELECT COMFORT CORPORATION
6105 TRENTON LANE NORTH
MINNEAPOLIS MN 55442
Page 42

3M DIVISION
PROJECT NAME
2982 CLEVELAND AVE N
ST PAUL MN 55113-9579
Help is just a click or
phone call away.
If you ever have product questions or need
additional assistance obtaining optimal
comfort, please visit us at:
sleepnumber.com
or call
1.800.472.7185
Representatives are available (CST):
Monday–Friday 7am – 10pm
Saturday 8am – 5:30pm
Sunday 10am – 6:30pm
6105 Trenton Lane North, Minneapolis, Minnesota 55442
 Loading...