

Congratulations for purchasing high quality Precision Acoustics loudspeakers. These high performance flush mounting loudspeakers have
been designed to give you many years of trouble free listening enjoyment.
Both the PA265IC and the PA265IW come with an easy to install mounting
system, with frame and grilles that can be painted to match your room
décor.
Though easy to install we recommend that you read carefully through this
instruction manual before beginning the installation, and to save your bill
of sale, needed should your speakers require servicing.
Instruction Manual
PA265IW
PA265IC
Félicitations, vous avez choisi d’acquérir les haut-parleurs de qualité
supérieure Precision Acoustics! Ces unités à montage en surface de
haute performance ont été conçus afin de vous permettre des années
d’écoute musicale sans problèmes. Les unités PA265IC et PA265IW sont
fournies avec un système d’ancrage façile à installer ainsi que de cadres
et de grillages pouvant être peints pour s’harmoniser à votre décor.
Quoi que façile d’installation, nous vous encourageons à lire attentive-
ment la suite d’étapes à suivre de ce feuillet avant de débuter les travaux.
Conservez également votre facture d’achat nécéssaire lors d’un appel de
service.
Mode d’emploi
PA265IW
PA265IC

What’s Inside the Box…
• Speaker with frame
• Grille
• Template/ Paint Mask
Deciding On A Suitable Location To
Install Your Speakers
Think of the following points when picking a loca-
tion to install your speakers:
• Install between wall studs, or ceiling joists,
and allow no less than 2-3 inches (5-8 cm)
clearance in all directions behind and around
the speaker.
• Best stereo imaging is obtained when the
loudspeakers are between 7-10 feet apart (2-
3m) depending on the height of your ceiling
or the width of your room. Also, keep loud
speakers 2-3 feet away from adjacent wall
surfaces that can color the sound you will
hear in the bass and mid-bass frequencies.
• You will be required to run speaker cable
from your receiver or amplifier to your chosen
location. Therefore make sure that there are
no obstruction such as ceiling joists,
heating/ventilating shafts, or wall studs in
the cable’s path that may hinder the running
of your cable to your desired location.
Tools You Will Need
• Jig saw or wall board saw
• Drill
• Philips ( star shaped) screwdriver
• Measuring tape
• Level
• Wire strippers
• Coat hanger or about 1.5 feet (40cm) of solid
core wire
• Wire snake (fish)
• Speaker cable
• Electronic stud finder (Optional)
In new constructions where the wallboard is not
yet installed, run 2 pair of good quality polarity
coded 2 conductor speaker wire (for left & right
speaker) from your receiver location to your desired
speaker location. Tie the loose wires at the speaker
location to a nail so that they are visible and easily
accessible once the drywall is installed. In a retrofit
installation, plan the path for your cable run as you
will later be fishing the speaker cable through the
wall or ceiling (attic or basement may also be an
option), to the speaker cut-outs in your drywall.
The length of your cable run will determine the
gauge of the speaker wire to use. The following is
meant as a guide to choosing your speaker cable
gauge:
Less than 6 feet (2m) - min. 18 gauge
6 to 30 feet (2-9m) – min. 16 gauge
30 to 50 feet (9-15m) – min. 14 gauge
Over 50 feet (>15m) – 12 gauge
Tip: When running your cable try to use the same
length of cable for the right and left run,
leaving yourself and additional 2’(60cm) to
facilitate speaker connections later on.
1.
Precision Acoustics PA265IC & PA265IW
À l’intérieur de la boîte
• Haut-parleurs et cadres
• Grillage
• Gabarit / Pochoir à peinture
Choix de l’emplacement d’installation des haut-parleurs
On doit tenir compte des points suivants lors du
choix d’un emplacement d’installation:
• Choisir un endroit entre les soliveaux du mur ou
du plafond permettant un jeu supplémentaire
d’environ 5 à 8 cm (2 à 3 pouces) en tout sens et
derrière le haut-parleur.
• L’image spatiale stéréophonique optimale s’ob
tient quand les haut-parleurs possèdent un écart
d’environ 2 à 3 mètres entre eux (7 à 10 pieds) en
fonction de la largeur ou de la hauteur de la
pièce. Il est aussi préférable de placer les hautparleurs à environ 1 mètre des murs adjacents qui
peuvent, en réfléchissant, modifier la qualité
sonore des basses et moyennement basses
fréquences d’écoute.
• Vous devrez faire passer des câbles, de calibre 18
ou plus gros, de votre synthonisateur ou de
votre amplificateur à l’endroit choisi pour chaque
haut-parleur. Vous devez vous assurer qu’il n’y a
pas d’obstacles tels des soliveaux de plafond ou
de mur ou encore des conduits de chauffage ou
de ventilation au long du trajet projeté qui pour
raient nuire au tirage des câbles.
Outils nécéssaires à l’installation
• Scie sauteuse ou sabreuse
• Perceuse électrique
• Tournevis philips (étoile)
• Ruban à mesurer
• Niveau
• Dénudeuse à fils
• Cintre métallique à vêtements ou fil solide
d’environ 40 cm (1.5 pied)
• Câble de tirage (fish)
• Câble à haut-parleurs
• Localisateur de soliveaux électronique
(optionel)
Si possible, lors de la construction avant la pose
du gypse, installer 2 paires de câbles de bon calibre, codés en polarité, de l’emplacement de
chaque haut-parleur (droite & gauche) à celui de
la chaîne stéréo. Attacher les extrémités des
câbles à un clou de façon à ce qu’ils soient visibles
et accessibles après la pose des panneaux de
gypse. Si l’installation est effectuée après la construction, planifier le trajet des câbles qui devront
être tirés au travers des murs ou plafonds en passant accessoirement par le grenier ou le sous-sol
pour être acheminés à leur emplacements respectifs.
Les longueurs totales des trajets serviront à déterminer le calibre des câbles utilisés. À titre d’indicatif, le plus petit calibre peut être choisi de la
façon suivante:
Moins de 2 mètres (6 pieds)
= calibre 18
De 2 à 9 mètres (6 à 30 pieds)
= calibre 16
De 9 à 15 mètres (30 à 50 pieds)
= calibre 14
Plus de 15 mètres (> 50 pieds)
= calibre 12
Conseil: Lors de l’installation, utiliser des
longueurs identiques pour les deux canaux
(gauche et droit) en ajoutant environ 60 cm (2
pieds) supplémentaire afin de permettre une
manipulation plus aisée.
1.
Precision Acoustics PA265IC & PA265IW
2.
Precision Acoustics PA265IC & PA265IW
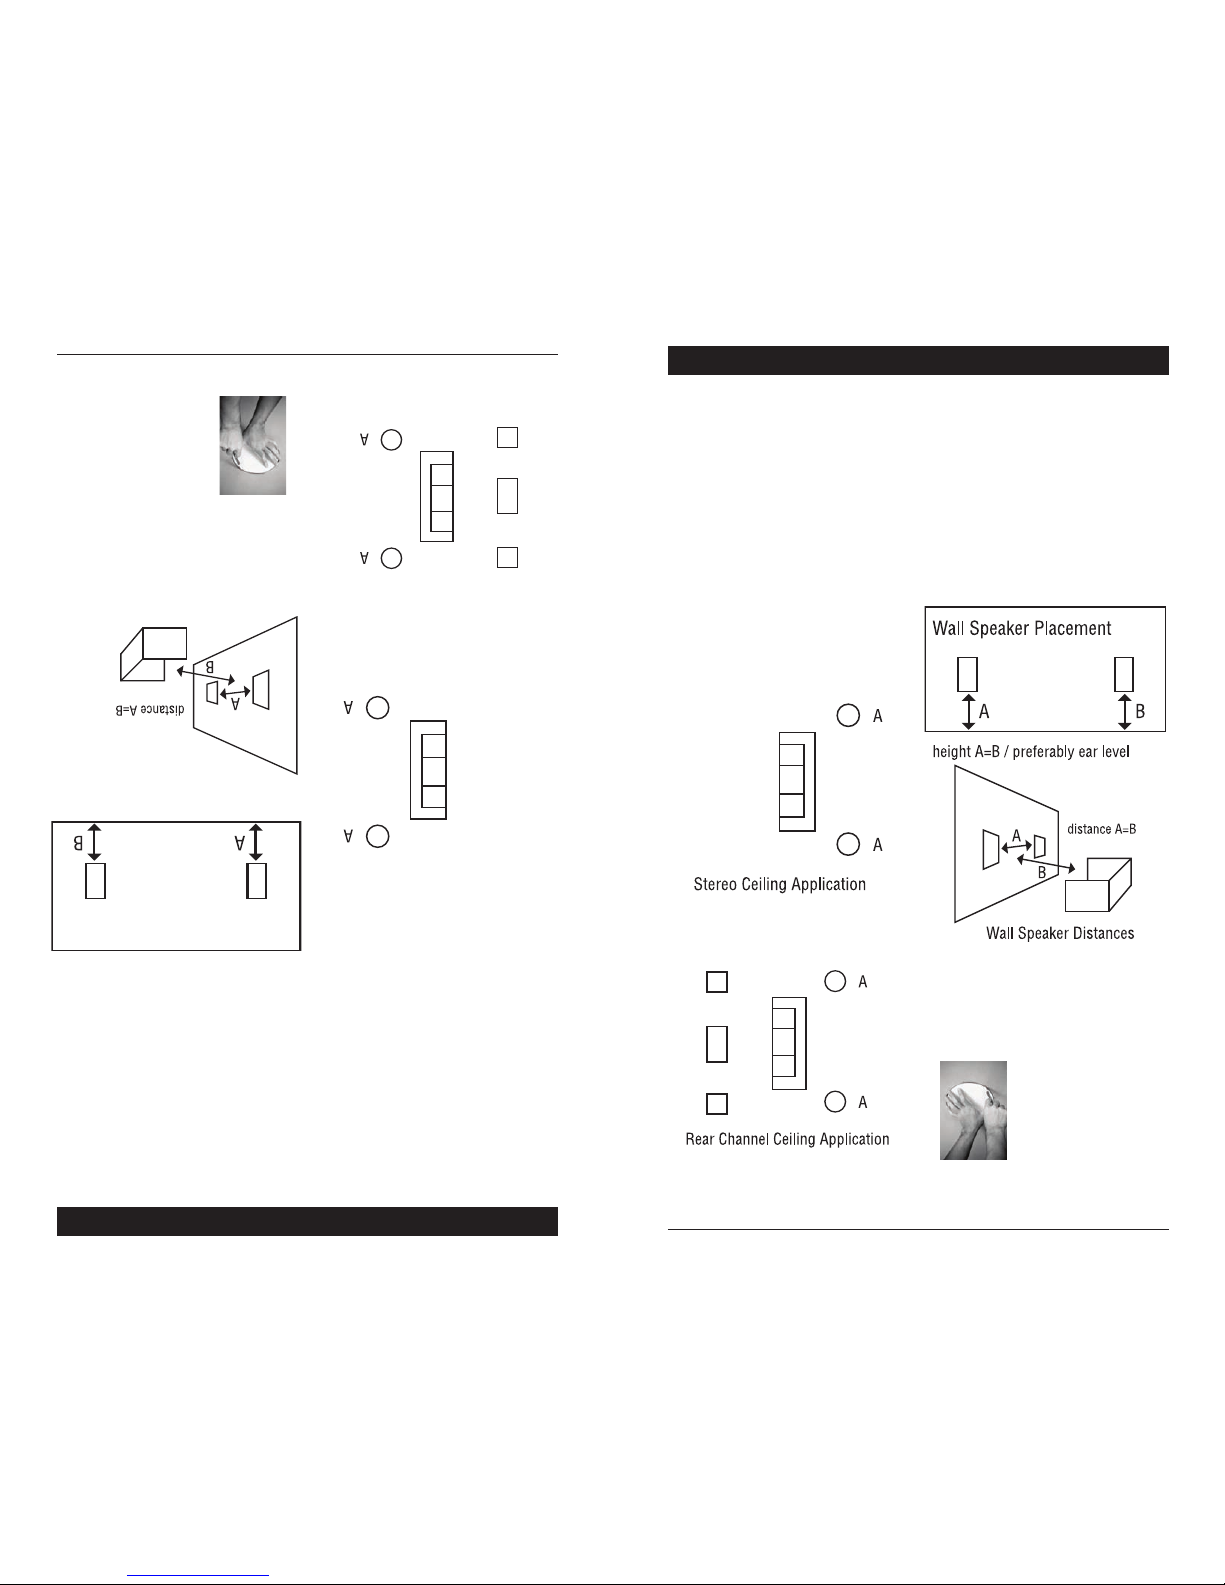
Speaker Placement and Installation
Precision Acoustics in-wall and ceiling speakers
use a mounting system known as “dog-ears”that
automatically clamp the speaker to your wall as
you tighten the Philips screws in the speaker’s
frame. This will make installing the speakers very
easy once you have prepared a cavity to receive
them.
Ceiling Speaker Placement (PA265IC):
Locate each speaker to one side of the listening
area. An 8’(2.5m) ceiling indicates an 8’separation
between the speakers, centered on the listening
area.
In rear channel, multi-channel surround applications locate speakers at the same distance, but to
the rear of the listening area.
Wall Speaker Placement (PA265IW):
Use a measuring tape to locate speakers at the
same height on each side of the listening area,
preferably at ear level. Use a level to help you
position your rectangular PA265IW in-wall speaker in a true vertical (or horizontal) position. For
stereo, maintain the same separation between the
speakers as between your listening area and the
speaker wall.
Check For Obstructions
• O nce you have determined the ideal location,
tap the wall or ceiling with your knuckles or use
an electronic stud finder to check for studs or
beams to be avoided.
• Place the speaker template against the wall or
ceiling at the chosen location and trace out
the cut hole.
2.
Precision Acoustics PA265IC & PA265IW
Localisation et installation des
haut-parleurs
Les haut-parleurs encastrables de murs et pla-
fonds Precision Acoustics, utilisent un système
d’ancrage spécial qui agrippe automatiquement
l’intérieur du mur lors du serrage des vis dans le
cadre du haut-parleur. Ceci permet une grande
facilité d’installation une fois la cavité préparée.
Position des haut-parleurs de plafond PA265IC:
Situer les haut-parleurs de chaque côté de la posi-
tion d’écoute choisie. Un plafond haut de 2.5
mètres (8 pieds) demande un écart semblable
entre les haut-parleurs soit 2.5 mètres réparti
également de chaque côté de la zone d’écoute.
Dans les applications multi-canaux “Surround”, les
haut-parleurs arrières doivent être à égale dis-
tance mais à l’arrière de la zone d’écoute.
Position des haut-parleurs muraux PA265IW:
Utiliser un ruban à mesurer afin de situer les haut-
parleurs à la même hauteur du sol, préférable-
ment à hauteur d’oreille en position d’écoute.
L’usage du niveau permet d’assurer une pose ver-
ticale ou horizontale parfaite des haut-parleurs
muraux PA265IW Pour l’écoute en stéréo, la dis-
tance séparant les haut-parleurs devrait être sen-
siblement la même que celle séparant le mur
suportant les haut-parleurs de la position d’écoute
normale.
Vérification des obstacles
• Une fois l’emplacement choisi, sonder le mur en le
cognant légèrement du poing ou en utilisant un
localisateur électronique de soliveaux afin d’iden-
tifier les poutres et soliveaux à contourner.
• Placer le gabarit contre le mur ou le plafond à l’en-
droit choisi et calquer au crayon les traits à
découper.
Mode stéréo.
Mode multi-canaux.
Distances pour haut-parleurs muraux.
Hauteur A=B / préférablement à hauteur d’oreille.
Placement au mur.

• Percer un trou au centre de l’emplacement tracé.
• Utiliser un bout de cintre ou de fil
rigide d’environ 30 cm (1 pied) plié à
angle droit et inséré dans le trou que
vous venez de percer afin de sonder
tout autour de ce dernier pour la
présence possible de fils, tuyaux, conduits,
poutres ou toute autre obstruction pouvant se
trouver dans l’espace prévu. Un petit trou peut
être rebouché aisément advenant l’impossibilité
d’utiliser un premier emplacement.
Installation
• Découper soigneusement selon le calque à l’aide
d’une scie passe-partout à dents
fines. Enlever le morceau de gypse et
dégager en le poussant, l’isolant, s’il
est présent.
Conseil: S’il n’y a pas d’isolant
(mur intérieur), il est conseillé
d’entourer la cavité de haut-parleur de dacron
ou de laine de verre isolante légèrement entassé
afin d’atténuer la réverbération et d’augmenter
la qualité sonore des basses et moyennes
fréquences.
• Tirer environ 60 cm (2 pieds) de câble à l’extérieur de l’ouverture du haut-parleur.
• Dégainer environ 1 cm (3/8 de
pouce) de l’extrémité de chaque fil du
câble et en brancher un sur chacune
des deux bornes du haut-parleur.
Note: S’assurer que le fil branché
au bornier “+” du haut-parleur
soit branché au bornier “+” de la
sortie de l’amplificateur et que le
bornier “-” du haut-parleur soit
branché au bornier “-” de l’amplificateur. Les
câbles à haut-parleurs sont habituellement
codés de façon à pouvoir différencier chaque fil
de l’autre, soit par un code de couleur sur la
gaine, un fil de soie inséré avec les conducteur
d’un des fils, du fil coloré ou encore par un marqueur physique à l’extérieur du câble même.
• S’assurer que les pivots d’ancrage automatique
soient suffisament reculés pour pivoter librement
et insérer le haut-parleur dans son ouverture.
Mettre au niveau et serrer les vis à têtes étoiles
(philips) du cadre afin d’ancrer le haut-parleur en
place.
Note: Ne pas trop serrer les vis,
vous pourriez endommager le
cadre ou le mur.
• Placez la grille sur l’haut-parleur
pour compléter l’installation.
Peindre l’haut-parleur
Vous pouvez peindre le cadre et le grillage afin
d’harmoniser ceux-ci à leur nouvel environment.
• Débuter en enlevant le grillage et en masquant
l’haut-parleur pour empêcher la peinture de l’atteindre. À cet effet, vous pouvez utiliser le gabarit
du haut-parleur. Peindre le cadre et laisser sécher
complètement.
• Peindre les grillages à l’écart des haut-parleurs,
en vous assurant de ne pas boucher les ouvertures
en appliquant trop de peinture. Laisser sécher
complètement avant de les installer sur les
cadres.
3.
Precision Acoustics PA265IC & PA265IW
• Drill a hole in the centre of the
traced outline.
• Cut approximately 1’ ( 30 cm)of
coat hanger wire and bend it to
a right angle in the middle.
Insert in the hole and rotate to
check for wires, pipes, studs or
other obstructions.
Installation
• Carefully cut out the speaker
hole with a fine toothed key
hole saw or drywall saw.
Remove the cutaway and com
press the insulation if any.
Tip: If no insulation is present,
you may want to consider loosely filling the cavity
with dacron, or fiberglass insulation to provide some
acoustic dampening, improving overall sound quali-
ty especially in the low or bass frequencies.
• Draw the speaker cable from the receiver or
power amplifier behind the wall or ceiling and out
of the speaker hole, allowing 2’
(60cm) of slack to protrude.
• Strip about 3/8”(1cm) off the
ends of the speaker wires and
connect to the speaker termi
nals.
Note: Make sure to connect the
“+” terminal on your amplifier
or receiver to the “+” terminal on
your speakers, and the “-” termi
nal on your amplifier or receiver
to the “-”terminal on your speak-
ers. Speaker cables are usually color-coded, red for
“+”, black for “-”, or indicate a “+” or “-“ directly on
the wire to help you make the correct connection.
• Ensure the “Dog Ears” are fully extended and
insert the speaker in the wall or ceiling. Level
and tighten the Philips screws on the speak-
er frame to fix the speaker in place.
Note: Do not over-tighten the screws as damage can
result to the speaker’s frame.
• Place grille on speakers to com
plete the installation.
Painting The Speaker
You may want to paint the speak-
er frame and grilles to a color that
suits your décor.
• Start by removing the grille and masking the
speaker so that no paint gets to the speaker.
You may use the speaker template as a mask
for this. Paint the speaker frame and let dry
thoroughly.
• Paint the grilles separate from the speakers,
allowing them to dry completely before plac-
ing them on the speaker frame. Be careful
not clog the grille holes with excessive paint.
You may choose to wrap your grilles in an acousti-
cally transparent cloth instead of painting them. To
do this, apply beads of grille cloth adhesive around
the inside edge of the grille and wrap the cloth
smoothly around it. Once dry, cut out excess cloth
from the grille and place on speaker frame.
3.
Precision Acoustics PA265IC & PA265IW

Conseils d’écoute
Vos haut-parleurs Precision Acoustics ont un minima et un maxima de puissance optimal. Pour une
musique d’ambiance à un niveau modéré d’écoute,
un récepteur ou un amplificateur dont la puissance
maximale est égale au minima de puissance des
haut-parleurs peut être utilisé.
Si vous prévoyez utiliser vos haut-parleurs à de plus
grandes puissances de façon soutenue, il est possible qu’un amplificateur de petite puissance s’avère
inadéquat et distorsionne les signaux parvenants
aux haut-parleurs. Si le son perçu se durçit ou
devient discordant lors d’une hausse de puissance,
abaisser la puissance à un niveau plus modéré.
Cette distorsion indique que l’amplificateur est sursollicité et pourrait endommager les haut-parleurs
d’aïgues.
Pour des écoutes à des niveaux plus élevés, il est
préférable d’utiliser un récepteur ou un amplificateur dont la puissance s’approche plus du maxima
des haut-parleurs afin de minimiser les risques
d’endommager les haut-parleurs d’aïgues.
Hautes fréquences directionnelles
Vos haut-parleurs Precision Acoustics sont munis
d’un système pivotant pour les composantes de
hautes fréquences. Comme les sons aigus sont plus
directionnels que les sons de basses fréquences, il
vous est possible d’expérimenter avec le système
pivotant d’aigus afin d’obtenir le meilleur effet
stéréo dans votre salle d’écoute. En visant légèrement les composantes d’aigus vers la position d’écoute habituelle, vous obtiendrez généralement un
meilleur résultat stéréo.
4.
Precision Acoustics PA265IC & PA265IW
Listening Tips
Your Precision Acoustics speakers have a mini-
mum/maximum wattage rating. For background
music listening at moderate volume settings, a
receiver or power amplifier rated at the minimum
power rating can be successfully used.
If you foresee using your loudspeakers at high vol-
ume levels for extended periods of time, a low
power amplifier, with insufficient current reserves,
may “clip” the musical signal, and distort the sound
reaching your speakers. If the sound you hear
becomes perceptively distorted or harsh as you
turn up the volume, turn the volume back down to
a more moderate level. Distortion is an indication
that the amplifier is being overdriven and stressing
the tweeters. Turning down the volume will pre-
vent damaging the tweeters.
For higher volume listening, it is recommended
that an amplifier or receiver with a power rating
toward the maximum recommended amplifier be
used to minimize the risk of low power distortion
damage to the tweeters.
Directing The High Frequencies
Your Precision Acoustics loudspeakers are equipped
with a pivoting high-frequency positioning sys-
tem. As high frequency sounds are more direction-
al in nature than bass sounds, you may experiment
with orienting the tweeters for the best stereo
effect in your room, or at your usual listening posi-
tion. Aiming the tweeters slightly toward the lis-
tening area usually provides the best stereo result.
4.
Precision Acoustics PA265IC & PA265IW

5.
Precision Acoustics PA265IC & PA265IW
Spécifications
Les spécifications de ce produit doivent servir de guide à sa performance. Precision Acoustics s’efforce
d’améliorer la valeur et les caratéristiques de performance de ses produits. En vertu de quoi toute spécifi-
cation est sujette à changement sans pré-avis.
Garantie
Vos Haut-Parleurs Precision Acoustics possèdent
une garantie non-transférable de 1 ans sur les
pièces et la main-d’oeuvre, à partir de la date
d’achat, contre tout défauts découlant de vices fab-
rication et de matériel d’origine. Conserver votre
facture dans un endroit sûr, elle serait nécéssaire
advenant un appel de service.
Ne sont pas couverts par la présente garantie sont
les dommages résultants; d’accidents, d’usage
impropre ou abusif ou encourus lors de service par
un agent non-authorisé.
Comment faire honorer la garantie
Advenant un appel de service nécéssaire durant la
période de garantie, Precision Acoustics prend à sa
charge le coût des pièces et de main-d’oeuvre liés à
la réparation du haut-parleur couvert par la
garantie.
Le service d’entretien et/ou de réparation peut être
obtenu par l’entremise de votre distributeur
Precision Acoustics ou d’un agent authorisé. Pour
contacter un agent de service près de chez vous,
S.V.P. téléphoner au service à la clientèle Precision
Acoustics au (514) 457-2555, ou par facsimilé au
(514) 457-5507.
Il est également possible de faire effectuer le serv-
ice chez Precision Acoustics, contacter le service à la
clientèle pour savoir comment procéder.
Transport
Vous devez vous acquitter des frais liés au transport
et aux coûts liés à l’acheminement des haut-par-
leurs au point de service. Lors de l’envoi de vos
haut-parleurs chez Precision Acoustics, les frais de
retour seront pré-payés si les réparations sont cou-
vertes par la présente garantie. Il sera nécéssaire de
présenter la facture originale dûment datée afin
d’établir votre éligibilité à la garantie.
CONTACT DE SERVICE
Precision Acoustics
21000 Trans-Canadienne
Baie d’Urfé, Québec, H9X-4B7
Tel: (514) 457-2555
Fax: (514) 457-5507
5.
Precision Acoustics PA265IC & PA265IW
Specifications
The specifications for this product are meant to be used as a guide to its performance. Precision Acoustics
continuously strives to improve the value, and performance characteristics, of its products. As such stated
specification may be subject to change without notice.
Warranty
Your Precision Acoustics speakers carry a nontransferable 1-year parts and labor warranty, from
date of purchase, against defects arising from
deficiencies in original materials and manufacturing. Please keep your bill of sale is a safe place, as
it will be needed should service be required on
your loudspeakers
Not covered under this warranty are damages
resulting from: accidents, misuse, abuse, or damage resulting from tampering by an unauthorized
service agent.
How To Obtain Warranty
Should your speakers require servicing during the
period this warranty is in effect, Precision
Acoustics will pay all labor and materials expenses
related to the repair of the loudspeaker’s warranty
defect.
Servicing may be obtained from your Precision
Acoustics dealer, or authorized Precision Acoustics
servicing agent. For a service agent near you,
please contact the Precision Acoustics customer
service department by telephone at
(514) 457-2555, or by fax at (514) 457-5507.
Servicing may also be obtained from Precision
Acoustics, please contact our customer service
department for instructions.
Transportation
You will be responsible for the transportation and
all shipping charges of your speakers to the warranty service point. If sending your speakers to
Precision Acoustics, return shipping will be prepaid if repairs are covered by the warranty. You
will be required to present your original dated bill
of sale for warranty eligibility determination.
SERVICE CONTACT
Precision Acoustics
21000 Trans-Canadienne
Baie d’Urfé, Québec, H9X-4B7
Tel: (514) 457-2555
Fax: (514) 457-5507
Size
Frequency Response
Woofer
High Frequency Driver
Sensitivity
Impedance
Recommended
Amplifier Power
PA265IW
6.5” 2-way In-wall
50Hz-20kHz
6.5” Polypropylene Cone
1” Soft Dome
88db
8 ohms
10-70 Watts RMS
PA265IC
6.5” 2-way ceiling
50Hz-20kHz
6.5” Polypropylene Cone
1” Soft Dome
88db
8 ohms
10-70 Watts RMS
Dimensions
Réponse spectrale
Basses
Aigues
Sensibilité
Impédance
Puissance
Recommandée
PA265IW
2-voies 165mm encastrable
au mur
50Hz-20kHz
Excitateur de grave en
polypropylène 165mm
Transducteur des aigus à
dôme souple 25mm
88db
8 ohms
10-70 Watts RMS
PA265IC
2-voies 165mm encastrable
au plafond
50Hz-20kHz
Excitateur de grave en
polypropylène 165mm
Transducteur des aigus à
dôme souple 25mm
88db
8 ohms
10-70 Watts RMS
 Loading...