

Page 1
Operating Instructions
350-8105-000c1
Precisa Balances
Series XB
Page 2

Page 3

Identification and copyright ■
1
Identification
The present operating instructions apply to Precisa balance of the
XB-Series with five-key control panel and multifunction display.
Customer service
Precisa Instruments AG
Moosmattstrasse 32
CH-8953 Dietikon
http://www.precisa.com
Refer to our website for information about local customer service centers and details of their addresses.
Copyright
These operating instructions are protected by copyright. All rights reserved. No part of
the operating instructions may be reproduced, processed, duplicated or published in any
form by photocopying, microfilming, reprinting or other process, in particular electronic
means, without the written agreement of Precisa Instruments AG.
© Precisa Instruments AG, 8953 Dietikon, Switzerland, 2005.
Page 4
■ Introduction
2
Introduction
What you should know about these Operating Instructions
Precisa balances are simple and functional to operate.
Nevertheless, you should read through these operating instructions in
their entirety, so that you can make optimal use of the full potential
and the diverse possibilities of the balance in your daily work.
These operating instructions contain guidance in the form of pictograms and keyboard diagrams, which should help you in finding the
required information:
• Key names are presented in quotation marks and are accentuated by
printing in semi-bold script: «ON/OFF».
• In the explanation of the operating steps, the appropriate display for
the current operating step is shown for clarity at the left alongside
the list of operating steps:
• For the labelling of dangers and advice, please see Chapter 1 “Safety”.
Guarantee-card
A guarantee-card, which was filled in by your Precisa dealer before
handing over the balance, is enclosed with the instruction manual.
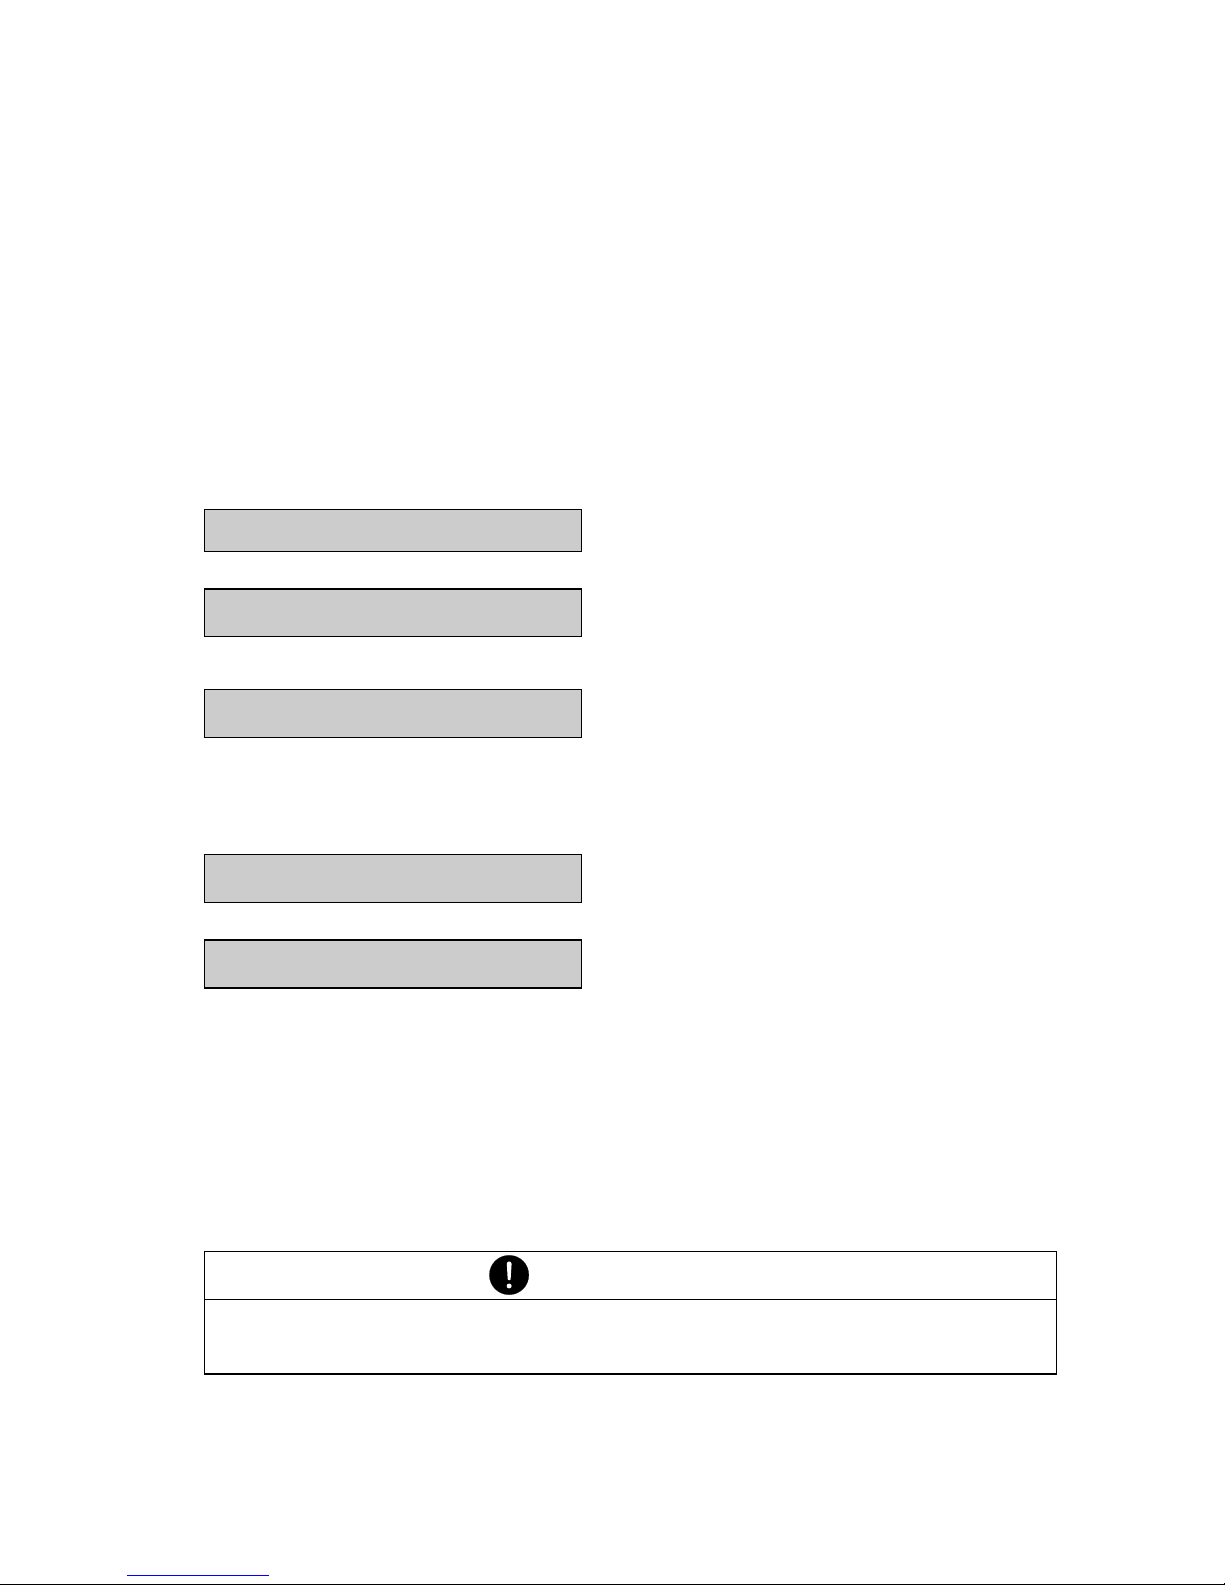
Display shows List of the Operating steps
Sprache Deutsch
•Press «MODE» button repea-
tedly
“SPRACHE DEUTSCH”,
“LANGUE FRANCAISE” or
“LANGUAGE ENGLISH”
appears in the display.
or
Langue francaise
or
language english
NOTE
Check, if the guarantee-card is enclosed with these operating
instructions and is completely filled out.
Page 5

Contents ■
3
1 Safety.......................................................... 7
1.1 Representations and symbols........................................ 7
1.2 Safety recommendations.............................................. 7
2 Your balance ................................................ 9
2.1 Construction and functions........................................... 9
2.1.1 Construction of the balance.......................................... 9
2.1.2 Functions of the balance ............................................ 10
2.2 Application, conformity, labelling................................. 12
2.2.1 Correct use of the balance.......................................... 12
2.2.2 Conformity ............................................................... 12
2.2.3 Labelling .................................................................. 12
2.3 Data and parameters.................................................. 13
2.3.1 Technical data .......................................................... 14
3 Starting up ................................................. 15
3.1 Unpacking the balance ............................................... 15
3.2 Scope of delivery ...................................................... 16
3.3 Assembly of the balance ............................................ 17
3.4 Choice of a suitable location....................................... 17
3.5 Checking the mains voltage........................................ 18
3.6 Levelling the balance ................................................. 18
3.7 Calibration of the balance........................................... 19
3.8 Dual Range and Floating Range balances ...................... 19
3.9 Standardized balance ................................................. 20
3.10 Under-floor weighing ................................................. 20
4 Modes of operation and operating ................. 22
4.1 Switching on the balance ........................................... 22
4.2 Auto-Standby Mode................................................... 22
4.3 Setting and storing the configuration ........................... 22
4.4 Significance of the two main menus ............................ 23
4.5 Activating the two main menus................................... 23
4.5.1 Activating the configuration menu ............................... 23
Page 6

■ Contents
4
4.5.2 Activating the application menu................................... 23
4.6 How the menu control operates................................... 24
4.6.1 Control panel ............................................................ 25
4.6.2 Operating in the weighing mode. ................................26
4.6.3 Display..................................................................... 27
4.7 Password protection of the menus............................... 27
4.8 Anti-theft encoding.................................................... 28
5 Working with the configuration menu ............. 29
5.1 Structure of the configuration menu............................. 29
5.2 Language-function ..................................................... 30
5.3 Contrast................................................................... 30
5.4 Selecting the weight unit............................................ 31
5.5 Print functions........................................................... 32
5.6 Calibration functions .................................................. 33
5.7 Weighing mode ......................................................... 34
5.8 Interface-functions..................................................... 35
5.9 Date and time ........................................................... 36
5.10 Password protection .................................................. 36
5.11 Anti-theft encoding.................................................... 37
6 Working with the application menu ................38
6.1 Structure of the application menu................................ 38
6.2 Selecting a working program....................................... 39
6.3 Changing application / weighing mode.......................... 39
6.4 Application “UNITS” .................................................. 40
6.5 Application “COUNT”................................................. 41
6.6 Application “PERCENT”.............................................. 42
6.7 Application «Net-Total» .............................................. 42
7 Special operating keys.................................. 45
7.1 The Tare key «T» ...................................................... 45
7.2 The Print key «PRINT» ............................................... 46
Page 7

Contents ■
5
8 Data transfer to peripheral devices ................ 47
8.1 Connection to peripheral devices................................. 48
8.2 Data-transfer ............................................................ 49
8.3 Remote control-commands ......................................... 50
8.4 Examples for the remote control of the balance............. 51
9 Error messages and correction of faults.......... 52
9.1 Notes on correcting faults .......................................... 52
10 Practical examples....................................... 54
10.1 Changing the configuration menu ................................ 54
10.1.1 Setting the choice of language.................................... 54
10.1.2 Setting the Weight unit .............................................. 54
10.1.3 Setting the Print functions.......................................... 55
10.1.4 Activation of password protection............................... 56
10.2 Selection of an application program ............................. 57
10.2.1 Setting for Counting by weighing ................................ 57
11 Maintenance and servicing ........................... 59
12 Transport, storage and disposal..................... 60
12.1 Transportation and shipping of the balance................... 60
12.2 Storage of the balance ............................................... 60
13 Accessories ................................................ 61
13.1 Accessories.............................................................. 61
14 Further information...................................... 63
14.1 Notes on the Weighing mode ...................................... 63
14.1.1 Set Weighing mode: FLOATINGDISPLAY...................... 63
14.1.2 Set Weighing mode: Stability control ........................... 63
14.1.3 Set Weighing mode: Auto-Standby .............................. 64
14.1.4 Set Weighing mode: Auto-Zero ................................... 64
14.2 Notes on calibration................................................... 64
14.2.1 External calibration by means of ICM ........................... 65
14.2.2 External calibration with freely selectable weight........... 65
Page 8

■ Contents
6
14.2.3 Internal calibration ..................................................... 66
14.2.4 Automatic calibration................................................. 67
15 Configuration menu tree ...............................68
16 Application menu tree .................................. 71
17 Configuration menu tree ...............................71
Page 9
1 Safety ■
7
1Safety
1.1 Representations and symbols
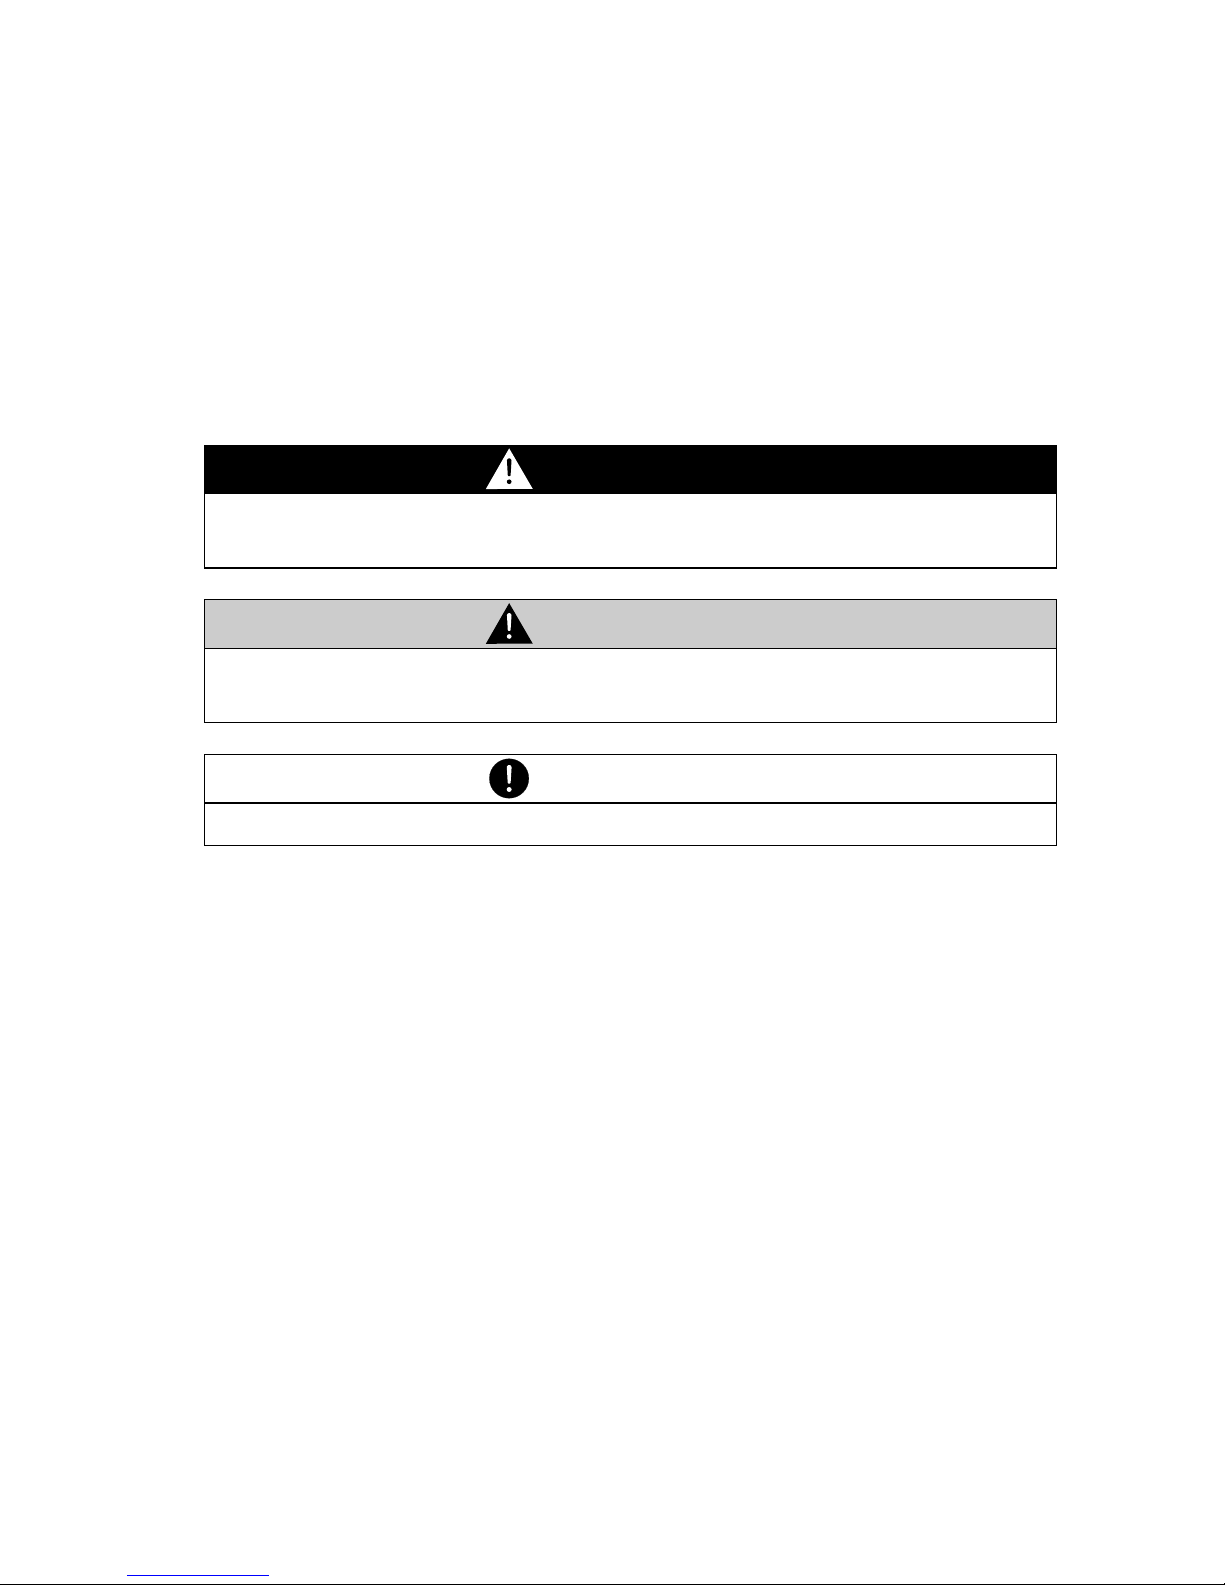
Important instructions, which involve safety, are highlighted with the
appropriate action:
1.2 Safety recommendations
• In using the balance in surroundings with increased safety requirements the corresponding regulations must be observed.
• The balance may only be used with the power adaptor (stamped:
Precisa) supplied exclusively for use with the Precisa balance.
• Before inserting the power adaptor, make sure that the operating
voltage stated on the power adaptor agrees with the mains voltage.
If not, please refer to Precisa Customer Service.
• If the power adaptor or its cable is damaged, the balance must
immediately be disconnected from the electricity supply (pull out the
power adaptor). The balance may only be operated with a power
adaptor in perfect condition.
DANGER
Warning of a possible danger, which can lead to death or to
serious injuries.
CAUTION
Warning of a possibly dangerous situation, which can lead to less
severe injuries or damage.
NOTE
Tips and important rules on the correct operation of the balance.
Page 10

■ 1 Safety
8
• If there is any reason to believe that it is no longer possible to
operate the balance without danger, the balance is to be immediately unplugged from the electricity supply (pull out power adaptor)
and secured against inadvertent operation.
• In carrying out maintenance work, it is essential to heed the recommendations in Chapter 11 “Maintenance and servicing”.
• The balance must not be operated in an area subject to explosion
risks.
• Take care when weighing liquids that no liquid is spilt into the inside
of the balance or into connections on the rear of the equipment or
the power adaptor.
If liquid is spilt on the balance, the latter must immediately be
unplugged from the mains electricity supply (pull out power
adaptor).
The balance may be operated after it has first been re-checked by a
Precisa Service technician.
• The operating instructions must be read by each operator of the
balance and must be available at the workplace at all times.
Page 11
2 Your balance ■
9
2 Your balance
2.1 Construction and functions
2.1.1 Construction of the balance
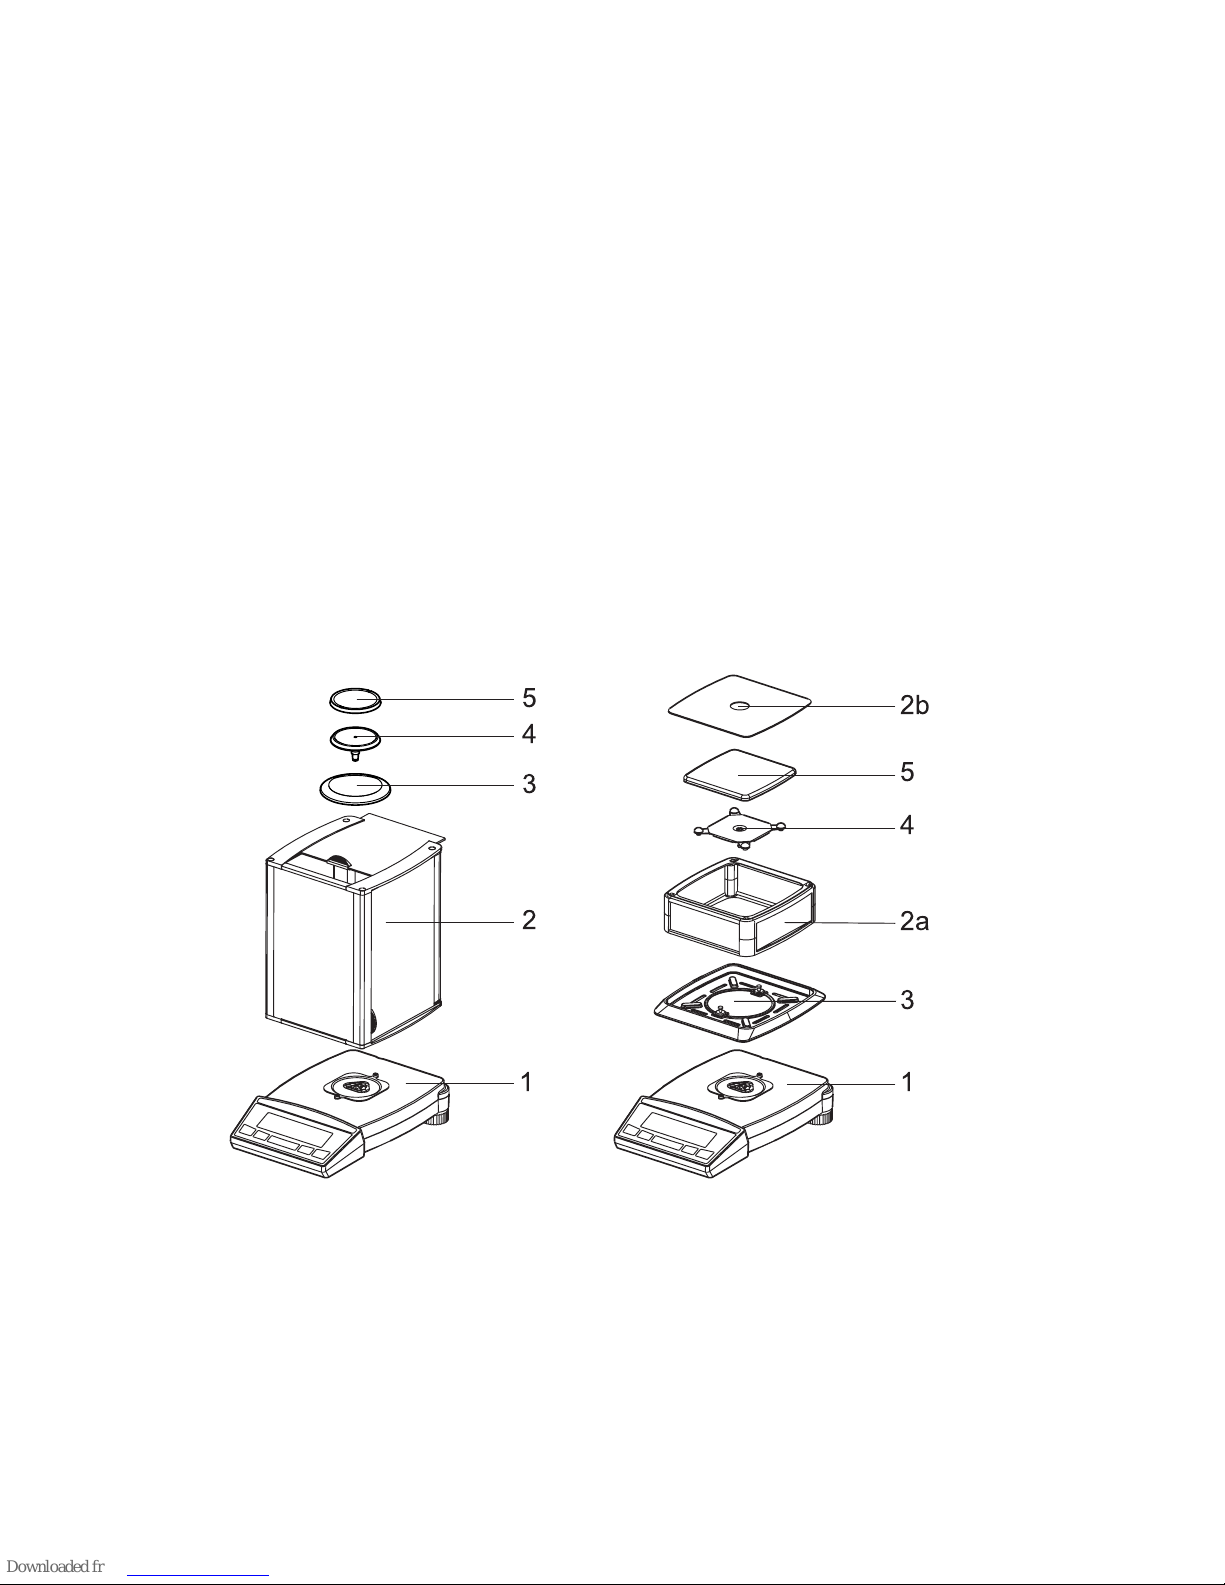
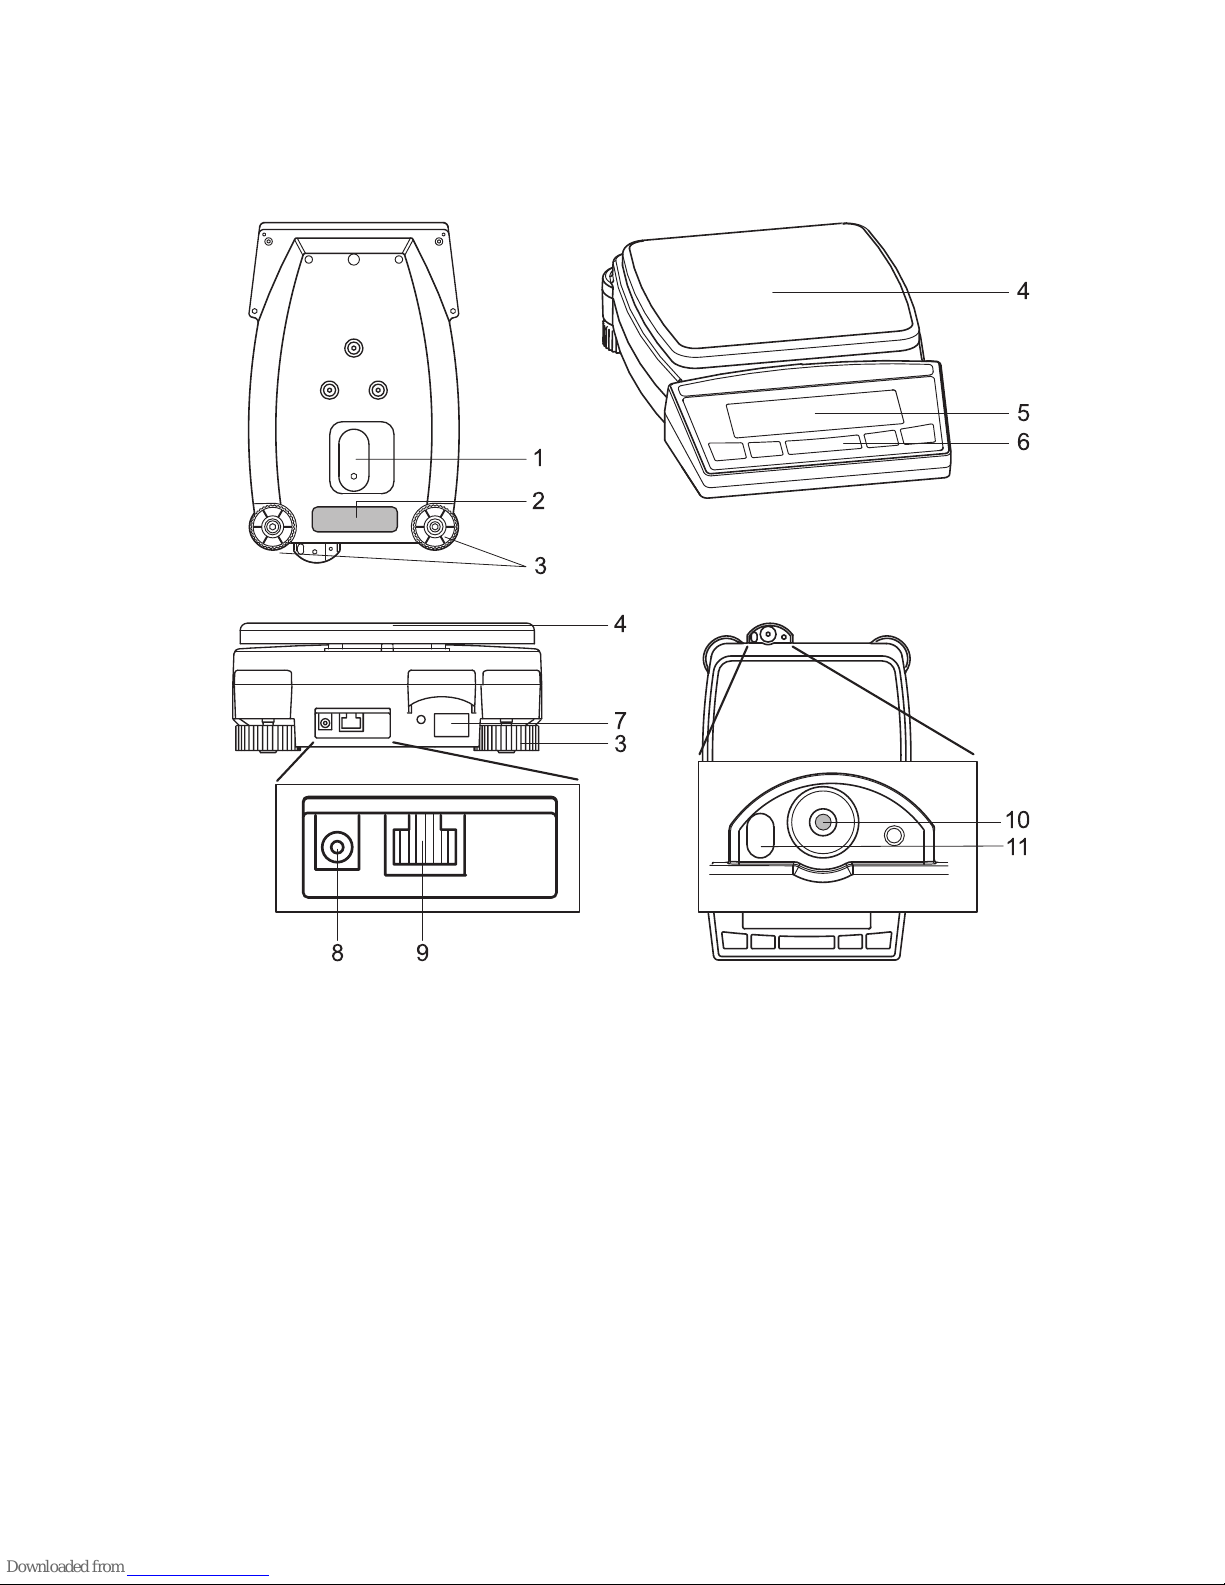
The balance consists of the balance body (1), the scale-pan holder (4)
and the pan (5), which depending on the model may be square (fig.
2.1, right) or round (fig. 2.1, left).
Depending on the model (see Chapter 2.3 “Data and parameters”) the
balance additionally has a simple windshield (fig. 2.1, right) or a
windshield with sliding doors (fig. 2.1, left) (2) and/or a protective ring
(3).
Fig. 2.1 Your balance
#
"
!
>
"
#
=
!
Page 12

■ 2 Your balance
10
2.1.2 Functions of the balance
Precisa balances of the XB-Series are high-quality electronic precision
balances with a readability of 0.0001 grammes to 1.0 gramme,
according to type.
The versatile weighing programs allow you to use the Precisa balances
of the XB-Series not only for simple weighings but also in a simple
manner for carrying out various weighing applications such as, for
example, percentage- or component counting weighings and document the measurements obtained accurately and unequivocally.
Within the XB-Series, both Dual-Range Balances and Floating-Range
Balances (with a relocatable area with a 10-fold increase in precision)
are available. In addition, in the XB series of balances, Precisa also
offers balances protected against water and dust to the international
1P65 standard.
Virtually all models of the XB-Series can be delivered in calibratable
design to EG/OIML specification.
The most important basic production features of the Precisa XB-Series
include:
• Anti-theft encoding with four-figure numerical code
• Multi-stage password protection for the program menus
• ICM-Autocalibration (intelligent calibration mode)
• 5-key multifunction control panel
• LCD- or fluorescent display with multi-line display
• ISO- and GLP-compliant reporting of results of measurements
• RS232/V24 serial interface for data transfer
• Capacity and residual tare display
• Storable user-configuration (UMM User Menu Memorized)
• Functions programmed ex-works for:
– Parts counting
– Percentage weighing
– Weighing in different, internationally-valid units
• Appliance for under-floor weighings
Page 13
2 Your balance ■
11
Fig. 2.2 Construction of the balance
1 Cover of the device for under-floor weighings
2Nameplate
3 Adjustable feet (for levelling)
4 Weighing pan
5 Multifunction display
6 5-key control panel
7 Serial No. plate
8 Connecting socket for power adaptor
9 RS232-Interface
10 Bubble level
11 Eyelet for attaching a safety chain
!
$
#
"
"
%
!
'&
Page 14
■ 2 Your balance
12
2.2 Application, conformity, labelling
2.2.1 Correct use of the balance
The balance may only be used for the weighing of solid-materials and
of liquids filled into secure containers.
The maximum allowable load of the balance must never be exceeded,
otherwise the balance may be damaged.
In using the balance in combination with other appliances made by
Precisa as well as with appliances produced by other manufacturers,
the current regulations for the safe use of the relevant attachments
and their application in accordance with instructions must be observed.
2.2.2 Conformity
The balance has been manufactured and tested in accordance with
the standards and recommendations set out in the enclosed certificate
of conformity.
The power adaptor produced for the operation of the balance and
intended exclusively for this application, complies with the electrical
protection class II.
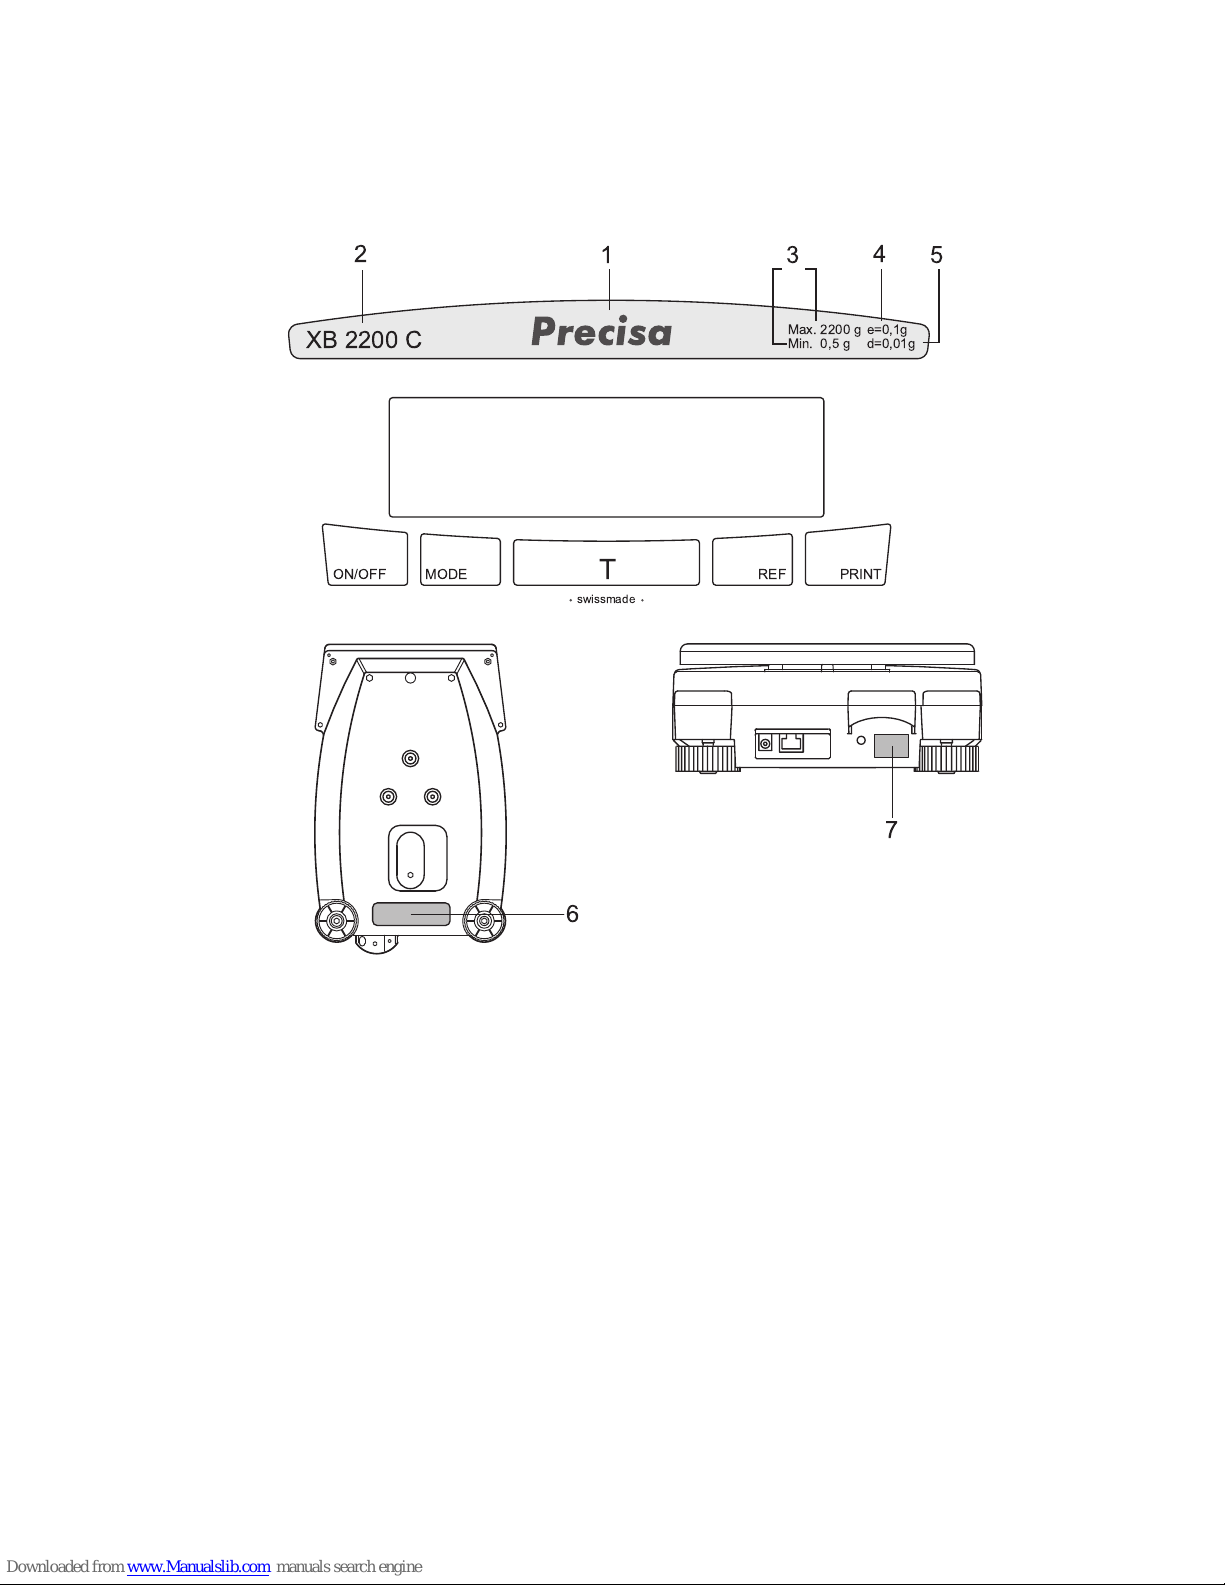
2.2.3 Labelling
Label Location of label
Manufacturer's nameplate (1)
Casing-front, middle
Nameplate (2) Casing-front, left
Weighing range (3) Casing-front, right, first column
Calibration value (4) Casing-front, right, second column above
Readability (5) Casing-front, under the calibration value
Model plate (6) Casing-underside, centre rear
Serial No. plate (7) Casing-rear, left, under the bubble level
Tab. 2.1 List of appliance labels
Page 15
2 Your balance ■
13
The balance shows the following labels:
Fig. 2.3 Balance labels
2.3 Data and parameters
The Precisa balances of Series XB are divided into five main-groups A,
C, D, G and M. The letter in the name corresponds to the design
specification (e.g. A = analytical balance, M = MilIigramme balance)
the number before it corresponding in each case to the maximum
allowable load (in grammes).
The allowable weighing range, the calibration value and the readability
of the balance are printed on the casing (see Tab. 2.1 List of appliance
labels) and are therefore not presented here.
6
7
XB 2200 C
Max. 2200 g
Min. 0,5 g
e=0,1g
d=0,01g
2HA?EI=
1
2
3
4
5
PRINTMODEON/OFF
swissmade
REF
T
Page 16

■ 2 Your balance
14
2.3.1 Technical data
• Precisa XB-A (e.g. XB 120 A)
– with closed glass-cover “BASIC” as standard
– round weighing pan,
∅ 80 mm
– Fluorescent- or LCD-Display
• Precisa XB-M (e.g. XB 620 M)
– with windshield “simple” as standard
– square weighing pan, 135 x 135 mm
– Fluorescent- or LCD-Display
– also available as Floating-Range version
• Precisa XB-C (e.g. XB 1200 C)
– square weighing pan, 170 x 170 mm
– Fluorescent- or LCD-Display
– also available as Floating-Range version
– also available with dust and water splash protection to IP65
• Precisa XB-D (e.g. XB 3200 D) and XB-G (e.g. XB 10200 G)
– square weighing pan, 200 x 200 mm
– Fluorescent- or LCD-Display
– also available as Floating-Range version
– also available with dust and water splash protection to IP65
The following applies to all Precisa-XB-balances:
• Mains connection
– 115 or 230V (+15/-20%); 50 to 60Hz
• Power consumption
– without peripheral appliances 6.0 VA
• RS232/V24 Interface
• Allowable ambient conditions
– Temperature: 5°C … 40°C
– Relative humidity: 25%... 85%, non-condensing
If you have any questions on the technical data or require detailed
technical information on your balance, please contact your Precisa
Technical Representative.
Page 17
3 Starting up ■
15
3Starting up
3.1 Unpacking the balance
Precisa balances are delivered in an environmentally-friendly package,
specifically developed for this precision instrument, which provides
optimal protection for the balance during transportation.
In order to avoid damage, attention must be given to the following
points when unpacking the balance:
• Unpack the balance quietly and carefully. It is a precision instrument.
• When outside temperatures are very low, the balance should first be
stored for some hours in the unopened transport package in a dry
room at normal temperature, so that no condensation settles on the
balance when unpacking.
• Check the balance immediately after unpacking for externally visible
damage. If you should find transport damages, please inform your
Precisa Services representative immediately.
• If the balance is not to be used immediately after purchase but only
at a later time, it should be stored in a dry place where fluctuations
in temperature are as low as possible (see Chapter 12 “Transport,
storage and disposal”).
• Read through these operating instructions, even if you already have
experience with Precisa-balances, before you work with the balance
and pay attention to the Safety recommendations (see Chapter 1
“Safety”).
NOTE
Retain the original packaging in order to avoid transportation damages when shipping or transporting the balance and to allow the balance to be stored in the best conditions if it is out of operation for
an extended period.
Page 18
■ 3 Starting up
16
3.2 Scope of delivery
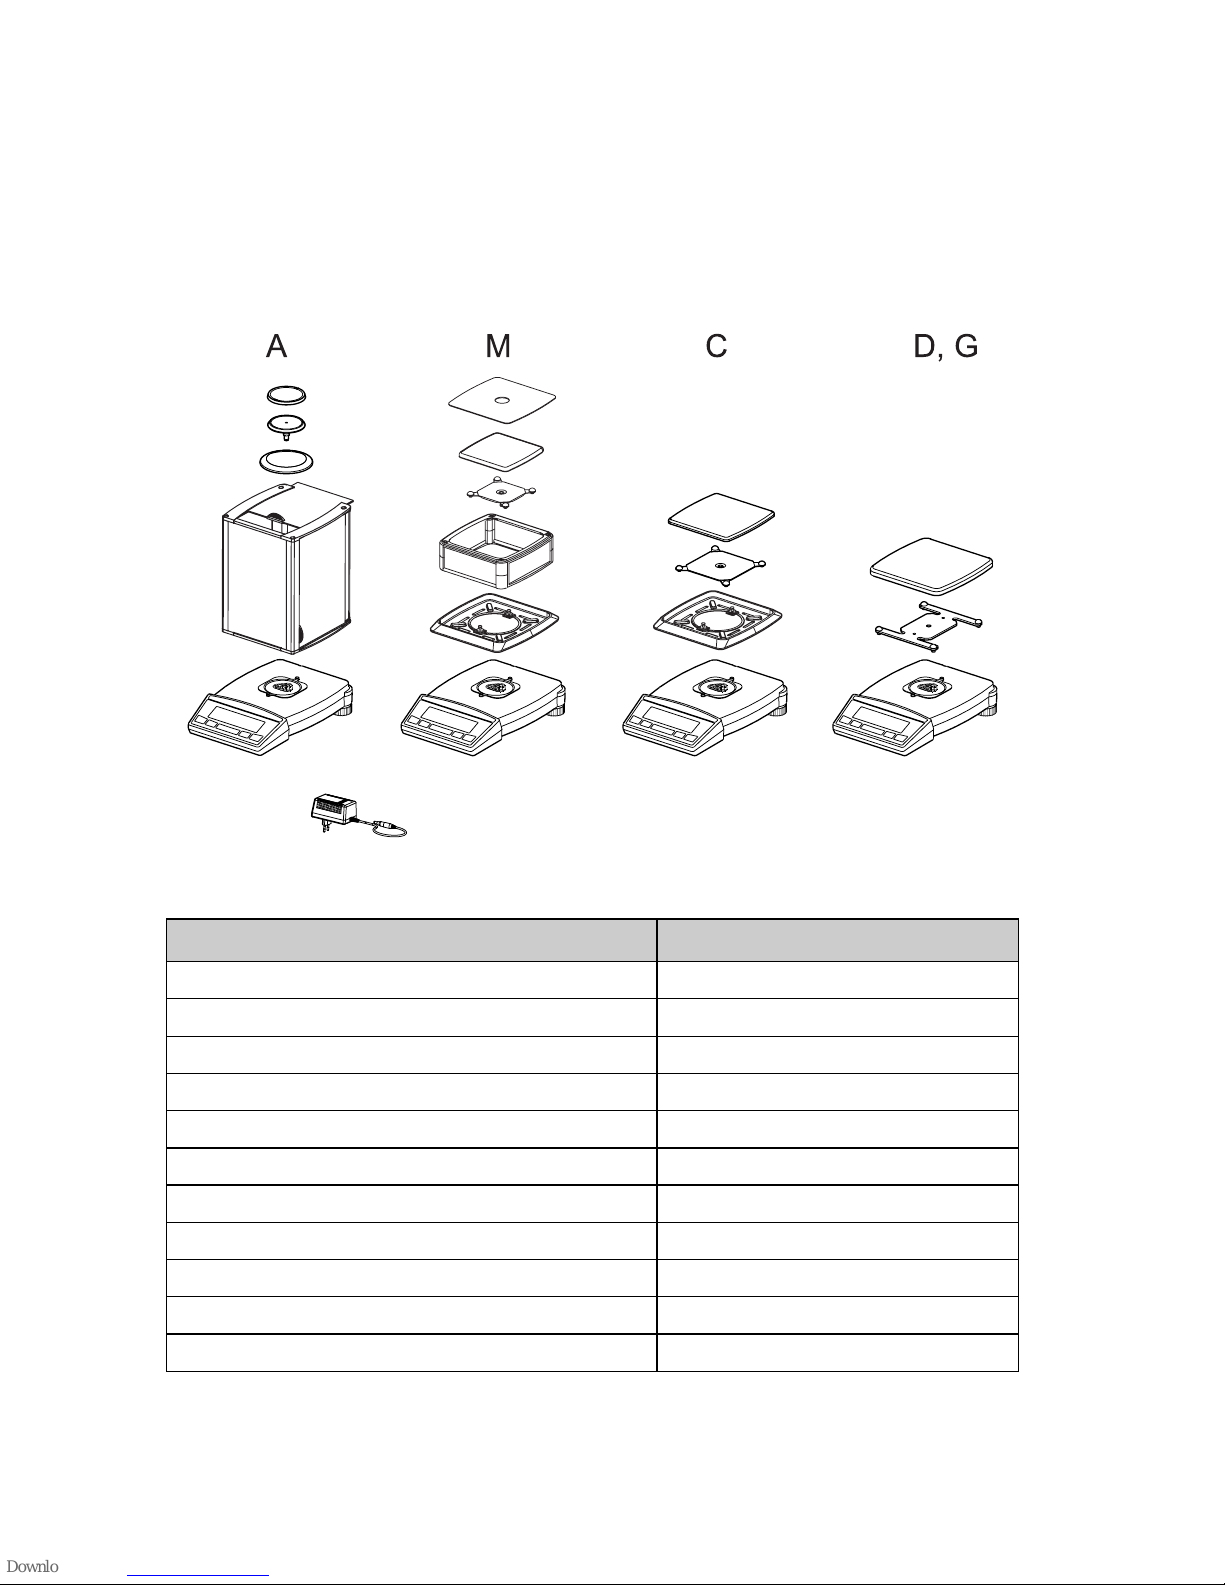
Inspect delivery for completeness immediately on unpacking all components.
Fig. 3.1 Scope of delivery (broken down by groups)
Component delivered present yes / no
Balance
Scale-pan support
Weighing pan
Power adaptor
Protection-cover for the display
Windshield BASIC (group A)
Windshield simple (group M)
Protective ring (groups A, M and C)
Operating instructions
Guarantee-card
Conformity note
Tab. 3.1: Check list for the scope of delivery
Page 19
3 Starting up ■
17
3.3 Assembly of the balance
The balance is delivered in partly dismantled condition. Assemble the
individual components in the following sequence (see fig. 2.1 and
fig. 2.2).
• Install the dust-protection cover on the balance
• Install the windshield as well as the protective ring with the two
screws supplied
• Place the scale-pan holder in position and add the weighing pan
• Insert the power adaptor cable plug into the socket at the rear of the
balance.
3.4 Choice of a suitable location
The balance location must be chosen in such a way as to guarantee
perfect functioning of your balance, so that the allowable ambient
conditions (see Chapter 2.3.1 “Technical data”) are maintained and,
in addition, so that the following prerequisites are met:
• Put the balance on a solid, firm and preferably vibration-proof,
horizontal base
• Make sure that the balance cannot be shaken or knocked over
• Protect from direct solar radiation
• Avoid drafts and excessive temperature fluctuations
NOTE
A screwdriver is required for assembly.
All parts must fit together easily. Do not apply force. Precisa
Customer Service will be pleased to help you with any problems.
NOTE
With difficult environment-conditions (where the balance may be
easily shaken or subject to vibration) the balance can nevertheless
provide accurate results through suitable adjustment of the stability
control (see Chapter 5.7 “Weighing mode”).
Page 20
■ 3 Starting up
18
3.5 Checking the mains voltage
The following Safety recommendations must be observed when
connecting the balance to the mains:
3.6 Levelling the balance
To function properly, the balance must be precisely horizontal.
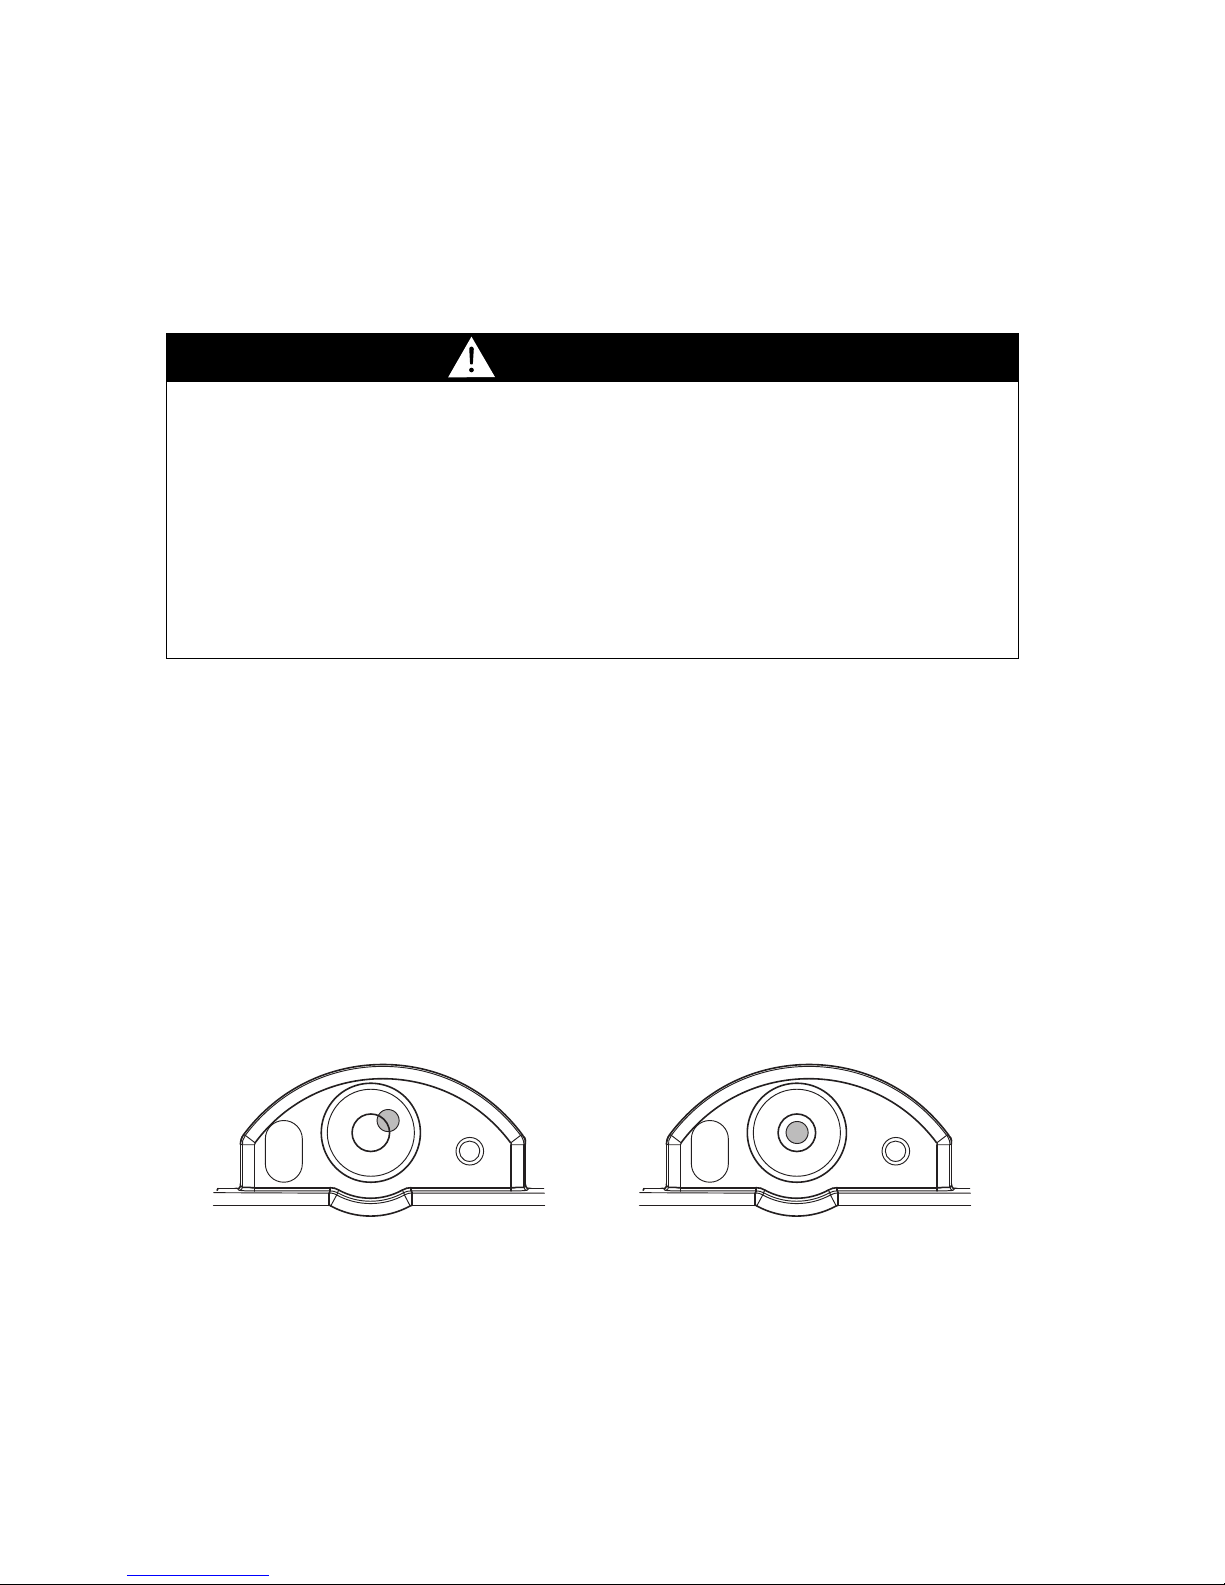
The balance is fitted with one “bubble level” and two adjustable feet
for level-control, with the aid of which it is possible to compensate for
small height differences and/or unevennesses in the surface on which
the balance is standing.
The two screw feet must be adjusted so that the air bubble is precisely in the centre of the sight glass of the bubble level (see Fig. 3.2
Correct levelling with the aid of the bubble level).
Fig. 3.2 Correct levelling with the aid of the bubble level
DANGER
The balance may only be operated with the power adaptor
supplied.
Check before connecting the power adaptor to the mains supply,
that the operating voltage stated on the power adaptor agrees
with the local mains voltage.
If the operating voltage is not the same as the mains voltage, the
power adaptor must on no account be connected to the mains
supply. Contact the Precisa-Customer Service.
Incorrect Correct
Page 21
3 Starting up ■
19
3.7 Calibration of the balance
Since the Earth's gravity is not the same everywhere, each balance
must – in accordance with the underlying physical weighing principle
– be adjusted to compensate for the gravity at each location. This
adjustment process, known as “calibration”, must be carried out on
initial installation and after each subsequent relocation. In order to get
exact measurements, it is recommended moreover, that the balance
should also be calibrated intermittently during the weighing operation.
The setting of the calibration is effected in the configuration menu.
Depending on the model of balance, this may be done externally, internally or automatically (see Chapter 5.6 “Calibration functions”).
With the aid of the “Intelligent Calibration Mode” ICM the balance can
itself determine the size of the calibration weight, which enables an
exact calibration with different size weights (in 10 g, 50 g, 100 g and
500 g steps, depending on implementation).
3.8 Dual Range and Floating Range balances
With the Precisa Dual Range balances, weighing is always first carried
out in the small, more exact range. Only when the small range is
exceeded will the balance switch automatically into the bigger range.
The Floating Range balances have a 10-fold more precise fine range,
which is movable over the entire weight range. By pressing the tare
key «T» the fine-area can be called up as often as required over the
entire weight range.
NOTE
In order to get exact measurements, the balance must again be
carefully levelled after each relocation.
NOTE
The balance must be calibrated on initial installation and after every
relocation.
If you work in accordance with “Good Laboratory Practice GLP” observe the prescribed intervals between calibrations (adjustments).
Page 22
■ 3 Starting up
20
3.9 Standardized balance
The standardized balances of the Precisa XB-Series are provided with
the EU/OIML licence or meet the local standardisation regulations.
The balance program and certain functions of the weighing output
differ from the standard program in the case of the standardized XB
balances – in accordance with the EU/OIML provisions.
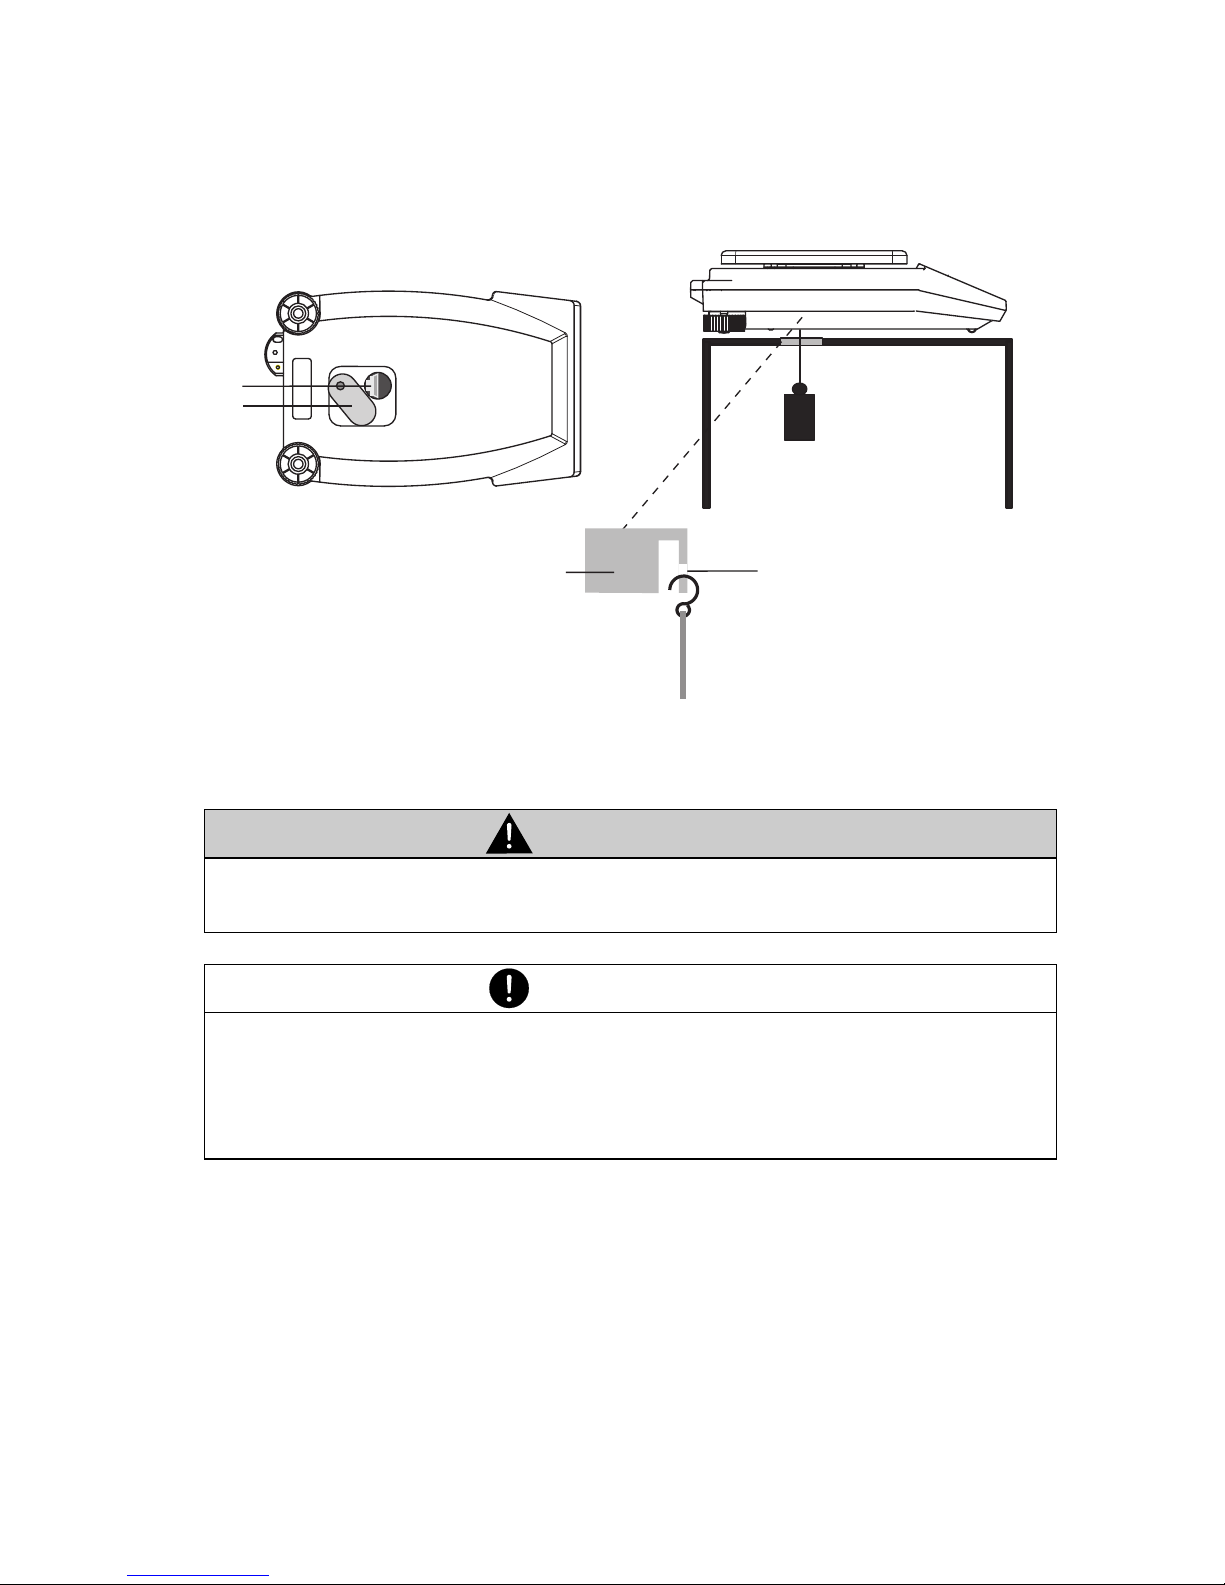
3.10 Under-floor weighing
Objects which, because of their size or shape, cannot be put on the
scale, can be weighed by means of under-floor weighing.
Proceed as follows:
• Turn off the balance.
• Remove the scale-pan and the scale-pan support and turn the balance around.
• Push the metal-cover (1) on the floor of the balance to one side.
• Hang a small hook (available as an accessory, see Chapter 13 “Accessories”) into the aperture (3) of the now visible metal casting (2).
• Place the balance over an opening.
• Replace the scale-pan support and the scale-pan.
• Level the balance (see Chapter 3.6 “Levelling the balance”).
• Switch on the balance.
NOTE
If a circle appears in the main-display of a standardized balance, so
the indicated value is unstandardised.
In balances of class (1) the circle also stands for the warm-up
phase.
Your Precisa Customer Service will be happy to assist you at any
time if you have any questions on the standardization of the balance or on working with standardized balances of the XB-Series.
Page 23
3 Starting up ■
21
• Hang the object to be weighed on the hook and carry out the
weighing.
Fig. 3.3 Setting up the balance for under-floor weighings
CAUTION
Take care that the hooks used for the under-floor weighing are
stable enough to hold the goods which you wish to weigh.
NOTE
Take care that no dirt or moisture can get into the balance with the
scale-pan carrier removed.
After completing the under-floor weighing, the opening in the floor
of the balance must be closed again (dust protection).
kg
1
2
3
2
Page 24

■ 4 Modes of operation and operating
22
4 Modes of operation and operating
4.1 Switching on the balance
•Press «ON/OFF» to switch on the balance.
The balance carries out a self-diagnosis in order to check the most important functions. After completion of the start-up process (approximately ten seconds) “Zero” appears in the display.
The balance is ready for operation and is in the weighing mode.
4.2 Auto-Standby Mode
The balance is equipped with an Auto-Standby mode, which can be
activated or deactivated in the configuration menu.
If the Auto-Standby mode is activated, the balance automatically
switches to Standby some time after the last weighing or key
operation (current-saving function).
The delay before switching to Standby is defined in the configuration
menu (see Chapter 5.7 “Weighing mode”).
• Press any button or put on a weight in order to switch the balance
from the Standby mode back to the weighing mode again.
4.3 Setting and storing the configuration
•Press «ON/OFF», to switch on the balance.
• Continue to hold down the «MODE» and the «T» button during the
start-up process, until the desired configuration appears on the
display and then release the button:
“FACTORY CONFIG.”: Load factory configuration.
“USER CONFIG.”: Load user configuration.
“STORE CONFIG.”: Store present configuration as user configu-
ration.
Page 25

4 Modes of operation and operating ■
23
4.4 Significance of the two main menus
The balance has two main menus available: the configuration menu
and the application menu.
The basic-program of the balance is defined in the configuration
menu. With this, you can either work with the basic-configuration
programmed ex-works, or define and store a user-configuration
adapted to your specific needs.
In the application menu, you define a working program, which is
suited to the specific weighing problem.
4.5 Activating the two main menus
4.5.1 Activating the configuration menu
•Press «ON/OFF» to switch on the balance.
• Continue to hold down the «MODE» button during the start-up
process (approximately 10 seconds), until the currently set
language appears.
• Now you can change the configuration menu.
4.5.2 Activating the application menu
• After the start-up process has finished, press «MODE» until “SET
APP. ...” appears on the display. You are now in the application
menu.
Page 26
■ 4 Modes of operation and operating
24
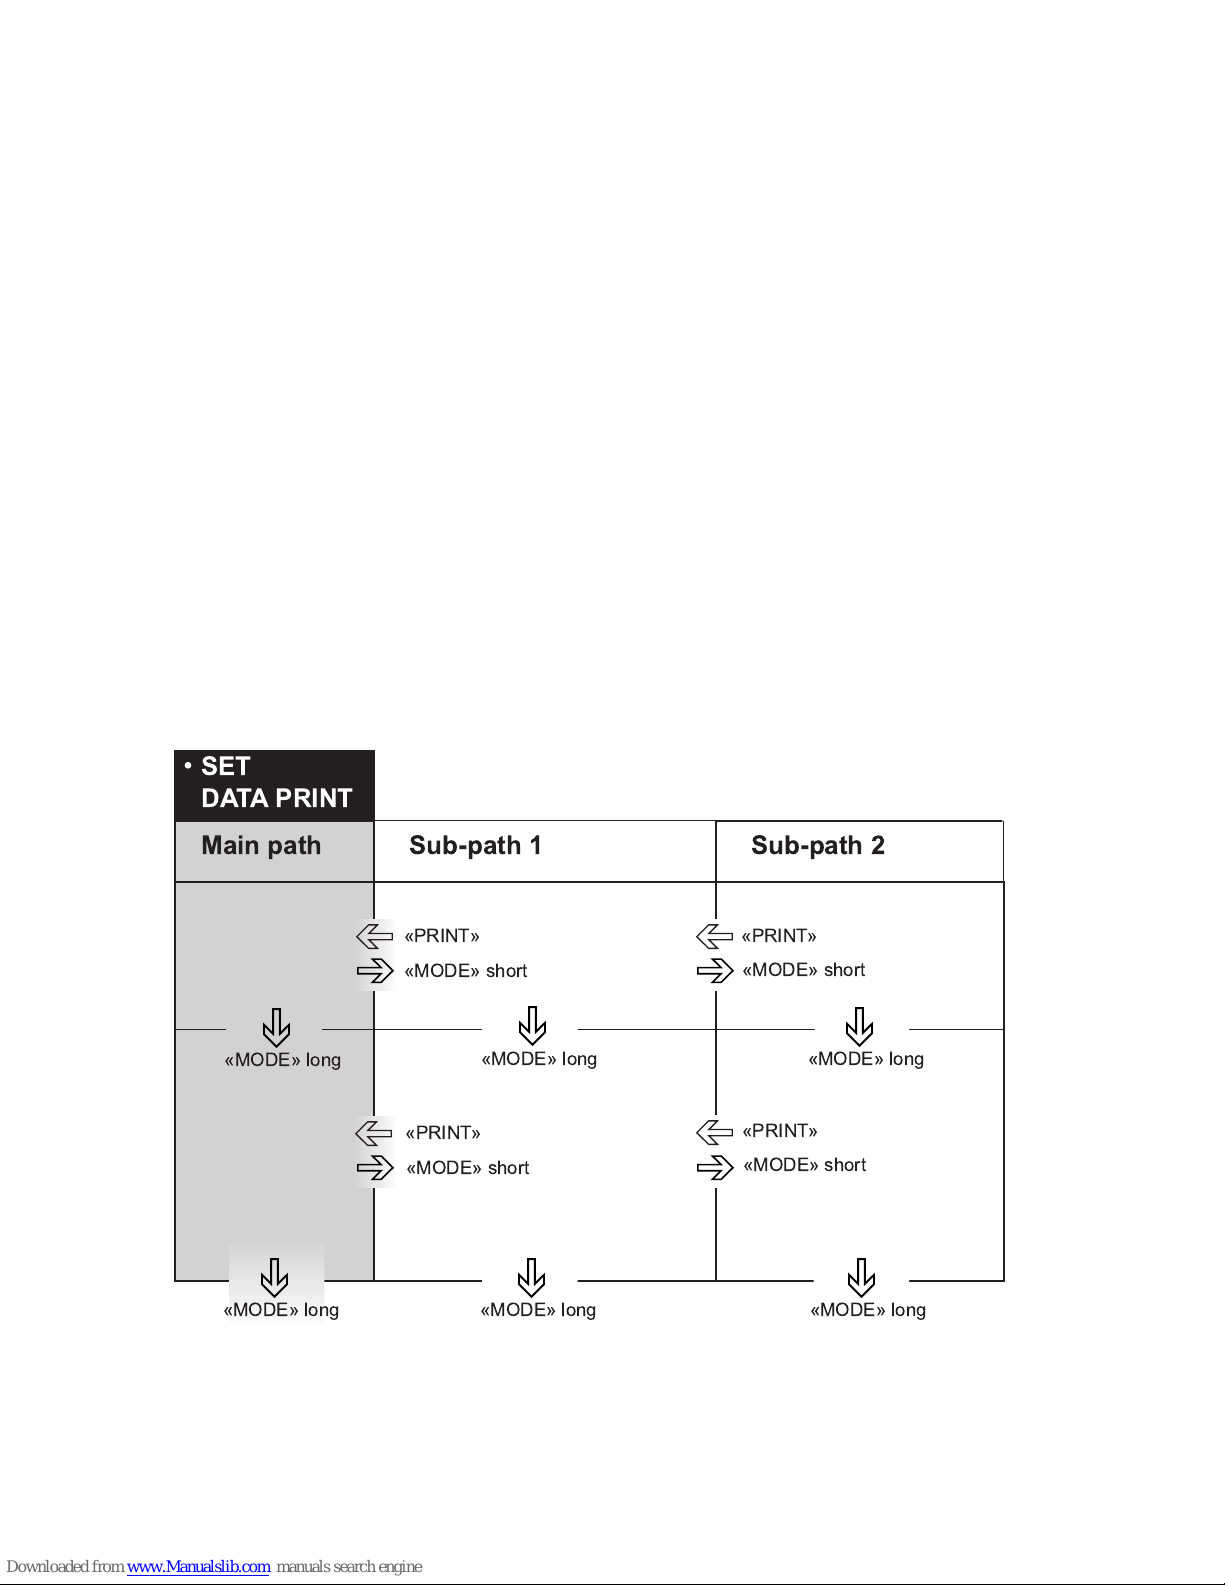
4.6 How the menu control operates
The configuration menu and the application menu each have a main
path and up to two sub-paths in which the parameters for the different
function programs of the balance are defined.
Moving in the menu path:
•«MODE»-short: In path to the right or start input.
•«MODE»-long: In path downwards.
•«PRINT»-button: In path to the left (in main path exit menu).
Input:
•«MODE»-short: Change value or position.
•«MODE»-long: Change one position to the right or terminate
input.
•«PRINT»-button: Terminate input.
)
*
)
*
)
*
,
)
*
,
,
,
,
,
Page 27
4 Modes of operation and operating ■
25
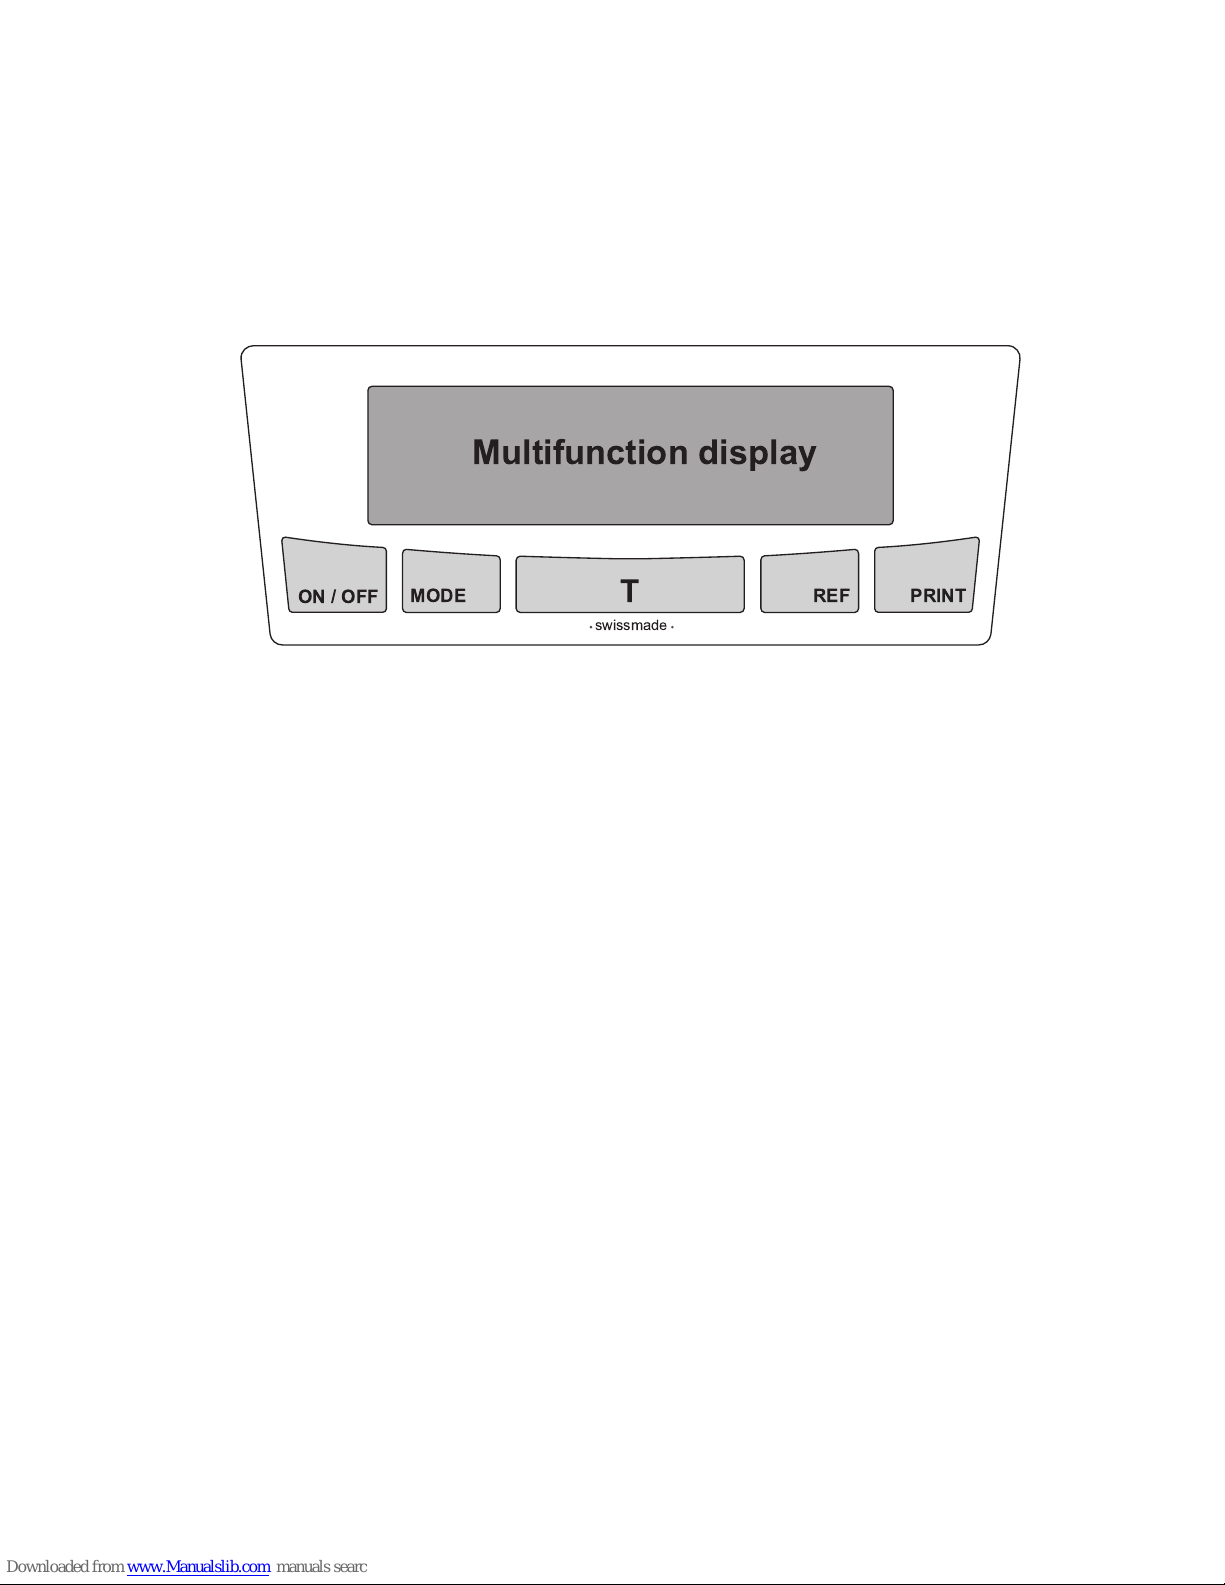
4.6.1 Control panel
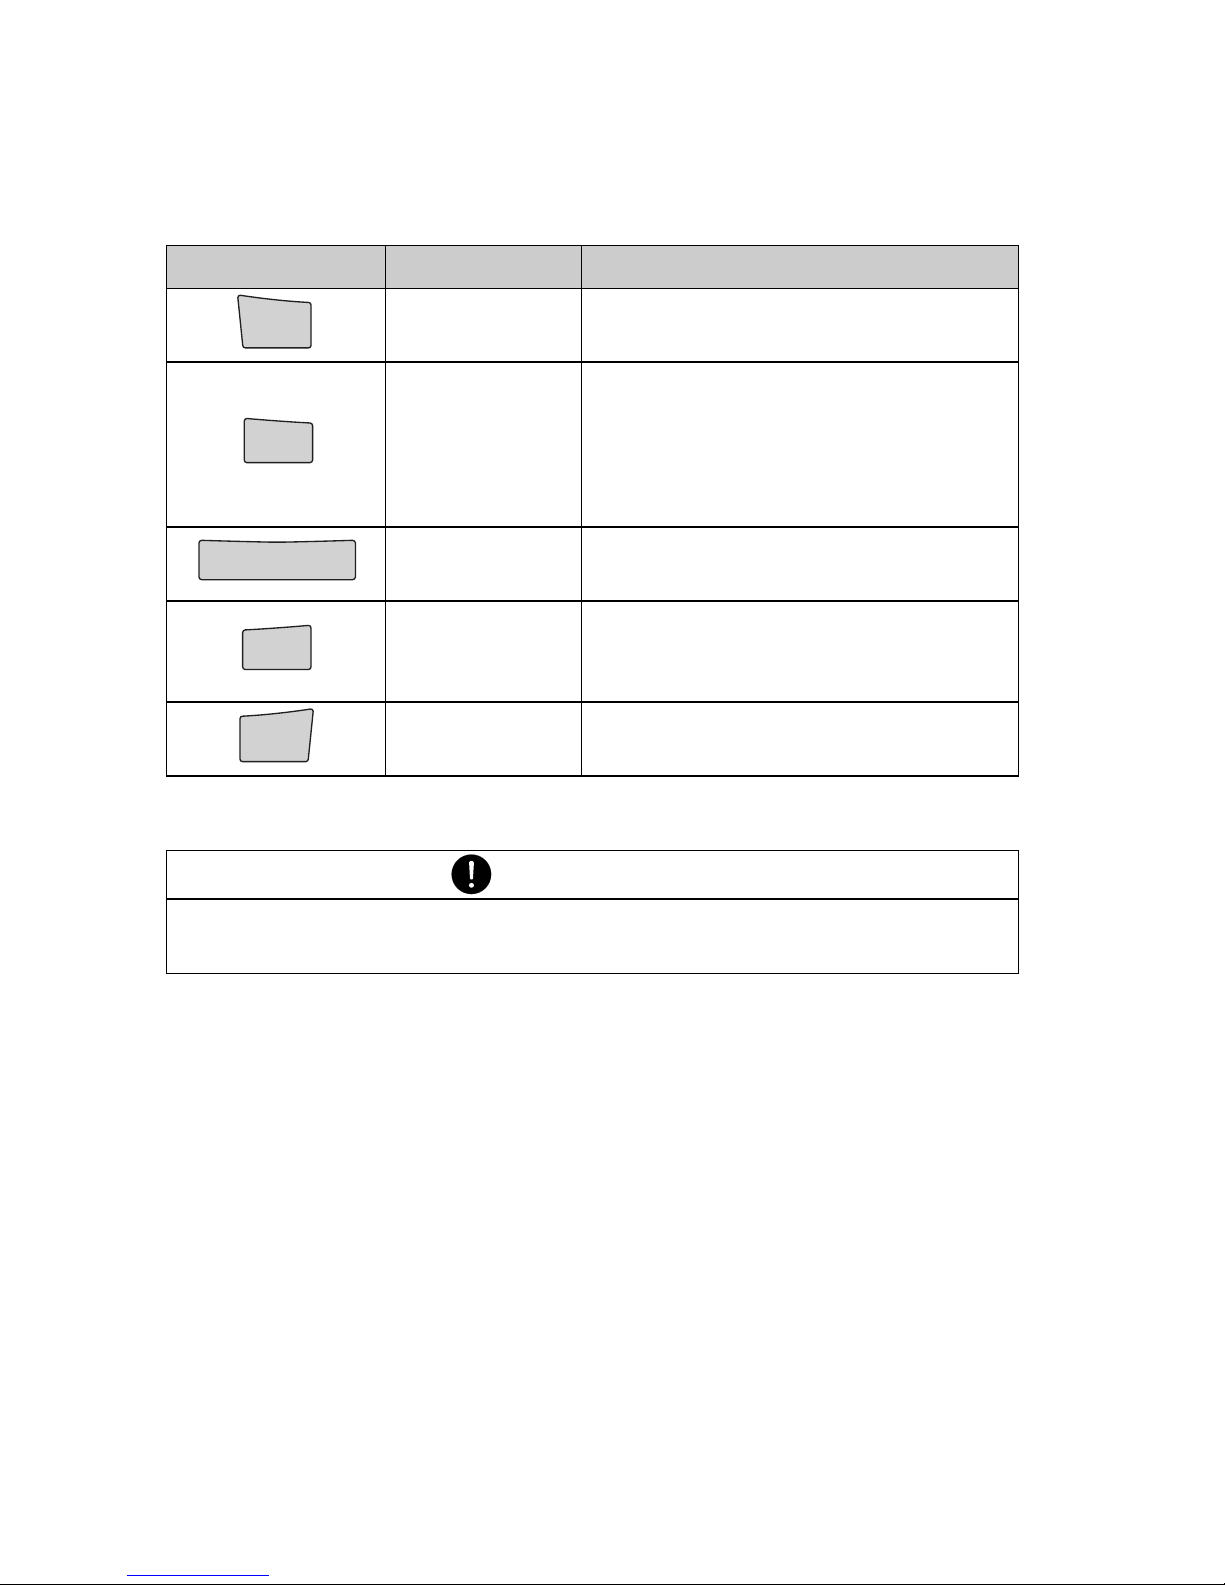
Four of the five keys of the Multifunctional Control Panel serve multiple functions (functions for the weighing mode and for the
programming mode respectively).
Fig. 4.1 The Five-key Control Panel
swissmade
Page 28
■ 4 Modes of operation and operating
26
4.6.2 Operating in the weighing mode.
For an illustration of the method of operation see Chapter 10 “Practical examples”.
Name Function during weighing
«ON/OFF»
• Switching the balance on and
off
«MODE»
• Calling up the configuration
menu and the application menu
• Switches between the Basic
program and the chosen
application
«T»
• Initiate Tare Function and/or
Calibration Function
«REF»
• Run application (see Chapter 6
“Working with the
application menu”)
«PRINT»
• Start print function
• Exit the menu
Tab. 4.1 Key functions
NOTE
For the operation of the «T» and «PRINT» see
Chapter 7 “Special operating keys”.
ON/OFF
MODE
T
REF
PRINT
Page 29
4 Modes of operation and operating ■
27
4.6.3 Display
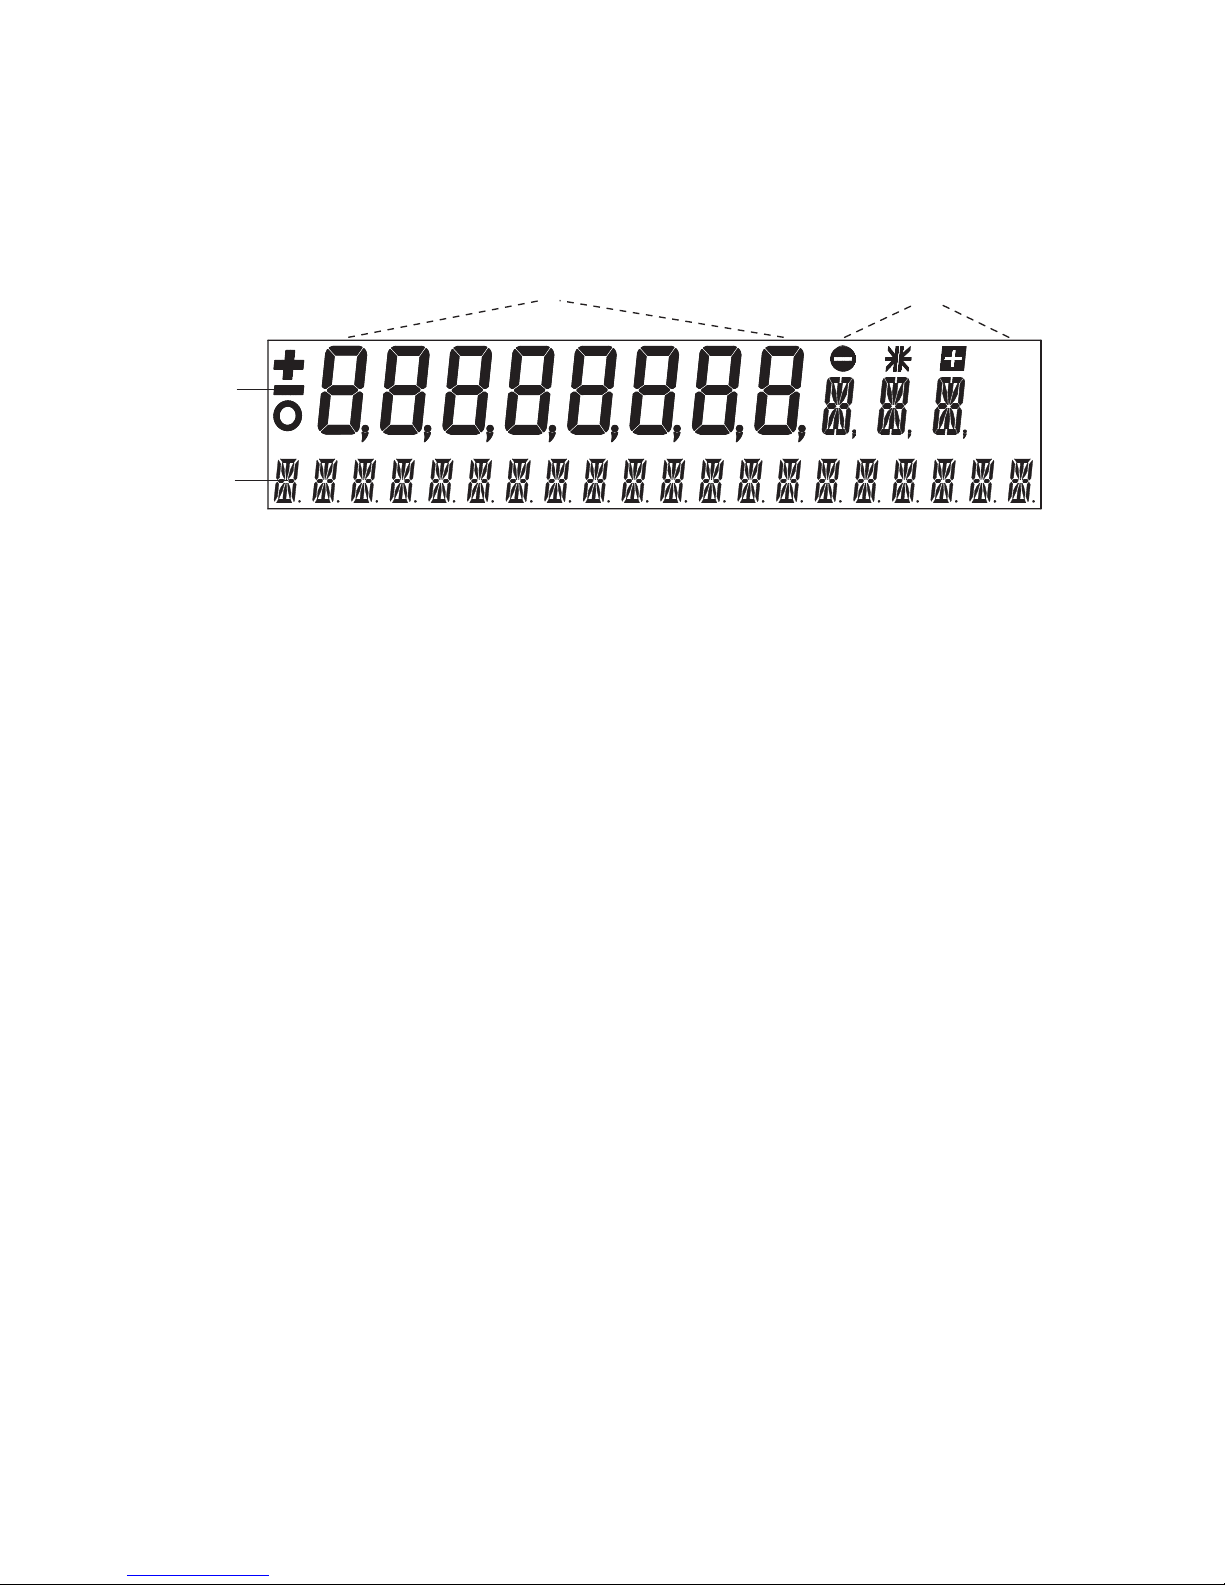
The balance display has two lines (1 and 2).
Fig. 4.2 Display
The upper display-line (1) includes the 8-figure measurement display
(3) as well as various symbols (4).
The lower line (2) serves as a 20-character info-line in connection with
the cursor keys for controlling the working programs.
4.7 Password protection of the menus
The two main menus of the balance can be protected by a freely
selectable, four-figure password against unintentional changes.
• With password protection deactivated, any operator can change the
balance configuration and application menus.
• With “standard” password protection activated, only the configuration menu is protected against unintentional changes.
• With “high” password protection activated, both the configuration
menu and the application menu are protected against unintentional
changes. Only after entering the correct, four-figure password can
changes be made to the configuration menu and the application
menu.
B/G
PT
NET
2
34
1
Page 30
■ 4 Modes of operation and operating
28
4.8 Anti-theft encoding
The balance can be protected against theft by a freely selectable,
four-figure numerical code:
• With anti-theft encoding deactivated, the balance can be switched
on again and operated after interruption of the power supply
without entering a code.
• With anti-theft encoding activated, the balance requires the entry of
the four-figure code after each interruption to the power supply.
• If the code is input incorrectly, the balance is blocked.
• If the balance is blocked, it must first be disconnected from the
power supply, then reconnected and unblocked by entering the
correct four-figure code.
• After seven consecutive incorrect entries the display will read “NO
ACCESS, CALL SERVICE”. In this case, only Precisa Service can
unblock the balance again.
To activate the anti-theft encoding and to alter the code programmed
in the works to one which you have chosen yourself, see
Chapter 5.11 “Anti-theft encoding”.
NOTE
The password protection is deactivated at the works.
The pre-programed password set in the works is: 7 9 1 4
This password is the same for all Precisa balances and is always
valid, in parallel with a self-selected password.
Make a note of your personal password.
NOTE
The anti-theft-encoding is deactivated in the works.
The pre-programmed code set by the works is: 8 9 3 7
This code is the same for all Precisa balances. For reasons of
security you should therefore always select your own code.
Keep your personal code in a safe place.
Page 31
5 Working with the configuration menu ■
29
5 Working with the
configuration menu
This chapter describes the configuration menu and its functions.
To activate the menu, see Chapter 4.5 “Activating the two main menus” and Chapter 4.6 “How the menu control operates”.
5.1 Structure of the configuration menu
The basic adjustment of the balance is defined in the configuration
menu:
Tab. 5.1 Contents of the configuration menu
Main path Definable functions
LANGUAGE
Language (E, G, F)
CONTRAST
Screen contrast (only for balances with LCD display)
UNIT-1
Unit in which the results of the weighing are displayed
SET
DATA PRINT
Print formats; Type of values to be printed (individual values, continuous printout, time or load
change dependent values, date, time, user, etc.)
SET
CALIBRATION
Method of calibration
SET
WEIGHING MODE
Stability mode (Quality of the balance location),
Auto-Standby mode, zero correction, tare method
(rapid or standard tare)
SET
INTERFACE
Baud-rate, parity, handshake functions of the peripheral interface
SET
DATE AND TIME
Date and time (standard format or American format p.m. and a.m.)
PASSWORD
Password protection for defining the menus
THEFTCODE
Activating/deactivating and changing the anti-theft
code.
Page 32
■ 5 Working with the configuration menu
30
Printing conventions used in this document:
• The settings in the sub-paths pre-programmed in the works are printed in bold in these operating instructions.
• For greater clarity, only that part of the menu tree which corresponds to the function is shown with each description of the
function.
• You will find the entire menu tree for the configuration menu in
Chapter 15 “Configuration menu tree”.
• Explanations of the menu functions are printed in italics.
5.2 Language-function
To activate the menu see Chapter 4.5 “Activating the two main menus” und Chapter 4.6 “How the menu control operates”.
In order to alter the language, proceed as follows:
• Switch off balance.
• Switch on balance and depress «MODE» until the currently
activated language is shown.
• Release «MODE».
•Press «MODE» repeatedly until the language you require is shown.
•Press «PRINT» in order to confirm the selection.
•Press «PRINT», in order to quit the menu.
5.3 Contrast
To activate the menu see Chapter 4.5 “Activating the two main menus” and Chapter 4.6 “How the menu control operates”.
Setting the display contrast in balances with LCD readout.
• LANGUAGE
SPRACHE DEUTSCH
LANGUAGE ENGLISH
LANGUE FRANCAISE
select language
•CONTRAST
CONTRAST 6 Set contrast Only with LCD displays
Page 33
5 Working with the configuration menu ■
31
5.4 Selecting the weight unit
To activate the menu see Chapter 4.5 “Activating the two main menus” and Chapter 4.6 “How the menu control operates”.
The balance can show results in different units, although with some
balances display is not possible in milligrammes or kilogrammes
because of the corresponding weight range.
Tab. 5.2 Possible weight units and conversion factors
•UNIT-1
UNIT-1 g
kg
----Bht
Gramme
Kilogramme
----Baht
Display Weight unit Conversion to grammes
g Gramme
(mg) Milligramme 0.001 g
(kg) Kilogramme 1000 g
GN Grain 0.06479891 g
dwt Pennyweight 1.555174 g
ozt Troy ounce 31.10347 g
oz Ounce 28.34952 g
Lb Pound 453.59237 g
ct Carat 0.2 g
C.M. Carat Metric 0.2 g
tLH Tael Hong Kong 37.4290 g
tLM Tael Malaysia 37.799366256 g
tLT Tael Taiwan 37.5 g
mo Momme 3.75 g
t Tola 11.6638038 g
Bht Baht 15.2 g
Page 34
■ 5 Working with the configuration menu
32
5.5 Print functions
To activate the menu see Chapter 4.5 “Activating the two main menus” and Chapter 4.6 “How the menu control operates”.
With “SET PRINTFORMAT”, elements which are switched on are printed in each case:
• With “UNITS” all momentarily active units are printed out,
• with “PRODUCT ttt...” the product name can be entered
alphanumerically,
• with “PRODUCTMODE HOLD” this product name is stored,
•SET
DATA
PRINT
AUTO-START ON/OFF Start print automatically on
switching on/off
MODE UNSTABLE Individual print, each value
MODE STABLE Individual print, stable value
MODE LOADCHANGE Print after load changes
MODE CONTINUOUS Continuous print after every
lntegration time
MODE TIMEBASE Continuous print with time
basis
TIMEBASE 2.0 Time basis (in seconds) freely
selectable
SET PRINTFORMAT DATE AND TIME ON/OFF
BALANCE-ID ON/OFF
PRODUCT-ID ON/OFF
GROSS AND TARE ON/OFF
UNITS ON/OFF
OPERATOR-ID ON/OFF
PRODUCT ttt...
PRODUCTMODE HOLD
PRODUCTMODE DELETE
PRODUCTMODE COUNT
OPERATOR ttt...
Page 35
5 Working with the configuration menu ■
33
• with “PRODUCTMODE DELETE” it is deleted after each expression,
• with “PRODUCTMODE COUNT” a counter, which is incremented by
1 after each expression,
• “OPERATOR ttt...” is the alphanumeric input of the operator.
When a peripheral device (for example a printer) is connected, the
balance interface must be configured in the submenu “SET INTERFACE” (see Chapter 5.8 “Interface-functions”).
5.6 Calibration functions
To activate the menu see Chapter 4.5 “Activating the two main menus” and Chapter 4.6 “How the menu control operates”.
For the calibration of the balance see Chapter 3.7 “Calibration of the
balance” and Chapter 14.2 “Notes on calibration”.
•SET CALIBRATION
MODE OFF Closed
MODE EXTERNAL External
MODE EXT-DEF. External with user-defi-
ned weight (DEF n.nnn g)
MODE INTERNAL with internal weight
MODE AUTO Automatic (AUTOCAL)
DEF. 0.000 g Calibration weight for
EXT.-DEF. mode
AUTOCAL. TIME/TEMP.
AUTOCAL. TIME
AUTOCAL.TEMPERATURE
Autocal. on time/temp.
Autocalibration on time
Autocal. on temperature
AUTOCAL.-TIME 6 h Time for Autocalibration
NOTE
The works setting depends on the model of balance. The internal
calibration modes are only available if the self calibration system
(SCS) is installed.
Page 36
■ 5 Working with the configuration menu
34
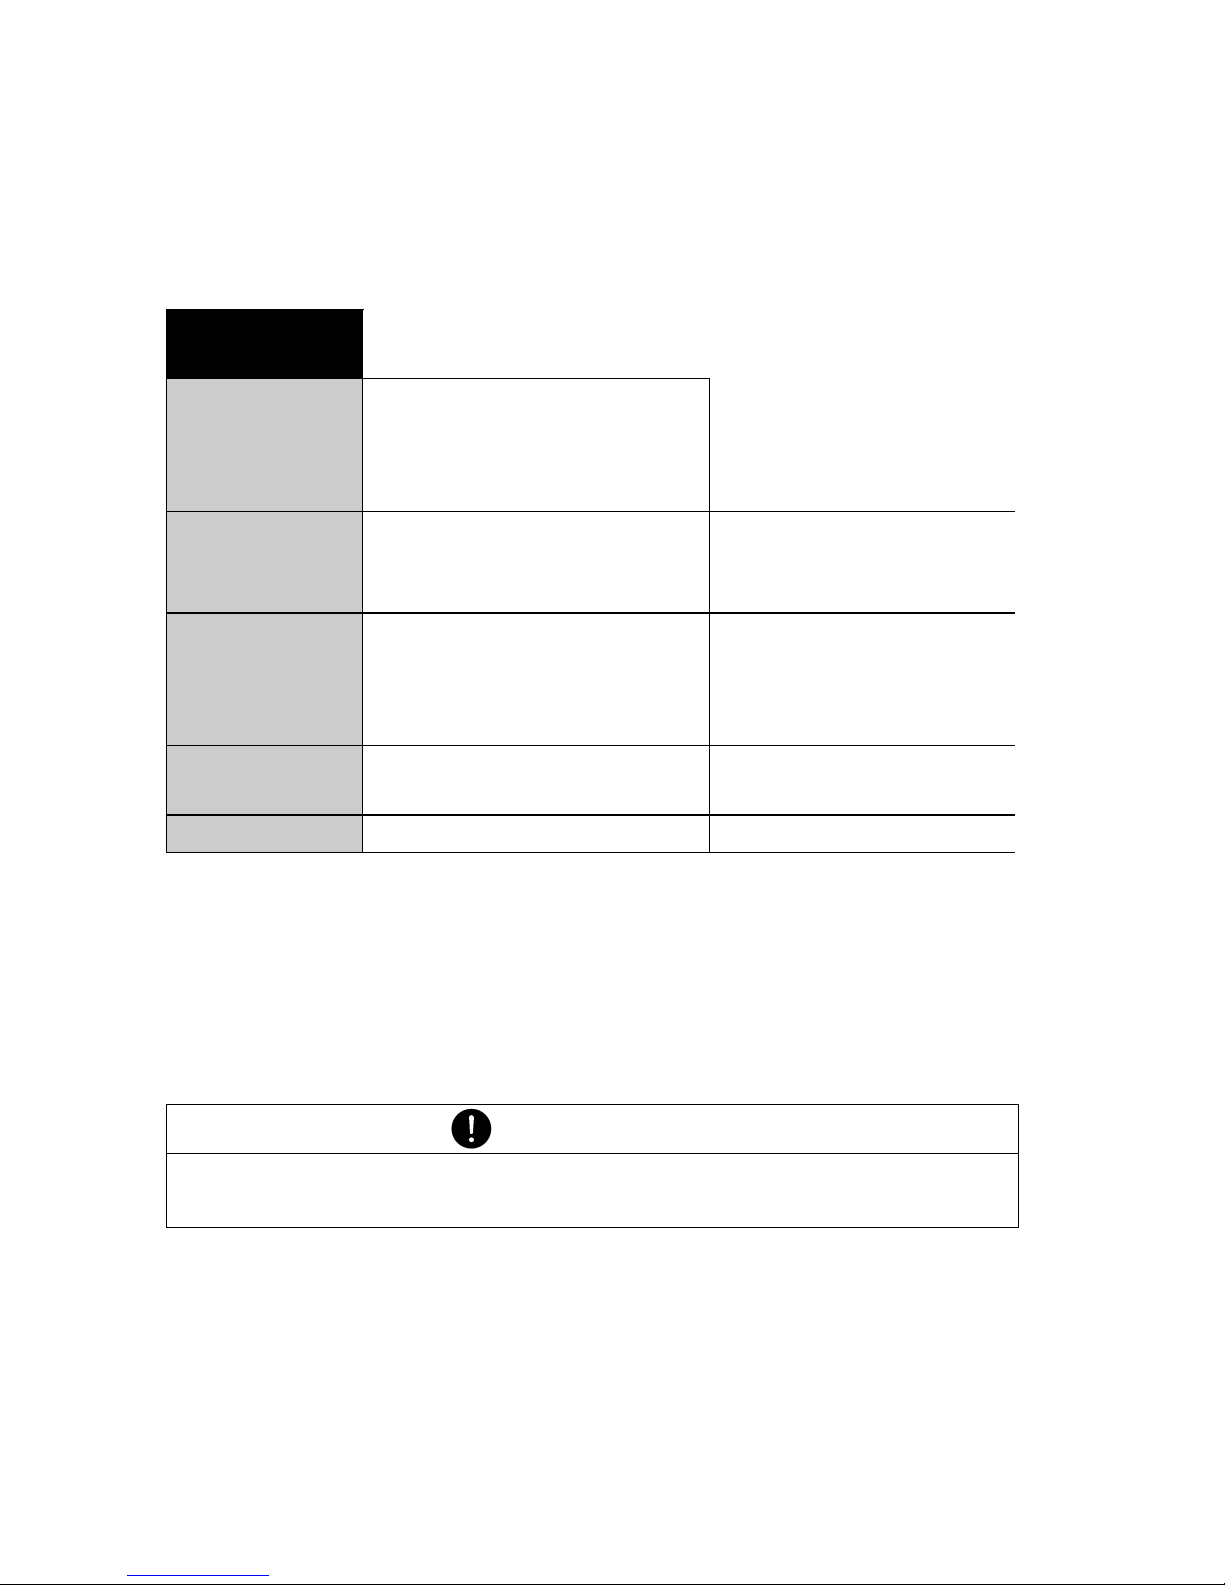
5.7 Weighing mode
To activate the menu see Chapter 4.5 “Activating the two main menus” and Chapter 4.6 “How the menu control operates”.
With the aid of the weighing mode functions, you describe the quality
of the balance location (see Chapter 3.4 “Choice of a suitable location”).
With the aid of the AUTO-STANDBY function, you can define the
period of non-use before the balance goes over automatically into the
energy-saving mode.
•SET WEIGHING MODE
FLOATINGDISPLAY 0.04
FLOATINGDISPLAY 0.08
FLOATINGDISPLAY 0.16
FLOATINGDISPLAY 0.32
Input lntegration time
(in seconds)
STABILITY LOW
STABILITY MEDIUM
STABILITY HIGH
Setting the Stability
control (instability of
the balance location)
AUTO-STANDBY OFF
AUTO-STANDBY 5 MIN
AUTO-STANDBY 10 MIN
AUTO-STANDBY 30 MIN
Auto-Standby not-active or active after
nn minutes
AUTO-ZERO ON/OFF Automatic zero correc-
tion on/off
QUICK-TARE ON/OFF Quick tare on/off
NOTE
The Auto-Standby function only works with the automatic zerocorrection activated (see Chapter 5.7 “Weighing mode”).
Page 37
5 Working with the configuration menu ■
35
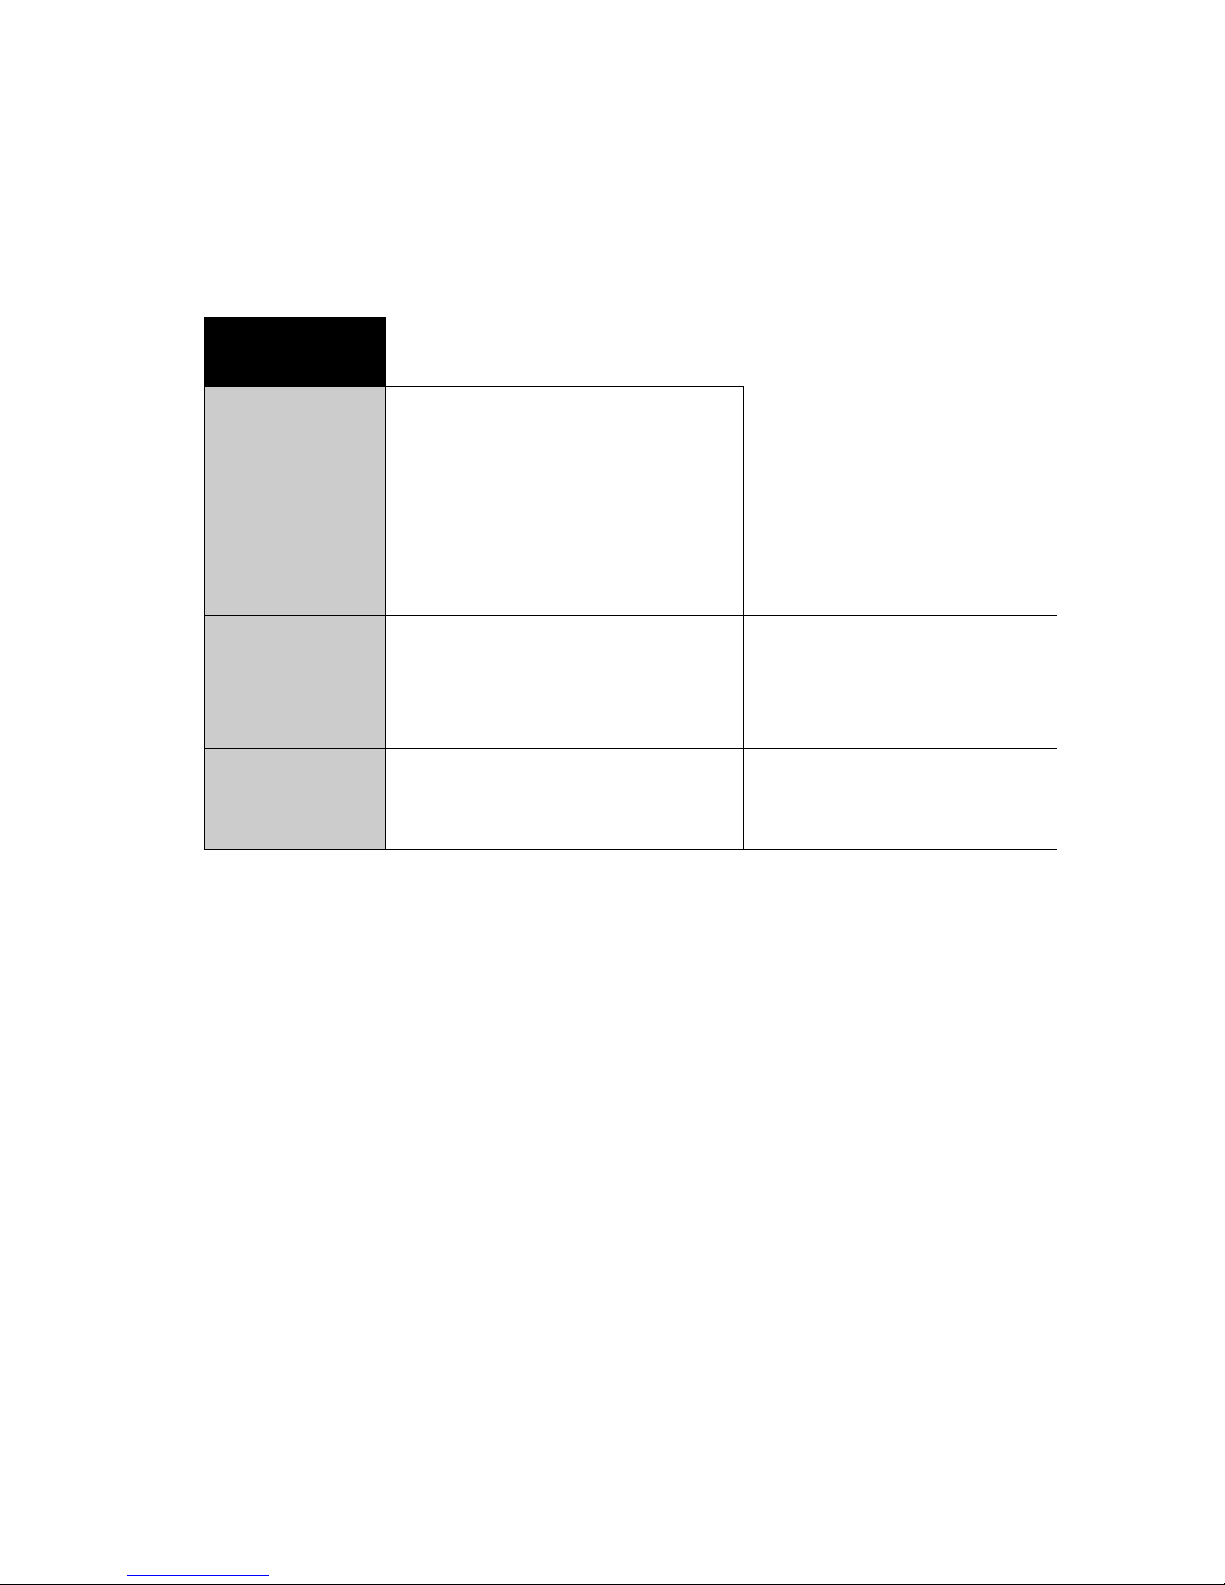
5.8 Interface-functions
To activate the menu see Chapter 4.5 “Activating the two main menus” and Chapter 4.6 “How the menu control operates”.
With the aid of the interface functions, the RS232/V24 interface of
the balance is matched to the interface of a peripheral device (see
Chapter 8 “Data transfer to peripheral devices”).
•SET
INTERFACE
BAUDRATE 300
BAUDRATE 600
BAUDRATE 1200
BAUDRATE 2400
BAUDRATE 4800
BAUDRATE 9600
BAUDRATE 19200
Select baud-rate
PARITY 7-EVEN-1STOP
PARITY 7-ODD-1STOP
PARITY 7-NO-2STOP
PARITY 8-NO-1STOP
Select parity
HANDSHAKE NO
HANDSHAKE XON-XOFF
HANDSHAKE HARDWARE
Enter handshake
function
Page 38
■ 5 Working with the configuration menu
36
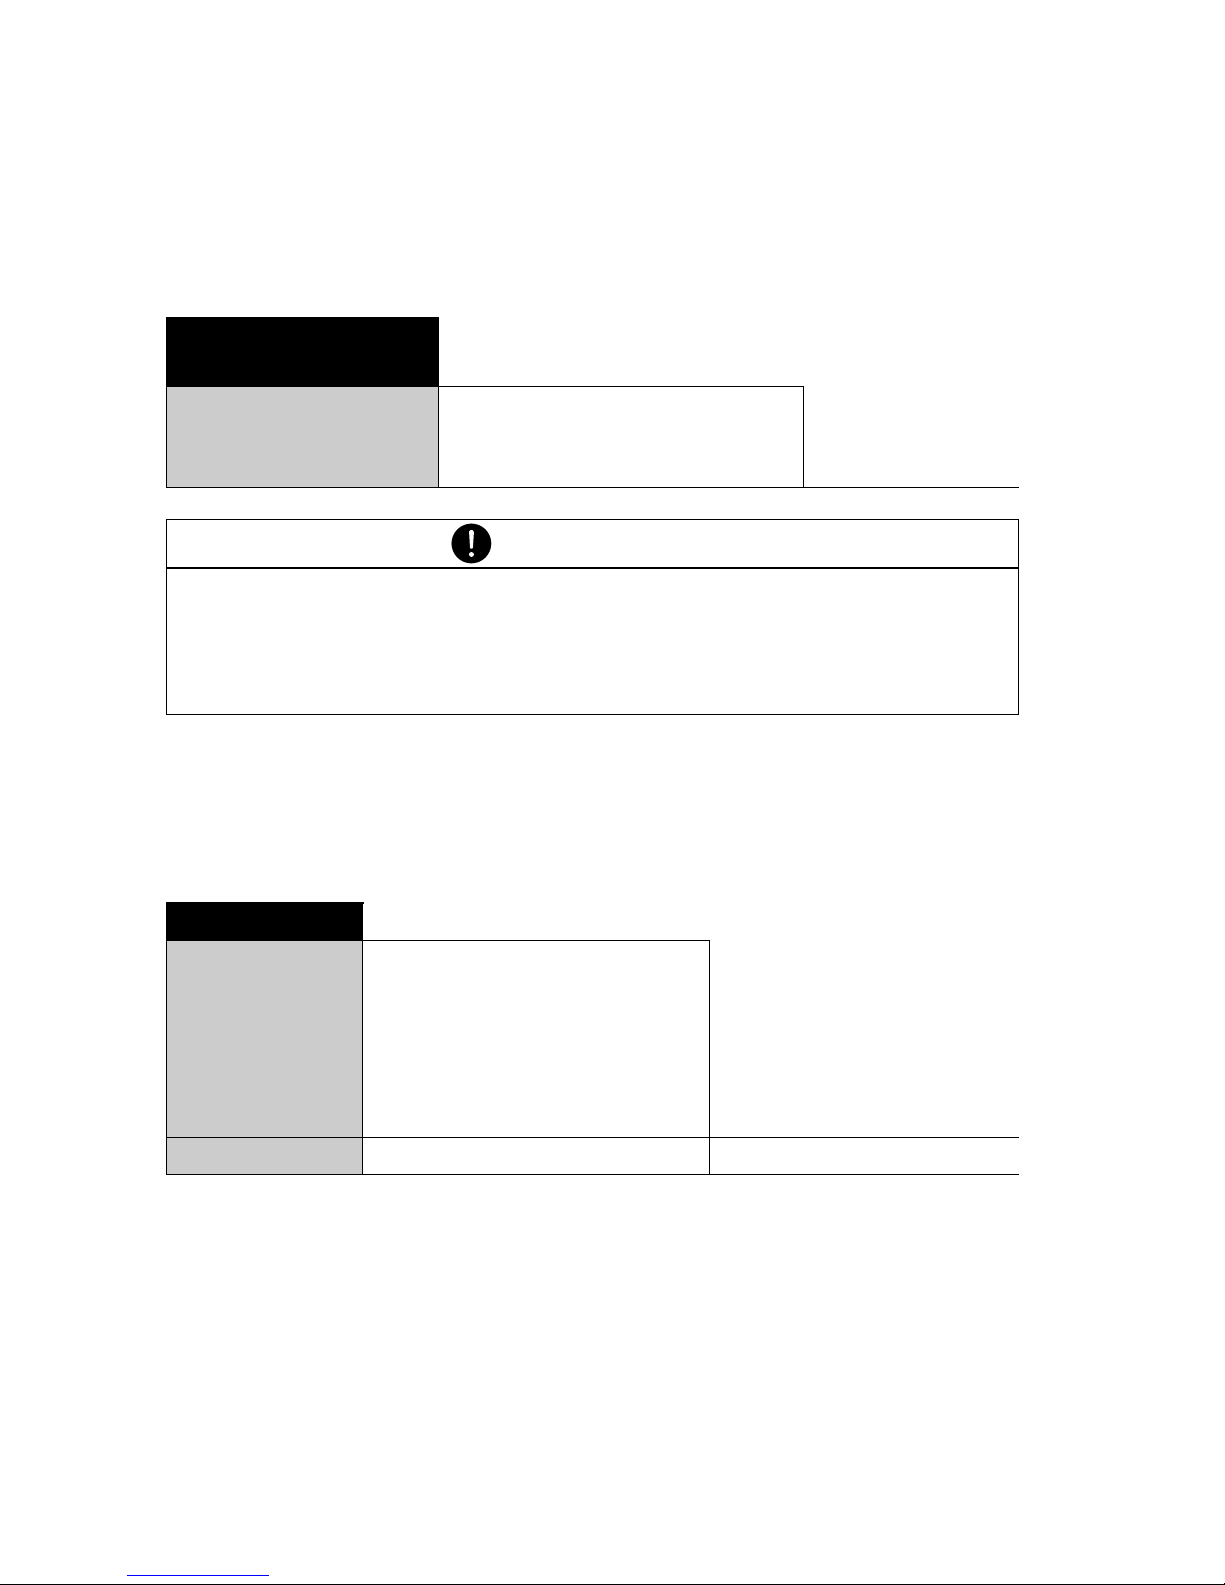
5.9 Date and time
To activate the menu see Chapter 4.5 “Activating the two main menus” and Chapter 4.6 “How the menu control operates”.
5.10 Password protection
To activate the menu see Chapter 4.5 “Activating the two main menus” and Chapter 4.6 “How the menu control operates”.
The password protection permits you to protect the application menu
and/or the configuration menu against unintentional changes.
See Chapter 4.7 “Password protection of the menus” and
Chapter 10.1.4 “Activation of password protection” for further
information on password protection.
•SET
DATE AND TIME
DATE [DD.MM.YY]
TIME [HH.MM.SS]
FORMAT STANDARD/US
Set date and
time
NOTE
These settings are only available if the clock is installed.
The date and time display continues in the event of a power failure.
If this is not the case, the balance backup battery is exhausted and
must be replaced by Precisa Customer Service.
• PASSWORD
PASSWORD
––––
DATA-PROTECTION OFF
DATA-PROTECTION MED
DATA-PROTECTION HIGH
No protection
The configuration menu
is protected
The configuration menu
and the application
menu are protected
NEW PASSWORD –––– Enter new password
Page 39
5 Working with the configuration menu ■
37
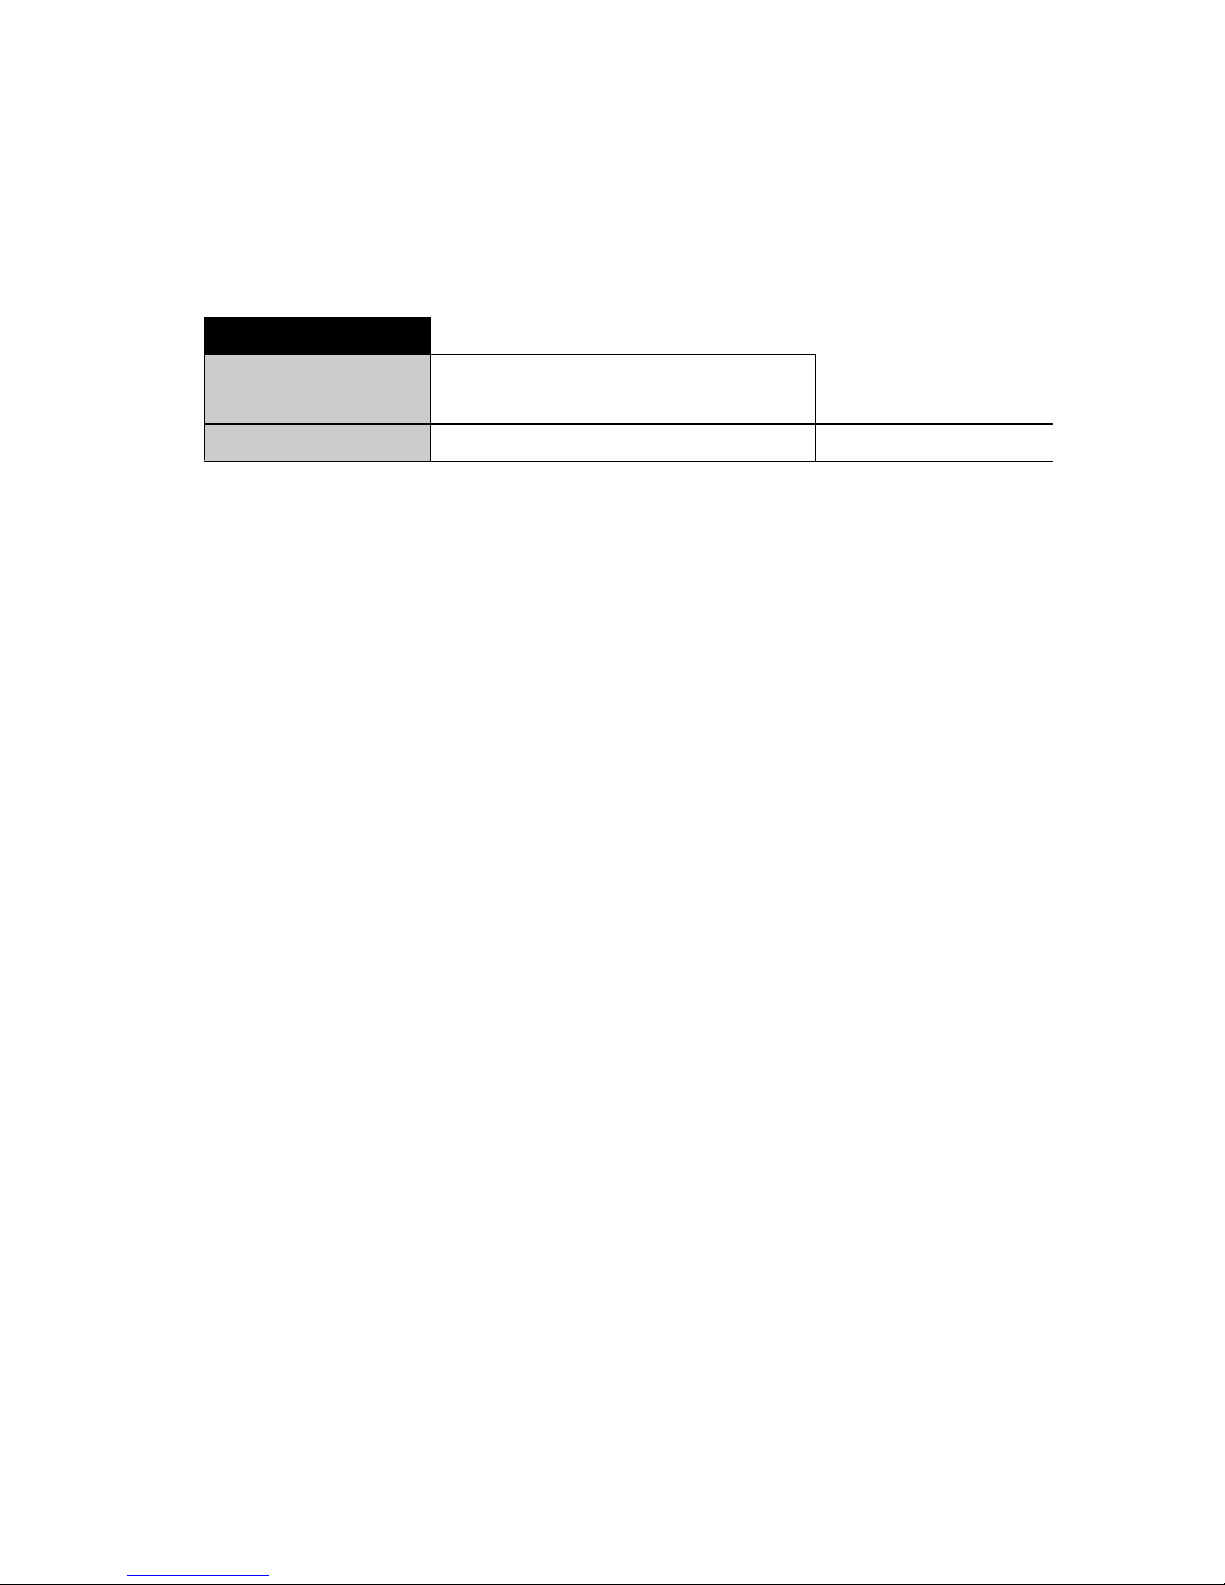
5.11 Anti-theft encoding
To activate the menu see Chapter 4.5 “Activating the two main menus” and Chapter 4.6 “How the menu control operates”.
If the anti-theft encoding is activated, a four-figure code must be
entered after every interruption of the power supply in order to release
the balance for use.
For further information on the anti-theft encoding see
Chapter 4.8
“Anti-theft encoding”.
To activate the anti-theft encoding, proceed as described for pass-
word protection.
• THEFTCODE
THEFTCODE
––––
THEFT-PROTECTION ON/OFF Switch encoding
on/off
NEW CODE –––– Enter new code
Page 40
■ 6 Working with the application menu
38
6 Working with the
application menu
This chapter explains which working programs the balance has and
how these are operated (see also Chapter 4.5 “Activating the two
main menus” and Chapter 4.6 “How the menu control operates”).
If «PRINT» is operated in an application, a report corresponding to the
application is printed out.
6.1 Structure of the application menu
To activate the menu see Chapter 4.5 “Activating the two main menus” and Chapter 4.6 “How the menu control operates”.
The working programs of the balance are called up using the application menu and adapted to the user's needs:
Printing conventions:
• The settings for the sub-menus programmed in works are printed in
bold in these operating instructions
• For a greater clarity, only that part of the menu tree which
corresponds to this application is shown with each application
description.
• You will find the complete menu tree for the application menu in
Chapter 16 “Application menu tree”.
• Explanations of the menu functions are printed in italics.
Main path Definable functions
SET APP. Select application program:
SETUP
APPLICATION
Specify parameters for the working program
selected under “Application»
AUTO-START
ON/OFF
The selected working program can, if required,
be loaded automatically every time the balance is
swtiched on
Tab. 6.1 Structure of contents of the application menu
Page 41
6 Working with the application menu ■
39
6.2 Selecting a working program
See Chapter 4.5 “Activating the two main menus” and Chapter 4.6
“How the menu control operates” for the activation of the application
menu.
In this function-field, select the desired working program.
If a working-program is selected in the “SET APP.” menu, then only
those sub-menus, which contain functions and parameters necessary
to define the chosen working program are shown in the “SETUP APPLICATION” menu.
To activate the menu see Chapter 4.5 “Activating the two main menus” and Chapter 4.6 “How the menu control operates”.
6.3 Changing application / weighing mode
To activate an application, it must first be selected in the application
menu (see Chapter 6.2 “Selecting a working program”).
•Press the «MODE» button. The display will show either the name of
the selected application “UNITS”, “COUNT”, ... or “BALANCING”
(for switching back to weighing mode).
(If “SET. APP. OFF” appears immediately, no application has yet
been selected.)
• Release the «MODE» button.
• The balance has now switched over to the application and you can
run the application with the «REF» button.
(In the weighing mode the «REF» button has no function).
• SELECT APPLICATION
SET APP. OFF
UNITS
COUNT
PERCENT
NET-TOTAL
DENSITY
Normal weighing
Different units
Parts counting
Percent weighings
Add weighing results with
intermediate tare
Density determinations
Page 42
■ 6 Working with the application menu
40
6.4 Application “UNITS”
See Chapter 4.5 “Activating the two main menus” and Chapter 4.6
“How the menu control operates” for the activation of the application
menu.
Operation:
Start the application (see Chapter 6.3 “Changing application / weighing mode”).
•Press the «REF» button until the desired unit appears on the display.
• Release the «REF» button.
•SETUP
APPLICATION
UNITS UNIT-2 kg kilogramme
UNIT-2 mg milligramme
UNIT-2 ----- ----UNIT-2 OFF not active
UNIT-3 GN Grain
UNIT-3 ----- ----UNIT-3 OFF not active
UNIT-4 C.M. Metric carat
UNIT-4 ----- ----UNIT-4 OFF not active
NOTE
For basic operation, Unit 1 is defined in the configuration menu
(standard unit for all weighings, if the working-program “UNITS” is
not called up, see Chapter 5.4 “Selecting the weight unit”).
Page 43
6 Working with the application menu ■
41
6.5 Application “COUNT”
See Chapter 4.5 “Activating the two main menus” and Chapter 4.6
“How the menu control operates” for the activation of the application
menu.
With the aid of the “COUNT” program you can count items of uniform
weight (screws, balls, coins, etc.).
Depending on the weight and tolerances of the objects to be counted,
you should count a representative number of items for the regulation
of the reference-weight.
Operation:
Start the application (see Chapter 6.3 “Changing application / weighing mode”).
• Place a number of objects on the weighing pan.
•Press the «REF»-button until the reference quantity appears on the
display.
• If the reference quantity is correct release the «REF»-button.
Otherwise hold down the «REF»-button. The pre-defined values will
appear (1, 10, 25, 50, ...). As soon as the desired value appears
release the «REF»-button. (The current value can be increased by 1
by briefly releasing and pressing the «REF»-button.)
•SETUP
APPLICATION
COUNT REFERENCE 10 PCS Reference-number of
pieces = 10
Page 44
■ 6 Working with the application menu
42
6.6 Application “PERCENT”
See Chapter 4.5 “Activating the two main menus” and Chapter 4.6
“How the menu control operates” for the activation of the application
menu.
With the aid of the “PERCENT” program you can display and print out
the weight of different measurements as a percentage of a previously
defined reference weight.
Operation:
Start the application (see Chapter 6.3 “Changing application / weighing mode”).
• Place the reference weight on the weighing pan.
•Press the «REF»-button until “REFERENCE 100%” appears on the
display.
• Release the «REF»-button.
6.7 Application «Net-Total»
There is no Setup menu for this application.
With the aid of the „NET-TOTAL“ application you can add individual
weighings, where the balance is tared to zero again before each individual weighing.
•SETUP
APPLICATION
PERCENT DECIMALS AUTO
0
1
2
3
Enter number of decimal
places
Page 45

6 Working with the application menu ■
43
Functions of the application:
Operation:
Start the application (see Chapter 6.3 “Changing application / weighing mode”).
• Place something on the weighing pan.
«Sto n»: - Take stable value and add to the sum of the
components.
- Tare balance.
- Short confirmation with display „StorEd n“.
«rESEt»: - Reset
«InFo»: - Display of:
- Total weight „TOT“
- Residual capacity „R-C“
- Individual components „n“
- Exit info with «MODE»-button.
Page 46

■ 6 Working with the application menu
44
•Press the «REF»-button until the desired function appears on the
display.
Release the «REF»-button.
Page 47
7 Special operating keys ■
45
7 Special operating keys
7.1 The Tare key «T»
• Effects taring
– Ensure that the balance is in the weighing mode
–Briefly press «T»
– The balance performs a tare operation.
• Effects a calibration
– Ensure that the balance is in the weighing mode
– Keep
«T» pressed until “CALIBRATION” is displayed
– Release «T»
– The balance carries out a calibration in accordance with the set-
tings in the configuration menu (cf. Chapter 5.6 “Calibration
functions”) and reports these by means of a printout.
• Carries out a calibration test
– Ensure that the balance is in the weighing mode
– Keep
«T» pressed until “TEST CALIBRATION” is displayed
– Release «T»
– The balance carries out a calibration test.
NOTE
A calibration and/or a calibration-test can be cancelled with
«ON/OFF».
Page 48

■ 7 Special operating keys
46
7.2 The Print key «PRINT»
• Print out an individual value or a report
– Ensure that the balance is in the weighing mode
– Briefly press «PRINT»
– The individual value or report will be printed out.
• Reset product counter to 1
– Ensure that the balance is in the weighing mode
–Keep «PRINT» pressed until “RESET PROD.-COUNTER” is
displayed
–Release «PRINT»
– The product counter will be reset to 1.
• Print out a balance status
– Ensure that the balance is in the weighing mode
–Keep «PRINT» pressed until “PRINT STATUS” is displayed
–Release «PRINT»
– The balance status will be printed out.
• Print out the application-setup
– Ensure that the balance is in the weighing mode
–Keep «PRINT» pressed until “PRINT APPLICATIONS” is displayed
–Release «PRINT»
– The application-setup will be printed out.
Page 49

8 Data transfer to peripheral devices ■
47
8 Data transfer to peripheral
devices
For data-transfers to peripheral devices, the balance is equipped with
an RS232/V24-interface.
Before the data-transfer, the RS232 interface must be matched with
the one in the peripheral device in the balance's configuration menu
(see Chapter 5.8 “Interface-functions”).
• Handshake
The handshake is set to “NO” (none) in the works. It can be set to
software handshake XON/XOFF, or to hardware handshake.
• Baud rate
Possible baud rates: 300, 600, 1200, 2400, 4800, 9600 or
19200 baud.
• Parity
Possible parity: 7 even 1 stop, 7 odd 1 stop, 7 No 2 stop or
8 No 1 stop.
ParitySB12345678SP
7-even-1 SB 1. DA 2.DA 3. DA 4.DA 5.DA 6.DA 7.DA PB SP
7-odd-1 SB 1.DA 2.DA 3.DA 4.DA 5.DA 6.DA 7.DA PB SP
7-no-2 SB 1.DA 2.DA 3.DA 4.DA 5.DA 6.DA 7.DA 1.SP 2.SP
8-no-1 SB 1.DA 2.DA 3.DA 4.DA 5.DA 6.DA 7.DA 8.DA SP
SB: Start bit PB: Parity bit
DA: Data bit SP: Stop bit
Page 50
■ 8 Data transfer to peripheral devices
48
8.1 Connection to peripheral devices
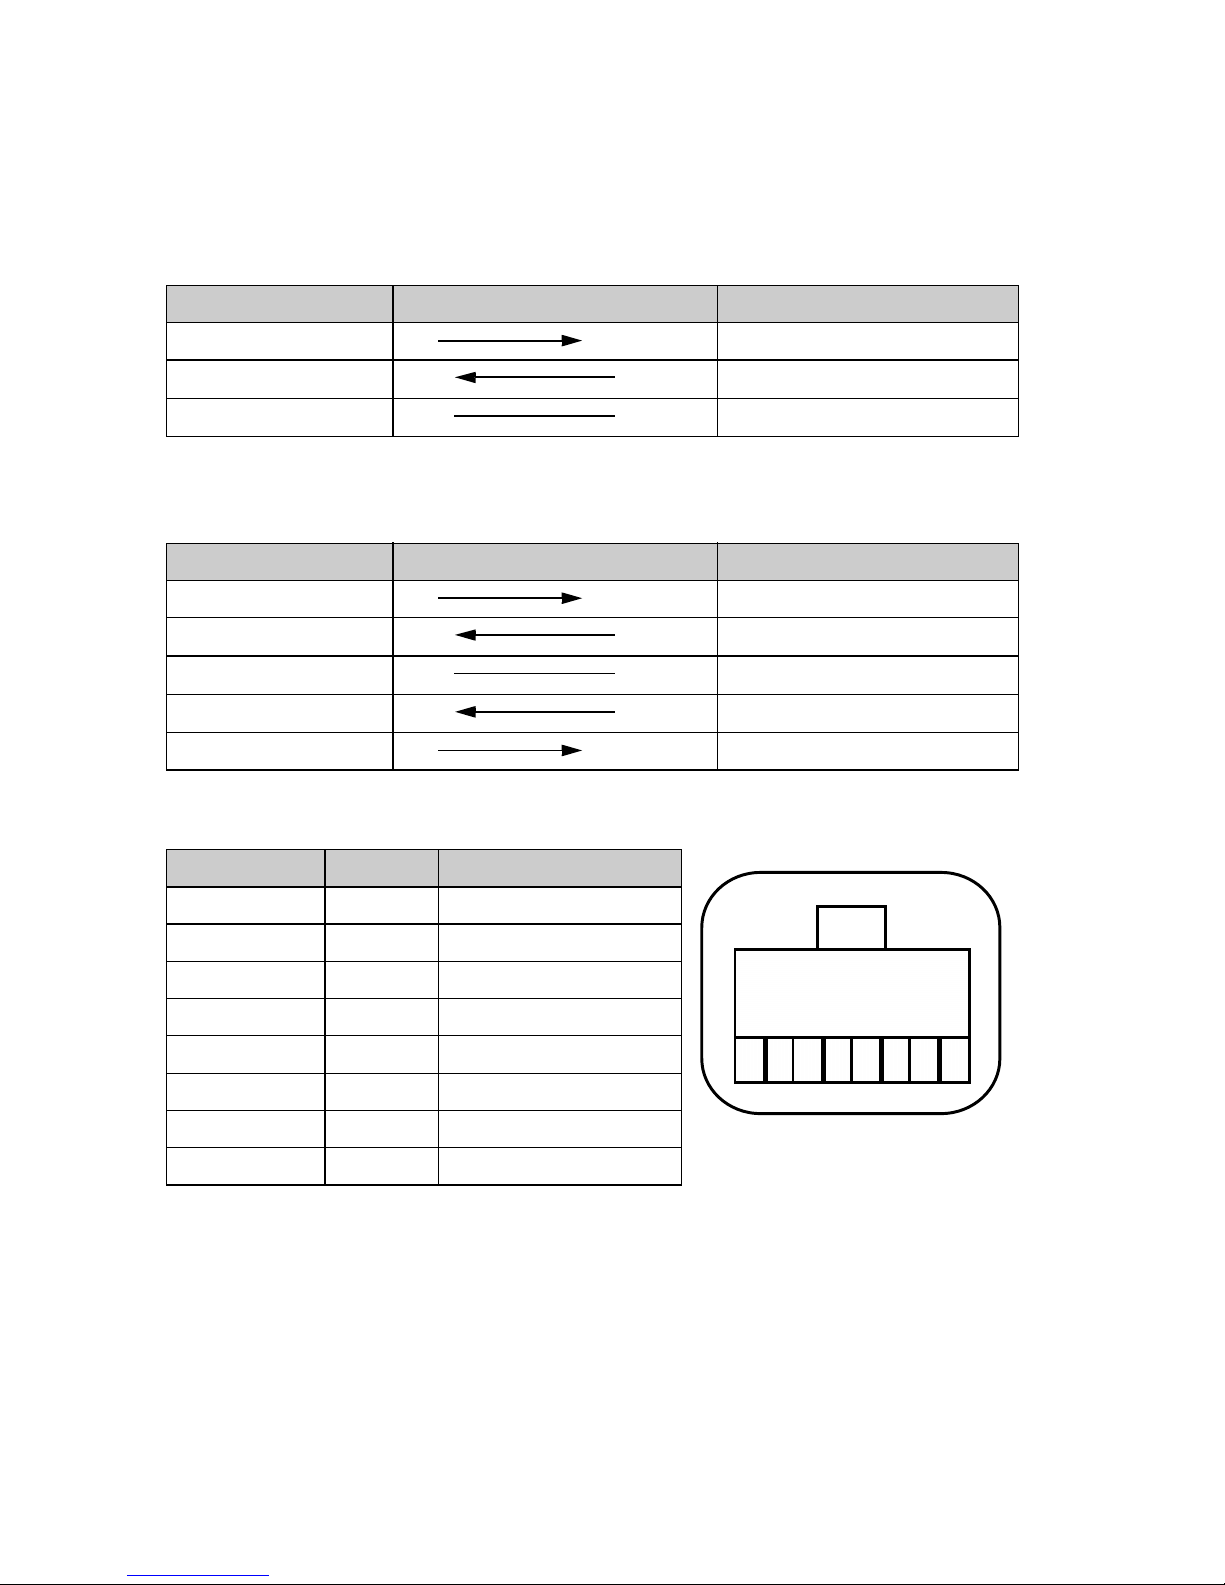
• Standard, duplex connection
• Standard, duplex connection with additional hardware handshake in
the peripheral device
• Pinout of RJ45 socket
Balance RJ 45 D25 / D9 Peripheral device
RS 232 out 2 3 / 2 RS 232 in
RS 232 in
6 2 / 3
RS 232 out
GND
5 7 / 5
GND
Balance RJ 45 D25 / D9 Peripheral device
RS 232 out 2 3 / 2 RS 232 in
RS 232 in
6 2 / 3
RS 232 out
GND
5 7 / 5
GND
CTS
3 20 / 4
DTR
DTR 7 5 / 8 CTS
Balance RJ 45 Remark
n.c. 1 Not connected
RS 232 out 2 Out (V24)
CTS 3 In (V24)
VDC 4 Out (9..16V)
GND 5 0V
RS 232 in 6 In (V24)
DTR 7 Out (V24)
EXTBUS 8 In (5V, logic)
8 7 6 5 4 3 2 1
Page 51
8 Data transfer to peripheral devices ■
49
8.2 Data-transfer
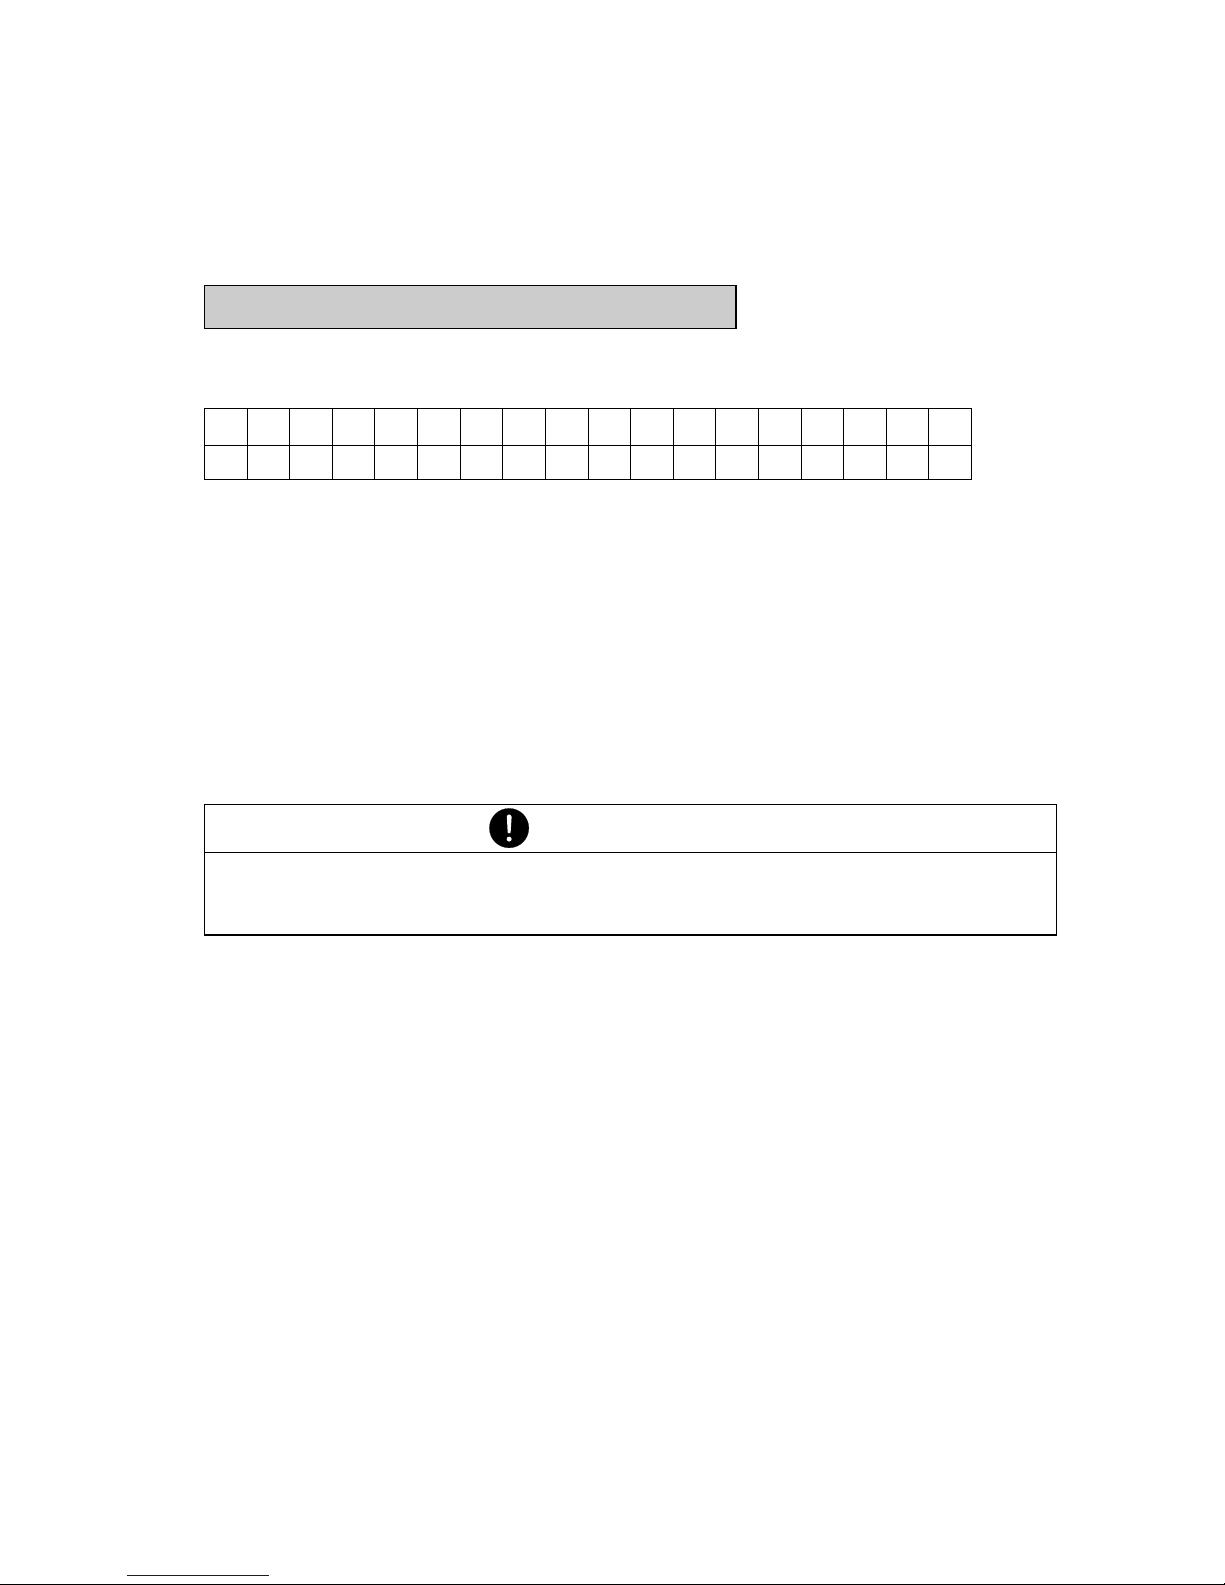
• Display
The data-transfer takes place in ASCII code:
S D7 D6 D5 D4 D3 D2 D1 D0 U U U
123456789101112131415.........
B B B S D7 D6 D5 D4 D3 D2 D1 DP D0 B U ... CR LF
B Blank (space)
S Sign (+, -, space)
DP Decimal Point
D0...D7 Digits
U ... Unit (only when weight is stable, else no unit transfered)
CR Carriage Return
LF Line Feed
NOTE
Unused positions are filled with spaces.
The decimal-point DP can be between D0 and D7.
Page 52
■ 8 Data transfer to peripheral devices
50
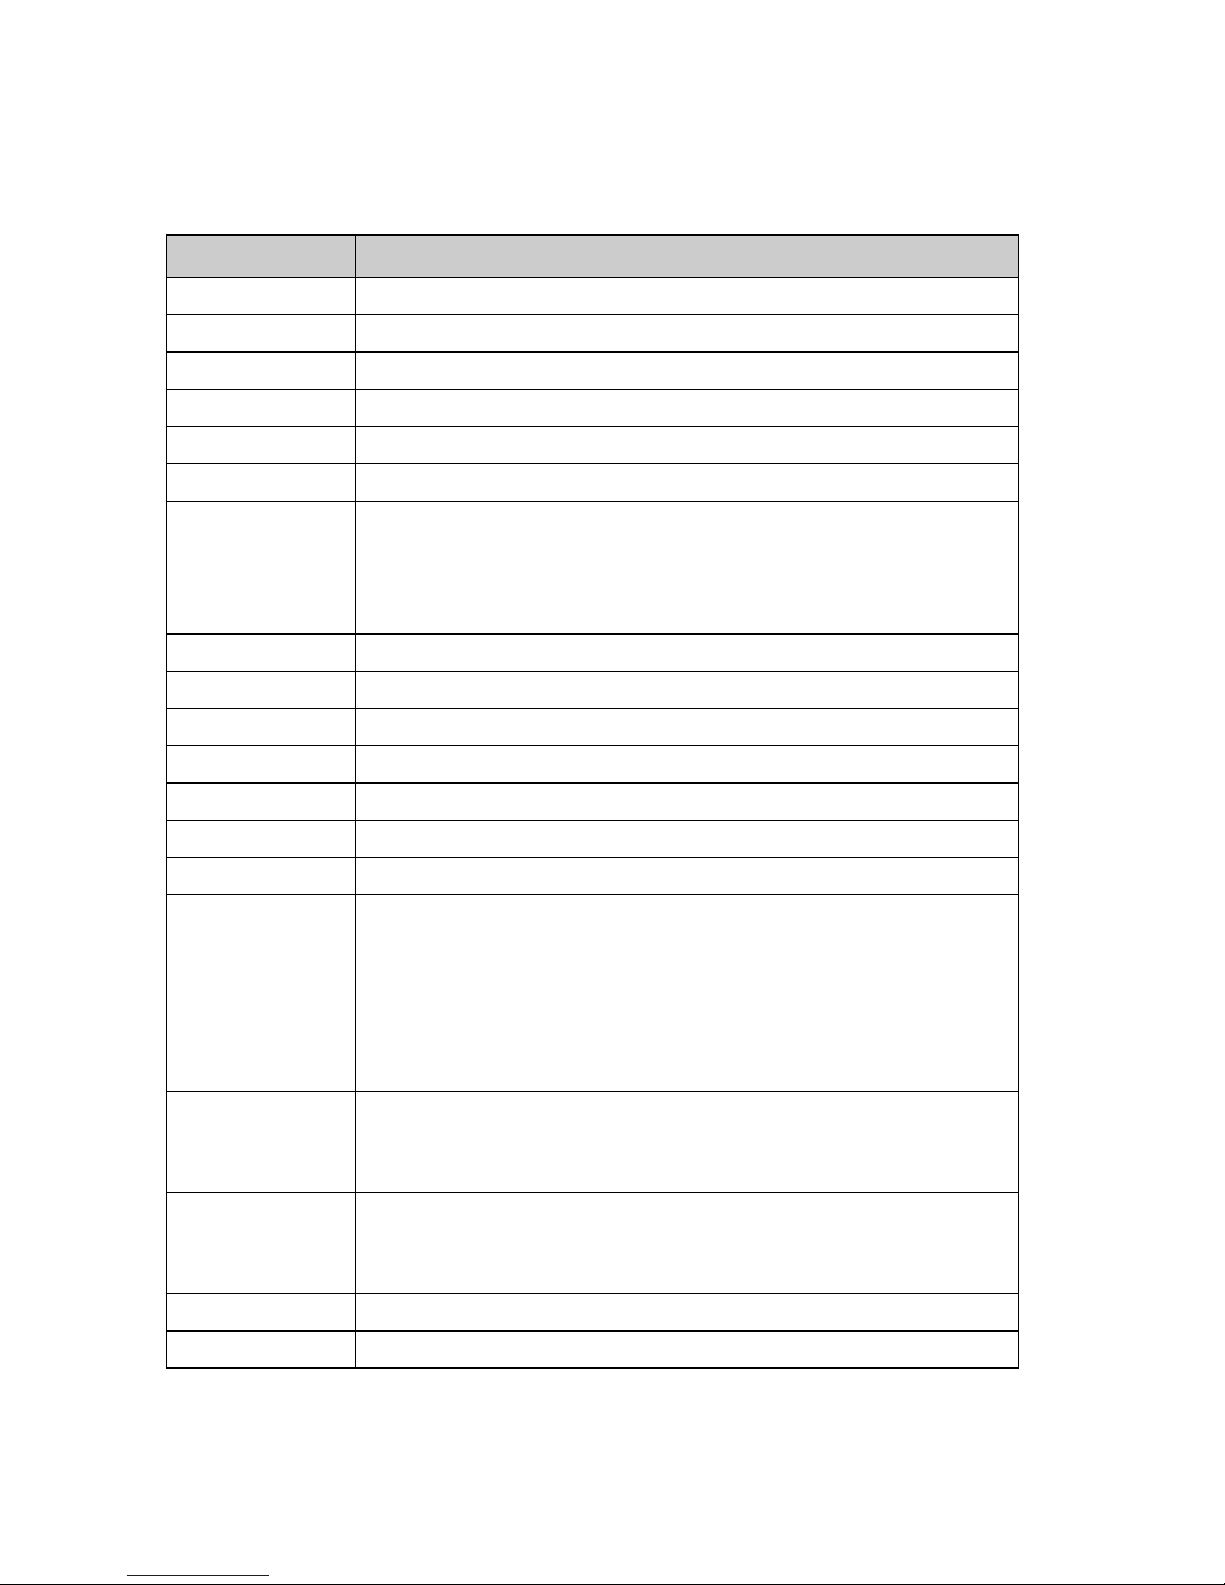
8.3 Remote control-commands
Command Function
ACKn Handshake n=0 off; n = 1 on
CAL Start calibration (only where INT or EXT selected)
DN Reset weight display
D.......... Describe weight display (right-aligned)
@N Reset Info display
@......... Describe Info display
In Set FLOATINGDISPLAY time n =0 t=0.04 s
n=1 t=0.08 s
n=2 t=0.16 s
n=3 t=0.32 s
N Reset balance
OFF Switch off balance
ON Switch on balance
PCxxxx Enter anti-theft code
PDT Print out date and time
PRT Start printing (Press “Print” key)
PST Start print status
Pn (ttt.t) Set print mode
n=0 Individually print each value (unstable)
n=1 Individually print each value (stable)
n=2 Print after change of load
n= 3 Print after each integration period
n=4 Print on time basis in s (ttt.t)
R%k Set current weight=100%
with k=0...7 decimal places (k=A: use automatic
positioning of decimal point)
REF%k rrr... Set reference weight rrr... for 100%
with k=0...7 decimal places (k=A: use automatic
positioning of decimal point)
Rnnn Set current weight=nnn items
REFrrr... Set reference weight rrr... for 1 item
Page 53
8 Data transfer to peripheral devices ■
51
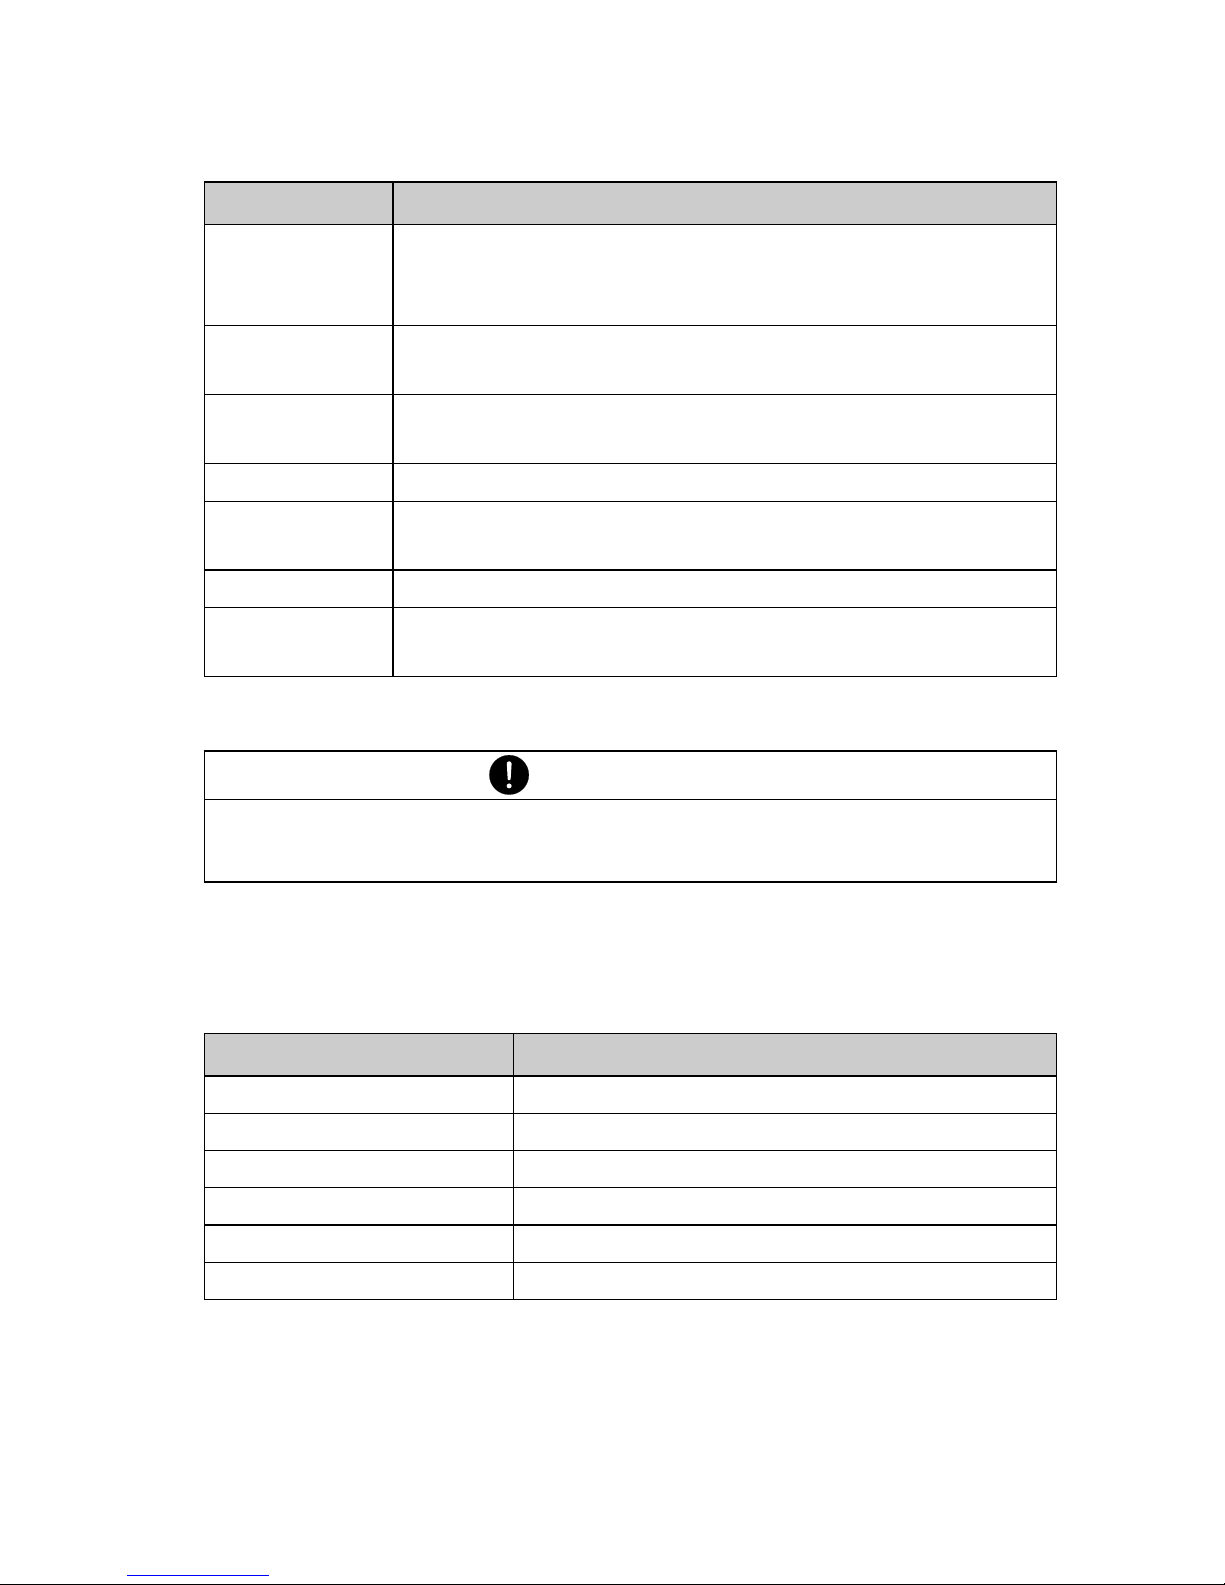
Tab. 8.4 Remote control-commands
8.4 Examples for the remote control of the
balance
Tab. 8.5 Examples for remote control
Sn Set stability n n=0 low
n=1 medium
n=2 high
SDTttmmjj
hhmmss
Set date and time (German) (Tag, Monat, Jahr,
Stunde, Minute, Sekunde)
SDTmmdyy
hhmmss
Set Date and Time (English) (Month, Day, Year,
Hour, Minutes, Seconds)
T (ttt) Tare or set tare to a specific value
Uxnn
Set unit x (1...4) of the balance with nn (0=g,
1=mg, 2=kg, ...)
UxS Switch balance to unit x (1...4)
ZERO Zero balance (provided weight is stable and within
the zero position range)
NOTE
Each remote control-command must terminate with «CR» «LF».
The commands are acknowledged if required.
Input Description of the function executed
D ––––– Five dashes will be shown
DTEST123 Will show: tESt123
D The display will be dark
T100 -100.000g (Tare set to 100 g)
T1 -1.00000 g (Tare set to 1 g)
T Balance will be tared
Command Function
Page 54
■ 9 Error messages and correction of faults
52
9 Error messages and correction of
faults
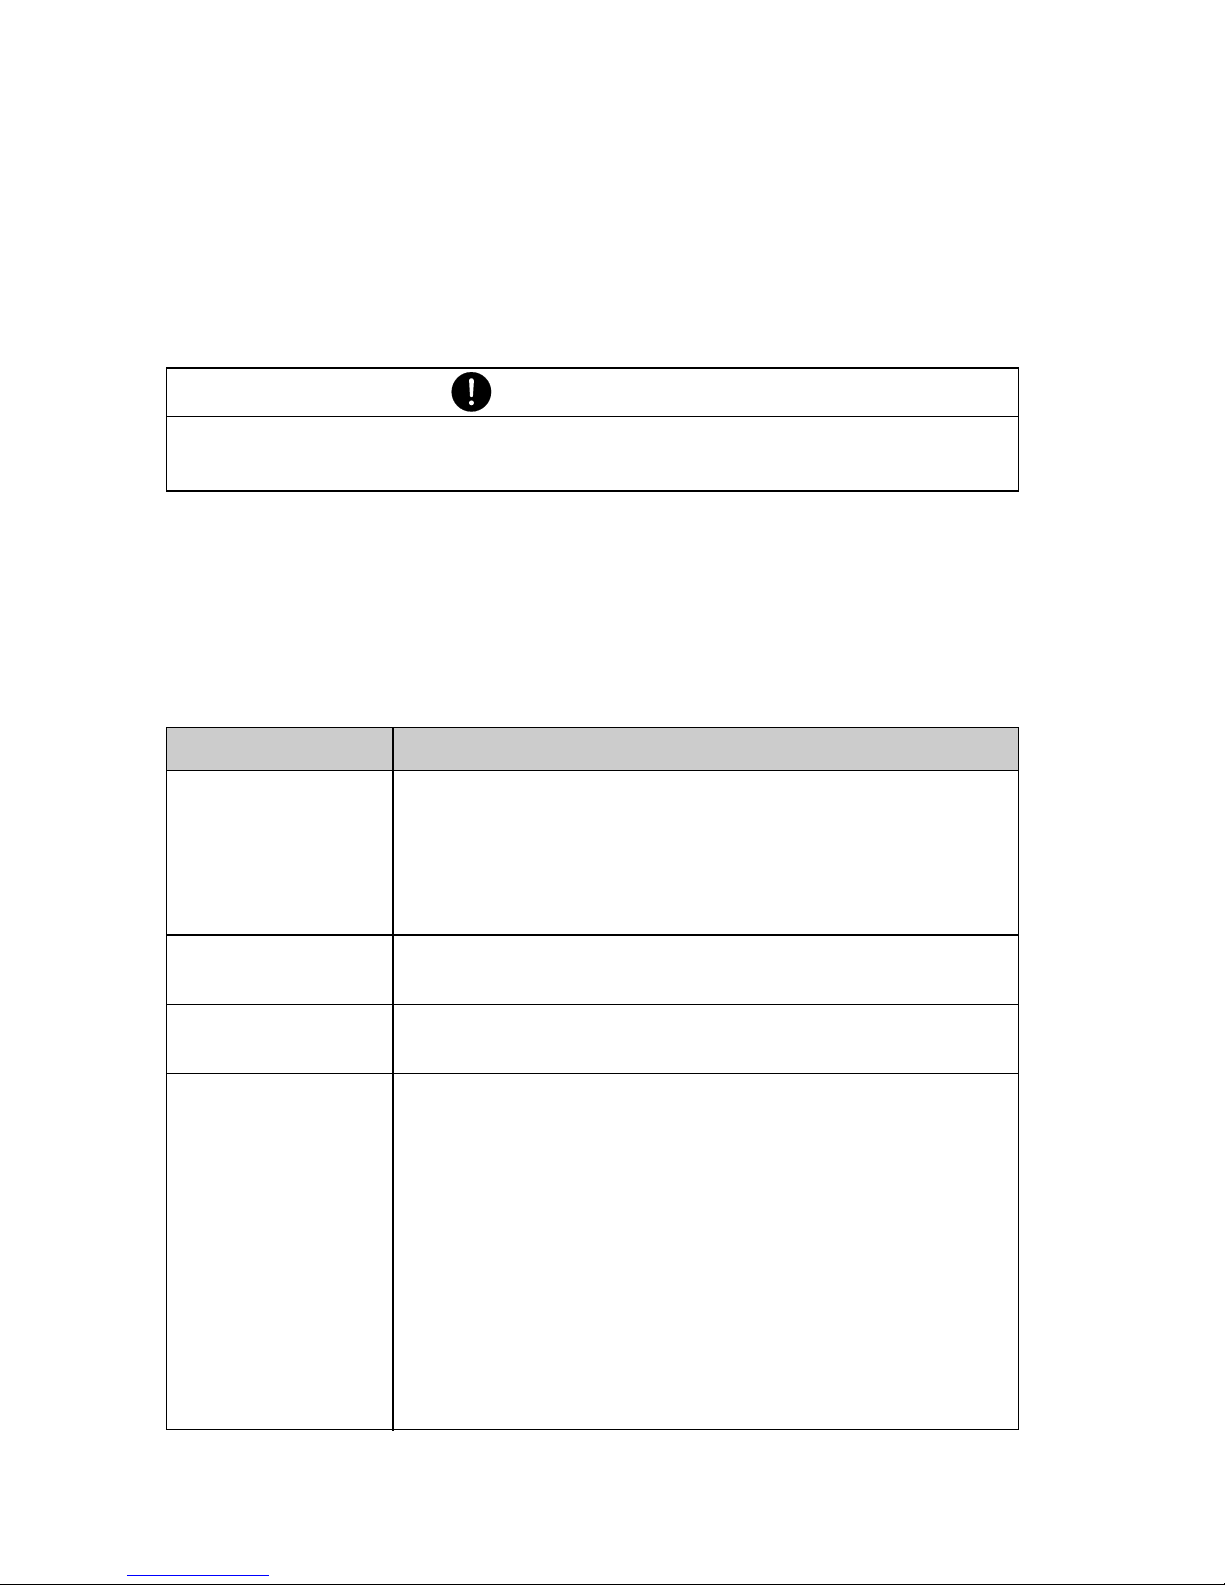
The balance shows a description of the fault in the info-line.
9.1 Notes on correcting faults
The following table shows faults and their possible causes. If you
cannot clear the fault on the basis of the table, please contact a Precisa Service Engineer.
NOTE
If an error occurs without a description of the error in the info-line,
a Precisa Service Engineer must be called.
Fault
Possible cause
Weight display does not
light
• Balance not switched on
• Connection to power adaptor is interrupted
• Power supply has failed (interruption to current)
• The power adaptor is defective
“OL” is shown
in display
• The weight range has been exceeded (Observe
information on the maximum weight range)
“UL” is shown
in display
• The weight range is below the range of the balance (Scale pan or scale pan holder missing)
The weight
display
fluctuates
continuously
• The draft is too strong at the balance location
• The balance support is vibrating or varying
• The scale pan is touching a foreign body
• The time chosen for FLOATINGDISPLAY is too
short
• The material being weighed is absorbing moisture
• The material being weighed is being blown
away, is evaporating or is subliming
• Strong temperature variations in the material
being weighed
Page 55
9 Error messages and correction of faults ■
53
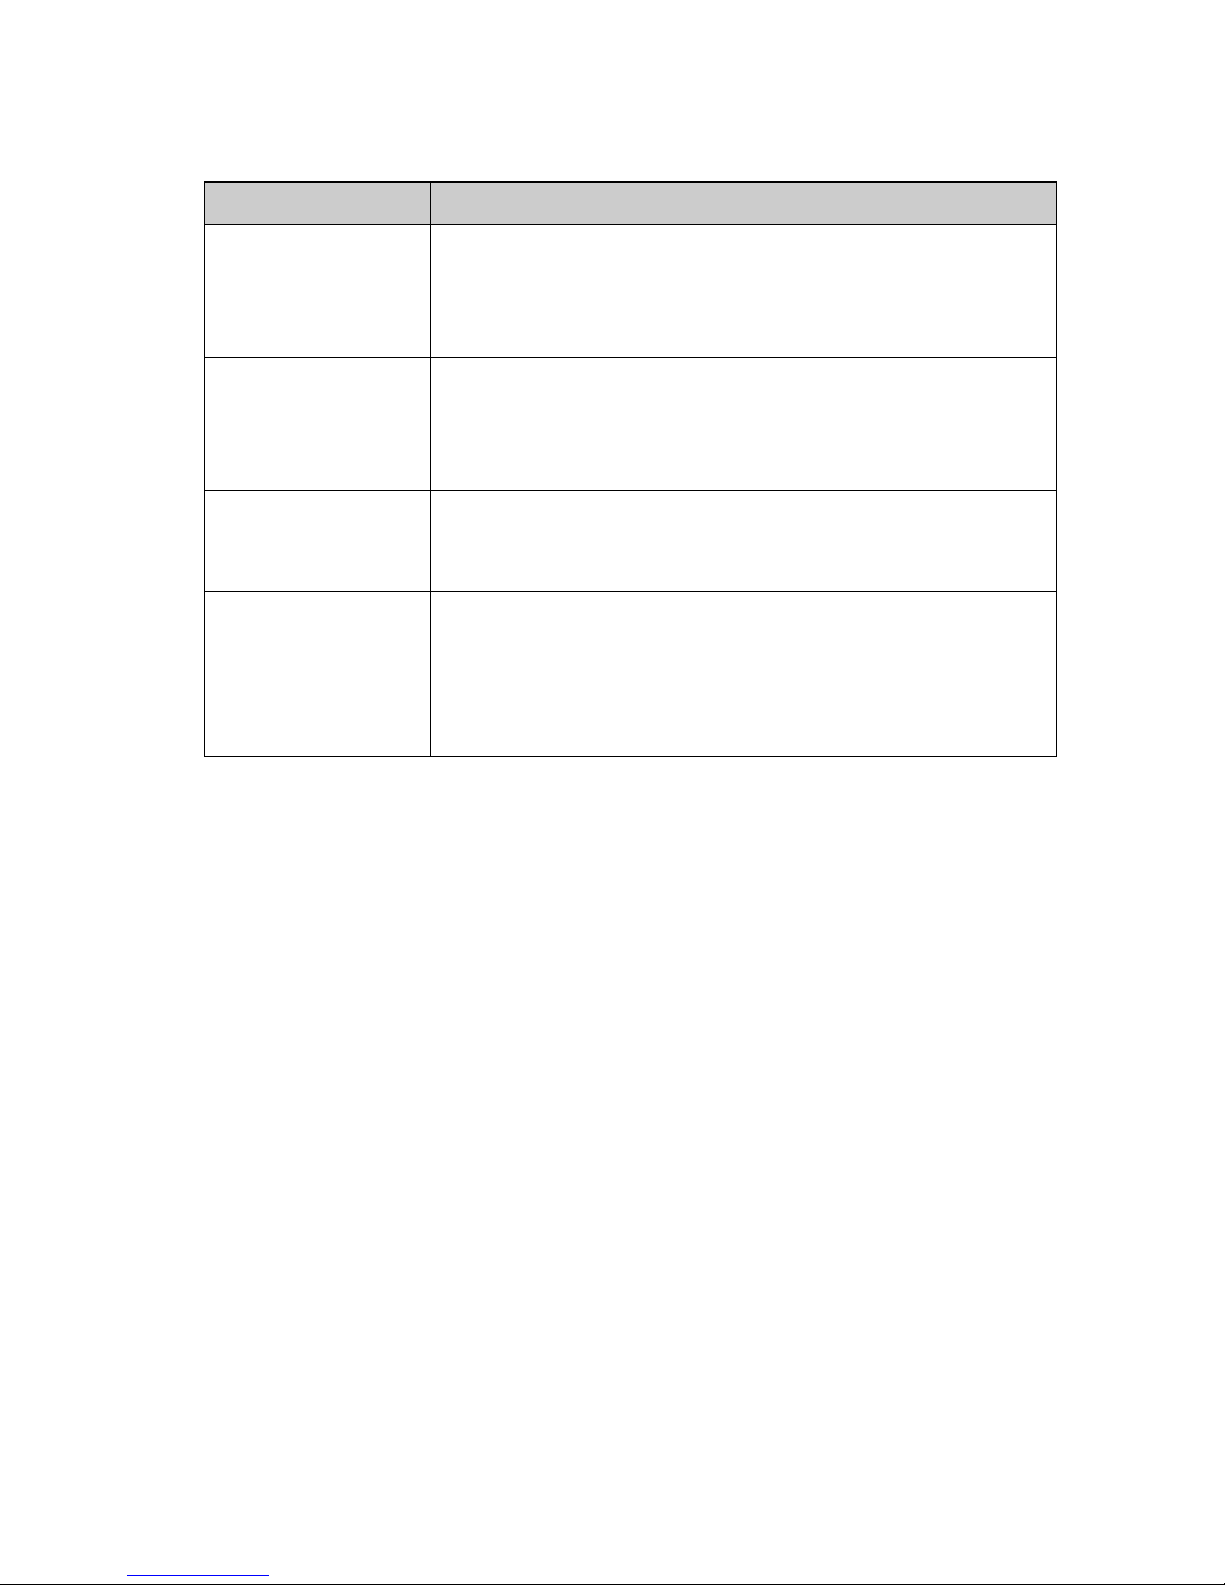
Tab. 9.1 Possible faults and their removal
Results of
weighing are
clearly incorrect
• The balance was not correctly tared
• The balance is not correctly levelled
• The calibration is no longer correct
• There are strong temperature variations
There is no
display or only
dashes
• The stability control (Balance functions) is set
too sensitively
• The time selected for FLOATINGDISPLAY is
unsatisfactory
Configuration
menu cannot
be changed
• The password lock is activated in the configuration menu
The display
flashes continuously during calibration
• The balance location is not quiet enough (Interrupt calibration with «ON/OFF» and relocate
the balance in a better position)
• Use of an imprecise calibration weight (only
applies to external calibration)
Fault
Possible cause
Page 56

■ 10 Practical examples
54
10 Practical examples
10.1 Changing the configuration menu
See Chapter 4.5.1 “Activating the configuration menu”, for the activation of the configuration menu.
10.1.1 Setting the choice of language
In order to alter the display language, proceed as follows:
10.1.2 Setting the Weight unit
In order to alter the weight unit, proceed as follows:
SPRACHE DEUTSCH
•Press «MODE» and hold down
until the currently set language
appears.
• Release the «MODE»-button.
or
LANGUE FRANCAISE
or
LANGUAGE ENGLISH
LANGUAGE ENGLISH
•Press «MODE» repeatedly, until
the desired language is displayed
(the display will flash).
• Hold down «MODE» until entry is
complete (display ceases to flash)
or press «PRINT».
•Press «PRINT» to exit menu.
unit-1 9
•Press «MODE» and hold down
until the currently set unit appears.
• Release the «MODE»-button.
unit-1 oz
•Press «MODE» repeatedly, until
the desired unit is displayed (the
display will flash).
•Press «PRINT» to confirm the
input (display ceases to flash).
•Press «PRINT» again to exit menu.
Page 57

10 Practical examples ■
55
10.1.3 Setting the Print functions
In order to alter the print parameters proceed as follows:
•Press «MODE» again and hold down the button until the next print
function appears. Change the setting in the same way.
•Press «PRINT» to return to “SET DATA PRINT”.
•Press «PRINT» again to exit menu.
SET DATA PRINT
•Press «MODE» and hold down
until “SET DATA PRINT” appears.
• Release the «MODE»-button.
AUTO-START OFF
•Press «MODE» briefly. “AUTO-
START ...” will appear.
AUTO-START ON
•Press «MODE» repeatedly, until
the desired setting is displayed
(ON or OFF will flash).
mODE STABLE
•Press «MODE» and hold down the
button until the next print
function appears (“MODE ...”).
• Release the «MODE»-button.
MODE TIMEBASE
•Press «MODE» repeatedly, until
the desired setting is displayed.
Page 58

■ 10 Practical examples
56
10.1.4 Activation of password protection
The possibilities for setting the password protection are described in
Chapter 5.10 “Password protection”.
In order to activate password protection, proceed as follows:
PASSWORd ––––
•Press «MODE» and hold down
button until “PASSWORD ––––”
appears.
• Release the «MODE»-button.
PASSWORd 7000
•Press «MODE» briefly. The first
digit of the password will flash.
• Enter the first digit by briefly pressing «MODE» repeatedly.
PASSWORd 7900
•Press «MODE» until the second
digit flashes. Enter the second
digit by briefly pressing «MODE»
repeatedly.
PASSWORd 7914
• In the same way enter the third
and fourth digit of the password.
• Hold down «MODE» until input is
complete (no digit flashing).
DATA-PROTECTION OFF
•Press «MODE» briefly. “DATA-
PROTECTION ...” will appear.
•Press «MODE» repeatedly, until
the desired data-protection is
displayed (the setting will flash).
new PASSWORd 7914
•Press «MODE» and hold down
button until “NEW PASSWORD
7914” appears.
• Release the «MODE»-button.
new PASSWORd 1234
• Your own new password can now
be entered in a similar manner to
the foregoing.
PASSWORd ––––
•Press «PRINT» to return to
“PASSWORD ––––”.
•Press «PRINT» to exit menu.
Page 59

10 Practical examples ■
57
10.2 Selection of an application program
See Chapter 4.5.2 “Activating the application menu” for the activation of the application menu.
10.2.1 Setting for Counting by weighing
For Setup, see Chapter 6.5 “Application “COUNT””
To count uniformly heavy objects such as coins, screws or similar
things, proceed as follows:
SET APP. . . .
•Press «MODE» and hold down
button until the currently set application appears.
• Release the «MODE»-button.
SET APP. count
•Press «MODE» repeatedly, until
“SET APP. COUNT” is displayed
(the application will flash).
•Press «PRINT» to confirm the
input.
SETup APPlication
•Press «MODE» until “SETUP AP-
PLICATION” appears.
• Release the «MODE»-button.
Reference 10 pcs
•Press «MODE» briefly, the cur-
rently set reference quantity appears.
• Release the «MODE»-button.
Reference 010 pcs
•Press «MODE» briefly. The first
digit of the reference quantity will
start to flash.
• Enter the first digit by briefly pressing «MODE» repeatedly.
Reference 020 pcs
•Press «MODE» until the second
digit flashes. Enter the second
digit by briefly pressing «MODE»
repeatedly.
Page 60

■ 10 Practical examples
58
By briefly depressing the «MODE»-button you can change to
“COUNT”.
Place the set number of objects on the weighing pan. The reference
weight for the count will be defined by briefly depressing the «REF»-
button.
Reference 025 pcs
• In the same way enter the third
digit of the reference quantity.
• Hold down «MODE» until input is
complete (no digit flashing).
•Press «PRINT» twice to exit
menu.
Page 61
11 Maintenance and servicing ■
59
11 Maintenance and servicing
The balance must be treated carefully and cleaned regularly. It is a
precision instrument.
Regularly dismantle the weighing pan and the weighing pan holder and
remove any dirt or dust from under the weighing pan and on the
balance housing with a soft brush or a soft, lint-free cloth, moistened
with a mild soap solution.
The scale and the holder can be cleaned under running water. Take
care that both parts are completely dry, before they are re-installed on
the balance.
The regular maintenance of the balance by your Precisa Service
Representative will guarantee unrestricted functioning and reliability
over many years and will extend the lifespan of the balance.
DANGER
For maintenance-work, the balance must be separated from the
power supply (remove power adaptor plug from socket). Also
ensure that the balance cannot be reconnected to the power
supply during the work by a third party.
Take care during cleaning that no liquid penetrates into the
appliance. If liquid is spilt on the balance, the latter must immediately be disconnected from the electricity supply. The balance may
only be used again after it has first been checked by a Precisa
Service Engineer.
The connections on the rear of the appliance and the power
adaptor may not come into contact with liquids.
CAUTION
Never use solvents, acids, alkalis, paint thinners, scouring powders or other aggressive or corrosive chemicals for cleaning, since
these substances attack the surfaces of the balance housing and
can cause damage.
Page 62
■ 12 Transport, storage and disposal
60
12 Transport, storage and disposal
12.1 Transportation and shipping of the balance
Your balance is a precision instrument. Treat it carefully.
Avoid shaking, severe impacts and vibration during the transportation.
Take care that there are no marked temperature fluctuations during
the transportation and that the balance does not become damp
(condensation).
12.2 Storage of the balance
If you would like to take the balance out of service for an extended
period, disconnect it from the electricity supply, clean it thoroughly
(see Chapter 11 “Maintenance and servicing”) and store it in a place
which fulfils the following conditions:
• No violent shaking, no vibrations
• No large temperature fluctuations
• No direct solar radiation
•No moisture
NOTE
The balance should preferably be dispatched and transported in the
original packaging to avoid transportation damage.
NOTE
The balance should preferably be stored in the original packaging,
since this provides optimal protection for the balance.
Page 63

13 Accessories ■
61
13 Accessories
13.1 Accessories
Accessory Article-number
Second display, free-standing 350-8504
Second display, built-in 350-8505
Second display, wall mounted 350-8516
Interface RS232 350-8506
Interface 20 mA current loop passive 350-8526
Analog output
-10 V... + 10 V (Resolution 10 mV)
350-8508
Smartbox Module for various applications:
Parts counting with stored values and part
numbers
350-8511-001
Finished pack control to FPVO 350-8511-002
Signal-lamp with 3 bulbs (green, yellow, red) 350-8510
Input/Output module
(6 TTL inputs, 8 Relay outputs)
350-8509
Multiplexer for up to 7 balances (RS232) 350-8513
Data-cable RJ45 - RJ45, 0.75 m 350-8525
Data-cable RJ45 - RJ45, 1.5 m 350-8520
Data-cable RJ45 - RJ45, 3 m 350-8521
Data-cable RJ45 - DB9 female (PC), 1.5m 350-8557
Data-cable RJ45 - DB25 female (PC), 1.5m 350-8558
Data-cable RJ45 - DB25 male (Printer), 1.5m 350-8559
Accumulator pack, complete 350-8514
Page 64

■ 13 Accessories
62
Accessory Article-number
Density determination kit 350-8515
Windshield for M- and C-balances
Heighth 180 mm
Heighth 260 mm
350-8518
350-8519
Dust cover for display 350-4096
Night cover 350-4097
Hooks for under-floor weighing 350-8527
Page 65
14 Further information ■
63
14 Further information
14.1 Notes on the Weighing mode
14.1.1 Set Weighing mode: FLOATINGDISPLAY
The value set for FLOATINGDISPLAY defines the period, after which
each new measurement is displayed.
For the definition of this period, the quality of the balance-location is
crucial. The stability control must also be suitably chosen.
Recommended values:
14.1.2 Set Weighing mode: Stability control
The value set for the stability control depends on the quality of the
balance location and must be correctly chosen in order to obtain
optimal, reproducible results. Choose:
• “HIGH STABILITY” at an optimal balance location,
• “MEDIUM STABILITY” at a good balance location or
• “LOW STABILITY” at a critical balance location
• Optimal balance location: FLOATINGDISPLAY 0.04 or
FLOATINGDISPLAY 0.08
• Good balance location: FLOATINGDISPLAY 0.16
• Critical balance location: FLOATINGDISPLAY 0.32
NOTE
The value of the Floating Display is a function of the stability control and the balance location. For balance location, see Chapter 3.4
“Choice of a suitable location” and Chapter 5.7 “Weighing mode”.
Page 66
■ 14 Further information
64
14.1.3 Set Weighing mode: Auto-Standby
The Auto-Standby mode turns off the balance automatically, if:
• the balance is tared and has shown “Zero” for at least 5 minutes
• the balance has received no remote control command via the interface for at least 5 minutes,
• the automatic zero correction “Auto-Zero” is activated.
It is possible to start the balance again after it has been switched off
by an automatic Auto-Standby:
• Briefly depress any key
• Put a weight on the scale
• Give a remote control command via the interface
14.1.4 Set Weighing mode: Auto-Zero
If the automatic zero correction “Auto-Zero” is activated, the balance
always gives a stable zero (e.g. even with room temperature fluctuations).
14.2 Notes on calibration
The calibration of the balance is fixed in the configuration menu (see
Chapter 3.7 “Calibration of the balance” and Chapter 5.6 “Calibration
functions”).
Possible types of calibration, depending on the model of balance:
• External calibration by means of ICM (Intelligent Calibration Mode)
• External calibration with freely selectable weight
• Internal calibration
• Automatic calibration
NOTE
The calibration can be interrupted at any time by pressing
«ON/OFF».
Page 67
14 Further information ■
65
14.2.1 External calibration by means of ICM
Depending on the type of balance, calibration weights in steps of
10 g, 50 g, 100 g and 500 g can be used, where the calibration
weight must correspond to the precision of the balance.
For an external calibration by means of ICM, “SET CALIBRATION
MODE EXTERNAL” must be selected in the configuration menu (see
Chapter 5.6 “Calibration functions”).
14.2.2 External calibration with freely selectable weight
For an external calibration with user-definable weight, “SET CALIBRATION MODE EXT. -DEF.” must be selected in the configuration menu
(see Chapter 5.6 “Calibration functions”).
Then, the effective value of the calibration weight (DEF. n'nnn g) must
be entered with up to tenfold precision compared with the balance.
• Switch to “BALANCING” with the
«MODE»-key
cALIBRation
•Press «T» until “CALIBRATION”
appears.
- - 0000 9
• The balance carries out a Zero
measurement (0.000 g is shown
flashing)
- - 2000 9
• After the zero measurement the
display flashes with the recommended calibration weight
• Place the calibration weight on
the pan
- - 2000 9
• The display continues to flash
• Calibration is complete when the
display stops flashing
+ 2000 9
NOTE
If calibration is carried out with the free weight, then only this
weight may be used.
Page 68

■ 14 Further information
66
Then proceed as follows:
14.2.3 Internal calibration
For an internal calibration with the built-in calibration weight “SET
CALIBRATION MODE INTERNAL” must be selected in the configuration menu (see Chapter 5.6 “Calibration functions”).
Then proceed as follows:
• Switch to “BALANCING” with the «MODE»-key
•Press «T» until “CALIBRATION” is shown.
• The calibration is finished after a certain period of time.
• Switch to “BALANCING” with the
«MODE»-key
cALIBRation
•Press «T» until “CALIBRATION”
appears.
- - 0000 9
• The balance carries out a Zero
measurement (0000 g is shown
flashing)
- - 372 9
• After the zero measurement the
display flashes with the previously entered calibration weight
• Place the calibration weight on
the pan
- - 372 9
• The display flashes rapidly
• Calibration is complete when the
display stops flashing (the exact
weight is shown)
+ 372.15 9
Page 69
14 Further information ■
67
14.2.4 Automatic calibration
For an automatic calibration with the built-in calibration weight “SET
CALIBRATION MODE AUTO” must be selected in the configuration
menu (see Chapter 5.6 “Calibration functions”).
The balance now calibrates itself automatically every 24 hours and/or
after each temperature change of 3 degrees Celsius, depending on the
definition in the configuration menu “SET CALIBRATION AUTOCAL”.
The time of the automatic calibration is as determined in the configuration menu under “SET CALIBRATION AUTOCAL. -TIME n h”.
(e.g. 6 h for 06.00 o'clock in the morning).
NOTE
For the automatic calibration by time and by time/temp. the date
and time of the balance must first be correctly set (see Chapter 5.9
“Date and time”).
The calibration can also be effected manually any time while autocalibration is activated.
The automatic calibration then takes place only if no weight is placed on the pan for at least five minutes.
It is recommended, that the time for the auto-calibration be set at
a time outside the normal business hours (for example, in the early
morning).
Page 70
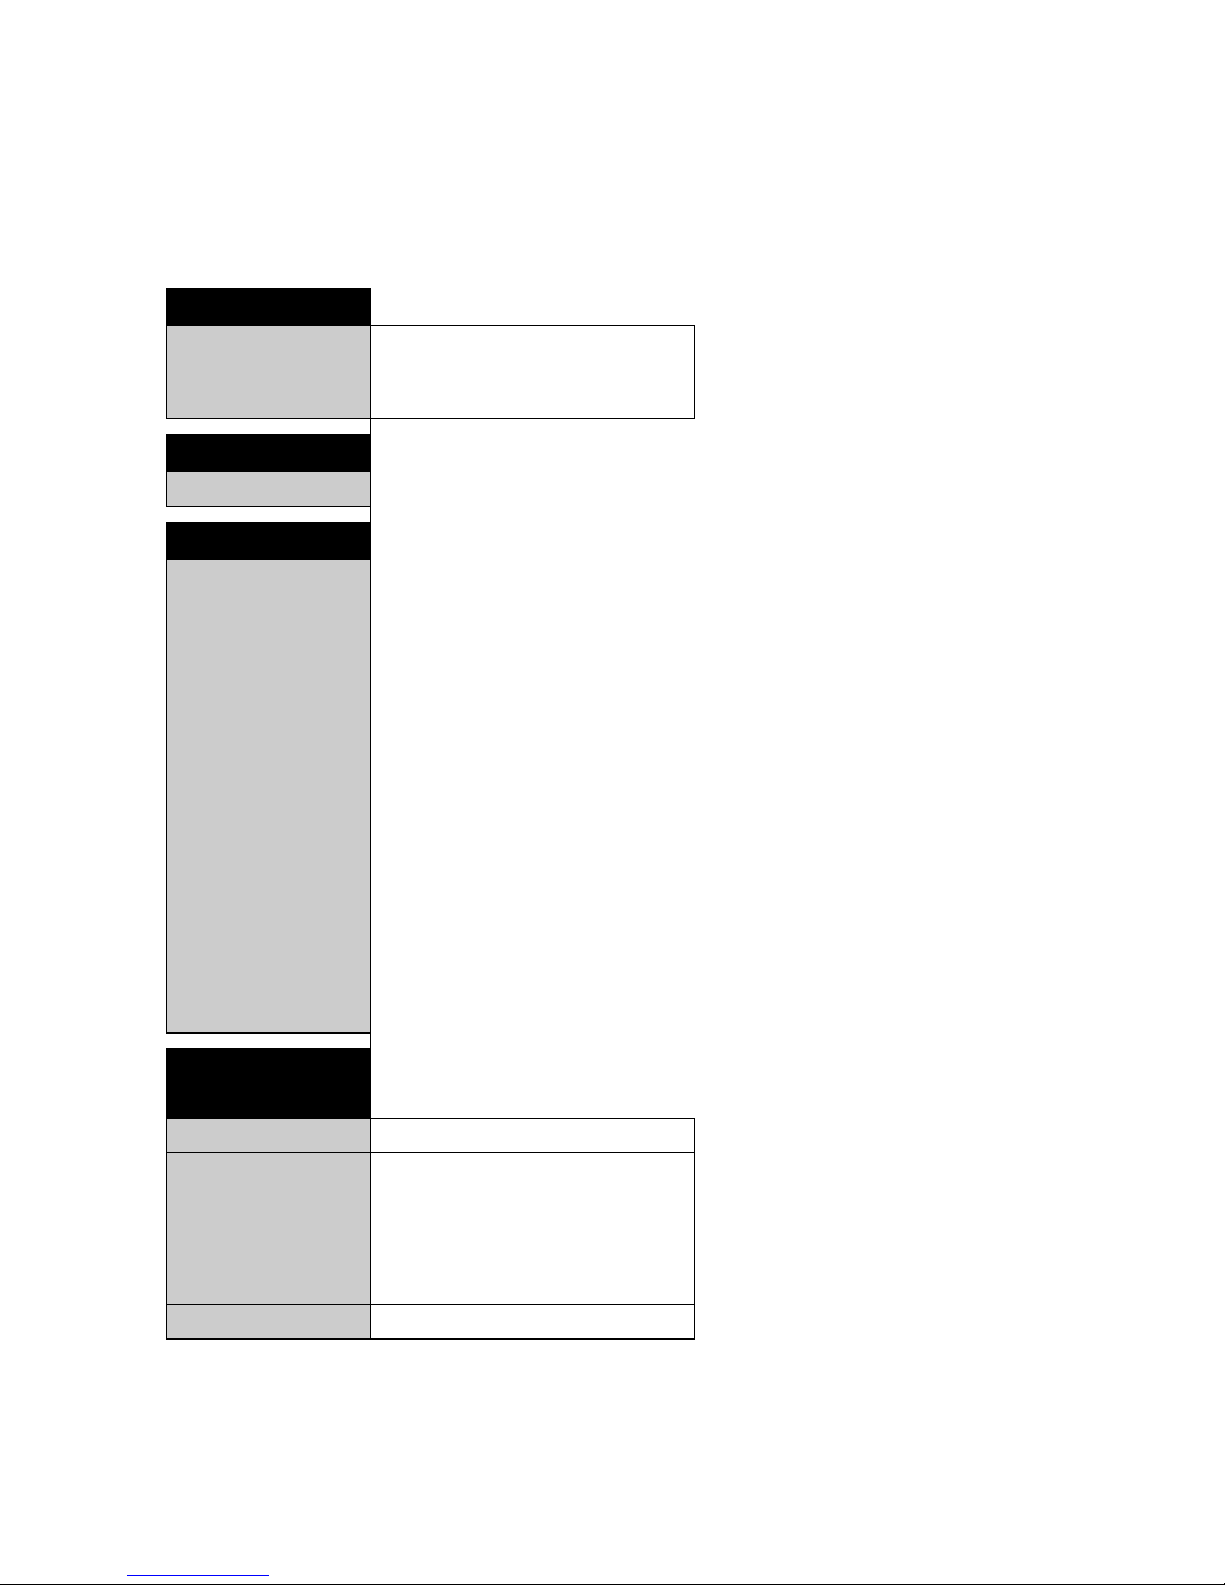
■ 15 Configuration menu tree
68
15 Configuration menu tree
«MODE»-button pressed on switching on:
• LANGUAGE
LANGUAGE ENGLISH
SPRACHE DEUTSCH
LANGUE FRANCAISE
•CONTRAST
CONTRAST 6
•UNIT-1
UNIT-1 g
mg
kg
GN
dwt
ozt
oz
Lb
ct
C.M
tlH
tlM
tlT
mo
t
Bht
•SET
DATA PRINT
AUTO-START ON/OFF
MODE UNSTABLE
MODE STABLE
MODE LOADCHANGE
MODE CONTINUOUS
MODE TIMEBASE
TIMEBASE 2.0
Page 71
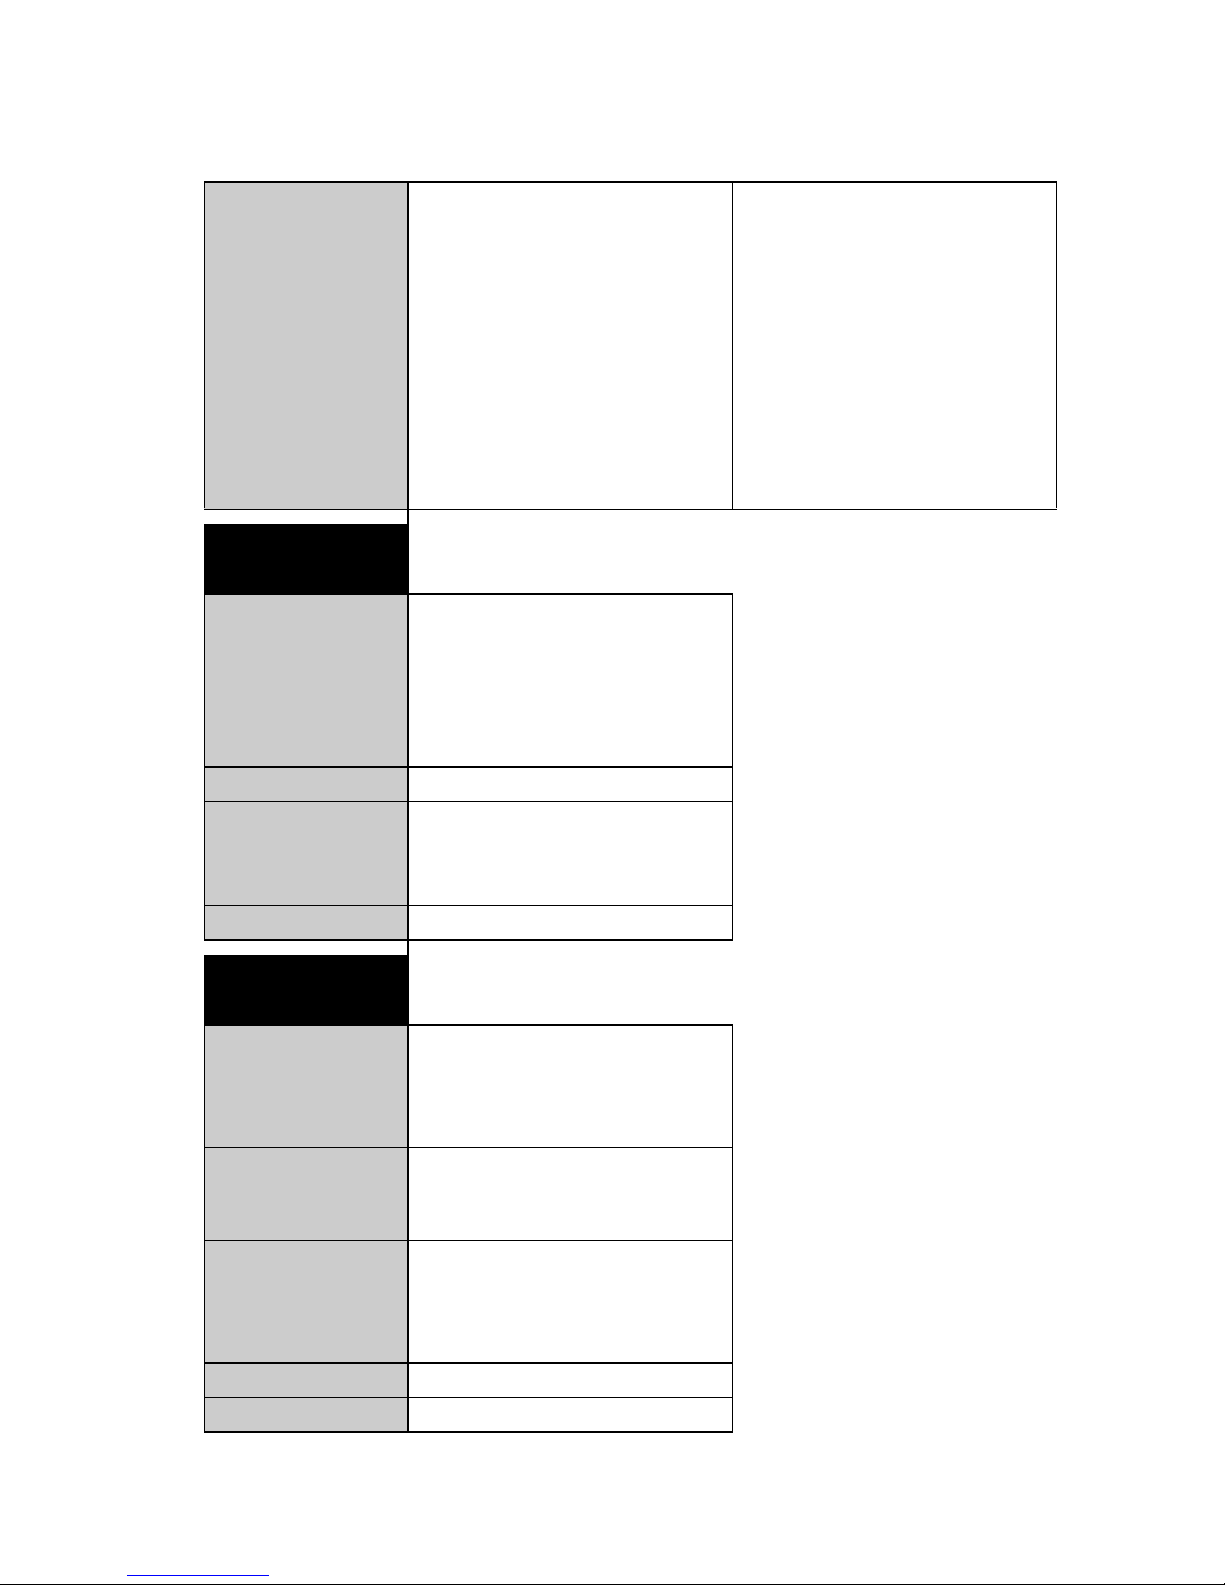
15 Configuration menu tree ■
69
SET PRINTFORMAT DATE AND TIME ON/OFF
BALANCE-ID ON/OFF
PRODUCT-ID ON/OFF
GROSS AND TARE ON/OFF
UNITS ON/OFF
OPERATOR-ID ON/OFF
PRODUCT ttt...
PRODUCTMODE HOLD
PRODUCTMODE DELETE
PRODUCTMODE COUNT
OPERATOR ttt...
•SET CALIBRATION
MODE OFF
MODE EXTERNAL
MODE EXT.-DEF.
MODE INTERNAL
MODE AUTO
DEF. 0.000 g
AUTOCAL. TIME/TEMP.
AUTOCAL.TEMPERATURE
AUTOCAL. TIME
AUTOCAL.-TIME 6 h
•SET WEIGHING MODE
FLOATINGDISPLAY 0.04
FLOATINGDISPLAY 0.08
FLOATINGDISPLAY 0.16
FLOATINGDISPLAY 0.32
STABILITY LOW
STABILITY MEDIUM
STABILITY HIGH
AUTO-STANDBY OFF
AUTO-STANDBY 5 MIN
AUTO-STANDBY 10 MIN
AUTO-STANDBY 30 MIN
AUTO-ZERO ON/OFF
QUICK-TARE ON/OFF
Page 72
■ 15 Configuration menu tree
70
•SET
INTERFACE
BAUDRATE 300
BAUDRATE 600
BAUDRATE 1200
BAUDRATE 2400
BAUDRATE 4800
BAUDRATE 9600
BAUDRATE 19200
PARITY 7-EVEN-1STOP
PARITY 7-ODD-1STOP
PARITY 7-NO-2STOP
PARITY 8-NO-1STOP
HANDSHAKE NO
HANDSHAKE XON-XOFF
HANDSHAKE HARDWARE
•SET DATE
AND TIME
DATE [DD.MM.YY]
TIME [HH.MM.SS]
FORMAT STANDARD/US
• PASSWORD
PASSWORD
––––
DATA-PROTECTION OFF
DATA-PROTECTION MED
DATA-PROTECTION HIGH
NEW PASSWORD ––––
• THEFTCODE
THEFTCODE
––––
THEFT-PROTECTION OFF
THEFT-PROTECTION ON
NEW CODE ––––
Page 73
16 Application menu tree ■
71
16 Application menu tree
Press «MODE»-button in operation:
17 Configuration menu tree
«MODE»- and «T»-button pressed on switching on:
•SET APP.
OFF
UNITS
COUNT
PERCENT
• SETUP APPLICATION
Division depends on the current
application, see Chapter 6 “Working with the application menu”
•AUTO-START
AUTO-START ON/OFF
FACTORY CONFIG. Load factory-configuration.
USER CONFIG. Load user-configuration.
STORE CONFIG. Store present configuration as user-con-
figuration.
 Loading...