

Page 1
schwarz / black (-)
schwarz / black (-)
blau / blue
blau / blue
rot / red (+)
rot / red (+)
weiß / white
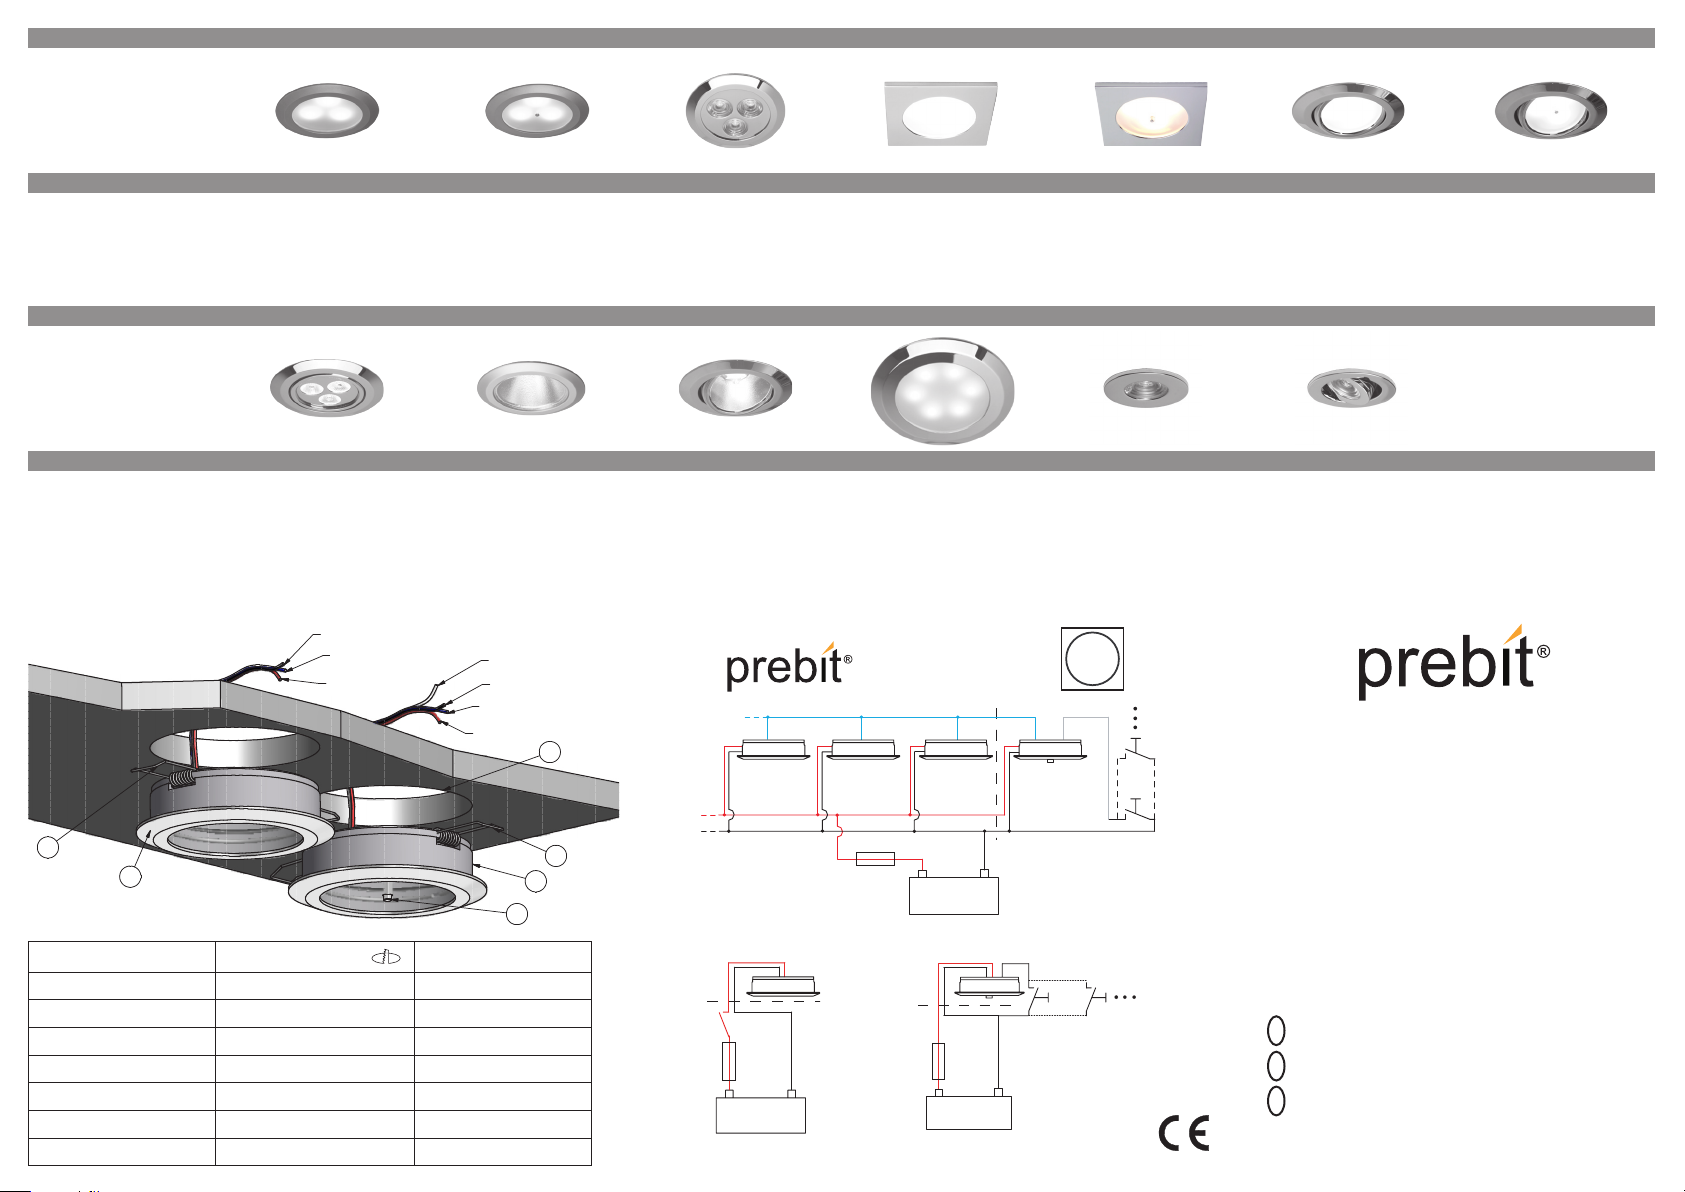
EB12-1 - Slave
EB12-2 - Master
4
3
3
1
2
2
+
-
Batterie /
Battery
Sicherung /
Fuse
rot / red
schwarz / black
weiß / white
Taster /
Pushbutton
XX-2
(Master*)
XX-1
(Slave)
blau / blue
XX-1
(Slave)
XX-1
(Slave)
* mit oder ohne
integrierten Taster /
* may be with or without
an integrated sof
t-switch
+
-
Batterie /
Battery
Sicherung /
Fuse
rot / red
schwarz / black
XX-1
+
-
Batterie /
Battery
Sicherung /
Fuse
rot / red
schwarz / black
XX-2
weiß /
white
Pushbutton
Farbtemperatur / Colour Temp:
zulässige Betriebstemperatur /
allowable operating Temp:
Spannung / operating Voltage:
Strom / Current Consumption:
Leistung / Power Consumption:
3.000 Kelvin (warm white)
-10°C...+50°C
DC 10-30V
0,28 A @ 12V / 0,14 A @ 24V
max. 3 W
3.000 Kelvin (warm white) / red
-10°C...+50°C
DC 10-30V
0,28 A @ 12V / 0,14 A @ 24V
max. 3 W
EB12-1L / EB12-2L
3.000 Kelvin (warm white)
-10°C...+50°C
DC 10-30V
0,28 A @ 12V / 0,14 A @ 24V
max. 3 W
EBQ12-1 / EBQ12-2 EBQ12-3
3.000 Kelvin (warm white)
-10°C...+50°C
DC 10-30V
0,28 A @ 12V / 0,14 A @ 24V
max. 3 W
3.000 Kelvin (warm white) / red
-10°C...+50°C
DC 10-30V
0,28 A @ 12V / 0,14 A @ 24V
max. 3 W
EB15-1 / EB15-2 EB15-3EB12-3EB12-1 / EB12-2Technical details :
3.000 Kelvin (warm white)
-10°C...+50°C
DC 10-30V
0,28 A @ 12V / 0,14 A @ 24V
max. 3 W
3.000 Kelvin (warm white) / red
-10°C...+50°C
DC 10-30V
0,28 A @ 12V / 0,14 A @ 24V
max. 3 W
EB15-3
EB15-1L / EB15-2L EB18-1 EB19-1Technical details : EB22-1 / EB22-2
Farbtemperatur / Colour Temp:
zulässige Betriebstemperatur /
allowable operating Temp:
Spannung / operating Voltage:
Strom / Current Consumption:
Leistung / Power Consumption:
3.000 Kelvin (warm white)
-10°C...+50°C
DC 10-30V
0,28 A @ 12V / 0,14 A @ 24V
max. 3 W
3.000 Kelvin (warm white)
-10°C...+50°C
DC 10-30V
0,6 A @ 12V / 0,3 A @ 24V
max. 7 W
Model
EB01-1 28 mm 32 mm
EB02-1 36 mm 32 mm
EB12 / EB12L / EBQ12
EB15 / EB15L 76 mm 20 mm
EB18-1 62 mm 71 mm
EB19-1 76 mm 72 mm
EB22 92 mm 22 mm
Installation opening
62 mm 18 mm
Installation depth
EB01-1 EB02-1
3.000 Kelvin (warm white)
-10°C...+50°C
DC 10-30V
0,6 A @ 12V / 0,3 A @ 24V
max. 7 W
3.000 Kelvin (warm white)
-10°C...+50°C
DC 10-30V
0,56 A @ 12V / 0,27 A @ 24V
max. 6 W
3.000 Kelvin (warm white)
-10°C...+50°C
DC 10-30V
0,16 A @ 12V / 0,13 A @ 24V
max. 2,5 W
GROUP
3.000 Kelvin (warm white)
-10°C...+50°C
DC 10-30V
0,16 A @ 12V / 0,13 A @ 24V
max. 2,5 W
teamwork
Made in Germany
Montage- und Bedienungsanleitung
Installation and User Guide
Montage- en bedieningsinstructie
EB01-1 EB02-1 EB12
EB12L EBQ12 EB15
EB15L EB18-1 EB19-1
EB22
prebit GmbH
Industriestrasse 21 Fax:+49 (0)2226 8922821
D GB NL
53359 Rheinbach [email protected]
Germany www.prebit.de
06.12
Tel.:+49 (0)2226 892280
Page 2

D GB NL
D GB NL
Bitte beachten Sie die nationalen Installations- und
Unfallverhütungsvorschriften.
Einbau
Alle in dieser Bedienungsanleitung genannten
Leuchten sind nur für Innenraumanwendung geeignet!
Bereiten Sie eine Einbauöffnung mit dem der
Leuchte entsprechenden Durchmesser vor. Dann
müssen Sie nur noch die Kabel (rot/schwarz) an
die Gleichstromspannung 10-30V anschließen, die
Federn nach hinten biegen und das Leuchtengehäuse in die Einbauöffnung schieben.
ACHTUNG: prebit®-Leuchten verfügen zwar über
einen Verpolungsschutz, bitte achten Sie dennoch
auf die richtige Polarität: rot (+) / schwarz (-)
Bedienung EB1X-1 / EB2X-1 (Slave)
Die Leuchte wird entwerder über einen externen
Schalter* ein- bzw ausgeschaltet oder als SlaveLeuchte durch die Master-Leuchte EB1X-2 / EB2X2 gesteuert.
Bedienung EB1X-2 / EB2X-2 (Master)
Zum Ein- und Ausschalten der Leuchte den Taster
kurz drücken. Längeres Drücken bei eingeschalteter Leuchte regelt die Helligkeit bis zum Maximum
(100%) oder Minimum (10%). Dann bleibt der Dimmer stehen, bis Sie ihn erneut betätigen. Wenn Sie
die Dimmrichtung ändern möchten, lassen Sie die
Taste kurz los und drücken innerhalb von einer Sekunde erneut.
Die Leuchte speichert automatisch ihren letzten Zustand und schaltet sich beim nächsten Mal genau
so wieder ein.
Bedienung EB12-3 / EB15-3
rot / weiß umschaltbare Leuchten
Ein Doppelklick wechselt zwischen rotem und
weißem Licht. Ausgeschaltete Leuchten können
mit einem Doppelklick immer auf rotes Licht
eingeschaltet werden.
Leuchten in Gruppenschaltung
Master / Slave
Wenn Sie mehrere XX-1 / XX-2-Leuchten gemeinsam schalten und dimmen möchten, benötigen Sie
nur eine Leuchte vom Typ EB1X-2 / EB2X-2 als
Master-Leuchte sowie eine bis max. 15 Leuchten
vom Typ EB1X-1 / EB2X-1 (hier als Slave-Leuchten). Verbinden Sie das blaue Steuerkabel der
Masterleuchte mit allen blauen Kabeln der Slaveleuchten untereinander (siehe Skizze). Nun steuert
die Masterleuchte synchron und zuverlässig alle
angeschlossenen EB1X-1 / EB2X-1.
ACHTUNG: mehrere Masterleuchten EB1X-2 /
EB2X-2 dürfen nicht untereinander verbunden
werden!
Anschluss an externen Taster
Um die Leuchten bequem über einen oder mehrere
externe Taster zu bedienen, verbinden Sie das
ße Kabel Ihrer EB1X-2 / EB2X-2 (Masterleuchte)
über einen handelsüblichen Taster mit dem Minus-
pol der Batterie. Somit können alle Funktionen dieser Leuchte (wie auch der gesamten Gruppe) zusätzlich von diesem Taster aus gesteuert werden.
ACHTUNG: Der externe Tasteranschluss darf über
den Taster nur mit dem Minuspol (-) der Batterie
verbunden werden!
wei-
Please observe national guidance and accident pre
vention provisions.
Installation
All lamps listed in this manual are only suitable for
indoor use!
Prepare an installation opening with the corresponding diameter of the light. All you have to do
then is to connect the cables (red/black) to the direct current 10-30V, bend the springs backward
and insert the light casing into the installation
opening.
PLEASE NOTE! prebit® lights do indeed have a reverse polarity protection, but nevertheless take care
that correct polarity is observed: red (+) / black (-)
Operation EB1X-1 / EB2X-1 (Slave)
The light is either switched on or off via an external
switch* or is used as a Slave-lamp and controlled by
Master-lamp EB1X-2 / EB2X-2.
Operation EB1X-2 / EB2X-2 (Master)
To switch the light on or off press the push-button
switch briefly. Brightness can be adjusted by holding down the switch. To reverse the dimming phase release the switch briefly and press again within
one second. The LED light can be dimmed to a
minimum (10%) or pushed to maximum bright-ness
(100%), and will remain at that respective level. The
light keeps this brightness until the next change.
Operation EB12-3 / EB15-3
red / white switchable lights
A double-click changes between the red and
white light. Lights are switched off can always be
switched on to red light with a double click.
Light group switching
Master / Slave
If you wish to switch and dim several XX-1 / XX-2
lights at once, you require only one type EB1X-2 /
EB2X-2 light as a master light, plus up to max. 15
type EB1X-1 / EB2X-1 lights (used in this configuration as slave lights). Interconnect the blue control
cable from the master light to all of the blue cables
from the slave lights (see diagram). Now the master
light will control all EB1X-1 / EB2X-1s connected to
it simultaneously and reliably.
CAUTION: Several master lights EB1X-2 / EB2X-2
may not be interconnected!
Connecting to an external push button
To operate the lights conveniently using one or
more external push buttons, connect the white cable from your EB1X-2 / EB2X-2 (master light) via a
conventional push-button switch with the negative
pole of the battery. This allows you to control all of
the light’s functions (as well as those of the entire
group) additionally with this push button.
CAUTION: The external push-button connection
may only be connected to the negative pole (-)
of the battery!
Bij de montage moeten de nationale installatievoor-
schriften en de voorschriften ter voorkoming van
ongevallen in acht genomen worden.
Montage
All lamps listed in this manual are only suitable for
indoor use!
Bereid een inbouwopening met de overeenkomstige diameter van het licht voor. Dan hoeft u alleen
nog maar de kabels (rood/zwart) op de gelijkstroomspanning van 10-30 V aan te sluiten, de veren
naar achteren te buigen en de behuizing van de
lamp in de inbouwopening te schuiven.
LET OP! prebit®-lampen zijn weliswaar beschermd
tegen verwisseling van de polen, maar let toch op de
juiste polariteit: rood (+) / zwart (-)
Bediening EB1X-1 / EB2X-1 (Slave)
Het licht wordt zowel in-of uitgeschakeld via een
externe schakelaar* of wordt gebruikt als een Slave-lamp en gecontroleerd door een Master-lamp
EB1X-2 / EB2X-2.
Bediening EB1X-2 / EB2X-2 (Master)
Voor het in- resp. uitschakelen van de lamp 1x kort
op de toets drukken. Door bij ingeschakelde lamp
langer te drukken kan de helderheid tot maximum
(100%) of minimum (10%) ingesteld worden. Dan
blijft de dimmer staan totdat u opnieuw op de toets
drukt. Als u de dimrichting wilt veranderen moet u
de toets even loslaten en dan binnen 1 seconde
opnieuw drukken.
De lamp slaat de laatst ingeschakelde toestand
automatisch op en brandt bij de volgende keer met
dezelfde helderheid.
Operation EB12-3 / EB15-3
red / white switchable lights
Met een “dubbelklik” schakelt u tussen rood en
wit licht.
Lights are switched off can always be switched on
to red light with a double click.
Light group switching
Master / Slave
If you wish to switch and dim several XX-1 / XX-2
lights at once, you require only one type EB1X-2 /
EB2X-2 light as a master light, plus up to max. 15
type EB1X-1 / EB2X-1 lights (used in this configuration as slave lights). Interconnect the blue control
cable from the master light to all of the blue cables
from the slave lights (see diagram). Now the master
light will control all EB1X-1 / EB2X-1s connected to
it simultaneously and reliably.
CAUTION: Several master lights EB1X-2 / EB2X-2
may not be interconnected!
Connecting to an external push button
To operate the lights conveniently using one or
more external push buttons, connect the
ble from your EB1X-2 / EB2X-2 (master light) via a
conventional push-button switch with the negative
pole of the battery. This allows you to control all of
the light’s functions (as well as those of the entire
group) additionally with this push button.
CAUTION: The external push-button connection
may only be connected to the negative pole (-)
of the battery!
white ca-
Reinigung
Die Optik Ihrer prebit-Leuchte kann dauerhaft
bewahrt werden, wenn Sie die Oberflächen zweimal in der Saison von möglichen Ablagerungen
befreien.
Vor jeder Reinigung die Leuchte bitte unbedingt
spannungsfrei schalten!
Idealerweise verwenden Sie ein weiches Tuch, das
mit Wasser angefeuchtet wurde. Bitte nehmen Sie
keine Reinigungs- oder Scheuermittel!
Sollte Ihre Leuchte mit Salzwasser in Berührung
gekommen sein, so reinigen Sie diese ebenfalls
mit einem Tuch, das mit klarem Wasser angefeuchtet wurde.
Konformitätserklärung
Hiermit erklärt die Firma prebit GmbH, dass sich alle
prebit-Leuchten in Übereinstimmung mit den grundlegenden Anforderungen der europäischen Richtlinie
für elektromagnetische Verträglichkeit (89/336/EWG)
befinden.
Allgemeine Sicherheitshinweise
1. Montage und Anschluss der Leuchte nur
durch Fachpersonal.
2. Leuchte nicht für Feuchtraum geeignet.
3. Leuchte vor allen Arbeiten (z.B. Reinigung)
spannungsfrei schalten.
4. Leuchte arbeitet mit Gleichstrom (DC). Auf
richtige Polung der Anschlüsse (+/-) achten.
5. Kein Garantieanspruch bei eigenmächtigen
Veränderungen und/oder unsachgemäßer
Benutzung!
Garantie
Die Garantiezeit beträgt drei Jahre und umfasst
notwendige Ersatzteile sowie die Arbeitszeit für
deren Einbau in die Leuchte selbst. Kosten für
Aus- und Einbau der Leuchte sind nicht Bestandteil der Garantie.
Haftungsausschluss
prebit garantiert für eine einwandfreie Beschaffenheit und Funktion der eigenen Produkte. Eine Garantie oder Haftung für indirekte oder weiterführende Schäden wird jedoch abgelehnt. Diese Anleitung
wurde nach bestem Wissen und Gewissen erstellt.
Es kann jedoch nicht für Fehler und daraus resultierende Schäden gehaftet werden.
Cleaning
Before cleaning disconnect the light from the power
supply.
Only clean with a slightly wet, soft cloth. The use of
clear water for wetting the cloth is recommended.
Please do not use any cleaning or abrasive solutions!
If your lamp comes in direct contact with salt water
, then clean them well with a cloth dampened with
clean water.
Declaration of Conformity
prebit GmbH hereby declares that all prebit-lights
complies with the fundamental requirements of the
European Directive on Electromagnetic Compatibility (89/336/EEC).
General Safety Instructions
1. Installation and connection by a technician
only.
2. Light not suitable for use in wet areas.
3. Disconnect light from mains supply before beginning any work (e.g. cleaning)!
4. Light works with DC, observe correct polarisation (+/-) of connections.
5. Warranty expires in case of improper maintenance and/or incorrect use!
Guarantee
The guarantee period is three years and includes
necessary replacement parts as well as installing
them in the light. Costs of dismounting/re-mounting
the light are not included in the guarantee.
Disclaimer
prebit guarantees that its own products are manufactured and function properly. This excludes
any guarantee or liability for indirect or extended
damages. These instructions were written to the
best of our knowledge and ability. No liability can be
accepted for mistakes made and damages resulting
from mistakes made.
Reiniging
Uw lampen behouden hun fraaie uiterlijk als de
oppervlakken twee keer per seizoen afgestoft
en gereinigd worden. Vòòr het reinigen moet de
lamp stroomloos gemaakt worden. Gebruik voor
de reiniging een zacht doekje dat met water een
beetje vochtig gemaakt is. Gebruik voor de reiniging geen schoonmaak- of schuurmiddelen!
If your lamp comes in direct contact with salt water
, then clean them well with a cloth dampened with
clean water.
Conformiteitsverklaring
Hiermee verklaart de firma prebit GmbH, dat all
prebit-lamps overeenkomt met de principiële eisen
van de Europese richtlijnen voor elektromagnetische verdraagzaamheid (89/336/EWG).
Algemene veiligheidsinformatie
1. Montage en aansluiting alleen door vakkundig personeel.
2. De lamp is niet geschikt voor gebruik in vochtige ruimten.
3. Voordat aan de lamp gewerkt wordt (bijv.
reiniging), moet deze stroomloos gemaakt
worden!
4. De lamp werkt op gelijkstroom (DC): let op
de juiste polariteit van de aansluitingen (plus/
min).
5. De garantie vervalt bij zelf uitgevoerde veranderingen en/of onvakkundig gebruik!
Garantie
De garantietijd bedraagt drie jaar en omvat de
noodzakelijke reserve-onderdelen alsmede de arbeidsuren voor de inbouw in de lamp zelf. Kosten
voor het uit- resp. inbouwen van de lamp zijn geen
onderdeel van de garantie.
Uitsluiting van de aansprakelijkheid
prebit garandeert een foutloze kwaliteit en functie
van de eigen producten. Een garantie of aansprakelijkheid voor indirecte of verdergaande schaden
wordt echter uitgesloten. Deze instructie werd opgesteld naar eer en geweten. Wij zijn echter niet
aansprakelijk voor fouten en daaruit resulterende
schaden.
 Loading...