

Page 1
SPEED OVEN
SPEED O V E N
INSTALLATION AND OPERATION MANUAL
Page 2

Page 3

LETTER TO OUR CUSTOMERS
Pratica Inc. is proud to become part of your day-to-day lives through our
products. By purchasing Pratica's appliances, you will have a partner in the
kitchen that dedicated to keeping your customers satisfied and who will
always be attentive to your needs.
We are available to serve you at any time, whether to solve an issue/dispute,
or to hear your ideas, suggestions, or criticisms.
Our Commitment
.
• To know and meet the needs of our customers.
• Offer reliable, high-performance, and energy-efficient products.
• Consistently look for ways to improve our processes, products, and
cost to offer more value to our customers every single day.
• Treat our customers with honesty and respect.
• Prática Inc. donates a portion of its profits to charitable causes.
.
This manual contains all the information for you to install and use your
equipment correctly and get the best results in performance, quality, and
safety.
We recommend that you read and follow all the guidelines contained
therein and keep this manual in a suitable place for future consultations.
Page 4

Page 5

SUMMARY
IMPORTANT SAFETY INSTRUCTIONS
Use Recommendations..........................................................................................
Restrictions of use..................................................................................................
General recommendations for cleaning.................................................................
Safety risk: cleaning chemicals..............................................................................
Safety risk: heating..................................................................................................
Safety risk: eletric power.........................................................................................
Suitable utensils......................................................................................................
Combination of suitable utensils............................................................................
PRECAUTIONS TO AVOID POSSIBLE EXPOSURE TO EXCESSIVE
MICROWAVE ENERGY..................................................................................
08
11
12
12
12
13
14
14
15
IDENTIFICATION OF SYMBOLS USED IN THIS MANUAL.................................
WARRANTY
Terms and Detailing................................................................................................
Warranty Exclusions................................................................................................
Notes and Recommendations................................................................................
INSTALLATION INSTRUCTIONS
Electrical Installation..............................................................................................
General Instructions...............................................................................................
Dimensions.............................................................................................................
General Recommendations...................................................................................
FIT EXPRESS TECHNOLOGY.........................................................................
PRINCIPLES OF OPERATION........................................................................
RECIPE CREATION......................................................................................
OPERATING INSTRUCTIONS
Preheating.............................................................................................................
Executing a Recipe................................................................................................
Accessing Options................................................................................................
User Settings.........................................................................................................
Ÿ Edit Groups........................................................................................................
Ÿ Edit Name..........................................................................................................
Ÿ Edit Group Image...............................................................................................
Ÿ Delete Group Recipes.......................................................................................
16
17
17
18
20
21
22
23
24
25
27
28
29
32
33
34
35
36
37
Page 6

OPERATING INSTRUCTIONS
Ÿ Delete Group.....................................................................................................
Ÿ Order - Group.....................................................................................................
Ÿ Change Group Temperature.............................................................................
Ÿ Edit Recipes......................................................................................................
Ÿ Edit Recipe Name.............................................................................................
Ÿ Edit Recipe Image.............................................................................................
Ÿ Edit Steps..........................................................................................................
Ÿ Delete Recipe....................................................................................................
Ÿ Order - Recipes..................................................................................................
Ÿ Edit Cook/Brown more......................................................................................
Ÿ Add/Remove favorites......................................................................................
Ÿ Preheat..............................................................................................................
Ÿ USB....................................................................................................................
Ÿ Current Temperature.........................................................................................
Ÿ Celsius/Fahrenheit...........................................................................................
Ÿ Wi-Fi..................................................................................................................
Ÿ Webb app - IOK - Internet of kitchen..................................................................
Ÿ System Update..................................................................................................
Ÿ Customer Support.............................................................................................
System
Ÿ Language..........................................................................................................
Ÿ Date/Time Adjustment.....................................................................................
Ÿ Volume..............................................................................................................
Ÿ Change Password.............................................................................................
Ÿ Restore Original Settings..................................................................................
Ÿ Edit Access.......................................................................................................
Ÿ Manufacturer’s Information.............................................................................
38
39
40
40
42
43
44
47
48
49
50
52
53
54
54
55
57
58
60
61
62
63
63
64
64
65
Favorites...............................................................................................................
Sound Alarms.......................................................................................................
Manual Mode........................................................................................................
CLEANING
Cleaning Procedure Guide....................................................................................
Catalytic Converter Cleaning Guide.....................................................................
Air Filter Cleaning Guide.......................................................................................
LIGHT BAR FUNCTIONS...............................................................................
ALERTS AND ERRORS: POSSIBLES SOLUTIONS
Alerts....................................................................................................................
Errors....................................................................................................................
Alerts and erros table...........................................................................................
65
66
67
70
75
75
76
77
78
79
Page 7

Page 8

IMPORTANT SAFETY INSTRUCTIONS
USE RECOMMENDATIONS
Ÿ Oven operation: It is recommended that the oven operator wear heat
resistant gloves and an apron (PPE's) to prevent burns when in contact
with the oven chamber and from the spillage of the tray's contents.
Ÿ Use of the panel: The panel must be operated with fingers only, the use of
any instrument may damage the equipment and jeopardize the operator's
safety.
CAUTION: To avoid burns, do not use containers with
liquids or kitchen products that become liquids when
heated to a boiling point. The oven must be placed,
following installation, 63in / 5ft/ 1.6m above floor level.
Ÿ WARNING: The lack of kiln cleaning can cause surface deterioraticn
which can adversely affect the life of the appliance and possibly result in
a dangerous situation.
Ÿ Remove metal or plastic sealing wires of bags inserted into the unit.
Check if the container being used has specifications for appropriate
temperature and is microwave safe.
Ÿ Do not use plastic utensils.
Ÿ Do not allow children to use or operate this equipment.
Ÿ Do not use the equipment if it is damaged, especially if its door is not
closing properly.
Ÿ Do not place any object between the inner cavity and the oven door,
obstructing the door from closing.
Ÿ Do not let the power cord hang over the edge of the table or counter.
.
Ÿ Only qualified personnel should open the equipment panel.
.
Ÿ Do not use plastic utensils.
.
Ÿ Do not use water jet for cleaning.
Ÿ Do not use steam cleaner for cleaning.
.
Ÿ Do not use the Microwave function without food in the chamber, as it can
damage the equipment.
08
Page 9

Ÿ Do not operate the equipment with the door open due to microwave
energy exposure.
Ÿ Do not allow food residue or other debris to accumulate on the surface of
the door and it’s hinge to avoid damaging the equipment.
Ÿ Foods with skin or membranes, such as tomatoes, potatoes, and
sausages, must be perforated with a fork as they may explode.
Ÿ Fully sealed packages should not be heated in the oven as they can
explode.
Ÿ Do not cover or block any air vents on unit.
Ÿ Do not use the equipment outdoors or without coverage.
Ÿ Do not use this product near water, including near the kitchen sink, in a wet
basement, or near a swimming pool.
Ÿ Do not use a water jet for cleaning the unit. Please see cleaning
instructions for proper cleaning.
Ÿ When cleaning the oven surfaces, use only non-abrasive products applied
with a nylon sponge or soft cloth (page 70) Note: Consult Prática to make .
sure the correct cleaning product is being used.
Ÿ To reduce the risk of fire in the oven cavity, remove wires used to seal
paper or plastic bags that will be placed into the oven.
Ÿ Carefully monitor the equipment when materials such as paper, plastic,
and other combustible materials are placed inside the oven for easy
cooking.
Ÿ Remove all contents located inside the oven cavity.
Ÿ If the product catches fire inside the oven cavity, close the door
immediately and turn the unit off or unplug it. The power can also be
turned off at the circuit breaker.
Ÿ Always wear heat resistant gloves or use holders or tongs to removing
food from inside the equipment to avoid burns.
09
Page 10

Ÿ Do not use the cavity of the for storage.equipment
Ÿ When heating liquids using the "microwave only" or "combined" function,
the contents should be stirred before heating to help prevent eruptive
boiling. In microwave mode, beverage heating can result in delayed
eruption, so care should be taken when handling the liquid's container.
Ÿ Liquids, such as water, coffee, or tea can overheat beyond the boiling point
without appearing to be boiling. Visible bubbling or boiling when the
container is removed from the microwave oven is not always present.
THIS COULD RESULT IN VERY HOT LIQUIDS SUDDENLY BOILING
OVER WHEN THE CONTAINER IS DISTURBED OR A UTENSIL IS
INSERTED INTO THE LIQUID.
Ÿ The minimum height of free space above the microwave should be of
5.9in (150mm).
Ÿ Only use utensils suitable for use in microwave ovens.
Ÿ When heating food in microwave safe container, check the oven
frequently due to the possibility of ignition.
Ÿ The oven should be cleaned daily and any food remains must be removed.
Ÿ Failure tc keep the oven clean may lead to deterioration of the surface,
which could adversely affect the equipment service life and possibly
result in the loss of warranty.
Ÿ Do not operate any heating or cooking appliance beneath this .equipment
Ÿ Do not mount unit over or near any portion of heating or cooking
equipment.
Ÿ Do not mount over a sink.
Ÿ Oversized foods or oversized metal utensils should not be inserted in the
oven as they may start a fire or create risk of electric shock.
Ÿ Do not clean with metal scouring pads. Pieces may burn off the pad and
touch electrical parts, creating a risk of electric shock.
10
Page 11

Ÿ Some products such as whole eggs and sealed containers – for example,
closed glass jars – can explode and should not be heated in this oven.
Ÿ Do not use paper appliances when is operating in toaster equipment
mode.
Ÿ Do not store any materials other than manufacturer's recommended
accessories in this oven when not in use.
Ÿ Do not cover racks or any other part of the oven with metal foil. This will
cause overheating of the oven.
Ÿ It is necessary to remove and clean the air filter frequently. For more
details, go to 5 of the manual.page 7
Ÿ Daily cleaning is required to remove grease from equipment. For more
details, see 70 of the manual.page
Ÿ Only clean parts listed in manual. Other than that, please contact the
manufacturer for instructions.
Ÿ Use this equipment only for the functions described in this manual.
RESTRICTIONS OF USE
Ÿ WARNING: Do not use corrosive chemicals or vapours in this device. This
type of oven is specifically designed to heat, regenerate, gratin, or finish
food that has already undergone some cooking process. Not suitable for
cooking food or products in general. It is not designed for industrial or
laboratory use.
Ÿ Use only utensils suitable for use in microwave ovens as listed on page 14.
Ÿ Never use the device to heat alcohol, cognac, rum, etc.
Ÿ Alcohol can catch fire more easily if overheated. Be careful and do not
leave the device unattended.
11
Page 12

Ÿ If smoke forms, turn off the device. Disconnect or isolate it from the power
supply and keep the door closed to muffle the flames.
GENERAL RECOMMENDATIONS FOR CLEANING
Ÿ The cooking chamber of the must be cleaned daily. Failure to equipment
keep the clean can lead to surface deterioration, which can equipment
adversely affect the life of the appliance and possibly result in a hazardous
situation.
Ÿ The equipment shall be disconnected from the main power source during
maintenance and replacement of parts. It is not necessary to disconnect
the equipment from the power supply during daily cleaning of the
equipment.
SAFETY RISK: CLEANING CHEMICALS
DANGER
Risk of chemical burns
or irritation of the skin,
eyes, and respiratory
system due to contact
with cleaning chemicals
and their fumes.
SAFETY RISK: HEATING
DANGER
Risk of burns from hot
surfaces.
12
WHERE OR IN WHAT SITUATIONS
DOES DANGER ARISE?
For all cleaning actions. Ÿ Do not let cleaning chemicals
When corrosive cleaning chemicals
are used.
WHERE OR IN WHAT SITUATIONS
DOES DANGER ARISE?
Inside the entire cavity, including all
parts that are or have been inside
during cooking, such as:
Ÿ Racks;
Ÿ Containers;
Ÿ Baking sheets.
Inside the equipment door. Wear personal protective clothing and
PREVENTIVE ACTION
come into contact with your skin or
eyes.
Ÿ Do not heat the appliance if there
are cleaning chemicals inside.
Ÿ Don’t bre athe in the chemical
spray.
Ÿ U se p e rs on a l p r o te ct i ve
equipment (PPE’s).
Ÿ St ri ct ly fo llow the s tep s for
cleaning (page 70).
PREVENTIVE ACTION
Ÿ Before starting cleaning tasks,
wait until the cavity has cooled
below 122°F (50°C) .
equipment (PPE’s) as shown on page
08.
Page 13

Ÿ SAFETY RISK: ELECTRIC POWER
DANGER
Risk of electric shock by
energized parts.
Risk of electrical shock
caused by a short circuit.
WHERE OR IN WHAT SITUATIONS
DOES DANGER ARISE?
Ÿ Under the covers;
Ÿ On the operating panel;
Ÿ Along the power cord.
In the equipment and adjacent metal
parts.
If the equipment on wheeled supports
start to move accidentally and the
power supply is switched off.
If the equipment comes into contact
with water.
PREVENTIVE ACTION
Ÿ Work on the electrical system
mus t be pe rf or med o nl y by
q u a li fi e d e l ec t ric i an s an
authorized service company.
Ÿ Professional Work.
Ÿ Make su re that al l e lectric al
con ne ct io ns ar e i n p er fe ct
co ndi ti on an d s ecu re ly fix ed
before using the equipment.
Ÿ Before preparing the equipment
fo r use , m ake sure th at the
equip men t i s connect ed to a
equip oten ti al co mpen sa tion
system (UE).
Ÿ When operating the equipment,
always engage the safety lock on
the wheels.
Ÿ Check daily that the wheel locks
are activated before starting the
operation.
Ÿ Do not wash the outer box with
water.
Ÿ Always keep the USB cover closed
while cleaning.
13
Page 14
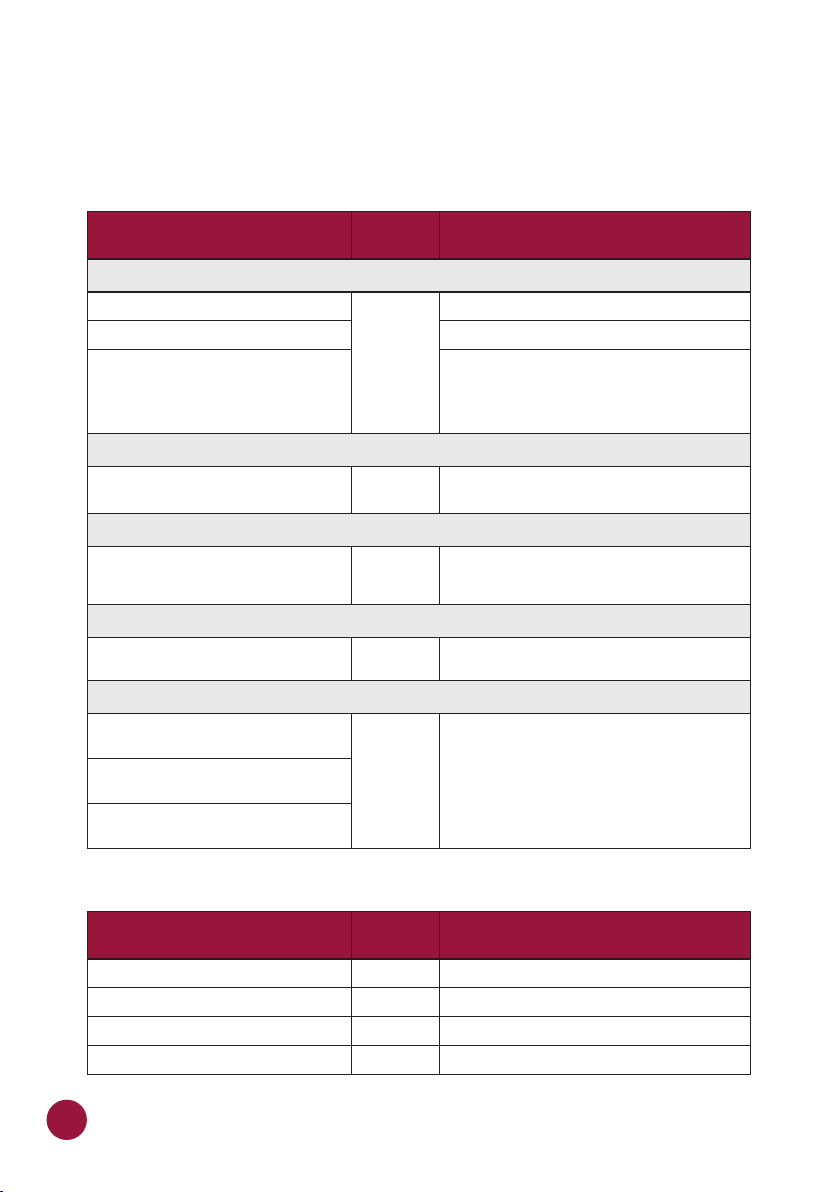
SUITABLE UTENSILS
Check the manufacturer’s instructions and temperature rating to determine
the suitability of individual containers and accessories to be used with the
equipment. The table below provides general guidelines:
SUITABLE KITCHEN UTENSILS
HEAT-RESISTANT CONTAINERS
Tempered glass.
Compatible ceramics.
Earthenware (crockery, porcelain, etc.)
Note: the level of mineral load present
in the utensil can affect the
performance of the equipment
Any metal or foil containers
Plastic containers
Fuels (paper, cardboard, etc.)
Tethers and labels
Cutlery
Temperature probes
ALLOWED PREVENTIVE ACTION
Do not use items with metallic decoration.
YES
METAL AND FOIL TRAYS
NO
PLASTIC CONTAINERS
NO
DISPOSABLE
YES
OTHER UTENSILS
NO
Use only disposables compatible with the
temperatures reached by the oven 536ºF (280°C).
During the cooking process, no
utensil such as probes, cutlery, straps, and
labels can be inside the oven.
COMBINATION OF SUITABLE UTENSILS
Speed Grill
Speed Grill + Solid Ptfe Basket
Speed Grill + Wave Tray
Teflon accessories
14
ALLOWED
YES
YES
YES
YES
OCCURRENCEACCESSORY COMBINATION
Page 15
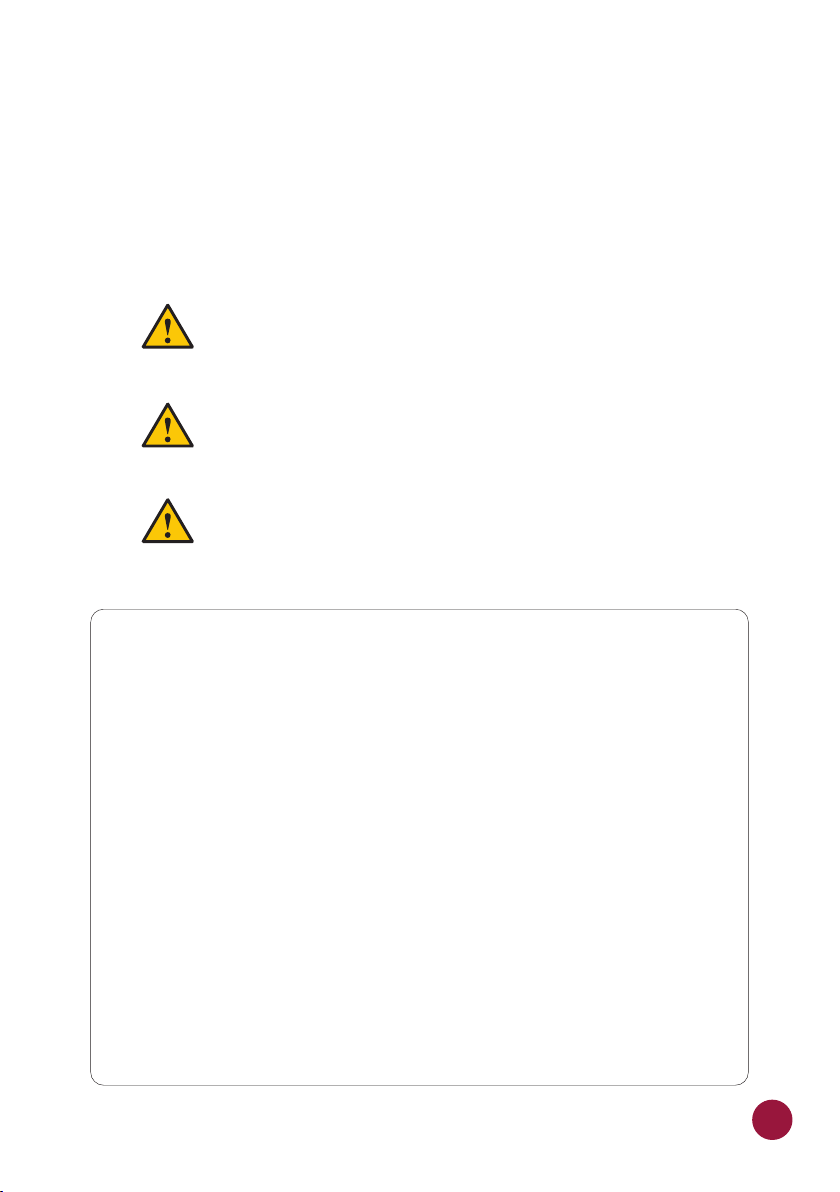
USE RECOMMENDATIONS (continuation)
CAUTION!
Ÿ This equipment is not intended for use by people (including children) with
reduced physical, sensory, or mental capabilities, or that have not been
properly trained to operate the unit.
Ÿ Do not use the oven handle to move the equipment. The
oven must be moved exclusively from its sides.
Ÿ Do not use the equipment door as support. It will cause
unevenness of the door and equipment malfunction.
Ÿ The oven door is only intended for sealing microwaves
generated during cooking. Using the door for any other
purpose not described in this manual may void the warranty.
PRECAUTIONS TO AVOID: POSSIBLE EXPOSURE
TO EXCESSIVE MICROWAVE ENERGY
(a) Do not attempt to operate this oven with the door open since open-door
operation can result in harmful exposure to microwave energy. It is important
not to disable or tamper with the safety interlocks.
(b) Do not place any object between the oven front face and the door or
allow food or cleaner residue to accumulate on sealing surfaces.
(c) Do not operate the oven if it is damaged. It is particularly important that
the oven door close properly and that there is no damage to the: (1 ) Door
(bent), (2 ) Hinges and latches (broken or loosened), and (3 ) Door seals and
sealing surfaces.
(d) The oven should not be adjusted or repaired by anyone except properly
qualified service personnel.
.
15
Page 16
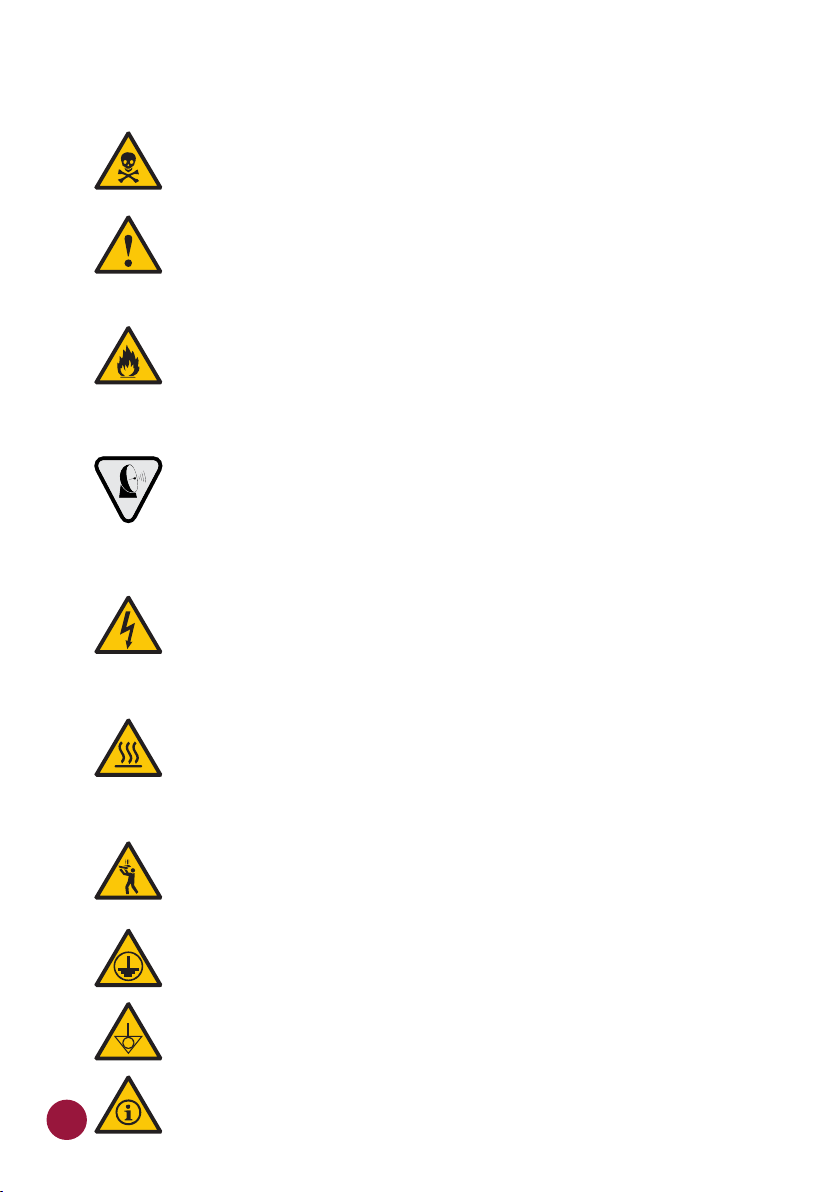
IDENTIFICATION OF SYMBOLS USED IN THIS MANUAL
DANGER! THREAT OF RISK THAT MAY CAUSE SERIOUS INJURY OR
DEATH
ALERT
WARNING - FIRE RISK - TO REDUCE THE RISK OF FIRE DO NOT
REMOVE THIS COVER. NO USER-SERVICEABLE PARTS INSIDE.
REPAIR SHOULD BE DONE BY AUTHORIZED SERVICE PERSONNEL
ONLY
MICROWAVE WARNING SYMBOL: THIS SYMBOL IDENTIFIES
THAT THERE IS A RISK OF INTERNAL AND EXTERNAL BURNS OF
BODY PARTS FOLLOWING EXPOSURE TO MICROWAVE ENERGY.
WARNING - RISK OF ELECTRIC SHOCK - TO REDUCE THE RISK OF
ELECTRIC SHOCK, DO NOT REMOVE THIS COVER. NO USERSERVICEABLE PARTS INSIDE. REPAIR SHOULD BE DONE BY
AUTHORIZED SERVICE PERSONNEL ONLY
16
WARNING - BURN RISK - DO NOT TOUCH ANY PART WITH THIS
SYMBOL WHILE THE OVEN IS IN OPERATION.
WARNING - RISK OF BURN FROM SPILLING OF HOT LOAD - TO
AVOID BURNS, DO NOT USE CONTAINERS WITH LIQUIDS OR
KITCHEN PRODUCTS THAT BECOME LIQUIDS WHEN HEATED
UP TO A BOILING POINT.
GROUNDING SYMBOL
EQUIPOTENTIAL SYMBOL
USE TIPS AND INFORMATION
Page 17

WARRANTY
TERMS AND DETAILING
a) Our products are warrantied for twelve months for parts and labor and
twenty-four months for all heating element parts; from the date the product is
installed. If, for any reason, there is no record of the installation date or the
purchase invoice is not found, the date of manufacture of the equipment
printed on the indicative label will be considered the date of the applicability of
this guarantee.
b) If new visits are needed to complete the delivery/installation of the product
due to the lack of adequate, electrical, or exhaust related conditions, the costs
of such visits shall be the customer's responsibility.
c) For the appliance's installation, the customer must provide all conditions
required (230v, 208v/240v, 380v, and 400v single/multi phase) in the
installation blueprint. The customer will also be responsible for transporting
the equipment to the installation site.
d) The warranty only covers manufacturing and component failures.
Damages caused by lack of heeding to label warnings on the product will not
be covered.
e) The warranty will cover adjustments and replacement of defective parts. It
is the responsibility of the authorized service technician to return the
defective parts to Pratica Inc. for analysis when requested by the
Manufacturer.
f) Warranty service calls will not justify the extent of the warranty, returns or
exchanges of the equipment, or any other type of claim.
WARRANTY EXCLUSIONS
.
a) The customer should thoroughly inspect the equipment upon delivery and
contact the carrier in case of shipping damage arising from transport.
b) Prática will not respond to any issues arising from electrical building
irregularities, or a lack of abiding to the local electrical code. These issues will
not be covered by the Warranty.
c) Use or installation not in accordance with the Installation and Operation
Manual accompanying the product.
17
Page 18

d) Failure to observe the installation details per the Installation and Operation
Manual, such as uneven floors, installing the oven next to equipment that
produces fat, heat, or solid particles, lack of air circulation, etc.
e) Any damage done to the oven or it’s components resulting from the use of
inappropriate cleaning products or methods will not be covered under the
warranty. For example, pouring water inside the electric panel, etc.
f) Changes performed by unauthorized technicians in the original conditions
of installation such as electrical distribution, installation location, etc.
g) Use of aggressive or abrasive products that are unsuitable for cleaning
which may tarnish, wear, scratch, or damage accessories or equipment
components.
h) Occurrences of electrical discharges arising from acts of nature or voltage
peaks caused by generators or power supply companies.
i) Damage to the equipment or its accessories caused by accidents, improper
operation, and improper handling or installation as described by the Operation
Manual included with this product.
j) Repair attempts by unauthorized third parties or use of non-OEM parts and
components, regardless of the damage or defects.
NOTES AND RECOMMENDATIONS
a) The operator should use the Installation and Operation Manual as a guide.
b) Make sure that the electric systems are made and installed by a qualified
company or technician.
c) Before contacting technical assistance, check the manual for
troubleshooting tips that can be solved without a technician. Always
remember that Pratica must be contacted first before getting in contact with
service agent.
18
Page 19
d) To contact Prática's authorized technical service or to make any
complaints, suggestions, or comments about the services provided by
authorized technicians, please call our customer service hotline at:
You may contact us via:
Phone: +1 214 584 6269
WhatsApp text or call: +1 218 748-8572
E-mail: [email protected]
Monday to Friday: 8 a.m. to 6 p.m. at any time zone
Saturday: 8 a.m. to 3 p.m. at any time zone
Sundays: Closed
Holidays: 8 a.m. to 3 p.m. at any time zone
All regions except the United States: +55 (35) 3449-1235 or by email at
[email protected]
MODEL
VOLTAGE
RESELLER
INVOICE
NUMBER
EQUIPMENT IDENTIFICATION
(Fill in to make technical support calls easier)
SERIAL NUMBER
PURCHASE DATE
19
Page 20
INSTALLATION INSTRUCTIONS
ELECTRICAL INSTALLATION
Ÿ Always follow the installation instructions in the instruction manual or the
product's spec sheet. This form is attached to the manual, in addition to being sent
by email upon approval of the order. It is also available on our website
(www.praticabr.com). If you have of questions, contact Prática Technical
Assistance:
USA | You may contact us via:
Phone: +1 214 584 6269
WhatsApp text or call:
+1 218 748-8572
E-mail: [email protected]
Ÿ All regions except the United States: +55 (35) 3449-1235 or by email at
Ÿ The installation of the Prática ovens must be done with the necessary care to avoid
problems, damage to the equipment, and guarantee its full use.
Ÿ This equipment must be installed by an authorized technician.
Ÿ The equipment MUST be grounded.
Ÿ The oven must have an exclusive circuit breaker.
Ÿ Do not immerse or expose the power cable to water.
Ÿ Keep the power cord away from heated surfaces.
Ÿ If the power cable is damaged, it must be immediately replaced by an
authorized technician to avoid shock hazards.
Ÿ Only qualified personnel should open the equipment panel.
Ÿ There is an equipotential point on the rear panel of the oven.
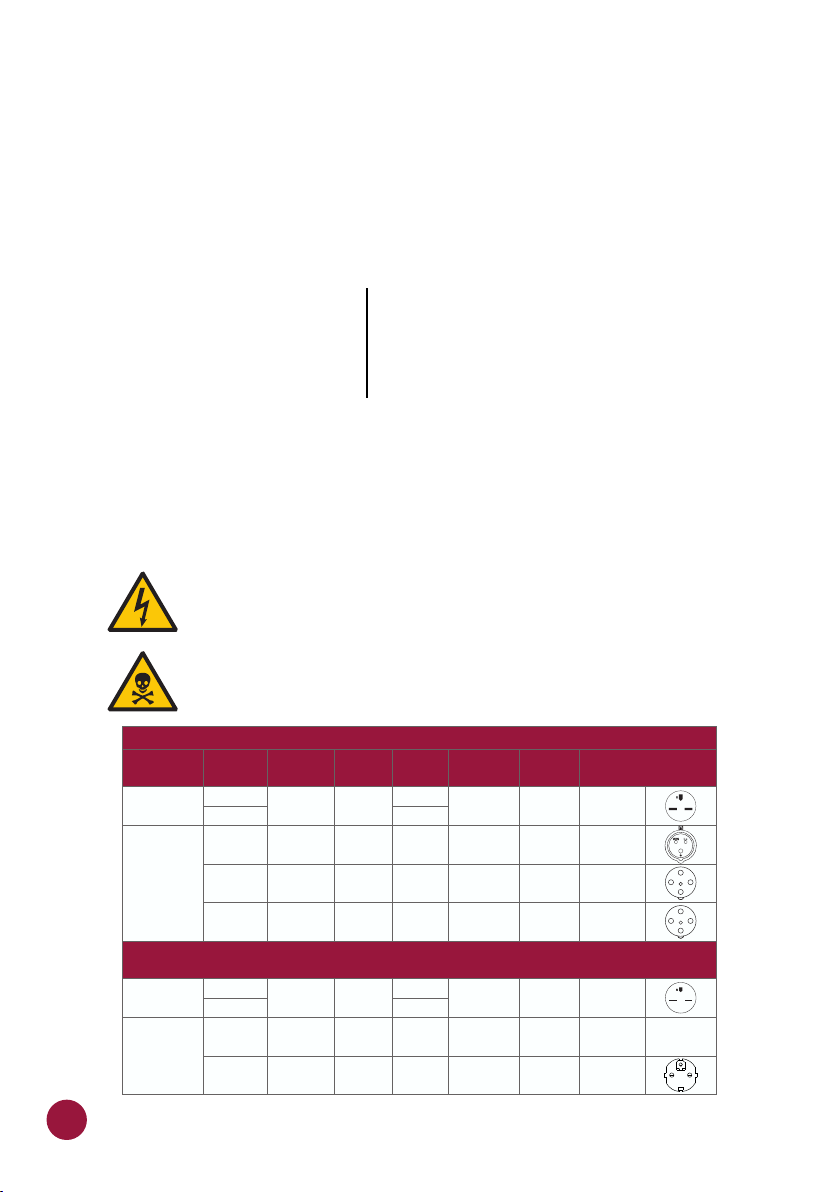
Region
USA/
Canada
Europe
USA/
Canada
Europe
*Prática recommends installing a type D circuit breaker whilst remaining in accordance with local regulations.
20
Voltage
Phases
(V)
208
Single
240
Single
230
380
208
240
230
230
Multi
Multi
(Note: The Fit SM (Single Mag) is not recommended for frozen products)
Single
Single
Single
Monday to Friday: 8 a.m. to 6 p.m. at any time zone
Saturday: 8 a.m. to 3 p.m. at any time zone
Sundays: Closed
Holidays: 8 a.m. to 3 p.m. at any time zone
FIT EXPRESS
Freq.
(Hz)
60
50
50
FIT SM
60
50
50 3.0
Power
*Circuit
(kW)
Breaker (A)
6.2
7.0
6.8 32
6.5
6.850400
2.7
3.1
3.0 13
Cable
30
16
16
15
16
3x10
AWG
3x4
mm²
5x2,5
mm²
5x2,5
mm²
3x10
AWG
3x1,5
mm²
3x1,5
mm²
NEMA
6-30
32A
(2P+E)
16A
(3P+N+E)
16A
(3P+N+E)
NEMA
6-15
13A
(2P+E)
16A
(2P+E)
Socket
NOT
PROVIDED
Page 21
INSTALLATION INSTRUCTIONS
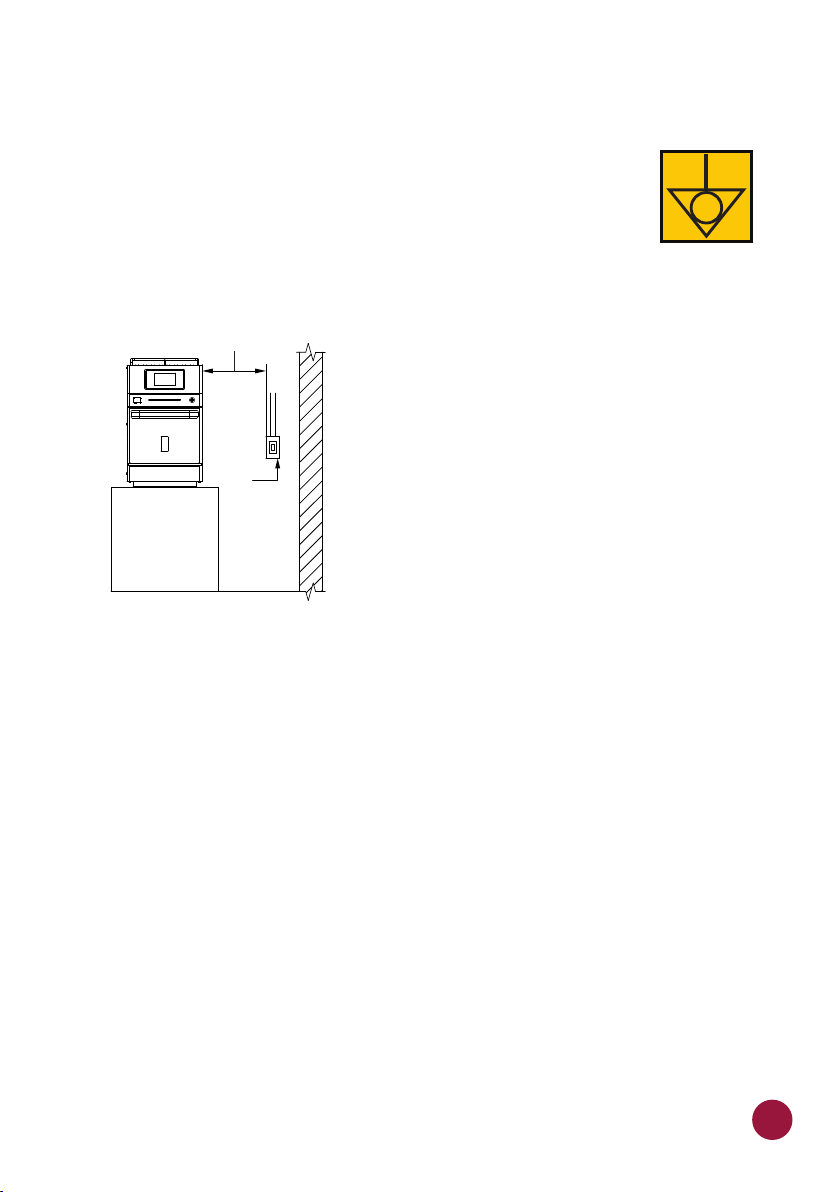
Note: The equipment has a connector for interconnection with
other equipment. This connector is intended to keep several
devices with the same electrical potential, not necessarily the
grounding of a local connection. This connector on the back of
the device is identified by the symbol on the right:
Ÿ Use of pressure cables to prevent movement
Maximum
Distance
70.8"
6
(1.8m)
Circuit
Breaker
of the power cable.
Ÿ In case the oven voltage is 380 volts, a
neutral cable (independent of the ground)
must be available.
Ÿ Ensure that the electrical characteristics of
the building power grid are in accordance
with the technical specifications located on
the data label on rear panel of the unit. The
building power grid installation is the
customer's responsibility.
Ÿ This unit must be properly grounded to avoid
electrical shock .
Ÿ The circuit braker should be located no more
than 70.8in / 6ft / 1.8m away from the unit.
GENERAL INSTRUCTIONS
Ÿ The oven must be installed on a surface or counter that supports its
weight of approximately 147.7lb (67 Kg).
Ÿ Do not obstruct the air inlets and outlets at the front bottom of the oven.
Ÿ The oven must not be positioned near stoves, deep fryers, hot plates, and
other equipment that releases fat, steam, and heat. The ventilation,
electrical panel, and motor vents must be far from these heat sources to
prevent damage to the electrical system of the equipment.
Ÿ The oven must be installed on a leveled surface, in a well-ventilated area.
Ÿ The installation of the equipment in a non-suitable place can result in the
loss of warranty.
21
Page 22
INSTALLATION INSTRUCTIONS
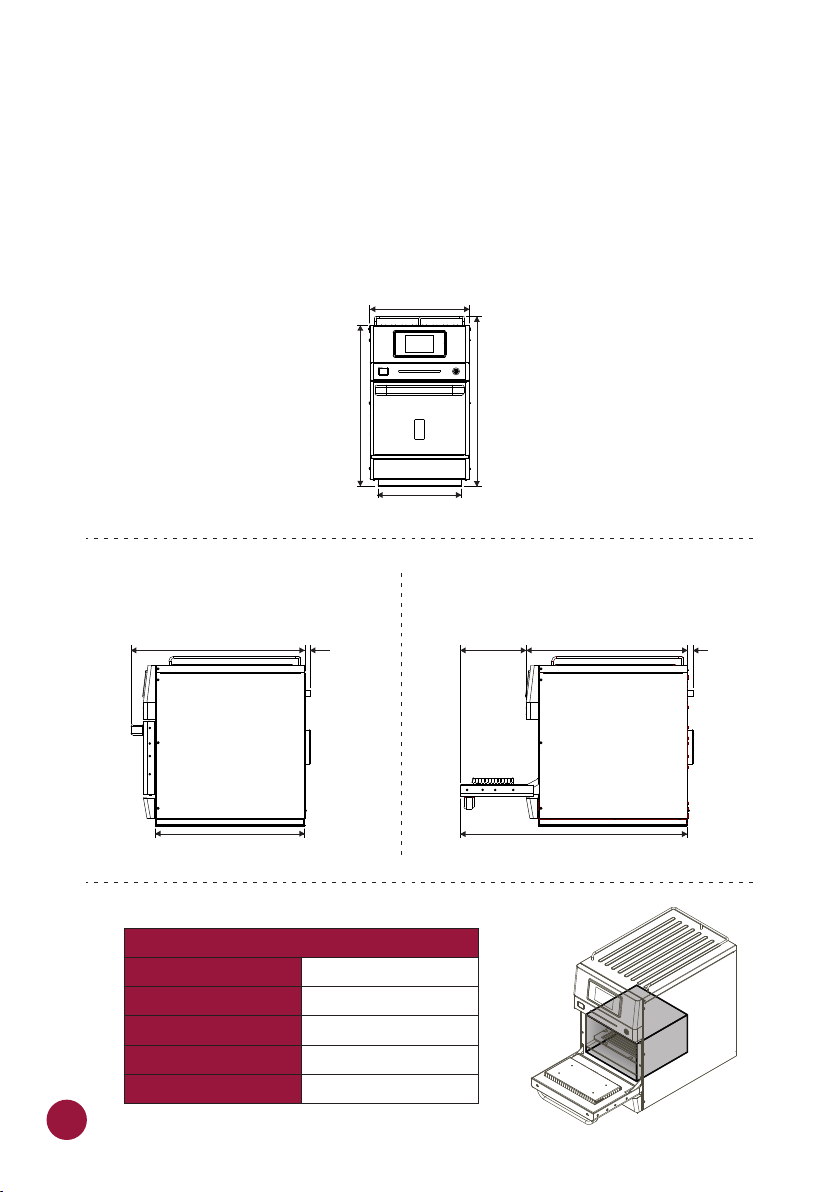
DIMENSIONS
FIT EXPRESS
FRONT VIEW
SIDE VIEW
26,4"
(673mm)
22,7"
(578 mm)
24,3"
(619 mm)
0,7"
(20mm)
15,1"
(386 mm)
12,7"
(324 mm)
SIDE VIEW
WITH DOOR OPEN
(256mm)
25,9"
(659 mm)
10"
35,4"
(900mm)
24,6"
(625mm)
0,7"
(20mm)
22
Chamber Dimension
Total capacity
Useful capacity
Height
Width
Depth
18.3L - 0.64 cu.
13L - 0.45 cu.
6.6" - 170mm -
12.4" - 315mm -
13.4" - 341mm -
Page 23
GENERAL RECOMMENDATIONS
Ÿ Do not use this product near water including kitchen sinks, or
in wet places.
Ÿ If residues accumulated inside the oven burn, keep the oven
door closed, turn off the electrical power at the oven's
exclusive circuit breaker and unplug the oven.
Ÿ Do not use the inside of the oven to dry or store.
Ÿ If the oven door is damaged, do not use it until it is repaired by
a qualified person.
Ÿ If there is a power failure during any process in progress in the oven, this
operation will be lost (saved recipes will not be lost).
Ÿ Do not cover or block any opening on the device.
Ÿ Do not use the oven outdoors.
Ÿ Do not store food inside the oven when it is not in operation.
Ÿ When activating the oven circuit breaker, wait ten seconds to switch on the
equipment.
23
Page 24
FIT EXPRESS T ECHNOLOGY
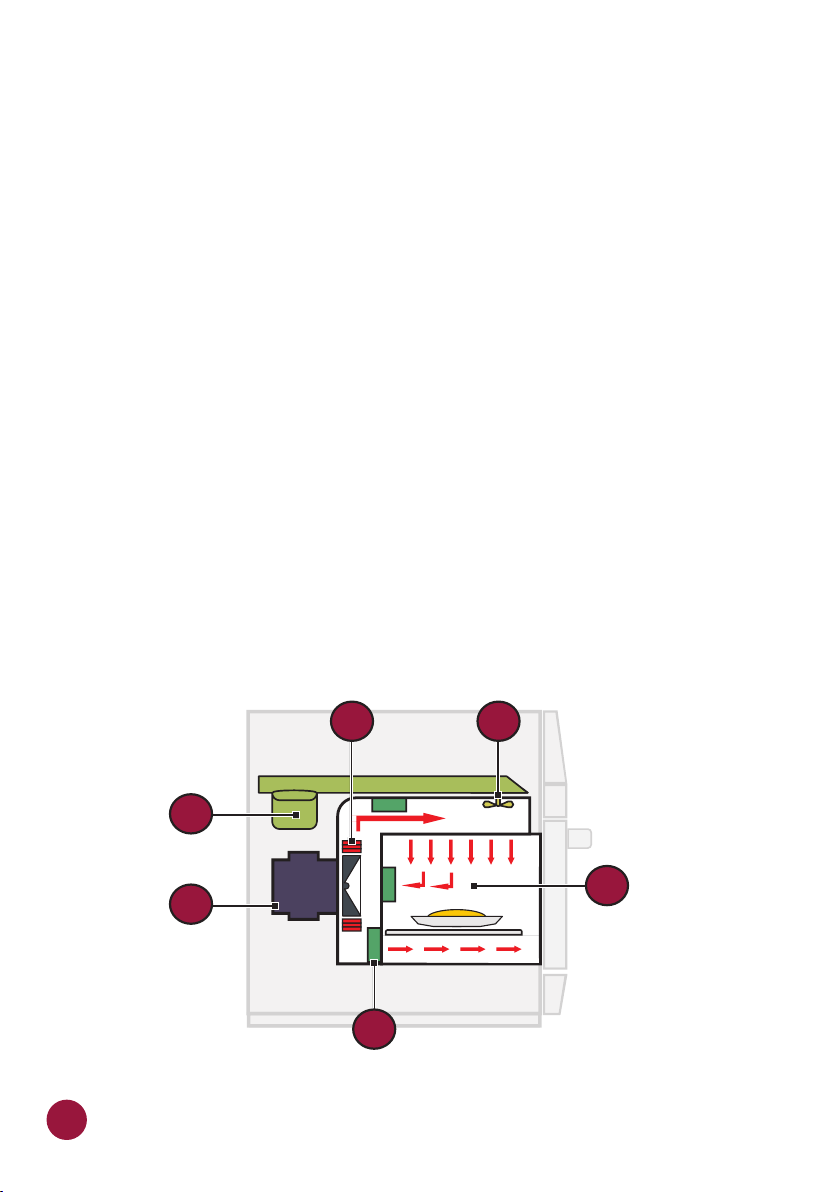
The Fit Express oven uses a combination of heating through high-speed
forced air convection and microwave energy to heat food more quickly than
the conventional methods.
The figure below illustrates the steps involving the technology:
1 - Magnetrons generate energy through microwaves, which uniformly heat the
water molecules of the food;
2 - Internal heating resistors transfer heat energy to circulating air;
3 - The Stirrer distributes the microwaves evenly;
4 - Impinged air is directed toward food;
5 - The Catalytic Converter converts the volatile organic compounds into
carbon dioxide and water (CO2 and H2O);
6 - The blower motor makes the air circulate at high speed.
24
1
6
2
3
4
5
Page 25
PRINCIPLES OF OPERATION
Microwaves are a type of radiant energy. Like radio waves, visible light, and
infrared, the microwaves are part of the electromagnetic spectrum, i.e., it is a
form of electromagnetic radiation. They are classified as non-ionizing
radiation. Because unlike x-rays and Alpha, Beta and Gamma rays, its effects
are strictly thermal and therefore do not alter the molecular structure of the
item that is being irradiated.
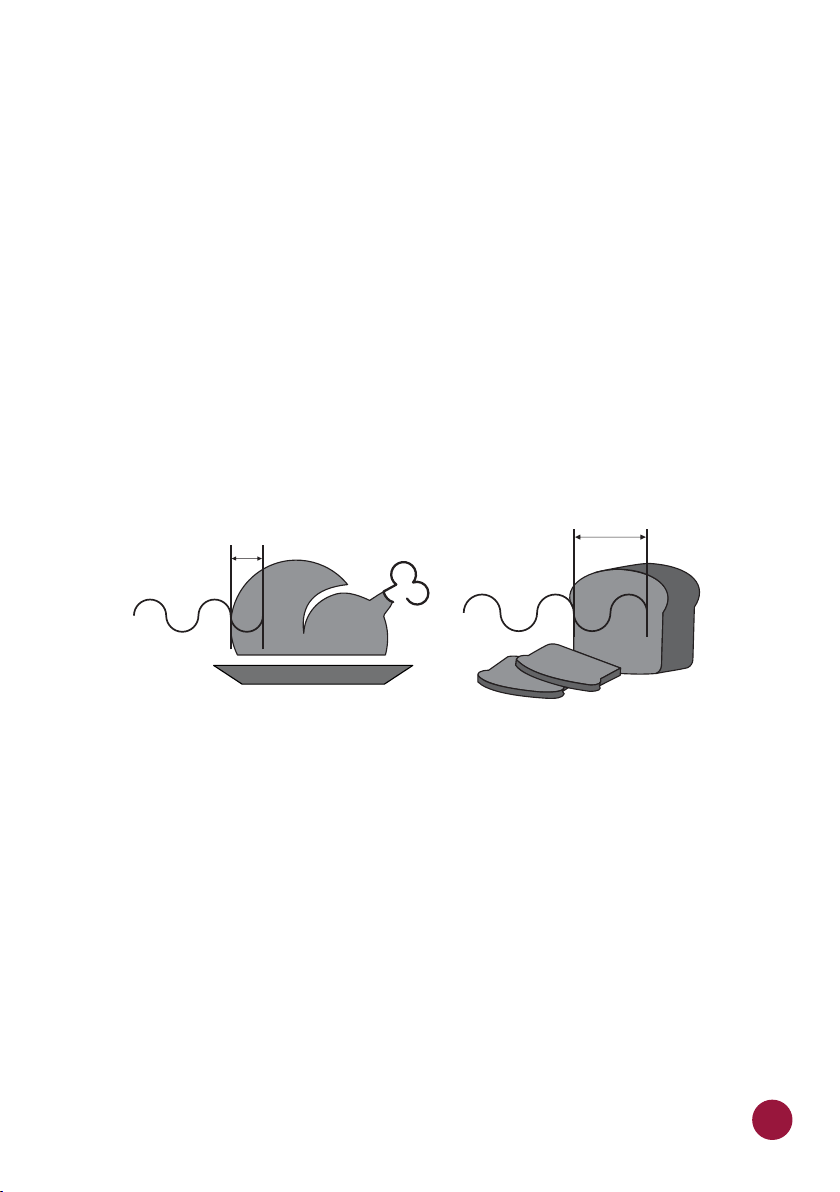
The basic principle of microwaves is to cook by molecular vibration. They
penetrate the food surface in a depth that ranges from two to seven
centimeters and heat the molecules of water, fat, and sugar by making them
vibrate. The heat is transmitted to the interior of the food by thermal
conduction, demystifying the idea that the microwaves cook food from the
inside out.
1.9" to 2.7"
0.7" to 1.1"
(20 to 30 mm)
(50 to 70 mm)
The Fit Express works through the association between microwaves and hot
air directed towards the food. The variables in the operation consist of:
a) Operation time.
b) Chamber temperature.
c) Microwaves power.
d) Air speed.
Each operation recipe can be programmed with up to eight steps and each of
them can have the variables mentioned above.
Temperatures: The preparation times and steps are short. The temperature
variation between steps will not be observed by the unit. Normally the
temperature used is the same temperature as the cook cavity set point.
25
Page 26
Microwaves: The microwave is adjustable between 0% and 100% for each 30
second interval. For example, the microwaves in a one-minute recipe with
microwave percentage programmed at 50%, will run for 15 seconds then
stop for 15 seconds. Then they will energize for another 15 seconds and
stop for the re maining 15 seconds. In 1 minute, they will act for a total of
30 seconds. The microwaves heat the food interna l ly and do not require a
specific m eans t o p ropagate.
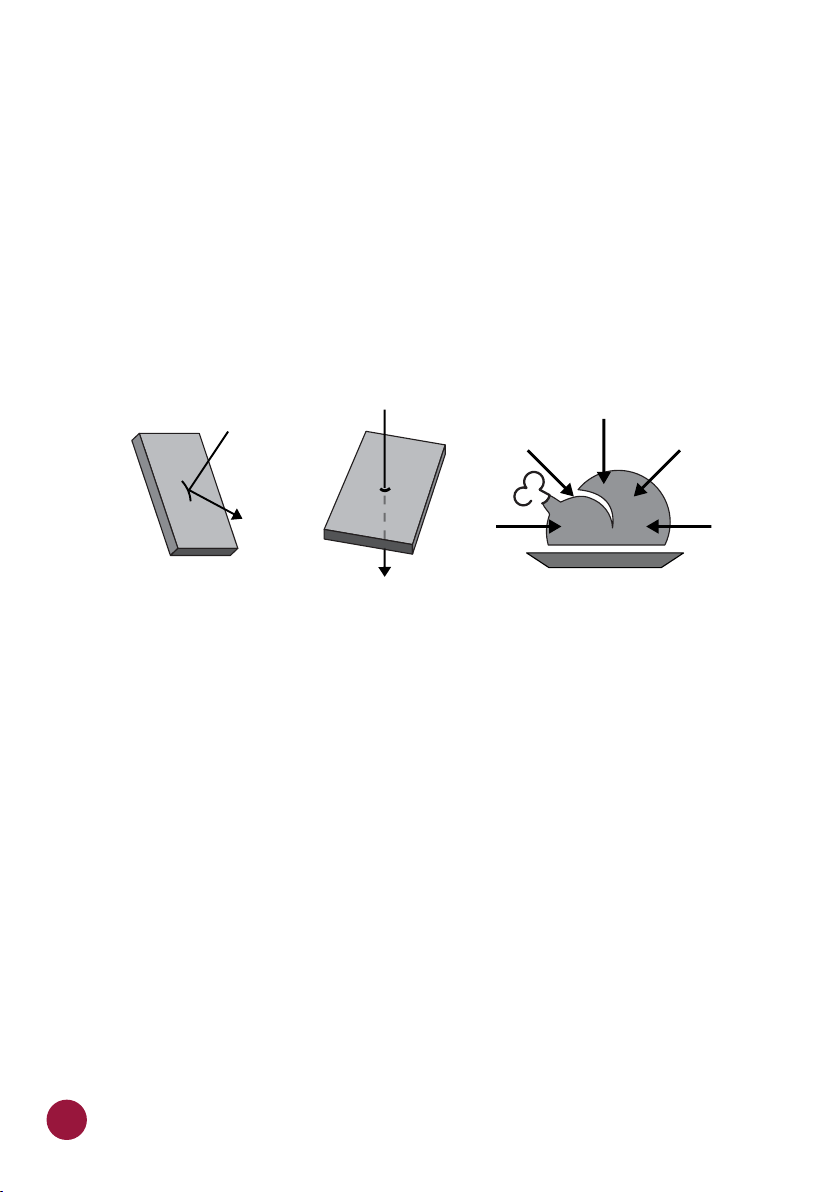
Microwaves are reflected by metals but will penetrate glass, plastics, and
ceramics.The microwaves penetrate food and become attracted to sugar,
fat, a nd w ater m olecules.
CHARACTERISTICS
METAL
The use of plastic or paper containers is forbidden because they will burn
inside the oven because of the heat.
Operation Time: The food heated by microwaves occur from the outside in
and the penetration level will vary depending on the type of food. Therefore,
you should relate the preparation time to the food composition, the quantity
of food processed, as well as its density and thickness. The larger the food
amount (quantity or density), the greater the time or percentage will be
needed for the microwave to take effect.
Hot Air Speed: The hot air speed can be adjusted between 0% and 100%. The
hot air is controlled by a blower motor which will envelope the food.
a) The higher the air speed, the more likely it will be to burn the product on the
outside.
b)The higher the air speed, the more it will affect the texture and crispness of
the product.
GLASS, PAPER AND
PLASTIC
FOOD
26
Page 27

RECIPES CREATION
When creating a recipe, all the variables mentioned earlier should be
considered. The microwaves and the air speed are the critical factors for a
successful preparation.
To get faster results in the recipe creation, we suggest beginning
programming at 1/10 of the total time of preparation used in a conventional
process.
The microwave effect is more efficient at the beginning of processes. For
*frozen products, work with two or three steps, so that at the beginning of the
process, the product is thawed with lower microwave levels and at the end of
the process, the desired colour and crispness are obtained.
Later, combine the air speed variations to reach the desired crispness and
color. Remember, the air also transmits heat to the food so keep that in mind
when setting blower percentage. The food's weight, size, and shape are
critical when setting the total cook time.
The following information is critical when creating a new recipe.
a) The initial temperature of the product will change the desired results if not
considered (e.g.; frozen, cold, or room temperature).
b) The size and/or weight variation of the portion of food will also play a crucial
role in determining the correct settings.
c) Only use containers approved for a microwave oven to prevent any damage
and to ensure that the product gets cooked thoroughly.
*Note: The Fit SM (Single Mag) is not recommended for frozen products.
27
Page 28
OPERATION
After initialization, choose your preferred language. See more about
languages on page 61.
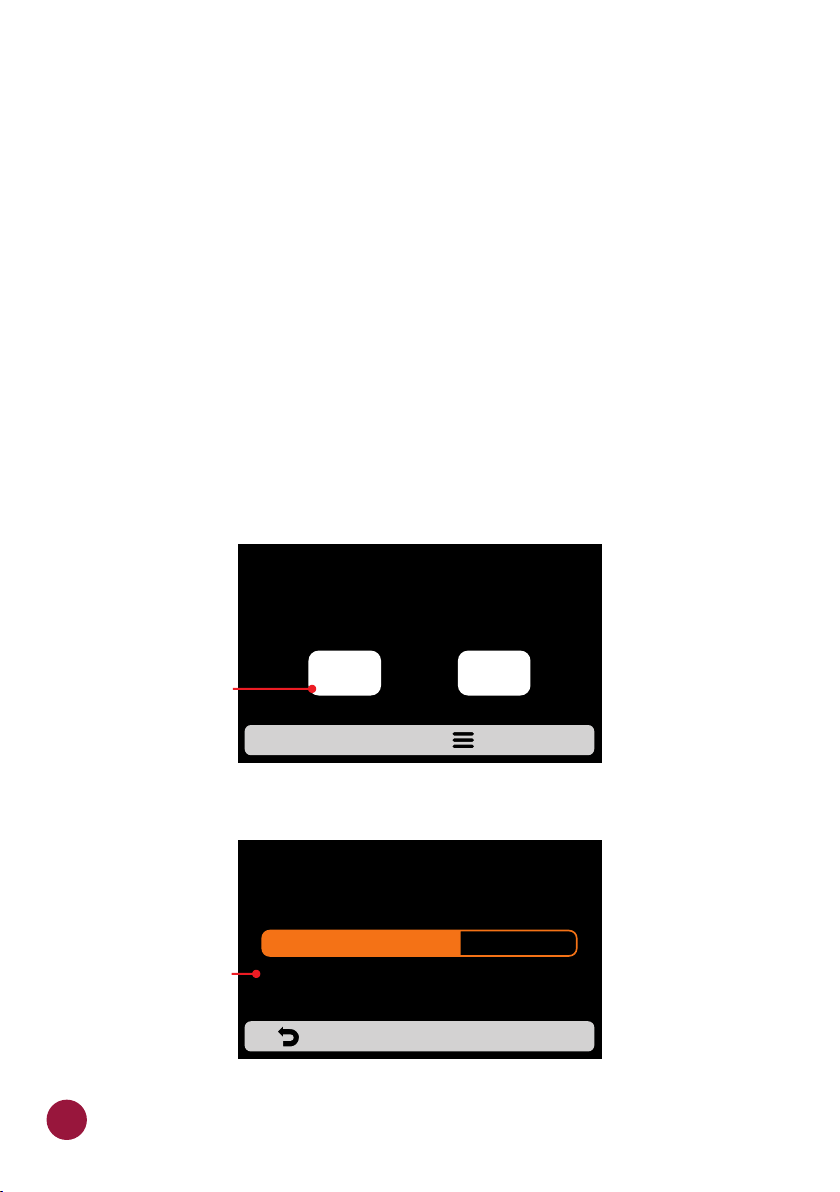
PREHEATING
a) To start the preheating process after turning on the equipment, choose
between Preheating Temperature 1 and Preheating Temperature 2.
b) The following screen will present the CURRENT and the PROGRAMMED
temperature with a bar between them indicating the remaining time until the
oven reaches it’s programmed temperature.
Note: The timer is only initiated when the CURRENT temperature is close to
reaching the PROGRAMMED temperature. This occurs so that the oven
temperature rises uniformly throughout the chamber.
WEDNESDAY
02/11/2022 - 02:16AM
PREHEAT AT:
The temperature can be
changed between Celsius
and Fahrenheit according
to the user's preference.
482°F
PREHEAT 1
482°F
PREHEAT 2
The temperature can be
changed between Celsius
and Fahrenheit according
to the user's preference.
28
525°F
CURRENT
WAIT, OVEN
PREHEATING
536°F
PROGRAMMED
Page 29
EXECUTING A RECIPE
.
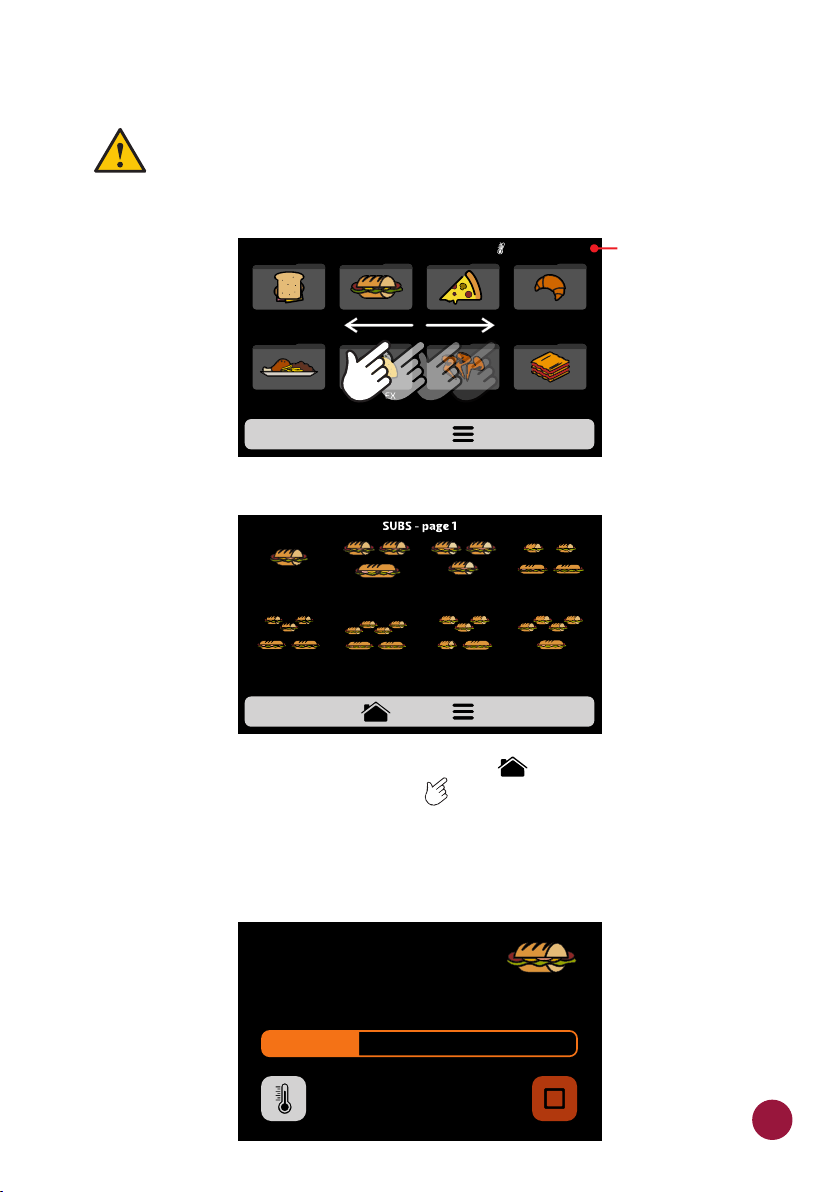
a) After preheating, select the Group icon desired. Slide the screens to the left
and right in order to transition between the group screens.
WARNING: FOR THE FOLLOWING INSTRUCTIONS TO BE VALID IT IS NECESSARY TO
PROGRAM RECIPES OR UPLOAD RECIPES BEFORE PROCEEDING.
GROUPS CURRENT 410°F
SANDWICH PIZZASUBS BAKERY
The temperature can be
changed between Celsius
and Fahrenheit according
to the user's preference.
MEAL
FINISHING
TEX-MEX CHICKEN
WINGS
GRATIN
b) The RECIPES of the selected group will be displayed, select the recipe
desired.
1 SUB 6-inch 2 SUB 6-inch
3 SUB 6-inch
2 SUB 12-inch
1 SUB 12-inch
4 SUB 6-inch
2 SUB 12-inch
Ÿ To return to the GROUPS screen, push the button: .
Ÿ To access the next recipes page, slide for right the screen and for the left to TEC
return.
Ÿ Note: Before starting a recipe, make sure there is food inside of the cooking cavity,
otherwise it may cause damages to the unit.
.c) The recipe will enter the preparation process immediately.
3 SUB 6-inch 2 SUB 6-inch
3 SUB 6-inch
or 1 SUB 6-inch
and 1 SUB 12-inch
or 2 SUB 12-inch
4 SUB 6-inch
1 SUB 12-inch
SUBS
1 SUB 6-inch
IN PROGRESS 30s
29
Page 30
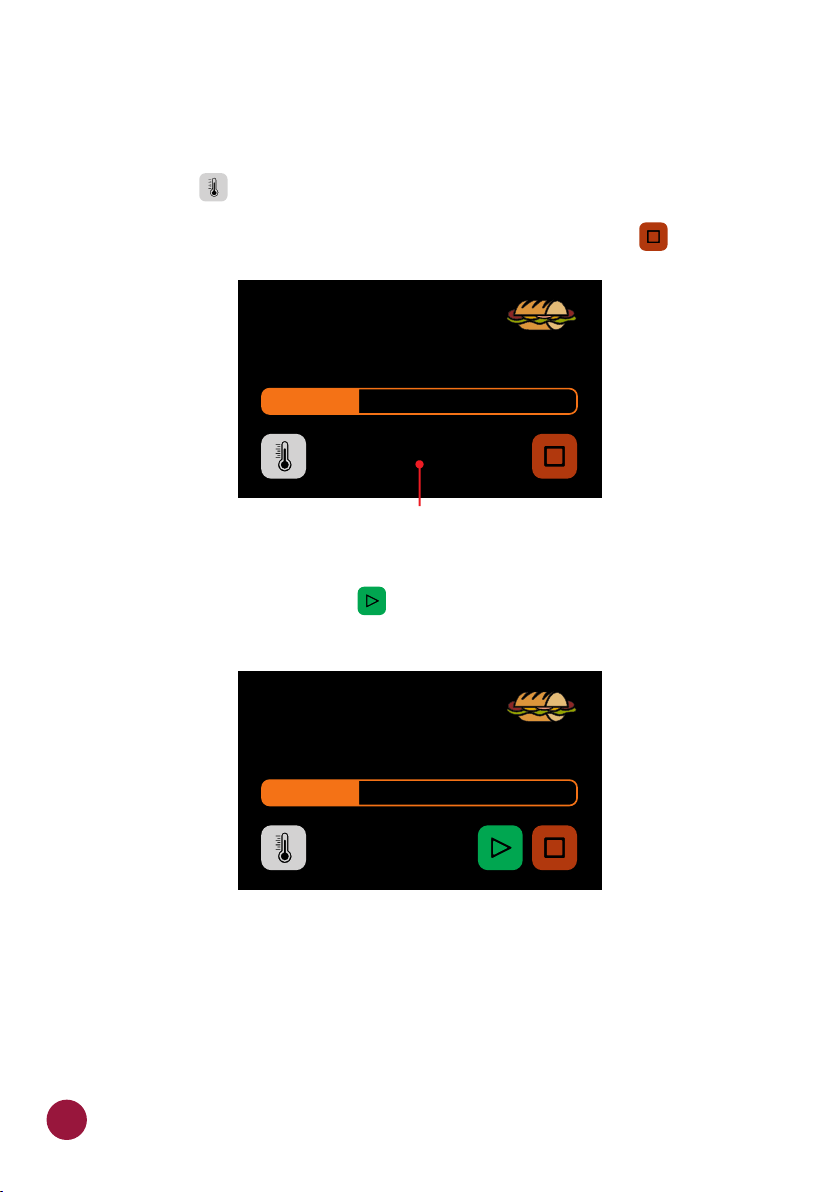
Ÿ The screen will display the group name, recipe name, status of the operation
(In progress or paused), and the remaining time for conclusion of the recipe.
d) It is possible to verify the temperature of the COOKING CHAMBER
pressing the button.TEC
e) In case you wish to cancel the execution of a recipe, press the button.TECL
SUBS
1 SUB 6-inch
IN PROGRESS 30s
CAVITY HEATER: 482 °F
The temperature can be changed between Celsius
and Fahrenheit according to the user's preference.
e) If the equipment door is opened, the operation will be paused; once the
door is closed again, press the to resume the operation.TECL
SUBS
1 SUB 6-inch
PAUSED OPERATION 30s
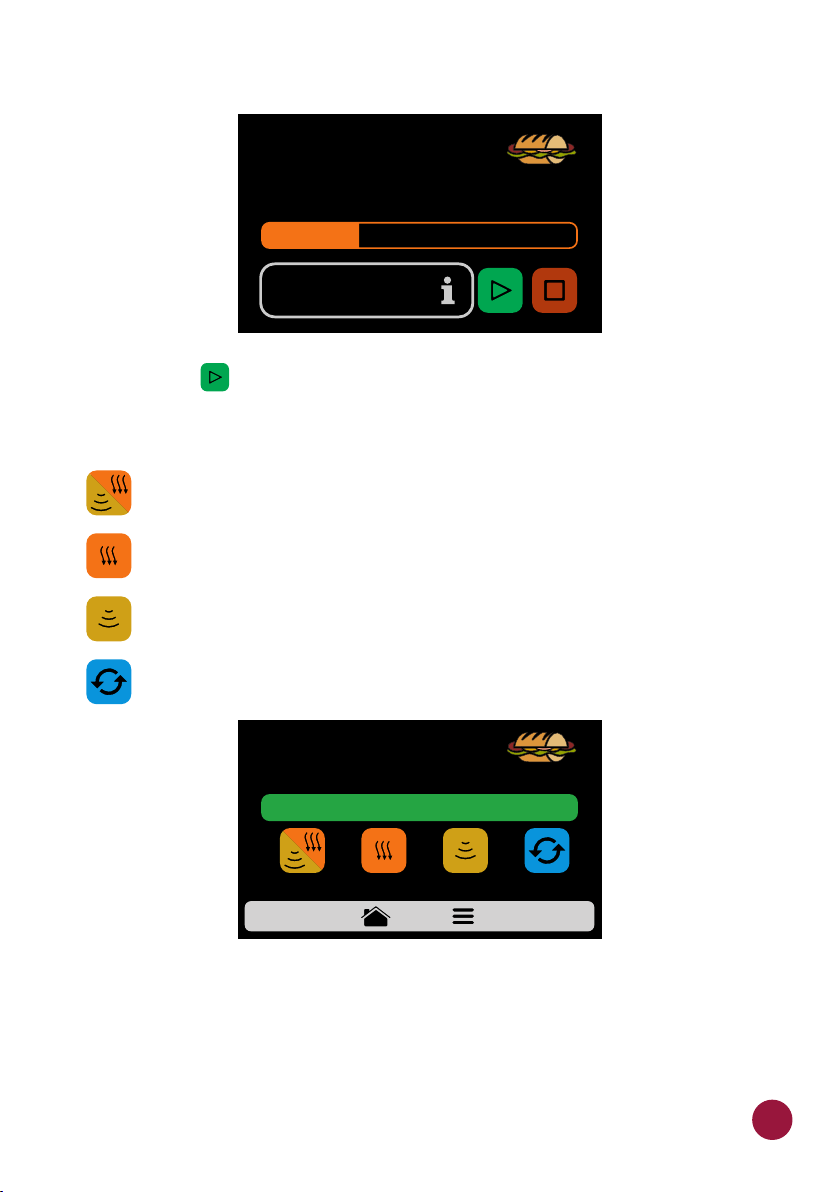
f) If the programmer of the recipes adds information to one of the steps, for
example: 'ADD TOMATOES', the recipe will be paused and the description of
the information will be presented beside the PLAY button, as in the next
image:
.
30
Page 31
SUBS
1 SUB 6-inch
IN PROGRESS 30s
ADD TOMATOES
g) Press the button to resume the operation.
h) Upon the recipe's completion, the following options will become available:
Cook/Brown More: Activates the microwave and hot air during a
predetermined time.
Brown More: Activates only the hot air during a predetermined time.
Cook More: Activates only the microwave during a predetermined
time.
Repeat Recipe: Repeats the same recipe chosen by the user.
SUBS
1 SUB 6-inch
READY!
COOK/
BROWN MORE
BROWN
MORE
COOK
MORE
REPEAT
RECIPE
Ÿ In “Cook/Brown More”, “Brown More” and “Cook More”, the time will be
defined at the moment of creating the recipe.
Ÿ The four options mentioned above may be disabled so that they do not
appear in any recipe. Learn more in the User's Settings: Edit Accesses (see
page 64).
31
Page 32
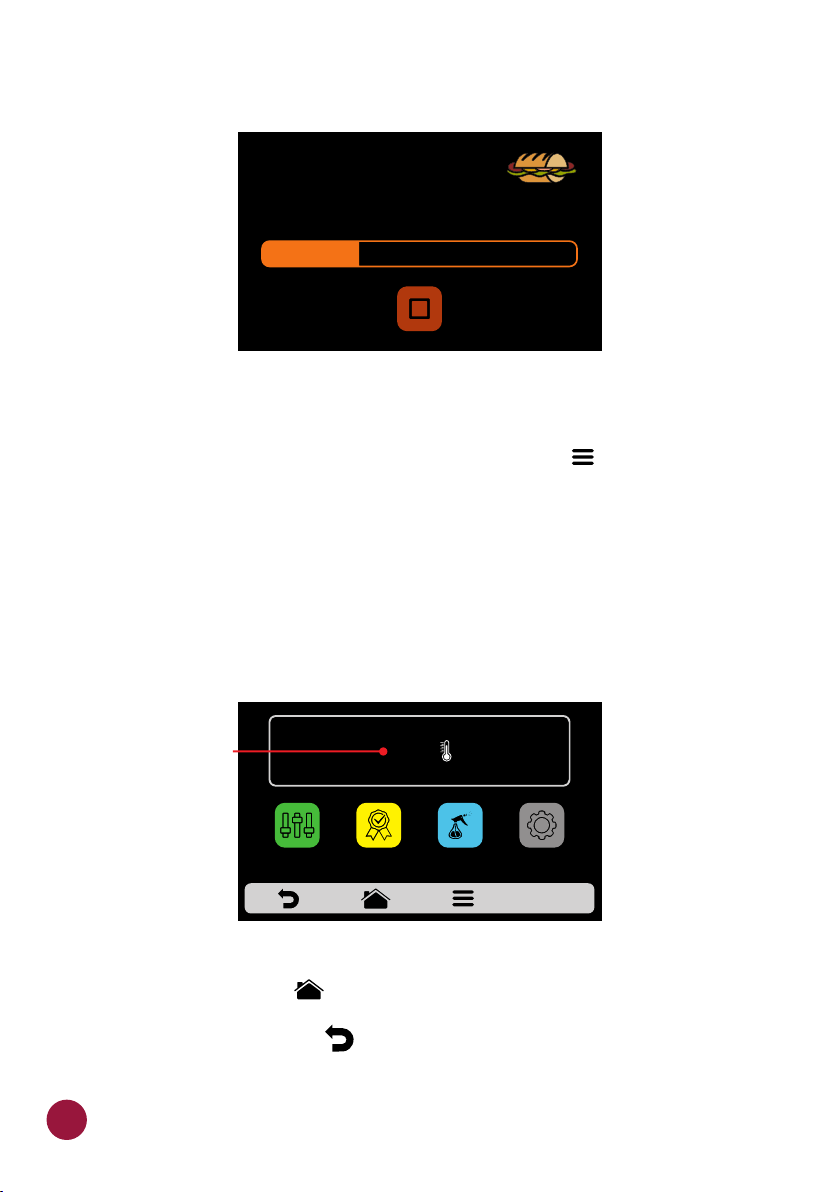
Example of Heat More in execution:
SUBS
1 SUB 6-inch
HEAT MORE
IN PROGRESS 10s
ACCESSING THE OPTIONS
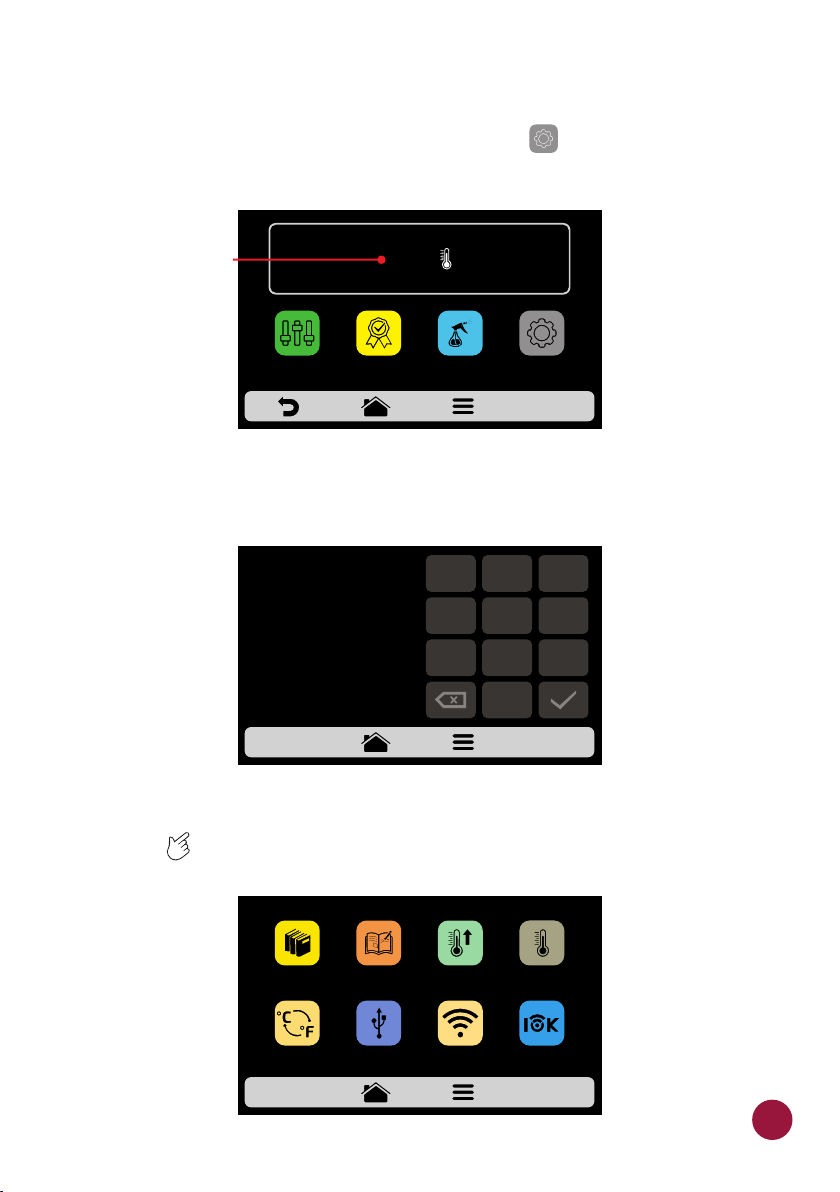
a) To access the settings, at any time, touch on the icon found in the fixed TEC
menu bar.
b) In the Options Screen, there will be information such as: Current
temperature in the Chamber, Favorites (see page 65), Manual Mode (see
page 67), Cleaning Guide (see page 70), and Settings (below).
Note: Manual Mode and Favorites will only be shown if enabled by the
administrator (see page 64).
The temperature can be
changed between Celsius
and Fahrenheit according
to the user's preference.
MANUAL
c) Touching on the icon once more will return to Groups Screen.TEC
d) Touching on the icon will return to the Preheating Temperature TEC
selection screen.
32
MODE
TEMPERATURE
482°F
DAILY CLEANING
GUIDE
SETTINGSFAVORITES
Page 33
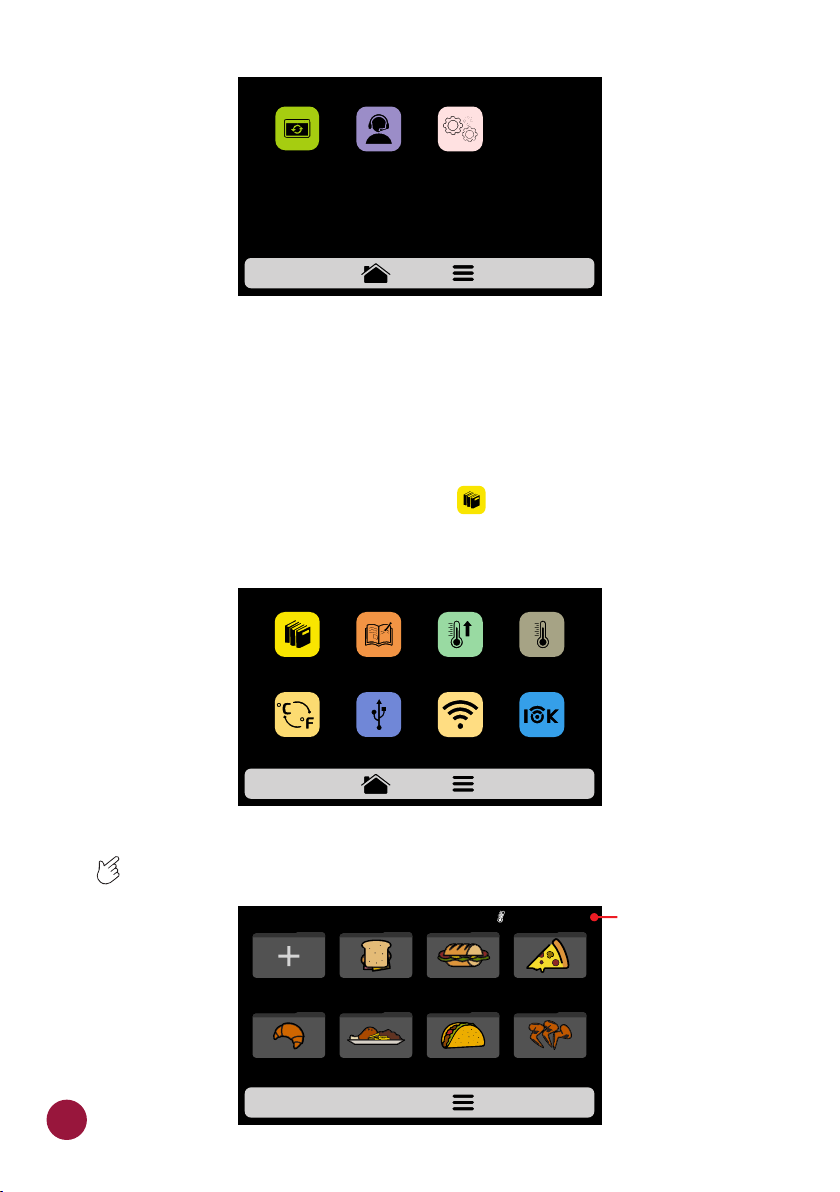
USER'S SETTINGS
a) Inside the Options Screen, click on the icon to inform the User's TEC
Password that will be presented.
The temperature can be
changed between Celsius
and Fahrenheit according
to the user's preference.
MANUAL
MODE
TEMPERATURE
482°F
DAILY CLEANING
GUIDE
SETTINGSFAVORITES
b) The standard password for the settings is 456789. This password may be
changed (see page 63).
1
3
2
ENTER PASSWORD
5
TO ACCESS
SETTINGS
456789
4
7
6
8 9
0
c) The User's Settings screen is composed by eleven items. Use the gridview,
sliding on the touch screen to access the next options screen. TEC
Understand each item in detail in the following pages.
MENU
EDIT
GROUPS
CELSIUS /
FAHRENHEIT
EDIT
RECIPES
USB
PREHEAT
WI-FI WEB
CURRENT
TEMPERATURE
APP
33
Page 34
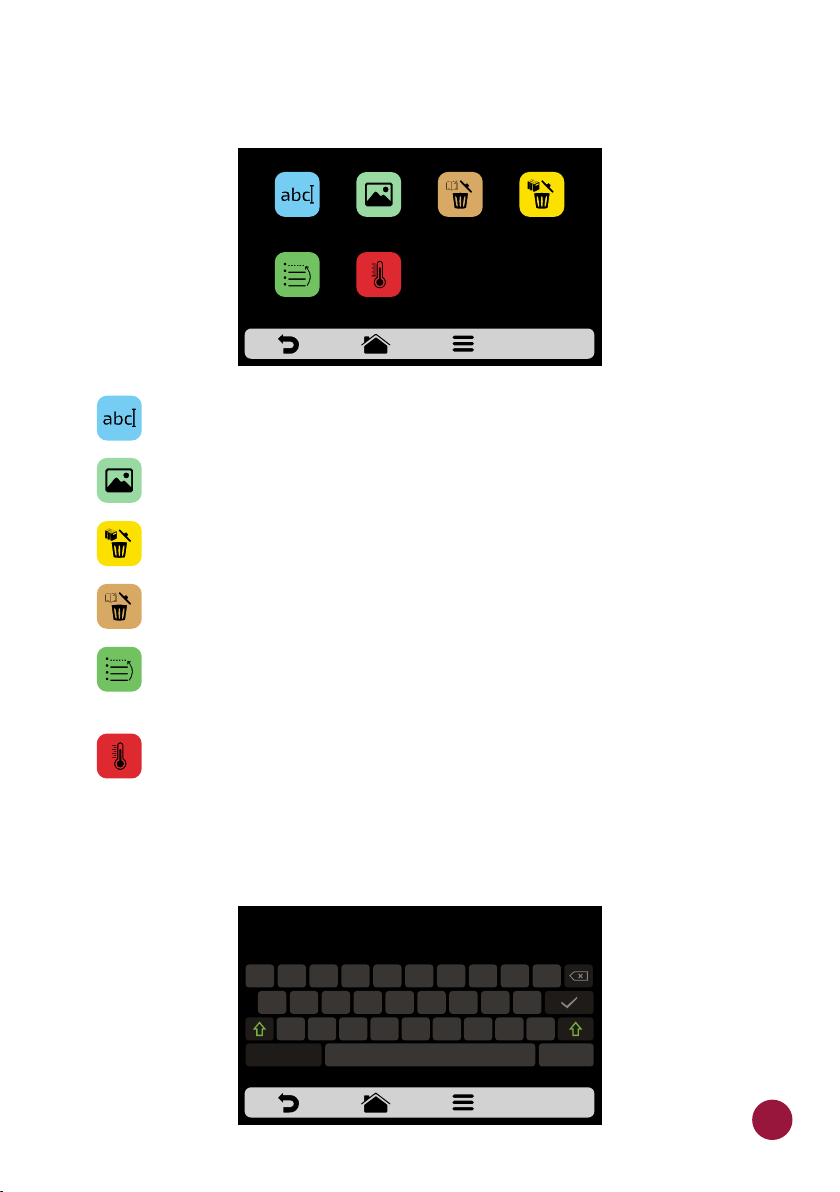
SETTINGS - page 2
UPDATE
CUSTUMER SUPPORT
SYSTEMSYSTEM
USER'S SETTINGS: EDIT GROUPS
Note: The kiln has two preheating temperatures as shown on page 28. After
pre-heating, the oven will show the recipes for the selected pre-heating group.
Recipes set in Group 1 will only be available when the “Preheating 1" option is
selected.
a) To edit the recipes groups, touch on the icon, the groups screen will be TEC
presented. However, the first slot on the screen will be the icon that allows the
user the possible to Create New Group.
SETTINGS - page 1
EDIT
GROUPS
EDIT
RECIPES
PREHEAT
CURRENT
TEMPERATURE
CELSIUS /
FAHRENHEIT
USB
WI-FI WEB
APP
b) Choose to create a new group, or select the group you desire to edit. Slide
TEC the screens to the left and right in order to transit between the group
screens.
GROUPS CURRENT 410°F
NEW GROUP
BAKERY
SANDWICH
FINISHING
SUBSBREAKFAST
TEX-MEXMEAL
PIZZA
CHICKEN
WINGS
The temperature can be
changed between Celsius
and Fahrenheit according
to the user's preference.
34
Page 35
c) The available options after choosing between editing or creating a group
will be:
GROUP: SNACKS
EDIT
NAME
ORDER CHANGE GROUP
EDIT
IMAGE
TEMPERATURE
DELETING
RECIPES
DELETE
GROUP
Edit Name: changes the group’s name. It is possible to use letters,
numbers, or special characters.
Edit Image: changes the images of the group icon.
Delete Group: deletes all the information of the selected group,
including the recipes.
Delete Recipes: deletes a selected recipe.
Order: changes the r»sition of a selected group in a larger list of
groups.
Change Group Temperature: changes the group preheating
temperature. Note: Recipes set in group 1 will only be available when
running Preheating 1 and the same applies to group 2.
EDIT NAME
a) By selecting the Edit Name option, the following screen will be displayed:
GROUP NAME
W E
Q
A S D
Z X C V B
&123
R T
F
Y
G H
U
I O
J
M
N
P
K
L
,
.
-
35
Page 36
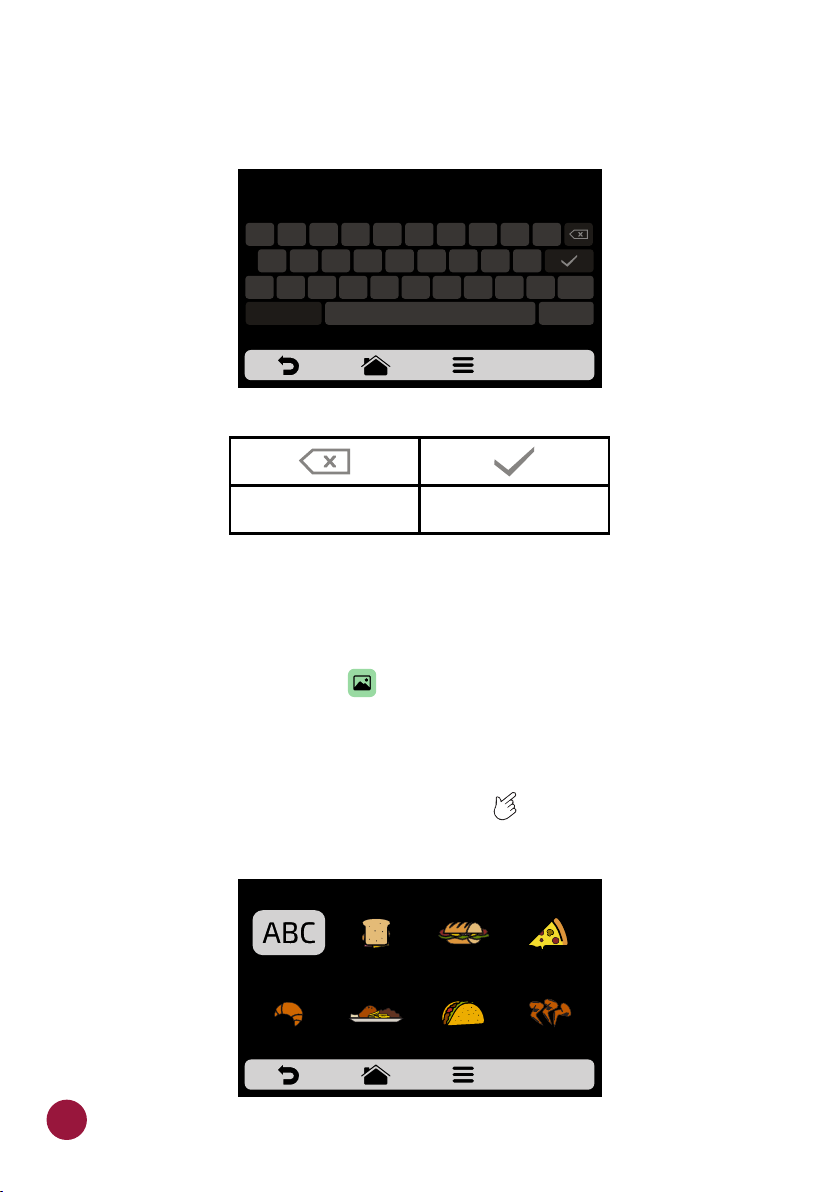
b) Clicking on and (1/2 and 2/2) the screen will toggle TECLA TECLAS
&123
ABCDE
between letters and numbers/special characters.
GROUP NAME
1
1/2 1/2
3 4
2
@
#
!
“
ABC
5
%
&
>
<
Deletes a character
7
6
*
‘
-
+
:
8 9 0
;
Saves the name and
returns to the options
( )
/
?
.
EDIT IMAGE
a) The Fit Express has an icon gallery that enables the user to change the
icons of the groups. Press the icon.TEC
b) A screen with an image library will be displayed. Browse through the
images and select the desired image. It is also possible, instead of adding an
image, to maintain the first letter of the group name as the group icon, just
click on the ABC icon. Use the gridview, sliding on the touch screen to see TEC
all images.
36
FIRST
CHARACTER OF
RECIPE NAME
CHOOSE AN IMAGE FOR THE RECIPE
Page 37
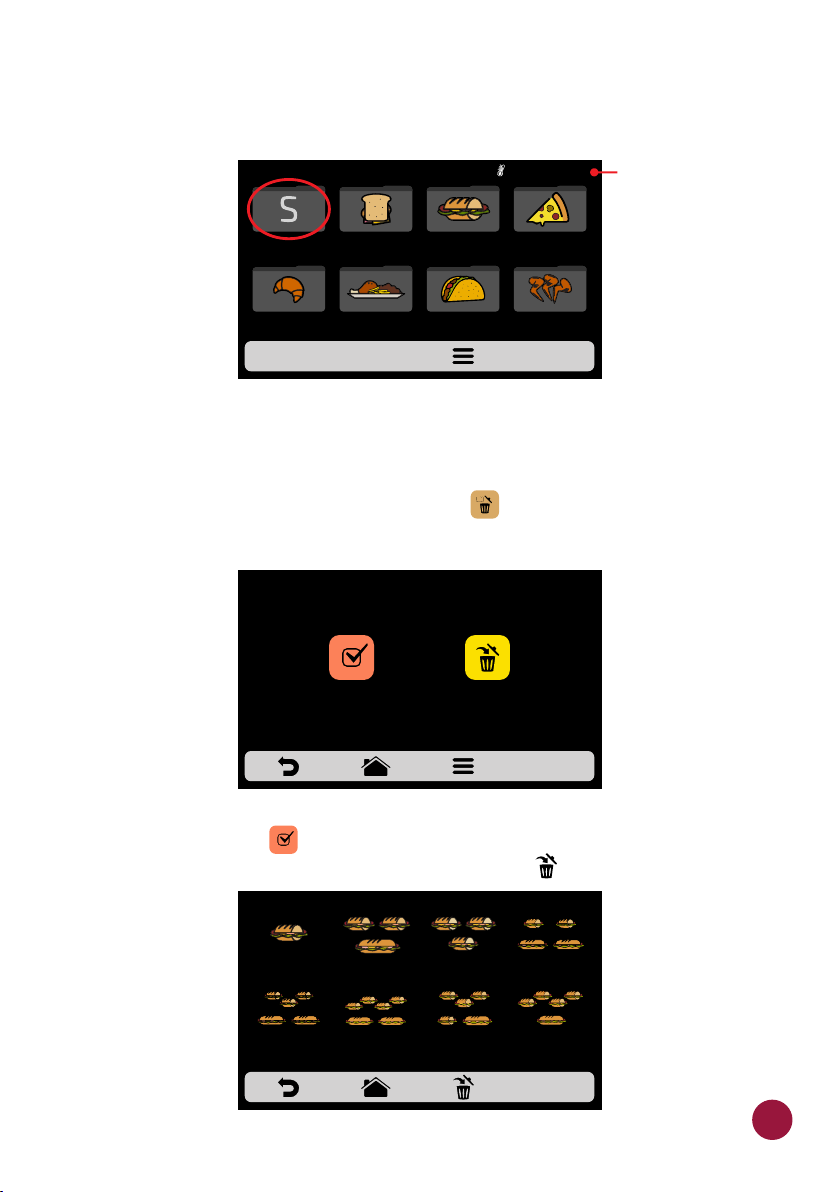
For example: if your group is called SNACKS, on the group screen, Snacks will
have letter 'S' as its icon.
GROUPS CURRENT 410°F
SNACKS
BAKERY
SANDWICH
FINISHING
SUBSBREAKFAST
TEX-MEXMEAL
PIZZA
CHICKEN
WINGS
The temperature can be
changed between Celsius
and Fahrenheit according
to the user's preference.
DELETING RECIPES
a) The deleting recipes option will enable you to only delete the recipes of the
previously selected group. Press the button .On the next screen, it will be TEC
possible to delete a selection of recipes, or all the recipes:
DELETE RECIPES
SELECT
RECIPES
DELETE ALL
RECIÉS
b) Select the recipes you wish to delete, the will indicate the selected TEC TEC
x
ones, and then click on the trash can of the fixed bar .TEC
SELECT RECIPES FOR DELETION
x
1 SUB 6-inch 2 SUB 6-inch
3 SUB 6-inch
2 SUB 12-inch
1 SUB 12-inch
4 SUB 6-inch
2 SUB 12-inch
x
3 SUB 6-inch 2 SUB 6-inch
x
3 SUB 6-inch
or 1 SUB 6-inch
and 1 SUB 12-inch
or 2 SUB 12-inch
4 SUB 6-inch
1 SUB 12-inch
37
Page 38
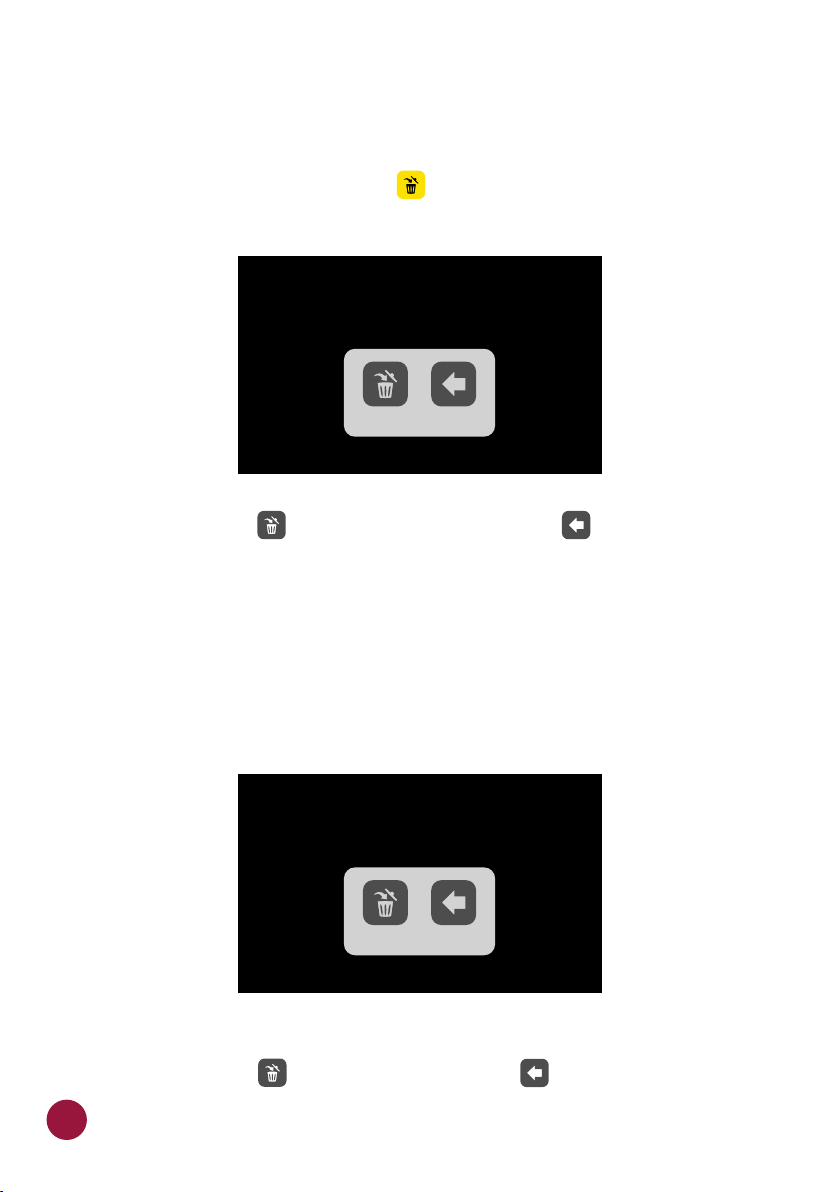
The opposite message will appear - To confirm the deletion of the recipes, click
on the icon “DELETE SELECTION”; to continue selecting, click on “CONTINUE
SELECTION”.
c) When clicking on the Delete All icon, the following message will be TEC
presented:
ALL THE RECIPES WILL
BE REMOVED FROM
THE GROUP
BACKDELETE
To confirm, click on or, to cancel, and return click on .
DELETE GROUP
a) ATTENTION: When choosing the option of deleting the group, all the
information referring to the group will be lost: including recipes, steps, and
other information. And in case the user does not perform a Backup (see page
53, USB Options), it will not be possible to recover this information.
THE GROUP
WILL BE DELETED
BACKDELETE
b) Press the button to confirm your choice, or to return to the options TEC TEC
screen.
38
Page 39
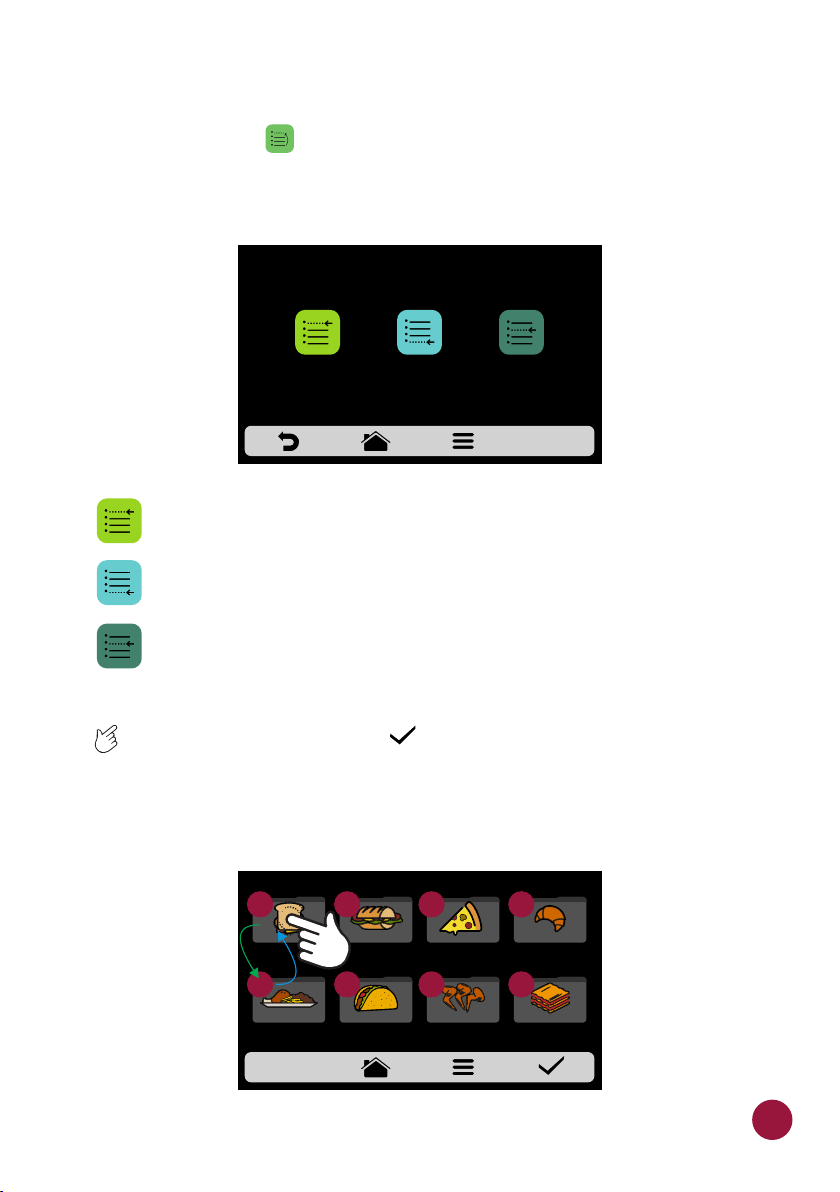
ORDER
a) The Order funcon , enables to change the sequence in which the groups will TEC
appear on the groups screen.
This screen is composed of three buons:
CHANGE ORDER
PLACE AT THE
LIST START
PLACE AT THE
LIST END
CHOOSE PLACE
IN THE LIST
Place at the list start: The group is moved to the beginning of the
groups list.
Place at the list end: The group is moved to the end of the groups list.
Choose place in the list: The operator will be directed to the groups
screen to choose the location desired.
b) To change the position of a group, just click on the group to select and slide
TEC TEC to the desired position. Press to save the change.
c) If the rearrangement of two groups is done vertically (1-2, 3-4, 5-6 and 7-8)
those groups will change position without changing the order of the other
groups, as shown in the image below:
SELECT THE GROUP
1
3
5
7
BREAKFAST
SANDWICH
2
MEAL
FINISHING
4
TEX-MEX CHICKEN
6
PIZZASUBS BAKERY
8
WINGS
GRATIN
39
Page 40
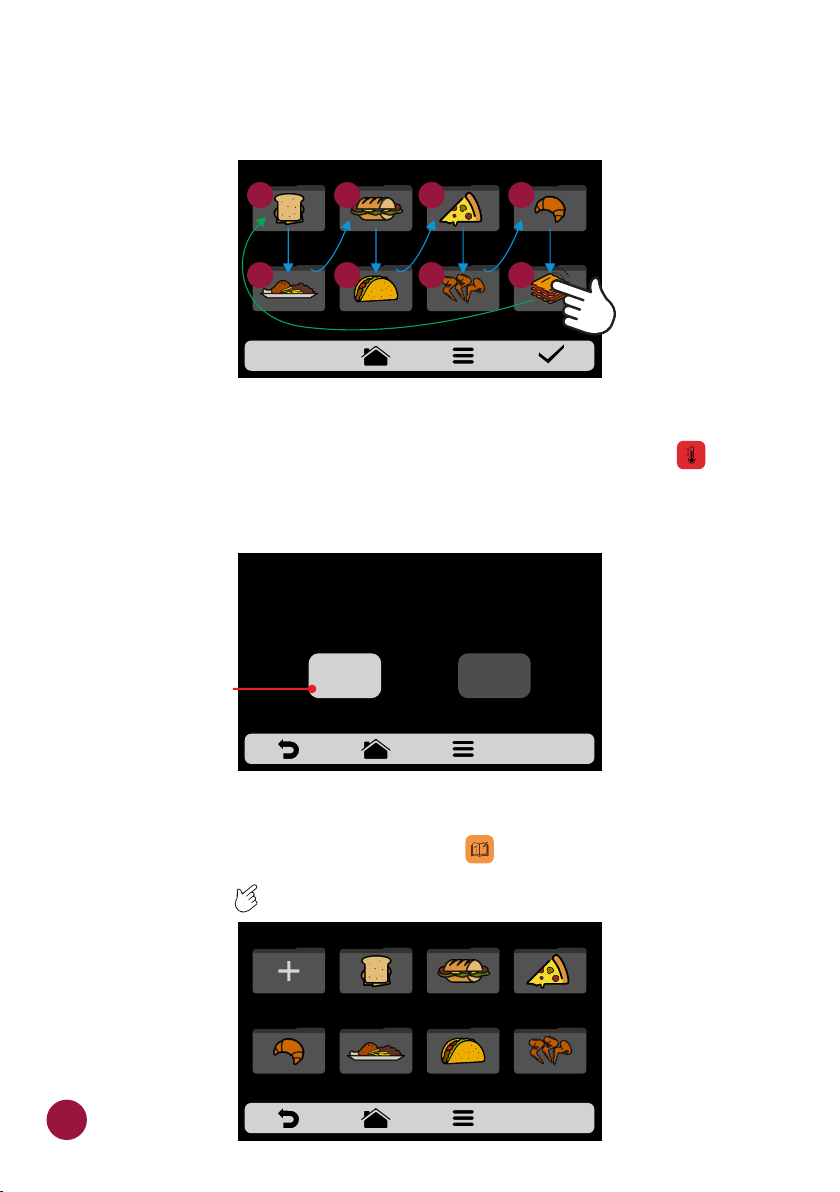
d) If the switching of groups is done randomly, once the position is selected,
the groups will be ordered sequentially (1, 2, 3, 4, 5, 6, 7 and 8), as shown in the
image below:
SELECT THE GROUP
1
3
5
7
BREAKFAST
SANDWICH
2
MEAL
FINISHING
4
TEX-MEX CHICKEN
PIZZASUBS BAKERY
6
WINGS
8
GRATIN
CHANGE GROUP TEMPERATURE
a) Choose the desired preheating temperature to the selected group .TEC
Note: Recipes set in group 1 will only be available when running Preheating 1
and the same applies to group 2.
CHANGE GROUP TEMPERATURE
CURRENT GROUP TEMPERATURE:
482 ° F
The temperature can be
changed between Celsius
and Fahrenheit according
to the user's preference.
482°F 482°F
PREHEATING 1 PREHEATING 2
USER'S SETTINGS: EDIT RECIPES
a) To edit the recipes, click on the icon . The groups screen will be TEC
displayed. Choose in which group you wish to change the recipes. Use the
gridview, sliding on the touch screen to see all recipes.TEC
SELECT GROUP - pag. 1
NEW GROUP
BAKERY
SANDWICH
FINISHING
SUBSBREAKFAST
TEX-MEXMEAL
PIZZA
CHICKEN
WINGS
40
Page 41
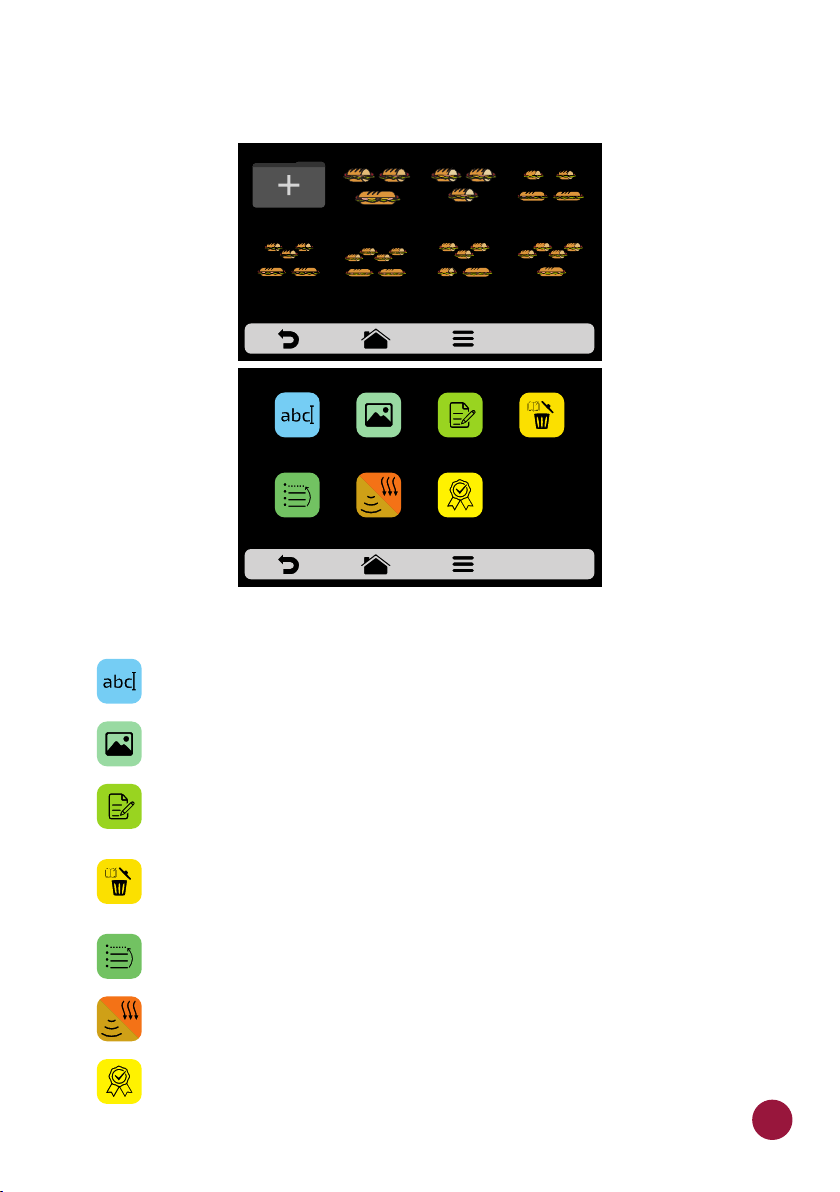
b) When accessing the recipes, it will be possible to edit an existing recipe
or create a new one.
SELECT RECIPE - pag. 1
CREATE NEW
RECIPE
3 SUB 6-inch
2 SUB 12-inch
EDIT
NAME
ORDER EDIT COOK/BROWN
2 SUB 6-inch
1 SUB 12-inch
4 SUB 6-inch
2 SUB 12-inch
SNACKS: 1 SUB 15cm
EDIT
IMAGE
MORE
3 SUB 6-inch 2 SUB 6-inch
3 SUB 6-inch
or 1 SUB 6-inch
and 1 SUB 12-inch
EDIT
STEPS
ADD TO
FAVORITES
or 2 SUB 12-inch
4 SUB 6-inch
1 SUB 12-inch
DELETE
RECIPE
The available options after choosing between editing or creating a recipe will be:
Edit Name: changes the name of the recipe, you may use letters,
numbers, or special characters.
Edit Image: changes the picture or icon of recipes.
Edit Steps: accesses the options for edititing the steps of the
selected recipe.
Delete Recipe: deletes all the information of the selected recipe,
including the steps.
Order: changes the location in which the recipe appears among the
other recipes of the group.
Cook/Brown More: Changes the time of Cook/ Brown More function.
Add/Remove from Favorites: Adds or removes the recipe from the
Favorites list.
41
Page 42
EDIT NAME
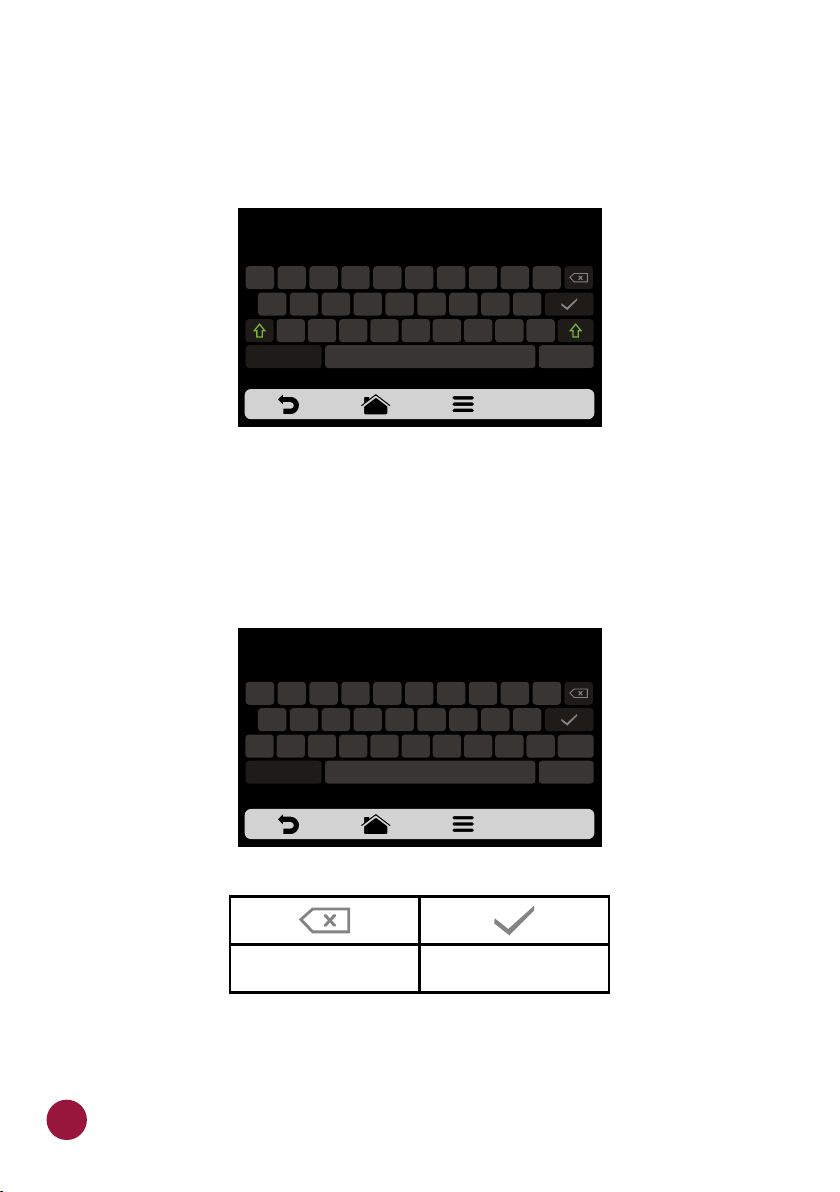
a) When selecting the Edit Name option, the following screen will be
presented:
GROUP NAME
W E
Q
A S D
Z X C V B
&123
b) Clicking on and (1/2 and 2/2) will toggle the screen TECLA TECLAS
&123
R T
F
ABCDE
Y
G H
U
I O
J
K
M
N
between letters and numbers/special characters.
GROUP NAME
1
1/2 1/2
3 4
2
@
#
!
“
ABC
5
%
&
>
<
7
6
*
‘
-
+
:
8 9 0
( )
;
P
L
,
.
-
/
?
.
42
Deletes a character
Saves the name and
returns to the options
Page 43
EDIT IMAGE
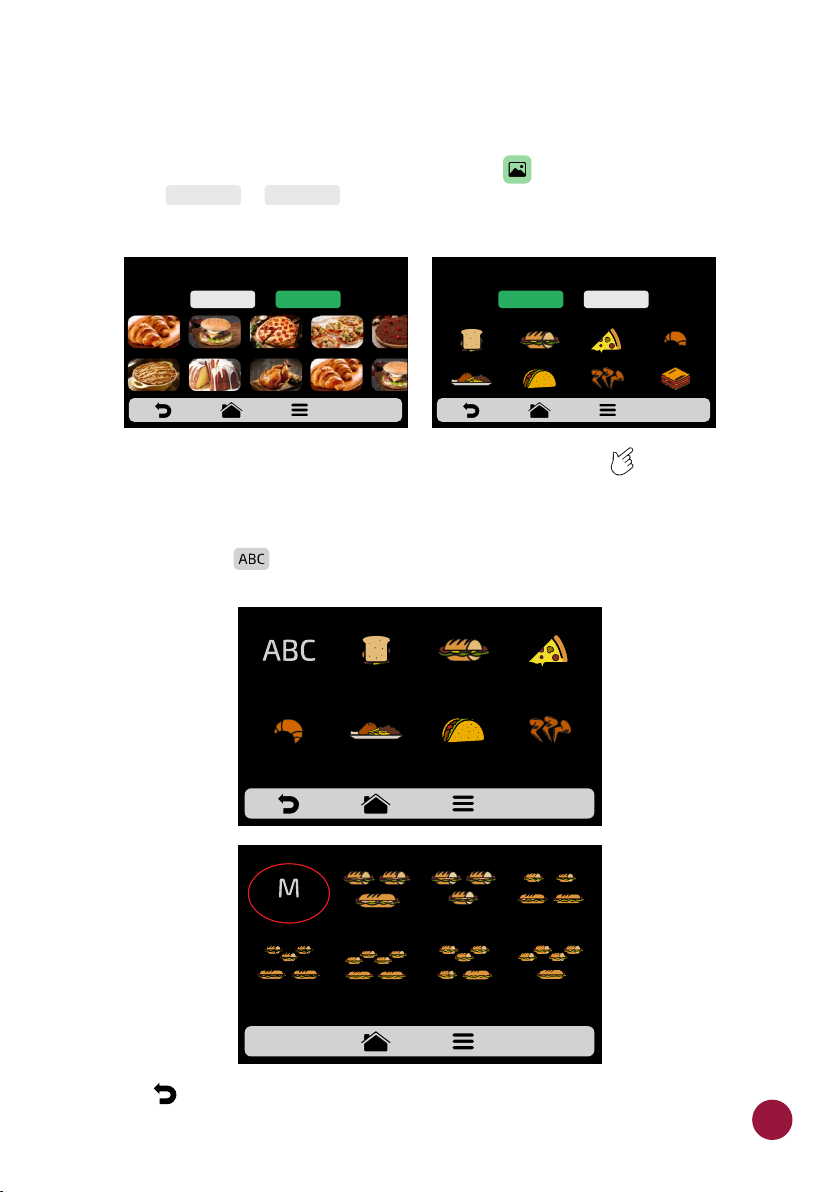
a) The Fit Express has an image gallery that enables the user to change the
icons/picture of the recipes. Click on the icon to edit and then choose TEC
between or for the displayed recipes.TECLAS TECLAS
ICONS
Choose “Pictures” for real food images Choose “Icons” for stylized food images
ICONS
b) To access the next recipes page, use the gridview, sliding on the touch TEC
screen to see all recipes.
c) Browse through the icons of the image library to select the desired icon or
press the button to transform the first letter of the recipe name into an TEC
icon, as shown in the adjacent example.
PICTURES
SELECT IMAGE
PICTURES
CHOOSE AN IMAGE FOR THE RECIPE
ICONS
SELECT IMAGE
PICTURES
c) Use to return to the recipe editing options.TEC
FIRST
CHARACTER OF
RECIPE NAME
MIXED
3 SUB 6-inch
2 SUB 12-inch
SUBS - pag. 1
2 SUB 6-inch
1 SUB 12-inch
4 SUB 6-inch
2 SUB 12-inch
3 SUB 6-inch 2 SUB 6-inch
3 SUB 6-inch
or 1 SUB 6-inch
and 1 SUB 12-inch
or 2 SUB 12-inch
4 SUB 6-inch
1 SUB 12-inch
43
Page 44
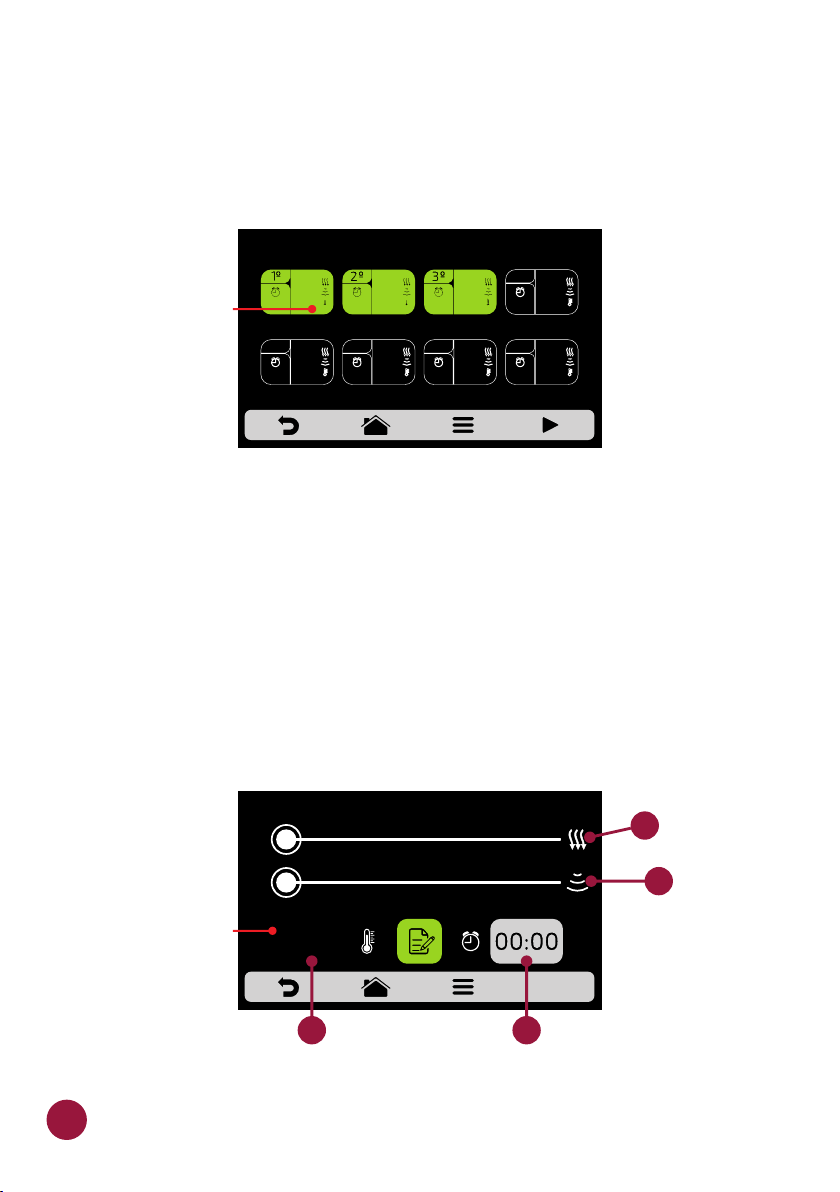
EDIT STEPS
a) Every recipe supports up to 8 steps. The active steps will appear in green on
the Edition screen, the inactive steps will be transparent. Click on a step to
edit it.
EDIT STEPS - SNACK: 1 SUB 6-inch
The temperature can be
changed between Celsius
and Fahrenheit according
to the user's preference.
00:05
100%
20%
104°F
00:20
50%
60%
176°F
00:15
90%
100%
104°F
b) For each step, it is necessary to specify the:
.
Ÿ 1 - Speed of hot air;
Ÿ 2 - % of microwaves;
Ÿ 3 - Temperature;
Ÿ 4 - Time.
0 10 20 30 40 50 60 70 80 90 100
0
1
The temperature can be
changed between Celsius
and Fahrenheit according
to the user's preference.
44
0
482°F
GROUP1
3
2
3
4
Page 45
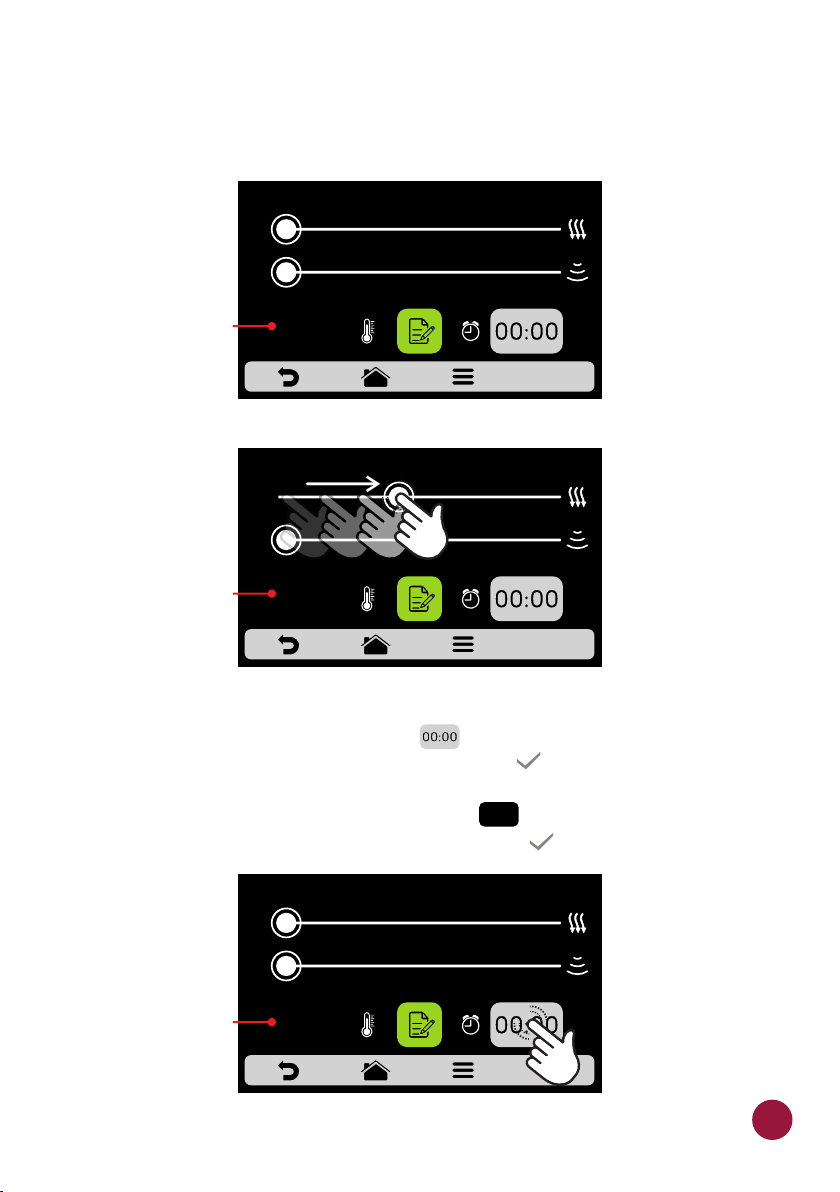
c) To change the Speed of Hot Air and Microwaves , click and drag the dot
on the bar of each parameter or click on the desired location.
0 10 20 30 40 50 60 70 80 90 100
0
0
The temperature can be
changed between Celsius
and Fahrenheit according
to the user's preference.
The temperature can be
changed between Celsius
and Fahrenheit according
to the user's preference.
482°F
GROUP1
0 10 20 30 40 50 60 70 80 90 100
0
0
482°F
GROUP1
d) To set the time click on the icon . A keyboard will appear on the TECL
opposite side, set the desired value and click on .TE
e) To define the temperature click on the icon . A keyboard will appear on TECL
482°F
GROUP1
the opposite side, set the desired value and click on . TE
0 10 20 30 40 50 60 70 80 90 100
0
0
The temperature can be
changed between Celsius
and Fahrenheit according
to the user's preference.
482°F
GROUP1
45
Page 46
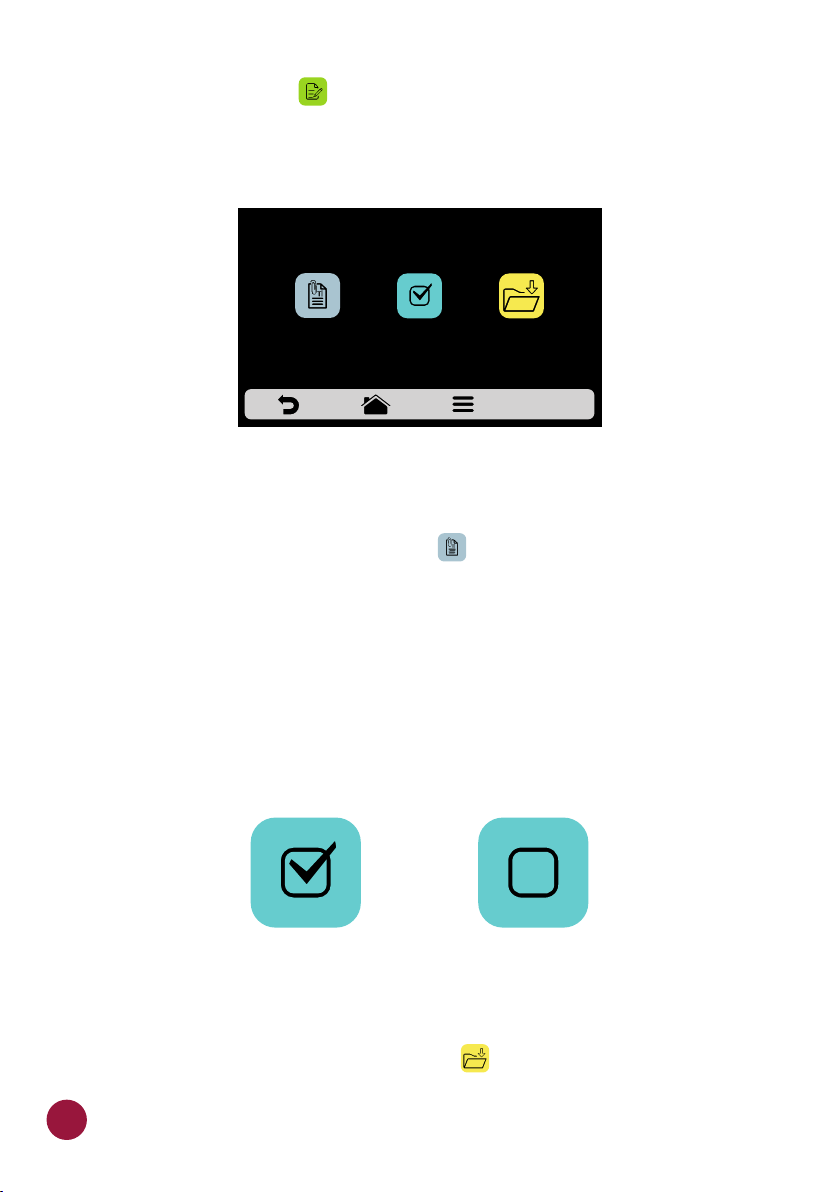
f) Click on the button to access the options for edition of the step TEC
parameters, which are:
STEP 1
ADD
INFORMATION
ACTIVATE/
DEACTIVATE
SAVE
g) Add Information, which will be displayed at the end of the step during the
execution of the recipe. Click on the icon .TEC
h) Enable and disable the step:
Ÿ The recipe only executes active steps. When a step is deactivated, it is not
deleted, and only remains hidden.
Ÿ To delete the step, it is necessary to set the value to the time parameter to
00:00.
ACTIVE INACTIVE
i) After concluding the edition of a step, use to save and return to the steps
screen to edit, create new step, or test the active steps.
46
Page 47
EDIT STEPS - SNACK: 1 SUB 6-inch
The temperature can be
changed between Celsius
and Fahrenheit according
to the user's preference.
00:05
100%
20%
104°F
00:20
50%
60%
176°F
00:15
90%
100%
68°F
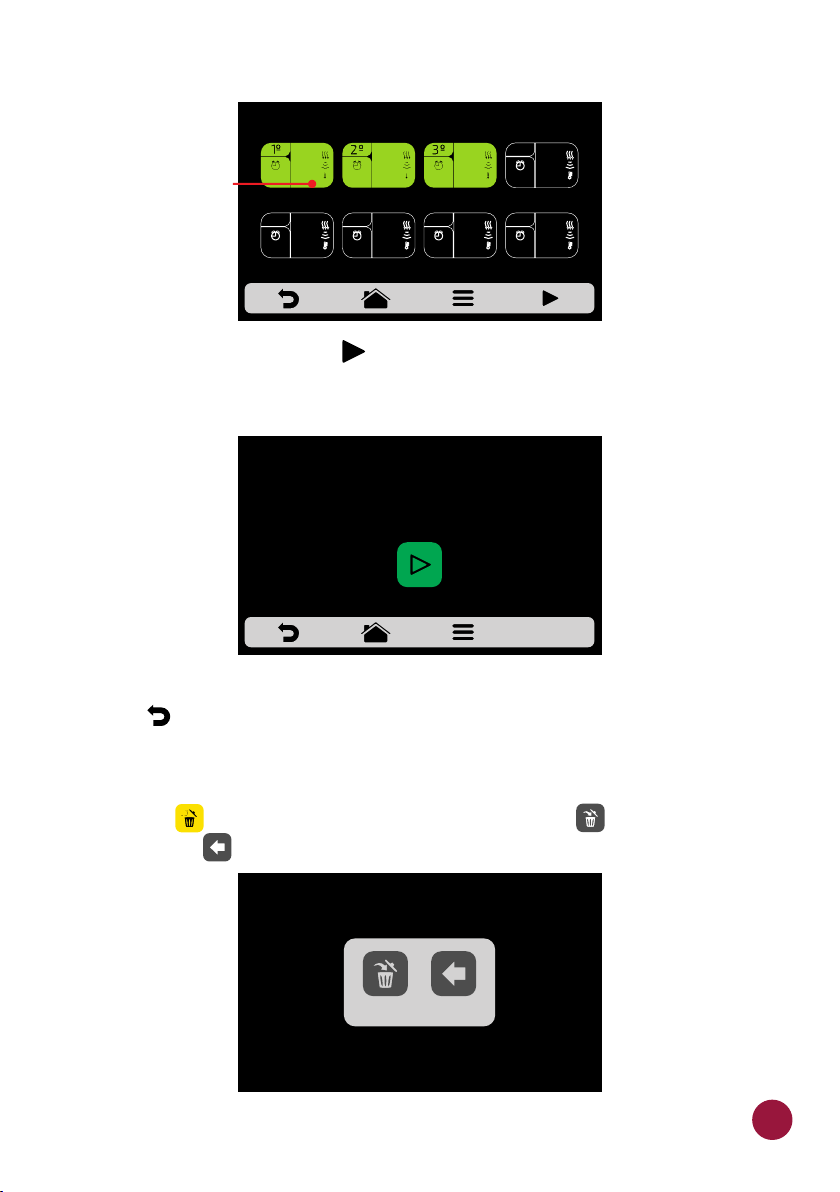
j) To test, click on the icon that is found in the fixed bar on the steps TEC
screen. Before proceeding with the test, make sure that there is food inside
the chamber.
BEFORE PROCEEDING,
MAKE SURE THERE IS FOOD
INSIDE THE OVEN.
k) Use to return to the recipe editing options.TEC
DELETING RECIPE
a) Press to delete the recipe, press the button to confirm the TEC TEC
exclusion or to return to the options for recipe edition.TEC
THE RECIPE 1 SUB 6-inch WILL BE REMOVED
BACKDELETE
47
Page 48
ORDER
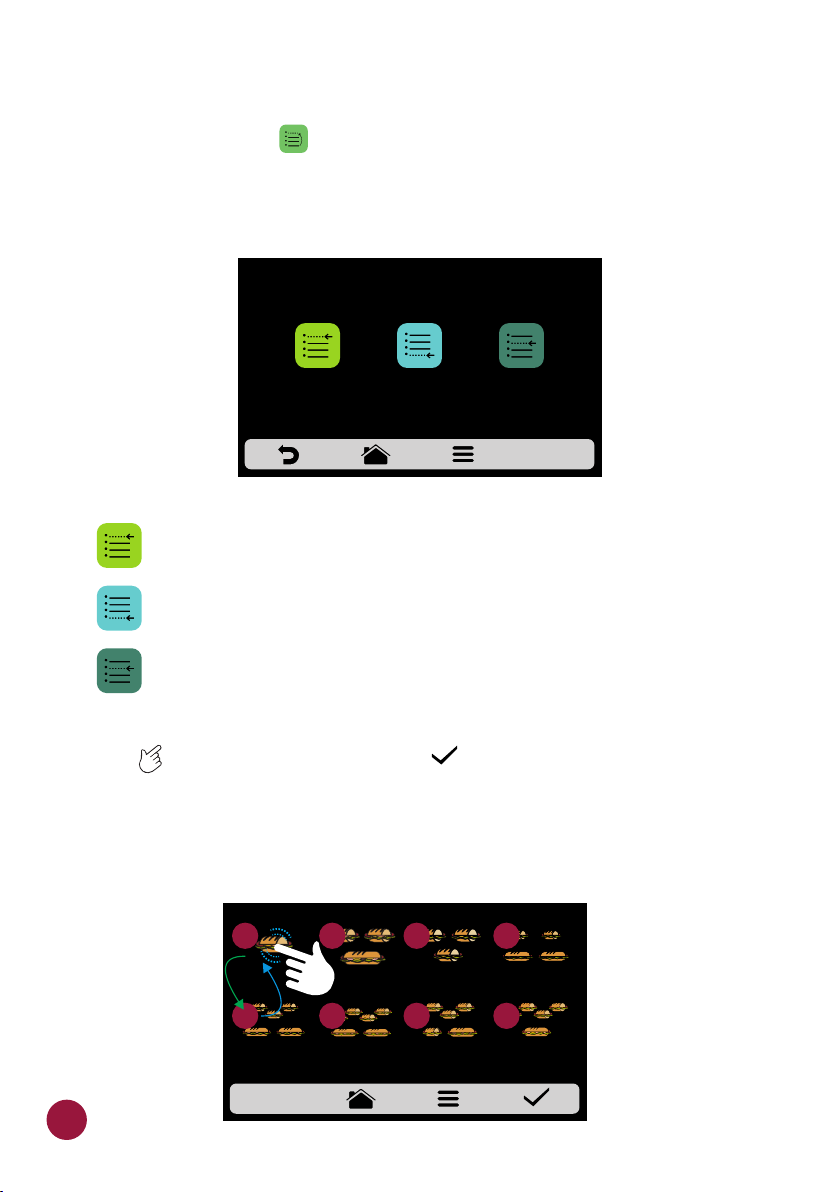
a) The Order function , allow to change the sequence in which the groups
will appear on the groups screen.
This screen is composed by three buttons:
CHANGE ORDER
PLACE AT THE
LIST START
PLACE AT THE
LIST END
CHOOSE PLACE
IN THE LIST
Place at the list start: The recipe is moved to the beginning of the
groups list.
Place at the list end: The recipe is moved to the end of the groups list.
Choose place in the list: The operator will be directed to the groups
screen to choose the location desired.
b) To change the position of a recipe, just press on the recipe to select and
slide to the desired position. Press to save the change.TEC TEC
c) If the rearrangment of two groups is done vestically (1-2, 3-4, 5-6 and 7-8)
these groups will change position without changing the order of the other
recipes, as shown in the image below:
SELECT THE RECIPE
1
3
5
7
48
1 SUB 6-inch 2 SUB 6-inch
2
3 SUB 6-inch
2 SUB 12-inch
1 SUB 12-inch
4
4 SUB 6-inch
2 SUB 12-inch
3 SUB 6-inch 2 SUB 6-inch
6
3 SUB 6-inch
or 1 SUB 6-inch
and 1 SUB 12-inch
or 2 SUB 12-inch
8
4 SUB 6-inch
1 SUB 12-inch
Page 49
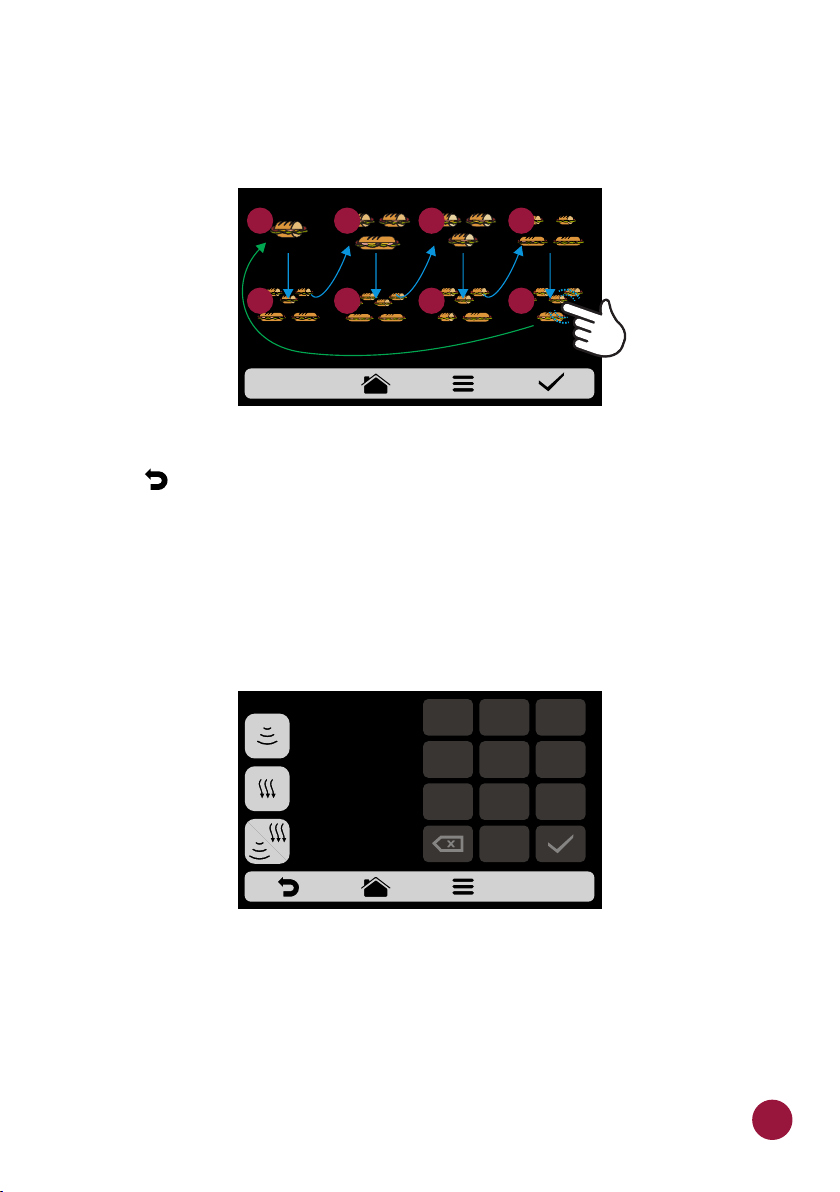
d) If the rearrabgement of groups is done randomly, once the position is
selected, the recipes will be ordered sequentially (1, 2, 3, 4, 5, 6, 7 and 8), as
shown in the image below:
SELECT THE RECIPE
1
3
5
7
1 SUB 6-inch 2 SUB 6-inch
2
3 SUB 6-inch
2 SUB 12-inch
1 SUB 12-inch
4
4 SUB 6-inch
2 SUB 12-inch
3 SUB 6-inch 2 SUB 6-inch
6
3 SUB 6-inch
or 1 SUB 6-inch
and 1 SUB 12-inch
or 2 SUB 12-inch
8
4 SUB 6-inch
1 SUB 12-inch
b) Use to return to the recipe editing options.
EDIT COOK / BROWN MORE
a) The Cook/Brown More function is defined by recipe, that is, it is not a fixed
value for all of them, the user may set the time he/she wishes for each option.
EDIT COOK/BROWN
00s
COOK MORE
00s
BROWN MORE
1
4
7
2
5
8 9
3
6
00s
COOK/BROWN MORE
0
Remember that:
Ÿ Brown More - Only activates HOT AIR.
Ÿ Cook More - Activates only the MICROWAVE.
Ÿ Cook/Brown More - Activates both HOT AIR and MICROWAVE.
49
Page 50
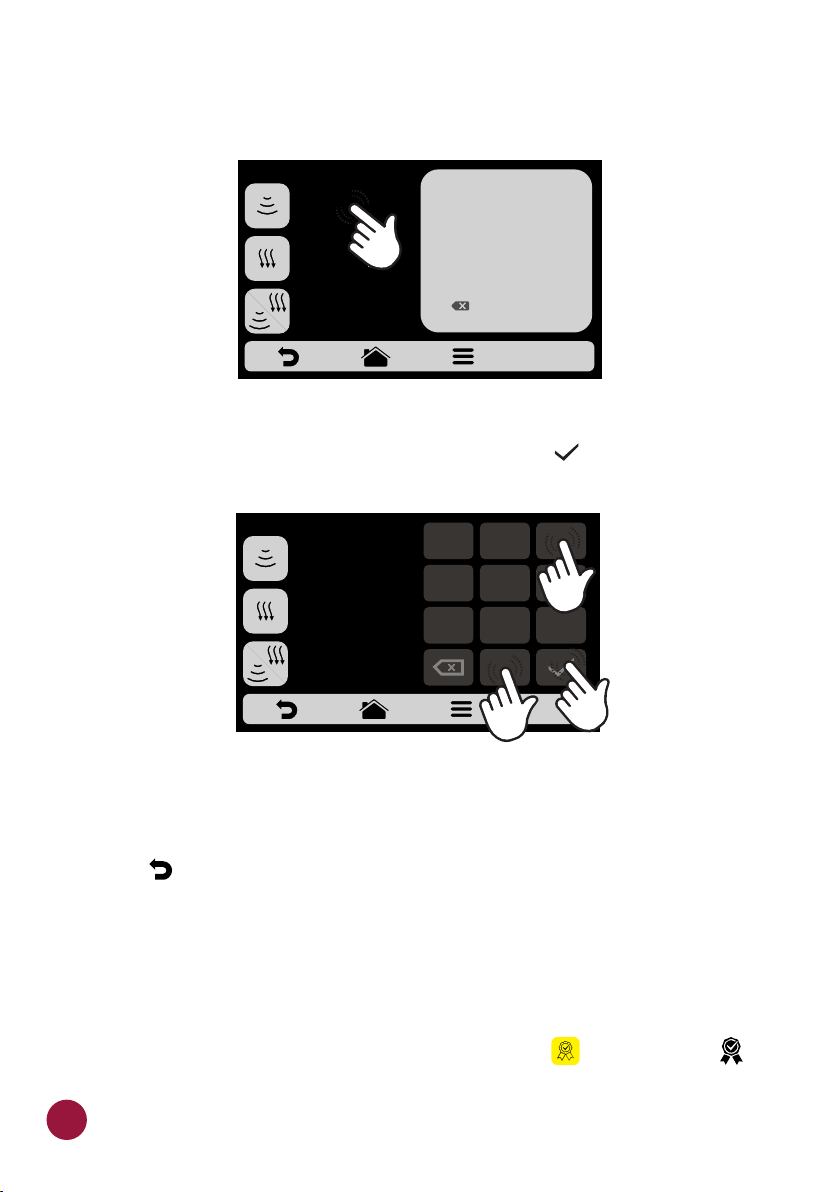
b) To set the time, just click on the value location, as show below.
EDIT COOK/BROWN
00s
COOK MORE
00s
BROWN MORE
00s
COOK/BROWN MORE
c) Use the numeric pad to inform the time and click on .TEC
1
4
7
3
2
5
6
8
9
OK
0
EDIT COOK/BROWN
30s
COOK MORE
00s
BROWN MORE
00s
COOK/BROWN MORE
d) The Cook/Brown More function may be disabled in the Settings of Edit
Access Page .(see page 64)
e) Use to return to the recipe editing options.TEC
1
4
7
2
5
8 9
0
3
6
6
ADD / REMOVE FROM FAVORITES
a) The Favorites function may be accessed through the options screen in the
fixed bar. However, it will be explained in detail on 5.page 6
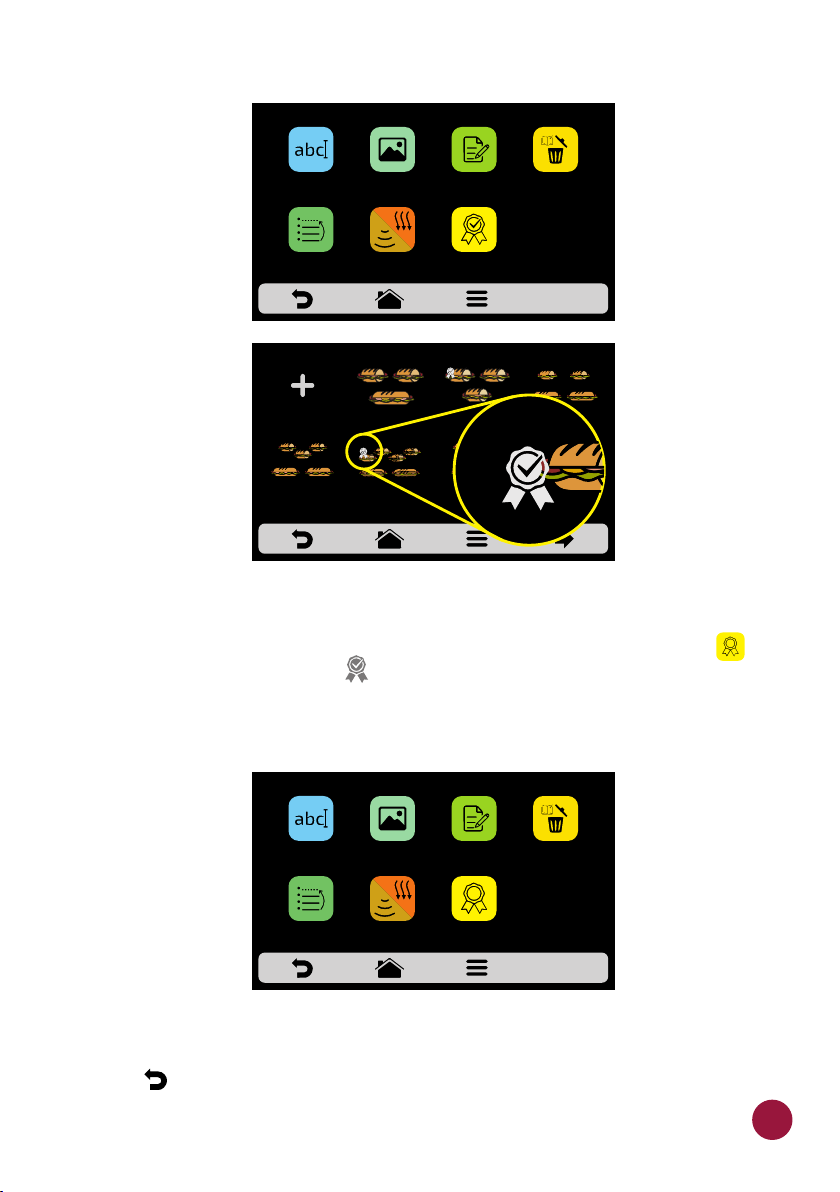
b) To add the recipe to the favorites, click on the icon . A small label TEC TEC
will be added in the upper left-hand corner of the recipe icon.
50
Page 51
SNACKS: 1 SUB 6-inch
EDIT
NAME
ORDER EDIT COOK/
EDIT
IMAGE
BROWN MORE
EDIT
STEPS
ADD TO
FAVORITES
DELTE
RECIPE
SELECT THE RECIPE- page 1
CREATE NEW
RECIPE
3 SUB 6-inch
2 SUB 12-inch
2 SUB 6-inch
1 SUB 12-inch
4 SUB 6-inch
2 SUB 12-inch
3 SUB 6-inch 2 SUB 6-inch
3 SUB 6-inch
or 1 SUB 6-inch
and 1 SUB 12-inch
or 2 SUB 12-inch
4 SUB 6-inch
1 SUB 12-inch
c) To remove the recipe from the favorites, repeat the same process. In the
edit recipe options screen, the Remove from Favorites icon will appear: , TEC
when clicking on it, the label will disappear from the icon and the recipe TEC
will be removed from the Favorites list.
SNACKS: 1 SUB 6-inch
EDIT
NAME
ORDER EDIT HEAT/
EDIT
IMAGE
BROWN MORE
STEPS
REMOVE FROM
FAVORITES
d) Use to return to the user editing options.
EDIT
RELETE
RECIPE
51
Page 52
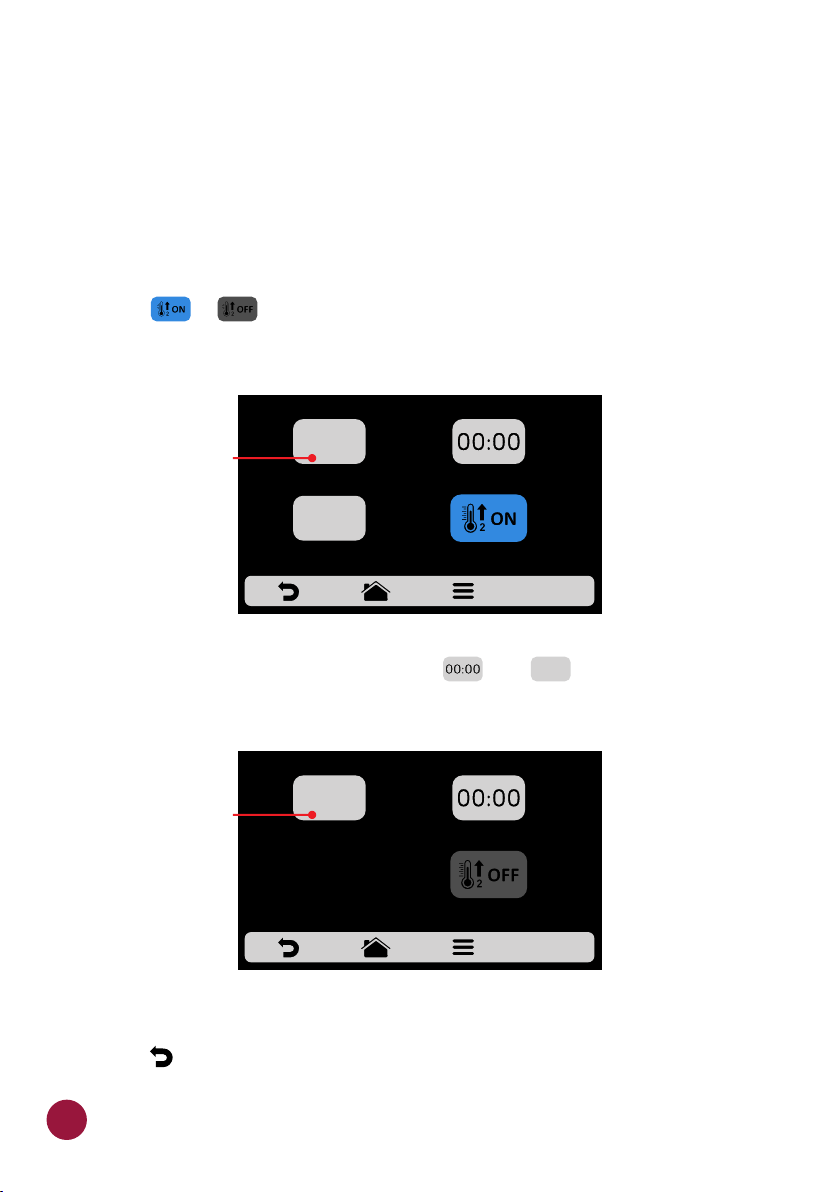
USER'S SETTINGS: PREHEAT
a) The editable parameters in Preheat are:
Ÿ Temperature Preheat 1.
Ÿ Temperature Preheat 2.
Ÿ Preheat Time: Set the stopwatch of the Preheating screen.
b) The / button enables/disables Preheat 2. When disabled, all BUTT oBUTT
settings related to Preheat 2 are hidden.
PREHEAT
The temperature can be
changed between Celsius
and Fahrenheit according
to the user's preference.
000°F
TEMPERATURE
PREHEAT 1
PREHEAT
TIME
000°F
TEMPERATURE
PREHEAT 2
c) To edit the values, click on the icons and to change the value TECL TECL
using the number pad.
PREHEAT
The temperature can be
changed between Celsius
and Fahrenheit according
to the user's preference.
000°F
TEMPERATURE
PREHEAT 1
PREHEAT
TIME
d) Use to return to the user editing options.TEC
52
000°F
Page 53
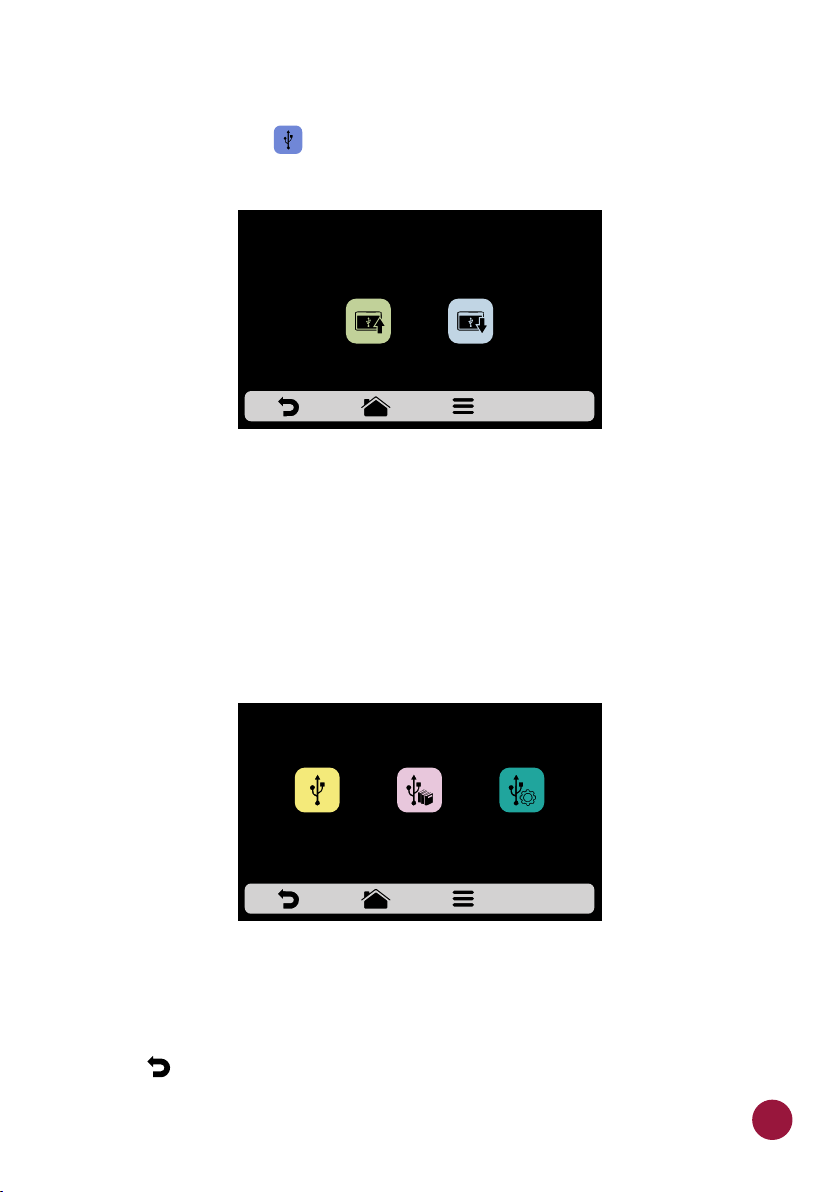
USER'S SETTINGS: USB
a) Press the button . The functions available in USB are: Import and TEC
Export.
USB
SELECT THE DESIRED OPTION, INSERT THE PEN DRIVE
AND WAIT FOR RECOGNITION
EXPORTIMPORT
b) When selecting one of the functions, the message: “Insert the pen drive and
wait for recognition” will appear.
After the pen drive is inserted and recognized, the user will be taken to a
screen containing previously chosen function options.
Ÿ Import: All, Menus, or Settings.
Ÿ Export: All, Menus, or Settings.
IMPORT
ALL
IMPORT
MENUS
IMPORT
SETTINGS
c) In case of error, the displayed message will be: “There was an error during
the Import/Export. Please remove USB disk and restart process.”
d) Use to return to the user editing options.
53
Page 54
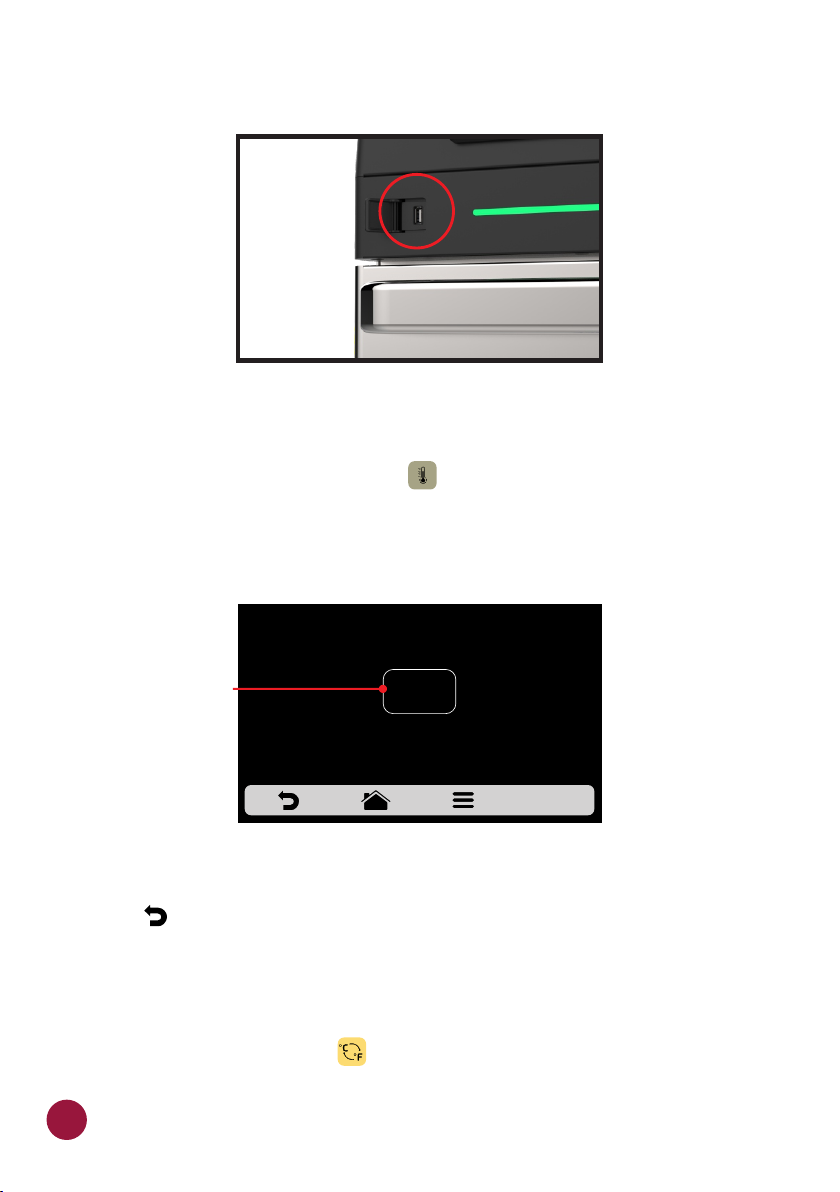
ACCESS TO THE USB PORT
USER'S SETTINGS: CURRENT TEMPERATURE
a) The Current Temperature screen : is only informative. It’s possible to TEC
verify the temperature of Cavity Heater.
CURRENT TEMPERATURE
The temperature can be
changed between Celsius
and Fahrenheit according
to the user's preference.
000°F
CAVITY HEATER
b) Use to return to the user editing options.
USER'S SETTINGS: CELSIUS/FAHRENHEIT
a) To change the unit of temperature displayed on the oven from Celsius to
Fahrenheit, click on the icon among the User's Settings, and set the oven TEC
to your desired unit of measure.
54
Page 55
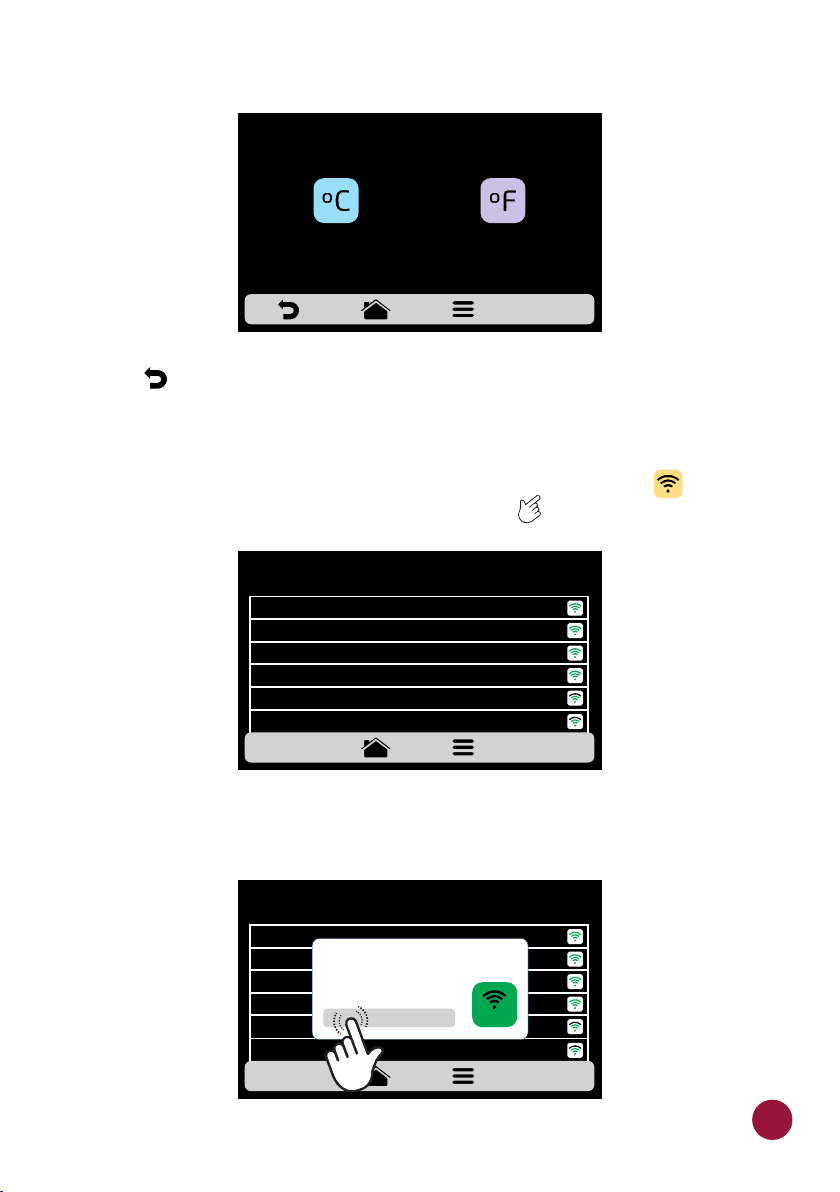
CELSIUS/FAHRENHEIT ADJUSTMENT
CELSIUS
FAHRENHEIT
b) Use to return to the user editing options.
WI-FI
a) If you want to connect to a new wi-fi network, press the button to view TEC
the available networks. Use the gridview, sliding on the touch screen to TEC
see all networks.
WI-FI NETWORK SETTINGS
MY NETWORK
NETWORK 2
NETWORK 3
NETWORK 4
NETWORK 5
NETWORK 6 CONNECT
CONNECT
CONNECT
CONNECT
CONNECT
CONNECT
b) Click on the network you want to connect to and then click on "ENTER
PASSWORD:".
WI-FI NETWORK SETTINGS
MY NETWORK
NETWORK 2
NETWORK 3
NETWORK 4
NETWORK 5
NETWORK 6 CONNECT
NETWORK: MY NETWORK
ENTER PASSWORD:
INCORRECT PASSWORD
*********
CONNECT
CONNECT
CONNECT
CONNECT
CONNECT
CONNECT
CONNECT
CONNECT
55
Page 56
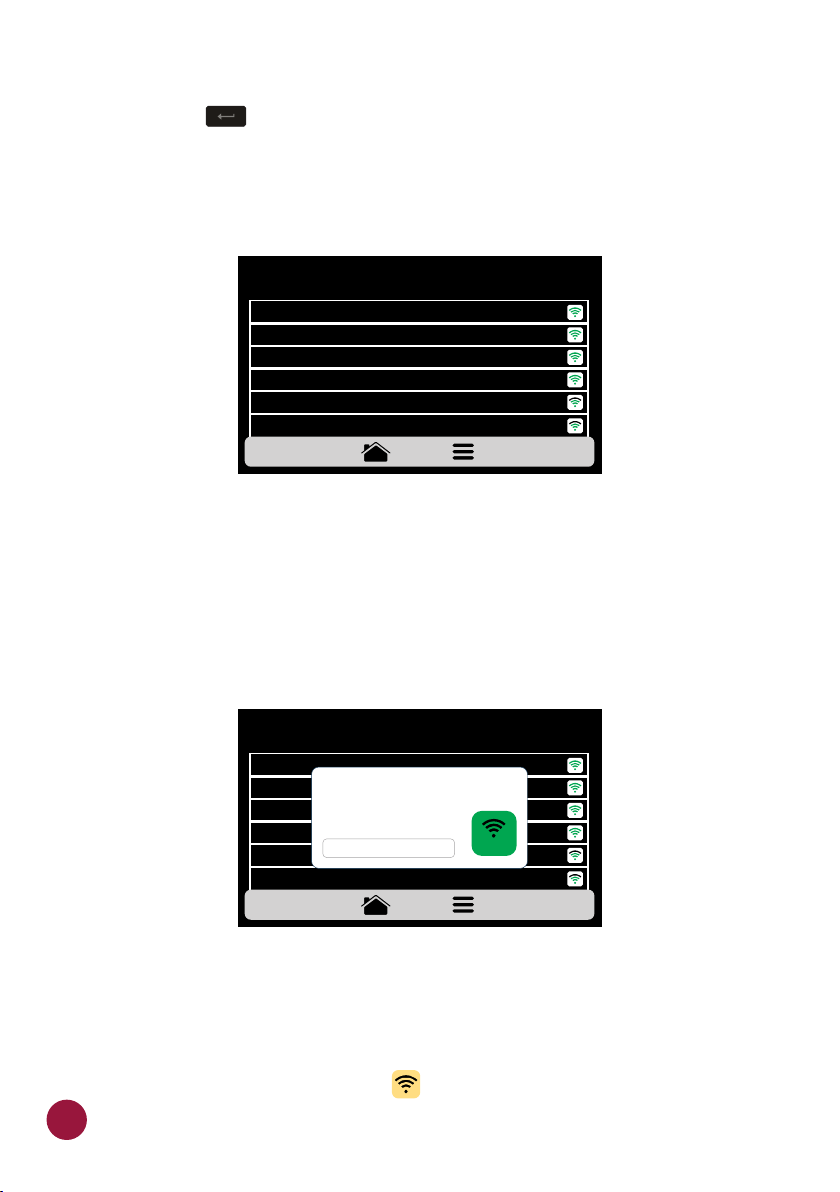
c) Use the alpha numeric keypad to enter the password. Once complete,
press the key .TEC
The following screen shows the oven connected to the desired network:
WI-FI NETWORK SETTINGS
MY NETWORK
NETWORK 2
NETWORK 3
NETWORK 4
NETWORK 5
NETWORK 6 CONNECT
CONNECT
CONNECT
CONNECT
CONNECT
CONNECT
d) If a user inputs an incorrect password, the following message will
appear on the screen. Upon seeing this message, enter the correct password and make a new attempt to connect to the network.
WI-FI NETWORK SETTINGS
MY NETWORK
NETWORK 2
NETWORK 3
NETWORK 4
NETWORK 5
NETWORK 6 CONNECT
NETWORK: MY NETWORK
.
ERROR! PLEASE, CHECK YOUR
NETWORK OR REINSERT
THE PASSWORD.
DISCONNECT
CONNECT
CONNECT
CONNECT
CONNECT
CONNECT
Note: After selecting the Wi-Fi network for the first time, the preheating
menu will be displayed. In the future, if the user wants to change network, he
must do so through the WI-FI icon in the settings menu.TEC
56
Page 57
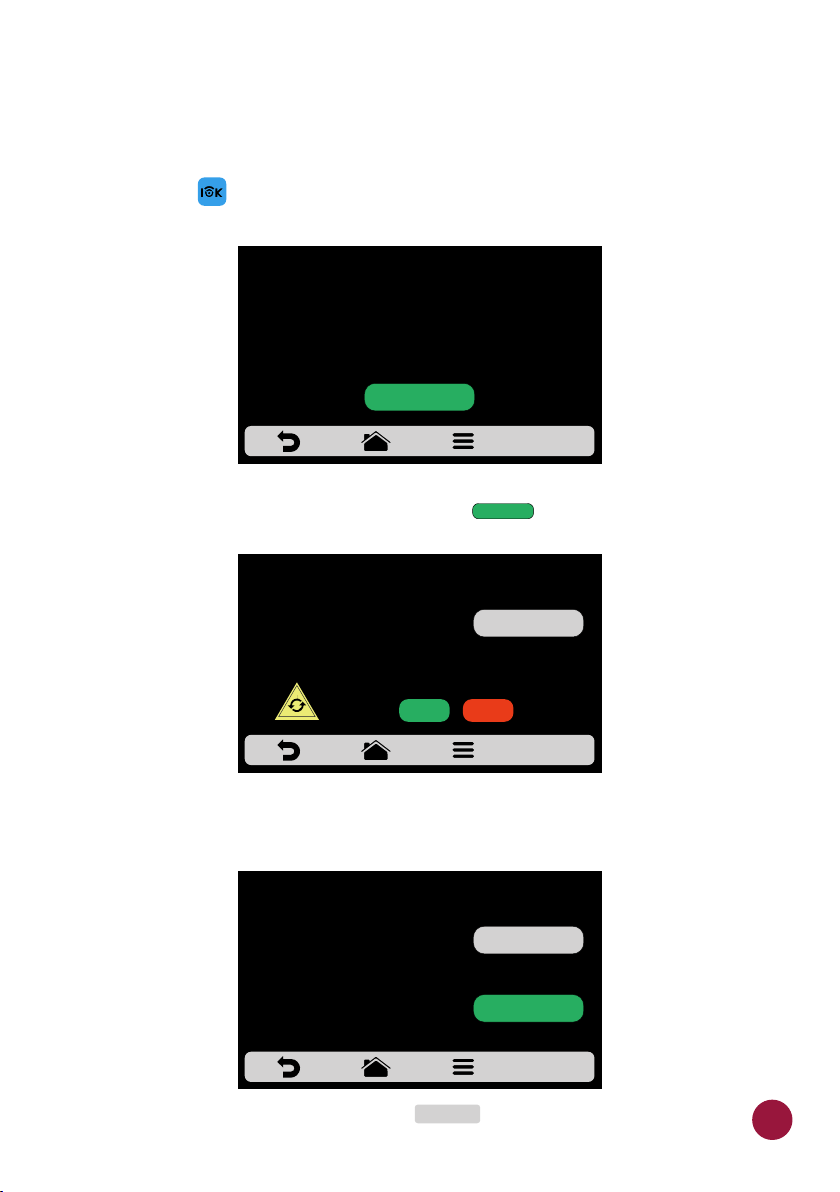
WEB APP (IOK - INTERNET OF KITCHEN)
a) Our Web App allows the user to create, edit, and upload/download recipes.
b) Press the icon to use the virtual platform. Access the plataform to use TEC
the PIN CODE at: new.praticaiok.com
WEB APP
REGISTER YOUR EQUIPMENT IN THE
WEB APP - NEW.PRATICAIOK.COM
USING THIS PIN CODE
YOUR PIN CODE:
SEARCH UPDATE
Ÿ All recipes created through the Web App can be sent directly to the
oven. When submitted, just click on the icon to update the oven TECLA
recipes, as shown below:
WEB APP
SEARCH UPDATE
NAME: NEW RECIPE
CURRENT MENU: MY RECIPES
THERE IS A NEW UPDATE FOR YOUR EQUIPMENT.
DO YOU WISH TO APPLY IT NOW?
YES NO
DESCONNECT
Ÿ Wait for the update bar to finish loading.
c) When you are connected to IOK, the following screen will be displayed:
WEB APP
NAME: NEW RECIPE
CURRENT MENU: MY RECIPES
THERE ARE NO NEW UPDATES
FOR YOUR EQUIPMENT.
Ÿ To disconnect from IOK press the button.TECLA
DISCONNECT
DESCONNECT
SEARCH UPDATE
57
Page 58
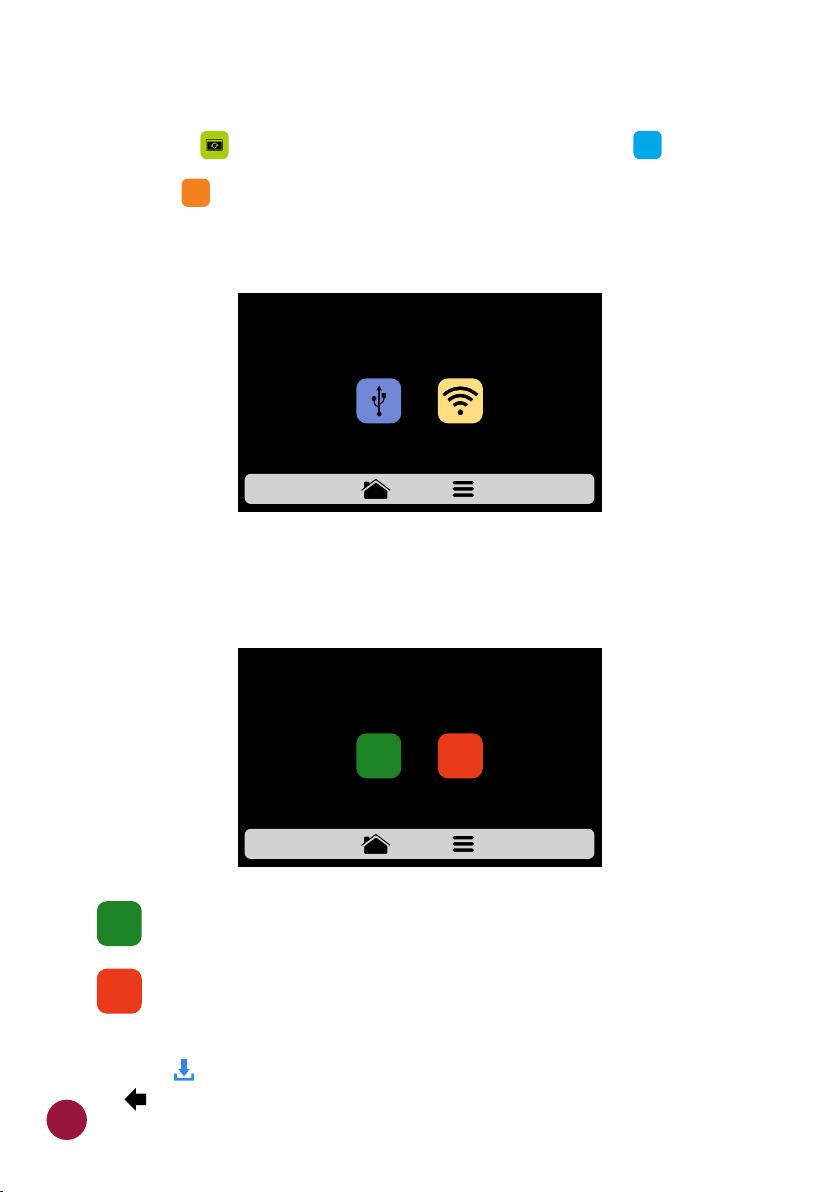
SYSTEM UPDATE
a) Press the button to choose how to update the system: .TEC TEC
Note: The option should only be used by an authorized technician.TEC
POWER
IHM
b) Then choose the Wi-fi option.
SYSTEM UPDATE
CHOOSE HOW YOU WANT TO UPDATE YOUR EQUIPMENT:
USB
WI-FI
b) When a new update is available, the following screen will appear. Press
the "Yes" icon to proceed with the update or "No" to return to the settings
menu.
.
WE FOUND AN UPDATE AVAILABLE FOR YOUR DEVICE.
SYSTEM UPDATE
DO YOU WANT TO DOWNLOAD IT NOW?
YES
The download is completed in the background and the user returns
YES
NO
to the previous screen.
NO
Returns to the settings menu.
c) While the download is being performed the green bar will blink, if you
press the icon, the download status screen will be displayed. By pressing TE
the icon, the previous screen will be displayed and the download will TEC
58
continue in the background.
Page 59
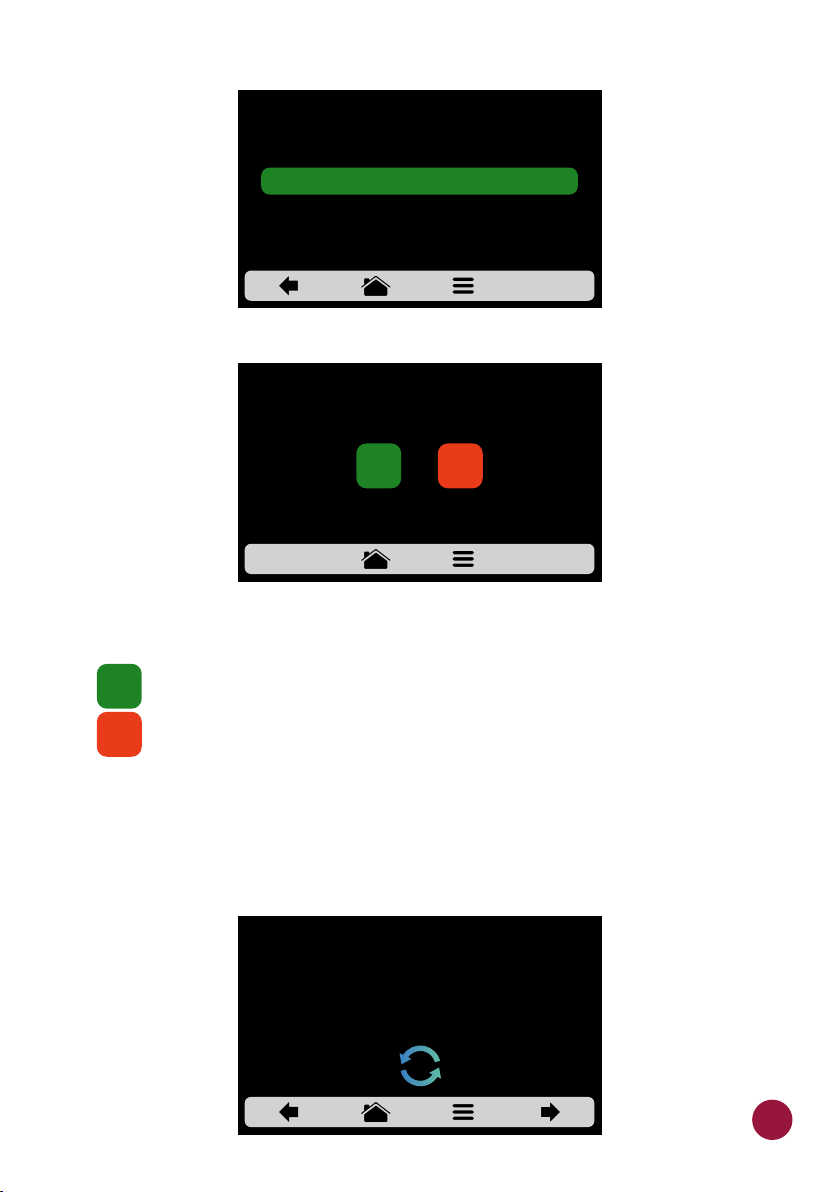
SYSTEM UPDATE
DOWNLOAD IN PROGRESS. PLEASE WAIT...
DO NOT INTERRUPT THE NETWORK CONNECTION
OR TURN OFF THE EQUIPMENT.
d) After the download is complete, restart your device.
SYSTEM UPDATE
TO COMPLETE THE UPDATE, YOUR EQUIPMENT MUST BE
RESTARTED. DO YOU WANT TO RESTART IT NOW?
YES
ATTENTION: IF YOU DO NOT RESTART NOW, THE UPDATE WILL
BE COMPILED THE NEXT TIME THE EQUIPMENT IS TURNED ON.
NO
Attention: If you do not restart the device immediately, the update will
postponed until the next time the equipment is turned on.
YES
Restarts the equipment.
NO
Returns to the settings menu.
e) If you do not have an update available, the following message will be
displayed on the screen:
“There are currently no updates available for your device. When there is, the
symbol below will be displayed in the upper right corner.”
SYSTEM UPDATE
THERE ARE CURRENTLY NO UPDATES AVAILABLE FOR
WHEN THERE IS, THE SYMBOL BELOW WILL BE
DISPLAYED IN THE UPPER RIGHT CORNER.
YOUR DEVICE.
59
Page 60
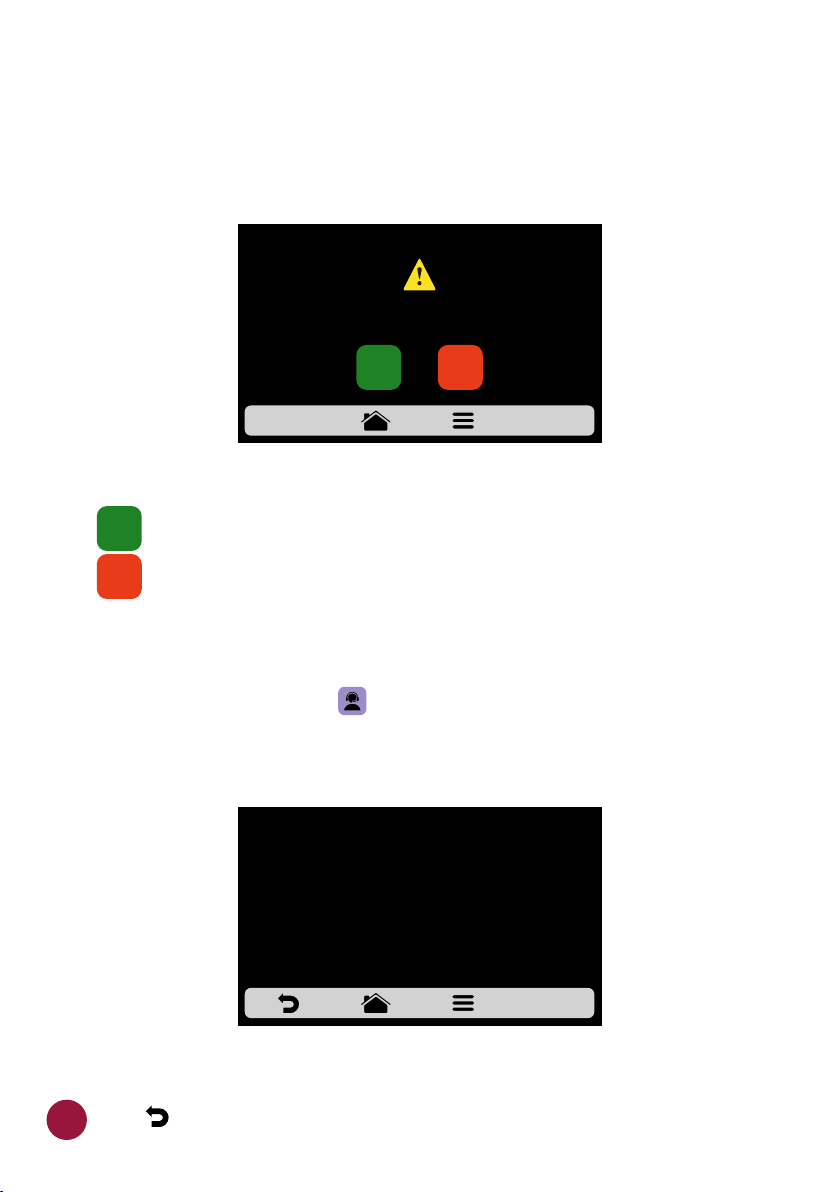
d) If an error occurs during the update, the following message will be
displayed on the screen:
“An error occurred while updating the system. Do you want to restart the
process?”
SYSTEM UPDATE
AN ERROR OCCURRED WHILE UPDATING THE SYSTEM.
DO YOU WANT TO RESTART THE PROCESS?
YES
Restarts the equipment.
NO
Returns to the settings menu.
YES
NO
USER'S SETTINGS: CUSTOMER SUPPORT
a) In the Customer Support information, you will find all the necessary TEC
data to contact Prática to answer questions and request repairs or technical
visits.
CUSTOMER SUPPORT
www.praticausa.com
info@p raticausa. com
comex@ praticabr.com
USA:
+1.214 .584.6269
GLOBAL
+55 35 3 449-1235
Manufa cturer A ddress:
Prátic a Klim aqui I nd. e Com. S.A.
Rodovi a BR 459 - km 101
Pouso Alegre - MG - Brazil
Zip Code: 37550-140
b) Use to return to the user editing options.
60
Page 61
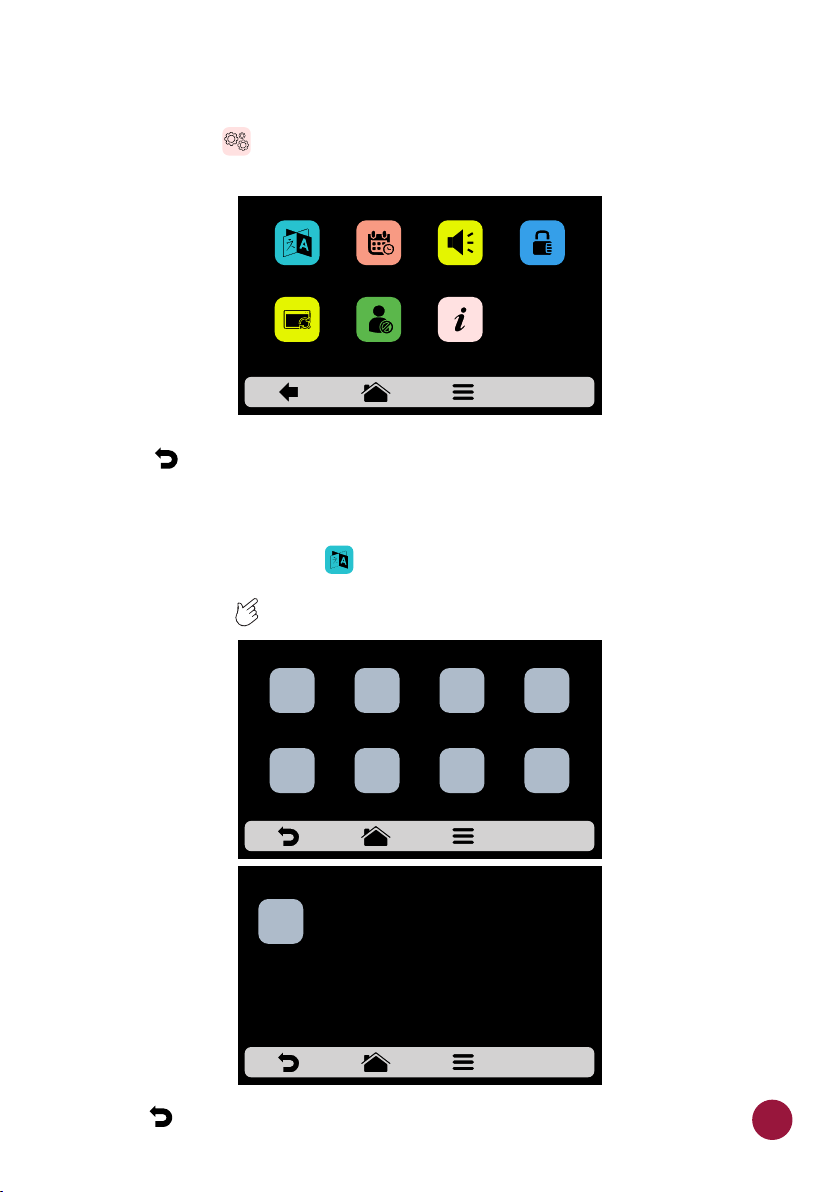
USER'S SETTINGS: SYSTEM
a) The Systen screen is composed by seven items. Understand each TEC
item in detail in the following pages.
SYSTEM
LANGUAGE
RESTORE
ORIGINAL SETTINGS
DATE/TIME
EDIT ACESS
VOLUME
MANUFACTURER
INFORMATION
CHANGE
PASSWORD
b) Use to return to the user editing options.TEC
SYSTEM: LANGUAGE
a) To change the language , just click on the icon and choose the desired TEC
language. We currently have the most spoken languages available. Use the
gridview, sliding on the touch screen to see all languages.TEC
CHANGE LANGUAGE
PT
PORTUGUÊS
EN
ENGLISH
ES
ESPAÑOL
FR
FRANÇAIS
DE
DEUTSCHE
PL
POLSKIE
RU
РУССКИЙ
ZH
中国人
b) Use to return to the user editing options.TEC
CHANGE LANGUAGE
EL
Ελληνικά
61
Page 62
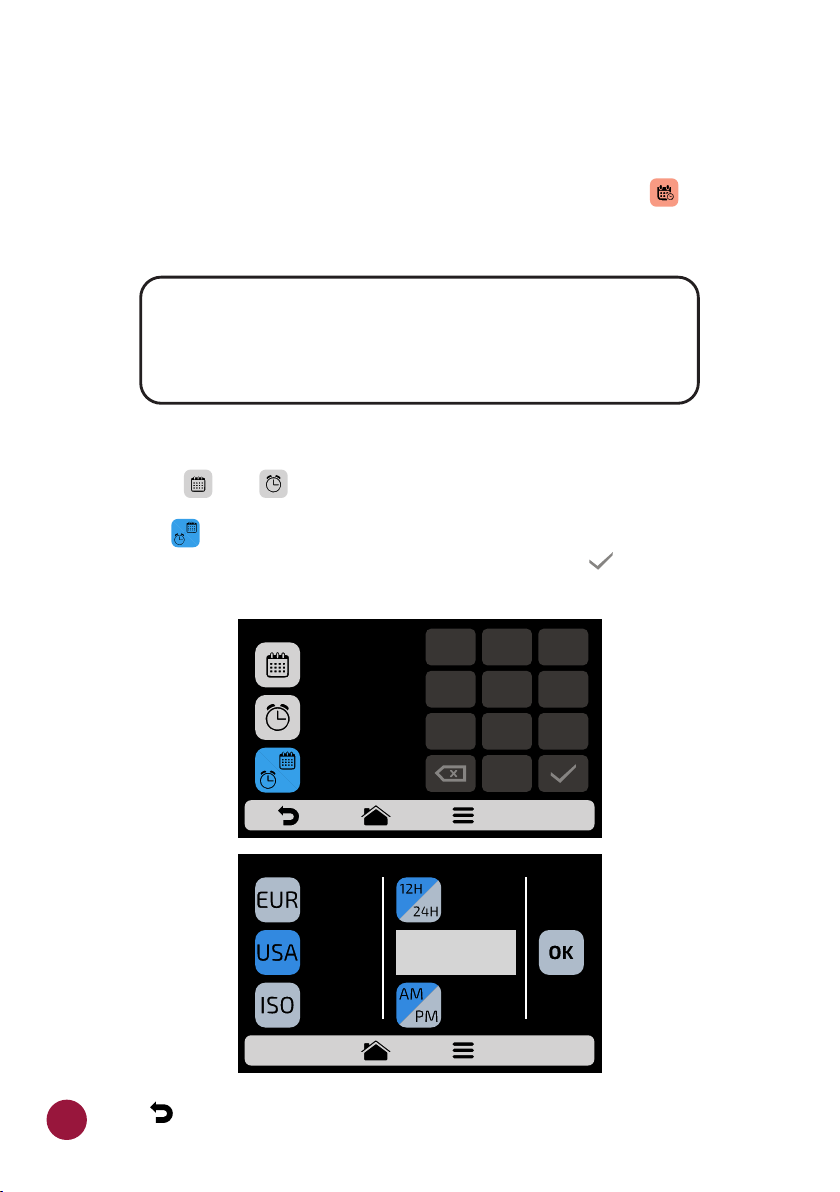
SYSTEM: DATE/TIME ADJUSTMENT
Note: If the oven is connected, it will automatically add all information.
a) It is possible to adjust the Date, Time, and Format of the device . It must TEC
be imputed by the user in the following standards:
EUROPEAN: DD/MM/YYYY
AMERICAN: MM/DD/YYYY
TIME: 24H FORMAT
12H FORMAT
ISO: YYYY/MM/DD
b) Click on and to edit, respectively, the date and time.TEC TEC
c) Press to change the date/time format. The following screen will be TEC
displayed. Choose the date and time format and click on to confirm and TEC
return to the options.
DATE/TIME SETTINGS
05/07/21
DD/MM/YYYY
13:57
24H FORMAT
CHANGE FORMAT
CHANGE DATE/TIME FORMAT
1
4
7
2
5
8 9
0
3
6
DD/MM/YYYY
MM/DD/YYYY
YYYY/MM/DD
d) Use to return to the user editing options.
62
Europe/Andorra
12H FORMAT
AM
v
v
Page 63
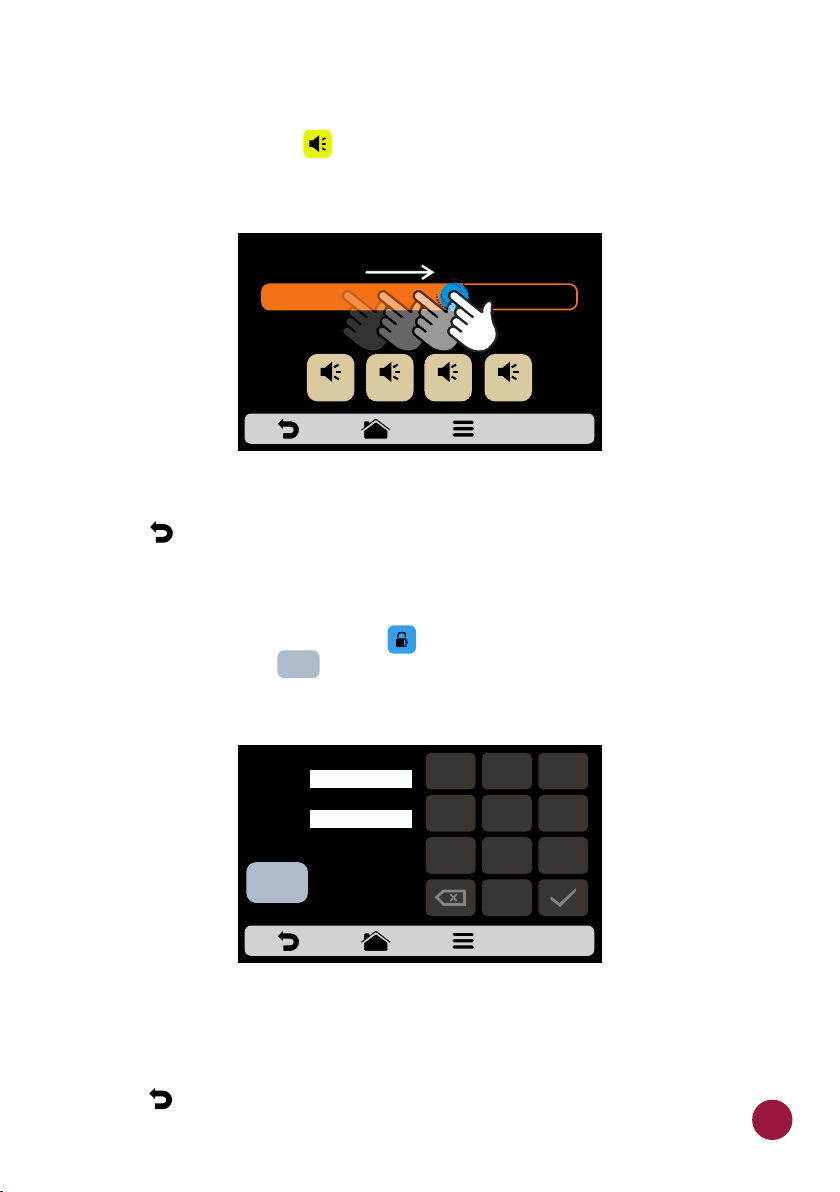
SYSTEM: VOLUME
a) In the volume screen you can switch between 4 types of sound and TEC
change the volume of the sound by sliding your finger on the screen.
VOLUME SETTINGS
Minimum Maximum
sound 2 sound 3 sound 4sound 1
d) Use to return to the user editing options.
SYSTEM: CHANGE PASSWORD
a) To change the user's password , just type the new password and then TEC
confirm it by clicking .TECLA
OK
NEW
PASSWORD:
CONFIRM
PASSWORD:
OK
1
4
7
2
5
8 9
0
3
6
b) In case you forget the password, contact Technical Support.
c) Use to return to the user editing options.TEC
63
Page 64
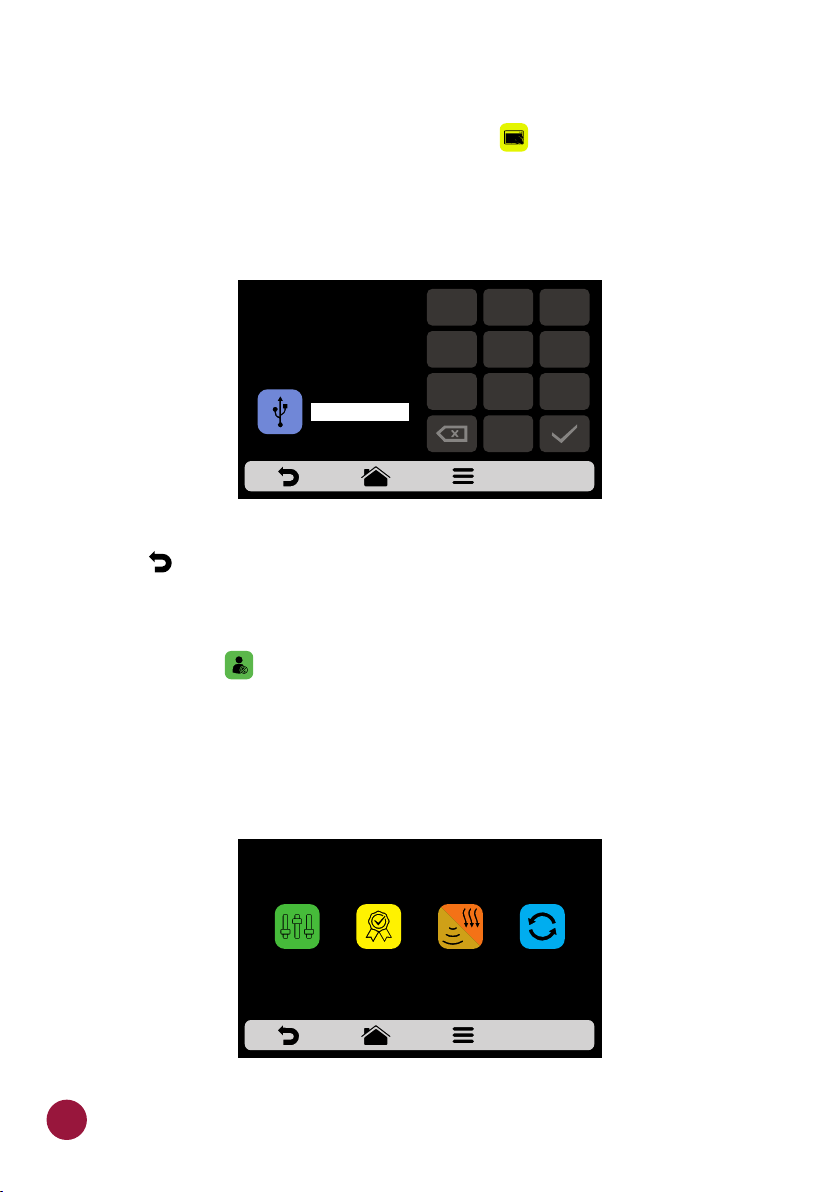
SYSTEM: RESTORE ORIGINAL SETTINGS
a) ATTENTION: The Restore Original Settings option will delete all the TEC
Groups, Recipes and their Steps, besides the Settings defined by the user.
Make sure to create a Backup through USB before proceeding. After inserting
the password and touching OK: IT IS NOT POSSIBLE TO RECOVER THE
INFORMATION.
THIS ACTION WILL DELETE
ALL THE CURRENT GROUPS,
RECIPES AND SETTINGS.
CREATE A BACKUP OR
USE PASSWORD TO CONFIRM
USB
1
4
7
2
5
8 9
0
3
6
b) Use to return to the user editing options.TEC
SYSTEM: EDIT ACCESS
a) Edit Access corresponds to the function in which you may block an TEC
operator’s access to that function.
For example: If you desire that the Favorites and Manual Mode functions are
never accessed by the operators, click on both of them. Doing this will turn the
icons dark gray, indicating that they are locked until the moment you desire to
unlock them.
EDIT ACCESSES
MANUAL
MODE
FAVORITES
COOK/BROWN
MORE
b) To unlock, click on the desired functions once more.
64
REPEAT
RECIPE
Page 65
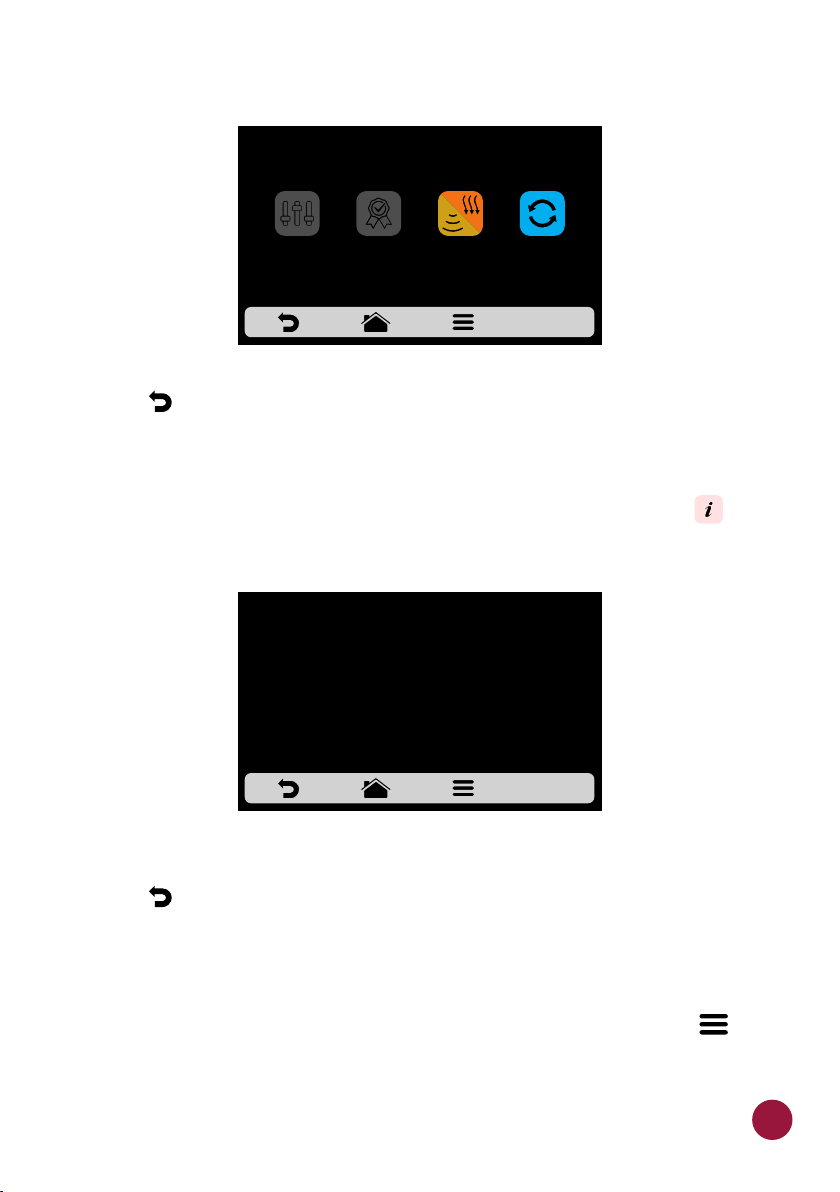
EDIT ACCESSES
MANUAL
MODE
FAVORITES
COOK/BROWN
MORE
REPEAT
RECIPE
c) Use to return to the user editing options.TEC
SYSTEM: MANUFACTURER'S INFORMATION
a) Information on Firmware Version, Serial and Manufacturing Date of TEC
the Fit Express are contained in this section.
MANUFACTURER'S INFORMATION
Fit Express
Firmware IHM: Uni R775 - 0x1000 - 89°F
Firmware Power: v1.0.5 - 0x0012 -89°F
Serial Number: 000 000
Manufacturing Date: 00/00/0000
Input Voltage: 208v - 0% - 0
c) Use to return to the user editing options.TEC
FAVORITES
a) The Favorites functionality works as a shortcut, in which you may allocate
the main and most used recipes. To access it, press the Options button in TEC
the fixed menu bar.
65
Page 66
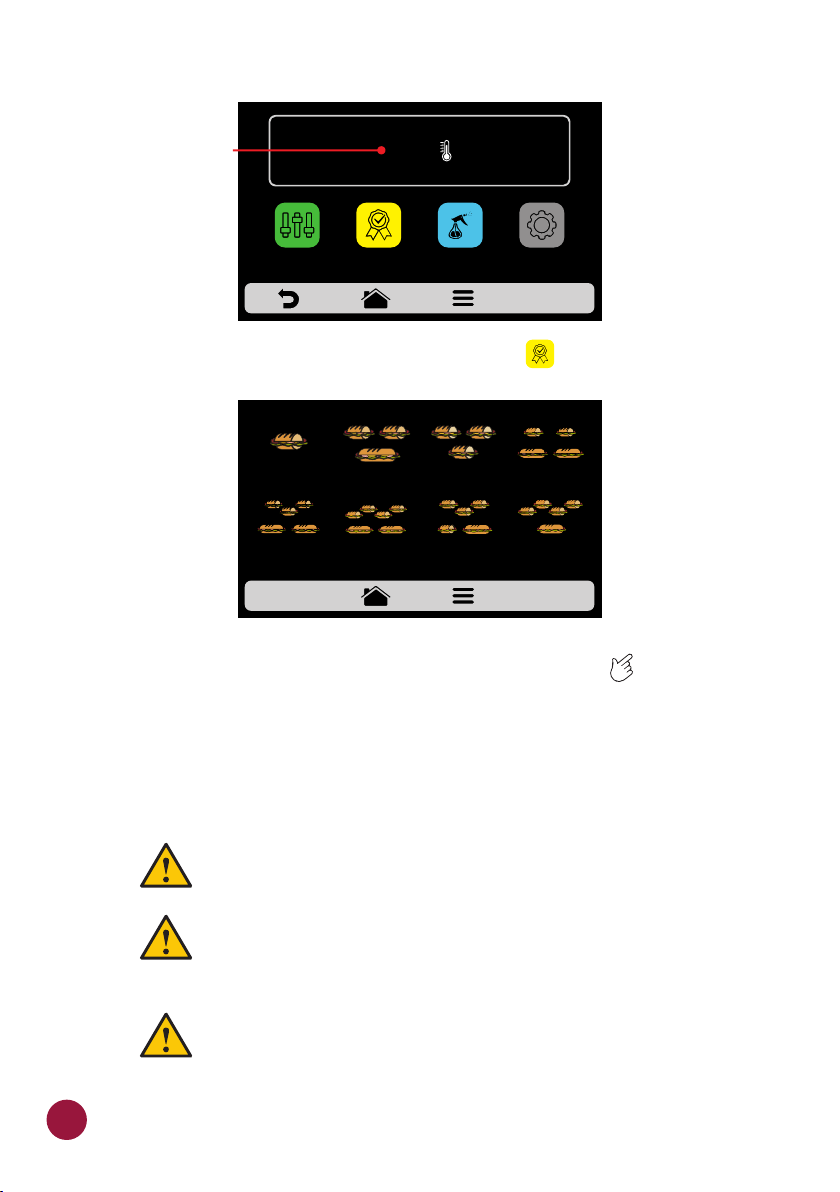
The temperature can be
changed between Celsius
and Fahrenheit according
to the user's preference.
TEMPERATURE
482°F
MANUAL
MODE
DAILY CLEANING
GUIDE
SETTINGSFAVORITES
b) After opening the Options screen, touch the icon .TEC
FAVORITES - page 1
1 SUB 6-inch 2 SUB 6-inch
3 SUB 6-inch
2 SUB 12-inch
1 SUB 12-inch
4 SUB 6-inch
2 SUB 12-inch
3 SUB 6-inch 2 SUB 6-inch
3 SUB 6-inch
or 1 SUB 6-inch
and 1 SUB 12-inch
or 2 SUB 12-inch
4 SUB 6-inch
1 SUB 12-inch
c) Browse through the recipes using the gridview by sliding on the touch TEC
screen.
d) See how to Add or Remove a recipe from the Favorites list on page 50.
SOUND ALARMS
66
Ÿ When a recipe is complete, the alarm will sound indicating
the end of the operation.
Ÿ If the oven door is open for more than 30s the alarm will
sound alerting the user
Ÿ Caution: If the alarm signal sounds continuously, the
equipment is malfunctioning. Turn off or disconnect from
the power grid and check the instruction manual before
operating.
Page 67
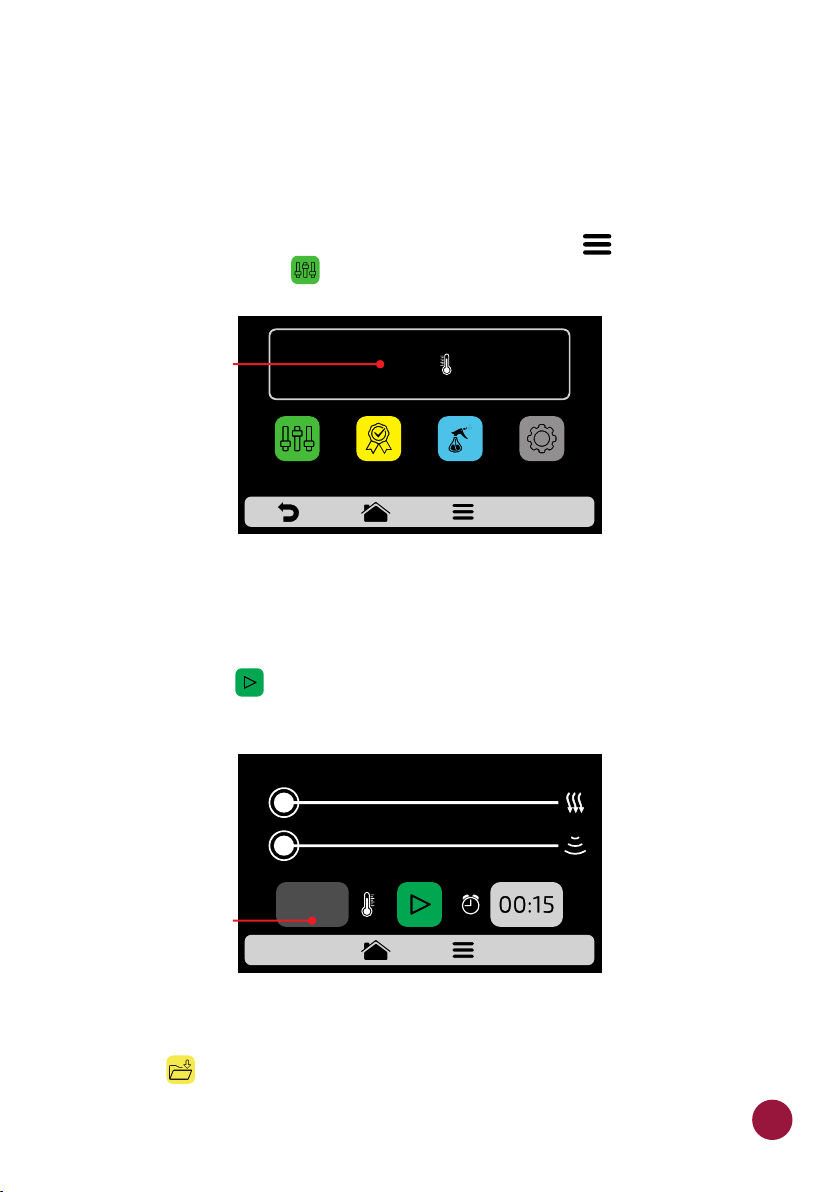
MANUAL MODE
a) In Manual Mode, it is possible to set the parameters of a recipe, execute it,
and if the result of your test is approved at the end of the operation, transform
it in a recipe.
b) To access the Manual Mode, click on the Options icon . In the Options TEC
screen, touch the icon .TEC
The temperature can be
changed between Celsius
and Fahrenheit according
to the user's preference.
MANUAL
MODE
TEMPERATURE
482°F
DAILY CLEANING
GUIDE
SETTINGSFAVORITES
c) Set the parameters of Time, Temperature, Speed of Hot Air, Microwaves
and of the Bottom Heater (Infra-red).
d) Press the icon to start the operation of Manual Mode.TEC
0 10 20 30 40 50 60 70 80 90 100
0
0
The temperature can be
changed between Celsius
and Fahrenheit according
to the user's preference.
382°F
e) After the conclusion of the operation, the Copy Parameters icon will be
enabled: .TEC
67
Page 68
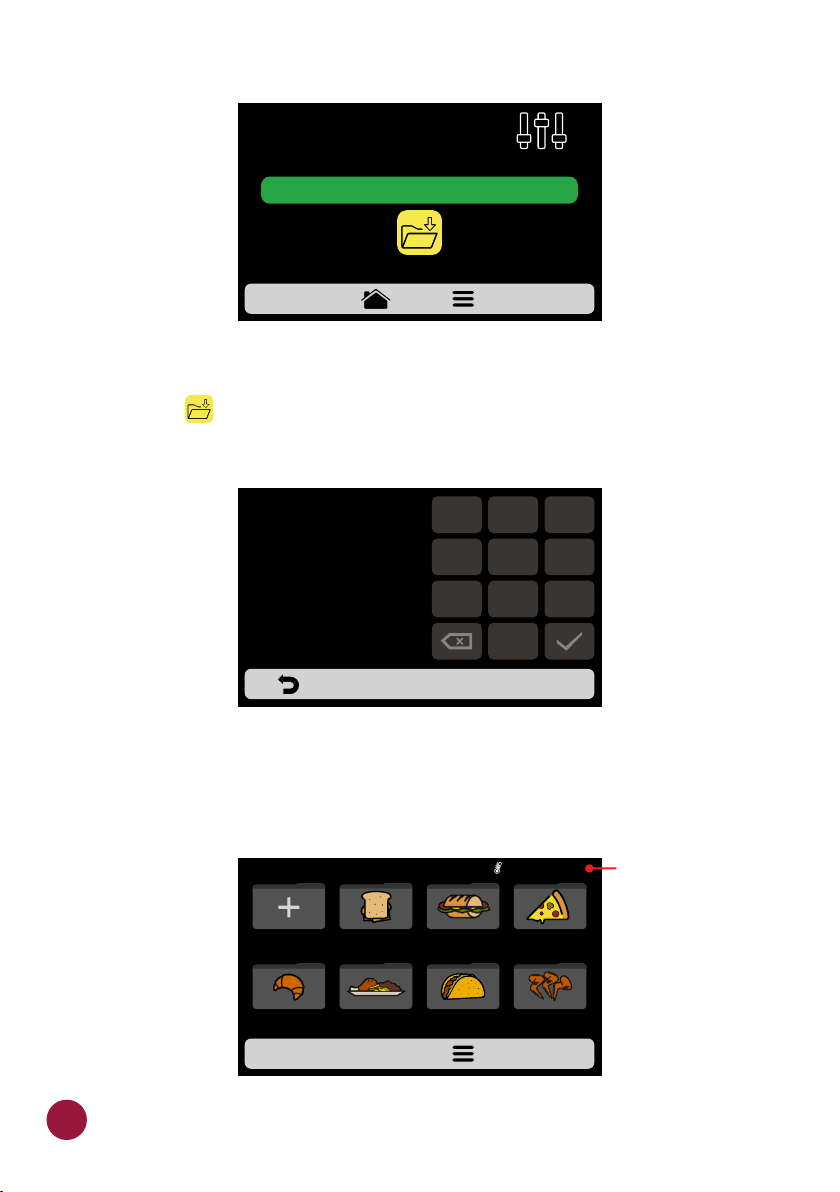
OPERATING IN MANUAL
MODE
READY!
COPY
PARAMETERS
f) Copy Parameters enables the user to transport the parameters set in
Manual Mode for the editing Groups and Recipes, that is, when the user clicks
on the icon the user will need to input the password in order to access the TEC
settings.
1
3
2
ENTER PASSWORD
TO ACCESS
SETTINGS
******
4
7
6
8 9
0
5
g) After inputing the user's password, choose between creating a new group
or allocating the transported parameters in a new recipe to an existing group.
GROUPS CURRENT 410°C
NEW GROUP
BAKERY
SANDWICH
FINISHING
SUBSBREAKFAST
TEX-MEXMEAL
PIZZA
CHICKEN
WINGS
The temperature can be
changed between Celsius
and Fahrenheit according
to the user's preference.
68
Page 69
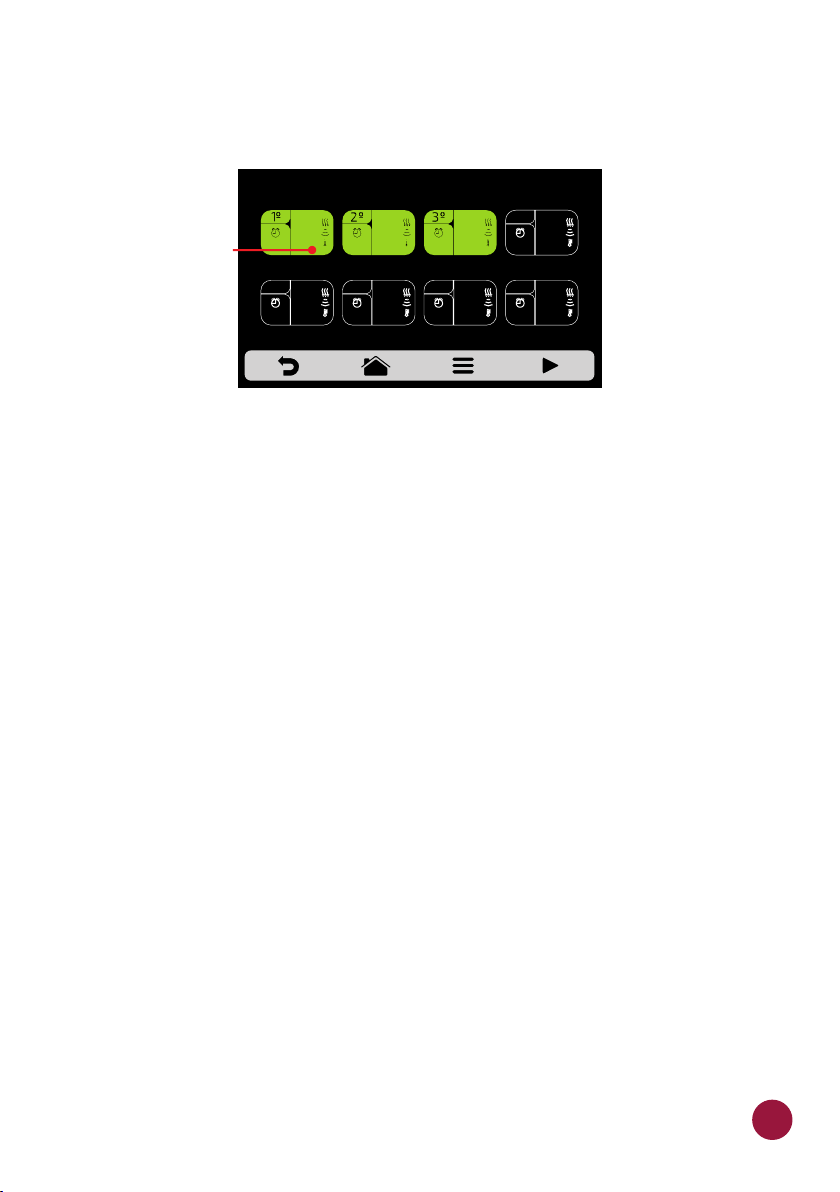
f) Selecti the name and image of the New Recipe and choose in which
position (step) you wish to allocate the transported information to.
EDIT STEPS
The temperature can be
changed between Celsius
and Fahrenheit according
to the user's preference.
00:05
100%
20%
104°F
00:20
50%
60%
176°F
00:15
90%
100%
68°F
g)To finish, if desired, set the other steps of the recipe.
69
Page 70
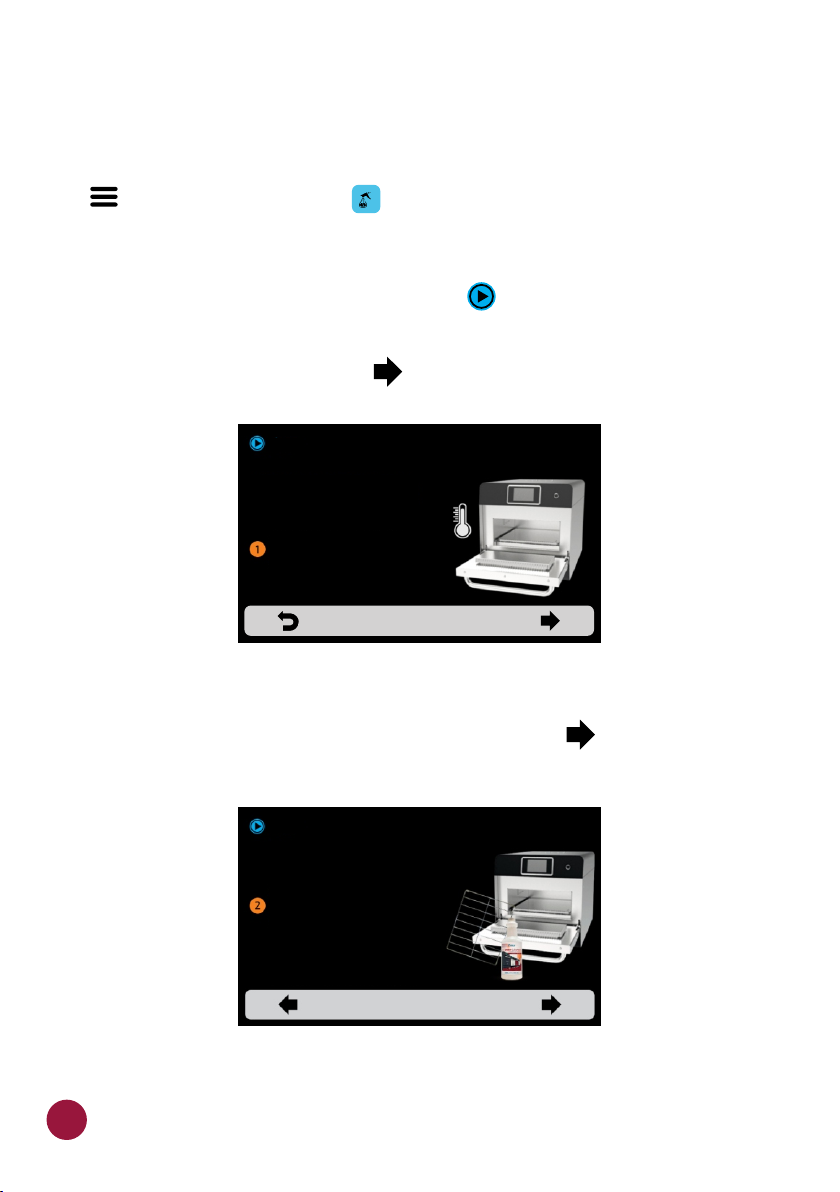
CLEANING PROCEDURE GUIDE
a) To help in the cleaning of the Fit Express, use the Cleaning Procedure Guide.
Accessing it through the Options screen, then click on the Options icon . TEC
Finally, press the button . Carefully follow the steps shown on the screen.TEC
b) At each step it is possible for the user to watch a video that teaches them
how to perform the cleaning by pressing the icon on the screen.TEC
st
1 : Open the door and wait for the temperature to get down to 122°F (50°C).
Proceed by clicking on the arrow:
VIDEO
LET'S BEGIN THE
CLEANING PROCEDURE.
OPEN THE DOOR AND WAIT
FOR THE TEMPERATURE TO
GET DOWN TO 122°F;
CURRENT TEMPERATURE: 200°F
nd
2 : Remove the rack, the back of the oven chamber, and the catalytic and
CLEANING PROCEDURE GUIDE
122°F
place them in the sink. Proceed by clicking on the arrow:
VIDEO
REMOVE TE RACK, THE BACK OF
THE OVEN CHAMBER AND THE
CARALYTIC CONVERTER AND
PLACE THEM ON THE SINK;
ALWAYS REMOVE THE CATALYTIC CONVERTER
PRIOR TO DOING THE CLEANING PROCEDURE.
CLEANING PROCEDURE GUIDE
70
Page 71
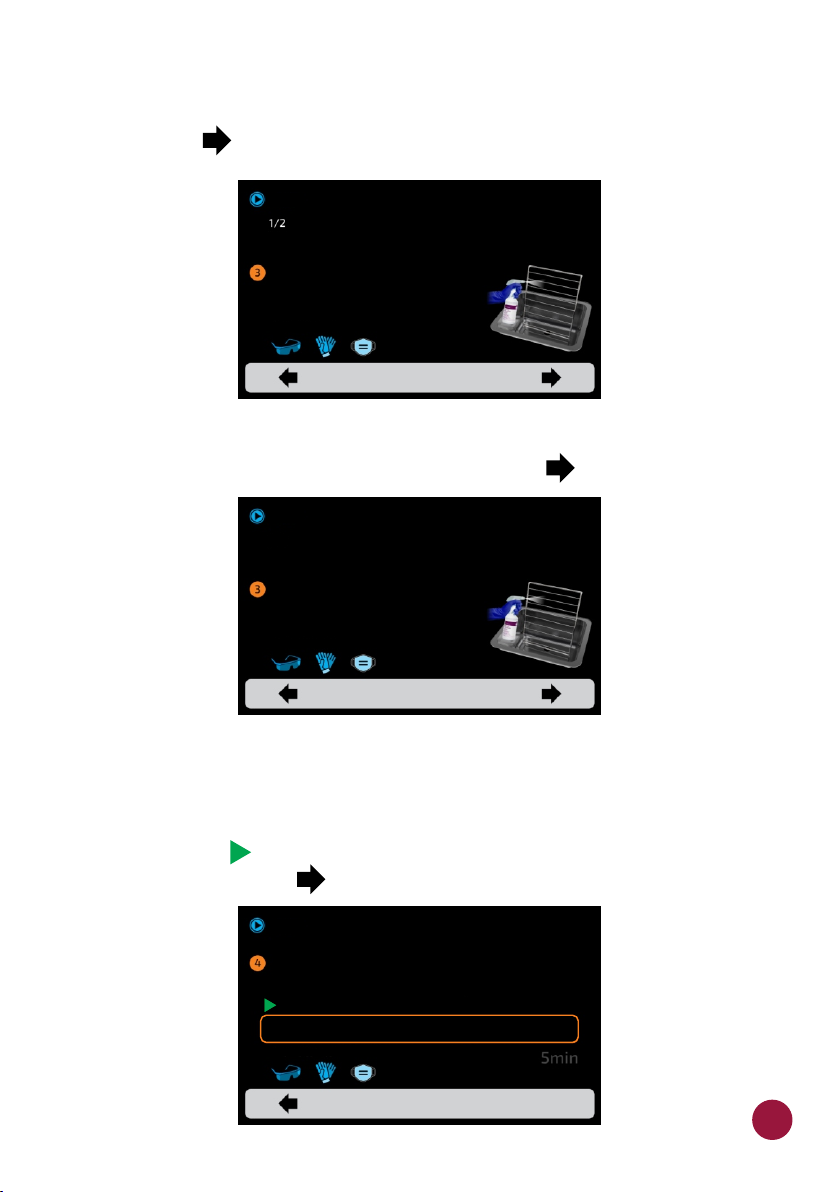
rd
3 : 1/2 - Apply the Oven Cleaner to the rack and the back of the oven chamber.
Leave it on for 2 minutes before continuting to next step. Proceed by clicking
on the arrow:
VIDEO
VIDEO
APPLY THE OVEN CLEANER ON
THE RACK AND ON THE BACK OF
THE OVEN CHAMBER AND LEAVE
IT FOR 2 MINUTES BEFORE THE
NEXT STEP.
PPEs NEEDED:
rd
3 : 2/2 - To wash the catalytic converter, place it in a containter with water and
CLEANING PROCEDURE GUIDE
DAILY CLEANING GUIDE
REMOVE THE COOK RACK AND
BOTTOM JET PLAT AND PLACE
IN THE SINK. PROCEED CLICKING
ON THE ARROW:
soap and let it soak. Proceed by clicking on the arrow:
VIDEO
VIDEO
2/2
TO WASH THE CATALYTIC
CONVERTER PLACE IT IN A
CONTAINTER WITH WATER AND
SOAP AND LET IT SOAK;
PPEs NEEDED:
CLEANING PROCEDURE GUIDE
DAILY CLEANING GUIDE
REMOVE THE COOK RACK AND
BOTTOM JET PLAT AND PLACE
IN THE SINK. PROCEED CLICKING
ON THE ARROW:
Note: After the oven has cooled down and before applying the Oven Cleaner,
wipe the chamber surfaces with a damp cloth to lower the temperature.
th
4 : Apply the oven cleaner on the chamber walls and the interior side of the
door. Press the icon to start the timer and leave it for 5 minutes. Proceed TEC
by clicking on the arrow:
VIDEO
VIDEO
PPEs NEEDED:
CLEANING PROCEDURE GUIDE
APPLY THE OVEN CLEANER IN THE CHAMBER WALLS
AND THE INSIDE OF THE DOOR. LEAVE IT FOR 5
START TIMER
MINUTES;
STEP COMPLETED. PROCEED!
71
Page 72
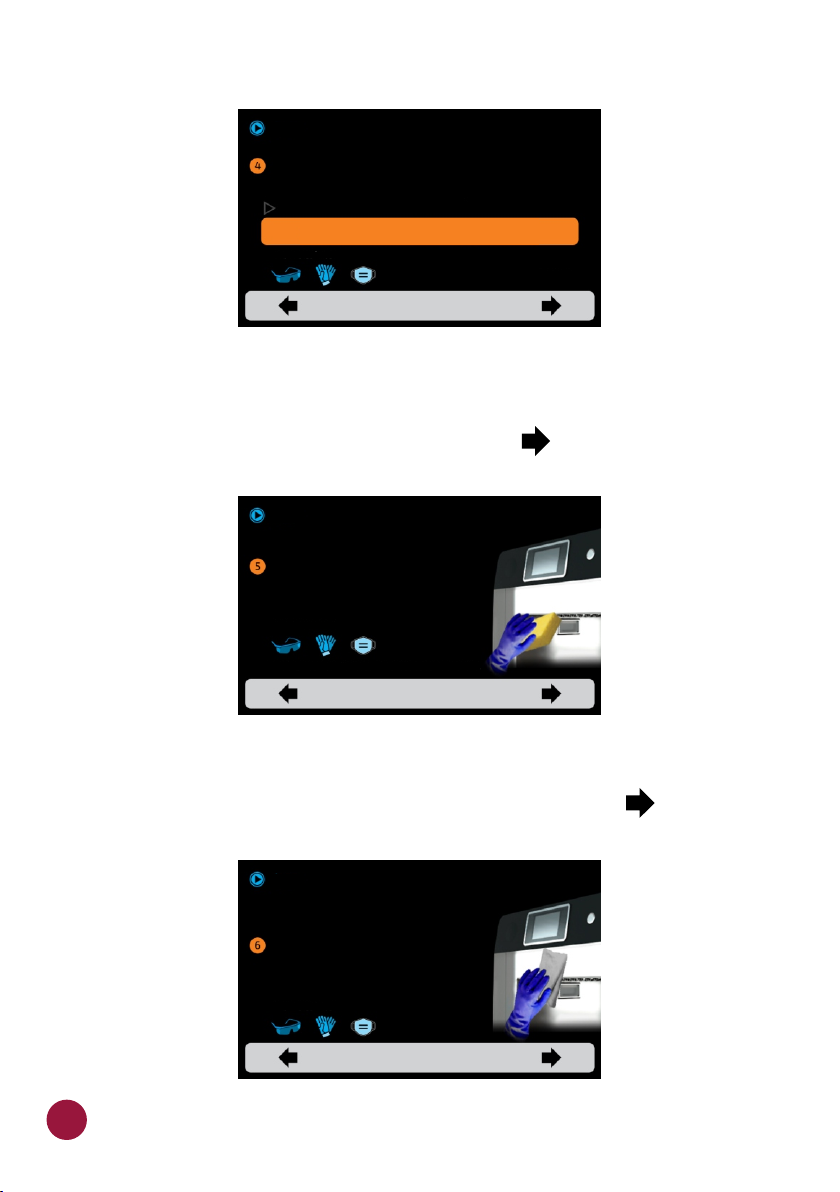
VIDEO
VIDEO
START TIMER
DAILY CLEANING GUIDE
CLEANING PROCEDURE GUIDE
APPLY THE OVEN CLEANER IN THE CHAMBER WALLS
AND THE INSIDE OF THE DOOR. LEAVE IT FOR 5
MINUTES;
PPEs NEEDED:
0min
At the end of the 5 minutes the alarm will sound
and releases the screen advance
th
5 : Use a non-scratch sponge to clean the cooking chamber and the glass of
the wave guides. Proceed by clicking on the arrow:
VIDEO
VIDEO
USE A NON-SCRATCH SPONGE TO
CLEAN ALL THE COOKING CHAMBER
AND THE GLASSES OF THE WAVE
GUIDES;
PPEs NEEDED:
*SOME MODELS DO NOT HAVE GLASS IN THE WAVE GUIDES.
th
6 : Clean/Rinse the chamber with a wet tissue to remove the excess soap and
CLEANING PROCEDURE GUIDE
dry it with a new, clean tissue. Proceed by clicking on the arrow:
72
VIDEO
VIDEO
CLEAN/RINSE THE CHAMBER WITH
A WET TISSUE TO REMOVE THE
EXCESS AND DRY IT WITH A NEW,
CLEAN TISSUE;
PPEs NEEDED:
CLEANING PROCEDURE GUIDE
Page 73
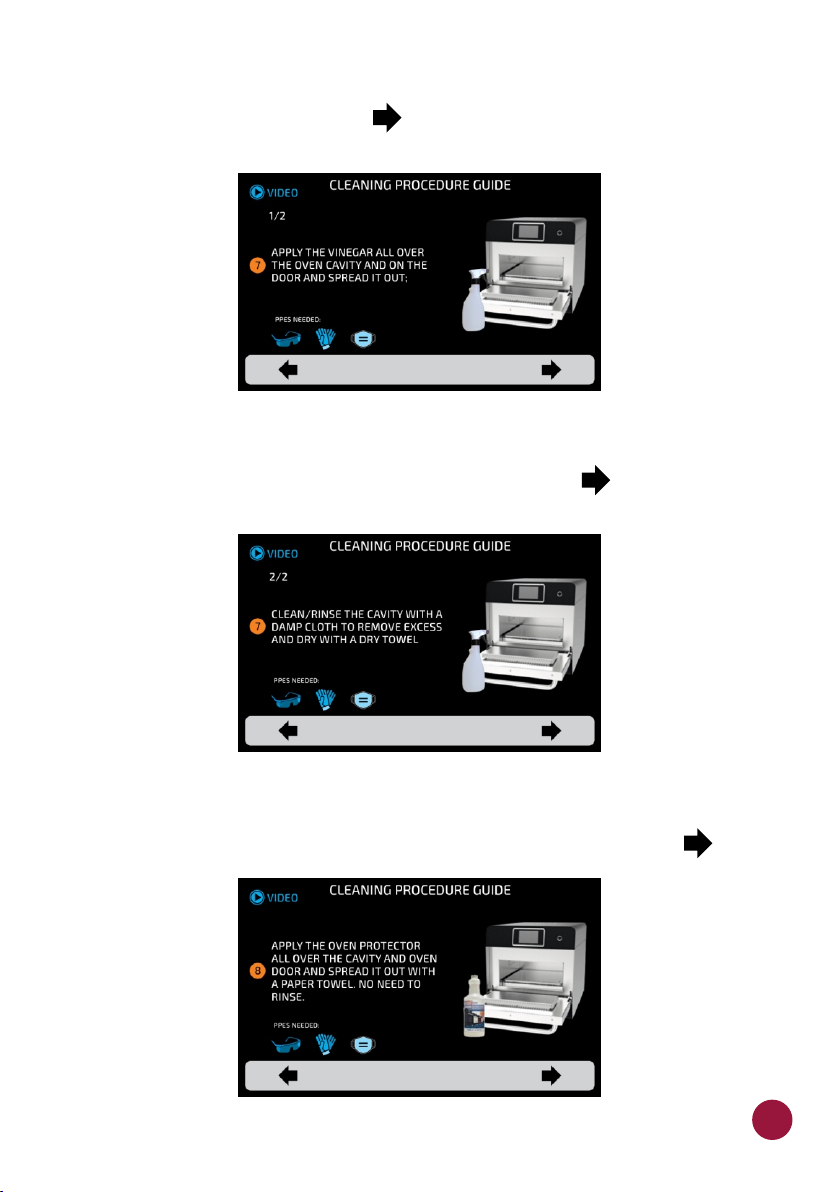
th
7 -1/2: Evenly apply vinegar to the oven cavity, including the doors interior.
Proceed by clicking on the arrow:
th
7 -2/2: Clean/rinse the cavity with a damp cloth to remove excess vinegar
and dry with a dry towel. Proceed by clicking on the arrow:
th
8 : Apply the oven protector to the cavity and oven door and spread evenly
with a paper towel. No need to rinse. Proceed by clicking on the arrow:
73
Page 74
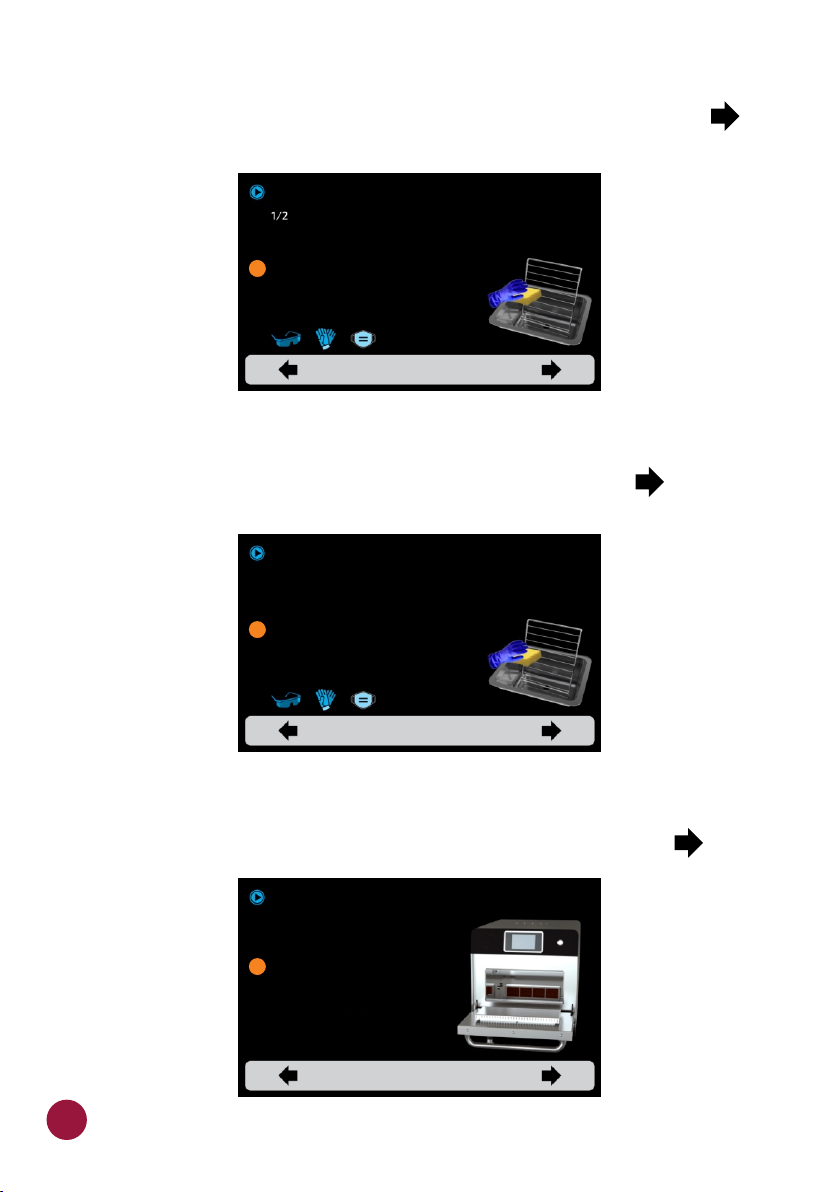
th
9 -1/2: Always use a non-scratch sponge to scrub away any persistent dirt on
the rack and back of the oven chamber. Proceed by clicking on the arrow:
VÍDEO
VIDEO
VIDEO
VIDEO
ALWAYS USE A NON-SCRATCH
SPONGE TO SCRUB ANY
9
PERSISTENT DIRTY IN THE RACK
AND BACK OF THE OVEN CHAMBER
PPEs NEEDED:
th
9 -2/2: Rinse the rack and the catalytic converter after applying cleaner or
CLEANING PROCEDURE GUIDE
DAILY CLEANING GUIDE
after soaking it in soapy water. Proceed by clicking on the arrow:
VIDEO
VIDEO
2/2
RINSE THE RACK, AND THE
9
CATALYTIC CONVERTER AFTER
APPLYING CLEANER OR AFTER
SOAKING IT IN SOAP WATER.
PPEs NEEDED:
th
10 : Reatach the catalytic converter, the back of the oven chamber, and the
CLEANING PROCEDURE GUIDE
DAILY CLEANING GUIDE
rack. make sure everything fits correctly. Finish by clicking the arrow:
VÍDEO
VIDEO
VIDEO
VIDEO
PUT BACK THE CATALYTIC
10
CONVERTER, THE BACK OF THE
OVEN CHAMBER AND THE RACK.
MAKE SURE IT FITS CORRECTLY.
CLEANING PROCEDURE
CONCLUIDED!
CLEANING PROCEDURE GUIDE
DAILY CLEANING GUIDE
74
Page 75
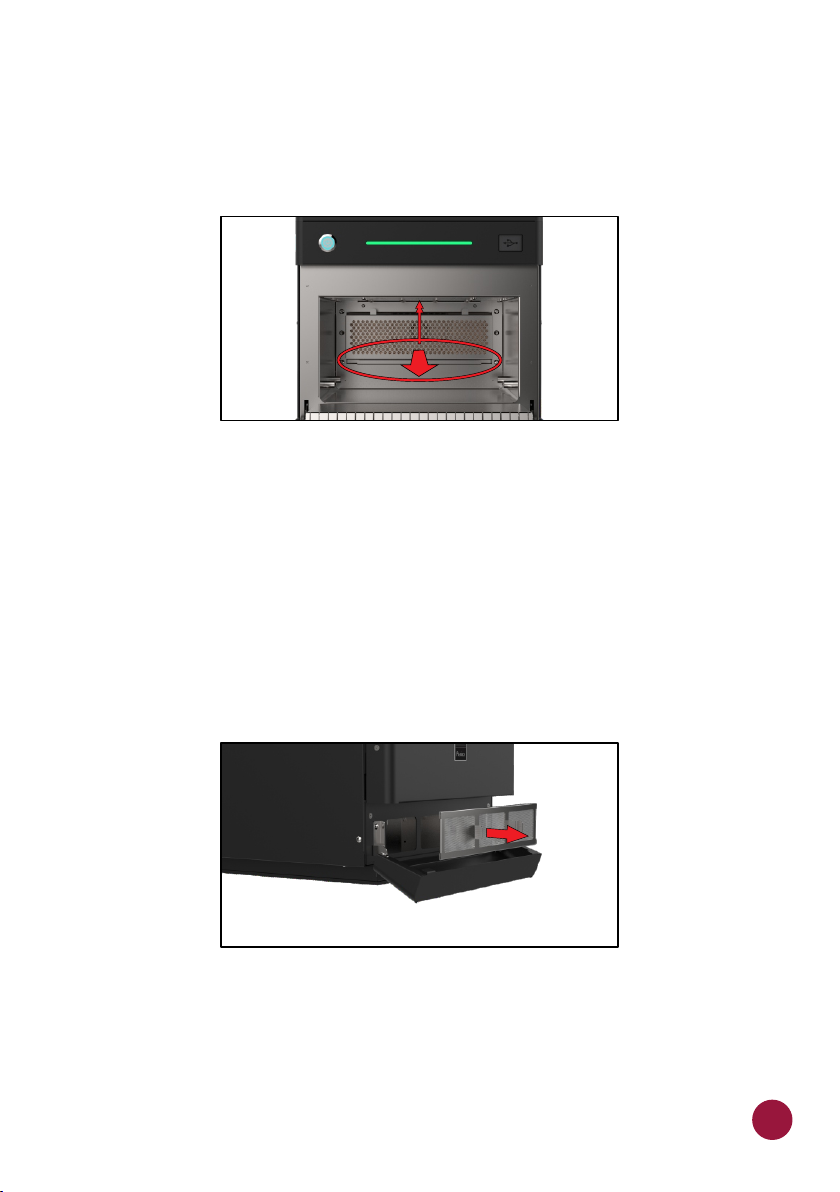
CATALYTIC CONVERTER CLEANING GUIDE
a) a) Remove the catalytic converter by lifting upward, then pull it backwards
(toward your body) as shown below:
b) To sanitize it correctly, soak the catalytic converter in a bowl with warm
water and neutral soap.
c) After 15 minutes in the solution, rinse thoroughly and reinstall.
AIR FILTER CLEANING GUIDE
a) To access the air filter, open the bottom cover.
b) Then remove the filter by moving backwards using the filter tabs as shown
in:
c) Inspect and clean with neutral detergents and water if necessary.
d) Rinse well with clean water and remove any excess water. If necessary,
shake or tap on a hard surface.
.
e) Reinstall the filter by placing it into the mounting brackets and pushing it
back under the oven.
75
Page 76
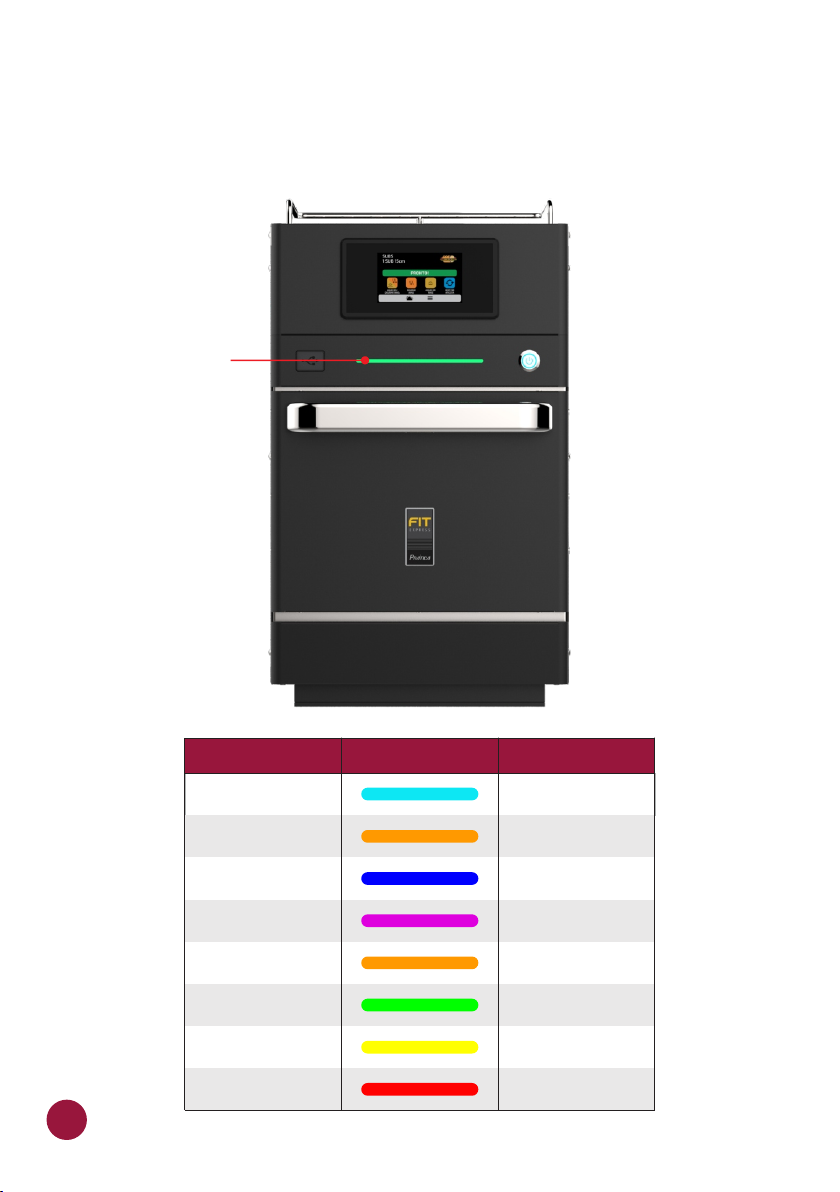
LIGHT BAR FUNCTIONS (LED)
a) The Fit Express oven has a light bar that indicates the process in progress
through different colors according to the table below:
Light bar
76
Function
Turning on/Stand-by
SYSTEM UPDATE
Preheating
Temperature control
Cleaning
Executing a recipe
Recipe ready
Failure
Error
Color State
Blink
On
On
On
On
Blink
On
On
Page 77
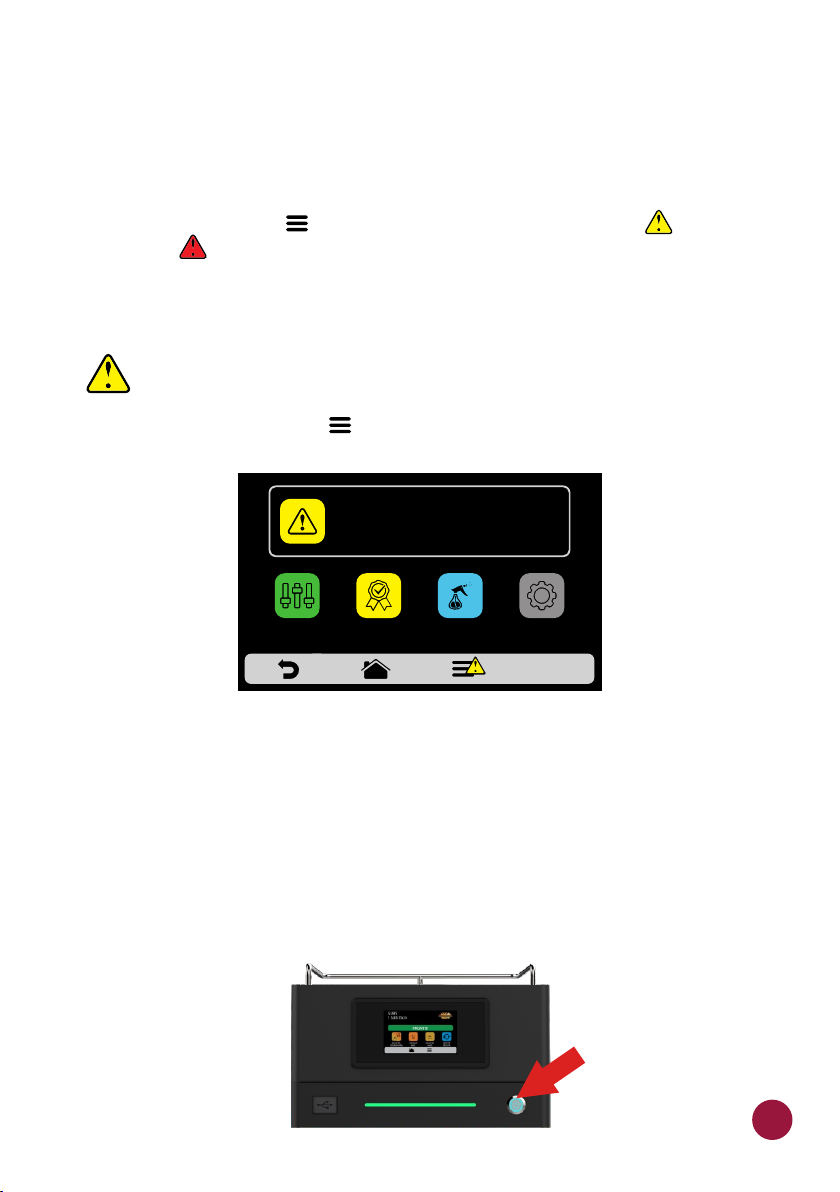
ALERTS AND ERRORS: POSSIBLE SOLUTIONS
a) The Fit Express was programmed to signal the user of any possible error
and alerts that may occur during operation.
b) On the Options icon , a yellow signal will appear for alerts ( ) and red TEC
for errors ( ).
c) See how to proceed in each case below:
ALERTS
a) Click on the Options icon .TEC
ALERT - CHAMBER SENSOR FAILURE
MANUAL
MODE
DAILY
CLEANING GUIDE
SETTINGSFAVORITES
b) The Options screen will display, instead of the chamber heater
temperature, a description of the alert. This is show in the adjacent example:
ALERT - CHAMBER SENSOR FAILURE
c) Follow the instructions as described on the screen. In this case, turn off and
turn on the oven again using the panel button:
77
Page 78
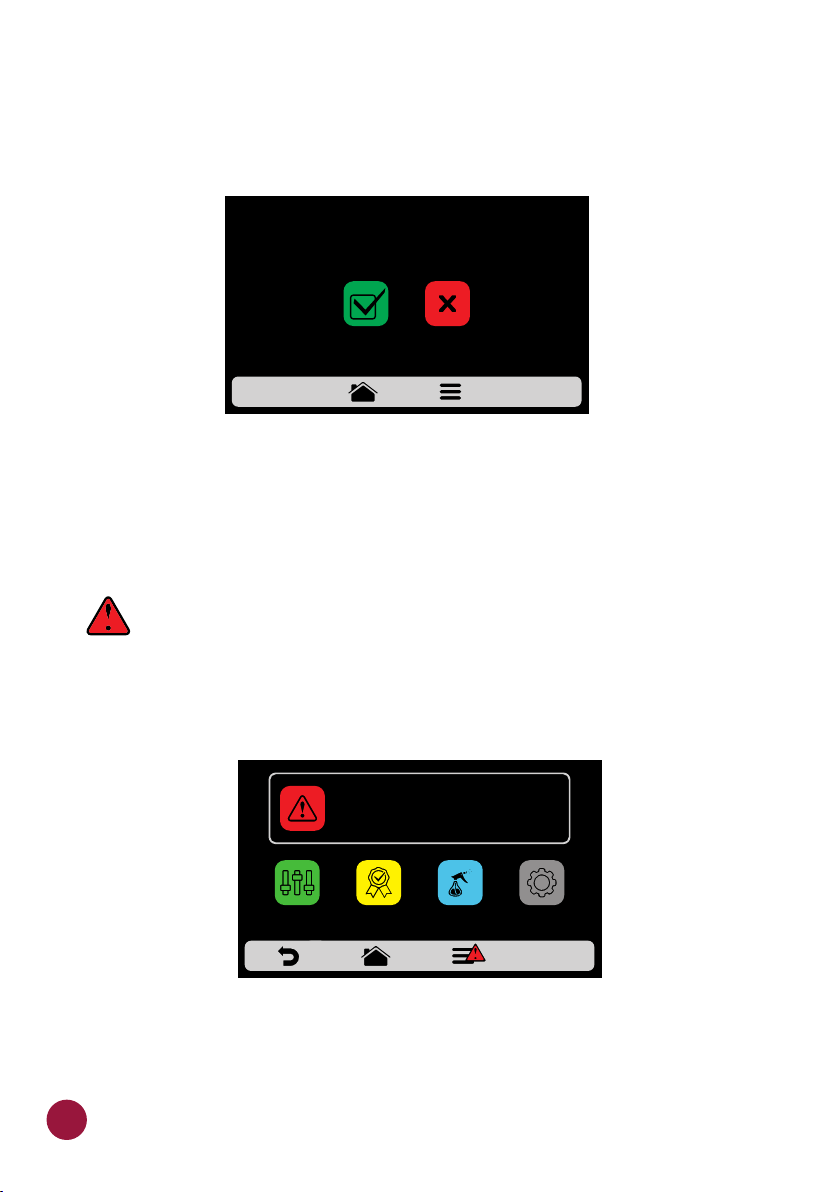
Note: If you press the power button, the following message will be shown on
the screen:
CONFIRM SHUTDOWN
CONFIRM CANCEL
Note: Or press the power button for 3 seconds to power off directly.
d) After turn on the equipment, if the alert persists, call Technical Support.
ERRORS
a) In case of several unsuccessful reset attempts, the alert will become an
error, and it will be necessary to contact Technical Support.
ERROR- CAN NETWORK COMMUNICATION FAILURE TURN
MANUAL
MODE
THE EQUIPMENT OFF AND ON
DAILY
CLEANING GUIDE
SETTINGSFAVORITES
b) Refer to the table on the next screen to verify the possible errors and alerts.
78
Page 79
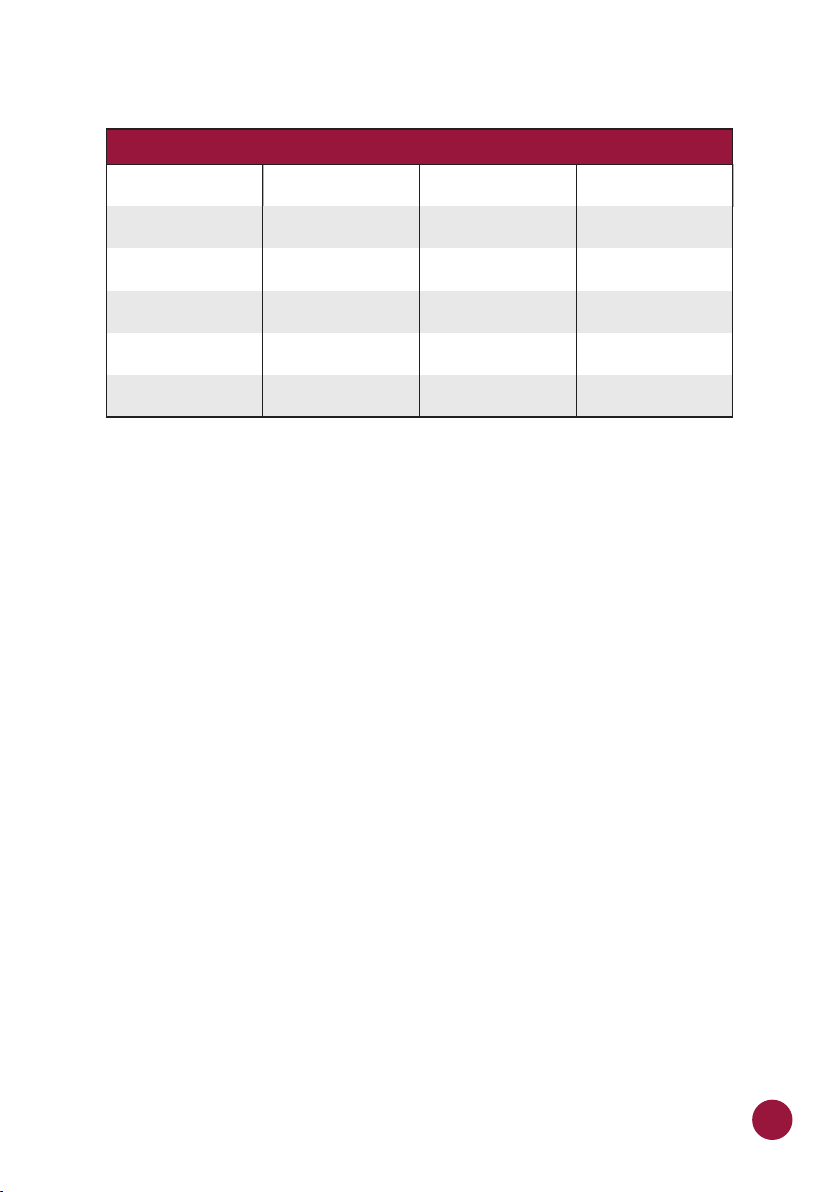
ALERTS AND ERRORS TABLE
Component
Inverter
Inverter
CLMG
Low Magnetron Current
Can Network
Communication
Chamber Sensor
Panel temperature
Becomes Alert when: Becomes Error when:
lost communicaon
-
fifteen seconds without
reaching the current
-
-
from 146°F (65°C) to
176°F (80°C)
cables disconnected
exceeding 176°F (80°C)
-
more than ten
reset aempts
-
or faulty
inactive
for 10 minutes
Error Sound Alarm
Off
On
On
On
On
On
You can call our technical assistance to provide feedback, offer suggestions, or
get technical assistance during normal business hours at:
You may contact us via:
Phone: +1 214 584 6269
WhatsApp text or call: +1 218 748-8572
E-mail: [email protected]
Monday to Friday: 8 a.m. to 6 p.m. at any time zone
Saturday: 8 a.m. to 3 p.m. at any time zone
Sundays: Closed
Holidays: 8 a.m. to 3 p.m. at any time zone
All regions except the United States: +55 (35) 3449-1235 or by email at
[email protected]
79
Page 80

FIT EXPRESS / FIT SM
INSTALLATION AND OPERATIONAL MANUAL
FEBRUARY 2023 - VERSION 05
CODE: 742638
Page 81

Page 82

Page 83

Page 84
PRÁTICA PRODUCTS, INC.
USA
424 East Church Street
Lewisville, TX 75057
Phone: +1 214 584-6269
www.praticausa.com
PRÁTICA PRODUTOS S.A.
BRAZIL
Rodovia BR 459, Km 101 S/N
37.556-140, Pouso Alegre - MG
Telefone: +55 35 3449-1235
 Loading...