

Page 1

INVERTER GENERATOR
P2000i
Operating Manual
Page 2

INVERTER GENERATOR – P2000i
2
We Appreciate Yo ur Business.
Thank you and congratulations on choosing PRAMAC.
This Operating Manual has been designed to instruct you on the correct use
and operation of your PRAMAC product. Your satisfaction with this product
and its safe operation is our ultimate concern. Therefore please take the time
to read the entire manual, especially the Safety Precautions. They will help
you to avoid potential hazards that may exist when working with this product
.
WARNING
READ AND
UNDERSTAND ALL SAFETY PRECAUTIONS IN THIS MANUAL BEFORE
OPERATING. FAILURE TO COMPLY WITH INSTRUCTIONS IN THIS MANUAL COULD
RESULT IN PERSONAL IN
JURY, PROPERTY DAMAGE, ANDIOR VOIDING OF YOUR
WARRANTY. PRAMAC WILL NOT BE UABLE FOR ANY DAMAGE BEC
AUSE OF FAILURE
TO FOLLOW THESE INSTRUCT/ONS.
Page 3

INVERTER GENERATOR – P2000i
3
Table of Contents
1
SAFETY INSTRUCTIONS AND WARNINGS ......................................... 4
2 CO NTRO LS AND FEATURES .............................................................. 12
2.1 Generator ......................................................................................... 12
2.2 Control Panel .................................................................................... 13
2.3 Control Functions ............................................................................. 14
3 G E TTING STARTED ............................................................................. 18
3.1 Unpack the Generator ...................................................................... 18
3.2 Adding engine Oil ............................................................................. 18
3.3 Adding Fuel ...................................................................................... 20
3.4 Starting the Engine ........................................................................... 21
3.5 Stopping the Engine ......................................................................... 23
4 ELECTRICAL CONNECTION ............................................................... 24
4.1 Capacity ........................................................................................... 24
4.2 Power Management ......................................................................... 24
4.3 Connecting Electrical Loads ............................................................. 24
4.4 Parellel Connection within 2 generator ............................................. 25
4.5 Battery Charging ............................................................................... 28
4.6 Wattage Reference Guide ................................................................ 29
5 MAINTENANCE .................................................................................... 31
5.1 Periodic Maintenance ....................................................................... 31
5.2 Spark Plug Maintenance ................................................................... 32
5.3 Engine Oil Replacement ................................................................... 33
5.4 Air Filter Maintenance ....................................................................... 34
5.5 Muffler Screen and Spark Arrestor Maintenance .............................. 35
5.6 Fuel Filter Maintenance .................................................................... 36
6 STORAGE ............................................................................................. 37
6.1 Long Term Storage ........................................................................... 37
7 TRO UBLE S HO O TING AND SPECIFICATIONS ................................... 39
7.1 Troubleshooting Diagram ................................................................. 39
7.2 Fuel Filter Maintenance .................................................................... 40
7.3 Specifications ................................................................................... 41
Page 4

INVERTER GENERATOR – P2000i
4
1 SAFETY INSTRUCTIONS AND WARNINGS
WARNING
THE ENGINE EXHAUST FROM THIS PRODUCT CONTAINS CHEMICALS TO CAUSE
CANCER, BIRTH DEFECTS OR OTHER REPRODUCTIVE HARM.
NOTE
Read this manual carefully before operating this machine. This manual should stay with this
machine if it is sold.
Page 5

INVERTER GENERATOR – P2000i
5
INTRODUCTION
This Operating Manual has been designed to instruct you on the correct
operation of your PRAMAC product. Your satisfaction with this product and its
safe operation is our ultimate concern. Therefore please take the time to read
the entire manual, especially the Safety Precautions. They will help you to
avoid potential hazards that may exist when working with this product.
Page 6

INVERTER GENERATOR – P2000i
6
IMPORTANT MANUAL INFORMATION
Particulary important information is distinguished in this manual by the
following notes.
Symbol Usage
This manual contains i mportant information that you need to know and
understand in orde r to assure YOUR S AFETY a nd PROPER OPERATION
OF EQUIPMENT. The following symbols help you recognize this
information. Please read the manual and pay attention to these
sections.
WARNING
WARNING INDICATE A CERTAINTY OR STRONG POSSIBILITY OF PERSONAL INJURY OR
DEATH IF INSTRUCTIONS ARE NOT FOLLOWED.
NOTICE
CAUTIONS INDICATE A POSSIBILITY ARE NOT FOLLOWED PROPERLY.
TIPS
TIPS GIVE HELPFUL INFORMATION
WARNING
PLEASE READ AND UNDERSTAND THIS MANUAL COMPLETELY BEFORE OPERATING
THE MACHINE.
TIP
Continually seeks advancements in product design and quality. Therefore,
wherein this manual contains the most current product information available
at the time of printing, there may be minor discrepancies between your
engine and this manual. If there is any question cancerning this manual,
please consult a PRAMAC dealer.
This manual should be considered a permanent part of this engine and
should remain with this engine when resod.
Product and specifications are subject to change without notice.
Page 7

INVERTER GENERATOR – P2000i
7
SAFE TY INFO RMATION
FUEL IS HIGHLY FLAMMABLE AND POISONOUS
• Always turn off the engine when refueling.
•
Never refuel while smoking or in the vicinity of an
open flame.
•
Take care not to spill any fuel on the engine or
muffler when refueling.
•
If you swallow any fuel, inhale fuel vapor, or allow
• Any to get in your eye(s), see your doctor immediately. If any fuel spills
on your skin or clothing, immediately wash with soap and water and
change your clothes.
• When operating or transporting the machine, be sure it is kept upright. If
it tilts, fuel may leak from the carburetor or fuel tank.
EXHAUST FUMES ARE POISON OUS
• Never operate the engine in a closed area or it may cause
unconsciousness and death within a short time. Operate the engine in a
well ventilated area.
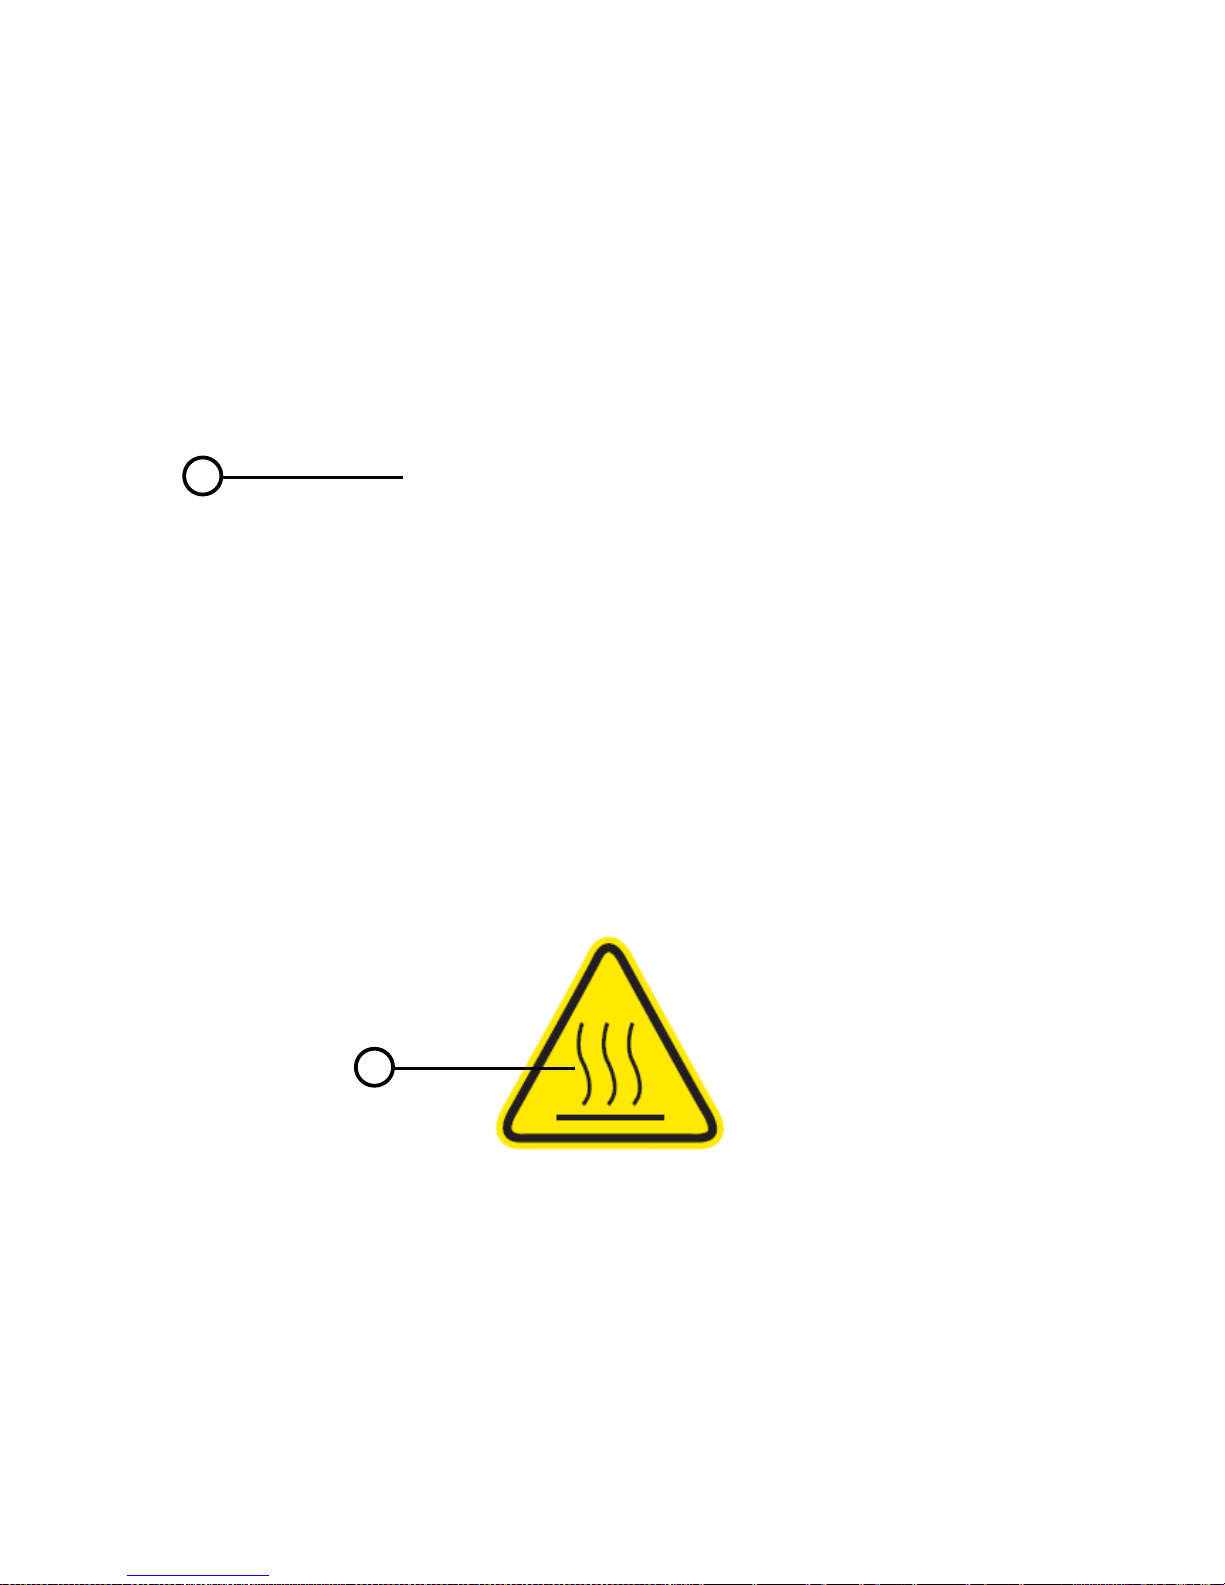
ENGINE AND MUFFLER MAY BE HOT
• Place the machine in a place where pedestrians or children are not likely
to touch the machine.
• Avoid placing any flammable materials near the exhaust outlet during
operation.
Page 8

INVERTER GENERATOR – P2000i
8
• Keep the machine at least 1m (3 ft) from buildings or other equipment, or
the engine may overheat @ 1 m (3 ft).
•
Do
not operate the engine with a dust cover, or other objects covering it.
• When covering the generator, be sure to do so only after the engine and
muffler have completely cooled down.
• Be sure to carry the generator only by its carrying handles.
• Do not place any
obstacles
on the generator.
ELECTRIC SHOCK PREVENTION
• Never operate the engine in rain or snow.
• Never touch the machine with wet hands or electrical shock will occur.
Page 9

INVERTER GENERATOR – P2000i
9
• Connect the ground lead of the machine to the ground terminal 1 to
ground the generator to earth (where needed) and connect the end to
the ground electrode buried in the ground.
CONNECTION NOTES
• Avoid connecting the generator to commercial power outlet.
CONNECTION
WARNING
Before the generator can be connected to a building’s electrical system, a licensed
electrician must install an isolation (transfer) switch in the building’s main fuse box. The
switch is the connection point for generator power and allows selec
tion of generator or
main line power to the building. This will prevent the generator from charging the main
power line (back feeding) when the main power supply has fail ed or has been turned off f or
line repair. Back feeding can electrocute or injure line
maintenance personnel. Also,
generator and building electrical system damage can occur when normal operati ng power
returns if unit is used without an isolation switch.
EXTENSION CORD NOTES
Extension cords should be protected by a tough flexible rubber sheath (I E C
245) or the equivalent to withstand mechanical stress.
Page 10

INVERTER GENERATOR – P2000i
10
LOCATION OF IMPORTANT LABELS
Please read the following labels carefully before operating this machine.
TIP
Maintain or replace safety and instruction labels, as necessary.
1
Page 11
INVERTER GENERATOR – P2000i
11
2
3
Page 12

INVERTER GENERATOR – P2000i
12
2 CONTROLS AND FEATURES
2.1 Generator
1. Muffler
2. Carrying handle
3. Vented Gas Cap
4. Recoil Starter
5. Control Panel
6. Fuel Gauge
7. Exhaust and Spark Arrestor
8. Oil filter cap
Page 13

INVERTER GENERATOR – P2000i
13
2.2 Control Panel
AC Pilot Light
1. Engine Switch
2. Economy Throttle (Black)
3. AC Pilot Light
4. Overload Indicator Light
5. Oil Warning Light
6. 12V DC Output
7. 8A DC Circuit Breaker
8. Fuel Petcock
9. Choke
10. 220/230/240V AC Outlets
This socket is only corresponding to a client, the different laws and regulations according to the sales area
changes corresponding to the socket.
11. Ground Terminal
Page 14

INVERTER GENERATOR – P2000i
14
2.3 Control Functions
ECONOMY THROTTLE
Throttle
When the Throttle switch is in the “I” position the throttle controls the engine
speed according to the connected electrical load. The results are better fuel
consumption and less noise. When the switch is in the “O” position the engine
runs at 4,500 rpm regardless of the electrical load.
NOTE
The Throttle must be “O” when using electrical devices that require a large star ting current,
such as a compressor, pump, or refrigenator.
Led Indicators
The LED Indicators assist in communicating proper and improper functions of
the unit.
Output Indicator (Green)
The Output Indicator comes on when the engine starts and produces power.
Overload Alarm (Red)
The Overload Alarm comes on when a connected device requires more
power than the generator is able to produce, the inverter control unit
overheats, or the AC output voltage rises above rated values. The Output
Indicator (Green) will go off and the Overload Alarm (Red) will stay on, but the
engine will continue to run.
When the Overload Alarm Light comes on and power generation stops,
proceed as follows:
Page 15

INVERTER GENERATOR – P2000i
15
1. Turn off any connected electric devices and stop the
engine.
2. Reduce the
total wattage
of connected electric devices within
the
rated
output.
3
. Check for blockages in the cooling air inlet and around
the
contro
l
unit.
lf any
blockages
are found remove
them.
4. After
checking, restart
the
engine.
NOTE
The Overload Alarm may come on for a few seconds when first using electrical devices that
require a large starting current, such as a compressor, pump, or refrigerator.
This is normal
behavior it is not a malfunction.
Low
Oil Alarm
(Red)
When the engine oil falls below the required
level the
Low Oil
Alarm
will
come on and the engine will stop automatically. The engine will not restart
until oil is added to the unit to bring it up to the appropriate level.
NOTE
When starting the unit, if the Low Oil Alarm light flickers and the engine will not start, you
will need to add engine oil before attempting to restart the engine.
NOTE
Generator should
only be operated on a level surface. DO NOT operate the generator on
loose ground or obvious inclines. The low oil shutdown feature may be prematurely
activated in these cases causing the engine to not start.
Engine
Switch
The Engine Switch controls the
ignition switch. The
switch must be in the
“I”
position to start the
generator. Switching
to
the
“O”
position stops the
engine and
will
not allow the engine to be
restarted.
Page 16

INVERTER GENERATOR – P2000i
16
12V 8A DC Outlet
The 12V 8A DC Outlet is for provided for battery charging. Follow instructions
in the owner’s manual for the battery for charging procedures.
8A DC Circuit Breaker
The 8A DC Circuit Breaker turns off automatically if the current exceeds 8A. If
the circuit breaker turns “O” you will need to push it “in” to turn it “I” again.
Fuel Petcock
The fuel Petcock controls the flow of gasoline from the fuel tank to the
carburetor. The Petcock knob should be in the “I” position when starting and
operating the generator. The Petcock knob should be in the “O” position when
the engine is not running and when storing or transporting the unit.
NOTE
The Fuel Petcock knob helps to prevent stale fuel from remaining in the carburetor while
storing or transporting the unit. Run the fuel out by turning the knob to the “O
” position and
letting the engine run until it stops.
Choke
The Choke is used when starting the engine “cold” (the engine is not hot).
Pull out fully on the choke when starting the engine. Once the engine has
warmed and a steady idle is achieved, push in on the choke. When restarting
a warm engine the choke is not necessary.
Page 17

INVERTER GENERATOR – P2000i
17
220/230/240V AC Outlets
The Outlets are used to power 220/230/240V Single Phase 50Hz loads
requiring up to 1600W continuous power.
This socket is only corresponding to a client, the different laws and
regulations according to the sales area changes corresponding to the socket.
Ground Terminal
The Ground (Earth) terminal is used to ground the generator when grounded
electrical devices are being used. Consult an electrician for local grounding
regulations.
Page 18

INVERTER GENERATOR – P2000i
18
3 GETTING STARTED
3.1 Unpack the Generator
Remove the generator from its packaging.
WARNING
Packaging is flammable! Do not attempt to add fuel to this unit before removing it from
packaging.
Inspect the generator to ensure that no damage has occurred in shipping or
handling. If the unit appears to be damaged, DO NOT add fuel or attempt to
start the generator. Please call PRAMAC costumer service.
Check to ensure that you received the f ollowing items:
• P 2000i 2000W Generator
• Parallel Cables
• Oil Funnel
If you did not receive any of the above items, please contact PRAMAC
costumer service.
3.2 Adding engine Oil
The generator has been shipped without engine oil. DO NOT add fuel or start
the engine before adding engine oil.
Figure 1
NOTE
In order to add motor oil you will need to remove the side panel from the unit.
Page 19

INVERTER GENERATOR – P2000i
19
Using a #2 Phillips-head screwdriver remove screws 1 and 2 (seen in figure
1) and lift up and away to remove the side panel.
Figure 2
Place the generator on a level surface. DO NOT tilt the generator while
adding oil. It can cause you to overfill the oil and/or cause the oil to leak into
areas in which it is not intended.
Remove the oil filler cap 1 (seen in figure 2).
Figure 3
Using the funnel (provided) fill with 0.4 L of SAE 10W-30 or 10W-40
(provided) (see figure 3). See figure 4 for proper oil level 1.
Figure 4
Replace oil filler cap and secure side panel with screws.
Recommended engine oil:
A. YAMALUBE4(10W-40)
SAE10W-30or10W-40
B. SAE #30
Page 20

INVERTER GENERATOR – P2000i
20
C. SAE#20
D. SAE#10W
Recommended engine oil grade: API Service SE type or higher Engine oil
quantity:
0.4L
3.3 Adding Fuel
The fuel tank capacty 4.1 Liter.
DO NOT overfill the tank, otherwise it may overflow when the fuel warms up
and expands.
NOTE
For safety reasons, once fuel has been added to this unit it cannot be returned to the place
of purchase.
1. Use clean, fresh, regular unleaded fuel with a minimum octane rating of
85.
2. DO NOT mix oil with fuel.
3. Clean area around the fuel cap.
4. Remove the fuel cap.
5. Be sure that the fuel strainer is in place.
6. Slowly add fuel to the tank.
7. Do not exceed the red marker position of the fuel filter.
8. Screw on the fuel cap and wipe away and spilled fuel.
NOTE
Use only unleaded gasoline.
The use of leaded gasoline will cause severe damage to internal engine parts.
After filling with fuel, make sure the fuel tank cap is tightened securely.
Page 21

INVERTER GENERATOR – P2000i
21
3.4 Starting the Engine
OPERATE THE ENGINE IN A WELL VENTILATED AREA.
DO NOT connect any electrical devices to the outlets on the generator before
starting the engine.
1. Turn the Economy Throttle switch "O"
You may turn the Economy Throttle switch to "I" once the engine is started
and a s teady idle is achieved, (below 0°(32°F)/5mins, below 5°C(41
°F)/3mins.).
2. While holding the fuel tank cap so that it will not move, turn the air vent
knob to "ON".
3. Turn the Fuel Petcock knob to the "I" position.
Page 22

INVERTER GENERATOR – P2000i
22
4 Turn the Engine Switch (Red) "I"
5. Pull the Choke Knob fully out.
NOTE
The Choke is
not needed to start a warm engine. Push the knob in to the original position
when starting the engine warm.
6. Grasp the carrying handle firmly to prevent the generator from falling
over when pulling the recoil starter.
7. Pull slowly on the recoil starter until it is engaged and then pull it briskly.
8. After the engine starts, warm up the engine until the engine does not
stop when the choke knob is returned the original position.
Page 23

INVERTER GENERATOR – P2000i
23
3.5 Stopping the Engine
Before stopping the engine turn off and disconnect any electronic devices
attached to the generator.
Turn the Throttle switch “O”.
Turn the Engine switch to “O”.
Turn the Fuel Petcock to “O”.
Page 24

INVERTER GENERATOR – P2000i
24
4 ELECTRICAL CONNECTION
4.1 Capacity
Follow these simple steps to calculate the running and starting watts
necessary for your purposes.
See Section 4.5 for Wattage Reference Guide.
1. Select the electrical devices you plan on running at the same time.
2. Total the running watts of these items. This is the amount of power you
need to keep your items running.
3. Identify the highest starting wattage of all devices identified in step
a. Add this number to the number calculated in step
b. Surge wattage is the extra burst of power needed to start
some electric driven equipment. Following the steps
listed under "Power Management" will guarantee that
only one device will be starting at a time.
4.2 Power Management
Use the following formula to convert voltage and amperage to watts: Volts x
Amps = Watts
To prolong the life of your generator and attached devices, follow these steps
to add electrical load:
1. Start the generator with no electrical load attached.
2. Allow the engine to run for several minutes to stabilize.
3. Plug in and turn on the first item. It is best to attach the item with the
largest load first.
4. Allow the engine to stabilize.
5. Plug in and turn on the next item.
6. Allow the engine to stabilize.
7. Repeat steps 5-6 for each additional.
4.3 Connecting Electrical Loa ds
1. Let the engine stabilize and warm up a few minutes after starting.
Page 25

INVERTER GENERATOR – P2000i
25
2. Prior to powering tools and equipment, make sure the generator's rated
voltage, and amperage capacity (220/230V AC @ 7 AMPs, 12V DC @ 8
AMPs) is adequate to supply all electrical loads that the unit will power. If
powering exceeds the generator's capacity, it may be necessary to group
one or more of the tools and/or equipment for connection to a separate
generator.
3. Once the generator is running, simply connect the power cords of
220/230 volt AC powered tools and equipment into the 220/230 volt AC
dual outlets and/or the power cord of a 12V DC powered tool to the DC
terminals.
4. DO NOT connect 3-phase loads to the generator.
5. DO NOT connect 60Hz loads to the generator.
6. DO NOT overload the generator.
NOTE
The DC terminals may be used for charging 12 volt type batteries only.
4.4 Parellel Connection wi t hin 2 generator
Performance: increase output through the parallel connection way within 2
sets of P2000i inverter generators.
Operation Guide:
1. 2 sets of P2000i inverter generators needed
Attention: generators are power off, without any loading equipments and
cable sockets.
Page 26

INVERTER GENERATOR – P2000i
26
2. Put the parallel connection wire 1 and 2 into the parallel connection
sockets 3 and 4.
Attention: Grounding Wire must be properly installed and worked if
needed. Keep each inverter generator in steady.
Page 27

INVERTER GENERATOR – P2000i
27
3. Start 2 sets of inverter generators. The starting operation is as the same
as normal process (refer on manual book starting parts).
Attention: Please make sure the parallel connection wires have been put
into the parallel connection sockets properly. If no connecting, starting
inverter generators could be damaged and no power.
4. Put the equipment plug 5 into socket 6, turn on the equipmentpower.
Warning:
Only 2 sets of P2000i inverter generator can be parallel connected.
More than 2 sets and above inverter generators parallel connection are not
permitted.
Only use P2000i specialized parallel connecting wire.
When use parallel connecting way for P2000i inverter generators, put the
plug into sockets safety.
Make use put the right plug into sockets for parallel connecting wire.
When working on parallel connecting way, don’t put off the parallel
connecting wire. Before starting, parallel connecting wire need to be
connected firstly. Only put off the wire after inverter generator power off.
When working on parallel connecting way, No currents output when
turning off one of the inverter generators.
When only operation on one inverter generator, make sure to put off
the parallel connecting wire.
When two sets of inverter generators working independently, don’t connect
the parallel connecting wire.
Read P2000i manual book carefully before operation.
Page 28

INVERTER GENERATOR – P2000i
28
4.5 Battery Charging
Start the engine first and allow it to reach idle before connecting the generator
to the battery. Battery Charging is performed using the 12V DC outlet only.
1. Be sure the Throttle switch is turned "O" while charging batteries.
2. Be sure to connect the red battery charger lead to the positive (+) battery
terminal, and connect the black lead to the negative (-) battery terminal.
DO NOT reverse these positions.
3. Connect the battery charger leads to the battery terminals securely so that
they are not disconnected due do engine vibration or other disturbances.
4. Charge the battery by following the instructions in the owner's manual for
the battery.
5. The DC Circuit Breaker will turn "O" automatically if the current exceeds
rated output.
6. To restart charging the battery, turn the DC protector on by pressing its
button to "I"
7. Refer to the owner's manual for the battery to determine charging times.
NOTE
Never start or stop the generator with electrical devices plugged in or turned on.
Page 29

INVERTER GENERATOR – P2000i
29
4.6 Wattage Reference Guide
Item
Running
Watts
Starting
Watts
Essentials
Light Bulb
100
100
Refrigerator/Freezer
1200
2400
Sump Pump
600
1800
Well Pump 1HP
2000
4000
Water Heater
4000 Security System
180 AM/FM Radio
300
Garage Door Opener 1/2 HP
500
600
Battery Charger 12V
110
Heating and Cooling
Air Conditioner 12000 BTU
1700
2500
Fan
300
600
Furnace Fan 1/3 Hp 1200 2000
Home Appliances
Microwave
1000
Electric Range – One Element
1500 Electric Skillet
1250 Coffee Maker
1500
Clothes Washer
1200
Entertainment
CD/DVD Player
100 Stereo Receiver
450 Television 27”
500 PC with 15” Monitor
800
Job Site
Belt Sander 3”
1000
1500
Bench Grinder 6”
700
1500
Circular Saw
1500
1500
Compressor 1 1/2 HP
1000
1000
Edge Trimmer
500
500
Hand Drill 1/2”
1000
1000
Paint Sprayer
600
1200
Table Saw
2000
2000
Page 30

INVERTER GENERATOR – P2000i
30
These are estimates only. Check your tool or appliance for exact wattage
requirements. The wattages listed are based on estimated wattage
requirements.
For exact wattages, check the data plate or owner's manual on the item you
wish to power using the generator.
Operating voltage and frequency requirement of all electronic equipment
should be checked prior to plugging to plugging them into this generator.
Damage may result if the equipment is not designed to operate within a +/10% voltage variation, and +/- 3 Hz frequency variation from the generator
specification ratings.
Your Power Needs
Tool or Appliance
Running
Watts
Starting
Watts
1.
2.
3.
4.
5.
Total Running Watts
Highest
Starting
Total running Watts
+ Highest Starting Watts
Page 31

INVERTER GENERATOR – P2000i
31
5 MAINTENANCE
5.1 Periodic Maintenance
Periodic inspection, adjustment and lubrication will keep your generator in the
safest and most efficient condition possible.
Item Routine Prior to use
Every
6mos.or
100hrs.
12mos.
or
300hrs.
Spark Plug
• Check condition
• Clean
and replace
if necessary
•
Fuel
• Check
fuel level
and leakage.
•
Fuel hose
• Check fuel hose for
cracks or damage
•
Replace if
necessary.
•
Engine oil
• Check
oil level in
engine.
•
• Replace*
•*
Air Filter Element
• Check condition
• Clean
•
Muffler Screen
• Check Condition
• Clean or replace if
necessary
•
Spark Arrestor
• Check Condition
•
Clean or replace if
necessary
•
Fuel Filter
• Check Condition
• Clean or replace if
necessary
•
* Initial replacement of the engine oil is after one month or 20 hours of
operation.
Page 32

INVERTER GENERATOR – P2000i
32
5.2 Spark Plug Maintenance
Spark plug inspection
The spark plug is an important engine component and should be checked
periodically.
1. Remove the screws 1 and then remove the cover 2.
2. Remove the spark plug cap 3 and access cap 4.
3. Insert the tool 5 through the hole in the outside of the cover.
4. Insert the handlebar 6 into the tool 5 and turn it counterclockwise to
remove the spark plug.
5. Check for discoloration. The carbon porcelain insulator around the
center electrode of spark plug should be a Medium-to-light tan color.
6. Check the spark plug type and gap. The spark plug gap should be
measured with a wire thickness gauge and, if necessary, adjusted to
specification.
Spark Plug Type:
BPR6HS (NGK)
Spark Plug Gap:
0.6-0.7 mm (0.024-0.028 in)
Spark Plug Torque:
20.0 N-m (2.0kgf m,14.8 Ibf
ft)
7. Install spark plug, spark plug cap, cover and screws.
Page 33

INVERTER GENERATOR – P2000i
33
5.3 Engine Oil Replacement
Initial replacement of the engine oil is after one month or 20 hours of
operation.
1. Place the generator on a level surface and warm up the engine for
several minutes. Then stop the engine and turn the Fuel Petcock knob to
"O" and the Fuel Tank Cap Air Vent knob to "OFF".
2. Remove the screws 1 and then remove the cover 2.
3. Remove the oil filler cap.
4. Place an oil pan under the engine. Tilt the generator to drain the oil
completely.
5. Return the generator to a level surface.
NOTE
DO NOT tilt the generator when adding engine oil.
This could result in overfilling and
damage to the engine.
6. Add engine oil to the upper level as seen in the diagram 1.
Recommended engine oil: YAMALUBE 4 (10W-40), SAE 10W-30 or MOW-40, SAE#30, SAE#20,
SAE10W.
Recommended engine oil grade: API Service SE type or higher Engine oil quantity: 0.4L (0.42US
qt, 0.035 Imp qt)
7. Install oil filler cap, cover, and screws.
Page 34

INVERTER GENERATOR – P2000i
34
5.4 Air Filter Maintenance
Should be performed every 6 months or 100 hours. The air filter may need to
be cleaned more frequently when using in unusually wet or dusty areas.
1. Remove the screws 1 and then remove the cover 2.
2. Remove the screws 2 and then remove the air filter case cover 2.
3. Remove the foam element ©.
4. Wash the foam element in solvent and dry it.
5. Oil the foam element and squeeze out excess oil. The foam element
should be wet but not dripping.
NOTE
Do not wring out the foam element when squeezing it. This could cause it to tear.
6. Insert the foam element into the air filter case. Be sure the foam element
sealing surface matches the air filter so there is no air leak.
NOTE
The engine should never run without the foam element.
7. Install air filter case cover, cover, and screws.
Page 35

INVERTER GENERATOR – P2000i
35
5.5 Muffler Screen and Spark Arrestor Maintenance
Should be performed every 6 months or 100 hours. The air filter may need to
be cleaned more frequently when using in unusually wet or dusty areas.
1. Remove the screws 1 and then remove the cover 2.
2. Loosen the bolt 1 and the remove the muffler cap 2, the muffler screen 3
and spark arrester 4.
3. Remove the carbon deposits on the muffler screen and spark arrester
using a wire brush. Use wire brush lightly to avoid damaging the muffler
screen or spark arrestor.
4. Check the muffler screen and spark arrester replace them if damaged.
5. Install the spark arrester.
6. Install the muffler cap.
7. Install the cover and tighten the screws.
Page 36

INVERTER GENERATOR – P2000i
36
5.6 Fuel Filter Maintenance
Should be performed every 12 months or 300 hours.
1. Remove the fuel tank cap and filter 1.
2. Clean the filter with gasoline.
3. If damaged, replace it.
4. Wipe the filter and install it.
5. Install the fuel tank cap.
WARNING
GASOLINE IS FLAMMABLE. DO NOT perform this maintenance while sm oking or near an
open flame.
Page 37

INVERTER GENERATOR – P2000i
37
6 STORAGE
6.1 Long Term Storage
Long term storage of your machine will require some preventive procedures
to guard against deterioration.
Drain the fuel
1. Turn the Engine switch to "O" 1.
2. Remove the fuel tank cap. Extract the fuel tank into an approved
gasoline container using a commercially available hand siphon. Then,
install the fuel tank cap.
WARNING
GASOLINE IS FLAMMABLE.
DO NOT perform this maintenance while smoking or near an
open flame.
WARNING
Immediately wipe off spilled fuel with a clean, dry, soft cloth, since fuel may deteriorate
painted surfaces or plastic parts..
3. Turn the Engine switch to "I".
4. Turn the fuel tank cap air vent knob to “ON” and Fuel Petcock knob to "I"
1.
5. Start the engine and let it run until it stops. Duration of the running engine
depends on the amount of the fuel left in the tank.
Page 38

INVERTER GENERATOR – P2000i
38
6. Remove the screws 1, and then remove the cover 2.
7. Drain the fuel from the carburetor by loosening the drain screw 3 on the
carburetor float chamber.
8. Turn the Engine switch to "O"
9. Turn the fuel cock knob to "O"
10. Tighten the drain screw.
11. Install the cover and tighten the screws.
12. Turn the fuel tank cap air vent knob to "OFF"
13. Store the generator in a dr y, well-ventilated place, with the cover placed
over it.
Engine
Perform the following steps to protect the cylinder, piston ring, etc. from
corrosion.
1. Remove the spark plug, pour about one table-spoon of SAE 10W-30 or
20W-40 motor oil into the spark plug hole and reinstall the speak plug.
Recoil start the engine by turning over several times (with ignition off) to
coat the cylinder walls with oil.
2. Pull the recoil starter until you feel compression. Then stop pulling, (this
prevents the cylinder and valves from rusting).
3. Clean exterior of the generator and apply a rust inhibitor.
4. Store the generator in a dry, well-ventilated place, with the cover placed
over it.
5. The generator must remain in a vertical position when stored, carried, or
operated.
Page 39

INVERTER GENERATOR – P2000i
39
7 TROUBLESHOOTING AND SPECIFICATIONS
7.1 Troubleshooting Diagr a m
A ENGINE DOES NOT START
B Turn the engine switch to “ON”, then pull the
recoil starter and c heck if the oil warning light
flickers
C Does not flicker
D Flicker
E Check engine oil level
F OK
Consult a dealer
G Level low
Add engine oil
H Pull the recoil starter and check the spark plug
for spark strength. (See “WARNING”)
WARNING
•
To Prevent FIRE HAZARDS be sure
fuel is not present in the
spark plug
area.
•
To prevent FIRE HAZARDS be sure to
place the spark plug as far way as
possible from ste spark plug hole and
carburetor area.
•
To prevent ELECTRIC SHOCK do not
hold spark plug lead with hand while
testing.
I OK
J Dose not spark
SEE K to the next page
SEE N to the next page
Page 40

INVERTER GENERATOR – P2000i
40
K Check the spark plug.
• Type: BPR6HS
• Gap: 0.6-0.7 mm (0.024-
0.028 in)
L
Incorrect
M
OK
Replace or
adjust Gap.
Clean the spark
plug.
N Check the following
• Fuel line clogging
• Air cleaner
element clogging.
O
Clogged
Q
Clean
or Replace; Consult a
dealer.
P
OK
R Consult a dealer.
7.2 Fuel Filter Maintenance
Use this section to troubleshoot common errors.
Engine won't start
Fuel systems: No fuel suppli ed t o combustion chamber
• No fuel in tank supply fuel.
• Fuel in tank Fuel tank cap air vent knob to “ON” and fuel cock knob
to "I".
• Clogged fuel line…clean fuel line.
• Clogged carburetor…clean carburetor.
Engine oil system insufficient
• Oil level is low…add engine oil.
Electrical systems
• Engine switch to "I" and pull the recoil starter. Poor spark
• Spark plug dirty with carbon or wet... Remove carbon or wipe spark
plug dry.
• Faulty ignition system…Consult a service center.
Generator won't produce power
• Safely device (DC protector) to "O" …press the DC protector to "I"
Page 41

INVERTER GENERATOR – P2000i
41
7.3 Specifications
Engine Type
4-Stroke OHV Air Cooled Single Cylinder
EPA Certified
Engine Displacement (cc)
79cc
Running Watts
1600w
Starting Watts
2000w
Rated Frequency
50Hz
Rated Voltage
230V
Rated Current
7A
Run Time
10.5hrsat1/4load
Receptacles (qty.) (1) 230V AC; (1) 12V 8A DC
Net Weight
21 KG
Noise Level (dB)
51dB@ 1/4 Load
Fuel Type
Unleaded gasoline
Fuel Capacity (liters)
4.3
Oil Type
SAE10W-40
Start Type
Recoil
Dimensions L x W x H (in.)
530x315x490mm
 Loading...