

Page 1

ActionCam! User Manual
ActionCam!
Android version
User Manual
© Copyright 2013.
All rights reserved. No part of this publication may be reproduced, transmitted,
transcribed, stored in a retrieval system or translated into any language or
computer language, in any form or by any means, electronic, mechanical, magnetic,
optical, manual or otherwise, without the prior written permission of the
manufacturer.
Page 2

ActionCam! User Manual
Contents
CHAPTER 1: OVERVIEW............................................................................- 1 -
1.1 INTRODUCTION..................................................................................- 1 -
1.2 REQUIREMENTS..................................................................................- 1 -
CHAPTER 2: MAIN FUNCTIONS.................................................................- 2 -
2.1 CAPTURE AND RECORD.......................................................................- 2 -
2.2 PREVIEW FILES..................................................................................- 3 -
2.3 DOWNLOAD FILES FROM REMOTE DV.................................................- 5 -
2.4 SEND TO SOCIAL NETWORKING WEBSITE OR EMAIL .........................- 6 -
2.5 PLAY TO A DMR ..................................................................................- 7 -
2.6 TRIM ..................................................................................................- 8 -
2.7 SETTINGS...........................................................................................- 9 -
Page 3

ActionCam! User Manual
Chapter 1: Overview
1.1 Introduction
Welcome to ActionCam!, a powerful application for controlling your WiFi DV, easily
trimming video, playing recorded media to a DMR device, or sharing media to a social
networking website. This manual provides an overview of the application’s key
features, and guidance on how to use ActionCam! to control your WiFi DV and sh are
the recorded contents.
1.2 Requirements
Supports official Android 2.3, 4.0 and 4.1 phones.
Screen Resolution: 800x480, 854x480, 960x540 and 1280x720
- 1 -
Page 4
ActionCam! User Manual
Chapter 2: Main Functions
ActionCam! is a powerful application that can help you to control DV capturi ng and
recording. Then, you can either download the recorded content to your device or
share it to social networking websites.
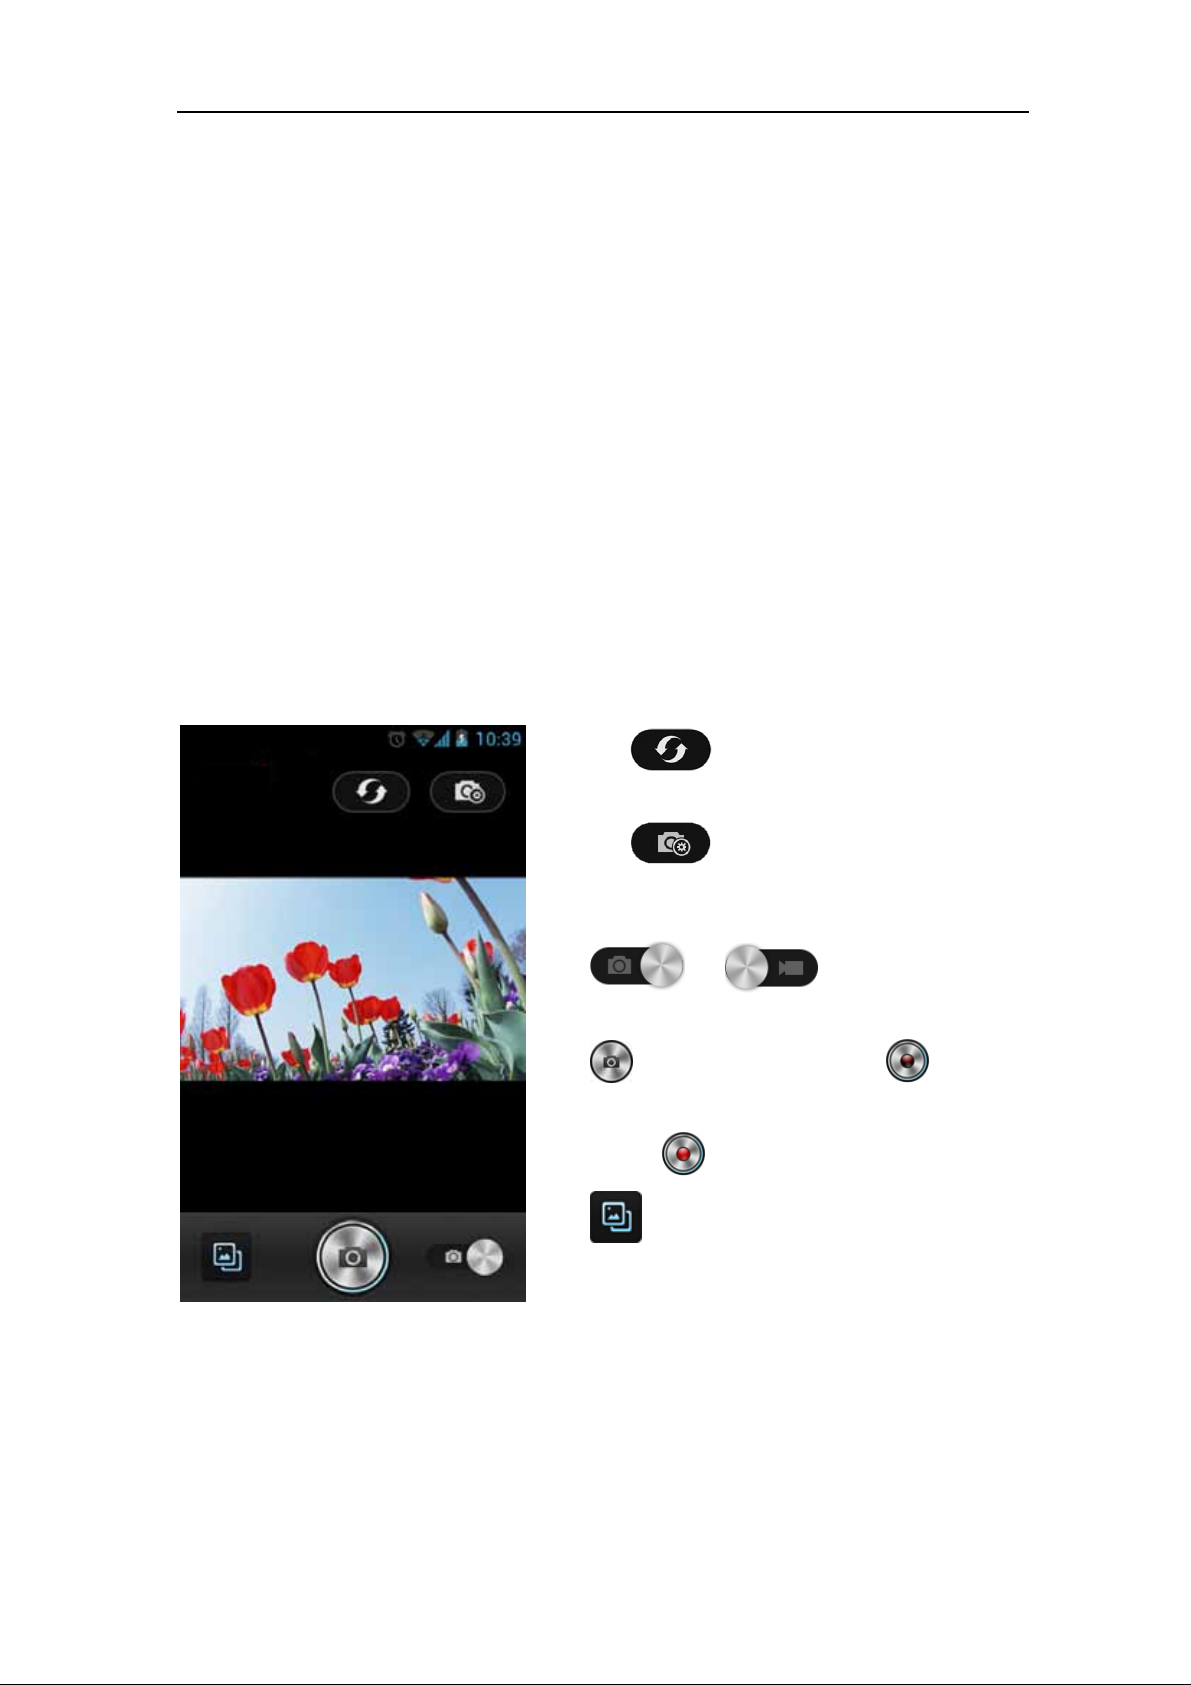
2.1 Capture and record
Before launching ActionCam!, please make sure your DV’s WiFi is turned on and
your devices have joined the same network. For any question on how to join to a WiFi
network, please refer to the Settings – WLAN feature of your phone.
Tap the ActionCam! icon on your phone to launch the application and the main
screen displays. From this screen, you can remotely control your DV to capture a
photo or record video.
Tap the
when the connection is lost.
Tap the
screen. Settings options on this screen vary
depending on the specific device.
Tap
capturing a photo and recording video.
Tap
recording video. When recording, the icon
changes to
Tap
to capture photo or tap to start
to go to the media album.
icon to reconnect the device
icon to go to the DV Settings
or to switch between
. Tap it again to stop recording.
- 2 -
Page 5
ActionCam! User Manual
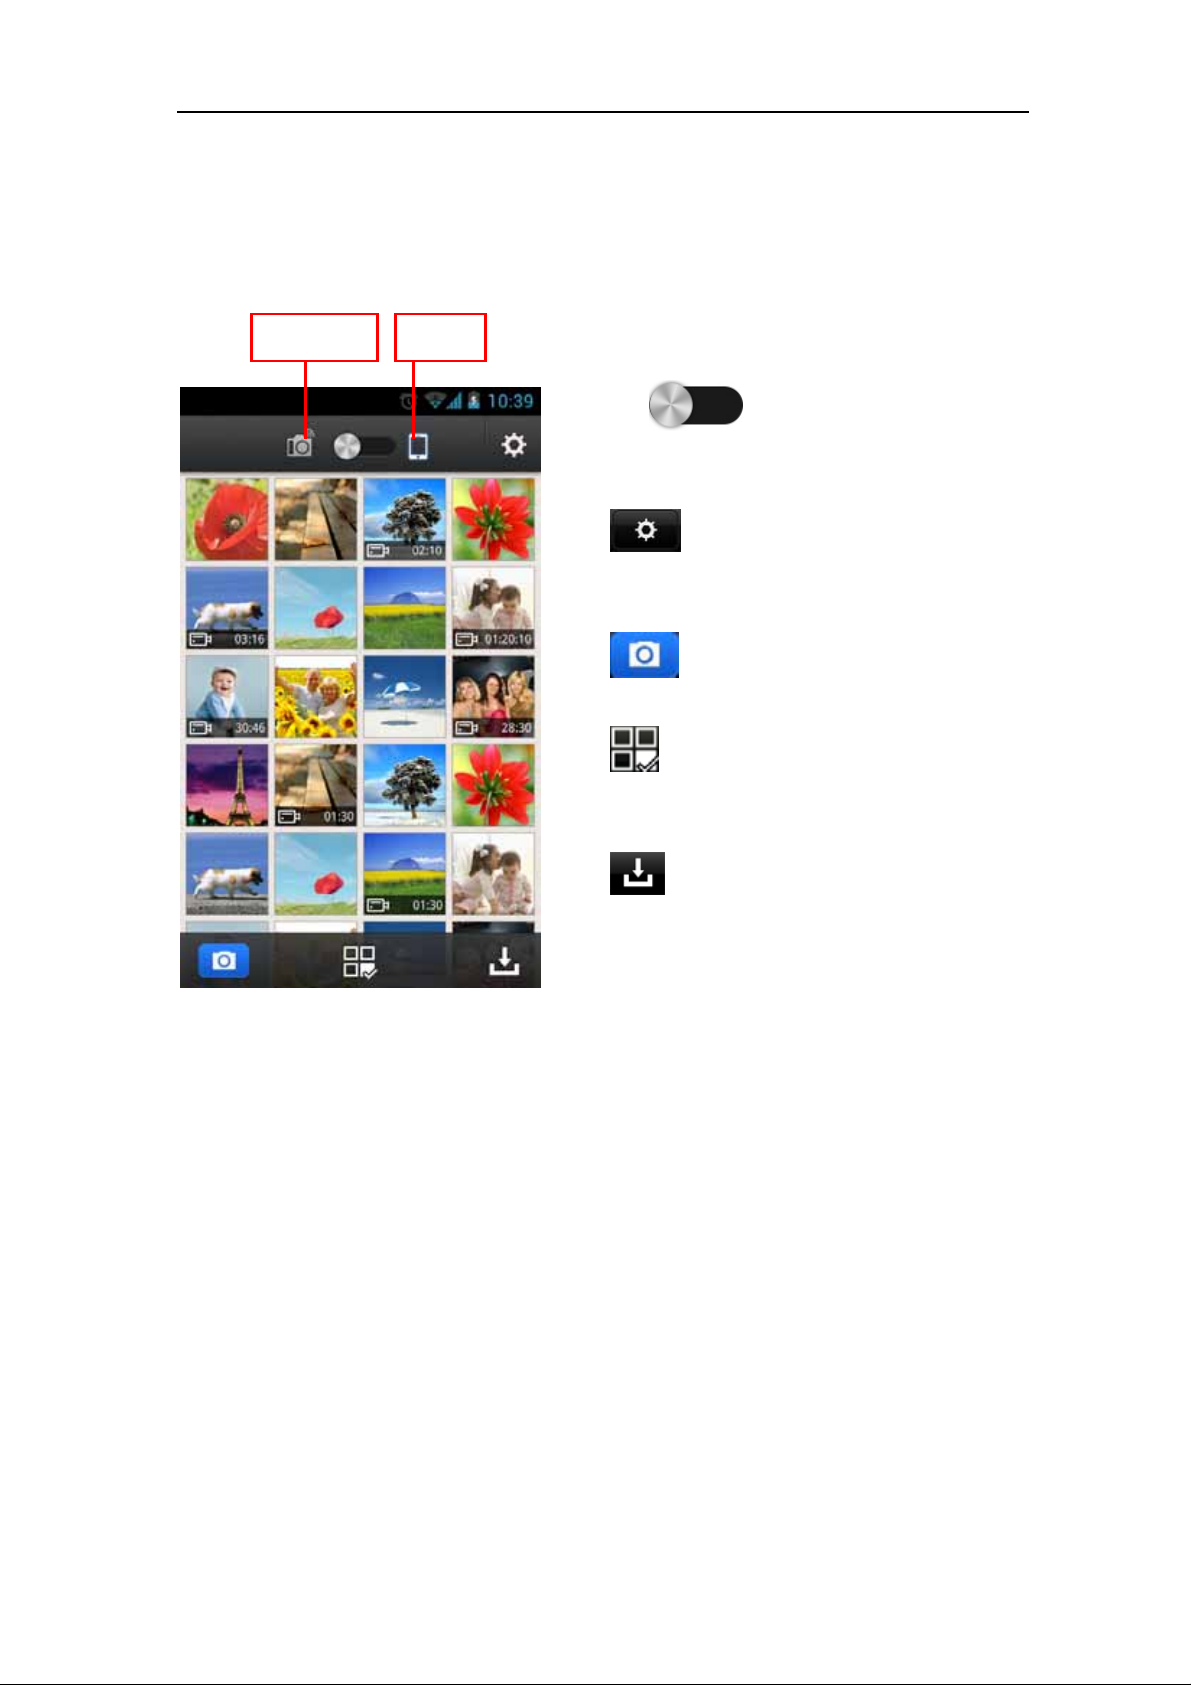
2.2 Preview files
In the media album, you can see all the captured and recorded files in your DV.
Remote Local
Tap the icon to switch between the
remote media album and the local media
album.
Tap
screen. Please refer to chapter 2.7 for detailed
information.
Tap
recording screen.
Tap
editing. Please refer to chapter 2.4, 2.5 and
2.6 for more information.
Tap to download files from the remote
DV to your local device. Please note this icon
appears only when in the remote thumbnail
preview screen. Please refer to chapter 2.3 for
more information about downloading.
Tap on the thumbnail to go to the large view screen.
to go to the application’s settings
to go back to the capture and
to get more options for sharing or
- 3 -
Page 6

ActionCam! User Manual
Drag left or right to switch files.
When you are browsing files on the local device, the
view information for the current file.
When you are browsing files on the remote DV, the
download the current file to your local device.
Tap
Please refer to chapter 2.4 for more information.
Tap
more information.
Tap
When you are previewing a video file, the
video trim screen. Please refer to chapter 2.6 for more information about trimming.
to share the current file to social networking websites or to send an email.
to play the current file to a DMR device. Please refer to chapter 2.5 for
to delete the current file.
icon appears. Tap on it to go to the
icon appears. Tap it to
icon appears. Tap it to
Tap
to go back to the thumbnail screen.
- 4 -
Page 7

ActionCam! User Manual
2.3 Download files from remote DV
Tap the icon on the thu mbnail screen to go to the downloading screen. Ju st
tap on the files you would like to download to your local device.
Special icons may appear in the right top
corner of some thumbnails:
means the file has been dow nloaded.
means the file is downloading.
means the file set to be downloaded.
Download all – Download all the files from
the remote DV to your local device.
Cancel – Cancel the downloading process.
Tap
screen.
to go back to the thumbnail
- 5 -
Page 8

ActionCam! User Manual
2.4 Send to a social networking website or email
In this screen, you can either share the media file via social networking websites or
via email.
Tap on the thumbnail to mark the file. Tap
again to ignore. Tap
to select all files.
When one or more files are marked, tap
and the available options will appear. Tap the
one you want to share to and you will go to
the corresponding sharing screen.
*Notes:
z SNS options vary depending on the social
networking apps you have installed on
your phone.
z If you are sharing files from the remote
DV, the application will download them to
the local device before sharing.
- 6 -
Page 9

ActionCam! User Manual
2.5 Play to a DMR
When one or more files are marked, tap to go to the Play to screen.
The available DLNA* certified DMR devices will be listed. Simply select t he one yo u
would like to play to.
Check “Always play to the selected device” and the selected files will always be
pushed to this device when you tap the
screen to clear this selection.
Tap
Tap
Tap the
selection screen.
*Note:
z Please make sure the DLNA certified DMR
z If the DMR device is not listed in the
website and search for your device to see if it is DLNA certified. Please make sure
the "Play To" Receiver option in the Features list is checked when searching.
icon in the future. Go to the Settings
to play the selected files and tap
to pause playback.
to play the previous file and tap
to play the next file.
button to go back to the DMR
is in the same network with your
handheld device before using this
function.
device list, please refer to the DLNA
- 7 -
Page 10

ActionCam! User Manual
2.6 Trim
When you are previewing a video file, the icon will be available. Tap on it to go
to the trim screen.
Menu
Start Point
Seek
Pointer
Seek to start
point
Seek to end
point
Tap the play icon and the seek pointer will move, show ing the currently displayin g
frame’s position in the storyboard. You can also simply drag the pointer to seek to the
frame you want.
To trim a video, when the seek pointer moves to the frame you want to start the
End Point
Storyboard
Expand the
storyboard
Narrow the
storyboard
video, tap
frame you want to end the video, tap
between the Start Point and End Point will be kept.
Tap
Tap
Tap
to expand the storyboard.
to narrow the storyboard.
to access the trim menu options: Save and Share
Save – Save the trimmed video to the media album.
Share – Share the trimmed video via social networking websites or email.
to move the Start Point to it. When the seek pointer moves to the
to move the End Point to it. The video
- 8 -
Page 11

ActionCam! User Manual
2.7 Settings
In this screen, you can set up the ActionCam! applications.
Download quality – Select Quick downloaded option in the popup screen to
download the file quickly with lower quality. Select Original files to download
original files.
Clear device for Play To – If the “Always play to the selected device” option is
checked in the play to screen, tap Clear to uncheck it.
Cache – Tap Clear to clear the cache files.
*Select Device - Tap this option to list the available DMS devices in the network.
Select the one you would like to use.
*RTSP server address – Tap to enter a new RTSP address.
WiFi Setting – Go to the phone’s WLAN settings screen to set up the WiFi
connection.
*Note:
This option may not available in some versions of the application.
- 9 -
 Loading...