

Prairie Labs heghest quality hearing aid Instruction Manual

Prairie Labs Inc.
Instruction Manual:
From your hearing healthcare professional and Prairie Labs Inc.
1

This manual contains important user information for the following
Prairie Labs hearing instruments. Your hearing healthcare provider can
Prairie Songs 1 Custom / BTE
Liberty Open Fit / BTE
Freedom 4 Open Fit
check and circle the appropriate information for your hearing instrument.
Prairie Songs 2 Custom / BTE
Prairie Songs 4 Custom / BTE
Monarch Open Fit
Revolution Receiver-in-the-Canal Open Fit
Other _________________________
Thank you for choosing Prairie Labs for your hearing needs.
2

Dear Hearing Instrument User: You are now the owner of a new fully digital
Prairie Labs hearing instrument that has been especially designed for you using
state of the art circuitry with the highest quality materials and workmanship.
In order to maximize the useful life of your hearing instrument we have compiled
some helpful hints that, if followed, will help you to get the most out of your
hearing instrument and batteries.
Please Remember:
It takes time and patience to get comfortable with your new hearing instrument.
Even if you are an experienced user of hearing instruments, you’re surrounding
may, at first, sound noisy or unnatural. Using your hearing instrument on a
regular basis will help you get the greatest benefit from your new fitting. Learn
to ‘focus’ on the people or sounds you want to hear. Do not hesitate to consult
your hearing healthcare professional for advice. We wish you good hearing!
3

Table of contents
Knowing Your Hearing Aid………..…... 3 Hearing Instrument Care & Protection……13,14
Left & Right Instruments…………...…...4 Important Notice for Prospective
Proper Placement………………....…4,5,6 Hearing Aid Users………………..…..…15,16
Removing Instruments………….….........7 Notice for Hearing Healthcare Providers….….17
Volume Control…………………...……..7 Extended Storage……………………………..18
Push Button/Multi Memory………...…...8 Children with Hearing Loss…………………..18
Directionality……………...……..………8 Troubleshooting Guide……………………19,20
Telephone Use…………………….……..9 Warranty Information…………………………21
Battery Information…………………..9,10 Service & Repair Information………….……..21
Cleaning Your Hearing Instrument…11,12 Owner Information……………………...…22,23
Key Word Index………………...……………24
4

Knowing your Hearing Aid
1. Microphone
2. Battery Door
3. Push Button
4. Volume Control
5. Sound Tube
6. Ear Bud
7. Ear Hook
nd
8. 2
Microphone
9. Canal
10. Retention Guard
Note: Features may vary depending on model.
5

Proper Placement On/In the Ear
If you are wearing hearing instruments on both ears, it is important to use the correct devise in
each ear. The sound tubes or molds are marked with ‘red’ lettering for the right ear, and ‘blue’
lettering for the left ear. Your hearing instrument should fit comfortably and easily in or over the
top of your ears. Your hearing healthcare provider will provide instruction on proper insertion and
removal.
Use the following instructions if you own an Open Fit hearing instrument with a flex tube
(Sound Tube) and ear bud. See pictures on top of next page.
1. Place the hearing instrument over the top of your ear.
2. Hold the sound tube where it attaches to the ear bud (where it bends) and gently push the
ear bud into your canal until it is just inside your ear canal (the tube should be flush
against your head).
3. Place the retention guard of the sound tube into the bowl of your concha.
To turn your hearing instrument “on”, you simply need to close the battery door after inserting a
battery. To turn your hearing instrument “off”, open the battery door completely.
6
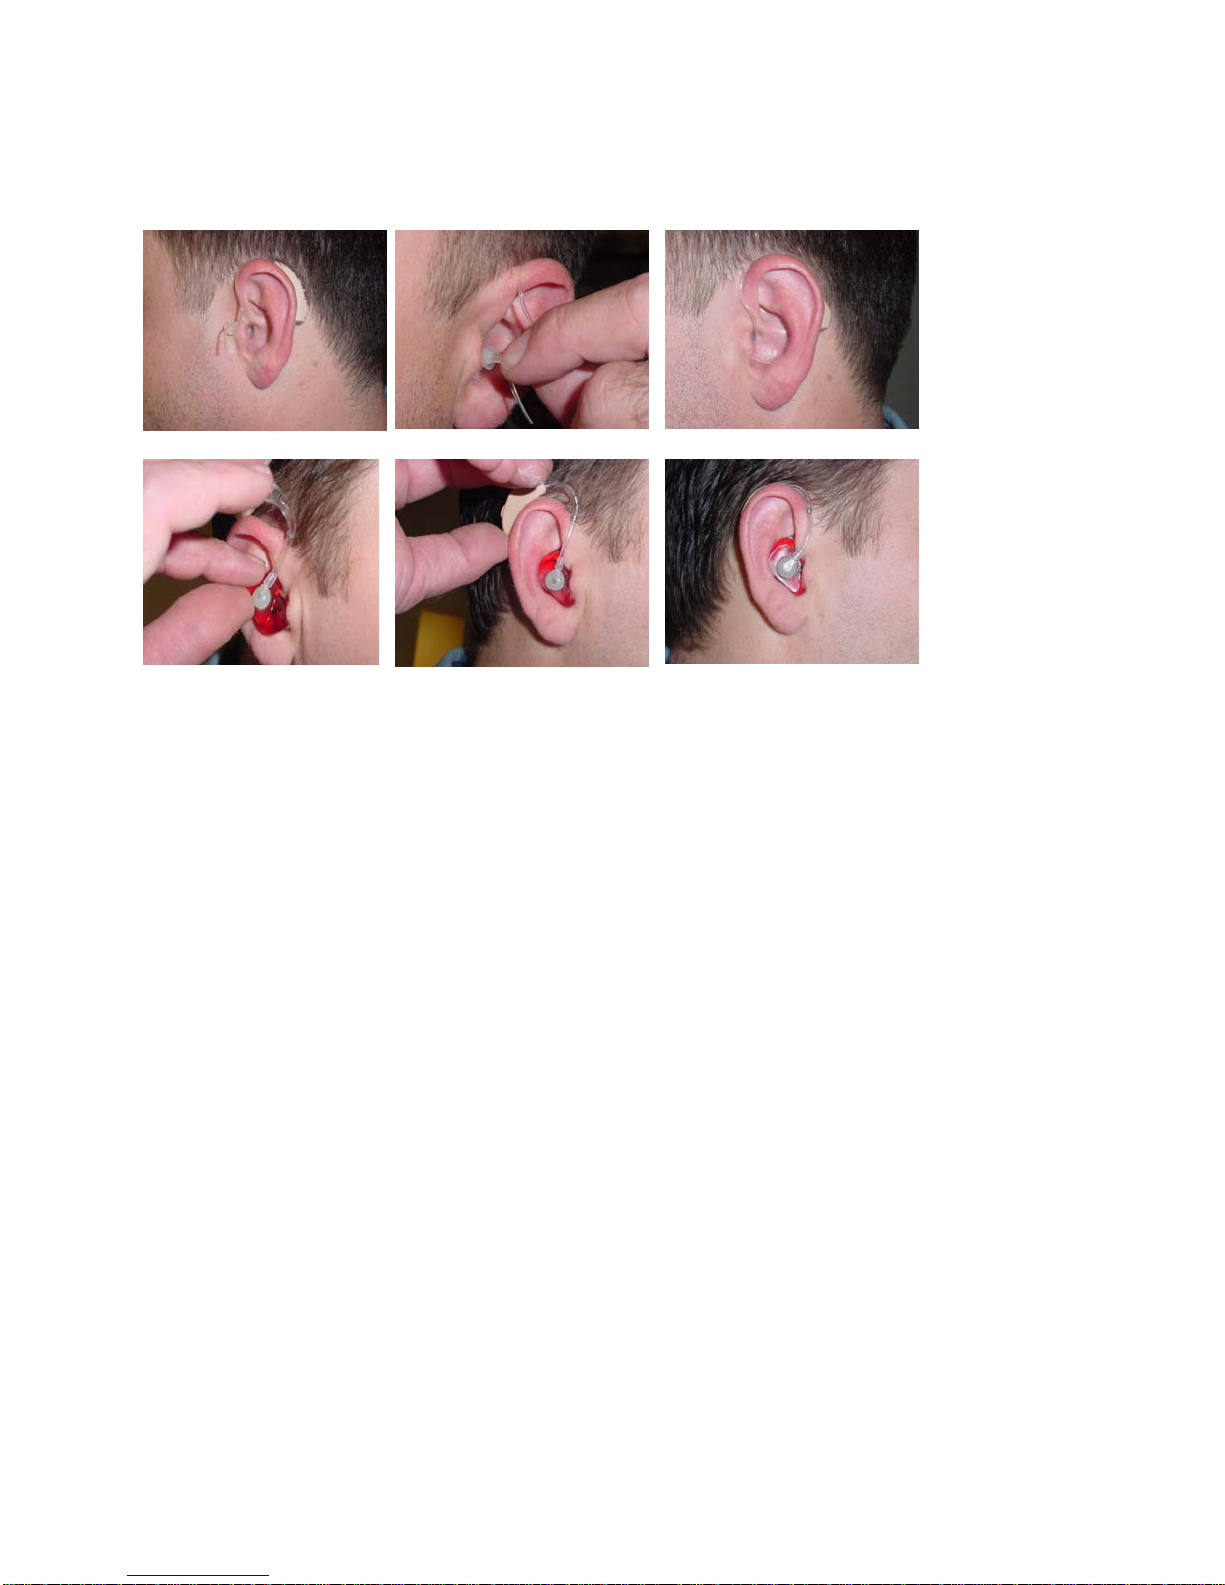
Step 1 Step 2 Step 3
7

Proper Placement On/In the Ear (cont.)
Use the following instructions if you own a custom hearing instrument or a behind the ear hearing
instrument with a custom mold. See pictures on previous page.
1. With the hearing instrument in the off position grasp your custom hearing instrument or
mold with your thumb and index finger.
2. Carefully insert the canal portion of the hearing instrument or mold into the ear.
3. Gently twist and push the hearing instrument or mold until properly seated.
4. For a behind the ear hearing instrument you can now place the instrument behind your
ear.
Once your hearing instrument is properly seated, you can easily turn it ‘On’ or ‘Off’ by turning the
volume control or closing the battery door.
8

Removing the Hearing Instrument
To remove the hearing instrument from your ear, simply grasp the instrument, mold or sound tube
with your thumb and index finger and gently pull them outward. Please be careful not to remove
the custom instrument by pulling on the battery door or volume control as this could easily cause
damage that would require repair. After removing hearing instruments from your ears, make sure
to open the battery door. This will turn the instrument off and conserve battery power. Consult
your hearing healthcare provider if you have difficulty removing the hearing instrument.
Volume Control
If your hearing instrument is equipped with a volume control, you will be able to adjust the
volume of your hearing instrument. When wearing these instruments, you can increase the
volume by turning the volume control wheel up, and reduce volume by turning it down. By
turning the volume control all the way down, you will feel a click; this is how you can turn your
hearing instrument off and on. Be careful not to force the volume control beyond where it stops,
this could damage your hearing instrument.
9
 Loading...