


PRAIM PR165 User’s Manual
Document number: 0016001018
Eighth Edition: November 1997
This document was produced by PRAIM
Under no circumstances will PRAIM (hereafter called PRAIM) be liable for any
damages, including incidental or consequential damages, expenses, lost profits or other
damages arising out of the use of or inability to use the product. The information contained
in this manual is subject to change at any time without notice. PRAIM shall not be liable for
technical or editorial omissions made herein; nor for incidental or consequential damages
resulting from the furnishing, performance or use of this material.References in this manual
to PRAIM products, programs and services does not imply that PRAIM intends to make
these available in all countries in which the PRAIM is marketed. References in this manual
to third party products, programs or services does not convey a commitment of any kind
from PRAIM, nor does it imply that PRAIM intends to make these available.
Trademarks and registered trademarks occurring in this publication are the properties of their
respective owners.
The information disclosed in this publication is the property of PRAIM and is protected by copyright.
All rights are reserved. No part of this manual may be reproduced in any way or by any means without
the prior written consent from PRAIM.
© 1997 PRAIM

This product complies with the following protection requirements of EC Council
directives:
· 89/336/EEC May 3th 1989 and subsequent changes;
The symbol indicates that the product, since Januar y 1st 1996, is in
conformance with
the f ollowing harmonic rules:
· EN 55022 Limits and methods of measurements of radio
interference characteristics of Information Technology Equipment;
· EN 50082-1 Electromagnetic Compatibility - Generic Immunity
Standard - Part 1: Residential, commercial and light industry;
T o following conditions may negate compliance with the abov e rules:
· Wrong power supply.
· Wrong use and installation or any operation not indicated by
the user's manual.
·
Component substitution by unauthorized personnel or the use of
unauthorized parts.
·
The use of the product with de vices not having the symbol.
Certifications

FCC Rules
This equipment has been tested and found to comply with the limits for a Class A digital
device, pursuant to Part 15 of the FCC Rules. These limits are designed to provide
reasonable protection against harmful interference when the equipment is operated in a
commercial environment. This equipment generates, uses, and can radiate radio frequency
energy and, if not installed and used in accordance with the instruction manual, may cause
harmful interference to radio communications. Operation of this equipment in a residential
area is likely to cause harmful interference in which case the user will be required to correct
the interference at his own expense.

1PRAIM PR165
Chapter 1
Introduction
About this publication
This publication describes the PRAIM PR165 printer interface. It is written
for users as a guide for installation and configuration. As such, it is assumed
that the reader is familiar with the general terminology used in the field of
IBM systems.
PR165 Twinax Interface
The PRAIM PR165 is an external interface that connects PC compatible
parallel or serial printers to either IBM Systems S/34, S/36, S/38, AS/400
or to IBM Remote Control Units 5251/12, 5294, 5394, 5494 and compatibles.

PRAIM PR1652
PR165 Interface versions
PRAIM PR165 is available in four different models:
With parallel Centronics connector:
• PR 165E-PAR for printers with up to 600 LPM (Lines Per Minute)
or 16 PPM (Pages Per Minute) printing speed
With built-in PC-Sharing feature:
• PR 165E-SHA for printers with up to 600 LPM (Lines Per Minute)
or 16 PPM (Pages Per Minute) printing speed
• PR 165S-SHA for printers with up to 2500 LPM (Lines Per Minute)
or 50 PPM (Pages Per Minute) printing speed
With serial connector:
• PR 165E-SER for printers with up to 600 LPM (Lines Per Minute)
or 16 PPM (Pages Per Minute) printing speed
Resident Barcode and Large Character (BCGC) capabilities are standard
and available on all models.
The following table describes the characteristics of each PRAIM PR165
model:
3PRAIM PR165
General characteristics of PRAIM PR165 Interfaces
NOTE The information contained in this manual applies to all
versions until otherwise noted.
MAX
PRINTER
SPEED
600 LPM /
16 PPM
MAX
PRINTER
SPEED
2500 LPM /
50 PPM
PC-SHARING
SERIAL
CONNECTION
BCGC
FUNCTION
PR 165E-PAR
* *
PR 165E-SHA
* * *
PR 165S-SHA
* * *
PR 165E-SER
* * *

PRAIM PR1654
PR165E-PAR
The figure below shows PR165E-PAR interface.
This product has a standard Centronics connector.
WARNING : PR165E-PAR doesn't support PC-Sharing optional
device.
Centronics Connector
PR165E-PAR Interface

5PRAIM PR165
PR165E-SHA / PR165S-SHA
The figure below shows PR165E-SHA and PR165S-SHA interfaces.
These interfaces have built-in PC-Sharing feature that allows the printer
to be shared between host and a Personal Computer.
The PC-Sharing option is explained later in this publication.
PC-Sharing device
PR165E-SHA Interface or
PR165S-SHA Interface

PRAIM PR1656
PR165E-SER
The figure below shows PR165E-SER Interface.
This product has a serial connector that allows the connection with the
serial printer.
PR165E-SER Interface
Serial Connector

7PRAIM PR165
Features
The PR165 Twinax interface supports the following features:
• COR / landscape, portrait.
• Text automatic justification.
• Automatic implementation of character fonts.
• Automatic implementation of paper trays.
• Full support of DW/36, TMS/38, Office AS/400.
• 15 selectable languages.
• Hex Pass-Through Function.
• Hex-Dump function.
• Resident Barcode and large character (BCGC) capabilities.
•
Firmware updating capabilities with onboard flash memory via PC.
Connectivity
The PR165 Twinax interface can be connected to the following IBM
Systems:
• S/34 (IBM 5340)
• S/36 (IBM 536x all models)
• S/38 (IBM 538x all models)
• AS/400 (IBM 940x all models)
It can also be connected to the following IBM Remote Control Units:
• 5251/12, 5294, 5394, 5494 or compatibles

PRAIM PR1658
IBM Printers Emulations
The PR165 Twinax interface supports the following IBM printer
emulations:
• IBM 5256/1
• IBM 5224/1
• IBM 5225/1
• IBM 4214/2
• IBM 4234/2
• IBM 5219/D1
• IBM 3812/1
The IBM 3812 emulation, is generally adopted for laser printers. While it
is similar to the 5219 it has extra features i.e. the implementation of COR
functions (landscape, portrait).
Additionally, it supports typical keyboard applications such as: Display
Write/36, Text Management/38 and Office AS/400.

9PRAIM PR165
Chapter 2
Parts and components
Package components
Your PR165 Twinax interface package should contain the following items:
• PR165 Twinax Interface.
• External Power Supply.
• User's manual.
PRAIM PR16510
Synchronism LED
Power LED
é
é
Twinax
Connector
Twinax
Connector
Figure 2.b
7
Parallel
Centronics cable
Interface familiarization
The various parts of the Twinax interface are shown in figures 2.a, 2.b,
2.c and 2.d.
é
Address/Function
selector
Figure 2.a
Twinax
Connector
11PRAIM PR165
Twinax
Connector
Figure 2.c
Twinax
Connector
Parallel
Centronics cable
Figure 2.d
Twinax
Connector
Parallel
Centronics cable
é
External power
supply connector
é

PRAIM PR16512
o Twinax connectors
The Twinax cable coming from the System or from the peripheral
preceding in the chain, should be connected to either one of these
two connectors.
The other connector should be used to connect other peripherals.
It is always possible to connect up to 7 peripherals (Video and/or
Printer) on the same line.
o Synchronism LED (green)
This light blinks when the system recognizes that the printer is
connected.
o Power LED (red)
Indicates that the interface is correctly powered by the printer, or by
AC/DC adapter.
Regardless of the power sources, the interface is controlled by the
printer.
o Function A ddress Selector
Position from 0 to 6 are the system's physical addresses associated
with the printer.
Position 7 has several functions:
HEX DUMP Function
When position 7 is selected while the printer is connected and
the system is on, all characters will be printed in EBCDIC
hexadecimal mode.
This function is used only for diagnostic purposes.
SELF TEST Function
To perform this function, position 7 should be selected
while the printer is off.
Thereafter, upon activating the printer, a test pattern will be
printed.

13PRAIM PR165
SET-UP Function
To be used to set up the configuration parameters of the
twinax interface upon installing the interface for the first time
or when any parameter modification is necessary.
For the implementation of this function, refer to the paragraph
concerning the configuration of the interface.
Printer hex-dump function position
Printer hex-dump function allows you to print all characters in the
ASCII hexadecimal format.
This function should be activated while the printer is on and
connected to the IBM System. To activate this function you
should select a value different than the selected physical address,
except 7, 8 and 9.
All the characters will be printed in hexadecimal format.
o External power supply connector (DC Input)
Used to attach the external power supply, when on pin 18 of the
Centronics connector is not available 5V. (250 mA).
NOTE PR165-SER Interface always requires external power supply.

PRAIM PR16514
This page is intentionally left blank

15PRAIM PR165
Chapter 3
Interface Configuration
Introduction
The interface requires the configuration of a few parameters to correctly
emulate the features of the chosen IBM printer.
The configuration will be implemented using an IBM or compatible
display station with IBM 5250 protocol, and with the simple instructions
provided by the interface firmware menu.
PRAIM PR16516
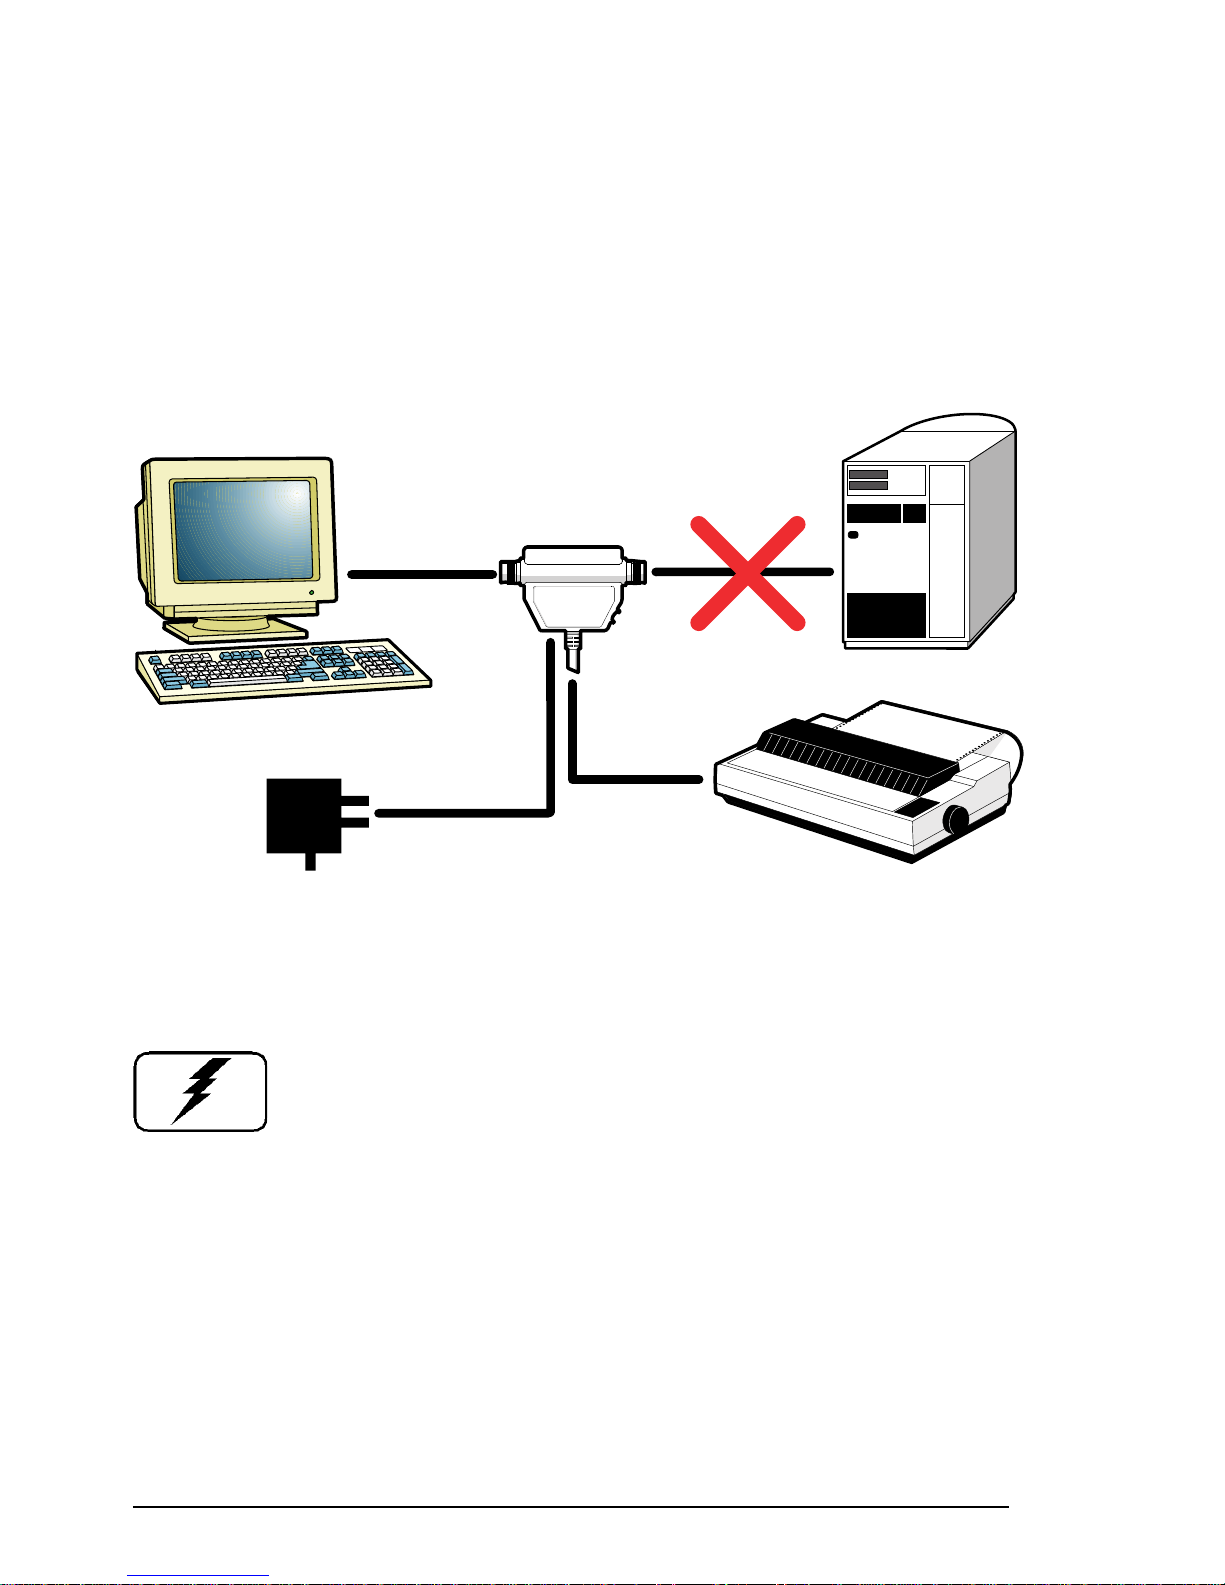
Basic Set-up Procedure
Before you begin the configuration procedure, you should connect the
Twinax interface to an IBM 5250 or compatible Display Station and to an
ASCII printer, as shown in the figure 3.a :
Follow the instructions below:
WARNING : To avoid possible damage to the equipment you
are installing, make sure the printer and display station are
turned off and the power cords are unplugged from the
electrical outlet.
1 Using a Twinax cable, connect the display station to either one of the
two Twinax connectors of the interface.
NOTE DO NOT use the free Twinax connector to connect to Host.
2 Set the Function/Address selector in position 7.
3 Plug the interface cable into the printer parallel port.
Figure 3.a
PRAIM PR165
Printer Interface
5250 Display Station
External Power Supply
ASCII Printer
Host

17PRAIM PR165
NOTE Before connecting the printer to the interface, it is necessary
to verify that there is not a connection incompatibility
between the printer and the interface.
For more information refer to appendix C of this manual
and to the printer documentation.
4 Connect the AC/DC adapter, if it is necessary.
NOTE PR165-SER Interface always requires external power supply.
5 Reconnect thr printer and display station power cables to their
respective connectors and then to a grounded electrical outlet.
6 Turn on the Display Station.
7 Turn the printer on and check that the red LED of the twinax interface
is on, if it is not, check the following:
- Wrong connection of the printer - interface cable.
- Missing of the +5V on the Centronics connectors, or insufficient
power. In this situation use external power-supply.
- Defective or wrong External power supply. For more details about
External power supply Refer to Appendix A.
8 The green LED will confirm that the installation is correctly
executed and the main menu will be displayed.

PRAIM PR16518
Setting the Parameters
The interface can be configured via a series of simple menus. The
following display station keyboard keys should be used when working in
these menus:
☞ Ar row keys to select the parameters .
☞ Enter Key to confirm the selection.
☞ F3 to return to the previous menu
The current parameters are displayed on the right side of the screen. The
options to be selected are displayed in reverse mode on the left side and the
selected options are highlighted.
All the menus shown in this publication are for demonstration only, and
their contents may be different for your configuration.

19PRAIM PR165
Main menu
The first configuration menu is the Main menu:
☞ Arr ow keys: Parameter selection
☞ Enter: Confirm selected parameter
☞ F3: Return to the previous menu
TWINAX PRINTER INTERFACE SETUP C opyright PRAIM Srl VX.XX
MAIN MENU
PRINTER SELECTION IBM Proprinter XL Em ulat.
EMULA TION SELECTION 5256/1
LANGUA GE SELECTION Italy
PAPER HANDLING Continuous f orm
HEX-PASS THROUGH CODES
EDIT SPECIAL PARAMETERS
HARD W ARE CONFIGURATION
REFRESH PRINTER
PRINT TRANSCODE TABLES
PRINT PARAMETERS LIST
SA VE/LOAD PARAMETERS
Press ENTER to Confirm F3 Exit from SETUP

PRAIM PR16520
The Main menu allows you to:
• Select the connected printer device.
• Set-up the IBM printer emulation.
• Select the language.
• Select the tractor type.
• Select the Hex Pass Through codes.
• Modify the special parameters.
• Set-up the optional devices.
• Print the EBCDIC International 5 table.
• Print a list of the configuration parameters.
• Save the parameters.

21PRAIM PR165
Printer Selection
When the Printer Selection option is chosen, the following menu will be
displayed:
A VAILABLE PRINTERS
> XXX XXX XX XXXXXX <
XXX XXX XX XXXXXX
XXX XXX XX XXXXXX
XXXXX XX
XXX XXX XX XXXXXX
XXX XXX XX XXXXXX
XXX XX XX XXXX
XXX XXX XX XXXXXX
XXX XX XXXXXXXX
XXX XXX XX XXXXXX
XXX XXXXXX XX
XXX XXXXX
XXXX
☞ Select the printer device that you want to connect to the Twinax
interface with the Arrow keys.
☞ Press Enter to confirm the selection.
☞ Press F3 to return to the pr evious menu.
TWINAX PRINTER INTERFACE SETUP Copyright PRAIM Srl VX.XX
Press ENTER to Confirm F3 Return to previous men u

PRAIM PR16522
Emulation Selection
When the Emulation Selection option is chosen, the following menu will
be displayed:
A VAILABLE EMULA TIONS
5256/1
5224/1
5225/1
4214/2
4234/2
5219/D1
3812/1
☞ Select with the Arro w keys, the desired IBM p rinter e mulation
available. The same emulation must be selected on the Host
System.
☞ Press Enter to confirm.
☞ Press F3 to return to the previous menu.
NOTE To obtain the performance provided by the IBM 3812
printer emulation with IBM S/36, select IBM 5219 printer
emulation.
TWINAX PRINTER INTERFACE SETUP Copyright PRAIM Srl VX.XX
Press ENTER to Confirm F3 Return to pre vious menu

23PRAIM PR165
Language Selection
When the Language Selection option is chosen, the following menu will
be displayed:
A V AILABLE LANGU A GES
International
USA
Germany
Belgium
Brasil
Canada
Denmark
Finland
France
Italy
Japan
Portugal
Spain
Spanish Seaking
United Kingdom
☞ Select with the Arrow keys the language configured on the Host
System.
☞ Press Enter to confirm.
☞ Press F3 to retur n to the previous menu.
TWINAX PRINTER INTERFACE SETUP Copyright PRAIM Srl VX.XX
Press ENTER to Confirm F3 Return to pre vious menu

PRAIM PR16524
Paper Handling
When the Paper Handling option is chosen, the following menu will be
displayed:
P APER HANDLING
Contin uous form
Cut sheet paper
Cut sheet F eeders
Paper size A4/ Legal
☞ Select with the Arr ow keys the option to be implemented.
☞ It is very important to make an accurate selection of this
parameter, because all performing functions depend on this
parameter.
TWINAX PRINTER INTERFACE SETUP Copyright PRAIM Srl VX.XX
Press ENTER to Confirm F3 Return to pre vious menu

25PRAIM PR165
NOTE If you want to use single sheets or paper trays, you must select
one of the following emulations: 4214, 5219, 3812.
If you want to use Cut Sheet Feeders tractor type, you should set up the
following menu which is displayed on the lower side of the screen once you
have selected cut sheet feeders from the tractor type menu:
Cut Sheet feeder 1 bin Not present
Cut Sheet feeder 2 bin Not present
Cut Sheet feeder 3 bin Not present
Envelope f eeder Not present
Manual feeder Not present
Paper size A4/Legal
Default Sheet F eeder None
☞ Select the feeder which is present on your printer with Arrow
keys.
☞ Press Enter key to confirm.
☞ Press F3 to return to the previous menu.
Press ENTER to Confirm F3 Return to previous men u

PRAIM PR16526
Hex Pass Through Codes
When the Hex Pass-Through Codes option is chosen, the following menu
will be displayed:
This option allows you to select the key-codes that are necessary for
opening and closing an escape sequence command string, that should be
sent to the connected printer. Each Key-code sequence can contain up to
four (4) hexadecimal values, including non-printable characters.
If no character is defined, no sequence will be sent.
The default codes for either opening or closing sequences are 50, 6C
(&% characters in EBCDIC table; appendix B of this publication).
TWINAX PRINTER INTERFACE SETUP Copyright PRAIM Srl VX.XX
HEX-P ASS THROUGH CODES
Opening Sequence. . . . : 50 6C
Closing Sequence. . . . : 50 6C
HPT T ype 0
Ignore - Commands Function Enable
No
Press ENTER to Confirm F3 Return to pre vious menu

27PRAIM PR165
To change these codes follow the instructions below:
☞ Select the sequence to be changed with the Up/Down Arrow
keys.
☞ Press Enter to confirm your selection. The selected sequence
will then be highlighted.
☞ Select the key-code to be changed with the Left/Right Arrow
keys.
☞ Refer to EBCDIC International 5 table (appendix B of this
publication) and enter the new value or modify the existing one.
☞ Press Enter again to confirm your selection.
☞ Press F3 to return to the pr evious menu.

PRAIM PR16528
HPT Type (Character Recovery)
This parameter allows recovery of HPT (Hex Pass-through) sequences in
text printouts.
☞ Select the parameter with the Up/Down Arrow keys.
☞ Press Enter, the value will be increased from 0 to 3.
0 = No character recovery.
1 = HPT sequence will be recovered by printing empty spaces.
The column counter will be updated.
2 = No empty spaces will be printed.
The column counter will be updated.
3 = HPT sequence will be recovered by printing empty spaces.
Column counter will not be updated.
Default value is 0.
The character recovery function can not be used with sequences with more
than 255 characters, including opening and closing sequences.
Ignore - Commands Function
The Ignore - Commands function allows you to ignore data and commands
coming from the Host. This function provides an opening sequence (for
example ^I) and a closing sequence (for example ^S).
When the Ignore - Commands function is activated, data and commands
that are coming from the Host after the opening sequence ( ^I) and before
the closing sequence (^S) are ignored.
The first character of each sequence ( ^ in our example) is the first character
of the Hex-Pass Through opening sequence.
The second character (I and S) is permanent.

29PRAIM PR165
Special Parameters
When the Special Parameters option is chosen, the following menu will
be displayed:
SPECIAL PARAMETERS
Transcode T able EBDCDIC -> ASCII Driver Default
Automatic Orientation No
Default Orientation Portrait
C.O.R mode Enlarged
LPI % reduct. for C. O.R 070
Power ON Interface Delay sec. 002
Operator Inter vention Delay min. 010
Operation at Form Length change Send Nothing
Operation at Quality change Send Host Value
Operation at CPI change Send Host Value
Operation at LPI change Send Host Value
Override Font Activation No
C.O.R Override Ye s
☞ Select the parameter that you intend to modify with the Arrow
keys.
☞
Press Enter to modify the parameter, this parameter is
confirmed
until a new modification is made.
TWINAX PRINTER INTERFACE SETUP Copyright PRAIM Srl VX.XX
ENTER : Toggle, Edit or Confirm a selection F3 : previous men u

PRAIM PR16530
NOTE The special parameters values are different for each printer
driver. N ew values remain valid if the driver remains the same.
Each time you change the printer driver, the values return to
factory defaults.
t Transcode Table
This option allows you to replace the standard ASCII character set
used by the selected printer, with another type of ASCII character
set. The same character set must be selected on the connected
printer.
Available character sets are :
- Driver default
- 437(CH.SET2) Code Page
- 850 Code Page
- Roman 8 Code Page
- EPSON Character Set
t C.O.R Mode
This option defines C.O.R. Mode.
For more information, see Appendix E.
Available settings are:
STANDARD
In this condition the twinax interface uses the IBM 3812 C.O.R
mode.
ENLARGED
The CPI value will be optimized for A4 and LEGAL paper format.

31PRAIM PR165
t Percentage of LPI reduction for standard C.O.R mode
This option allows you to define the percentage of LPI reduction
for the standard C.O.R mode. The default value for this parameter
is 67% which is optimized for Letter format paper sheets.
NOTE The correct percentage of the LPI reduction for A4 format
paper sheet is 65%.
t Paper automatic orientation
This option functions only with the laser drivers.
See appendix E, for more information.
The selectable values are:
YES
NO
t Default orientation
This option functions only with the laser drivers.
See appendix E, for more information.
The selectable values are:
VERTICAL
HORIZONTAL
C.O.R
t Power ON interface Delay
This option allows you to define the initial delay at power on.
This parameter should be defined in seconds.
t "Operator intervention delay" definition
This parameter is very important if the connected printer has a big
buffer or requires a long time to warm up.
This parameter should be defined in seconds.

PRAIM PR16532
t Operation at Form Length change
This option allows you to define the operation to be executed when
a change Form Length command is transmitted from the Host.
If the selected value is Send Nothing, the change form length
command will not be transmitted to the printer. If the selected value
is Send Host Value, the change form length command defined by the
Host will be transmitted to the printer.
t Operation at Print Quality change
This option allows you to define the operation to be executed when
a change Print Quality command is transmitted from the Host.
If the selected value is Send Nothing, the change Print Quality
command will not be transmitted to the printer. If the selected value
is Send Host Value, the change Print Quality command defined by
the Host will be transmitted to the printer.

33PRAIM PR165
t Operation at CPI (Characters Per Inch) change
Selectable values for this option are:
✱ Send Nothing
For each CPI change command from the host no CPI
command will be sent to the printer.
✱ Send Host value
For each CPI change command from the host the sequences of
CPI selected by the host will be transmitted to printer.
✱ Send 10 CPI sequence
For each CPI change command from the host, a sequence of
10 CPI will be sent to the printer.
✱ Send 12CPI sequence
For each CPI change command from the host, a sequence of
12 CPI will be sent to the printer.
✱ Send 15CPI sequence
For each CPI change command from the host, a sequence of
15 CPI will be sent to the printer.
✱ Send 17CPI sequence
For each CPI change command from the host, a sequence of
17 CPI will be sent to the printer.

PRAIM PR16534
t Operation at LPI (Lines Per Inch) change
Selectable values for this option are:
✱ Send Nothing
For each LPI change command from the host, no LPI command
will be sent to the printer.
✱ Send Host value
For each LPI change command from the host, the LPI sequence
selected by the Host will be transmitted to the printer.
✱ Send 4 LPI sequence
For each LPI change command from the host, a sequence of
4 LPI will be sent to the printer.
✱ Send 6 LPI sequence
For each LPI change command from the host, a sequence of
6 LPI will be sent to the printer.
✱ Send 8 LPI sequence
For each LPI change command from the host, a sequence of
8 LPI will be sent to the printer.

35PRAIM PR165
t Override Font Activation
This option is valid only with IBM 3812 and IBM 5219 emulations.
NO
The font selection is related to the General Font ID (GFID) transmitted
from the Host.
YES
The font selection is related to the horizontal spacing transmitted
from the Host.
t C.O.R. Override
This option sets the print quality during C.O.R. execution.
YES
The C.O.R. execution is related to the print quality.
NO
The C.O.R. execution is not related to the print quality.

PRAIM PR16536
Hardware Configuration
By selection of the Hardware Configuration option, the following menu
will be displayed:
HARD W ARE CONFIGURA TION
PC-SHARING No
MODE: Parallel
SERIAL CONFIGURATION
This menu allows you to enable or disable the PC-Sharing feature on the
PR165E-SHA and PR165S-SHA and to enable and to configure the serial
connection on the PR165E-SER.
This menu is explained on the following pages.
TWINAX PRINTER INTERFACE SETUP Copyright PRAIM Srl VX.XX
ENTER :Edit or Confirm a selection F3: previous menu

37PRAIM PR165
PC-Sharing
PC-Sharing feature is an option present on the PR165E-SHA
and PR165S-SHA interfaces that allows the printer to be shared between
the IBM host and a Personal Computer.
WARNING : PR165E-PAR and PR165E-SER doesn't support
PC-Sharing optional device.
To enable the PC-Sharing device follow the instructions below:
☞ Select PC-Sharing option with Arr ow keys.
☞ Press Enter to enable the PC-Shar i ng device.
Enabling Serial Connection (PR165E-SER)
To enable the serial connection on PR165E-SER Interface follow the
instructions below:
☞ Select Mode: option with Ar row keys.
☞ Press Enter to select the serial connection mode.

PRAIM PR16538
Serial Mode Configuration (PR165E-SER)
When the Serial Configuration option is chosen, the following menu will
be displayed on the lower part of the screen:
This option allows you to set up the serial connection on PR165E-SER
interface.
Definable values are:
• The serial line transmission speed.
• The parity type.
• The data bit format.
• The stop bit format.
The values defined by this menu should match to the printer values.
ENTER: Edit or Confirm a selection F3: previous menu
Bits per second (baud) 9600
Parity bit No
Data Length 8 bits
Number of stop bits 1

39PRAIM PR165
The parameters contained in this menu can be defined as follows:
☞ Select the parameter to be defined with Arrow keys.
☞ Press Enter to confirm.
☞ Press F3 to return to the pr evious menu.
Refer to Appendix F of this publication for details.

PRAIM PR16540
Refresh Printer
When the Refresh Printer option is chosen, the following menu will be
displayed:
☞ Select the option that you want to use with the Arrow keys.
☞ Press Enter to confirm your selection.
☞ Press Enter again to confirm or press any other key to cancel
the selection.
TWINAX PRINTER INTERFACE SETUP Copyright PRAIM Srl VX.XX
REFRESH PRINTER
Customize Printer Refresh No
Customization Sequence. :
BEFORE HOST JOB Delay sec. 060
Refr . BEFORE Host Job Seq. :
AFTER HOST JOB Dela y sec. 060
Refr . AFTER Host job Seq. :
ENTER = edit. F3 = Return prev. menu Free SPACE in memory 00373

41PRAIM PR165
Printer Sharing
The PR165 interface can share the printer with other environments.
The interface might load some system resources to the printer. If the printer
is shared with other environments, those resources can be cleared.
This menu allows you to define the sharing options in order to restore all
the previous loaded system resources.
The printer can be shared in two different ways:
1. PC-Sharing (PR165E-SHA and PR165S-SHA models only).
2. Other environments sharing.

PRAIM PR16542
1. PC Sharing (PR165E-SHA and PR165S-SHA models only)
The PC Sharing feature allows the printer to be shared between host and
a Personal Computer as shown in the figure 3.b :
Host
Personal Computer
Printer
PRAIM PR165E-SHA or
PRAIM PR165S-SHA
PC-Sharing
Figure 3.b

43PRAIM PR165
2. Other environments sharing
In addition to the parallel interface, some printers can have other interfaces
(e.g. RS232, Ethernet, etc.). In this way these printers can be connected to
various environments simultaneously.
Host
Printer
Server
PRAIM PR165
Figure 3.c
Figure 3.c

PRAIM PR16544
The Refresh Printer menu allows you to define the following:
t Customize print refresh sequence
This option allows you to define a user sequence to be sent to the
printer before the first character of the system job.
To define this sequence follow the instructions below:
☞ Select Customize Printer Refresh option with Arr ow keys.
☞ Press Enter to enable the function.
☞ Select Customization sequence with Arr ow keys.
☞ Press Enter to confirm your selection, the cursor appears on the
right side.
☞ Type the sequence in hexadecimal f ormat (e.g. 1B 45 etc..).
☞ Press Enter to confirm.
t BEFORE Host Job Delay
This option allows you to define the time-out in seconds before
printing any job received from Host, the avoids conflicts with jobs
received from other devices connected to the printer.
If the delay is set to 000 the option is disabled.
The default value is 000.
t BEFORE Host Job Sequence
This option allows you to define a command string to be sent to the
printer before printing any job received from Host and when the
timeout expires.
The command string can be defined in either text or hexadecimal
format.

45PRAIM PR165
t AFTER Host Job Delay
This option allows you to define the time-out in seconds before the
printer is released from the Host.
The default value is 060 seconds.
t AFTER Host Job Sequence
This option allows you to define a command string to be sent to the
printer after a print job is received from the Host and when the
relative timeout has expired.
The command string must be defined in hexadecimal format.

PRAIM PR16546
EBCDIC Table Printing
This option allows you to print the EBCDIC International 5 character table,
which is used to check the print characters.
☞ Select Print EBCDIC Tabl e option with the Arrow keys.
☞ Press Enter to start.
Parameters List Printing
This option allows you to print all configuration parameters.
☞ Select Print Parameters List option with the Arrow keys.
☞ Press Enter to start.

47PRAIM PR165
TWINAX PRINTER INTERFACE SETUP Copyright PRAIM Srl VX.XX
SA VE / L O AD PARAMETERS
SAVE IN INTERF A CE MEMOR Y
SAVE IN EXTERNAL MEMOR Y
LOAD DAT A FROM EXTERNAL MEMOR Y
RE-LOAD OLD SETTINGS
LOAD FACTORY SETTING
Saving Parameters
By selecting of the Save / Load Parameters option, the following menu
will be displayed:
☞ Select the option that you intend to use with the Arrow keys.
☞ Press Enter to confirm your selection.
☞ Press Enter again to confirm or press any other key to cancel
the selection.
☞ Press any key to return to the previous menu.
Press ENTER to Confirm F3: Return to previous menu

PRAIM PR16548
This menu allows you to:
• Save all configuration parameters into the internal memory of
the interface.
• Save all configuration parameters into an external memory
cartridge.
• Load all configuration parameters from an external memory
cartridge.
•
Restore the configuration parameters of the last saved operation.
• Restore the default values.
NOTE1 Save In Interface Memory, Save In External Memory and
Load Data From External Memory options will cancel all
information of the previous configuration.
Re-load Old Settings and Load Factory Settings options
will cancel all configured parameters.
NOTE2 Load Factory Settings option disables the serial connection
(PRAIM PR165E-SER). To restore the serial mode, refer to
"Hardware Configuration" menu.

49PRAIM PR165
Chapter 4
Connecting to the System
Introduction
Before connecting to the Host, ensure that the values selected as
configuration parameters on the Twinax interface, are the same values
selected on the Host system.
To properly configure all the parameters on the Host system, please refer
to the documentation supplied by IBM.
Connecting to the Twinax Line
To connect the PR165 interface to the Twinax Line proceed as follows:
WARNING : To avoid possible damage to the equipment you
are installing, make sure the printer and display station are
turned off and the power cords are unplugged from the
electrical outlet.
1 Plug the Twinax cable coming from the IBM system to either one of
the two twinax connectors of the PR165 interface.
A cable for another peripheral can be plugged into the free connector.
2 Plug the Centronics cable of the interface into the parallel
connector of the printer.

PRAIM PR16550
NOTE Before connecting the printer to the interface, it is necessary to
verify that there is not a connection incompatibility between
the printer and the interface. For more information refer to
appendix D of this manual and to the printer documentation.
3 Plug the AC/DC adapter, if necessary.
NOTE PR165-SER Interface always requires external power supply.
Interface Self-test
1 Set the Function/Address selector of the Twinax interface to
position 7.
2 Load paper on printer.
3 Turn on the printer, the interface red light comes on, and the one
page test-pattern begins printing.
4 Check the test pattern to see if all configuration parameters are
correct.
5 Turn the printer off and select the desired address using the
interface's Function/Address selector. The printer and interface
are now properly connected.

51PRAIM PR165
Chapter 5
Operation Modes
Graphic Applications A.P.F. / B.G.U.
The PR165 interface configured with emulation 5224 and 5225
supports graphic applications either for graphics or barcode printing.
The graphic characteristics of IBM 5224/5225 printers are from 90 to 135
dpi and from 10 to 15 cpi.
Not all the printers and their drivers supported by the PR165 interface
can support the same resolution specifications.
The twinax interface PR165 manages the graphics data through a particular
ESCape code:
ESC* n
Where n stands for the graphic resolution to be obtained.
Check the test pattern obtained with the self-test procedure to verify if
your printer supports IBM graphic applications.

PRAIM PR16552
Hex Pass-Through Mode
The Twinax interface PR165 supports the Hex Pass-Through function.
With this function, it is possible to implement those features which
are provided by the selected printer, but are not provided by the
selected emulation.
NOTE The Hex Pass-Through feature can be used with the following
IBM emulations:
5256, 5224, 5225, 4214, 4234 and
5219, 3812 in D/P mode.
To use this function, you should send to the printer a character string
which represents the function which you would like to enable.
This character string must be offset by the opening and closing ESCape
sequences which were chosen in the Hex Pass-Through section of the
configuration menu (see chapter 3).
On the next page is a sample of a Hex Pass Through sequence which allows
the printout to be underlined.
NOTE &% has been chosen for both the opening and closing Hex
Pass Through sequence, in the exemple.

53PRAIM PR165
In this example, the ESCape command that enables automatic text
underlining is the following:
NOTE This example applies to HP-PCL Emulation.
Mnemonic format:
ESC&d1D
Hexadecimal format:
1B26643144
In this case the final characters string to be sent to the printer will be:
&%1B26643144&%
It is also possible to insert within the key- codes, only those characters
that are not present on the keyboard; for example, in this case, the
mnemonic value ESC.
In this case the characters string to be sent will be:
&%1B&%&d1D

PRAIM PR16554
For example if you send a print job as follows:
Normal Printing
&% 1B 26 64 31 44 &%
Underlined Printing
You will obtain the following printout:
Normal Printing
Underlined printing
To disable automatic text underlining you should send the following
command in the mnemonic format to the interface:
ESC&d@
The same command in the hexadecimal format is:
1B266440

55PRAIM PR165
Automatic Closing
A Hex Pass-through sequence can be closed automatically using the
following procedure:
1. Define the opening sequence with a maximum of two (2) characters.
2. Do not define any character for the closing sequence.
3. Insert the opening sequence before each byte of the Hex Pass-through
command.
Example:
In this example the % character has been chosen as the opening sequence.
To send 1B 26 64 31 44 as an ESCape command to the printer with
Automatic closing you must use the following syntax:
%1B%26%64%31%44

PRAIM PR16556
Chapter 6
BCGC Option
The BCGC Option (Bar Code Graphic Characters)
The BCGC function allows you to print graphic characters and bar codes
by using simple programming commands.
The PR165 Twinax interface supports this function only with the
following IBM printer emulations:
• 5256, 5224, 5225, 4214, 4234 and 5219, 3812 D/P mode.
The BCGC function is supported by the following printer drivers:
• IBM proprinter emulation
• Epson FX emulation
• Epson FX- DFX emulation
• Epson LQ emulation
• IBM PPDS emulation
• IBM PPDS (Laser) emulation
• DPL24C emulation
• HP PCL emulation
NOTE The IBM proprinter should be used with a printer that
supports the following Escape sequence:
ESC] (1B 5D) "Reverse line feed"

57PRAIM PR165
Bar Code Printing
Using the BCGC option it is possible to obtain the following types of
barcode:
Type Barcode Type Barcode
1 EAN8 9 2x5 MATRIX
2 EAN13 A 2x5 INTERLEAVED
3 UPCA B CODABAR
4 UPCE C CODE 39
5 EAN/UPC2 D CODE MSI
6 EAN/UPC5 E CODE 128 PARTIAL
8 2x5 INDUSTRIAL F CODE 128 COMPLETE
Depending on the type of barcode that you want to produce, there are three
possible commands to choose from:
To print barcodes type 1, 2, 3, 4, 5, 6 you have to use the command with
the following syntax:
<Open HPT>H<Height>,<Hri f l ag>,<Type>,<Data><Close HPT>
To print bar codes type 8, 9, A, B, D, E, F you have to use the command
with the following syntax:
<Open HPT>H<Height>,<Hri flag>,<Type>,<Chk digit flag>,<Data><Close HPT>
To print bar codes type C you have to use the command with the following
syntax:
<Open HPT>H<Height>,<Hri flag>,C,<Chk digit flag>,<Ast flag>,<Data><Close HPT>
Tabel 6.1

PRAIM PR16558
Where:
Open/Close HPT Is the opening and closing command sequence
defined during the interface configuration
(Hex Pass Through sequences).
Default setting is &%.
Height Is the height of the barcode expressed in
1/12
inchs,
this value should be 1 to 99 inclusive.
Hri flag This option indicates if and where the HRI
(Human Readable Interpretation) should be printed.
Its value can be:
- N = The HRI will not be printed.
- B = The HRI will be printed under the barcode.
- A = The HRI will be printed above the barcode.
Type Is the type of the barcode that you want to obtain.
Its values are included in table 6.1.
Chk digit Indicates if the barcode checkdigit should be
flag calculated and printed.
Its value can be:
- Y= The check digit will be calculated and
printed.
- N= The check digit will not be calculated
and printed.
Ast Flag Indicates that the barcode should be printed with
asterisk as start/stop.
Its value can be:
- Y =The Ast Flag will be printed.
- N =The Ast Flag will not be printed.
Data Is the Data of the Barcode that you want to
print, the range and number of characters are
different according to the type of Bar code used.
These values are included on table 6.2.

59PRAIM PR165
Parameter Default
Height
= 2
Hri flag
= B
Type
= 1
Chk digit flag
= N
Ast flag
= N
Type Valid Characters Characters Chk Digit
1 0÷9 7 1 Automatic
2 0÷9 12 1 Automatic
3 0÷9 11 1 Automatic
4 0÷9 10 1 Automatic
5 0÷9 2 No
6 0÷9 5 No
8 0÷9 Max 50 Optional
9 0÷9 Max 50 Optional
A 0÷9 Max 50 Optional
B /, +, :, ., $, 0÷9 Max 50 Optional
A÷D as start-stop
C 0÷9 Max 50 Optional
$, /, +, %, Space
D 0÷9 16 Optional
E See Appendix G Max 50 Optional
F See Appendix G Max 50 Optional
The parameters Height, Hri flag, Type, Chk digit, flag and Ast flag, can
also be omitted. In this case the default values will be used (see table 6.3).
Table 6.3
Table 6.2

PRAIM PR16560
Example 1
To print an EAN8 type barcode you must use the following syntax:
&%H5,B,1,1234567&%
Result:
Example 2
To print a 2X5 MATRIX type barcode you must use the following
command string:
&%H5,B,9,Y,1234567890&%
Result:

61PRAIM PR165
Example 3
To print a CODE 39 type barcode you must use the following syntax:
&%H5,B,C,Y,Y,1234567890ABCD&%
Result:

PRAIM PR16562
Graphic Character Printing
Using BCGC option it is possible to print graphic characters.
You have to use the command with the following syntax:
<OpenHPT>G<Exp>,<Prop>,<Data><CloseHPT>
Where:
Open/CloseHPT Is the opening and closing command sequence
defined during the interface configuration
(Hex Pass Through sequences).
Default setting is &%.
Exp Is the character vertical expansion factor
expressed in
1/12
inchs, this value must be in-
cluded between 1 and 99.
Prop This option enables horizontal compression of
characters.
- 0 = The characters will not be compressed.
- 1 = The characters will be compressed.
Data Is the string of characters to be printed.
You can use ASCII Characters in the range of 20H
to 7FH. (Use actual character, not ASCII value.
See exemple).
This string can be composed with max 70
characters.

63PRAIM PR165
Example
To print a phrase with graphic characters you must use the following
command string:
&%G8,0,BCGC TEST&%
Result:

PRAIM PR16564
BCGC Rotation
BCGC object (Barcode and Graphic Characters) can be rotated 0°, 90° and
270°.
Object alignment to ordinary text and the print position at the end of Hex
Pass-through sequence are shown below:
1) Text Before.. Text After..............
Barcode with 0° Rotation
2) Text Before... Text After........
Graphic character with 0°Rotation
3) Text Before... Text After.................................
Barcode or Graphic Character
With 90° or 270° Rotation

65PRAIM PR165
Syntax for object rotation
Barcodes
<OpenHPT>H<Exp>,...............,<Data>,,<Rot><CloseHPT>
Graphic Characters
<OpenHPT>G<Exp>,<Prop>,<Data>,,<Rot>,<DPas><CloseHPT>
Where:
Rot Indicates object rotation, available values are:
0 - No rotation (horizontal)
1 - 90° Rotation
3 - 270° Rotation
DPas Enables double strike printing for horizontal
graphic characters (Rotated graphic characters are
double striked by default).
Available values are:
Y - Enables double strike
N - Disable double strike
If this value is not present the graphic character
will not be printed.
Exp Is the character vertical expansion factor
expressed in 1/15 inchs, this value must be between
1 and 99.

PRAIM PR16566
This page is intentionally left blank

67PRAIM PR165
Appendix A
External Power Supply
Characteristics
External Power Supply Characteristics
The external power supply must be 6
VDC and 500 mA with a jack connector
of 5,5 mm, polarized as shown in
figure A.1.
Figure A.a

PRAIM PR16568
This page is intentionally left blank

69PRAIM PR165
Appendix B
EBCDIC International 5 Table
EBCDIC International 5 table
456 78 9ABCDEF
0&-øØ°
µµ
µµ
µ¢{}\0
1é/Éaj~£AJ÷1
2âêÂÊbks¥BKS2
3äëÄËc lt •CLT3
4àèÀÈdmu DMU4
5áíÁÍenv§ENV5
6ã î Ã Î f ow¶FOW6
7åïÅ Ïg px
1/4 GP X7
8çìÇ Ìh qy
1/2 HQ Y8
9ñ
ββ
ββ
βÑ`i rz
3/4 IRZ9
A[] :«
a
¡
¬¬
¬¬
¬
-
123
B.$ #»
o
ôûÔÛ
C<*% d æD ö ÖÜ
D() y Y òùÒÙ
E+; >= Æ óúÓÚ
F!^?" ¤®=õÿÕ-
:
-
,
_
¿
,
/
/
+
I
@
I
00
x
Table B-1

PRAIM PR16570
This page is intentionally left blank

71PRAIM PR165
Appendix C
Printer Connector
Characteristics
PR165E-PAR Centronics Connector Characteristics
The following table describes the PR165E-PAR Centronics connector's
PIN assignment.
PIN SIGNAL
1STROBE
2DATA 0
3DATA 1
4DATA 2
5 DATA3
6 DATA4
7 DATA5
8 DATA6
9 DATA7
10 ACKNOWLEDGE
11 BUSY
12 P APER END
13 SEL ECT
14 NO T US ED
15 NO T US ED
16 NO T US ED

PRAIM PR16572
PIN SIGNAL
17 SHIELD GROUND
18 POW ER SUPPLY INPUT
19 GROUND
20 NO T US ED
21 NO T US ED
22 NO T US ED
23 NO T US ED
24 NO T US ED
25 NO T US ED
26 NO T US ED
27 NO T US ED
28 NO T US ED
29 NO T US ED
30 GROUND
31 OUTPUT VCC (5V.100mA)
32 NO T US ED
33 NO T US ED
34 RESERVED
35 RESERVED
36 NO T US ED

73PRAIM PR165
PIN SIGNAL PIN SIGNAL
1STROBE1STROBE
2 DATA 0 2 DATA 0
3 DATA 1 3 DATA 1
4 DATA 2 4 DAT A2
5 DAT A3 5 D AT A3
6 DAT A4 6 D AT A4
7 DAT A5 7 D AT A5
8 DAT A6 8 D AT A6
9 DAT A7 9 D AT A7
10 AC KNOWLEDG E 10 ACKNOWLEDG E
11 BUSY 11 BUSY
12 PAPER END 12 PA PER END
13 SELECT 13 SELECT
14 AUTO FEED XT 14 AUTO FEED X T
15 NOT USED 15 NO T USED
16 NOT USED 16 NO T USED
17 SHIELD GROUND 17 SHI ELD GROUND
18 POW ER SUPPLY INPUT 18 +5VOLT with a 4,7 k ohm r esist or
19 NOT USED 19 NO T USED
20 NOT USED 20 NO T USED
21 NOT USED 21 NO T USED
PRINTER PC
PR165E-SHA/PR165S-SHA Printer and PC
Connectors Characteristics
The following table describes the PR165E-SHA/PR165S-SHA printer and
PC connectors PIN assignment.

PRAIM PR16574
PRINTER PC
PIN SIGNAL PIN SIGNAL
22 N OT USED 22 NOT USED
23 N OT USED 23 NOT USED
24 N OT USED 24 NOT USED
25 N OT USED 25 NOT USED
26 N OT USED 26 NOT USED
27 N OT USED 27 NOT USED
28 N OT USED 28 NOT USED
29 N OT USED 29 NOT USED
30 GROUND 30 GROUND
31 INIT 31 INIT
32 E RROR 32 ERR OR
33 N OT USED 33 NOT USED
34 N OT USED 34 NOT USED
35 N OT USED 35 NOT USED
36 SELIN 36 SELIN

75PRAIM PR165
PR165E-SER Serial Connector Characteristics
The following table describes the PR165E-SER serial connector PIN
assignment.
PIN PRINTER SIGNAL
1 NOT USED
2 TX
3 RX
4 RTS (ref. Appendix G: Table 1, Table 2)
5 CTS (ref. Appendix G: Table 3)
6 DSR (ref. Appendix G: Table 3)
7 GROUND
8 CD (ref. Appendix G: Table 3)
9 NOT USED
10 NOT USED
11 RC (ref. Appendix G: Table 1)
12 NOT USED
13 NOT USED
14 NOT USED
15 NOT USED
16 NOT USED
17 NOT USED
18 NOT USED
19 NOT USED
20 DTR (ref. Appendix G: Table 1, Table 2)
21 NOT USED
22 NOT USED
23 NOT USED
24 NOT USED
25 NOT USED

PRAIM PR16576
This page is intentionally left blank

77PRAIM PR165
Appendix D
PC-Sharing Feature
PC-Sharing feature (PR165E-SHA / PR165S-SHA)
The figure below shows PR165E-SHA and PR165S-SHA interfaces.
These interfaces have built-in PC-Sharing feature that allows the printer
to be shared between host and a Personal Computer.
PR165E-PAR Interface or
PR165S-PAR Interface
PC-Sharing device
Figure D.a

PRAIM PR16578
The PC-Sharing device has two connectors for printer and personal
Computer attachment. Two LEDs on PC-Sharing device enables the user
to recognize the system in use in that moment (PC or Host).
PC Connector
Host LEDPC LED
Printer
Connector
é
é
Figure D.b
Figure D.c

79PRAIM PR165
To use the PC-Sharing feature follow the instructions below :
WARNING : Ensure that the printer is turned off and
unplugged from the electrical outlet.
1 Insert the PC-Sharing device into the printer parallel port.
2 Plug the parallel cable from Personal Computer into the PC connector
of the PC-Sharing device.
3 Turn the printer on, the Host LED indicator then will comes on to
confirm the correct connection.
Refer to Chapter 3 for details on PC-Sharing configuration.

PRAIM PR16580
This page is intentionally left blank

81PRAIM PR165
Appendix E
Flow Charts
Introduction
This appendix contains flow charts that describe Orientation Handling
options.
These flow charts are related to configuration menus.
Refer to Figure D.bChapter 3 for details.


PRAIM PR16584
This page is intentionally left blank

85PRAIM PR165
Appendix F
PR165E-SER Interface
Hardware Configuration
Introduction
If at the end of configuration procedure the PR165E-SER interface doesn't
function correctly, you should modify the serial connector hardware
configuration. To modify the hardware configuration you must change the
dip switches setting.
Figure F.a shows the dip switches on the serial connector of
PR165E-SER interface.
Serial Connector
Dip Switches
Figure F.a

PRAIM PR16586
You can solve the following problems by changing the DIP-Switches
setting:
• Start-up problems with the interface.
• Communication problems between the printer and the interface.
Start-up problems with the inter face
If the interface doesn't switch on, refer to your printer documentation
and control the position of switches 5 - 2 - 4.
You should set one of these switches in a position where the logic level
signal is high at printer power on. See table F-1 for correct signal detection.
The default condition is switch 5 = ON, it means that the interface comes
on when RTS signal logic level is high.
WARNING: Only one of these switches can be set to "ON".
DIP-SWITCH SIGNAL DEFAULT P O SITI O N
5 RTS PIN4 ON
2 DTR PIN20 OFF
4 RC PIN11 OFF
Table F-1

87PRAIM PR165
DIP-SWITCH SIGNAL DEFAULT P OSITION
8 RTS PIN4 OFF
1 DTR PIN20 ON
Communication problems between the printer and
the interface
If the interface comes on but there are communication problems between
the printer and the interface, check dip switches 8 and 1. Refer to table
F-2 to change one of these dip switches setting to a normally high logic
level when the printer is ready to receive data.
The default condition is switch 1 = ON that means the printer receives data
when the DTR signal logic level is high.
WARNING: Only one of these switches can be set to "ON".
If the printer requires that CTS(PIN5), DSR(PIN6) or CD(PIN8) signals to
be connected to a fixed (high or low) logic level, refer to the table F-3:
WARNING: Only one of these switches can be set to "ON".
DIP-SWITCH SIGNAL HIGH LEVEL LOW LEVEL
7 CTS PIN5 ON OFF
6 DSR PIN6 ON OFF
3 CD PIN8 ON OFF
T able F-2
T able F-3

PRAIM PR16588
This page is intentionally left blank

89PRAIM PR165
Appendix G
Barcode 128 Specification
Barcode 128 complete - Type F
Valid Characters: 128 alphanumeric characters (ASCII hexadecimal
codes between 20 and 7F) plus special and control characters, see tabel
G-2 on following pages for details.
Number of characters: Maximum 50.
Check Digit: Optional.
HRI: Optional with HRI flag.
Barcode 128 Partial- Type E
This type of barcode has the same characteristics of Type F Barcode but
doesn't process control characters.

PRAIM PR16590
Supported Characters
Barcode 128 can support three type of character tabels: Code A, Code B
and Code C.
Code A: 20-60 ASCII characters, Control characters and Special
characters.
Code B : Complete set of ASCII characters and Special Characters.
Code C : Compressed numeric characters and Special Characters.
Special Characters
All the characters greater than item # 96,(see table G-2) excluding
following characters: SHIFT, FNC1, FNC2, FNC3 and FNC4.
Control Characters
Are characters represnting control commands (e.g.: CR LF BEL).
In the Code A table between items #64 and #96 (see table G-2).
Service Characters
Control characters can not be included in HPT strings. To include control
characters in HPT strings the “>“ (3E ASCII hexadecimal code) service
character must be used. To obtain a certain control character, the service
character must be combined with a alphanumerical character as shown in
table G-1. For example to obtain a "Carriage Return" command the
following combination must be used: “>M”.
The alphanumerical characters that
can be used with the service character
are ASCII characters between 41 and
5F ( Capital Letters,”[ “, “\”, “ ]”and
“^”) excluding “0” (30H).
Syntax Code 128
>030 (“>“)
>‘64 (NUL)
>A65 (SOH)
.... ....
>M77 (CR)
.... ....
>^94 (RS)
Table G-1

91PRAIM PR165
0
Space Space 0
1
! ! 1
2
" " 2
3
# # 3
4
$ $ 4
5
% % 5
6
& & 6
7
' ' 7
8
( ( 8
9
) ) 9
10
* * 10
11
+ +
11
12
' ' 12
13
hyphen hyphen 13
14
period period 14
15
/ / 15
16
0 0 16
17
1 1 17
18
2 2 18
19
3 3 19
20
4 4 20
21
5 5 21
Tab le G-2 (continues
)
ITEM # Code A Code B Code C

PRAIM PR16592
22
6 6 22
23
7 7 23
24
8 8 24
25
9 9 25
26
: :
26
27
; ; 27
28
< < 28
29
= = 29
30
> > 30
31
? ? 31
32
@ @ 32
33
A A 33
34
B B 34
35
C C 35
36
D D 36
37
E E 37
38
F F 38
39
G G 39
40
H H 40
41
I I 41
42
J J 42
43
K K 43
ITEM # Code A Code B Code C
Tab le G-2 (continues
)

93PRAIM PR165
44
L L 44
45
M M 45
46
N N 46
47
O O 47
48
P P 48
49
Q Q 49
50
R R 50
51
S S 51
52
T T 52
53
U U 53
54
V V 54
55
W W 55
56
X X 56
57
Y Y 57
58
Z Z 58
59
[ [ 59
60
\ \ 60
61
] ] 61
62
^ ^ 62
63
_ _ 63
64
NUL ' 64
65
SOH a 65
ITEM # Code A Code B Code C
Tab le G-2 (continues
)

PRAIM PR16594
87
ETB w 87
66
STX b 66
67
ETX c 67
68
EOT d 68
69
ENQ e 69
70
ACK f 70
71
BEL g 71
72
BS h 72
73
HT i 73
74
LF j 74
75
VT k 75
76
FF l 76
77
CR m 77
78
SO n 78
79
SI o 79
80
DLE p 80
81
DC1 q 81
82
DC2 r 82
83
DC3 s 83
84
DC4 t 84
85
NAK u 85
86
SYN v 86
ITEM # Code A Code B Code C
Tab le G-2 (continues
)

95PRAIM PR165
88
CAN x 88
89
EM y 89
90
SUB z 90
91
ESC { 91
92
FS | 92
93
GS } 93
94
RS ~ 94
95
US DEL 95
96
FNC3 FNC3 96
97
FNC2 FNC2 97
98
SHIFT SHIFT 98
99
CODEC CODEC 99
100
CODEB FUNC4 100
101
FNC4 CODEA 101
102
FNC1 FNC1 102
ITEM # Code A Code B Code C
Table G-2

PRAIM PR16596
This page is intentionally left blank
 Loading...