

Praim PR 165E-PAR, PR 165S-SHA, PR 165E-SHA, PR 165E-SER User Manual

PRAIM PR165 User’s Manual
Document number: 0016001018
Eighth Edition: November 1997
This document was produced by PRAIM
Under no circumstances will PRAIM (hereafter called PRAIM) be liable for any
damages, including incidental or consequential damages, expenses, lost profits or other
damages arising out of the use of or inability to use the product. The information contained
in this manual is subject to change at any time without notice. PRAIM shall not be liable for
technical or editorial omissions made herein; nor for incidental or consequential damages
resulting from the furnishing, performance or use of this material.References in this manual
to PRAIM products, programs and services does not imply that PRAIM intends to make
these available in all countries in which the PRAIM is marketed. References in this manual
to third party products, programs or services does not convey a commitment of any kind
from PRAIM, nor does it imply that PRAIM intends to make these available.
Trademarks and registered trademarks occurring in this publication are the properties of their
respective owners.
The information disclosed in this publication is the property of PRAIM and is protected by copyright.
All rights are reserved. No part of this manual may be reproduced in any way or by any means without
the prior written consent from PRAIM.
© 1997 PRAIM

This product complies with the following protection requirements of EC Council
directives:
· 89/336/EEC May 3th 1989 and subsequent changes;
The symbol indicates that the product, since Januar y 1st 1996, is in
conformance with
the f ollowing harmonic rules:
· EN 55022 Limits and methods of measurements of radio
interference characteristics of Information Technology Equipment;
· EN 50082-1 Electromagnetic Compatibility - Generic Immunity
Standard - Part 1: Residential, commercial and light industry;
T o following conditions may negate compliance with the abov e rules:
· Wrong power supply.
· Wrong use and installation or any operation not indicated by
the user's manual.
·
Component substitution by unauthorized personnel or the use of
unauthorized parts.
·
The use of the product with de vices not having the symbol.
Certifications

FCC Rules
This equipment has been tested and found to comply with the limits for a Class A digital
device, pursuant to Part 15 of the FCC Rules. These limits are designed to provide
reasonable protection against harmful interference when the equipment is operated in a
commercial environment. This equipment generates, uses, and can radiate radio frequency
energy and, if not installed and used in accordance with the instruction manual, may cause
harmful interference to radio communications. Operation of this equipment in a residential
area is likely to cause harmful interference in which case the user will be required to correct
the interference at his own expense.

1PRAIM PR165
Chapter 1
Introduction
About this publication
This publication describes the PRAIM PR165 printer interface. It is written
for users as a guide for installation and configuration. As such, it is assumed
that the reader is familiar with the general terminology used in the field of
IBM systems.
PR165 Twinax Interface
The PRAIM PR165 is an external interface that connects PC compatible
parallel or serial printers to either IBM Systems S/34, S/36, S/38, AS/400
or to IBM Remote Control Units 5251/12, 5294, 5394, 5494 and compatibles.

PRAIM PR1652
PR165 Interface versions
PRAIM PR165 is available in four different models:
With parallel Centronics connector:
• PR 165E-PAR for printers with up to 600 LPM (Lines Per Minute)
or 16 PPM (Pages Per Minute) printing speed
With built-in PC-Sharing feature:
• PR 165E-SHA for printers with up to 600 LPM (Lines Per Minute)
or 16 PPM (Pages Per Minute) printing speed
• PR 165S-SHA for printers with up to 2500 LPM (Lines Per Minute)
or 50 PPM (Pages Per Minute) printing speed
With serial connector:
• PR 165E-SER for printers with up to 600 LPM (Lines Per Minute)
or 16 PPM (Pages Per Minute) printing speed
Resident Barcode and Large Character (BCGC) capabilities are standard
and available on all models.
The following table describes the characteristics of each PRAIM PR165
model:
3PRAIM PR165
General characteristics of PRAIM PR165 Interfaces
NOTE The information contained in this manual applies to all
versions until otherwise noted.
MAX
PRINTER
SPEED
600 LPM /
16 PPM
MAX
PRINTER
SPEED
2500 LPM /
50 PPM
PC-SHARING
SERIAL
CONNECTION
BCGC
FUNCTION
PR 165E-PAR
* *
PR 165E-SHA
* * *
PR 165S-SHA
* * *
PR 165E-SER
* * *

PRAIM PR1654
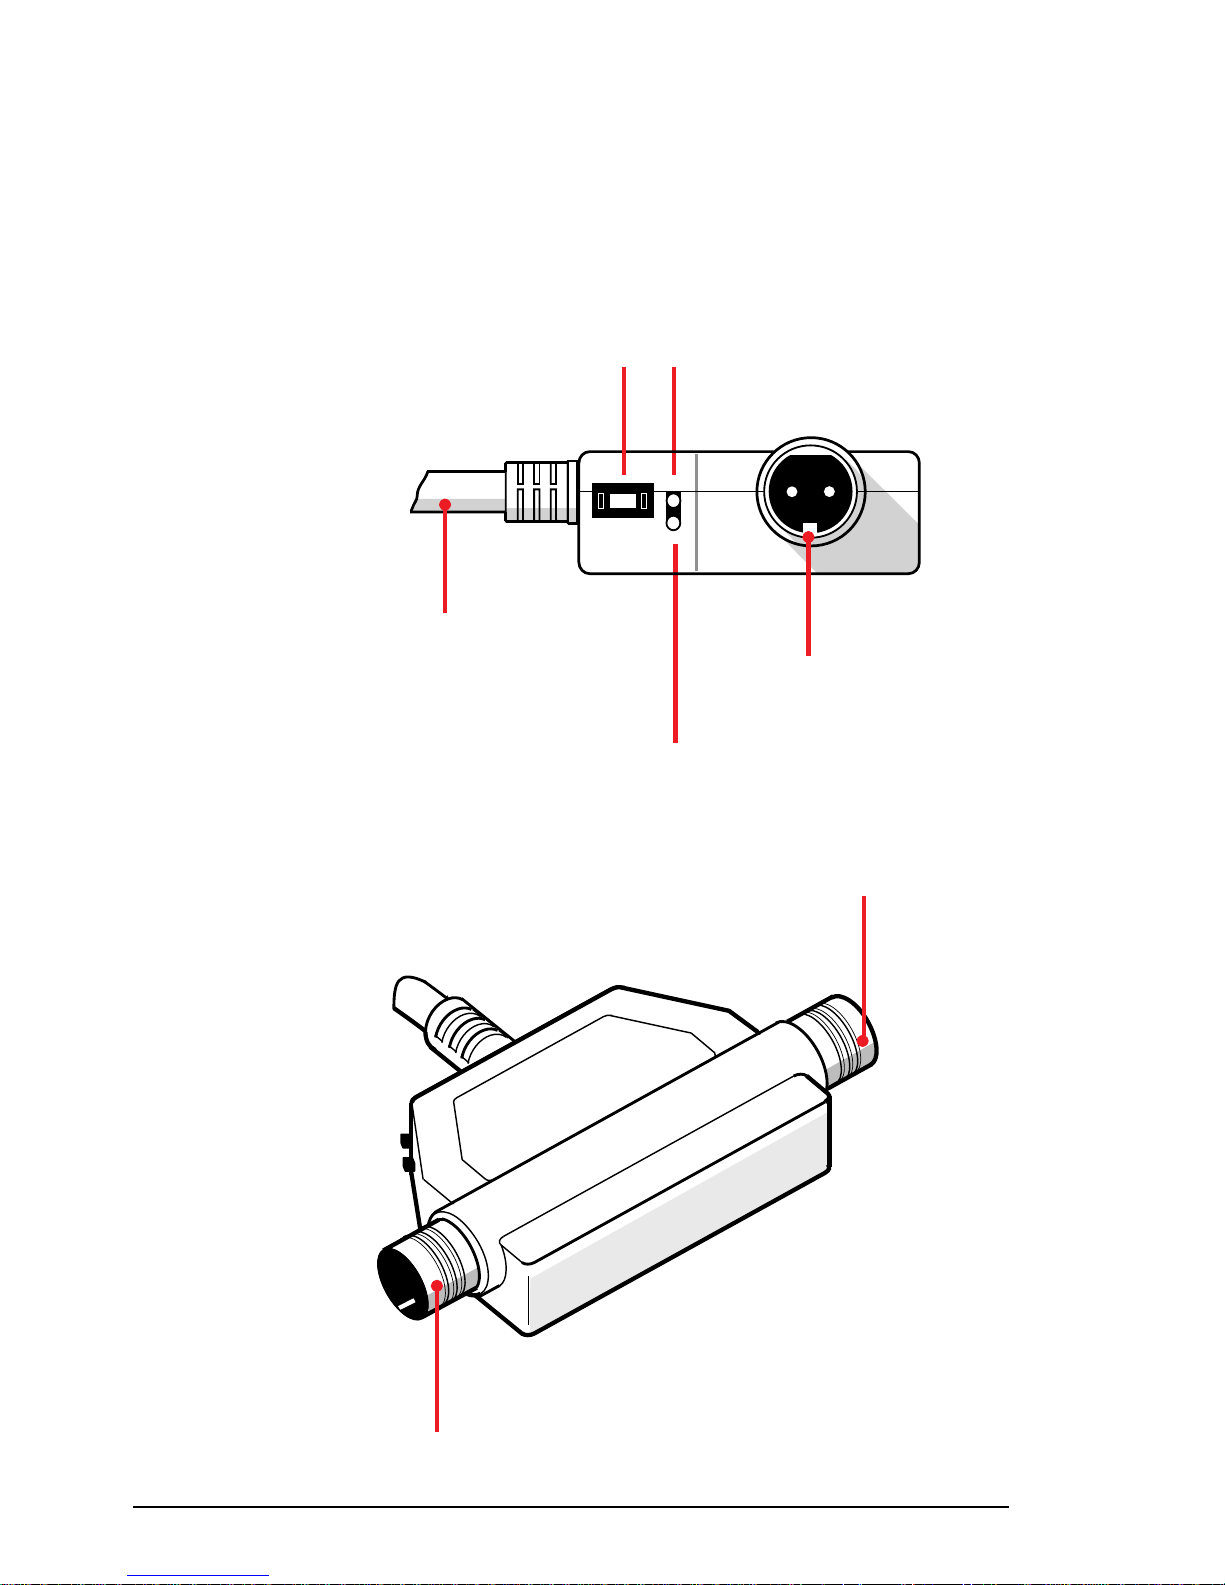
PR165E-PAR
The figure below shows PR165E-PAR interface.
This product has a standard Centronics connector.
WARNING : PR165E-PAR doesn't support PC-Sharing optional
device.
Centronics Connector
PR165E-PAR Interface

5PRAIM PR165
PR165E-SHA / PR165S-SHA
The figure below shows PR165E-SHA and PR165S-SHA interfaces.
These interfaces have built-in PC-Sharing feature that allows the printer
to be shared between host and a Personal Computer.
The PC-Sharing option is explained later in this publication.
PC-Sharing device
PR165E-SHA Interface or
PR165S-SHA Interface

PRAIM PR1656
PR165E-SER
The figure below shows PR165E-SER Interface.
This product has a serial connector that allows the connection with the
serial printer.
PR165E-SER Interface
Serial Connector

7PRAIM PR165
Features
The PR165 Twinax interface supports the following features:
• COR / landscape, portrait.
• Text automatic justification.
• Automatic implementation of character fonts.
• Automatic implementation of paper trays.
• Full support of DW/36, TMS/38, Office AS/400.
• 15 selectable languages.
• Hex Pass-Through Function.
• Hex-Dump function.
• Resident Barcode and large character (BCGC) capabilities.
•
Firmware updating capabilities with onboard flash memory via PC.
Connectivity
The PR165 Twinax interface can be connected to the following IBM
Systems:
• S/34 (IBM 5340)
• S/36 (IBM 536x all models)
• S/38 (IBM 538x all models)
• AS/400 (IBM 940x all models)
It can also be connected to the following IBM Remote Control Units:
• 5251/12, 5294, 5394, 5494 or compatibles

PRAIM PR1658
IBM Printers Emulations
The PR165 Twinax interface supports the following IBM printer
emulations:
• IBM 5256/1
• IBM 5224/1
• IBM 5225/1
• IBM 4214/2
• IBM 4234/2
• IBM 5219/D1
• IBM 3812/1
The IBM 3812 emulation, is generally adopted for laser printers. While it
is similar to the 5219 it has extra features i.e. the implementation of COR
functions (landscape, portrait).
Additionally, it supports typical keyboard applications such as: Display
Write/36, Text Management/38 and Office AS/400.

9PRAIM PR165
Chapter 2
Parts and components
Package components
Your PR165 Twinax interface package should contain the following items:
• PR165 Twinax Interface.
• External Power Supply.
• User's manual.
PRAIM PR16510
Synchronism LED
Power LED
é
é
Twinax
Connector
Twinax
Connector
Figure 2.b
7
Parallel
Centronics cable
Interface familiarization
The various parts of the Twinax interface are shown in figures 2.a, 2.b,
2.c and 2.d.
é
Address/Function
selector
Figure 2.a
Twinax
Connector
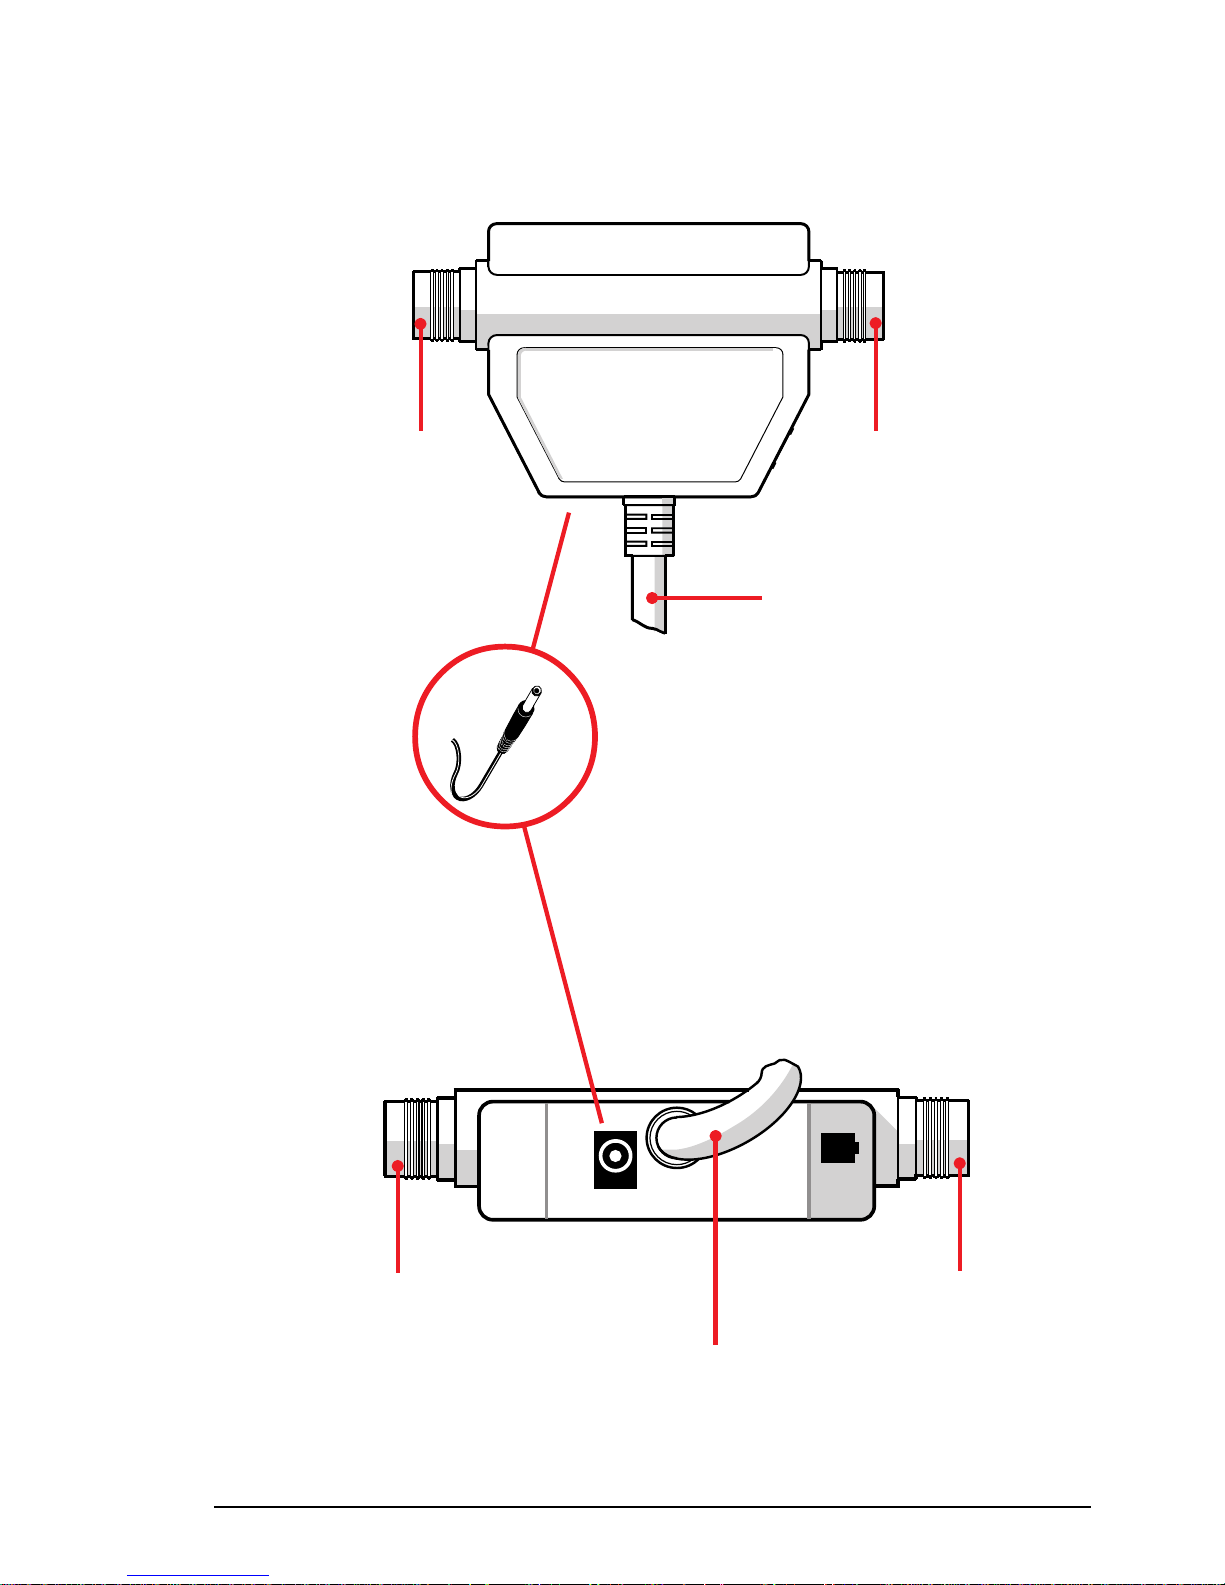
11PRAIM PR165
Twinax
Connector
Figure 2.c
Twinax
Connector
Parallel
Centronics cable
Figure 2.d
Twinax
Connector
Parallel
Centronics cable
é
External power
supply connector
é

PRAIM PR16512
o Twinax connectors
The Twinax cable coming from the System or from the peripheral
preceding in the chain, should be connected to either one of these
two connectors.
The other connector should be used to connect other peripherals.
It is always possible to connect up to 7 peripherals (Video and/or
Printer) on the same line.
o Synchronism LED (green)
This light blinks when the system recognizes that the printer is
connected.
o Power LED (red)
Indicates that the interface is correctly powered by the printer, or by
AC/DC adapter.
Regardless of the power sources, the interface is controlled by the
printer.
o Function A ddress Selector
Position from 0 to 6 are the system's physical addresses associated
with the printer.
Position 7 has several functions:
HEX DUMP Function
When position 7 is selected while the printer is connected and
the system is on, all characters will be printed in EBCDIC
hexadecimal mode.
This function is used only for diagnostic purposes.
SELF TEST Function
To perform this function, position 7 should be selected
while the printer is off.
Thereafter, upon activating the printer, a test pattern will be
printed.

13PRAIM PR165
SET-UP Function
To be used to set up the configuration parameters of the
twinax interface upon installing the interface for the first time
or when any parameter modification is necessary.
For the implementation of this function, refer to the paragraph
concerning the configuration of the interface.
Printer hex-dump function position
Printer hex-dump function allows you to print all characters in the
ASCII hexadecimal format.
This function should be activated while the printer is on and
connected to the IBM System. To activate this function you
should select a value different than the selected physical address,
except 7, 8 and 9.
All the characters will be printed in hexadecimal format.
o External power supply connector (DC Input)
Used to attach the external power supply, when on pin 18 of the
Centronics connector is not available 5V. (250 mA).
NOTE PR165-SER Interface always requires external power supply.

PRAIM PR16514
This page is intentionally left blank

15PRAIM PR165
Chapter 3
Interface Configuration
Introduction
The interface requires the configuration of a few parameters to correctly
emulate the features of the chosen IBM printer.
The configuration will be implemented using an IBM or compatible
display station with IBM 5250 protocol, and with the simple instructions
provided by the interface firmware menu.
PRAIM PR16516
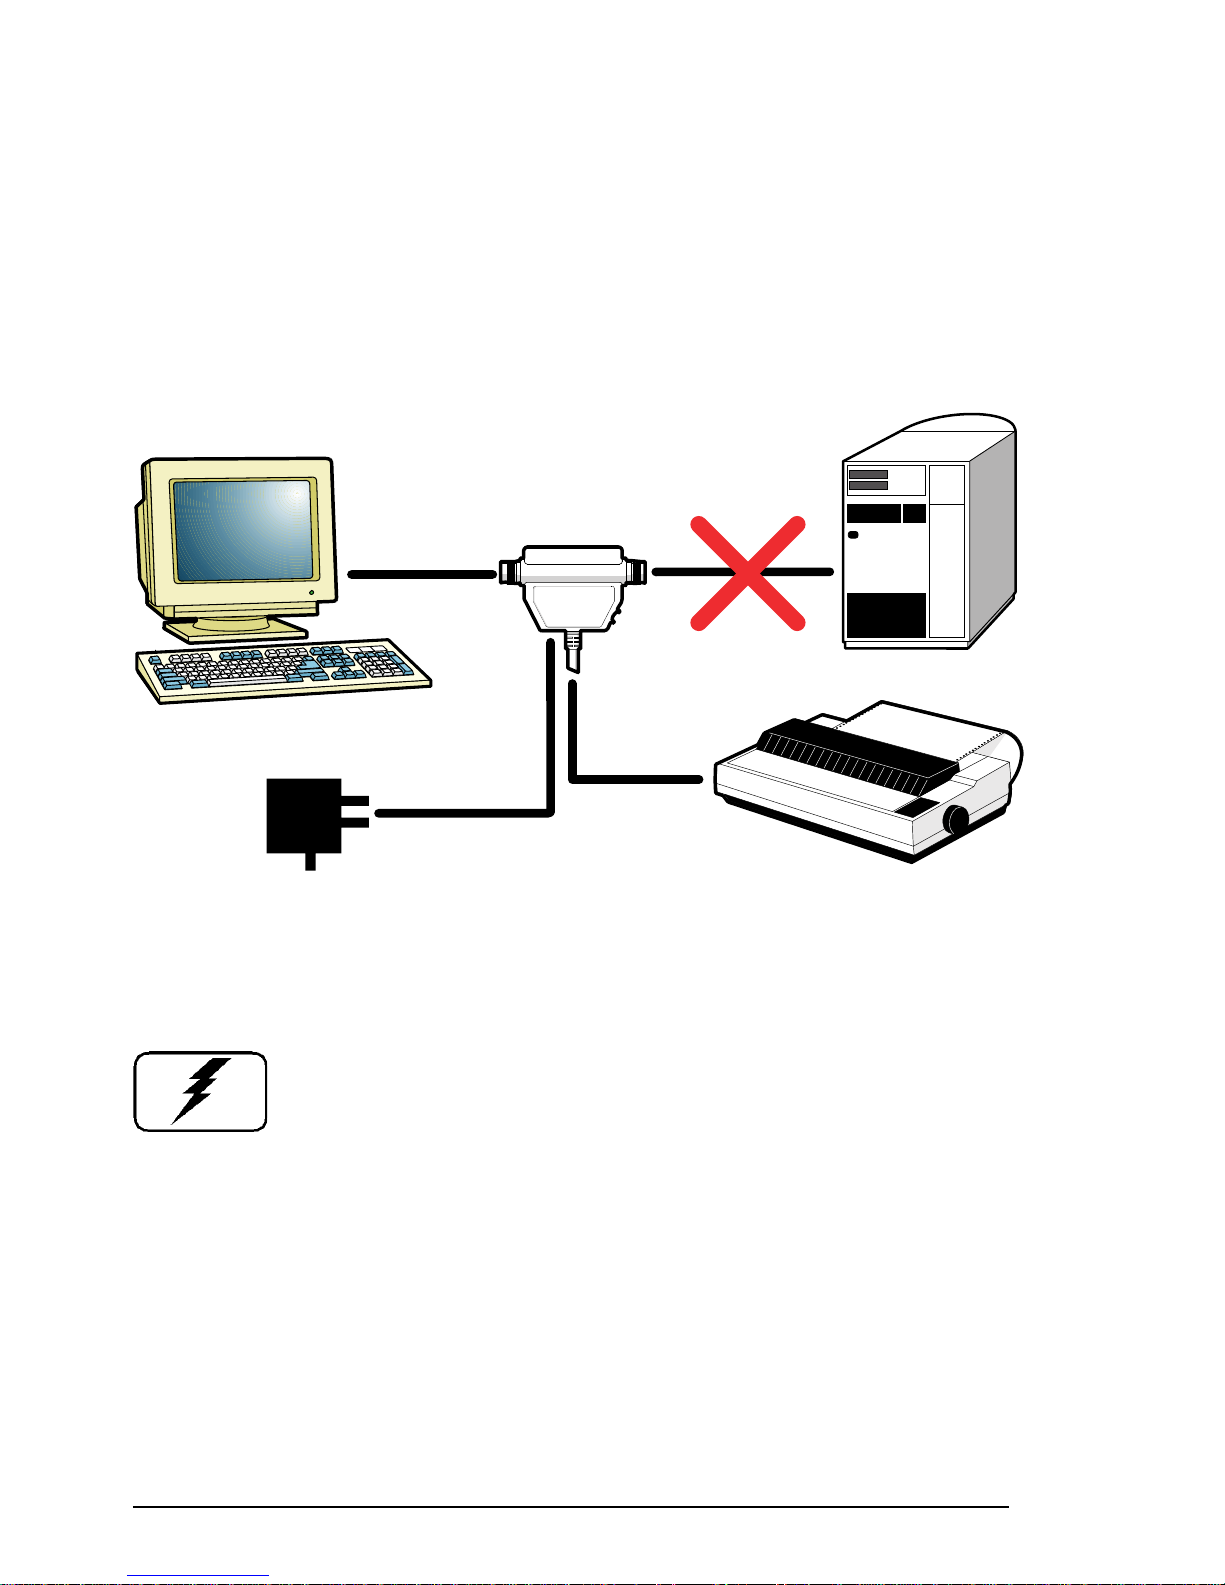
Basic Set-up Procedure
Before you begin the configuration procedure, you should connect the
Twinax interface to an IBM 5250 or compatible Display Station and to an
ASCII printer, as shown in the figure 3.a :
Follow the instructions below:
WARNING : To avoid possible damage to the equipment you
are installing, make sure the printer and display station are
turned off and the power cords are unplugged from the
electrical outlet.
1 Using a Twinax cable, connect the display station to either one of the
two Twinax connectors of the interface.
NOTE DO NOT use the free Twinax connector to connect to Host.
2 Set the Function/Address selector in position 7.
3 Plug the interface cable into the printer parallel port.
Figure 3.a
PRAIM PR165
Printer Interface
5250 Display Station
External Power Supply
ASCII Printer
Host

17PRAIM PR165
NOTE Before connecting the printer to the interface, it is necessary
to verify that there is not a connection incompatibility
between the printer and the interface.
For more information refer to appendix C of this manual
and to the printer documentation.
4 Connect the AC/DC adapter, if it is necessary.
NOTE PR165-SER Interface always requires external power supply.
5 Reconnect thr printer and display station power cables to their
respective connectors and then to a grounded electrical outlet.
6 Turn on the Display Station.
7 Turn the printer on and check that the red LED of the twinax interface
is on, if it is not, check the following:
- Wrong connection of the printer - interface cable.
- Missing of the +5V on the Centronics connectors, or insufficient
power. In this situation use external power-supply.
- Defective or wrong External power supply. For more details about
External power supply Refer to Appendix A.
8 The green LED will confirm that the installation is correctly
executed and the main menu will be displayed.

PRAIM PR16518
Setting the Parameters
The interface can be configured via a series of simple menus. The
following display station keyboard keys should be used when working in
these menus:
☞ Ar row keys to select the parameters .
☞ Enter Key to confirm the selection.
☞ F3 to return to the previous menu
The current parameters are displayed on the right side of the screen. The
options to be selected are displayed in reverse mode on the left side and the
selected options are highlighted.
All the menus shown in this publication are for demonstration only, and
their contents may be different for your configuration.

19PRAIM PR165
Main menu
The first configuration menu is the Main menu:
☞ Arr ow keys: Parameter selection
☞ Enter: Confirm selected parameter
☞ F3: Return to the previous menu
TWINAX PRINTER INTERFACE SETUP C opyright PRAIM Srl VX.XX
MAIN MENU
PRINTER SELECTION IBM Proprinter XL Em ulat.
EMULA TION SELECTION 5256/1
LANGUA GE SELECTION Italy
PAPER HANDLING Continuous f orm
HEX-PASS THROUGH CODES
EDIT SPECIAL PARAMETERS
HARD W ARE CONFIGURATION
REFRESH PRINTER
PRINT TRANSCODE TABLES
PRINT PARAMETERS LIST
SA VE/LOAD PARAMETERS
Press ENTER to Confirm F3 Exit from SETUP

PRAIM PR16520
The Main menu allows you to:
• Select the connected printer device.
• Set-up the IBM printer emulation.
• Select the language.
• Select the tractor type.
• Select the Hex Pass Through codes.
• Modify the special parameters.
• Set-up the optional devices.
• Print the EBCDIC International 5 table.
• Print a list of the configuration parameters.
• Save the parameters.

21PRAIM PR165
Printer Selection
When the Printer Selection option is chosen, the following menu will be
displayed:
A VAILABLE PRINTERS
> XXX XXX XX XXXXXX <
XXX XXX XX XXXXXX
XXX XXX XX XXXXXX
XXXXX XX
XXX XXX XX XXXXXX
XXX XXX XX XXXXXX
XXX XX XX XXXX
XXX XXX XX XXXXXX
XXX XX XXXXXXXX
XXX XXX XX XXXXXX
XXX XXXXXX XX
XXX XXXXX
XXXX
☞ Select the printer device that you want to connect to the Twinax
interface with the Arrow keys.
☞ Press Enter to confirm the selection.
☞ Press F3 to return to the pr evious menu.
TWINAX PRINTER INTERFACE SETUP Copyright PRAIM Srl VX.XX
Press ENTER to Confirm F3 Return to previous men u

PRAIM PR16522
Emulation Selection
When the Emulation Selection option is chosen, the following menu will
be displayed:
A VAILABLE EMULA TIONS
5256/1
5224/1
5225/1
4214/2
4234/2
5219/D1
3812/1
☞ Select with the Arro w keys, the desired IBM p rinter e mulation
available. The same emulation must be selected on the Host
System.
☞ Press Enter to confirm.
☞ Press F3 to return to the previous menu.
NOTE To obtain the performance provided by the IBM 3812
printer emulation with IBM S/36, select IBM 5219 printer
emulation.
TWINAX PRINTER INTERFACE SETUP Copyright PRAIM Srl VX.XX
Press ENTER to Confirm F3 Return to pre vious menu

23PRAIM PR165
Language Selection
When the Language Selection option is chosen, the following menu will
be displayed:
A V AILABLE LANGU A GES
International
USA
Germany
Belgium
Brasil
Canada
Denmark
Finland
France
Italy
Japan
Portugal
Spain
Spanish Seaking
United Kingdom
☞ Select with the Arrow keys the language configured on the Host
System.
☞ Press Enter to confirm.
☞ Press F3 to retur n to the previous menu.
TWINAX PRINTER INTERFACE SETUP Copyright PRAIM Srl VX.XX
Press ENTER to Confirm F3 Return to pre vious menu

PRAIM PR16524
Paper Handling
When the Paper Handling option is chosen, the following menu will be
displayed:
P APER HANDLING
Contin uous form
Cut sheet paper
Cut sheet F eeders
Paper size A4/ Legal
☞ Select with the Arr ow keys the option to be implemented.
☞ It is very important to make an accurate selection of this
parameter, because all performing functions depend on this
parameter.
TWINAX PRINTER INTERFACE SETUP Copyright PRAIM Srl VX.XX
Press ENTER to Confirm F3 Return to pre vious menu

25PRAIM PR165
NOTE If you want to use single sheets or paper trays, you must select
one of the following emulations: 4214, 5219, 3812.
If you want to use Cut Sheet Feeders tractor type, you should set up the
following menu which is displayed on the lower side of the screen once you
have selected cut sheet feeders from the tractor type menu:
Cut Sheet feeder 1 bin Not present
Cut Sheet feeder 2 bin Not present
Cut Sheet feeder 3 bin Not present
Envelope f eeder Not present
Manual feeder Not present
Paper size A4/Legal
Default Sheet F eeder None
☞ Select the feeder which is present on your printer with Arrow
keys.
☞ Press Enter key to confirm.
☞ Press F3 to return to the previous menu.
Press ENTER to Confirm F3 Return to previous men u

PRAIM PR16526
Hex Pass Through Codes
When the Hex Pass-Through Codes option is chosen, the following menu
will be displayed:
This option allows you to select the key-codes that are necessary for
opening and closing an escape sequence command string, that should be
sent to the connected printer. Each Key-code sequence can contain up to
four (4) hexadecimal values, including non-printable characters.
If no character is defined, no sequence will be sent.
The default codes for either opening or closing sequences are 50, 6C
(&% characters in EBCDIC table; appendix B of this publication).
TWINAX PRINTER INTERFACE SETUP Copyright PRAIM Srl VX.XX
HEX-P ASS THROUGH CODES
Opening Sequence. . . . : 50 6C
Closing Sequence. . . . : 50 6C
HPT T ype 0
Ignore - Commands Function Enable
No
Press ENTER to Confirm F3 Return to pre vious menu
 Loading...