

Page 1
0
Page 2
1
Table of Contents
KNOWING YOUR DEVICE 3
DEVICE SPECIFICATION 5
BASIC INSTALLATIONS 6
GUIDELINE FOR INSTALLING SIM/SAM CARD 6
GUIDELINE FOR INSTALLING MICRO SD CARD 7
FIRST TIME USE 8
SCREEN CALIBRATION 8
TIME, DATE AND TIME ZONE CONFIGURATION 8
TOUCH SCREEN OPERATIONS 9
USING THE STYLUS 9
START MENU 10
SHELL TASKBAR 11
THE TASKBAR APPEARS ON THE TOP OF YOUR HRT700 SCREEN. 11
SOFTWARE INPUT PANEL (SIP) 12
KEYPAD 13
CUSTOMIZING YOUR HRT700 14
LCD BRIGHTNESS CONTROL 15
KEYPAD LIGHT CONTROL 17
POWER 18
DISPLAY 19
MOUSE 19
KEYBOARD 20
Page 3
2
AUDIO VOLUME 20
STYLUS PROPERTIES 21
NETWORK & DIAL – UP CONNECTION 21
REGIONAL SETTING 22
OWNER PROPERTIES 22
PC CONNECTION 23
STORAGE PROPERTIES 24
SYSTEM PROPERTIES 24
PASSWORD PROPERTIES 25
SCREEN ROTATION 25
TASKBAR & SECURE SHELL 26
BLUETOOTH DEVICE PROPERTIES 26
INPUT SELECTION PANEL 27
DATE & TIME PROPERTIES 27
INTERNET OPTIONS 28
REMOVE PROGRAMS 28
INTERNET EXPLORER 29
FEATURES 31
WIRELESS LAN (WI-FI) USAGE 31
BLUETOOTH USAGE 33
GSM USAGE 39
USING THE CONTACT CARD READER 41
USING THE FINGERPRINT SENSOR 41
USING THE PRINTER 42
APPENDIX: TROUBLESHOOTING GUIDE 43
RESET THE HRT700 AND CLEAR MEMORY 43
IF HRT700 RUNS OUT OF POWER 44
IF HRT700 RUNS OUT OF MEMORY 45
SCREEN FREEZES OR RESPONDS SLOWLY 45
INACCURATE RESPONSE TO STYLUS TAPS 46
ROUTINE MAINTENANCE 47
BATTERY GUIDELINES 47
TRAVEL GUIDELINES 48
SHIPPING GUIDELINES 48
Page 4
3
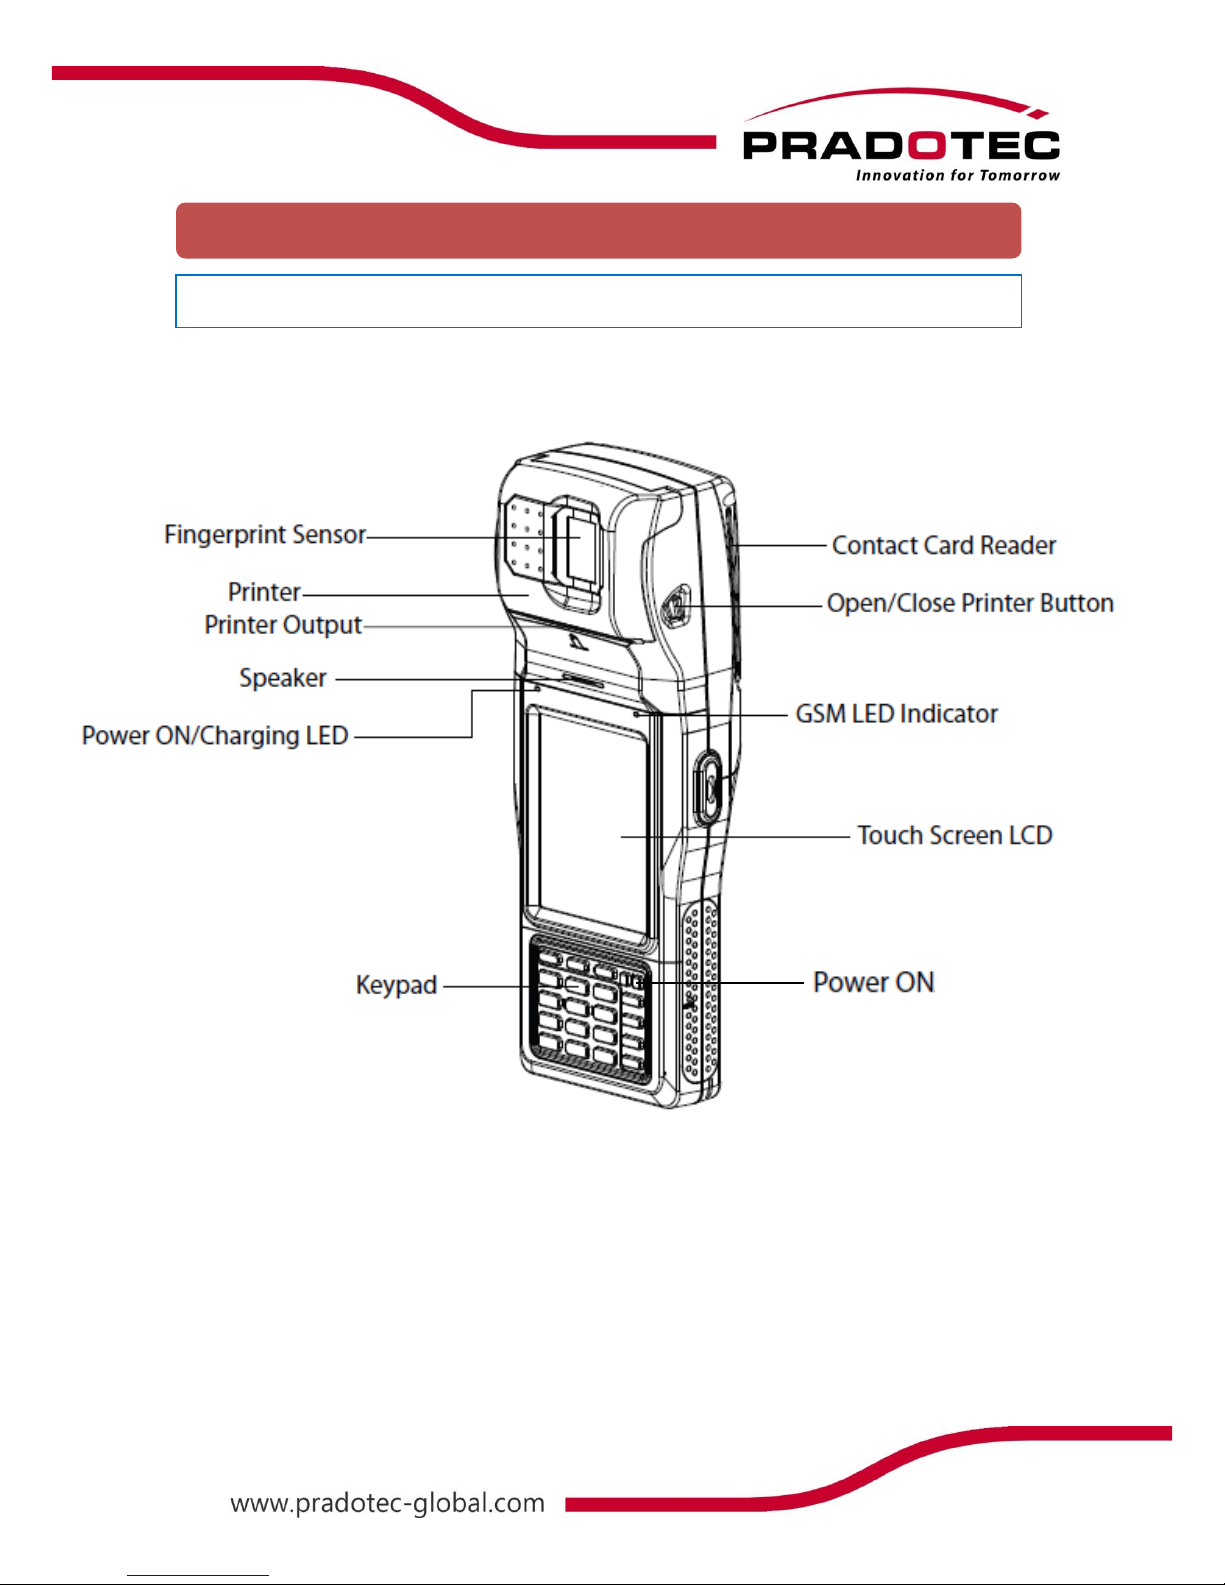
Knowing Your Device
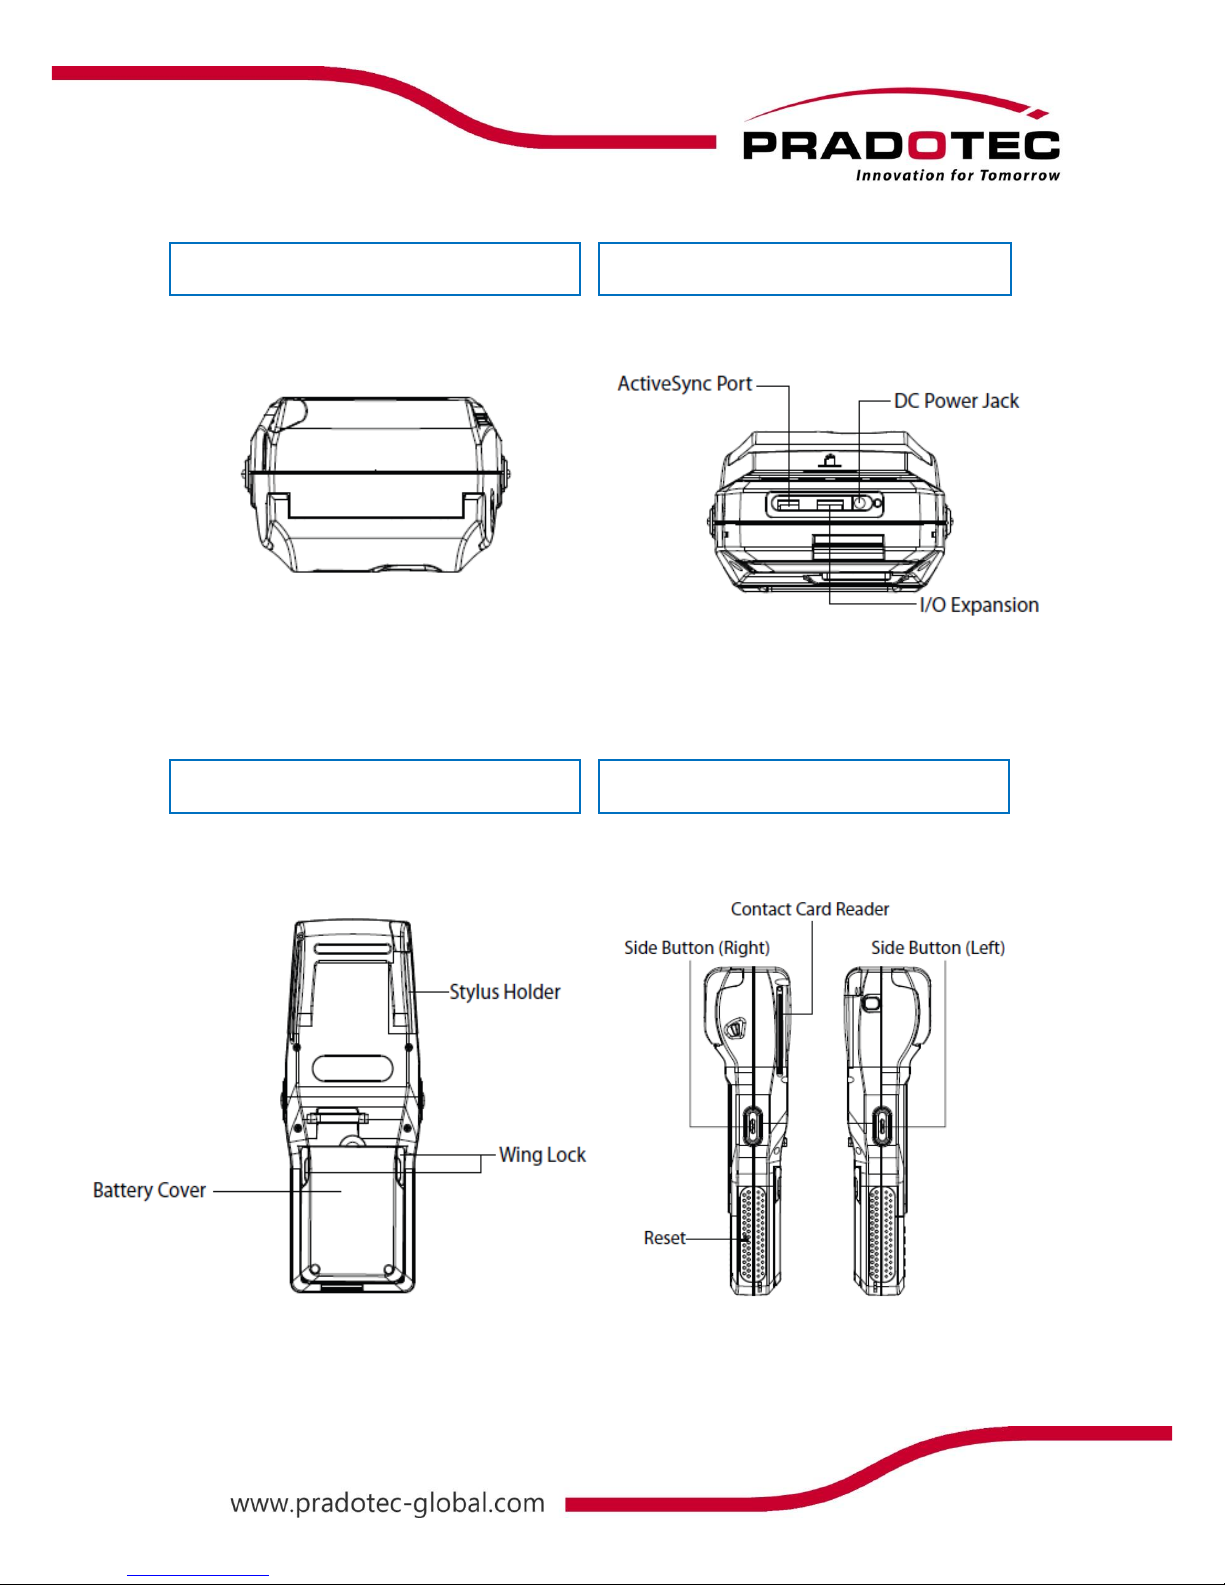
FRONT
Page 5
4
TOP
BOTTOM
BACK
SIDE
Page 6

5
Device Specification
Memory 256MB DDR-2 RAM, 4GB Flas h
Memory Expansion 1 x micro-SD Memory Slot (Support up to 32GB)
Device Operating System WinCE 6.0
Host PC Operating System Windows® 7/ Vista/ XP
Programming Language
C++ Programming, NET Programming in Microsoft® Visual Studio 2005
Bluetooth Bluetooth Version 2.0
Wireless LAN IEEE 802.11 b/g Wi-Fi
Network 3.5G - W-CDMA, 850,900, 2100 MHz
GSM/ GPRS/ EDGE (1 X SIM Slot)
USB USB Client 1.1 (ActiveSync)
Display 3.5” (480x640) Transflective TFT Colour Touch Screen
Keypad 12 Alphanumeric Buttons, 3 Function Buttons and 1 Power On/Off Button
LED 1 x Power Status, 1 x Network Status, 1 x Charge status
Speaker Built-in Mono Speaker
Battery 7.4V 1850mAH Li-ion Battery
Operating Time 4 - 6 Hours
Dimension (LxWxH) mm Standard Model
Weight Less than 500g
Operating Temperature -100c to +500c
Storage Temperature -200c to +600c
Humidity 5% to 90% RH, Non-condensing
IP Rating IP65 (Dust & Water Resistance)
Drop Test 1.5m
Sensor Optical s ensor
Resolution 500dpi
Active Area (mm) 14 x 22
Supported Template Sagem Algorithm
Template Formats Morpho Proprietary, ISO 19794-2, ANSI/ INCITS 378, RAW/Bitmap,
WSQ (Optional)
Standard ISO/IEC 7816 Part 1, 2, 3, (T=0, T=1)
Card Slot 1 x ID-1 Card Slot
3 x ID-0 SAM Slots
Communication Speed 9.6 kbps up to 115.2kbps
Card Type Clas s A & B
Standard EADER Integrated 2” Thermal printer
FINGERPRINT SENSOR
PRINTER
CONTACT CARD READER
SYSTEMS
COMMUNICATION INTERFACES
HUMAN INTERFACES
MECHANICAL
POWER
ENVIRONMENT
Page 7
6
Charge the Battery
Your battery has been partially charged at the factory, but you may need to recharge it for 4
hours before you can switch on your device for the first time.
Guideline for Installing SIM/SAM card
When you subscribe to a Cellular Network, you are provided with a SIM card loaded card
loaded with your subscription details (PIN, optional services available and etc).
WARNING
Keep all SIM cards out of the reach of children.
The SIM card and its contacts can be easily damaged by scratches or bending.
Be careful when handling, inserting or removing the card.
Before installing the SIM card, always make sure that the HRT700 is fully charged as the
application will not work properly with insufficient amount of power.
To insert the SIM card
1) Firstly closed all the programs and switch off the unit
2) Removed the hand strap
3) Unlock both wing lock
4) Removed the Battery cover
5) Removed the Battery pack
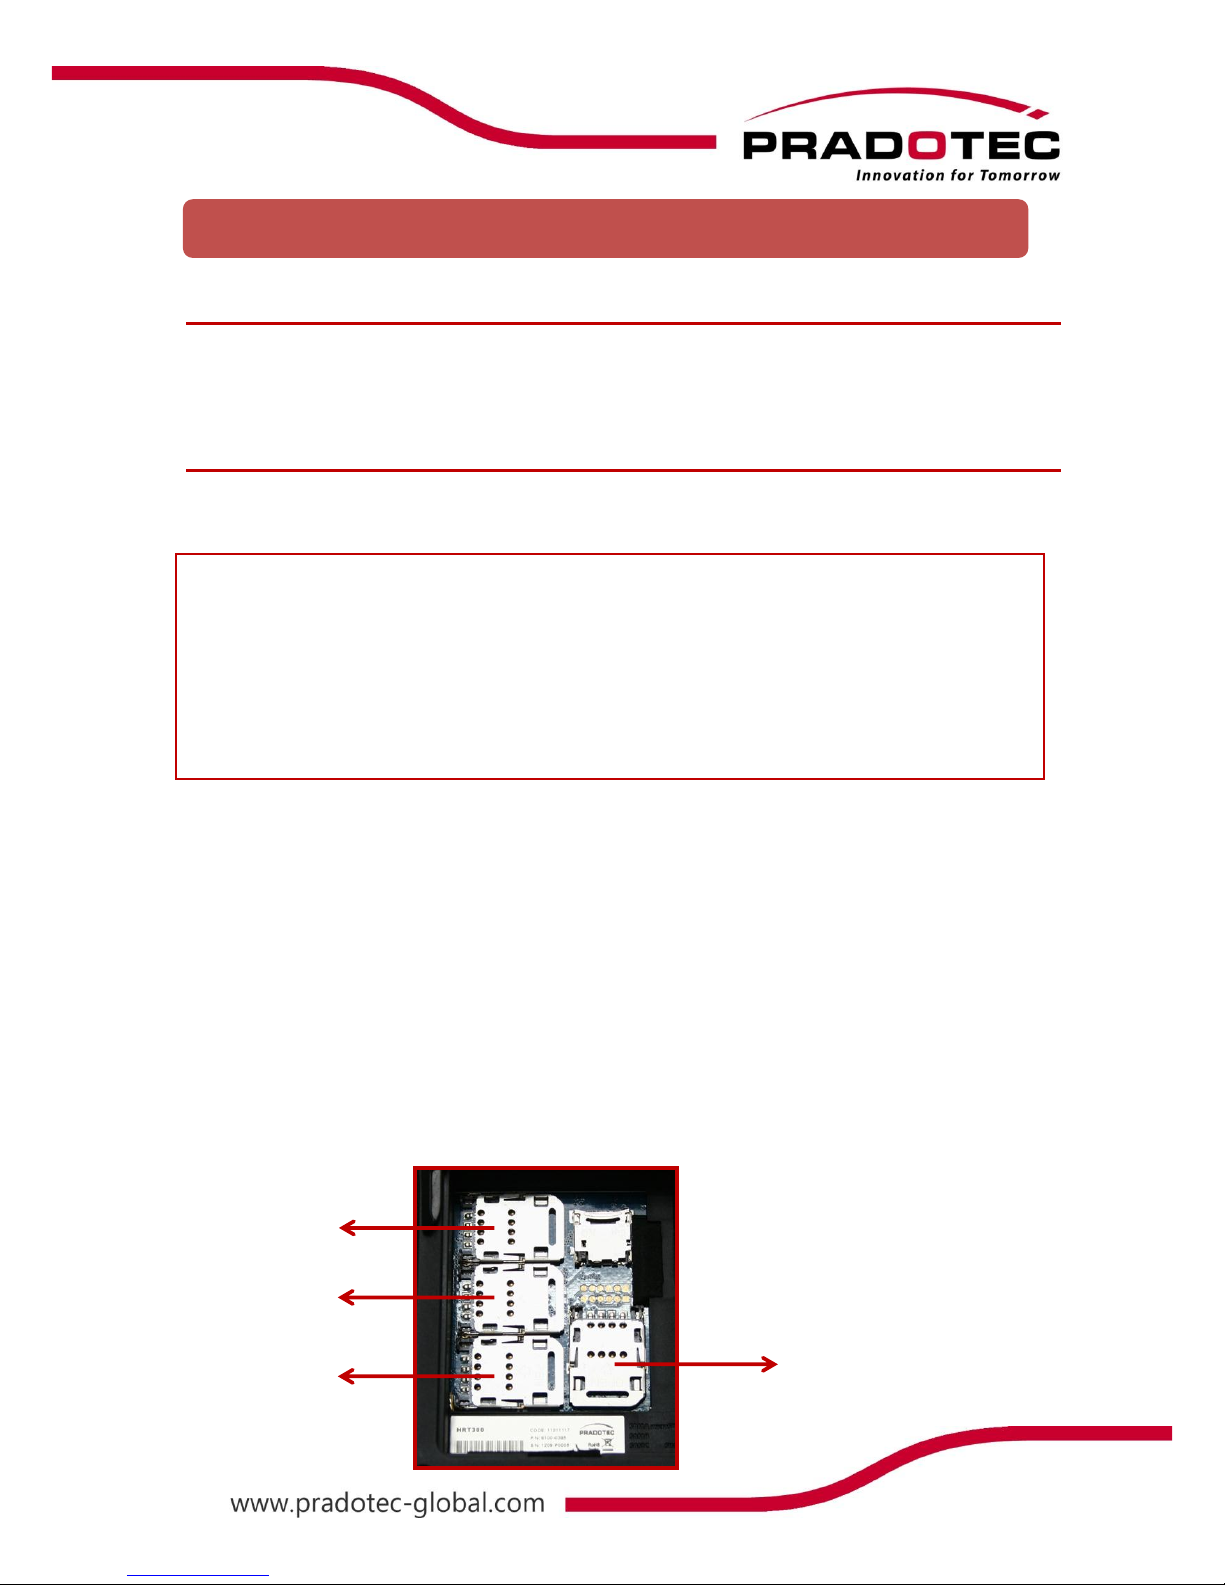
6) Unlock the SIM Slot and pull back the cover until easy for insertion.
7) When inserting the SIM card, ensure that the cut corner faces top right
and the gold contacts of the card face into the unit
SAM A
SAM B
SAM C
SIM
(Slot 0)
(Slot 2)
(Slot 3)
Basic Installations
Page 8
7
8) Push down the SIM slot cover and slide outward to lock it
9) Place the battery pack followed by battery cover
10) Push the wing lock to secured the battery cover and finally install back the hand
strap
To insert the SAM cards
1) It will be the same as inserting the SIM card, but on the others three slots
2) SAM card is for internal security
Guideline For Installing Micro SD Card
1) Firstly closed all the programs and switch off the unit
2) Removed the hand strap
3) Unlock both wing lock
4) Removed the battery cover
5) Removed the battery pack
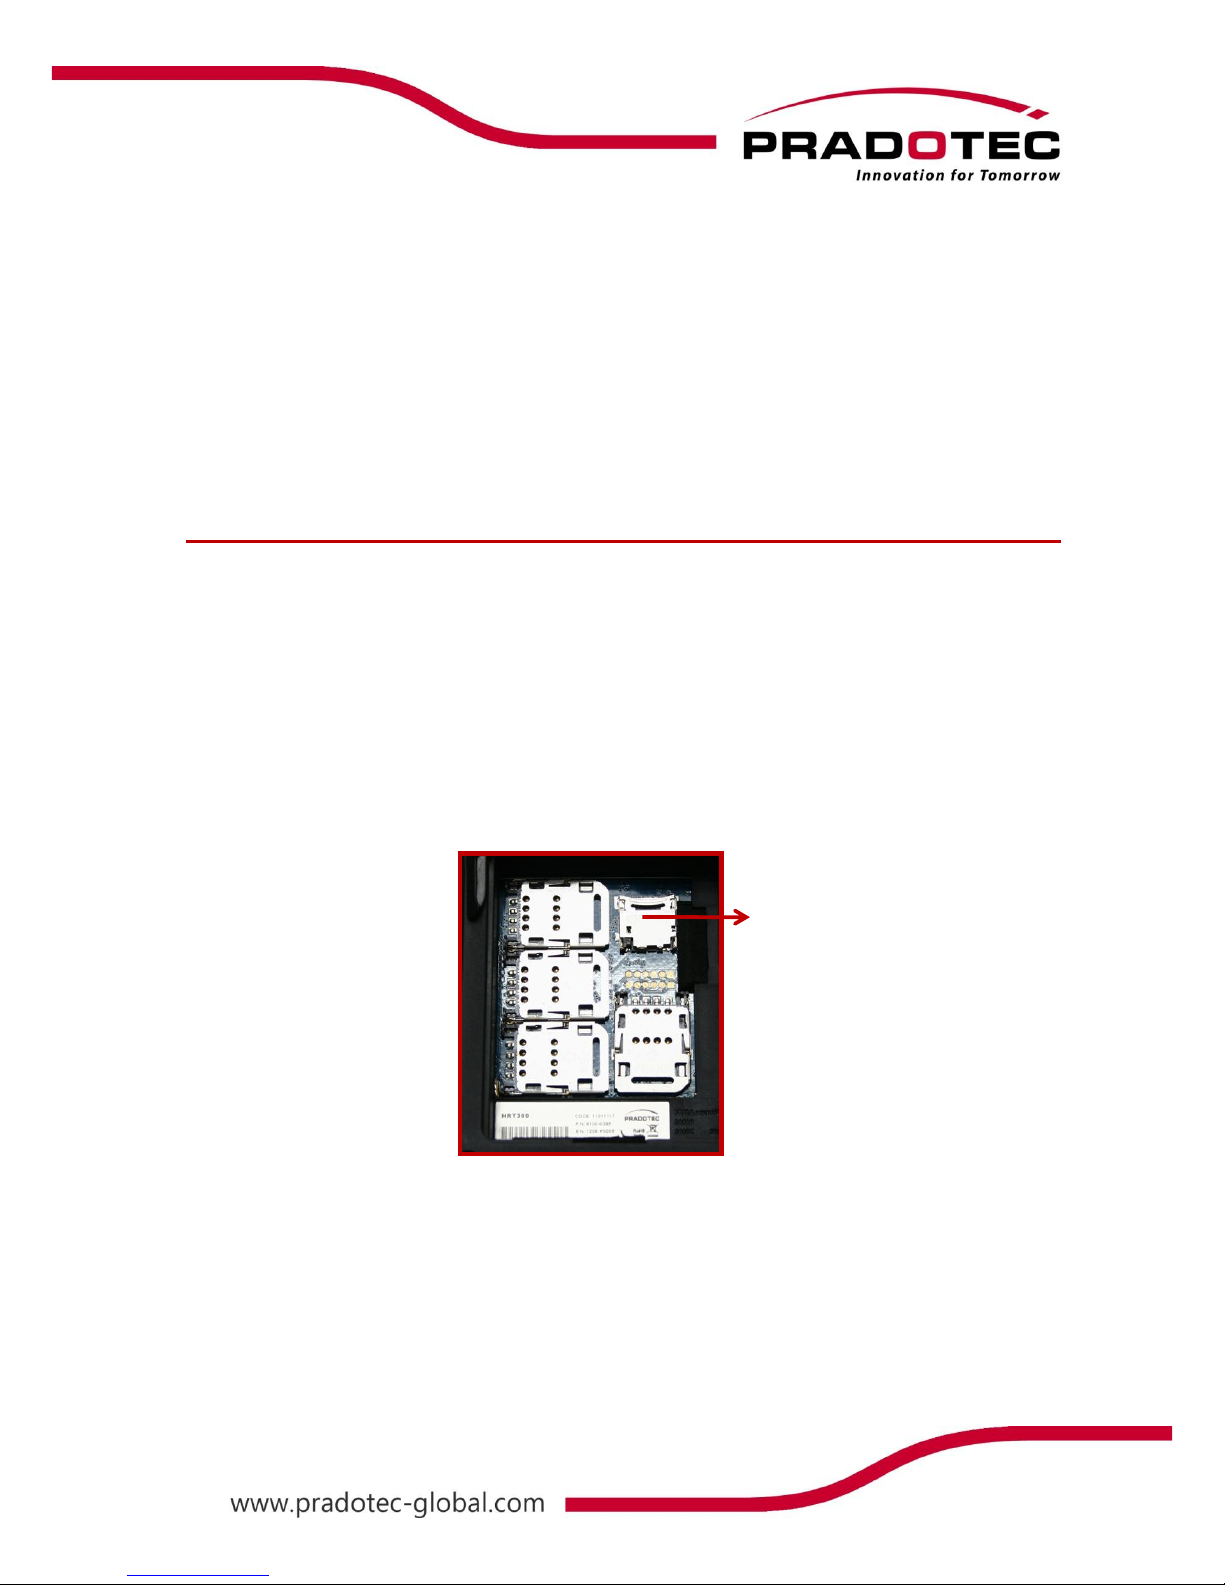
6) Unlock the Micro SD slot and pull back the cover until easy for insertion.
7) When inserting the Micro SD card, ensure that the gold contacts of the card face
into the unit
8) Push down the Micro SD slot cover and slide inward to lock it
9) Place the battery pack followed by battery cover
10) Push the wing lock to secured the battery cover and finally install back the hand
strap
MICRO SD
Page 9
8
Screen Calibration
Once the charging has completed, turn on the unit by pressing the power button.
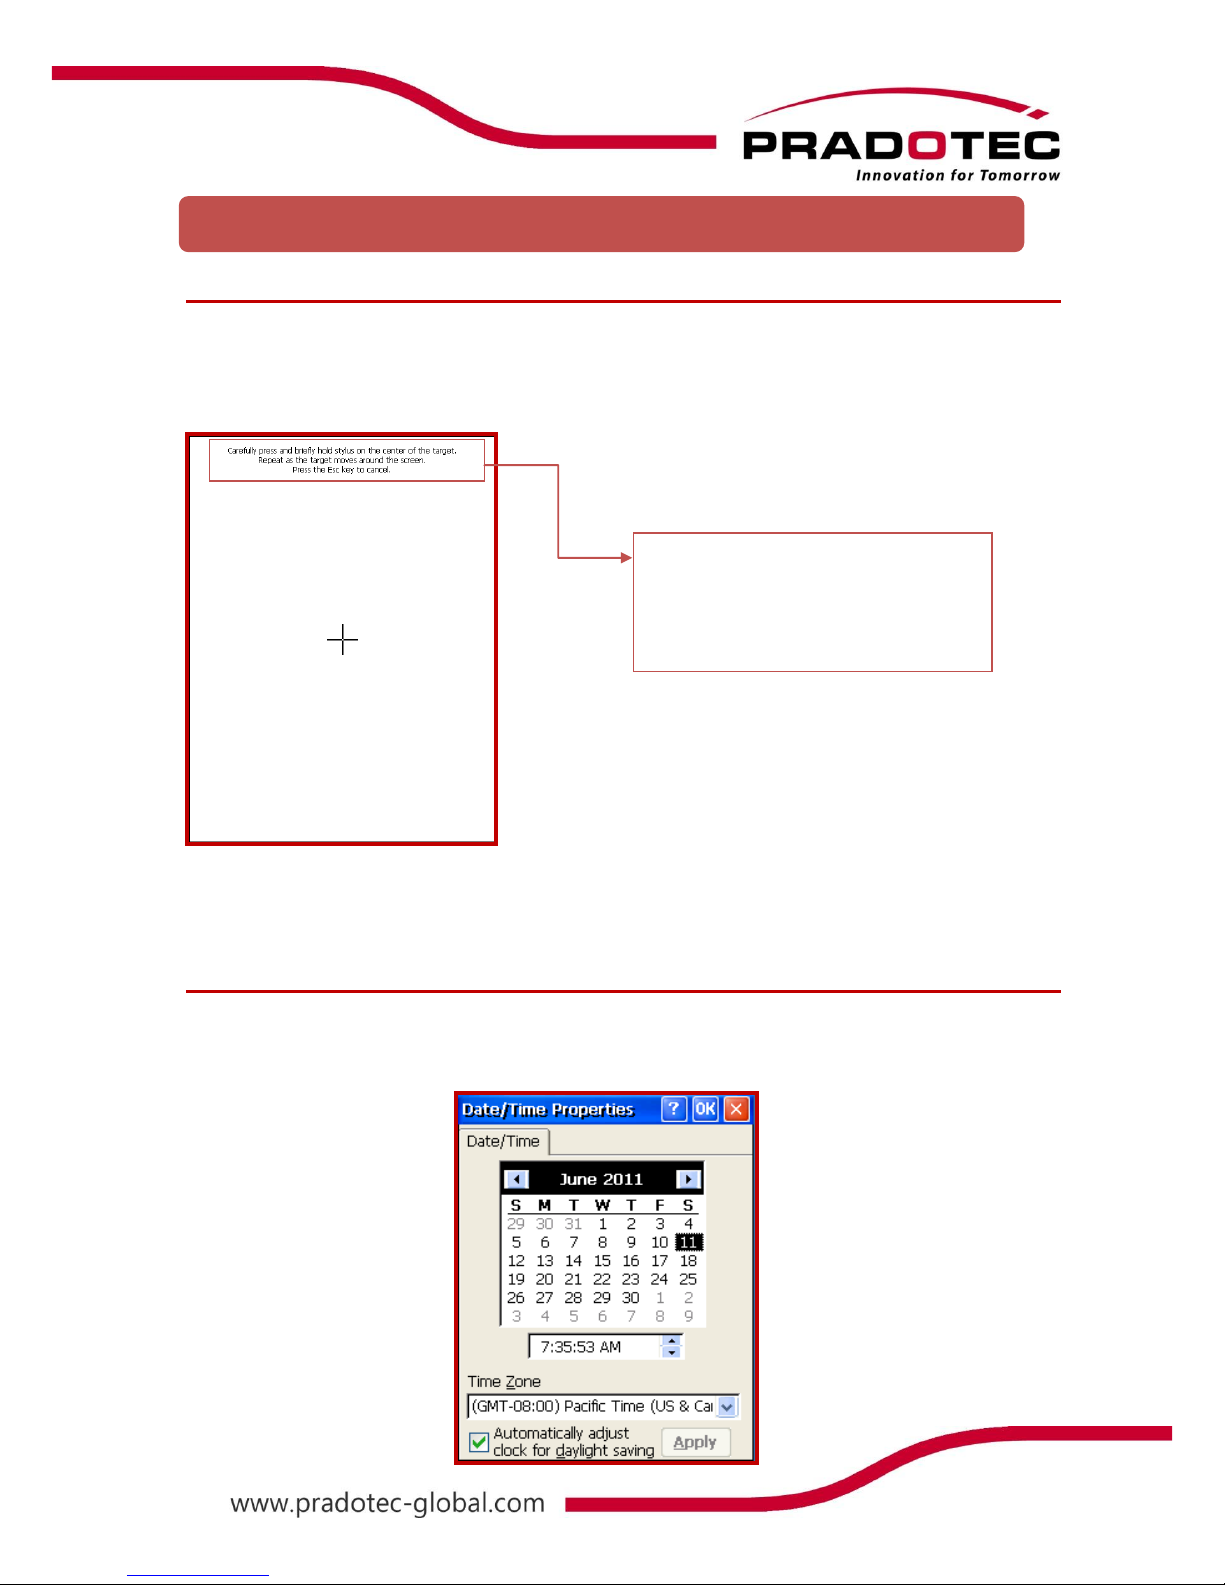
On the first time basis, it is advisable to calibrate the screen by going to:
Start -> Settings -> Control Panel -> Stylus.
Follow the cursor and tap on it. After this, Time, Date and Time Zone configuration screen will
be required to be set as the default time, date and time zone differ from places to places.
Time, Date and Time Zone configuration
Go to Start -> Settings -> Control Panel -> Date/Time.
“Time, Date and Time Zone configuration” application will be shown as below.
First Time Use
Carefully press and briefly hold
stylus on the centre of the target.
Repeat as the target moves around
the screen. Press ESC key to cancel
Page 10
9
The following defines the various operations that you can perform with the stylus.
Tap
Touch the screen once with the stylus to select items or options
Double Tap
Tap the item twice to open or execute a program
Drag
Hold the stylus on the screen and drag across the screen to select text and
images. Drag in a list to select multiple items
Data input and virtually all other operations are performed using a stylus, which is housed
inside the stylus holder at the right corner (left corner) of the HRT700.
IMPORTANT
Avoid misplace or lose the stylus by always storing it in the stylus holder when not in
use.
Avoid breaking the tip of the stylus.
Use only the stylus that comes with the HRT700, or some other stylus type instrument
with a soft, blunt point to perform touch screen operations. Never use a pen, pencil, or
other sharp writing element.
Touch Screen Operations
Using the Stylus
Page 11
10
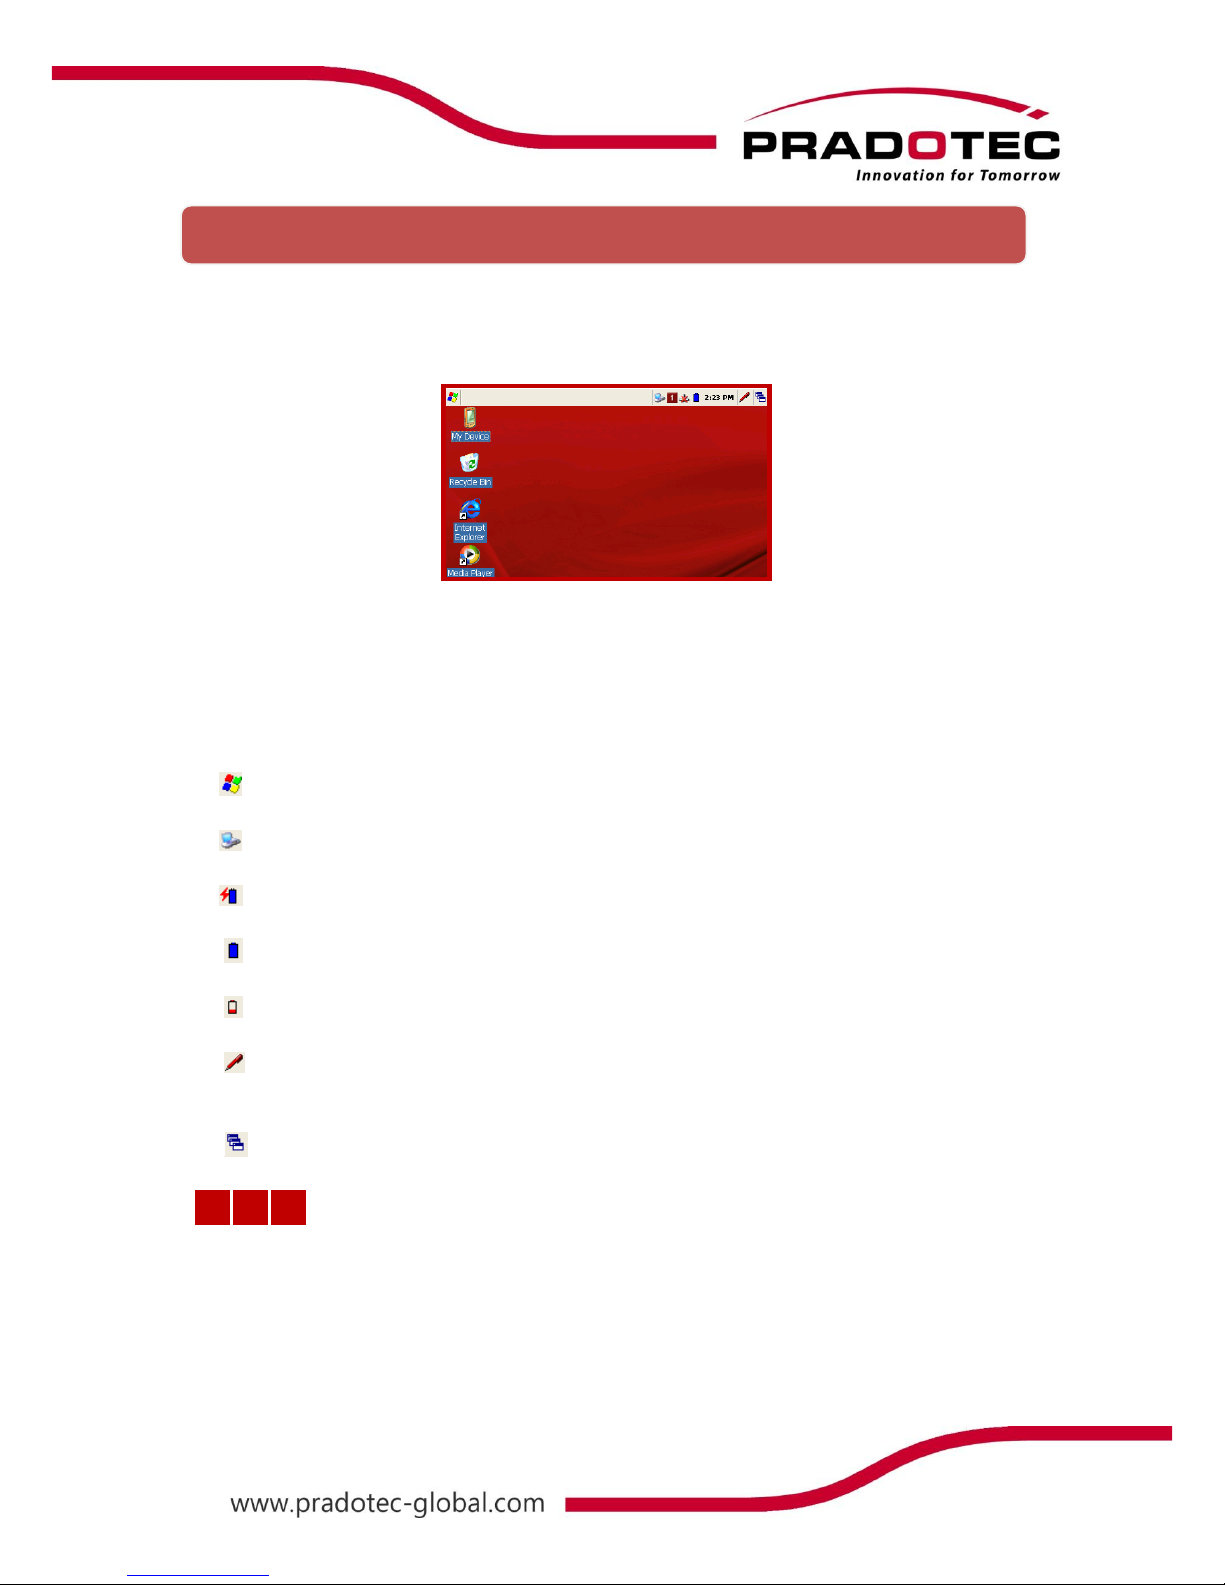
Your HRT700 is pre-installed with a collection of useful programs. These include Microsoft
WordPad and customized programs. You can select the program you want from the Start
button or by tapping on the screen; a list of customized programs will be shown.
Taskbar Items
The Control Panel includes the following standard items which allow user to customize
system wide properties.
Status Icon Meaning
Start Menu, Tap to switch to a program
Indicate unit connected to PC ActiveSync
Batteries are charging
Batteries are fully charged
Batteries are low
Tap for display or hide keyboard, tap and hold to choose other input
method
Quick launch menu
Start Menu
1 a A
Current Keypad Input method
Page 12
11
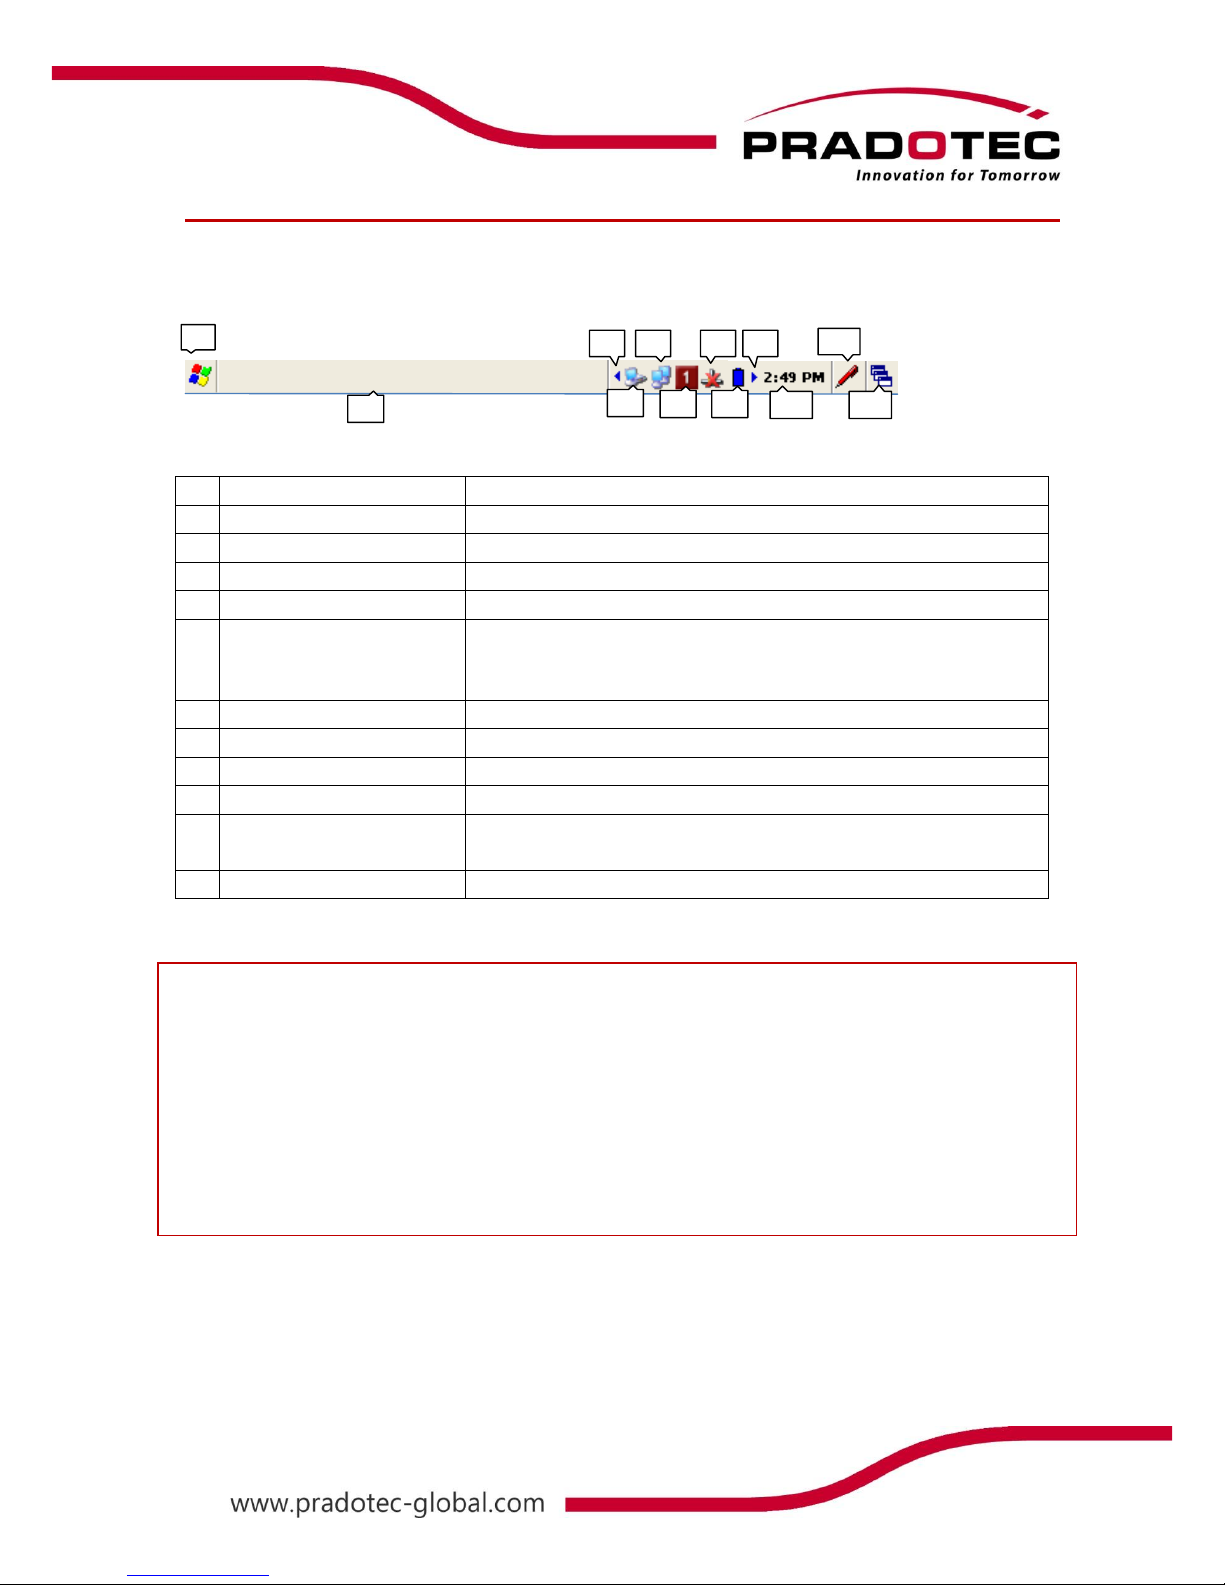
Shell taskbar
The taskbar appears on the top of your HRT700 screen.
1
Start button
Single tap to display the Start menu
2
Active application
Display the latest application running
3
Left
Single tap to see the hidden icon on the left
4
Direct Connection
Double tap to execute the direct network status dialog
5
WI-FI Connection
Double tap to execute the WI-FI network setting
6
Keypad Input Method
Single press on the ‘ALPHA’ to change mode of input by
keypad
Numerical (1) , Small Alphabet (a) , Capital Alphabet(A)
7
Bluetooth Network
Single tap to execute Bluetooth network setting
8
Power icon
Single tap to display the power status on your HRT700
9
Right
Single tap to see the hidden icon on the left
10
Time
Single tap to display the time, date and time zone menu
11
Software Input Panel
(SIP)
Single tap to display or hide the Keypad
12
Application switching
Single tap to display all the active application
NOTE:
● An internal battery icon appears in the status icon. See Taskbar Item for more
information about icons.
● Messages also appear on the screen to warn you when the battery power is
critically low.
You can check the current battery level at any time by tapping Start -> Settings -> Control
Panel -> Power to display Power Properties.
1
2
3 4 5 6 7 8 9
10
11
12
Page 13
12
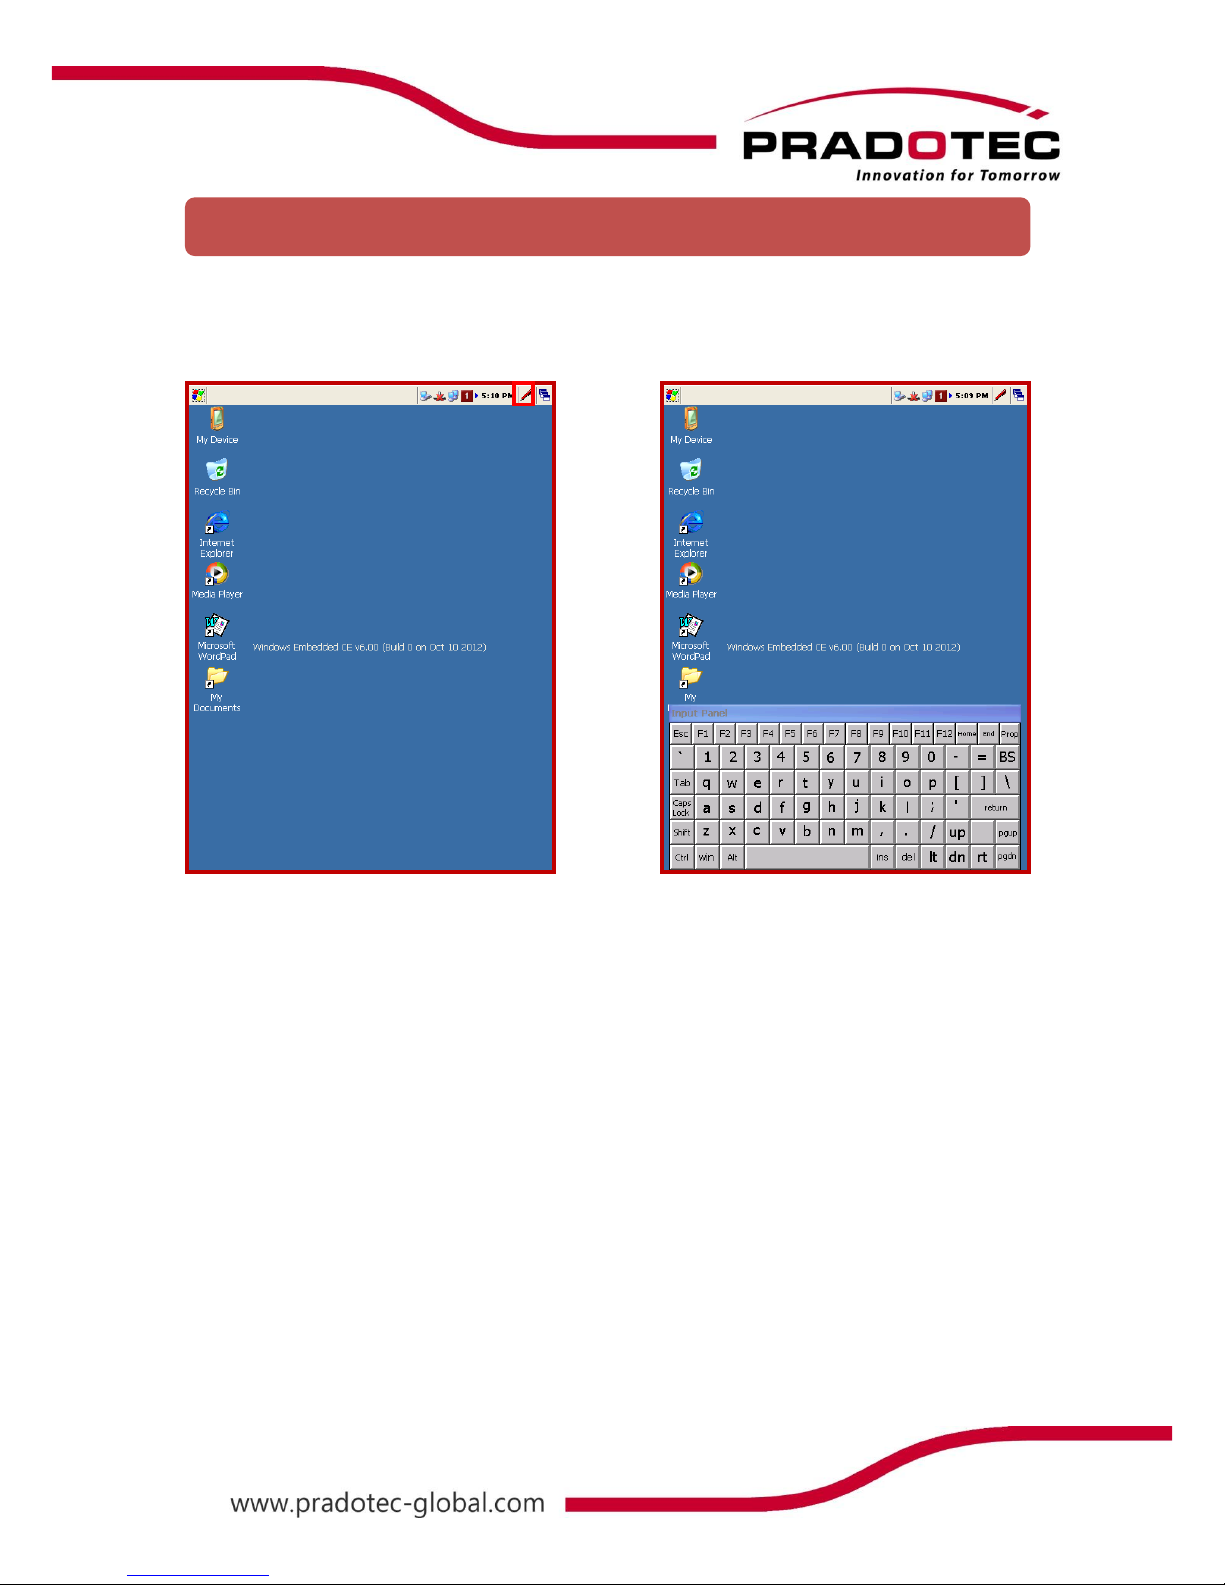
On the taskbar of the HRT700, tap on the SIP icon. The software input panel will be shown at
the bottom of the screen. Tap on the SIP icon again in order to hide the software input panel.
Software Input Panel (SIP)
Page 14
13
Keypad
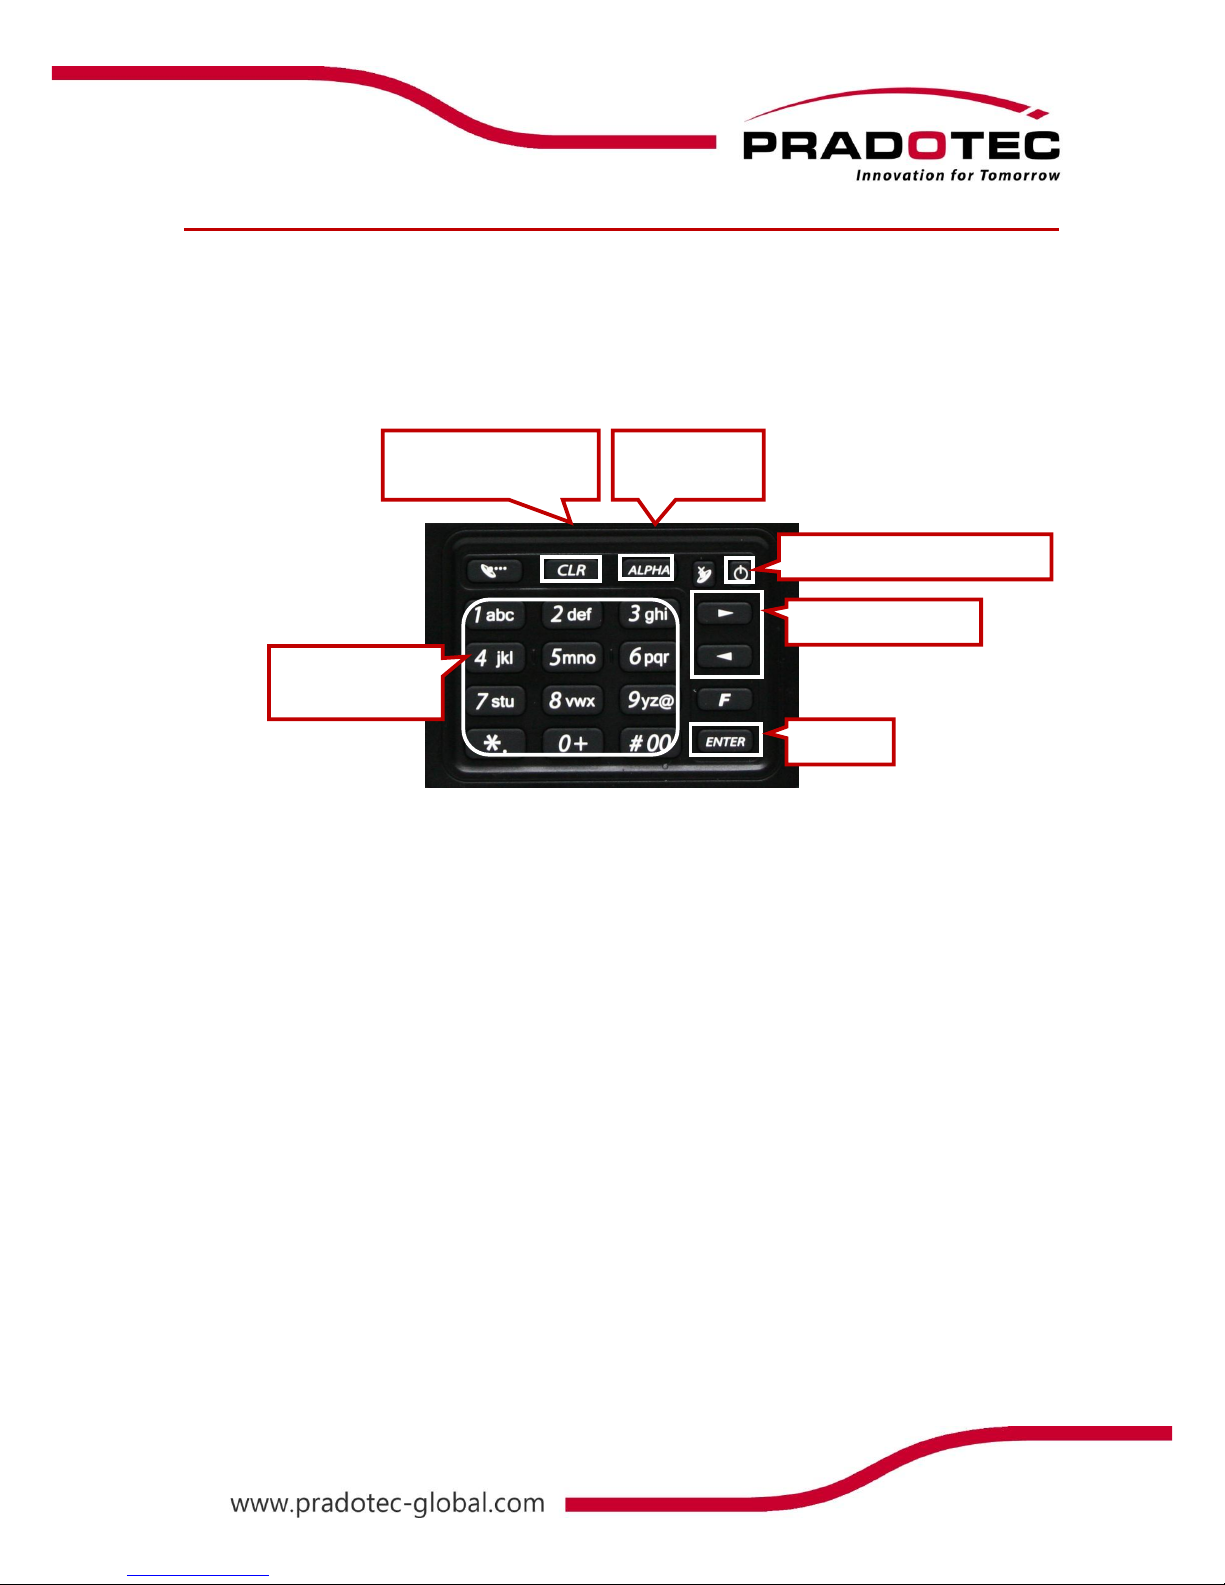
Learning to use your keypad is easy. This section will describe the basic concept of using the
keypad in writing a message or executing a task like increasing volume.
Controls and Interfaces
● Nav. Left & Right
Press to go to the left or right. Selecting the left or the right item / icon.
● Enter button
Pressing it will perform enter function or skip to the next line when writing.
● Power button
Press once to turn on / suspend the device. User may wake up the device by pressing
it too
● CLR
This button allows user to clear entry or use as backspace function.
● Alpha numerical keypad
It will act as numerical keypad when toggle function is OFF. Once ON, you can key in
any character just by pressing and holding on the button until the character appears.
● Alpha button
Press it to change the mode of entering characters by keypad. Sequences of the
modes are numerical characters, lower-case alphabets then upper-case alphabets.
Alpha Numerical
Keypad
Nav. Left & Right
Enter
Clear entry or
Backspace function
Keypad input
mode
Power on, Wake or Suspend
Page 15
14
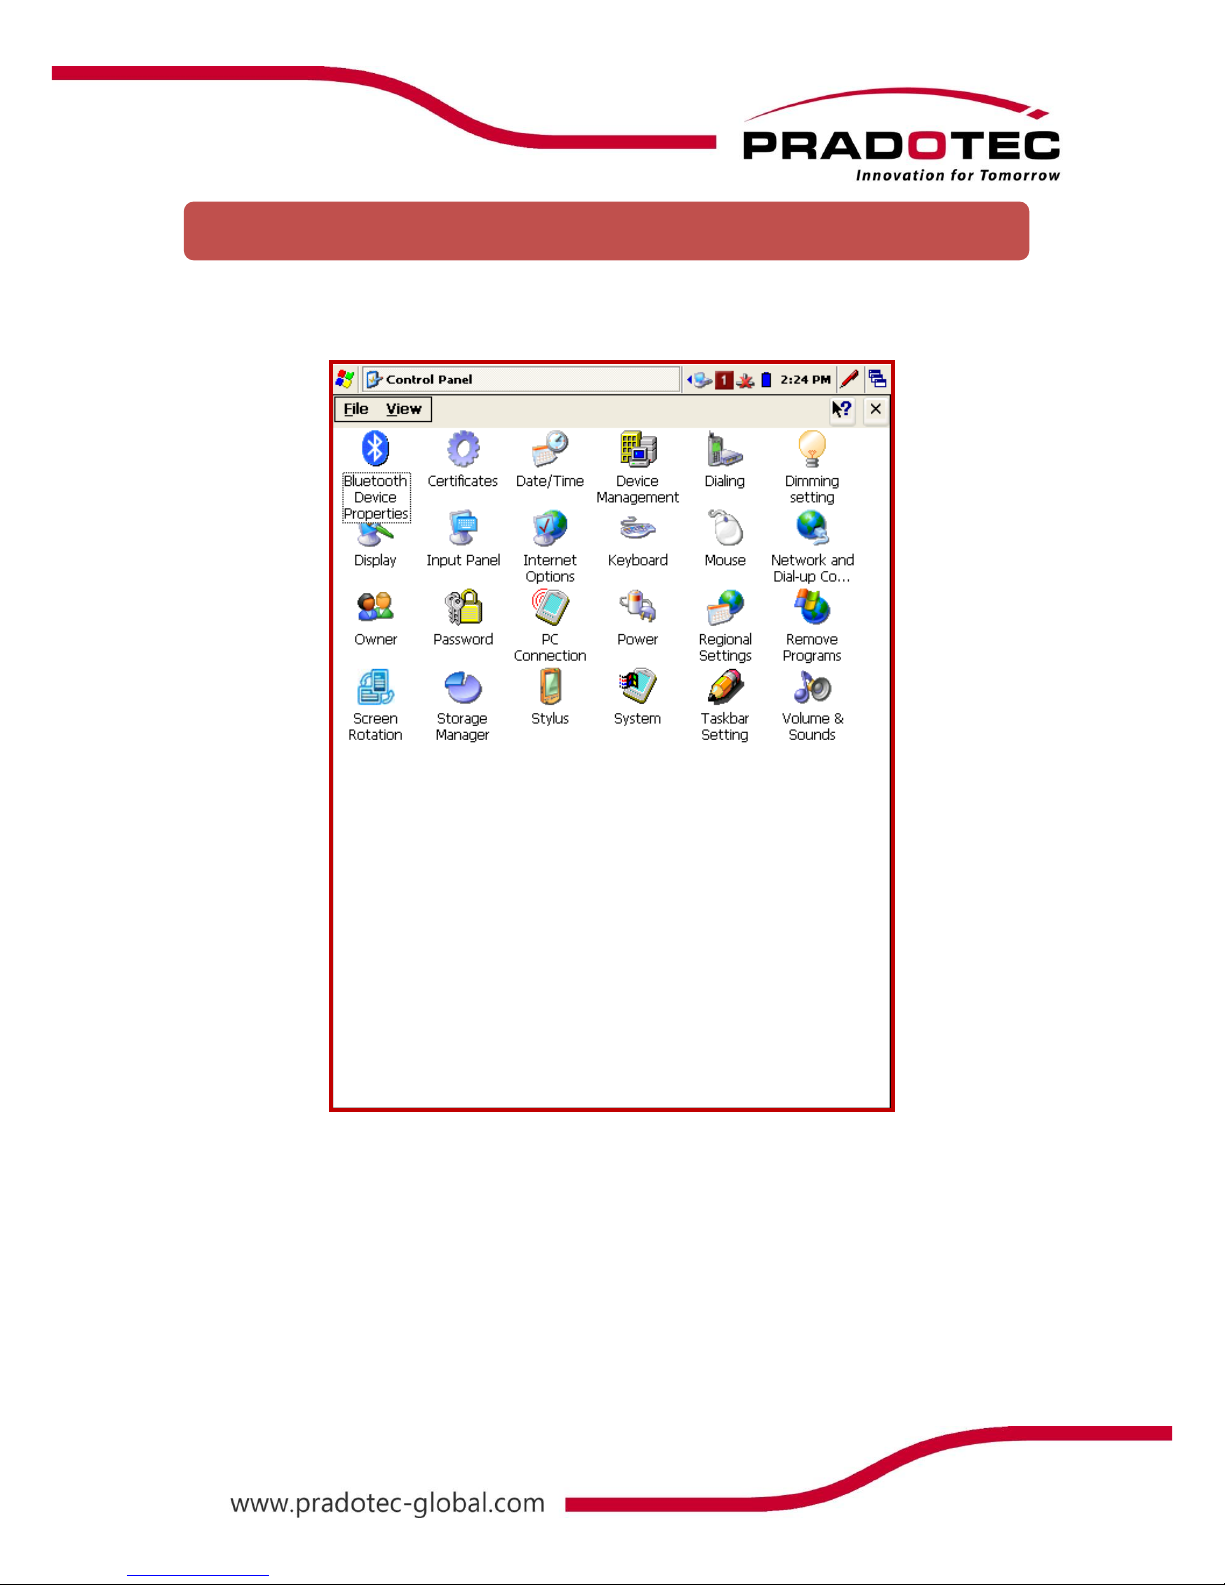
You can customize your setting of your HRT700 to suit your particular needs. E.g. Setting
password, so that nobody can use your handheld or change the background display and etc..
Tap on Start -> Settings -> Control Panel, as shown on the previous page. In the menu, it
contains icon showing different settings that can be customized.
Customizing your HRT700
Page 16
15
LCD Brightness Control
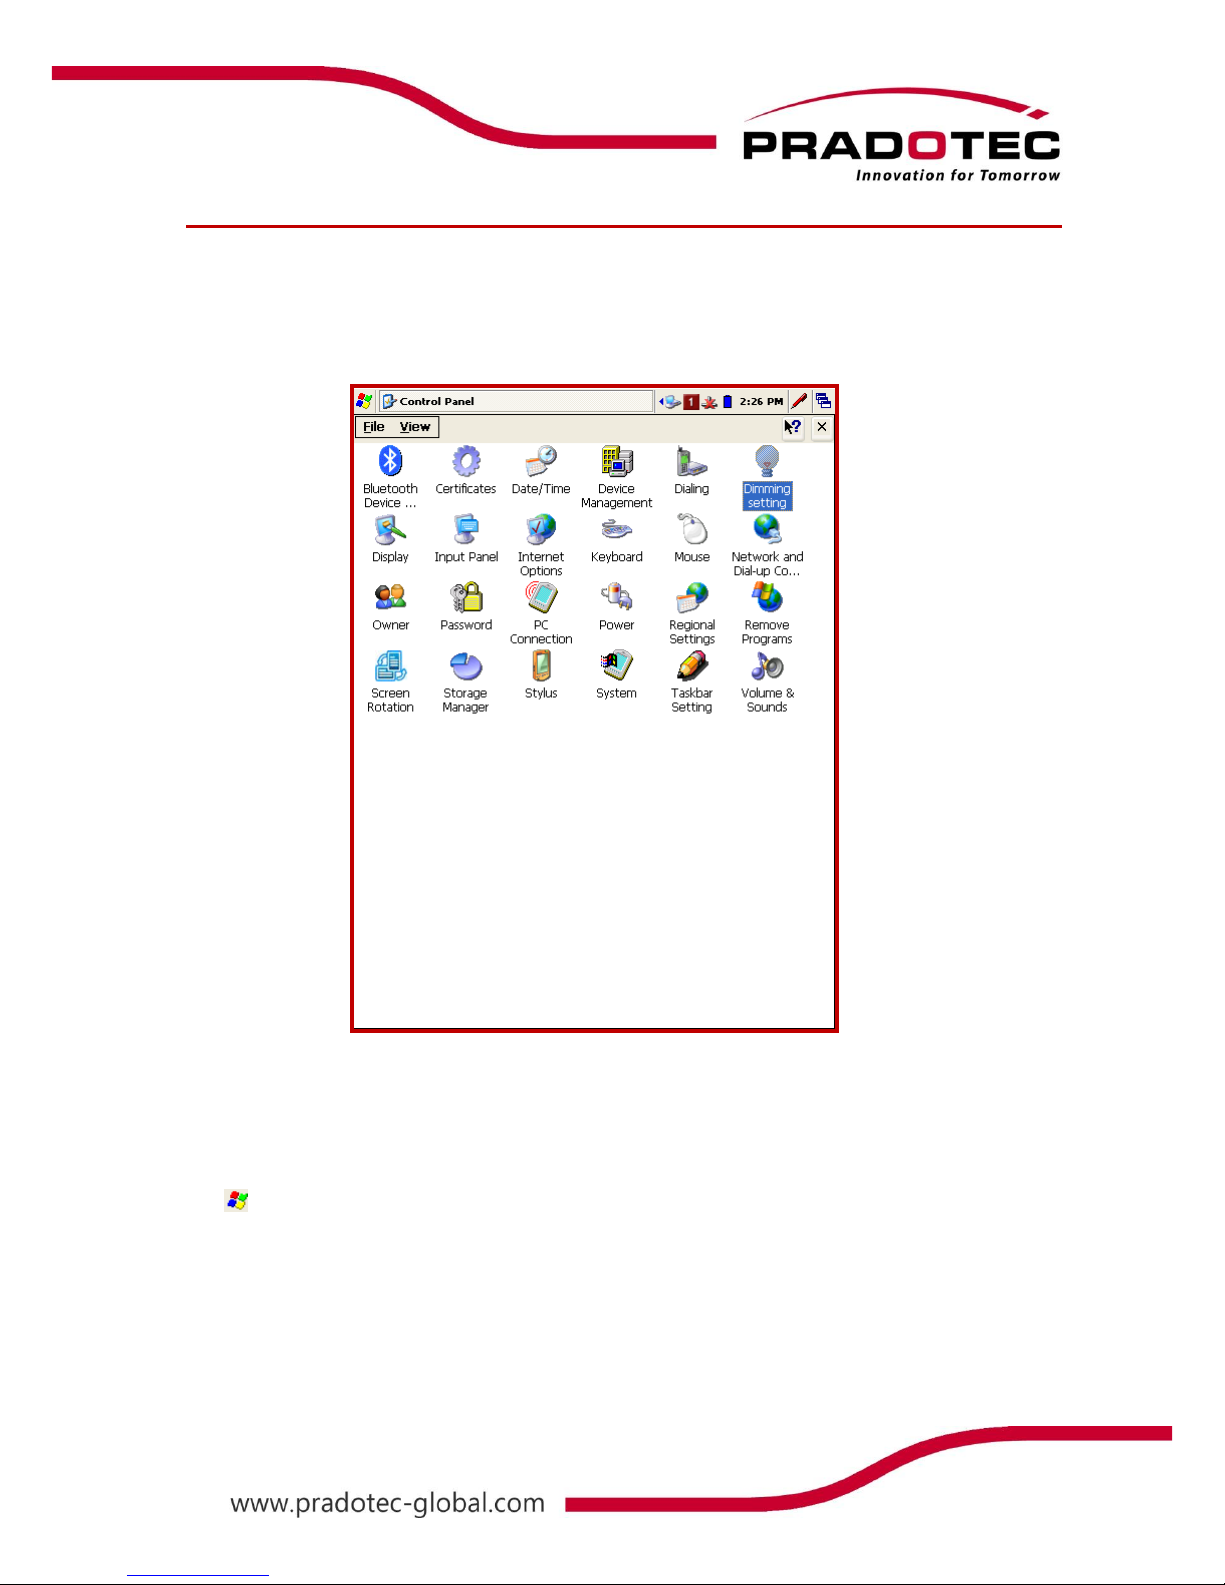
The unit can be powered by either battery or external power. Users may change the
brightness of the LCD backlight through the backlight control panel applet according to the
power mode.
Adjusting Display Brightness
Use the following operations to adjust display brightness to make it easier to read.
Tap and click Settings and choose Control Panel. On the Control Panel, tap Dimming
Setting. A screen box will appear. Make sure it is on the LCD Light tab. Tap the dark or
bright tab to control the brightness of the screen.
Page 17
16
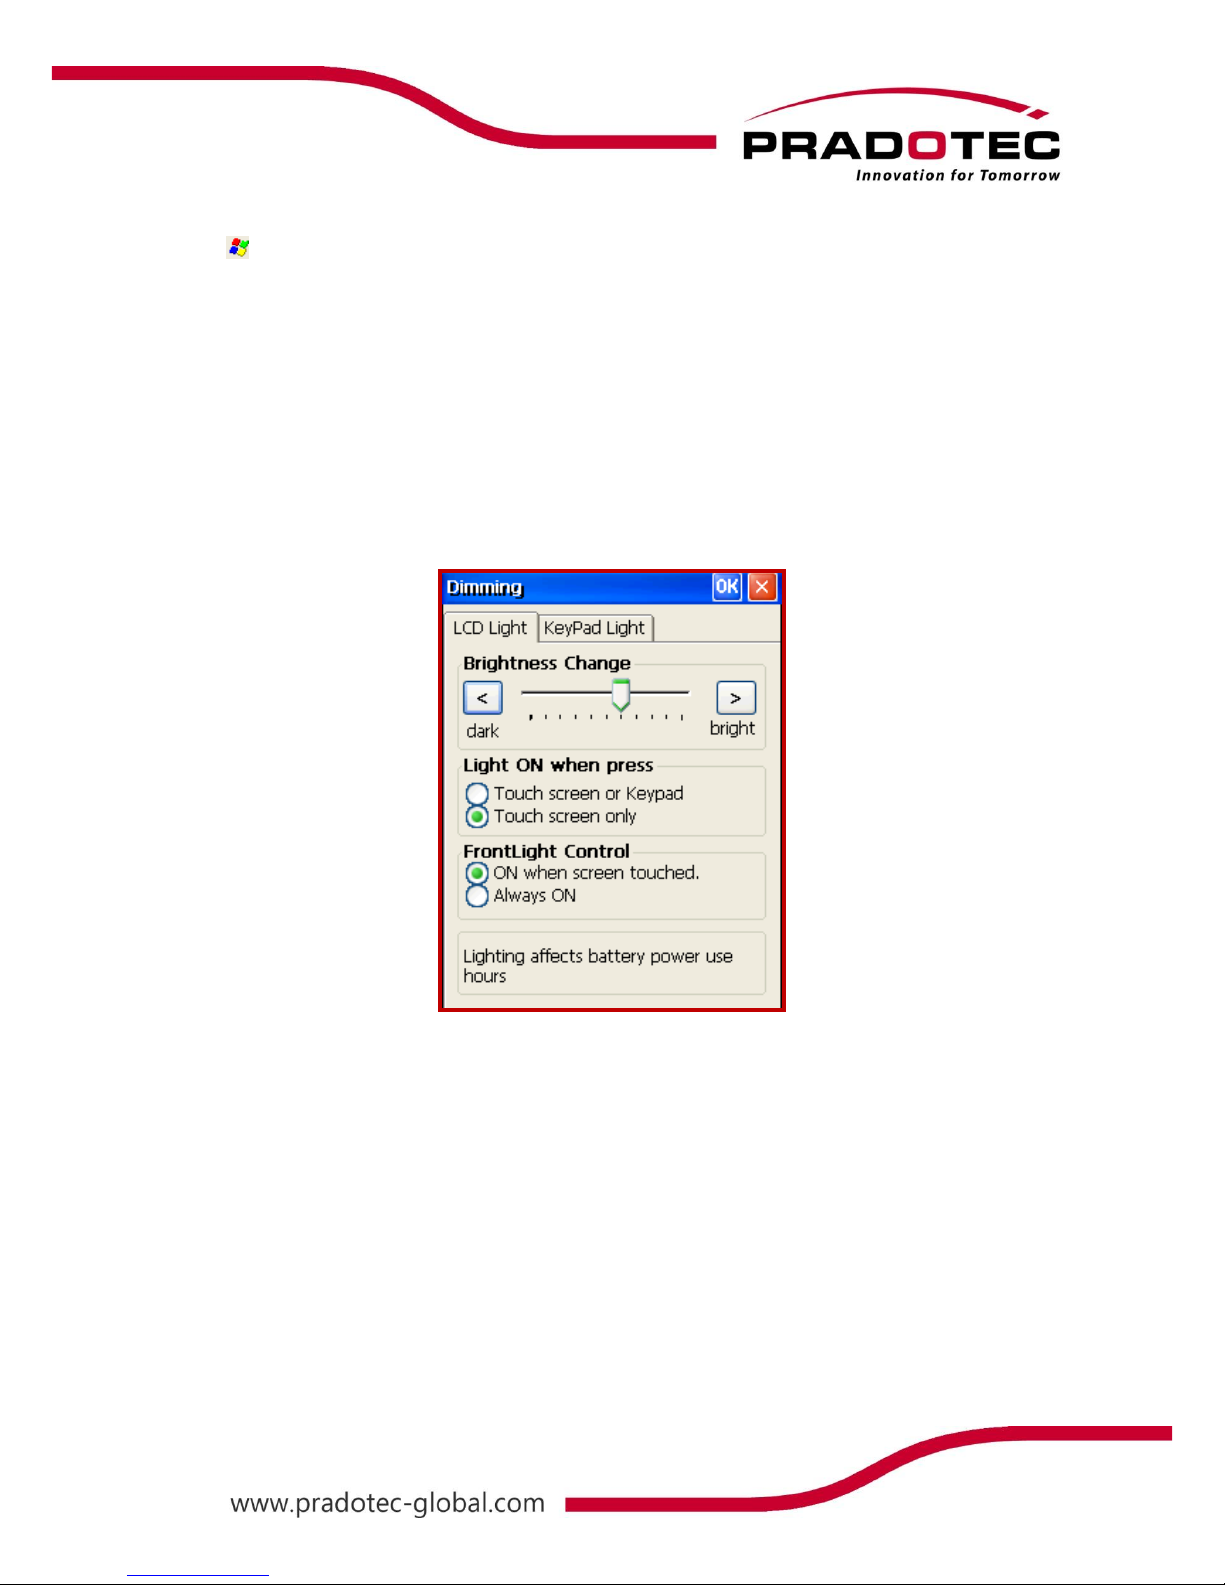
Adjust How the Screen Light can be Turned On
Tap and click Settings and choose Control Panel. On the Control Panel, tap Dimming
Setting. Select the LCD Light tab. Below the Brightness Change option, there is two more
option for screen light setting.
Select Touch screen or Keypad in order to turn on the light of the LCD by touching either
the touch screen or keypad, or select Touch screen only to turn on the light of the LCD by
touching the screen only. On the option below, choosing ON when screen touched is to let
the light to be off after certain time and turn on when the device is touched while choosing
Always ON is to let the light never off until the device is suspended.
Page 18
17
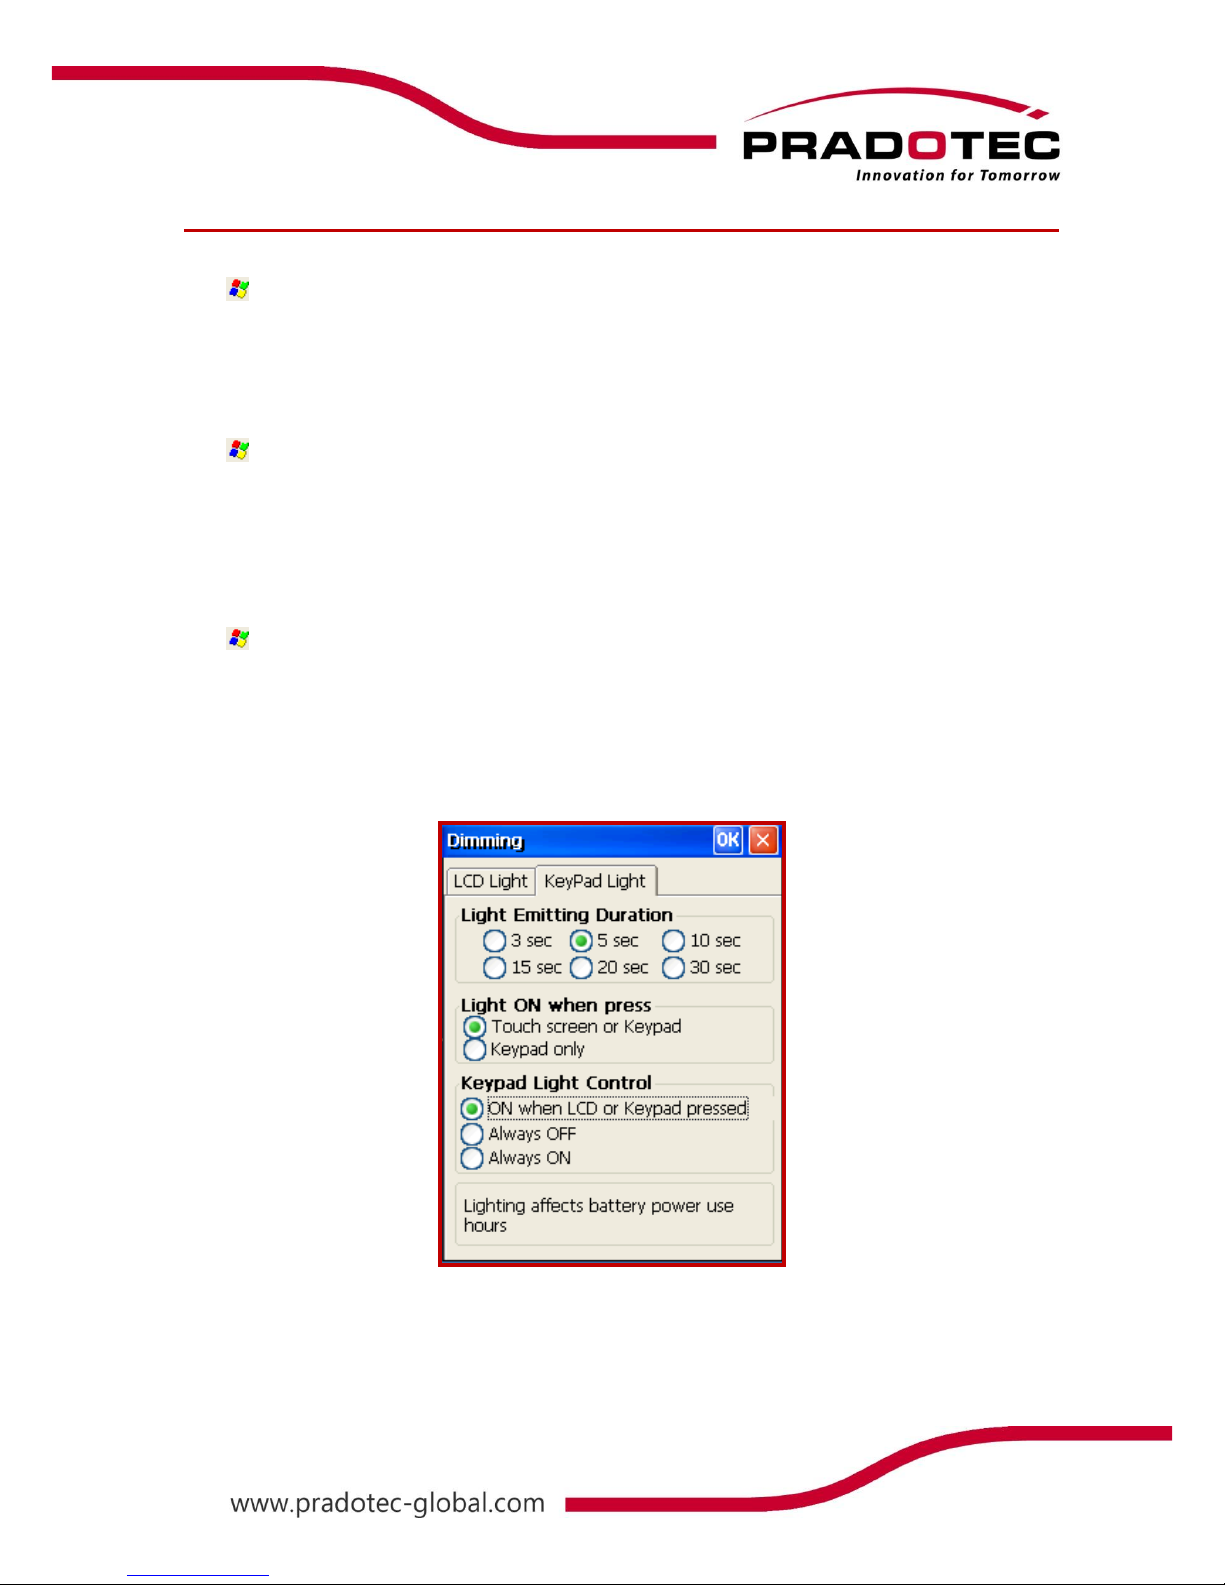
Keypad Light Control
Adjust Light Emitting Duration for Keypad
Tap and click Settings and choose Control Panel. On the Control Panel, tap Dimming
Setting. Select the KeyPad Light tab. Select duration from 3 seconds to 30 seconds, as after
that selected duration, the keypad light will be off.
Adjust How the Keypad Light will be Turned On
Tap and click Settings and choose Control Panel. On the Control Panel, tap Dimming
Setting. Make sure the KeyPad Light tab is selected. Select Touch Screen or Keypad for
turning on the light of keypad by touching either the screen or the keypad or select Keypad
only to turn on the light of keypad by touching on the keypad itself.
Adjust the Keypad Light Control
Tap and click Settings and choose Control Panel. On the Control Panel, tap Dimming
Setting. Make sure the KeyPad Light tab is selected. Select ON when LCD or Keypad
pressed to enable the previous option. Select Always OFF, the keypad light will be turned off
the entire time else select Always ON, the keypad light will be turned on entire time until the
device is suspended.
Page 19
18
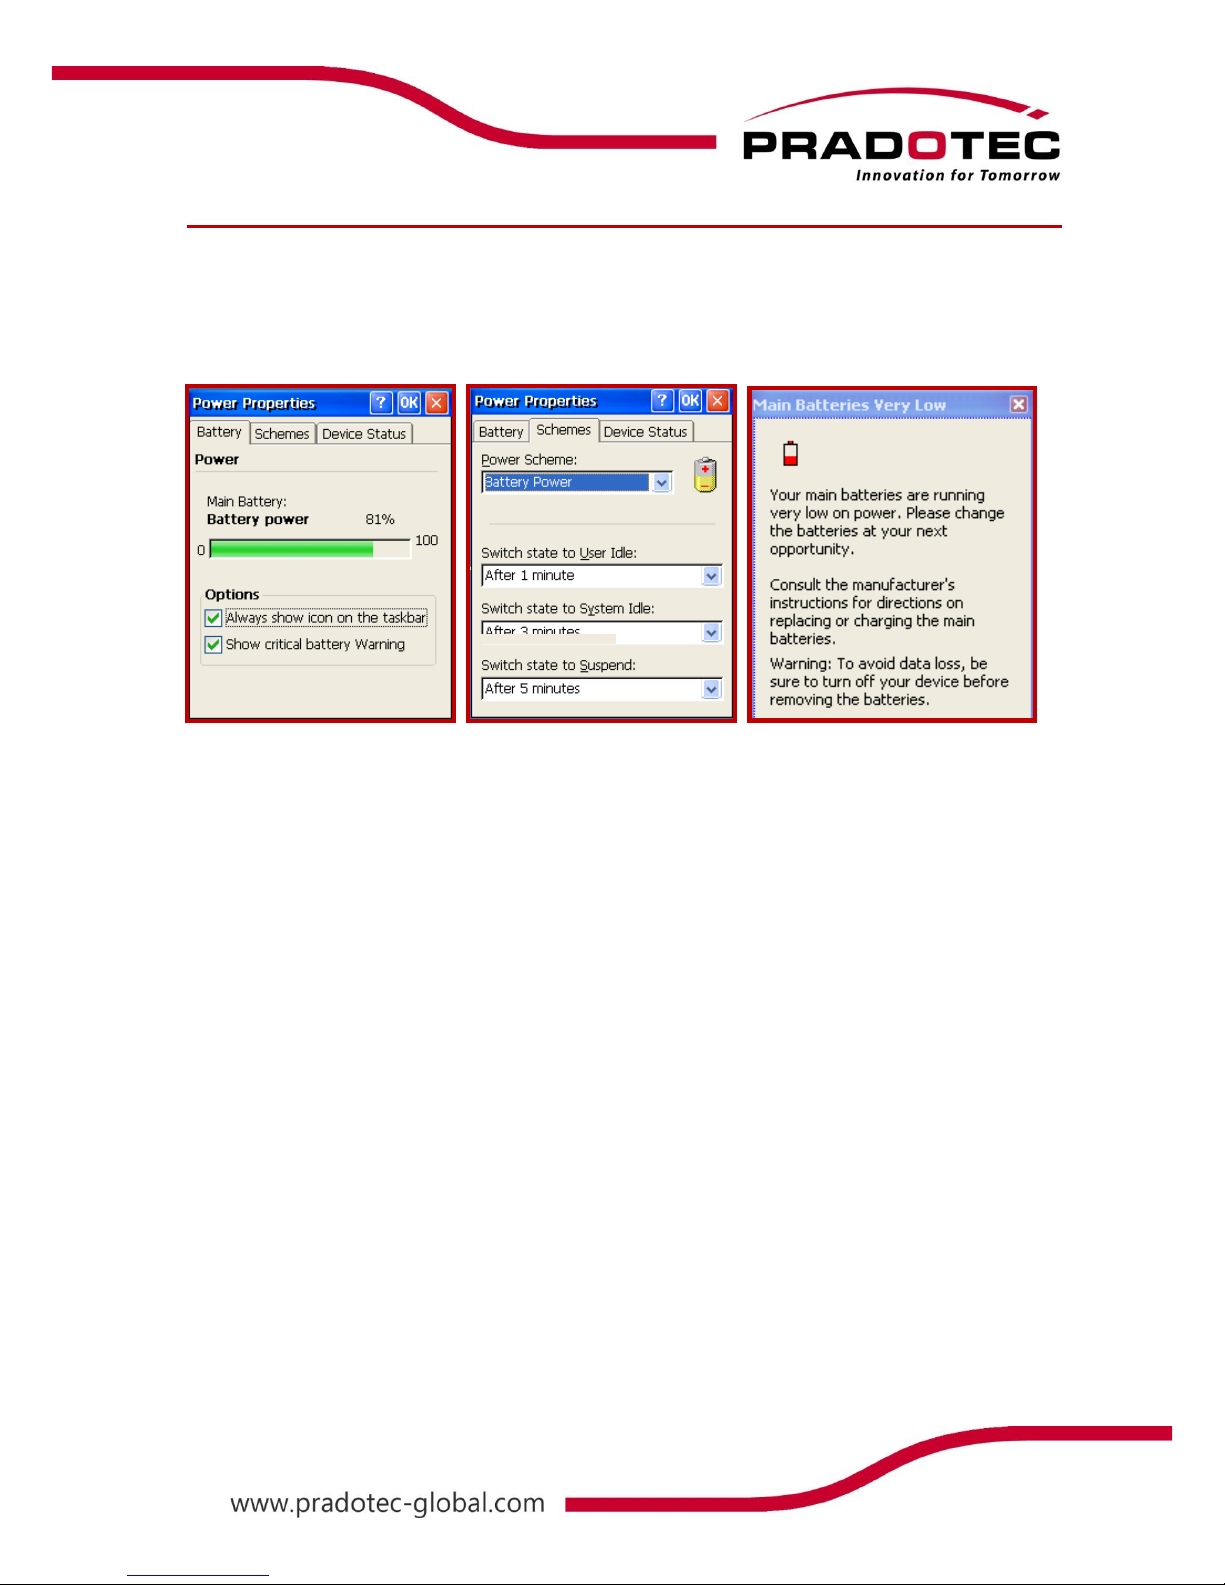
Power
User may check the power status of the main battery by clicking on the power icon. In the
power properties menu, for the Battery tab, user may check on the option to Always show
icon on the taskbar. Another option that user may check on is to Show critical battery
Warning, which means a window will be popped out when the device is low battery.
System Power States
The OS have 4 different power states that will be the four states of the internal power
manager state machine. The state transition will be linked to system conditions:
a) User activities
b) System activities
c) Application requests
d) Timers
The four states are:
On - In this state the device is full active and user can use all the different peripherals,
and by consequence the current consumption is maximum
User Idle - This state is reach when user is not using the device after a time out, the
power consumption can be reduced by, for example, decreasing the display backlight
intensity and disabling peripherals.
System Idle - after application inactivity, the power manager switch to this state.
Suspend - in this state the device is consuming the less power as possible, but the
device cannot be used, the processor clock is decreased (or turned in a suspend state
if supported), the peripherals are usually turned off and the SDRAM is still refreshed.
The transition from On to User Idle and User Idle to Suspend is done after timer’s expiration,
those timers value can be setup through the control panel’s Power applet to customize your
device.
Page 20
19
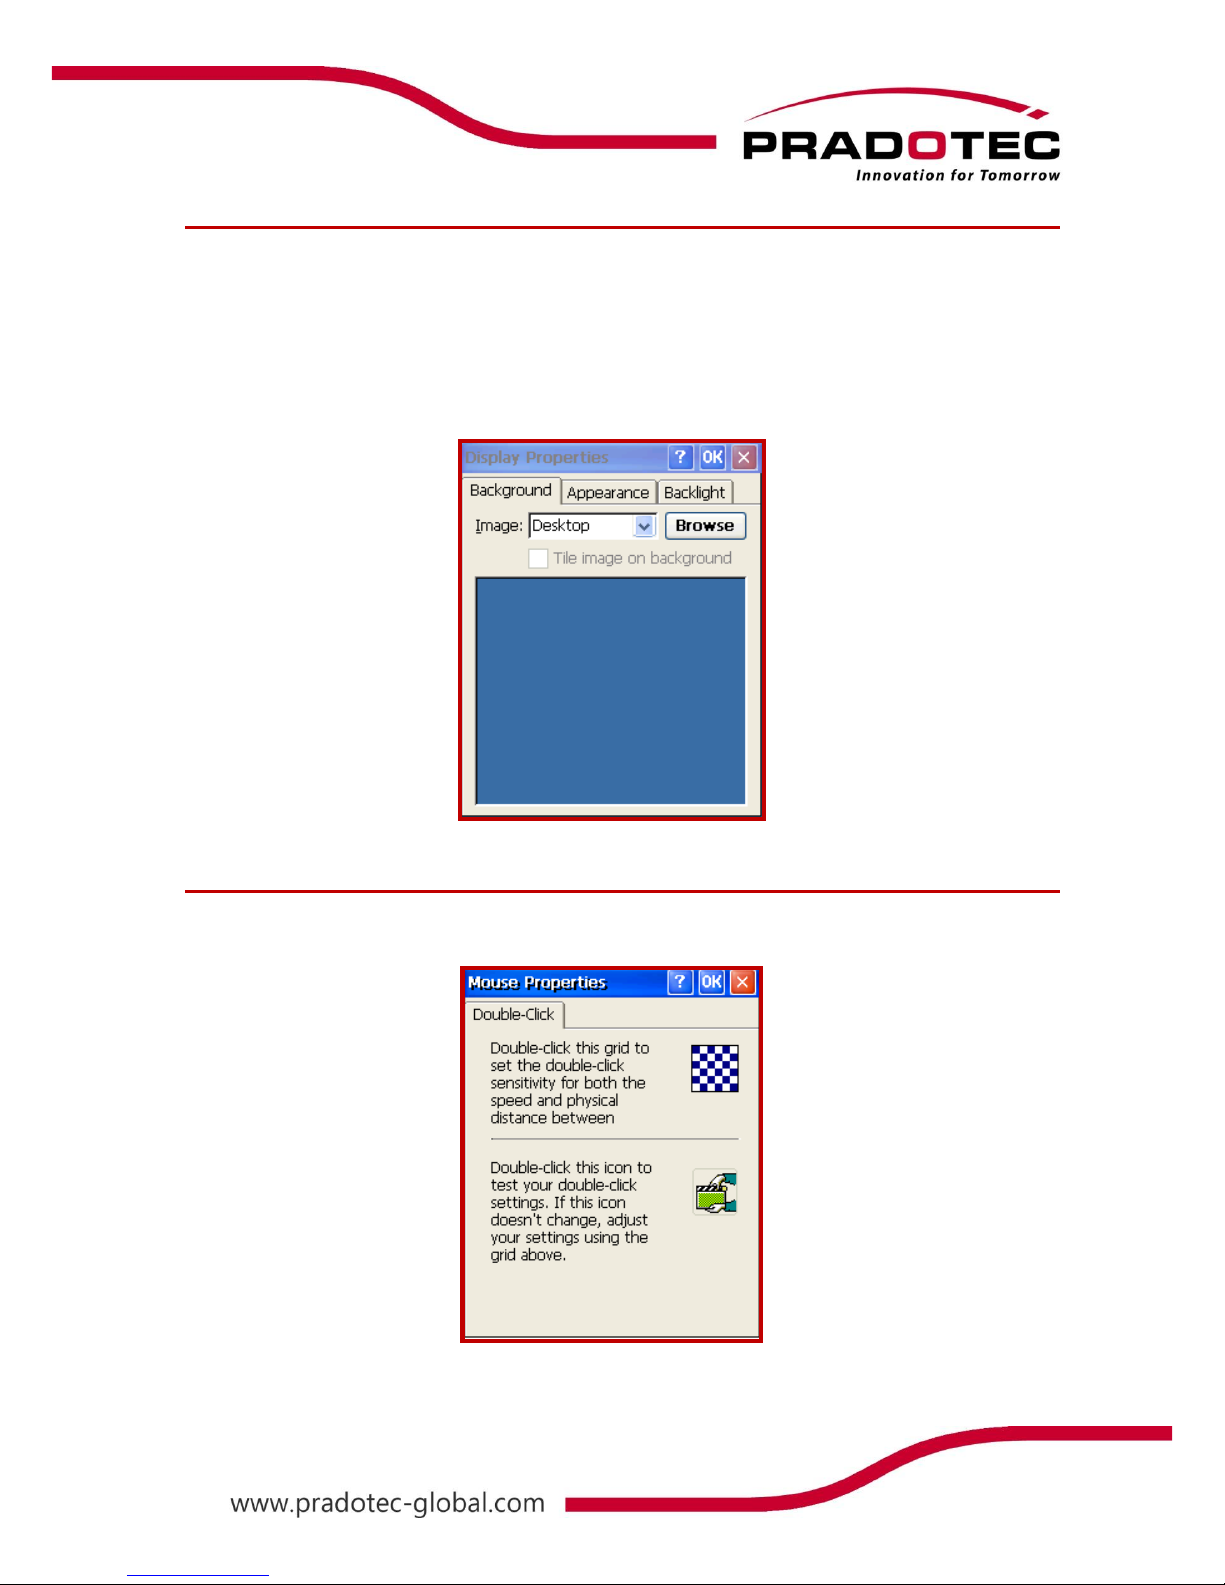
Display
The resolution for the device is 640x480. User can customize the screen display by changing
the picture on the Display Properties.
Or user may insert new picture just by transferring it from any personal computer. User may
select the Display Properties by holding the pointer on the desktop, and then select
Properties or go to Start -> Settings -> Control Panel -> Display Properties. User can tile
desired image on the display property.
Mouse
On the Mouse Menu, user can set and test the sensitivity and speed of double clicking.
Page 21
20
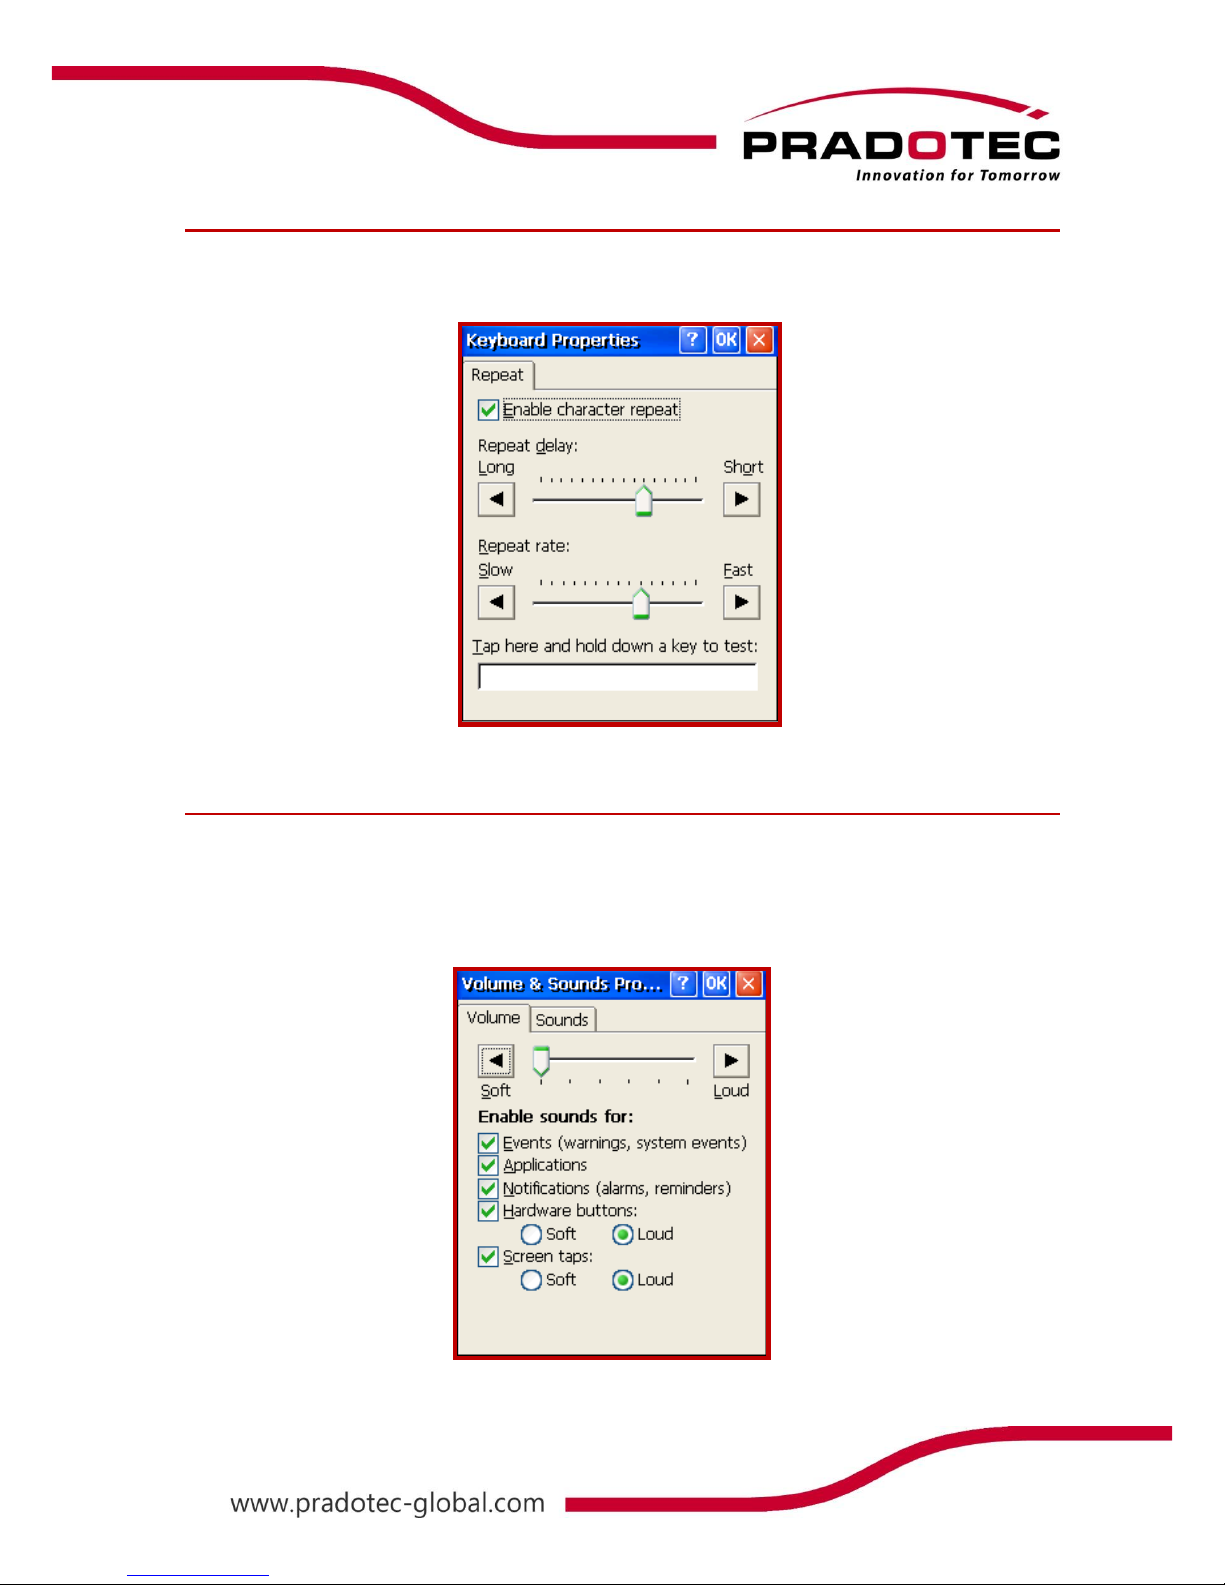
Keyboard
In the Keyboard Menu, you can set two things: repeat delay and repeat rate and an option to
check on whether to Enable character repeat or not.
Audio Volume
When you choose the Volume and Sound properties, on the first page you can set the
volume of the speaker and enable sounds for certain warning or applications. On the Volume
tab, user can set the volume of the sound. When you click on Sound page, user can
customize the window events’ sound.
Page 22
21
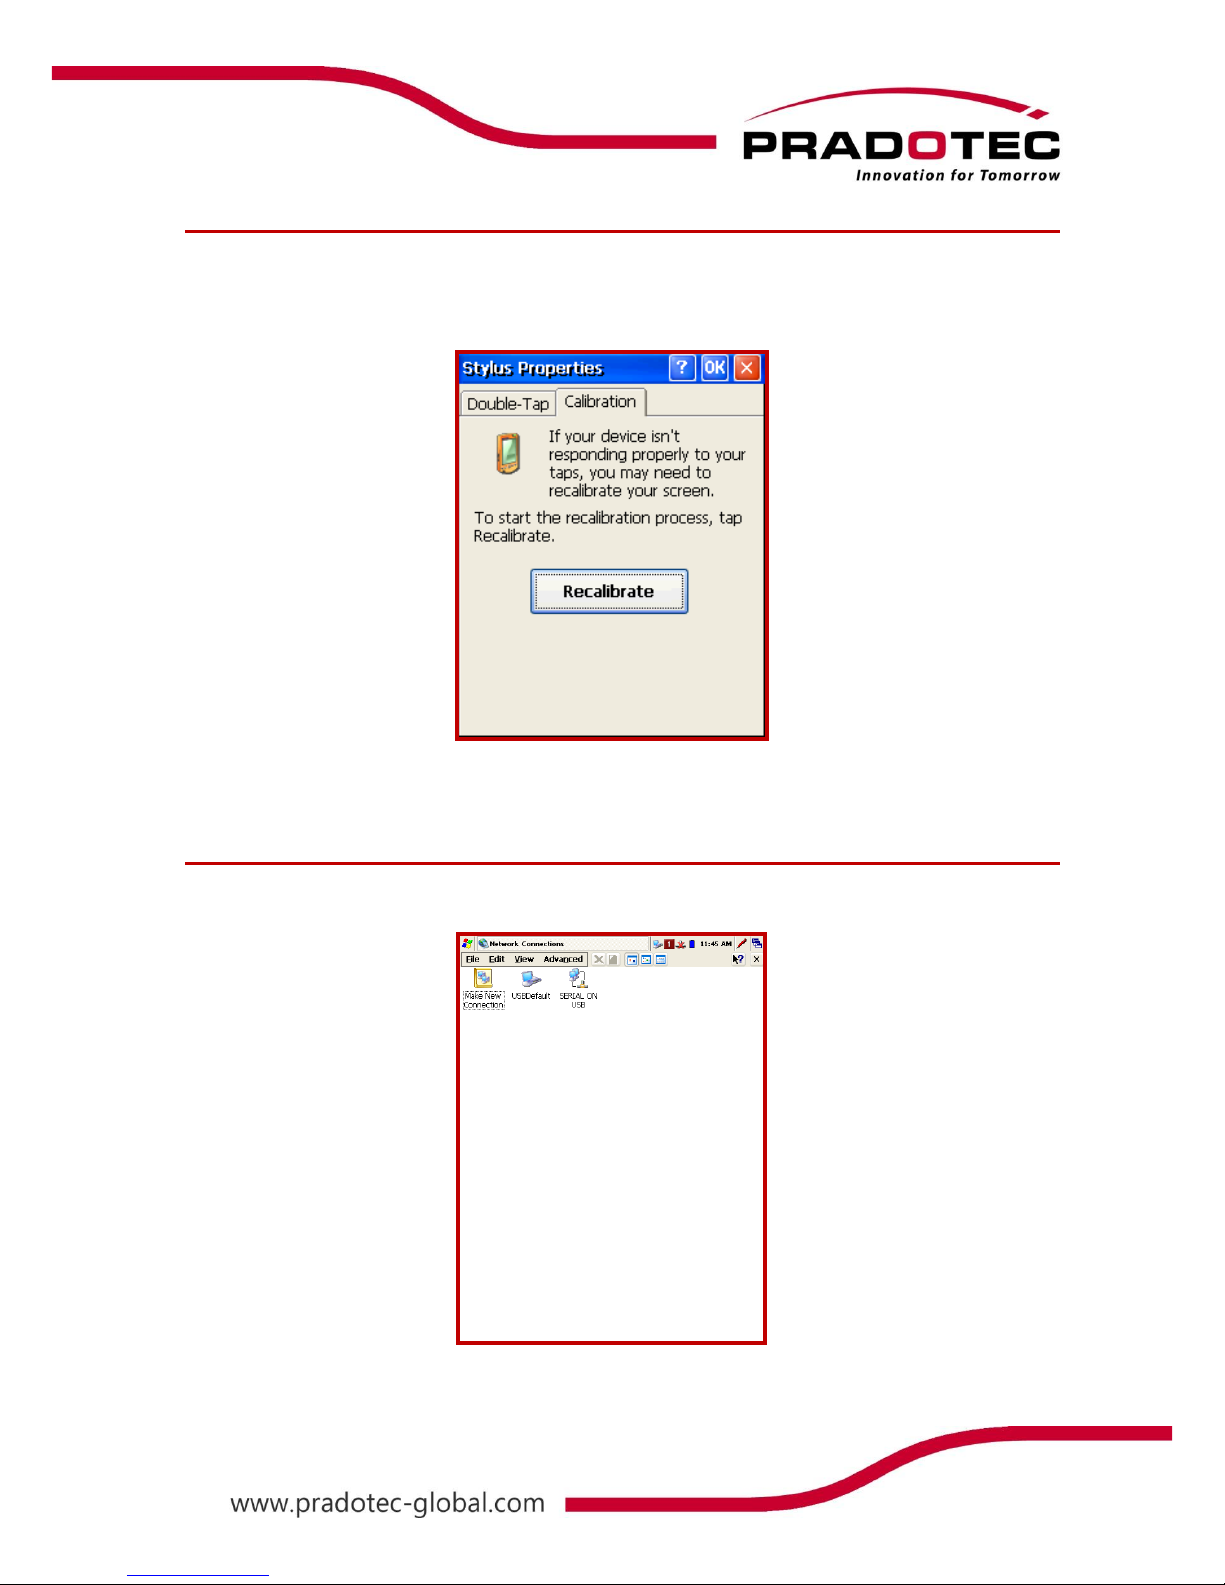
Stylus Properties
In this Stylus Properties, user can recalibrate the sensitivity of the stylus as well as checking
on the mouse double-tap setting.
Network & Dial – Up Connection
When tapping on the Network and Dial-up Connection, a default connection will be
created as “USB ActiveSync”.
Page 23
22
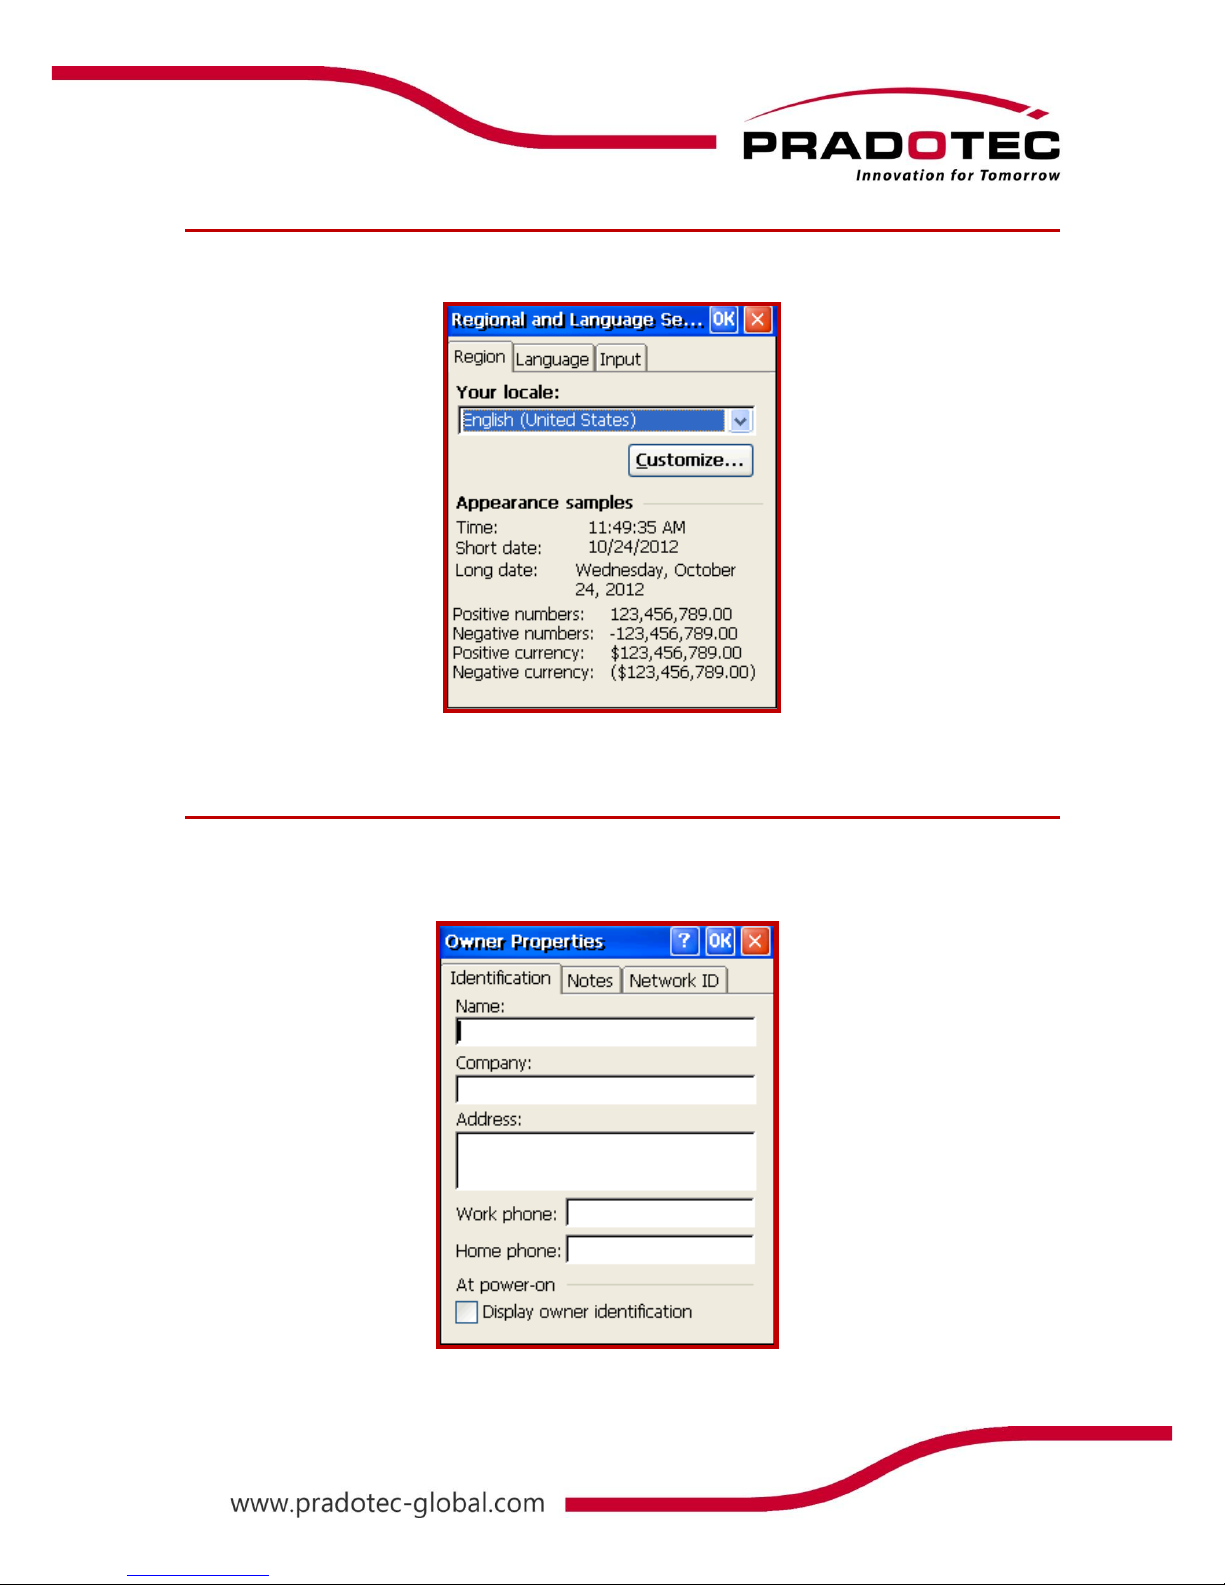
Regional Setting
On the Regional Setting, user can set your local, language, number, current time and date
accordingly.
Owner Properties
On the Owner Properties, user could insert their own personal information and network ID.
This depends on user’s preferences.
Page 24
23
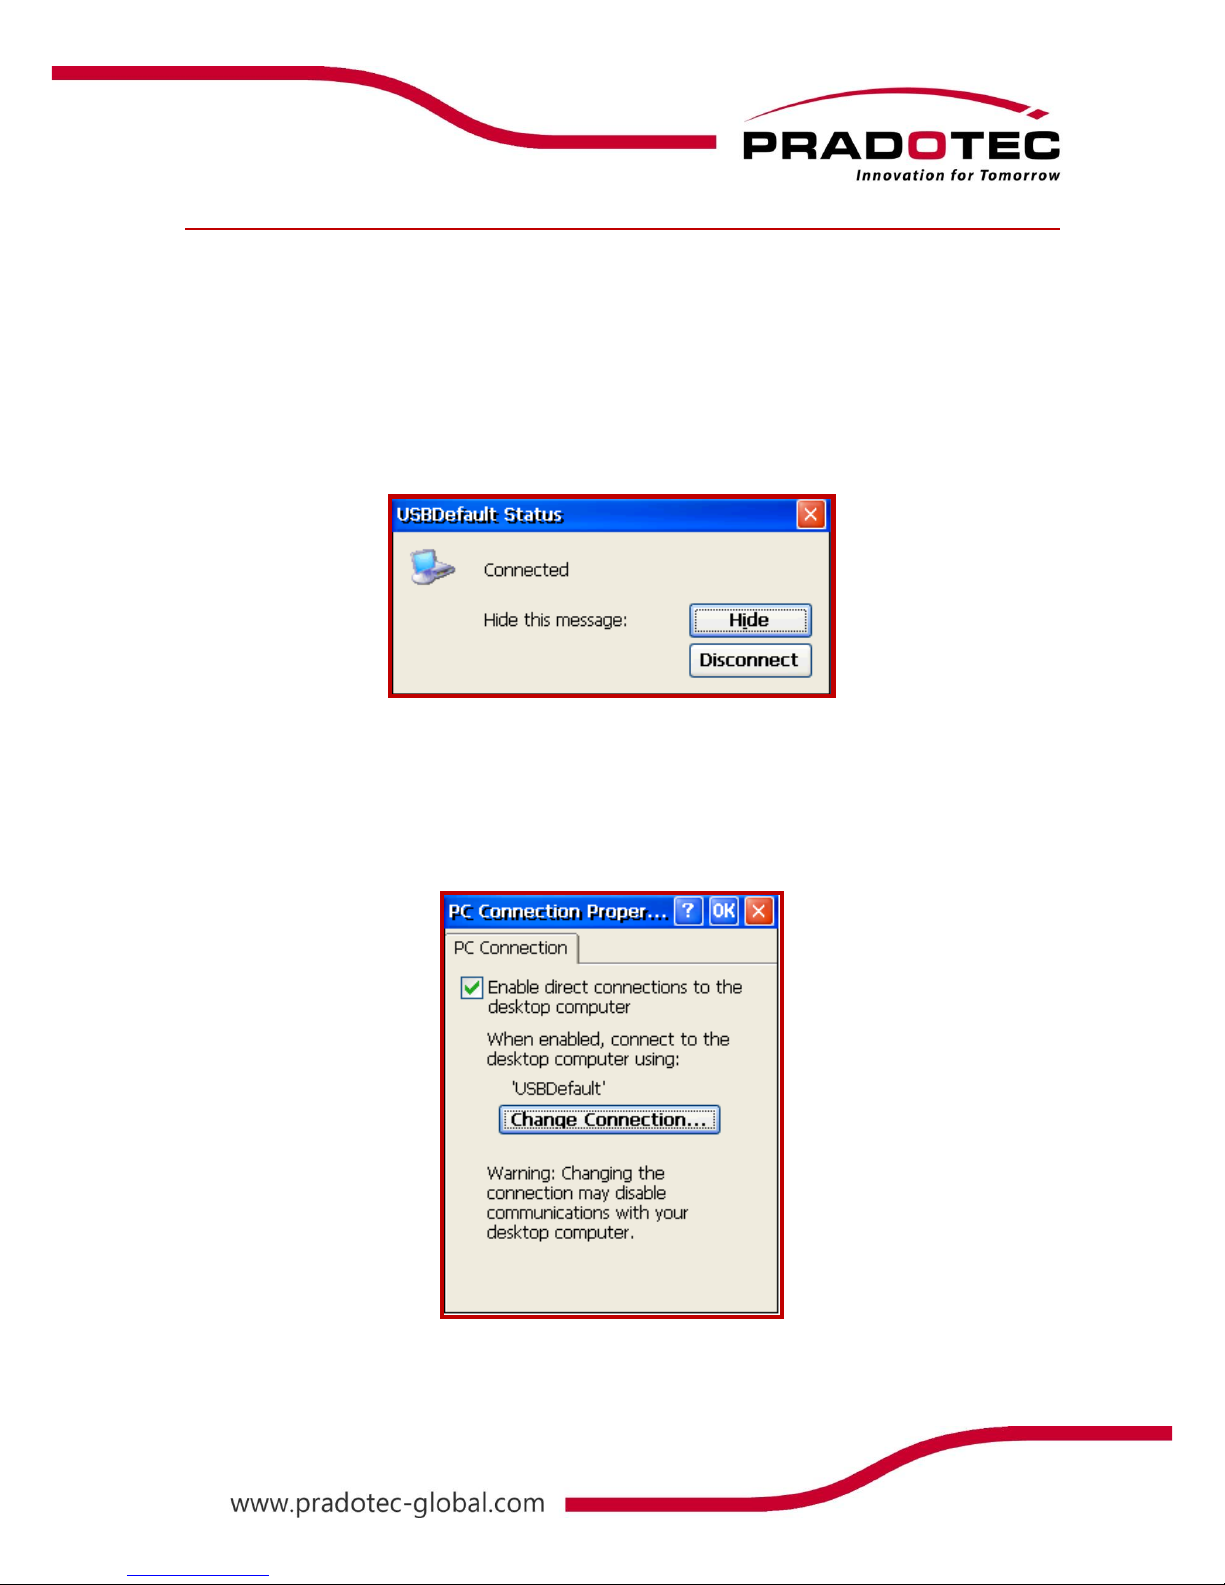
PC Connection
PC Connection is to enable the unit to directly communicate with personal computer or
other communication devices. The default is set to USB ActiveSync. However, if there is more
than one connection being created on the "Network and Dial-Up Connection", user need to
change the connection setting before any of the communication devices can be linked, e.g.
IrDA. To check the status of PC connection, user can go to
Start -> Settings -> Control Panel -> Network and Dial-up Connection -> USB Default.
For the setting, user can go to
Start -> Settings -> Control Panel -> PC Connection.
Page 25
24
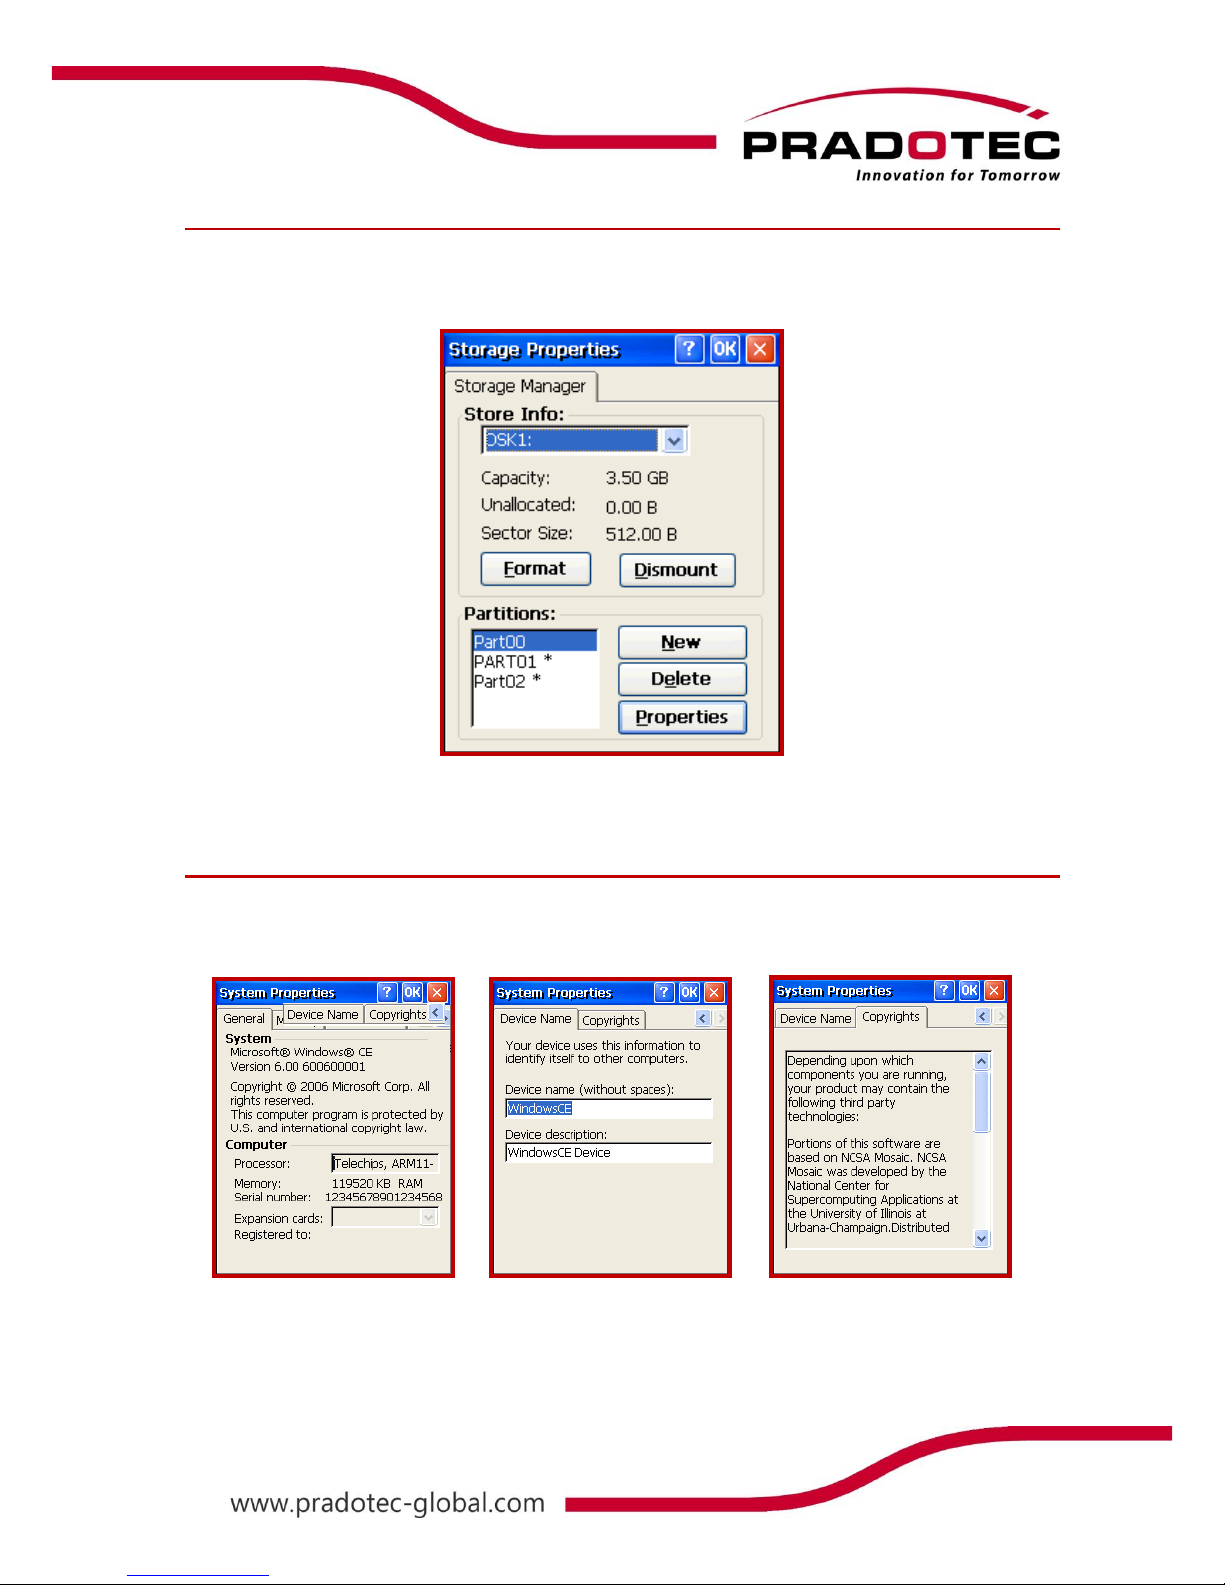
Storage Properties
Go to Start -> Settings -> Control Panel -> Storage Manager. In the Storage Properties,
user can manage the storage by formatting it, dismounting it or create new partition on it.
System Properties
In the System Properties, it will show the user the system information, device name and
copyrights.
Page 26
25
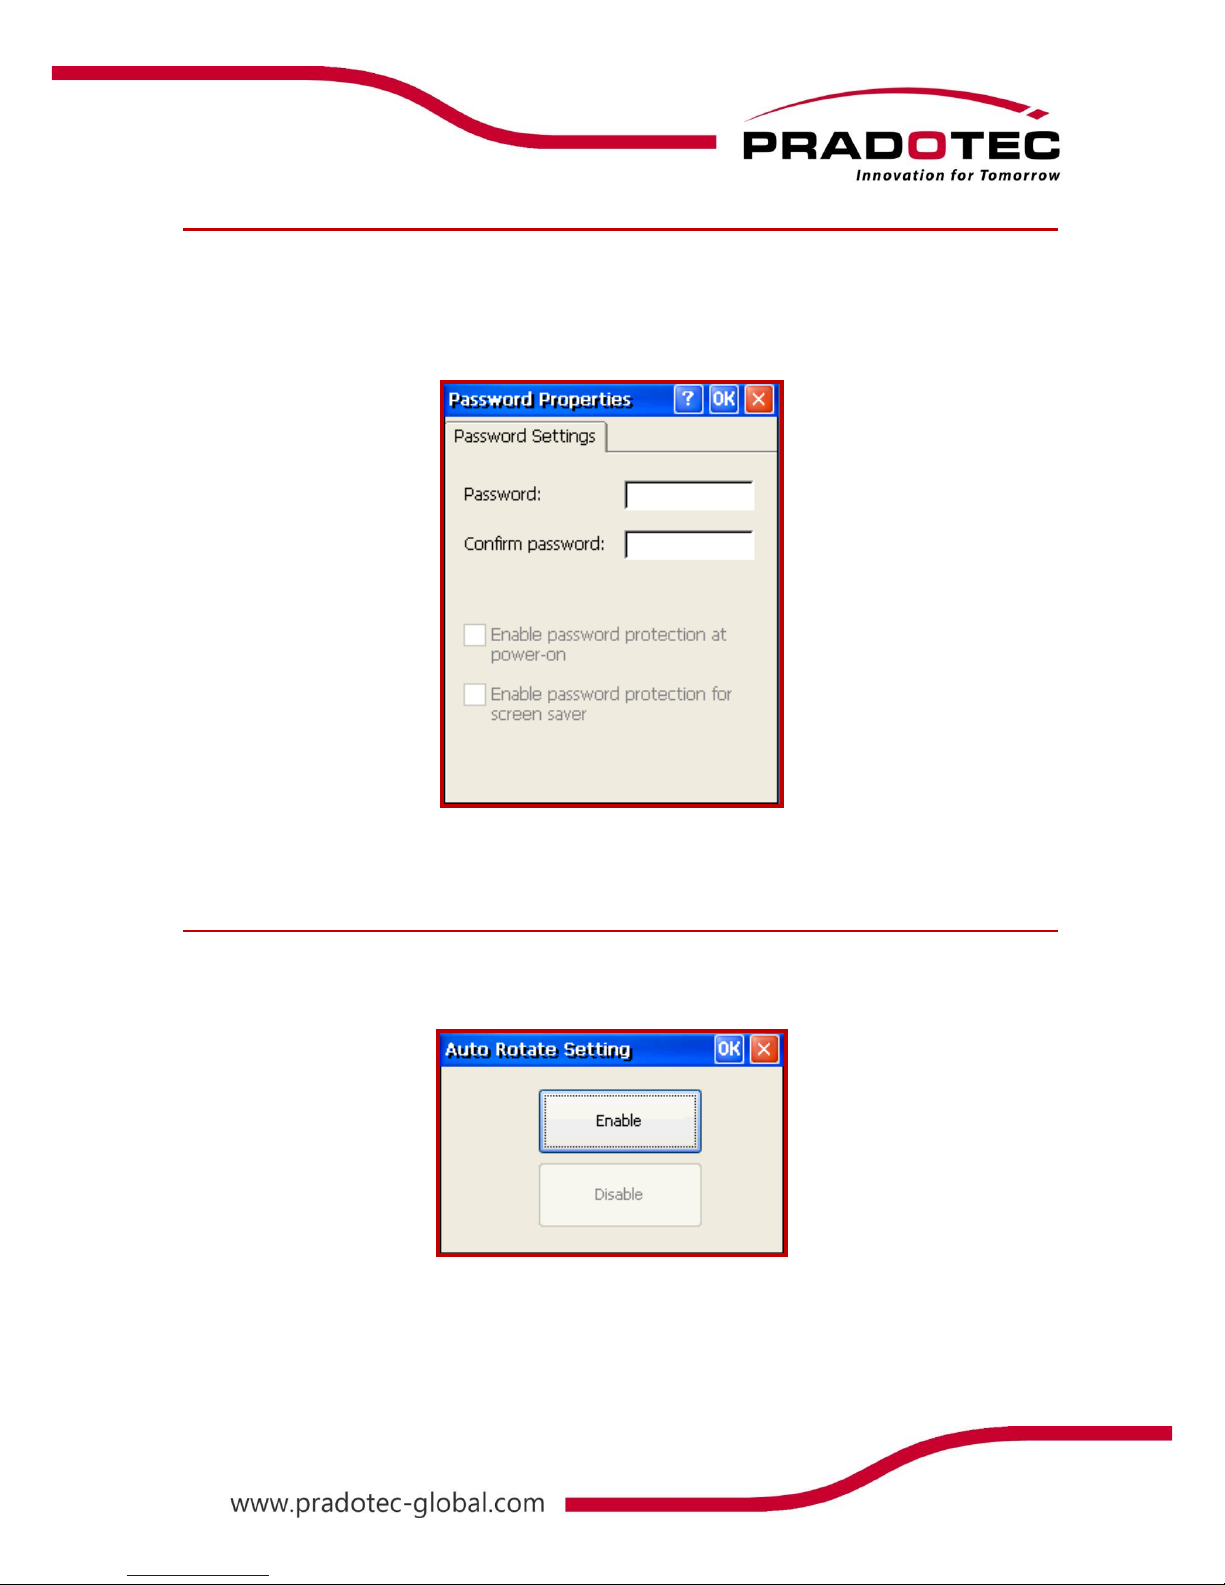
Password Properties
User can set the Password to maintain privacy or prevent people from reading the HRT700.
Screen Rotation
This feature allows user to rotate the screen display. It is useful for viewing landscape picture.
Page 27
26
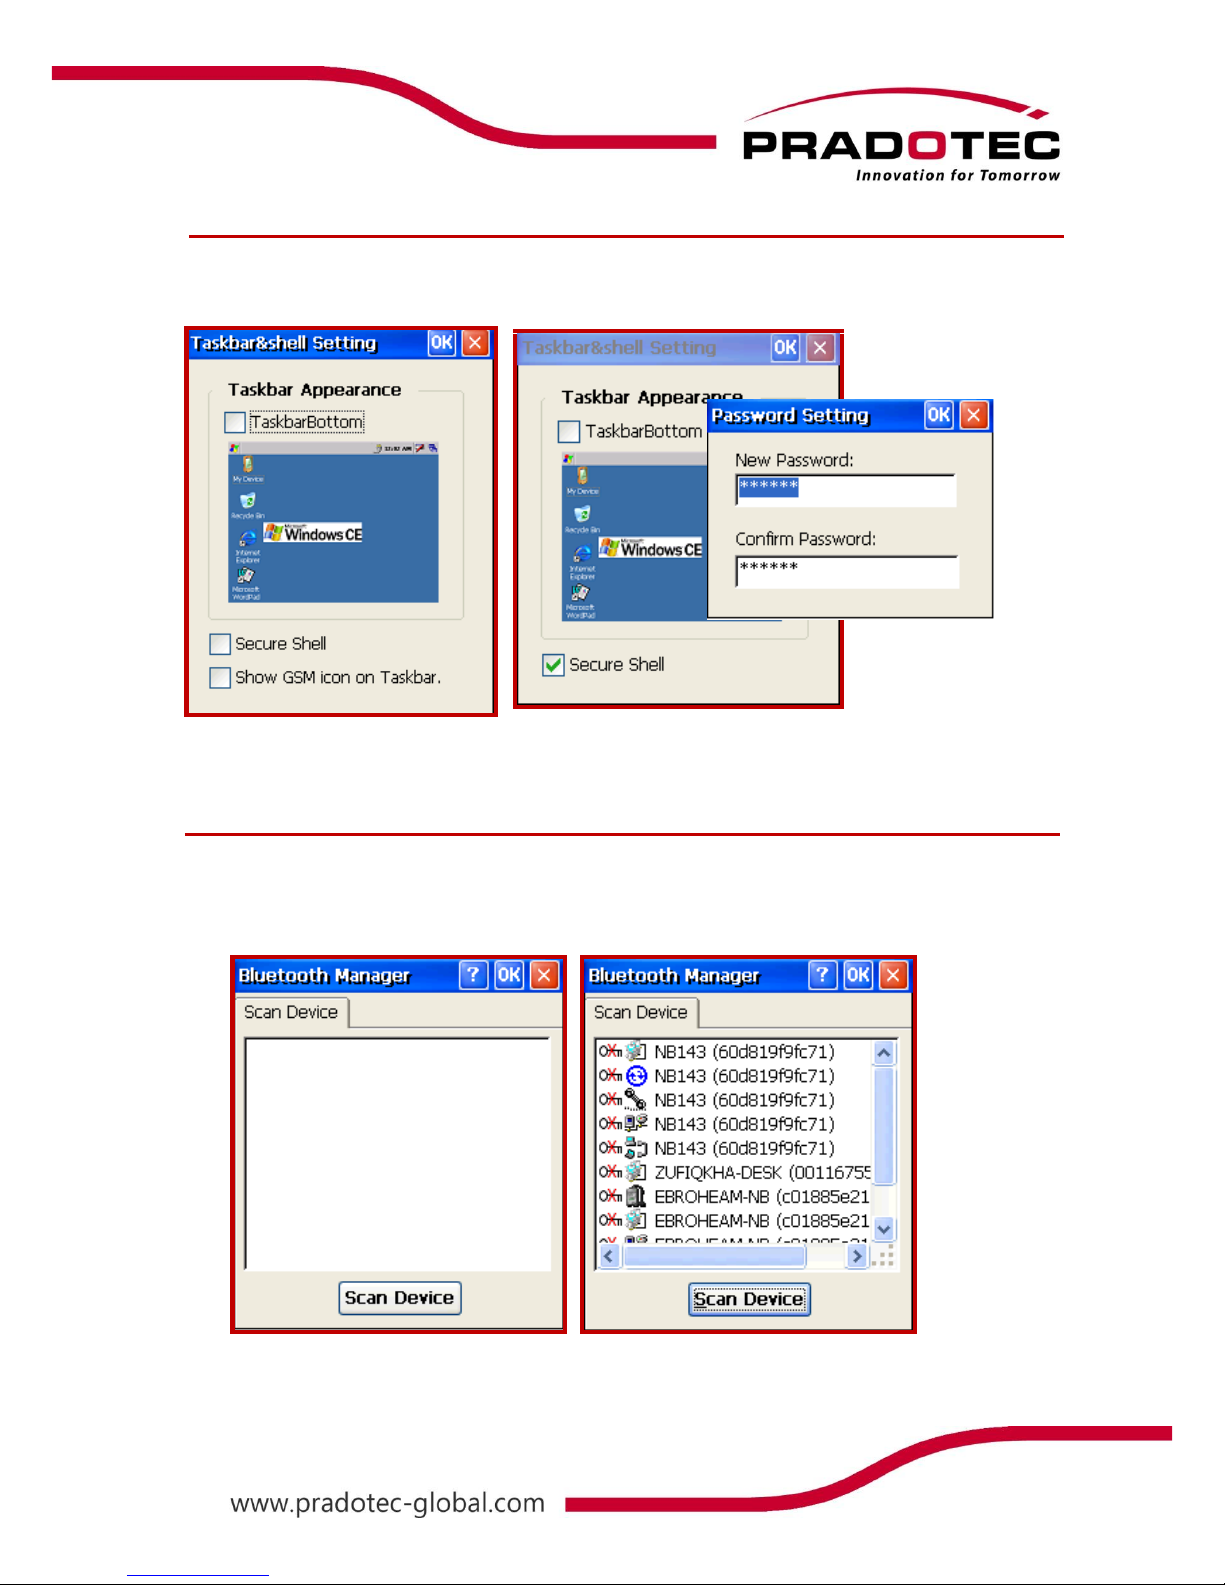
Taskbar & Secure Shell
Allow user to set the Taskbar and Secure Shell feature. Secure Shell enables user to control
accessibility of Control Panel. The default password is “123456”.
Bluetooth Device Properties
Allow user to scan and pair with connecting Bluetooth devices. The HRT700 Bluetooth feature
must be turn on for it to scan. For turning on the Bluetooth, please refer to the manual below.
Page 28
27
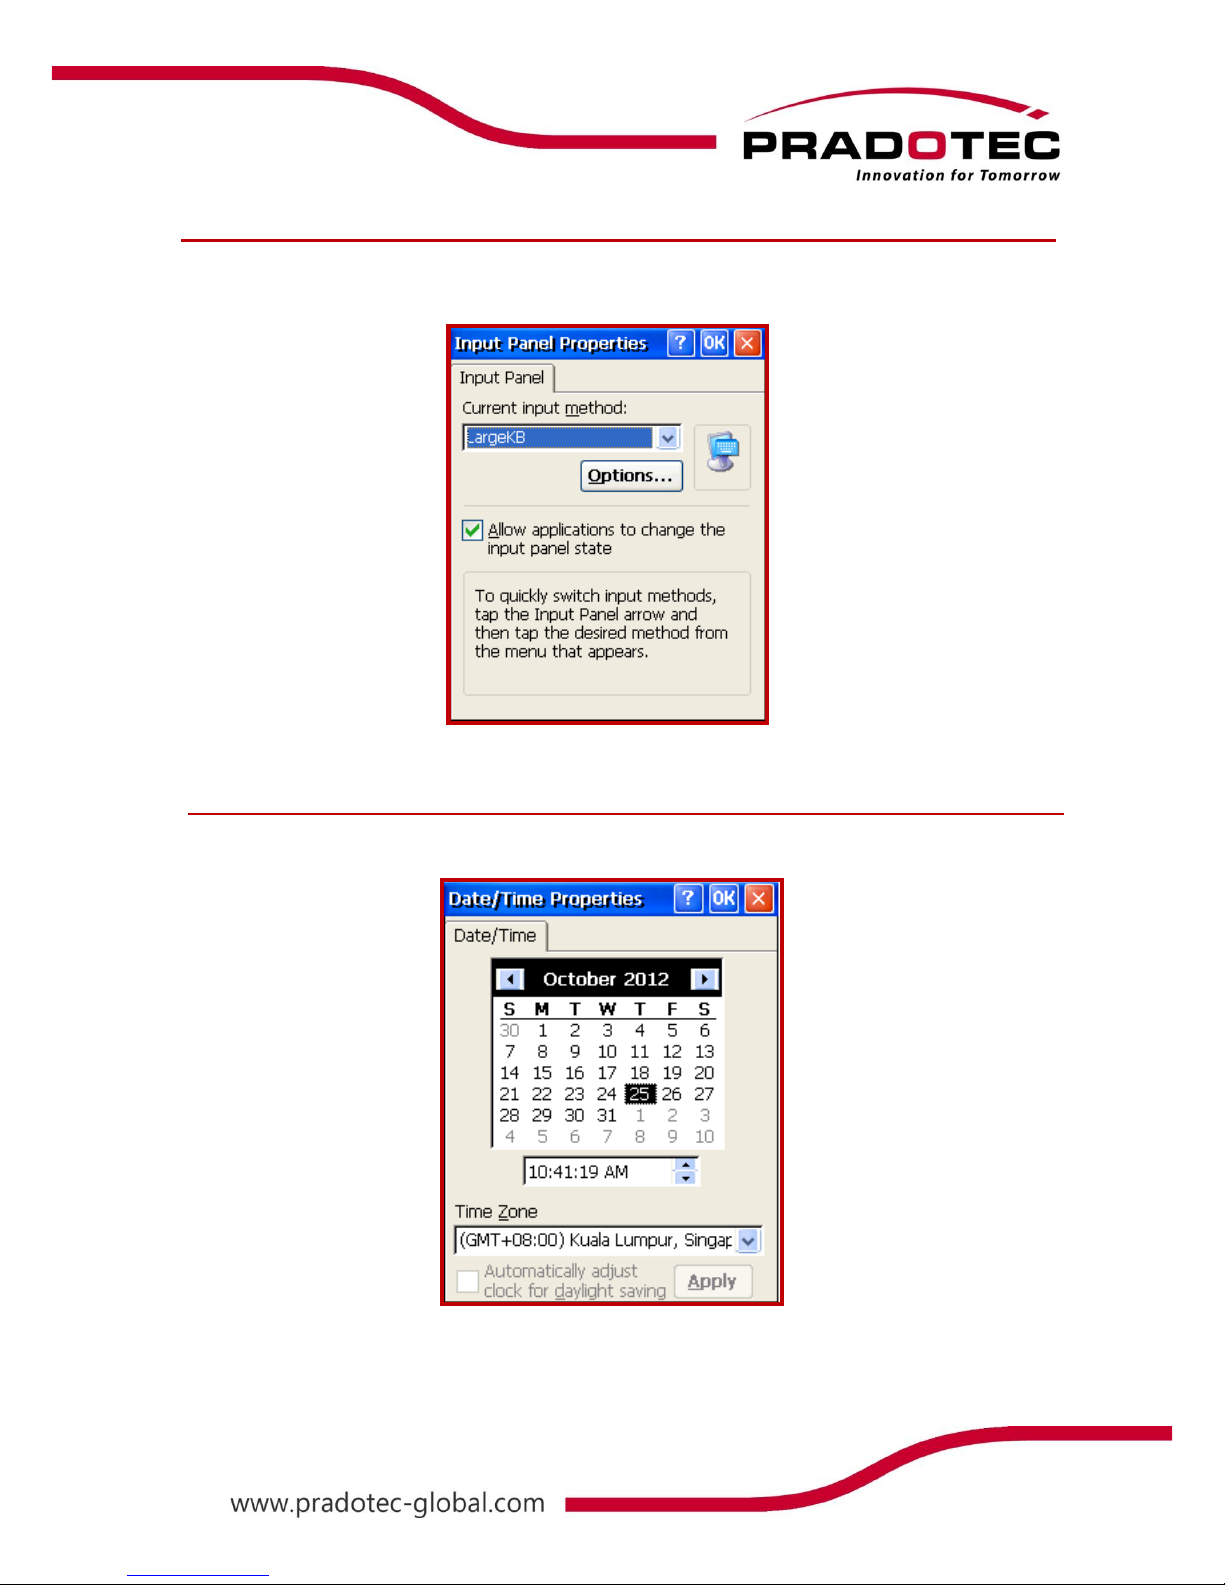
Input Selection Panel
Allow user to change current Input Panel state: Large KB.
Single tap on the SIP at the taskbar will activate the input panel selection.
Date & Time Properties
Allow user to configure the date, time and time zone. It also comes with the daylight saving
features.
Page 29
28
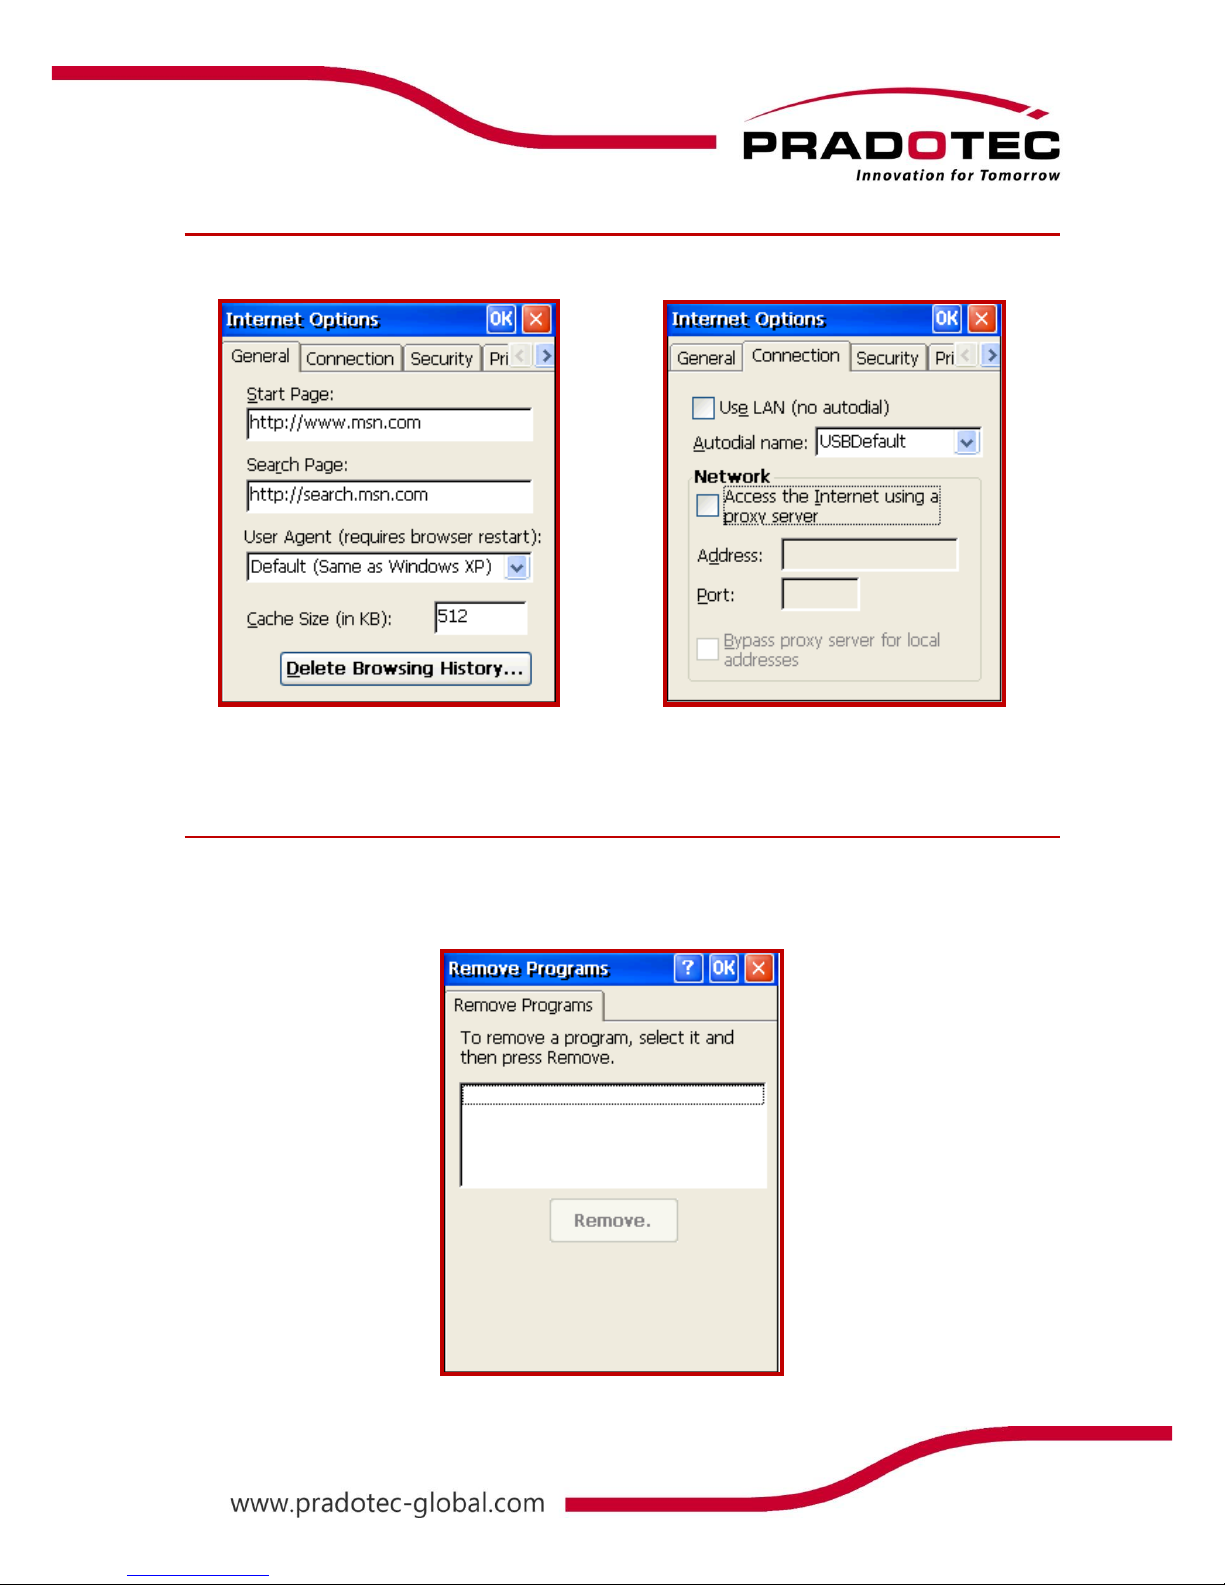
Internet Options
Allow user to configure the network connection setting and the default homepage.
Remove Programs
Allow user to remove installed programs systematically.
Page 30
29
Internet Explorer makes it easier to get the most from the World Wide Web, whether you are
searching for new information or browsing through your favorite Web sites.
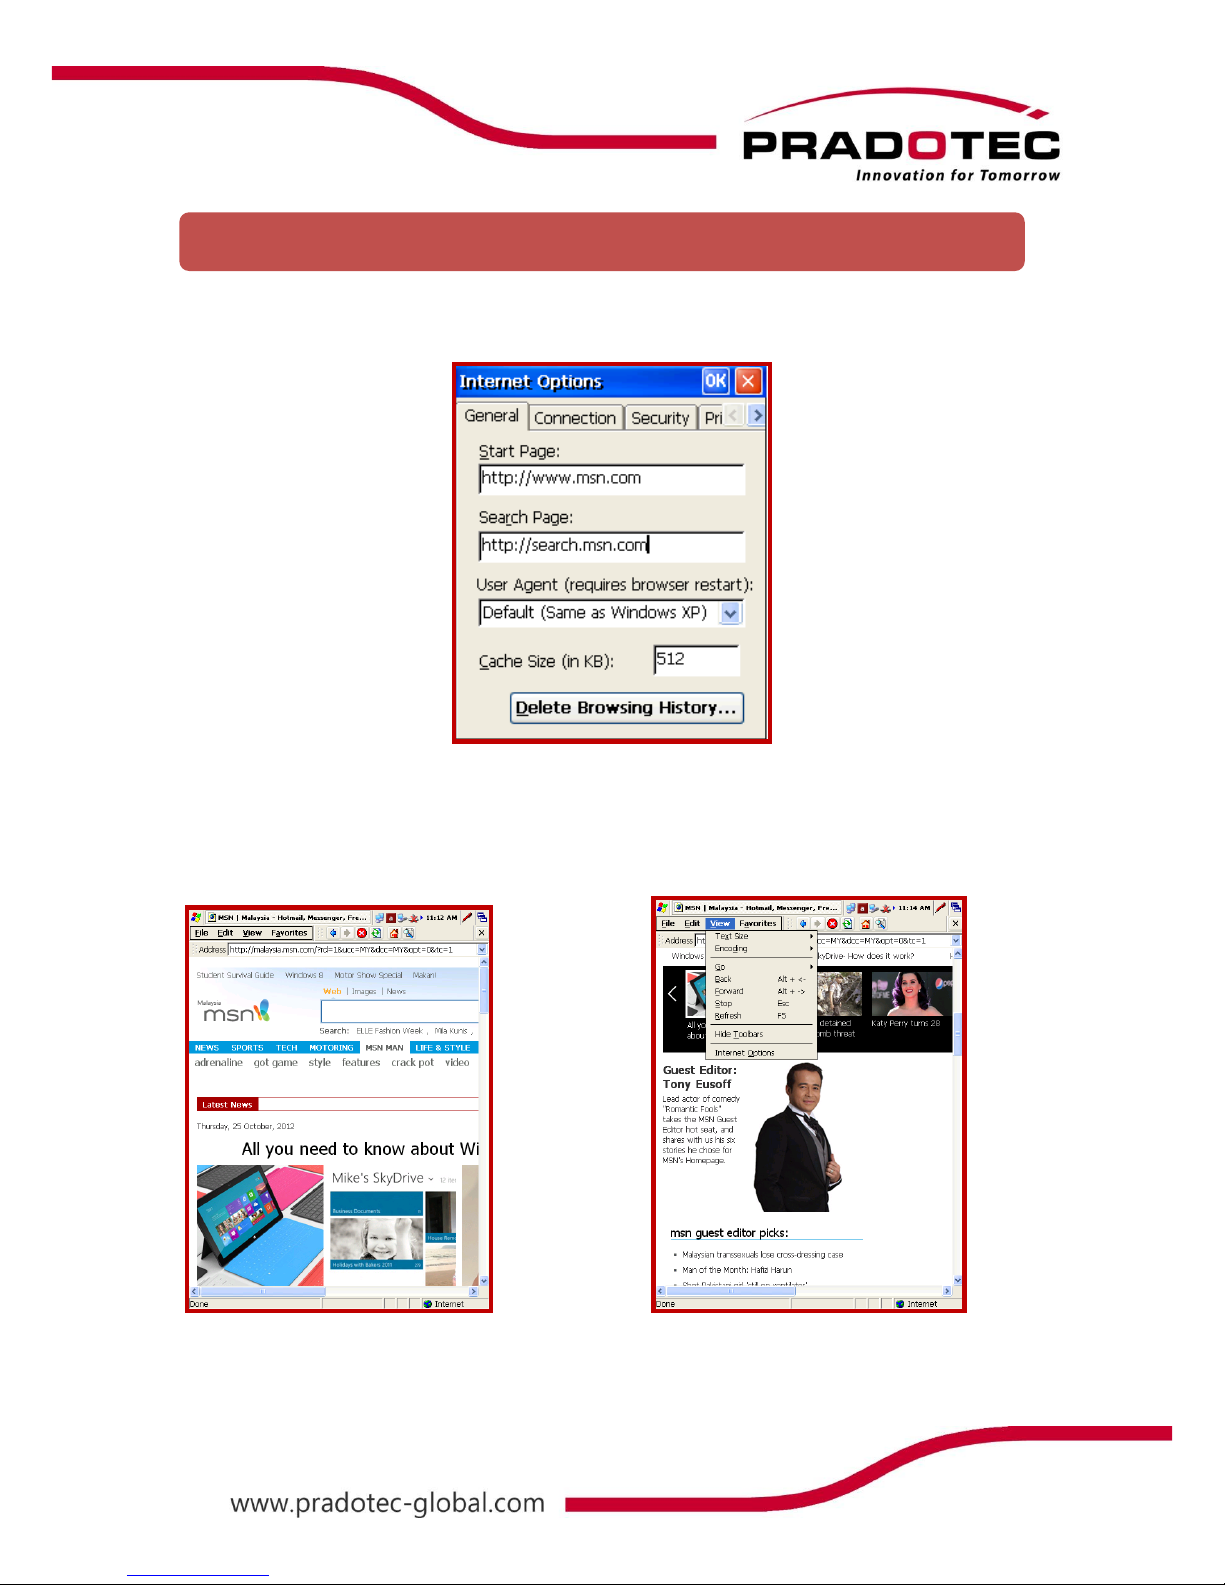
In the control panel menu, under the internet option, user may customize the appearance of
the browser when the program is launched. User may also customize other options relating
to connection, security and advanced.
The start page of Internet Explorer. The View menu user has the option of
limiting the taskbar to be shown and font size.
Internet Explorer
Page 31
30
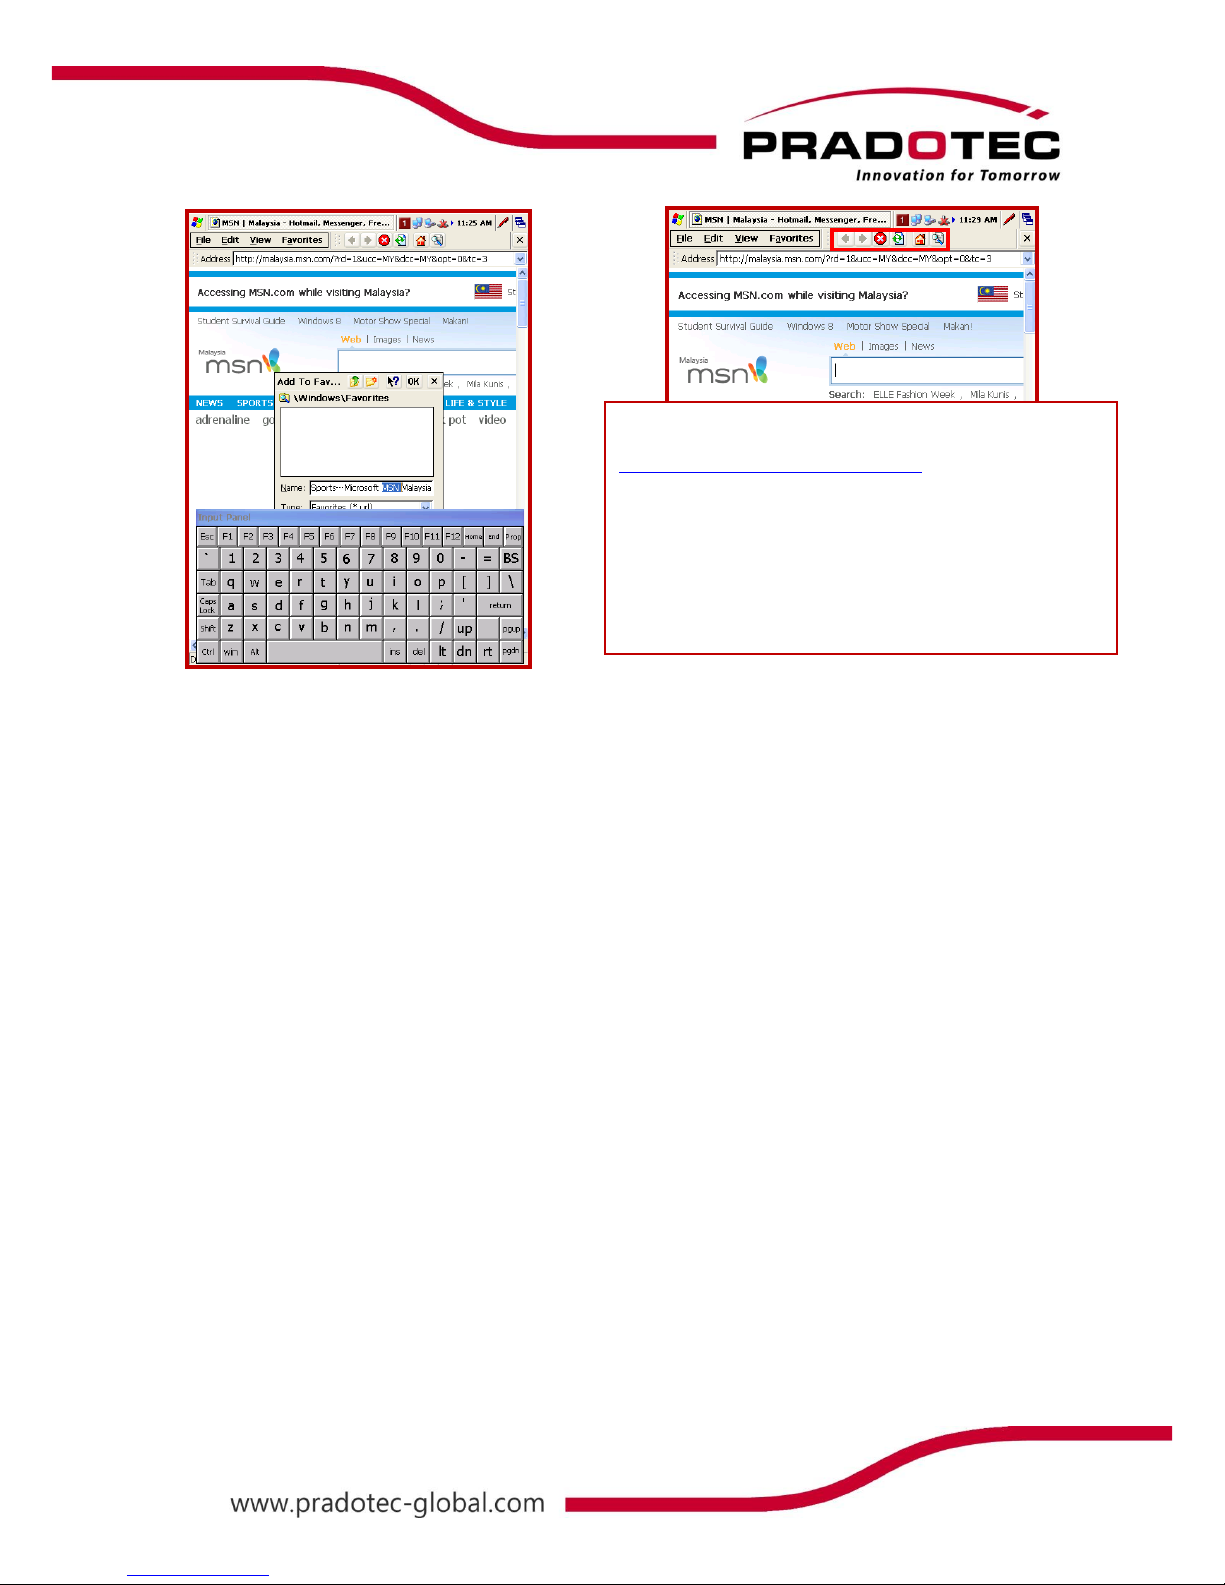
On the Favorite menu, user may store and organize webpages that are used frequently by
adding the shortcut in the Favorite list. User may also synchronize the list of favorite link in
HRT700 with another desktop computer where changes can be made to either one. For more
information on synchronization, see ActiveSync Help on desktop computer.
User could also go to a webpage, by typing the internet
address – for example,
www.PRADOTEC-GLOBAL.com.my
in the address bar and then click the Go button. The
Back and Forward buttons will enable user to return to
the previous page or view the next page.
The stop button will enable user to stop viewing a page
when the webpage is taking too long to open. When
receiving a message that a web page cannot be
displayed or to make sure you have the latest version of
Page 32
31
Getting Connected
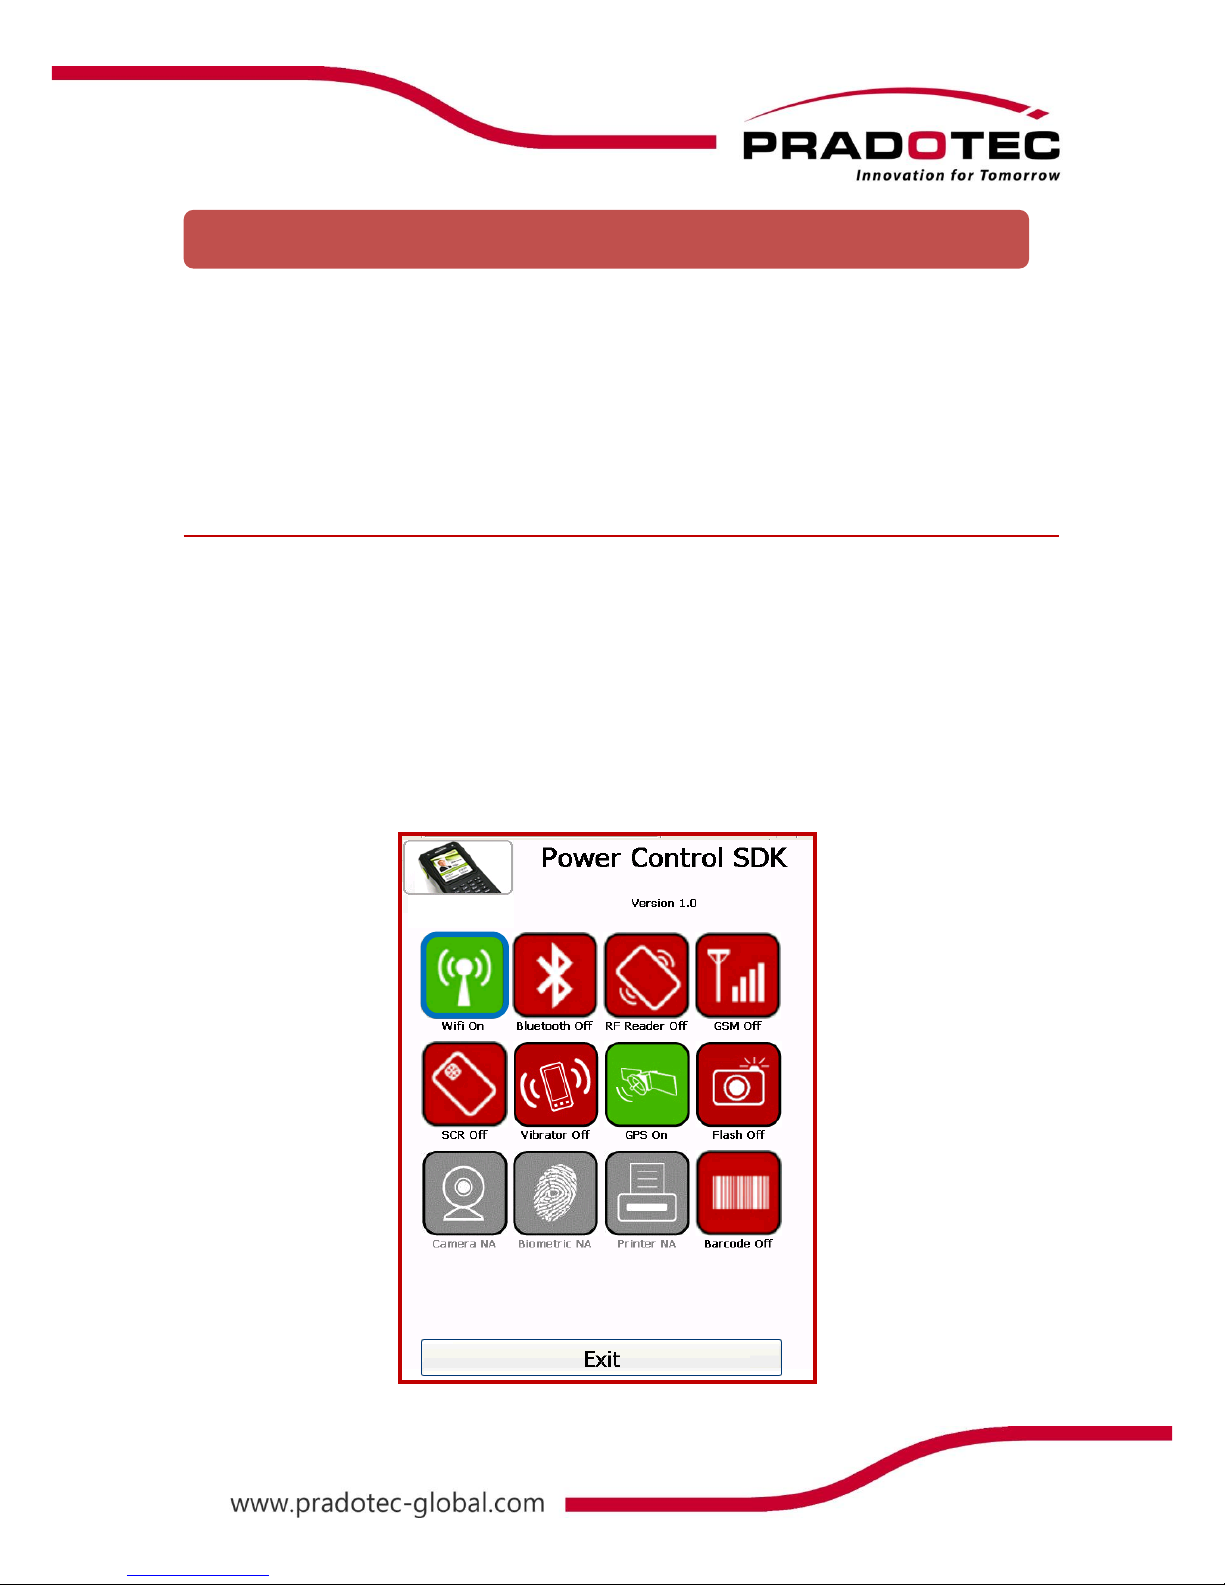
All the features and peripherals of HRT300 can be accessed and enabled by getting into the
Power Control screen. The following pathway would lead the user to the Power Control
screen.
Start -> Settings -> Control Panel -> Power Control
Wireless LAN (Wi-Fi) Usage
HRT700 has built in wireless LAN which enable user to access Internet by accessing available
wireless provided at public areas, company or home. To access this feature, first turn it ON by
following the instructions below.
Go to Power Control, press once on the icon to turn ON or turn OFF the Wireless LAN
function. If the icon is red, then it is on the OFF status, or else if the icon is green, it is on the
ON status.
Features
HRTSeries
Page 33
32
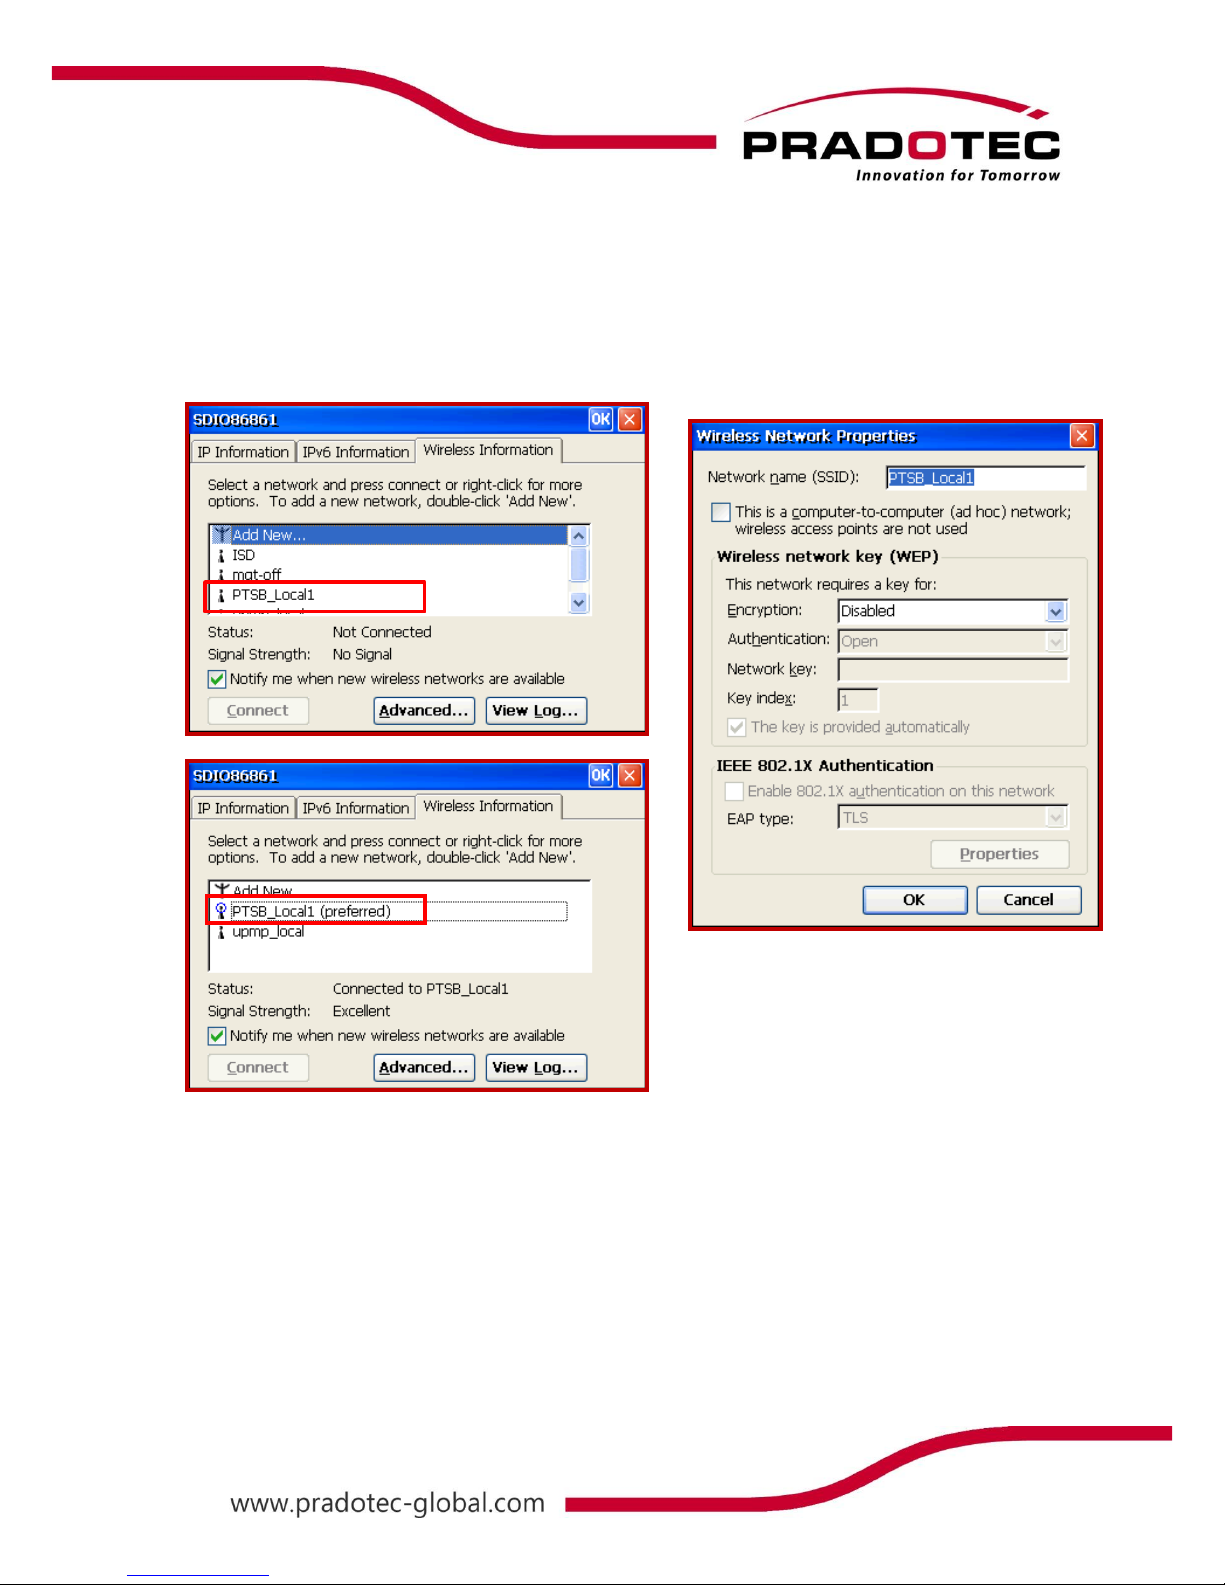
The network icon will popped up on the shell taskbar. Double tap on the icon to configure
the WiFi network properties. On the Wireless Information tab, check on the Notify me
when new wireless networks are available. Select the preferable network, press Connect
and a Wireless Network Properties window will be popped out. Enter the Network key if
the network autentication is enable, else press OK.
The icon before the Network name will be changed; it shows that the device is connected to
the network. User can check on the status and the signal strength.
Page 34
33
Bluetooth Usage
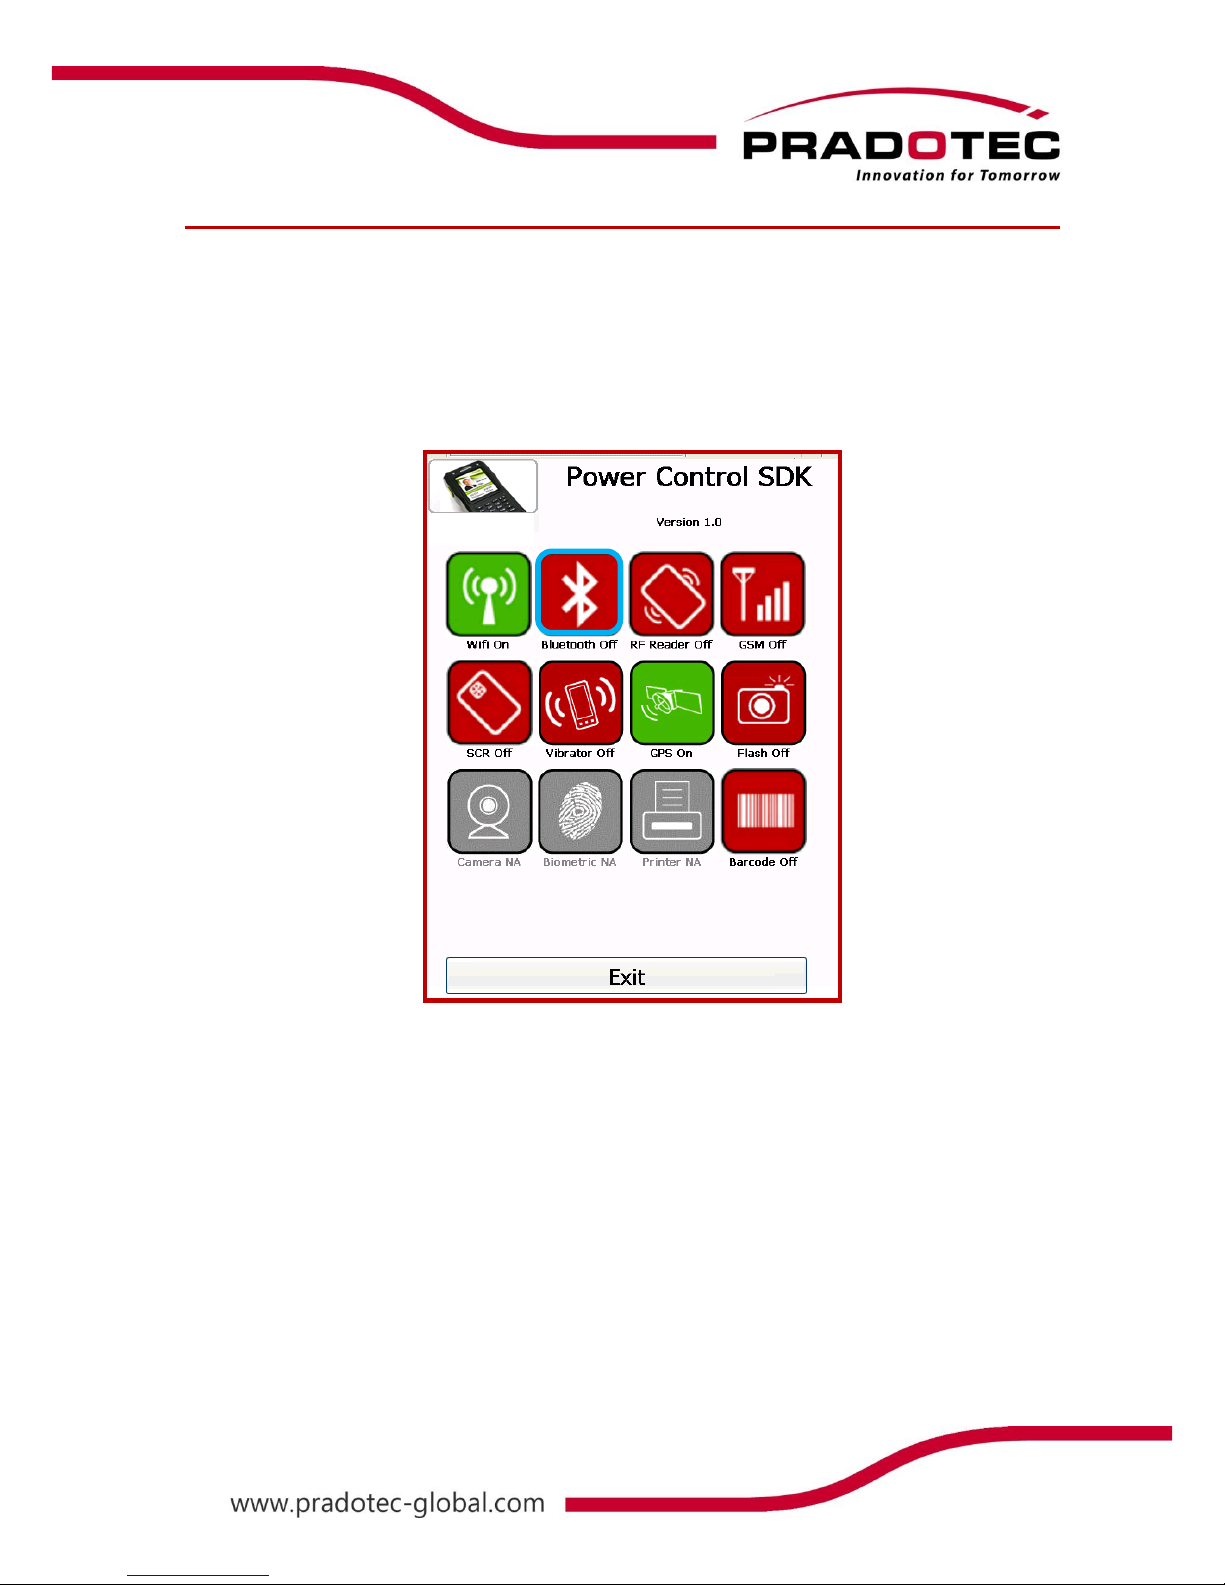
Bluetooth Manager allows user to scan, pair and link with other Bluetooth devices. The
Bluetooth feature of the device must be turned ON in order to do the scanning. For the steps
on turning ON the Bluetooth feature, please refer to the manual below.
To access Bluetooth function, go to Start -> Settings -> Control Panel -> Power Control
and press once on the Bluetooth icon to activate it. If the icon is green, which means it is
turned ON, or else if the icon is red, it is turned OFF or inactive.
HRTSeries
Page 35
34
User may scan and pair with other Bluetooth devices such as mobile phones, PCs, laptops
and etc.
In order to connect to another device, user needs to scan for the device first. Make sure the
other Bluetooth device which wish to be connected is in the coverage.
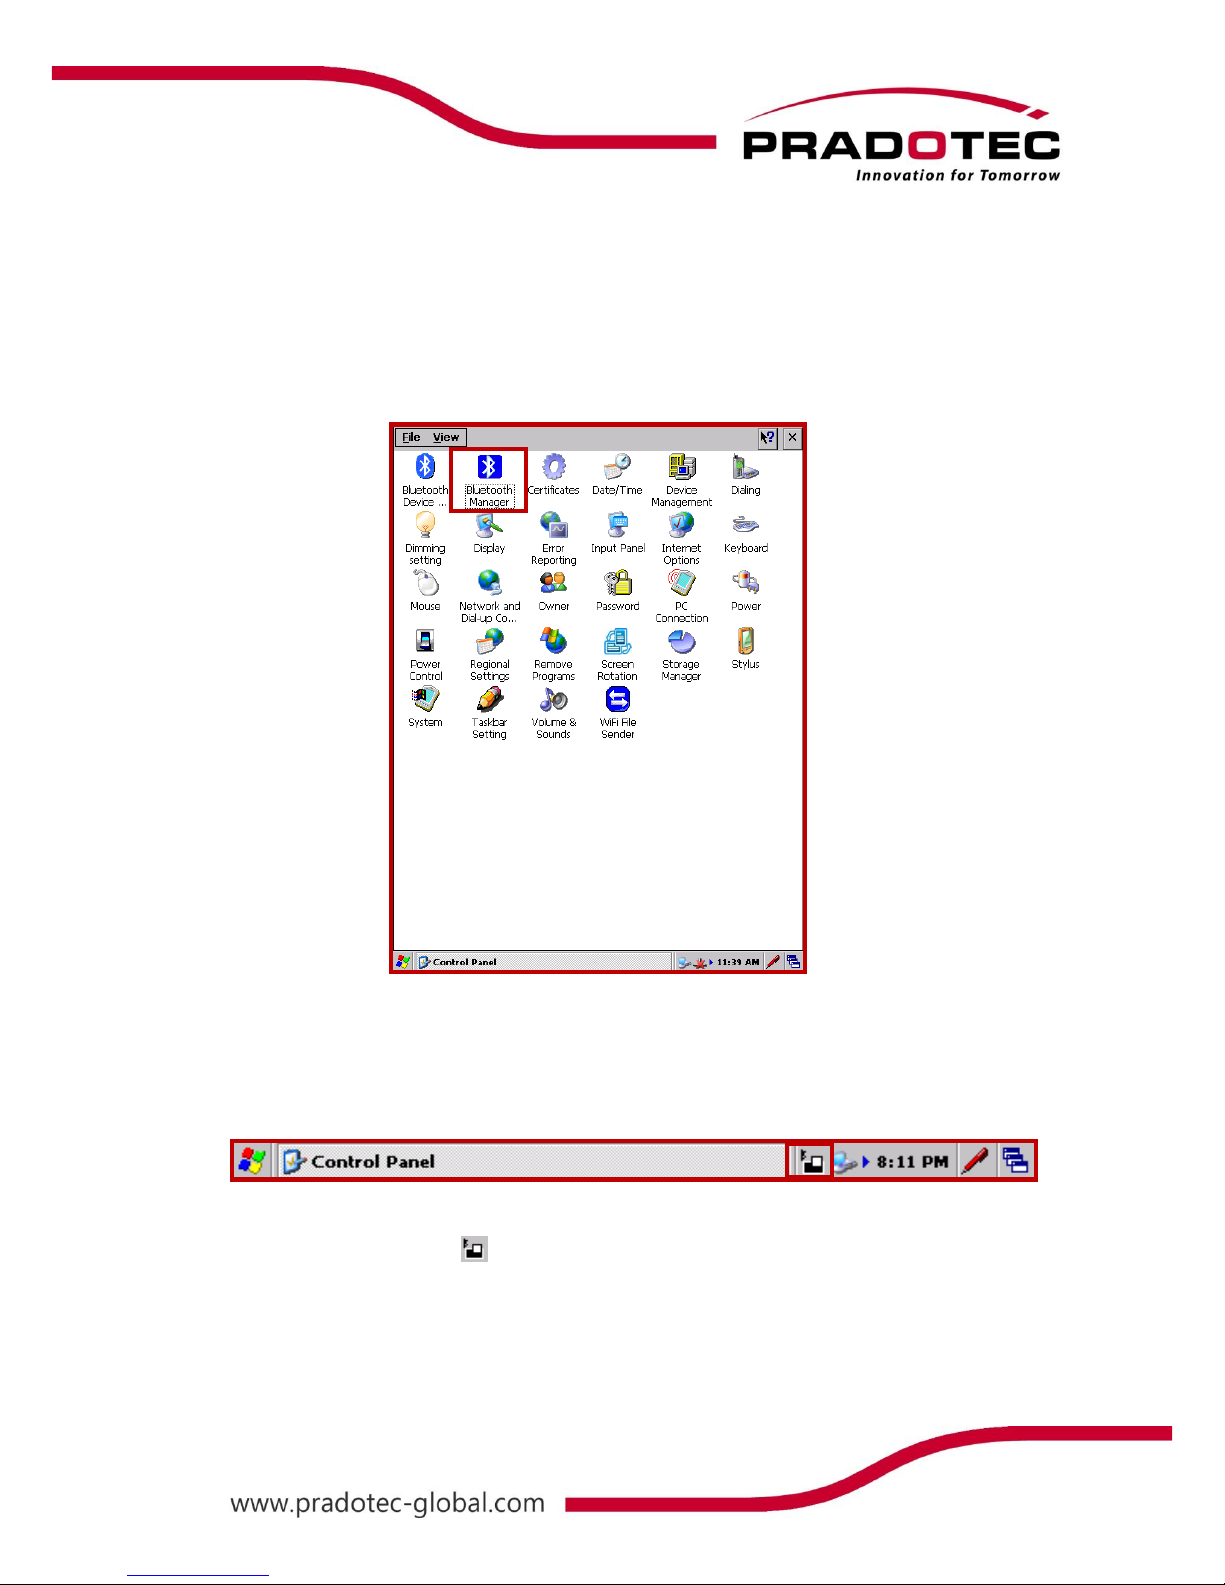
1) Go to Start -> Settings -> Control Panel -> Bluetooth Manager.
.
2) After that, an icon will appear at the taskbar.
3) Single tab on the icon, to continue
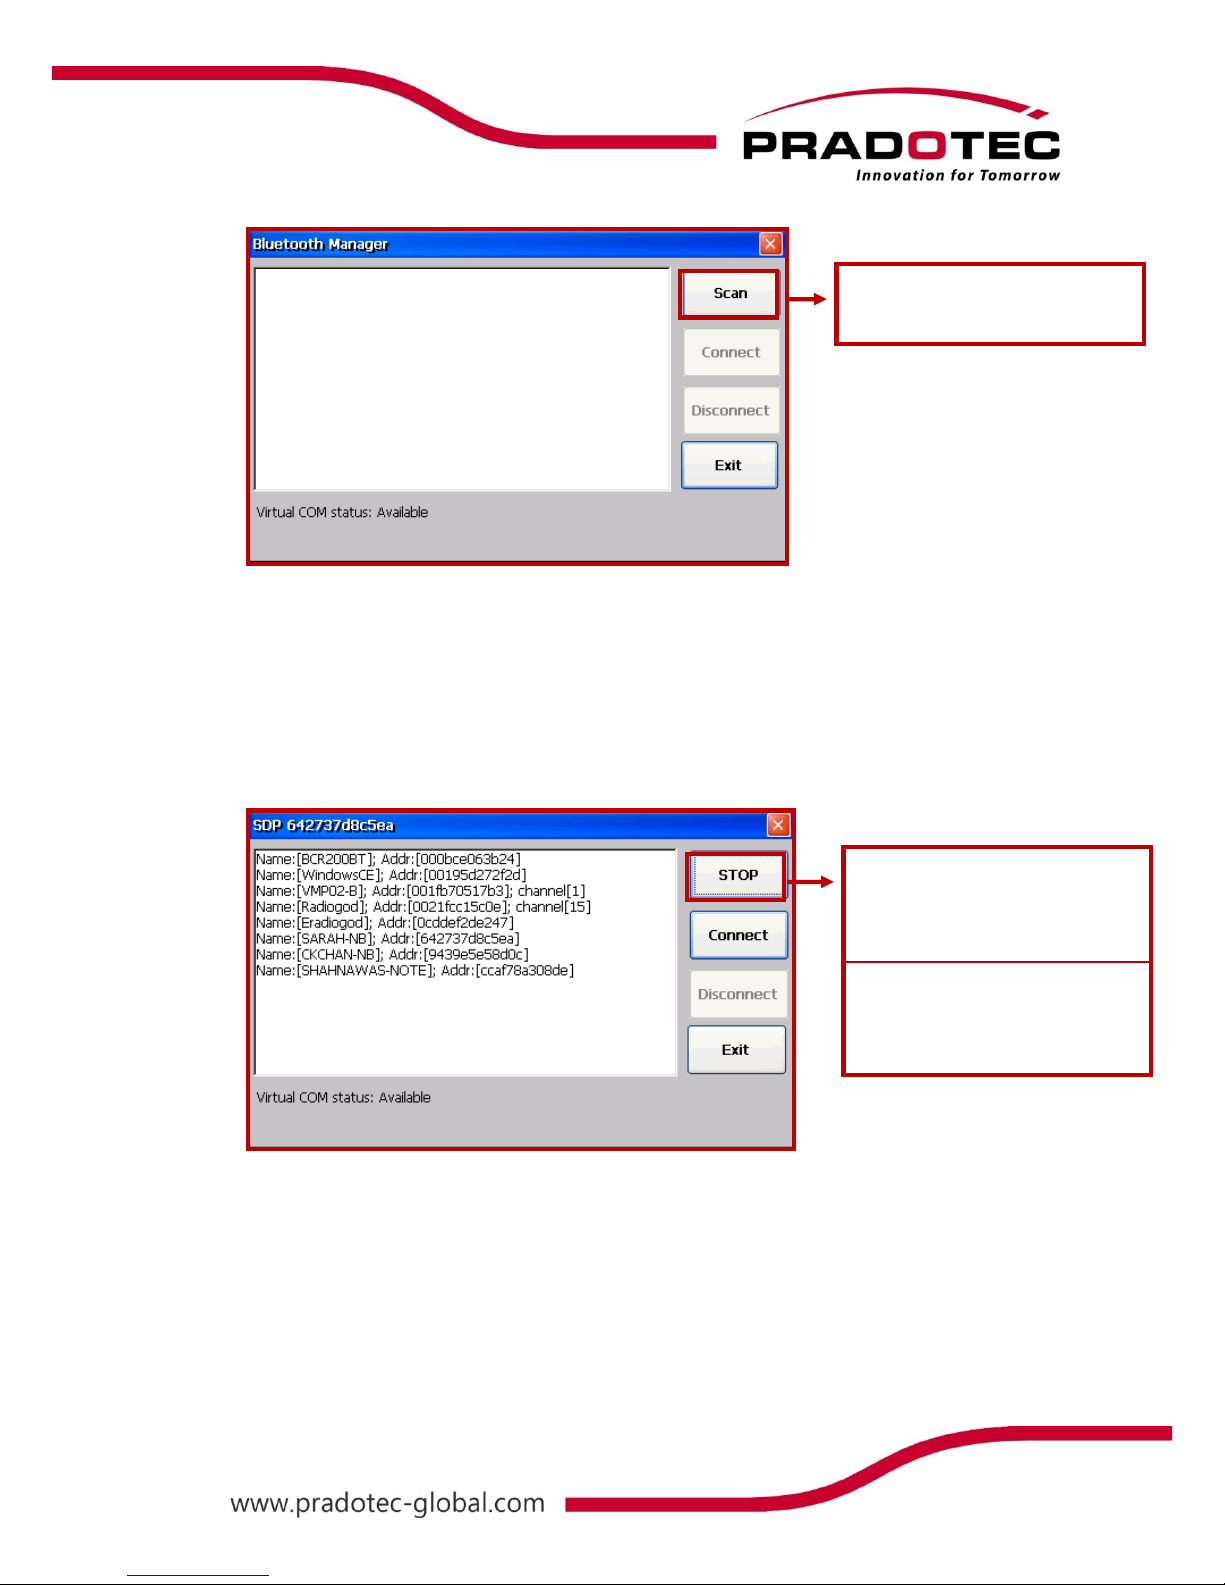
4) The Bluetooth Manager window will appear as below.
Page 36
35
5) Make sure the device that wishes to be connected is at the coverage area. Press Scan
to start scanning.
6) Press STOP if does not wish to continue scanning. Or else, wait until the scanning
process to complete. STOP button will change back to Scan button after the scanning
process is complete.
The device does not make
any connection to any device
Wait for STOP to change to
Scan, else the scanning
process is incomplete.
It changes to Scan, which
means the scanning process
is completed.
Page 37
36
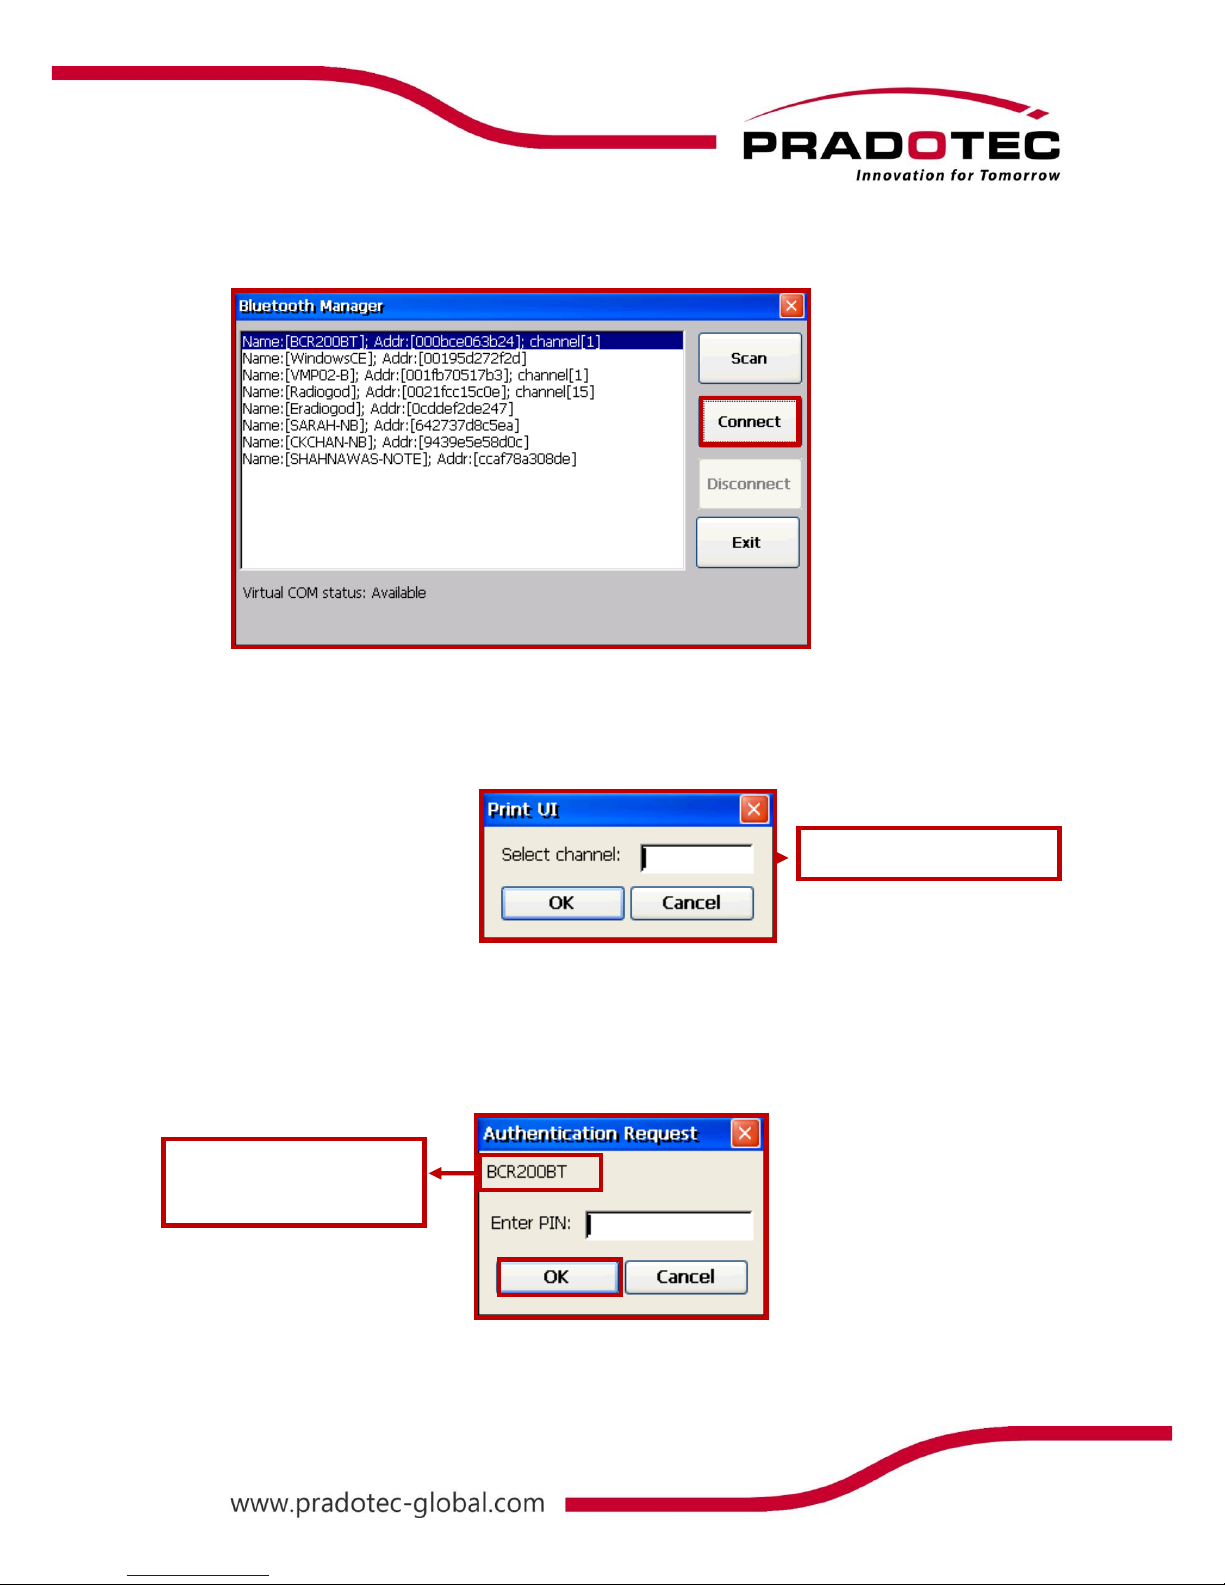
7) Select the device that wish to be connected. Press Connect
8) A Print UI window will be popped up if the channel is not stated. Insert channel
between 1 to 30, less than 1 or more than 30 are bad channels. Then press OK.
9) An Authentication Request window will be popped up. Enter the same PIN for both
devices. Once the device is successfully connected, a Success window popped up.
Press OK, the dialog will be ended automatically but the icon on the taskbar remains.
Channel between 1 to 30
Name of the device that
is connected
Page 38
37
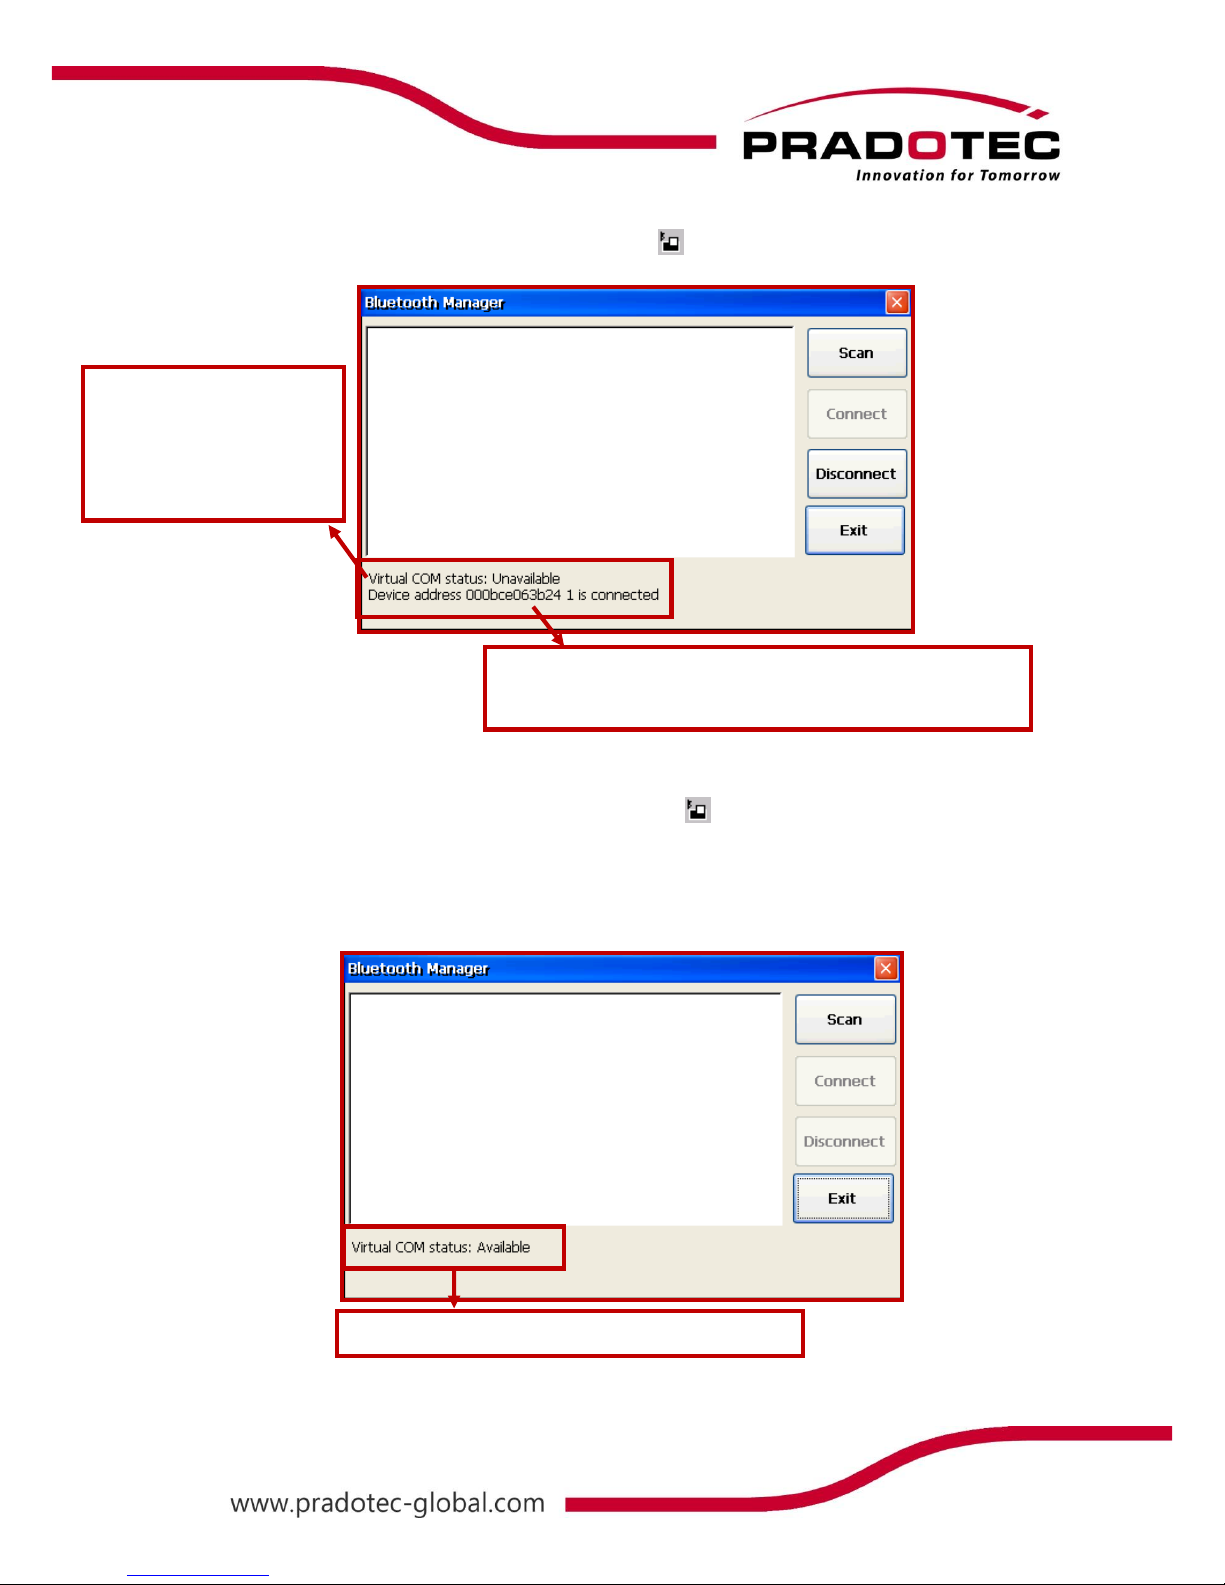
10) Click once on the Bluetooth Manager icon, if wish to check on the connection.
11) Click once on the Bluetooth Manager icon, to reopen the dialog. A device is
connected to this device by Virtual COM. In order to connect with other device, this
device needs to be disconnected with the current device to continue further. Press
Disconnect.
Unavailable means that
there is a device
connected to this device
by Virtual COM
This is the address and channel of the device that is
connected to the device
Available, no device is connected to this device
Page 39
38
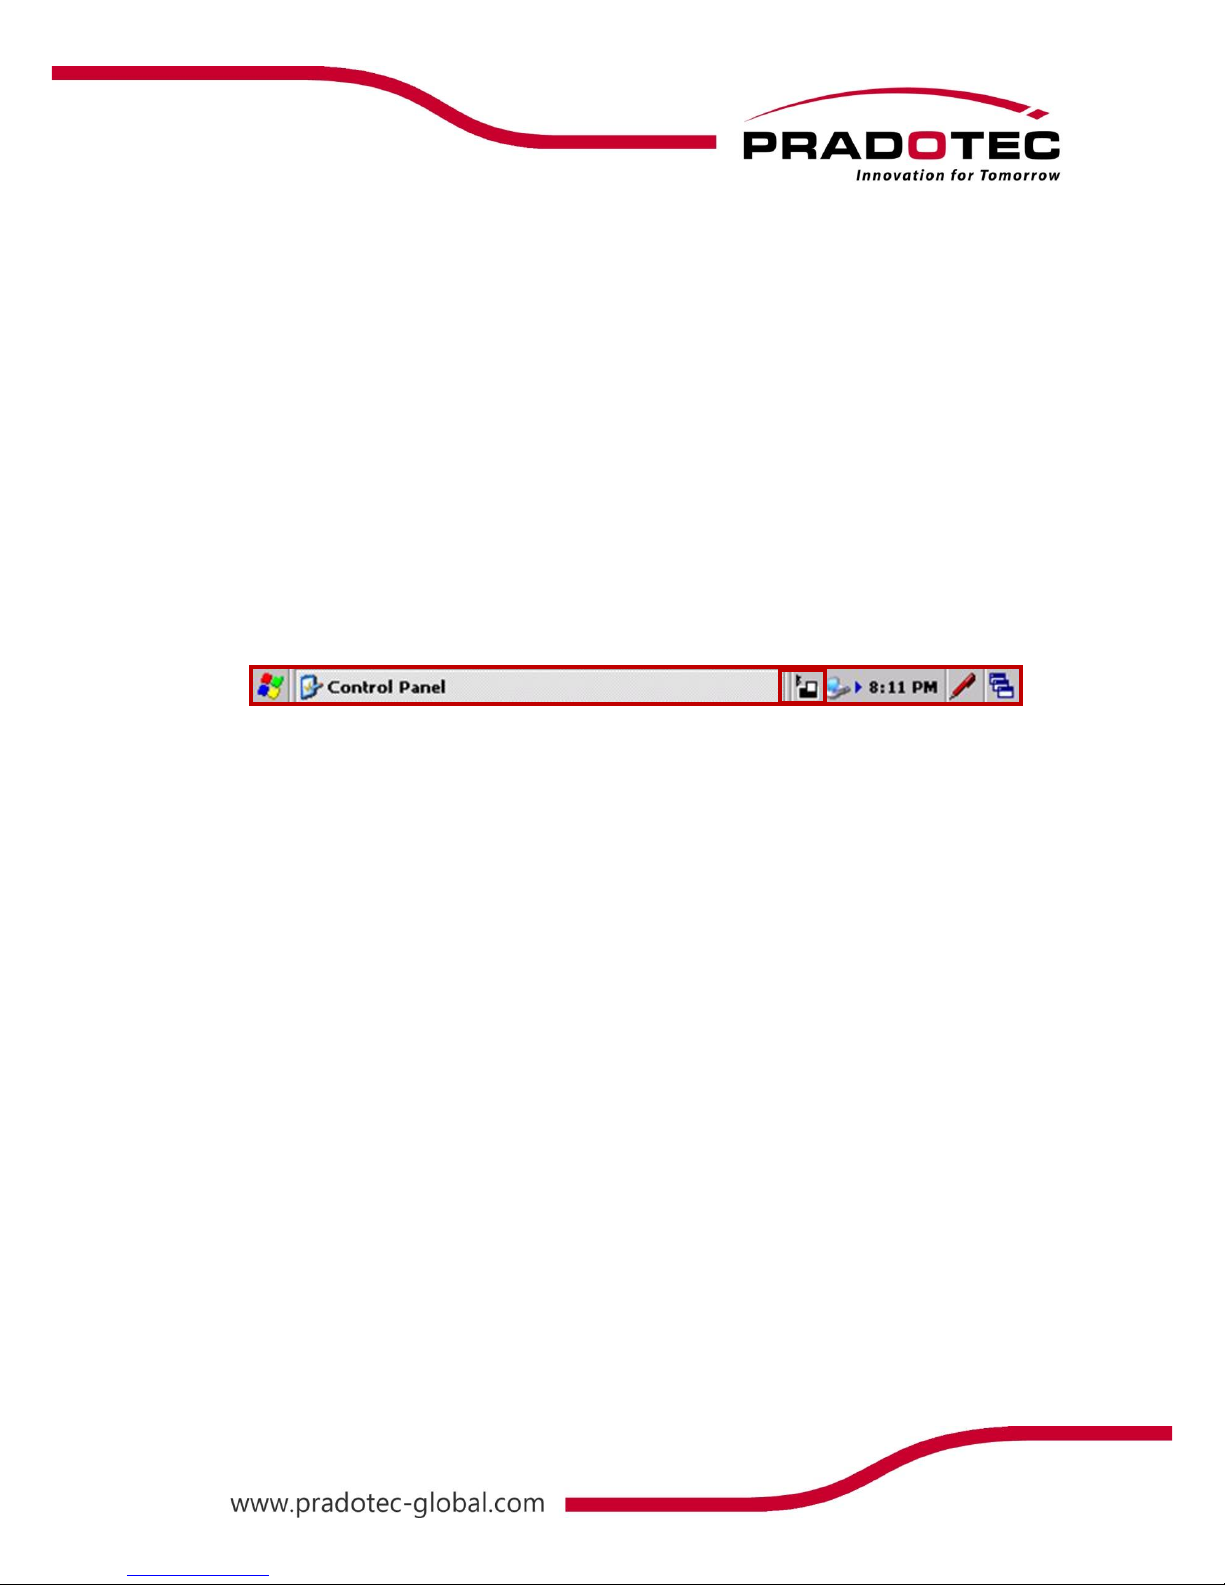
12) Please make sure that the Bluetooth Manager icon remained at the taskbar. If the
icon disappeared, launch the program again. There are few scenarios that the taskbar
icon may disappear:
Exit button is pressed. This will cause the entire application to close
Soft reset button is pressed. All the running application will be exited.
13) If the device is suspended, make sure the Bluetooth feature is turned ON after
turning on the device. Check if the Bluetooth Manager icon is available on the
taskbar or not. Go to the Start -> Settings -> Control Panel to launch the Bluetooth
Manager, if the Bluetooth Manager icon is unavailable on the taskbar. Once the
Bluetooth Manager icon is available on the taskbar, you may perform any other
Bluetooth application.
14) If soft-reset of the device is pressed, all the application is exited. First, turn ON the
Bluetooth feature on the Start -> Settings -> Control Panel -> Power Control.
Then, go to Control Panel and launch the Bluetooth Manager. Once the Bluetooth
Manager icon is available on the taskbar, you may perform any other Bluetooth
application. It will be connecting to the latest connected device before soft-reset and
if the device is not disconnected.
15) The connection will remain until the device is disconnected or is being hard-reset,
which is Restored to factory setting.
Page 40
39
GSM Usage
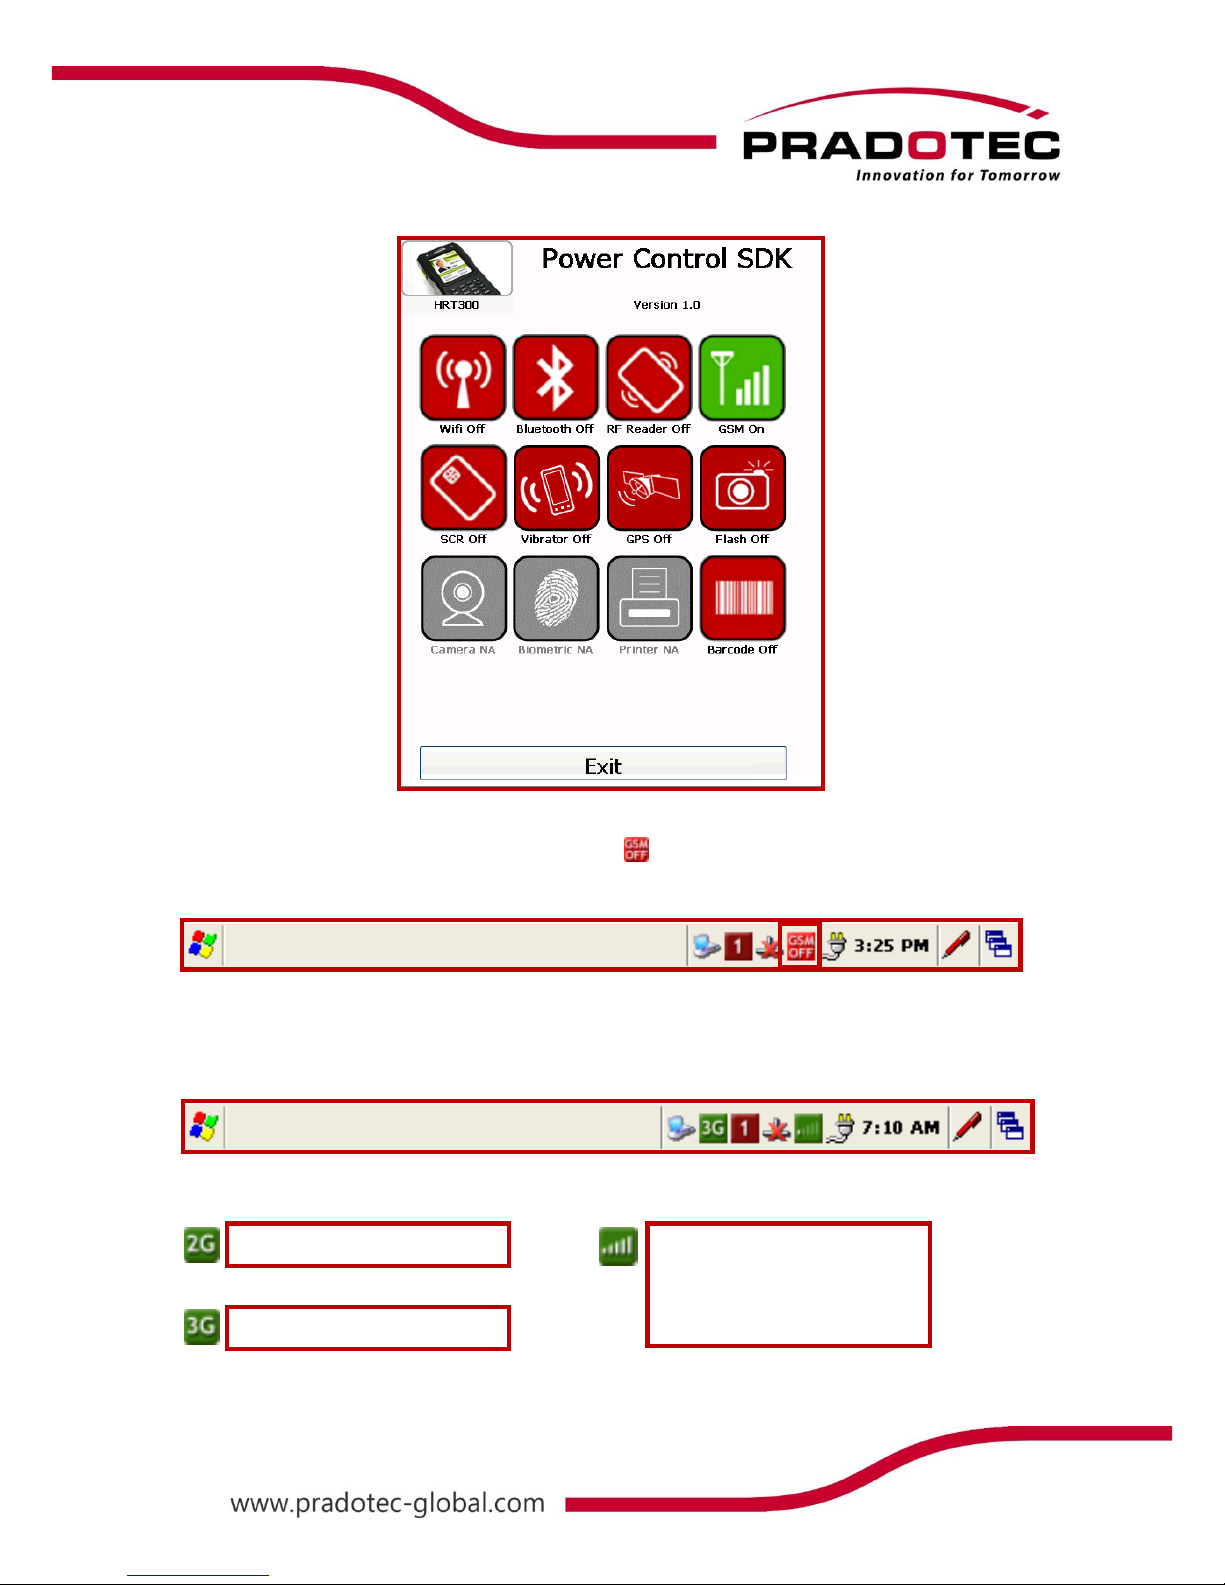
To access GSM function, go to Start -> Settings -> Control Panel -> Power Control and
press once on the GSM icon to activate it.
Icon is Green – ON
Icon is Red – OFF
The GSM status will be displayed on the GSM icon at the top right of the device.
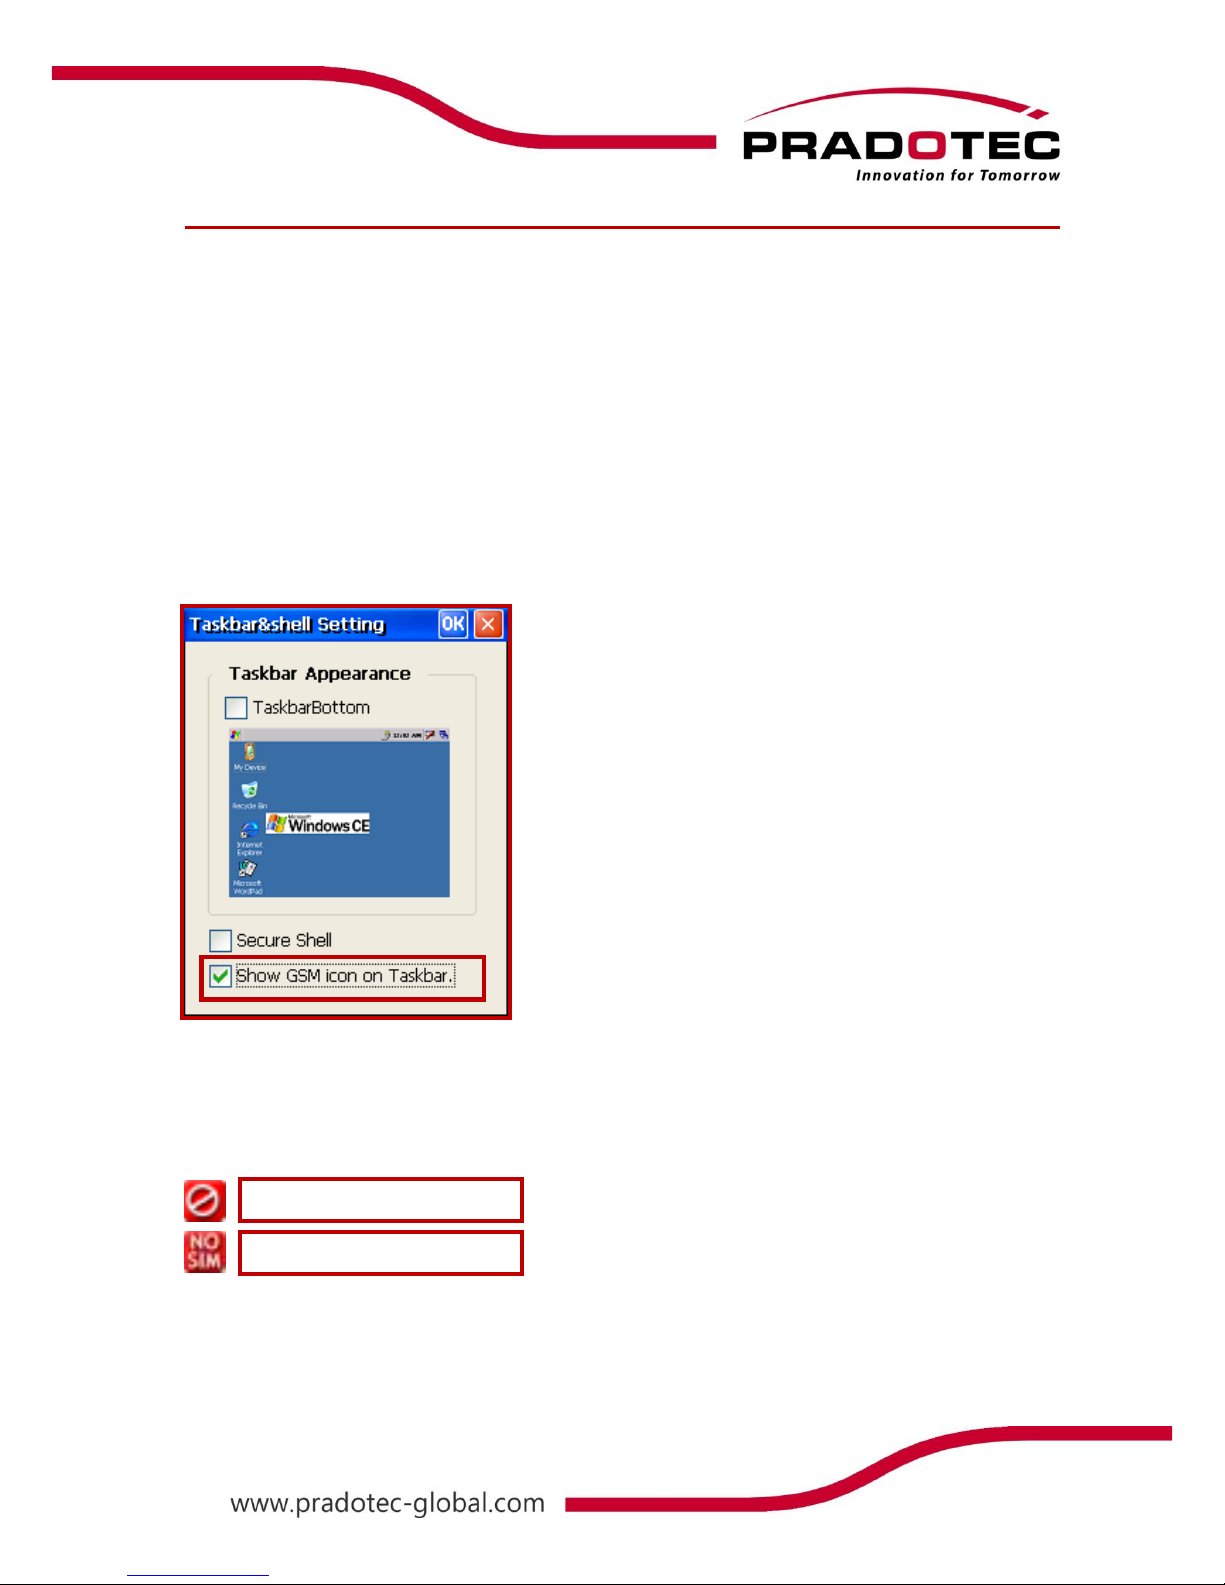
First, in order to know the service and coverage of GSM, go to Start -> Settings -> Control
Panel -> Taskbar Setting. Check on the Show GSM icon on Taskbar.
If there is no SIM card inserted into HRT700, there are two icons showing on the taskbar.
No GSM service
No SIM card inserted
Page 41
40
While the GSM module is configuring, this icon, - GSM OFF will appear on the taskbar or
while the SIM card is inserted but GSM module is not turned ON.
After the GSM module is configured, two new icons will be appearing on the taskbar. Both of
the icons show the status of the GSM module of the HRT700.
HRTSeries
2G Service
3G Service
Coverage of GSM
Empty means low while full
means excellent
Page 42
41
Using the Contact Card Reader
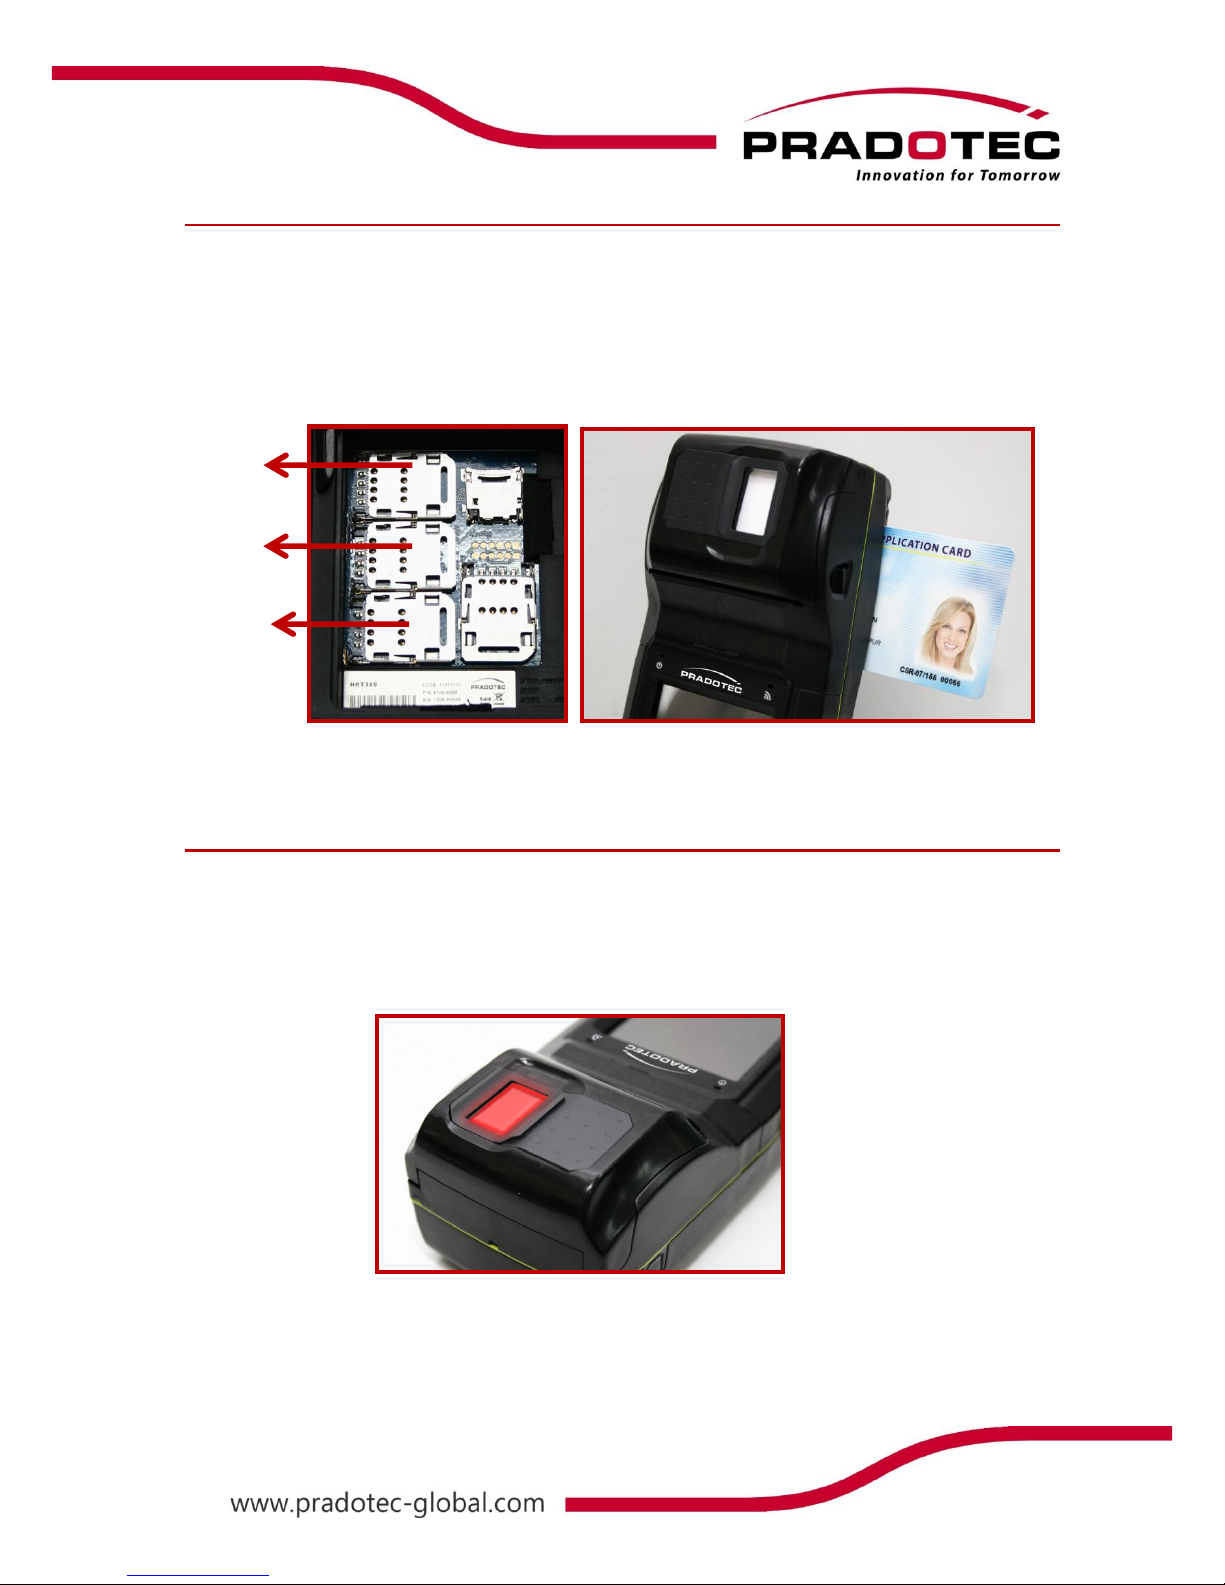
1. There are 4 slots that are available. For smart card, user may insert the smart card into
slot 1 which is located at the top most of the device.
2. Slot 0, 2 and 3 is specifically designed for SAM. These 3 slots are located at the back
of the device, behind the battery.
Using the Fingerprint Sensor
1. When the optical finger print sensor is ready, the sensor window will light up.
2. Place finger on the centre of the finger print sensor window.
3. Wait and remove finger only when the light on the sensor is dimmed.
SAM A
(Slot 0)
SAM B
(Slot 2)
SAM C
(Slot 3)
Page 43
42
Using the Printer
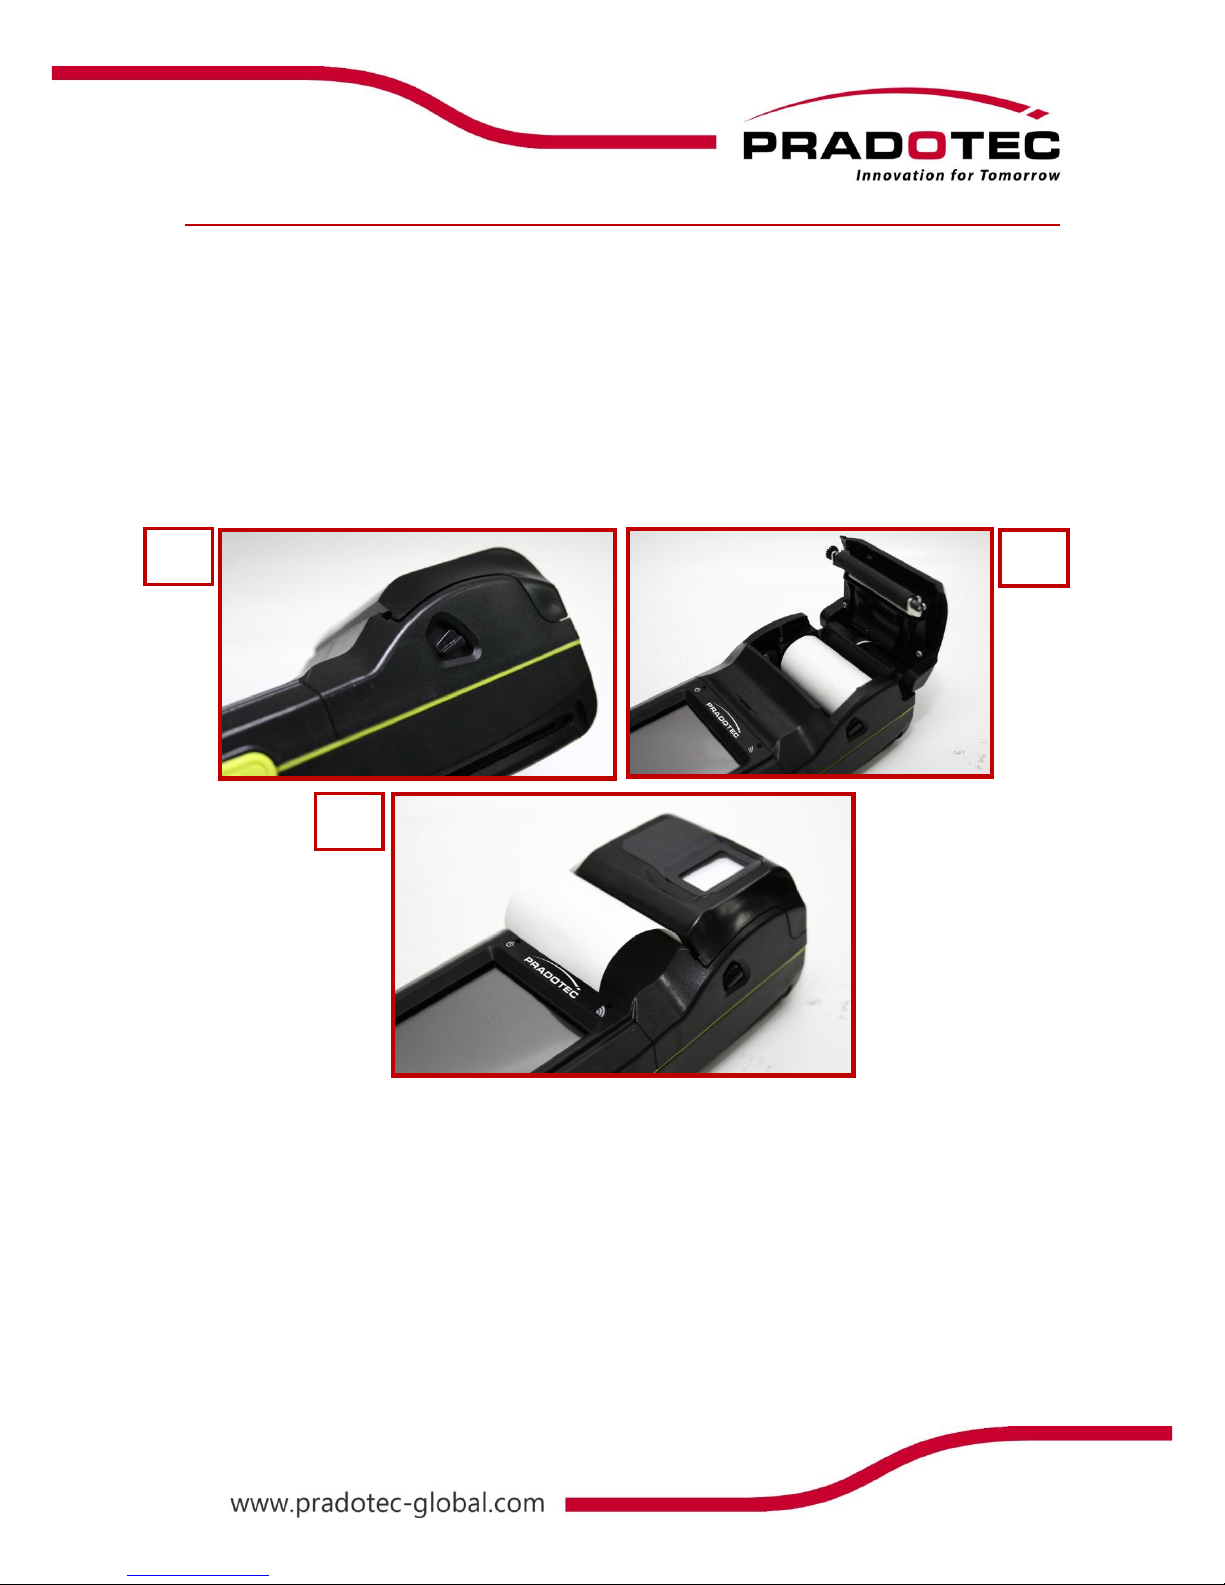
1. Push down the Printer knob to open the printer cover
2. Unlock the printer cover and rotate the cover towards top side to open it. (A)
3. Place the paper roll into the housing as shown in figure (B)
4. Hold the extreme end of the paper roll by keeping a few centimetres of thermal paper out
of the paper roller from the printer cover(C)
5. Ensure paper in its proper place and gently close the printer cover.
B A C
Page 44
43
Reset the HRT700 and clear memory
To Reset the HRT700
If your HRT700 responds slowly, stops responding as expected, or “freezes”, try resetting it. A
reset causes the HRT700 to restart and re-adjust its memory allocation.
Any unsaved data in the open windows may be lost.
● Use the stylus to press the Reset button.
Restore to Factory Setting
1. Turn the HRT700 ON.
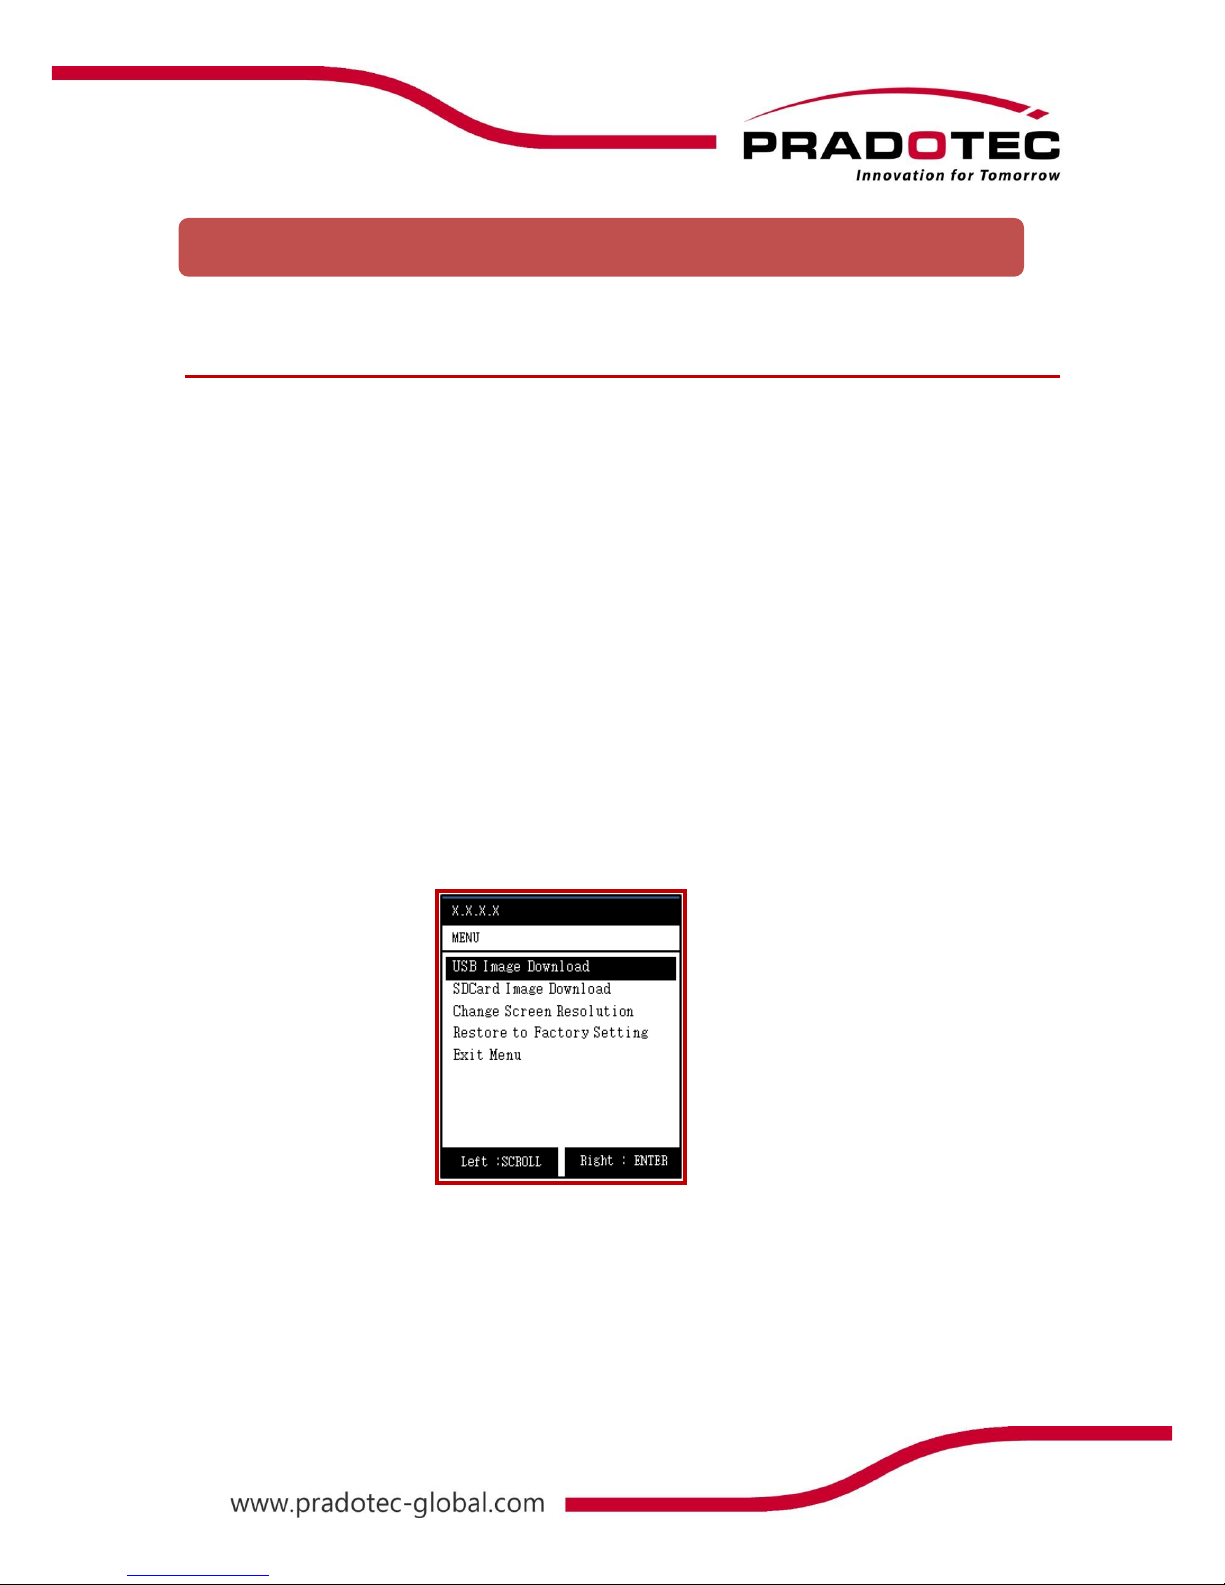
2. Press and hold the Side Button (right) button, and use the stylus to press the Reset
button. A window as below will be shown on the screen.
3. Press the Side Button (left), button to scroll, select Restore to Factory Setting.
4. Press the Side Button (right) button. Then, select Yes by pressing Side Button
(right) button again.
Appendix: Troubleshooting Guide
Page 45
44
If HRT700 runs out of Power
Low Battery Power
When batteries are running low, you will see a low battery icon in the navigation bar.
Replace or recharge the batteries as soon as possible. Running on low battery power will
affect the device’s peripheral performance. Hence, the device will automatically shut down
when the battery power is critically low. Under normal conditions, a fully charged battery can
be used for long hours. Here are a few tips to help you get the most from them.
WARNING
If the battery is low, you run the risk of losing the data in your HRT700
Use External Power Whenever Possible
Use the AC adapter to plug your HRT700 into external power whenever possible, especially
when:
● Establishing a remote connection (some modems use a lot of power).
● Using the backlight feature of your HRT700 display.
● Connecting to a desktop computer.
Shorten the Auto-Suspend Time
While on battery power mode, your HRT700 will automatically suspend after a predefined
idle period. Maximize the battery’s life by shortening the idle time. Tap and then Settings.
On the Control Panel tab, tap Power, and then adjust the Schemes setting.
Turn Off the Sounds when Necessary
The HRT700 produces sounds in response to a number of events, such as warnings,
appointments, and screen taps or when you press hardware-button. To optimize battery’s life,
turn off any unnecessary sound. Tap and then Settings. On the Control Panel tab, tap
Volume & Sounds and clear checked boxes on the Events, Application, keyClicks and
Notification tabs.
Turn Off the Unused Peripherals
Turning OFF all the unused peripherals in the device will save and optimize the battery‘s life.
To turn OFF all the unused peripherals, tap and then Settings. On the Control
Panel tab, tap Power Control and switch OFF all the unused peripherals.
Page 46

45
If HRT700 runs out of Memory
Memory on your HRT700 is shared between storage memory and program memory.
Storage memory is used to store the information you created and programs you installed.
Program memory is used to run programs in your HRT700. The HRT700 automatically
manages the allocation between storage and program memories. However, in some
situations, such as when memory is low, the HRT700 may not be able to automatically adjust
the allocation. If you receive a message stating that storage or program memory is
unavailable, try the following solutions.
Storage Memory-Secure Digital (SD) Storage Card
1. Move data to a Secure Digital (SD) Storage Card.
2. Tap , Program and then Windows Explorer. A folder named “Storage Card” will
appear once the SD memory card is inserted.
3. This folder will disappear automatically once the card is taken out from the slot.
4. Move any file or data into the “Storage Card” folder for backup purposes.
5. Files or data save in the SD card can be opened in any other SD card reader or
computer.
6. Files copied from computer can also be opened in the HRT700 unit, as long
as it does not exceed the memory of the unit.
Program memory
1. Stop programs that you are not currently using. In most cases, programs
automatically stop to free needed memory. However, in some situations, such as when
confirmation dialog boxes are waiting for a user’s response, the program may not be
able to stop automatically.
2. Clear storage memory as described in the preceding section. This will free some
storage memory so that it can be allocated to program memory.
3. Reset your HRT700, as described in “Reset the HRT700”.
Screen Freezes or Responds Slowly
Reset your HRT700. See “Reset the HRT700”, earlier in this appendix.
Screen is Blank
If the HRT700 does not respond when you press the Power button briefly, press and hold the
button for a full second. If this does not work:
1. Make sure your battery cover is locked and all expansion slots are secured.
2. Plug the HRT700 into AC power.
3. Change or recharge the main batteries.
Page 47
46
Screen is Dark
Prolonged exposure to direct sunlight may cause your HRT700 screen to be temporarily dim.
This is a normal case for LCD screens and it is not permanent.
Inaccurate Response to Stylus Taps
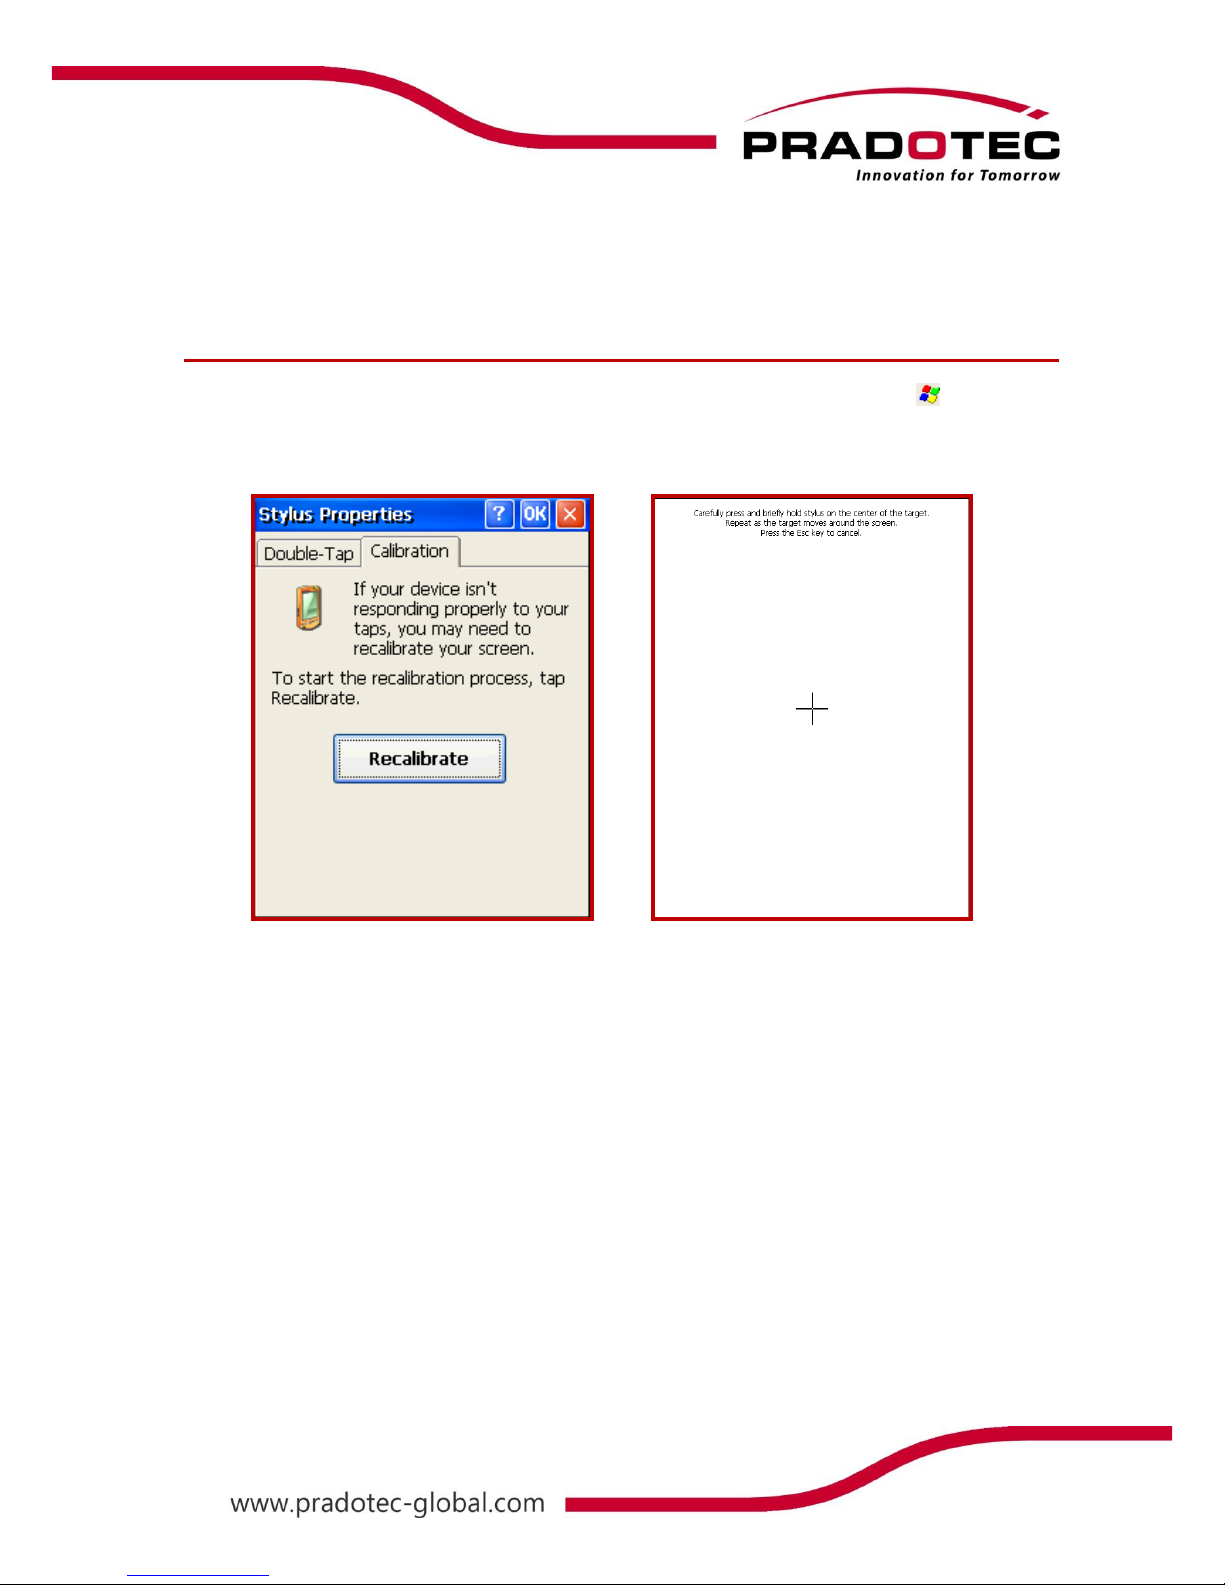
Adjust the touch screen to respond more accurately to screen taps. Tap and then
Settings. On the Control Panel, tap Stylus. In the Stylus Properties, choose Calibration.
Tap “Calibrate” and follow the instructions on the screens as shown below:
Slow or no response
Reset the HRT700. See “Reset the HRT700”, earlier in this appendix.
Page 48
47
Routine Maintenance
This section provides recommended guidelines for taking care of your HRT700. Following
these guidelines helps to ensure the lifespan of your HRT700 and reduces the risk of damage.
Routine Care
To keep your HRT700 in good condition and working properly, follow these guidelines:
● Keep your HRT700 away from excessive moisture and extreme temperature.
Do not expose your HRT700 to liquids or precipitation.
● Do not place anything on top of your HRT700 to prevent damage to the
screen.
● Store your HRT700 in a protective case when not in use.
● Clean your HRT700 by wiping the screen and the exterior with a soft, damp
cloth moistened only with water.
To reduce the risk of electric shock or damage to the internal components, do
not spray liquid directly on the screen or allow excess liquid to drip inside your
HRT700. Using soap or other cleaning products on the screen may discolor and
damage the screen.
● Avoid exposing your HRT700 to direct sunlight or strong ultraviolet light for
extended periods of time. Also avoid scratching the surface of the screen and
banging it against hard objects.
● Use only the HRT700 stylus to prevent scratches on the screen.
Battery Guidelines
Follow local regulations regarding the safe disposal of your HRT700. Your vendor can advise
you on local regulations, and/or the existence of any battery disposal programs in the
operation.
The HRT700 should not be disposed along with the general household waste. In order to
forward them for recycling or dispose them properly, please use the public collection system
or return them to Pradotec or the authorized partners
Page 49
48
Travel Guidelines
For safety and convenience when traveling with your HRT700, follow these guidelines:
● Back up your data before you leave.
● Take a backup copy of your data with you.
● Disconnect all external equipment from your HRT700.
● Take the AC adapter and new batteries with you.
● Hand-carry your HRT700 in a protective case. Do not check in with your
luggage.
● Beware of potential effects of airport security devices on your HRT700.
There are three types of airport security devices: X-ray machines, magnetic
detectors (the device you walk through for security scanning), and security
magnetic wands. You can send your device through airport X-ray machines.
However, it is recommended that you do not send your HRT700 through
magnetic detectors or expose it to security magnetic wands.
● Check with the airline if you plan to use your HRT700 on the plane. In-flight,
the use of electronic devices is at the discretion of the airline.
International Travel
Before traveling internationally with your HRT700, be sure to:
● Check local customs regulations on wireless devices.
Shipping Guidelines
When shipping your HRT700, follow these guidelines:
● Safeguard your data by making a backup copy.
● If shipping the backup copy, be sure that the medium (diskette, tape, or SD
card) is not exposed to electrical or magnetic impulses while stored or in
transit.
● Turn off your HRT700 and disconnect all external devices.
● Pack your HRT700 and all external devices (such as the cradle, cords, and
cables) in their original packing boxes or in similar packaging with sufficient
packing material to protect them.
Page 50

49
FCC STATEMENT :
This device (FCC ID:SX3-HRT700)complies with Part 15 of the FCC Rules. Operation is subject to the following
two conditions:
(1) This device may not cause harmful interference, and
(2) This device must accept any interference received, including interference that may
cause undesired operation.
NOTE: This equipment has been tested and found to comply with the limits for a Class B
digital device, pursuant to Part 15 of the FCC Rules. These limits are designed to provide
reasonable protection against harmful interference in a residential installation.
This equipment generates uses and can radiate radio frequency energy and, if not
installed and used in accordance with the instructions, may cause harmful interference to
radio communications. However, there is no guarantee that interference will not occur in a
particular installation. If this equipment does cause harmful interference to radio or
television reception, which can be determined by turning the equipment off and on, the
user is encouraged to try to correct the interference by one or more of the following
measures:
Reorient or relocate the receiving antenna.
Increase the separation between the equipment and receiver.
Connect the equipment into an outlet on a circuit different from that to which the
receiver is connected.
Consult the dealer or an experienced radio/TV technician for help.
Warning: Changes or modifications not expressly approved by the party responsible for
compliance could void the user's authority to operate the equipment.
SAR Statement:
The device complies with RF specifications when used near at a distance of 0 cm from your body.
Ensure that the device accessories, such as a device case and device holster, are not composed of metal
components. Keep the device away from your body to meet the distance requirement.
This device is also designed to meet the requirements for exposure to radio waves established
by the Federal Communications Commission(USA).
The SAR limit adopted by the USA is 1.6 W/kg averaged over one gram of tissue.
The highest SAR value reported to the FCC for this device type complies with this limit.
The highest SAR value reported to the FCC for this device type when properly worn on the body is 0.080W/kg
 Loading...