

Page 1
Guardzilla 360
Quickstart Guide
Take a tour of
the app
Your Guardzilla
360 Security Video
Camera is easy to
operate via its handy
phone app. Take a
few minutes to review
our Quickstart Guide,
which provides tips
on using the app’s
key functions on the
app home screen. For
more information go to
www.guardzilla.com/
support.
1
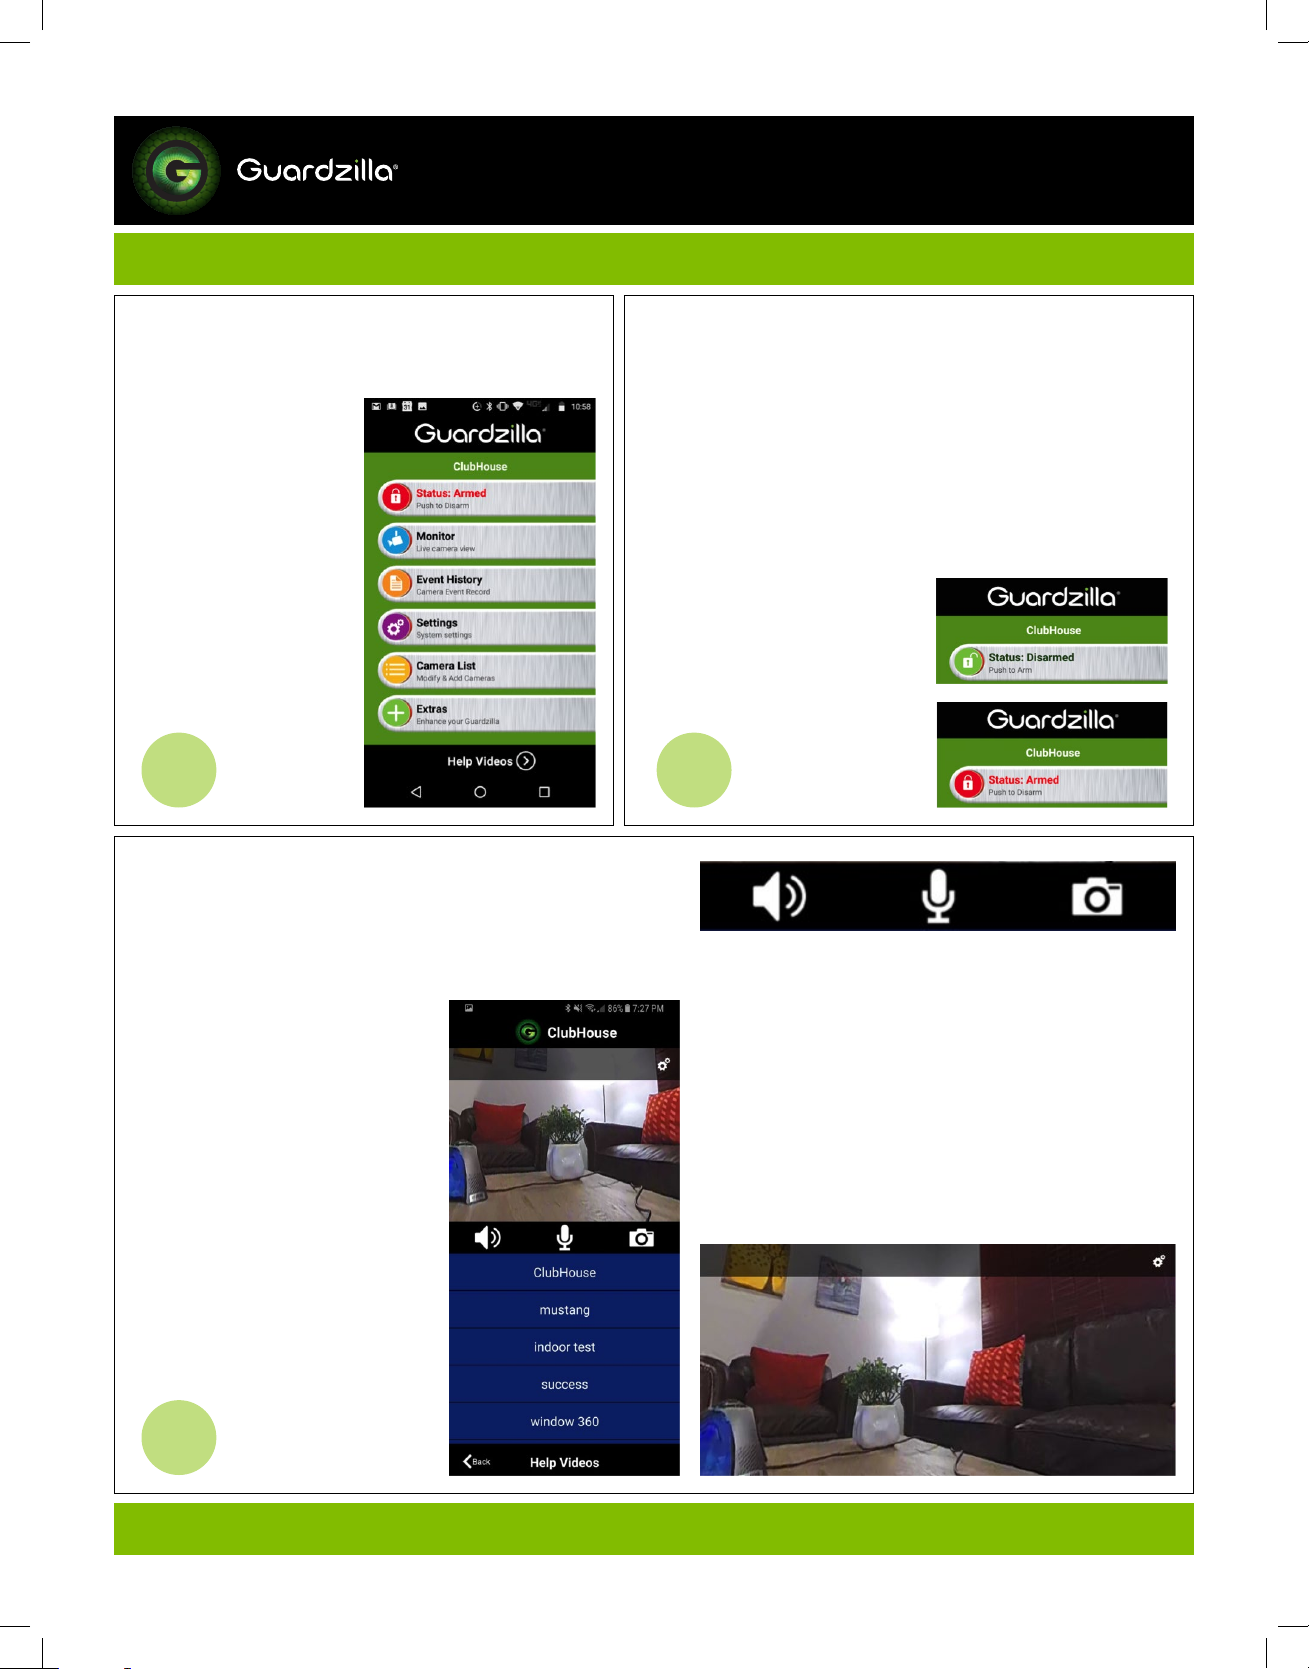
ABOUT MONITOR:
The Monitor button enables
the user to see a live 360
from the camera from their
phone app; and communicate
with those in the room. To
view a live video feed press
the Monitor button on the app
homescreen.
To view 360
live video feed in the upright
mode or turn the phone
horizontally and the image
will fill the screen. To view all
areas of the video either: 1)
drag a finger across the screen
in the desired direction; or 2)
move the phone in the desired
viewing direction. NOTE: The
gravity feature of the camera
will always return the image to
the level panoramic view.
o
video: View the
o
view
ABOUT ARM/DISARM:
The Status Disarmed/Armed button activates the
camera’s motion detection function. When the lock icon
is green and says Status: Disarmed the camera is
disarmed. To arm the camera, touch the Status: Disarmed
row. It will turn red and indicate Status: Armed. When
armed, if motion is detected an email and/or push
notification will be sent to the user’s phone, video of the
event will be recorded (and stored in the Event History
area) and the siren will blare, if activated (see Settings
below). To disarm, touch the Status: Armed again.
2
To talk and listen into the room: Press the speaker
icon (it will light up green) to get an audio feed from
the room. Press the microphone icon to speak into
the room. Press both icons to carry on a live two-way
conversation with a person in the room. Press the
camera icon to take an image of the room, which can
be viewed in the Event History area of the app.
NOTE: If your phone is within hearing distance of
your 360 camera you may experience feedback. We
recommend turning off the speaker or microphone
(by touching the icons) until the phone is out of
hearing range.
3
Page 2
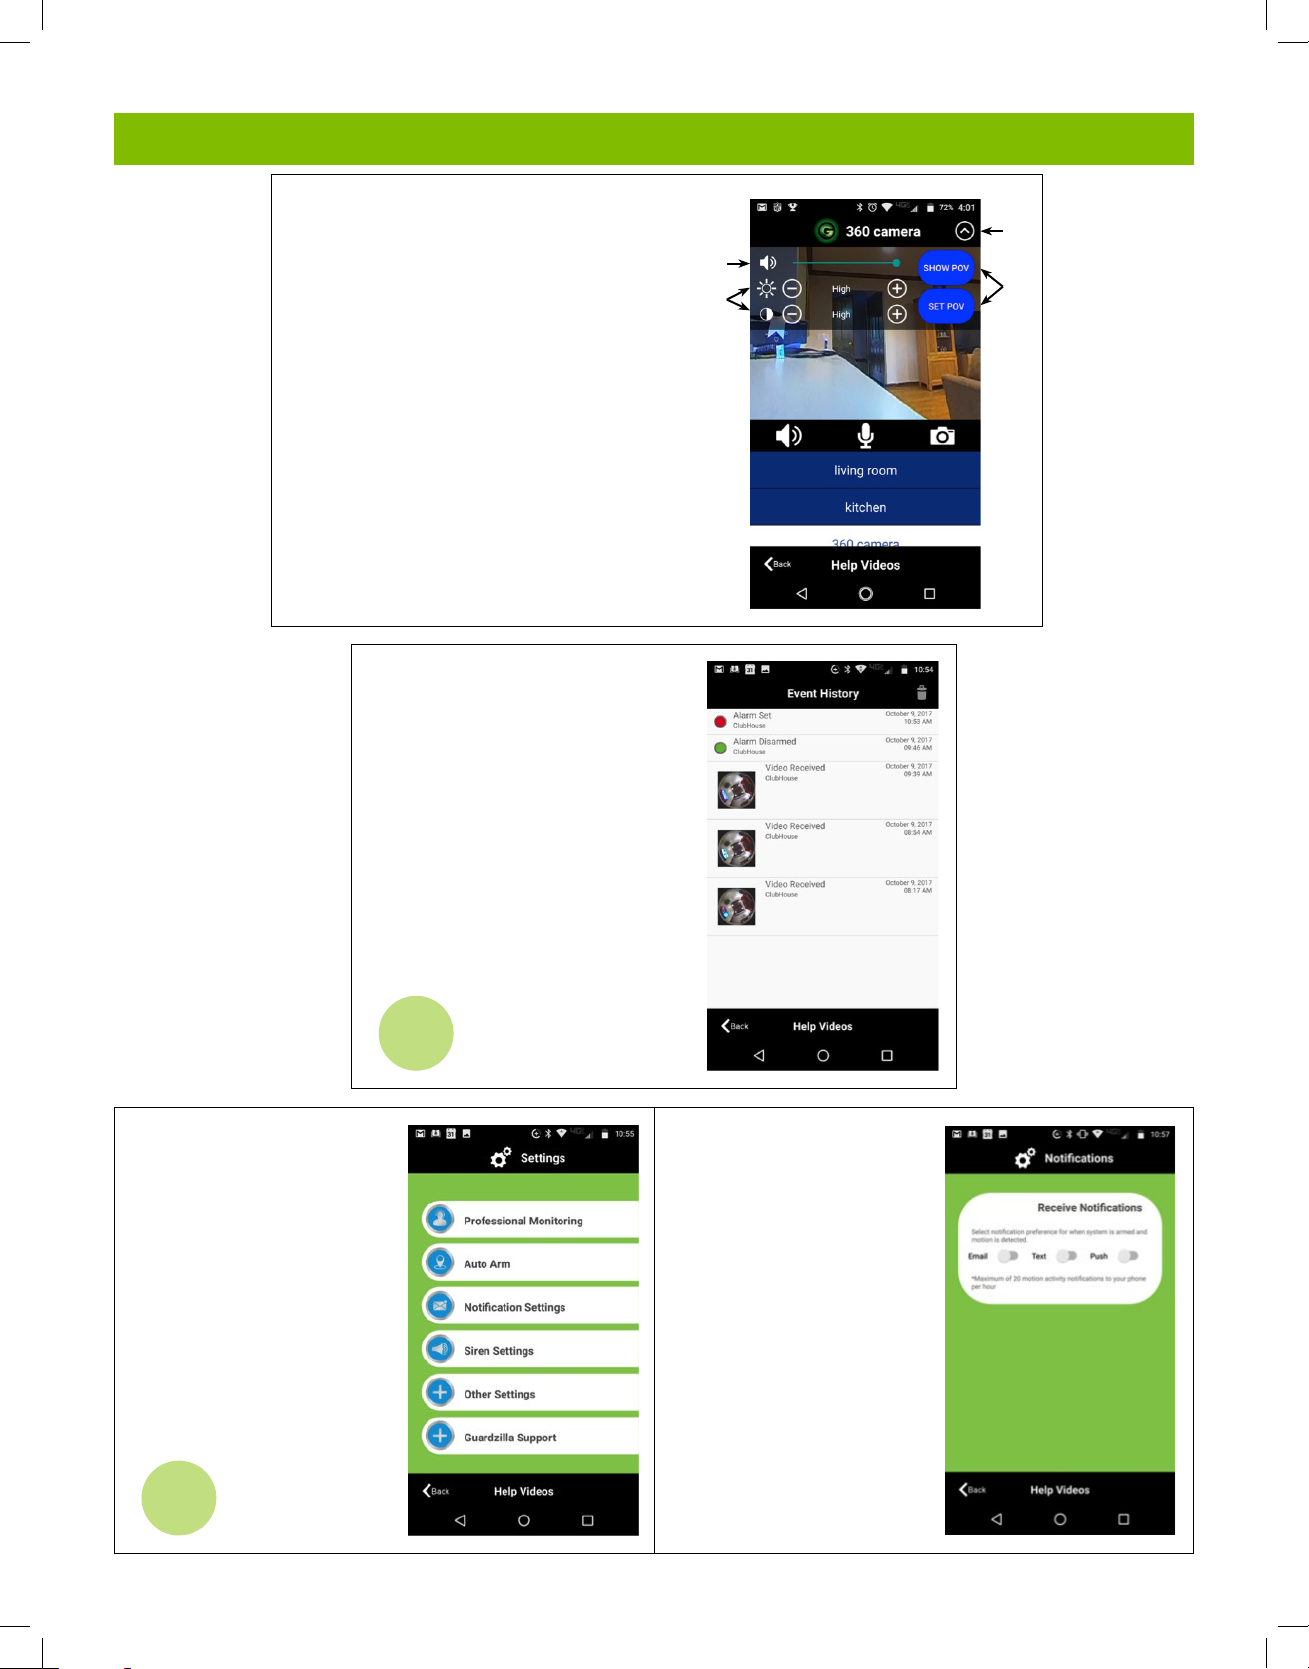
The MONITOR area also has a
control panel for adjusting settings.
Touch the arrow icon in the upper
right hand corner of the screen to
reveal the control panel (#1). To
adjust the audio loudness (#2),
move the slider to the desired
setting. To adjust the video image
brightness and contrast (#3) press
the plus (+) or minus (-) signs to
your desired settings. To set the
point of view (POV) your camera
displays when the MONITOR is first
opened press the SHOW POV button
(#4) to see where your camera first
points. To change the POV use your
finger to slide the video image to
the desired view, then press the SET
POV button (#4).
ABOUT THE EVENT HISTORY:
The EVENT HISTORY button
enables the user to view all of the
events the Guardzilla 360 camera
records, such as motion events
(e.g. motion detected), images
taken, and actions (e.g. alarm
armed, alarm disarmed). To view
a motion detection video press the
desired video, then view the video.
The Live Video Feed button will
connect to the current video feed
in the room.
1
2
3
4
ABOUT SETTINGS:
The SETTINGS button
enables the user to
customize all the settings
in the app to their
preferences.
The key settings to use to
get started are:
• Notifications
• Siren
• Auto Arm
• Call Button Contacts
5
4
Notification Settings:
Select how you want
to be informed on your
smartphone when motion
is detected. Choose to be
notified by email AND/OR
a push message alert by
sliding the slider to the on
position under each option.
Page 3

FCC Compliance Statement available in the phone app at:
Settings > Other Settings > Legal and Compliance
Siren Settings:
Decide if you want the 100
decibel siren to sound when
motion is detected (or not),
and for how long (5, 15, 30,
60 or 120 seconds).
Call Button Contacts:
The three call buttons on the
Guardzilla 360 camera can be
programmed to send an instant push
notification to three individual smart
phones (e.g. mom, dad, emergency
contact). To program a call button
first select Other Settings in the
Settings area of the app, then select
Call Button Contacts. Enter the
email address of the desired contact
person, then press Save. This email
will be associated with the first call
button on the camera. Repeat the
process to program the second and
third buttons.
AutoArm:
The auto arm feature will
automatically arm your
system when you leave
your home and disarm
itself when you return. This
action occurs when your
smart phone is .25 miles
from your home. To activate
Auto Arm slide the slider to
the right to activate.
Guardzilla is a registered trademark of Practecol, LLC
www.guardzilla.com
iPhone is a registered trademark of Apple Inc.
Page 4

FCC Compliance Statement:
This device complies with Part 15 of the FCC Rules. Operation is subject to the following two conditions: (1) this device may not cause harmful
interference, and (2) this device must accept any interference received, including interference that may cause undesired operation.
This equipment has been tested and found to comply with the limits for a Class B digital device, pursuant to Part 15 of the FCC Rules. These
limits are designed to provide reasonable protection against harmful interference in a residential installation. This equipment generates, uses
and can radiate radio frequency energy and, if not installed and used in accordance with the instructions, may cause harmful interference to
radio communications.
However, there is no guarantee that interference will not occur in a particular installation. If this equipment does cause harmful interference
to radio or television reception, which can be determined by turning the equipment off and on, the user is encouraged to try to correct the
interference by one or more of the following measures:
• Reorient or relocate the receiving antenna.
• Increase the separation between the equipment and receiver.
• Connect the equipment into an outlet on a circuit different from that to which the receiver is connected.
• Consult the dealer or an experienced radio/TV technician for help.
Warning: Changes or modifications to this unit not expressly approved by the manufacturer could void the user’s authority to operate the
equipment.
RF Radiation Exposure Statement:
This equipment complies with FCC radiation exposure limits set forth for an uncontrolled environment. This equipment should be installed and
operated with a minimum distance of 20cm between the radiator and your body. The device must not be co-located or operating in conjunction
with any other antenna or transmitter.
Industry Canada (IC) Compliance Statement:
This device complies with Industry Canada license-exempt RSS standard(s). Operation is subject to the following two conditions:
(1) This device may not cause interference, and
(2) This device must accept any interference, including interference that may cause undesired operation of the device.
This equipment complies with IC RSS-102 radiation exposure limits set forth for an uncontrolled environment. This equipment should be
installed and operated with minimum distance 20cm between the radiator and your body.
Le présent appareil est conforme aux CNR d’Industrie Canada applicables aux appareils radio exempts de licence. L’exploitation est autorisée
aux deux conditions suivantes:
(1) l’appareil ne doit pas produire de brouillage, et
(2) l’utilisateur de l’appareil doit accepter tout brouillage radioélectrique subi, même si le brouillage est susceptible d’en
compromettre le fonctionnement.
Cet équipement est conforme aux limites d’exposition aux radiations IC CNR-102 établies pour un environnement non contrôlé. Cet
équipement doit être installé et utilisé avec une distance minimale de 20 cm entre le radiateur et votre corps.
 Loading...