

Page 1

Portable Digital MP3 Player
User's Manual
JoyTone-U900
※ The actual product may be different in design or color from what is shown in this manual.
※ Functions of the product are subject to change without notice for upgrade purpose.
※ Please read the manual before using the product.
※ Windows Media and Windows Media Logo are registered trademarks of Microsoft Corp.
for WindowsⓇ98SE/ME/2000 & XP
for Mac OS 9.X/10.X
Page 2

Safety (FCC INFORMATION FOR USER)
This device complies with part 15 of the FCC Rules. Operation is subject to the following two
conditions: (1) this device may not cause harmful interference, and (2) this device must accept
any interference receives, including interference that may cause undesired operation.
CAUTION :
Any changes or modifications in construction of this device which are not expressly approved
by the party responsible for compliance could void the user’s authority to operate the equipment.
NOTE :
This equipment has been tested and found to comply with the limits for a Class B digital
device, pursuant to Part 15 of the FCC Rules. These limits are designed to provide reasonable
protection against harmful interference in a residential installation. This equipment generates,
uses and can radiate radio frequency energy, if not installed and used in accordance with the
instructions, may cause harmful interference to radio communications.However, there is no
guarantee that interference will not occur in a particular installation. If this equipment causes'
harmful interference to radio or television reception, which can be determined by turning the
equipment off and on, the user is encouraged to try to correct the interference by one or more
of the following measures:
• Reorient or relocate the receiving antenna.
• Increase the separation between the equipment and reciever.
• Connect the equipment into an outlet on a circuit different from that to which the
receiver is connected.
• Consult the dealer or an experienced radio/TV technician for help
For Canadian model
This class B digital apparatus complies with Canadian ICES-003.
For models having a power cord with a polarized plug:
CAUTION : TO PREVENT ELECTRIC SHOCK, MATCH WIDE BLADE OF PLUG TO
Modèle pour les Canadien
Cet appareil numèrique de la classe B est conforme à la norme NMB-003 du Canada.
WIDE SLOT. FULLY INSERT.
Page 3

Table of Contents
Safety (FCC INFORMATION FOR USER)
Table of Contents ………………………………………………………………… 1
Table of Contents
4. Useful Features ……………………………………………………………… 31
1. Getting Started ………………………………………………………………… 3
1-1. Safety Warning ……………………………………………………………………… 3
1-2. About U900 ………………………………………………………………………… 5
1-3. Package Contents ………………………………………………………………… 7
1-4. Tour of U900 ………………………………………………………………………… 8
1-5. Summary of Basic Control ………………………………………………………… 12
2. Connecting to PC ………………………………………………………………………… 13
2-1. Installing Joy Tone Manager (for Font & Firmware Upgrade) ………………… 13
2-2. Software Installation ……………………………………………………………… 15
2-3. Connecting to PC …………………………………………………………………… 16
2-4. File Management …………………………………………………………………… 18
1. Uploading/Downloading Files ………………………………………………… 18
2. Removing USB Connection …………………………………………………… 19
3. Basic Functions …………………………………………………………………………… 20
3-1. Basic Operation …………………………………………………………………… 20
1. Changing Mode ………………………………………………………………… 20
2. Navigation ……………………………………………………………………… 20
3. Deleting Folders/Files ………………………………………………………… 22
4. Menu Functions ………………………………………………………………… 23
5. Hold ……………………………………………………………………………… 23
3-2. Listening to Music ………………………………………………………………… 24
3-3. Listening to FM …………………………………………………………………… 26
3-4. FM Recording ……………………………………………………………………… 29
3-5. Voice Recording/In-line Encoding ………………………………………………… 30
1
4-1. Playlist (m3u support) …………………………………………………………………… 31
4-2. Creating a Playlist ………………………………………………………………………… 32
4-3. Formatting ………………………………………………………………………………… 32
4-4. Joy Tone Manager Program …………………………………………………………… 33
5. Menu Configuration …………………………………………………………… 40
5-1. Menu Structure …………………………………………………………………………… 40
5-2. Configuring Menu in Playback Mode …………………………………………………… 41
5-3. Configuring Menu in FM Mode ………………………………………………………… 47
6. Miscellaneous ………………………………………………………………… 49
6-1. Inserting a Battery ………………………………………………………………………… 49
6-2. Troubleshooting ………………………………………………………………………… 50
6-3. Technical Specification ………………………………………………………………… 51
2
Page 4
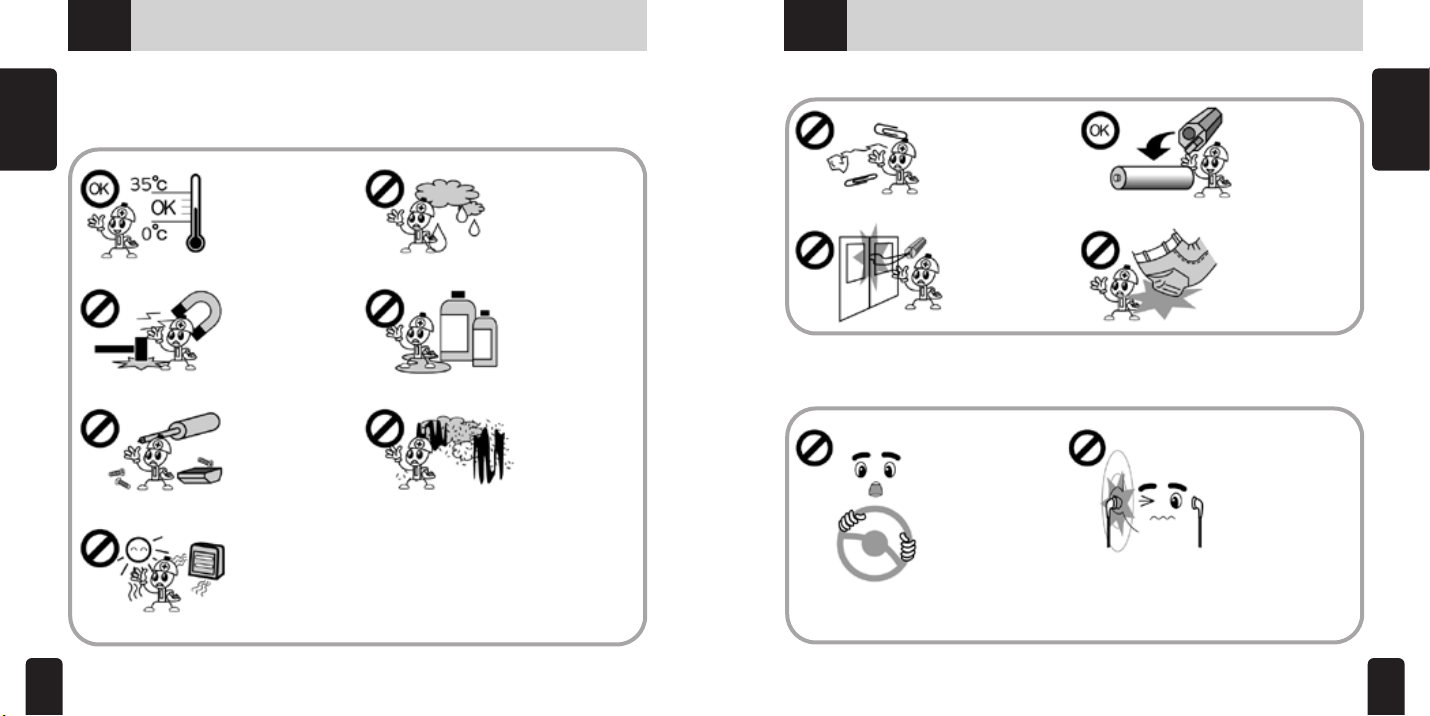
1-1
Safety Warning
※ This section contains important information on your health and safety.
※ Please read it carefully before using the product.
Started
1. Getting
Do not store your player where the temperature is above 35°C or
below 0°C.
Do not drop your playe r, al lo w ex te rn al
shock or leave it near
a magnet.
Avo i d st o ri ng you r
player in moist area.
Avo id c ont act wit h
suc h ch emi ca ls as
be nze ne or thinn er,
which can peel off the
paint.
1-1
Safety Warning
Do no t h av e f or eign
substance go into your
player.
Use the necklace with
caution, which mig ht
get caught in doors to
cause physical injury.
※ Warning on Use of Earphones
Remove the battery
when the product is
not in use for a long
period of time.
Be cautious that falling
down with the product
in the pockets of your
clothes could result in
bruise or fracture.
Started
1. Getting
Do not attempt to disas sembl e, repai r o r
modify your player.
Avoid direct sunlight
or heat.
3
Avoid where there
is excessive dust or
soot.
▶ Road Safety
Do not use earphon es
while driving, cycling, or
operating any types of
mo tor ized veh icl es. It
cr eates tr affic ha zar d
an d is il legal in som e
a r e a s . I t i s a l s o
potentially dangerous to
us e ea rp ho ne s wh il e
wa lki ng, espe cia lly at
pedestrian crossings.
▶ Pr eve nti ng Hear ing
Damage
Do not use earphones at
high volume for a prolonged period of time. It
can ser io us ly i mp air
you r heari ng a bility. If
you experience a ringing
in your ear, reduce the
volume or stop using the
product.
4
Page 5
1-2
About U900
1-2
About U900
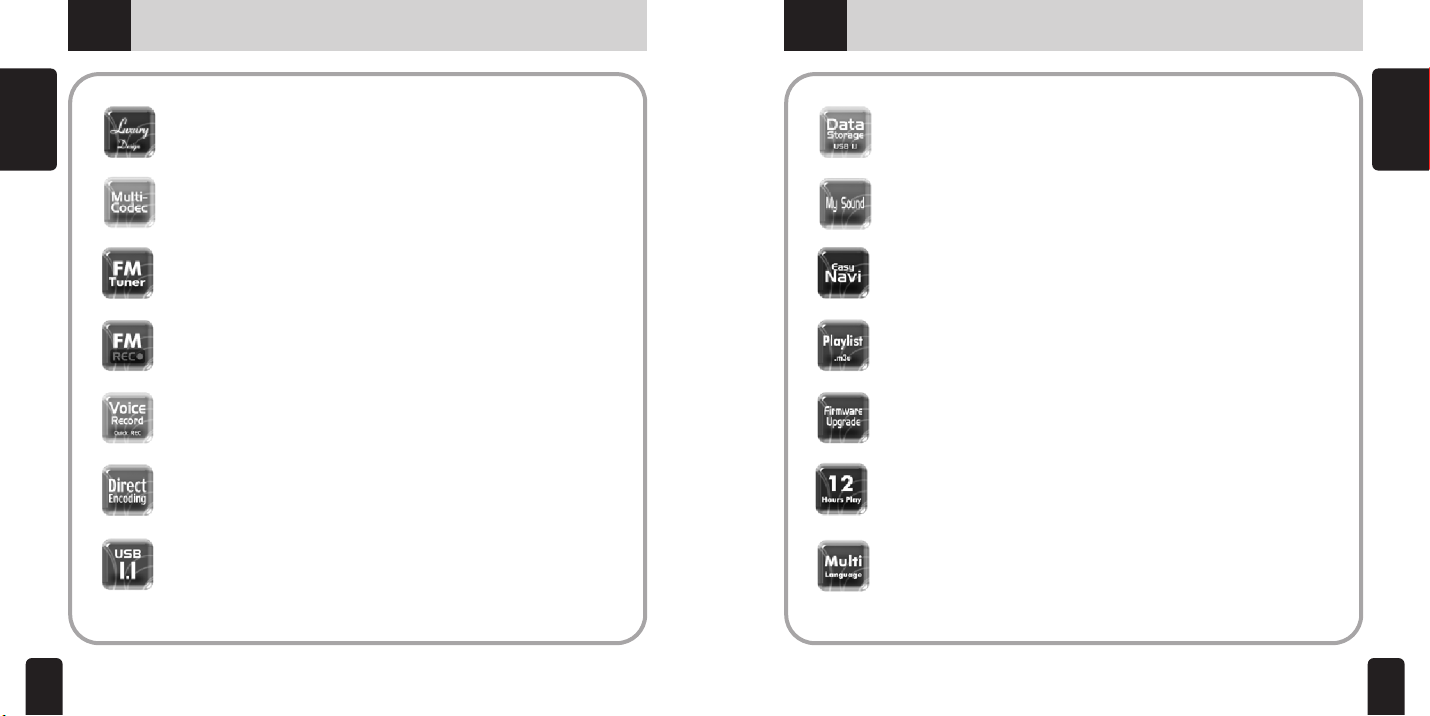
■ Luxurious Design
Started
1. Getting
The exquisite octagonal design of U900 is simple, but luxurious.
■ Multi-Codec Player
Plays MP3 and WMA files.
■ FM Tuner
Auto memory, preset up to 20 stations, and selectable FM frequency by country.
■ FM Recording
Records FM broadcasting to MP3.
■ High-Sensitive Voice Recording
The high-sensitive microphone on U900 helps you catch any urgent recordings
instantly (quick recording).
■ Direct Encoding
Record and convert CD or cassette music directly into MP3 from ENC jack
without PC.
■ Built-in USB Connector
No need for USB cable anymore. U900 has a built-in USB connector.
5
■ Removable Storage Device by Plug & Play
Use Windows Explorer to copy and delete files.
■ My Sound System
Create your own sound effect using 3D Sound, bass and treble for realistic
sound and perfect tune.
■ Convenient Navigation
Easy to save and search files.
■ Supports Playlist
U900 supports up to 5 playlists or m3u files.
■ Firmware Upgradeable
Upgrade features and functions of U900 by simply upgrading the firmware of
U900
■ Maximum 12 hours of Playing Time
U900 presents maximum 12 hours of music enjoyment on one AAA battery.
■ Multi-Language Support
Supports Korean, Chinese, English, Japanese, European languages and others
Started
1. Getting
6
Page 6
1-3
Package Contents
1-4
Tour of U900
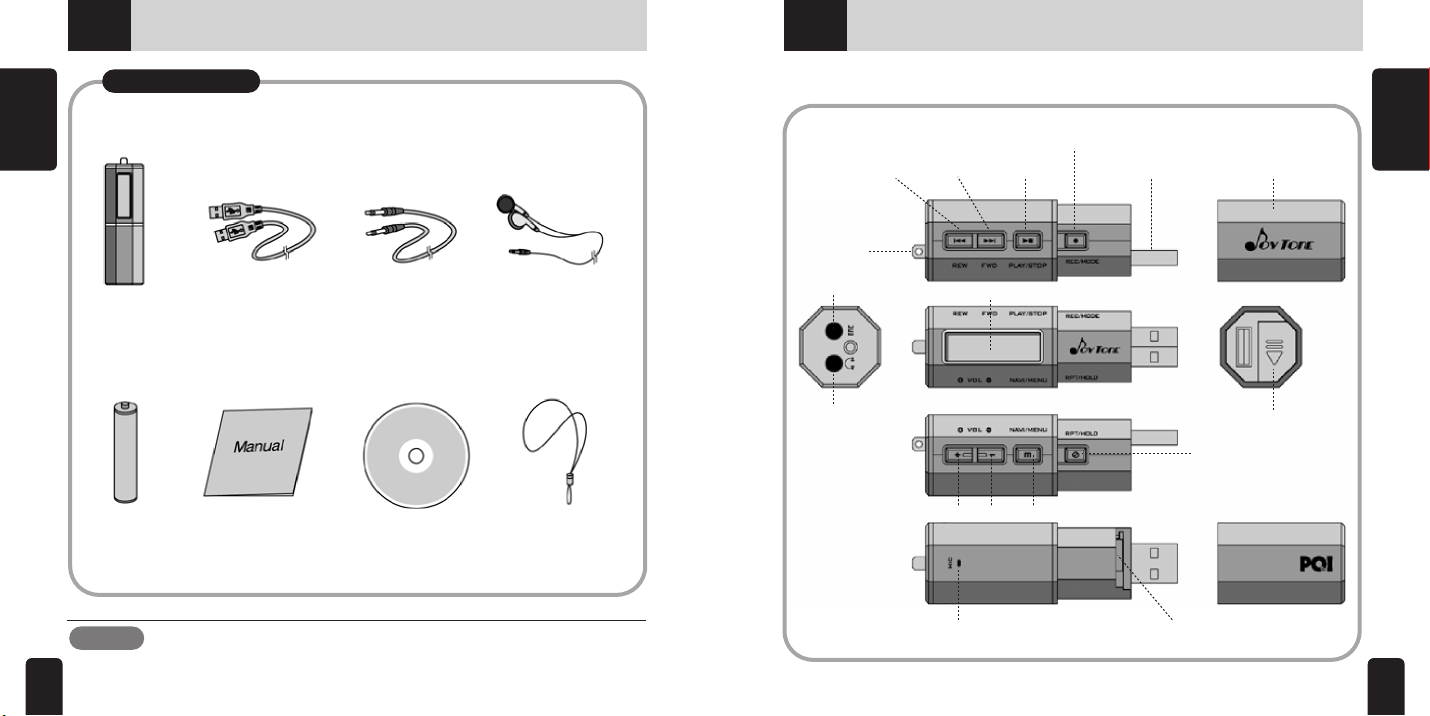
Basic Contents
Started
1. Getting
JoyTone-U900 USB Cable LINE-IN Cable High-quality Earphone
AAA Battery User Manual Installation CD Necklace
Note
※ The design of the basic contents and the optional items may be changed without prior
notice for product upgrade.
7
1. Main Unit
┃◀◀Reverse ▶▶┃Forward ▶■Play/Stop
Neck Strap
Encoding (Line-In)
Jack
Earphone Jack
●REC/MODE
(Recording/A-B Section
Repeat /Mode Change)
LCD Window
Volume + Volume− M (Menu/Navigation)
MIC (Microphone)
USB Connector USB Connector Cover
Battery Compartment Cover
RPT/Hold
(Hold/Repeat/Delete Files)
Battery Compartment
( - inside; + outside)
Started
1. Getting
8
Page 7
1-4
Tour of U900
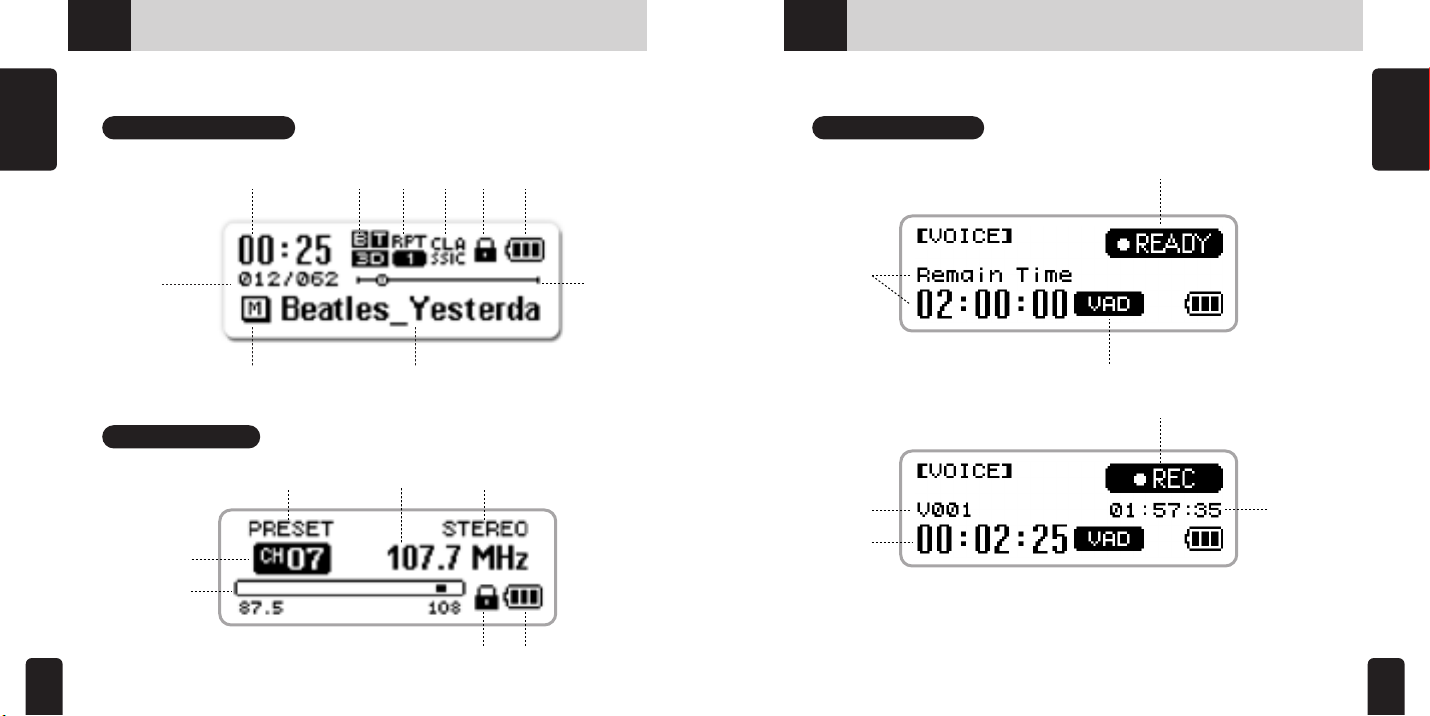
2. LCD Overview
1-4
Tour of U900
Started
1. Getting
9
Music Playback Mode
Track No./
Number of Files
FM Mode
Preset Channel Number
Frequency Range
Playing Time My Sound Repeat EQ Hold Battery Indicator
Folder Icon Title
Current Listening Mode STEREOCurrent Frequency
Hold Battery Indicator
Playing Bar
(Bit rate, Sample rate)
Voice Recording
Remaining Time for
Recording
File Name
Recorded Time
Recording Ready Icon
Voice Recording Icon
Recording Icon
Remaining Time for
Recording
10
Started
1. Getting
Page 8
1-4
Tour of U900
1-5
Summary of Basic Control
1. Getting
11
Started
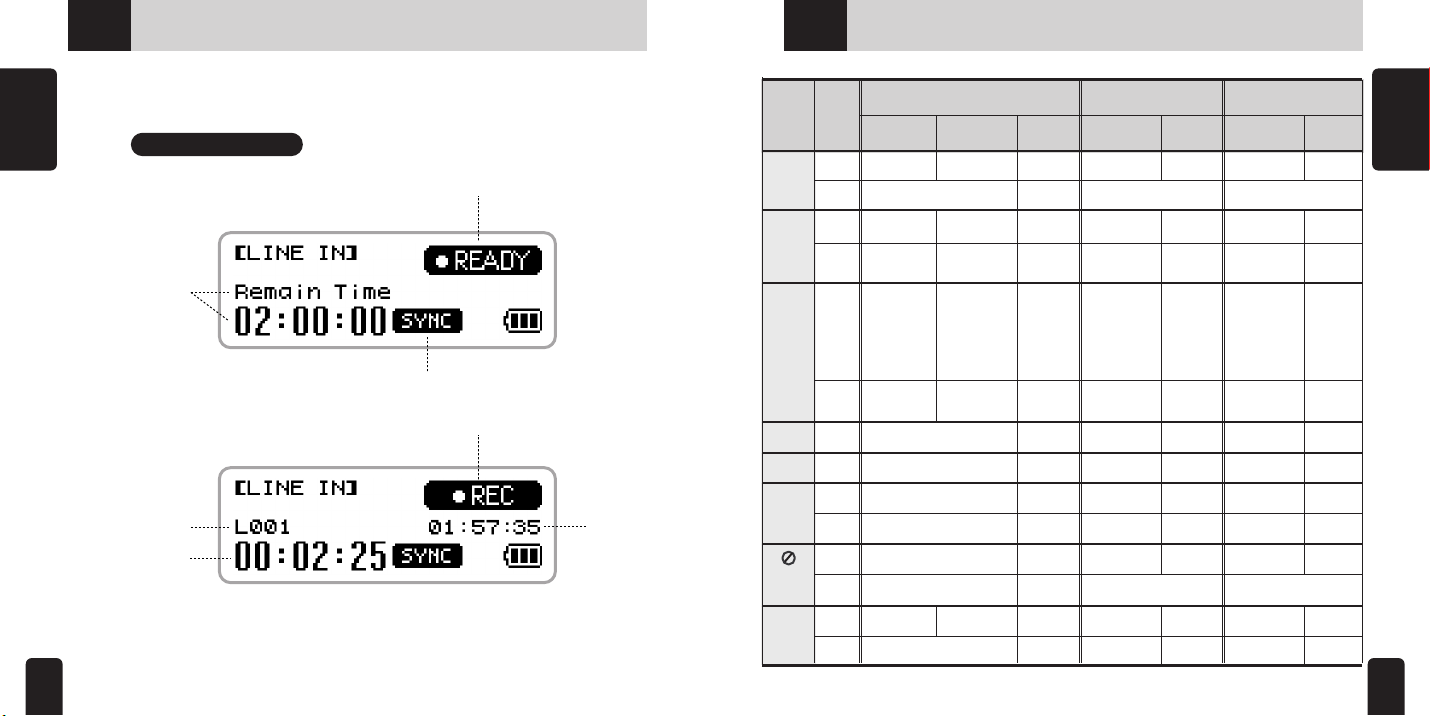
Line-in Recording
Remaining Time for
Recording
File Name
Recorded Time
Recording Ready Icon
Track Detection On
Recording Icon
Remaining Time for
Recording
Button Action
Short
▶■
Long
Short
▶▶┃
Long
Short
┃◀◀
Long
+
−
Short
M
(Menu)
Long
Short
RPT/
Long
HOLD
Short
●
REC/
Long
MODE
Music Mode Recording Mode FM Mode
When
Playing
Stop Play Play Play Pause
Play next
track
Fast Forward
Within the first 5
sec.: move to
the previous
track
After the first 5
sec.: Move to
the beginning of
the current track
Fast Forward
Change to Navigation mode
Change Repeat option
A-B Section
repeat
(Music, Recording, FM)
At Stop
Power OFF Power OFF
Move to next
track
Fast forward
search through
tracks
Move to the
previous track
Fast reverse
search through
tracks
Volume up
Volume down
Hold ON/OFF Hold ON/OFF Hold ON/OFF
Start
recording
Mode change
Menu/
Navigation
-
-
-
Move to up-
per menu/
folder
-
Move left
Move right
Select/Play
Delete
-
-
-
Stop
Recording Recording
Move to next
track
Fast search
through files
Move to the
previous file
Fast backward
search through
files
Volume up Volume up
Volume down Volume down
Change to
Navigation mode
Change MenuChange Menu Exit Menu Change Menu
Change Repeat
option
Start
recording
Mode change Mode change
recording
Change frequen-
-
-
AUTO SCAN +
- -
- -
AUTO SCAN −
- -
- -
- -
- -
Change preset /
- -
Stop
- -
FM
STEREO
ON/OFF
Power OFF
cy
/station
Change
frequency
/station
-
frequency
Start
recording
Pause
-
-
Stop
recording
12
Started
1. Getting
Page 9

2-1
Installing Joy Tone Manager(for Font & Firmware Upgrade)
System Requirements
2-1
Installing Joy Tone Manager(for Font & Firmware Upgrade)
※ Your PC should satisfy the
followin g requir eme nts t o
install the program :
● Pentium 133MHz or faster
●
Windows 98SE/ME/2000/XP
to PC
2. Connecting
● 2 0MB o f f ree h ard dis k
space
● CD-Rom Drive
● USB Port (1.1)
● Windows 2000 users must
log in as an administrator to
install the driver.
Caution
※ Windows ME/2000/XP users can upload or download files without the Joy Tone
13
1. Insert the installation CD into
the CD-Rom drive.
The CD will start running automatically. Please
follow the instruction that appears and click Next
to proceed.
2. Click NEXT in the windows that
appear afterward to finish the
installation.
manager, but to install font and firmware, the manager must be installed.
<Installation>
Check Yes and click Finish to
reboot your PC.
※ Windows 98 users must install the USB driver to use U900 as a removable storage.
(Refer to page 15 for installing the driver.)
Select the folder to install the Joy
Tone Manager, and click Next.
to PC
2. Connecting
14
Page 10

2-2
Installing USB Driver for Windows 98
2-3
Connecting to PC
1. Insert the CD into the CD-Rom drive.
2. Connect U900 to the USB port on your PC, and the following
windows will appear.
to PC
2. Connecting
1. Click Yes when the device
installation wizard window
appears.
4. When the driver is found,
click Next.
2. Ch eck “S ea rch fo r t he
driver (recommended)”,
and click Next.
3. Check “Select the folder
to be searched” a nd go
to D:\Driver\Win98 Mass
Storage Driver.
Note
Windows 98/ME users who install
the Joy Tone Manager do not have
5. After installation is
complete, click Finish.
to install the USB driver separately.
1. Detach the USB cover.
2. Connect the player to your PC(you do not have to turn the power on.)
● If prompted, reboot your PC.
3. After showing a message, “looking for a new device,” the
connection will be established. The installation windows may
not appear.
Caution
※ Connecting USB during music playback or other operation may cause a malfunction.
Stop any playback, or operating your player before the USB connection is made.
to PC
2. Connecting
15
16
Page 11

2-3
Connecting to PC
2-4
Managing Files as a Removable Storage Device
In Windows XP
※ The following windows will appear when U900 is connected to PC.
to PC
2. Connecting
2. Click Next when Hardware installation window appears
3. Cl ic k Finish af te r n ew hardware
search is done.
17
1. Click Next in the Hardware Search
Wizard window
1. File Download/Upload
● After connecting the player to PC, double-click “My Computer.”
● Select “Removable Disk”.
● Select the files you want to transfer, and drag and drop them into Music folder.
Caution
※ Music files must be stored in Music folder.
※ Never disconnect the USB cable when the
following message appears on LCD.
to PC
2. Connecting
18
Page 12

2-4
Managing Files as a Removable Storage Device
3-1
Basic Operation
2. Removing USB Connection from PC
● Double-click the Eject Hardware icon on the Windows task bar, and stop the
device before removing the USB device from your PC.
to PC
2. Connecting
● Select Stop USB Mass Storage Device from the popup menu, and follow the
instruction to safely remove the player from your PC.
Caution
※ Follow the instruction above to prevent damage to data and your PC.
1. Changing Mode
● Pressin g REC /MODE long will c han ge mode in the order of MUSIC -FM-
RECORDING. Use “-” and “+” to move left and right, and “M” to select.
REC/MODE button
Move Left/Right
: + /-
Long click
2. Navigation
● Pressing M button short will start Navigation feature.
- Use + and - buttons to move left and right, and press M short to select.
- Use ◀◀ button to move to upper folder.
● Press the M button long to finish Navigation mode.
Navigation Display
To upper folder
Type
Music Folder: stores music files only (it may be a file or folder)
FM Folder: Stores recorded FM files.
Line-in Folder: Stores line-in encoded files.
Voice Folder: Stores voice record files.
Playlist Folder: Stores m3u or playlist files (up to 5)
Folder File
3. Basic
Functions
19
File/Folder Information Location Bar
Current Order/Total Number of Files or Folders
20
Page 13

3-1
Basic Operation
3-1
Basic Operation
Listening to Music using Navigation
NAVI button
Press Short
Open
the Navigation
display
Move to a folder using +/- buttons.
3. Basic
Functions
Press Short
Move to
a sub-folder.
Select a folder/file using +/- buttons.
Press Short
Play the
selected song.
3. Deleting Files
● Press M button short to open Navigation.
● Move to the file you want to delete using + and - buttons.
● Press RPT/HOLD button, and the message, “Are you sure to delete”, will appear.
Choose Yes using + or - button, and press M to confirm your selection.
Caution
※ You cannot delete a folder.
3. Basic
Functions
21
22
Page 14

3-1
Basic Operation
3-2
Listenting to Music
3. Basic
4. Menu
● Press M button long to open Menu.
- Use + and - buttons to move left and right, and press M short to select.
- Use ◀◀ button to move to upper folder.
- Press M button long again to close Menu.
Move Left/Right: +.- buttons Select: Press the M button short
LCD
Main Menu Exit
Functions
To upper folder
Menu detail
Moving to Upper Menu
5. Hold
● Press RPT/HOLD long to lock the buttons.
Press long
Note
※ Auto Hold will lock the buttons automati-
cally after power off. You can select this
option in Menu.
to lower folder.
Hold
1. Power On/Off
Power on
Press long
Power off
Press long
2. Selecting the Next Song and Fast Forward within a Track
Press short
Selecting the next song
Fast forward within a track
Press long
3. Selecting the Previous Song and Fast Reverse within a Track
Press short
Selecting the previous song
Fast reverse within a track
Press long
4. Volume (adjustable from 0 to 30)
Volume up
Press short
or long
Volume down
Press long
or long
3. Basic
Functions
23
24
Page 15

3-2
Listenting to Music
3-3
Listenting to FM
5. Changing Repeat Option
● Press RPT/HOLD short each time to change the repeat option in the order of
(no display) → RPT 1 → RPT D → RPT A → RND D → RND A → INT.
● (no display) : Plays entire collection and stops.
● RPT 1 : Repeats current track continuously.
● RPT D : Repeats all tracks in a folder continuously.
● RPT A : Repeat all tracks continuously.
3. Basic
● RND D : Plays the tracks in a folder in random order and stops.
Functions
● RND A : Plays all tracks in random order and stops.
● INT : Plays the first 10 seconds of each track.
6. AB Section Repeat
● During playback, press REC/MODE short to mark a starting point (A) and once
again to mark an ending point (B) of a section you want to repeatedly listen to.
Pressing it third time will turn off the section repeat option.
REC/MODE button
RPT/HOLD button
Press short
Press short
AB Section Repeat
※ Press REC/MODE long to change to FM mode. (Press M button to select.)
REC/MODE button
Press long
1. Stereo/Mono
● While listening, press PLAY/STOP short to
toggle between stereo and mono.
2. Tuning
● Use │◀◀ and ▶▶│ to change FM frequency.
3. Using Auto Scan
● Press │◀◀ or ▶▶│ long to start auto scan
backward or forward.
Note
※ You can configure the unit of frequency change in Menu
(refer to page 39 “5. Frequency Unit”)
Fast reverse or Fast forward
Fast reverse or Fast forward
Press short
Press short
Press long
3. Basic
Functions
25
26
Page 16

3-3
Listenting to FM
3-3
Listenting to FM
4. Preset/Manual Tuning
● Press RPT/HOLD short either to listen to the presets or to tune frequency manually.
3. Basic
Functions
5. Listening to Preset Stations
● Press │◀◀ or ▶▶│ buttons short to change the preset station.
Note
※ Auto scan is not supported in preset mode.
RPT/HOLD button
Press short
Press short
6. Presetting Radio Stations (up to 20 stations)
● Tune to desired FM frequency.
● Press M button long to open Menu, and select Memory.
Choose a channel number to store the station, and press M long to store.
CH 01:
Press long
Choose a channel
7. Automatic Presetting (Auto Memory)
● Tune and preset automatically.
●
Press M long to open Menu, and select Auto Memory to start automatic presetting.
Auto Memory
Press M to select
Auto Memory
Caution
Press long
complete
※ Executing Auto Memory will replace the previously stored stations with the new
selections.
Yes
Press M long
to store.
3. Basic
Functions
27
28
Page 17

3-4
FM Recording
3-5
Voice Recording/Line-in Encoding
1. Recording FM
● While listening to FM, press REC/MODE
to start recording.
2. Pausing Recording
● While recording, press PLAY/STOP to
3. Basic
Functions
pause, and again to resume.
3. Finishing Recording
● While recording, press REC/MODE to
stop.
4. Playing Recorded Files
● To play the recorded files, change the mode to Music mode, select a file you
want to play in the FM folder and play. (Use NAVI function to search a desired
file. Refer to page 20 “2. Navigation”)
Note
※ FM is recorded in the FM folder as MP3. e.g.) F000.mp3
※ The compressed rate of a recorded file can be changed in Menu.
※ You cannot adjust volume while recording.
REC/MODE
PLAY/STOP
REC/MODE
Press short
Press short
※ Either change to Recording mode by pressing REC/MODE
button long, or press REC/MODE in Music mode.
1. Starting Recording
● Press REC/MODE short to start recording.
Press short
2. Pause
● Press PLAY/STOP to pause, and again to
resume.
PLAY/STOP
Press short
3. Finishing Recording
● While recording, press REC/MODE to stop.
REC/MODE
Press short
4. Playing Recorded Files
● Press PLAY/STOP to play a recorded file, or change to Music mode and select a
recorded file you want to play in the Recording folder. (Use NAVI function to
search a desired file. Refer to page 20 “2. Navigation”)
Note
※ Connect other music device to ENC terminal to start in-line encoding.
※ Voice record will be stored in Voice folder as MP3. e.g.) V000.mp3
※ Line-in encoding will be stored in Line folder as MP3. e.g.) L000.mp3
3. Basic
Functions
29
30
Page 18

4-1
Playlist (m3u support)
4-2
Creating a Playlist
※ U900 supports playback of m3u
(up to five m3u files are supported.)
1. Move the m3u files created in PC to the Playlist folder.
2. Selecting m3u.
● Press Navi button short to start Navigation
and move to the Playlist folder.
※ Playlist folder
Press short
Features
4. Useful
● Sel ec t a p la yli st , sho wn a s P , in th e
Playlist folder.
※ m3u file
3. Canceling Playlist Playback
● Press NAVI button short to start Navigation, and select other music file. This will
automatically cancel playlist playback.
Note
※ If a music file is not stored in the player, but its name is listed in a playlist, it will be
skipped when the playlist is selected for playback.
※ A playlist must be stored in the Playlist folder to play.
Press short
Press short
1. Connect the player to your PC, and run the Windows Explorer
and Winamp.
2. Drag music files from the player (removable disk), and drop it in
the playlist window of Winamp. Click Save List button located at
the bottom right corner of Winamp.
Click save list
button
3. When the Save Playlist window appears, save the list as m3u.
Features
4. Useful
31
32
Page 19

4-3
Formatting
4-4
Joy Tone Manager Program
1. Formatting in the Player
● Turn on U900.
● Press M button to open Menu, and select System Configuration and then Format.
Format
Yes
Features
4. Useful
Format
Caution
33
※ Format must be done in the player.
※ Formatting in your PC may cause a malfunction.
※ Formatting will reset the player to default state with default folders
(Music/FM/Line/Voice/Playlist folders)
If Yes
If Yes
If No
Go back to previous screen.
You can upgrade firmware and download fonts using the Joy Tone
manager program.
Manager Program
Manager Program icon
FirmwareUpgrade
FontDownload
information
Exit
34
Features
4. Useful
Page 20

4-4
Joy Tone Manager Program
4-4
Joy Tone Manager Program
Firmware Upgrade
Firmware upgrade keeps your player up to date.
1. Turn on U900
● Press M button to open Menu, and select System Configuration → Firmware
Upgrade.
Firmware Upgrade
If No
Features
4. Useful
Connect the player to PC.
35
If Yes
Go back to previous screen.
Use a USB cable to connect to PC.
The player is connected to PC.
2. Download the upgrade file from internet.
● Download the upgrade file from “www.pqi.com.tw”
3. Run the Joy Tone manager.
● Click the firmware upgrade icon.
● Search and select the downloaded upgrade file.
Note
※ Refer to page 13 for installing U900 driver.
36
Features
4. Useful
Page 21

4-4
Joy Tone Manager Program
4-4
Joy Tone Manager Program
● Upgrade will take place automatically.
Font Download
Use “Font Download” function to restore the fonts deleted by formatting the player.
Run “Font Download” when the fonts are not shown correctly.
● Run the Joy Tone manager, and click “Font Download” icon.
Features
4. Useful
● Download a font file into the removable disk.
● Click Yes to overwrite the existing data.
Features
4. Useful
37
38
Page 22

4-4
Joy Tone Manager Program
5-1
Menu Structure
Information
● Click ‘?’ icon to see information on Joy Tone Manager.
Features
4. Useful
Exit
● Exit the Manager.
※ Menu contains two modes: Music Mode & FM Mode
Music Mode FM Mode
5. Menu
Configulation
39
40
Page 23

5-2
Music Mode
5-2
Music Mode
Menu Setup
1. Opening Menu
● Press M (Menu/Navigation) long to
open Menu.
2. Moving Through Menu Options
● Use +/ - bu tt ons to move up an d
down.
3. Selecting a Menu Option
● Press M (Menu/Navigation) short to
select a Menu option.
4. Moving to Upper Menu /
Exiting Menu
5. Menu
Configulation
41
● Use┃◀◀ button or select the upper
menu icon.
Select
Press long
Press Short
To exit Menu, press long
Moving to Upper Menu
Press Short
Press Short
1. Preset EQ
● Selects a preset EQ
·[Flat],[Classic],[Rock],[Jazz],[Pop],[Live],[User's EQ]
·Default : [Flat]
2. Display
● File/Tag
·Displays file name or tag information.
·Default : [File]
● Time
·Displays elapsed playing time (Normal) or remaining playing time (Remain).
·Default : [Normal]
·Playing time for a VBR (Variable Bit Rate) file might
display correctly.
● Scroll
·Sets up the scrolling speed of tag information or file
name.
·Default : [X1]
● LCD
·Users can choose to display playing bar, bit rate, or
sampling frequency information.
·Default : [Playing Bar]
● Language
·Sets up language for OS in which a music file is
created.
·Default : [English]
Flat
File
Normal
X1
Playing Bar
English
5. Menu
Configulation
42
Page 24

5-2
Music Mode
5-2
Music Mode
3. System
● Beep
·Beep on/off
·Default : [On]
● Resume
·Resume from beginning or last point
·Default : [Last Point]
● Sleep
·Sleep timer (setup by 10 min interval)
·Default : [Off]
● Stop Power Off
·Sets up time for automatic power off when inactive.
·Default : [1 Min]
● Backlight
·Sets up time for the back light to be on.
·Default : [5 Sec]
● Contrast
·Sets up LCD contrast (level 1 ~ 20)
5. Menu
Configulation
43
·Default : [Level 11]
● System Reset
·Resets to the factory default state.
On
Beginning
Off
30Sec
Off
Level 1
System Reset
● Start With Hold On
·Sets up Auto Hold on or off. When it is on, Buttons
get locked when power becomes off.
·Default : [Off]
● Firmware Upgrade
·Upgrades functions of the player.
·Default : [No]
1. Turn the power on.
2. Select MENU-SYSTEM-UPGRADE
3. Connect to PC.
4. Run the Joy Tone Manager.
5. Click Firmware Upgrade to complete upgrade.
● Format
·Formats the player
·All menu or system setups are retained.
·Default : [No]
● Battery
·Sets up the type of battery used for precise measurement on its capacity.
·Default : [Alkaline]
● Player Info.
·Shows player information.
Caution
※ Refer to page 35 for detailed information on firmware upgrade
※ Refer to page 33 for more information on format.
※ All data will be lost after formatting.
※ Turning the power on after formatting will reinstate the default folders only.
※ The basic setups and version are retained.
Off
Yes
Yes
Alkaline
Player info.
5. Menu
Configulation
44
Page 25

5-2
Music Mode
5-2
Music Mode
4. Recording
● Voice B/R
·Sets up bit rate for voice recording
·Default : [32Kbps]
● Line B/R
·Sets up bit rate for line-in encoding
·Default : [128Kbps]
● FM B/R
·Sets up bit rate for FM encoding
·Default : [32Kbps]
● VAD (Voice Activity Detection)
·With this feature on, voice recording takes place
when only voice is detected.
·
When it is off, recording continues until it is stopped.
·Default : [Off]
● Sync
·Detect s tracks a nd s epa rat es r eco rdi ng i nto a
single file automatically.
·Sync Off : records as a single file
·Sync 1 : records a single file and stops
·Sync On : automatically converts each track
5. Menu
Configulation
·Default : [Sync Off]
into a single file and stops.
32 Kbps
32 Kbps
32 Kbps
On
Sync Off
5. My Sound
● User’s EQ
·Adjustable 5-band EQ
·Move between the bands : ◀◀ / ▶▶ (Move left/right)
·Adjust the frequency : + / − (Move up/down)
·Select : M button
● 3D
·[Off], [Low], [Middle], [High]
·Sets 3D sound on or off.
·Default : [Middle]
● Bass
·OFF / Level 1~5
·Adjusts bass intensity.
·Default : [Level 3]
● Treble
·Off / Level 1~5
·Adjusts treble effect.
·Default : [Off]
User’s EQ
User’s EQ
Off
Off
Off
5. Menu
Configulation
45
46
Page 26

5-3
FM Mode
5-3
FM Mode
1. Memory
● Stores up to 20 preset radio stations.
(CH1~CH20)
2. Auto Memory
● Automatically tunes and stores radio stations.
3. System
● Beep
·Sets beep sound on or off.
·Default : [On]
● Sleep
·Sleep timer. (Adjustable by 10min)
·Default : [Off]
● FM B/R
·Sets up bit rate for FM recording.
5. Menu
Configulation
·Default : [32Kbps]
● Backlight
·Sets up time for the backlight to be on.
(Adjustable by sec)
·Default : [5Sec]
CH 1 : 87.7 MHz
Auto Memory
On
Off
32 Kbps
Off
● Contrast
·Sets up LCD contrast.
·Default : [Level 11]
● Player Info.
·Shows player information such as the total memory
size, available memory, firmware version, and etc.
4. FM Band
● Sets up FM band by country.
·[US/EU/KOR/CHN], [JAPAN] (two bands)
·Default : [US/EU/KOR/CHN]
5. Frequency Unit
● Sets up the frequency-tuning unit.
·Default : [100KHz]
Level 1
Player Info.
US/EU/KOR/CHN
100 KHz
5. Menu
Configulation
47
48
Page 27

6-1
Inserting a Battery
6-2
Troubleshooting
No power
■ Check whether the battery has been inserted correctly.
■ Check whether HOLD is on. (If it is on, set it off.)
1. P ull o ut t he U SB c over t o
remove it.
2. Push the battery compartment
co ver in th e directi on of the
arrow shown in the picture.
3. Push it up to open the door.
4. Insert a AAA battery,
- inside.
Note
6. Miscellaneous
※ Make sure + and - locations before inserting a battery.
※ Remove the battery when the player is not in use for a prolonged period of time to
prevent damage by corrosion.
49
Power gets turned off automatically
■ Check if Sleep or Auto Off is set on.
No Sound
■ Check if earphone is connected to line-in jack.
■ Check if volume is at 0.
Noise
■ Check for any foreign substance on earphone jack.
■ Corrupted MP3 or WMA files may cause a static noise and
produce interrupted sound. Check for any file corruption.
Buttons do not work
■ Check if HOLD is on. If it is on, turn it off.
No backlight
■ Check the Menu setup for backlight option.
Download Failure
■ Check if USB is correctly and securely connected.
■
If you are using Windows 98, the USB driver must be installed.
Playing time is not displayed properly
■
Files with VBR may not display playtime properly. This is normal.
6. Miscellaneous
50
Page 28

6-3
Technical Specification
51
Model
Supported File Format
Dimension
FM
Audio Earphone Output
Battery Life
USB
Operational Temperature
Language
6. Miscellaneous
Power
Size
Weight
Material
FM
Earphone Output
SN
Output Frequency
SN
JoyTone-U900
MPEG1,2,2.5 Layer3(32Kbps~320Kbps),
WMA(32Kbps~192Kbps)
1.5V AAA (alkaline) x 1
25×80×25mm(W×H×D)
33g (without battery)
Plastic
87.5~108.0 (US/EU/KOR/CHN)
76.0~91.0 (JAPAN)
10mW(L) + 10mW(R) (16 ohm at max volume)
50 dB<
20Hz~20KHz
10mW(L) + 10mW(R) (16 ohm at max volume)
95 dB<
12 hours
Supports 1.1
0℃~ +35℃
Supports 35 languages(Unicode)
 Loading...