

Page 1
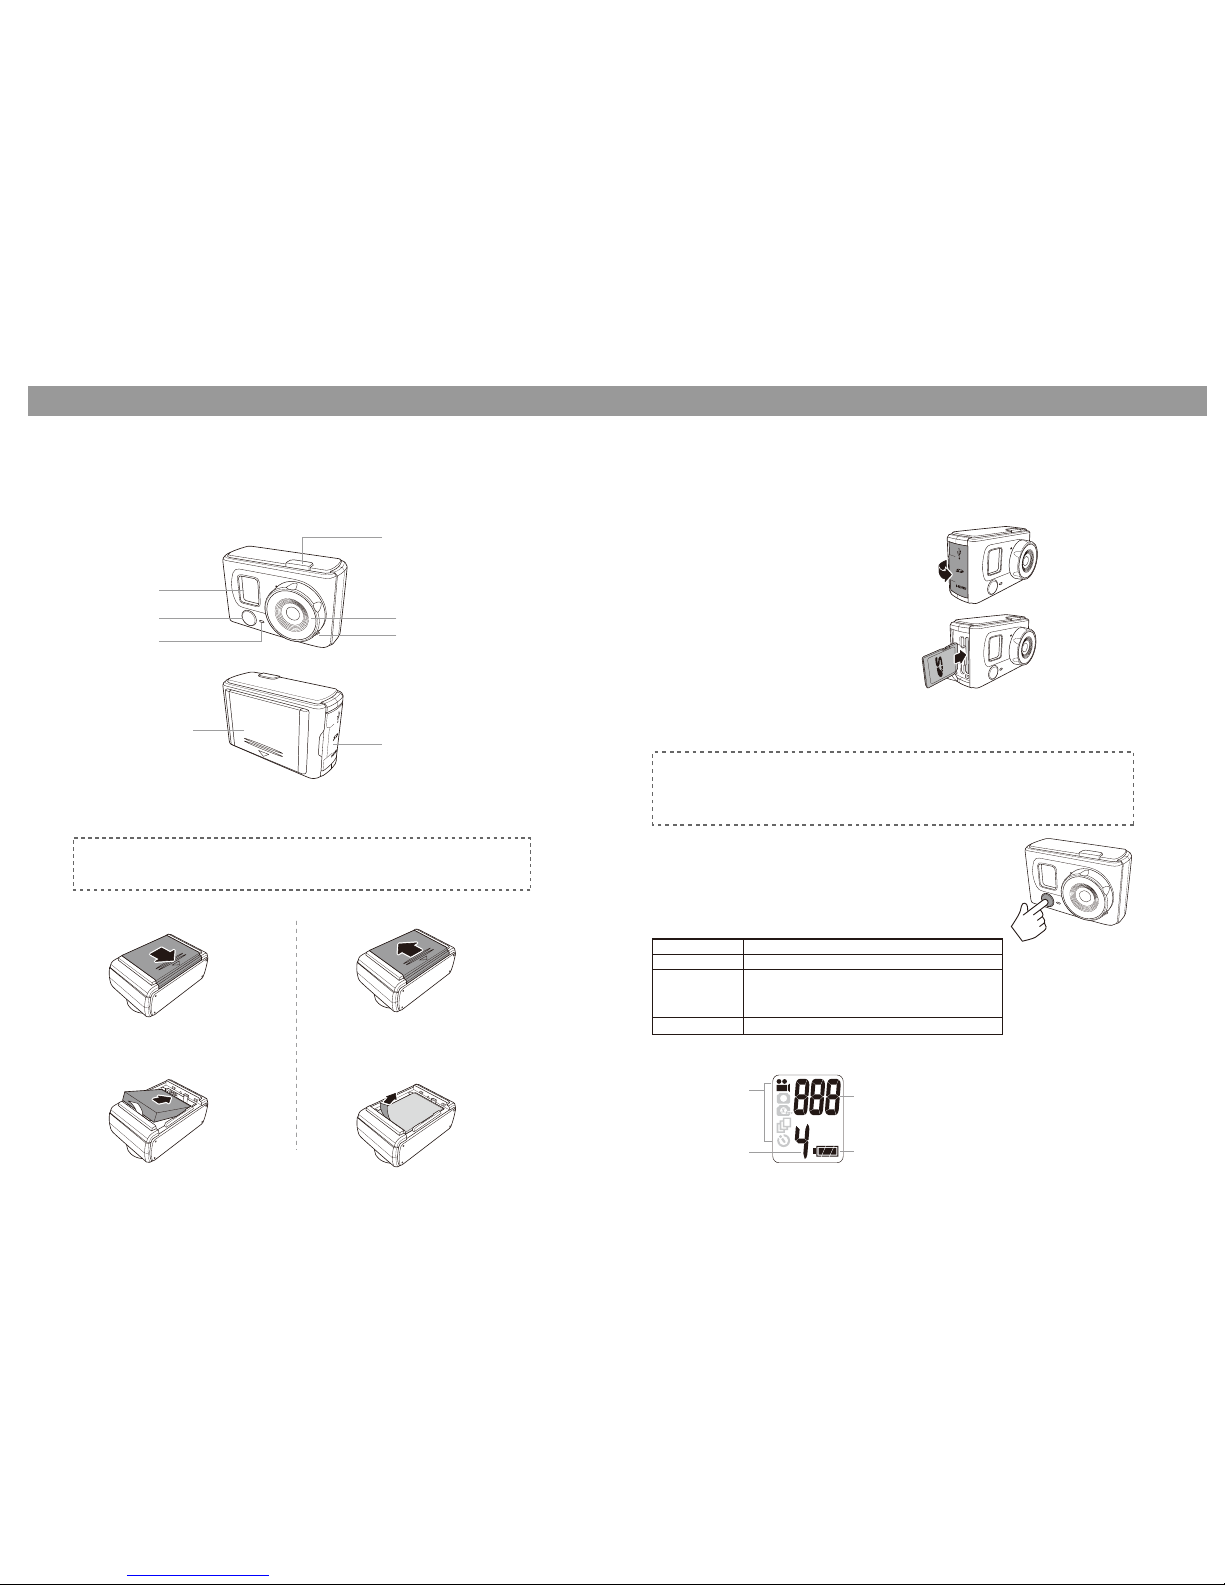
Inserting the SD Card
1. Open the SD card and connectors cover.
2. Insert the SD card with the metal contacts
facing the back of the video camera.
3. Push the SD card into the slot until it
clicks into place.
4. Close the SD card and connectors cover.
An SD card is required to capture photos and videos. The video
camera supports SDHC cards up to 32GB.
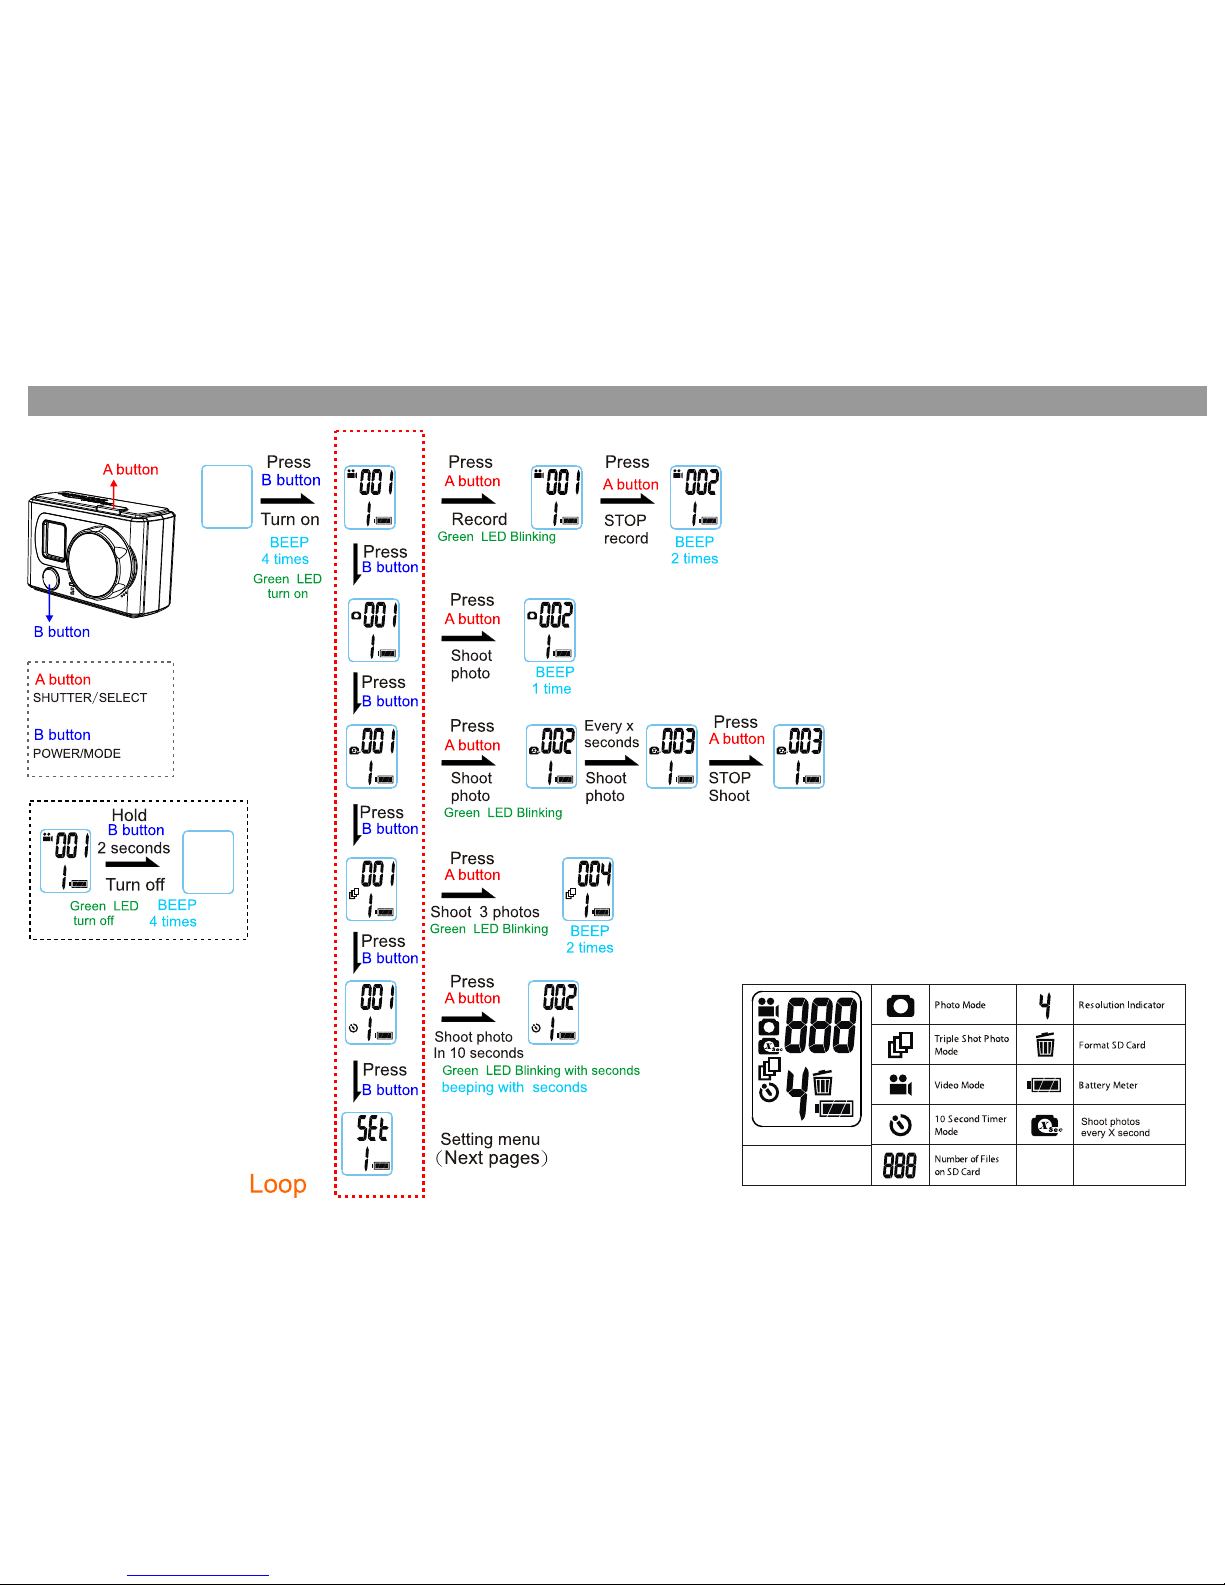
Turning On
The LCD Screen
Press the Menu button to turn on the video camera.
To turn off the video camera
Press and hold the Menu button for 2 seconds.
To remove the SD card
Push the SD card to eject it from the slot.
Warning
- Do not remove the SD card while data is being recorded. Doing so may corrupt
the saved data and damage the card.
- Turn off the video camera before removing the SD card.
Inserting the Battery
1. Push down the battery compartment
cover to open it.
2. Align the battery contacts and
then insert the battery into the
compartment.
To remove the battery
1. Open the battery compartment.
2. Pull the ribbon to remove the battery.
3. Close the battery compartment cover.
Warning
Use only the supplied battery or a similar battery recommended by the
manufacturer or your dealer.
LED Indicator
Color Description
Green Video camera is turned on
Green Blinking - Video recording is in progress
- Self-timer is activated
- Continuous or triple shooting is activated
Red Battery is charging
Number of captured videos or
photos
Capture mode
indicator
Battery status
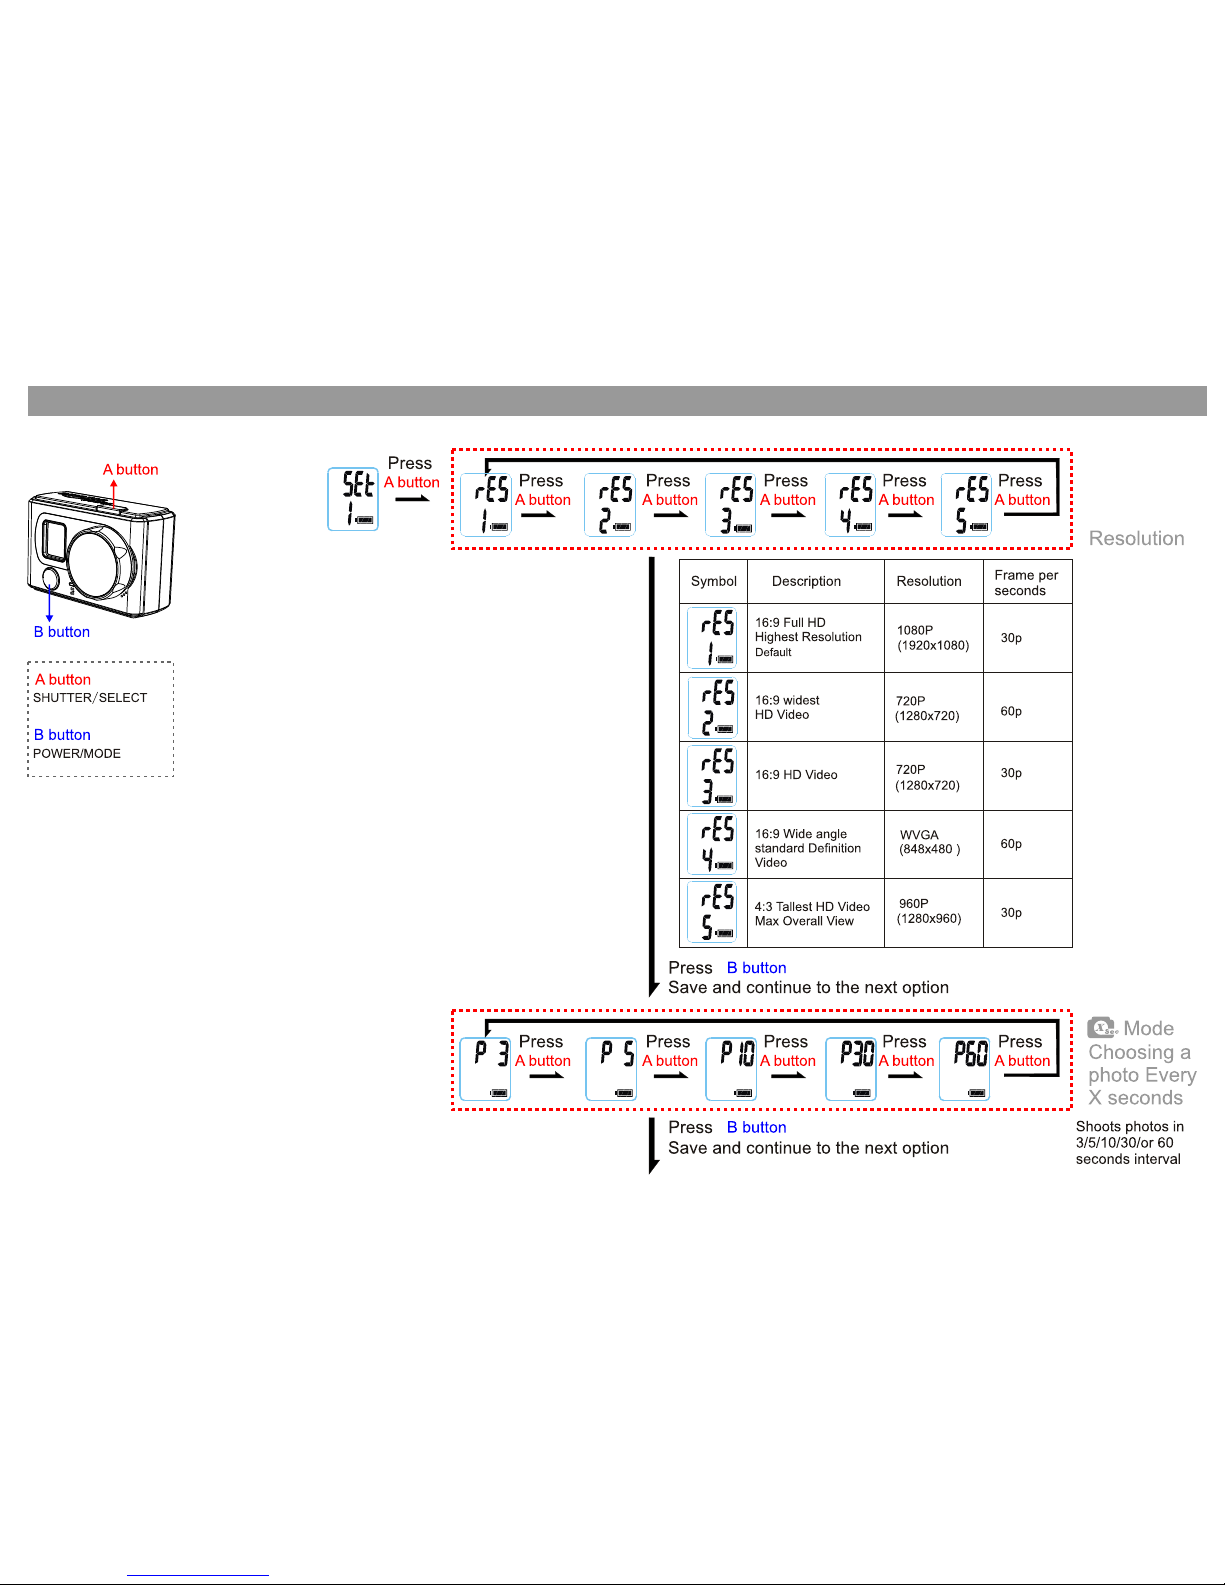
Current resolution
setting
User manual- “PQI Air” Cam
LCD screen
POWER/
MODE button
LED indicator
SHUTTER/SELECT button
Lens
Microphone
SD card and connectors compartment
Battery compartment
P1
PQI Air Cam
Page 2
PQI Air Cam
P2
Page 3
PQI Air Cam
P3
Page 4

PQI Air Cam
P4
Page 5

PQI Air Cam
P5
Page 6

PQI Air Cam
P6
Page 7

PQI Air Cam
P7
Page 8

PQI Air Cam
Troubleshooting
"bAt" message on the LCD screen
If you see the "bAt" message on the LCD screen, it means that the battery is almost used up. Charge the
camera battery.
"FUL" message on the LCD screen
If you see the "FUL" message on the LCD screen, it means that the SD card is full. You cannot shoot any or
record in this situation. Transfer the SD card files to the computer and delete the files from your SD card.
"Err" message on the LCD screen
If you see the "Err" message on the LCD screen, it means that the SD card may have compatibility issues.
Try to format the card first using the camera (Delete menu). If it still does not work, format using the PC.
"---" message on the LCD screen
If you see the "---" message on the LCD screen, it means that the SD card is not inserted. Insert the SD card.
FCC Statement
Modifications not approved by the party responsible for compliance could void user’s authority to operate the
equipment.
This equipment has been tested and found to comply with the limits for Class B digital device, pursuant to part 15 of the
FCC Rules. These limits are designed to provide reasonable protection against harmful interference in a residential
installation. This equipment generates and can radiate radio frequency energy and, if not installed and used in
accordance with the instructions, may cause harmful interference to radio or television reception, which can be
determined by turning the equipment on and off.
The user is encouraged to try to correct the interference by one or more of the following measures:
• Reorient or relocate the receiving antenna.
• Increase the separation between the equipment and the receiver.
• Connect the equipment into an outlet on a circuit different from that to which the receiver is connected.
• Consult the dealer or an experienced radio/TV technician for help.
P8
 Loading...