

Page 1
User Manual
A300V
Wireless Portable Hard Drive
Version: 1.0
Page 2
2
Table of Contents
Product Introduction ................................................................................................ 3
Package Contents .................................................................................................... 3
Quick User Manual ................................................................................................... 3
Leather sleeve ............................................................................................................. 4
Product Features ...................................................................................................... 5
Supported Formats .................................................................................................. 5
System Requirements ............................................................................................. 6
Introduction to Air Bank ......................................................................................... 7
Charging ...................................................................................................................... 9
Connecting to a Computer ..................................................................................... 9
Safely Remove from the Computer ...................................................................... 9
Installing Air Bank App: PQI Air Bank+ ............................................................ 10
Connecting to Air Bank ......................................................................................... 13
Begin Using the PQI Air Bank+ App .................................................................. 14
Air Bank: View files list on the Air Bank ....................................... 14
Image: View Images ............................................................................ 17
Music: Search Music ........................................................................... 18
Video: Watch Videos ........................................................................... 19
Phone Contents ................................................................................... 20
Setup ....................................................................................................... 21
Page 3
3
Product Introduction
Thank you for your purchase of the Air Bank Wireless/USB Portable Drive. You can now
wirelessly transmit data to your iPhone, iPad, iPod touch, Android smart phone or tablet, and
other Wi-Fi enabled devices.
Air Bank enables multimedia sharing with up to 5 devices for enjoyment for the whole family.
The built-in battery supports 5 hours of continuous streaming playback to a wireless single
user within a 15m radius. The Air Bank is also a portable Wireless Station for Internet sharing
with the smart phone or tablet.
Reminder:
(1) Battery life varies by the number of connecting users and the data transferred.
(2) Data transfer speed over Wi-Fi varies by the distance and number of connecting users.
Package Contents
Air Bank
Quick User Manual
Page 4

4
USB 3.0 cable
Leather sleeve
Page 5

5
Product Features
Browse photos
Browse documents
Play music
Play video
Wi-Fi WPA2 encryption
Support up to 5 wireless devices accessing different files
For iOS and Android
App designed for iOS
App designed for Android
Wireless sharing of photo, video, music, documents
Built-in Li battery for up to 5 hours of movie playback
USB3.0 cable included for file transfer and charging
Secure wireless setup
Built-in Ethernet port for portable wireless access point
Supported Formats
Based on the device platform
iOS supported formats:
Documents: .pdf, .txt, .doc, .docx, .xls, .xlsx, .ppt, .pptx
Images: .jpg, .png
Audio: .mp3, .wav, .aif
Video: .mp4, .mov
Android supported formats:
Documents: .pdf, .txt, .doc, .docx, .xls, .xlsx, .ppt, .pptx
Images: .jpg, .png, bmp, .gif
Audio: .mp3, .mp4, .3gp, .wav, .ogg, .imy, .aif
Video: .mp4, .3gp
Page 6

6
System Requirements
For data transfer to Air Bank through USB:
! Microsoft Windows® XP
! Microsoft Windows Vista®
! Microsoft Windows® 7
! Microsoft Windows® 8
! Mac® OSX 10.5 or newer
! Linux® Kernel 2.4 or newer
For devices connecting to Air Bank+:
iOS:
iPhone 3GS, 4, 4S, 5, iPod touch (Gen4) and iPad, iPad2, New iPad. (iOS4.0 and up is
recommended)
Android:
Android 2.1 and up
Page 7
7
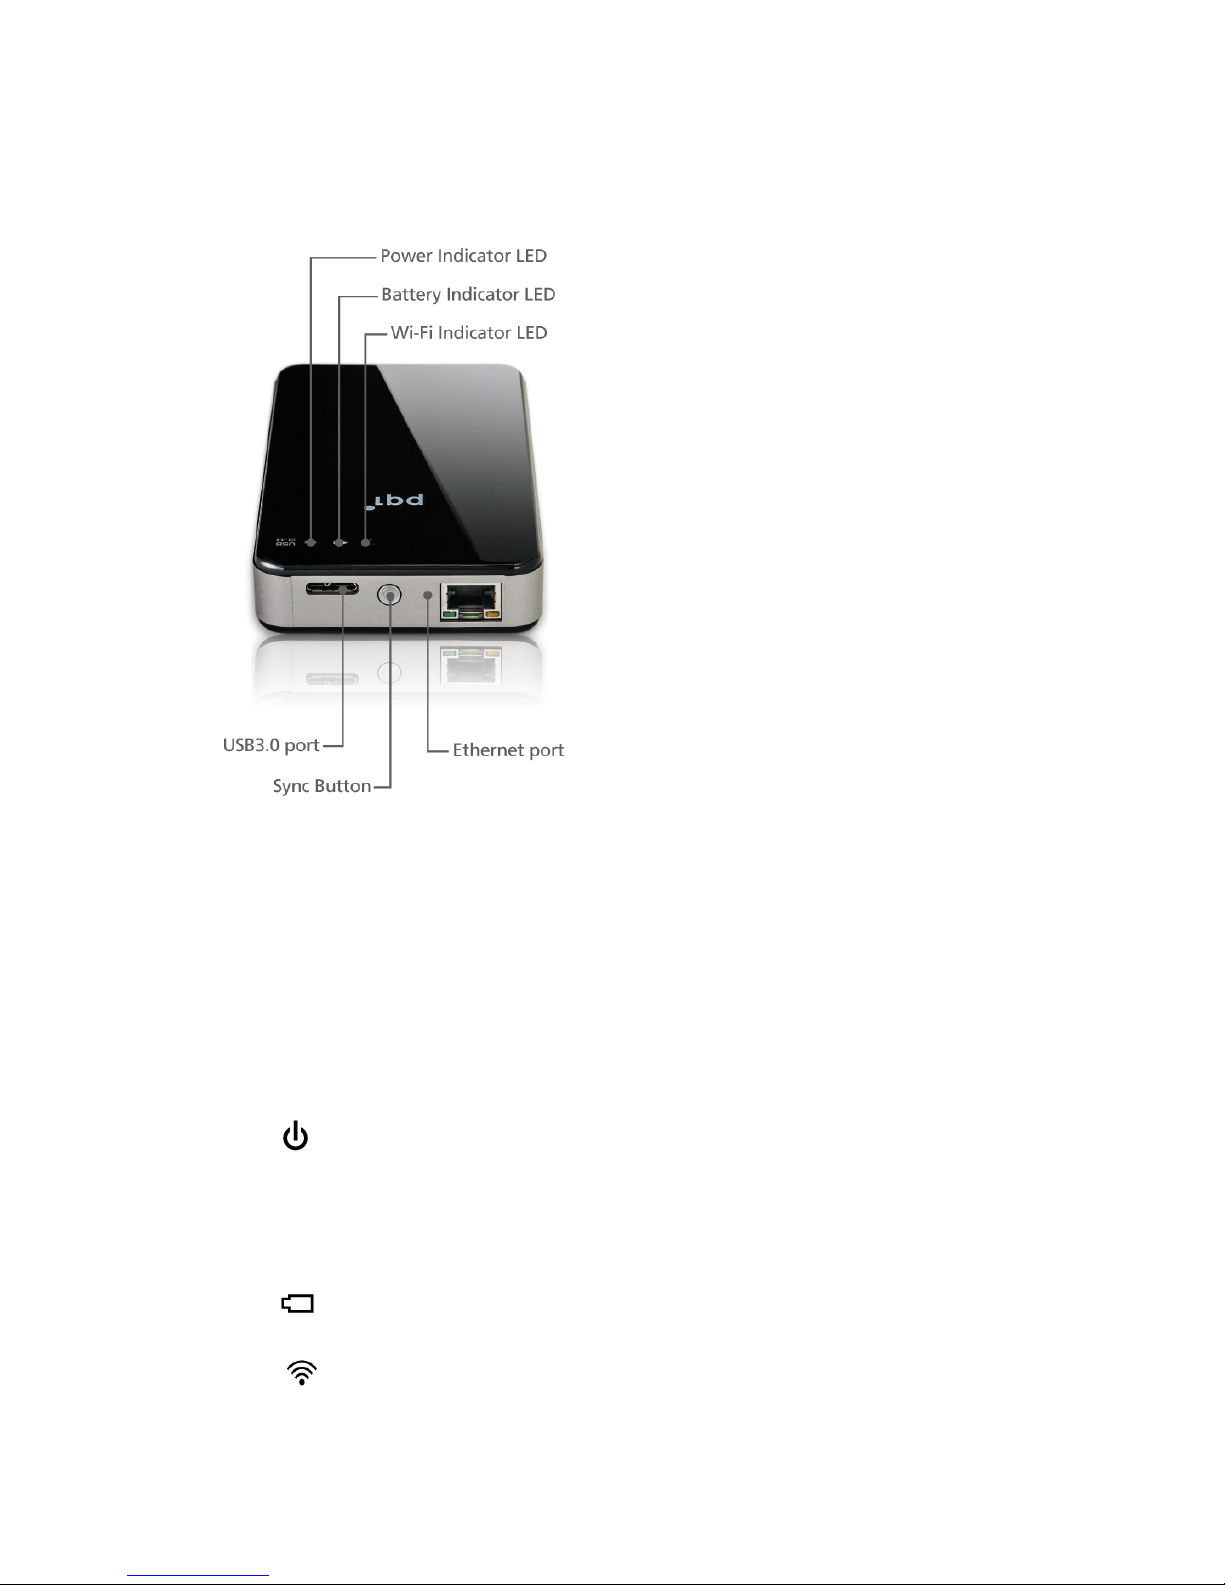
Introduction to Air Bank
System Switch: Wi-Fi is enabled when switch is ON.
When switch is OFF, you can use as a general portable drive for USB
data transfer.
USB Port: For charging and data transfer.
Reminder: Wi-Fi can be enabled while charging through USB but data transfer
is disabled. To transfer data using USB, please disable the Air Bank Wi-Fi
function.
LED Indicator:
1. Power Indicator:
Solid green when power ON.
Solid orange when charging during power ON.
Solid orange when charging during power OFF; indicator turns off when charging complete.
2. Power Indicator: Solid red when battery level is lower than 20%.
3. Wi-Fi Signal Indicator: Flashing blue when Wi-Fi enabled; rapid flashing blue
during data transfer.
Page 8

8
Reset Button: Push 3-5 seconds to reset to factory default. This will not delete data
stored on the Air Bank.
Page 9

9
Charging
Please fully charge your Air Bank before first use.
Either charge through a USB adaptor or from the PC/Notebook USB slot, and read the Power
Indicator to determine the charging status.
Connecting to a Computer
The built-in Li battery is being charged once Air Bank is connected to a PC. There are two
different modes based on the state of the Wi-Fi Switch:
(1) Wi-Fi OFF: Air Bank is a USB drive and your favorite files can be directly copied from your
computer by dragging them to the Air Bank.
(2) Wi-Fi ON: Use the wireless feature while charging.
Safely Remove from the Computer
Windows user:
Right click on the USB icon on the lower right corner of the task tray and select "Safely remove
hardware" to safely remove Air Bank.
Mac user:
Drag the disk icon to the trash bin to safely remove Air Bank.
Page 10

10
Installing Air Bank App: PQI Air Bank+
PQI Air Bank+ is a multimedia app developed exclusively for PQI Air Bank on iOS and Android
devices. Users can wirelessly access files on the Air Bank through the PQI Air Bank+ app.
Photos, music, and videos are categorized in the app for quicker file access.
Installing PQI Air Bank+ on iOS
1. Access the iOS App Store and search for "PQI Air Bank+" or PQI.
2. Select "PQI Air Bank+", choose "FREE", and then select "INSTALL APP" to begin.
Page 11

11
3. Once installed, it will show up in your iOS device.
Installing PQI Air Bank+ on Android
1. Access Android Google Play and search for "PQI Air Bank+" or PQI.
2. Select "PQI Air Bank+" Free and then select "Install" to begin.
3. Once installed, it will show up in your Android device.
Page 12

12
Page 13

13
Connecting to Air Bank
Please follow the steps below for iOS/Android devices:
(1) Push and hold the Power Button for two seconds to power on with green indicator. After a
few seconds, Wi-Fi is enabled with flashing blue indicator.
(2) In your iOS/Android device "Settings", go to the Wi-Fi settings and select "PQI Air Bank"
from the list to enable connection.
(3) After connection is established, launch "PQI Air Bank+" on the portable device to access
files stored on the Air Bank.
Note: Repeat steps 1 to 3 to configure up to 5 devices connecting to the Air Bank.
For wireless devices other than iOS or Android, please follow the steps
below:
(1) Push and hold the Power Button for two seconds to power on with green indicator. After a
few seconds, Wi-Fi is enabled with flashing blue indicator.
(2) Connect your Wi-Fi device to the Air Bank.
(3) After connection is established, launch the Internet browser and enter "192.168.100.1" in
the address bar.
(4) All files and folders on the root directory of the Air Bank are shown on the web page.
!
Page 14

14
Begin Using the PQI Air Bank+ App
After wirelessly connecting your iOS/Android device to the Air Bank, use the "PQI Air Bank+"
app to browse files and perform simple operations.
Reminder: Make sure the file formats are supported on your iOS/Android device.
The following function tabs can be seen on the Air Bank+ main screen:
Air Bank: View files list on the Air Bank
Open this tab to browse the details of all files on the Air Bank. Click the file to view contents or
click the box on the right to select the file for download.
Air Bank+ Tab
Page 15

15
!!!!!!
Select and you will see the file operation menu. "Delete", "Refresh", "Create Folder",
"Download", or "Exit" for the selected files; select "Cancel" to return to the file list.
Delete
Select "Delete" and the delete button appears to the left of the files. Select the button and then
confirm to delete the file.
Air Bank main screen
File operation menu
Selected file for download
View file contents
Page 16

16
Refresh
Select "Refresh" to refresh the files list.
Create Folder
Select "Create Folder" to create a new folder under the directory.
Download
Mark the checkbox to the right of the file and select "Download" to download the selected file(s)
from the Air Bank to the user device.
Delete button in front of the files
Enter new folder name
Page 17

17
Exit
Select "Exit" to quit the "Air Bank+" app.
Image: View Images
Select and all Air Bank supported images will be shown. Please refer to Supported Formats.
Select the files to show contents in slideshow.
Image screen
Select file
Begin file download
Page 18

18
Select and a checkbox appears in the bottom right corner of the image. The selected
image(s) can be saved to an album (iOS only) or a folder of the device.
Music: Search Music
All supported music files will be automatically shown on the same page. Please refer to
Supported Formats.
Slideshow screen
Checkmark the image(s)
to save
Page 19

19
Select your favorite music for playback.
Video: Watch Videos
All supported movie files will be automatically shown on the same page. Then select the video
you want to start playback. Please refer to Supported Formats.
Music screen
Music playback
screen
Page 20

20
Phone Contents
Browse downloaded files and select the file to view contents. Select the checkbox to the right
of the file to upload to Air Bank. This function can also be used if not connected to the Air
Bank.
Movie screen
Movie playback
screen
Page 21

21
Select and you will see the file operation menu. "Delete", "Refresh", "Create Folder",
"Upload", or "Exit" for the selected files; select "Cancel" to return to the file list.
Upload Image (iOS only)
Select and the device's built-in gallery is shown. Select the images to save to the Air
Bank.
Setup
File operation menu
Contents screen
Page 22

22
Login:
Factory default of Air Bank requires no login. Please setup an administrator account and
password immediately.
Please login using the administrator account and password for making changes to the
settings.
Factory default:
Restore factory default settings
Reboot:
Reboot the Air Bank after changing the channel, SSID, and Wi-Fi password, etc. for the
changes take effect.
Save:
Save the channel, SSID, and Wi-Fi password, etc. Settings will take effect after next reboot.
Channel:
Select the Wi-Fi channel used by Air Bank to avoid conflicts with existing wireless networks.
The default setting is "Auto" for automatic channel selection.
Device name/SSID:
Default is "PQI Air Bank". The device name can be changed for Wi-Fi connection from other
devices.
Wi-Fi password:
Enabled or disabled. Enable to password protect the data from unauthorized access. Enter at
Setup screen
Page 23

23
least 8 and up to 63 alphanumerical characters (case sensitive).
WAN Mode:
DHCP or Static IP. Default is DHCP. To set Air Bank for static IP, please change WAN Mode
to "Static" and then the IP Address field can be modified.
Wireless Station Configuration:
Station SSID: Set the Wi-Fi station SSID
Station Security Mode: Set the Wi-Fi station encryption
Station Password: Set the Wi-Fi station password
[Connect] button: Push the [Connect] button to connect to the Wi-Fi station
[Disconnect] button: Push the [Disconnect] button to disconnect from the Wi-Fi station
Reminder: In you lost your password and cannot access the Air Bank, please push and hold
the Reset for 3-5 seconds to reset to factory default. This will not delete data stored on the Air
Bank.
Web Setup/Using Wireless Station
(1) Push and hold the Power Button for two seconds to power on with green indicator. After
a few seconds, Wi-Fi is enabled with flashing blue indicator.
(2) Connect your Wi-Fi device to the Air Bank.
(3) After connection is established, launch the Internet browser and enter "192.168.100.1" in
the address bar.
Login Screen
(1) Enter user name and password
(2) Push [Login] button
Setup Web Login
(1) Enter the user name and password
(2) Confirm password
(3) Push OK
(4) Use new user name and password to login
Page 24

24
AP Mode
(1) Create new network name for your Air Bank
(2) Check [Security] to set the network password
(3) Select the network channel
(4) Check [WAN DHCP] if an IP address is assigned by your Internet service provider
(5) If you need to use a static IP for the Internet, make sure [WAN DHCP] is unchecked and
set the following fields.
! Static IP
! Submask IP
! Gateway IP
(6) Push [Apply Changes]
Concurrent Mode
(1) Push [Scan] for surrounding wireless networks
(2) Select your wireless network name and push [Connect]
(3) Your portable device can now access the Internet through the Air Bank
NCC/DGT Advisory Statement
Article 12
Any changes or modifications to the frequency, amplifier power, or original specifications and
functionality of this certified low-power radio without express approval is prohibited.
Article 14
Operation of the low power radio shall not interfere with aviation safety and legitimate
communication; in case of radio interference, operation of the device shall immediately be
stopped until radio interference is reduced.
The legitimate communication mentioned in the preceding paragraph is the radio
communication regulated by the Telecommunication Act.
The low power radio shall tolerate radio interference from legitimate communication or
industrial, scientific, and medical instruments.
Page 25

25
FCC Compliance and Advisory Statement
This device complies with Part 15 of the FCC rules. Operation is subject to the following two
conditions: (1) this device may not cause harmful interference, and (2) this device must accept
any interference received, including interference that may cause undesired operation. This
equipment has been tested and found to comply with the limits for a Class B digital device,
according to Part 15 of the FCC rules. These limits are designed to provide reasonable
protection against harmful interference in a residential installation. This equipment generates,
uses and can radiate radio frequency energy and if not installed and used in accordance with
the instructions, may cause harmful interference to radio communications. However, there is
no guarantee that interference will not occur in a particular installation. If this equipment does
cause harmful interference to radio or television reception, which can be determined by turning
the equipment off and on, the user is encouraged to try to correct the interference by one or
more of the following measures:
1. Reorient the receiving antenna.
2. Increase the separation between the equipment and receiver.
3. Connect the equipment into an outlet on a circuit different from that to which the receiver is
connected.
4. Consult the dealer or an experienced radio/TV technician for help. Any special
accessories needed for compliance must be specified in the instruction manual.
WARNING: A shielded-type power cord is required in order to meet FCC emission limits and
also to prevent interference to the nearby radio and television reception. It is essential that only
the supplied power cord be used. Use only shielded cables to connect I/O devices to this
equipment.
CAUTION: Any changes or modifications not expressly approved by the party responsible for
compliance could void your authority to operate the equipment.
For product available in the USA/Canada market, only channel 1~11 can be operated.
Selection of other channels is not possible.
This device and its antenna(s) must not be co-located or operation in
conjunction with any other antenna or transmitter.
FCC SAR Statement:
Federal Communication Commission (FCC) Radiation Exposure Statement
This EUT is compliance with SAR for general population/uncontrolled exposure limits in
ANSI/IEEE C95.1-1999 and had been tested in accordance with the measurement methods
and procedures specified in OET Bulletin 65 Supplement C. This equipment should be
Page 26

26
installed and operated with minimum distance 1 cm between the radiator & your body.
 Loading...