

Page 1

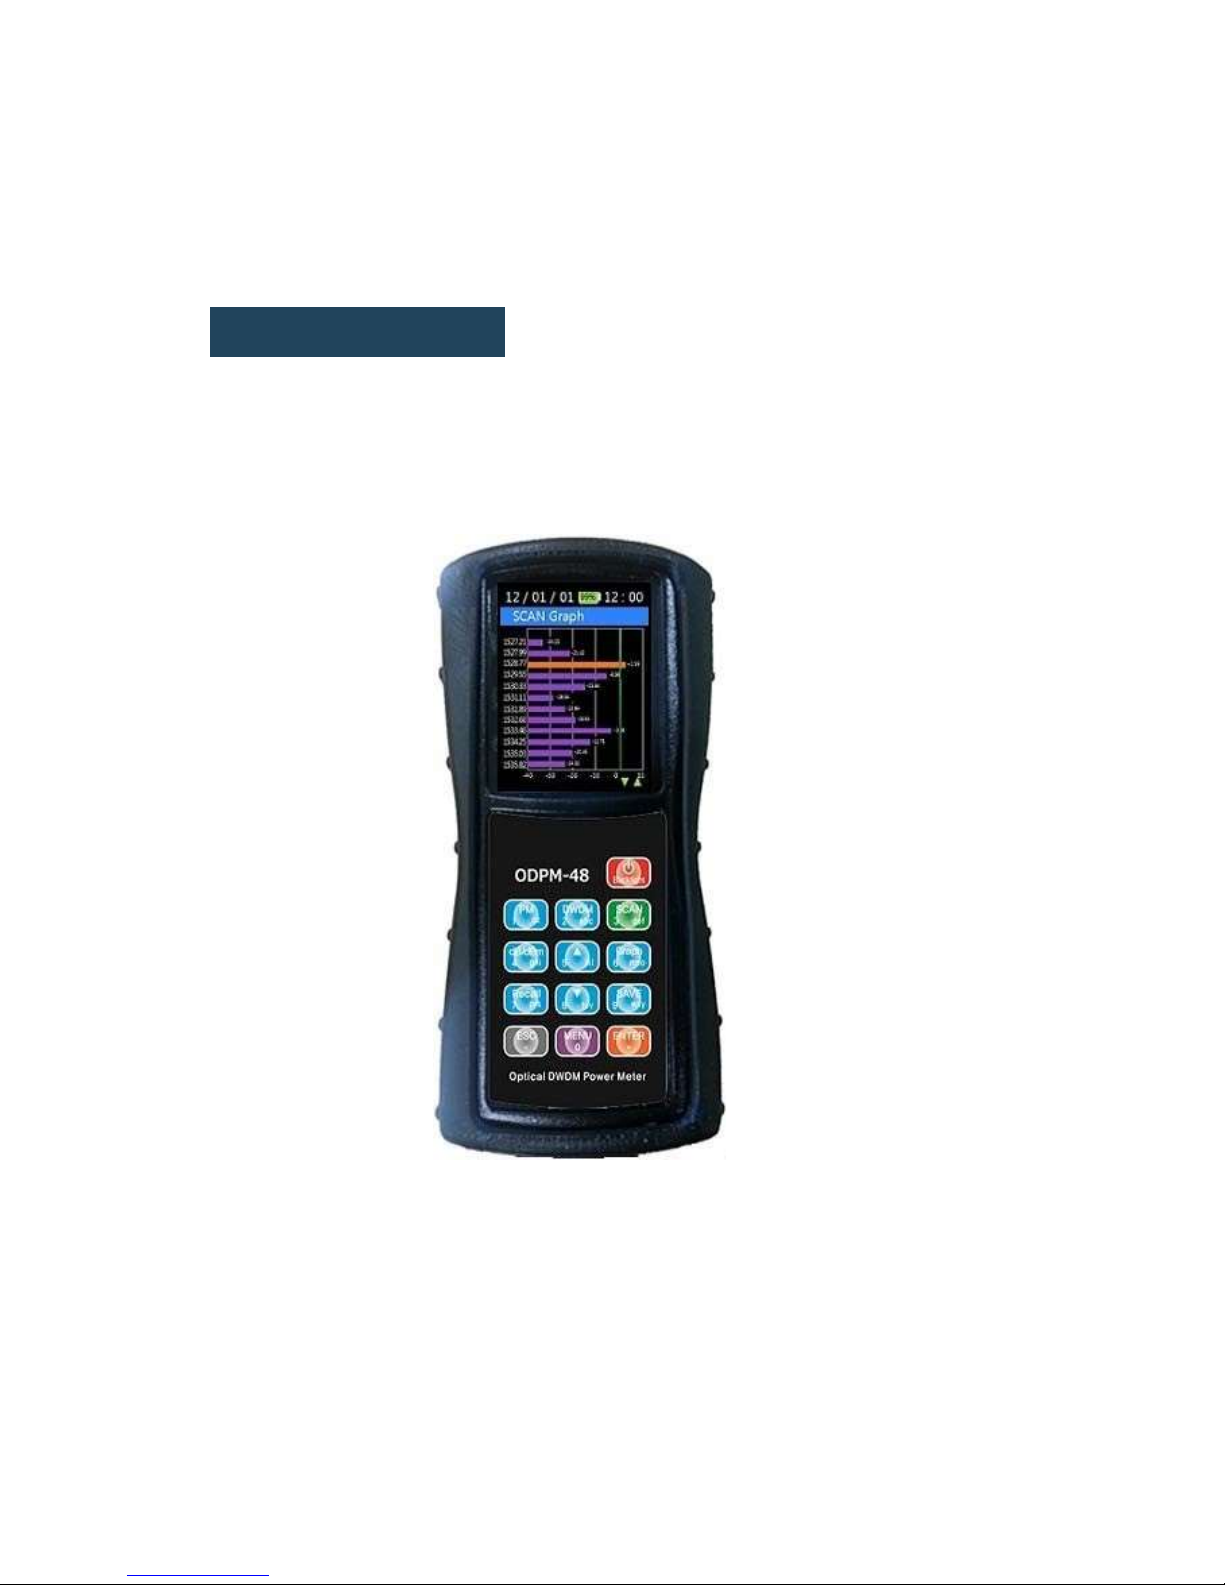
ODPM-48
Page 1/26
User Manual
Optical DWDM Power Meter
ODPM-48
Page 2
ODPM-48
Page 2/26
1. Introduction
ODPM-48 is developed to measure exact power and frequency
adoptable to DWDM network conditions. This instrument is portable
and made to be appropriate to the outside environment.
1.1 Main Functions
- Automatic Wavelength & Power detection
- It is compact in size and lightweight for excellent portability
Page 3
ODPM-48
Page 3/26
- ODPM-48 is easy-to-use testing instruments for optical fiber DWDM
network
- Auto shut off function
- Fast response for full 48-channels
- High-quality graphics
- Saves/ Stores measured large data
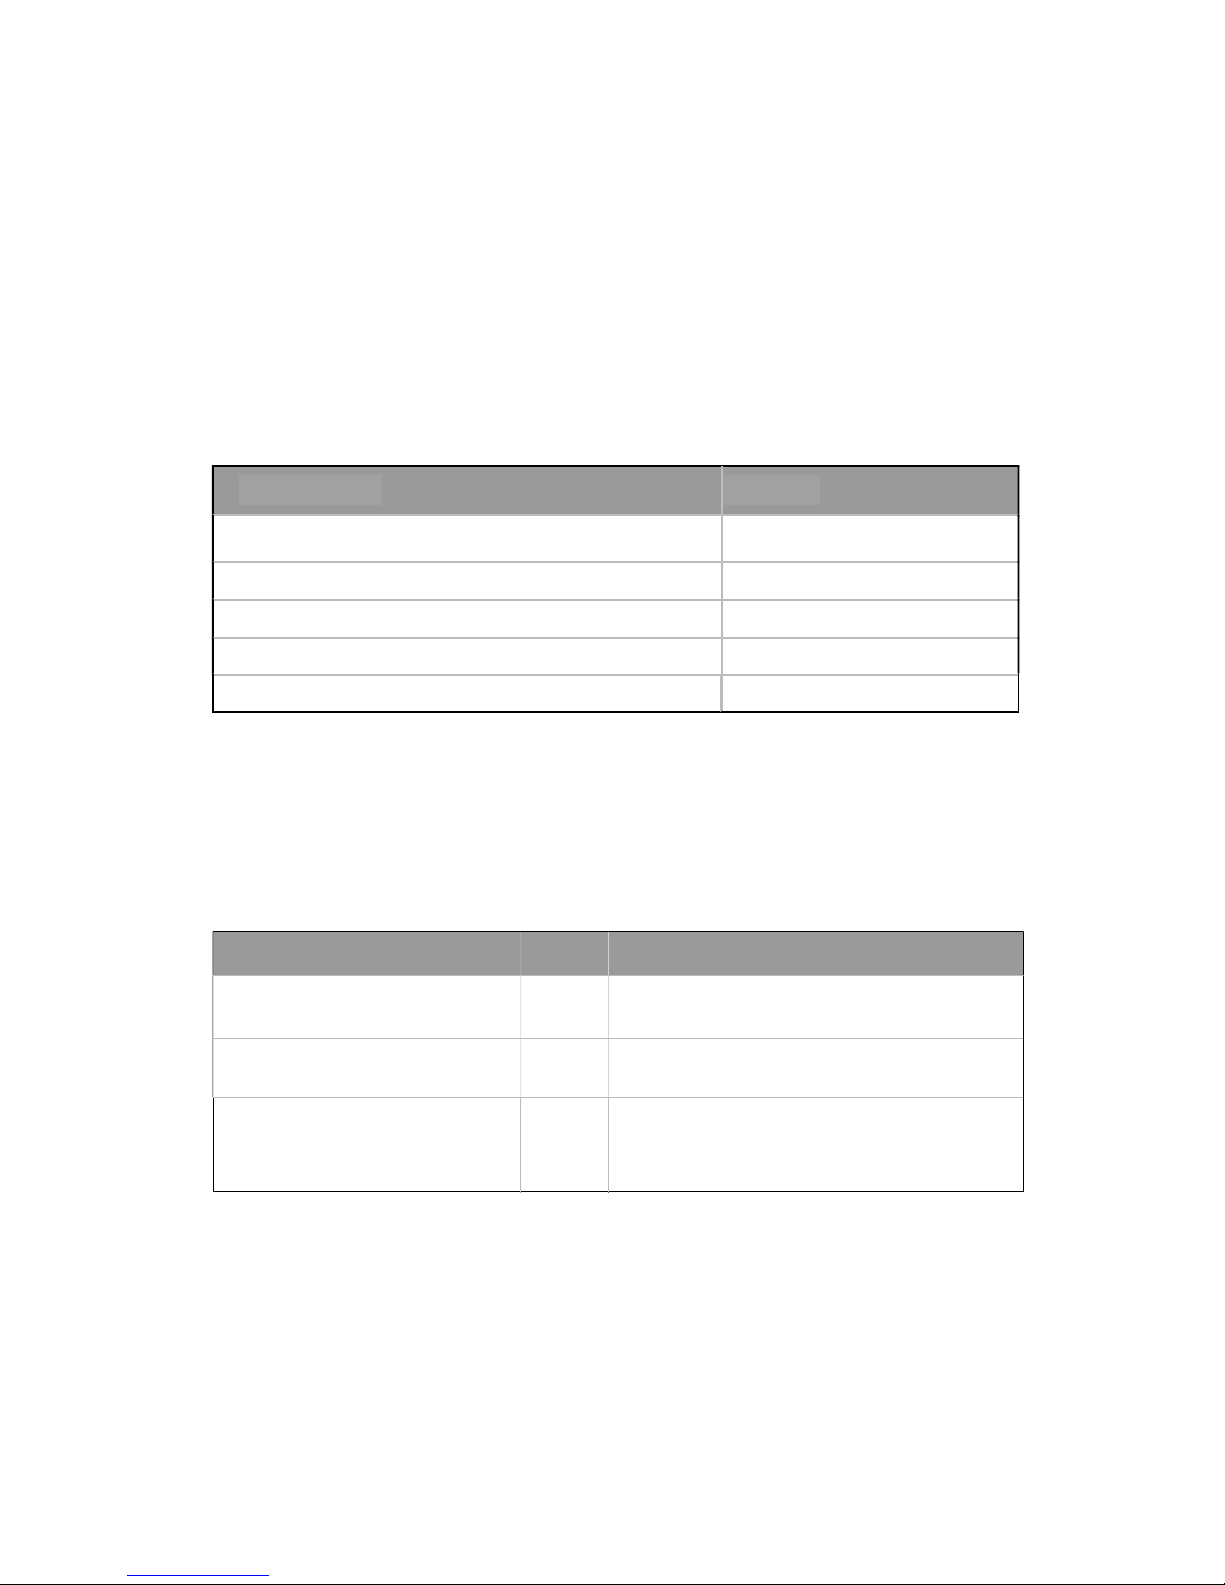
1.2 Standard Accessories
Accessories Quantity
Power Meter Body (included Battery) 1 EA
Body Rubber Case 1 EA
USB Data Cable 1 EA
Typical 5-pin Charger 1 EA
User Manual 1 EA
1.3 Optical Standards
- Wavelength
Parameter
Unit
Specification
Channel Spacing
GHz
DWDM 100GHz
(according to ITU-T)
Number of Channels
48 (ITU Channel 17~64)
Channel Frequencies THz
frequencies 196.4 ~ 191.7
(1526.43nm ~ 1563.86nm)
- Optical Power
Page 4
ODPM-48
Page 4/26
Parameter
Unit
Specification
Range of display
dBm
+10 ~ -40
Accuracy
dB
±1.0dB @ -30dBm
Resolvability
dB
0.01
Measuring unit
dB / dBm
- Optical Connector
Optical connector interchangeable adapter.
SC, FC, ST, LC
1.4 Specifications
- Input voltage : 1800mAh 3.7v
- Electricity consumption : MAX 0.25A
- Power Supply : Rechargeable Lithium-
Polymer Battery
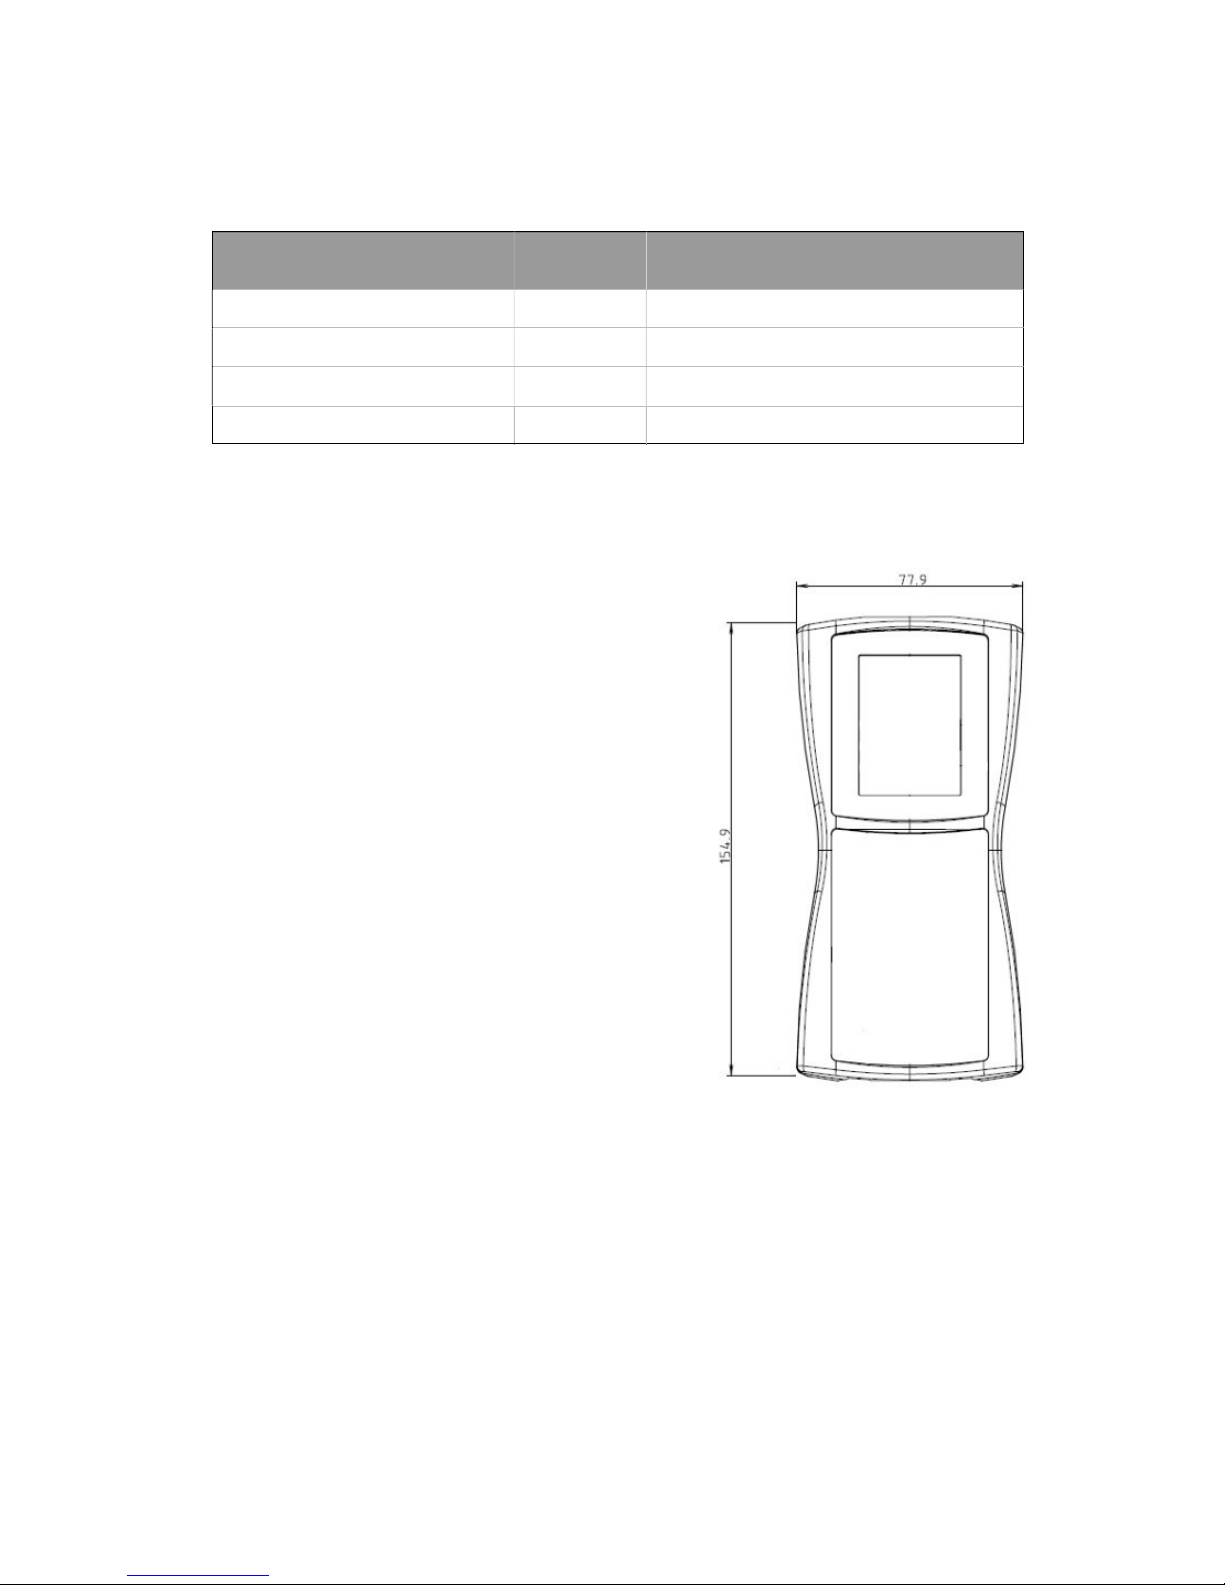
- Weight : 250g
- Width : 77.9mm
- Height : 154.9mm
- Thickness : 35mm
- Display size : 2.8 inch
- Operating Temperature : -20℃ ~ +55℃
- Guaranteed time of operating
: 420 minutes when fully charged
- Relative Humidity
: ~90% RH from 0 ~ 40℃
1.5 About the charger
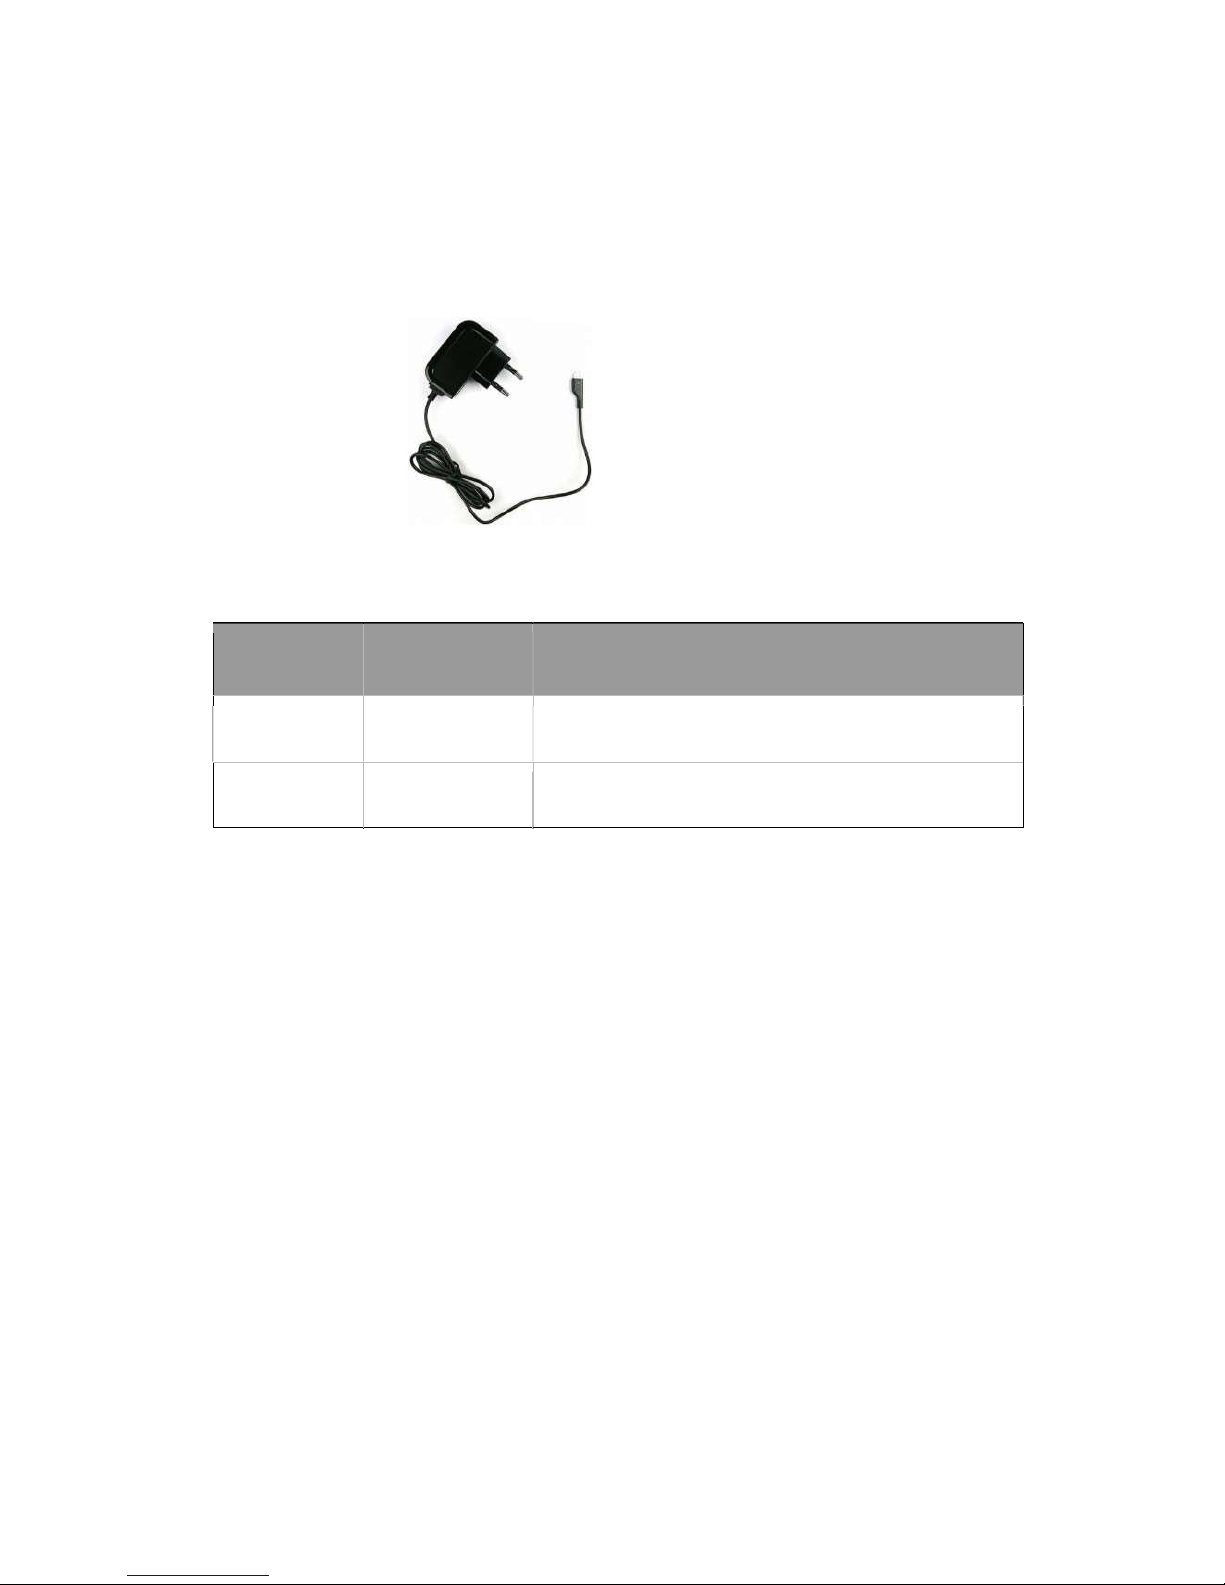
A rechargeable battery is installed inside the measuring instrument,
and this charger module has the Ministry of Information and
Page 5
ODPM-48
Page 5/26
Communication standard 5 pin charger phot. Connect the connecting
point to the top of the ODPM-48 after the included cable is connected
to the charger.
[ Typical 5-pin Charger ]
-Charging conditions :
LED Color
Action of LED
Conditions for battery charge
Red
ON
Charging
Green
ON
Fully charged
※ Caution
- Do not allow battery to short circuit.
- Keep the battery away from fire.
- Never dismantle, change structure of distort the battery.
- Do not dip the battery in water or other liquid.
- Do not store the battery in places warmer than 60 degrees Celsius.
- Do not drop or give a shock to the battery.
1.6 Warranty
Page 6
ODPM-48
Page 6/26
ODPM-48 you bought is passed our all inspection and then is
shipped to the customers. TheFibers give you a warranty for one
year from the buying date. During the warranty period, the returned
product by freight prepaid from the customer, TheFibers will provide
repair and replacement for any defective product without additional
charge which is needed to repair or replacement.
However please careful that the following are expressly NOT
COVERED under warranty:
▪ Any loss, damage by using un-approved Battery and AC Adaptor
▪ In case the serial or warranty sticker is removed
▪ Failure to use products under abnormal operating conditions
▪ Any loss, damage by user fault
▪ Any damage by disassembly without permission
2. Getting Started
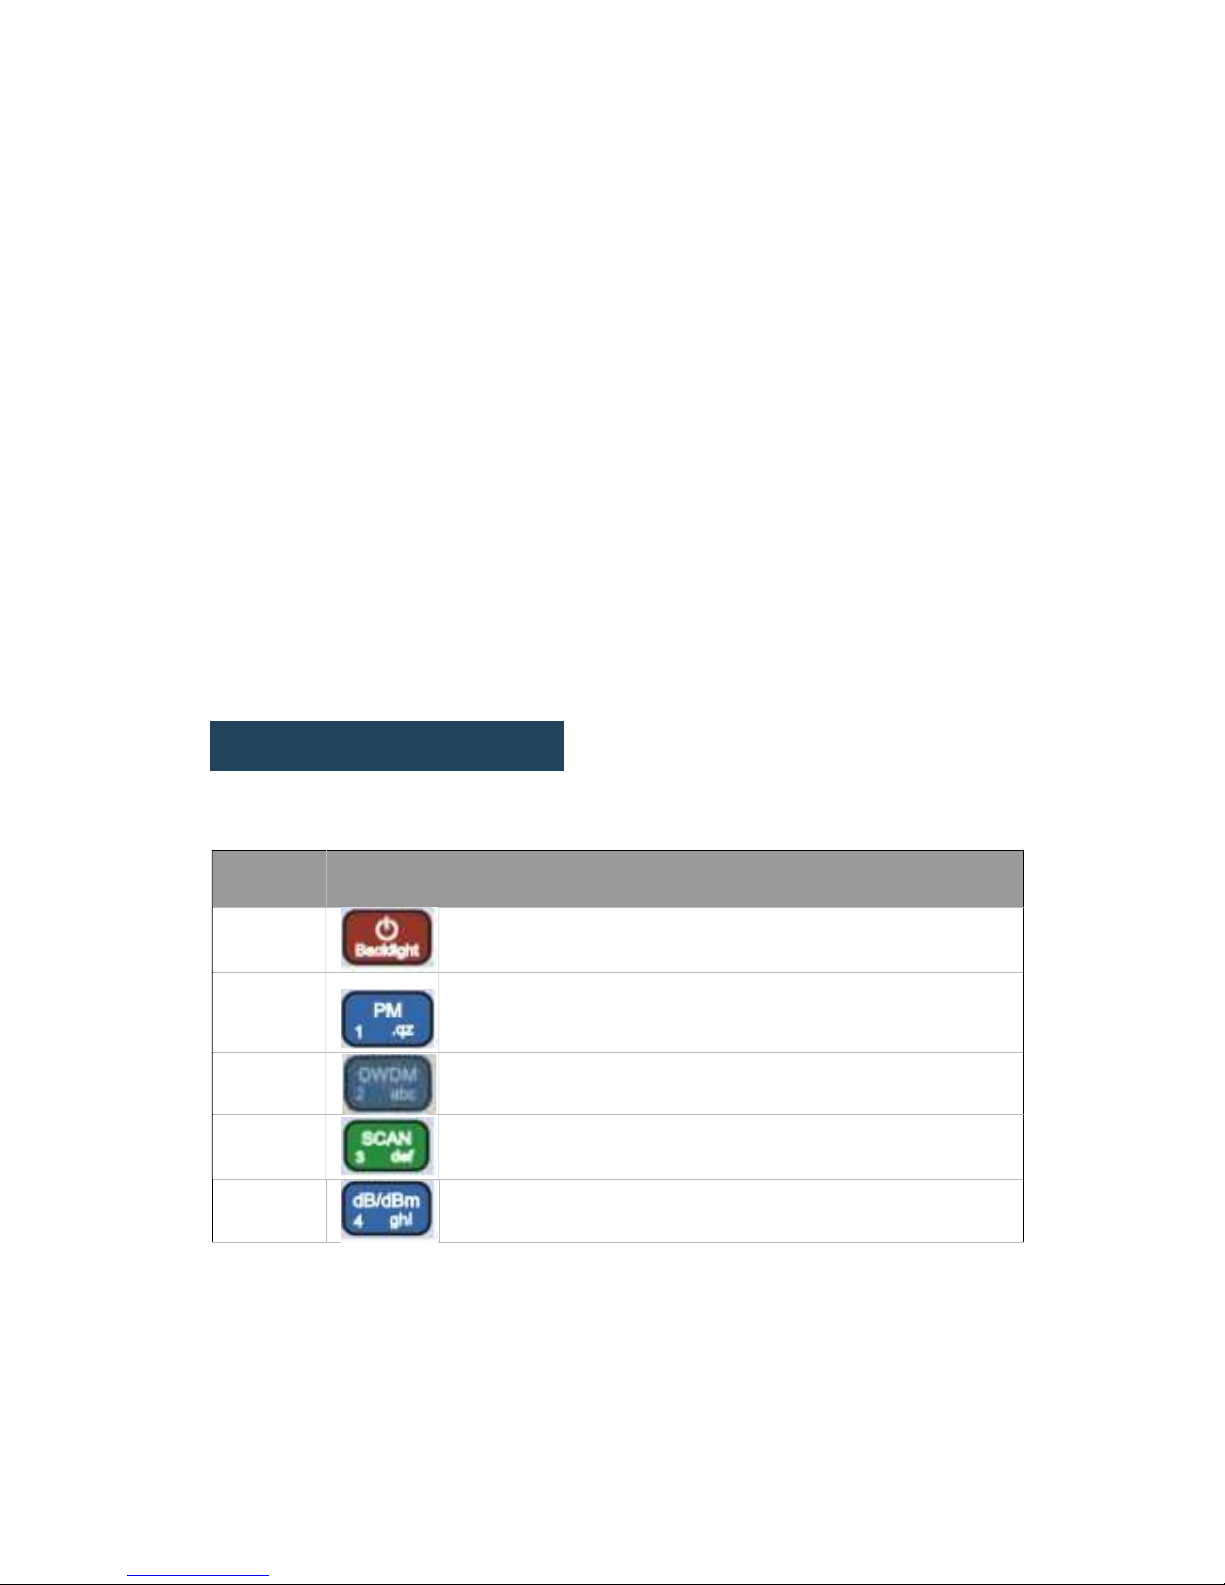
2.1 Explanation of user interface and operating keys
Key
Function
Backlight
Power ON/OFF
PM
Power Display
DWDM
Scanned dB value of the wavelength is
represented as a data.
SCAN
Wavelength is scanned and dB value is
represented.
dB/dBm
Each time you press the key, dB and dBm are
repeated.
Page 7
ODPM-48
Page 7/26
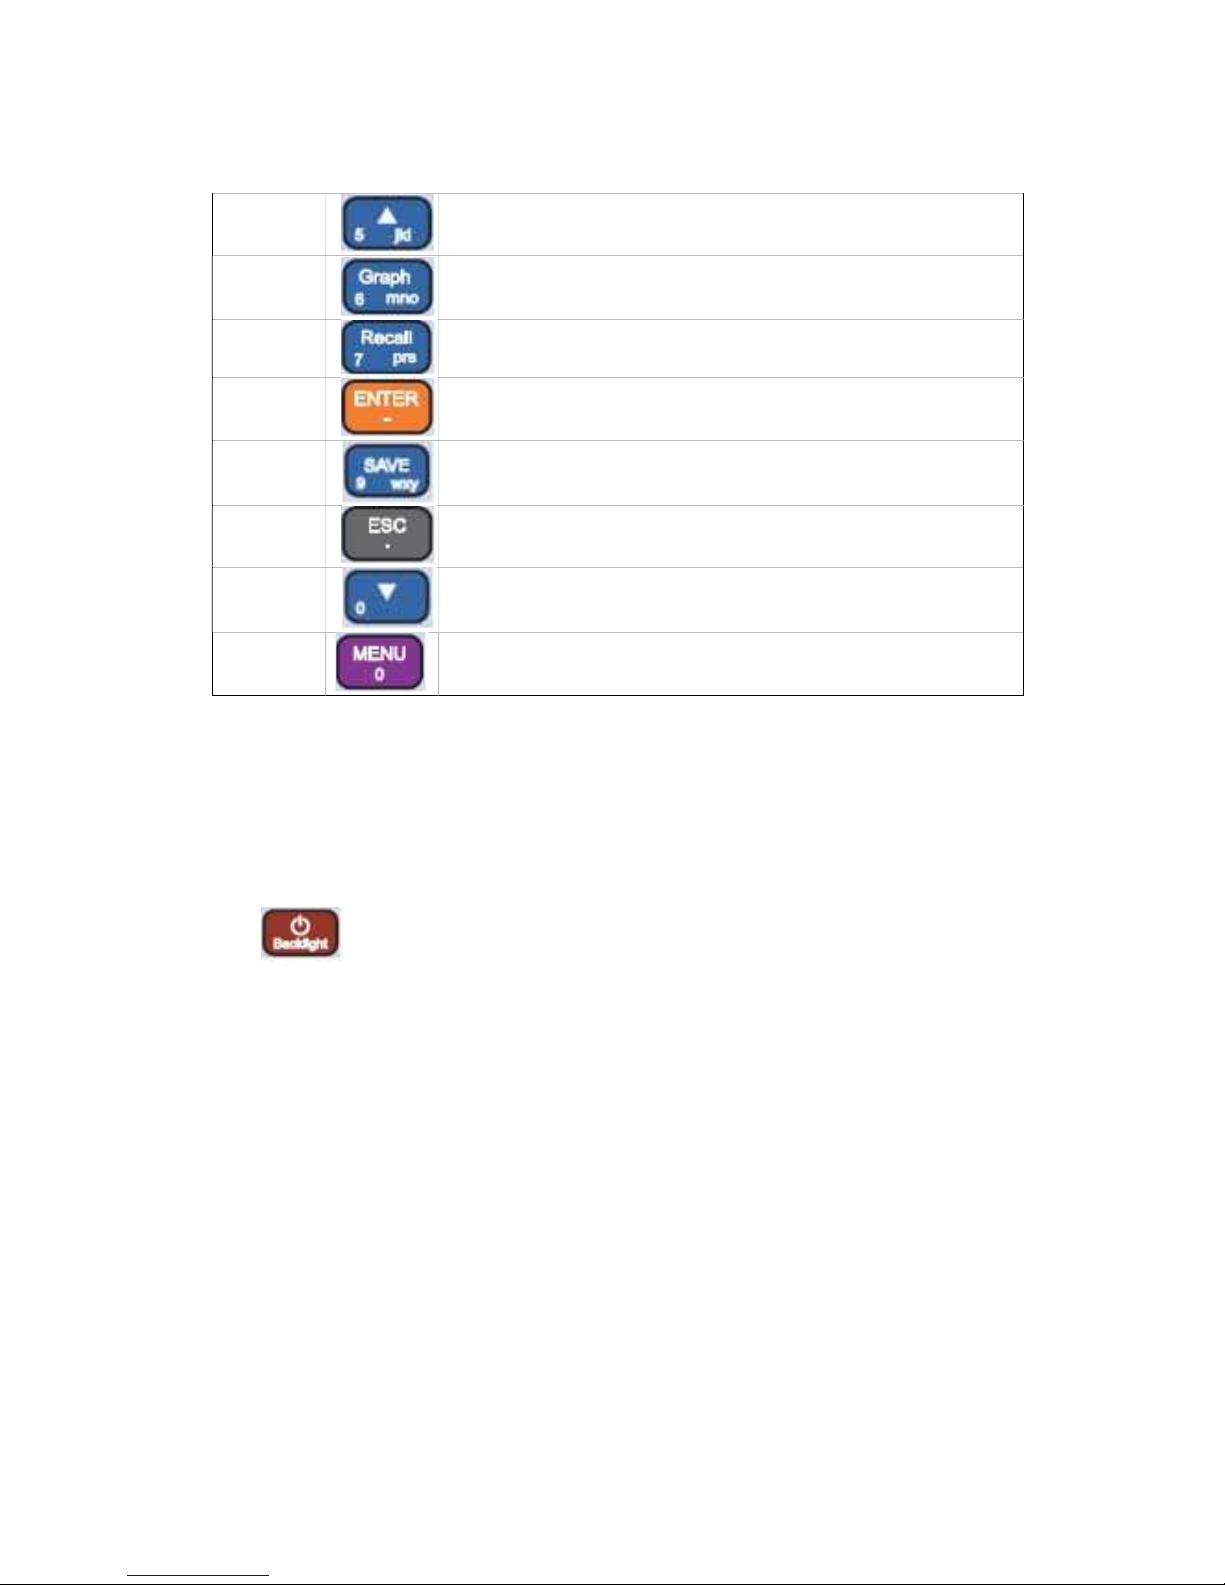
▲
Up arrow
Graph
Scanned dB value of the wavelength is
represented as a graph.
Recall
Recall data
ENTER
Enter
Save
Data Save
ESC
Cancel
▼
Down arrow
MENU
Set up and Data delete
2.2 Screen Information
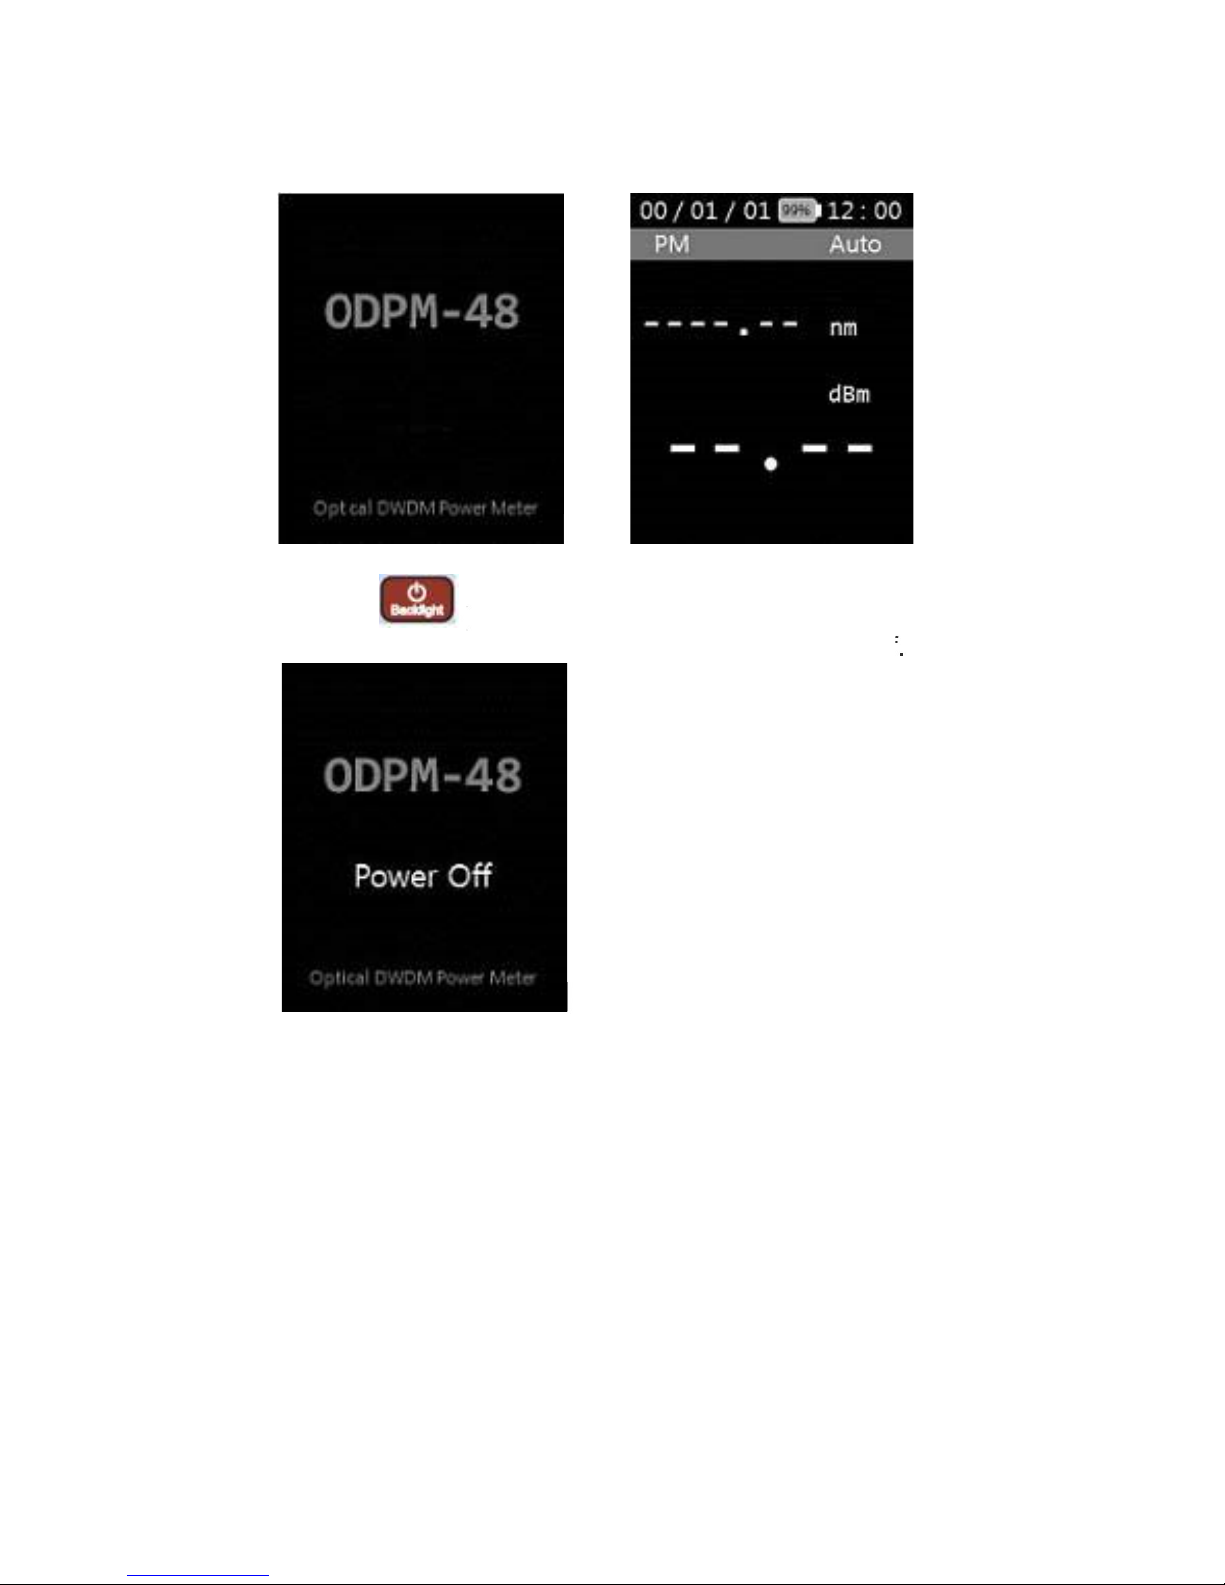
1) Power ON / OFF
- Is used to turn the instrument power on and
off. If you press the
(Backlight) button for more than 2 seconds, the logo shown
below appears and it moves to ‘Power Meter’, which is the basic
channel.
Page 8
ODPM-48
Page 8/26
- Press the
( Backlight) button for more than 2 seconds to turn
the power off.
Page 9
ODPM-48
Page 9/26
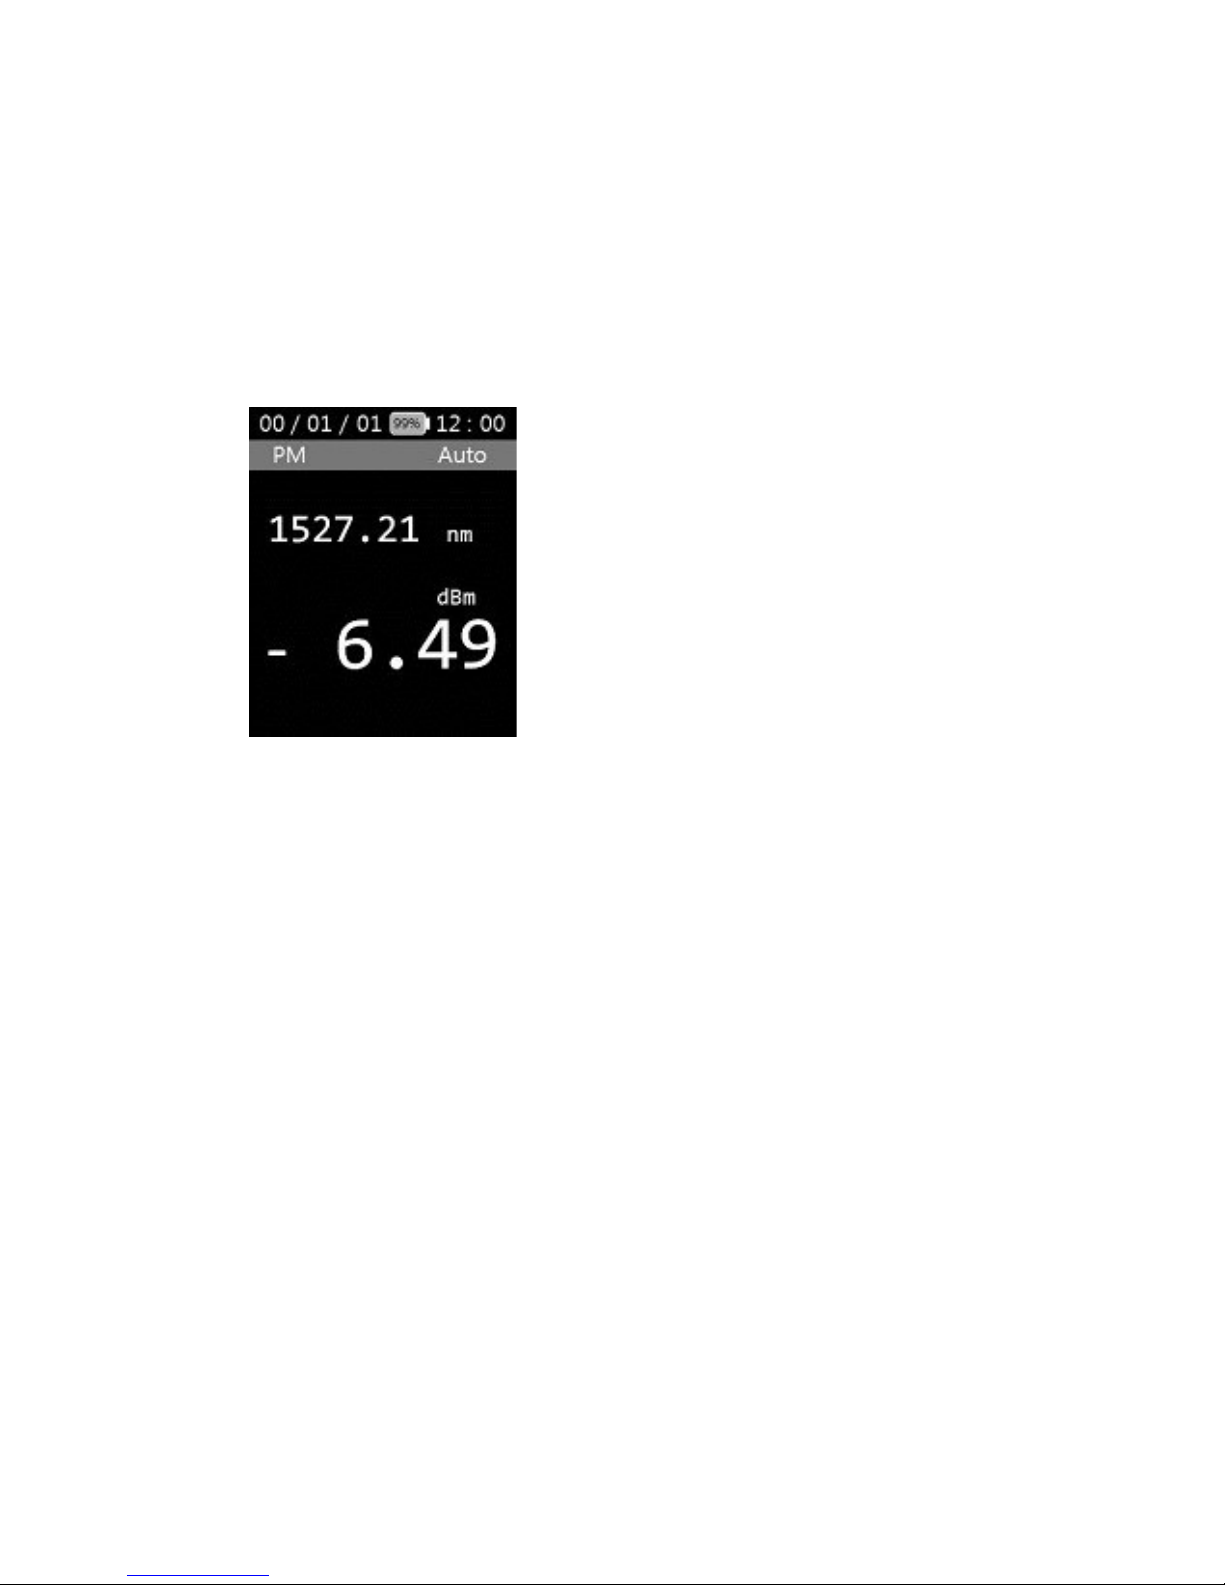
2) Power Meter
- Power Measurement is divided into ‘Auto’ and ‘Manual’. If you select
'Auto', the largest value are shown after the measurement.
- Use the arrow keys to different values can be found.
- 'Manual' is the wavelength of the desired user is used to determine
the value of dBm.
Page 10
ODPM-48
Page 10/26
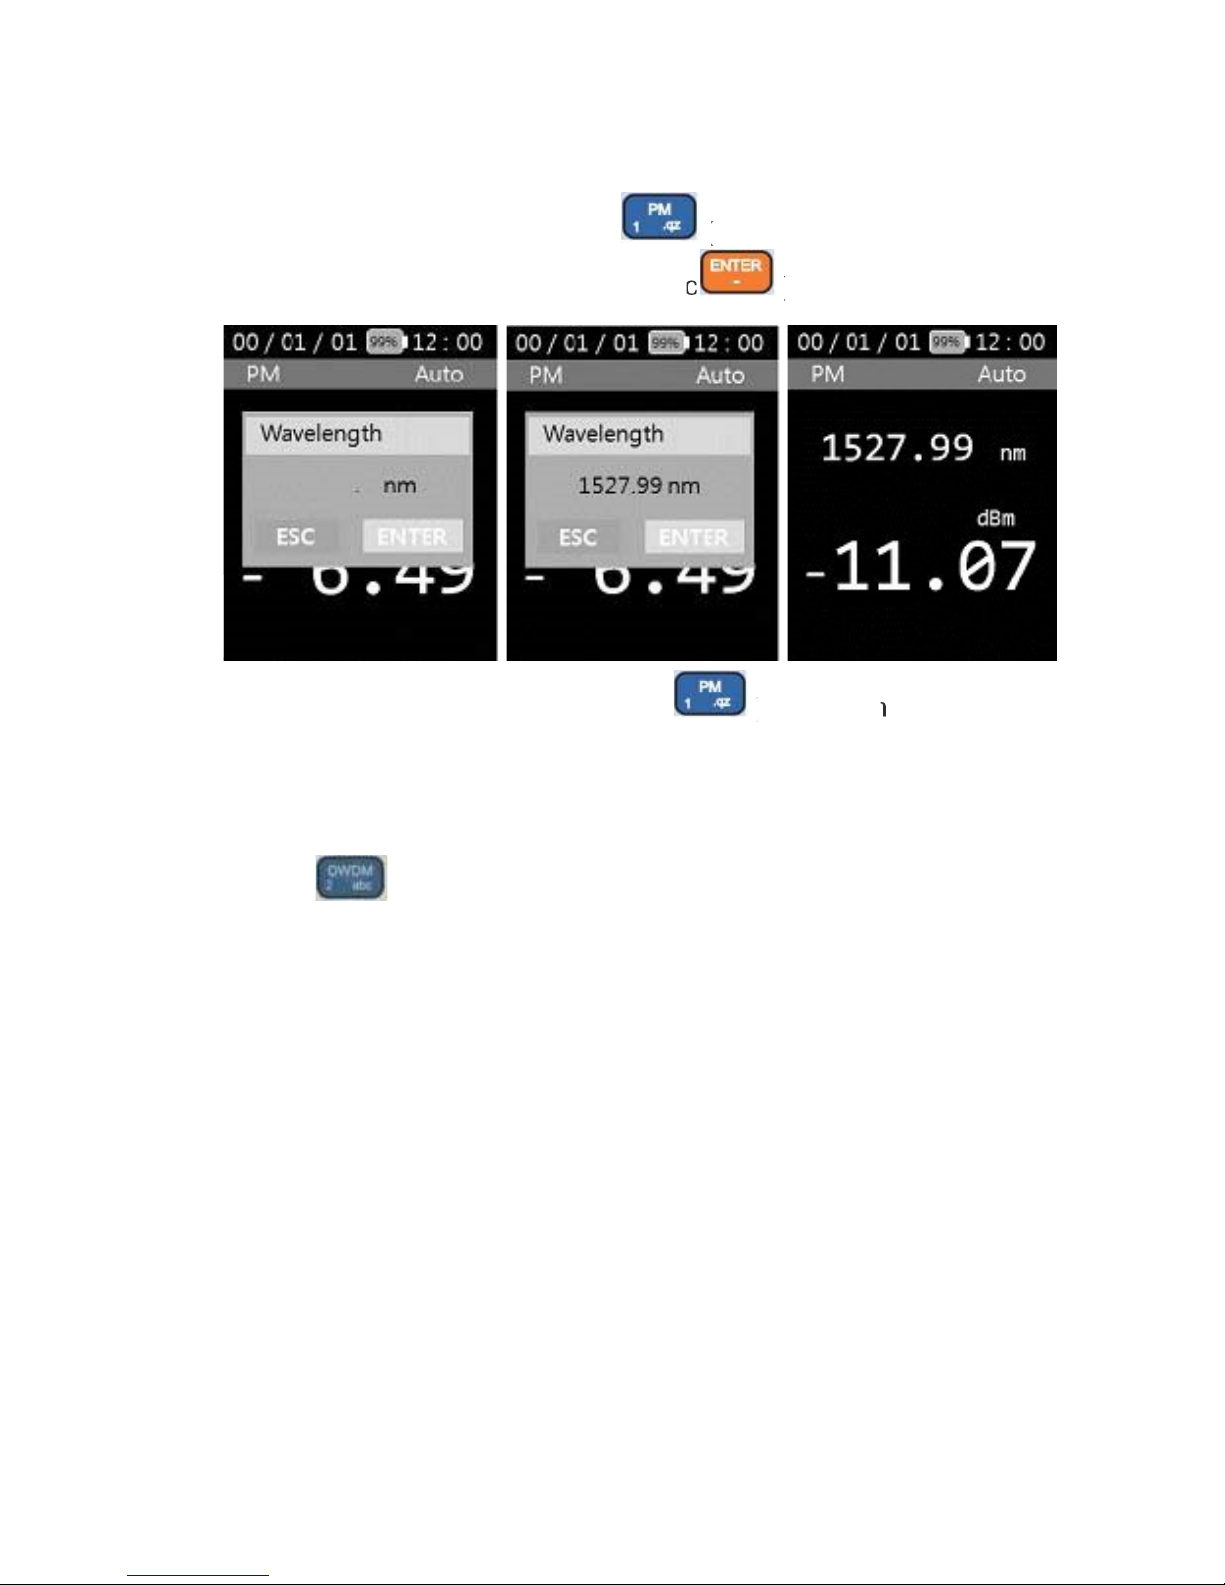
- If you want to re-select ‘Auto’, click
3) DWDM
- Depress the (DWDM) button, then the display will show as the figure
below.
- ‘DWDM’ is divided into ‘Auto’ and ‘Manual’.
-
In the above screen , click
(
PM) button, will write the
wavelength to be
measured. And click
(
Enter) button.
(
PM) button .
Page 11
ODPM-48
Page 11/26
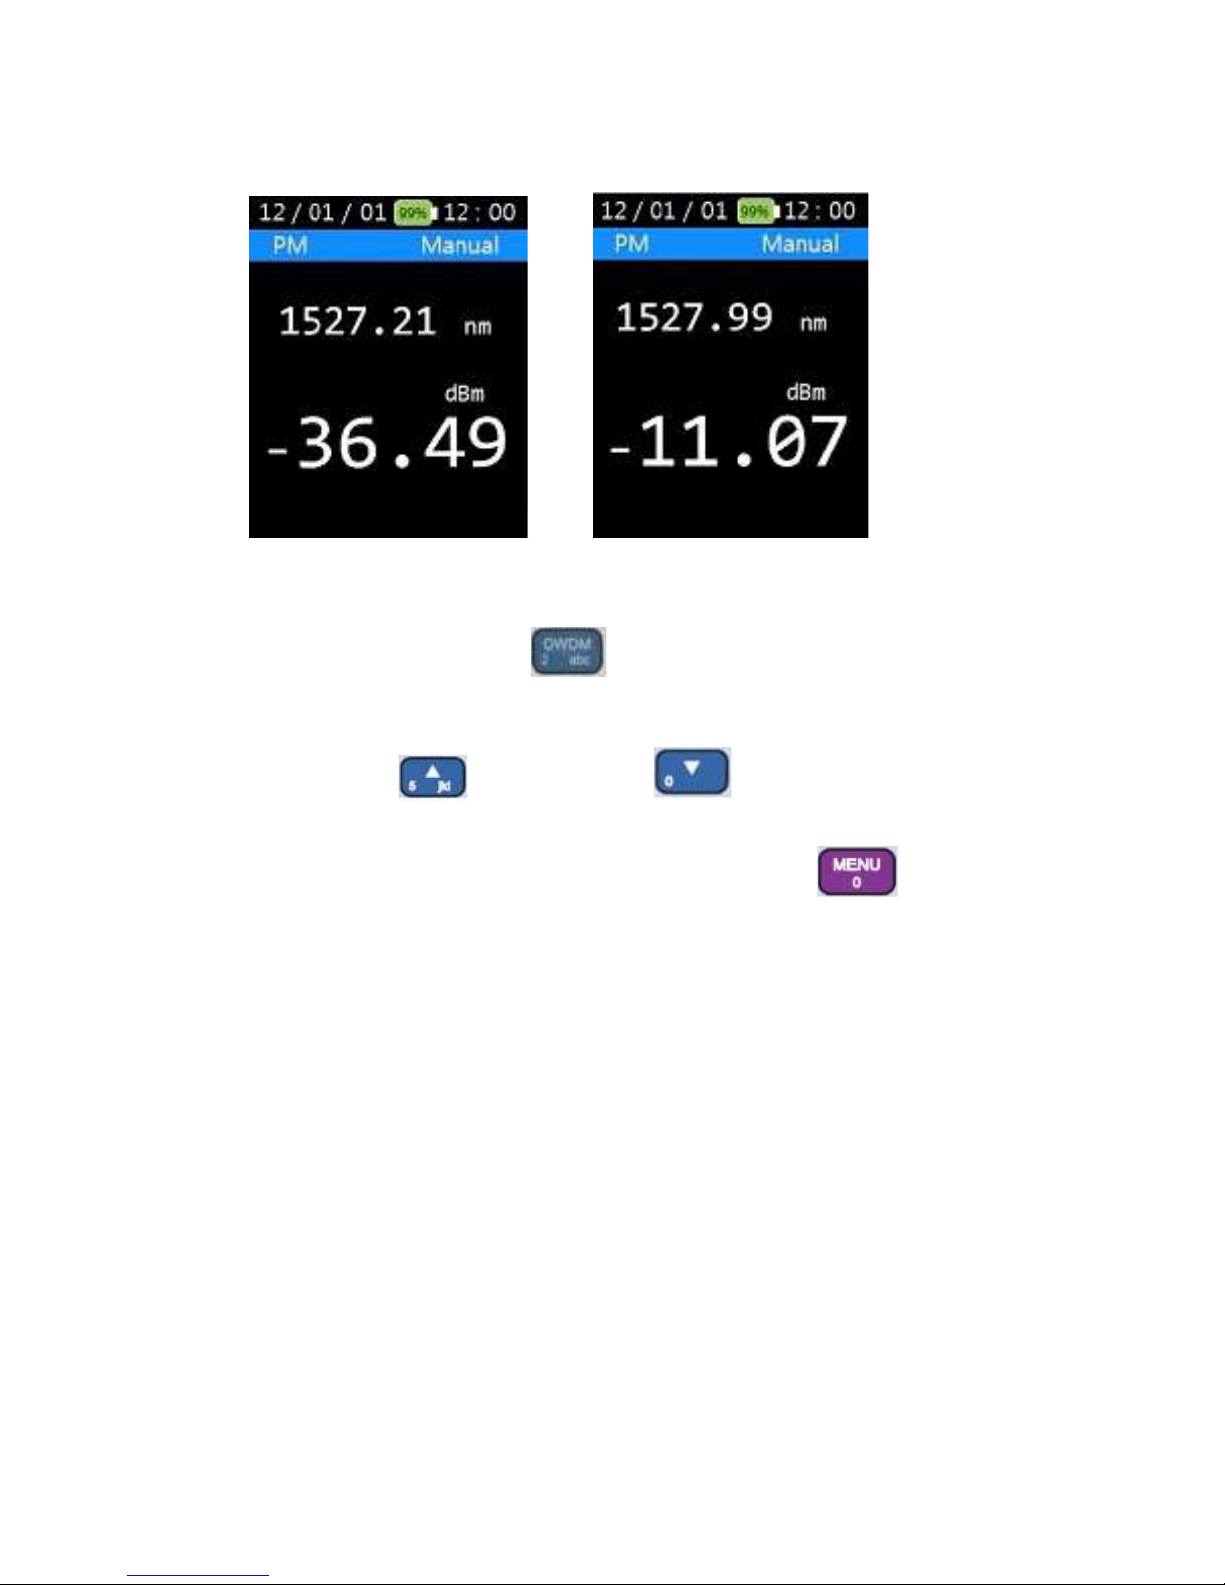
- The moment you click on the (DWDM) button, it is scanned only
once in Manual mode.
- If a screen shows asking for a channel selection, input the channel you
want and press the (Up arrow) and (Down arrow) key.
- Selection of ‘Manual’ and ‘Auto’ can be done by this (Menu). 4)
SCAN
Page 12
ODPM-48
Page 12/26
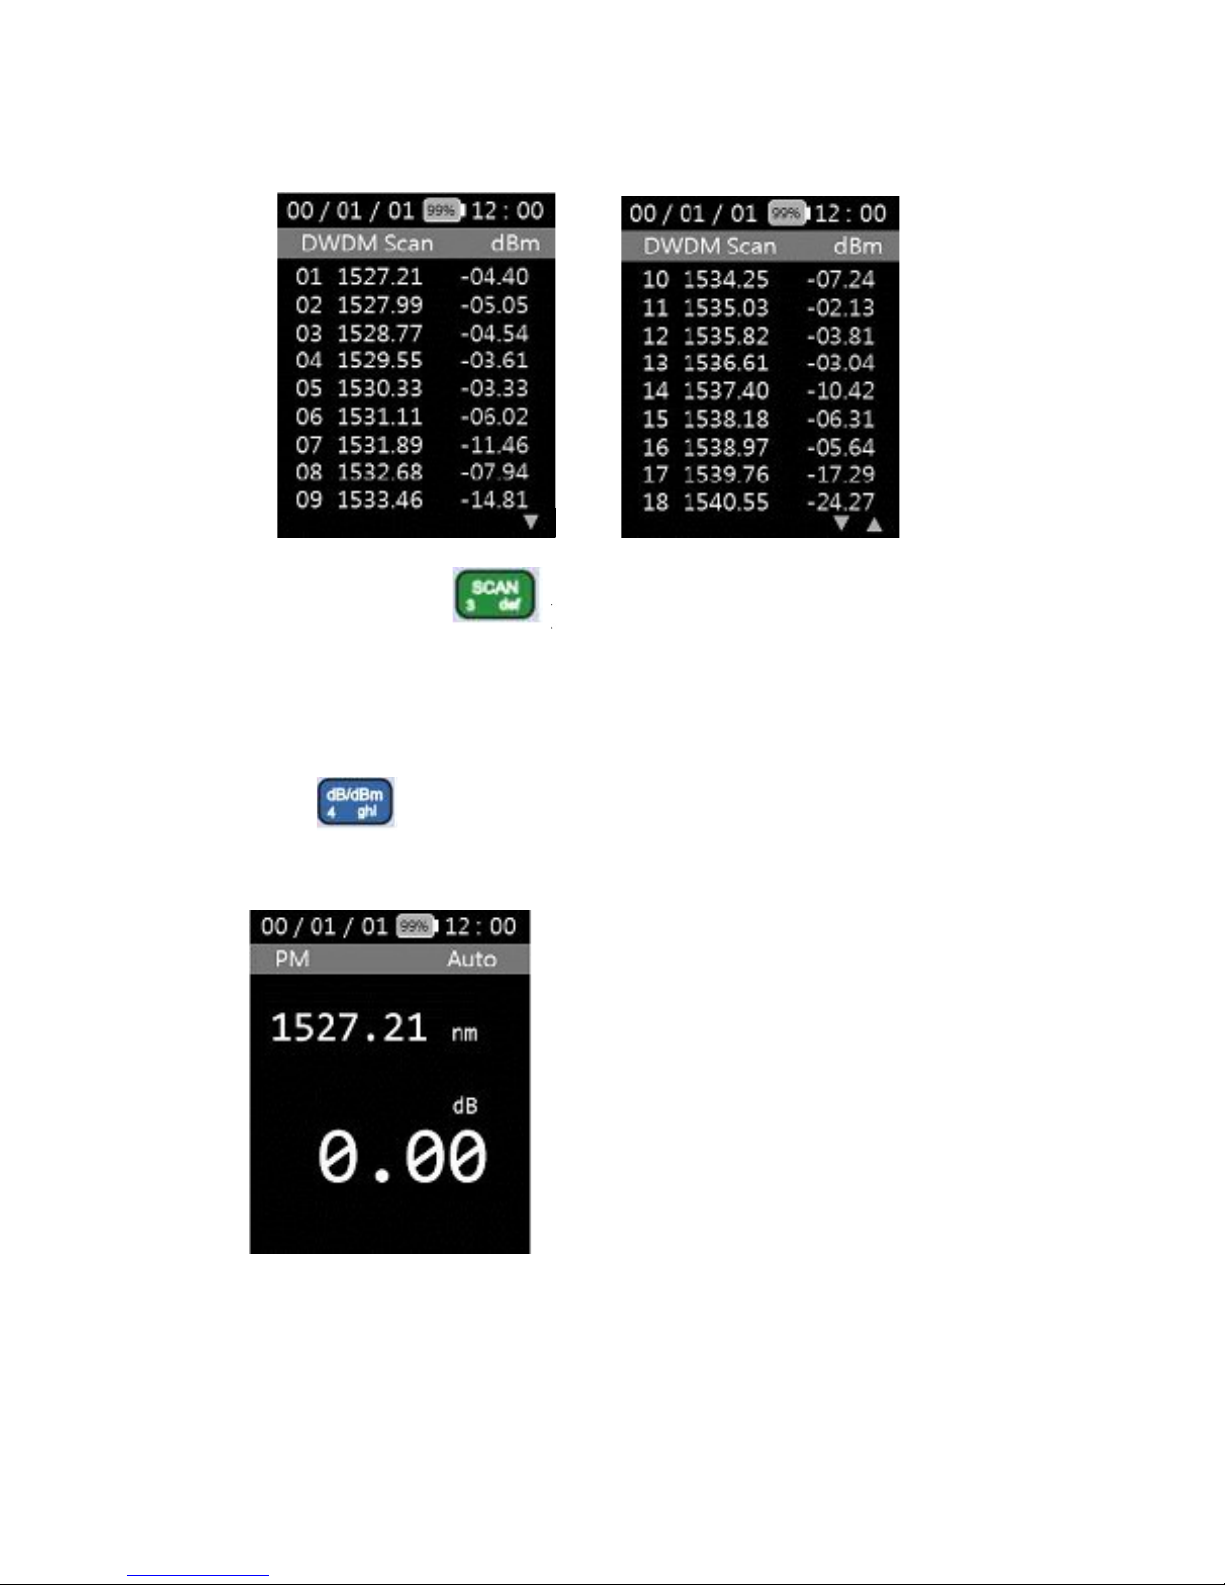
- If you
press
the are
scanned.
5) dB/dBm
- Pressing the (dB/dBm) key alternately shows the ‘dBm’ and
‘dB’.
( SCAN) button, The selected wavelengths
Page 13
ODPM-48
Page 13/26
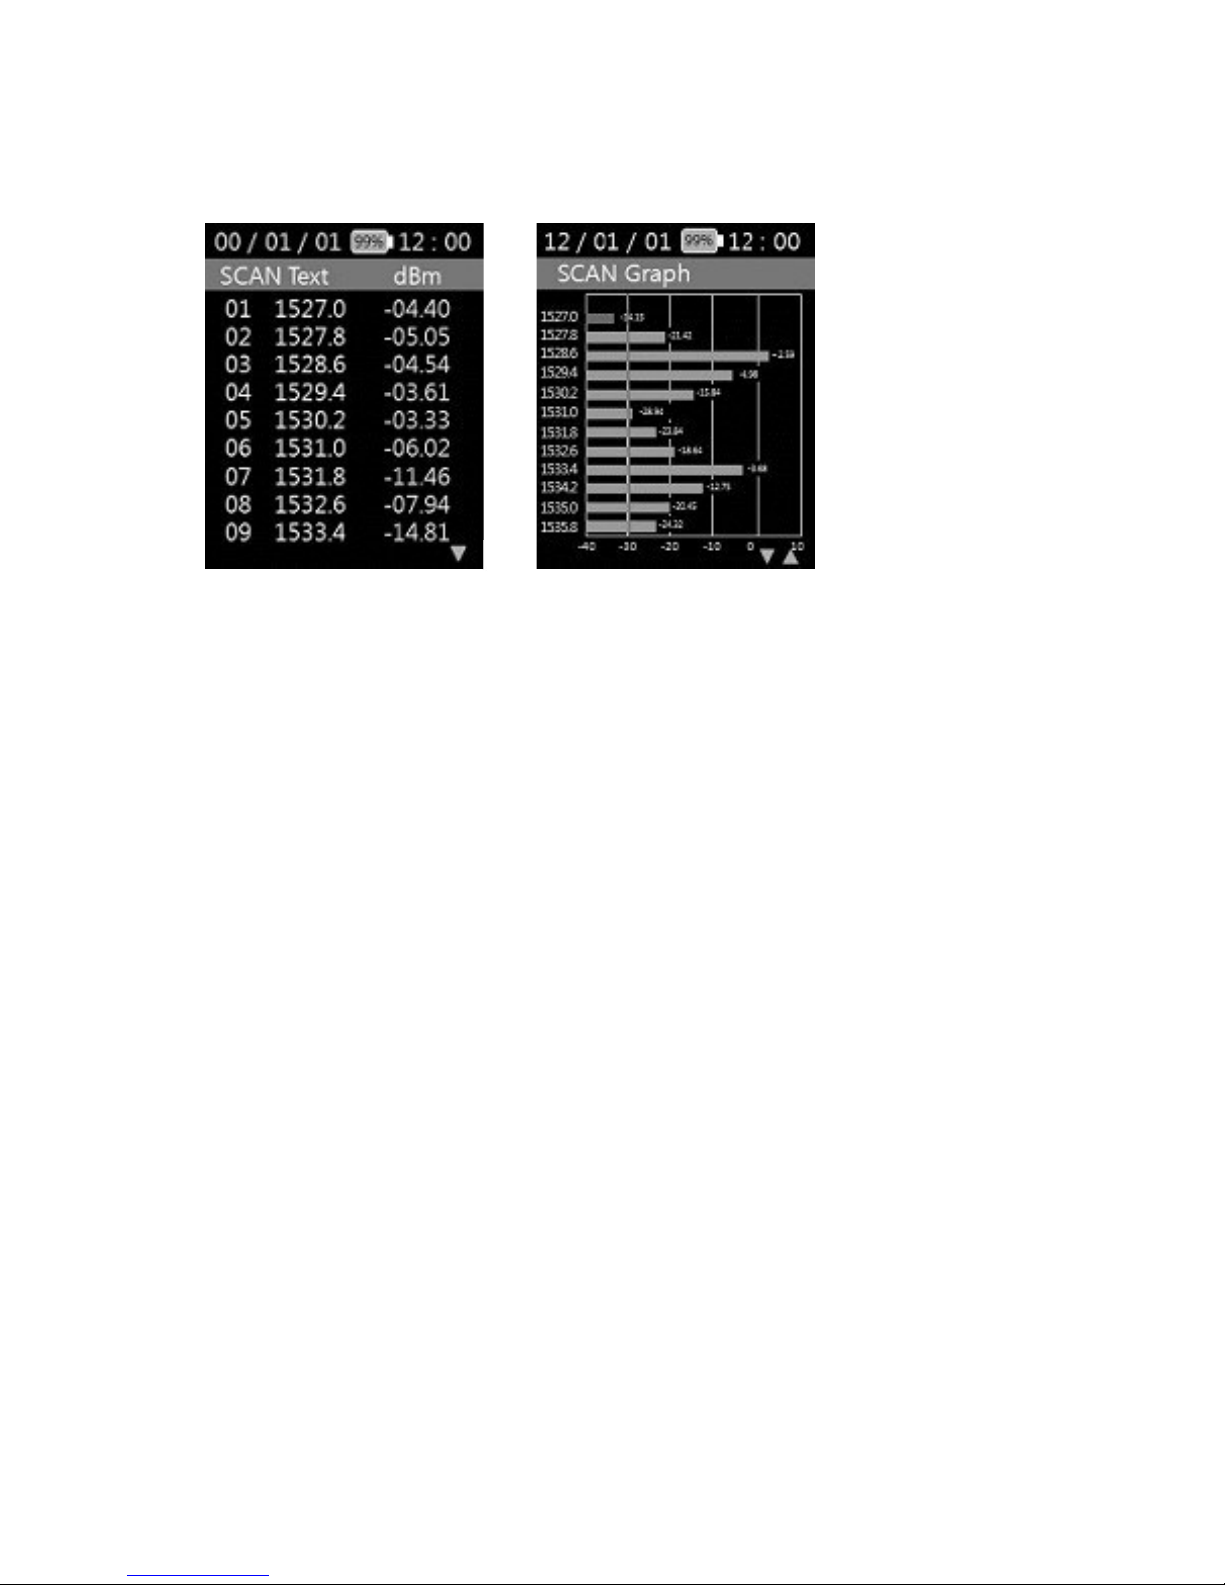
5) Graph
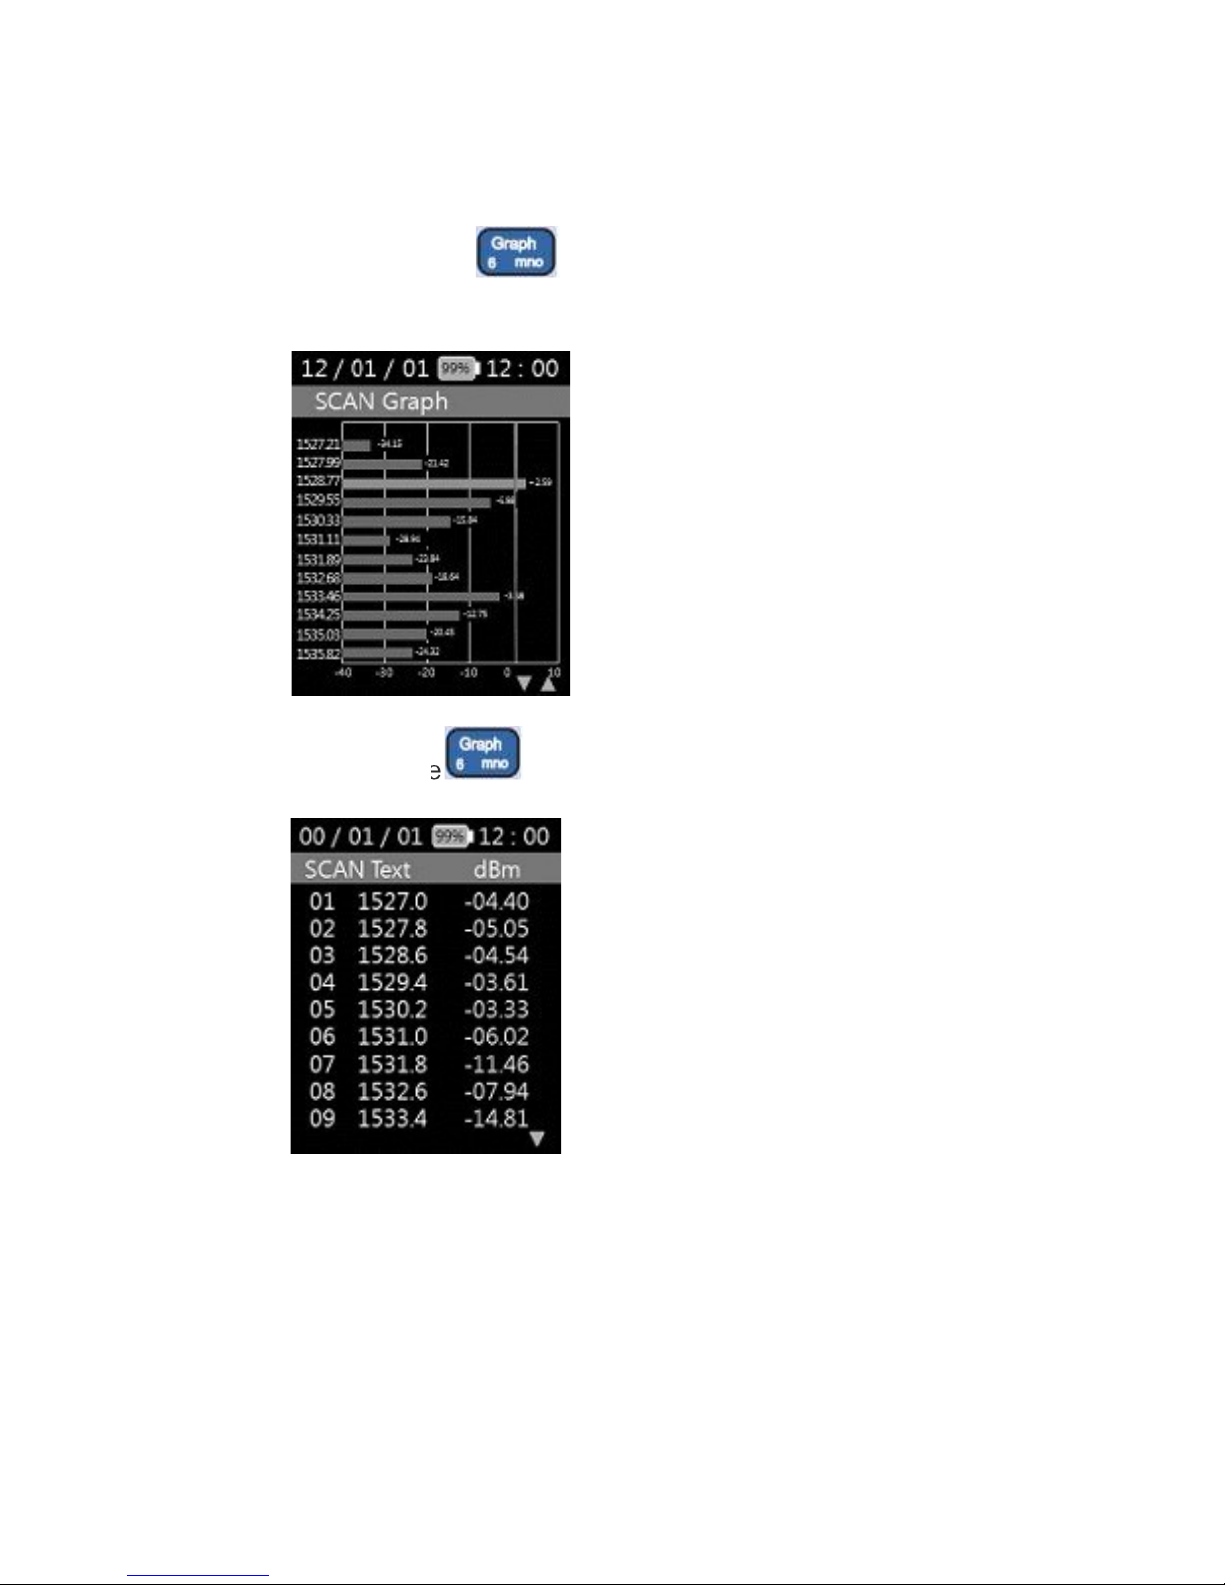
- If you press the (Graph) button after scanning, a graph screen
like the one on the right show.
- If you press the
Page 14
ODPM-48
Page
14/26
(Graph) button again it returns to text
mode.
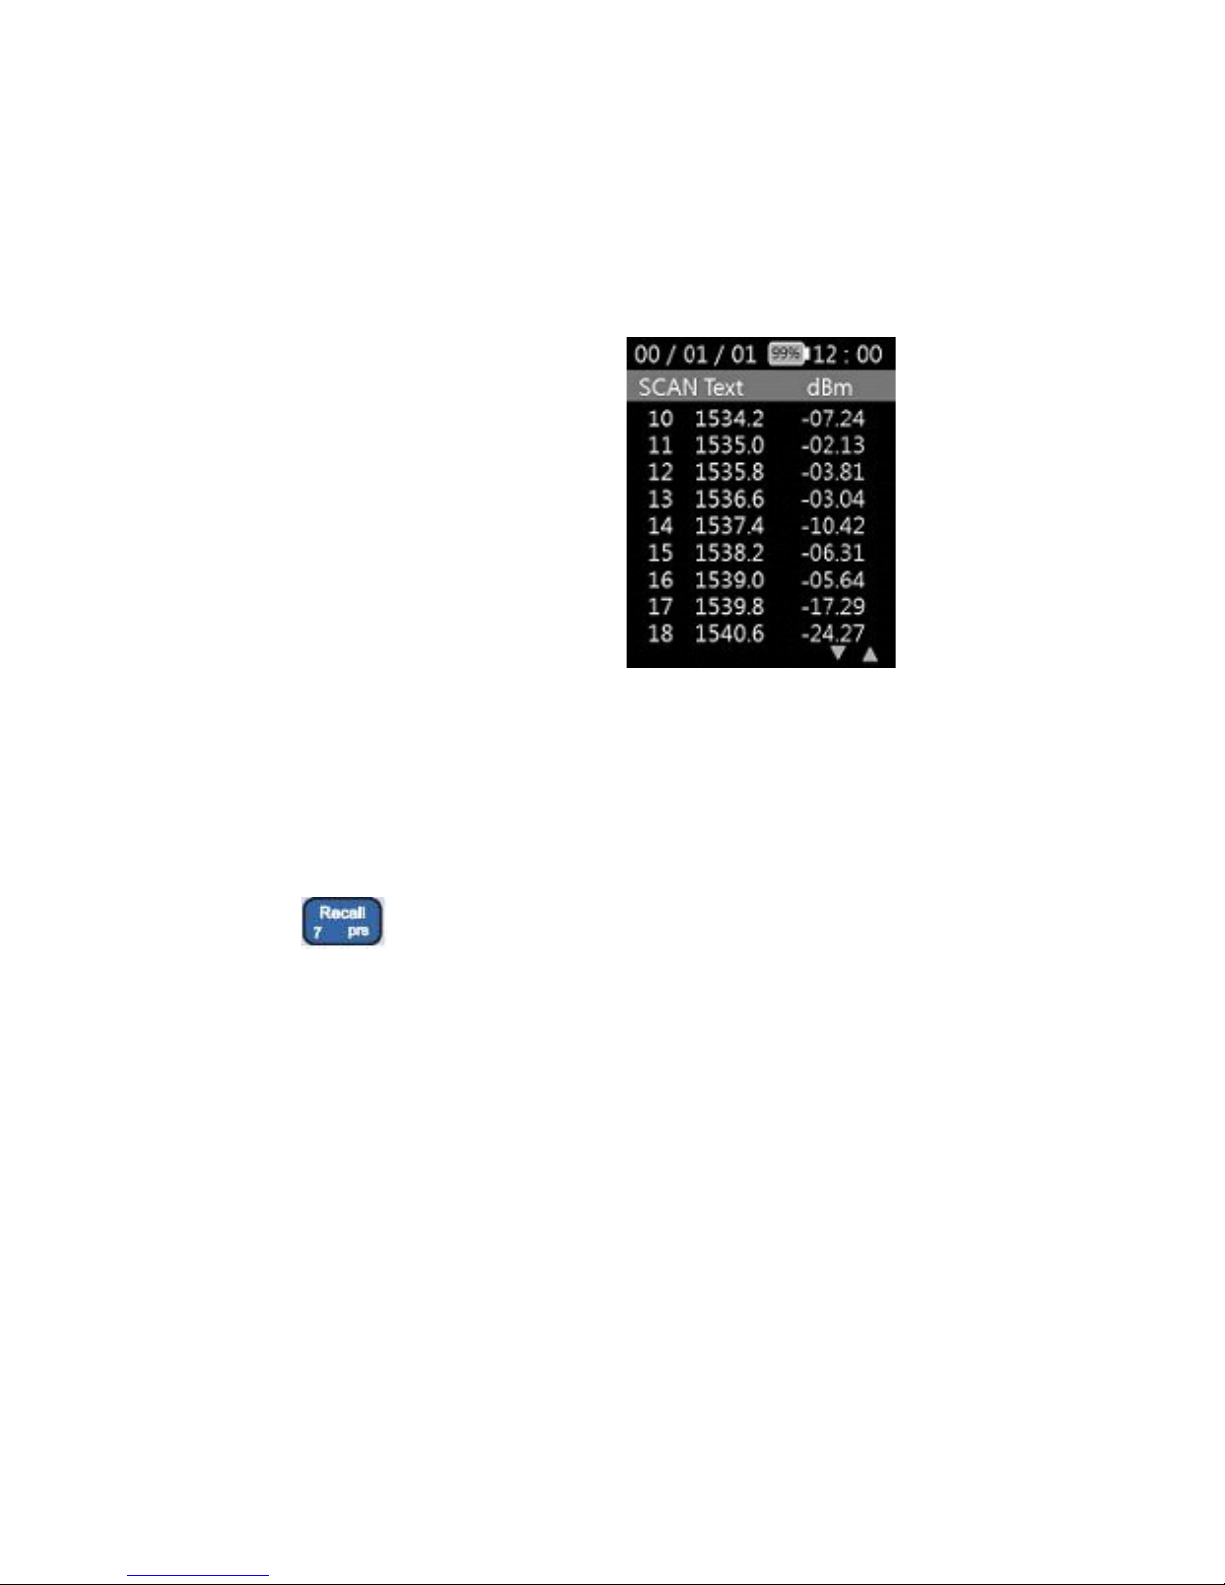
6) Recall
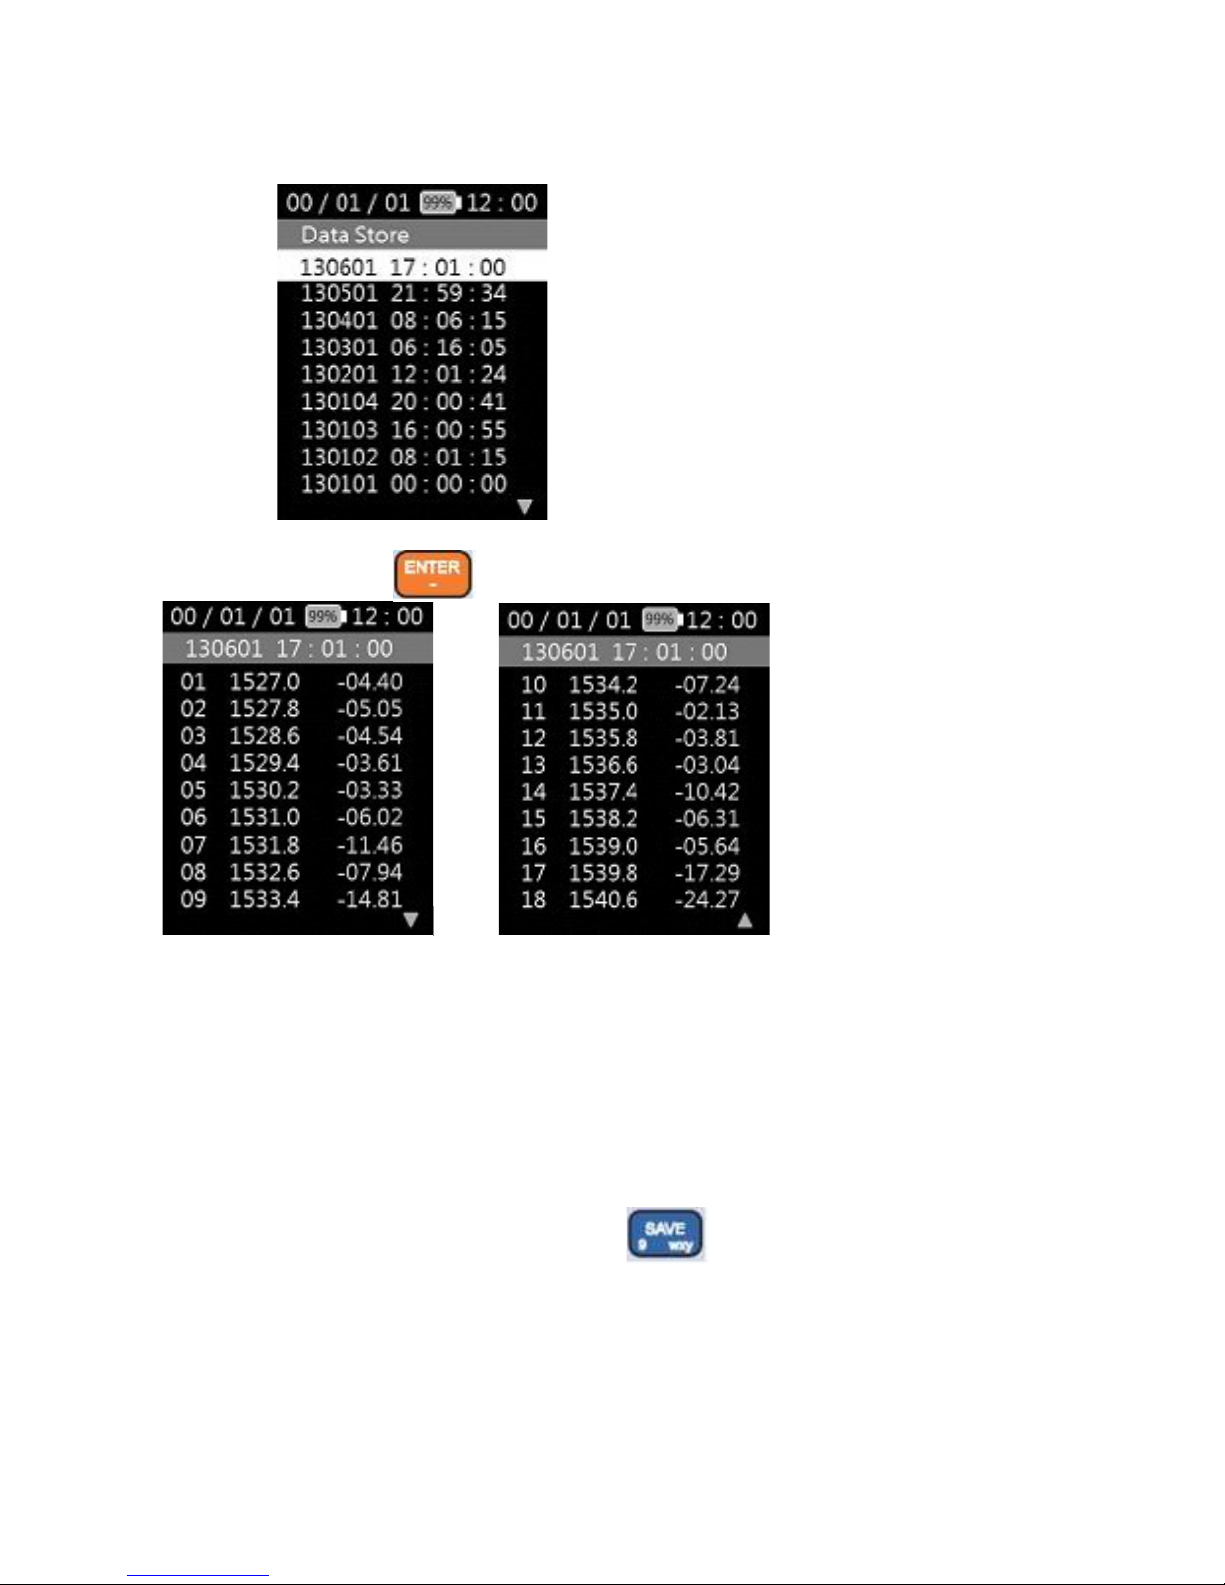
- Press the (Recall) button to access the menu that calls the
measured result of optical power for each channel in the form of text.
Page 15
ODPM-48
Page 15/26
- Press the (Enter) button to select the data you
want, the data saved are displayed.
7) Save
- This saves the currently displayed value, and All text and graph
modes are savable using the (save) button.
Page 16
ODPM-48
Page 16/26
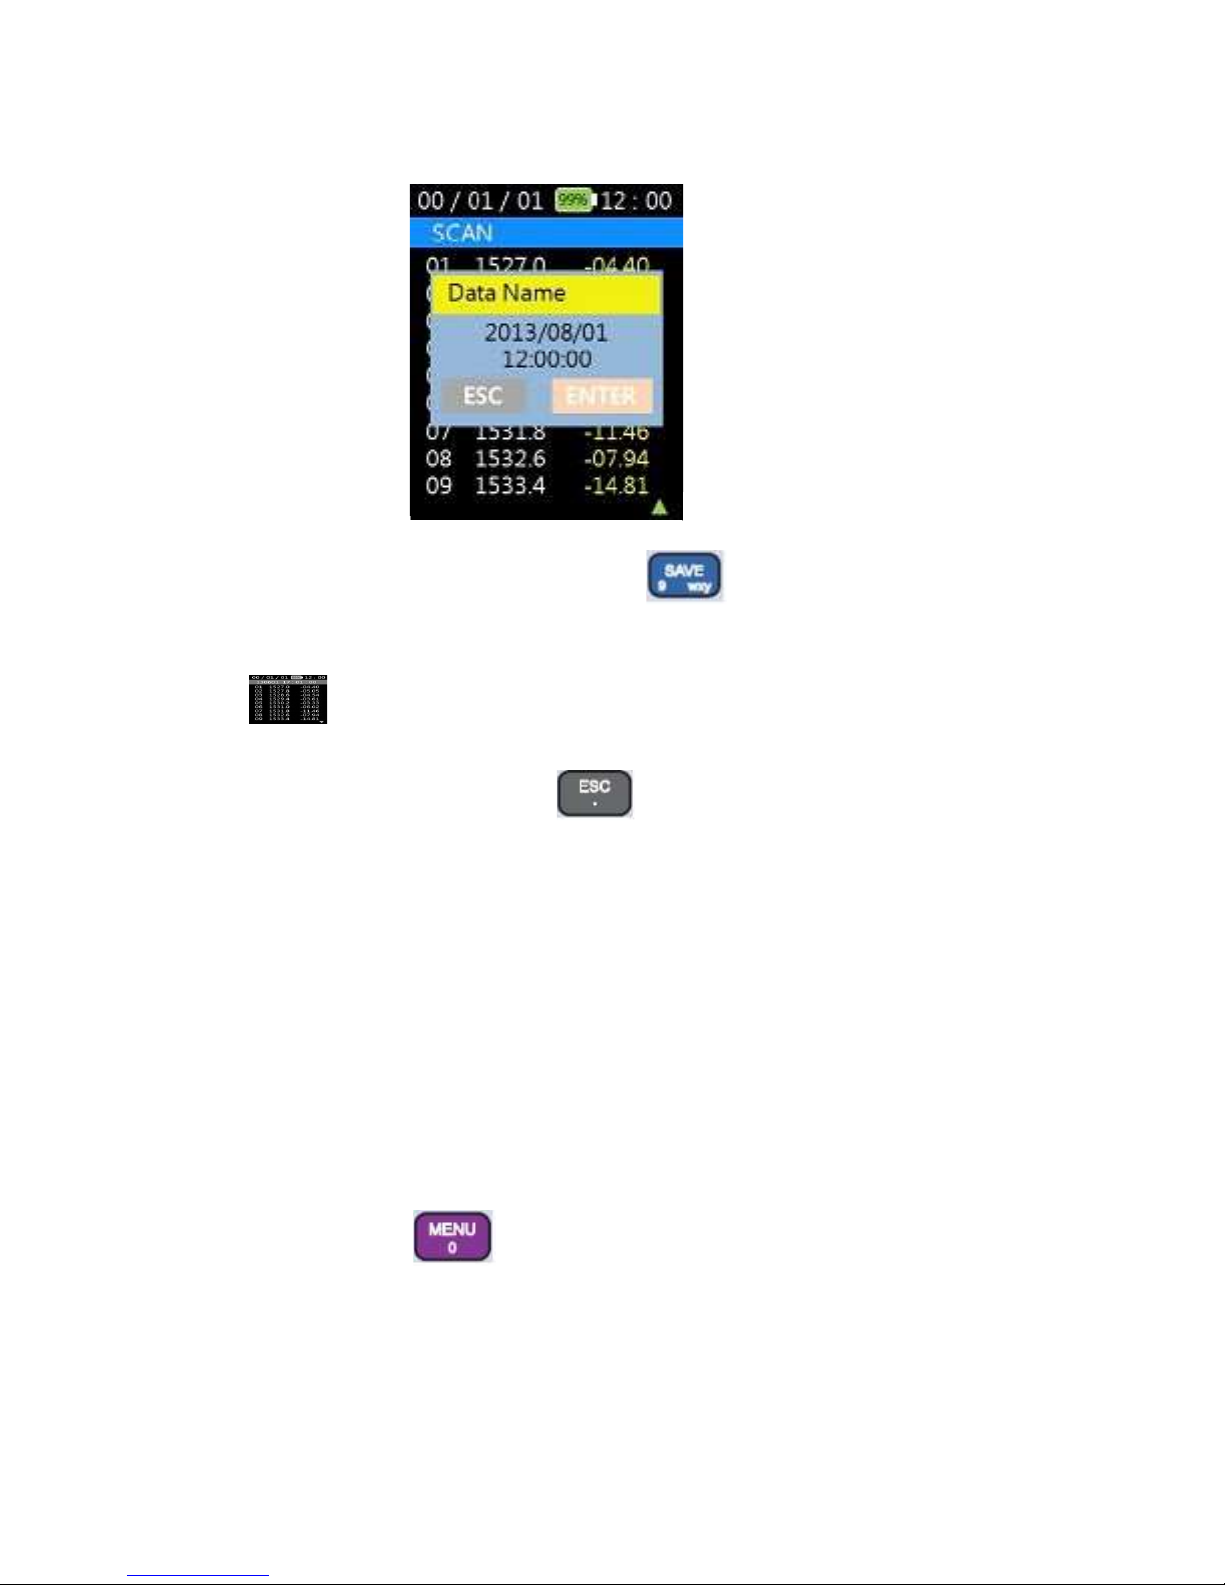
- When you press the (save) button the following
message shows and asks the name of the Data to be saved, and the data
based on the current data and time is saved if you press the
(Enter) button.
- If you want to stop saving, press (ESC).
2.3 Menu
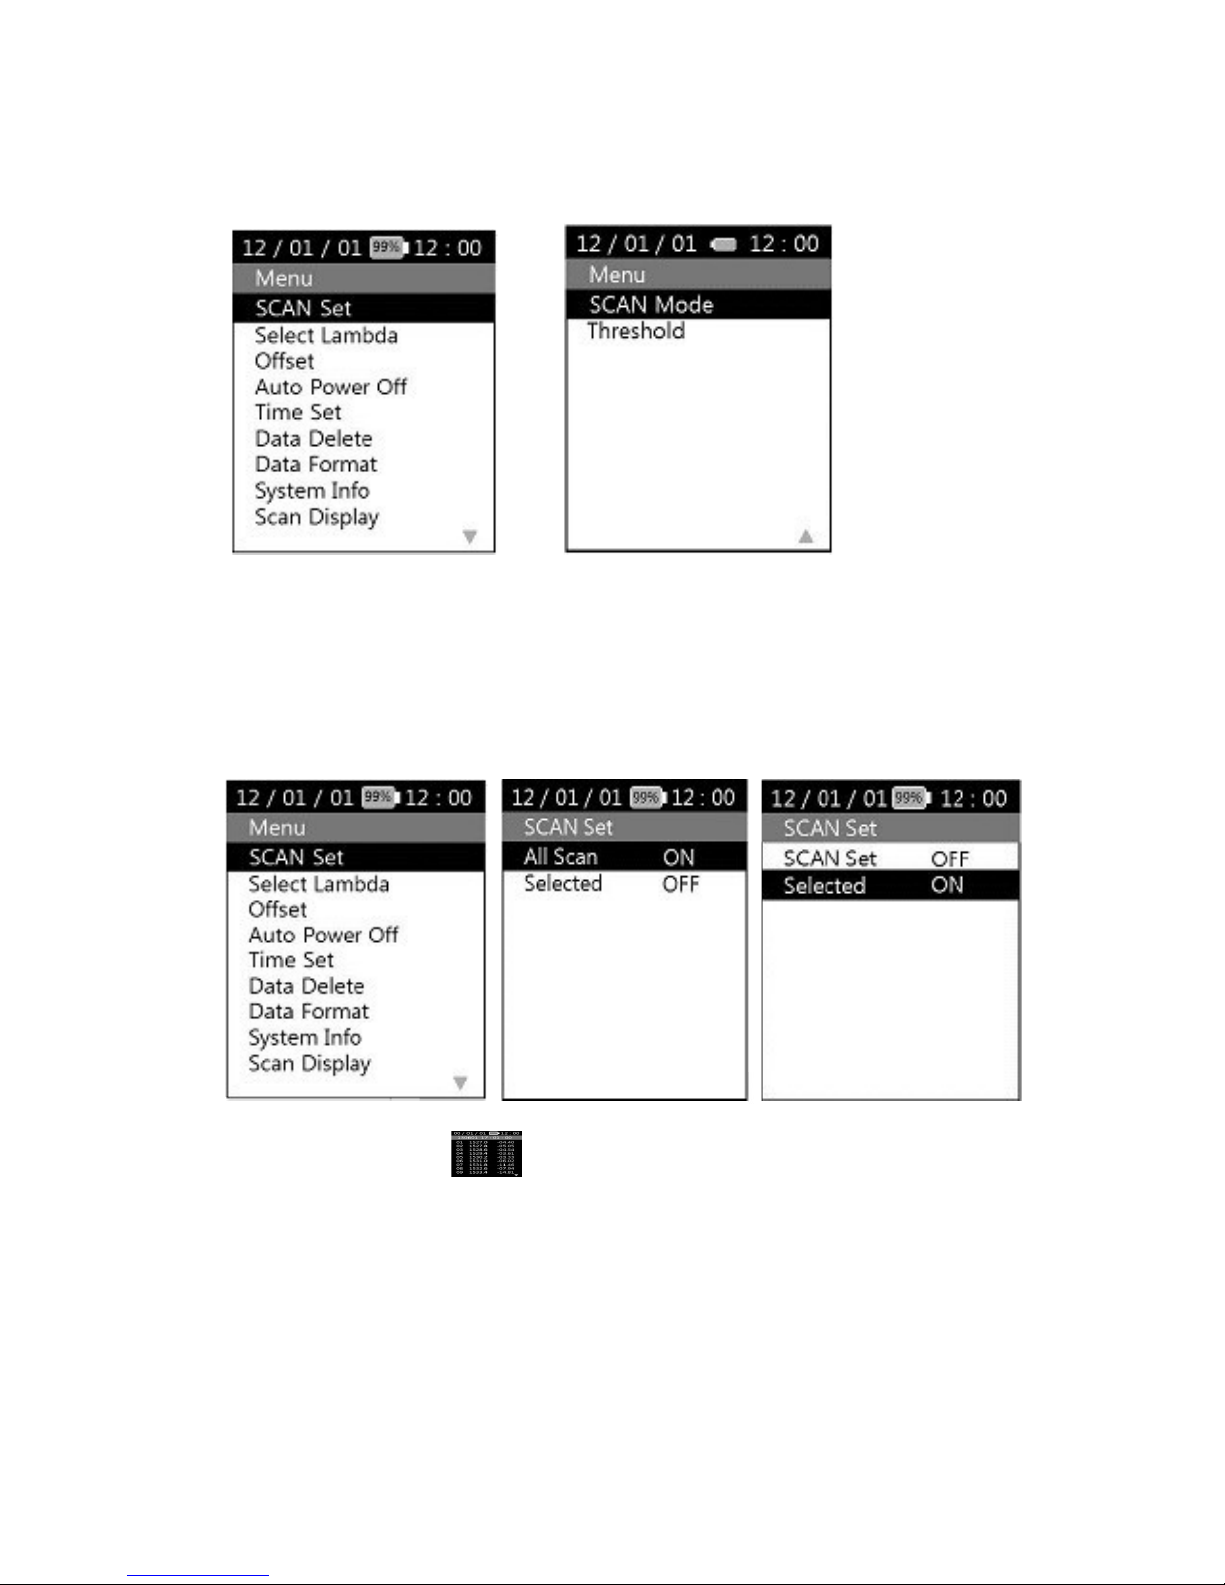
If you press the (Menu) button, it changes to a screen where
you can configure the operating environment of ODPM-48.
Page 17
ODPM-48
Page 17/26
- The menu consists of ‘SCAN SET’, ‘Select Lambda’, ‘Off Set’, ‘Auto
Power Off’, ‘Time Set’, ‘Data Delete’, ‘Data Format’, ‘System Info’,
‘Scan Display’, ‘SCAN Mode’ and ‘Threshold’.
1) Scan Set
(Enter) button after selecting ‘Scan Set’, a
- If you press the
Page 18
ODPM-48
Page 18/26
set up screen for ‘Scan Set’ shows up. ‘All Scan’ is registered 48
wavelength. As the channel values that users mainly use are provided in
the screen, it is easy to set up the channel value that the user wants.
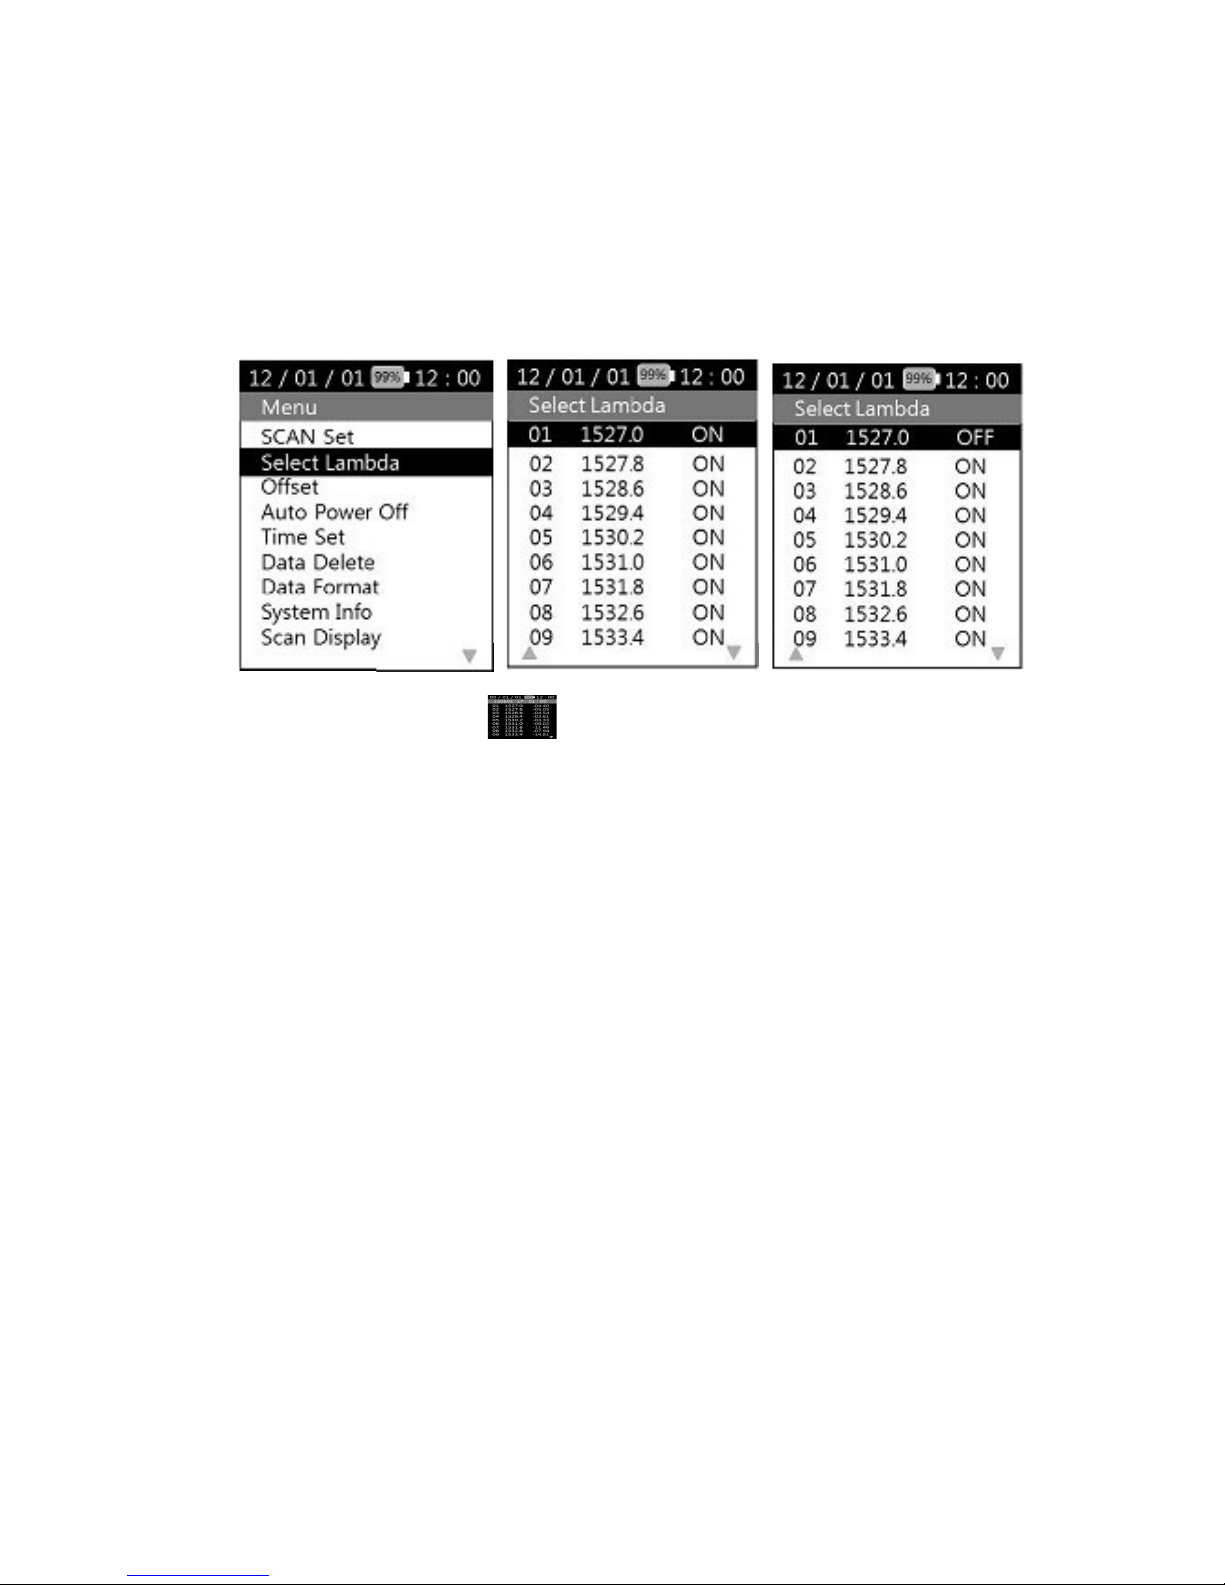
2) Select Lambda
(Enter) button after selecting ‘Select
Lambda’, you can select the channel that you want. If you then press
the ENTER button, it changes from OFF to ON.
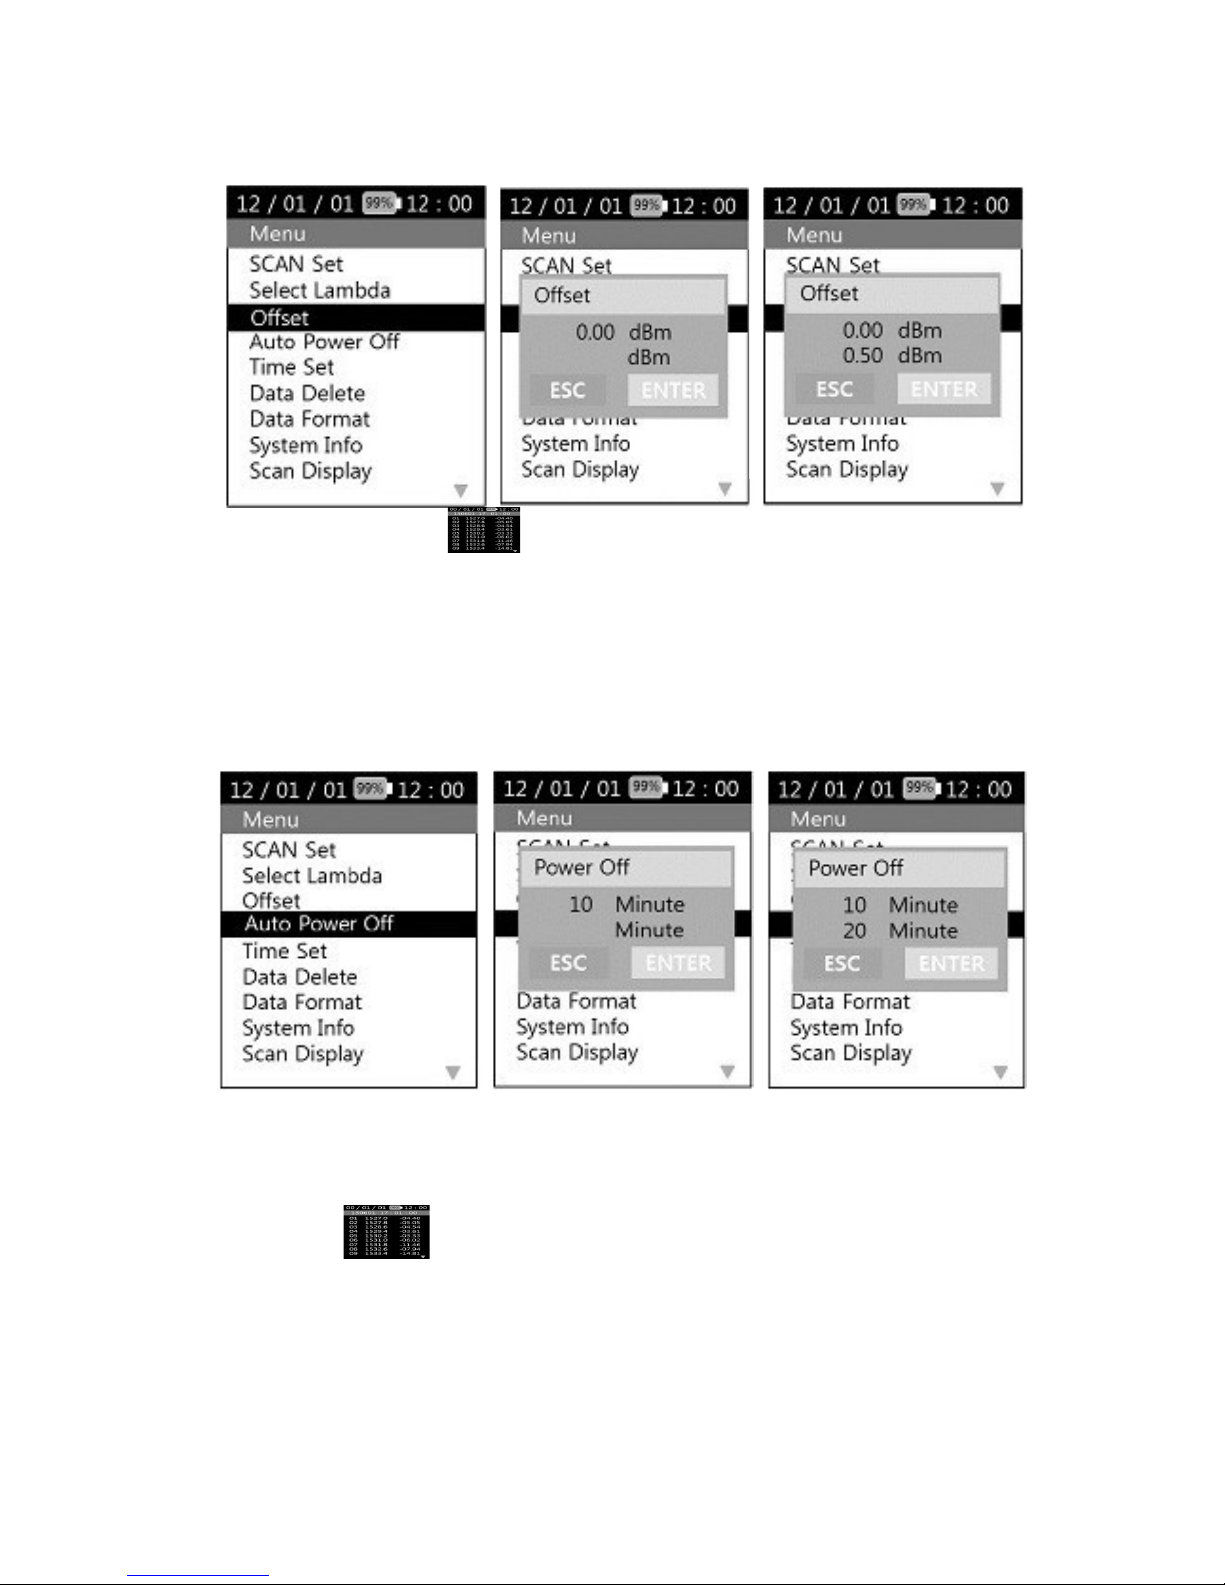
3) Off Set
-
If you press the
Page 19
ODPM-48
Page 19/26
(Enter) button after selecting ‘Off Set’, you
can set up dBm value and the optical power value on the screen.
- You can set the ‘Off Set’ by pressing the ESC key and ENTER.
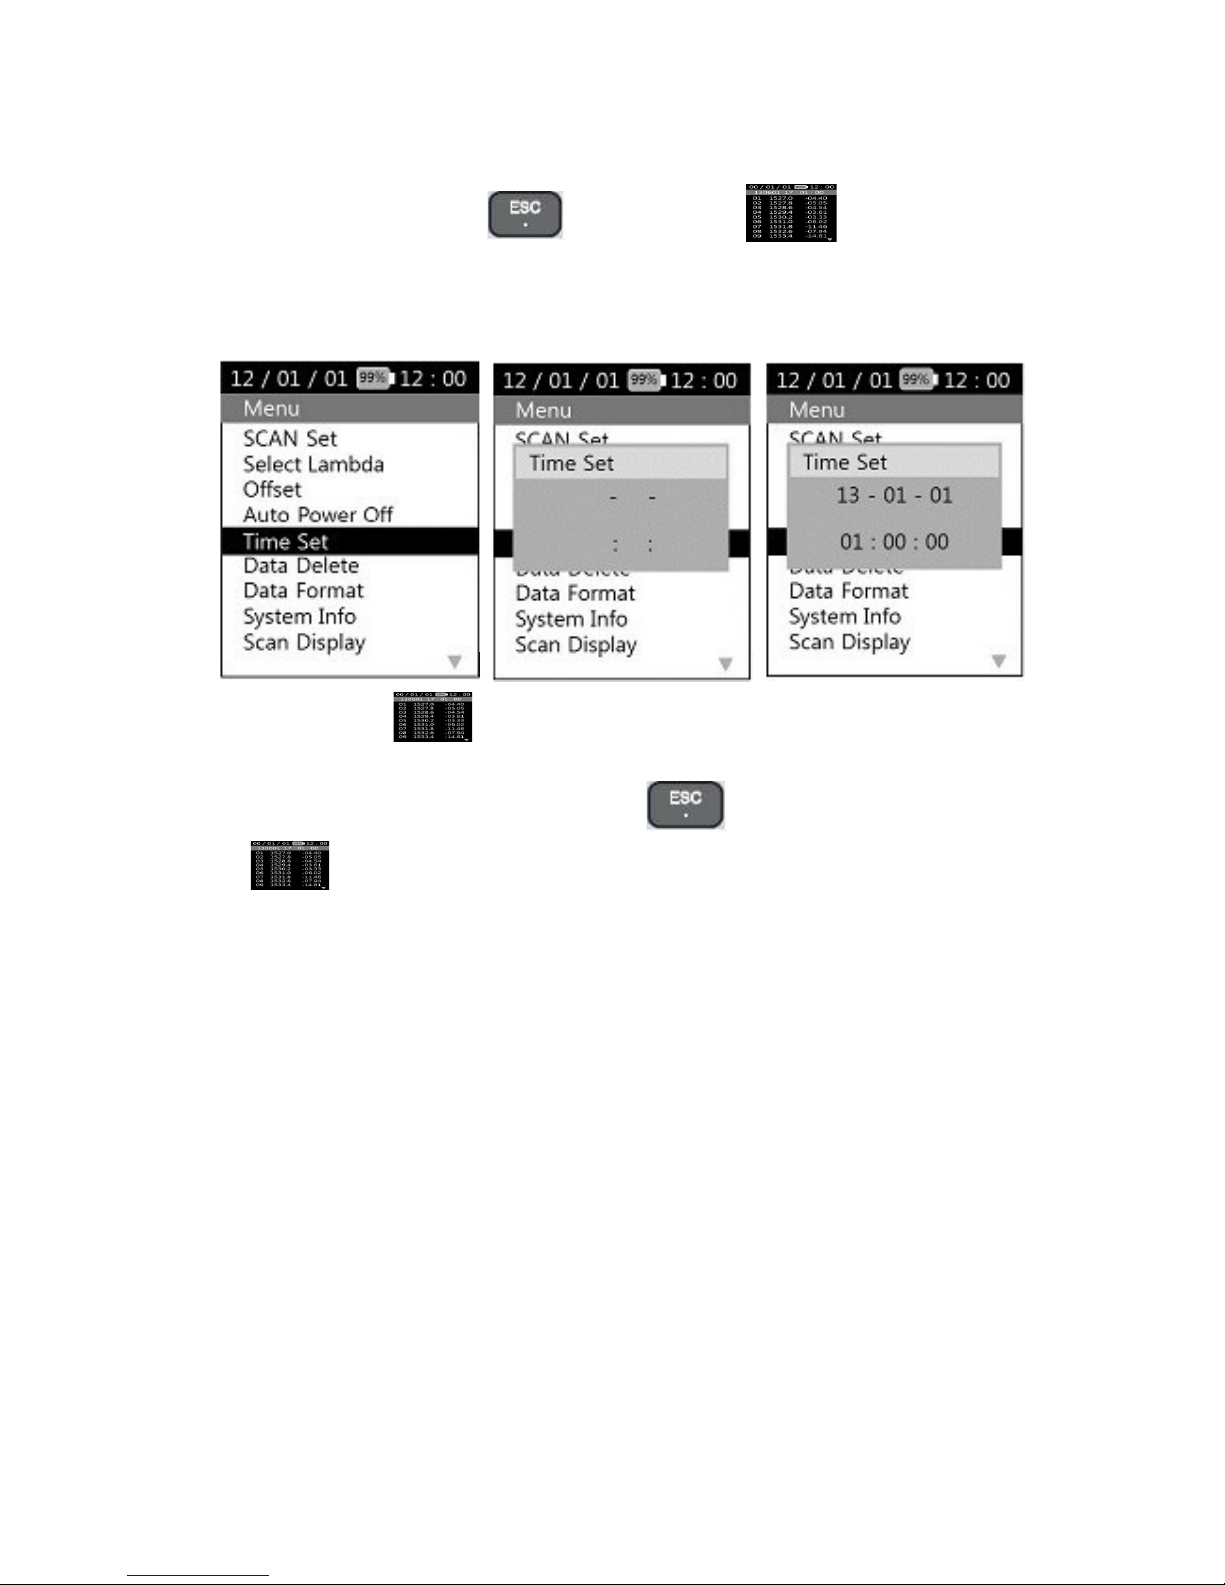
4) Auto Power Off
- The power automatically goes off if the user does not input any key in the
determined time.
- If you press the (Enter) button after selecting ‘Auto Power OFF’, you
can set the Auto power off time in minutes.
- If you press the
Page 20
ODPM-48
Page 20/26
- You can set the time by the (ESC) key and (Enter).
5) Time Set
- If you press the (Enter) button after selecting ‘Time Set’, you can
set the today date and current time.
- You can set the time by pressing the (ESC) key and
(Enter) button.
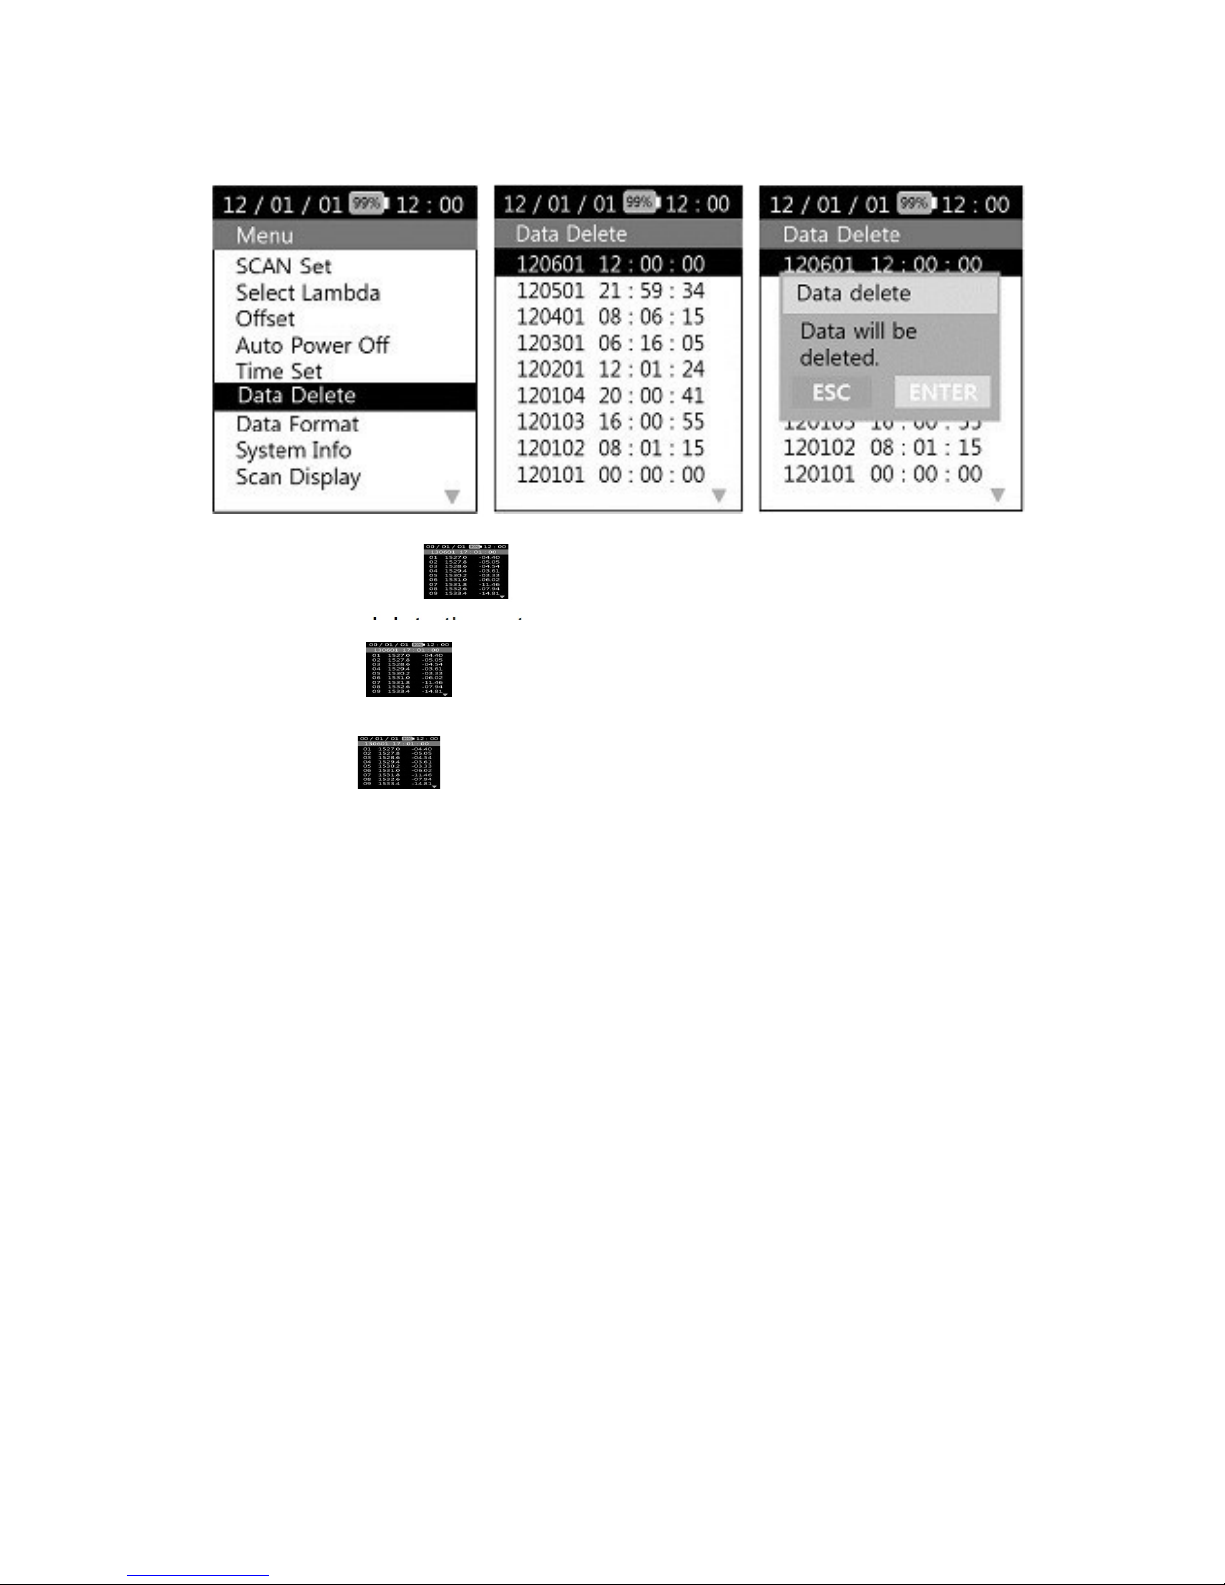
6) Data Delete
Page 21
ODPM-48
Page 21/26
you can delete the data.
- If you press the (Enter) key after choosing the data you want to
delete, message appears on the screen.
- If you press the (Enter) button, it is deleted from the memory.
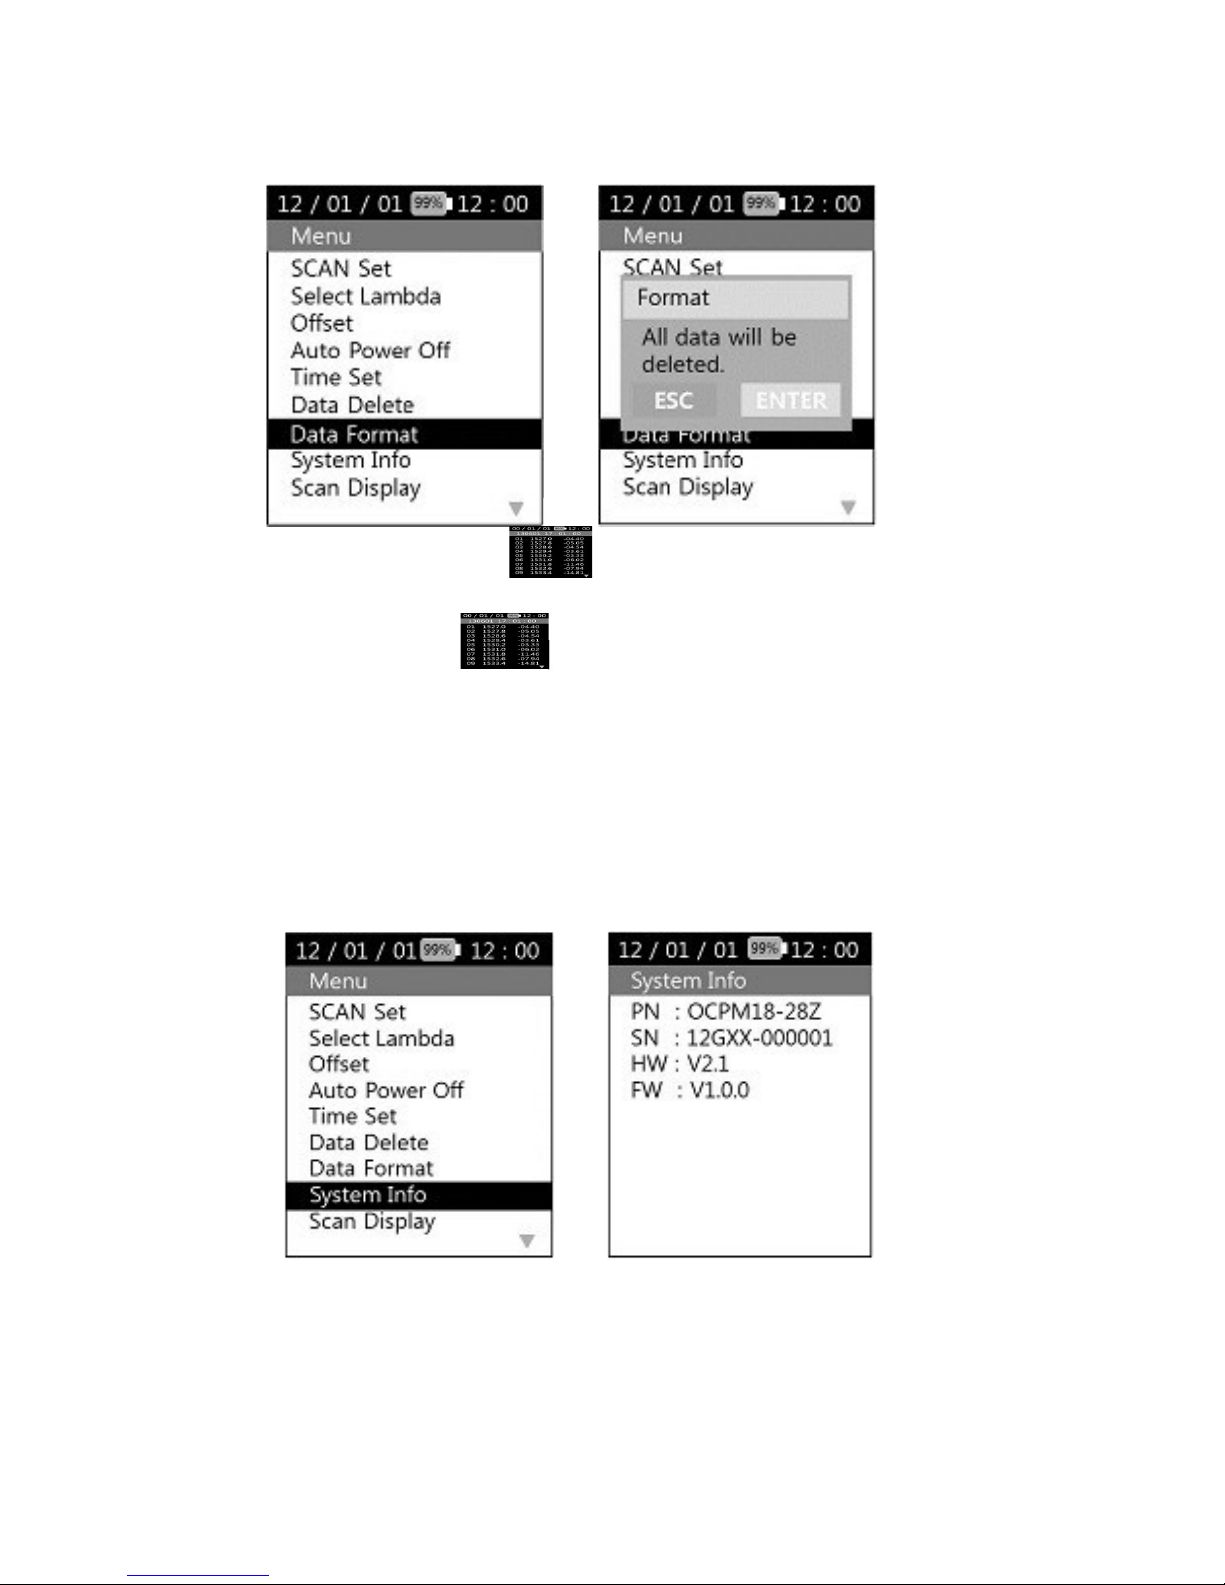
7) Data Format
- You can delete all saved files by formatting the
transportable memory.
- If you press the
(Enter) button after selecting ‘Delete Data’,
Page 22
ODPM-48
Page 22/26
- If
you
press the the memory.
8) System Info
Generates information about the equipment.
-
If you press the
(Enter) key after
‘Data Format’,
message appears on the screen.
(Enter) button, all files are deleted from
Page 23
ODPM-48
Page 23/26
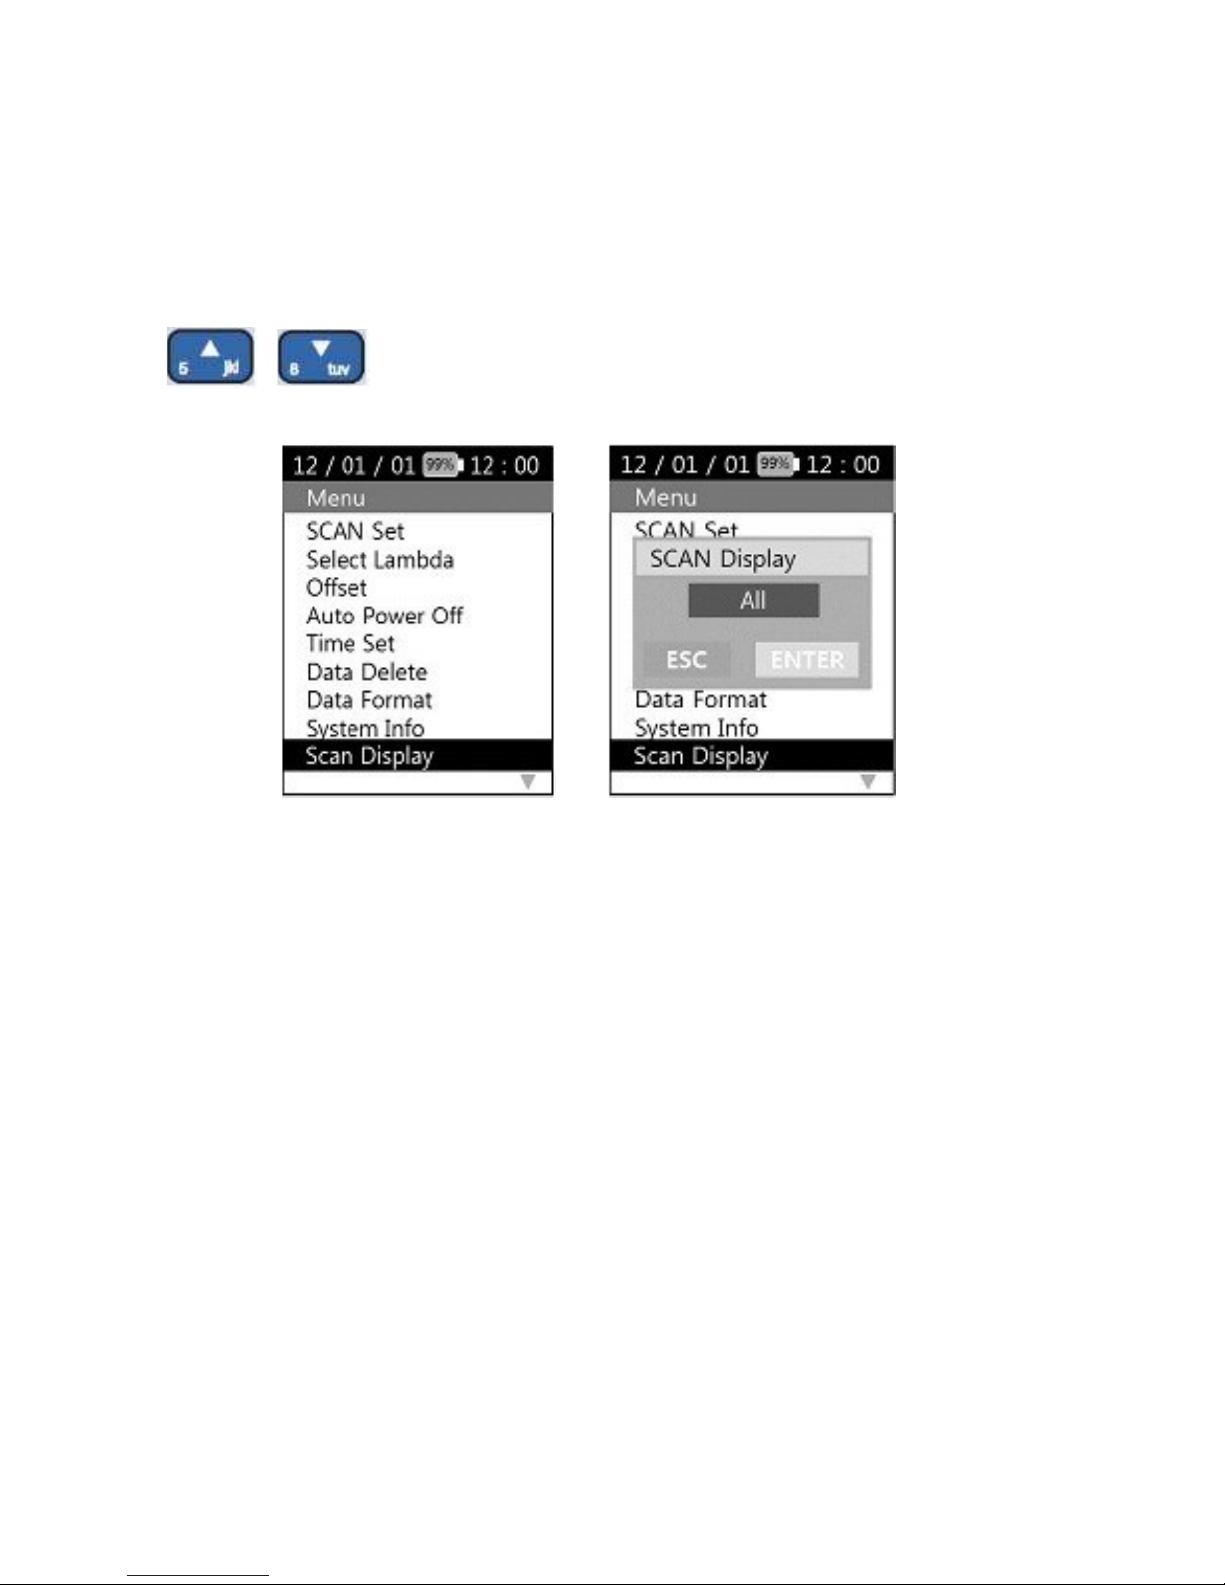
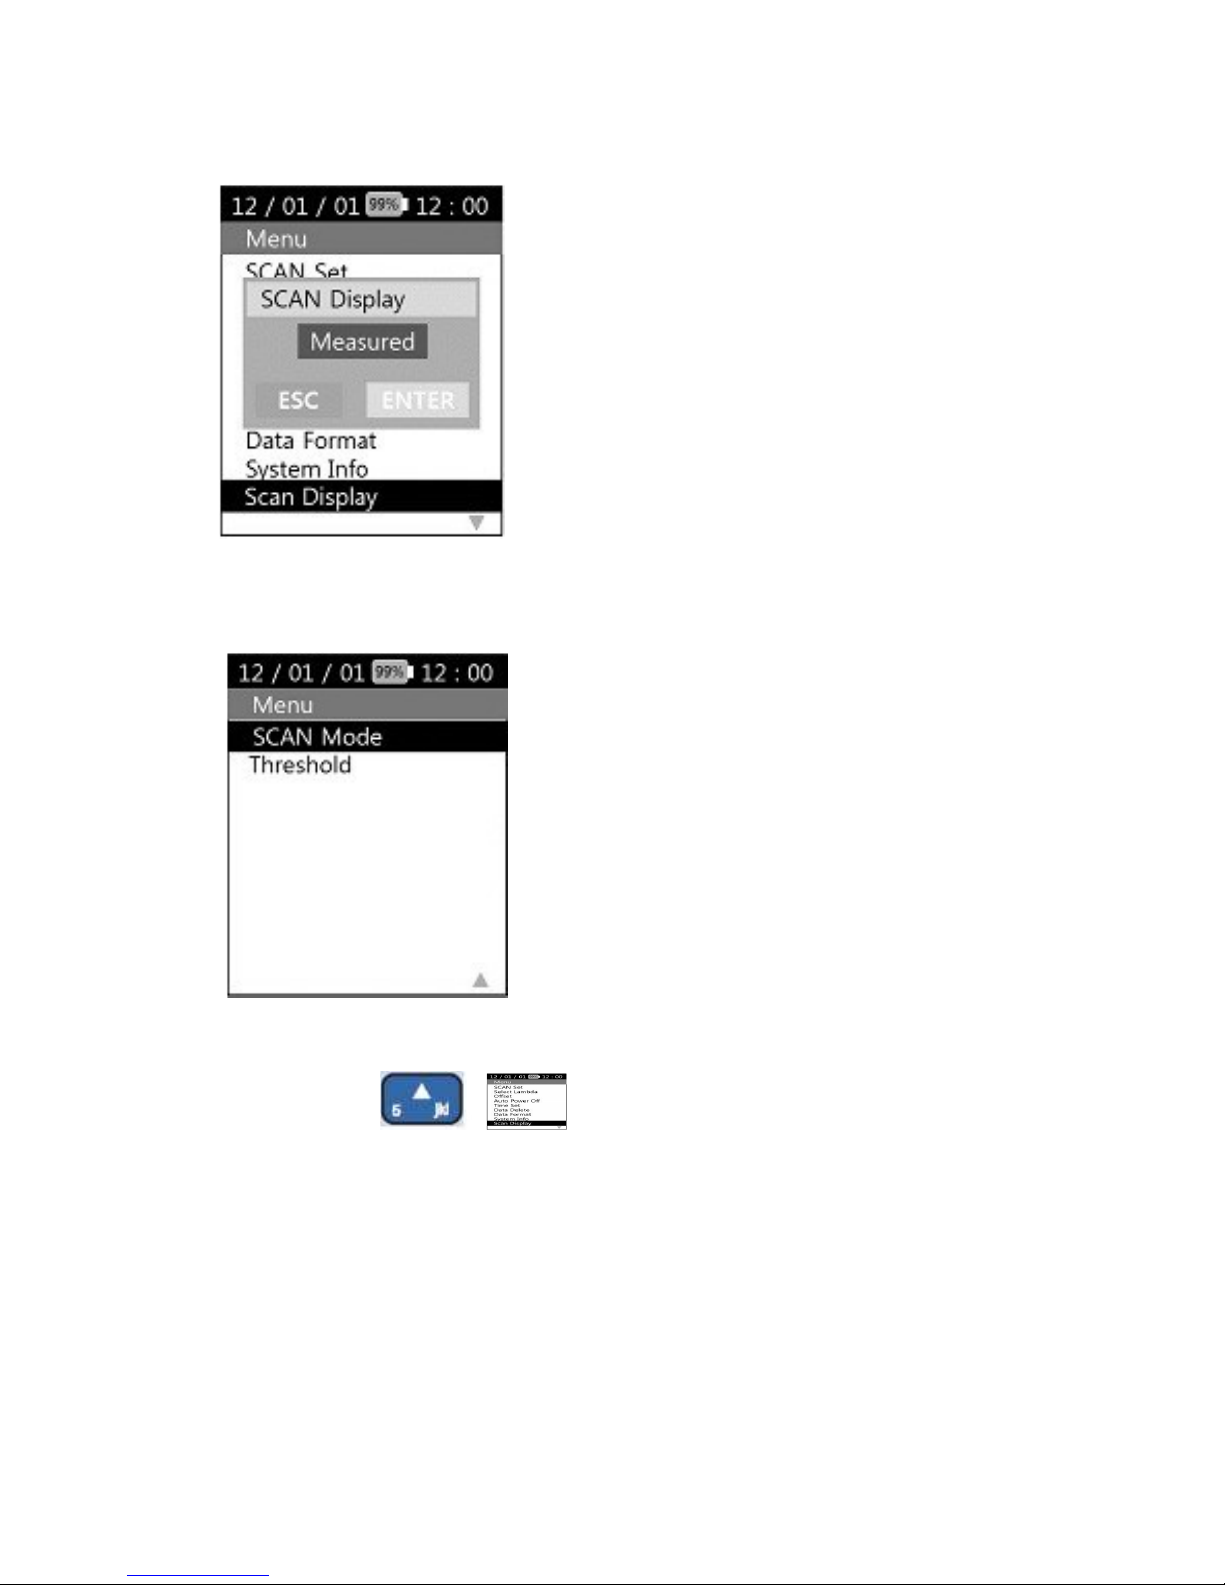
9) Scan Display
- ‘Scan Display’ consists of ‘All’ and ‘Measured’. This can be selected using
the arrow keys .
- If you choose the ‘All’, from 1527.21nm to 1564.68nm values of 48
wavelengths are output.
- If you choose the ‘Measured’, the value of the wavelength to be measured
are output.
,
Page 24
ODPM-48
Page 24/26
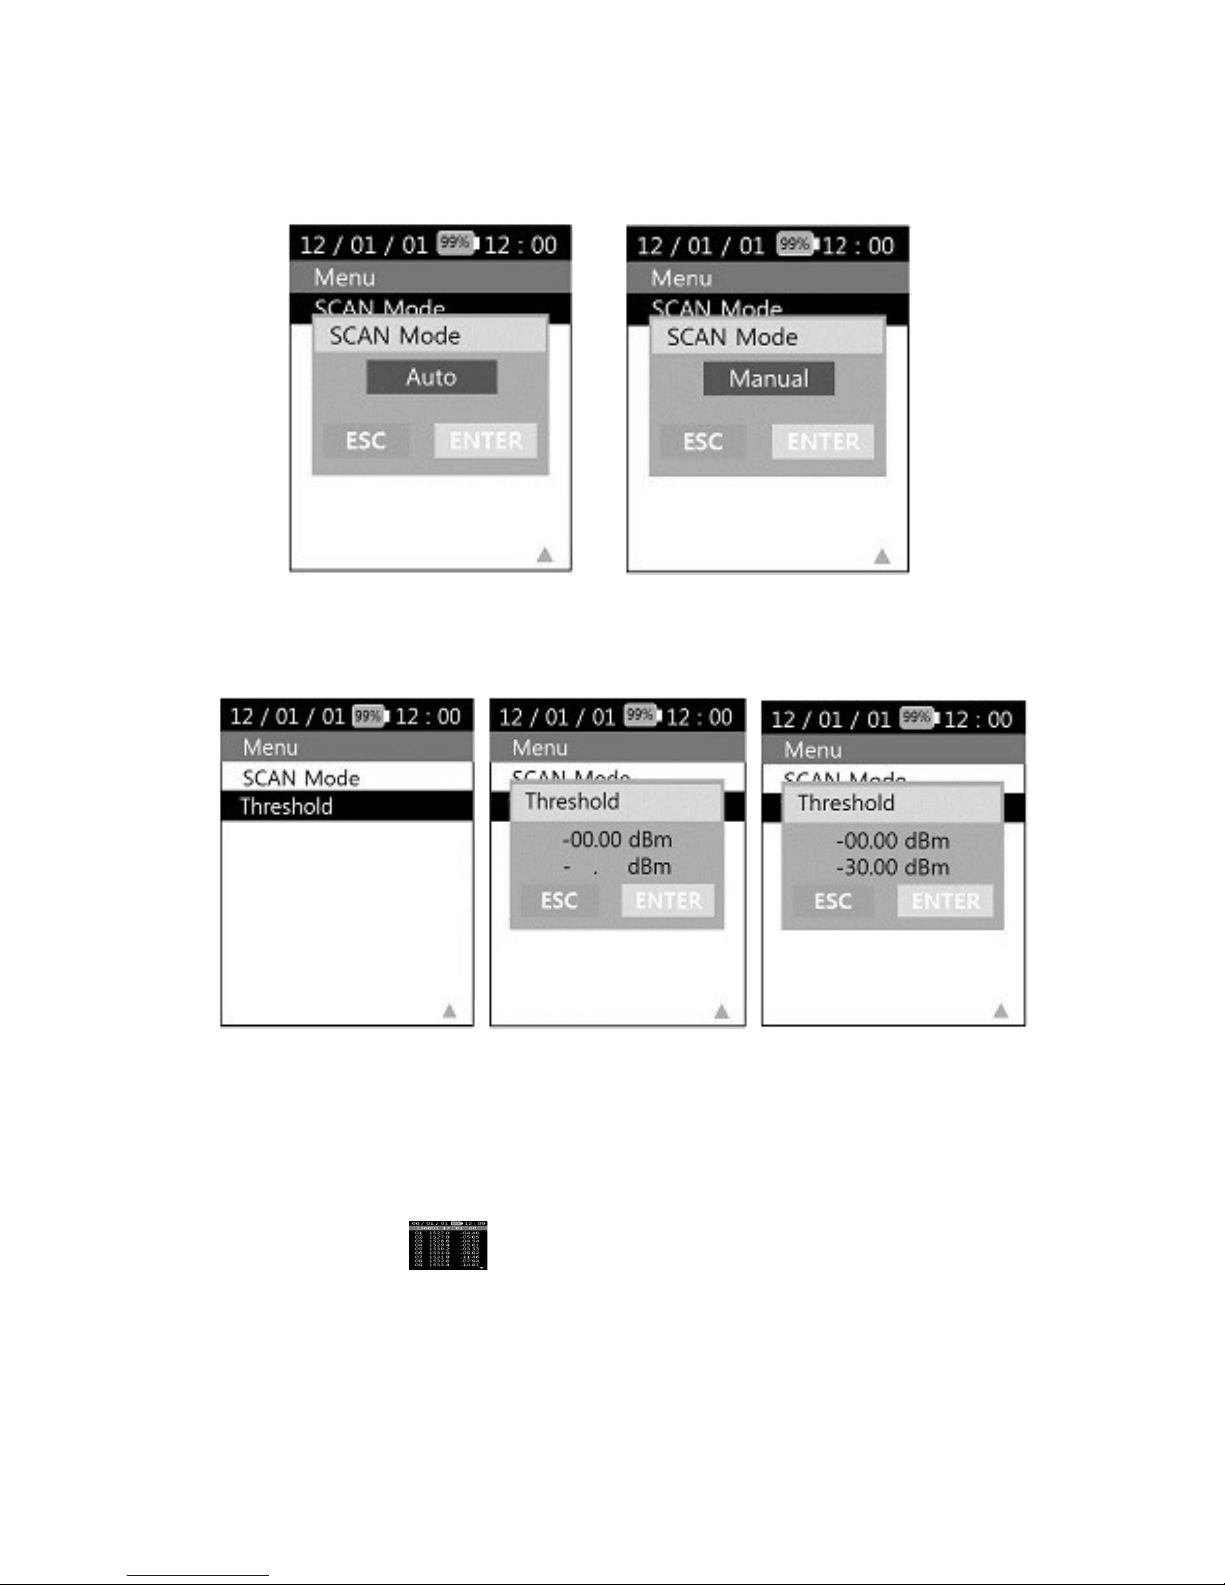
10) Scan Mode
- The ‘Scan Mode’ consists of the ‘Auto’ and ‘Manual’. This can be
selected using the arrow keys.
- If you choose the ‘Auto’, when selecting ‘DWDM’, shows the real time
changing values. If you choose the ‘Measured’, when ‘SCAN’ and
selecting ‘DWDM’, shows the values.
,
Page 25
ODPM-48
Page 25/26
11) Threshold
- You can change the baseline.
- ‘-30.00dBm’ is the default setting.
- If you press the (Enter) button after selecting ‘Threshold’, you
can set the baseline.
Page 26
ODPM-48
Page 26/26
- Baseline changes can be found at the graph screen.
 Loading...