


EPSILON
Self Tune PID
Process Controller
with Ramp / Soak Profile
User Manual
PRF

CONTENTS
1. FRONT PANEL LAYOUT 1
2. BASIC OPERATION 3
3. 7SET-UP MODE ACCESS AND OPERATION
4. 9CONTROL PARAMETERS
5. 11ALARM PARAMETERS
6. 13CONFIGURATION PARAMETERS
7. 16SUPERVISORY PARAMETERS
8. 18PROFILE PARAMETERS
9. 21OP2 & OP3 FUNCTION PARAMETERS
10. 25HARDWARE ASSEMBLY & CONFIGURATIONS
11. MECHANICAL INSTALLATION 30
12. ELECTRICAL CONNECTIONS 32
User Manual
EPSILON
1. FRONT PANEL LAYOUT 37
2. CONNECTIONS 39BACK PANEL TERMINAL
3. INPUT & OUTPUT HARDWARE JUMPER SETTINGS 42
For Size 48X48
For Size 96X96

1
READOUTS
The Upper Readout is a 4 digit, 7-segment bright red LED display and usually displays the PV (Process Value). In Set-up
Mode, the Upper Readout displays parameter values/options.
The Lower Readout is a 4 digit, 7-segment bright green LED display and usually displays Setpoint Value or % Output Power. In
Set-up Mode, the Lower Readout displays parameter names (prompts) .
INDICATORS
The front panel indicators are red LED’s that show the status related to control, alarms and operation mode. Refer Table 1.1
below for details.
FRONT PANEL LAYOUT
The controller front panel comprises of digital readouts, LED indicators and membrane keys as shown in Figure 1.1 below.
User Manual
EPSILON
Table 1.1
ALM
1
ALM
2
LED
Status
OP1
• Indicates Output-1 ON/OFF status if the Control Output Type
is Relay / SSR.
• Remains OFF if the Control Output Type is DC Linear.
• Flashes while Alarm-1 is active.
• Flashes while the Ramp/Soak profile is in progress.
• Glows continuously if profile is in HOLD state.
• Remains OFF if profile is not in progress.
PRF
• Indicates Output-2 ON/OFF status if the Control Output Type
is Relay / SSR.
• Remains OFF if the Control Output Type is DC Linear.
OP2
• Flashes while Alarm-2 is active.
Figure 1.1
PPI
EPSILON
OP1 OP2
PRF
Upper Readout
Lower Readout
Profile Status
ENTER Key
UP Key
DOWN Key
PAGE Key
Output-1 Status
Output-2 Status
Alarm-1 Status
Alarm-2 Status
1
2
ALM
KEYS
There are four tactile keys provided on the front panel for configuring the controller, setting-up the parameter values and
selecting Operation Modes. Refer Table 1.2 for detailed key operations.
Section 1

2
Table 1.2
Symbol
Key
Function
Press to enter or exit set-up mode.
DOWN
UP
ENTER
Press to store the set parameter value and to scroll to the next
parameter on the PAGE.
Press to increase the parameter value. Pressing once increases
the value by one count; keeping pressed speeds up the change.
Press to decrease the parameter value. Pressing once decreases
the value by one count; keeping pressed speeds up the change.
PAGE
User Manual
EPSILON

3
PV above Max. Range
PV below Min. Range
Message Error Type
Cause
Thermocouple / RTD broken
Sensor Open
Under-range
Over-range
Table 2.1
Heat or Cool Power
Uni-directional Control
Heat Power
Cool Power
Bi-directional Control
Figure 2.1
BASIC OPERATION
POWER-UP
Upon power-up, all displays and indicators are lit on for approximately 3 seconds. This is followed by the indication of the
controller model name on the Upper Readout and the firmware version on the Lower Readout, for
approximately 1 second.
MAIN DISPLAY MODE
After the Power-up display sequence, the Upper Readout starts showing the measured PV (Process Value) and the Lower
Readout displays the Setpoint Value. This is the MAIN Display Mode that shall be used most often.
% Output Power Indication
In PID control mode, the Lower Readout can be toggled using ENTER key to indicate either % output power or setpoint value
SP. The output power is indicated with the left most digit showing ‘P’, ‘H’ or ‘C’ depending upon uni-directional (Heat or Cool) or
bi-directional (Heat and Cool) control mode. Refer Figure 2.1 below.
Adjusting SP (Control Setpoint)
If permitted at Supervisory Level, the SP value can be directly adjusted on the Lower Readout in the MAIN Display Mode.
While the Lower Readout shows the control setpoint, step through the following sequence for adjusting the SP value :
1. Press and release UP or DOWN key once. The Lower Readout starts flashing.
2. Use UP/ DOWN keys to adjust the SP value.
3. Press and release ENTER key. The Lower Readout stops flashing and the new set value is registered and stored.
Tune Mode Indication
The Lower Readout flashes while the controller is Tuning. Do not disturb the process or alter any parameter values while
Tuning is in progress. The “Tune” message automatically disappears upon completion of Tuning procedure.
Profile Mode Indications
While a Profile Cycle is in progress, the front panel indicator ‘PRF’ flashes or glows steadily. The steady glowing indicates that
though the profile is active, it is currently in HOLD state. Also, the Lower Readout shows the Profile Setpoint instead of the
control setpoint SP. The % Output Power (if PID Control) can be viewed by toggling the Lower Readout using ENTER key.
Note
While Profile Cycle is in progress, the Control Setpoint SP can still be adjusted on Lower Readout. While the Lower Readout shows Profile
Setpoint, use UP/DOWN keys to adjust the control setpoint SP as described earlier.
PV Error Indications
The PV Error type is flashed on the Upper Readout. For different errors and the causes, refer Table 2.1 below.
User Manual
EPSILON
Section 2

4
CONTROL / ALARM STATUS UNDER PV ERROR CONDITIONS
a) The tuning, if in progress, is aborted.
b) The Profile Cycle, if in progress, enters in HOLD state.
c) Under Over-range or Under-range error condition, all the control outputs are switched off. However, under Sensor Open
error, the PID control output power is maintained at the value set for the parameter “Sensor Break Output Power” on
PAGE-12.
d) For Alarm activation, the under-range condition is treated as minimum PV, whereas the over-range and open conditions
are treated as maximum PV. Thus, Process High, positive Deviation Band and Window Band alarms activate under Over-
range/Open error. Similarly, Process Low, negative Deviation Band and Window Band alarms activate under Underrange error.
STANDBY MODE
This mode allows the operator to put the controller in ‘indication-only’ mode wherein all the output control signals as well as
Alarm Relays are forced OFF. This may be desired prior to the start of a new process batch.
If enabled at supervisory level, the standby mode can be activated or de-activated by setting the parameter ‘Standby’ to Yes or
No respectively. The standby parameter is available on operator page, explained later in the section.
Notes:
1. The Standby and Tuning modes are mutually exclusive. If Standby mode is activated while the controller is tuning, the controller aborts
tuning operation and enters Standby mode.
2. If the Power Supply to the controller is switched-off or a Power-failure occurs while the controller is operating in Standby mode; upon
resumption of power, the controller continues to operate in Standby mode.
OPERATOR PAGE AND PARAMETERS
The controller provides a separate page that contains parameters that require frequent settings by the operator. The page is
called Operator Page and the parameters are called Operator Parameters. The availability of operator parameters is
controlled at supervisory level and the parameter setting is not affected by the master lock status.
Accessing Operator Page & Adjusting Parameters
Step through the following sequence to open the operator page and to adjust the operator parameter values.
1. Press and release PAGE key. The Lower Readout shows (PAGE) and Upper Readout shows (0).
2. Press ENTER key. The Lower Readout shows prompt for the first available operator parameter and the Upper Readout
shows value for the parameter.
3. Use UP / DOWN keys to adjust the value and then press ENTER key to store the set value and scroll to next parameter.
The controller automatically reverts to MAIN Display Mode upon scrolling through the last operator parameter. Alternatively,
use PAGE key to return to MAIN Display Mode.
The operator parameters are described in Table 2.2. Note that the parameters presented on operator page depend upon the
functions selected/enabled and supervisory level permissions.
The operator parameter list mainly includes :
a) Profile related commands like Start, Abort, Pause, Skip etc.
b) Standby mode entry / exit.
c) Control Setpoint (SP) value.
d) Alarm-1 Setpoint / Band values.
e) Alarm-2 Setpoint / Band values.
User Manual
EPSILON

5
No
Yes
(Default : No)
No
Yes
(Default : No)
No
Yes
(Default : No)
No
Yes
(Default : No)
No
Yes
(Default : No)
No
Yes
(Default : No)
Table 2.2
Parameter Description
Settings
(Default Value)
Setpoint Low Limit
to Setpoint High Limit
(Default : -199)
Setpoint Low Limit
to Setpoint High Limit
(Default : -199)
This parameter is available if Output-2 (OP2) and / or Output-3
(OP3) Relay/SSR is programmed to turn ON as an ‘End-of-Profile’
signal. Set this parameter to ‘Yes’ (after end of profile is reached)
to acknowledge the Alarm and to turn OFF the output.
END OF PROFILE ACKNOWLEDGE
These parameters are mutually exclusive. Use ‘Start’ command to
commence a new Profile Cycle and ‘Abort’ command to abort /
terminate a running Profile cycle. Set the value to ‘Yes’ to issue the
command.
PROFILE START COMMAND
These parameters are mutually exclusive. Use ‘Start’ command to
commence a new Profile Cycle and ‘Abort’ command to abort /
terminate a running Profile cycle. Set the value to ‘Yes’ to issue the
command.
PROFILE ABORT COMMAND
This parameter is available while a profile cycle is in progress and
can be used to pause (halt) the profile as long as desired. Set the
command to ‘Yes’ for pausing and ‘No’ to continue. Under Pause
state, the ramp segment stops ramping while the soak segment
stops counting down the timer.
PROFILE PAUSE COMMAND
Use this command to terminate a running profile segment and to
move to the next segment. Skipping the last segment will result in
completion of the current profile cycle.
SEGMENT SKIP COMMAND
This parameter is available and applicable only if Standby mode is
enabled at supervisory level. Set the parameter value to ‘Yes’ or
‘No’ for entering and exiting the Standby mode, respectively.
(DE)ACTIVATE STANDBY MODE
This is the Setpoint value that the controller respects for the
control purpose while it is not running a profile or not in standby /
tuning mode.
CONTROL SETPOINT
The alternate control setpoint that the controller respects for
control purpose when selected through remote input terminals.
This parameter is available only if the hardware Remote Input
module is fitted and if the selected Utility Option is Auxiliary
Setpoint.
AUXILIARY CONTROL SETPOINT
User Manual
EPSILON

6
ALARM-2 SETPOINT
The Definitions / Descriptions are same as Alarm 1 but applied to
Alarm 2.
ALARM-1 WINDOW BAND
The Definitions / Descriptions are same as Alarm 1 Setpoint
ALARM-1 DEVIATION BAND
The Definitions / Descriptions are same as Alarm 1 Setpoint
The Definitions / Descriptions are same as Alarm 1 but applied to
Alarm 2.
ALARM-2 DEVIATION BAND
The Definitions / Descriptions are same as Alarm 1 but applied to
Alarm 2.
ALARM-2 WINDOW BAND
Parameter Description
Settings
(Default Value)
Throughout the range for
the selected Input Type
(Default :
For Process Low : -199
For Process High : 1376)
The setpoint / Band value (depending upon the type of Alarm) for
Alarm-1. This parameter is not available if the selected Alarm type
is ‘None’.
ALARM-1 SETPOINT
Throughout the range for
the selected Input Type
(Default :
For Process Low : -199
For Process High : 1376)
(Default : 5 or 5.0)
-999 to 999 or
-999.9 to 999.9
3 to 999 or
0.3 to 999.9
(Default : 5 or 5.0)
(Default : 5 or 5.0)
-999 to 999 or
-999.9 to 999.9
3 to 999 or
0.3 to 999.9
(Default : 5 or 5.0)
User Manual
EPSILON

7
The various parameters are arranged in different groups, called PAGES, depending upon the functions they represent. Each
group is assigned a unique numeric value, called PAGE NUMBER, for its access.
The parameters are always presented in a fixed format: The Lower Readout displays the parameter prompt (Identification
Name) and the Upper Readout displays the set value. The parameters appear in the same sequence as listed in their
respective sections.
SET-UP MODE
The Set-up Mode allows the user to view and modify the parameter values. Follow the steps below for setting the parameter
values:
1. Press and release PAGE key. The Lower Readout shows (PAGE) and Upper Readout shows (0).
2. Use UP / DOWN keys to set the desired PAGE NUMBER.
3. Press and release ENTER key. The Lower Readout shows the prompt for the first parameter listed in the set PAGE and
the Upper Readout shows its current value. If the entered PAGE NUMBER is invalid (contains no parameter list or any
associated function), the controller reverts to the MAIN Display Mode.
4. Press and release the ENTER key until the prompt for the required parameter appears on the Lower Readout. (The last
parameter in the list rolls back to the first parameter).
5. Use UP / DOWN keys to adjust the parameter value. The display flashes if UP key is pressed after reaching the maximum
value or DOWN key is pressed after reaching the minimum value.
6. Press and release the ENTER key. The new value gets stored in the controller’s non-volatile memory and the next
parameter in the list is displayed.
The Figure 3.1 illustrates the example of altering the value for the parameter ‘Control Output’.
Figure 3.1
SET-UP MODE : ACCESS AND OPERATION
Notes
1. Each page contains a fixed list of parameters that are presented in a pre-determined sequence. Note however that the availability of a
few parameters, called Conditional Parameters, depend upon the settings for some other parameters. For example, the parameter
‘Control Hysteresis’ for Output-1 is available only if, the set value for the parameter ‘Control Action’ is ‘On-Off’.
2. To exit the set-up mode and return to the MAIN Display Mode, press and release PAGE key.
3. If no key is pressed for approximately 30 seconds, the set-up mode times out and reverts to the MAIN Display Mode.
User Manual
EPSILON
Main Display
Mode
Default Page
Page Number
Press PAGE
key to enter
Set-up Mode
Use UP/DOWN
key to set the
Page Number
Press ENTER
key to open
the Page
Use UP/DOWN
keys to change
the value
Press ENTER
key to store the value &
move to next parameter
First Parameter
on Page-12
New Parameter
value
Next Parameter
on Page-12
or
or
Section 3

8
MASTER LOCKING
The controller facilitates locking all the PAGES (except Operator PAGE) by applying Master Lock Code. Under Locking, the
parameters are available for view only and can not be adjusted. The Master Lock, however, does not lock the operator
parameters. This feature allows protecting the rather less frequently used parameters against any inadvertent changes while
making the frequently used operator parameters still available for any editing.
For enabling / disabling the Lock, step through the following sequence:
Locking
1. Press and release PAGE key while the controller is in the MAIN Display Mode. The Lower Readout shows PAGE and the
Upper Readout shows 0.
2. Use UP / DOWN keys to set the Page Number to 123 on the Upper Readout.
3. Press and release ENTER key. The controller returns to the MAIN Display Mode with the Lock enabled.
The Figure 3.2 below illustrates the Locking procedure.
Figure 3.2
UnLocking
Repeat the Locking procedure twice for unlocking.
User Manual
EPSILON
MAIN Display
Mode
Default Page Locking Code
MAIN Display
Mode
Press PAGE
key to enter
Set-up Mode
Use UP/DOWN
key to set the
‘Locking Code’
Press ENTER key
to Lock & Return to
Main Mode
or

9
The parameters presented on PAGE-10 depend upon the type of algorithm selected for the control purpose, viz., On-Off,
Pulsed On-Off and PID. The parameter list further extends if the selected control mode is bi-directional (that is, heat-cool
control). Refer Table 4.1 for the parameter descriptions and settings.
CONTROL PARAMETERS
Table 4.1
Visit www.ppiindia.net. Refer technical notes on CONTROL and TUNING for detailed understanding of the
parameters / terminologies used for describing control parameters in this section.
0 to 600 Seconds
(Default : 16 Sec.)
0 to 3600 Seconds
(Default : 100 Sec.)
PROPORTIONAL BAND
(Available for PID Control only)
Sets proportional gain (% power per unit error). Defined in same
units and resolution as that for PV.
INTEGRAL TIME
(Available for PID Control only)
Sets integral time constant in Seconds. Setting the value to 0,
cuts-off the integral action.
DERIVATIVE TIME
(Available for PID Control only)
Sets derivative time constant in Seconds. Setting the value to 0,
cuts-off the derivative action.
1 to 999 Units
(Default : 50 units)
Settings
(Default Value)
Parameter Description
0.5 to 100.0 Seconds
(in steps of 0.5 secs.)
(Default : 10.0 Sec.)
0.1 to 10.0
(Default : 1.0)
0.5 to 100.0 Seconds
(in steps of 0.5 secs.)
(Default : 10.0 sec.)
1 to 999
(Default : 2)
HYSTERESIS
(Available for On-Off or Pulsed On-Off Control only)
Sets differential (dead) band between On-Off switching for OP1.
(Available for PID Control with bi-directional, that is, Heat-Cool mode)
Sets the On + Off cycle time in Seconds for time proportional
power output through Relay / SSR for OP2.
*COOL CYCLE TIME
(Available for PID Control with bi-directional, that is, Heat-Cool mode)
Sets the ratio of cooling power to the heating power.
*RELATIVE COOL GAIN
CYCLE TIME
(Available for PID Control only)
Sets the total ‘On + Off’ time in Seconds for time proportional
power output through Relay / SSR for OP1.
Pulse ON Time
to 120.0 Seconds
(Default : 2.0 sec.)
PULSE TIME
(Available for Pulsed On-Off Control only)
Sets the total ‘On + Off’ pulse time in Seconds for Relay / SSR
output for OP1.
User Manual
EPSILON
Section 4

10
Parameter Description
Settings
(Default Value)
Cool ON Time
to 120.0 Seconds
(Default : 2.0)
0.1 to Value set for
Cool Pulse Time
(Default : 1.0)
0 to Power High
(Default : 0)
0.1 to Value set
for Pulse Time
(Default : 1.0)
1 to 999
(Default : 2)
HEAT POWER LOW
(Available for PID Control only)
Sets the lower % Output power limit for OP1.
(Available for Pulsed On-Off Control with bi-directional mode)
Sets the ON pulse time in Seconds for Relay/SSR Output for OP2.
*COOL ON TIME
(Available for Pulsed On-Off Control with bi-directional mode)
Sets the total ‘On + Off’ pulse time in Seconds for Relay / SSR
Output for OP2.
*COOL PULSE TIME
(Available for On-Off or Pulsed On-Off Control with bi-directional mode)
Sets differential (dead) band between On-Off switching for OP2.
*COOL HYSTERESIS
ON TIME
(Available for Pulsed On-Off Control only)
Sets the ON pulse time in Seconds for Relay/SSR Output for OP1.
HEAT POWER HIGH
(Available for PID Control only)
Sets the higher % Output power limit for OP1 .
Power Low to 100
(Default : 100)
0 to Cool Power High
(Default : 0)
Cool Power Low to 100
(Default : 100)
(Available for PID Control with bi-directional, that is, Heat-Cool mode)
Sets the higher % Output power limit for OP2.
*COOL POWER HIGH
(Available for PID Control with bi-directional, that is, Heat-Cool mode)
Sets the lower % Output power limit for OP2.
*COOL POWER LOW
* The parameters marked with asterisk symbol are available only if the controller is supplied with Bi-Directional control (Heat +
Cool) mode option.
User Manual
EPSILON

11
None
Process Low
Process High
Deviation Band
Window Band
(Default : None)
ALARM-2 TYPE
Select the Alarm-2 activation type. Selecting ‘None’ will disable
the alarm and suppress all the related parameters for Alarm-2.
ALARM-1 INHIBIT
Set to ‘Yes’ to suppress Alarm-1 activation upon power-up or
process start-up.
ALARM-1 HYSTERESIS
Sets differential (dead) band between Alarm-1 switching ON and
OFF states.
ALARM-1 WINDOW BAND
(Available for Window Band Alarm-1 Type)
Sets symmetrical positive and negative deviation (offset) limits
from control setpoint for both High and Low Alarm-1 activation.
ALARM-1 TYPE
Select the Alarm-1 activation type. Selecting ‘None’ will disable
the alarm and suppress all the related parameters for Alarm-1.
Min. to Max. Range specified
for the selected Input Type
(Default : Min or Max Range)
ALARM-1 DEVIATION BAND
(Available for Deviation Band Alarm-1 Type)
Sets positive or negative deviation (offset) limit from control
setpoint for High or Low Alarm-1 activation, respectively.
ALARM-1 SETPOINT
(Available for Process High or Process Low Alarm-1 Type)
Sets Alarm limit independent of control setpoint for Alarm-1.
None
Process Low
Process High
Deviation Band
Window Band
(Default : None)
Parameter Description
Settings
(Default Value)
-999 to 999 or
-999.9 to 999.9
(Default : 5)
3 to 999
(Default : 5)
1 to 999
(Default : 2)
No
Yes
(Default : No)
ALARM PARAMETERS
The parameters required for configuring Alarm-1 and Alarm-2 are grouped on PAGE-11. The configuration includes selecting
the type of Alarm, setting the hysteresis value, enabling / disabling start-up alarm suppression, etc. Refer Table 5.1 for
parameter description & settings.
Visit www.ppiindia.net. Refer technical notes on ALARM for detailed understanding of the parameters/terminologies
used for describing the Alarm parameters in this section.
Table 5.1
User Manual
EPSILON
Section 5

12
Parameter Description
Settings
(Default Value)
-999 to 999
(Default : 5)
3 to 999
(Default : 5)
1 to 999
(Default : 2)
ALARM-2 INHIBIT
Set to Yes to suppress Alarm-2 activation upon power-up or
process start-up.
ALARM-2 HYSTERESIS
Sets differential (dead) band between Alarm-2 switching ON and
OFF states.
ALARM-2 WINDOW BAND
(Available for Window Band Alarm-2 Type)
Sets symmetrical positive and negative deviation (offset) limits
from control setpoint for both High and Low Alarm-2 activation.
ALARM-2 DEVIATION BAND
(Available for Deviation Band Alarm-2 Type)
Sets positive or negative deviation (offset) limit from control
setpoint for High or Low Alarm-2 activation, respectively.
ALARM-2 SETPOINT
(Available for Process High or Process Low Alarm-2 Type)
Sets Alarm limit independent of control setpoint for Alarm-2.
Min. to Max. Range specified
for the selected Input Type
(Default : Min or Max Range)
No
Yes
(Default : No)
User Manual
EPSILON

13
Reverse
Normal
(Default : Reverse)
°C
°F
(Default : C)°
Relay
SSR
0 - 20 mA
4 - 20 mA
0 - 5 V
0 - 10 V
(Default : Relay)
PV RANGE LOW
( Available for DC Linear Inputs)
Sets process value corresponding to minimum DC Linear signal
input (e.g., 0 V, 0 mA, 4 mA, etc.)
PV UNITS
(Available for Thermocouple / RTD Inputs)
Selects temperature measurement units in °C or °F .
PV RESOLUTION
(Not Available for Thermocouple Inputs)
Sets the process value indication resolution (decimal point). All
the resolution based parameters (control setpoint, hysteresis,
alarm setpoints etc.) then follow this resolution setting.
INPUT TYPE
Select Input type in accordance with the type of Thermocouple or
RTD sensor or transducer output connected for process value
measurement. Ensure proper hardware jumper settings.
CONTROL LOGIC
Select Reverse (heat logic) or Direct (cool logic).
CONTROL ACTION
Select appropriate Control Algorit hm suited for process
requirement.
CONTROL OUTPUT (OP1) TYPE
Select the output type in accordance with the hardware
configuration for Output-1 (OP1).
Refer Table 6.2
(Default : 1)
Pulse
On-Off
PID
(Default : PID)
Parameter Description
Settings
(Default Value)
-1999 to 9999
(Default : 0)
Refer Table 6.2
(Default : Type K)
Table 6.1
CONFIGURATION PARAMETERS
The controller is provided with a variety of hardware options and software features to cater to a host of applications. The
controller thus needs to be appropriately configured in terms of inputs / outputs and other features like control algorithm, digital
filter, etc.
The PAGE-12 presents configuration parameters that are listed below in Table 6.1 .
User Manual
EPSILON
Section 6

14
-1999 to 9999
(Default : 1000)
PV RANGE HIGH
( Available for DC Linear Inputs)
Sets process value corresponding to maximum DC Linear signal
input (e.g., 5 V, 10 V, 20 mA, etc.)
Parameter Description
Settings
(Default Value)
SETPOINT LOW LIMIT
Sets minimum permissible control setpoint value.
(Default : -199)
Min. Range for the
selected Input Type to
Setpoint High Limit
OFFSET FOR PV
This value is algebraically added to the measured PV to derive the
final PV that is displayed and compared for alarm / control.
Final PV = Measured PV + Offset
0.5 to 60.0 Seconds
(in steps of 0.5 Seconds)
(Default : 2.0 Sec.)
SENSOR BREAK OUTPUT POWER
(Available for PID control only)
In case of Thermocouple / RTD broken or disconnected, the
controller outputs this power value under open loop condition.
-100 to 100
(Default : 0)
DIGITAL FILTER TIME CONSTANT
Sets the time constant, in Seconds, for the low-pass digital filter
applied to the measured PV. The filter helps smoothening /
averaging the signal input and removing the undesired noise.
SETPOINT HIGH LIMIT
Sets maximum permissible control setpoint value.
Setpoint Low Limit to
Max. Range for the
selected Input Type
(Default : 1376)
-199 to 999 or
-199.9 to 999.9
(Default : 0)
User Manual
EPSILON

15
Table 6.2
Resolution
Option
What it means
Range (Min. to Max. )
Type J Thermocouple
Type K Thermocouple
Type T Thermocouple
0 to +960°C / +32 to +1760°F
-200 to +1376°C / -328 to +2508°F
-200 to +385°C / -328 to +725°F
Type R Thermocouple
Type S Thermocouple
Type B Thermocouple
Type N Thermocouple
0 to +1770°C / +32 to +3218°F
0 to +1765°C / +32 to +3209°F
0 to +1825°C / +32 to +3218°F
0 to +1300°C / +32 to +2372°F
Fixed
1°C / 1°F
0 to 20mA DC current
4 to 20mA DC current
0 to 50mV DC voltage
0 to 200mV DC voltage
0 to 1.25V DC voltage
0 to 5.0V DC voltage
0 to 10.0V DC voltage
1 to 5.0V DC voltage
3-wire, RTD Pt100
-1999 to +9999 units
-199 to +600°C / -328 to +1112°F
-199.9 to 600.0°C / -199.9 to 999.9°F
or
User settable
1°C / 1°F
or
0.1°C / 0.1°F
User settable
1 / 0.1 / 0.01/
0.001 units
Reserved for customer specific Thermocouple type not listed
above. The type shall be specified in accordance with the
ordered (optional on request) thermocouple type.
User Manual
EPSILON

16
Yes
No
(Default : No)
Enable
Disable
(Default : Disable)
Enable
Disable
(Default : Enable)
Enable
Disable
(Default : Enable)
Enable
Disable
(Default : Disable)
Enable
Disable
(Default : Disable)
Enable
Disable
(Default : Disable)
PROFILE ABORT COMMAND
ON OPERATOR PAGE
Supervisory control over availability of ‘Profile-Abort’ command on
Operator Page. ‘Enable’ for availability.
ALARM SP ADJUSTMENT
ON OPERATOR PAGE
Supervisory permission for Alarm setpoint adjustments on
Operator Page. Set to ‘Enable’ for permission.
SP ADJUSTMENT ON OPERATOR PAGE
Supervisory permission for control setpoint editing on Operator
Page. Set to ‘Enable’ for permission.
SP ADJUSTMENT ON LOWER READOUT
Supervisory permission for control setpoint editing on Lower
Readout. Set to ‘Enable’ for permission.
(Available for PID control with Overshoot Inhibit enabled )
This parameter adjusts the effectiveness of the Overshoot Inhibit
feature. Increase the value if the overshoot is curbed but the PV
takes longer to reach the SP. Decreases the value if the overshoot
persists.
OVERSHOOT INHIBIT FACTOR
OVERSHOOT INHIBIT
(Available for PID control only)
Enabling this feature controls the PV rise or fall upon process
start-up in order to reach the control setpoint with as minimum
overshoot as possible.
STANDBY MODE
Supervisory control over availability of Standby (entry / exit)
command on Operator Page. ‘Enable’ for availability.
SELF-TUNE COMMAND
(Available for PID control only)
Set to ‘Yes’ to initiate a new tuning cycle or set to ‘No’ to abort a
tuning operation in progress.
SUPERVISORY PARAMETERS
The supervisory level responsibilities include exercising control over operator, making process related decisions and
controlling the availability of process data for remote use. The PAGE-13 parameters allow implementation of supervisory level
decisions. The Table 7.1 below list supervisory parameters.
Table 7.1
Settings
(Default Value)
User Manual
EPSILON
Parameter Description
1.0 to 2.0
(Default : 1.0)
Section 7

17
(Default : Even)
None
Even
Odd
Auxiliary
Setpoint
Serial Comm.
None
(Default : Serial Comm.)
4800
9600
19200
38400
57600
(Default : 9.6 )
COMMUNICATION WRITE ENABLE
Setting to ‘No’ disallows the host to set or modify any parameter
value. The value however can be read by the host.
CONTROLLER ID NUMBER
Unique numeric code assigned to the controller for identification
by the host. Set the value as required by the host.
COMMUNICATION PARITY
One of the communication error trapping features. Select the data
packet parity as implemented by the host protocol.
BAUD RATE
Communication speed in ‘Bits per Second’. Set the value to match
with the host baud rate.
Parameter Description
Settings
(Default Value)
UTILITY OPTION SELECTION
Enable / Disable the available utility feature. Set to ‘None’ for
disabling utility feature.
1 to 127
(Default : 1)
No
Yes
(Default : No)
User Manual
EPSILON

18
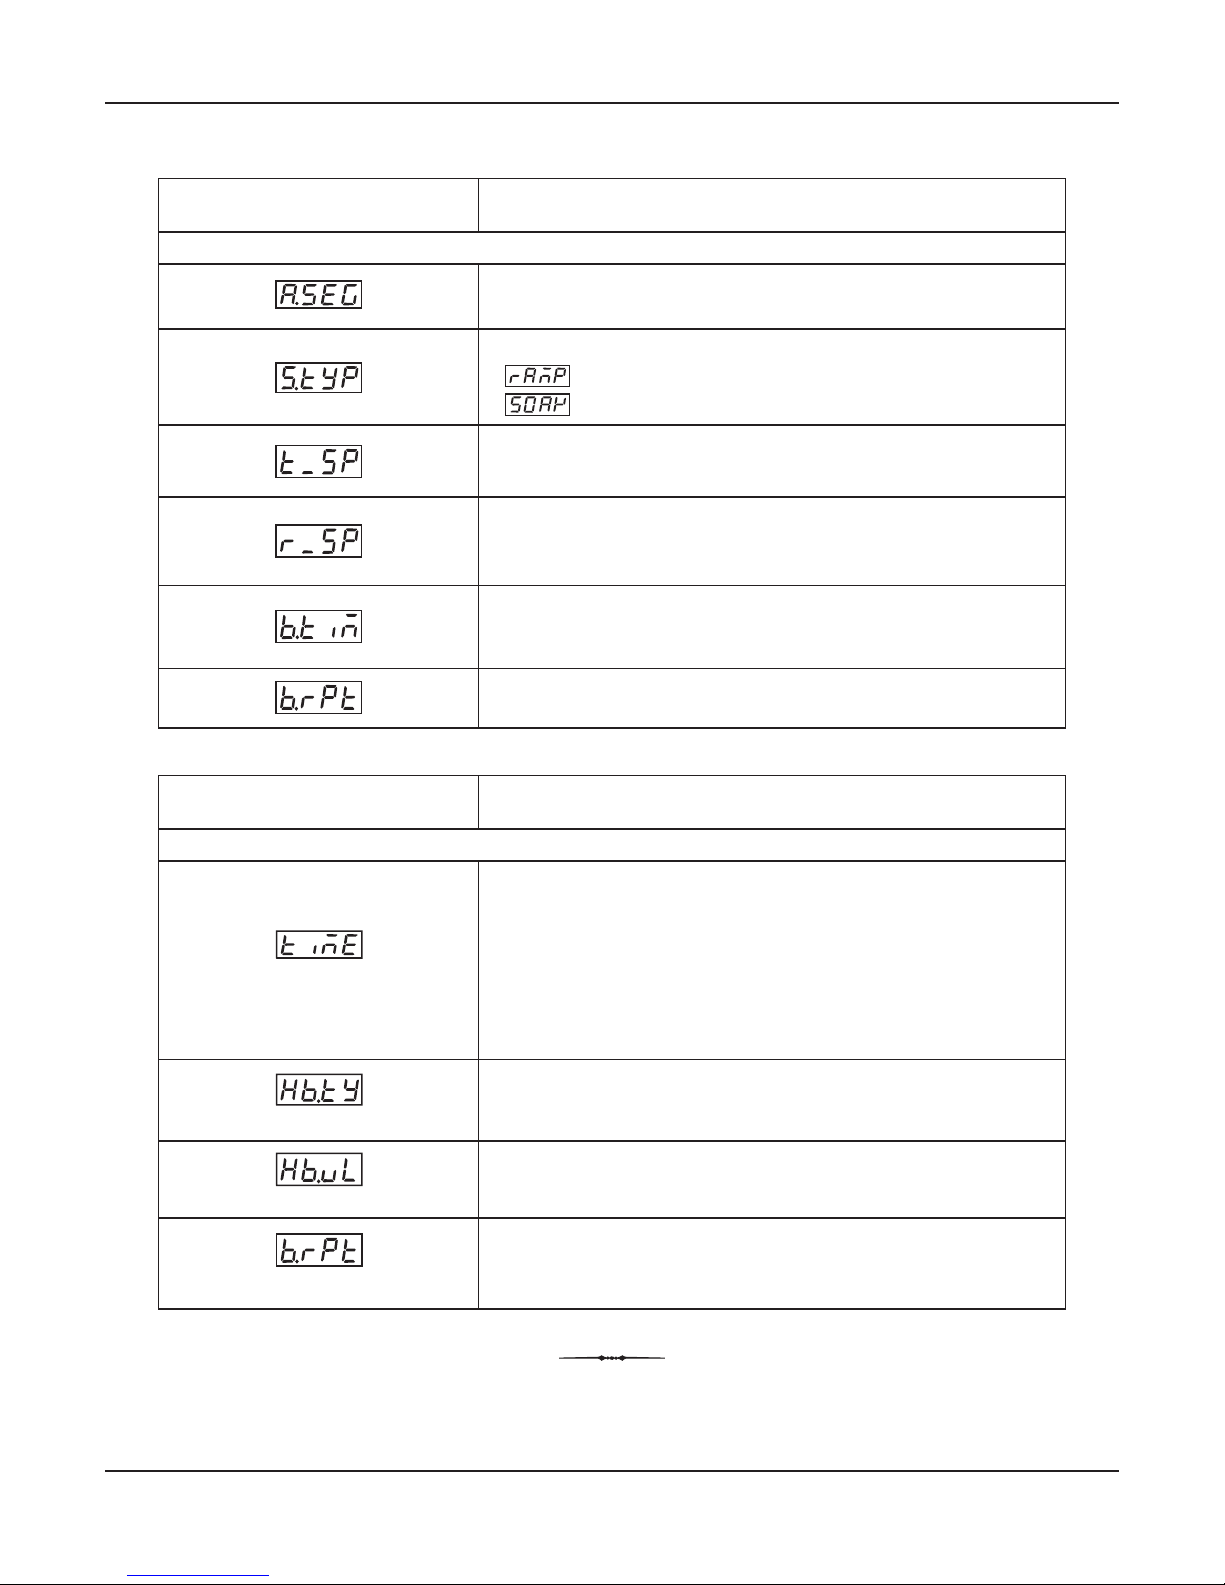
PROFILE PARAMETERS
The profile utility requires profile configuration and profile settings. Also, the utility facilitates viewing the various status related
information and allows on-line alterations of the operation parameters. To simplify profile operation, the rather large list of
parameters has been split in multiple pages as under.
PAGE-16 : Profile Configuration
Configure profile in terms of the number of segments, number of cycles (repeats), output status upon profile completion and
power fail recovery method. Refer Table 8.1.
PAGE-14 : Profile Settings
Set individual profile segment for the target setpoint, time interval, hold back type and hold back value. Refer Table 8.2.
PAGE-1 : Status Information
View the current status of a running profile such as the segment type in progress, the running ramping setpoint value or
balance soak time, the number of repeats remaining, etc. Refer Table 8.3 .
PAGE-2 : On-line Alterations
The profile facilitates altering the running segment of the profile for the current execution without affecting the profile settings
on PAGE-14. That is, the changes made to the parameter values become applicable for the current execution of the segment
only. This allows adjusting the profile, if required, in accordance to some unexpected process changes. Refer Table 8.4.
PAGE-0 (Operator Page) : Profile Commands
(Refer section “Basic Operation’’ for parameter listing and definitions)
Start a new profile cycle or abort a running profile cycle. Also, a running segment can be paused or skipped.
Except for operator page, all the pages along with the parameter listing and definitions are described below.
Visit www.ppiindia.net. Refer technical notes on PROFILE for detailed understanding of the parameters/
terminologies used for describing the profile parameters in this section.
COMMON HOLDBACK
The profile allows either Common or Independent Holdback type
and value for each of the profile segments. Set this parameter to
‘Yes’ if common settings are desired for the Holdback feature.
Set the number of times the profile is to be repeated before end of
profile. The last segment of the profile cycle is followed by the first
segment for the next repeat.
NUMBER OF REPEATS
NUMBER OF SEGMENTS
Set the number of segments to constitute the setpoint profile.
ENABLING PROFILE FEATURE
Enable or Disable the setpoint profile feature. Disabling the
feature will suppress all other profile related parameters.
Parameter Description
Settings
(Default Value)
Profile Configuration Parameters : PAGE 16
1 to 9999
(Default : 1)
1 to n
(n = 4, 8, 12 or 16 depending
on factory configuration)
(Default : n)
Enable
Disable
(Default : Disable)
No
Yes
(Default : No)
Table 8.1
User Manual
EPSILON
Section 8

19
Abort
Continue
(Default : Continue)
Parameter Description
Settings
(Default Value)
‘POWER FAIL RECOVERY’ STRATEGY
Abort
A running profile shall terminate in case of power failure.
Continue
(a) If a ramp segment was in progress at the time of power failure
then the ramp segment execution resumes with the profile
setpoint prevailing at the time of power failure.
(b) If a soak segment was in progress at the time of power failure
then the soak segment execution resumes with the balance time.
OUTPUT OFF
Set to ‘Yes’ if after the end of profile, all the control outputs are to be
forced Off till the issuance of next profile Start command.
No
Yes
(Default : No)
TARGET SETPOINT
Set the Target (End) value for the selected profile segment
number.
(Available only holdback type in other than None).
Set the band value (deviation from profile setpoint) for the profile
holdback feature.
HOLDBACK VALUE
Disable the Holdback Band or set the scope (up, down or both) for
the profile holdback feature.
HOLDBACK TYPE
SEGMENT NUMBER
Select profile segment number for which the Target Setpoint/Time
Interval values are to be edited.
(Default : -199)
Min. to Max. Range
specified for the
selected Input Type
None
Down
Both
Up
(Default : None)
Parameter Description
Settings
(Default Value)
Table 8.2
Profile Setting Parameters : PAGE 14
0 to 9999 Minutes
(Default : 0)
1 to 999
(Default : 1)
1 to n
(n = 4, 8, 12 or 16 depending
on factory configuration)
(Default : 1)
User Manual
EPSILON
Set the time duration of ramping or soaking for the selected profile
segment number.
TIME INTERVAL
20
Time Interval
Holdback Type
Holdback Value
Balance Repeats
Parameter
Balance Repeats
The remaining profile repeats.
Balance Time
The remaining time, in minutes, that the current segment shall
take for completion.
Ramping Setpoint
The instantaneous Ramping Setpoint value, if the current
segment type is Ramp.
Target Setpoint
Target setpoint value for the current segment.
The current segment is Ramp.
The current segment is Soak.
Segment Type
Active Segment Number
The current profile segment (ramp / soak) number in progress.
Table 8.3
Lower Readout
Prompt
Upper Readout
Information
Profile Status Information : PAGE 1
Table 8.4
On-Line Alteration Parameters : PAGE 2
Effect on the running segment
The time interval for a Ramp segment actually determines the
RATE at which the setpoint steps towards the target setpoint.
Thus, altering the time interval shall immediately affect the ‘Ramp
Rate’ for the current segment.
If the time interval is modified for the Soak segment then the
elapsed time so far is ignored and the soak timer starts counting
down to 0 from the altered time interval value.
The modified Holdback Band Type is applied immediately on the
current segment.
The modified Holdback Band Value is applied immediately on the
current segment.
The modified repeats become the new target repeats with
immediate effect.
User Manual
EPSILON

21
OP2 & OP3 FUNCTION PARAMETERS
The controller is supplied with two optional hardware plug-in modules, viz., OP2 and OP3. The modules are interchangeable
and factory configured for either Relay / SSR (jumper selectable) or DC Linear Voltage or DC Linear Current.
The OP2 module can be programmed to function as an Output for any one of the followings : Alarm-1, End of Profile, Cool
Control for Bi-directional Control, Auxiliary Control or Blower Control.
The OP3 module can be programmed to function as an Output for any one of the followings : Alarm-2, End of Profile or PV/SP
Re-transmission.
The OP2 and OP3 function selection and the related parameters are listed below in Table 9.1.
Table 9.1
OFF
ON
(Default : ON)
OP2 EVENT STATUS
(Available if OP2 function is End of Profile)
Selecting ‘ON’ keeps the OP2 OFF while profile is in progress and
turns ON at the end of profile.
Selecting ‘OFF’ keeps the OP2 ON while profile is in progress and
turns OFF at the end of profile.
(Available if OP2 function is Cool Control)
Select the type of OP2 module fitted (that is, Relay / SSR, DC
Current or DC Voltage) as Output-2.
OUTPUT-2 TYPE
OUTPUT-2 FUNCTION SELECTION
(Applicable for OP2 hardware module, if fitted)
Select the function / feature to which the OP2 module is to be
logically attached for activation.
(Default : None)
Cool Control
End Of Profile
None
Alarm
Auxiliary
Control
Blower
(Default : Normal)
Reverse
Normal
ALARM-1 LOGIC
(Available if OP2 function is Alarm)
Select ‘Normal’ for Audio / Visual Alarm or ‘Reverse’ for Tripping
the system.
Parameter Description
Settings
(Default Value)
Relay
SSR
0 - 20 mA
4 - 20 mA
0 - 5 V
0 - 10 V
(Default : Relay)
User Manual
EPSILON
Section 9

22
OP2 EVENT TIME
(Available if OP2 function is End of Profile & if OP2 Event Status set to
ON)
Set the time (in selected units) for which the OP2 is to be kept ON
after the End of Profile. For indefinite time interval, set the value to
0.
OP2 EVENT TIME UNITS
(Available if OP2 function is End of Profile & if OP2 Event Status set to
ON)
Select time units for the parameter ‘OP2 Event Time’.
OFFSET VALUE FOR AUXILIARY
CONTROL SETPOINT
(Available if OP2 function is Auxiliary Control)
This parameter value is algebraically added to the Control SP to
obtain the setpoint value for the Auxiliary Control. Can be set as
positive value or negative value.
Auxiliary Control Setpoint = Control Setpoint (SP) + Offset Value
AUXILIARY CONTROL HYSTERESIS
(Available if OP2 function is Auxiliary Control)
Differential (dead) band between the ON and OFF control states.
(Available if OP2 function is Auxiliary Control)
If set to ‘Normal’,the output remains ON for PV below Setpoint and
OFF otherwise. If set to ‘Reverse’, the output remains ON for PV
above Setpoint and OFF otherwise.
AUXILIARY CONTROL LOGIC
OFFSET VALUE FOR BLOWER
CONTROL SETPOINT
(Available if OP2 function is Blower Control)
This parameter value is algebraically added to the Control SP to
obtain the setpoint value for the Blower Control. Can be set as
positive value or negative value.
Blower Control Setpoint = Control Setpoint (SP) + Offset Value
BLOWER CONTROL HYSTERESIS
(Available if OP2 function is Blower Control)
Differential (dead) band between the blower ON and OFF states.
BLOWER CONTROL TIME DELAY
(Available if OP2 function is Blower Control)
This parameter is mainly used for Compressor Load. The set time
delay is elapsed each time before the compressor is switched ON.
Set the value to 0 if no time Delay is required.
Parameter Description
Settings
(Default Value)
0 to 25 or
0.0 to 25.0
(Default : 0)
(Default : 0)
0 to 9999
(Default : 0)
-199 to 999 or
-199.9 to 999.9
(Default : 2)
1 to 999 or
0.1 to 999.9
0.00 to 10.00 Min. Sec
(in steps of 5 Seconds)
1 to 25 or
0.1 to 25.0
(Default : 2)
Seconds
Minutes
Hours
(Default : Seconds)
(Default : Normal)
Reverse
Normal
User Manual
EPSILON

23
OUTPUT-3 FUNCTION SELECTION
(Applicable for OP3 hardware module, if fitted)
Select the function / feature to which the OP3 module is to be
logically attached for activation.
(Available if OP3 function is Alarm)
Select ‘Normal’ if Alarm-2 is to activate an Audio / Visual alarm.
Select ‘Reverse’ if Alarm-2 is to Trip the system.
(Available if OP3 function is End of Profile)
Selecting ‘ON’ keeps the OP3 OFF while profile is in progress and
turns ON at the end of profile.
Selecting ‘OFF’ keeps the OP3 ON while profile is in progress and
turns OFF at the end of profile.
(Available if OP3 function is End of Profile & if OP3 Event Status is set to
ON)
Set the time (in selected units) for which the OP3 is to be kept ON
after the End of Profile. For indefinite time interval, set the value to
0.
(Available if OP3 function is End of Profile & if OP3 Event Status is set to
ON)
Select time units for the parameter ‘OP3 Event Time’.
(Available if OP3 function is recorder)
Select the parameter (process value or setpoint) which is to be
transmitted for remote recording / control.
0 - 20 mA
4 - 20 mA
0 - 5 V
0 - 10 V
(Default : 0 - 20 mA)
(Default : Normal)
Reverse
Normal
Seconds
Minutes
Hours
(Default : Seconds)
OFF
ON
(Default : ON)
None
Alarm
End Of Profile
Recorder
(Default : Alarm)
(Default : Process Value)
Setpoint
Process Value
Parameter Description
Settings
(Default Value)
ALARM-2 LOGIC
OP3 EVENT STATUS
OP3 EVENT TIME
OP3 EVENT TIME UNITS
SELECT PV OR SP FOR
RECORDER TRANSMISSION
(Default : 0)
0 to 9999
RECORDER OUTPUT TYPE
(Available if OP3 function is recorder)
Select the type of OP3 module fitted (DC Current or DC Voltage)
as Output-3.
User Manual
EPSILON

24
Parameter Description
Settings
(Default Value)
RECORDER LOW
(Available if OP3 function is recorder)
Set the minimum parameter value (SP or PV) that shall
correspond to the minimum recorder output signal level (0 mA or 4
mA or 0 V).
Min. to Max. Range
Specified for the
Selected Input Type
(Default : 1376)
Min. to Max. Range
Specified for the
Selected Input Type
(Default : -199)
RECORDER HIGH
(Available if OP3 function is recorder)
Set the maximum parameter value (SP or PV) that shall
correspond to the maximum recorder output signal level (20 mA or
10 V or 5 V).
User Manual
EPSILON

25
Power Supply
PCB
CPU PCB
Display
PCB
‘UP’ inscribed on topside
UP
UP
Placing Back
Removal
Pullout Grip
PPI
EPSILON
OP1
OP2
PRF
1
2
neuro 102
1
2
3
4
5
6
7
8
9
10
1
1
12
13
14
15
16
17
18
N/O
C
+
-
REL AY
SSR / DC Li near
OUTP UT 1
Pt100
T/C
mV, V, mA
I
N
P
U
T
O
U
TP
U
T
2
+
S
S
R
/
D
C
L
i
n
e
ar
R
E
L
A
Y
N/O
N/C
C
O
U
TP
U
T
3
SERIAL
COMMS.
+
SSR / DC Linear
RELA
Y
N/O
N/C
C
PPI
L
N
A
C
D
C
SUPP LY
GND
A
B
AUXILIARY SP
SELECTION
ALM
ELECTRONIC ASSEMBLY
The basic electronics assembly (without any plug-in modules), comprises of 3 Printed Circuit Boards (PCB). When viewed
from the front; the CPU PCB is to the right, Power-supply PCB is to the left and the Display PCB is behind the bezel.
The electronic assembly can be removed from the plastic enclosure and placed back as described and illustrated in Figure
10.2.
Figure 10.1
UP
UP
Front Label
Pullout Grip
Enclosure
Connection Diagram
Rear Terminals
Ventilations
Ratchets
Panel Mounting Clamp
Panel Sealing
Gasket
Bezel
PPI
EPSILON
OP1
OP2
PRF
1
2
neuro 102
1
2
3
4
5
6
7
8
9
10
1
1
12
13
14
15
16
17
18
N/O
C
+
-
REL AY
SSR / DC L inear
OUT PUT 1
Pt100
T/C
mV, V, mA
I
N
PUT
O
U
TP
U
T
2
+
S
SR
/
D
C
L
i
ne
a
r
RE
L
A
Y
N/O
N/C
C
O
UT
P
U
T
3
SERIAL
COMMS.
+
SSR / DC Linear
RELA
Y
N/O
N/C
C
PPI
L
N
A
C
D
C
SUP PLY
GND
A
B
AUXILIARY SP
SELECTION
ALM
HARDWARE ASSEMBLY AND CONFIGURATIONS
The Figure 10.1 below shows the controller outer-case viewed with front label upright.
Figure 10.2
User Manual
EPSILON
Section 10

26
Link Parked
Pins Shorted
DC Linear Current (mA)
All Other Input Types
(a) (b)
Removing Assembly from Enclosure
With the controller upright, hold the Bezel with the fingers on the pullout grips provided on the left and right sides of the bezel.
Pull the bezel outward. The assembly comes out with the bezel.
Placing Assembly Back into Enclosure
With the controller upright (the UP inscribed on the Enclosure is on the topside), insert the bezel gently with the boards on
either side sliding into the guides provided inside of the Enclosure. Ensure that the bezel fits in tight on the Enclosure-front to
secure the panel-sealing gasket (provided to meet IP65 safety requirements).
The Input type and the Output-1 type are user configurable and thus require, besides parameter selections, proper jumper-
settings prior to electrical connections. The jumper settings are provided in the form of Pins & Shorting-Link arrangements on
the CPU PCB towards the rear end as shown in Figure 10.3. The Jumper setting marked A is for Input configuration whereas
those marked B & C are for Output-1 configuration.
INPUT : Jumper Settings - A
For DC Linear Current Inputs (0-20 mA or 4-20 mA), short the Pins using Shorting-Link as shown in Figure 10.4 (a). For all
other Input types, keep the Shorting-Link parked leaving the Pins open, as shown in Figure 10.4 (b).
OUTPUT-1 : Jumper Settings - B & C
Besides the parameter settings, the Output-1 configuration requires jumper settings marked B & C for different output type
selections as shown in the Table 10.1 below.
Figure 10.4
Figure 10.3
CPU PCB
Pins
Shorting
Link
1
2 3
B
C
1
2
3
4
PPI
EPSILON
}
}
BA
C
Input Jumper Settings
User Manual
EPSILON

27
B
1
2
3
A
1
2
3
A
B
MOUNTING PLUG-IN MODULES
The controller supports up to 3 plug-in modules, viz. Output-2 Module (Relay/SSR or DC Linear), Output-3 Module
(Relay/SSR or DC Linear) and Option Module (RS485 Serial Port or Digital Input for Auxiliary Setpoint selection). These
modules are either pre-fitted while the controller is shipped from the factory or can be fitted by the user later.
All 3 plug-in modules are provided with female sockets that directly fit into the corresponding male plugs provided on either
Power-supply PCB or CPU PCB. The Output-2 and Option Modules fit into plugs provided on Power-supply PCB whereas the
Output-3 Module fits into plug provided on the CPU PCB.
OUTPUT-2 & OUTPUT-3 : Modules and Jumper Settings
The Output-2 and Output-3 Modules come in three versions, viz., Relay/SSR, DC Linear Voltage and DC Linear Current. Both
the modules are identical and, thus, can be fitted interchangeably in Output-2 or Output-3 positions.
Relay / SSR Module
This module can be configured for either Relay or SSR output through proper jumper selection. Two jumper settings A and B,
as shown in Figure 10.5 are required for Relay or SSR selection. Refer Table 10.2.
Figure 10.6
DC Voltage/Current Module
Figure 10.5
Relay/SSR Module
Table 10.1
Output-1 Jumper Settings
Output Type
Relay
SSR Drive
1 2 3 4
1 2 3 4
1 2 3 4
1
2
3
1
2
3
1
2
3
DC Linear
Current
(or Voltage)
Jumper Setting - CJumper Setting - B
User Manual
EPSILON

28
Figure 10.7
Mounting Output-2 Module
PPI
Plug & Socket
Connector
Projected
Parts
Slots
Output
Module
Power Supply Board
Front Label Upright
EPSILON
DC Linear Voltage / Current Module
The DC Linear Module is factory configured for either Current or Voltage output. The current output can be configured for 0-20
mA or 4-20 mA and similarly the voltage output can be configured for 0-5 V or 0-10 V through parameter settings. No jumper
settings are required. Refer Figure 10.6.
MOUNTING / UN-MOUNTING OF MODULES
The Figures 10.7 & 10.8 illustrate how to mount the plug-in Output-2 & Output-3 module, respectively. Notice the orientation of
the controller and a few identifying components shown in figures to help locate the plugs for the modules. Ensure that the
socket snap-fits into the plug and the 2 projected parts on the module fit into the 2 slots provided on the Power-Supply / CPU
PCB for proper electrical contacts and secured fitting.
For plugging out the module(s), follow the steps below:
1. Gently pull apart the Power-supply board and the CPU board until the projected parts of the module board come out of the
slots.
2. Pull the module outward to unlock the socket from the plug.
Table 10.2
User Manual
EPSILON
1 2 3 1 2 3
Relay
SSR
Output Type Jumper Setting - BJumper Setting - A
1 2 3 1 2 3

29
The plug for the Serial Communication or Auxiliary SP Selection module is located on the Power-supply PCB. The Figure 10.9
below illustrates how to plug-in the Serial Communication/Auxiliary SP module. To plug (or unplug) the module simply insert
(or remove) the socket into (or from) the plug.
Figure 10.8
Mounting Output-3 Module
Output
Module
Projected
Parts
PPI
Plug & Socket
Connector
Slots
CPU Board
Front Label
Upside-down
EPSILON
User Manual
EPSILON
Figure 10.9
Mounting Serial Communication/Auxiliary SP Selection Module
Plug & Socket
Connectors
Serial Communication/
Auxiliary SP Selection
Module
Power Supply Board
Front Label
Upside-down
PPI
EPSILON

30
The following precautions should be strictly observed while installing the controller:
1. The place of installation should be free of corrosive/combustible gases and electrically conductive pollution.
2. Ensure that the place of installation is not subject to rapid ambient changes that can cause condensation. Also the Ambient
Temperature and Relative Humidity surrounding the controller should not exceed the maximum specified for the proper
operation of the controller.
3. The place of installation should be adequately protected against excessive electrostatic or electromagnetic interference.
4. The controller should not be subject to direct vibration or shock.
5. The controller should not be exposed to dust, salt air, direct sunlight or radiant heat.
OUTER DIMENSIONS
The Figure 11.1 shows the outer dimensions of the controller.
Figure 11.1
MECHANICAL INSTALLATION
PANEL CUTOUT AND RECOMMENDED MINIMUM SPACING
The Figure 11.2 shows the panel cutout requirements for a single controller and also the minimum spacing recommended if
several controllers are required to be mounted on a single panel.
Panel Cutout
45 X 45 mm
-0, +0.5 mm
(1.77 X 1.77 in)
(-0, +0.02 in)
10mm (0.39in)
38mm (1.5in)
Figure 11.2
110mm
(4.33in)
10mm (0.39in)
Front View
Side View
PPI
AL1 AL2
PRF
48mm
(1.89in)
48mm
(1.89in)
M
C
EPSILON
User Manual
EPSILON
Section 11

31
UP
UP
PPI
OP1
OP2
HBA
Panel Mounting Clamp
Mounting Panel with
Square Cutout
Controller
Tongues
Springs
Ratchets
Bezel
Slide Forward
EPSILON
neuro
1
2
3
4
5
6
7
8
9
10
1
1
12
13
14
15
16
17
18
N/O
C
+
-
RE LAY
SSR / DC Linear
OUT PUT 1
Pt100
T/C
mV, V, mA
I
N
P
U
T
O
U
T
P
U
T
2
+
S
S
R
/
D
C
L
in
e
a
r
R
E
L
A
Y
N/O
N/C
C
O
U
T
P
UT
3
SERIAL
COMMS.
+
SSR / DC Linear
RELAY
N/O
N/C
C
PPI
L
N
A
C
D
C
SUP PLY
GND
A
B
AUXILIARY SP
SELECTION
PANEL MOUNTING
Follow the steps below for mounting the controller on panel:
1. Prepare a square cutout to the size shown in Figure 11.2.
2. Remove the Panel Mounting Clamp from the controller Enclosure.
3. Insert the rear of the controller housing through the panel cutout from the front of the mounting panel.
4. Hold the controller gently against the mounting panel such that it positions squarely against the panel wall, see Figure
11.3. Apply pressure only on the bezel and not on the front label.
5. Slide the mounting clamp forward until it is firmly in contact with the rear face of the mounting panel and the tongues of the
clamp engage in the ratchets on the controller enclosure, as shown in Figure 11.3. Ensure that the springs of the clamp
push firmly against the rear face of the mounting panel for secured mounting.
Figure 11.3
User Manual
EPSILON

32
WARNING
M I S H A N D L I N G / NE GL IG EN CE CA N
RESULT IN PERSONAL DEATH OR SERIOUS
INJURY.
WARNING
MISHANDLING / NEGLIGENCE CAN
RESULT IN PERSONA L DEATH OR
SERIOUS INJURY.
ELECTRICAL CONNECTIONS
1. The user must rigidly observe the Local Electrical Regulations.
2. Do not make any connections to the unused terminals for making a tie-point for other wires (or for any other reasons) as
they may have some internal connections. Failing to observe this may result in permanent damage to the controller.
3. Run power supply cables separated from the low-level signal cables (like Thermocouple, RTD, DC Linear Current /
Voltage, etc.). If the cables are run through conduits, use separate conduits for power supply cable and low-level signal
cables.
4. Use appropriate fuses and switches, wherever necessary, for driving the high voltage loads to protect the controller from
any possible damage due to high voltage surges of extended duration or short-circuits on loads.
5. Take care not to over-tighten the terminal screws while making connections.
6. Make sure that the controller supply is switched-off while making/removing any connections or removing the controller
from its enclosure.
CONNECTION DIAGRAM
The Electrical Connection Diagram is shown on the left side of the controller enclosure. The diagram shows the terminals
viewed from the REAR SIDE with the controller label upright. Refer the label provided on the Rear Side for terminal numbers.
Note that the OUTPUT-2, OUTPUT-3 and the Serial Comm./Auxiliary SP connections are applicable only if the respective
plug-in modules are fitted. Also the DC SUPPLY is applicable only if the controller is supplied with 18 to 34 VDC supply voltage
option.
The rear panel electrical wiring connection diagram is shown in Figure12.1 below.
Figure 12.1
User Manual
EPSILON
Section 12
+12V
SSR / DC Linear
RELAY
OUTPUT 1
mV, V, mA
T/C
INPUT
Pt100
NO
C NC
RS 485
85 ~ 265 V
AC SUPPLY
GND
SSR / DC Linear
RELAY
OUTPUT 2
SSR / DC Linear
RELAY
OUTPUT 3
NO
CNC
NO
C
L
N
1
2
3
4
5
13
7
12
8
14
9
15
16
17
11
18
10
6
PPI
48X48

33
Figure 12.3 (b)
6
5
4
Drive for SSR
DC Voltage level is generated for switching the external SSR (Solid State Relay). Connect (+) and
(-) terminals of SSR to controller terminals 6 and 4, respectively. Use Zero-Crossover, 3 to 30 VDC
operated SSR, rated approximately 1.5 times the actual load rating. Use appropriate Heat Sink for
load ratings exceeding 10 A.
6
5
4
N/O
C
Figure 12.3 (a)
DESCRIPTIONS
The back panel connections are described as under:
INPUT (Terminals : 1, 2, 3)
The controller accepts Thermocouples (J, K, T, R, S, B, N), 3-wire RTD Pt100 and DC Linear Current/Voltage (mV / V / mA) as
input.
Thermocouple
Connect Thermocouple Positive (+) to terminal 1 and Negative (-) to terminal 2 as shown in Figure
12.2 (a). Use the correct type of Thermocouple extension lead wires or compensating cable for the
entire distance ensuring the correct polarity throughout. Avoid joints in the cable.
3
2
1
Figure 12.2 (a)
3
2
1
Figure 12.2 (b)
RTD Pt100, 3-wire
Connect single leaded end of RTD bulb to terminal 1 and the double leaded ends to terminal 2 and 3
(interchangeable) as shown in Figure 12.2 (b). Use copper conductor leads of very low resistance
ensuring that all 3 leads are of the same gauge and length. Avoid joints in the cable.
DC Linear Voltage (mV / V)
Use a shielded twisted pair with the shield grounded at the signal source for connecting mV / V
source. Connect common (-) to terminal 2 and the signal (+) to terminal 1, as shown in Figure 12.2
(c).
Figure 12.2 (c)
3
2
1
DC Linear Current (mA)
Use a shielded twisted pair with the shield grounded at the signal source for connecting mA source.
Connect common (-) to terminal 2 and the signal (+) to terminal 1, as shown in Figure 12.2 (d).
Make sure that the Jumper Pins for Input selection are shorted using the Shorting-Link (Refer
Section 10 Hardware Assembly and Configurations, Input-Jumper Settings).
Figure 12.2 (d)
3
2
1
OUTPUT-1 (Relay Terminals : 5, 6; SSR / DC Linear Terminals : 4, 6)
The Output-1 can be configured (through jumper settings) as either Relay, SSR Drive or DC Linear Current (or Voltage).
Relay
Potential-free Relay changeover contacts N/O (Normally Open) and C (Common) rated 2A/240
VAC (resistive load) are provided as Relay output. Use external auxiliary device like contactor with
appropriate contact ratings for driving the actual load.
User Manual
EPSILON

34
The controller is designed for installation in an enclosure which provides adequate
protection against electric shock. Local regulations regarding electrical installation
should be rigidly observed. Consideration should be given to prevention of access
to the Power Supply terminals by unauthorized personnel.
Caution
DC Linear Current / Voltage Output
The DC Linear (0/4-20 mA) Current or (0-5/10 V) Voltage output is also available at Terminal 6 (+)
and Terminal 4 (-) if the Output-1 is configured for DC Linear.
Figure 12.3 (c)
6
5
4
Line
Neutral
12 (L)
13 (N)
2 Pole
Isolating Switch
Fuse
Power Supply
Terminal
Terminating Resistor
Screened Cable
Twisted
Wire Pair
(100 to 150 Ohms)
15 (B-)
HOST
B-
B+
Master Device
Serial Comm.
Terminals
14 (B+)
OUTPUT- 2 (Terminals : 7, 8, 9)
OUTPUT- 3 (Terminals : 16, 17, 18)
The Output-2 and Output-3 are available through plug-in modules. The modules are factory configured for either Relay / SSR
or DC Linear Voltage or DC Linear Current. The connection descriptions are the same as those described for Output-1.
POWER SUPPLY (Terminals : 12, 13)
Figure 12.4
As standard, the controller is supplied with power connections suited for 85 to 264 VAC. Use well-insulated copper conductor
2
wire of the size not smaller than 0.5mm for connections. Connect Line (Phase) to terminal 12 and the Neutral (Return) to
terminal 13 as shown in Figure 12.4. The controller is not provided with fuse and power switch. If necessary, mount them
separately. Use a time lag fuse rated 1A @ 240 VAC.
For DC Supply, connect Signal (+) & Common (-) to controller terminals 12 & 13, respectively.
SERIAL COMMUNICATION PORT (Terminals : 14 , 15)
(Applicable if the Option plug-in module for RS485 Serial Port is fitted.)
Figure 12.5
If the Optional plug-in communication board is fitted, connect terminal 15 and 14 of the controller to (+) and (-) terminals of the
Master device. For reliable noise free communication, use a pair of twisted wires inside screened cable as shown in Figure
12.5. The wire should have less than 100 ohms / km nominal DC resistance (typically 24 AWG or thicker). Connect the
terminating resistor (typically 100 to 150 ohm) at one end to improve noise immunity.
User Manual
EPSILON

35
Potential-free
Contact closure
TTL-Compatible
Voltage Level
Figure 12.6 (a) Figure 12.6 (b)
14
15
14
15
DIGITAL INPUT FOR AUXILIARY SP SELECTION (Terminals : 14, 15)
(Applicable if the Option plug-in module for Auxiliary SP Selection is fitted.)
The plug-in Option module for selecting Auxiliary SP is factory configured for either potential-free contact closure or TTLcompatible voltage input.
The Setpoint selection is as under :
(a) Potential-Free Contacts
OPEN : Main SP selected
CLOSE : Auxiliary SP selected
(b) TTL-compatible Voltage
> 0.6 V : Main SP selected
< 0.5 V : Auxiliary SP selected
User Manual
EPSILON

36
EPSILON
96X96
User Manual
EPSILON 96X96

37
FRONT PANEL LAYOUT
READOUTS
The Upper Readout is a 4 digit, 7-segment bright red LED display and usually displays the PV (Process Value). In Program
Mode, the Upper Readout displays parameter values/options.
The Lower Readout is a 4 digit, 7-segment bright green LED display and usually displays SP (Control Setpoint) Value. In
Program Mode, the Lower Readout displays parameter names (prompts).
INDICATORS
The Table 1.1 lists each front panel LED and the associated status
The front panel contains digital readouts, LED indicators and keys.
Table 1.1
• Flashes while Alarm-2 is active.
OP2
OP1
Status
Indicator
ALM1
• Indicates Output-2 ON/OFF status if the Control Output Type
is Relay / SSR.
• Remains OFF if the Control Output Type is DC Linear.
• Indicates Output-1 ON/OFF status if the Control Output Type
is Relay / SSR.
• Remains OFF if the Control Output Type is DC Linear.
• Flashes while the Ramp/Soak profile is in progress.
• Glows continuously if profile is in HOLD state.
• Remains OFF if profile is not in progress.
PRF
• Flashes while Alarm-1 is active.
ALM2
User Manual
EPSILON 96X96
OP1
PRF
EPSILON 96
PPI
OP2
Upper Readout
Profile Status
ENTER Key
UP Key
DOWN Key
PAGE Key
Output-1 Status
Lower Readout
Output-2 Status
ALM1 ALM2
Alarm-2 Status
Alarm-1 Status
Section 1
Figure 1.1

38
KEYS
The Table 1.2 lists the four front panel keys and the associated function.
Table 1.2
Symbol
Key
Function
Press to enter or exit set-up mode.
DOWN
UP
ENTER
Press to store the set parameter value and to scroll to the next
parameter on the PAGE.
Press to increase the parameter value. Pressing once increases
the value by one count; keeping pressed speeds up the change.
Press to decrease the parameter value. Pressing once decreases
the value by one count; keeping pressed speeds up the change.
PAGE
User Manual
EPSILON 96X96

39
BACK PANEL TERMINAL CONNECTIONS
Figure 2.1
INPUT (Terminals 1, 2 & 3)
The controller accepts Thermocouples (J, K, T, R, S, B, N) or 3-wire RTD Pt100 and DC linear current/Voltage (mV/V/mA) as
input.
3
2
1
Figure 2.2 (a)
Thermocouple
3
2
1
Figure 2.2 (b)
RTD Pt100
3
2
1
Figure 2.2 (c)
DC Linear
mV / V / mA
Thermocouple
Connect Thermocouple Positive (+) to terminal 1 and Negative (-) to terminal 2 as shown in Figure 2.2 (a). Use correct type of
extension lead wires or compensating cable. Avoid joints in the cable.
RTD Pt100, 3-wire
Connect single leaded end of RTD bulb to terminal 1 and the double leaded ends to terminal 2 and 3 (interchangeable) as
shown in Figure 2.2 (b). Use low resistance copper conductor leads of the same gauge and length.
DC Linear Current/Voltage (mV / V / mA)
Connect DC Linear source common (-) to terminal 2 and the signal (+) to terminal 1, as shown in Figure 2.2 (c). Use a shielded
twisted pair with the shield grounded at the signal source end.
User Manual
EPSILON 96X96
OUTPUT-2
RS485
OUTPUT
-3
mV
, V, mA
96 X 96
OUTPUT
-1
INPUT
SSR/DC Linear
SSR/DC Linear
RELAY
NO
C
NC
RELAY
RELAY
T/C
Pt100
SSR/
DC Linear
NO
C
NC
NO
C
NC
85 ~ 265 V
AC SUPPLY
N
L
1
2
3
4
5
13
7
12
8
14
9
15
16
17
11
18
10
6
Section 2

40
OUTPUT-1 (Terminals 4, 5 & 6)
The Output-1 can be configured (through jumper settings) as either Relay, SSR Drive or DC Linear output. Note that either
Current (mA) or Voltage is provided as DC Linear output.
Figure 2.3 (c )
6
5
4
Output-1: mA / V
Figure 2.3 (a)
6
5
4
NO
C
Output-1 : Relay
NC
Output-1: SSR
6
5
4
Figure 2.3 (b)
Relay Output
Potential-free Relay changeover contacts NO (Normally Open), C (Common) & NC (Normally Closed) rated 10A/240 VAC
(resistive load) are provided as Relay output as shown in Figure 2.3 (a).
SSR Output
Connect (+) and (-) terminals of SSR to terminals 6 & 5, respectively as shown in Figure 2.3 (b). Use Zero-Crossover, 3 to 30
VDC operated SSR.
DC Linear Current/Voltage (mA / V) Output
The DC Linear Current (0/4-20mA) or Voltage (0-5/10V) output is also available at Terminal 6 (+) and Terminal 5 (-) as shown in
Figure 2.3 (c) if the Output-1 is configured for DC Linear.
Figure 2.4 (a)
Relay Output
NO
C
NC
9 (16)
7 (18)
8 (17)
SSR Output
Figure 2.4 (b)
9 (18)
7 (16)
8 (17)
9
7
8
Figure 2.4 (c)
DC Linear
mV/V/mA
OUTPUT- 2 (Terminals 7, 8 & 9)
The Output-2 is fitted as either Relay/SSR or DC Linear module.
In case of Relay/SSR; the Output-2 is jumper selectable as either Relay or SSR as shown in Figure 2.4(a) & 2.4(b)
respectively.
In case of DC Linear; Output-2 is supplied as either DC Current or DC Voltage. Connections are shown in figure 2.4(c).
OUTPUT- 3 (Terminal 16, 17 & 18)
The Output-3 module (if fitted) can be configured as either Relay or SSR through hardware jumper setting as shown in Figure
2.4(a) & 2.4(b) respectively.
POWER SUPPLY
The controller accepts single phase, 50/60 Hz Line Voltage ranging from 85 VAC to 264 VAC. Use
well-insulated copper conductor wire of the size not smaller than 0.5mm for power supply
2
connections. Connect Line Voltage as shown in Figure 2.5.
Figure 2.5
13
12
L
N
User Manual
EPSILON 96X96

41
Terminating Resistor
Screened Cable
Twisted
Wire Pair
(100 to 150 Ohms)
14 (B-)
15 (B+)
HOST
B-
B+
Master Device
Serial Comm.
Terminals
SERIAL COMMUNICATION PORT
(Applicable if the Option plug-in module for RS485 Serial Port is fitted.)
Connect terminal 15 and 14 of the controller to the BUS(+) and BUS(-) terminals of the master device. For reliable noise free
communication, use a pair of twisted wires inside screened cable as shown in Figure 2.6. The wire should have less than 100
ohms / km nominal DC resistance (typically 24 AWG or thicker). Connect the terminating resistor (typically 100 to 150 ohm) at
one end to improve noise immunity.
Figure 2.6
User Manual
EPSILON 96X96

42
INPUT & OUTPUT HARDWARE JUMPER SETTINGS
INPUT : Jumper Settings
In addition to parameter settings, the Input Type selection also requires proper jumper settings. For the jumper settings; Pins &
Shorting-Link arrangement, marked ‘A’, is provided on the CPU PCB as shown in Figure 3.1. For Jumper configuration refer
Table 3.1.
Table 3.1
Input Jumper Settings
Thermocouple,
RTD Pt100,
mV & V
DC Linear
Current (mA)
1
2
3
Input Type
1
2
3
Jumper ‘A’ Setting
User Manual
EPSILON 96X96
Section 3
Figure 3.1
Output 1 B & C
Jumper Settings
Input
Jumper Setting
Output 2
Jumper Setting
1
2
3
C
1
3
2
4
B
1
2
3
A
1
2
D
Display
Keys
3
1
2
3
E
CPU Board
}

43
OUTPUT-1 : Jumper Settings
Output-1 Type is user selectable as Relay, SSR, DC Volts or DC Current. Besides the parameter settings, the Output-1
configuration requires proper jumper settings. The jumper setting are provided as Pins & Shorting Link arrangement (marked
‘B’ & ‘C’) on CPU PCB, as shown in Figure 3.1 and listed in Table 3.2.
OUTPUT-2 : Jumper Settings
Output-2 is supplied with either Relay/SSR or DC Voltage or DC Current module. In case of Relay/SSR module; the output can
be configured as either Relay/SSR using Pins & Shorting Link arrangement (marked ‘D’ & ‘E’) on CPU PCB, as shown in
Figure 3.1 and listed in Table 3.3.
Table 3.2
Output-1 Jumper Settings
Table 3.3
Output-2 Jumper Settings
1 2 3 1 2 3
Relay
SSR
Output Type Jumper Setting - EJumper Setting - D
1 2 3 1 2 3
User Manual
EPSILON 96X96
Relay
SSR Drive
1 2 3
DC Linear
Current
(or Voltage)
1
2
3
4
1
2
3
4
1
2
3
4
Output Type
1 2 3
1 2 3
Jumper Setting - CJumper Setting - B

44
1 2 3 1 2 3
Relay
SSR
Output Type Jumper Setting - BJumper Setting - A
1 2 3
1 2 3
Table 3.4
Output-3 Jumper Settings
OUTPUT-3 : Jumper Settings
Output-3, if fitted, is jumper selectable as either Relay or SSR using Pins & Shorting Link arrangement (marked ‘A’ & ‘B’) on
Power Supply PCB, as shown in Figure 3.2 and listed in Table 3.4 below.
Figure 3.2
Serial Communication Plug-in Module
The 8-Pin Male Plug for mounting the Serial Communication Module is located on the Power-supply PCB, as shown in the
Figure 3.2 above. The Serial Communication Module is provided with a 8-Pin female socket on the bottom side for the
mounting purpose. To plug (or unplug) the module simply insert (or remove) the socket into (or from) the plug.
User Manual
EPSILON 96X96
Output 3
Jumper Setting
Serial Communication
Module
Power-Supply
PCB
8 Pin Male Plug
8 Pin Female
Socket
CN3
CN4
1
2
3
A
1
2
3
B
EPSILON 96
PPI

45
w w w . p p i i n d i a . n e t
Process Precision Instruments
101, Diamond Industrial Estate, Navghar, Vasai Road (E),
Dist. Palghar - 401 210.Maharashtra, India
0250 - 2391722/33/37/42 07498799226, 09321985369
support@ppiindia.net sales@ppiindia.net,
Mar 2017
 Loading...